Patra/Patrode With Bok Choy Leaves (Alu Wadi)
Patra or Patrode is a simple and healthy snack from western India. It is also called Alu Wadi in some regions. This dish is popular in karnataka too. Different regions, different names same dish.
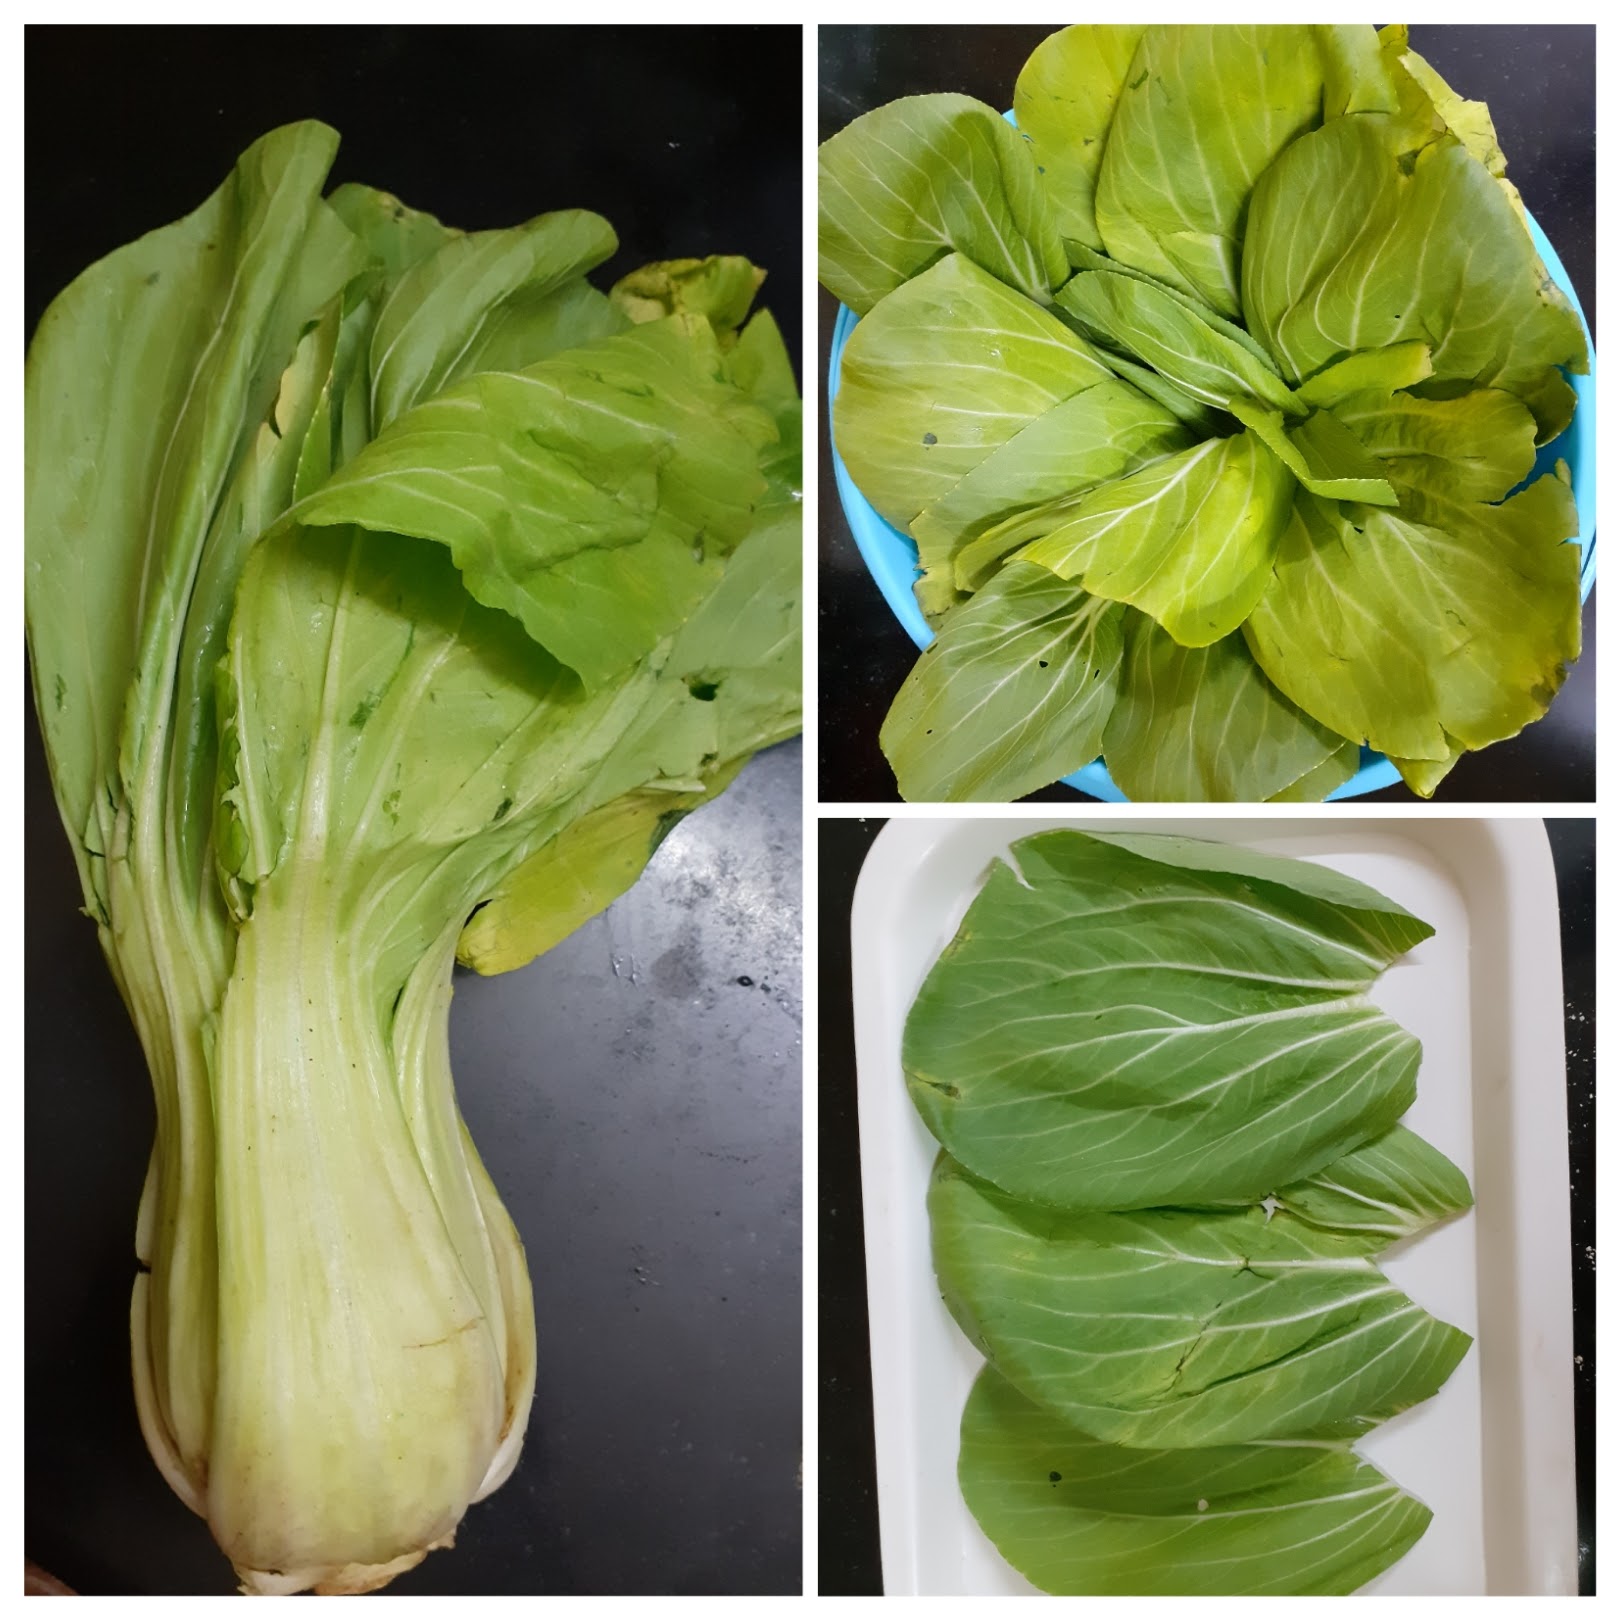
In this healthy snack usually the Arbi or Colacassia leaves are used. Spinach leaves can also be used, but they have to be big and thick. Since that variety is not available all the time I decided to give the dish a twist by using a different leaf altogether. Bok Choy, or Pok choy is a type of chinese cabbage. The leaves are thick and nice so I decided to give the Patra a try with these leaves. It was a huge hit in my house and everyone came back for more.
Since I was making this the first time, I made only a small quantity and with my folks asking for more have promised to make some again very soon. So, what I’m driving at is that if you are one of those people who loves this dish and wait for the Arbi leaves to arrive in the market, well don’t wait. Grab some Pok Choy and try it out. The Pok Choy is closer in taste to Spinach with which Patra are made, if not for Arbi/Colaccssia leaves.
This is a steamed snack just like the Kothimbir Vadi, it can be fried too of you prefer. I have steamed and pan roasted them.
While you are here check out my other snack recipes like Mirchi Bajji, Semolina Cheese balls, Samosa Pie, Potato Cheddar Bake, Dhania wale Namak Parey and more…
Here is the recipe ot Patra with Bok Choy Leaf-
PREP TIME: 15MINS COOK TIME: 30MINS
TOTAL TIME: 45 MINS CUISINE: INDIAN
COURSE :SNACK SERVINGS: 5
AUTHOR: RAJNI RAM
Bok choy/ Pok choy 2 heads ( clip leaves carefully, wash and dab dry with towel)
Besan/ Chickpea flour 2 cups
Salt as required
Red chilli powder 1 tsp
Coriander powder 1 tsp
Fennel powder 1 tsp
Turmeric powder 1/2 tsp
Sugar 1/2 tsp
Tamarind pulp 2 tsp diluted in 1/2 cup water or make pulp with Gooseberry size tamarind ball.
Green chilli 1 finely chopped
Ginger 1/2 inch piece finely chopped
Sesame seeds a few
Kopra / desiccated coconut 2 tsp
Oil 3 tsp for tempering
Directions:
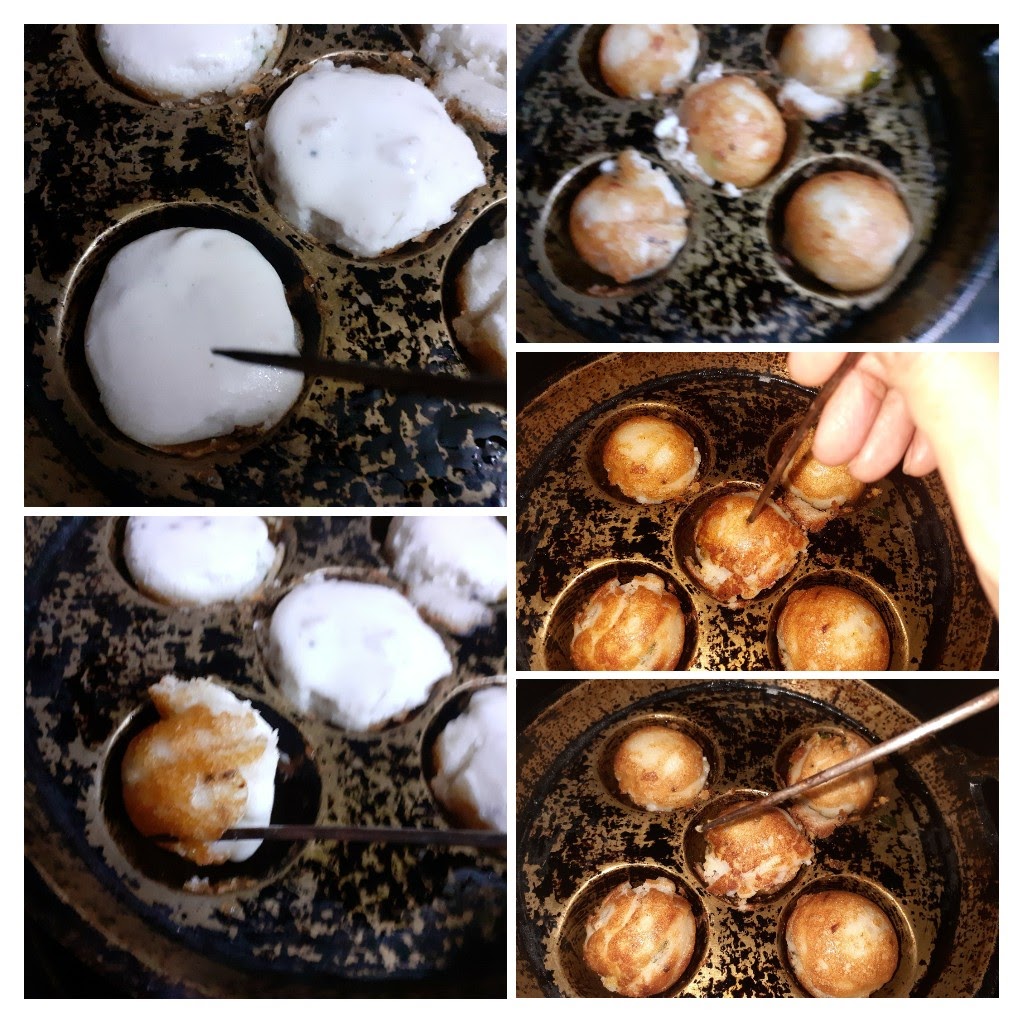
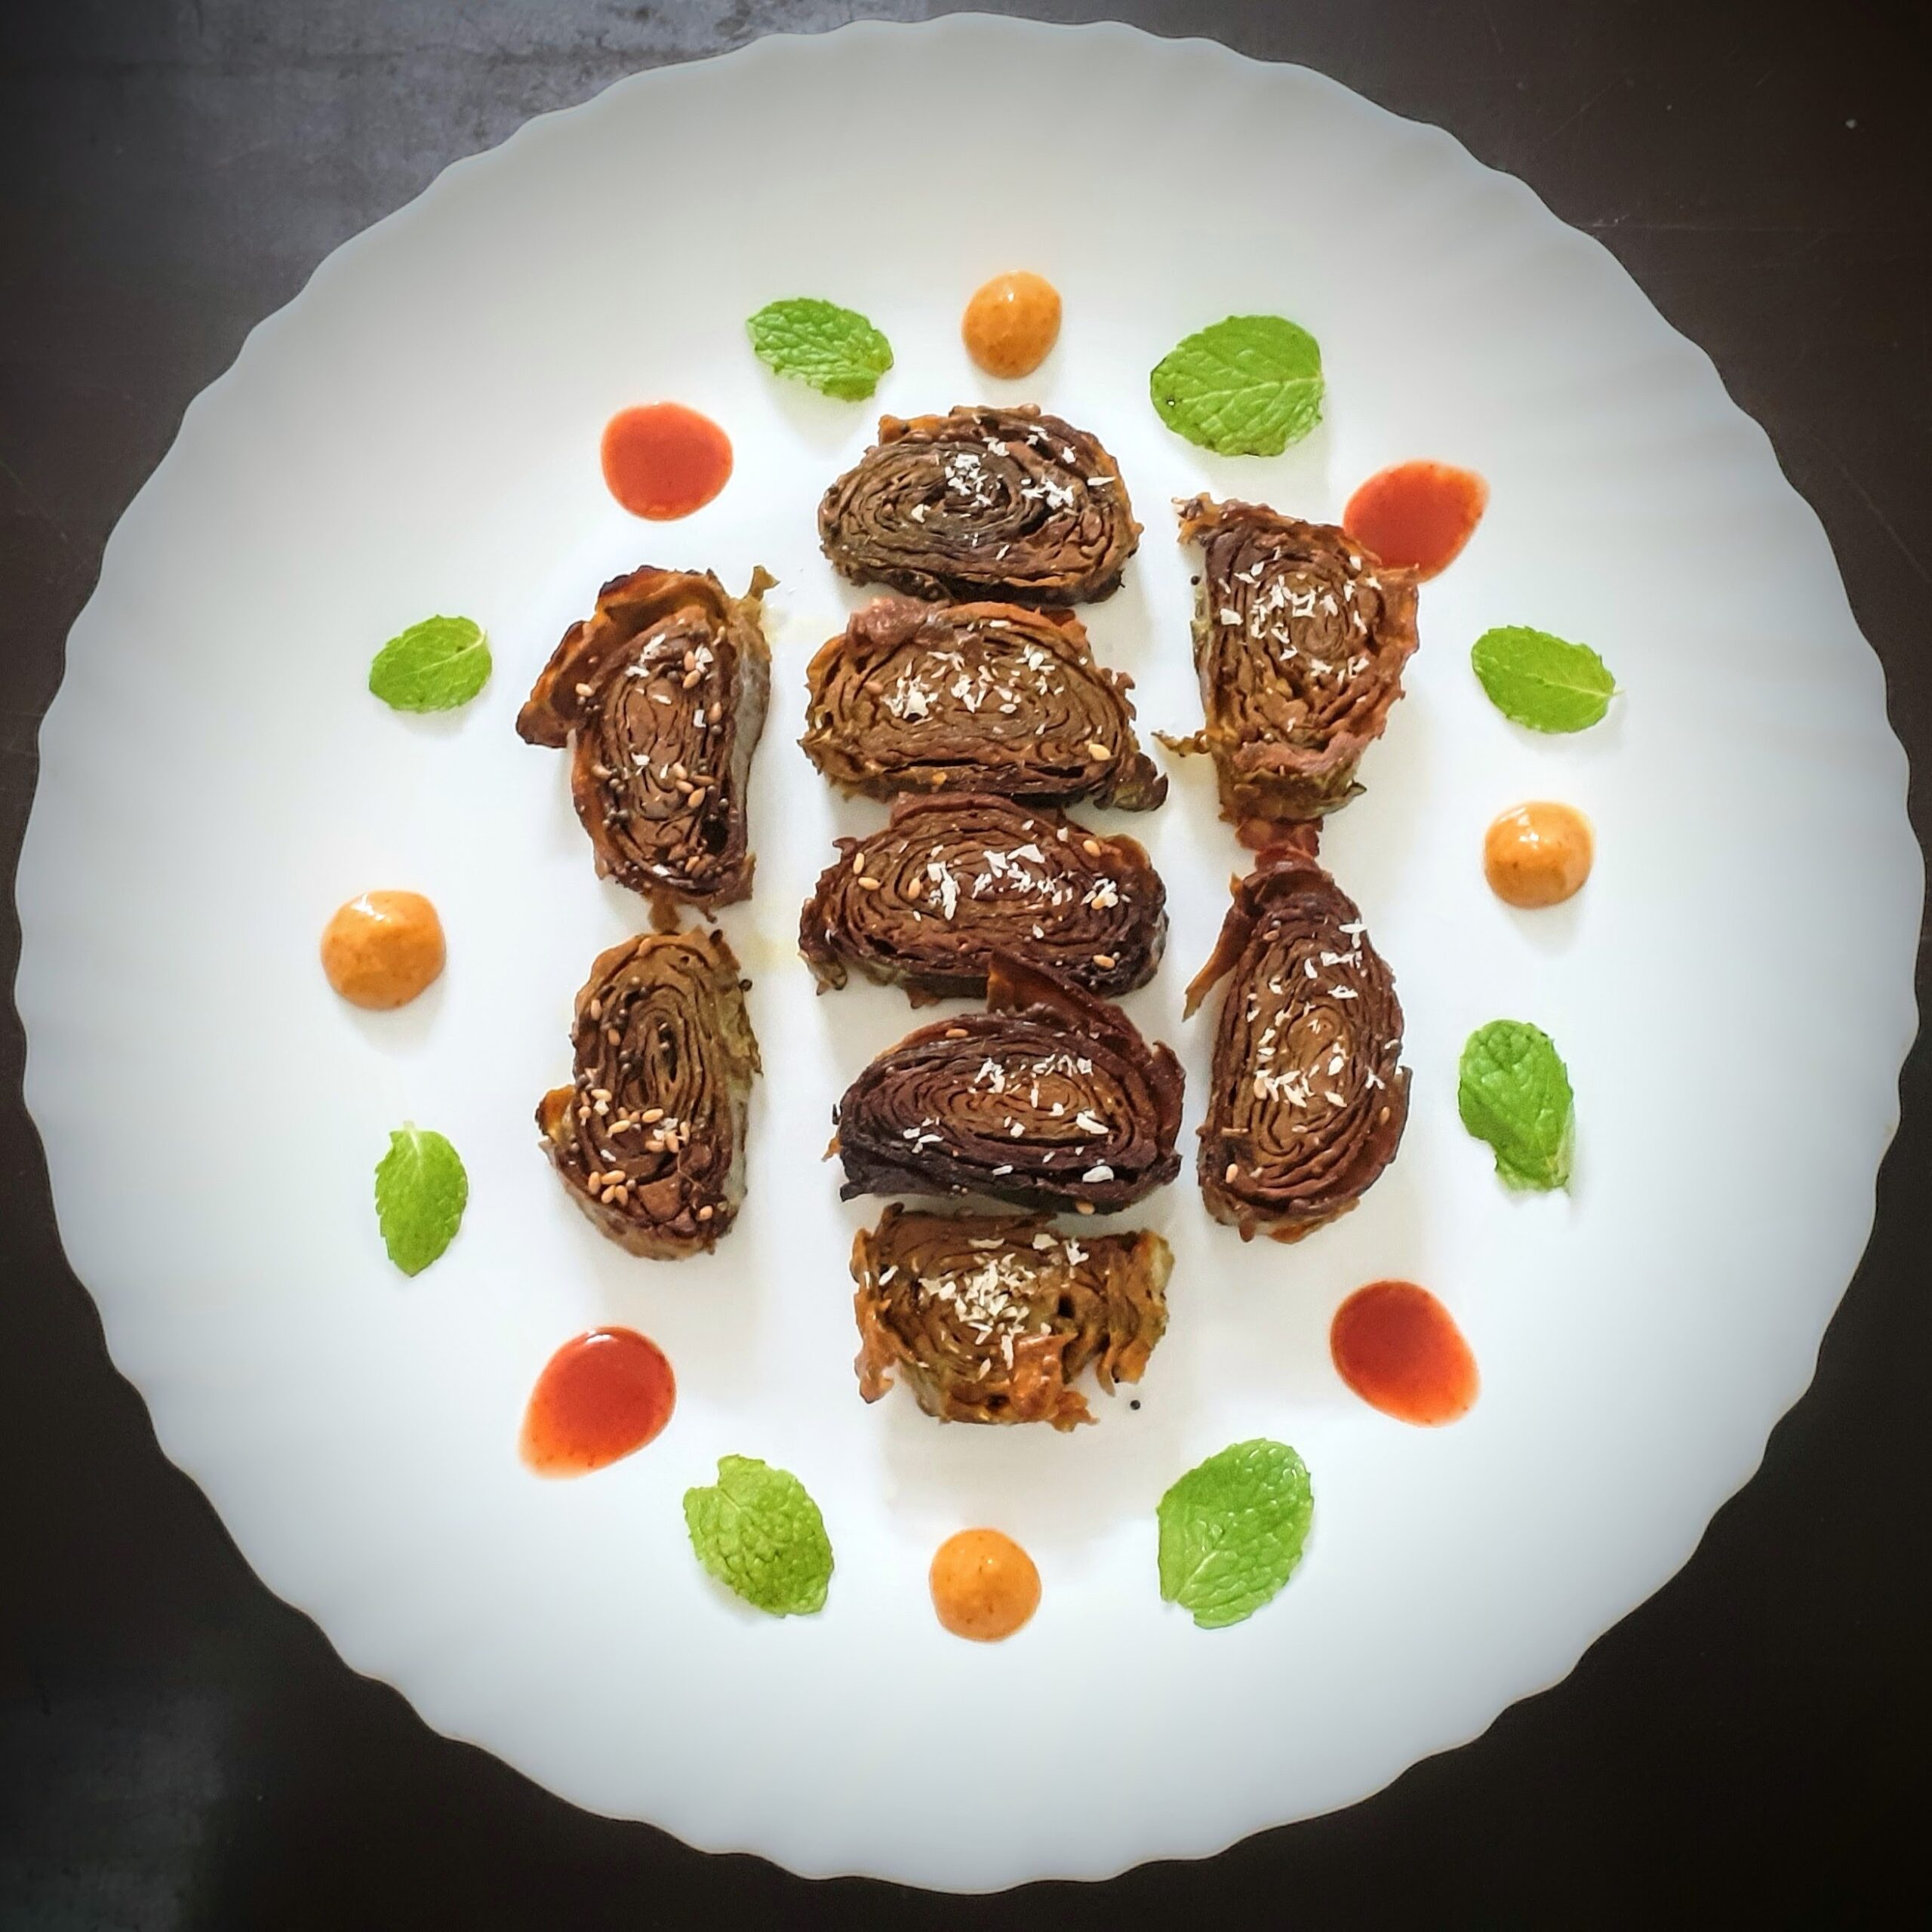
Carefully cut the leaves from the Bok choy, wash them in water and pat dry. Keep aside. Now in a bowl take the besan and add all the masala powders and salt. Mix well with fingers and now start adding the tamarind water little by little to make a thick paste/ batter. If using tamarind paste add paste along with masalas, mix and then use water to make the paste. The batter has to be smooth and thick that it sticks to the leaves and does not slide off. Now take the leaves, bigger ones. Apply the paste to 3 leaves, and arrange 3 of them over lapping the other as shown in the picture. This is the first layer. On this another 3 paste applied leaves have to be arranged. If the leaves are in different sizes, keep bigger ones below and smaller ones on top. Like this for 3 layers. Now start rolling the leaves from left to right, and as you role more of the paste has to be applied each time you roll the leaf. After rolling completely, apply the besan paste all over the rolled leaf. Place this in a greased cooker vessel. Repeat for remaining leaves. I made two such rolls. Place the second roll also in the cooker vessel and keep the vessel in the cooker to steam. Steam for 20 to 25 minutes. Put off the cooker and wait 2 minutes. Now open and cool the steams rolls completely. Once cooled cut them into 1/2 inch thick circles and keep aside. Take oil in a Tava or Pan and heat. Add mustard seeds, Jeera, asafoetida, green chillies, sesame seeds and ginger. When the mustard pops arrange the cut circles on the tava and roast on one side. When it turns a golden brown, flip and roast the other side. Sprinkle some Kopra/ desiccated coconut and remove the Parta off the Tava. Enjoy with some green chutney and chai. Bon Appetit!!!
STEPWISE RECIPE FOLLOWS:
1.Carefully cut the leaves from the Bok choy, wash them in water and pat dry. Keep aside.
2. Now in a bowl take the besan and add all the masala powders and salt. Mix well with fingers and now start adding the tamarind water little by little to make a thick paste/ batter. The batter has to be thick and smooth.

3. Apply the paste to 3 leaves, and arrange 3 of them over lapping the other as shown in the picture. This is the first layer. On this another 3 paste applied leaves have to be arranged. Make 3 such layers.
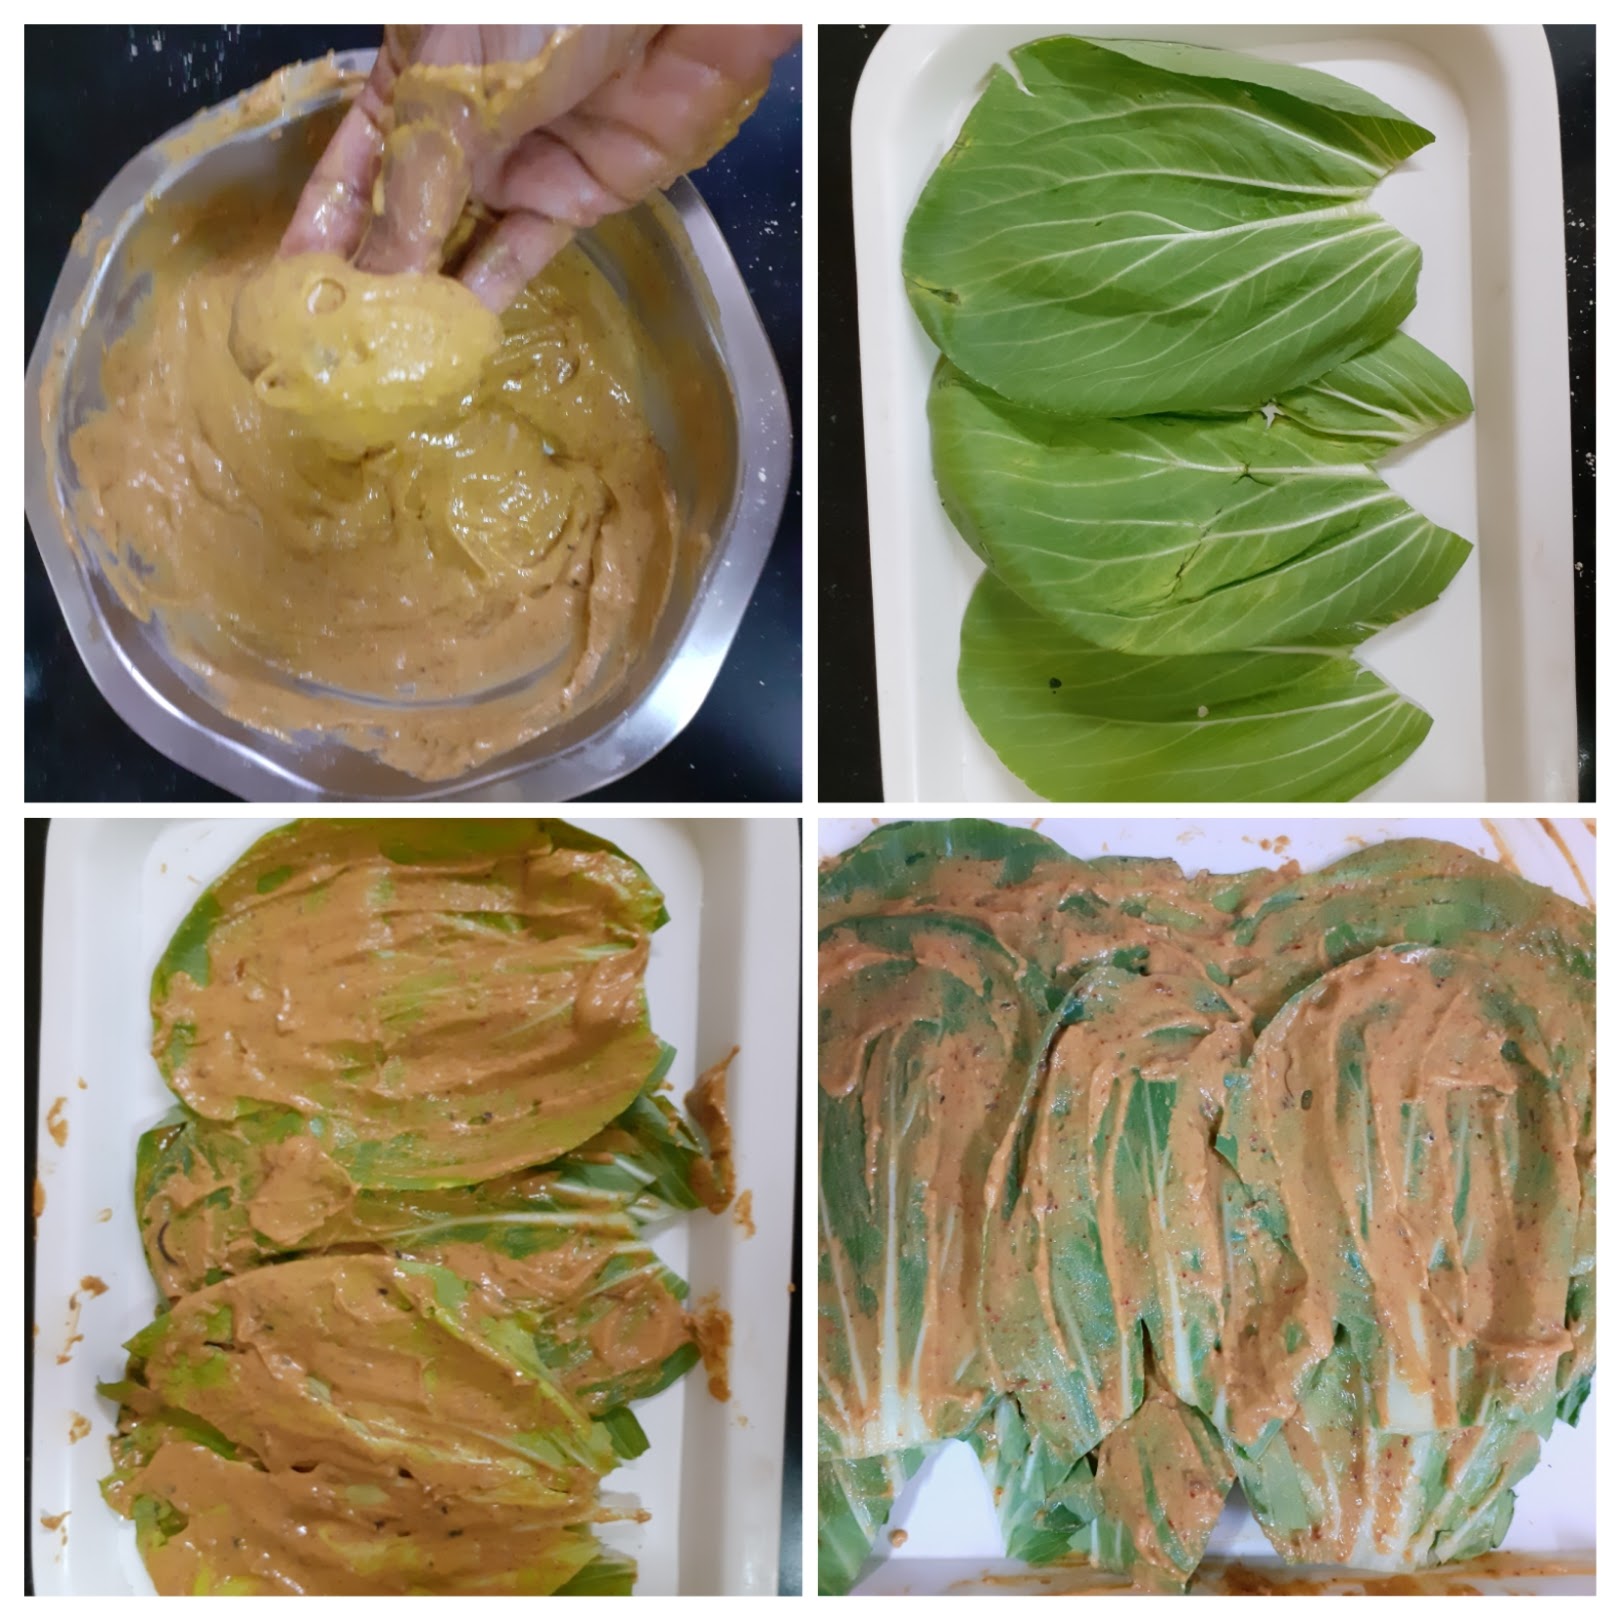
4. Now start rolling the leaves from left to right, and as you role more of the paste has to be applied each time you roll the leaf. After rolling completely, apply the besan paste all over the rolled leaf. Place this in a greased cooker vessel. Repeat the process and put both rolls in cooker vessel.
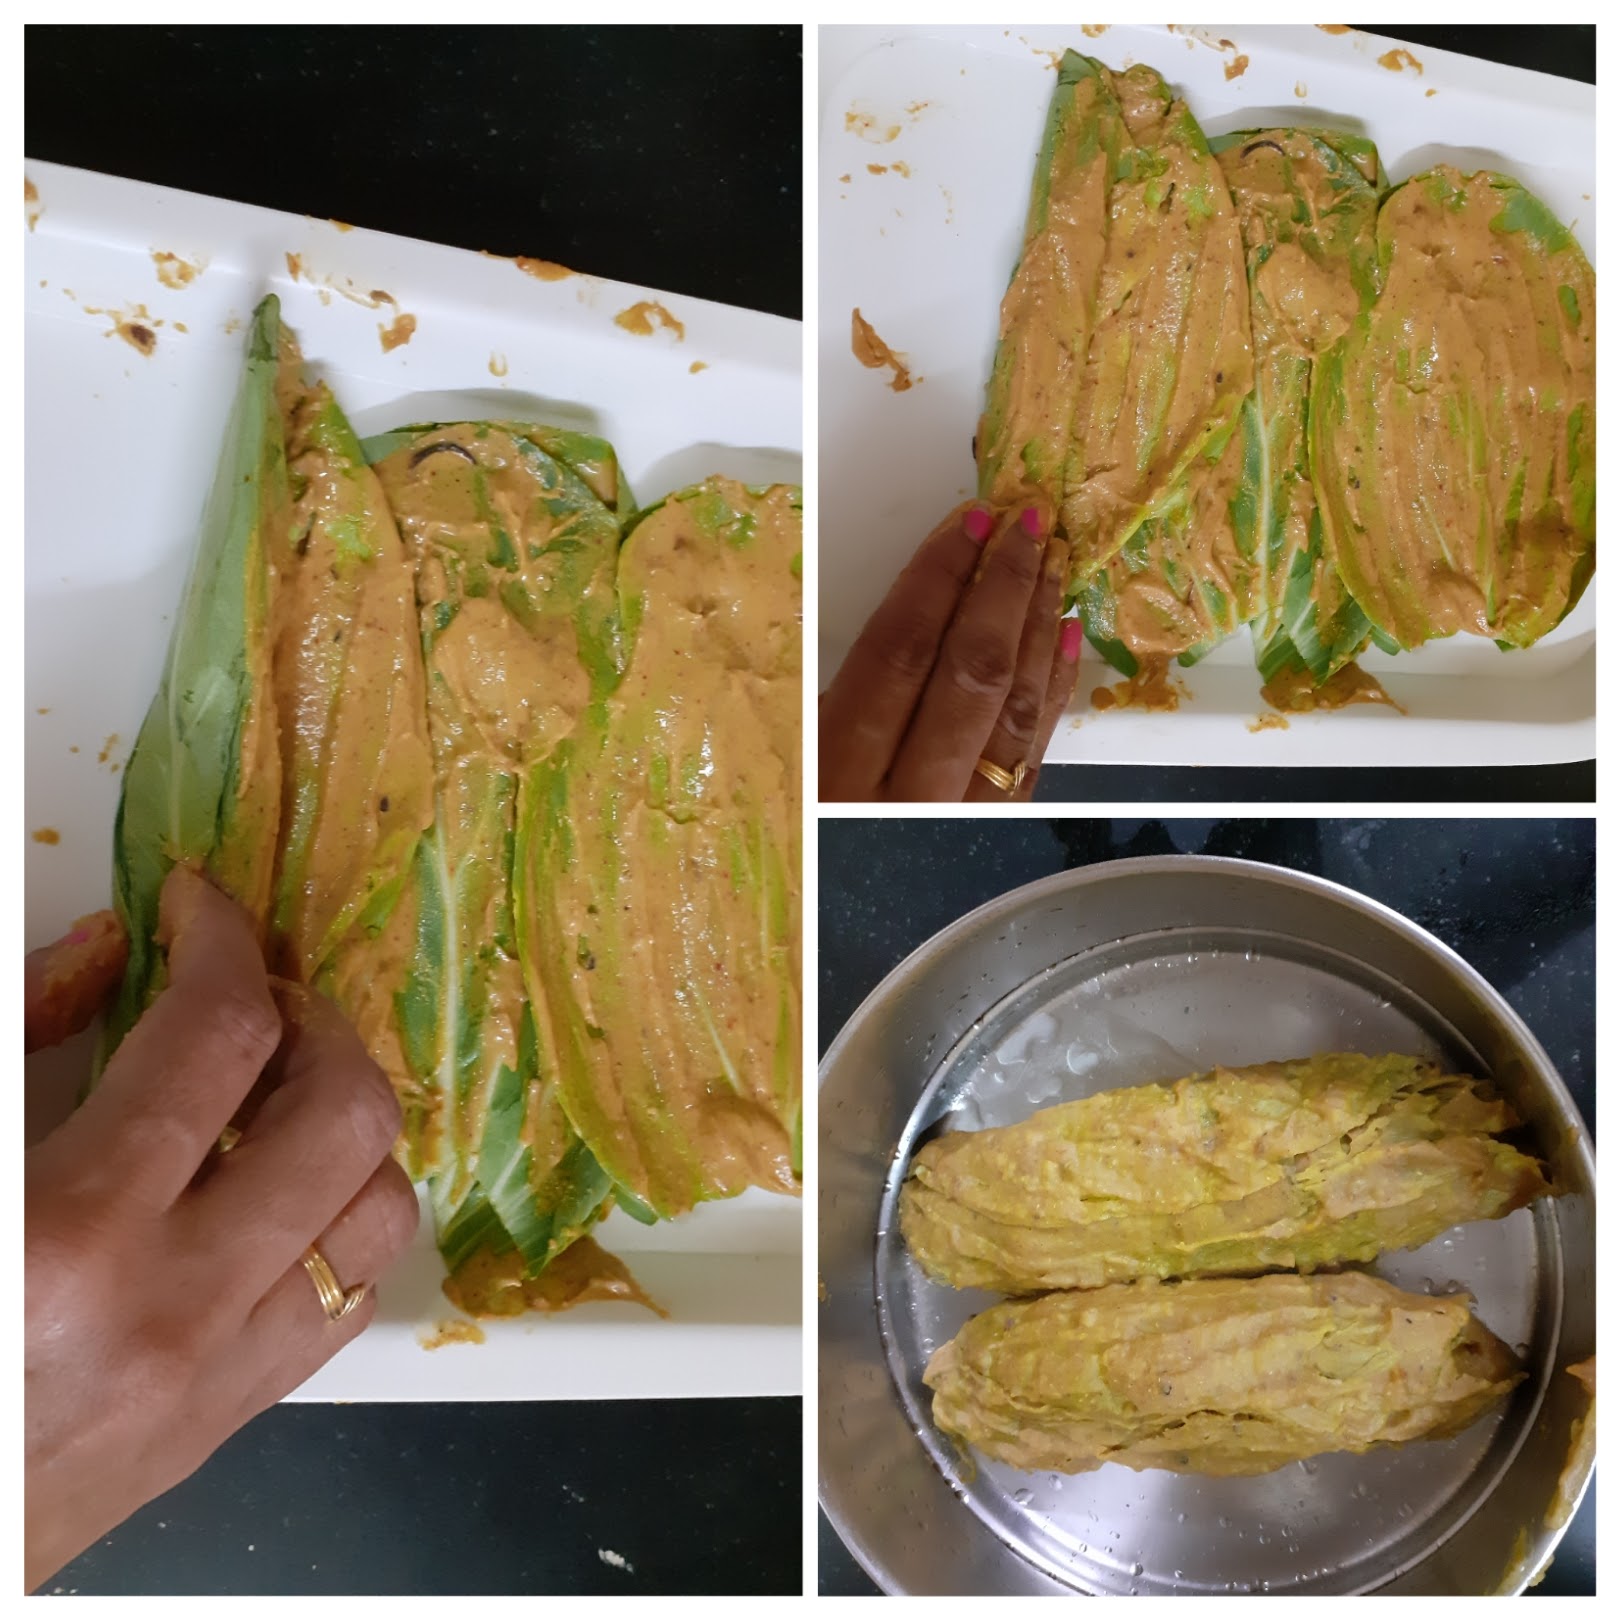
5. Keep the vessel in the cooker to steam. Steam for 20 to 25 minutes. Put off the cooker and wait 2 minutes. Now open and cool the steams rolls completely. Once cooled cut them into 1/2 inch thick circles and keep aside.
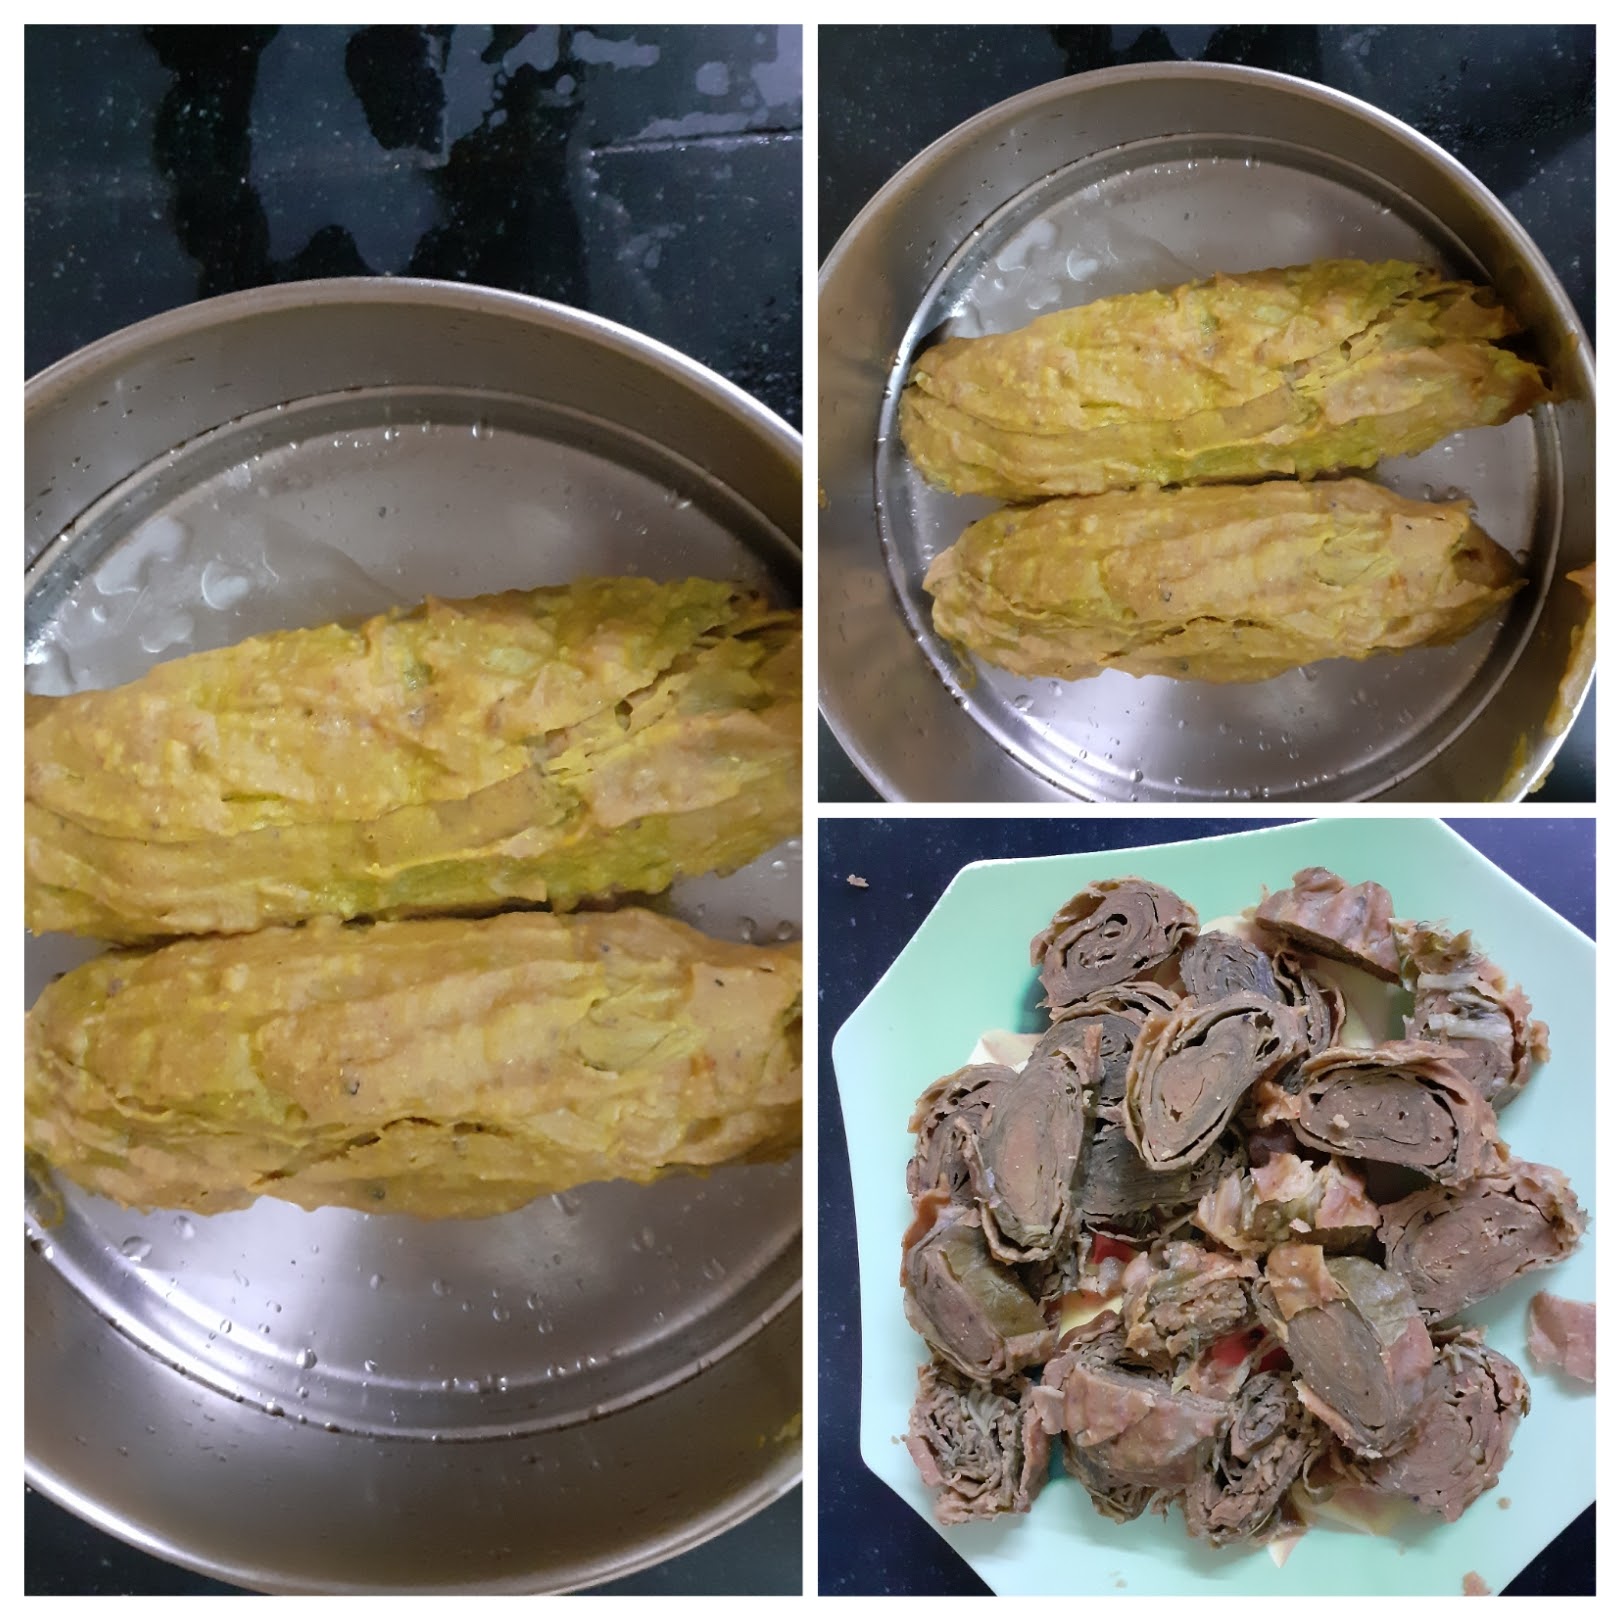
6. Take oil in a Tava or Pan and heat. Add mustard seeds, Jeera, asafoetida, green chillies, sesame seeds and ginger. When the mustard pops arrange the cut circles on the tava and roast on one side. When it turns a golden brown, flip and roast the other side. Sprinkle some Kopra/ desiccated coconut and remove the Parta off the Tava. Enjoy.


NOTES:
1. Select leaves which are fresh and big.
2. At the base of the leaf if the stem is hard, make a V shape cut to remove the hard veins.
3. Ensure the batter is thick like a paste or else it won’t stick to the leaf. Incase the batter turns runny add more besan and adjust spice and continue with the recipe.
4. While toasting on the Tava take care not to burn them or the taste will change.
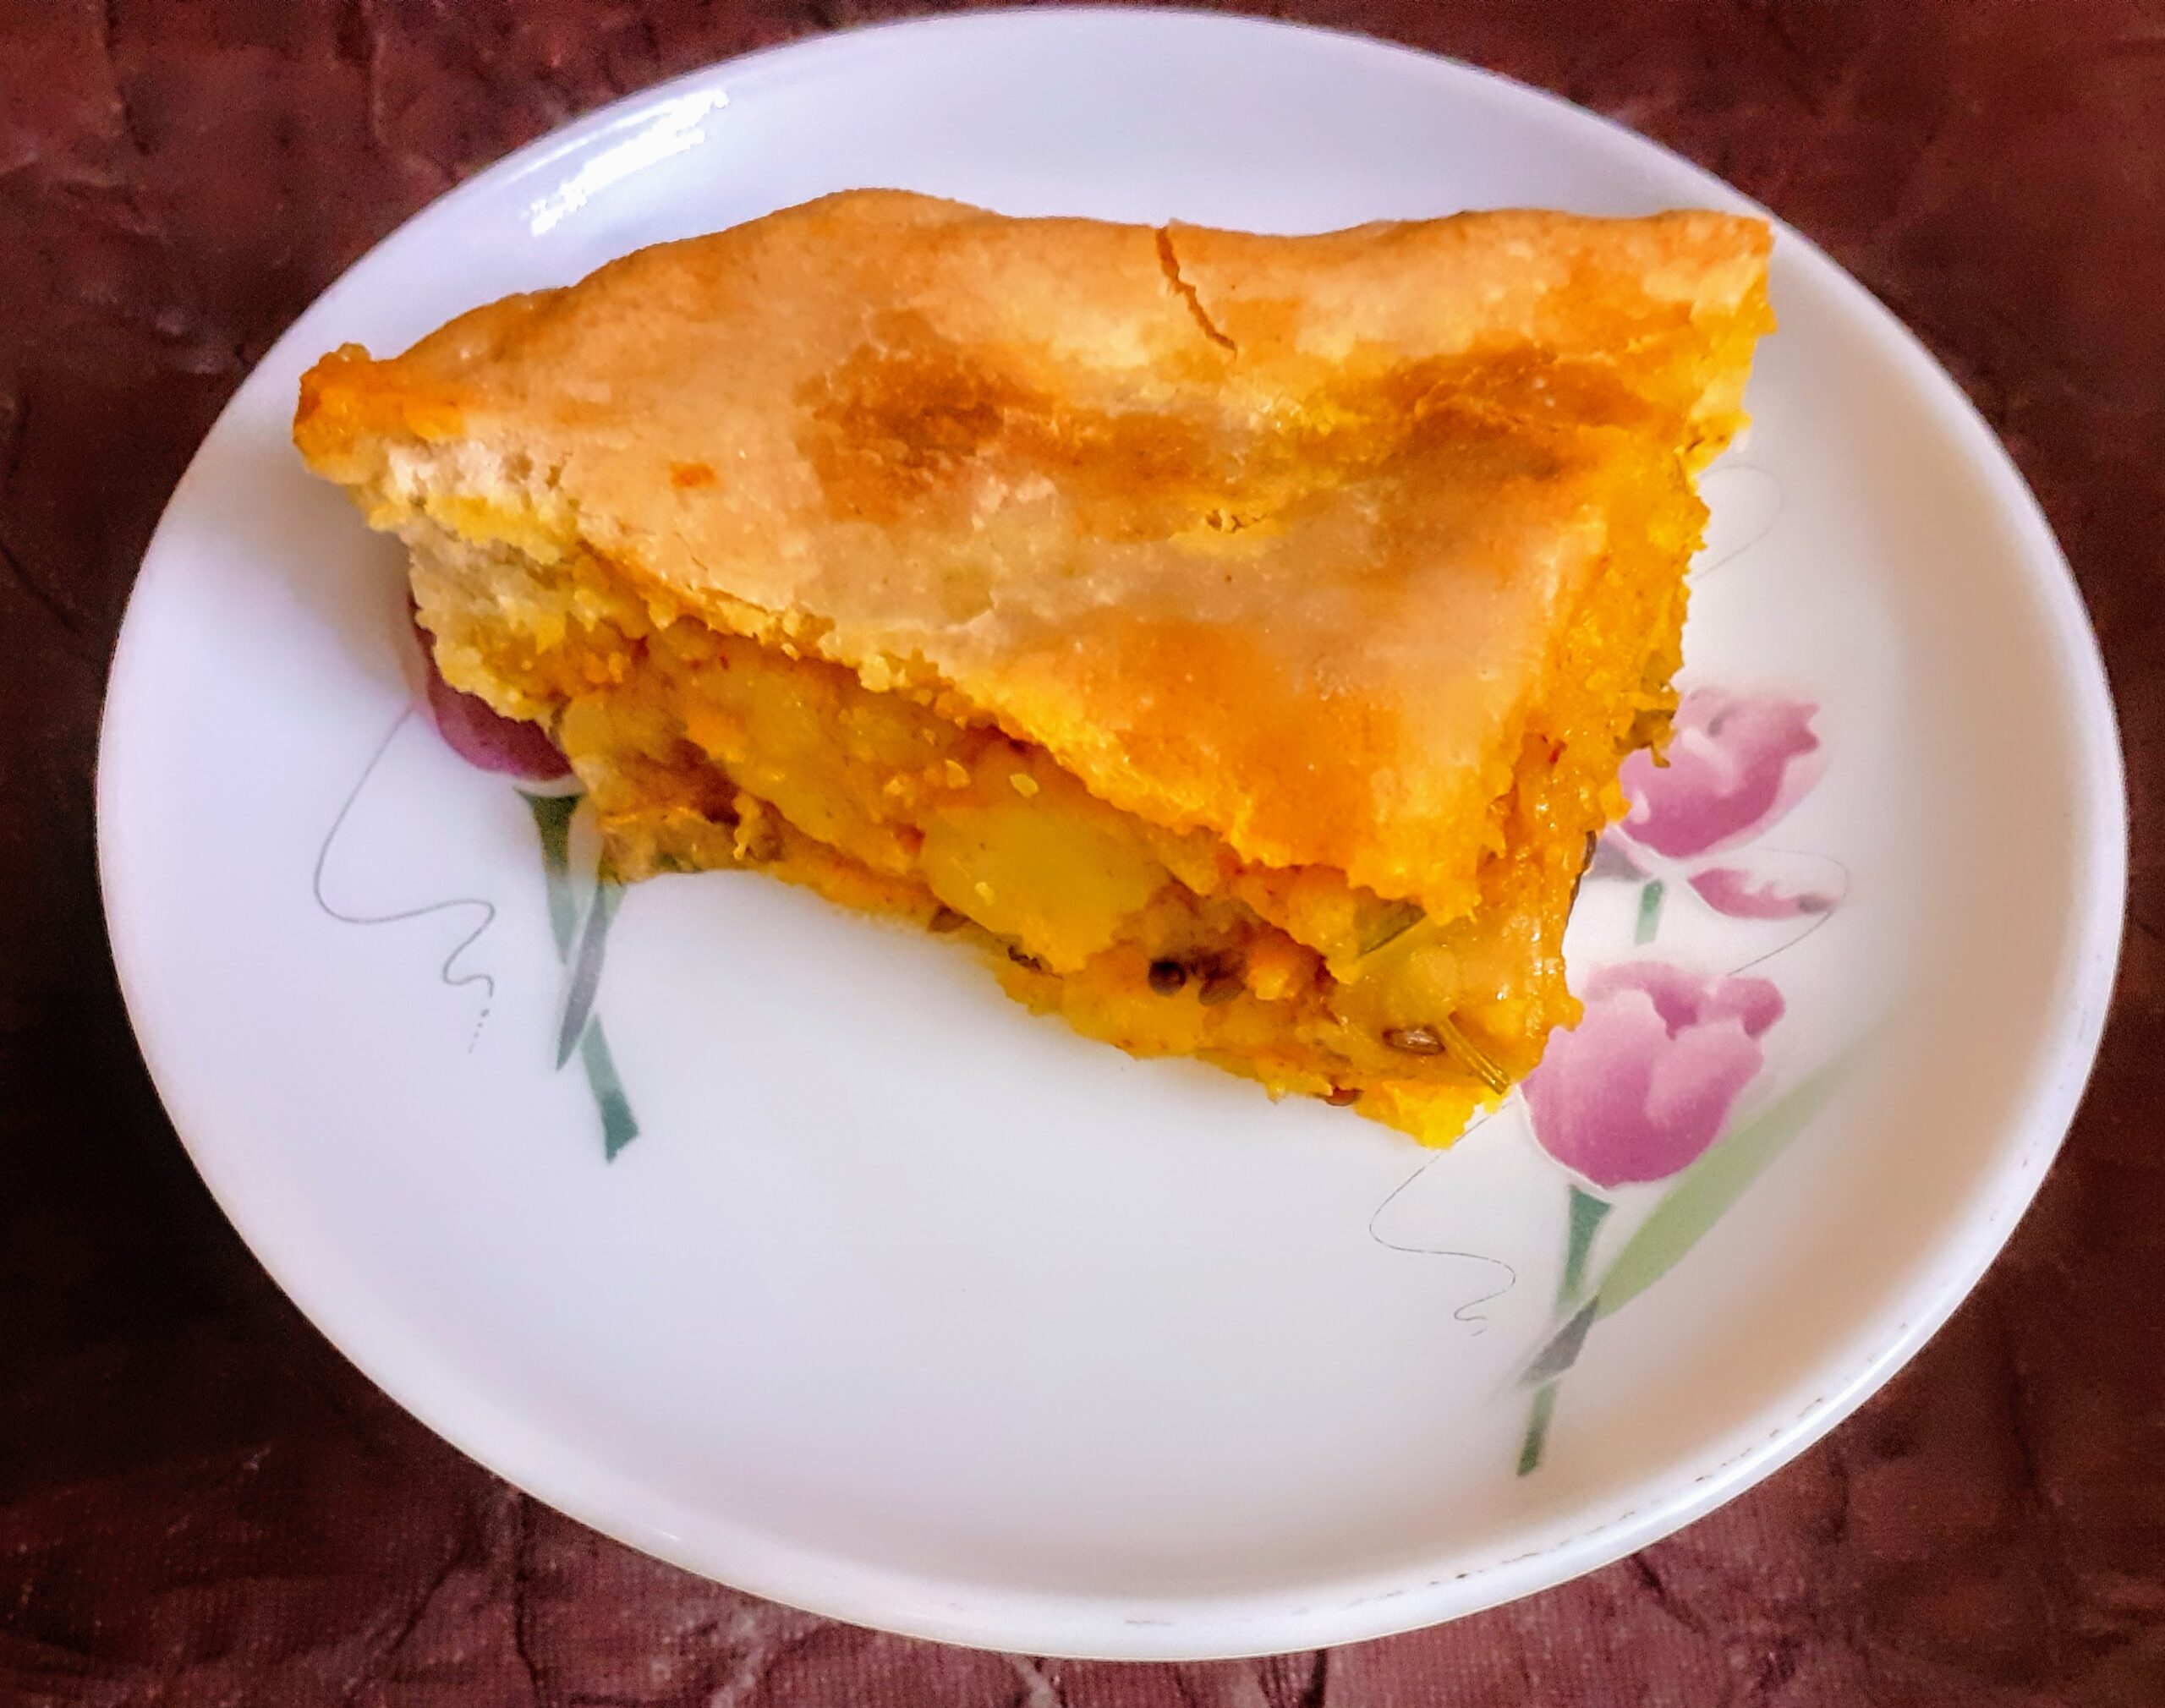
Samosa Pie
When one wants to have Samosa but “I feel guilty having fried stuff” is the mood, what to do? You bake it???? and call it a pie????.
Well, I’m a fan of Samosas and love them fried, but the Mr. is on a no fried stuff mode, so I just went ahead and baked it. I did not expect to get a nicely browned crust but made a slight adjustment and I got baked Samosas which had a golden-brown crust. Happy moment.
I have used Chiroti Rava/ Suji in this recipe. Chiroti Suji is more popular towards Karnataka, where it is used in making Dosas, and other fried snacks. I use this Choroti Rava to make most fried food like Samosa, Kachori, Karachikai(sweet fried snack). This Rava gives the much-required crunch to these snacks. This Suji, when kneaded and rested, becomes as pliable as maida or refined flour. Chiroti Rava is available in all departmental stores. If Chiroti is not available it can be easily swapped with Maida.
While you are here please check out my other snack recipes like Masala Wheat flour Papdis( 2 ways), Unni appam(sweet), Thattai/Nipattu, Kothimbir vadi, Kuzhi Paniyaram, Suji Cheese balls, and more…
Here is the recipe of Samosa Pie for you-
Ingredients:
Chiroti Suji 2 cups
Maida 1/4 cup
Salt to taste
Potatoes 5 big cooked and mashed
Onion 2 small or 1 big finely chopped
Green Peas a handful (optional)
Red chilli powder 1 to 1.5 tsp
Coriander 1 tsp
Baking Powder 1/4 tsp
Cumin seeds 1.5 tsp (divided)
Turmeric powder 1 tsp
Amchur/dry mango powder 2 tsp
Fresh Coriander leaves chopped 1tbsp
Garam Masala powder 1/2 tsp
Oil for brushing and kneading
Directions:
To make the dough:
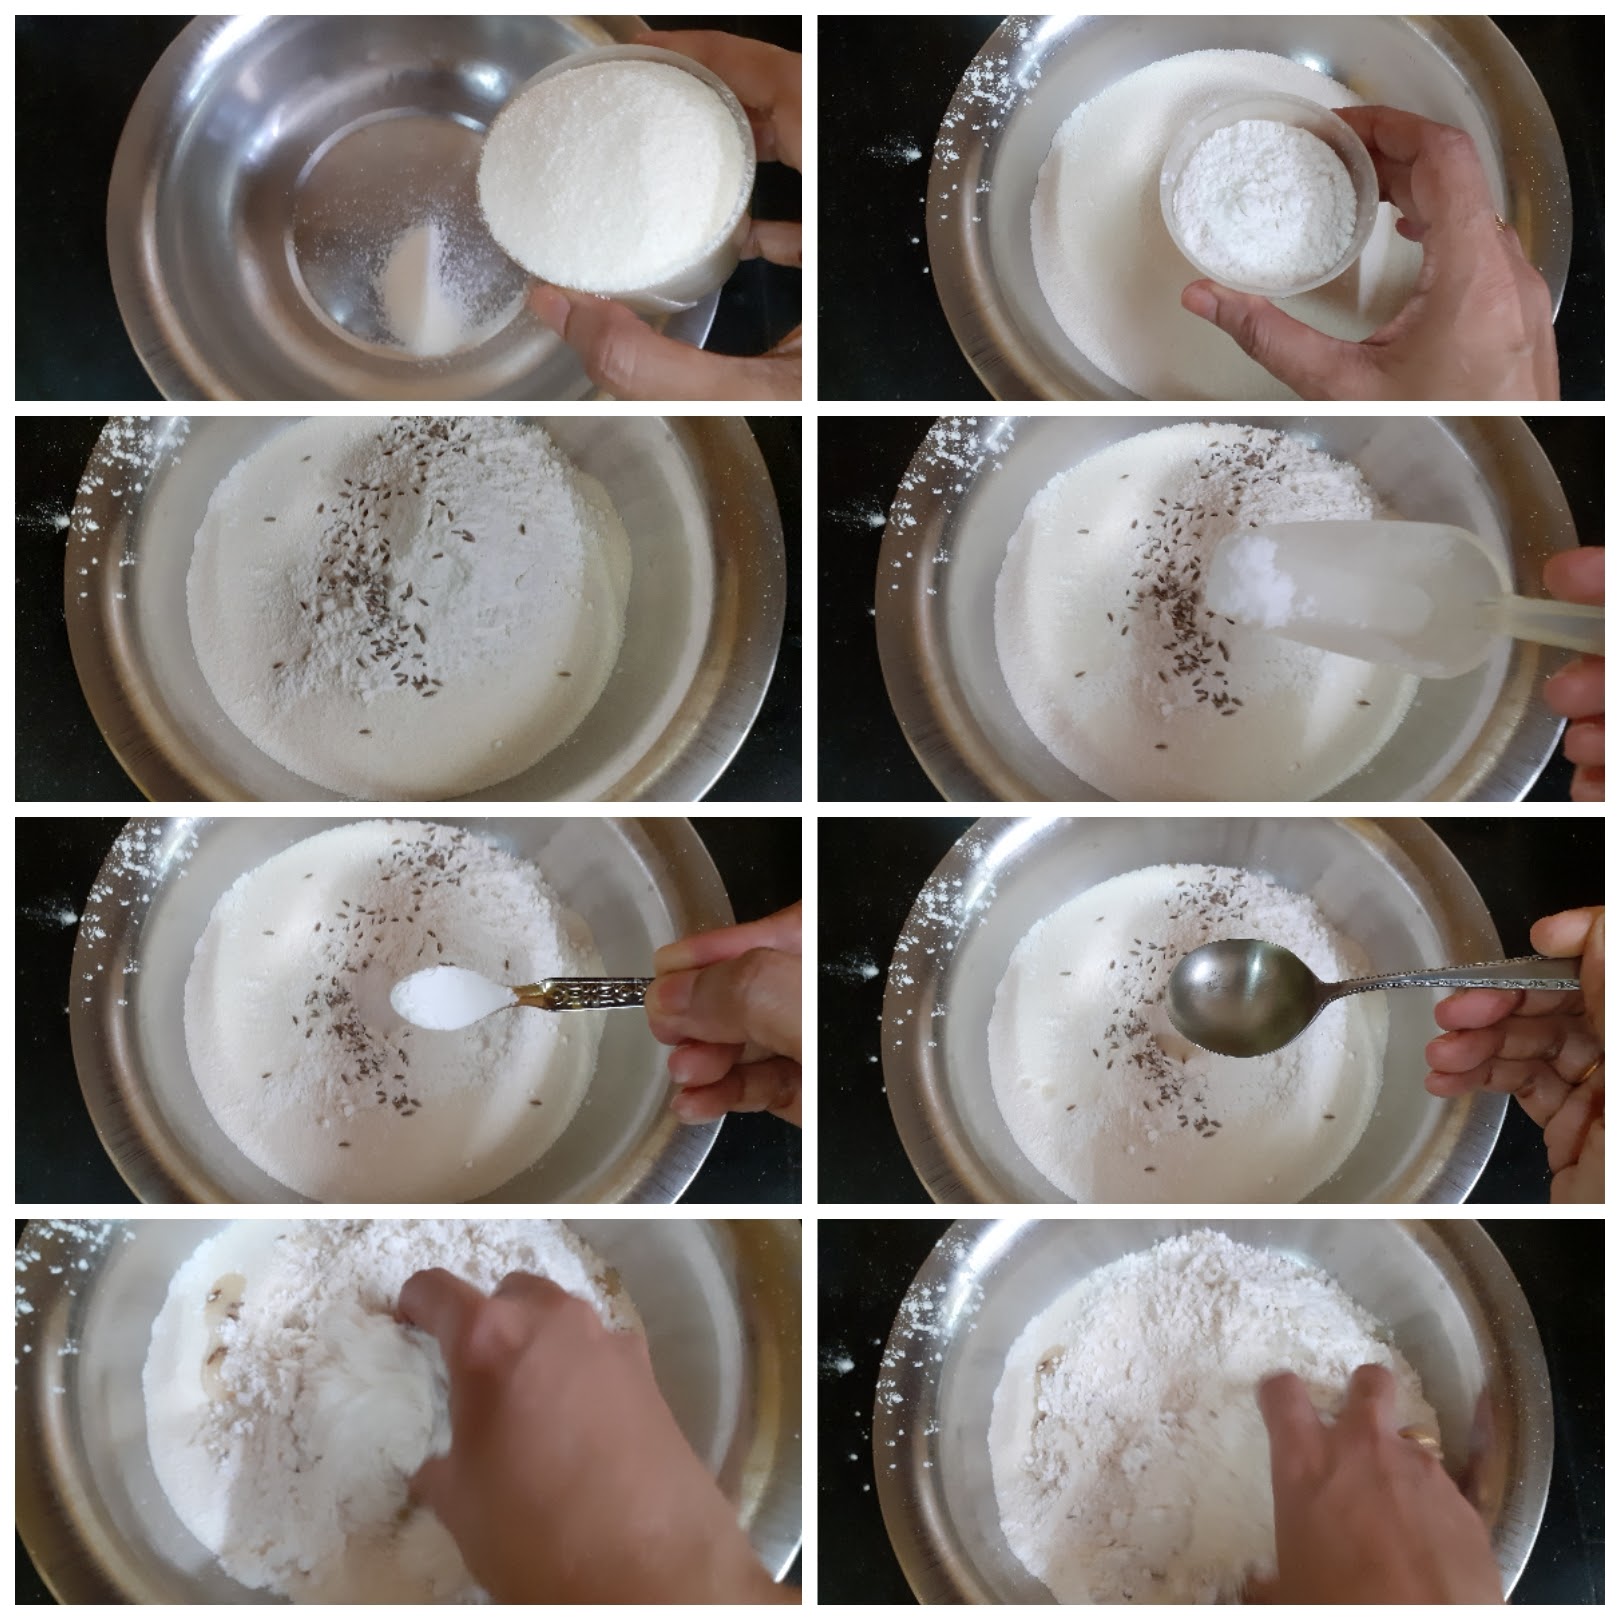
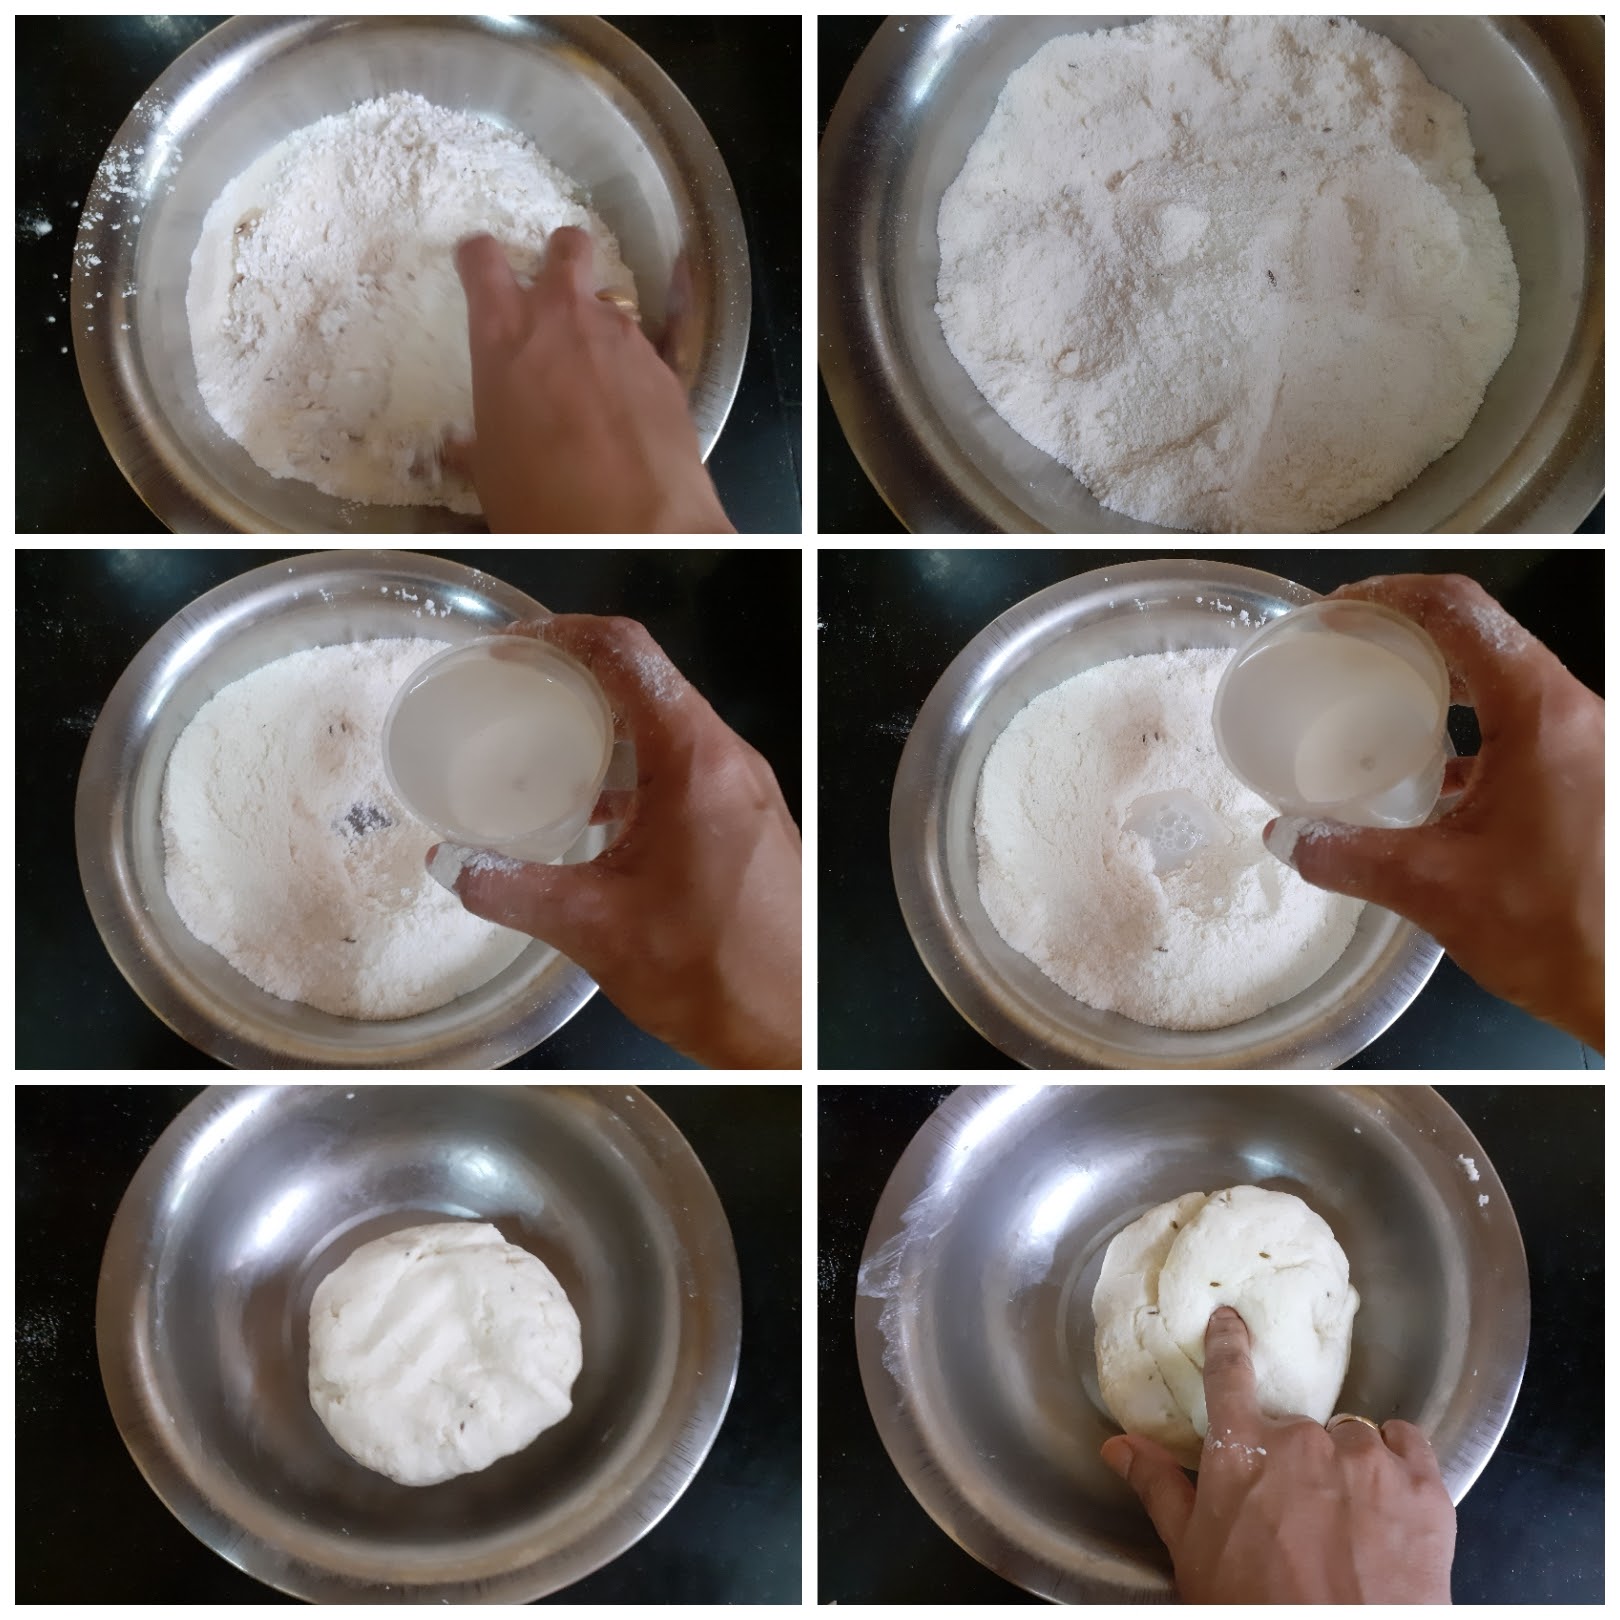
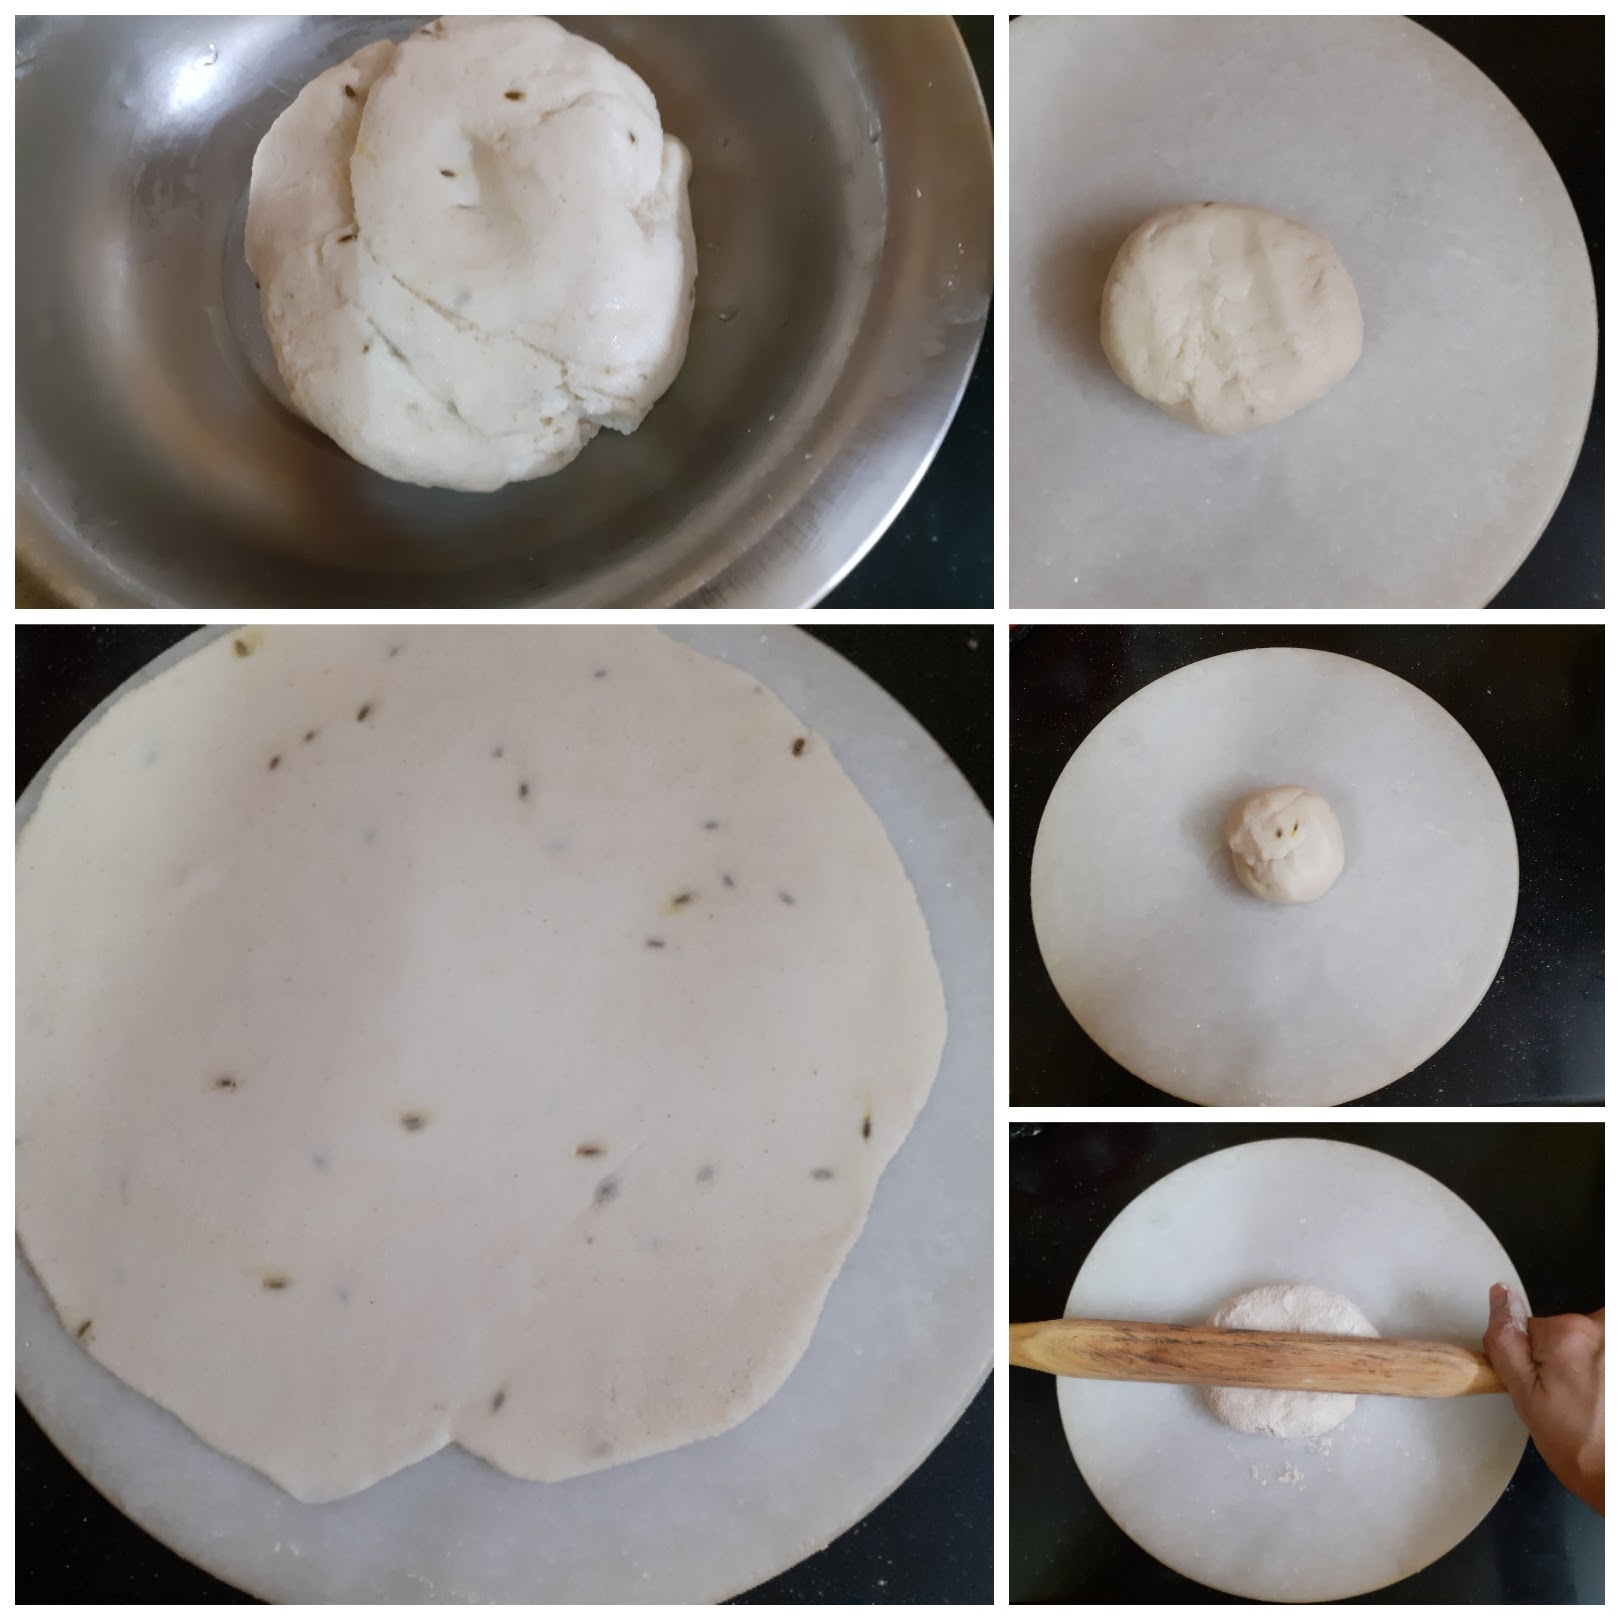
Take the Chiroti Rava in a mixing bowl and add the Maida to it. Add 1/2 tsp Cumin seeds. Add Baking powder and salt and mix well. Create a well in the centre and add 1 tbsp oil and combine well. No water must be added now. Mix in the oil nicely into the flour, takes about a minute. Now form a well again in the centre and adding water little by little combine to form a stiff dough. Rest the dough for 1/2 an hour at least before use. (Refer note 5)
To make the filling:
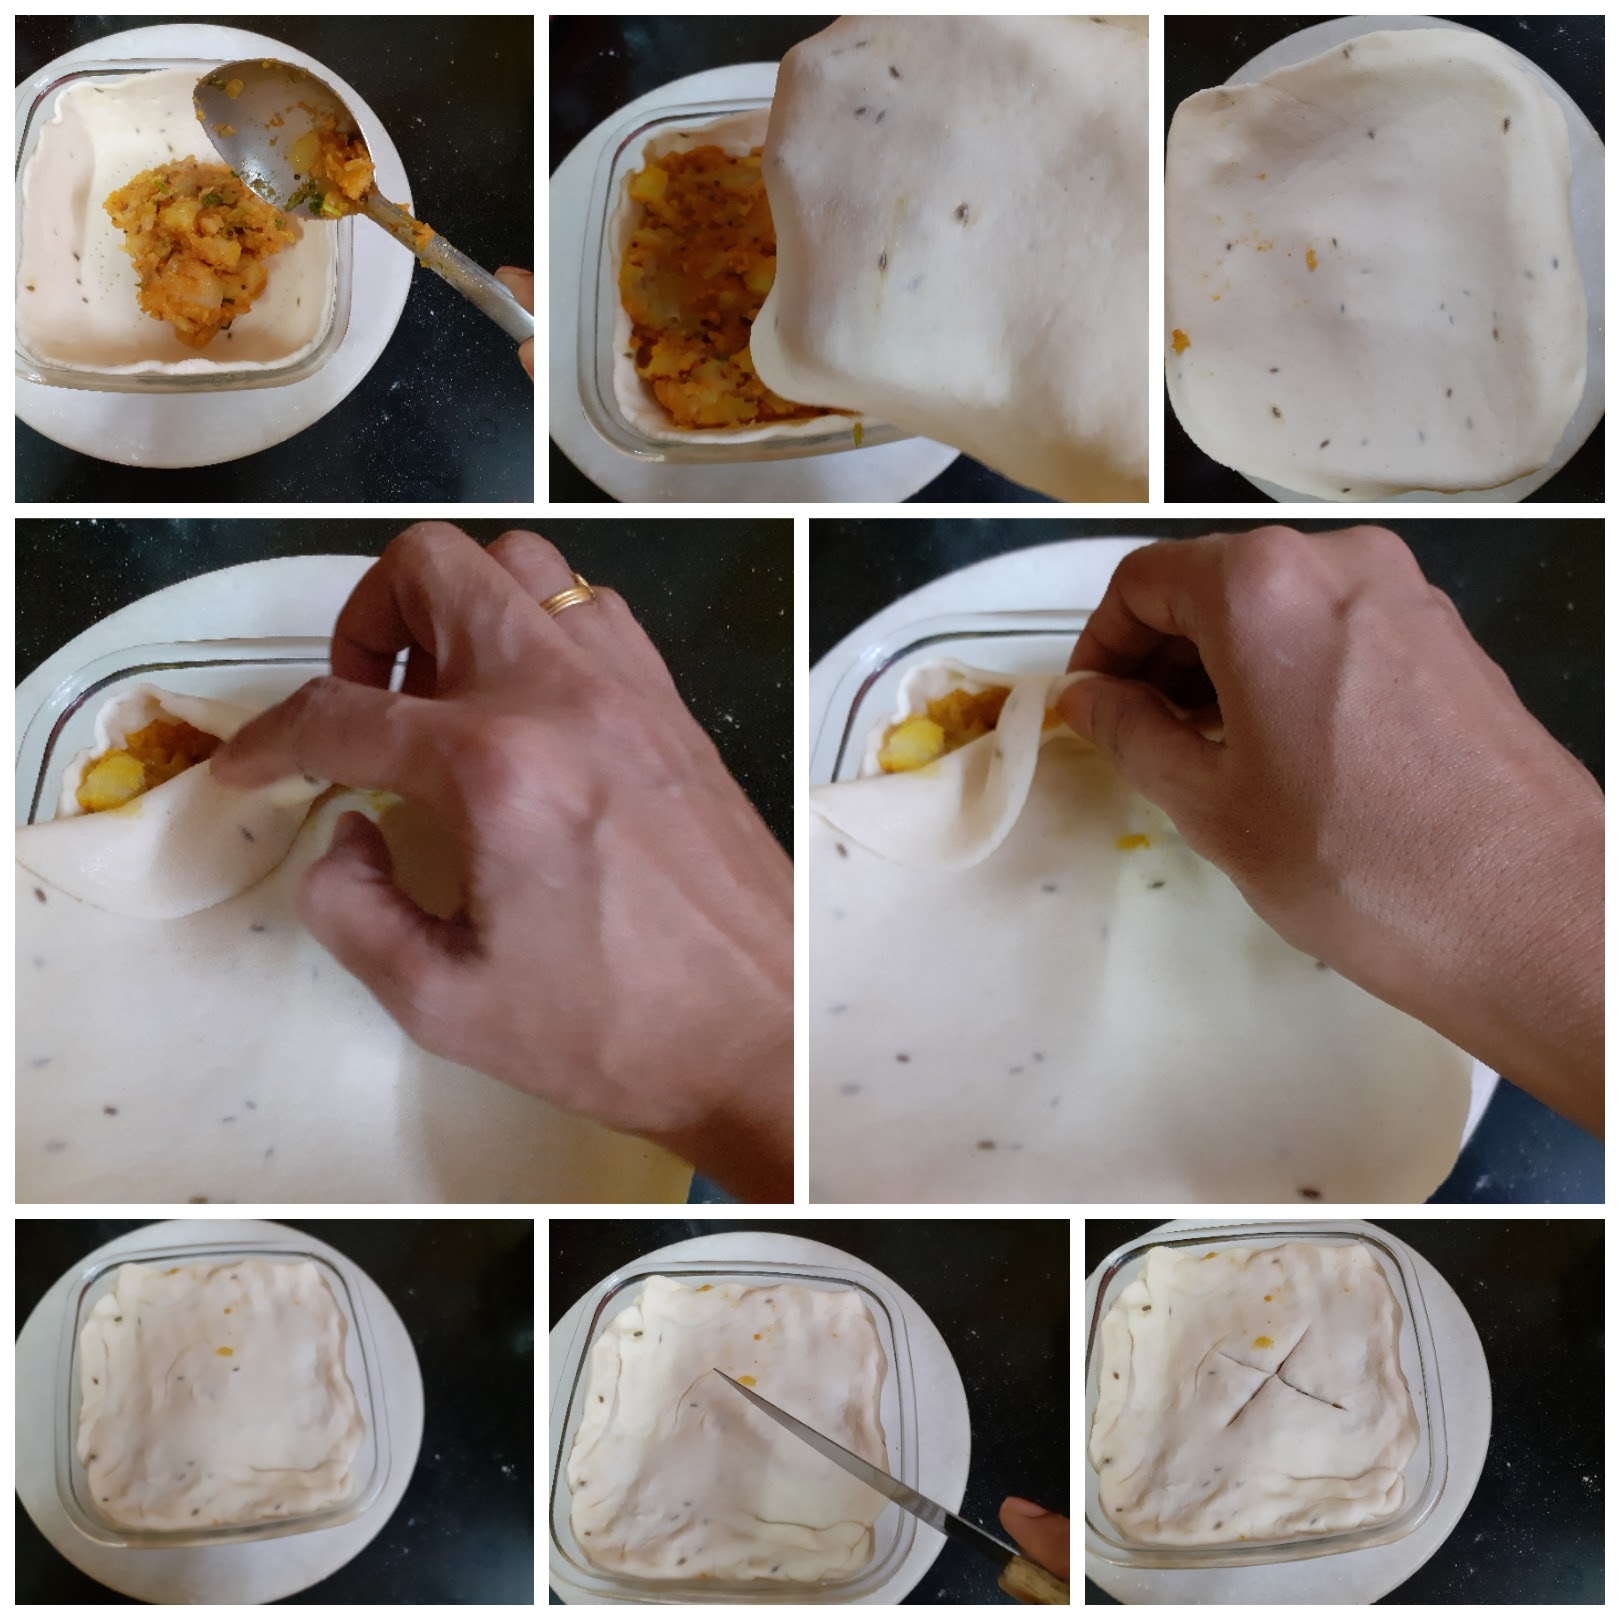
In a Kadai heat oil. Add cumin seeds and mustard seeds, and as they crackle add the chopped onions. Fry the onions until light brown and add the mashed potatoes. Now add salt, followed by red chilli powder, coriander powder, Amchur powder, and mix them all nicely such that all masalas get well incorporated with the potatoes. Finally, add the garam masala powder(picture not taken) and chopped coriander and stir. Allow the filling to cool down a bit.
To assemble the pie:
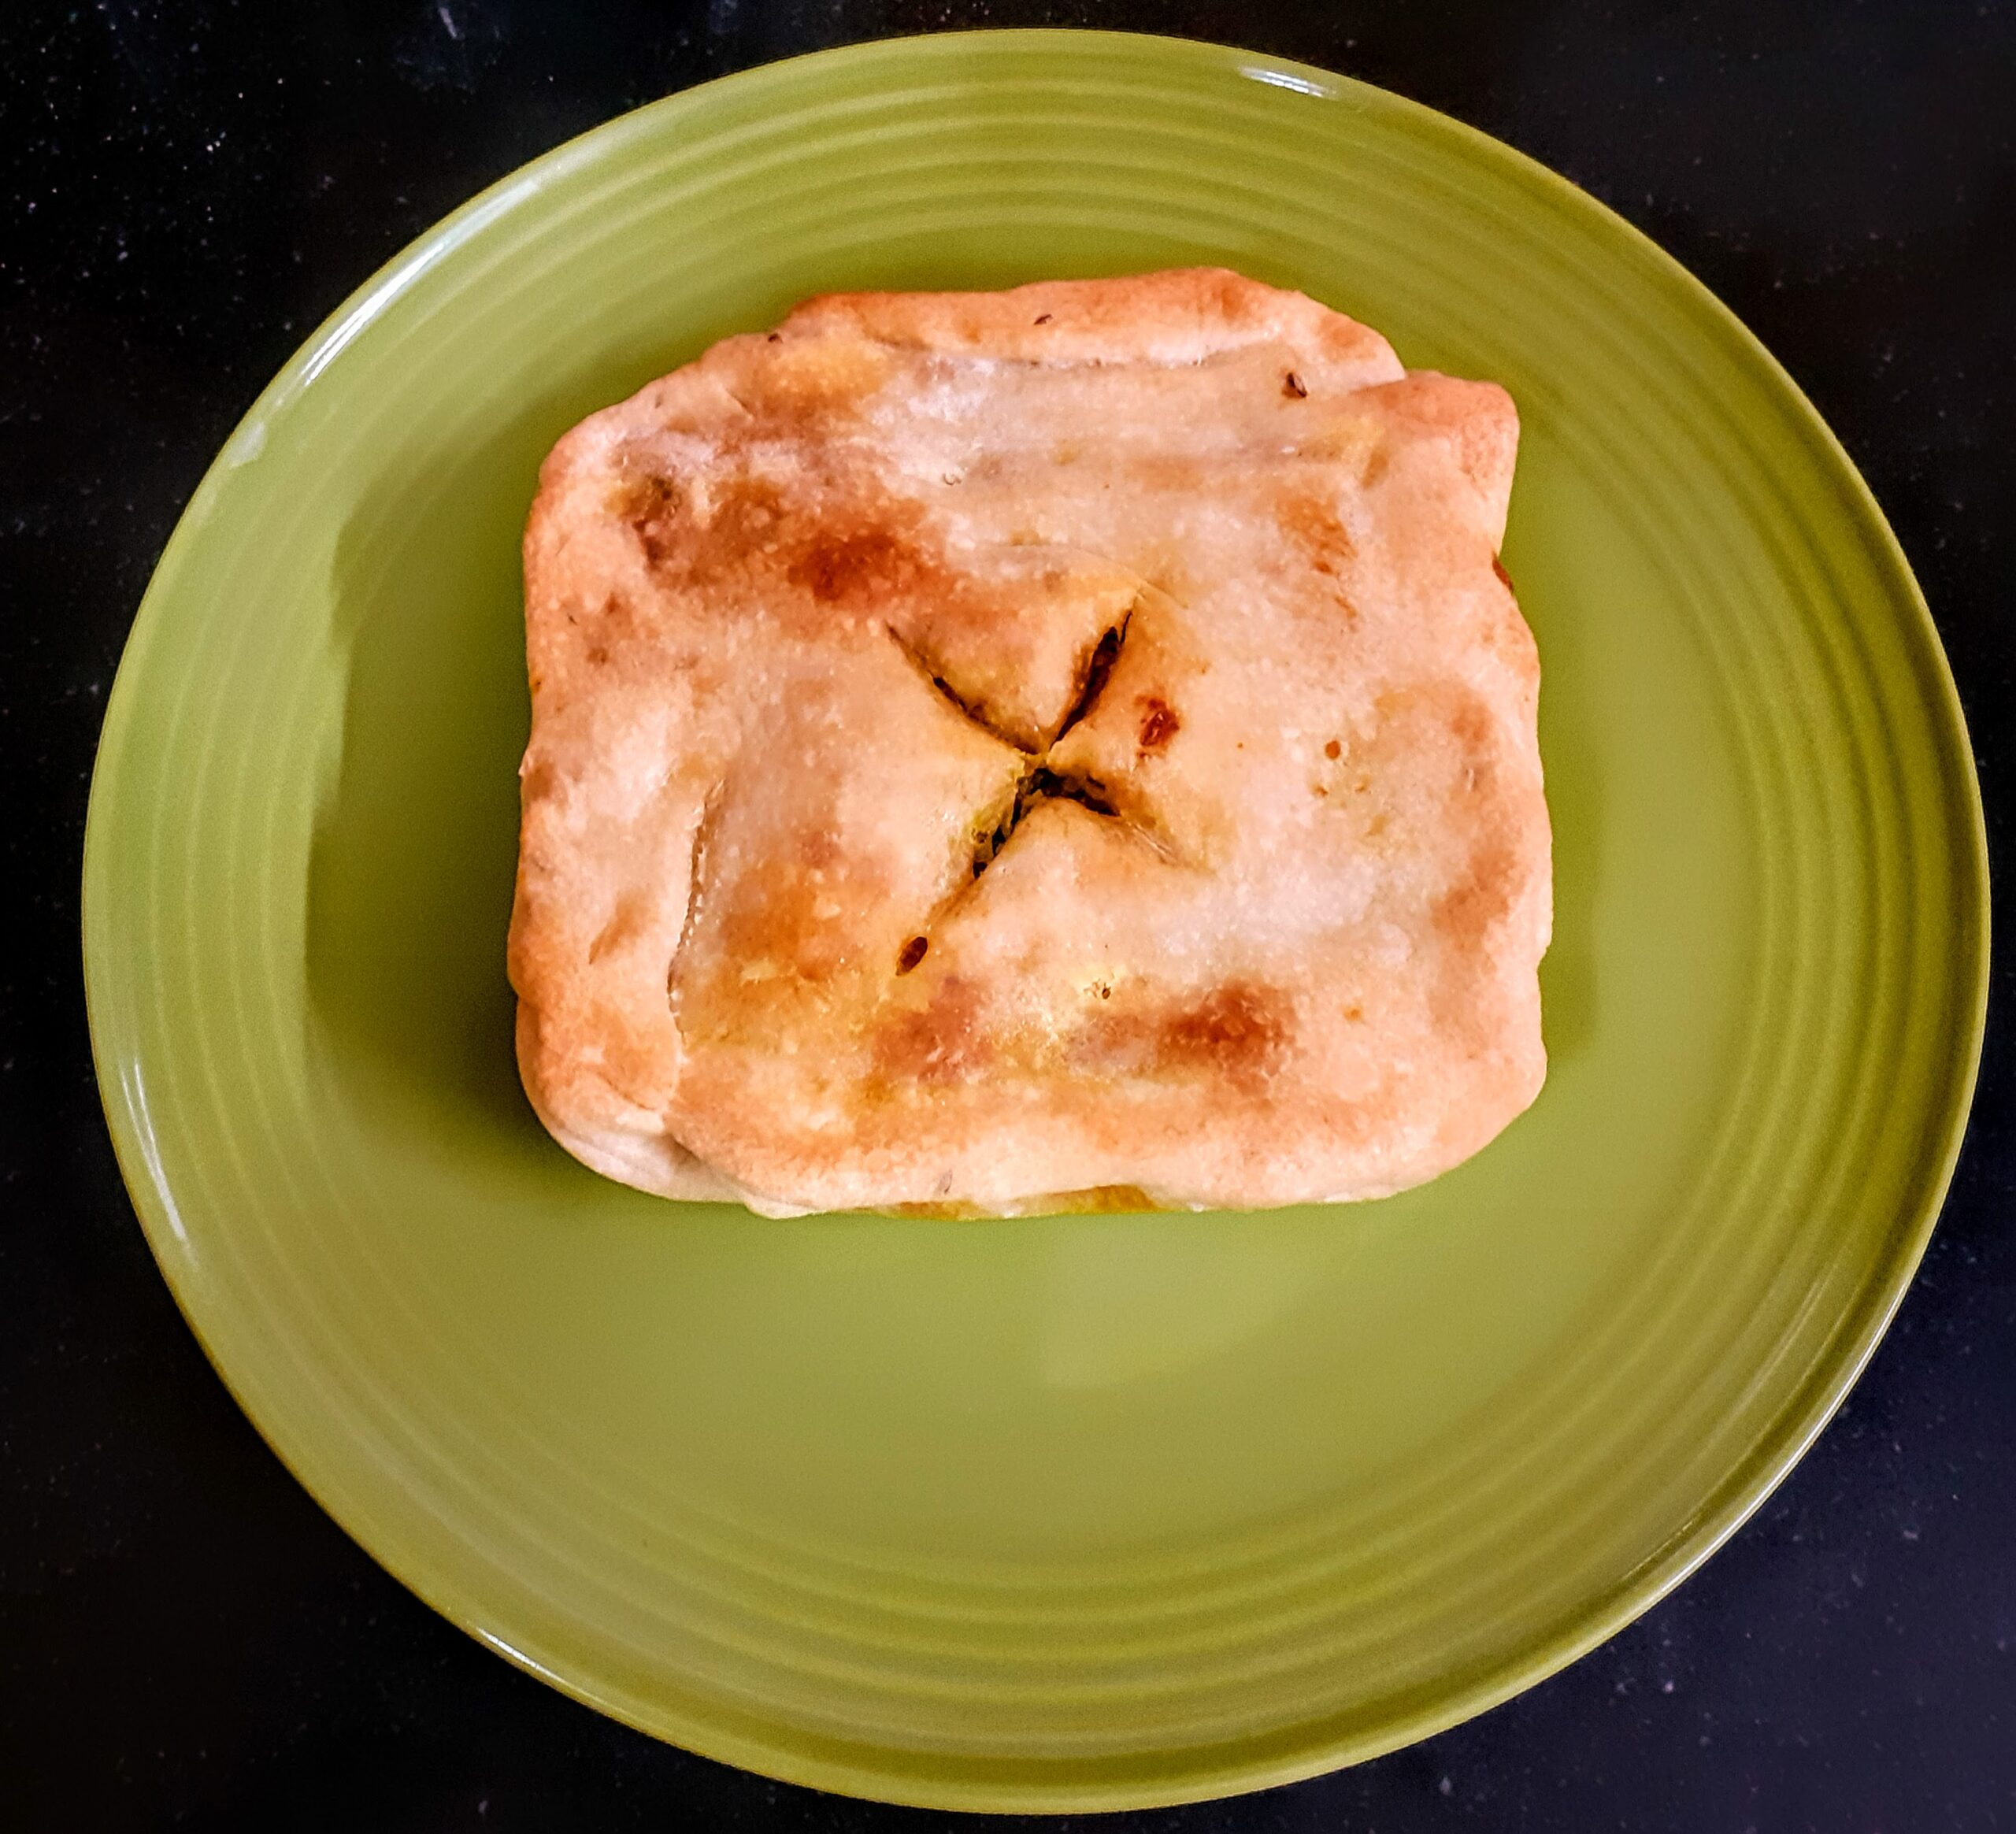
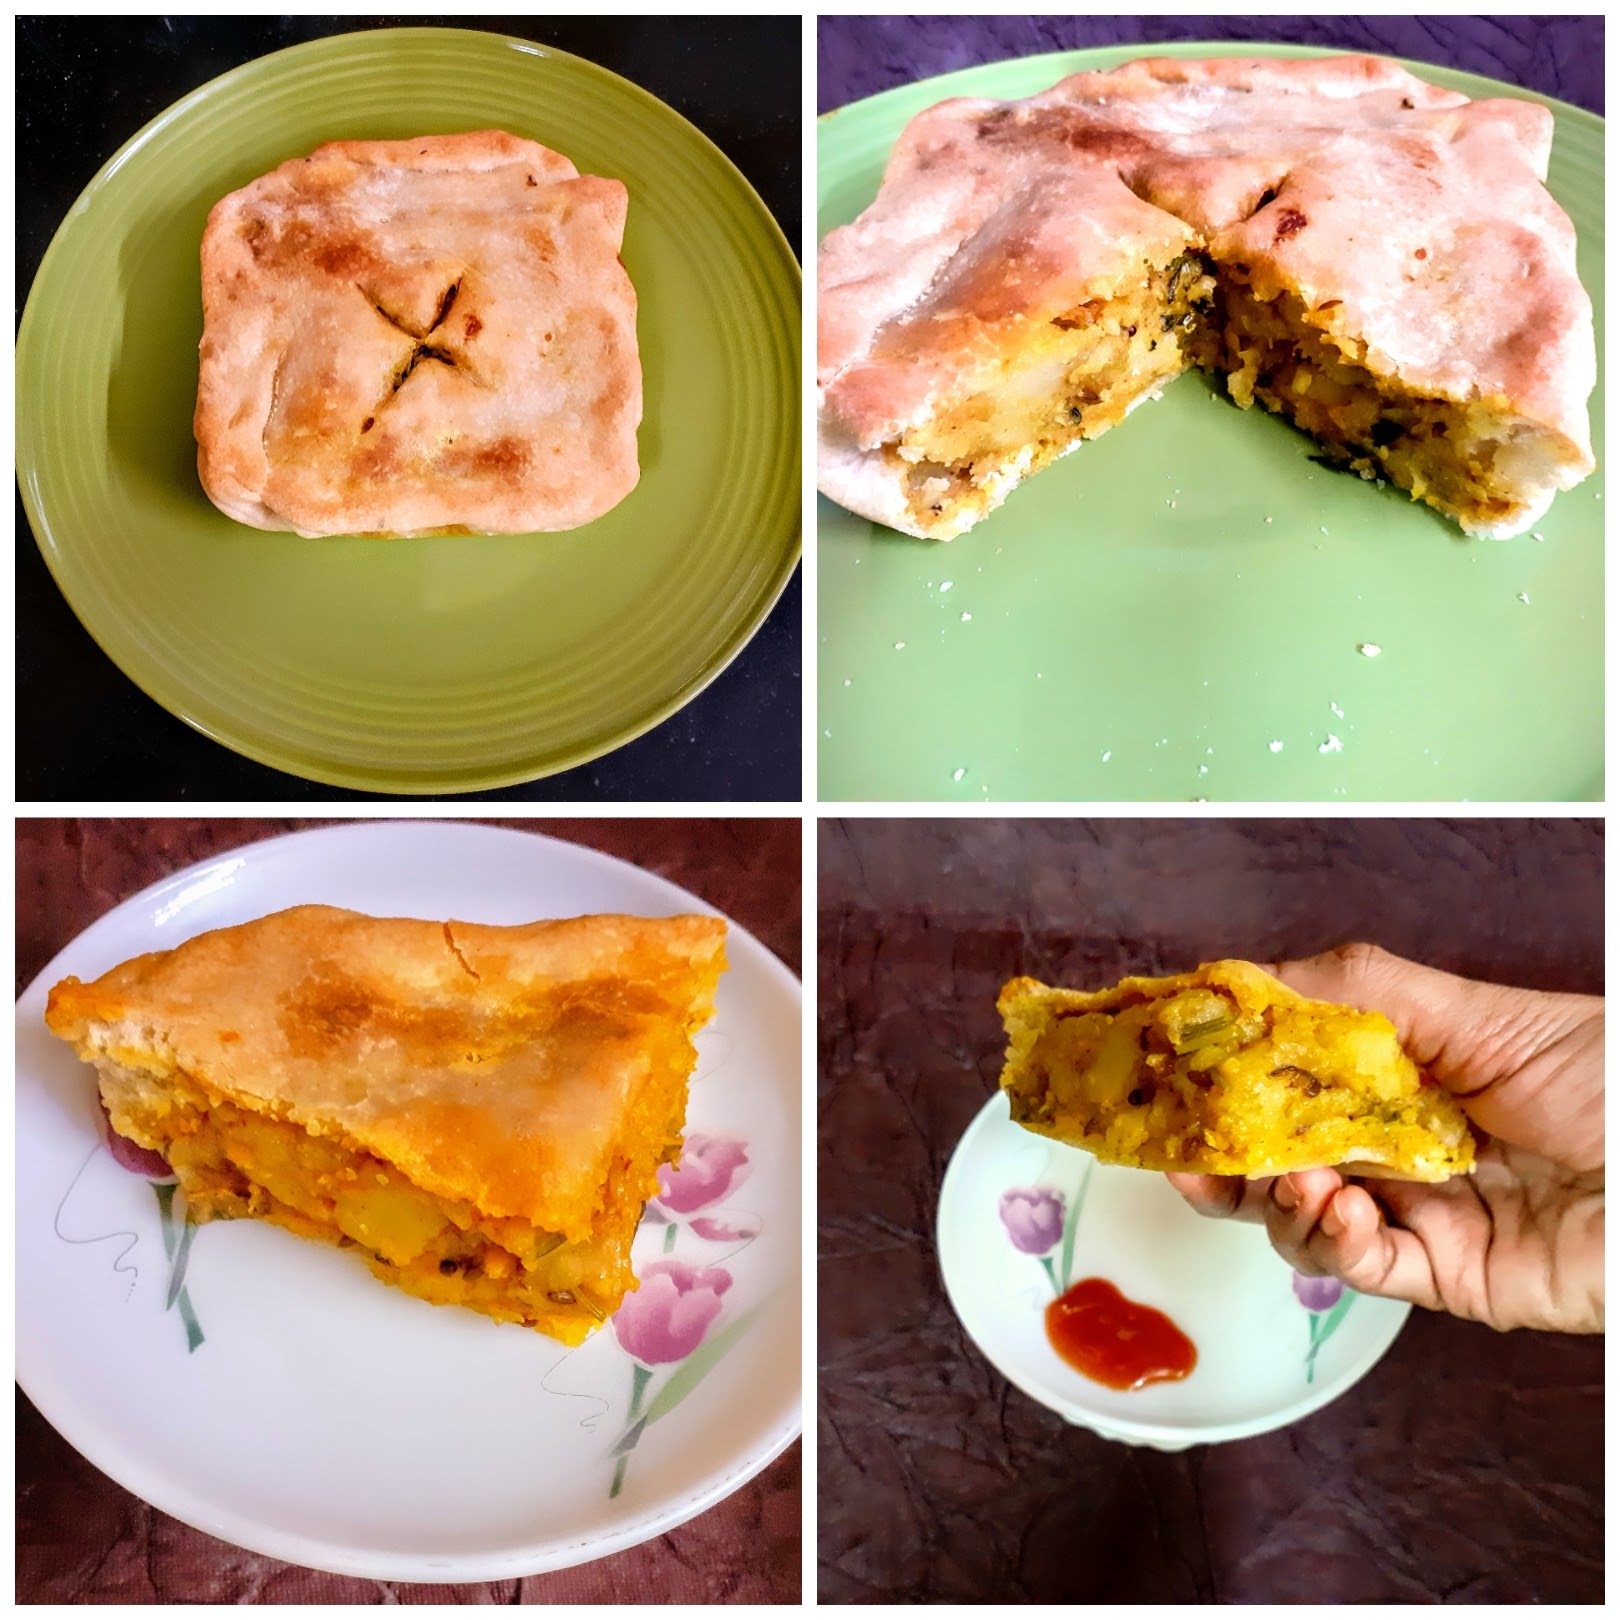
Preheat the oven to 180C for 10 minutes. Knead the Chiroti dough again and divide it into two halves-one slightly bigger than the other. Roll each of them into a circle like a Chapati. The bigger part of dough should be rolled out thicker than the smaller portion of the dough. After rolling the dough, grease the pie dish or any oven-safe dish that is flat. Take the dough that was rolled bigger and thicker, and press it to the bottom of the pie dish forming the base. Prick holes to the dough base as shown in the picture. Now fill in the stuffing on the base, leaving a little space on top to seal it. Now with the dough that was rolled thinner, cover the filling and start sealing the edges. To seal the edges, bring the bottom and upper edge together and give it a twist as shown in the picture. Make a cross-cut with a knife after sealing the stuffing. Now place the dish inside the oven and bake 200 C for 15 minutes. Remove and turn it over gently and bake again at 200 C for 5 minutes. Remove from the oven, turn it over again and now grill for 5 minutes(that’s how I got the golden colour). The crunchy and tasty Samosa is ready to dig in. Enjoy. Bon Appetit.
STEPWISE RECIPE FOLLOWS:
1. Take the Chiroti Rava in a mixing bowl and add the Maida to it. Add half teaspoon Cumin seeds, Baking powder and salt and mix well. Create a well in the centre and add 1 tbsp oil and combine well.
2. Mix in the oil nicely into the flour, takes about a minute. Now form a well again in the centre and adding water little by little combine to form a stiff dough. Rest the dough for 1/2 an hour at least before use.
3. In a Kadai heat oil. Add cumin seeds and mustard seeds, and as they crackle add the chopped onions. Fry the onions until light brown and add the mashed potatoes.
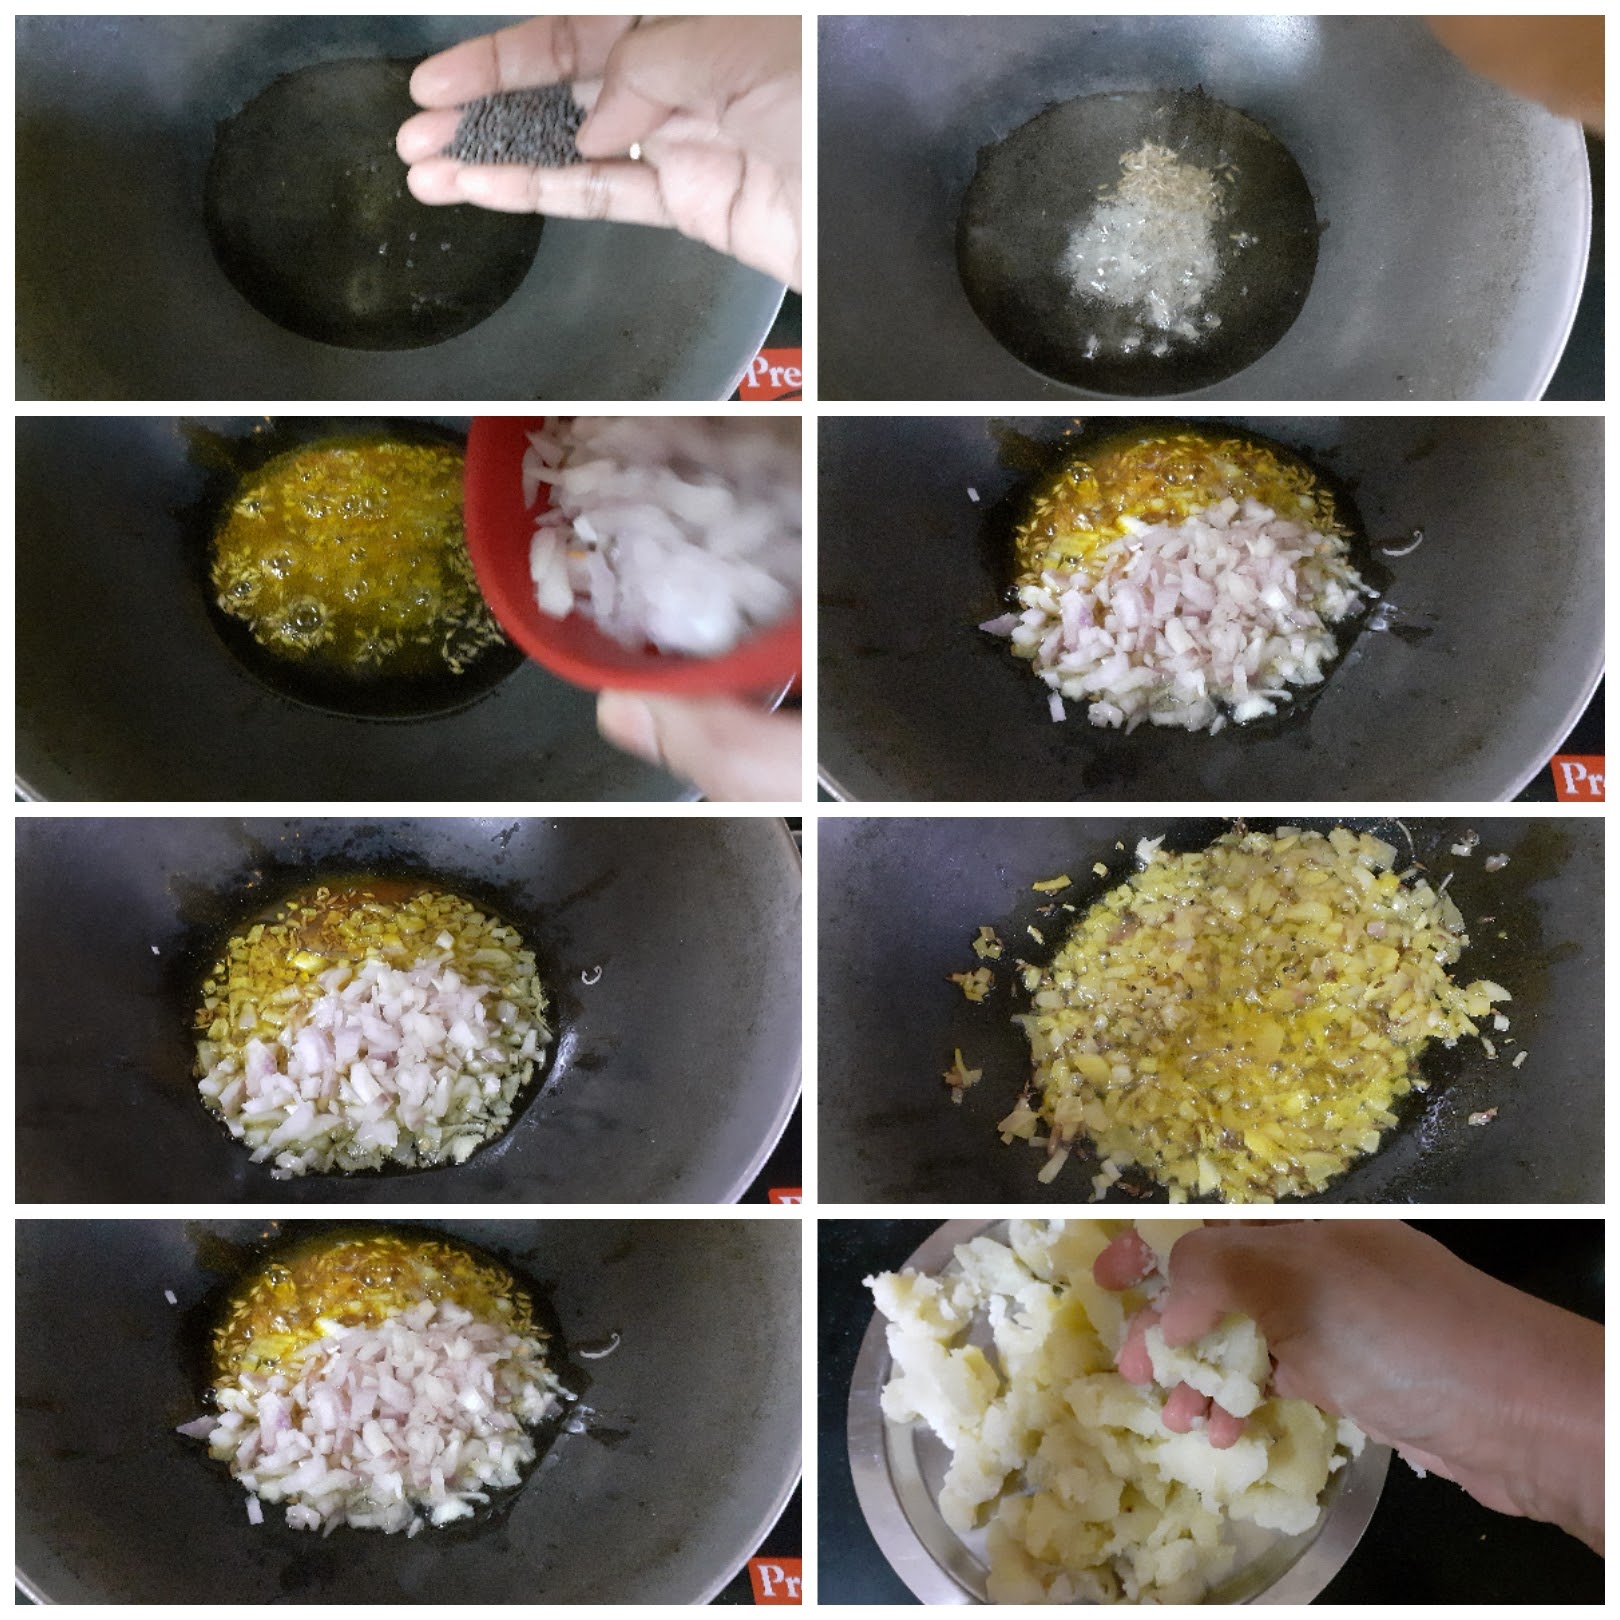
4. Now add salt, followed by red chilli powder, coriander powder, Amchur powder, and mix them all nicely such that all masalas get well incorporated with the potatoes. Finally, add the garam masala powder(picture not taken) and chopped coriander and stir. Allow the filling to cool down a bit.

5. Preheat the oven to 180C for 10 minutes. Knead the Chiroti dough again and divide it into two halves-one slightly bigger than the other. Roll each of them into a circle like a Chapati.
6. The bigger part of dough should be rolled out thicker than the smaller portion of the dough. After rolling the dough, grease the pie dish or any oven-safe dish that is flat. Take the dough that was rolled bigger and thicker, and press it to the bottom of the pie dish forming the base. Prick holes to the dough base as shown in the picture.

7. Now fill in the stuffing on the base, leaving a little space on top to seal it. Now with the dough that was rolled thinner, cover the filling and start sealing the edges. To seal the edges, bring the bottom and upper edge together and give it a twist as shown in the picture. Make a cross-cut with a knife after sealing the stuffing.
8. Now place the dish inside the oven and bake 200 C for 15 minutes. Remove and turn it over gently and bake again at 200 C for 5 minutes. Remove from the oven, turn it over again and now grill for 5 minutes(that’s how I got the golden colour). The crunchy and tasty Samosa is ready to dig in.
NOTES:
1. Let not the Chiroti Rava stop you from making this dish. Just use Maida and continue as per recipe. Instead of 2 cups Chiroti and 1/4 cup maida, use 21/4 cup Maida or 2 cups maida and 1/4 cup wheat flour.
2. I have not used green peas in this recipe, it can be an add- in to the stuffing. If using pre-cook it and add it along with the potatoes in the recipe.
3. Feel free to increase or decrease spice levels as per taste.
4.. If you are not particular about the browning on the top, it is fine to not grill, but I would recommend it because it is really worth the 5 minutes.
5. I made 2 Samosa pies with the quantity of flour and potatoes used here.
6. Holes are pricked to the dough base after placing on the pie dish to avoid puffing. Ensure that you follow this step. If the pastry puffs the crunchiness will be compromised.
7. After the filling is put in and the edges are filled, make a cross-cut to ensure cooking is even through the layers.
If you tried this recipe and liked it please comment below. I would love to hear from you. If you have a query about the recipe email us and ill respond as soon as I can.
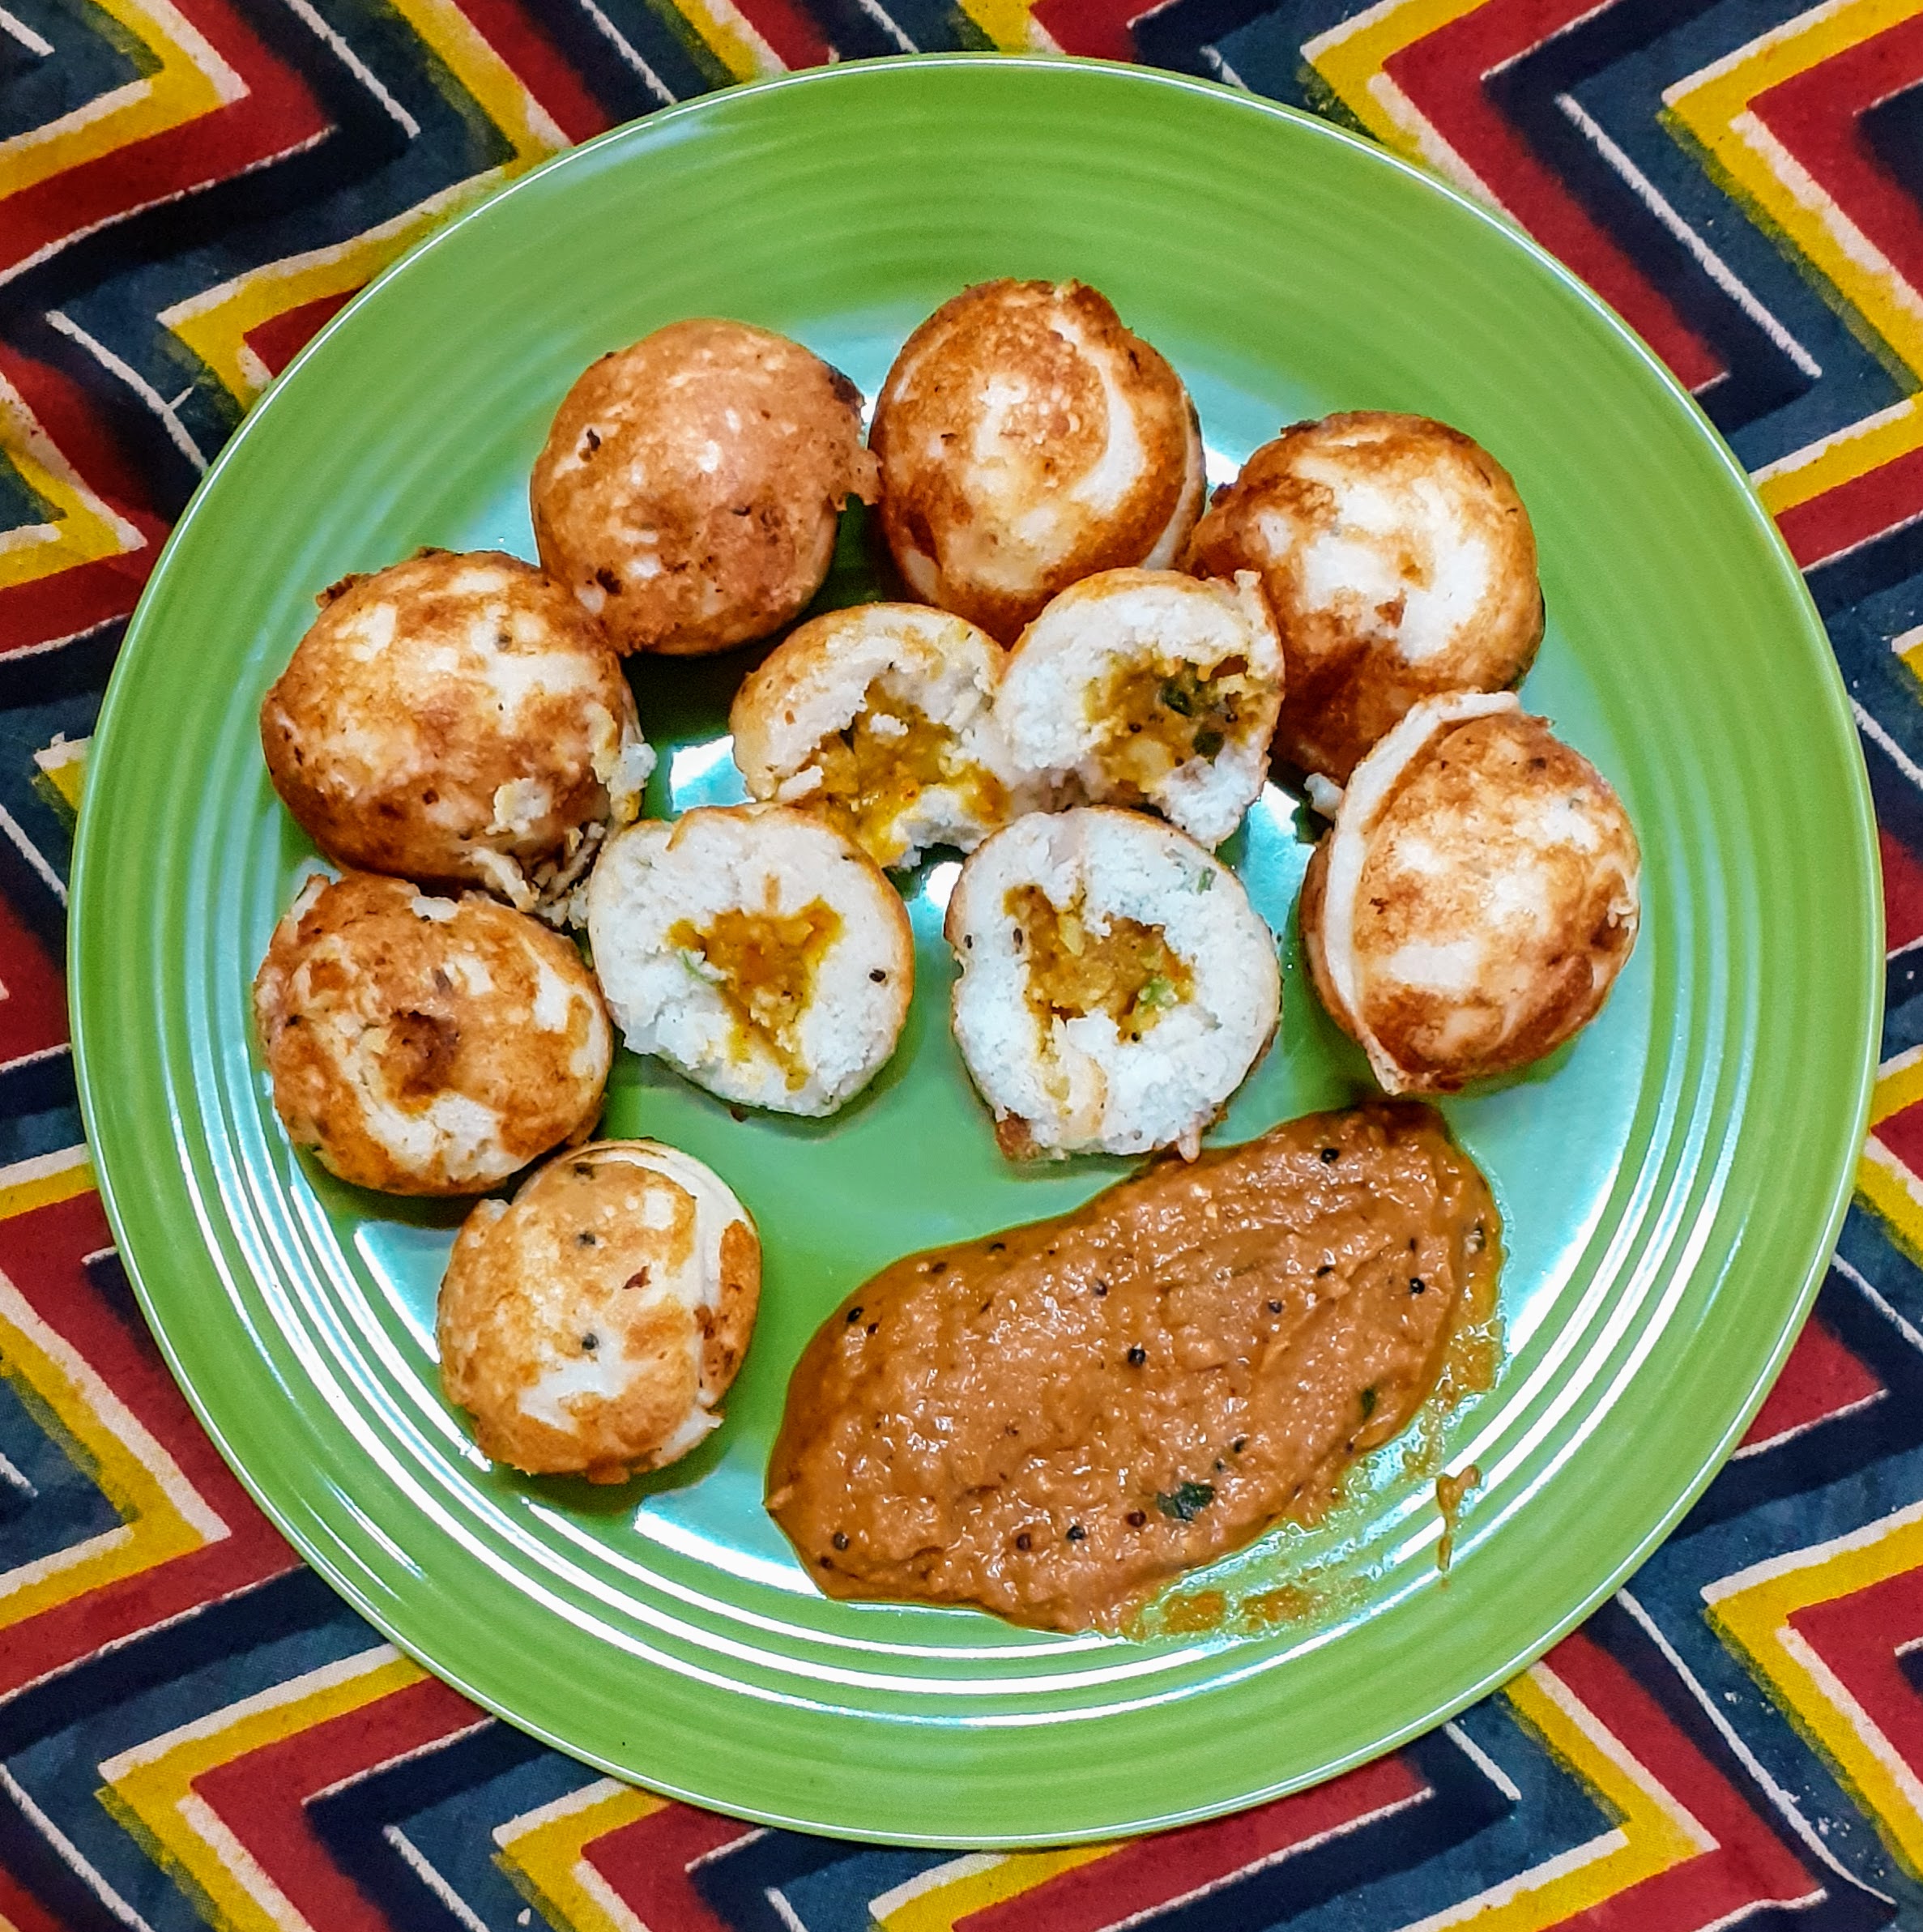
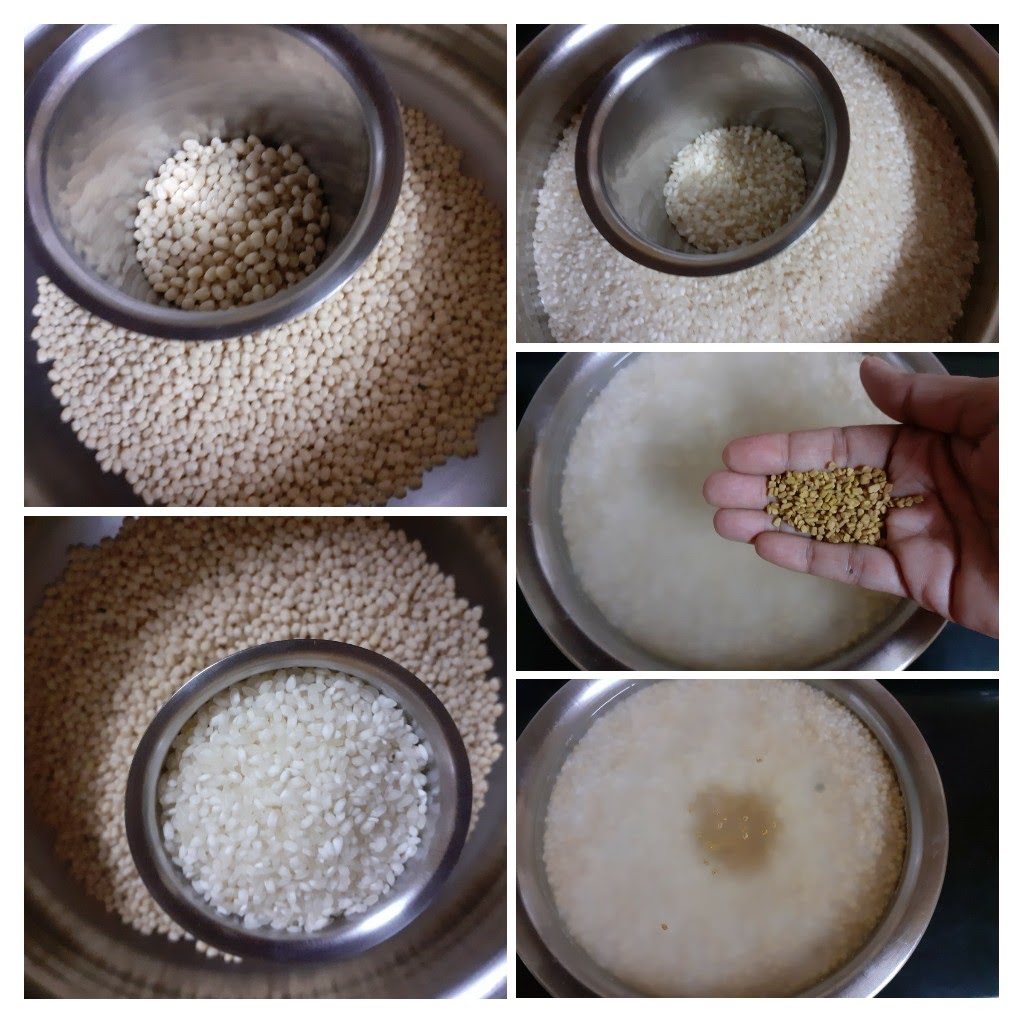
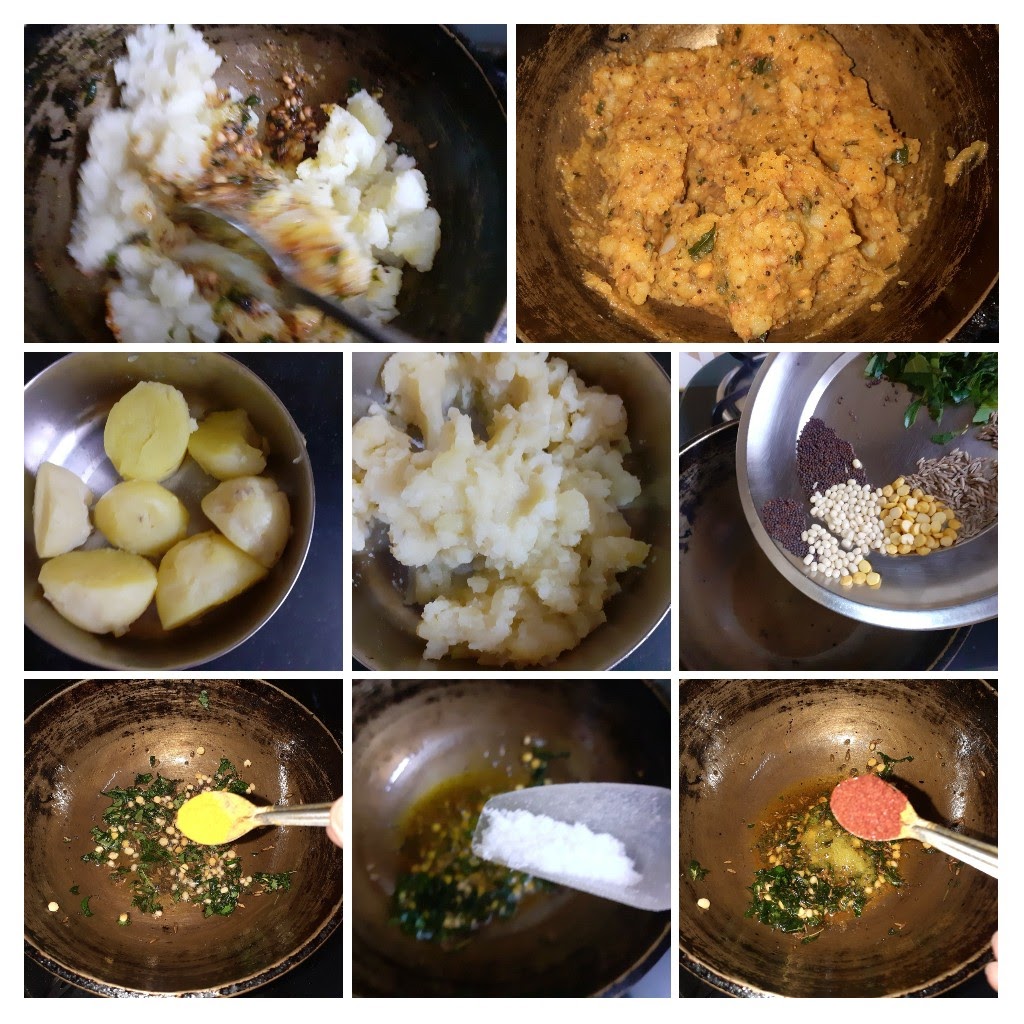
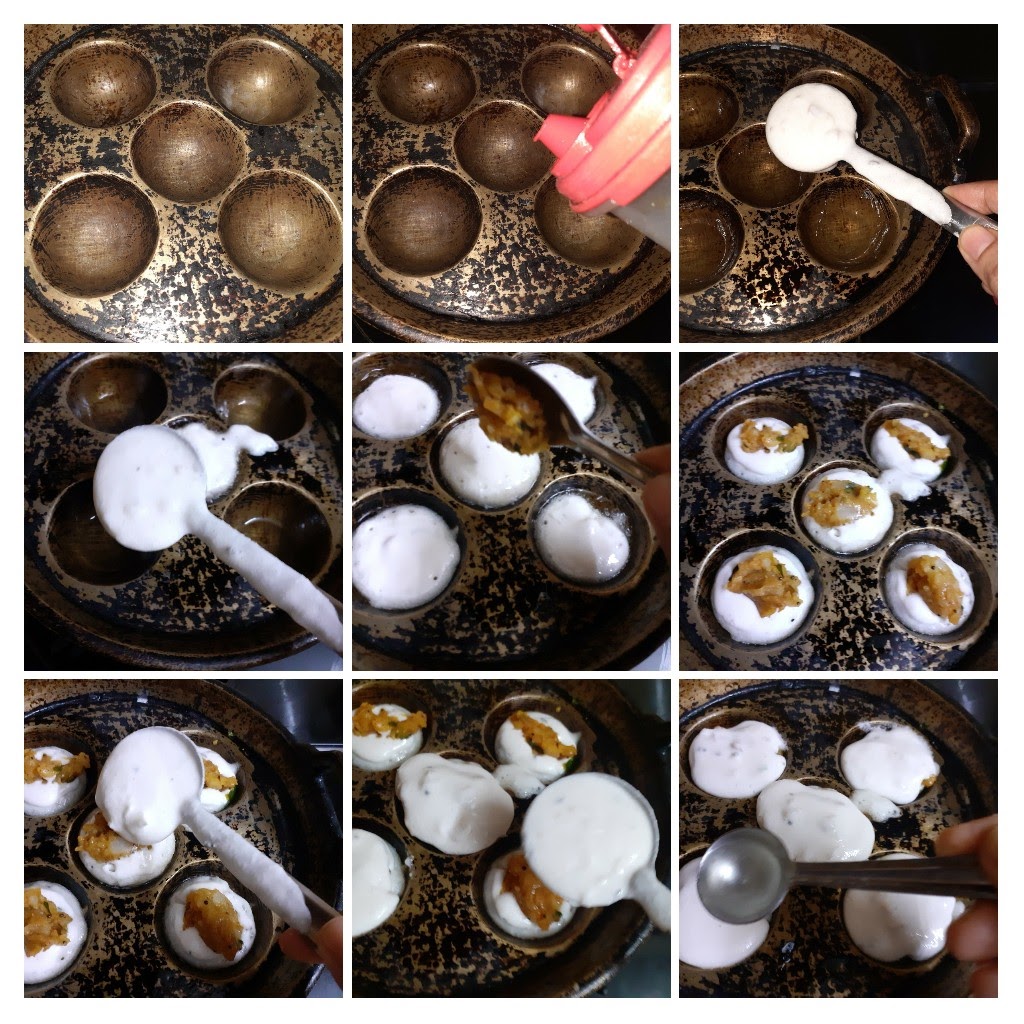
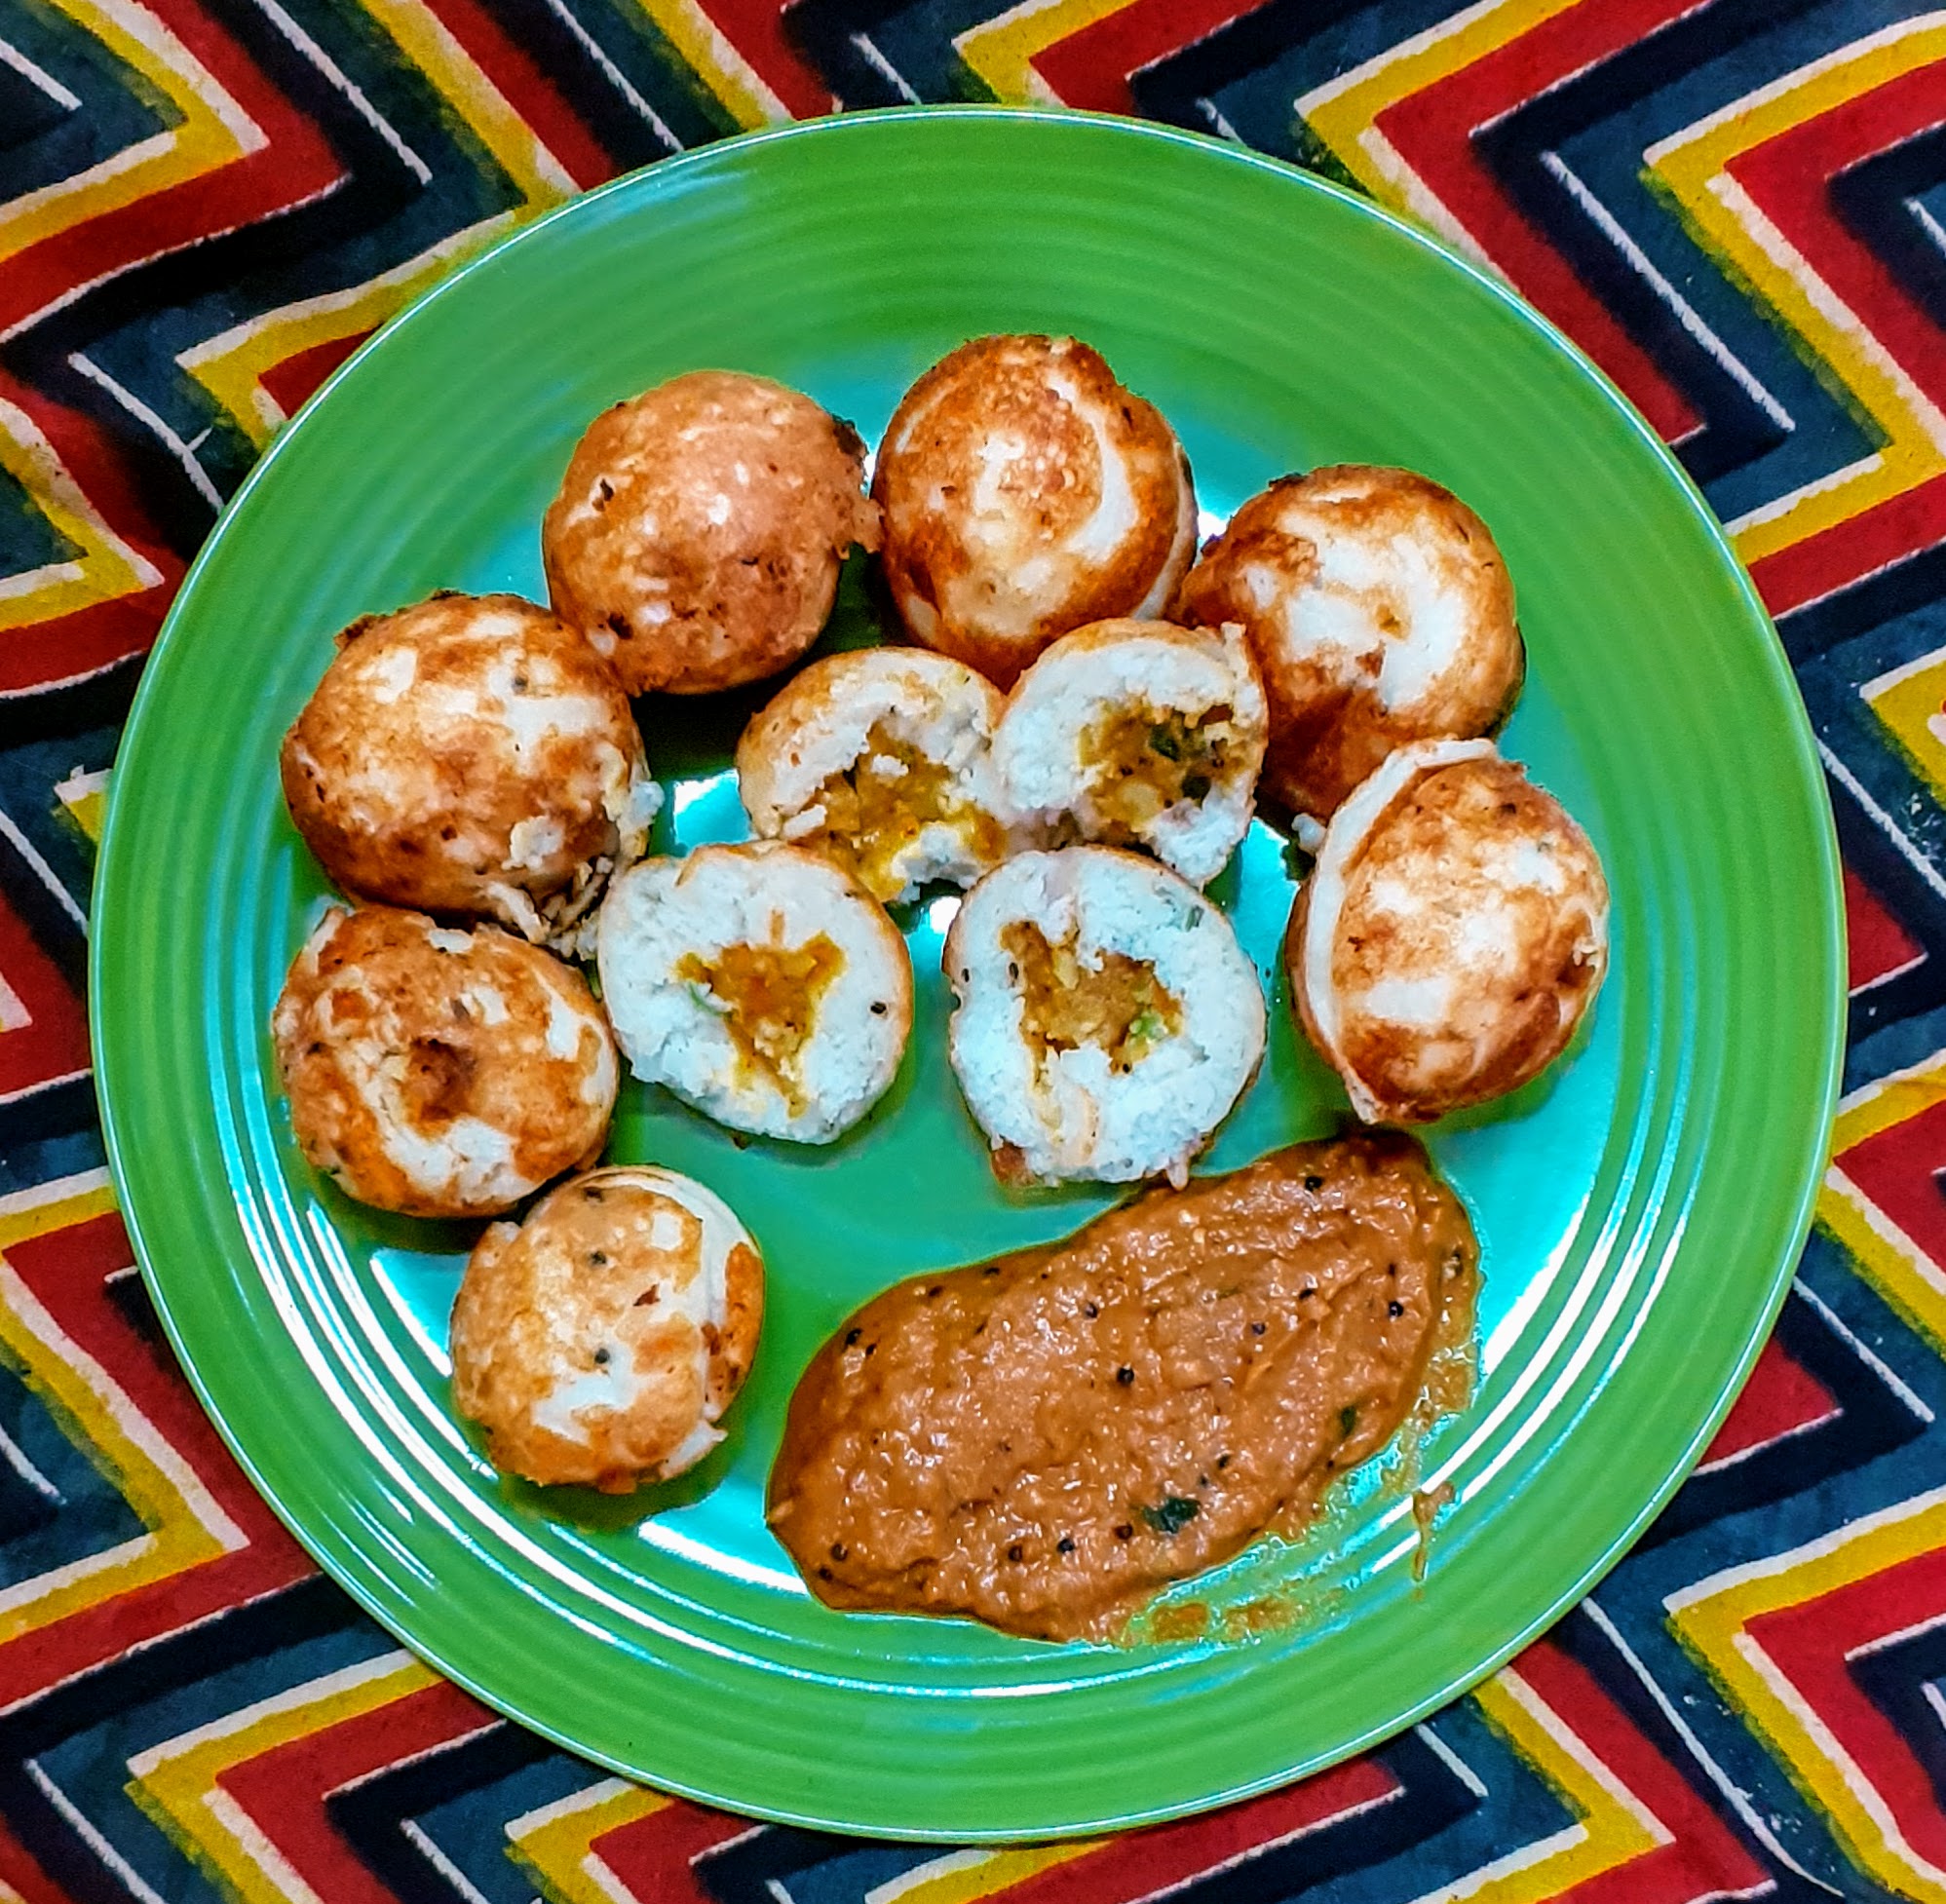
Stuffed Kuzhi Paniyaram (Savory)
Kuzhi Paniyarams are basically Lentil and rice batter dumplings. The batter is fermented and then poured into a Paniyaram pan which gives them the shape. Most often in South Indian homes the Kuzhi Paniyaram or Kuzhi appam as we call it is made from the Idli batter itself. When the batter becomes a little sour it is made into Paniyaram. That is because the Idli/Dosa batter is made for a whole week as a quick breakfast or dinner option. So day 1 is Idli, day 2 Dosa and day 3 onwards its Paniyaram and dosa with the batter, as sour Idlis are not that great to taste. However, when I have guests over I prefer making the batter especially for this as it makes the crust crisp and enhances the taste of the Paniyaram to a different level and the texture on the inside of the Paniyaram is lovely.