Roti is a flat bread made with whole wheat flour or refined flour. The dough is unleavened. Rotis form the staple food of most Indians on the northern side. Rotis can be of different kinds like, Chapati, Phulka, Tandoori roti, Roomali roti, Missi roti and more. In all the mentioned varieties differ in either the flour proportions or the method how they are cooked.
Rice Rotis are the softest and are made with steamed rice flour. Unlike the Akki Roti these rotis do not have chopped onions and other spices added to them. If made correctly, they also fluff up like a phulka. Since they are made with rice flour these Rotis are gluten free and perfect for people with gluten resistance.
As I am on a series creating Thaalis from all around India and also documenting the variations to them based on ingredients used or not used, I cooked this Rotis as part of the Gluten free thaali.
The dough for these Rotis is like the one made for Modak/kozhakattai. Having said this, it is important to make the dough well. I have cooked the Rotis with store bough rice flour, so some cracks towards the edge are seen. A smooth flour will ensure no cracks at all. The flour can also be made by pounding rice to a fine flour at home itself in a mixie.
Here is the recipe of Rice Roti or Chawal Ki Roti-
PREP TIME: 20 Mins COOK TIME: 20 Mins
TOTAL TIME: 40Mins COURSE: BREADS
CUISINE: INDIAN SERVINGS: 4(8 Pcs)
AUTHOR: Rajni Ram
Ingredients:
Rice flour (fine) 2 cups
Water 2 to 2.5 cups
Oil 1 tbsp (sesame or refined)
Salt 1/2 tsp
Directions: Take the rice flour in a heavy bottomed vessel or bowl. Add the salt and mix well with a spatula or using your fingers. Now put about 2 cups water, with the oil to boil. Roll boil the water(that is when the water bubbles are moving from bottom to top), switch of the flame and gradually pour the water into the flour, mixing with a spatula all the time. Stir until the water soaks up all the flour. The mixture may appear a little dry, but don’t worry. Cover the vessel and put it on the flame and cook covered on low flame for 2 minutes. Remove from flame and cool a little. Remember it should not cool down completely. Now while still the dough is a little hot, using your hands start kneading the dough. Keep a bowl of water at regular temperature and keep dipping your hands into it so that you are able to deal with the hot dough. Knead at the temperature your hands are able to take without trouble, If you find the dough a little dry or brittle, don’t hesitate to sprinkle(not pour) some water and knead again. Sprinkle-knead, sprinkle-knead, until you get a dough of smooth texture. Divide the dough into 8 or 10 portions, and ball them up. Dust with a little rice flour and roll them into a medium sized roti. (please refer notes at this point). Heat a Tava/girdle and cook o one side using a little oil, flip and cook the other side. The rotis will remain white, a few brown or black spots may appear when the rotis are done. These rotis can also be cooked as phulka, but I have not done so today. While cooking the Rotis on the Tava, press them well with a spatula, to puff them up. Enjoy the Roti with a curry of your choice.
STEPWISE RECIPE FOLLOWS:
1. Take the rice flour in a heavy bottomed vessel or bowl. Add the salt and mix well with a spatula or using your fingers. Now put about 2 cups water, with the oil to boil. Roll boil the water(that is when the water bubbles are moving from bottom to top), switch of the flame and gradually pour the water into the flour, mixing with a spatula all the time. Stir until the water soaks up all the flour. The mixture may appear a little dry, but don’t worry.
2. Cover the vessel and put it on the flame and cook covered on low flame for 2 minutes. Remove from flame and cool a little. Remember it should not cool down completely. Now while still the dough is a little hot, using your hands start kneading the dough. Keep a bowl of water at regular temperature and keep dipping your hands into it so that you are able to deal with the hot dough.
3. If you find the dough a little dry or brittle, don’t hesitate to sprinkle(not pour) some water and knead again. Sprinkle-knead, sprinkle-knead, until you get a dough of smooth texture. Divide the dough into 8 or 10 portions, and ball them up. Dust with a little rice flour and roll them into a medium sized roti. (please refer notes at this point).
4. Heat a Tava/girdle and cook o one side using a little oil, flip and cook the other side. The Rotis will remain white, a few brown or black spots may appear when the Rotis are done. These Rotis can also be cooked as Phulka, but I have not done so today. While cooking the Rotis on the Tava, press them well with a spatula, to puff them up. Enjoy the Roti with a curry of your choice.
NOTES:
1. Roll boil the water means when the water bubbles are moving from bottom to top.
2. If you find the dough a little dry or brittle, don’t hesitate to sprinkle(not pour) some water and knead again. Sprinkle-knead, sprinkle-knead, until you get a dough of smooth texture.
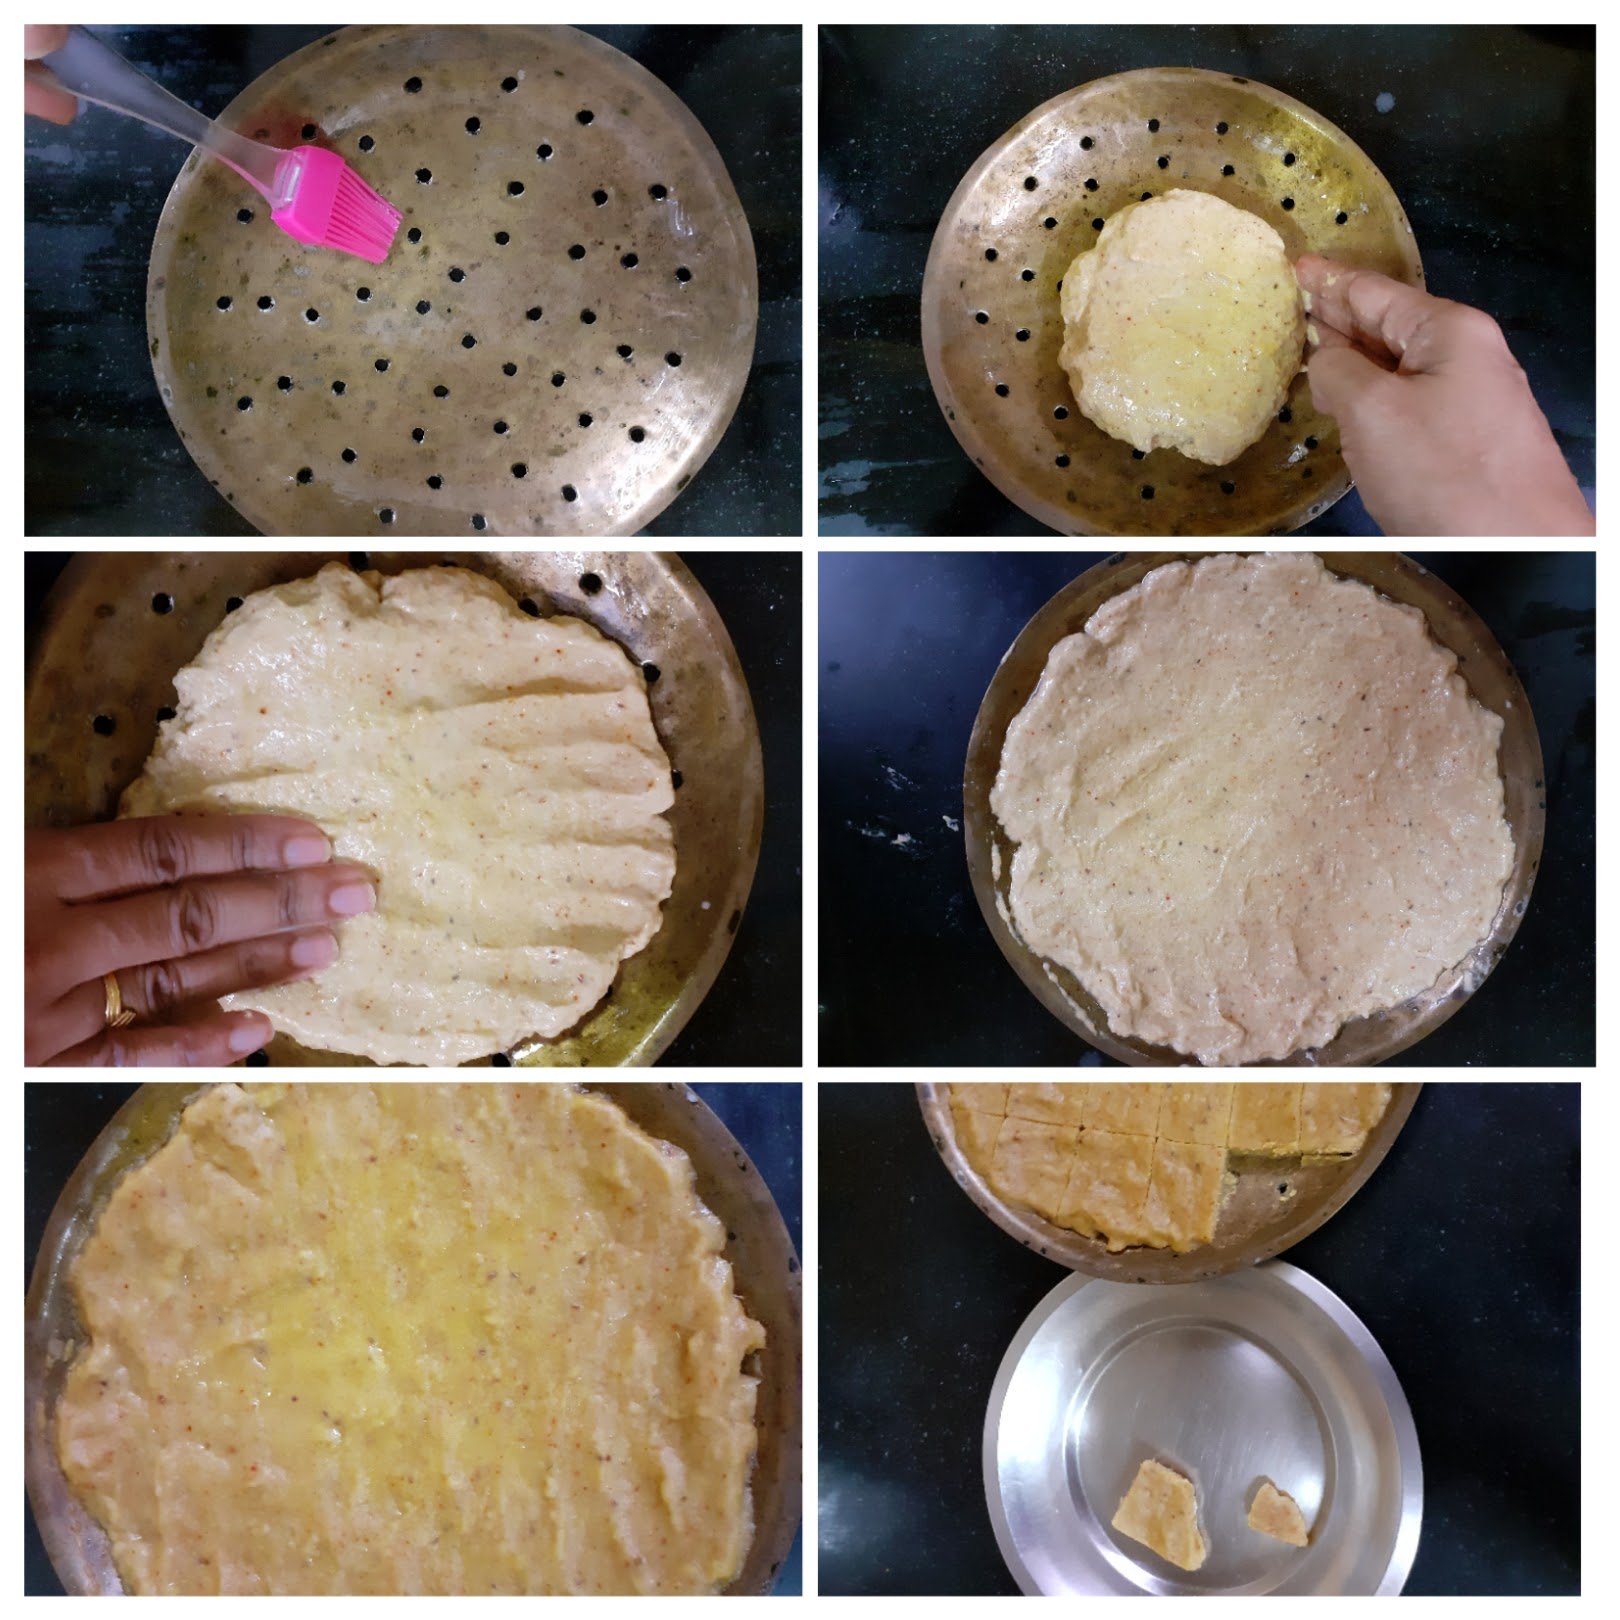
3. After the rolling the Roti if you are unable to ease it out of the platform, use a rice serving spatula to ease it out without tearing(refer pictures).
4. These rotis have to be rolled gently.
5. To knead while the dough is still hot, i knead them into small balls first and then combined all of them to make a huge smooth ball.(refer picture in step 2.
6. I did not use any oil to cook the Rotis, but you can definitely use if you prefer.
Cool Tempered Curd Rice With Cumumber
Curd rice is a south Indian dish prepared with pre cooked rice, yougurt, milk, and some tempering. South Indian food especially the Tamil Brahmin culture considers Curd Rice aka Thayir Sadam as a full stop to their meal. This is a simple meal in itself which can be paired with your choice of pickle to beat the heat of the summer.
The tempering and the add-ins to the curd rice are totally customizable to our preferences. Anything from grated carrots, shallots, curd chillies, green chillies, mango-ginger, grapes, pomegranate etc; can be added. In the current recipe I have used finely chopped cucumbers.
Yogurt/ curd is a prebiotic and most houses make homemade curds which is far more better as compared to
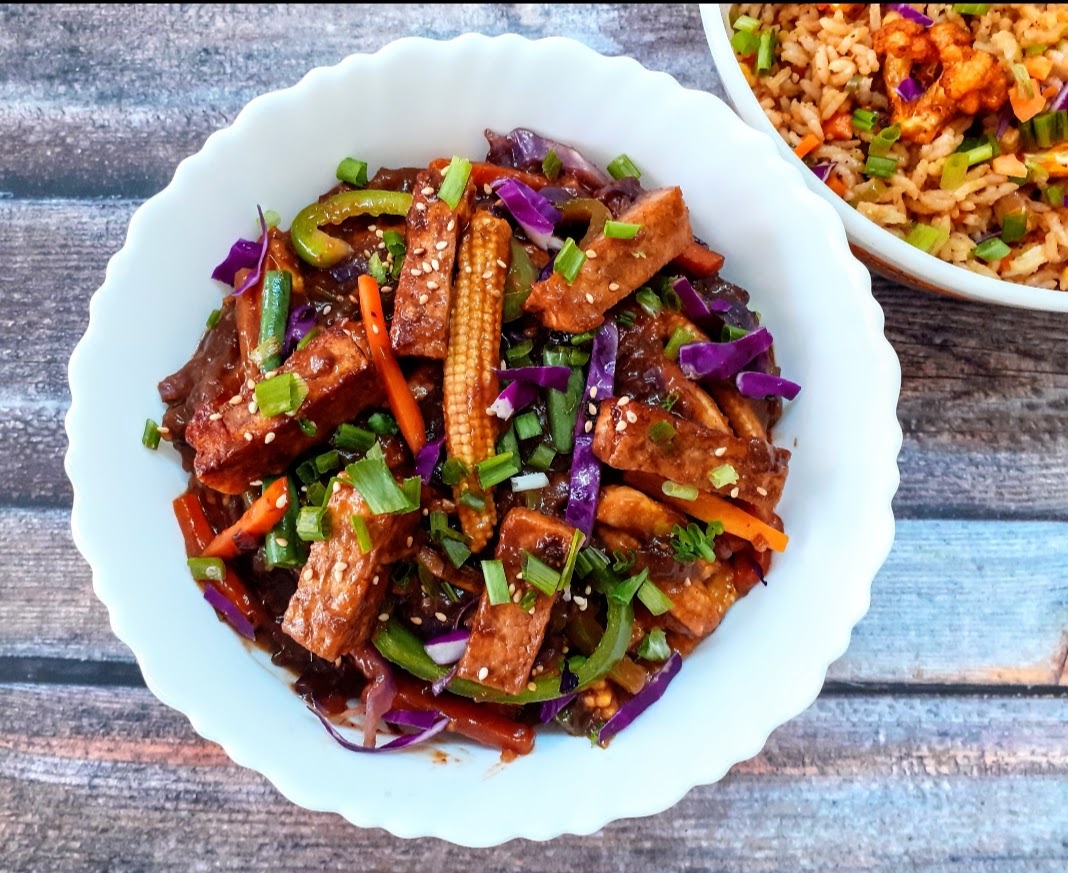
Tofu And Stir Fried Vegetables In Hot Schezwan Sauce
Any Tofu lovers? I agree its an acquired taste,but going by the health benefits it has to offer, I try including it in my diet now and then. People are not very fond of the bland taste, but once that is overcome, Tofu does taste good.
Tofu is a plant based milk product that comes from the milk of Soya beans, it is also called Bean curd. There are different kinds of Tofu based on their texture, such as- silken, soft, firm and extra firm. Depending on the dish we make the tofu is chosen. Popular dishes with Tofu include Soups, stir fry, and curries.
Tofu has zero percent cholesterol and is a weight watchers delight, because it is protein dense and less in carbohydrates. It is also considered to be a good source of iron and calcium.
So how do we take away the blandness, obviously by marination. Tofu requires a little more time than paneer to marinate. So, I plan ahead when I want to cook my tofu dish. I prefer Tofu as a stir fry or as part of mixed vegetables in a sauce. So this dish is a combination of a Stir- fry and sauce. In this dish I have infused the sauce while stir frying instead of marination.
I usually choose to make this with fried rice as the Schezwan sauce base of this dish is the perfect pairing for the fried rice. I usually use a homemade Schezwan sauce made the traditional way using Chinese five spice, but for this particular recipe I have used Ching’s secret Schezwan Rice masala. Since I am using a ready made masala the work gets done a little sooner, so it is perfect for my after work dinners.
Here is the recipe for Tofu and stir fried vegetables in hot Schezwan sauce-
PREP TIME: 20 Mins COOK TIME: 40 Mins
TOTAL TIME:60 Mins COURSE: MAIN
CUISINE: FUSION SERVINGS: 5
AUTHOR: Rajni Ram
Ingredients:
Tofu 200 gm cut to cubes
Green chillies 4 (divided)
Garlic 10 cloves (divided)
Ginger 1 inch piece (divided)
Assorted vegetables 1.5 cups ( I used capsicum, carrot,purple cabbage, spring onion, baby corn, Red bell peppers, all cut lengthwise).
Ching’s Secret Schezwan Rice Masala 1/2 packet
Chings secret Schezwan sauce/chutney 1 tsp
Soya sauce 1 tsp
Vinegar 2 tsp
Salt as required
Sugar 1 tsp
Water as required
Cornflour 1/2 tbsp
Sesame seeds 1 tsp
Oil for sauteing
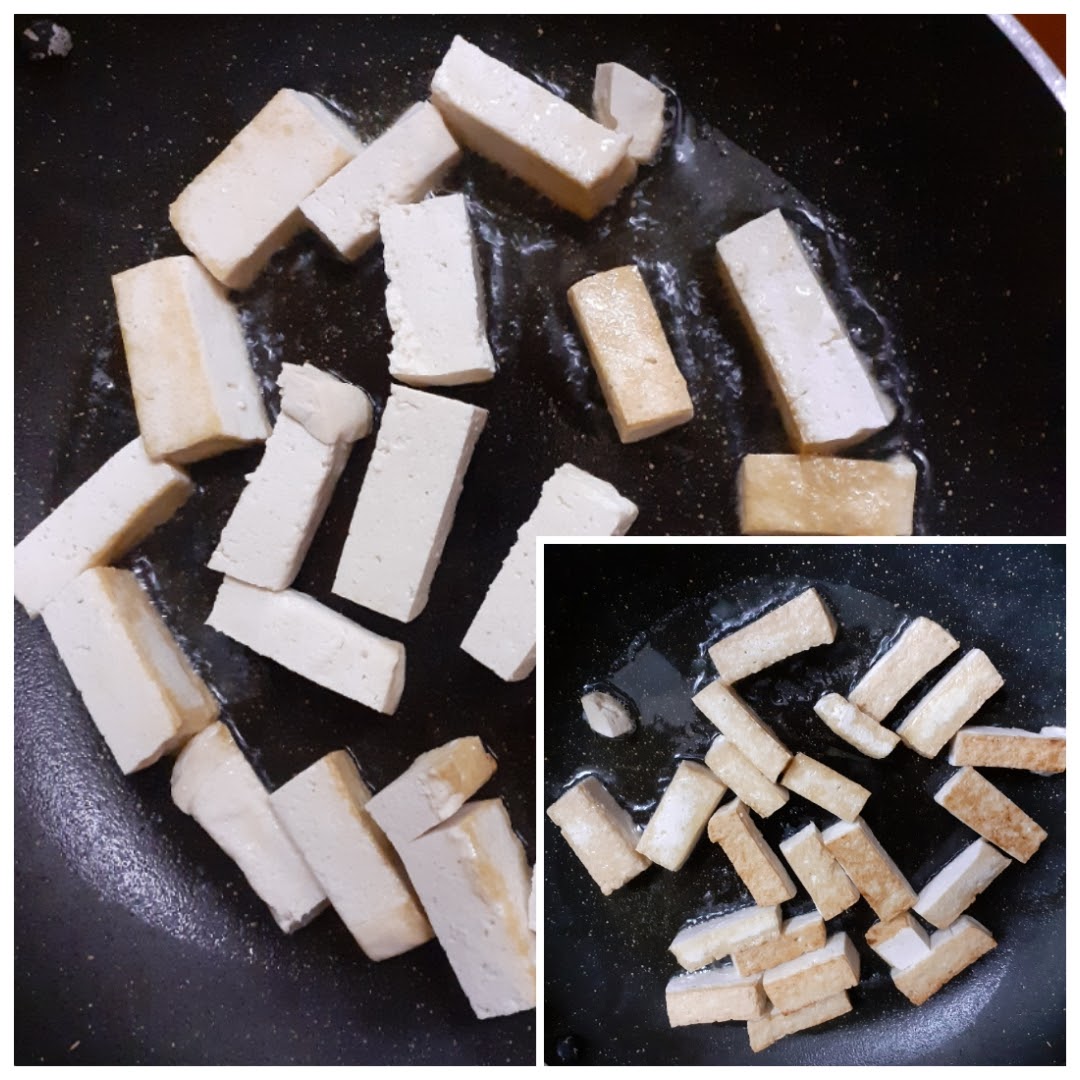
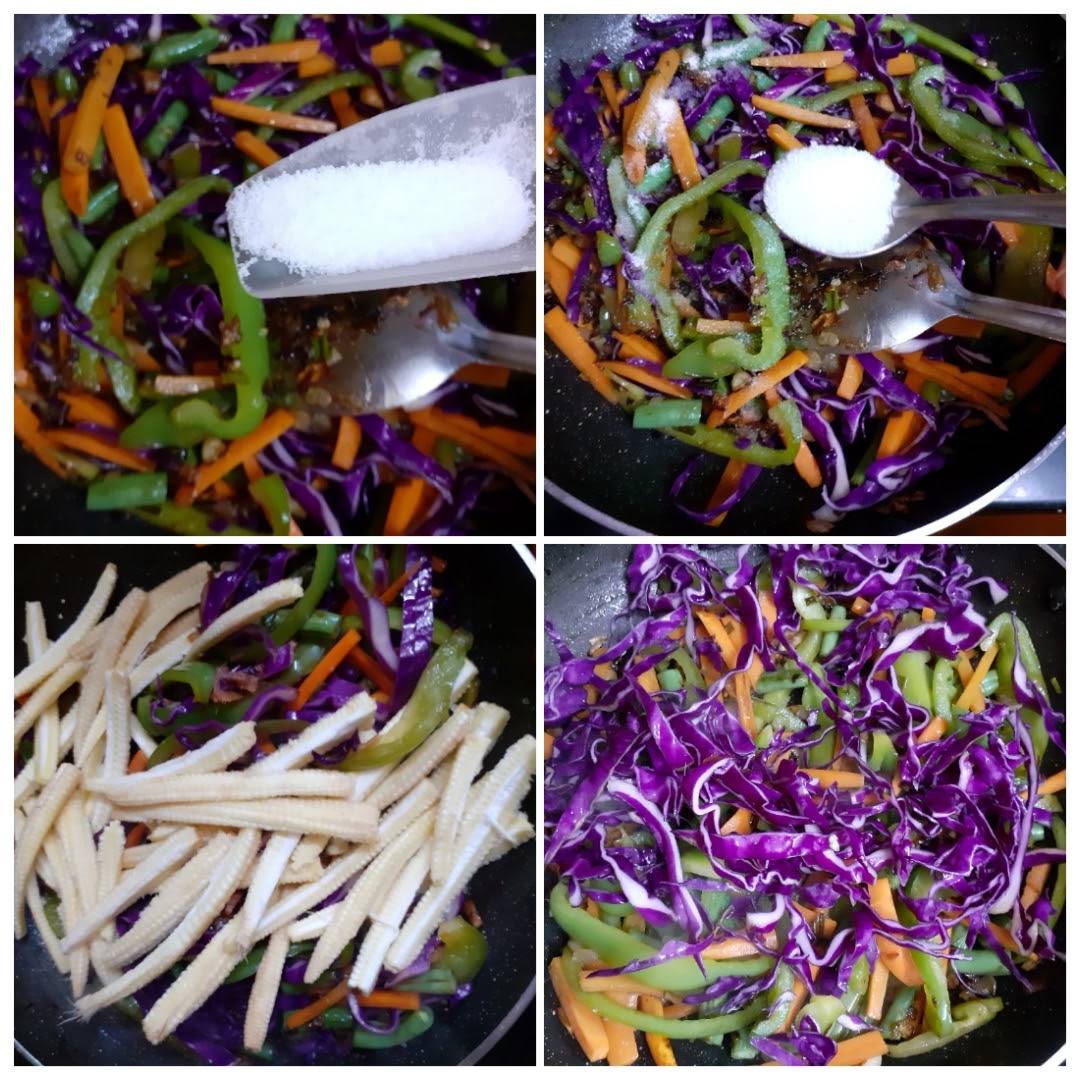
Directions: In a blender take green chillies(2), garlic(4 pods), ginger(1/2 inch), soya sauce and Vinegar, and blend. In a pan take some Oil for sauteing the Tofu. Drop in the tofu cubes when oil id hot and stir fry until they have a brown coating. Now pour the blended sauce into the tofu and continue to stir fry, until all the sauce is absorbed by the Tofu pieces and they turn dry. Transfer to a plate and keep aside. In the same pan take some more oil. When hot add the chopped garlic, green chillies and ginger and fry for 30 seconds. Now add the Spring onion(both greens as well as bulb), and saute. Further add the capsicum, carrot, cabbage and saute, add the salt and sugar, and continue to stir fry until the vegetables are done, but are still firm. In a bowl take the corn flour, Chings Schezwan masala powder, and any remaining sauce used for trying the tofu, and make a slurry by mixing them in 1/2 cup water. Pour this slurry into the stir fried vegetables, add another 1/2 cup water, Schezwan sauce or chutney and stir everything together very well. Finally add the stir fried Tofu pieces and cook for 2 minutes. Switch off the flame and sprinkle some sesame seeds. Enjoy hot with some Fried rice.
STEPWISE RECIPE FOLLOWS:
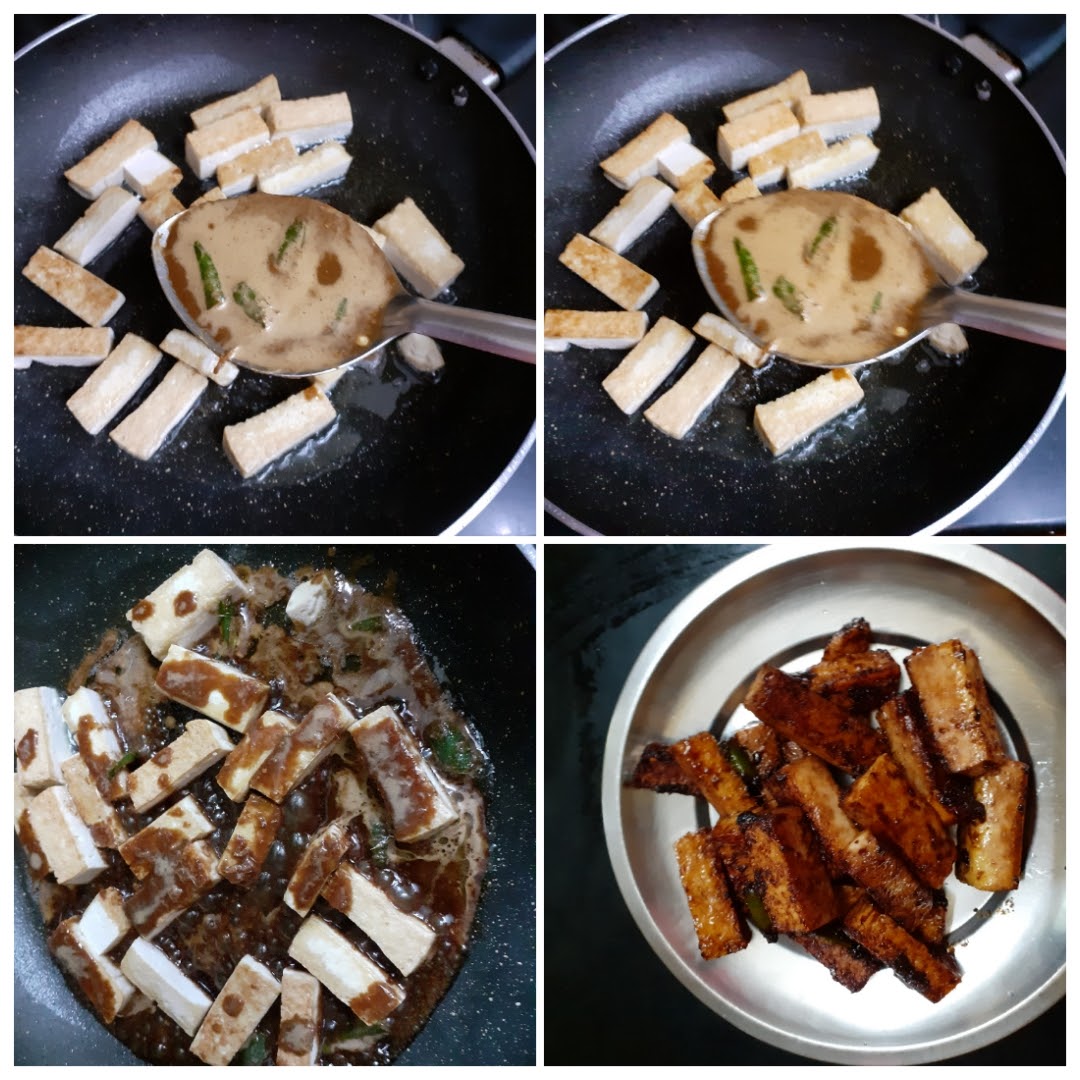
1. In a blender take green chillies(2), garlic(4 pods), ginger(1/2 inch), Soya sauce and Vinegar, and blend. (Picture not inserted). In a pan take some Oil for sauteing the Tofu. Drop in the tofu cubes when oil id hot and stir fry until they have a brown coating.
2. Now pour the blended sauce into the tofu and continue to stir fry, until all the sauce is absorbed by the Tofu pieces and they turn dry. Transfer to a plate and keep aside.
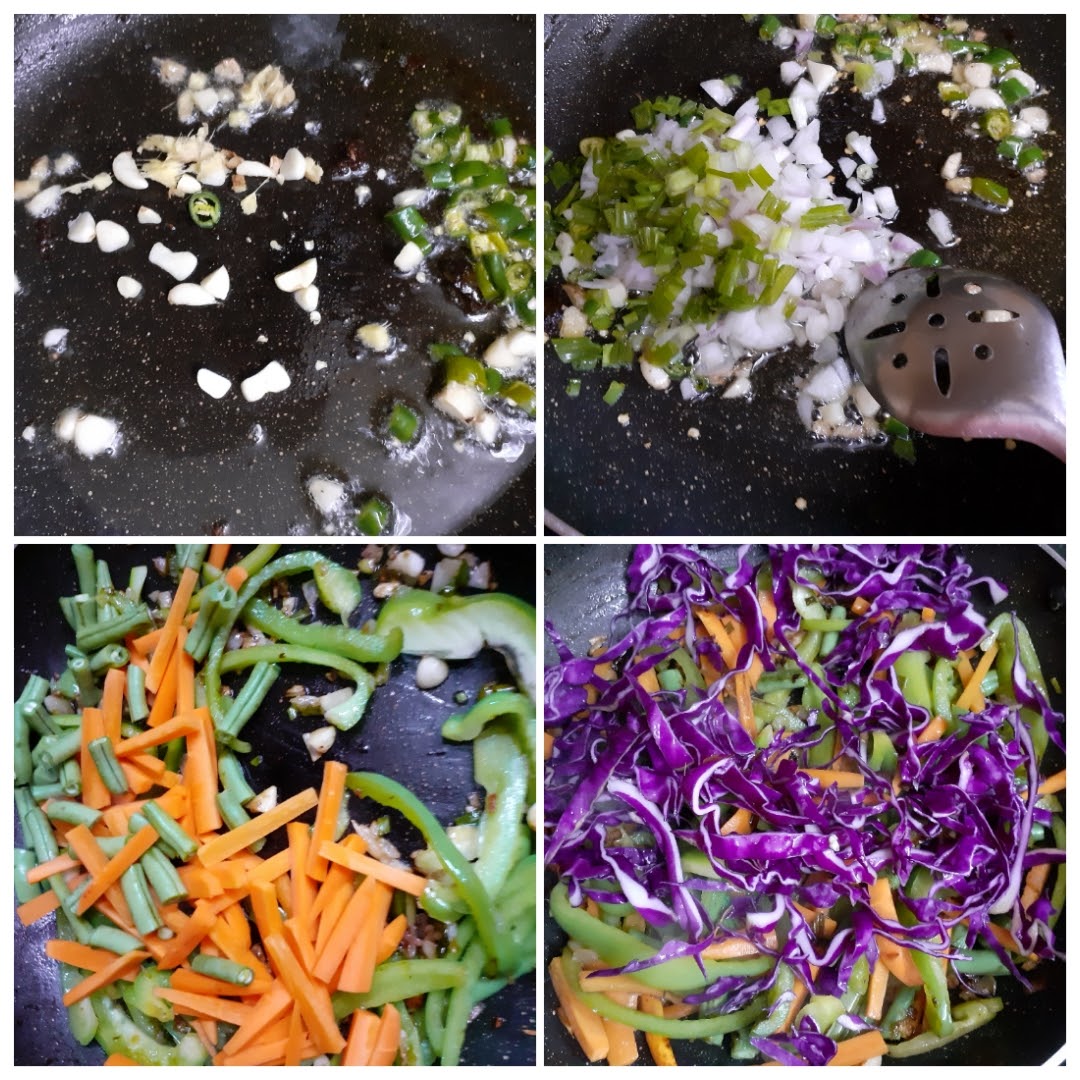
3. In the same pan take some more oil. When hot add the chopped garlic, green chillies and ginger and fry for 30 seconds. Now add the Spring onion(both greens as well as bulb), and saute. Further add the capsicum, carrot, cabbage and saute.
4. Add the salt and sugar, and continue to stir fry until the vegetables are done, but are still firm.
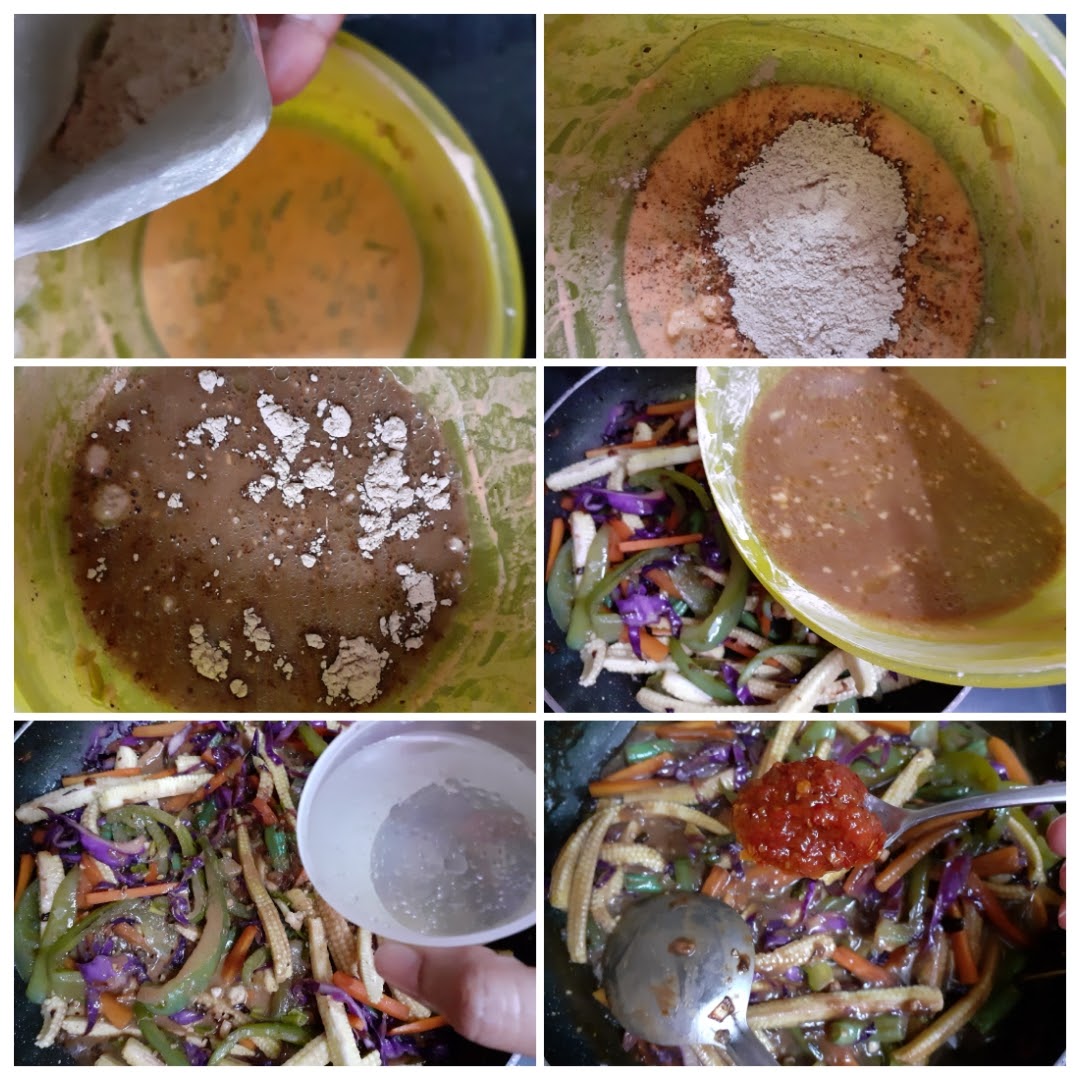
5. In a bowl take the corn flour, Chings Schezwan masala powder, and any remaining sauce used for trying the tofu, and make a slurry by mixing them in 1/2 cup water. Pour this slurry into the stir fried vegetables, add another 1/2 cup water, Schezwan sauce or chutney and stir everything together very well.
6. Finally add the stir fried Tofu pieces and cook for 2 minutes. Switch off the flame and sprinkle some sesame seeds. Enjoy hot with some Fried rice.
NOTES:
1. Tofu can be easily swapped with Paneer in this recipe.
2. The vegetables used here are completely customizable.
3. This recipe has been cooked with store bought sauce. To make homemade Schezwan sauce, click here.
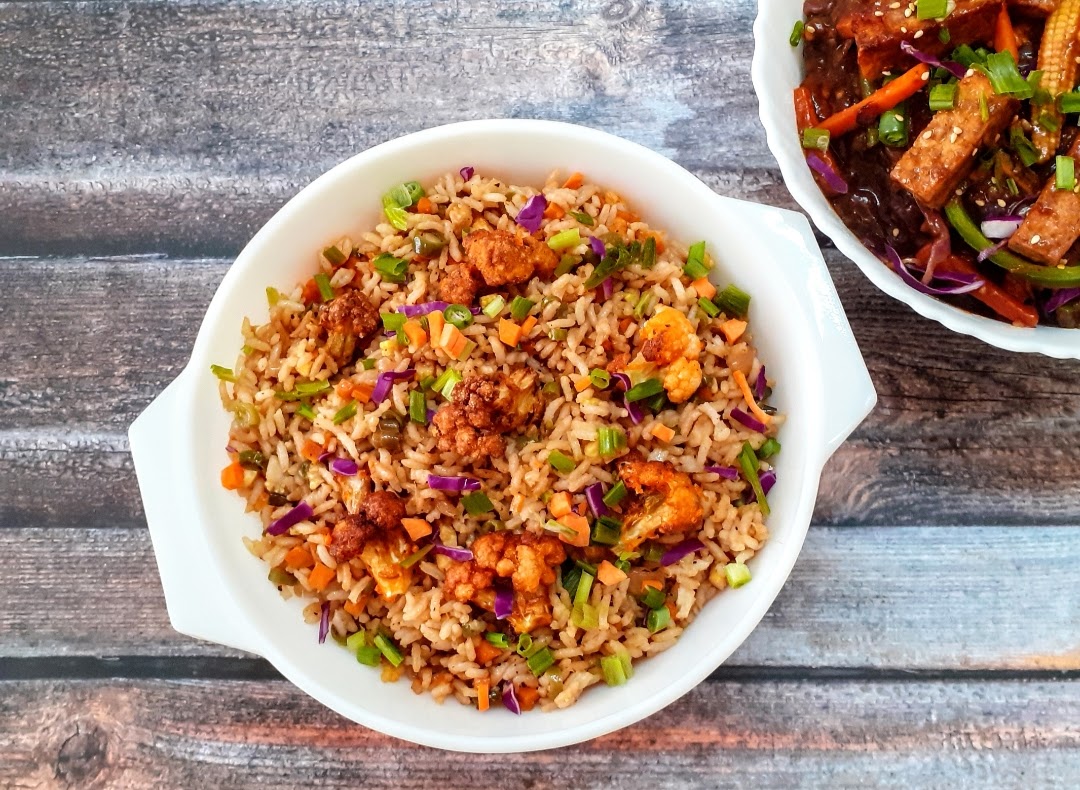
4. I served the Tofu and stir fried vegetables in hot Schezwan sauce, with Gobi fried rice.
Paneer Makhni
Paneer or Cottage cheese is a acid set cheese got from cow or buffalo milk. It is a non- aged cheese made by curdling milk, disposing the whey, and collecting the fat, which is paneer. It is a rich source of milk protein. Paneer was introduced to India by the Persian and Afghan rulers in the 16th century, it is said. Paneer is a rich source of Calcium, iron, Mangesium, and also makes one feel full for longer.
Paneer is a savior in many ways than one. Do you agree? You want something easy-paneer to the rescue, or want something special for a get together-paneer to the rescue. Paneer is a regularly stocked item in my fridge. Sometimes I do make Paneer at home also, but that is not very frequent. Makhni gravy is a very subtly flavoured base, and while I have a Dal Makhni on the blog, it is but a must to have a Paneer Makhni or Paneer Makhanwala. A few whole spices make a world of difference in terms of flavour and you get the restaurant effect in the gravy.
In this recipe the idea is to go liberal on the butter to get the perfect taste. In my usual paneer recipes you will find that I would have used either cashewnuts or cream, or even none at all. But this dish has both cream and cashewnuts thus making it special and rich. Something you will want to make for an occasion, or to cook for a loved one.
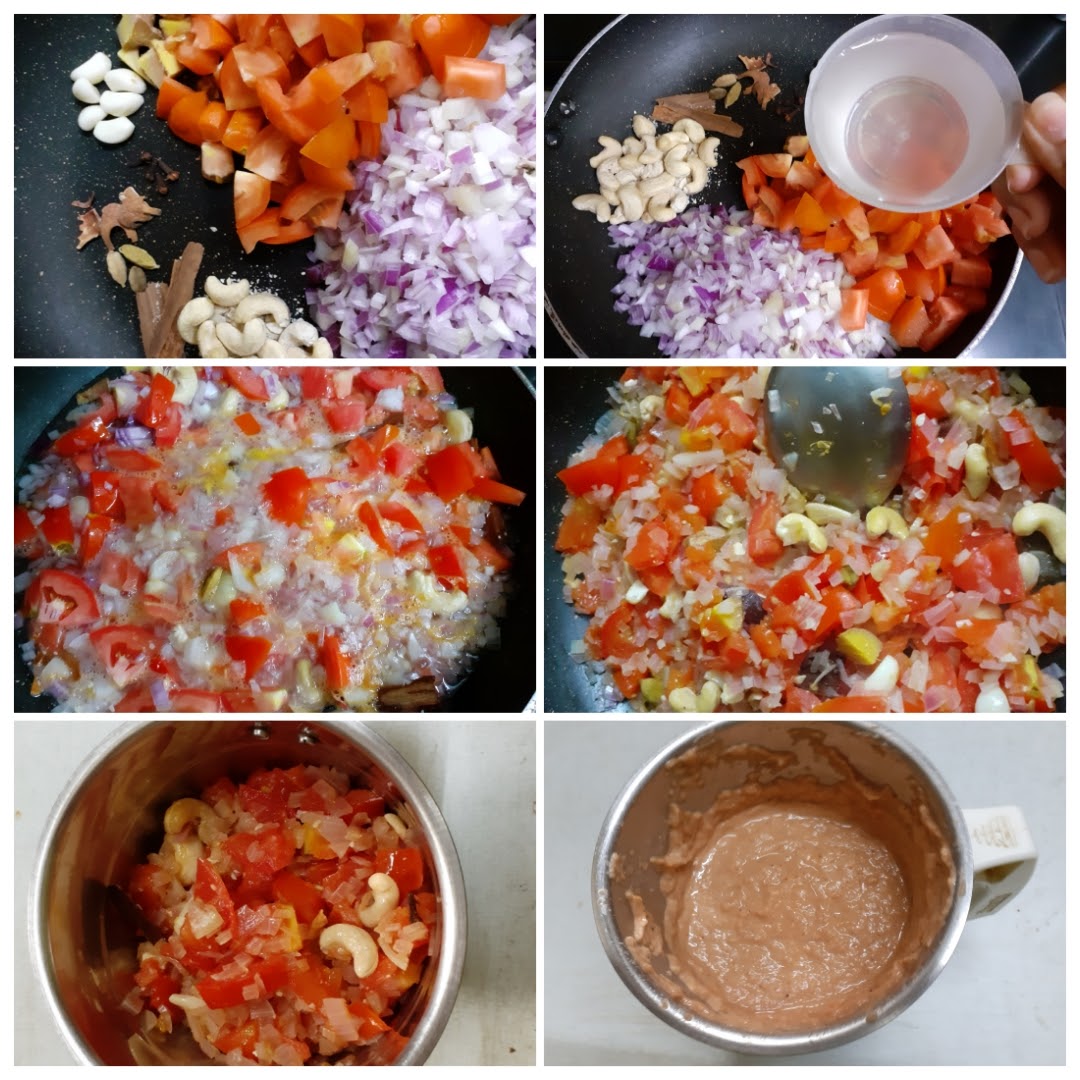
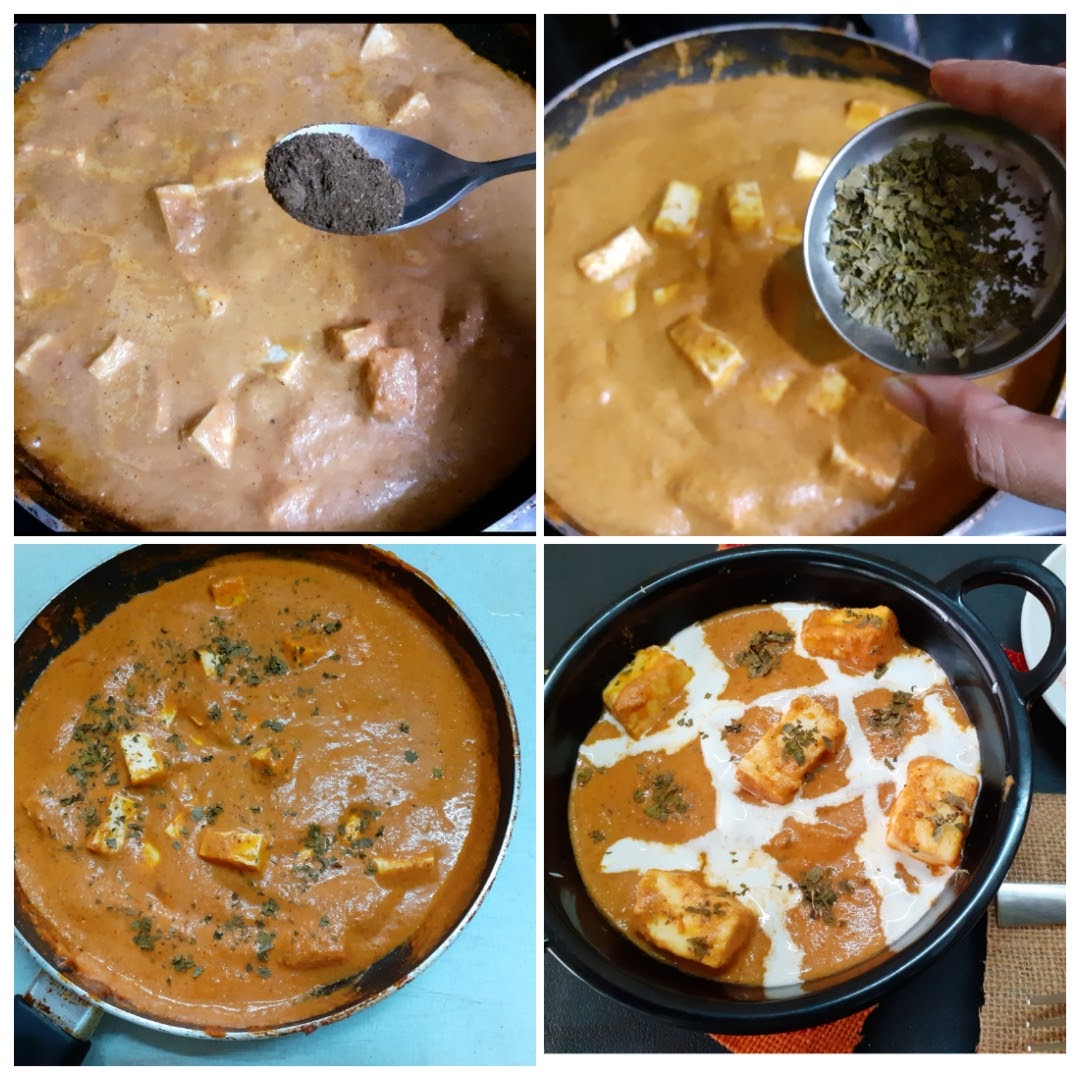
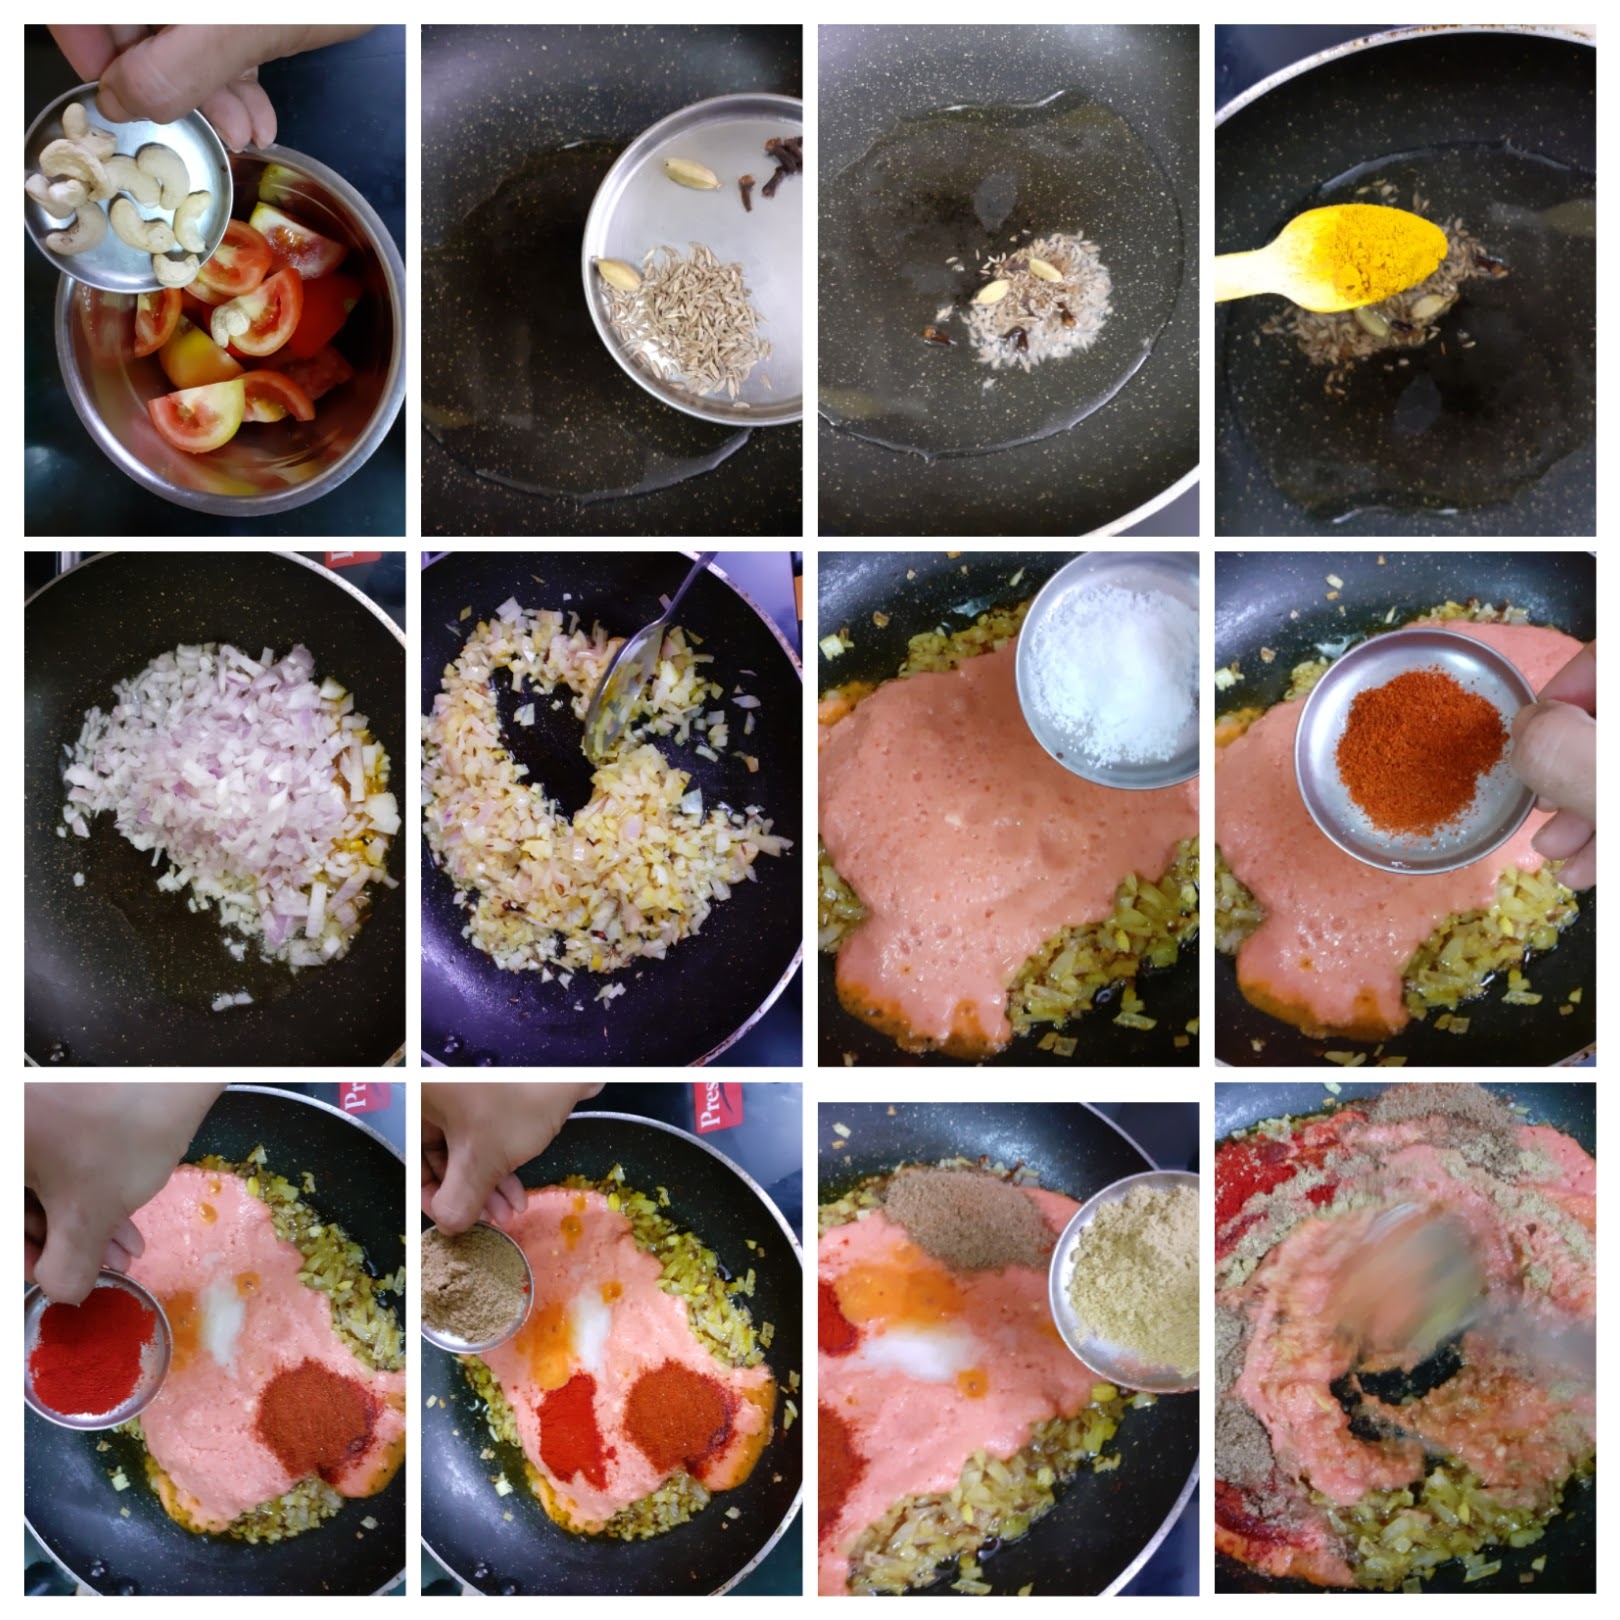
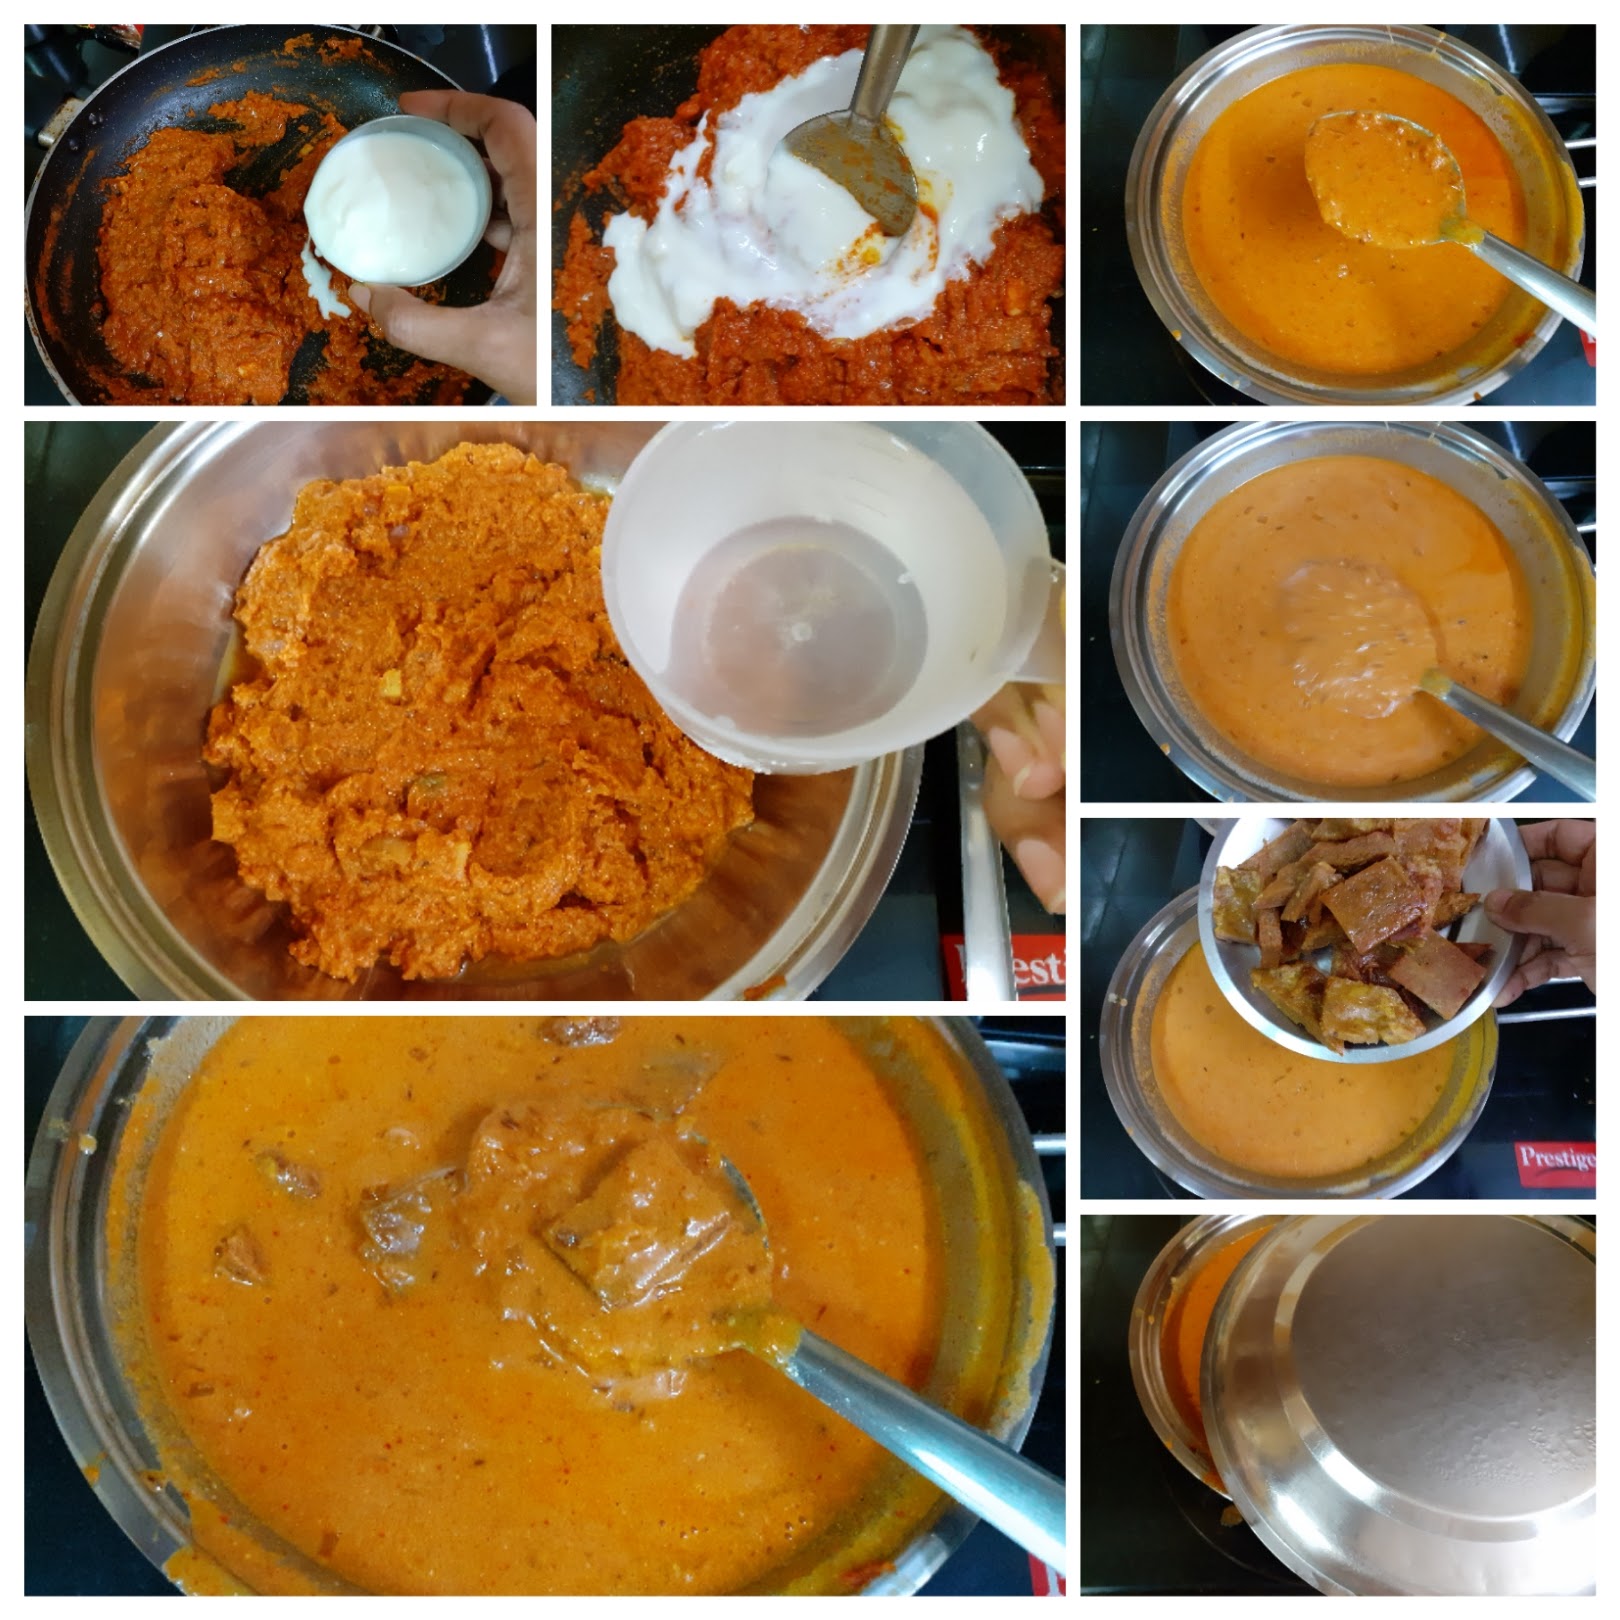
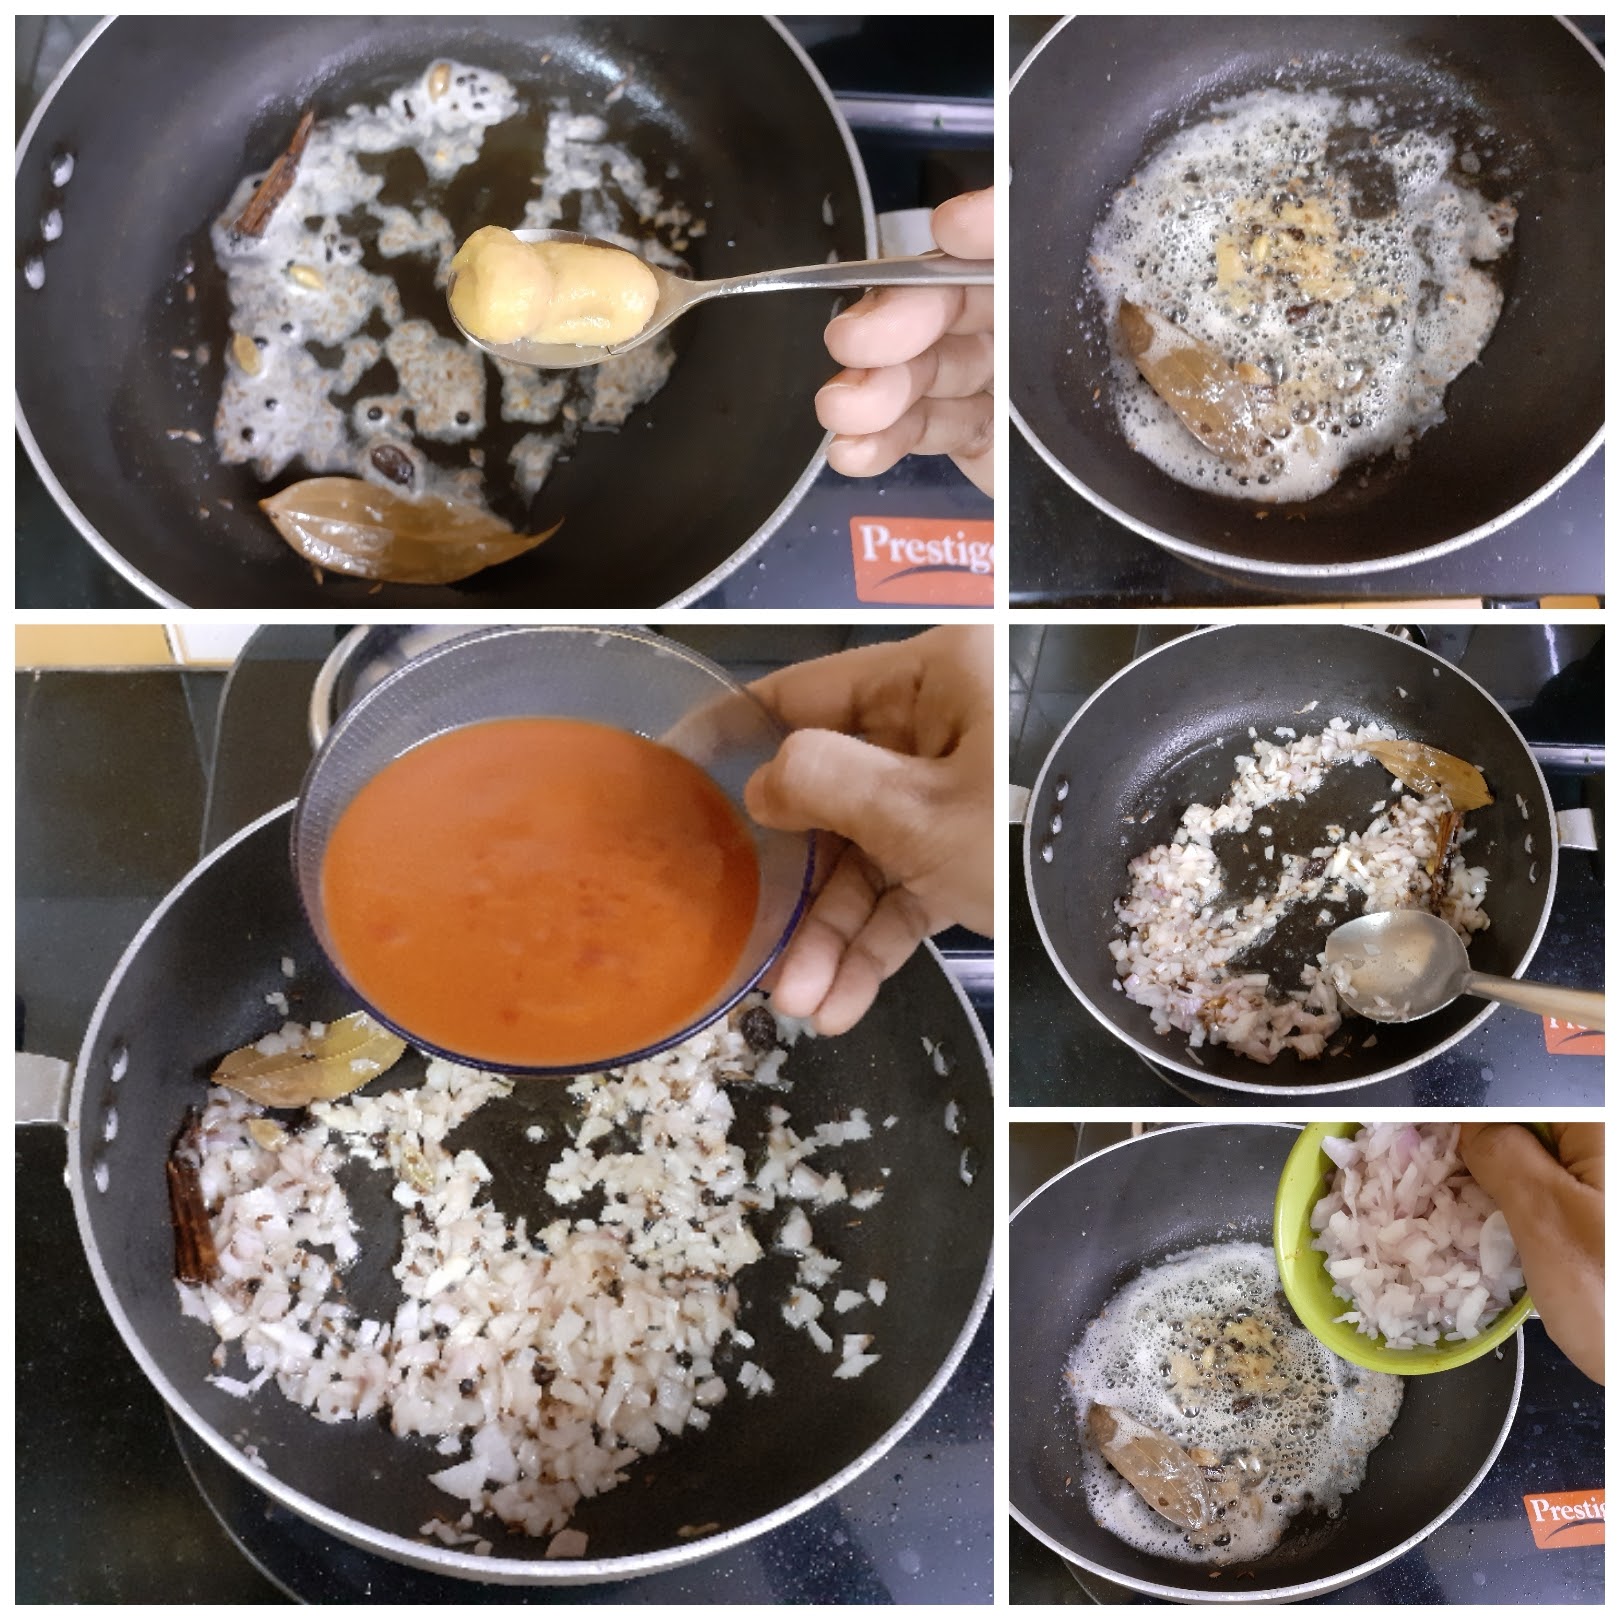
Directions: In a pan add all the ingredients mentioned under “ingredients to be ground”, and cook until the onions are transparent and the tomatoes are mushy. Cool and grind to a fine paste. Now in the same pan, add the butter and let it melt. Add the bay leaf, followed by the ground paste, salt, red chilli powder(both regular and kashmiri), and stir. Cook on medium heat, stirring every now and then. Cover partially and cook until you see the butter releasing on the sides. Now pour 1 to 1.5 cups water to dilute the gravy, add the sugar and stir. Now add the cream, and mix well. Drop in the paneer cubes and let the gravy simmer on low flame for 5 minutes or until the gravy thickens. Finally, add the garam masala powder, and kasoori methi and switch off the flame. Serve hot with Parathas, Pulav, Biryani, Puri or Rotis.
STEPWISE RECIPE FOLLOWS:
1. In a pan add all the ingredients mentioned under “ingredients to be ground”, and cook until the onions are transparent and the tomatoes are mushy. Cool and grind to a fine paste.
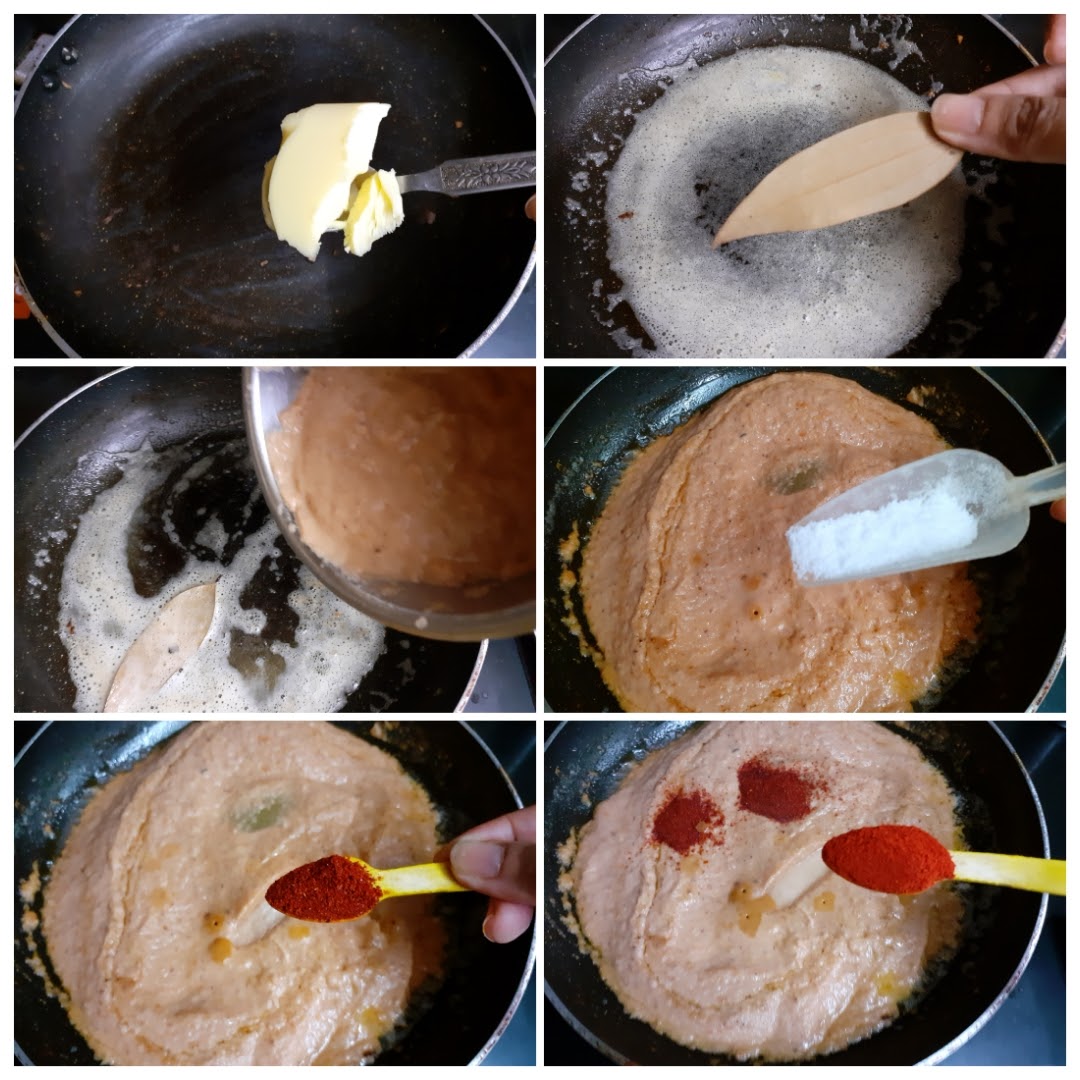
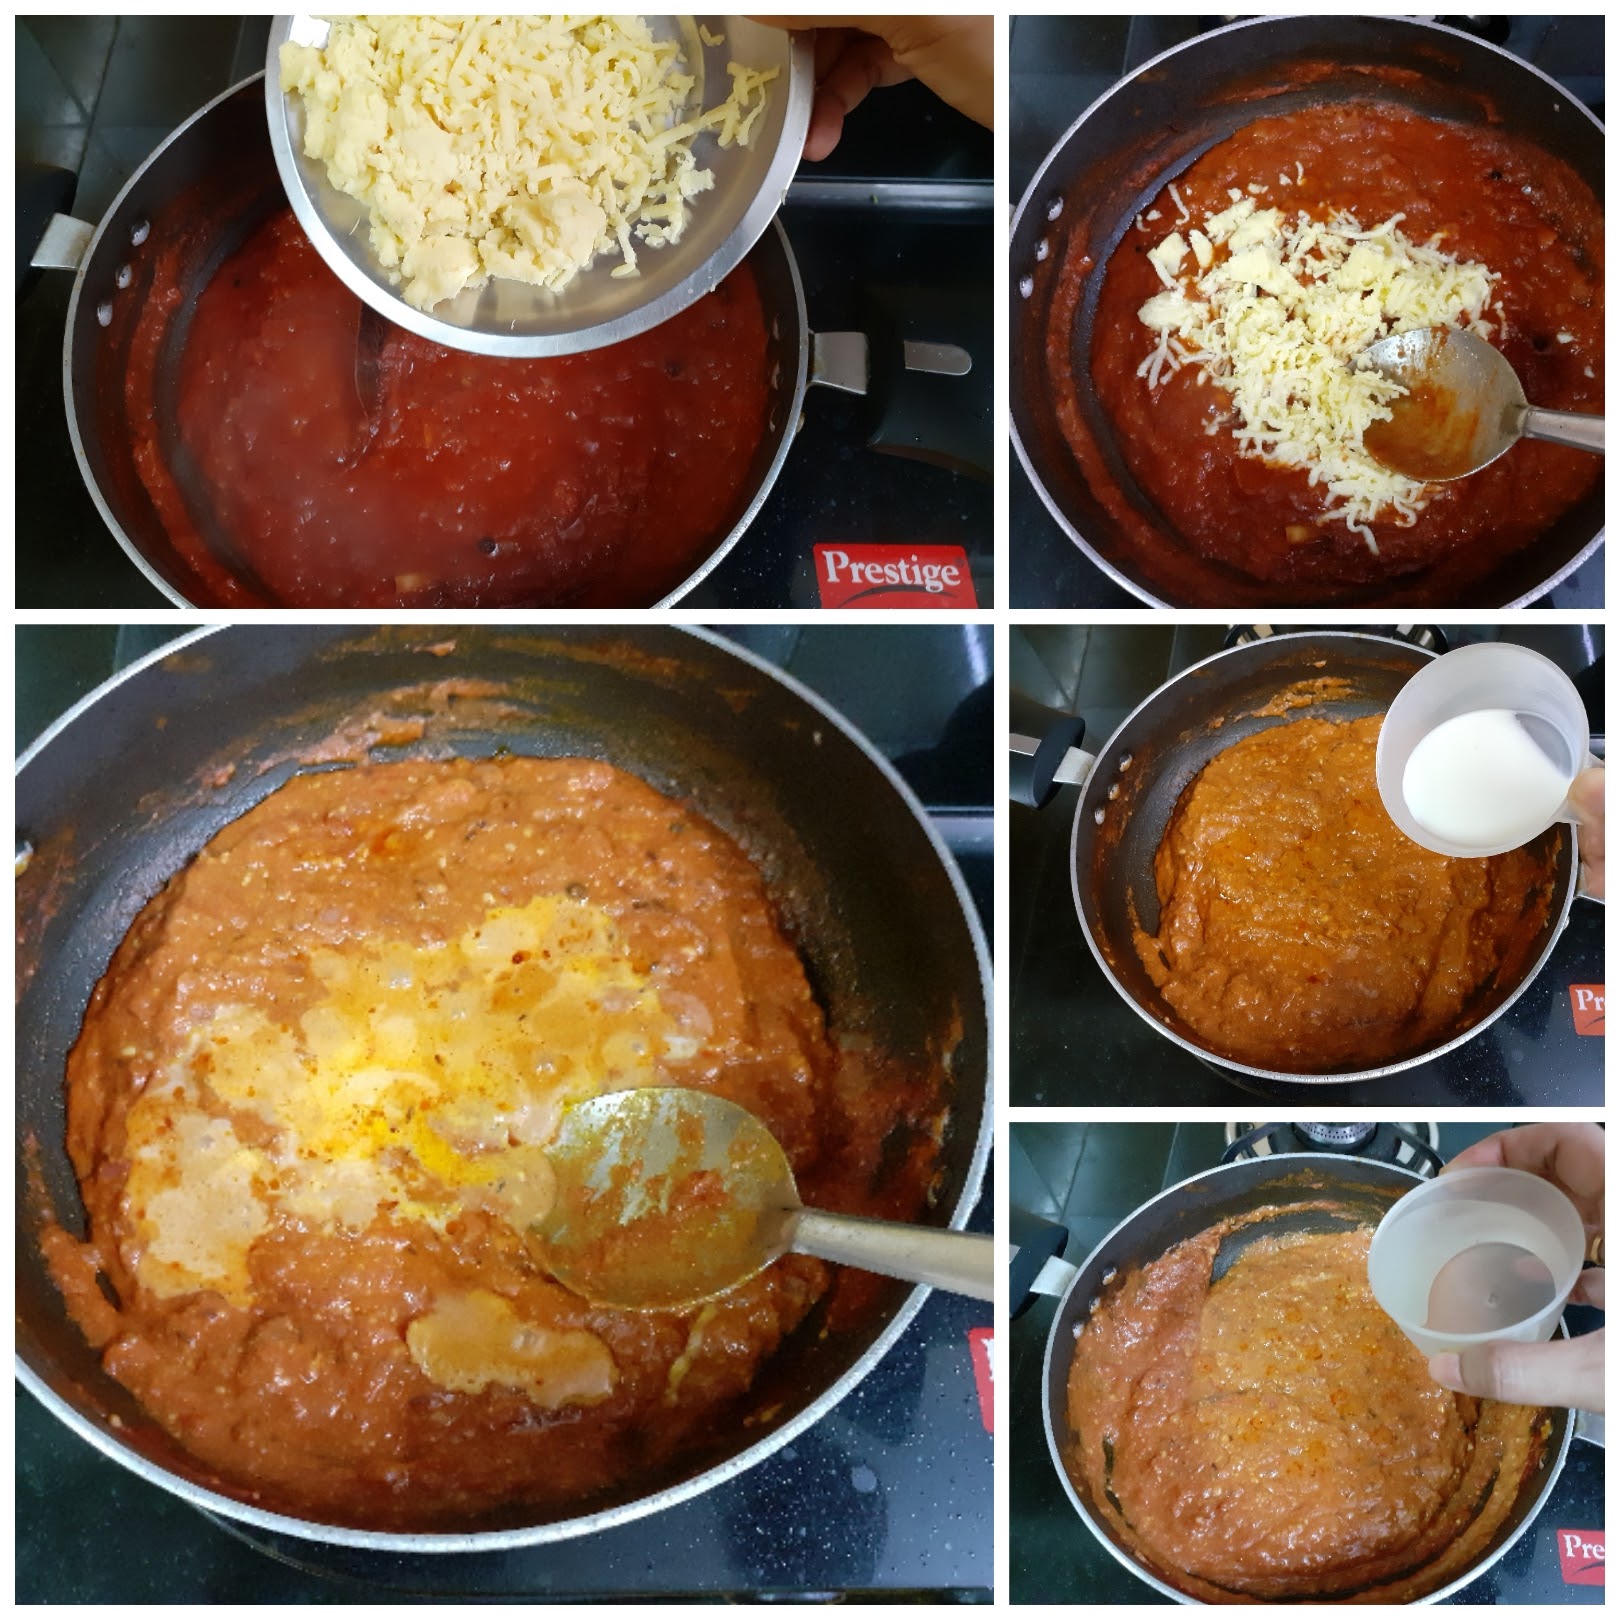
2. Now in the same pan, add the butter and let it melt. Add the bay leaf, followed by the ground paste, salt, red chilli powder(both regular and kashmiri), and stir.
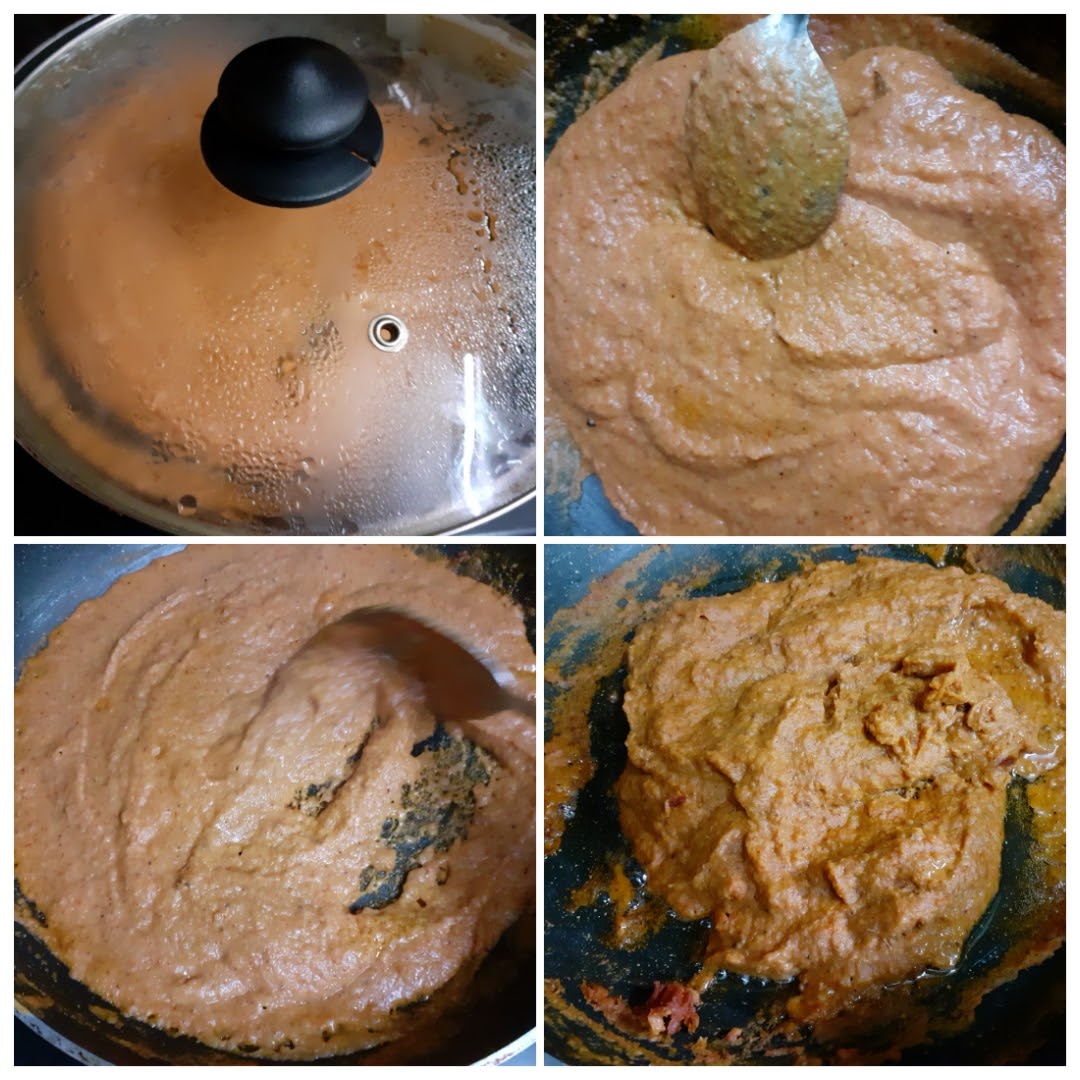
3. Cook on medium heat, stirring every now and then. Cover partially and cook until you see the butter releasing on the sides.
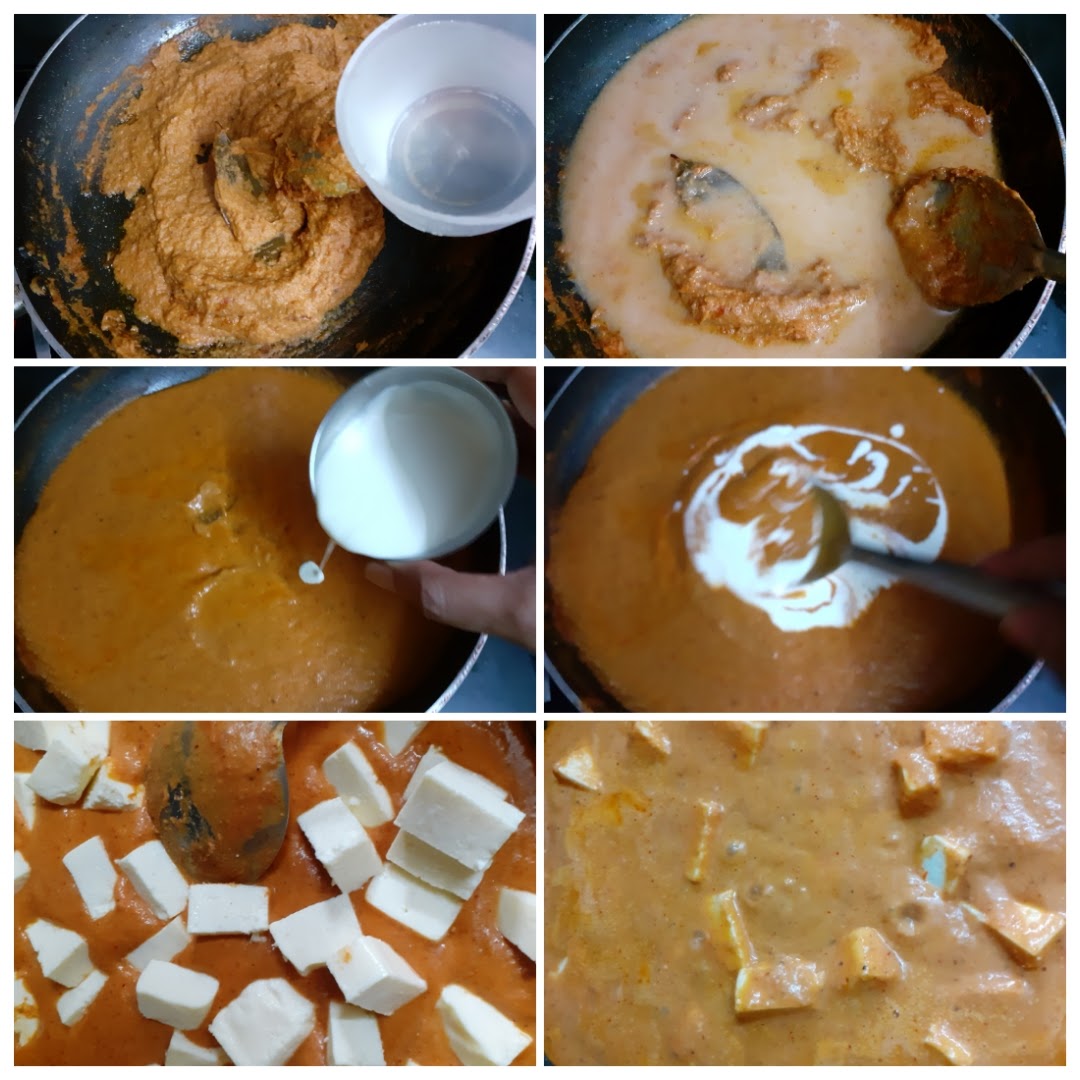
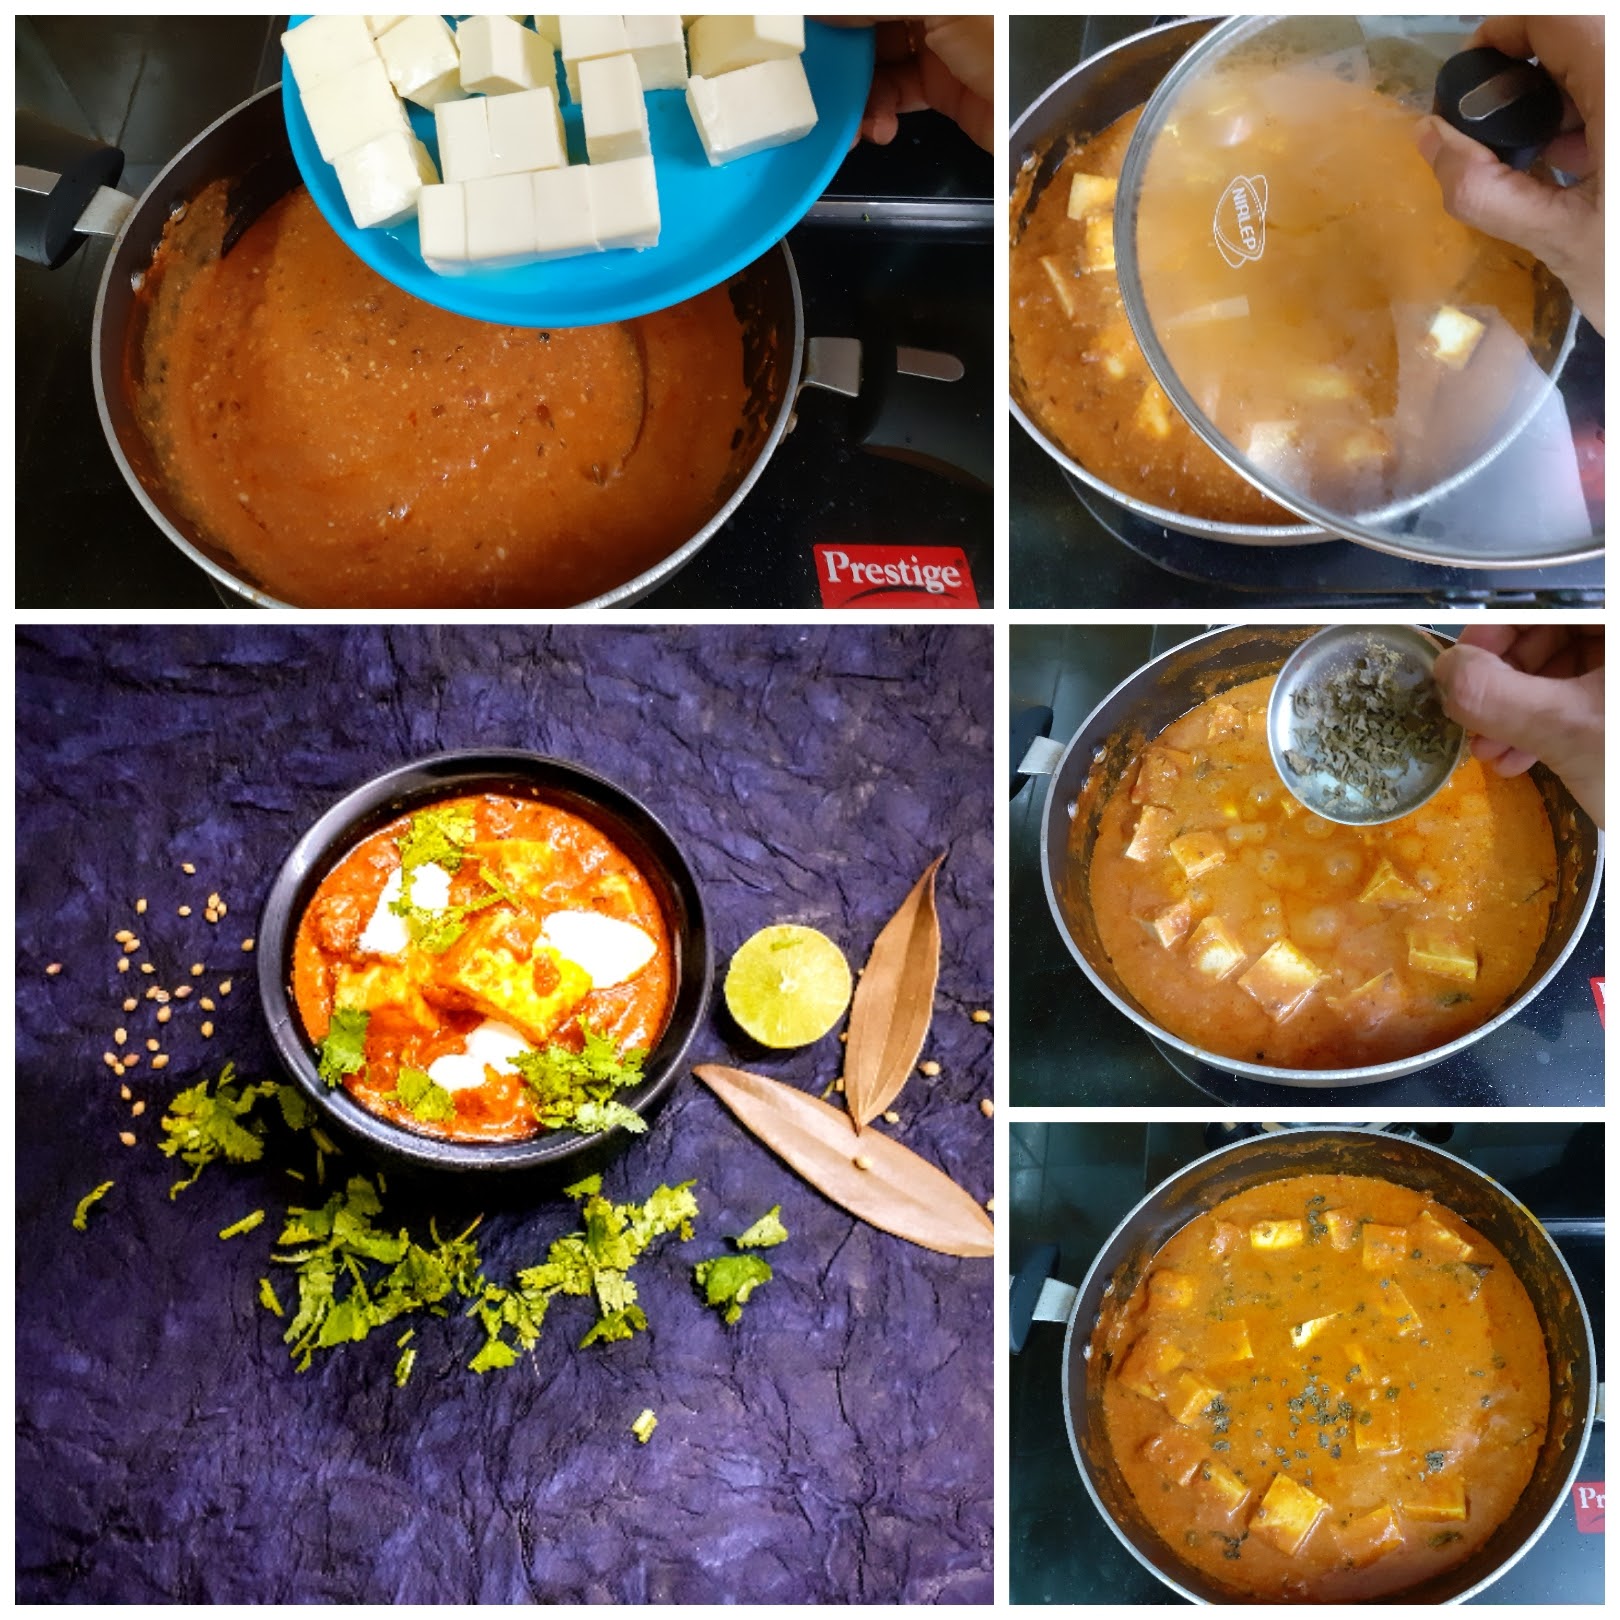
4. Now pour 1 to 1.5 cups water to dilute the gravy, add the sugar and stir. Now add the cream, and mix well. Drop in the paneer cubes and let the gravy simmer on low flame for 5 minutes or until the gravy thickens.
5. Finally, add the garam masala powder, and kasoori methi and switch off the flame. Serve hot with Parathas, Pulav, Biryani, Puri or Rotis.
NOTES:
1. The key to the perfect restaurant like taste is the butter, as the name suggests. Be liberal with it.
2. This recipe can be made without onion too. Just skip adding the onions and continue as per directions.
3. I would suggest serving this dish with a subtle pulav , rice or roti to enjoy the flavours of this dish. As it is mildly flavoured.
4. While cooking the gravy, the butter releasing from the sides is a key step. Refer step 3, picture 4.
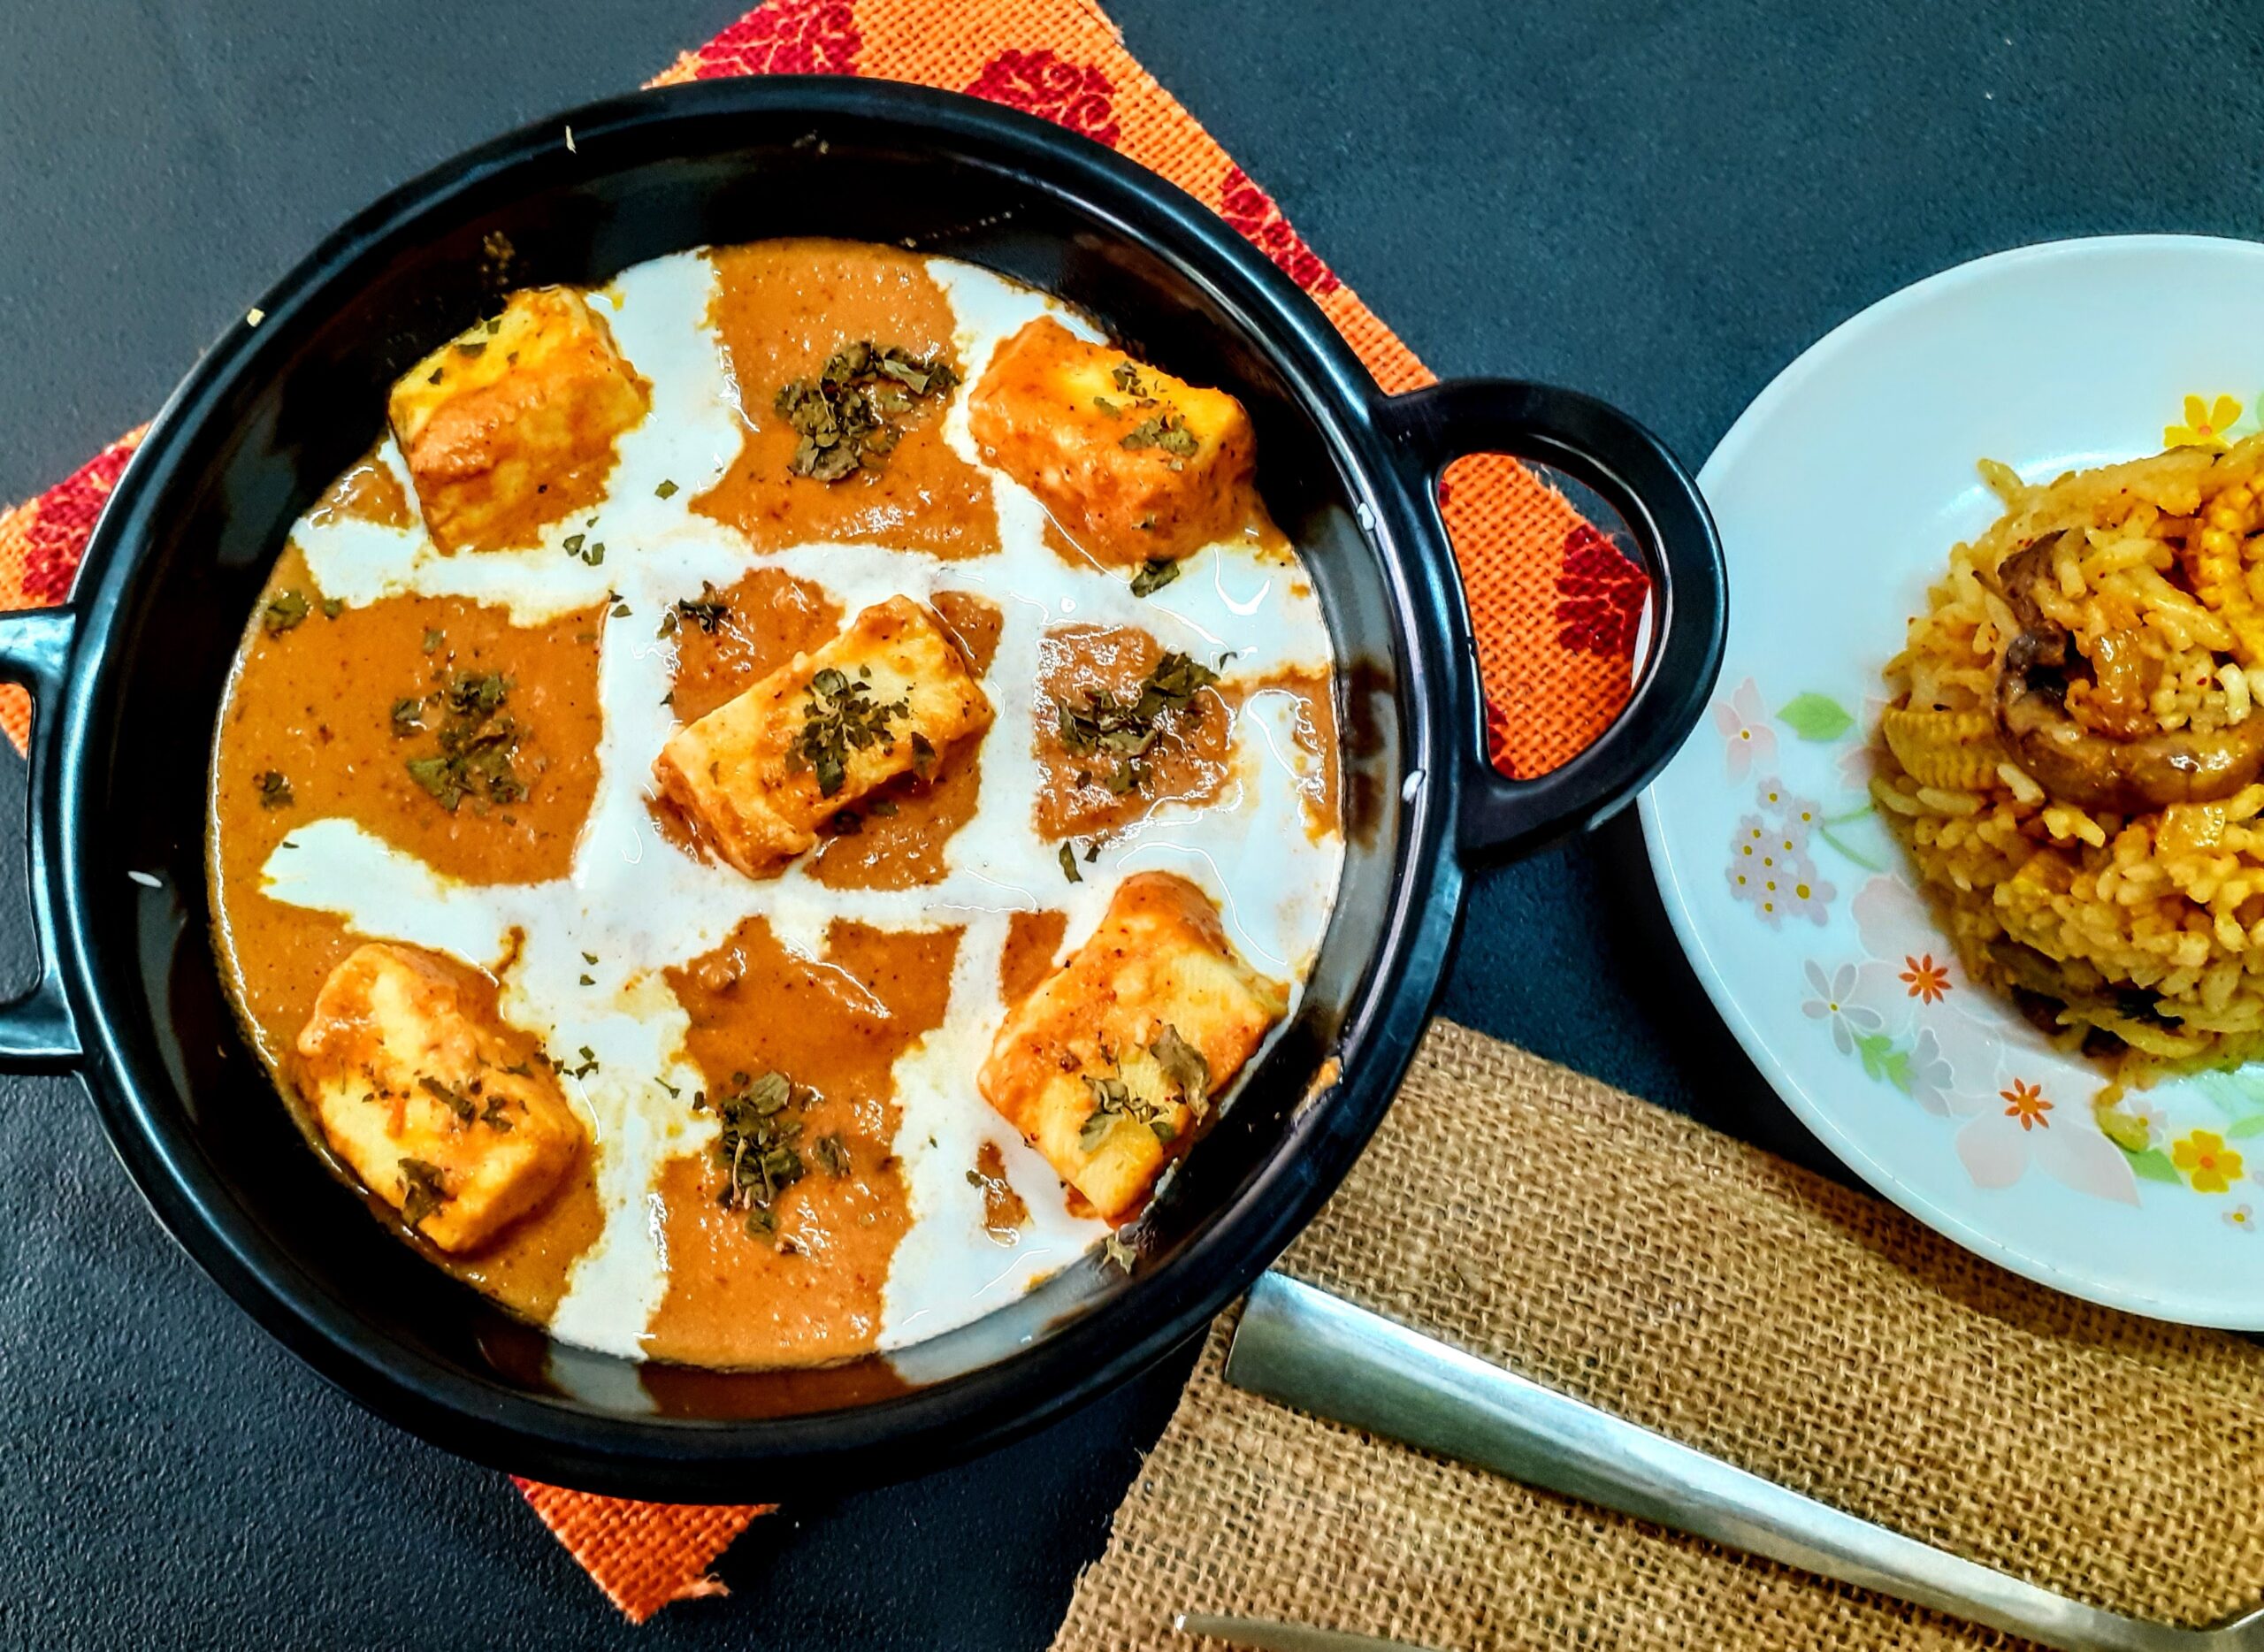
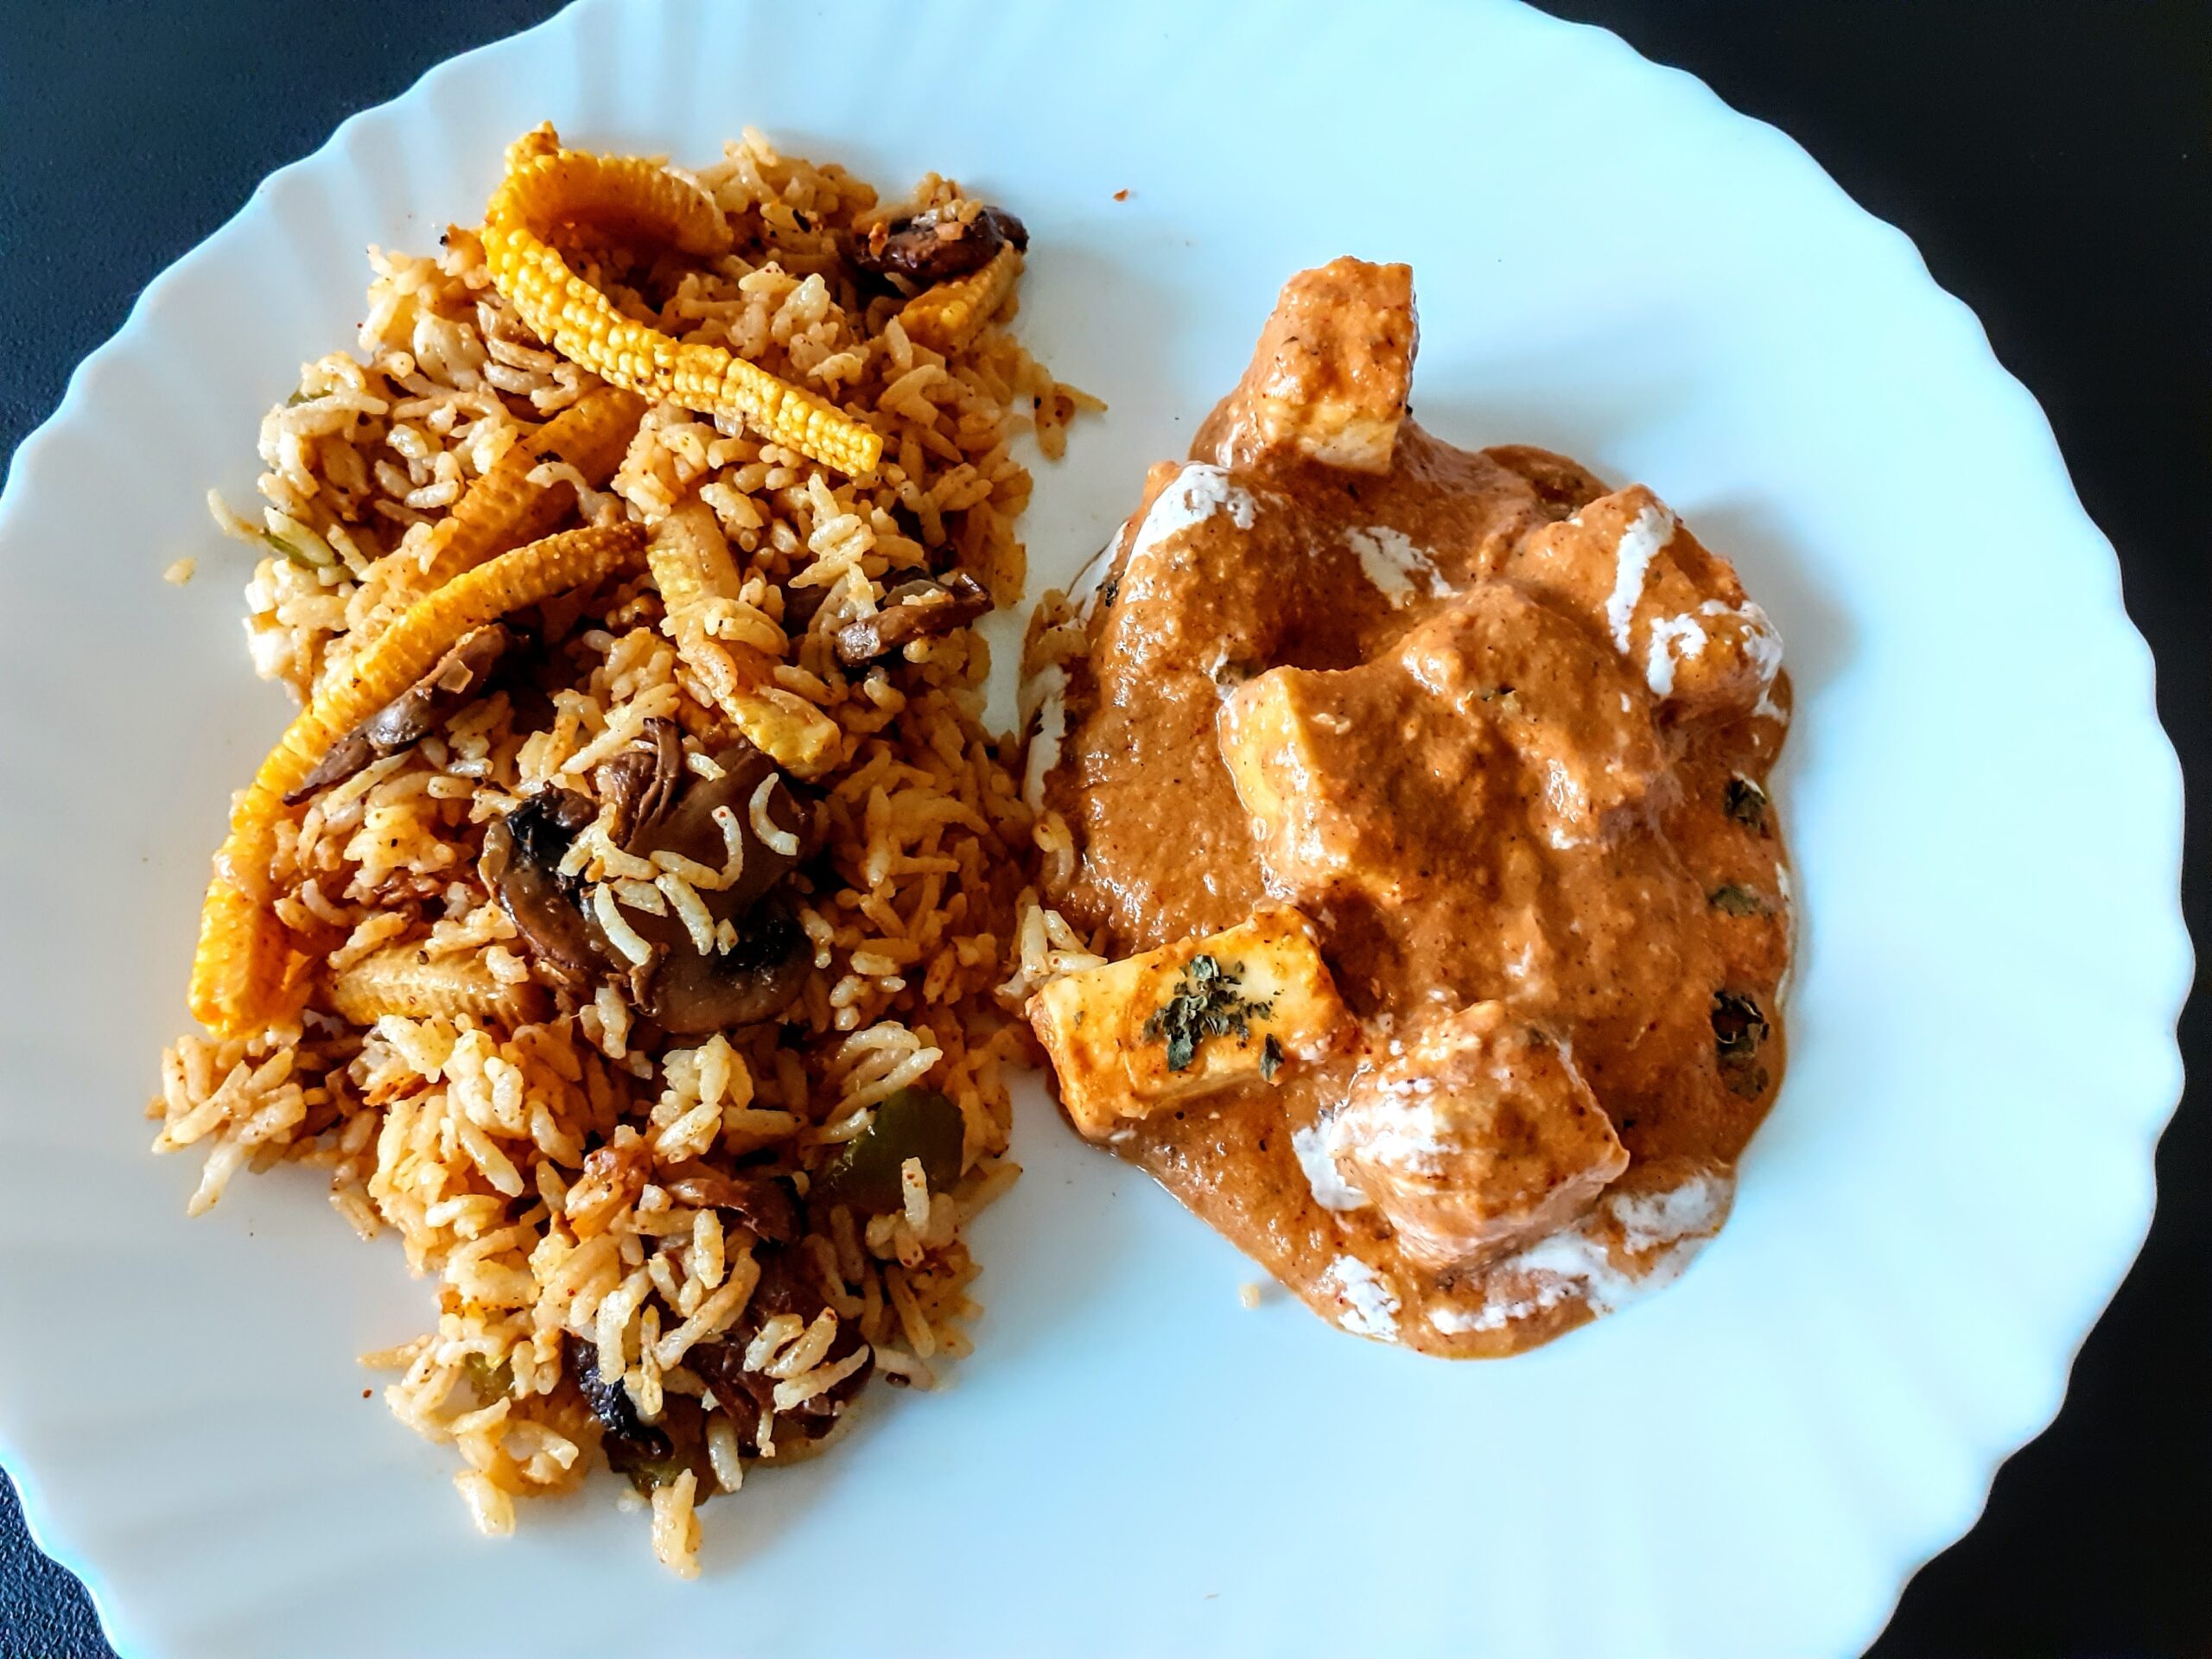
Here’s how I served the Paneer Makhanwala with a Baby Corn pulav
If you tried this recipe and liked it please comment below. I would love to hear from you. If you have a query about the recipe email us and ill respond as soon as I can.
If you would like to receive our recipes on your mail please leave your mail id at the homepage. Every time Rajjo’s Kitchenn has a new post we will mail the recipe to you.
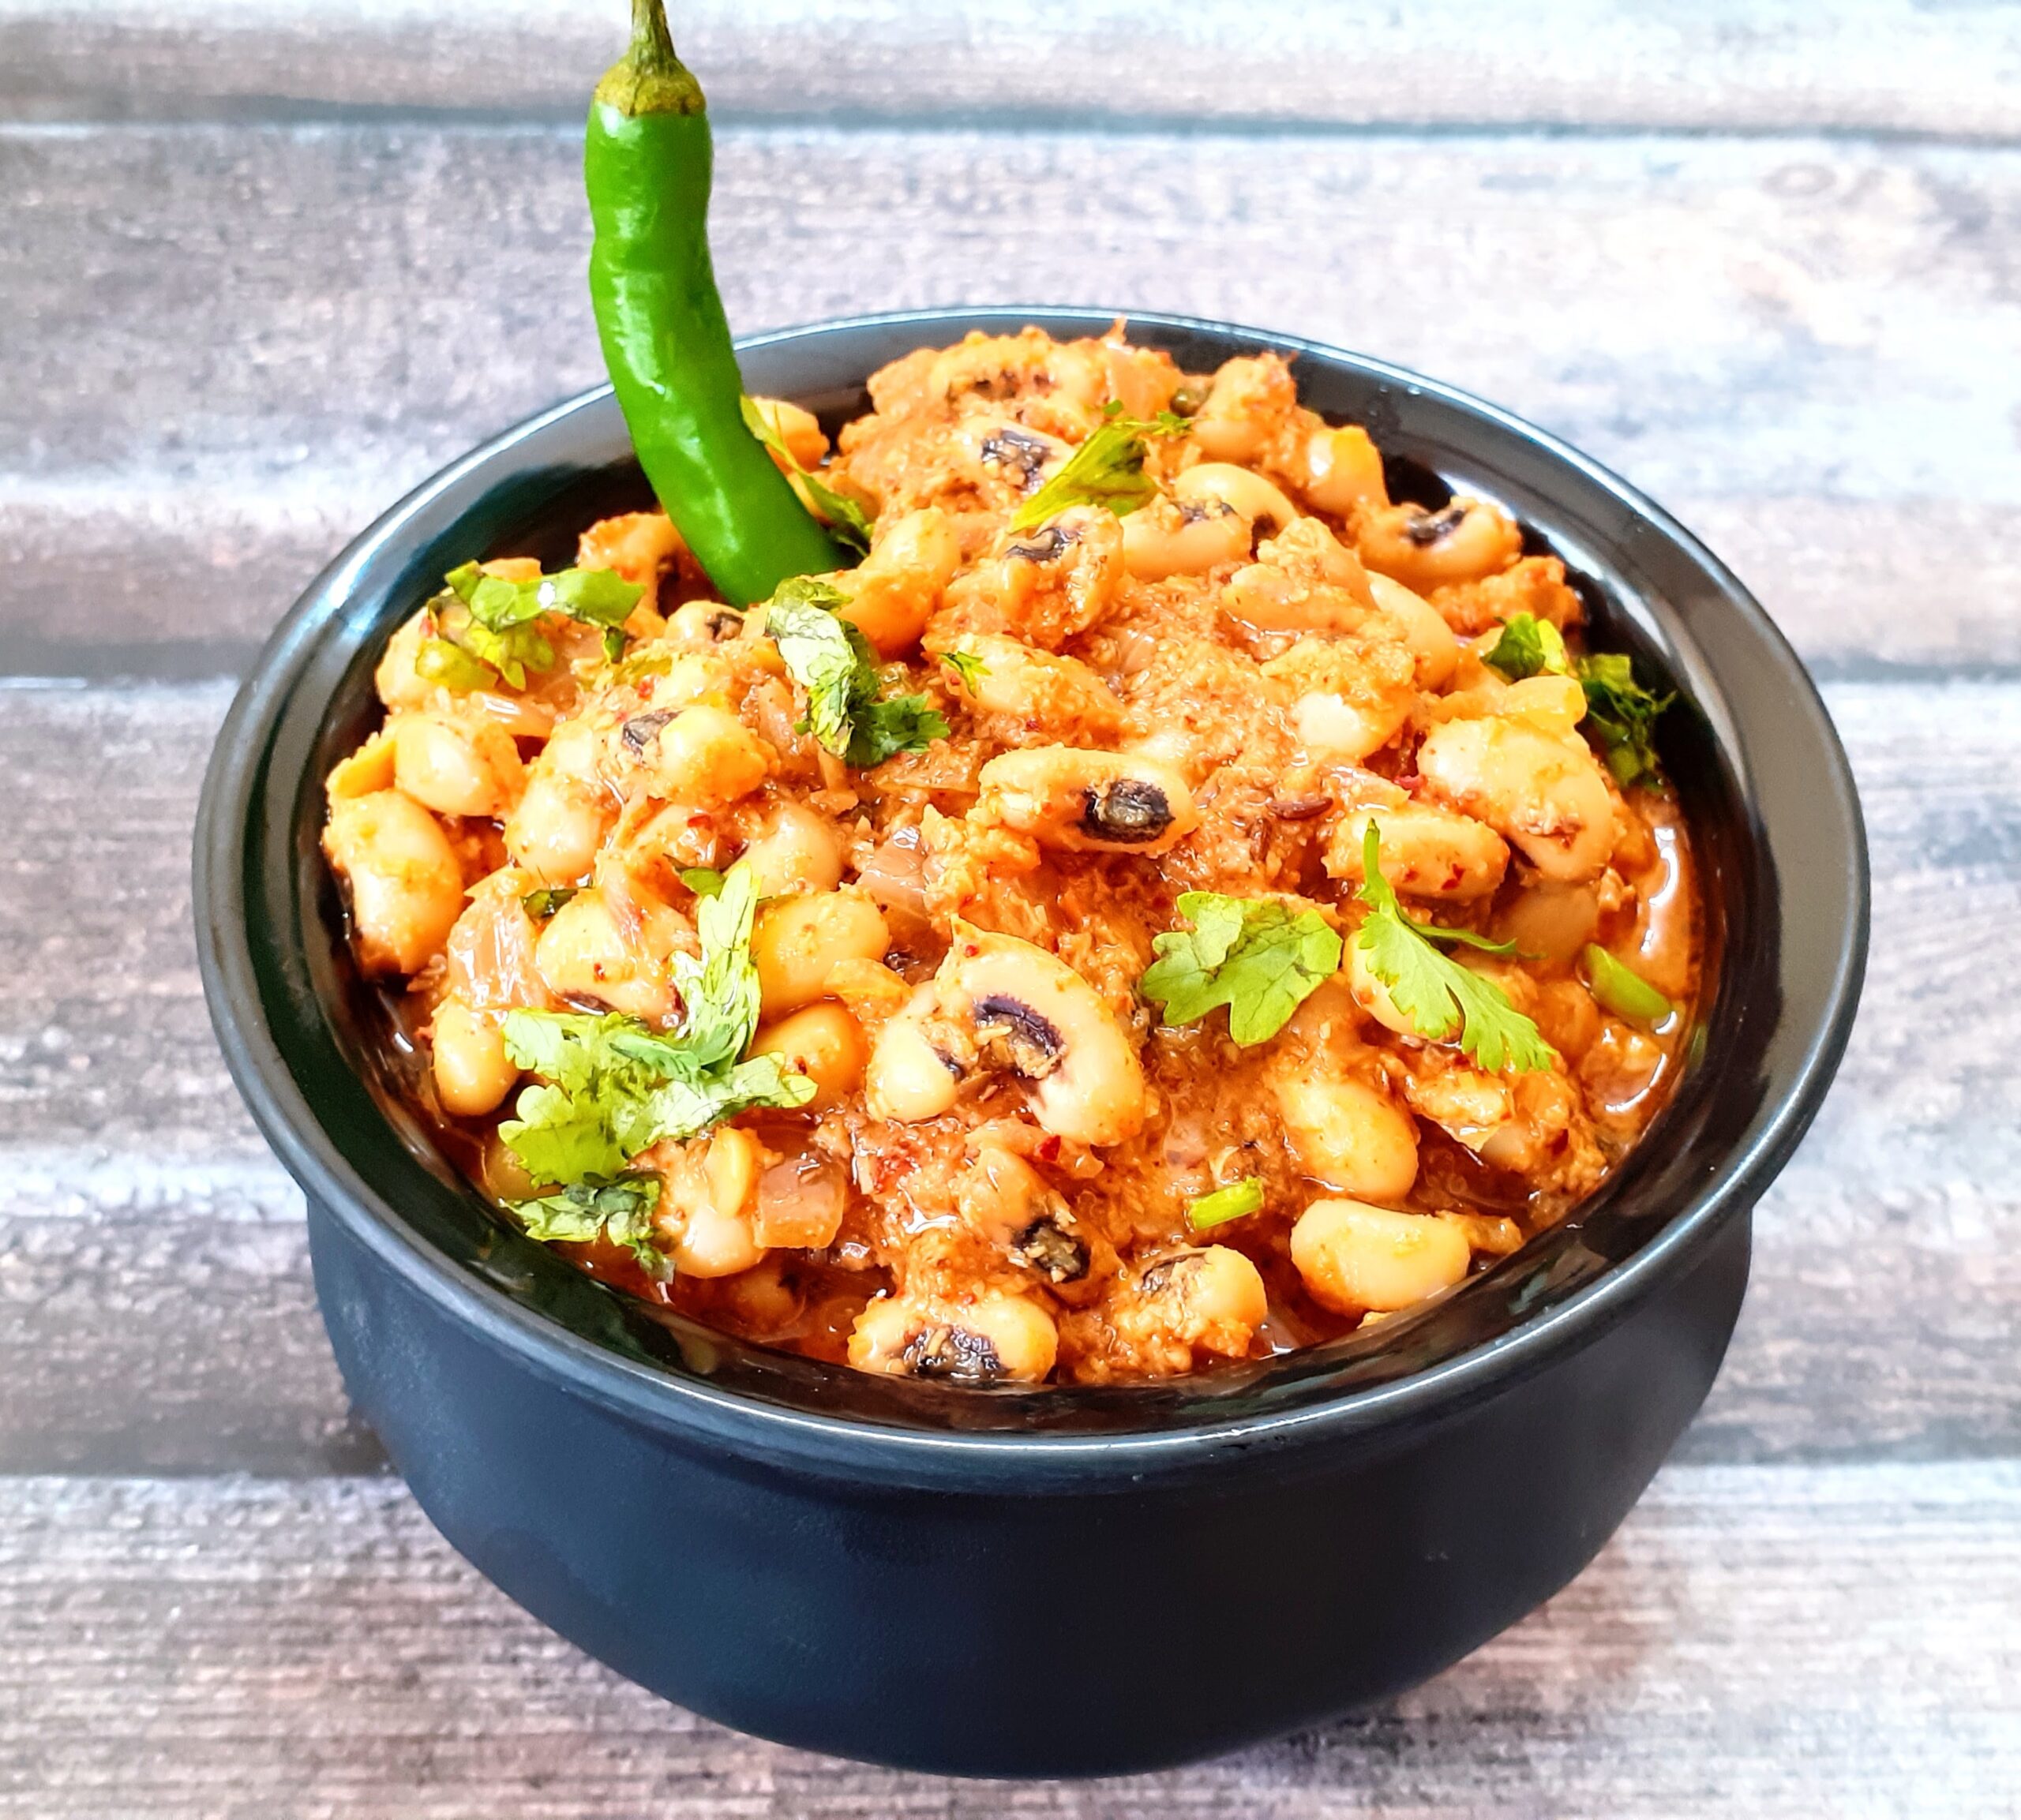
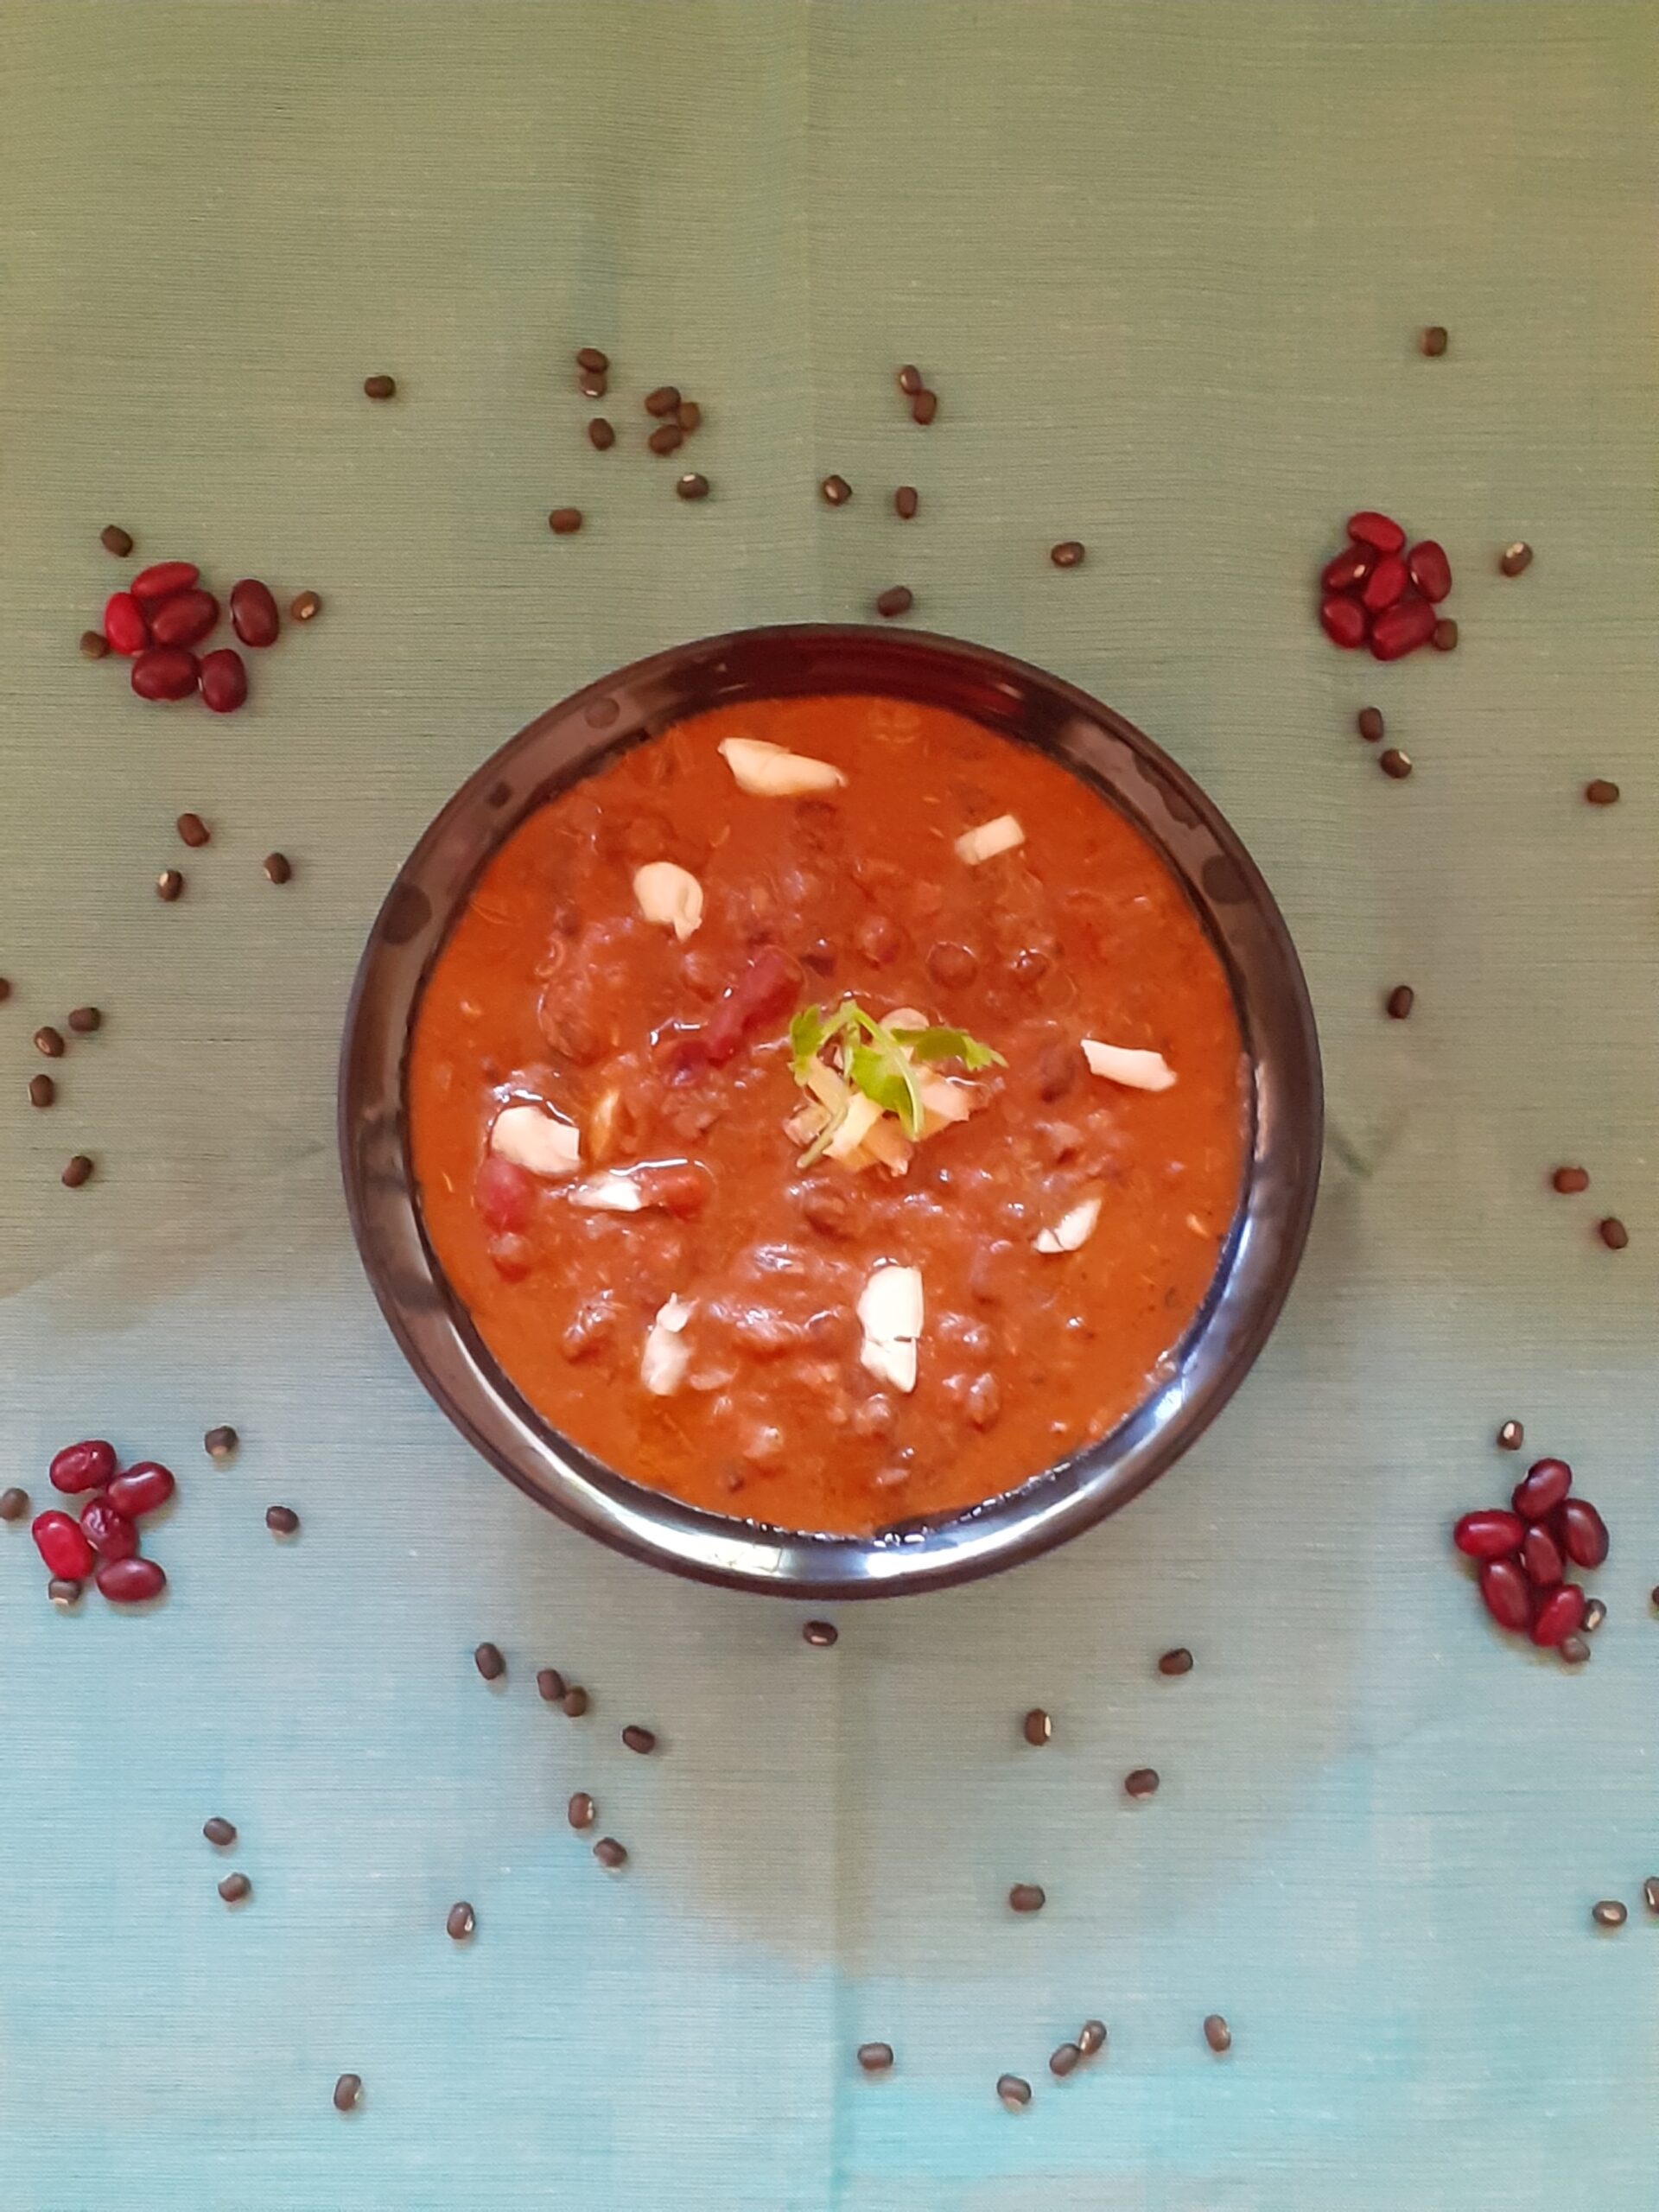
Goan Style Lobia Curry/Goan Style Black Eyed Bean Curry
Black eyed beans or Cow peas as they are called, are legumes that are available all over the globe. In India they are used in many regional cuisines. The Lobia masala is a popular dish in north India, and so is the Eriserry from Kerala cuisine that uses the legume along with Ash gourd and Yam. In Tamilnadu is it made into a Sundal(salad), or used with other vegetables to make a curry. In the Andhra cuisine It is made into a Vada (fritter), the Gujarati cuisine also has its version of the Lobia curry, called Chawli masala. That’s how wide the usage of these beans is across India.
Cow Peas/ black eyed beans have a soluble fibre that helps in reducing cholesterol, it is said. These are nutrient dense legumes with the richness of Vitamins- A, B1, B2, B3, B6, C , that helps in healthy cell development. They also are rich in micro nutrients like Magnesium, zinc, iron, and copper(source net.med). These legumes also support weight loss and boost digestive health. That I guess is reason enough to include them in your diet, if you haven’t already.
Though the Lobia Sundal (salad) is a regular feature in my house, and so is the Erissery, and Lobia masala, I recently tried a Goan style Lobia curry and it turned out so good. The Goan spice combination of Coriander seeds, Cumin seeds and coconut, gave a very good dimension to the dish, and it tasted different from the regular Lobia masala. Hence documenting this recipe for you all to try.
PREP TIME: 10Mins+(soak time 4-5 hrs) COOK TIME: 30 Mins
TOTAL TIME: 40Mins COURSE: MAIN
CUISINE: INDIAN SERVINGS: 4
AUTHOR: Rajni Ram
Ingredients:
Lobia/cow peas/black eyed beans/ 1 cup soak for 4-5 hrs
Onion 1 medium chopped fine
Tomatoes 2 large pureed
Coconut 2 tbsp
Tamarind paste 1 tsp or pulp from a tiny bit of tamarind
Green chillies 2 split
Bay leaf 1
Coriander seeds/dhania 2 tsp
Cumin seeds/Jeera 1 tsp
Dry red chillies (regular/spicy ones)1
Kashmiri or Byadagi chillies 1
Turmeric powder 1/2 tsp
Ginger garlic paste 1tsp
Red chilli powder(regular) 1 tsp
Kashmiri red chilli powder 1 tsp
Oil for sauteing
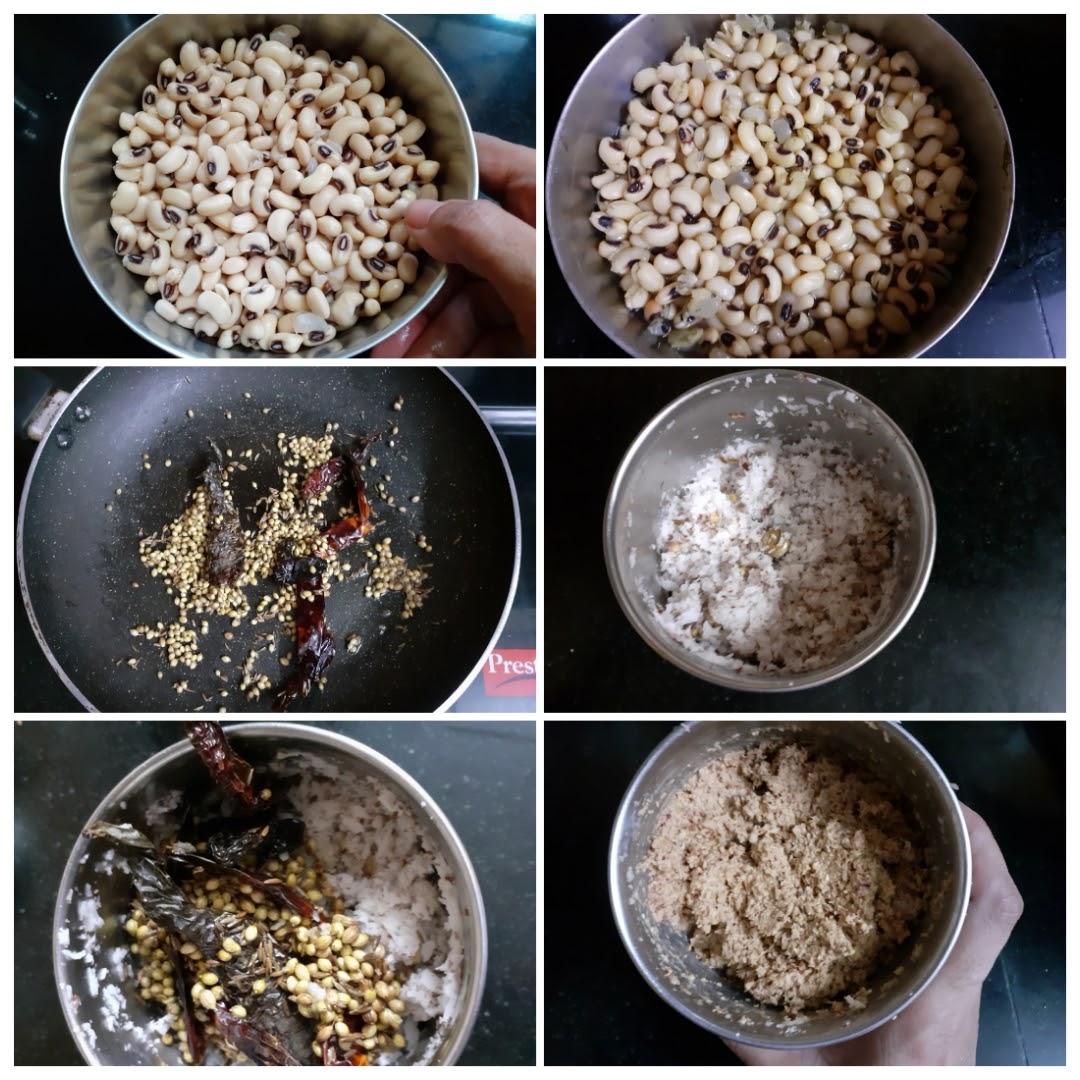
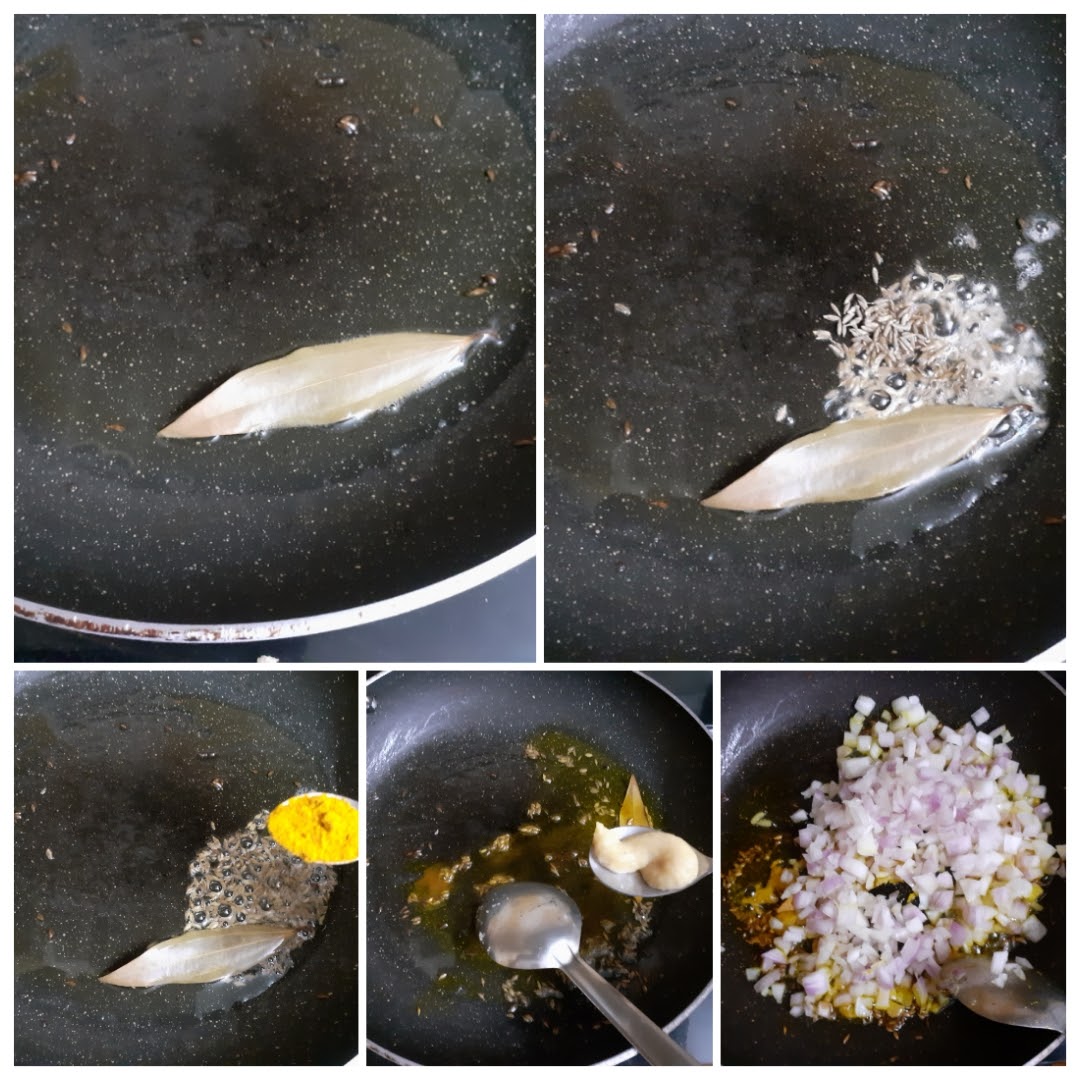
Directions: Wash and drain the water from Lobia, add fresh water and pressure cook for whistles or until soft. In a pan, roast the coriander seeds, cumin seeds, dry red chillies, and Kashmiri red chillies until crisp. cool. Now put them in a blender jar along with coconut and grind to a fine paste using little water. Set aside. Now in the same pan take some oil and heat. Add the Bay leaf, followed by cumin seeds, and turmeric powder. When the cumin seeds splutter, add the ginger-garlic paste, and fry. Now drop in the chopped onions and saute. When the onions turn light brown, add the split green chillies and saute another 30 secs. Now add the ground masala paste and fry nicely in the oil. When the mixture becomes dry, add the tomato paste, followed by the cooked Lobia/Black eyed beans, along with the water in which the lobia was cooked. Let the mixture simmer for 5 minutes. Now add, salt, red chilli powder, Kashmiri chilli powder, and further simmer for 10 minutes. Add water if required to adjust consistency. After 5 minutes, add the tamarind paste, and cook for just a minute and switch off the flame. Garnish with finely chopped coriander leaves and serve hot with Rotis or rice.
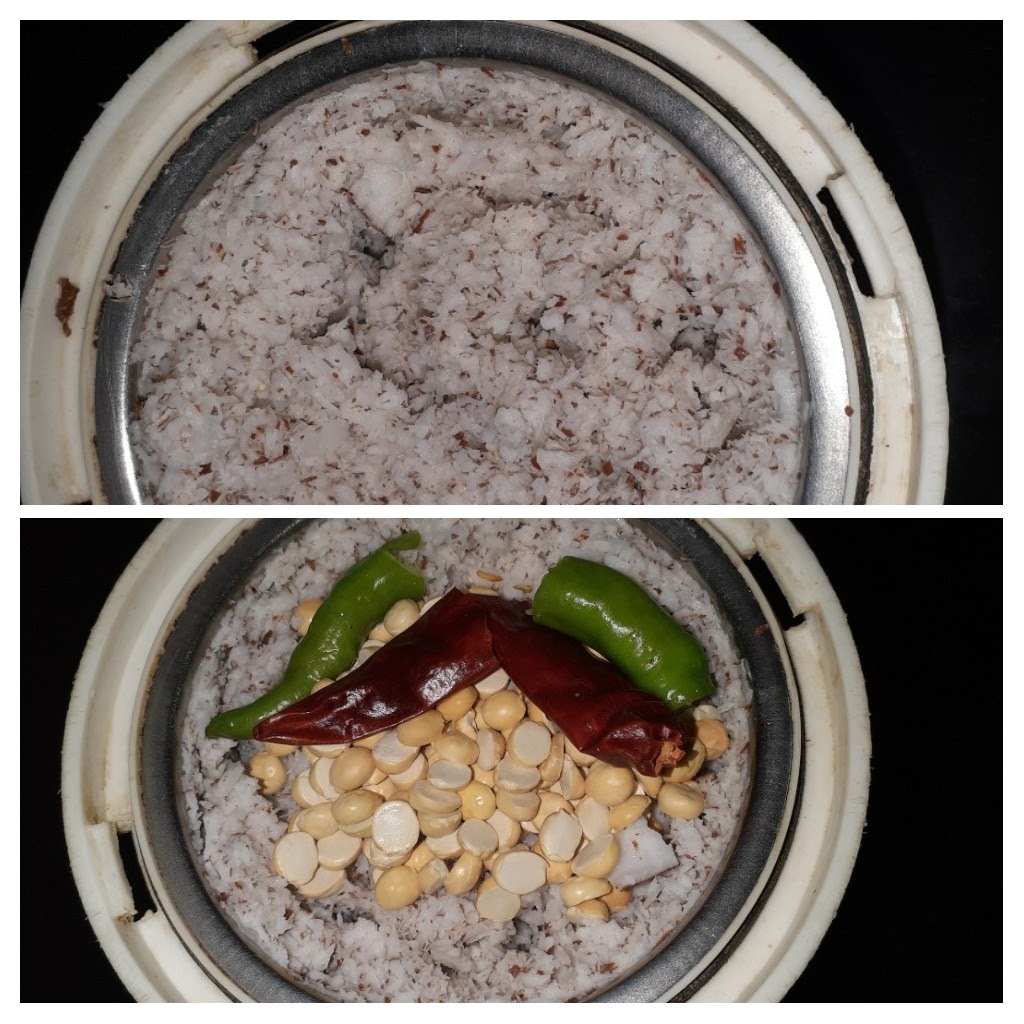
1. Wash and drain the water from Lobia, add fresh water and pressure cook for whistles or until soft. In a pan, roast the coriander seeds, cumin seeds, dry red chillies, and Kashmiri red chillies until crisp. cool. Now put them in a blender jar along with coconut and grind to a fine paste using little water. Set aside.
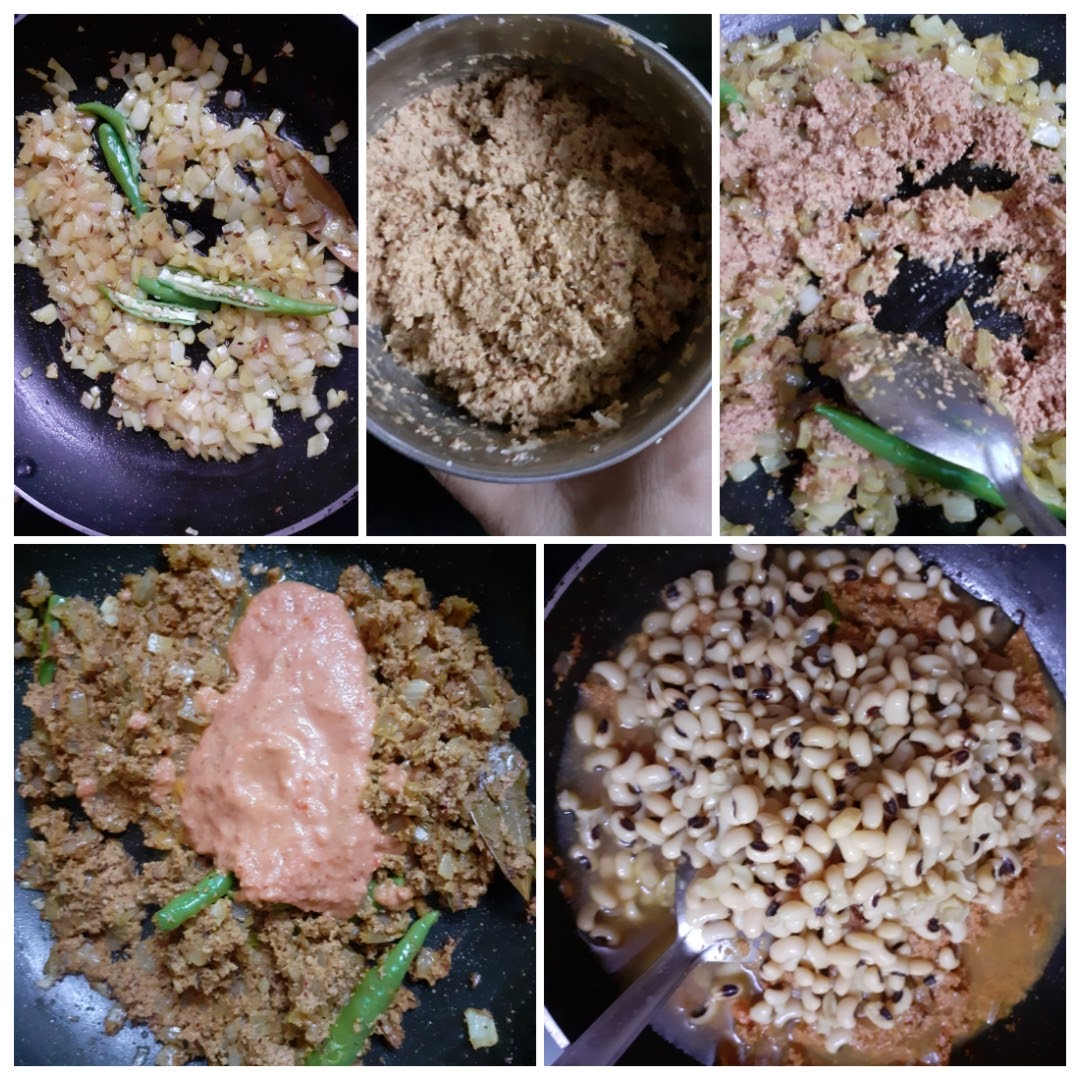
2. Now in the same pan take some oil and heat. Add the Bay leaf, followed by cumin seeds, and turmeric powder. When the cumin seeds splutter, add the ginger-garlic paste, and fry. Now drop in the chopped onions and saute.
3. When the onions turn light brown, add the split green chillies and saute another 30 secs. Now add the ground masala paste and fry nicely in the oil. When the mixture becomes dry, add the tomato paste, followed by the cooked Lobia/Black eyed beans, along with the water in which the lobia was cooked. Let the mixture simmer for 5 minutes.
4. Now add, salt, red chilli powder, Kashmiri chilli powder, and further simmer for 10 minutes. Add water if required to adjust consistency. After 5 minutes, add the tamarind paste, and cook for just a minute and switch off the flame. Garnish with finely chopped coriander leaves and serve hot with Rotis or rice.
NOTES:
1. There is another variety of the Lobia which are red in colour and resemble kidney beans/Rajma. This curry can be made with those red coloured beans too.
2. The spice level of this curry is medium. Feel free to increase or decrease as per taste.
3. Usually when i refer to “oil of sauteing” in the ingredient list, I mean the regular refined oil. When i use a specific oil like Coconut or Sesame, I always specify.
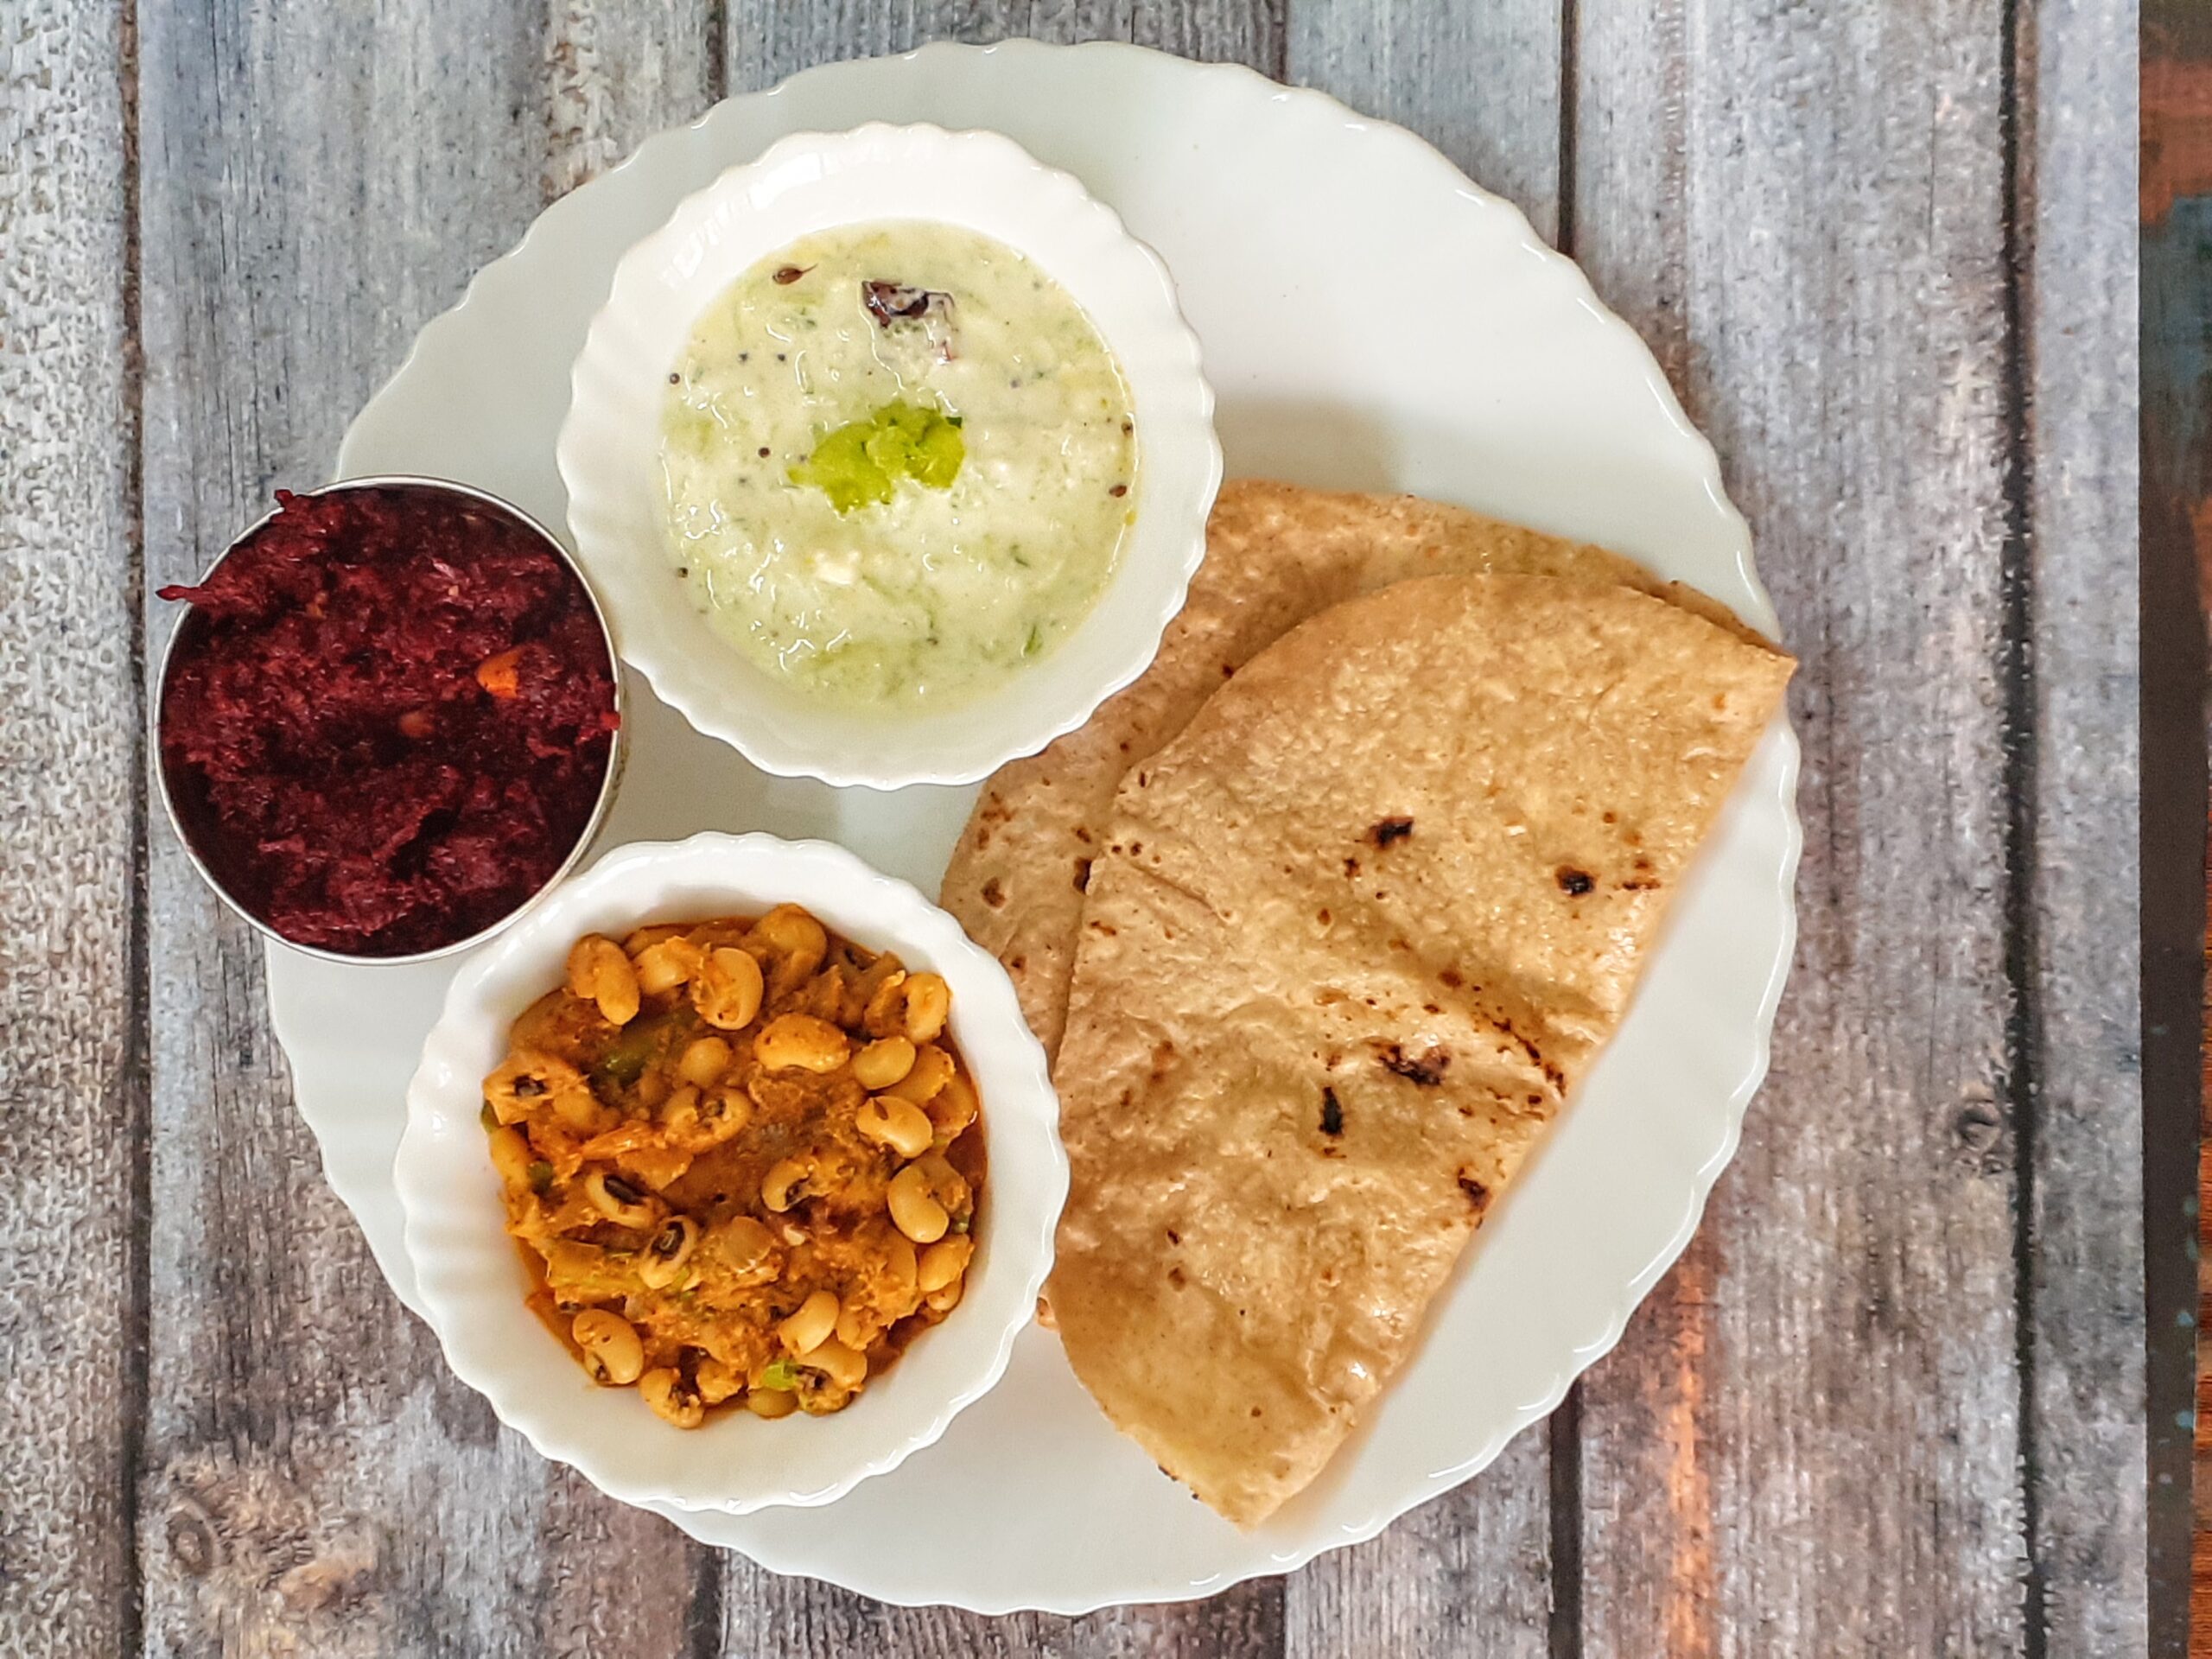
This is how I served my Goan style Lobia curry with Roti, Cucumber Raita, and Beetroot Halwa to make it a complete meal.
If you tried this recipe and liked it please comment below. I would love to hear from you. If you have a query about the recipe email us and ill respond as soon as I can.
If you would like to receive our recipes on your mail please leave your mail id at the homepage. Every time Rajjo’s Kitchenn has a new post we will mail the recipe to you.
Lemon Poppy Seed/Khus Khus Salad Dressing
This creamy Lemon Poppy Seed/Khus Khus salad dressing is perfect for a veggie loaded salad you would want to have as lunch or dinner. This dressing is a great way to spruce up your salad.
This salad dressing is a low carb version.
What I like in a home made dressing is that you get to customize everything from the spice, salt and sugar. And this salad doesn’t take any time at all. It is just a add everything to blender and blitz kind of dressing. This salad dressing comes together in just about 5 minutes. It stays well in the refrigerator upto 10 days and can be used as and when required.
1. In a blender pour the ACV, Olive oil, Lemon juice, salt, sugar powder, crushed garlic cloves, Dijon mustard, and blend at high speed for 30 seconds. Stop and blend again for 30 seconds.
2. Now add the Poppy seeds and give another pulse for 30 seconds. The dressing is ready to use now. Store in a bottle and refrigerate.This can also be used as sauce for burgers and other breads.
NOTES:
1. I could not find black poppy seeds her, otherwise they would have provided a great contrast. Anyway this doesn’t affect the taste or flavour in anyway.
2. If you prefer a sweeter dressing, add one more tablespoon of sugar powder.
Chakki Ki Shak/ Chakki Ki Subji
The cuisine of Madhya Pradesh ( central India) has been unexplored by me so far. Recently while looking up the internet I saw this interesting recipe called Chakki Ki Shak from the MP cuisine. I found the recipe simple and interesting and as I don’t have this cuisine on the blog I gave it a try and the dish turned out so delicious that I had to blog it.
While looking up this recipe in detail I also came to know of many more interesting vegetarian recipes from the region and I will surely bring them all here over a period of time. If you are following the blog you know by now that when I try a new recipe it has to turn out well thrice, and that takes time.
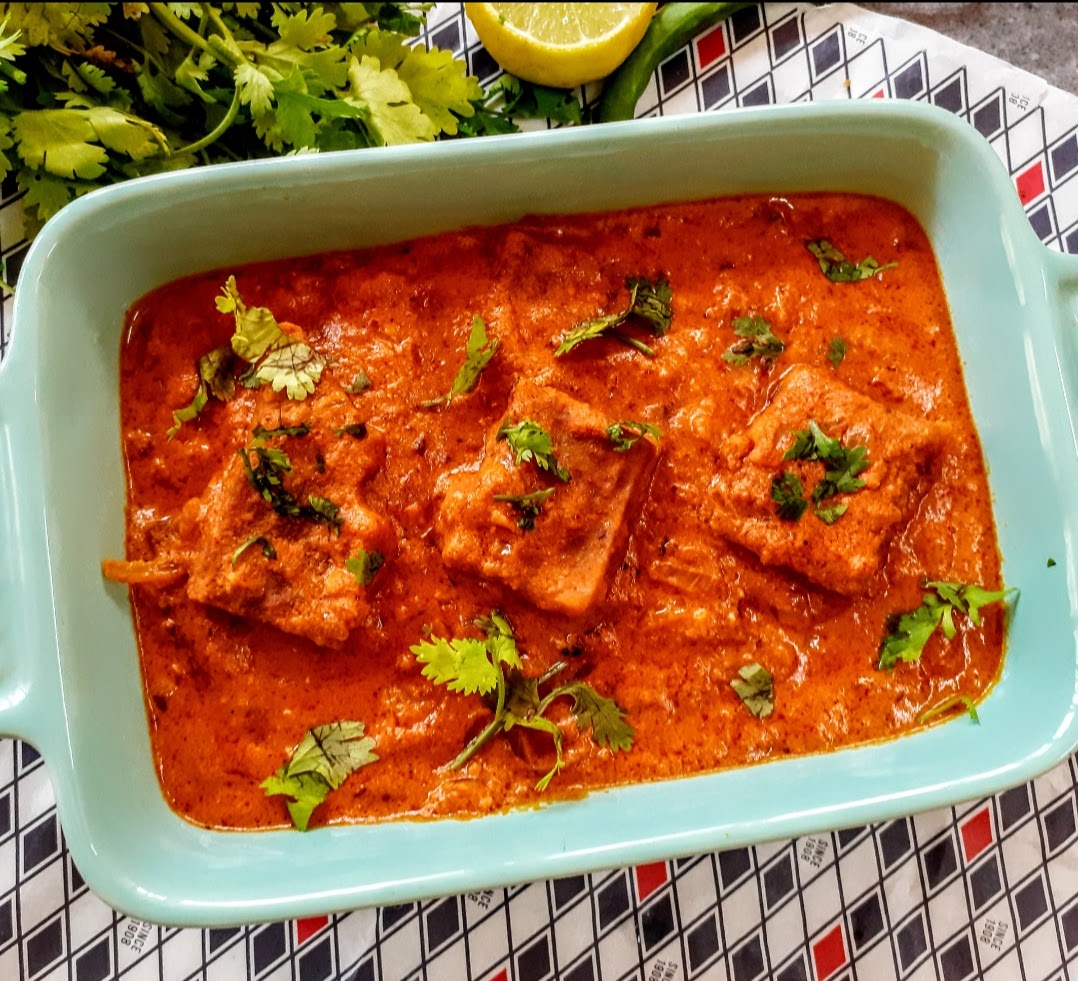
Before we delve into the recipe, I must tell you that MP being the center of India is surrounded by various states and hence there is a similarity of cuisine between them. I found some dishes bearing similarities with Rajasthani and Maharashtrian cuisine. Wheat, Jowar, and Maize form the staple food, do you see that’s how “Bhutte Ka Kees” is a specialty from MP, Bafla which is made of whole wheat flour is also a famous dish from the region. The current dish Chakki ki Shak is a curry made of whole wheat flour and some aromatic spices. The flour dumplings are simmered in a tangy sauce.
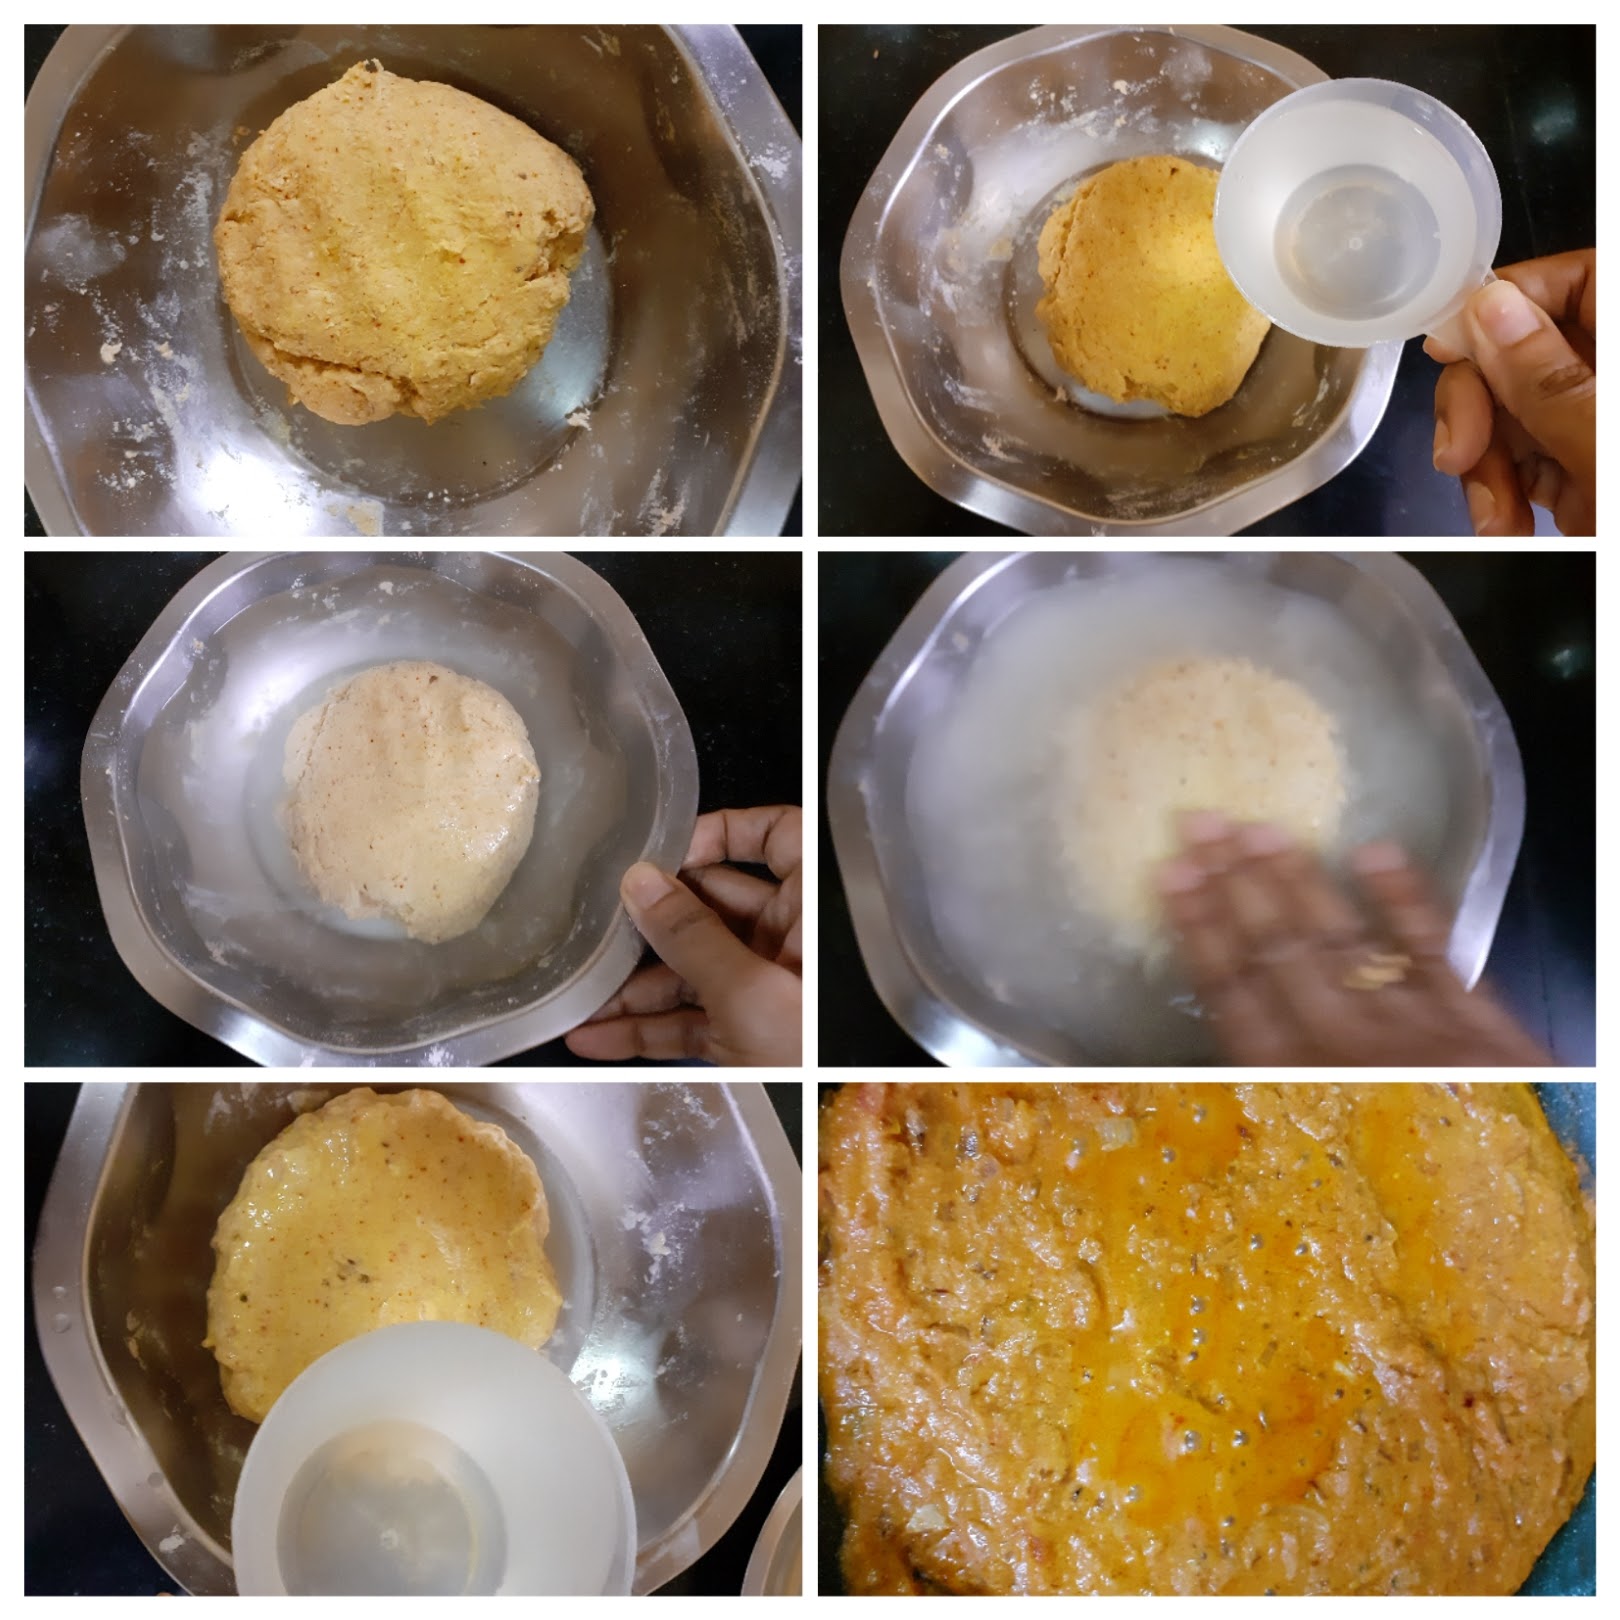
In a bowl take the flour add the oil, salt and all spices and using water form a soft dough. It should be like roti dough. Immerse this dough in water for 15 minutes. After 15 minutes, scrub the flour lightly with your fingers, the water will become hazy. Throw this water. Pour some more water on the dough and scrub again and discard the water. The dough is now ready to be made to Chakki. Get the steamer ready, as the water in the steamer is getting boiled, smear your steamer plate with oil and spread this dough evenly on the plate using your fingers. Now place this in the steamer for 10 to 15 mins. Remove and cool the chakki. On cooling, cut into diamonds or squares. In a pan take some oil for shallow frying, and fry the Chakki to a golden brown. Drain on absorbent paper and keep aside.
Directions for gravy preparation:
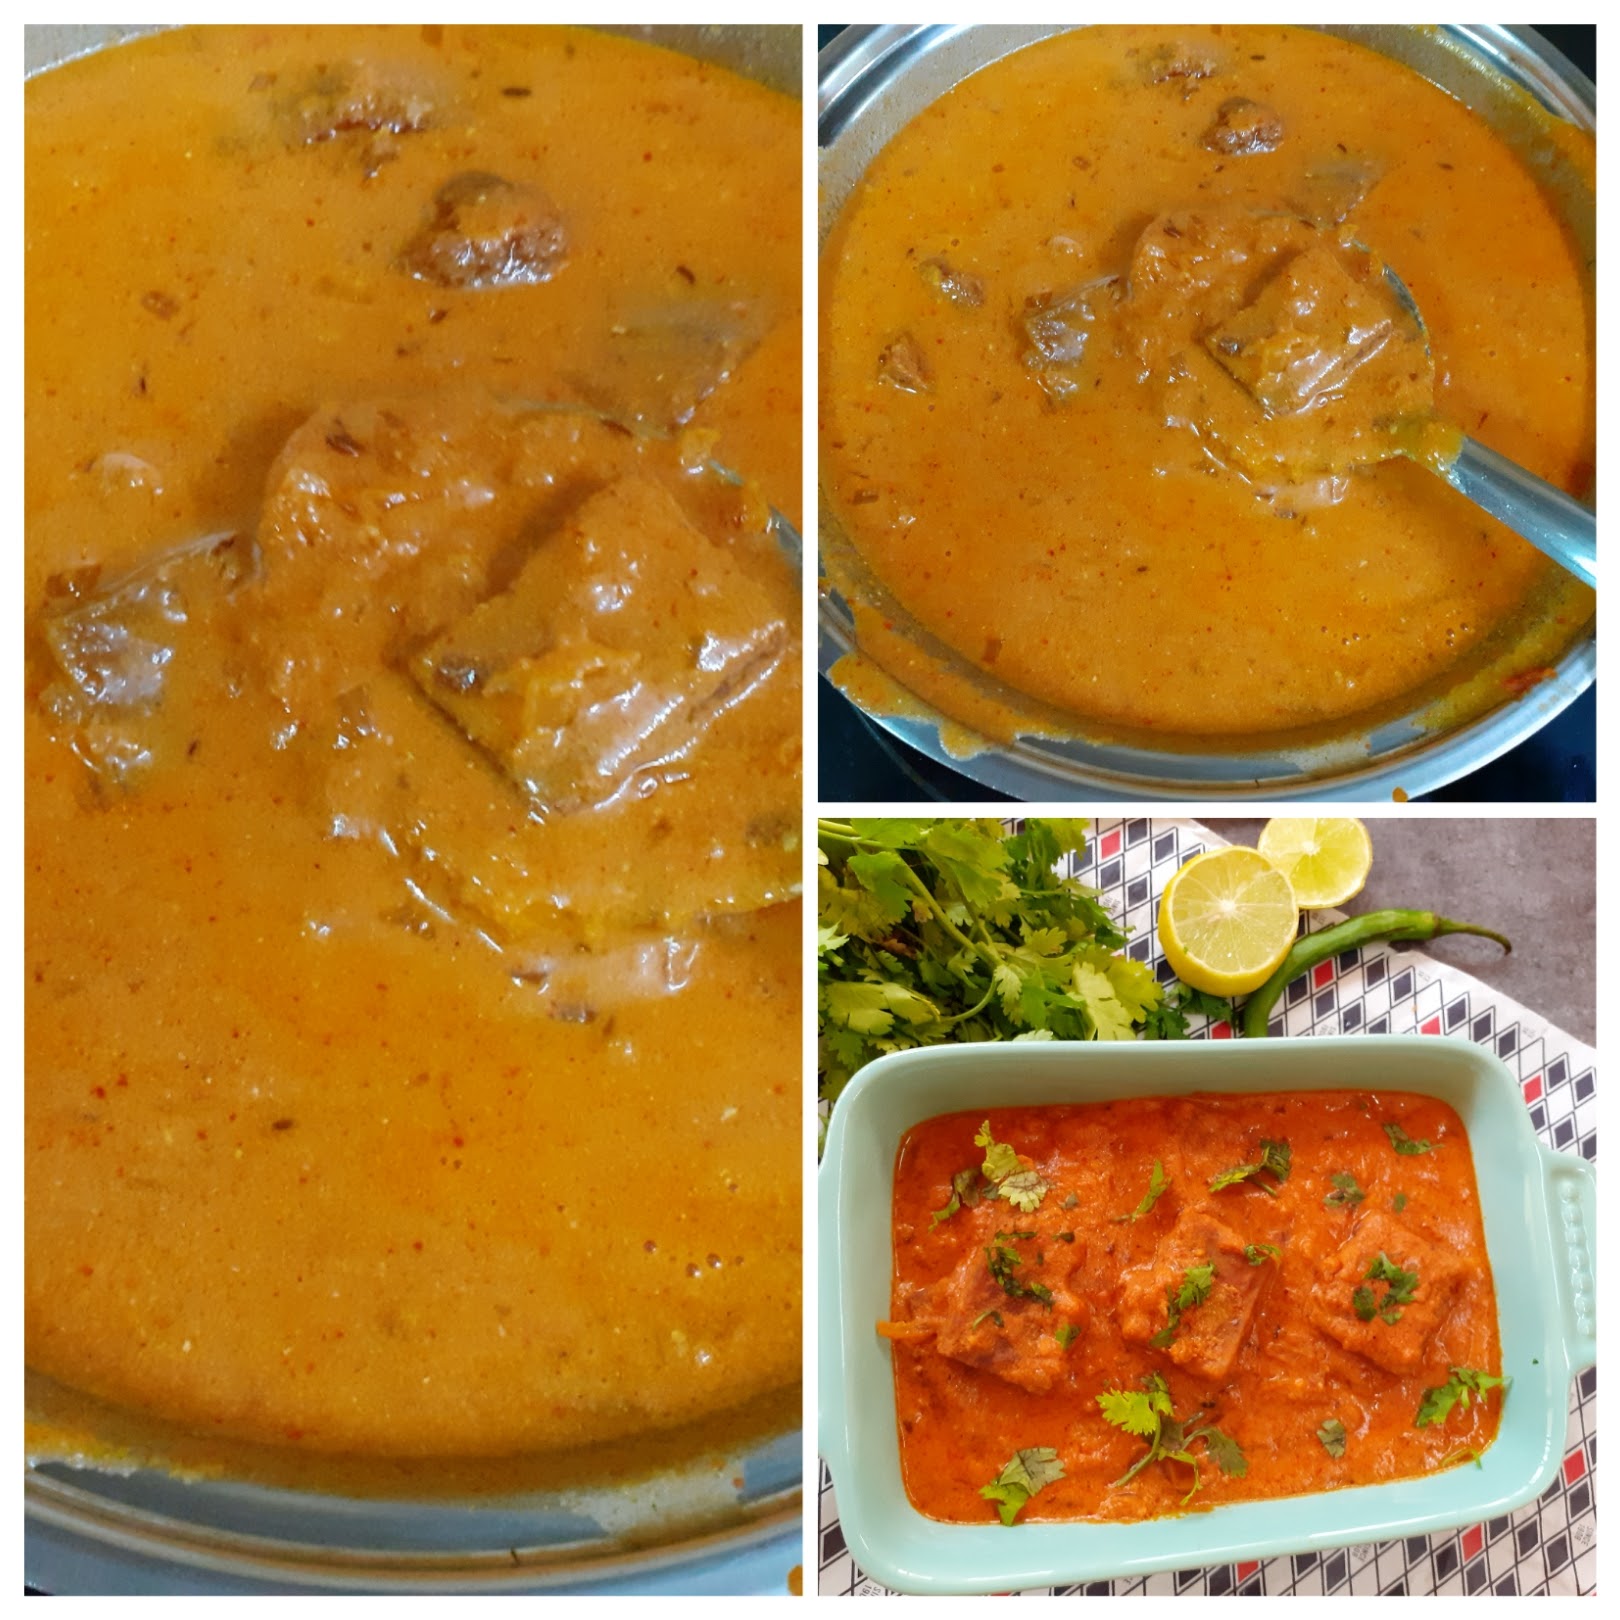
In a blender add the chopped Tomatoes, and cashewnuts and blend to a smooth paste. In a Pan or Kadai take 1 tbsp oil and heat. Add the cumin seeds, cardamom and cloves and fry until aromatic. Now add the finely chopped onions ,turmeric powder, and saute until light brown. Now add the ground paste followed by all the spice powders- red chilli powder(both regular and Kashmiri), coriander powder, fennel powder and mix well. Cook for two minutes until the raw smell goes away. Now add half a cup of curd and stir continuously for 2 minutes. Add 2 cups water and gently drop in the cooled and cut Chakki(wheat flour dumplings). Cover and cook the dumplings in this gravy until they turn soft and the gravy thickens up. Depending on what you are serving the Chakki Ki Shak with you can thin down or thicken the gravy. Finally add Garam masala powder and fresh coriander leaves and switch off the flame.
Serving Suggestion: With Roti, Paratha, Naan or Plain or Jeera rice.
STEPWISE RECIPE FOLLOWS:
1. In a bowl take the flour add the oil, salt and all spices and using water form a soft dough. It should be like roti dough. Immerse this dough in water for 15 minutes. After 15 minutes, scrub the flour lightly with your fingers, the water will become hazy. Throw this water. Pour some more water on the dough and scrub again and discard the water.
2. Get the steamer ready, as the water in the steamer is getting boiled, smear your steamer plate with oil and spread this dough evenly on the plate using your fingers. Now place this in the steamer for 10 to 15 mins. Remove and cool the chakki. On cooling, cut into diamonds or squares. In a pan take some oil for shallow frying, and fry the Chakki to a golden brown. Drain on absorbent paper and keep aside.
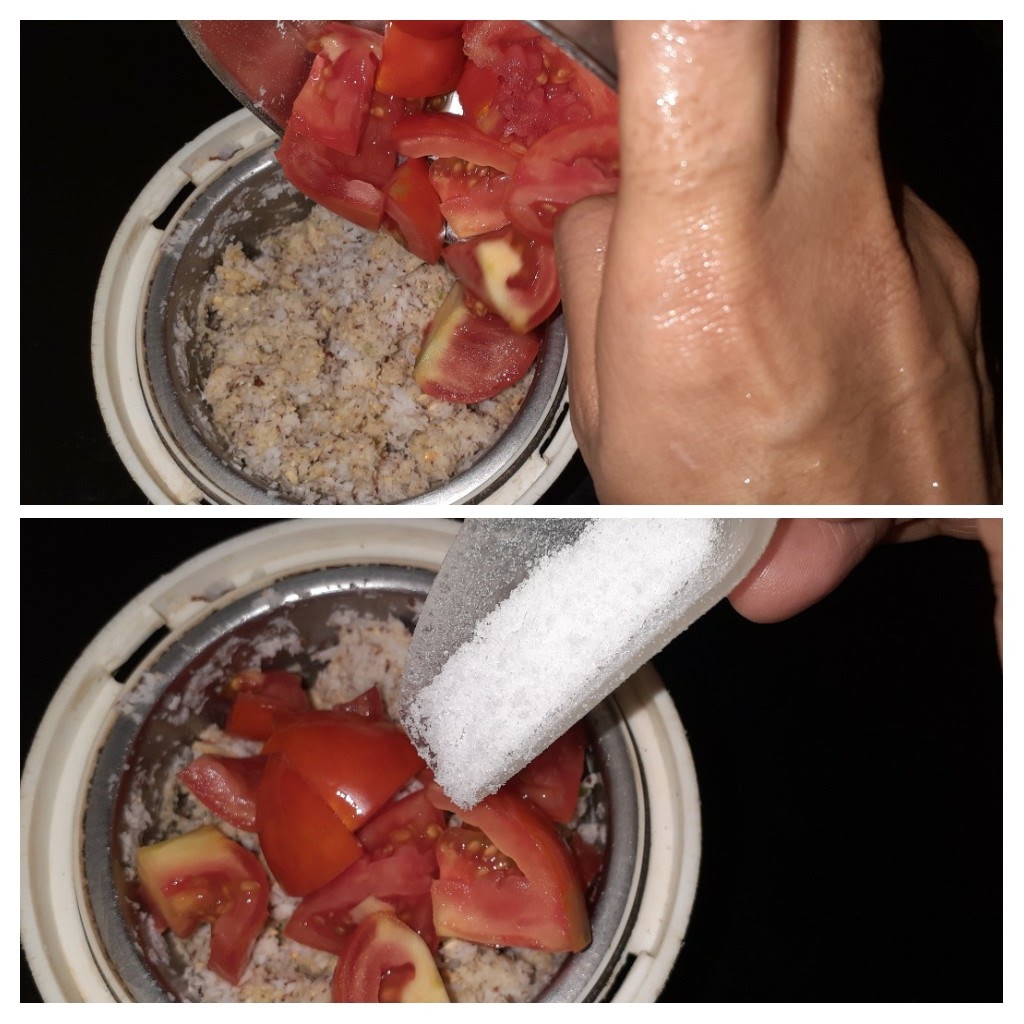
3. In a blender add the chopped Tomatoes, and cashewnuts and blend to a smooth paste. In a Pan or Kadai take 1 tbsp oil and heat. Add the cumin seeds, cardamom and cloves and fry until aromatic. Now add the finely chopped onions ,turmeric powder, and saute until light brown. Now add the ground paste followed by all the spice powders- red chilli powder(both regular and Kashmiri), coriander powder, fennel powder and mix well. Cook for two minutes.
4. Now add half a cup of curd and stir continuously for 2 minutes. Add 2 cups water and gently drop in the cooled and cut Chakki(wheat flour dumplings). Cover and cook the dumplings in this gravy until they turn soft and the gravy thickens up.
6. Finally add Garam masala powder and fresh coriander leaves and switch off the flame.
NOTES:
1. Since most recipes suggested soaking and washing the dough, i have followed it. One can also try steaming the dough, cutting to pieces and frying also.
2. The gravy can be allowed to thicken further if serving with Rotis.
3. Whichever the method, resting the dough for 15 mins is essential.
If you tried this recipe and liked it please comment below. I would love to hear from you. If you have a query about the recipe email us and i’ll respond as soon as I can.
If you would like to receive our recipes on your mail please leave your mail id at the homepage. Every time Rajjo’s Kitchenn has a new post we will mail the recipe to you.
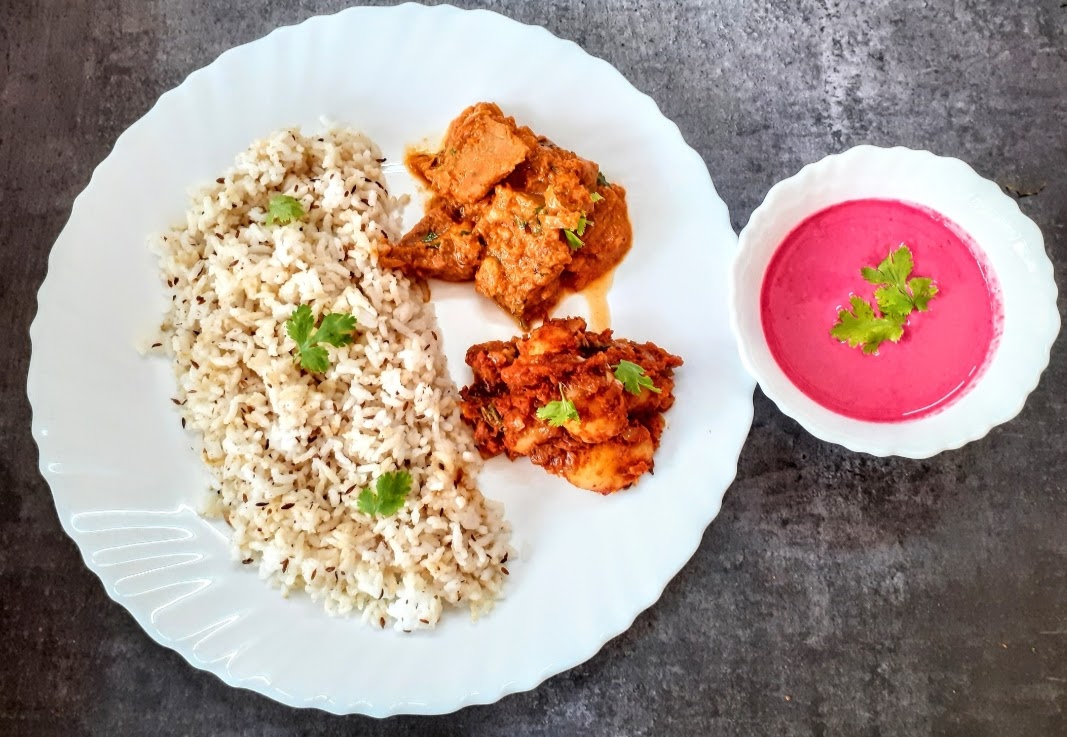
This is my meal with Chakki Ki Sakh. I served it with Jeera Pulav, Bombay Potatoes and Beet root Raita.
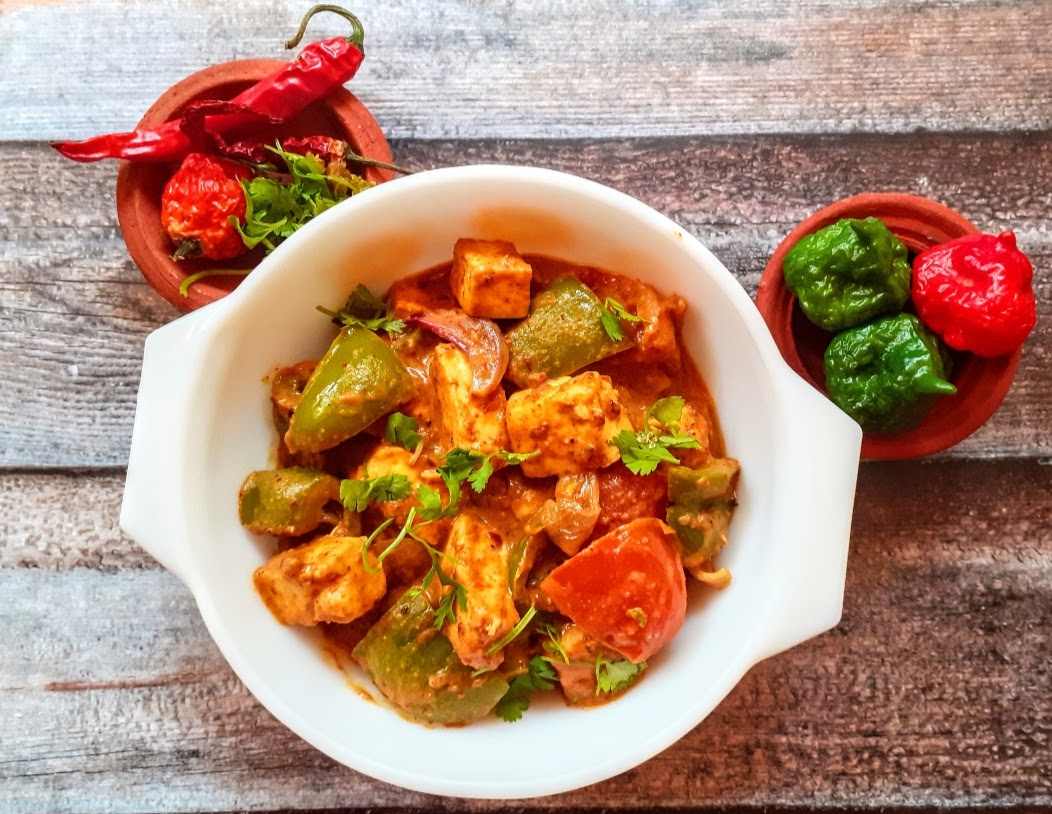
Kadai Paneer (Gravy)
Kadai Paneer is a dish I like and make very frequently at home. I have this weekly one day is Paneer day compulsorily policy. Here on my blog I have another Kadai Paneer recipe which is a Semi dry version of this recipe. Though the Masala is same, the way I made it is slightly different. The Semi dry Kadai Paneer recipe is good to go with Rotis, and other flat breads and is a good lunch box recipe as it doesn’t have much in the name of gravy and so is not messy at all, to carry in a box.
This gravy version is a great option to go with rice dishes like Matar Pulav, Jeera Rice, Biriyani etc. This version is what you will find at Dhabas in the North India. Considering Dhaba meals are supposed to be reasonably priced, do you think they would use Cashewnuts and cream etc, to thicken their gravy? Well, they use a very everyday ingredient that is found in Indian Kitchens and is gaining popularity the world over for its high protein quotient (and we have been using it since ages, that’s India for us, a treasure house of recipes and food culture). Any guesses as to what that ingredient is? Besan. Yes, the humble chickpea flour. To find out how to use it, read the recipe and try it out and you will agree that it tastes delicious.
Here goes the recipe for Kadai Paneer gravy style-
PREP TIME: 15 COOK TIME:15 MINS
TOTAL TIME: 30 MINS COURSE: MAIN
CUISINE: NORTH INDIAN SERVINGS: 5
AUTHOR: RAJNI RAM
Ingredients:
Paneer 200 gm cubed
Onion 1 large cut into petals
Onion 1 medium size chopped finely
Capsicum 1 medium cut to large cubes
Green chillies 2 slit lengthwise
Ginger garlic paste 1 tsp
Garlic 3 to 4 cloves (big ones)
Tomatoes 2 large pureed
Tomato 1 medium diced
Turmeric powder 1/2 tsp
Salt as required
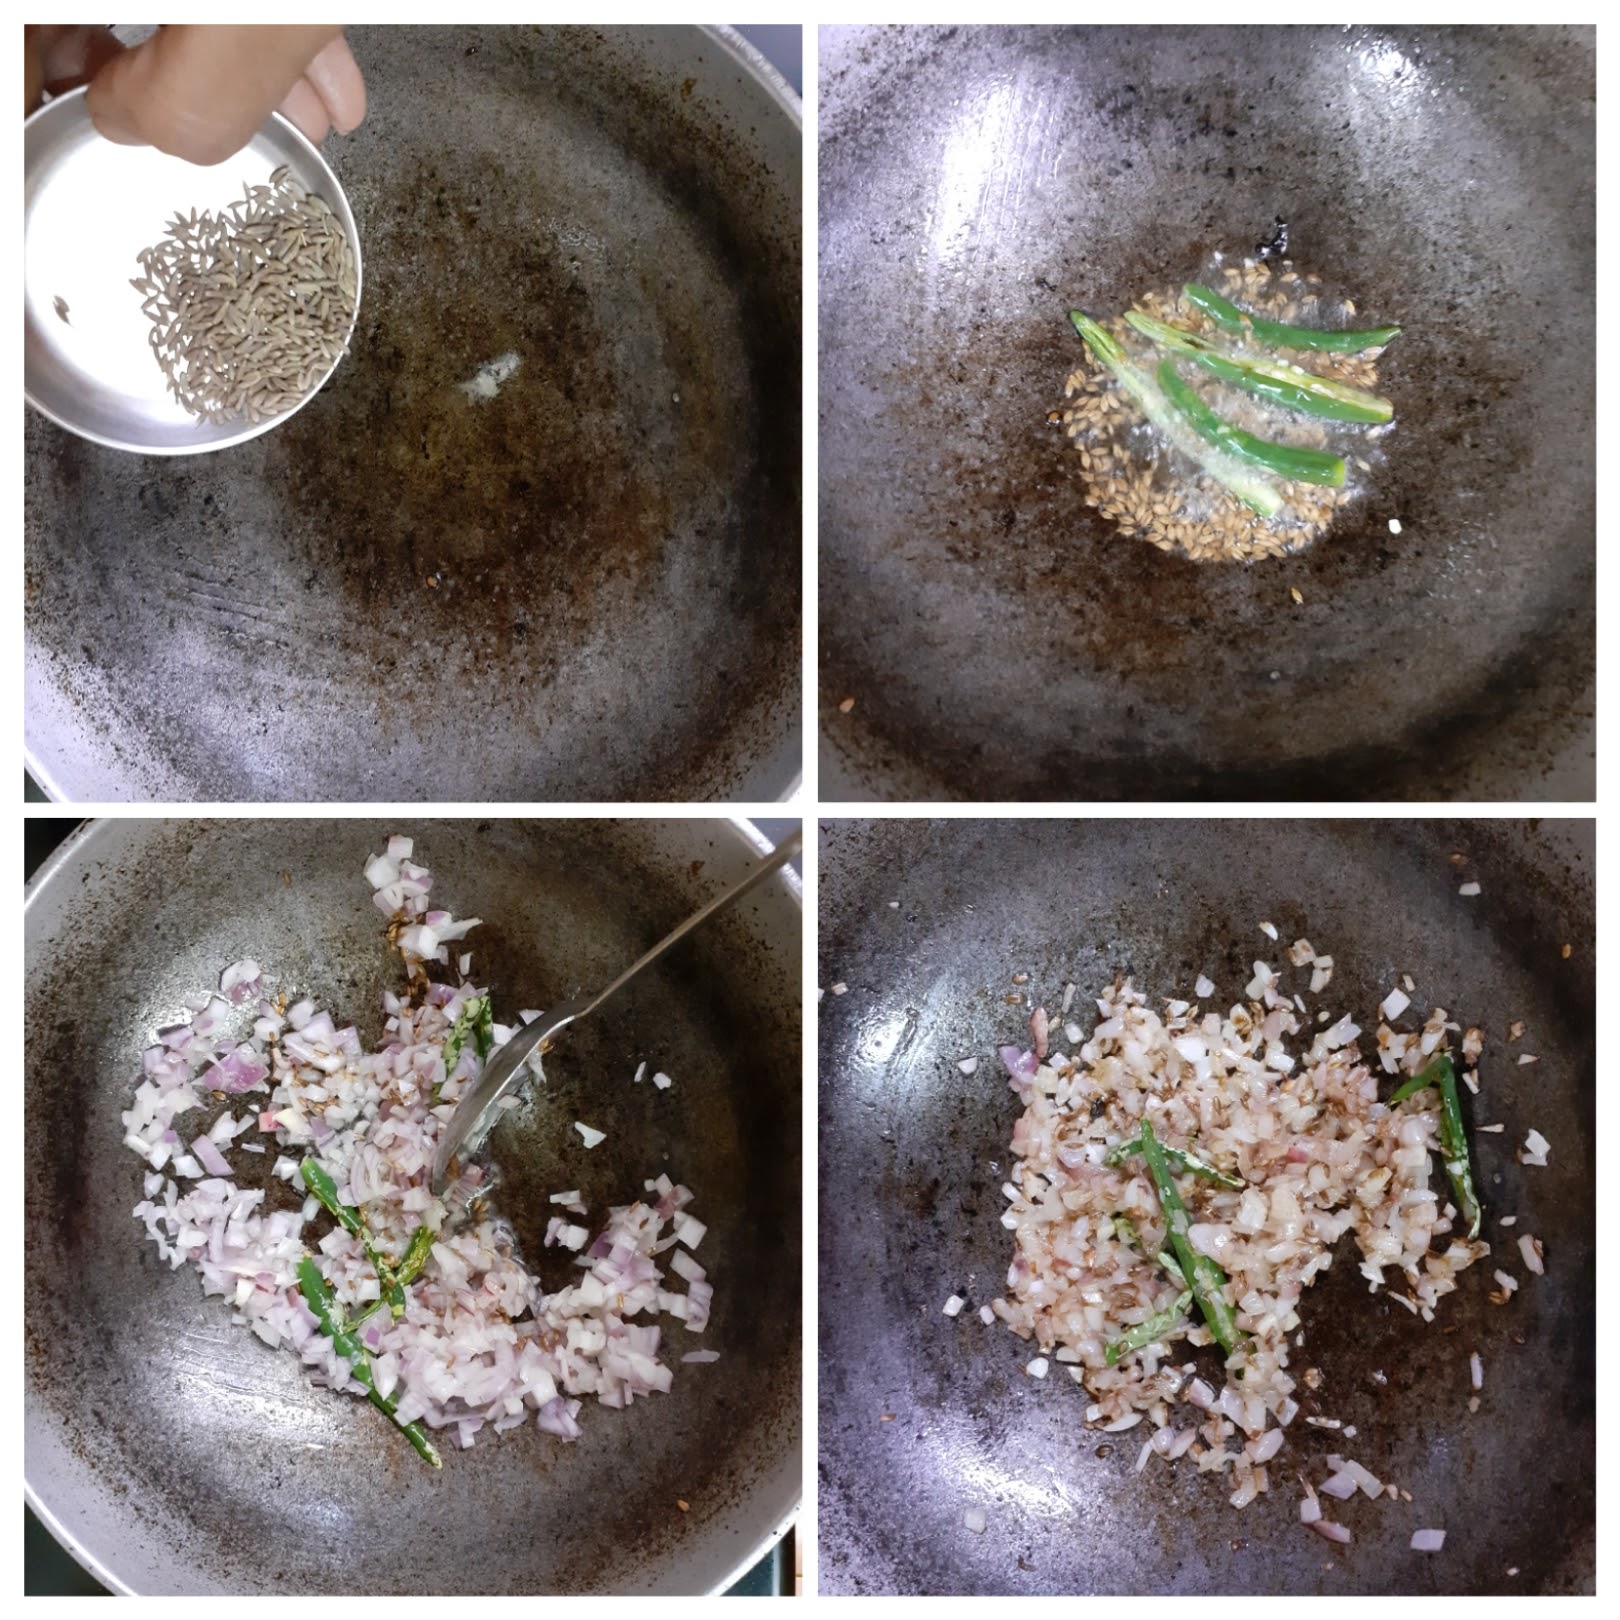
Cumin seeds 1 tsp
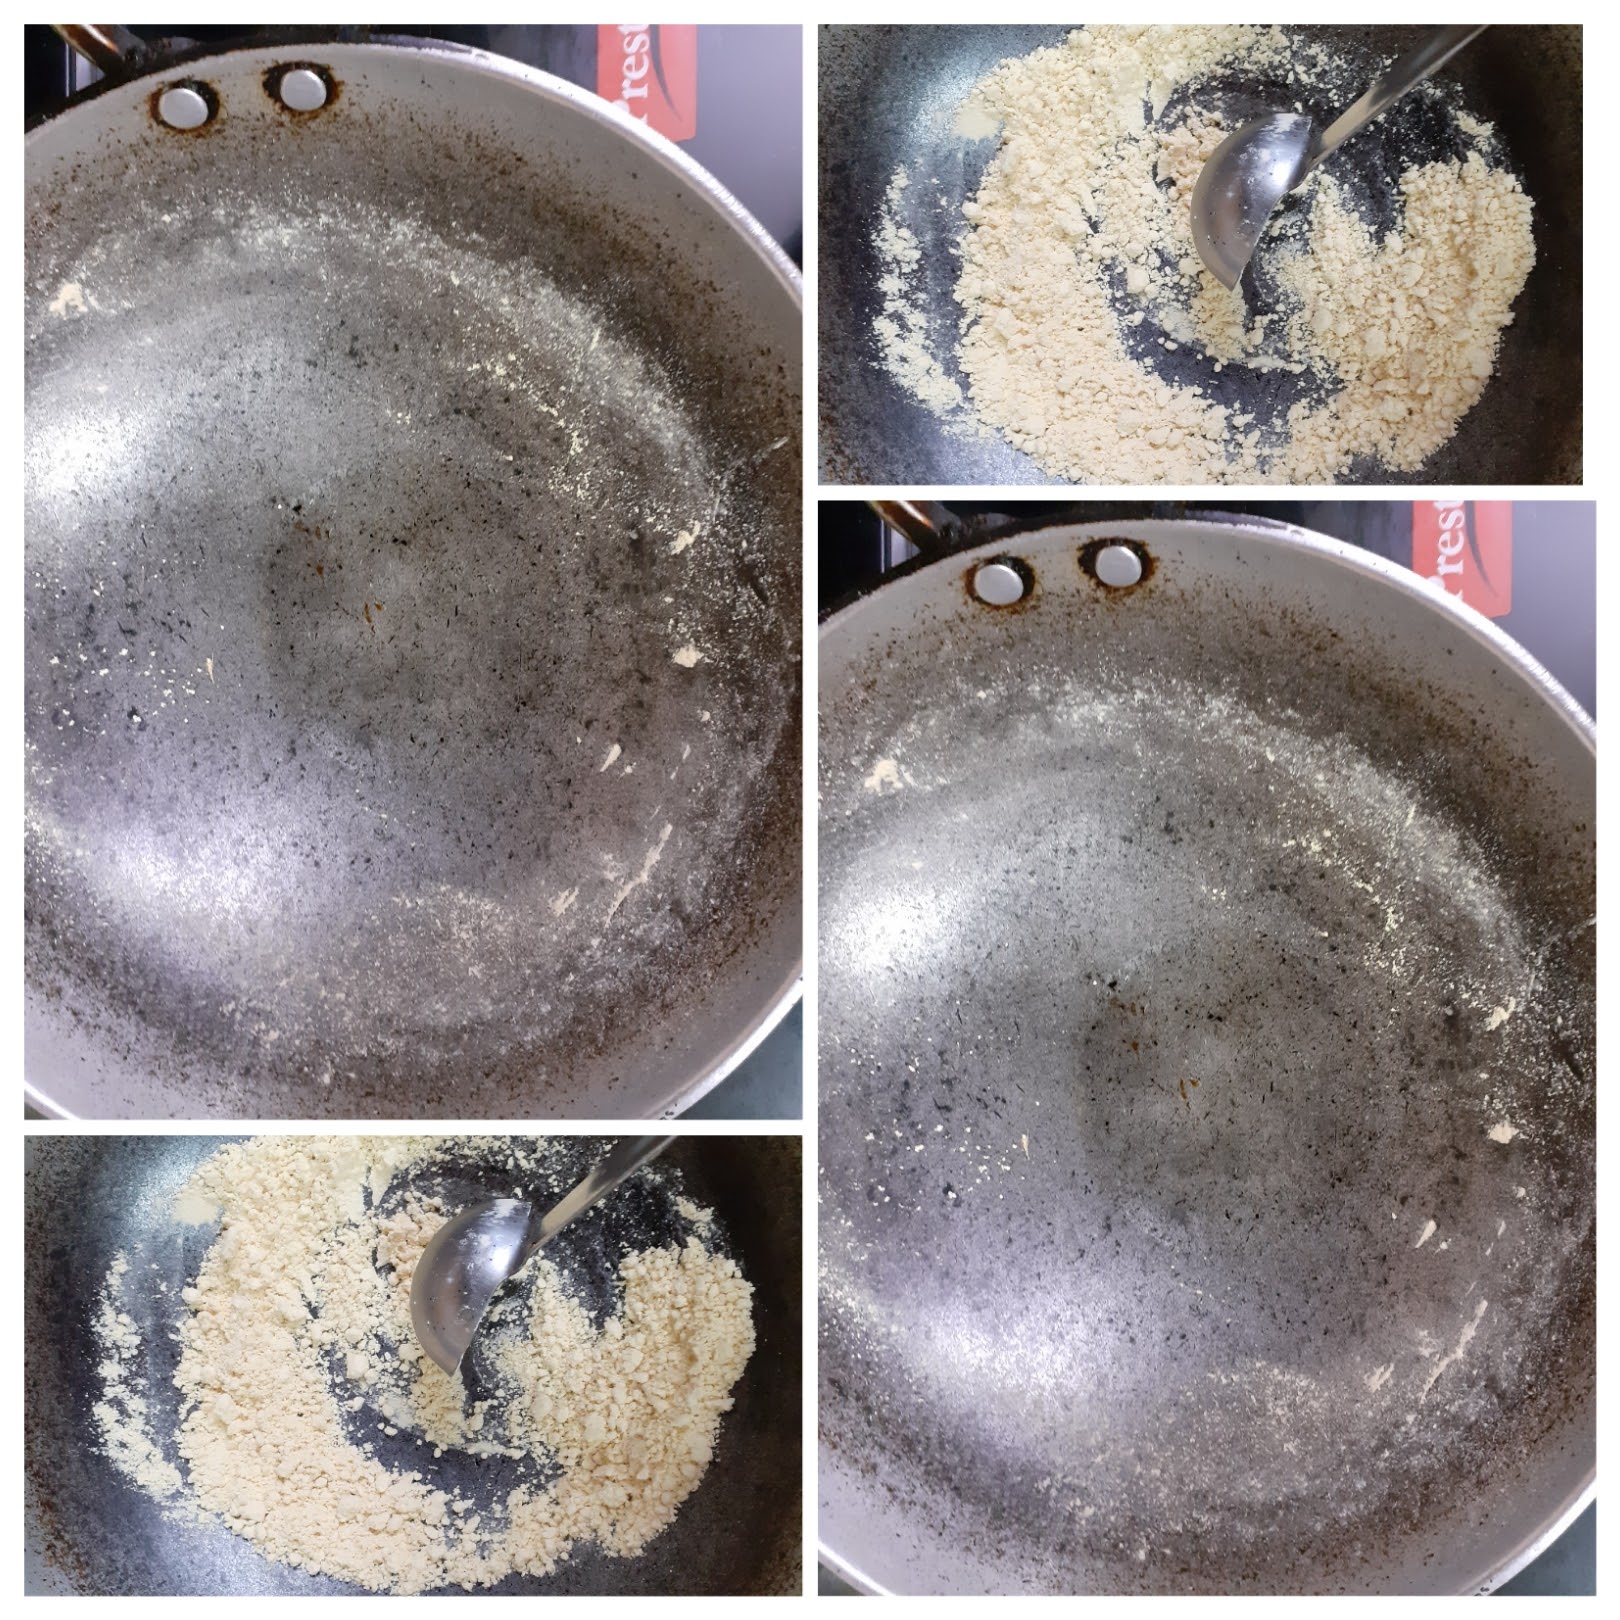
Besan/ Chick pea flour 1.5 tbsp roasted on low flame until aromatic
Methi seeds/ Fenugreek seeds 2 pinches
Garam Masala Powder 1/2 tsp
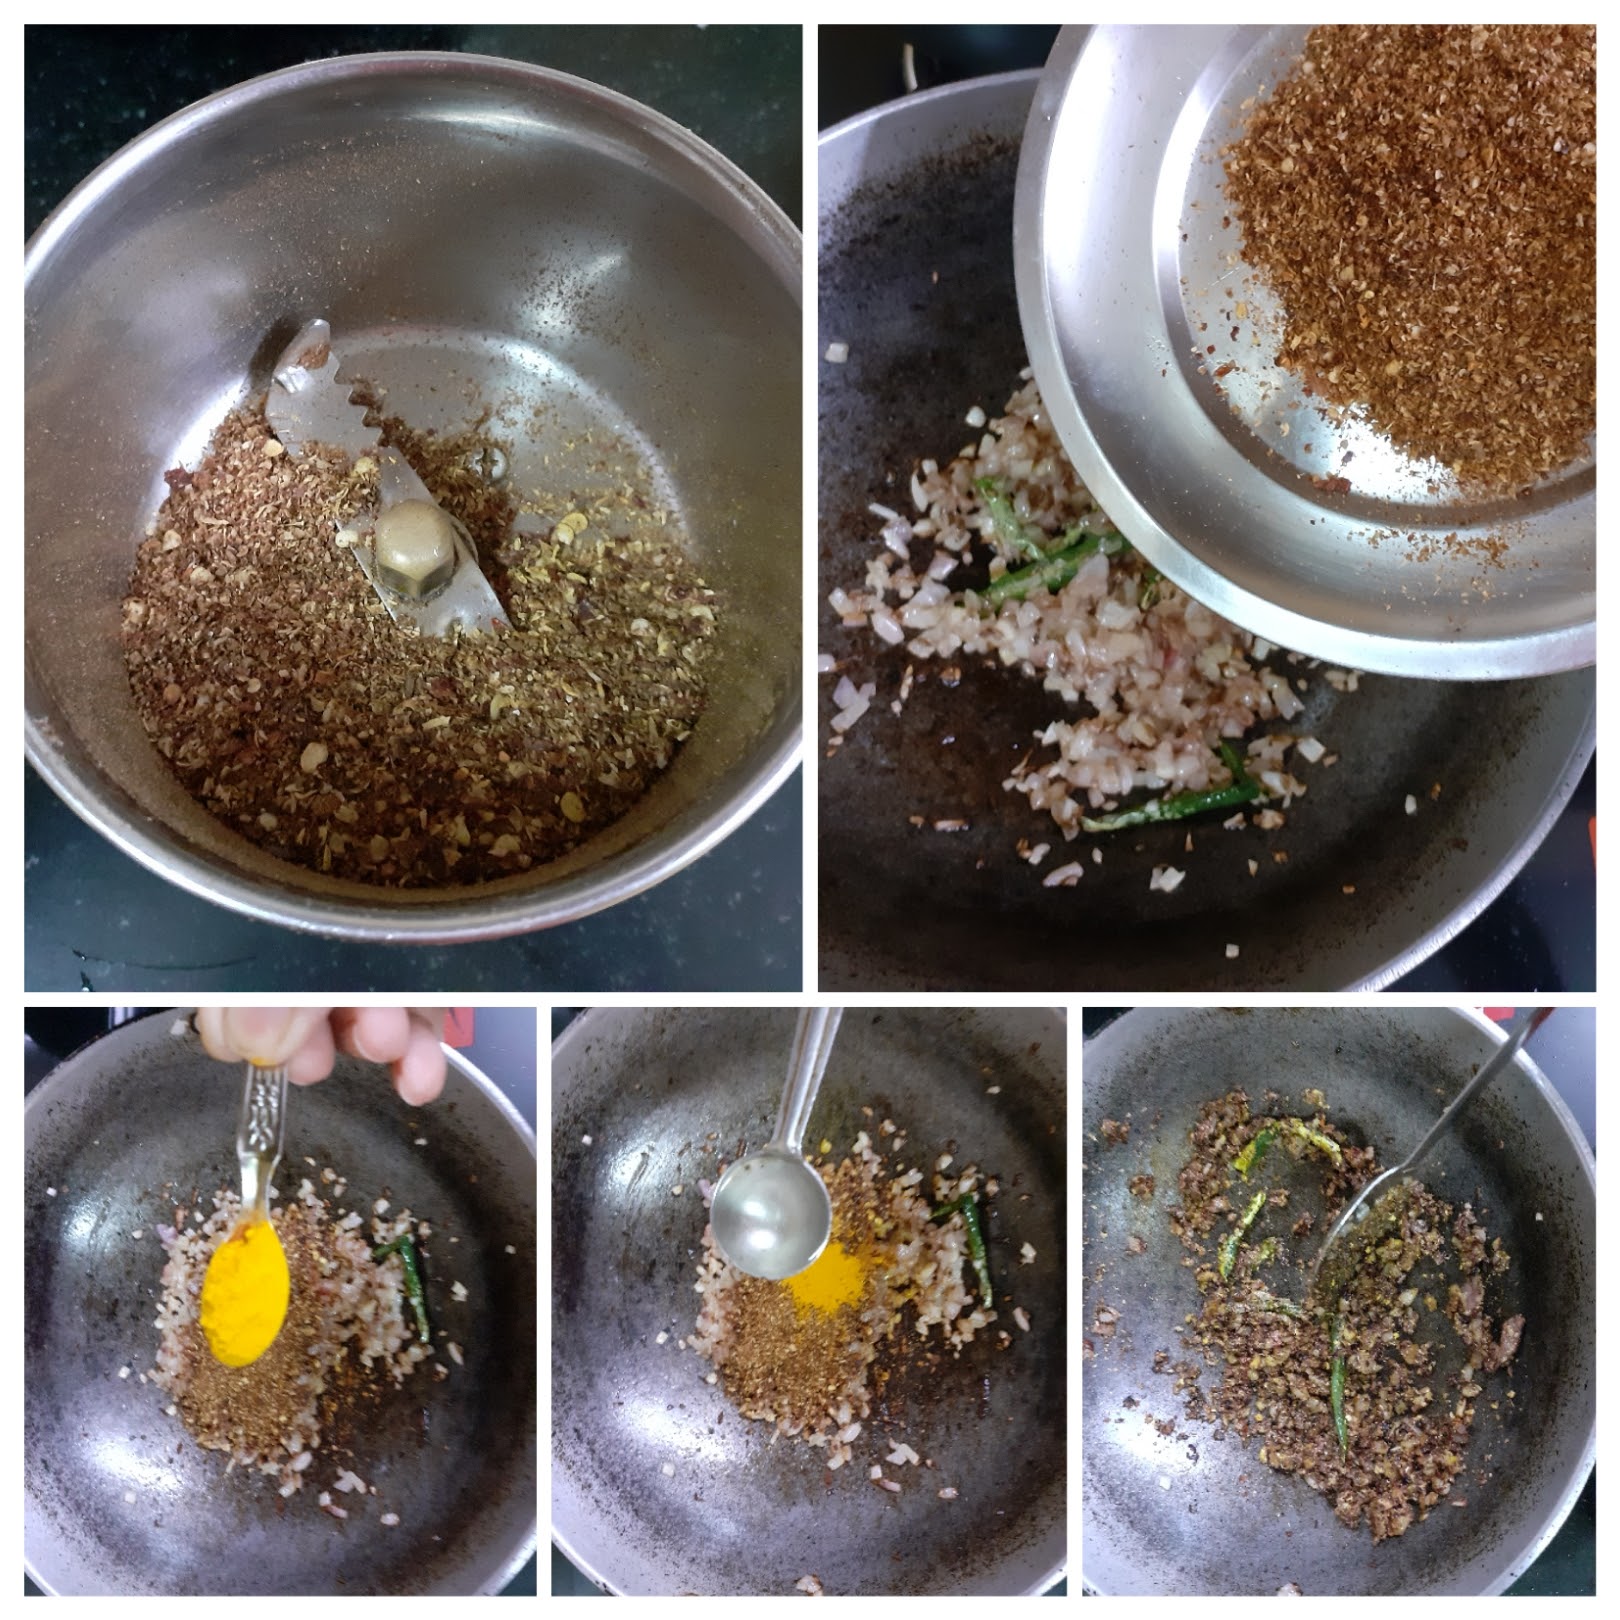
To be ground:
Coriander seeds 1 tbsp
Cloves 2
Jeera/ Cumin seeds 1 tsp
Dry red chilli 2 regular and 1 Kashmiri dry red chilli (optional)
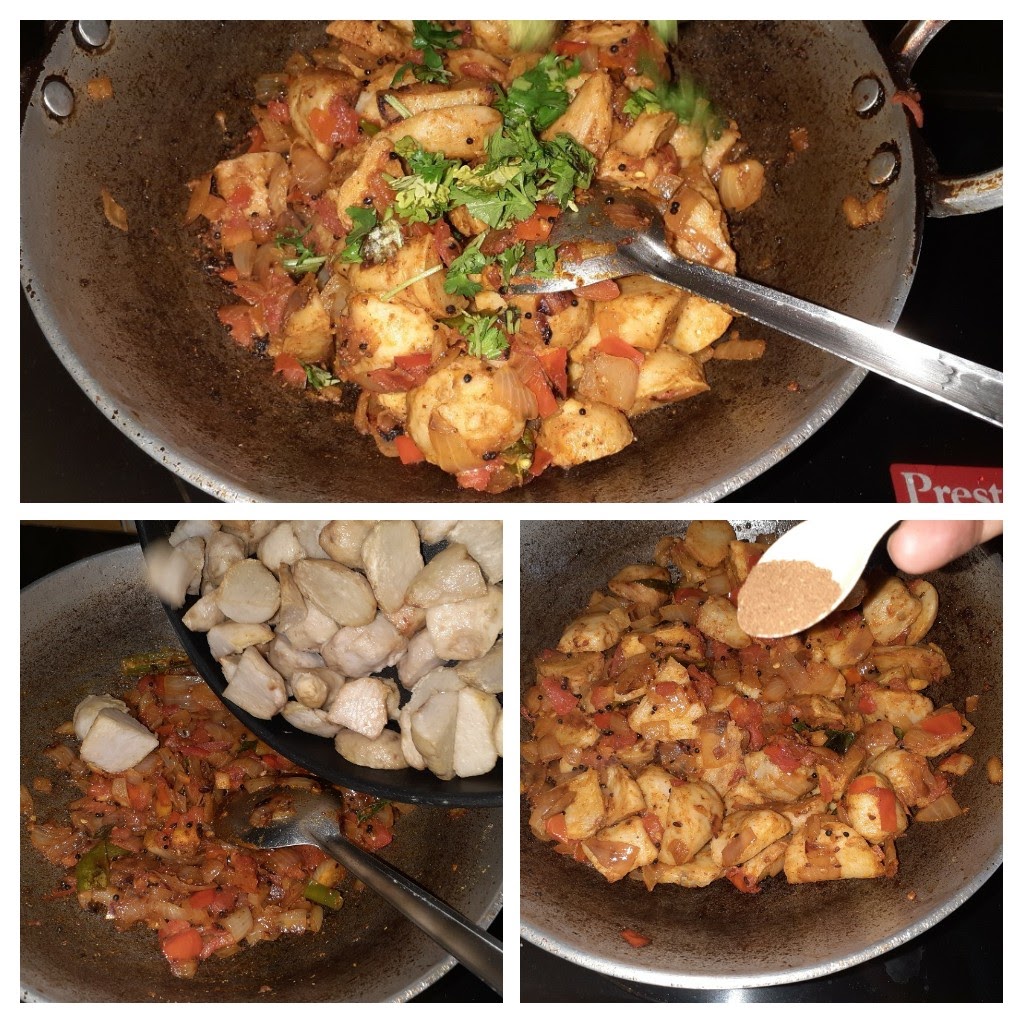
Directions:
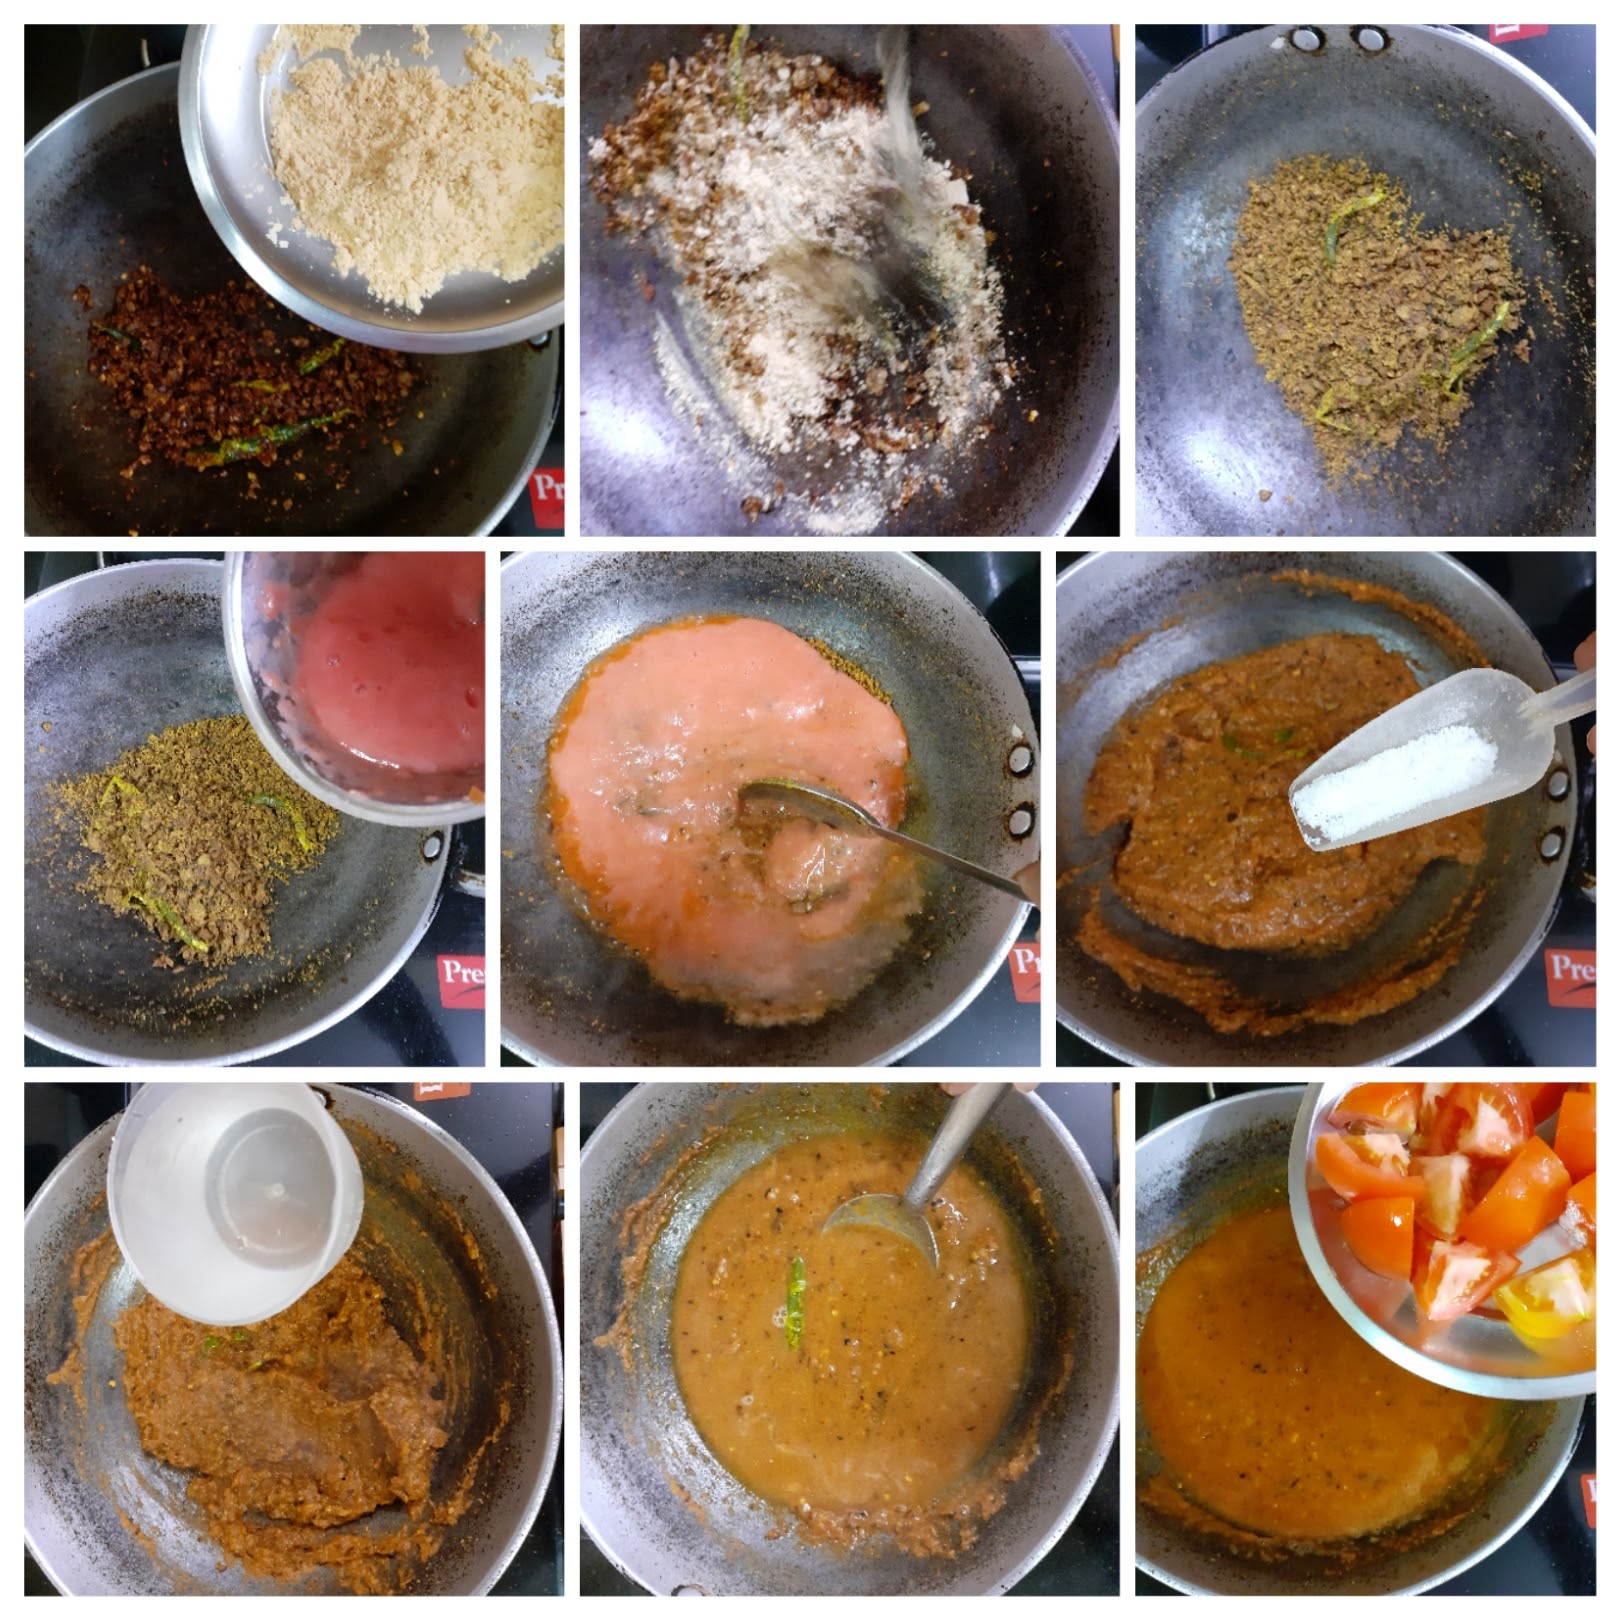
Take a Kadai and heat it, add the Besan and saute on low flame until it turns aromatic and light brown in colour. Keep stirring so that the Besan does not burn. Once aromatic, transfer to a plate. Now in the same kadai take 1 tbsp oil and drop in the Onion petals and saute for 1 minute. Now add the cubed capsicum and continue to saute over high flame for another 1 minute. Take care to stir constantly and the onion and capsicum should not overcook or turn limp. Transfer to a plate. Now in the same kadai take some more oil and add cumin seeds. Once they start crackling add the slit green chillies and saute for 30 secs. Now add the finely chopped onions and crushed garlic and continue to saute until the onion starts turning brown. In the meanwhile roast and grind the spices mentioned under “to be ground” and set aside. Grind them coarse and not very fine. Now add this powder to the sauteed onions, add turmeric powder, and if the mixture looks dry add another teaspoon of oil and saute the masalas in oil. Now add the roasted Besan and saute until the mixture starts appearing crumbly, but dry. To this add the tomato puree and mix nicely. Smoothen out all the lumps from the Besan. Add salt, followed by 1 to 1.5 cups water, drop in the diced tomatoes and cook for 5 minutes. Check for taste and add red chilli powder if required and adjust salt if required. Now add the cubed Paneer pieces , and the previously sauteed onion and capsicum and stir nicely. Add the fenugreek/Methi seeds. Cook until the gravy thickens. If you are particular about adding cream add now(this step is optional). Add garam masala powder and put off the flame. The yummy Kadai Paneer gravy style is ready. Enjoy with your favourite rice or Flat bread. Bon Appetit.
STEPWISE RECIPE FOLLOWS:
1. Take a Kadai and heat it, add the Besan and saute on low flame until it turns aromatic and light brown in colour. Keep stirring so that the Besan does not burn. Once aromatic, transfer to a plate.
2. Now in the same kadai take 1 tbsp oil and drop in the Onion petals and saute for 1 minute. Now add the cubed capsicum and continue to saute over high flame for another 1 minute. Take care to stir constantly and the onion and capsicum should not overcook or turn limp. Transfer to a plate.
3. Now in the same kadai take some more oil and add cumin seeds. Once they start crackling add the slit green chillies and saute for 30 secs. Now add the finely chopped onions and crushed garlic and continue to saute until the onion starts turning brown.
4. In the meanwhile roast and grind the spices mentioned under “to be ground” and set aside. Grind them coarse and not very fine. Now add this powder to the sauteed onions, add turmeric powder, and if the mixture looks dry add another teaspoon of oil and saute the Masalas in oil.
5. Now add the roasted Besan and saute until the mixture starts appearing crumbly, but dry. To this add the tomato puree and mix nicely. Smoothen out all the lumps from the Besan. Add salt, followed by 1 to 1.5 cups water, drop in the diced tomatoes and cook for 5 minutes. Check for taste and add red chilli powder if required and adjust salt if required.
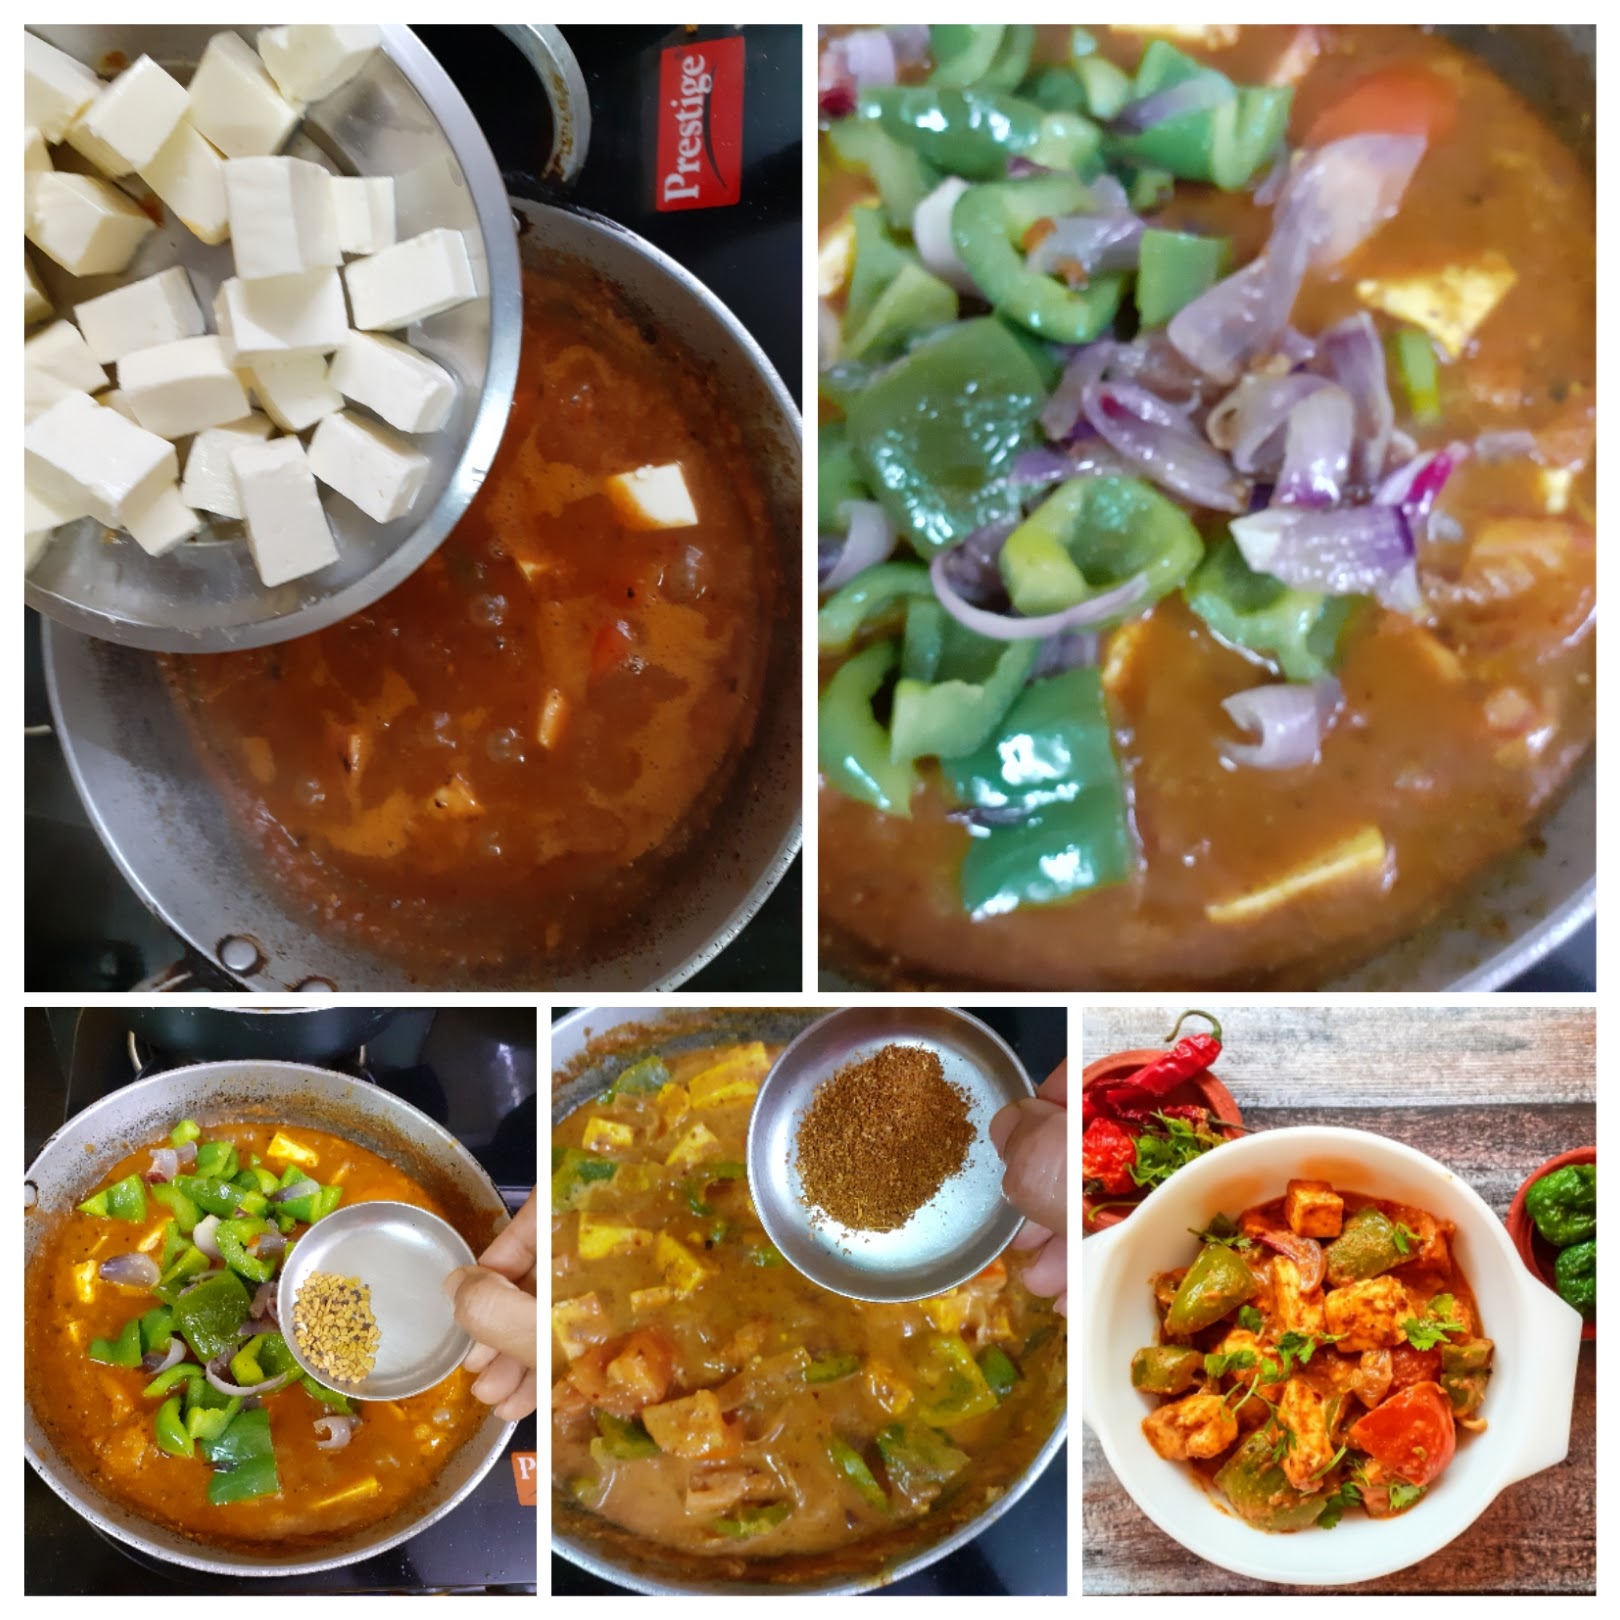
6. Now add the cubed Paneer pieces , and the previously sauteed onion and capsicum and stir nicely. Add the Methi seeds and cook until the gravy thickens. If you are particular about adding cream add now(this step is optional). Add Garam Masala powder and put off the flame. Garnish with coriander leaves. The yummy Kadai Paneer gravy style is ready.
NOTES:
1. Roast the Besan very carefully. Any burnt taste or flavour will change the taste of the dish. I always have a bottle of roasted Besan in my kitchen it helps to thicken gravies in a jiffy.
2. The roast and ground powder can be made ahead and stored in a bottle. This called the Kadai Masala because of which the dish gets its name.
3. I have not used cream in this dish. If you prefer adding cream, do go ahead and do so. I have specifically mentioned when to do so.
If you tried this recipe and liked it please comment below. I would love to hear from you. If you have a query about the recipe email us and ill respond as soon as I can.
If you would like to receive our recipes in your mail please leave your mail id at the homepage. Every time Rajjo’s Kitchen has a new post we will mail the recipe to you.
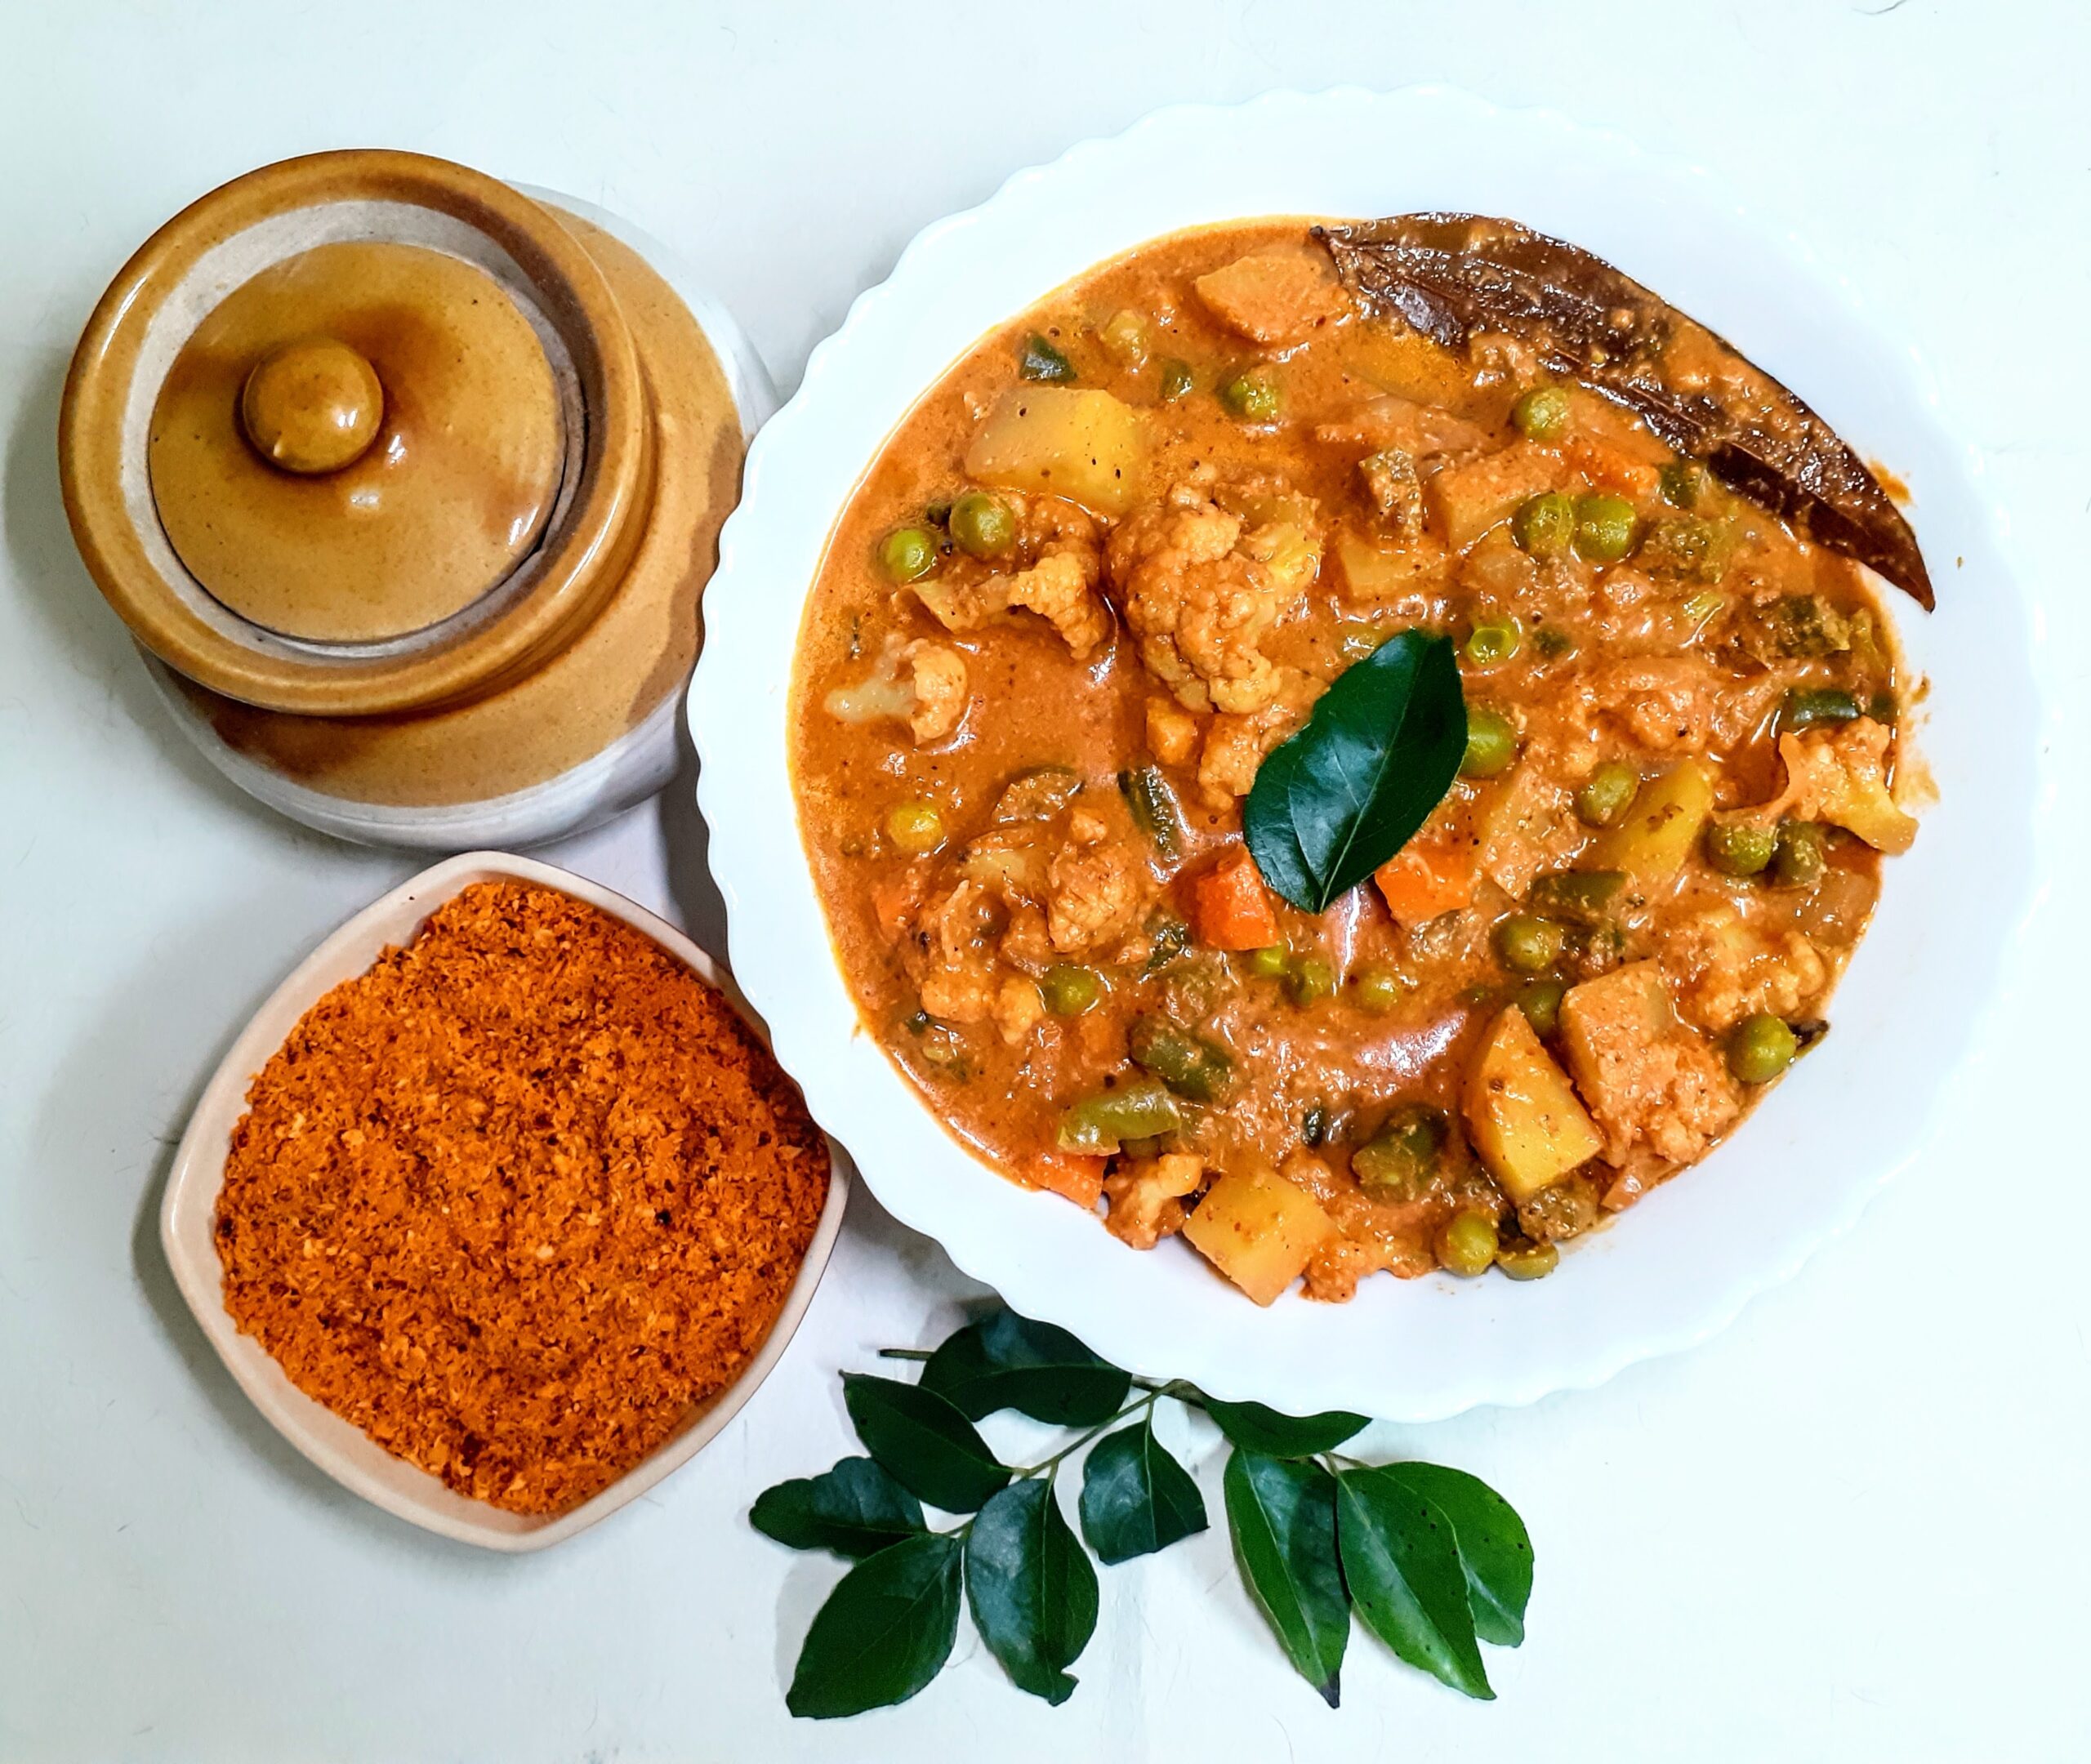
South Indian Vegetable Kurma
The South Indian Vegetable Kurma is a very popular dish in most south Indian restaurants. It goes very well with most south Indian dishes like the Sevai aka string hoppers, Parotta, Kothu Parotta( for which it forms part of the kotthu gravy), Poori, Dosa, Kal Dosa Rava Dosa, and more…
Than the ones at a restaurant I like the home version as the masalas can be customized. I find the restaurant ones very pungent with a strong masala impact which subdues the taste of the vegetables. A good kurma is one where the taste and texture of the vegetables is retained and the mild masalas enhance the taste of the dish.
So here’s my version of the South Indian Vegetable Kurma–
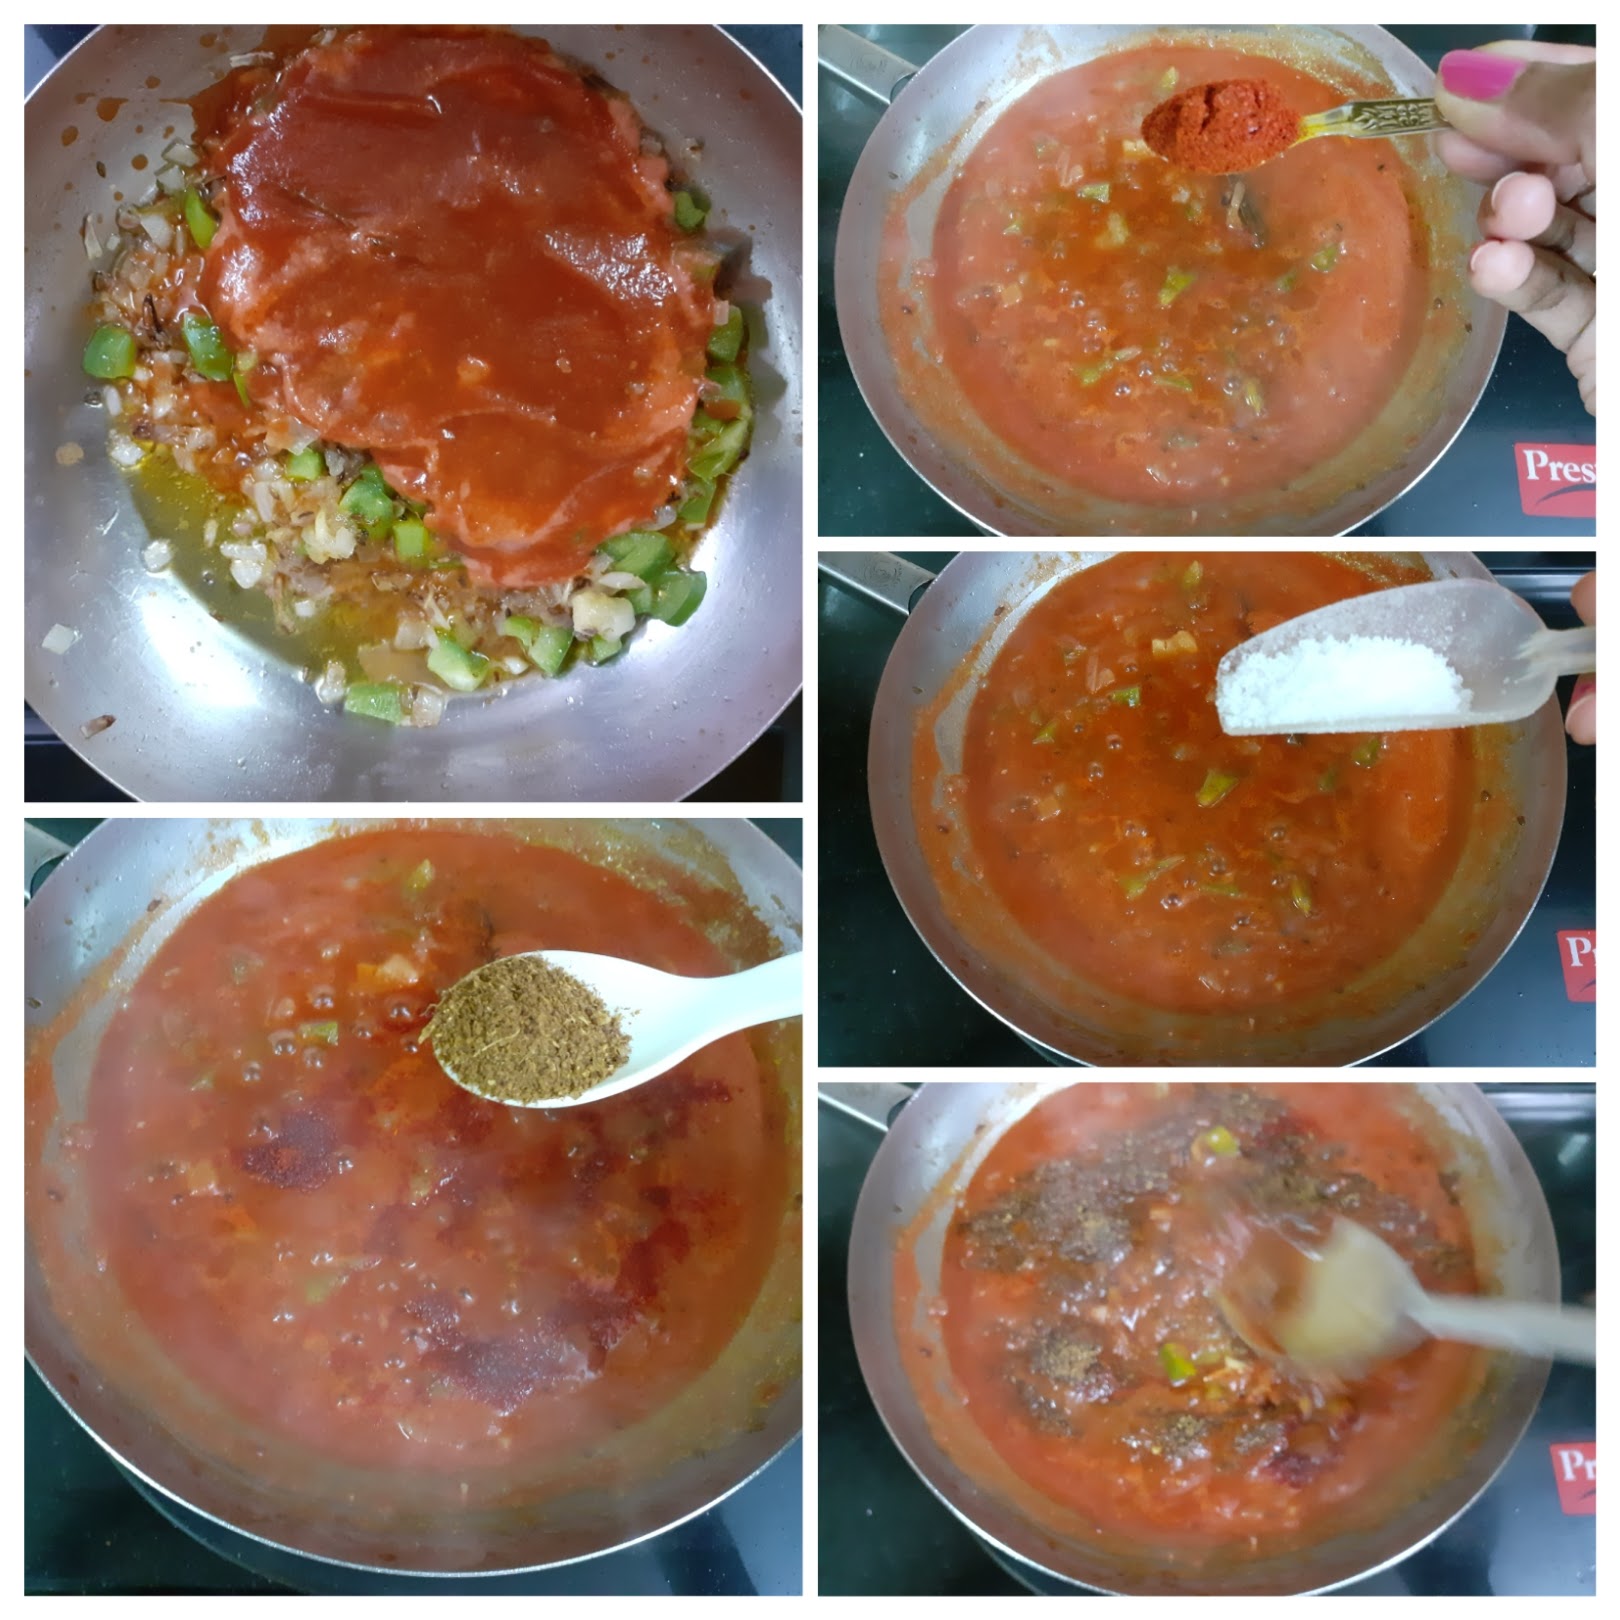
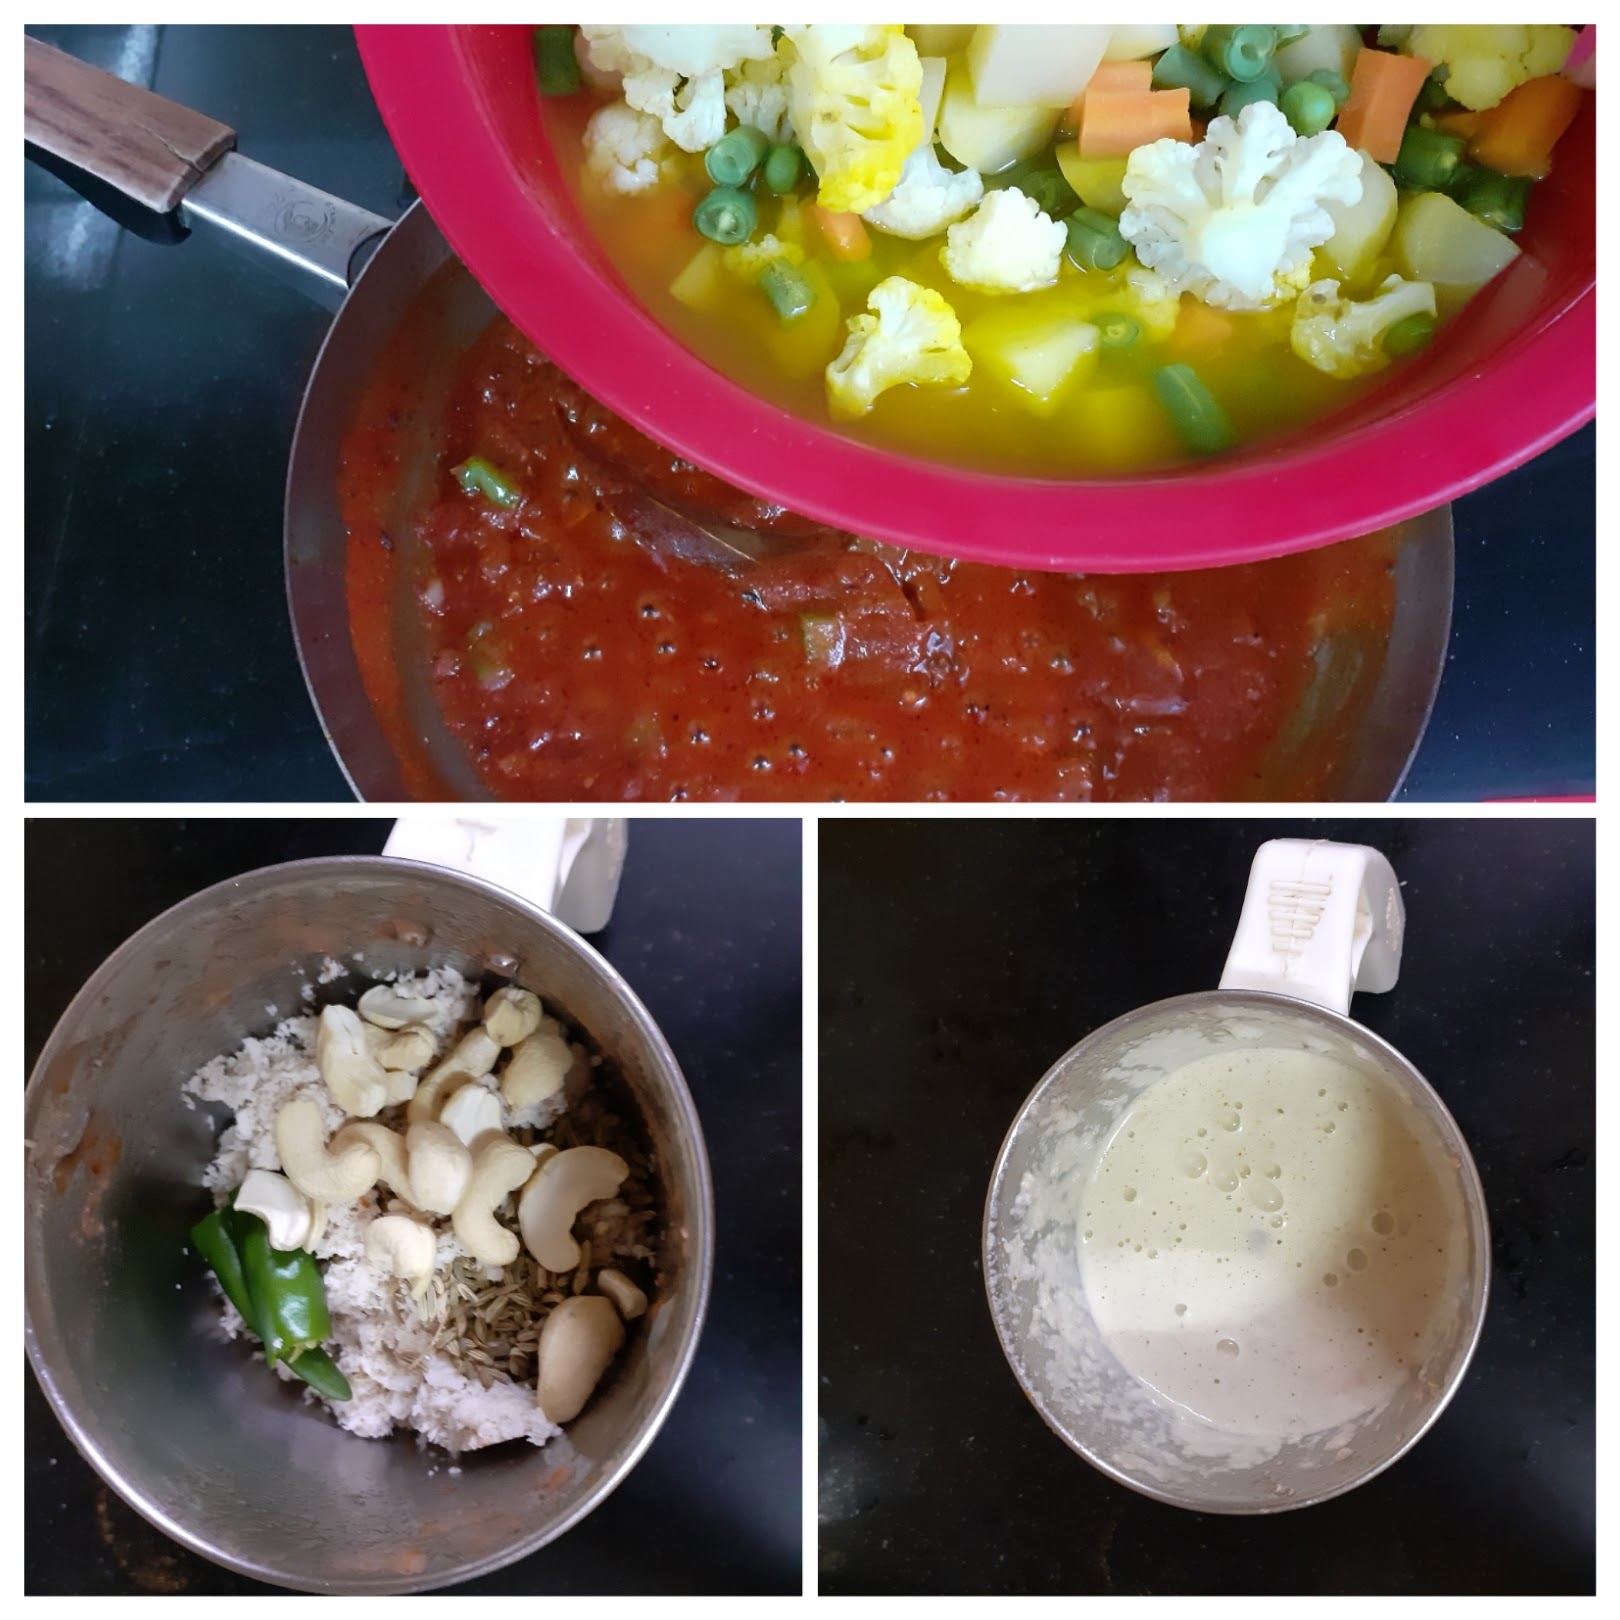
Steam all the mix vegetables with salt and turmeric powder, except capsicum, onion and tomatoes. Take care to not turn them mushy. Now in a pan or Kadai pour oil and heat. Put in the Bay leaf, cumin seeds, green cardamom and cloves and fry for 30 seconds. Now add the onions and ginger garlic paste,and saute for 30 seconds. Add the capsicum and continue to saute for another minute. Now add the tomato puree and all other spice powders like red chilli powder, biryani masala and the salt. Cook the gravy until the oil separates. Now add the steamed vegetables, mix well and cook for a minute. Grind the coconut, fennel seed, cashewnuts and green chillies to a smooth paste adding a little water. Pour this paste into the cooking gravy. Cook for another2 minutes or until the gravy cones together and put of the stove. Garnish with curry leaves add the garam masala powder now if using, and enjoy with your choice of tiffin.
STEPWISE RECIPE FOLLOWS:
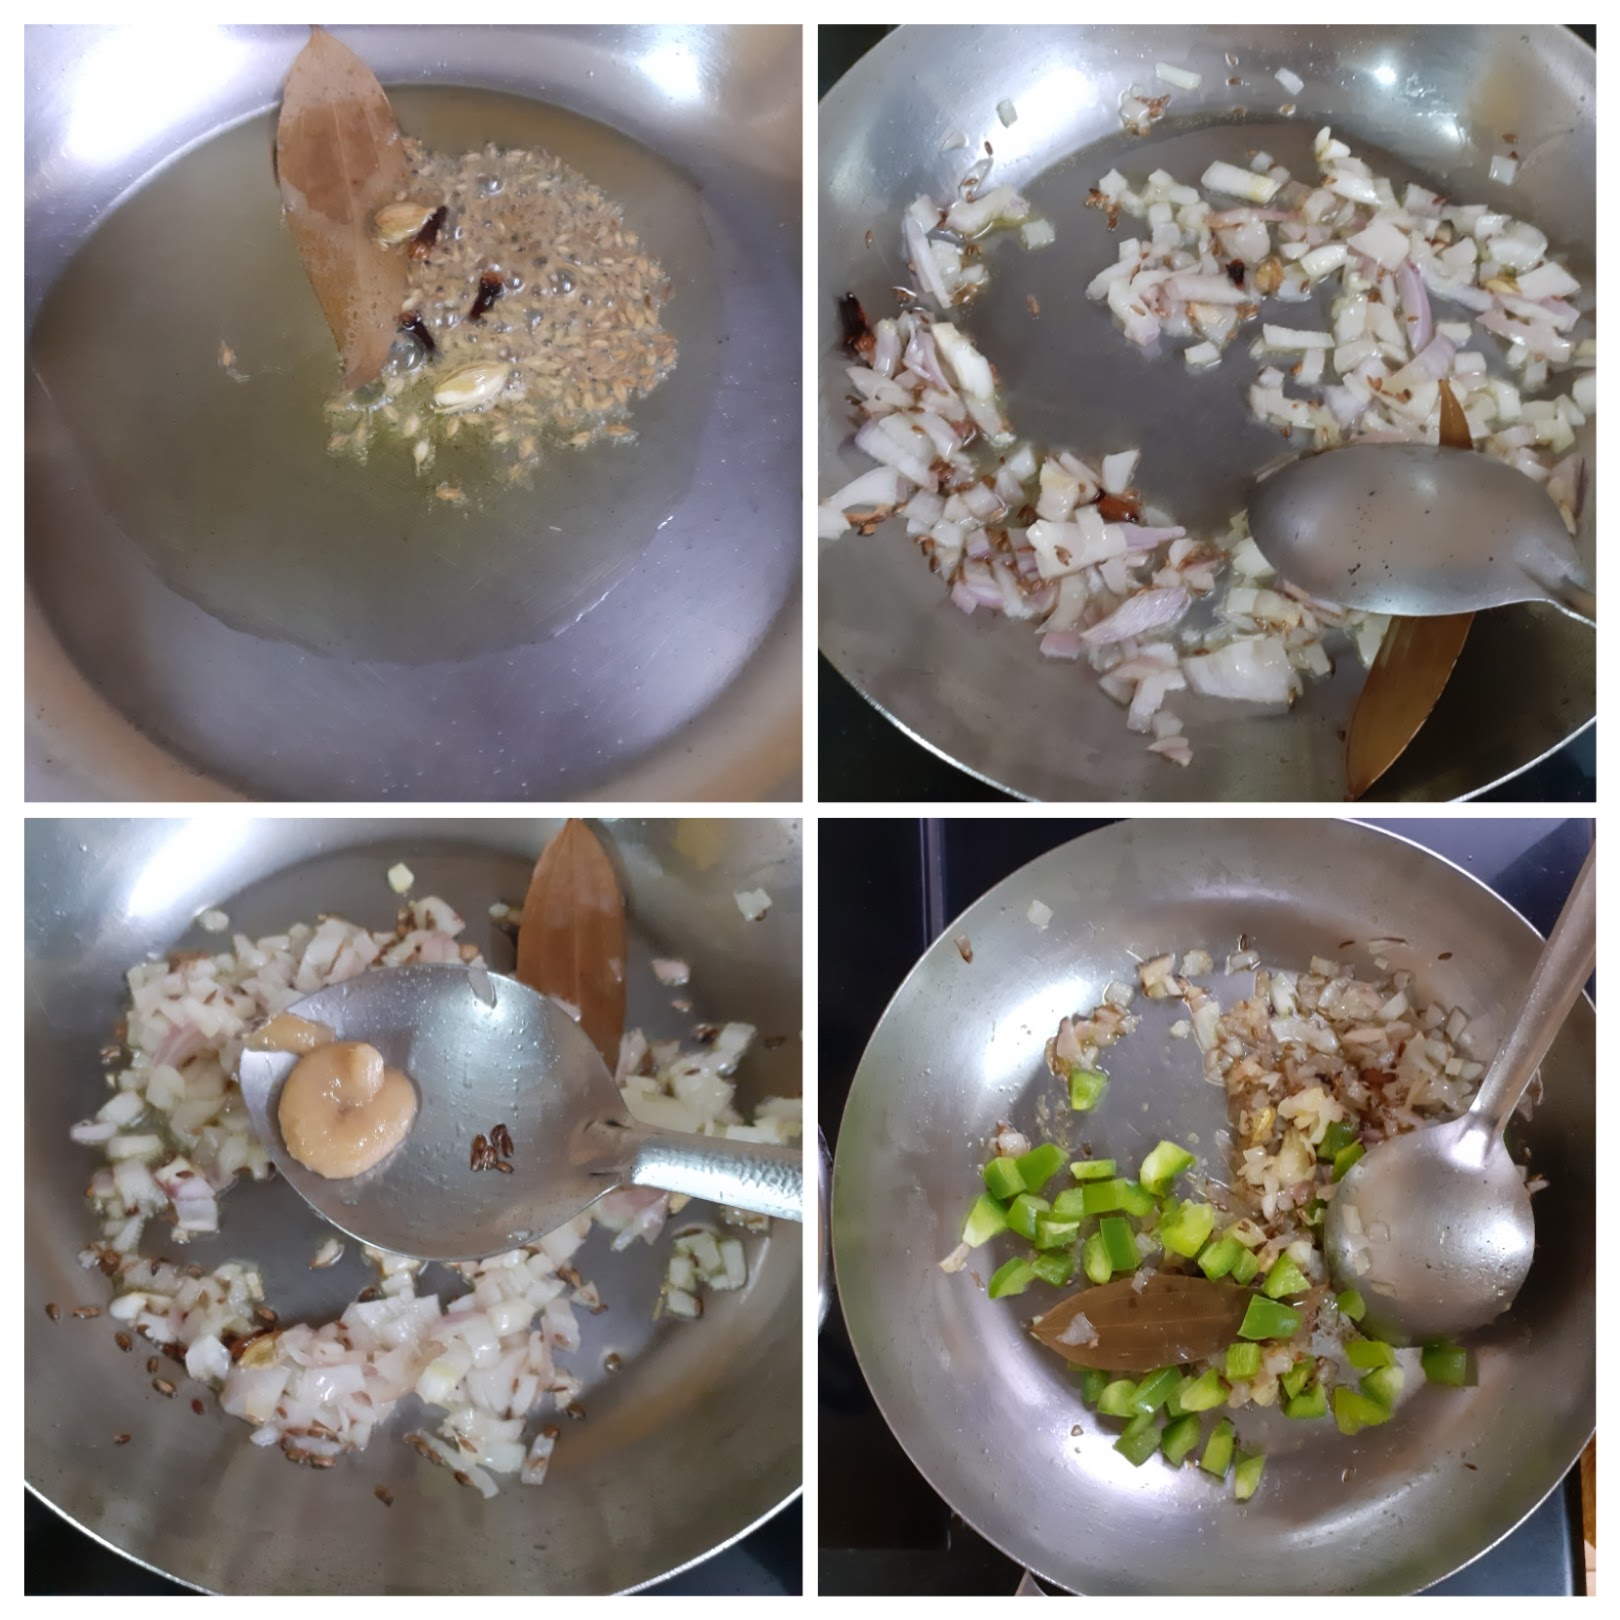
1. Steam all the mix vegetables with some salt and turmeric powder, except capsicum, onion and tomatoes. Take care to not turn them mushy.
2. Now in a pan or Kadai pour oil and heat. Put in the Bay leaf, cumin seeds, green cardamom and cloves and fry for 30 seconds. Now add the onions and ginger garlic paste, and saute for 30 seconds. Add the capsicum and continue to saute for another minute
3. Now add the tomato puree and all other spice powders like red chilli powder, biryani masala and the salt. Cook the gravy until the oil separates.
4. Now add the steamed vegetables, mix well and cook for a minute. Grind the coconut, fennel seed, cashewnuts and green chillies to a smooth paste adding a little water.
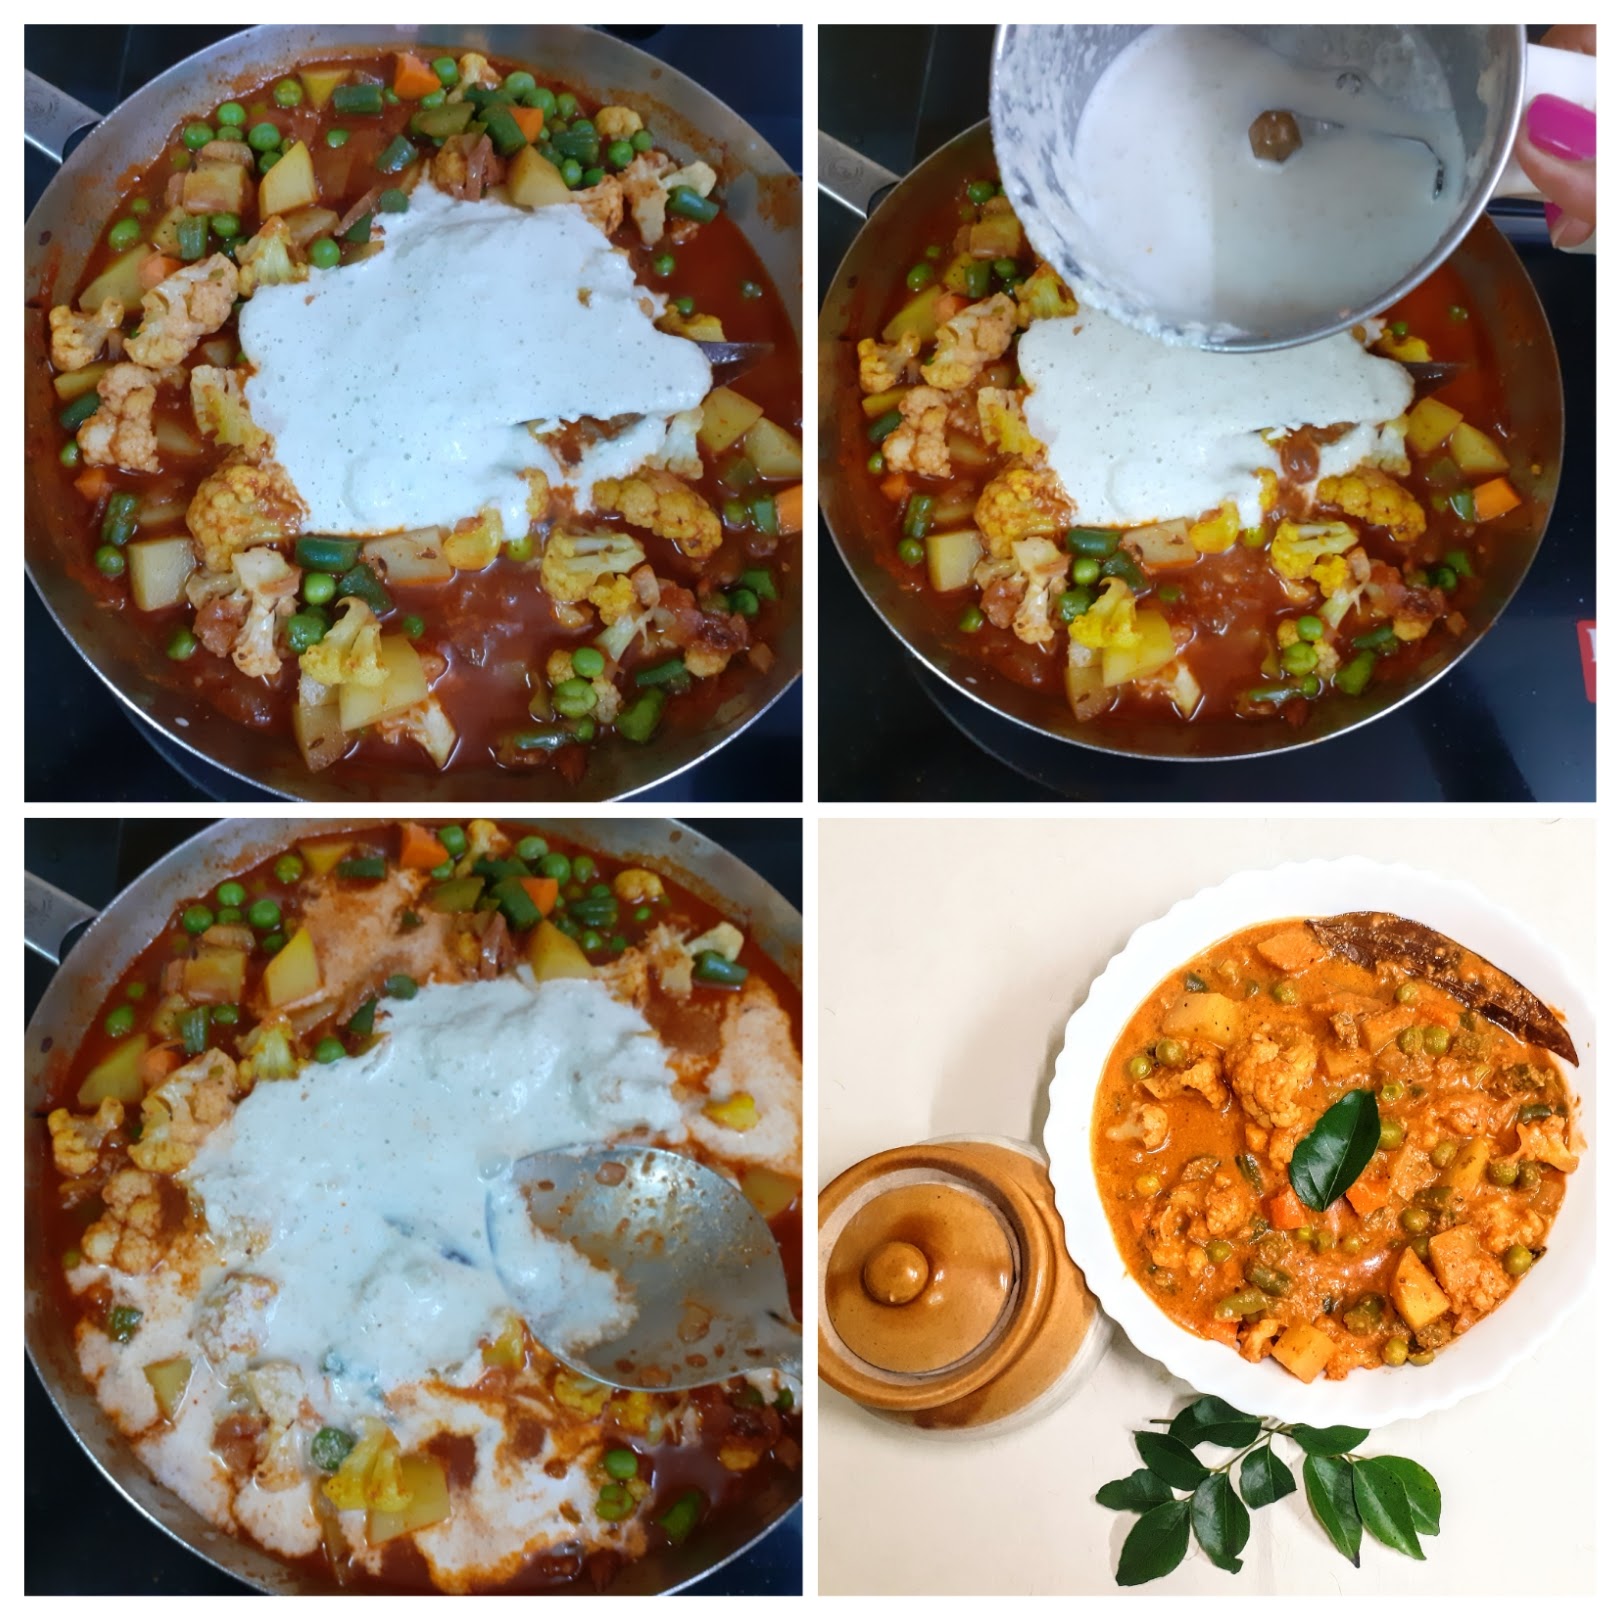
5. Pour this paste into the cooking gravy. Cook for another2 minutes or until the gravy cones together and put of the stove. Garnish with curry leaves add the garam masala powder now if using, and enjoy with your choice of tiffin
NOTES:
1. The vegetables used can be customized to your liking. That said vegetables with a lit of water content like gourds, brinjal etc are not preferred much.
2. For a thicker gravy add more cashew and coconut. For a thinner one reduce the cashew and coconut or use the quantity given and then thin down with water
3. I use biryani masala for the kurma as it gives a very nice flavoring to the kurma. One can use garam masala too but the authentic taste does not come in.
4. I use homemade Biryani masala. For recipe of Biryani masala click here. Feel free to use store bought one too.
If you tried this recipe and liked it, please let us know in the comment box. I would love to hear from you. If you would like to receive our future posts on your mail, please leave your mail Id so that we can post it to you.
Mava Paneer Curry
Mava or Khoya when added in a recipe gives it a rich texture, flavour and taste. Mava is mostly used in sweet dishes, but can be used in gravies also to add body to a dish. The khoya is available in all stores or can be made at home. Check notes for making at home.
In this recipe, I have used the store-bought Mava. In this recipe, I have used whole spices which make the dish burst with flavours. Mava Paneer can be relished with Rotis, Naans and also rice varieties like Jeera Rice, Pulav, Masala rice and more.
Mava/ Khoya 200 gm (shredded)- divide into 2 halves
Paneer 400 gm cubed
Cloves 5 -6
Jeera/ Cumin seeds 1 tsp
Peppercorns 1/2 tsp
Badi Elaichi/ Black Cardamom 1
Cinnamon 1/2 inch stick
Bay leaf/ Tej patha 1
Elaichi/ Green Cardamom 2-3
Coriander powder 2 tsp
Fennel powder 1 tsp
Red chilli powder 1 to 1.5 tsp
Salt to taste
Onion 1 chopped fine
Tomato Puree 2 cups or 3 large tomatoes pureed
Ginger Garlic paste 1 tsp
Kasoori Methi/ dry fenugreek leaves 1 tsp
Coriander leaves finely chopped 1 tbsp
Directions:
In a Karahi heat 2 tbsp oil. Add all the whole masalas(spices) -Bay leaves, Cinnamon stick, Green cardamom, cloves, Black cardamom and Cumin seeds, and fry them for 30 seconds or until aromatic. Now add the ginger-garlic paste to it and fry for 10 seconds, Follow it up by adding the finely chopped onions. Fry until the onions turn a light brown and now add the tomato puree. Add the salt, red chilli powder, coriander powder, fennel powder and stir nicely. Cook for a minute or two until the raw smell of the masalas and tomato puree is gone. Now add one half of the shredded Mava/khoya and mix it in such that it combines well with the tomato puree. Once the Mava is added the mixture thickens, So dilute with 1/4 to 1/2 cup milk, followed by 2 cups water. Allow the gravy to cook for 2 minutes and add the remaining the Mava and stir well. Now add the Paneer cubes and cover and cook for a minute or two, or until the gravy thickens. Open the lid and garnish with some crushed Kasoori Methi(dried fenugreek leaves) and the Mava Paneer curry is ready.
Serving Suggestions: with Rotis, Naans, Parathas, Jeera rice or even plain rice.
STEPWISE RECIPE FOLLOWS:
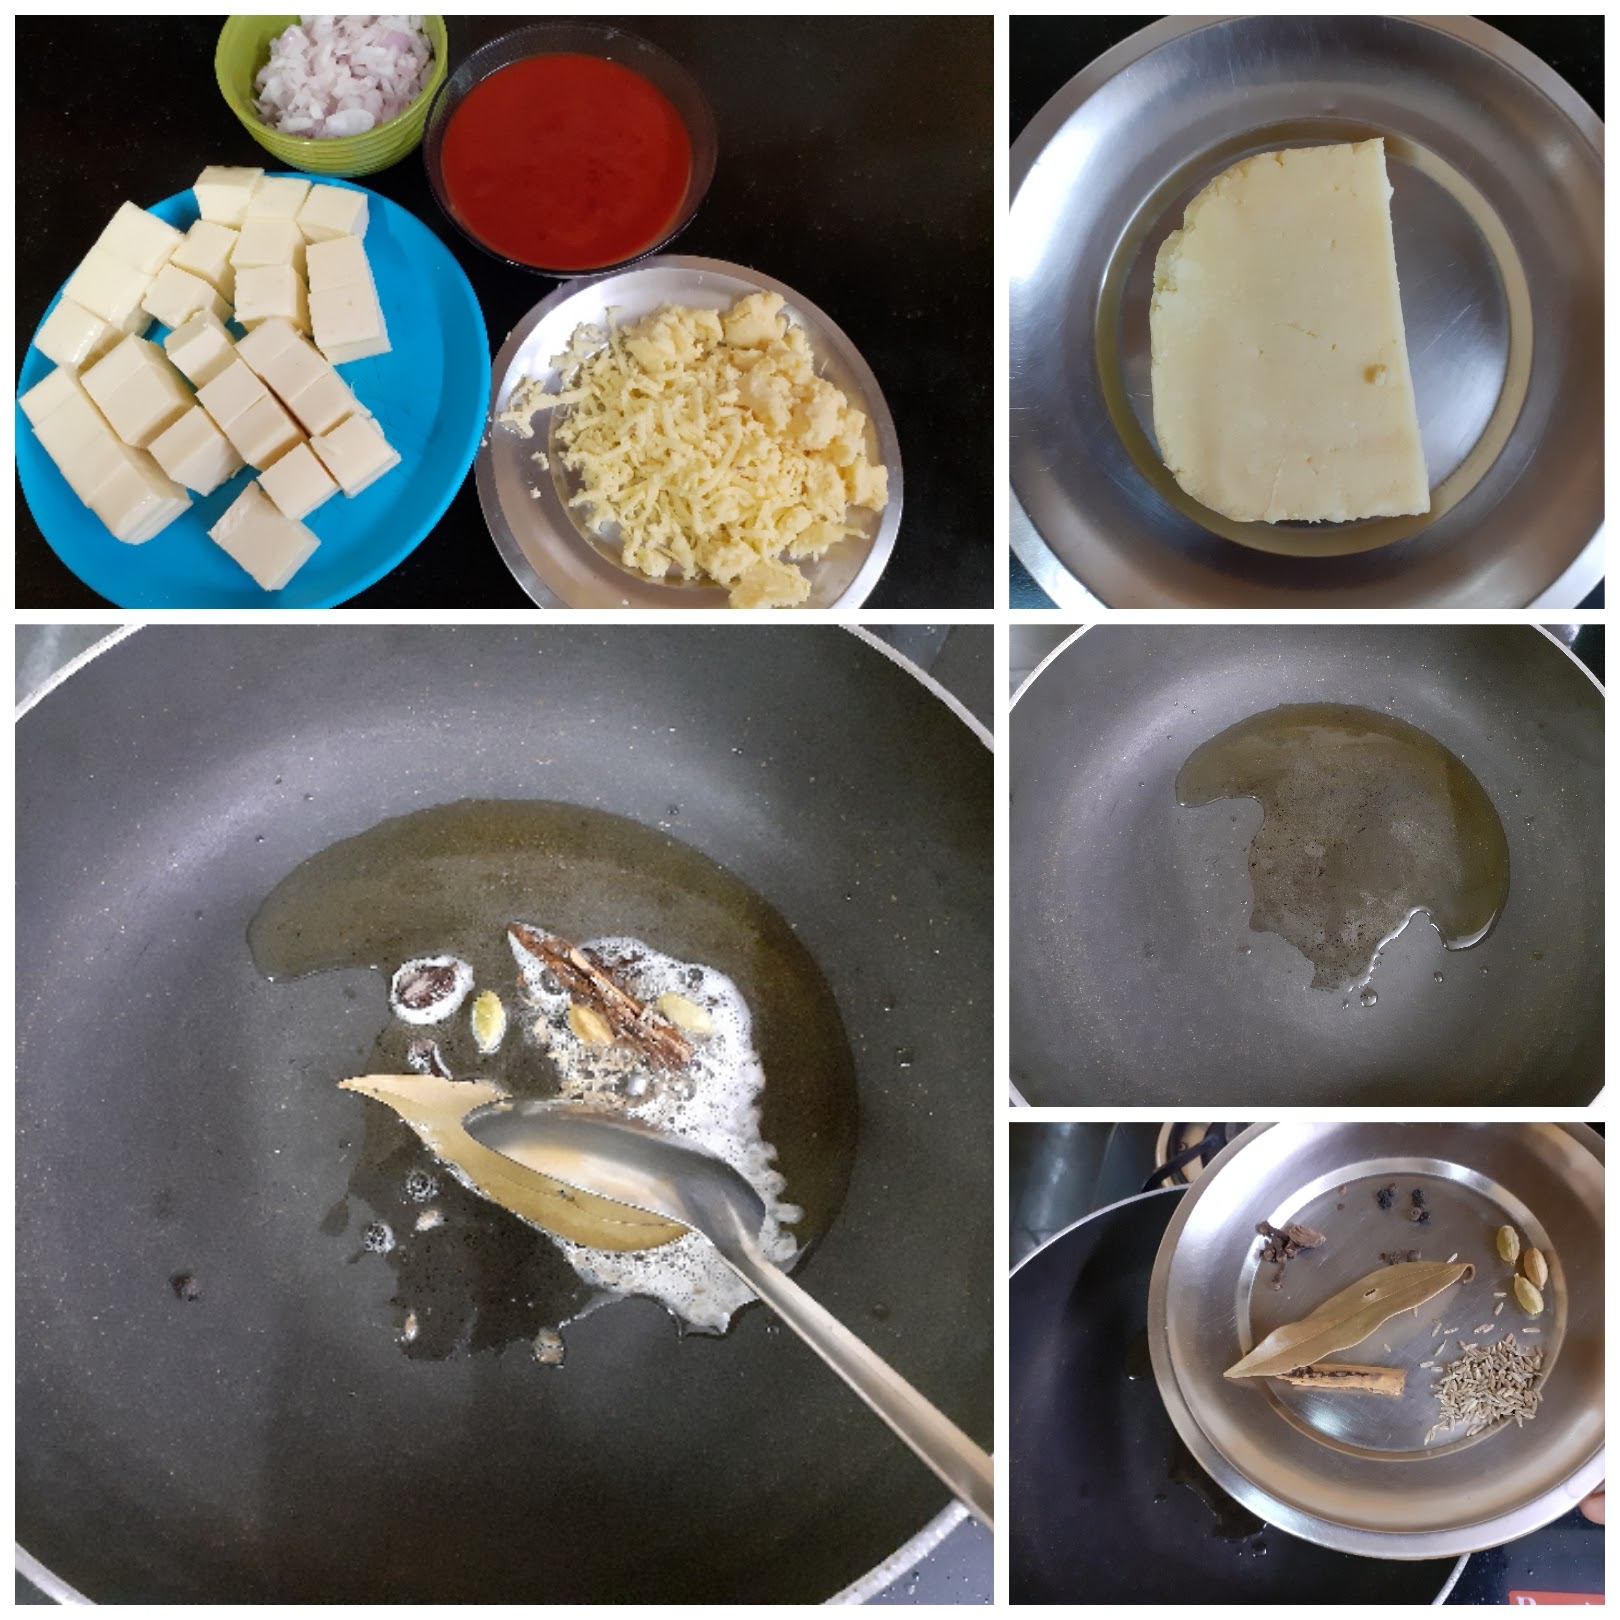
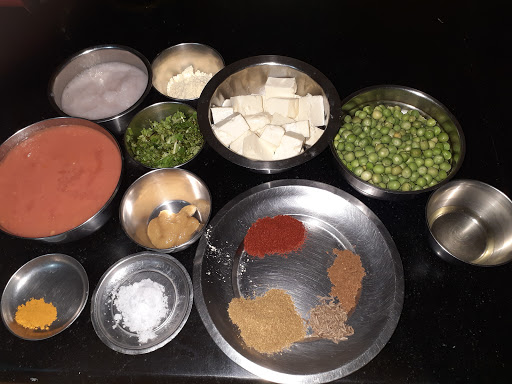
1. Assemble all ingredients. In a Karahi heat 2 tbsp oil. Add all the whole masalas(spices) -Bay leaves, Cinnamon stick, Green cardamom, cloves, Black cardamom and Cumin seeds, and fry them for 30 seconds or until aromatic.
2. Now add the ginger-garlic paste to it and fry for 10 seconds, Follow it up by adding the finely chopped onions. Fry until the onions turn a light brown and now add the tomato puree.
3. Add the salt, red chilli powder, coriander powder, fennel powder and stir nicely. Cook for a minute or two until the raw smell of the masalas and tomato puree is gone.
4. Now add one half of the shredded Mava/khoya and mix it in such that it combines well with the tomato puree. Once the Mava is added the mixture thickens, So dilute with 1/4 to 1/2 cup milk, followed by 2 cups water. allow the gravy to cook for 2 minutes.
5. Now add the paneer cubes, cover the Karahi and cook for another 2 minutes or so, or until the gravy thickens. Open the lid, add crushed Kasuri Methi and put off the flame. Garnish with finely chopped coriander leaves and a drizzle of cream if required. The Mava Paneer curry is ready to savour.
NOTES:
1. In this recipe I have used 400 gm Paneer and 200 gm of Mava/Khoya. This can be scaled down conveniently for a lesser quantity of curry.
2. To make instant Khoya/Mava- take 1 cup milk and boil. Reduce it(evaporate by boiling) to half and add 2 tablespoons of milk powder and 1 tsp ghee. Homemade instant Mava is ready. For this recipe, you may need twice the amount of this quantity.
If you tried this recipe and liked it please comment below. I would love to hear from you. If you have a query about the recipe email us and ill respond as soon as I can.
If you would like to receive our recipes in your mail please leave your mail id at the homepage. Every time Rajjo’s Kitchen has a new post we will mail the recipe to you.
Creamy Pink Sauce Pasta
Well, who doesn’t love pink Pasta? Yes, pink pasta. Usually, pink pasta is made with a combination of white sauce and tomato pasta sauce. In this recipe, I have used a lot of tomato puree and milk, some cream, and loads of Parmesan cheese. The sauce is extremely slurpy and delicious. The sauce can be used as it is or one can add-in as per their preference.
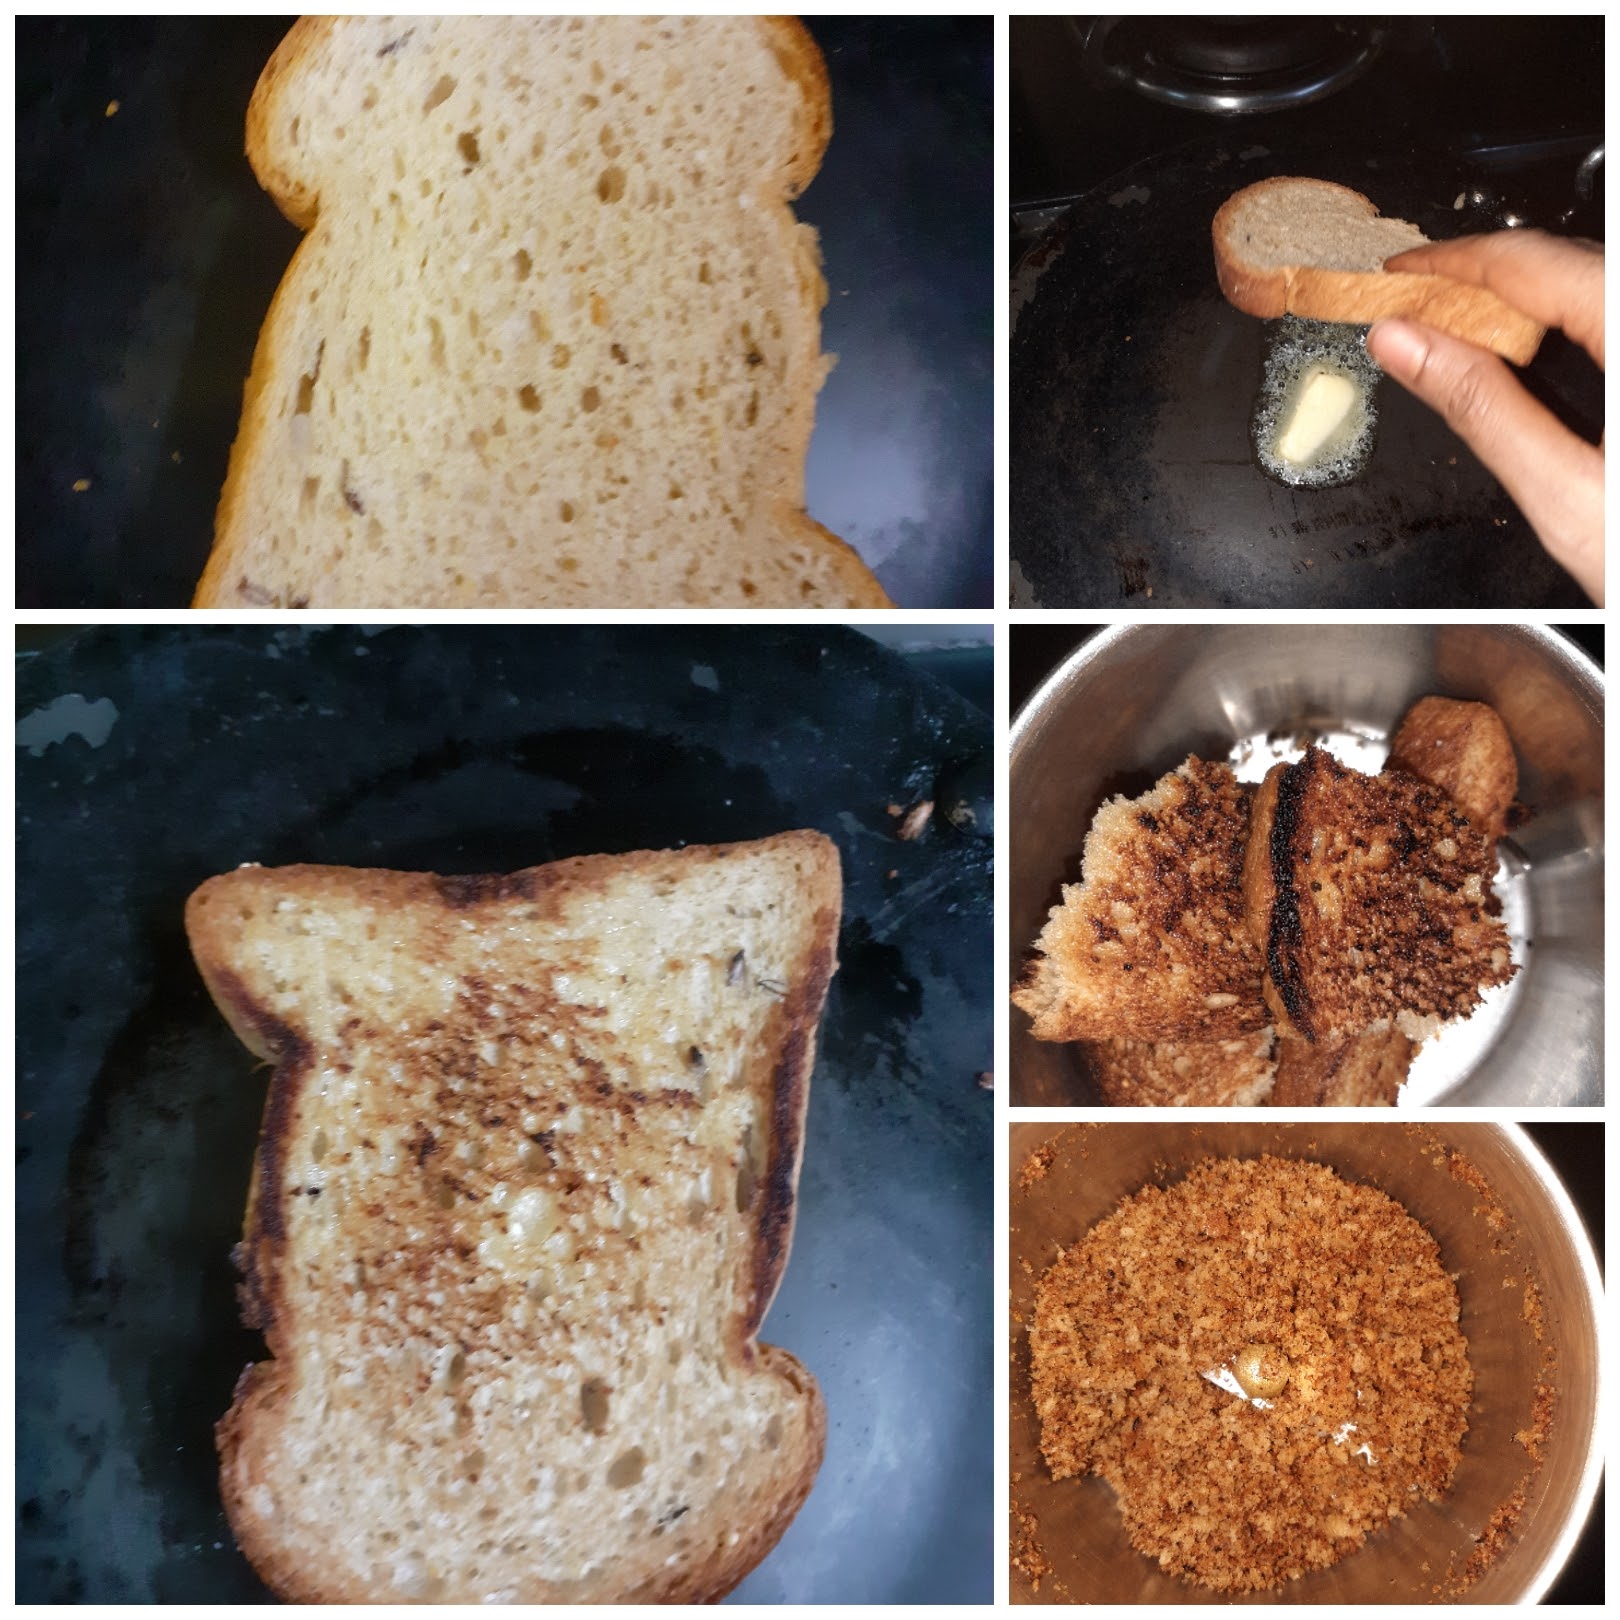
I am also letting you into a little secret of how restaurants get that creamy texture. I have also used Pangritato(toasted bread crumbs) which takes this dish to a completely different level. This Pasta sauce is very easy to make and the dish gets done very quickly.
I have used Spaghetti and a few pieces of Macaroni just for some aesthetic effect and nothing else. You can avoid it completely, or use only Macaroni instead of Spaghetti or use both like I did. Children are sure to love this recipe and adults too and the bowl will be clean.
The use of parmesan cheese gives a nice sharp taste to the sauce. Feel free to add other herbs like Basil, I have used only Italian seasoning.
Here is the recipe of Creamy Tomato pasta for you–
PREP TIME: 20 MINS COOK TIME: 20 MINS
TOTAL TIME: 40 MINS SERVINGS: 4
CUISINE: WORLD FOOD AUTHOR: Rajni Ram
Ingredients:
Spaghetti 1 packet (300 gm)
Macaroni 1 handful(optional)
Tomato puree 200 to 250 ml
Cream (medium or high fat) 1/2 cup
Milk 1 cup
Parmesan cheese 1 cup and a little more
Bread slice 1(for the Pangritato)
Pepper powder 1 tsp
Red chilli powder 1 tsp
Garlic 5 pods crushed
Onion 1 finely chopped
Chilli flakes 2 tsp(divided)
Oregano or Italian seasoning 2 tsp(divided)
Cilantro/Coriander leaves finely chopped 2 tsp
Olive oil/butter 2 tbsp
Directions:
Cook the pasta aldente( a little undone- just put off the flame 2 minutes than the recommended time on the pasta packet). Reserve 2 cup of the water in which the pasta cooked and drain the remaining. Pour cold water over pasta, drain it completely and place the pasta in a colander.
Put 1 tsp of chilli flakes and Italian seasoning in 1 cup of the reserved pasta water and pour this water over the pasta in the colander, the water will drain away but the flakes and the seasoning will stick to the pasta. This step is what gives that flavouring in restaurants( 1 secret revealed).
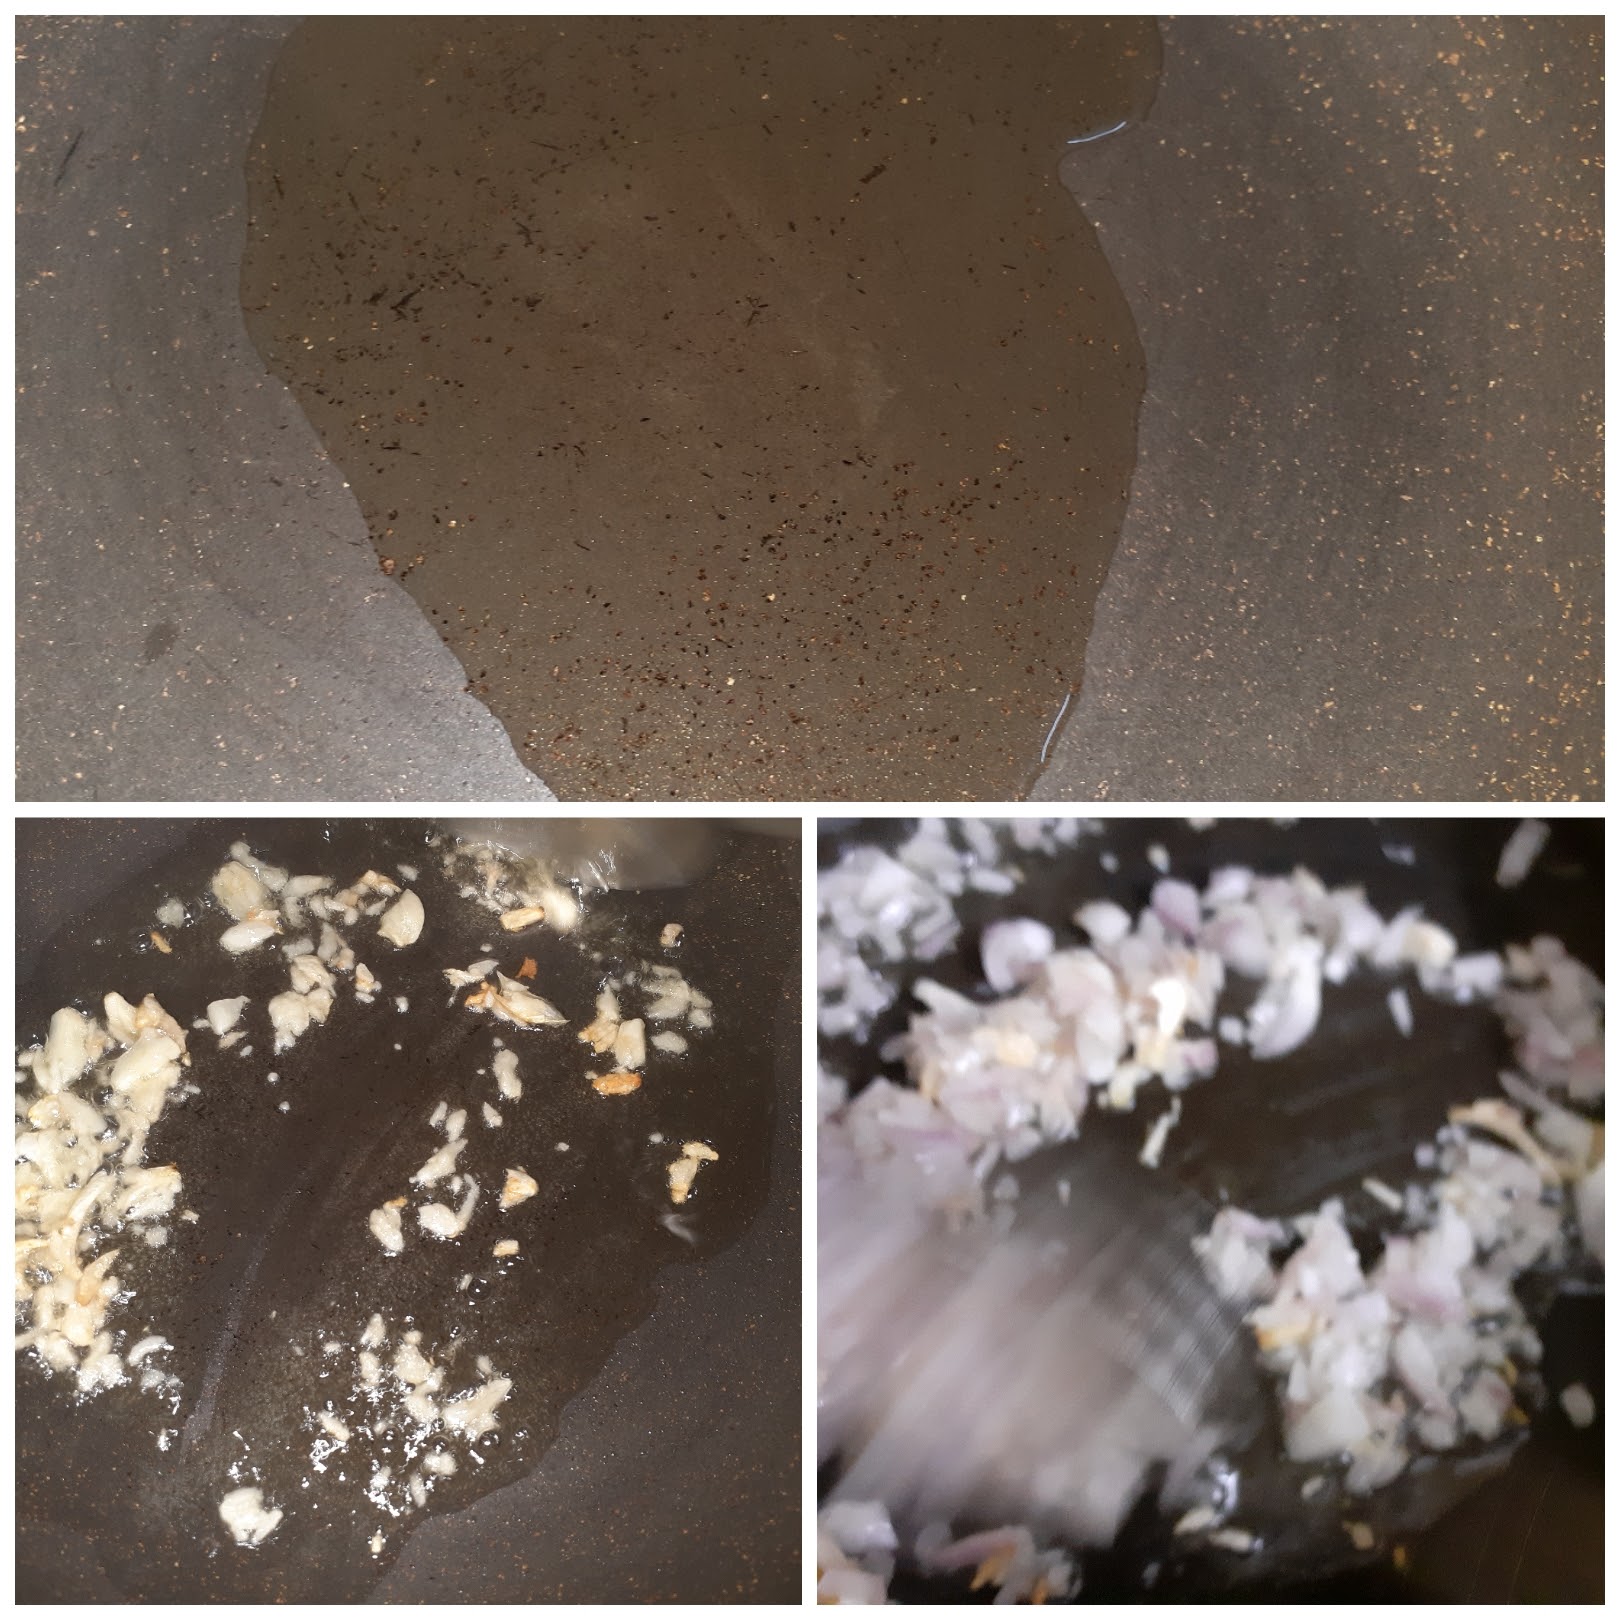
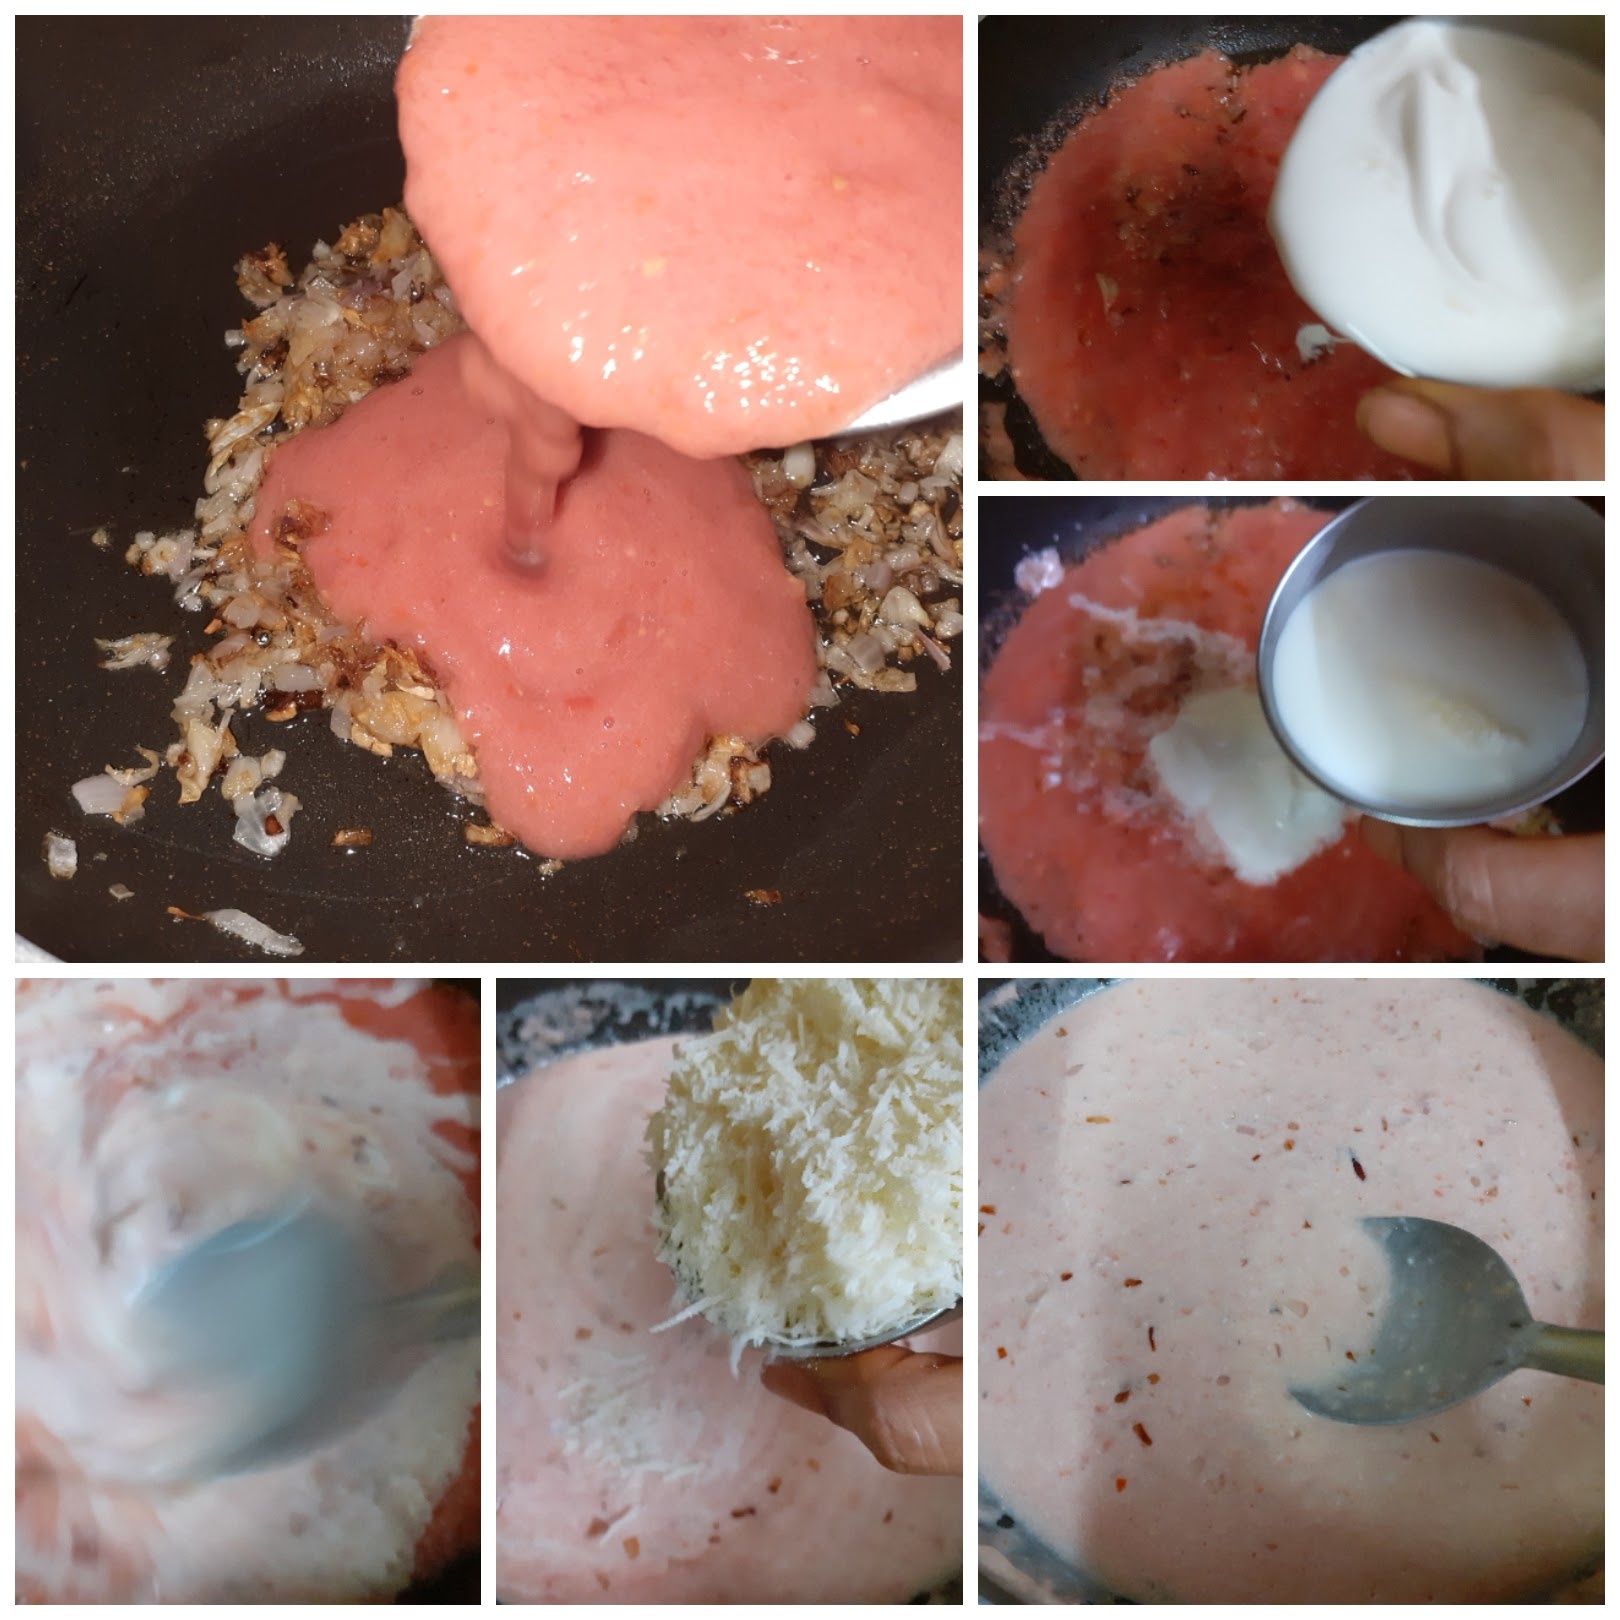
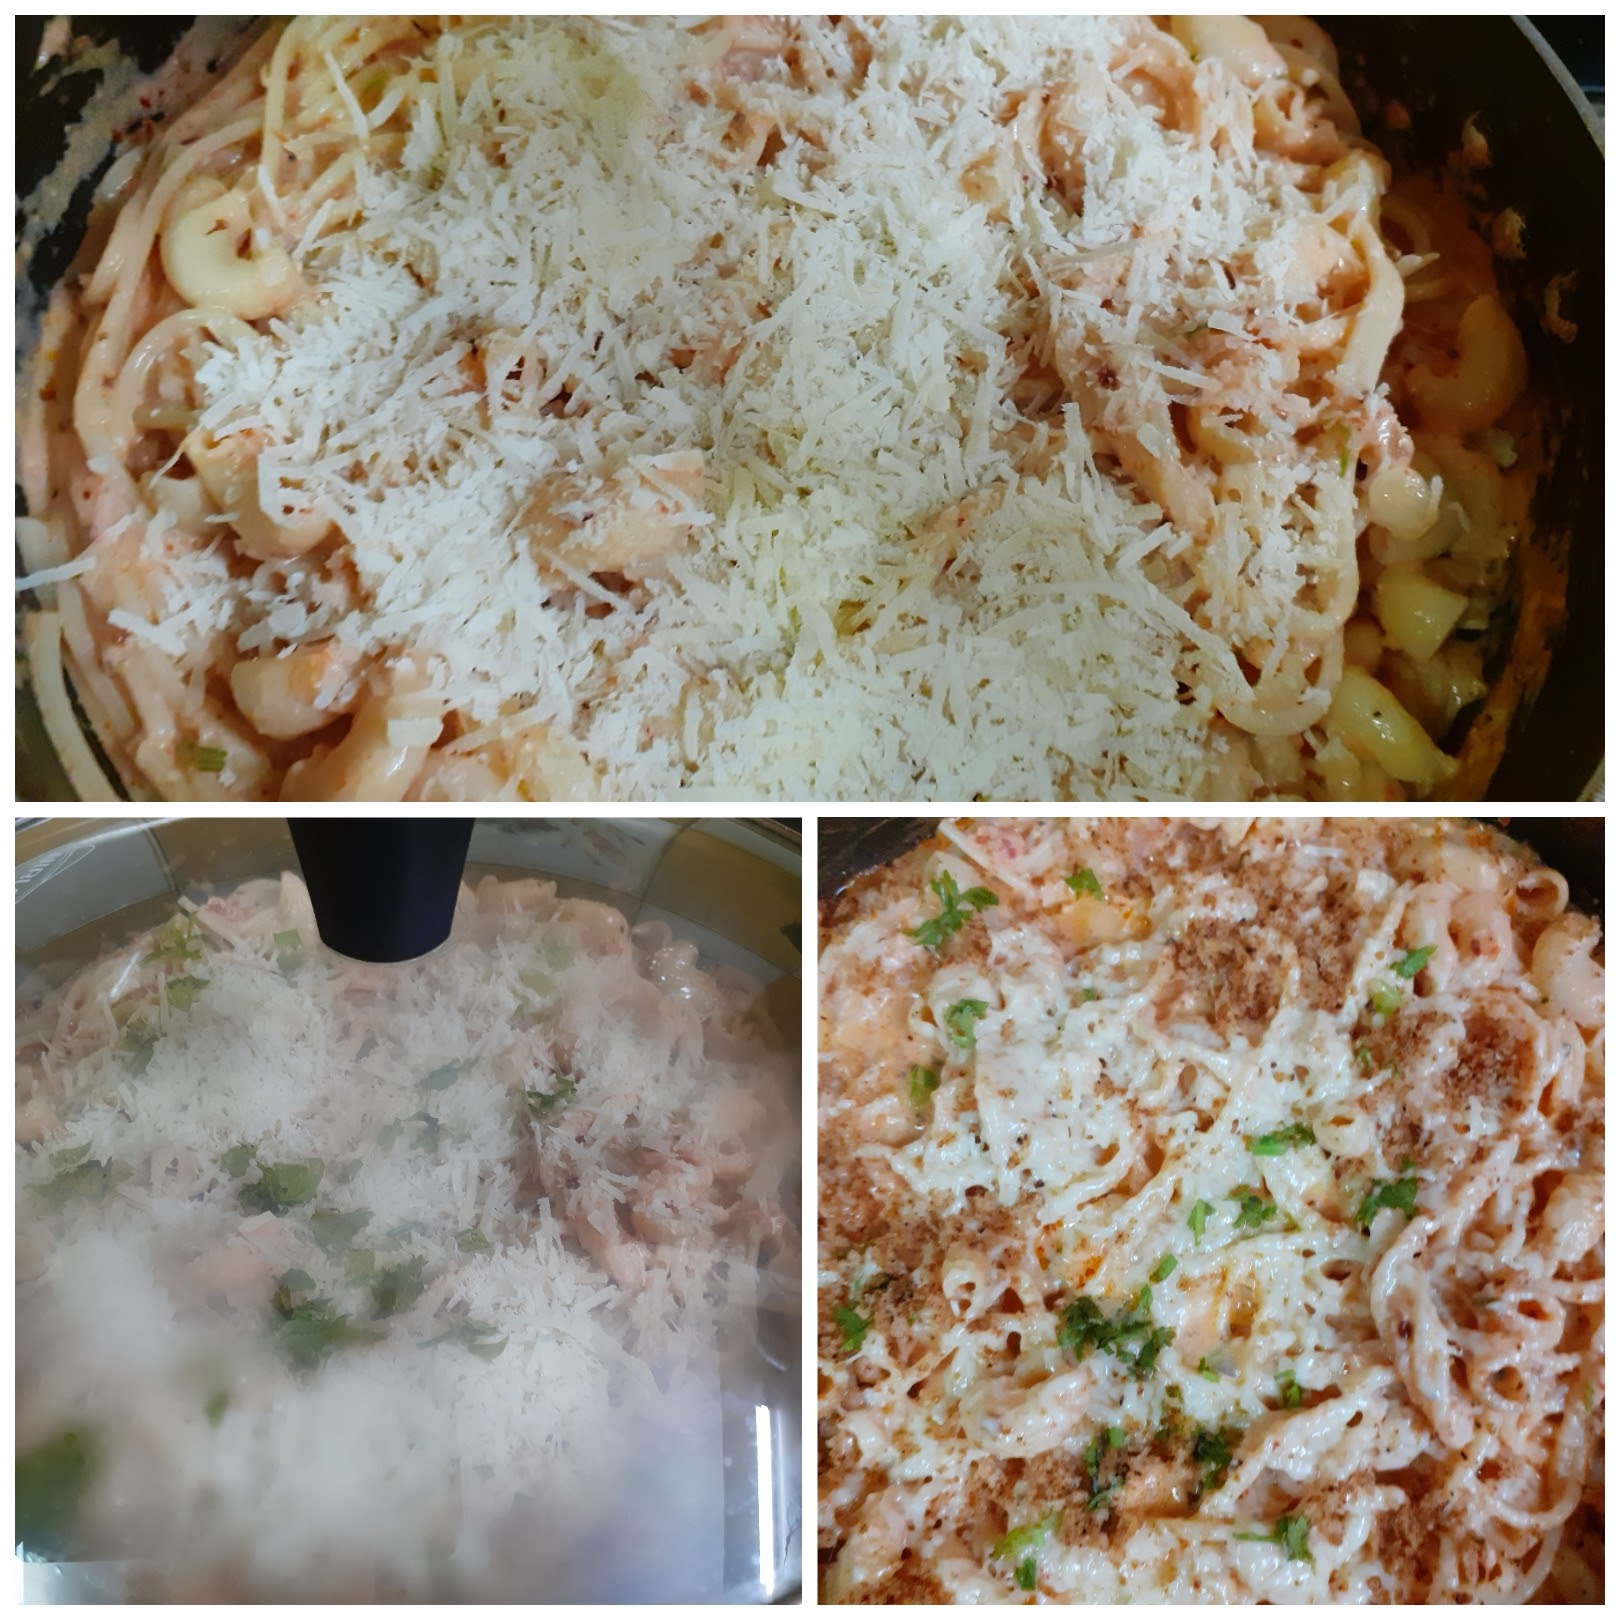
Now in a wok or pan add 2 tbsp Olive oil/butter and heat. add the crushed garlic and saute for 30 seconds and add the onion. Continue to saute until the onions turn transparent. Now reduce the heat and pour in all other ingredients into the pan, like tomato puree, cream, milk and 3/4 cup of parmesan cheese. Stir the contents nicely over a medium flame until the cheese melts completely and the sauce starts bubbling. Add the reserved cup of pasta water to the sauce and dilute it, this is what gives the sauciness when the sauce becomes thick again( secret 2 revealed????). Now add the pepper powder, red chilli powder and salt to the sauce and continue to cook. The sauce will now become dense ad thick if it’s too thick then dilute again by adding 1/4 cup water. The sauce should be thick and stick to the pasta and not run all over it. Now add the cooked pasta to the sauce and mix nicely. The sauce should have covered all the pasta nicely. Now add the chopped Cilantro, Italian seasoning and top up with the remaining Parmesan cheese, cover and cook for a minute. Put off the flame and serve immediately. Yummy saucy pasta is ready. Enjoy. Bon Appetit.
For the Pangritato: Toast one bread slice with a little butter until crisp and powder it. this powder is Pangritato, basically toasted bread crumbs.
They are used a lot in Italian cooking.
STEPWISE RECIPE FOLLOWS:
1. Assemble all ingredients.
Cooking the pasta perfectly- Take about 2 litres of water in a big vessel( I prefer a flat and broad one) and boil it. When it begins to boil add a teaspoon of salt(reduce heat before you add salt or the boiling water will overflow), a teaspoon of oil and add the pasta. Keep stirring and cooking it and keep checking in between if it is done. Remember that you have put off the flame while it’s still a little undone or let’s say when it is 3/4 done. Remember to reserve 2 cups of this water and drain the rest. Immediately pour some cold water over the pasta and drain it. Place the pasta in a colander. Add 1 tsp of red chilli flakes and oregano seasoning to 1 cup of the reserved pasta water, a pinch of salt and pour it over the pasta that is cooling. This step ensures that the pasta is full of flavours.
2. In a wok/pan add 2 tbsp butter or olive oil and heat. Add the crushed garlic and saute for 30 seconds. Now add the onions and saute until they turn translucent.
3. Now reduce the flame to low and add the tomato puree, cream, milk and 3/4 of the Parmesan cheese and cook until the cheese melts. Keep stirring. The sauce will thicken. Now pour the remaining pasta water or regular water is fine too if you don’t have enough pasta water and dilute the sauce.
4. Now add the salt, red chilli powder, pepper powder, chilli flakes and simmer the sauce until it thickens again. Now put in the pasta into the sauce and mix it nicely, the movement should be from bottom to top so that the sauce spreads evenly over the pasta.
5. Finally, reduce the flame and top up the pasta with the remaining cheese and cook covered for a minute until the cheese melts. Now put off the flame and add the Pangritato. Enjoy this yummy pasta piping hot.
NOTES:
1. For any pasta recipe to turn out well, cooking the pasta carefully is very important.
2. Zucchini, Broccoli, Red onions etc can be added to the sauce. if adding them, add after sauteeing the onions and saute them also for 3 minutes.
3. If Parmesan is not available Cheddar also can be used, but definitely, there will be a difference in taste.
4. The sauce I made was just enough to put the pasta in, you can make more if you like it very saucy.
5. If you forget to reserve the pasta water, it is fine. Just continue with regular water or vegetable broth if you have.
6. I have added Macaroni only for the aesthetics, it fine if the recipe is made without it too.
If you tried this recipe and liked it please comment below. I would love to hear from you.
If you want the recipes emailed to you leave your id in the homepage near the????
icon. Whenever we have a new post the recipe will be mailed to you. Thank you for showing interest in Rajjo’s Kitchen.
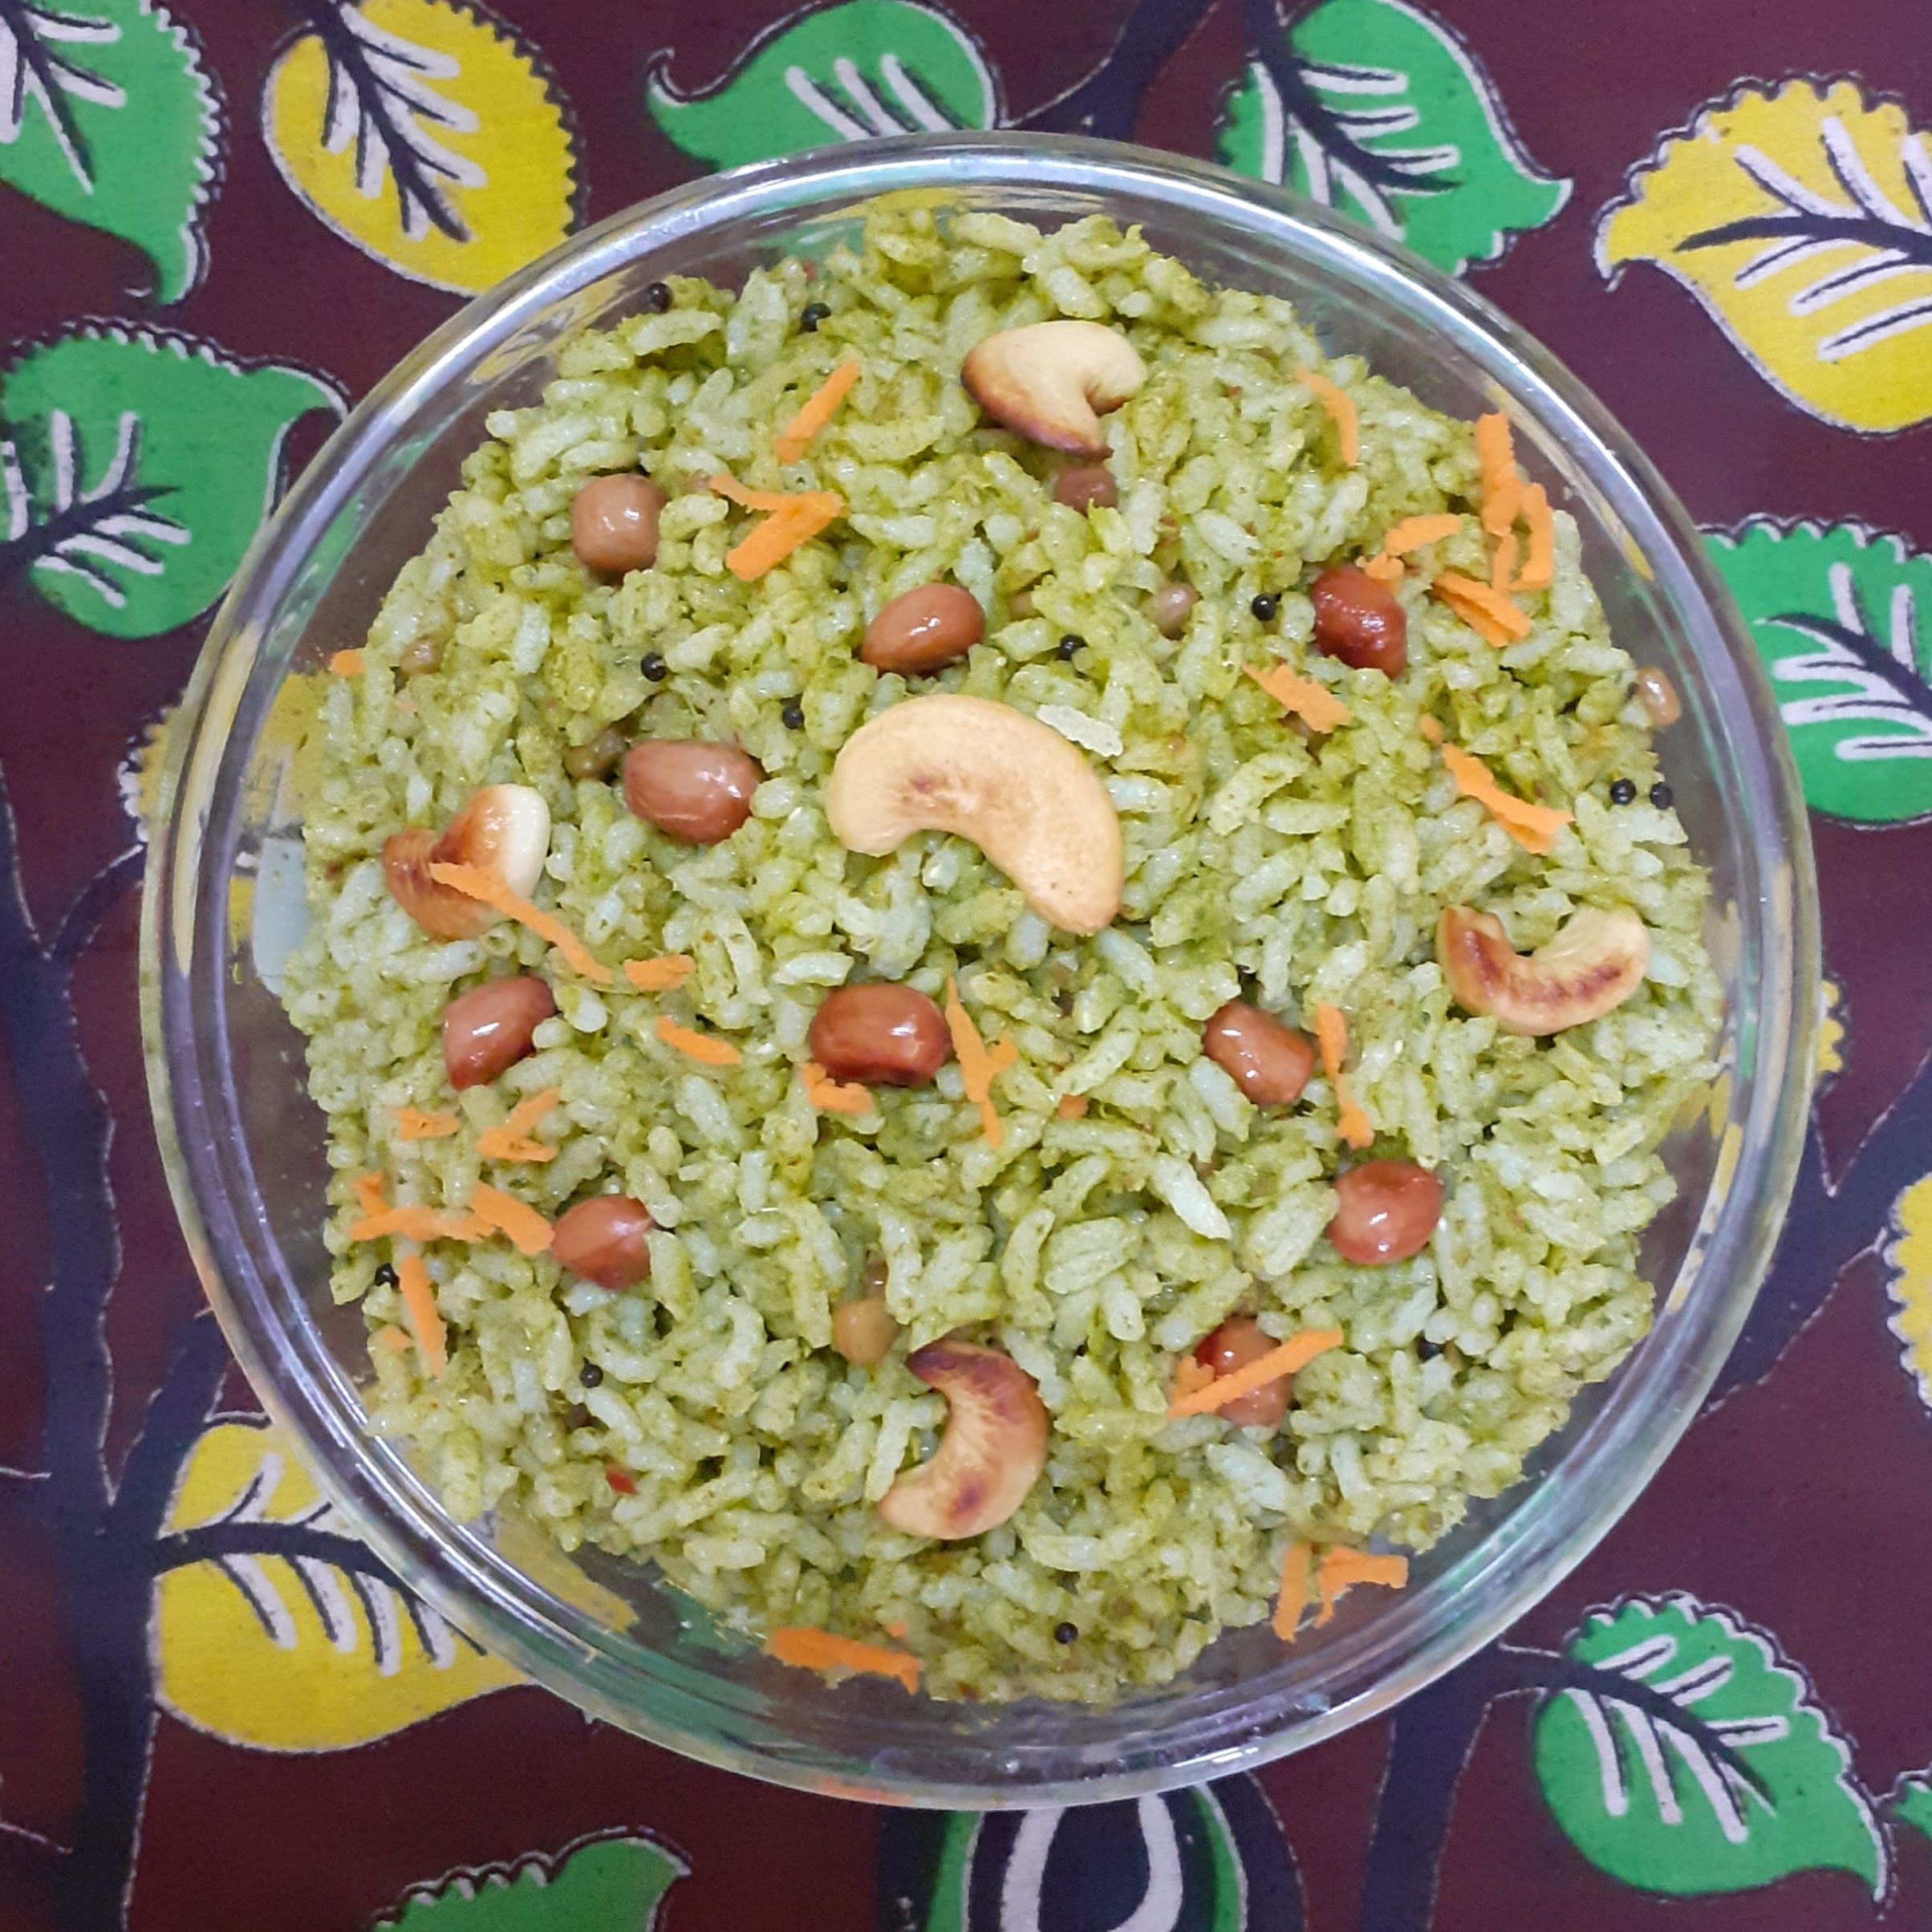
Coriander Rice/Chutney Rice
My love for this herb is perennial. I love adding it to Subjis not just as a garnish but a few springs just as one of the ingredients. There are many condiments made of this humble herb like Chutneys, Dips, Raitas, Pickle, etc; Coriander rice is a simple and healthy rice variety and a great lunch box option for kids. It is healthy too as Coriander is rich in fiber and essential nutrients. It aids in digestion too. So why leave out such a beneficial herb from main course cooking and limit it to just being a condiment. Therefore I thought of adding this Coriander rice recipe to my blog post.
Try adding a few sprigs of it to any subji, not in the end but while cooking and see how the dish gets elevated in taste and flavour.
I’m calling this chutney rice as these are almost the same ingredients we use for green chutney, barring the chutney Chana. Well, tamarind/raw mango is added in green chutney though, I will try that version shortly and post. Here is the recipe for Coriander Rice…
PREP TIME: 10Mins COOK TIME: 30 Mins
TOTAL TIME: 40 Mins COURSE: MAIN
CUISINE: SOUTH INDIAN SERVINGS: 4
AUTHOR: Rajni Ram
Ingredients:
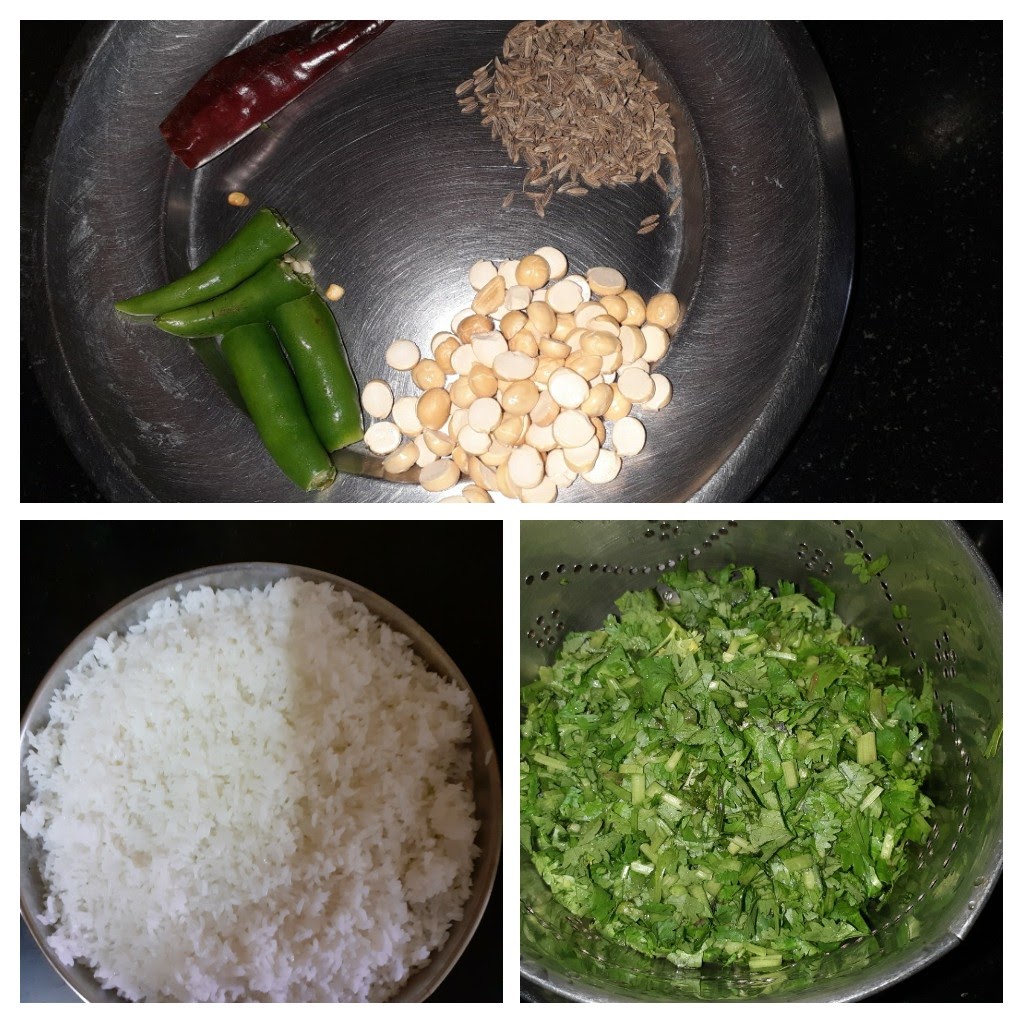
Coriander leaves 1 bunch finely chopped
Rice(regular) 1 cup precooked
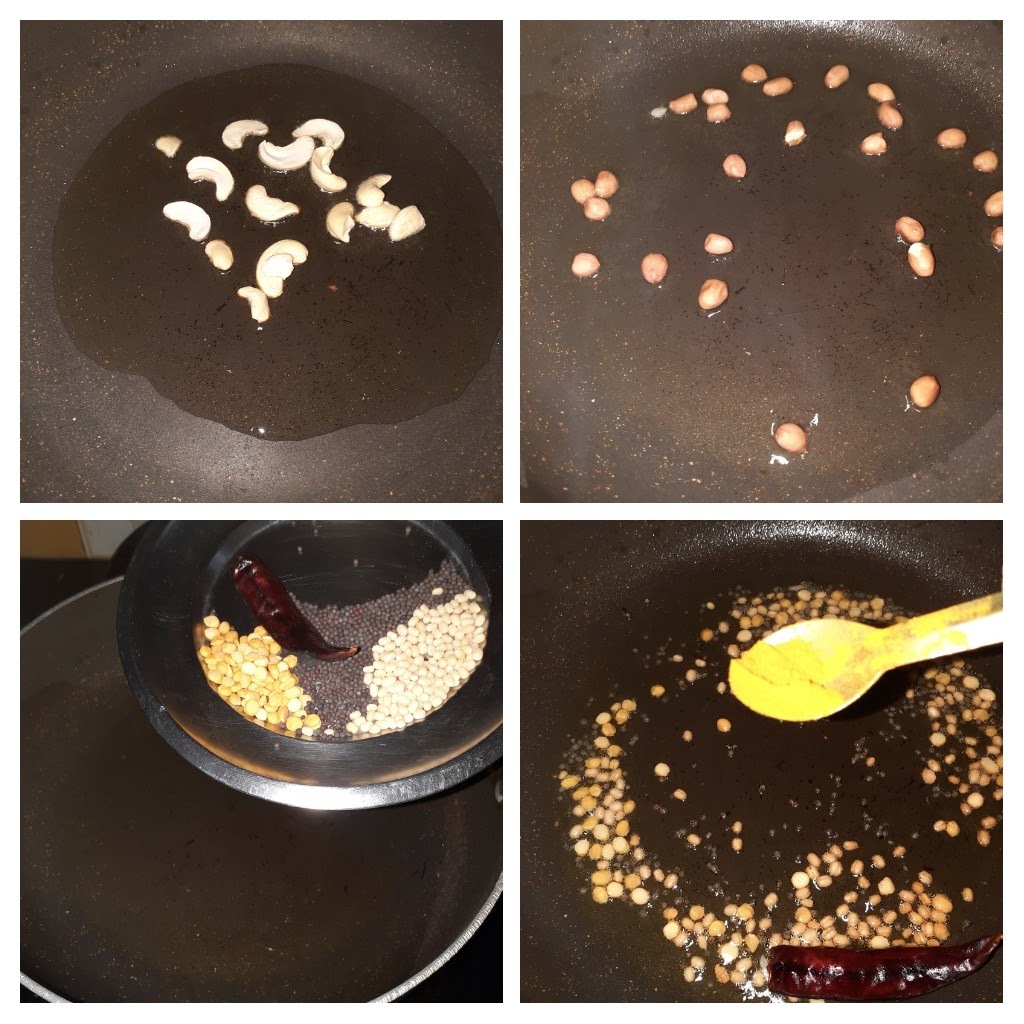
Peanuts 1 tbsp
Cashewnuts a few
Green chillies 2
Cumin seeds 1 tsp
Fried gram dal(chutney chana)/Pottukadalai 1 tbsp
Turmeric powder 1 tsp
Mustard seeds1 tsp
Chana Dal(Bengal gram) 1 tsp
Urad dal(black gram) 1 tsp
Dry red chillies 1-2 broken
Oil for tempering 1 tbsp
Directions:
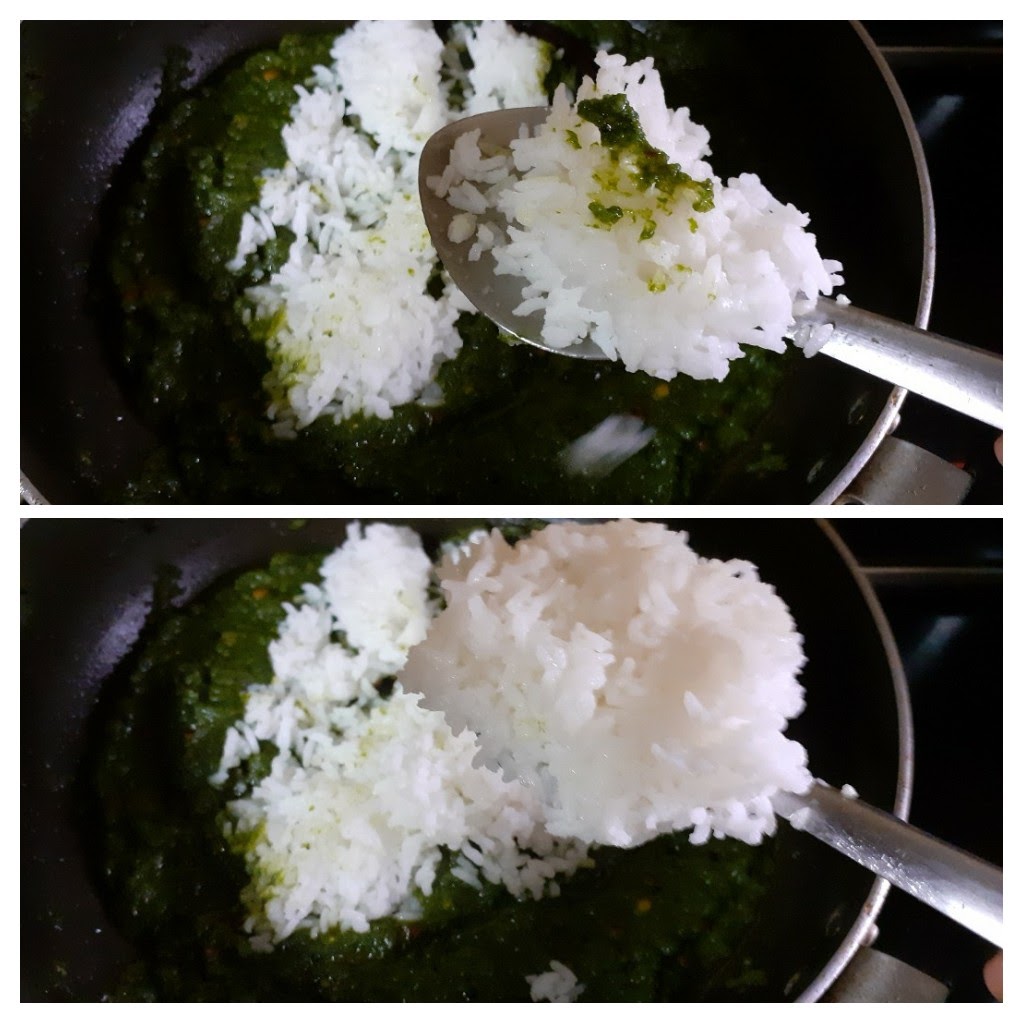
Cook 1 cup rice in a pressure cooker( I used pot in pot method, you can cook directly too) adding 3 cups water for 3-4 whistles. Once pressure releases spread out the rice on a plate to cool and also drizzle 2 tsp oil over the rice so that the grains do not stick together. Put the chopped coriander, cumin seeds, green chillies and the fried chana/ Pottukadalai and grind at first without water, then after a spin or two add little water and grind to a smooth paste. In a karahi or pan pour some oil and heat. Add the mustard seeds, chana dal, urad dal, dry red chilli and fry until golden brown. Now add the turmeric powder, followed by the ground Coriander puree and nicely fry the paste in oil on low heat. The paste will get a little dense. Add salt and fry for another 2 minutes. Now start mixing in the cooled rice little by little into the cooked paste, and mix nicely so that the rice is nicely coated with the paste. Put off flame and garnish with peanuts and cashewnuts. The flavourful Coriander Rice is ready to serve. Enjoy the lovely green of the rice. Bon Appetit.
Serving suggestions: Raita, Potato fry, or Cauliflower roast or Colaccasia(Arbi/Sepankezhangu) roast and papad.
STEPWISE RECIPE FOLLOWS:
1. Assemble all ingredients. Chop coriander leaves finely, Cook the rice for 3 to 4 whistles, cool on a plate and set aside.
2. Put the chopped coriander into the blender along with the green chillies, cumin seeds and fried chana/pottukadalai. Without adding water pulse them once or twice. Now add some water and grind to a smooth paste. Set aside.
3. In a karahi or pan pour some oil for tempering. Fry the peanuts to a golden colour and the cashew too and keep aside. In the same oil put in the mustard seeds. Let them crackle then add Chana dal, urad dal followed by dry red chillies. Fry until golden brown and add the turmeric powder.
4. Now pour the coriander paste into the oil and fry the paste nicely for 2 minutes. Add salt and continue to fry for another 2 minutes. The moisture should evaporate and the paste should become a little dense.
5. Add the cooked and cooled rice little by little to the paste. Mix well and switch off the flame. The flavourful Coriander rice is ready to serve.
NOTES:
1. While frying the paste in oil be careful not to evaporate it completely. The consistency should resemble sauce consistency.
2. Spread out the rice on a plate and drizzle oil or the rice will turn soft and lumpy once added to the paste.
If you tried this recipe and liked it then please comment below. I would love to hear from you.
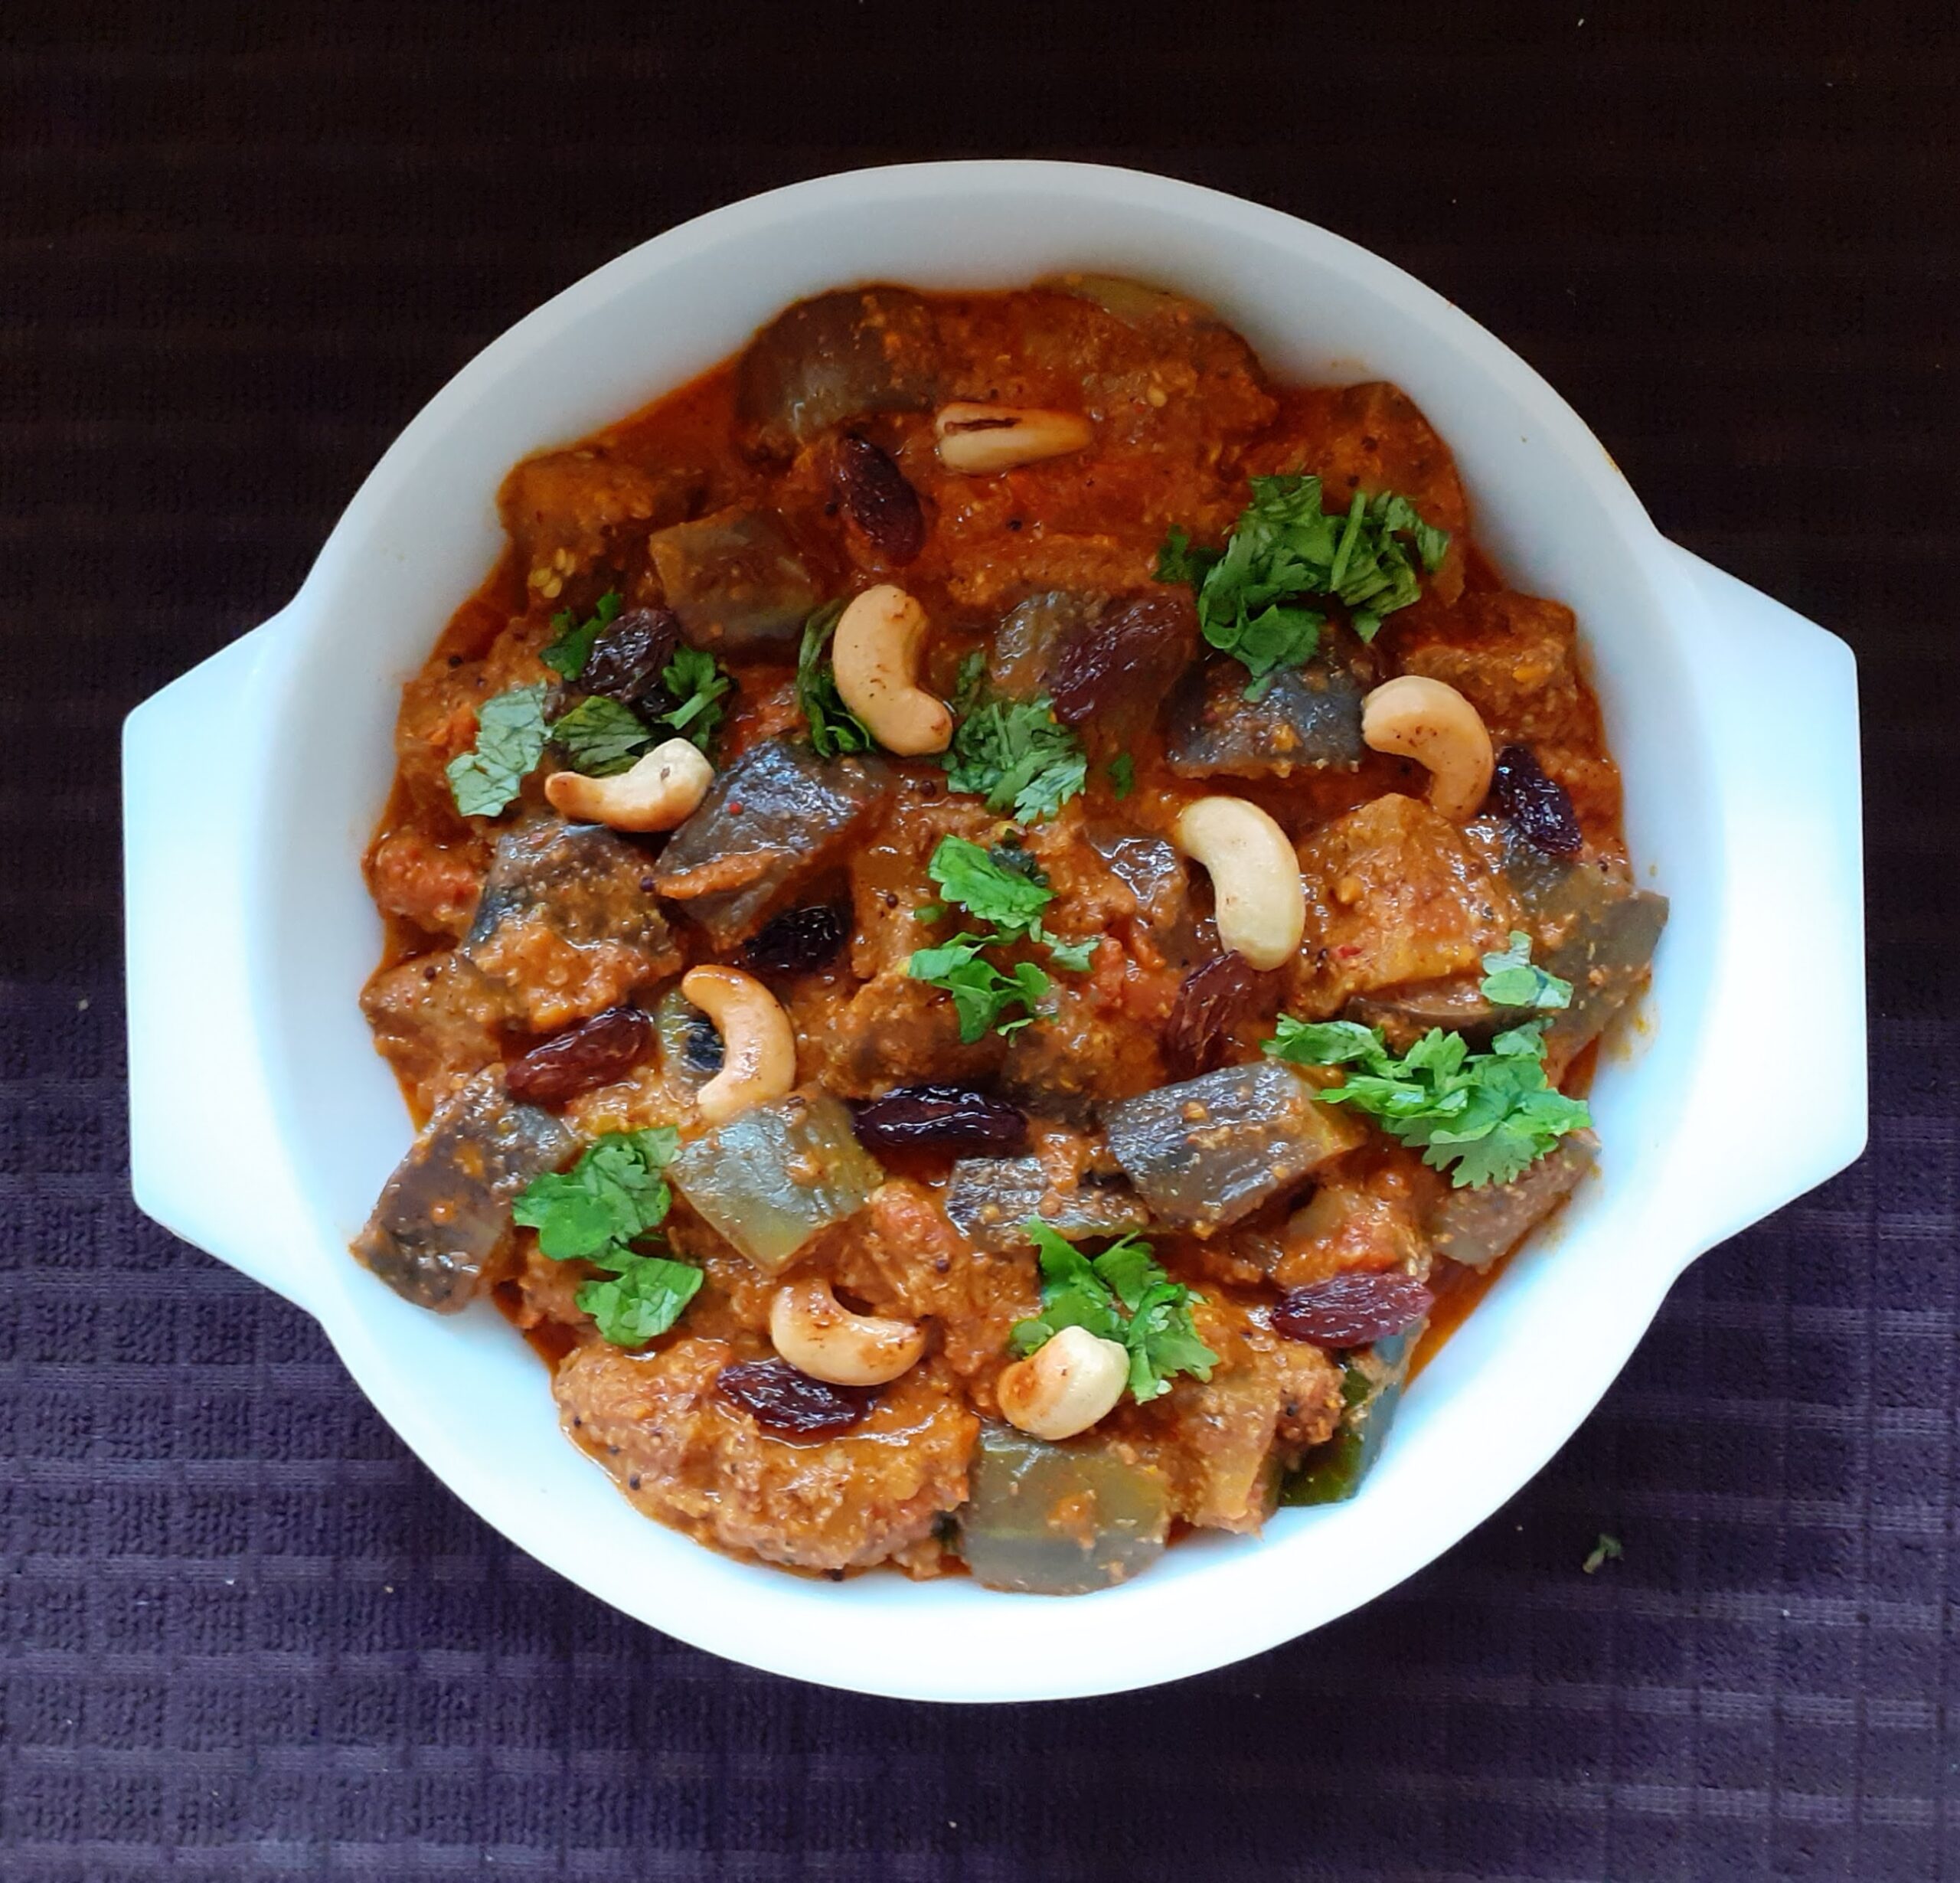
Brinjal Pepper Masala (No Onion-No Garlic Recipe)
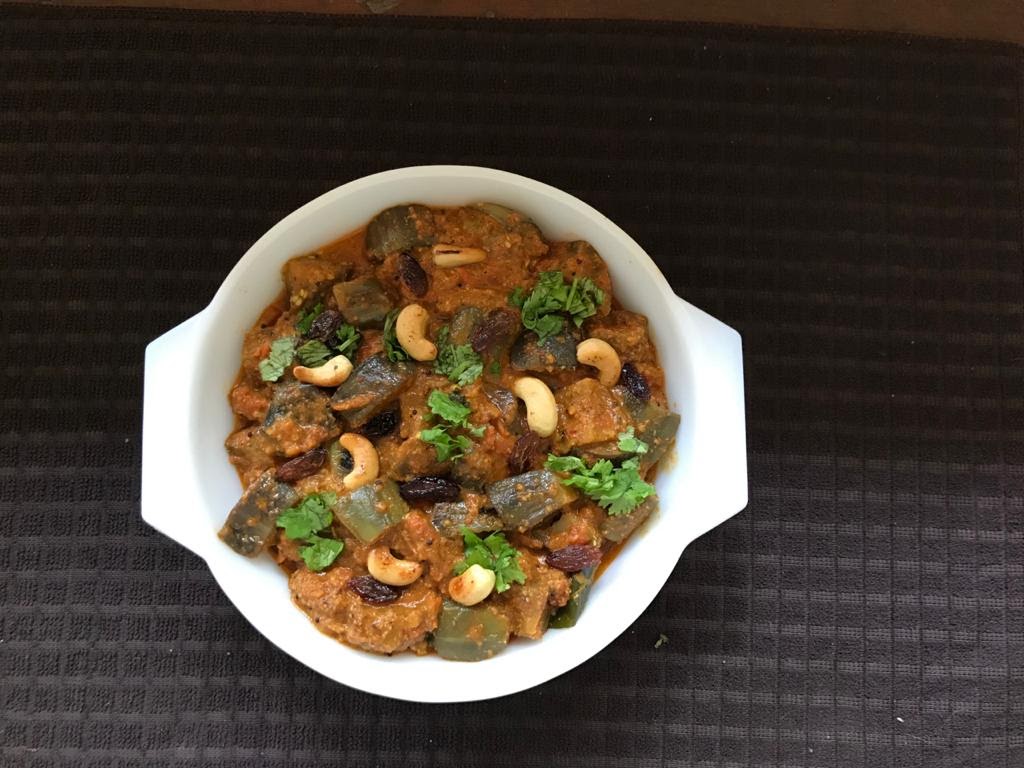
An everyday subji made from Brinjals and very simple gravy. Brinjals combined in a tomato and coconut gravy with some black peppers for spice. A very mildly flavoured dish, it has some Cashewnuts and Raisins too which enhance its taste. As I mentioned in one of my earlier posts Brinjals are very versatile vegetables and a large variety of recipes can be made with them from different cuisines. There are many types of Brinjal too and some recipes are specific to the Brinjal.
In this recipe, you can use any variety except the Bhara Baigan( the large fleshy one), as we want the Brinjal pieces to be firm and not mushy.
I learnt this subji from one of the guest house cooks where we stayed during our transfers from city to city. The gravy is of the South Indian style but believe me, it goes perfectly well with any of the rice varieties like Pulav or vegetable rice or even plain rice. It can also be served with Rotis. The Cashews and especially the raisins are like surprise packages in this dish which keep popping every 1 or 2 scoops. If you don’t like nuts or Raisins in your subjis(like I did until I tasted this) then you can always omit their use.
While you are here take a look at Gutti Vankaya Kura, which is also a Brinjal dish with Andhra flavours. Also check out, Methi Wale Baingan, Please look up other subjis too under the label Subjis while you are here.
PREP TIME: 20 Mins COOK TIME: 20 Mins
TOTAL TIME: 40 Mins COURSE: MAIN
CUISINE: SOUTH INDIAN SERVINGS: 4
AUTHOR: Rajni Ram
Here is the recipe of Brinjal Pepper Masala-
Ingredients:
Brinjal (any variety except Bharta Baigan) 250 gm diced medium
Tomatoes 3 large finely chopped
Curry leaves a few
Oil for sauteeing
Turmeric powder
Red chilli powder
Ingredients for paste:
Pepper 1 tsp(add more for more spice)
Cumin 1 tsp
Dry red chillies 3
Grated coconut 2-3 tbsp
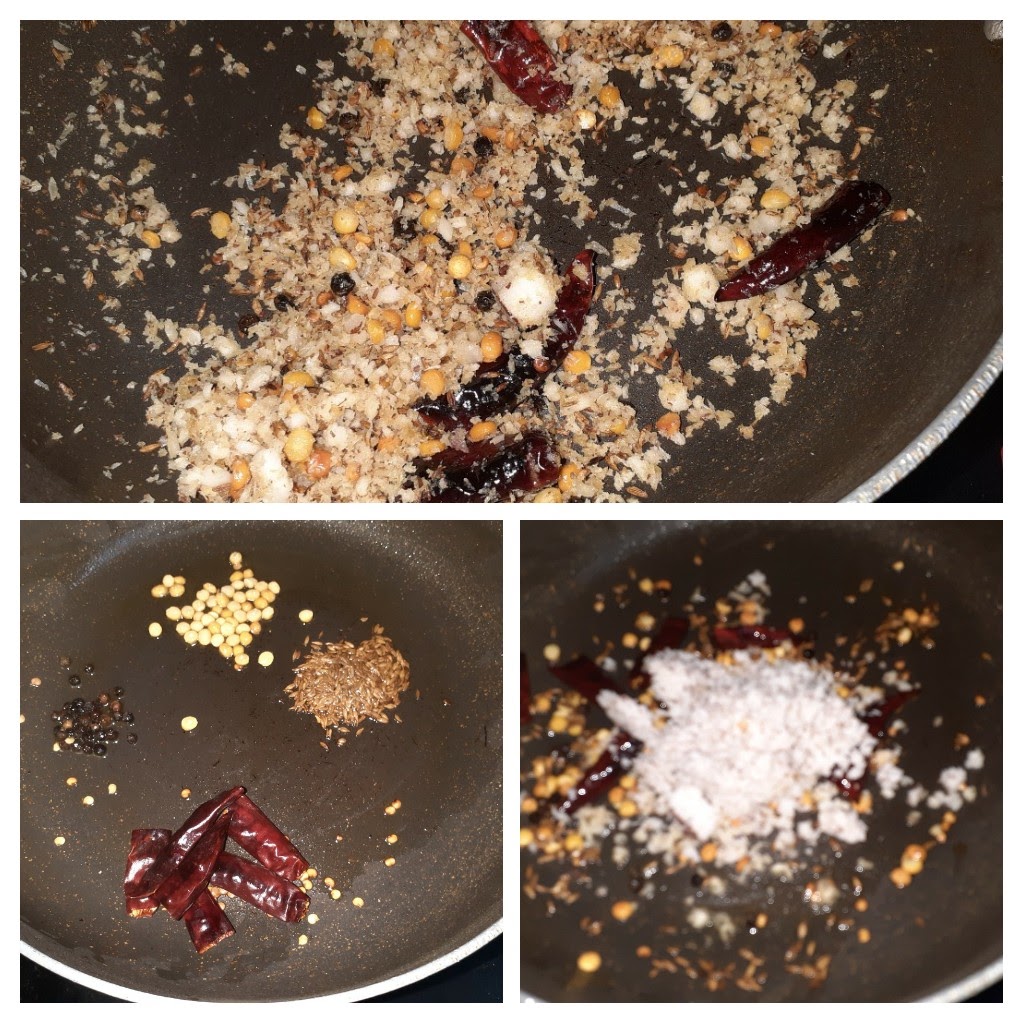
Directions for making paste:
Heat a karahi with 1 tsp oil and put in all ingredients mentioned under paste, in the same order and roast them until light brown. Cool it and grind it in a blender to a smooth paste.
Directions:
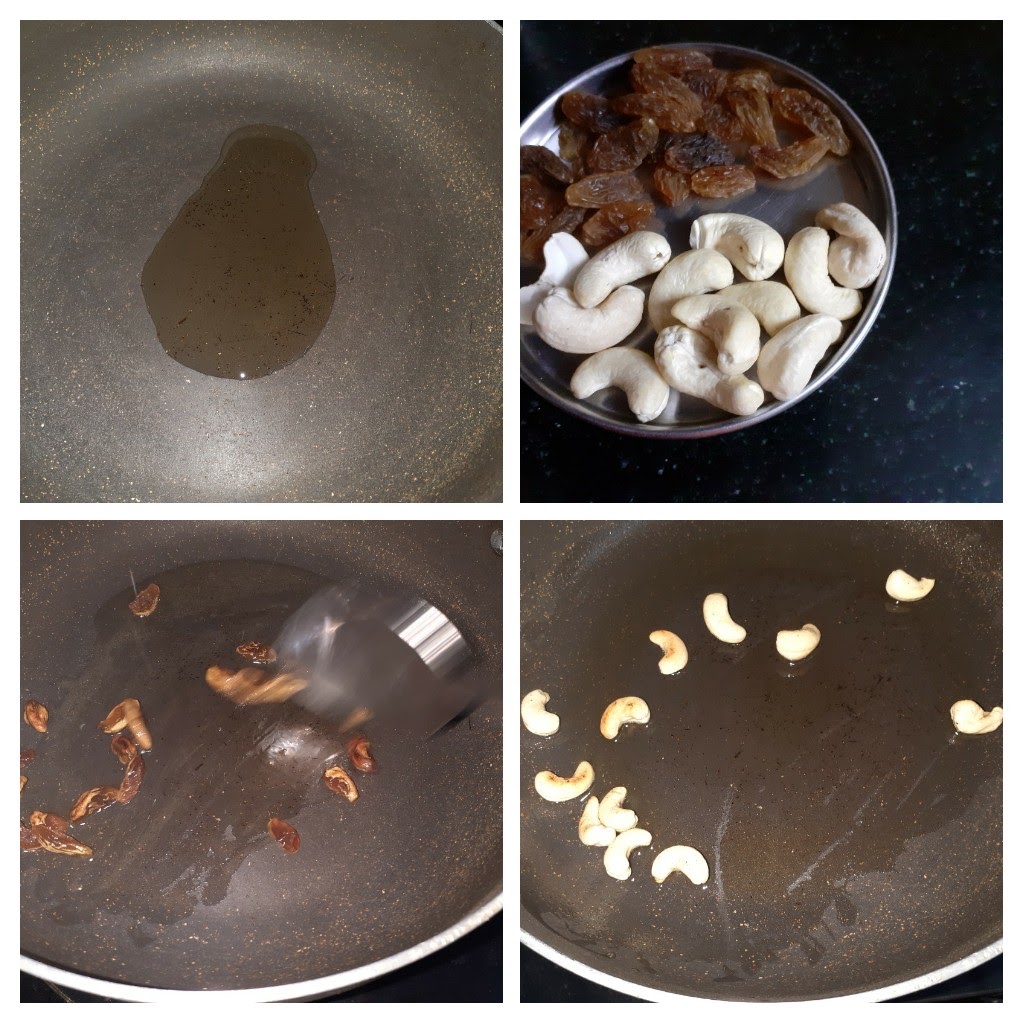
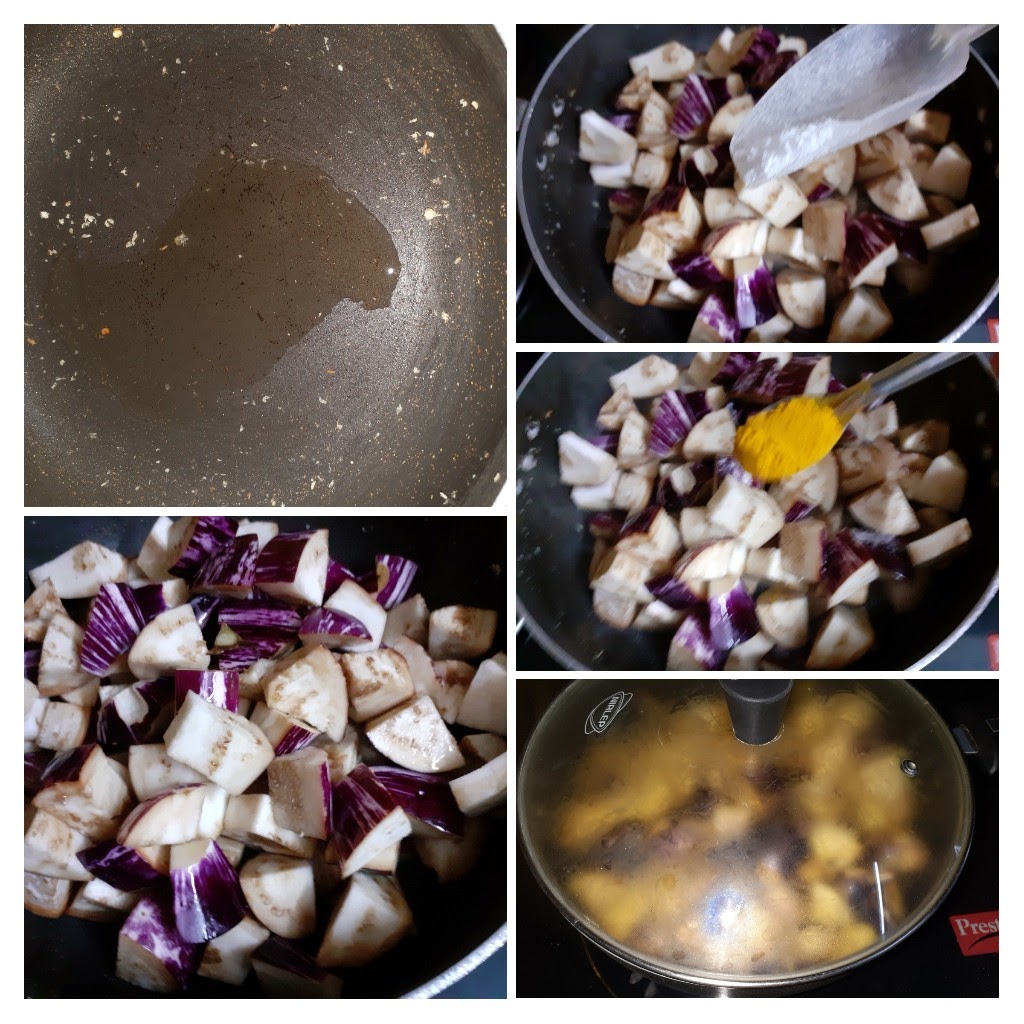
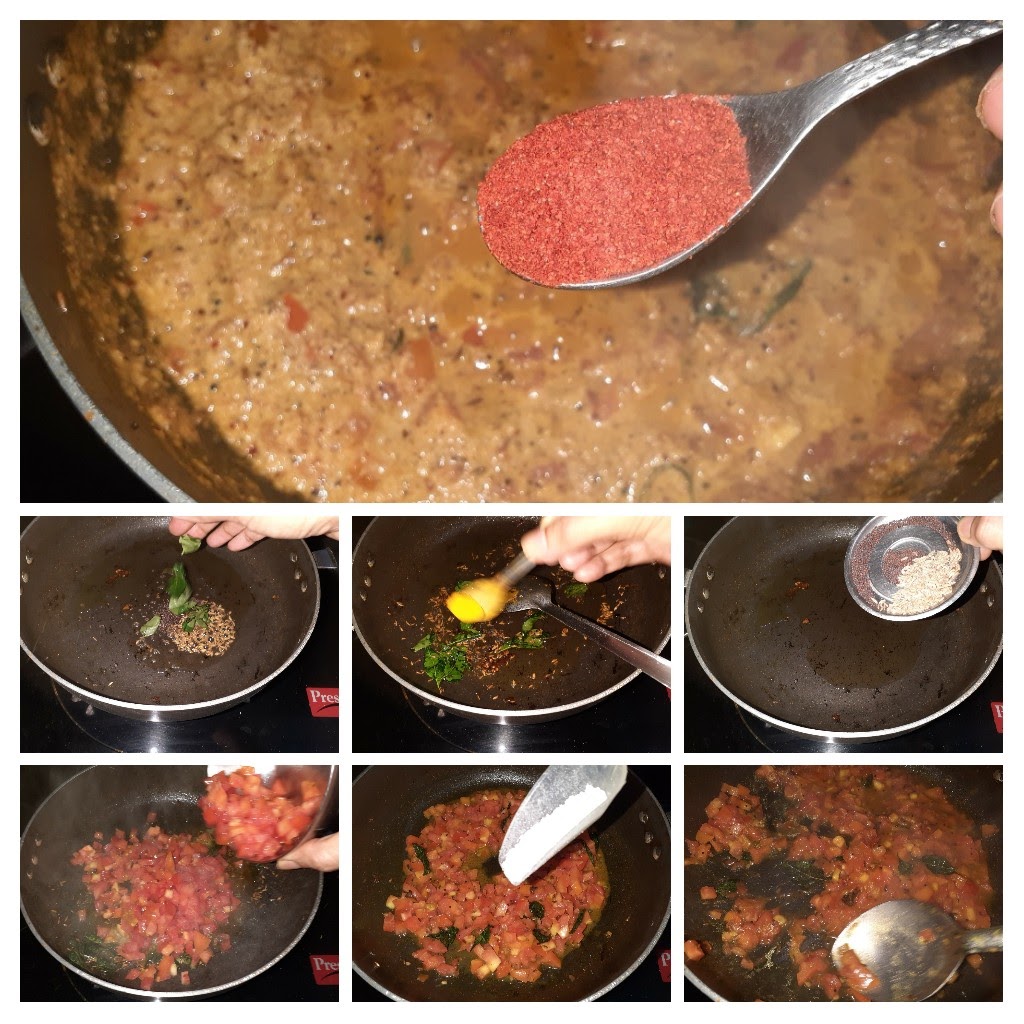
Dice the brinjals to medium size and put them in some water. Chop tomatoes very fine and set aside. In a Karahi pour some oil-around a tablespoon, let it heat up and put in the Cashewnuts, fry them until they are golden brown, remove them and put in the Raisins. Fry them too until they puff up and remove from oil. Now add the diced Brinjals to the same karahi and add 1/2 tsp turmeric powder, 1/2 tsp salt, stir well and cover it and cook for 3 minutes. Stir again and cover for another 2 minutes. The brinjal should have turned a little tender but still retain shape. Transfer the brinjals to another vessel and set aside. Now in the same karahi take 2 tsp oil and heat. Add the mustard seeds, let them crackle. Add the cumin seeds followed by turmeric powder and curry leaves. Give it a stir and add the chopped tomatoes. Now add some salt followed by red chilli powder and fry nicely in the oil. Let the tomatoes break, keep mashing them with the back of the spatula. When it turns pulpy, add the ground paste, sauteed Brinjals followed by 1 cup of water, cover and cook for 7 minutes. When you open the lid, the brinjals should have cooked fully, but retain shape and the curry should have come together. Now switch off the flame and add in the fried nuts and Raisins. Brinjal Pepper masala is ready to serve. I served it with some Pulav, any rice or Indian bread varieties will go well with it. Enjoy. Bon Appetit.
STEPWISE RECIPE FOLLOWS:
1. Assemble all ingredients. Dice the Brinjals, chop the tomatoes, grate the coconut and keep ready.
2. In a karahi take around 1 tbsp oil, add the nuts and the raisins one after the other and fry. The cashew nuts should turn golden brown and the raisins should fluff up. Remove them into a separate plate.
3. Now to the same karahi add the diced Brinjals followed by salt 1/2 tsp and turmeric powder 1/2 tsp. Stir them and cover the karahi for 3 minutes. Open the lid, stir again and cover and cook for 2 minutes. Open and check the brinjals, they should have turned a little tender but should have retained the shape. Remove them to another vessel. If still undone, then cover and cook for another 2 minutes.
4. Now pour a little oil into the karahi, about 1 tsp and heat. Roast all the masalas , mentioned under paste in the same order. Pepper being first, followed by cumin seeds, dry red chillies and finally add the coconut and fry until they get a nice brown colour. Cool, transfer to a blender and grind to a fine paste.
5. In the same karahi pour 2 tsp oil and heat. Add the mustard seeds followed by cumin seeds, turmeric powder and curry leaves. Fry and put in the tomatoes followed by salt and red chilli powder. Stir and cook the tomatoes. Keep mashing them with the back of the spatula so that they turn mushy.
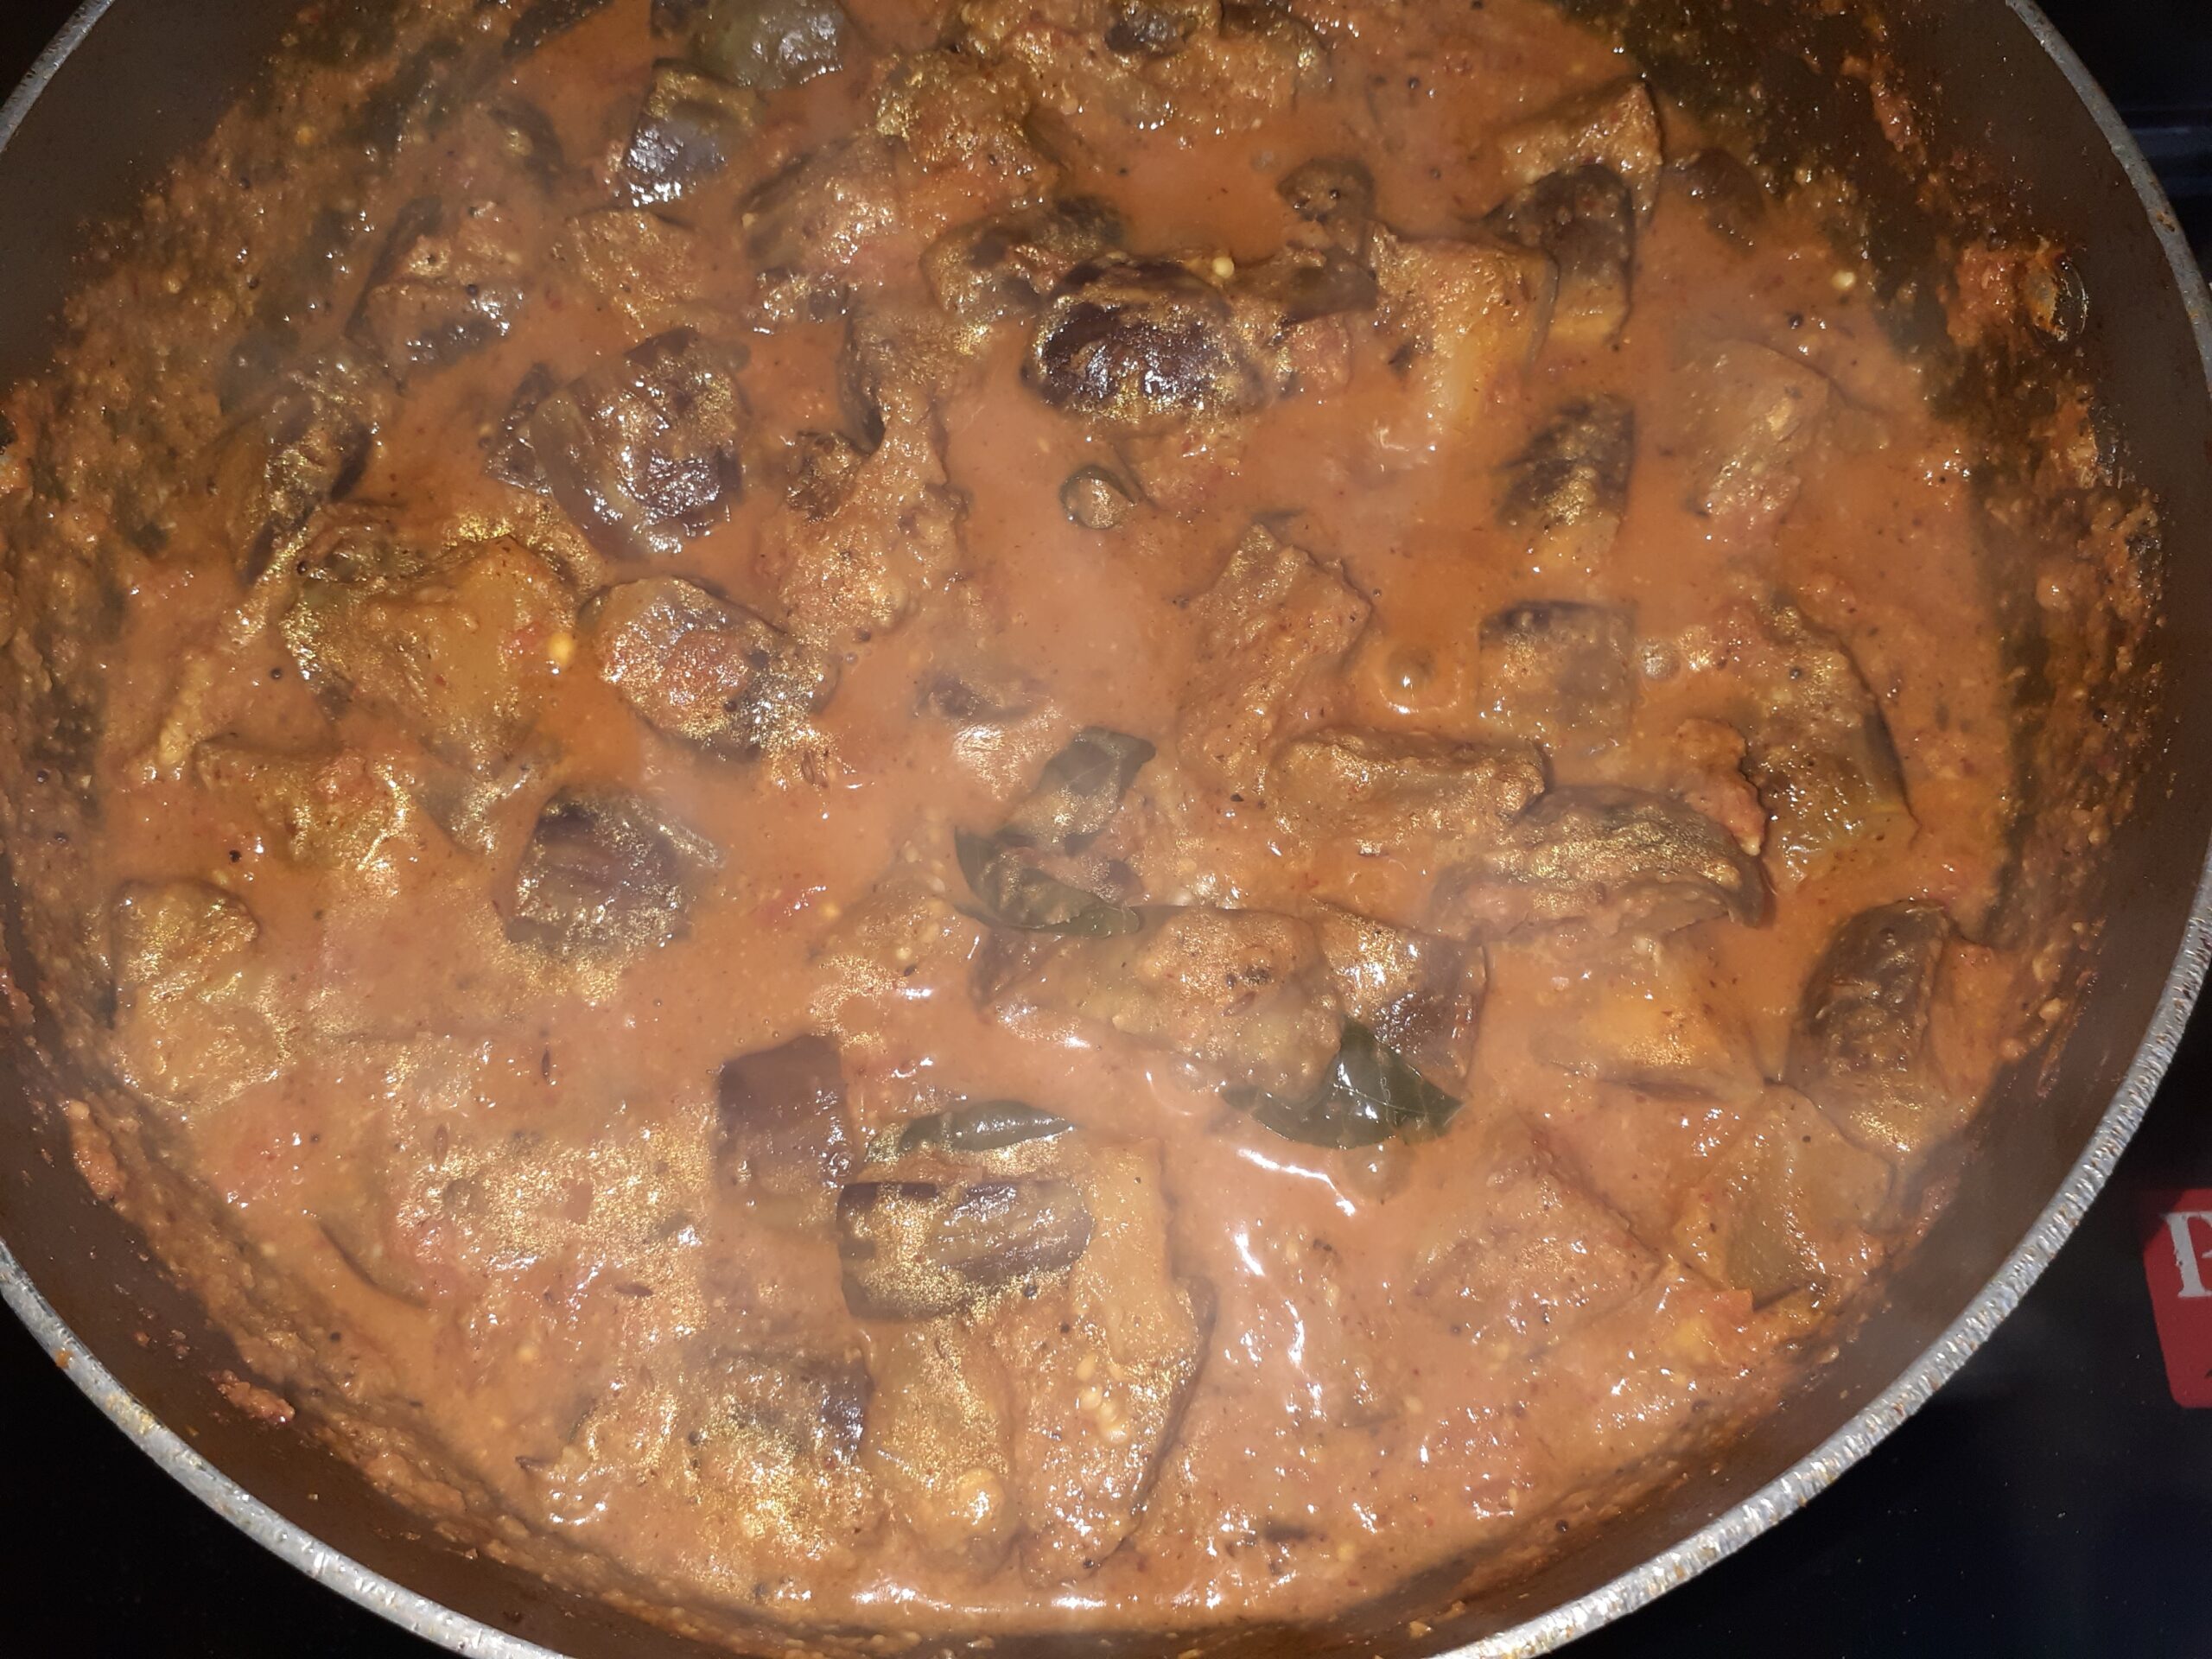
6. Now add the ground paste, followed by 1 cup water and put in the sauteed brinjals and cover the karahi and cook the brinjals in the paste for 7 minutes approximately, stirring once in between.
7. The Brinjals should be completely cooked by now, but not limp. the gravy too should have come together and should not be runny. Switch off the flame and drop in the fried nuts and raisins. Brinjal pepper masala is now ready. Serve hot with plain rice, Pulavs or with hot Chapatis.
NOTES:
1. Any variety of brinjal can be used except for the big fleshy one(Bharta Baingan).
2. Coriander seeds have been excluded from the paste, to get the same taste as mentioned in the recipe do not add them as they change the flavour of the dish completely.
3. More pepper can be added depending upon your spice levels. Be sure to reduce the red chillies or red chilli powder if increasing the pepper quantity.
4. The Cashewnuts and enhance the taste of the dish but if you don’t like the nuts coming in the way, they can be excluded altogether.
5. Kashmiri red chilli powder can be used instead of the regular one for colour.
If you tried this recipe and liked it please comment below. I would love to hear from you.
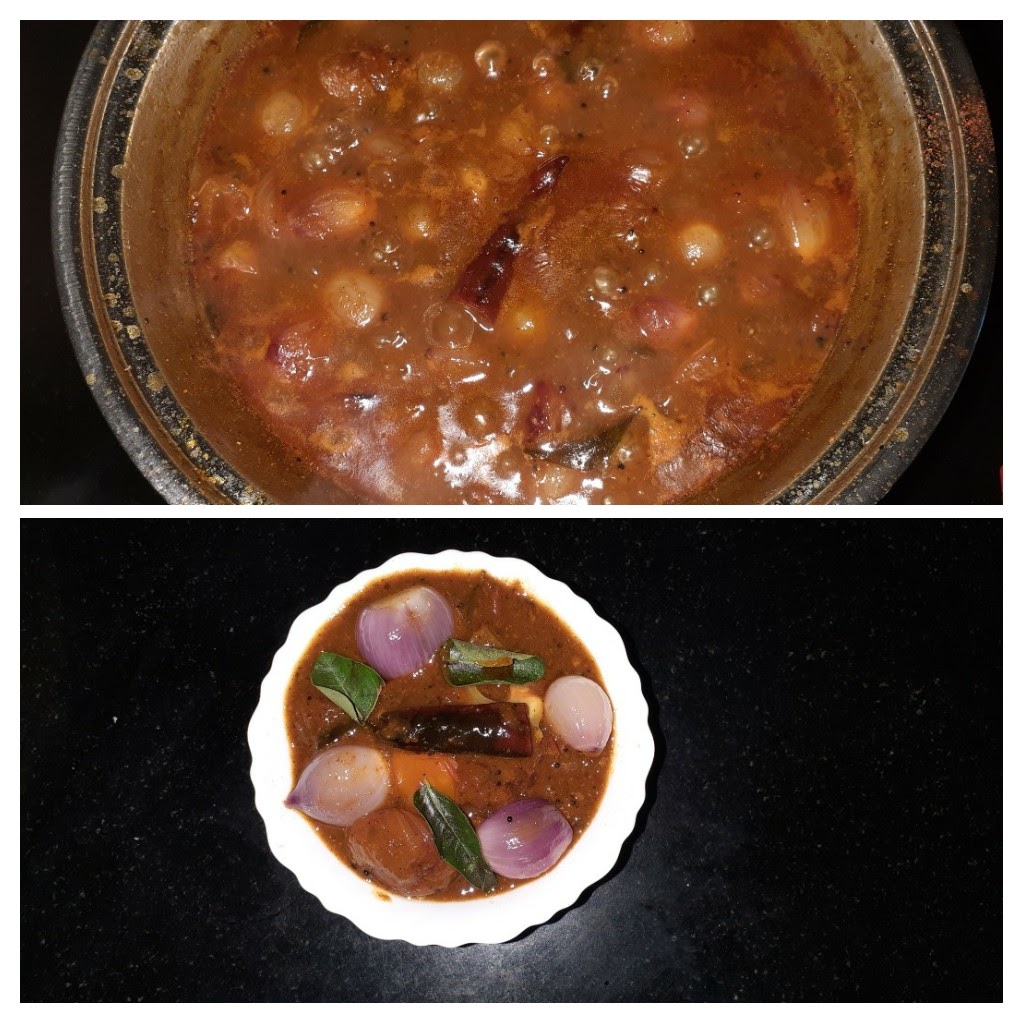
Vatha Kozhambu (Shallots In A Spicy Tamarind Gravy)
This is a traditional South Indian recipe. There are many variations to this recipe and a large variety of vegetables or dehydrated berries(Turkey berry, cluster beans, etc;) are simmered in a spicy tamarind sauce. Usually served with hot rice and ghee, but goes well with Dosas and Idlis too. I have used Sambar powder here, though Vatha Kozhambu powder is also used, there is not much difference in the taste and Sambar powder works well. For the recipe of Sambar Powder click here. Let’s get to the recipe without much ado.
PREP TIME: 20 Mins COOK TIME: 15 Mins
TOTAL TIME: 35 Mins COURSE: MAIN
CUISINE: SOUTH INDIAN SERVINGS: 4
AUTHOR: Rajni Ram
Ingredients:
Shallots 200 gm skinned
Tomato 1 large
Tamarind lemon sized ball( soaked in water and pulped)
Salt as per taste
Sambar powder 1 tbsp
Red chilli powder 1 tsp
Turmeric powder 1 tsp
Asafoetida 1 tsp
Mustard seeds 1 tsp
Fenugreek seeds 1/2 tsp
Dry red chillies 2 broken
Curry leaves a few
Sesame oil/ Til oil 1 tbsp( can use more if you prefer)
Directions:
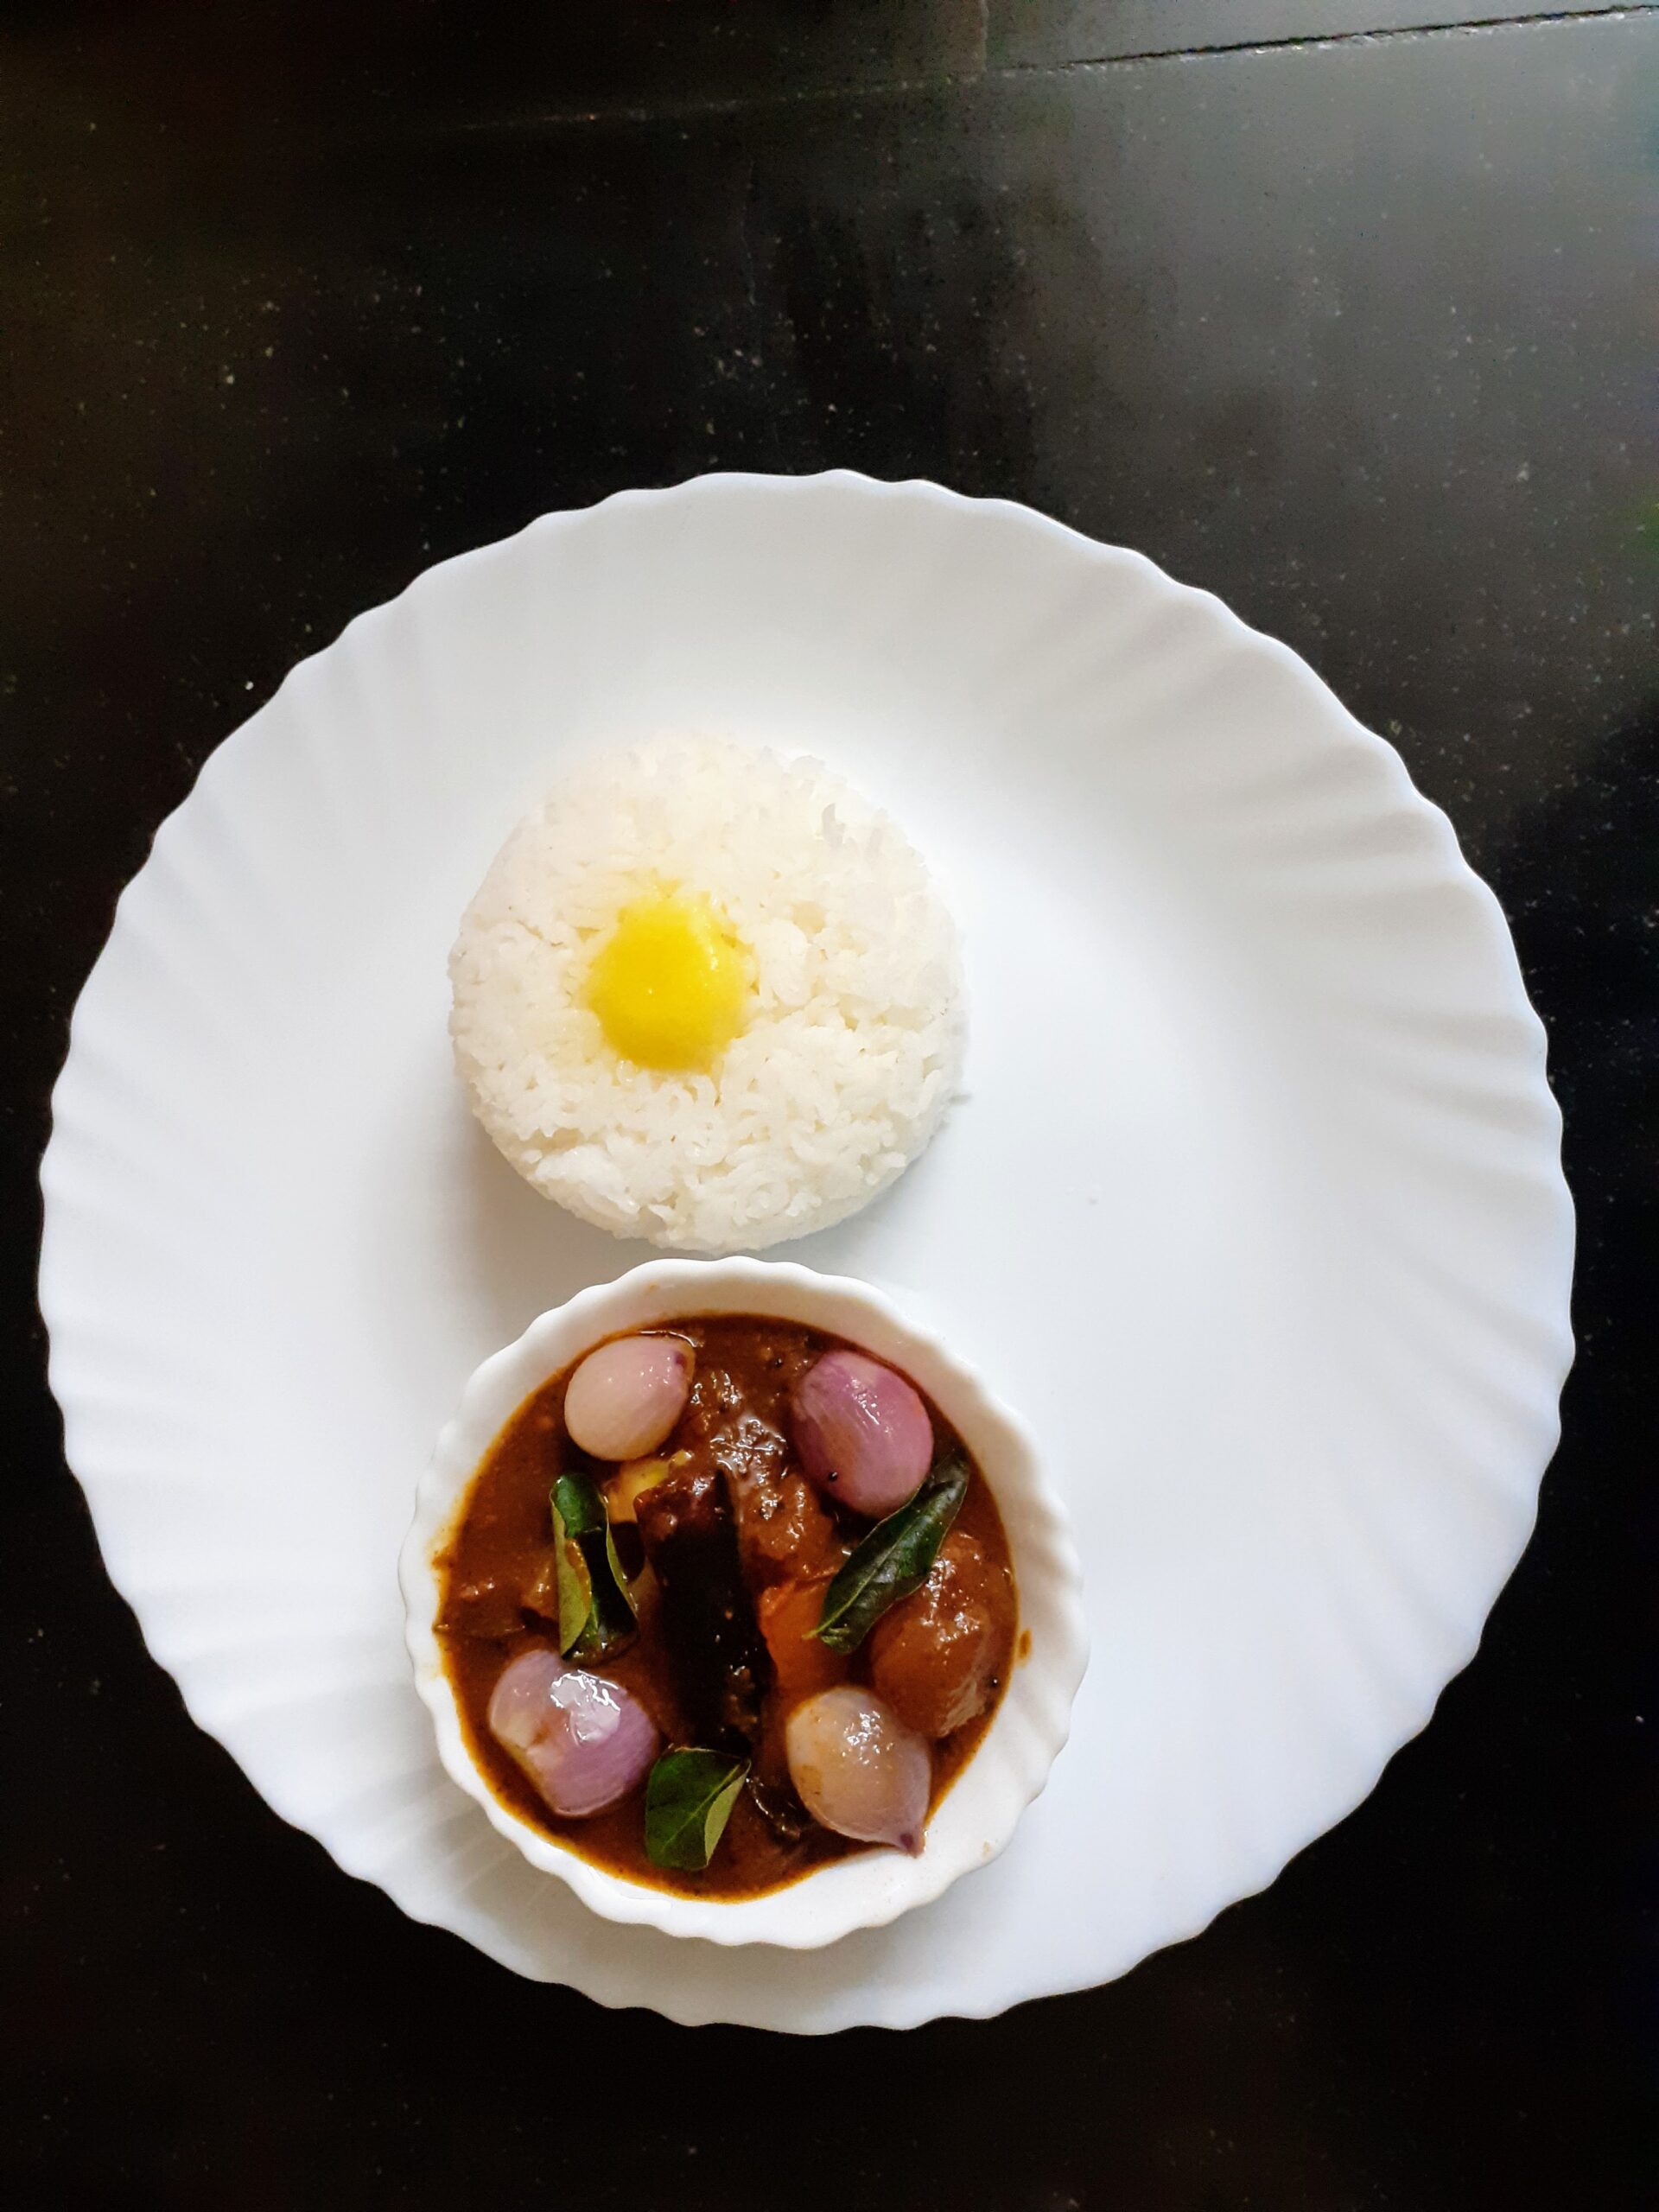
Peel the skin off the Shallots and keep ready. Chop the tomatoes. Soak a lemon sized ball of tamarind in a little warm water, let it cool and extract the pulp. Now in a pan or karahi take a tablespoon of Sesame/Til oil and heat. Add the mustard seeds, fenugreek seeds, asafoetida, dry red chillies, and curry leaves and saute for a minute. Add the Shallots and saute until they start turning translucent. Now add the tomatoes and continue to saute for a minute. Add the dry spices- Sambar powder, turmeric powder, and red chilli powder and continue to stir fry. If the mixture is too dry add another 2 teaspoons of oil, otherwise the masala may burn. Saute for another minute and pour the tamarind pulp and add the salt. Stir well and allow it to simmer on low flame until it thickens and reduces a bit. The oil will form a layer on top and the mixture will reduce, at this stage put off the stove. The Shallot Vatha Kozhambu is ready to serve with hot rice, Dosas, Idlis etc.
Direction to make Sambar powder is given under the label powders.
STEPWISE RECIPE FOLLOWS:
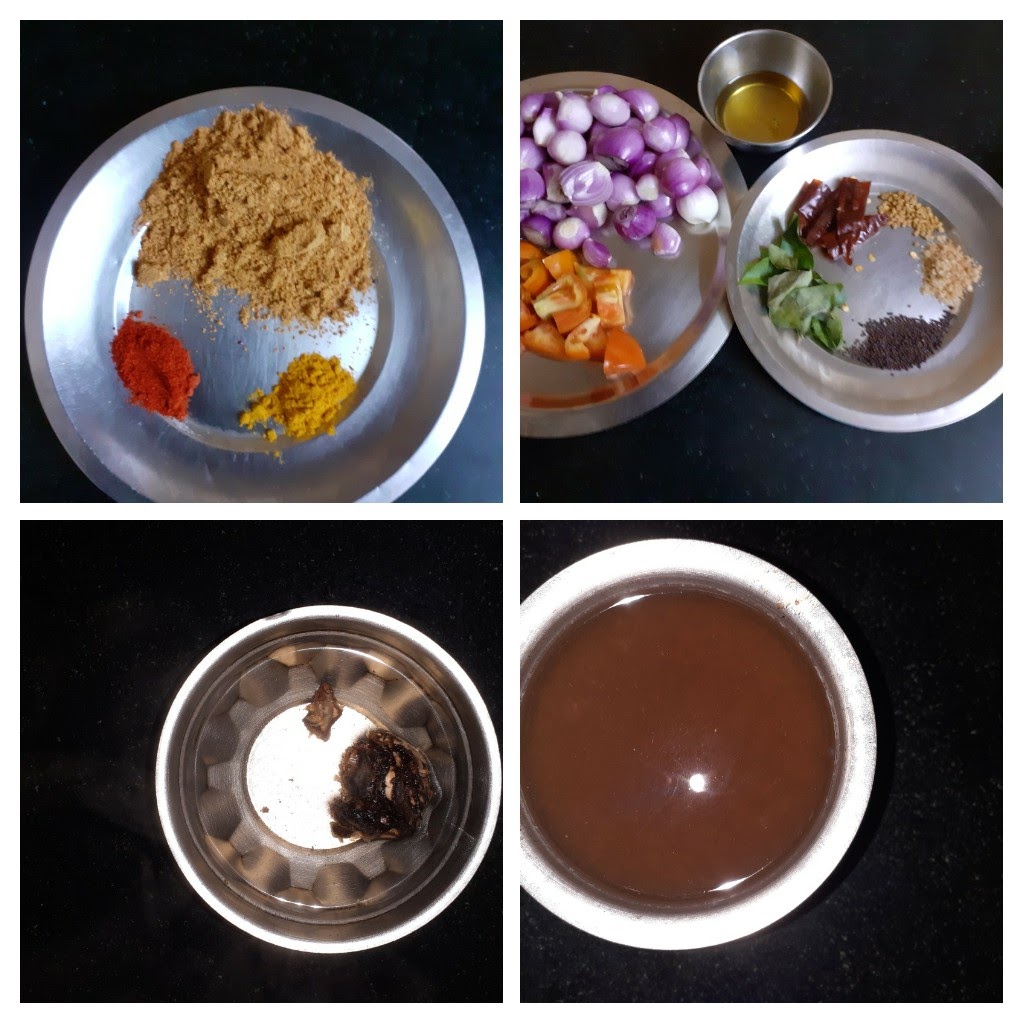
1. Assemble all ingredients. Shallots skinned and tomatoes chopped. Soak tamarind(lemon sized ball) and get the pulp.
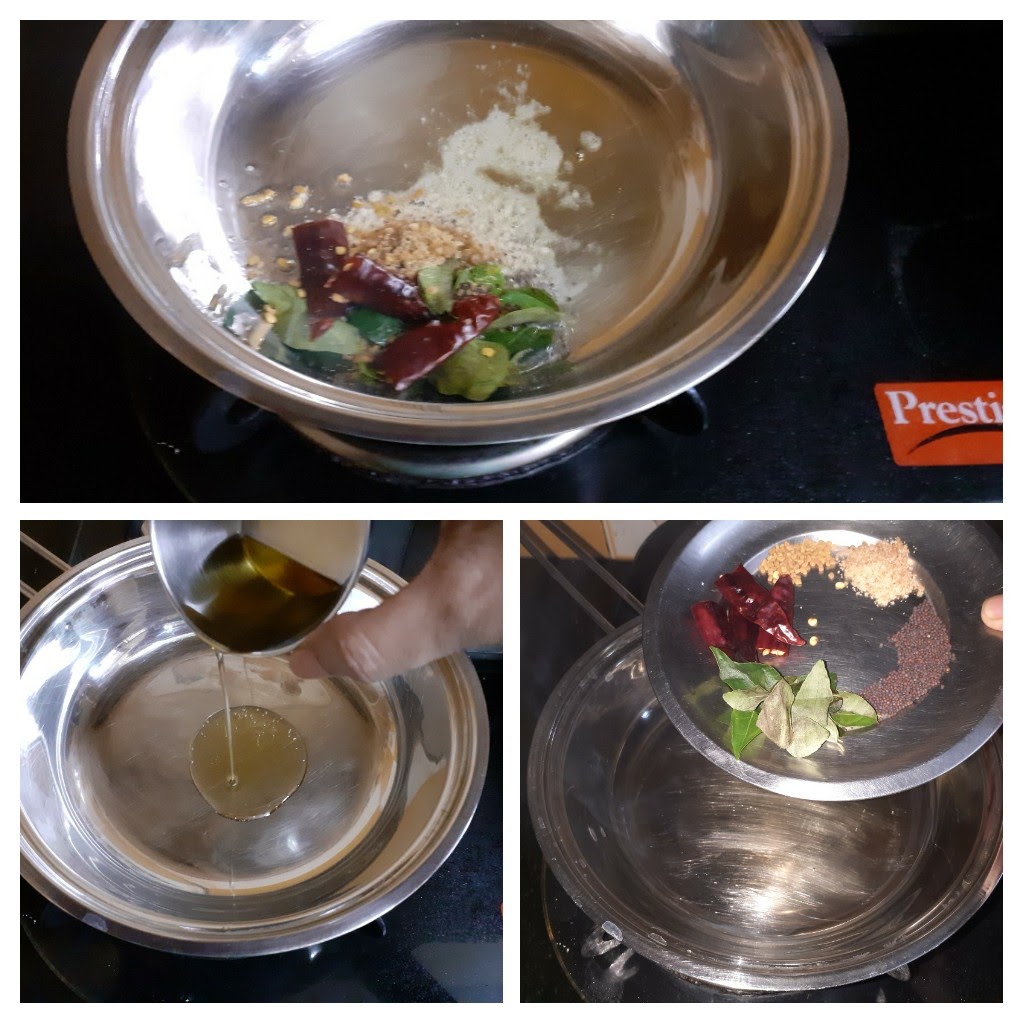
2. In a pan/karahi heat some Til oil(preferable, if not continue with refined oil). Add mustard seeds, fenugreek seeds, dry red chillies, asafoetida, curry leaves, and fry.
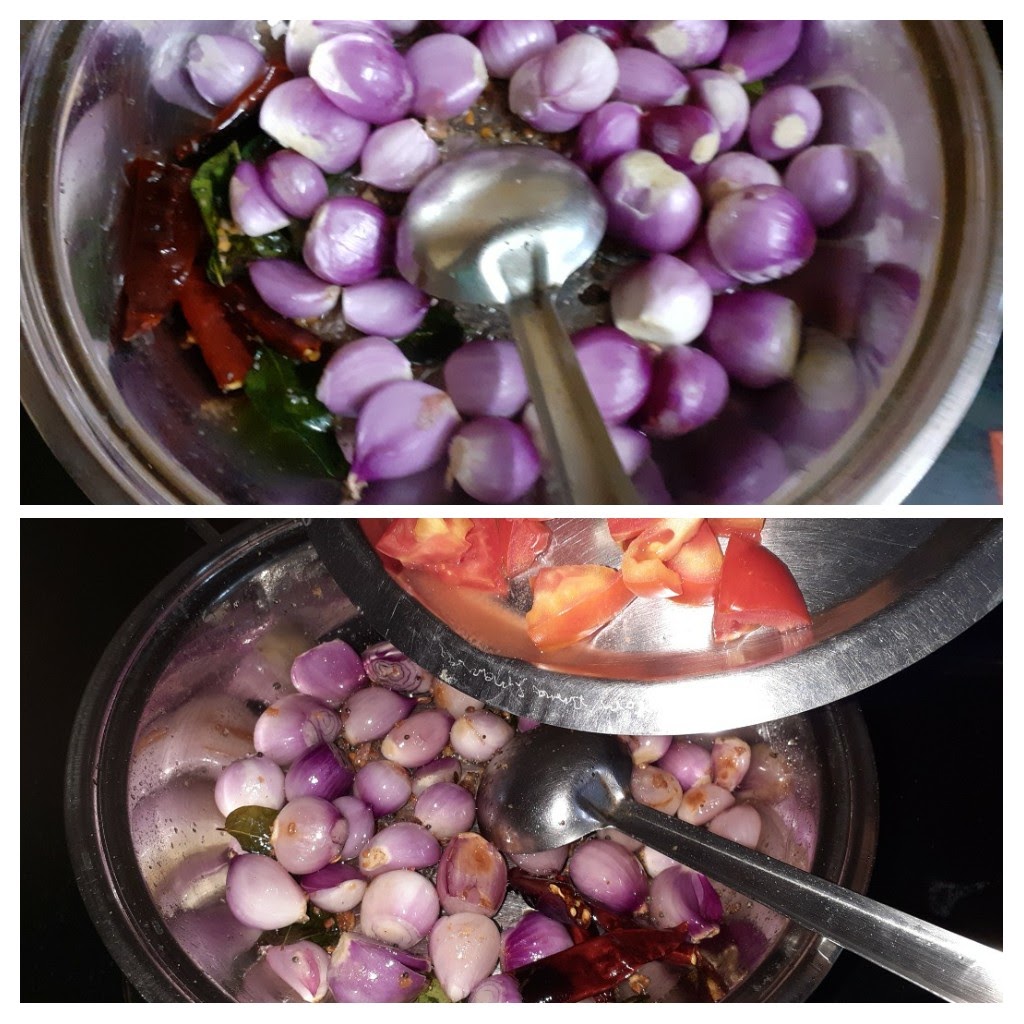
3. Add the shallots and stir well so that the oil coats all the shallots. Fry until they turn translucent. Add the tomatoes and continue to stir fry for another minute.
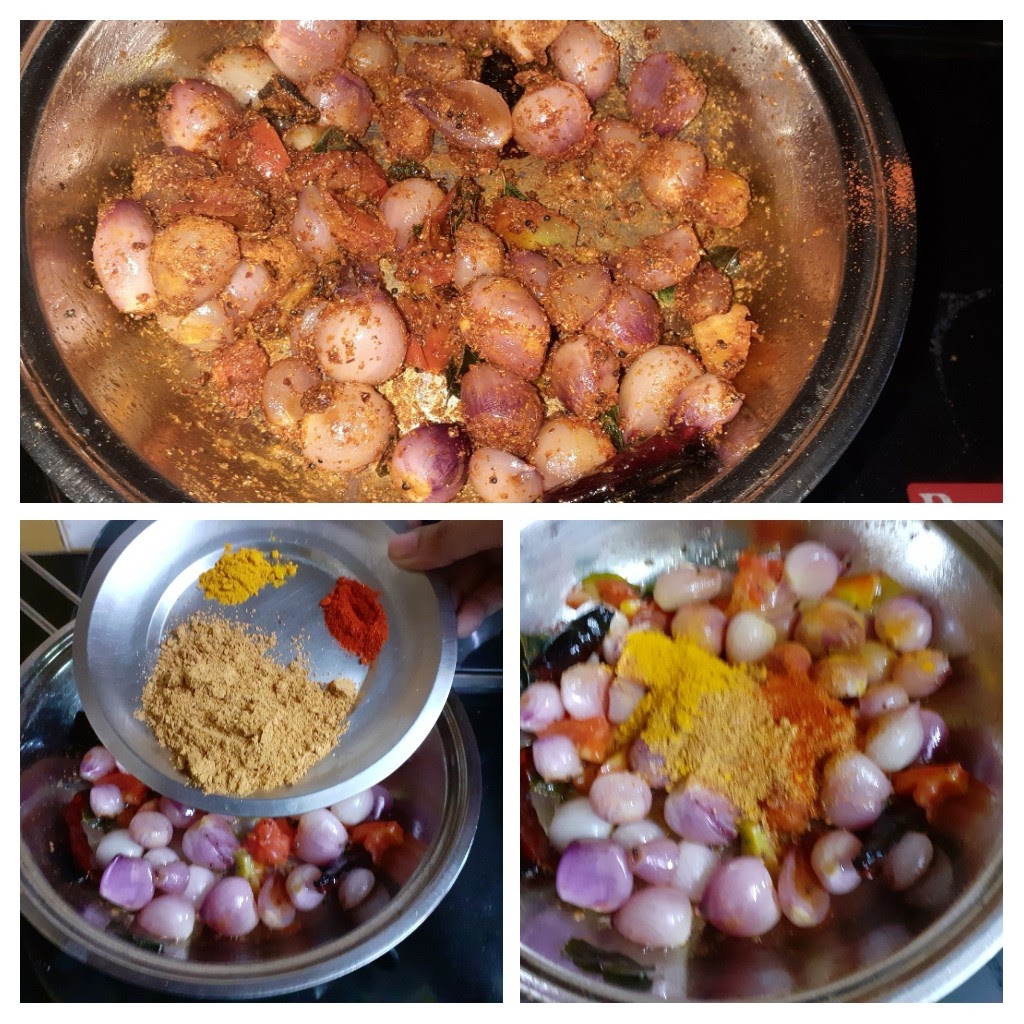
4. Now add in all the dry spices- Sambar powder, red chilli powder, turmeric powder, and continue to fry. If the mixture is too dry after adding the powders, then add 2 tsp of oil and fry, until the raw taste of the masalas is gone.
5. Pour the tamarind pulp and in the salt and stir well and allow the mixture to boil. Let it simmer until the mixture thickens and reduces in quantity. The oil will form a layer on top. At this stage put off the stove. The Shallot Vatha Kozhambu is ready to serve with hot rice and ghee.
NOTES:
1. I have used Shallots here, other vegetables that can be used are Drumsticks, Ladies finger, Onions, dehydrated berries like Turkey berry(Sundakai), and even dehydrated vegetables like Cluster beans, Bitter gourd, etc.
2. Sesame oil enhances the flavour of the dish, so I highly recommend it.
3. Frying the dry masalas in the oil well(step4), gives the dish the perfect flavour.
4. The fenugreek seeds also impart the aroma a lovely flavour to this dish, but they should be used in the quantity mentioned and not more, as they can turn the dish bitter.
If you tried this recipe and liked it please comment below. I would love to hear from you.
Dal Makhni 2 ways
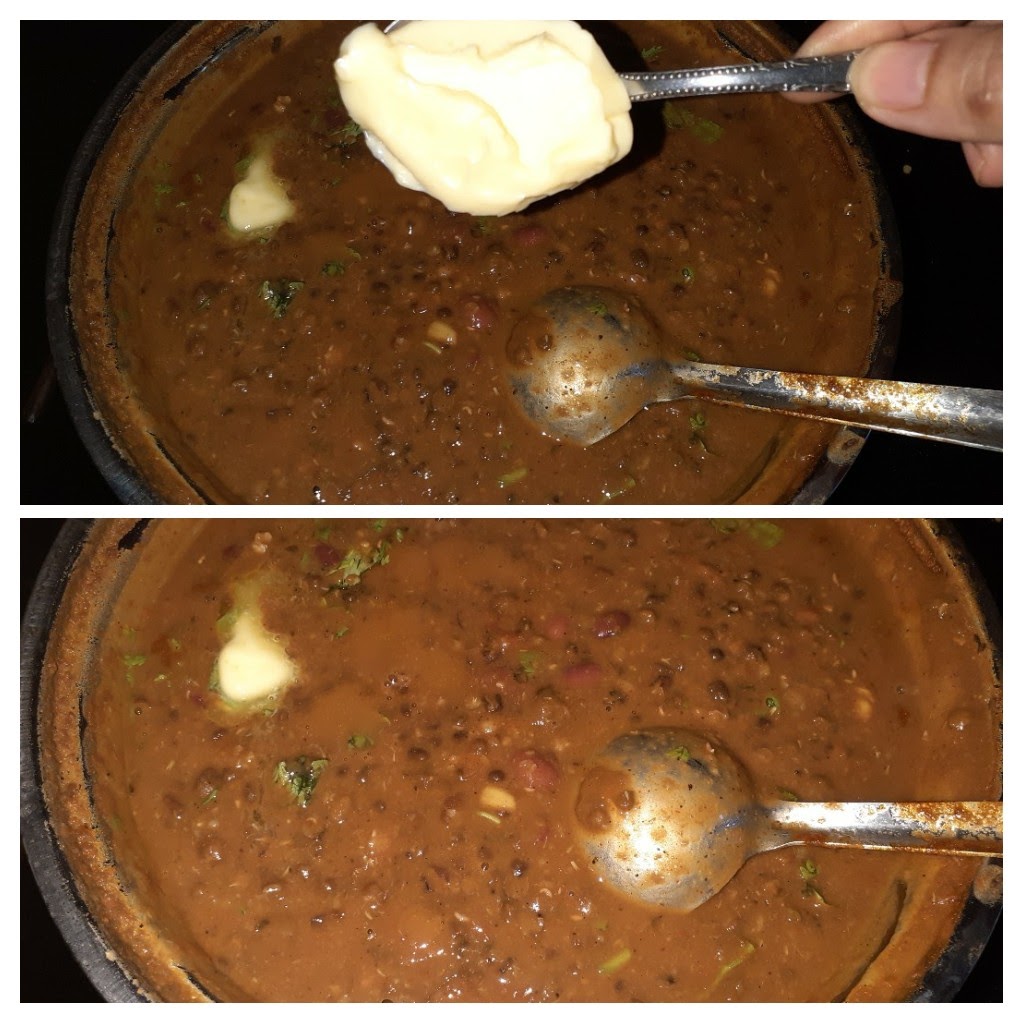
Dal Makhni or Dal Makhani is one of the all-time favourite dishes of my family, whenever we are at a North Indian joint. So I have tasted many versions of it and used to make this recipe at one point in time with cream, as most recipes suggest. I found the dal to be heavy when made this way and then I chanced upon the recipe for Dal Makhni that I’m blogging now on a spice packet, I tried it and it tasted almost like the restaurant ones, so have been following this recipe for a long time now.
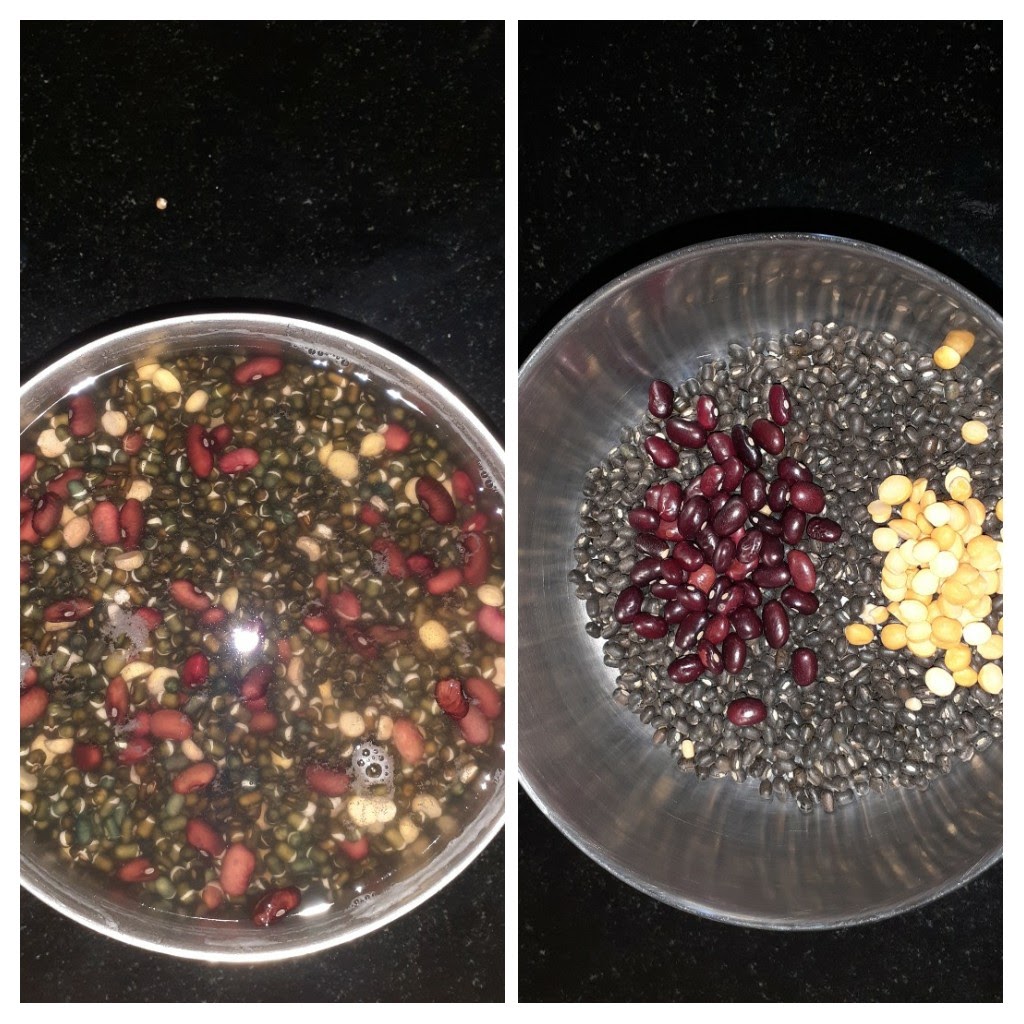
Dal Makhni is a dish from Punjab and the main ingredients are black lentils( Black Urad dal whole) Rajma, butter and other spices and condiments. It gets the creamy texture and taste from butter and slow cooking. The longer you cook it on low fire, the tastier. That said, this dal can be made without butter/ cream too. And it tastes all the same.
While you are here please checkout my other recipes like Choley, Pakode wali Dal,
Black Whole Urad 200 gm ( black lentils) Soaked overnight
Rajma 1 handful (soaked overnight)
Chana dal 1 tbsp.
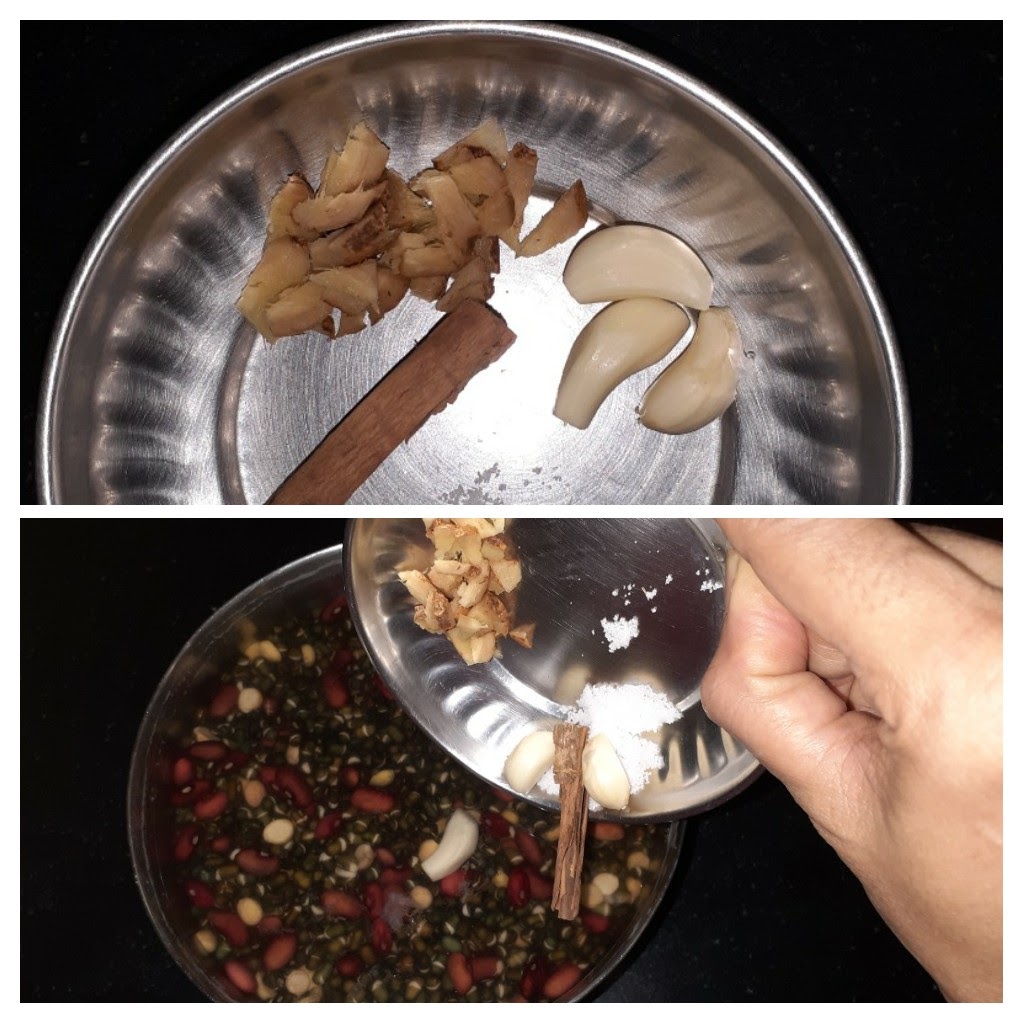
Garlic 8 pods (finely chopped)
ginger 1-inch piece chopped
Butter 2 tbsp
Tomato 3 medium pureed
Salt as per taste
Red chilli powder 1 tsp( more if you like it spicy)
Dal makhani masala 1.5 tbsp
Kasoori Methi 1 tsp crushed
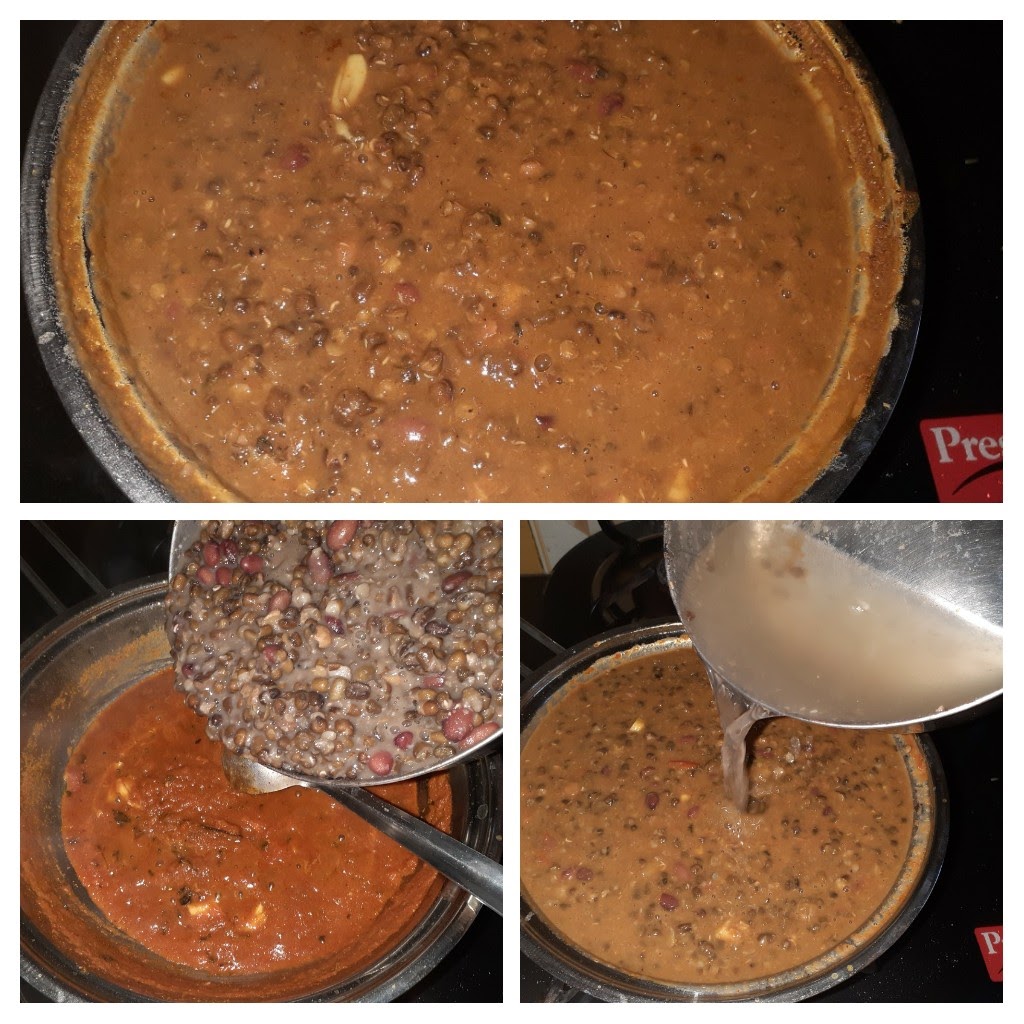
Directions: Soak the Black Urad, Rajma and Chana dal overnight. Once soaked put them in a pressure cooker with 2 pods of garlic and the ginger and cook for 6 to 8 whistles. Heat 1 tbsp butter in a pan and heat. Put in the Cinnamon stick and garlic and fry don’t brown them. Add in the Kasoori Methi and fry for half a minute. Now add the tomato puree and cook for 3 minutes. Add in the Dal Makhni masala, Red chilli powder, salt and cook until the butter floats. Lightly mash the cooked dals and add them to the tomato mixture. Stir nicely and add 2 cups water and reduce the heat and cook on low fire for about 25 to 30 minutes. Switch off the stove and add another tablespoon of butter and garnish with finely chopped coriander. Creamy Dal Makhni is ready to serve. This Dal goes really well with Parathas, Roti, Jeera rice and other Indian bread. Enjoy and Bon Appetit.
STEPWISE RECIPE FOLLOWS:
1. Assemble all ingredients. Soak the dals overnight.
2. Cook the soaked dal in a pressure cooker along with some garlic and the ginger and a piece of cinnamon stick for 8 to 10 whistles.
3. Take some butter in a pan and heat. Put in the Cinnamon stick and garlic and fry for 1/2 a minute. The garlic must not turn brown. Add in the crushed Kasoori Methi and fry for a minute.
4. Now add in the pureed tomatoes followed by salt, red chilli powder and Dal Makhani masala and cook. Cook until the butter floats/ forms a layer on top.
5. Now add the cooked dal, stir nicely and add 2 cups of water and cook on low fire for 25 to 30 minutes.
6. After 30 mins put off the stove and add a tablespoon( or more)of butter to the dal and garnish with chopped coriander.
NOTES:
1. The Chana dal gives the creaminess to this dish, so don’t do away with it, at the same time don’t put too much of it or the taste may vary.
2. If you don’t have Dal Makhni Masala, use a small quantity of garam masala. For the measures that are given above 2 tsp garam masala should be sufficient.
3. Adding Kashmiri red chilli powder will give the dish a good colour. I have added a mix of both regular red chilli powder and Kashmiri red chilli powder, so that spice and colour are balanced.
If you tried this recipe and liked it please comment below. I would love to hear from you.
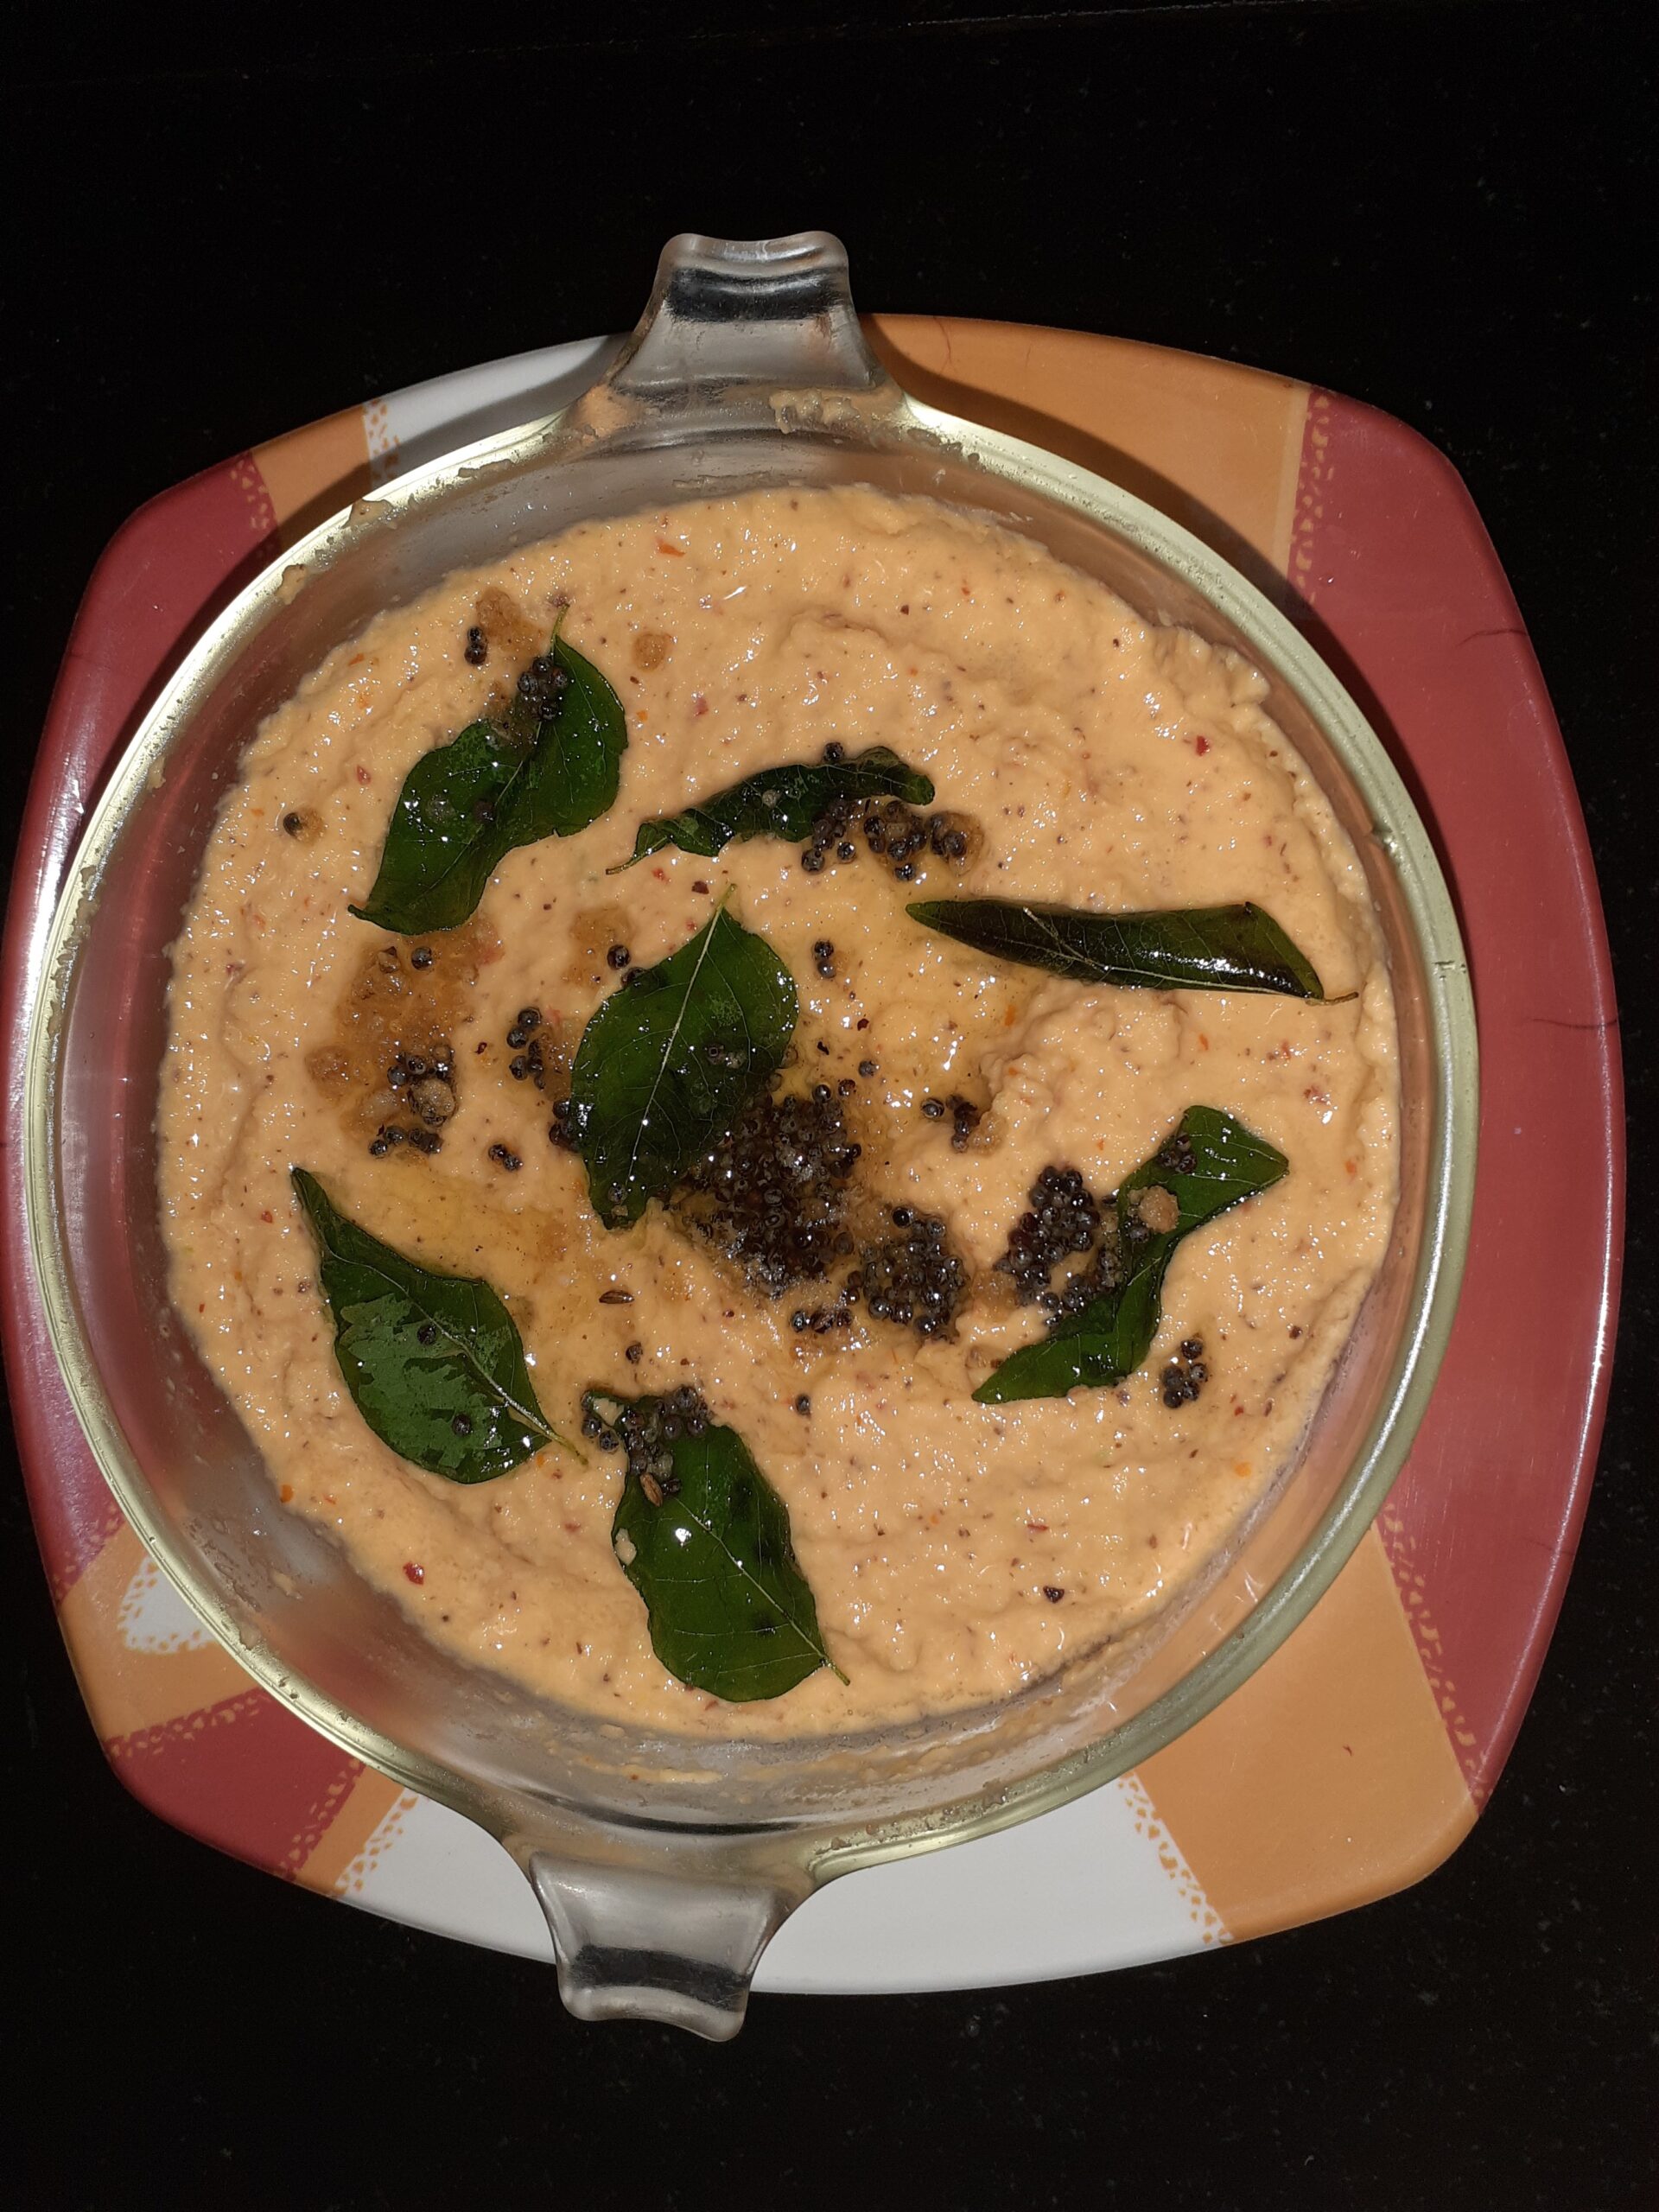
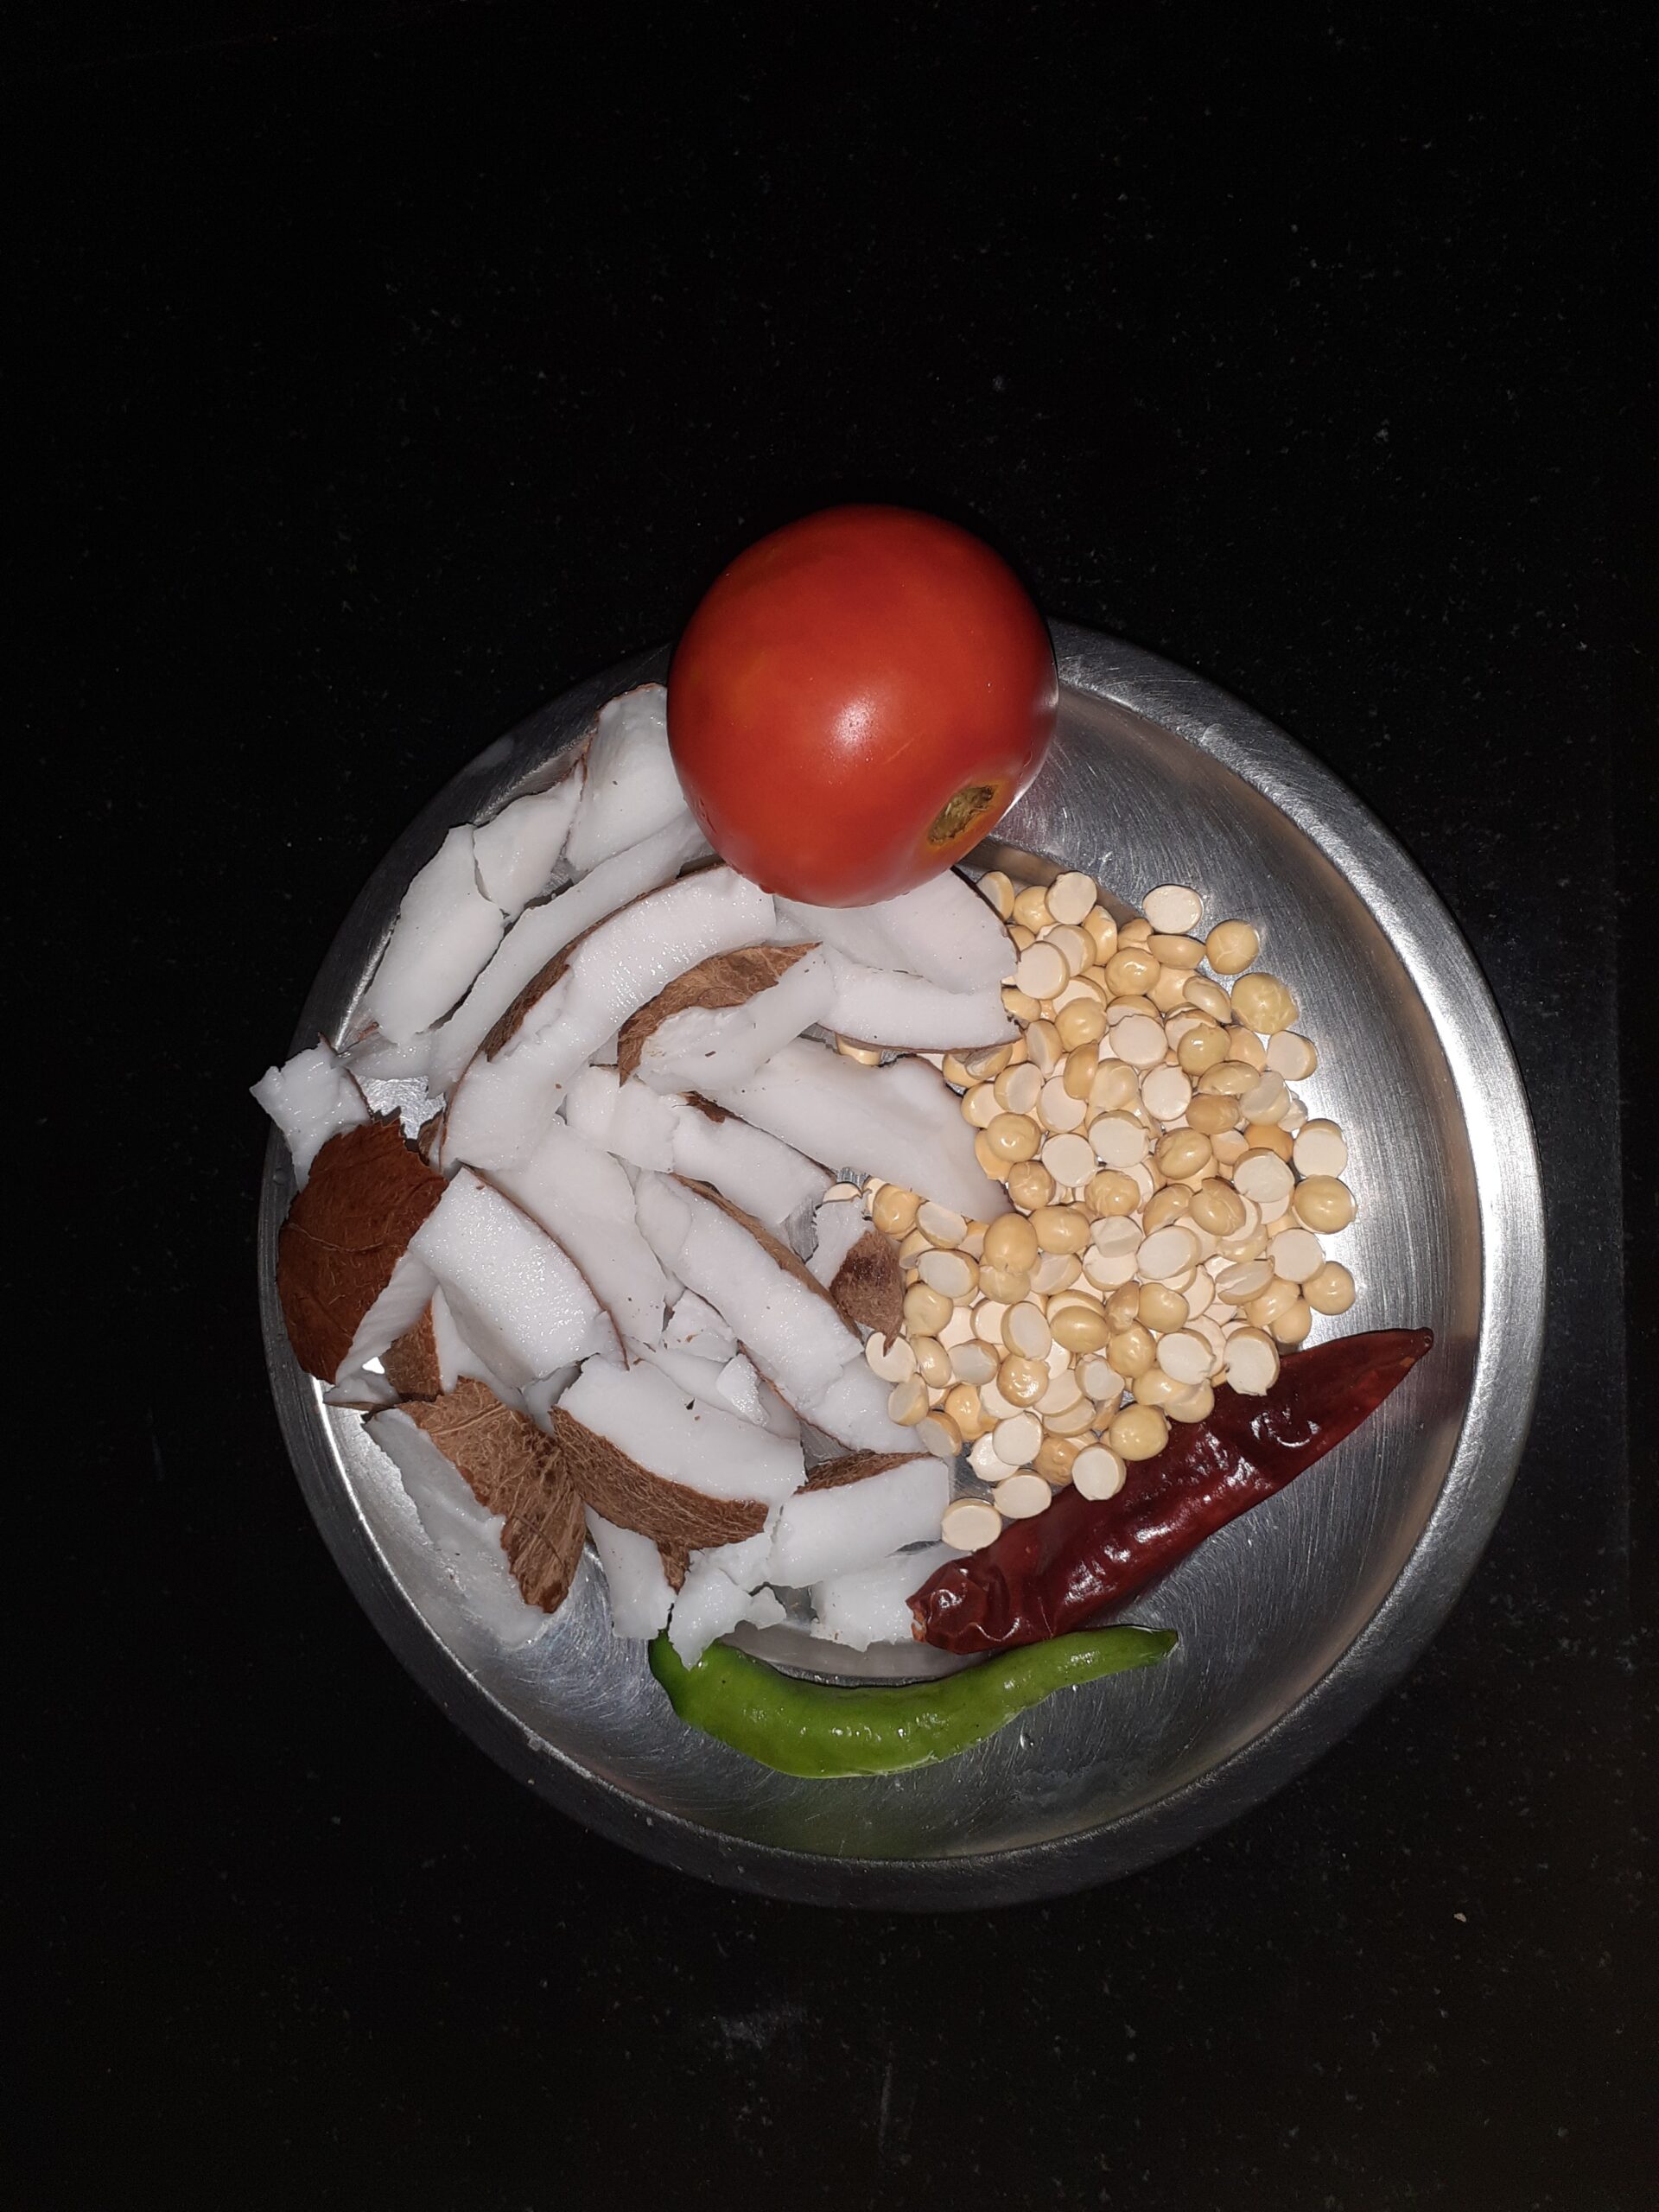
Coconut Tomato Chutney
This chutney is very easy to make. I have added Tomato for the freshness and tang and so you don’t have to add either tamarind or lemon as in the regular coconut chutney. Goes really well with Idli, Dosa, Pongal, Paniyaram etc.
In a blender put in the fresh coconut, fried chana dal, green chillies and dry grind to a coarse paste. Add some salt as per taste and add in the chopped tomatoes and now grind to a fine paste. Add in some water to adjust consistency and give it a nice spin in the blender. The Coconut tomato chutney is ready to be served with Idli, Dosas, Pongal, etc. Enjoy. Bon Appetit.
STEPWISE RECIPE FOLLOWS:
1. Assemble all ingredients.
2. In a blender put in the coconut and grind coarse. Add the fried chana, green chillies and red chillies and grind without water.
3. Add the chopped tomato and salt and to grind smooth. Add little water to adjust consistency, add salt and give a single spin in the blender.
4. Take 2 tsp oil in small tempering Kadai and add in the mustard seeds, after they splutter add the asafoetida, and curry leaves. Pour the tempering into the chutney.
NOTES:
1. Since we have added tomato there is no need to add any other form of sour ingredients like tamarind or lemon.
2. First, dry grind all ingredients and then only add in the chopped tomato, otherwise, they won’t get ground evenly.
We would love to hear what you think of this recipe. Let us know in the comments.
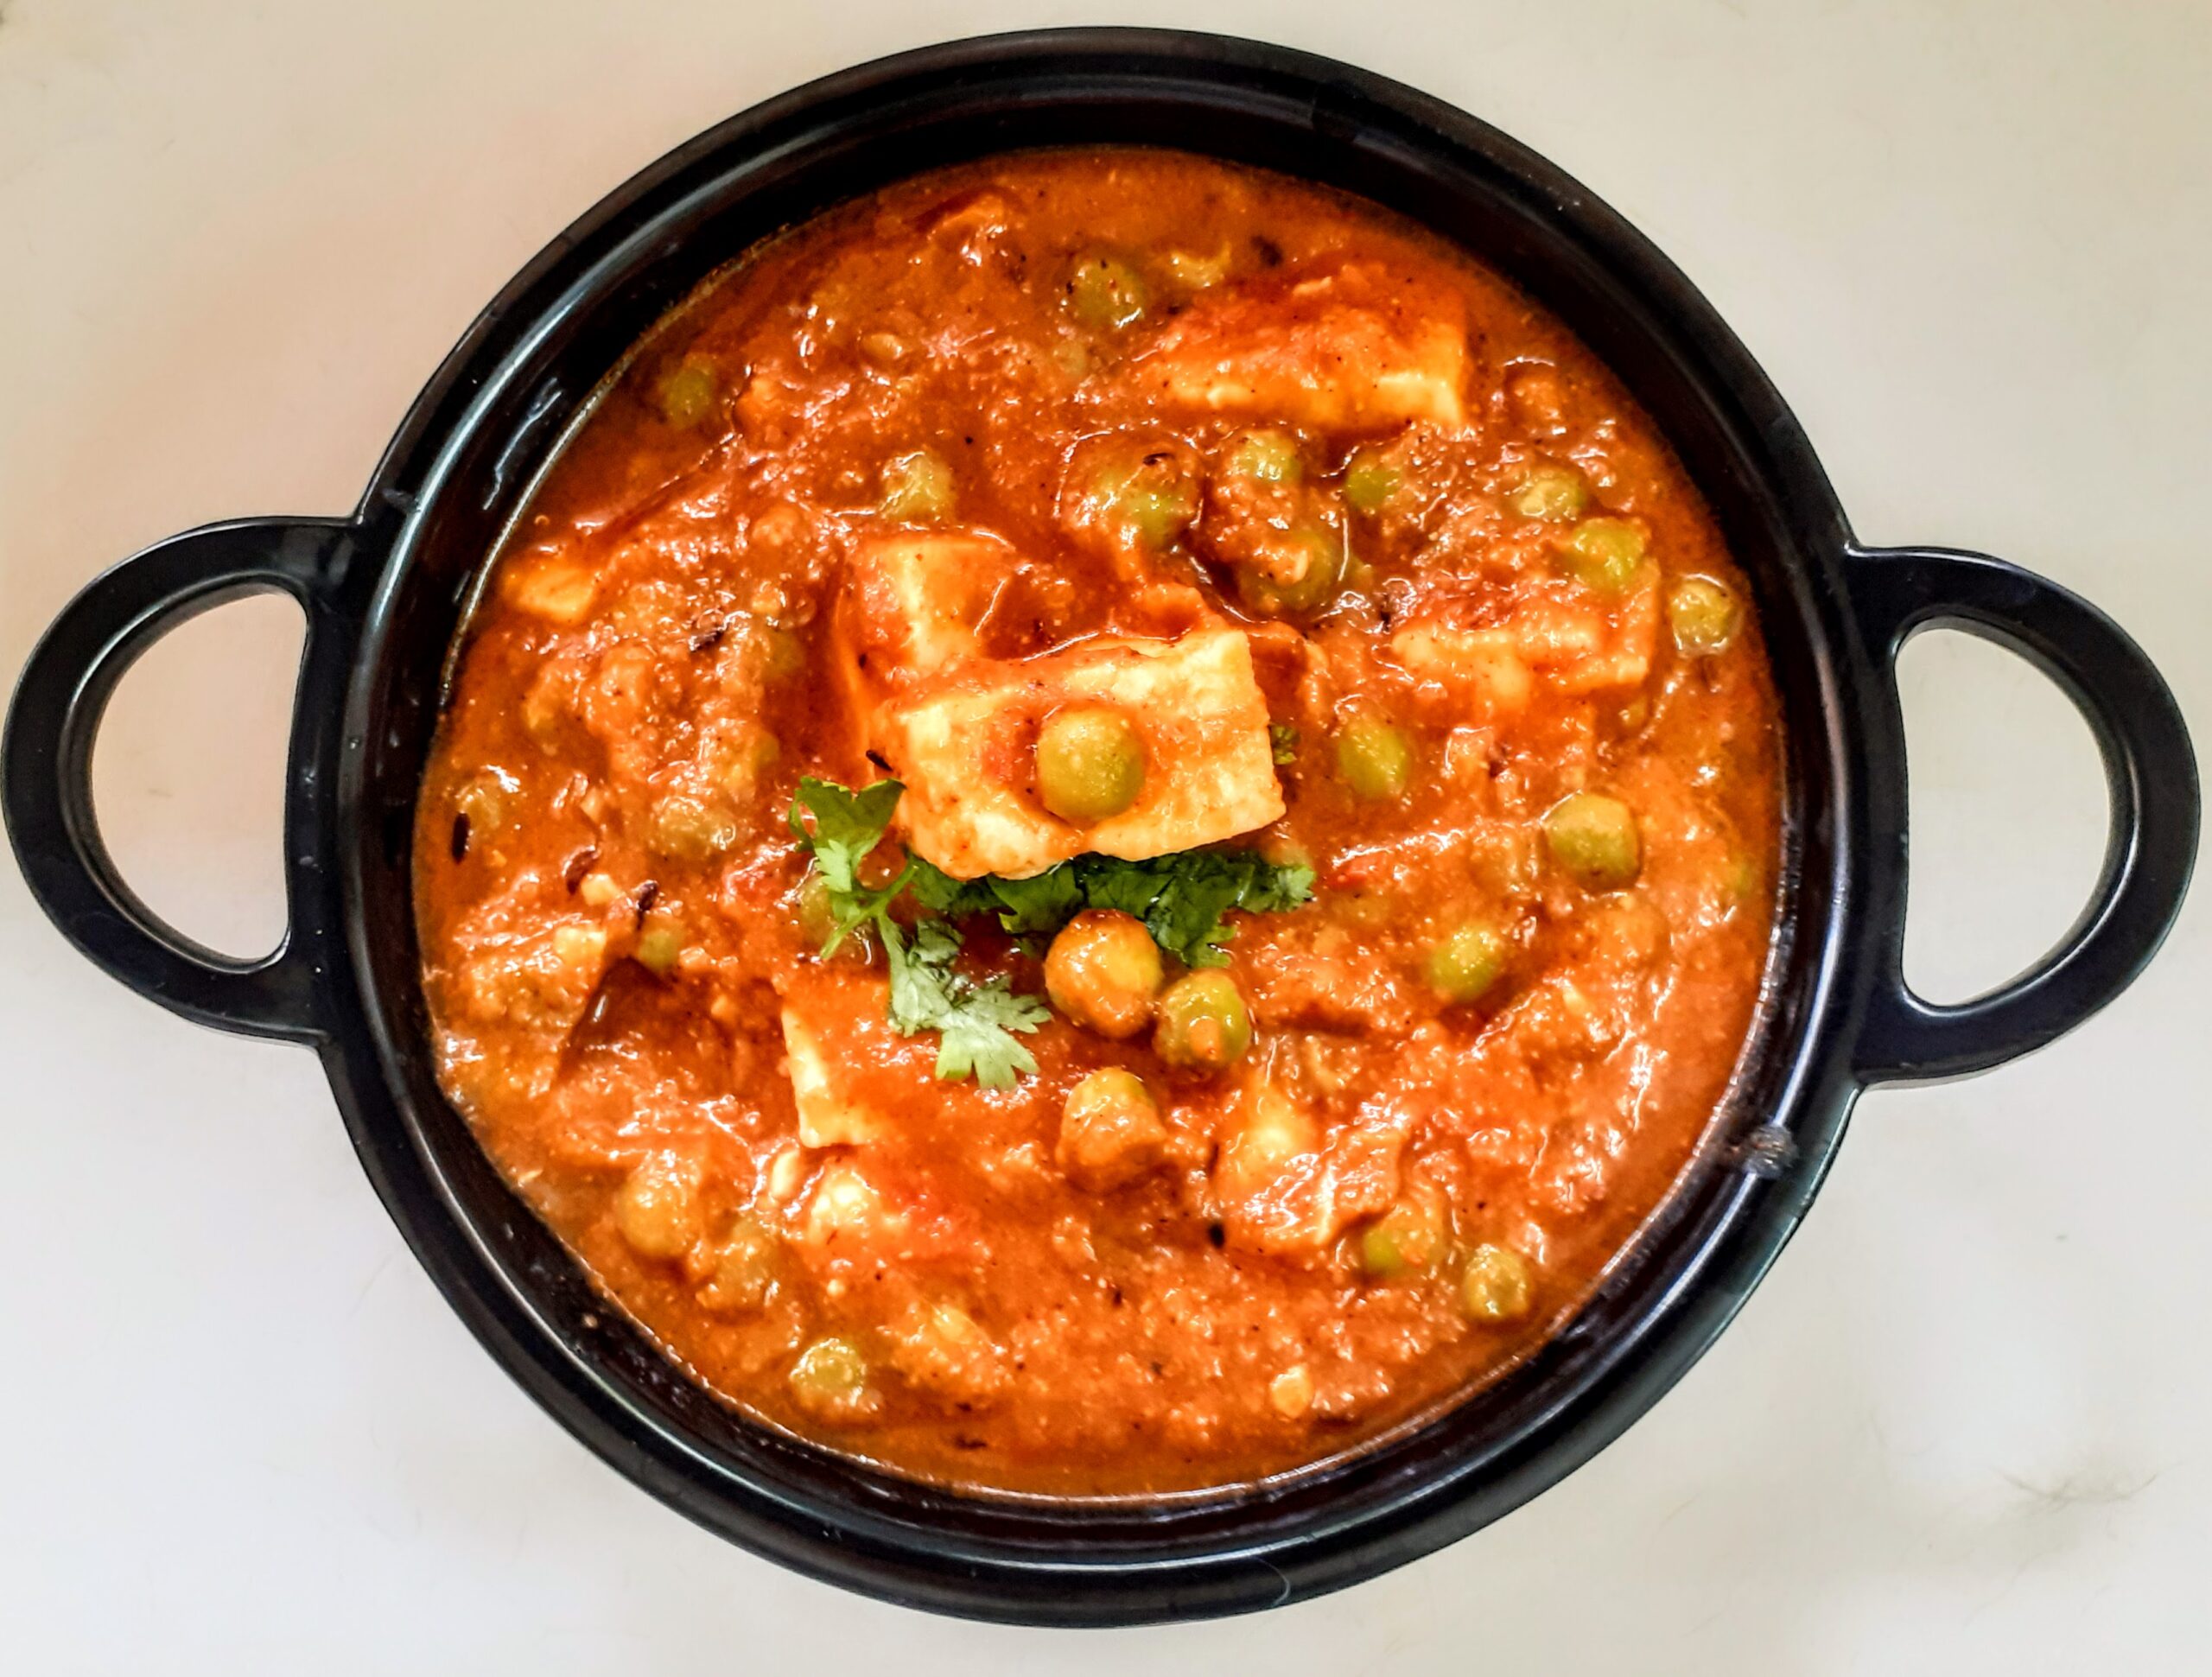
Matar Paneer (One Pot)
Matar Paneer is an everyday dish made of Green Peas and cottage cheese in a tomato gravy. Usually had with any Indian flatbread or with rice. The sweetness of the Peas, the tanginess of the tomatoes, the texture of the Paneer, and the flavors of the spices all gel so well. It can be directly made in a pressure cooker( which I have done today) or can be made in a karahi.
In Rajjo’s Kitchen whenever I say tomatoes its mostly the local one( desi) and not the hybrid tomatoes ones which are sweeter. When I’m using the Hybrid ones will always specify.
Let’s get to the recipe right away.
PREP TIME: 15 COOK TIME: 15Mins
TOTAL TIME:30Mins COURSE: MAIN
CUISINE: NORTH INDIAN SERVINGS: 6
AUTHOR: Rajni Ram
Ingredients:
Green Peas 100 gm
Paneer 200 gm cut into cubes
Tomatoes 2 large or 3 medium(pureed)
Onions 1 large pureed
Ginger-garlic paste 1 tsp
Refined oil 6 tsp( 3 tsp first and 3 later, follow the recipe)
Besan or Gram flour 1 Tbsp(or) Cashew nuts 6( pre-soaked)
Fresh coriander leaves finely chopped 2 tsp
Salt to taste
Jeera/ Cumin 1/2 tsp
Turmeric powder 1/2 tsp
Red chilli powder 1 tsp ( can add 1/2 tsp more if you need more spice)
Coriander powder
Garam Masala powder
Directions:
If using a pressure cooker you don’t have to precook the peas. If using the Karahi method, precook the peas( they should be cooked soft, but not mushy).
Put the cooker on the stove, heat on medium. once hot, pour oil 3 tsp.
once the oil is hot, add the cumin seeds, as they crackle add the turmeric powder.
Now add the onions puree and cook until transparent, don’t brown them. Add in the Ginger Garlic paste and saute well. The onion and Ginger Garlic paste will start releasing oil once they are cooked. Add another 3 tsp oil, reduce the flame of the stove and put in the Besan, and nicely saute it in the oil. Take care to not burn it. As the Besan browns, add the tomato puree and drop in the peas, add salt followed by all the spice powders( except Garam Masala powder). add about 1.5 cups water, close the cooker, and put on the whistle. cook for 6 whistles and put off the stove. While the pressure reduces in the cooker, let’s get our Paneer ready. Cut them into cubes, and drop them in boiling water with a pinch of salt for 2 minutes. Remove immediately and transfer to a plate. Once the pressure in the cooker releases, open the cooker and drop in the cubed Paneer and switch on the stove on low. check for salt and spices at this stage and adjust it. Add the Garam Masala powder now and put off the stove. Transfer the contents to a bowl and garnish with fresh coriander leaves. You can decorate it with a little grated cheese, for the restaurant effect. Voila, your Matar Paneer is ready. Enjoy!
STEPWISE RECIPE FOLLOWS:
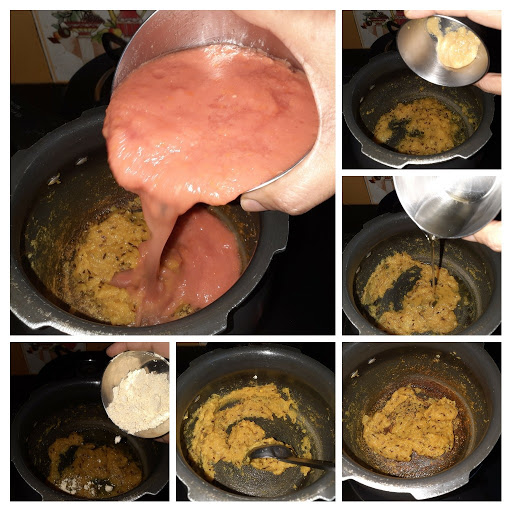
1. Assemble all ingredients.
2. Put the pressure cooker on the stove and let it heat up. Once hot, pour 3 tsp oil and heat. Add Jeera and as it splutters add the onion paste and saute nicely.
3. Add the ginger-garlic paste and saute further until the oil is released. At this stage add the remaining 3 tsp oil and add the besan to this and roast on low flame till it becomes a little brown. It may appear as a paste, keep stirring this paste continuously till you see a light brown color. Add the tomato puree and stir nicely so that no lumps of the paste remain.
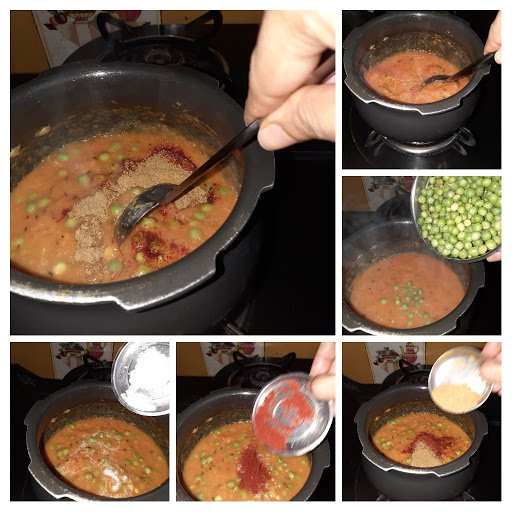
4. Let a slight boil come and add the Green Peas followed by all the masala powders( except Garam Masala). Add salt and stir.
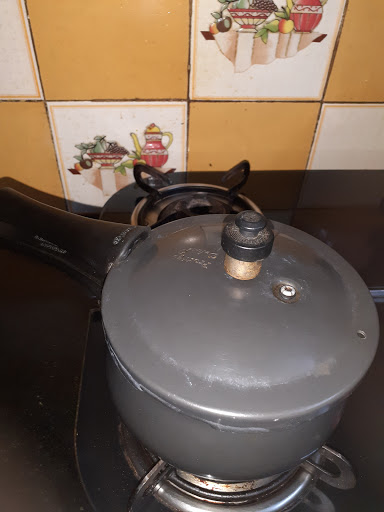
5. Add 1 cup water, give a nice stir close the lid of cooker and let 6 whistles come.
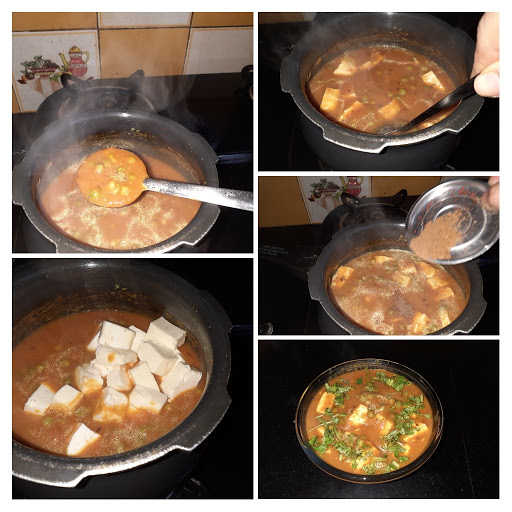
6. After the pressure comes down open the cooker. Switch on the stove and add the paneer cubes and let it boil on low heat for two minutes. Add the Garam Masala powder, give it a stir and empty into a bowl. Garnish with fresh coriander. You can also sprinkle some shredded cheese to decorate( I forgot to do so).
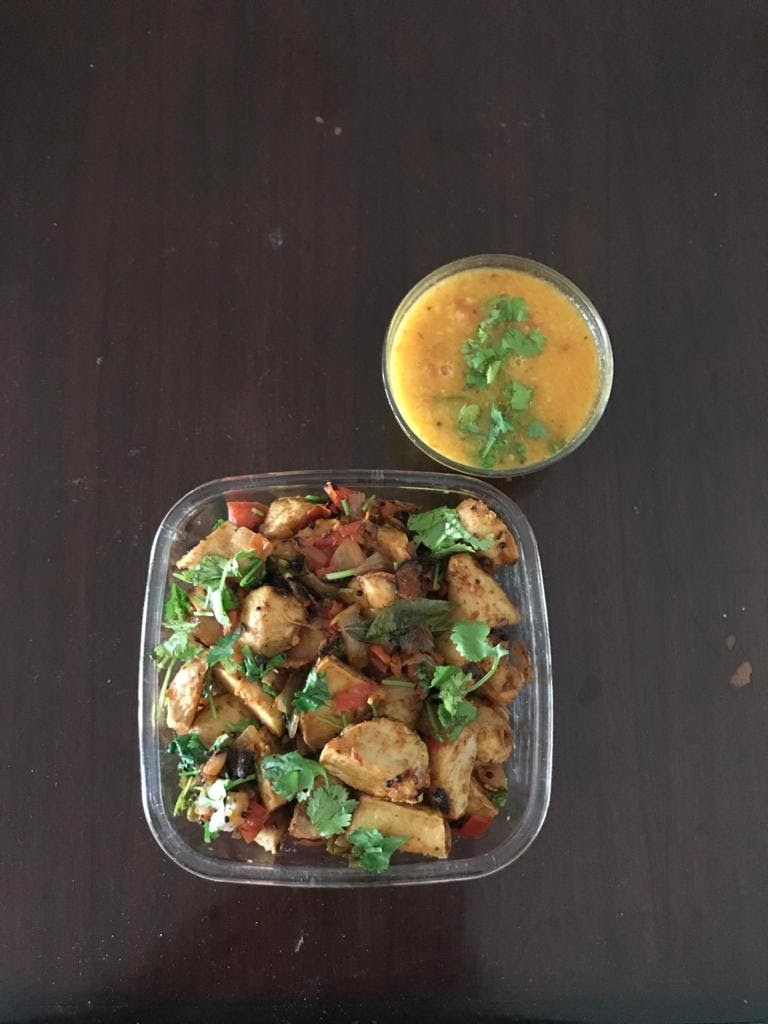
Your tasty Matar Paneer is ready. Enjoy with Phulkas, Rotis, or Naan on the side or just rice.
Bon appetit…
NOTES
1. As it’s a simple everyday subji ( side dish) I did not add the whole masala in the beginning. If you are cooking it for a get-together or party, you can add the whole masala like 1 or 2 cloves, 1 Tej Patha( Bay leaf), few Peppercorns along with Jeera.
2. If you want to use cashew nuts instead of the Besan then, after adding Jeera saute onion, ginger garlic paste and cut tomatoes until they turn soft. Cool and blend in mixie. Pour this paste into the cooker and continue from step 4.
3. I usually don’t fry the Paneer in oil, instead, I put it in boiling water for exactly 2 mins, don’t let it stay in hot water for more than that, they may stick to each other.
If following the karahi method, pre-cook the peas and follow the same method.
If you tried this recipe and liked it, comment below. I would love to hear from you.
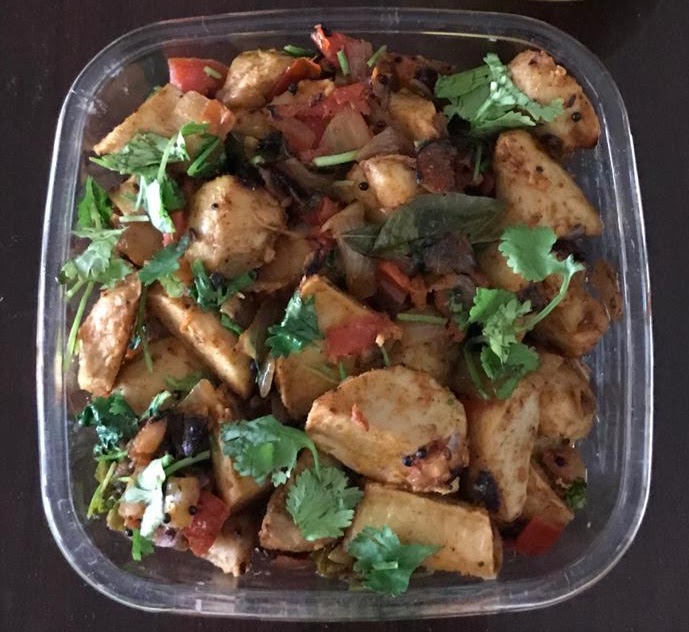
Arbi Masala (Spicy Colacassia)
A simple everyday subji. I make the Arbi/Arvi as a roast, sometimes a simple fry and it can also be added while making Sambhar or Kadi. This tuber is a little slimy, but that can be managed by dusting the Arbi with a little Besan/ Gram flour or rice flour. In this recipe, I have pre-cooked the Arbi in a pressure cooker and then baked it for the extra crispiness. You can also deep fry it. I do that quite often too. Let’s get to the recipe right away.
PREP TIME: 10Mins COOK TIME: 40Mins
TOTAL TIME: 50 Mins COURSE: MAIN
CUISINE: SOUTH INDIAN SERVINGS: 4
AUTHOR: RAJNI RAM
Ingredients:
Arbi/Colaccasia 250 gm( boiled and skin peeled)
Onions 2 roughly chopped
Tomatoes 2 large finely chopped
Green chilli 2 chopped
Fresh coriander 1 tbsp finely chopped
Salt to taste
Red chilli powder 1 tsp
Coriander powder 1.5 tsp
Fennel powder(optional) 1 tsp
Garam masala powder 1/2 tsp
oil for frying and making the masala.
Cumin 1 tsp
Curry leaves a few
Directions:
Boil the Arbi in a pressure cooker, with a little salt for 2 whistles. Stick to 2 whistles or it will turn soggy and lose the crispness in the subji. Cool it, Peel the skin cut it into medium size pieces( if very small, use as it is), and set aside. To deep-fry, take oil in a Karahi and heat it. drop the cut Arbi gently into the oil and fry until they are a nice brown and crisp.
If baking, then place them on a greased tray, drizzle a little oil over them, or you could use a brush to apply the oil and bake at 180 degrees for half an hour, turning over the Arbi midway, say around 15 mins. Bake until brown and crisp. Set aside.
Now in a pan or Karahi heat 1 tbsp oil. Add the cumin and turmeric and add the green chilli and chopped onion to this and saute well. Fry them well, but don’t get them brown. Now add in the tomatoes, salt, and all the dry spices. cook until the tomatoes break and release water and the mixture looks like a thick paste. Add the garam masala and fresh coriander and mix. Finally, add in the fried/baked Arbi and mix nicely, so that the masala paste coats it evenly. Serve hot with Parathas, Roti, or Dal Chawal.
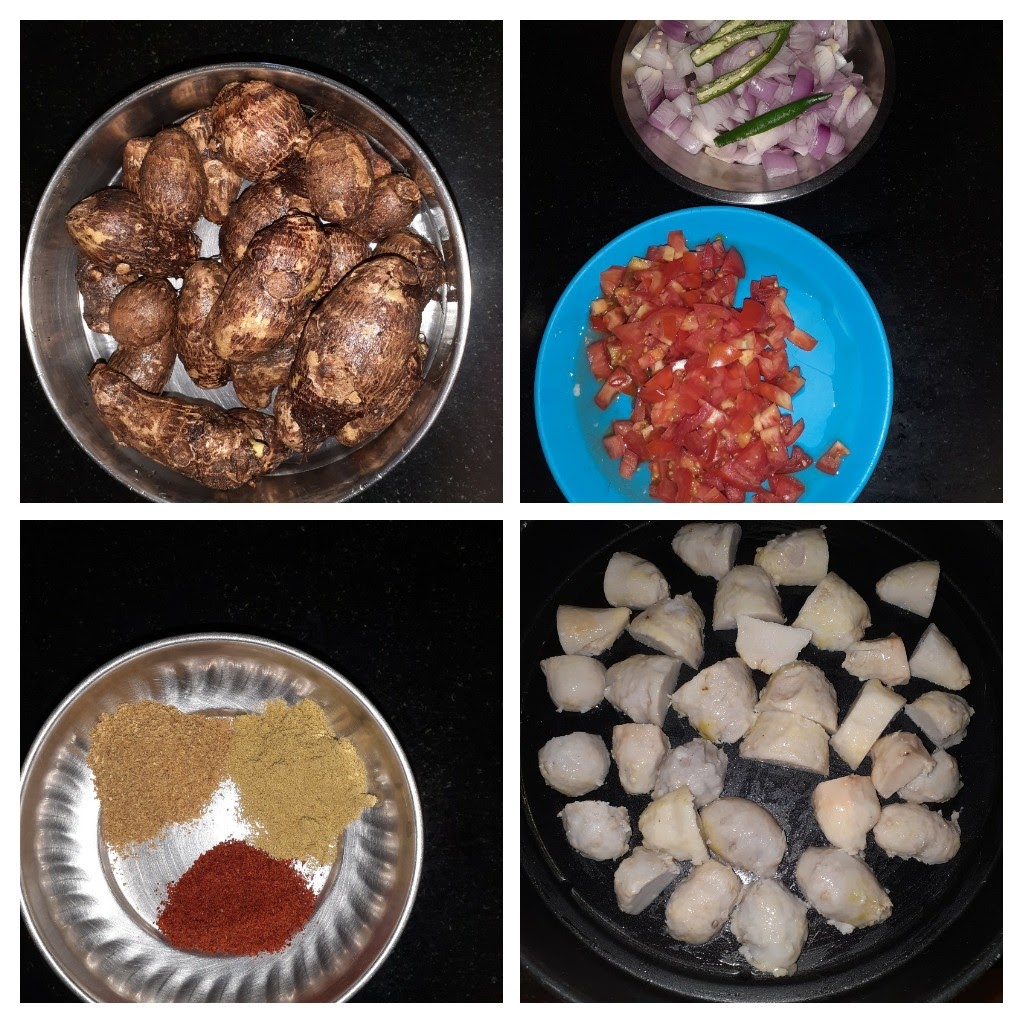
STEPWISE RECIPE FOLLOWS
1. Assemble all ingredients. Cook Arbi in a pressure cooker for 2 whistles. cool. Peel skin, cut into cubes, and set aside.
2. Fry the cooked and cut Arbi in oil or bake in the oven at 180 degrees for 1/2 an hour. They should be nicely browned and crisp.
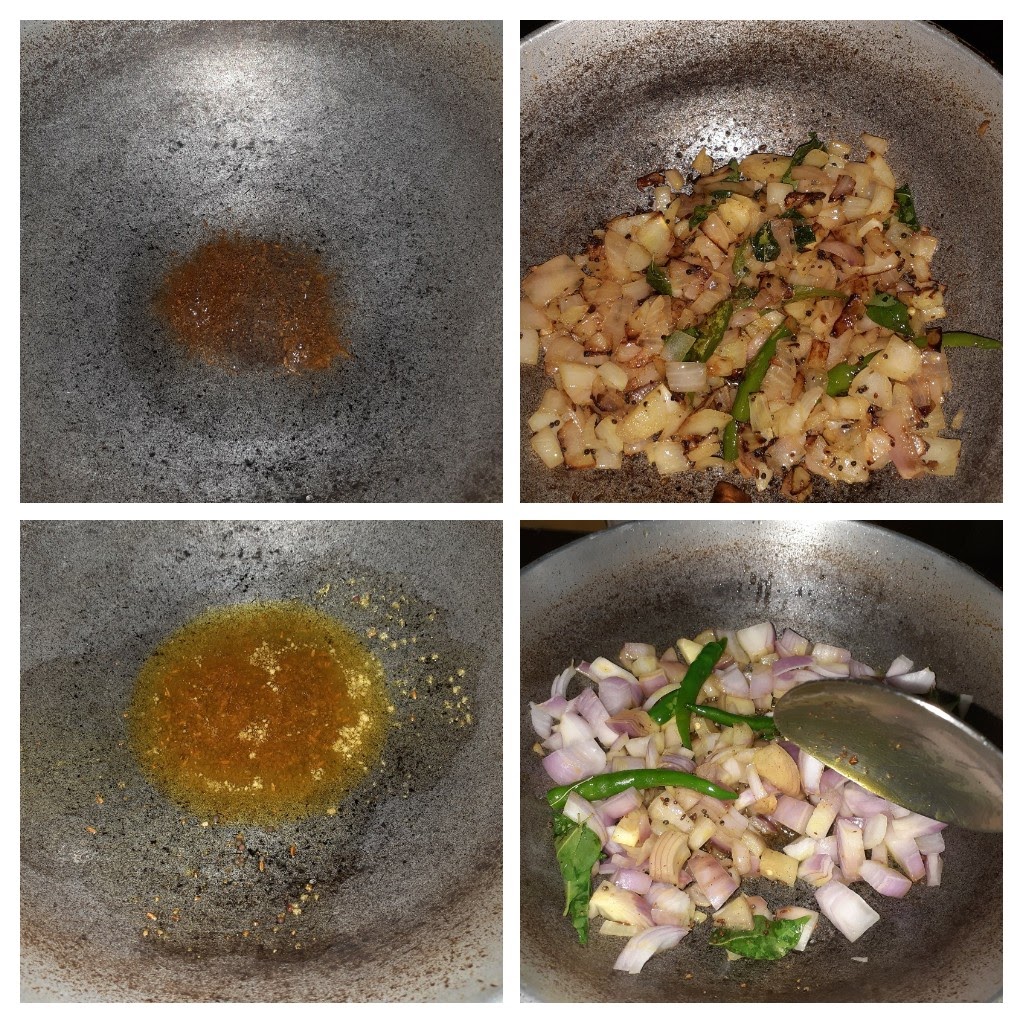
3. In a pan or karahi heat oil. Add the cumin and turmeric powder. Add in the green chillies and onion and fry well.
4. Add the tomatoes, salt, and all dry spices mentioned under ingredients. Saute the mixture well. The tomatoes should become soft and the mixture should resemble a semi-dry paste.
5. Add in the garam masala and chopped coriander and finally add the fried/baked Arbi and give a good stir. The masala paste should coat all the Arbi’s well. Sprinkle some more chopped coriander and we are ready to serve.
6. Serve with Rotis, Parathas, or just Dal Chawal. Enjoy. Bon Appetit.
Notes: 1. Amchur/ dry mango powder can be used along with other dry masalas if you prefer a little more tanginess. I have not added as I almost always use the country tomatoes/desi tomatoes/Naatu thakkali. They are naturally sour than the hybrid tomatoes or the Bangalore ones.
2. A little gram flour can be mixed with the dry spices and sprinkled over the Arbi before frying them. I have added besan as the Arbi is going to be mixed into the paste, and so will not taste bland.
If you tried this recipe and liked it please comment below. I would love to hear from you.
Mint/Pudina Raita
Mint by itself is such a flavourful herb, it heightens the taste of everything else. Since it has a strong flavour it should be used in moderation. Here I have made a Raita(curd sauce) with Mint, which goes well with Parathas, Naans, Kebabs and with any mixed rice variety. The lovely green colour and the minty freshness gets the salivary buds in action. This is a simple recipe and takes under 7 minutes to make if you have all ingredients ready.
Well, one may think why am I blogging something so simple, something that anyone can make. Well, its just to establish the fact that something as simple as a well made Raita can lift the effect of a recipe gone wrong. People trying their hand at cooking for the first time will be encouraged by its simplicity to try cooking more often.
Let’s get to the recipe right away.
PREP TIME: 10 Mins COOK TIME: 5 Mins
TOTAL TIME: 15Mins COURSE: MAIN
CUISINE: SOUTH INDIAN/ SERVINGS: 4
NORTH INDIAN
Ingredients: Author: Rajni Ram
Mint leaves 1/2 a bunch
Green chilli 1(if not hot enough can add one more)
Curd 400 gms
Roasted Jeera powder 1/2 tsp
Salt as per taste.
Directions:
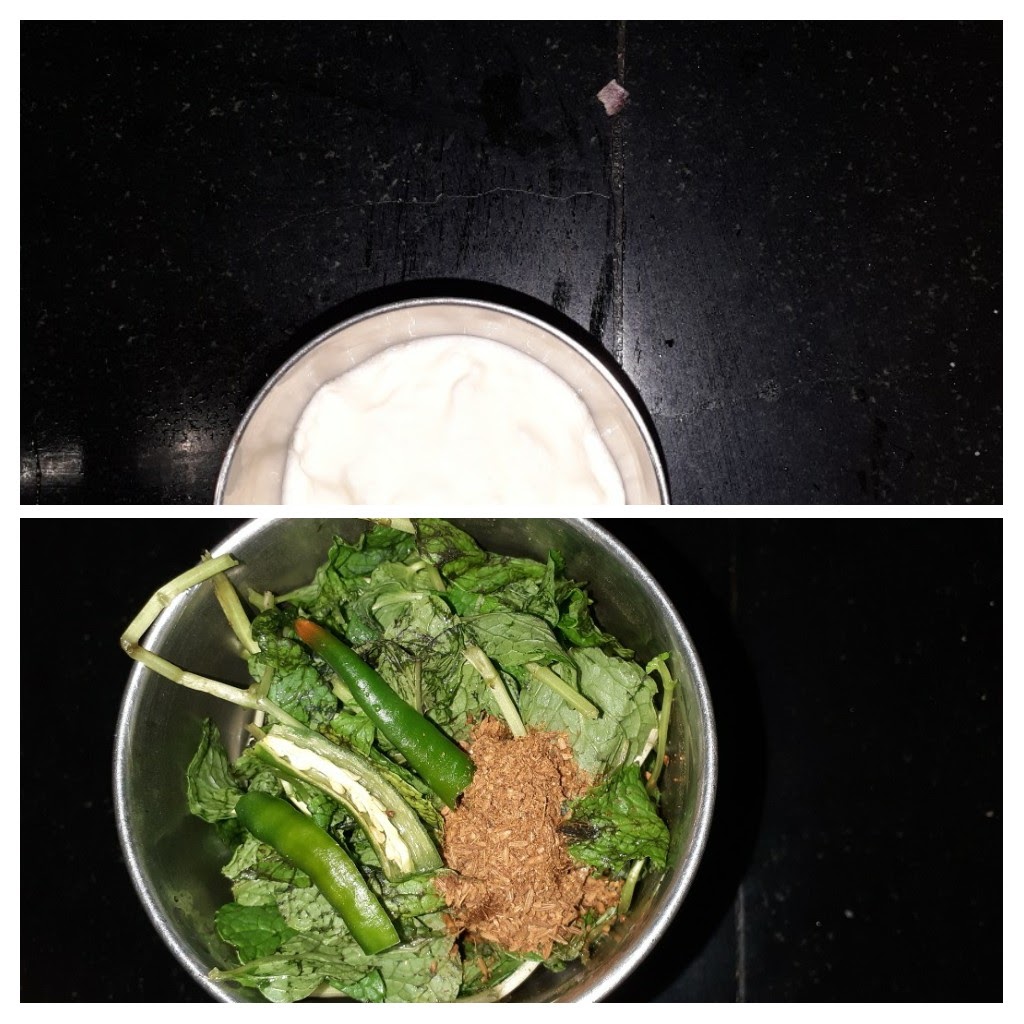
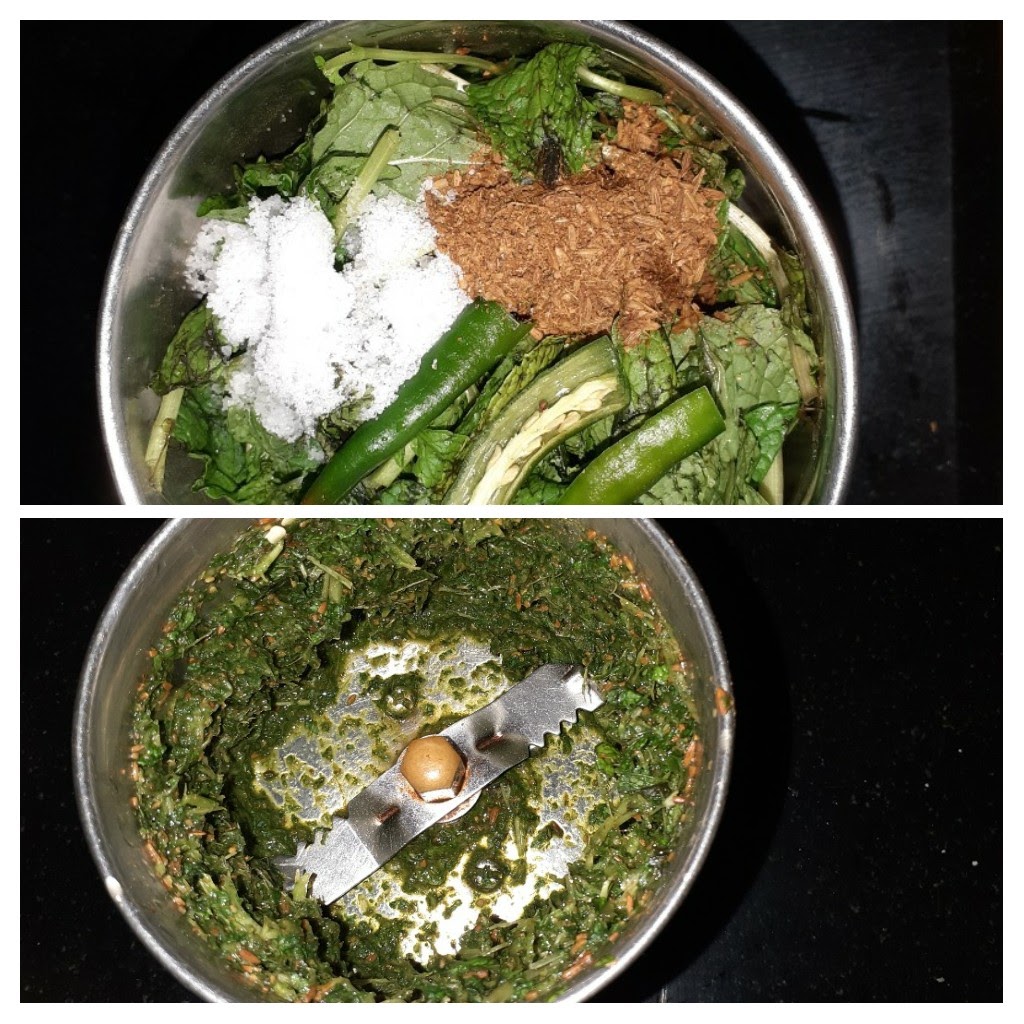
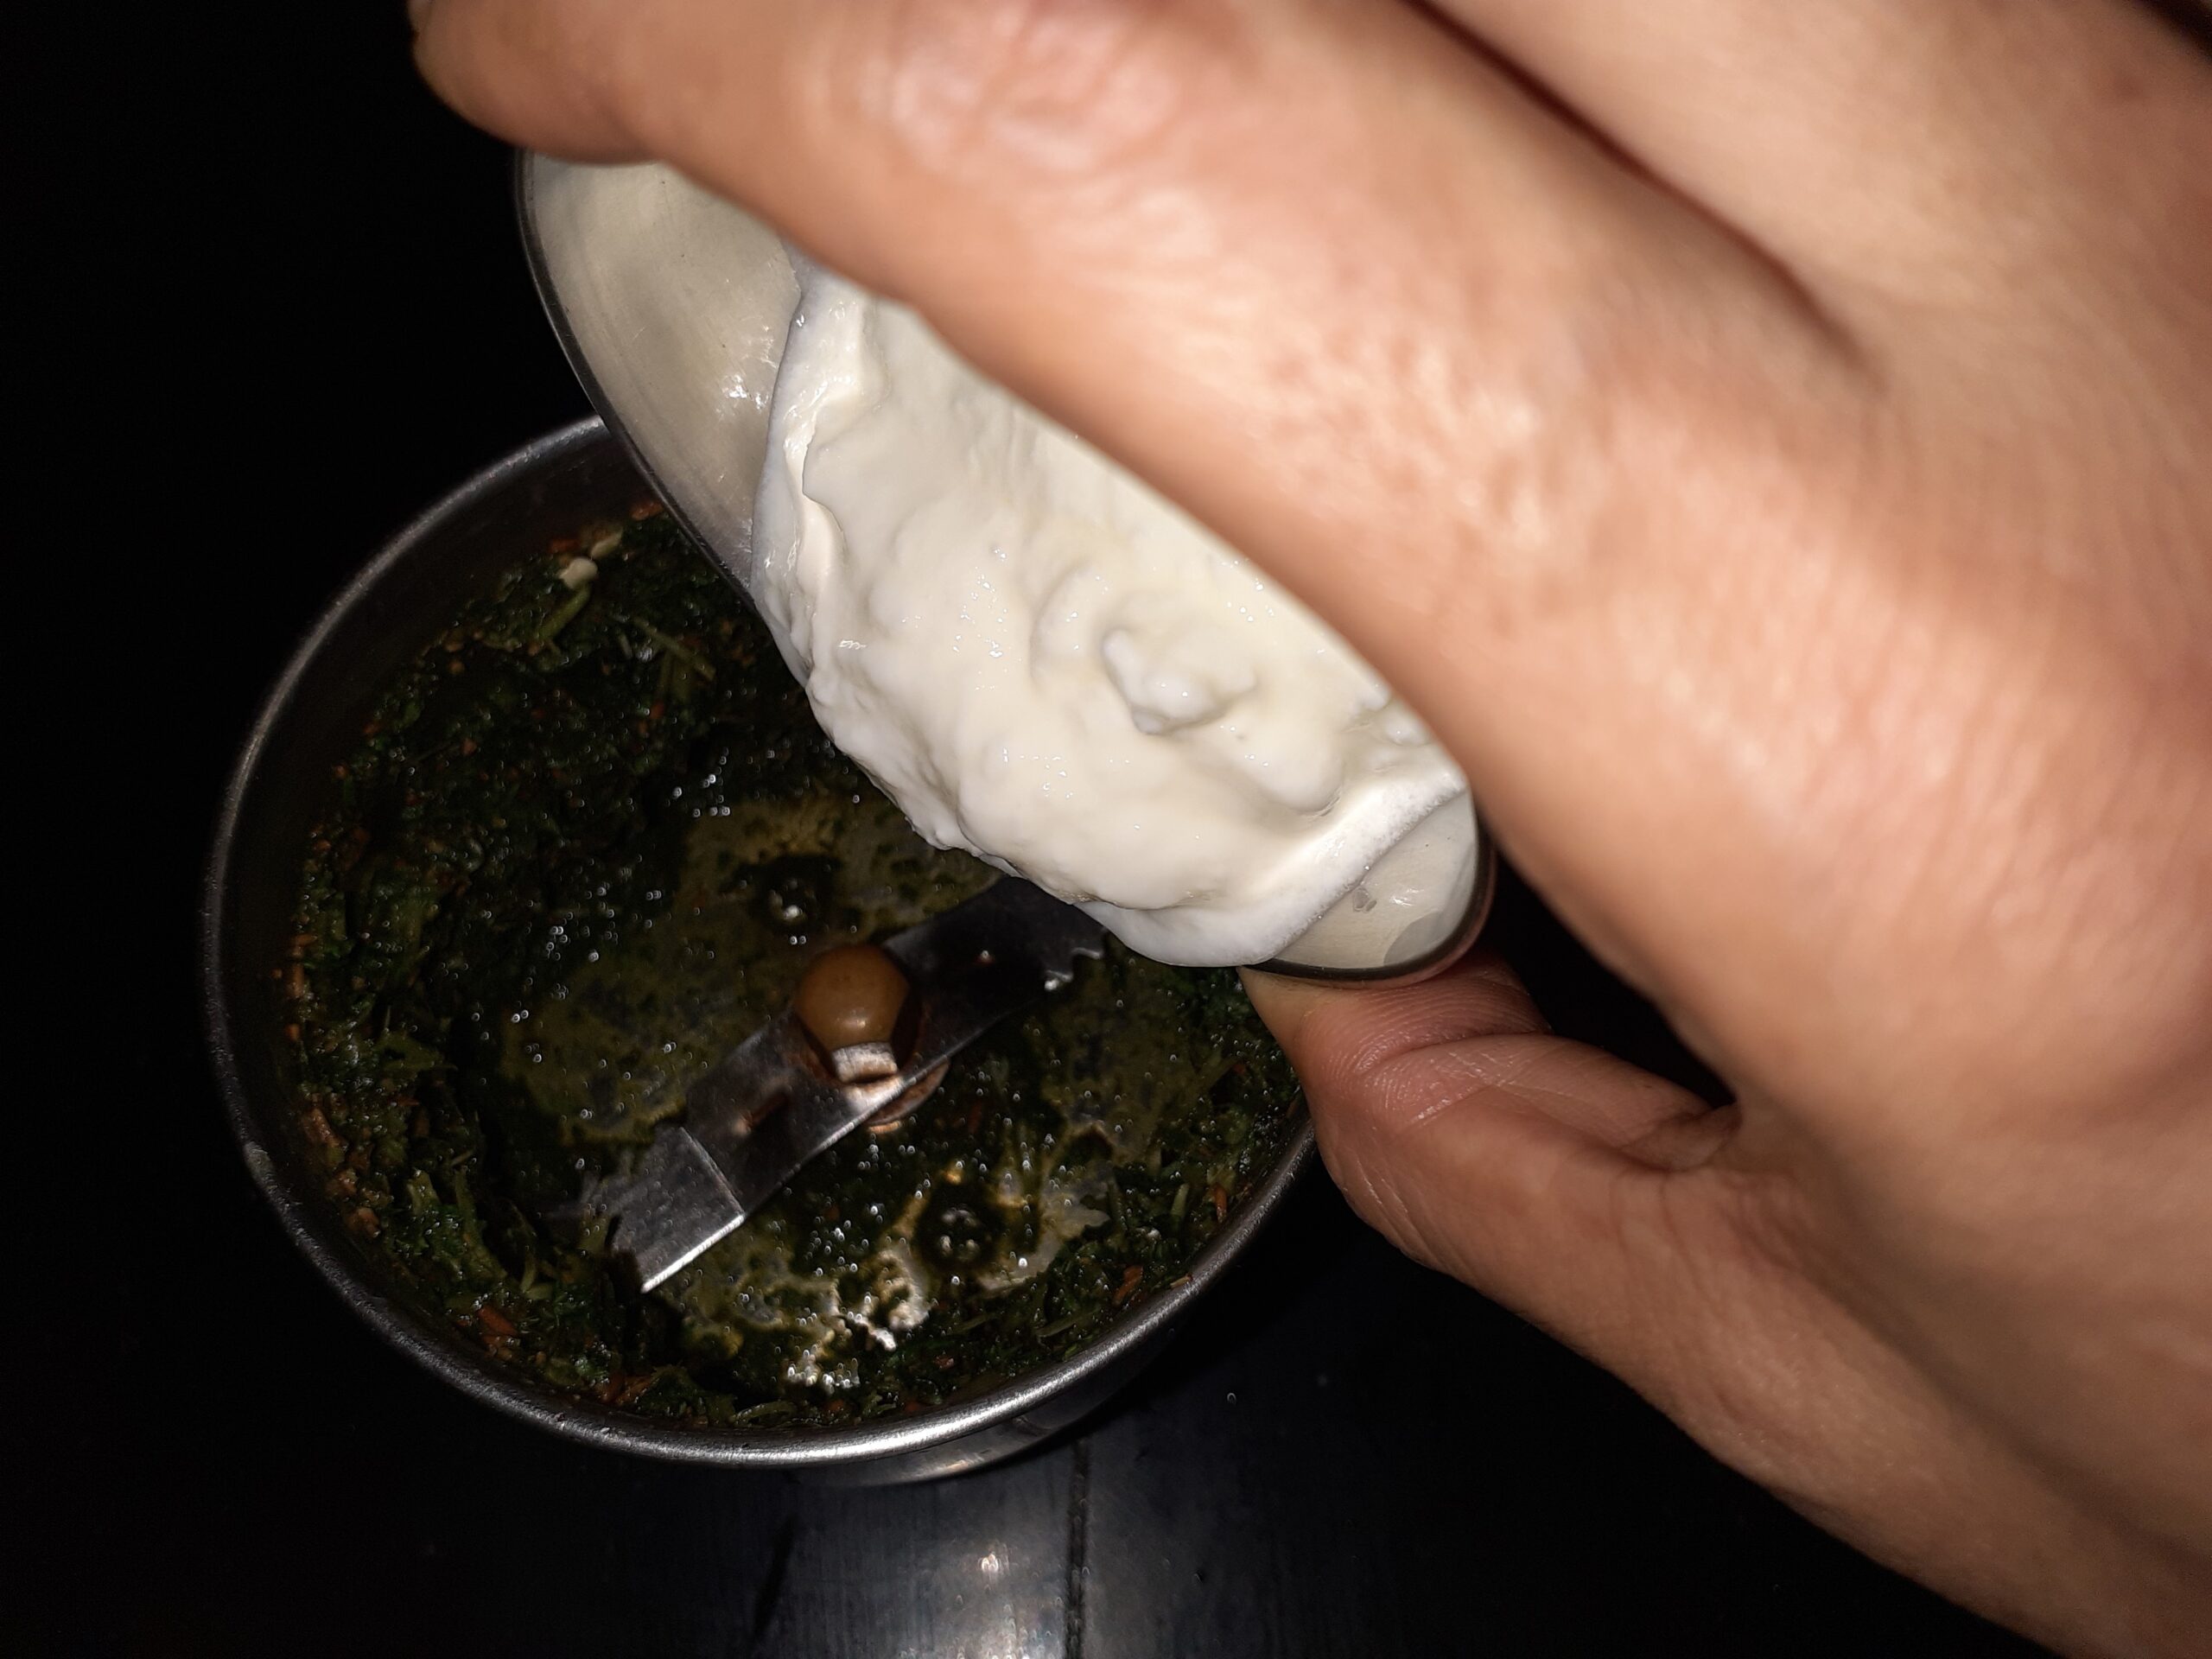
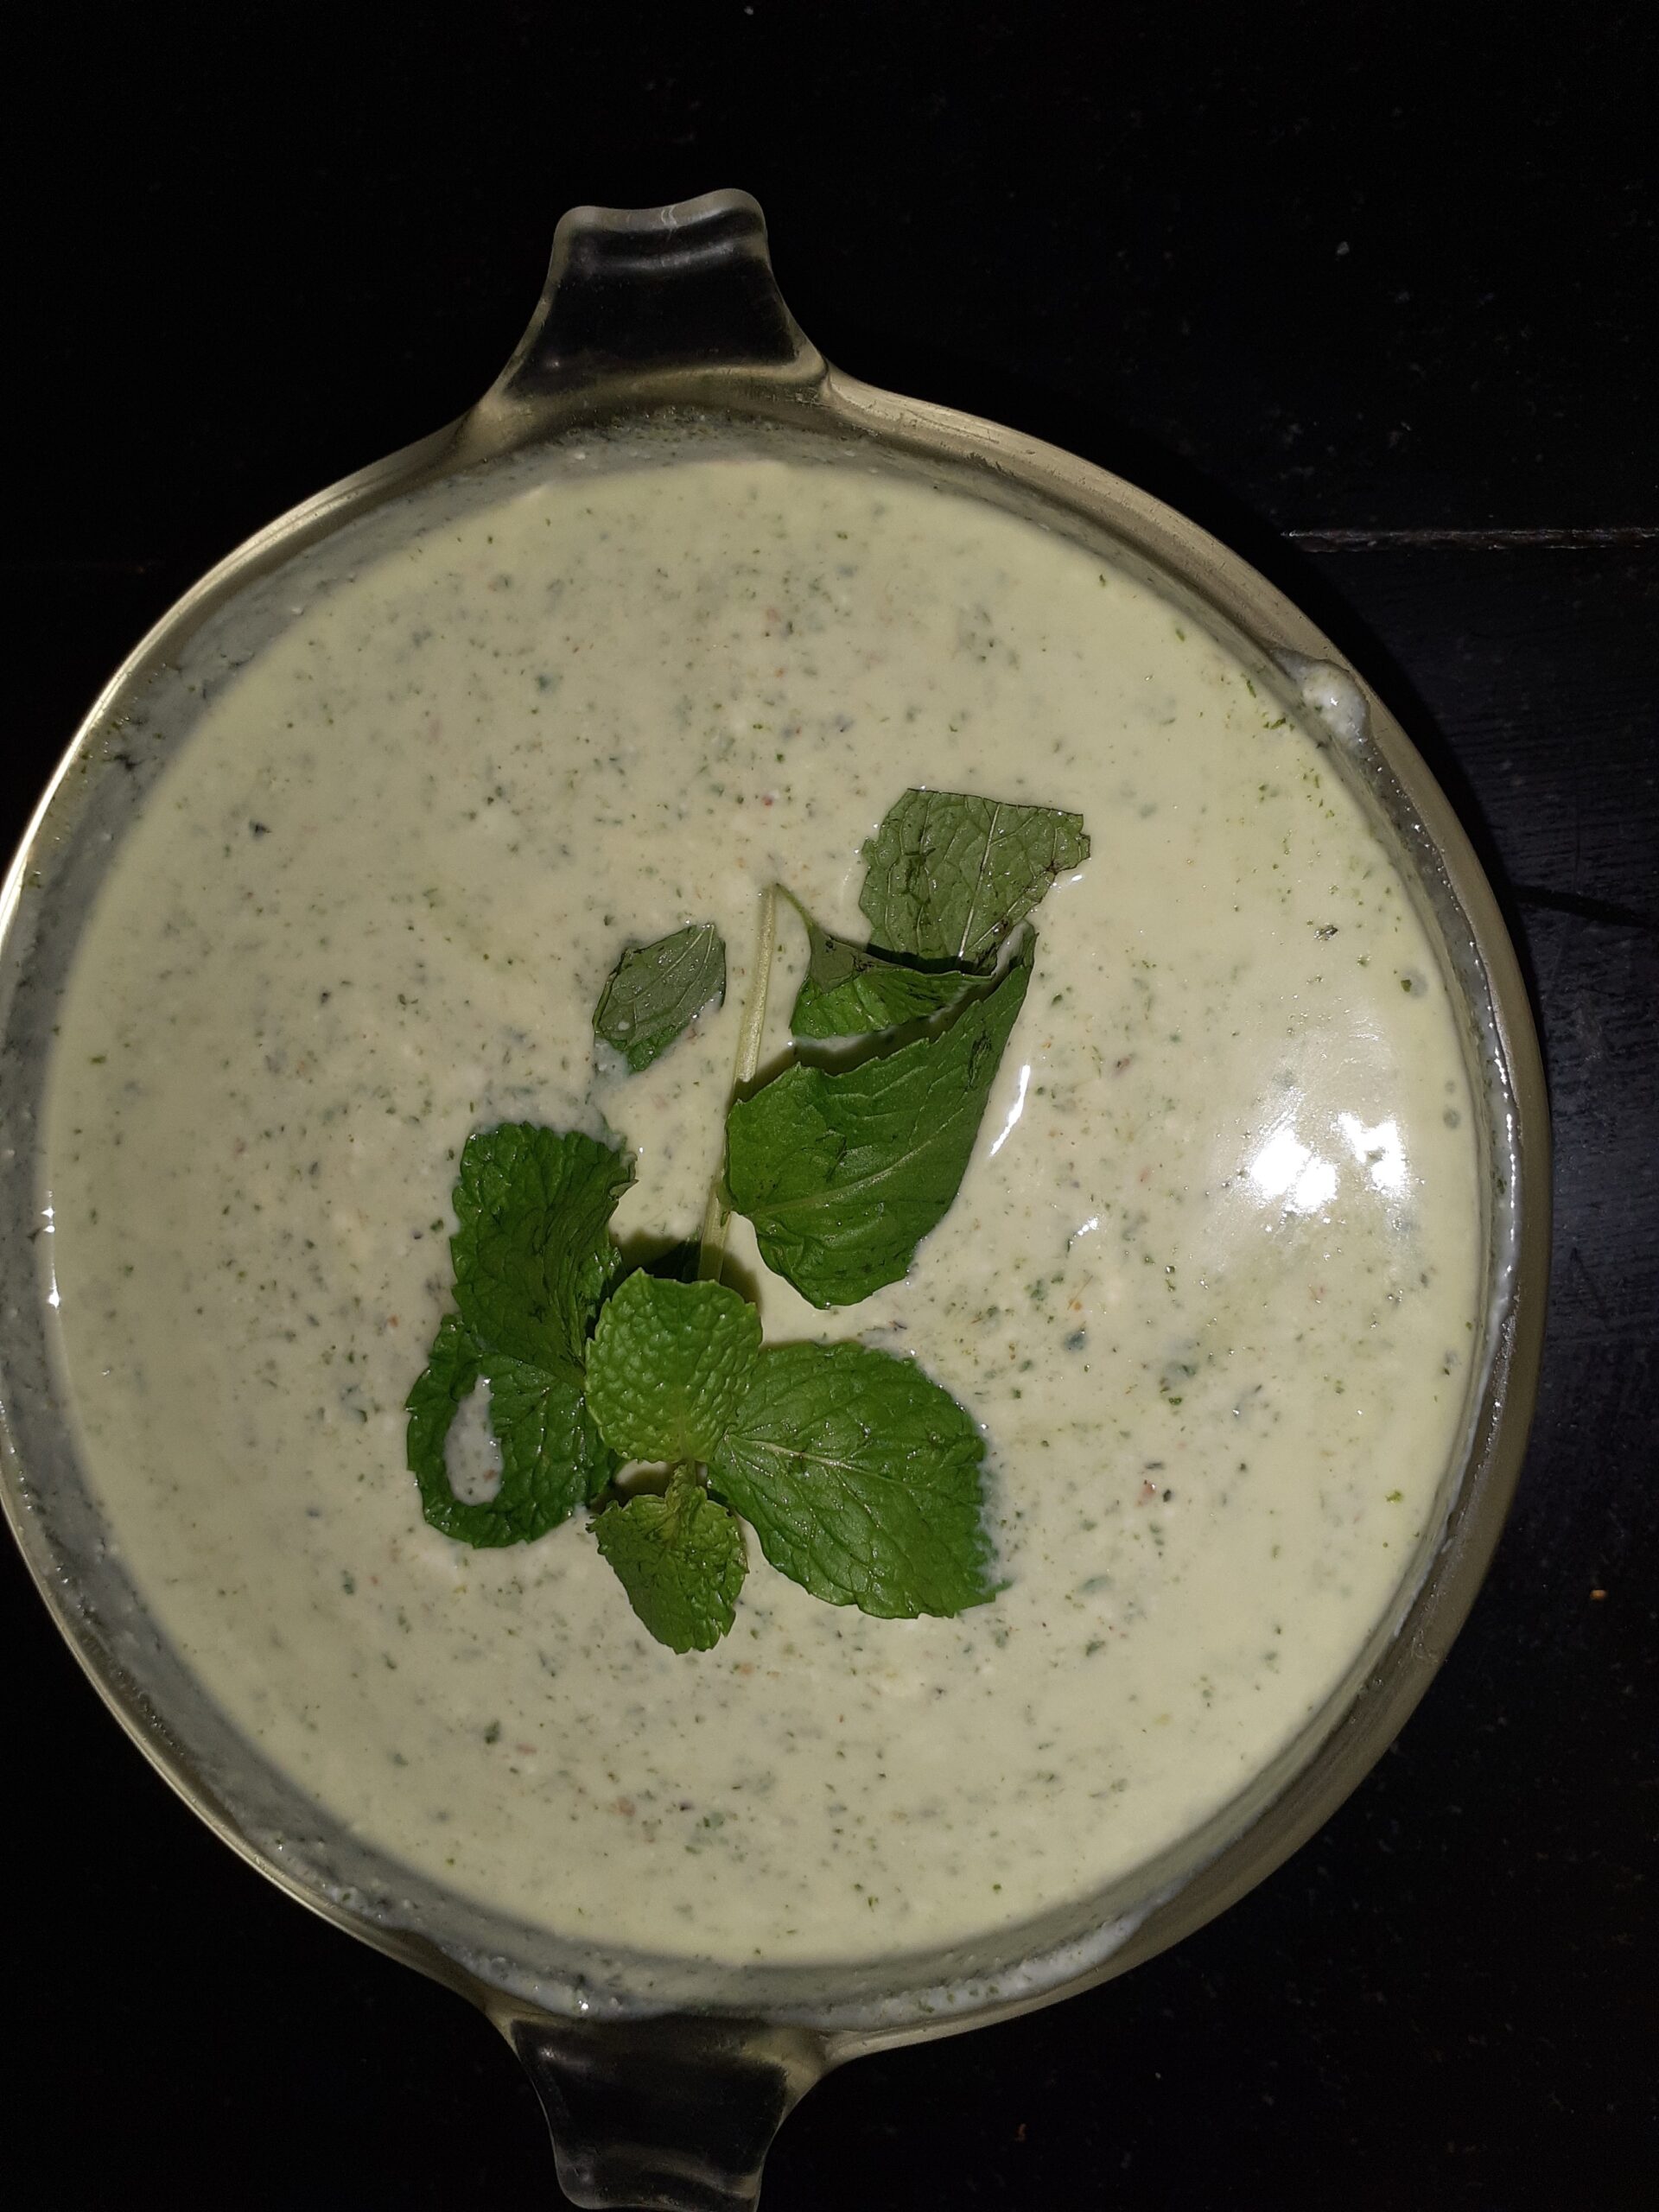
Wash the Mint leaves well and let the water drain. Smoothen the curd( do not beat or whip). Put the Mint leaves, Green chillies, roasted Jeera powder and salt in a blender and give it a good spin. Add about a cup of curd from the 400 gms to the blender and grind to a smooth paste. Now add this paste to the remaining curd and mix well. Put it in the refrigerator until ready to serve. Enjoy the Mint Raita with your meal. Bon Appetit.
STEPWISE RECIPE FOLLOWS:
1. Assemble all ingredients. Wash Mint leaves and drain the water.
2. Put the mint leaves(you can put the tender stems too), green chillies, roasted Jeera powder and salt in a blender and blend.
3. Now add a cup of curd to the ground mix and give it a good spin. It should become a fine paste.
4. Add this paste to the remaining curd and mix well. The Mint Raita is ready. Put it in the refrigerator until ready to serve.
Notes:
1. You can temper the raita with mustard and jeera if you wish. I haven’t done it, as I think the Mint by itself is enough.
2. You can add grated Cucumbers, Carrot or finely chopped onion or Boondi to this raita.
3. This Raita can also be used to soak Dahi Vadas.
If you tried this recipe and liked it, comment below. Would love to hear from you.
Flavoured Rice
A very simple yet flavourful rice. You can make it on the days when you want no masalas. Since there are no pungent spices this Rice goes well with a lot of accompaniments like dal fry, raita, Rajma, Choley and more. Flavoured rice and simple dal fry make for soul food. Let’s get to the recipe right away.
PREPTIME: 15Mins COOK TIME: 20 Mins
TOTAL TIME: 35 Mins COURSE: MAIN
CUISINE: NORTH INDIAN SERVINGS: 4
Ingredients:
Basmathi rice 1 cup
Raisins( preferably black) around 10
Cashewnuts around 6 to 8
Walnuts( broken)around 6 to 8
Almonds around 5
Cloves 5
Cinnamon 1 inch stick
Milk 1/4 cup
Saffron 2 pinches
Ghee 2 tbsp
Onion 1 medium cut to thin slices
Directions:
Soak the rice for 15 minutes, drain water and set aside. In a Karahi take ghee and heat. Add the dry nuts and raisins and fry until the nuts are light brown. Remove the nuts from the oil and add in the onion slices and fry until nicely browned. Remove them and set aside. Add little oil to the karahi and put in the whole masalas, fry until aromatic. Add 2 cups water and the milk along with saffron, add some salt and the dry fruits and boil. When it starts boiling transfer the soaked rice, cover and cook, keep stirring every now and then and cover and cook again until the rice is done. Takes about 15 minutes on low fire. Once done, put off the stove, add in the browned onions and mix well. Flavoured rice is ready to serve. Enjoy. Bone Appetite.
STEPWISE RECIPE FOLLOWS:
1. Assemble all ingredients. Soak the Basmathi rice for 15 minutes and drain water.
2. Heat the ghee in a karahi and add the nuts and raisins and fry. Remove when lightly browned. Add in the onion to the same ghee and fry them until they are well browned. Remove onions and set aside.
3. Add a little oil to the karahi and drop the whole masalas into it when hot. Fry until aromatic, add two cups water, the saffron soaked milk, fried nuts and salt and bring the water to a boil,
4. As it boils, transfer the soaked rice and mix well. Cover and cook for few minutes, stir in between and cover and cook again until done. Takes about 15 minutes for the rice to cook on low fire. The water should have evaporated completely.
5. Once done, put off the stove and add the browned onions, mix nicely and the flavoured rice is ready to serve.
NOTES:
1. Other whole masalas like cardamom, peppercorns, fennel, cumin etc have not been added on purpose, as then the Pulav taste will come in. This rice has a very subtle flavour.
2. Saffron is optional, but if added gives a good flavour to the dish.
3. Cook rice on low fire, as high heat cooking will evaporate the water fast and the rice won’t cook well and may remain raw.
4. Water to cook rice can be adjusted as per your preference, but rice must be grainy and not mushy.
5. I have numbered a few pictures to avoid confusion in steps.
If you made this recipe and liked it, please do comment below. I would love to hear from you.