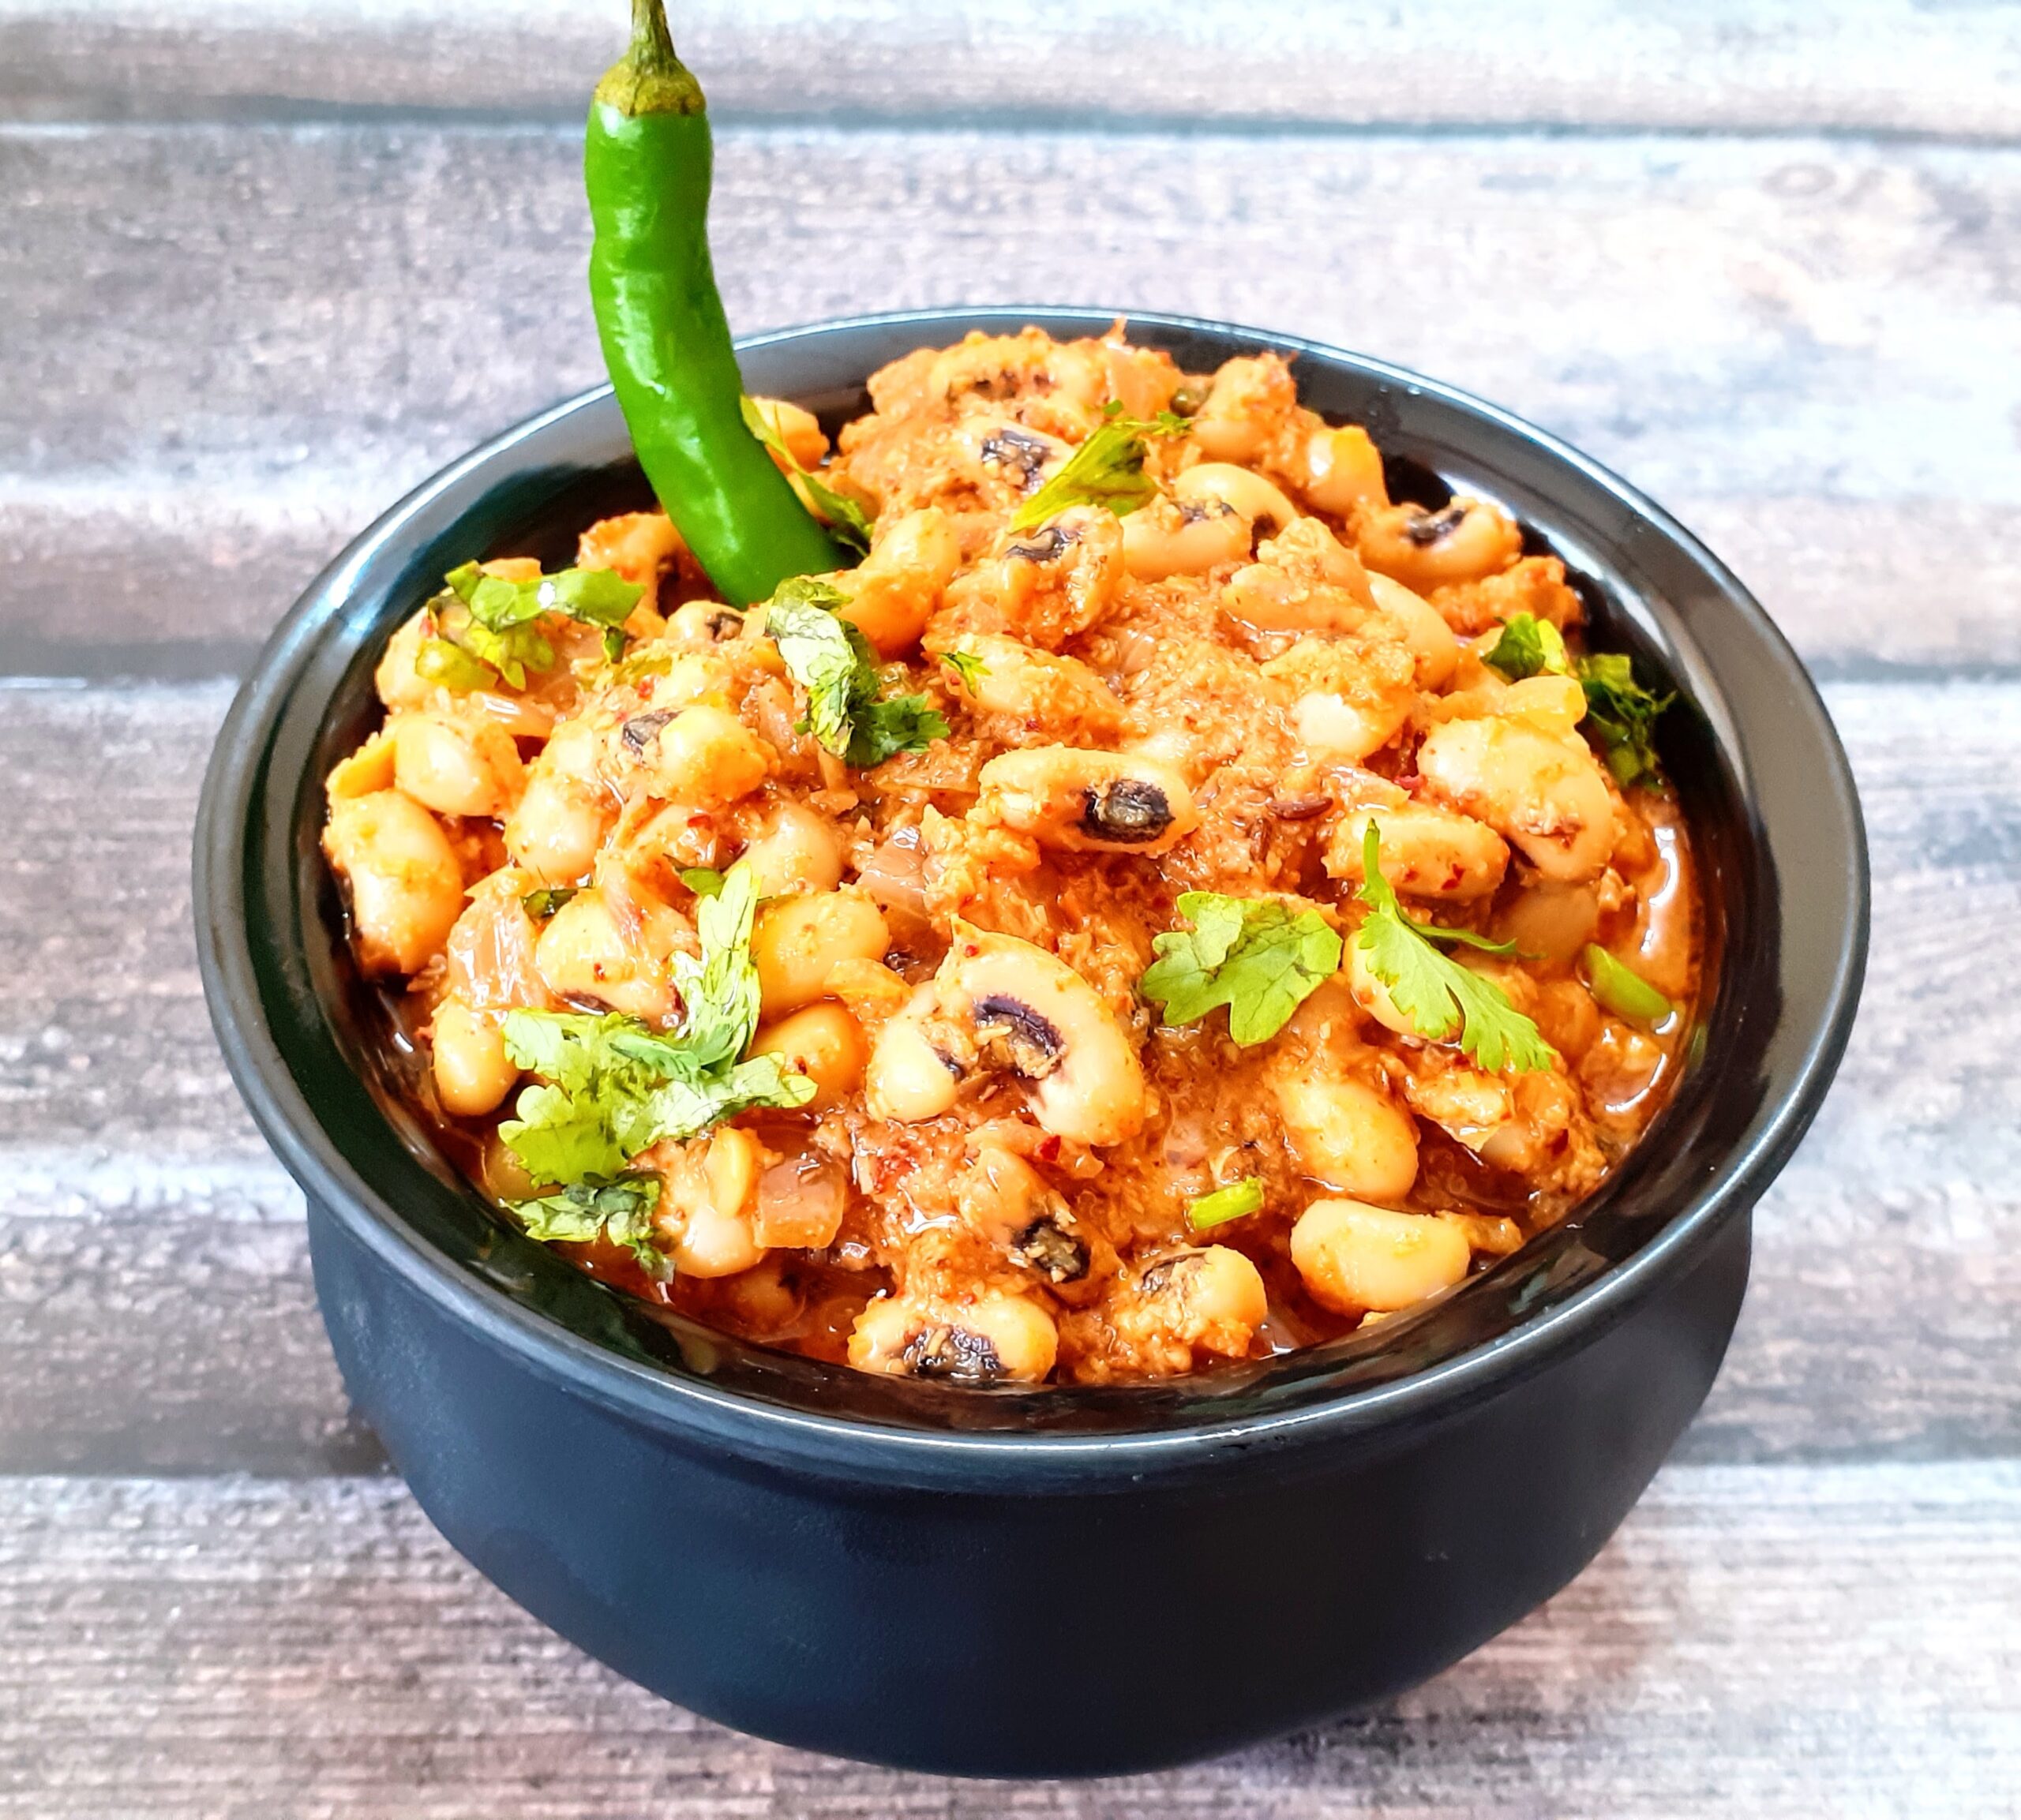
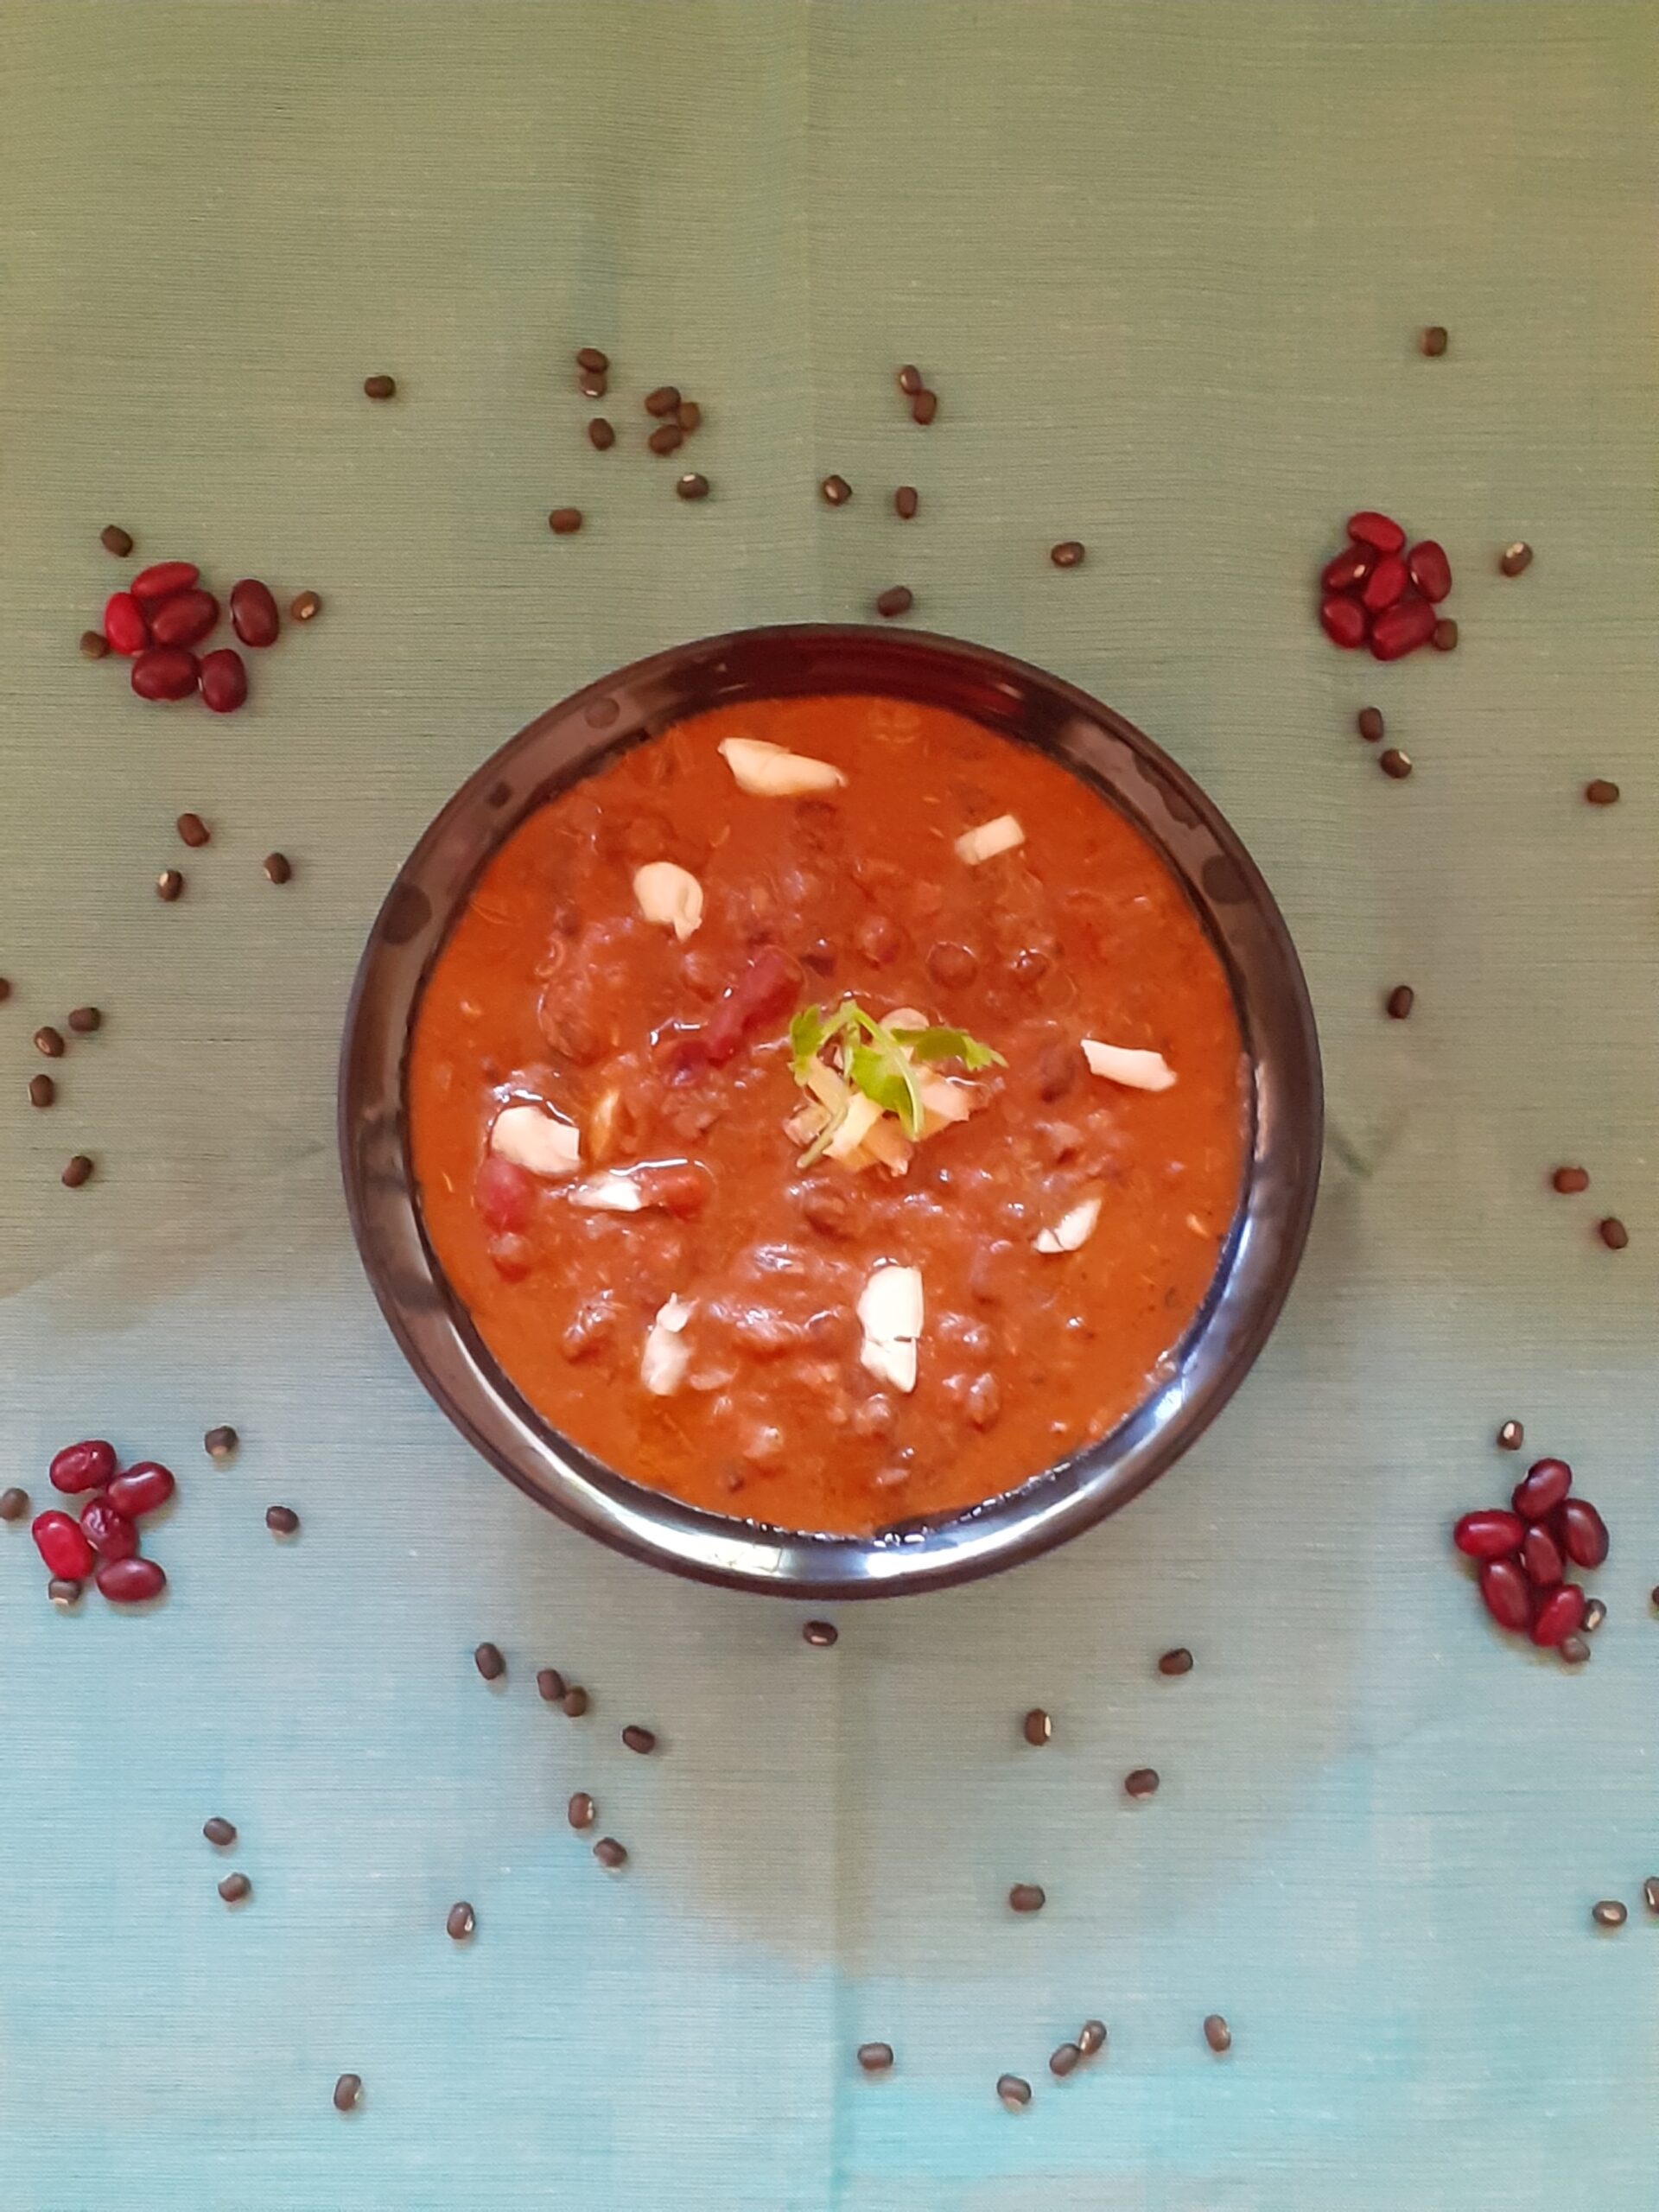
Goan Style Lobia Curry/Goan Style Black Eyed Bean Curry
Black eyed beans or Cow peas as they are called, are legumes that are available all over the globe. In India they are used in many regional cuisines. The Lobia masala is a popular dish in north India, and so is the Eriserry from Kerala cuisine that uses the legume along with Ash gourd and Yam. In Tamilnadu is it made into a Sundal(salad), or used with other vegetables to make a curry. In the Andhra cuisine It is made into a Vada (fritter), the Gujarati cuisine also has its version of the Lobia curry, called Chawli masala. That’s how wide the usage of these beans is across India.
Cow Peas/ black eyed beans have a soluble fibre that helps in reducing cholesterol, it is said. These are nutrient dense legumes with the richness of Vitamins- A, B1, B2, B3, B6, C , that helps in healthy cell development. They also are rich in micro nutrients like Magnesium, zinc, iron, and copper(source net.med). These legumes also support weight loss and boost digestive health. That I guess is reason enough to include them in your diet, if you haven’t already.
Though the Lobia Sundal (salad) is a regular feature in my house, and so is the Erissery, and Lobia masala, I recently tried a Goan style Lobia curry and it turned out so good. The Goan spice combination of Coriander seeds, Cumin seeds and coconut, gave a very good dimension to the dish, and it tasted different from the regular Lobia masala. Hence documenting this recipe for you all to try.
PREP TIME: 10Mins+(soak time 4-5 hrs) COOK TIME: 30 Mins
TOTAL TIME: 40Mins COURSE: MAIN
CUISINE: INDIAN SERVINGS: 4
AUTHOR: Rajni Ram
Ingredients:
Lobia/cow peas/black eyed beans/ 1 cup soak for 4-5 hrs
Onion 1 medium chopped fine
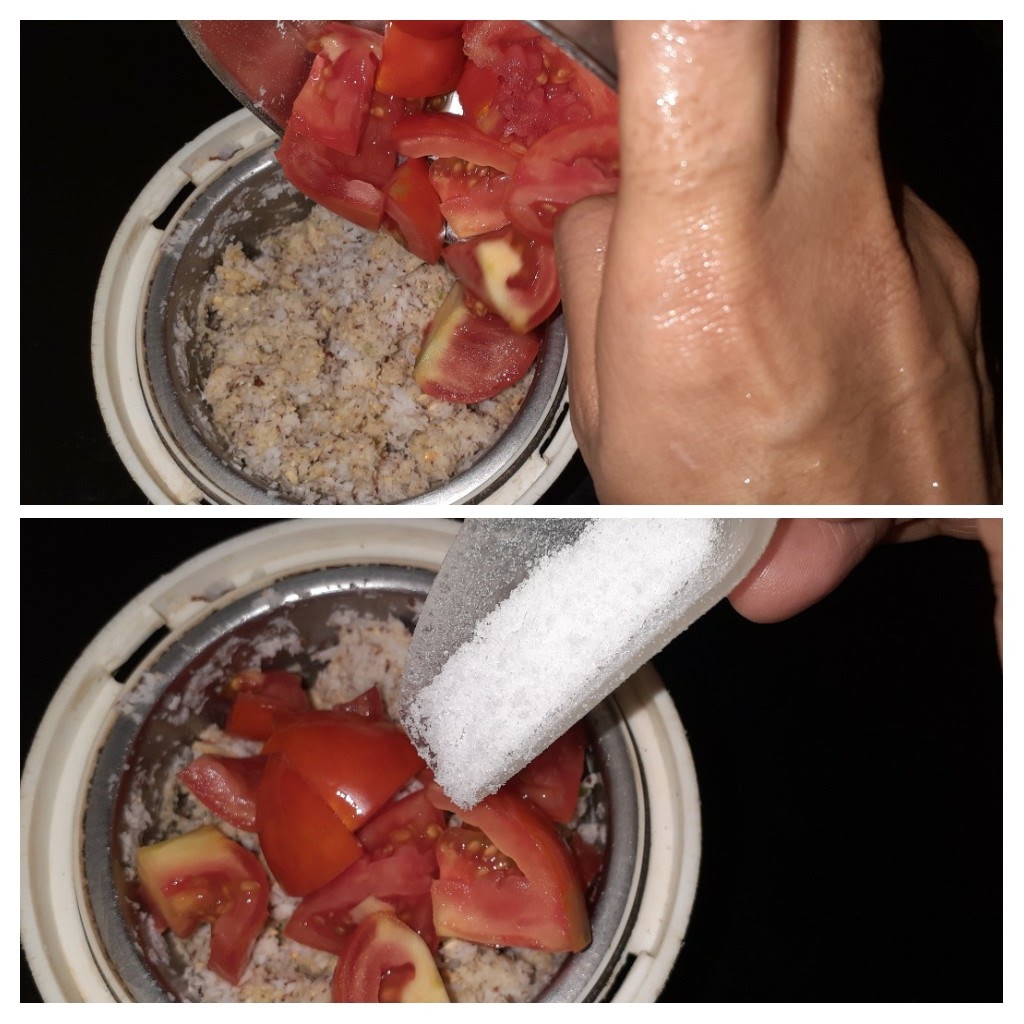
Tomatoes 2 large pureed
Coconut 2 tbsp
Tamarind paste 1 tsp or pulp from a tiny bit of tamarind
Green chillies 2 split
Bay leaf 1
Coriander seeds/dhania 2 tsp
Cumin seeds/Jeera 1 tsp
Dry red chillies (regular/spicy ones)1
Kashmiri or Byadagi chillies 1
Turmeric powder 1/2 tsp
Ginger garlic paste 1tsp
Red chilli powder(regular) 1 tsp
Kashmiri red chilli powder 1 tsp
Oil for sauteing
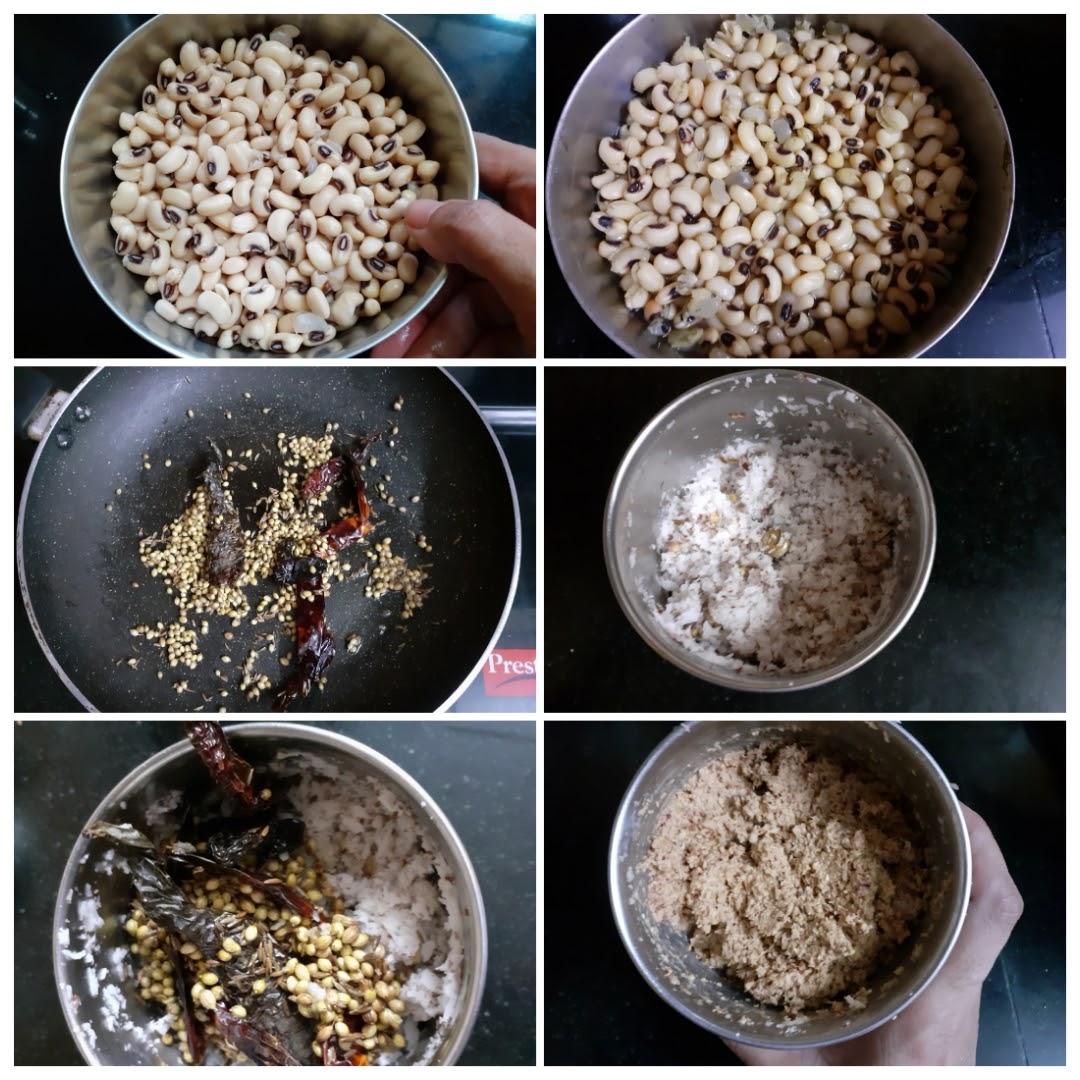
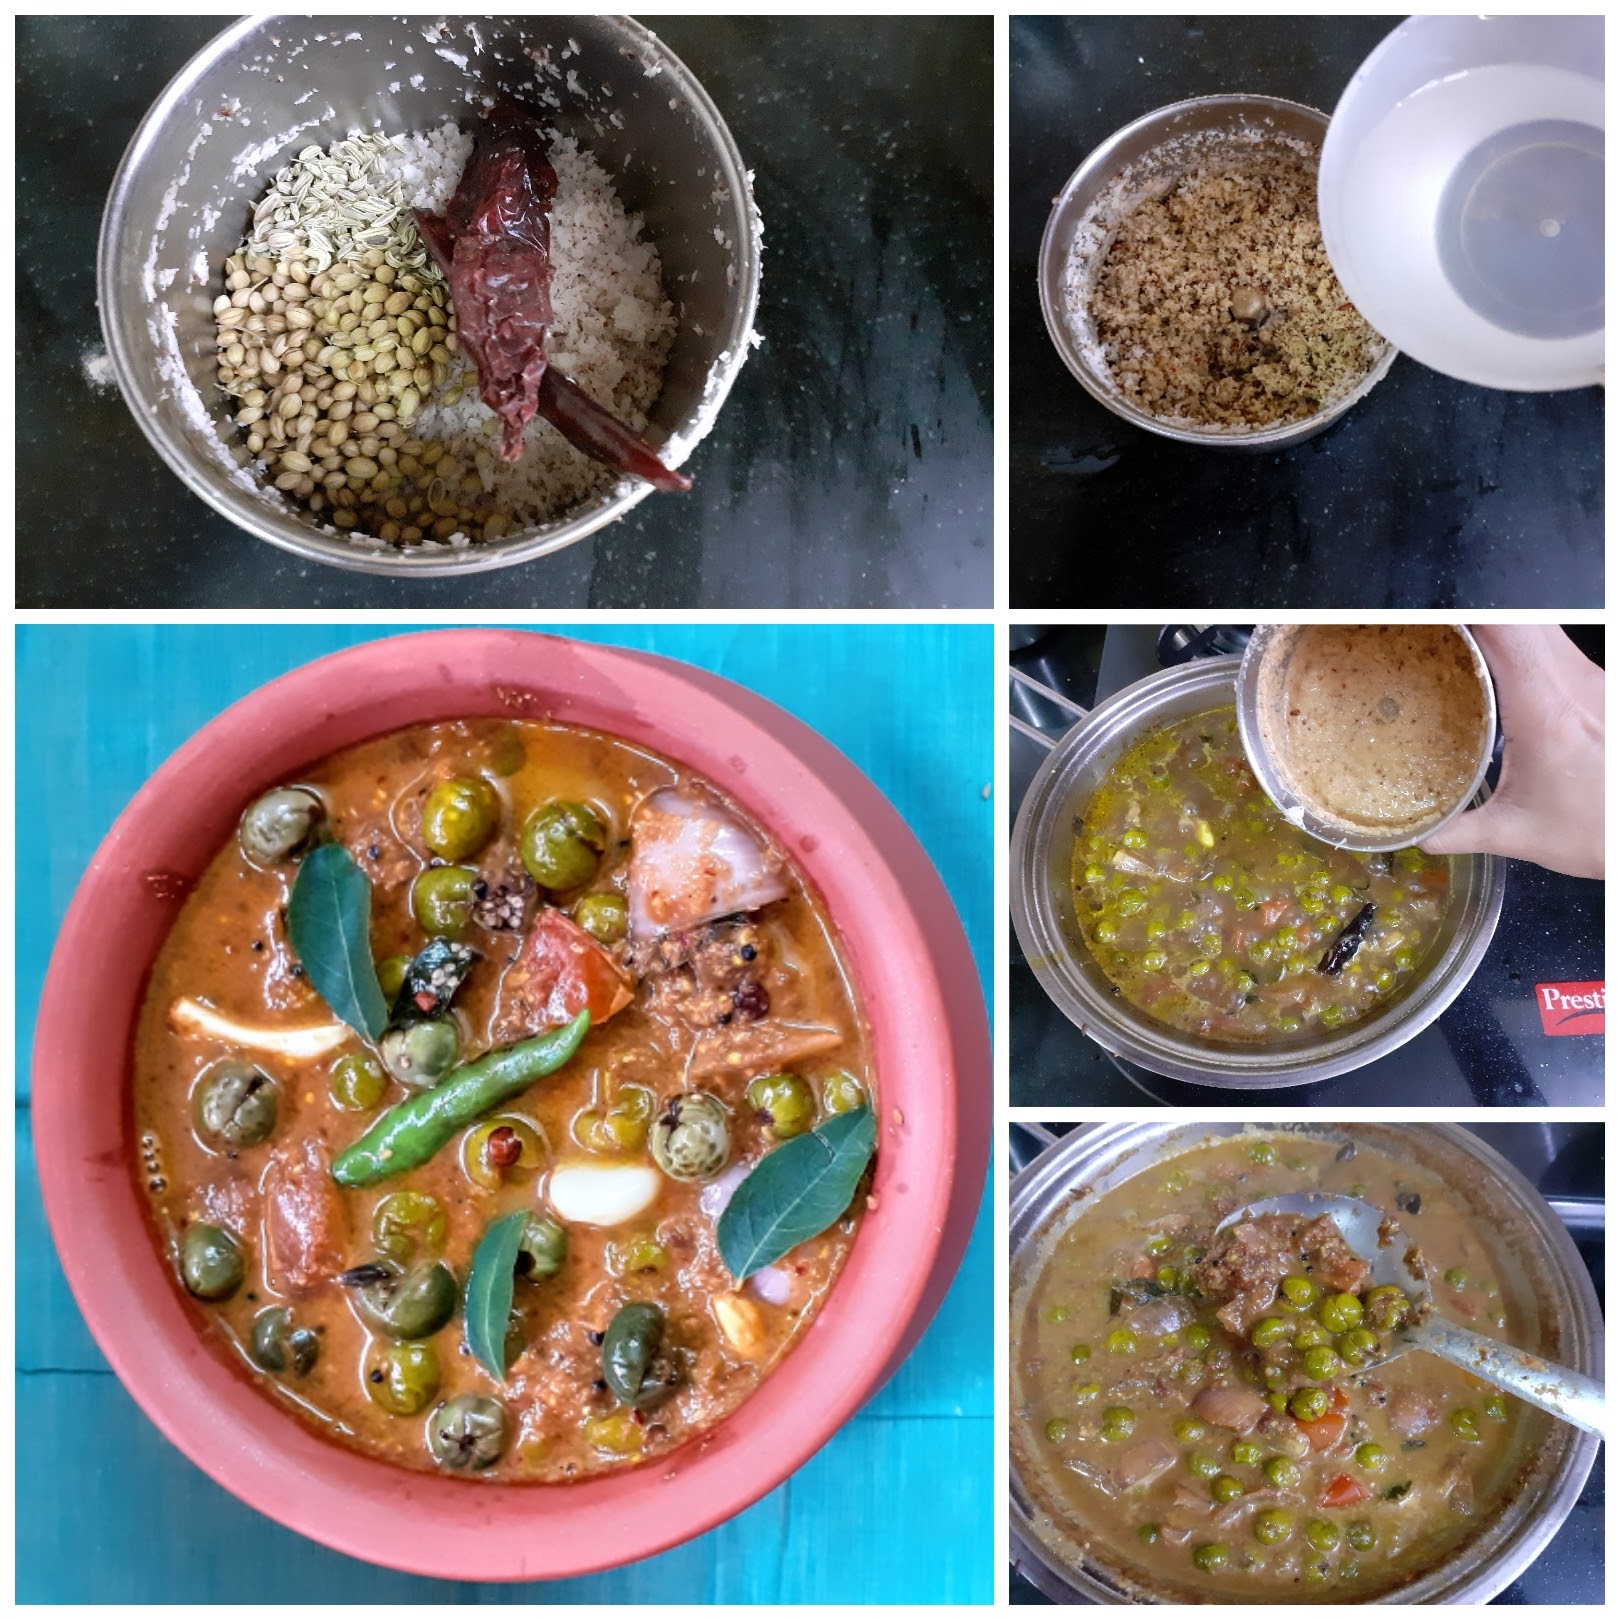
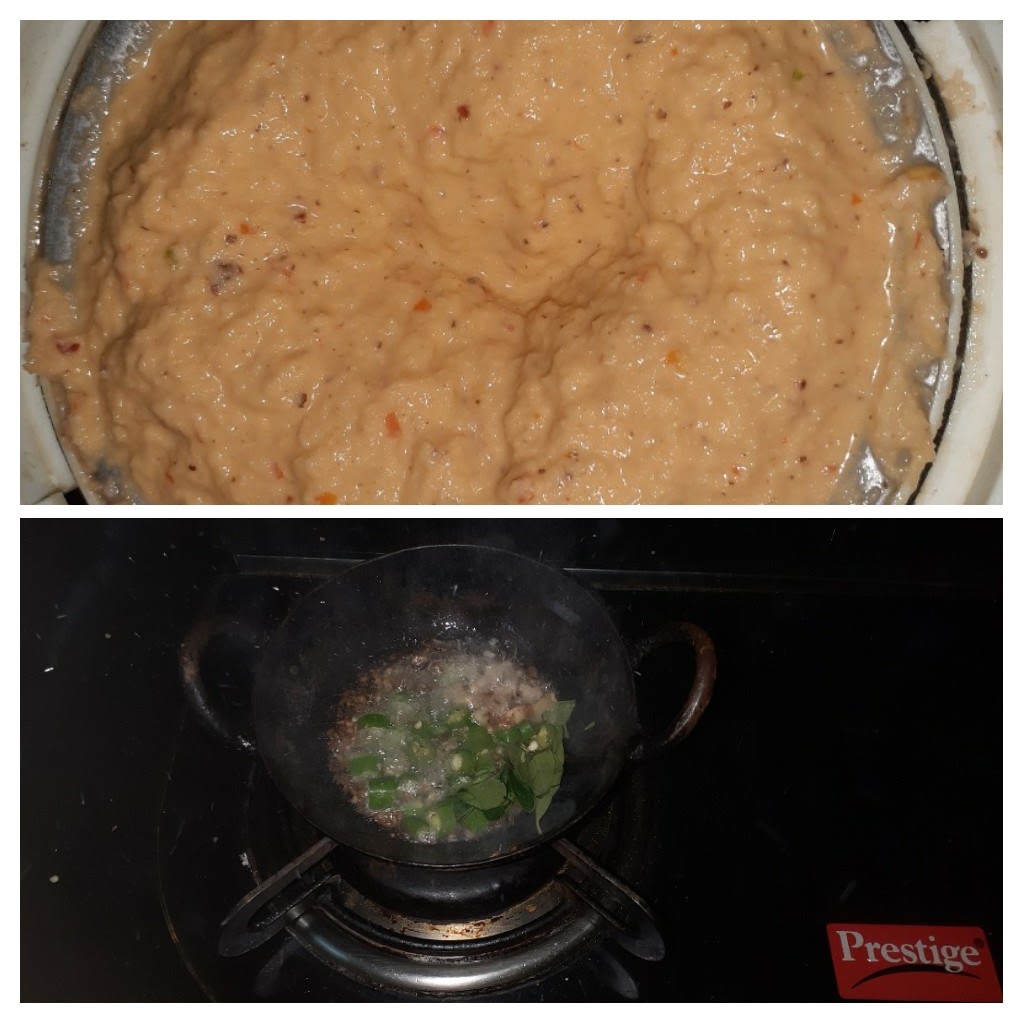
Directions: Wash and drain the water from Lobia, add fresh water and pressure cook for whistles or until soft. In a pan, roast the coriander seeds, cumin seeds, dry red chillies, and Kashmiri red chillies until crisp. cool. Now put them in a blender jar along with coconut and grind to a fine paste using little water. Set aside. Now in the same pan take some oil and heat. Add the Bay leaf, followed by cumin seeds, and turmeric powder. When the cumin seeds splutter, add the ginger-garlic paste, and fry. Now drop in the chopped onions and saute. When the onions turn light brown, add the split green chillies and saute another 30 secs. Now add the ground masala paste and fry nicely in the oil. When the mixture becomes dry, add the tomato paste, followed by the cooked Lobia/Black eyed beans, along with the water in which the lobia was cooked. Let the mixture simmer for 5 minutes. Now add, salt, red chilli powder, Kashmiri chilli powder, and further simmer for 10 minutes. Add water if required to adjust consistency. After 5 minutes, add the tamarind paste, and cook for just a minute and switch off the flame. Garnish with finely chopped coriander leaves and serve hot with Rotis or rice.
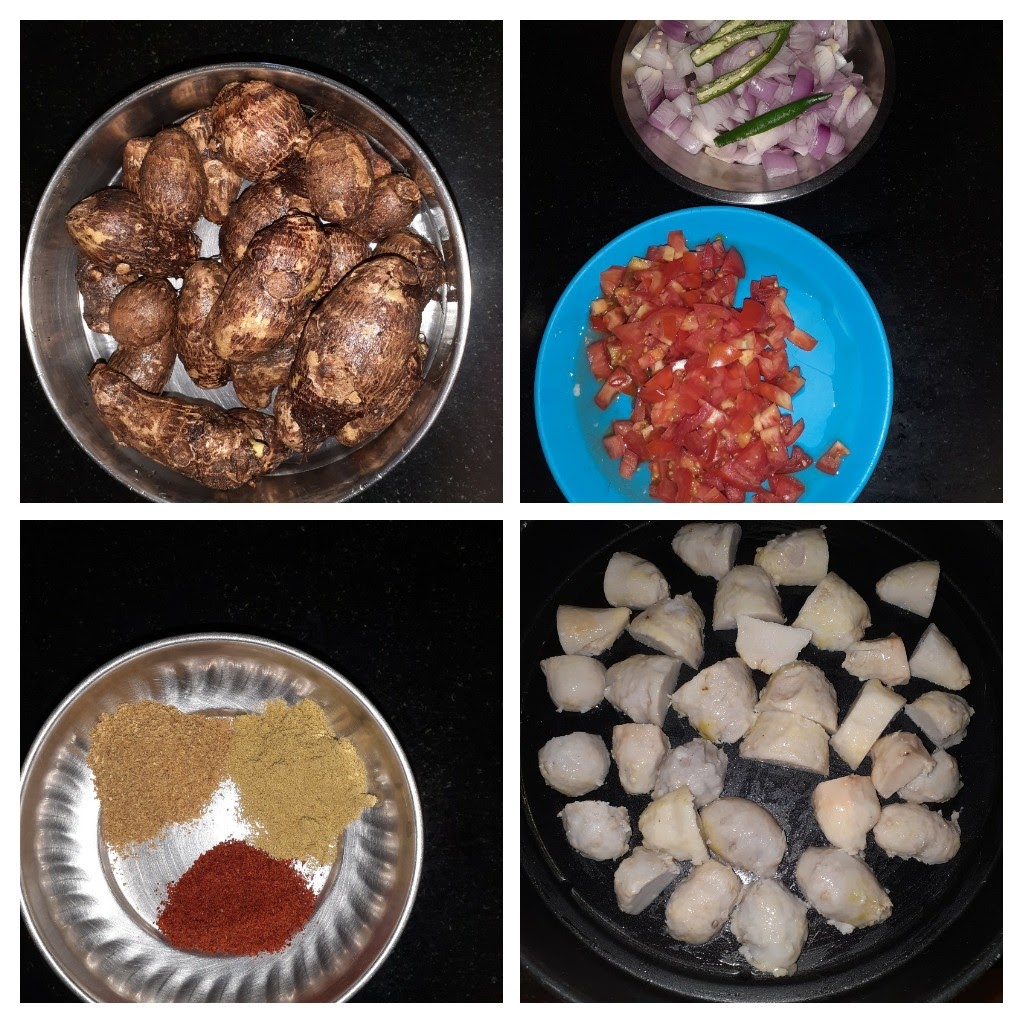
1. Wash and drain the water from Lobia, add fresh water and pressure cook for whistles or until soft. In a pan, roast the coriander seeds, cumin seeds, dry red chillies, and Kashmiri red chillies until crisp. cool. Now put them in a blender jar along with coconut and grind to a fine paste using little water. Set aside.
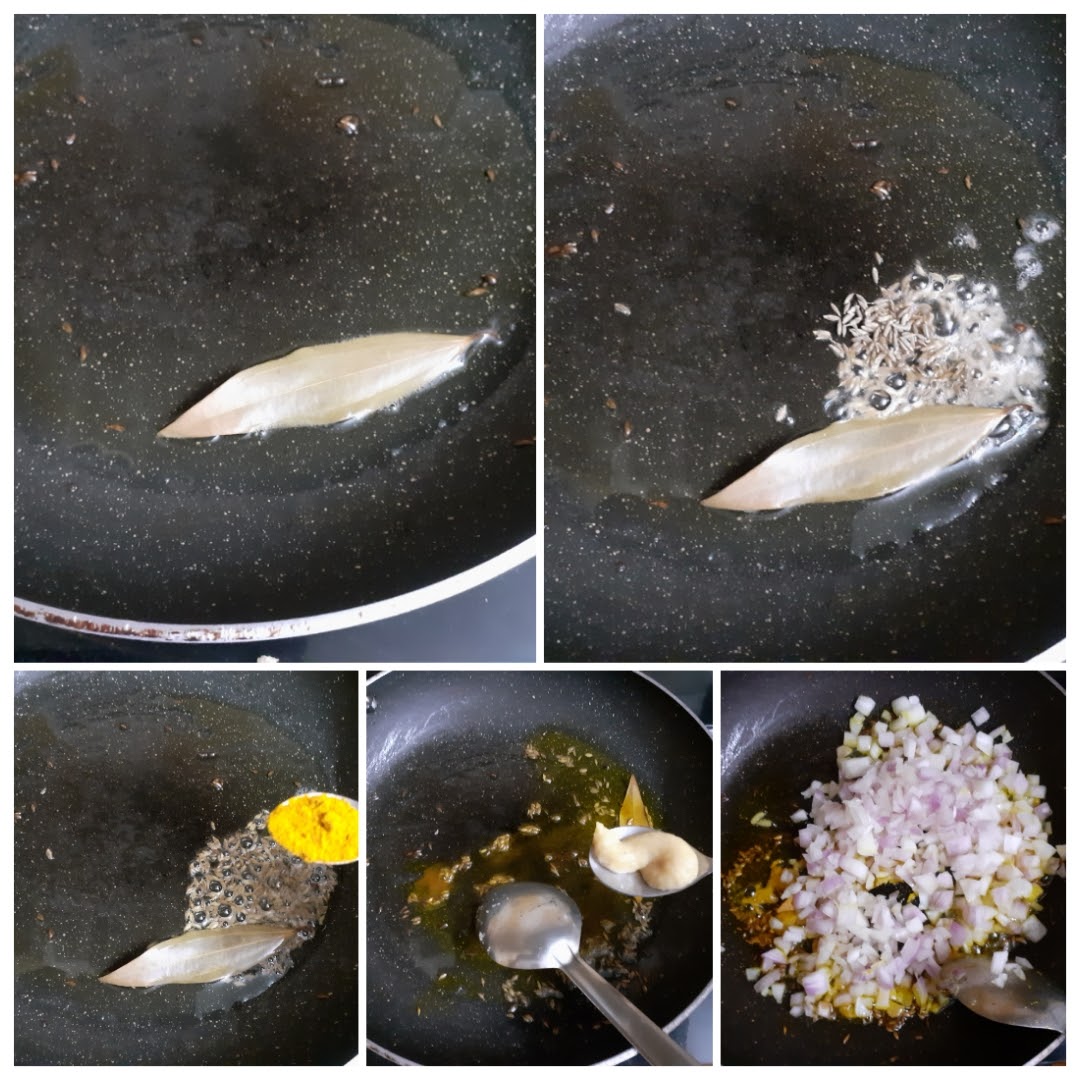
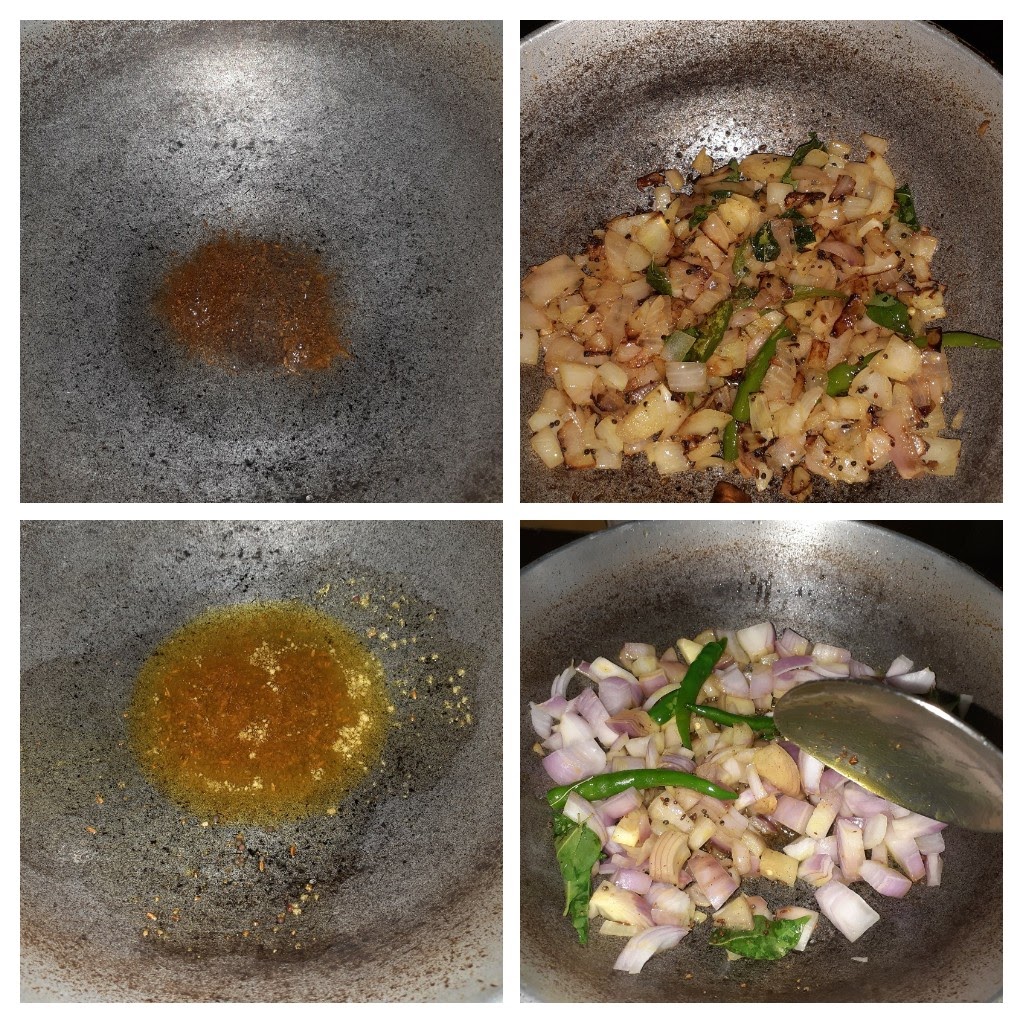
2. Now in the same pan take some oil and heat. Add the Bay leaf, followed by cumin seeds, and turmeric powder. When the cumin seeds splutter, add the ginger-garlic paste, and fry. Now drop in the chopped onions and saute.
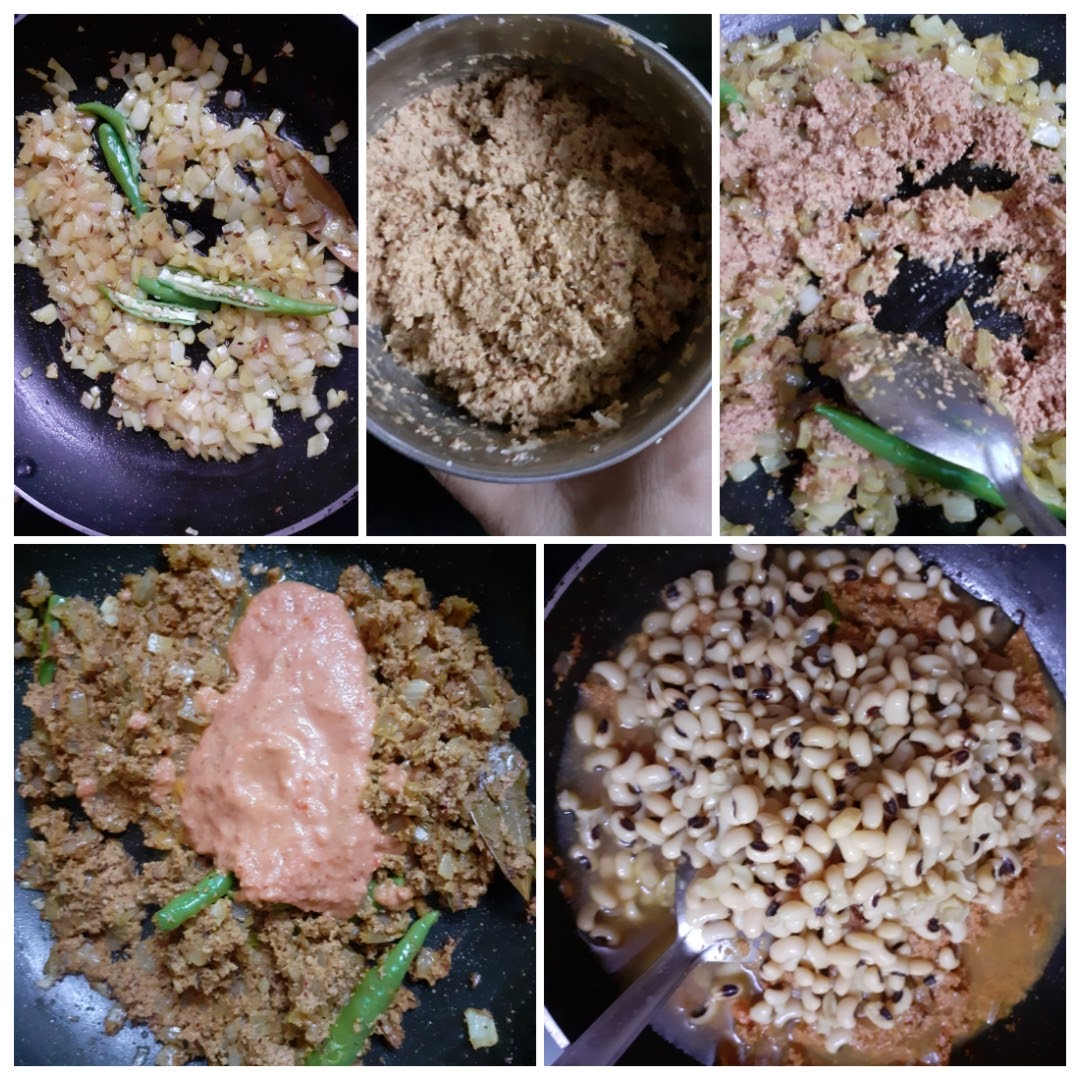
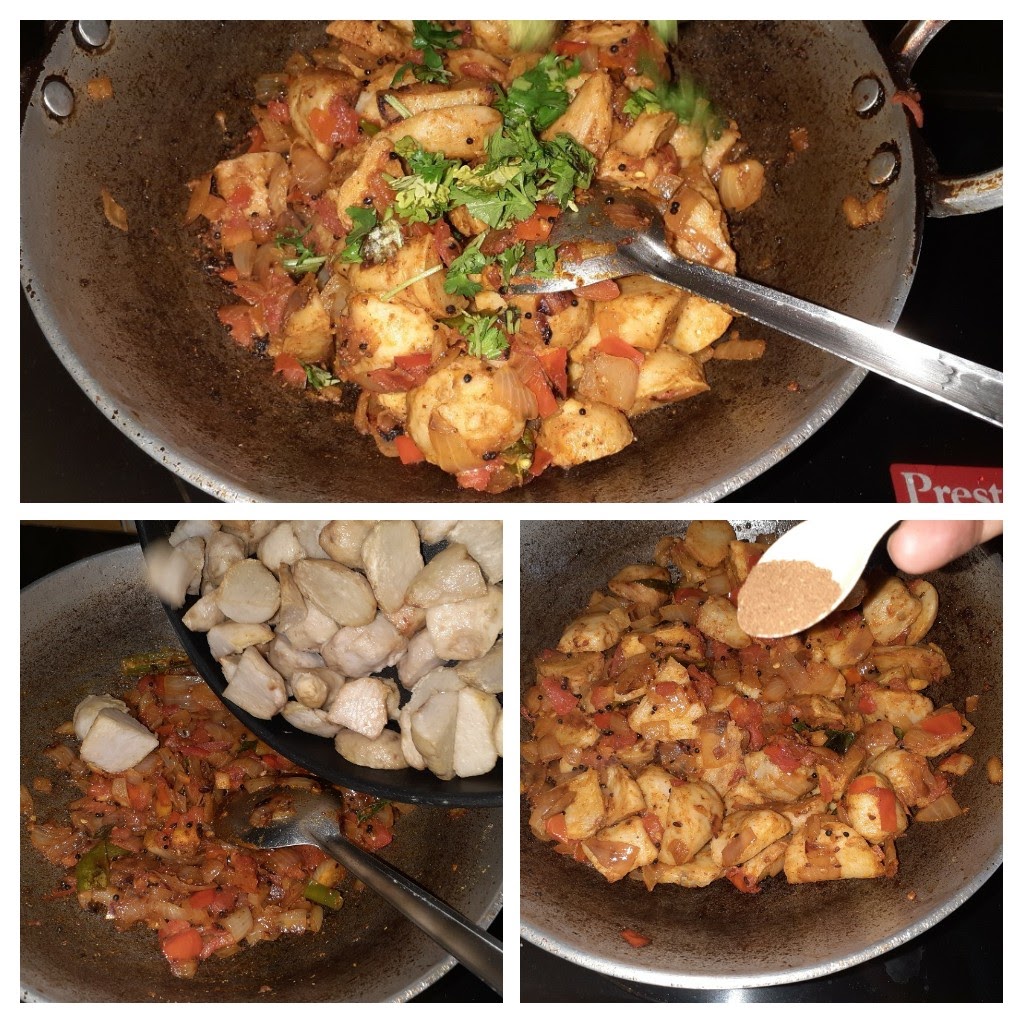
3. When the onions turn light brown, add the split green chillies and saute another 30 secs. Now add the ground masala paste and fry nicely in the oil. When the mixture becomes dry, add the tomato paste, followed by the cooked Lobia/Black eyed beans, along with the water in which the lobia was cooked. Let the mixture simmer for 5 minutes.
4. Now add, salt, red chilli powder, Kashmiri chilli powder, and further simmer for 10 minutes. Add water if required to adjust consistency. After 5 minutes, add the tamarind paste, and cook for just a minute and switch off the flame. Garnish with finely chopped coriander leaves and serve hot with Rotis or rice.
NOTES:
1. There is another variety of the Lobia which are red in colour and resemble kidney beans/Rajma. This curry can be made with those red coloured beans too.
2. The spice level of this curry is medium. Feel free to increase or decrease as per taste.
3. Usually when i refer to “oil of sauteing” in the ingredient list, I mean the regular refined oil. When i use a specific oil like Coconut or Sesame, I always specify.
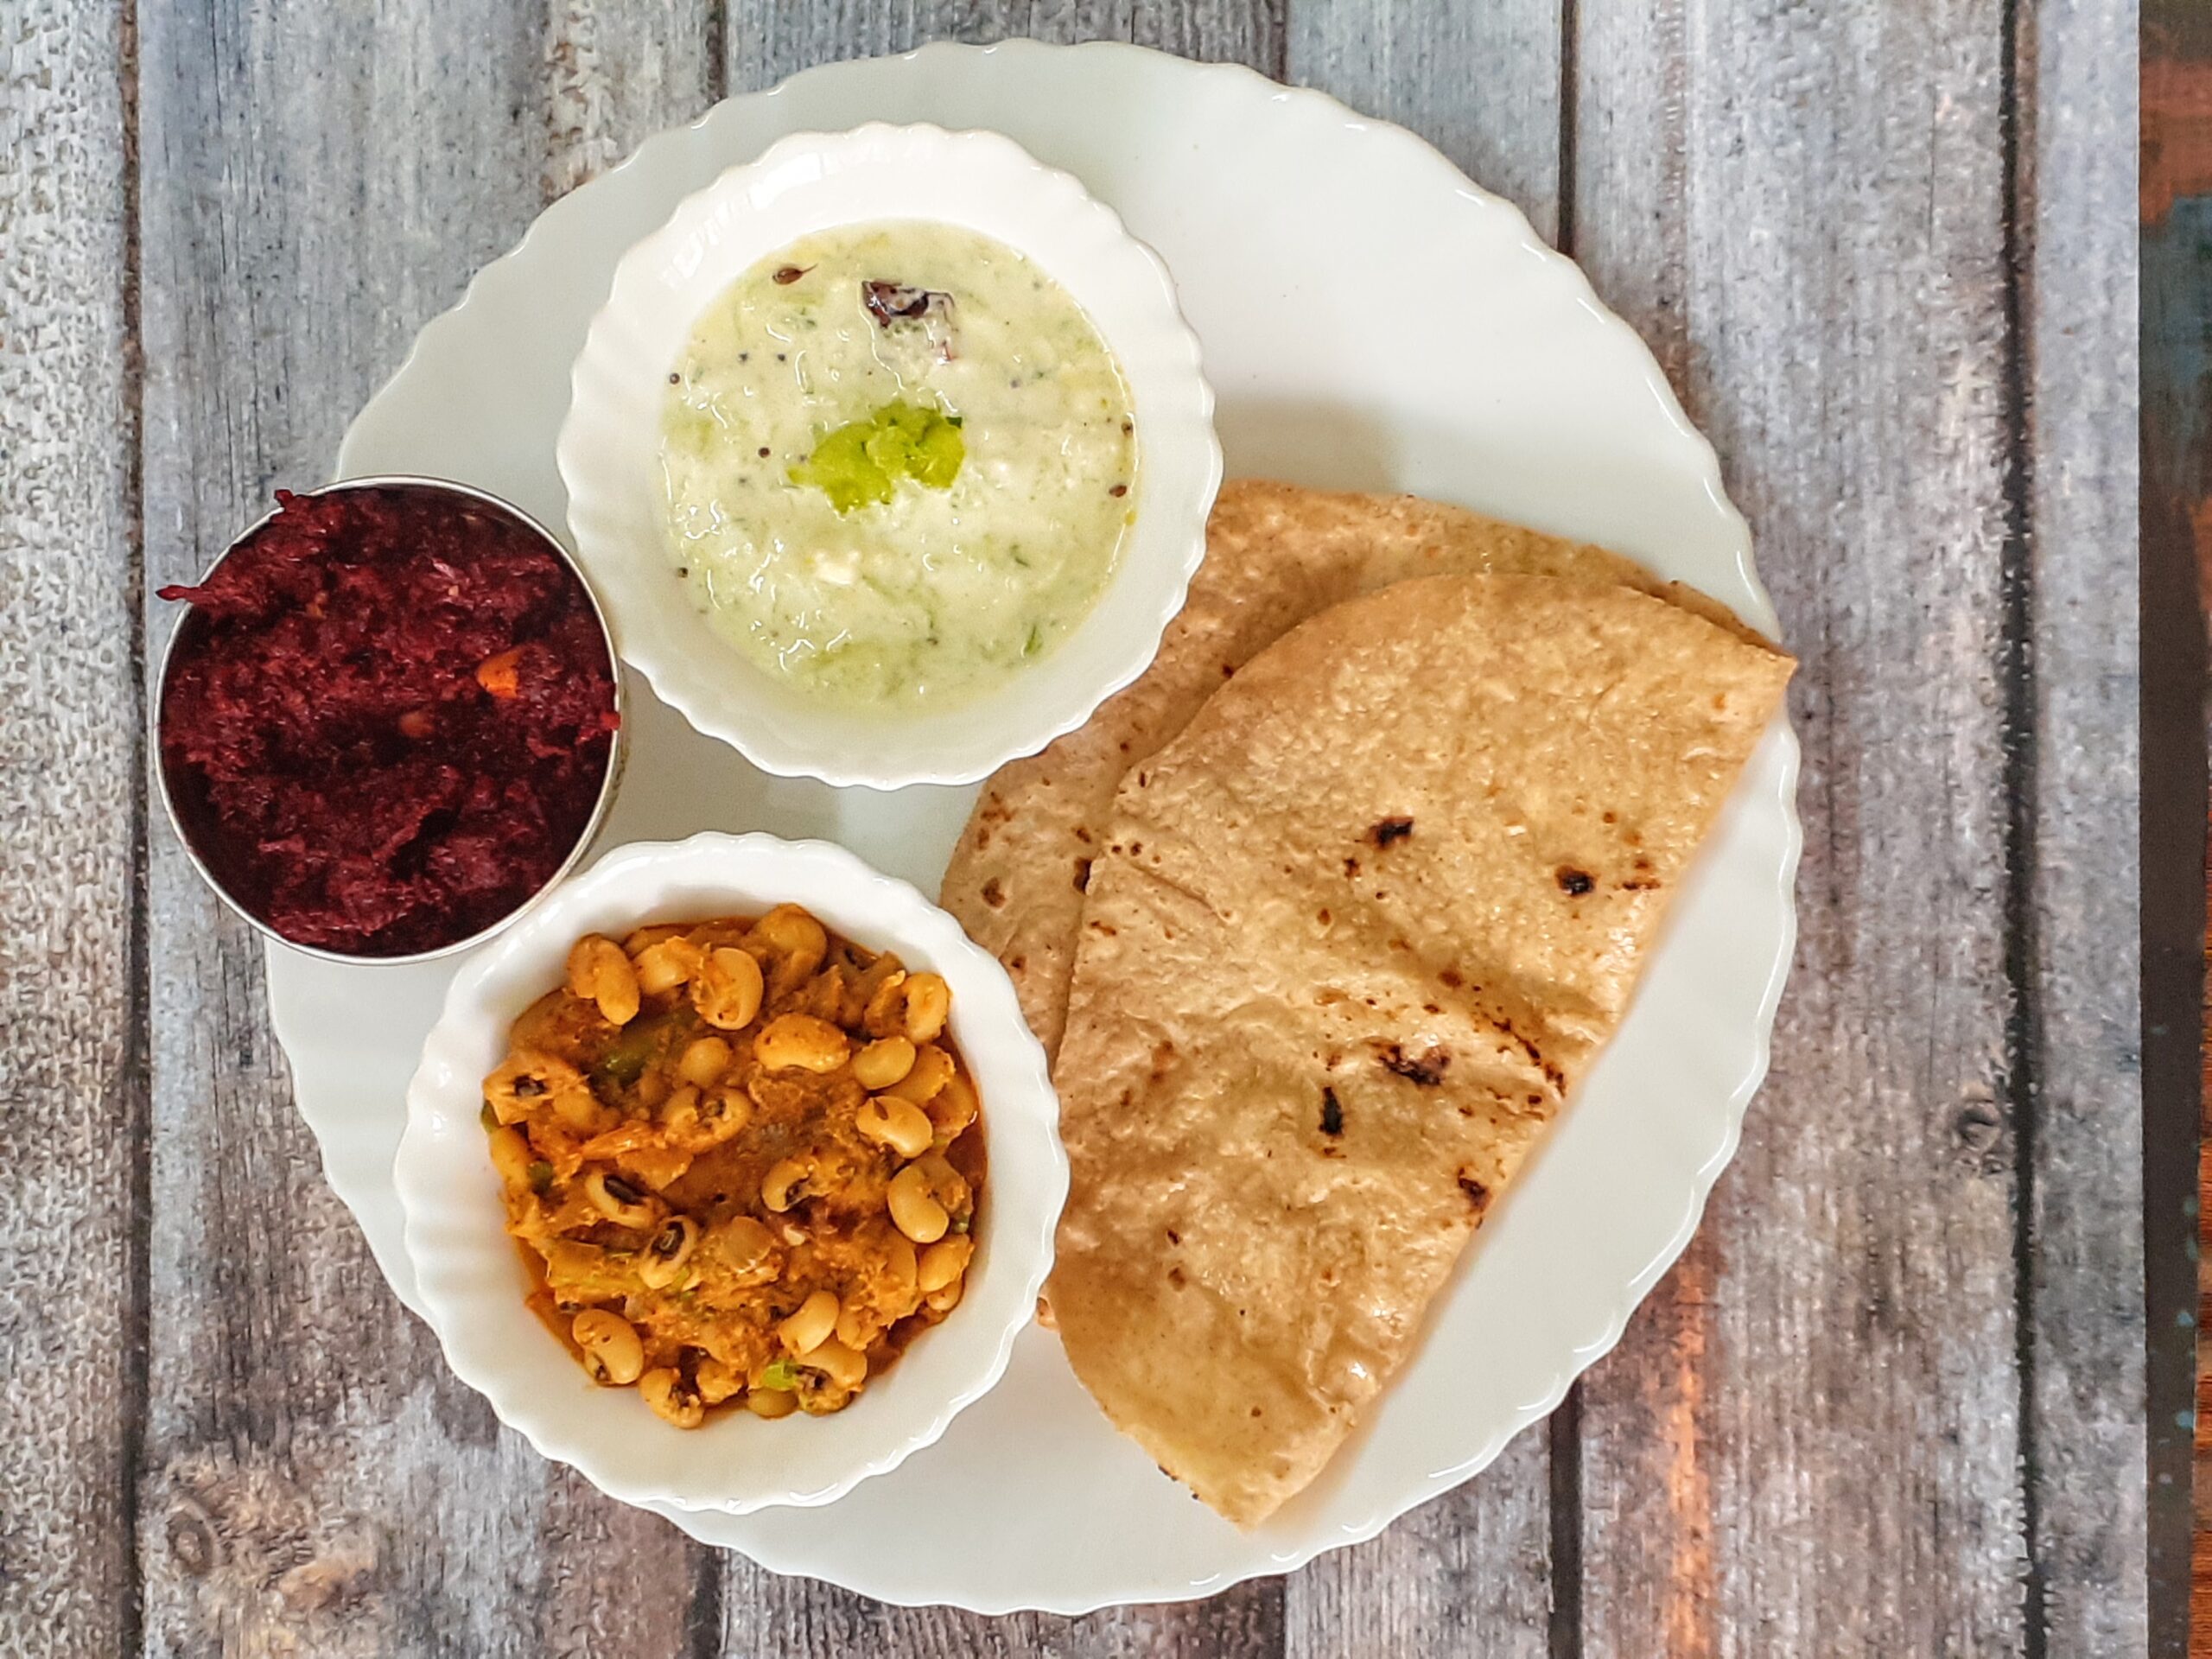
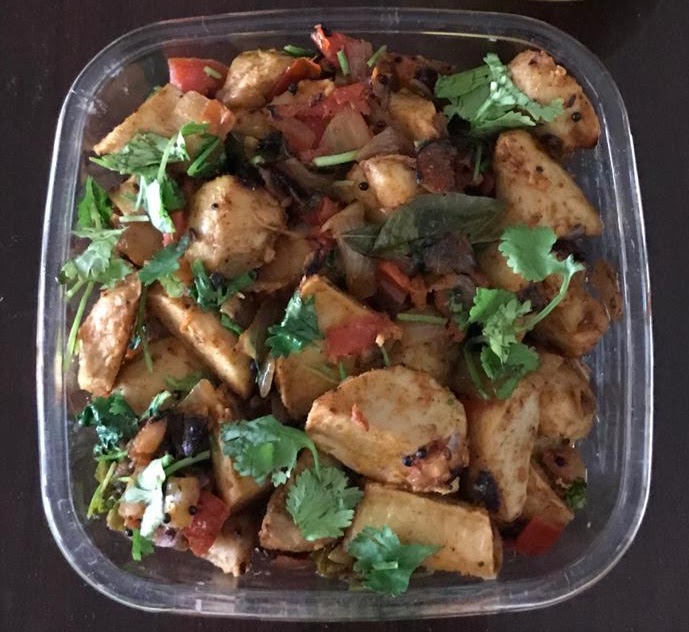
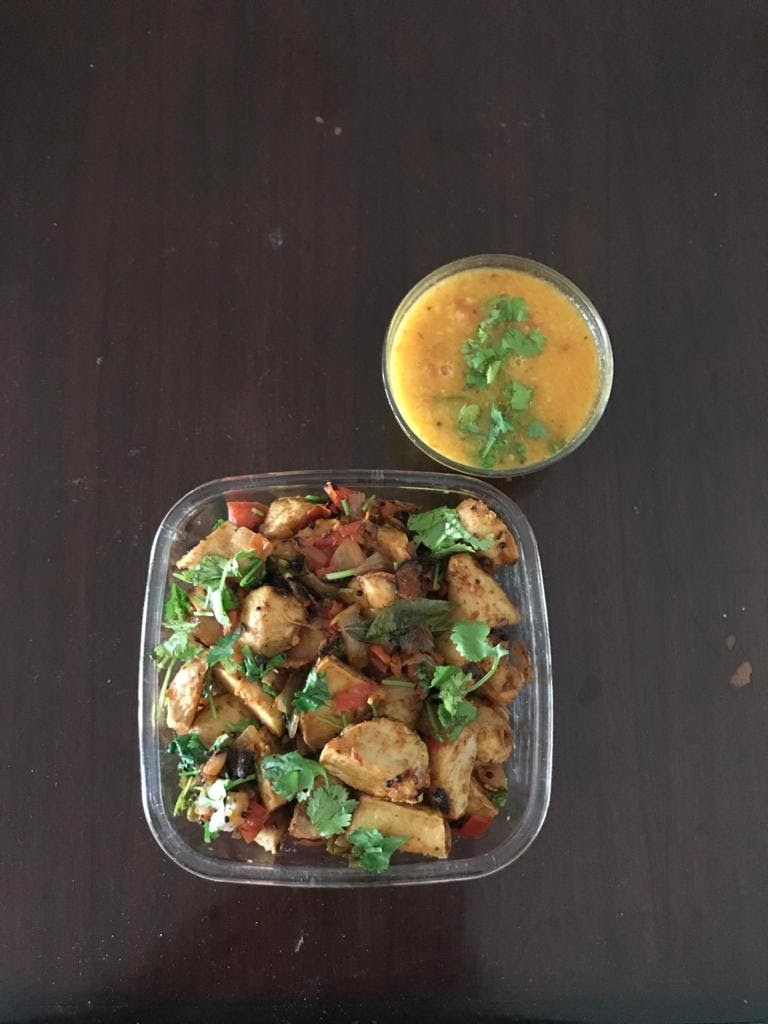
This is how I served my Goan style Lobia curry with Roti, Cucumber Raita, and Beetroot Halwa to make it a complete meal.
If you tried this recipe and liked it please comment below. I would love to hear from you. If you have a query about the recipe email us and ill respond as soon as I can.
If you would like to receive our recipes on your mail please leave your mail id at the homepage. Every time Rajjo’s Kitchenn has a new post we will mail the recipe to you.
Lemon Poppy Seed/Khus Khus Salad Dressing
This creamy Lemon Poppy Seed/Khus Khus salad dressing is perfect for a veggie loaded salad you would want to have as lunch or dinner. This dressing is a great way to spruce up your salad.
This salad dressing is a low carb version.
What I like in a home made dressing is that you get to customize everything from the spice, salt and sugar. And this salad doesn’t take any time at all. It is just a add everything to blender and blitz kind of dressing. This salad dressing comes together in just about 5 minutes. It stays well in the refrigerator upto 10 days and can be used as and when required.
1. In a blender pour the ACV, Olive oil, Lemon juice, salt, sugar powder, crushed garlic cloves, Dijon mustard, and blend at high speed for 30 seconds. Stop and blend again for 30 seconds.
2. Now add the Poppy seeds and give another pulse for 30 seconds. The dressing is ready to use now. Store in a bottle and refrigerate.This can also be used as sauce for burgers and other breads.
NOTES:
1. I could not find black poppy seeds her, otherwise they would have provided a great contrast. Anyway this doesn’t affect the taste or flavour in anyway.
2. If you prefer a sweeter dressing, add one more tablespoon of sugar powder.
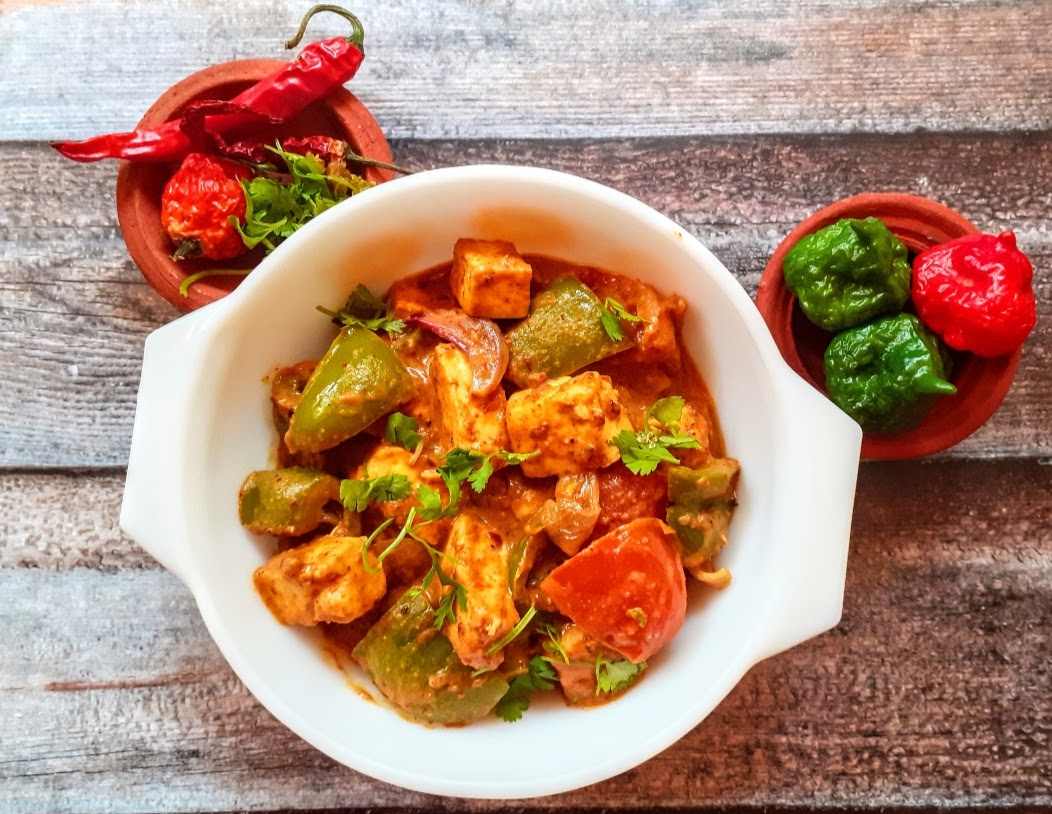
Kadai Paneer (Gravy)
Kadai Paneer is a dish I like and make very frequently at home. I have this weekly one day is Paneer day compulsorily policy. Here on my blog I have another Kadai Paneer recipe which is a Semi dry version of this recipe. Though the Masala is same, the way I made it is slightly different. The Semi dry Kadai Paneer recipe is good to go with Rotis, and other flat breads and is a good lunch box recipe as it doesn’t have much in the name of gravy and so is not messy at all, to carry in a box.
This gravy version is a great option to go with rice dishes like Matar Pulav, Jeera Rice, Biriyani etc. This version is what you will find at Dhabas in the North India. Considering Dhaba meals are supposed to be reasonably priced, do you think they would use Cashewnuts and cream etc, to thicken their gravy? Well, they use a very everyday ingredient that is found in Indian Kitchens and is gaining popularity the world over for its high protein quotient (and we have been using it since ages, that’s India for us, a treasure house of recipes and food culture). Any guesses as to what that ingredient is? Besan. Yes, the humble chickpea flour. To find out how to use it, read the recipe and try it out and you will agree that it tastes delicious.
Here goes the recipe for Kadai Paneer gravy style-
PREP TIME: 15 COOK TIME:15 MINS
TOTAL TIME: 30 MINS COURSE: MAIN
CUISINE: NORTH INDIAN SERVINGS: 5
AUTHOR: RAJNI RAM
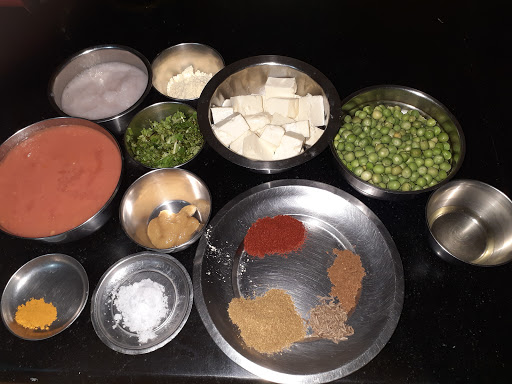
Ingredients:
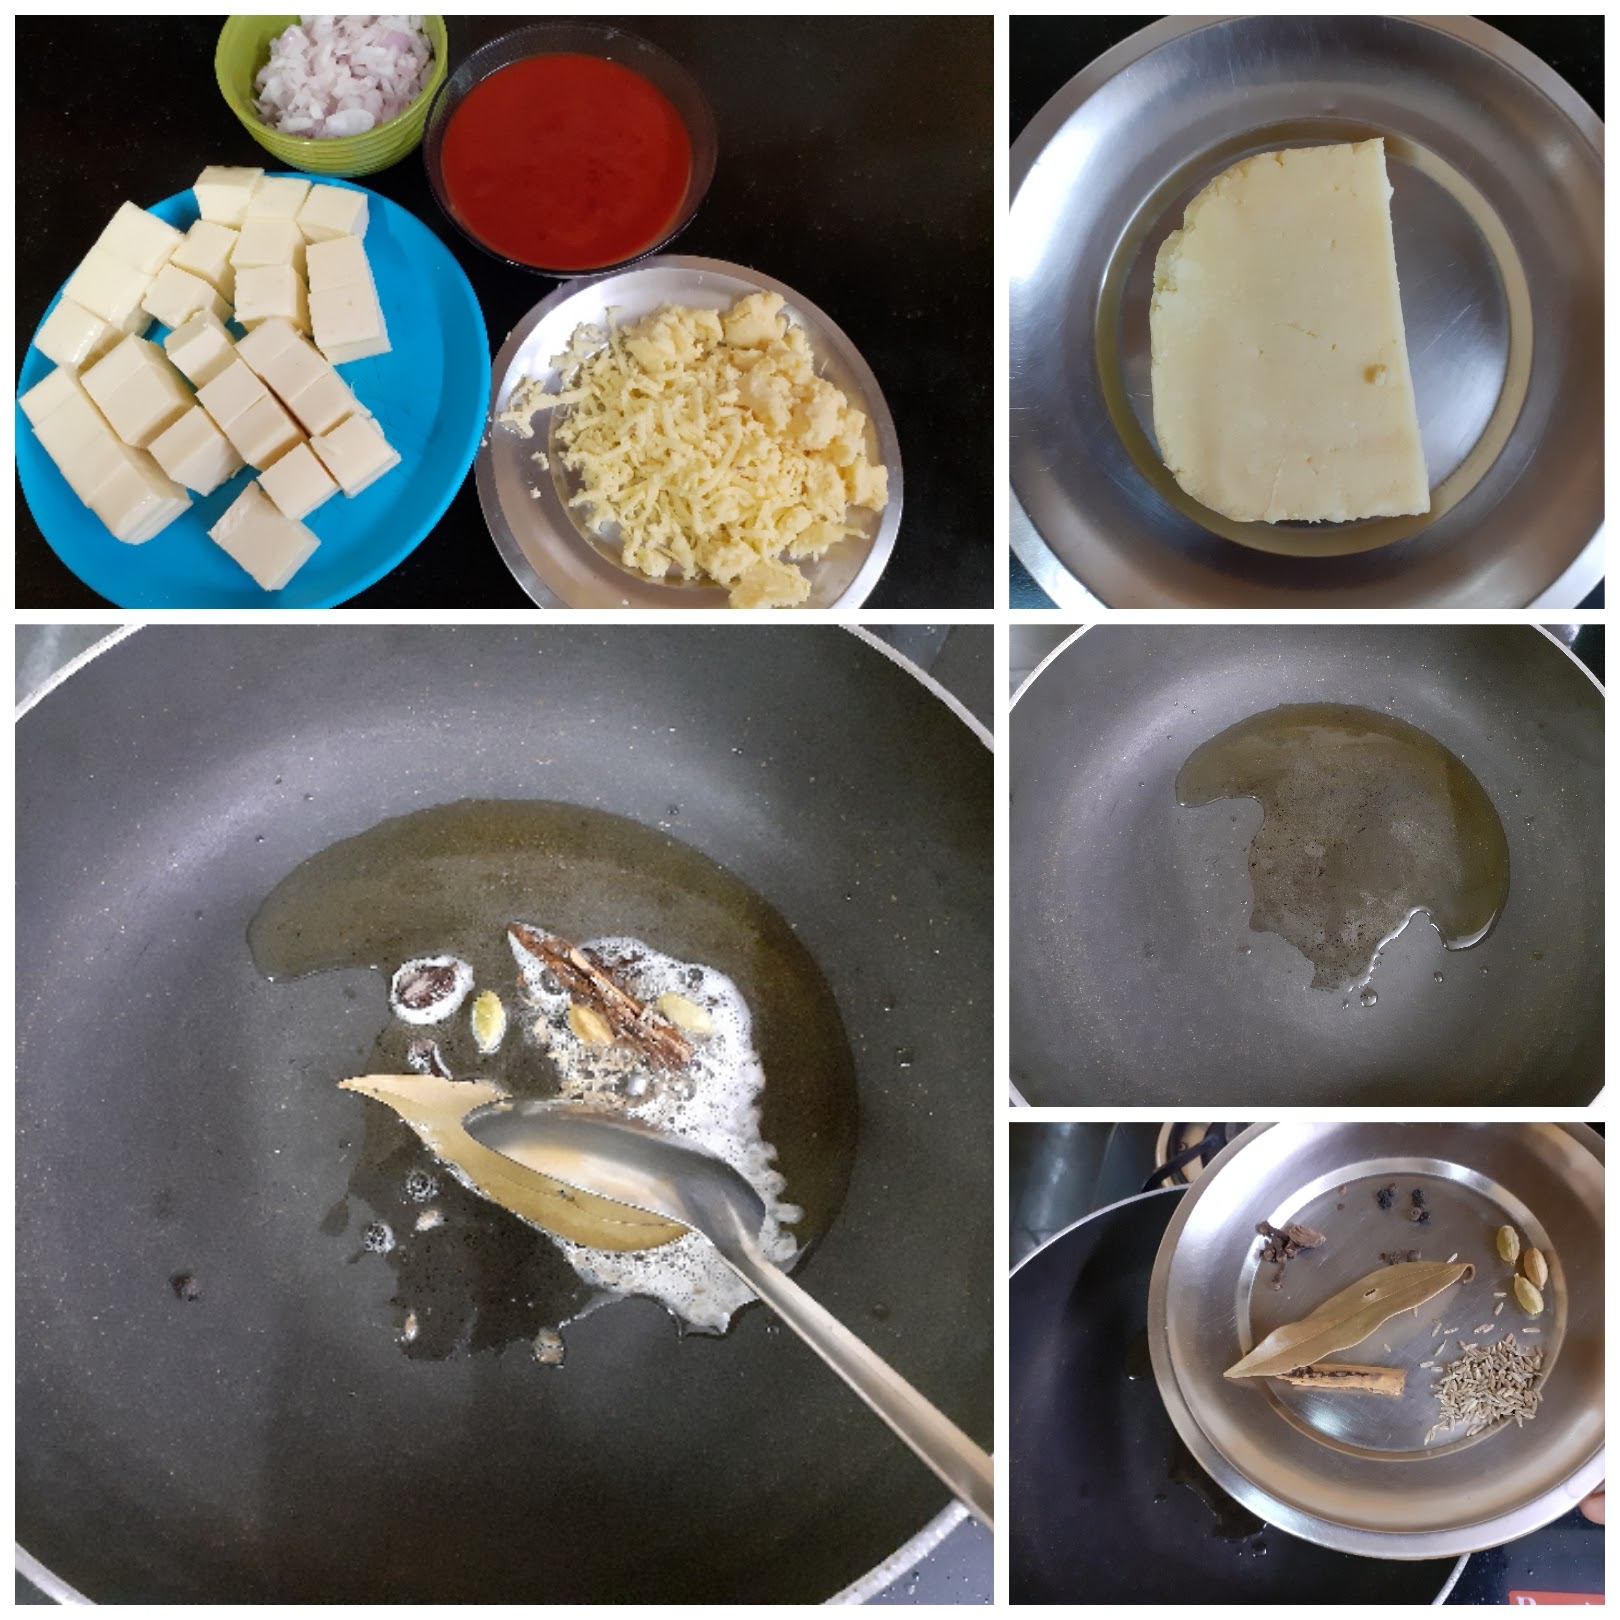
Paneer 200 gm cubed
Onion 1 large cut into petals
Onion 1 medium size chopped finely
Capsicum 1 medium cut to large cubes
Green chillies 2 slit lengthwise
Ginger garlic paste 1 tsp
Garlic 3 to 4 cloves (big ones)
Tomatoes 2 large pureed
Tomato 1 medium diced
Turmeric powder 1/2 tsp
Salt as required
Cumin seeds 1 tsp
Besan/ Chick pea flour 1.5 tbsp roasted on low flame until aromatic
Methi seeds/ Fenugreek seeds 2 pinches
Garam Masala Powder 1/2 tsp
To be ground:
Coriander seeds 1 tbsp
Cloves 2
Jeera/ Cumin seeds 1 tsp
Dry red chilli 2 regular and 1 Kashmiri dry red chilli (optional)
Directions:
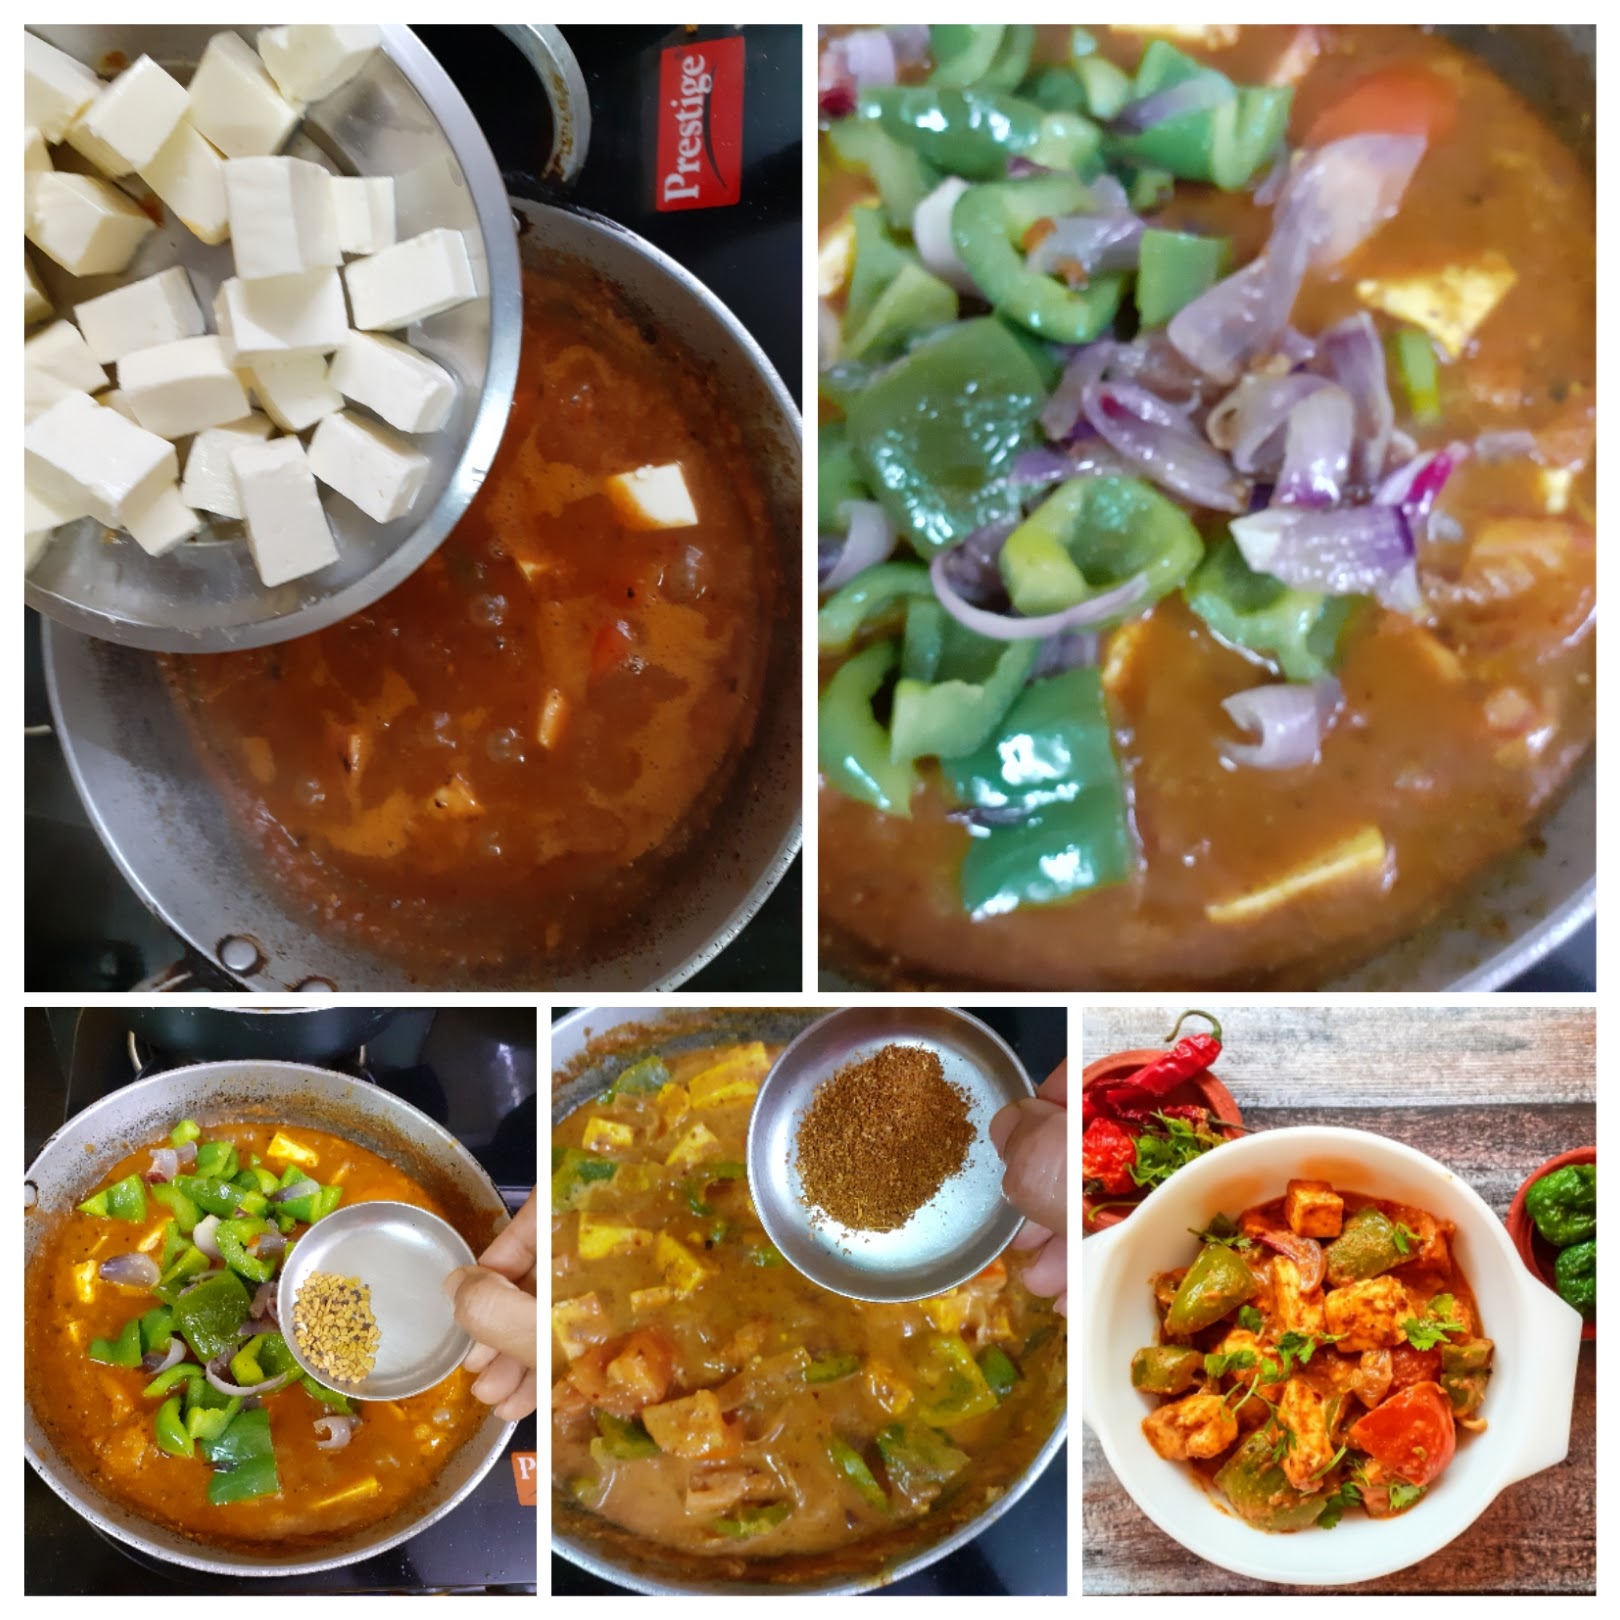
Take a Kadai and heat it, add the Besan and saute on low flame until it turns aromatic and light brown in colour. Keep stirring so that the Besan does not burn. Once aromatic, transfer to a plate. Now in the same kadai take 1 tbsp oil and drop in the Onion petals and saute for 1 minute. Now add the cubed capsicum and continue to saute over high flame for another 1 minute. Take care to stir constantly and the onion and capsicum should not overcook or turn limp. Transfer to a plate. Now in the same kadai take some more oil and add cumin seeds. Once they start crackling add the slit green chillies and saute for 30 secs. Now add the finely chopped onions and crushed garlic and continue to saute until the onion starts turning brown. In the meanwhile roast and grind the spices mentioned under “to be ground” and set aside. Grind them coarse and not very fine. Now add this powder to the sauteed onions, add turmeric powder, and if the mixture looks dry add another teaspoon of oil and saute the masalas in oil. Now add the roasted Besan and saute until the mixture starts appearing crumbly, but dry. To this add the tomato puree and mix nicely. Smoothen out all the lumps from the Besan. Add salt, followed by 1 to 1.5 cups water, drop in the diced tomatoes and cook for 5 minutes. Check for taste and add red chilli powder if required and adjust salt if required. Now add the cubed Paneer pieces , and the previously sauteed onion and capsicum and stir nicely. Add the fenugreek/Methi seeds. Cook until the gravy thickens. If you are particular about adding cream add now(this step is optional). Add garam masala powder and put off the flame. The yummy Kadai Paneer gravy style is ready. Enjoy with your favourite rice or Flat bread. Bon Appetit.
STEPWISE RECIPE FOLLOWS:
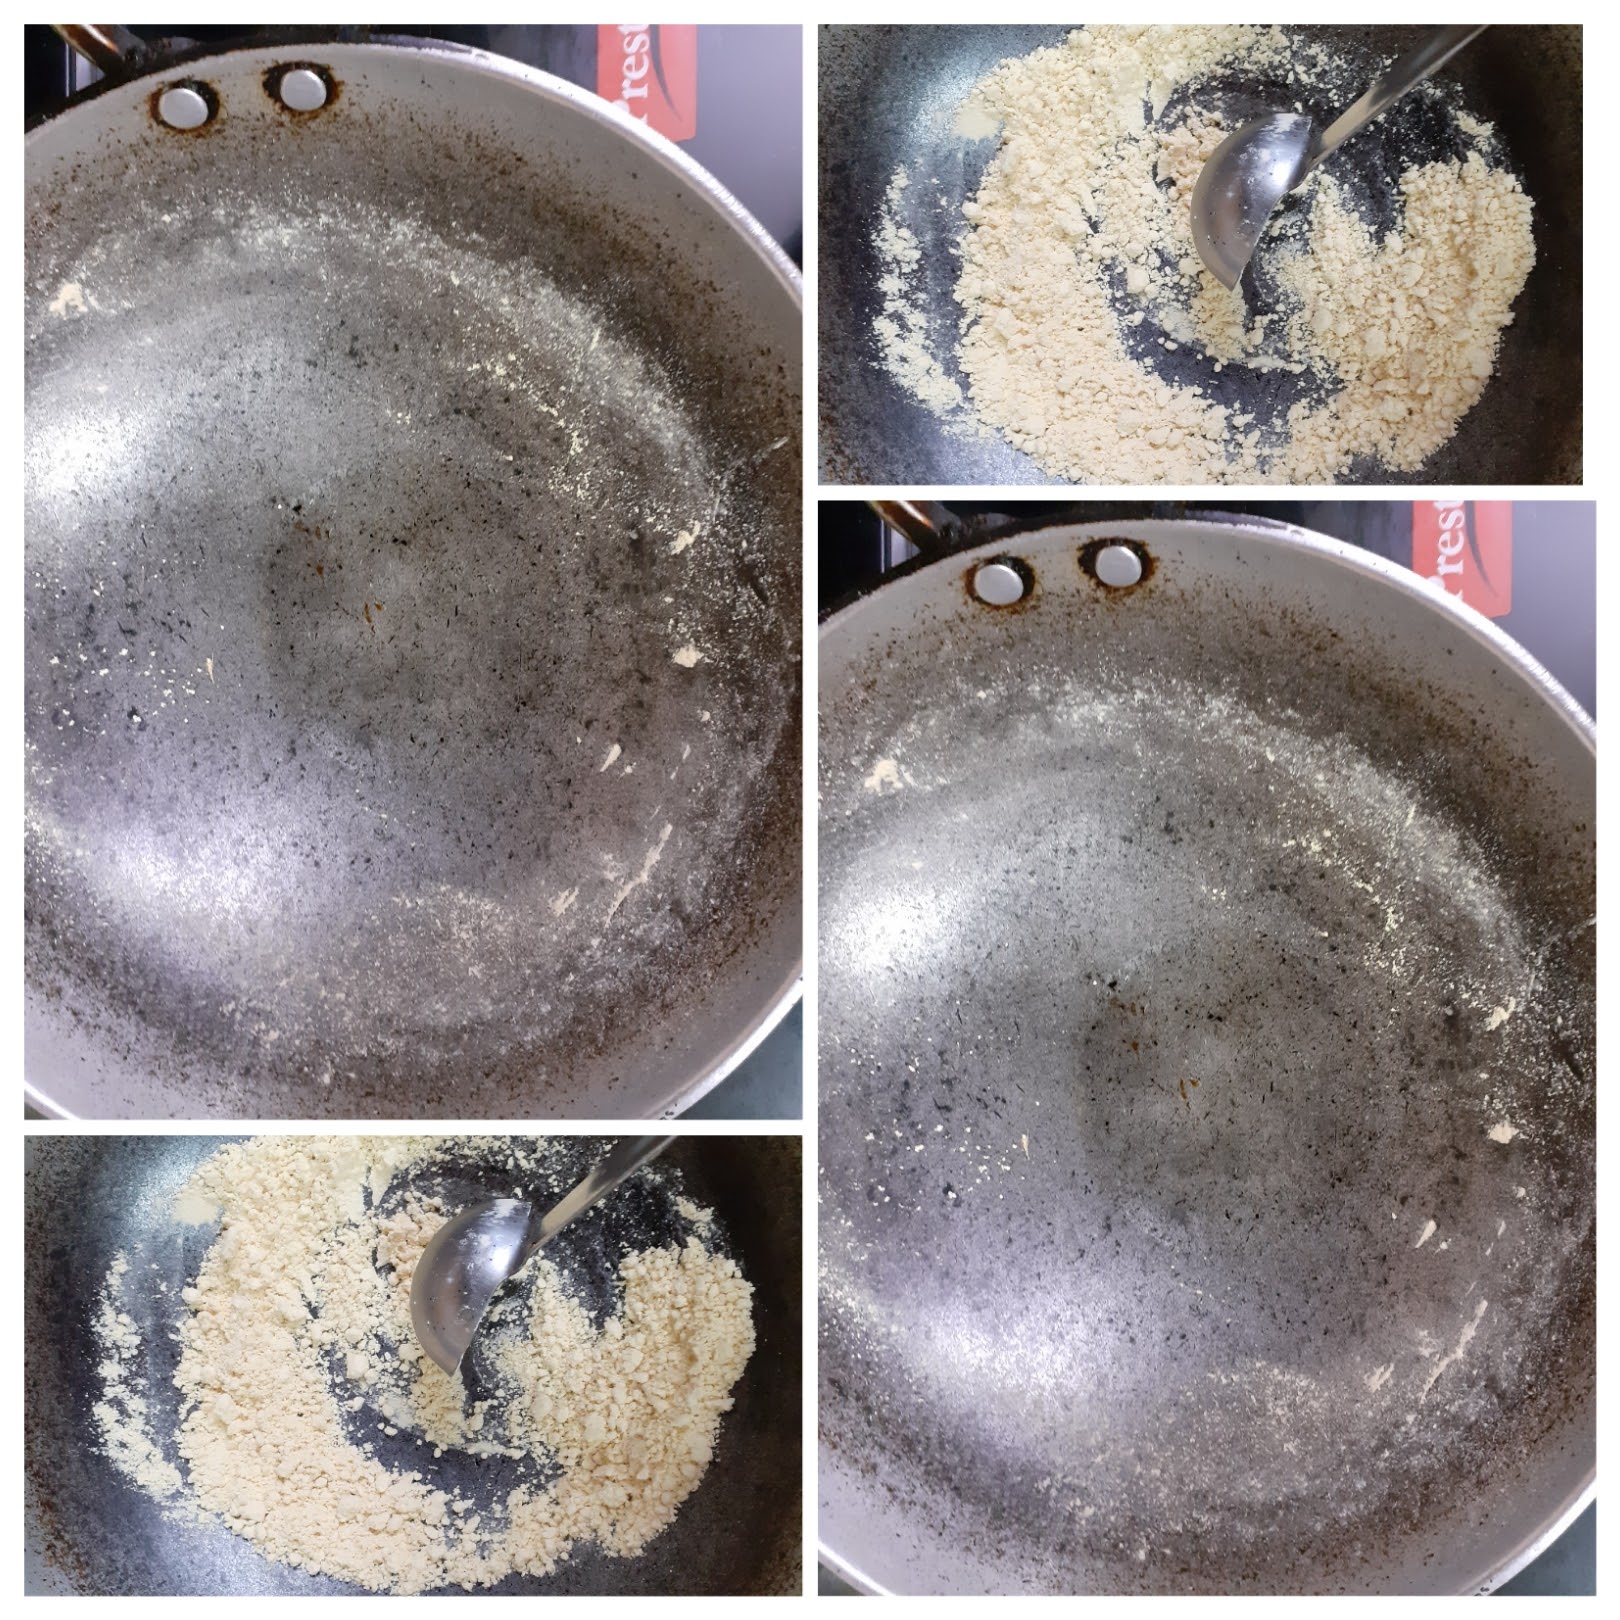
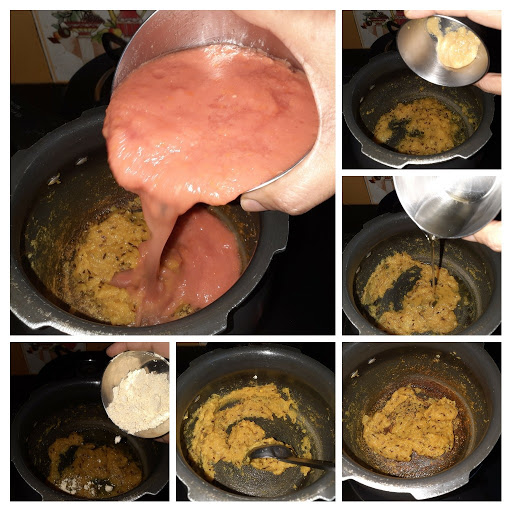
1. Take a Kadai and heat it, add the Besan and saute on low flame until it turns aromatic and light brown in colour. Keep stirring so that the Besan does not burn. Once aromatic, transfer to a plate.
2. Now in the same kadai take 1 tbsp oil and drop in the Onion petals and saute for 1 minute. Now add the cubed capsicum and continue to saute over high flame for another 1 minute. Take care to stir constantly and the onion and capsicum should not overcook or turn limp. Transfer to a plate.
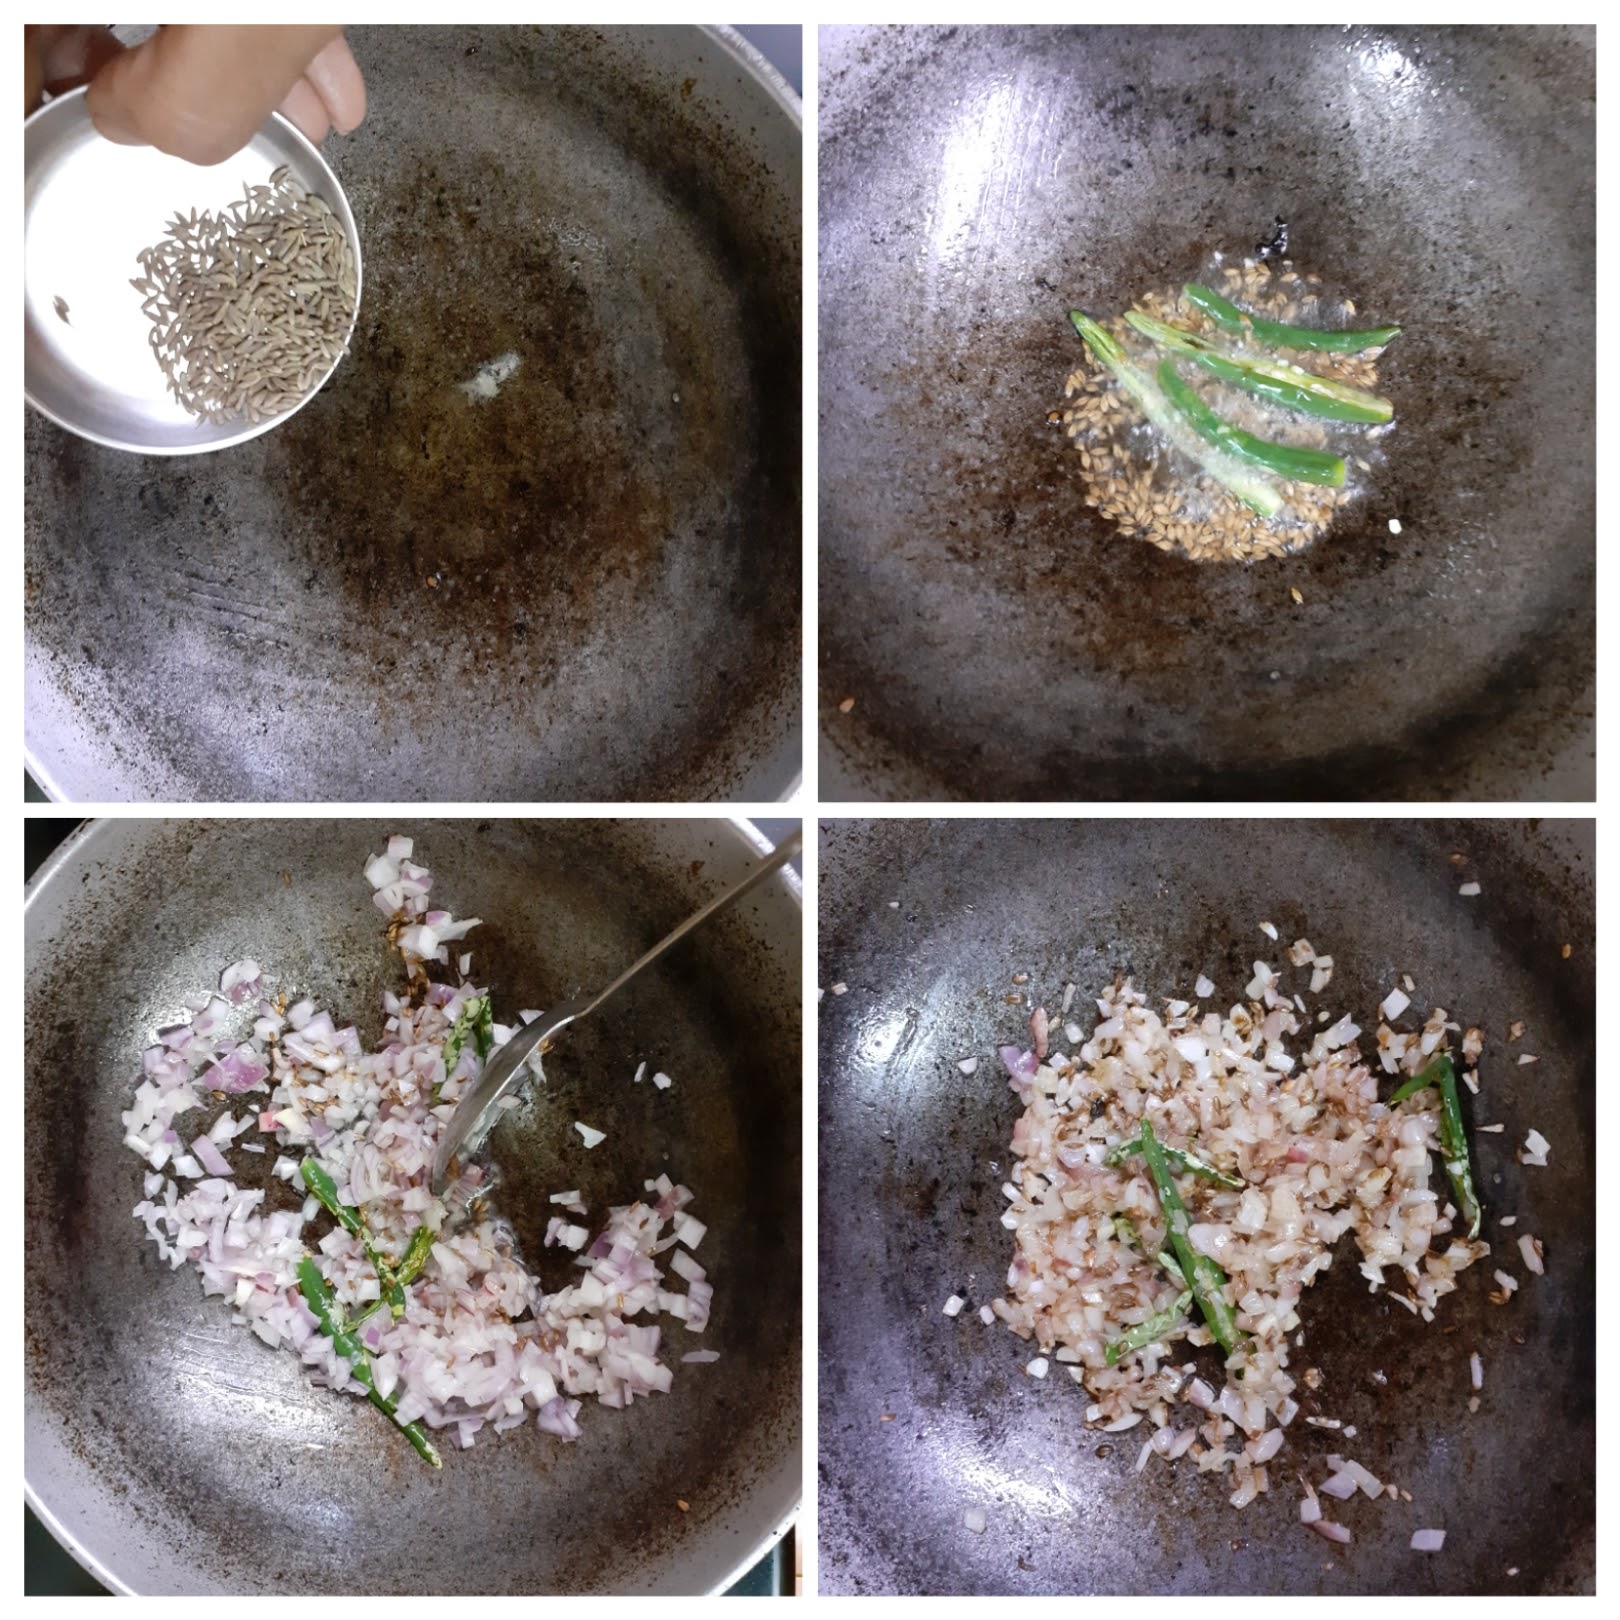
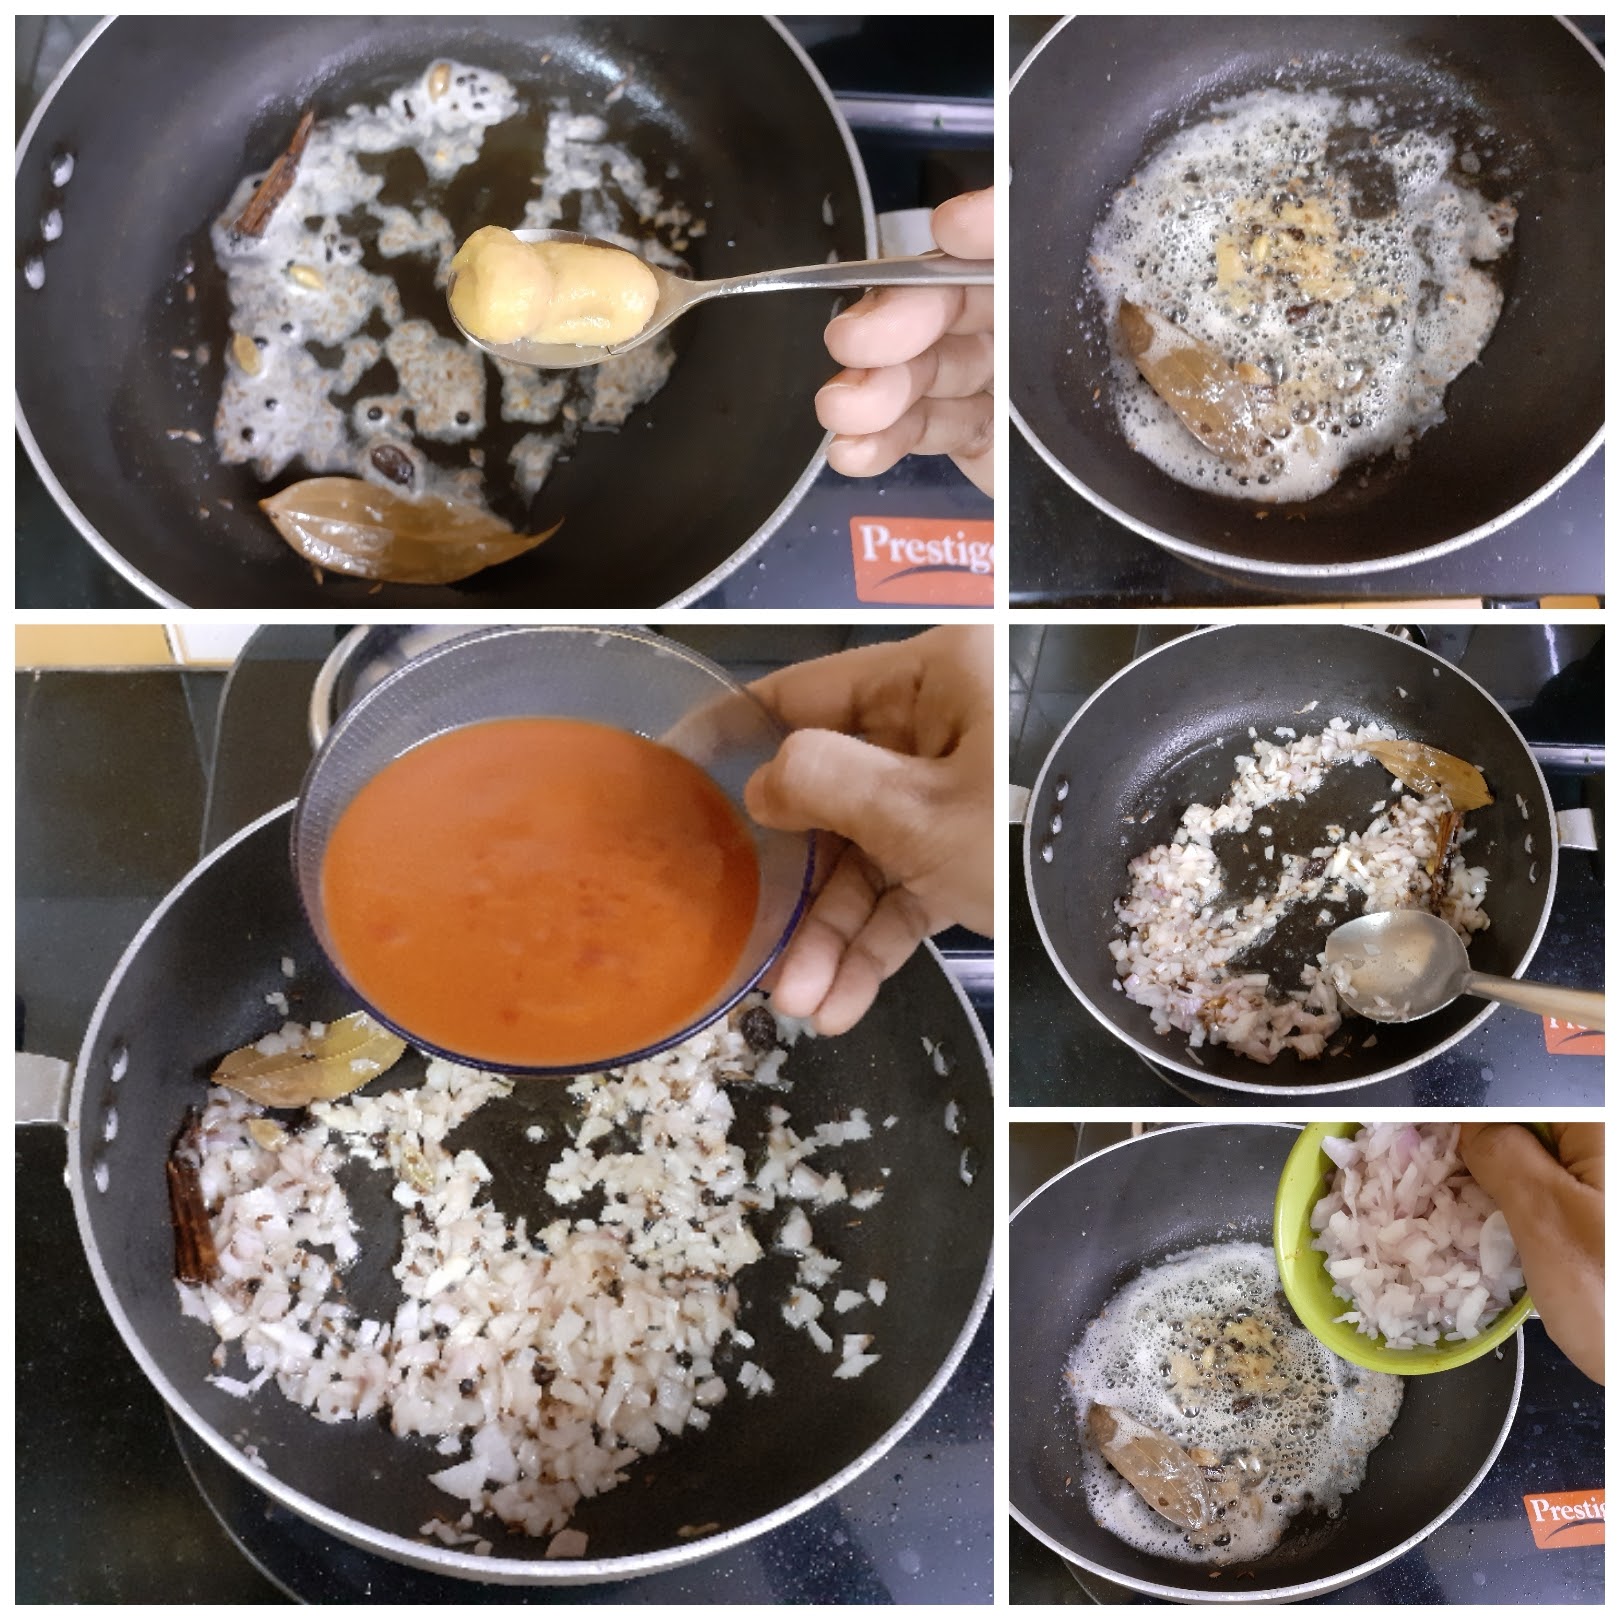
3. Now in the same kadai take some more oil and add cumin seeds. Once they start crackling add the slit green chillies and saute for 30 secs. Now add the finely chopped onions and crushed garlic and continue to saute until the onion starts turning brown.
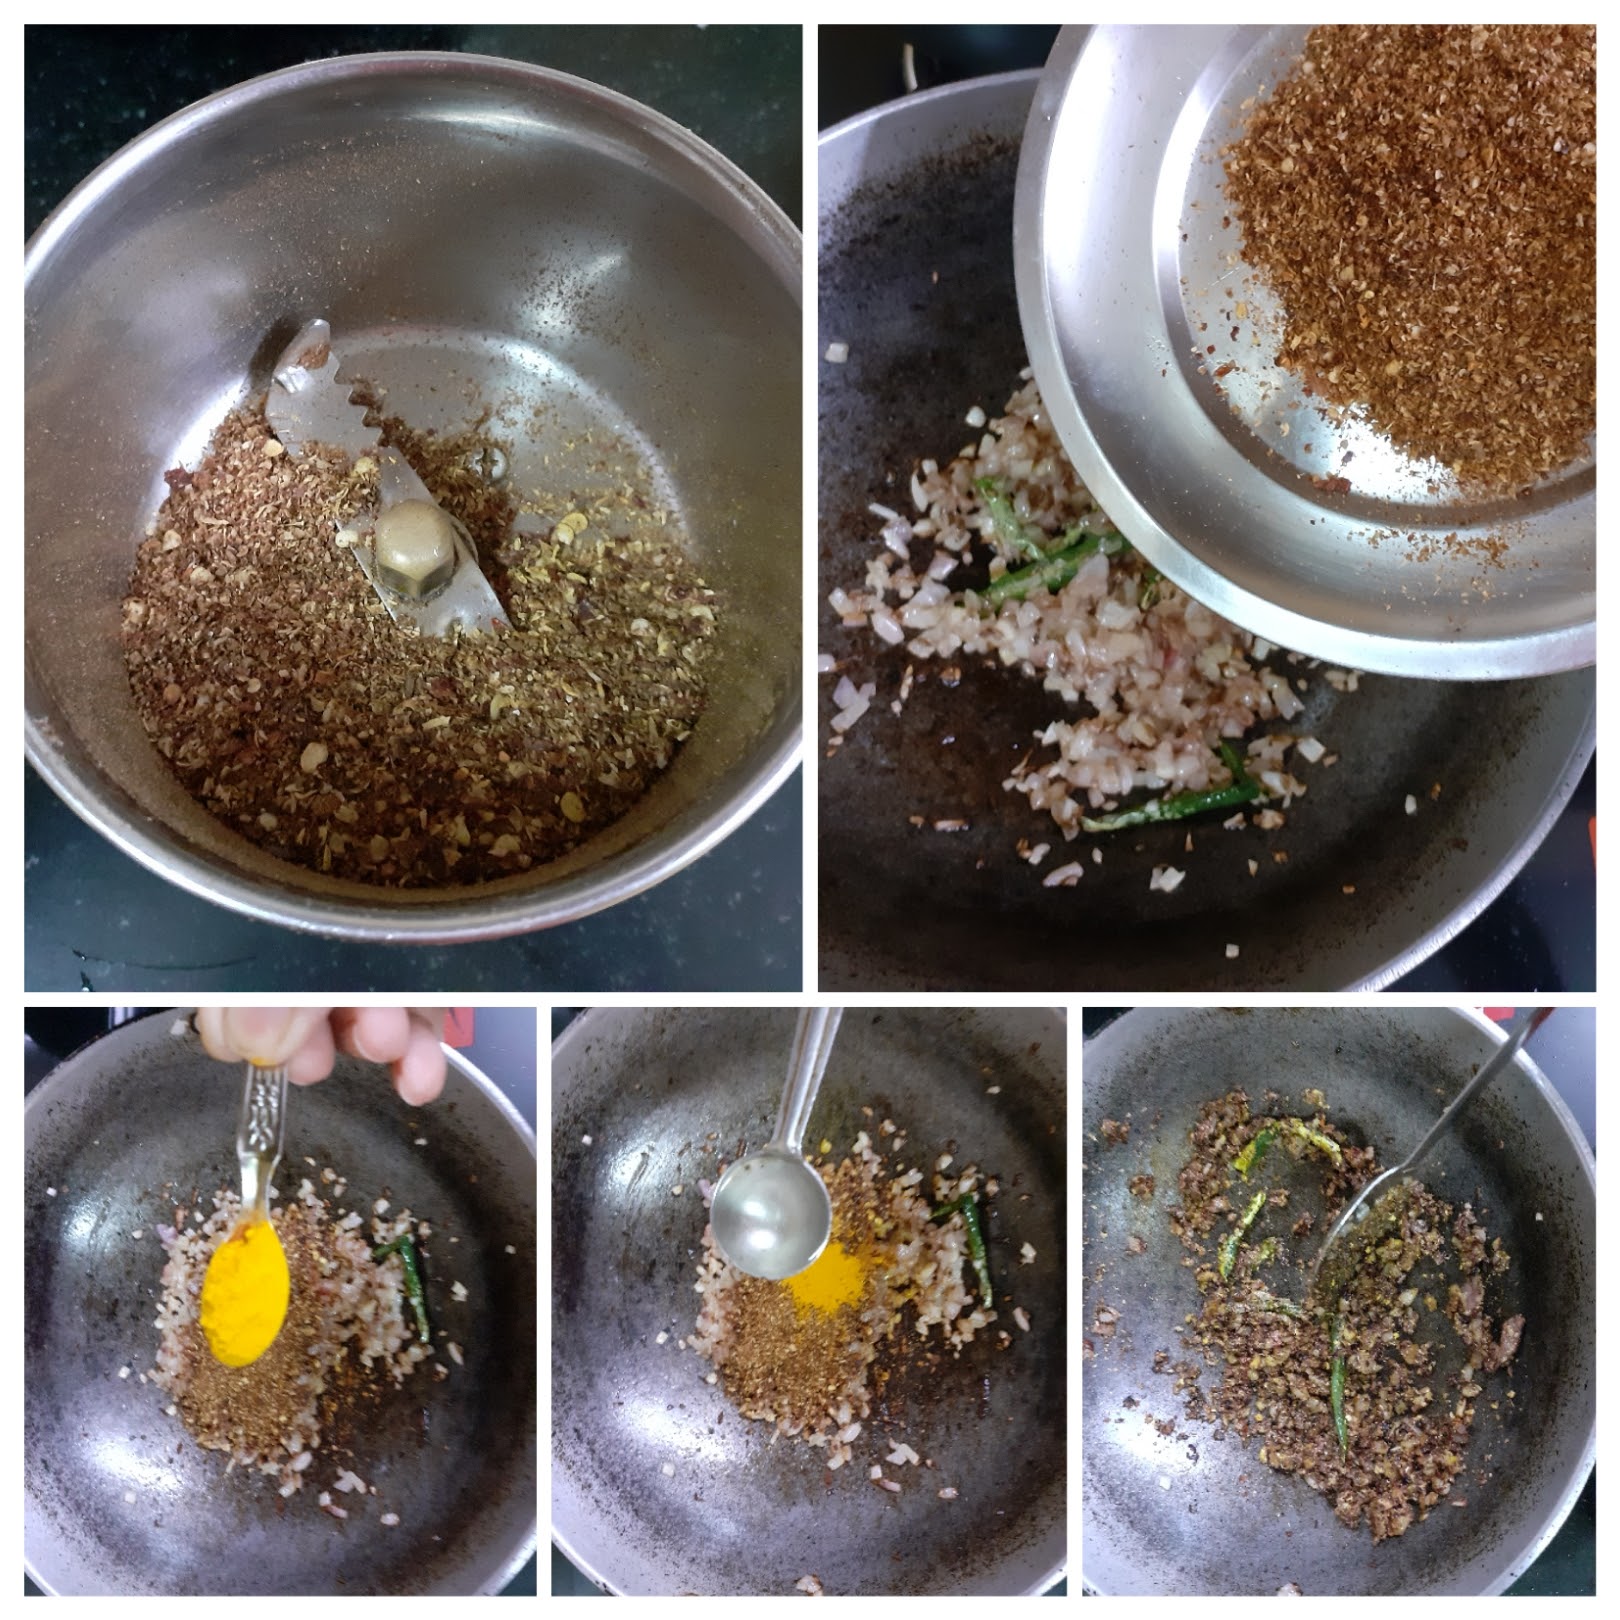
4. In the meanwhile roast and grind the spices mentioned under “to be ground” and set aside. Grind them coarse and not very fine. Now add this powder to the sauteed onions, add turmeric powder, and if the mixture looks dry add another teaspoon of oil and saute the Masalas in oil.
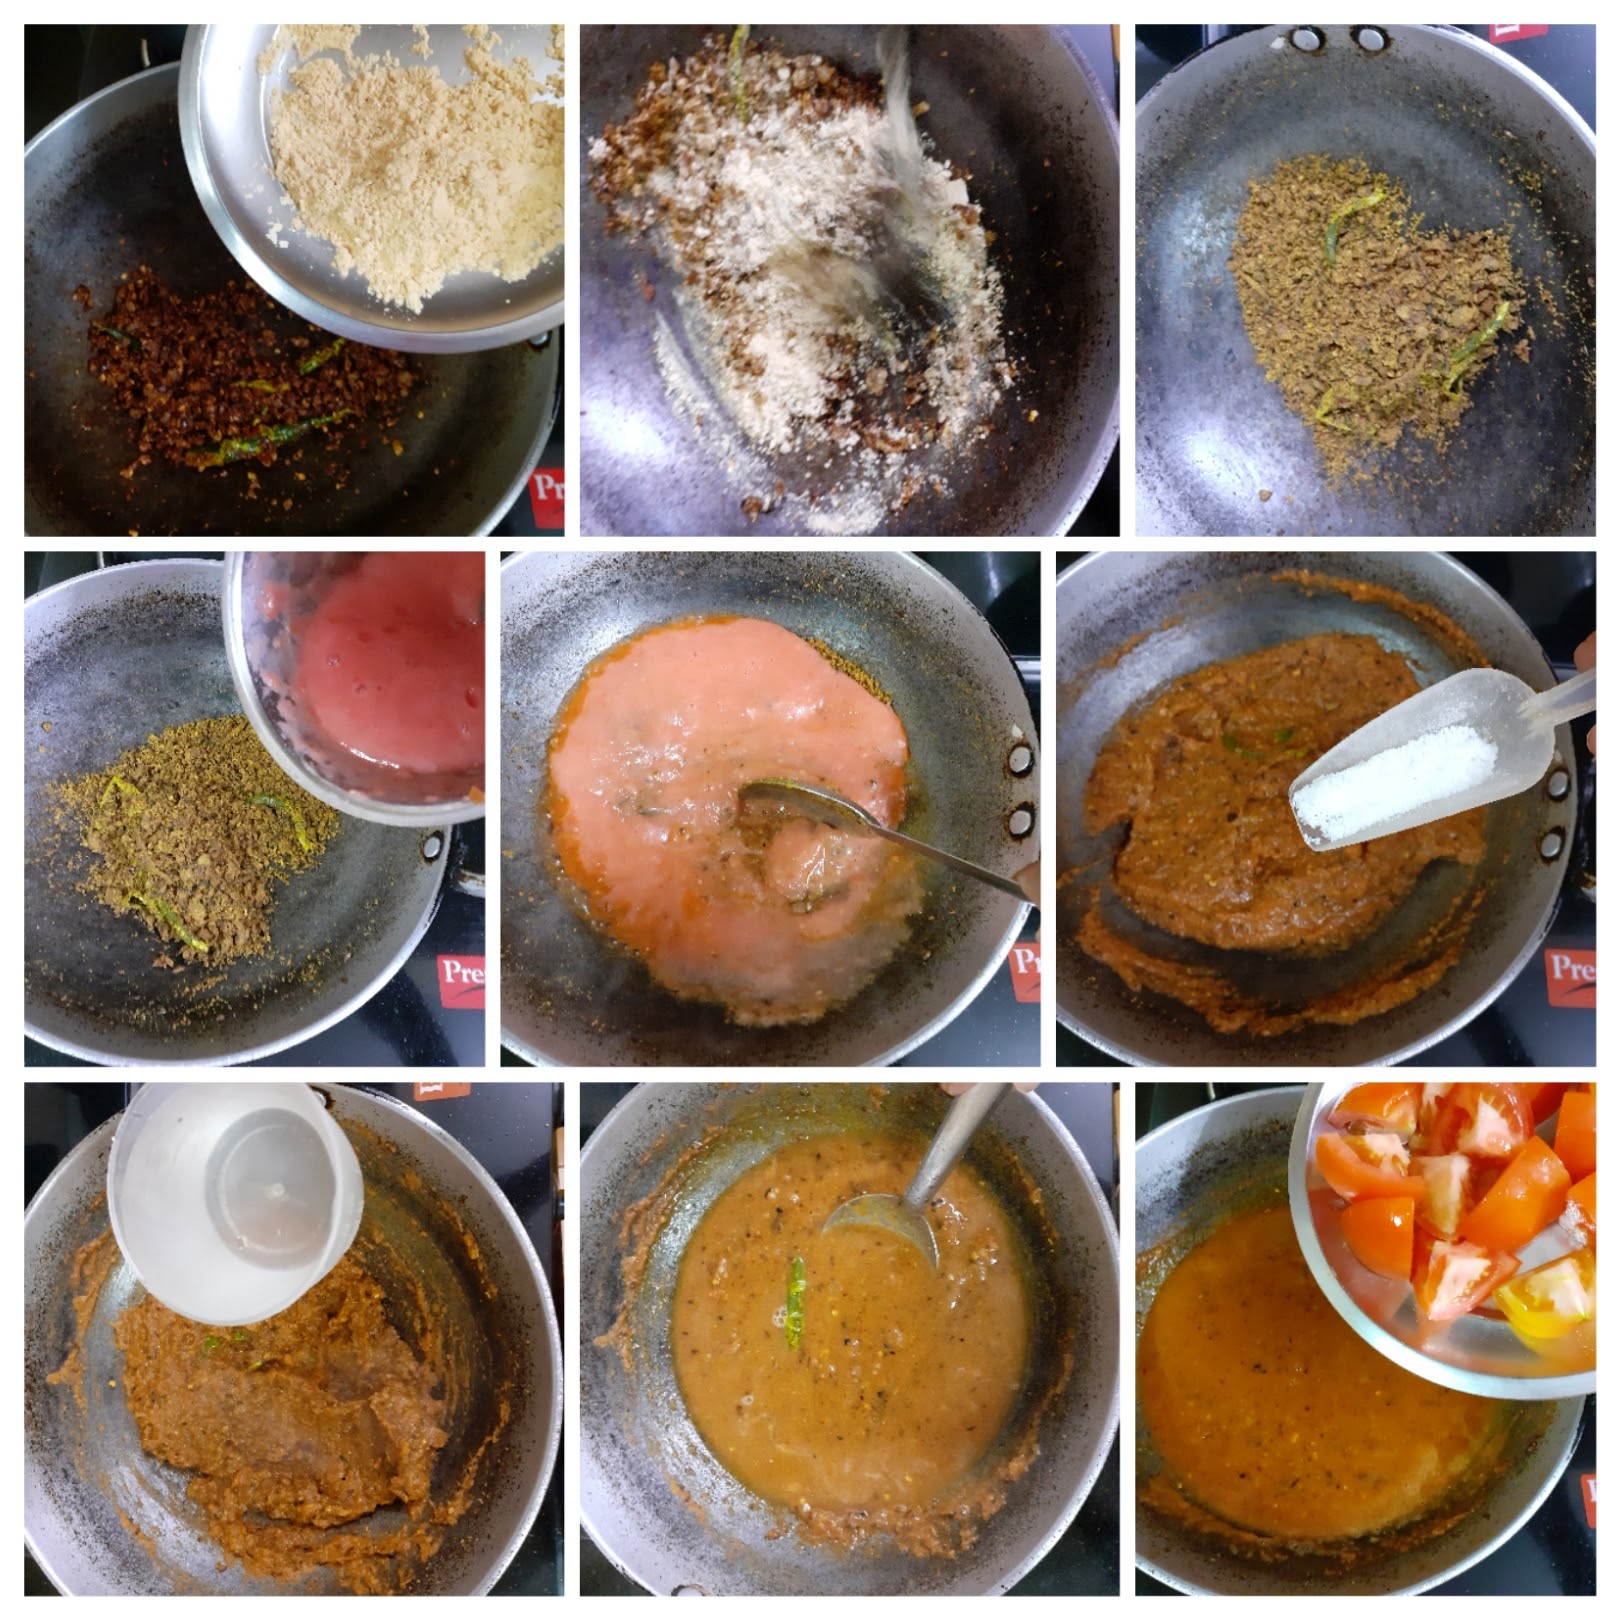
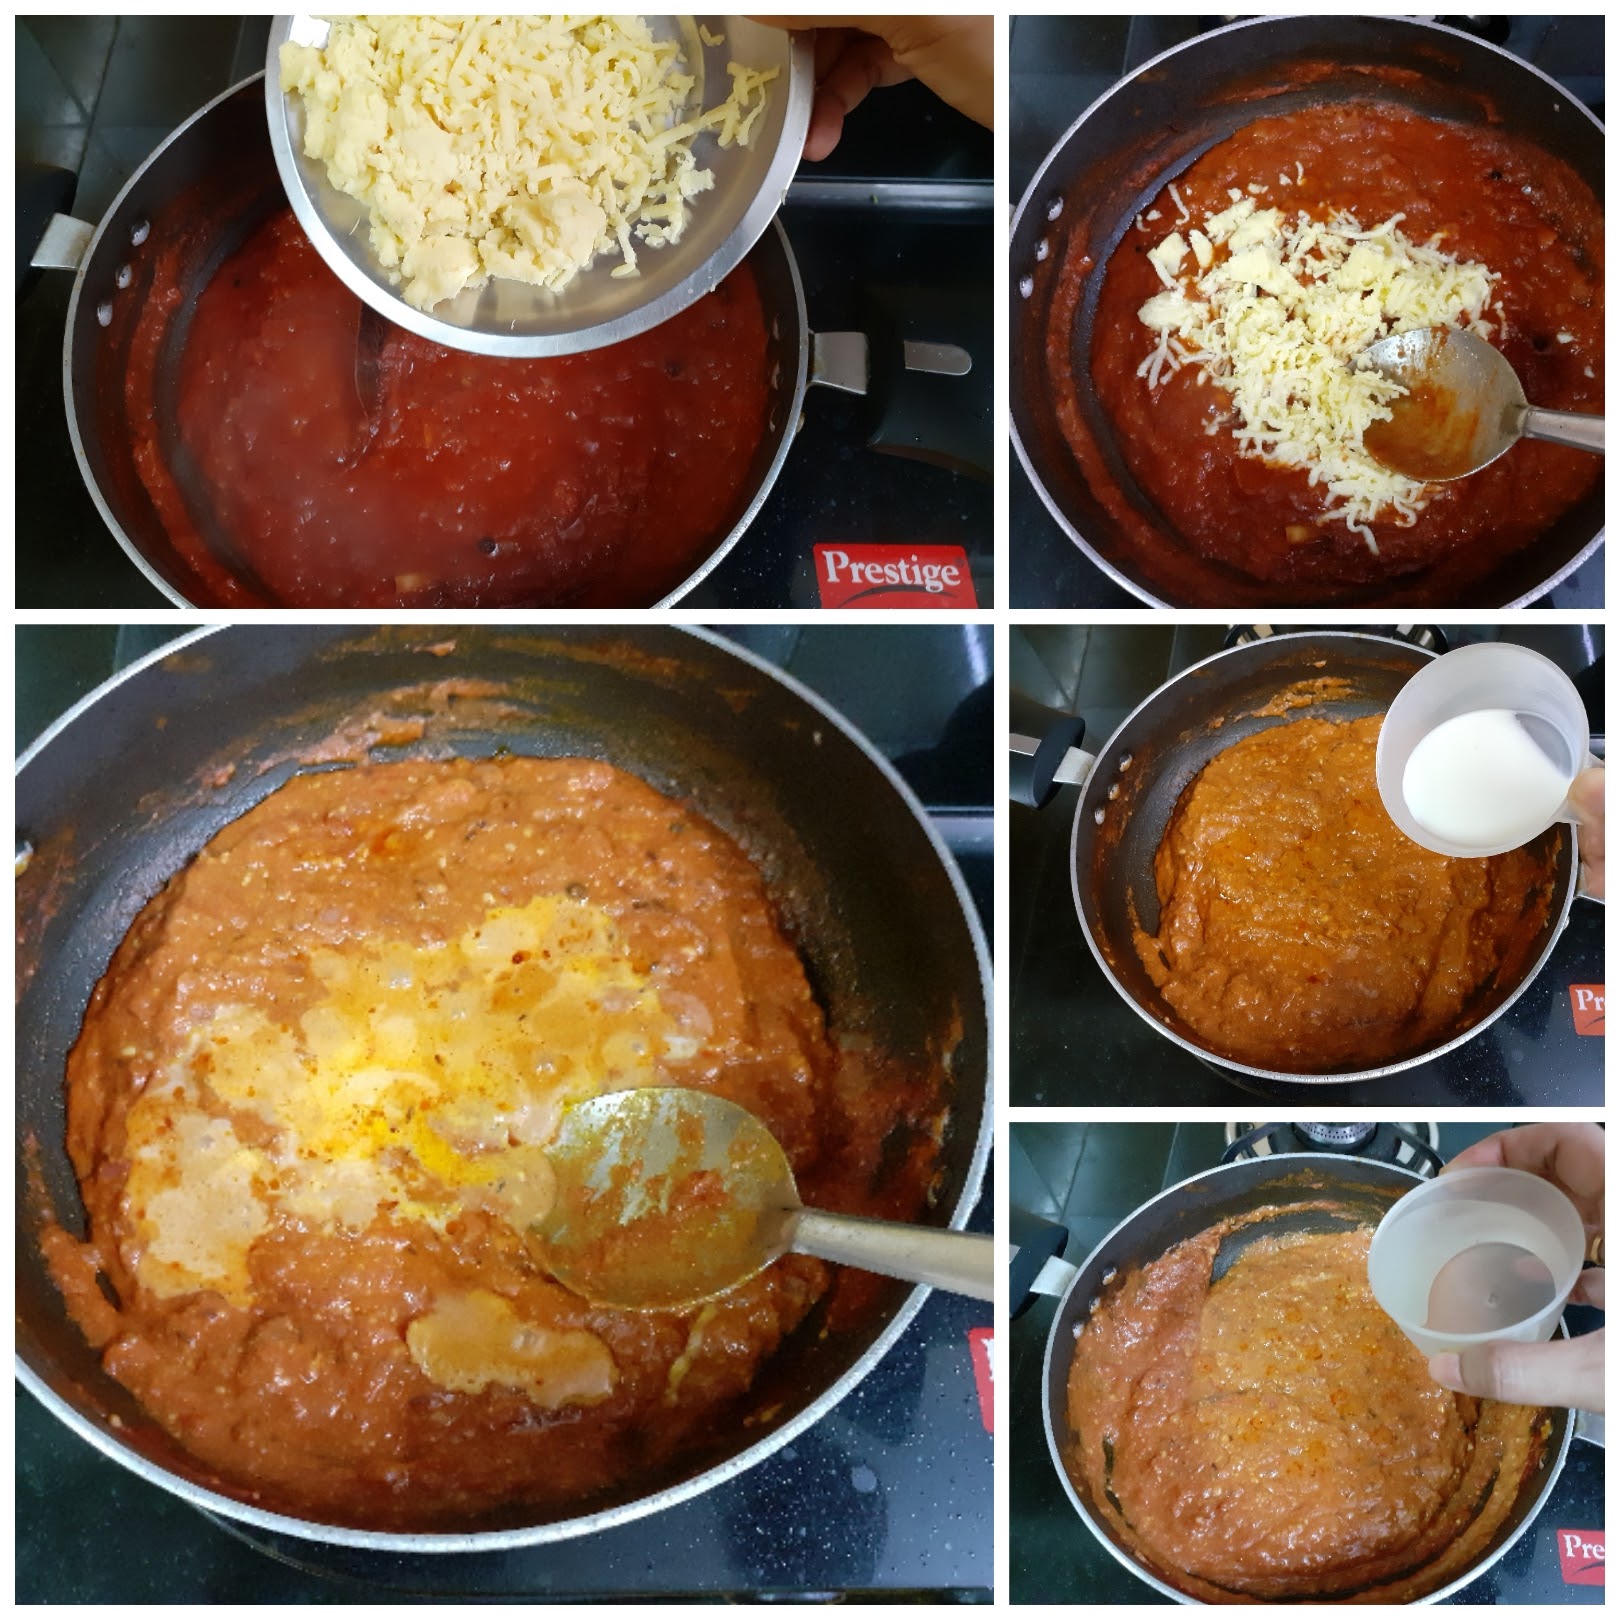
5. Now add the roasted Besan and saute until the mixture starts appearing crumbly, but dry. To this add the tomato puree and mix nicely. Smoothen out all the lumps from the Besan. Add salt, followed by 1 to 1.5 cups water, drop in the diced tomatoes and cook for 5 minutes. Check for taste and add red chilli powder if required and adjust salt if required.
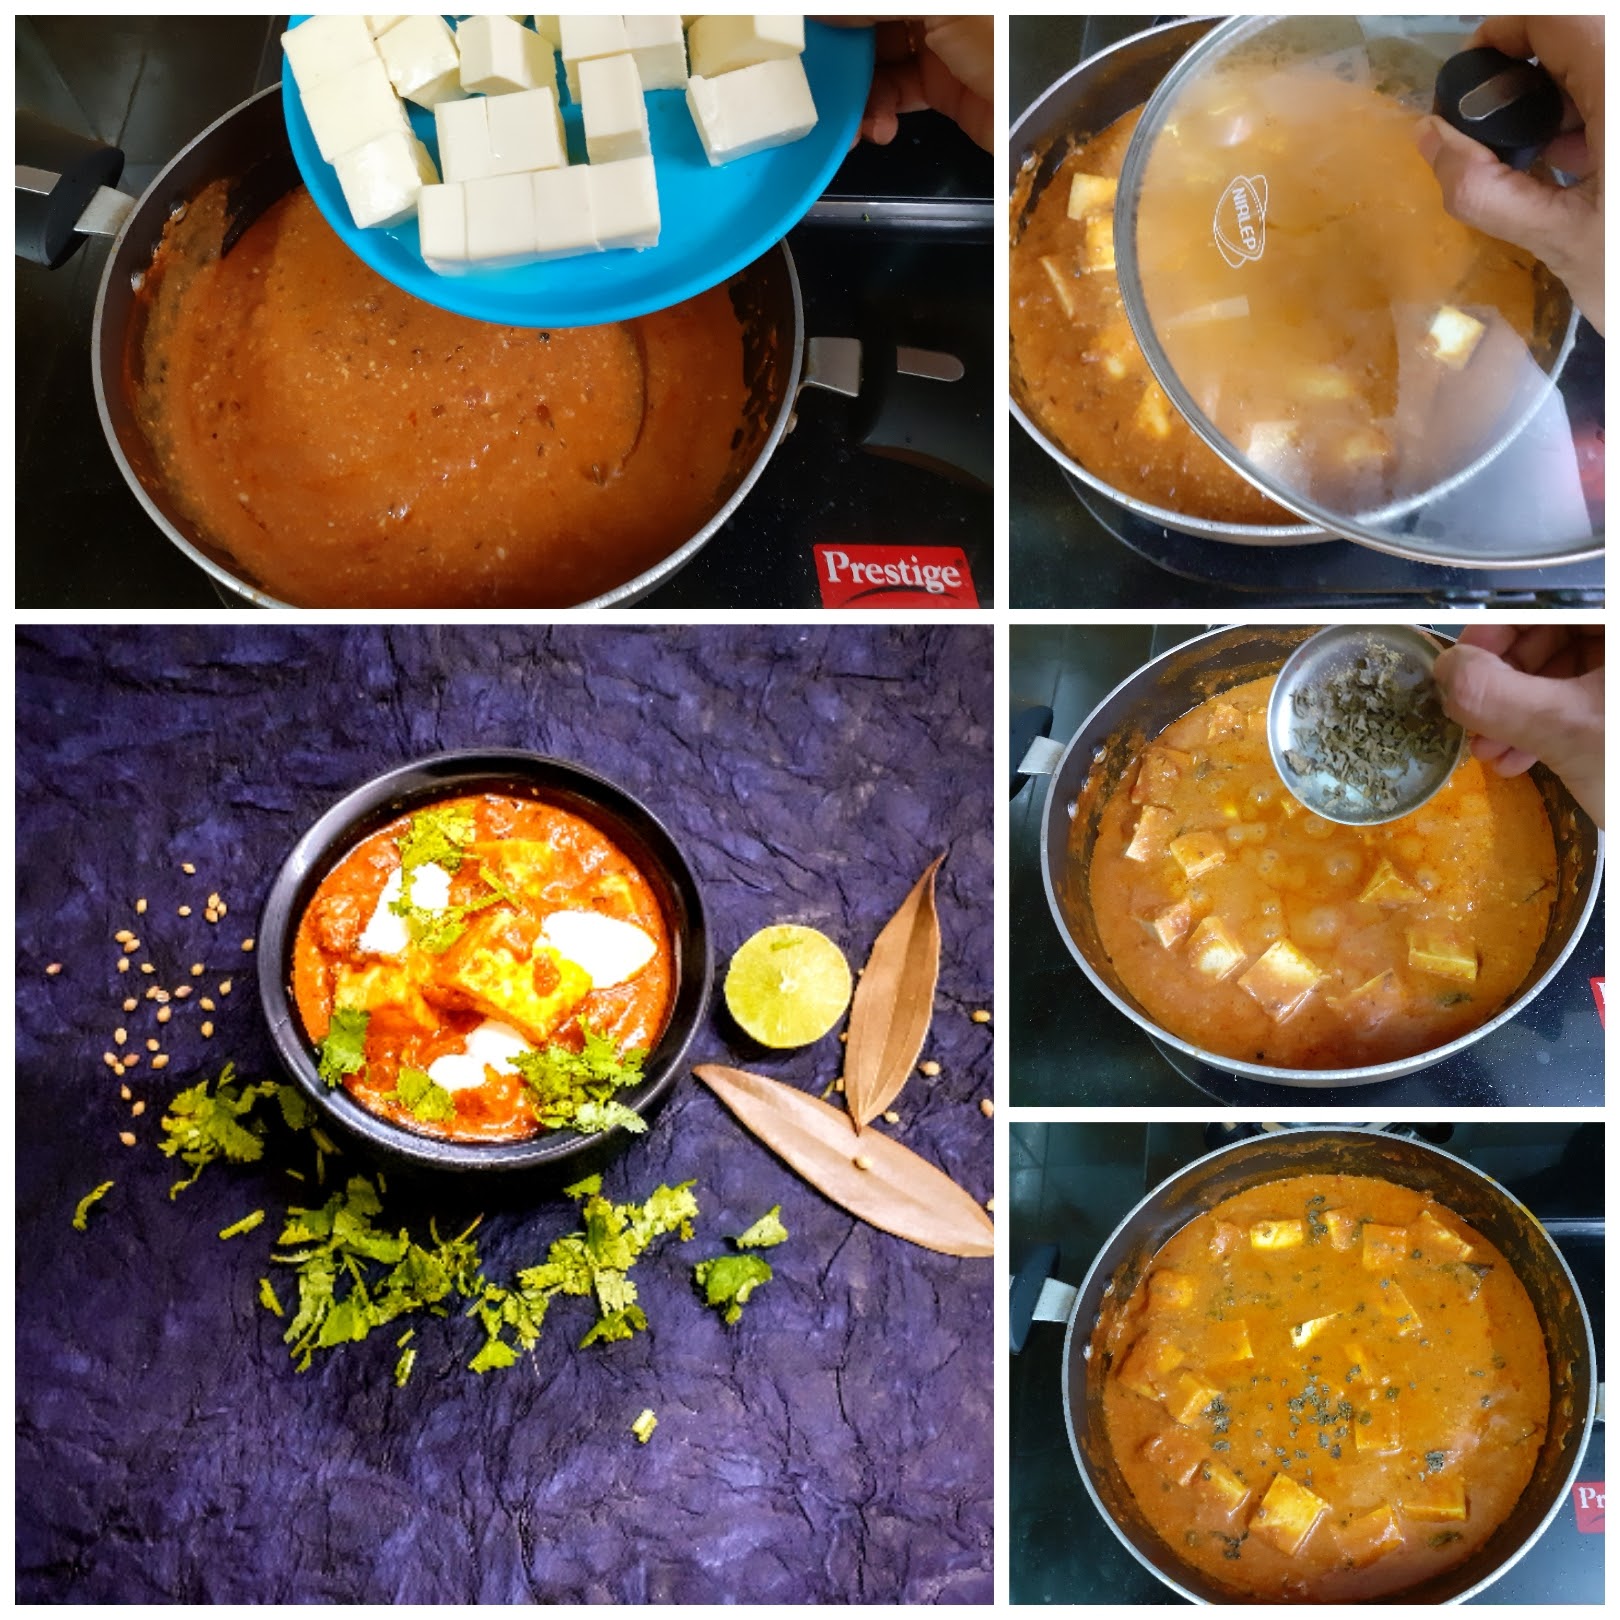
6. Now add the cubed Paneer pieces , and the previously sauteed onion and capsicum and stir nicely. Add the Methi seeds and cook until the gravy thickens. If you are particular about adding cream add now(this step is optional). Add Garam Masala powder and put off the flame. Garnish with coriander leaves. The yummy Kadai Paneer gravy style is ready.
NOTES:
1. Roast the Besan very carefully. Any burnt taste or flavour will change the taste of the dish. I always have a bottle of roasted Besan in my kitchen it helps to thicken gravies in a jiffy.
2. The roast and ground powder can be made ahead and stored in a bottle. This called the Kadai Masala because of which the dish gets its name.
3. I have not used cream in this dish. If you prefer adding cream, do go ahead and do so. I have specifically mentioned when to do so.
If you tried this recipe and liked it please comment below. I would love to hear from you. If you have a query about the recipe email us and ill respond as soon as I can.
If you would like to receive our recipes in your mail please leave your mail id at the homepage. Every time Rajjo’s Kitchen has a new post we will mail the recipe to you.
Palakkad Mini Thaali (Thali Ideas)
A Thaali is a 3 course(and above) Indian meal which features a combination of dishes that are wholesome, mix and match with each other in terms of texture and flavour, and are balanced. India being a country with a huge food culture and heritage there are a great number of thaalis which can be cooked, either within a single cuisine, or a mixture of cuisines that match well.
This is an attempt by me to bring here as many Thaali ideas as possible for you all to create. We all want an balanced meal which takes very little time to create, and this is just that. The Thaalis in this series will range from simple to complex, and festive to on the go thaali’s.
The below Thaali took me under 60 mins to create. All the recipes mentioned here are also available separately. But here I am giving the whole process of how I went about creating it, and also giving the recipes side by side.
Do let me know in the comment section if I should create more Thaalis like this for you to try. This current one is a simple working day thaali, which one can create before leaving for work(can pack this as lunch as well), or once back home, or any day.
Before I delve into the recipe I would like to give you a small introduction to Palakkad also called Palghat, which is a city in the state of Kerala. It shares its border with Tamilnadu and has a cuisine of its own. Many people are not aware of the amazing dishes this small district in Kerala has and so I am taking it on me to bring you all a few varieties from this cuisine.
This is a cuisine I was born into. Yes, on my paternal and maternal sides I am a Palakkad Iyer. We are a different breed by ourselves, and our cuisine is very unique.
Palakkad people are mostly vegetarians. The dishes are mostly cooked with coconut and usually tempered in coconut oil.
In the blog, I have recipes of Sukhiyan, Adai, etc, which belong to that cuisine.
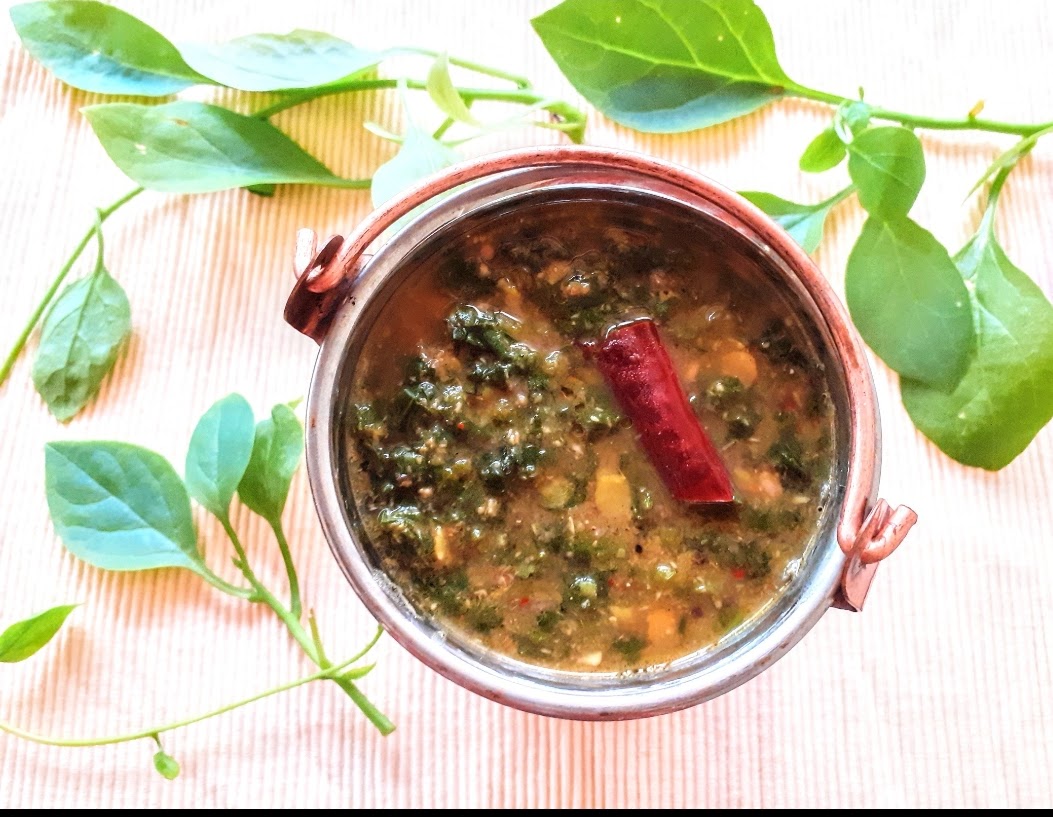
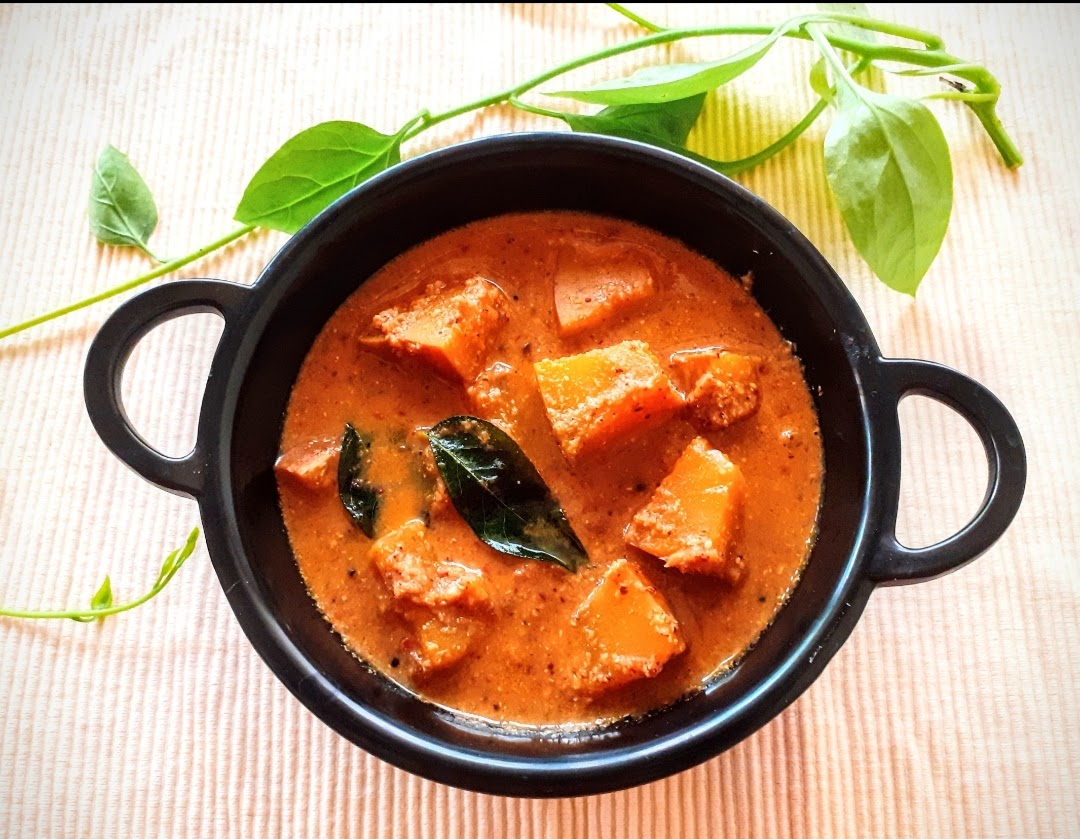
Like all cuisines, Palakkad cuisine also has some unique combinations. For example, this dish of Keerai Molagootal, meaning a spinach/palak based dal with spiced coconut gravy, tempered in coconut oil, and the Mathan Puli Pachchadi, which is a pumpkin chutney simmered in a tangy tamarind sauce with a small bit of jaggery is a unique combination. Here the dal is mildly spiced and flavoured and the chutney or pachchadi, as it is called is a sweet and sour one that perfectly balances the mildness of the Molagootal.
Molagootal is a dish that can be made with many varieties of vegetables like- Snake gourd, Ash gourd, or a combination of vegetables like yam, ash gourd and drumsticks etc;
Similarly Puli Pachadi is a dish can can be made with a variety of vegetables like Ladiesfinger, Brinjal, and Ripe mangoes.
Planning goes a long way in creating a wholesome, and delicious meal. Please go though all recipes to check if you have all ingredients mentioned.
PREP TIME: 30 Mins(previous day) COOK TIME: 55 Mins
TOTAL TIME:85 Mins COURSE: MAIN/ THAALI
CUISINE: NORTH INDIAN SERVINGS: 5
AUTHOR: Rajni Ram
Elements of this Thaali:
*Carrot Salad, *White Rice, *Keerai Molagootal(spinach dal), *Mathan Puli Pachadi, *Lotus stem crisps, and *Poppadum *Curd(not in picture)
Pre prep: All Vegetables were cut the previous day ( Julienne or Grate the carrot for salad. Chop the spinach finely, wash and drain, chop Pumpkin to cubes, and store in fridge.)
Preperation and cooking:
STEP 1: Wash the rice and Tuvar dal and put them in individual vessels and cook in the pressure cooker upto 5 whistles. (alternatively use the method you regularly use to cook rice and dal).
STEP 2: Start cooking the Palak/spinach as per recipe
STEP 3: Start cooking the Pumpkin as per recipe
STEP 4: While the palak and Pumpkin are cooking, grate the carrot and finish the salad.
STEP 5: Temper both the Molagootal and Mathan Pachadi at the same time.
STEP 6: Fry the Poppadums incase using.
RECIPES FOLLOW:
1. Keerai Molagootal:
Ingredients:
Spinach/Palak 1 bunch chopped finely
Tuvar dal/Toor dal 1/2 cup cooked soft in a pressure cooker
Grated coconut 2 tbsp
Cumin seeds 1tsp
Dry red chillies 1 or 2 depending on spice preference
Peppercorns 4 to 5
Salt as required
Turmeric powder 1 tsp
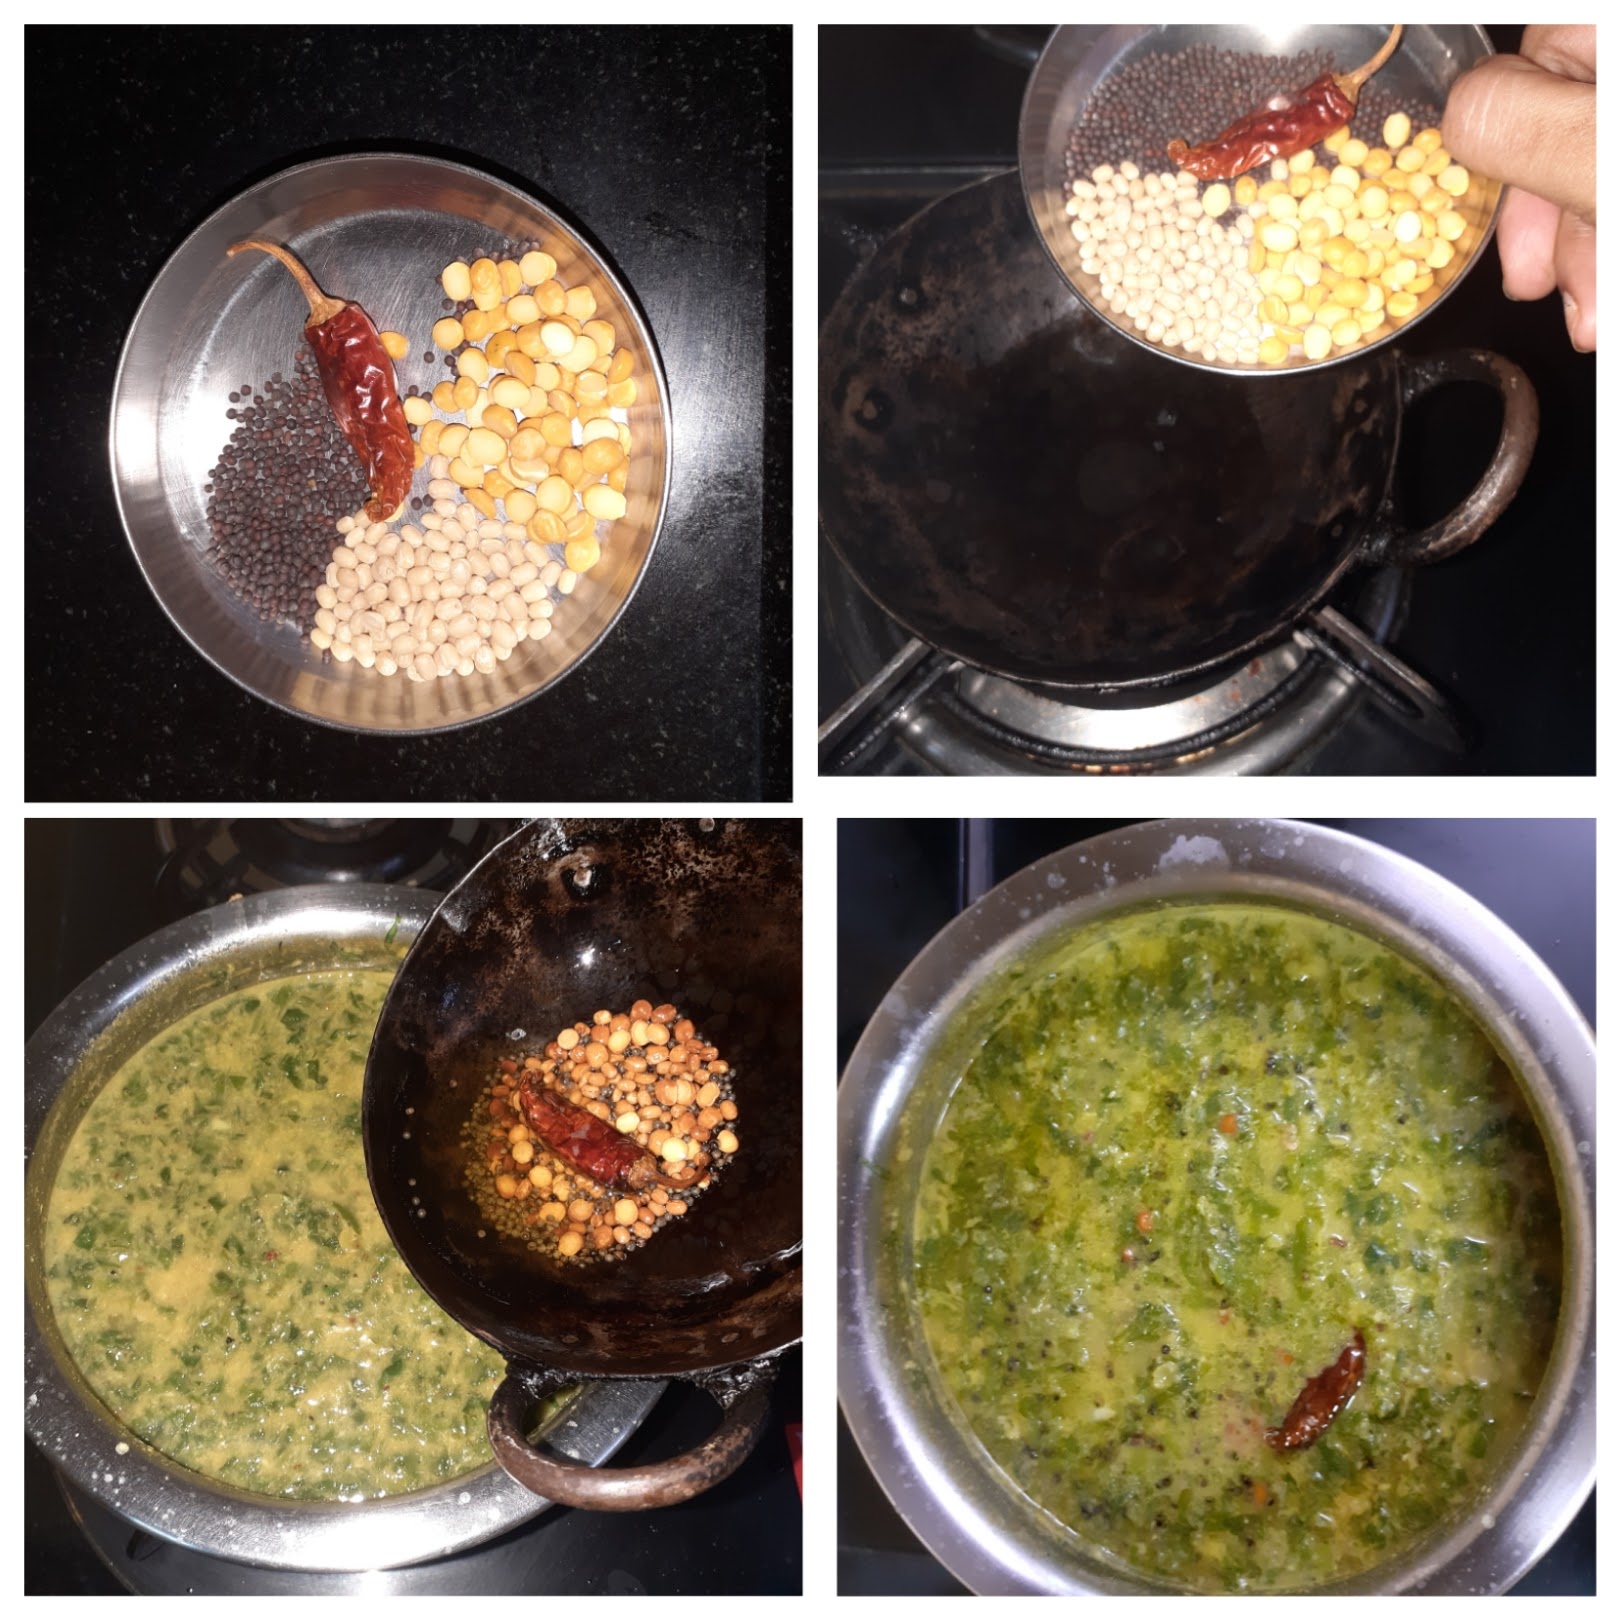
For tempering
Coconut oil ( or refined oil) 2 tsp
Mustard seeds 1 tsp
Chana dal 2 tsp
Urad dal 2 tsp
Dry red chilli 1 broken to bits
STEPWISE RECIPE:
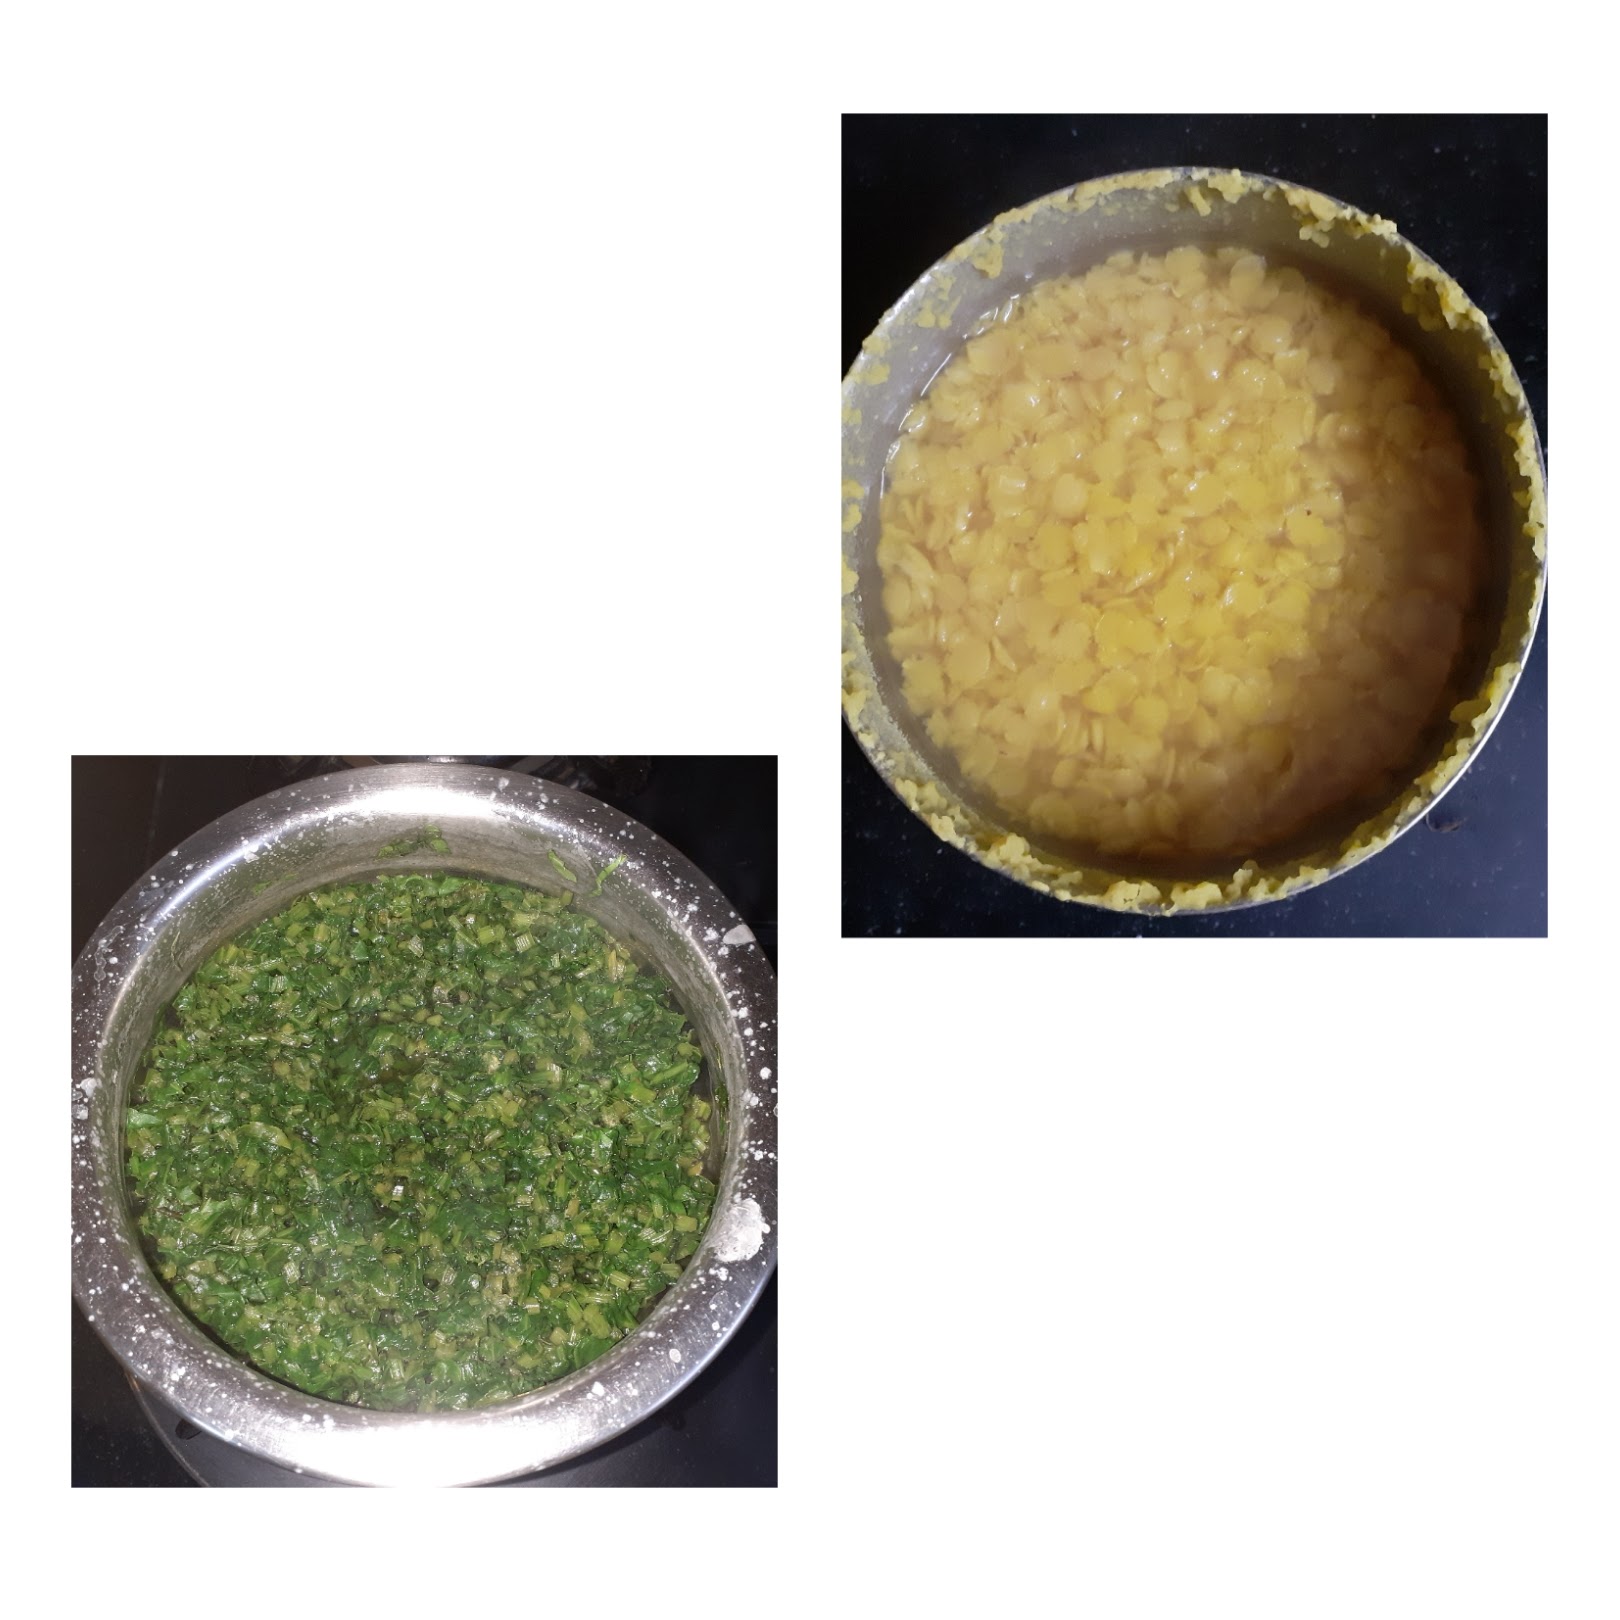
1. Chop the Palak finely, wash, drain the water and cook the palak with a small amount of water, salt and turmeric powder. Cook the Tuvar dal in a pressure cooker until soft and keep aside.
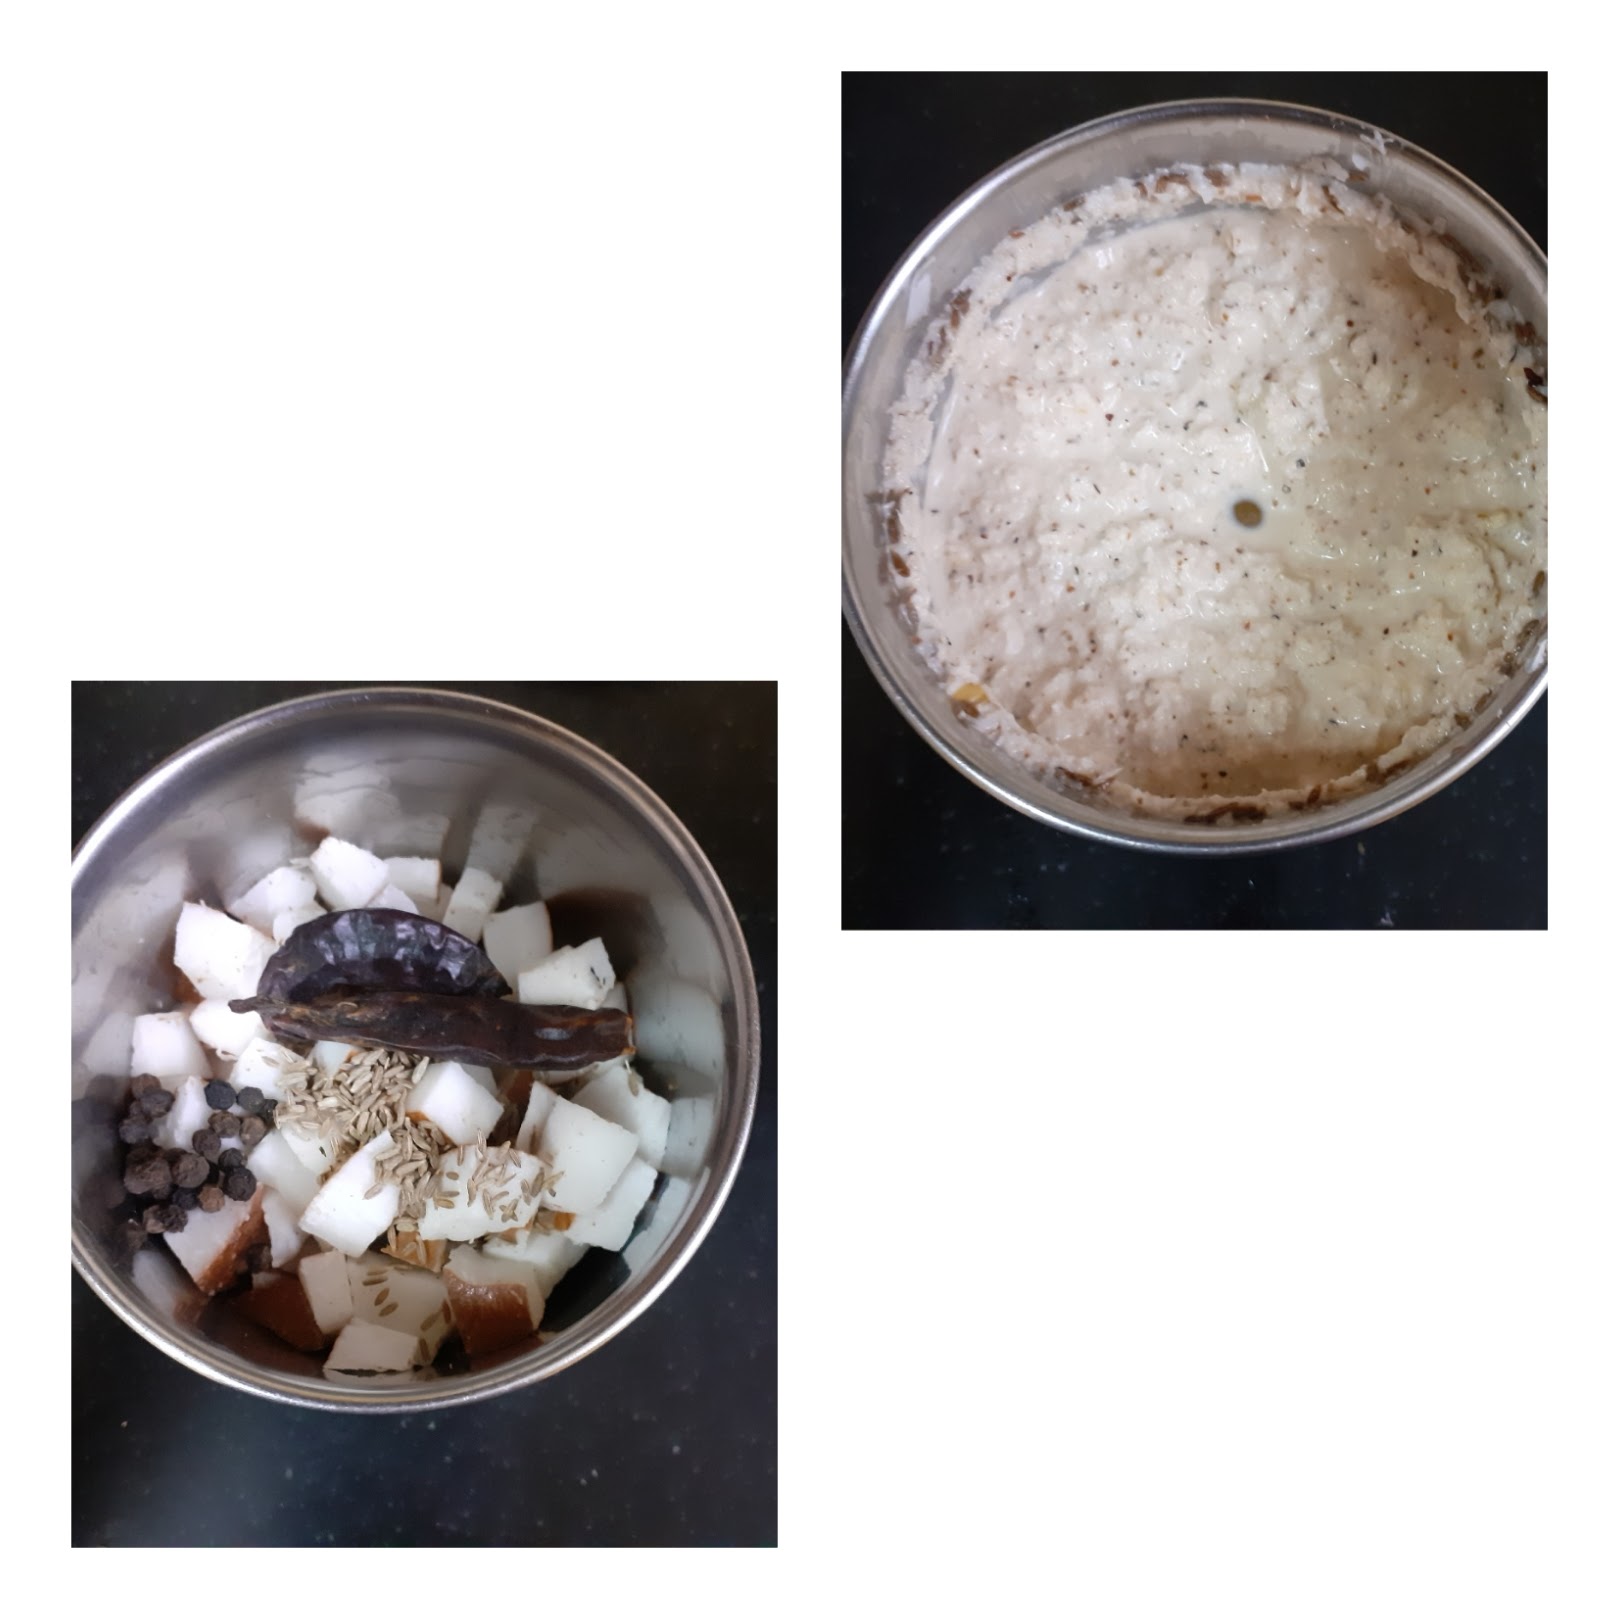
2. Grind the coconut, cumin seeds, peppercorns, and dry red chillies to a fine paste and keep aside.
3. Once the palak is cooked, add the ground coconut paste and allow it to boil for a few minutes( around 2 to 3 minutes will do).
4. Once the rawness of the coconut paste is gone, mash the cooked tuvar dal with the back of a ladle and add it to the palak and coconut mixture. Let it cook on low flame for 4 to 5 minutes. If it is too thick, add some water and dilute. Check for salt and adjust and put off the flame.
5. In a small tadka Kadai take 2 tsp coconut oil or refined oil and heat. Add the mustard seeds and as they splutter add the chana dal and urad dal followed by dry red chillies and fry until light brown. Drop this into the Palak and dal mixture. The simple and healthy Palak Molagootal is ready.
NOTES:
1. One can use refined oil if they don’t prefer coconut oil. Coconut oil enhances the taste of the dish manifold.
2. The consistency of the dish should be like a dal fry and not too thin or too thick.
3. Add more coconut for the gravy if you prefer, but increase the spiciness by adding more chillies in case you are using more coconut.
4. The palak should not be overcooked and must retain its texture.
2. MATHAN PULI PACHADI:
Mathan/pumpkin 200 gms chopped to cubes
Tamarind pulp 1/2 cup or make pulp from gooseberry sized bit of tamarind
Asafoetida 1/4 tsp
Grated coconut 2 tbsp
Mustard seeds 2 tsp
Cumin seeds 1 tsp
Dry red chillies 2
Jaggery 1 tsp
Turmeric powder 1/4 tsp
Salt as required
Red chilli powder 1/4 tsp
For tempering:
Coconut oil or refined oil 2 tsp
Curry leaves a few
Mustard seeds 1 tsp
Urad dal 1 tsp
Dry red chilli broken to bits 1
In this recipe, we will be tempering first and then making the dish.
STEPWISE RECIPE FOLLOWS:
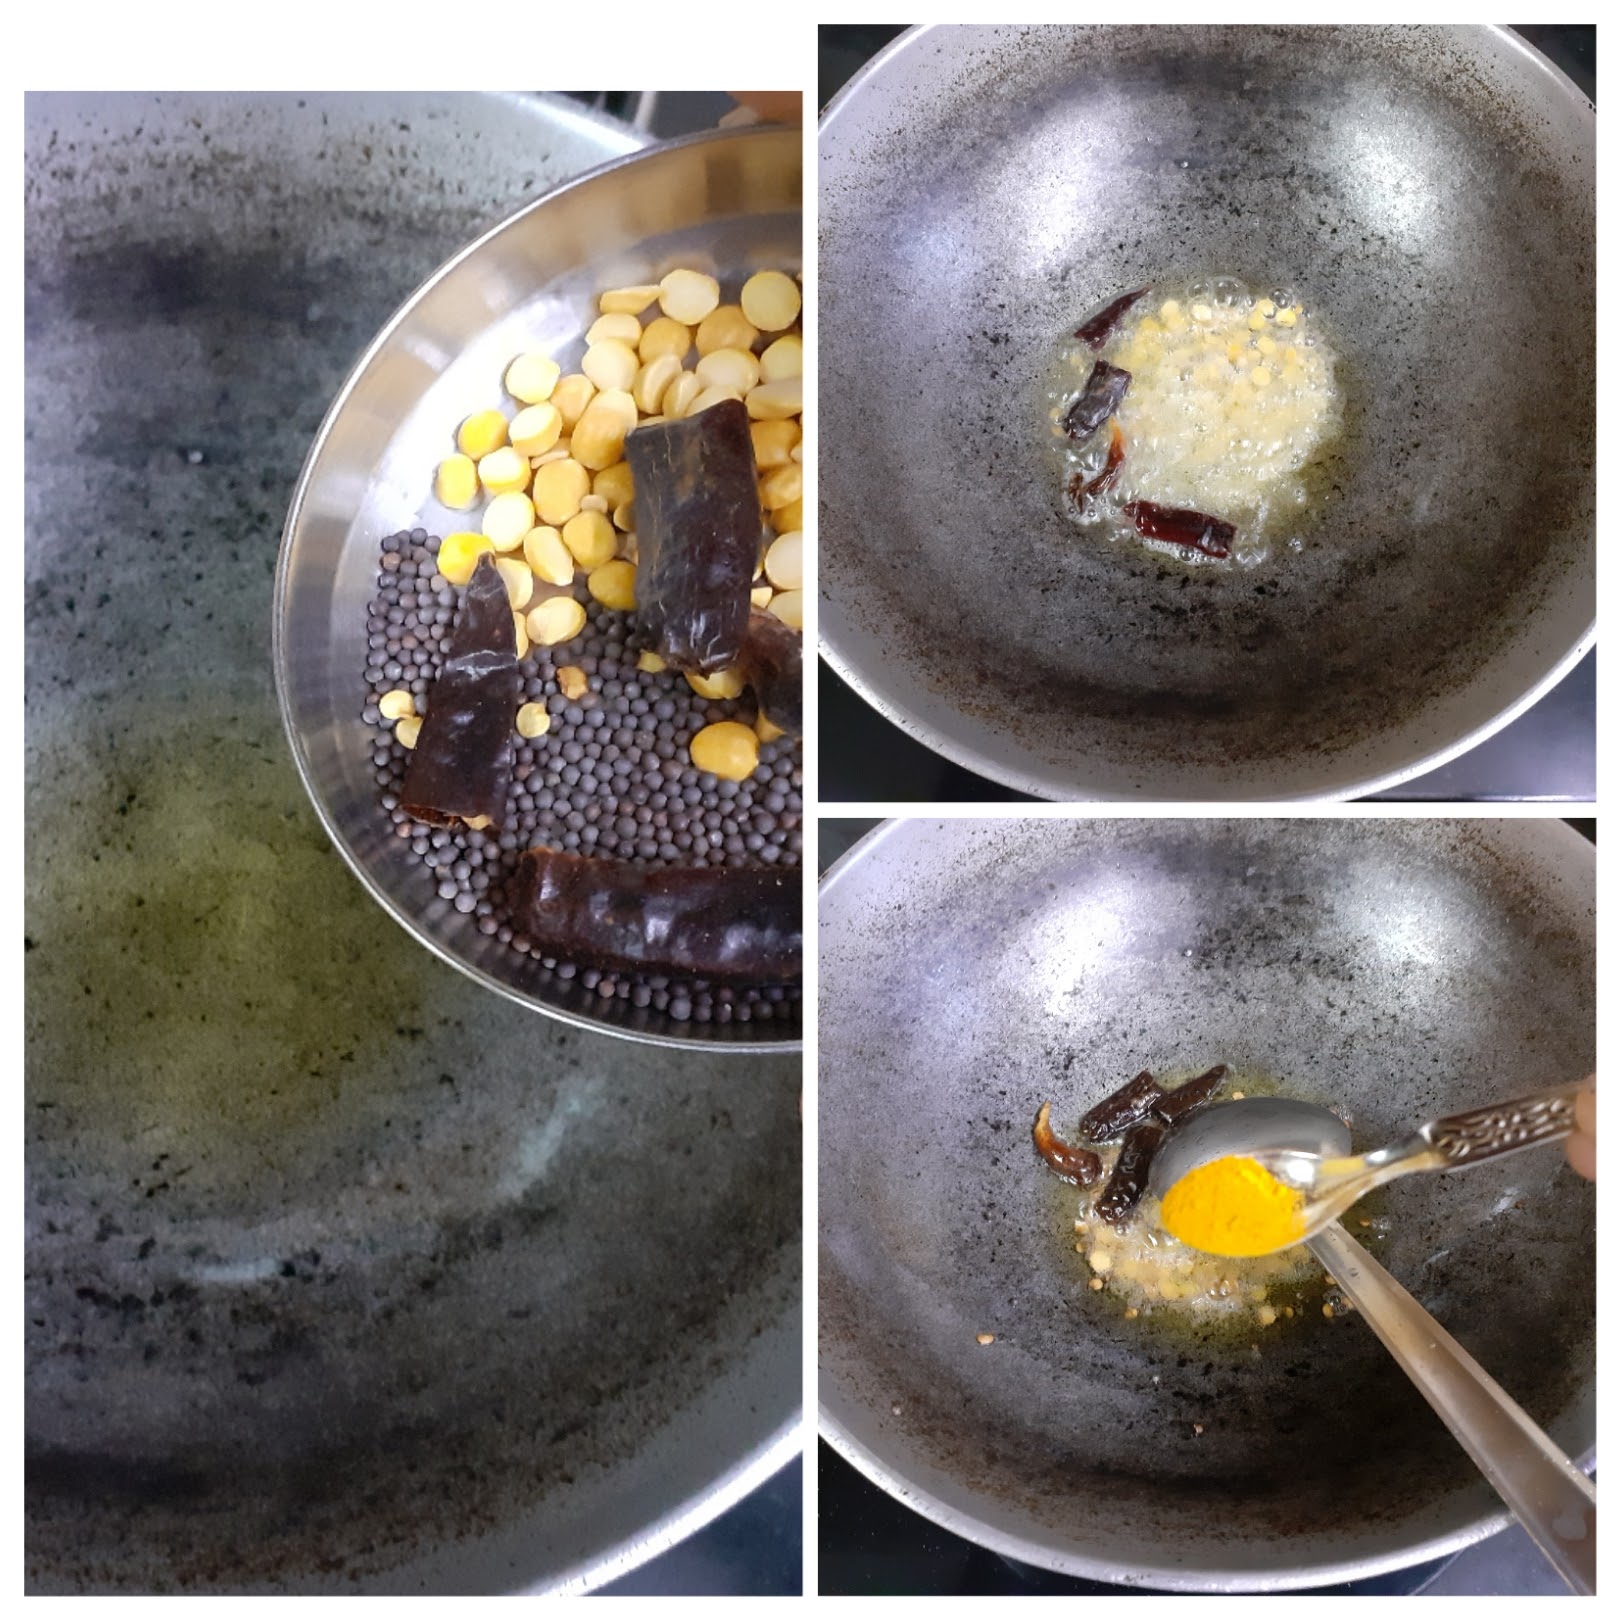
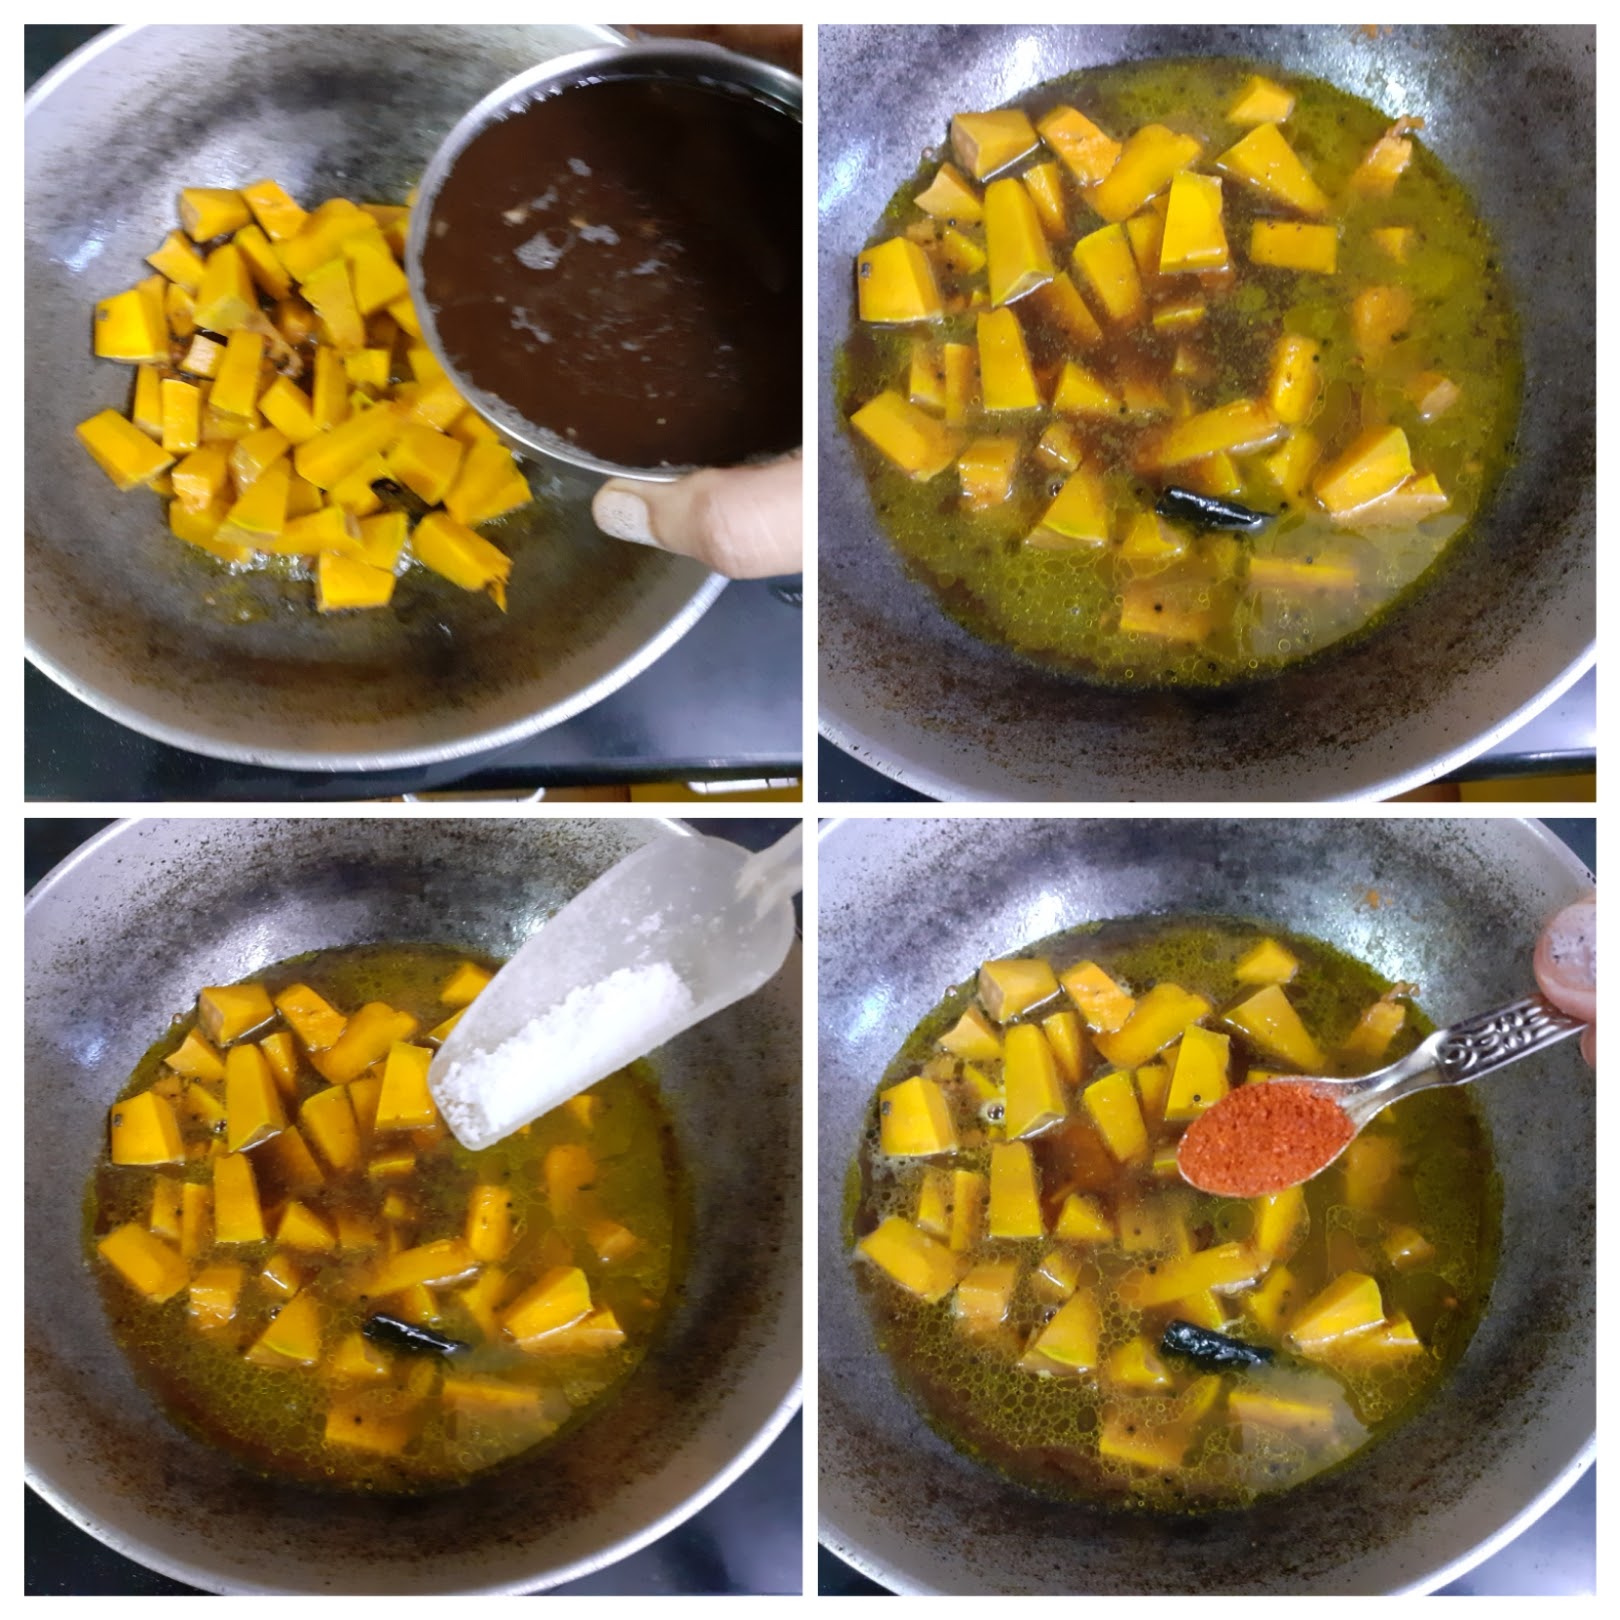
1. Heat Coconut oil/refined oil in a pan for tempering(dish will be made in the same pan so choose appropriately). Now add all the tempering ingredients one by one starting with mustard seeds. Fry for 30 seconds. Add turmeric powder.
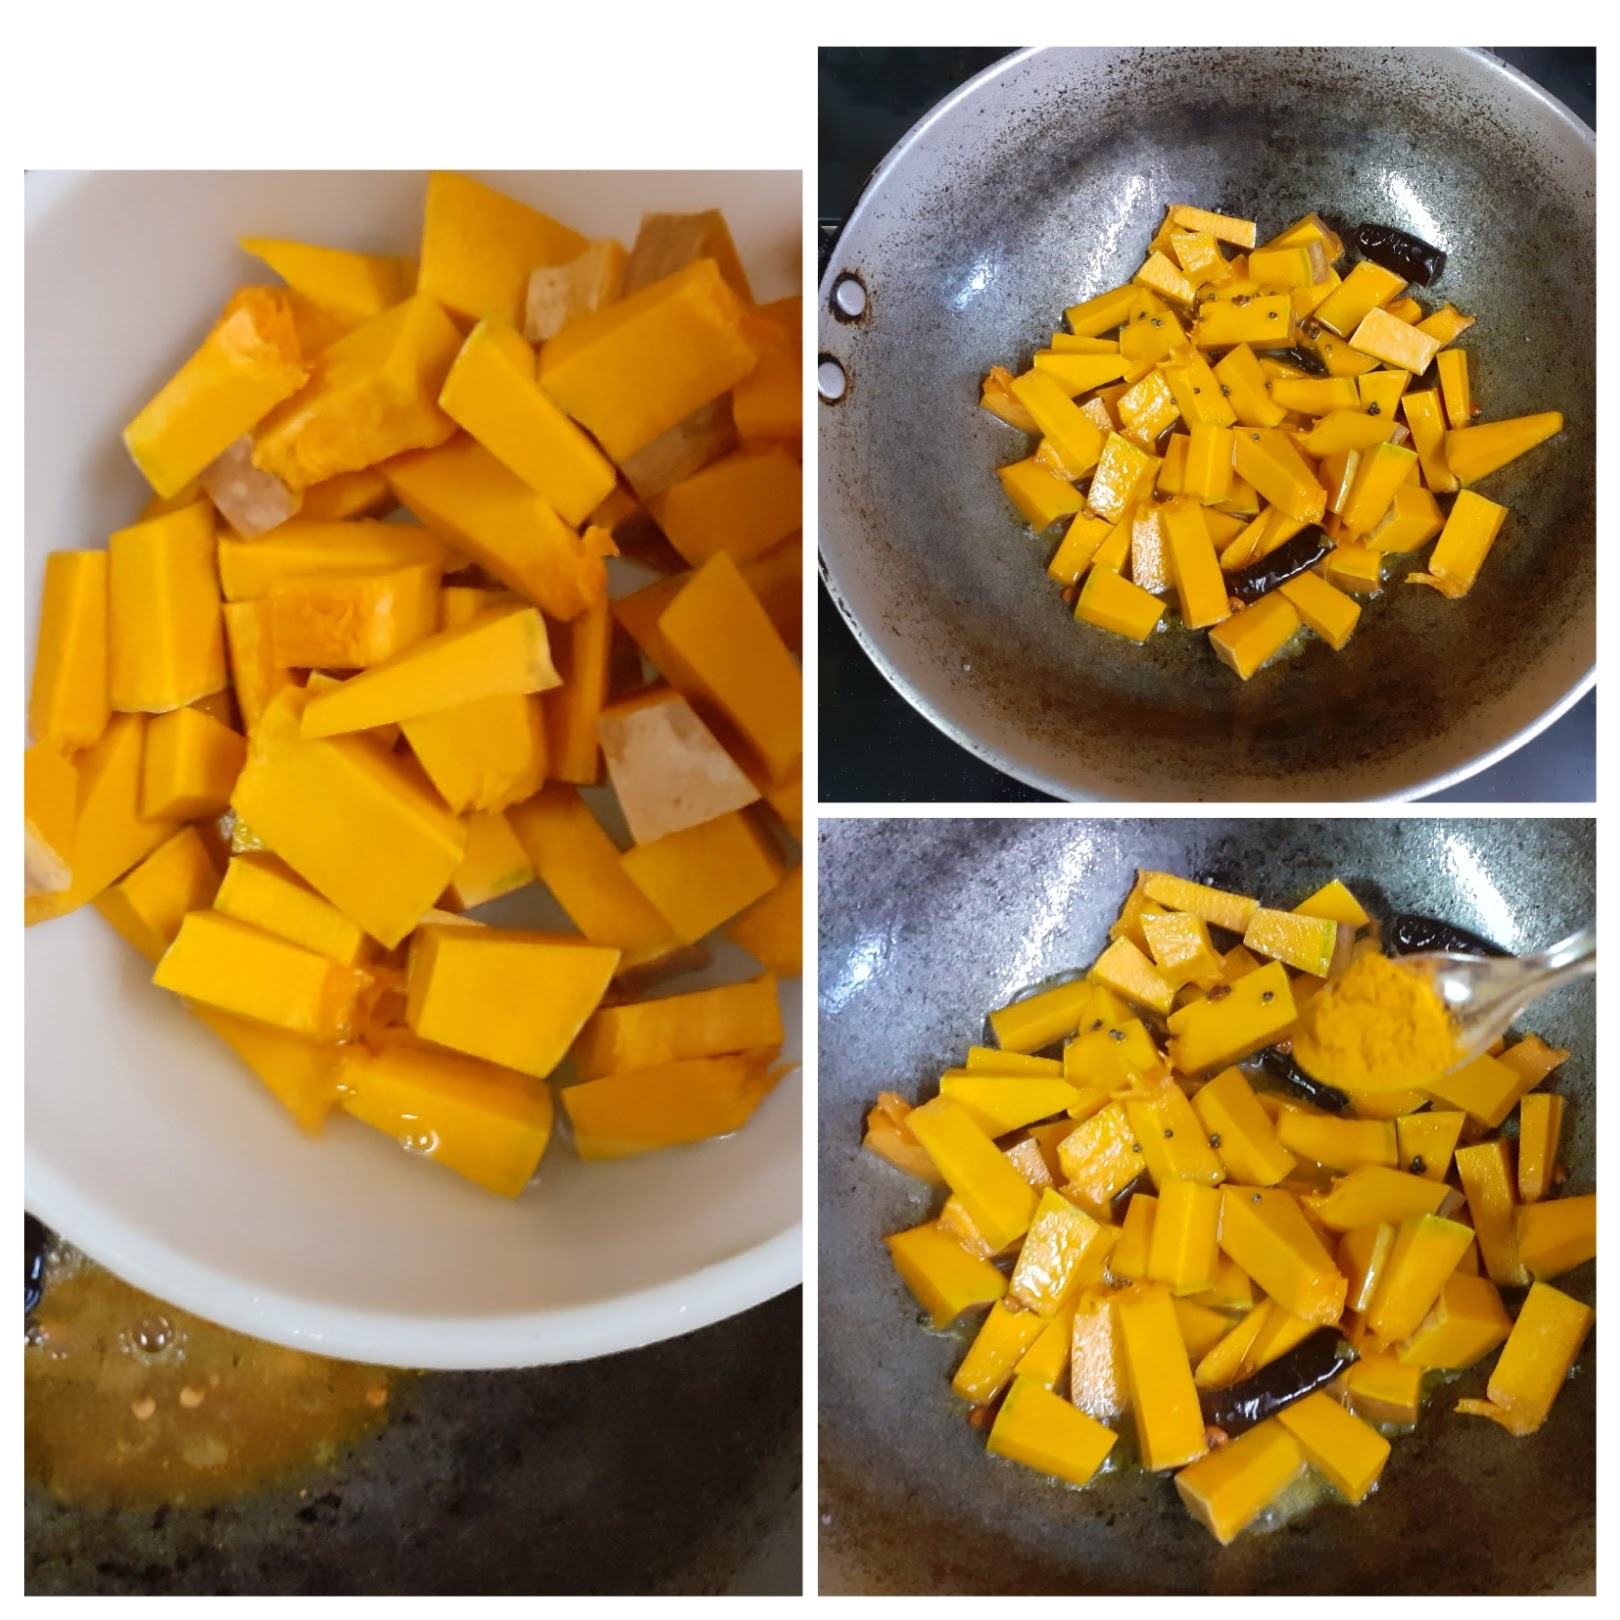
2. When the dals in the tempering turn light brown add the cubed pumpkin and saute for a minute or two.
3. Now add the tamarind pulp(should be dilute) and let the pumpkin cook in it. Add required salt while cooking, and 1/4 tsp of red chilli powder.
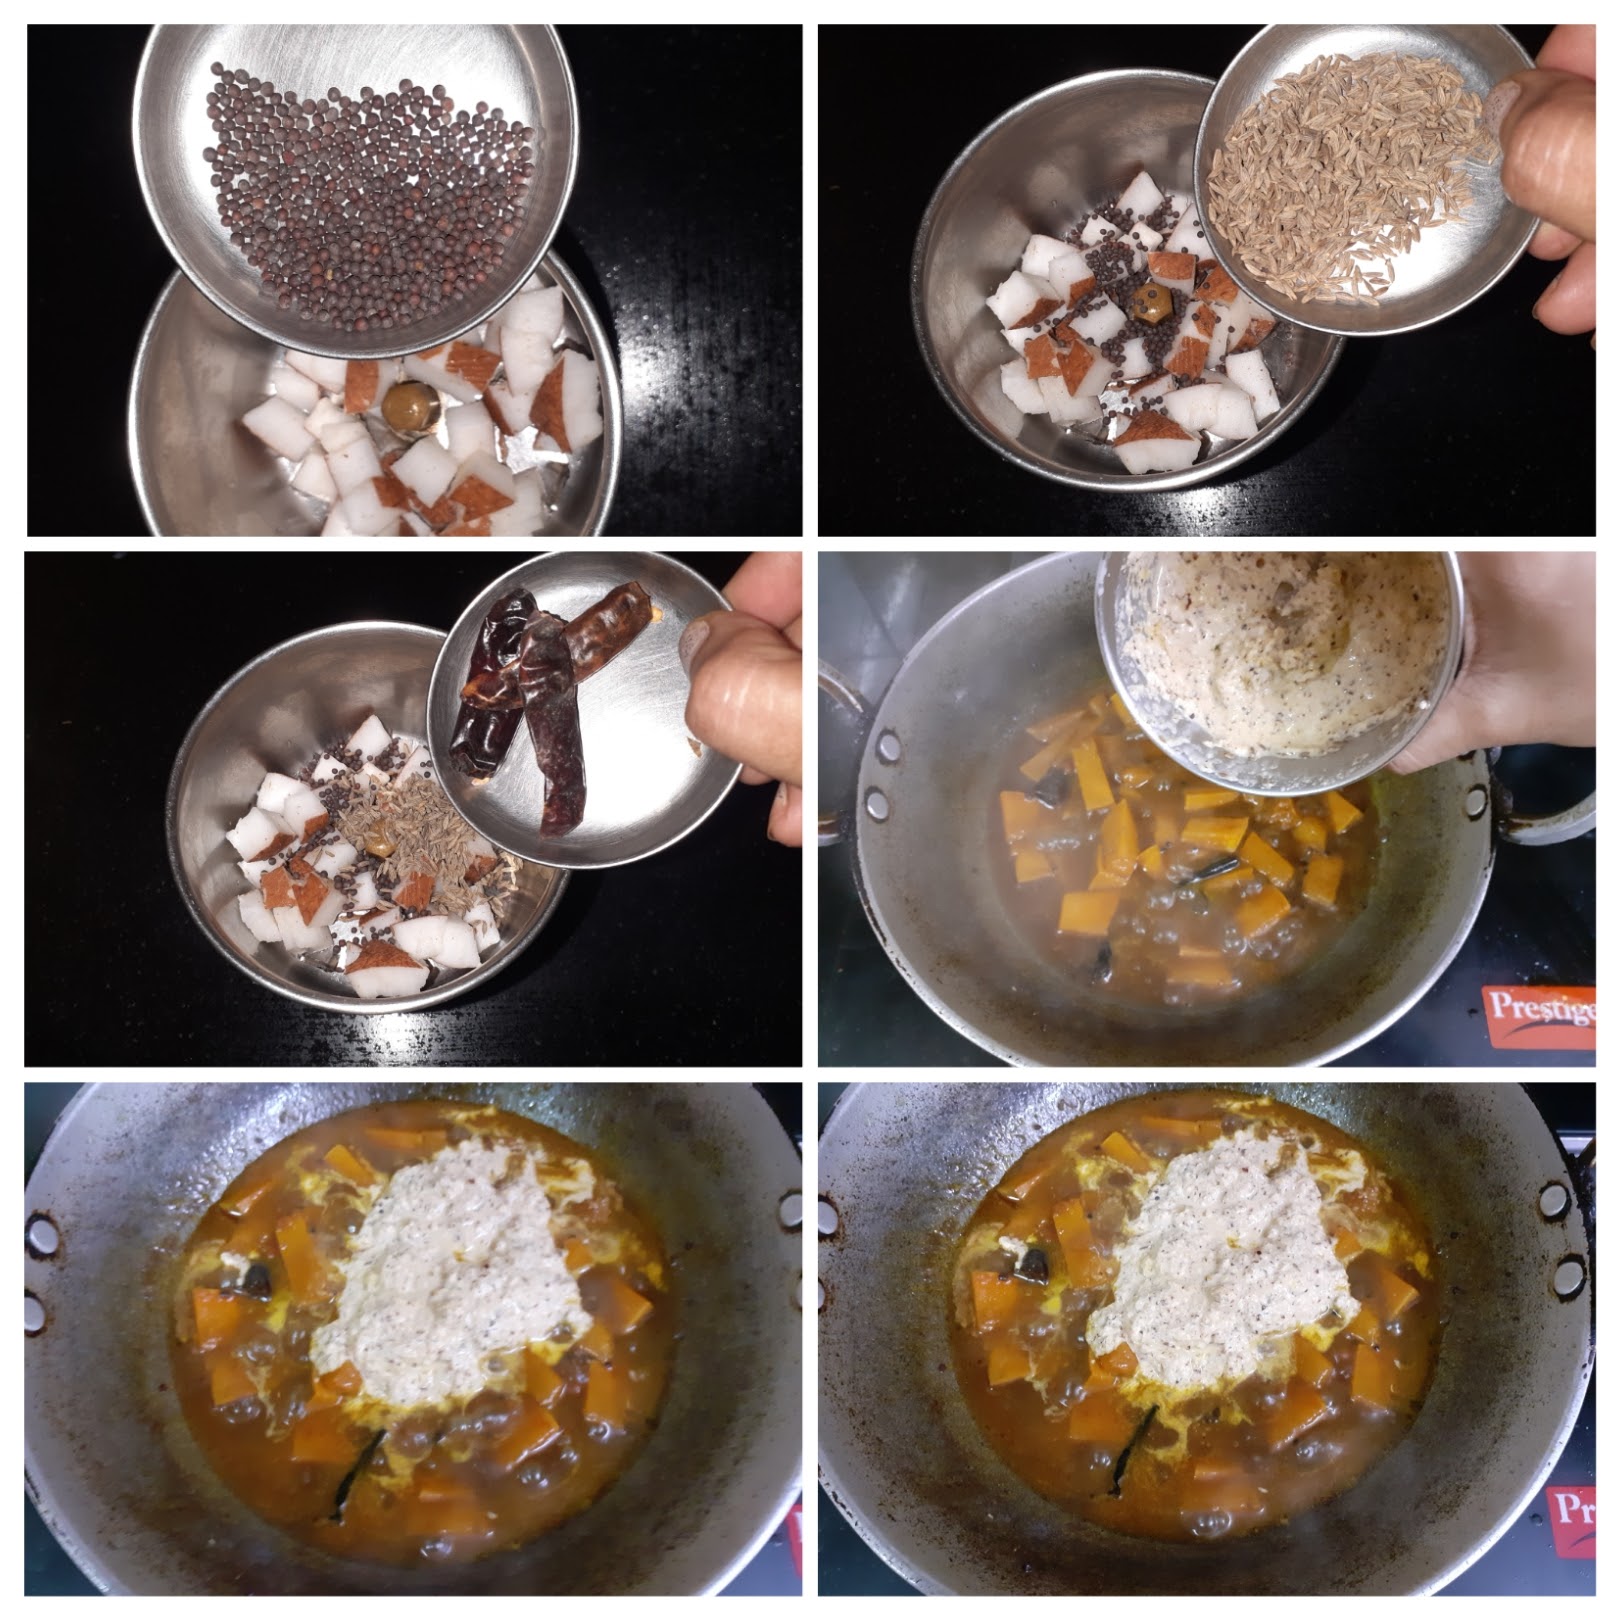
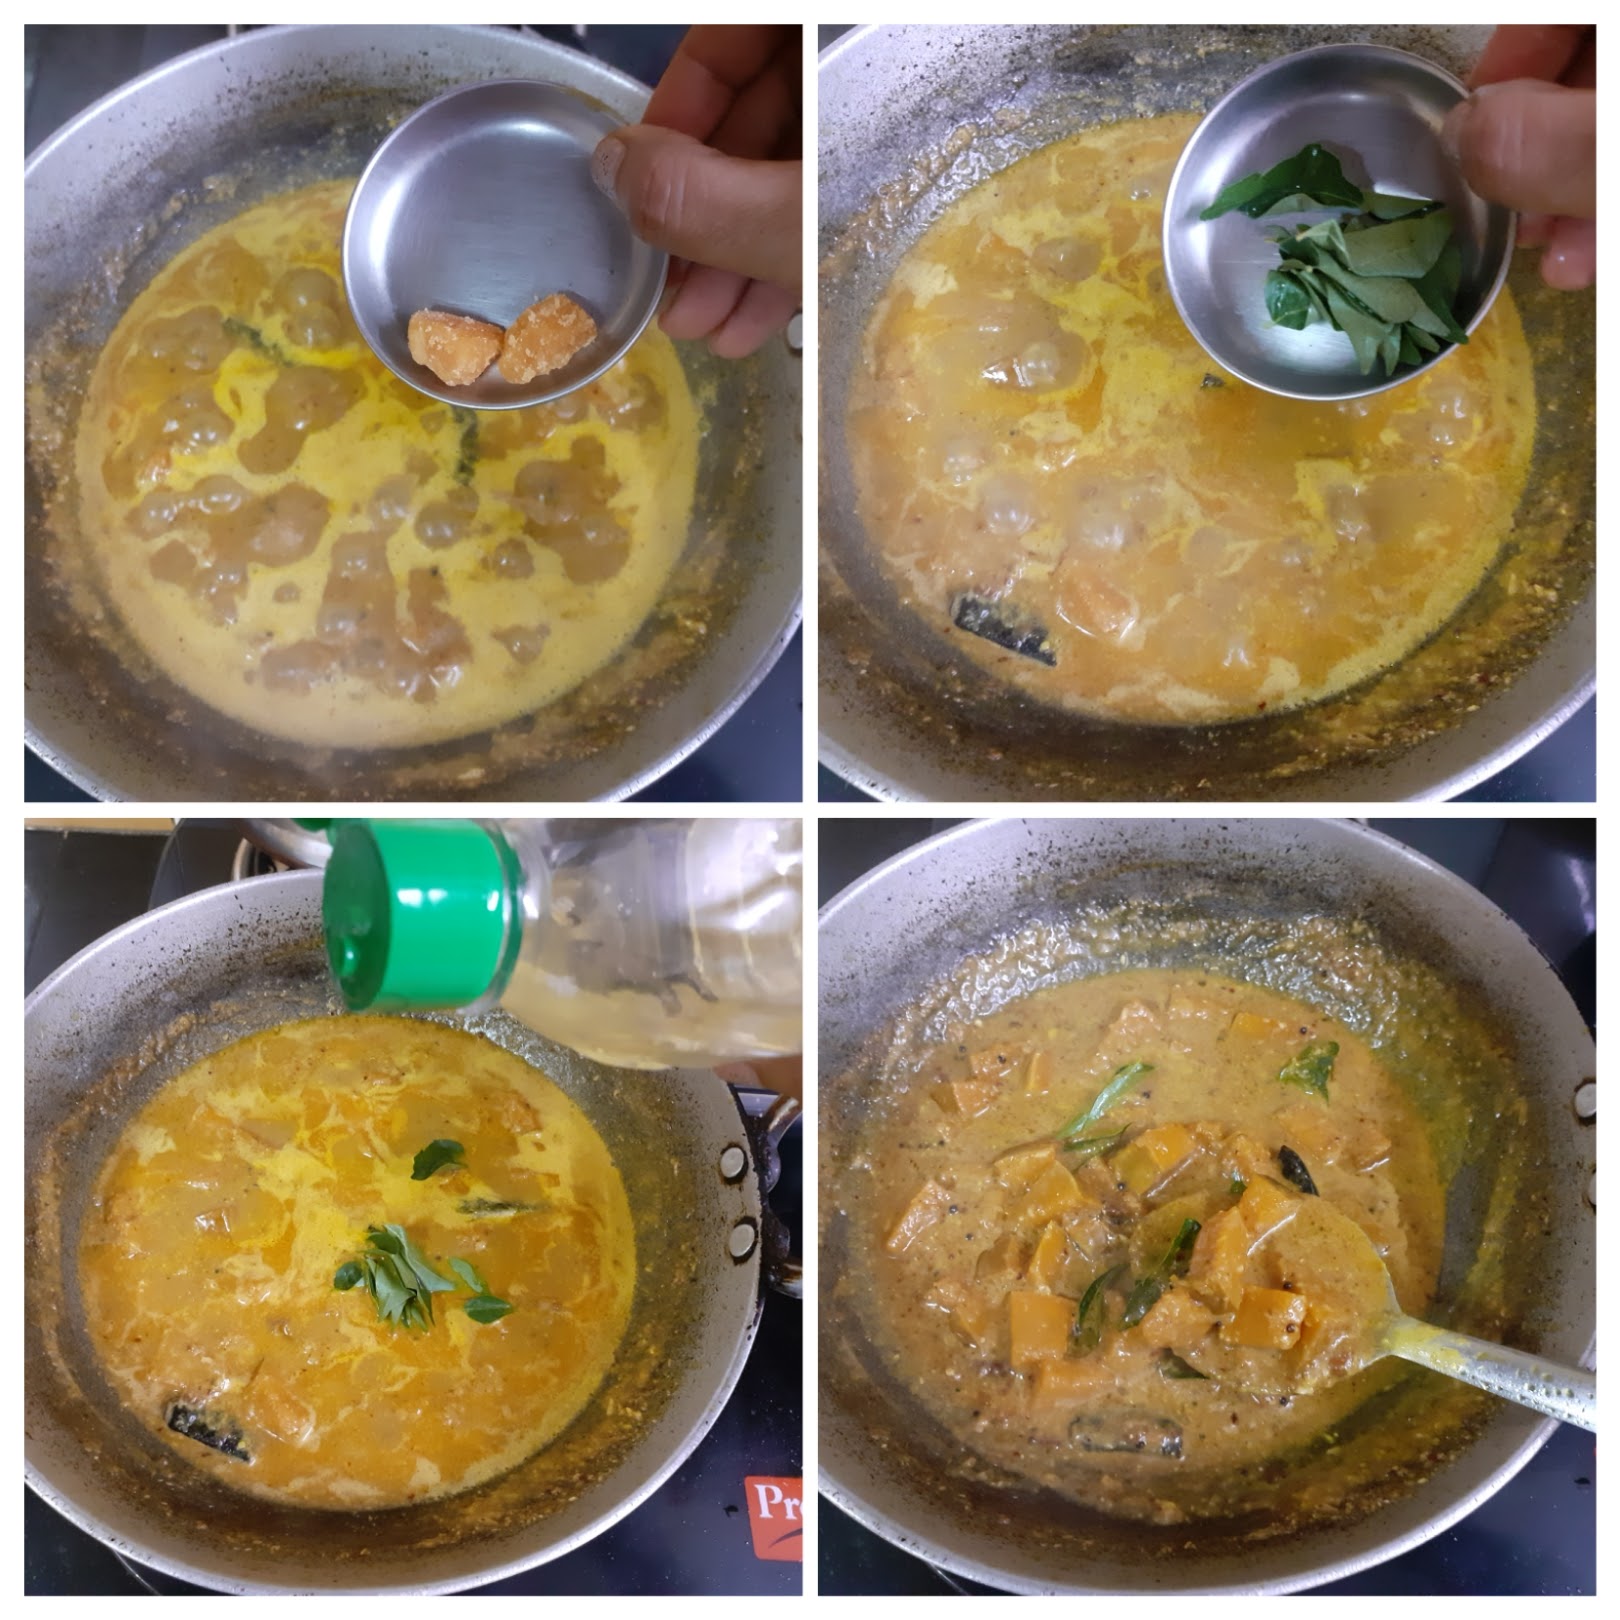
4. Grind the coconut, dry red chillies, mustard seeds and cumin seeds to a fine paste by adding little water. Add this paste to the cooked pumpkin and continue to cook for a few minutes, on low flame.
5. Finally, add the jaggery, few more curry leaves and drizzle some coconut oil(optional) stir well to dissolve the jaggery and put off the stove. The sweet and sour Mathan Pachadi is ready to serve.
NOTES:
1. This pachchadi can be made with other vegetables like Lady’s finger, Brinjal, Ripe mango etc;
2. Maintaining the balance between the tanginess and sweetness is prime to this dish. so sticking to the quantities given will help.
3. Adding more mustard then required can turn the dish bitter.
If you tried this recipe and liked it please comment below. I would love to hear from you. If you have a query about the recipe email us and ill respond as soon as I can.
If you would like to receive our recipes in your mail please leave your mail id at the homepage. Every time Rajjo’s Kitchen has a new post we will mail the recipe to you.
3. Carrot Salad:
Ingredients:
Carrots 2 meduium grated
Green chillies chopped finely
Curry leaves a few, chopped finely
Salt as required
Lemon juice 2 tsp approx
Oil for tempering 2 tsp
Mustard seeds 1/2 tsp
Asafoetida 1/4 tsp
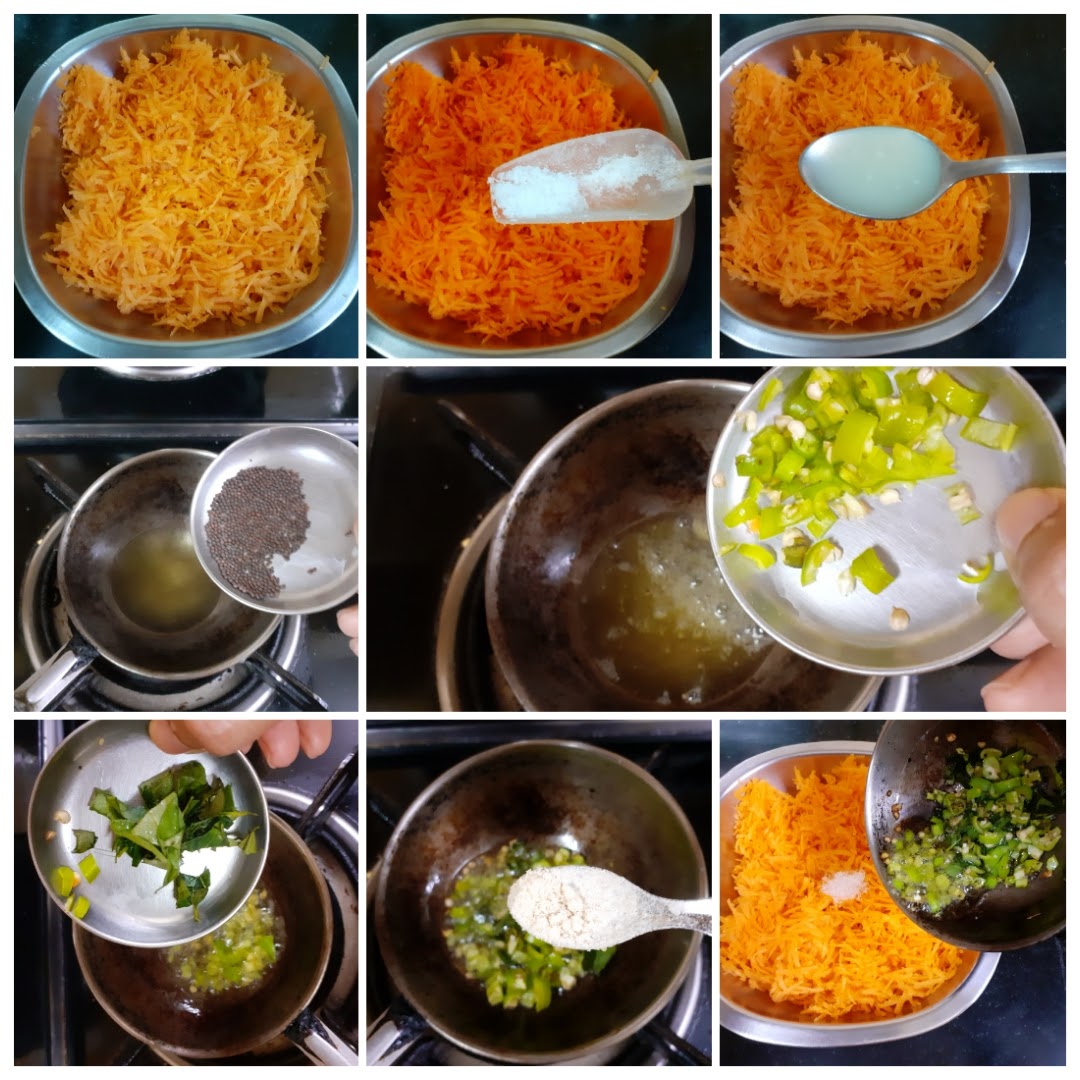
Directions: Take the grated carrots in a bowl. Add salt and lemon juice. Now take oil for tempering and heat it. Add the mustard seeds, once they crackle add, green chillies and curry leaves to the oil followed by asafoetida. drop this tempering into the carrot and mix nicely. Healthy and delicious carrot salad is ready.
NOTES:
1. This same recipe can be tried with radish too.
OVERALL NOTES:
1. 1. Planning goes a long way in creating a wholesome, and delicious meal. Please go though all recipes to check if you have all ingredients mentioned.
2. All vegetables can be chopped and washed and stored the previous day itself.
3. The Poppadum and other fries are completely optional. While at home we prefer eating that way, but while carrying it for work, I exclude the Poppadums.
4. The carrot for the salad can also be grated and stored the previous day.
Mava Paneer Curry
Mava or Khoya when added in a recipe gives it a rich texture, flavour and taste. Mava is mostly used in sweet dishes, but can be used in gravies also to add body to a dish. The khoya is available in all stores or can be made at home. Check notes for making at home.
In this recipe, I have used the store-bought Mava. In this recipe, I have used whole spices which make the dish burst with flavours. Mava Paneer can be relished with Rotis, Naans and also rice varieties like Jeera Rice, Pulav, Masala rice and more.
Mava/ Khoya 200 gm (shredded)- divide into 2 halves
Paneer 400 gm cubed
Cloves 5 -6
Jeera/ Cumin seeds 1 tsp
Peppercorns 1/2 tsp
Badi Elaichi/ Black Cardamom 1
Cinnamon 1/2 inch stick
Bay leaf/ Tej patha 1
Elaichi/ Green Cardamom 2-3
Coriander powder 2 tsp
Fennel powder 1 tsp
Red chilli powder 1 to 1.5 tsp
Salt to taste
Onion 1 chopped fine
Tomato Puree 2 cups or 3 large tomatoes pureed
Ginger Garlic paste 1 tsp
Kasoori Methi/ dry fenugreek leaves 1 tsp
Coriander leaves finely chopped 1 tbsp
Directions:
In a Karahi heat 2 tbsp oil. Add all the whole masalas(spices) -Bay leaves, Cinnamon stick, Green cardamom, cloves, Black cardamom and Cumin seeds, and fry them for 30 seconds or until aromatic. Now add the ginger-garlic paste to it and fry for 10 seconds, Follow it up by adding the finely chopped onions. Fry until the onions turn a light brown and now add the tomato puree. Add the salt, red chilli powder, coriander powder, fennel powder and stir nicely. Cook for a minute or two until the raw smell of the masalas and tomato puree is gone. Now add one half of the shredded Mava/khoya and mix it in such that it combines well with the tomato puree. Once the Mava is added the mixture thickens, So dilute with 1/4 to 1/2 cup milk, followed by 2 cups water. Allow the gravy to cook for 2 minutes and add the remaining the Mava and stir well. Now add the Paneer cubes and cover and cook for a minute or two, or until the gravy thickens. Open the lid and garnish with some crushed Kasoori Methi(dried fenugreek leaves) and the Mava Paneer curry is ready.
Serving Suggestions: with Rotis, Naans, Parathas, Jeera rice or even plain rice.
STEPWISE RECIPE FOLLOWS:
1. Assemble all ingredients. In a Karahi heat 2 tbsp oil. Add all the whole masalas(spices) -Bay leaves, Cinnamon stick, Green cardamom, cloves, Black cardamom and Cumin seeds, and fry them for 30 seconds or until aromatic.
2. Now add the ginger-garlic paste to it and fry for 10 seconds, Follow it up by adding the finely chopped onions. Fry until the onions turn a light brown and now add the tomato puree.
3. Add the salt, red chilli powder, coriander powder, fennel powder and stir nicely. Cook for a minute or two until the raw smell of the masalas and tomato puree is gone.
4. Now add one half of the shredded Mava/khoya and mix it in such that it combines well with the tomato puree. Once the Mava is added the mixture thickens, So dilute with 1/4 to 1/2 cup milk, followed by 2 cups water. allow the gravy to cook for 2 minutes.
5. Now add the paneer cubes, cover the Karahi and cook for another 2 minutes or so, or until the gravy thickens. Open the lid, add crushed Kasuri Methi and put off the flame. Garnish with finely chopped coriander leaves and a drizzle of cream if required. The Mava Paneer curry is ready to savour.
NOTES:
1. In this recipe I have used 400 gm Paneer and 200 gm of Mava/Khoya. This can be scaled down conveniently for a lesser quantity of curry.
2. To make instant Khoya/Mava- take 1 cup milk and boil. Reduce it(evaporate by boiling) to half and add 2 tablespoons of milk powder and 1 tsp ghee. Homemade instant Mava is ready. For this recipe, you may need twice the amount of this quantity.
If you tried this recipe and liked it please comment below. I would love to hear from you. If you have a query about the recipe email us and ill respond as soon as I can.
If you would like to receive our recipes in your mail please leave your mail id at the homepage. Every time Rajjo’s Kitchen has a new post we will mail the recipe to you.
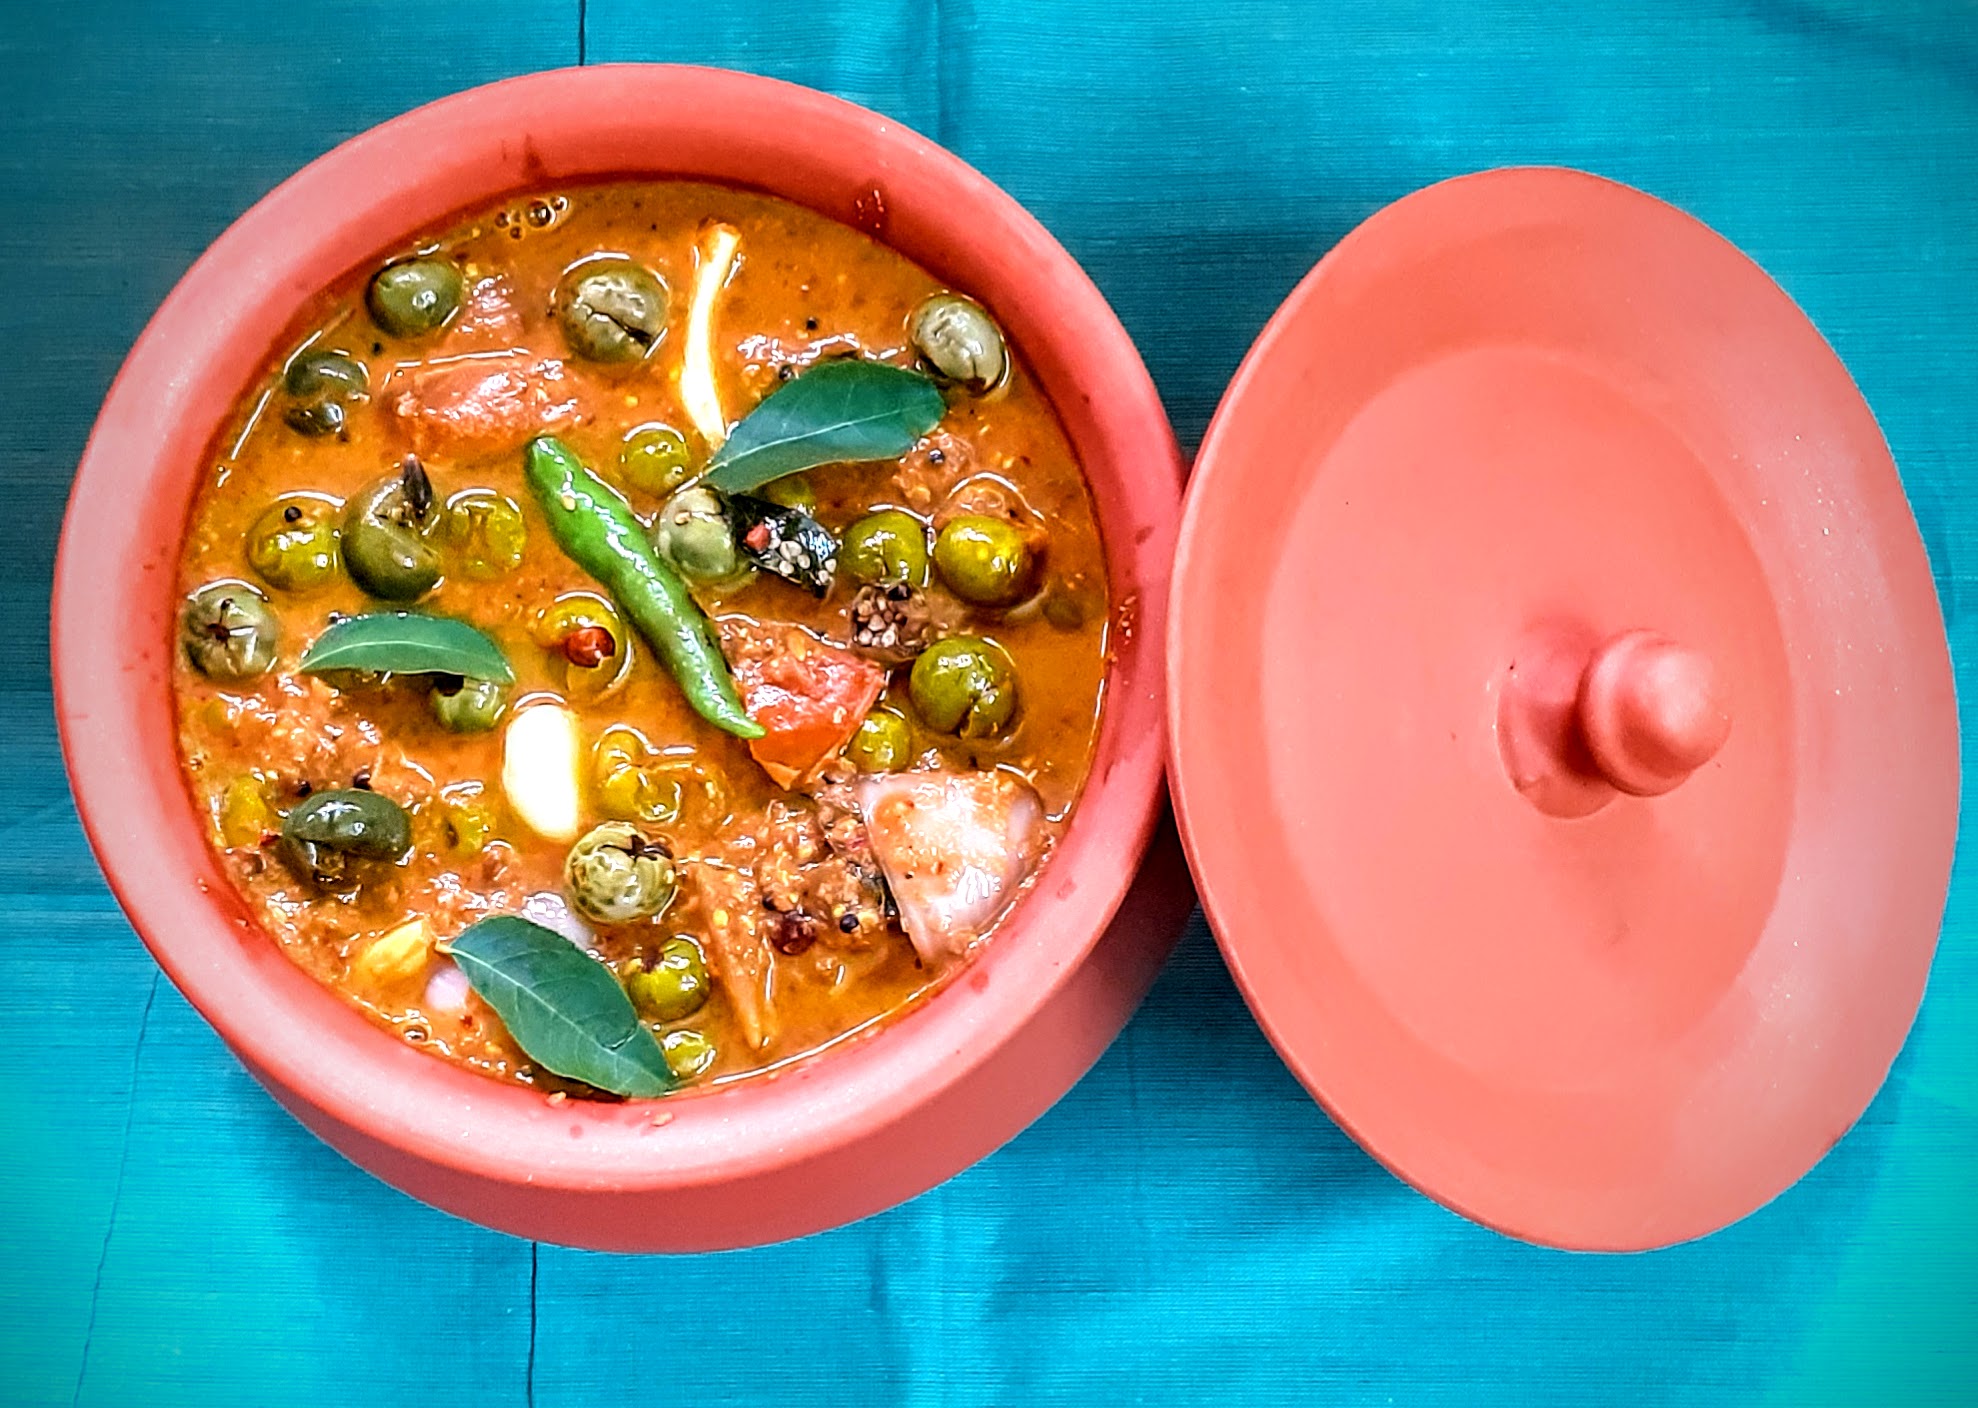
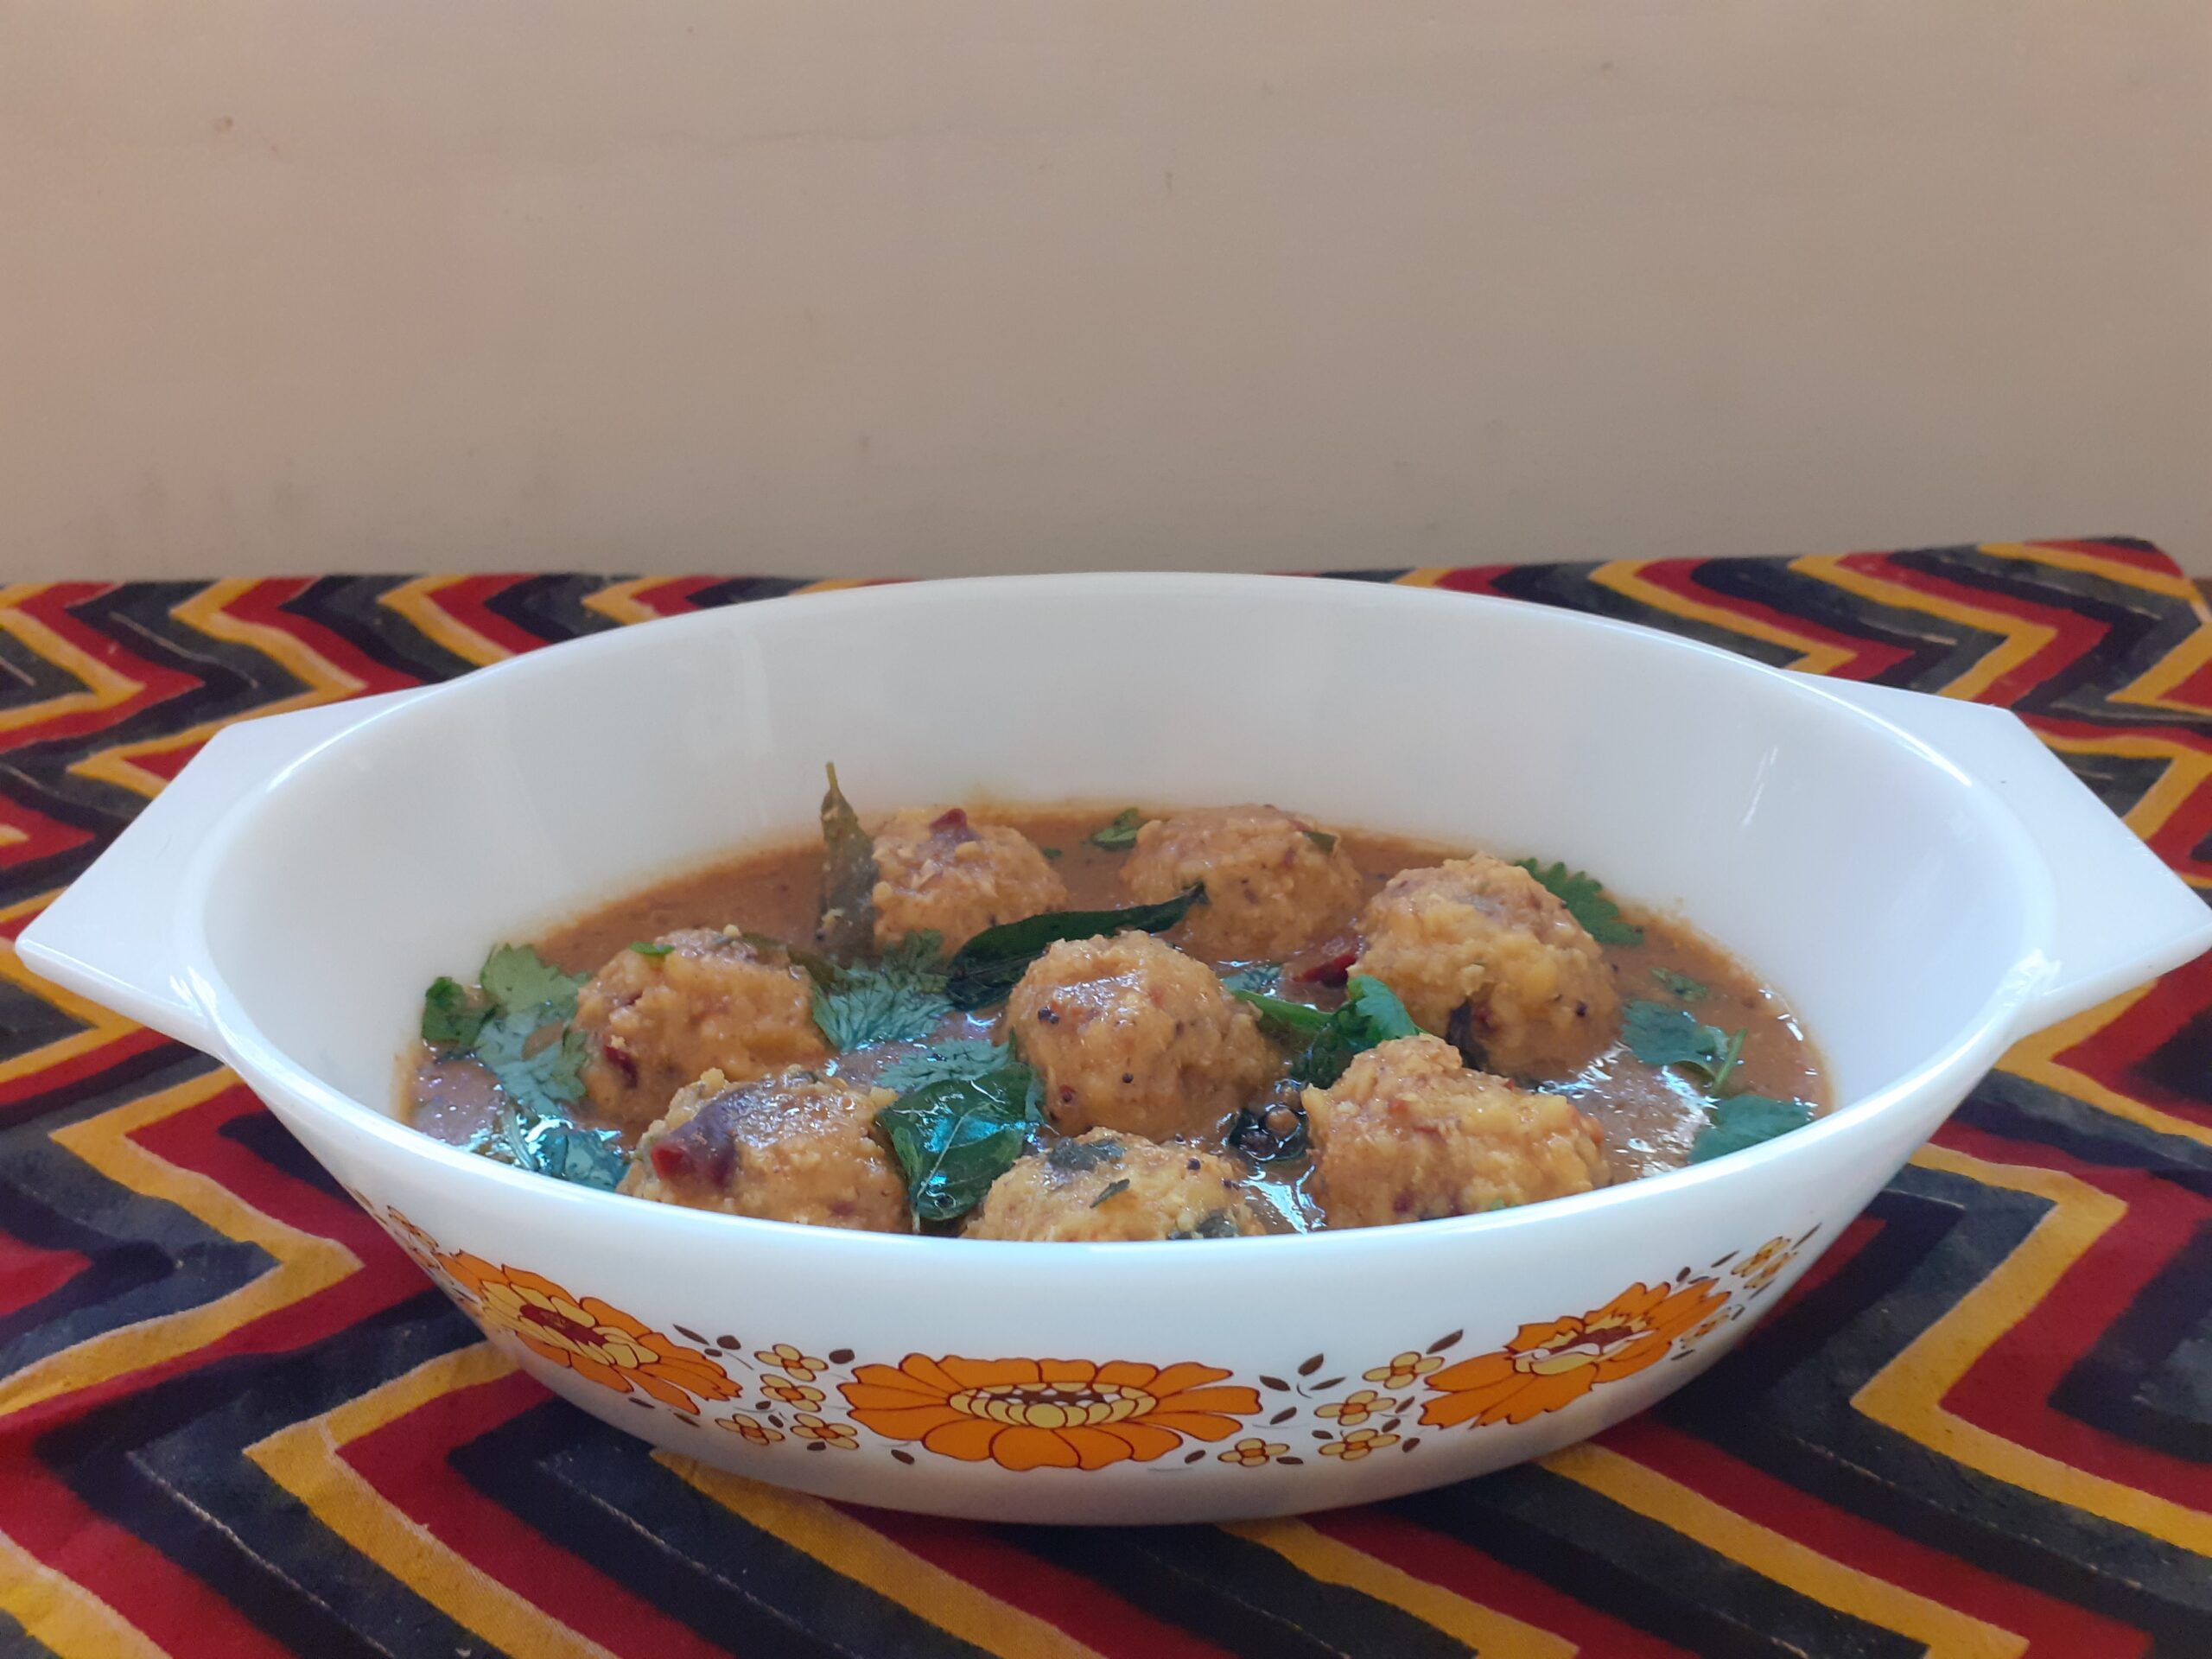
Pachai Sundakkai Kuzhambu (Chettinad Style)
Sundakkai/ Chundakkai in Tamil or Turkery Berry in English, as it is widely known, is a vegetable used in South Indian cooking to make a Kuzhambu or a gravy in which these berries are simmered with spices. As tasty as the Kuzhambu tastes, the berries are slightly bitter and have many medicinal benefits. This Vegetable is also known as Kudenekayi in Kannada or Usthikaya in Telugu. In Hindi it is called Bankatiya. I am giving here different names so that if you know this vegetable, one must try out recipes made of it because of its medicinal properties.
In SouthIndia the berries are blanched and then dried in the sun for a few days until it changes colour and is completely dry. The dried berries are then stored in an airtight jar then used to make the Sundakkai Vathakuzhambu. The dried berries are also fried in ghee and make an yummy accompaniment for curd rice. The berries fried in ghee are also mixed with hot rice and eaten as it is believed that it helps in deworming.
Health benefits of Sundakkai/ Turkey Berry- cures common cold, helps in treating kidney related issues, treats Anaemia, helps in treating cough and asthma, clears mucus, help in controlling diabetes, and they heal gastric ulcers.1Berry myriad benefits.
In this recipe I am using the fresh Sundakkai and not the dried ones( Vathal). Here the berries are cooked in tamarind sauce with a spicy, ground masala paste. The fresh berries are little bitter and so have to smashed using a pestle, so that as the Berry gets cooked in the tamarind pulp the bitterness is reduced. I am calling this a Chettinad style Kuzhambu because the masala paste used here is the Chettinad masala paste.
Here is the recipe of Pachai Sundakkai Kuzhambu for you-
PREP TIME: 15 MINS COOK TIME: 20 Mins
TOTAL TIME: 35 Mins COURSE: MAIN
CUISINE: SOUTH INDIAN SERVINGS: 5
AUTHOR: Rajni Ram
Ingredients:
Sundakkai/ Turkey Berry (fresh) 150 gm
Tamarind paste 1.5 tbsp ( or pulp of lemon sized ball)
Onion 1 (medium) diced
Tomato 1 large chopped roughly
Garlic 10 to 12 cloves
Curry leaves a few leaves
Green chillies 2
Gingelly/Til/Sesame oil 1.5 tbsp
Asafoetida 1/2 tsp
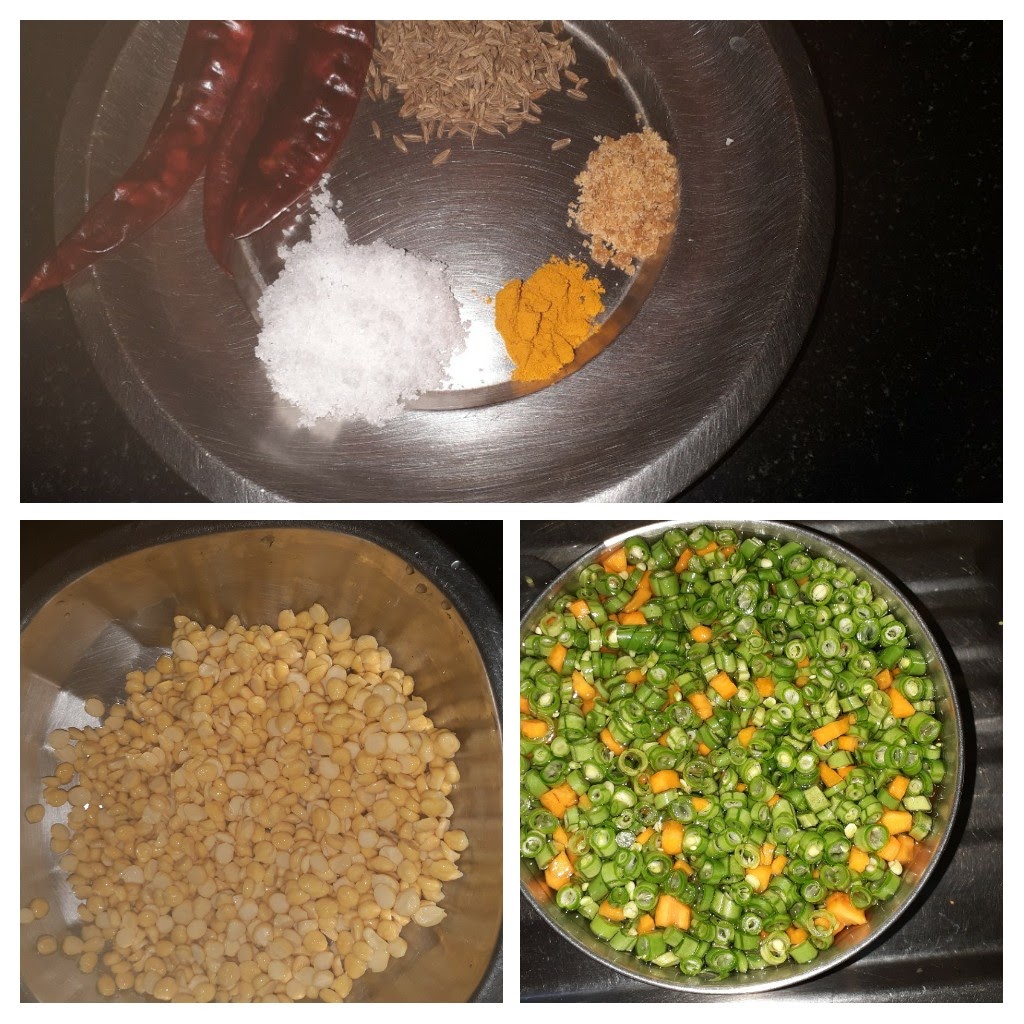
To grind:
Coriander seeds 1 tbsp
Fennel seeds 1.5 tsp
Dry red chilli 2
Kashmiri dry red chilli 1(optional)
Coconut gratings 1.5 tbsp
To temper:
Mustard seeds 1 tsp
Chana dal(gram) 1 tsp
Dry red chilli 1 broken
Methi/ fenugreek seeds 1 pinch
Asafoetida 1/2 tsp
Method:
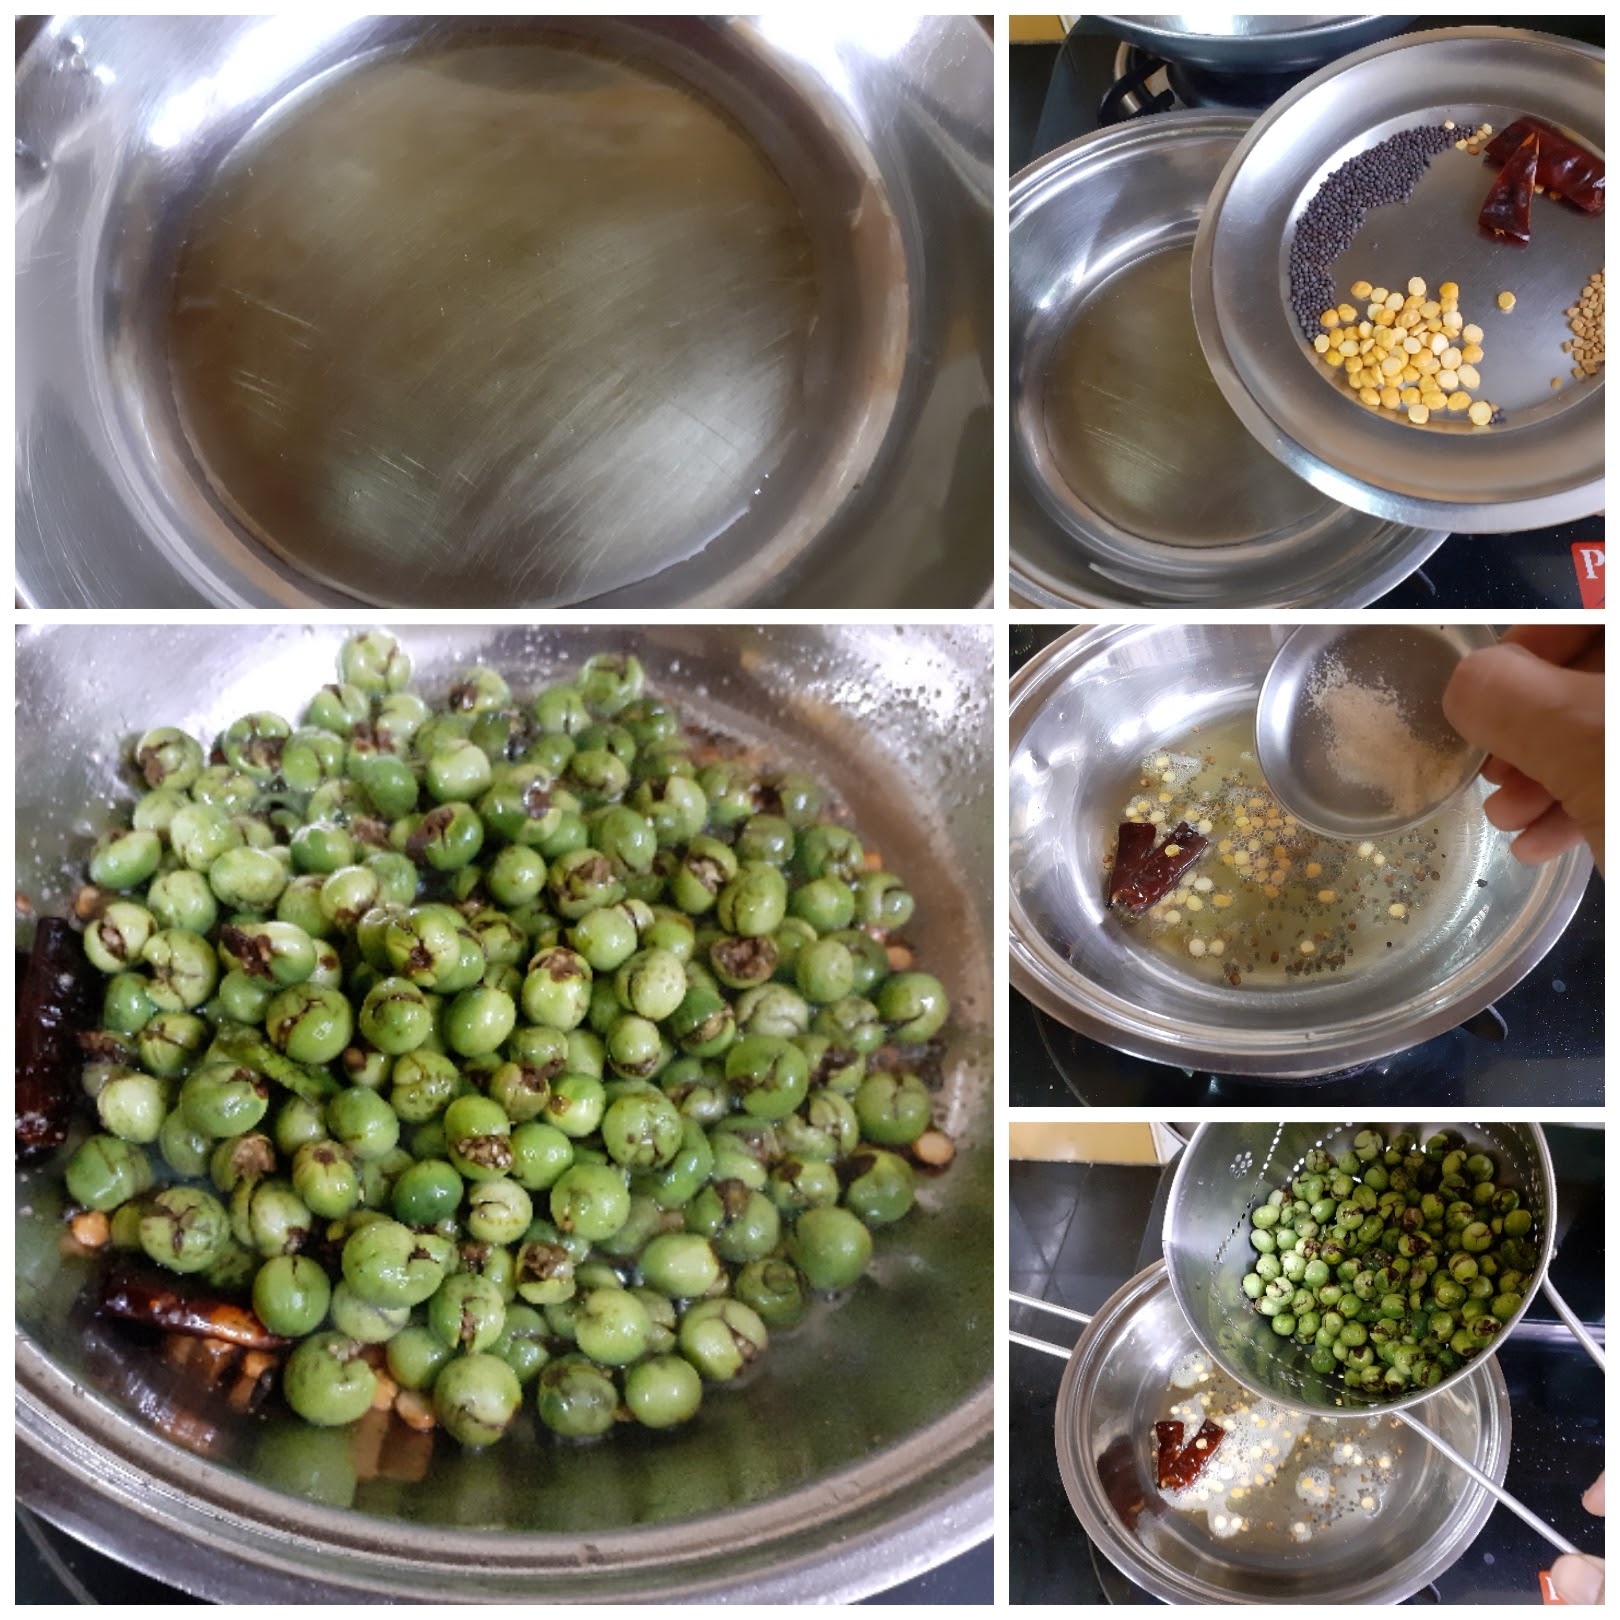
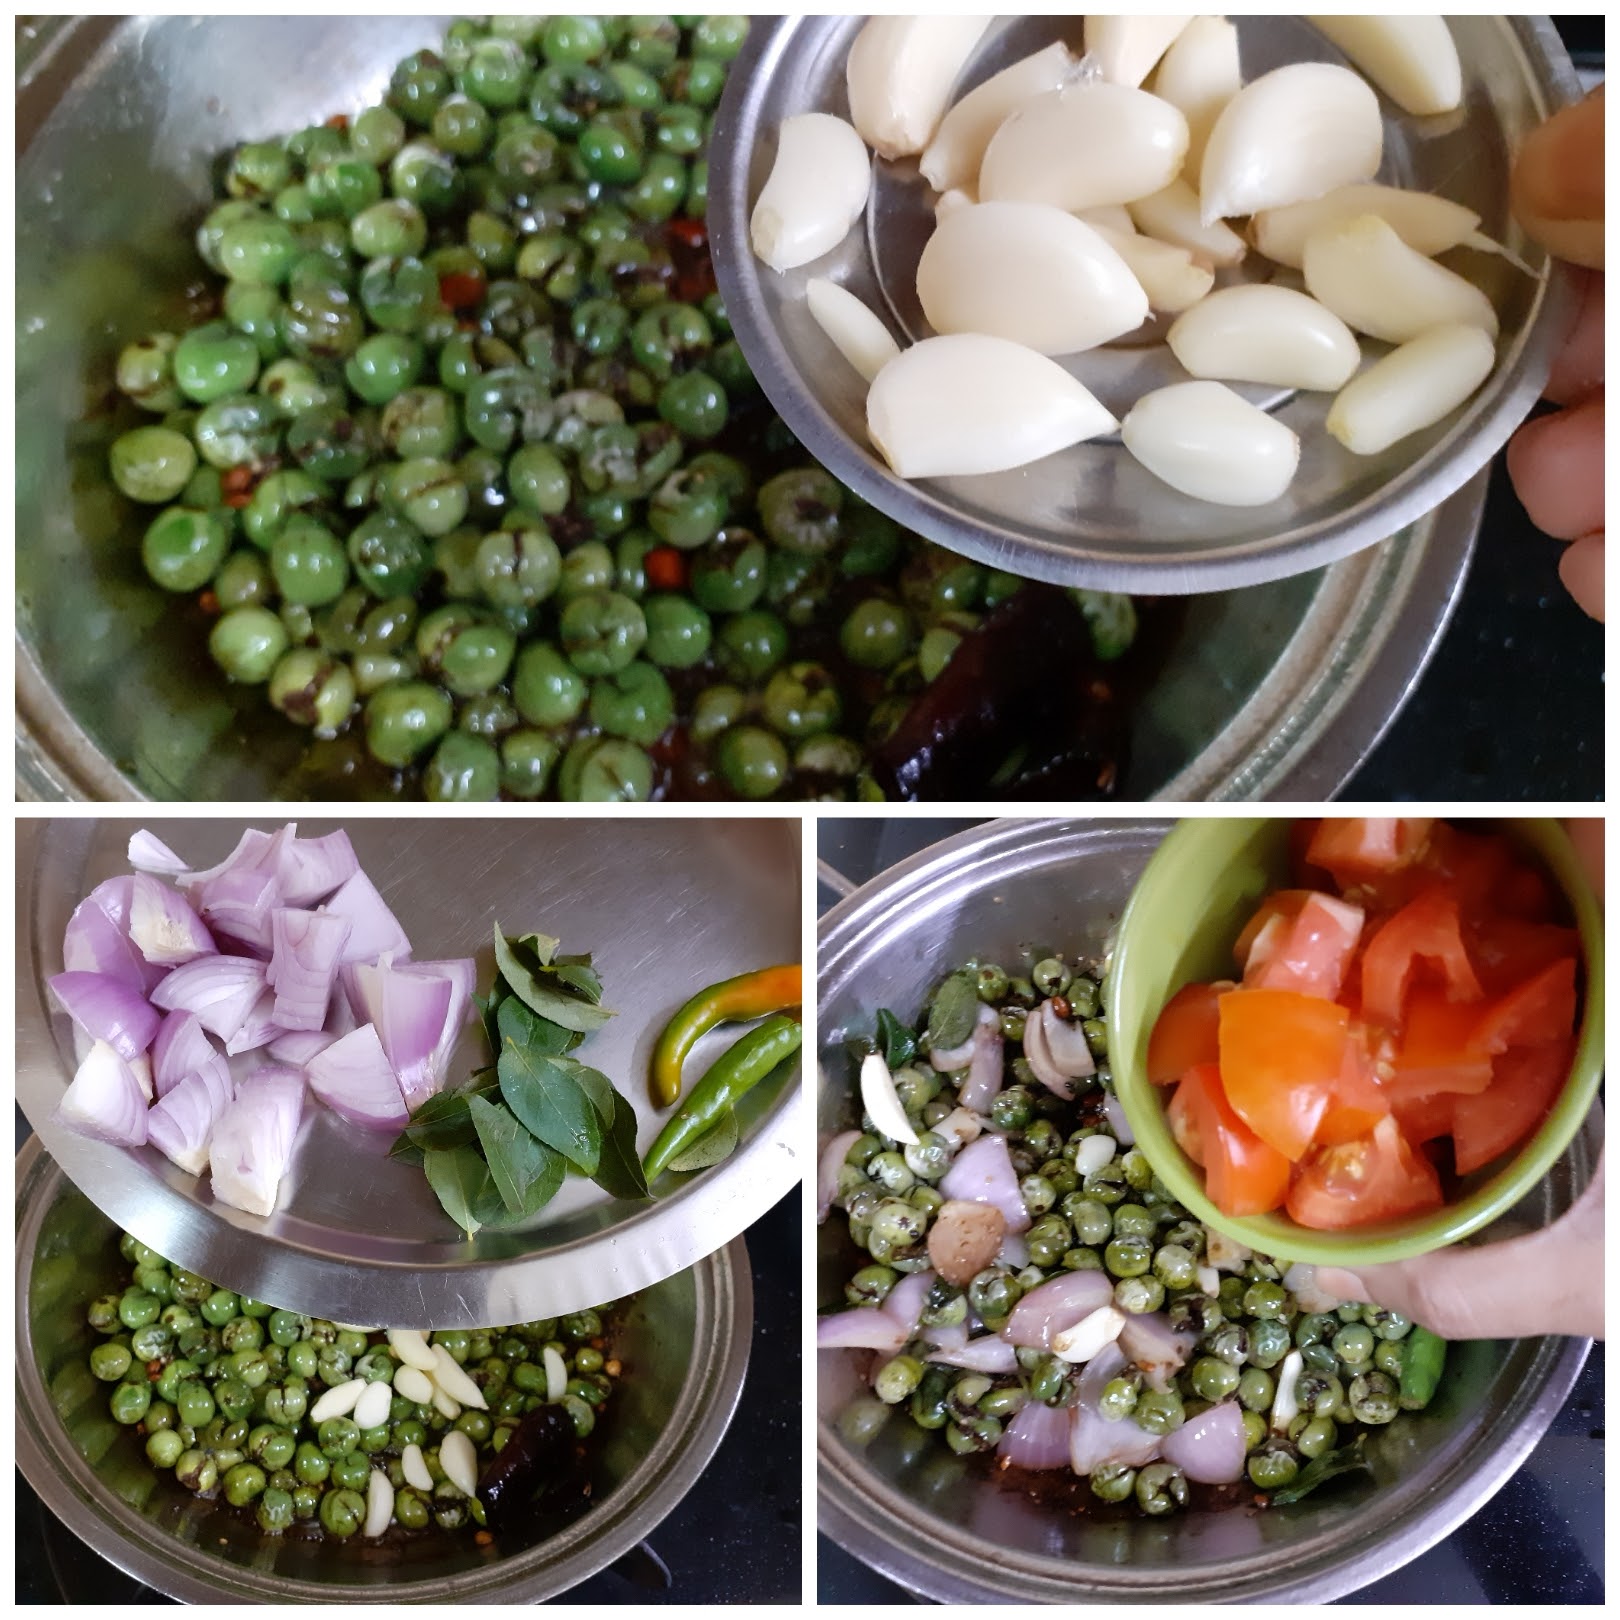
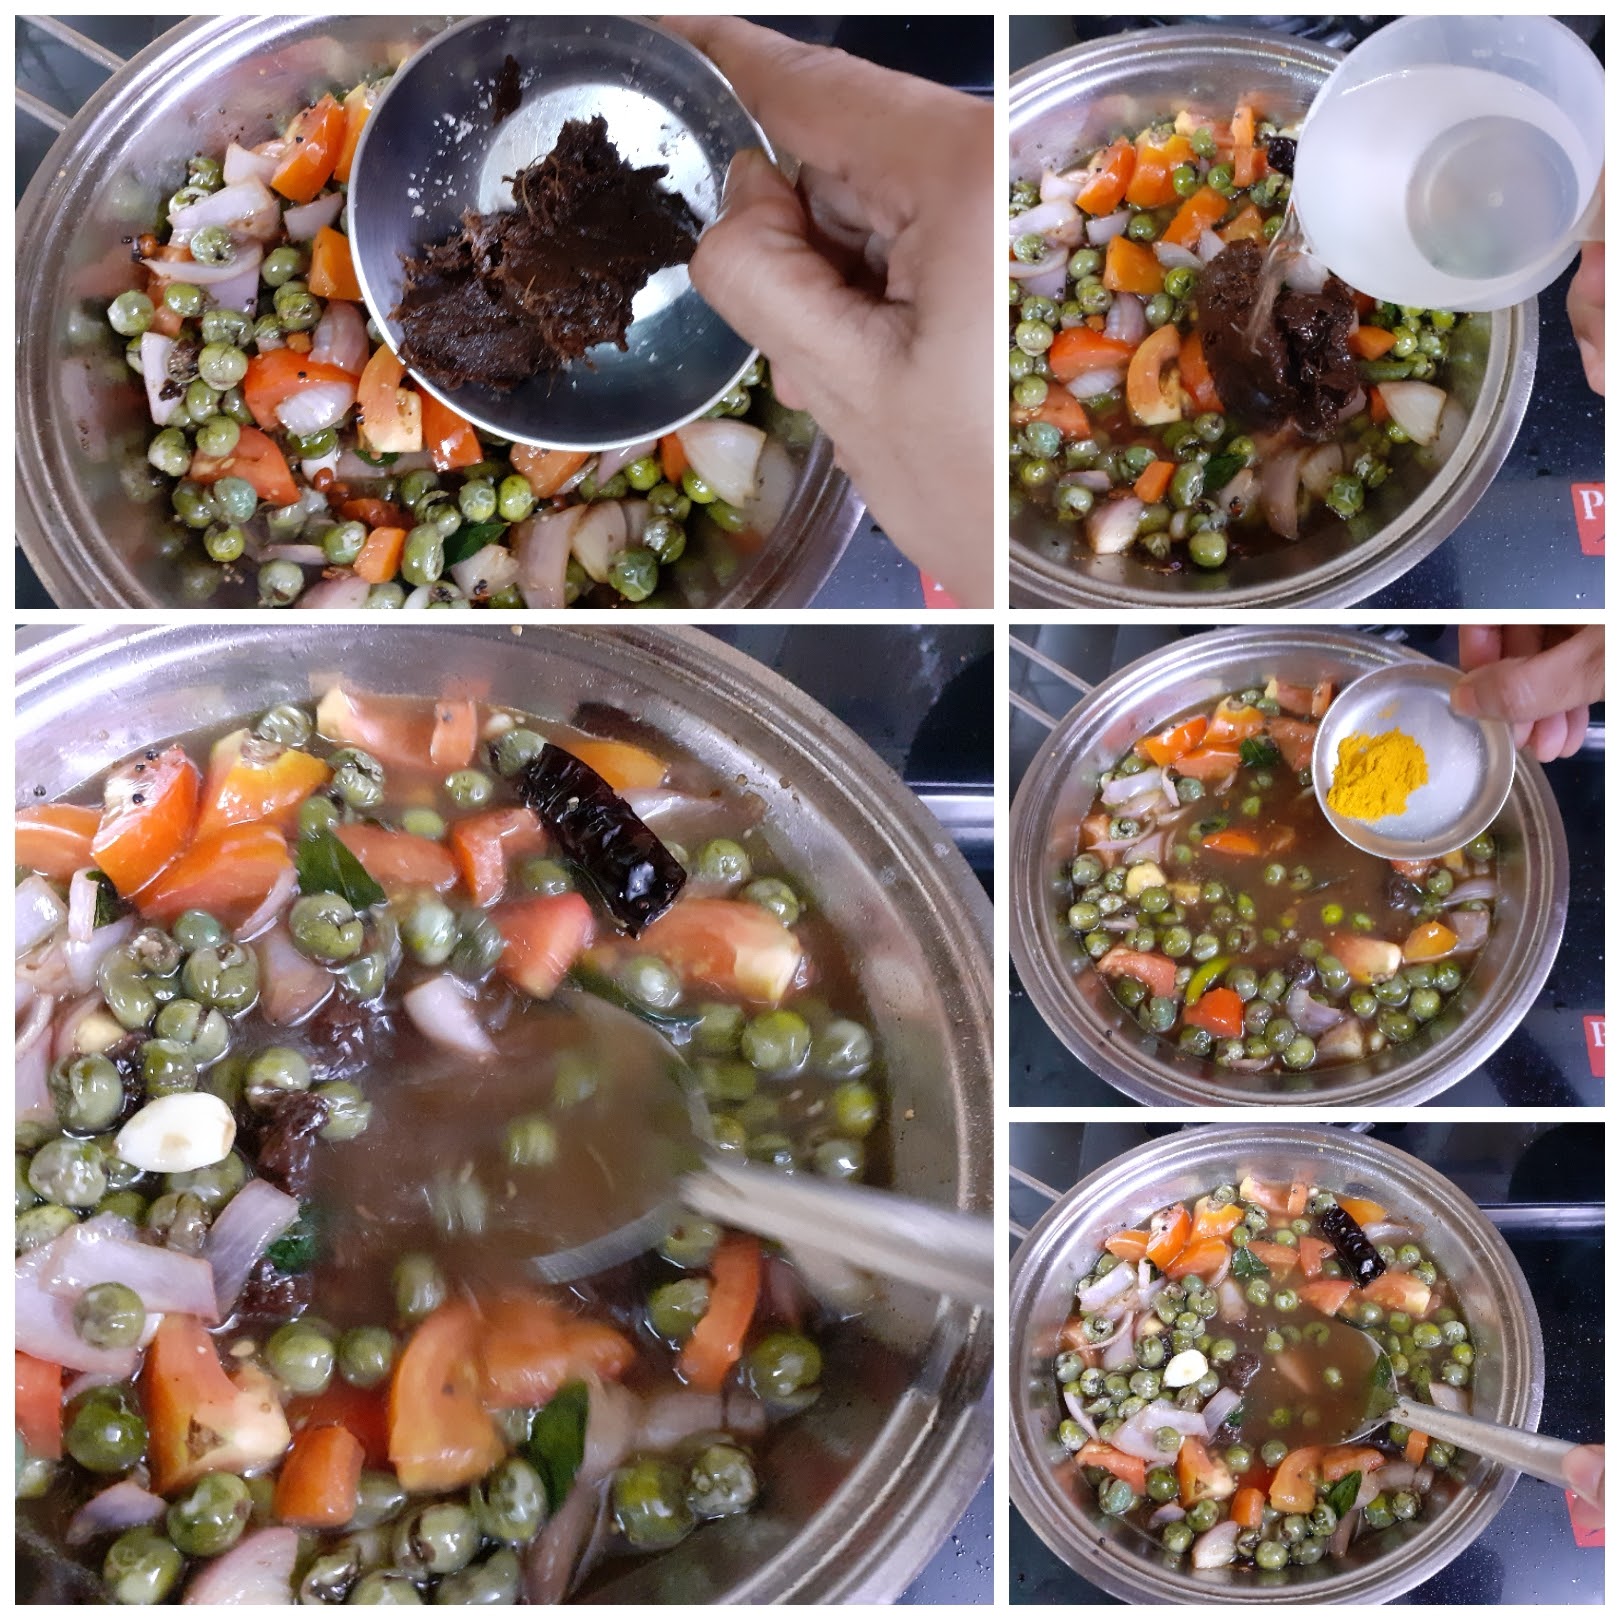
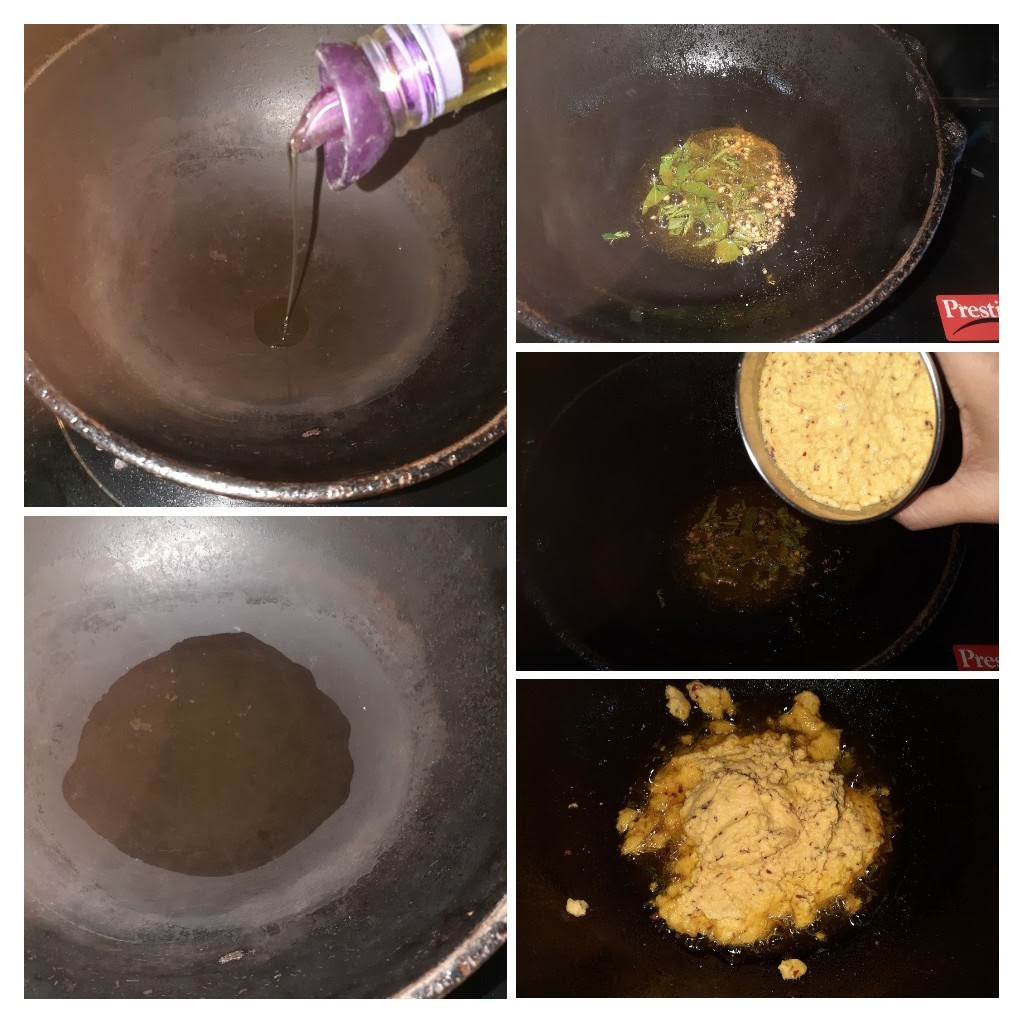
Wash and pat dry the Sundakkai/Turkey berry. Now with a mortar and pestle smash it lightly, such that it splits midway(refer picture). Now in a pan heat oil, add all ingredients under tempering followed by asafoetida and fry for 30 seconds. Now add the lightly crushed Sundakkai to the tempering and fry nicely for a minute.Now add the garlic cloves followed by onion, curry leaves and green chillies and continue to saute for 2 minutes. Now add the tomatoes and saute until the tomatoes turn tender. Add the tamarind paste followed by 2.5 cups water (or) add the pulp extracted from lemon sized ball of tamarind. Stir nicely and begin boiling. Add turmeric powder and cook until the Sundakkai turns tender. Check for doneness of Sundakkai by crushing one with a spoon/ladle. If it mashes easily the berries are cooked. Now grind all the ingredients under “to grind” to a coarse mixture, then add 1/2 cup water and grind to a smooth paste. Add this paste to the Sundakkai simmering in the Tamarind pulp,stir well and allow to cook. Continue cooking until the gravy thickens and the raw small of the masala is gone. The tasty and healthy Chettinad style Sundakkai Kuzhambu is ready.
SERVING SUGGESTIONS: With hot rice, with Dosa, Idli, pongal,
and Curd rice.
STEPWISE RECIPE FOLLOWS:
1. Assemble all ingredients. Wash and pat dry the Sundakkai/Turkey berry. Now with a mortar and pestle smash it lightly, such that it splits midway.
2. Now in a pan heat oil, add all ingredients under tempering followed by asafoetida and fry for 30 seconds. Now add the lightly crushed Sundakkai to the tempering and fry nicely for a minute.
3. Add the garlic cloves followed by onion, curry leaves and green chillies and continue to saute for 2 minutes. Now add the tomatoes and saute until the tomatoes turn tender.
4. Add the tamarind paste followed by 2.5 cups water (or) add the pulp extracted from lemon sized ball of tamarind. Stir nicely and begin boiling. Add turmeric powder and cook until the Sundakkai turns tender.
5. Now grind all the ingredients under “to grind” to a coarse mixture, then add 1/2 cup water and grind to a smooth paste. Add this paste to the Sundakkai simmering in the Tamarind pulp,stir well and allow to cook. Continue cooking until the gravy thickens and the raw small of the masala is gone.
NOTES:
1. Follow the precedure given to split open the berry midway. The kuzhambu will taste to bitter if the berries are not split.
2. After the berries cook in the tamarind sauce, check for doneness by pressing them with a ladle or soon. If they crush easily, they are cooked.
3. I have used Gingelly/Til oil as it adds extra flavour to the dish. Unless one is allergic to sesame oil or does not like the taste I recommend using the oil. Alternately refined oil can be used.
If you tried this recipe and liked it please comment below. I would love to hear from you. If you have a query about the recipe email us and ill respond as soon as I can.
If you would like to receive our recipes in your mail please leave your mail id at the homepage. Every time Rajjo’s Kitchen has a new post we will mail the recipe to you.
Creamy Pink Sauce Pasta
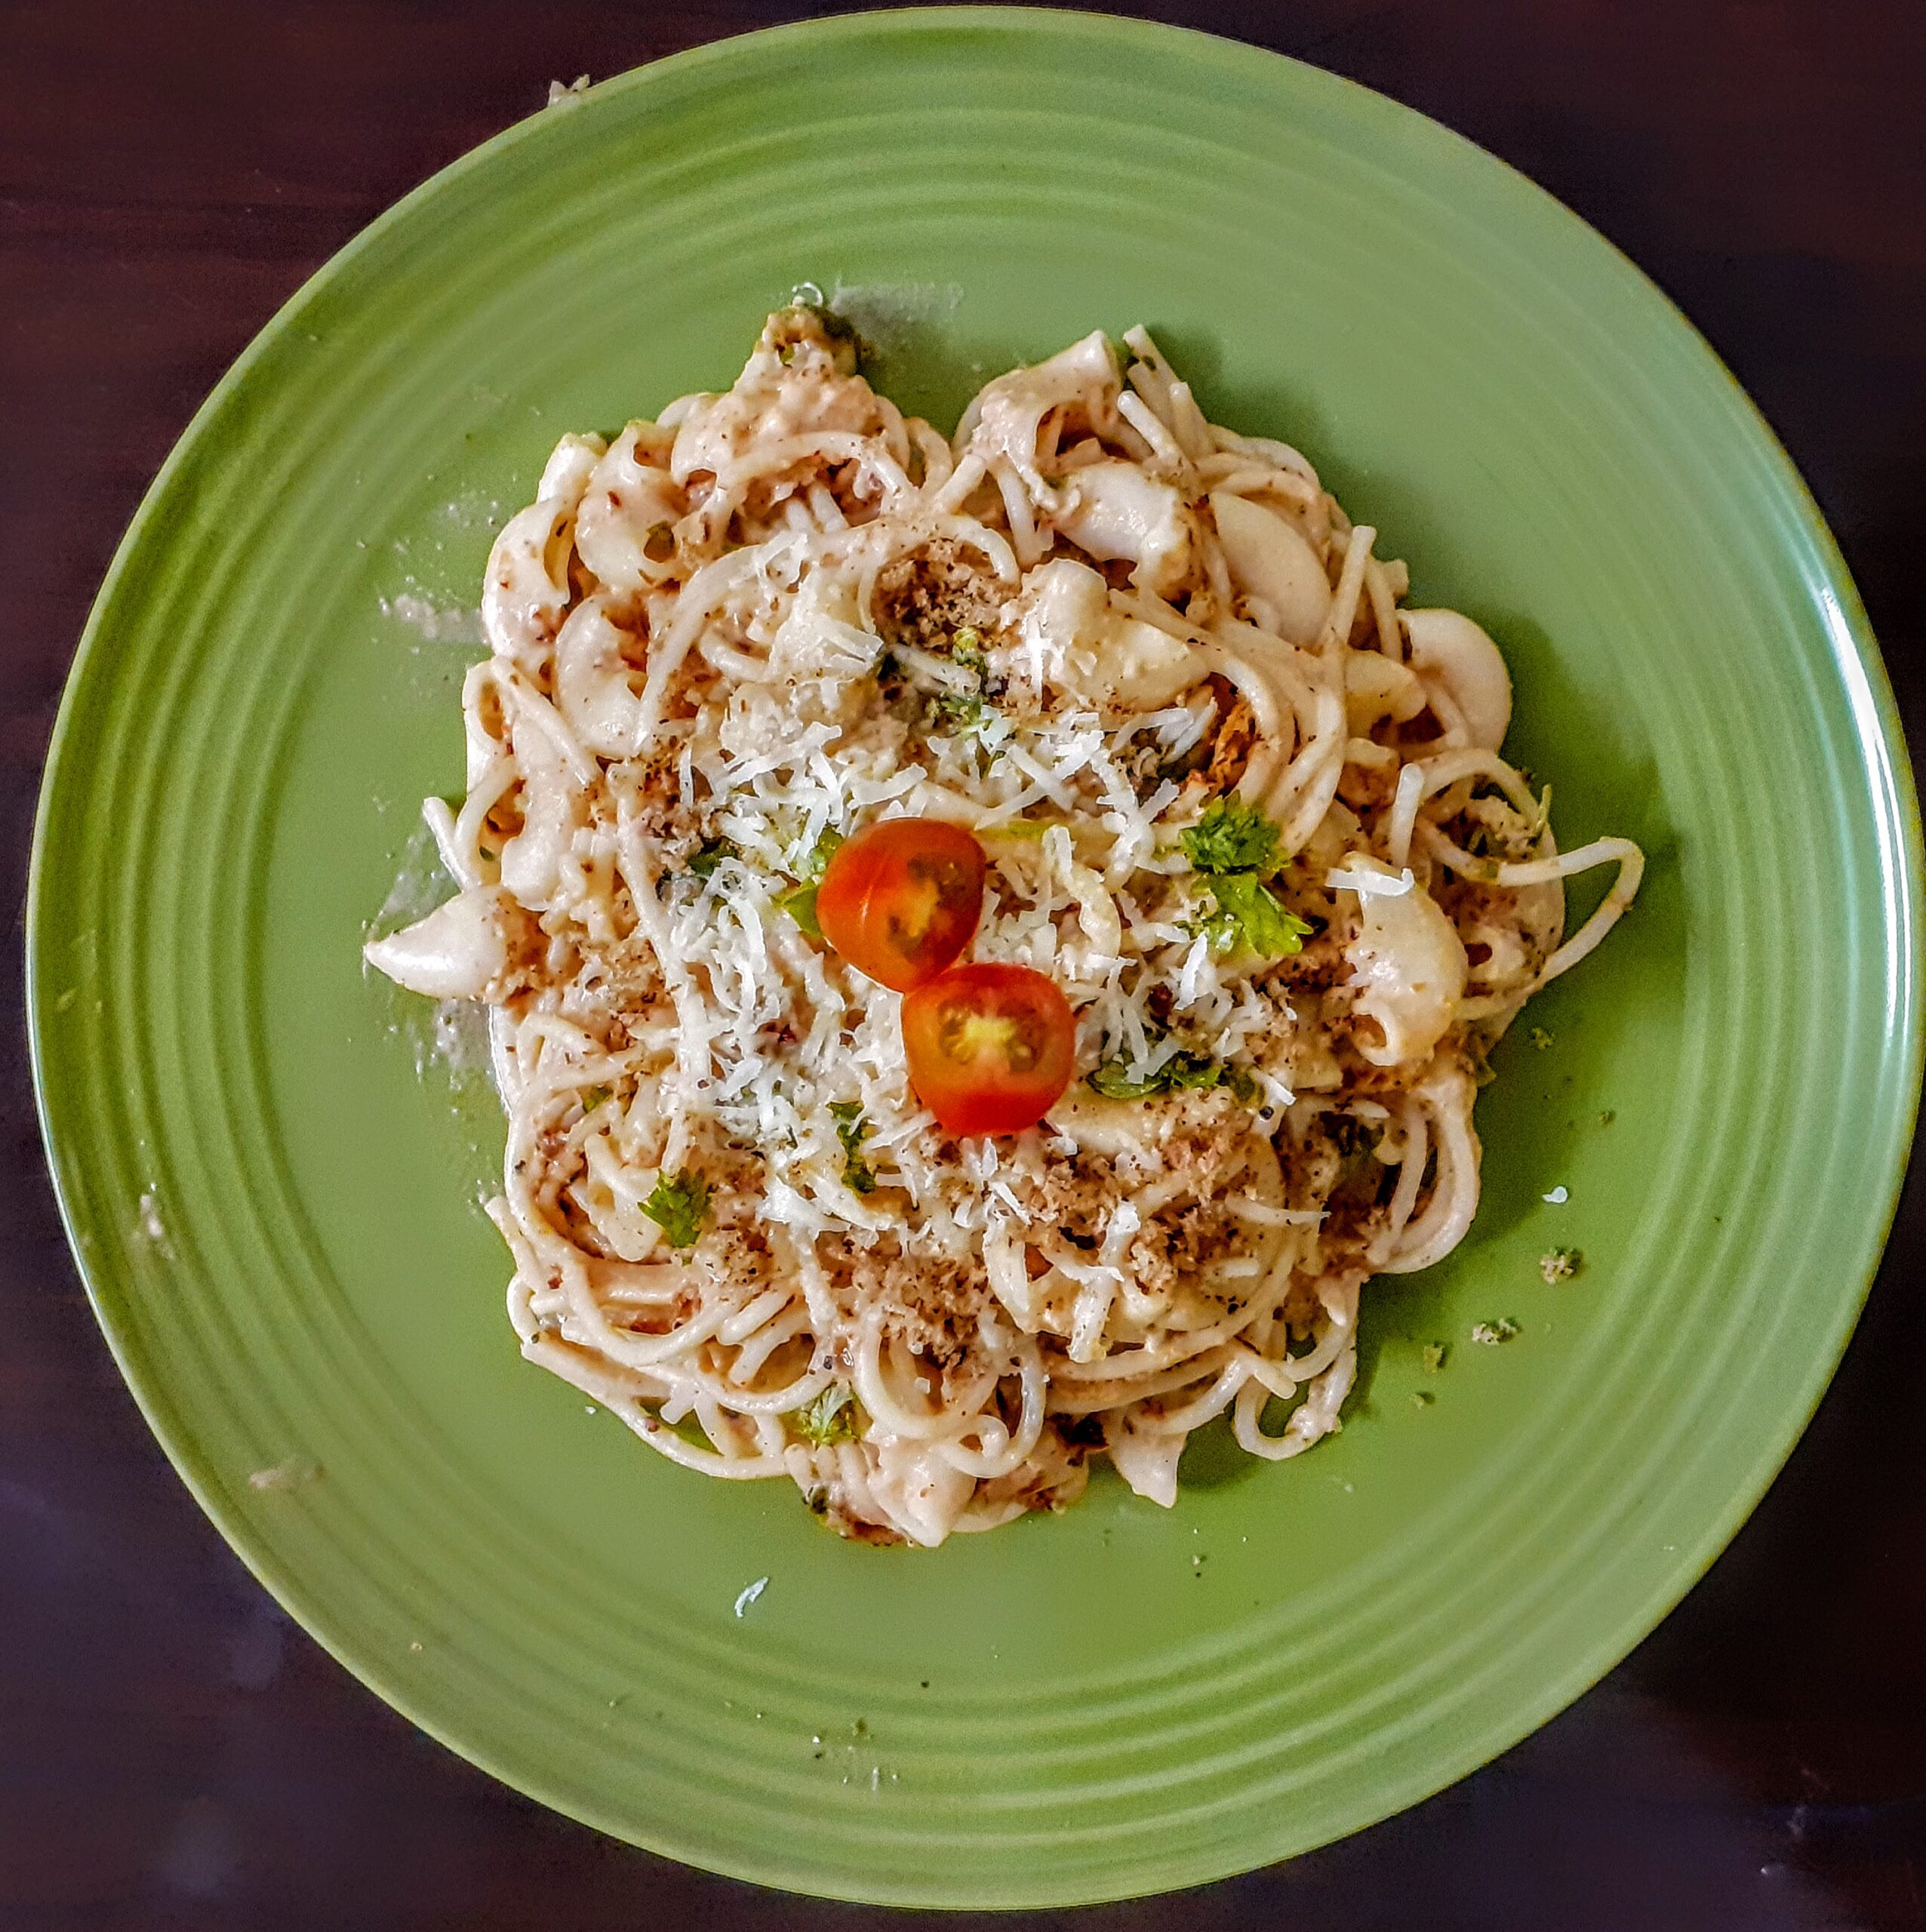
Well, who doesn’t love pink Pasta? Yes, pink pasta. Usually, pink pasta is made with a combination of white sauce and tomato pasta sauce. In this recipe, I have used a lot of tomato puree and milk, some cream, and loads of Parmesan cheese. The sauce is extremely slurpy and delicious. The sauce can be used as it is or one can add-in as per their preference.
I am also letting you into a little secret of how restaurants get that creamy texture. I have also used Pangritato(toasted bread crumbs) which takes this dish to a completely different level. This Pasta sauce is very easy to make and the dish gets done very quickly.
I have used Spaghetti and a few pieces of Macaroni just for some aesthetic effect and nothing else. You can avoid it completely, or use only Macaroni instead of Spaghetti or use both like I did. Children are sure to love this recipe and adults too and the bowl will be clean.
The use of parmesan cheese gives a nice sharp taste to the sauce. Feel free to add other herbs like Basil, I have used only Italian seasoning.
Here is the recipe of Creamy Tomato pasta for you–
PREP TIME: 20 MINS COOK TIME: 20 MINS
TOTAL TIME: 40 MINS SERVINGS: 4
CUISINE: WORLD FOOD AUTHOR: Rajni Ram
Ingredients:
Spaghetti 1 packet (300 gm)
Macaroni 1 handful(optional)
Tomato puree 200 to 250 ml
Cream (medium or high fat) 1/2 cup
Milk 1 cup
Parmesan cheese 1 cup and a little more
Bread slice 1(for the Pangritato)
Pepper powder 1 tsp
Red chilli powder 1 tsp
Garlic 5 pods crushed
Onion 1 finely chopped
Chilli flakes 2 tsp(divided)
Oregano or Italian seasoning 2 tsp(divided)
Cilantro/Coriander leaves finely chopped 2 tsp
Olive oil/butter 2 tbsp
Directions:
Cook the pasta aldente( a little undone- just put off the flame 2 minutes than the recommended time on the pasta packet). Reserve 2 cup of the water in which the pasta cooked and drain the remaining. Pour cold water over pasta, drain it completely and place the pasta in a colander.
Put 1 tsp of chilli flakes and Italian seasoning in 1 cup of the reserved pasta water and pour this water over the pasta in the colander, the water will drain away but the flakes and the seasoning will stick to the pasta. This step is what gives that flavouring in restaurants( 1 secret revealed).
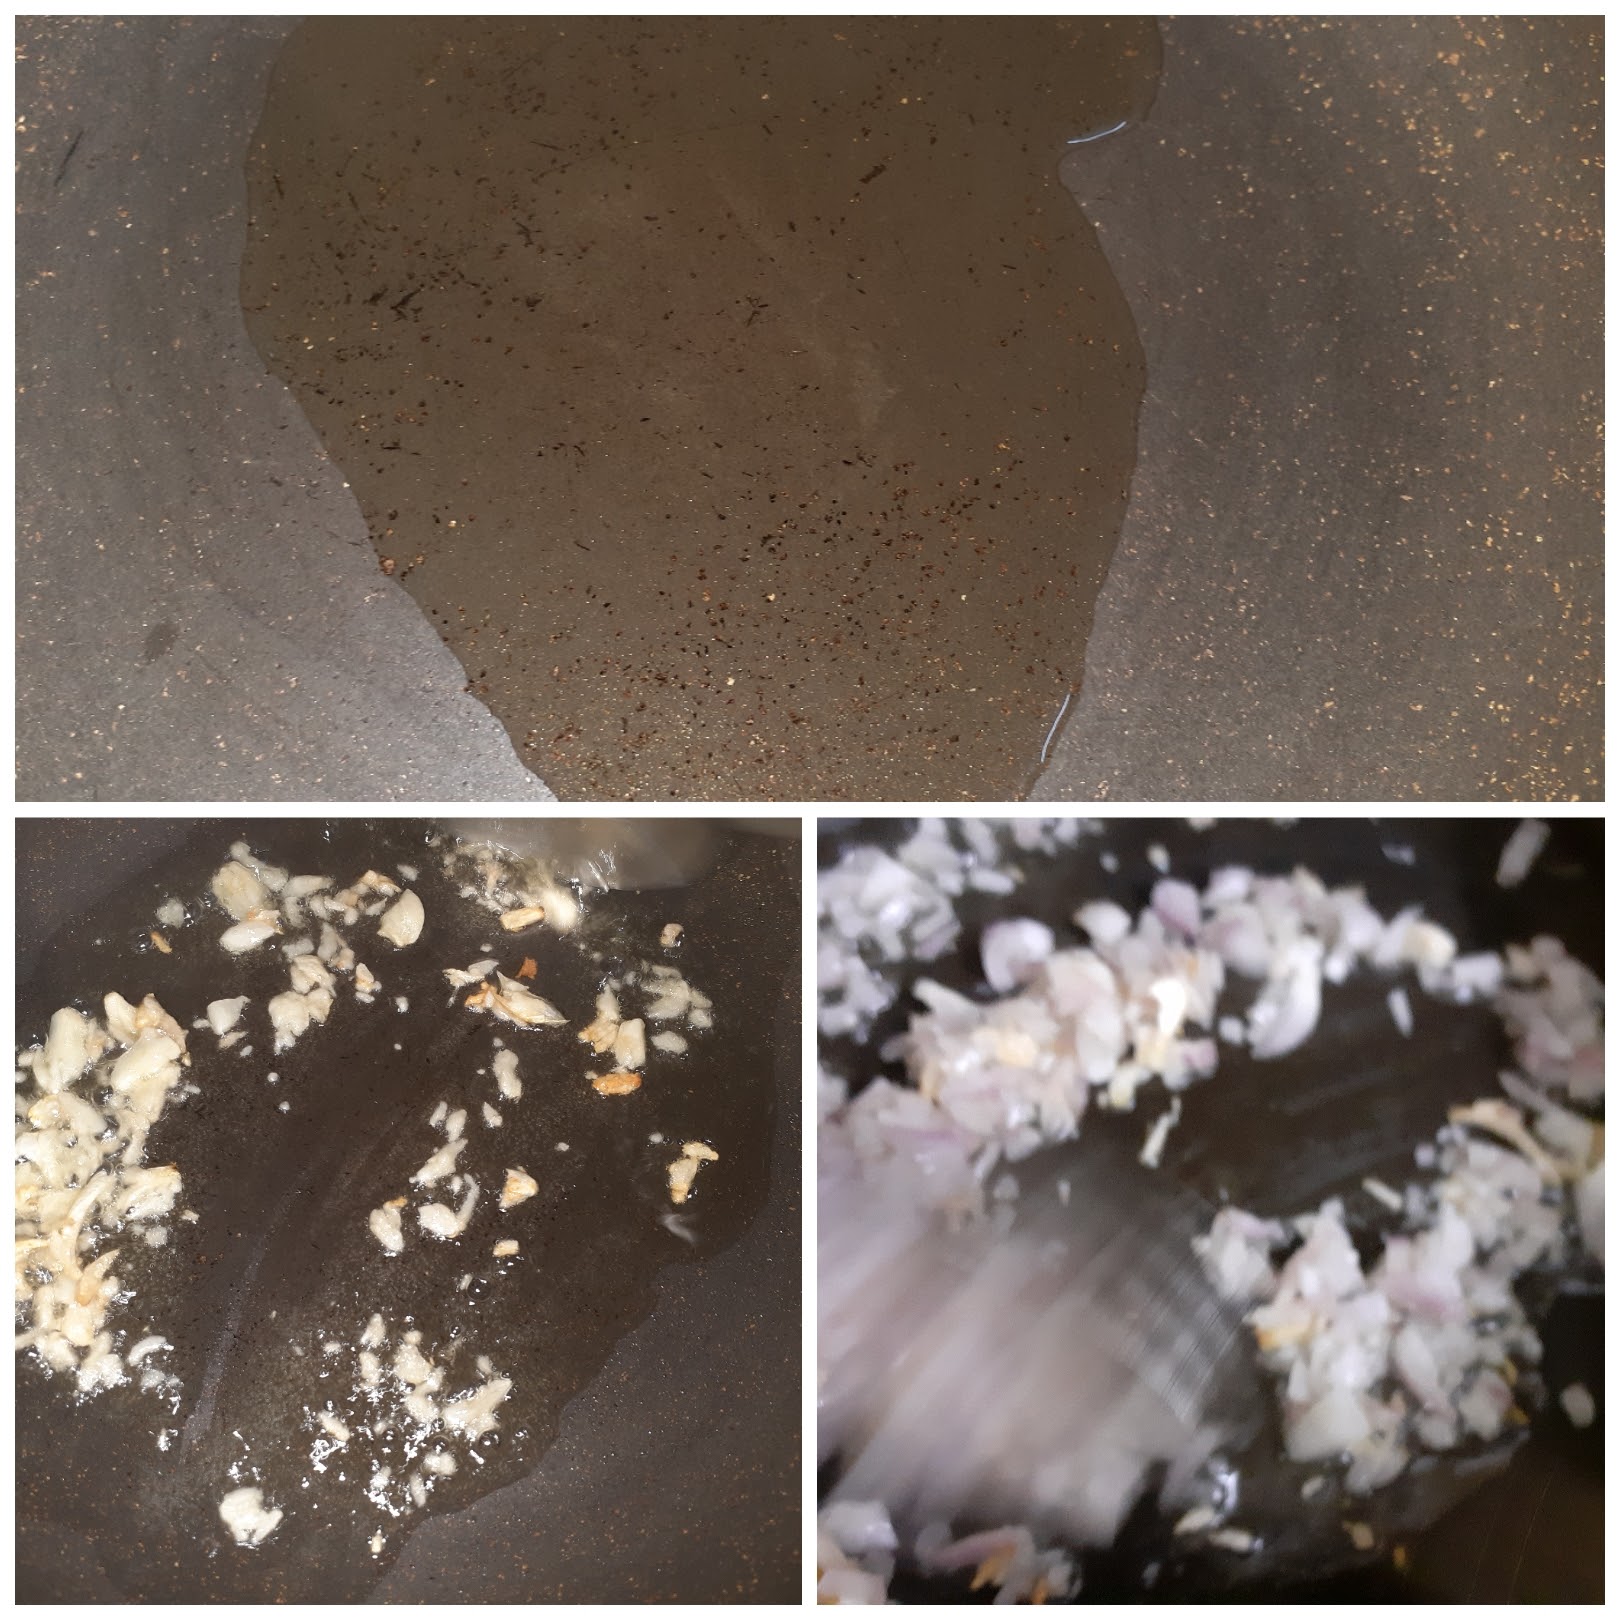
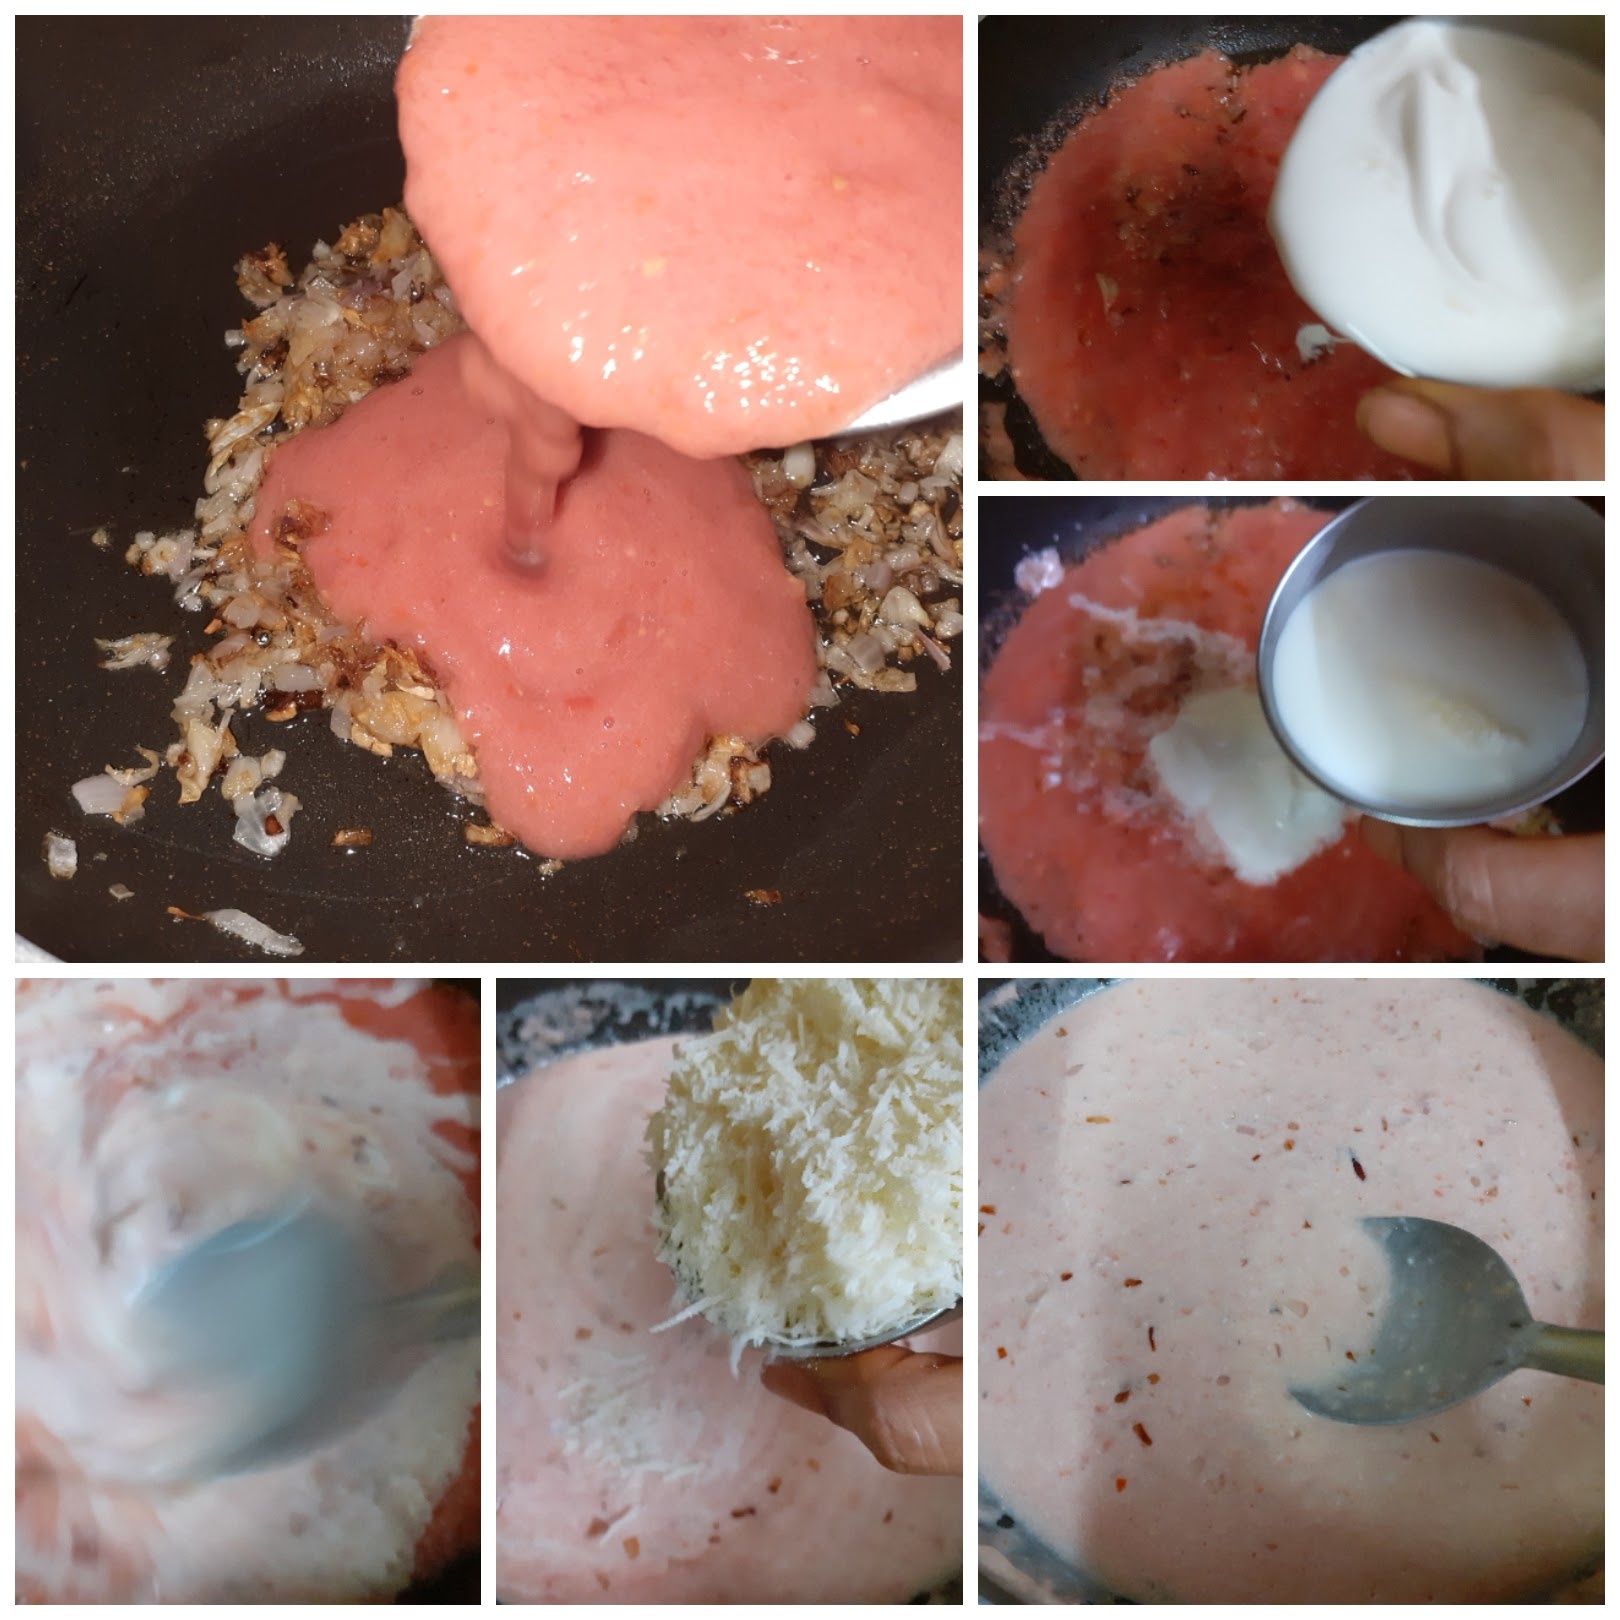
Now in a wok or pan add 2 tbsp Olive oil/butter and heat. add the crushed garlic and saute for 30 seconds and add the onion. Continue to saute until the onions turn transparent. Now reduce the heat and pour in all other ingredients into the pan, like tomato puree, cream, milk and 3/4 cup of parmesan cheese. Stir the contents nicely over a medium flame until the cheese melts completely and the sauce starts bubbling. Add the reserved cup of pasta water to the sauce and dilute it, this is what gives the sauciness when the sauce becomes thick again( secret 2 revealed????). Now add the pepper powder, red chilli powder and salt to the sauce and continue to cook. The sauce will now become dense ad thick if it’s too thick then dilute again by adding 1/4 cup water. The sauce should be thick and stick to the pasta and not run all over it. Now add the cooked pasta to the sauce and mix nicely. The sauce should have covered all the pasta nicely. Now add the chopped Cilantro, Italian seasoning and top up with the remaining Parmesan cheese, cover and cook for a minute. Put off the flame and serve immediately. Yummy saucy pasta is ready. Enjoy. Bon Appetit.
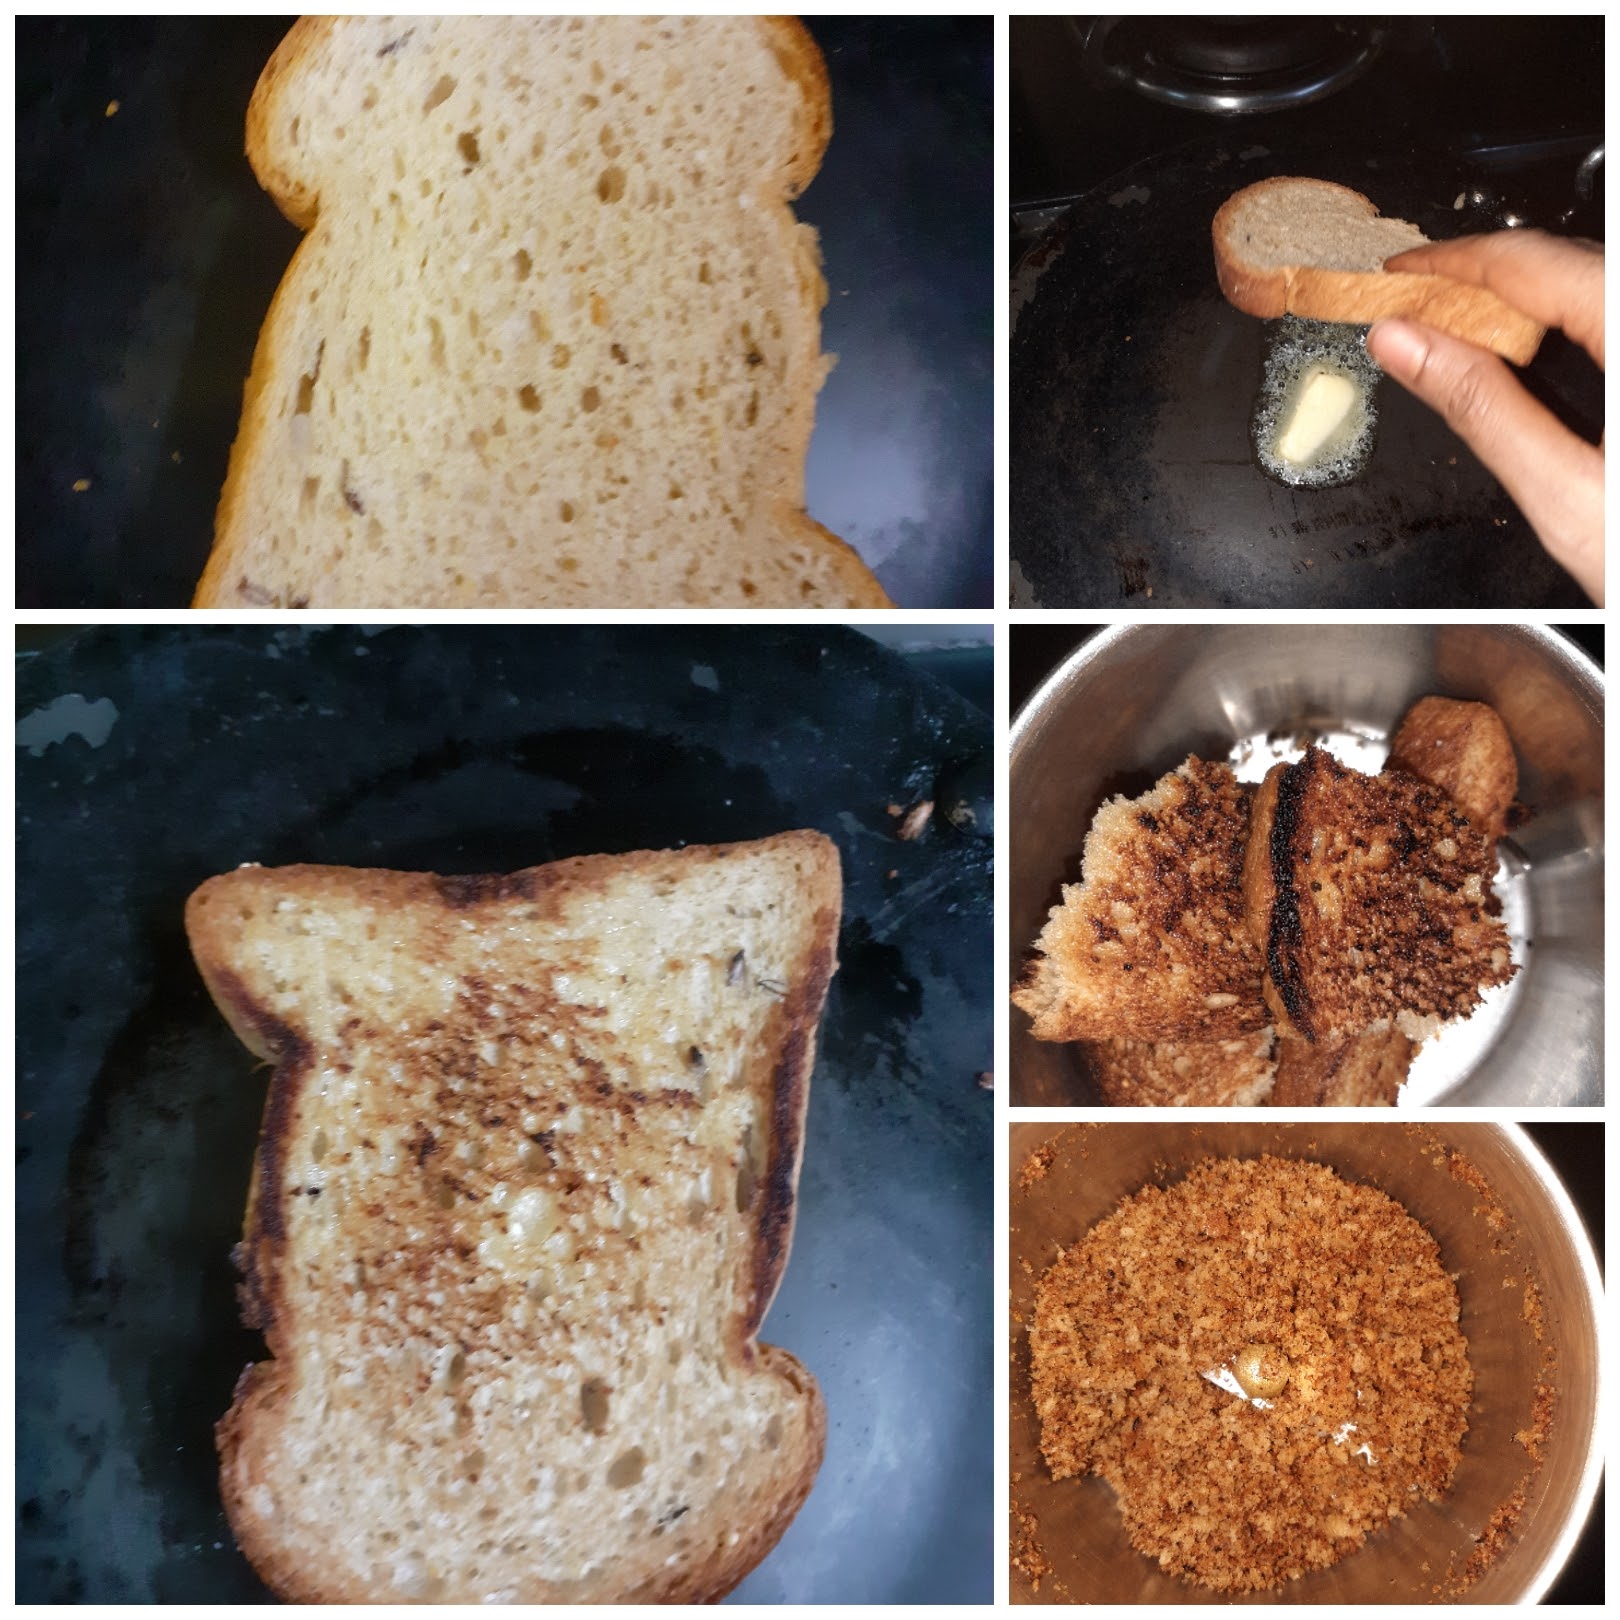
For the Pangritato: Toast one bread slice with a little butter until crisp and powder it. this powder is Pangritato, basically toasted bread crumbs.
They are used a lot in Italian cooking.
STEPWISE RECIPE FOLLOWS:
1. Assemble all ingredients.
Cooking the pasta perfectly- Take about 2 litres of water in a big vessel( I prefer a flat and broad one) and boil it. When it begins to boil add a teaspoon of salt(reduce heat before you add salt or the boiling water will overflow), a teaspoon of oil and add the pasta. Keep stirring and cooking it and keep checking in between if it is done. Remember that you have put off the flame while it’s still a little undone or let’s say when it is 3/4 done. Remember to reserve 2 cups of this water and drain the rest. Immediately pour some cold water over the pasta and drain it. Place the pasta in a colander. Add 1 tsp of red chilli flakes and oregano seasoning to 1 cup of the reserved pasta water, a pinch of salt and pour it over the pasta that is cooling. This step ensures that the pasta is full of flavours.
2. In a wok/pan add 2 tbsp butter or olive oil and heat. Add the crushed garlic and saute for 30 seconds. Now add the onions and saute until they turn translucent.
3. Now reduce the flame to low and add the tomato puree, cream, milk and 3/4 of the Parmesan cheese and cook until the cheese melts. Keep stirring. The sauce will thicken. Now pour the remaining pasta water or regular water is fine too if you don’t have enough pasta water and dilute the sauce.
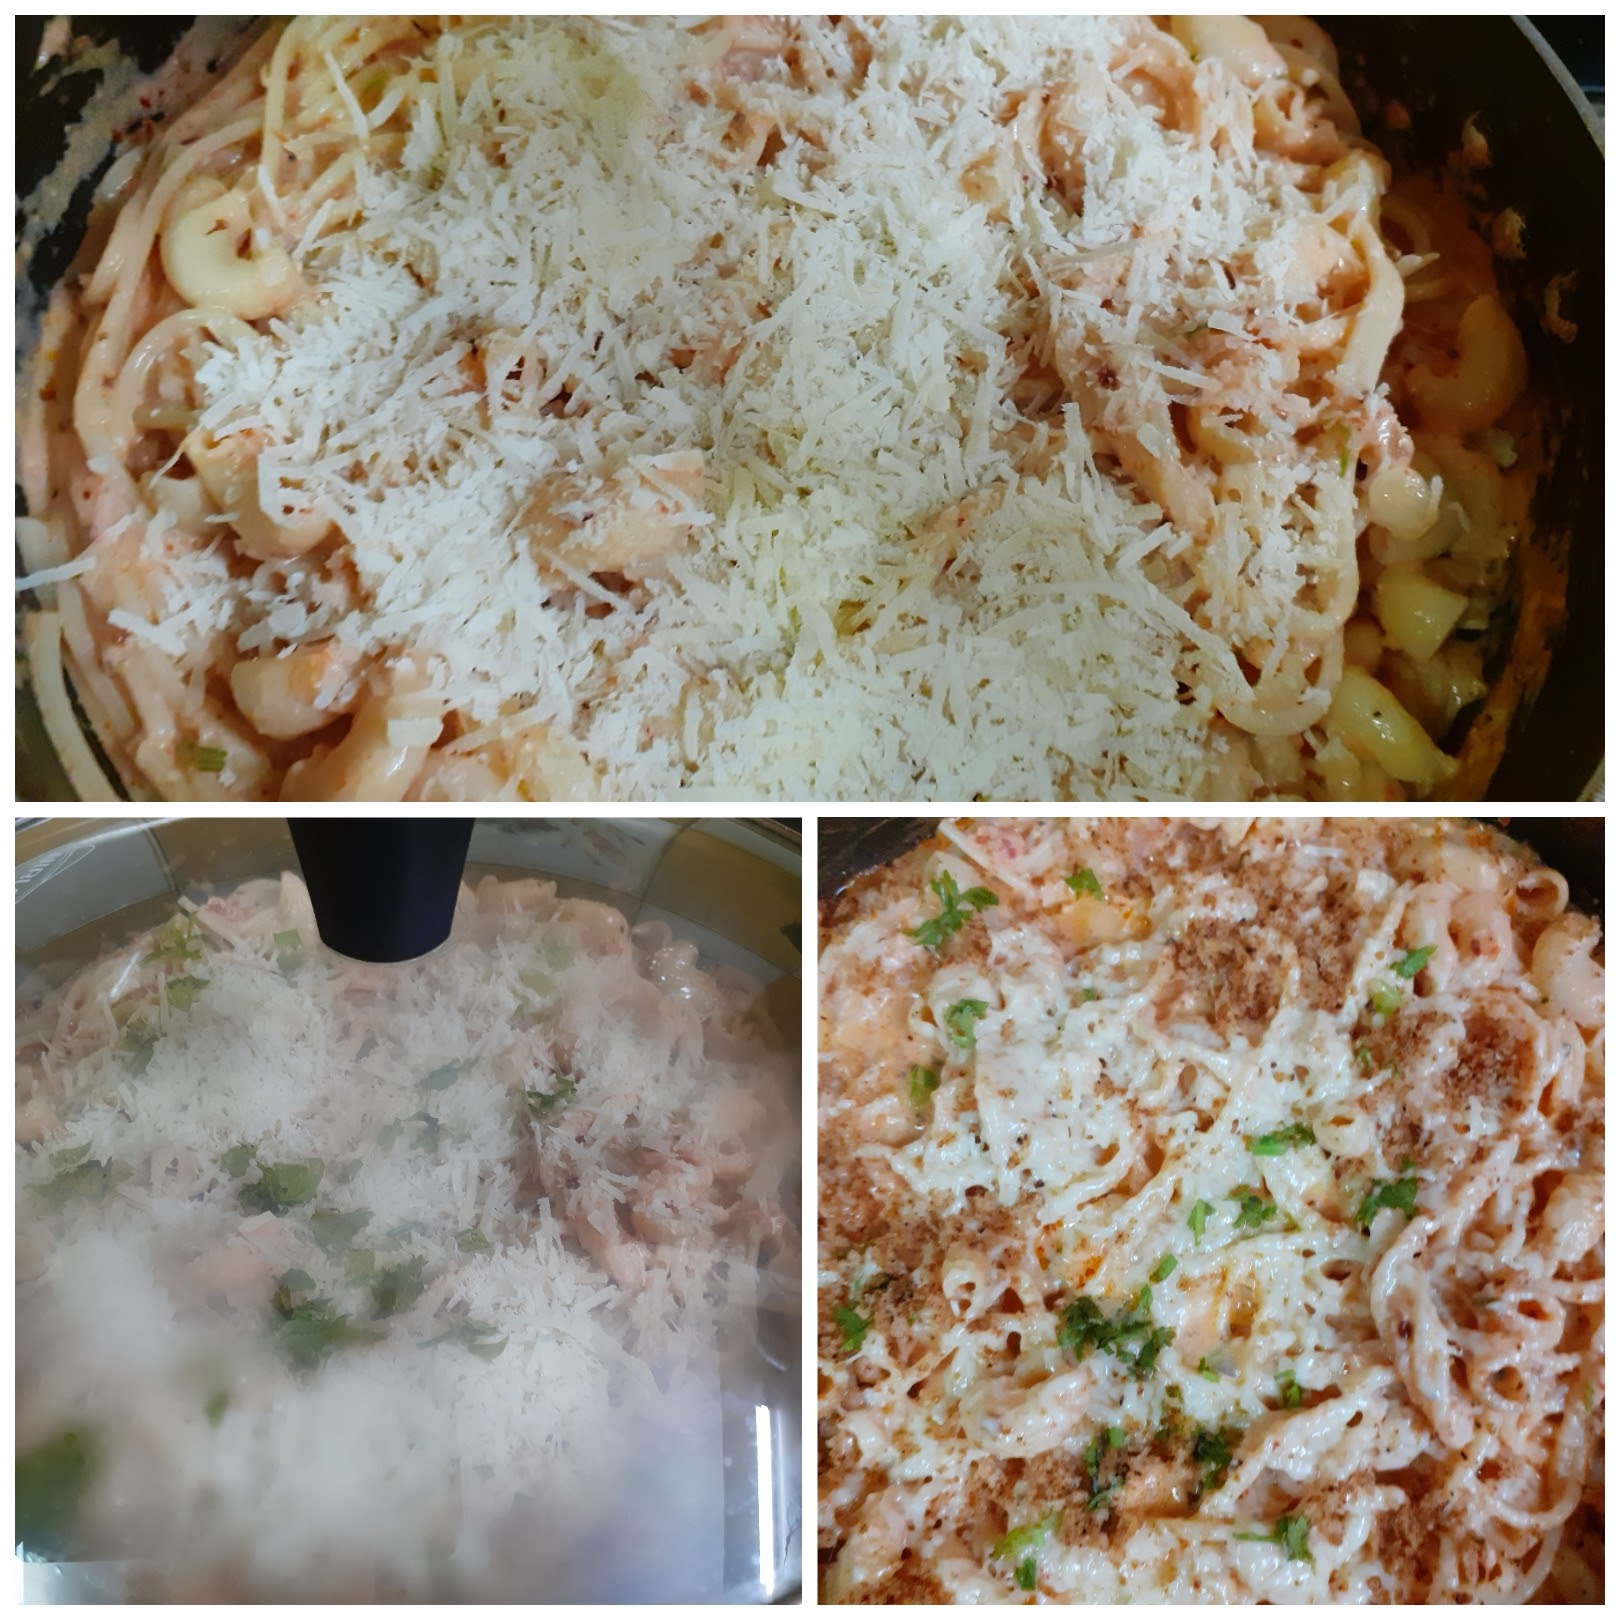
4. Now add the salt, red chilli powder, pepper powder, chilli flakes and simmer the sauce until it thickens again. Now put in the pasta into the sauce and mix it nicely, the movement should be from bottom to top so that the sauce spreads evenly over the pasta.
5. Finally, reduce the flame and top up the pasta with the remaining cheese and cook covered for a minute until the cheese melts. Now put off the flame and add the Pangritato. Enjoy this yummy pasta piping hot.
NOTES:
1. For any pasta recipe to turn out well, cooking the pasta carefully is very important.
2. Zucchini, Broccoli, Red onions etc can be added to the sauce. if adding them, add after sauteeing the onions and saute them also for 3 minutes.
3. If Parmesan is not available Cheddar also can be used, but definitely, there will be a difference in taste.
4. The sauce I made was just enough to put the pasta in, you can make more if you like it very saucy.
5. If you forget to reserve the pasta water, it is fine. Just continue with regular water or vegetable broth if you have.
6. I have added Macaroni only for the aesthetics, it fine if the recipe is made without it too.
If you tried this recipe and liked it please comment below. I would love to hear from you.
If you want the recipes emailed to you leave your id in the homepage near the????
icon. Whenever we have a new post the recipe will be mailed to you. Thank you for showing interest in Rajjo’s Kitchen.
Stuffed Kuzhi Paniyaram (Savory)
Kuzhi Paniyarams are basically Lentil and rice batter dumplings. The batter is fermented and then poured into a Paniyaram pan which gives them the shape. Most often in South Indian homes the Kuzhi Paniyaram or Kuzhi appam as we call it is made from the Idli batter itself. When the batter becomes a little sour it is made into Paniyaram. That is because the Idli/Dosa batter is made for a whole week as a quick breakfast or dinner option. So day 1 is Idli, day 2 Dosa and day 3 onwards its Paniyaram and dosa with the batter, as sour Idlis are not that great to taste. However, when I have guests over I prefer making the batter especially for this as it makes the crust crisp and enhances the taste of the Paniyaram to a different level and the texture on the inside of the Paniyaram is lovely.
There are many variations of the Paniyaram batter. It is usually made with Urad dal and rice, Raagi(Finger millet)flour, Jowar(Sorghum) flour, Bajra(Pearl millet) flour, etc can also be used in the batter. The proportions of the Dal and rice also vary from home to home. The Paniyaram batter is used as it is or sometimes, finely chopped Onion, grated Carrots, and other vegetables can also be added.
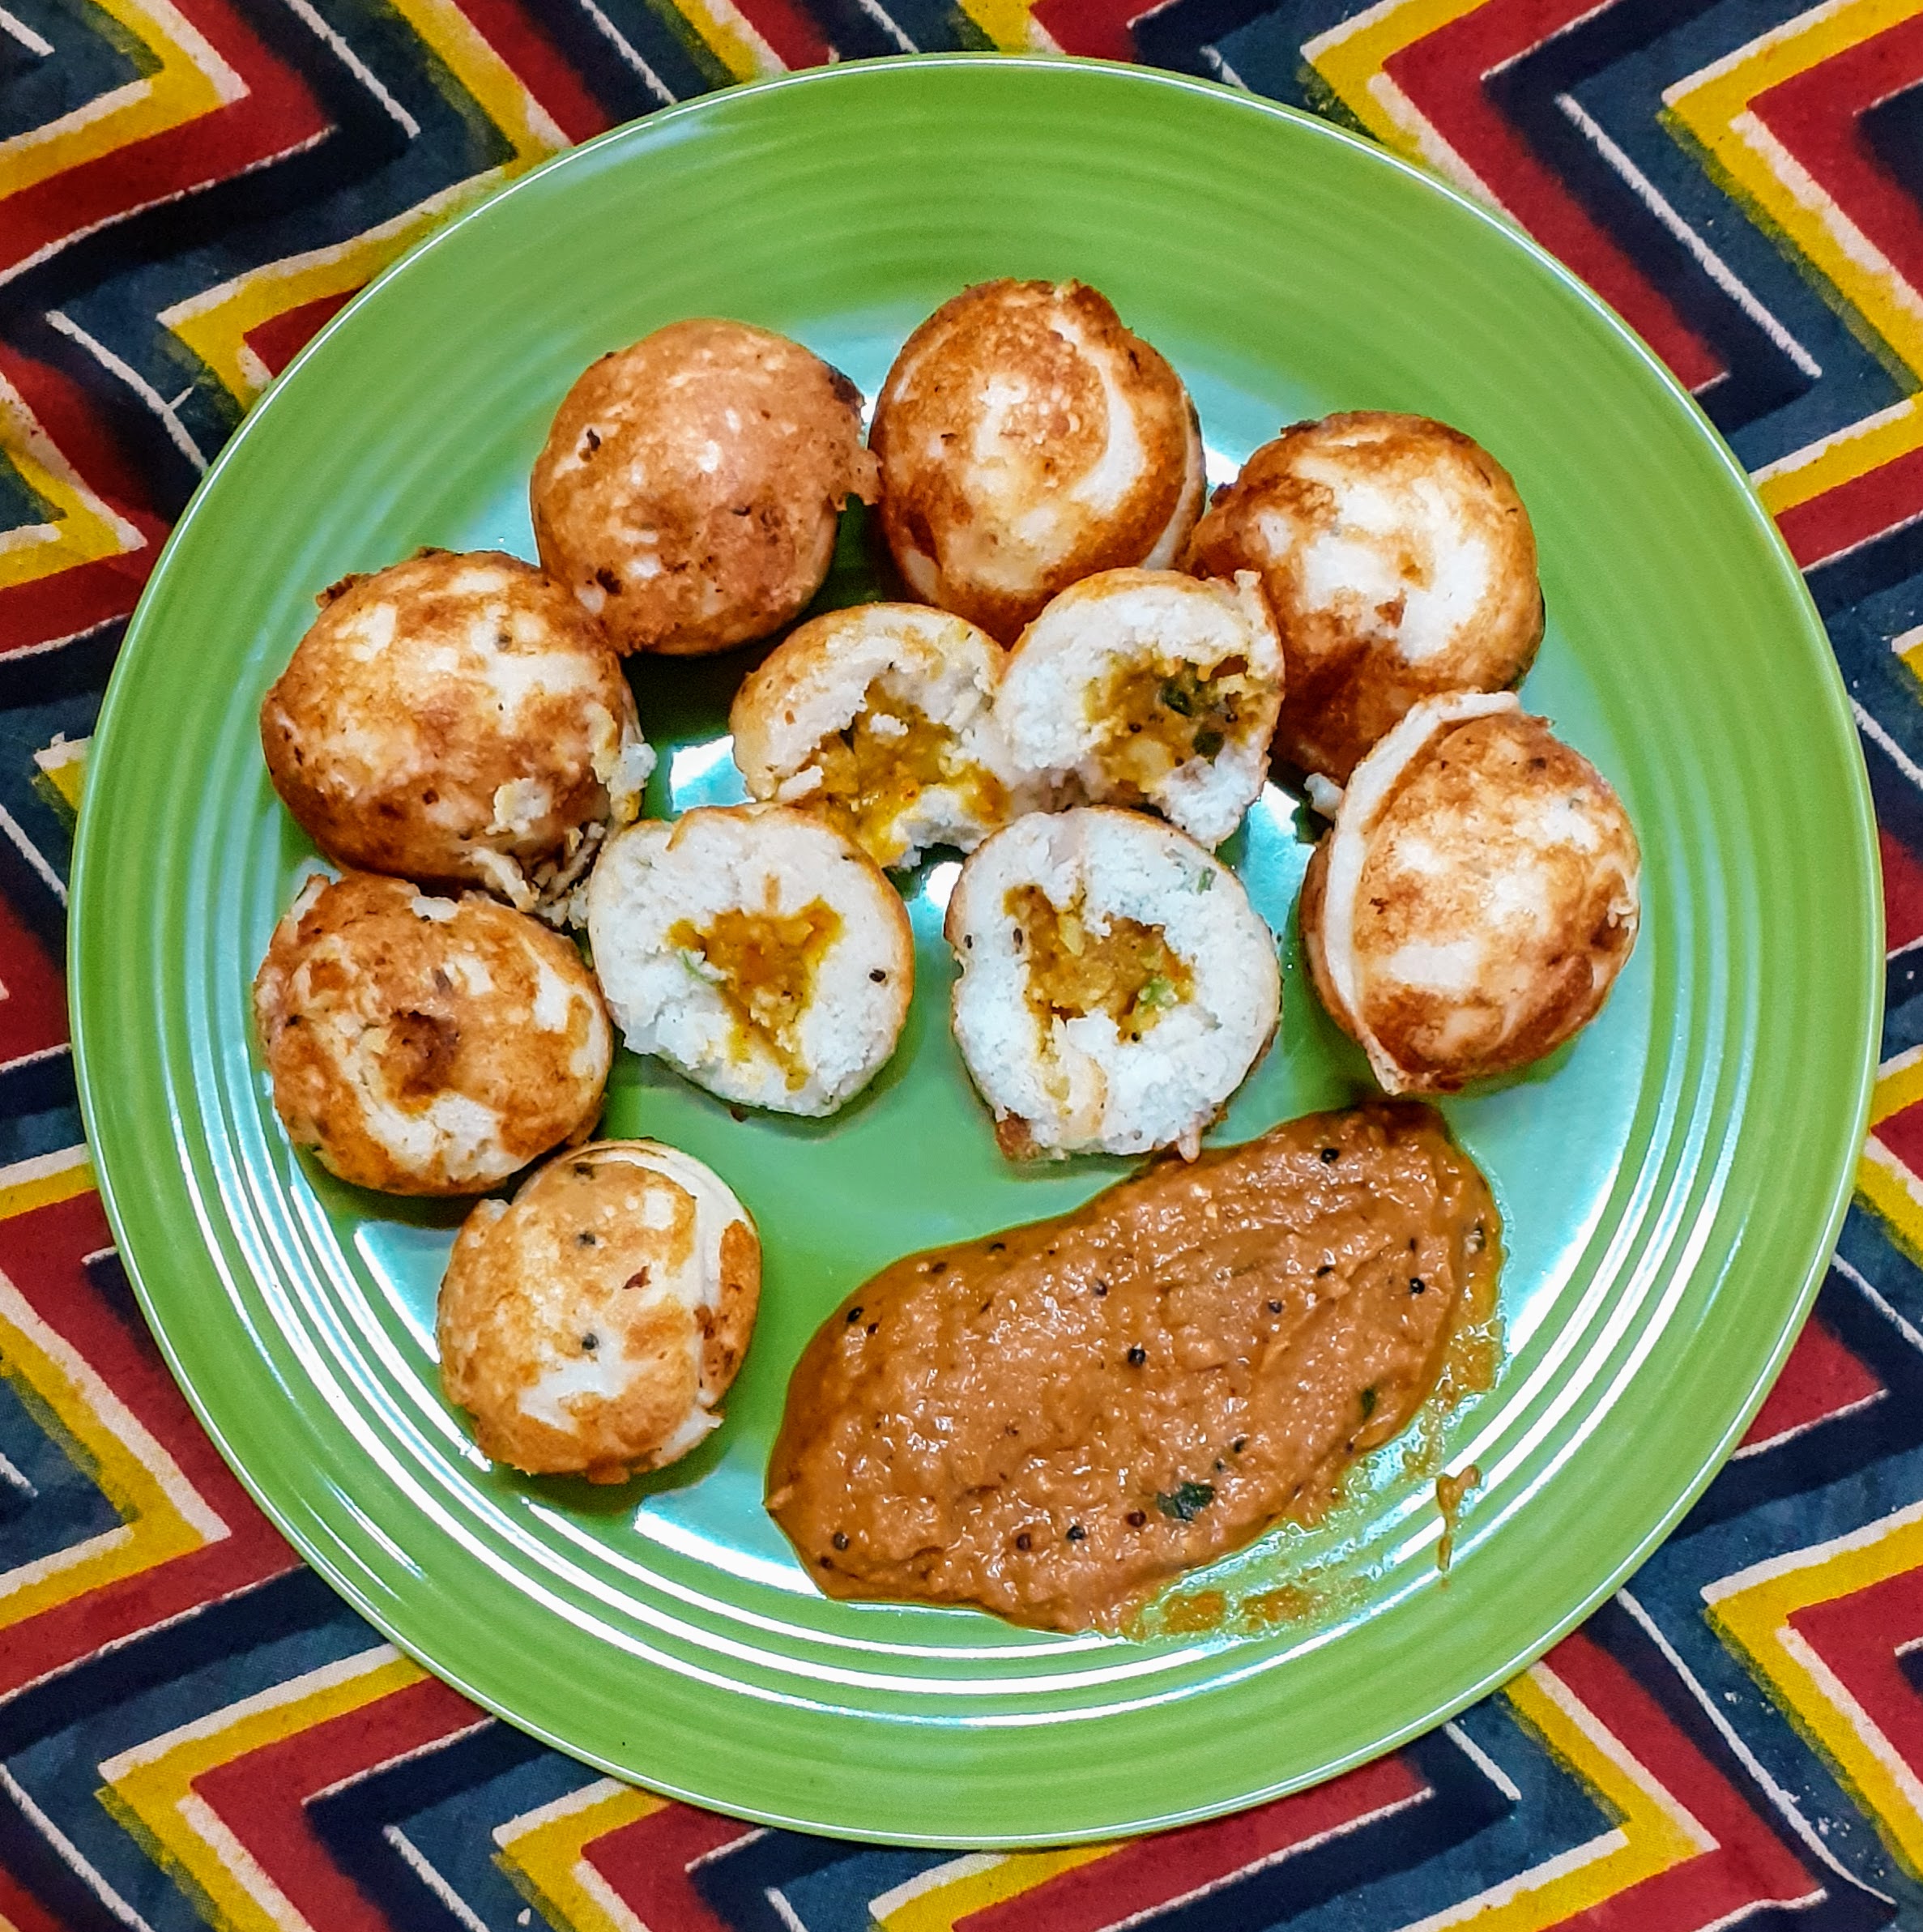
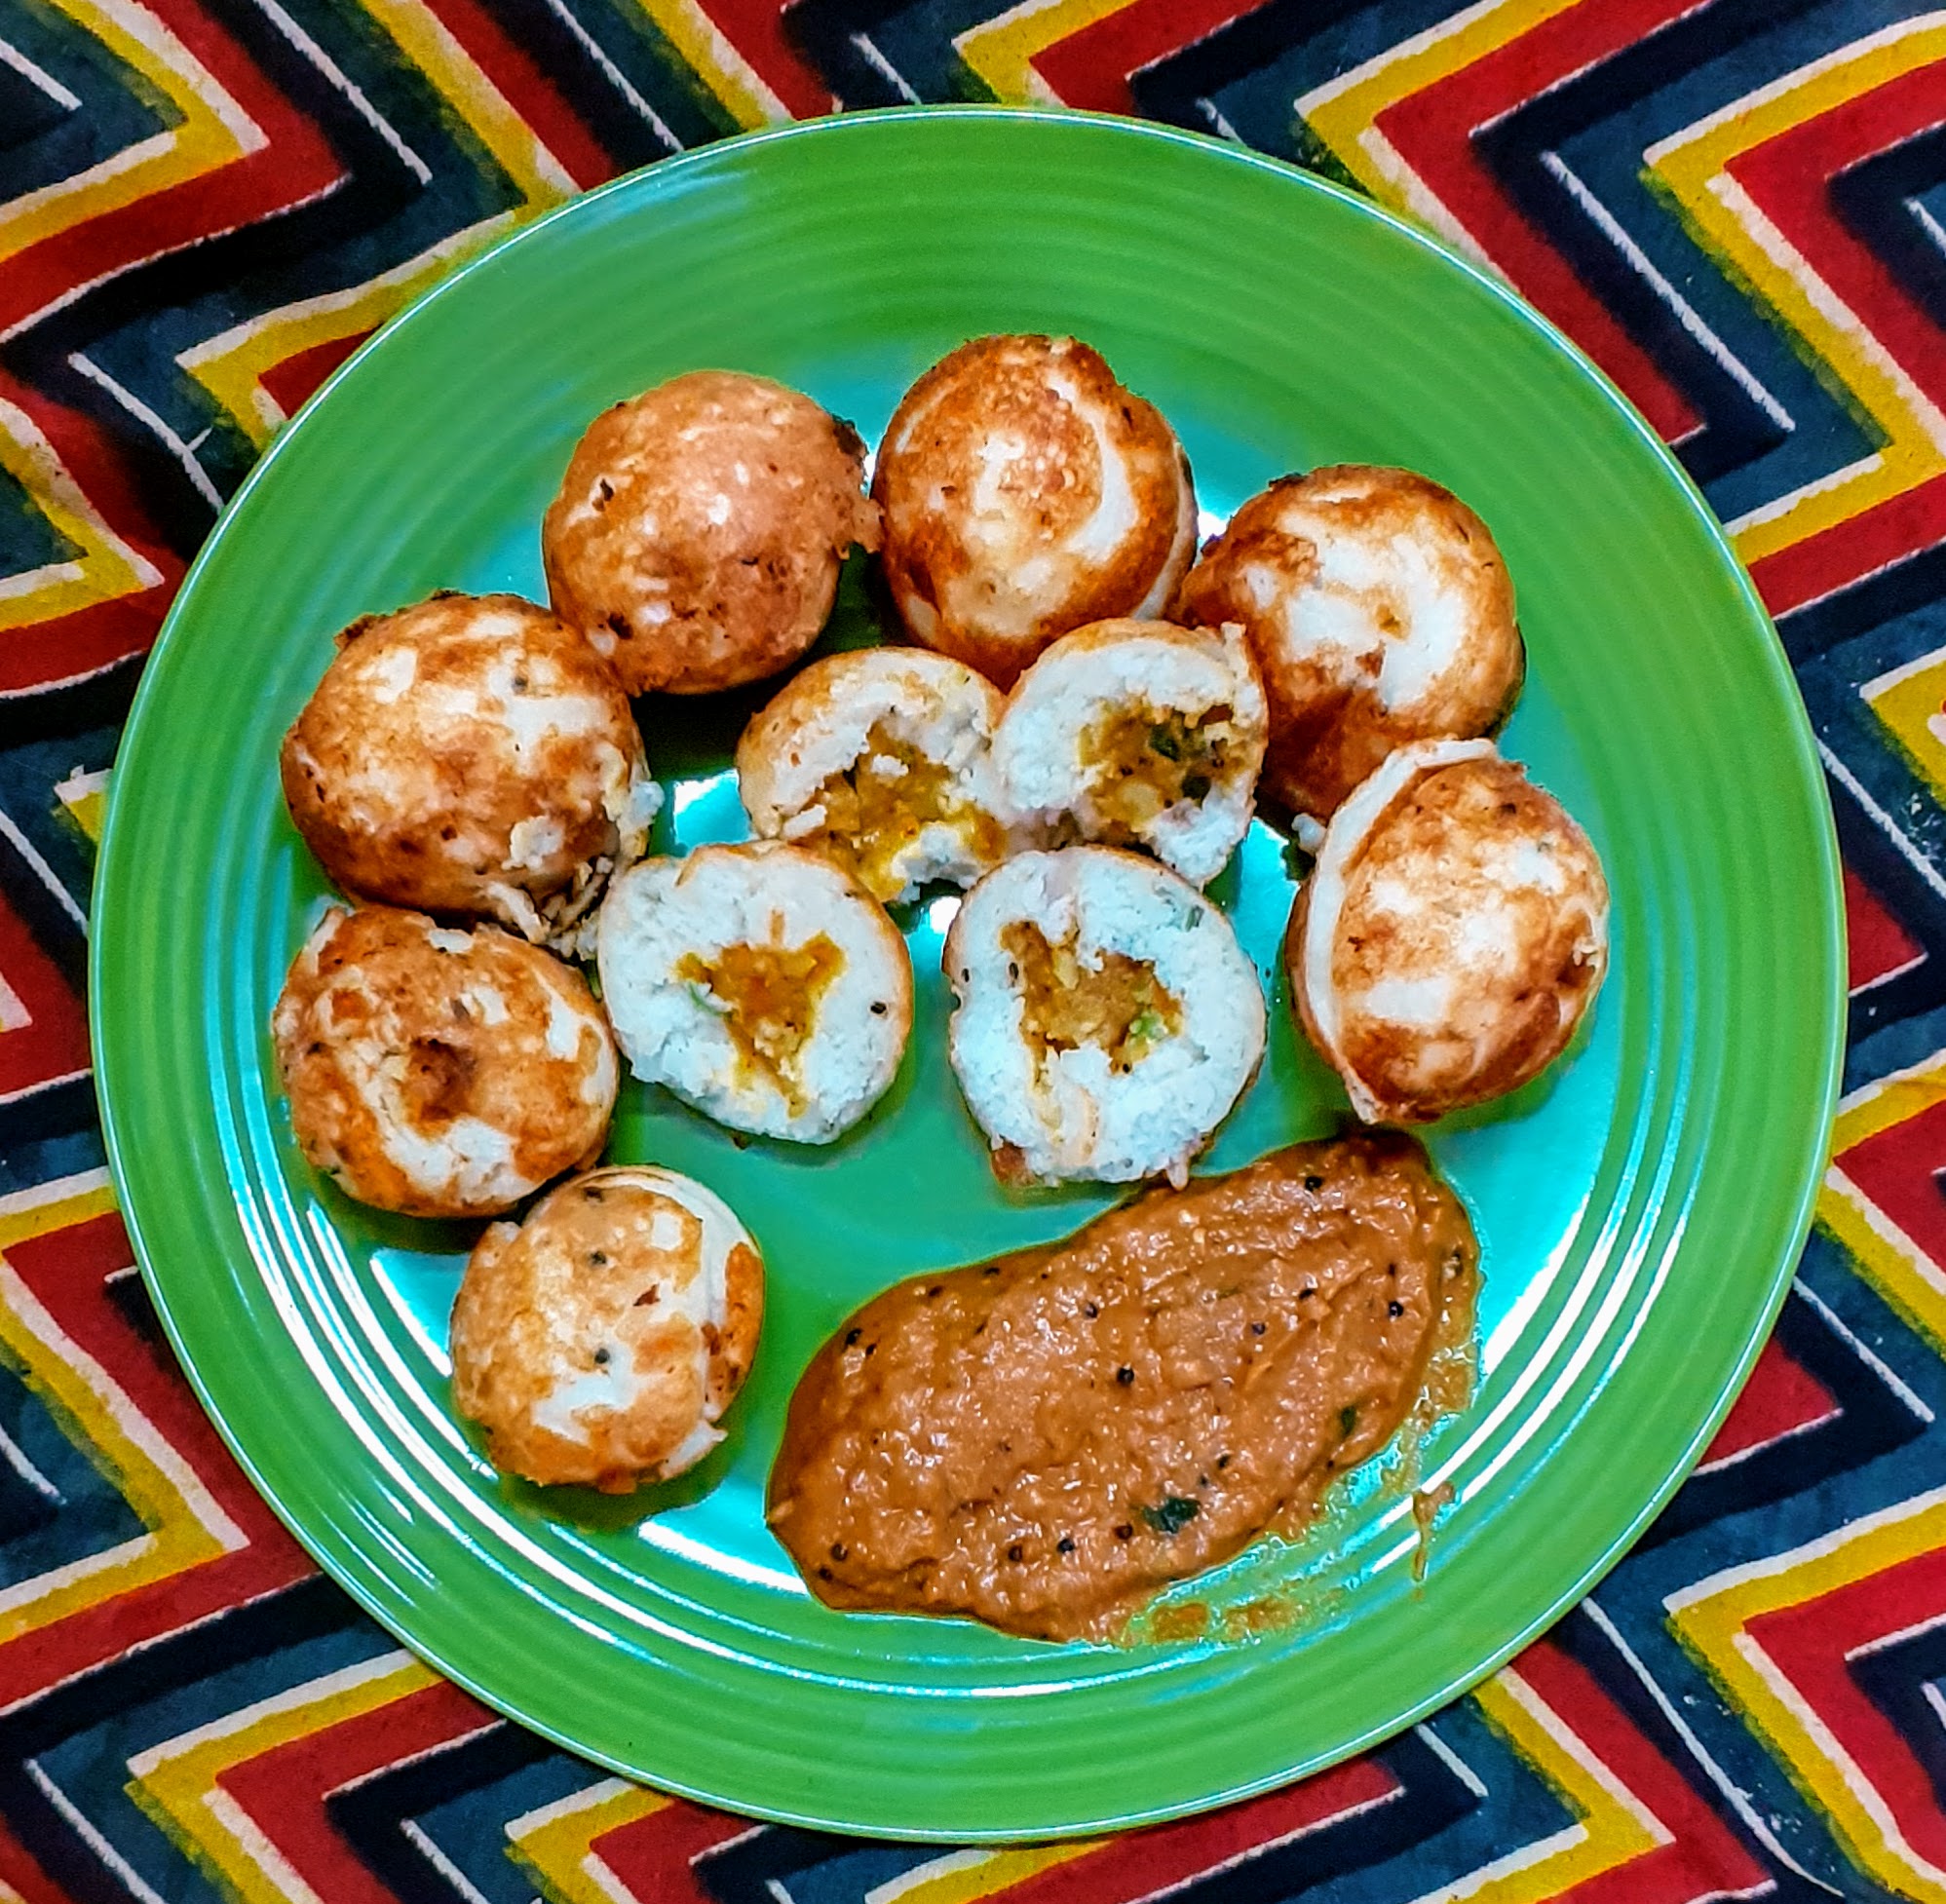
I have stuffed the Paniyaram with a mashed potato spicy stuffing which tastes wonderful, I have also added finely chopped onions, green chillies, ginger and curry leaves to the batter. This combination of onion in the batter and the Potato stuffing within is a perfect one.
I personally don’t like using the non-stick Paniyaram pan for this dish, as the traditional brass or iron ones give the Paniyaram its crispy exterior. If you have only the non-stick one with you, that’s fine too.
Kuzhi Paniyarams can be served as Breakfast, starters or even for dinner with any chutney.
While you are here please check out other recipes of mine like Dahi Pohe, Adai,
PREP TIME: 20 Mins(+4 hrs soak) COOK TIME: 40 Mins
TOTAL TIME: 60 Mins COURSE: SNACK/TIFFIN
CUISINE: SOUTH INDIAN SERVINGS: 4
AUTHOR: Rajni Ram
Here is the recipe of Stuffed Kuzhi Paniyaram–
Ingredients for batter:
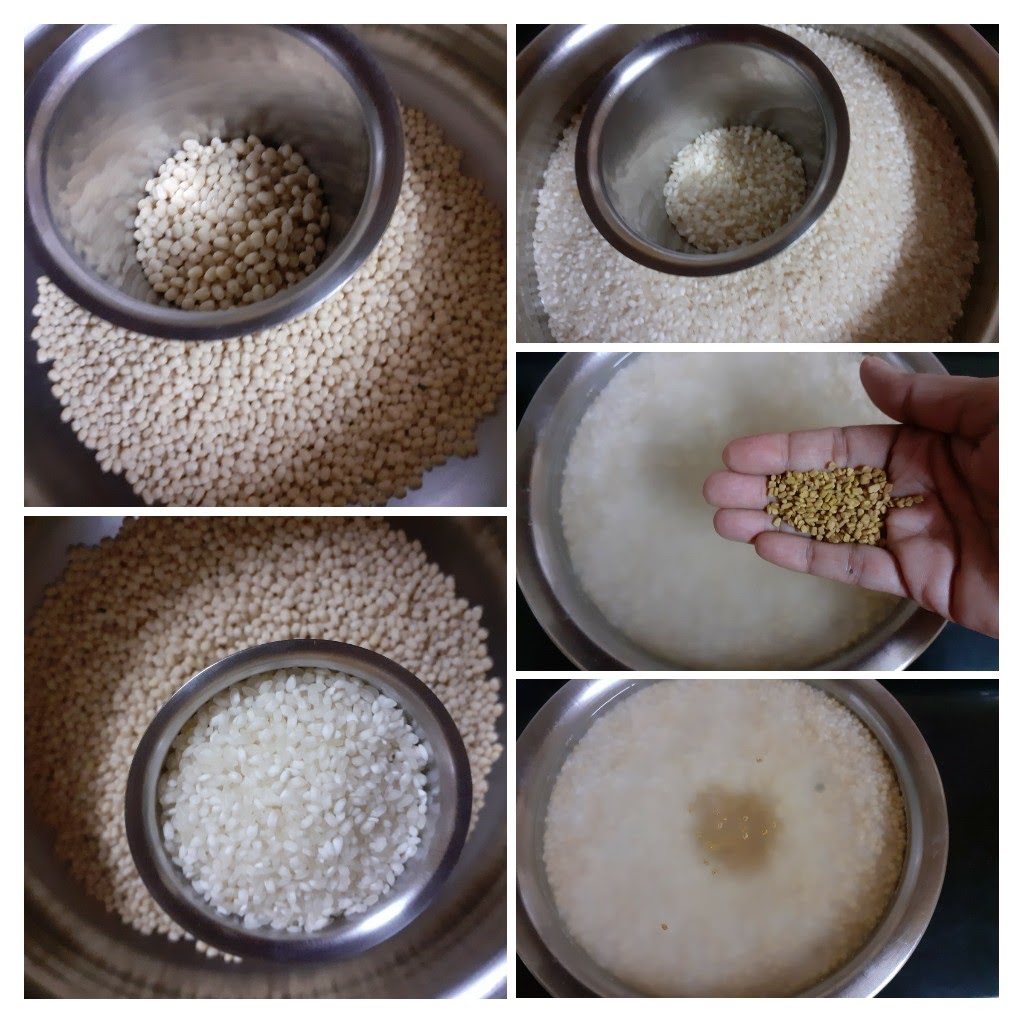
Urad dal/black gram(whole without skin) 1 cup
Idli Rice/Boiled rice 1.5 cup
Raw rice(any variety except Basmathi) 1.5 cup
Methi seeds/fenugreek seeds 1 tsp
Ingredients for stuffing:
Potatoes 4 medium(boiled)
Turmeric powder 1/2 tsp
Red chilli powder 1 tsp
Mustard seeds/Rai 1 tsp
Cumin seeds/jeera 1 tsp
Asafoetida 1/4 tsp
Curry leaves a few (finely chopped)
Salt as per taste
oil for tempering and for greasing the Paniyaram pan.
Directions for Batter:
Soak the dal and both rice varieties along with a teaspoon of methi seeds in a huge vessel for 3-4 hours and grind to a smooth paste to a batter of medium consistency(should resemble Idli batter). Add salt, and leave to ferment for 6-8 hours for a perfect texture of the Paniyaram. While grinding add little water at a time, the batter should be a smooth one, but not runny.
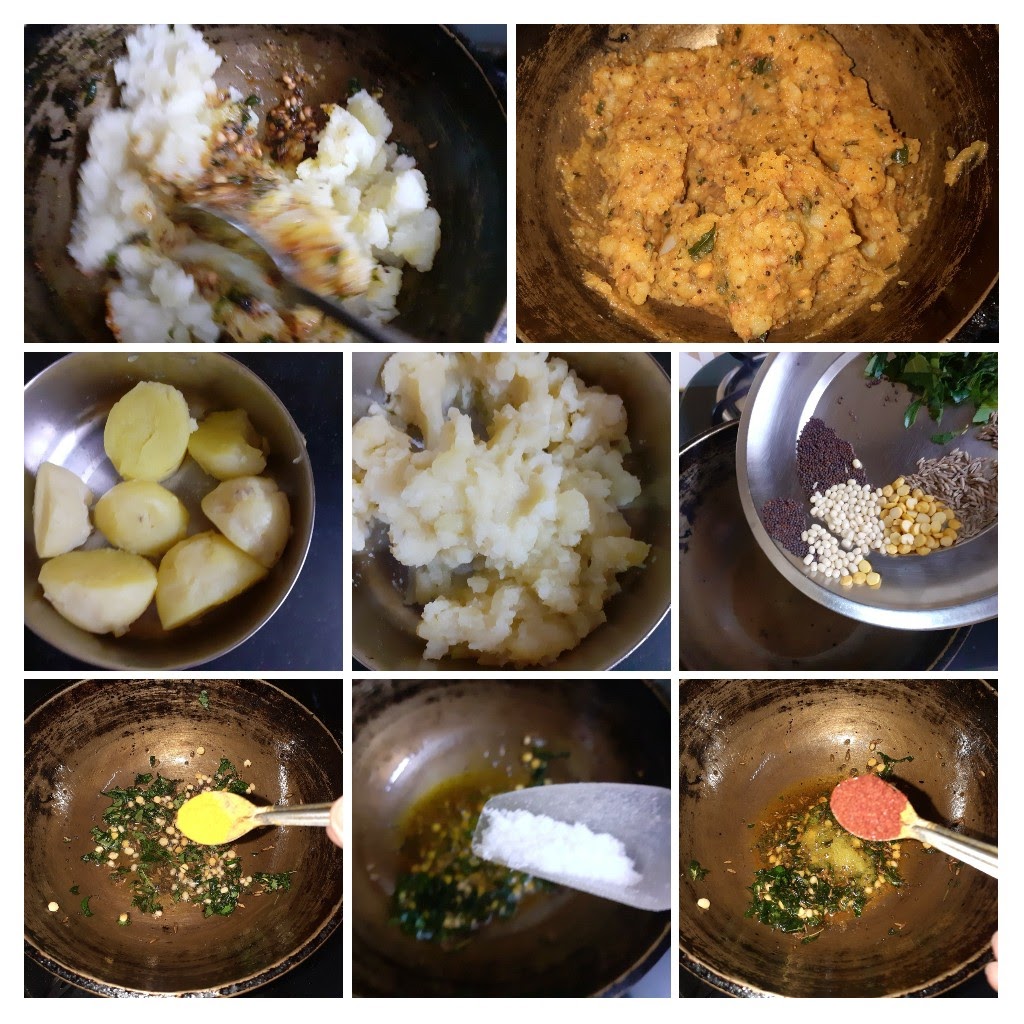
Directions for Stuffing:
Boil the potatoes, peel the skin and mash them well. Now in a pan pour some oil and heat. Add the mustard seeds, as they crackle, add the Cumin followed by turmeric powder, red chilli powder, salt, asafoetida and curry leaves. Nicely fry the masala in the oil for 30 seconds and drop the mashed potato into the tempering and mix nicely, so that the tempering is evenly distributed. Cool the mixture.
After it ferments temper the batter with mustard seeds and asafoetida.
Directions for Paniyaram:
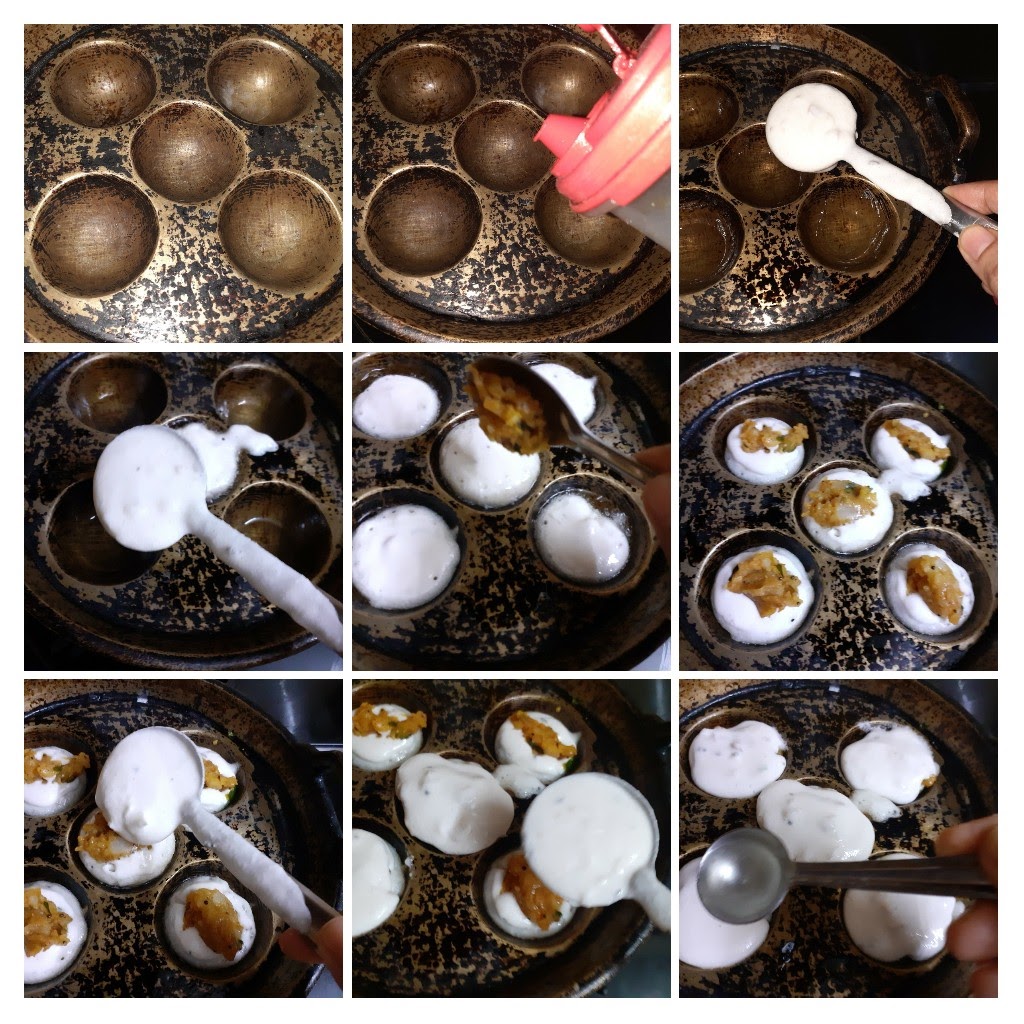
Chop Onions, green chillies, ginger and curry leaves finely and add them to the fermented batter and stir well.
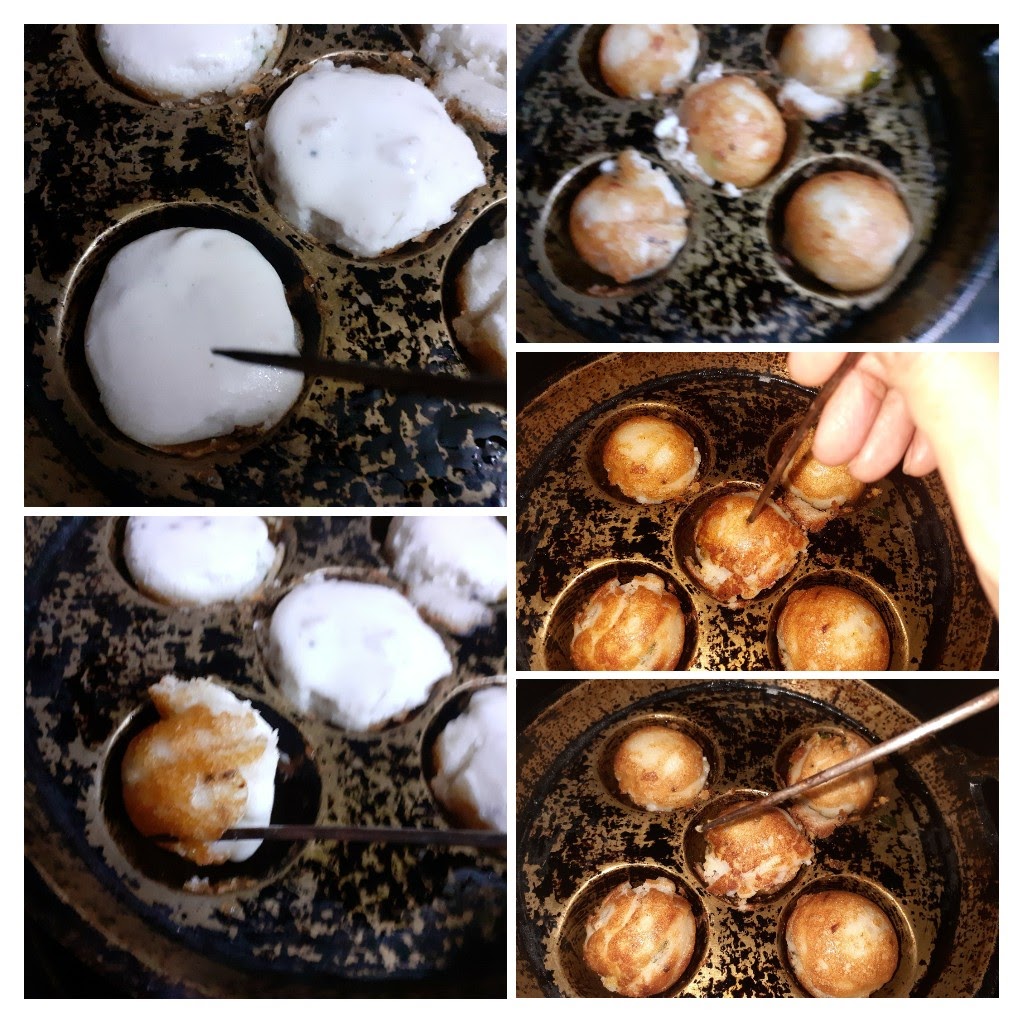
Put the Paniyaram pan on the flame and let it heat up. Pour oil into the moulds(if using a traditional metal pan, only the first round will need 1 tsp oil per mould, rest of the batches will need only a few drops). Wait for 1/2 a minute, let the oil heat up, now reduce the flame and with a small round ladle pour 1 scoop of batter into each mould, now take the stuffing little at a time with a spoon and drop it in the centre of the batter. Now cover up the stuffing with 1/2 scoop of batter and increase heat. Drizzle little oil around the corners of each mould, reduce the flame and slowly loosen them from the sides. Now flip each Paniyaram and cook the other side. When done loosen it from the mould and remove it. The crispy and tasty Kuzhi Paniyarams are ready..serve them with Tomato Coconut chutney or Tomato onion chutney. Enjoy. Bon Appetit.
STEPWISE RECIPE FOLLOWS:
1. Soak the dal and rice along with 1 tsp methi seeds for 3 hours minimum and grind to a smooth paste of medium consistency(Idli batter consistency). Add the salt, mix and allow to ferment for 6 to 8 hours.
2. Preparation of stuffing–Boil Potatoes, peel and mash them. In a pan take 1 tbsp oil and heat. Now add the mustard, followed by cumin, turmeric powder, salt, red chilli powder, asafoetida and curry leaves. Fry the masala for 30 seconds and add the mashed potato to the tempering and mix well. The tempering should have coated the potatoes well. Check for salt and spice. The stuffing should be a little spicy.
3. To the fermented batter add finely chopped onions, ginger, green chillies and curry leaves and stir nicely. Temper the batter with mustard seeds, cumin seeds and asafoetida.
4. Now put the Paniyaram pan on the flame and heat. Pour 1 tsp oil in each mould. Once the oil is heated, using a small round ladle, pour 1 scoop of batter into each mould. Now with a spoon drop little of the stuffing in the centre of the batter, now pour more batter to cover the stuffing. Drizzle some oil in the corners and cook for 1/2 a minute. Now loosen the edges of the paniyaram using a fork/ spoon or thin metal wire to flip them around, cook them and remove them from the pan when done. For doneness when you stick the metal wire or toothpick in the centre of the paniyaram, it should come out clean.
(I have included a short video so that you understand the process of cooking the Paniyaram in the pan.)
5. Repeat this process for the entire batter or how many ever you wish to serve, the remaining batter can be stored in the fridge and used to make uthappam.
The Paniyaram is ready to serve. It goes well with all chutneys or just by itself as it has a stuffing. It can be served with Sambar too.
How do make this recipe without a Paniyaram pan?
well, make a thicker batter, and also make small balls of the stuffing. Now take the stuffing and drop it in the batter, use your hands to coat the stuffing with batter and deep fry them in a Kadai of oil.
NOTES:
1. As the recipe involves soaking and fermentation, plan your time. In winters give more time for fermentation.
2. The onion, green chillies, ginger and curry leaves can also be sauteed in oil and added to the batter.
3. If using a nonstick paniyaram pan, I recommend drizzling it with some oil for a crunchy exterior.
4. Only small amounts of the stuffing as to put in the center of the batter, not too much of it.
If you tried this recipe and liked it please comment below. I would love to hear from you.
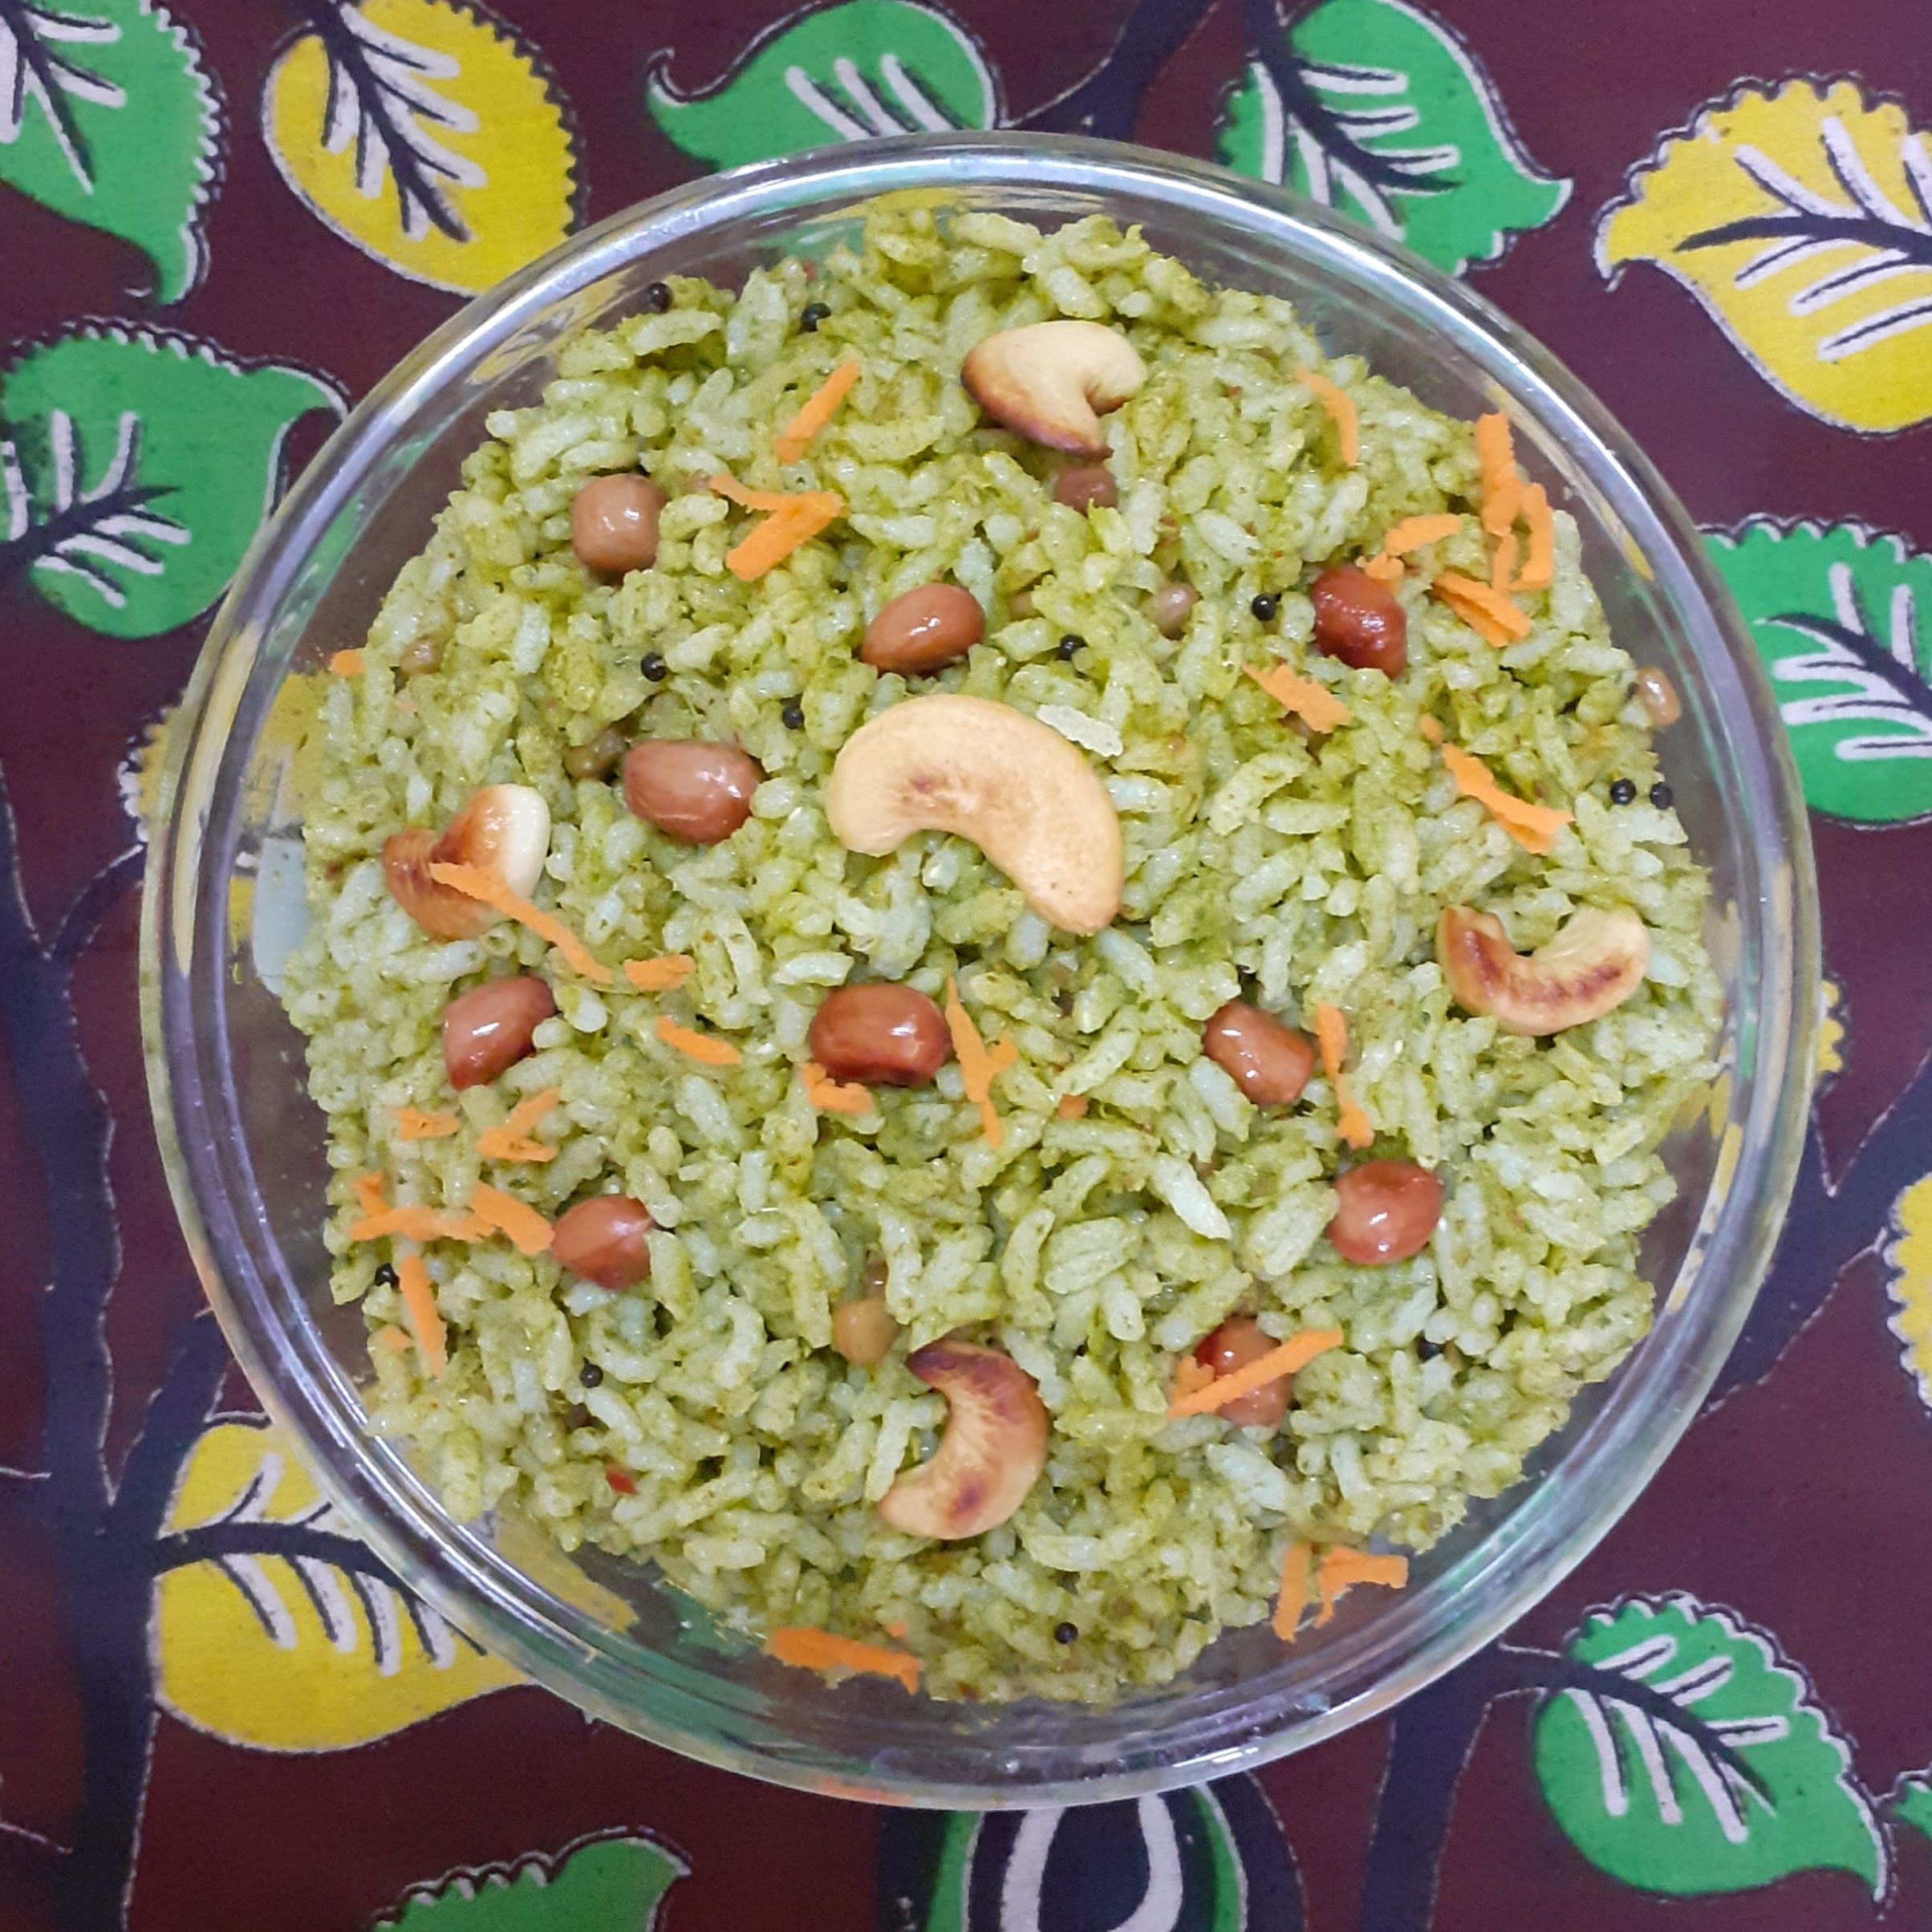
Coriander Rice/Chutney Rice
My love for this herb is perennial. I love adding it to Subjis not just as a garnish but a few springs just as one of the ingredients. There are many condiments made of this humble herb like Chutneys, Dips, Raitas, Pickle, etc; Coriander rice is a simple and healthy rice variety and a great lunch box option for kids. It is healthy too as Coriander is rich in fiber and essential nutrients. It aids in digestion too. So why leave out such a beneficial herb from main course cooking and limit it to just being a condiment. Therefore I thought of adding this Coriander rice recipe to my blog post.
Try adding a few sprigs of it to any subji, not in the end but while cooking and see how the dish gets elevated in taste and flavour.
I’m calling this chutney rice as these are almost the same ingredients we use for green chutney, barring the chutney Chana. Well, tamarind/raw mango is added in green chutney though, I will try that version shortly and post. Here is the recipe for Coriander Rice…
PREP TIME: 10Mins COOK TIME: 30 Mins
TOTAL TIME: 40 Mins COURSE: MAIN
CUISINE: SOUTH INDIAN SERVINGS: 4
AUTHOR: Rajni Ram
Ingredients:
Coriander leaves 1 bunch finely chopped
Rice(regular) 1 cup precooked
Peanuts 1 tbsp
Cashewnuts a few
Green chillies 2
Cumin seeds 1 tsp
Fried gram dal(chutney chana)/Pottukadalai 1 tbsp
Turmeric powder 1 tsp
Mustard seeds1 tsp
Chana Dal(Bengal gram) 1 tsp
Urad dal(black gram) 1 tsp
Dry red chillies 1-2 broken
Oil for tempering 1 tbsp
Directions:
Cook 1 cup rice in a pressure cooker( I used pot in pot method, you can cook directly too) adding 3 cups water for 3-4 whistles. Once pressure releases spread out the rice on a plate to cool and also drizzle 2 tsp oil over the rice so that the grains do not stick together. Put the chopped coriander, cumin seeds, green chillies and the fried chana/ Pottukadalai and grind at first without water, then after a spin or two add little water and grind to a smooth paste. In a karahi or pan pour some oil and heat. Add the mustard seeds, chana dal, urad dal, dry red chilli and fry until golden brown. Now add the turmeric powder, followed by the ground Coriander puree and nicely fry the paste in oil on low heat. The paste will get a little dense. Add salt and fry for another 2 minutes. Now start mixing in the cooled rice little by little into the cooked paste, and mix nicely so that the rice is nicely coated with the paste. Put off flame and garnish with peanuts and cashewnuts. The flavourful Coriander Rice is ready to serve. Enjoy the lovely green of the rice. Bon Appetit.
Serving suggestions: Raita, Potato fry, or Cauliflower roast or Colaccasia(Arbi/Sepankezhangu) roast and papad.
STEPWISE RECIPE FOLLOWS:
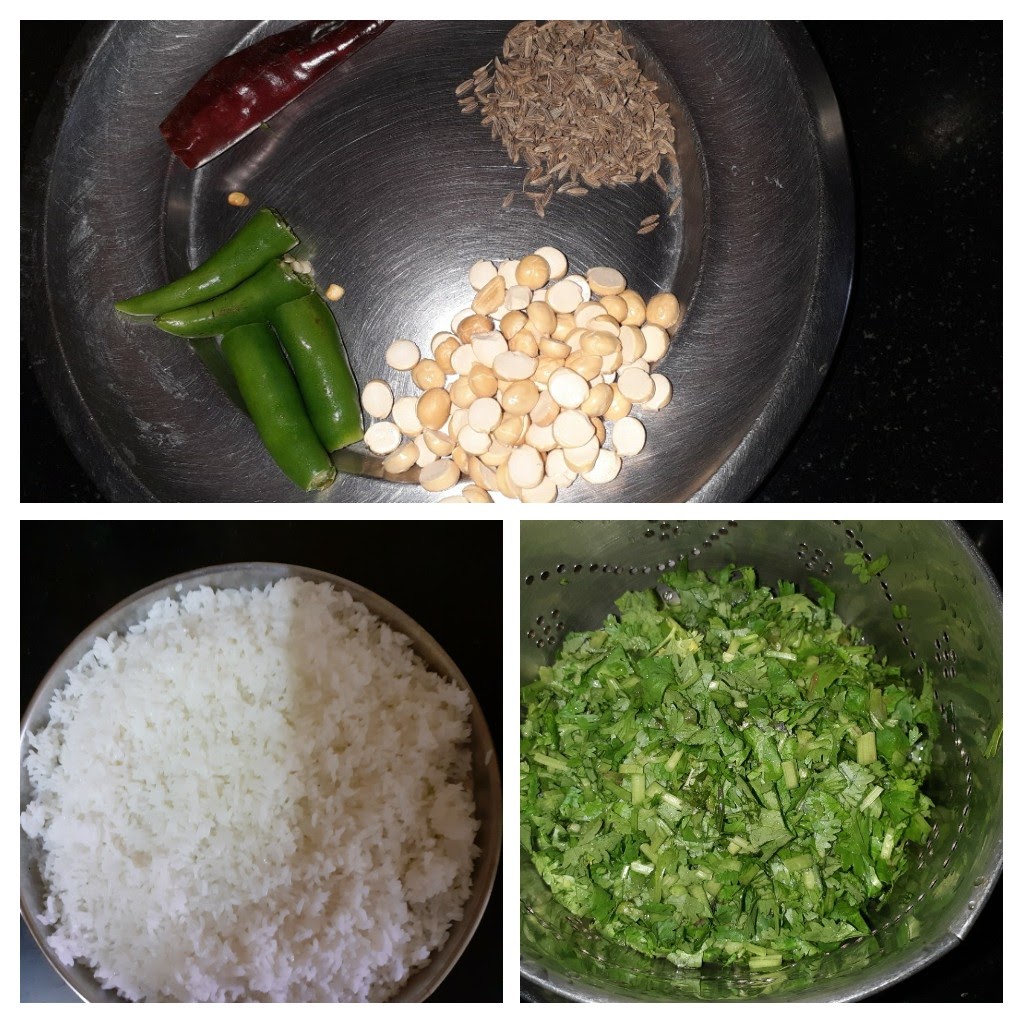
1. Assemble all ingredients. Chop coriander leaves finely, Cook the rice for 3 to 4 whistles, cool on a plate and set aside.
2. Put the chopped coriander into the blender along with the green chillies, cumin seeds and fried chana/pottukadalai. Without adding water pulse them once or twice. Now add some water and grind to a smooth paste. Set aside.
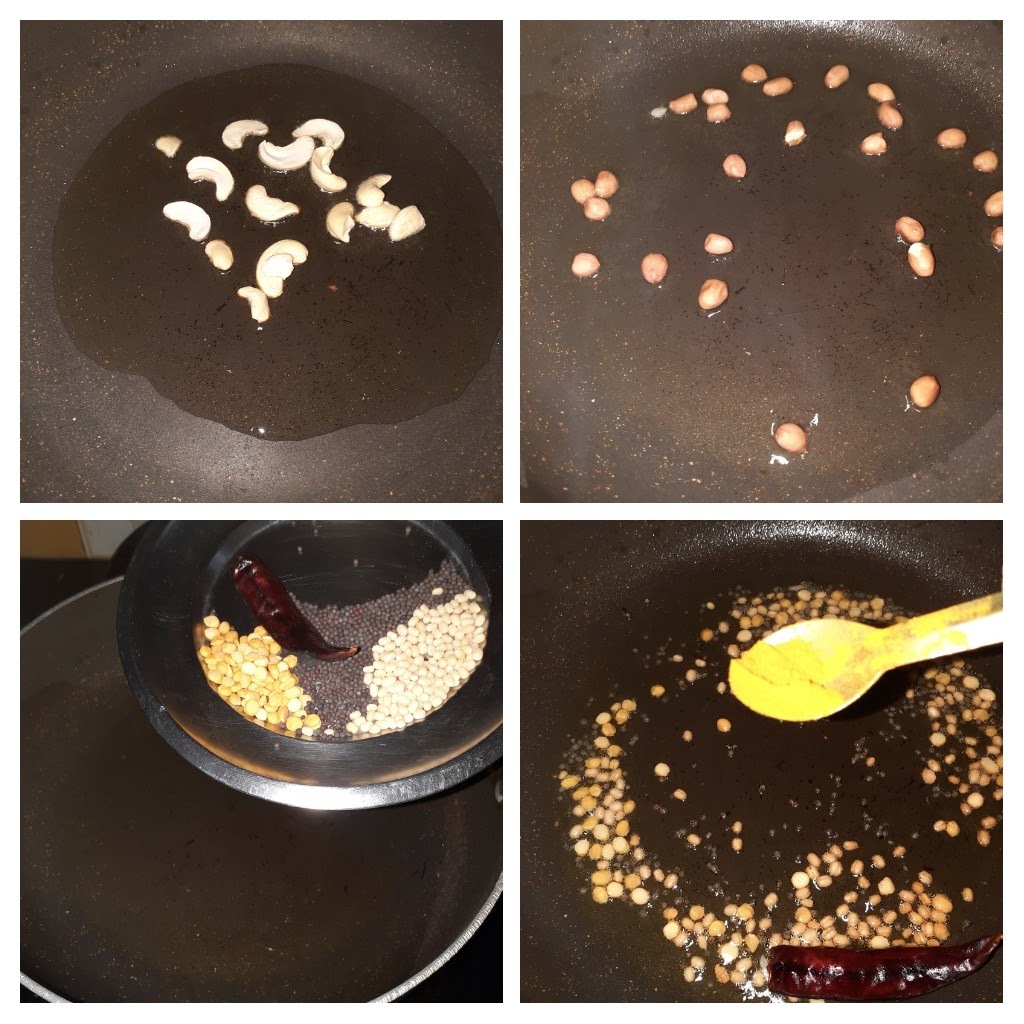
3. In a karahi or pan pour some oil for tempering. Fry the peanuts to a golden colour and the cashew too and keep aside. In the same oil put in the mustard seeds. Let them crackle then add Chana dal, urad dal followed by dry red chillies. Fry until golden brown and add the turmeric powder.
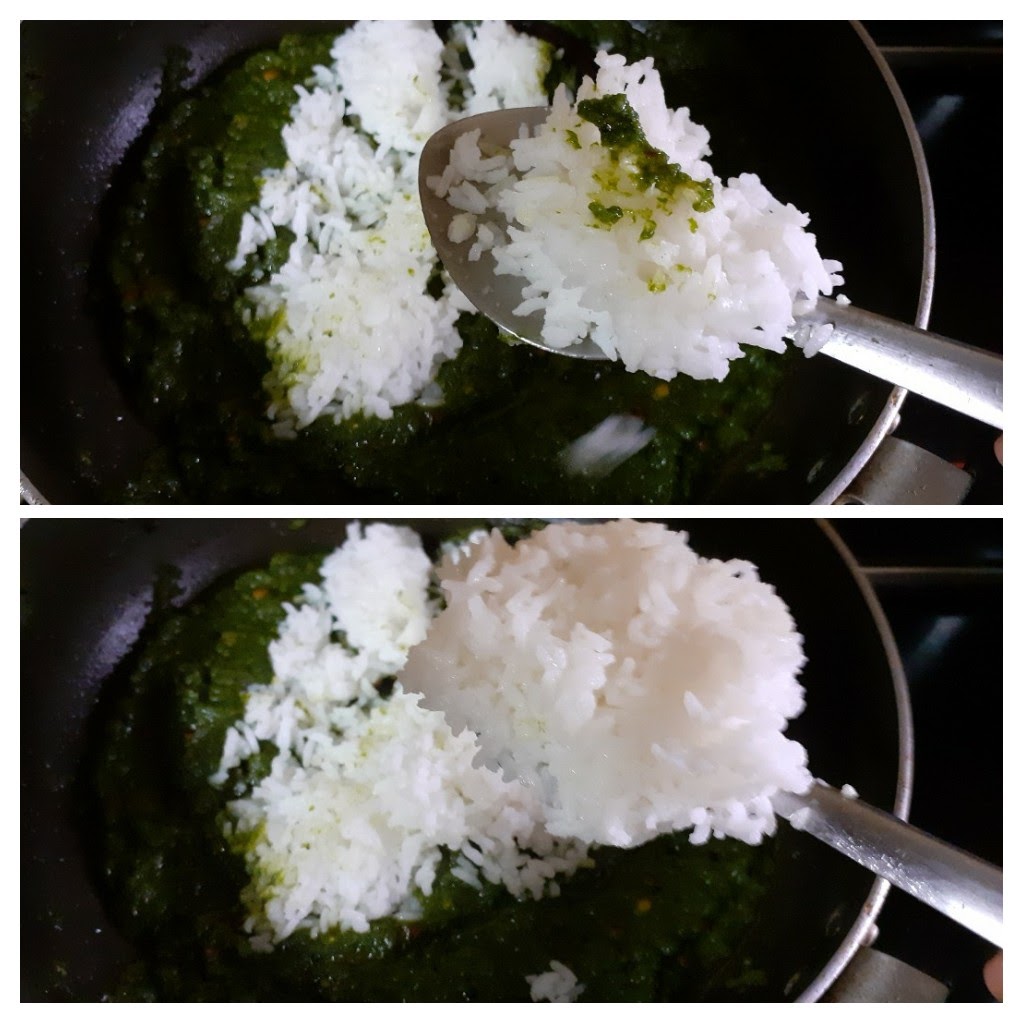
4. Now pour the coriander paste into the oil and fry the paste nicely for 2 minutes. Add salt and continue to fry for another 2 minutes. The moisture should evaporate and the paste should become a little dense.
5. Add the cooked and cooled rice little by little to the paste. Mix well and switch off the flame. The flavourful Coriander rice is ready to serve.
NOTES:
1. While frying the paste in oil be careful not to evaporate it completely. The consistency should resemble sauce consistency.
2. Spread out the rice on a plate and drizzle oil or the rice will turn soft and lumpy once added to the paste.
If you tried this recipe and liked it then please comment below. I would love to hear from you.
Pruppu Urundai Kozhambu (Dal Dumplings In Tamarind Sauce)
I love cooking this dish though it involves some amount of preparation and detail. Paruppu Urundai Kozhambu is a delicious traditional South Indian recipe. I learnt this from my mother in law and she was an expert at it. In this preparation, dumplings of Dal/ lentils are cooked in a tangy tamarind sauce. This dish is served with rice but goes well as a side dish for Dosas, Idli, Pongal etc. As in all recipes, there are different methods of making the dumplings. Some steam the dumplings before adding it to the sauce, while some cook it directly in the tamarind sauce. I prefer and follow the second method. The dumplings are able to absorb the flavours this way. I also love using fresh coriander in the dumplings as it realove cooking this dish though it involves some amount of preparation and detail. Paruppu Urundai Kozhambu is a delicious traditionaand add them to the sauce, whereas other recipes suggest cooking it lly elevates the dish to a different level. So when there are no coriander leaves at home I don’t make the dish. Whether coriander is added or not, this dish is just amazingly tasty. So don’t wait for the coriander, just cook on. While you are here check out the recipe of Vatha Kozhambu A similar recipe with Shallots cooked in a tangy tamarind sauce.
Here is the recipe of Paruppu Urundai Kozhambu.
PREP TIME: 20 Mins+ soak time COOK TIME: 30 Mins
TOTAL TIME: 60 Mins COURSE: MAIN
CUISINE: SOUTH INDIAN SERVINGS: 5
AUTHOR: Rajni Ram
Ingredients:
Tuvar dal/ Pigeon peas 2 cups soaked for 1 hour
Tamarind 2 lemon sized balls( pulp extracted)
Grated Coconut 3 tbsp
Sambar powder 2 tbsp
Dry red chillies 5
Mustard seeds 2 tsp
Asafoetida 2 tsp
Methi seeds/ fenugreek seeds
Curry leaves few
Coriander leaves(optional)
Salt as required
Directions to make Urundai( dumplings)
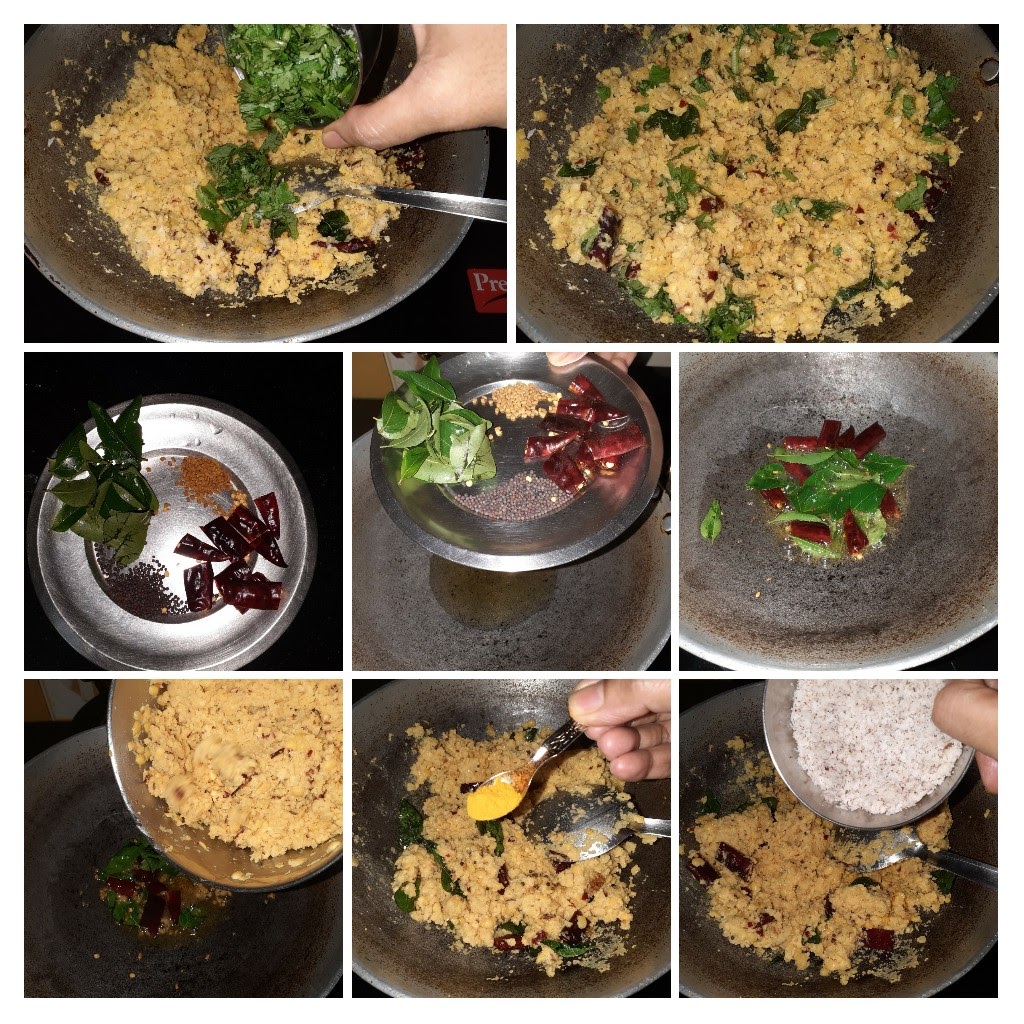
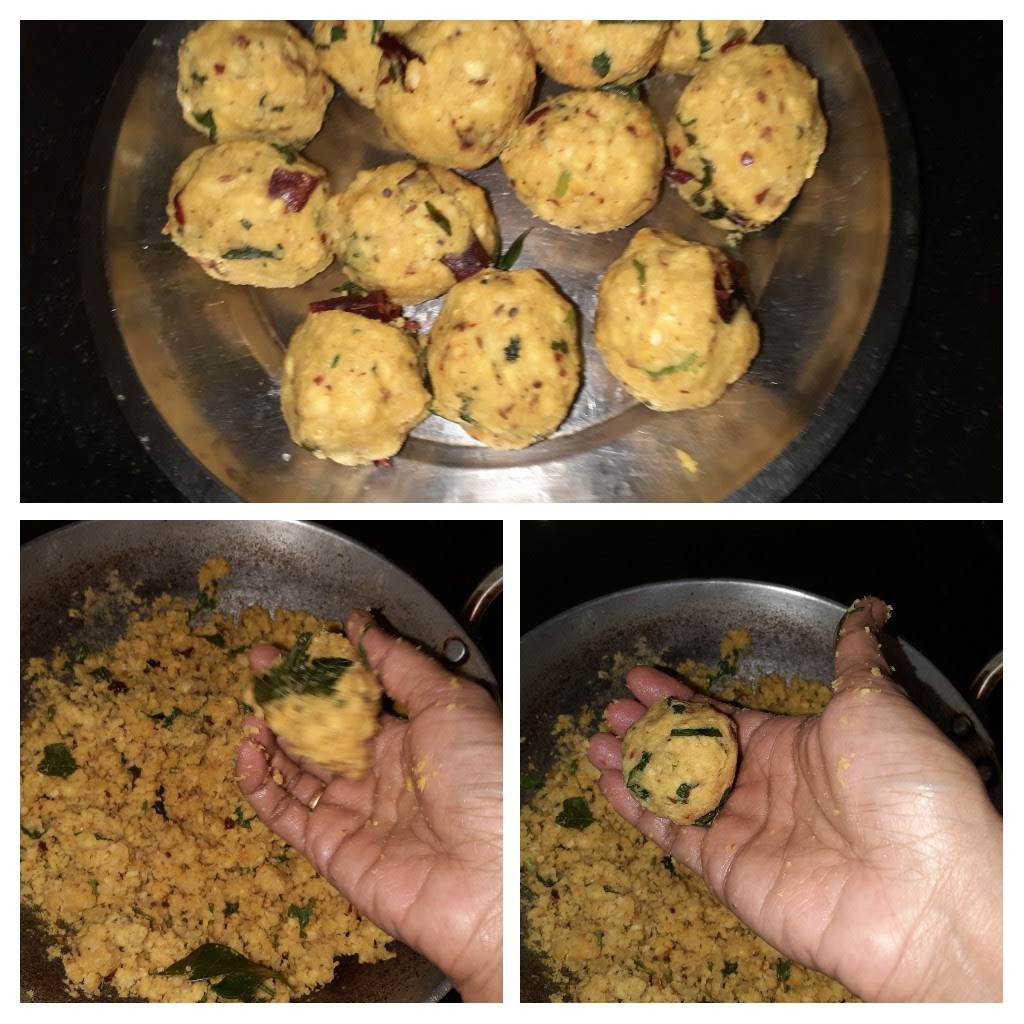
Drain out the water from the soaked dal and put it in the blender. Add 1 tsp asafoetida, dry red chillies 3, salt ( as per preference) and grind to a coarse mixture. Now in a karahi or pan add 1 tbsp oil to temper and sauté the mixture. As the oil heats up add 1 tsp mustard seeds, as they crackle add a few Methi seeds, broken dry red chillies, asafoetida1 tsp, curry leaves and fry them. Once they are golden brown add the coarsely ground dal mixture and salt and sauté nicely over a medium flame for 5 minutes. Add the grated coconut and keep stirring constantly as the mixture may stick to the pan/karahi bottom. This step is just to take away the moisture, the dal need not be crumbled, just stirred. After sautéing transfer the sautéed dal to another vessel and cool. Once cooled shape them into dumplings. I could make around 13 dumplings from this mixture. The dumplings should be a little bigger than a Lemon. Set the dumplings aside.
Directions for the Kozhambu( gravy/ sauce)
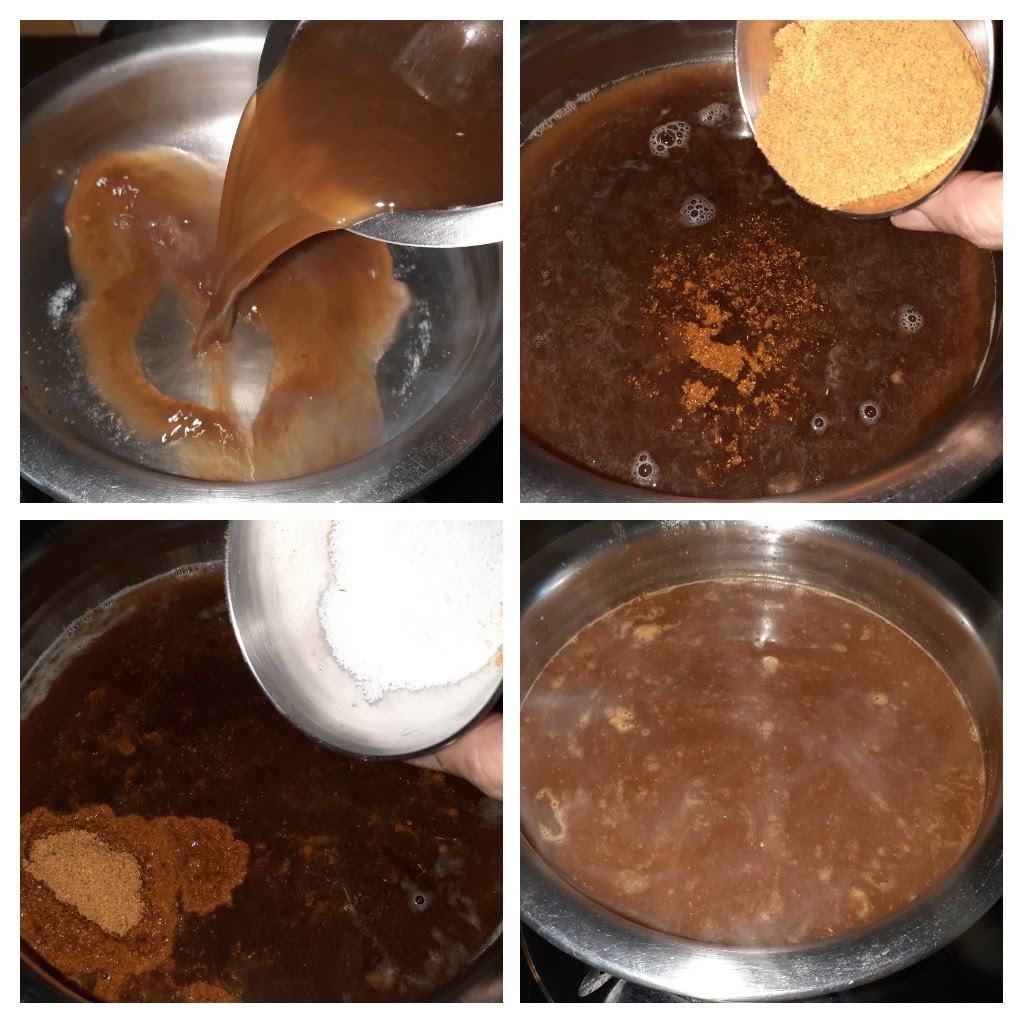
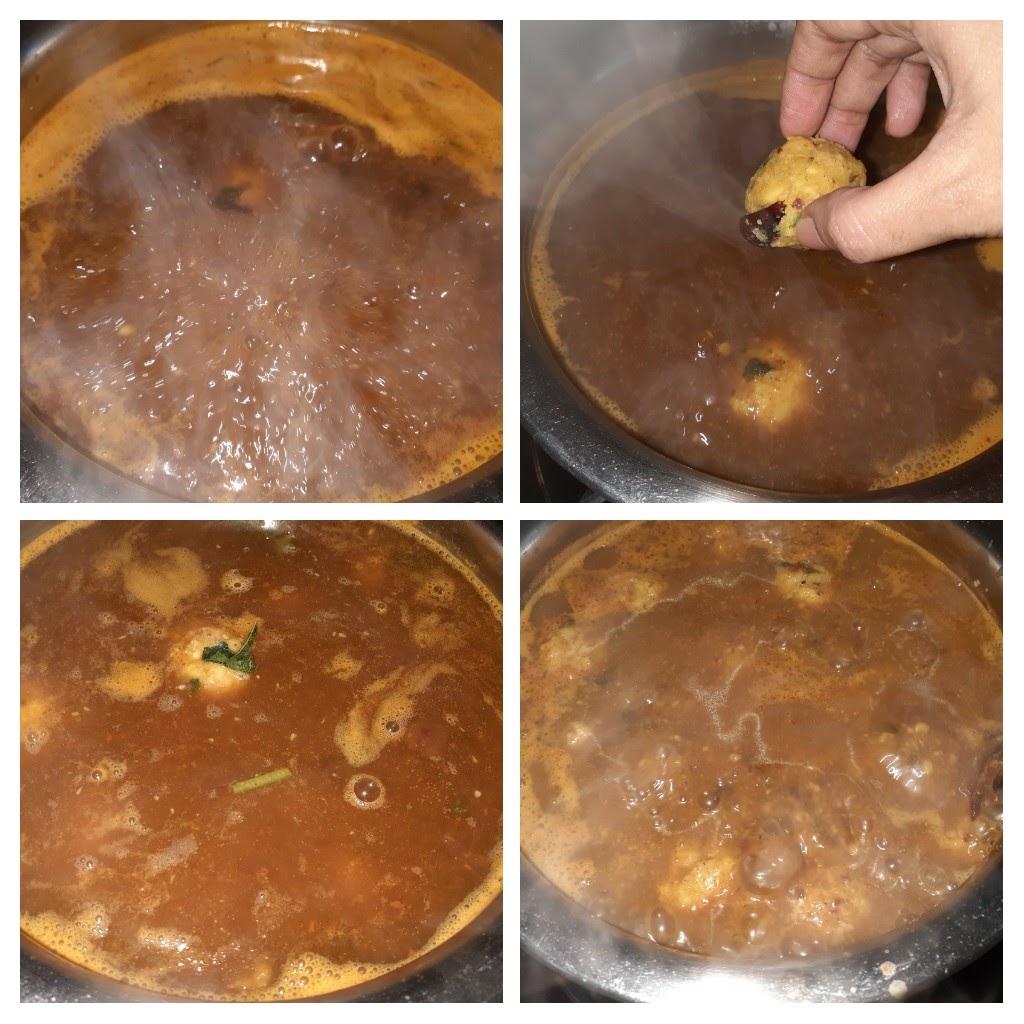
Extract the pulp from the tamarind and dilute it. You should have about 700 ml of tamarind juice if it’s too sour dilute with another 100 ml. Pour this diluted extract into a deep thick bottomed dish and switch on the flame. Add salt, turmeric powder, Sambar powder, asafoetida and boil. As it starts boiling and the raw smell of the masalas is gone( around 7 minutes into the process on medium flame), add one Urundai( dumpling) and test. If it doesn’t break while cooking on medium heat in the next 1 minutes, reserve 1 dumpling and all the other dumplings can be put into the tamarind water one by one after reducing the heat to low. If the first Urundai disintegrates in the water, put off the flame, undo all the dumplings and add 1 tablespoon rice flour and shape them to dumplings again and continue the process mentioned above. Cook the Urundais(dumplings) in low to medium flame while stirring gently every now and then until they start rising to the top. Once cooked the dumplings will float above. Now add about 1 cup water to the reserved dumpling and break it up. Pour this paste into the kozhambu( gravy) after the dumplings have risen and cook for 2 minutes or until the gravy has thickened to a Sambar like consistency. Switch off the flame and temper the Kozhambu with a little oil in a Kadai and put mustard seeds, followed by Asafoetida and curry leaves. The delicious Paruppu Urundai Kozhambu is ready.
Serving Suggestions: with hot rice and ghee, Dosas, Idlis, Ven Pongal, Kuthiravali Pongal( millet Pongal) etc.
STEPWISE RECIPE FOLLOWS:
1. Assemble all ingredients. Soak the Tuvar dal for 1 hour, soak the tamarind in warm water and extract the pulp, dilute pulp, grate the coconut, and keep ready.
2. Drain water from the soaked dal and put it into the blender, followed by red chillies, turmeric powder, salt and asafoetida. Grind them to a coarse paste, without adding water.
3. Now in a karahi pour oil for tempering and heat. Put in mustard seeds. As they crackle add the methi seeds, turmeric powder, broken dry red chillies, asafoetida 1 tsp and curry leaves and fry. Now add in the dal mixture to this and start sauteeing, so that the moisture from the dal gets evaporated. Add the grated coconut, saute for another minute and switch off the flame. Finally, add some finely chopped coriander to the dal mixture. Leave the mixture to cool.
4. In a deep vessel, preferably flat one pour the tamarind extract. It should be a dilute extract of 700 ml. Add turmeric powder 1tsp, asafoetida 1 tsp, Sambar powder 3 tbsp, salt and boil the extract on medium flame.
5. After the extract is put to boil, shape the dumplings of the Dal mixture and keep aside.
6. When the mixture bubbles up and froths( about 5 mins from boiling) and all the raw smell of the powders is gone drop one dumpling gently into the boiling mixture. Flame on medium, wait for 2 minutes. If the dumpling does not disintegrate in this time, retain 1 dumpling and put in all the other dumplings one by one. Reduce flame to low and continue to boil.
7. As the dumplings cook in the tamarind extract they will slowly start rising to the top(I have added a short video). When all have risen, break the single reserved dumpling and add 1 cup water to it. Give it a stir so that it becomes a paste. Add this paste into the boiling tamarind gravy to thicken the gravy. Cook for 2 minutes and switch off the flame.
8. Take a small tempering Kadai and add little oil. heat and add mustard seeds, asafoetida 1/2 tsp and curry leaves. Pour the tempering into the Kozhambu.
The tasty Paruppu Urundai Kozhambu is ready to serve.
NOTES:
1. Definitely soak the dal, helps in binding.
2. Sometimes depending on the dal quality the dumplings can break/disintegrate in the extract while boiling. That is why I have recommended putting only a single one to test.
3. If the tester dumpling disintegrates, break up all the other dumplings and add 1 tbsp rice flour to it. Mix well and shape into dumplings again. Before you do this do not forget to switch off the flame in which the extract is cooking as we dont want it to evaporate now.
4. Some recipes recommend adding rice flour to the dal mixture while shaping them itself. I prefer not doing this as it makes the dumplings tougher or hard. So I prefer adding rice flour only if required.
If you tried this recipe and liked it please comment below. I would love to hear from you.
Beans Paruppu Usli
Paruppu Usli is a South Indian(Tamilian) dish made by crumbling dal. The crumbled dal is then added to cooked vegetables. A wide variety of vegetables like Banana flowers, Cabbage, Capsicum, Radish greens, and Beans can be added to the Usli.
This is a dry(without gravy)side dish which can be served to go with Rasam rice, Vatha Kozhambu rice, More Kozhambu(Kadi)rice, and other varieties.
There are many versions of making the Usli. Some use just a single dal to make the Usli(dal crumble) and some use a combination of dals. I prefer Chana dal(split peas) to make the Usili. It is very easy to crumble this dal and is tastier than the other dals.
The Usli tastes amazing just by itself too. Here’s the recipe of Beans Paruppu Usli.
PREP TIME: 20 Mins COOK TIME: 20 Mins
TOTAL TIME: 40 Mins COURSE: MAIN
CUISINE: SOUTH INDIAN SERVINGS: 4
AUTHOR: Rajni Ram
Ingredients:
French Beans 250 gms chopped fine.
Carrot 1 (just for colour)
Chana dal 1cup soaked for 1/2 an hour
Cumin seeds 1 tsp
Dry red chillies 3
Asafoetida 1/2 tsp
Turmeric powder
Curry leaves a few finely chopped
Oil(refined) for crumbling the dal 2tbsp
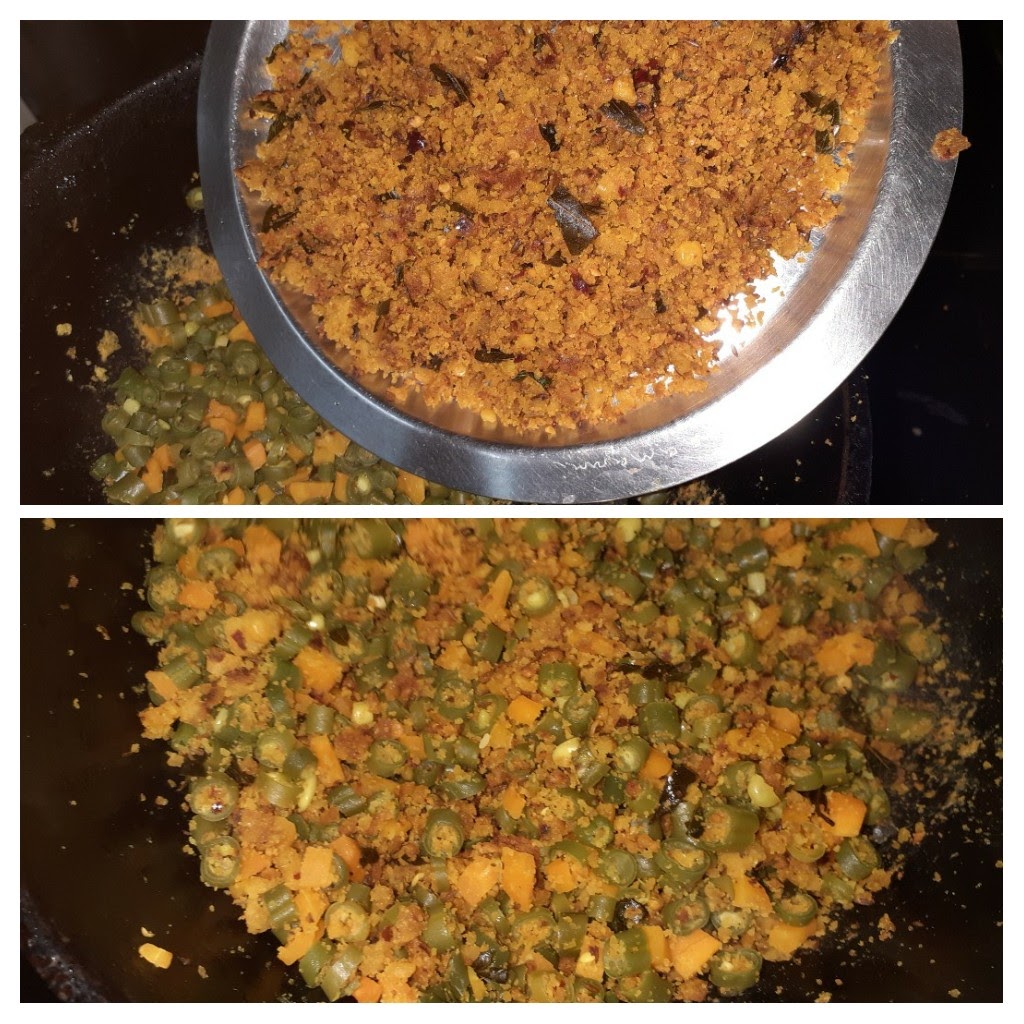
Directions:
Chop the French Beans, and carrot and add some salt and turmeric powder and cook them in sufficient water. When you can crush the Beans-carrot between your index and thumb finger, stop cooking. Drain the water and cool. Now put the soaked Chana dal after draining out the water in a blender, add the dry red chillies, cumin seeds, turmeric powder, salt and asafoetida and grind to a coarse paste. Add very little water to grind. Now take oil in a heavy-bottomed Karahi(preferably NOT nonstick) and heat. Add the finely chopped curry leaves and pour the dal mixture into karahi immediately. Start scrambling the dal. A Dosa flipper works best for this while you are scrambling the dal, keep breaking the bigger lumps for them to crumble further. The finer you are able to crumble the better. This takes between 10 to 15 minutes. Once you have fully crumbled the dal it should look like a coarse powder. Transfer the crumbled dal to another vessel from the karahi. Now add the cooked Beans-Carrot to the Karahi and start evaporating any remaining moisture in it, by sautéing it well. When there is no more moisture in the Beans add the crumbled dal mixture to the Beans-Carrot and mix well. Check for salt and adjust if required. The yummy Beans Usli is now ready to serve. Serve it with some Vatha Kuzhambu rice, Rasam rice or More Kozhambu rice. I love it with Rotis too. Enjoy. Bon Appetit.
STEPWISE RECIPE FOLLOWS:
1. Assemble all ingredients. Chop and cook the Beans and Carrot( take care, not to overcook)and soak the Chana dal for 1/2 an hour.
2. Now in a blender put the soaked Chana dal after draining the water, the cumin seeds, dry red chillies, turmeric and asafoetida and grind to a coarse paste. Add as little water as possible.
3. Take a Karahi and pour in oil around 2 tablespoons and heat. Add the chopped curry leaves to the oil and add the ground Chana dal mixture.
4. Start scrambling the mixture using a Dosa flipper( makes the process easier). Keep breaking the bigger lumps into smaller ones and crumble the mixture. It should start becoming dry. By the end of the crumbling procedure, the dal should look like a coarse powder. This takes 10 to 15 minutes and some patience. Flame to be medium to low throughout.
A quick video to show you how to crumble the dal????
5. Once the dal is crumbled, transfer it from the Karahi to another vessel. In the same karahi put in the cooked Beans and Carrot and evaporate any remaining moisture.
6. Once the vegetables become dry add the crumbled dal to them and stir. Mix them nicely so that the vegetables and dal are well combined. The Beans Paruppu Usli is now ready to serve.
NOTES:
1. The dal has to soak at least for half an hour.
2. I have not tempered the Usli while or after making it, anyway no harm in tempering too.
3. The vegetable should be nicely stir-fried and all water evaporated before adding the dal crumble because if there is any moisture it will all turn lumpy.
4. Instead of Beans, any other vegetable given above can also be used. The crumble procedure will be the same.
If you tried this recipe and liked it then please comment below. I would love to hear from you.
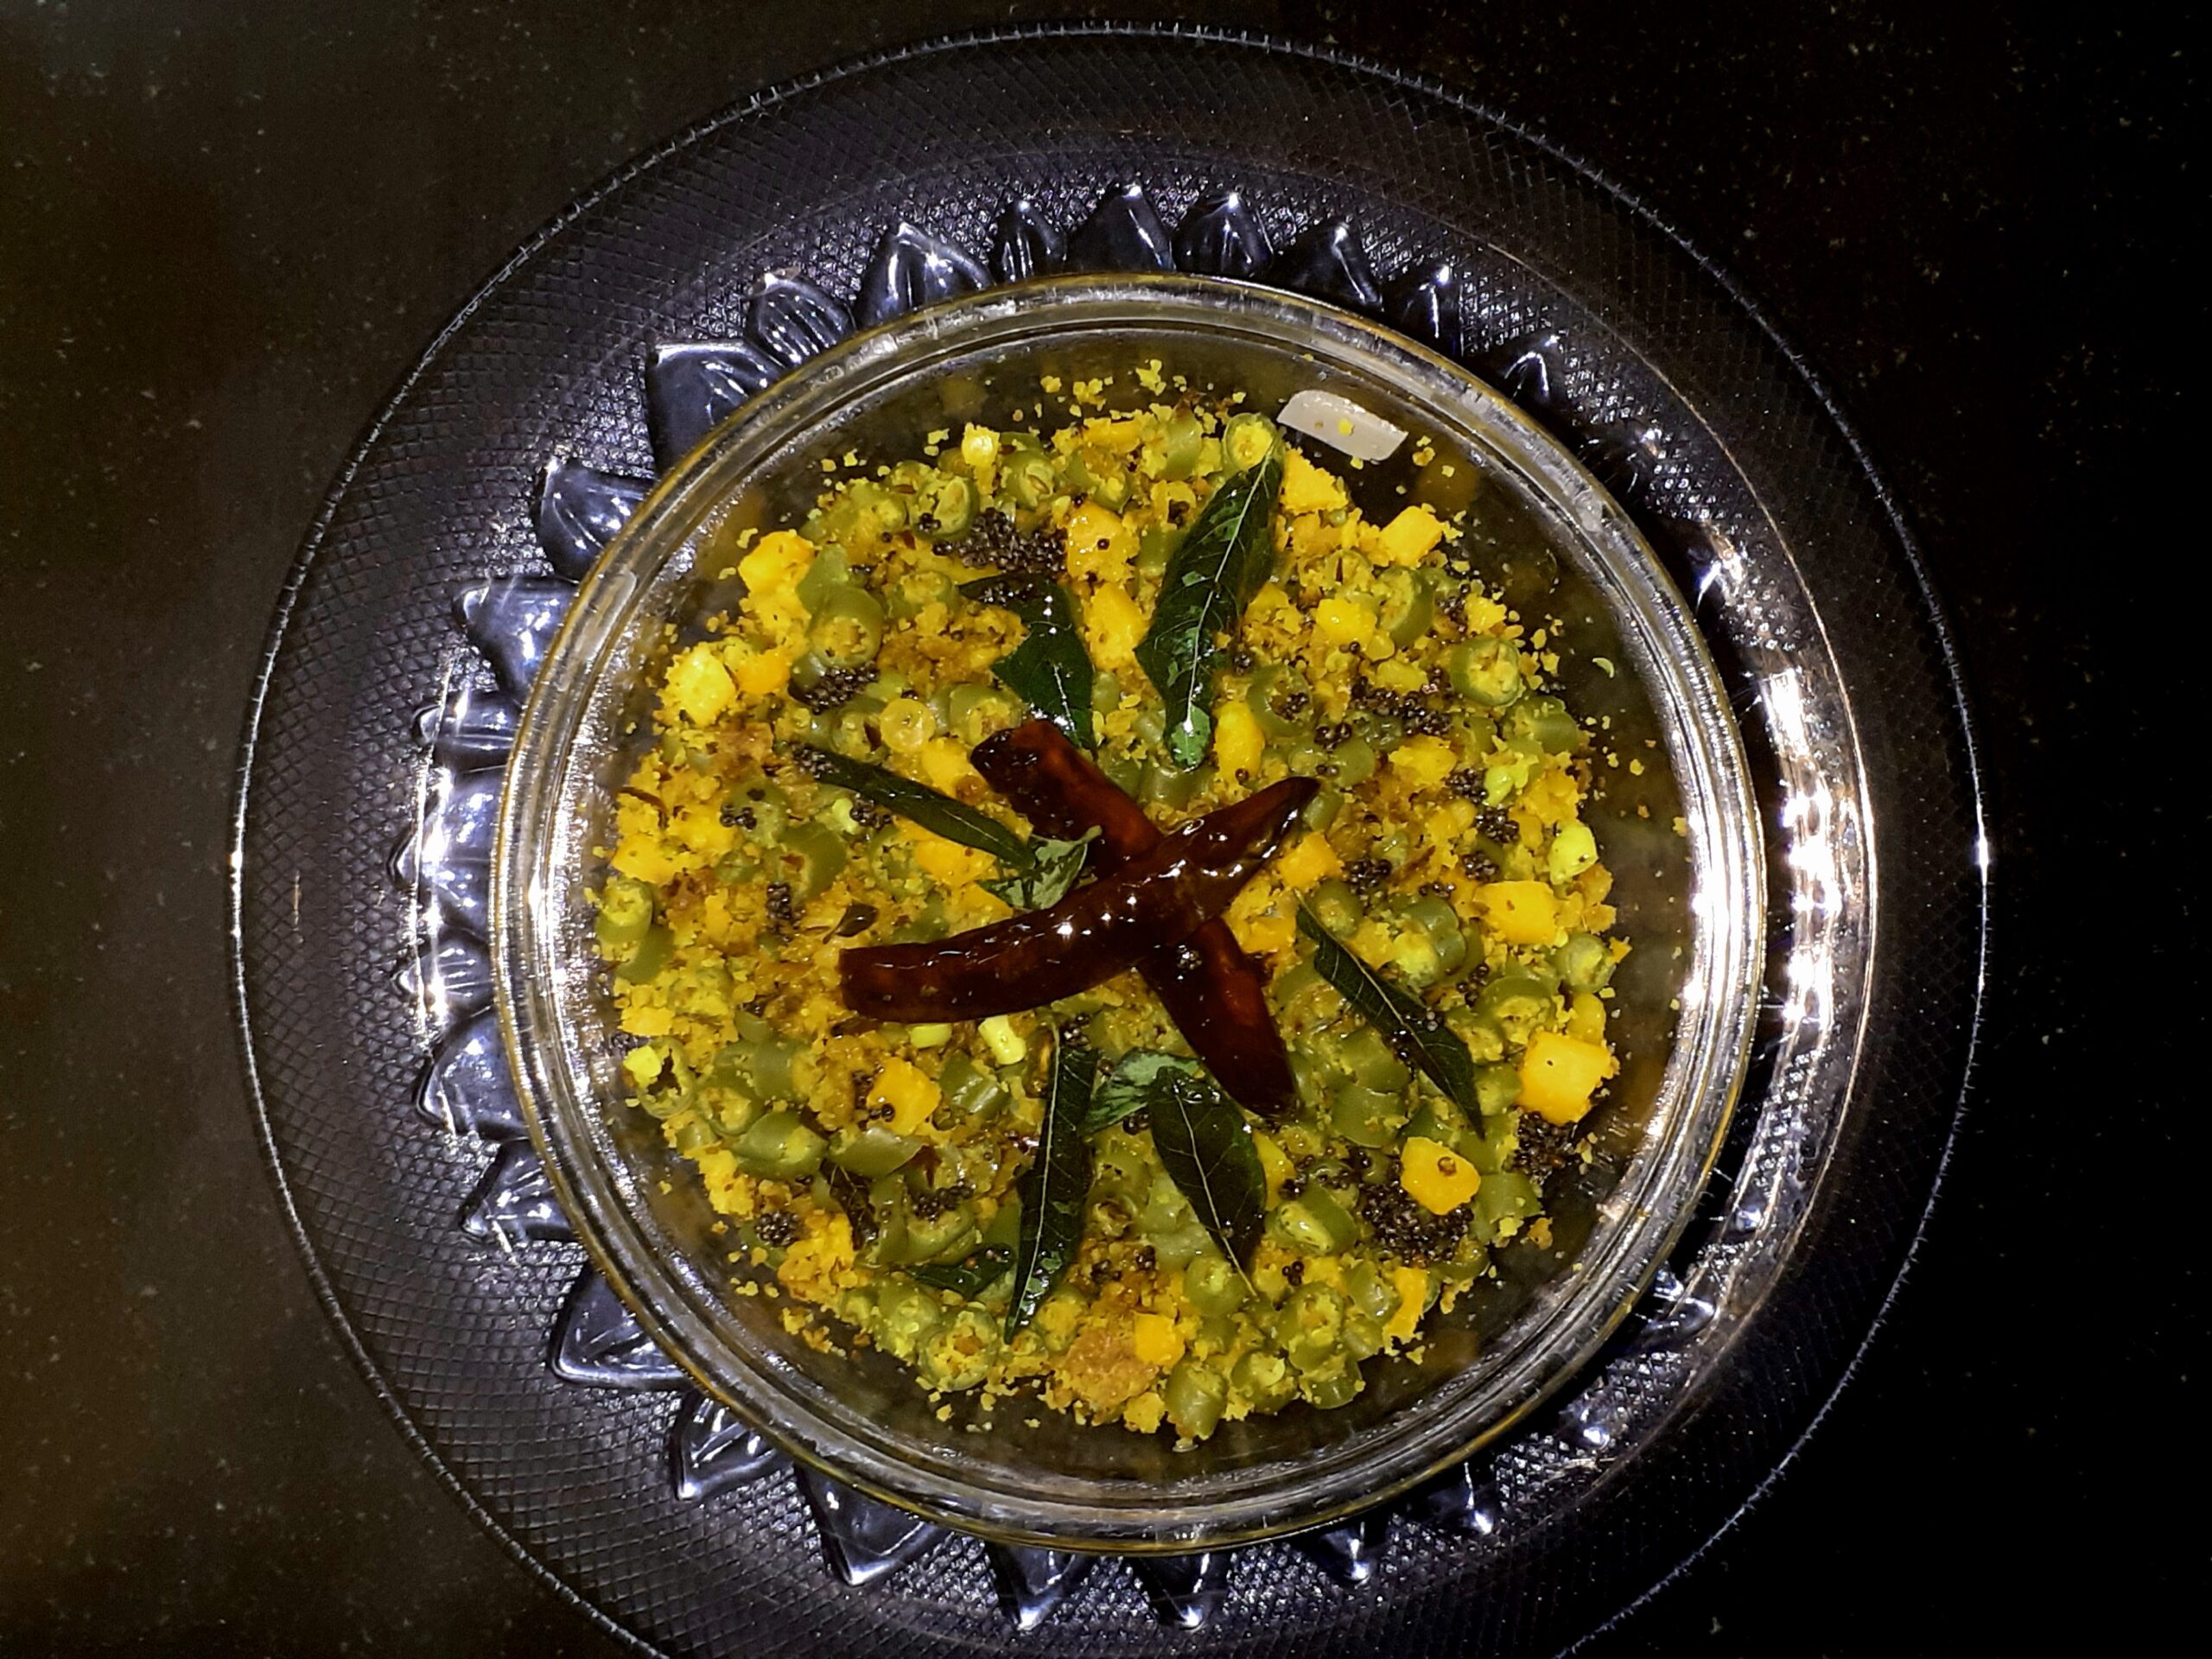
Atte Ka Sheera (Insant Wheat Halwa)
Halwa is a popular dish in the Indian subcontinent and there are many varieties of Halwa like Rava/Suji Halwa, Moong dal halwa, Chana dal halwa, Lauki halwa, Carrot halwa, and many more. This recipe Atte Ka Sheera is very popular in North India during both the Navrathras, as it is offered to little girls on the Ashtami day( day 8 of Navrathri) as Prasad(holy offering).
This Halwa gets done in no time and is healthy and tasty at the same time. My girl loves it and whenever any of us craves sweet at home I make it instantly, like today.
The smooth texture of the Halwa lies in roasting the Wheat flour correctly, as an under roasted flour can make the halwa lumpy. There are many variations to making this Halwa and I chanced upon this one in an old recipe book and have always made it that way ever since. Do check out my other sweet and dessert recipes.
PREP TIME: 10 Mins COOK TIME: 20Mins
TOTAL TIME: 30Mins COURSE: DESSERT
CUISINE: NORTH INDIAN SERVINGS: 4
AUTHOR: Rajni Ram
Ingredients:
Wheat flour 1 cup( any size is fine, but use the same cup for all measures in this recipe).
Sugar 1 cup
water 2 cups
Ghee 1/2 cup
Cardamom powder 1/4 tsp
Directions:
Take a heavy-bottomed pan /Karahi/Urli and heat it. Add 1 tbsp ghee and add in the wheat flour and start roasting it, stirring continuously. after 5 minutes add another tablespoon of ghee and continue to roast. Don’t forget to keep stirring, as the flour can get burnt. as the roasting continues the atta/wheat flour will give a nice aroma, keep roasting until the flour turns golden brown. Once it is nicely browned turn off the flame. In another saucepan heat water, and drop the sugar into it, dissolve it and allow it to boil. Once the sugar is dissolved switch off the flame. Now slowly pour the sugar water into the roasted wheat flour and keep stirring continuously(remember to keep the flame off while pouring the sugar water). Once you have poured all the water, switch on the flame and continue to stir, until the halwa starts leaving the bottom of the pan/karahi. turn off the flame add the nuts and remaining ghee. Atte Ka Sheera is ready. Enjoy this wholesome goodness. Bon Appetit.
STEPWISE RECIPE FOLLOWS:
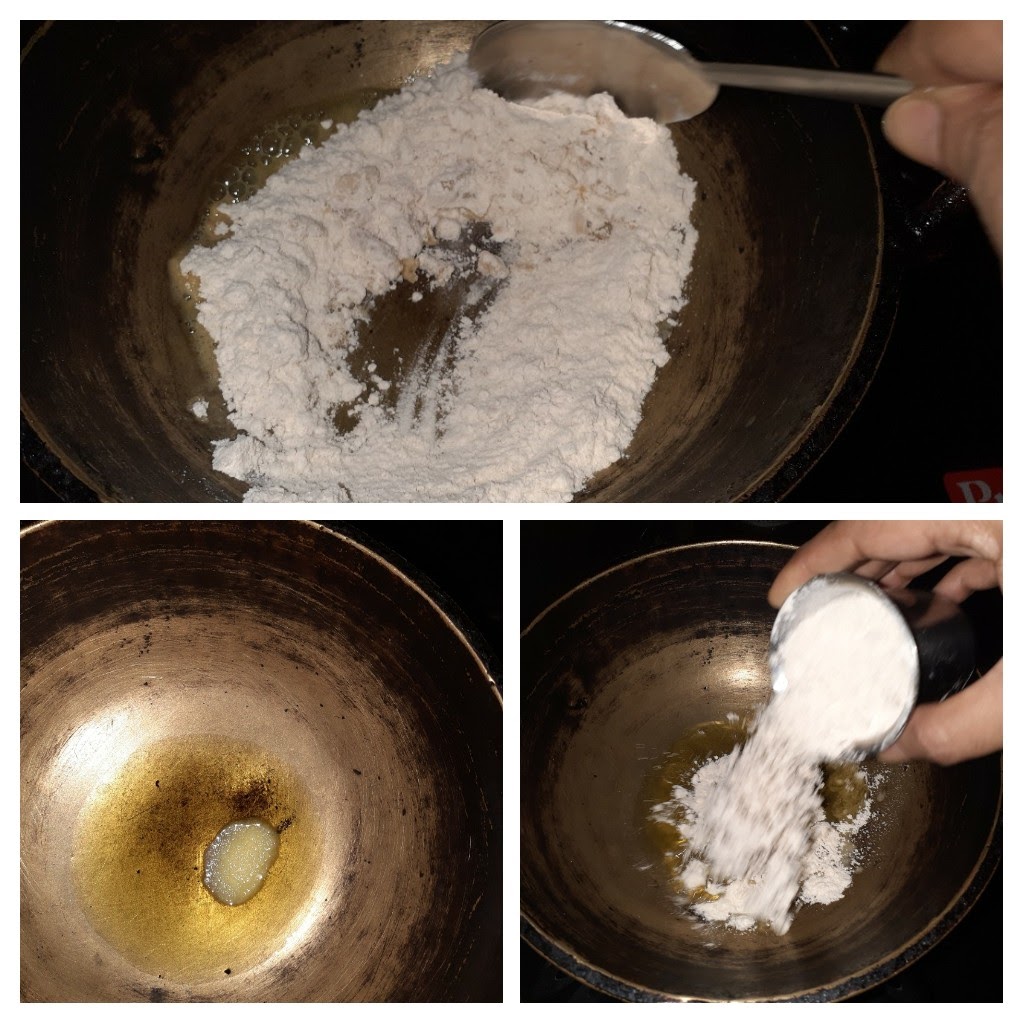
1. Assemble all ingredients.
2. In a heavy-bottomed pan/karahi pour 1 tablespoon ghee, add the wheat flour and start roasting. Keep stirring continuously.
3. After 5 minutes of roasting add another tablespoon of ghee and continue to roast. The flour starts turning brown and also starts giving out a nice aroma. Continue to roast until the flour turns golden brown. (Remember to keep flame at low or medium). Once browned switch off the flame.
4. Now in a saucepan pour the water and drop in the sugar and boil, add a few pods of cardamom to this(later it can be fished out). Once the water starts boiling and the sugar has completely dissolved put off the flame.
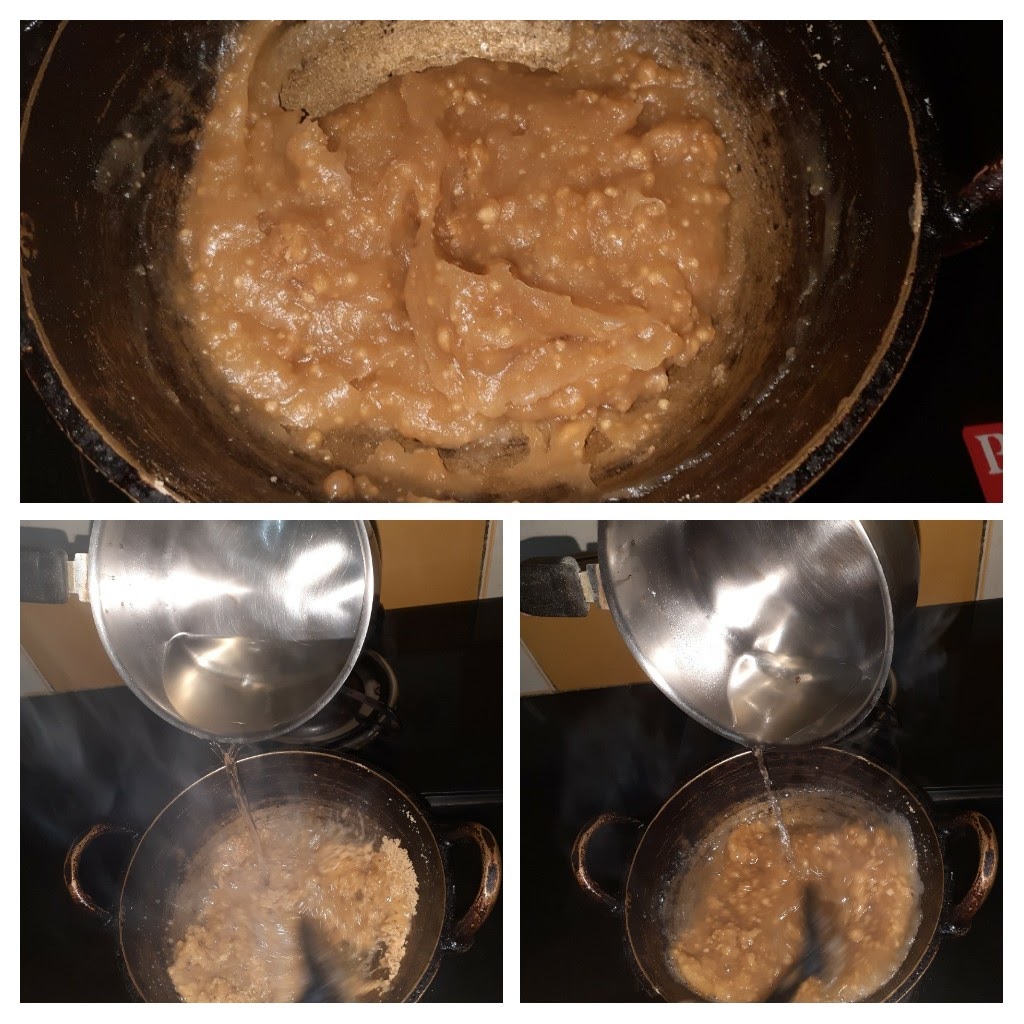
5. Now slowly pour the sugar water into the roasted wheat flour, while stirring simultaneously. Remember to keep the flame of while pouring the water into the Atta. If the flame is not switched off the water can splutter on the hand, and the halwa can get lumpy too.
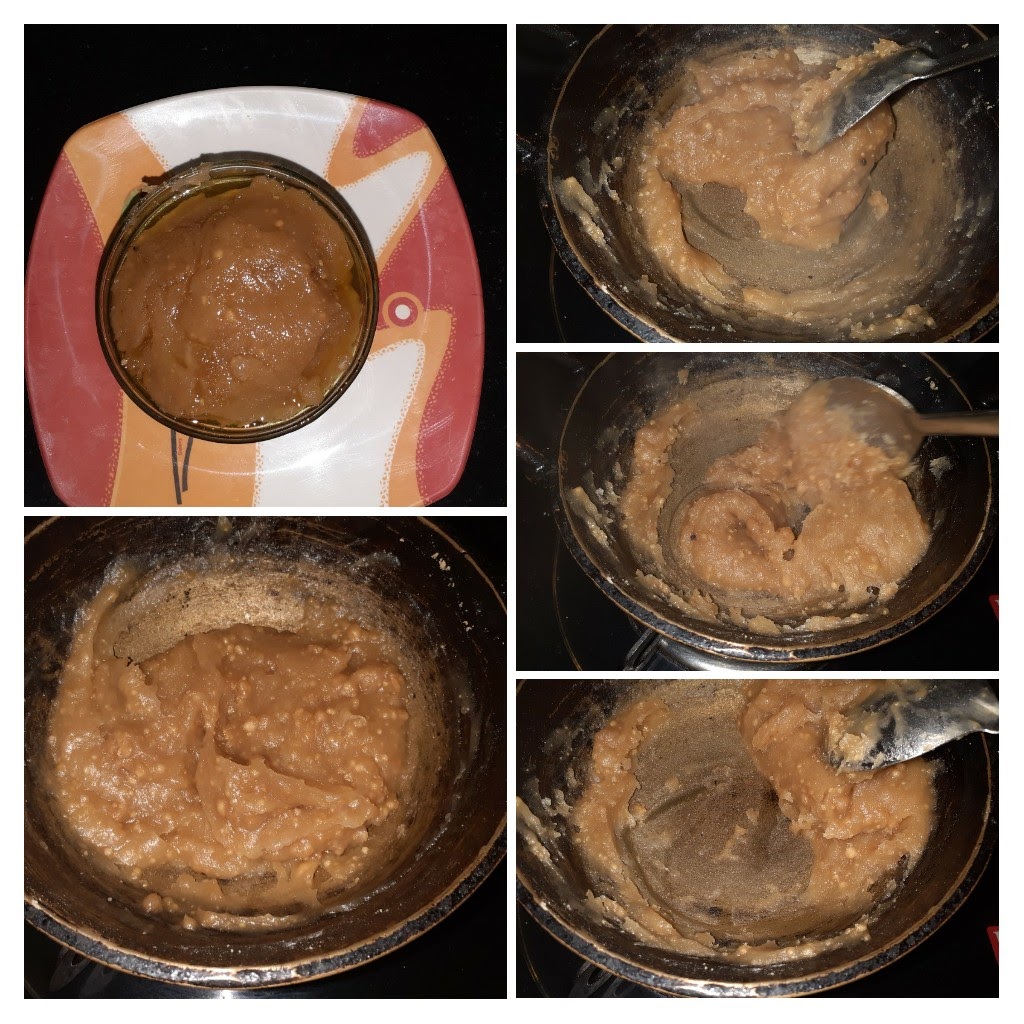
6. Once you have poured in all the water, switch on the flame and continue stirring, until the halwa starts leaving the pan bottom and swirls along with the ladle. At this stage add the remaining ghee and garnish with some dry nuts.
Atte Ka Sheera is ready to serve.
NOTES:
1. Roasting the flour is the most critical step to get a smooth and creamy Halwa.
2. Roasting must be done in low to medium flame and not high as this could burn the flour.
3. After roasting the flour and while preparing the sugar water, keep the flame of the flour off.
4. While pouring the sugar water into the Ata also the flame must be off. Switch on after pouring all the water.
5. I have used only 1/2 a cup of ghee, more can be added if required.
If you tried this recipe and liked it please comment below. I would love to hear from you.
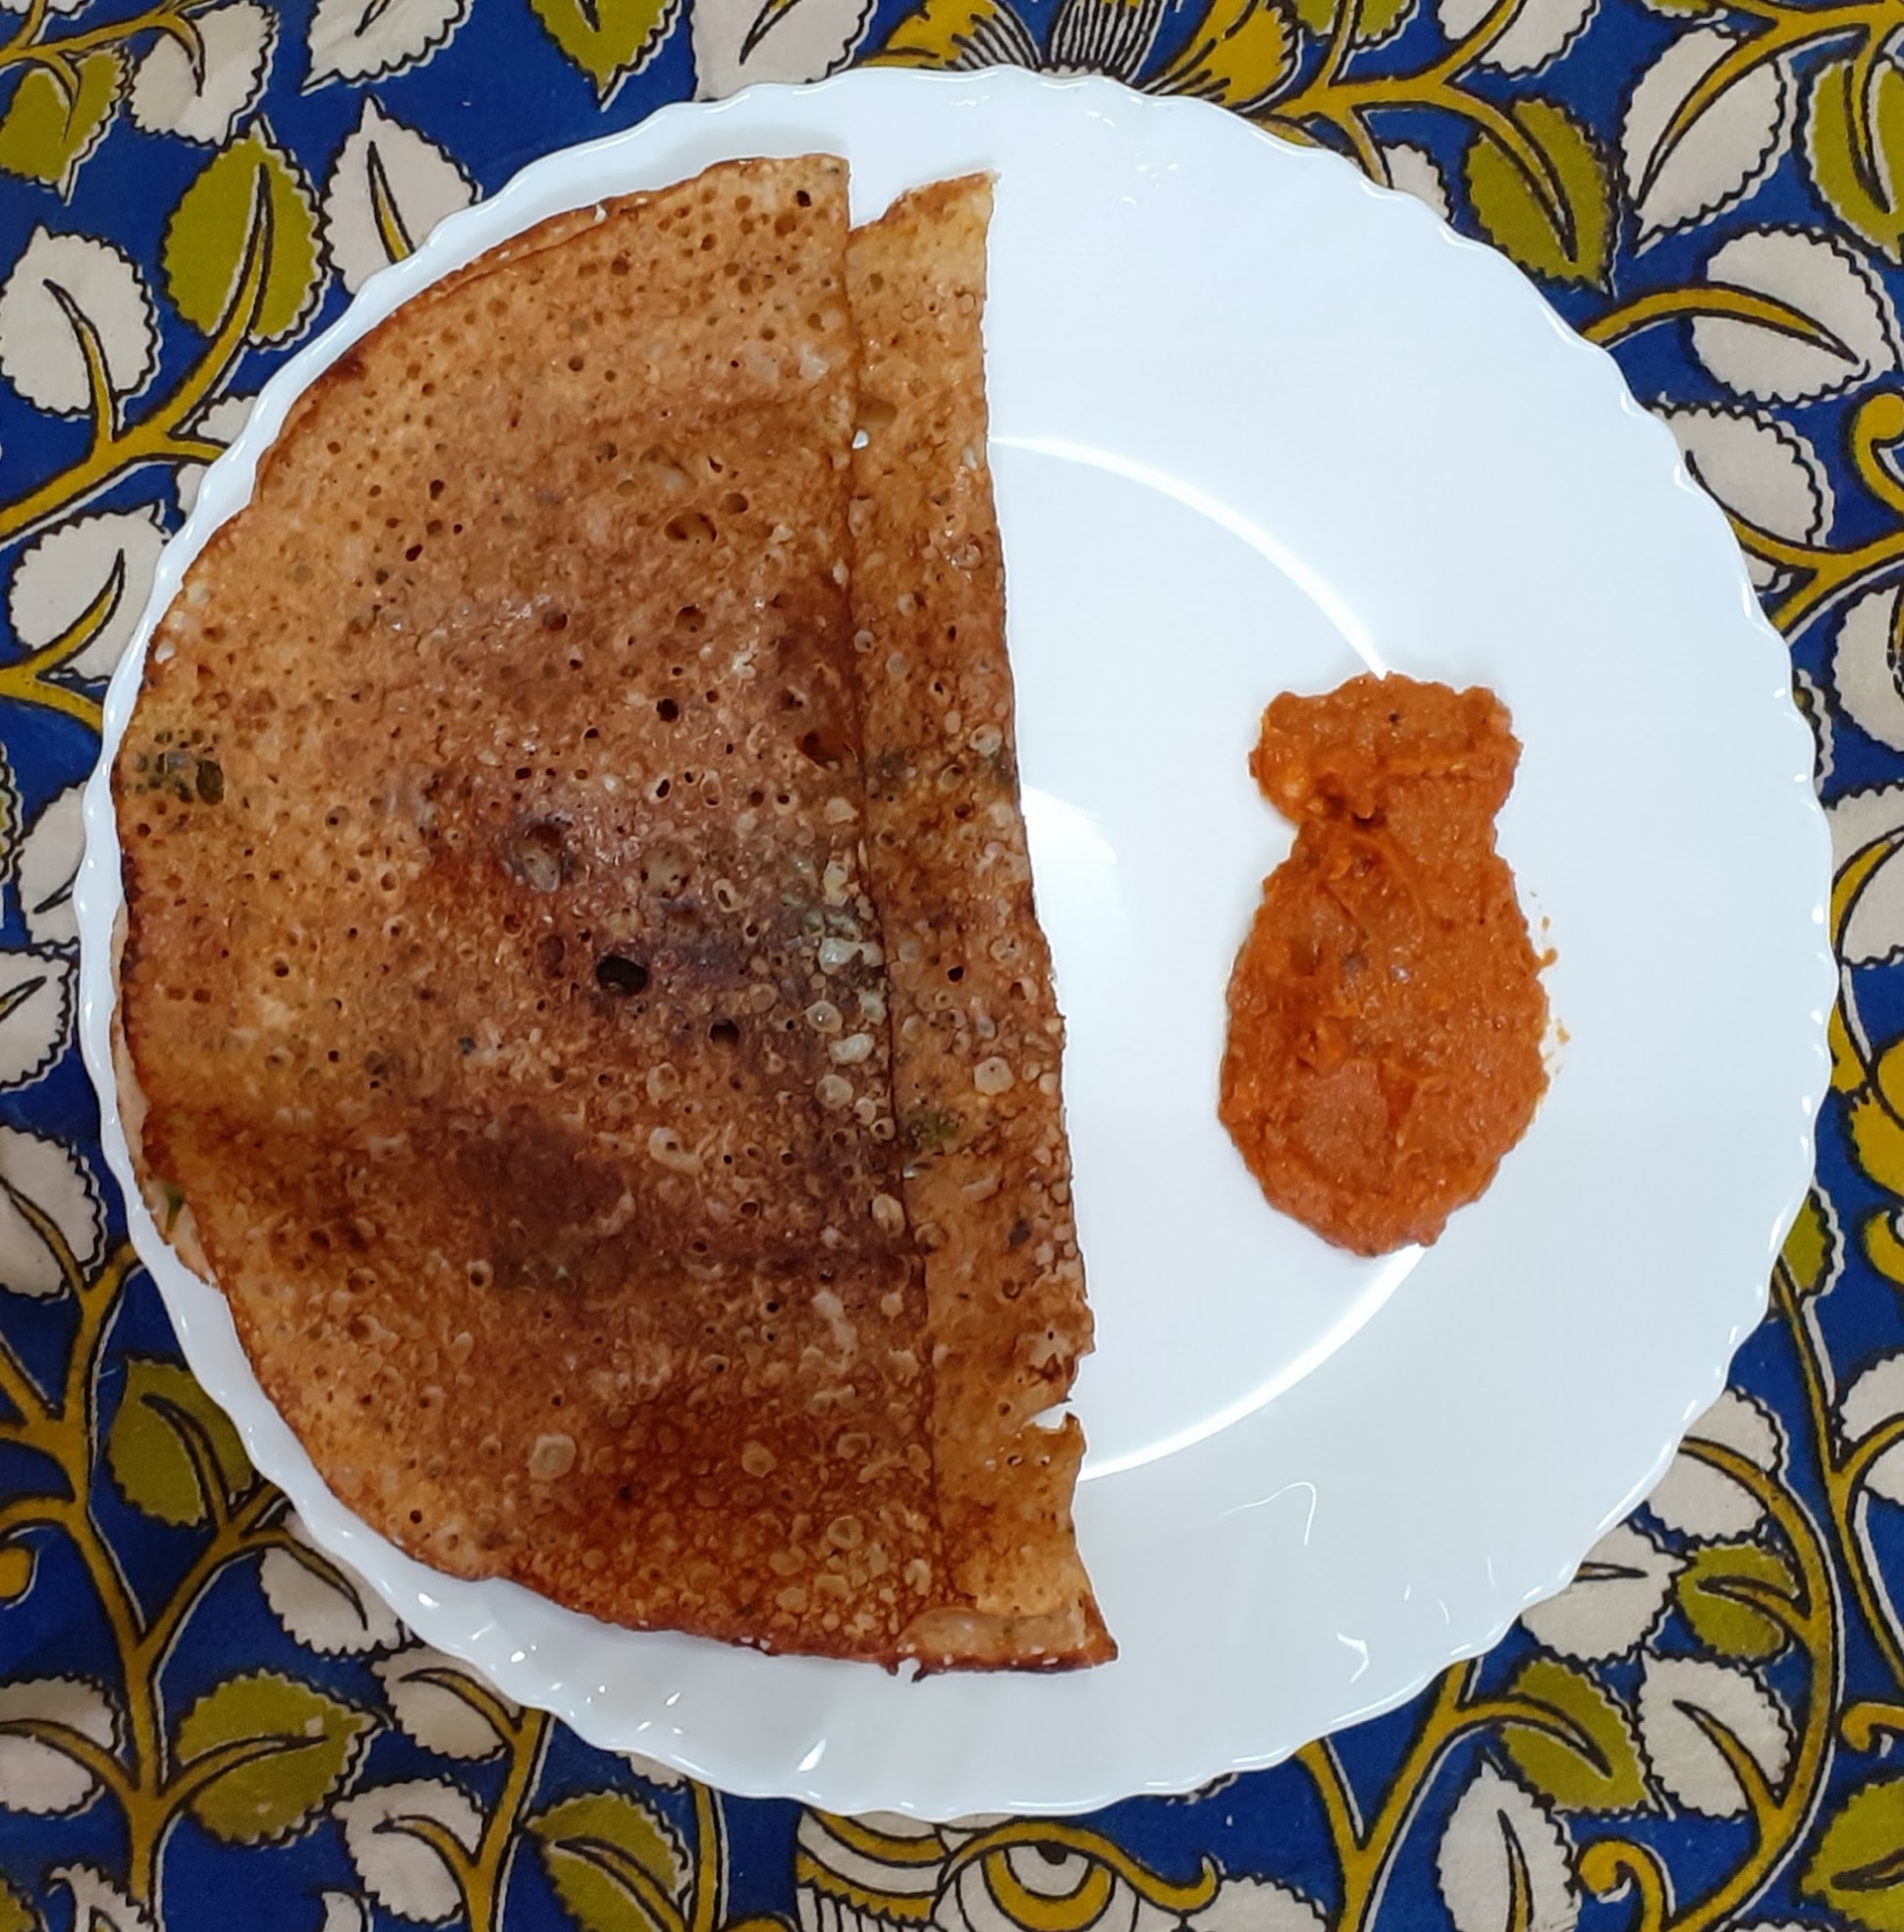
Rava Dosa
Dosas come in many varieties and these Rava Dosas are full of flavour and are crisp too. This is a foolproof recipe. In my family, we have made it this way for years and what’s more, just add any healthy millet flour to this and it will still come out well. In restaurants, this Dosa is made with Maida instead of the wheat flour. You can do that too. I’m partial to what flour so have replaced Maida/ refined flour with it.
Let’s get to the recipe right away.
PREP TIME: 10Mins COOK TIME: 40Mins
TOTAL TIME: 50 Mins COURSE: MAIN
CUISINE: SOUTH INDIAN SERVINGS: 4
AUTHOR: Rajni Ram
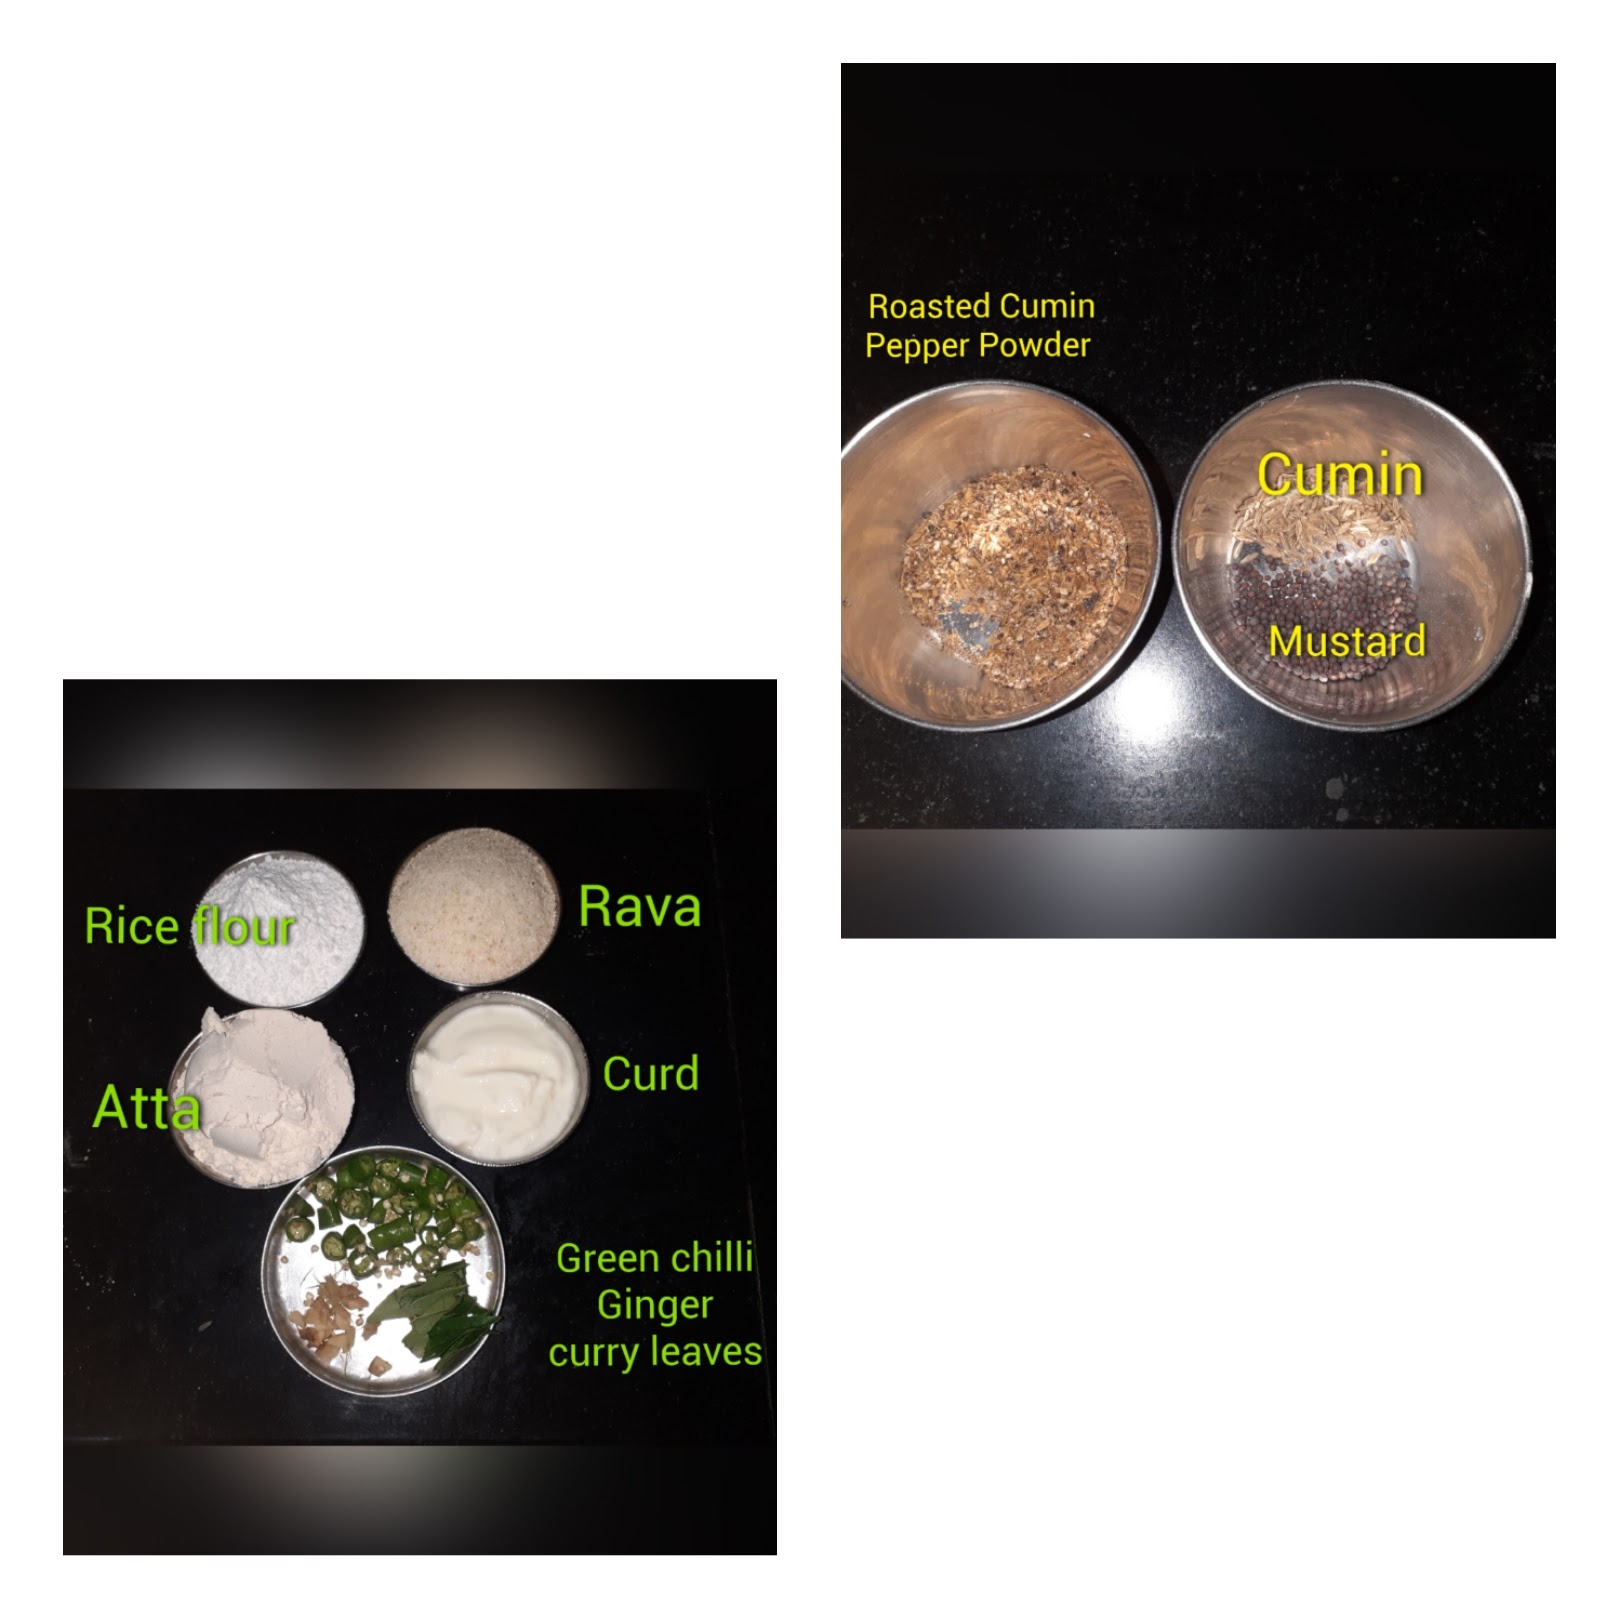
Ingredients:
Rava/ Sooji 1 cup( roasting Rava is optional, but I would recommend it) Rice flour 1 cup
Wheat flour 1 cup
Curd 1 cup
Water -around 1 litre or a little more
Roasted cumin and pepper powder
Green chillies 2
Ginger 1 inch piece
Curry leaves- few leaves cut fine
Coriander leaves finely chopped.
Salt as per taste( I used 1.5 tsp)
Directions:
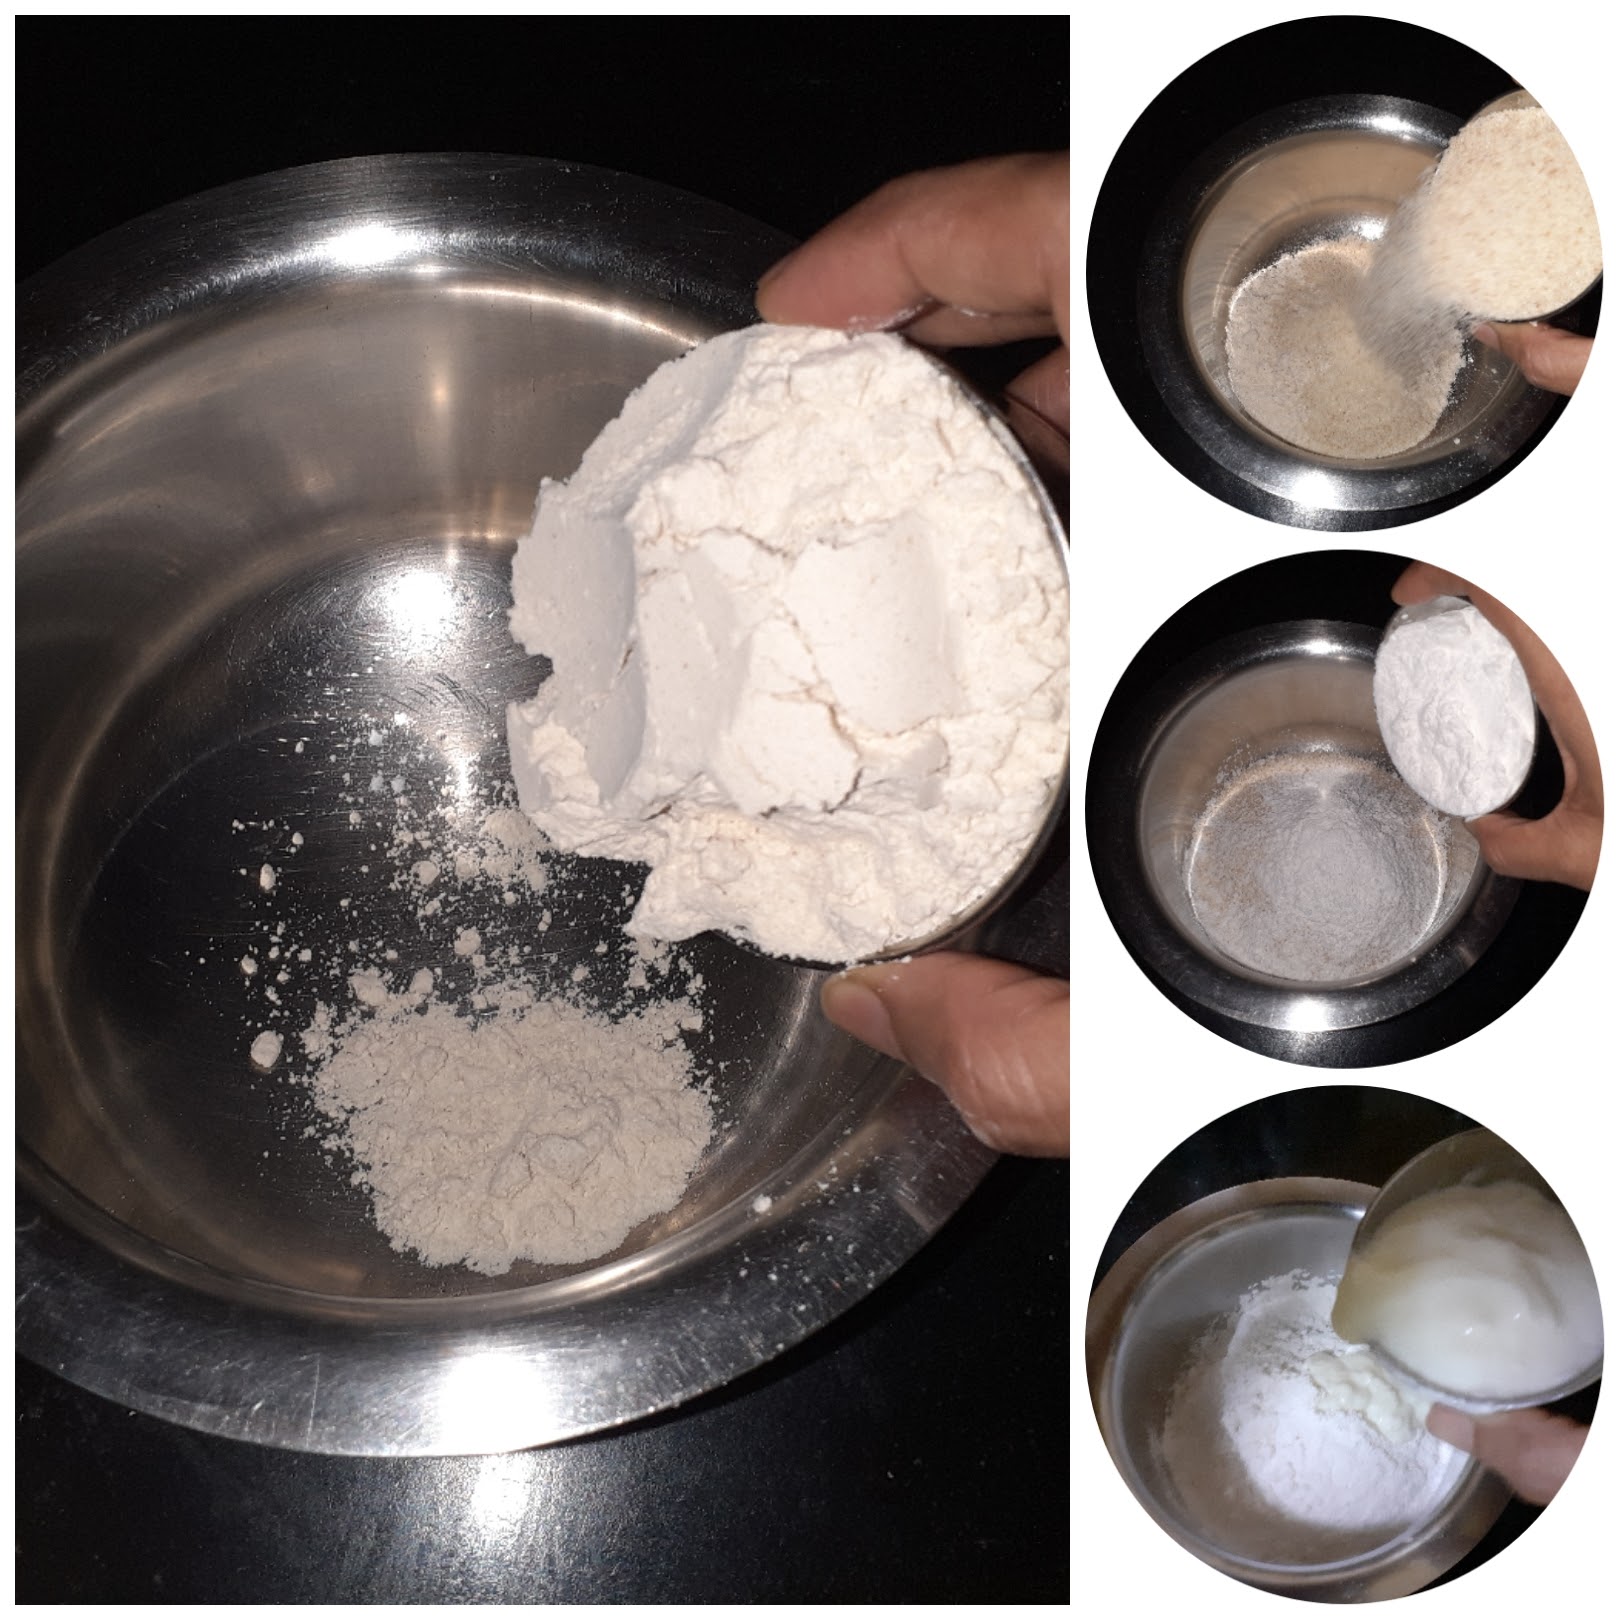
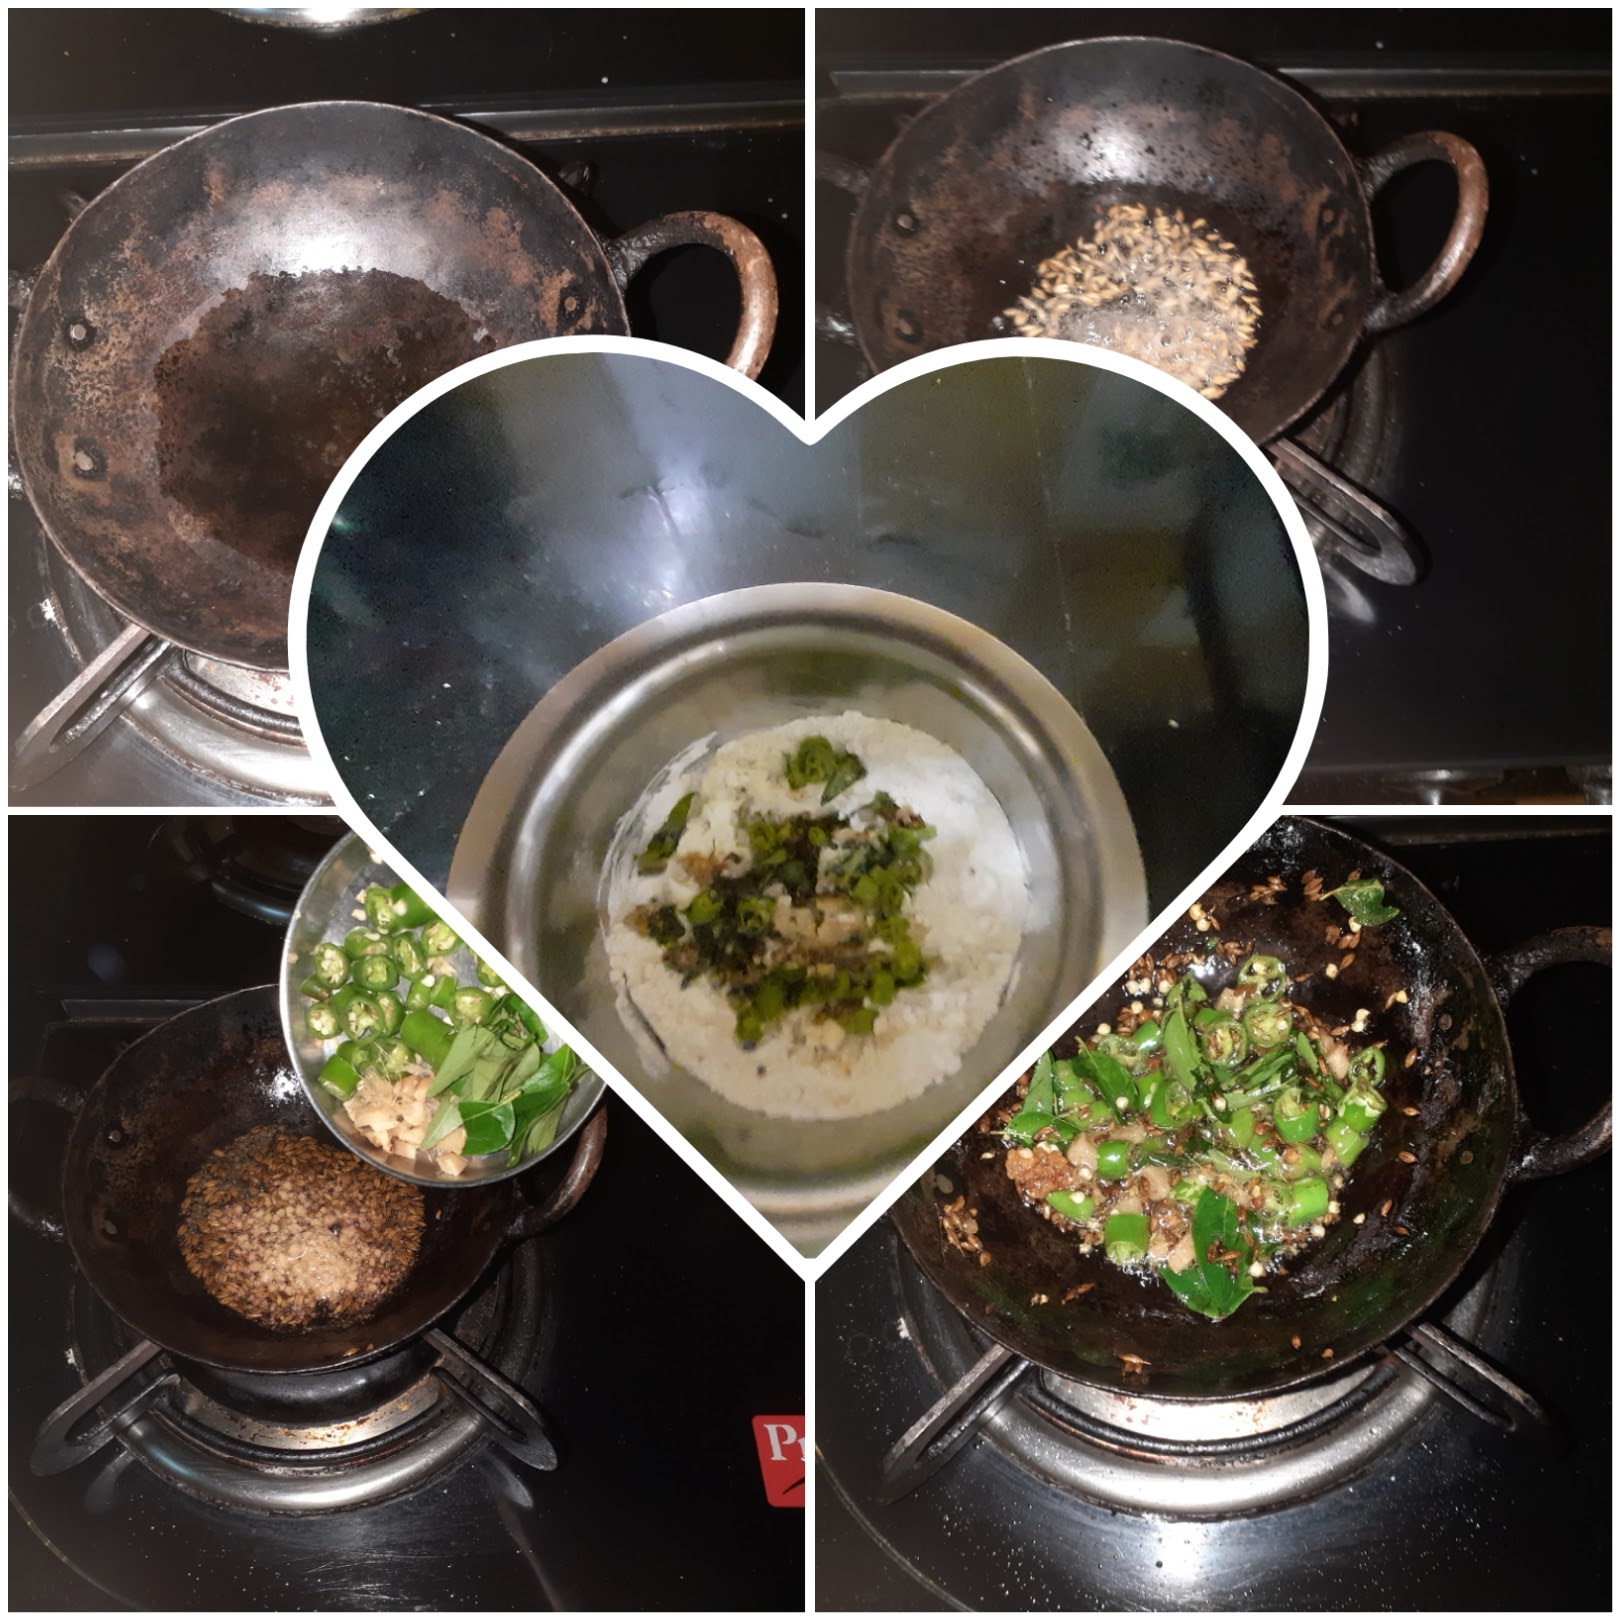
Take a 1-litre vessel. Put in all the three flours.
Add the curd to it. Add in the salt and the roasted cumin pepper powder. Add a little of the water from 1 litre and mix well forming a paste without lumps. Once that’s done mix in the remaining water little by little and stirring every now and then so lumps don’t form. Don’t pour all the water at a time. Depending on the quality of the Sooji, you might use, less too. The batter should neither be too thick nor too watery. It should be a little loose than the normal Dosa batter. Take 3 tsp oil in a small tadka karahi and heat. Add the mustard and Cumin and once they crackle put in the finely cut green chillies, ginger and curry leaves. Also, add 1/2 tsp of Hing/ Asafoetida and turn off the stove. Add this tempering to the batter. Let the batter stand for 10 mins and you are ready to pour the Dosa on the girdle. There your crispy Rava Dosa is ready. Enjoy. Bon Appetit!
STEPWISE RECIPE FOLLOWS:
1. Assemble all ingredients.
2. Take a 1-litre vessel and add in Rava/ Sooji, wheat flour and Rice flour. Add in the curd.
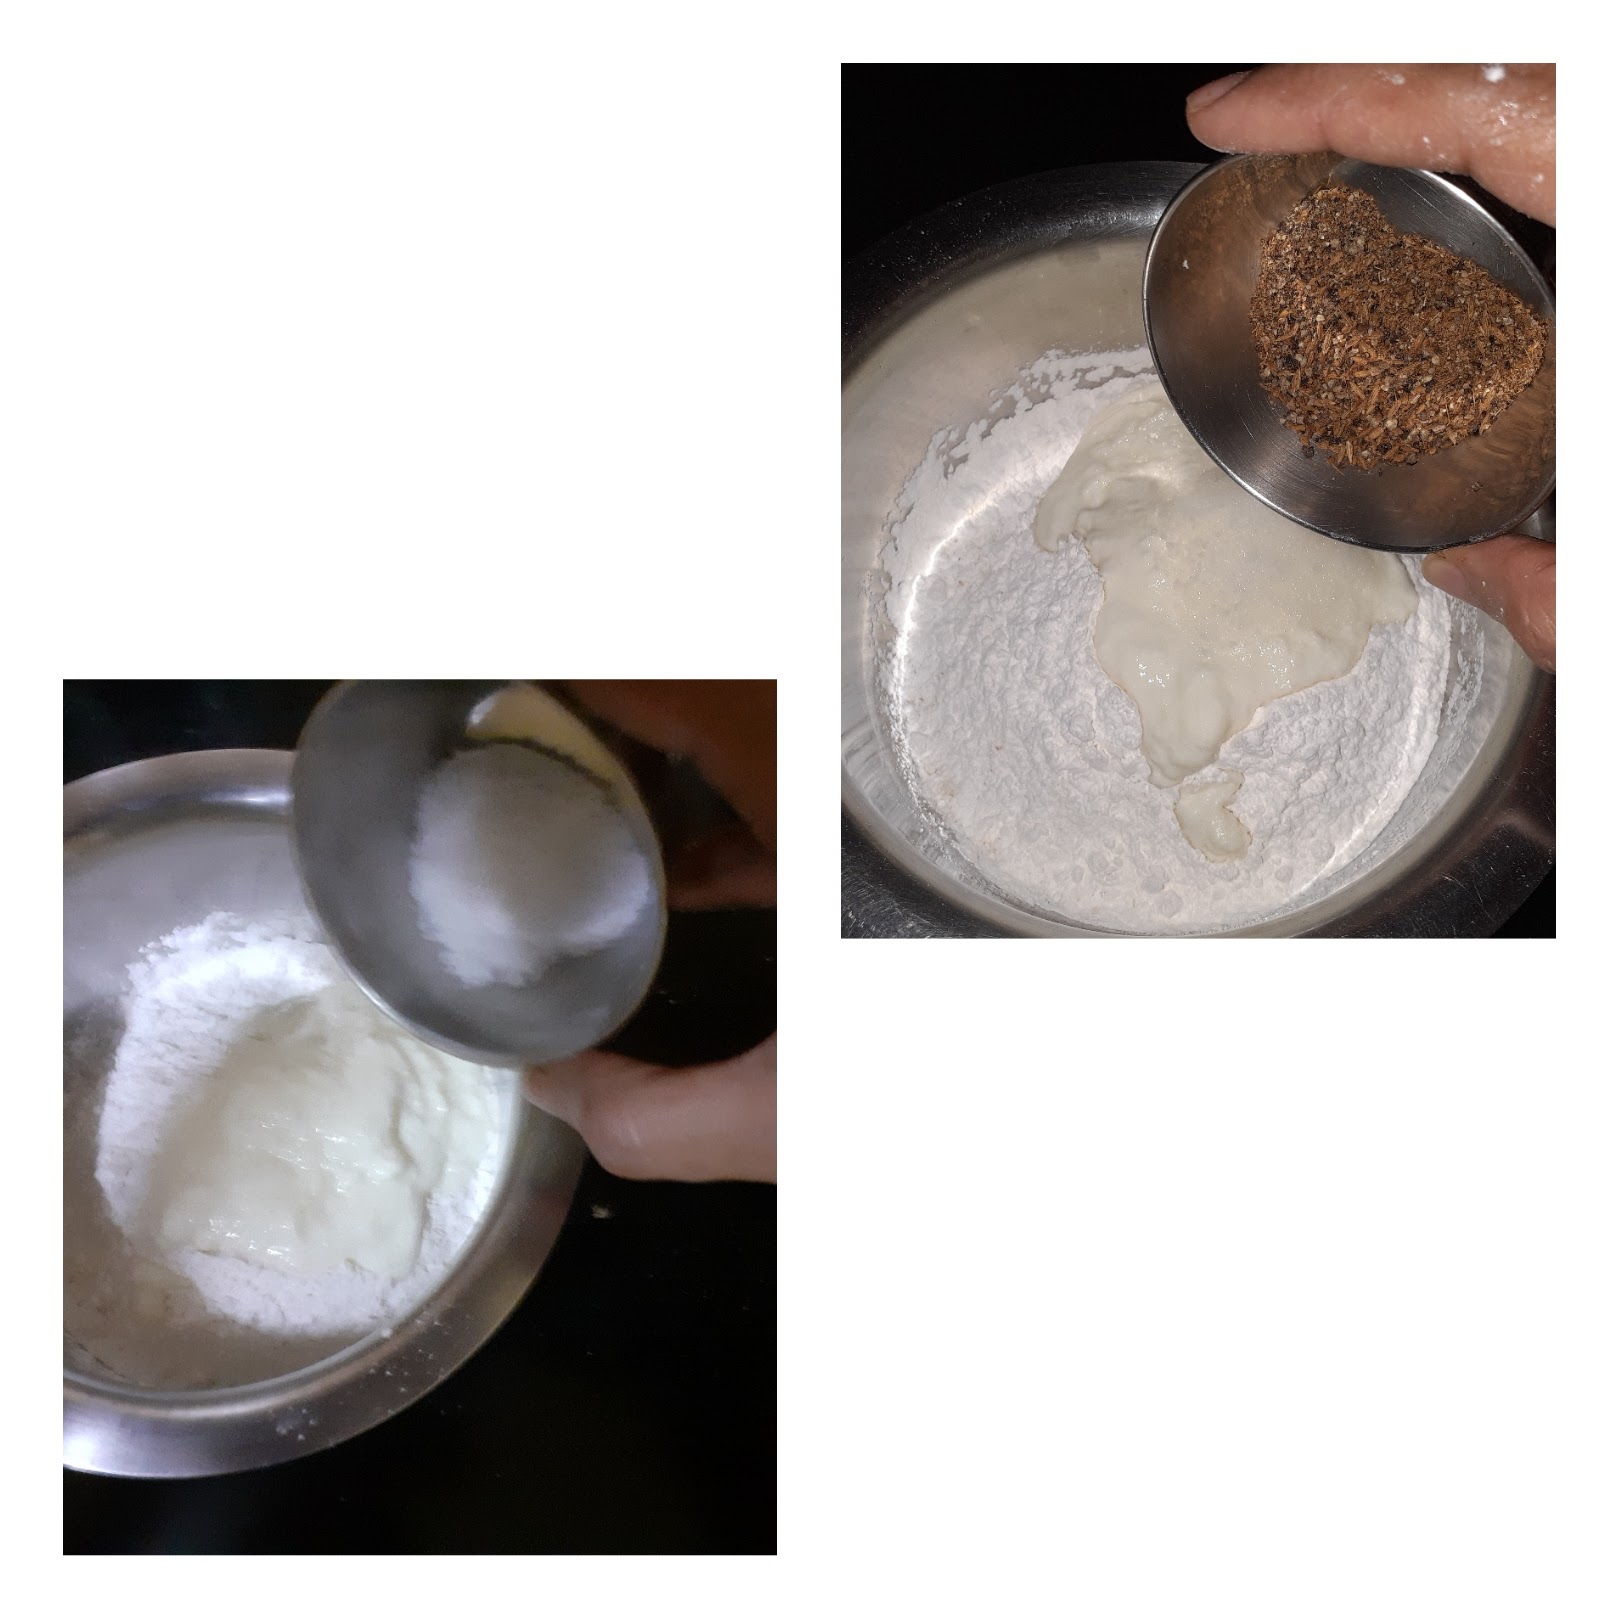
3. Add the salt and the roasted cumin- pepper powder( to make powder take 2 tsp Jeera and 1 tsp pepper and roast on low fire to get the aroma of the spices. Cool and grind coarse).
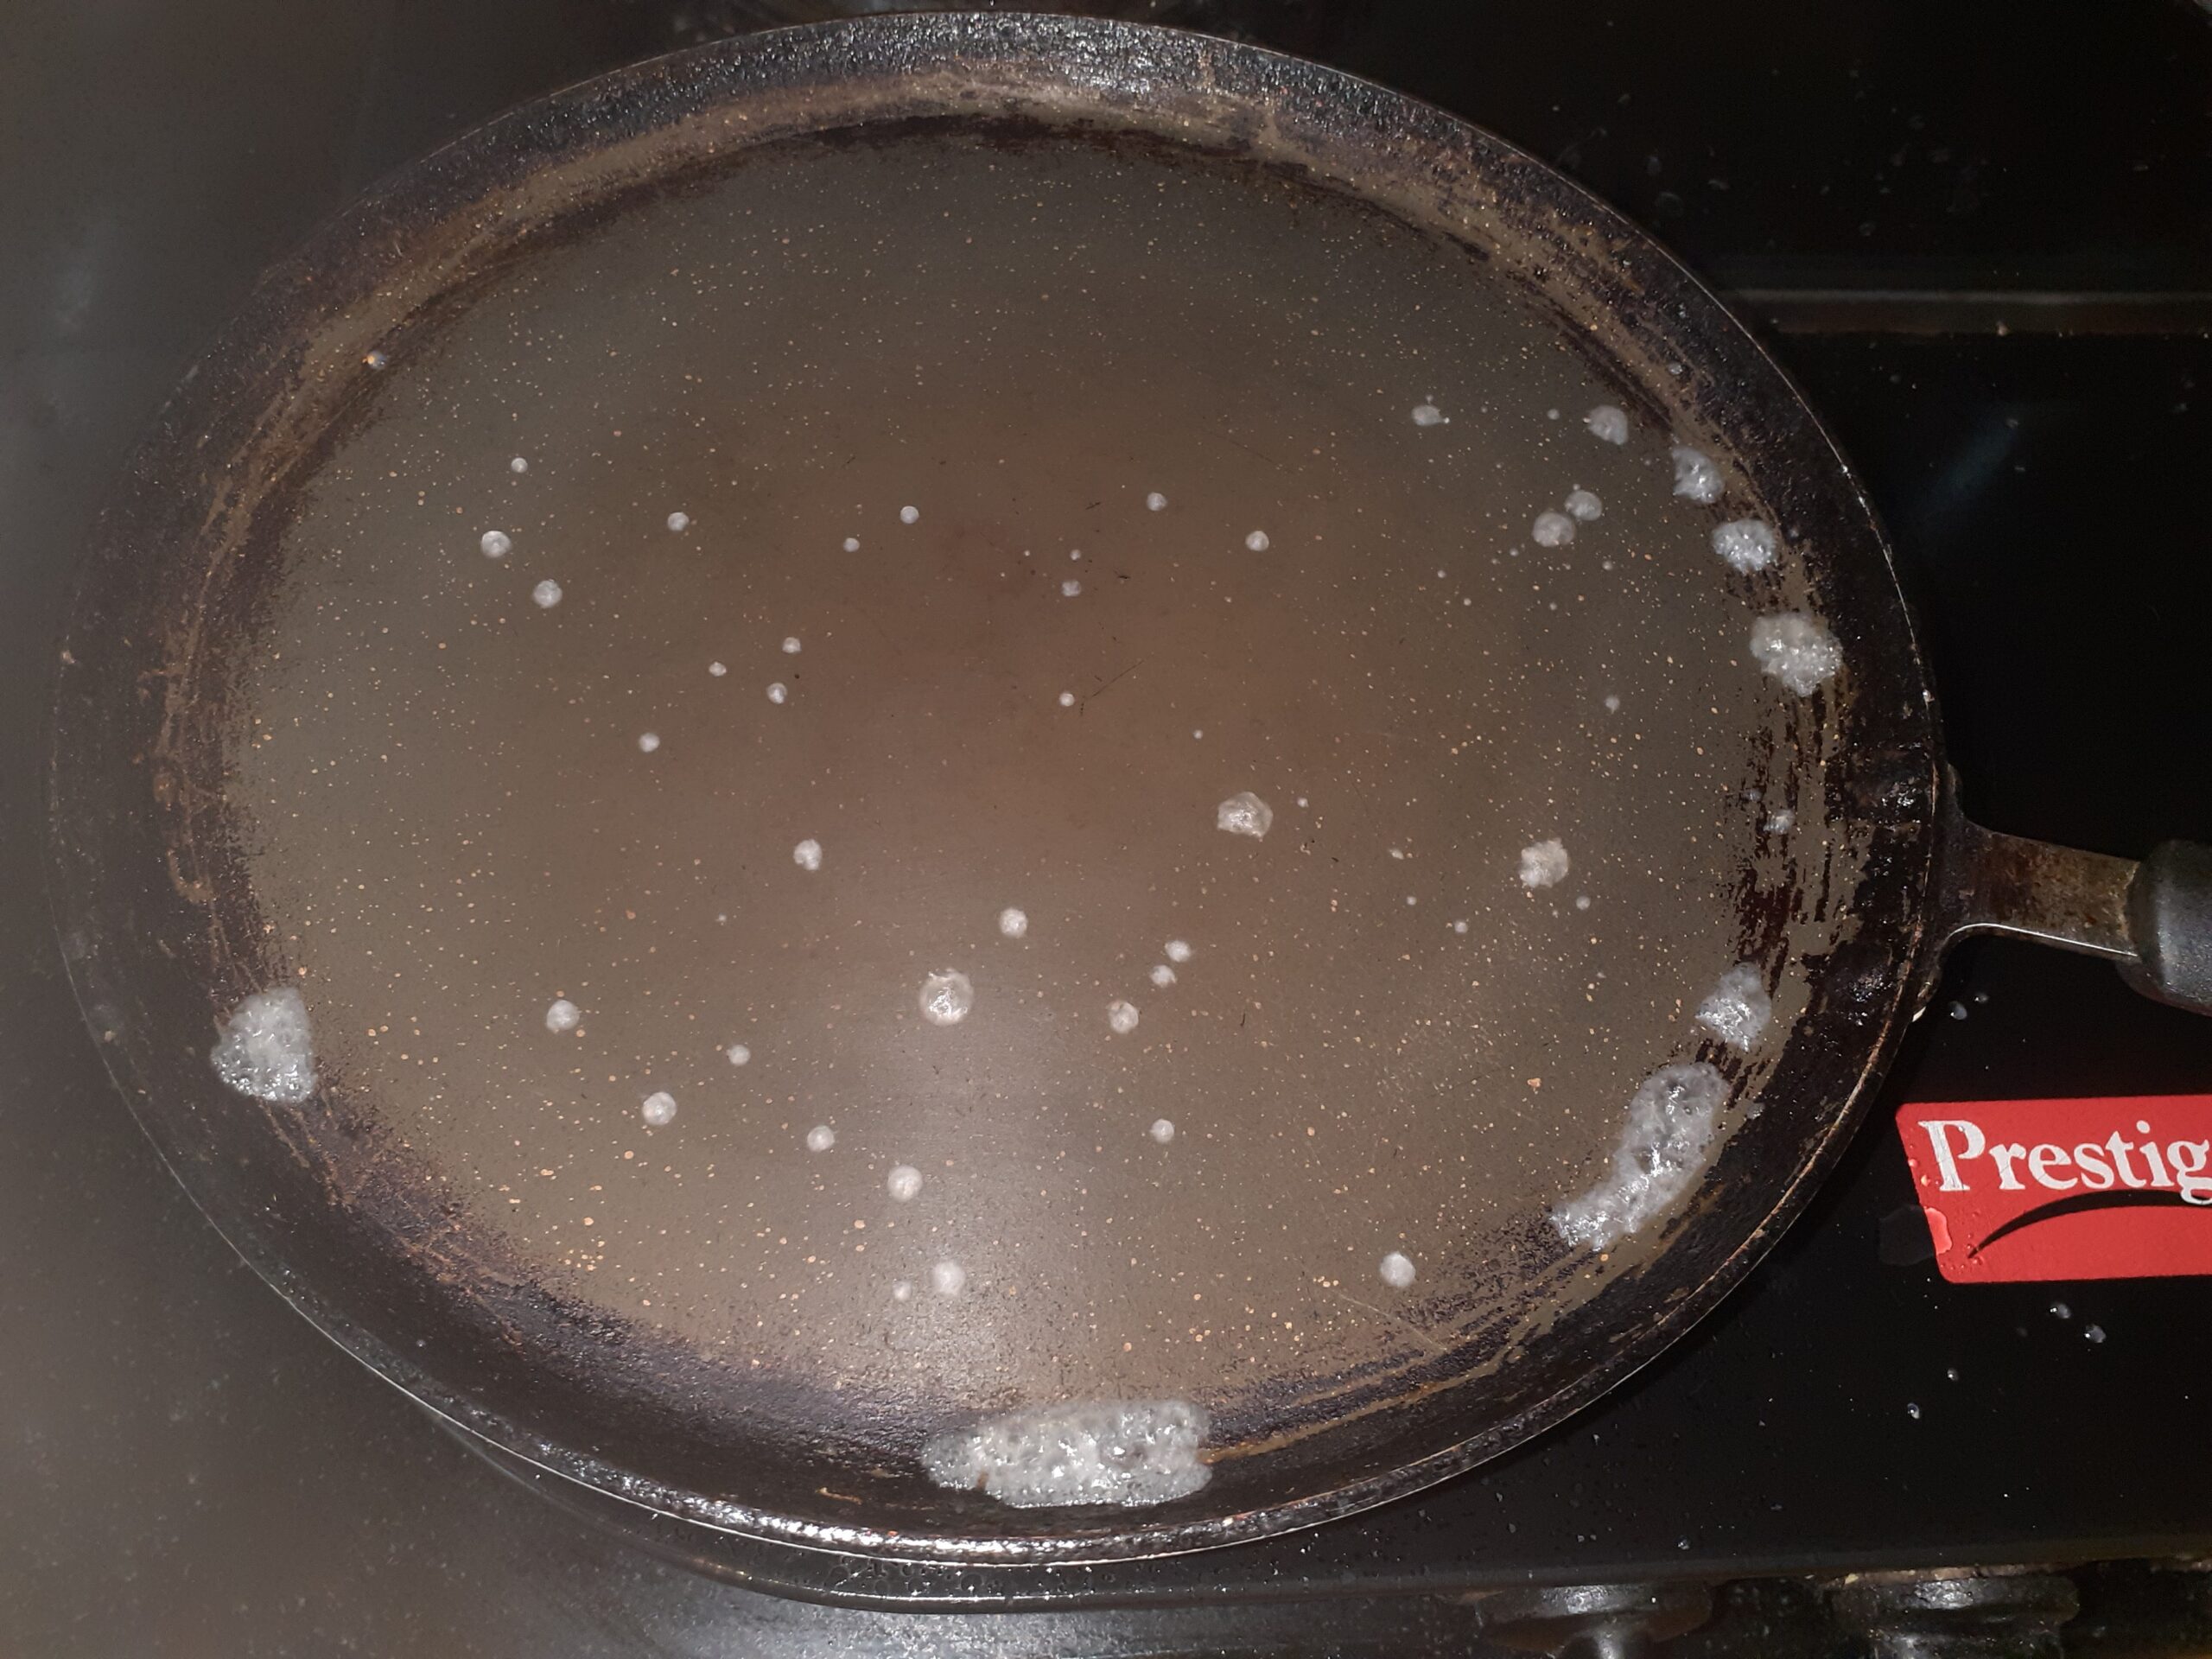
4. Add water( up to 1 litre) little at a time and stirring constantly so that no lumps are formed. Pour the remaining water until you achieve the consistency shown in the picture( a little thinner than the regular Dosa).
5. Take oil in a small tadka karahi. Add the mustard and cumin seeds. When they crackle add the cut green chillies, ginger and curry leaves. Add Asafoetida too and crush a little. Pour this tempering into the batter. Add the chopped coriander and let the batter stand for 10 mins atleast. There your batter is ready.
6. To make crispy Dosas, put a girdle on the Tava( I used a non-stick one). The girdle has to be really hot or else your dosa will be lumpy.
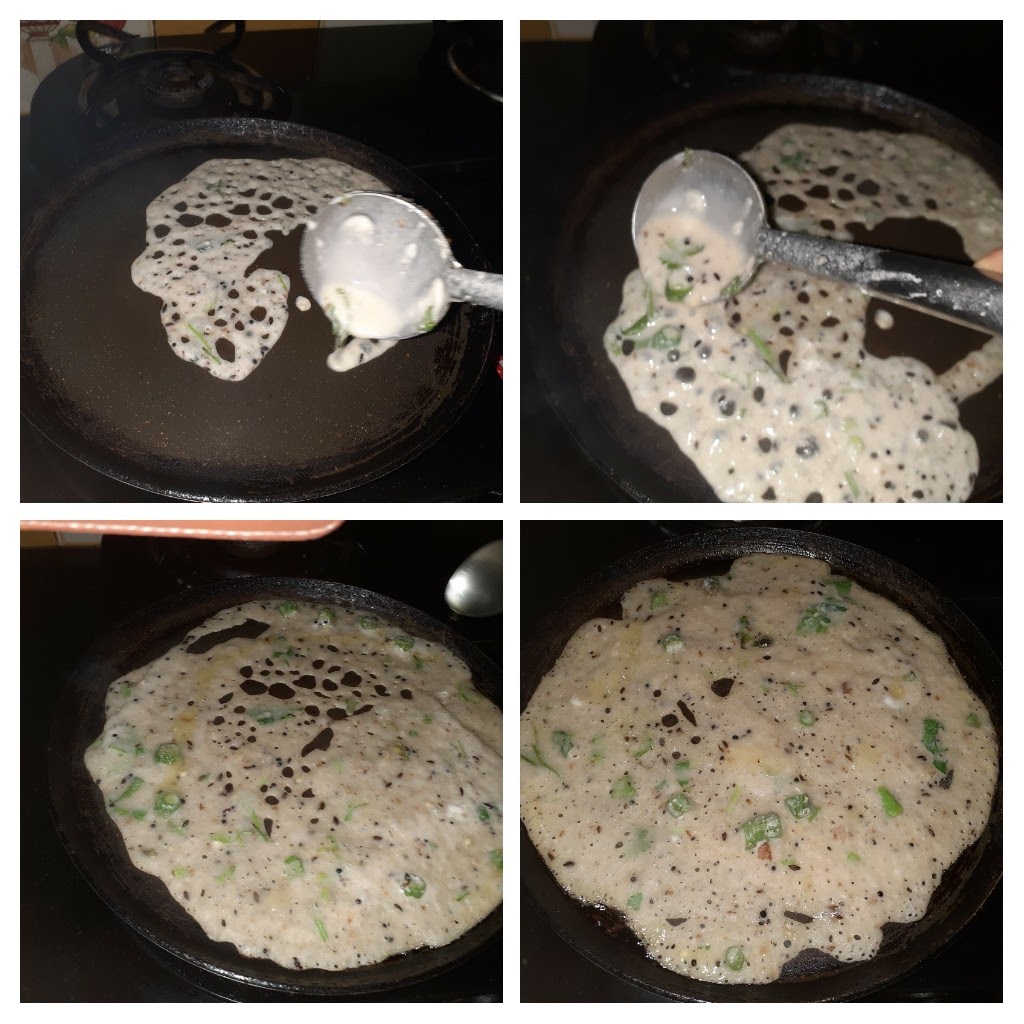
7. Now pour the batter on the girdle forming a circle. You cannot spread the batter like the regular dosa, you’ll have to pour it as shown in the picture. Drizzle oil over the Dosa and cook.
8. Cook until it becomes crisp and is a golden brown, then flip over and cook again. If you want it crisper be generous with the oil.
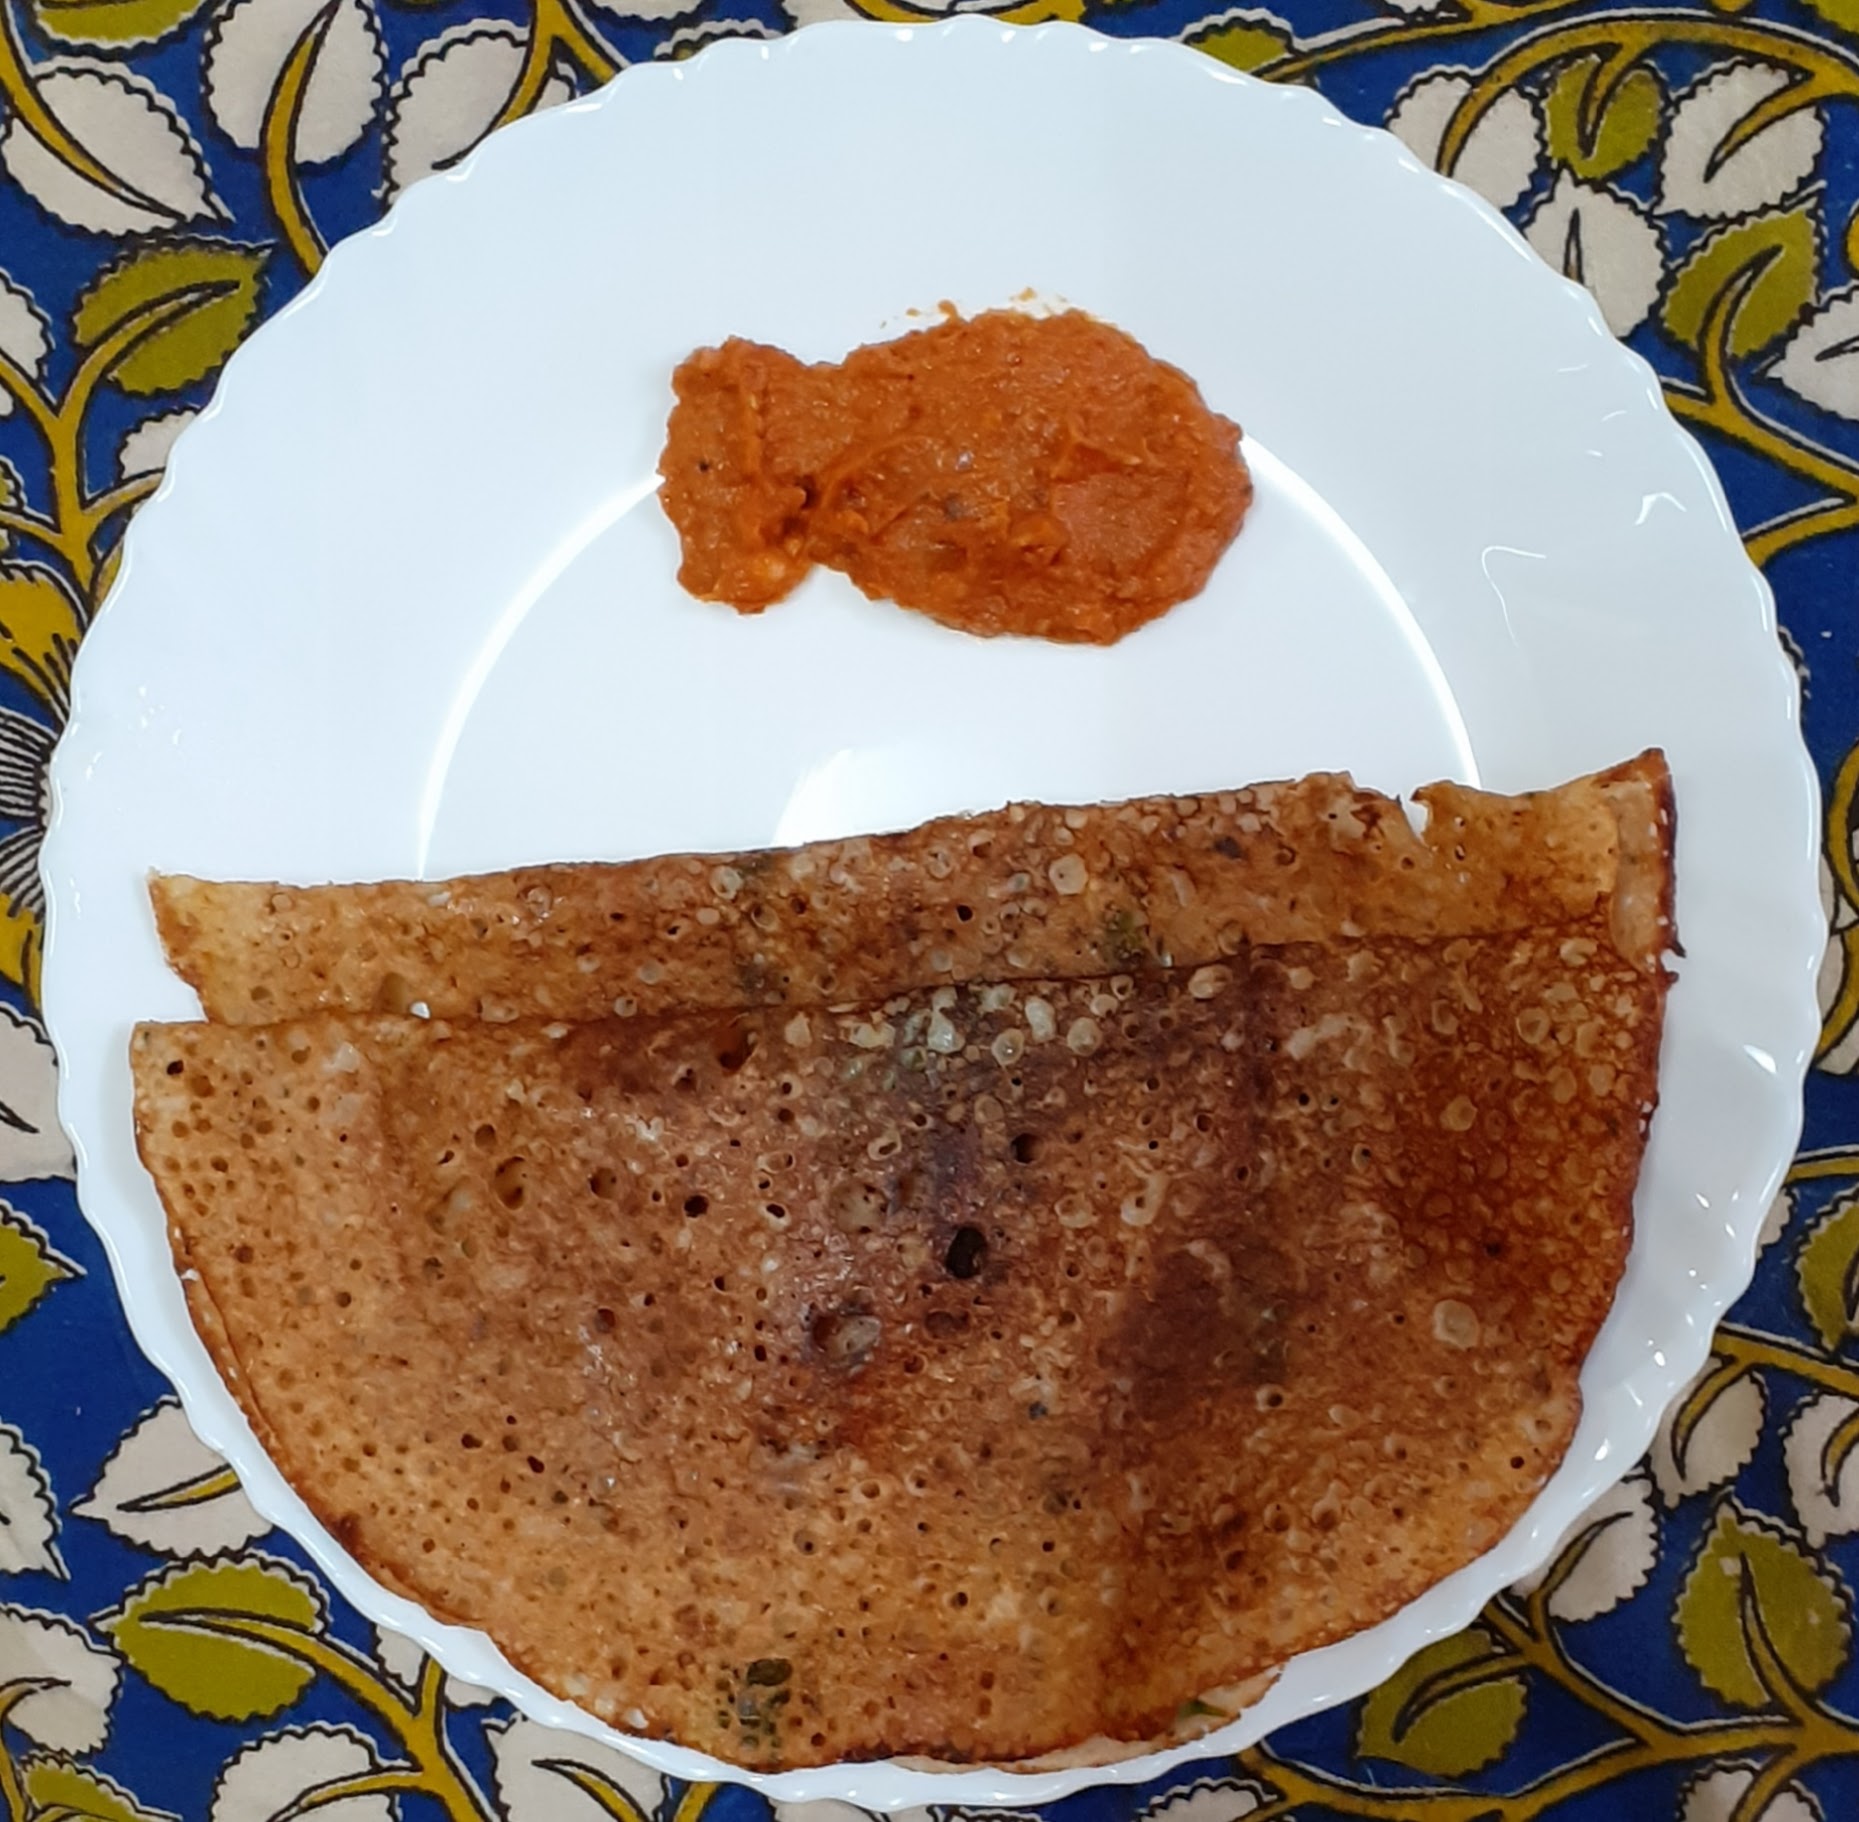
Your crisp Rava Dosa is ready. Enjoy with chutney( check out the recipe in chutney section) and idli podi ( check out the recipe in powders section).
NOTES:
1. As said earlier it’s a foolproof batter and won’t let you down. Just stick to the measurements.
2. Rava Dosa is usually made with Maida in restaurants as it gives that extra crispy edge, feel free to use that too. Since I am partial to wheat flour have replaced Maida with it.
3. Instead of wheat flour or Maida, you can use Ragi flour, Jowar flour or any other millet flour and the Dosa will still come out well.
4. If you are sceptical of replacing the wheat flour with any millet flour, just add a cup of millet flour along with the other flours. That works too.
5. Be generous with the oil for crisp Dosas and be patient. Unlike the regular Dosas, they take a little longer to cook and get crisp, and the patience will be worth it.
6. It’s important to get the girdle quite hot. Do the little test of sprinkling water on your girdle when it’s hot. If the water evaporates very quickly, that’s the right heat. You can start pouring the batter on the girdle.
If you tried this recipe and liked it please comment below. Would love to hear from you.
Dal Makhni 2 ways
Dal Makhni or Dal Makhani is one of the all-time favourite dishes of my family, whenever we are at a North Indian joint. So I have tasted many versions of it and used to make this recipe at one point in time with cream, as most recipes suggest. I found the dal to be heavy when made this way and then I chanced upon the recipe for Dal Makhni that I’m blogging now on a spice packet, I tried it and it tasted almost like the restaurant ones, so have been following this recipe for a long time now.
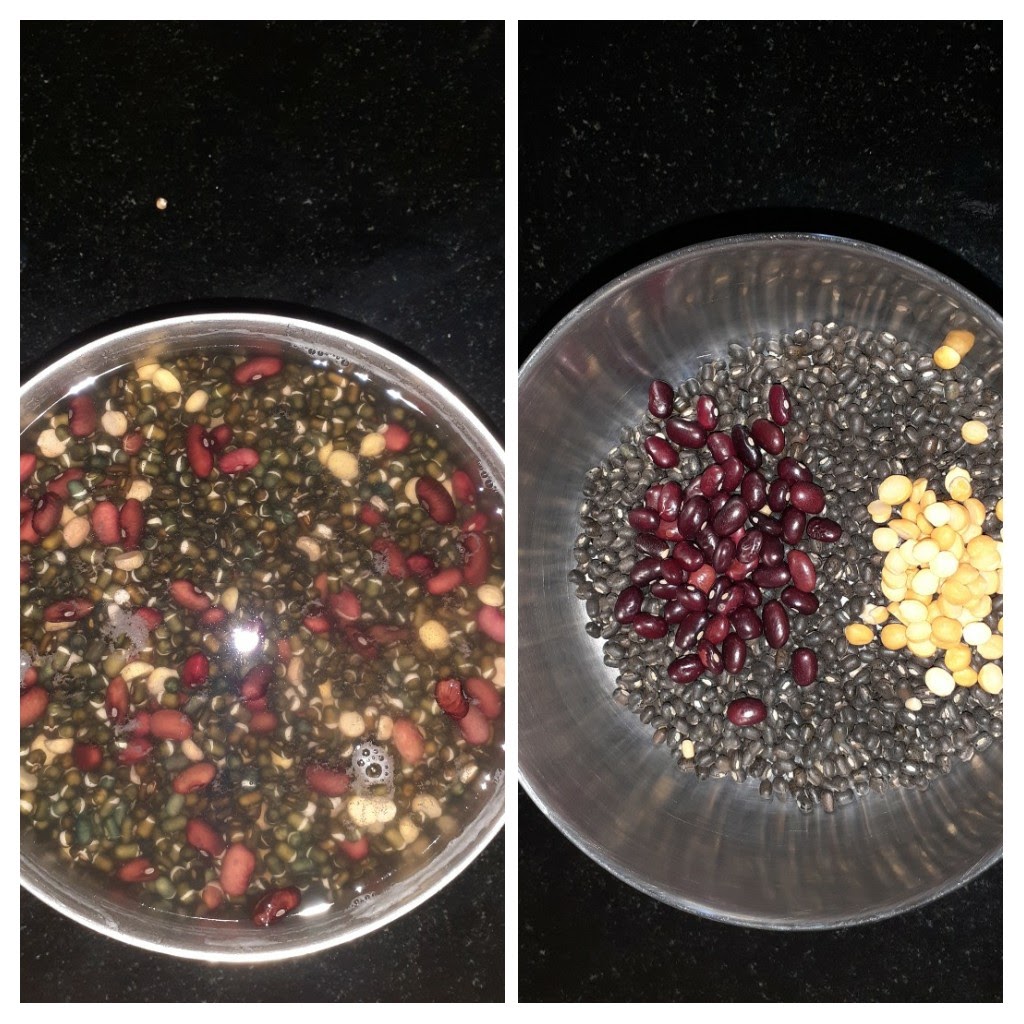
Dal Makhni is a dish from Punjab and the main ingredients are black lentils( Black Urad dal whole) Rajma, butter and other spices and condiments. It gets the creamy texture and taste from butter and slow cooking. The longer you cook it on low fire, the tastier. That said, this dal can be made without butter/ cream too. And it tastes all the same.
While you are here please checkout my other recipes like Choley, Pakode wali Dal,
Black Whole Urad 200 gm ( black lentils) Soaked overnight
Rajma 1 handful (soaked overnight)
Chana dal 1 tbsp.
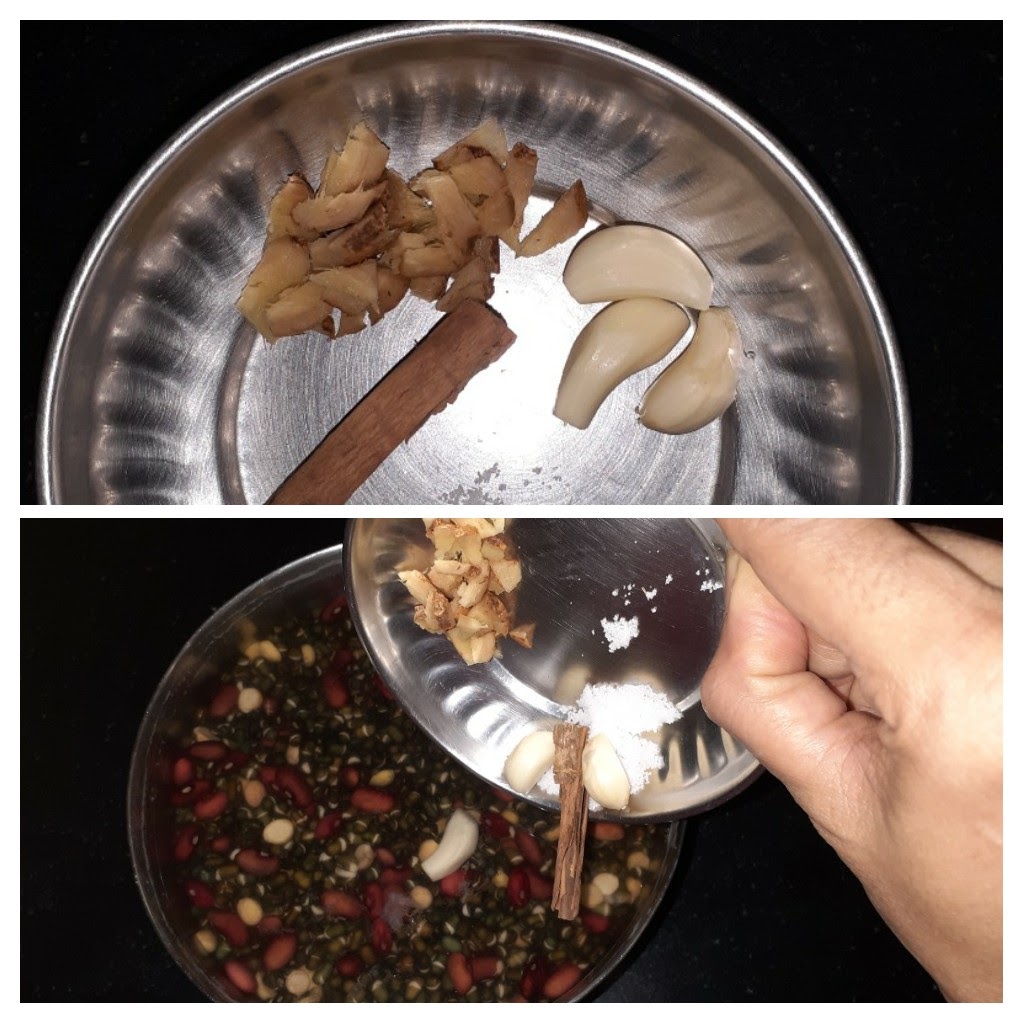
Garlic 8 pods (finely chopped)
ginger 1-inch piece chopped
Butter 2 tbsp
Tomato 3 medium pureed
Salt as per taste
Red chilli powder 1 tsp( more if you like it spicy)
Dal makhani masala 1.5 tbsp
Kasoori Methi 1 tsp crushed
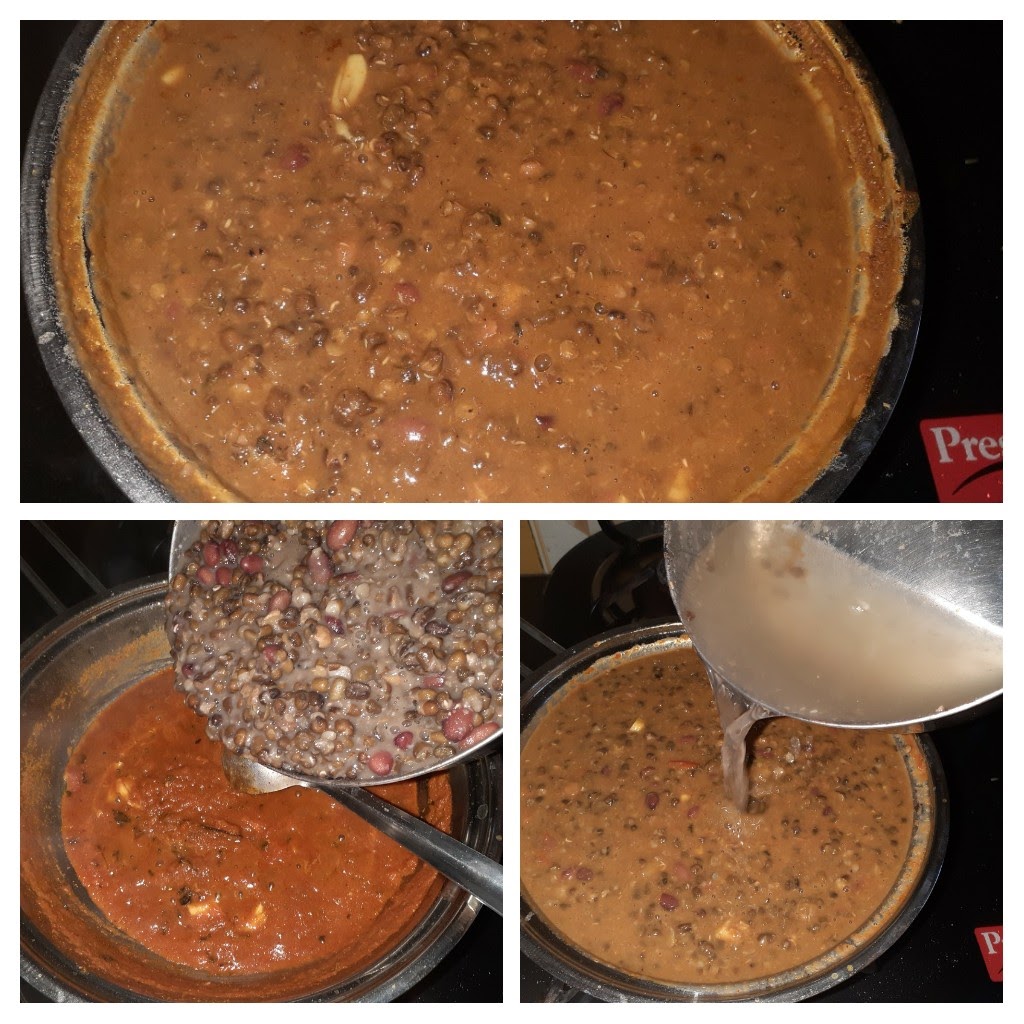
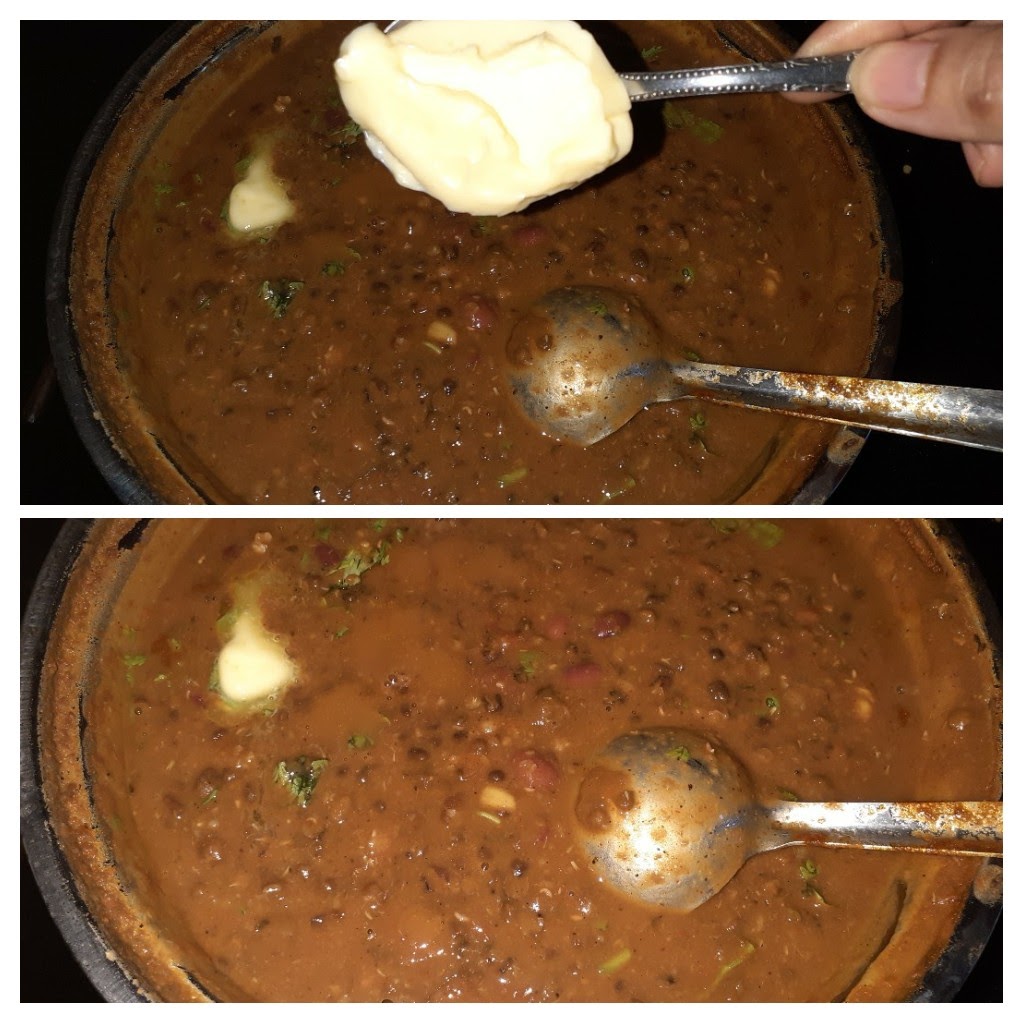
Directions: Soak the Black Urad, Rajma and Chana dal overnight. Once soaked put them in a pressure cooker with 2 pods of garlic and the ginger and cook for 6 to 8 whistles. Heat 1 tbsp butter in a pan and heat. Put in the Cinnamon stick and garlic and fry don’t brown them. Add in the Kasoori Methi and fry for half a minute. Now add the tomato puree and cook for 3 minutes. Add in the Dal Makhni masala, Red chilli powder, salt and cook until the butter floats. Lightly mash the cooked dals and add them to the tomato mixture. Stir nicely and add 2 cups water and reduce the heat and cook on low fire for about 25 to 30 minutes. Switch off the stove and add another tablespoon of butter and garnish with finely chopped coriander. Creamy Dal Makhni is ready to serve. This Dal goes really well with Parathas, Roti, Jeera rice and other Indian bread. Enjoy and Bon Appetit.
STEPWISE RECIPE FOLLOWS:
1. Assemble all ingredients. Soak the dals overnight.
2. Cook the soaked dal in a pressure cooker along with some garlic and the ginger and a piece of cinnamon stick for 8 to 10 whistles.
3. Take some butter in a pan and heat. Put in the Cinnamon stick and garlic and fry for 1/2 a minute. The garlic must not turn brown. Add in the crushed Kasoori Methi and fry for a minute.
4. Now add in the pureed tomatoes followed by salt, red chilli powder and Dal Makhani masala and cook. Cook until the butter floats/ forms a layer on top.
5. Now add the cooked dal, stir nicely and add 2 cups of water and cook on low fire for 25 to 30 minutes.
6. After 30 mins put off the stove and add a tablespoon( or more)of butter to the dal and garnish with chopped coriander.
NOTES:
1. The Chana dal gives the creaminess to this dish, so don’t do away with it, at the same time don’t put too much of it or the taste may vary.
2. If you don’t have Dal Makhni Masala, use a small quantity of garam masala. For the measures that are given above 2 tsp garam masala should be sufficient.
3. Adding Kashmiri red chilli powder will give the dish a good colour. I have added a mix of both regular red chilli powder and Kashmiri red chilli powder, so that spice and colour are balanced.
If you tried this recipe and liked it please comment below. I would love to hear from you.
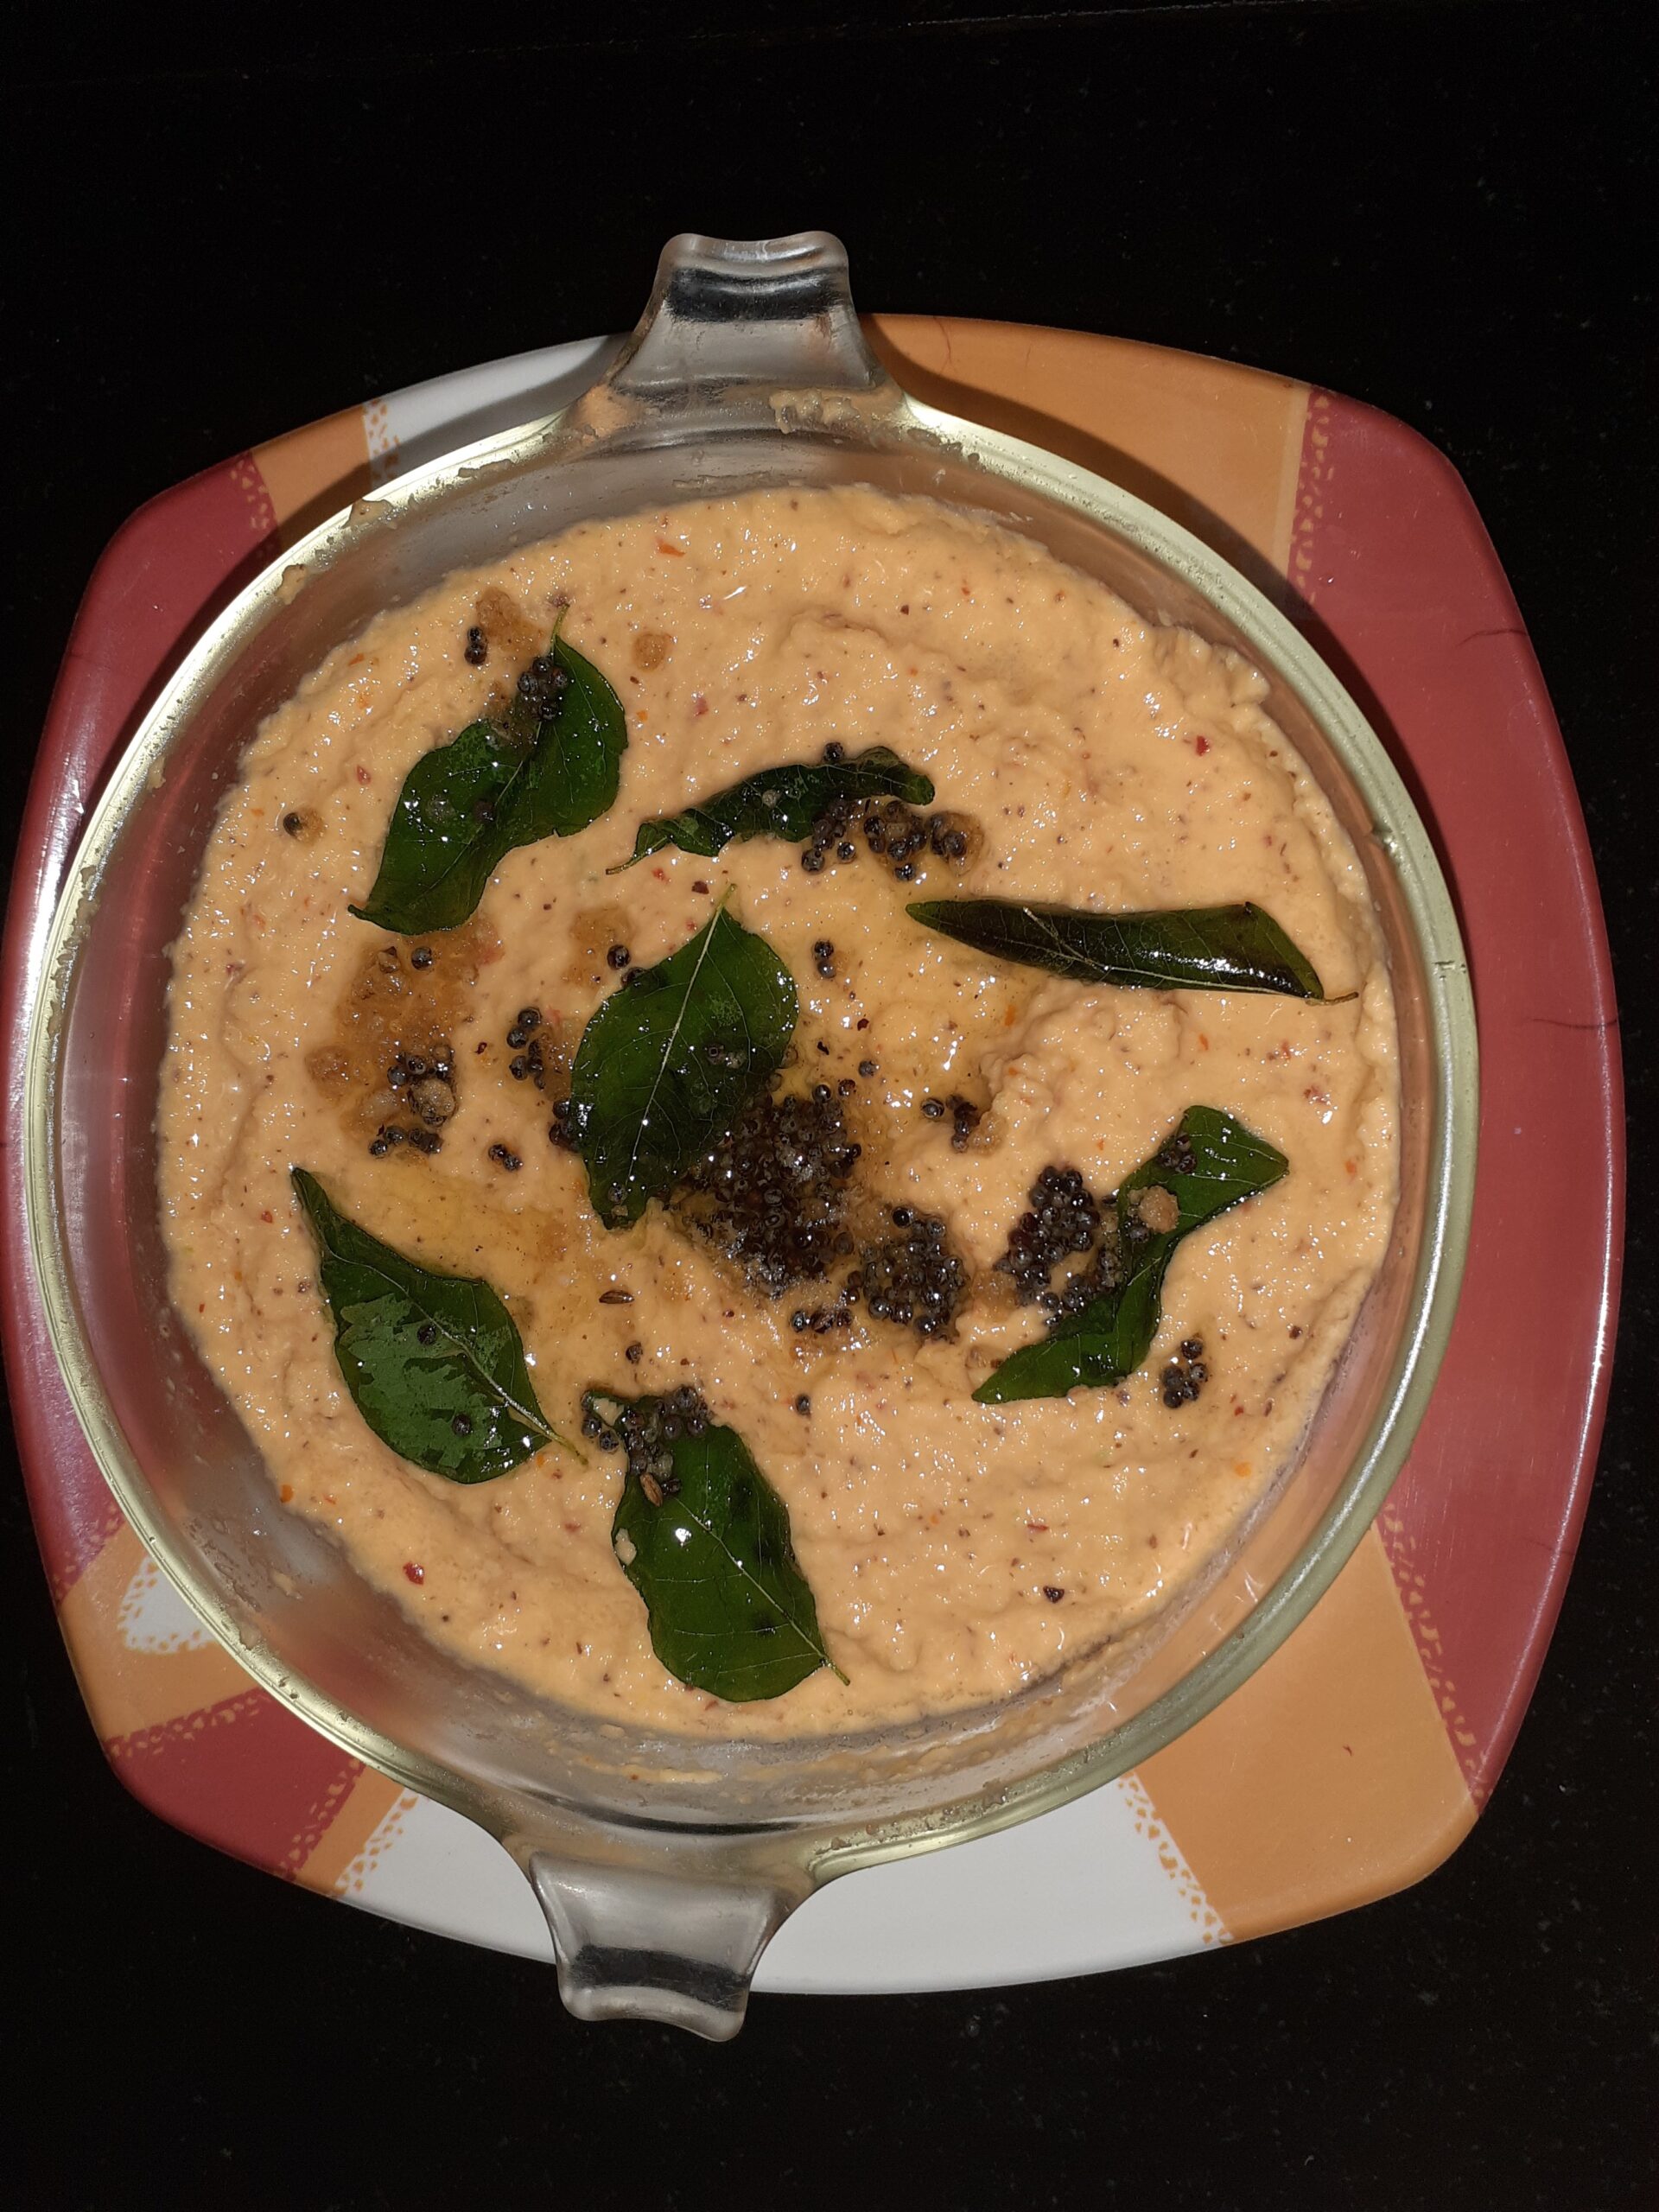
Coconut Tomato Chutney
This chutney is very easy to make. I have added Tomato for the freshness and tang and so you don’t have to add either tamarind or lemon as in the regular coconut chutney. Goes really well with Idli, Dosa, Pongal, Paniyaram etc.
In a blender put in the fresh coconut, fried chana dal, green chillies and dry grind to a coarse paste. Add some salt as per taste and add in the chopped tomatoes and now grind to a fine paste. Add in some water to adjust consistency and give it a nice spin in the blender. The Coconut tomato chutney is ready to be served with Idli, Dosas, Pongal, etc. Enjoy. Bon Appetit.
STEPWISE RECIPE FOLLOWS:
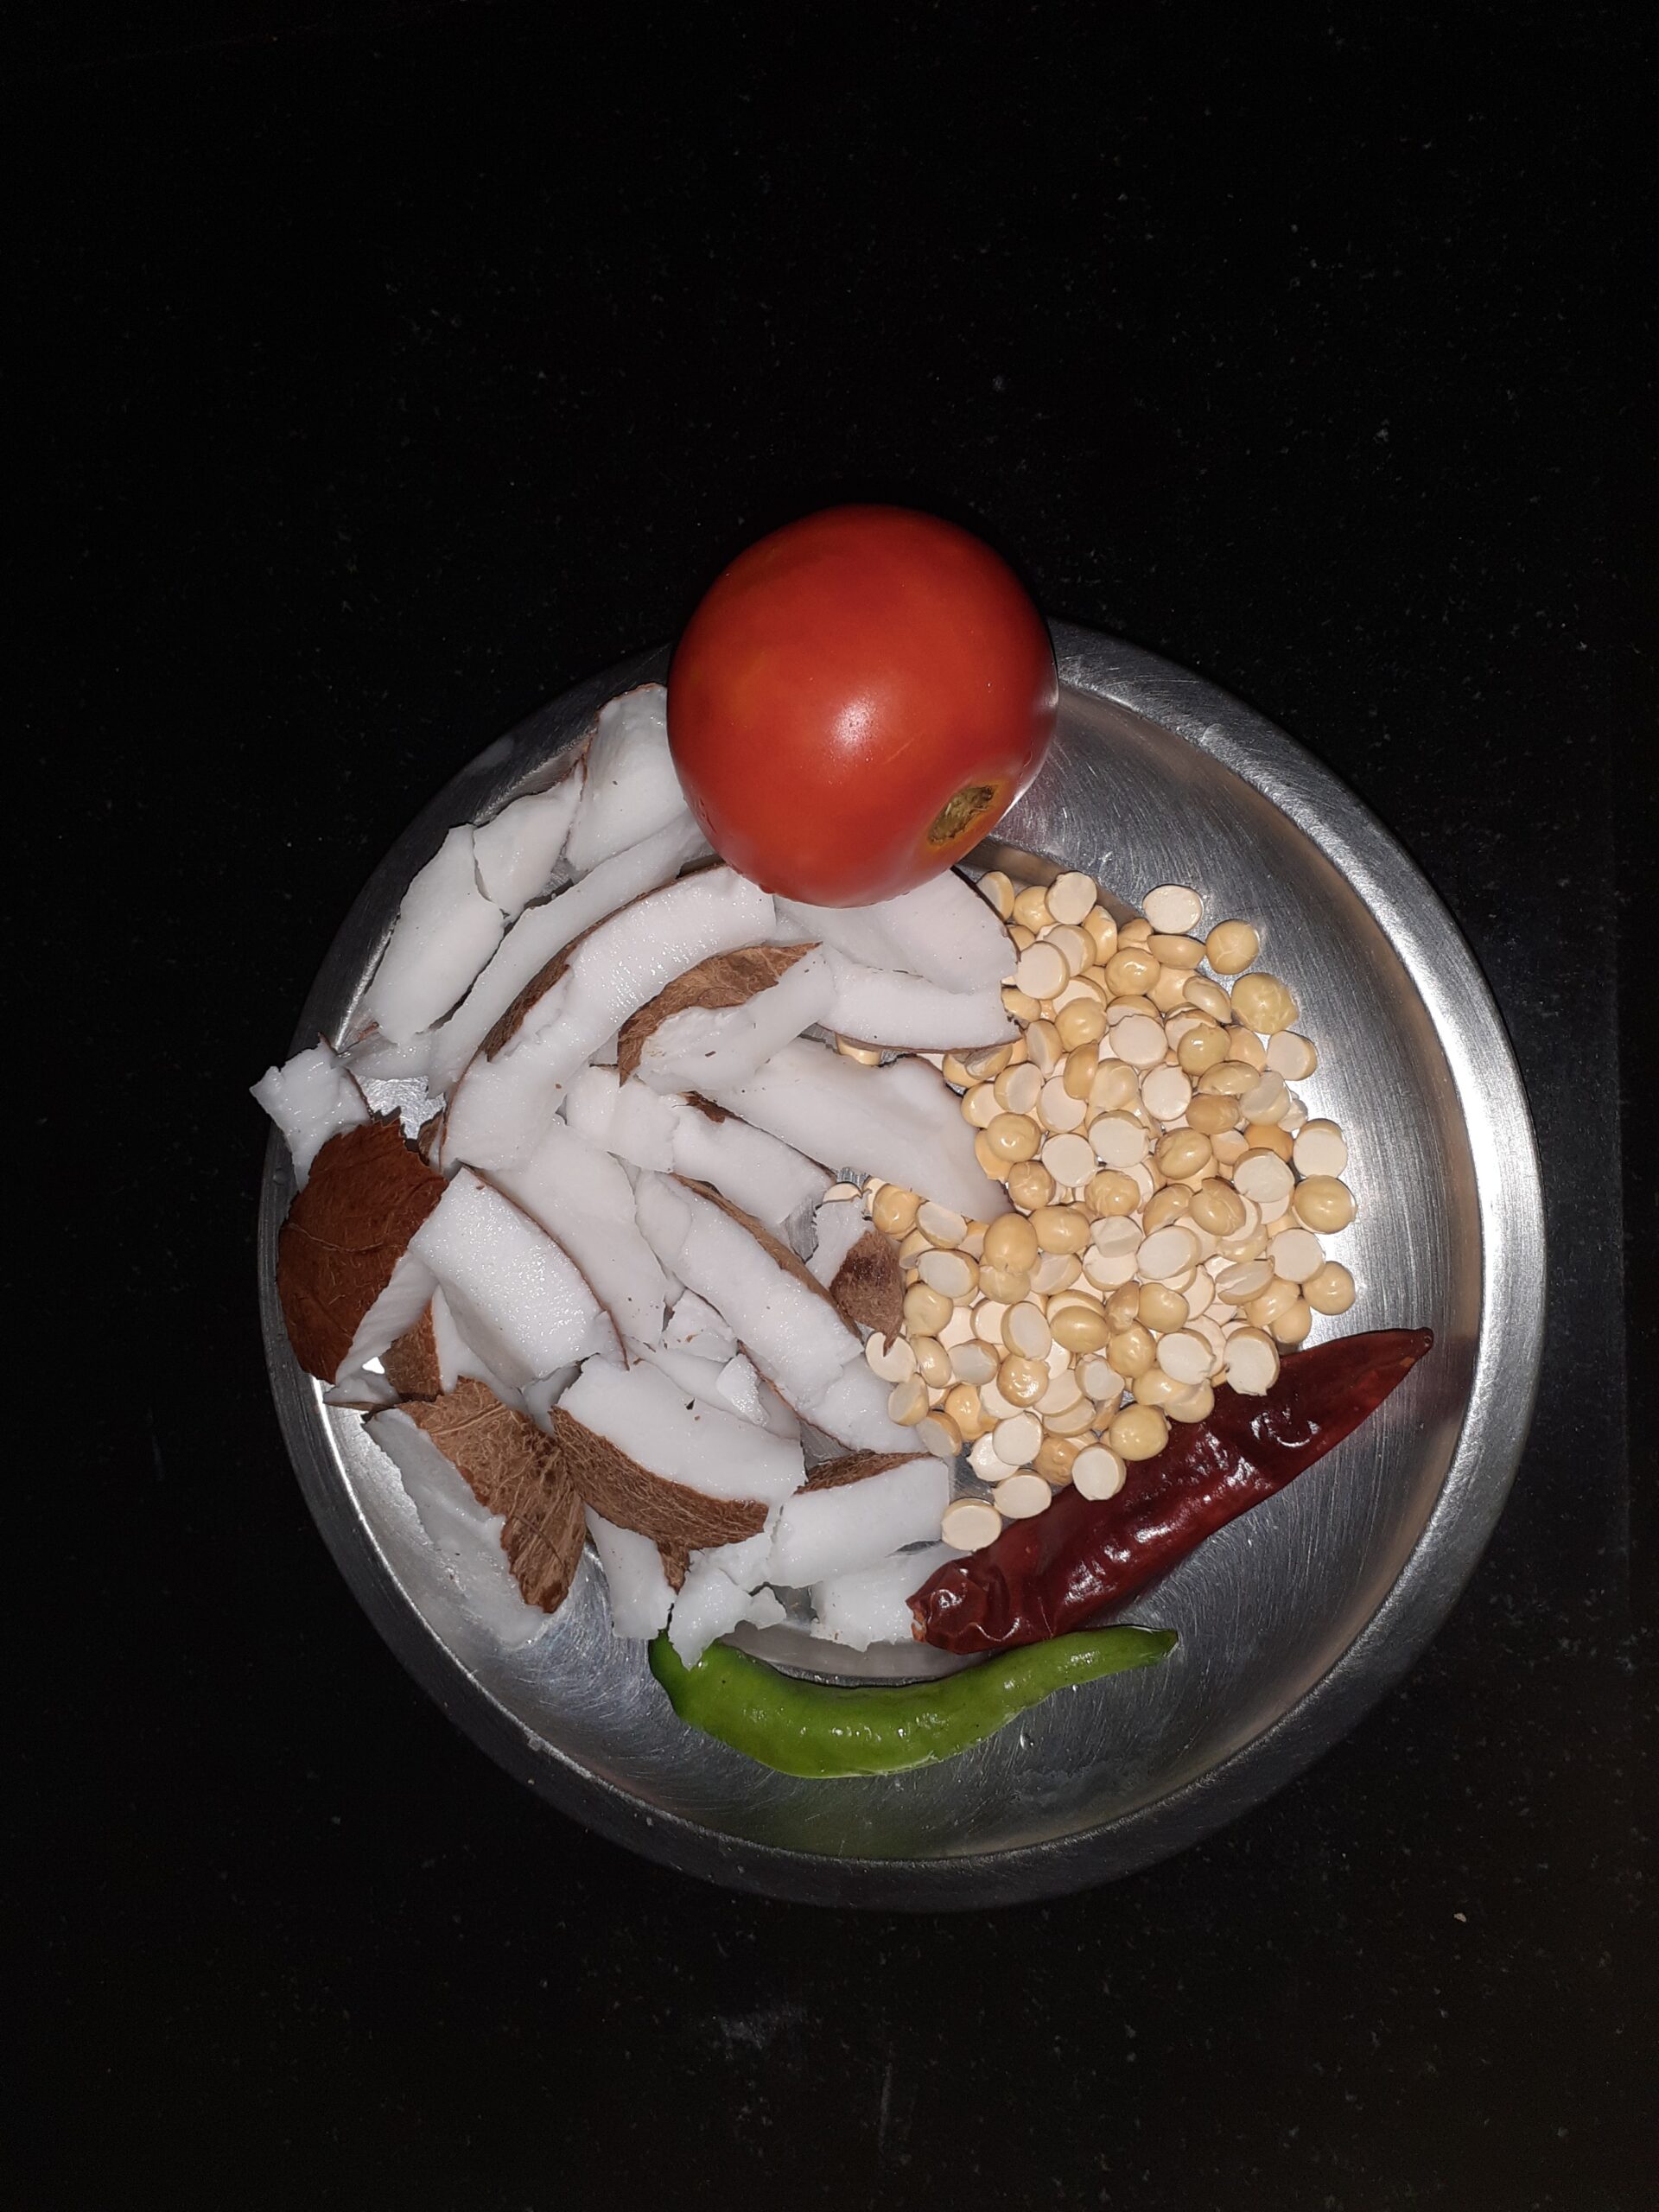
1. Assemble all ingredients.
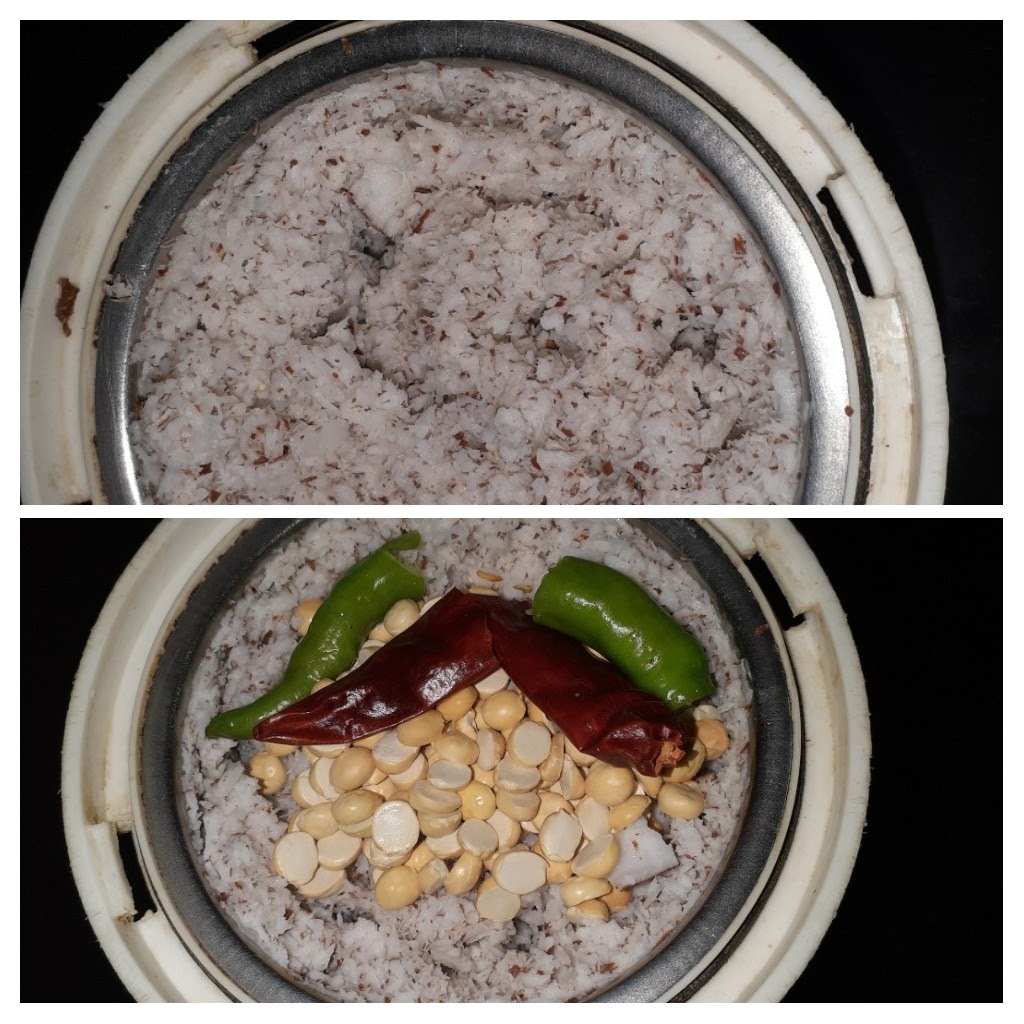
2. In a blender put in the coconut and grind coarse. Add the fried chana, green chillies and red chillies and grind without water.
3. Add the chopped tomato and salt and to grind smooth. Add little water to adjust consistency, add salt and give a single spin in the blender.
4. Take 2 tsp oil in small tempering Kadai and add in the mustard seeds, after they splutter add the asafoetida, and curry leaves. Pour the tempering into the chutney.
NOTES:
1. Since we have added tomato there is no need to add any other form of sour ingredients like tamarind or lemon.
2. First, dry grind all ingredients and then only add in the chopped tomato, otherwise, they won’t get ground evenly.
We would love to hear what you think of this recipe. Let us know in the comments.
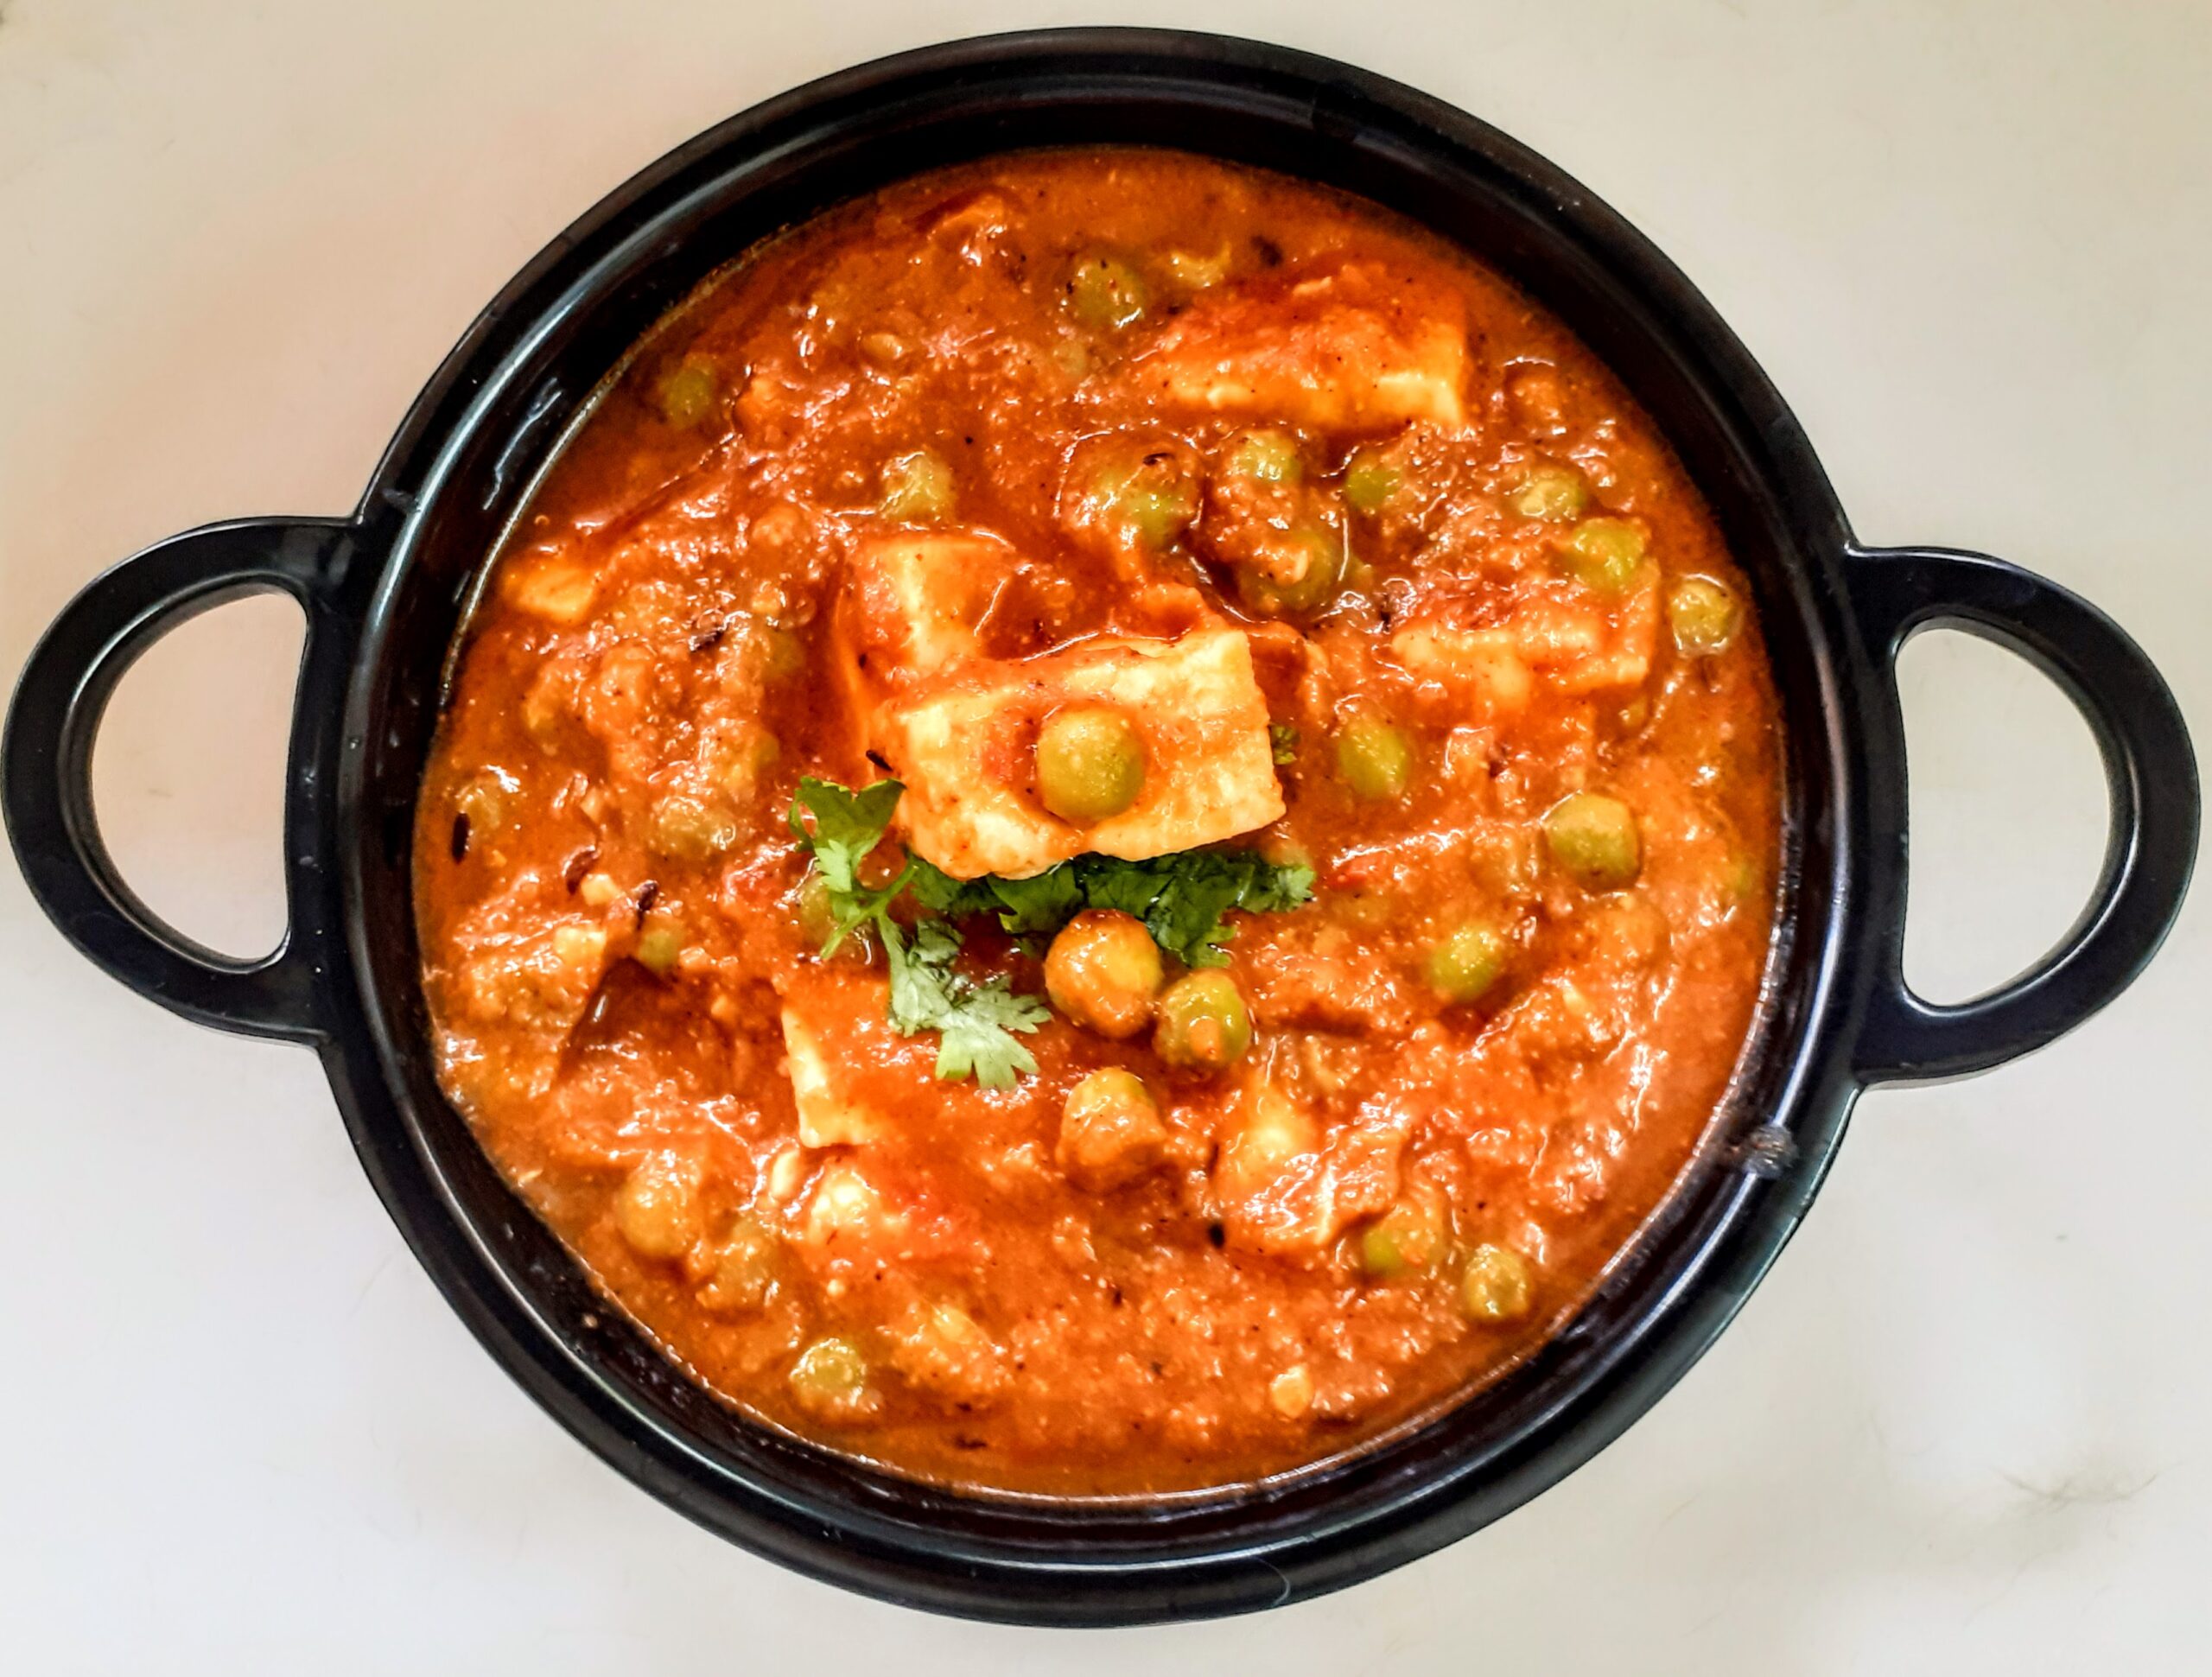
Matar Paneer (One Pot)
Matar Paneer is an everyday dish made of Green Peas and cottage cheese in a tomato gravy. Usually had with any Indian flatbread or with rice. The sweetness of the Peas, the tanginess of the tomatoes, the texture of the Paneer, and the flavors of the spices all gel so well. It can be directly made in a pressure cooker( which I have done today) or can be made in a karahi.
In Rajjo’s Kitchen whenever I say tomatoes its mostly the local one( desi) and not the hybrid tomatoes ones which are sweeter. When I’m using the Hybrid ones will always specify.
Let’s get to the recipe right away.
PREP TIME: 15 COOK TIME: 15Mins
TOTAL TIME:30Mins COURSE: MAIN
CUISINE: NORTH INDIAN SERVINGS: 6
AUTHOR: Rajni Ram
Ingredients:
Green Peas 100 gm
Paneer 200 gm cut into cubes
Tomatoes 2 large or 3 medium(pureed)
Onions 1 large pureed
Ginger-garlic paste 1 tsp
Refined oil 6 tsp( 3 tsp first and 3 later, follow the recipe)
Besan or Gram flour 1 Tbsp(or) Cashew nuts 6( pre-soaked)
Fresh coriander leaves finely chopped 2 tsp
Salt to taste
Jeera/ Cumin 1/2 tsp
Turmeric powder 1/2 tsp
Red chilli powder 1 tsp ( can add 1/2 tsp more if you need more spice)
Coriander powder
Garam Masala powder
Directions:
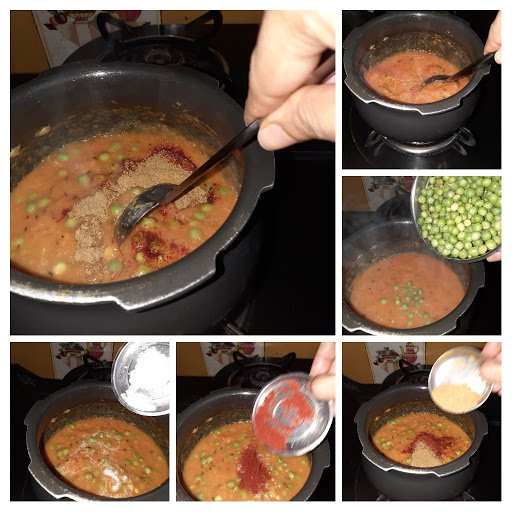
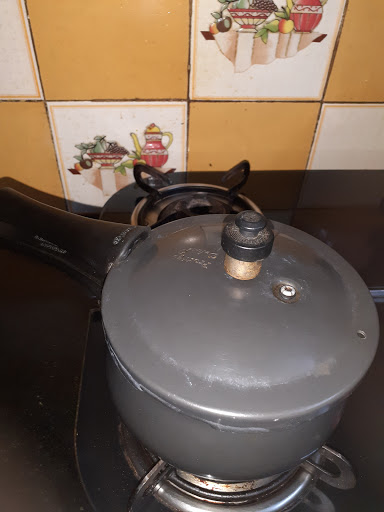
If using a pressure cooker you don’t have to precook the peas. If using the Karahi method, precook the peas( they should be cooked soft, but not mushy).
Put the cooker on the stove, heat on medium. once hot, pour oil 3 tsp.
once the oil is hot, add the cumin seeds, as they crackle add the turmeric powder.
Now add the onions puree and cook until transparent, don’t brown them. Add in the Ginger Garlic paste and saute well. The onion and Ginger Garlic paste will start releasing oil once they are cooked. Add another 3 tsp oil, reduce the flame of the stove and put in the Besan, and nicely saute it in the oil. Take care to not burn it. As the Besan browns, add the tomato puree and drop in the peas, add salt followed by all the spice powders( except Garam Masala powder). add about 1.5 cups water, close the cooker, and put on the whistle. cook for 6 whistles and put off the stove. While the pressure reduces in the cooker, let’s get our Paneer ready. Cut them into cubes, and drop them in boiling water with a pinch of salt for 2 minutes. Remove immediately and transfer to a plate. Once the pressure in the cooker releases, open the cooker and drop in the cubed Paneer and switch on the stove on low. check for salt and spices at this stage and adjust it. Add the Garam Masala powder now and put off the stove. Transfer the contents to a bowl and garnish with fresh coriander leaves. You can decorate it with a little grated cheese, for the restaurant effect. Voila, your Matar Paneer is ready. Enjoy!
STEPWISE RECIPE FOLLOWS:
1. Assemble all ingredients.
2. Put the pressure cooker on the stove and let it heat up. Once hot, pour 3 tsp oil and heat. Add Jeera and as it splutters add the onion paste and saute nicely.
3. Add the ginger-garlic paste and saute further until the oil is released. At this stage add the remaining 3 tsp oil and add the besan to this and roast on low flame till it becomes a little brown. It may appear as a paste, keep stirring this paste continuously till you see a light brown color. Add the tomato puree and stir nicely so that no lumps of the paste remain.
4. Let a slight boil come and add the Green Peas followed by all the masala powders( except Garam Masala). Add salt and stir.
5. Add 1 cup water, give a nice stir close the lid of cooker and let 6 whistles come.
6. After the pressure comes down open the cooker. Switch on the stove and add the paneer cubes and let it boil on low heat for two minutes. Add the Garam Masala powder, give it a stir and empty into a bowl. Garnish with fresh coriander. You can also sprinkle some shredded cheese to decorate( I forgot to do so).
Your tasty Matar Paneer is ready. Enjoy with Phulkas, Rotis, or Naan on the side or just rice.
Bon appetit…
NOTES
1. As it’s a simple everyday subji ( side dish) I did not add the whole masala in the beginning. If you are cooking it for a get-together or party, you can add the whole masala like 1 or 2 cloves, 1 Tej Patha( Bay leaf), few Peppercorns along with Jeera.
2. If you want to use cashew nuts instead of the Besan then, after adding Jeera saute onion, ginger garlic paste and cut tomatoes until they turn soft. Cool and blend in mixie. Pour this paste into the cooker and continue from step 4.
3. I usually don’t fry the Paneer in oil, instead, I put it in boiling water for exactly 2 mins, don’t let it stay in hot water for more than that, they may stick to each other.
If following the karahi method, pre-cook the peas and follow the same method.
If you tried this recipe and liked it, comment below. I would love to hear from you.
Arbi Masala (Spicy Colacassia)
A simple everyday subji. I make the Arbi/Arvi as a roast, sometimes a simple fry and it can also be added while making Sambhar or Kadi. This tuber is a little slimy, but that can be managed by dusting the Arbi with a little Besan/ Gram flour or rice flour. In this recipe, I have pre-cooked the Arbi in a pressure cooker and then baked it for the extra crispiness. You can also deep fry it. I do that quite often too. Let’s get to the recipe right away.
PREP TIME: 10Mins COOK TIME: 40Mins
TOTAL TIME: 50 Mins COURSE: MAIN
CUISINE: SOUTH INDIAN SERVINGS: 4
AUTHOR: RAJNI RAM
Ingredients:
Arbi/Colaccasia 250 gm( boiled and skin peeled)
Onions 2 roughly chopped
Tomatoes 2 large finely chopped
Green chilli 2 chopped
Fresh coriander 1 tbsp finely chopped
Salt to taste
Red chilli powder 1 tsp
Coriander powder 1.5 tsp
Fennel powder(optional) 1 tsp
Garam masala powder 1/2 tsp
oil for frying and making the masala.
Cumin 1 tsp
Curry leaves a few
Directions:
Boil the Arbi in a pressure cooker, with a little salt for 2 whistles. Stick to 2 whistles or it will turn soggy and lose the crispness in the subji. Cool it, Peel the skin cut it into medium size pieces( if very small, use as it is), and set aside. To deep-fry, take oil in a Karahi and heat it. drop the cut Arbi gently into the oil and fry until they are a nice brown and crisp.
If baking, then place them on a greased tray, drizzle a little oil over them, or you could use a brush to apply the oil and bake at 180 degrees for half an hour, turning over the Arbi midway, say around 15 mins. Bake until brown and crisp. Set aside.
Now in a pan or Karahi heat 1 tbsp oil. Add the cumin and turmeric and add the green chilli and chopped onion to this and saute well. Fry them well, but don’t get them brown. Now add in the tomatoes, salt, and all the dry spices. cook until the tomatoes break and release water and the mixture looks like a thick paste. Add the garam masala and fresh coriander and mix. Finally, add in the fried/baked Arbi and mix nicely, so that the masala paste coats it evenly. Serve hot with Parathas, Roti, or Dal Chawal.
STEPWISE RECIPE FOLLOWS
1. Assemble all ingredients. Cook Arbi in a pressure cooker for 2 whistles. cool. Peel skin, cut into cubes, and set aside.
2. Fry the cooked and cut Arbi in oil or bake in the oven at 180 degrees for 1/2 an hour. They should be nicely browned and crisp.
3. In a pan or karahi heat oil. Add the cumin and turmeric powder. Add in the green chillies and onion and fry well.
4. Add the tomatoes, salt, and all dry spices mentioned under ingredients. Saute the mixture well. The tomatoes should become soft and the mixture should resemble a semi-dry paste.
5. Add in the garam masala and chopped coriander and finally add the fried/baked Arbi and give a good stir. The masala paste should coat all the Arbi’s well. Sprinkle some more chopped coriander and we are ready to serve.
6. Serve with Rotis, Parathas, or just Dal Chawal. Enjoy. Bon Appetit.
Notes: 1. Amchur/ dry mango powder can be used along with other dry masalas if you prefer a little more tanginess. I have not added as I almost always use the country tomatoes/desi tomatoes/Naatu thakkali. They are naturally sour than the hybrid tomatoes or the Bangalore ones.
2. A little gram flour can be mixed with the dry spices and sprinkled over the Arbi before frying them. I have added besan as the Arbi is going to be mixed into the paste, and so will not taste bland.
If you tried this recipe and liked it please comment below. I would love to hear from you.
Flavoured Rice
A very simple yet flavourful rice. You can make it on the days when you want no masalas. Since there are no pungent spices this Rice goes well with a lot of accompaniments like dal fry, raita, Rajma, Choley and more. Flavoured rice and simple dal fry make for soul food. Let’s get to the recipe right away.
PREPTIME: 15Mins COOK TIME: 20 Mins
TOTAL TIME: 35 Mins COURSE: MAIN
CUISINE: NORTH INDIAN SERVINGS: 4
Ingredients:
Basmathi rice 1 cup
Raisins( preferably black) around 10
Cashewnuts around 6 to 8
Walnuts( broken)around 6 to 8
Almonds around 5
Cloves 5
Cinnamon 1 inch stick
Milk 1/4 cup
Saffron 2 pinches
Ghee 2 tbsp
Onion 1 medium cut to thin slices
Directions:
Soak the rice for 15 minutes, drain water and set aside. In a Karahi take ghee and heat. Add the dry nuts and raisins and fry until the nuts are light brown. Remove the nuts from the oil and add in the onion slices and fry until nicely browned. Remove them and set aside. Add little oil to the karahi and put in the whole masalas, fry until aromatic. Add 2 cups water and the milk along with saffron, add some salt and the dry fruits and boil. When it starts boiling transfer the soaked rice, cover and cook, keep stirring every now and then and cover and cook again until the rice is done. Takes about 15 minutes on low fire. Once done, put off the stove, add in the browned onions and mix well. Flavoured rice is ready to serve. Enjoy. Bone Appetite.
STEPWISE RECIPE FOLLOWS:
1. Assemble all ingredients. Soak the Basmathi rice for 15 minutes and drain water.
2. Heat the ghee in a karahi and add the nuts and raisins and fry. Remove when lightly browned. Add in the onion to the same ghee and fry them until they are well browned. Remove onions and set aside.
3. Add a little oil to the karahi and drop the whole masalas into it when hot. Fry until aromatic, add two cups water, the saffron soaked milk, fried nuts and salt and bring the water to a boil,
4. As it boils, transfer the soaked rice and mix well. Cover and cook for few minutes, stir in between and cover and cook again until done. Takes about 15 minutes for the rice to cook on low fire. The water should have evaporated completely.
5. Once done, put off the stove and add the browned onions, mix nicely and the flavoured rice is ready to serve.
NOTES:
1. Other whole masalas like cardamom, peppercorns, fennel, cumin etc have not been added on purpose, as then the Pulav taste will come in. This rice has a very subtle flavour.
2. Saffron is optional, but if added gives a good flavour to the dish.
3. Cook rice on low fire, as high heat cooking will evaporate the water fast and the rice won’t cook well and may remain raw.
4. Water to cook rice can be adjusted as per your preference, but rice must be grainy and not mushy.
5. I have numbered a few pictures to avoid confusion in steps.
If you made this recipe and liked it, please do comment below. I would love to hear from you.