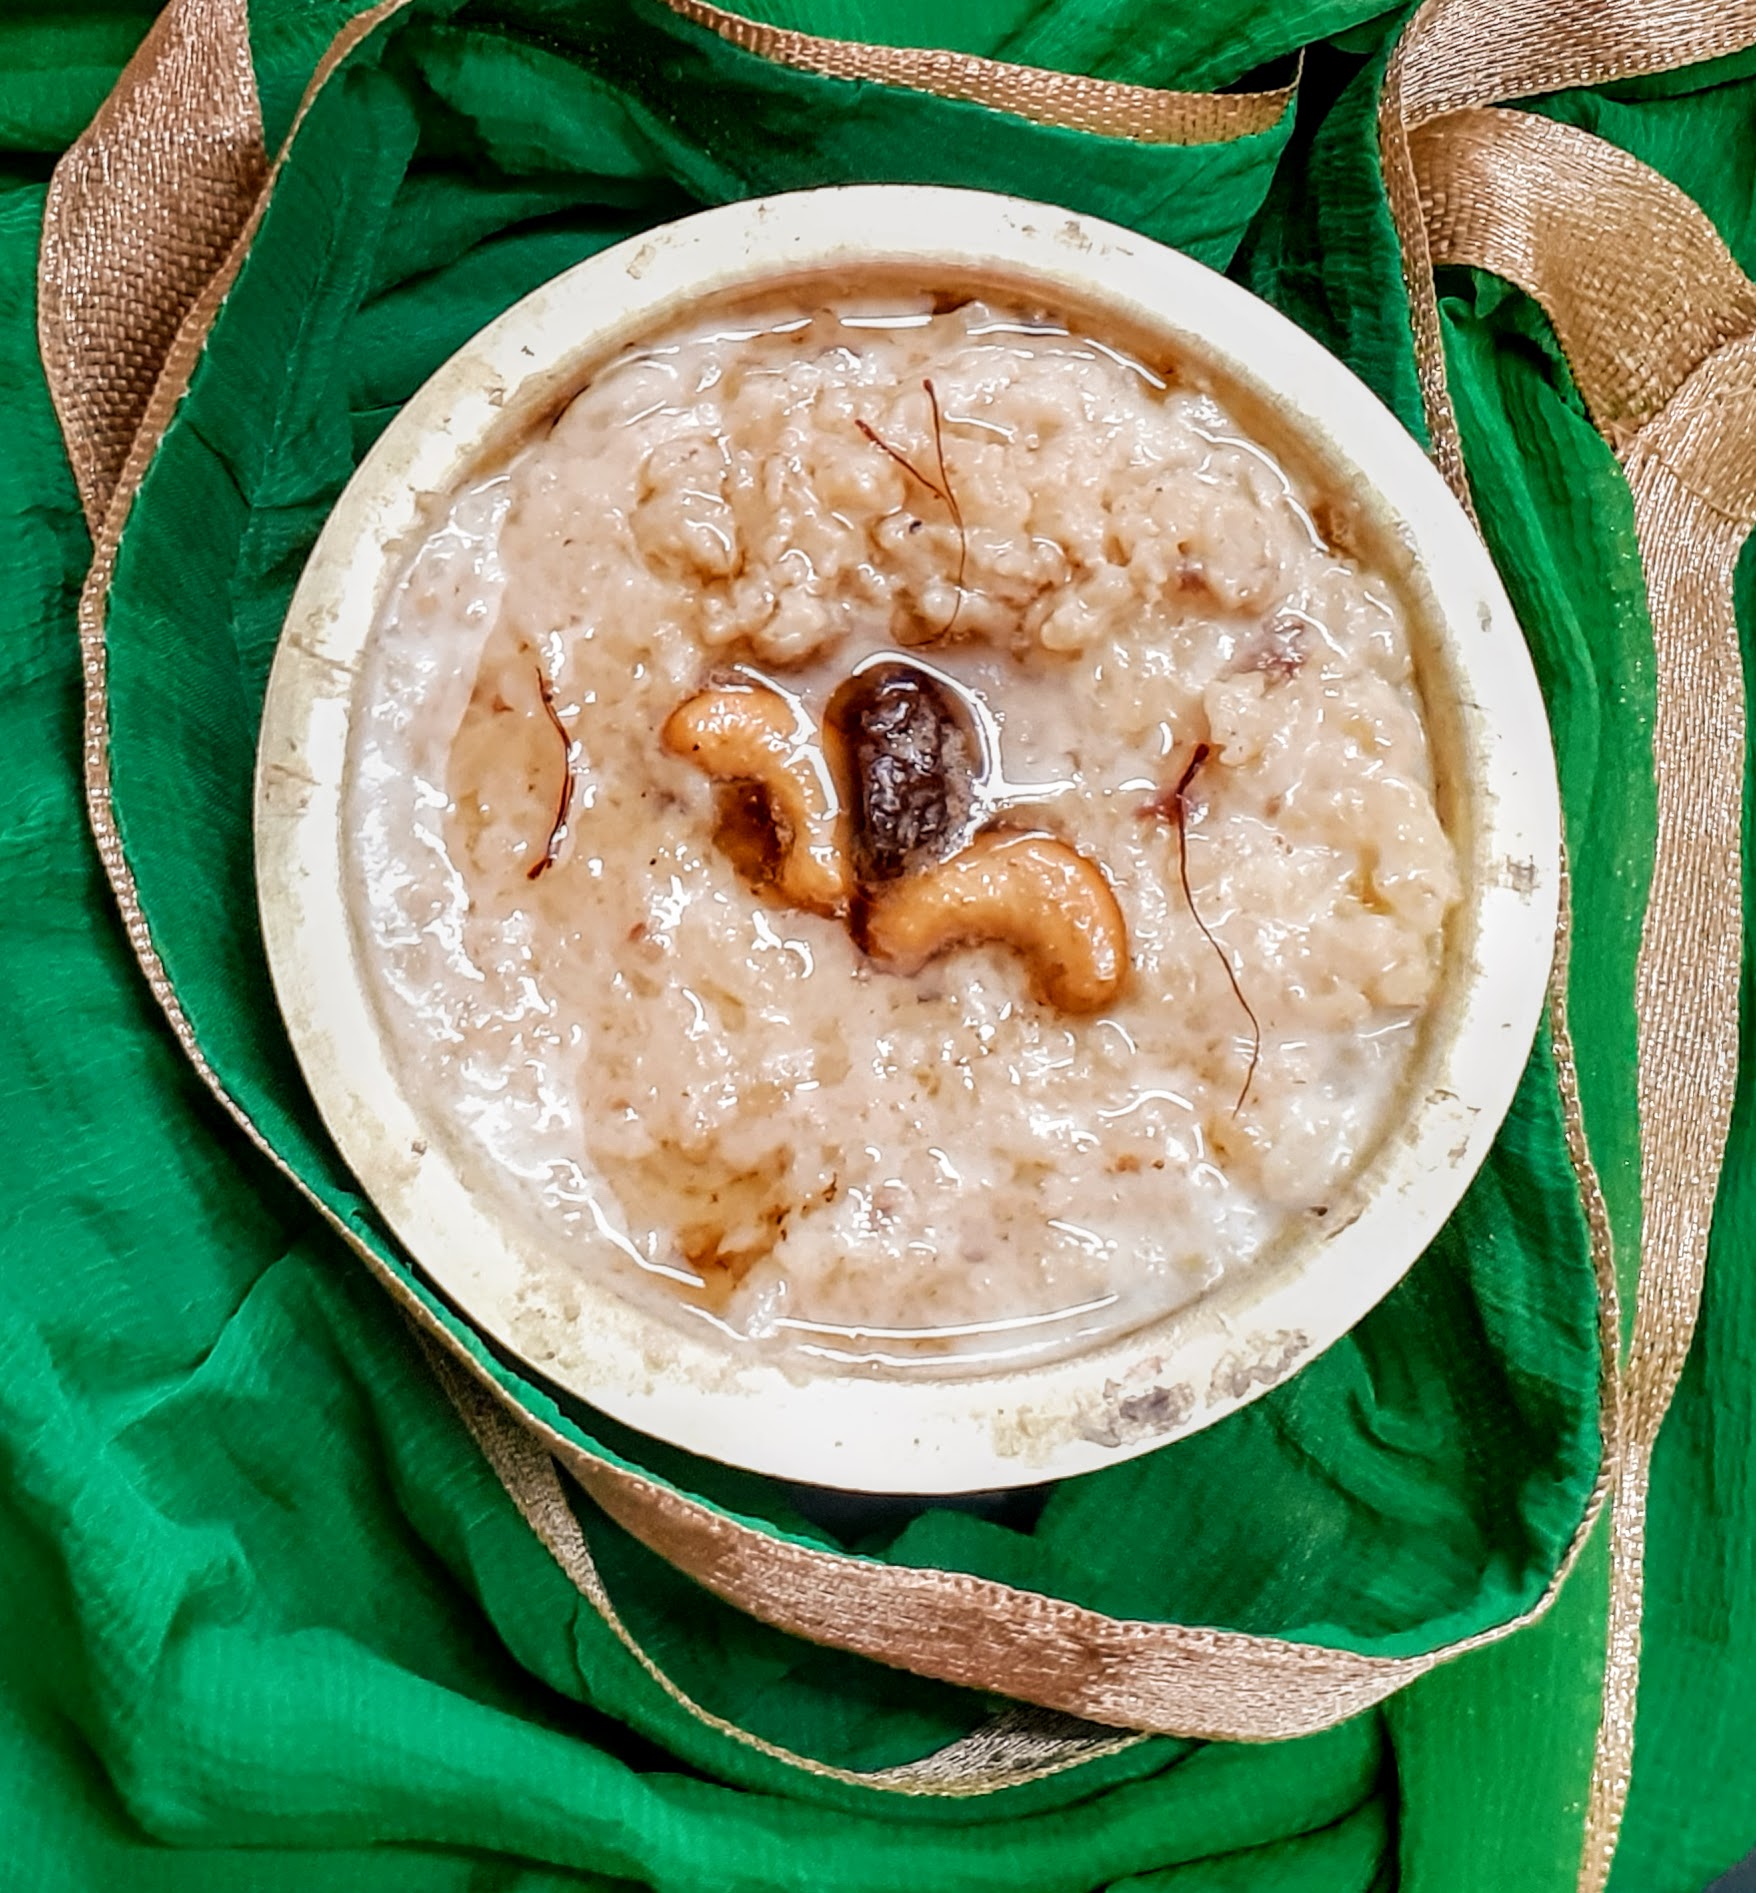
This is a very traditional South Indian sweet dish. Lord Mahavishnu is offered this sweet as prasad(holy offering). The main ingredients are Rice, moong dal, jaggery, milk, and ghee. The ingredients are similar to the Sweet Pongal but both taste very different. It tastes heavenly when served a little warm. Without much ado let’s get to the recipe right away.
This recipe already exists on this blog, but I am adding another method to make it, which is the one-pot method. One can choose whichever method they find doable. The results are the same for both, just a few steps vary which I will guide you through here.
While you are here check out my other Indian Sweet recipes like Malpua, Pineapple Rabri, Atte ka Sheera, Chakkarai Pongal, Aval Kesari, Unni appam, Sugiyan, and many more…
Here is the recipe of One -Pot Akkaravadisal for you-
PREP TIME: 15 COOK TIME: 20Mins
TOTAL TIME:40Mins COURSE: DESSERT
CUISINE: SOUTH INDIAN SERVINGS: 5
AUTHOR: Rajni Ram
Ingredients:
Rice 1 cup
Moong dal/ green gram 1/4 cup
Milk 6 cups
Jaggery 1 cup
Water 1/4 cup
Sugar ( optional) 1 tbsp
Ghee 3/4 cup
Cardamom/ elaichi powder 1 tsp
Saffron ( optional) 2 pinches, soaked in warm milk
Raw camphor( optional) 1 pinch powdered
Cashewnuts 8 to 10
Raisins 8 to 10
DIRECTIONS:
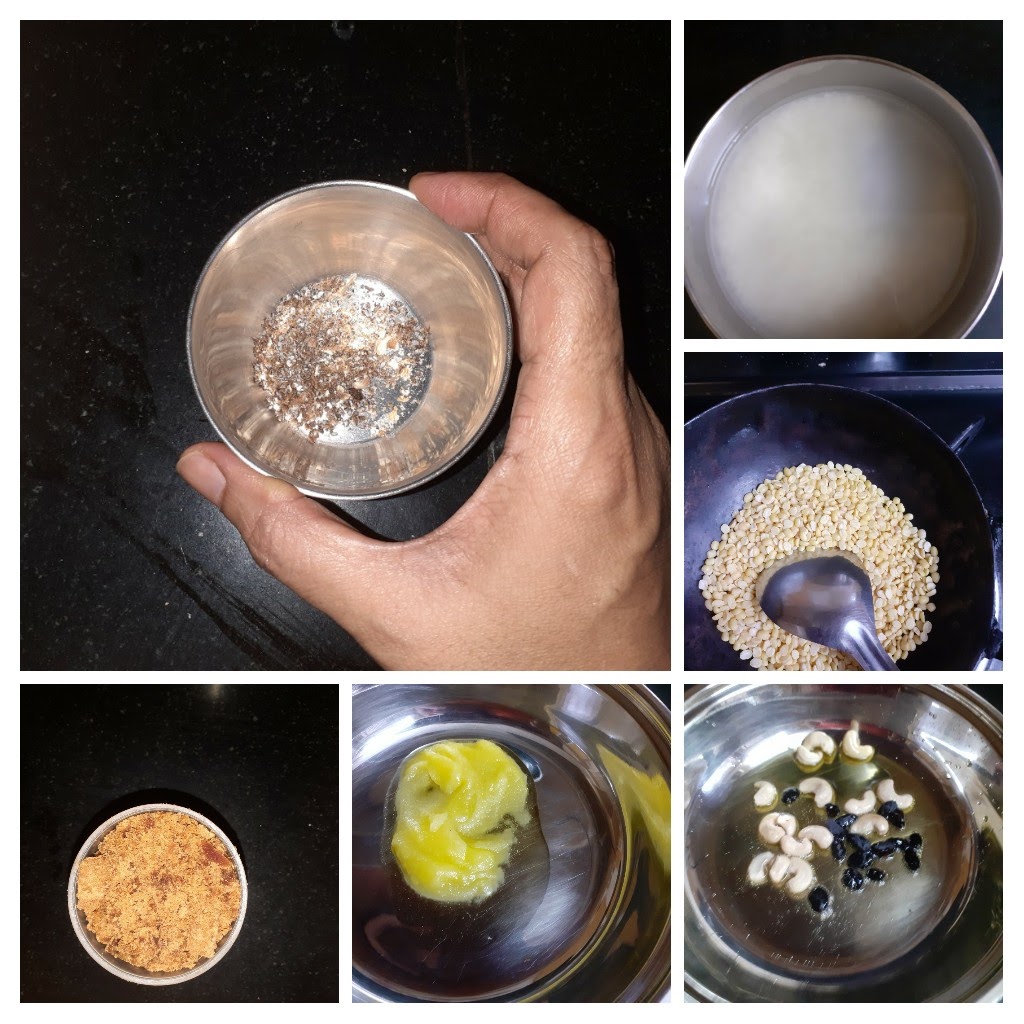
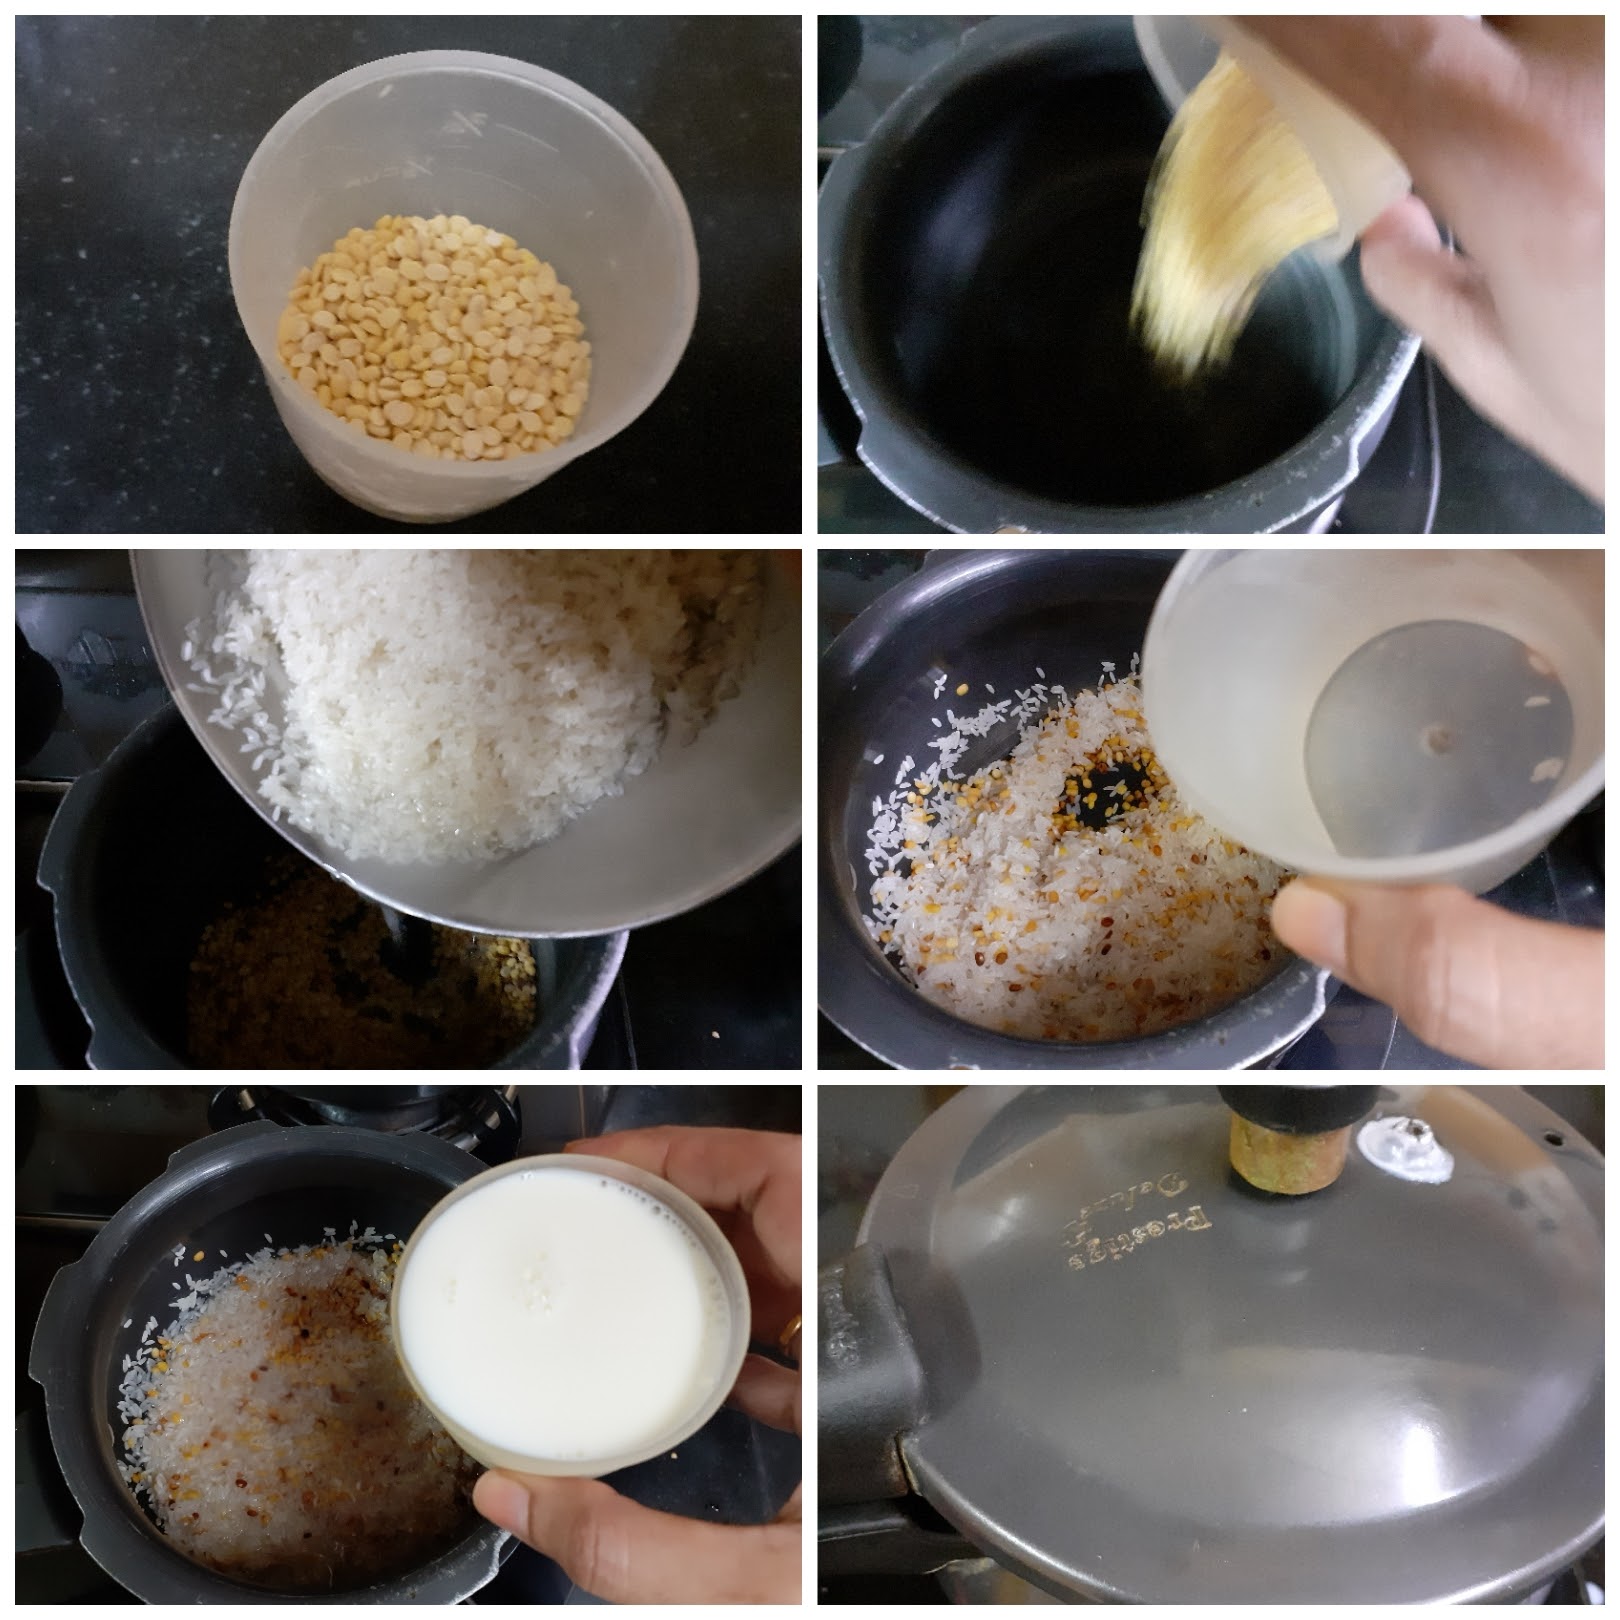
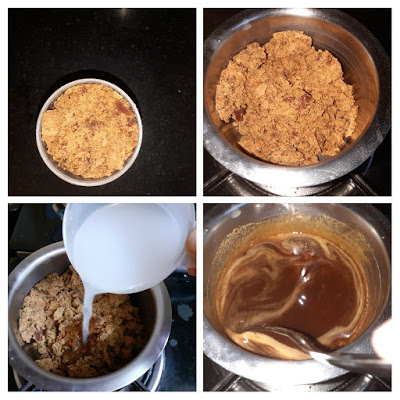
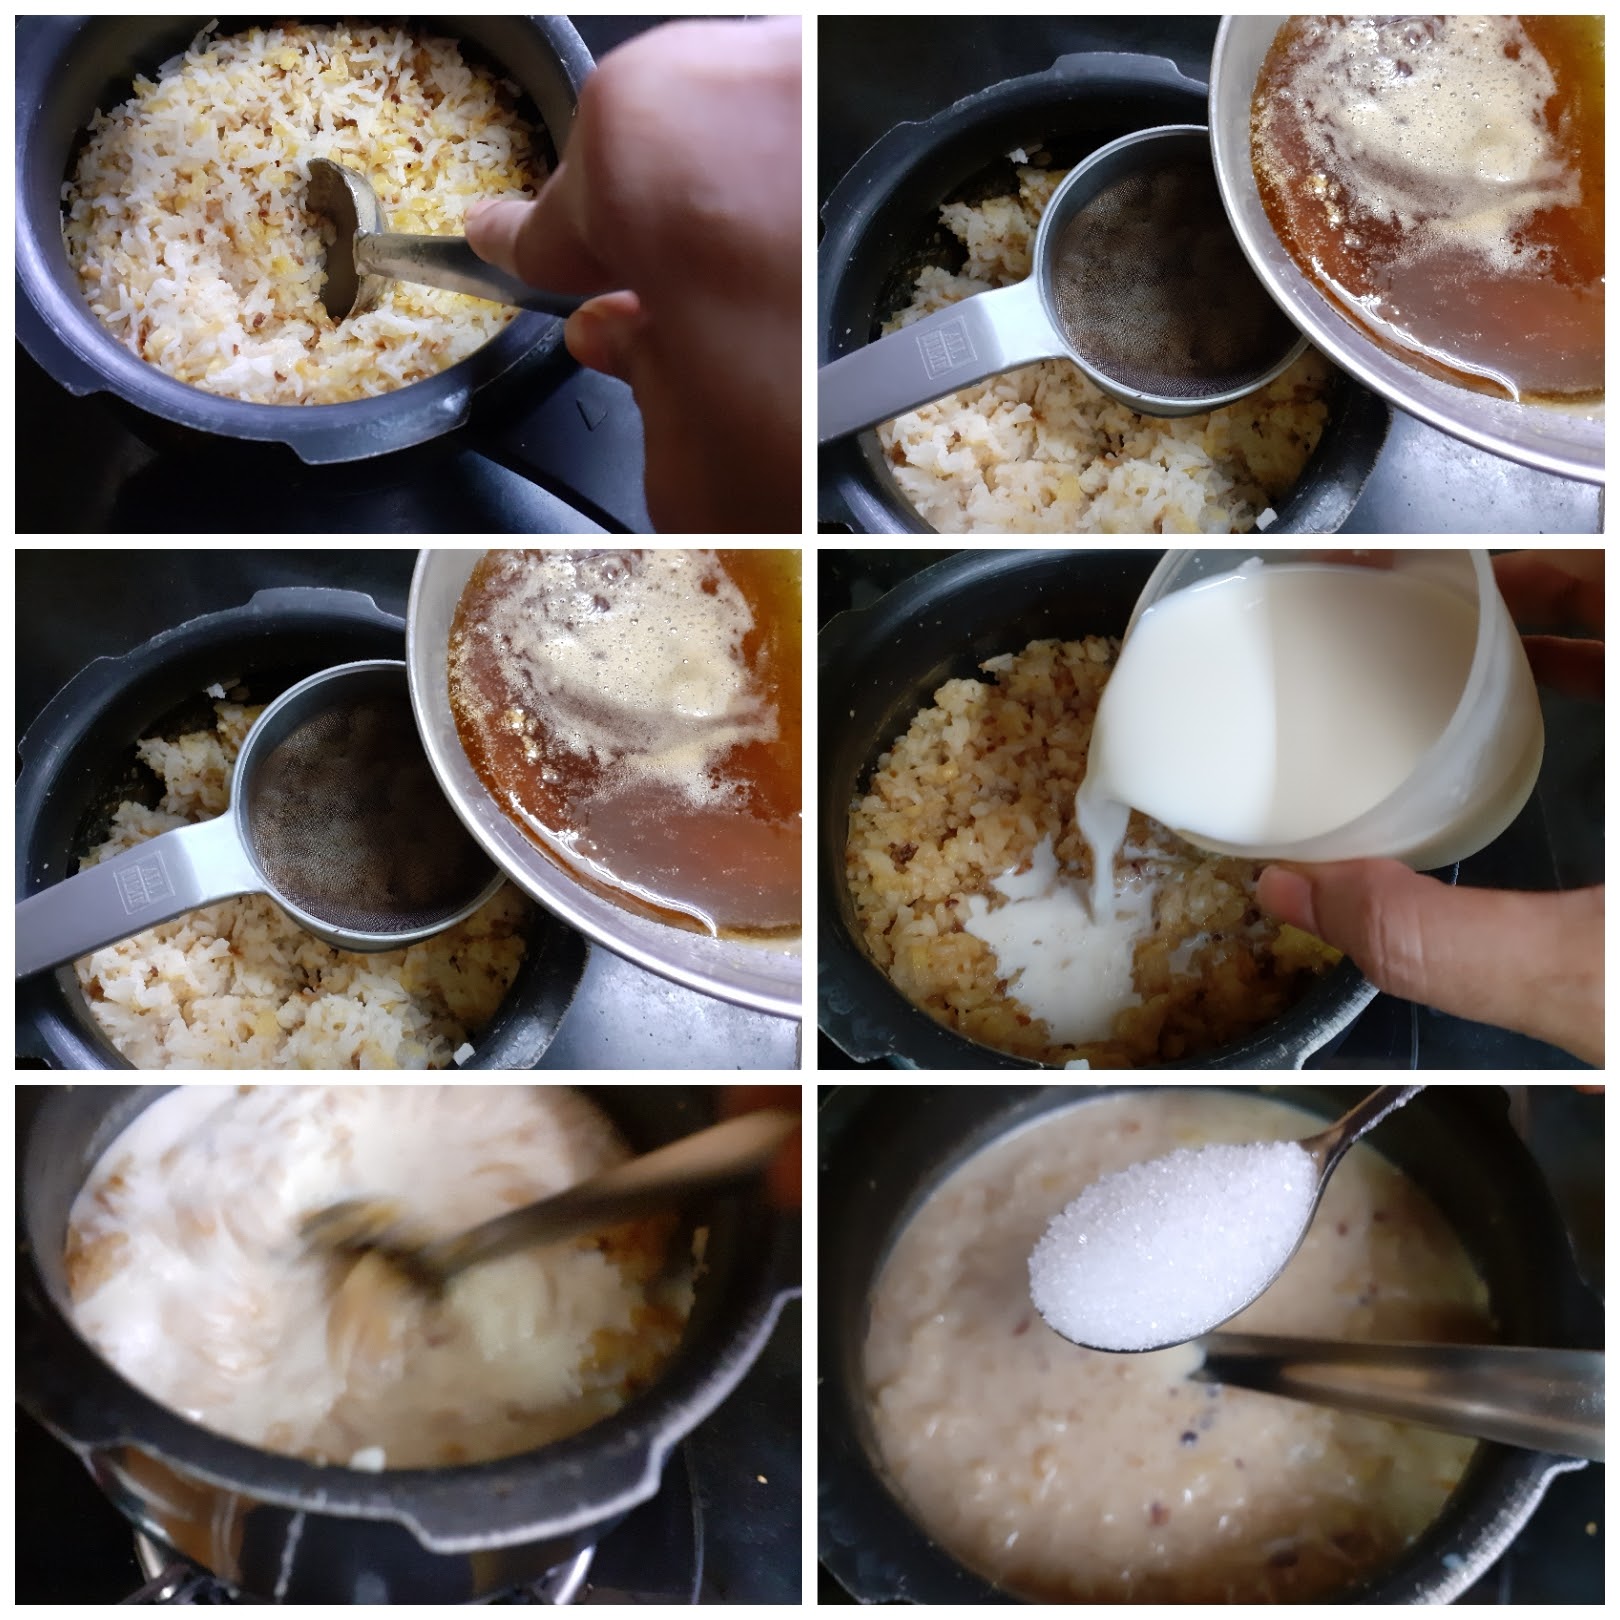
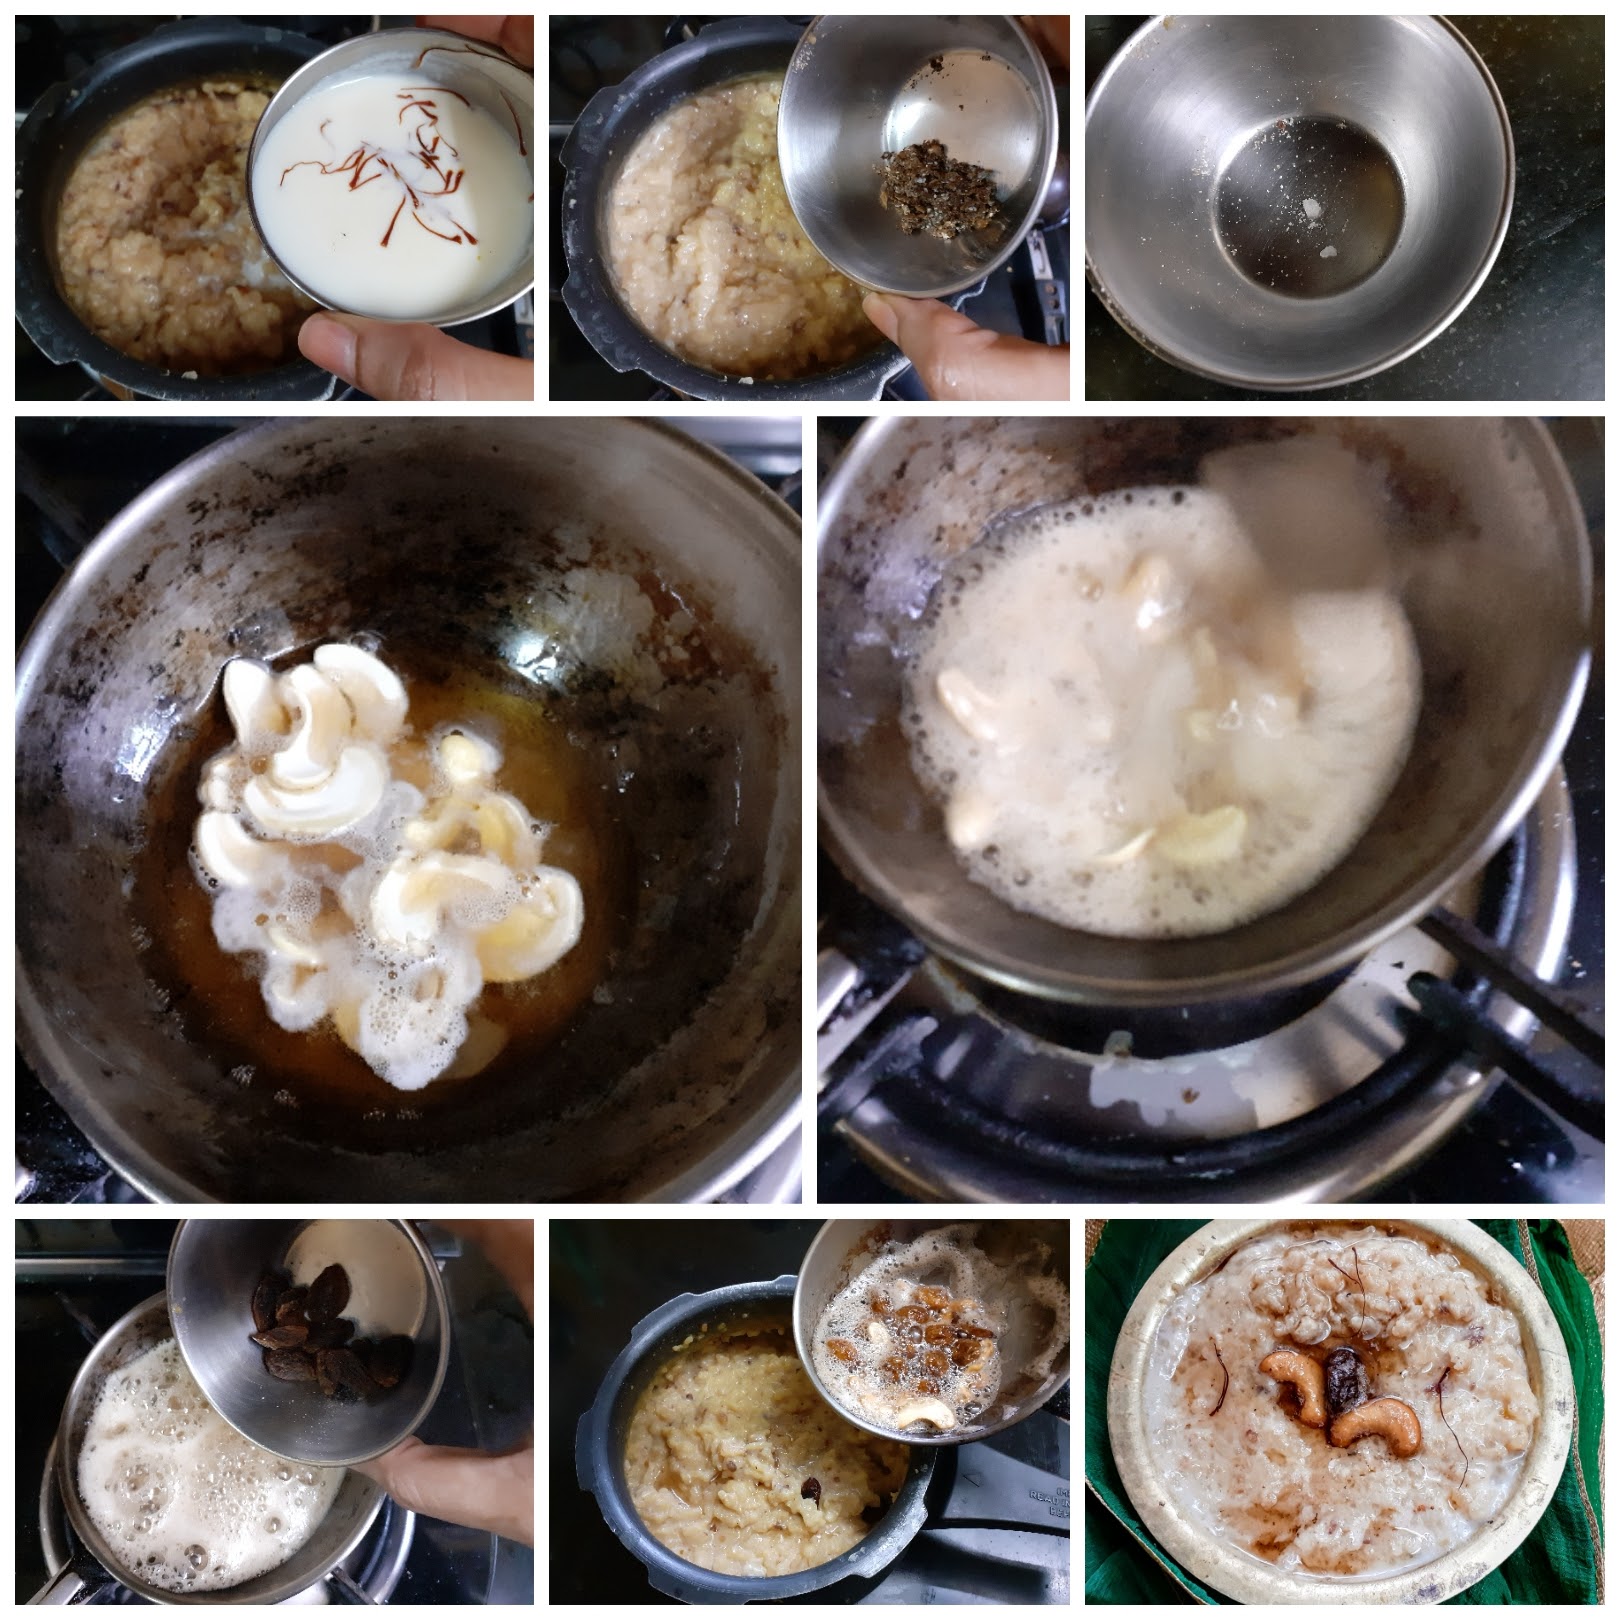
Dry roast the Moong dal directly in the cooker to a light brown colour. Stir constantly and take care not to burn the dal. It will give out a nice aroma. Put the jaggery in a separate vessel, add water, and bring to a boil. Put off the heat and stir to dissolve the jaggery. Keep aside. Now to the roasted moong dal in the cooker, add the washed rice. Pour 2 cups milk and 1 cup water, close the cooker and cook for 5 to 6 whistles ( flame should be on low throughout, otherwise there are chances of the milk overflowing through the sides). Once pressure releases open the cooker and mash the contents well. Put the cooker on flame again and strain the liquid jaggery into the cooker directly. Pour another 2 cups milk and stir nicely. There may be lumps, break them down patiently by stirring. Like I always say add 2 teaspoons of sugar to any jaggery dish to enhance the taste of jaggery. Add more milk if the 2 cups of milk get absorbed. We want a texture that is semi-solid and smooth, not lumpy. Now add the cardamom powder, raw camphor(optional), and add in the raisins and nuts fried in ghee. The one-pot Akkaravadisal is ready to serve. Enjoy BonAppetit. This is a popular Prasad(holy offering) dish that can be offered during Pujas.
STEPWISE RECIPE FOLLOWS:
1. Assemble all ingredients.
2.Dry roast the Moong dal directly in the cooker to a light brown colour. Stir constantly and take care not to burn the dal. It will give out a nice aroma. Now to the roasted moong dal in the cooker, add the washed rice. Pour 2 cups milk and 1 cup water, close the cooker and cook for 5 to 6 whistles ( flame should be on low throughout, otherwise there are chances of the milk overflowing through the sides).
3. Until the pressure releases let’s get the jaggery ready. In a small vessel take the jaggery, add 1/4 cup water and bring to a boil, put out the stove, and stir the jaggery to dissolve it.
4. Once pressure releases open the cooker and mash the contents well. Put the cooker on flame again and strain the liquid jaggery into the cooker directly. Pour another 2 cups milk and stir nicely. There may be lumps, break them down patiently by stirring. Add two spoons sugar.
5. Add milk in which the saffron strands were soaked followed by Cardamom powder, raw camphor(optional). Finally, add the nuts and raisins fried in ghee.
NOTES:
1. The only glitch in this method is the milk overflowing from the cooker or the milk sticking to the bottom of the cooker. To manage this the flame should be on low through out until the whistles are over.
2. We are straining the jaggery to remove impurities in the jaggery. I recommend not missing this step.
3. To get that smooth texture and consistency add more milk if required.
If you tried this recipe please do comment below, we would love to hear fom you.
If you leave us your mail id, recipes can directly be mailed to you, whenever we have a new post.
Show some love-like and follows us on Instagram and Facebook.
Karuvepilai Podi/Curry Leaves Powder (For Rice)
Karuvepilai or curry leaf plant is an aromatic plant the leaves of which are used in seasoning dishes. Most south Indian dishes have Curry leaves as their common tempering element. Apart from imparting their aroma to a dish they also add a huge amount of flavour. These leaves have many medicinal properties like- high calcium content, rich in Iron, aids in digestion, improves vision, rich in Vitamin A, and many more such benefits.
In our house, we make this powder with fresh curry leaves and other spices that can be mixed with hot rice and ghee, or it can be added to rice tempered with peanuts and spices and made into Karuvepilai Sadam or Curry leaves rice.
Karuvepilai powder can be stored in an airtight container for 3 months and more.
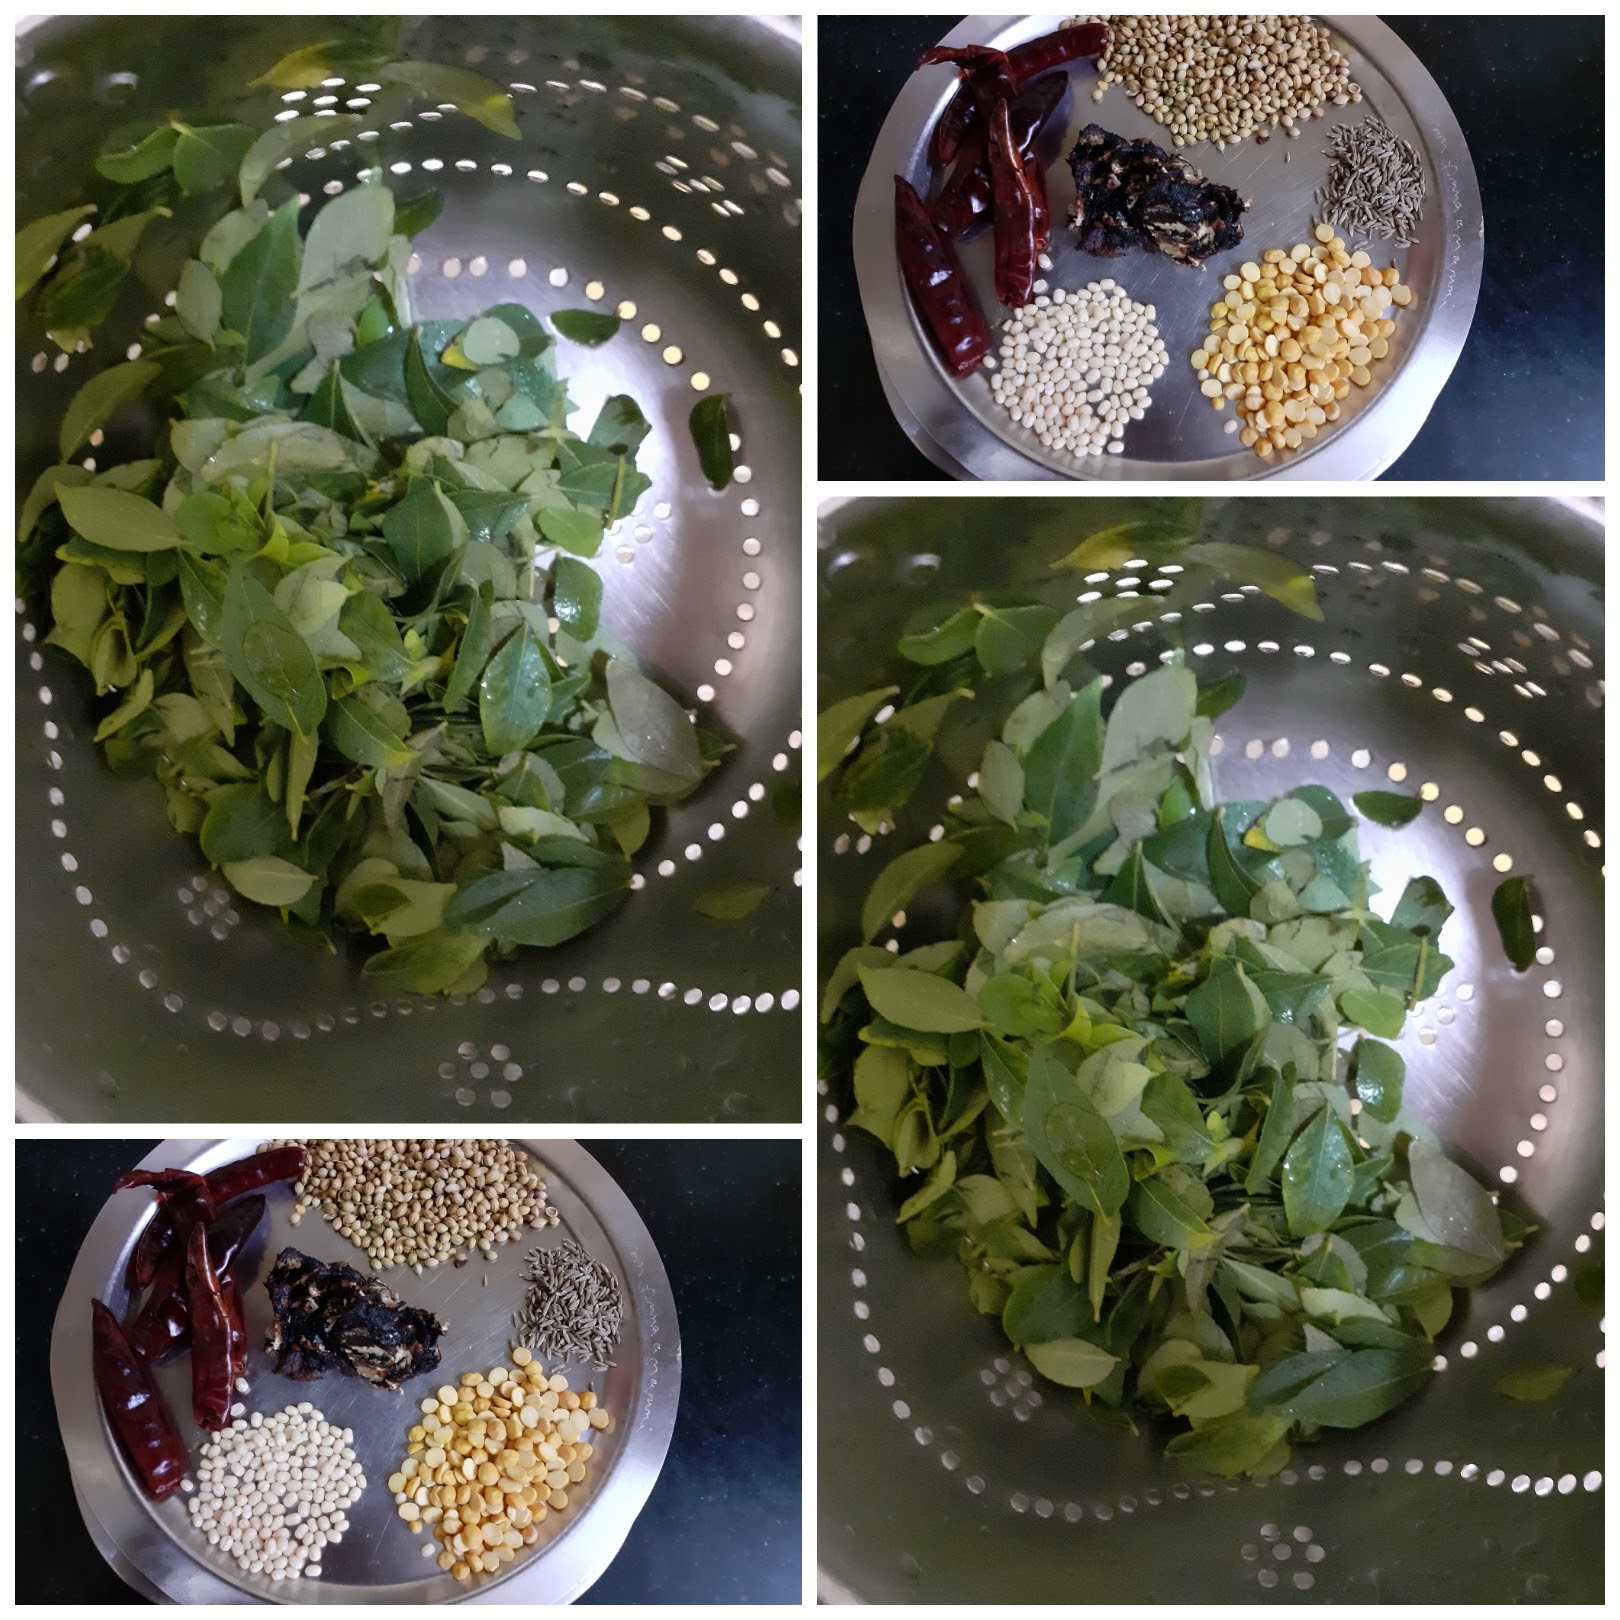
Curry leaves 2 cups(stalks removed) washed and pat dried
Coriander seeds/Dhania 2 tbsp
Chana dal/ Gram 1 tbsp
Urad dal 1/2 tbsp
Jeera/ Cumin seeds 1 tsp
Dry red chillies 5 big ones
Tamarind lemon sized ball
Salt to taste.
Asafoetida 1 tsp
Oil for frying spices 1 tbsp
Directions:
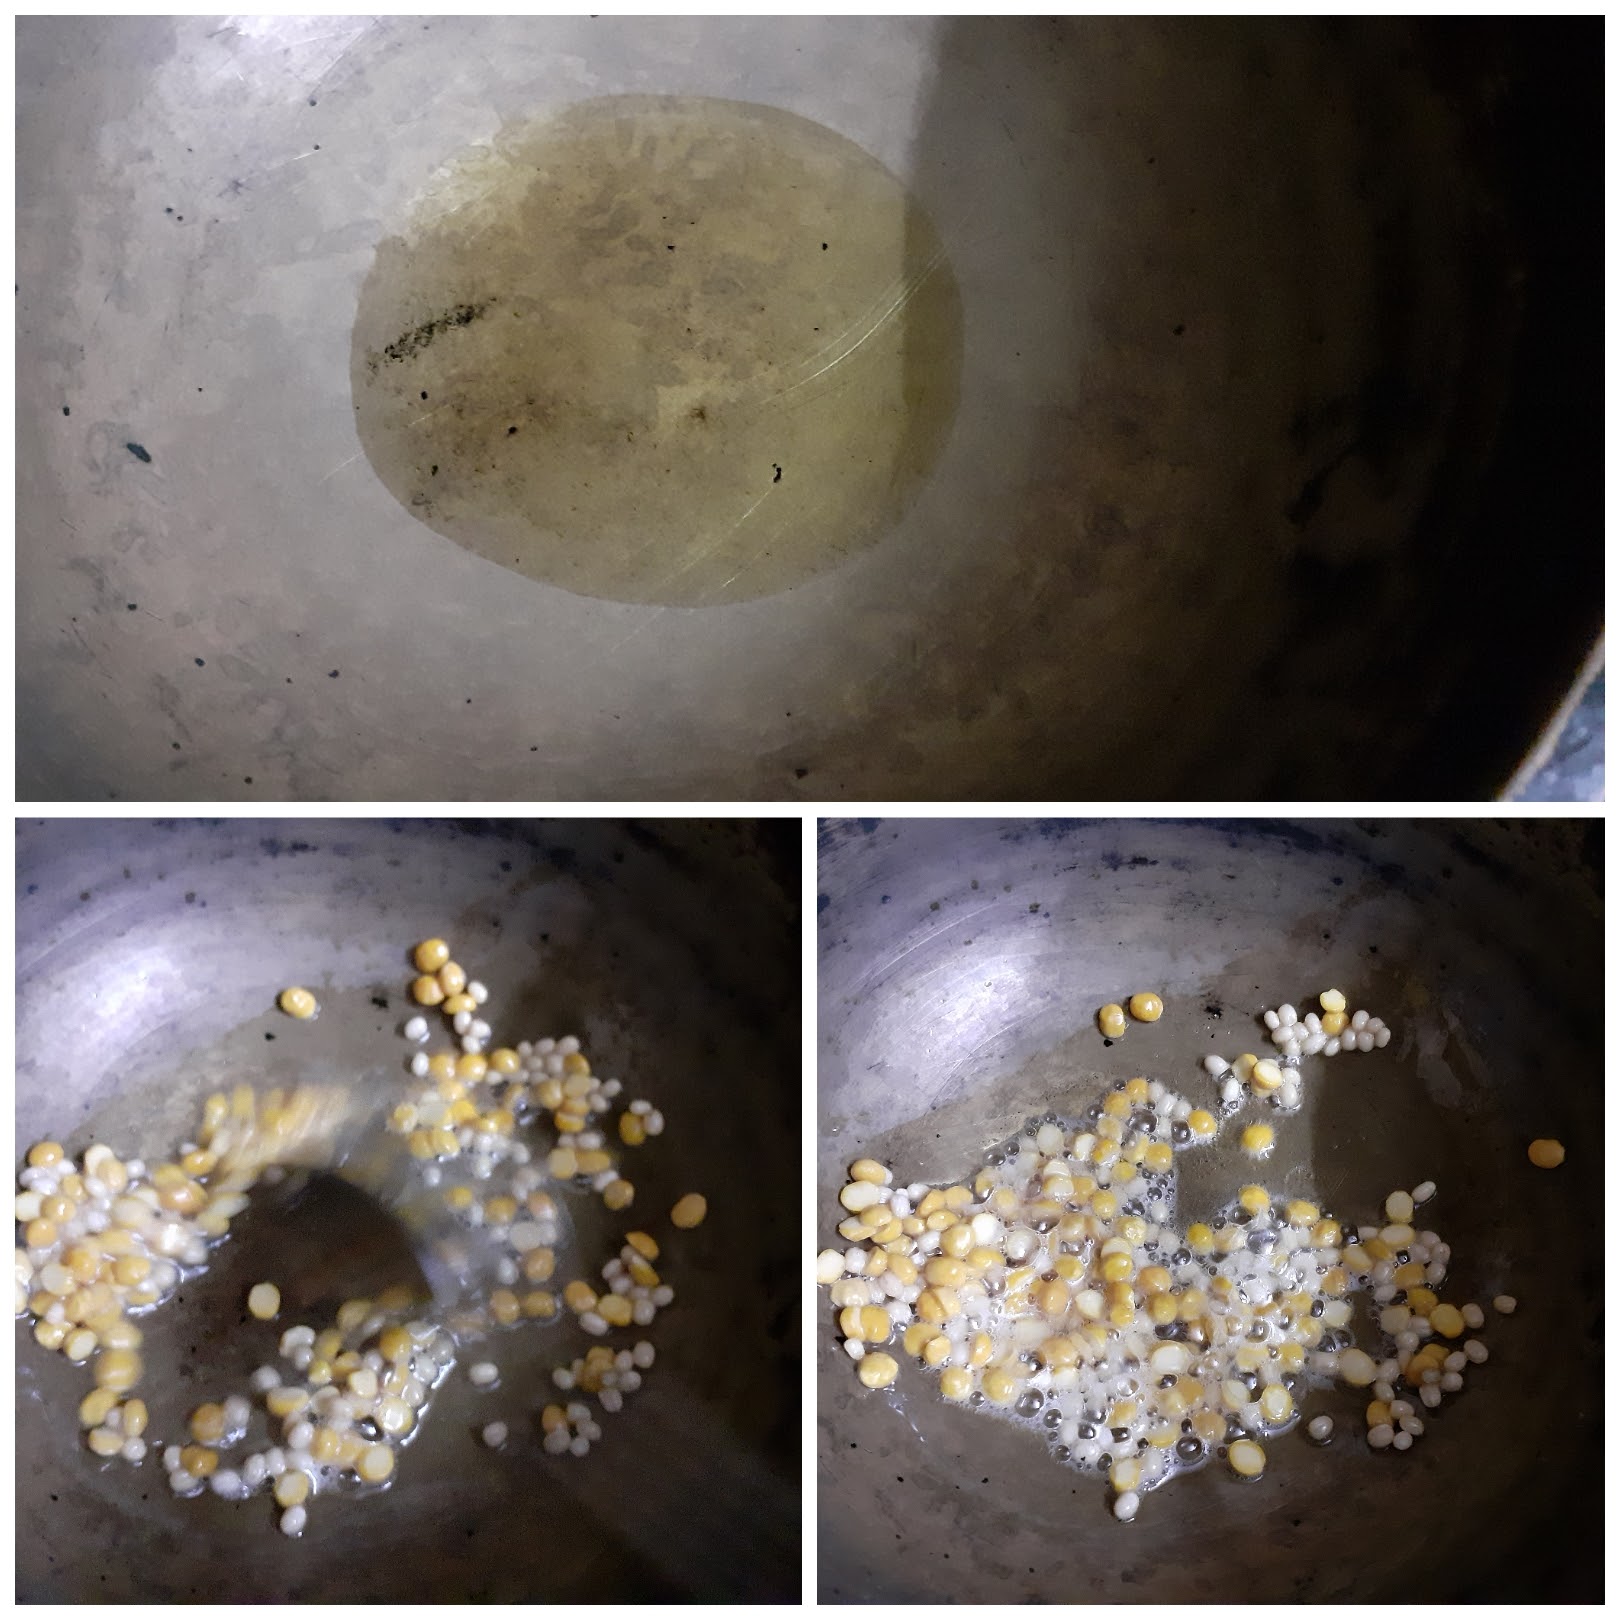
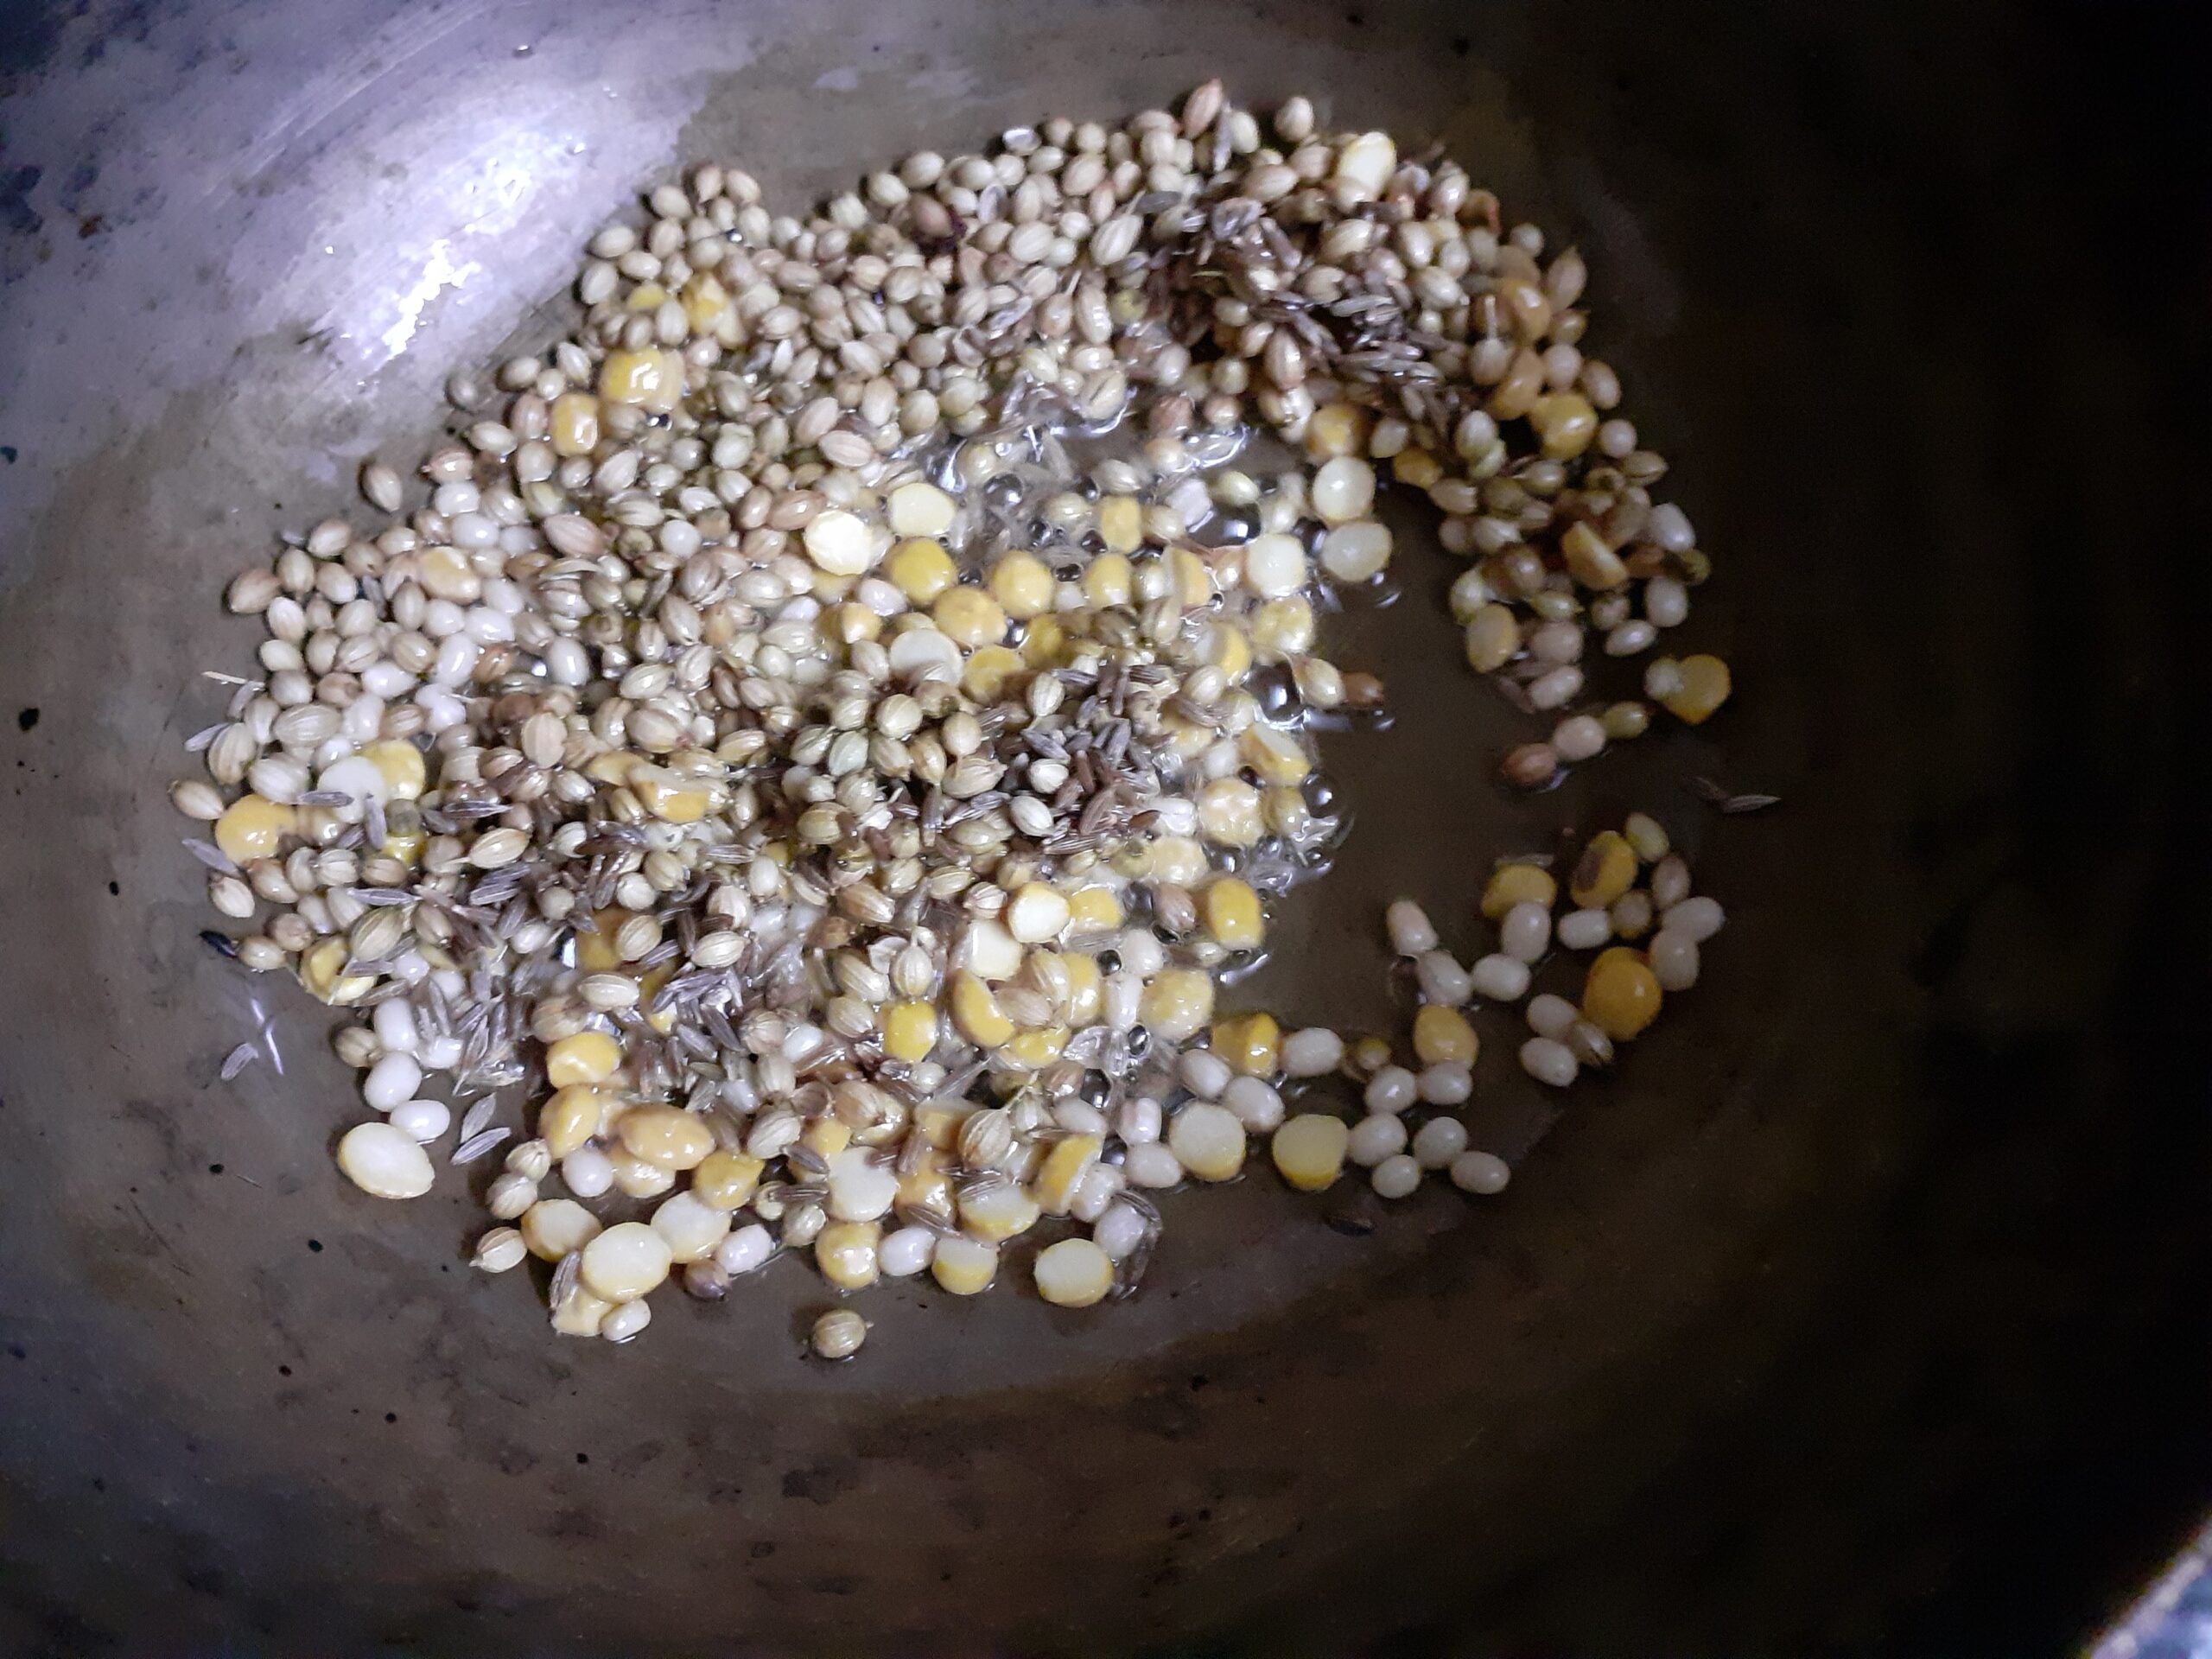
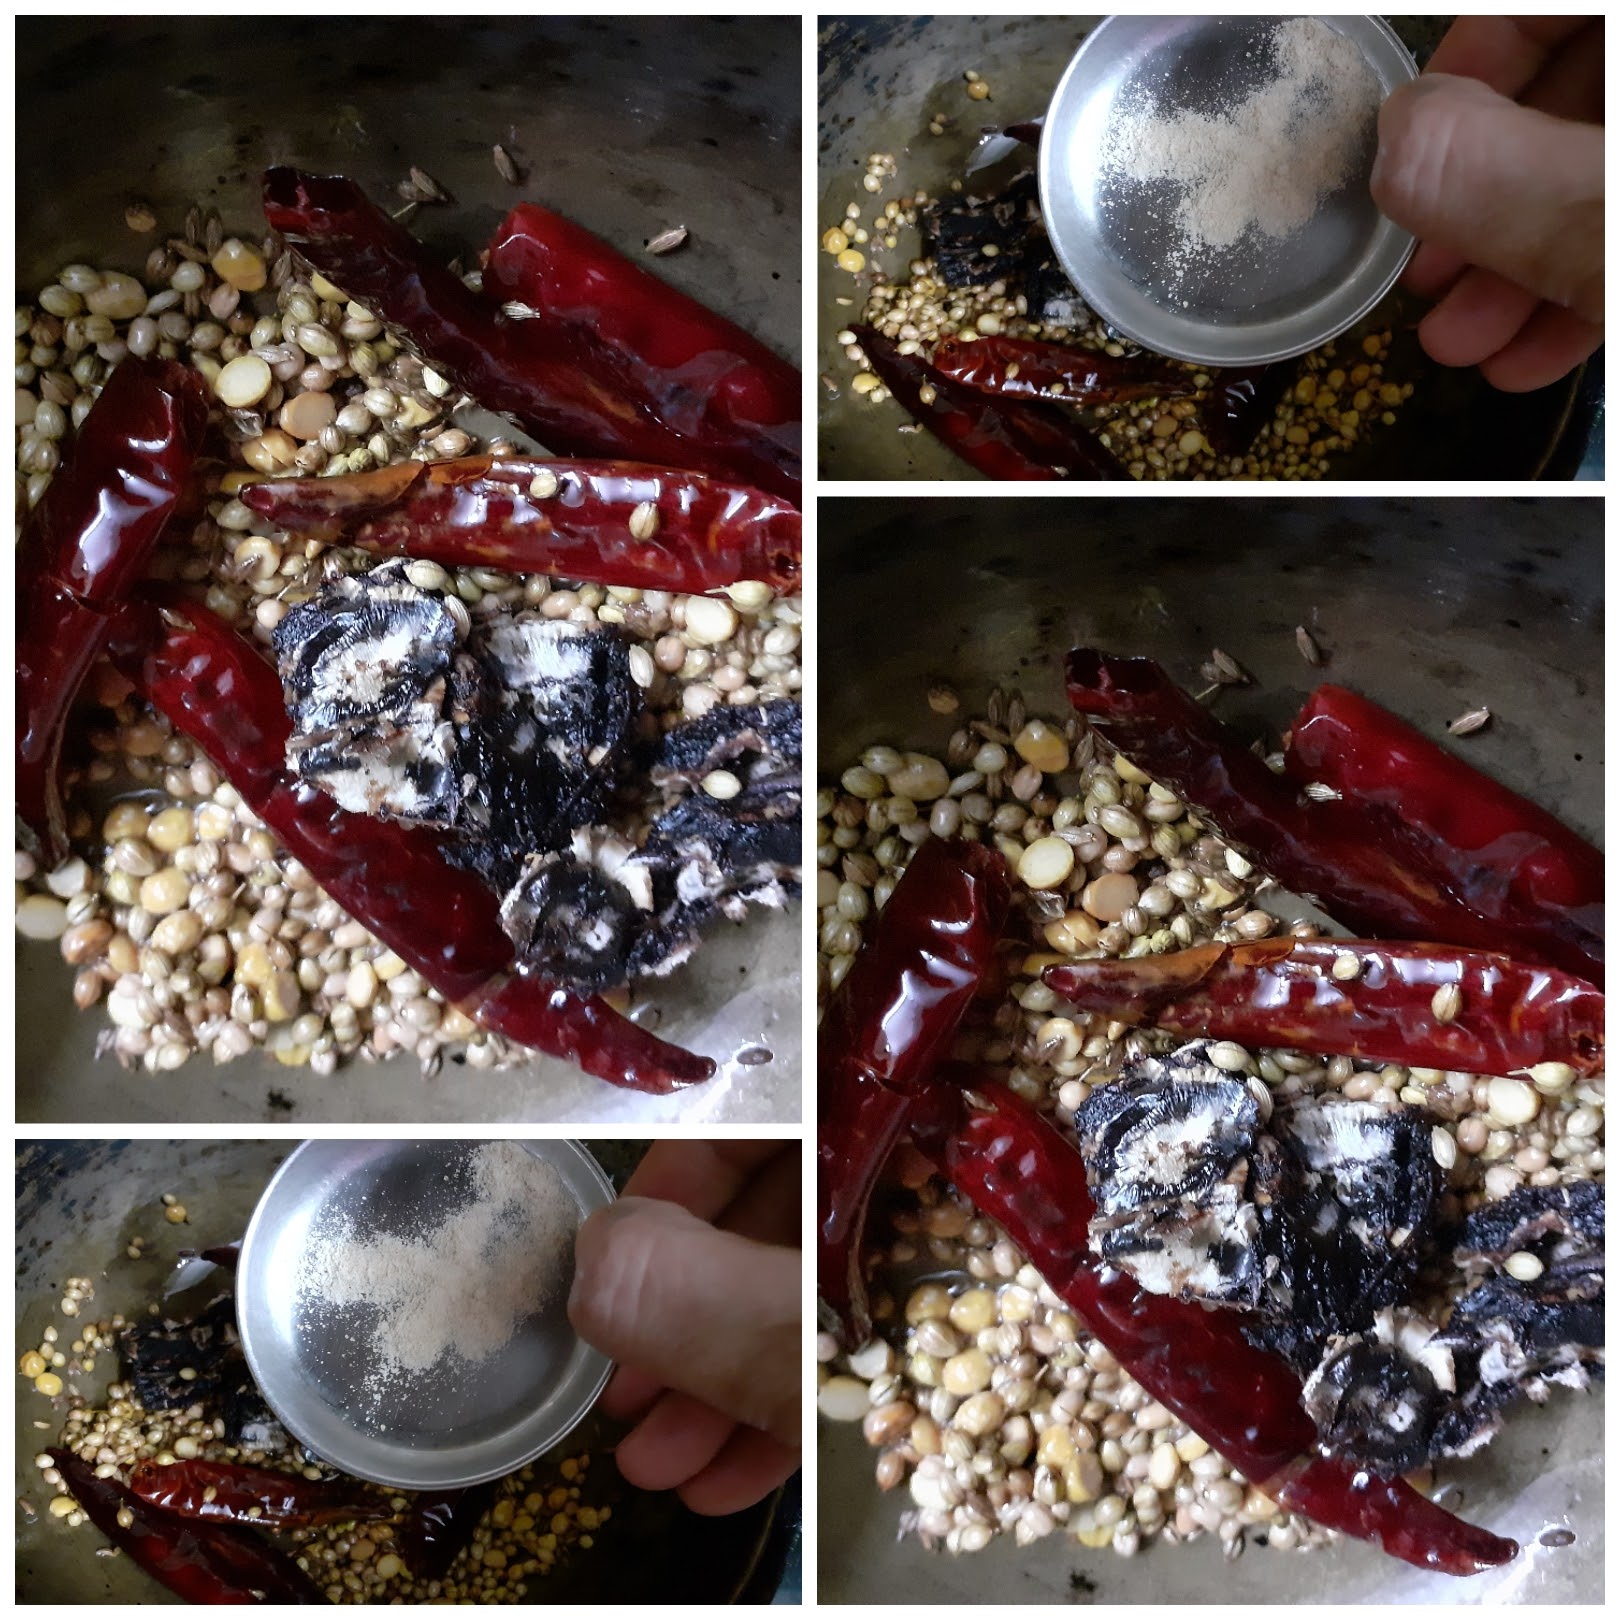
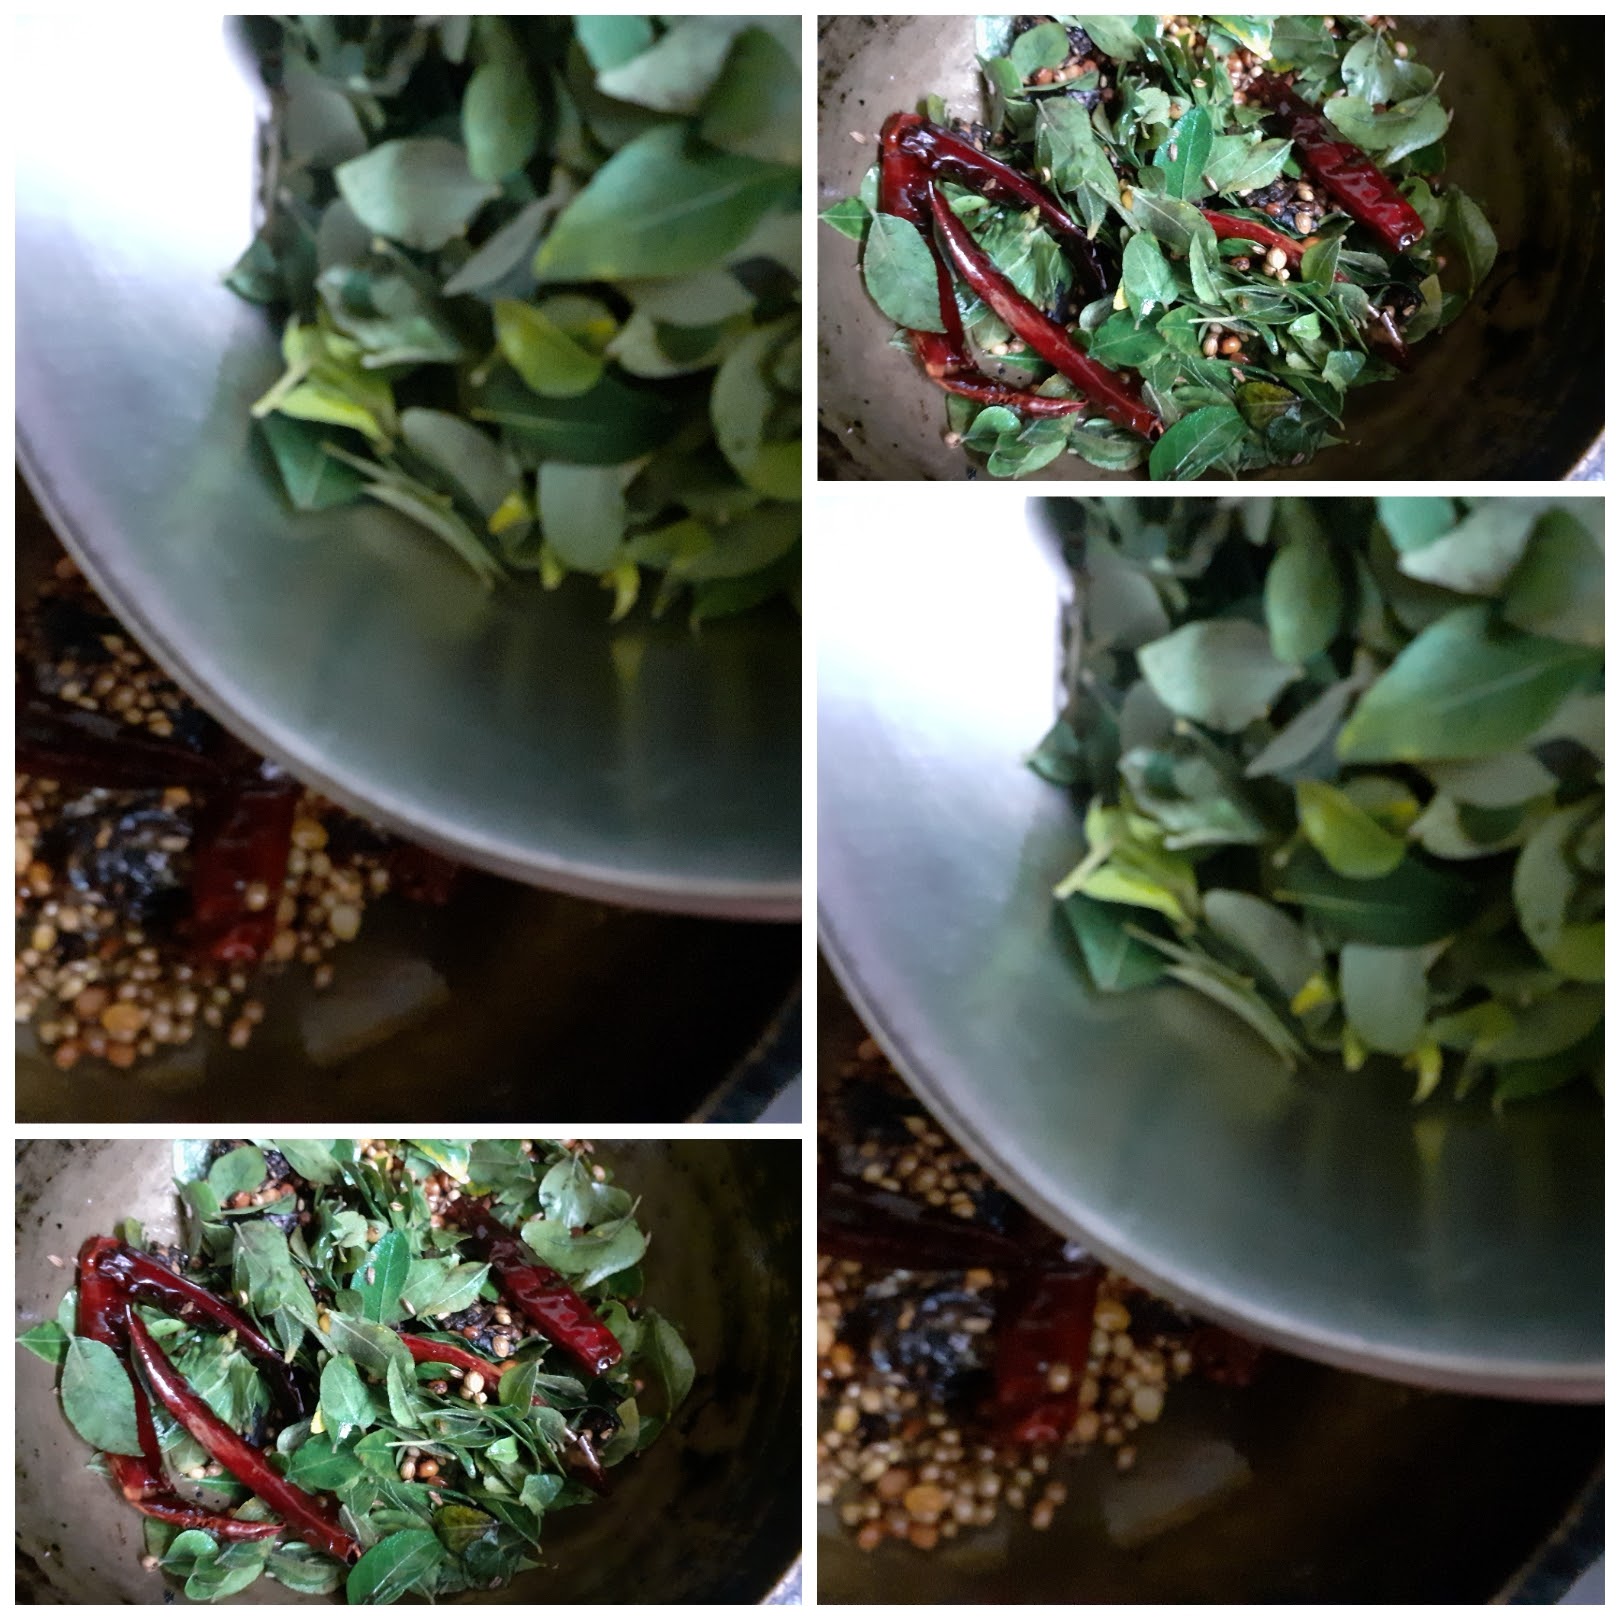
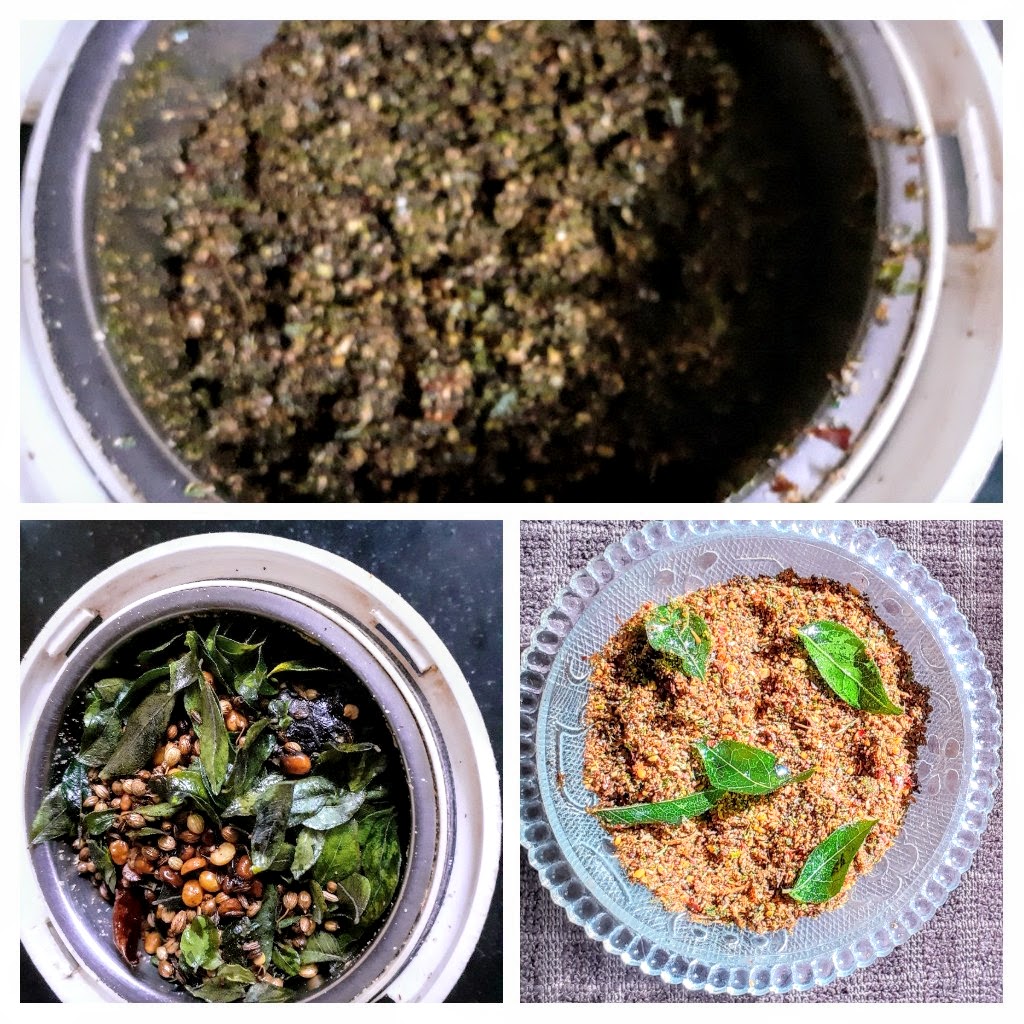
In a Kadai heat the oil and add the chana dal and urad dal and fry until they turn golden brown. Now add the coriander seeds and Cumin and continue to fry. When the coriander turns aromatic add the dry red chillies and continue to fry. Now add the tamarind followed by asafoetida and fry until the tamarind turn a little crisp, about 30 seconds. Finally, add the washed and pat dried curry leaves and saute for about a minute. Switch off the flame and cool all the roasted ingredients. On cooling, transfer them to the dry mixer jar and grind to a fine powder. Add salt and give another spin the mixture. The Karuvepilai powder is ready for storing. Enjoy with hot rice and ghee. One ball of rice with this powder helps maintain iron levels, good for hair growth and has many more benefits.
STEPWISE RECIPE FOLLOWS:
1. Assemble all ingredients.
2. Heat oil in a Kadai and add the urad dal and chana dal and fry until they turn light brown.
3. Add the coriander seeds and cumin seeds and continue to fry until the coriander seeds turn aromatic.
4. Now add the dry red chillies, tamarind, followed by the asafoetida and continue frying until the tamarind turns a little crisp.
5. Now add the washed and dried curry leaves and saute for a few minutes and put off the stove. Cool the roasted ingredients.
6. Put all of them in a dry grinder jar and grind to a fine powder. Add salt as required and the Kruvepilai powder is ready to store.
NOTES:
1. The curry leaves must be separated from the stalks, washed and pat dried.
2. Salt can be added while grinding or after grinding.
3. Store ina dry container.
4. More dry red chillies can be added for more spiciness.
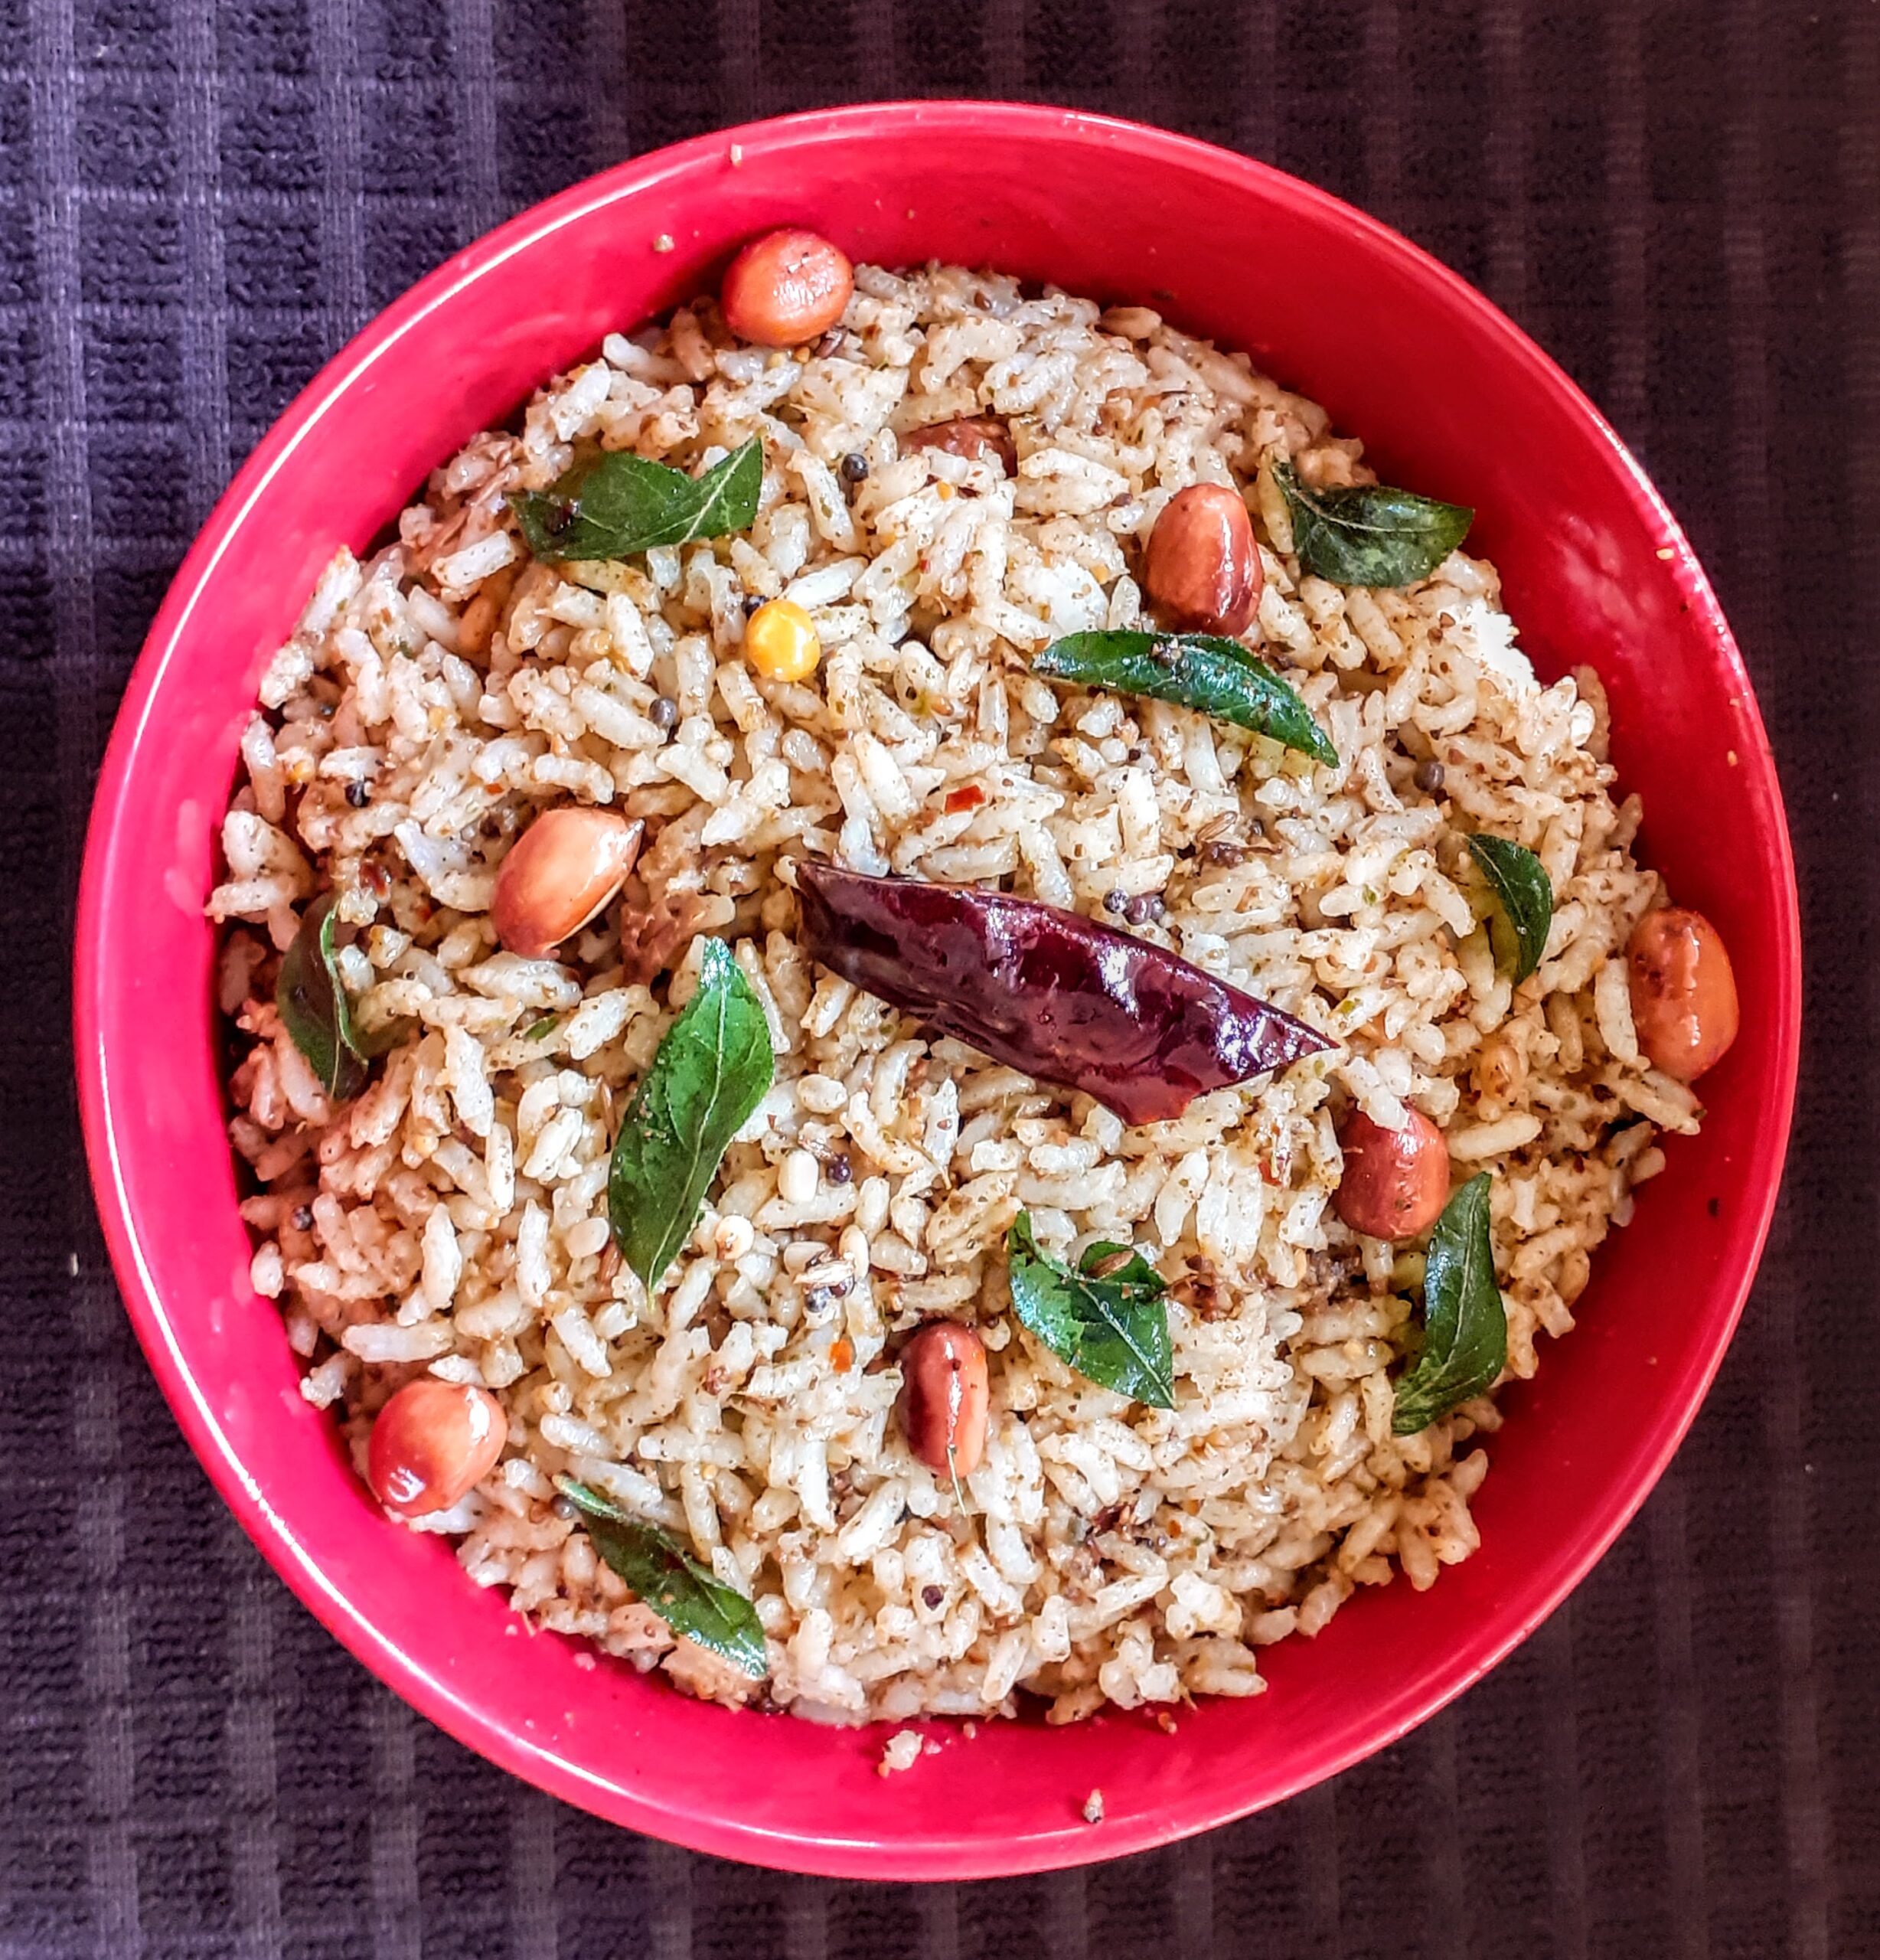
Karuvepilai Rice made from the Karuvepilai Podi
To make Karuvepilai Rice- In a Kadai heat oil. When hot add peanuts and fry until light brown. Now add mustard seeds 1 tsp, chana dal 1 tsp, Urad dal 1 tsp, followed by broken dry red chillies and aasafoetida. Fry until the dals turn light brown. Add Cooked rice made from 1 cup rice, followed by 2 to 3 tbsp of Karuvepilai Podi. Check and adjust salt. The yummy and healthy Karuvepilai Rice is ready. Enjoy. Bon Appetit.
If you tried this recipe and liked it please comment below. We would love to hear from you.
Want our recipes on your mail box? Leave your mail id in the homepage and we shall mail them to you.
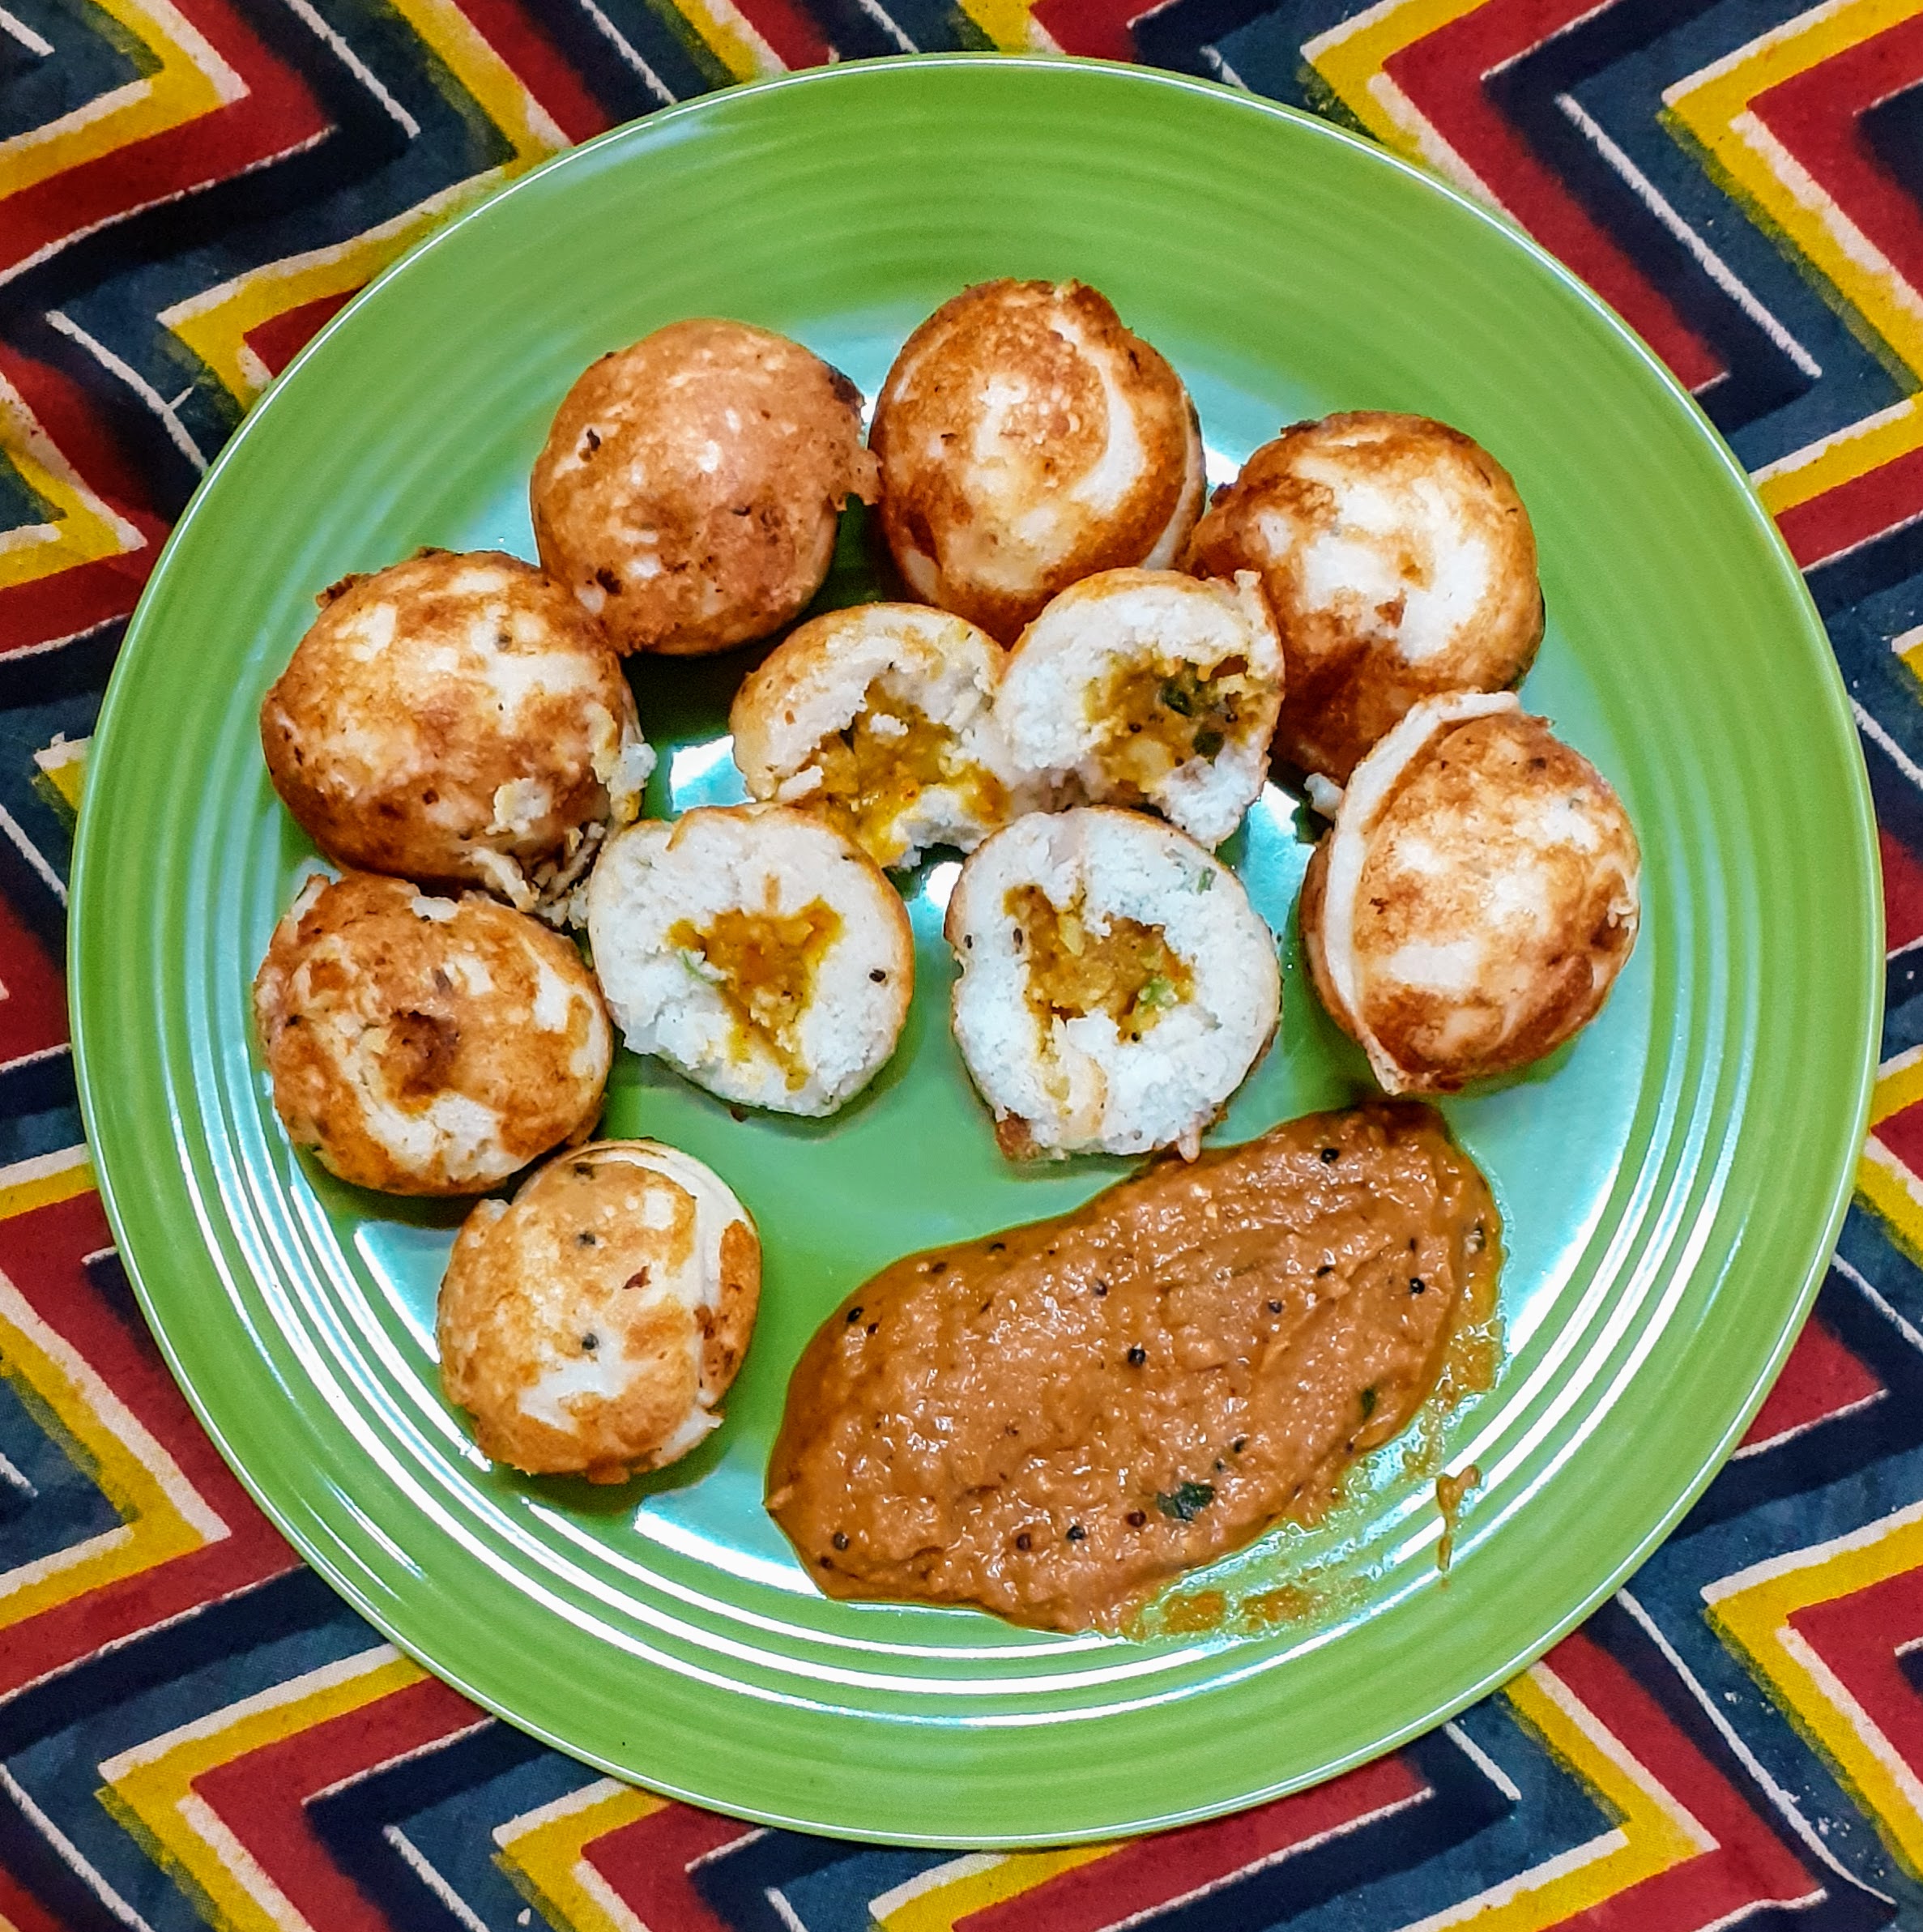
Stuffed Kuzhi Paniyaram (Savory)
Kuzhi Paniyarams are basically Lentil and rice batter dumplings. The batter is fermented and then poured into a Paniyaram pan which gives them the shape. Most often in South Indian homes the Kuzhi Paniyaram or Kuzhi appam as we call it is made from the Idli batter itself. When the batter becomes a little sour it is made into Paniyaram. That is because the Idli/Dosa batter is made for a whole week as a quick breakfast or dinner option. So day 1 is Idli, day 2 Dosa and day 3 onwards its Paniyaram and dosa with the batter, as sour Idlis are not that great to taste. However, when I have guests over I prefer making the batter especially for this as it makes the crust crisp and enhances the taste of the Paniyaram to a different level and the texture on the inside of the Paniyaram is lovely.
There are many variations of the Paniyaram batter. It is usually made with Urad dal and rice, Raagi(Finger millet)flour, Jowar(Sorghum) flour, Bajra(Pearl millet) flour, etc can also be used in the batter. The proportions of the Dal and rice also vary from home to home. The Paniyaram batter is used as it is or sometimes, finely chopped Onion, grated Carrots, and other vegetables can also be added.
I have stuffed the Paniyaram with a mashed potato spicy stuffing which tastes wonderful, I have also added finely chopped onions, green chillies, ginger and curry leaves to the batter. This combination of onion in the batter and the Potato stuffing within is a perfect one.
I personally don’t like using the non-stick Paniyaram pan for this dish, as the traditional brass or iron ones give the Paniyaram its crispy exterior. If you have only the non-stick one with you, that’s fine too.
Kuzhi Paniyarams can be served as Breakfast, starters or even for dinner with any chutney.
While you are here please check out other recipes of mine like Dahi Pohe, Adai,
PREP TIME: 20 Mins(+4 hrs soak) COOK TIME: 40 Mins
TOTAL TIME: 60 Mins COURSE: SNACK/TIFFIN
CUISINE: SOUTH INDIAN SERVINGS: 4
AUTHOR: Rajni Ram
Here is the recipe of Stuffed Kuzhi Paniyaram–
Ingredients for batter:
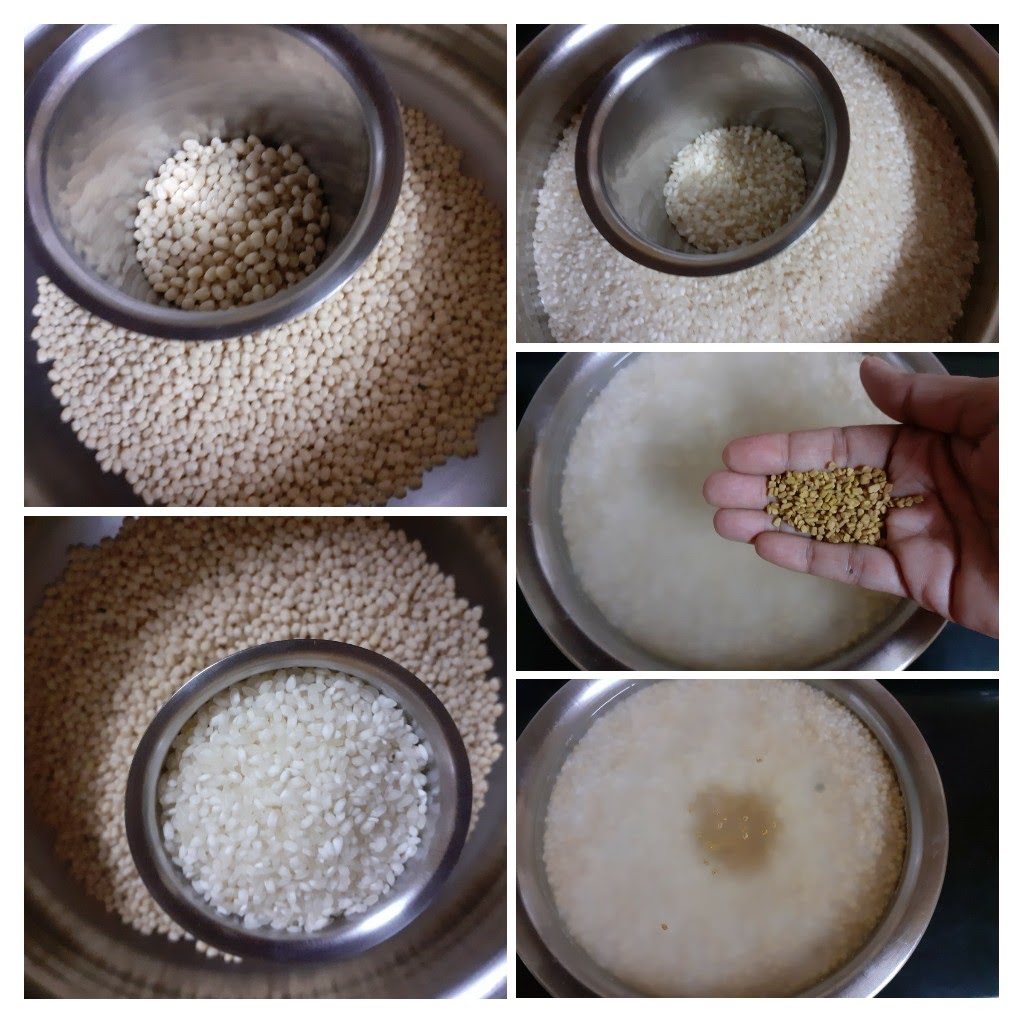
Urad dal/black gram(whole without skin) 1 cup
Idli Rice/Boiled rice 1.5 cup
Raw rice(any variety except Basmathi) 1.5 cup
Methi seeds/fenugreek seeds 1 tsp
Ingredients for stuffing:
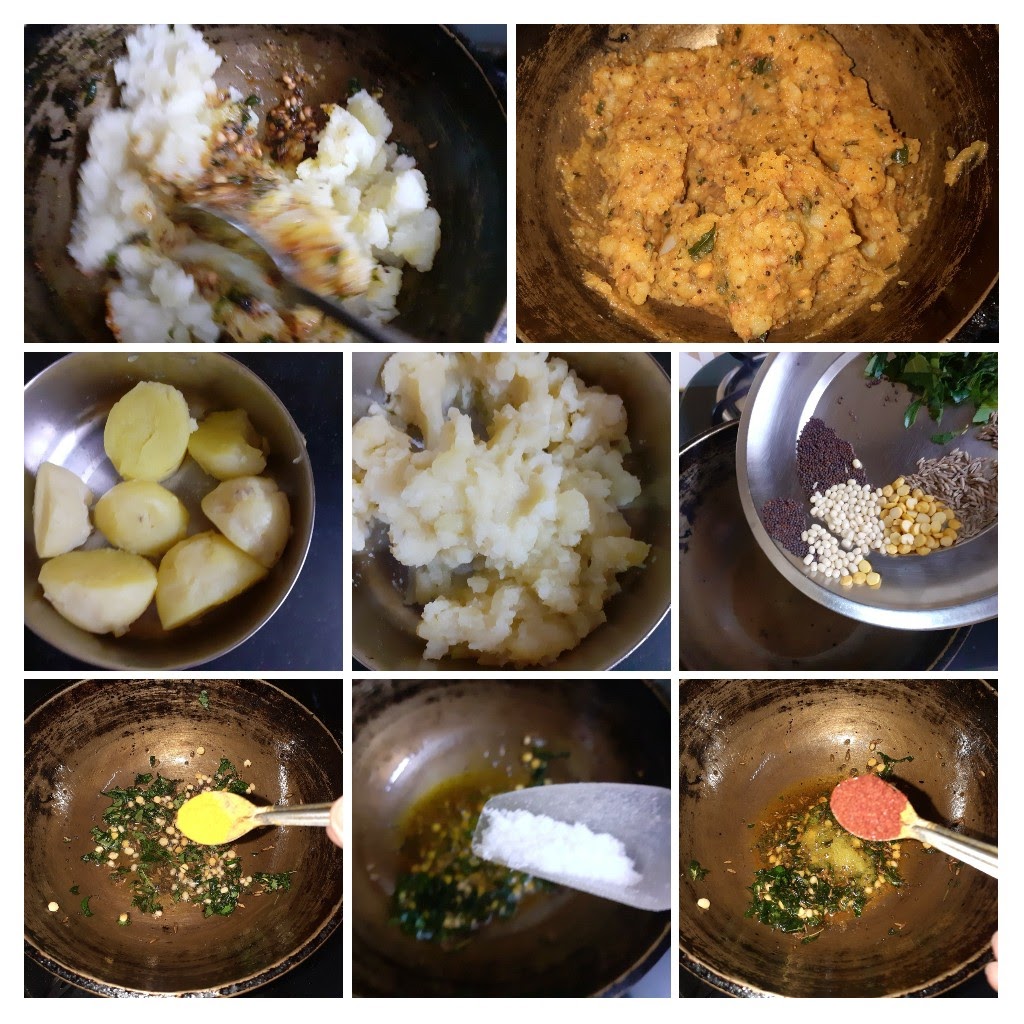
Potatoes 4 medium(boiled)
Turmeric powder 1/2 tsp
Red chilli powder 1 tsp
Mustard seeds/Rai 1 tsp
Cumin seeds/jeera 1 tsp
Asafoetida 1/4 tsp
Curry leaves a few (finely chopped)
Salt as per taste
oil for tempering and for greasing the Paniyaram pan.
Directions for Batter:
Soak the dal and both rice varieties along with a teaspoon of methi seeds in a huge vessel for 3-4 hours and grind to a smooth paste to a batter of medium consistency(should resemble Idli batter). Add salt, and leave to ferment for 6-8 hours for a perfect texture of the Paniyaram. While grinding add little water at a time, the batter should be a smooth one, but not runny.
Directions for Stuffing:
Boil the potatoes, peel the skin and mash them well. Now in a pan pour some oil and heat. Add the mustard seeds, as they crackle, add the Cumin followed by turmeric powder, red chilli powder, salt, asafoetida and curry leaves. Nicely fry the masala in the oil for 30 seconds and drop the mashed potato into the tempering and mix nicely, so that the tempering is evenly distributed. Cool the mixture.
After it ferments temper the batter with mustard seeds and asafoetida.
Directions for Paniyaram:
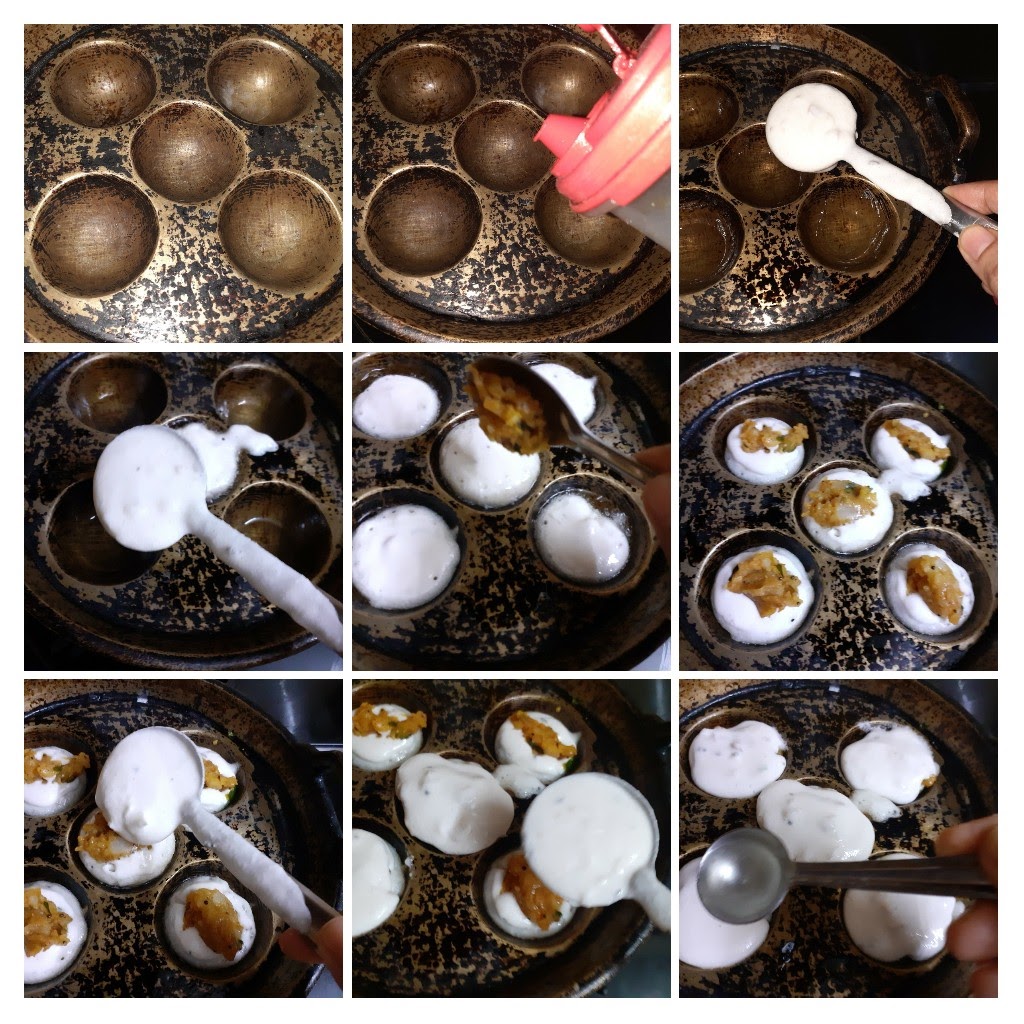
Chop Onions, green chillies, ginger and curry leaves finely and add them to the fermented batter and stir well.
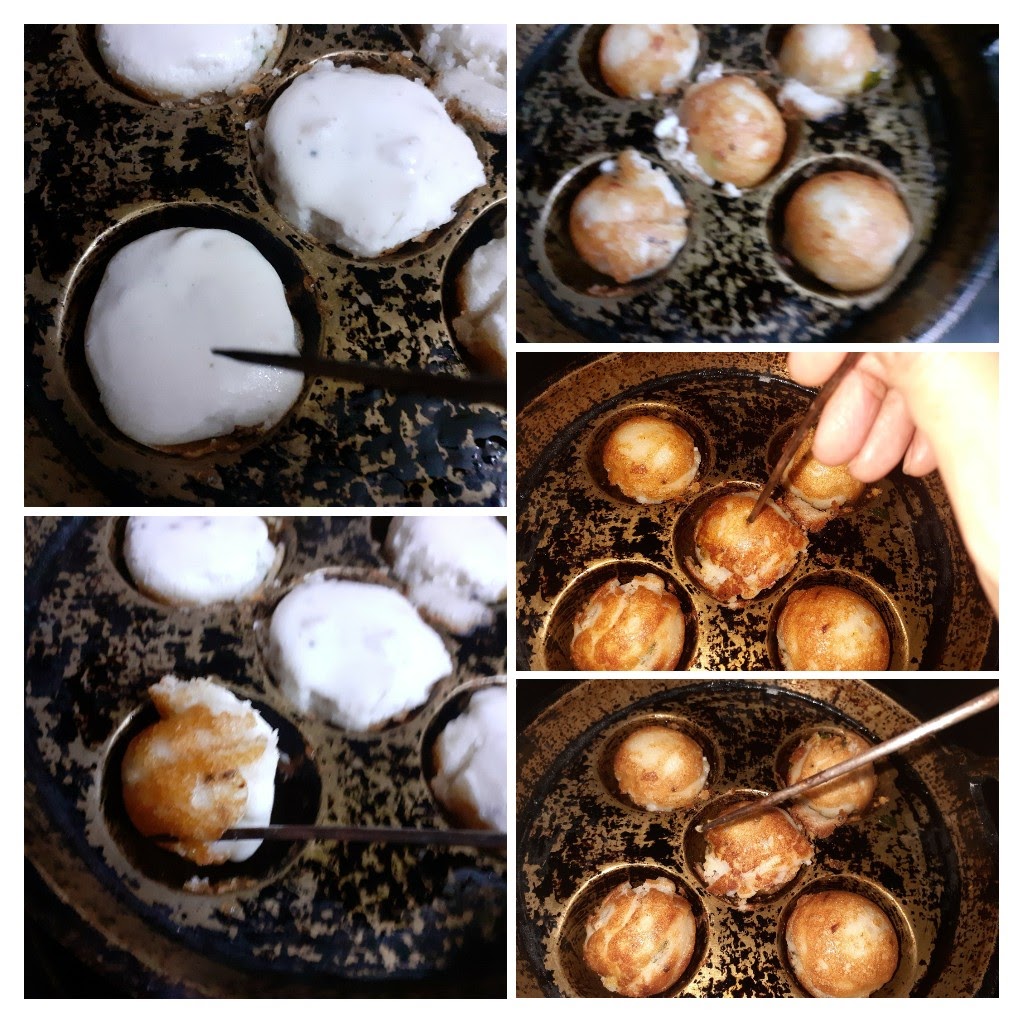
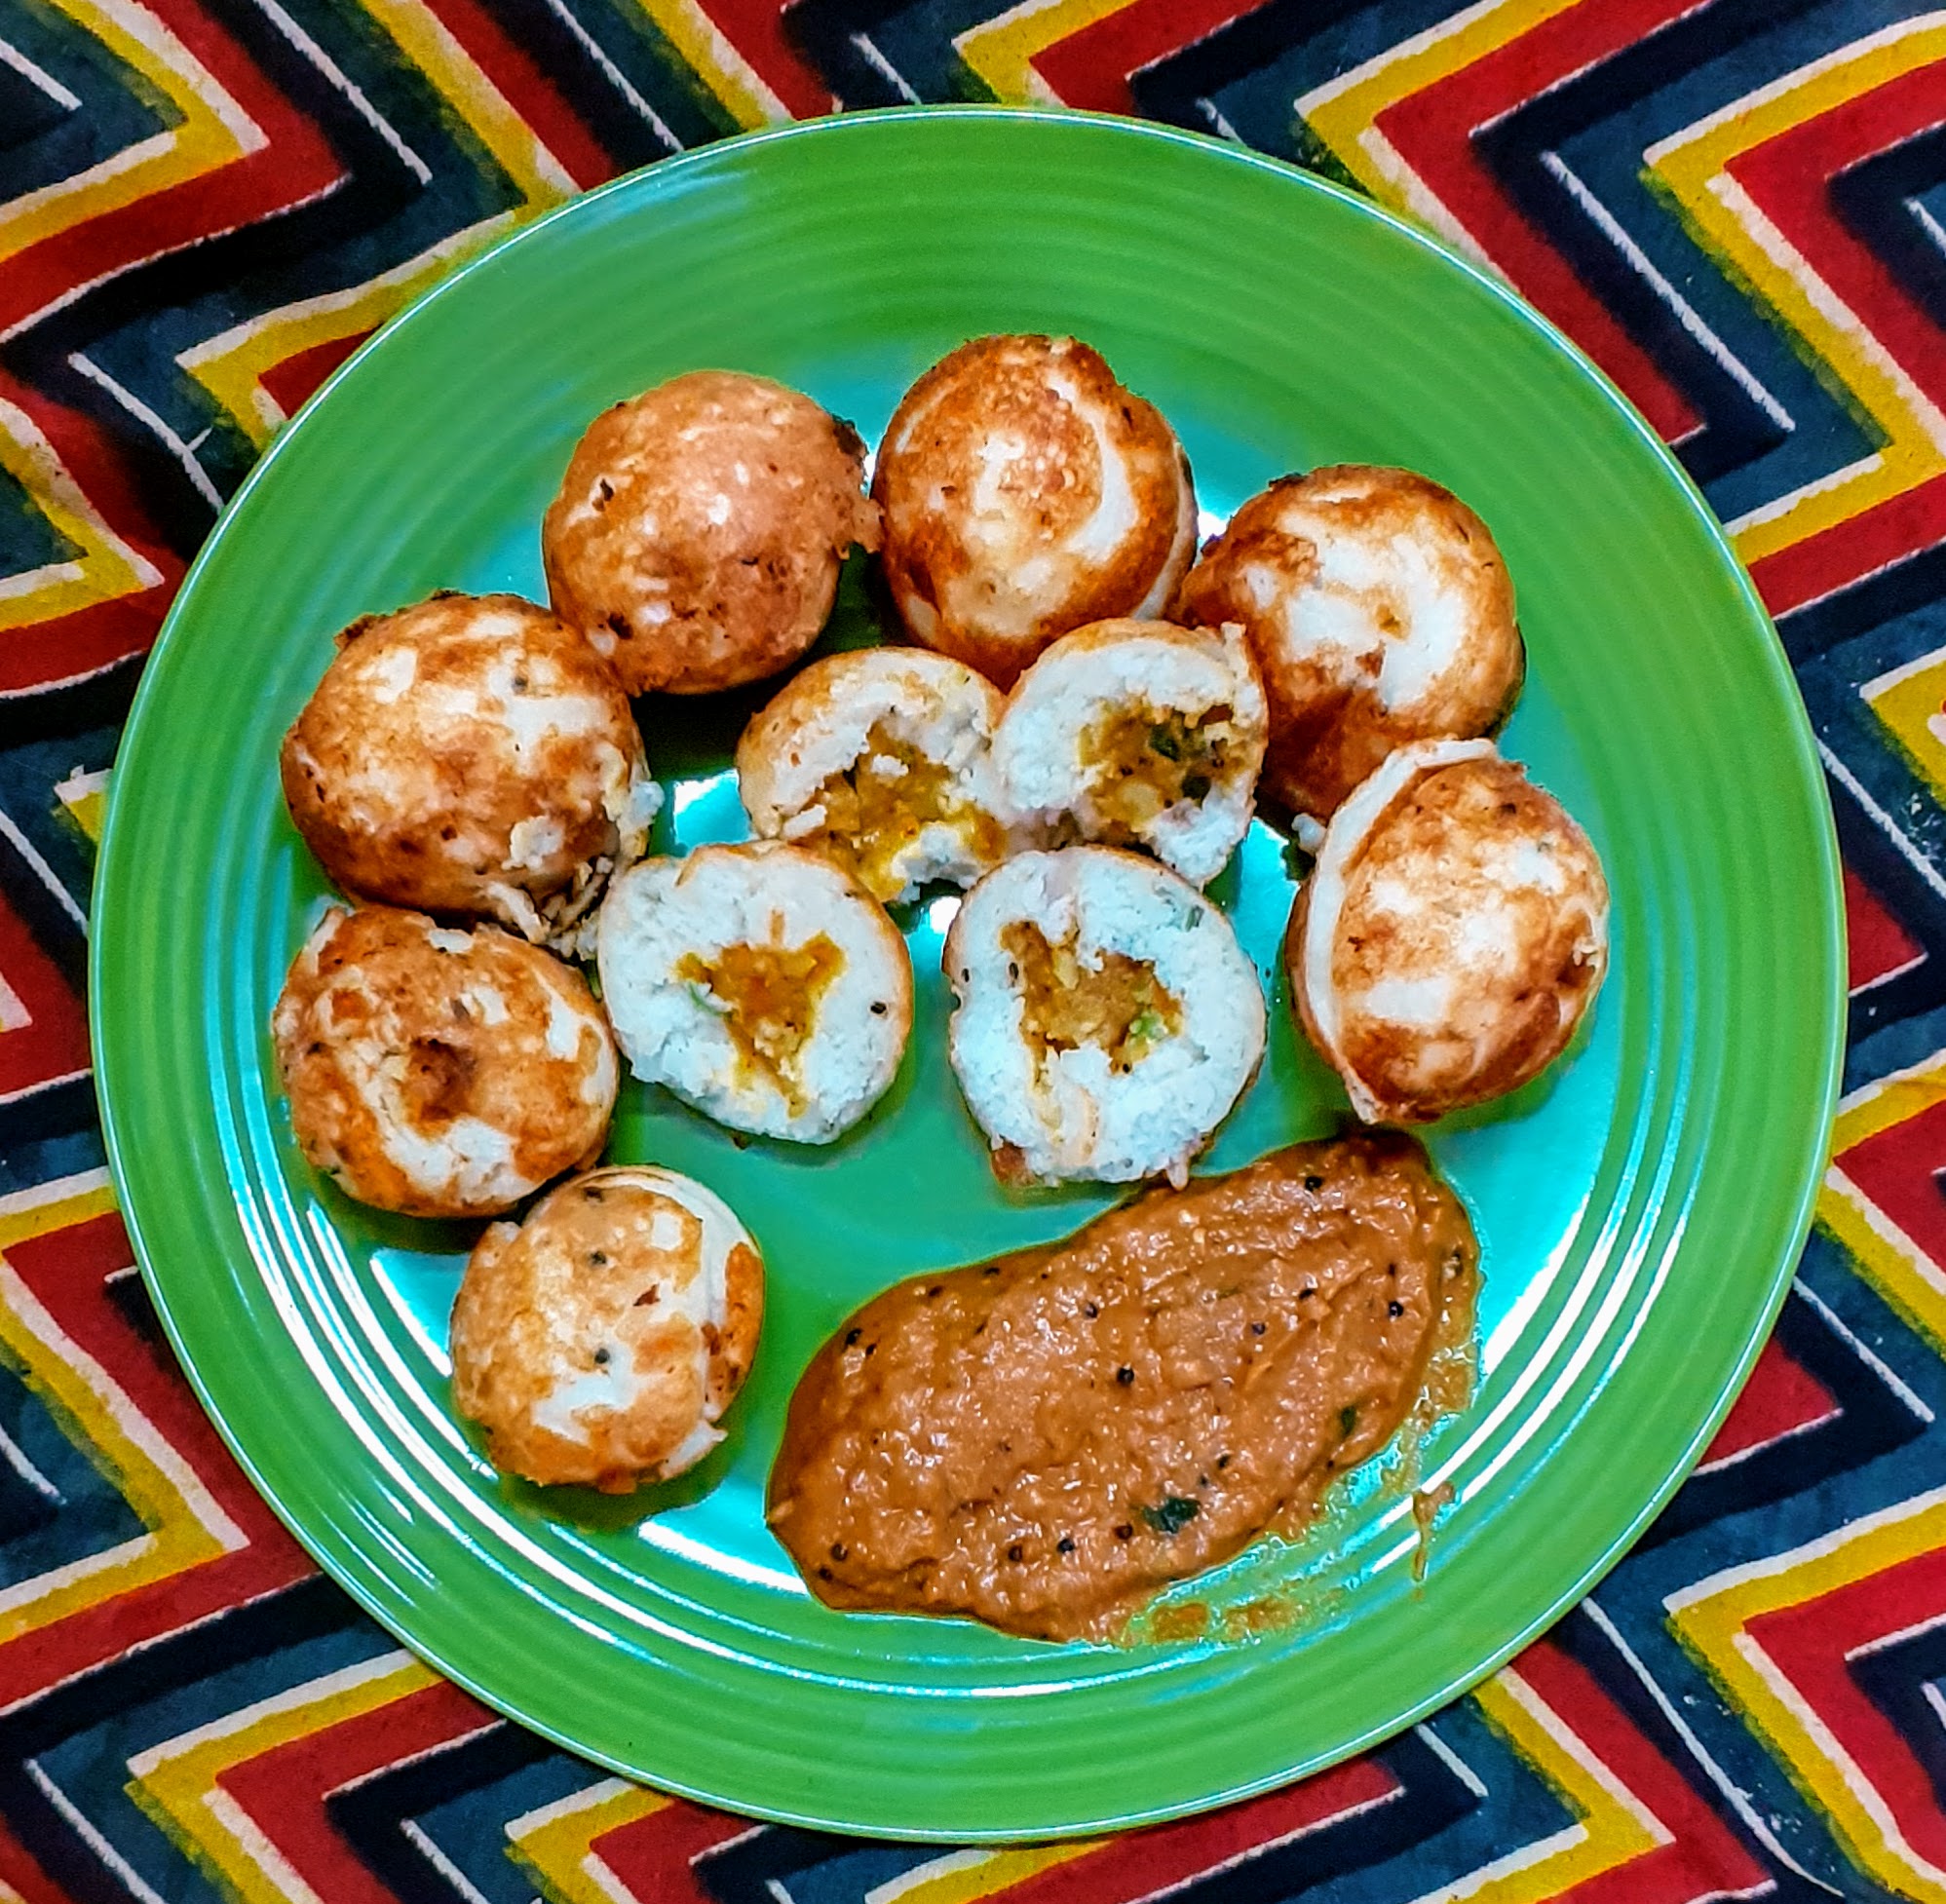
Put the Paniyaram pan on the flame and let it heat up. Pour oil into the moulds(if using a traditional metal pan, only the first round will need 1 tsp oil per mould, rest of the batches will need only a few drops). Wait for 1/2 a minute, let the oil heat up, now reduce the flame and with a small round ladle pour 1 scoop of batter into each mould, now take the stuffing little at a time with a spoon and drop it in the centre of the batter. Now cover up the stuffing with 1/2 scoop of batter and increase heat. Drizzle little oil around the corners of each mould, reduce the flame and slowly loosen them from the sides. Now flip each Paniyaram and cook the other side. When done loosen it from the mould and remove it. The crispy and tasty Kuzhi Paniyarams are ready..serve them with Tomato Coconut chutney or Tomato onion chutney. Enjoy. Bon Appetit.
STEPWISE RECIPE FOLLOWS:
1. Soak the dal and rice along with 1 tsp methi seeds for 3 hours minimum and grind to a smooth paste of medium consistency(Idli batter consistency). Add the salt, mix and allow to ferment for 6 to 8 hours.
2. Preparation of stuffing–Boil Potatoes, peel and mash them. In a pan take 1 tbsp oil and heat. Now add the mustard, followed by cumin, turmeric powder, salt, red chilli powder, asafoetida and curry leaves. Fry the masala for 30 seconds and add the mashed potato to the tempering and mix well. The tempering should have coated the potatoes well. Check for salt and spice. The stuffing should be a little spicy.
3. To the fermented batter add finely chopped onions, ginger, green chillies and curry leaves and stir nicely. Temper the batter with mustard seeds, cumin seeds and asafoetida.
4. Now put the Paniyaram pan on the flame and heat. Pour 1 tsp oil in each mould. Once the oil is heated, using a small round ladle, pour 1 scoop of batter into each mould. Now with a spoon drop little of the stuffing in the centre of the batter, now pour more batter to cover the stuffing. Drizzle some oil in the corners and cook for 1/2 a minute. Now loosen the edges of the paniyaram using a fork/ spoon or thin metal wire to flip them around, cook them and remove them from the pan when done. For doneness when you stick the metal wire or toothpick in the centre of the paniyaram, it should come out clean.
(I have included a short video so that you understand the process of cooking the Paniyaram in the pan.)
5. Repeat this process for the entire batter or how many ever you wish to serve, the remaining batter can be stored in the fridge and used to make uthappam.
The Paniyaram is ready to serve. It goes well with all chutneys or just by itself as it has a stuffing. It can be served with Sambar too.
How do make this recipe without a Paniyaram pan?
well, make a thicker batter, and also make small balls of the stuffing. Now take the stuffing and drop it in the batter, use your hands to coat the stuffing with batter and deep fry them in a Kadai of oil.
NOTES:
1. As the recipe involves soaking and fermentation, plan your time. In winters give more time for fermentation.
2. The onion, green chillies, ginger and curry leaves can also be sauteed in oil and added to the batter.
3. If using a nonstick paniyaram pan, I recommend drizzling it with some oil for a crunchy exterior.
4. Only small amounts of the stuffing as to put in the center of the batter, not too much of it.
If you tried this recipe and liked it please comment below. I would love to hear from you.
Pruppu Urundai Kozhambu (Dal Dumplings In Tamarind Sauce)
I love cooking this dish though it involves some amount of preparation and detail. Paruppu Urundai Kozhambu is a delicious traditional South Indian recipe. I learnt this from my mother in law and she was an expert at it. In this preparation, dumplings of Dal/ lentils are cooked in a tangy tamarind sauce. This dish is served with rice but goes well as a side dish for Dosas, Idli, Pongal etc. As in all recipes, there are different methods of making the dumplings. Some steam the dumplings before adding it to the sauce, while some cook it directly in the tamarind sauce. I prefer and follow the second method. The dumplings are able to absorb the flavours this way. I also love using fresh coriander in the dumplings as it realove cooking this dish though it involves some amount of preparation and detail. Paruppu Urundai Kozhambu is a delicious traditionaand add them to the sauce, whereas other recipes suggest cooking it lly elevates the dish to a different level. So when there are no coriander leaves at home I don’t make the dish. Whether coriander is added or not, this dish is just amazingly tasty. So don’t wait for the coriander, just cook on. While you are here check out the recipe of Vatha Kozhambu A similar recipe with Shallots cooked in a tangy tamarind sauce.
Here is the recipe of Paruppu Urundai Kozhambu.
PREP TIME: 20 Mins+ soak time COOK TIME: 30 Mins
TOTAL TIME: 60 Mins COURSE: MAIN
CUISINE: SOUTH INDIAN SERVINGS: 5
AUTHOR: Rajni Ram
Ingredients:
Tuvar dal/ Pigeon peas 2 cups soaked for 1 hour
Tamarind 2 lemon sized balls( pulp extracted)
Grated Coconut 3 tbsp
Sambar powder 2 tbsp
Dry red chillies 5
Mustard seeds 2 tsp
Asafoetida 2 tsp
Methi seeds/ fenugreek seeds
Curry leaves few
Coriander leaves(optional)
Salt as required
Directions to make Urundai( dumplings)
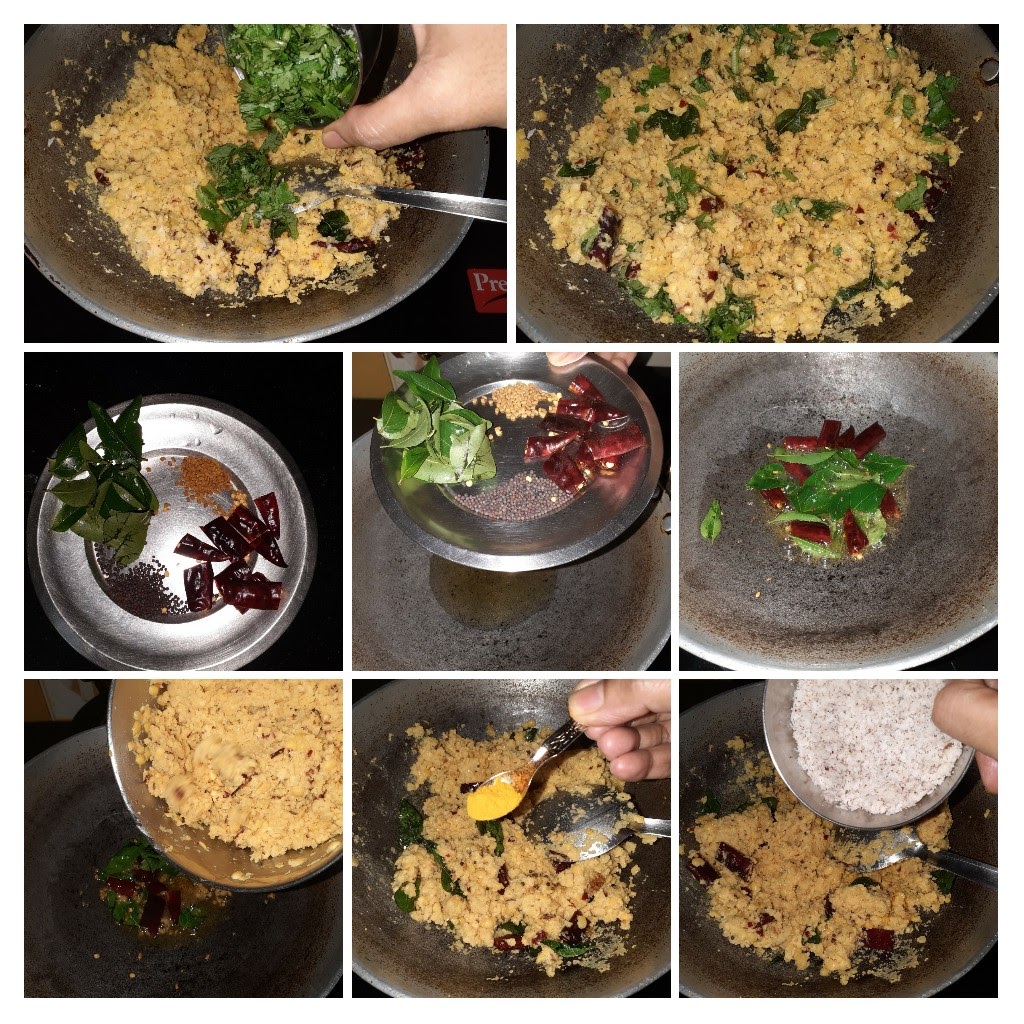
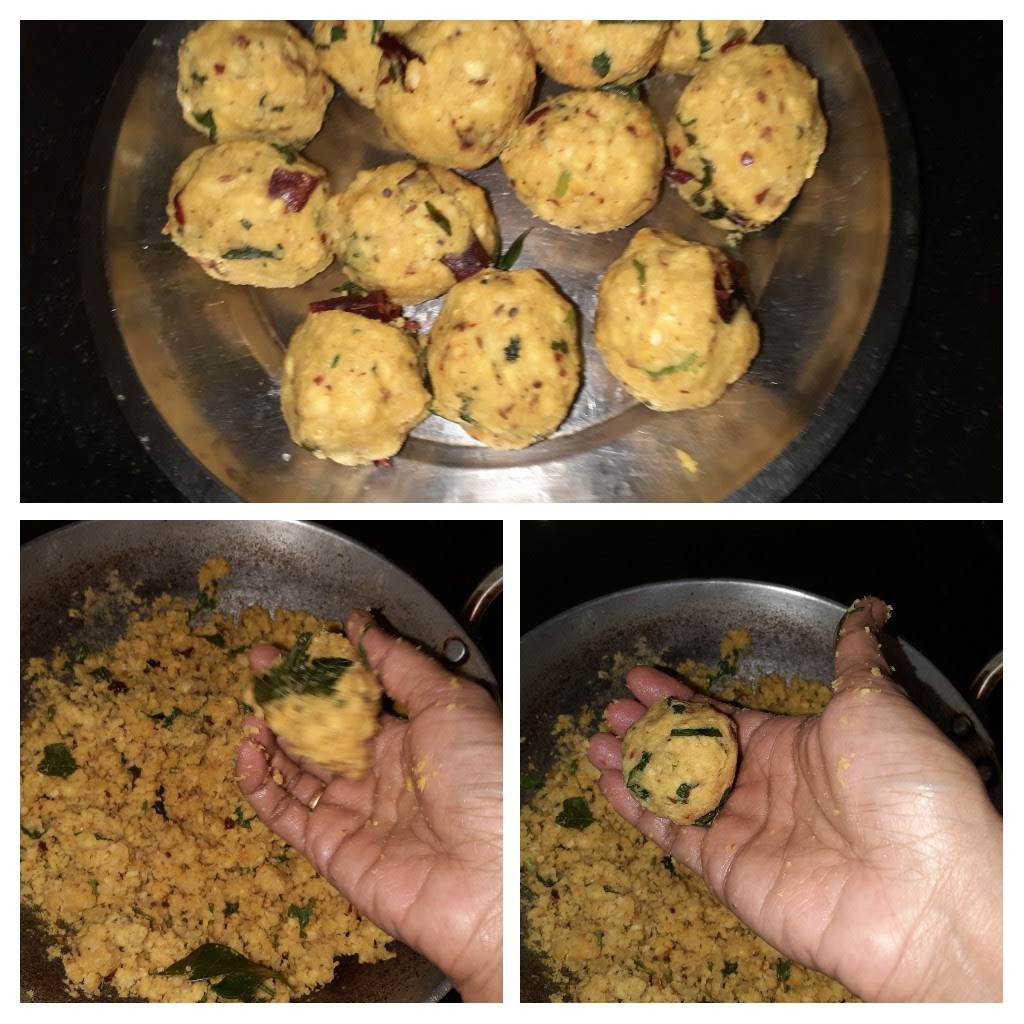
Drain out the water from the soaked dal and put it in the blender. Add 1 tsp asafoetida, dry red chillies 3, salt ( as per preference) and grind to a coarse mixture. Now in a karahi or pan add 1 tbsp oil to temper and sauté the mixture. As the oil heats up add 1 tsp mustard seeds, as they crackle add a few Methi seeds, broken dry red chillies, asafoetida1 tsp, curry leaves and fry them. Once they are golden brown add the coarsely ground dal mixture and salt and sauté nicely over a medium flame for 5 minutes. Add the grated coconut and keep stirring constantly as the mixture may stick to the pan/karahi bottom. This step is just to take away the moisture, the dal need not be crumbled, just stirred. After sautéing transfer the sautéed dal to another vessel and cool. Once cooled shape them into dumplings. I could make around 13 dumplings from this mixture. The dumplings should be a little bigger than a Lemon. Set the dumplings aside.
Directions for the Kozhambu( gravy/ sauce)
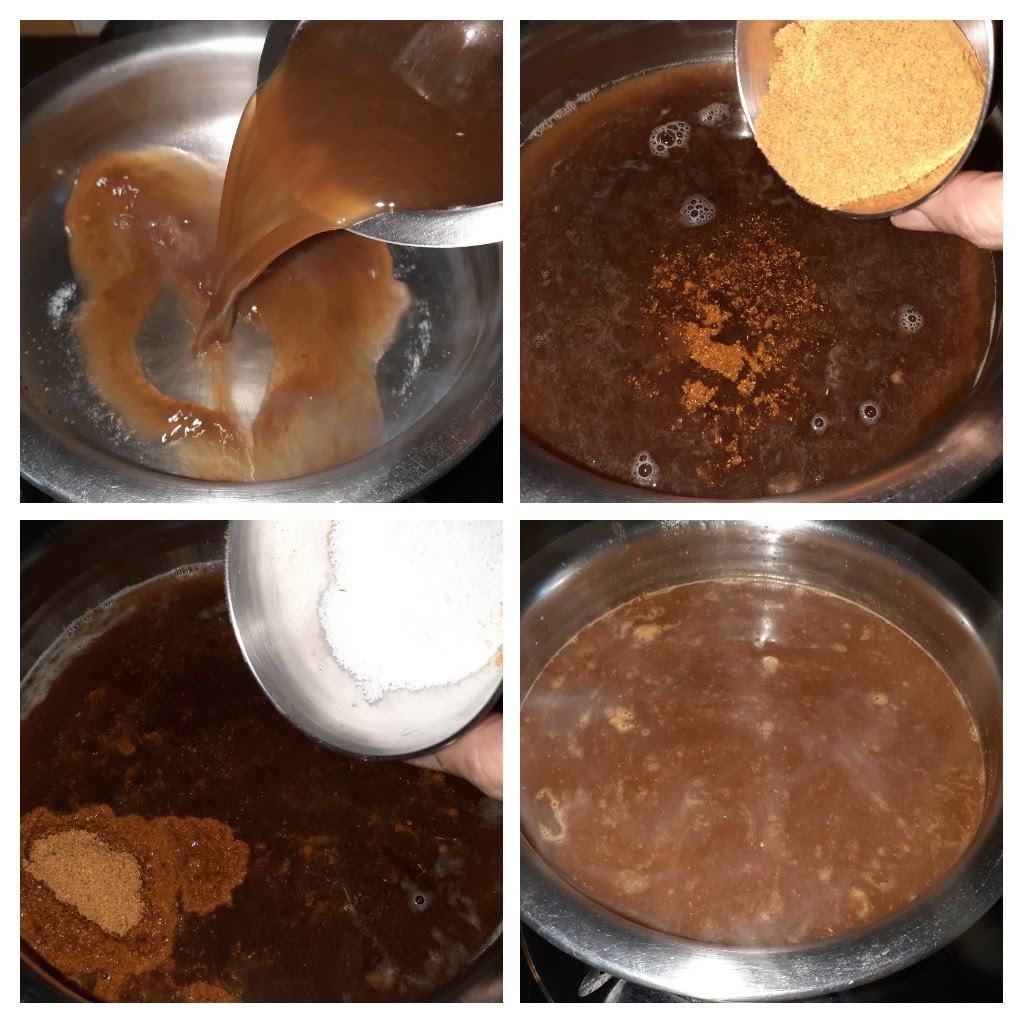
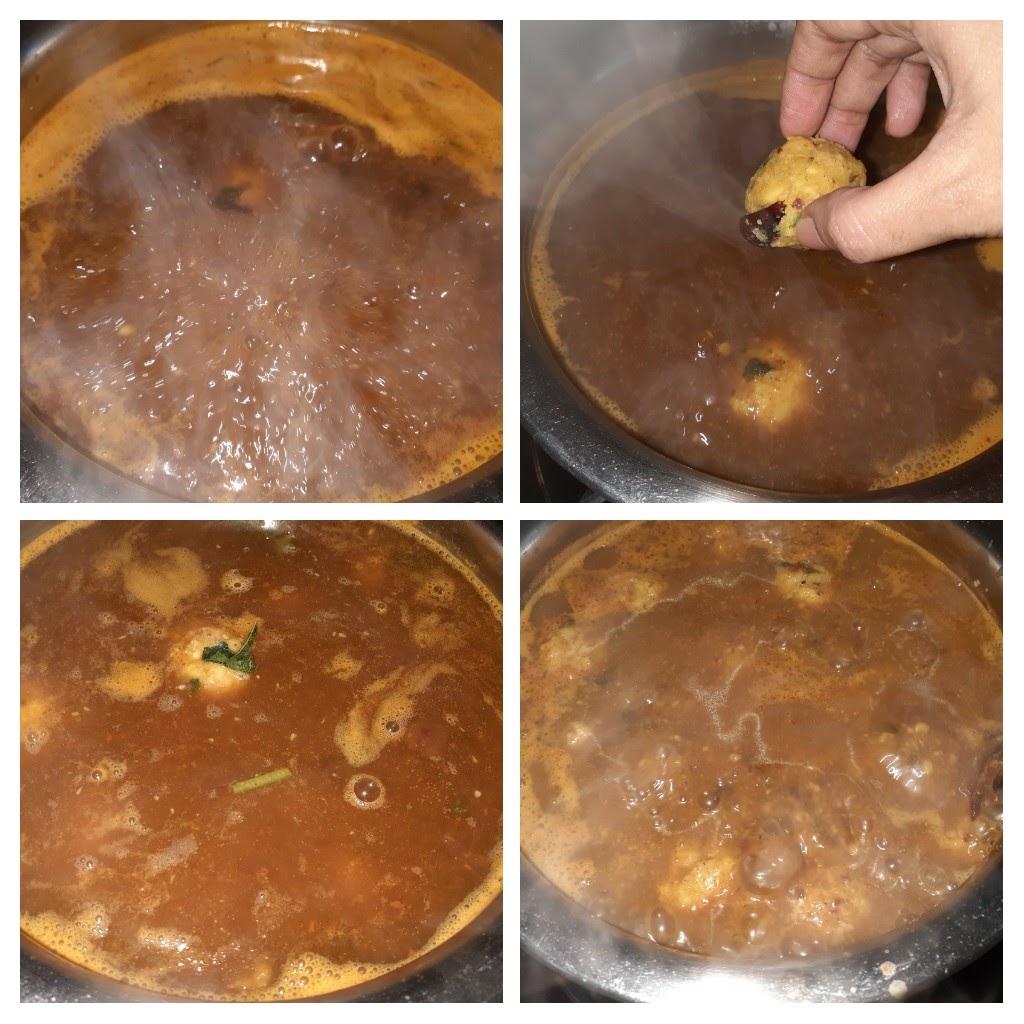
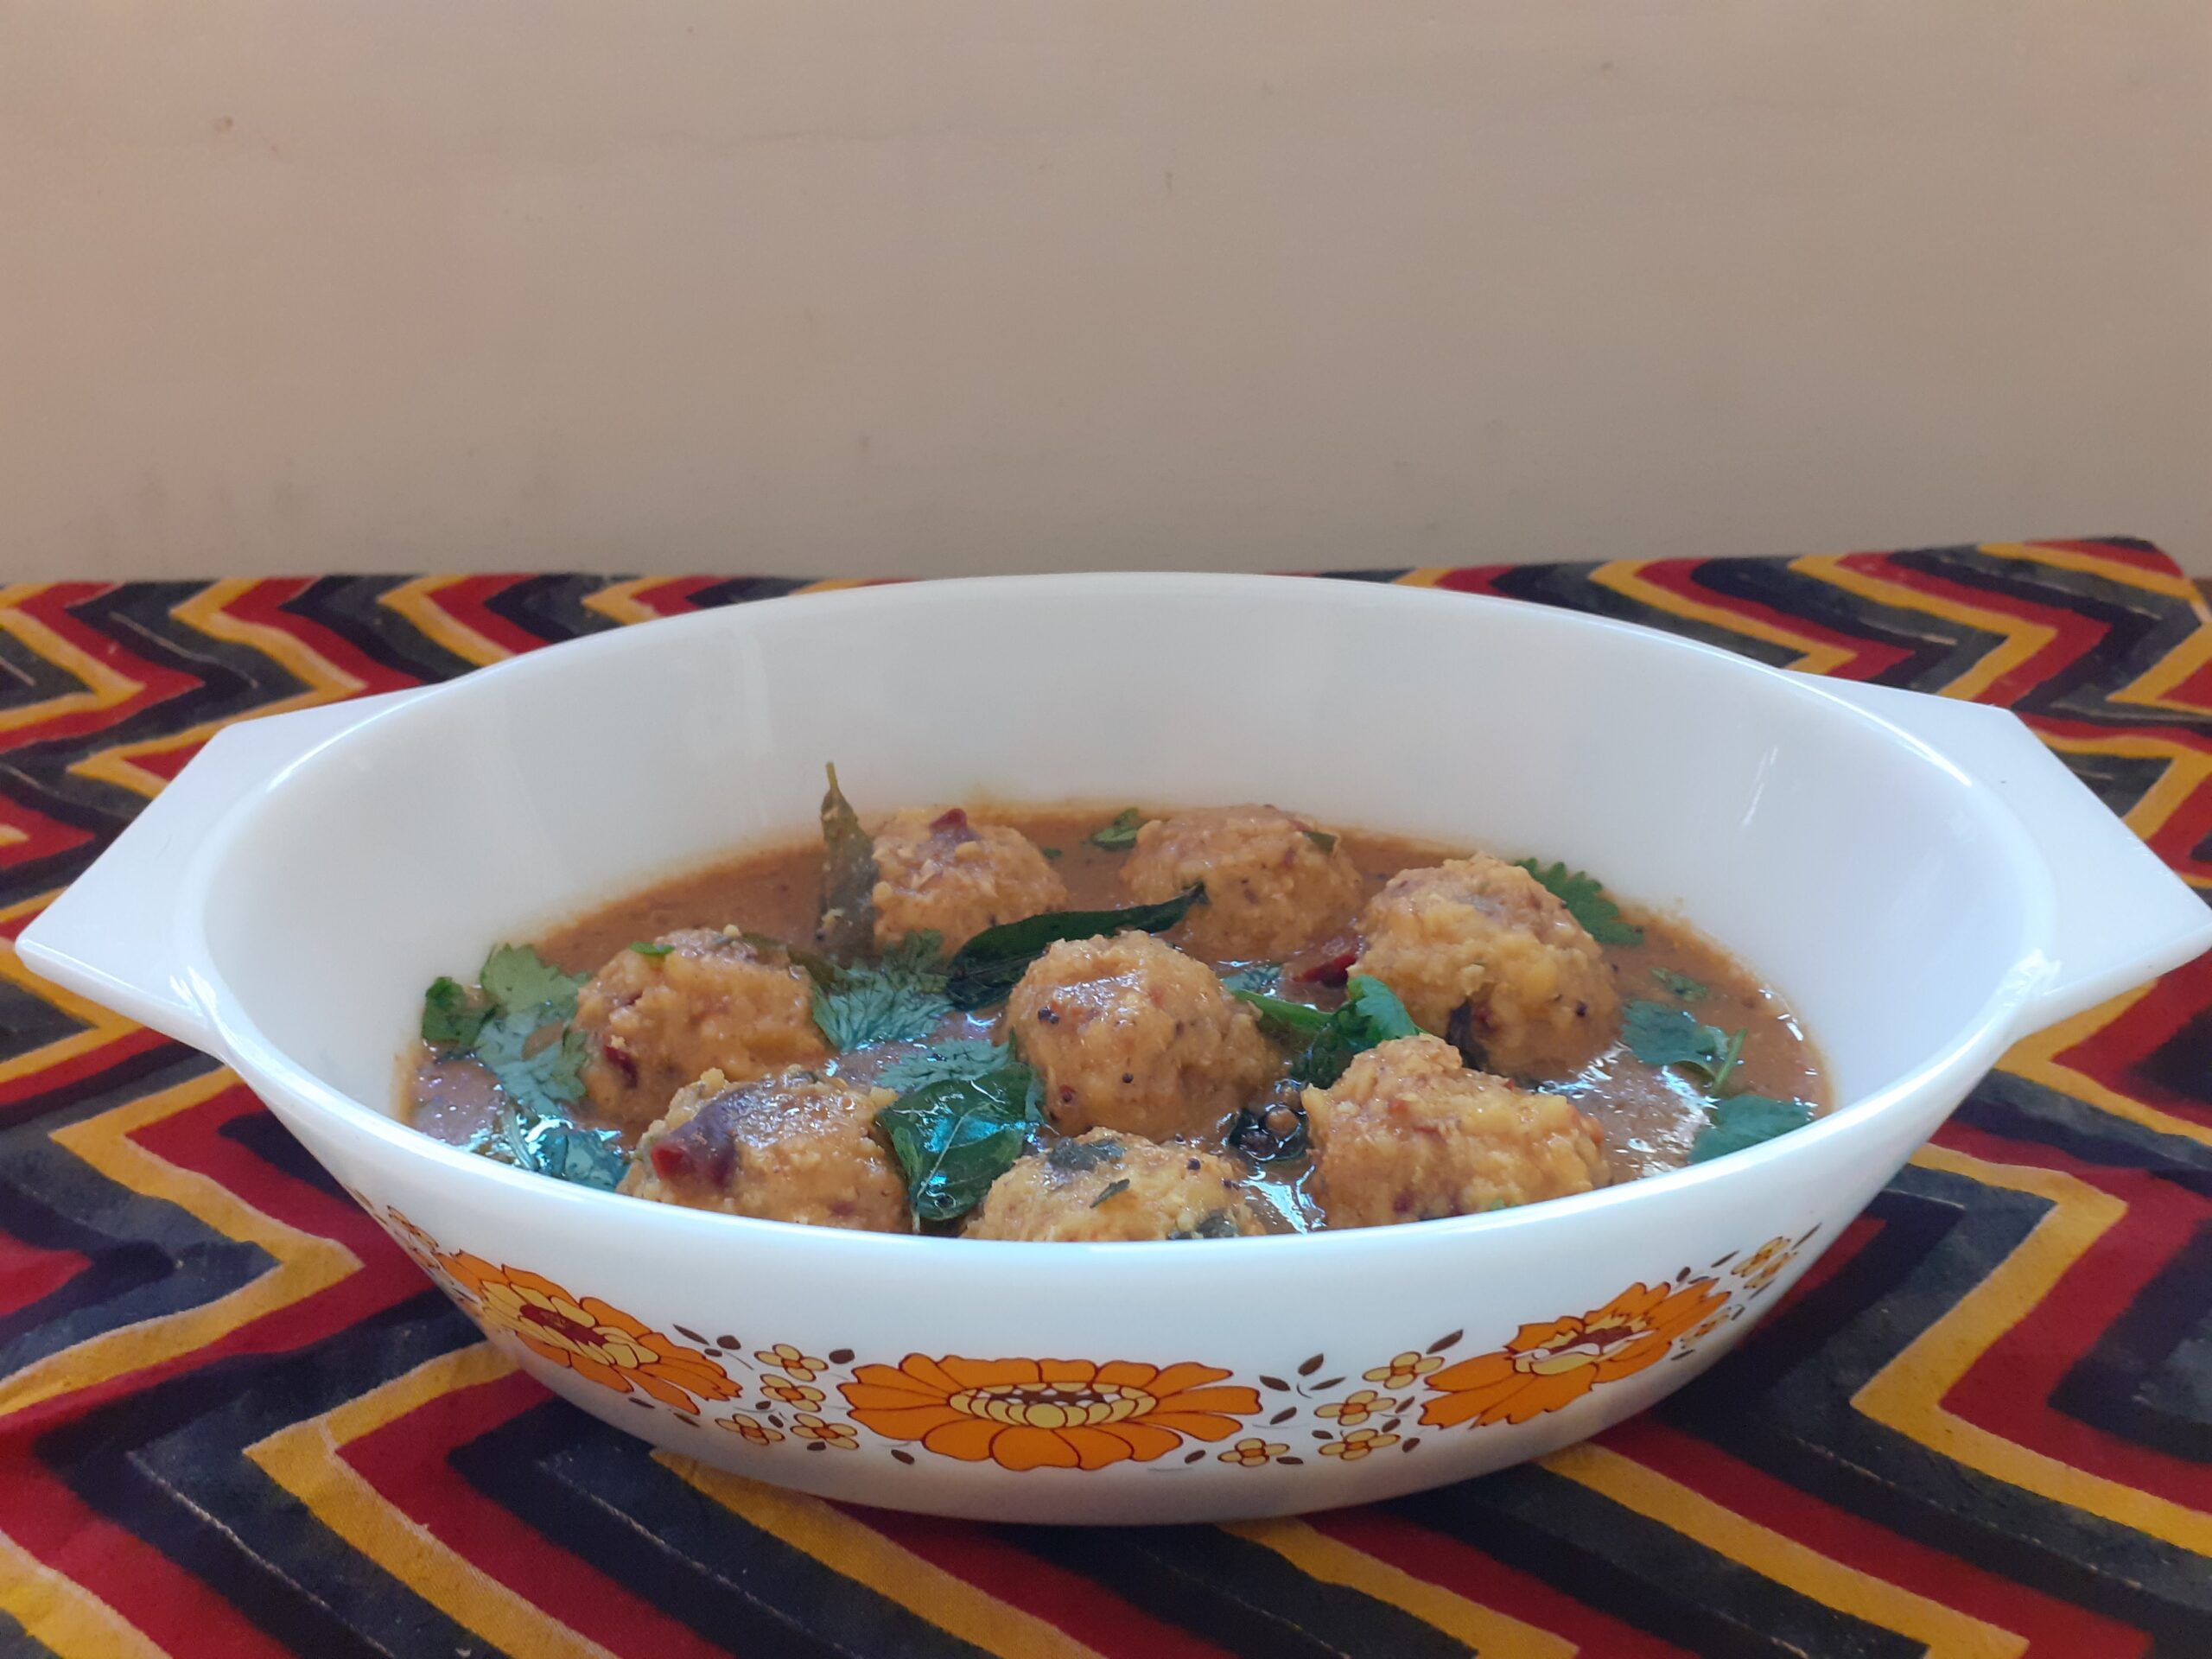
Extract the pulp from the tamarind and dilute it. You should have about 700 ml of tamarind juice if it’s too sour dilute with another 100 ml. Pour this diluted extract into a deep thick bottomed dish and switch on the flame. Add salt, turmeric powder, Sambar powder, asafoetida and boil. As it starts boiling and the raw smell of the masalas is gone( around 7 minutes into the process on medium flame), add one Urundai( dumpling) and test. If it doesn’t break while cooking on medium heat in the next 1 minutes, reserve 1 dumpling and all the other dumplings can be put into the tamarind water one by one after reducing the heat to low. If the first Urundai disintegrates in the water, put off the flame, undo all the dumplings and add 1 tablespoon rice flour and shape them to dumplings again and continue the process mentioned above. Cook the Urundais(dumplings) in low to medium flame while stirring gently every now and then until they start rising to the top. Once cooked the dumplings will float above. Now add about 1 cup water to the reserved dumpling and break it up. Pour this paste into the kozhambu( gravy) after the dumplings have risen and cook for 2 minutes or until the gravy has thickened to a Sambar like consistency. Switch off the flame and temper the Kozhambu with a little oil in a Kadai and put mustard seeds, followed by Asafoetida and curry leaves. The delicious Paruppu Urundai Kozhambu is ready.
Serving Suggestions: with hot rice and ghee, Dosas, Idlis, Ven Pongal, Kuthiravali Pongal( millet Pongal) etc.
STEPWISE RECIPE FOLLOWS:
1. Assemble all ingredients. Soak the Tuvar dal for 1 hour, soak the tamarind in warm water and extract the pulp, dilute pulp, grate the coconut, and keep ready.
2. Drain water from the soaked dal and put it into the blender, followed by red chillies, turmeric powder, salt and asafoetida. Grind them to a coarse paste, without adding water.
3. Now in a karahi pour oil for tempering and heat. Put in mustard seeds. As they crackle add the methi seeds, turmeric powder, broken dry red chillies, asafoetida 1 tsp and curry leaves and fry. Now add in the dal mixture to this and start sauteeing, so that the moisture from the dal gets evaporated. Add the grated coconut, saute for another minute and switch off the flame. Finally, add some finely chopped coriander to the dal mixture. Leave the mixture to cool.
4. In a deep vessel, preferably flat one pour the tamarind extract. It should be a dilute extract of 700 ml. Add turmeric powder 1tsp, asafoetida 1 tsp, Sambar powder 3 tbsp, salt and boil the extract on medium flame.
5. After the extract is put to boil, shape the dumplings of the Dal mixture and keep aside.
6. When the mixture bubbles up and froths( about 5 mins from boiling) and all the raw smell of the powders is gone drop one dumpling gently into the boiling mixture. Flame on medium, wait for 2 minutes. If the dumpling does not disintegrate in this time, retain 1 dumpling and put in all the other dumplings one by one. Reduce flame to low and continue to boil.
7. As the dumplings cook in the tamarind extract they will slowly start rising to the top(I have added a short video). When all have risen, break the single reserved dumpling and add 1 cup water to it. Give it a stir so that it becomes a paste. Add this paste into the boiling tamarind gravy to thicken the gravy. Cook for 2 minutes and switch off the flame.
8. Take a small tempering Kadai and add little oil. heat and add mustard seeds, asafoetida 1/2 tsp and curry leaves. Pour the tempering into the Kozhambu.
The tasty Paruppu Urundai Kozhambu is ready to serve.
NOTES:
1. Definitely soak the dal, helps in binding.
2. Sometimes depending on the dal quality the dumplings can break/disintegrate in the extract while boiling. That is why I have recommended putting only a single one to test.
3. If the tester dumpling disintegrates, break up all the other dumplings and add 1 tbsp rice flour to it. Mix well and shape into dumplings again. Before you do this do not forget to switch off the flame in which the extract is cooking as we dont want it to evaporate now.
4. Some recipes recommend adding rice flour to the dal mixture while shaping them itself. I prefer not doing this as it makes the dumplings tougher or hard. So I prefer adding rice flour only if required.
If you tried this recipe and liked it please comment below. I would love to hear from you.
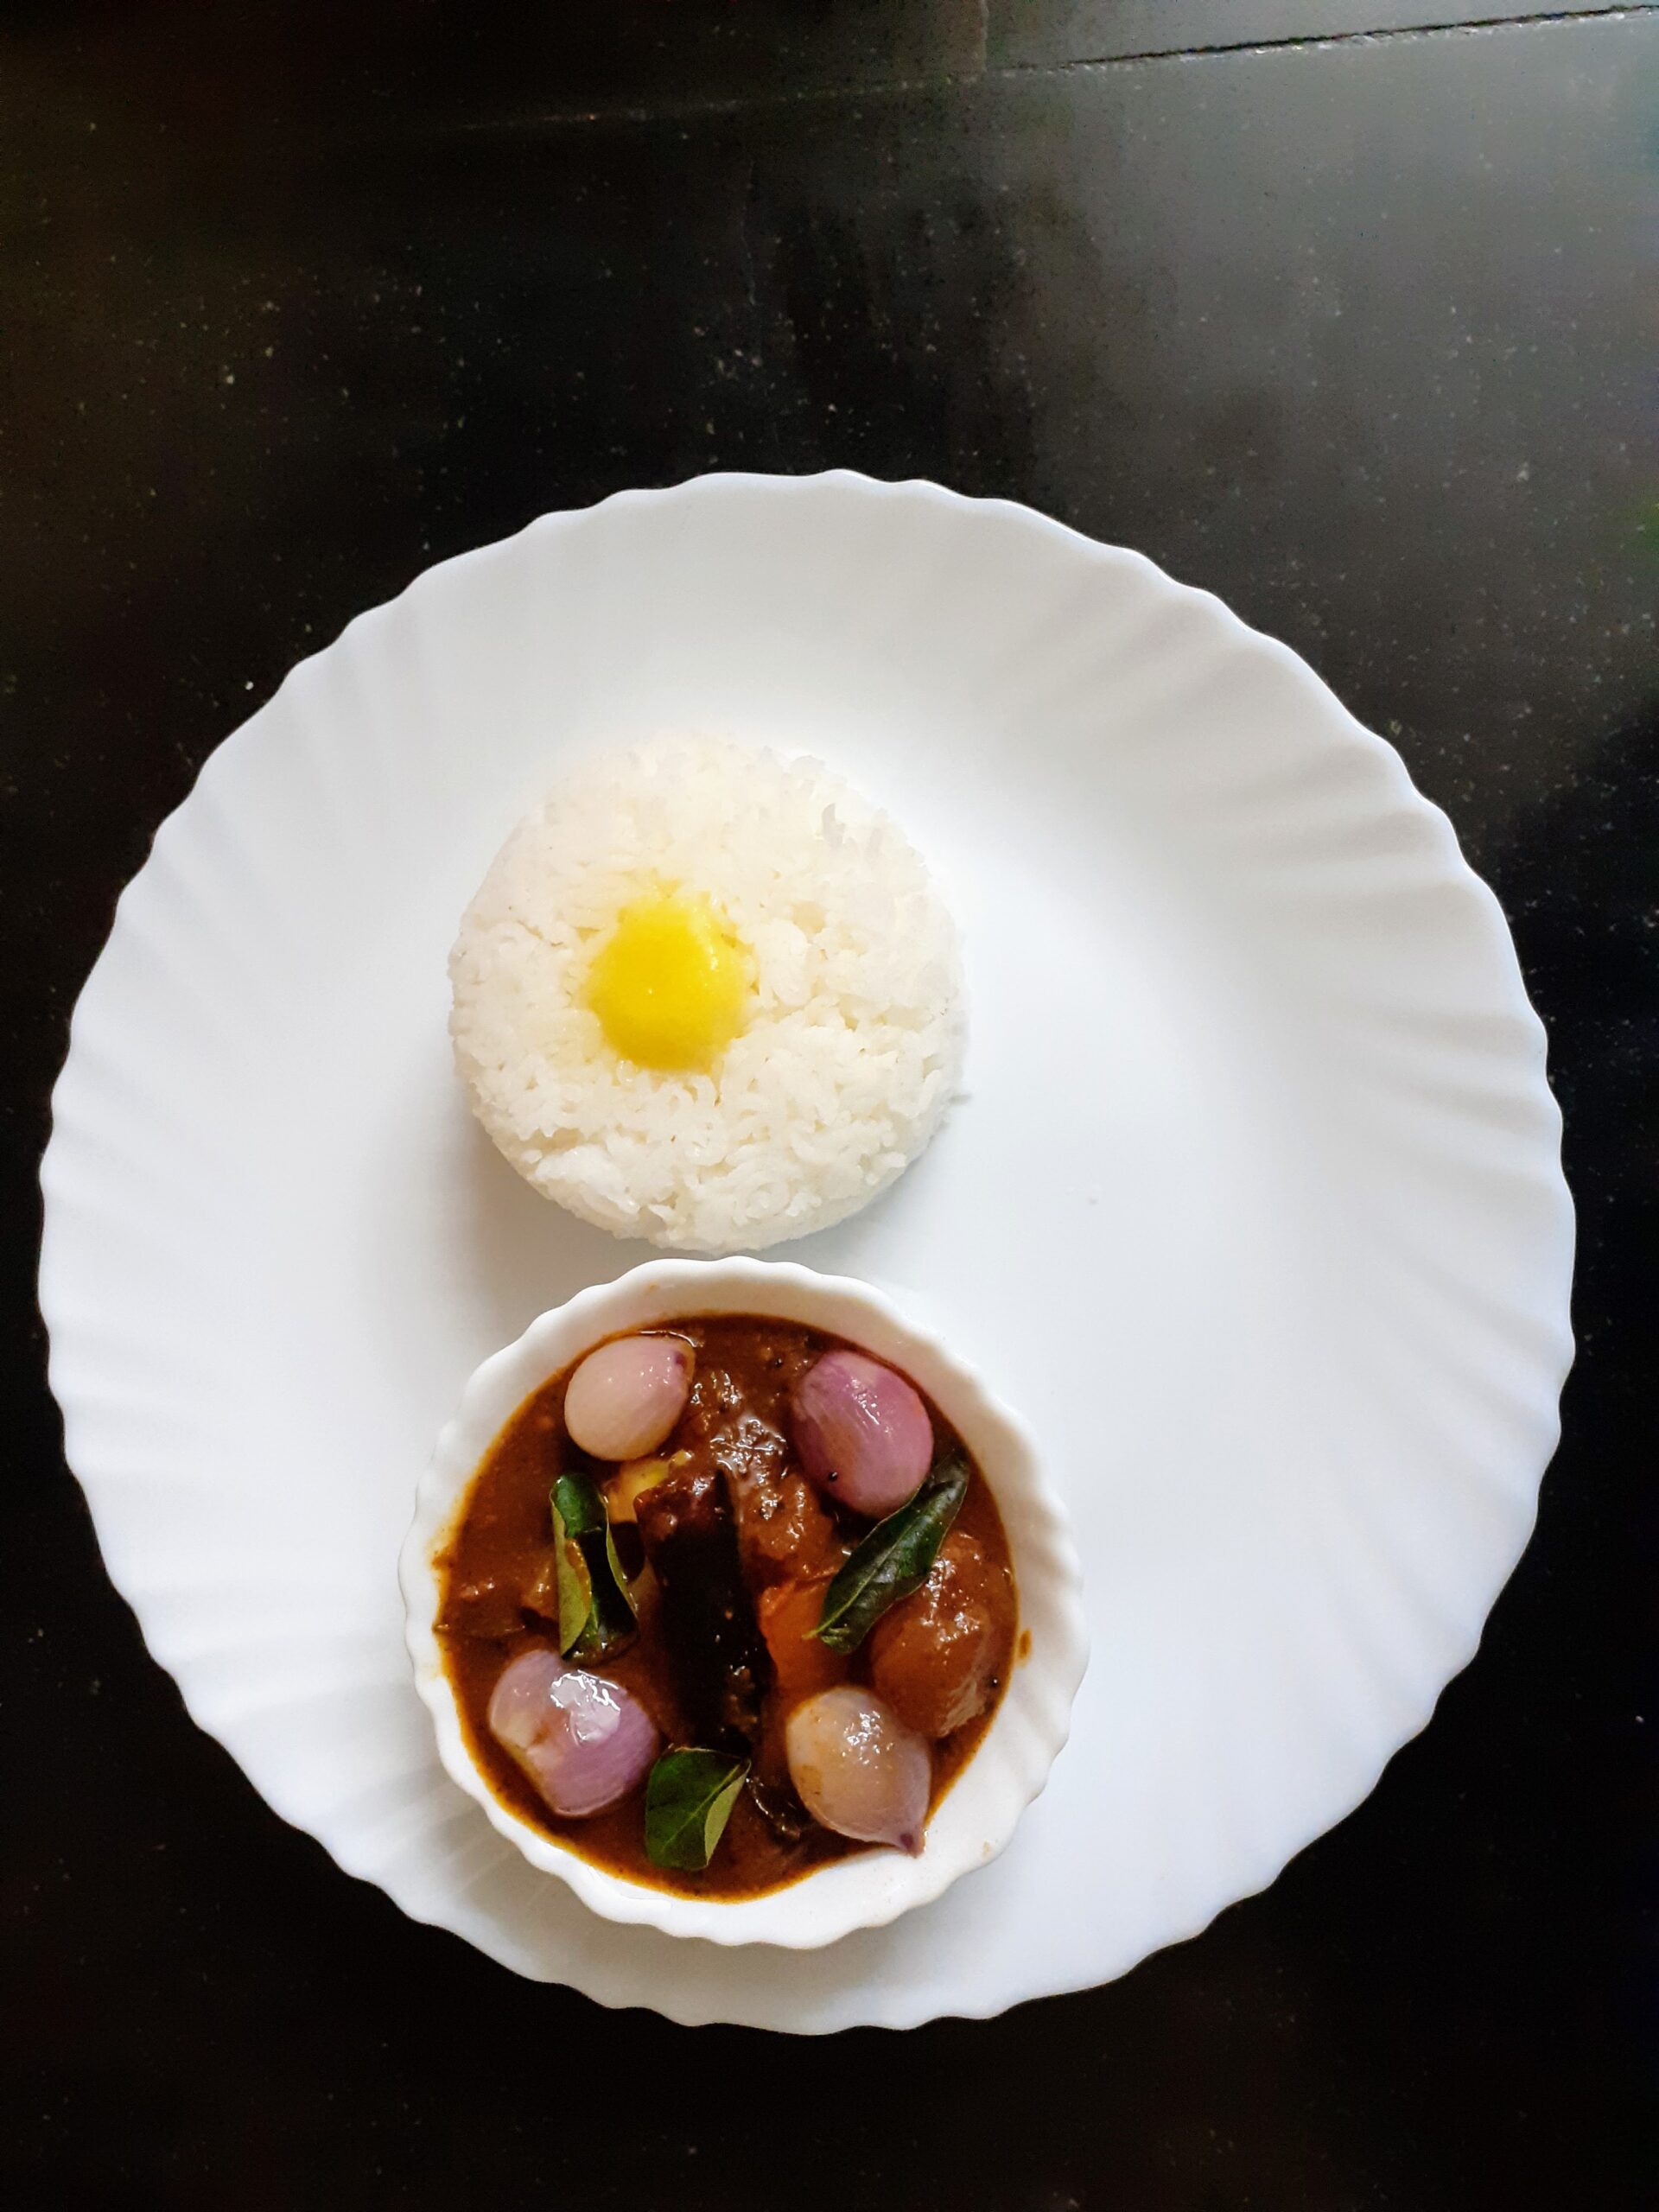
Vatha Kozhambu (Shallots In A Spicy Tamarind Gravy)
This is a traditional South Indian recipe. There are many variations to this recipe and a large variety of vegetables or dehydrated berries(Turkey berry, cluster beans, etc;) are simmered in a spicy tamarind sauce. Usually served with hot rice and ghee, but goes well with Dosas and Idlis too. I have used Sambar powder here, though Vatha Kozhambu powder is also used, there is not much difference in the taste and Sambar powder works well. For the recipe of Sambar Powder click here. Let’s get to the recipe without much ado.
PREP TIME: 20 Mins COOK TIME: 15 Mins
TOTAL TIME: 35 Mins COURSE: MAIN
CUISINE: SOUTH INDIAN SERVINGS: 4
AUTHOR: Rajni Ram
Ingredients:
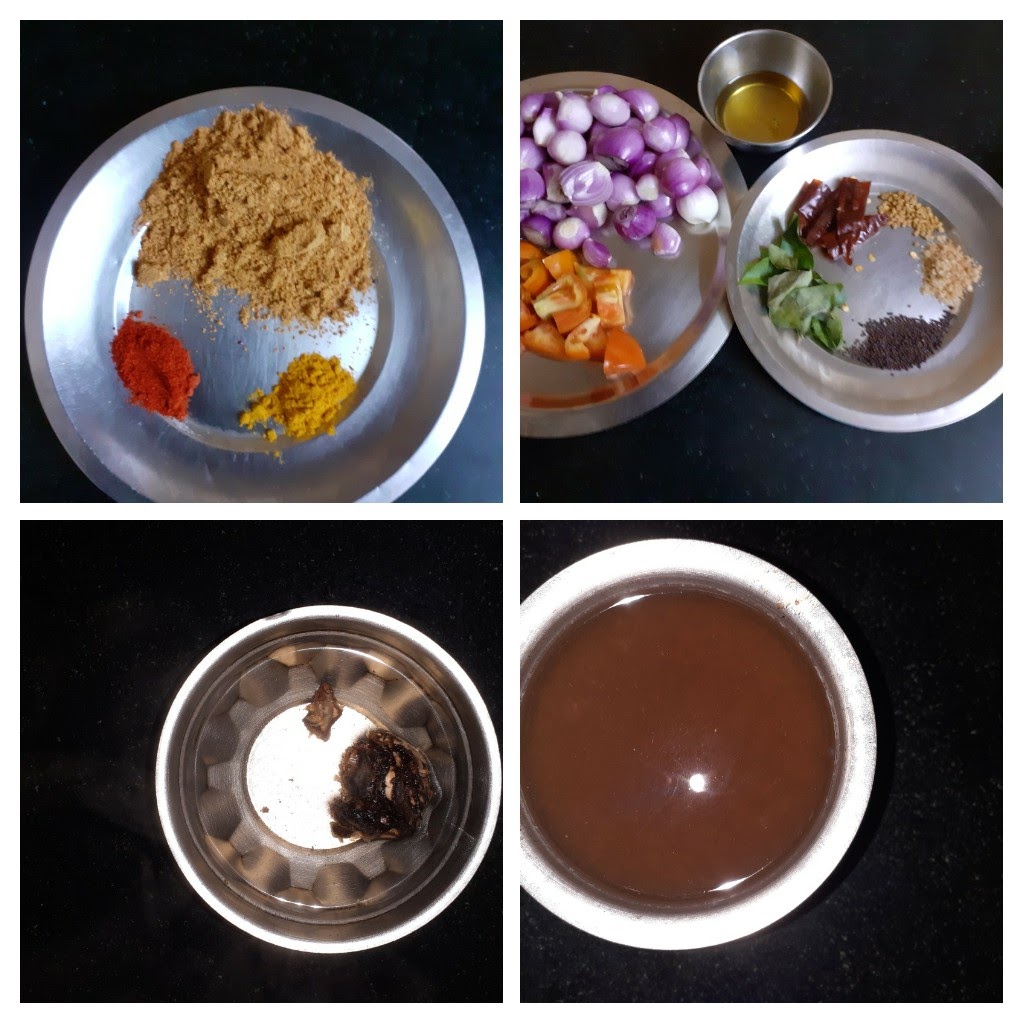
Shallots 200 gm skinned
Tomato 1 large
Tamarind lemon sized ball( soaked in water and pulped)
Salt as per taste
Sambar powder 1 tbsp
Red chilli powder 1 tsp
Turmeric powder 1 tsp
Asafoetida 1 tsp
Mustard seeds 1 tsp
Fenugreek seeds 1/2 tsp
Dry red chillies 2 broken
Curry leaves a few
Sesame oil/ Til oil 1 tbsp( can use more if you prefer)
Directions:
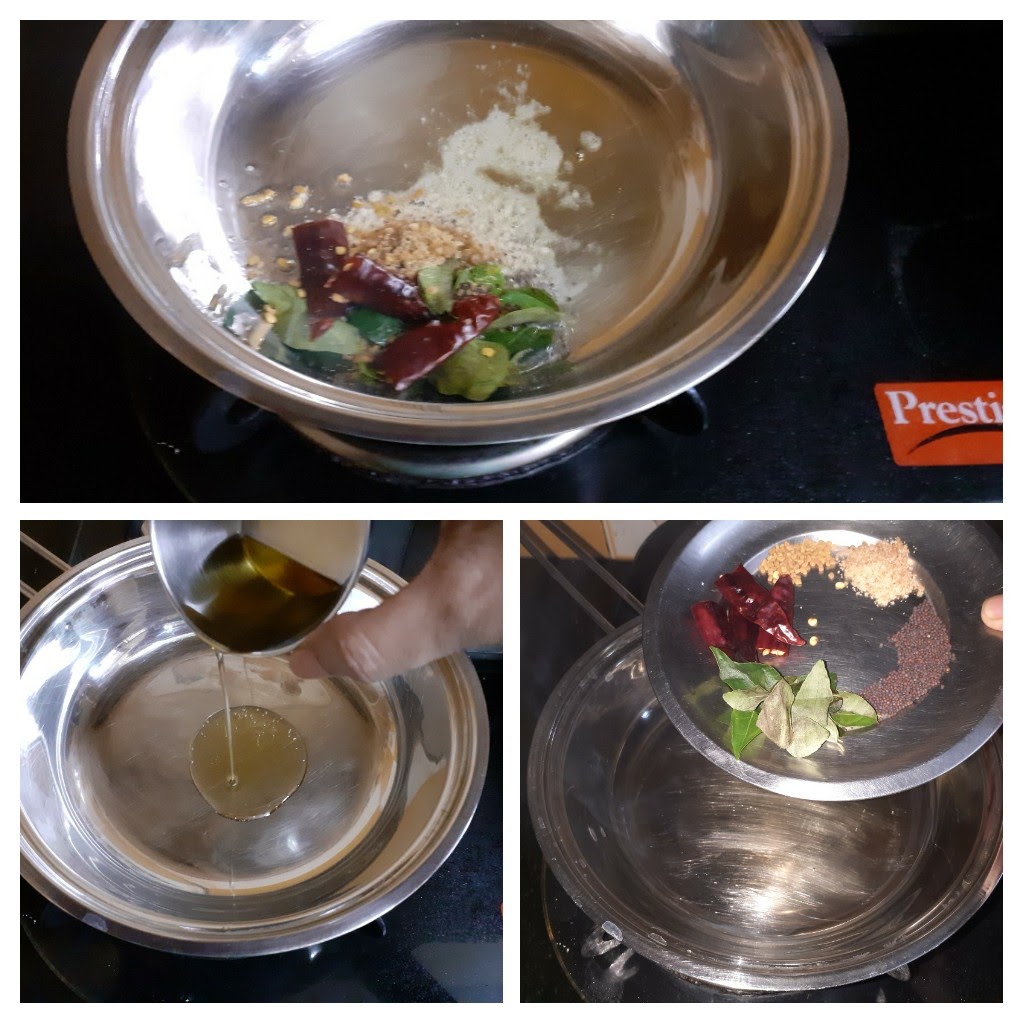
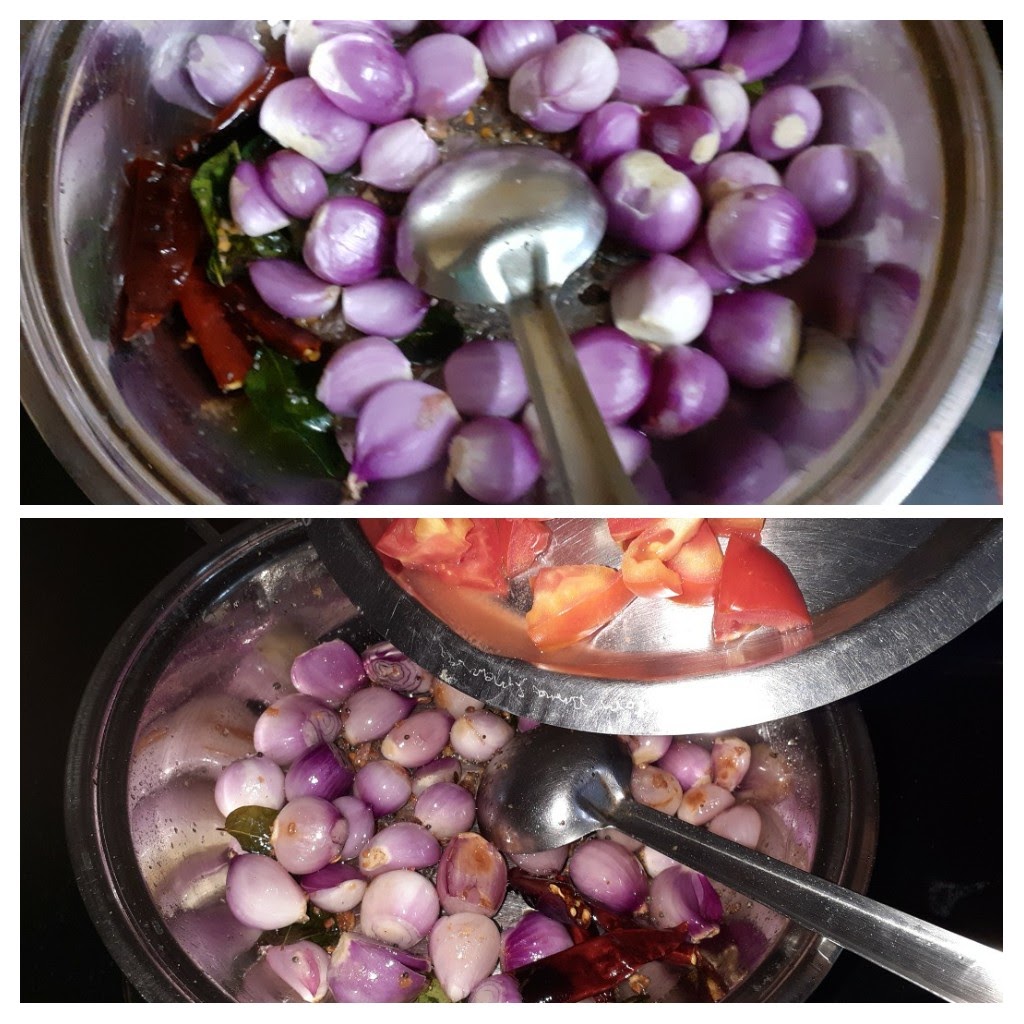
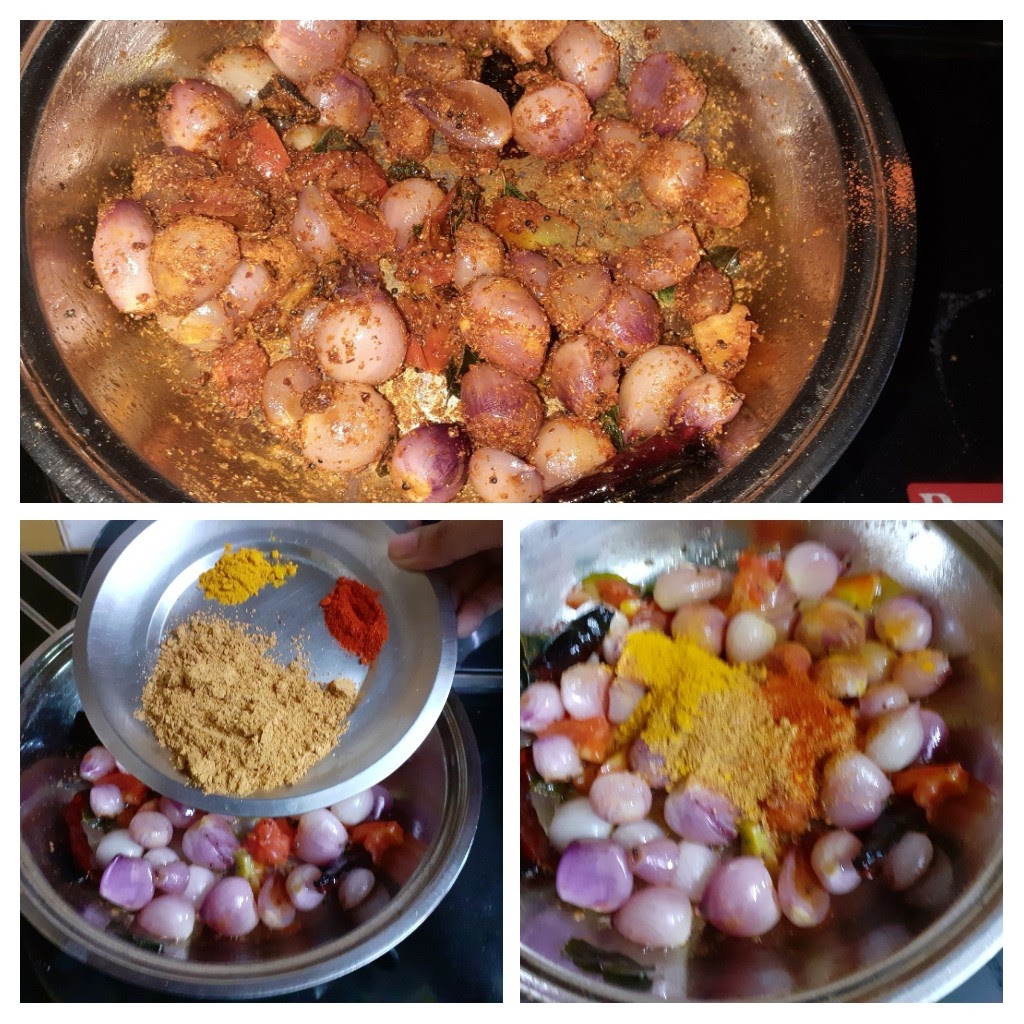
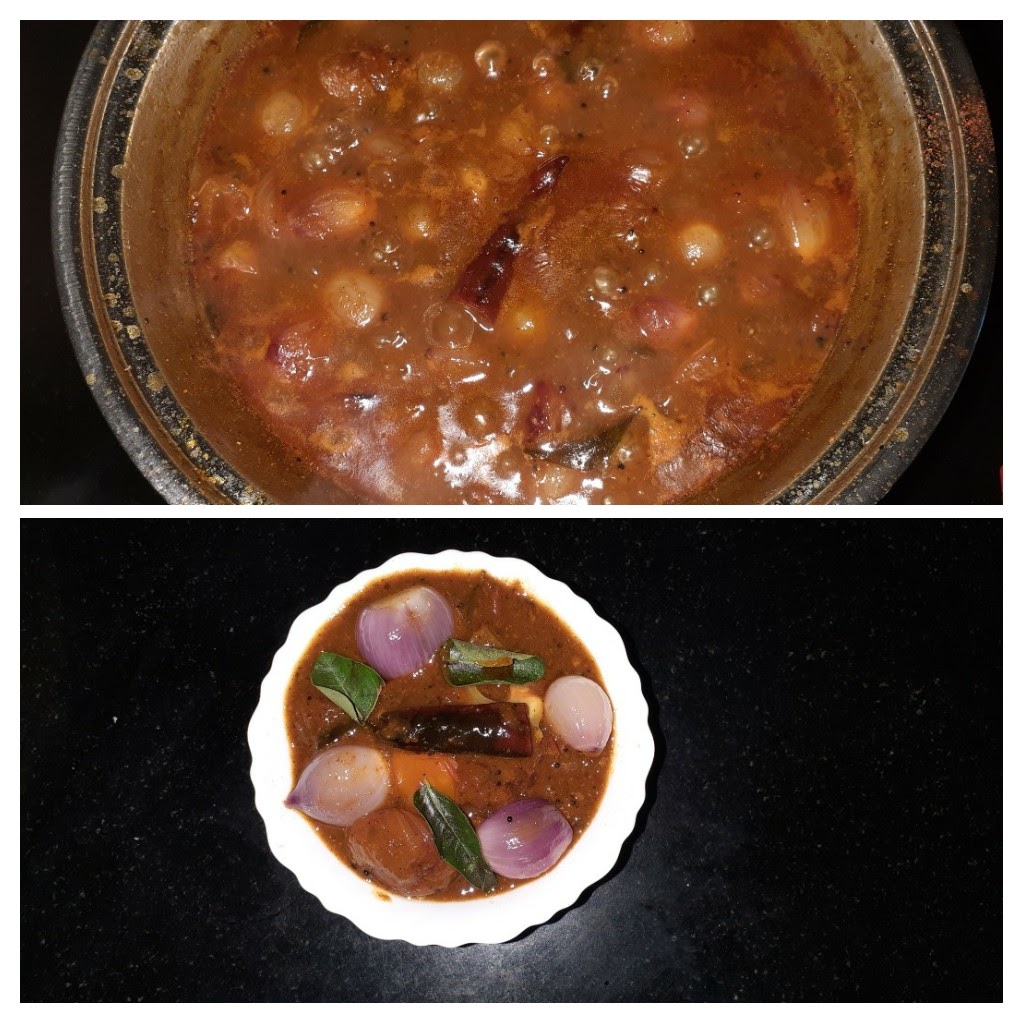
Peel the skin off the Shallots and keep ready. Chop the tomatoes. Soak a lemon sized ball of tamarind in a little warm water, let it cool and extract the pulp. Now in a pan or karahi take a tablespoon of Sesame/Til oil and heat. Add the mustard seeds, fenugreek seeds, asafoetida, dry red chillies, and curry leaves and saute for a minute. Add the Shallots and saute until they start turning translucent. Now add the tomatoes and continue to saute for a minute. Add the dry spices- Sambar powder, turmeric powder, and red chilli powder and continue to stir fry. If the mixture is too dry add another 2 teaspoons of oil, otherwise the masala may burn. Saute for another minute and pour the tamarind pulp and add the salt. Stir well and allow it to simmer on low flame until it thickens and reduces a bit. The oil will form a layer on top and the mixture will reduce, at this stage put off the stove. The Shallot Vatha Kozhambu is ready to serve with hot rice, Dosas, Idlis etc.
Direction to make Sambar powder is given under the label powders.
STEPWISE RECIPE FOLLOWS:
1. Assemble all ingredients. Shallots skinned and tomatoes chopped. Soak tamarind(lemon sized ball) and get the pulp.
2. In a pan/karahi heat some Til oil(preferable, if not continue with refined oil). Add mustard seeds, fenugreek seeds, dry red chillies, asafoetida, curry leaves, and fry.
3. Add the shallots and stir well so that the oil coats all the shallots. Fry until they turn translucent. Add the tomatoes and continue to stir fry for another minute.
4. Now add in all the dry spices- Sambar powder, red chilli powder, turmeric powder, and continue to fry. If the mixture is too dry after adding the powders, then add 2 tsp of oil and fry, until the raw taste of the masalas is gone.
5. Pour the tamarind pulp and in the salt and stir well and allow the mixture to boil. Let it simmer until the mixture thickens and reduces in quantity. The oil will form a layer on top. At this stage put off the stove. The Shallot Vatha Kozhambu is ready to serve with hot rice and ghee.
NOTES:
1. I have used Shallots here, other vegetables that can be used are Drumsticks, Ladies finger, Onions, dehydrated berries like Turkey berry(Sundakai), and even dehydrated vegetables like Cluster beans, Bitter gourd, etc.
2. Sesame oil enhances the flavour of the dish, so I highly recommend it.
3. Frying the dry masalas in the oil well(step4), gives the dish the perfect flavour.
4. The fenugreek seeds also impart the aroma a lovely flavour to this dish, but they should be used in the quantity mentioned and not more, as they can turn the dish bitter.
If you tried this recipe and liked it please comment below. I would love to hear from you.
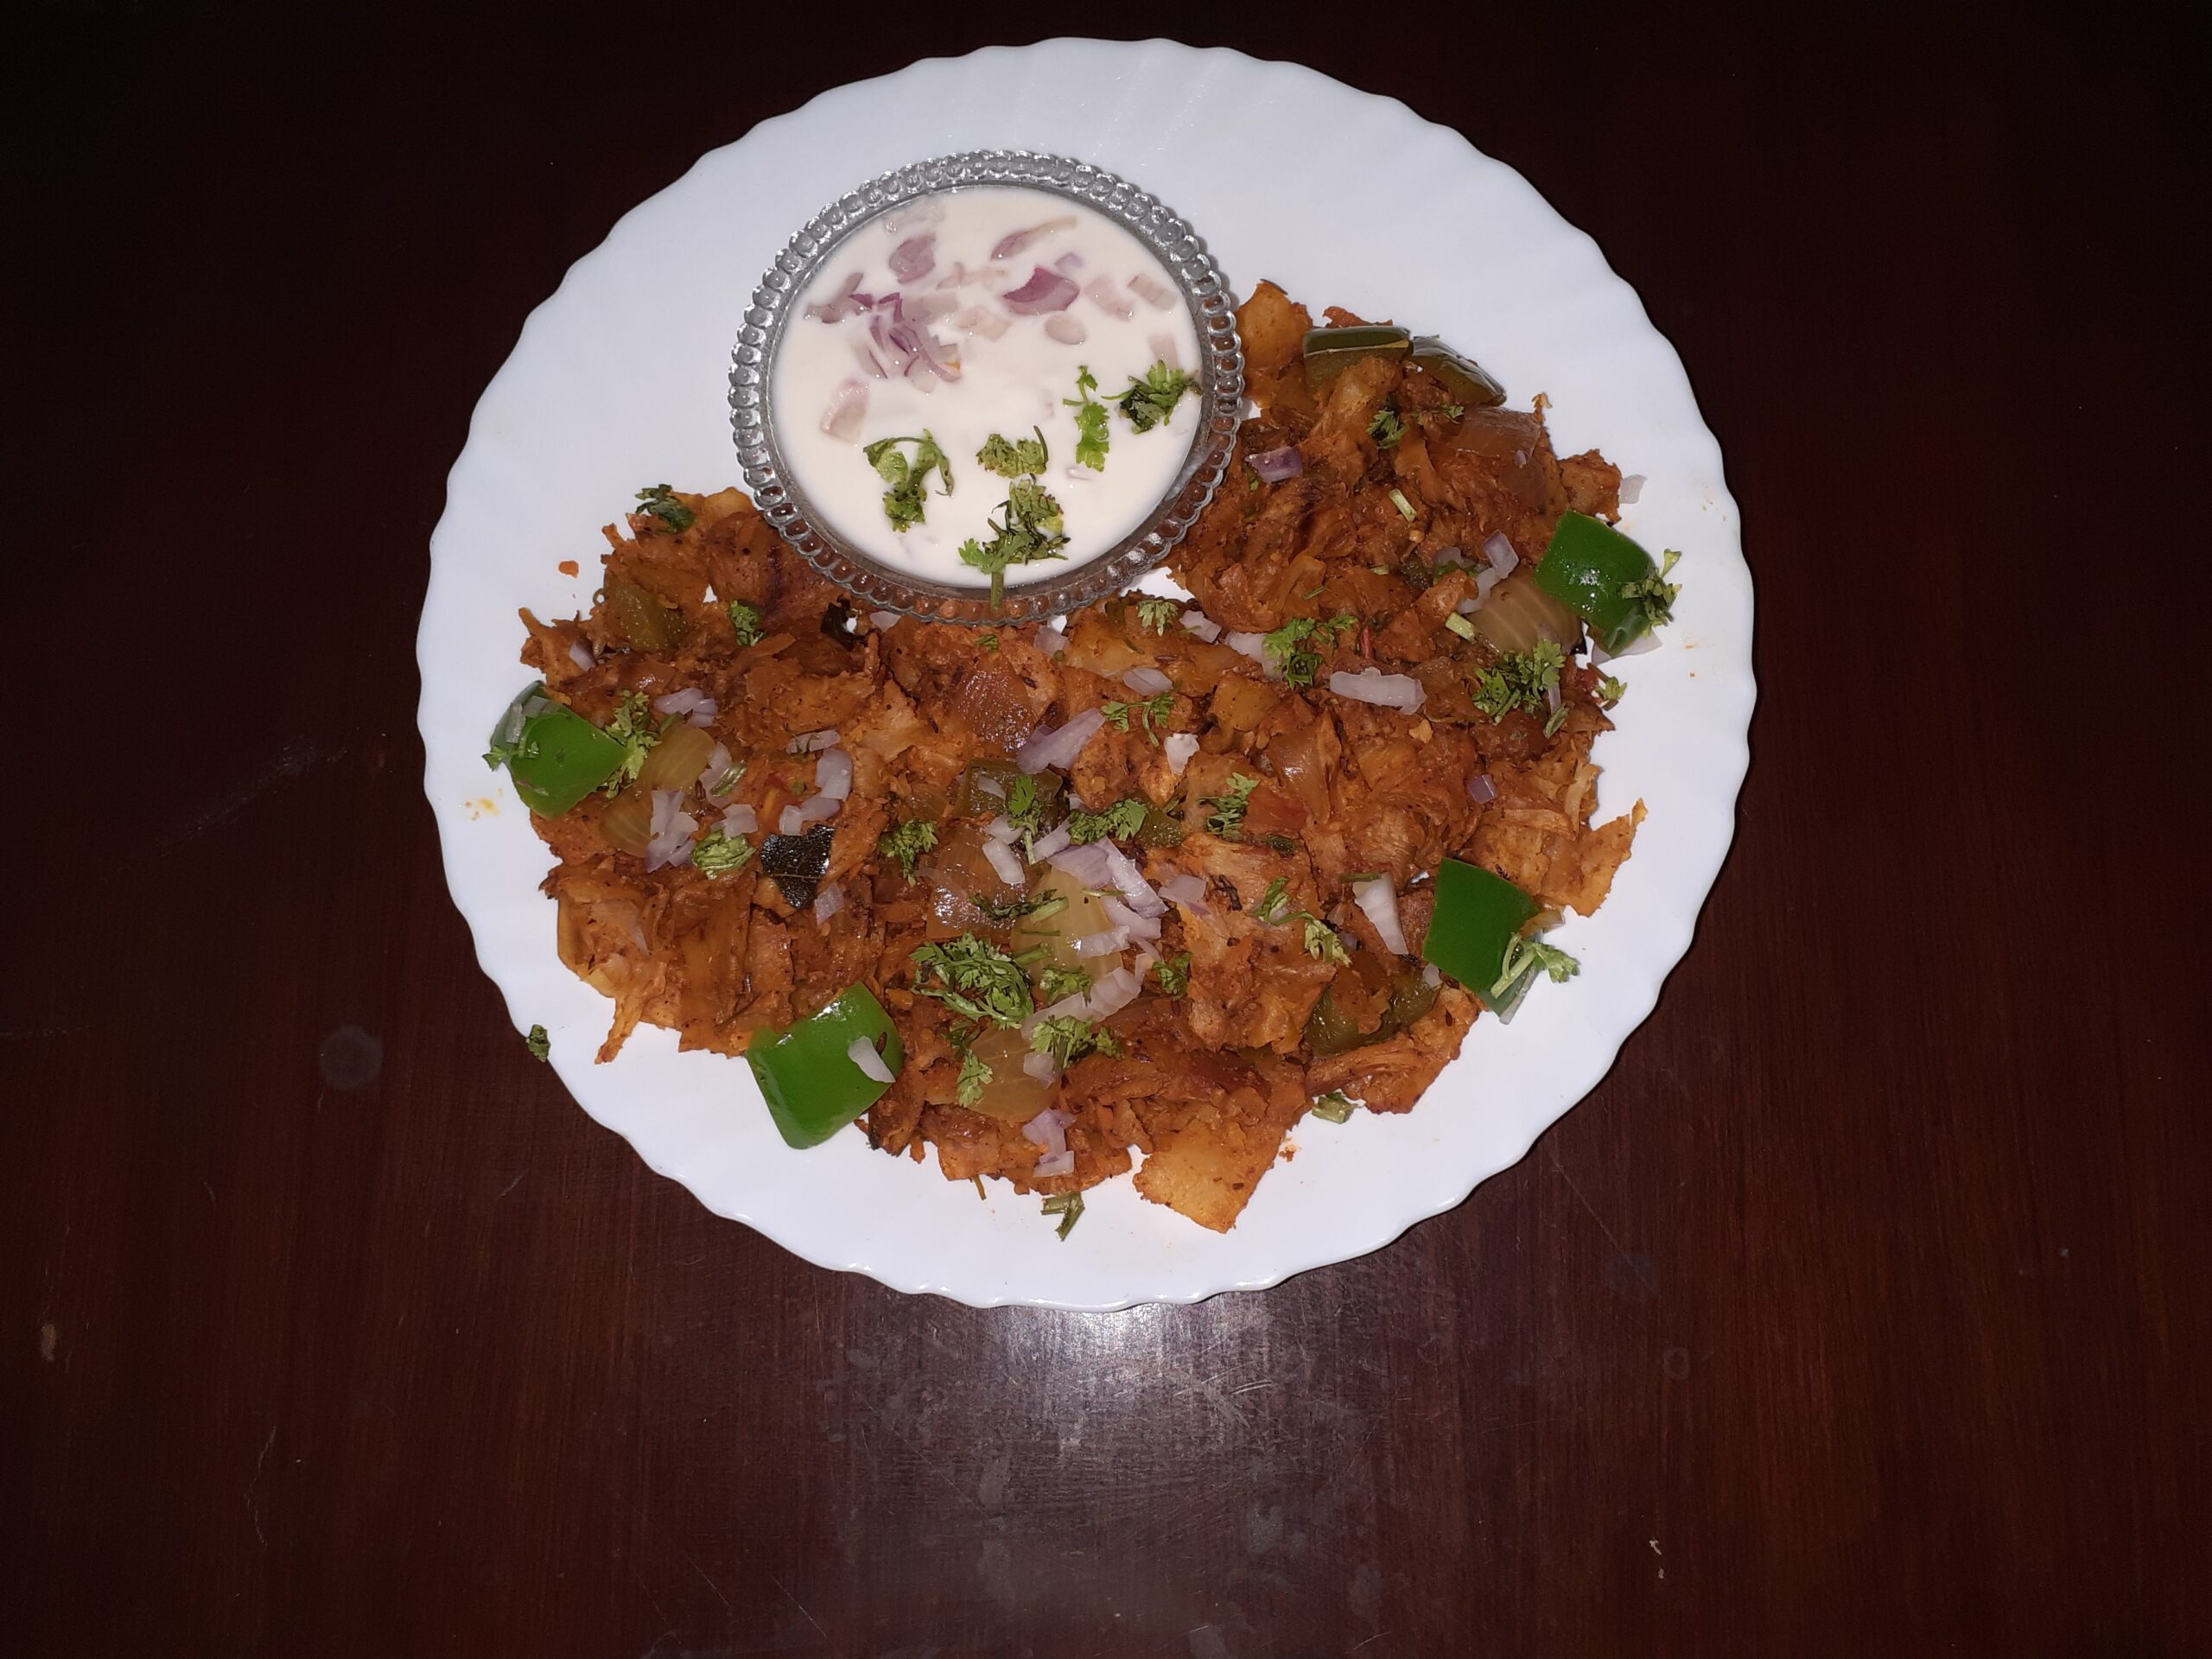
Veg Kothu Parotta
This is a south Indian street food recipe, made form Parathas(called Parotta in the South) and sauteed vegetables in a spicy tomato base. The Parottas are shredded(minced)and added to the gravy and further stir-fried to a crispy flaky dish. There are many variations to this dish, but I am keeping it simple. This dish can be served with sauce or raita. Usually, leftover parathas or chapatis can be used for making this dish. Store-bought Parathas can be used too. Let’s get to the recipe.
PREP TIME: 20 Mins COOK TIME: 25Mins
TOTAL TIME: 45 Mins COURSE: MAIN
CUISINE: SOUTH INDIAN SERVINGS: 4
AUTHOR: Rajni Ram
Ingredients:
Parathas 5
Onion 2 medium diced and petals separated
Carrot 1 grated coarse
Capsicum 1 diced to cubes
Tomato 1 diced
Tomato puree 1 cup
Cashewnuts 10
Cloves 4
Cinnamon 1 small stick
Green chillies 3 split lengthwise
ginger-garlic paste 1 tsp
Cumin seeds 1 tsp
Curry leaves few
Turmeric powder 1/2 tsp
Red chilli powder 1 tsp
Coriander powder 1 tsp
Biriyani masala(powder) 1.5 tsp
Garam masala 1/2 tsp
Salt as per taste
Oil for stir fry
Directions:
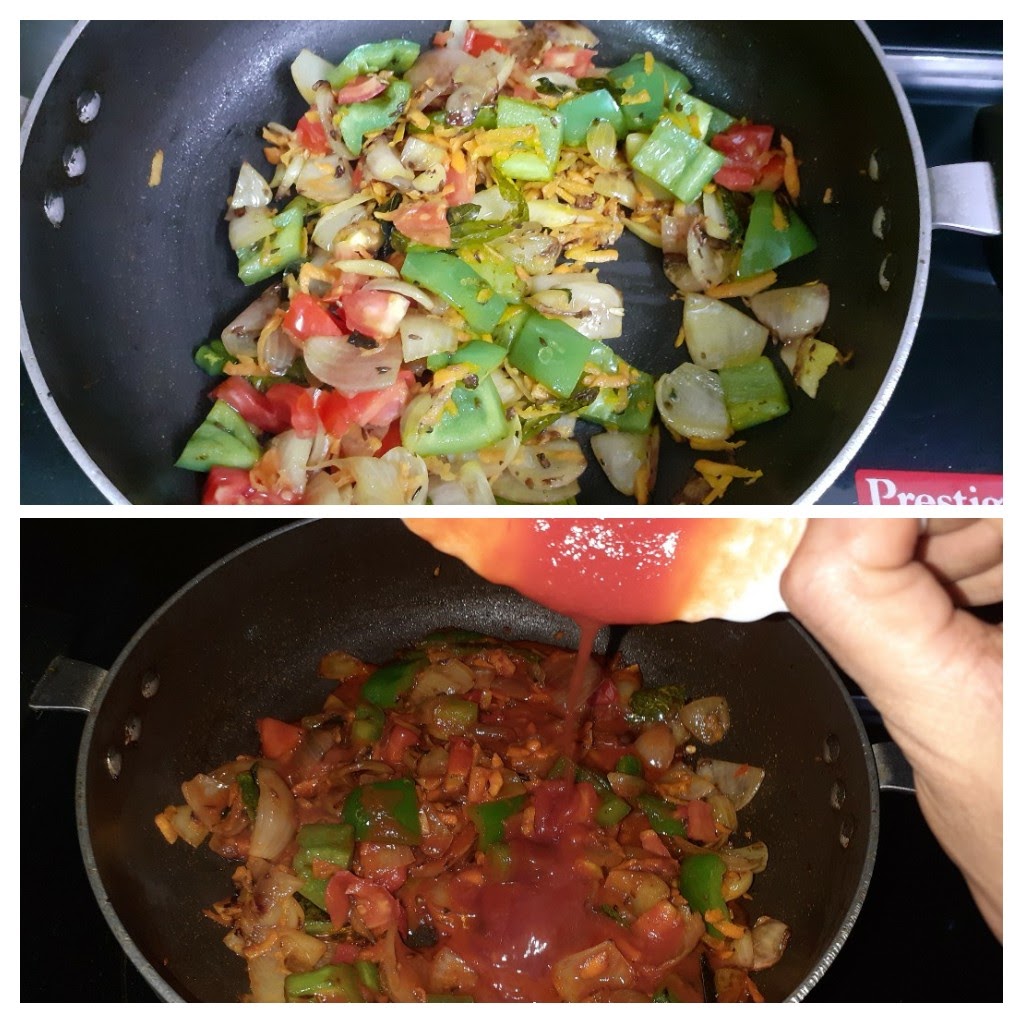
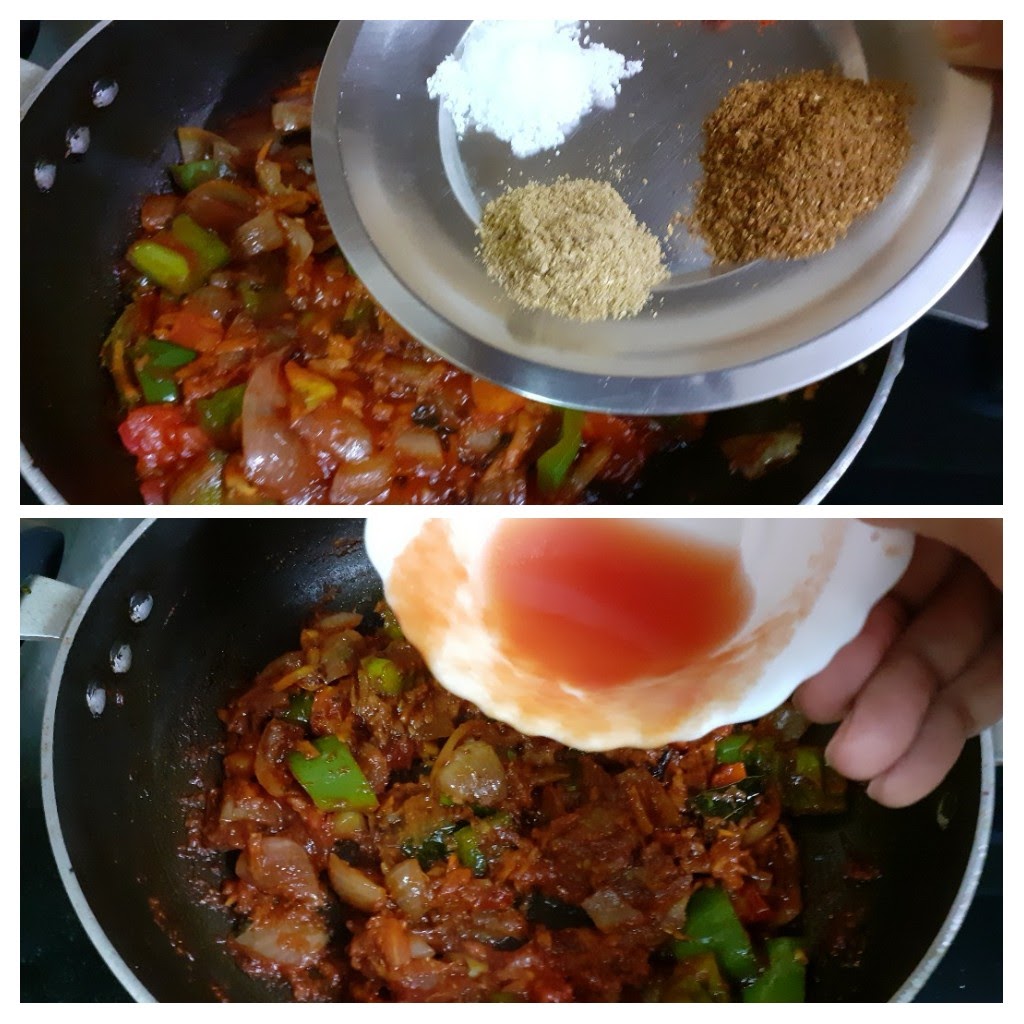
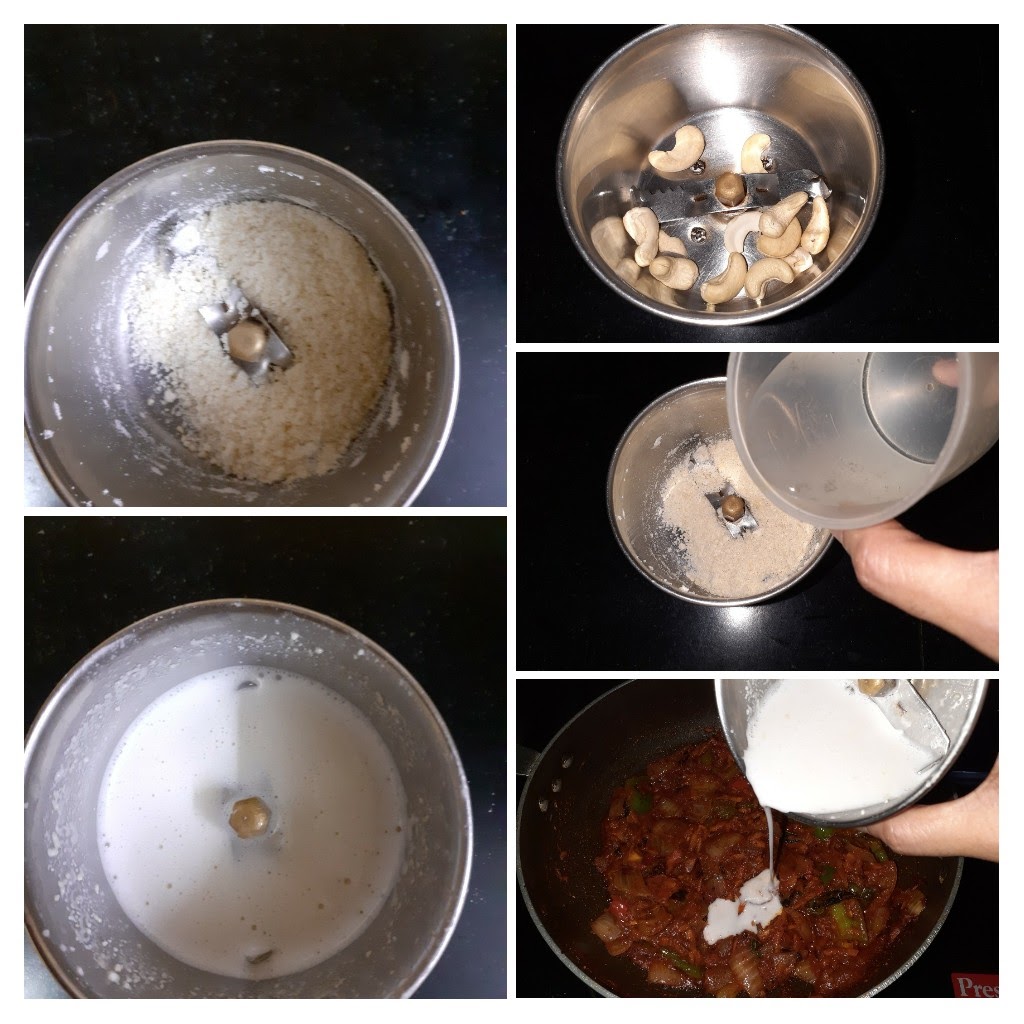
If the Parathas are store-bought, heat them on the tava/girdle with a little oil, cooking both sides. Cool them and using kitchen scissors tear them to pieces or use your fingers to tear them into 1 inch long pieces. keep this aside. In a pan/ Karahi take 4 tsp oil, heat and add the cumin seeds. Put in the turmeric powder and drop the green chillies and curry leaves into the oil, followed by the onions and fry at high heat for 1 minute. Now add the capsicum and continue to fry on high heat. Add the carrot, reduce heat and fry for 30 seconds. Now add the tomatoes, fry for another 30 seconds and pour the tomato puree and give a good stir. Now add the masalas- coriander powder, red chilli powder, Biriyani masala and salt. Stir well and cook for a few minutes, grind the cashew nuts to a loose paste and add it to the gravy. Continue to cook until the gravy thickens and starts getting dry, add the garam masala powder and put off the heat and let the mixture cool a bit. After 5 minutes add in the minced paratha pieces, switch on the stove and mix the parathas well with the gravy. The gravy should coat all the pieces and not turn them soggy. While mixing keep mashing the paratha will a flat spatula so that the parathas can further get minced. Stop once you have a dry mixture. The Kothu Parotta is ready to serve. Tastes best when served immediately. Any variety of Raita is a good accompaniment for this. Enjoy. Bon Appetit.
STEPWISE RECIPE FOLLOWS:
1. Assemble all ingredients and cook the parathas ahead if store bough, as they have to cool.
2. Tear the parathas into 1-inch pieces.
3. In a pan/karahi take 4 tsp oil and heat. Put in the cumin seeds and allow to splutter. Add in the green chillies and curry leaves. Also add 3 Cloves and 1 small stick Cinnamon.
4. Add in the onions and saute at high heat. Add the ginger-garlic paste, put in the capsicum and continue to stir fry, follow up with carrots. Reduce heat.
5. Add the chopped tomatoes, fry for 30 seconds and the tomato puree. Stir and cook for a few minutes.
6. Add all the masalas(dry spice powders), add 2 tbsp water and continue to cook.
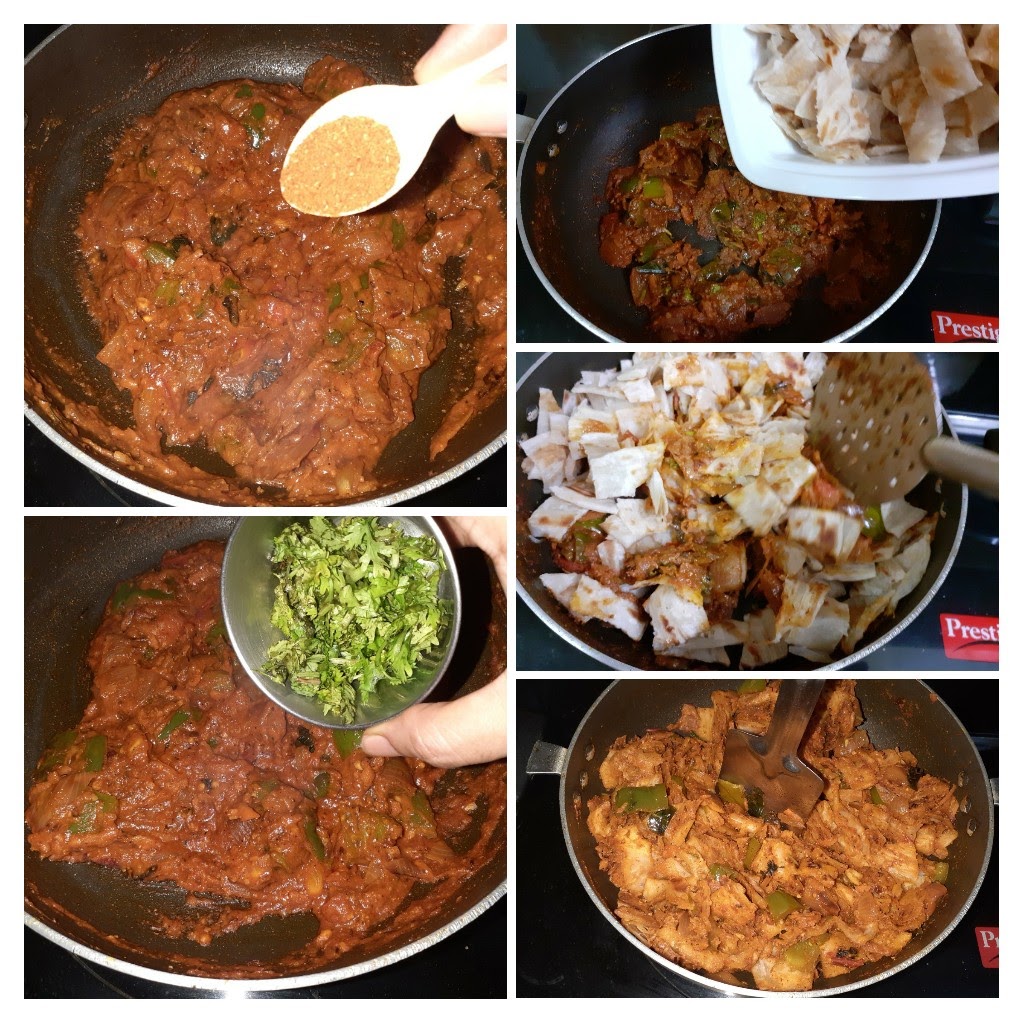
7. Powder the cashew nuts then add 2 tbsp water and grind them to a loose paste. Add this to the tomato gravy. Cook until the mixture thickens. the consistency should be like tomato sauce. Put off at this stage. Add chopped coriander and garam masala powder.
8. Let this cool for 5 minutes. Now add the paratha pieces and switch on the stove and mix the contents well. while mixing keep mashing the parathas with a flipper, so that they get minced further. When the paratha resembles a mince and the mixture is dry, put off the stove. the Kothu Paratha is now ready to serve.
NOTES:
1. The consistency of the gravy should neither be too thick nor too thin. It should resemble tomato sauce in consistency.
2. ou can other vegetables too if you like.
3. If you have ready-made biriyani mix paste you can use that too, but add a lesser quantity.
4. This recipe should be served immediately or else the paratha will turn chewy.
5. If you want to make it ahead, you can make the gravy ahead and add the paratha pieces just before you serve.
If you tried this recipe and liked it please do comment below. I would love to hear from you.