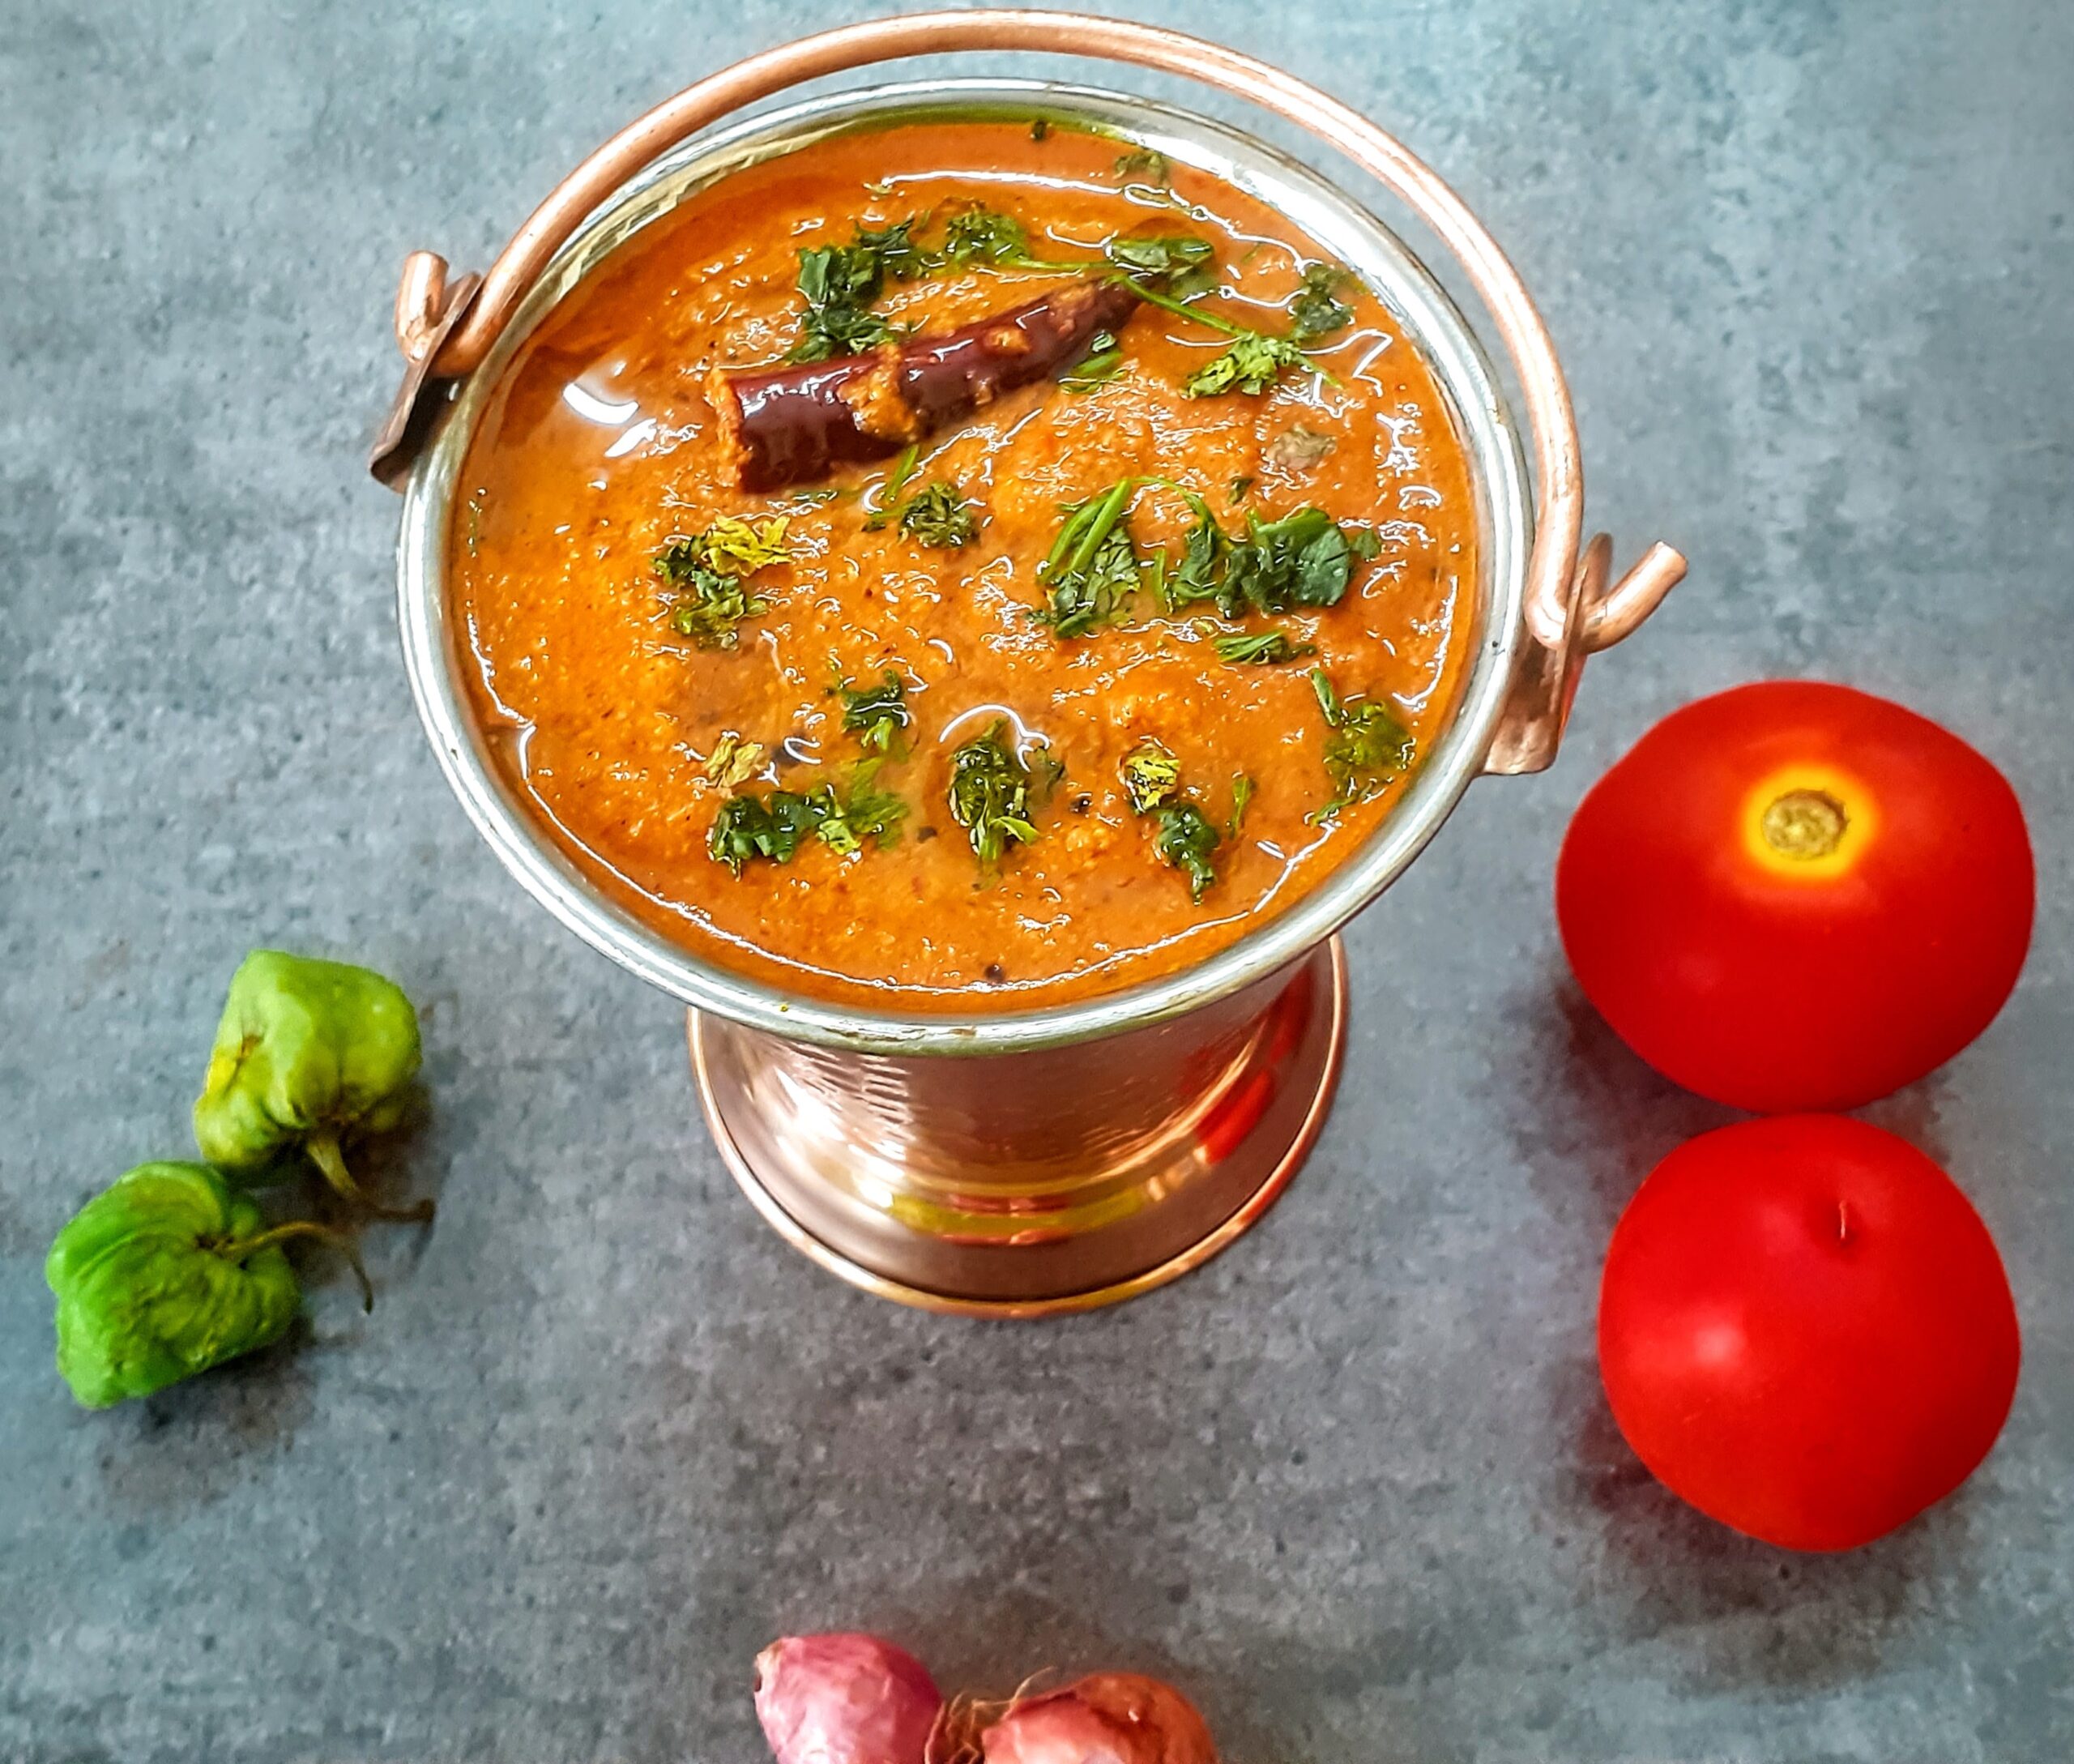
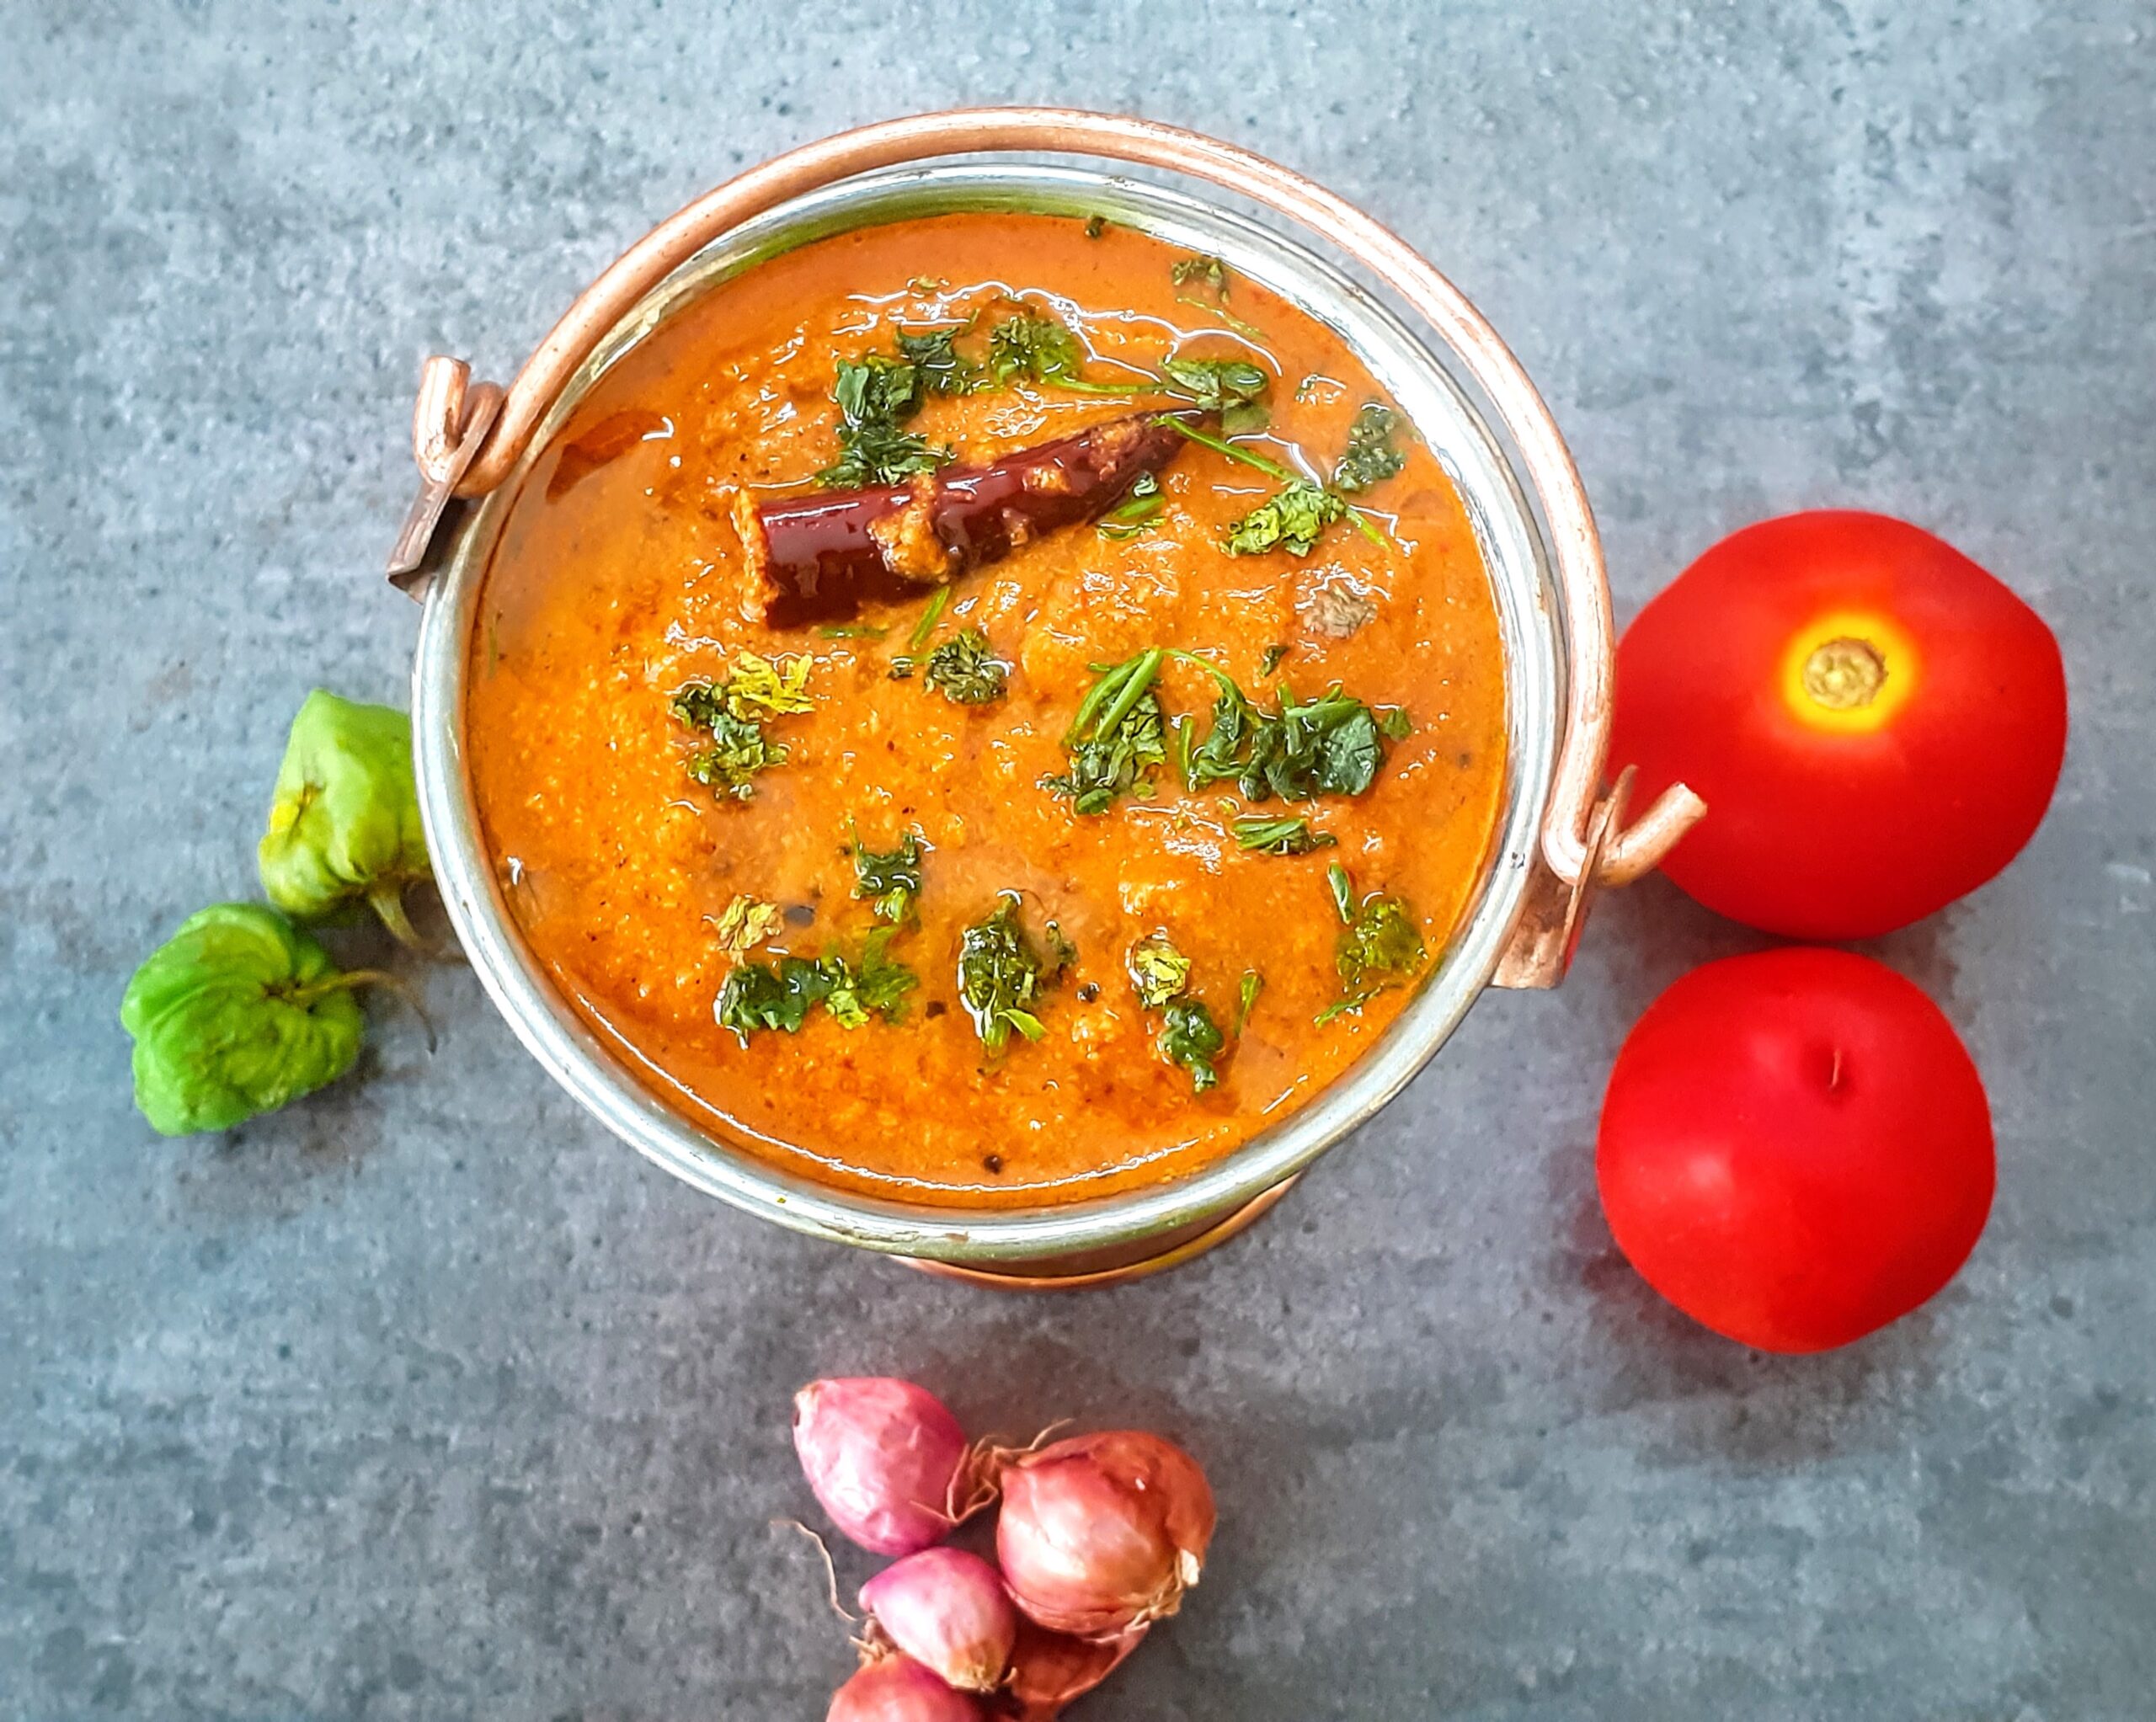
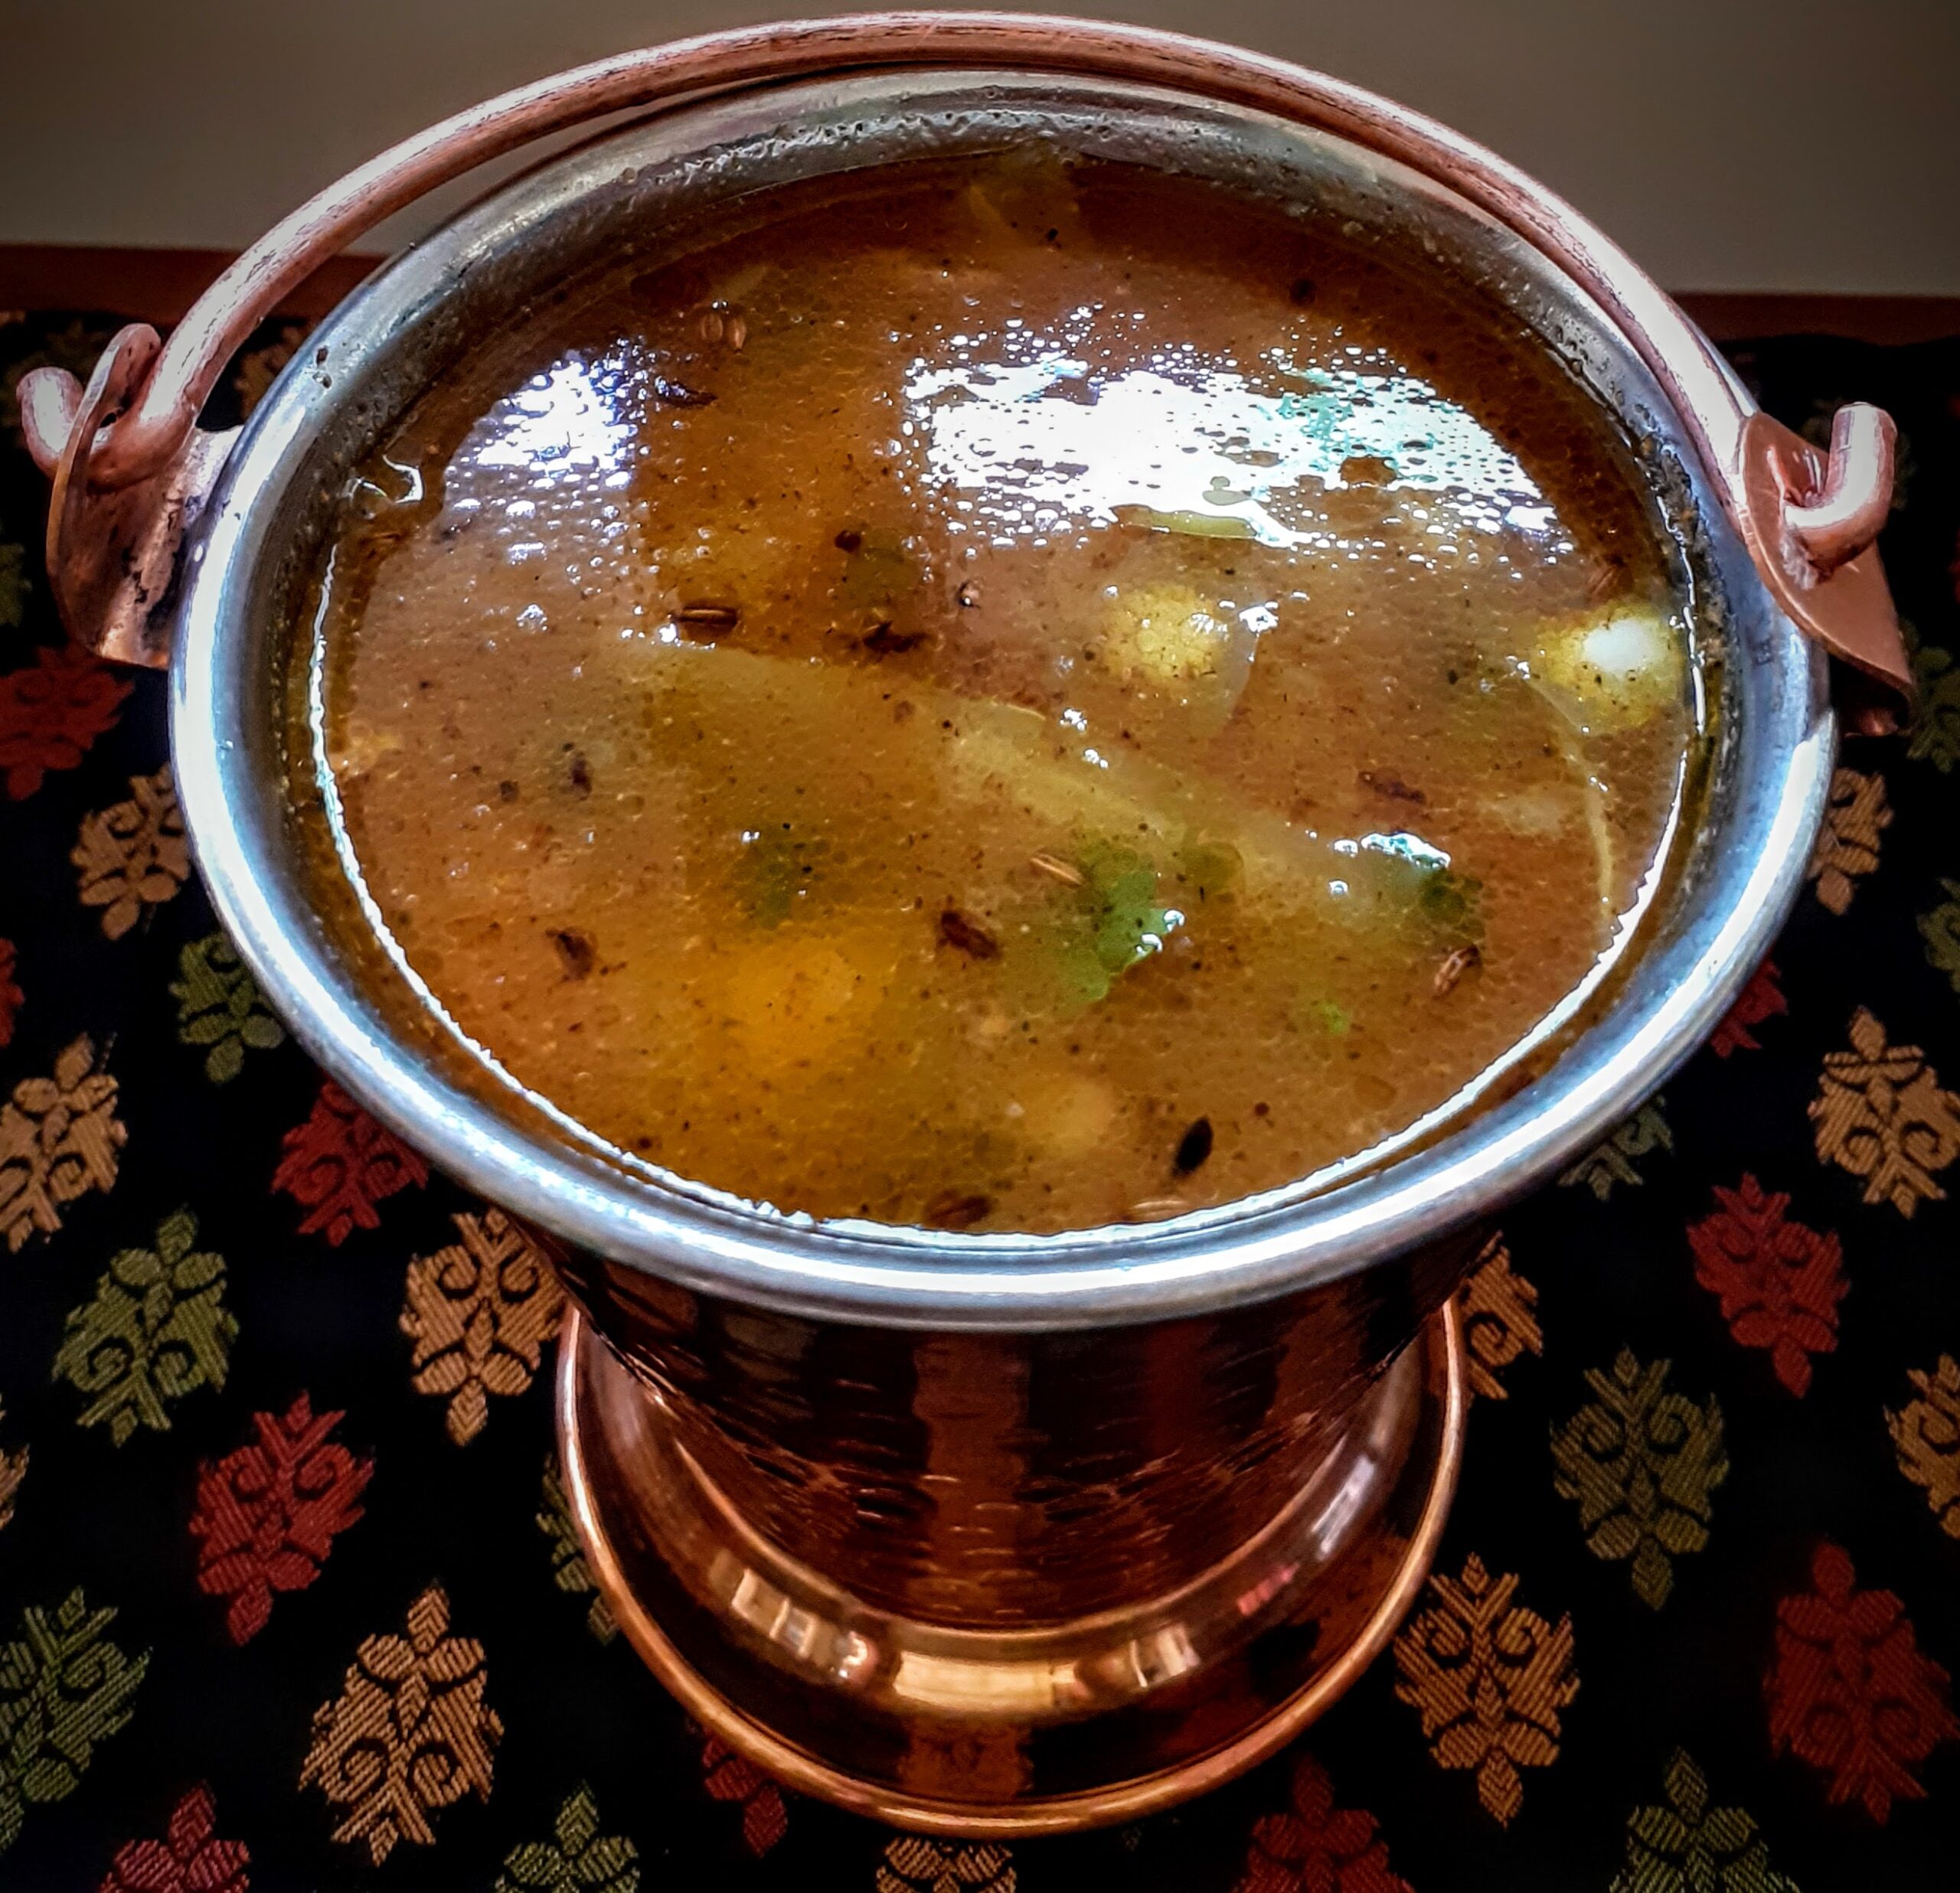
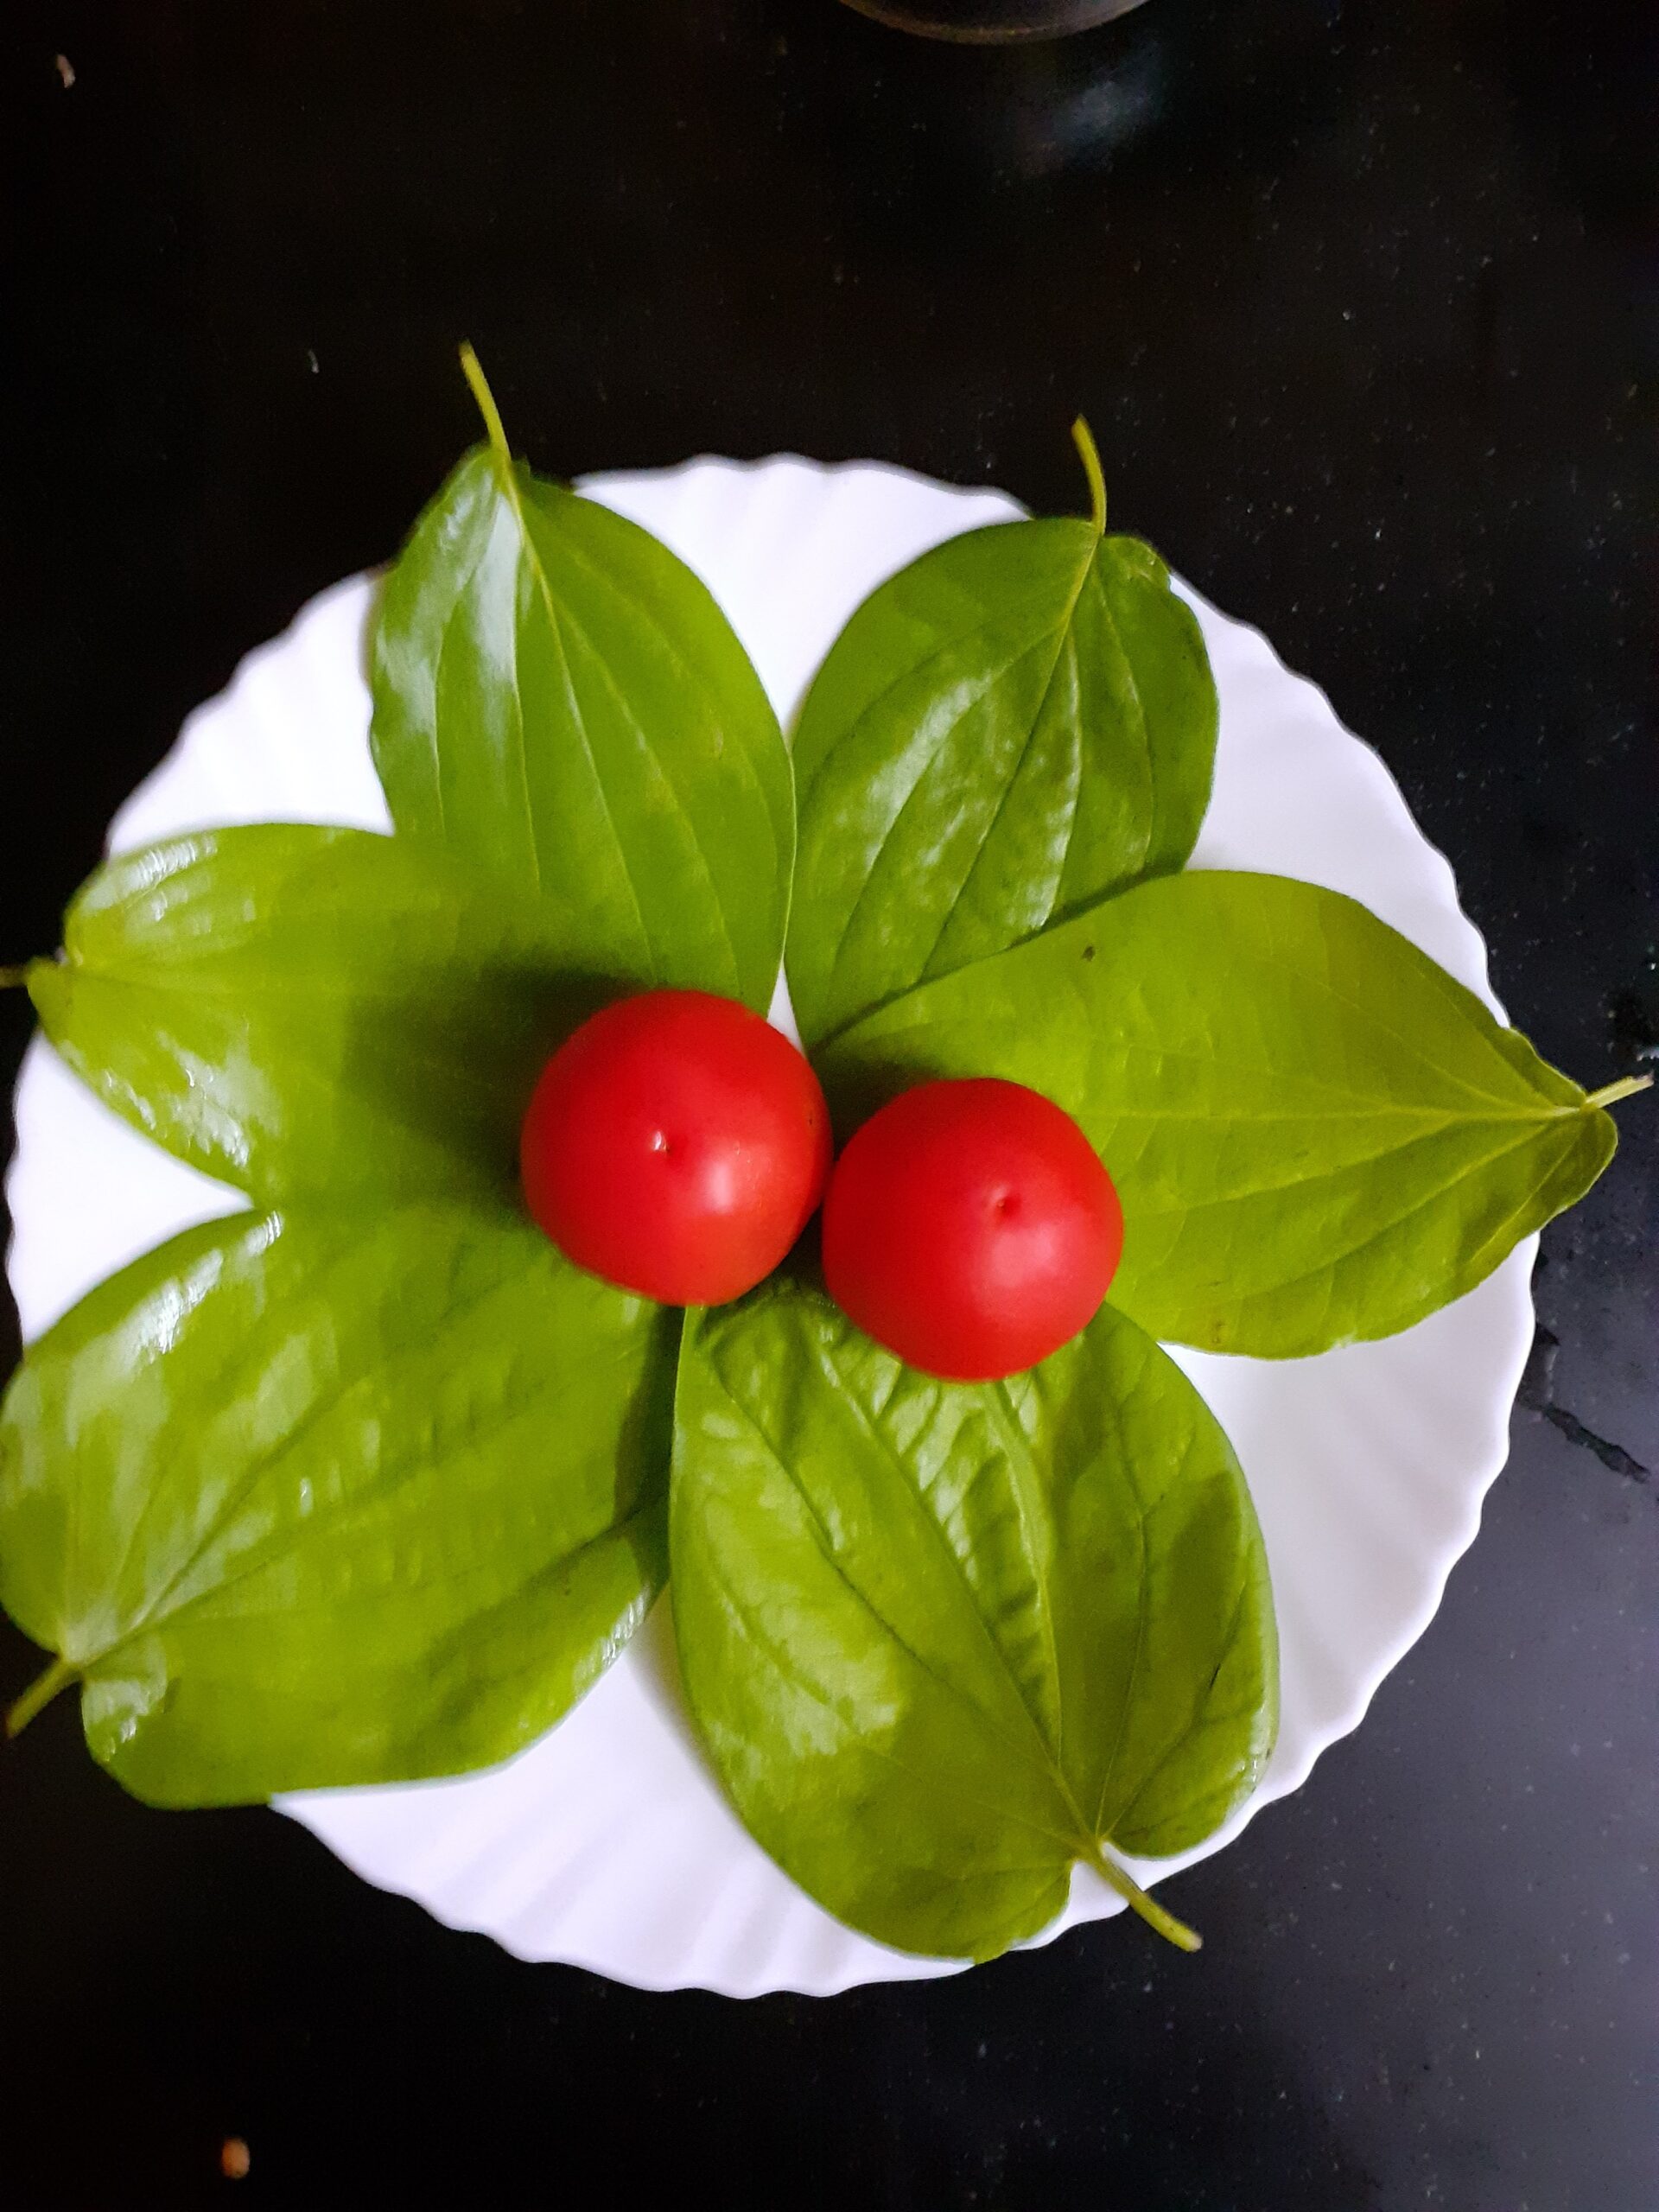
Thakkali Aati Kachina Kuzhambu is basically a Tomato curry, that goes on the sides with pretty much anything. Idli, Dosa, Parathas and Rice, all taste great with this. This a traditional recipe from the Kongunaad region of Tamil Nadu. I have deviated a little from the original recipe, a few addition/deletion of spices and condiments. The rich taste and flavour of tomatoes and the texture given by coconut, makes this curry a winner.
This curry is different from a chutney or sambar, in its basic ingredients. The consistency may be that of Sambar, but there is no dal used in this curry. Just three ingredients Shallots(Sambar onions), Tomatoes,Coconut, apart from other spices. Even better is the fact that you can store it in the fridge for a couple of days, and use as required.
If you have been following the blog, then you know by now what a tomato addict I am, and I just can’t cook without them. Anyone on the same page as me? Infact, in my social media handle I have spoken many times about my insecurity of tomatoes getting over. So much that i keep stocking excess of them. And this stocking has become excess during the pandemic lockdown. So every now and then such Tomato gravies and chutney’s are made at my place to keep consuming them????.
Here is the recipe for Thakkali Aati Kachina Kuzhambu-
PREP TIME: 10 COOK TIME: 20 MINS
TOTAL TIME:30Mins COURSE: MAIN COURSE
CUISINE: SOUTH INDIAN SERVINGS: 6
AUTHOR: Rajni Ram
Ingredients:
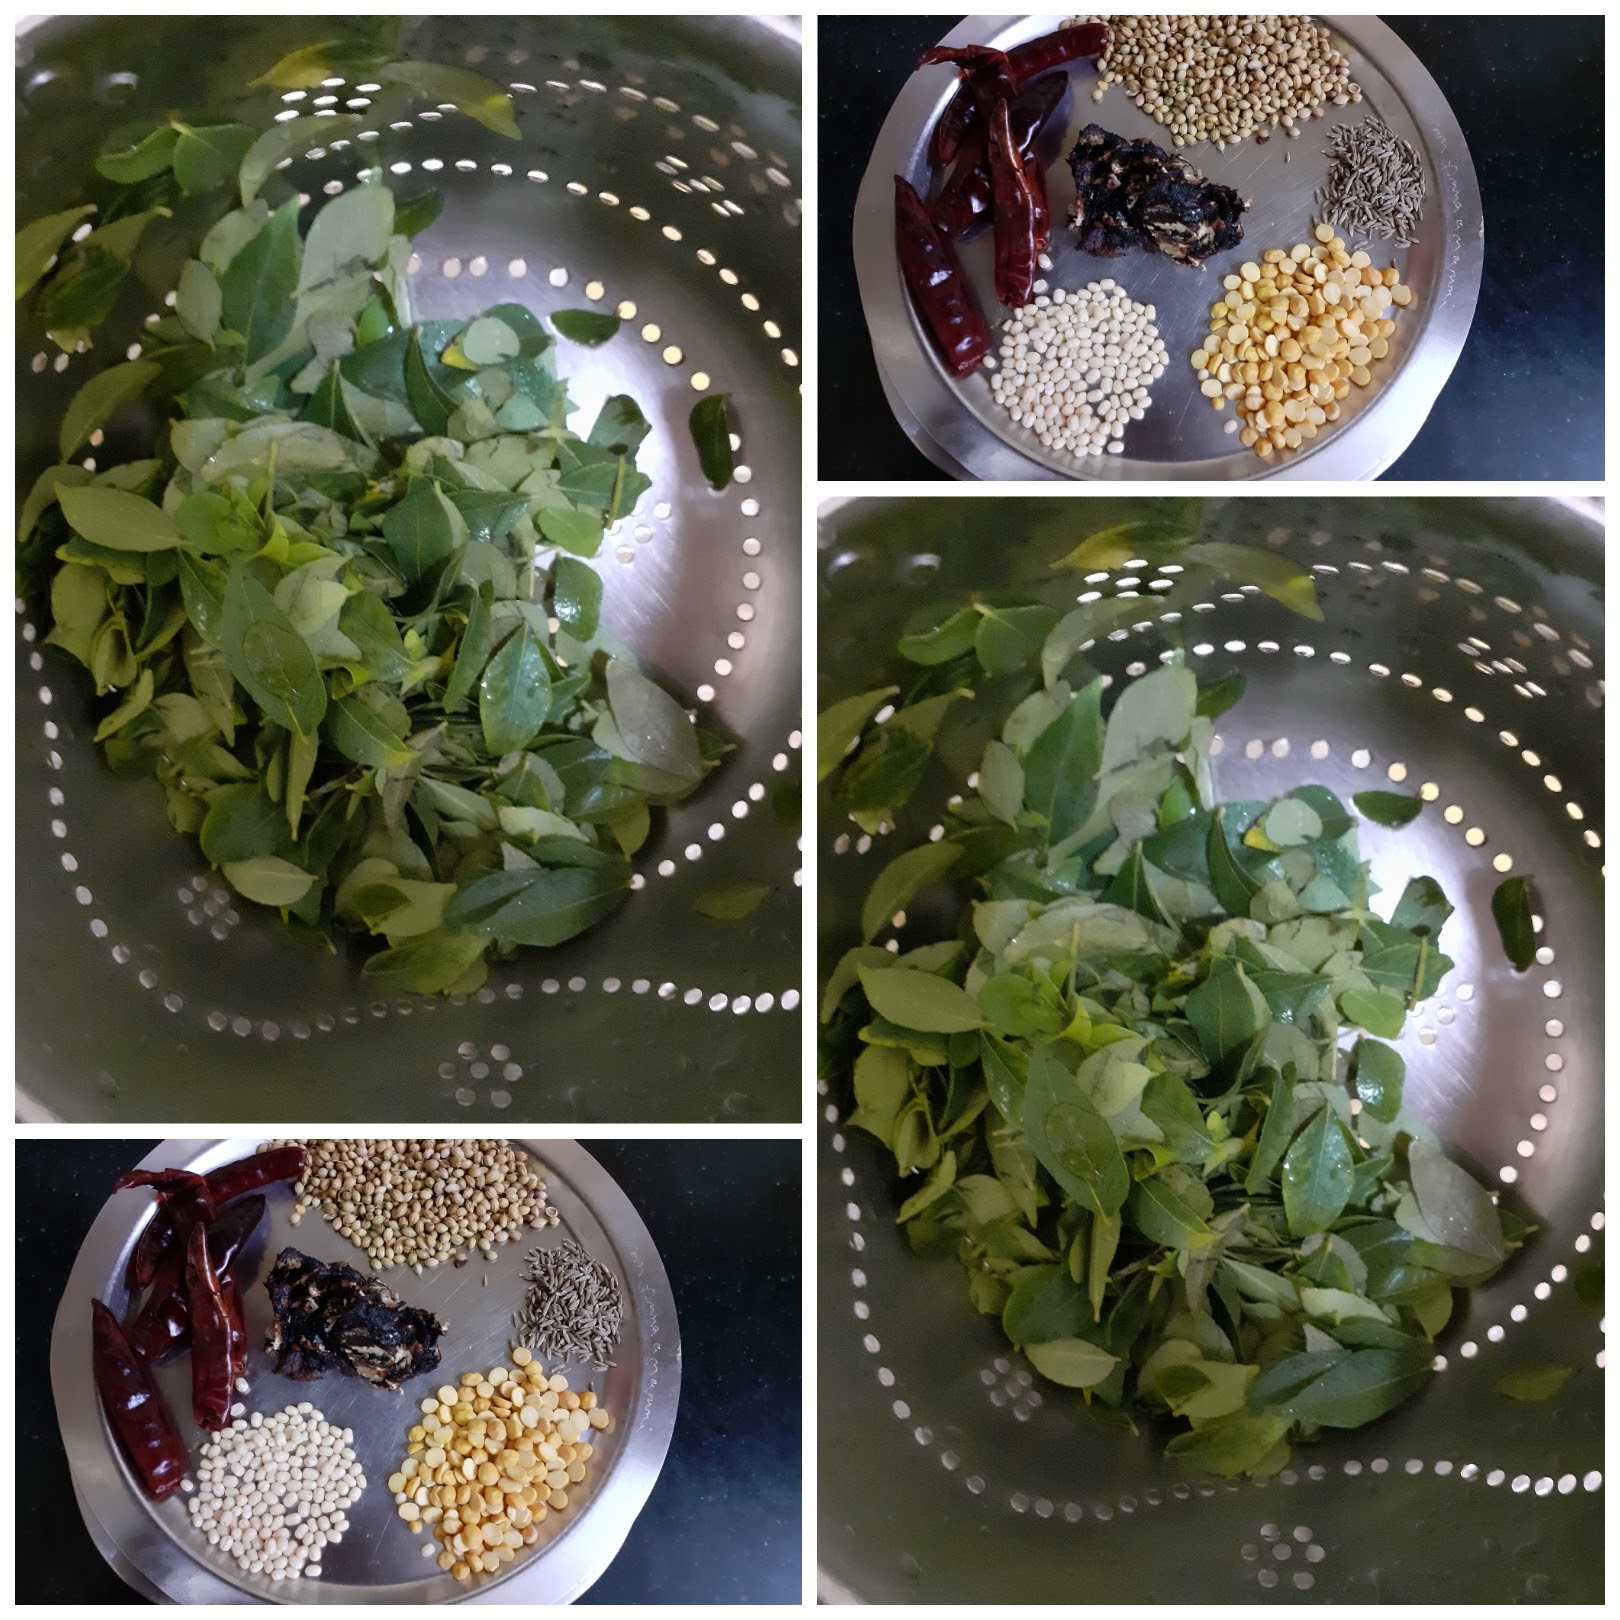
Tomatoes 4 large ones
Shallots/Sambar onions 20 nos peeled (10 ahead and 10 later)
Garlic 4 cloves
Dry red chillies 4 + 1
Curry leaves a few
Coconut 2 tablespoons
Mustard seeds 1 tsp
Fenugreek seeds 1/2 tsp
Asafoetida 1/2 tsp
Salt as required
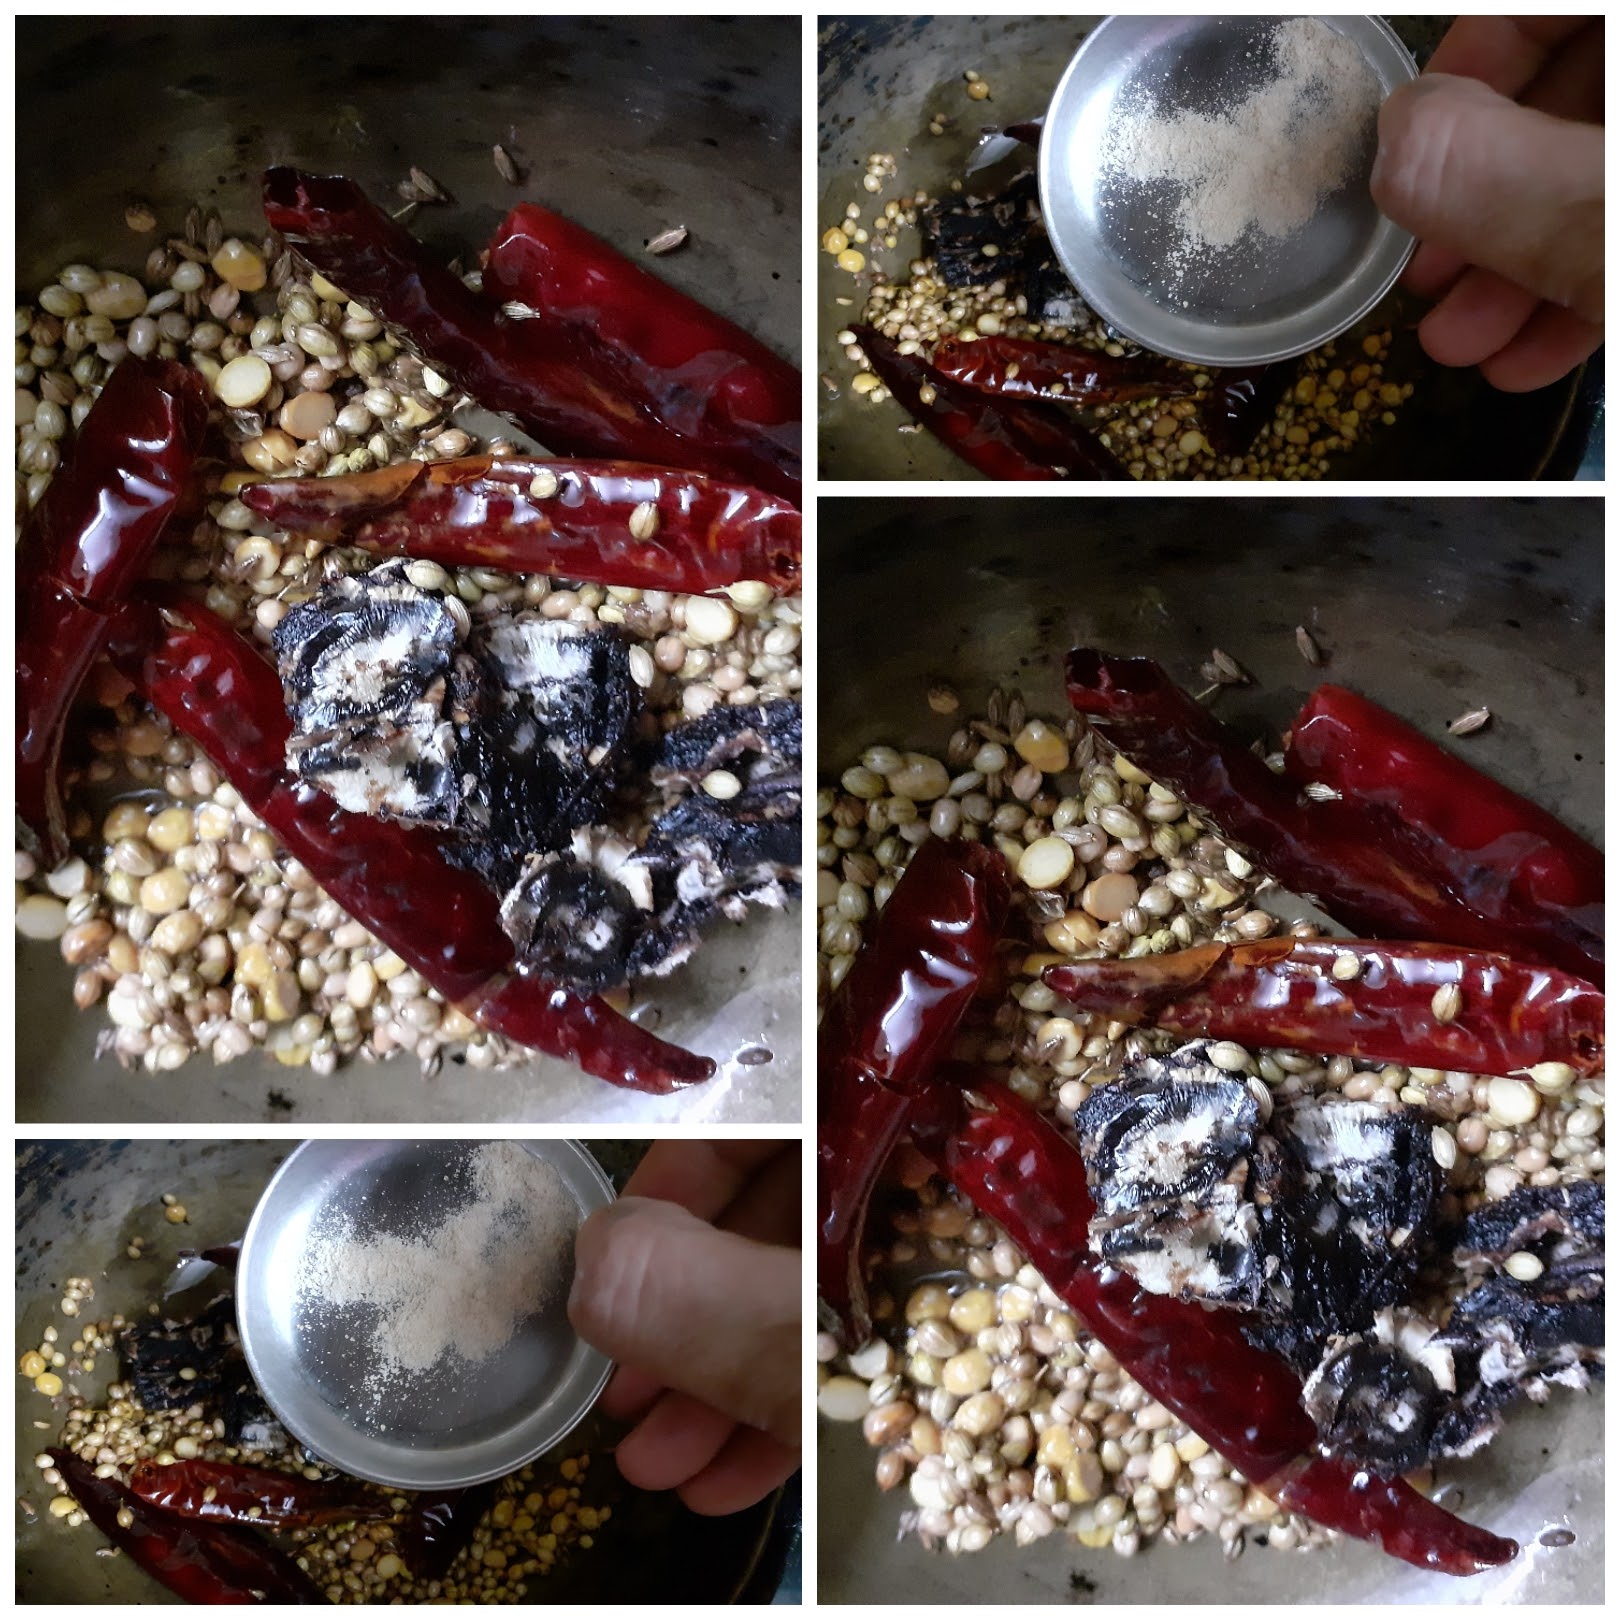
Sambar powder 1 tbsp
Red chilli powder regular 1 tsp
Kashmiri red chilli powder 1 tsp
Pepper powder 1 tsp
Oil for sauteing till oil/coconut oil/refined oil
Directions:
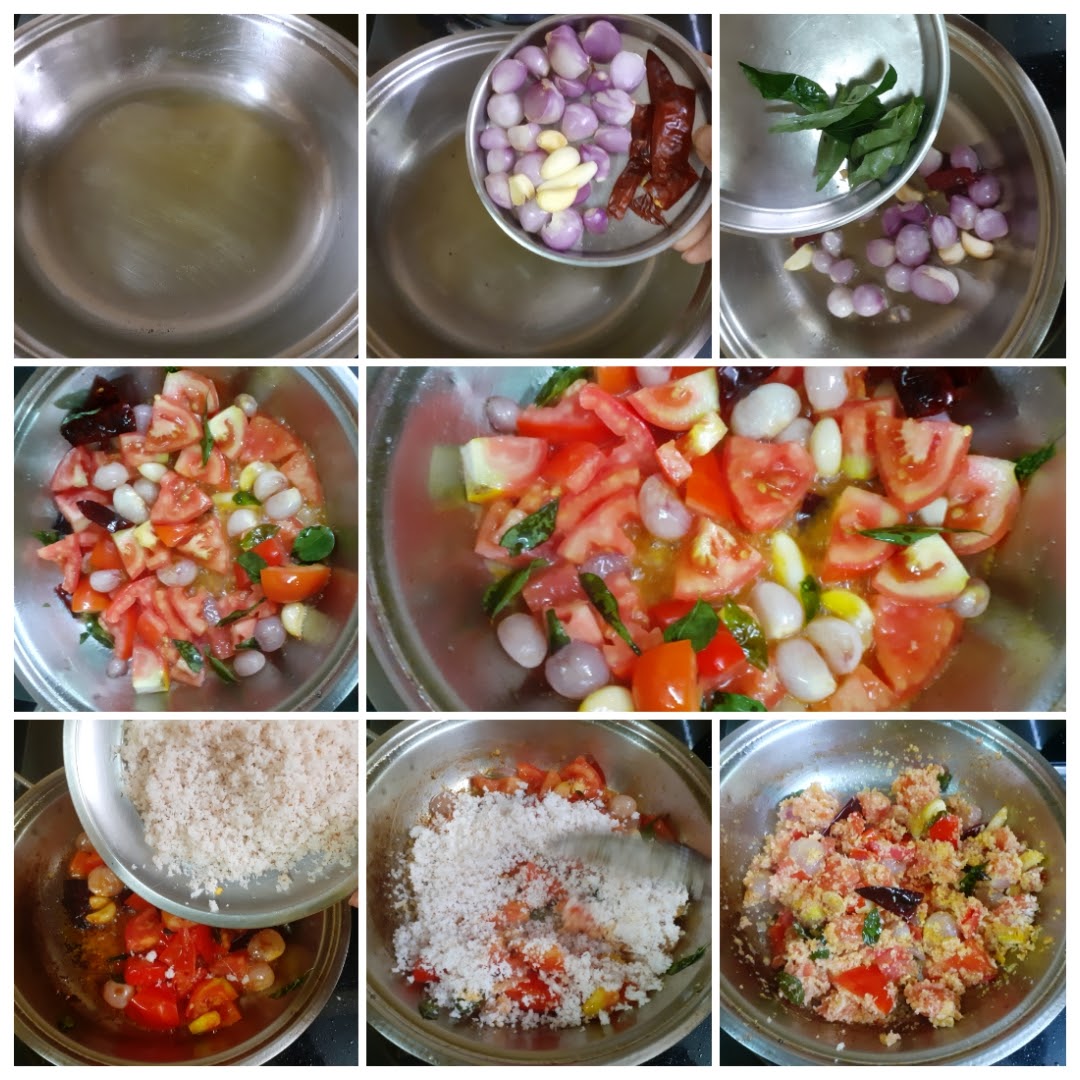
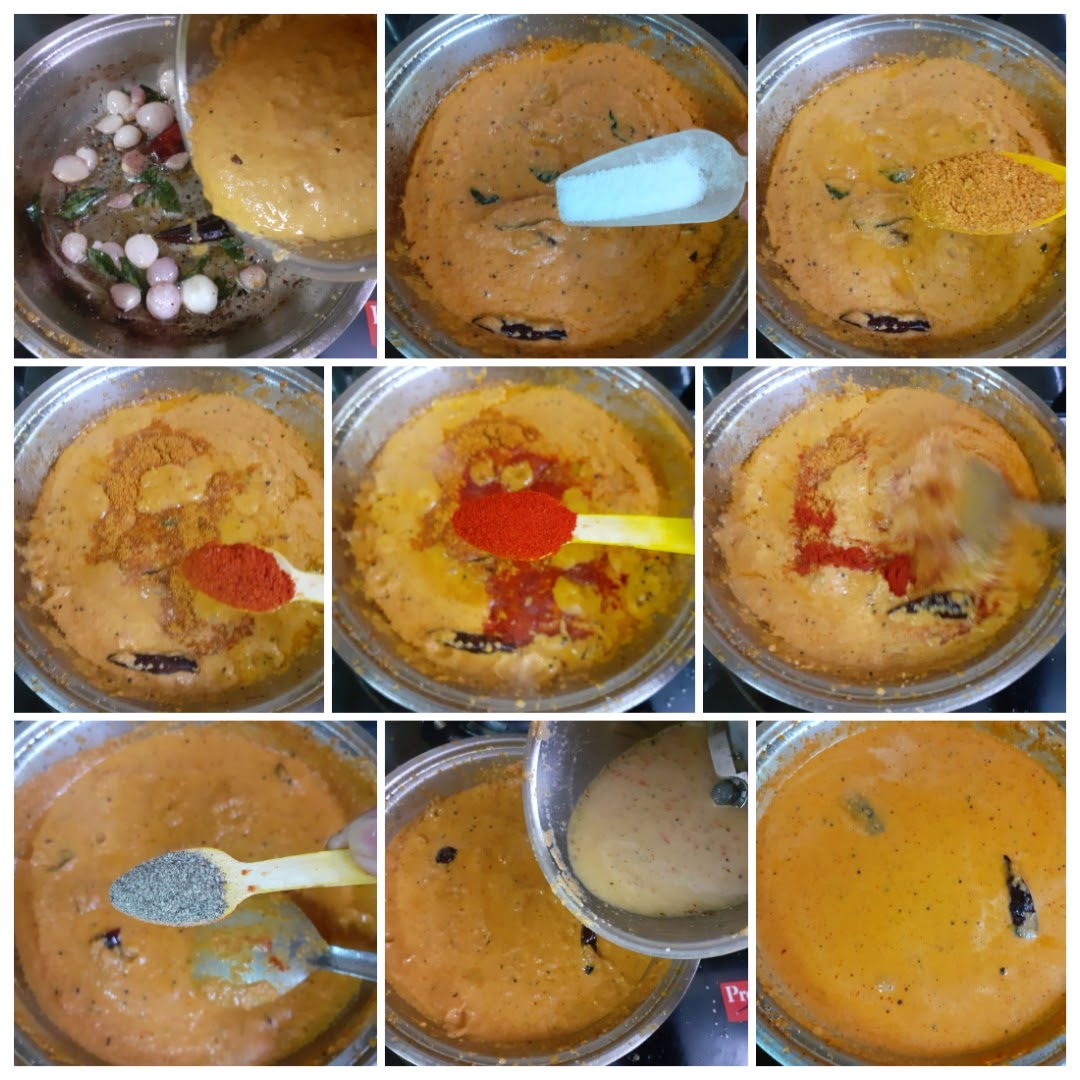
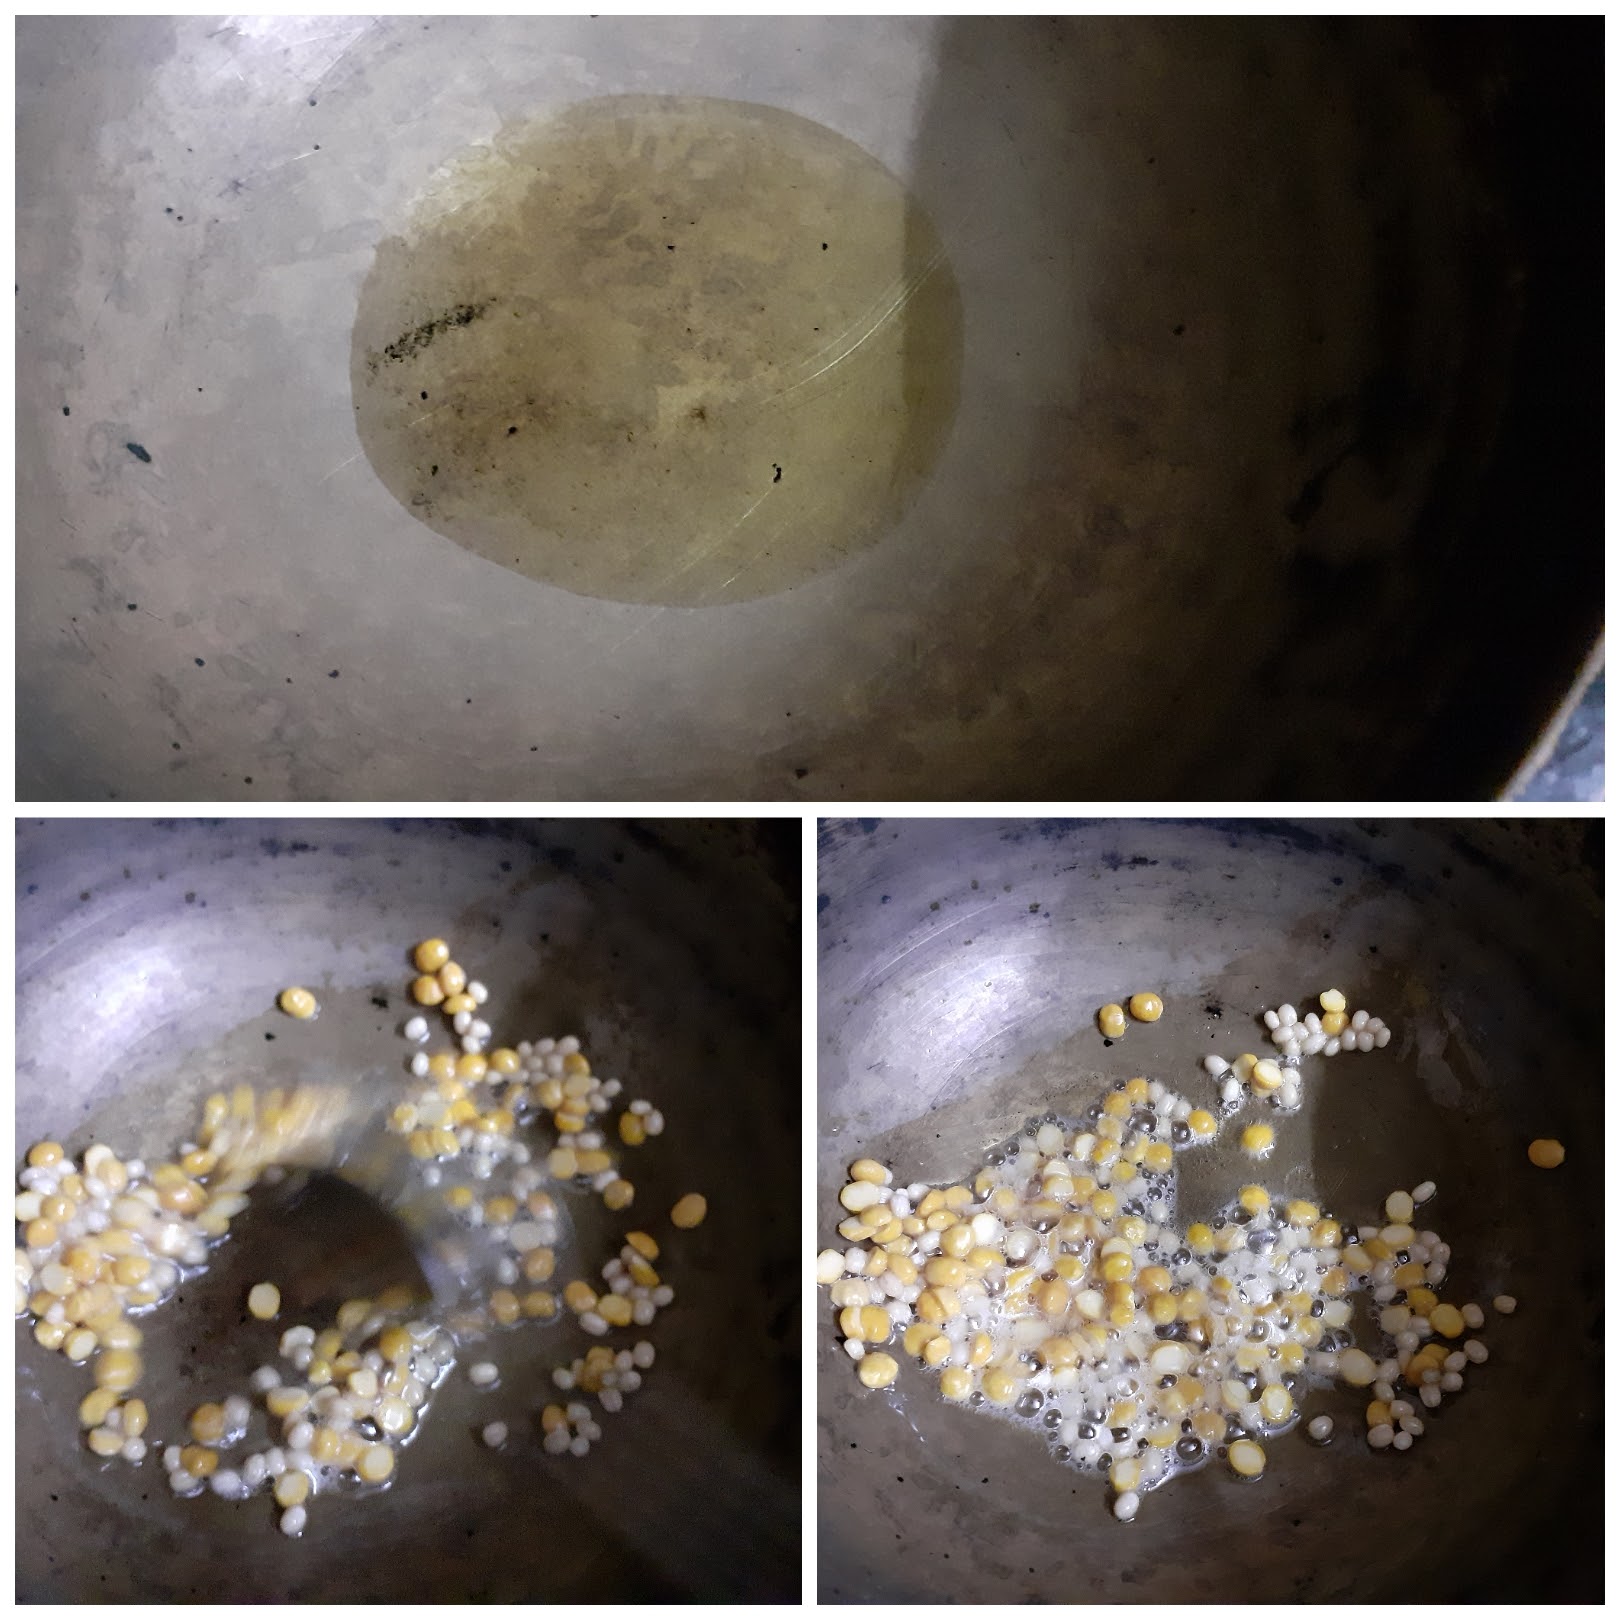
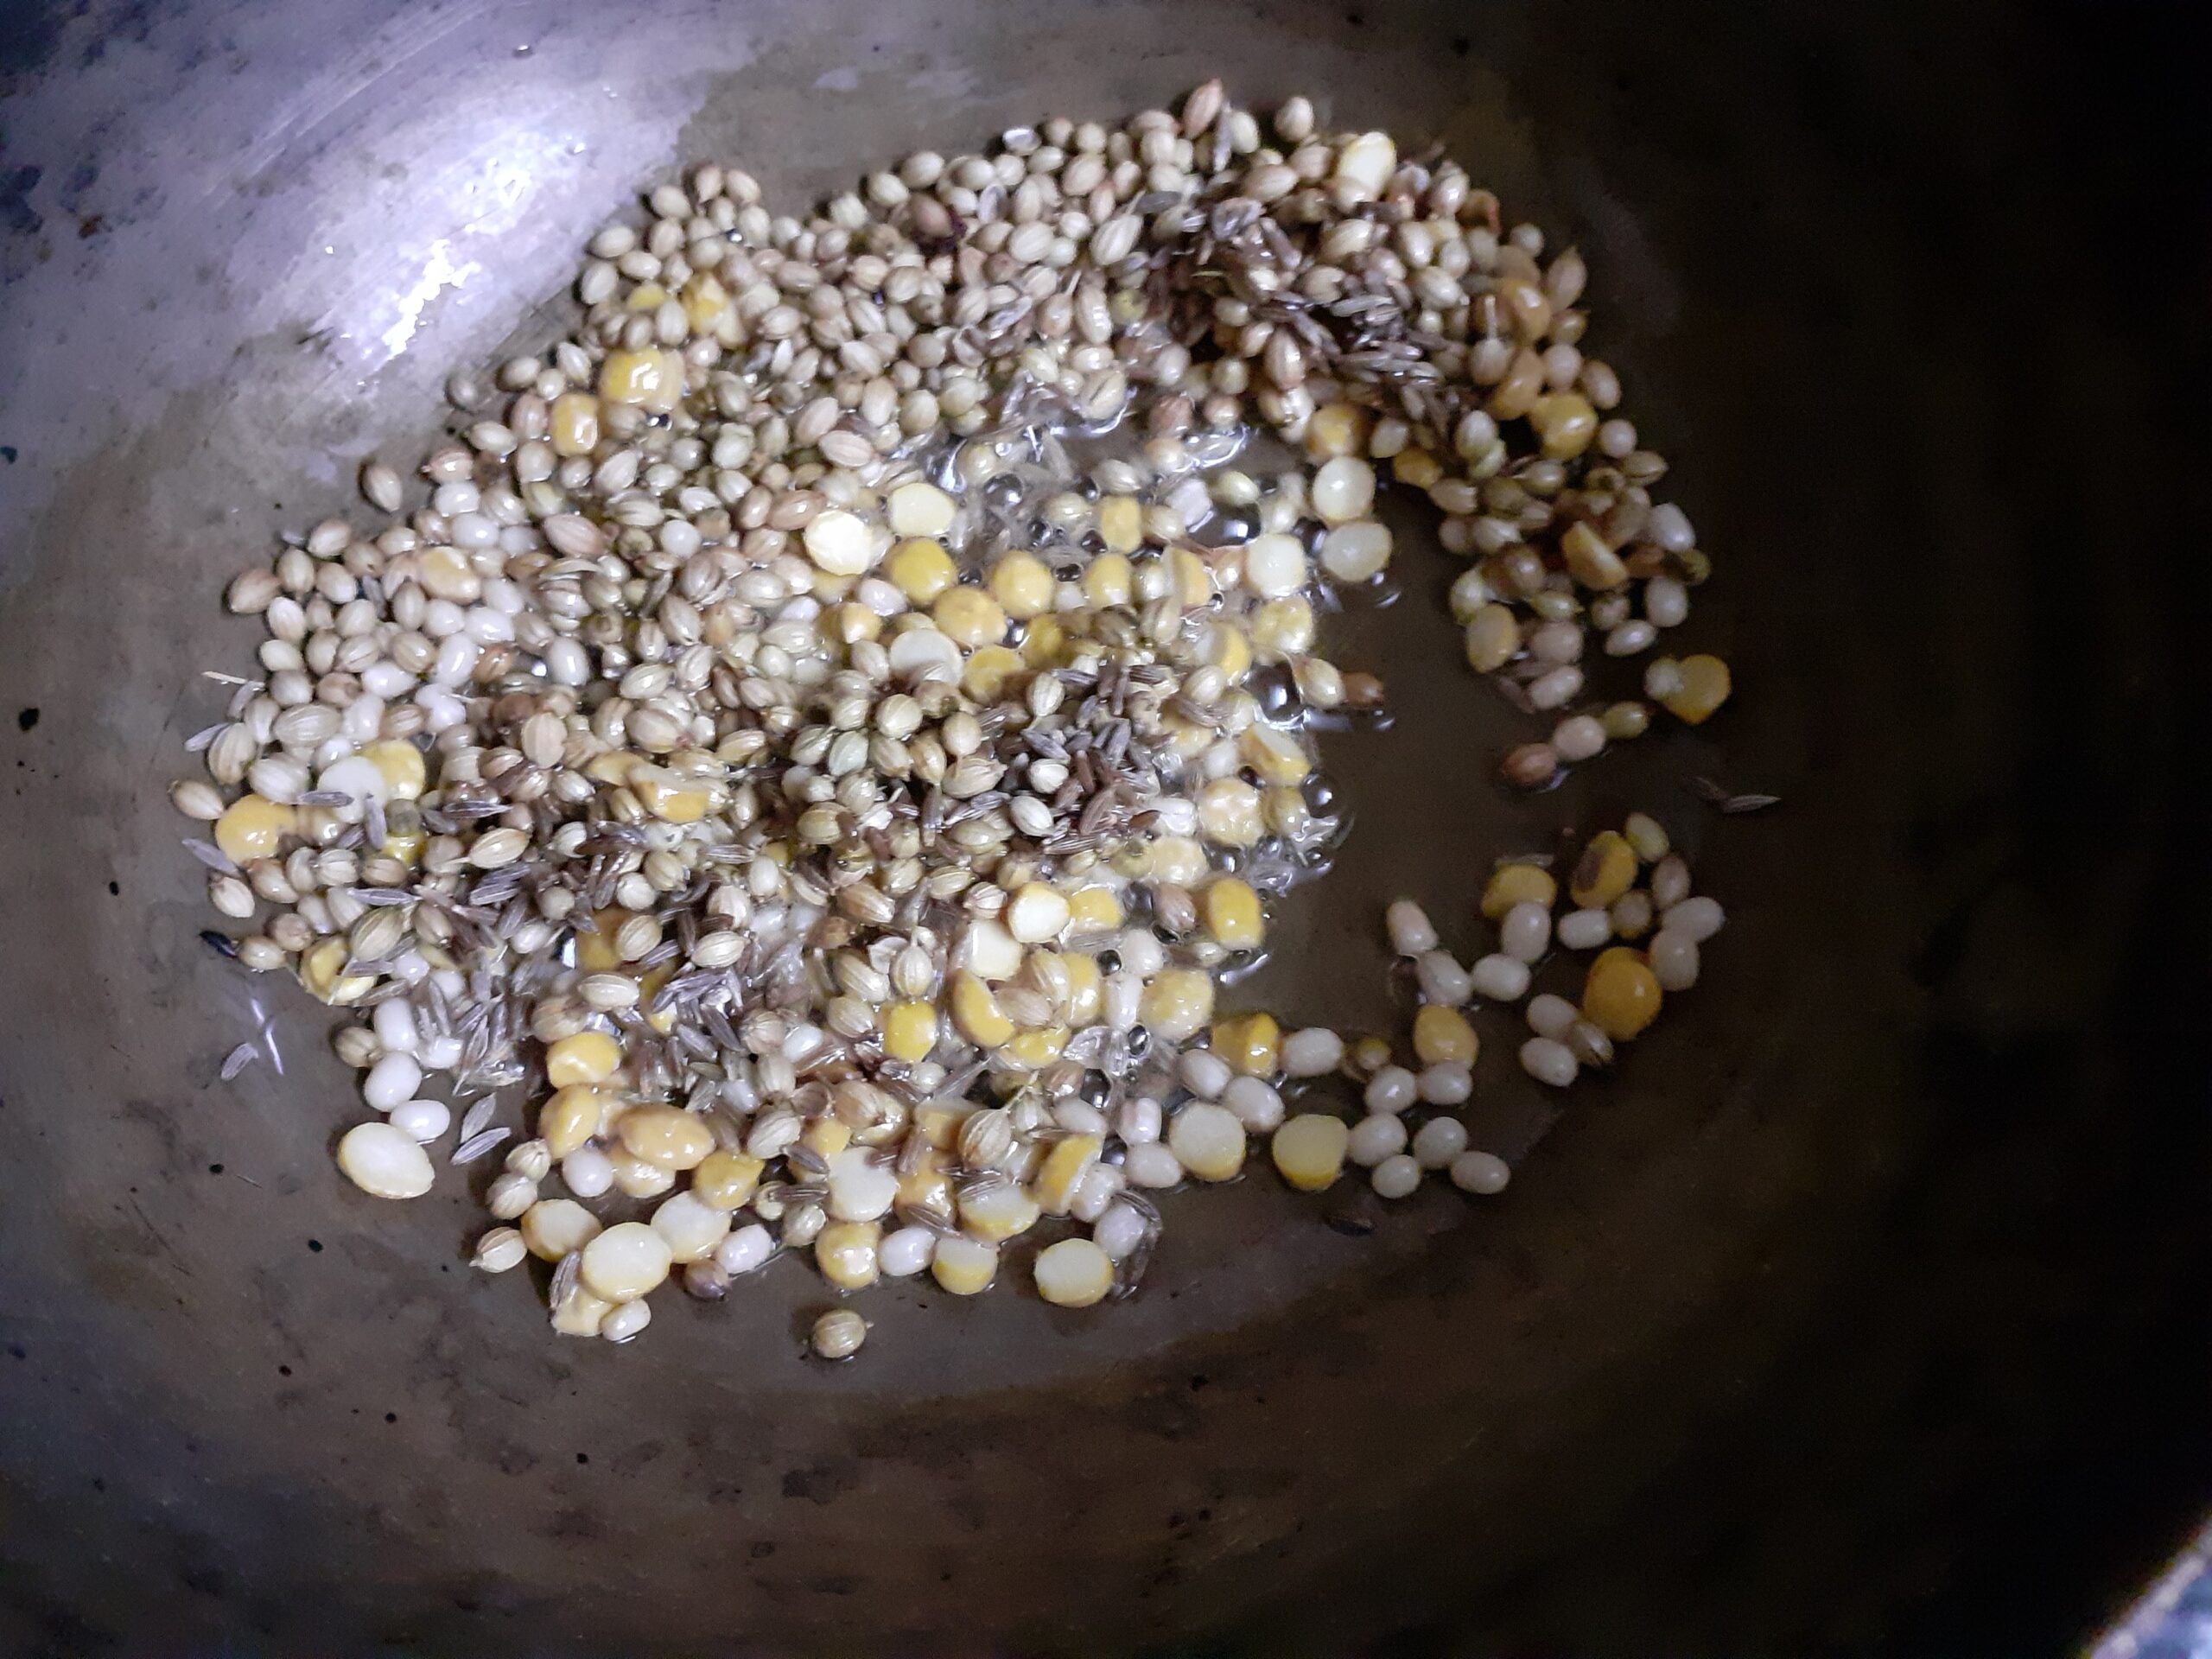
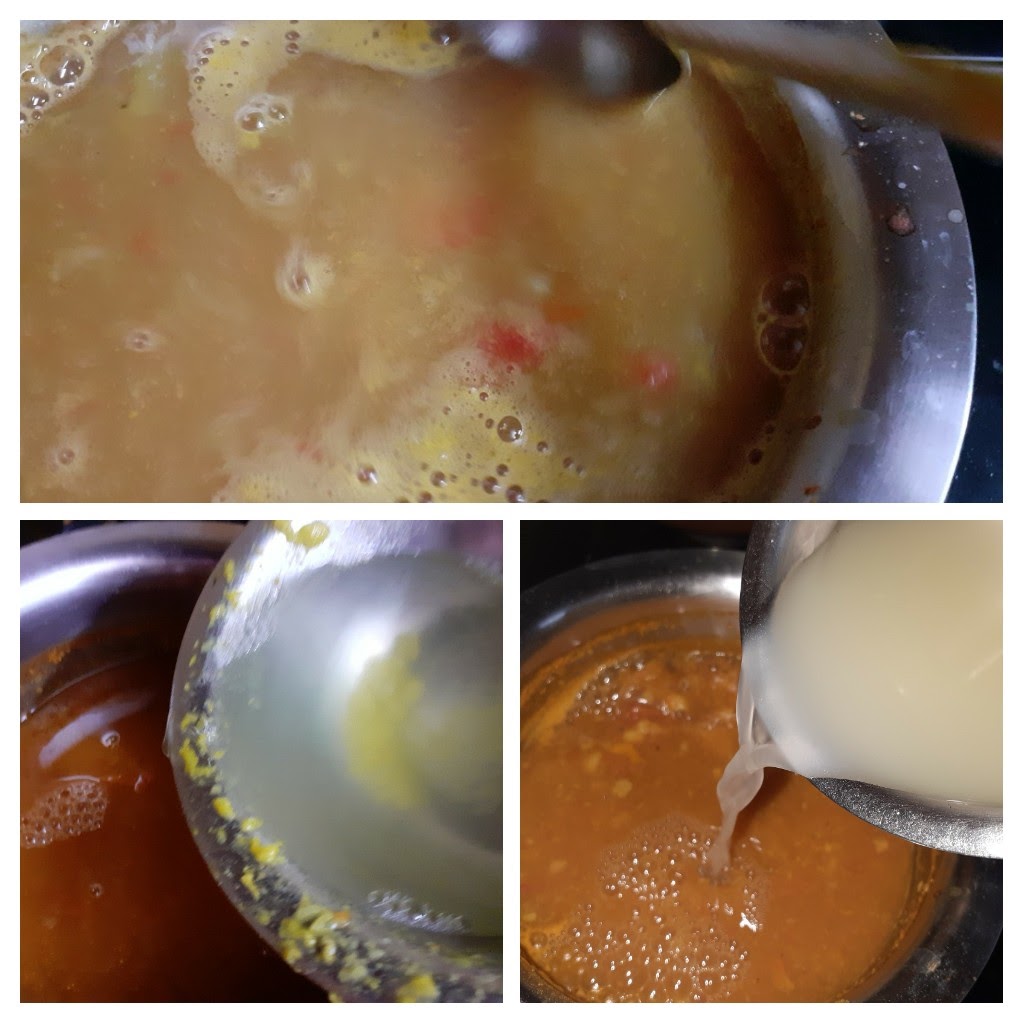
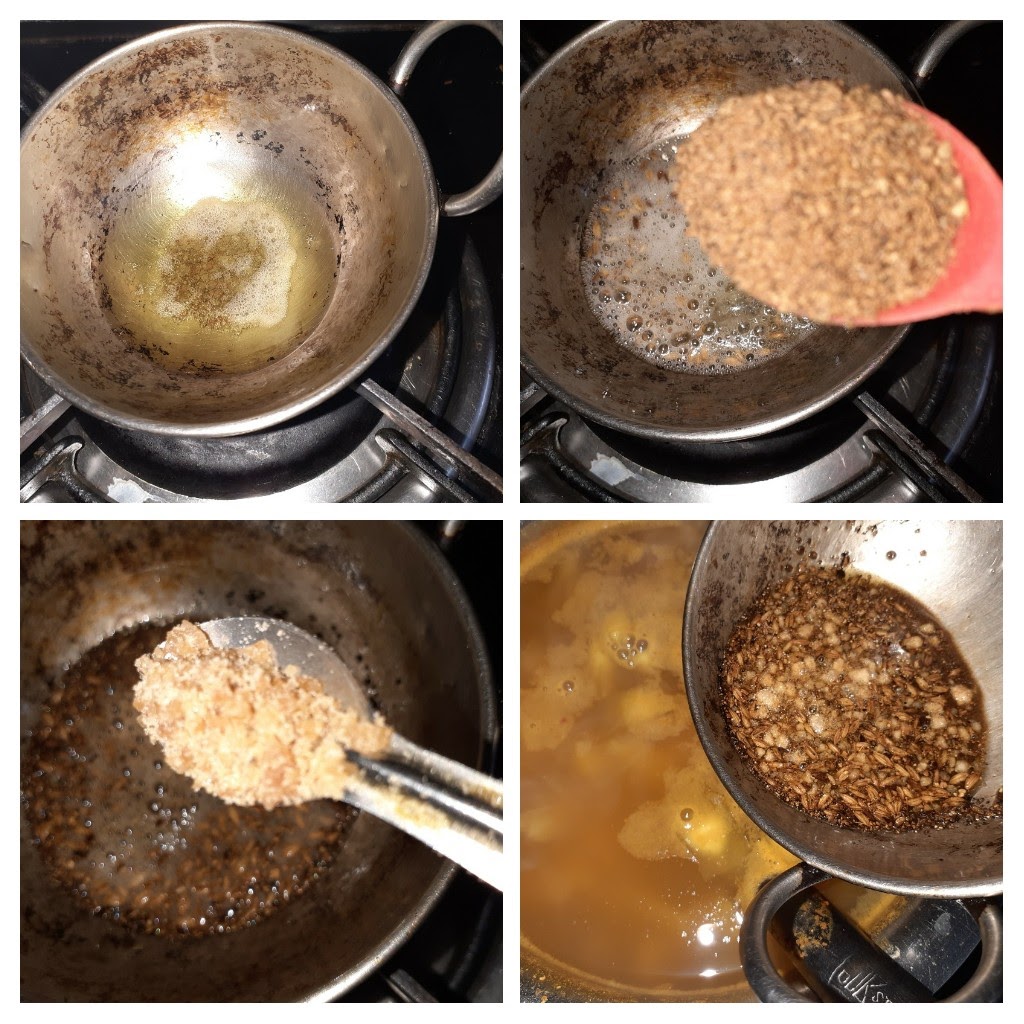
In a Pan/Kadai heat some oil for sauteing. Gently drop the shallots(half of them), garlic and red chillies and saute. Add curry leaves and continue to saute. When the onions start turning a light brown, add the tomatoes and saute until they turn mushy. Now add the coconut and saute for a minute or two. Put off the flame and cool the mixture. Once cool, grind this mixture to a smooth paste and keep aside. Now to the same kadai, add a little more oil and heat. Add mustard seeds, fenugreek seeds, dry red chilli and curry leaves. Add some asafoetida. Now add the remaining shallots and saute until light brown. Now add the prepared tomato paste. Also add salt, sambar powder, red chilli powder(regular), kashmiri red chilli powder, and mix well. Now add some pepper powder. Add about 2 cups water and allow the gravy to thicken. The final consistency of the gravy should be like Sambar. Enjoy with Rice, Idli Dosa, Puri or Parathas. Bon appetite.
STEPWISE RECIPE FOLLOWS:
1. In a Pan/Kadai heat some oil for sauteing. Gently drop the shallots(half of them), garlic and red chillies and saute. Add curry leaves and continue to saute. When the onions start turning a light brown, add the tomatoes and saute until they turn mushy. Now add the coconut and saute for a minute or two. Put off the flame and cool the mixture.
2. Once cool, grind this mixture to a smooth paste and keep aside. Now to the same kadai, add a little more oil and heat. Add mustard seeds, fenugreek seeds, dry red chilli and curry leaves. Add some asafoetida. Now add the remaining shallots and saute until light brown.
3. Now add the prepared tomato paste. Also add salt, sambar powder, red chilli powder(regular), kashmiri red chilli powder, and mix well. Now add some pepper powder. Add about 2 cups water and allow the gravy to thicken. The final consistency of the gravy should be like Sambar.
NOTES:
1. Country tomatoes are the best variety for this recipe, as they are a little sour.
2. Instead of adding pepper powder later, once can add whole peppercorns while sauteing the onion and tomatoes.
3. This curry can be kept in the refrigerator for 3 days and warmed up as required.
Rasakalan
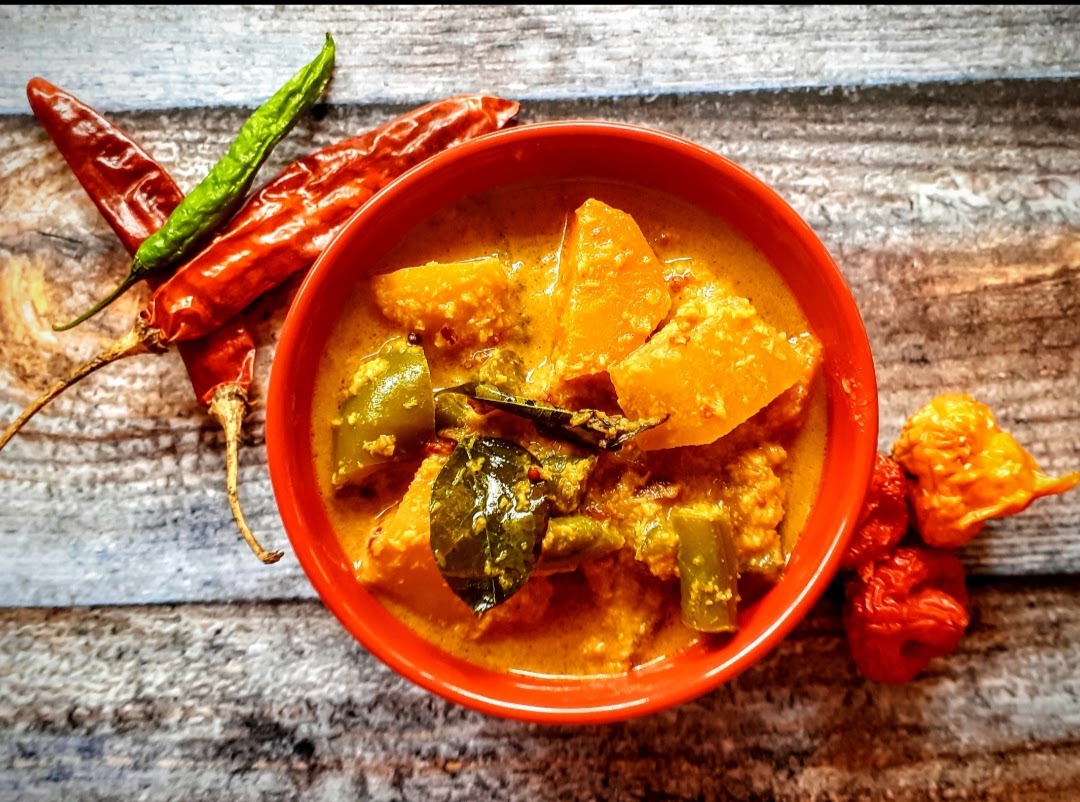
Rasakalan is a traditional mixed vegetable dish from the Palakkad cuisine. The dish is so rustic and delicious and very easy to make. It is great to go with hot rice or can be served on the sides with Dosa or Idli. The vegetables mostly used in this dish are Ash gourd, Sweet potato, pumpkin, that are cooked in a tangy tamarind sauce and then a flavourful coconut masala paste is added. It is the paste that makes all the difference. Finally the seasoning in coconut oil enhances the flavours of the dish and takes it to a different level.
In our family my aunt makes this the best, so this recipe has been adapted from her instructions. This recipe allows you to customize the vegetables as per your liking. I have used a mix of Ash gourd, Capsicum, Carrot, Beans and Potatoes.
Tamarind paste 1 tbsp or soak gooseberry size tamarind ball and extract pulp appx 1.5 cup
Turmeric powder 1/2 tsp
Salt as required
Coconut 2 tbsp
Green chillies 2
Dry red chillies 4 (or depending on spice choice)
Jaggery 1 tsp
Coconut oil or refined oil 1/2 tbsp
Mustard seeds 1 tsp
Chana dal ( gram dal) 1/2 tbsp
Asafoetida 1/2 tsp
Dry red chilli broken 1
Curry leaves a few
Directions:
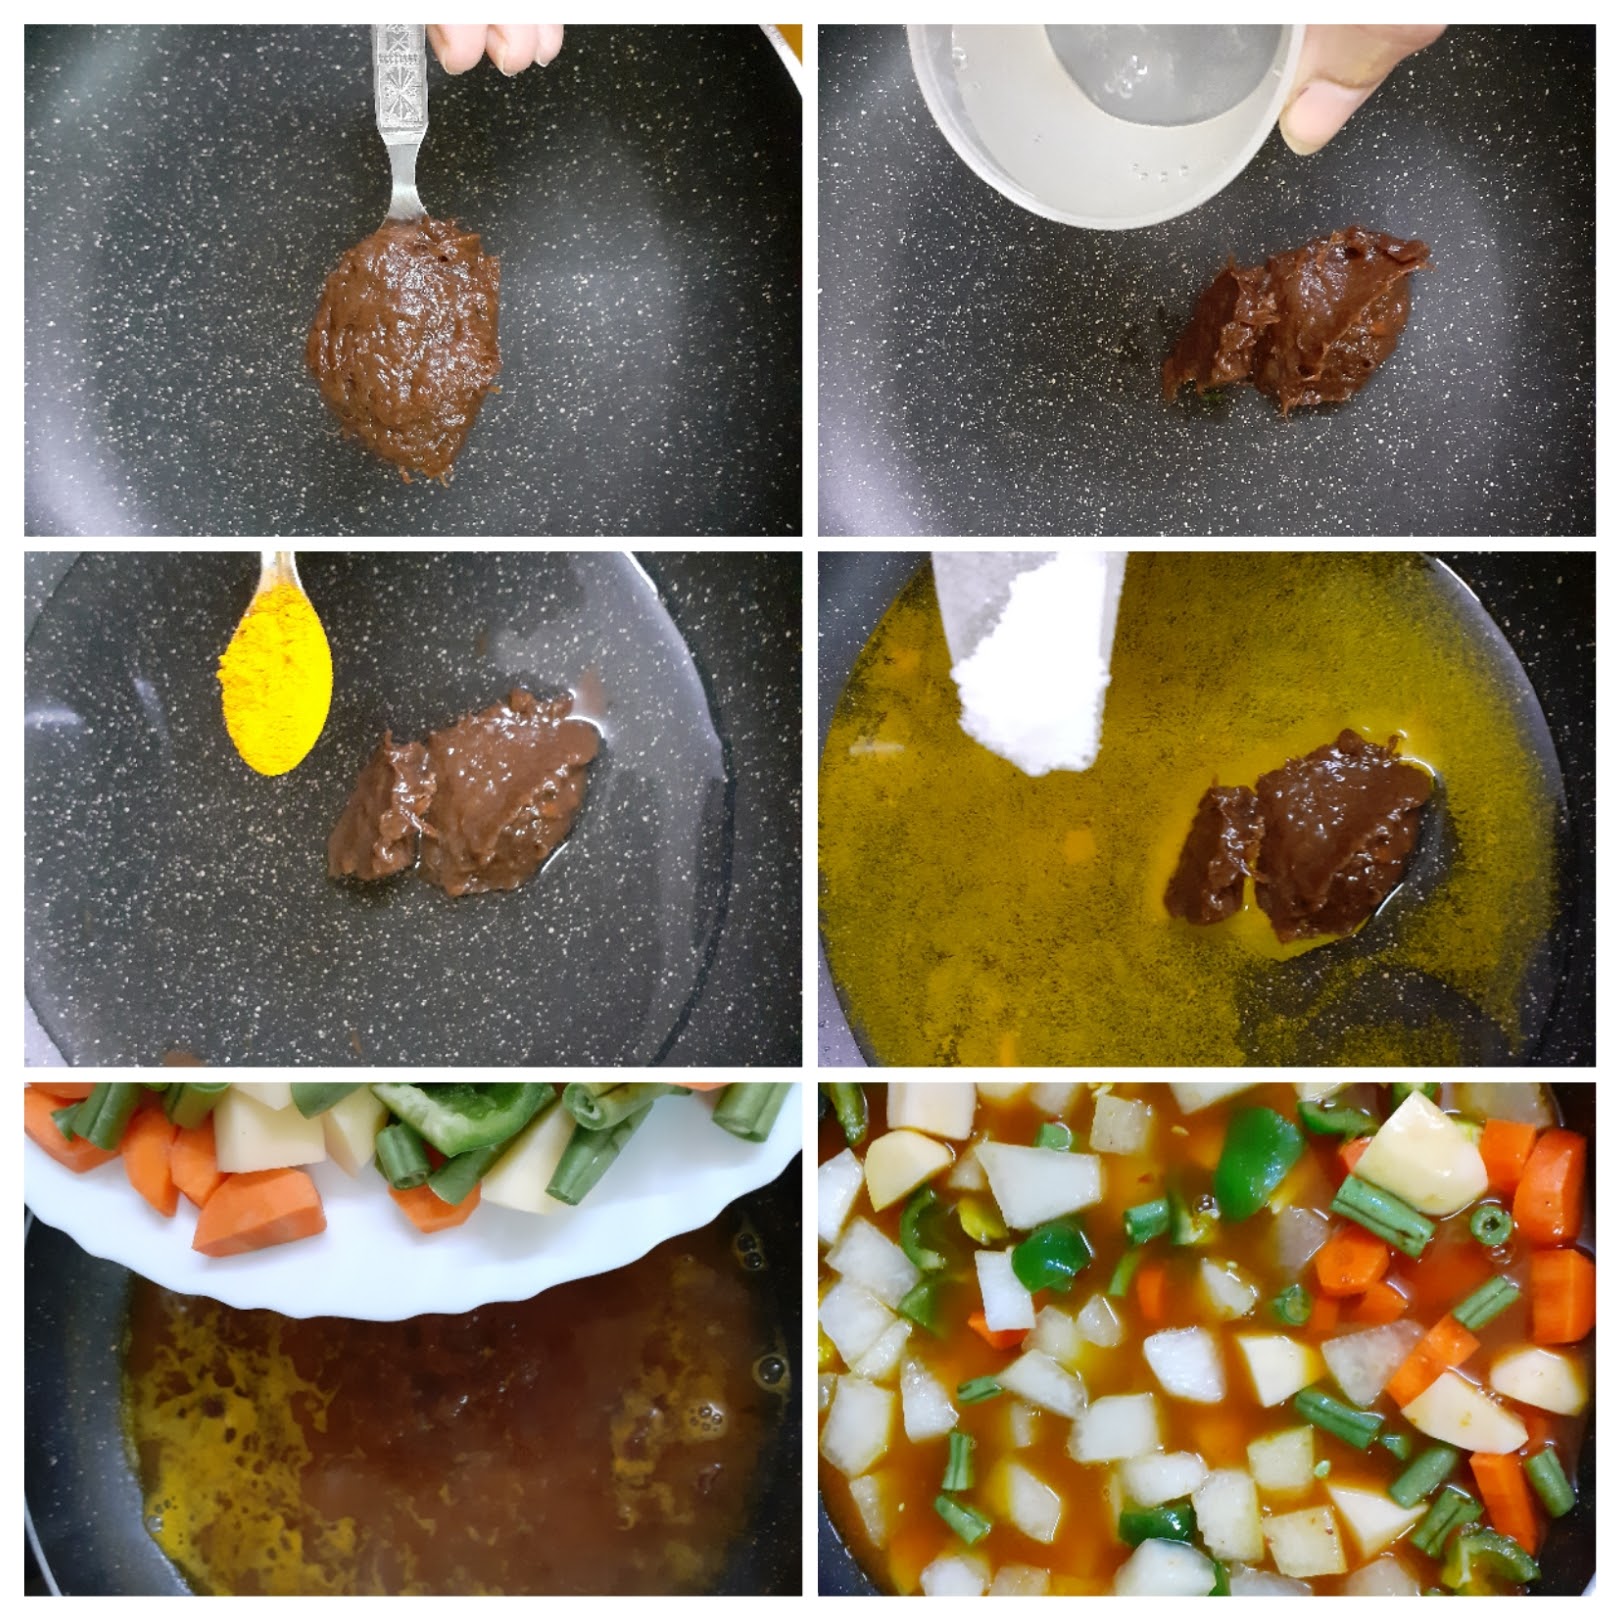
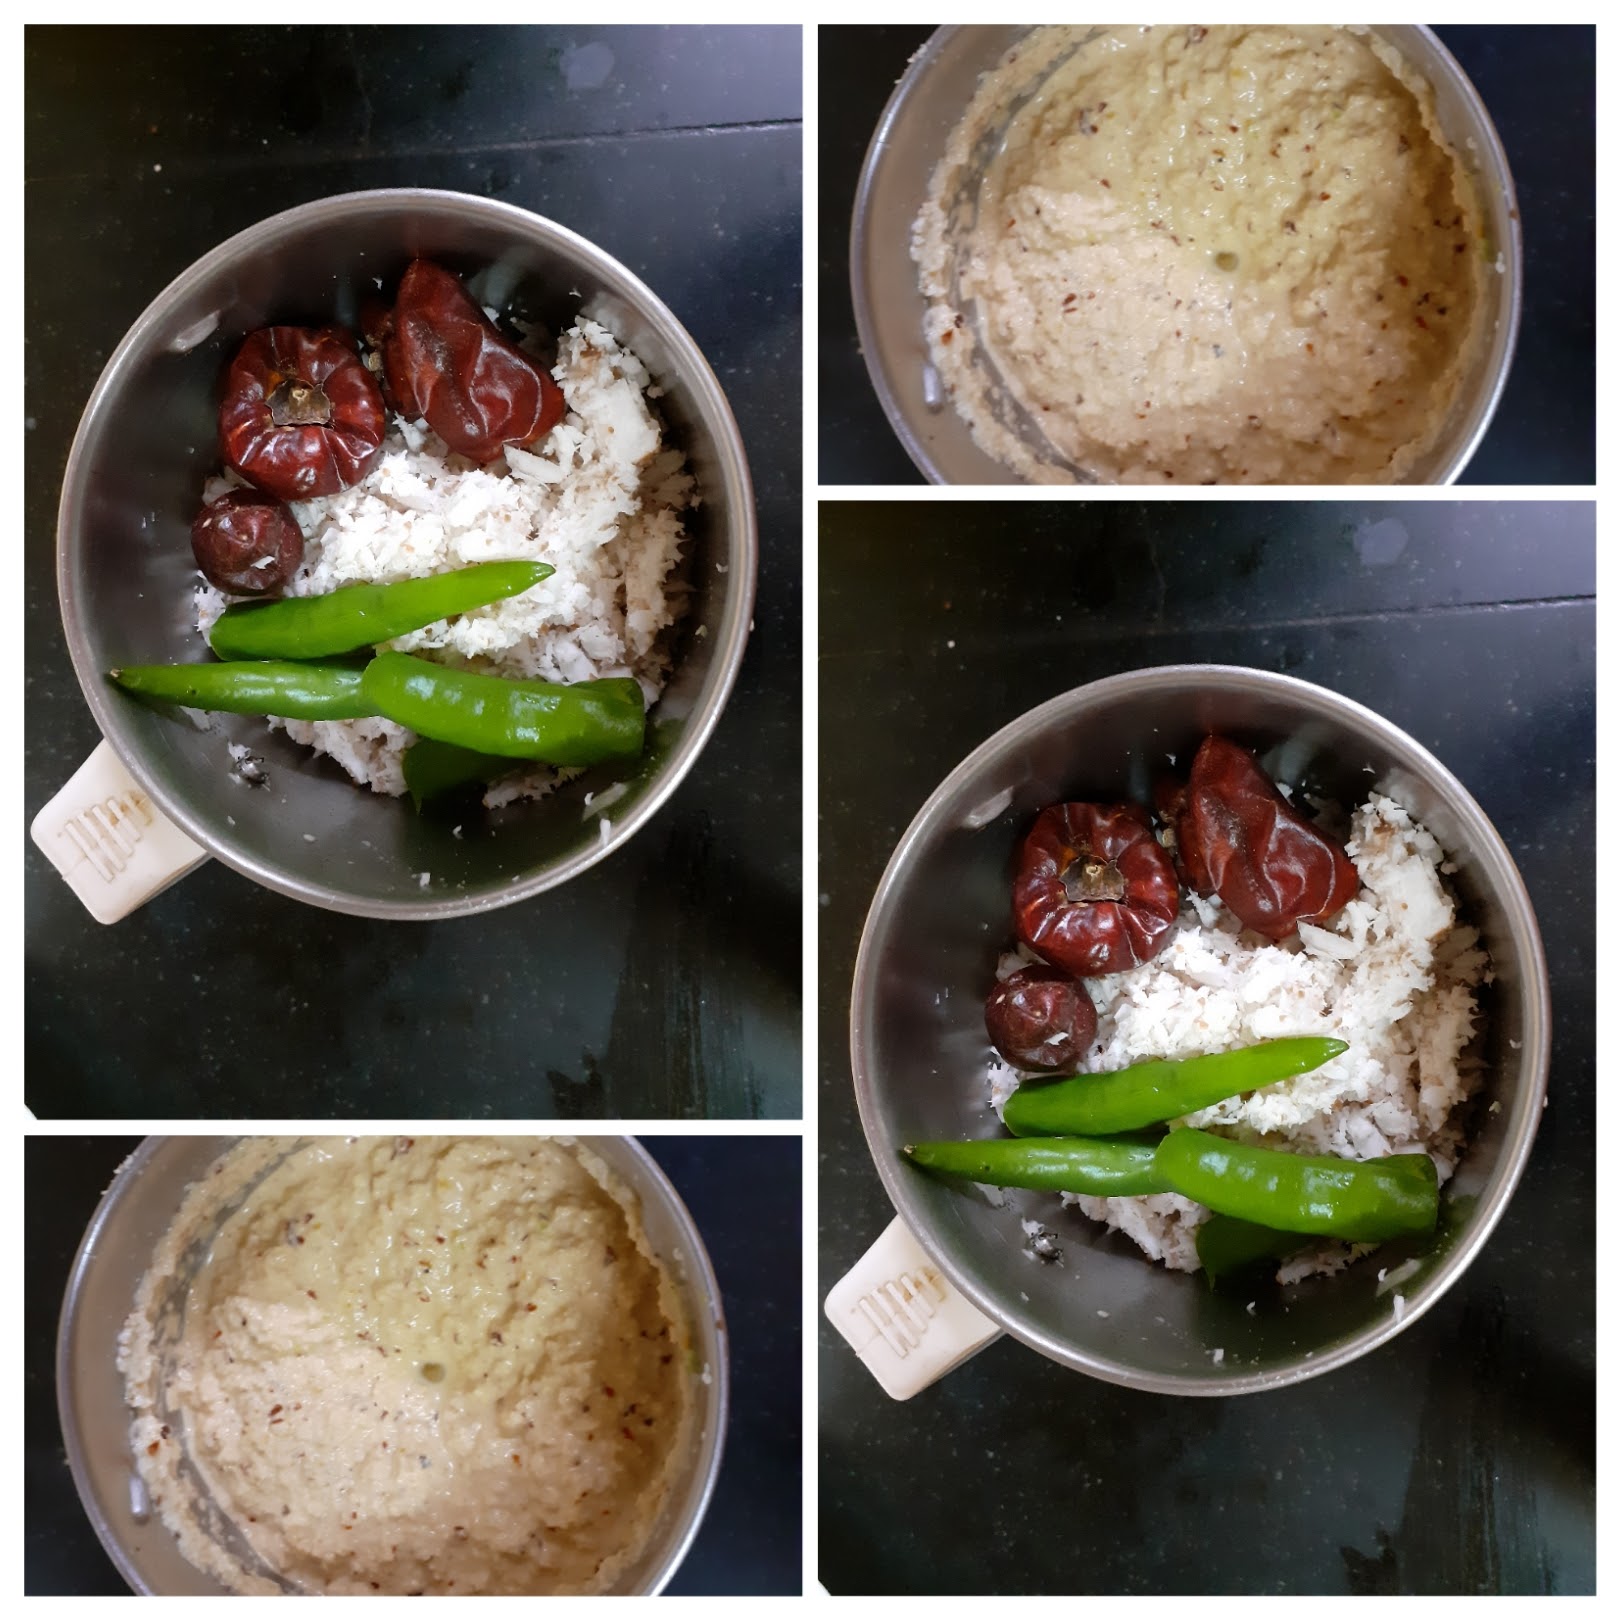
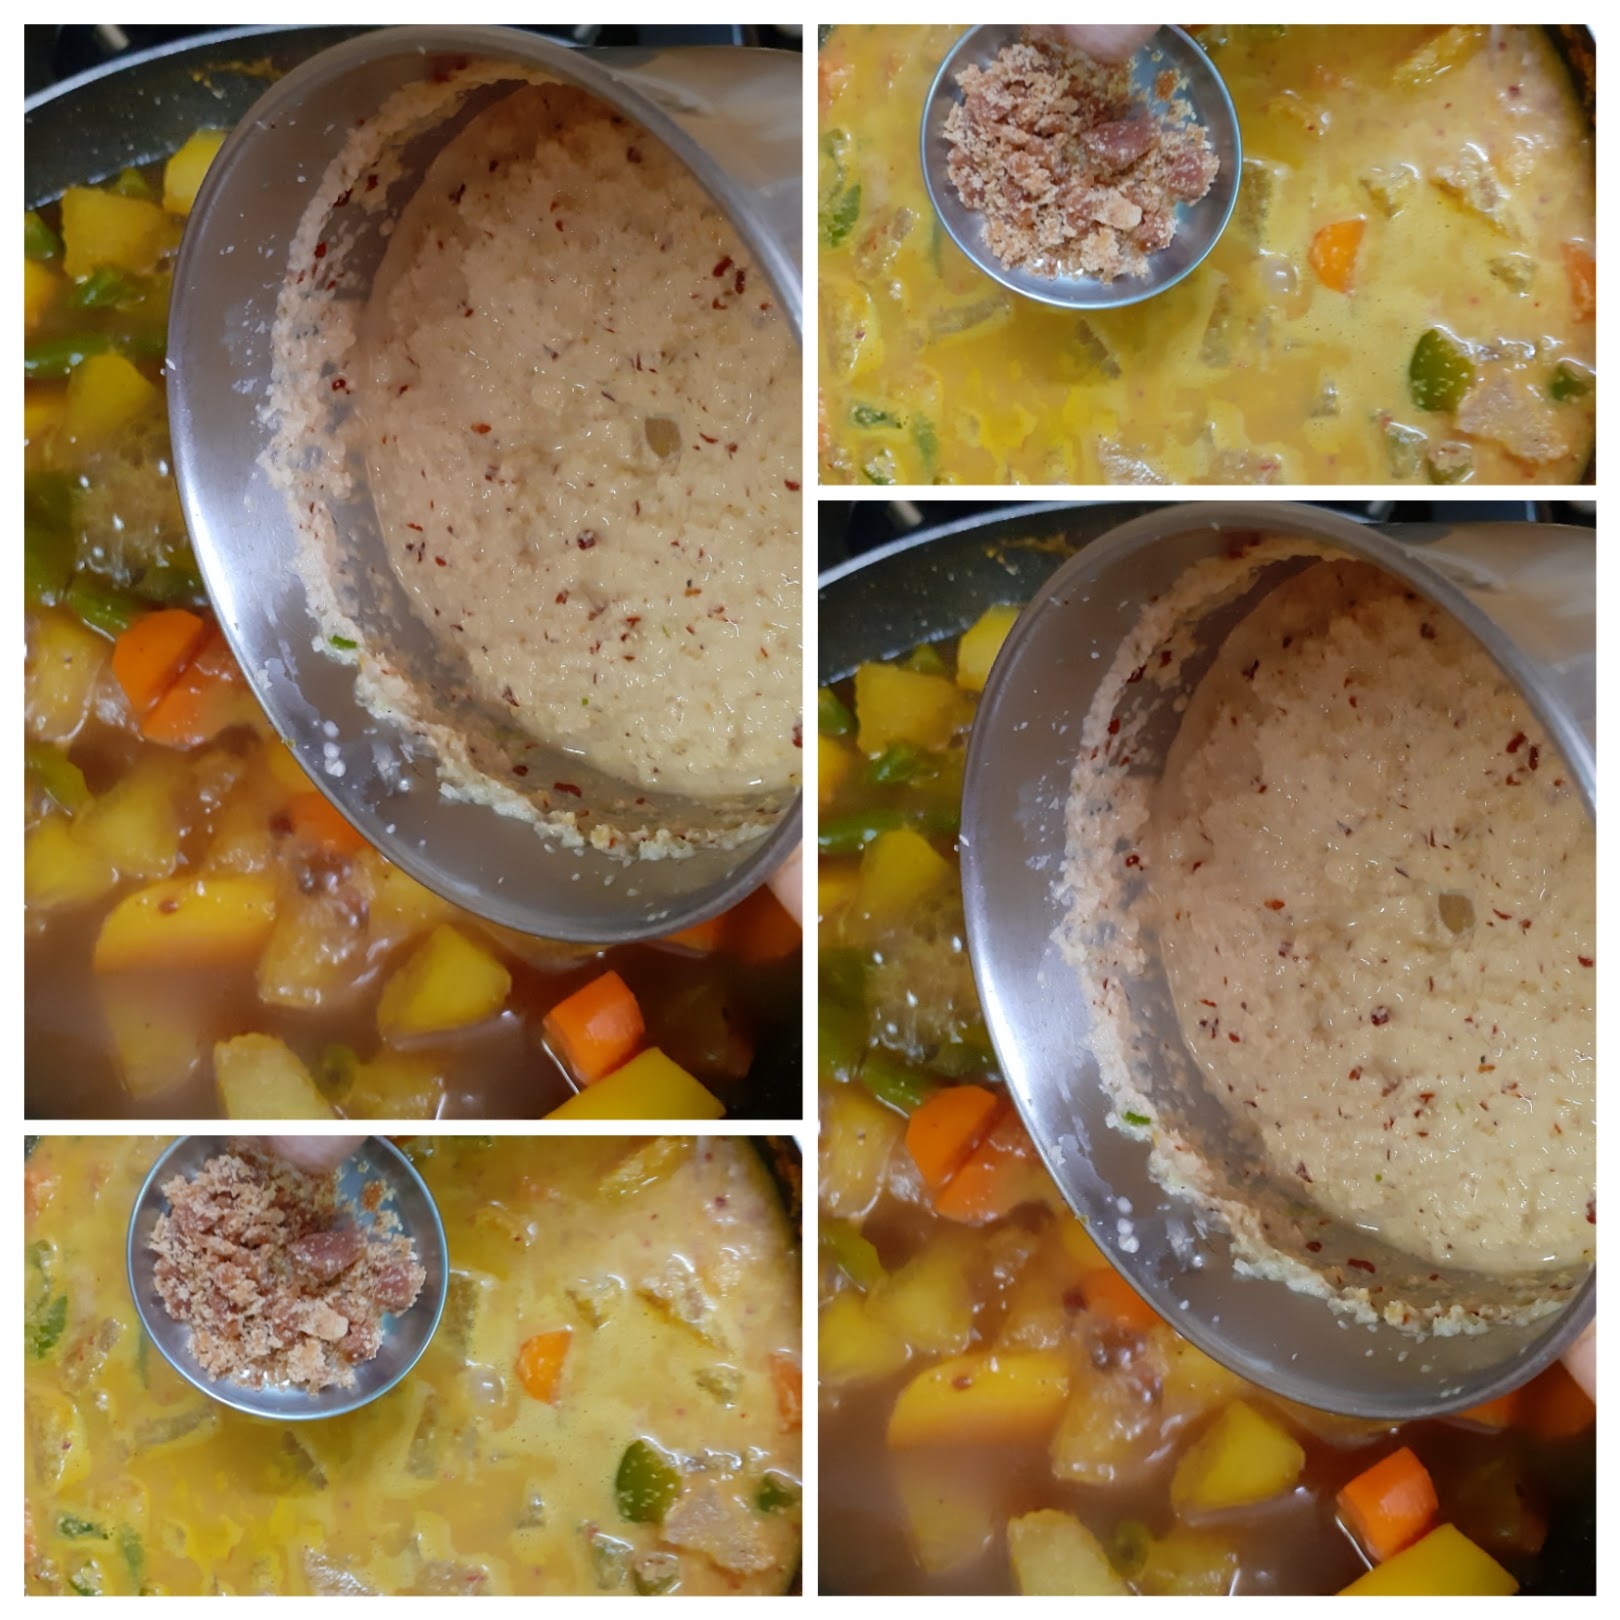
In a pan add the tamarind paste plus 2 cups water or tamarind pulp 1.5 cups and switch on the flame. Add turmeric powder and salt followed by chopped vegetables and cook until the vegetables are done. The vegetables should be well cooked but firm. Overcooking may ruin the taste of the dish. When the vegetables are cooked grind the coconut, green chillies, dry red chillies to a smooth paste adding a little water. Pour this paste into the vegetable and tamarind gravy and cook further for 2 to 3 minutes, or until the gravy comes together. Put off the flame. In a tempering Kadai take some coconut oil or any oil of our choice and heat. Add mustard seeds, when they crackle add the gram dal, asafoetida and curry leaves. Add this tempering to the cooked curry. The delicious Rasakalan is ready to serve. Enjoy with hot rice or with Dosa, pongal or upma.
STEPWISE RECIPE FOLLOWS:
1. In a pan add the tamarind paste plus 2 cups water or tamarind pulp 1.5 cups and switch on the flame. Add turmeric powder and salt followed by chopped vegetables and cook until the vegetables are done.
2. When the vegetables are cooked grind the coconut, green chillies, dry red chillies to a smooth paste adding a little water.
3. Pour this paste into the vegetable and tamarind gravy and cook further for 2 to 3 minutes, or until the gravy comes together. Add the jaggery and put off the flame.
4. In a tempering Kadai take some coconut oil or any oil of our choice and heat. Add mustard seeds, when they crackle add the gram dal, asafoetida and curry leaves. Add this tempering to the cooked curry. The delicious Rasakalan is ready to serve. Enjoy with hot rice or with Dosa, pongal or upma.
NOTES:
1. As said earlier the vegetables can be customized to ones liking, keeping the vegetables traditional and Indian helps in retaining the traditional taste.
2. Using coconut oil enhances the taste, but any other oil of preference can be used too. Note taste will vary though.
3. The texture and consistency of this dish should be thicker then Sambar.
If you tried this recipe and liked it please comment below. I would love to hear from you. If you have a query about the recipe email us and ill respond as soon as I can.
If you would like to receive our recipes in your mail please leave your mail id at the homepage. Every time Rajjo’s Kitchen has a new post we will mail the recipe to you.
.
Menthiya Keerai Kootu/South Indian Methi Dal
Fenugreek or Methi green are my most favorite greens and i wish they were perennial. That said, even though they can be grown at home perennially, its always good to eat seasonal food, to get the maximum benefits out of them. These slightly bitter greens have loads of benefits to offer and one should make the most of it.
As said earlier I love these greens, so even in my regular North Indian subji’s I use a few sprigs for flavour. On my blog you will find Methi used in different ways like the Aloo Methi Paratha, Methi Wale Baingan and more…
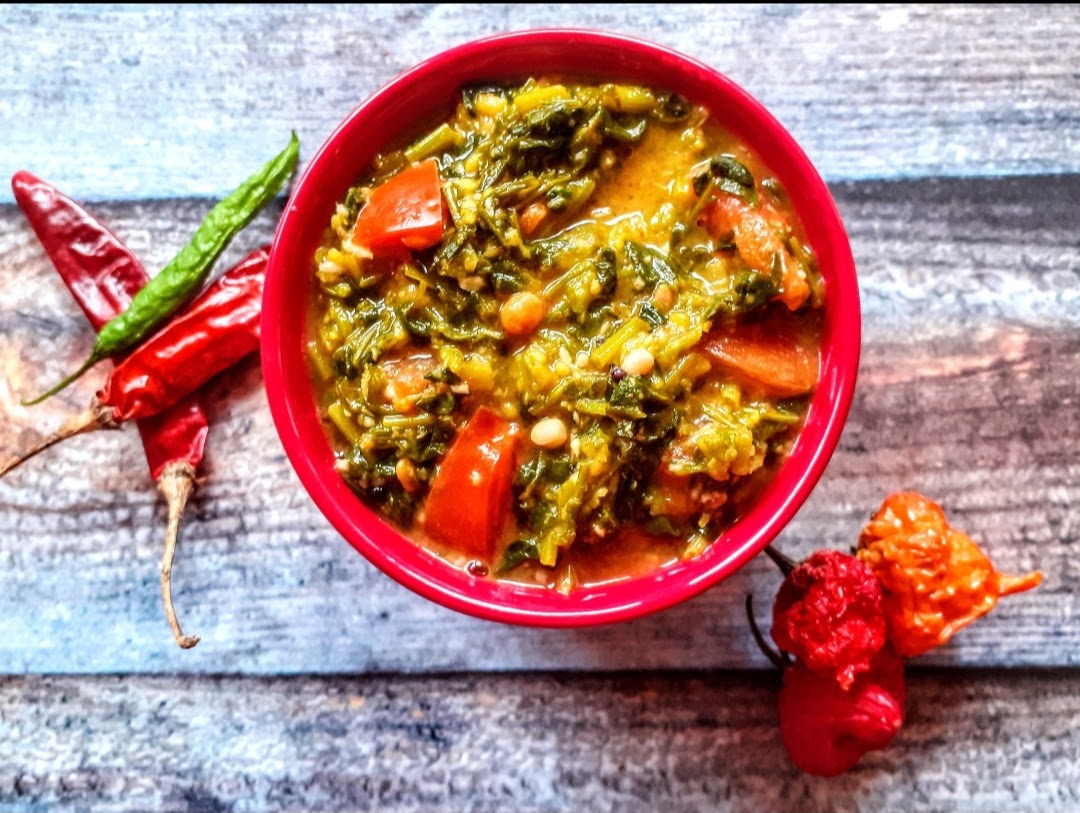
Today I am posting a simple everyday South Indian recipe which is Menthiya Keerai kootu or Methi dal. This is different from the North Indain version as here ground coconut paste is used for flavouring, which reduces the bitterness of the Methi and ehances its flavour. I prefer using Moongdal for this kootu though Tuvar dal also can be used. Let’s get to the recipe right away.
This is a simple recipe that gets done in under 30 minutes. The dal can be pre cooked to make quick dinner after a long day at work. Just this Kootu and some Rice and one is in for a super healthy and satiating meal.
Here is the recipe for Menthiya Keerai Kootu
PREP TIME: 10 MINS COOK TIME:15 MINS
TOTAL TIME: 25 MINS COURSE: MAIN
CUISINE: SOUTH INDIAN SERVINGS: 4
AUTHOR: RAJNI RAM
Ingredients:
Methi green/Fenugreek greens 1 bunch
Moong dal 1/2 cup Roasted to light brown
Tomato 1 finely chopped
Grated Coconut 2 tbsp
Cumin 1 tsp
Turmeric powder 1 tsp
Sambar powder 1 tsp
Red chilli powder 1 tsp
Dry red chillies 2 whole
Mustard seeds 1 tsp
Urad dal 2 tsp
Chana dal 1 tsp
Oil for tempering (I used coconut oil)
Directions:
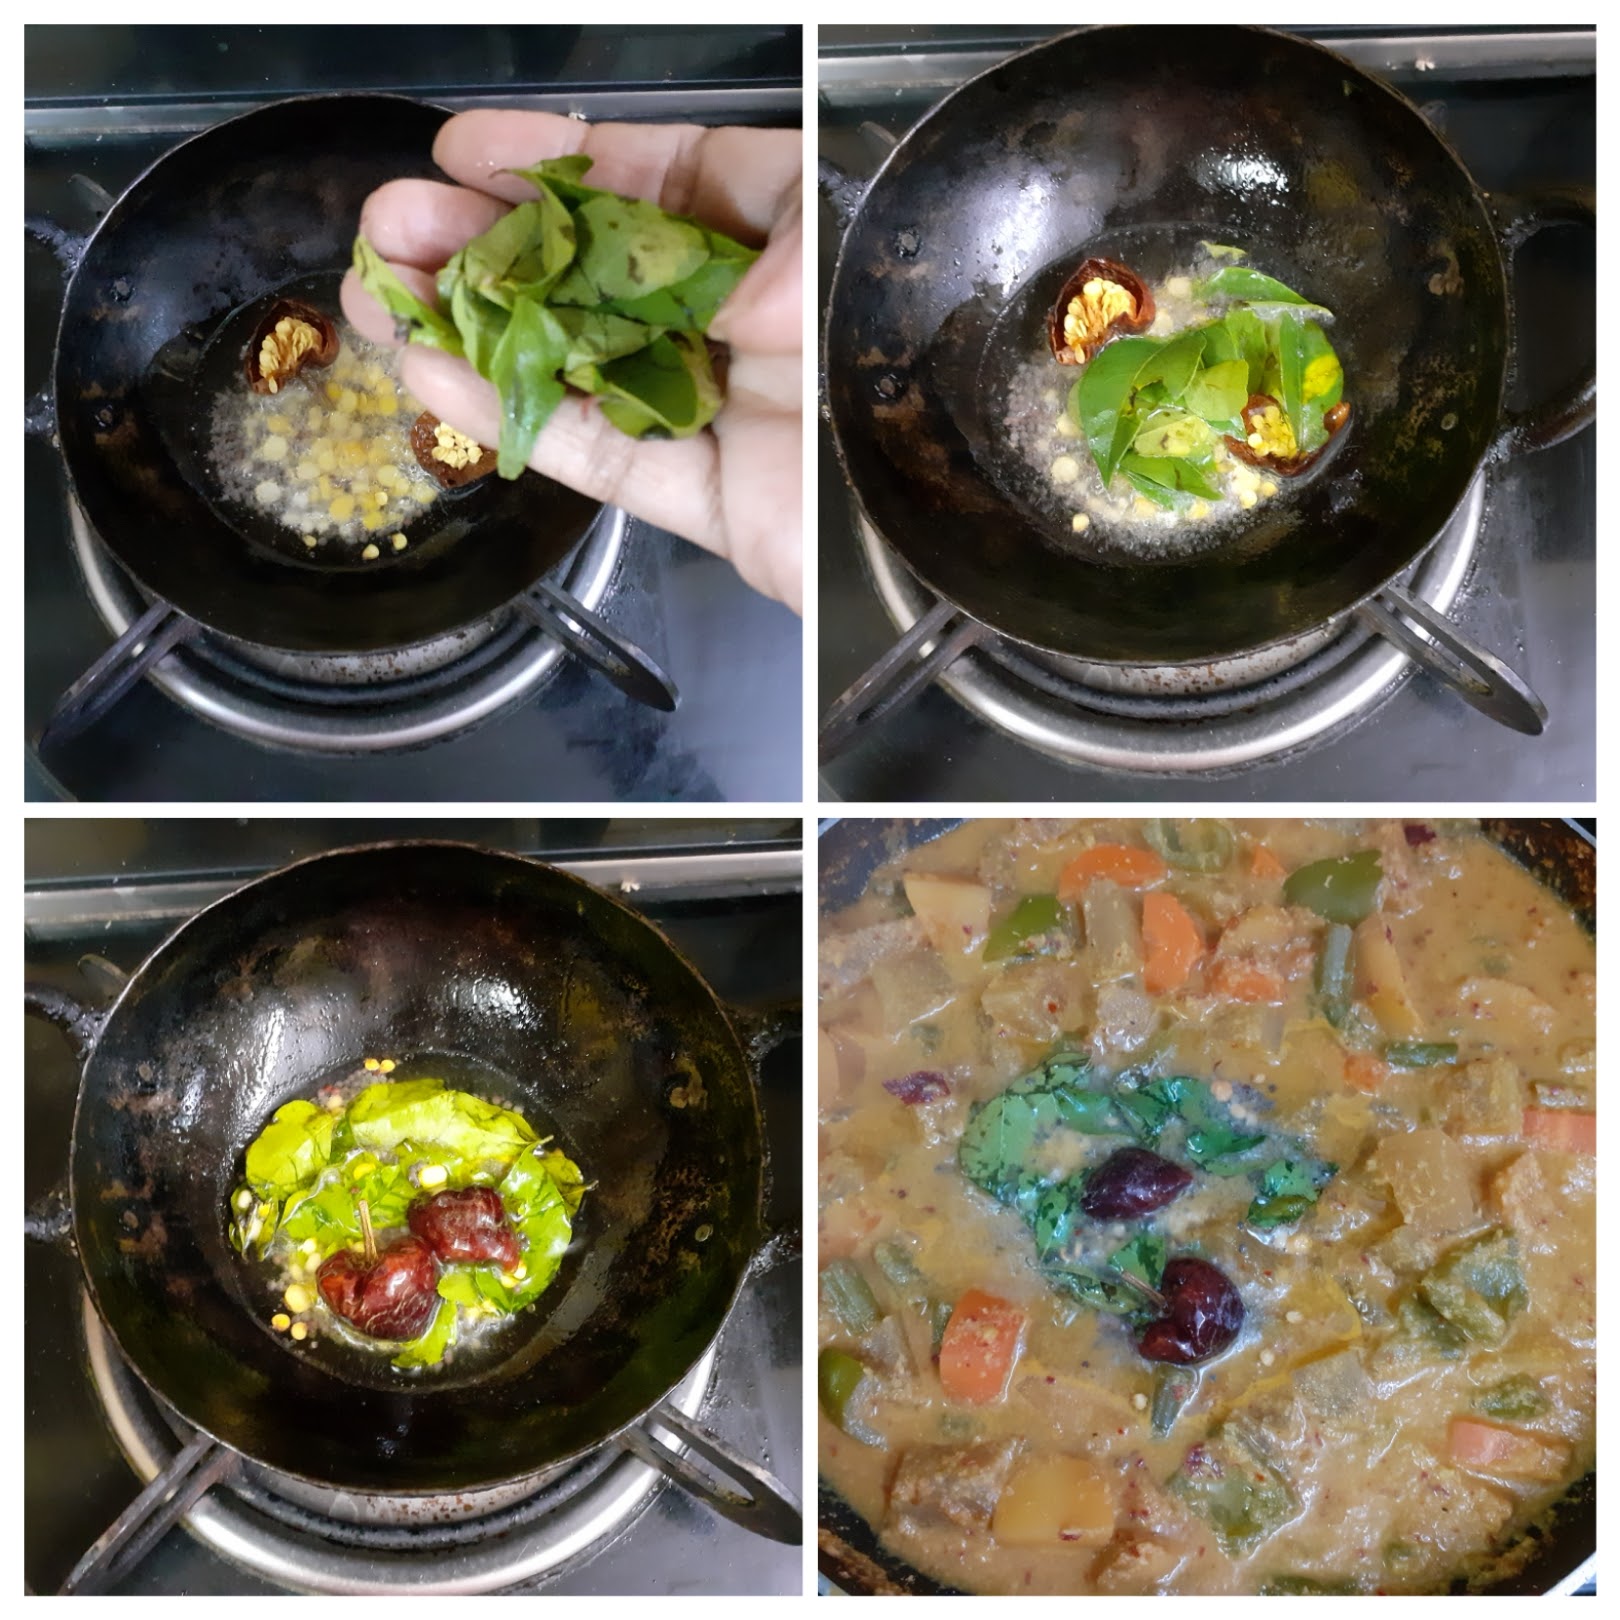
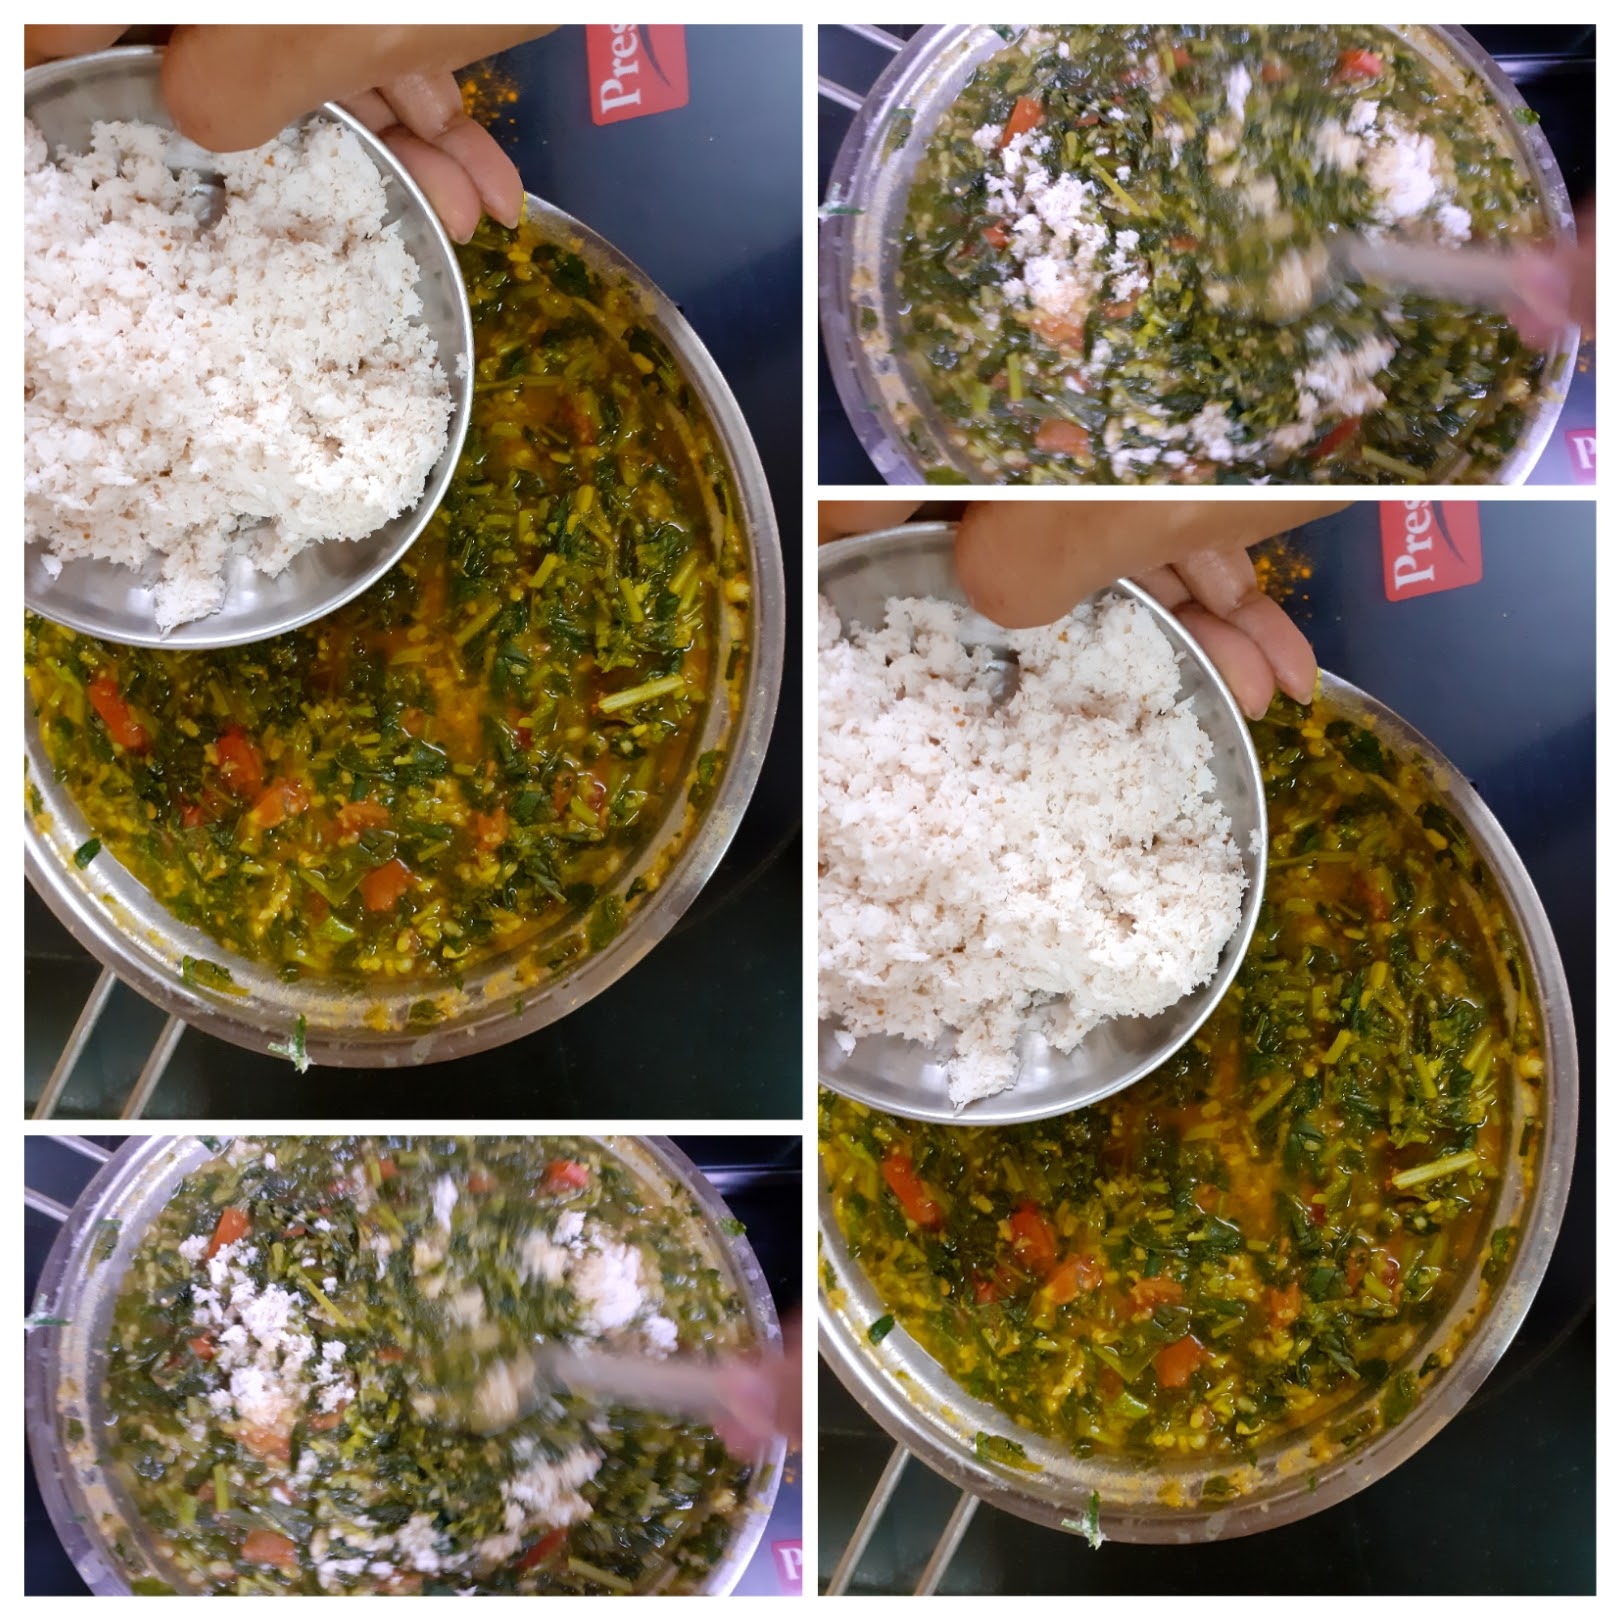
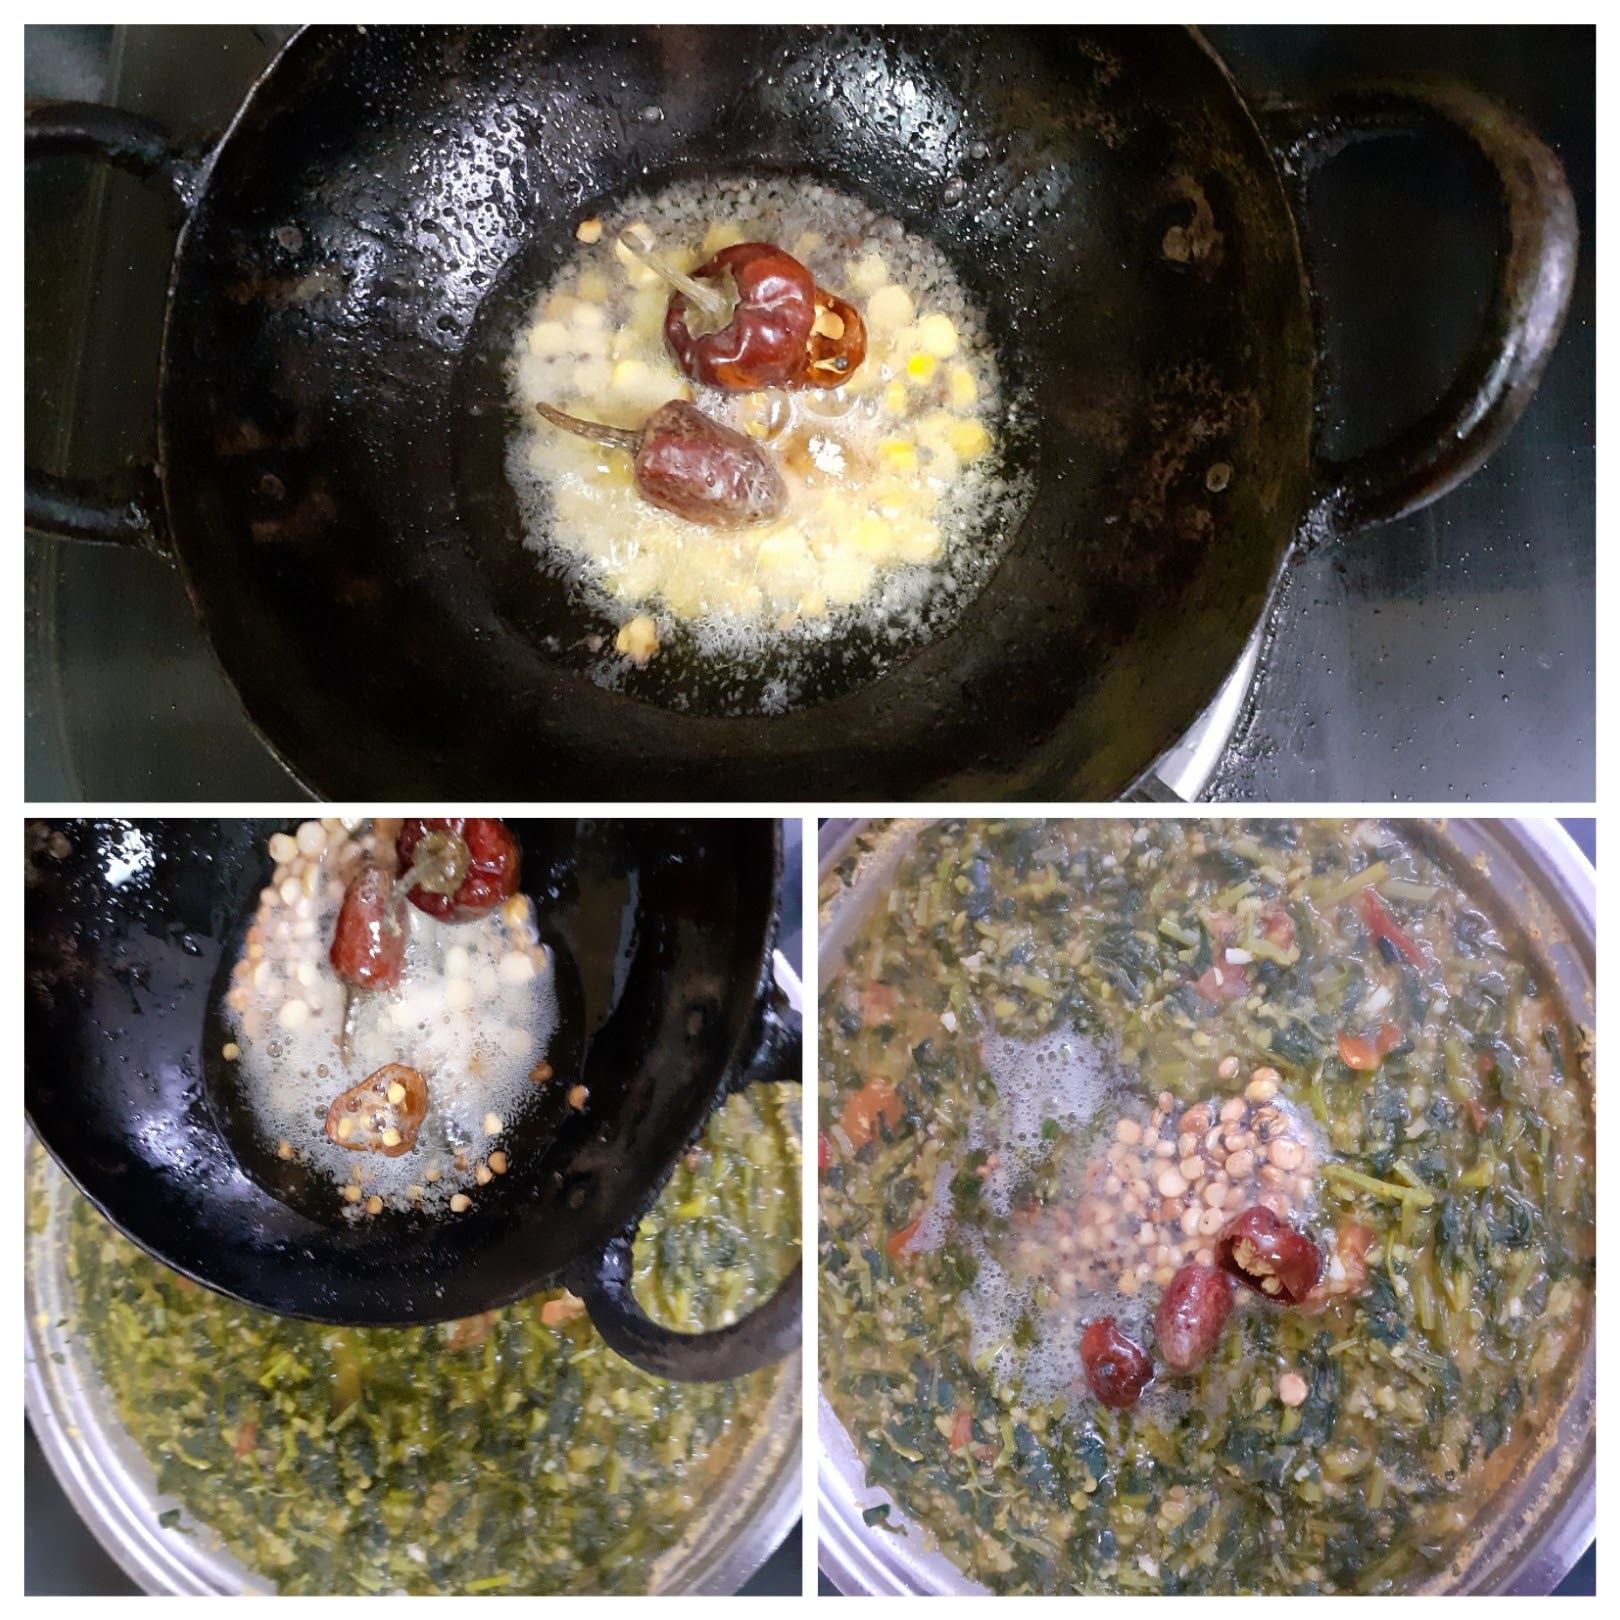
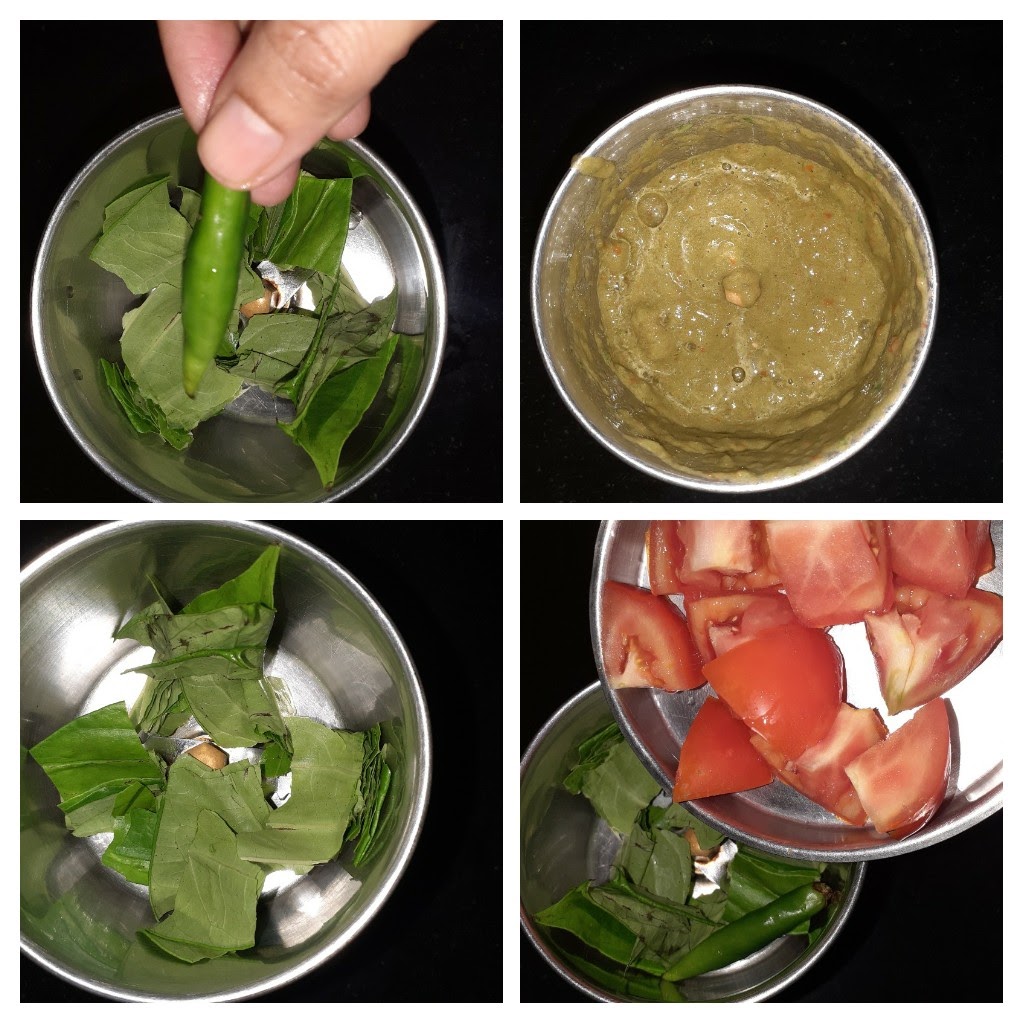
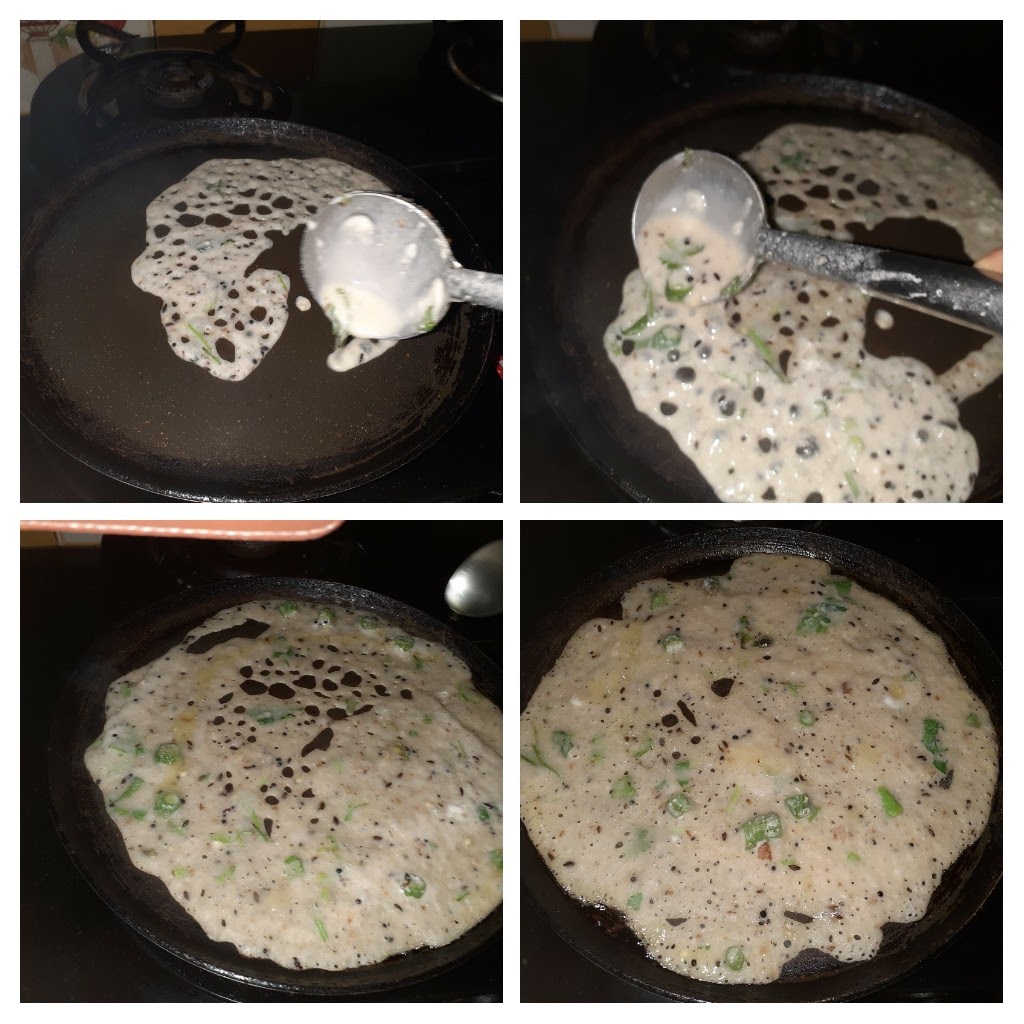
In a Karahi dry roast the Moong Dal to a light brown colour and pressure cook for 4 whistles. In a pan, take the Methi leaves and add 1 cup water followed by turmeric powder and salt and cook. When the leaves are half done add Sambar powder and red chilli powder and continue to cook. Add chopped tomatoes and cook for another minute. Now add the cooked dal and give it a nice mix. Add grated coconut, mix well, cook for 2 minutes and put off the flame. In a small Tadka Kadai take some oil for tempering. When oil is hot add the mustard seeds, followed by Urad dal, Chana dal , broken dry red chilli, and asafoetida. Pour the tempering in to the Methi dal and the delicious and healthy Menthiya Keerai kootu is ready.
Serving Suggestions: This Methi dal or Menthiya Keerai kootu goes very well with Vathakuzhambu rice, Rasam rice, Paruppu podi. And me, I love them with Rotis too.
STEPWISE RECIPE FOLLOWS:
1. In a Karahi dry roast the Moong Dal to a light brown colour and pressure cook for 4 whistles, with a little turmeric powder. In a pan, take the Methi leaves and add 1 cup water followed by turmeric powder and salt and cook.
2. In a pan, take the Methi leaves and add 1 cup water followed by turmeric powder and salt and cook. When the leaves are half done add Sambar powder and red chilli powder and continue to cook. Add chopped tomatoes and cook for another minute.
3. Now add the cooked dal and give it a nice mix. Add grated coconut, mix well, cook for 2 minutes and put off the flame.
4. In a small tadka Kadai take some oil for tempering. When oil is hot add the mustard seeds, followed by Urad dal, Chana dal , broken dry red chilli, and asafoetida. Pour the tempering in to the Methi dal and the delicious and healthy Menthiya Keerai kootu is ready.
NOTES:
1. Dry roasting the Moong dal gives a good flavour, aroma and texture to the Kootu. I always have a roasted batch ready.
2. I have used Coconut oil for enhanced flavour as i used it for all south Indian tempering except Sambar and Rasam. One can use refined oil too.
3. Not over cooking the Methi greens is important, other wise the taste is lost.
If you tried this recipe and liked it please comment below. I would love to hear from you. If you have a query about the recipe email us and ill respond as soon as I can.
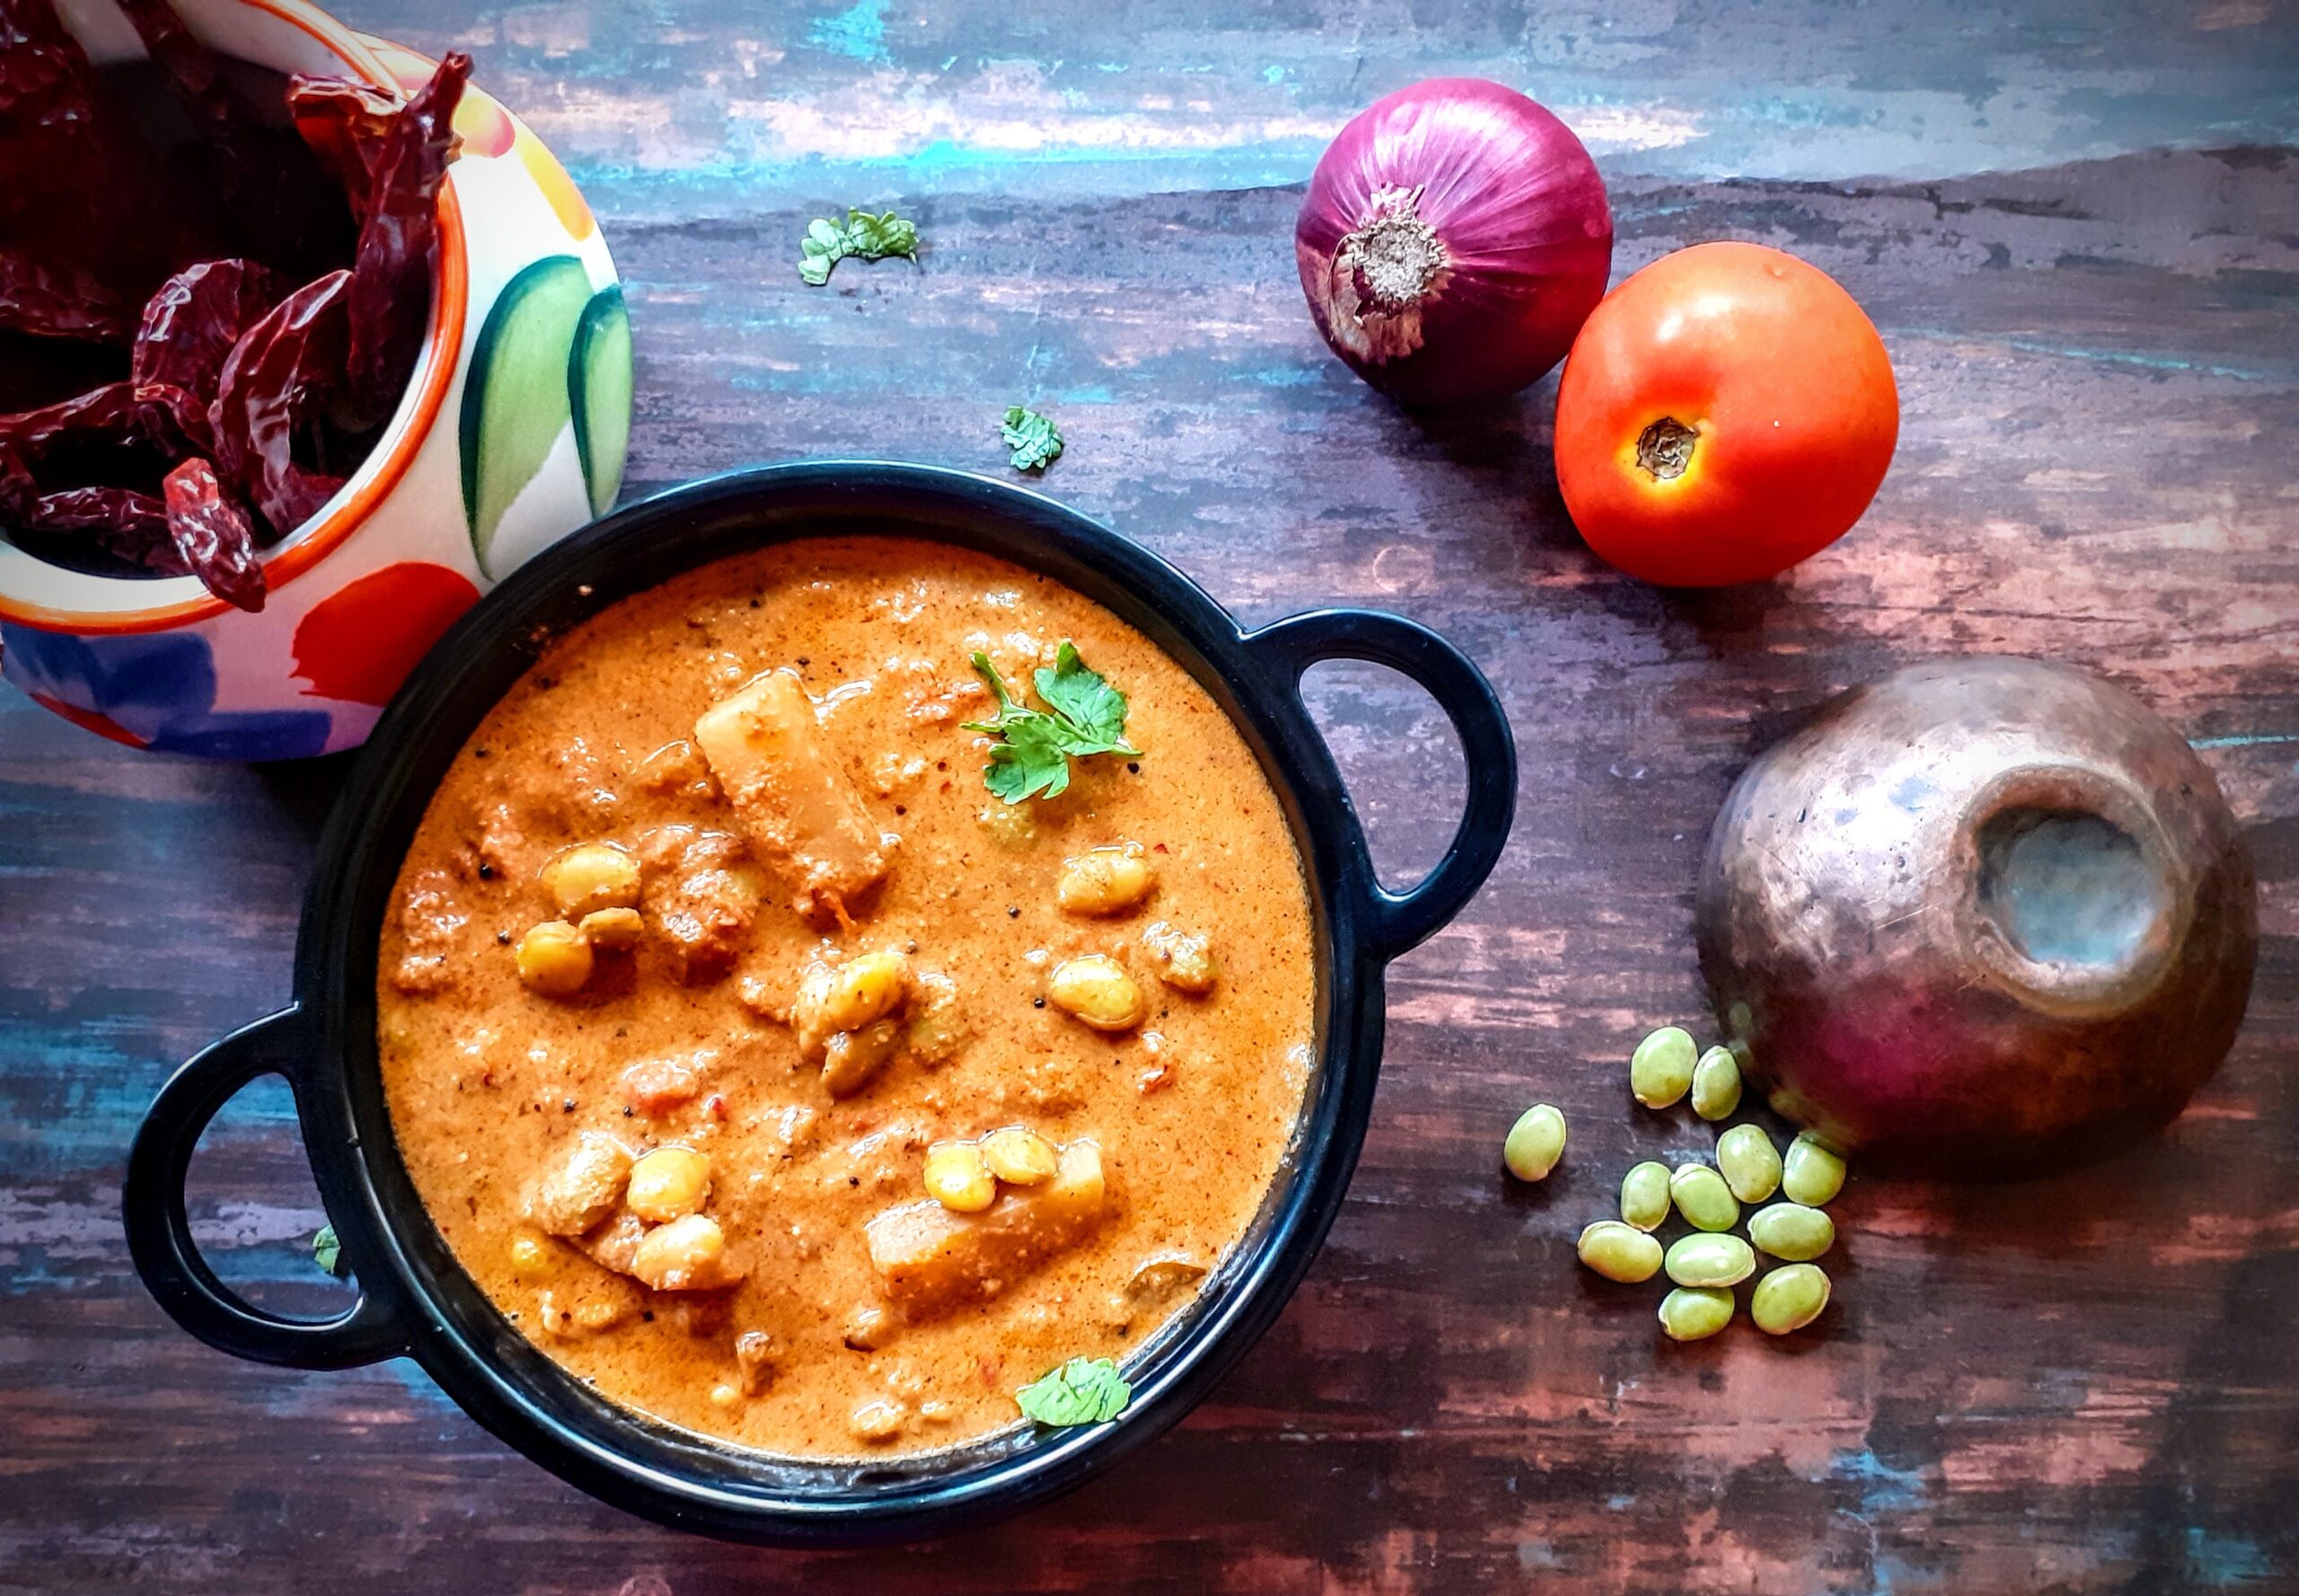
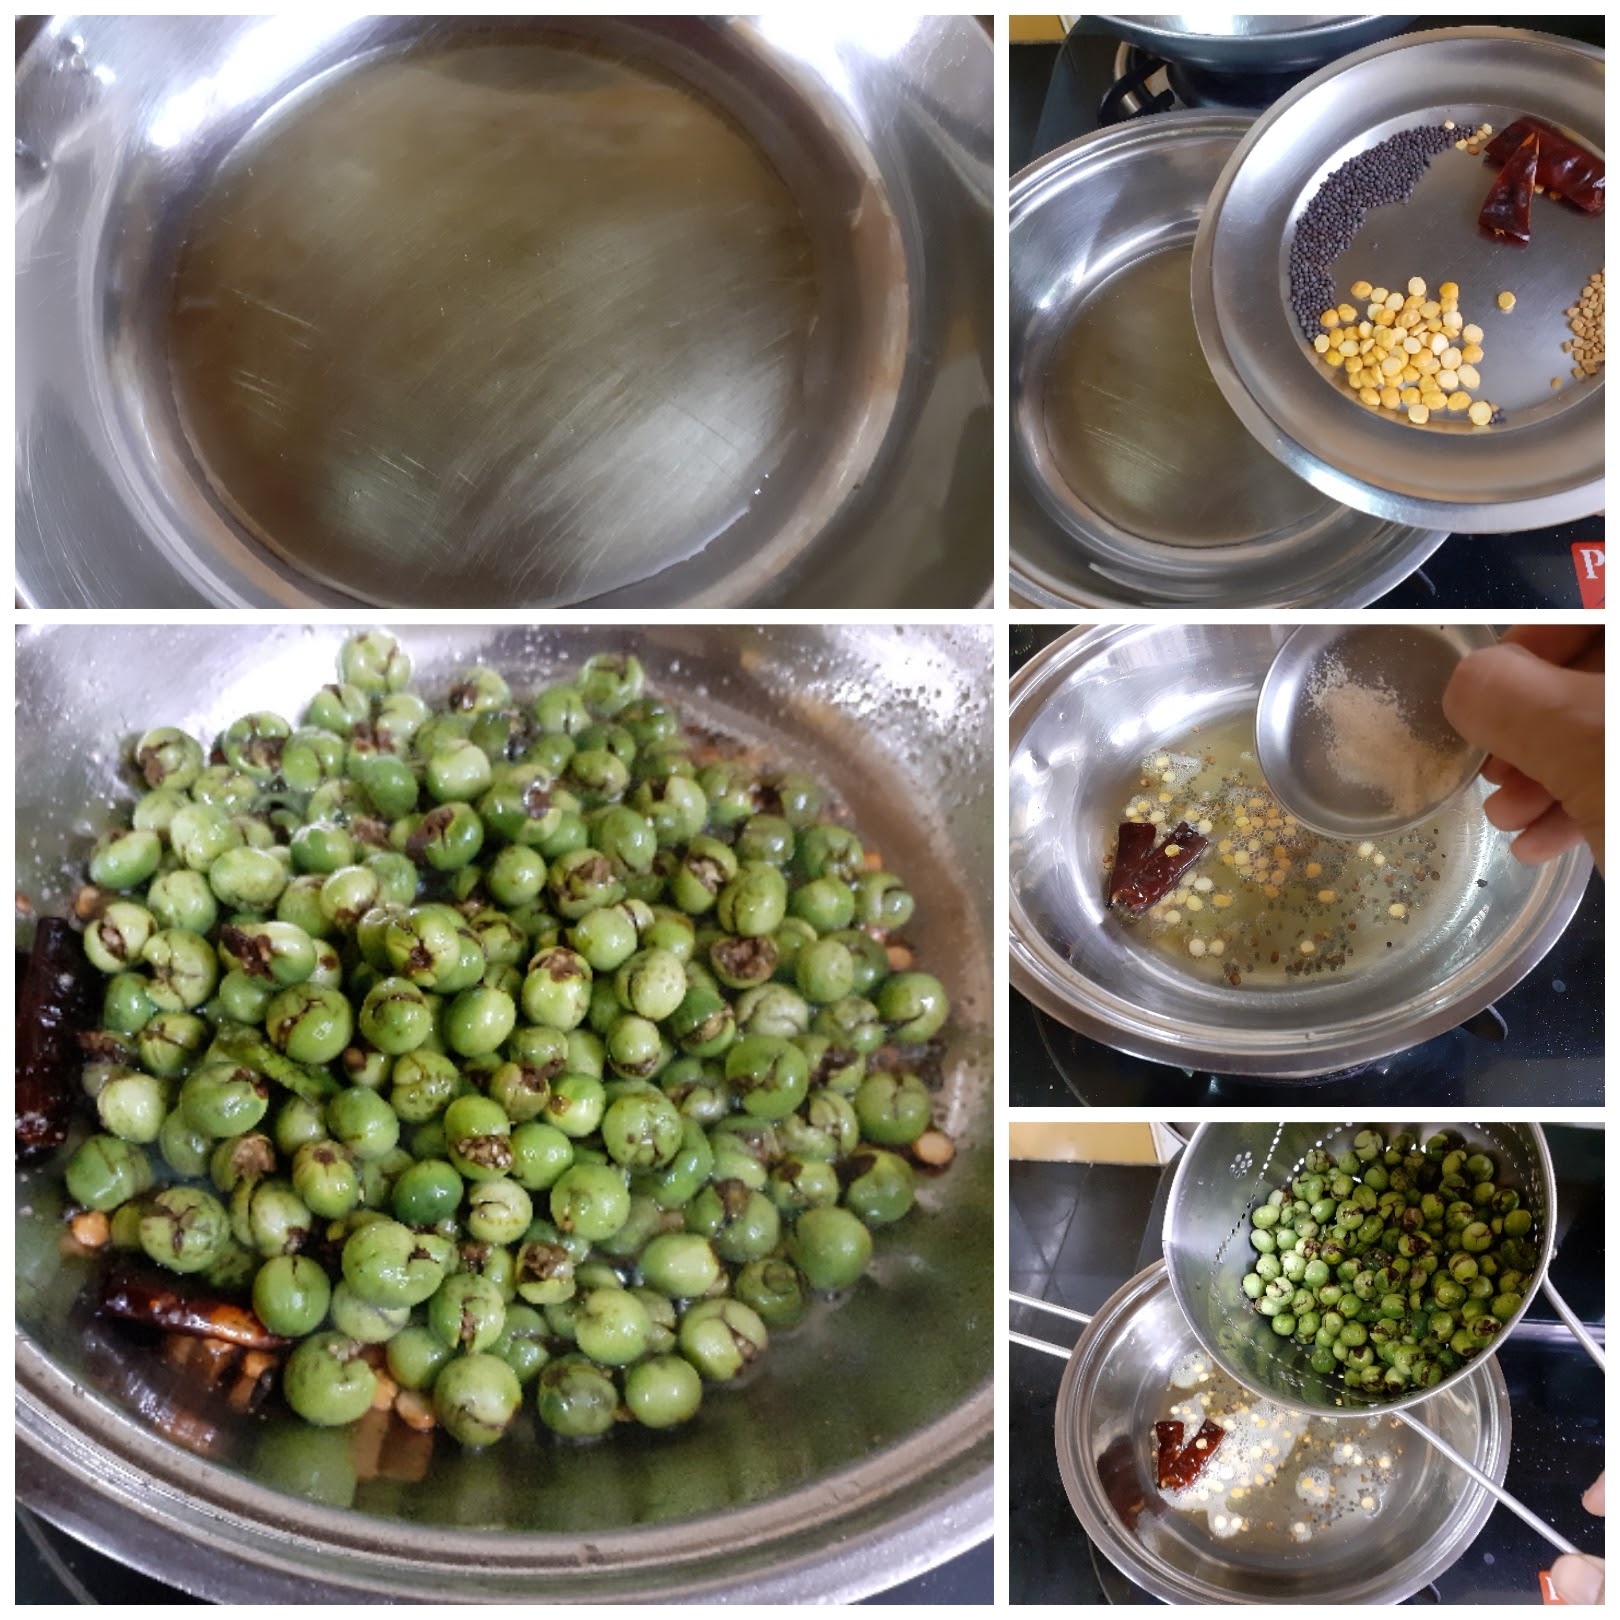
Pachai Mochai Kuzhambu (Field Beans Gravy)
Though I may try fancy recipes from time to time, eat local and seasonal has always been my slogan. When it is carrot season I make my Gajar Halwa and during the Grape season my Grape conserve. Homemade is always a better option and the pandemic has taught us just that.
In south India December to February and specially the time around the harvest festival Pongal, is the season for Field Beans or Mocha Kottai as it is called in Tamil Nadu. These beans are used in the Pongal Kuzhambu that is made on the day of the Pongal festival, where in a Kuzhambu or Sambar is made with all the freshly harvested vegetables, which includes tubers, green vegetables and legumes likes the Field Beans.
I usually make this recipe in the Chettinad style where a the beans are cooked in a tangy gravy with garlic and coconut paste. This time however, I have tried it out in a different style which tasted very good and was an instant hit in my house. I added some Potatoes too and it turned out like a two in one curry, one that can go with rice as well as with Paratha, chapati etc. The vessel just went empty. In my house when the vessel goes empty and nothing remains for dinner, it means the dish was super good????, and here comes this dish called the Pachai(fresh) Mochai Kuzhambu with a different gravy.
Here is the recipe for Pachai Mochai Kuzhambu for you-
PREP TIME: 20 MINS COOK TIME:15 MINS
TOTAL TIME: 35 MINS COURSE: MAIN
CUISINE:INDIAN SERVINGS: 4
AUTHOR: RAJNI RAM
Ingredients:
Pachai Mochai Kottai (fresh Field Beans) 200 gm (pressured cooked for 5 whistles)
Onion 1 roughly chopped
Tomatoes 2 roughly chopped
Potato 1 large diced
Sambar Powder 1 tbsp. (refer notes)
Red chilli powder 1 tsp
Tamarind gooseberry sized ball pulp extracted
Jaggery a small bit
To be roasted and ground:
Peanuts 2 tbsp.
Dry red chillies 3 large ones
Fennel 1 tsp
Poppy seeds/Khus khus 1 tsp
Coconut 2 tbsp
To temper:
Oil 1 tbsp
Mustard seeds 1 tsp
Mustard seeds a pinch
Chana dal 2 tsp
Asafoetida 1/2 tsp
Dry red chilli 1 broken
Curry leaves a few
Directions:
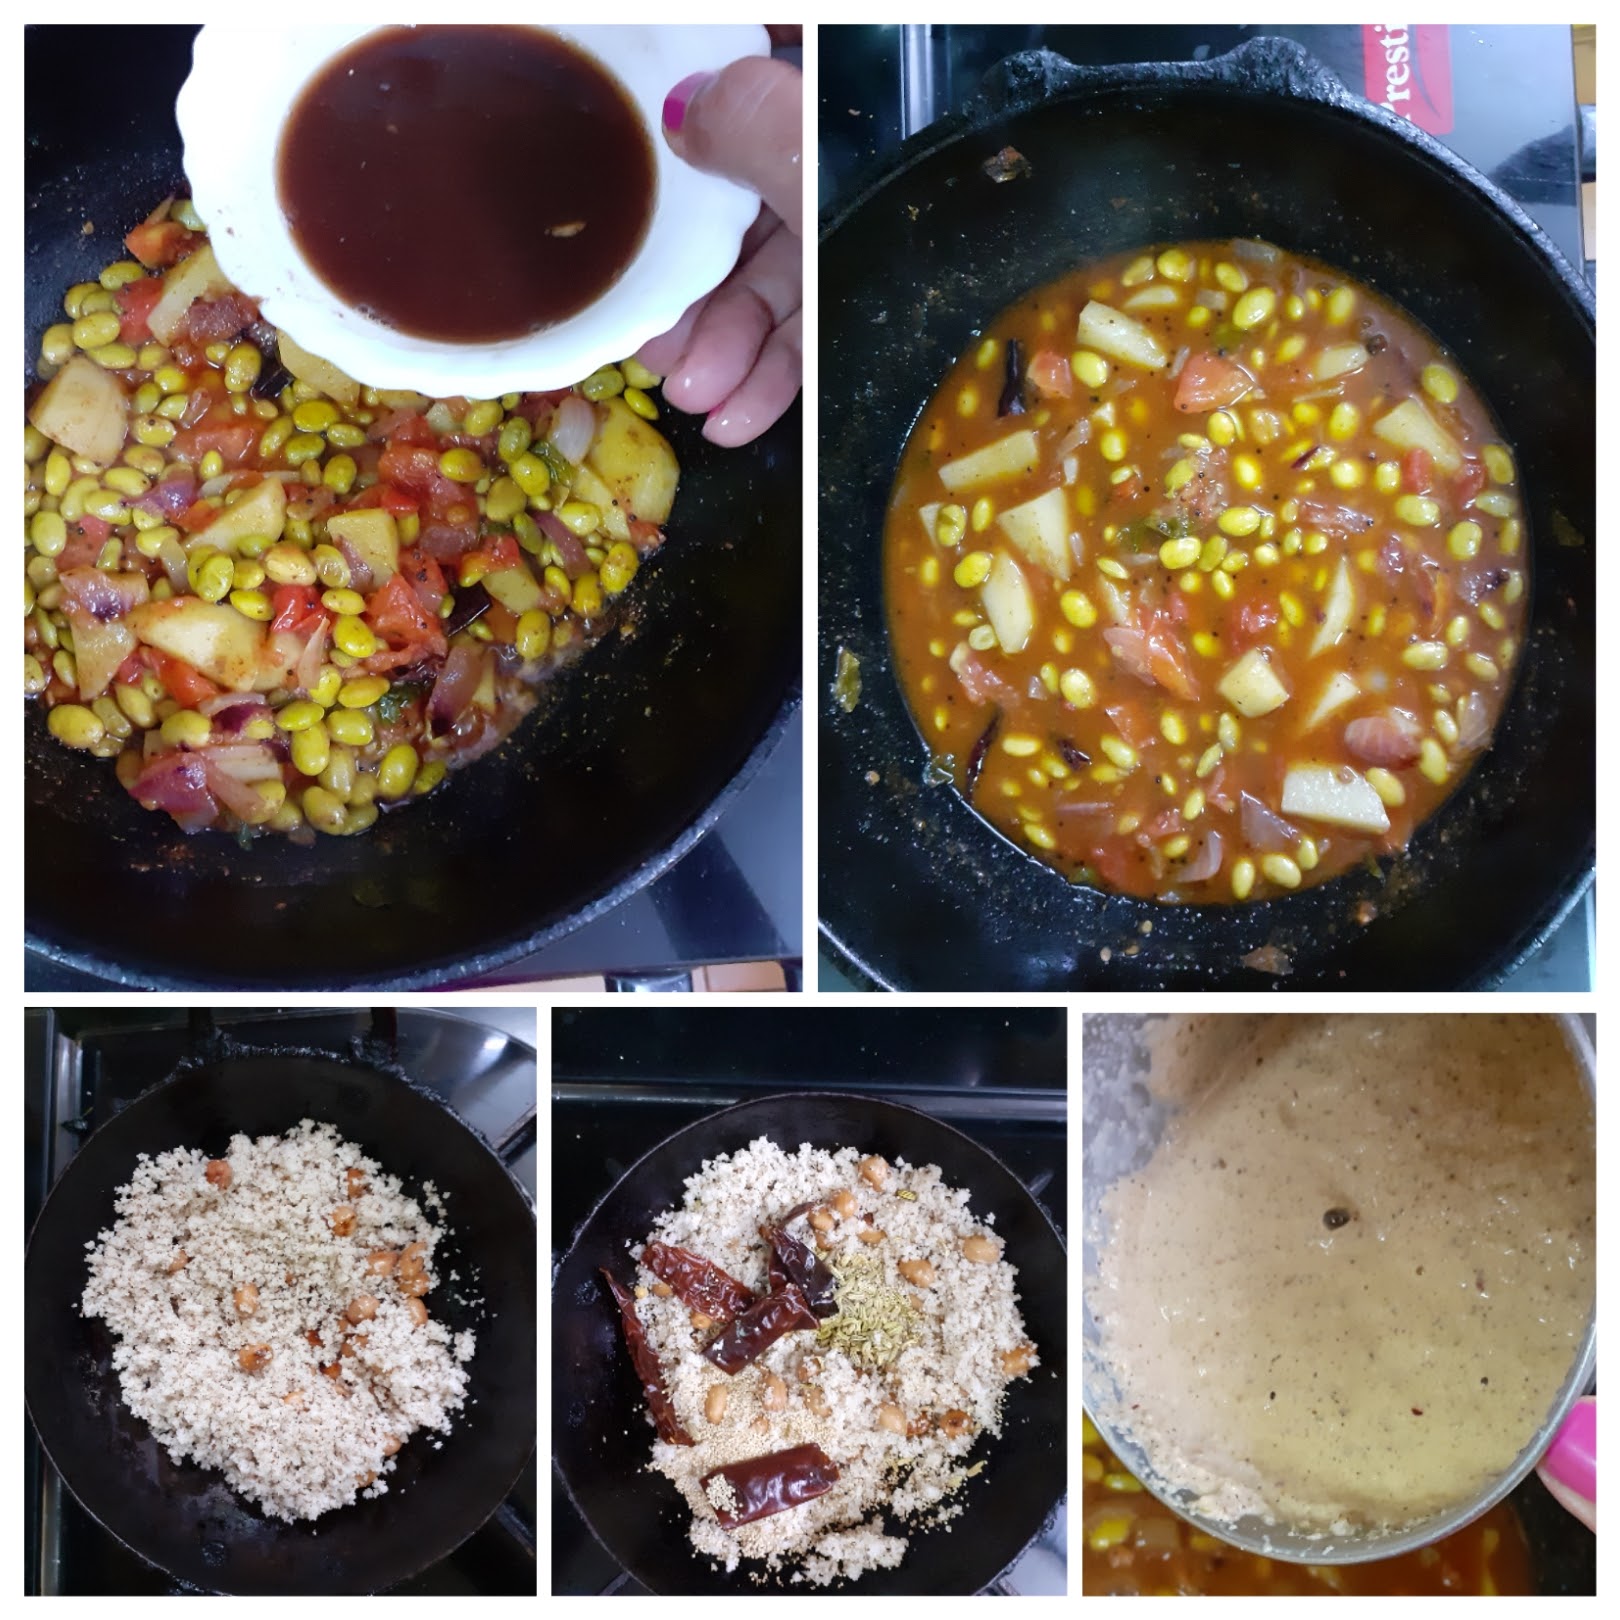
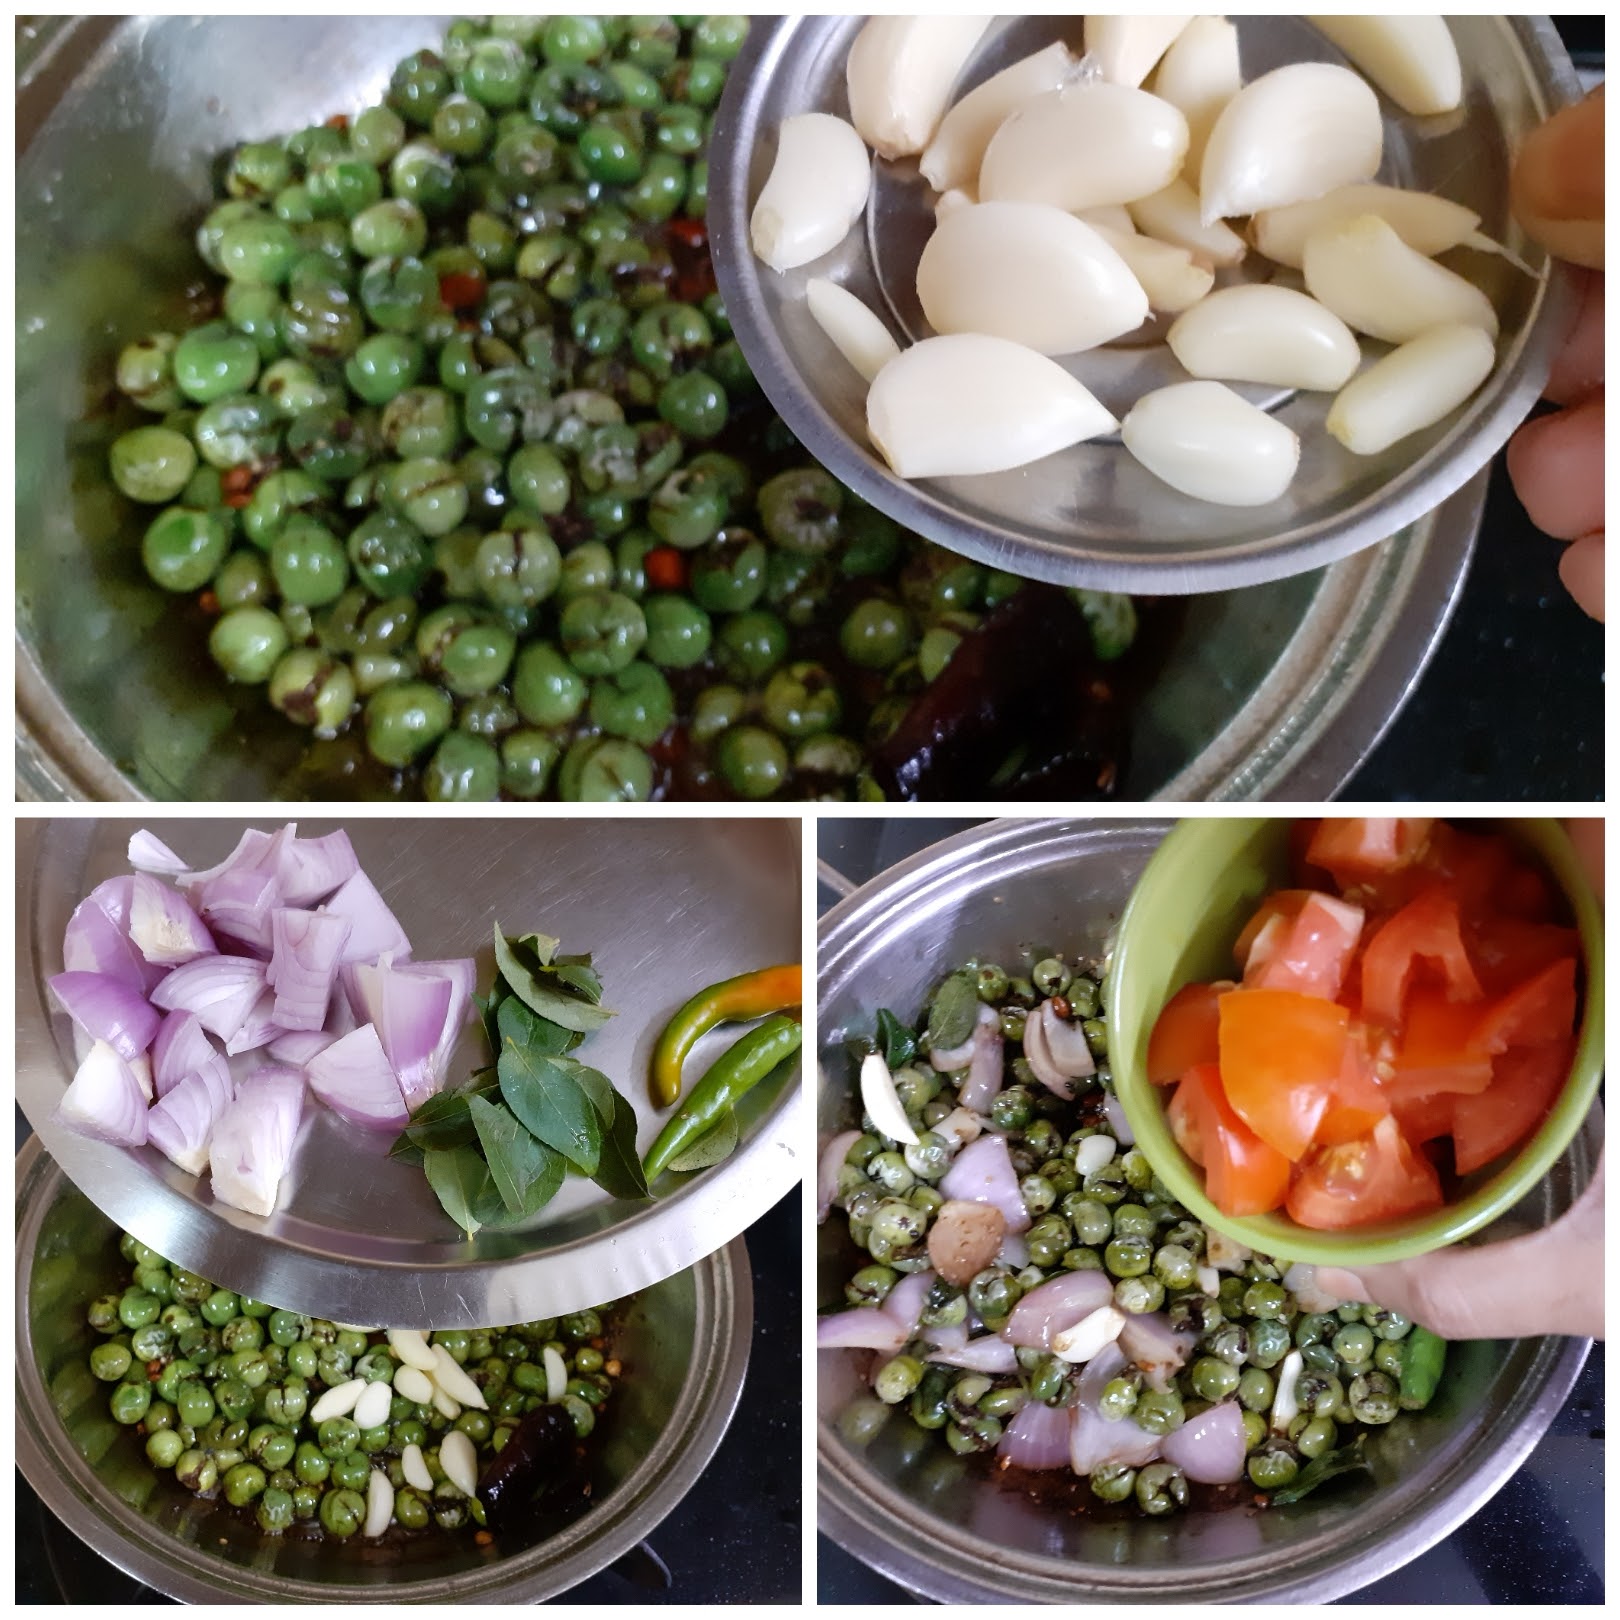
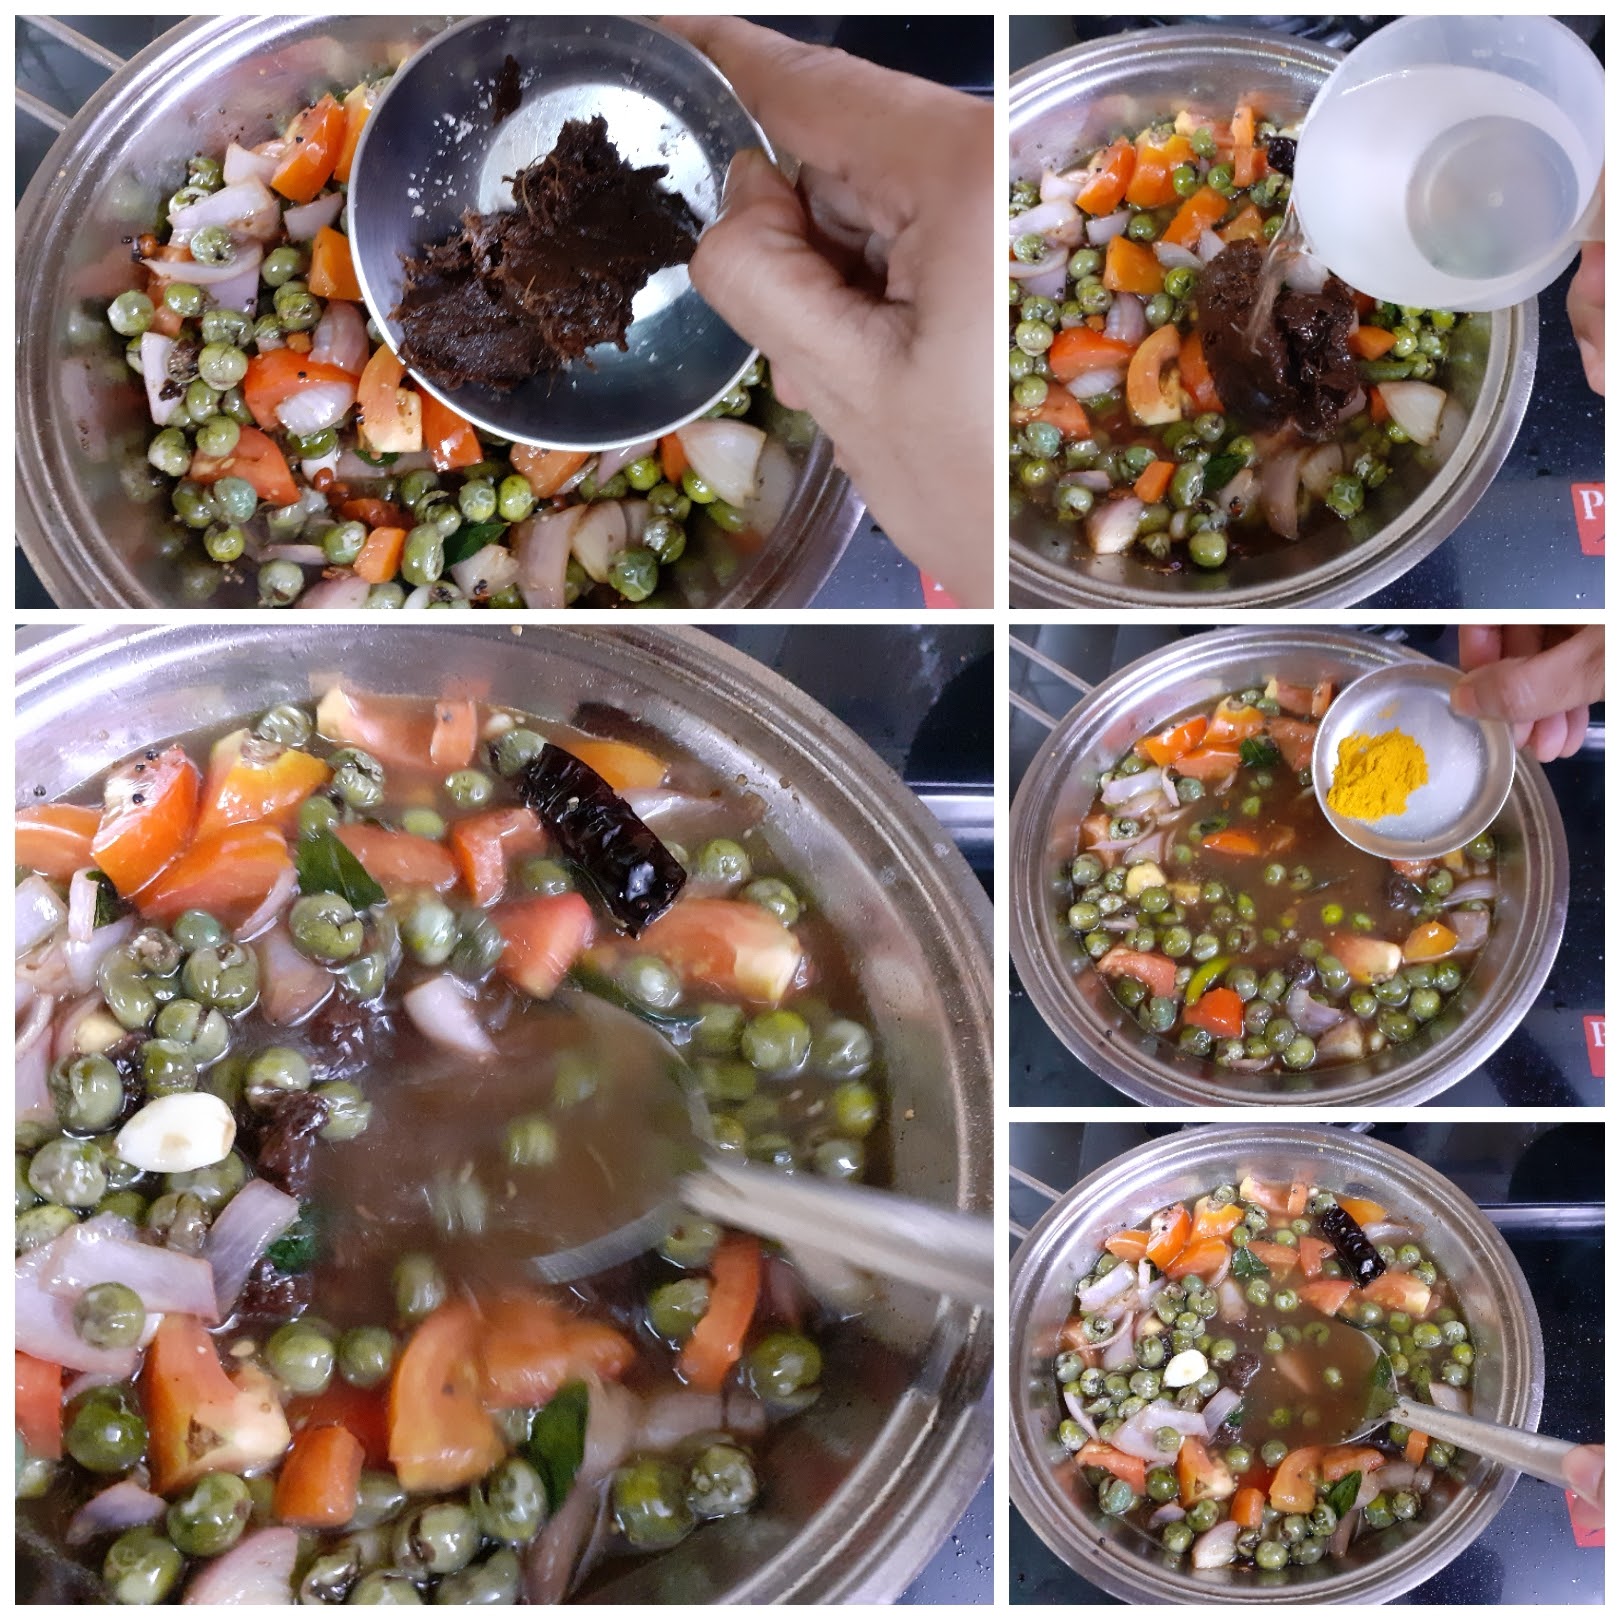
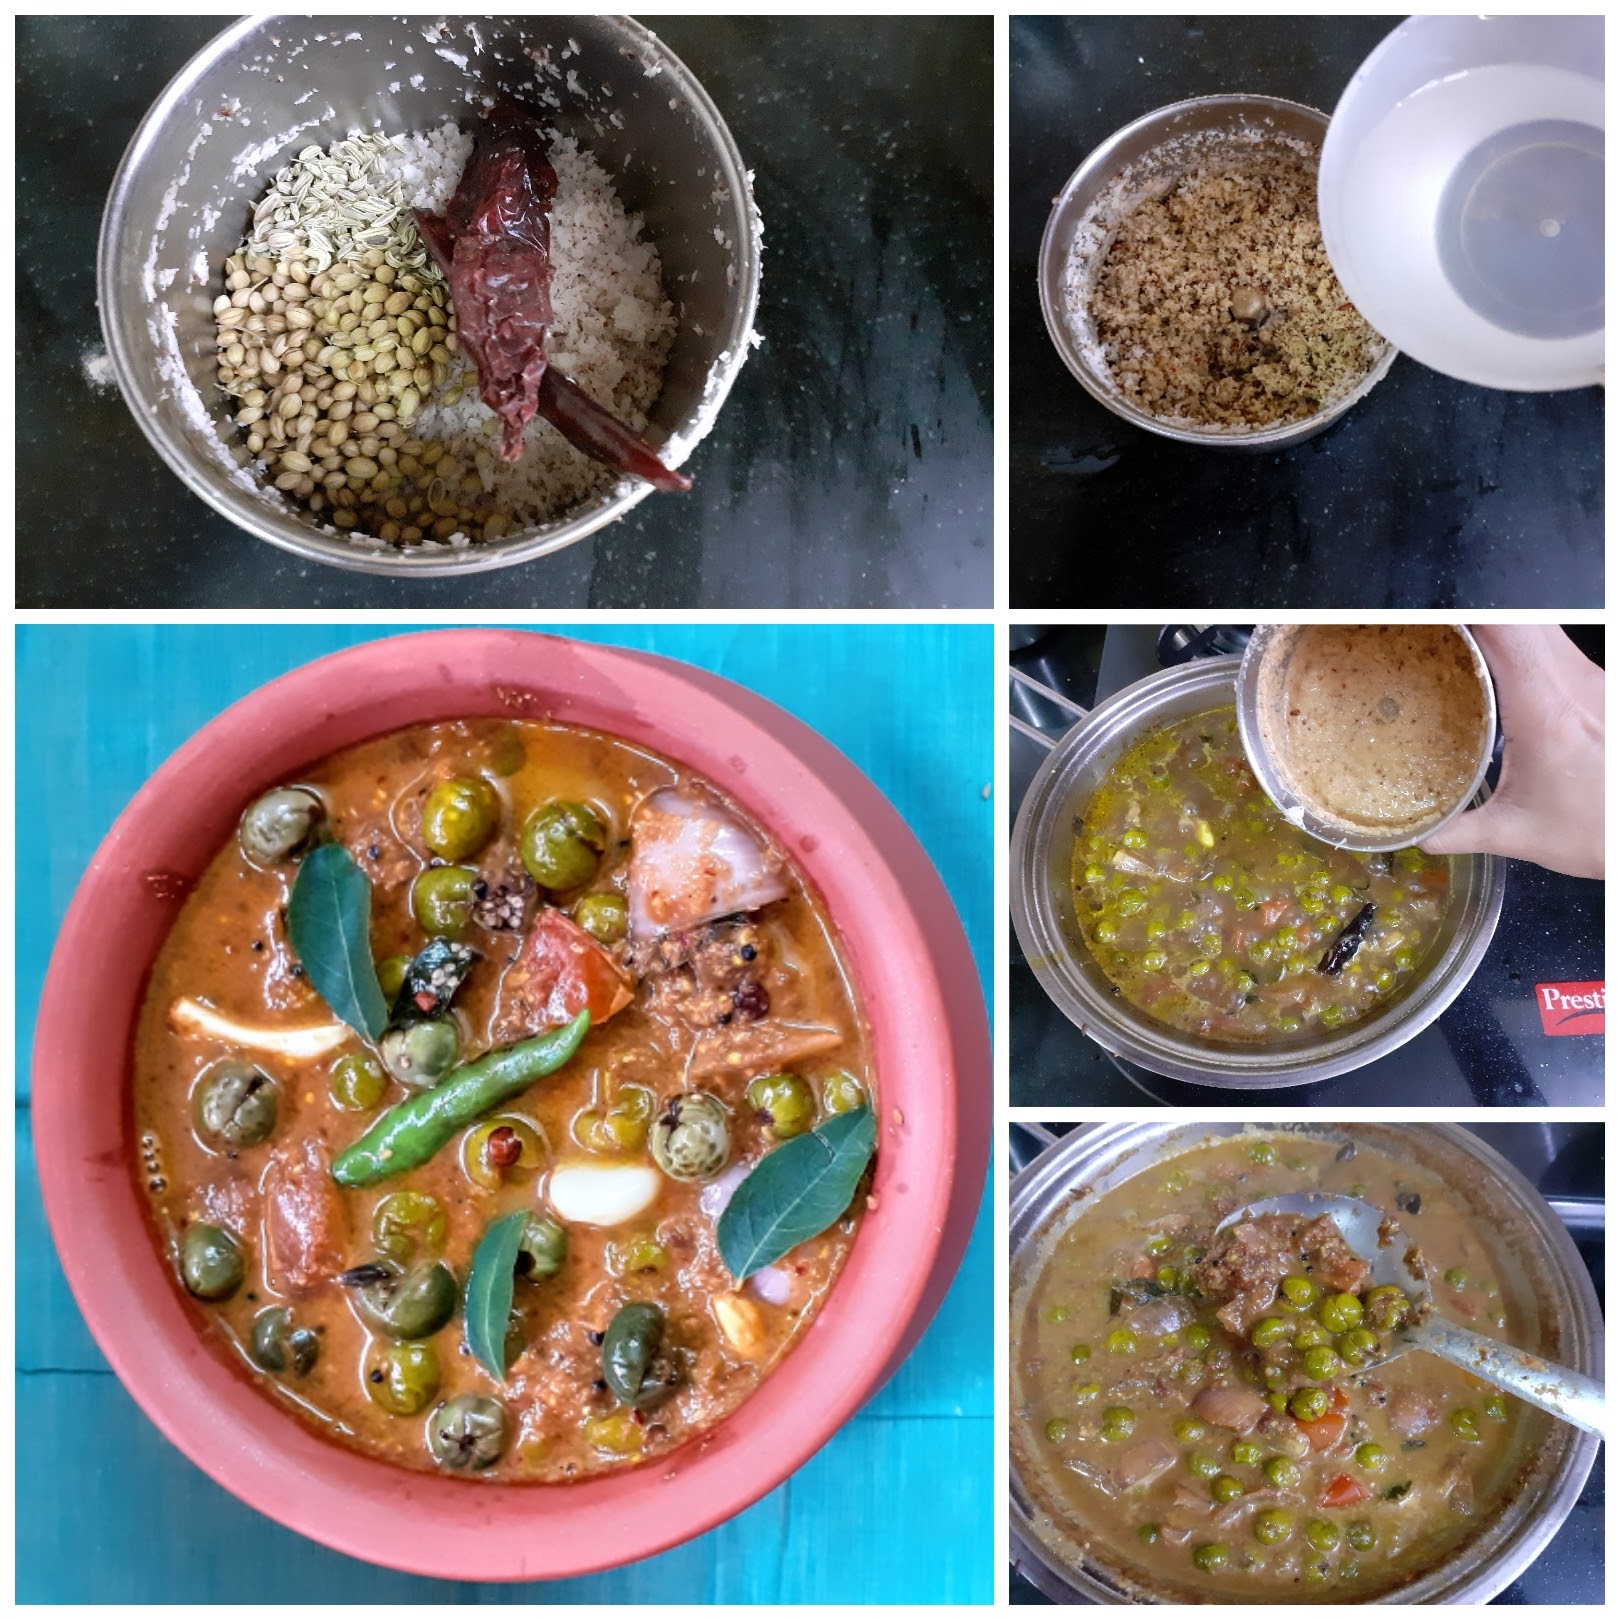
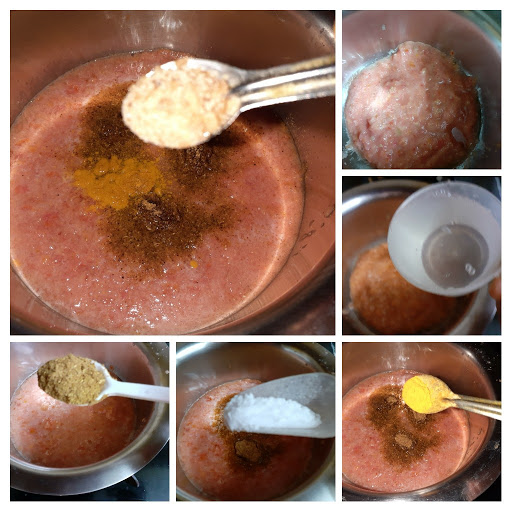
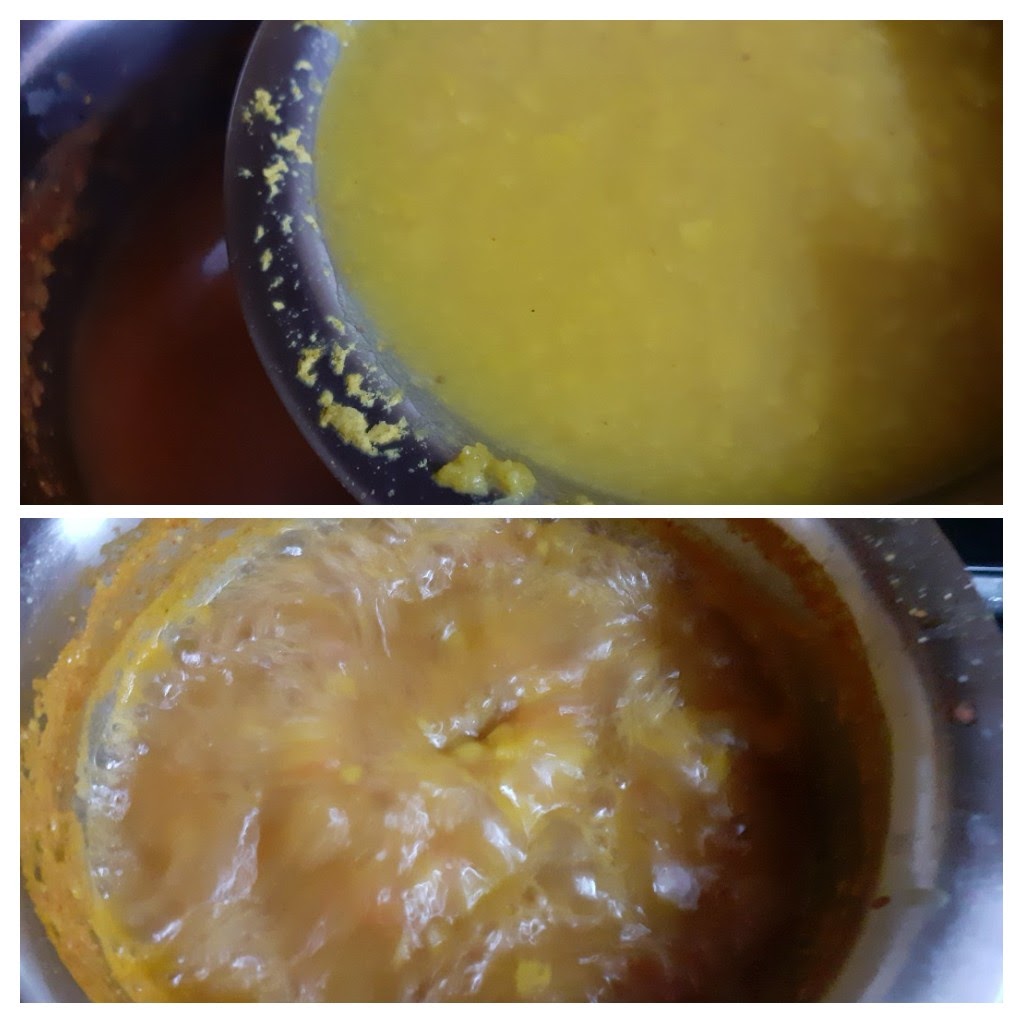
In a big Kadai/pan put the oil and heat. Add all ingredients mentioned under “to temper”. When the mustard seeds begin to pop add the onion and sauté. When the onions start turning a light brown, add the potatoes and continue to sauté for a minute or two. Now add the chopped tomatoes, followed by salt, Sambar powder, red chilli powder, and the cooked Mocha Kottai(field beans). Mix nicely and let it cook for 2 minutes. Now pour the tamarind extract and let the potatoes cook. Keep the flame low. In the meanwhile take a small kadai and add 1 tsp oil and roast all ingredients mentioned under “to be roast and ground”. Start by adding the groundnuts first, followed by coconut, dry red chilli, fennel seeds and poppy seeds, Roast until the coconut starts turning a light brown in colour. Cool and grind to a smooth paste adding a little water. The potatoes must have cooked by now. Check for doneness of potatoes and add the ground paste and mix well. Dilute adding 2 cups water and continue to cook. The gravy will come together and the consistency will thicken. Add a small bit of jaggery and stir and put off the flame. The delicious Pachai Mochai Kuzhambu is ready to serve. Enjoy. Bon Appetit.
STEPWISE RECIPE FOLLOWS:
1. In a big Kadai/pan put the oil and heat. Add all ingredients mentioned under “to temper”. When the mustard seeds begin to pop add the onion and sauté.
2. When the onions start turning a light brown add the potatoes and continue to sauté for a minute or two. Now add the chopped tomatoes, followed by salt, Sambar powder, red chilli powder, and the cooked Mocha Kottai(field beans). Mix nicely and let it cook for 2 minutes.
3. Now pour the tamarind extract and let the potatoes cook. In the meanwhile take a small kadai and add 1 tsp oil and roast all ingredients mentioned under “to be roast and ground”. Start by adding the groundnuts first, followed by coconut, dry red chilli, fennel seeds and poppy seeds, Roast until the coconut starts turning a light brown in colour. Cool and grind to a smooth paste adding a little water.
4. The potatoes must have cooked by now. Add the ground paste and mix well. Dilute adding 2 cups water and continue to cook. The gravy will come together and the consistency will thicken. Add a small bit of jaggery and stir and put off the flame. The delicious Pachai Mochai Kuzhambu is ready to serve.
NOTES:
1. I used homemade sambar powder as that really enhances the taste of the dish. However, store bought one also can be used. Foe the recipe of homemade sambar powder click here.
2. The use of jaggery is to cut down the gassiness of the peanuts, as some people cannot digest it. I recommend adding it though adding jaggery is not compulsory.
3. Take care not to overcook the Beans, at the same time they must be cooked well.
4. If you have roasted peanuts that too can be added, then only the coconut, chillies, fennel and poppy seeds need to be roasted.
5. This recipe can be followed for any fresh beans(seeds) variety. When the fresh Mochai are not available, the dry ones are sold. They can be soaked, cooked and the same recipe can be followed.
If you tried this recipe and liked it please comment below. I would love to hear from you. If you have a query about the recipe email us and ill respond as soon as I can.
If you would like to receive our recipes in your mail please leave your mail id at the homepage. Every time Rajjo’s Kitchen has a new post we will mail the recipe to you.
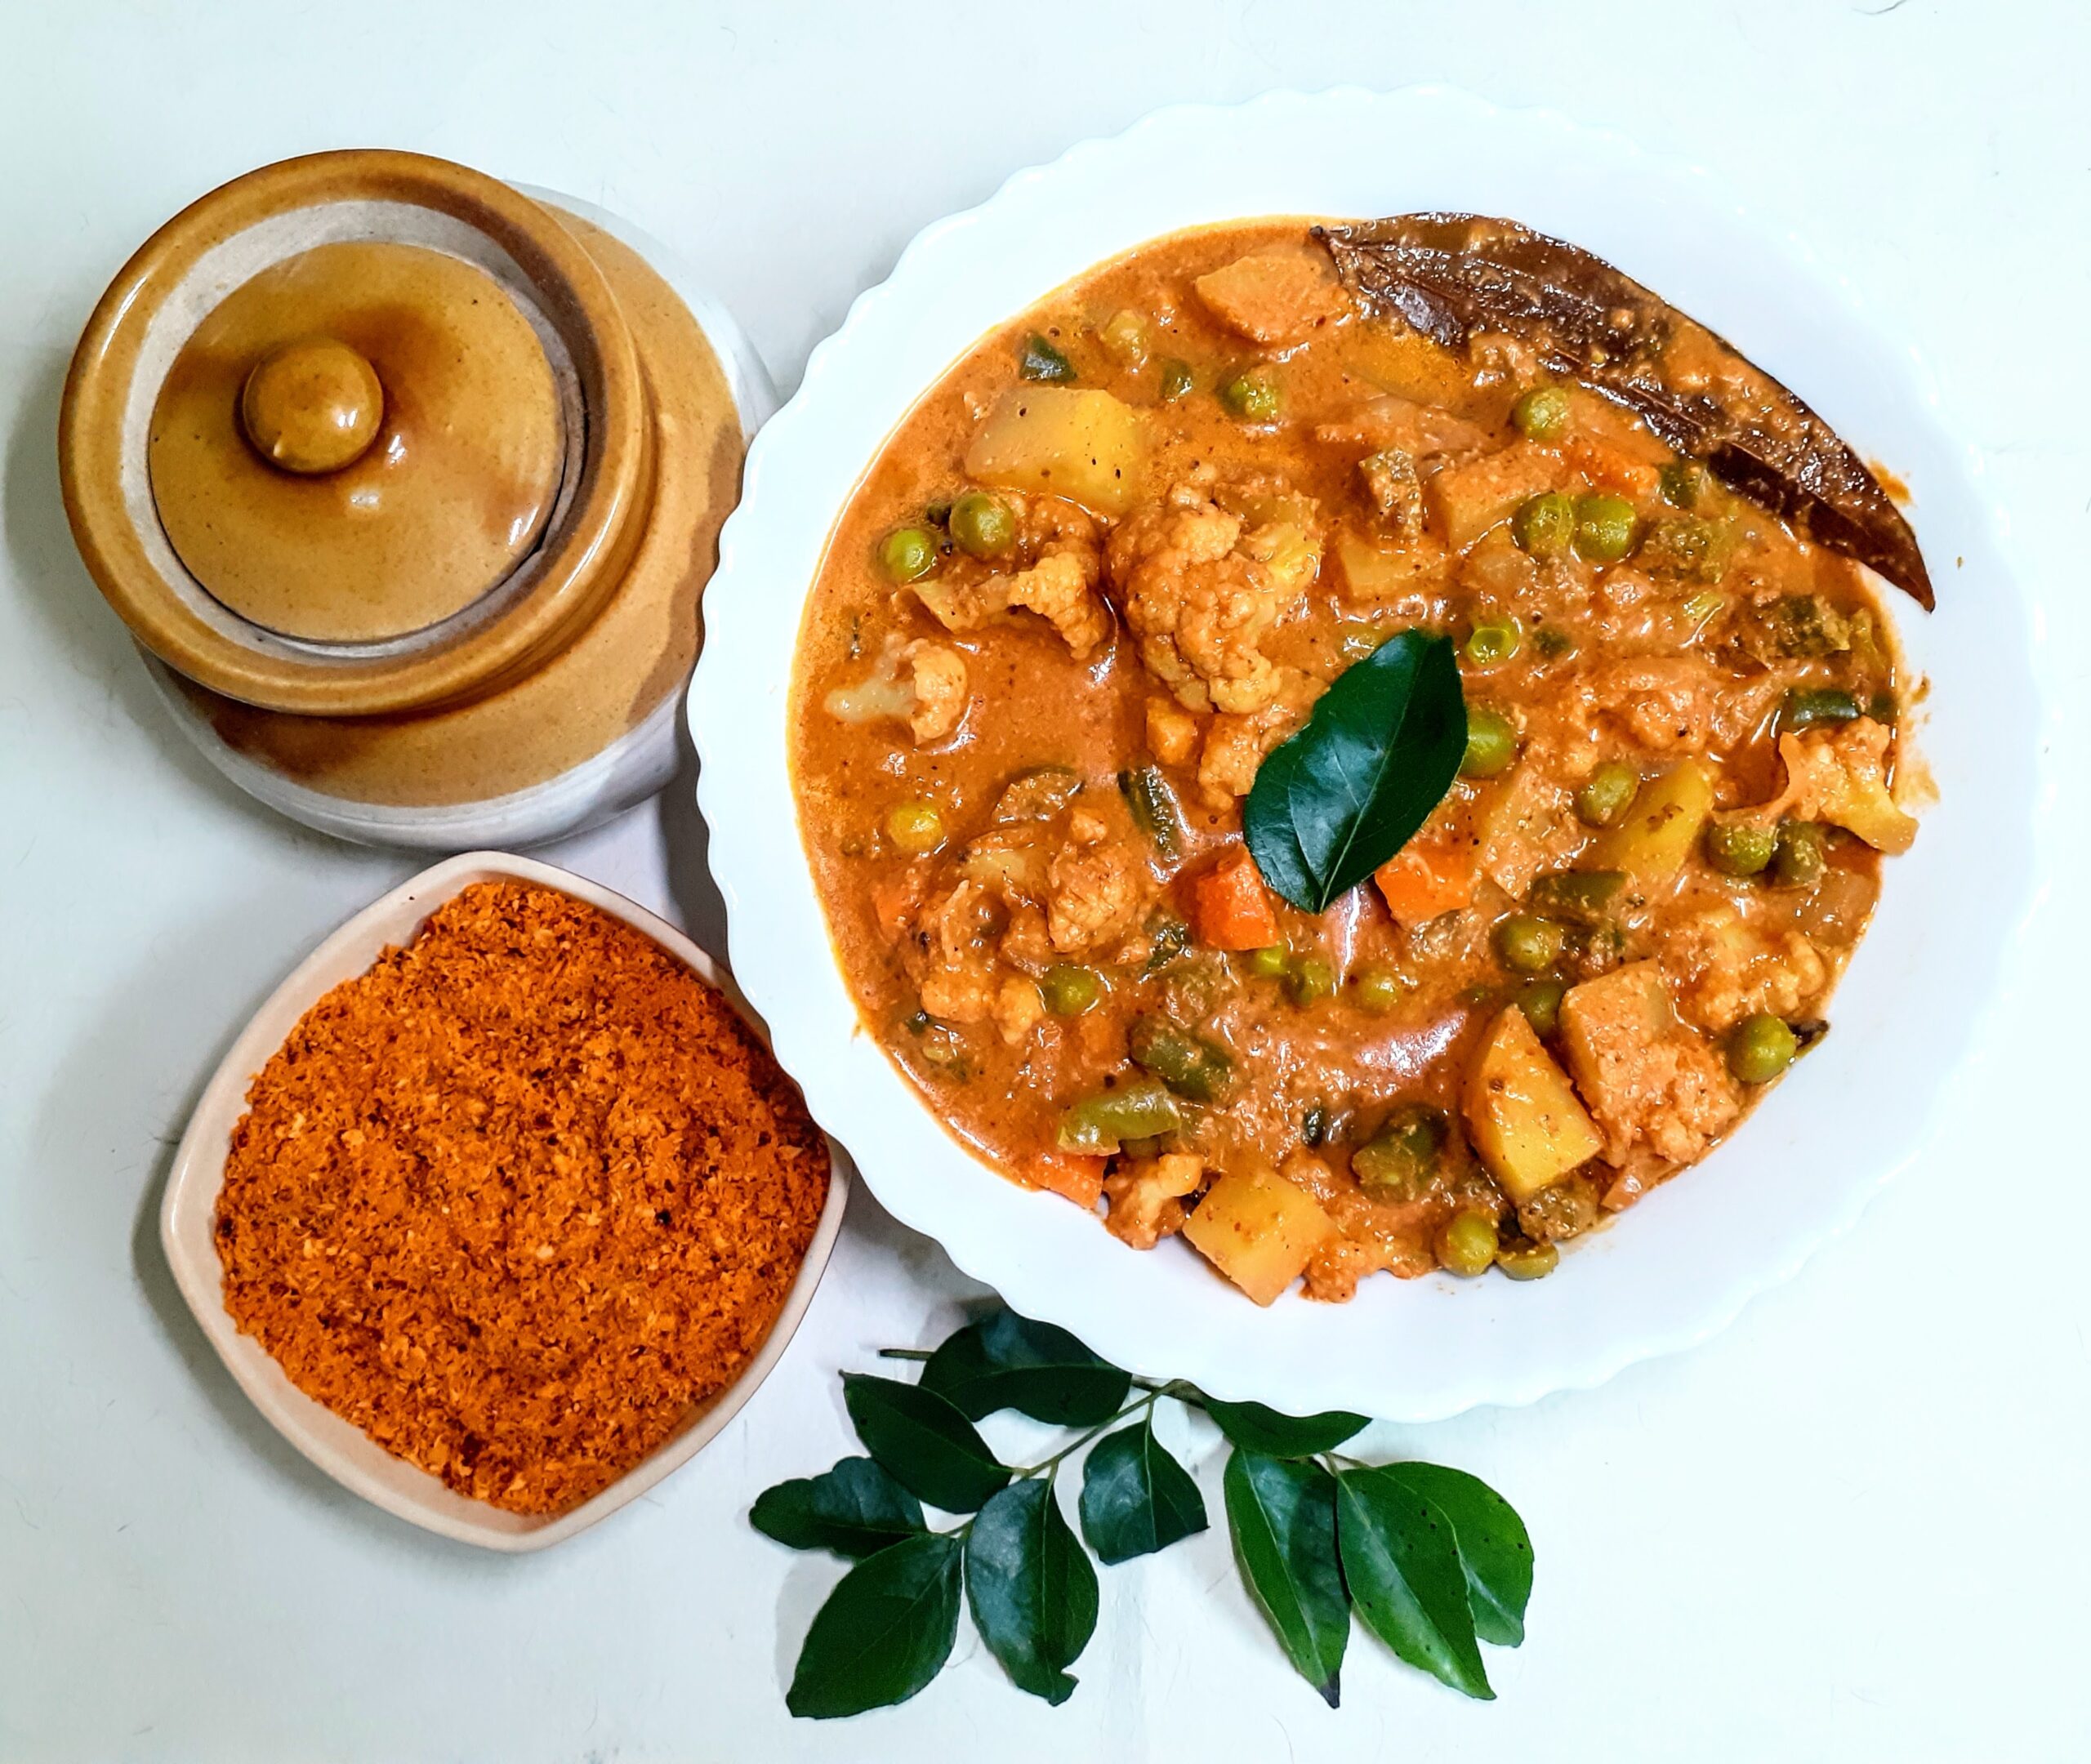
South Indian Vegetable Kurma
The South Indian Vegetable Kurma is a very popular dish in most south Indian restaurants. It goes very well with most south Indian dishes like the Sevai aka string hoppers, Parotta, Kothu Parotta( for which it forms part of the kotthu gravy), Poori, Dosa, Kal Dosa Rava Dosa, and more…
Than the ones at a restaurant I like the home version as the masalas can be customized. I find the restaurant ones very pungent with a strong masala impact which subdues the taste of the vegetables. A good kurma is one where the taste and texture of the vegetables is retained and the mild masalas enhance the taste of the dish.
So here’s my version of the South Indian Vegetable Kurma–
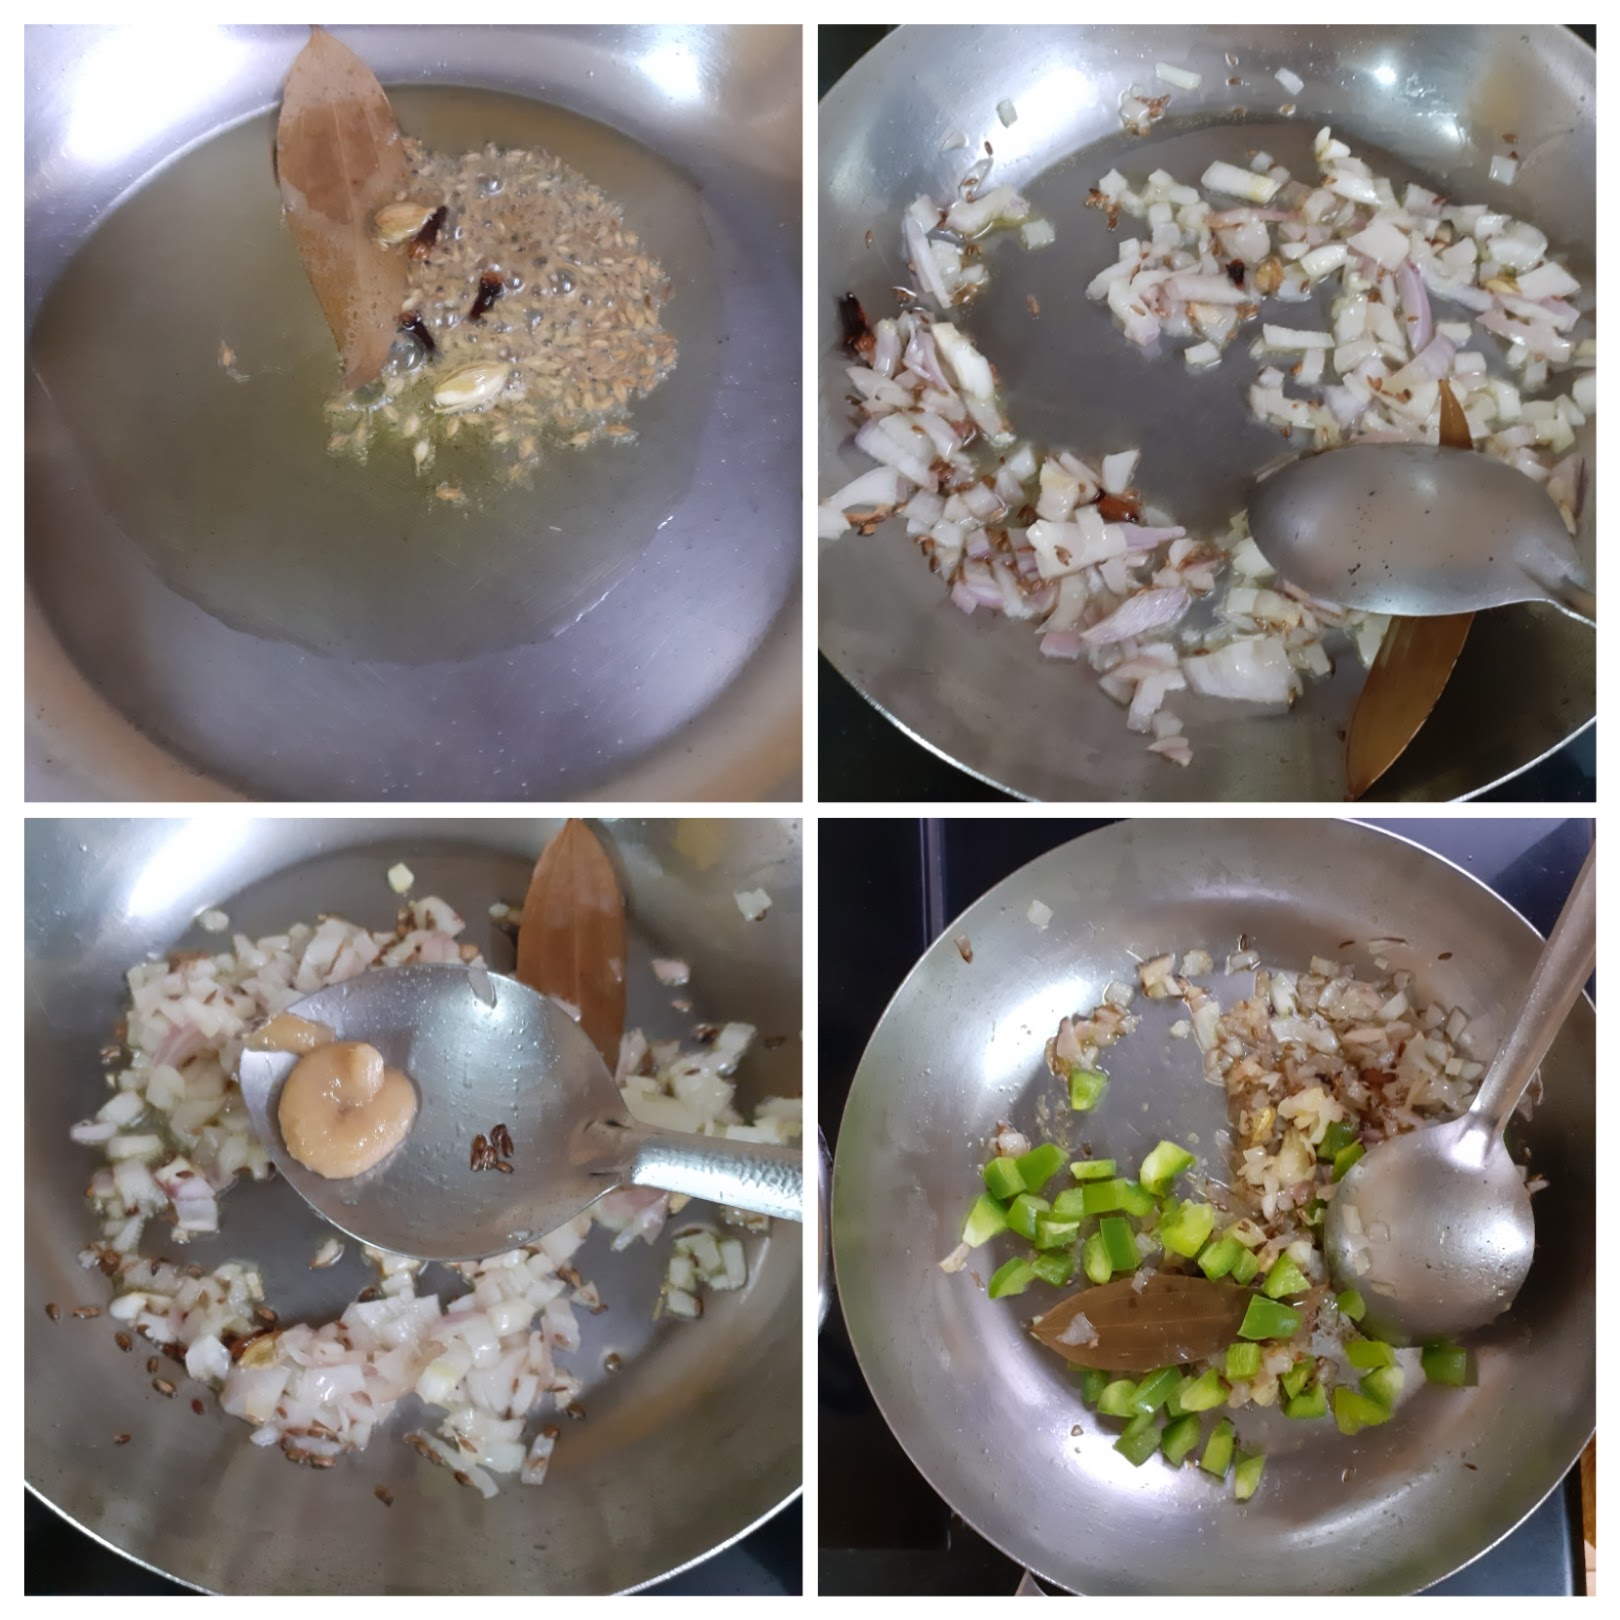
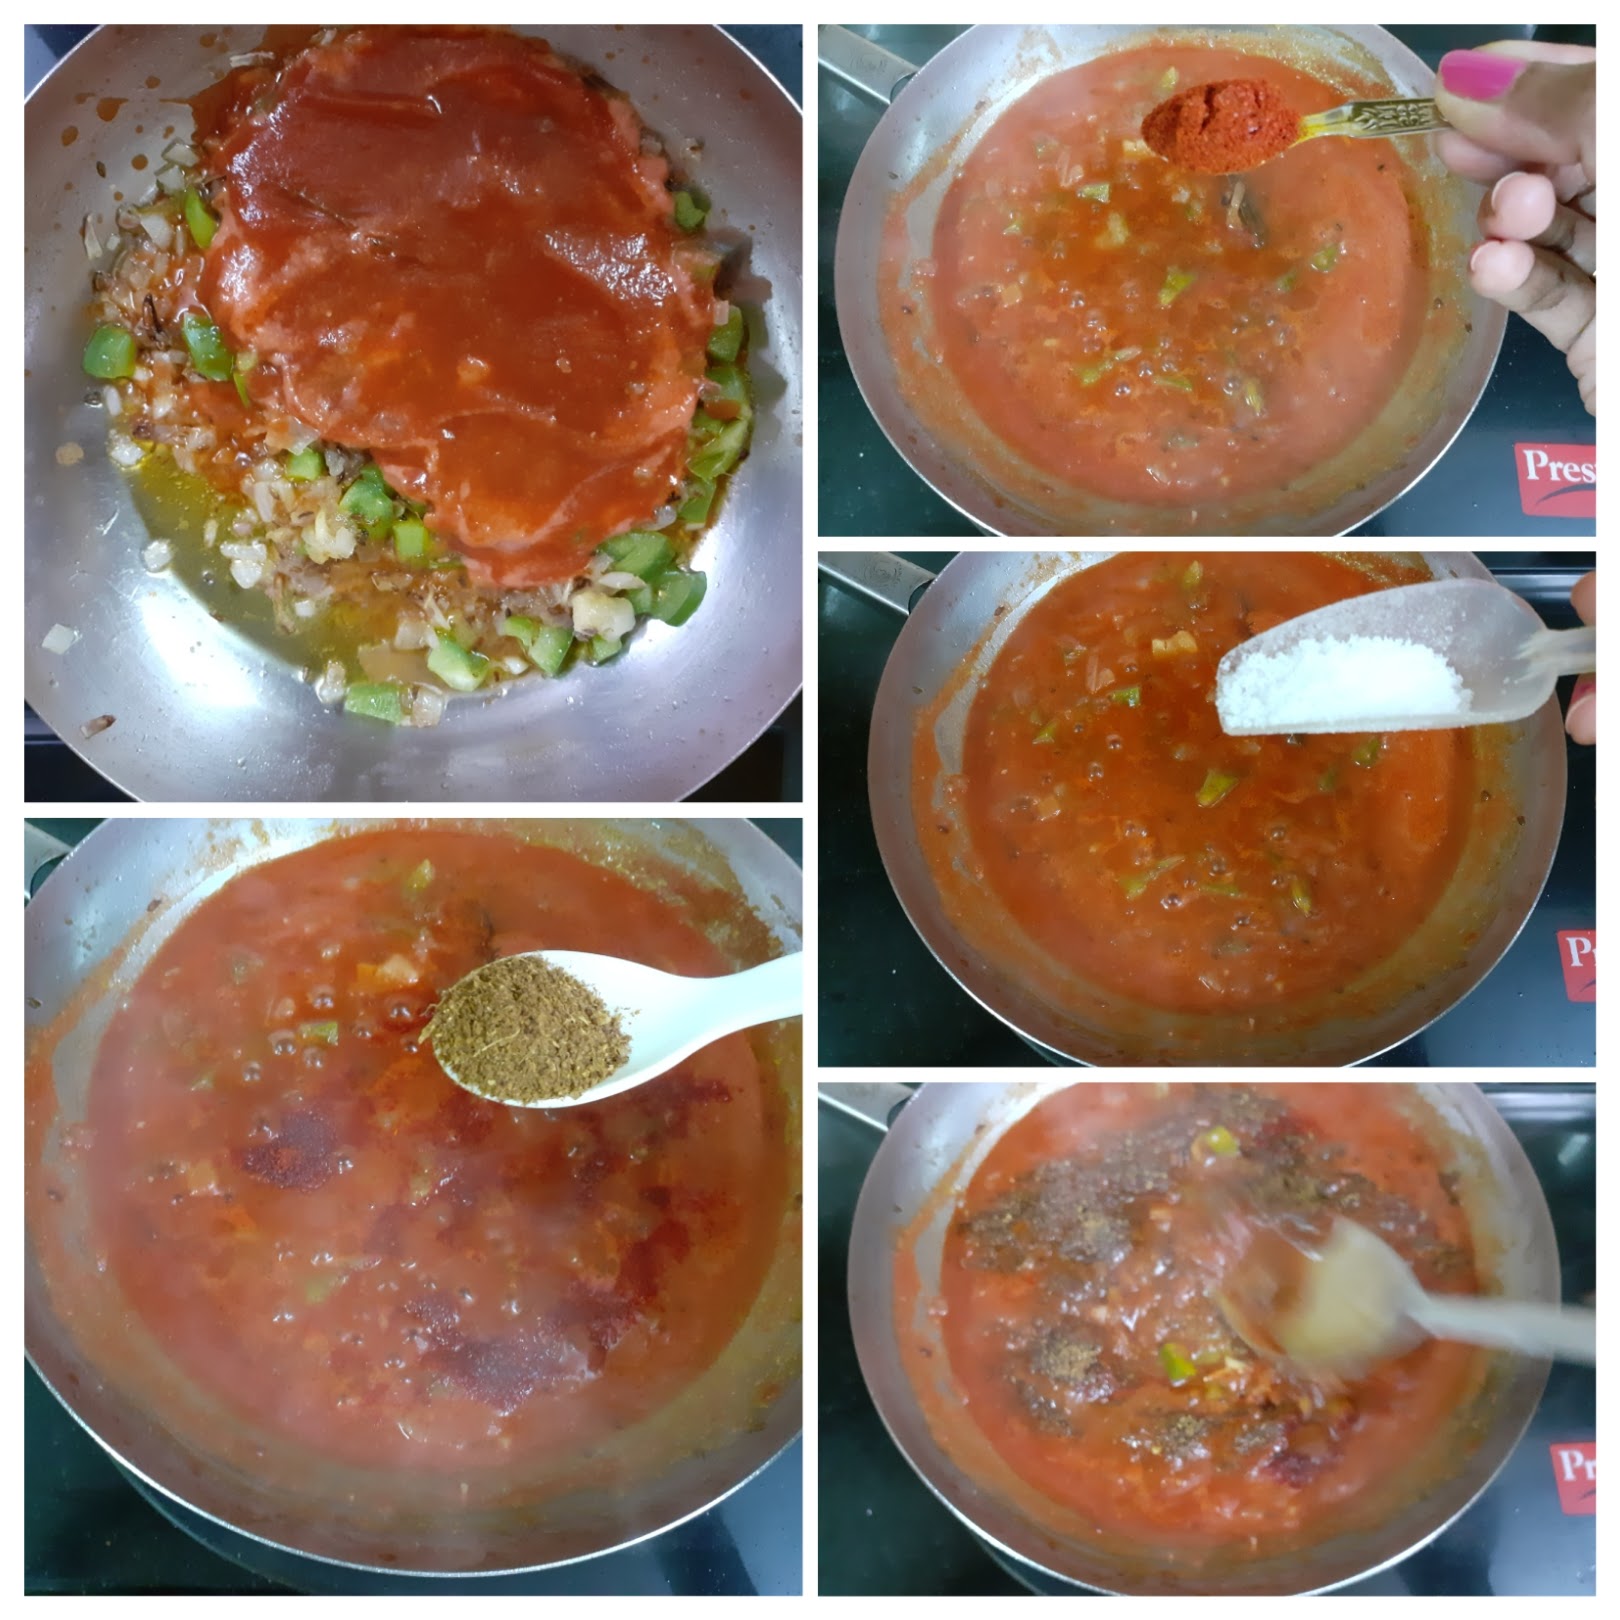
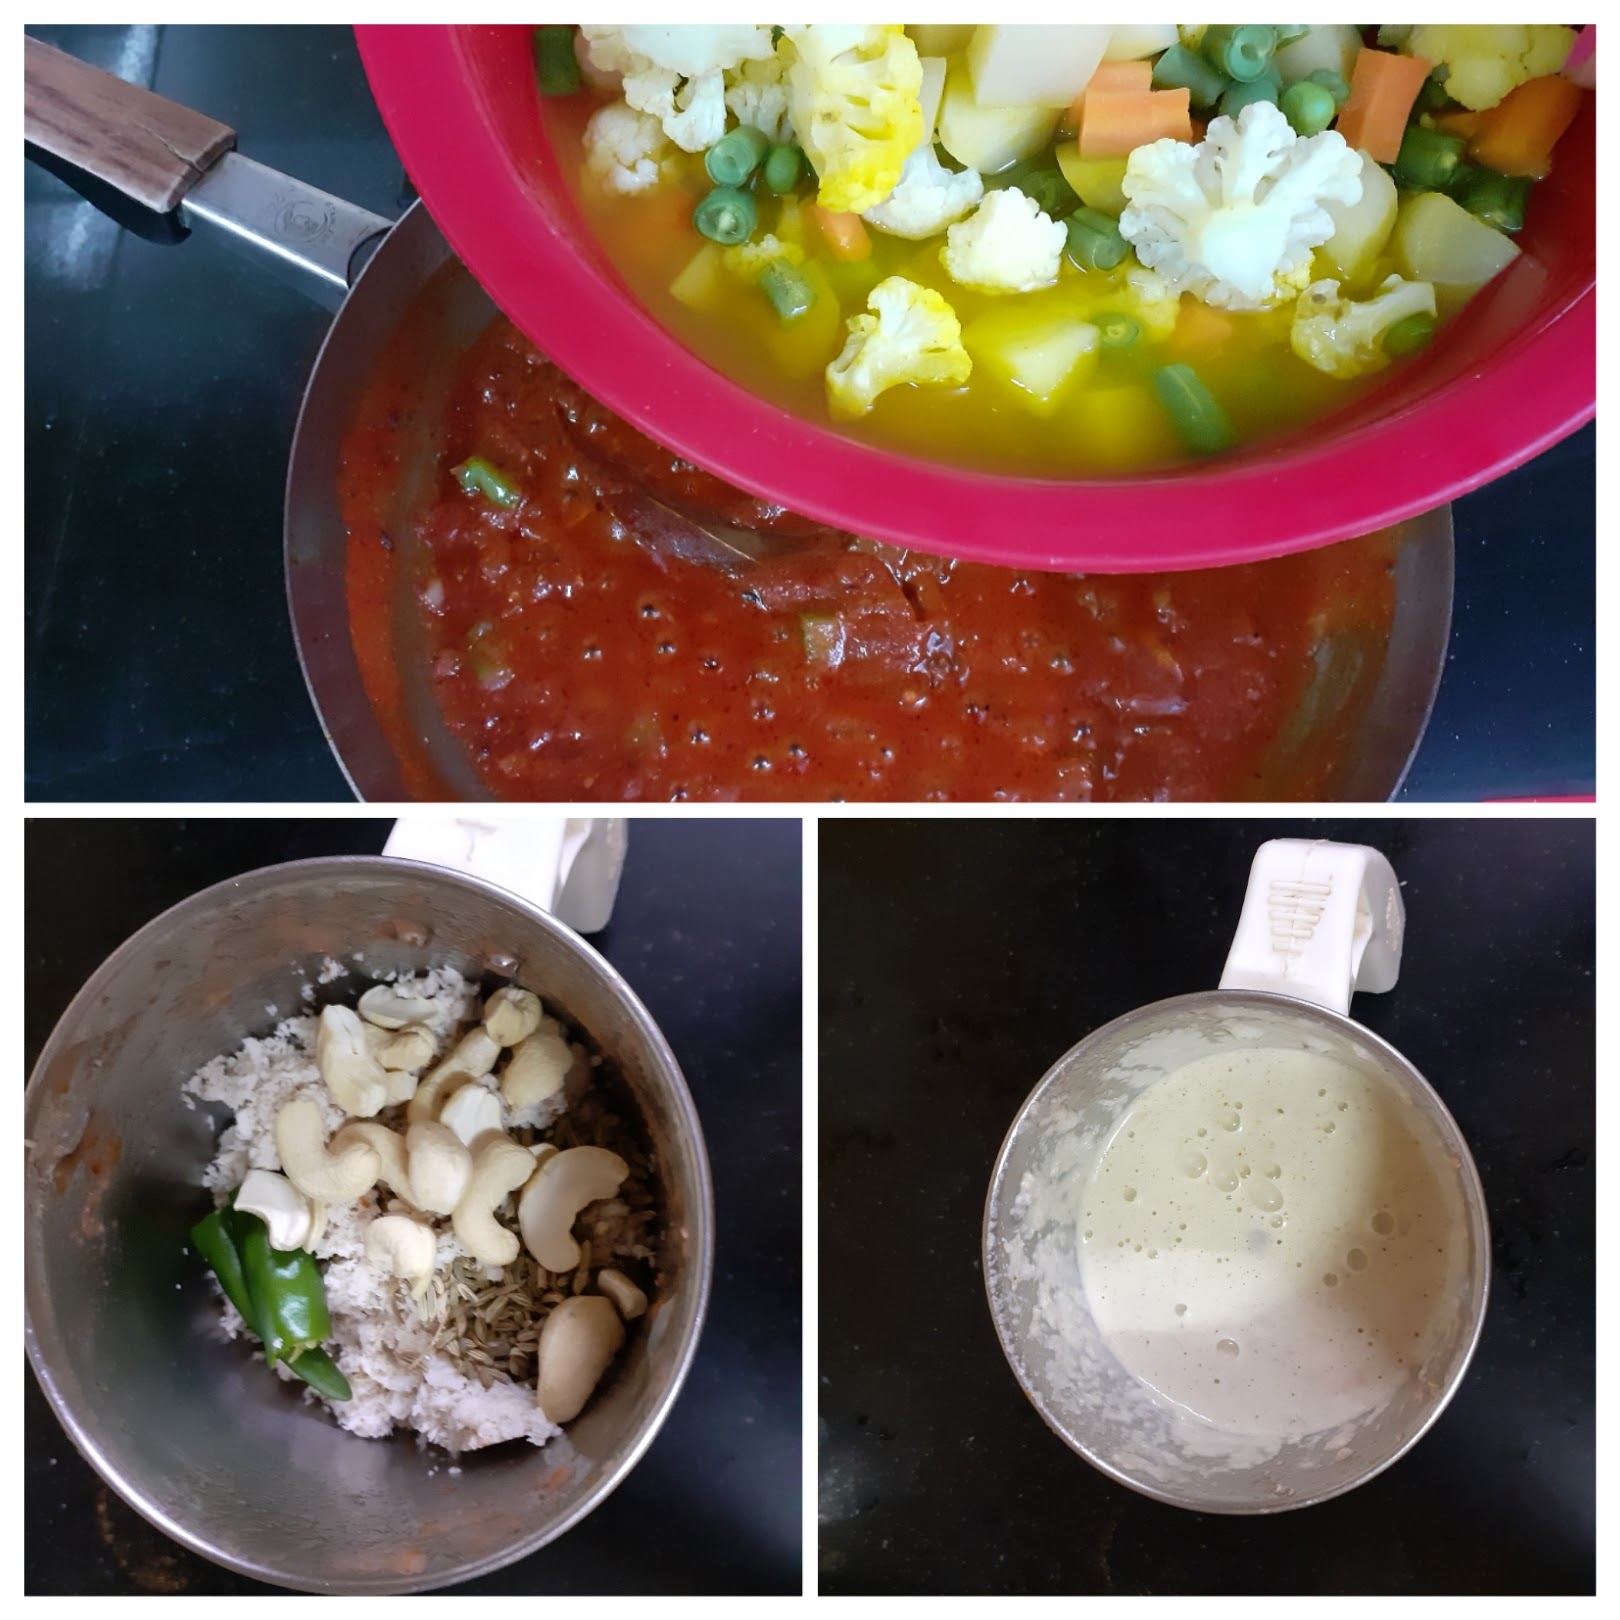
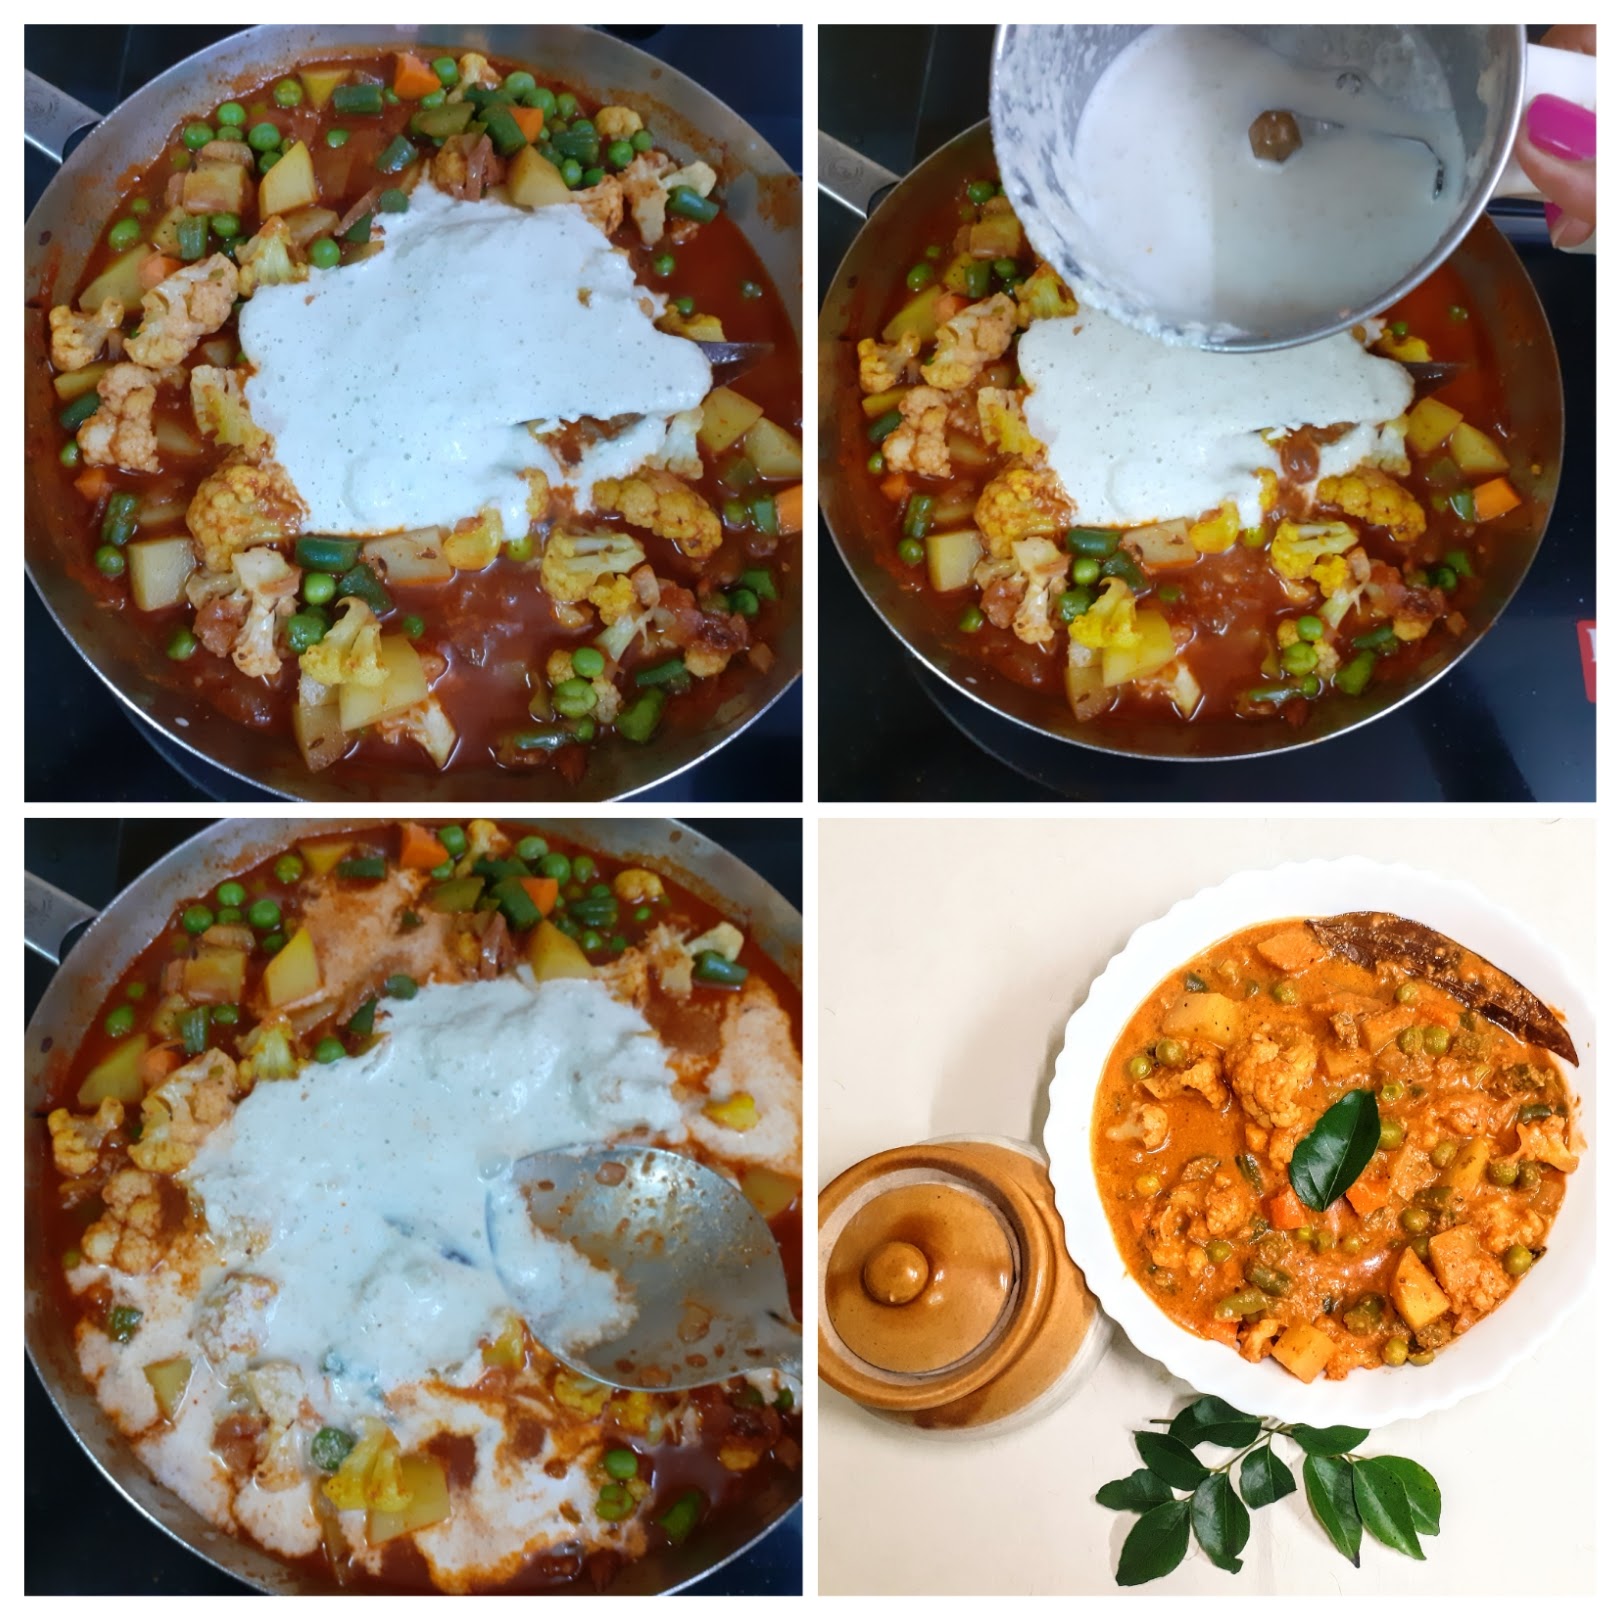
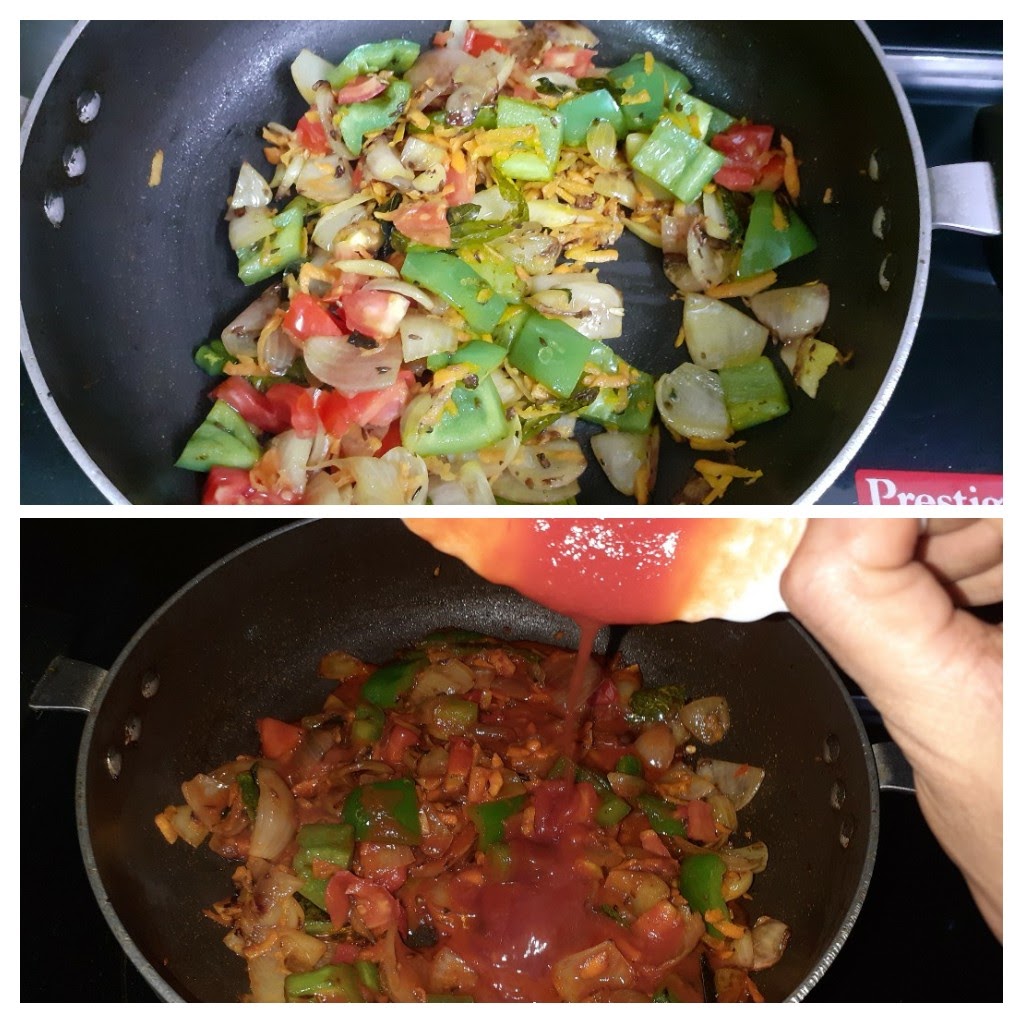
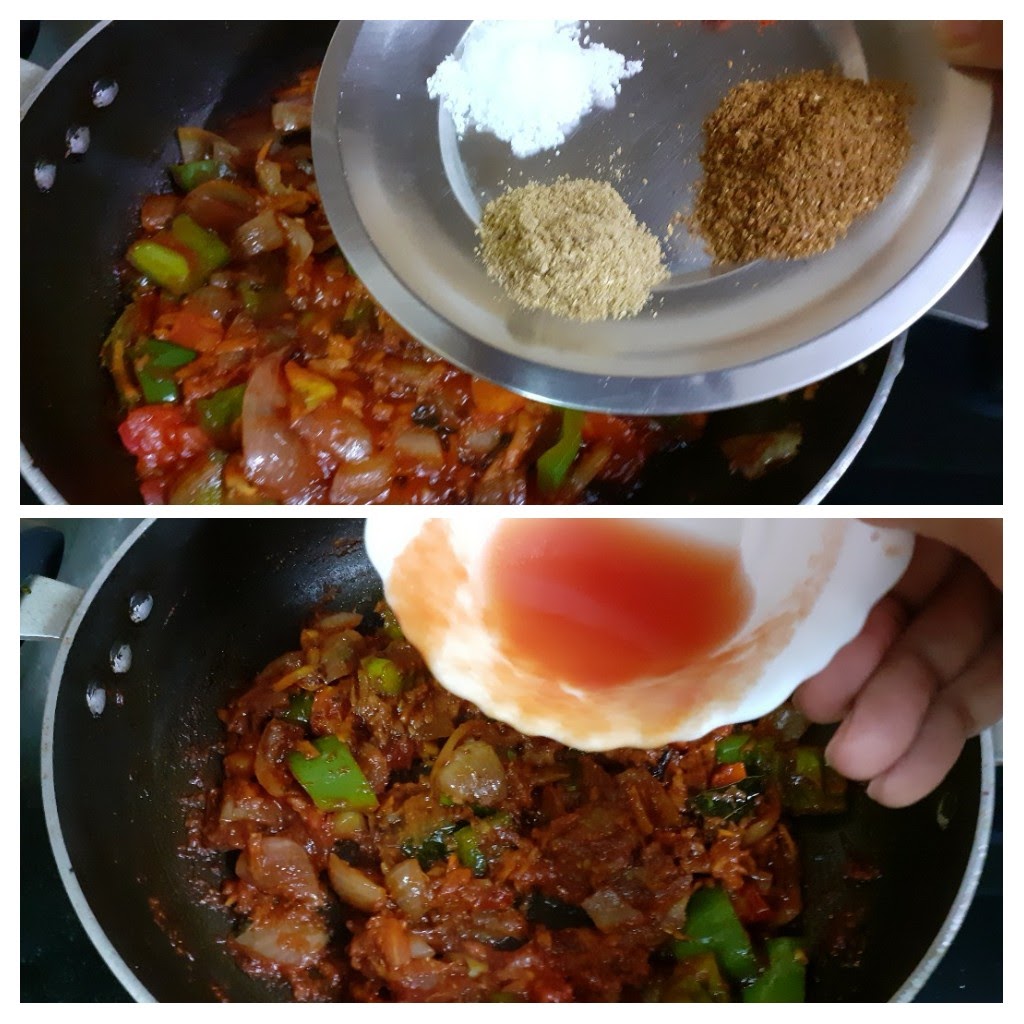
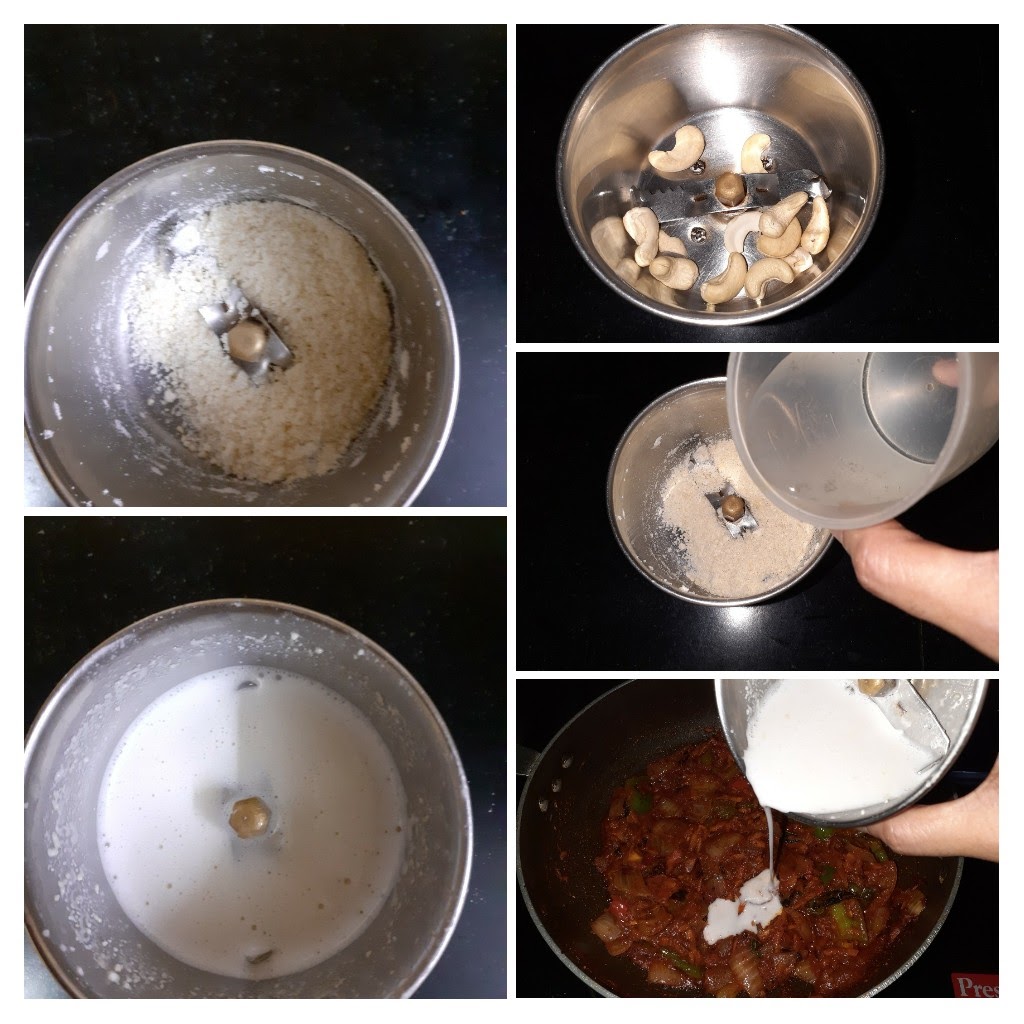
Steam all the mix vegetables with salt and turmeric powder, except capsicum, onion and tomatoes. Take care to not turn them mushy. Now in a pan or Kadai pour oil and heat. Put in the Bay leaf, cumin seeds, green cardamom and cloves and fry for 30 seconds. Now add the onions and ginger garlic paste,and saute for 30 seconds. Add the capsicum and continue to saute for another minute. Now add the tomato puree and all other spice powders like red chilli powder, biryani masala and the salt. Cook the gravy until the oil separates. Now add the steamed vegetables, mix well and cook for a minute. Grind the coconut, fennel seed, cashewnuts and green chillies to a smooth paste adding a little water. Pour this paste into the cooking gravy. Cook for another2 minutes or until the gravy cones together and put of the stove. Garnish with curry leaves add the garam masala powder now if using, and enjoy with your choice of tiffin.
STEPWISE RECIPE FOLLOWS:
1. Steam all the mix vegetables with some salt and turmeric powder, except capsicum, onion and tomatoes. Take care to not turn them mushy.
2. Now in a pan or Kadai pour oil and heat. Put in the Bay leaf, cumin seeds, green cardamom and cloves and fry for 30 seconds. Now add the onions and ginger garlic paste, and saute for 30 seconds. Add the capsicum and continue to saute for another minute
3. Now add the tomato puree and all other spice powders like red chilli powder, biryani masala and the salt. Cook the gravy until the oil separates.
4. Now add the steamed vegetables, mix well and cook for a minute. Grind the coconut, fennel seed, cashewnuts and green chillies to a smooth paste adding a little water.
5. Pour this paste into the cooking gravy. Cook for another2 minutes or until the gravy cones together and put of the stove. Garnish with curry leaves add the garam masala powder now if using, and enjoy with your choice of tiffin
NOTES:
1. The vegetables used can be customized to your liking. That said vegetables with a lit of water content like gourds, brinjal etc are not preferred much.
2. For a thicker gravy add more cashew and coconut. For a thinner one reduce the cashew and coconut or use the quantity given and then thin down with water
3. I use biryani masala for the kurma as it gives a very nice flavoring to the kurma. One can use garam masala too but the authentic taste does not come in.
4. I use homemade Biryani masala. For recipe of Biryani masala click here. Feel free to use store bought one too.
If you tried this recipe and liked it, please let us know in the comment box. I would love to hear from you. If you would like to receive our future posts on your mail, please leave your mail Id so that we can post it to you.
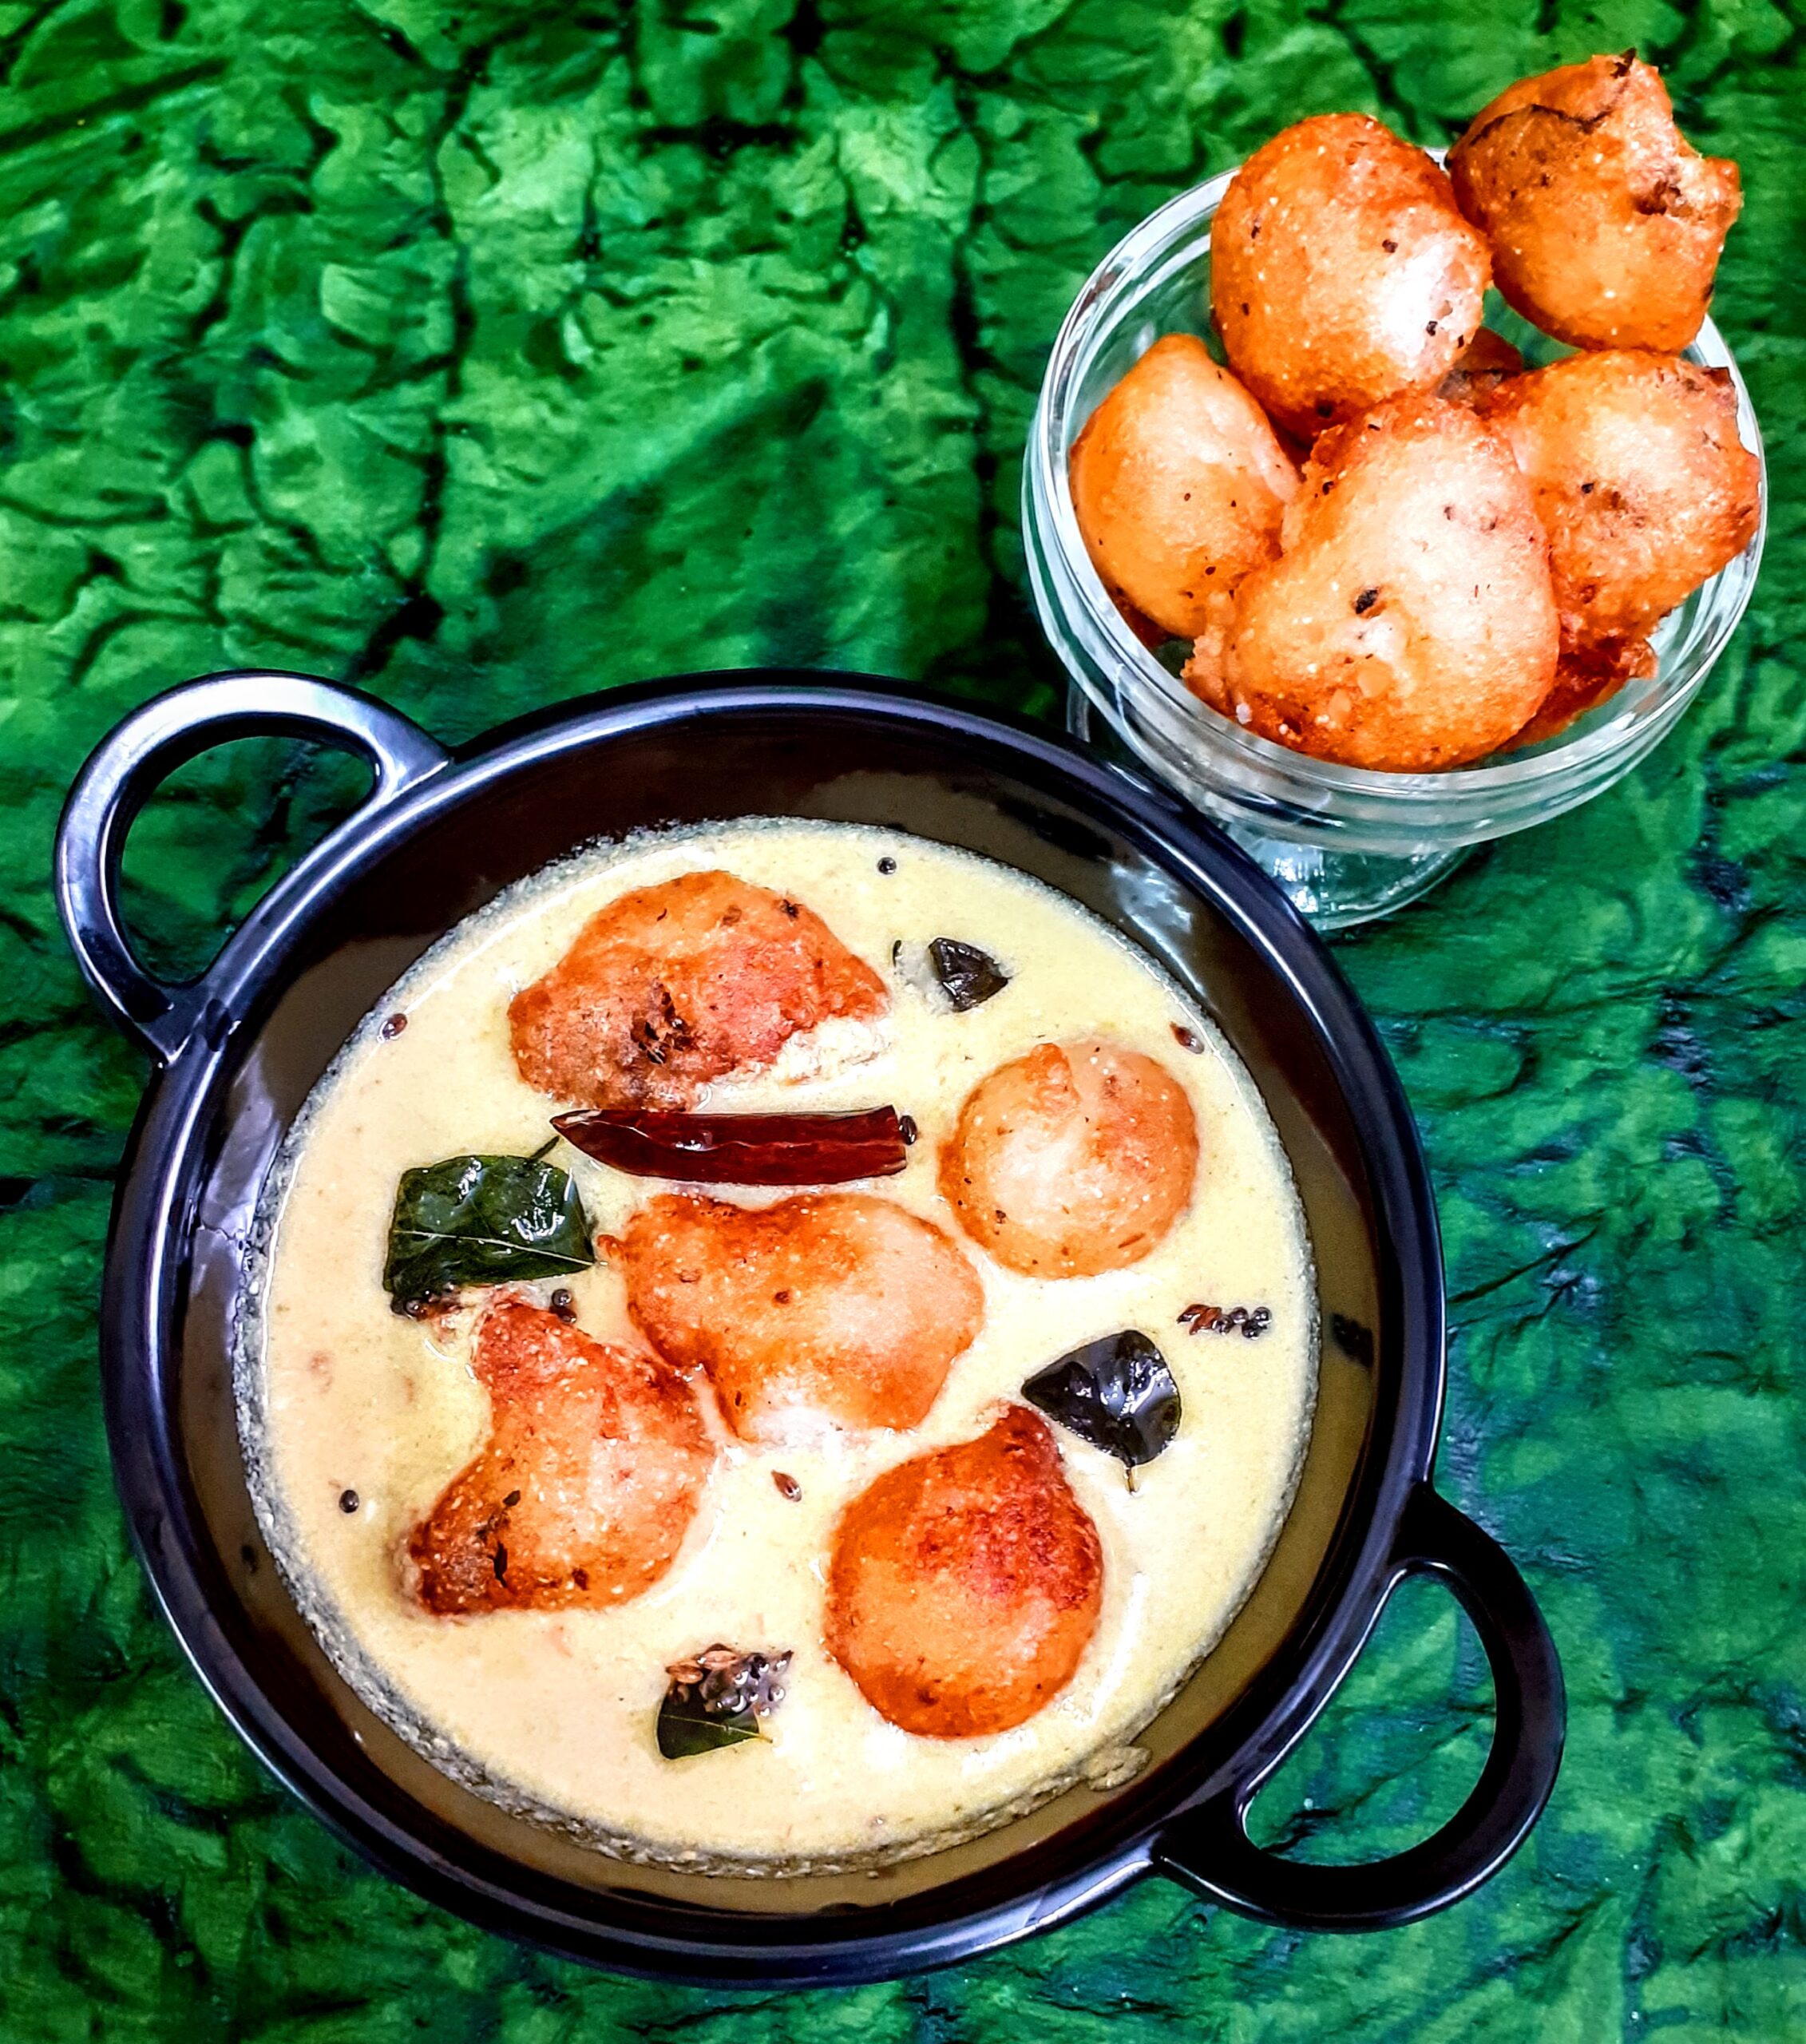
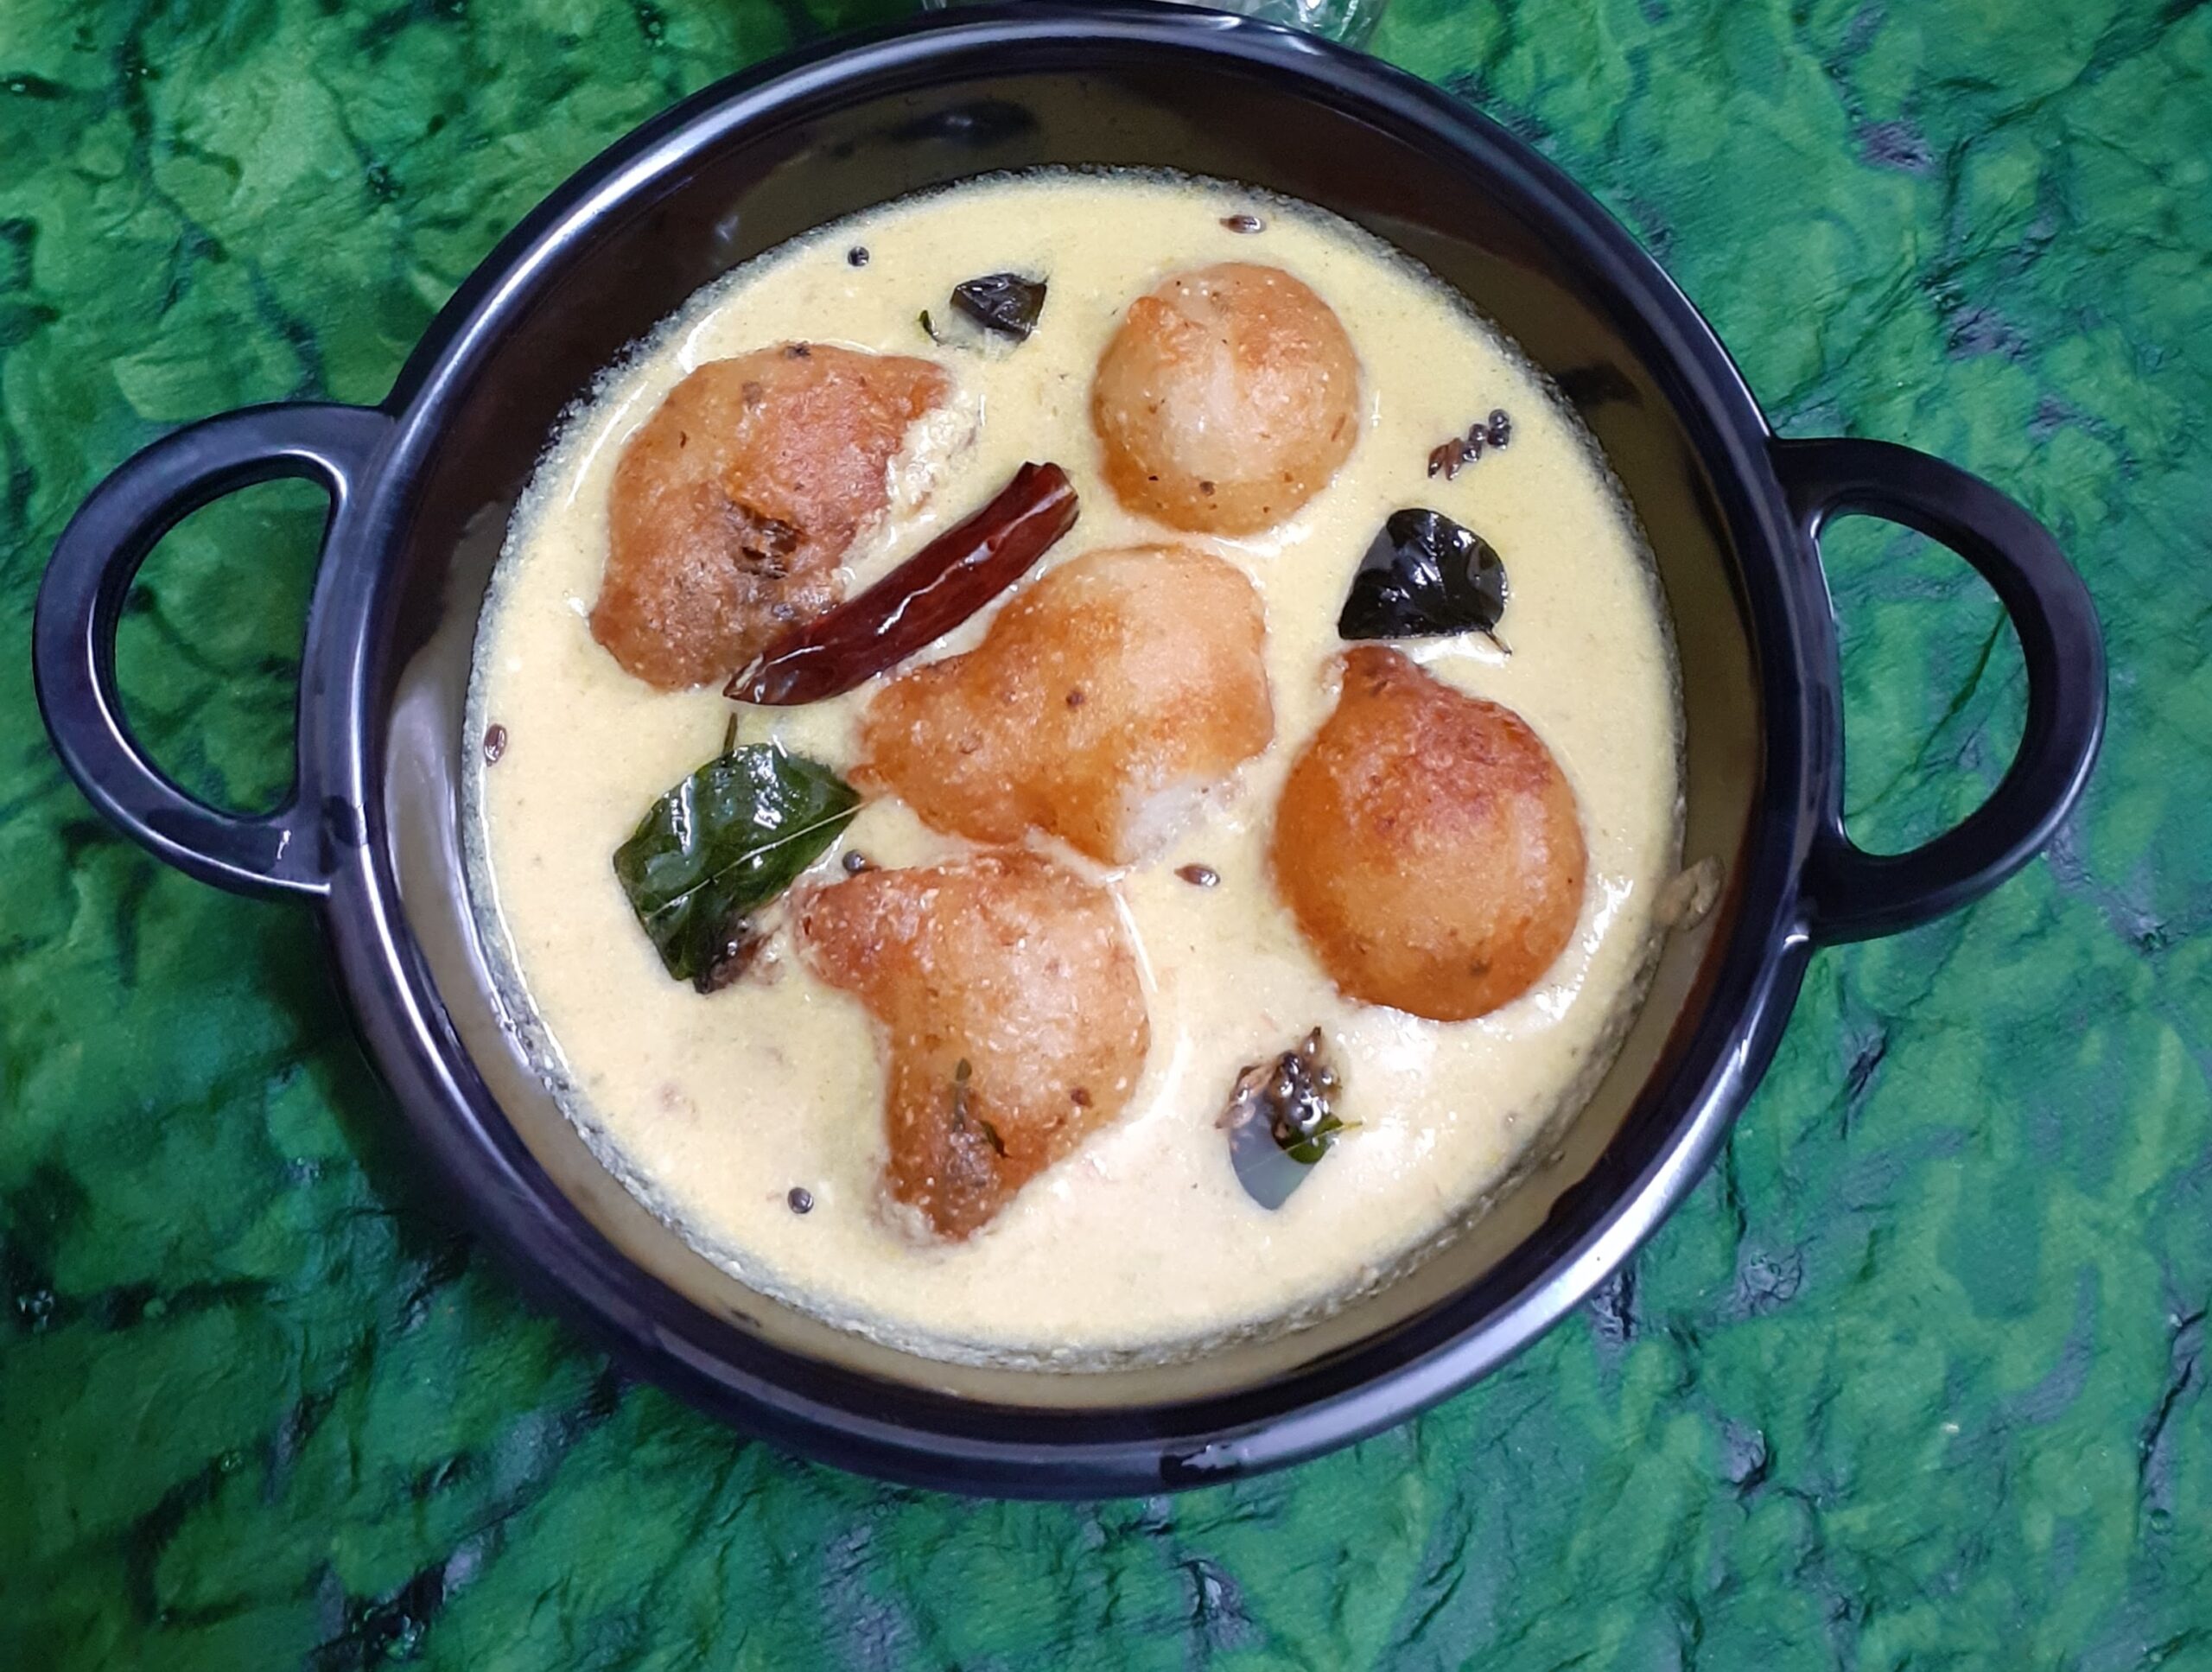
Bonda Moru Kuzhambu
This is a popular south Indian dish made of curd/yogurt and is the counterpart of the North Indian Kadi. In the North Indian Kadi chickpea flour or besan is used to give body to the dish, whereas in Mor Kuzhambu, Chana dal and Tuvar dal( yellow lentils and gram) along with coconut and coriander seeds are used to give body. The masalas used in Kadi are in powdered form, whereas in the South Indian Mor Kuzhambu the whole masalas are ground to a paste.
The array of vegetables that can be used in making this dish is huge. Vegetables like Plantains, Brinjal, Colaccasia/Arbi, Ash gourd, Pumpkin, Mango(ripe), Bhindi/Vendakai can be used to make this dish. These vegetables are used in a combination or individually to make the Mor Kuzhambu. Sometimes lentil dumplings are also used.
In this recipe, I am showing the method for the Bonda/Dumpling Moru Kuzhambu. This is a dish that I used to make so often in the past and then stopped making altogether for the past two years, for no specific reason ofcourse. Though the Moru Kuzhambu/Kadi is a weekly dish in my house, the Bonda Moru Kuzhambu I make only once in a while.
Usually, Urad dal/ Black lentils are soaked and ground to a fine batter and then deep-fried in oil. There is a popular south Indian snack called Mysore Bonda, so these Bondas are put in the Kadi. I make this in a much simpler fashion though. Idli/Dosa batter is a staple in all our homes, I have used that to make the Bondas with a little additional flours. That’s all.
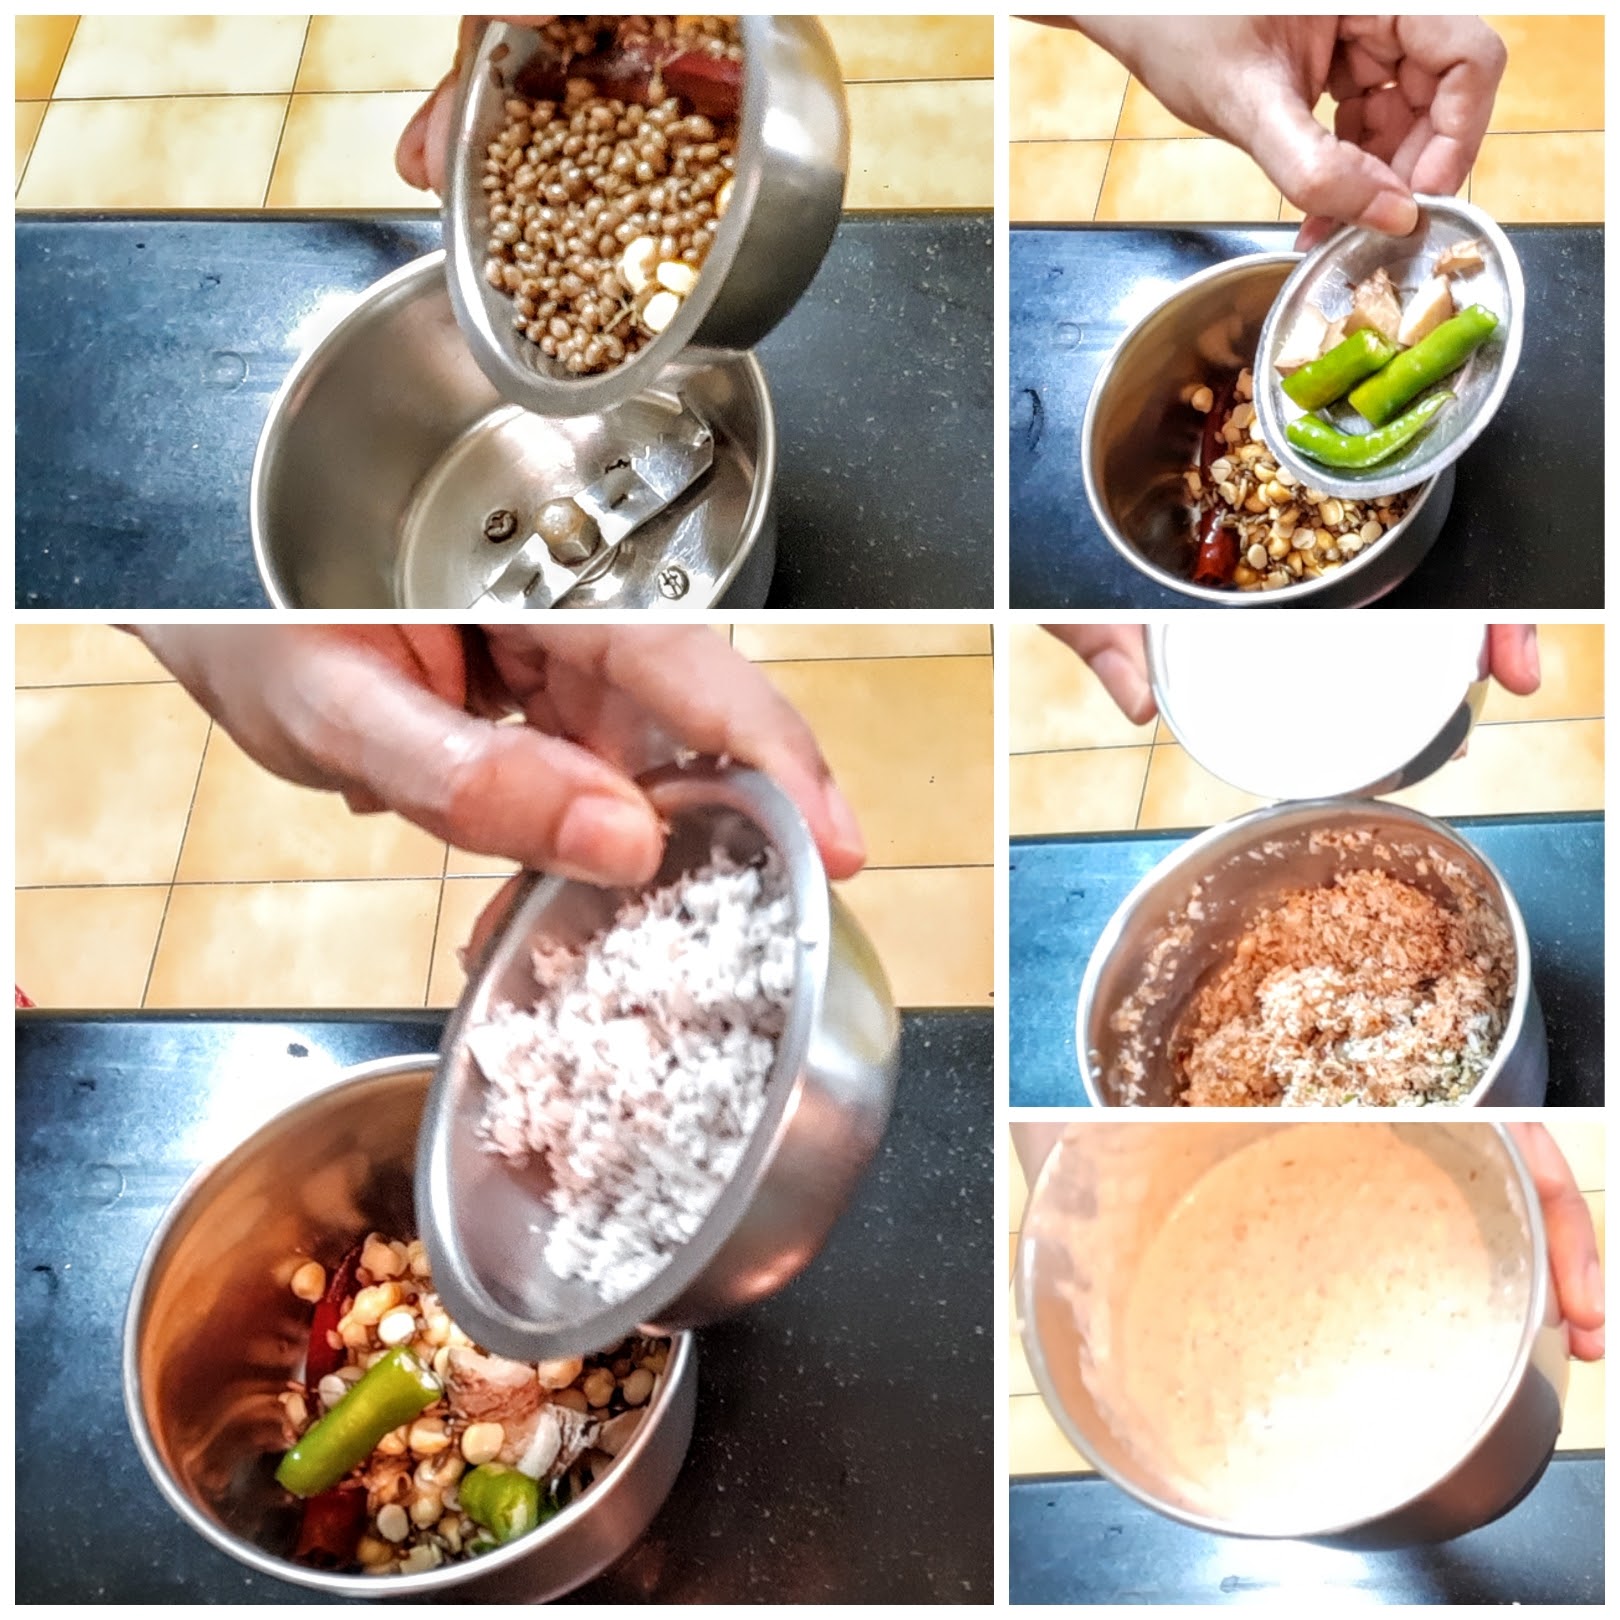
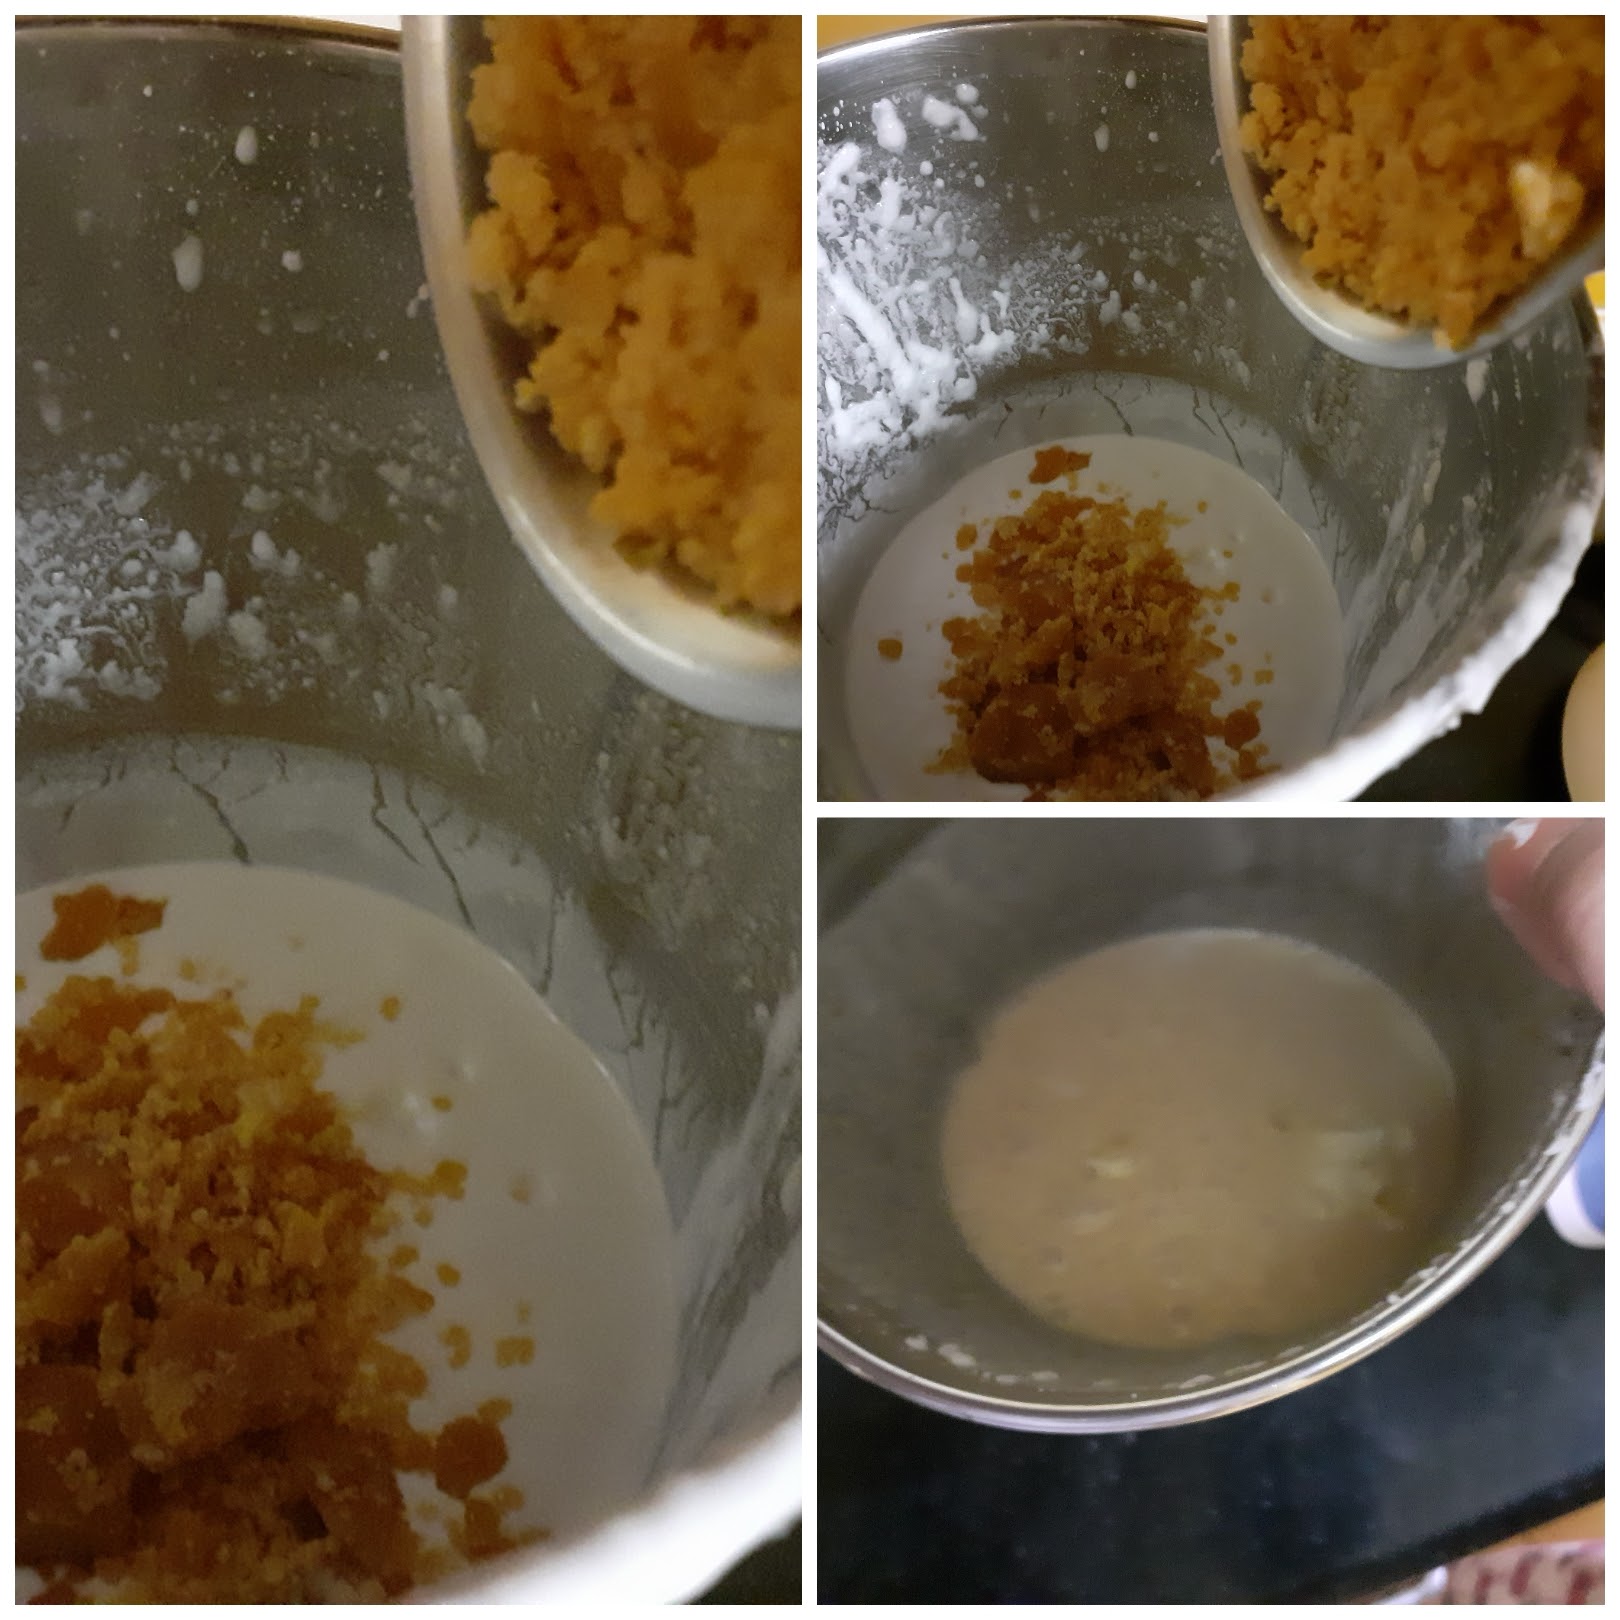
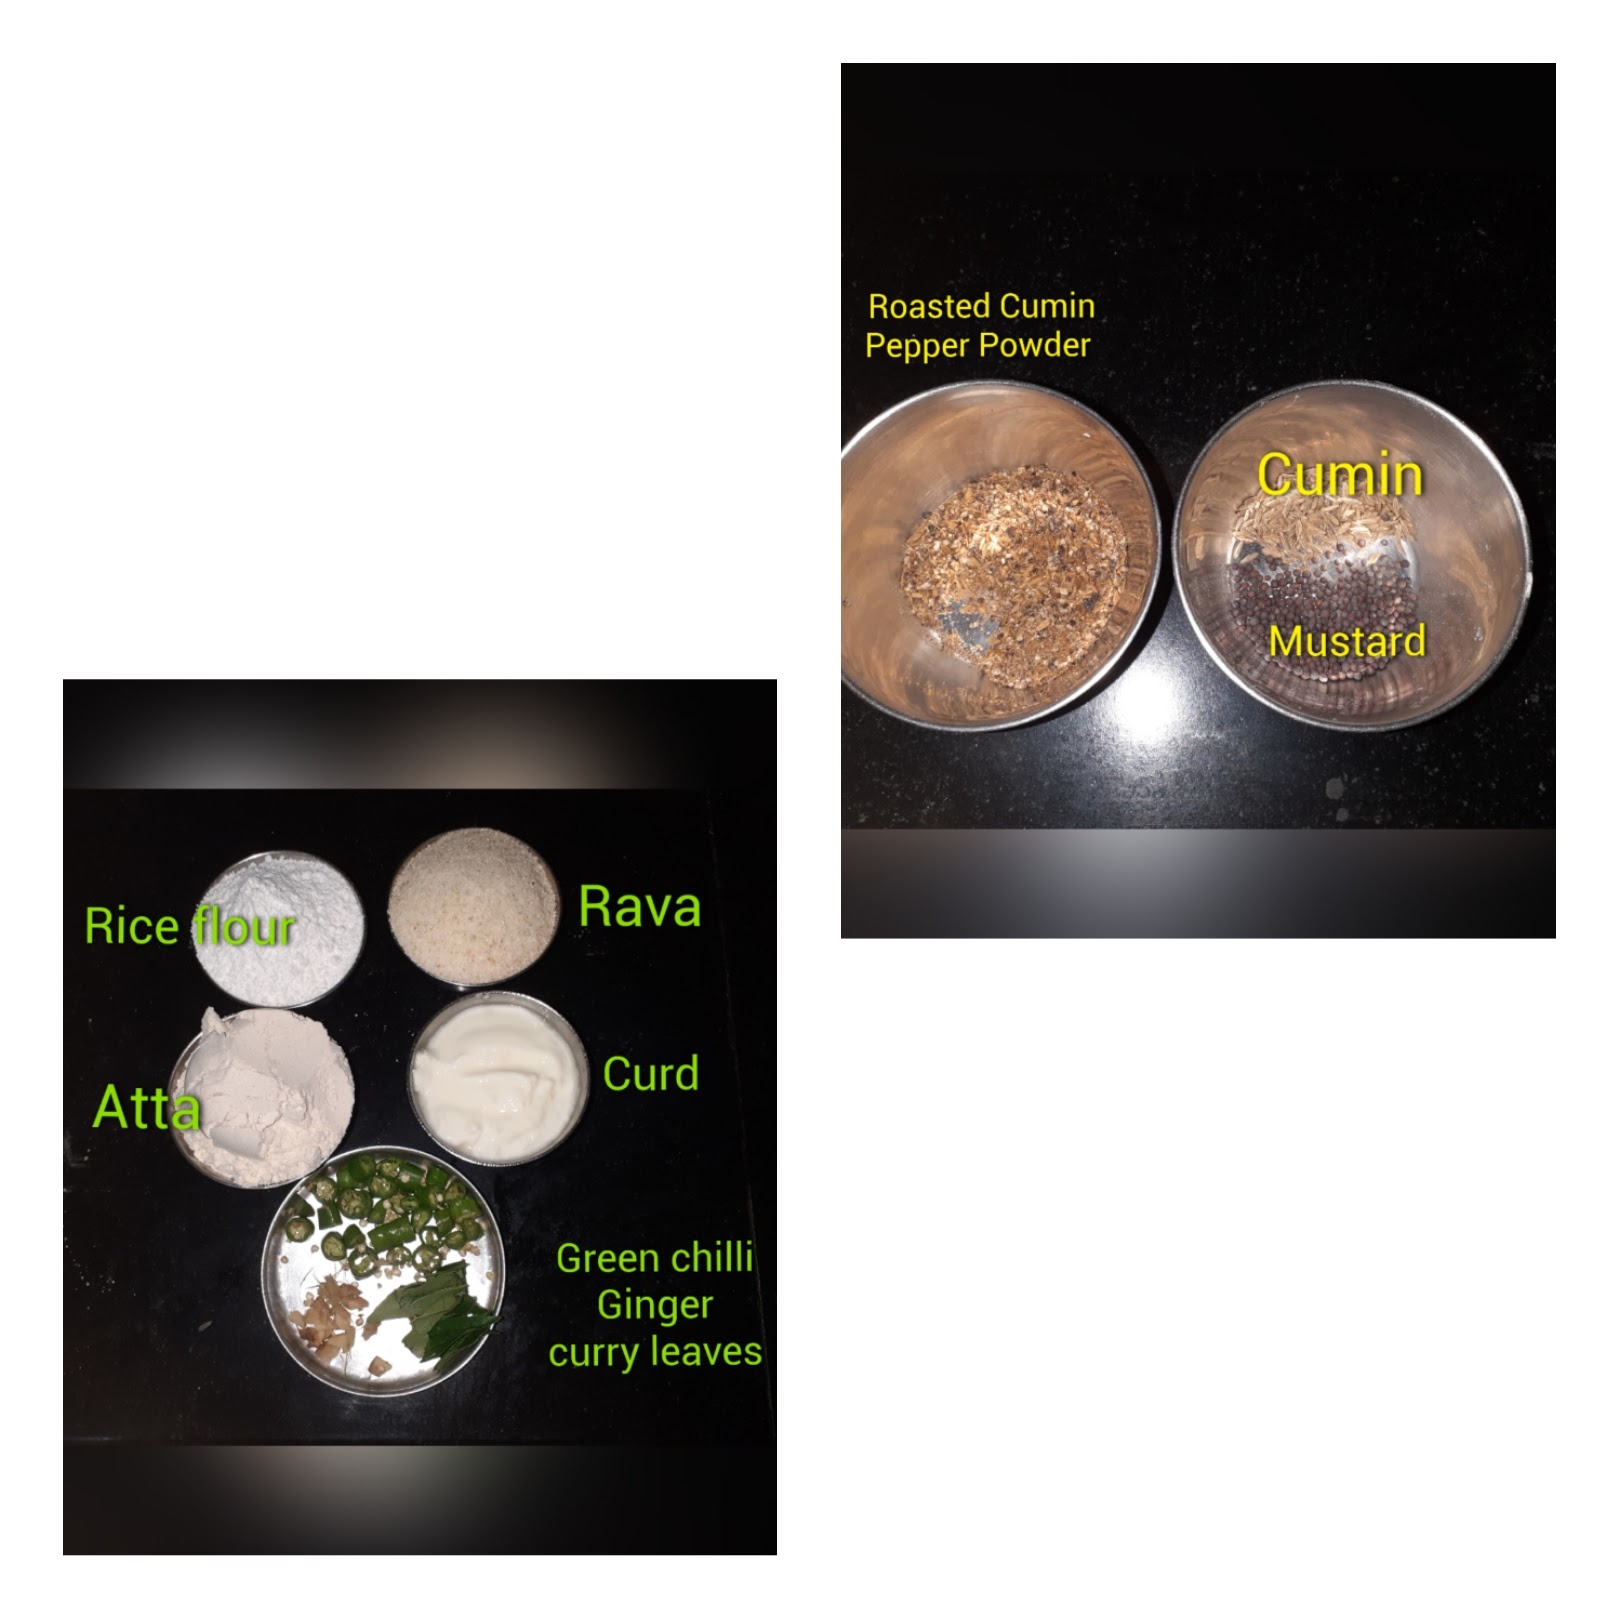
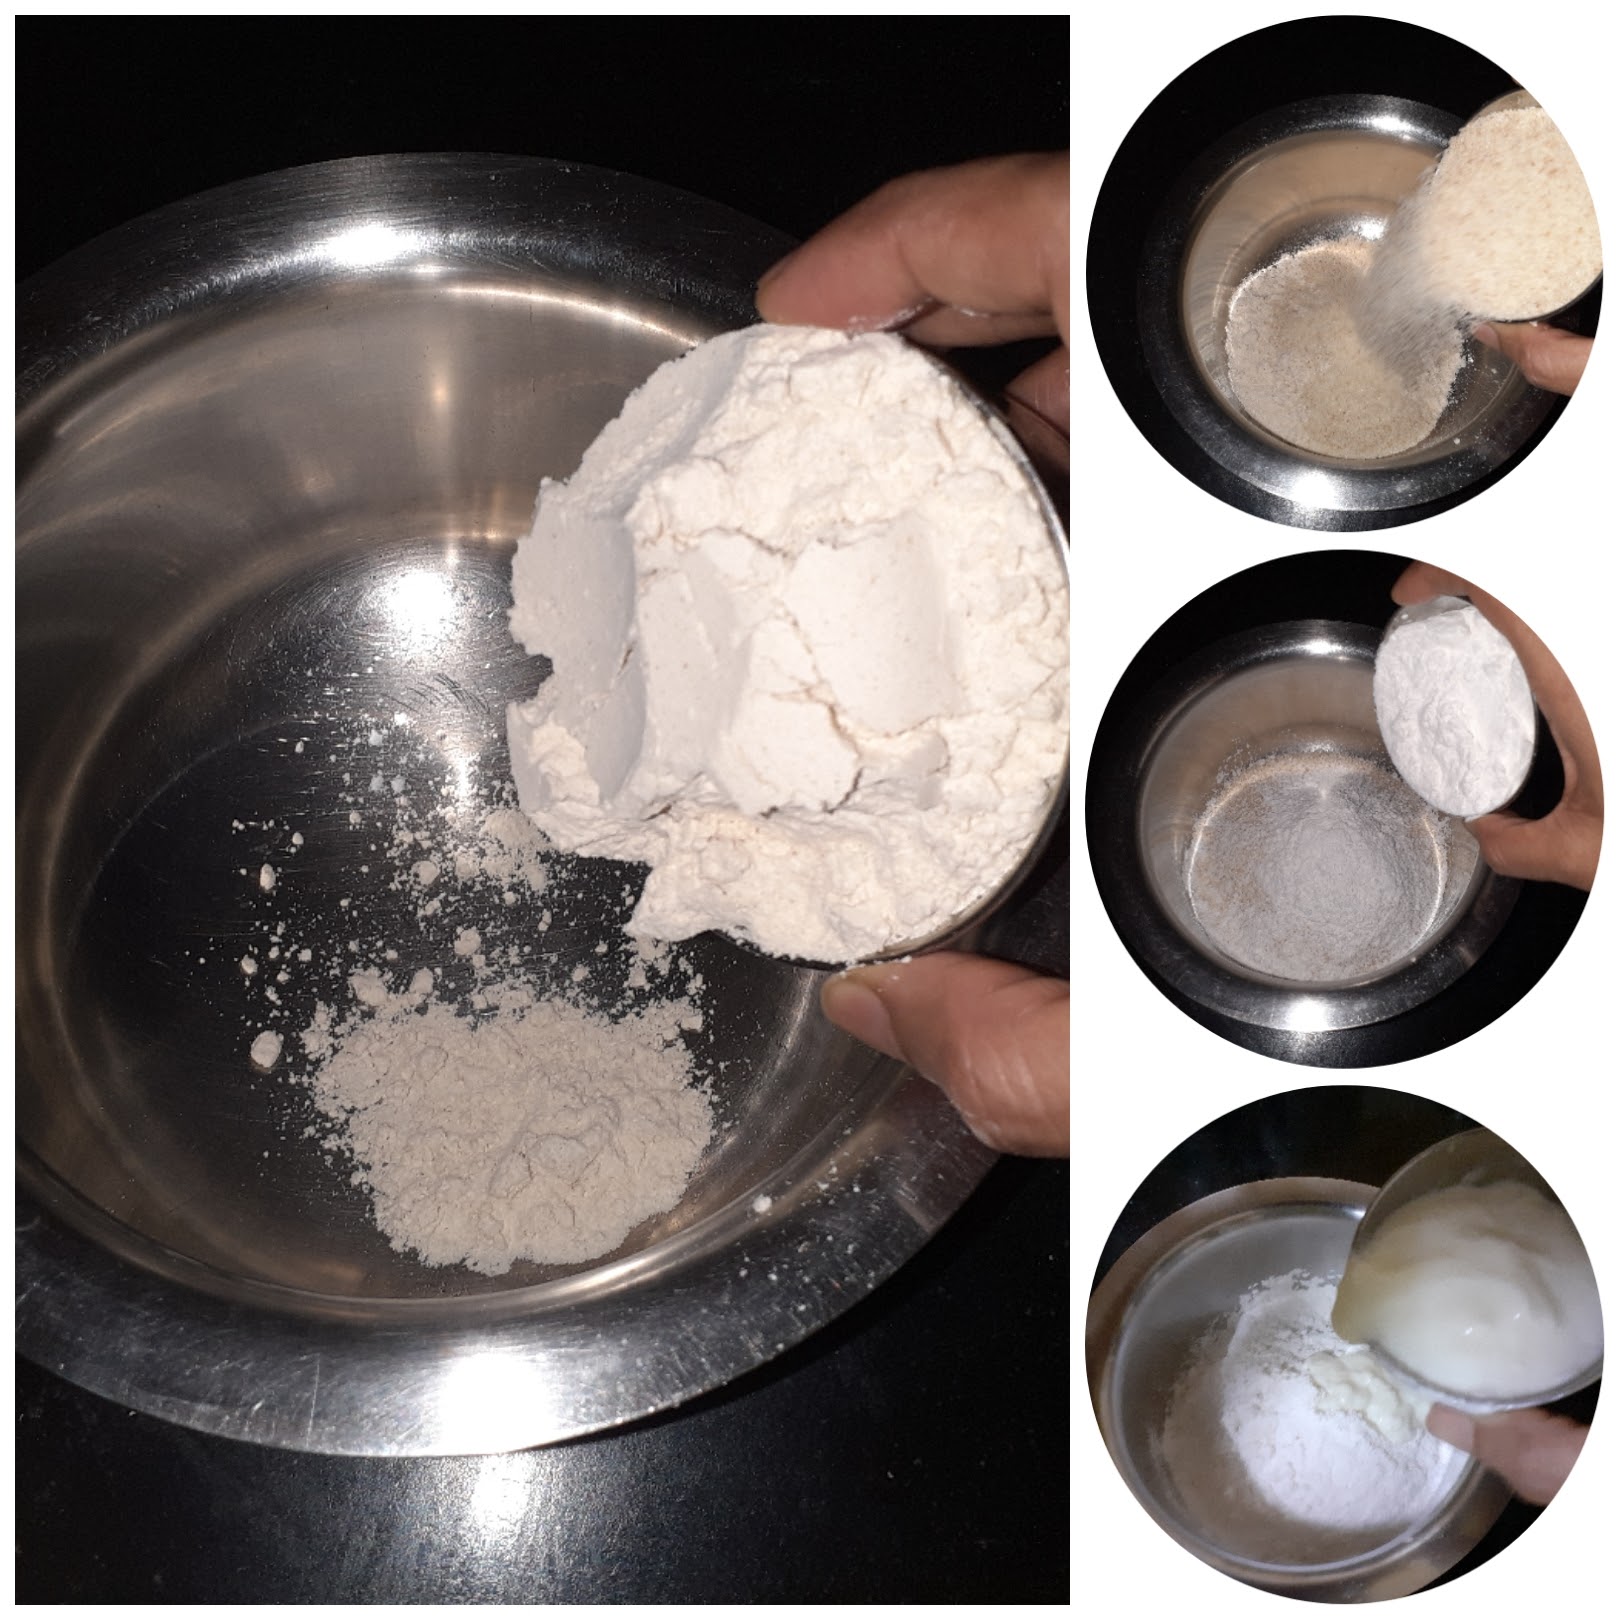
Soak all ingredients mentioned under “to soak” for 15 minutes. After 15 minutes, drain water and put the soaked ingredients into a blender. Add the ingredients mentioned under “to grind” except the curd and grind them to a coarse mixture. Now add 2 tbsp curd to the coarse mixture and grind again to a smooth paste.
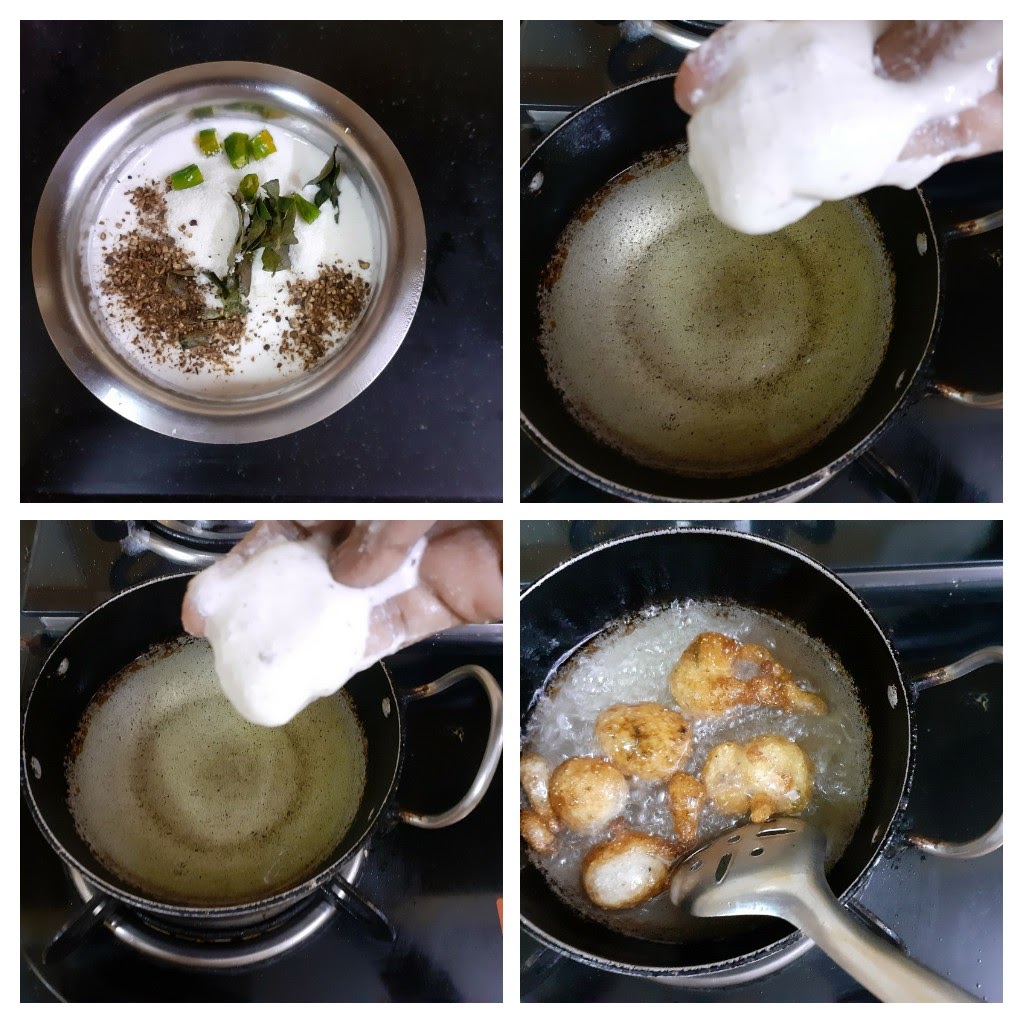
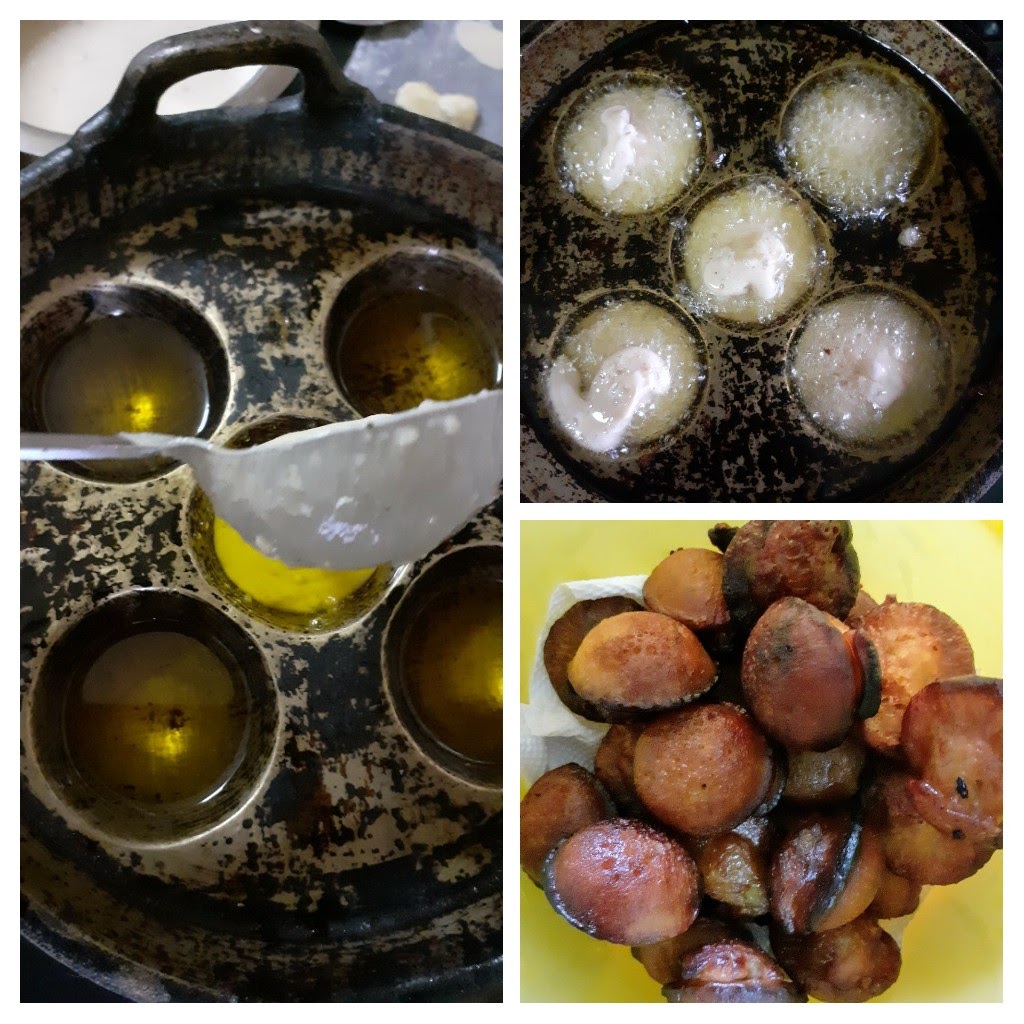
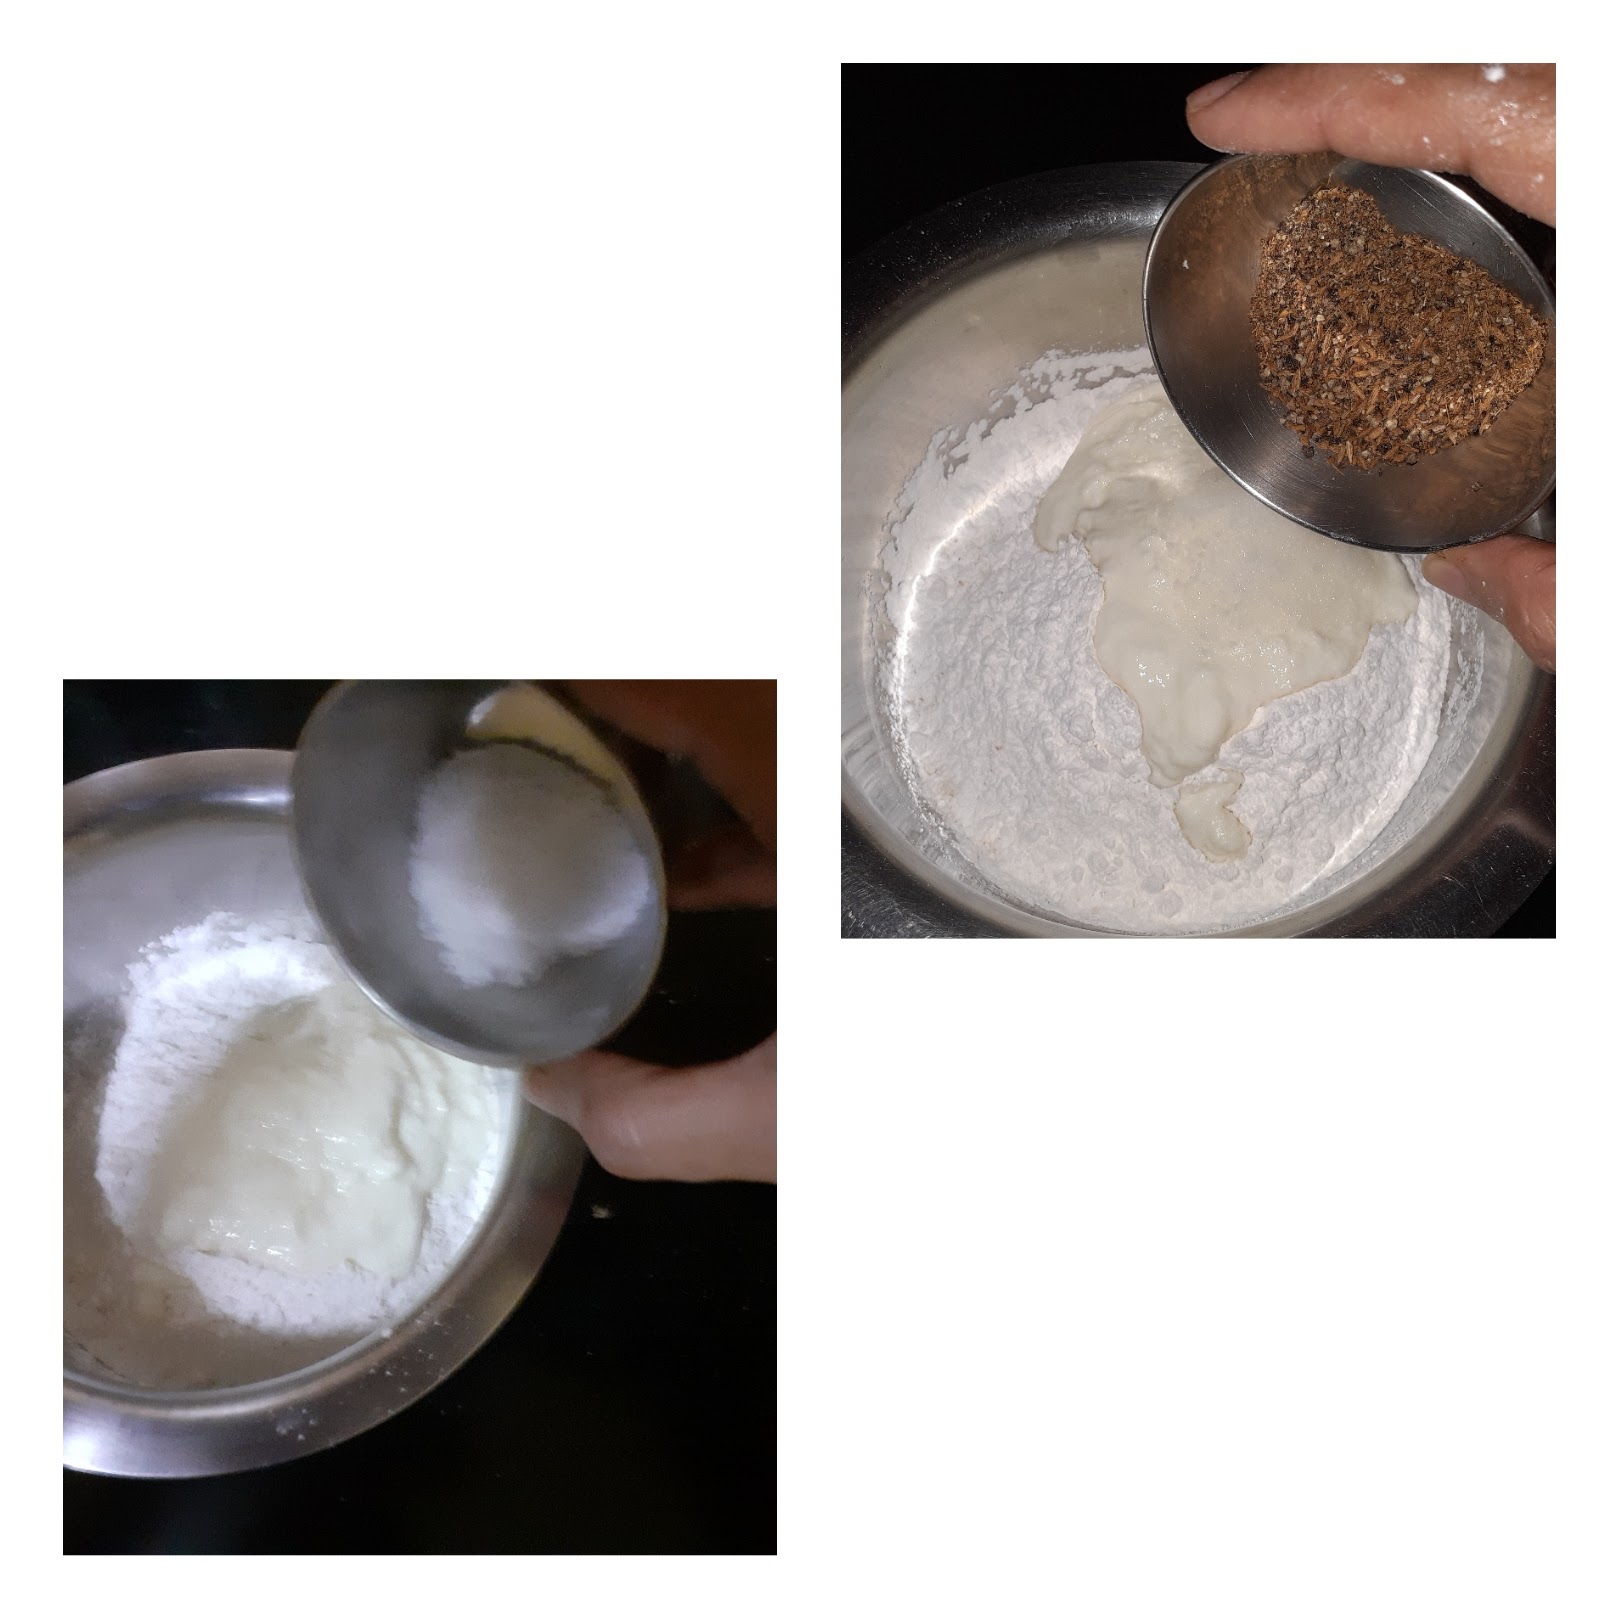
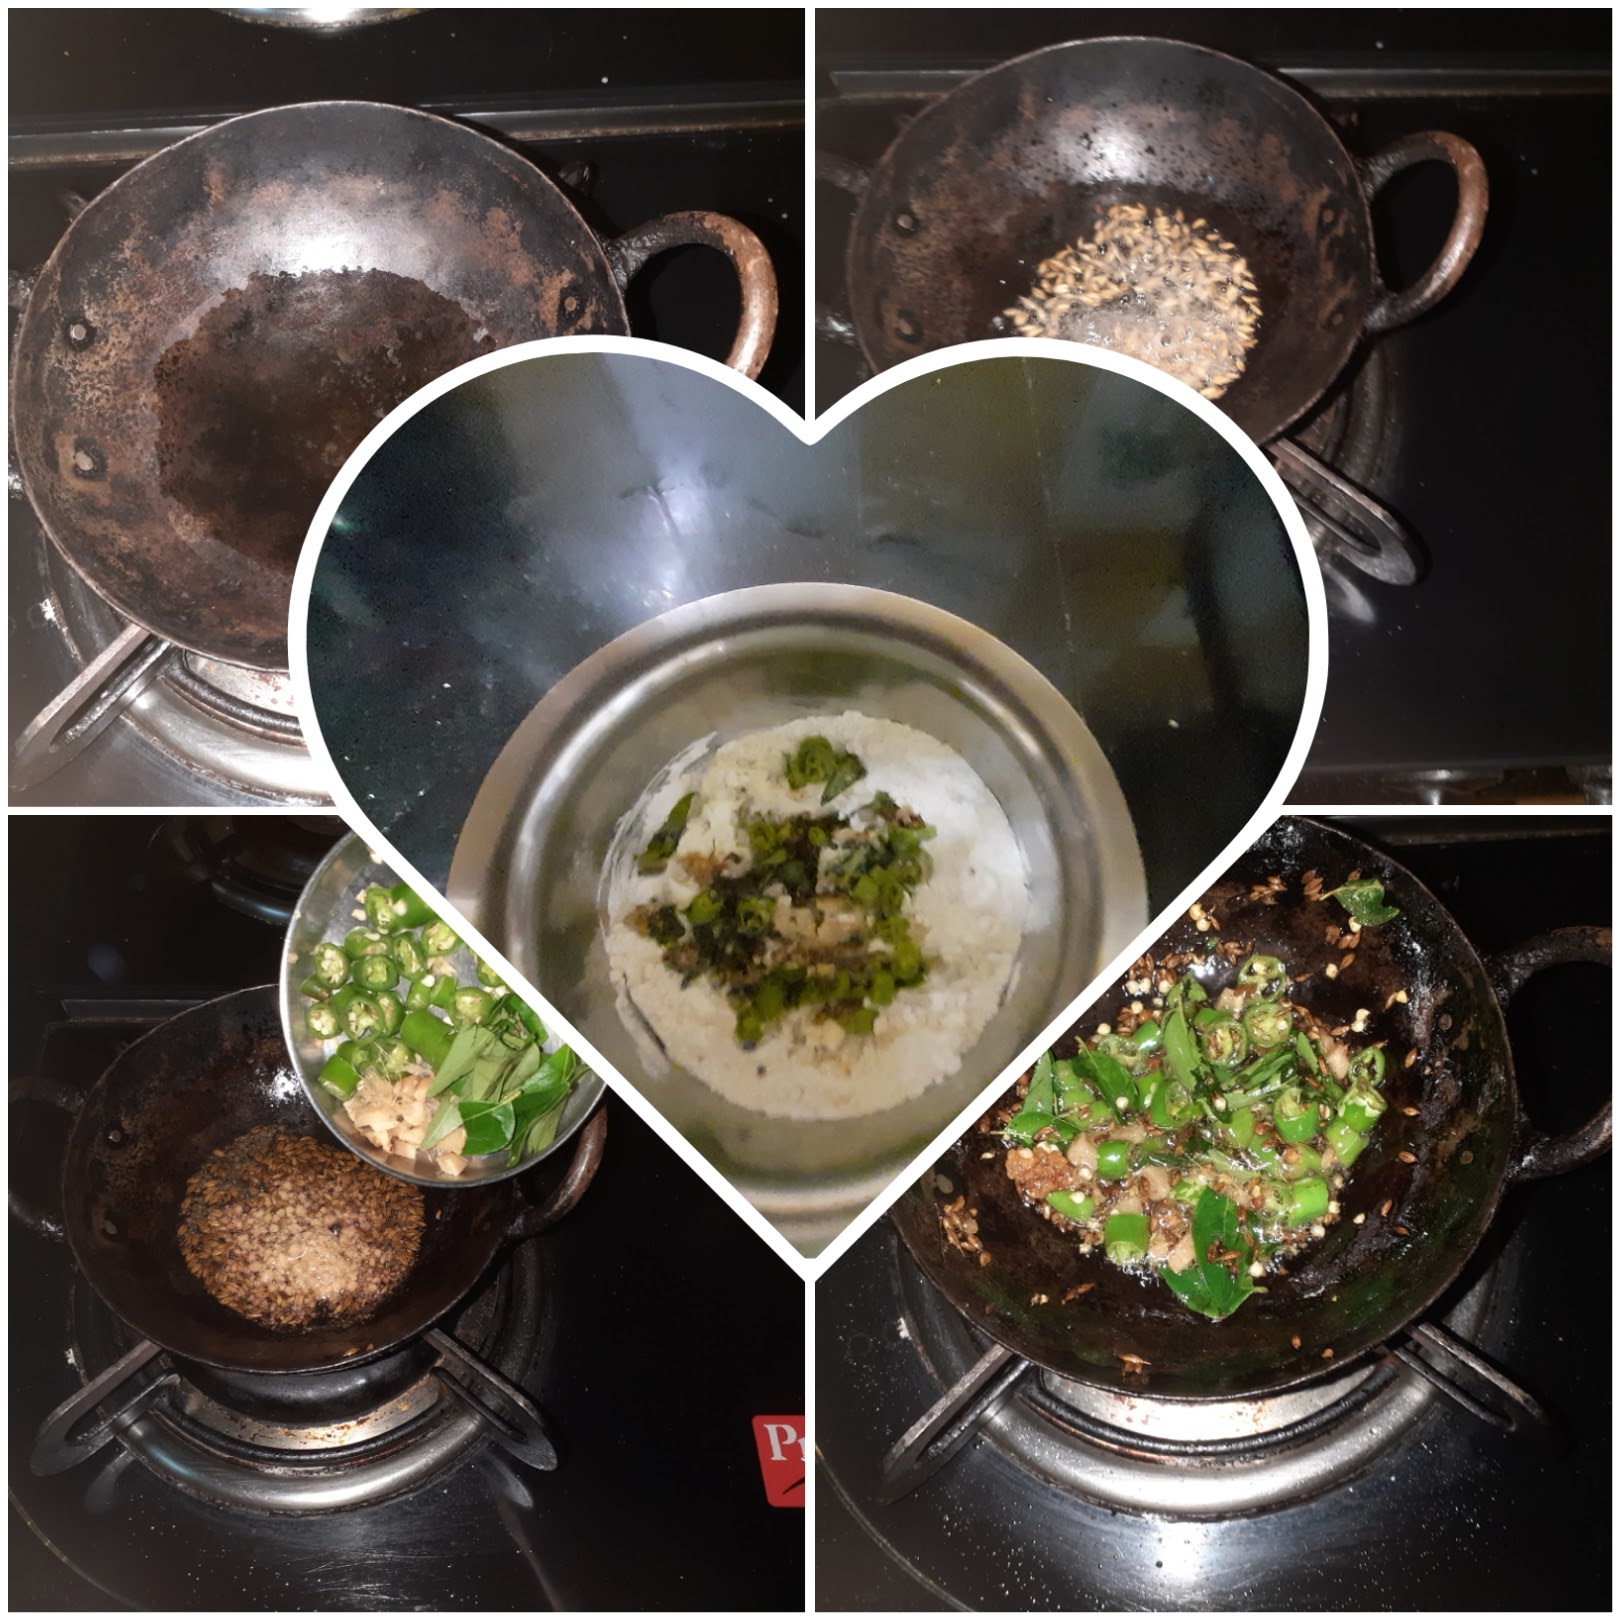
While the above ingredients are soaking, let’s fry the Bondas. To the Idli/Dosa batter add the rice flour, green chillies, ginger, cumin-pepper powder, and curry leaves and mix nicely. Heat oil in a Kadai for deep frying the Bondas. Now drop a small amount of batter into the oil with your finger or one can use a tablespoon to do it. Drop tiny amounts of batter, because they fluff up in the oil. Repeat for all batter, drain in absorbent paper and keep aside.
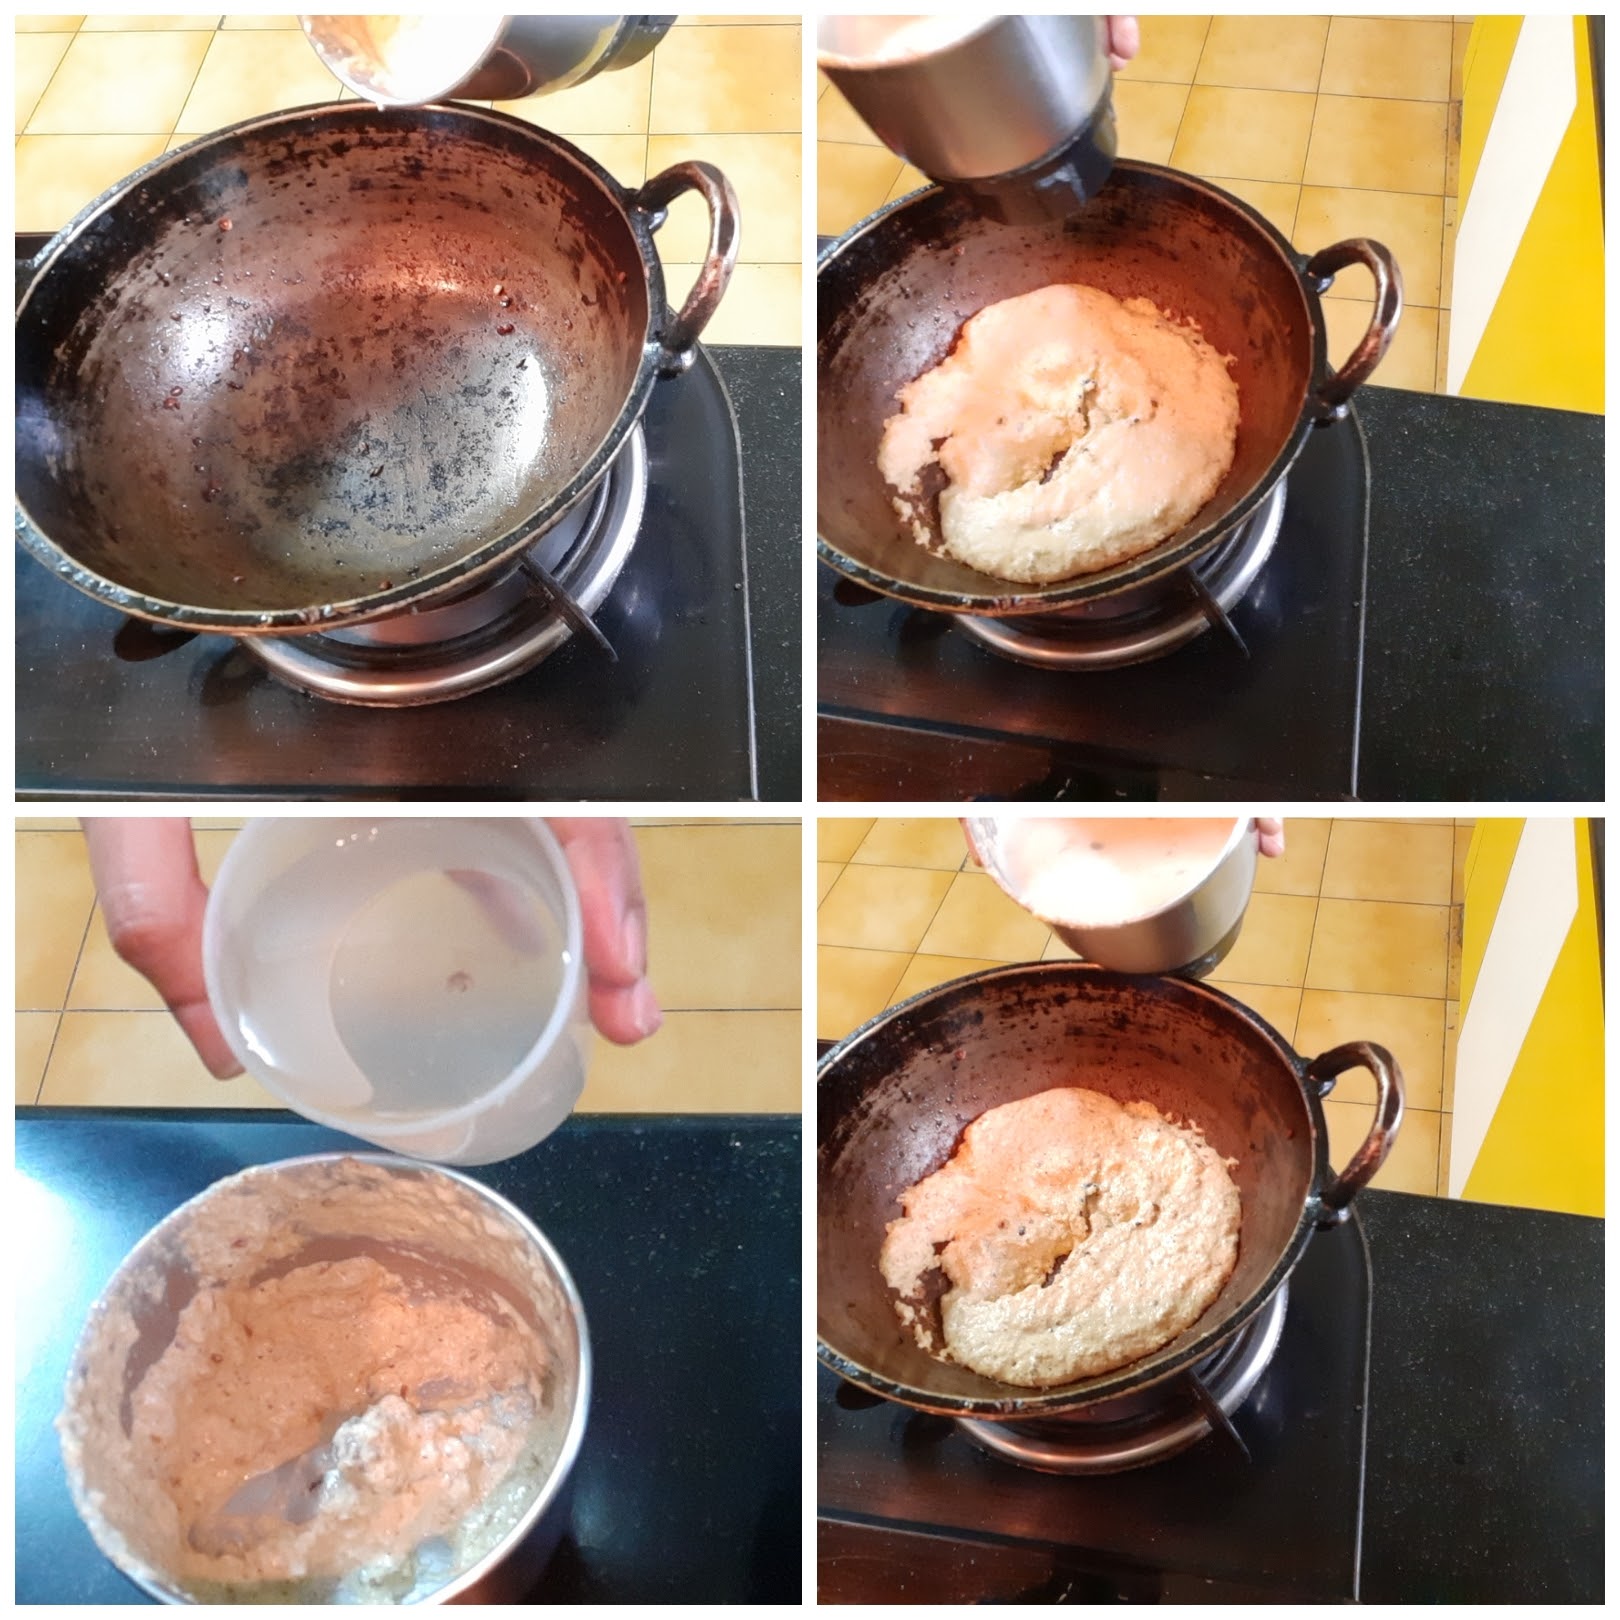
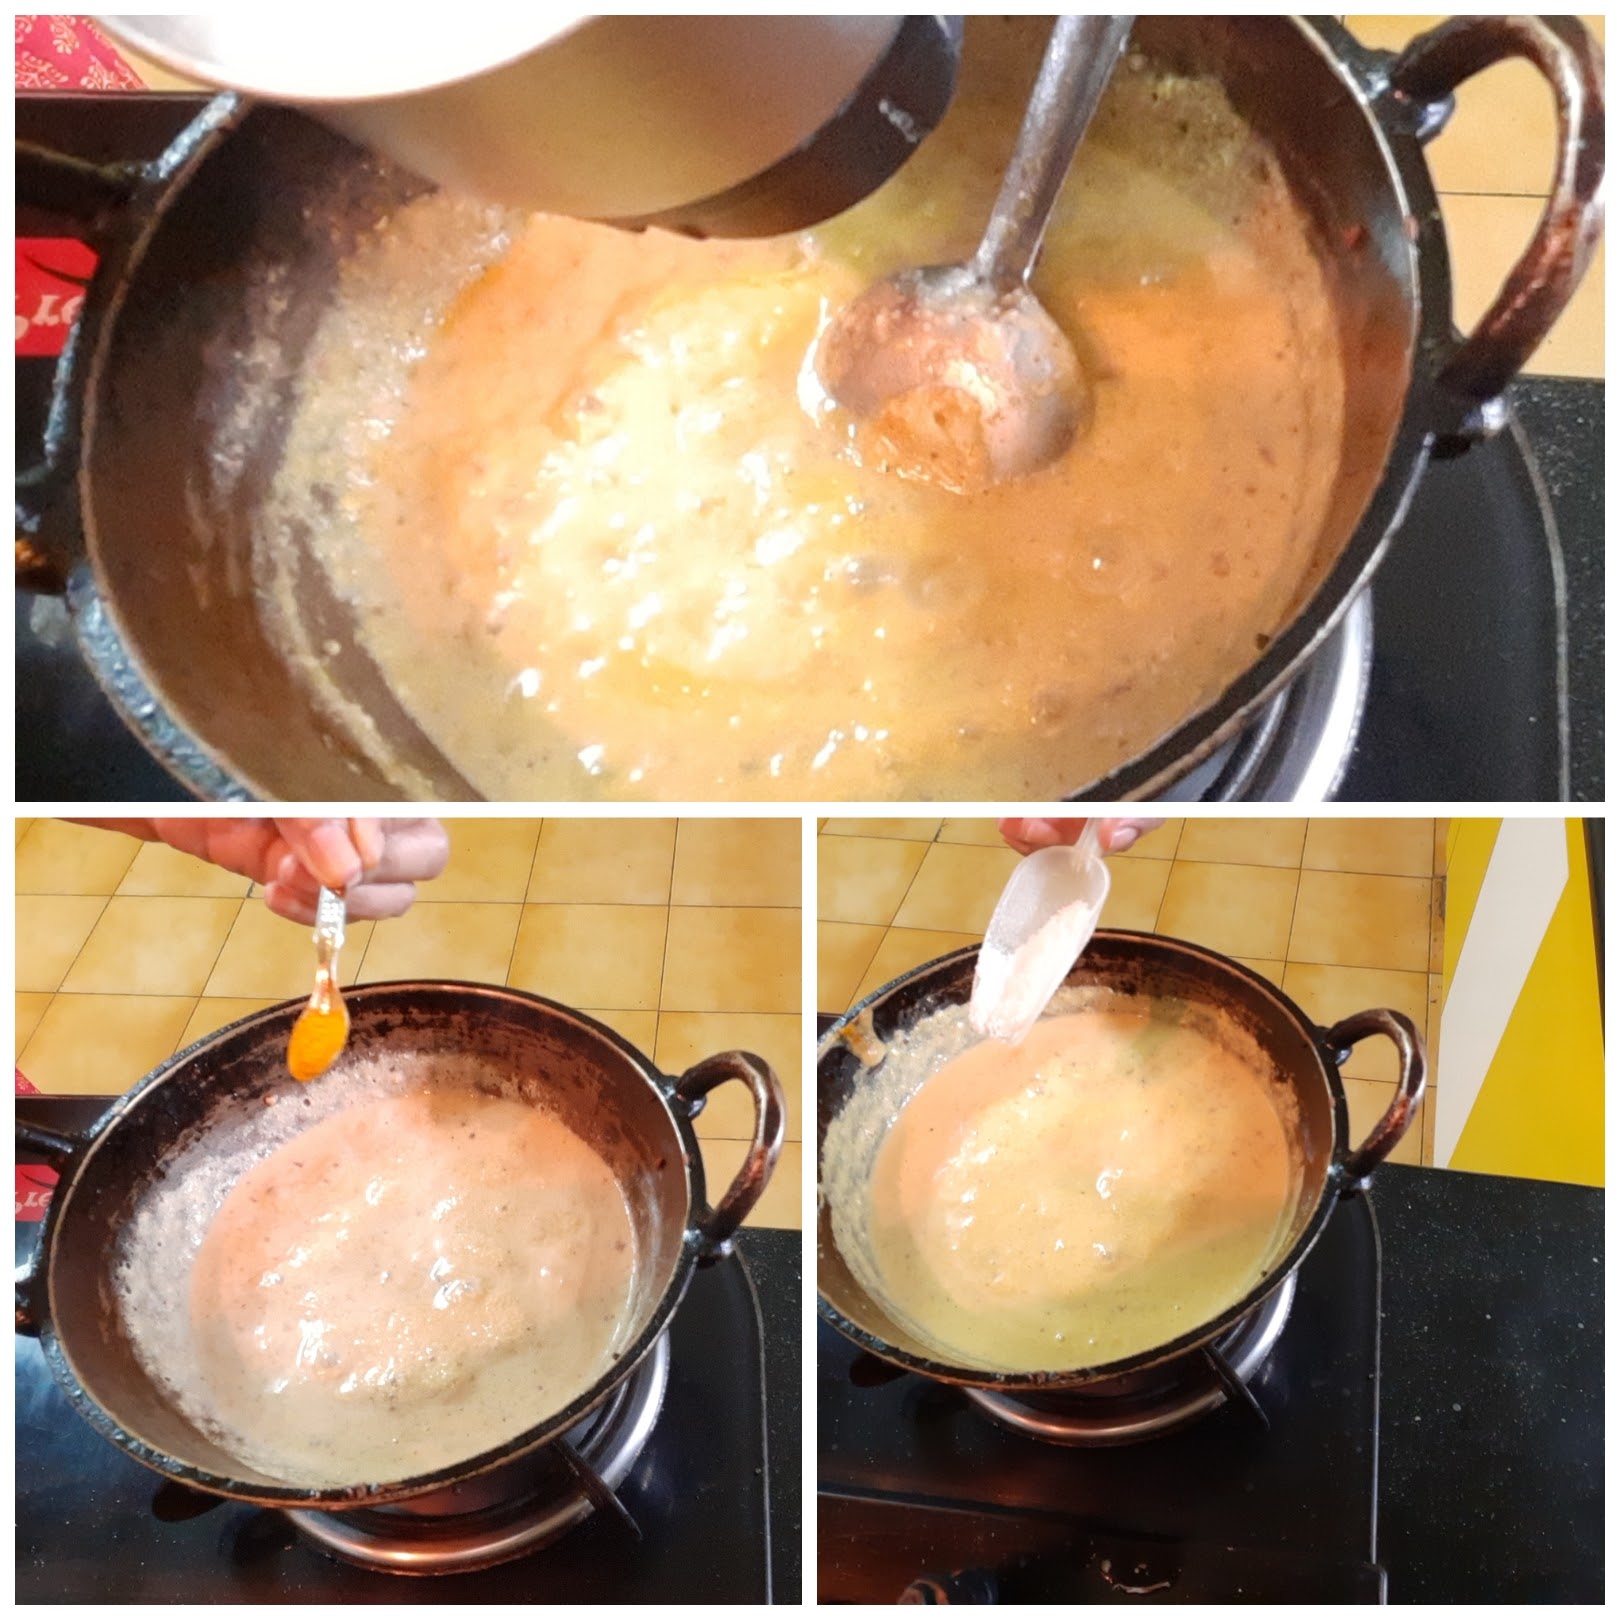
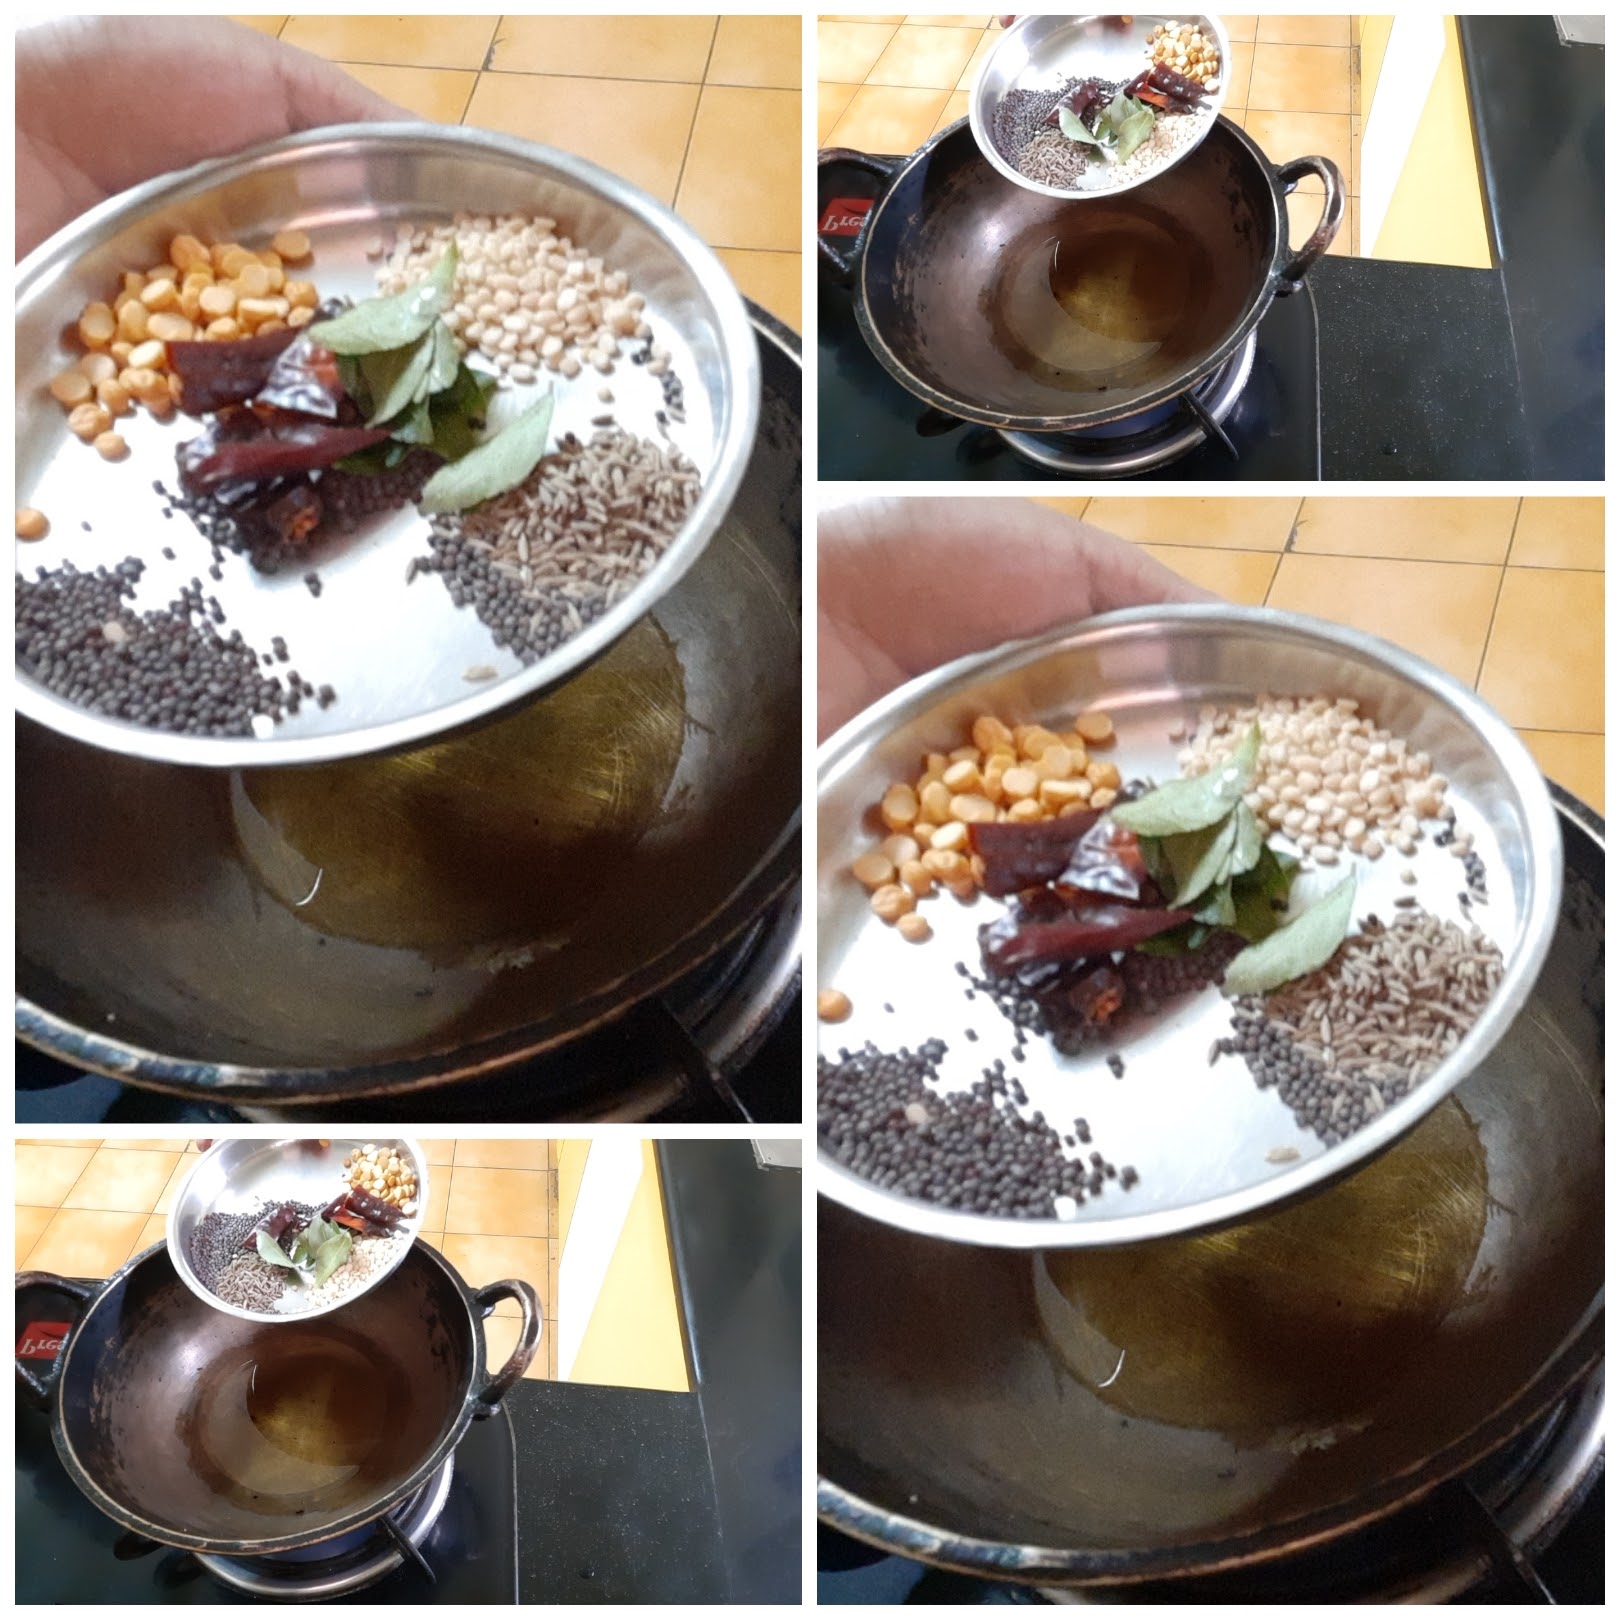
Now put a Kadai on the flame and pour the ground paste into it. Reduce the flame and add 1 to 1.5 cups of water and simmer it. The paste has to cook well, for about 2 minutes or until the raw taste of the masalas is gone. Now smoothen the remaining curd(we used only 2 tbsp for the paste) with a whisk or give it a single spin in the blender and pour this curd into the cooking paste. Add turmeric powder and salt. The flame should be low throughout. Once the curd is poured, keep stirring constantly for a few minutes. This should take approximately 2 minutes and then switch off the flame. Once the curd is poured, it should not simmer for long. Now add the fried Bondas. Now in a small Kadai heat oil, add all the tempering ingredients, fry them and add to the Mor Kuzhambu.
Let the Bondas soak for 10 minutes. The tasty Bonda Mor Kuzhambu is ready to relish.
Serving Suggestions: Hot rice and Parupu Usili on the sides. It is a match made in heaven with Coconut(Thengai ) Sevai(rice hoopers) or even with Coconut rice.
STEPWISE RECIPE FOLLOWS
1. Assemble all ingredients. Soak all ingredients mentioned under “to soak” for 15 minutes. After 15 minutes, drain water and put the soaked ingredients into a blender.
2.Add the ingredients mentioned under “to grind” except the curd and grind them to a coarse mixture. Now add 2 tbsp curd to the coarse mixture and grind again to a smooth paste.
3. To the Idli/Dosa batter add the rice flour, green chillies, ginger, cumin-pepper powder, and curry leaves and mix nicely. Heat oil in a Kadai for deep frying the Bondas. Now drop a small amount of batter into the oil with your finger or one can use a tablespoon to do it. Repeat for all batter, drain in absorbent paper and keep aside.
4. Now put a Kadai on the flame and pour the ground paste into it. Reduce the flame and add 1 to 1.5 cups of water and simmer it. The paste has to cook well, for about 2 minutes or until the raw taste of the masalas is gone.
5. Now smoothen the remaining curd(we used only 2 tbsp for the paste) with a whisk or give it a single spin in the blender and pour this curd into the cooking paste. Add turmeric powder and salt.
6. Once the curd is poured, keep stirring constantly for a few minutes, approx. 2 minutes and put off the flame. Now in a Kadai heat oil, add all the tempering ingredients, fry them and add to the Mor Kuzhambu. Let the Bondas soak for a few minutes and then the Mor Kuzhambu is ready to serve.
NOTES:
1. The flame should always be low while cooking this dish, as curd on the high flame will split and the water will separate.
2. For the same reason once the curd is poured into the masala paste it has to be stirred constantly, to avoid separating of water and curd, which will turn the dish runny.
3. To fry the Bondas use a spoon to drop the batter, as it is safer. At a time a few Bondas can be fried.
If you tried this recipe and liked it please comment below. I would love to hear from you. If you have a query about the recipe email us and ill respond as soon as I can.
If you would like to receive our recipes in your mail please leave your mail id at the homepage. Every time Rajjo’s Kitchen has a new post we will mail the recipe to you.
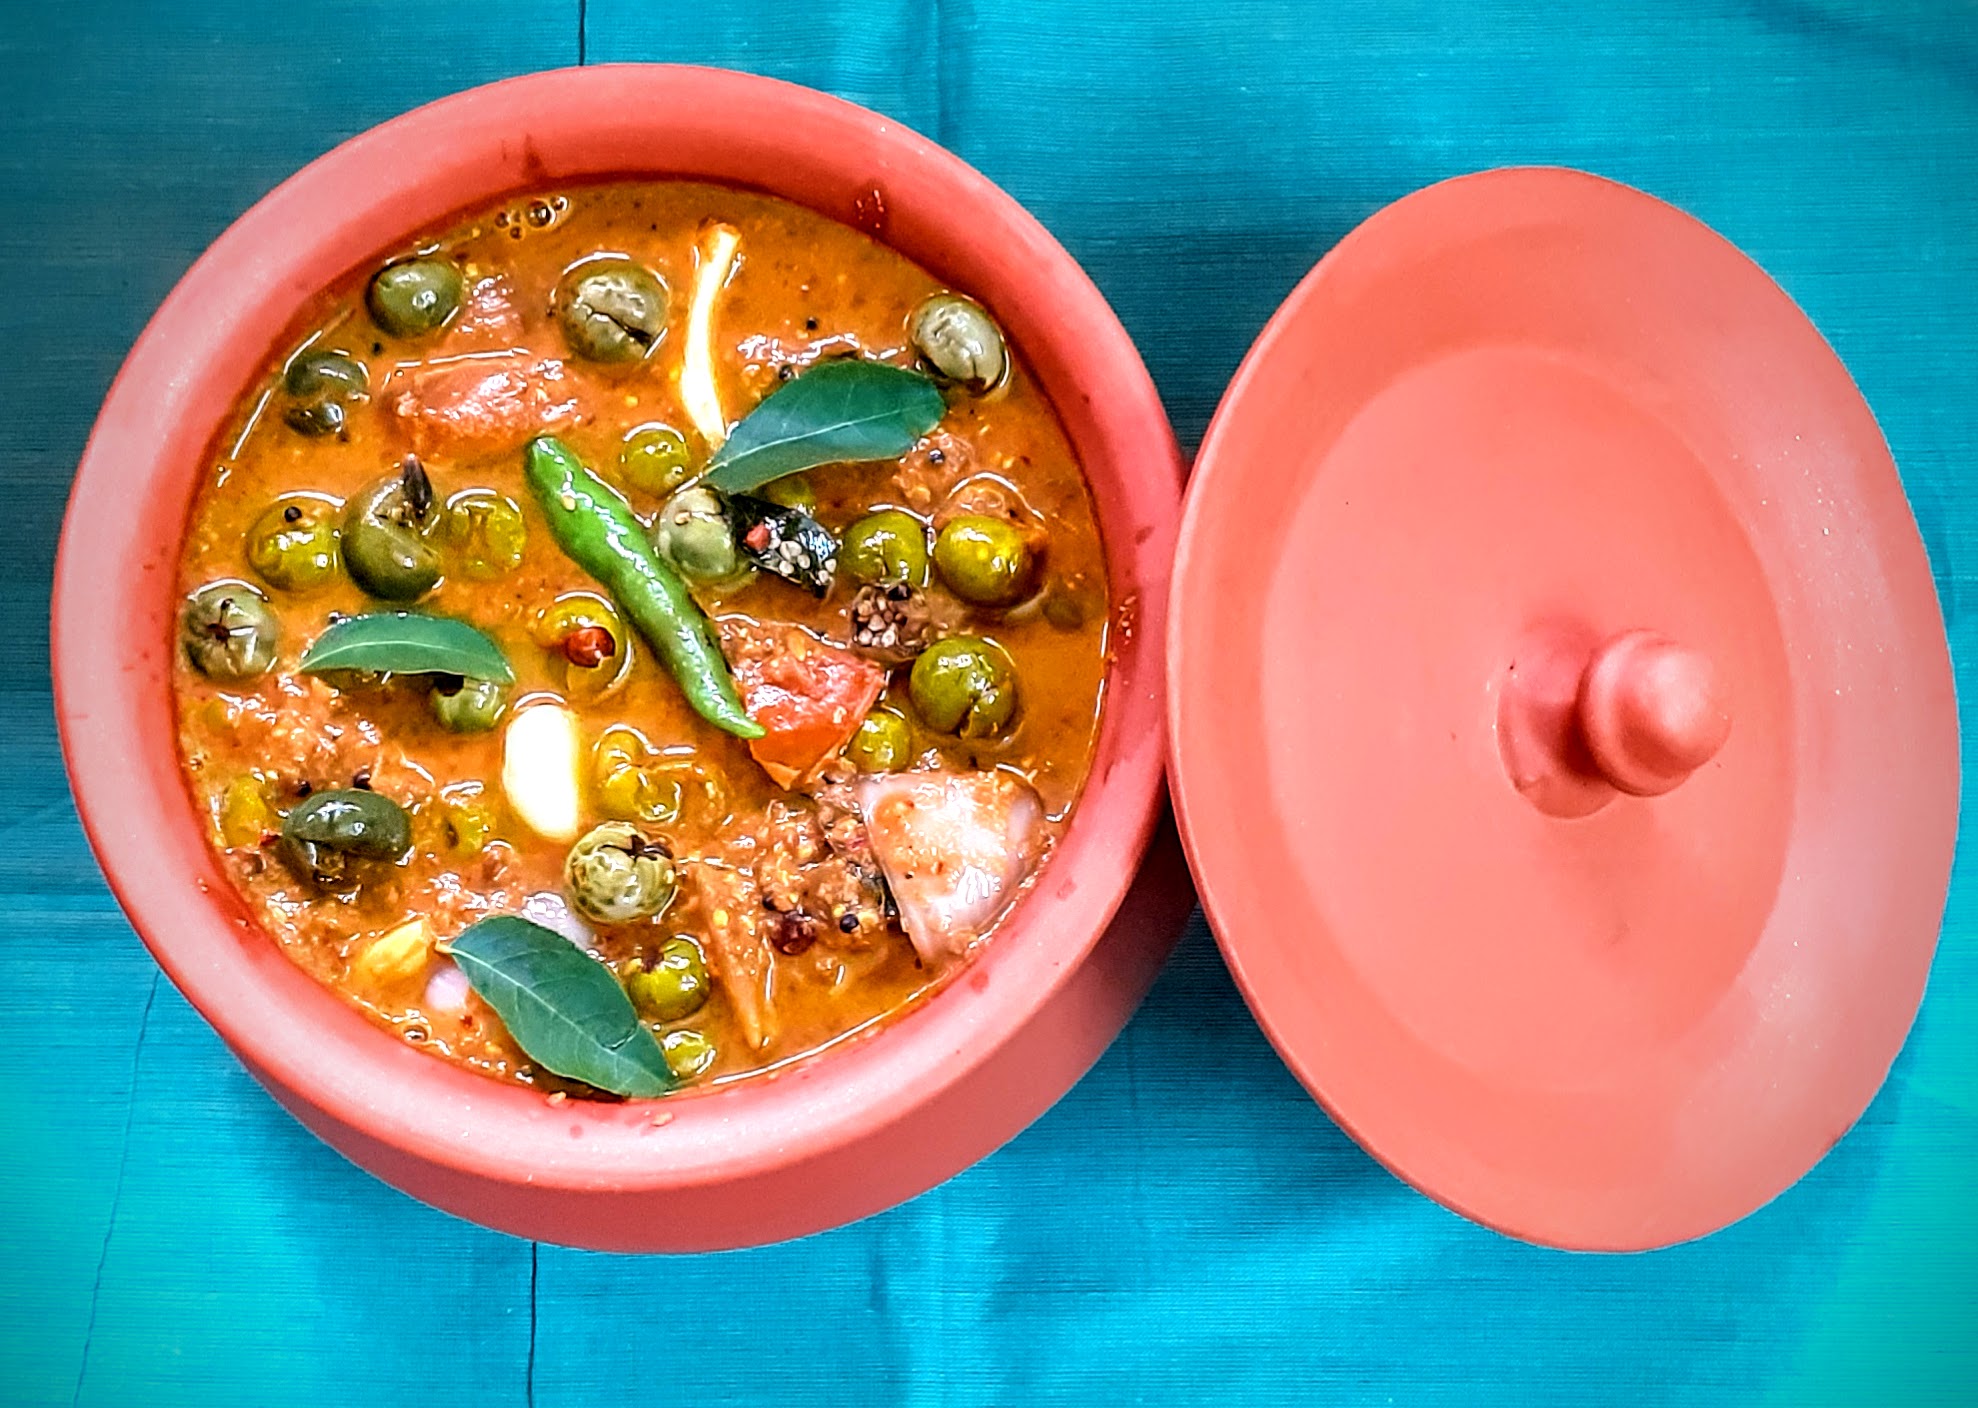
Pachai Sundakkai Kuzhambu (Chettinad Style)
Sundakkai/ Chundakkai in Tamil or Turkery Berry in English, as it is widely known, is a vegetable used in South Indian cooking to make a Kuzhambu or a gravy in which these berries are simmered with spices. As tasty as the Kuzhambu tastes, the berries are slightly bitter and have many medicinal benefits. This Vegetable is also known as Kudenekayi in Kannada or Usthikaya in Telugu. In Hindi it is called Bankatiya. I am giving here different names so that if you know this vegetable, one must try out recipes made of it because of its medicinal properties.
In SouthIndia the berries are blanched and then dried in the sun for a few days until it changes colour and is completely dry. The dried berries are then stored in an airtight jar then used to make the Sundakkai Vathakuzhambu. The dried berries are also fried in ghee and make an yummy accompaniment for curd rice. The berries fried in ghee are also mixed with hot rice and eaten as it is believed that it helps in deworming.
Health benefits of Sundakkai/ Turkey Berry- cures common cold, helps in treating kidney related issues, treats Anaemia, helps in treating cough and asthma, clears mucus, help in controlling diabetes, and they heal gastric ulcers.1Berry myriad benefits.
In this recipe I am using the fresh Sundakkai and not the dried ones( Vathal). Here the berries are cooked in tamarind sauce with a spicy, ground masala paste. The fresh berries are little bitter and so have to smashed using a pestle, so that as the Berry gets cooked in the tamarind pulp the bitterness is reduced. I am calling this a Chettinad style Kuzhambu because the masala paste used here is the Chettinad masala paste.
Here is the recipe of Pachai Sundakkai Kuzhambu for you-
PREP TIME: 15 MINS COOK TIME: 20 Mins
TOTAL TIME: 35 Mins COURSE: MAIN
CUISINE: SOUTH INDIAN SERVINGS: 5
AUTHOR: Rajni Ram
Ingredients:
Sundakkai/ Turkey Berry (fresh) 150 gm
Tamarind paste 1.5 tbsp ( or pulp of lemon sized ball)
Onion 1 (medium) diced
Tomato 1 large chopped roughly
Garlic 10 to 12 cloves
Curry leaves a few leaves
Green chillies 2
Gingelly/Til/Sesame oil 1.5 tbsp
Asafoetida 1/2 tsp
To grind:
Coriander seeds 1 tbsp
Fennel seeds 1.5 tsp
Dry red chilli 2
Kashmiri dry red chilli 1(optional)
Coconut gratings 1.5 tbsp
To temper:
Mustard seeds 1 tsp
Chana dal(gram) 1 tsp
Dry red chilli 1 broken
Methi/ fenugreek seeds 1 pinch
Asafoetida 1/2 tsp
Method:
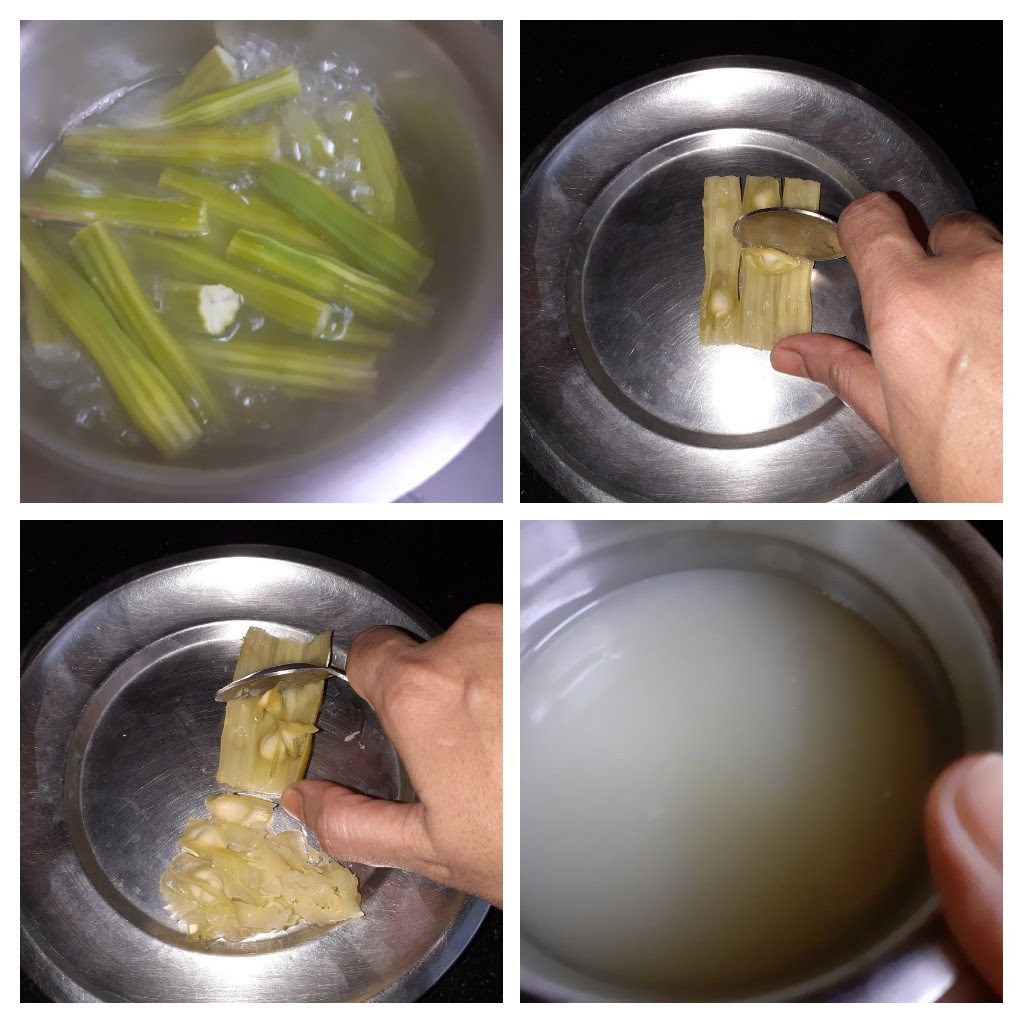
Wash and pat dry the Sundakkai/Turkey berry. Now with a mortar and pestle smash it lightly, such that it splits midway(refer picture). Now in a pan heat oil, add all ingredients under tempering followed by asafoetida and fry for 30 seconds. Now add the lightly crushed Sundakkai to the tempering and fry nicely for a minute.Now add the garlic cloves followed by onion, curry leaves and green chillies and continue to saute for 2 minutes. Now add the tomatoes and saute until the tomatoes turn tender. Add the tamarind paste followed by 2.5 cups water (or) add the pulp extracted from lemon sized ball of tamarind. Stir nicely and begin boiling. Add turmeric powder and cook until the Sundakkai turns tender. Check for doneness of Sundakkai by crushing one with a spoon/ladle. If it mashes easily the berries are cooked. Now grind all the ingredients under “to grind” to a coarse mixture, then add 1/2 cup water and grind to a smooth paste. Add this paste to the Sundakkai simmering in the Tamarind pulp,stir well and allow to cook. Continue cooking until the gravy thickens and the raw small of the masala is gone. The tasty and healthy Chettinad style Sundakkai Kuzhambu is ready.
SERVING SUGGESTIONS: With hot rice, with Dosa, Idli, pongal,
and Curd rice.
STEPWISE RECIPE FOLLOWS:
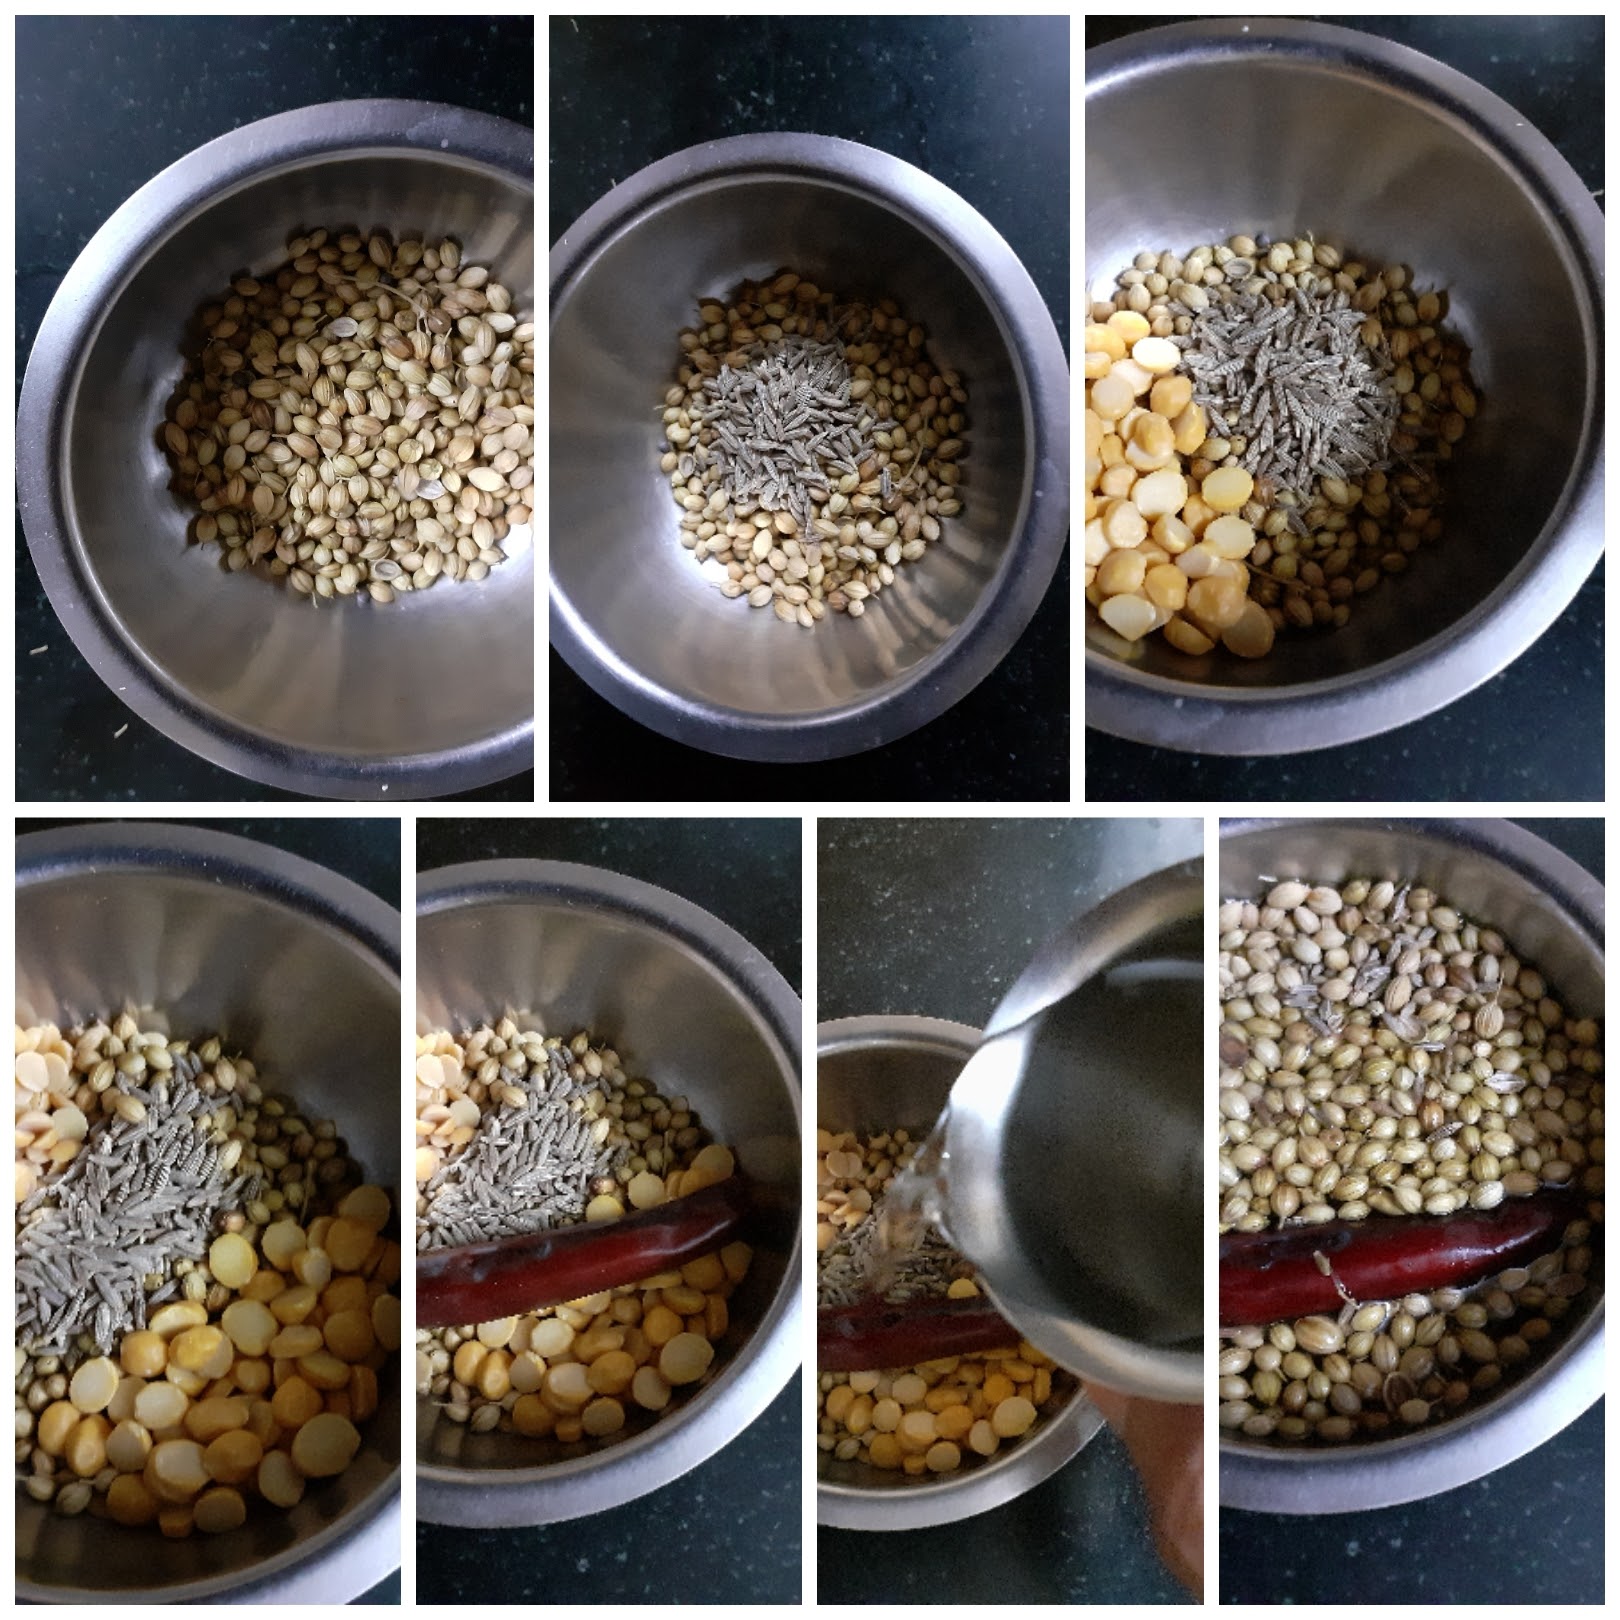
1. Assemble all ingredients. Wash and pat dry the Sundakkai/Turkey berry. Now with a mortar and pestle smash it lightly, such that it splits midway.
2. Now in a pan heat oil, add all ingredients under tempering followed by asafoetida and fry for 30 seconds. Now add the lightly crushed Sundakkai to the tempering and fry nicely for a minute.
3. Add the garlic cloves followed by onion, curry leaves and green chillies and continue to saute for 2 minutes. Now add the tomatoes and saute until the tomatoes turn tender.
4. Add the tamarind paste followed by 2.5 cups water (or) add the pulp extracted from lemon sized ball of tamarind. Stir nicely and begin boiling. Add turmeric powder and cook until the Sundakkai turns tender.
5. Now grind all the ingredients under “to grind” to a coarse mixture, then add 1/2 cup water and grind to a smooth paste. Add this paste to the Sundakkai simmering in the Tamarind pulp,stir well and allow to cook. Continue cooking until the gravy thickens and the raw small of the masala is gone.
NOTES:
1. Follow the precedure given to split open the berry midway. The kuzhambu will taste to bitter if the berries are not split.
2. After the berries cook in the tamarind sauce, check for doneness by pressing them with a ladle or soon. If they crush easily, they are cooked.
3. I have used Gingelly/Til oil as it adds extra flavour to the dish. Unless one is allergic to sesame oil or does not like the taste I recommend using the oil. Alternately refined oil can be used.
If you tried this recipe and liked it please comment below. I would love to hear from you. If you have a query about the recipe email us and ill respond as soon as I can.
If you would like to receive our recipes in your mail please leave your mail id at the homepage. Every time Rajjo’s Kitchen has a new post we will mail the recipe to you.
Karuvepilai Podi/Curry Leaves Powder (For Rice)
Karuvepilai or curry leaf plant is an aromatic plant the leaves of which are used in seasoning dishes. Most south Indian dishes have Curry leaves as their common tempering element. Apart from imparting their aroma to a dish they also add a huge amount of flavour. These leaves have many medicinal properties like- high calcium content, rich in Iron, aids in digestion, improves vision, rich in Vitamin A, and many more such benefits.
In our house, we make this powder with fresh curry leaves and other spices that can be mixed with hot rice and ghee, or it can be added to rice tempered with peanuts and spices and made into Karuvepilai Sadam or Curry leaves rice.
Karuvepilai powder can be stored in an airtight container for 3 months and more.
Curry leaves 2 cups(stalks removed) washed and pat dried
Coriander seeds/Dhania 2 tbsp
Chana dal/ Gram 1 tbsp
Urad dal 1/2 tbsp
Jeera/ Cumin seeds 1 tsp
Dry red chillies 5 big ones
Tamarind lemon sized ball
Salt to taste.
Asafoetida 1 tsp
Oil for frying spices 1 tbsp
Directions:
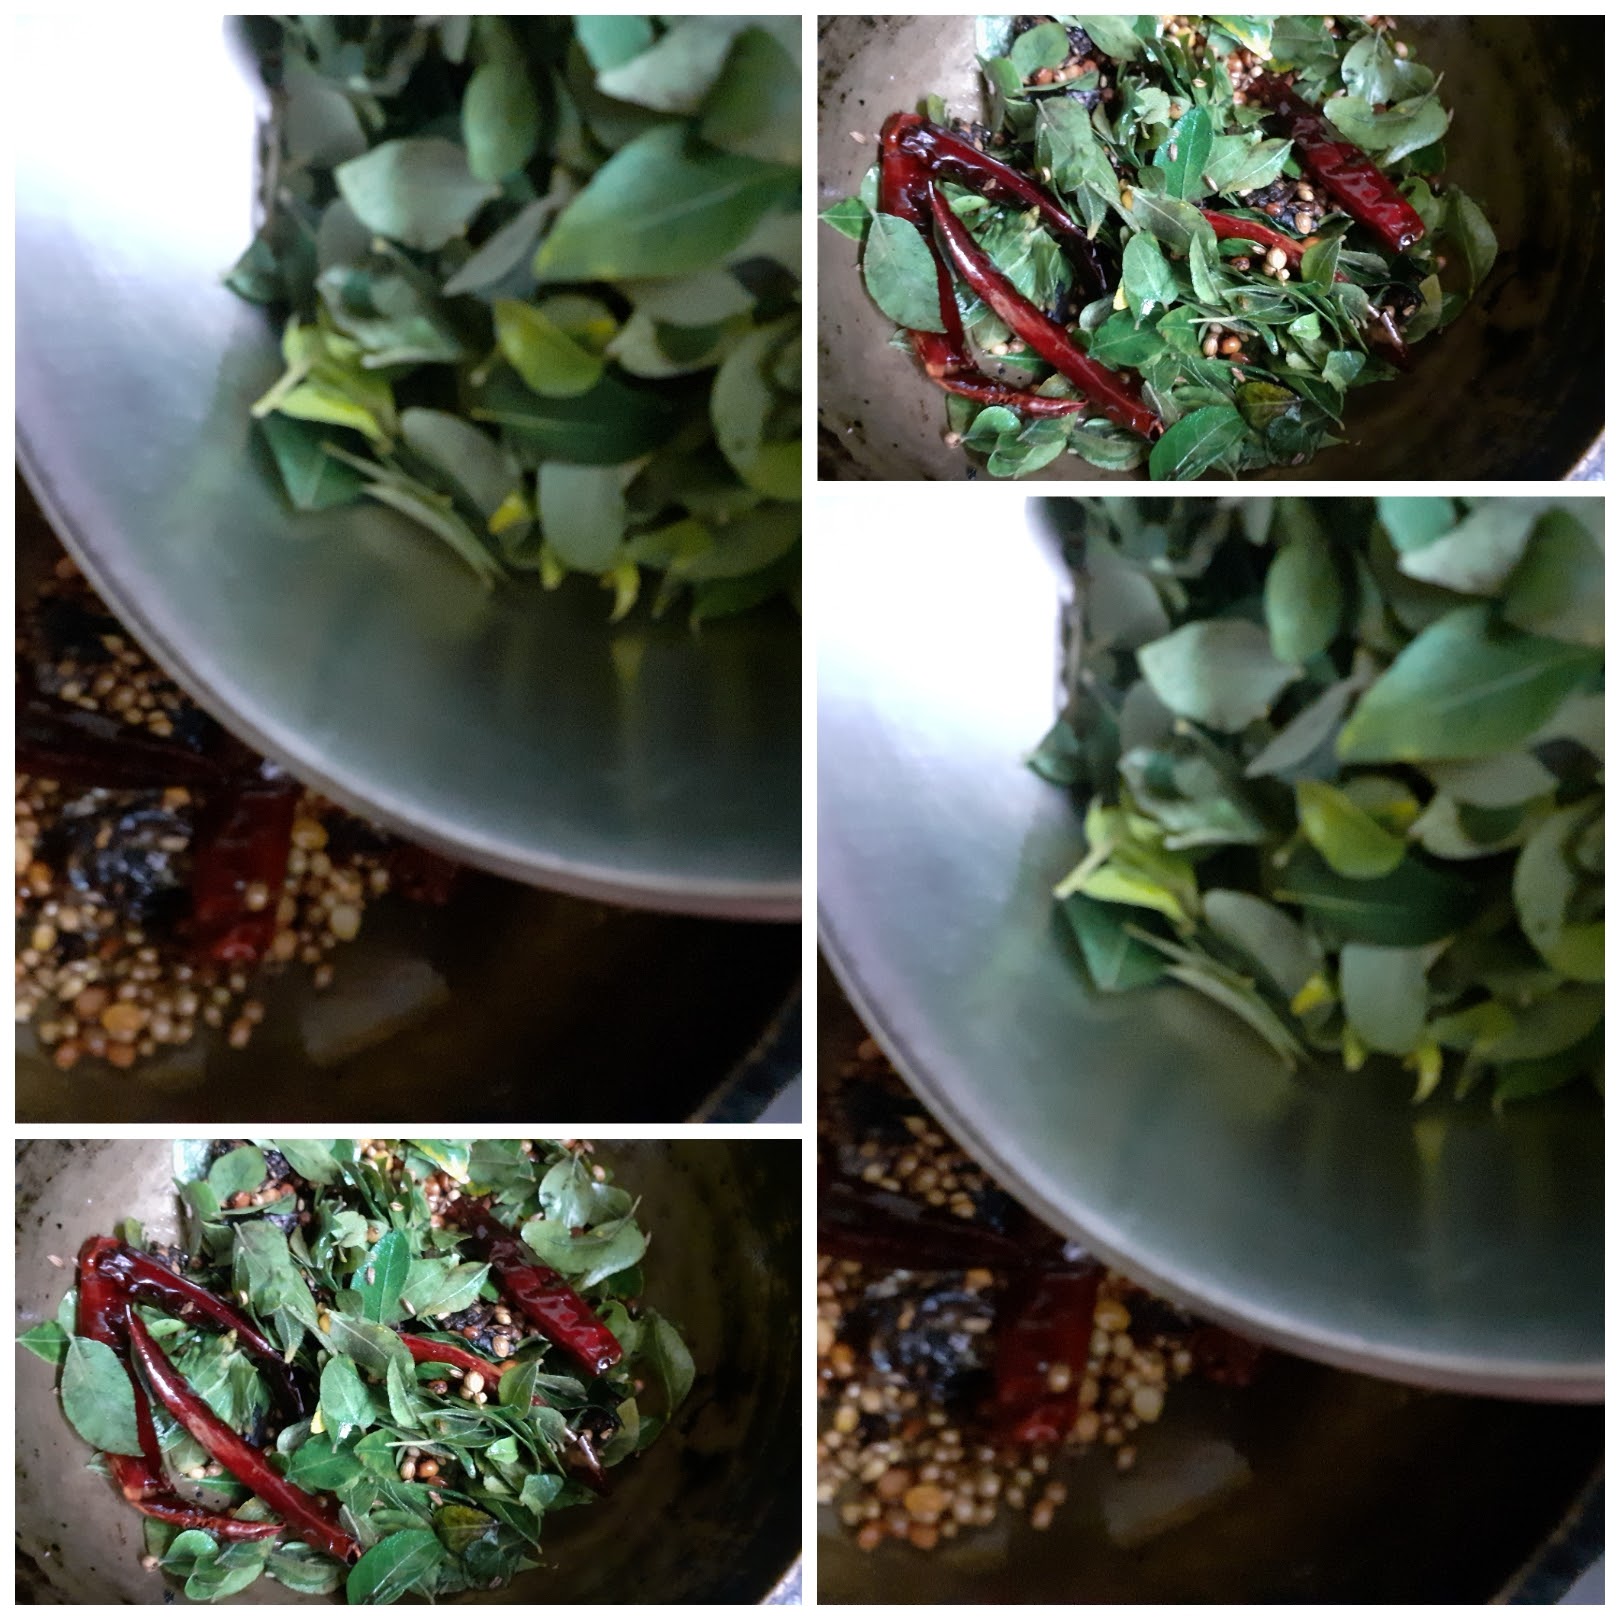
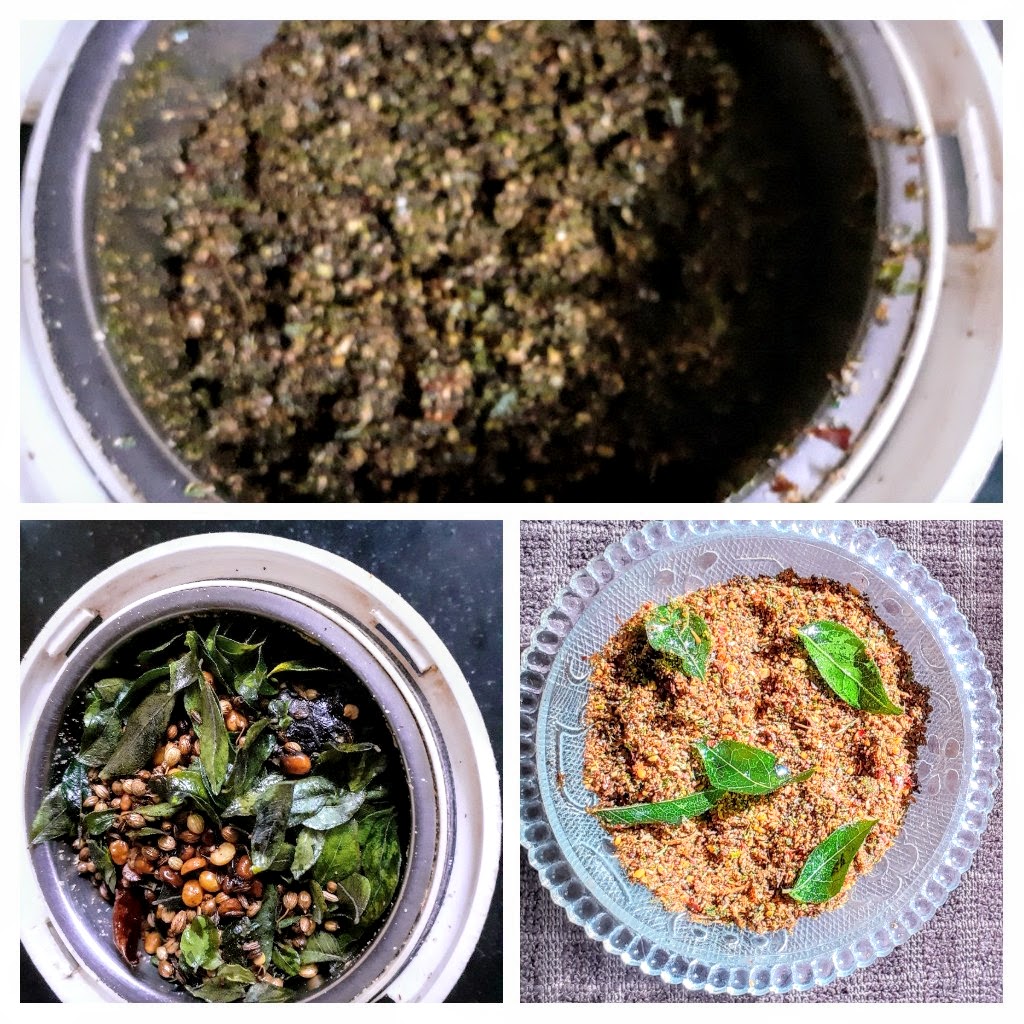
In a Kadai heat the oil and add the chana dal and urad dal and fry until they turn golden brown. Now add the coriander seeds and Cumin and continue to fry. When the coriander turns aromatic add the dry red chillies and continue to fry. Now add the tamarind followed by asafoetida and fry until the tamarind turn a little crisp, about 30 seconds. Finally, add the washed and pat dried curry leaves and saute for about a minute. Switch off the flame and cool all the roasted ingredients. On cooling, transfer them to the dry mixer jar and grind to a fine powder. Add salt and give another spin the mixture. The Karuvepilai powder is ready for storing. Enjoy with hot rice and ghee. One ball of rice with this powder helps maintain iron levels, good for hair growth and has many more benefits.
STEPWISE RECIPE FOLLOWS:
1. Assemble all ingredients.
2. Heat oil in a Kadai and add the urad dal and chana dal and fry until they turn light brown.
3. Add the coriander seeds and cumin seeds and continue to fry until the coriander seeds turn aromatic.
4. Now add the dry red chillies, tamarind, followed by the asafoetida and continue frying until the tamarind turns a little crisp.
5. Now add the washed and dried curry leaves and saute for a few minutes and put off the stove. Cool the roasted ingredients.
6. Put all of them in a dry grinder jar and grind to a fine powder. Add salt as required and the Kruvepilai powder is ready to store.
NOTES:
1. The curry leaves must be separated from the stalks, washed and pat dried.
2. Salt can be added while grinding or after grinding.
3. Store ina dry container.
4. More dry red chillies can be added for more spiciness.
Karuvepilai Rice made from the Karuvepilai Podi
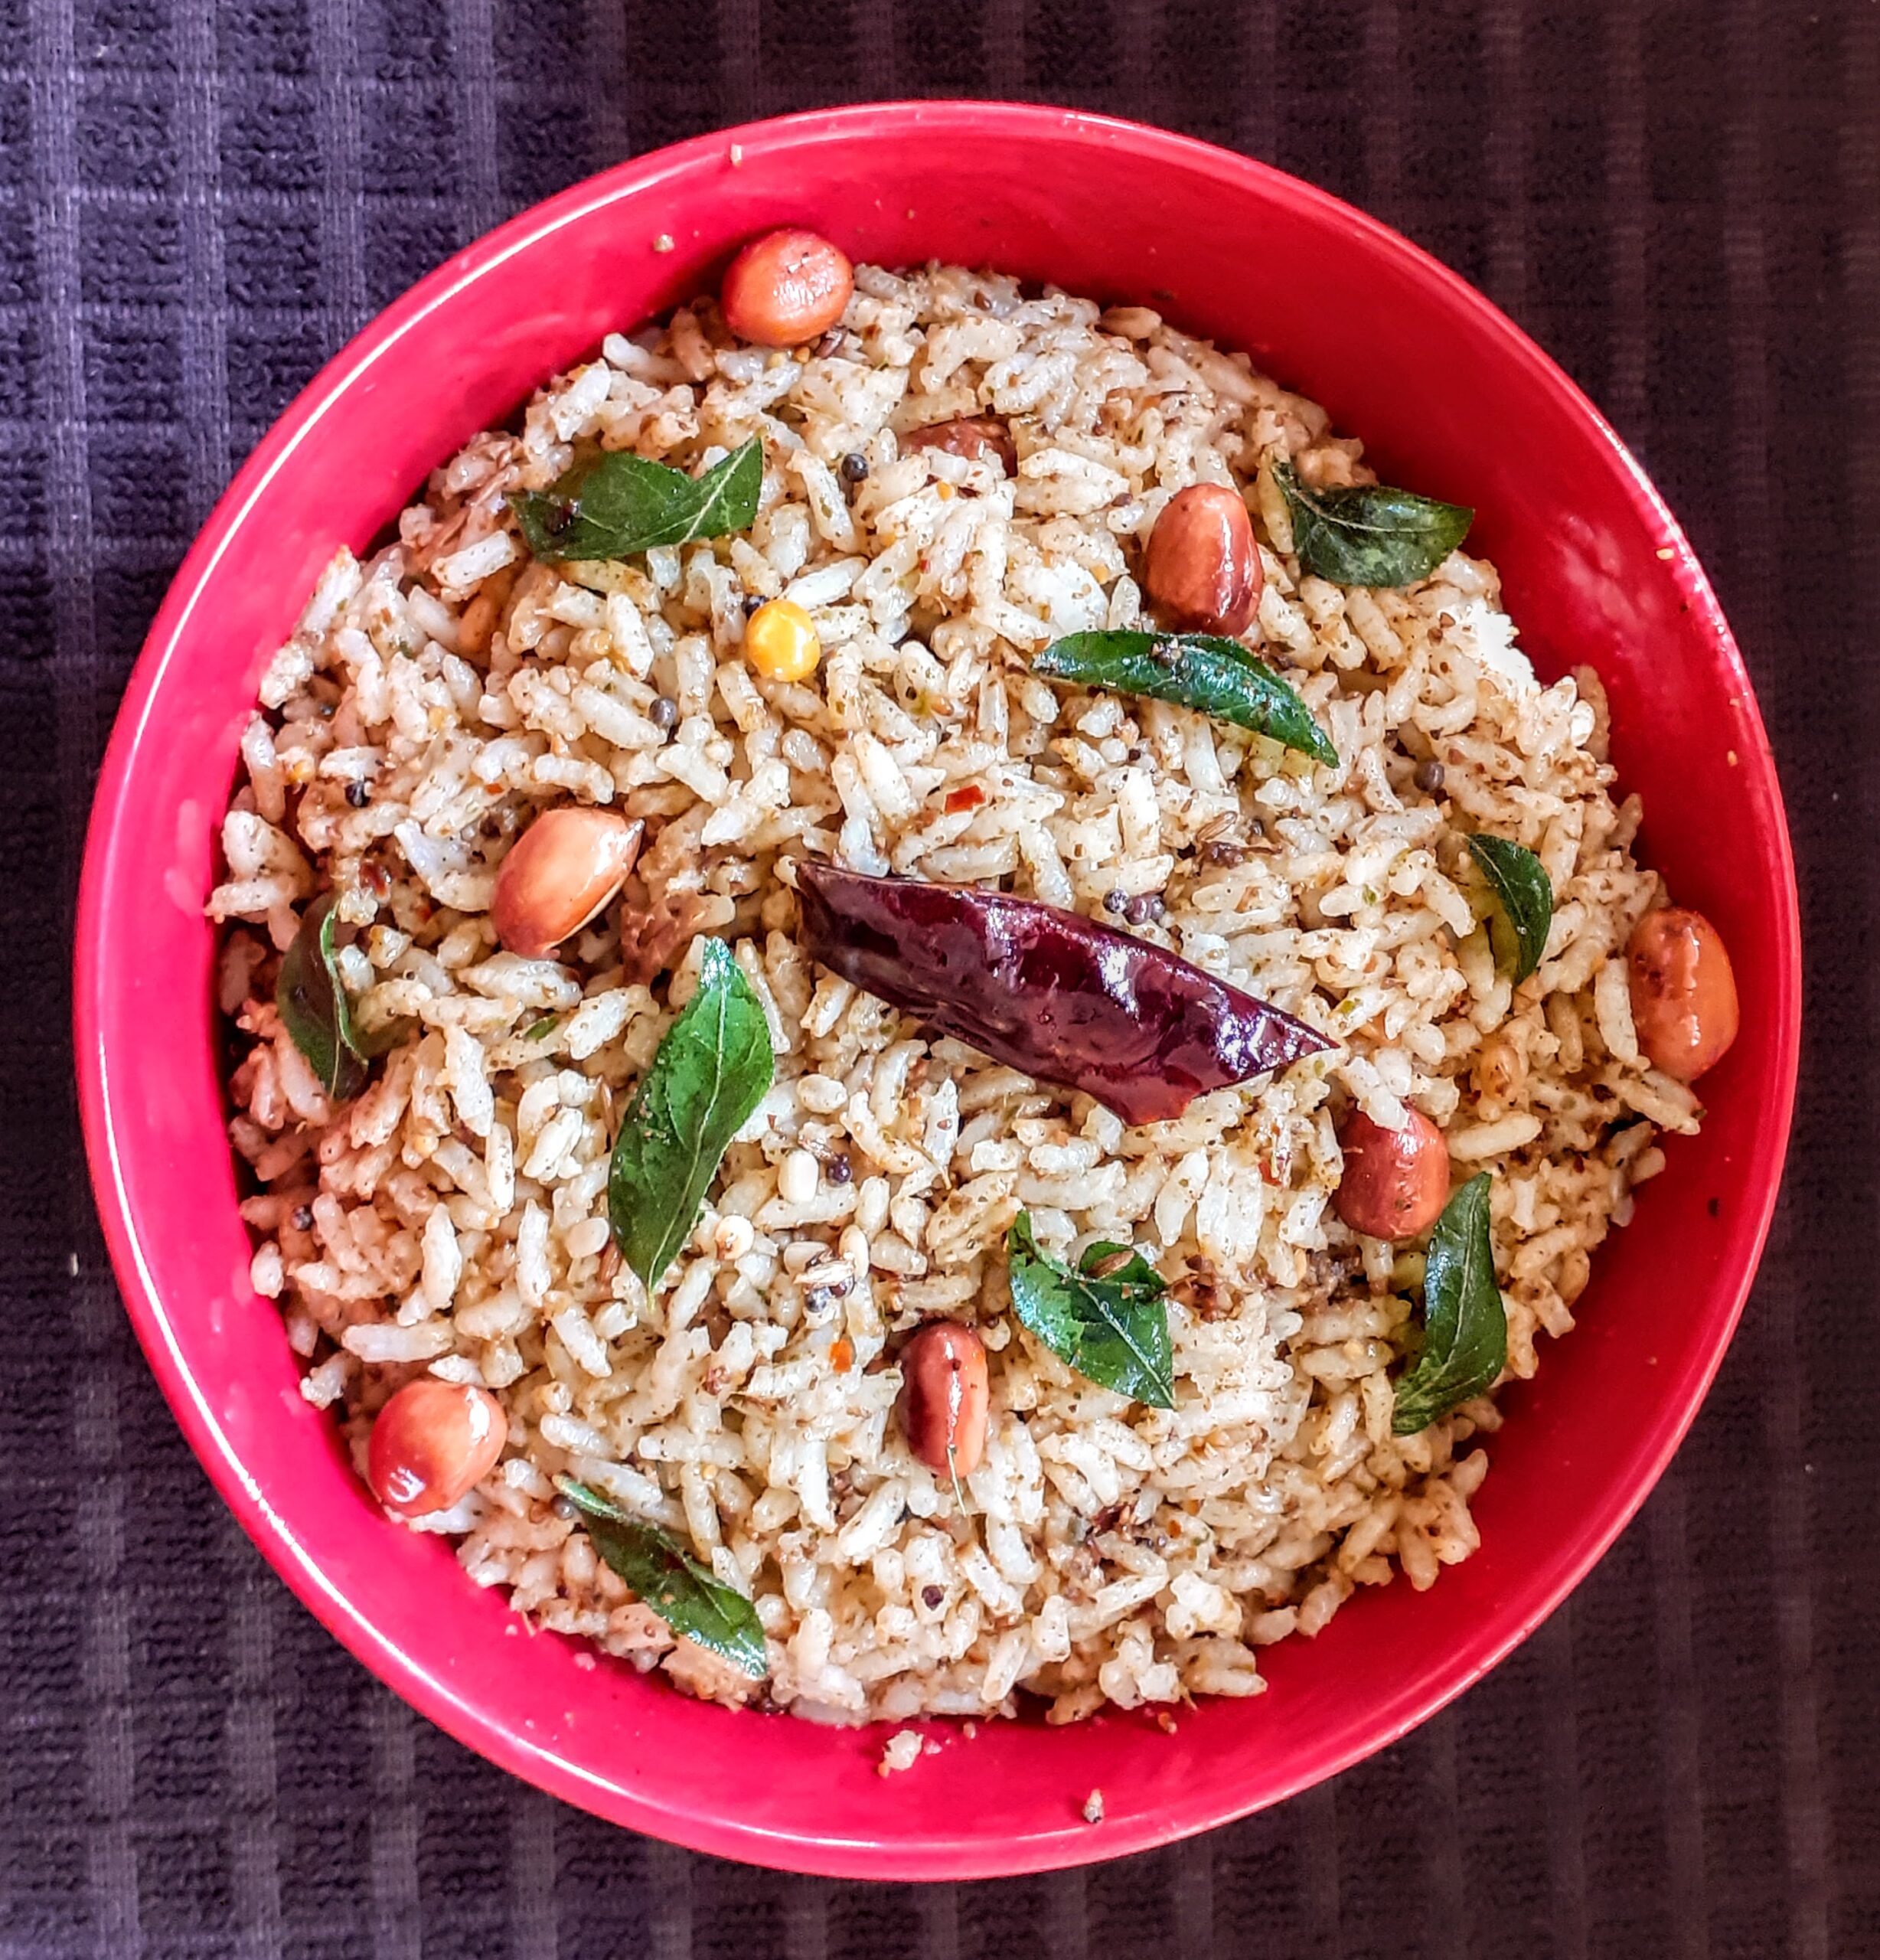
To make Karuvepilai Rice- In a Kadai heat oil. When hot add peanuts and fry until light brown. Now add mustard seeds 1 tsp, chana dal 1 tsp, Urad dal 1 tsp, followed by broken dry red chillies and aasafoetida. Fry until the dals turn light brown. Add Cooked rice made from 1 cup rice, followed by 2 to 3 tbsp of Karuvepilai Podi. Check and adjust salt. The yummy and healthy Karuvepilai Rice is ready. Enjoy. Bon Appetit.
If you tried this recipe and liked it please comment below. We would love to hear from you.
Want our recipes on your mail box? Leave your mail id in the homepage and we shall mail them to you.
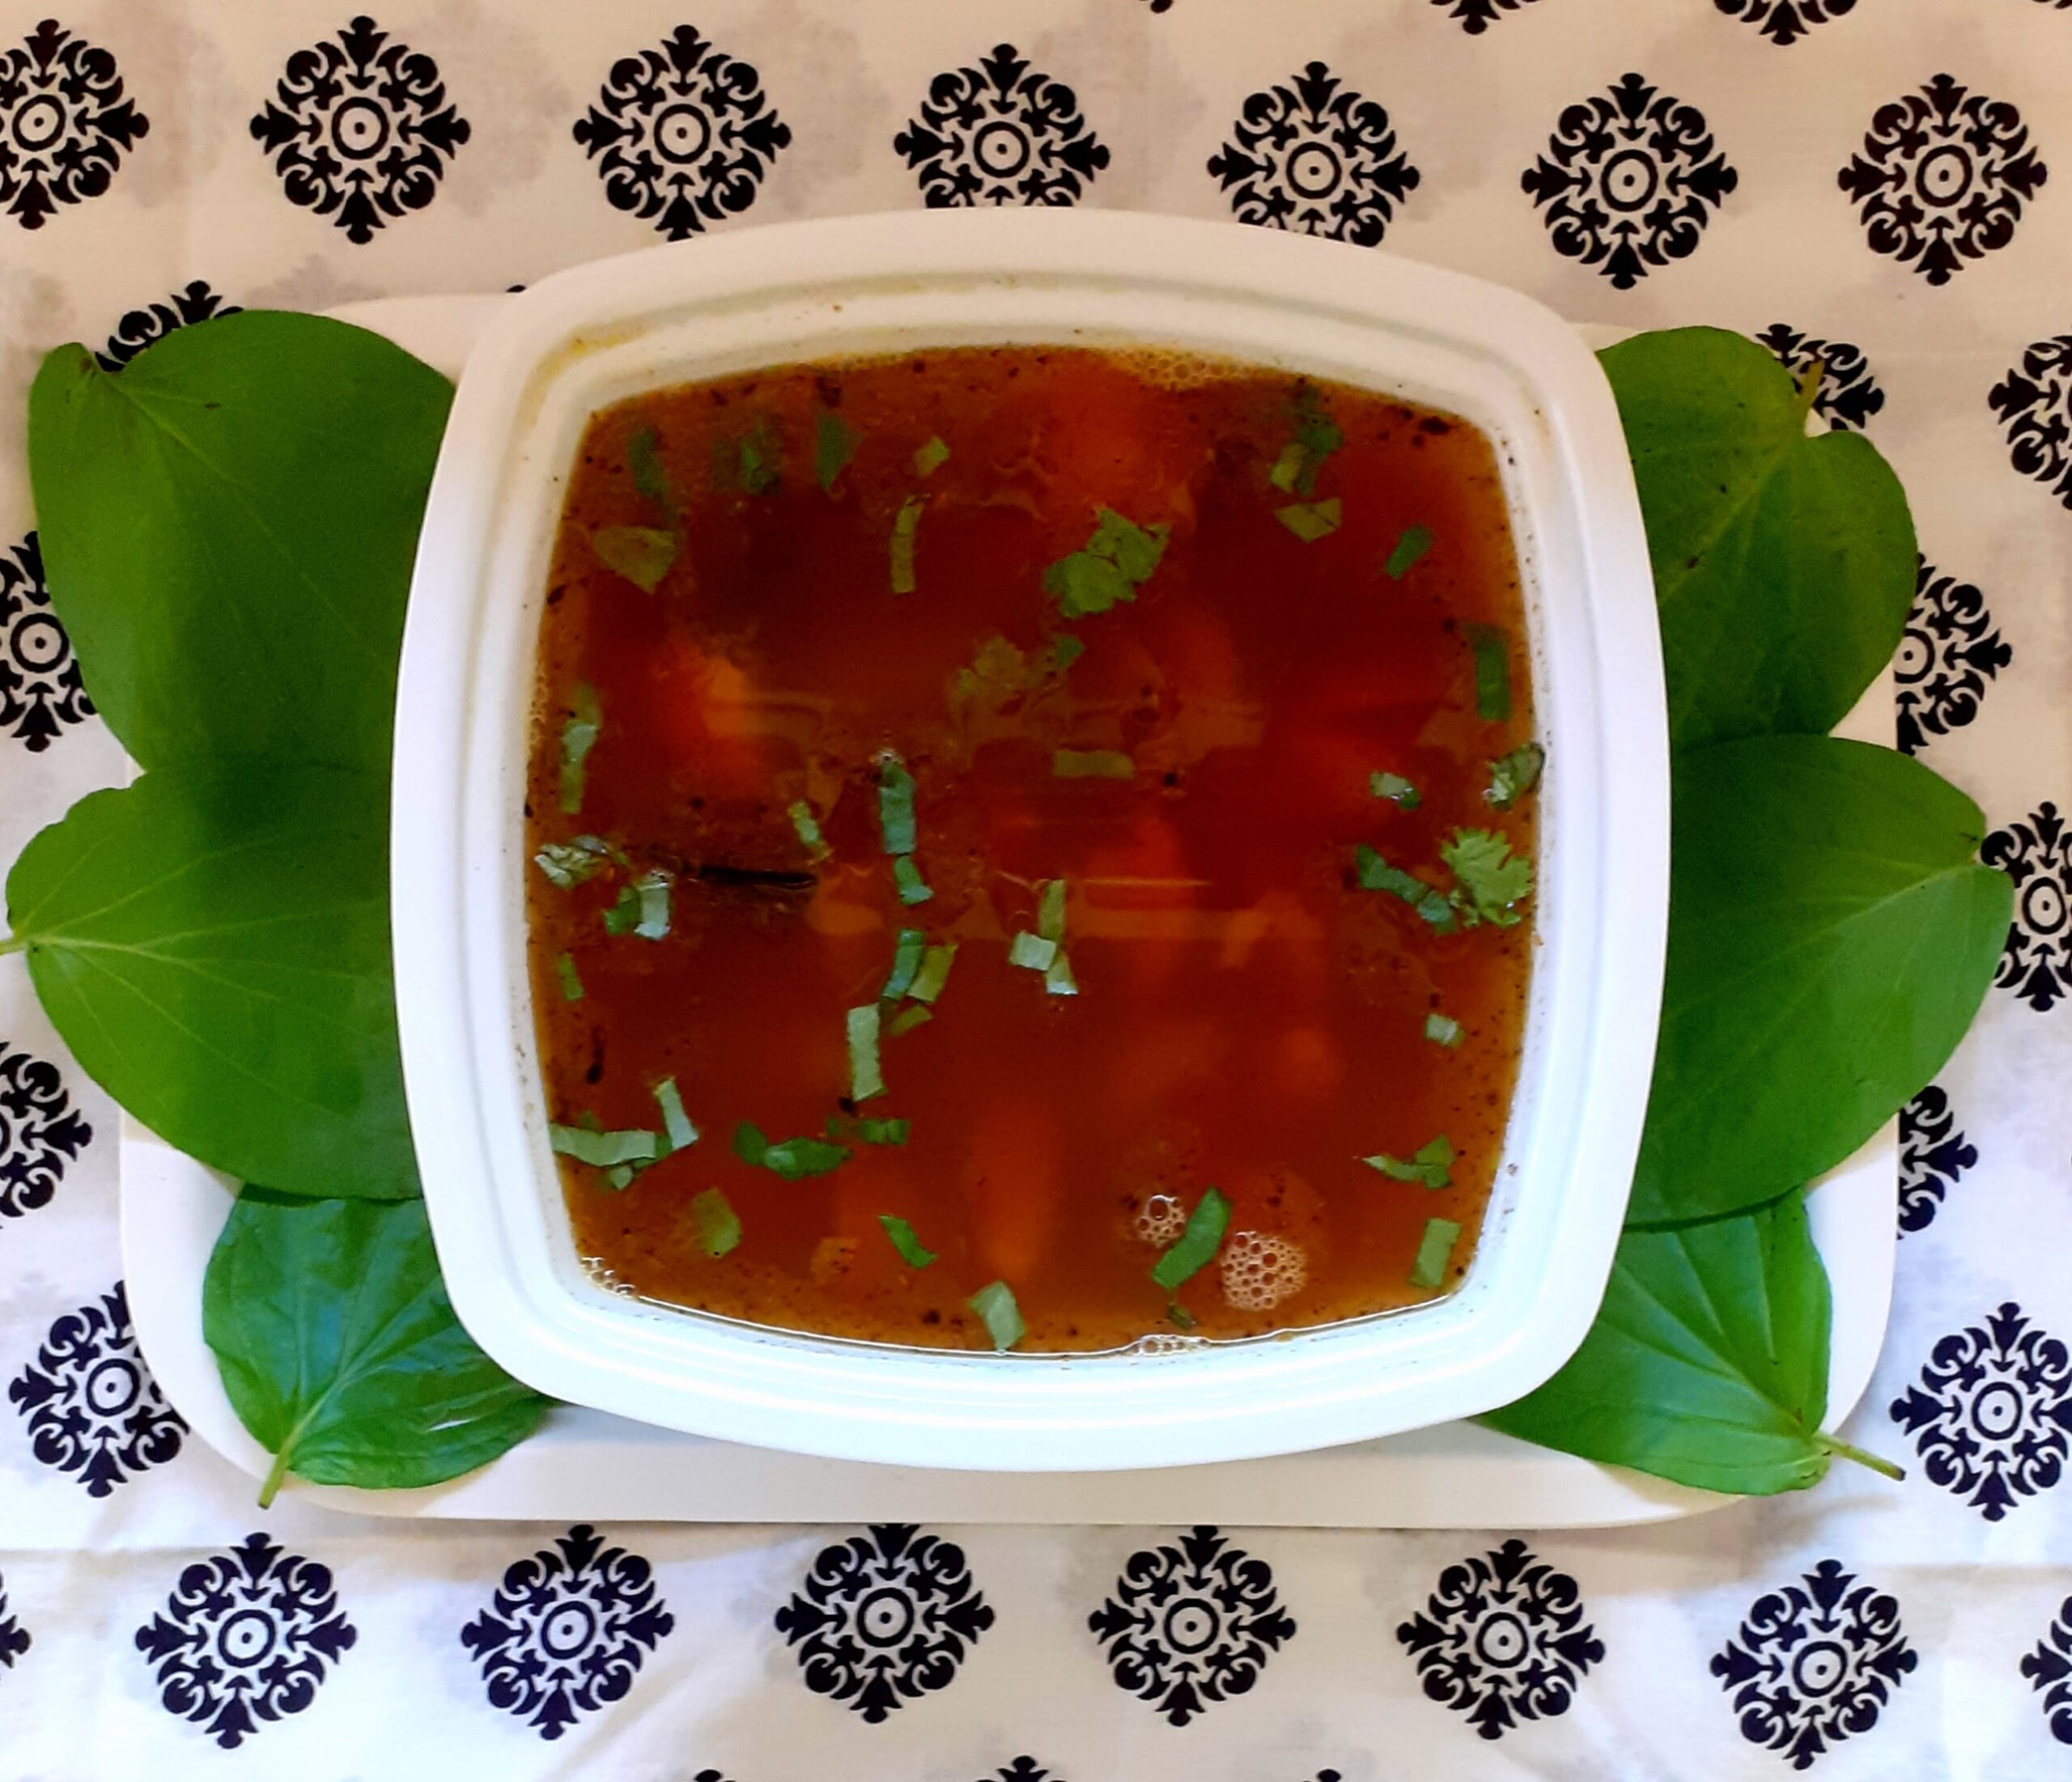
Drumstick Rasam/Murungakkai Rasam
Rasam is a popular South Indian dish prepared with tamarind, tomatoes, and Rasam powder. There are many variations of this dish, and each South Indian household has its own recipe for the proportions of the ingredients of the rasam powder. Therefore though Rasam is almost a regular feature in all South Indian households its taste is unique to each. No two Rasam recipes taste the same. Rasam is also a sought after comfort food in South Indian households when one has a Cold(Common Cold) or is a little under the weather because it is made of simple ingredients that are easily digestible and pepper that helps in combating the cold.
Earlier the Rasam was an everyday feature in most South Indian households along with Sambar or Vatha Kozhambu or Moru Kozhambu and a part of the Main course. Some households follow it to this day, but as the eating patterns of people has changed and is now more global the humble Rasam has taken a back seat or is made on a festival day where there is a feast(Elai Sapadu) or sometimes is also being served as a soup in elite gatherings.
Drumstick Rasam is a very flavourful Rasam, as Drumsticks by themselves have a wonderful fragrance and flavour.
Moringa is the latest buzz word everywhere. What with Moringa leaves powder trending the healthy list. Well, the Moringa tree and dishes cooked from its fruit, flowers and leaves have been in India for ages. We have used its fruit, the drumstick in Subjis, Sambar, dal, etc; the leaves too are very aromatic and used as an add-in in Dosas, chilas, and more. The flowers too when added while making ghee, give the ghee a nice flavour and make it aromatic. My grandmother always added a few flowers just before putting off the flame while making ghee and would remove the flowers later, while bottling the ghee. My mother makes a pickle of it too, which is just as wonderful.
There are many different types of Rasam Like the Pepper Rasam, Tomato Rasam, Lemon Rasam, Garlic Rasam, Neem Flower (Vepampoo) Rasam, Drumstick Rasam,Pineapple Rasamand the Vetrilai(Betel leaf) Rasam. I have already posted the recipe of pineapple Rasam and slowly over a period of time plan to cover all the Rasam varieties mentioned here. I have also given the recipe to a perfect Rasam Powder here. It yields an aromatic and flavourful Rasam.
Here is the recipe of Drumstick/Murungakkai Rasam for you-
PREP TIME: 10 Mins COOK TIME: 20 Mins
TOTAL TIME: 30 Mins COURSE: MAIN / APPETISER
CUISINE: SOUTH INDIAN SERVINGS: 4
AUTHOR: Rajni Ram
Ingredients:
Drumsticks 3 big fleshy ones chopped to 3-inch pieces (refer note 1)
Tomatoes 2 large (note 3)
Tuvar dal/ Yellow lentils 1/4 cup cooked in a pressure cooker
Rasam powder 3 tsp
Lemon 1
Coriander leaves finely chopped
Asafoetida 1 tsp (split 1/2 while boiling and 1/2 for tempering)
Turmeric powder 1 tsp
Salt as per taste
Roasted Pepper & Cumin powder 1 tsp( dry roast in the ratio 2:1 and grind coarse)
Directions:
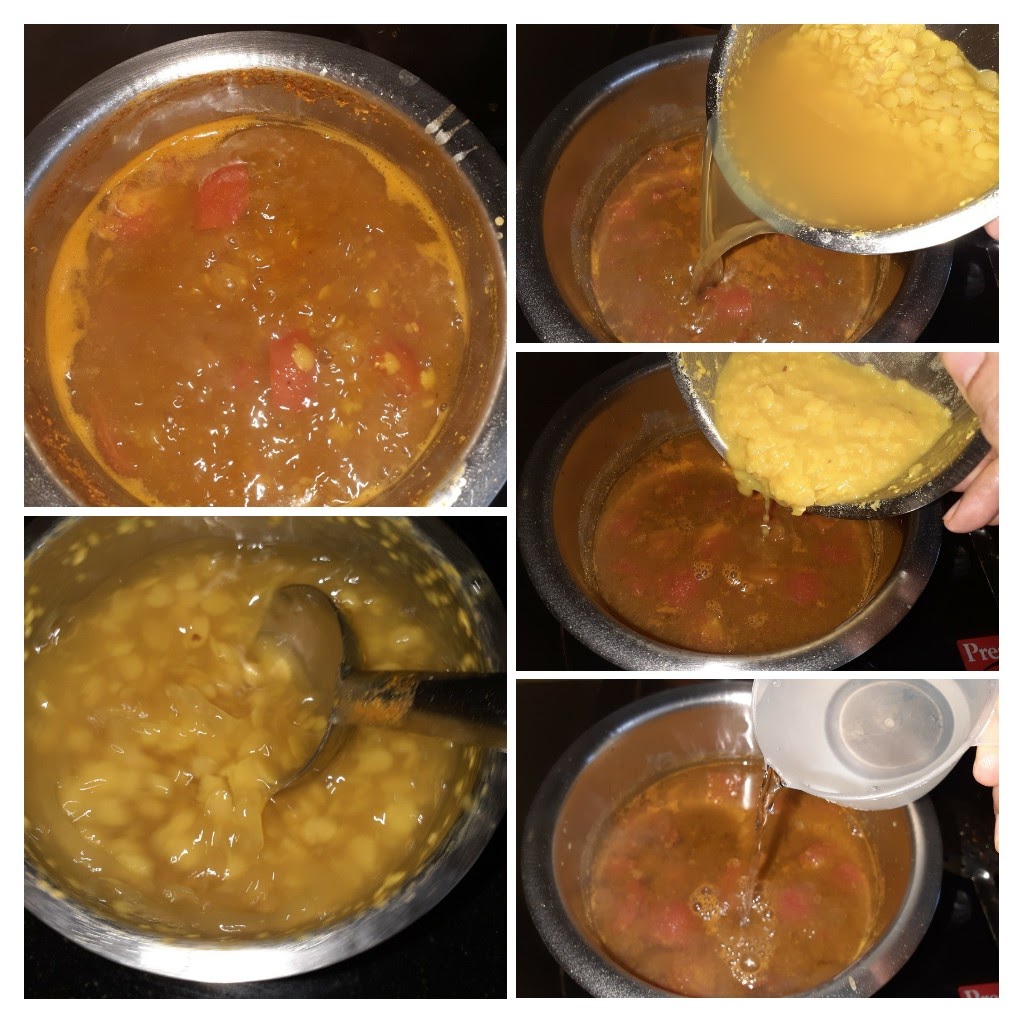
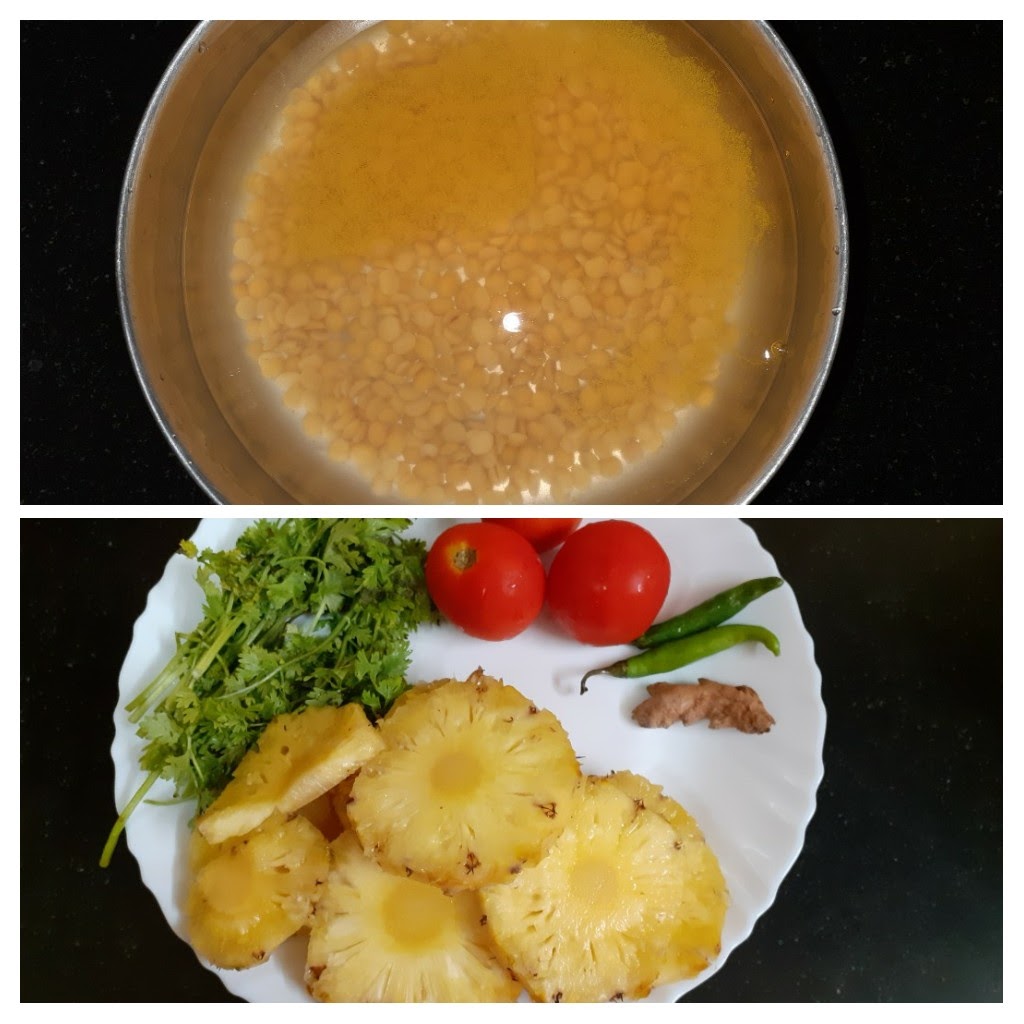
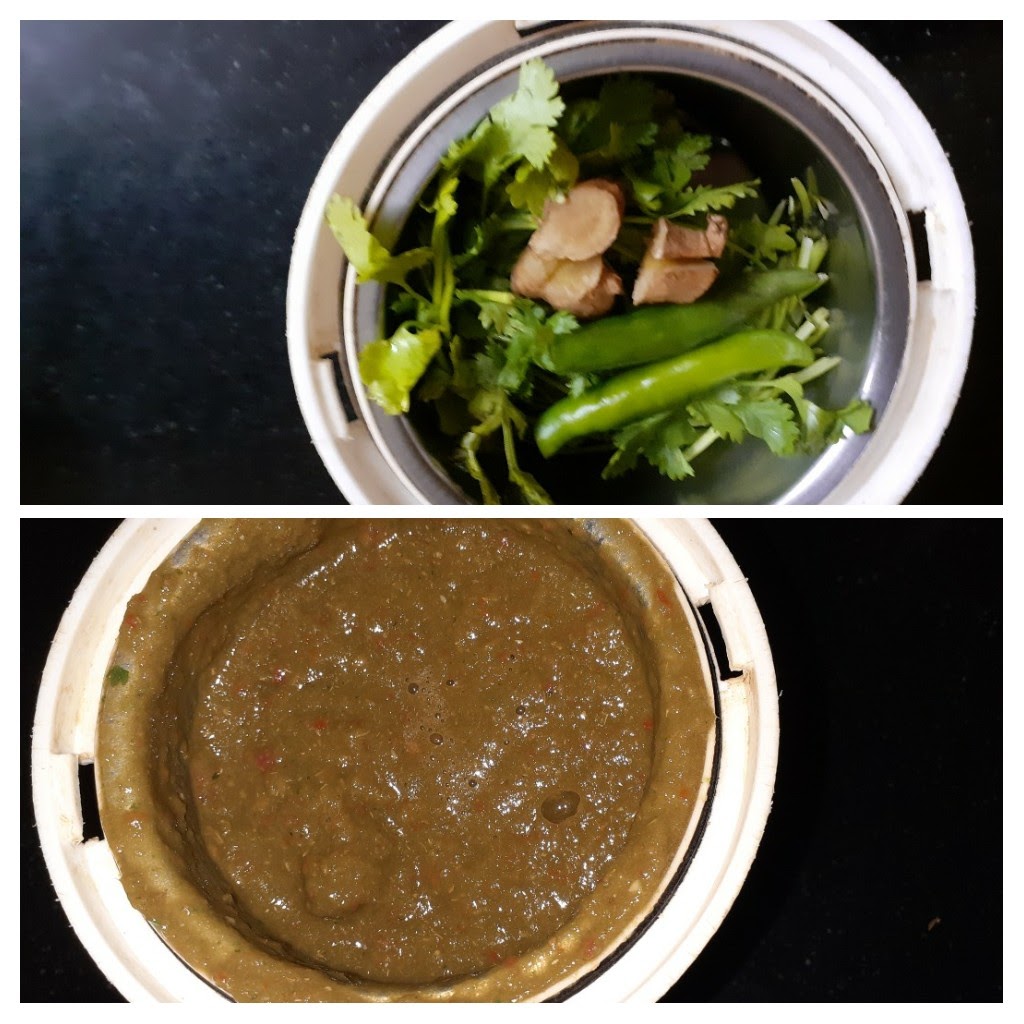
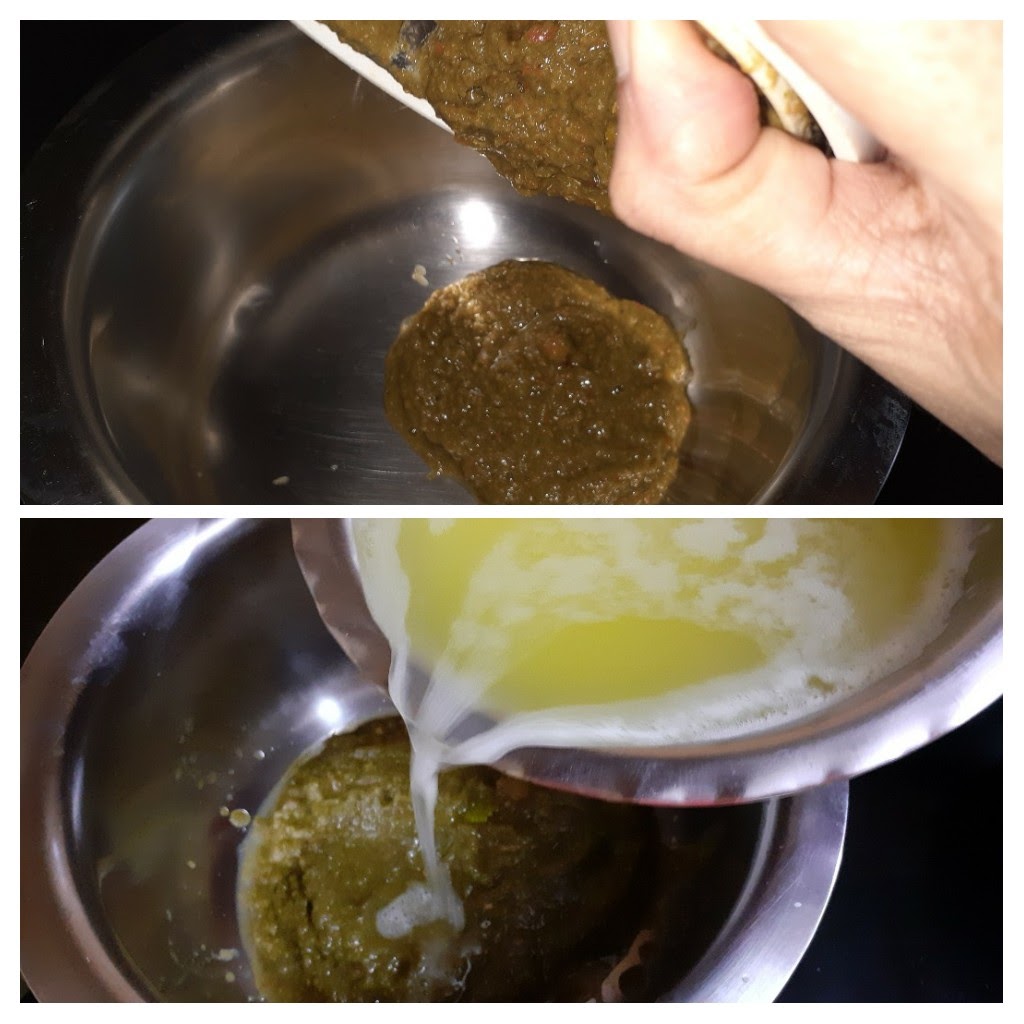
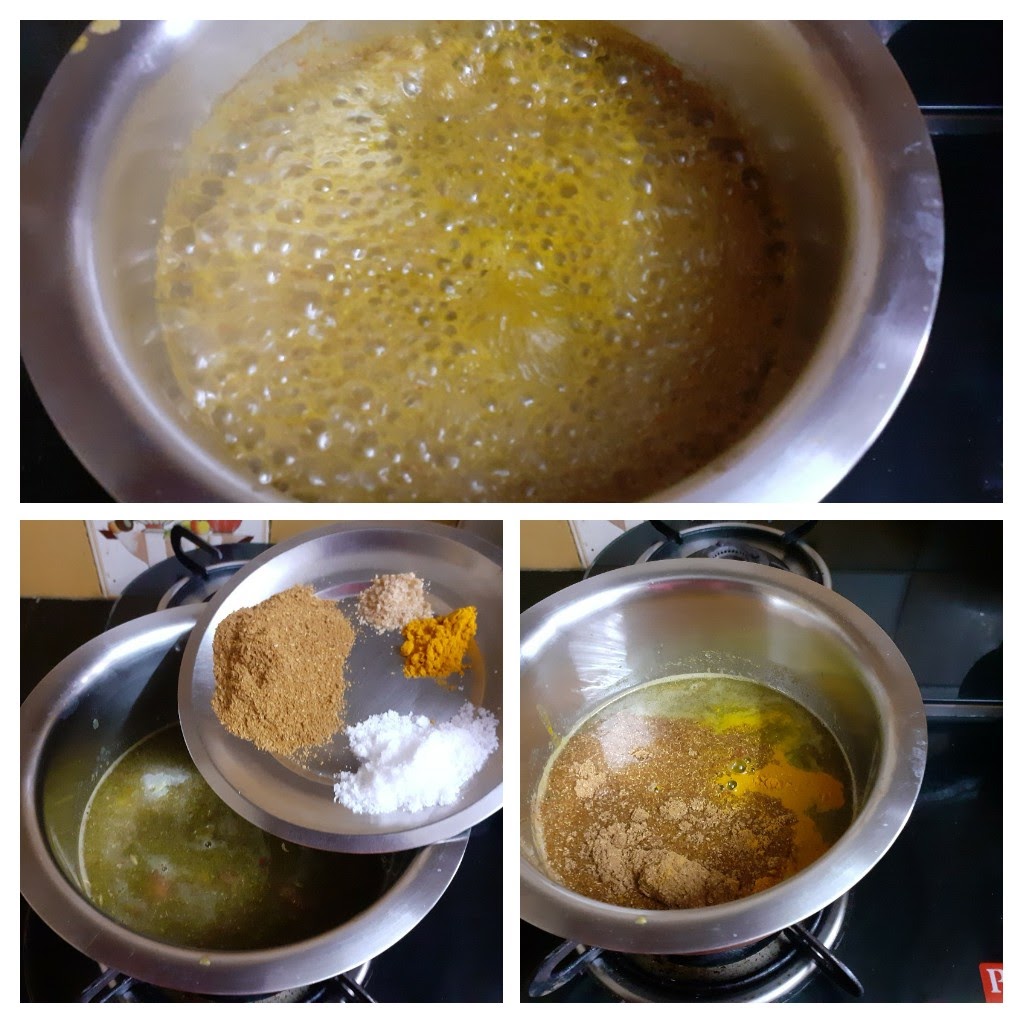
Put the dal in a vessel and cook it in the pressure cooker. I used pot in pot method, you can use whichever is convenient. The dal should have cooked well. Now cut the Drumsticks, put them in a vessel and boil. Cook until the flesh inside turns tender(approx 10 minutes). Reserve the water in which the drumsticks cooked. Cool the cooked drumsticks and scrape out the fleshy part with a spoon(refer picture). Don’t discard the seeds unless they are very hard. Keep aside. Now grind 2 tomatoes to a puree and pour it in a 1-litre vessel. Add 2 cups water, followed by 3 tsp Rasam Powder, adequate salt, turmeric powder and asafoetida and bring to a boil. Continue to boil until the rawness of the powders is gone. Now mash the cooked dal nicely and pour it into the boiling mixture along with any water the dal may have retained. Cook for two minutes and now its time to add the water reserved after cooking the drumsticks. After pouring the drumstick broth if you find the Rasam(soupy), dilute by adding 1 to 1.5 cups of hot water and continue to boil the Rasam for another 2 minutes, now add the drumstick scrappings(seeds and all) and continue to boil until the Rasam froths up and rises in the vessel and comes to the brim. Switch off the flame and squeeze a lemon into it. Now take 2 tsp ghee in a small tempering Kadai and heat. Add mustard seeds, as they crackle add the Asafoetida powder, roasted pepper-cumin powder and put off the stove. Now add the curry leaves to the ghee, and pour the tempering into the Rasam. Garnish with finely chopped coriander leaves. The healthy, flavourful and fragrant Drumstick rasam is ready. Enjoy and Bon Appetit.
Serving suggestions: Just as a soup, with hot rice and ghee, with Oats porridge(try this it tastes yummy).
Sometimes I also pour it on my chapatis while hot.????
STEPWISE RECIPE FOLLOWS:
1. Assemble all ingredients. Cook the dal and keep ready. Cut the Drumsticks into 3-inch pieces and cook them in water with a little salt. Cool them scrape out the flesh with a spoon and reserve the water in which they cooked.
2. Pour the puree of 2 tomatoes into a 1-litre vessel and add 2 cups water, followed by 3 tsp Rasam powder, adequate salt, turmeric powder, asafoetida and bring to a boil.
3. Now add the cooked and mashed dal along with the water to the boiling mixture and continue to cook until the rawness of the powders is gone(approx. 5minutes).
4. Now add the Drumstick broth(water in which the drumsticks cooked) to the mixture and if the consistency is too dense add 1 to 1.5 cups of hot water and bring to a boil.
5. Now add the drumstick scrapings to the boiling rasam and continue to boil until the rasam froths up and rises to the brim. Put off the flame and squeeze a lemon into it, or add 3 tsp lemon juice to it.
6. In a tempering Kadai heat 2 tsp of ghee. when it heats up, put the mustard seeds into it, as they crackle add the asafoetida and the roasted cumin-pepper powder. Put off the flame and then add the curry leaves. Drop this tempering into the Rasam and serve hot with hot rice and ghee or follow any of the serving suggestions given above.
NOTES:
1. Picking the Drumsticks well is critical, pick thick but tender ones. After cooking the seeds also can be used, don’t discard them as they have the most flavour.
2. I have used the Country variety of tomatoes(Naatu Thakkali) instead of the Hybrid ones as they give the rasam some tang when not using tamarind.
3. If you serve Rasam with something unusual do let us, know..we love learning and trying new combinations.
If you tried this recipe and liked it please comment below. I would love to hear from you. If you have a query about the recipe email us and ill respond as soon as I can.
If you would like to receive our recipes on your mail please leave your mail id at the homepage. Every time Rajjo’s Kitchen has a new post we will mail the recipe to you.
Unni Appam/Nei Appam/Sweet Appam
This Appam recipe is the Kerala style Appam, made with soaked raw Rice, Jaggery, Banana and Cardamom. It is one of the most simple recipes and is also one of the main offerings in festivals like Janmashtami, and Ganesh Chaturthi. In our house, it is also an instant snack that my mother would make in a jiffy apart from the soak time. Usually, an Appam mould/ Appa karai is required for this, but some also make it by directly pouring a ladle of batter into the oil and deep-frying. If fried without a mould the shape is flat like that of a Pancake, whereas the one made in a mould is round. It is best made with ghee, though oil too can be substituted for ghee.
Grinding the batter to the right consistency is a critical step, as too dilute a batter will affect the moulding of the appam and the batter may just scatter away in the oil. Therefore I have mentioned the right way to grind the batter in the recipe. Once the batter is ground we are just five minutes away from yummy tasting Nei Appams.
Here is the recipe of Sweet Appam/ Unni Appam for you–
PREP TIME: 10Mins+ 1 hr(soak) COOK TIME: 30Mins
TOTAL TIME: 40Mins COURSE: DESSERT/SWEET
CUISINE: SOUTH INDIAN SERVINGS:15 pcs
AUTHOR: Rajni Ram
Ingredients:
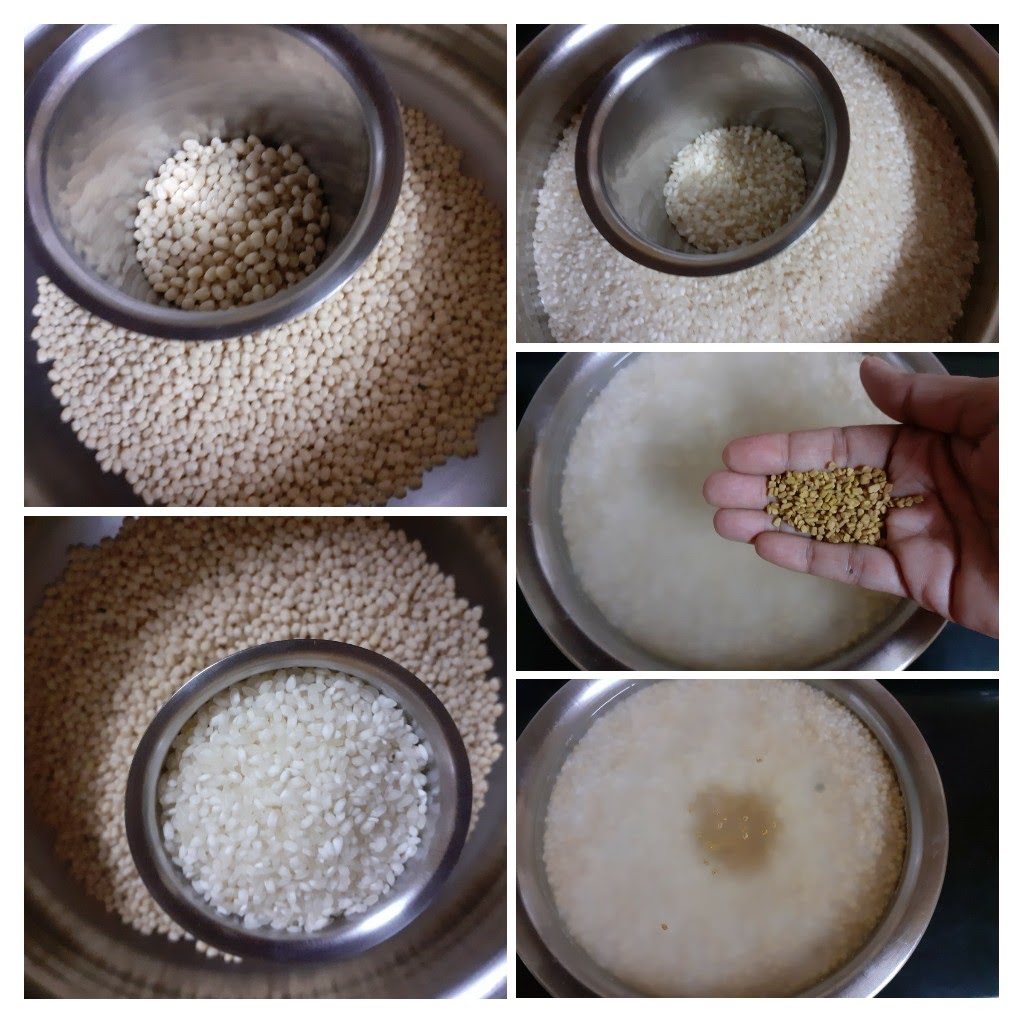
Raw Rice 1 cup soaked for 1-hour minimum ( 1 cup equals 200 gm) ( refer note1)
Jaggery 1 cup powdered/shredded
Banana 1/2 to 3/4 th of 1 large
Cardamom powder 1/2 tsp
Coconut grated or cut to small pieces 2 Tbsp
Directions:
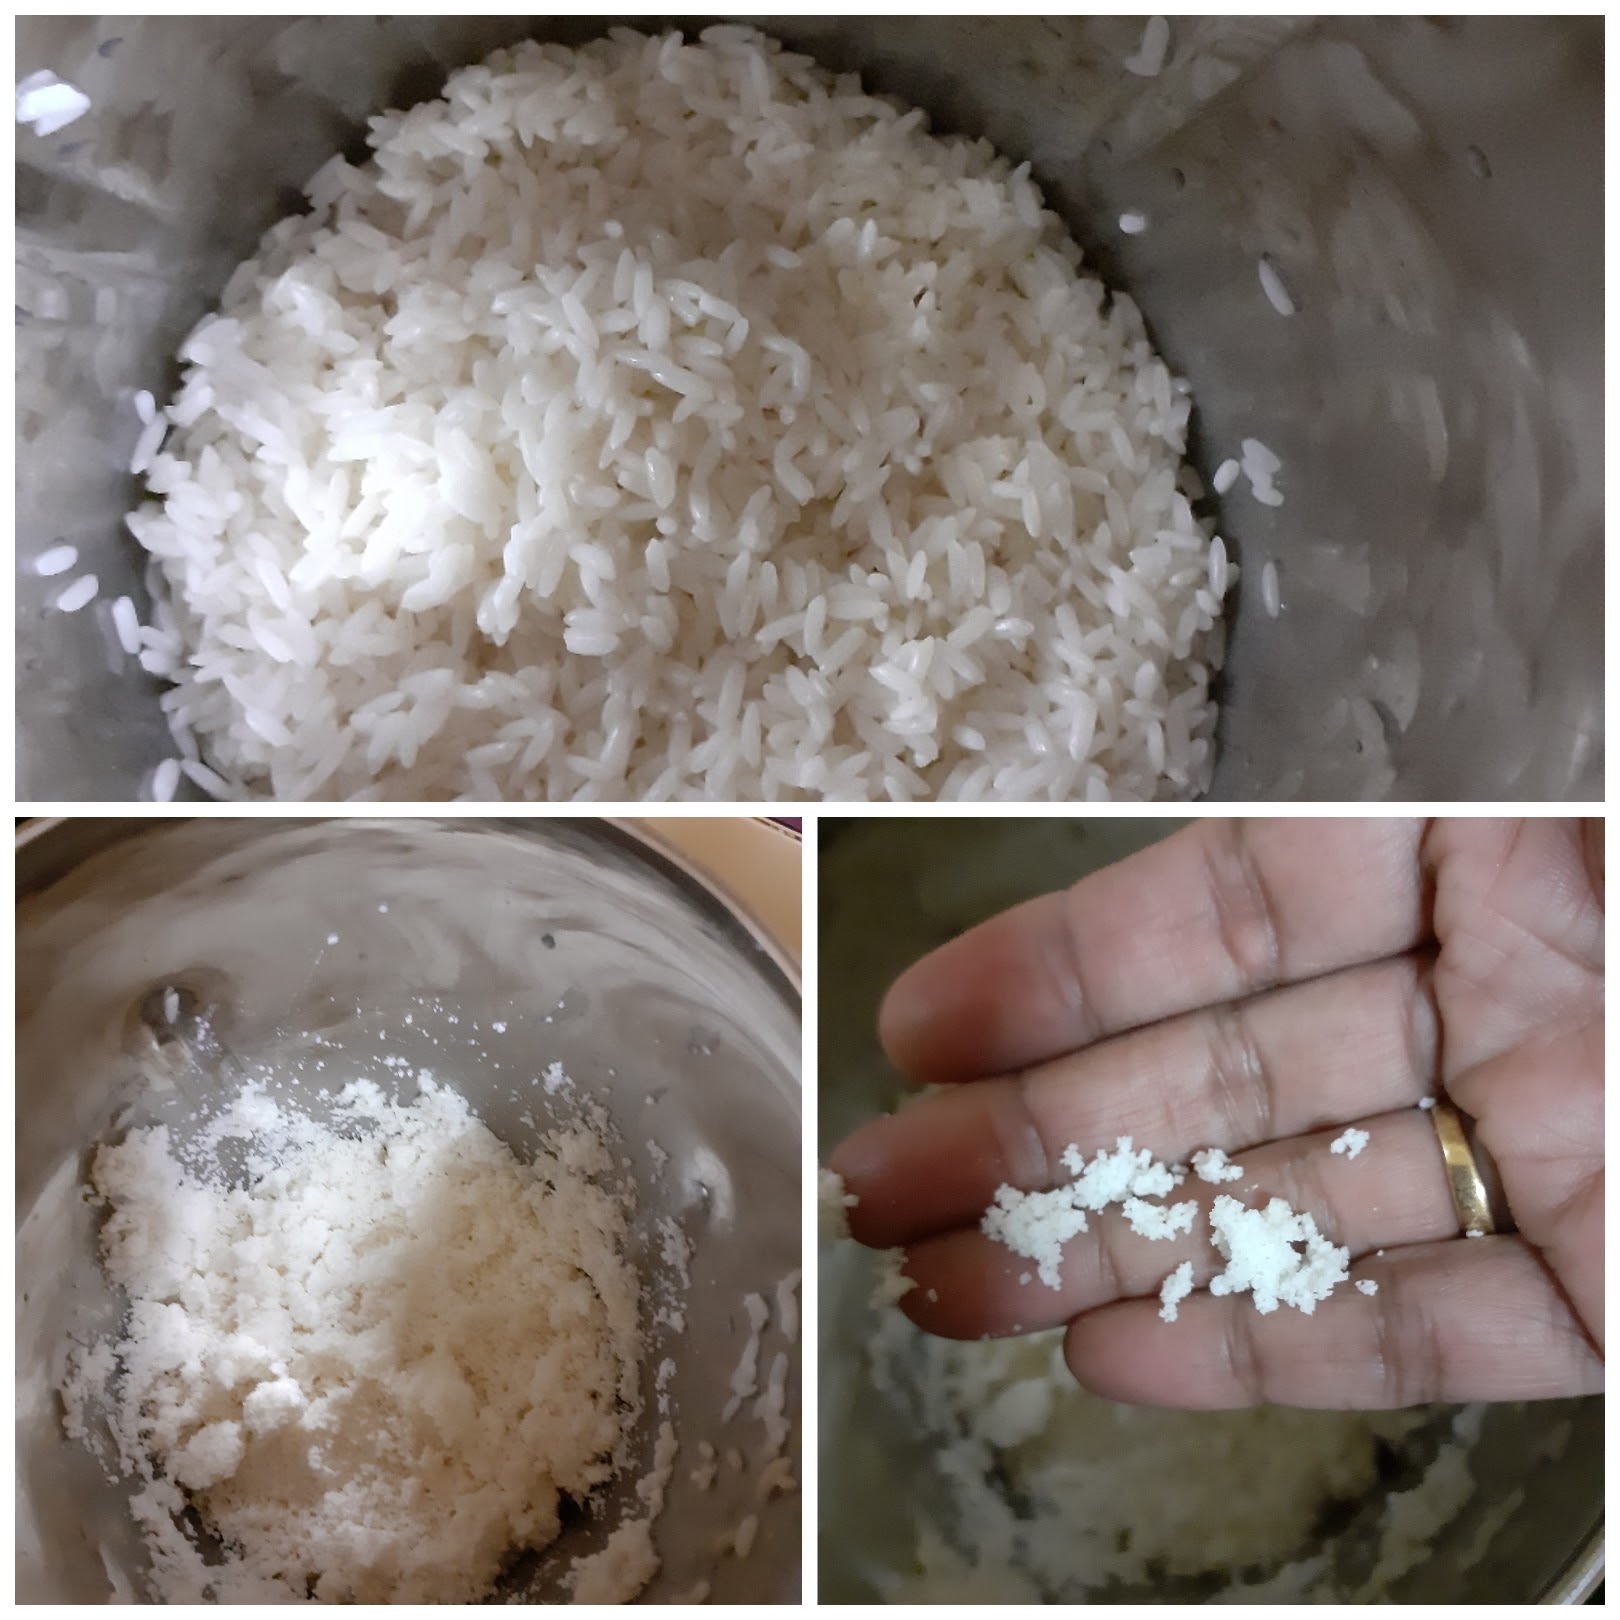
Soak the Rice for a minimum of 1 hour and up to a maximum of 1.5 hours. After soaking, drain all water and out the rice into a blender. Grind it first to a Rava/Sooji like texture without adding water, now add little water and grind to a smooth paste. Take care not to add too much water, as adding jaggery will liquify it further. So try to use only 1/4 cup water to get a smooth texture. Now add the Jaggery and grind again. Add coconut grating and blitz. Mash the bananas with your fingers and add them to the batter and bring again to a smooth batter. Transfer to a vessel and add the cardamom powder. The Appam batter is now ready.
Now put the Appam mould/Appam Chetty or Appa Karal on flame and heat it well. Spoon in the ghee into the moulds liberally. Let the ghee heat up, now spoon the batter into the moulds and fry on one side until golden brown, using a kambi/skewer or a fork, to loosen the edges of the Appam and flip it to the other side and fry until golden brown. To check for doneness, pierce the appam with the skewer/toothpick or fork in the center, if it comes out clean, remove appams from the mould. The delicious Unni appam/ Sweet Paniyarams/ Nei Appams are ready. Enjoy. Bon Appetit.
STEPWISE RECIPE FOLLOWS:
1. Soak rice for 1 hour. It can be soaked up to a maximum of 1.5 hours.
2. After an hour drain all the water and put the rice ina blender and grind it without any water at first to a Rava/Sooji like texture.
3. Now add water little by little and grind it to a smooth paste. Water should be used minimally. I used around 1/4 cup water to grind. Check cup measurement given above.
4. Now add the jaggery again and grind to a smooth paste, add the coconut gratings and blitz again.
5. Now mash 3/4 of a Banana with your fingers and add it to the paste, grind once again to a smooth batter. The consistency should be that of dosa batter. Transfer it to a vessel and add the cardamom powder. The appam batter is ready. Have added a mini video to show the consistency of the batter.
6. Put an Appam Chetty on the flame. Spoon in the ghee and heat it. Now spoon in the batter into the moulds and fry on now side until a golden brown. Using a skewer or fork loosen the edges of the appam and gently flip it to the other side and fry again to a golden colour. Repeat for all batter. The Sweet Appams are now ready.
NOTES:
1. Any raw rice variety can be used other than Basmathi as the Basmathi rice does not have a lot of starch content that is required for binding. The appams turn out rubbery with it.
2. While grinding if you end up with a runny batter accidentally, then add rice flour a tablespoon at a time until you achieve the right consistency.
3. If the batter splits or breaks apart in the ghee either your batter is runny or too much jaggery has been added. So modify accordingly and fry.
4. It is ideal to fry these appams in ghee/clarified butter as it tastes best. But oil also can be used.
5. Banana varieties that are sweet can be used. Avoid the slight sour ones like Poovan.
6. Always start with frying a single Appam first so that if something needs to be adjusted it can be done and then the rest can be fried.
If you tried this recipe and liked it please comment below. I would love to hear from you. If you have a query about the recipe email us and ill respond as soon as I can.
If you would like to receive our recipes on your mail please leave your mail id at the homepage. Every time Rajjo’s Kitchen has a new post we will mail the recipe to you.
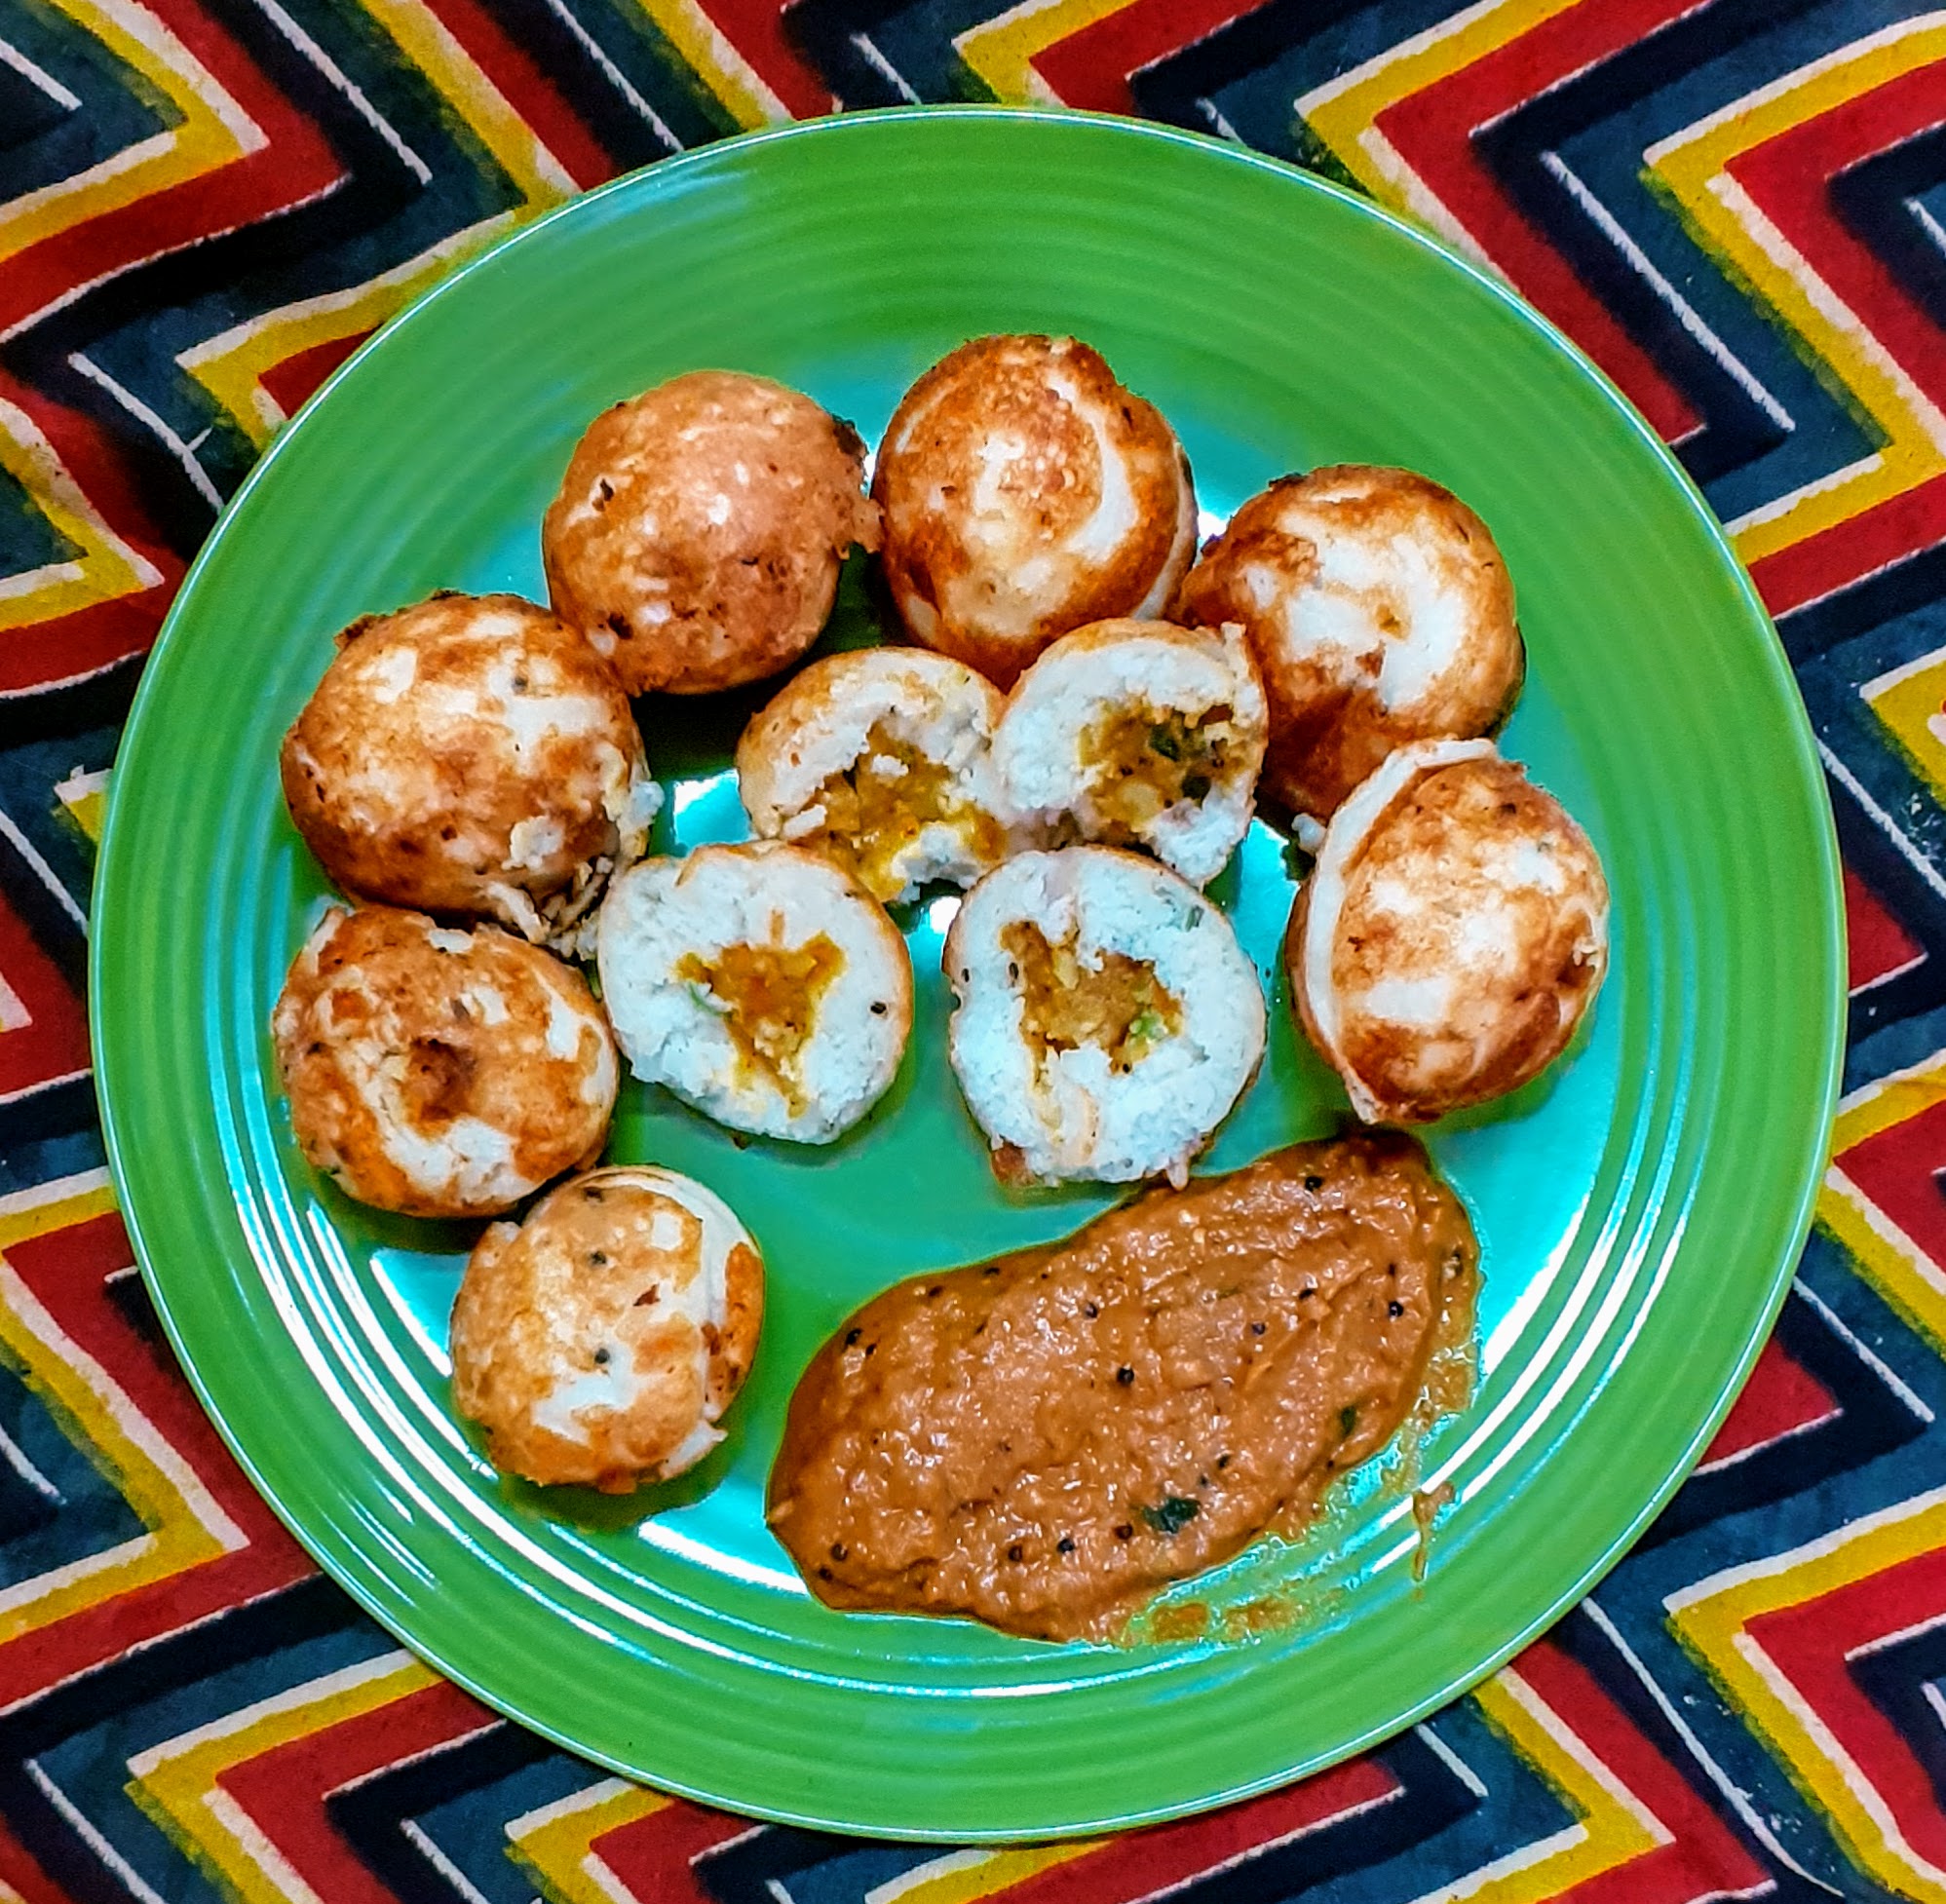
Stuffed Kuzhi Paniyaram (Savory)
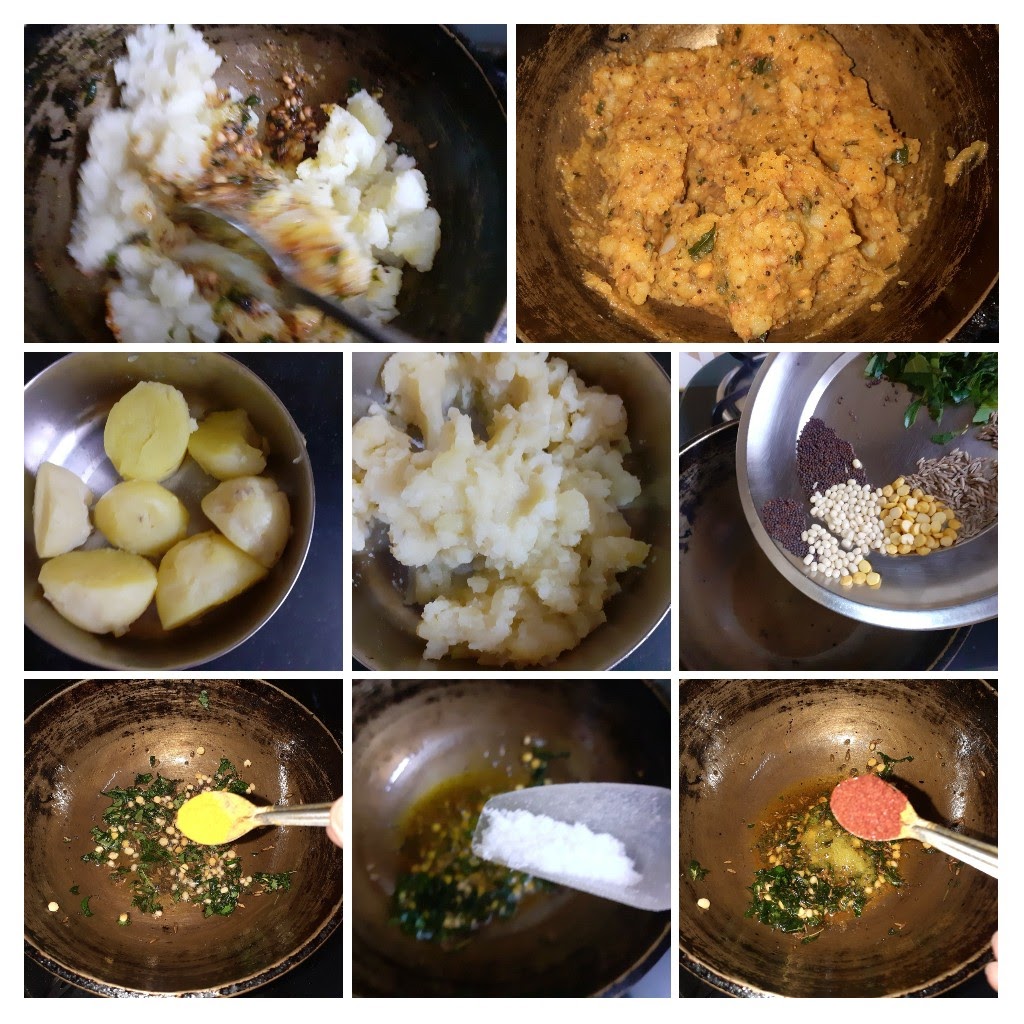
Kuzhi Paniyarams are basically Lentil and rice batter dumplings. The batter is fermented and then poured into a Paniyaram pan which gives them the shape. Most often in South Indian homes the Kuzhi Paniyaram or Kuzhi appam as we call it is made from the Idli batter itself. When the batter becomes a little sour it is made into Paniyaram. That is because the Idli/Dosa batter is made for a whole week as a quick breakfast or dinner option. So day 1 is Idli, day 2 Dosa and day 3 onwards its Paniyaram and dosa with the batter, as sour Idlis are not that great to taste. However, when I have guests over I prefer making the batter especially for this as it makes the crust crisp and enhances the taste of the Paniyaram to a different level and the texture on the inside of the Paniyaram is lovely.
There are many variations of the Paniyaram batter. It is usually made with Urad dal and rice, Raagi(Finger millet)flour, Jowar(Sorghum) flour, Bajra(Pearl millet) flour, etc can also be used in the batter. The proportions of the Dal and rice also vary from home to home. The Paniyaram batter is used as it is or sometimes, finely chopped Onion, grated Carrots, and other vegetables can also be added.
I have stuffed the Paniyaram with a mashed potato spicy stuffing which tastes wonderful, I have also added finely chopped onions, green chillies, ginger and curry leaves to the batter. This combination of onion in the batter and the Potato stuffing within is a perfect one.
I personally don’t like using the non-stick Paniyaram pan for this dish, as the traditional brass or iron ones give the Paniyaram its crispy exterior. If you have only the non-stick one with you, that’s fine too.
Kuzhi Paniyarams can be served as Breakfast, starters or even for dinner with any chutney.
While you are here please check out other recipes of mine like Dahi Pohe, Adai,
PREP TIME: 20 Mins(+4 hrs soak) COOK TIME: 40 Mins
TOTAL TIME: 60 Mins COURSE: SNACK/TIFFIN
CUISINE: SOUTH INDIAN SERVINGS: 4
AUTHOR: Rajni Ram
Here is the recipe of Stuffed Kuzhi Paniyaram–
Ingredients for batter:
Urad dal/black gram(whole without skin) 1 cup
Idli Rice/Boiled rice 1.5 cup
Raw rice(any variety except Basmathi) 1.5 cup
Methi seeds/fenugreek seeds 1 tsp
Ingredients for stuffing:
Potatoes 4 medium(boiled)
Turmeric powder 1/2 tsp
Red chilli powder 1 tsp
Mustard seeds/Rai 1 tsp
Cumin seeds/jeera 1 tsp
Asafoetida 1/4 tsp
Curry leaves a few (finely chopped)
Salt as per taste
oil for tempering and for greasing the Paniyaram pan.
Directions for Batter:
Soak the dal and both rice varieties along with a teaspoon of methi seeds in a huge vessel for 3-4 hours and grind to a smooth paste to a batter of medium consistency(should resemble Idli batter). Add salt, and leave to ferment for 6-8 hours for a perfect texture of the Paniyaram. While grinding add little water at a time, the batter should be a smooth one, but not runny.
Directions for Stuffing:
Boil the potatoes, peel the skin and mash them well. Now in a pan pour some oil and heat. Add the mustard seeds, as they crackle, add the Cumin followed by turmeric powder, red chilli powder, salt, asafoetida and curry leaves. Nicely fry the masala in the oil for 30 seconds and drop the mashed potato into the tempering and mix nicely, so that the tempering is evenly distributed. Cool the mixture.
After it ferments temper the batter with mustard seeds and asafoetida.
Directions for Paniyaram:
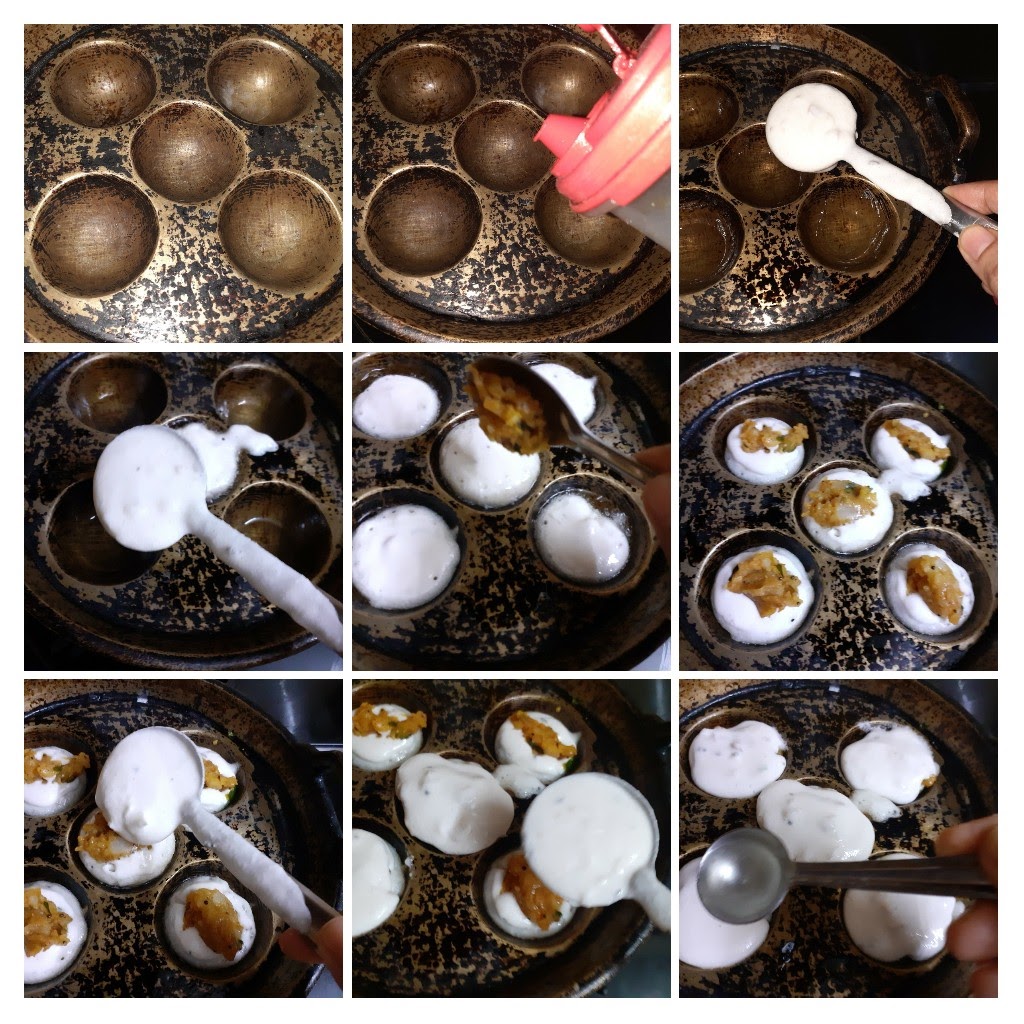
Chop Onions, green chillies, ginger and curry leaves finely and add them to the fermented batter and stir well.
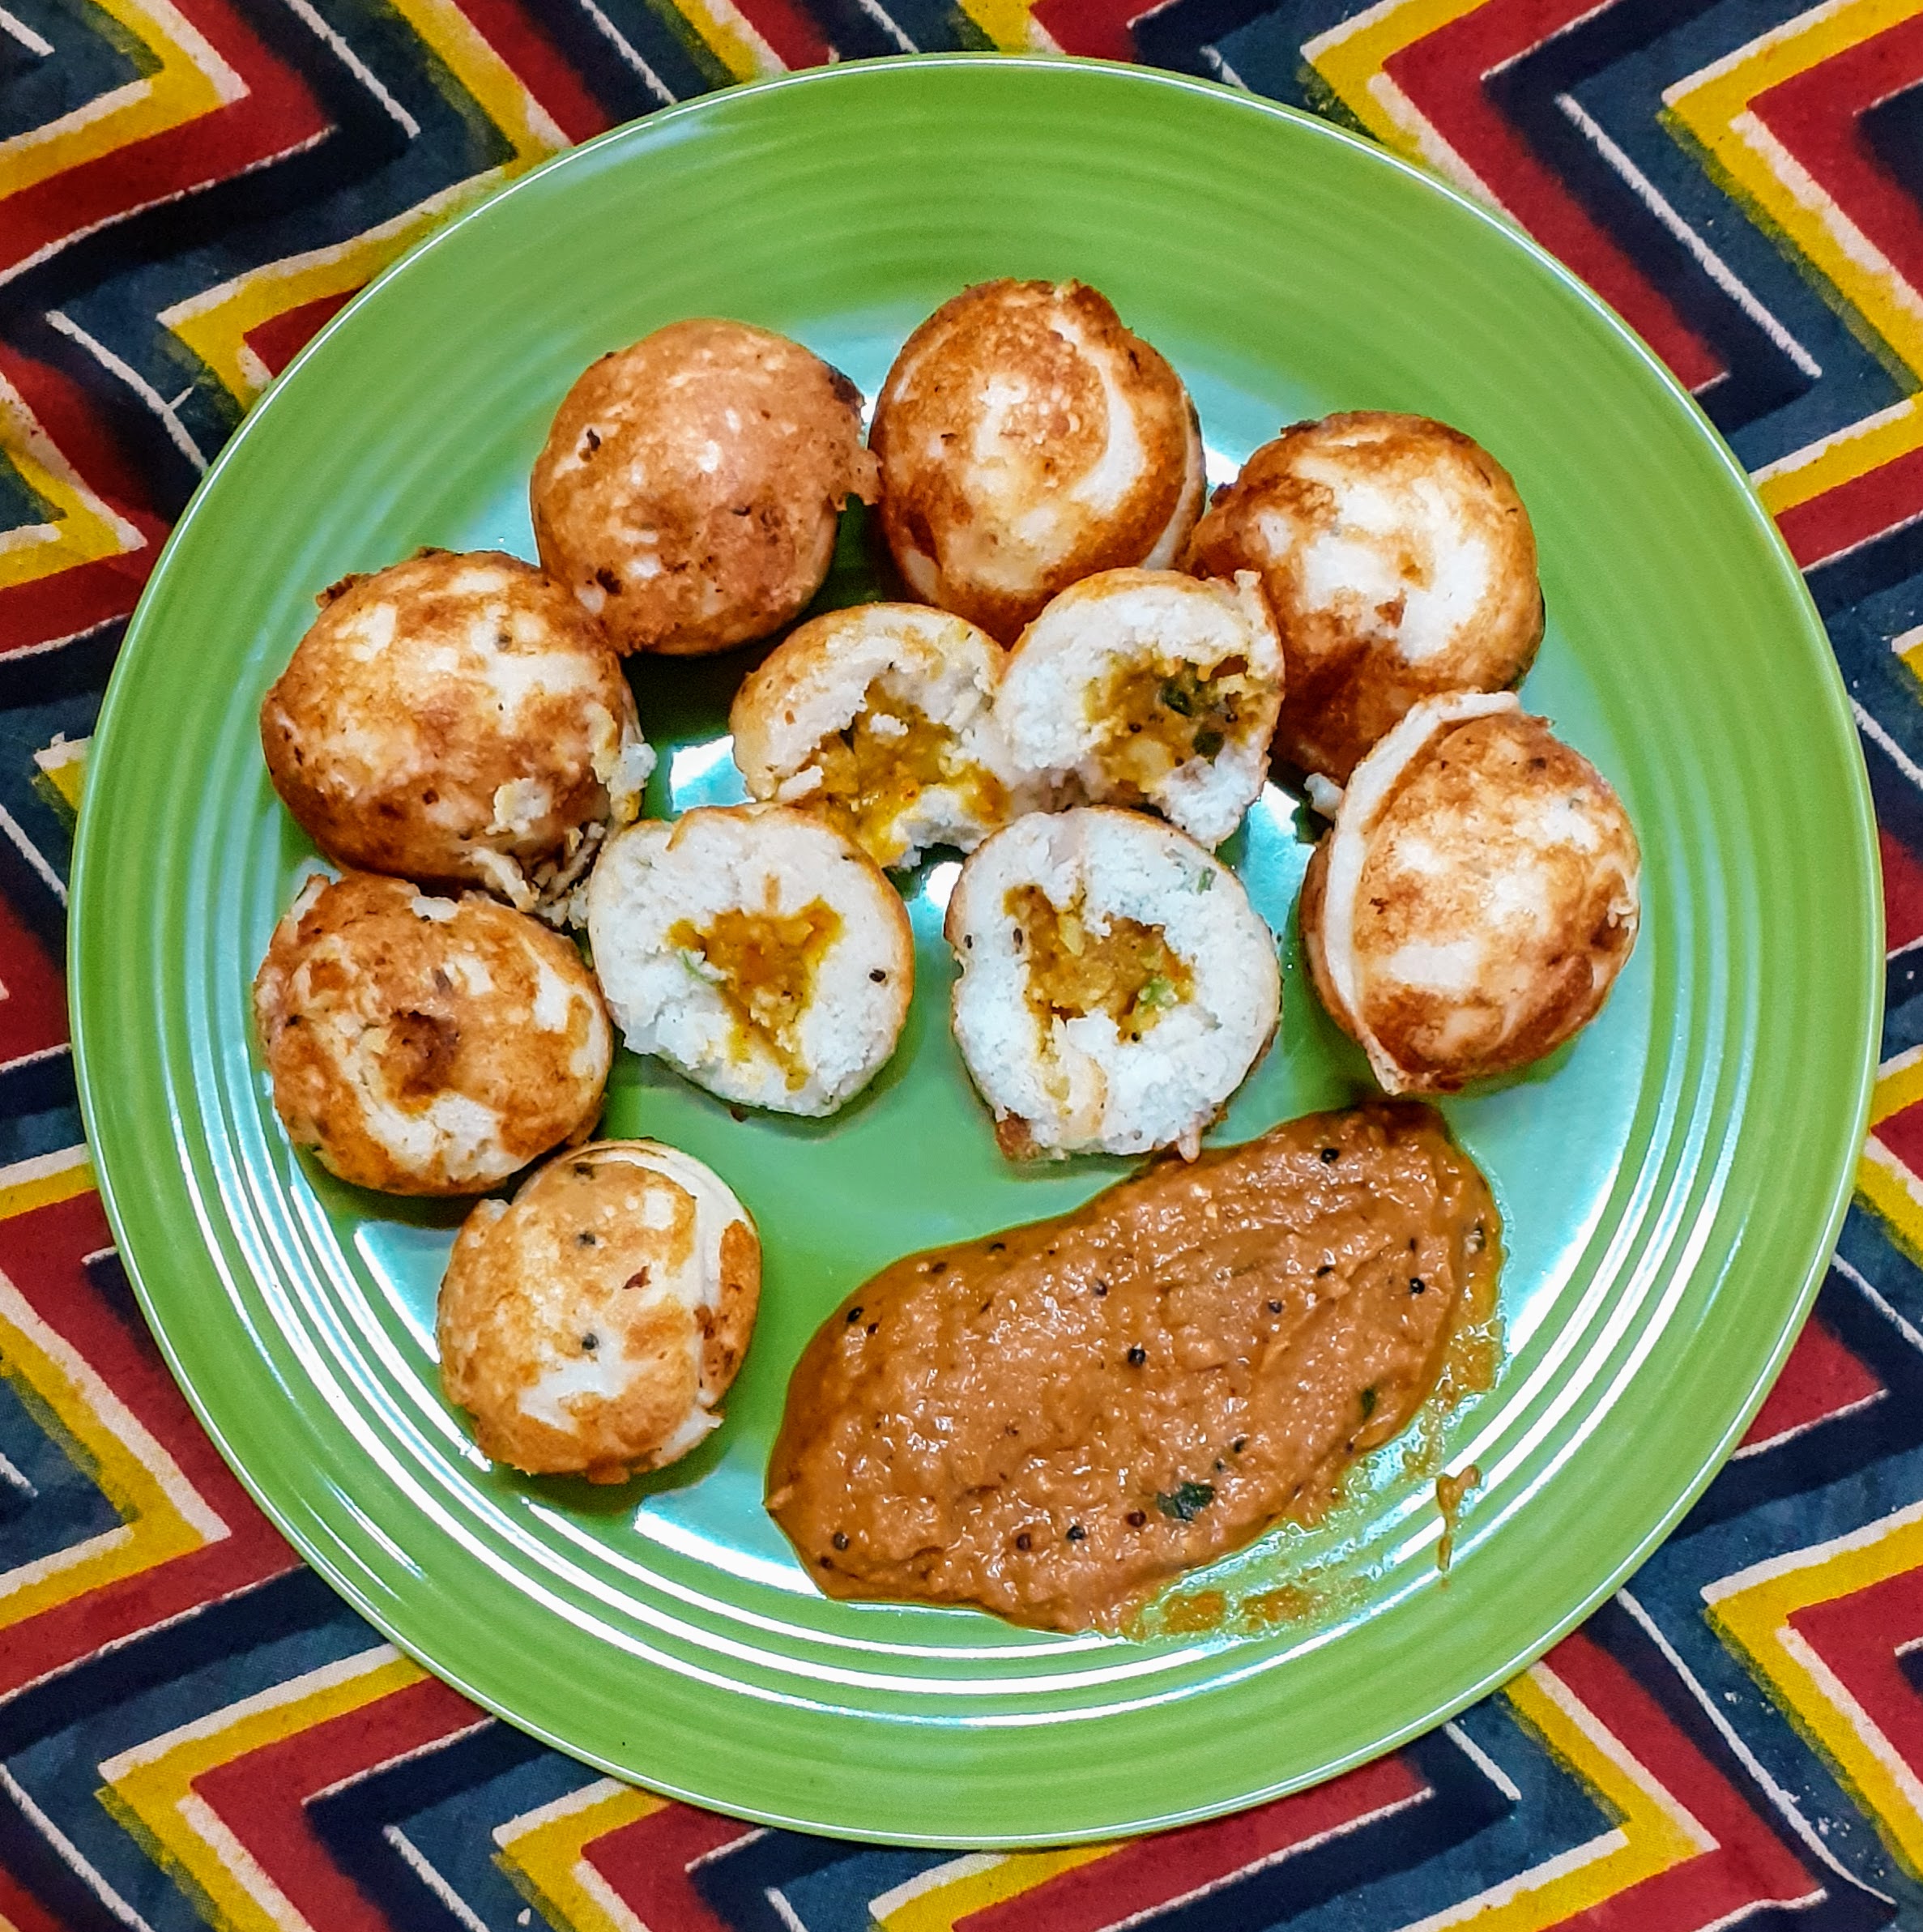
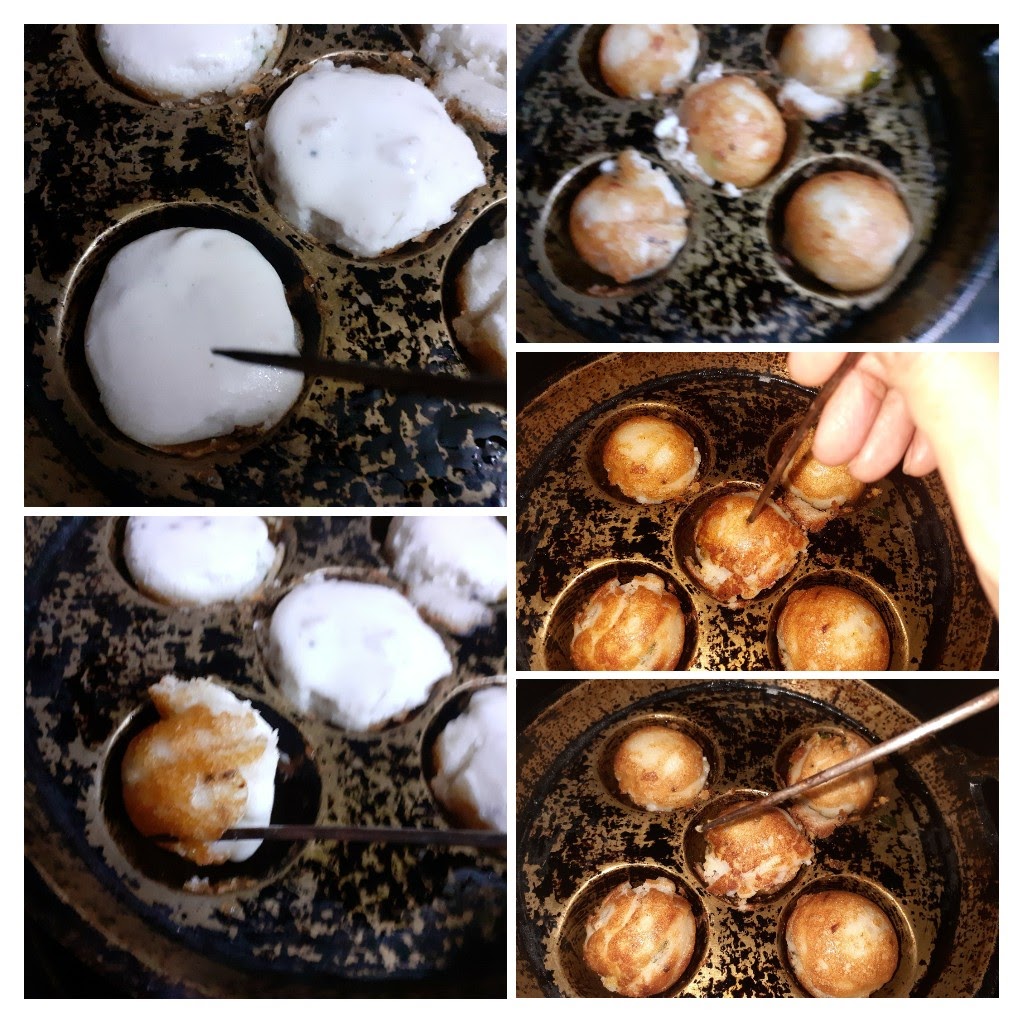
Put the Paniyaram pan on the flame and let it heat up. Pour oil into the moulds(if using a traditional metal pan, only the first round will need 1 tsp oil per mould, rest of the batches will need only a few drops). Wait for 1/2 a minute, let the oil heat up, now reduce the flame and with a small round ladle pour 1 scoop of batter into each mould, now take the stuffing little at a time with a spoon and drop it in the centre of the batter. Now cover up the stuffing with 1/2 scoop of batter and increase heat. Drizzle little oil around the corners of each mould, reduce the flame and slowly loosen them from the sides. Now flip each Paniyaram and cook the other side. When done loosen it from the mould and remove it. The crispy and tasty Kuzhi Paniyarams are ready..serve them with Tomato Coconut chutney or Tomato onion chutney. Enjoy. Bon Appetit.
STEPWISE RECIPE FOLLOWS:
1. Soak the dal and rice along with 1 tsp methi seeds for 3 hours minimum and grind to a smooth paste of medium consistency(Idli batter consistency). Add the salt, mix and allow to ferment for 6 to 8 hours.
2. Preparation of stuffing–Boil Potatoes, peel and mash them. In a pan take 1 tbsp oil and heat. Now add the mustard, followed by cumin, turmeric powder, salt, red chilli powder, asafoetida and curry leaves. Fry the masala for 30 seconds and add the mashed potato to the tempering and mix well. The tempering should have coated the potatoes well. Check for salt and spice. The stuffing should be a little spicy.
3. To the fermented batter add finely chopped onions, ginger, green chillies and curry leaves and stir nicely. Temper the batter with mustard seeds, cumin seeds and asafoetida.
4. Now put the Paniyaram pan on the flame and heat. Pour 1 tsp oil in each mould. Once the oil is heated, using a small round ladle, pour 1 scoop of batter into each mould. Now with a spoon drop little of the stuffing in the centre of the batter, now pour more batter to cover the stuffing. Drizzle some oil in the corners and cook for 1/2 a minute. Now loosen the edges of the paniyaram using a fork/ spoon or thin metal wire to flip them around, cook them and remove them from the pan when done. For doneness when you stick the metal wire or toothpick in the centre of the paniyaram, it should come out clean.
(I have included a short video so that you understand the process of cooking the Paniyaram in the pan.)
5. Repeat this process for the entire batter or how many ever you wish to serve, the remaining batter can be stored in the fridge and used to make uthappam.
The Paniyaram is ready to serve. It goes well with all chutneys or just by itself as it has a stuffing. It can be served with Sambar too.
How do make this recipe without a Paniyaram pan?
well, make a thicker batter, and also make small balls of the stuffing. Now take the stuffing and drop it in the batter, use your hands to coat the stuffing with batter and deep fry them in a Kadai of oil.
NOTES:
1. As the recipe involves soaking and fermentation, plan your time. In winters give more time for fermentation.
2. The onion, green chillies, ginger and curry leaves can also be sauteed in oil and added to the batter.
3. If using a nonstick paniyaram pan, I recommend drizzling it with some oil for a crunchy exterior.
4. Only small amounts of the stuffing as to put in the center of the batter, not too much of it.
If you tried this recipe and liked it please comment below. I would love to hear from you.
Vetrilai Rasam/Betle Leaf Rasam
Rasam is a popular South Indian dish prepared with tamarind, tomatoes, and Rasam powder. There are many variations of this dish, and each South Indian household has its own recipe for the proportions of the ingredients of the rasam powder. Therefore though Rasam is almost a regular feature in all South Indian households its taste is unique to each. No two Rasam recipes taste the same. Rasam is also a sought after comfort food in South Indian households when one has a Cold(Common Cold) or is a little under the weather because it is made of simple ingredients that are easily digestible and pepper that helps in combating the cold.
Earlier the Rasam was an everyday feature in most South Indian households along with Sambar or Vatha Kozhambu or Moru Kozhambu and a part of the Main course. Some households follow it to this day, but as the eating patterns of people has changed and is now more global the humble Rasam has taken a back seat or is made on a festival day where there is a feast(Elai Sapadu) or sometimes is also being served as a soup in elite gatherings.
There are different types of Rasam Like the Pepper Rasam, Tomato Rasam, Lemon Rasam, Garlic Rasam, Neem Flower (Vepampoo) Rasam, Drumstick Rasam, Pineapple Rasam and the Vetrilai(Betel leaf) Rasam. I have already posted the recipe of pineapple Rasam and slowly over a period of time plan to cover all the Rasam varieties mentioned here.
The Vetrilai also called Vethalai Rasam is has Betel leaves, Tomatoes, and the Rasam Powder as the main ingredients. This Rasam is a very mildly flavoured rasam. For more intense flavour add more Betel leaves.I am posting the recipe of the Rasam powder as the powder used makes a great impact on the flavour of the Rasam. This is also the reason why I said that the Rasam of no two households tastes the same as each has its own proportion. That said Rasam in any form is Comfort food????.
While you are here please check out the recipe of Pineapple Rasam.
Here is the recipe of Vetrilai Rasam for you–
PREP TIME: 10 Mins COOK TIME: 20 Mins
TOTAL TIME: 30 Mins COURSE: MAIN / APPETISER
CUISINE: SOUTH INDIAN SERVINGS: 4
AUTHOR: Rajni Ram
Ingredients:
Betel leaves/Vetrilai 10-12 leaves(refer note 1)
Tomatoes 5 (note 3)
Tuvar dal/ Yellow lentils 1/4 cup cooked in a pressure cooker
Rasam powder 3 tsp
Green chilli 1
Lemon 1
Coriander leaves finely chopped
Garlic(optional) (refer note 2)
Asafoetida 1 tsp (split 1/2 while boiling and 1/2 for tempering)
Turmeric powder 1 tsp
Salt as per taste
Roasted Pepper & Cumin powder 1 tsp( dry roast in the ratio 2:1 and grind coarse)
Directions:
Put the dal in a vessel and cook it in the pressure cooker. I used pot in pot method, you can use whichever is convenient. The dal should have cooked well. Remove the stalks from Betel leaves, reserve one leaf for garnish and put the remaining in a blender, put 2 chopped tomatoes and the green chilli into the blender too, and grind them to a smooth puree. Chop the remaining 3 tomatoes into big cubes and put them in a 1-litre vessel. Add the Betel leaf-tomato puree also to this vessel and pour 3 cups water(1 cup =150 ml). Put the vessel on a medium flame and add the Rasam Powder, followed by turmeric powder, asafoetida and salt. Boil the mixture until the raw smell of the Betel leaves and tomatoes is gone(around 7 minutes from boiling on medium flame). Now separate the water from the cooked dal and reserve. Mash the dal nicely with the back of a ladle. Pour the dal into the boiling mixture followed by the reserved water and add 2 to 3 cups of more plain water. Now continue to boil the mixture on a low flame until the Rasam froths up and boils and starts rising in the vessel( around 10 minutes on low flame). Don’t let it to overflow. When it rises up squeeze the juice of 1 lemon and put off the flame immediately. Now take 2 tsp ghee in a small tempering Kadai and heat. Add mustard seeds, as they crackle add the Asafoetida powder, roasted pepper-cumin powder and put off the stove. Now add the curry leaves to the ghee, and pour the tempering into the Rasam. Garnish with finely cut Betel leaves(only 1 leaf will do) and coriander leaves. The yummy Vetrilai Rasam is ready to slurp. Enjoy and Bon Appetit.
Serving suggestions: Just as a soup, with hot rice and ghee, with Oats porridge(try this it tastes yummy).
Sometimes I also pour it on my chapatis while hot.????
STEPWISE RECIPE FOLLOWS:
1. Assemble all ingredients. Cook the dal and keep ready. Remove the stalks from the Betel leaves, cut them to big bits, chop the tomatoes and keep aside.
2. In a blender put in the cut Betel leaves(reserve 1 for garnish), 2 chopped tomatoes, and green chilli and puree them smooth.
3. In a 1 litre vessel put the remaining 3 chopped tomatoes and the Betel-tomato puree and pour 3 cups of water. Put the vessel on the flame. Now add Rasam powder, Salt, turmeric powder, asafoetida and bring to a boil on medium flame. Keep boiling until the raw smell of the rasam powder and the Betel leaves goes away. This takes approximately 7 minutes on medium flame.
4. Now mash the dal nicely, if the dal has retained water, reserve it. Pour the dal into the boiling Rasam mixture, follow it up with the reserved dal water and add 2-3 more cups of plain water, and start boiling again on low flame.
5. Around about 10 minutes of boiling on a low flame the Rasam should start frothing up and rising in the vessel. When it starts coming towards the brim, add lemon juice and put off the stove immediately.
6. In a tempering Kadai heat 2 tsp of ghee. when it heats up put the mustard seeds into it, as they crackle add the asafoetida and the roasted cumin-pepper powder. Put off the flame and then add the curry leaves. Drop this tempering into the Rasam and serve hot with hot rice and ghee or follow any of the serving suggestions given above.
NOTES:
1. Betel leaves come in many varieties, but 2 of them are popular and in common use. One is light green and thin(the one I have used and you see in my pictures) another is a little deeper shade of green and the leaves are thick. So if using the light green ones use 10 to 12 leaves. If using the darker ones then reduce the quantity by half, use about 6-8 leaves as their flavour is more intense.
2. If using garlic grind it along with the Betel tomato puree. Around 2 pods should be enough or it will overpower the Betel taste.
3. I have used the sweeter hybrid variety of tomatoes(Bangalore ones) which I usually don’t, hence I used 5 of them. If using the country variety(Naatu thakkali) then 3 should be enough. Two to grind and two to put chopped.
4. If you serve Rasam with something unusual do let us, know..we love learning and trying new combinations.
If you tried this recipe and liked it please comment below. I would love to hear from you.
Brinjal Pepper Masala (No Onion-No Garlic Recipe)
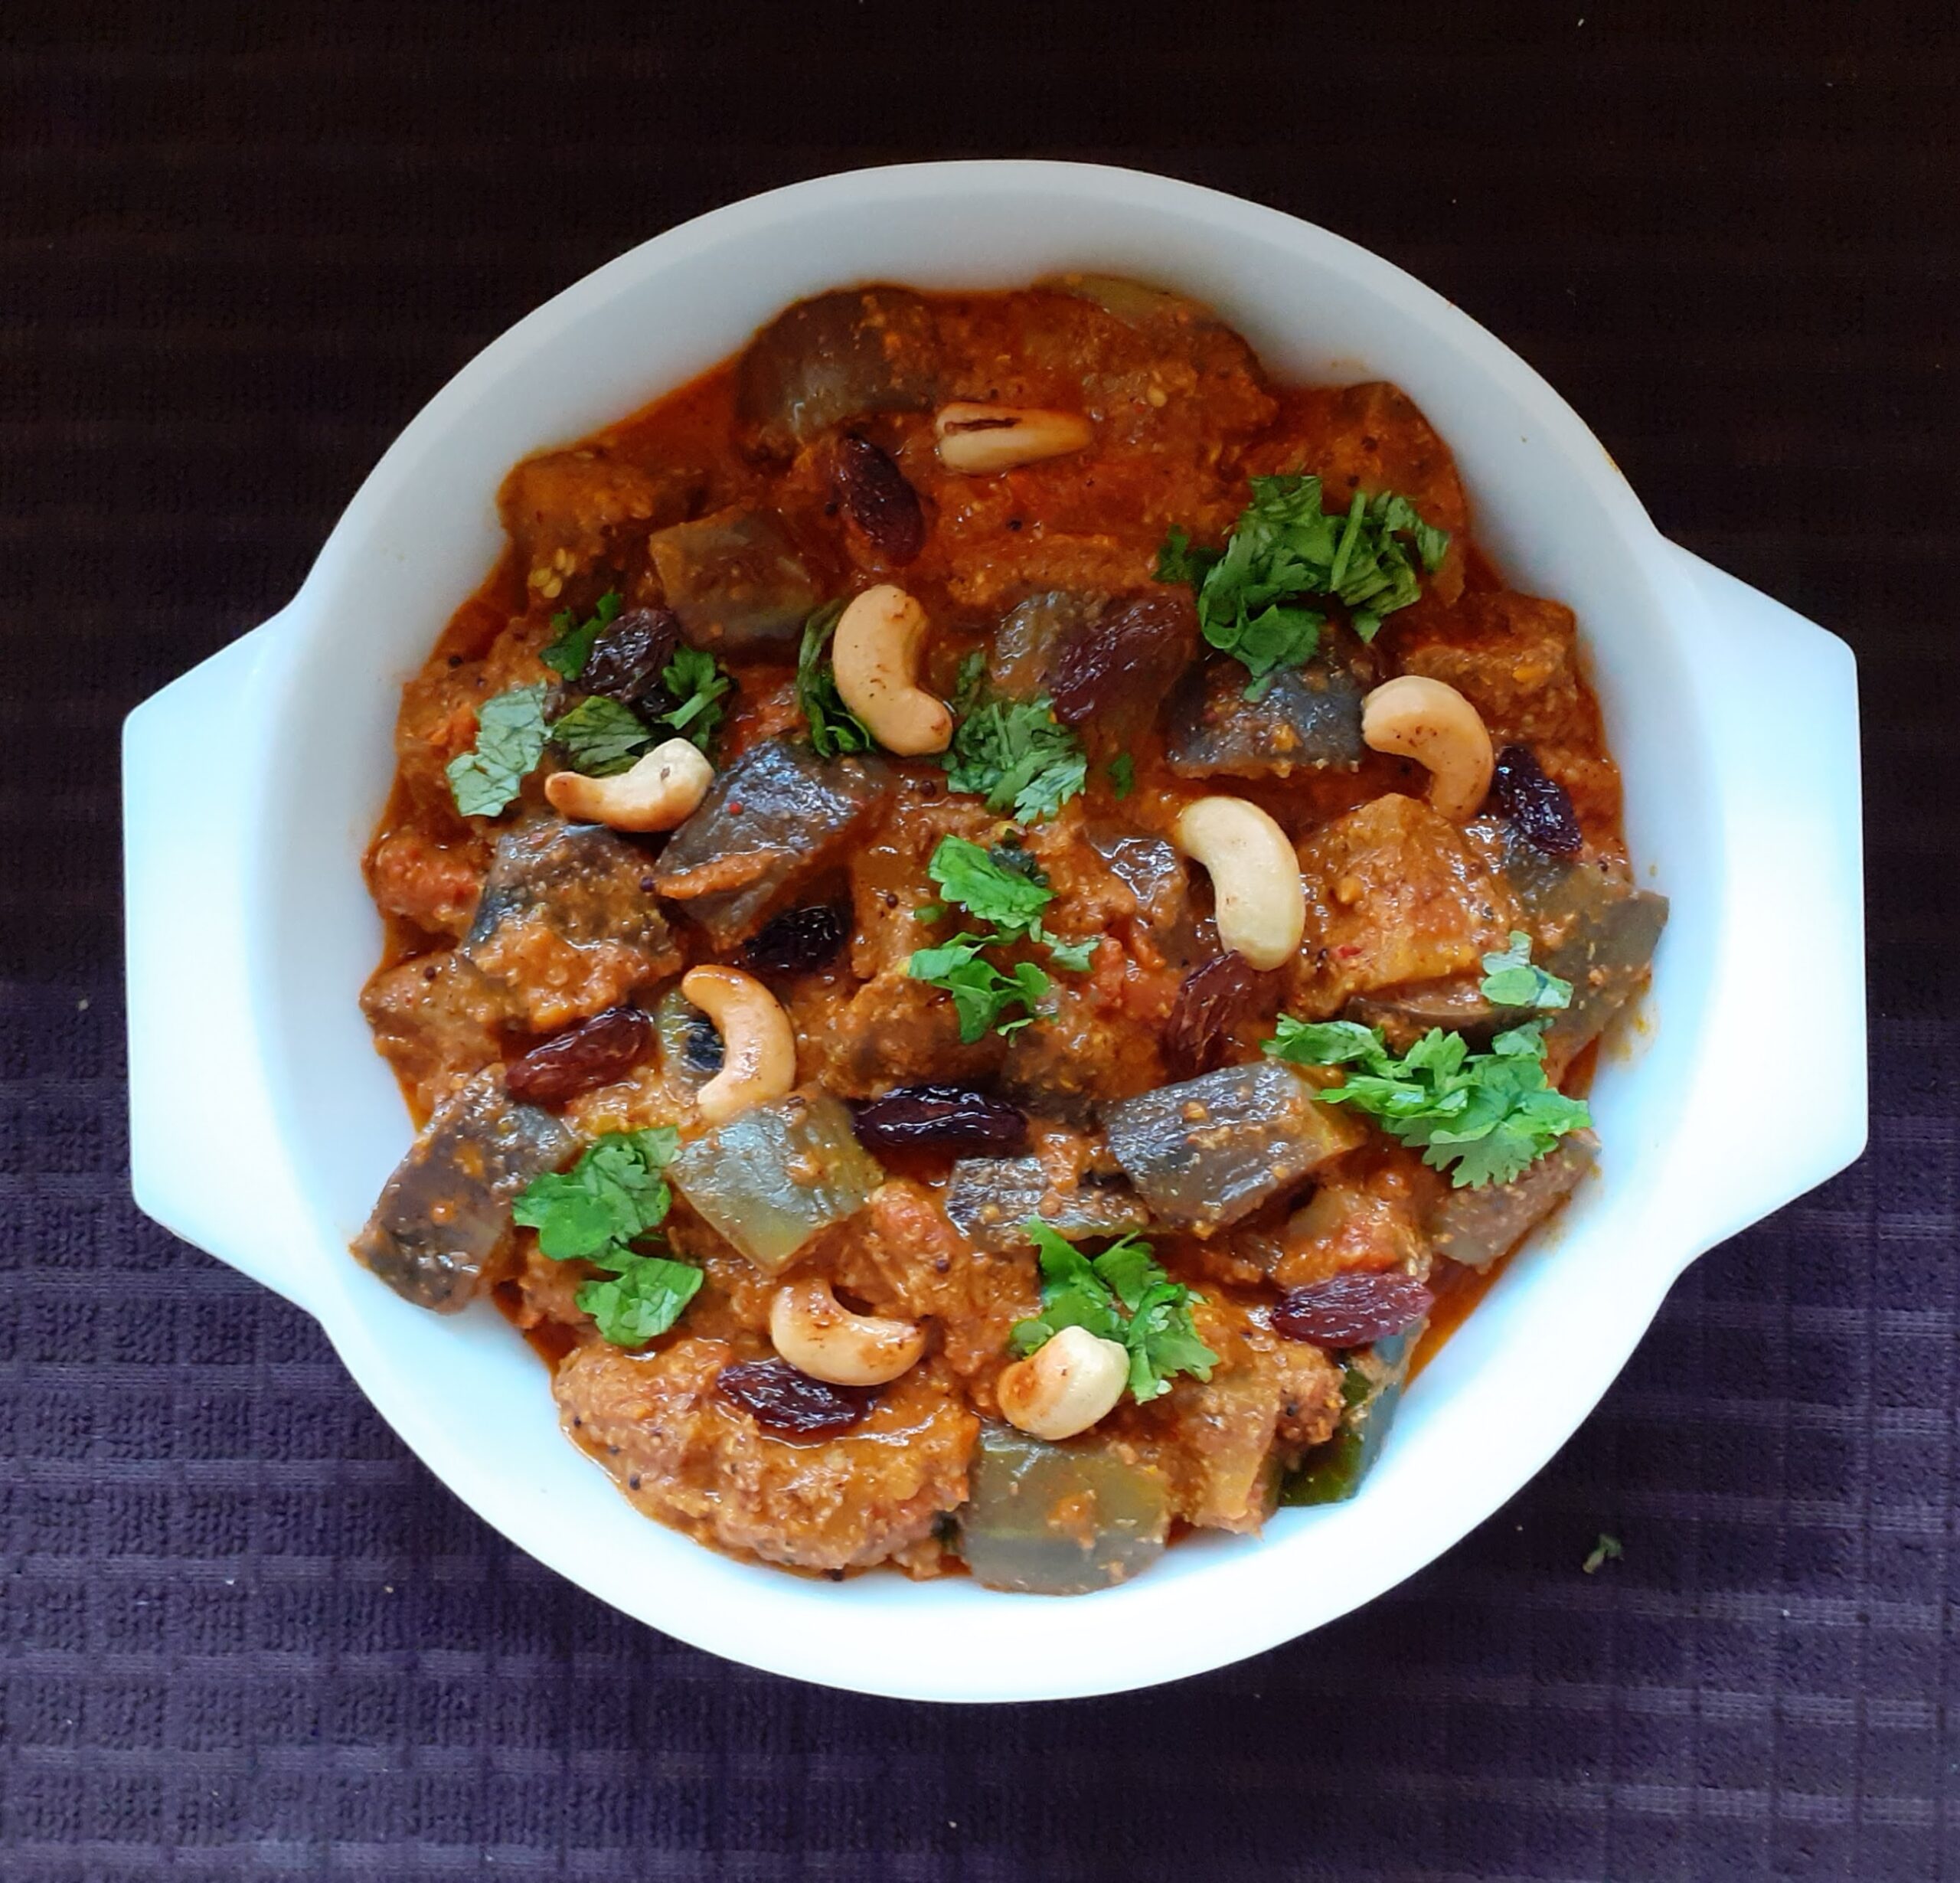
An everyday subji made from Brinjals and very simple gravy. Brinjals combined in a tomato and coconut gravy with some black peppers for spice. A very mildly flavoured dish, it has some Cashewnuts and Raisins too which enhance its taste. As I mentioned in one of my earlier posts Brinjals are very versatile vegetables and a large variety of recipes can be made with them from different cuisines. There are many types of Brinjal too and some recipes are specific to the Brinjal.
In this recipe, you can use any variety except the Bhara Baigan( the large fleshy one), as we want the Brinjal pieces to be firm and not mushy.
I learnt this subji from one of the guest house cooks where we stayed during our transfers from city to city. The gravy is of the South Indian style but believe me, it goes perfectly well with any of the rice varieties like Pulav or vegetable rice or even plain rice. It can also be served with Rotis. The Cashews and especially the raisins are like surprise packages in this dish which keep popping every 1 or 2 scoops. If you don’t like nuts or Raisins in your subjis(like I did until I tasted this) then you can always omit their use.
While you are here take a look at Gutti Vankaya Kura, which is also a Brinjal dish with Andhra flavours. Also check out, Methi Wale Baingan, Please look up other subjis too under the label Subjis while you are here.
PREP TIME: 20 Mins COOK TIME: 20 Mins
TOTAL TIME: 40 Mins COURSE: MAIN
CUISINE: SOUTH INDIAN SERVINGS: 4
AUTHOR: Rajni Ram
Here is the recipe of Brinjal Pepper Masala-
Ingredients:
Brinjal (any variety except Bharta Baigan) 250 gm diced medium
Tomatoes 3 large finely chopped
Curry leaves a few
Oil for sauteeing
Turmeric powder
Red chilli powder
Ingredients for paste:
Pepper 1 tsp(add more for more spice)
Cumin 1 tsp
Dry red chillies 3
Grated coconut 2-3 tbsp
Directions for making paste:
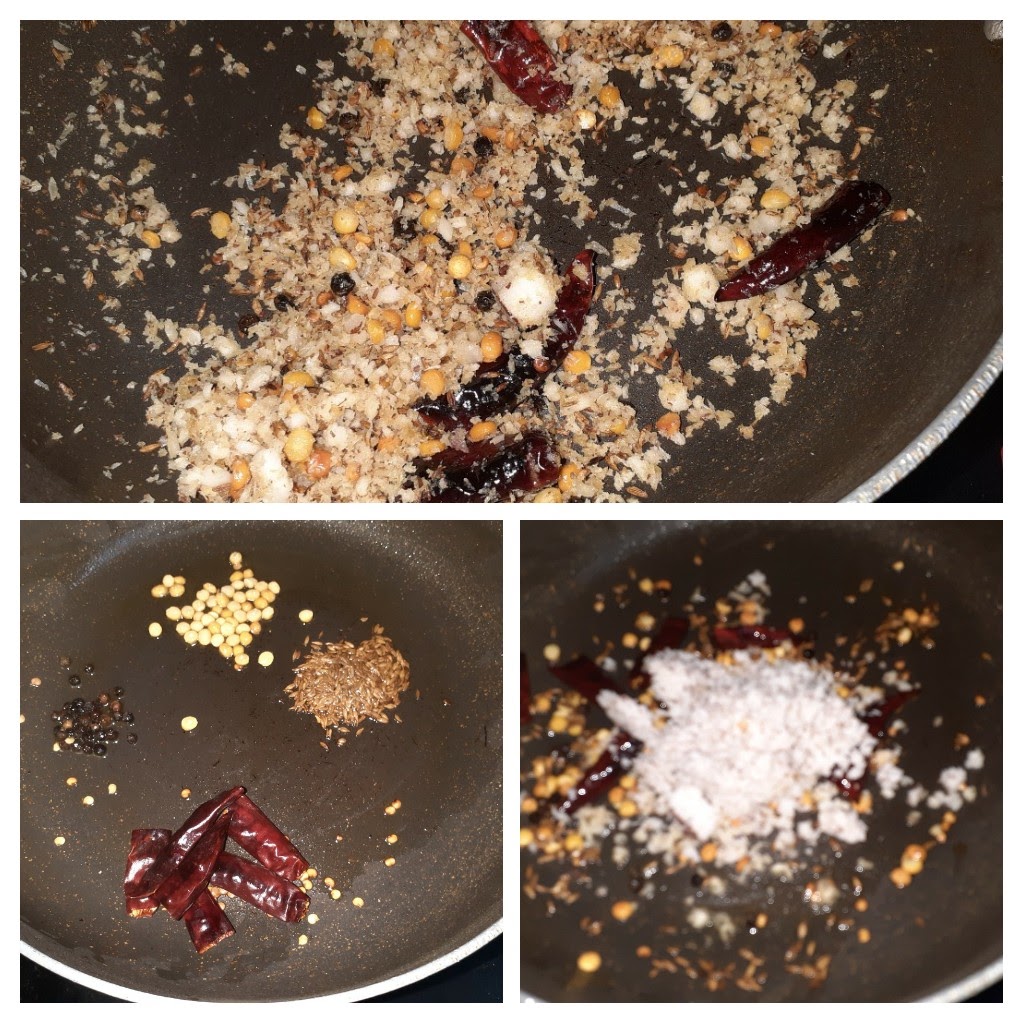
Heat a karahi with 1 tsp oil and put in all ingredients mentioned under paste, in the same order and roast them until light brown. Cool it and grind it in a blender to a smooth paste.
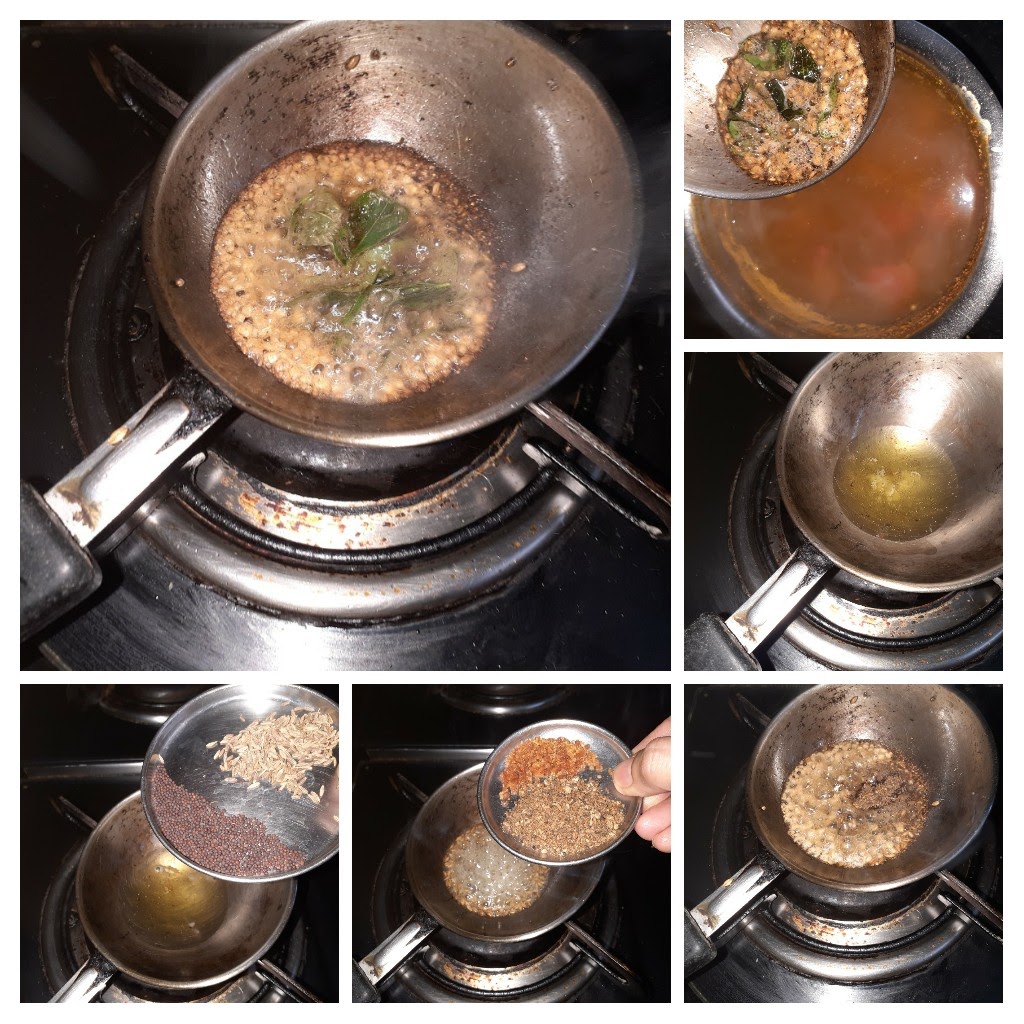
Directions:
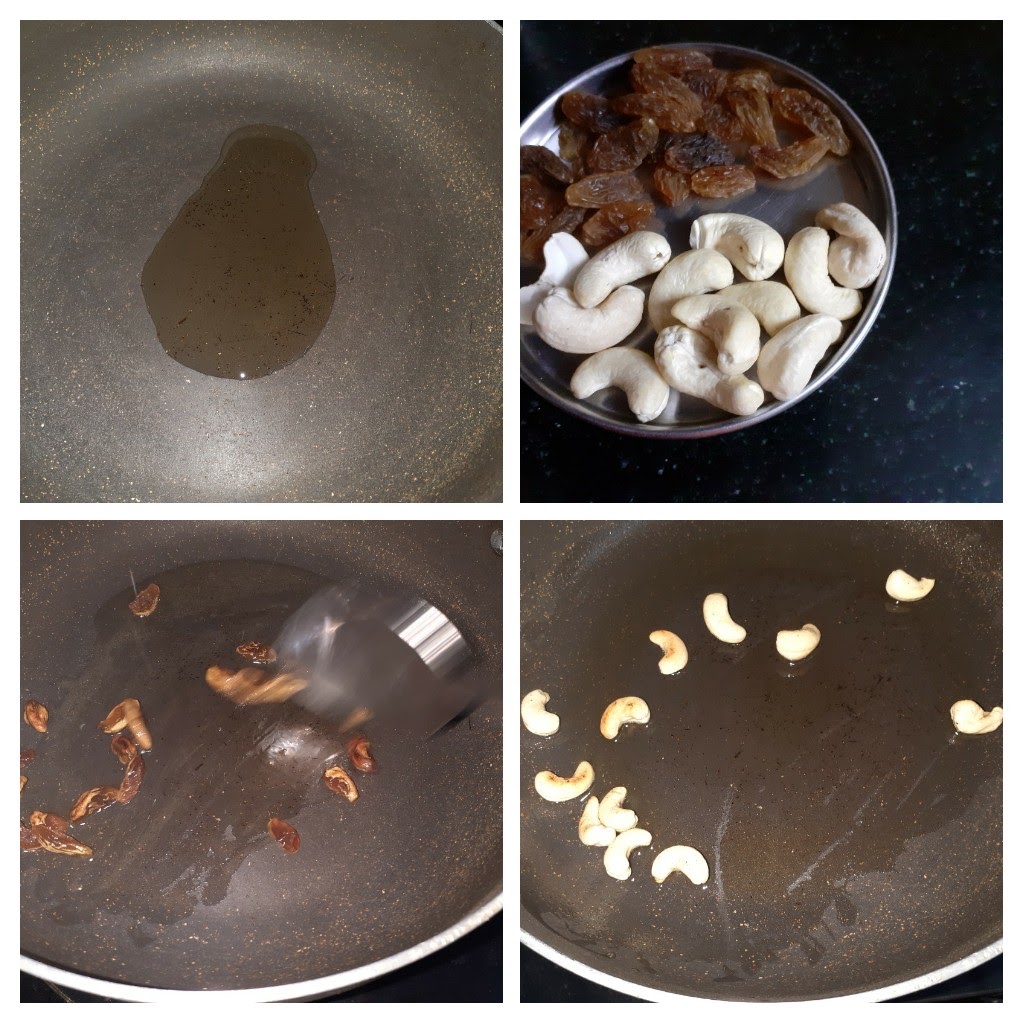
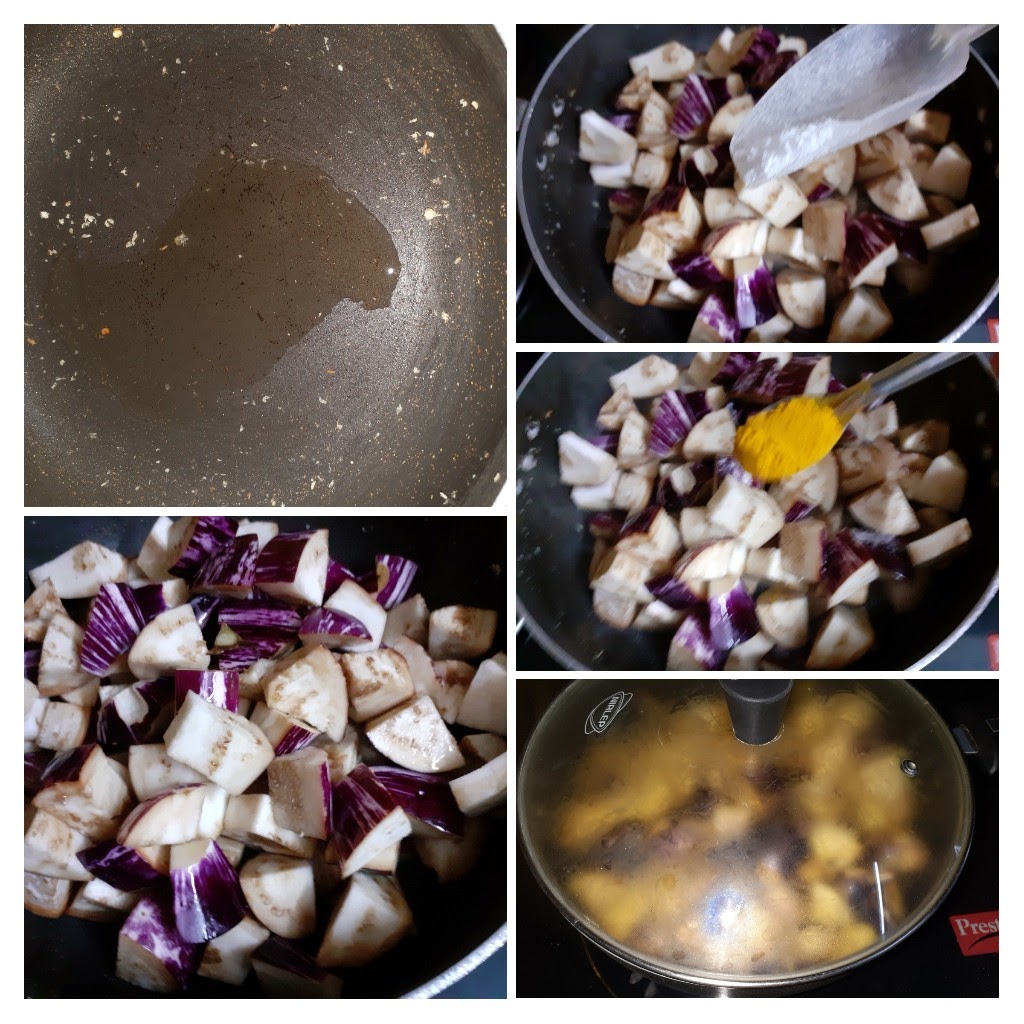
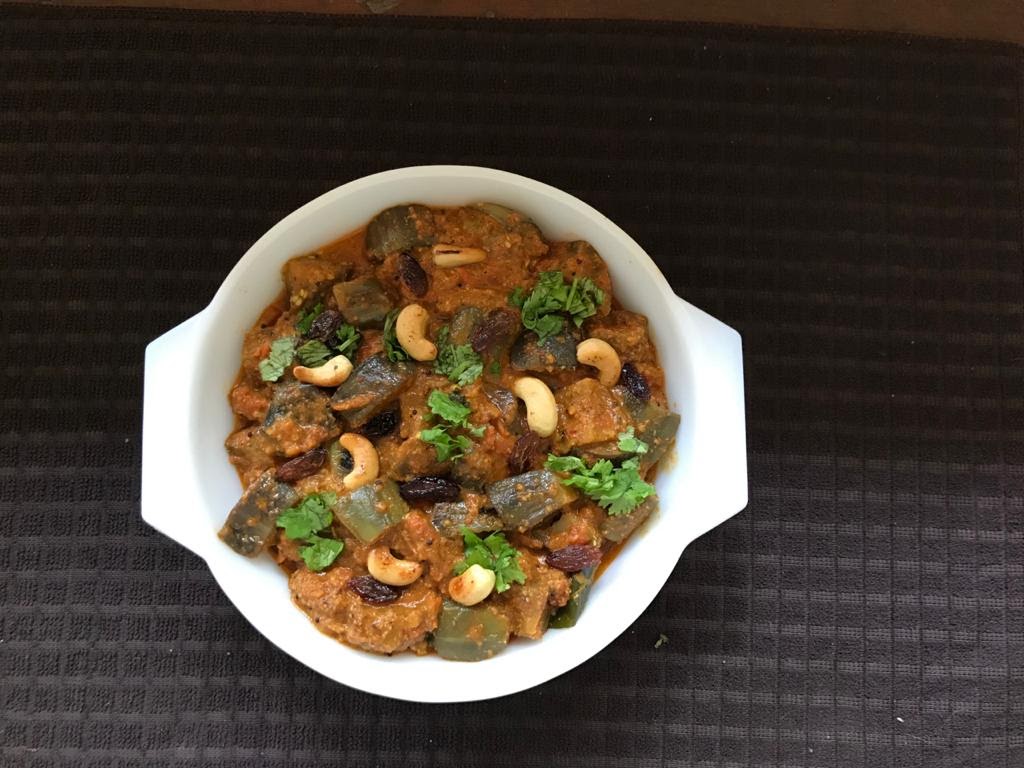
Dice the brinjals to medium size and put them in some water. Chop tomatoes very fine and set aside. In a Karahi pour some oil-around a tablespoon, let it heat up and put in the Cashewnuts, fry them until they are golden brown, remove them and put in the Raisins. Fry them too until they puff up and remove from oil. Now add the diced Brinjals to the same karahi and add 1/2 tsp turmeric powder, 1/2 tsp salt, stir well and cover it and cook for 3 minutes. Stir again and cover for another 2 minutes. The brinjal should have turned a little tender but still retain shape. Transfer the brinjals to another vessel and set aside. Now in the same karahi take 2 tsp oil and heat. Add the mustard seeds, let them crackle. Add the cumin seeds followed by turmeric powder and curry leaves. Give it a stir and add the chopped tomatoes. Now add some salt followed by red chilli powder and fry nicely in the oil. Let the tomatoes break, keep mashing them with the back of the spatula. When it turns pulpy, add the ground paste, sauteed Brinjals followed by 1 cup of water, cover and cook for 7 minutes. When you open the lid, the brinjals should have cooked fully, but retain shape and the curry should have come together. Now switch off the flame and add in the fried nuts and Raisins. Brinjal Pepper masala is ready to serve. I served it with some Pulav, any rice or Indian bread varieties will go well with it. Enjoy. Bon Appetit.
STEPWISE RECIPE FOLLOWS:
1. Assemble all ingredients. Dice the Brinjals, chop the tomatoes, grate the coconut and keep ready.
2. In a karahi take around 1 tbsp oil, add the nuts and the raisins one after the other and fry. The cashew nuts should turn golden brown and the raisins should fluff up. Remove them into a separate plate.
3. Now to the same karahi add the diced Brinjals followed by salt 1/2 tsp and turmeric powder 1/2 tsp. Stir them and cover the karahi for 3 minutes. Open the lid, stir again and cover and cook for 2 minutes. Open and check the brinjals, they should have turned a little tender but should have retained the shape. Remove them to another vessel. If still undone, then cover and cook for another 2 minutes.
4. Now pour a little oil into the karahi, about 1 tsp and heat. Roast all the masalas , mentioned under paste in the same order. Pepper being first, followed by cumin seeds, dry red chillies and finally add the coconut and fry until they get a nice brown colour. Cool, transfer to a blender and grind to a fine paste.
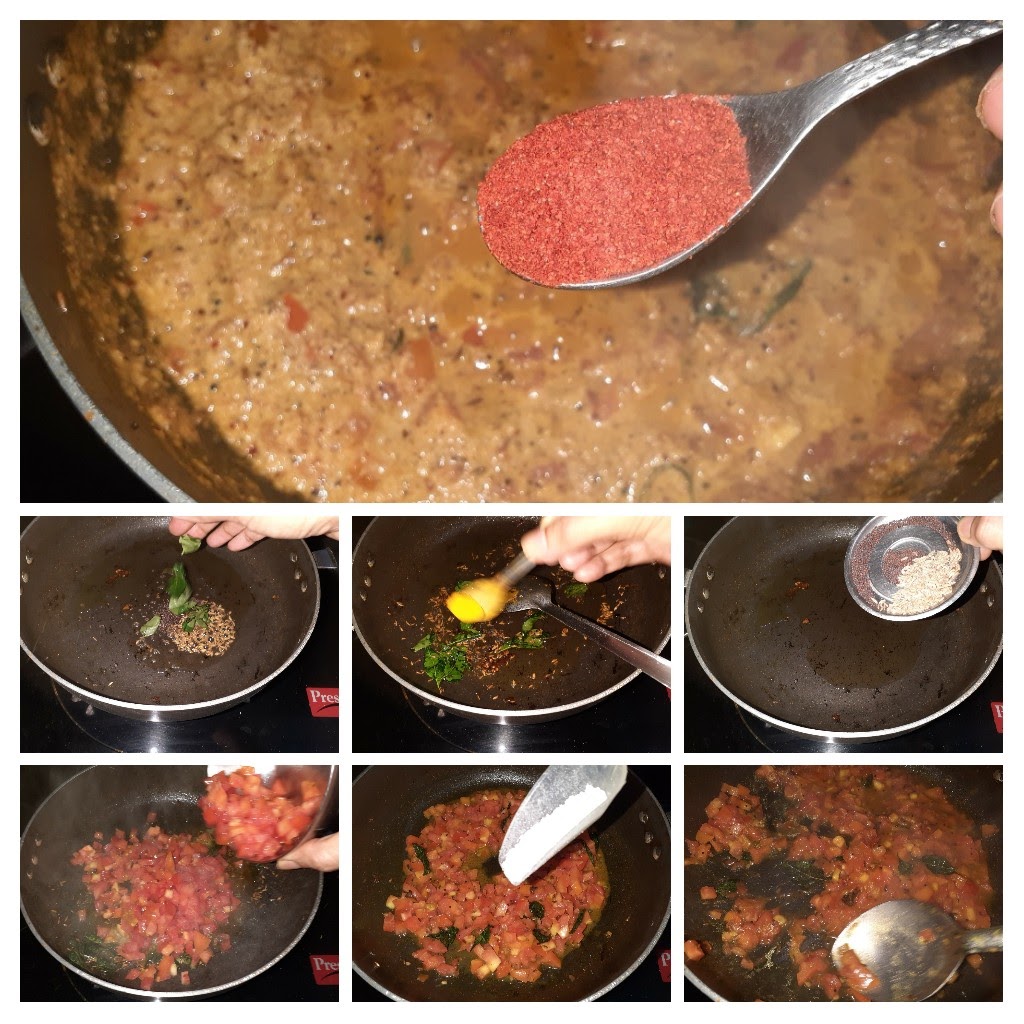
5. In the same karahi pour 2 tsp oil and heat. Add the mustard seeds followed by cumin seeds, turmeric powder and curry leaves. Fry and put in the tomatoes followed by salt and red chilli powder. Stir and cook the tomatoes. Keep mashing them with the back of the spatula so that they turn mushy.
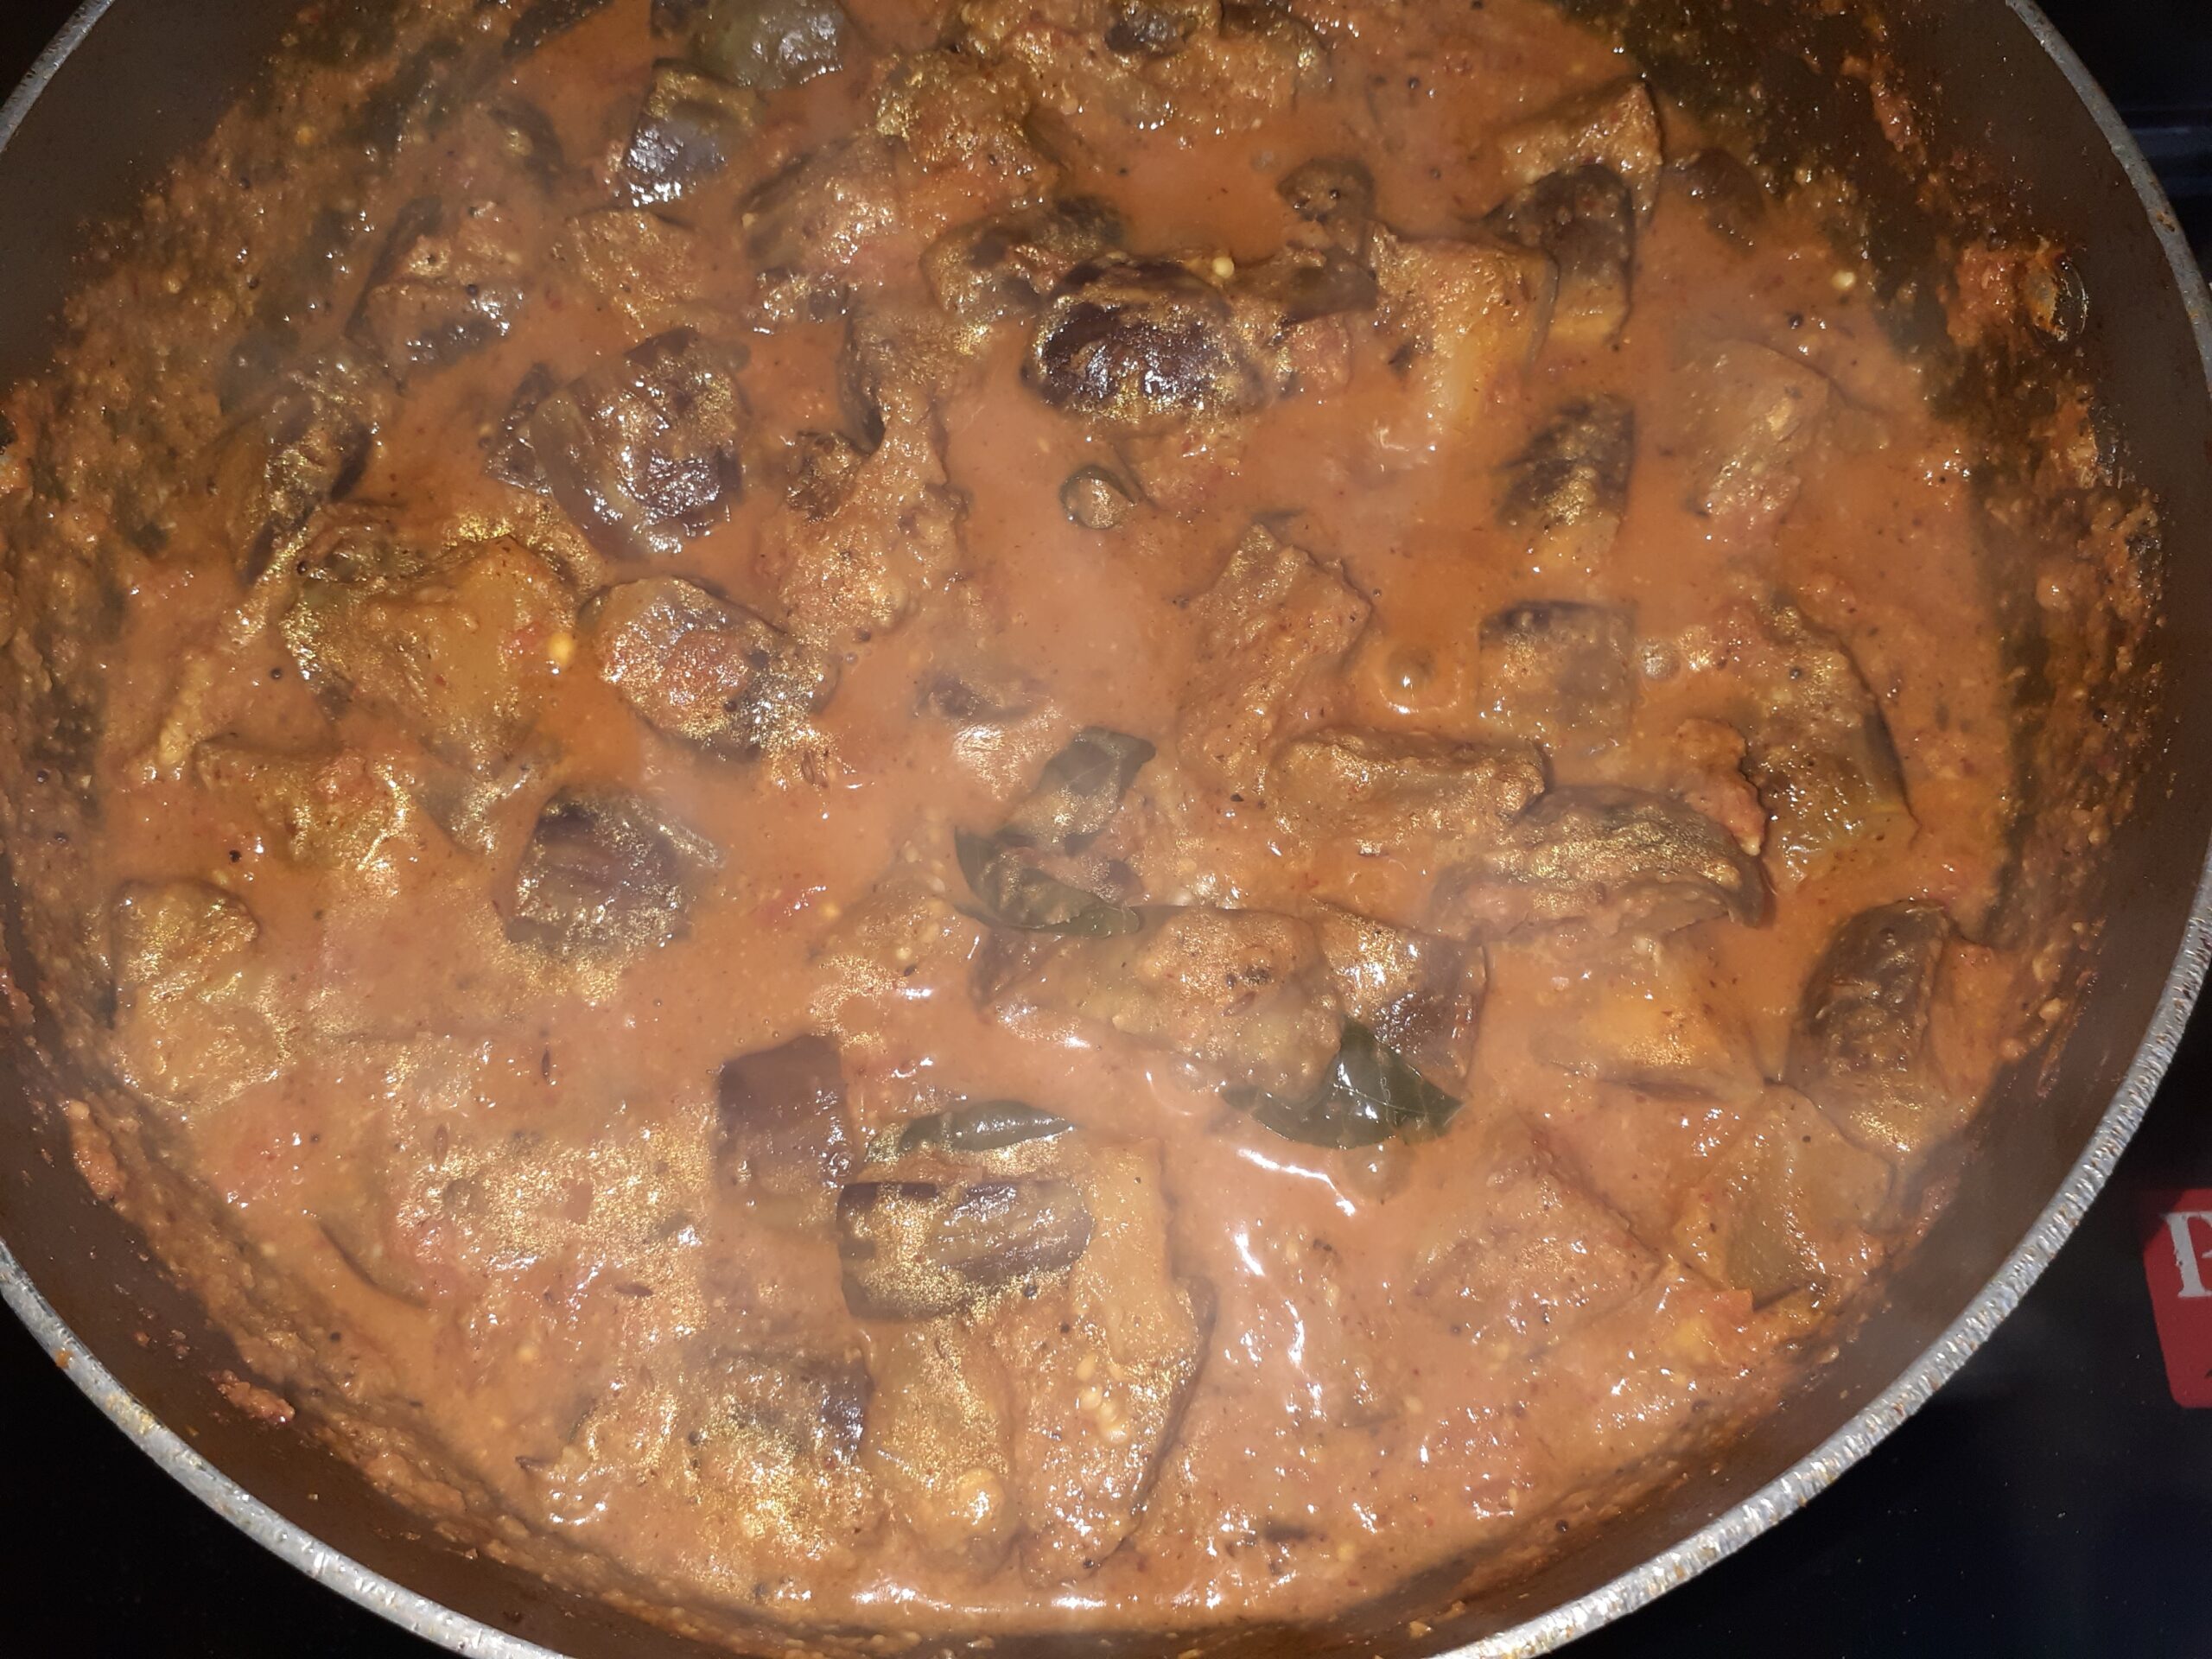
6. Now add the ground paste, followed by 1 cup water and put in the sauteed brinjals and cover the karahi and cook the brinjals in the paste for 7 minutes approximately, stirring once in between.
7. The Brinjals should be completely cooked by now, but not limp. the gravy too should have come together and should not be runny. Switch off the flame and drop in the fried nuts and raisins. Brinjal pepper masala is now ready. Serve hot with plain rice, Pulavs or with hot Chapatis.
NOTES:
1. Any variety of brinjal can be used except for the big fleshy one(Bharta Baingan).
2. Coriander seeds have been excluded from the paste, to get the same taste as mentioned in the recipe do not add them as they change the flavour of the dish completely.
3. More pepper can be added depending upon your spice levels. Be sure to reduce the red chillies or red chilli powder if increasing the pepper quantity.
4. The Cashewnuts and enhance the taste of the dish but if you don’t like the nuts coming in the way, they can be excluded altogether.
5. Kashmiri red chilli powder can be used instead of the regular one for colour.
If you tried this recipe and liked it please comment below. I would love to hear from you.
Pruppu Urundai Kozhambu (Dal Dumplings In Tamarind Sauce)
I love cooking this dish though it involves some amount of preparation and detail. Paruppu Urundai Kozhambu is a delicious traditional South Indian recipe. I learnt this from my mother in law and she was an expert at it. In this preparation, dumplings of Dal/ lentils are cooked in a tangy tamarind sauce. This dish is served with rice but goes well as a side dish for Dosas, Idli, Pongal etc. As in all recipes, there are different methods of making the dumplings. Some steam the dumplings before adding it to the sauce, while some cook it directly in the tamarind sauce. I prefer and follow the second method. The dumplings are able to absorb the flavours this way. I also love using fresh coriander in the dumplings as it realove cooking this dish though it involves some amount of preparation and detail. Paruppu Urundai Kozhambu is a delicious traditionaand add them to the sauce, whereas other recipes suggest cooking it lly elevates the dish to a different level. So when there are no coriander leaves at home I don’t make the dish. Whether coriander is added or not, this dish is just amazingly tasty. So don’t wait for the coriander, just cook on. While you are here check out the recipe of Vatha Kozhambu A similar recipe with Shallots cooked in a tangy tamarind sauce.
Here is the recipe of Paruppu Urundai Kozhambu.
PREP TIME: 20 Mins+ soak time COOK TIME: 30 Mins
TOTAL TIME: 60 Mins COURSE: MAIN
CUISINE: SOUTH INDIAN SERVINGS: 5
AUTHOR: Rajni Ram
Ingredients:
Tuvar dal/ Pigeon peas 2 cups soaked for 1 hour
Tamarind 2 lemon sized balls( pulp extracted)
Grated Coconut 3 tbsp
Sambar powder 2 tbsp
Dry red chillies 5
Mustard seeds 2 tsp
Asafoetida 2 tsp
Methi seeds/ fenugreek seeds
Curry leaves few
Coriander leaves(optional)
Salt as required
Directions to make Urundai( dumplings)
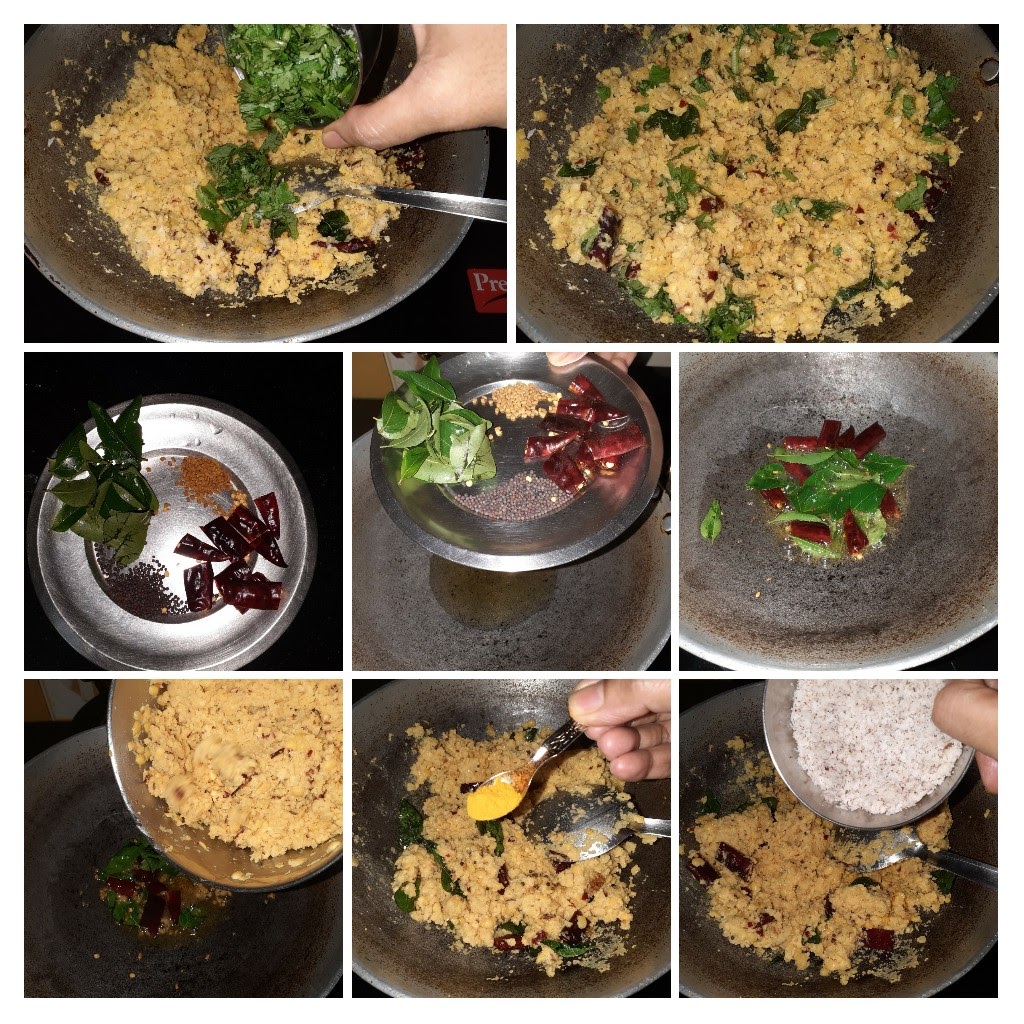
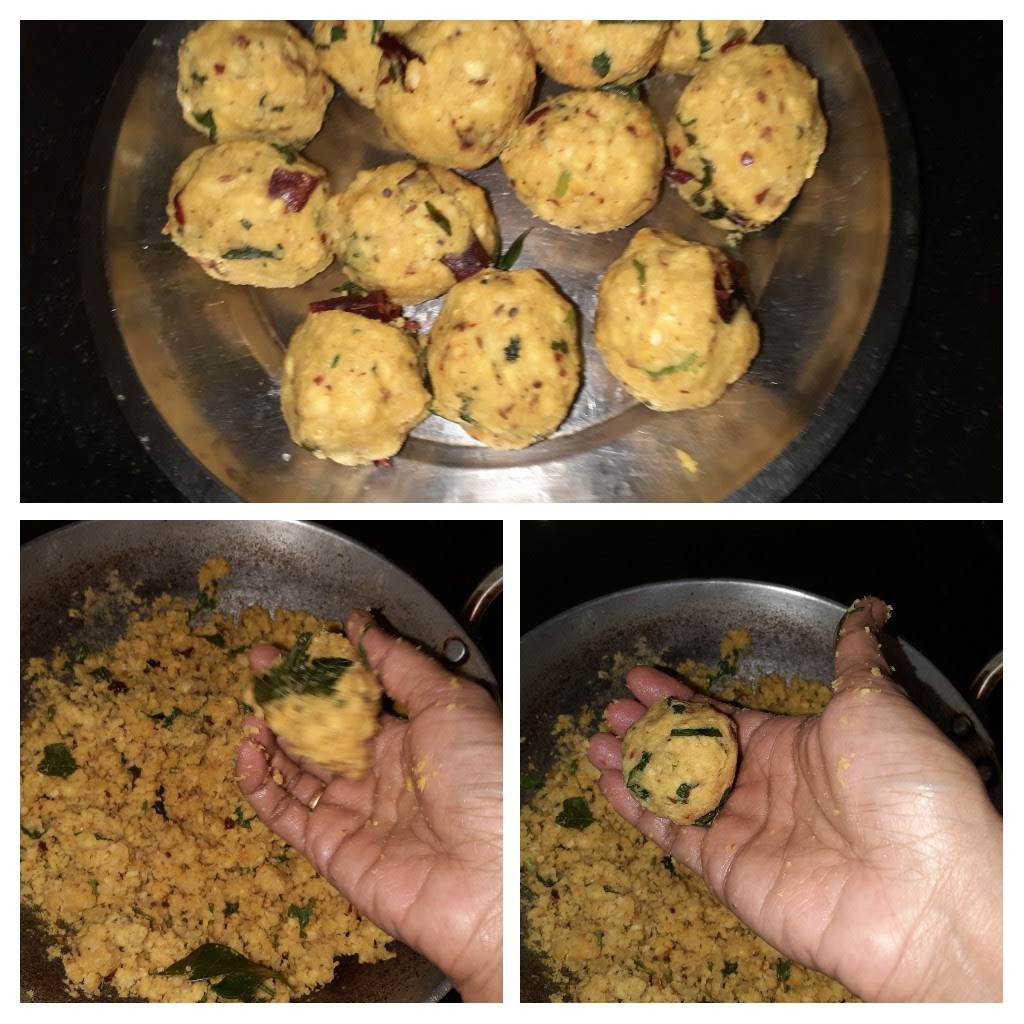
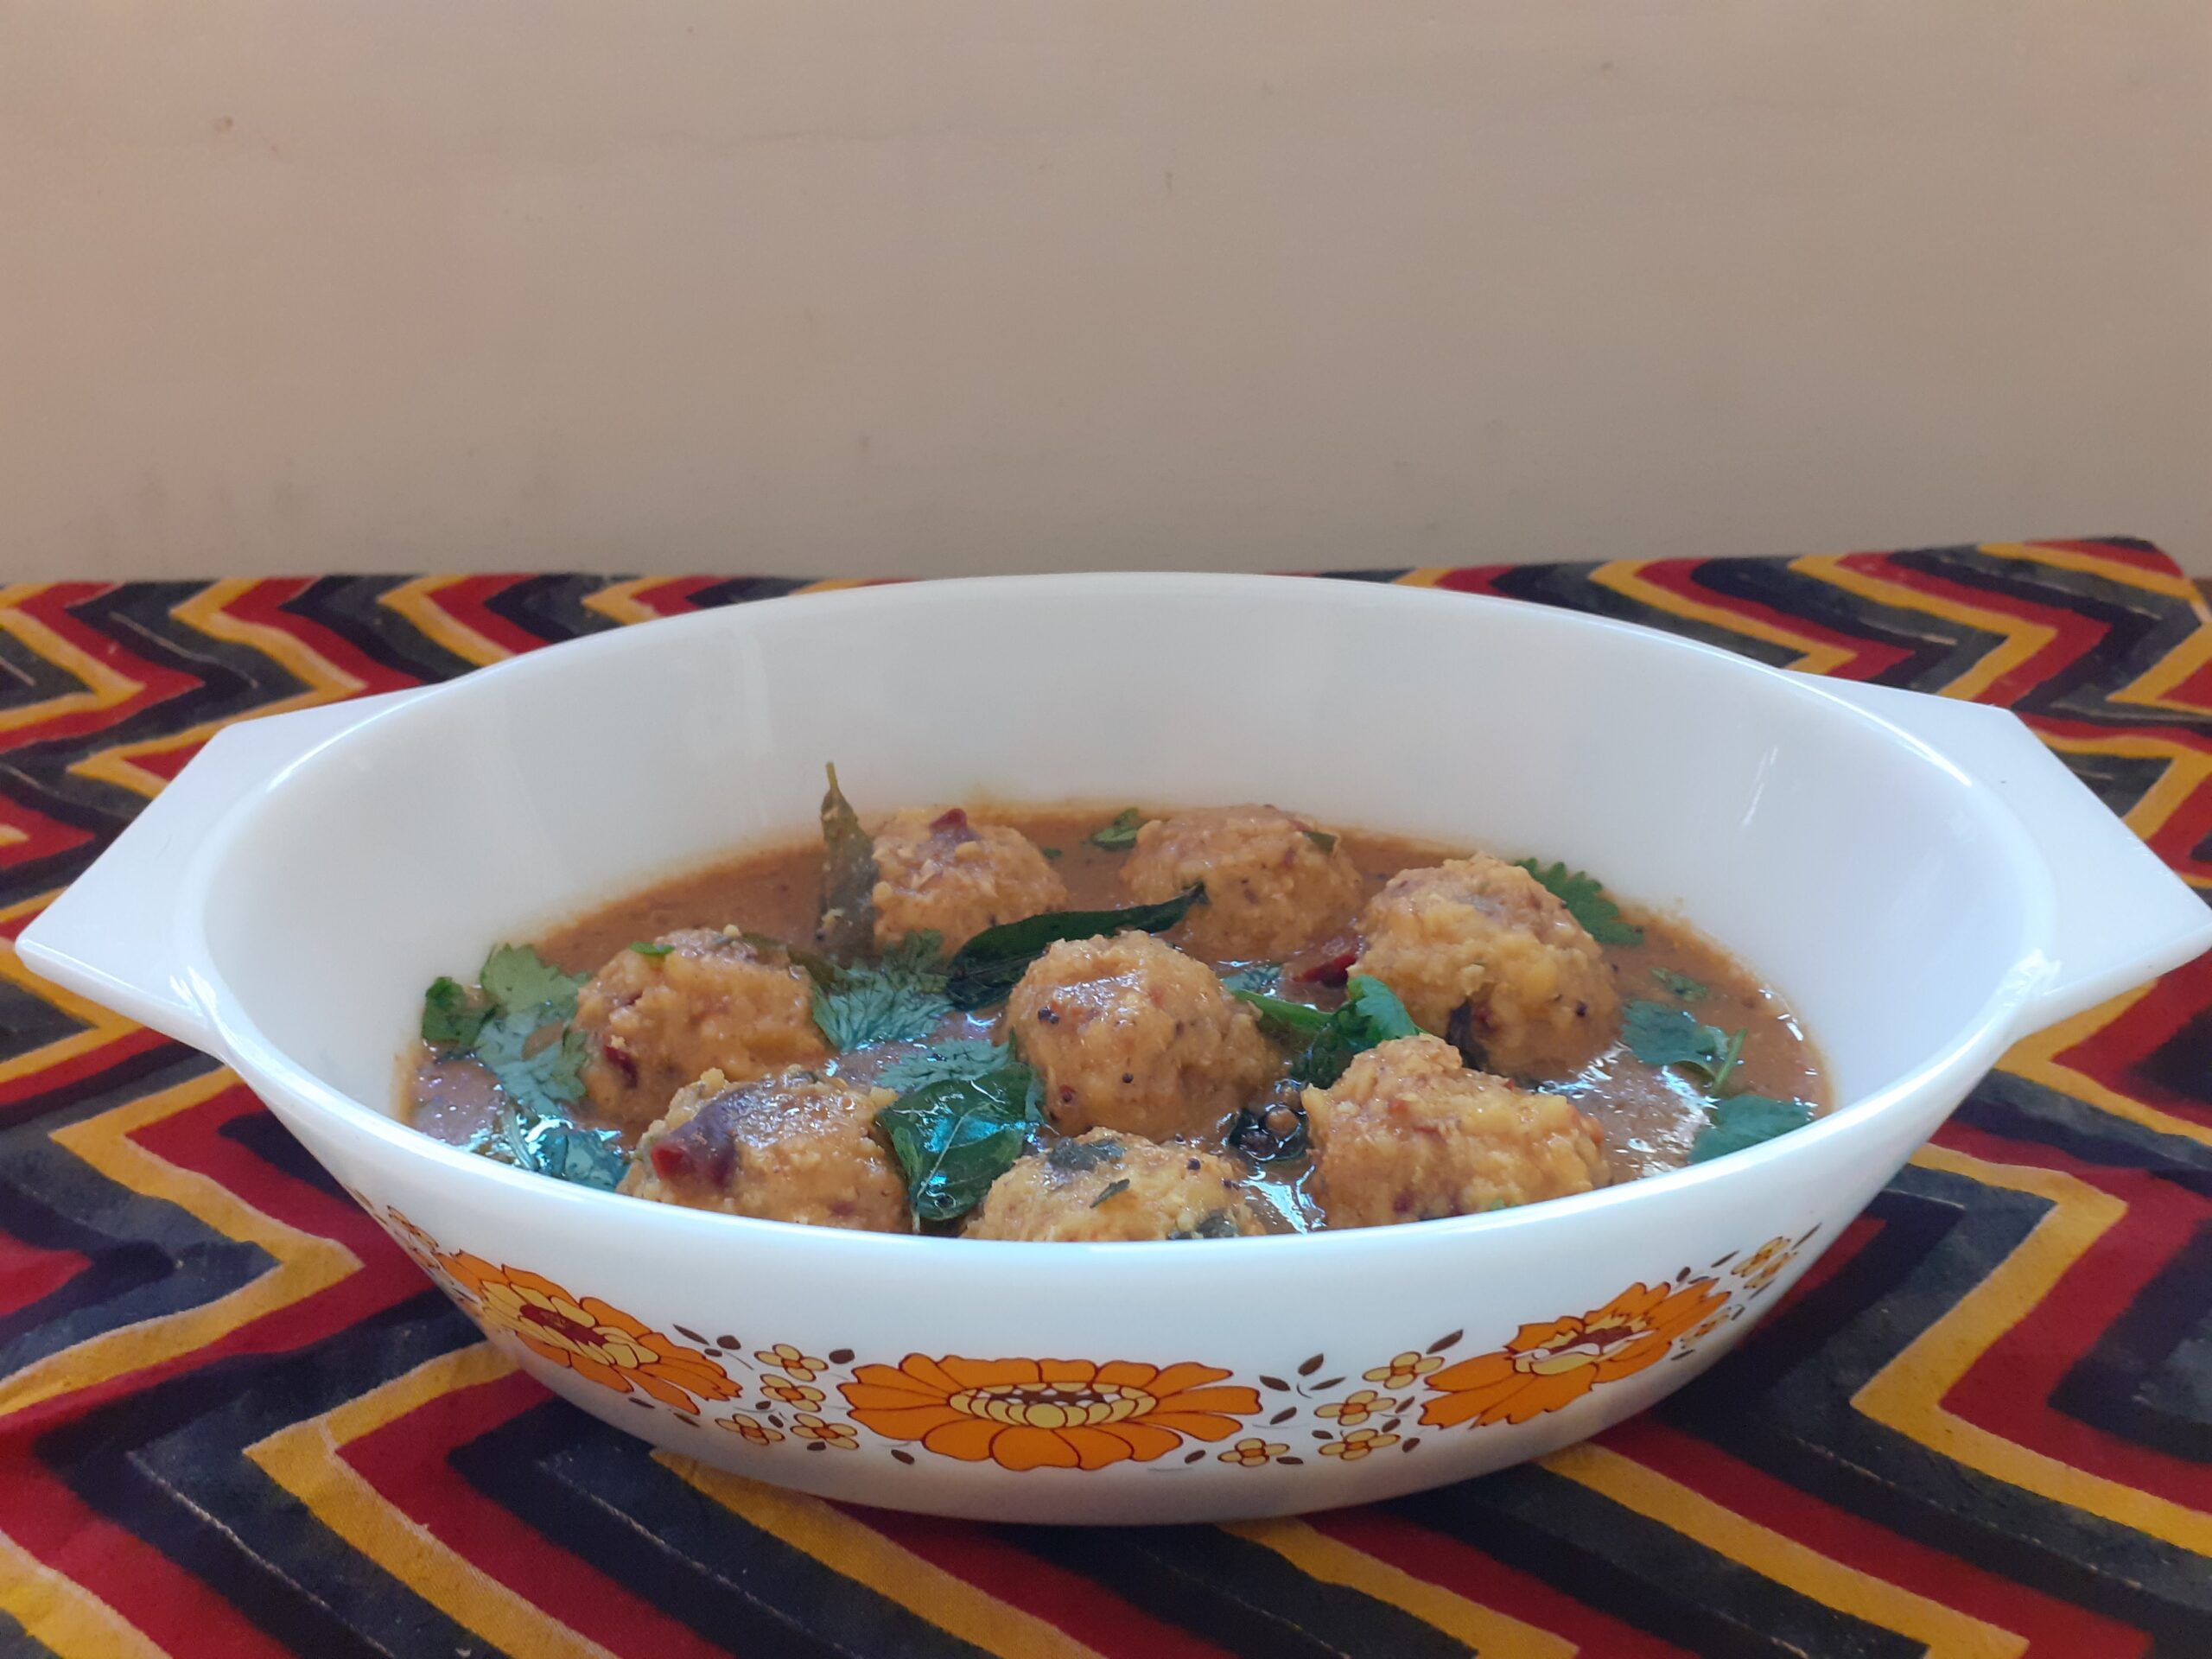
Drain out the water from the soaked dal and put it in the blender. Add 1 tsp asafoetida, dry red chillies 3, salt ( as per preference) and grind to a coarse mixture. Now in a karahi or pan add 1 tbsp oil to temper and sauté the mixture. As the oil heats up add 1 tsp mustard seeds, as they crackle add a few Methi seeds, broken dry red chillies, asafoetida1 tsp, curry leaves and fry them. Once they are golden brown add the coarsely ground dal mixture and salt and sauté nicely over a medium flame for 5 minutes. Add the grated coconut and keep stirring constantly as the mixture may stick to the pan/karahi bottom. This step is just to take away the moisture, the dal need not be crumbled, just stirred. After sautéing transfer the sautéed dal to another vessel and cool. Once cooled shape them into dumplings. I could make around 13 dumplings from this mixture. The dumplings should be a little bigger than a Lemon. Set the dumplings aside.
Directions for the Kozhambu( gravy/ sauce)
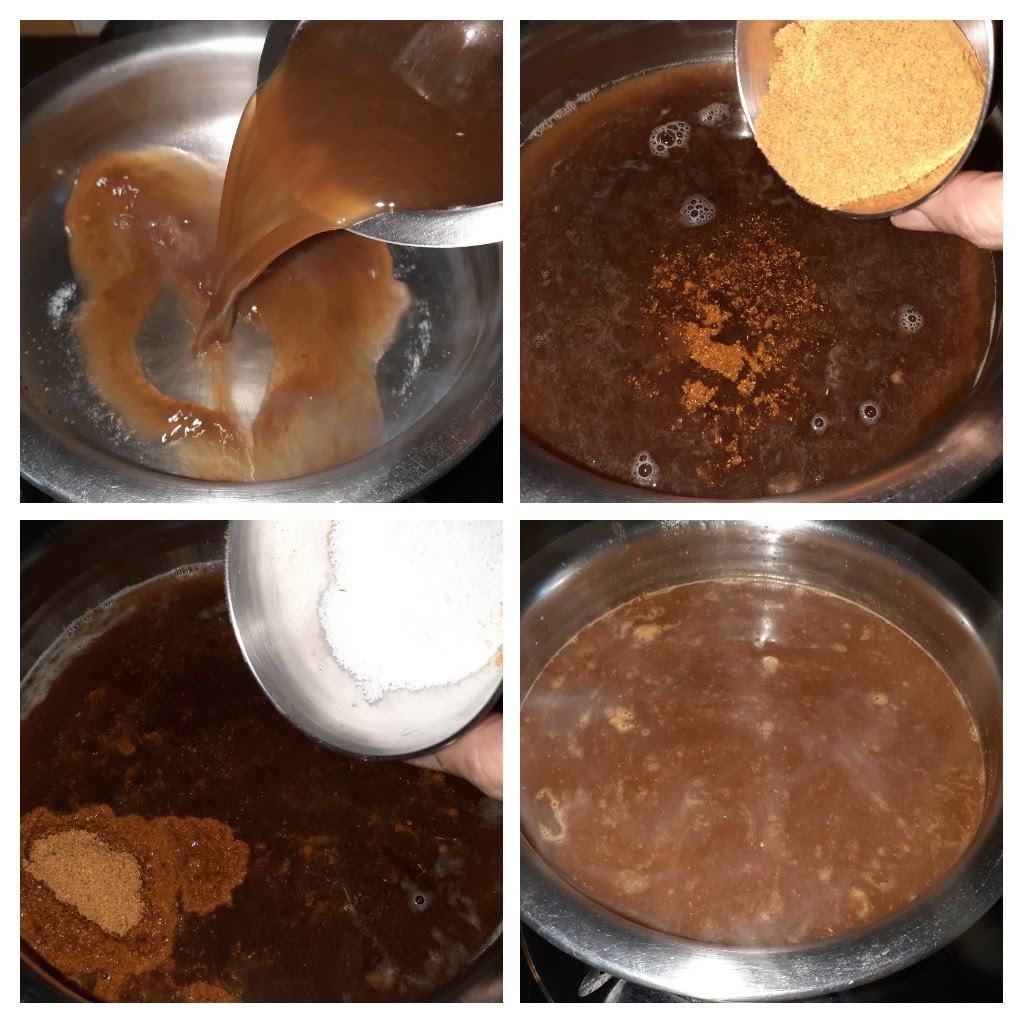
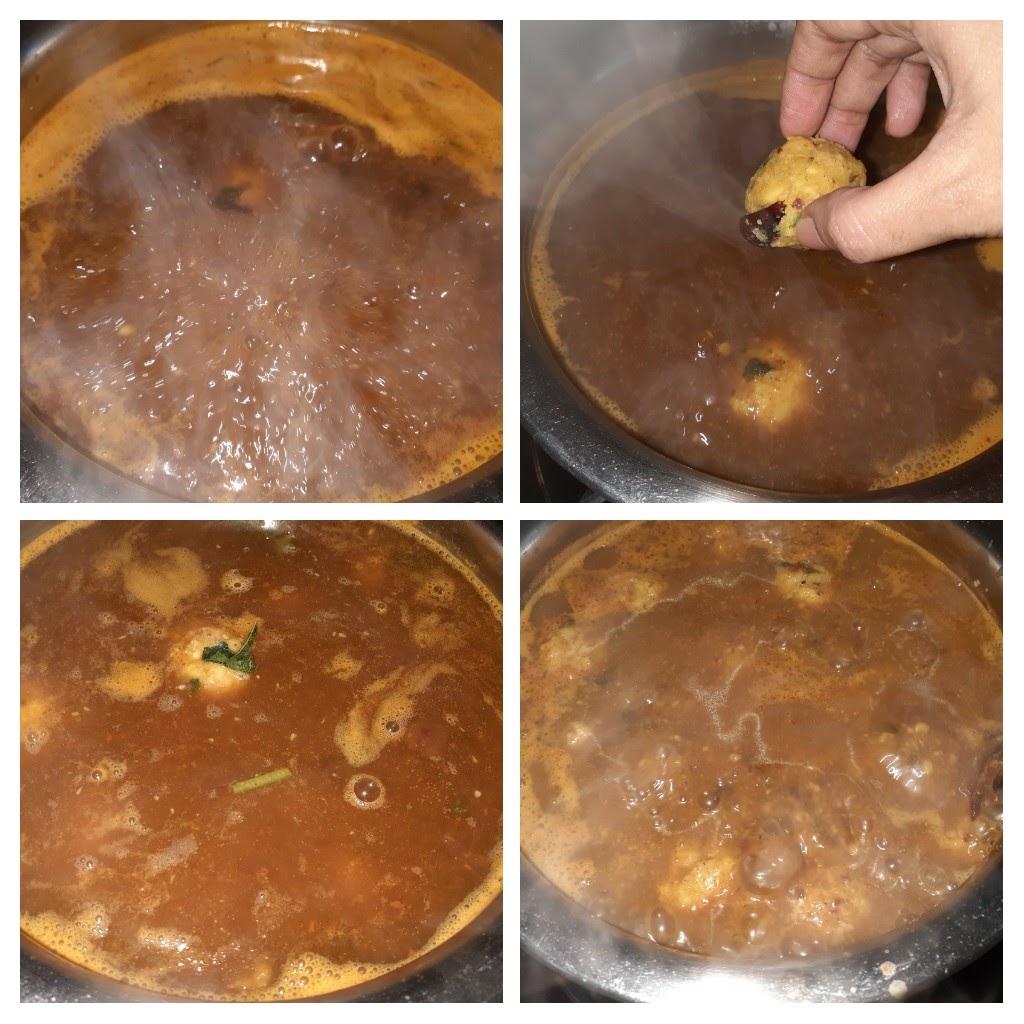
Extract the pulp from the tamarind and dilute it. You should have about 700 ml of tamarind juice if it’s too sour dilute with another 100 ml. Pour this diluted extract into a deep thick bottomed dish and switch on the flame. Add salt, turmeric powder, Sambar powder, asafoetida and boil. As it starts boiling and the raw smell of the masalas is gone( around 7 minutes into the process on medium flame), add one Urundai( dumpling) and test. If it doesn’t break while cooking on medium heat in the next 1 minutes, reserve 1 dumpling and all the other dumplings can be put into the tamarind water one by one after reducing the heat to low. If the first Urundai disintegrates in the water, put off the flame, undo all the dumplings and add 1 tablespoon rice flour and shape them to dumplings again and continue the process mentioned above. Cook the Urundais(dumplings) in low to medium flame while stirring gently every now and then until they start rising to the top. Once cooked the dumplings will float above. Now add about 1 cup water to the reserved dumpling and break it up. Pour this paste into the kozhambu( gravy) after the dumplings have risen and cook for 2 minutes or until the gravy has thickened to a Sambar like consistency. Switch off the flame and temper the Kozhambu with a little oil in a Kadai and put mustard seeds, followed by Asafoetida and curry leaves. The delicious Paruppu Urundai Kozhambu is ready.
Serving Suggestions: with hot rice and ghee, Dosas, Idlis, Ven Pongal, Kuthiravali Pongal( millet Pongal) etc.
STEPWISE RECIPE FOLLOWS:
1. Assemble all ingredients. Soak the Tuvar dal for 1 hour, soak the tamarind in warm water and extract the pulp, dilute pulp, grate the coconut, and keep ready.
2. Drain water from the soaked dal and put it into the blender, followed by red chillies, turmeric powder, salt and asafoetida. Grind them to a coarse paste, without adding water.
3. Now in a karahi pour oil for tempering and heat. Put in mustard seeds. As they crackle add the methi seeds, turmeric powder, broken dry red chillies, asafoetida 1 tsp and curry leaves and fry. Now add in the dal mixture to this and start sauteeing, so that the moisture from the dal gets evaporated. Add the grated coconut, saute for another minute and switch off the flame. Finally, add some finely chopped coriander to the dal mixture. Leave the mixture to cool.
4. In a deep vessel, preferably flat one pour the tamarind extract. It should be a dilute extract of 700 ml. Add turmeric powder 1tsp, asafoetida 1 tsp, Sambar powder 3 tbsp, salt and boil the extract on medium flame.
5. After the extract is put to boil, shape the dumplings of the Dal mixture and keep aside.
6. When the mixture bubbles up and froths( about 5 mins from boiling) and all the raw smell of the powders is gone drop one dumpling gently into the boiling mixture. Flame on medium, wait for 2 minutes. If the dumpling does not disintegrate in this time, retain 1 dumpling and put in all the other dumplings one by one. Reduce flame to low and continue to boil.
7. As the dumplings cook in the tamarind extract they will slowly start rising to the top(I have added a short video). When all have risen, break the single reserved dumpling and add 1 cup water to it. Give it a stir so that it becomes a paste. Add this paste into the boiling tamarind gravy to thicken the gravy. Cook for 2 minutes and switch off the flame.
8. Take a small tempering Kadai and add little oil. heat and add mustard seeds, asafoetida 1/2 tsp and curry leaves. Pour the tempering into the Kozhambu.
The tasty Paruppu Urundai Kozhambu is ready to serve.
NOTES:
1. Definitely soak the dal, helps in binding.
2. Sometimes depending on the dal quality the dumplings can break/disintegrate in the extract while boiling. That is why I have recommended putting only a single one to test.
3. If the tester dumpling disintegrates, break up all the other dumplings and add 1 tbsp rice flour to it. Mix well and shape into dumplings again. Before you do this do not forget to switch off the flame in which the extract is cooking as we dont want it to evaporate now.
4. Some recipes recommend adding rice flour to the dal mixture while shaping them itself. I prefer not doing this as it makes the dumplings tougher or hard. So I prefer adding rice flour only if required.
If you tried this recipe and liked it please comment below. I would love to hear from you.
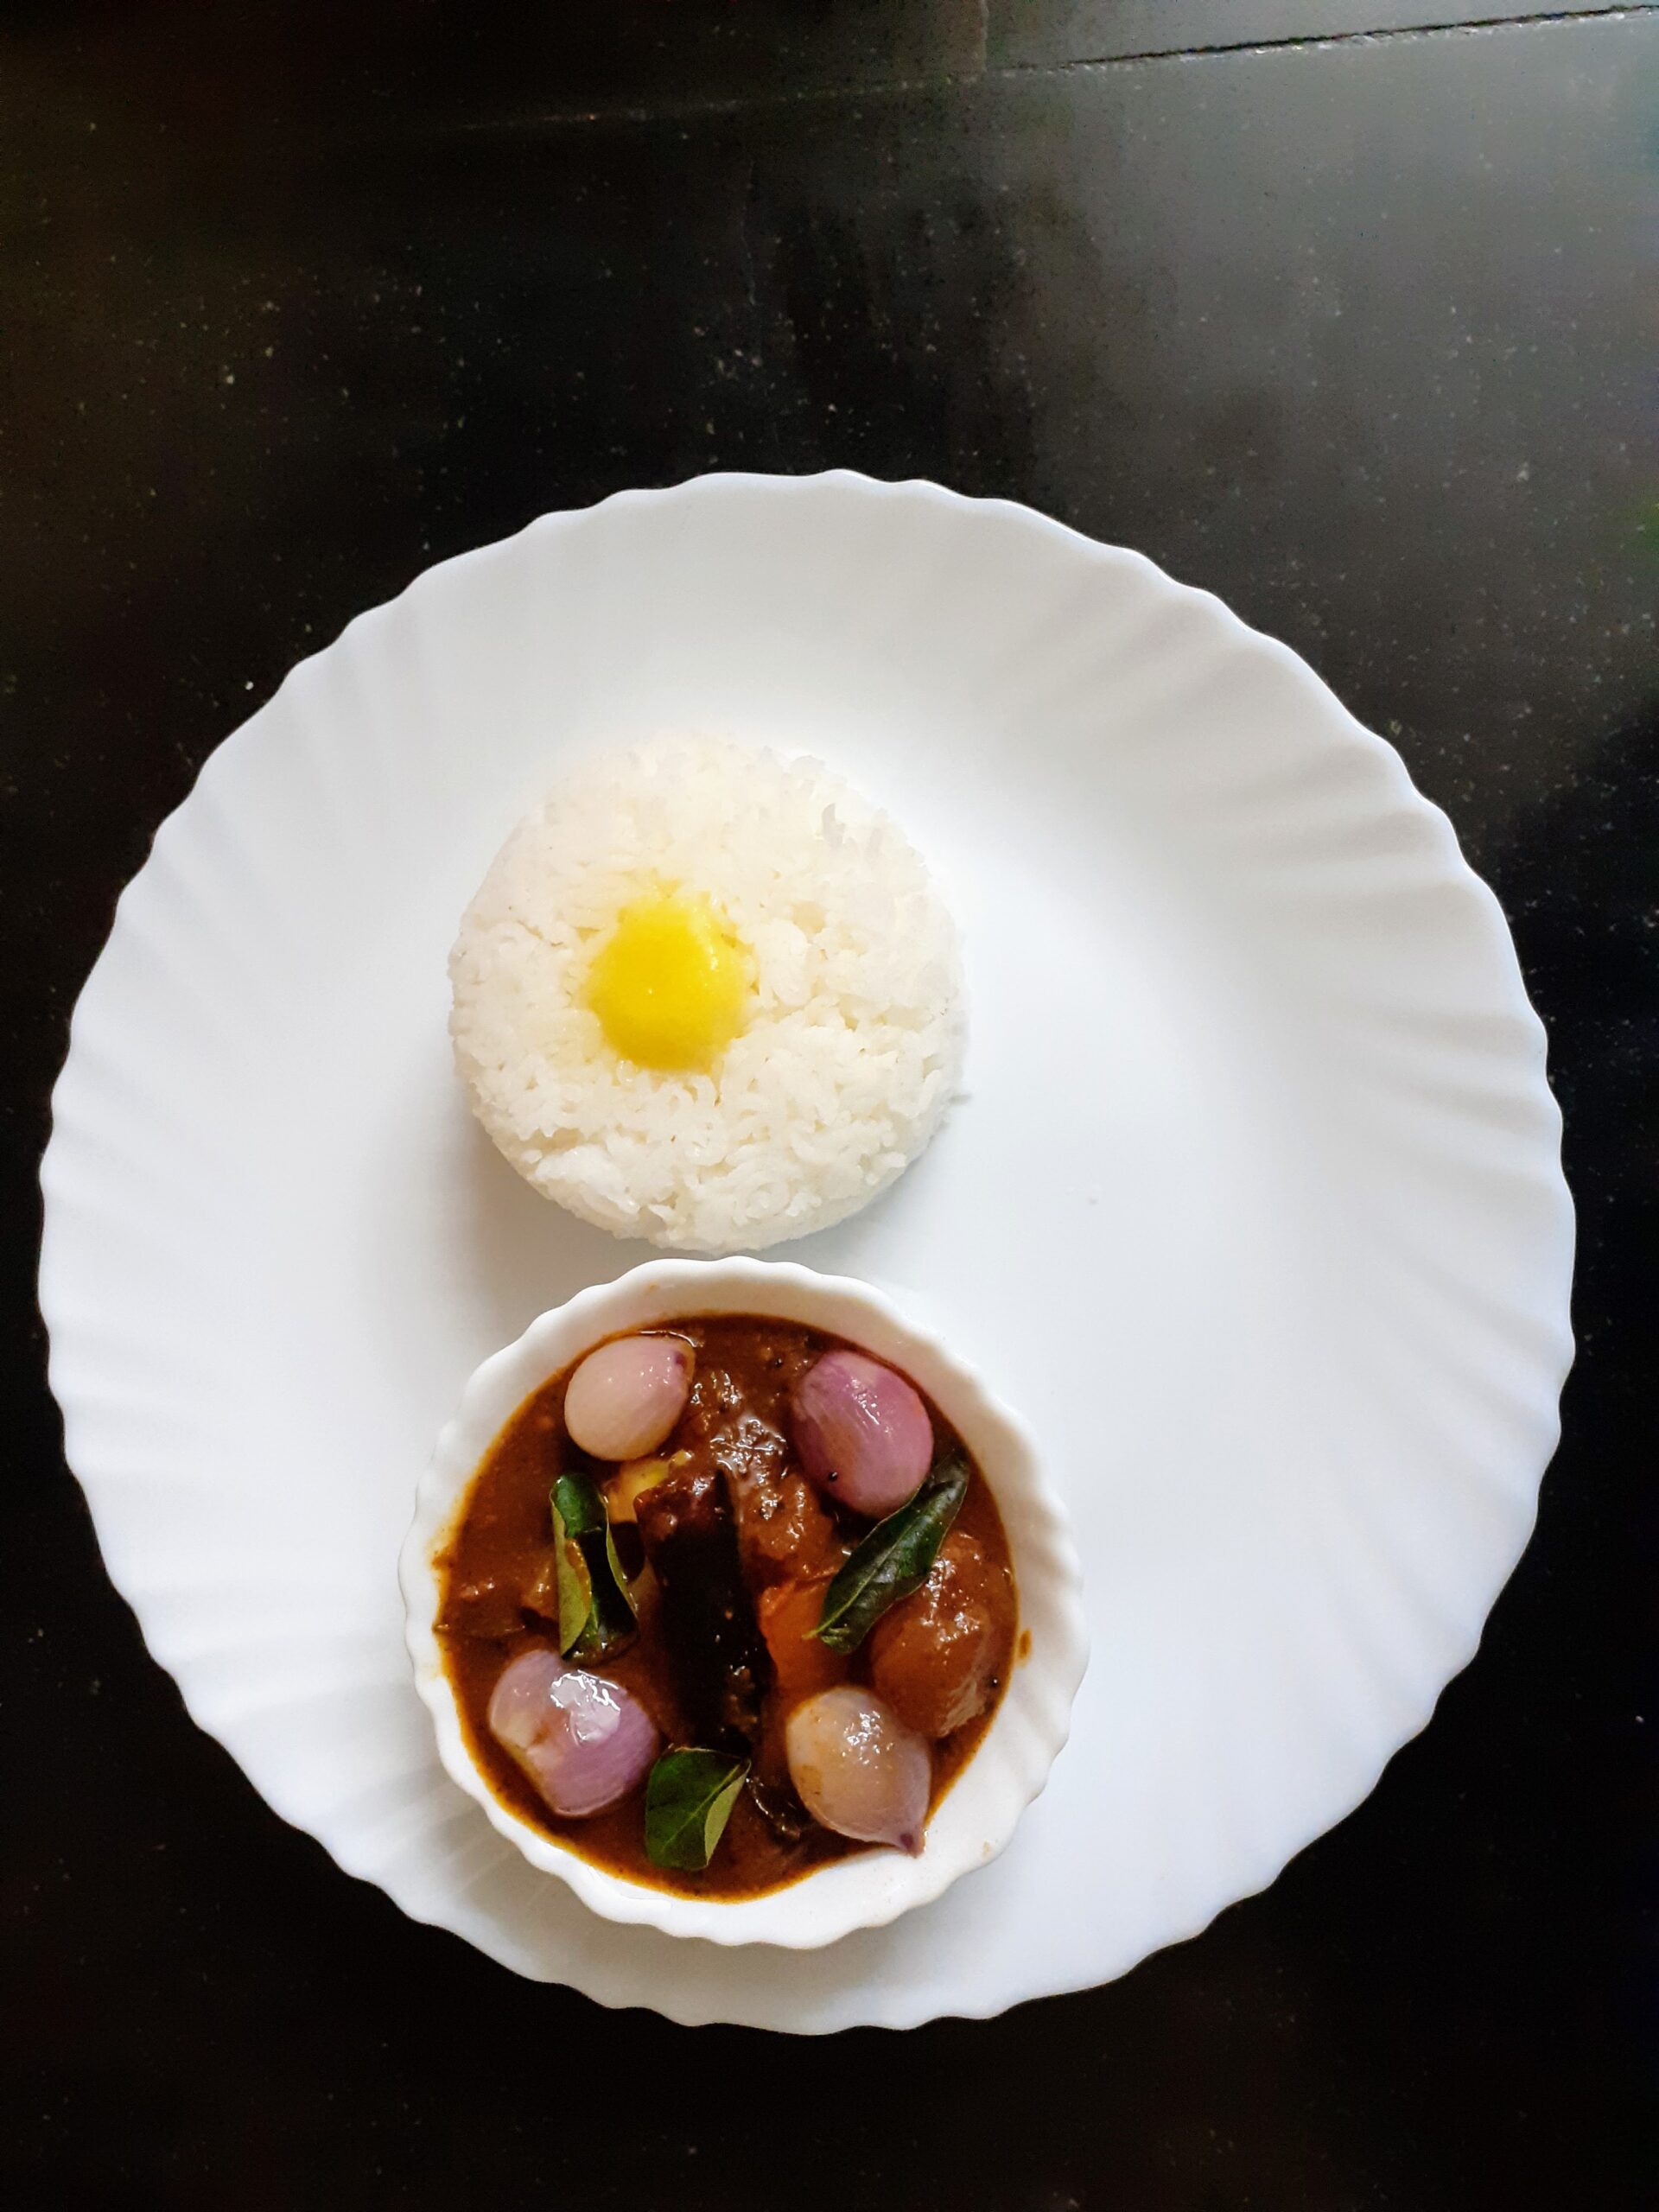
Vatha Kozhambu (Shallots In A Spicy Tamarind Gravy)
This is a traditional South Indian recipe. There are many variations to this recipe and a large variety of vegetables or dehydrated berries(Turkey berry, cluster beans, etc;) are simmered in a spicy tamarind sauce. Usually served with hot rice and ghee, but goes well with Dosas and Idlis too. I have used Sambar powder here, though Vatha Kozhambu powder is also used, there is not much difference in the taste and Sambar powder works well. For the recipe of Sambar Powder click here. Let’s get to the recipe without much ado.
PREP TIME: 20 Mins COOK TIME: 15 Mins
TOTAL TIME: 35 Mins COURSE: MAIN
CUISINE: SOUTH INDIAN SERVINGS: 4
AUTHOR: Rajni Ram
Ingredients:
Shallots 200 gm skinned
Tomato 1 large
Tamarind lemon sized ball( soaked in water and pulped)
Salt as per taste
Sambar powder 1 tbsp
Red chilli powder 1 tsp
Turmeric powder 1 tsp
Asafoetida 1 tsp
Mustard seeds 1 tsp
Fenugreek seeds 1/2 tsp
Dry red chillies 2 broken
Curry leaves a few
Sesame oil/ Til oil 1 tbsp( can use more if you prefer)
Directions:
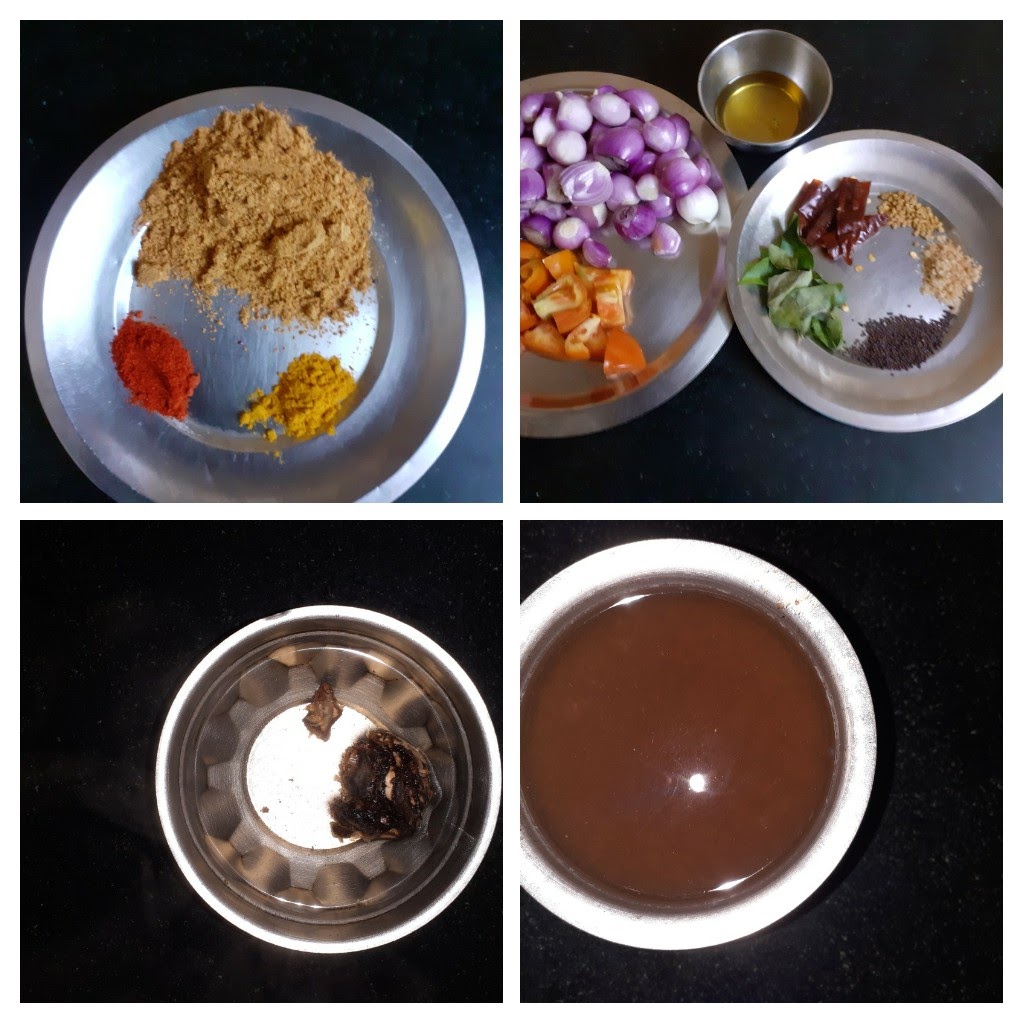
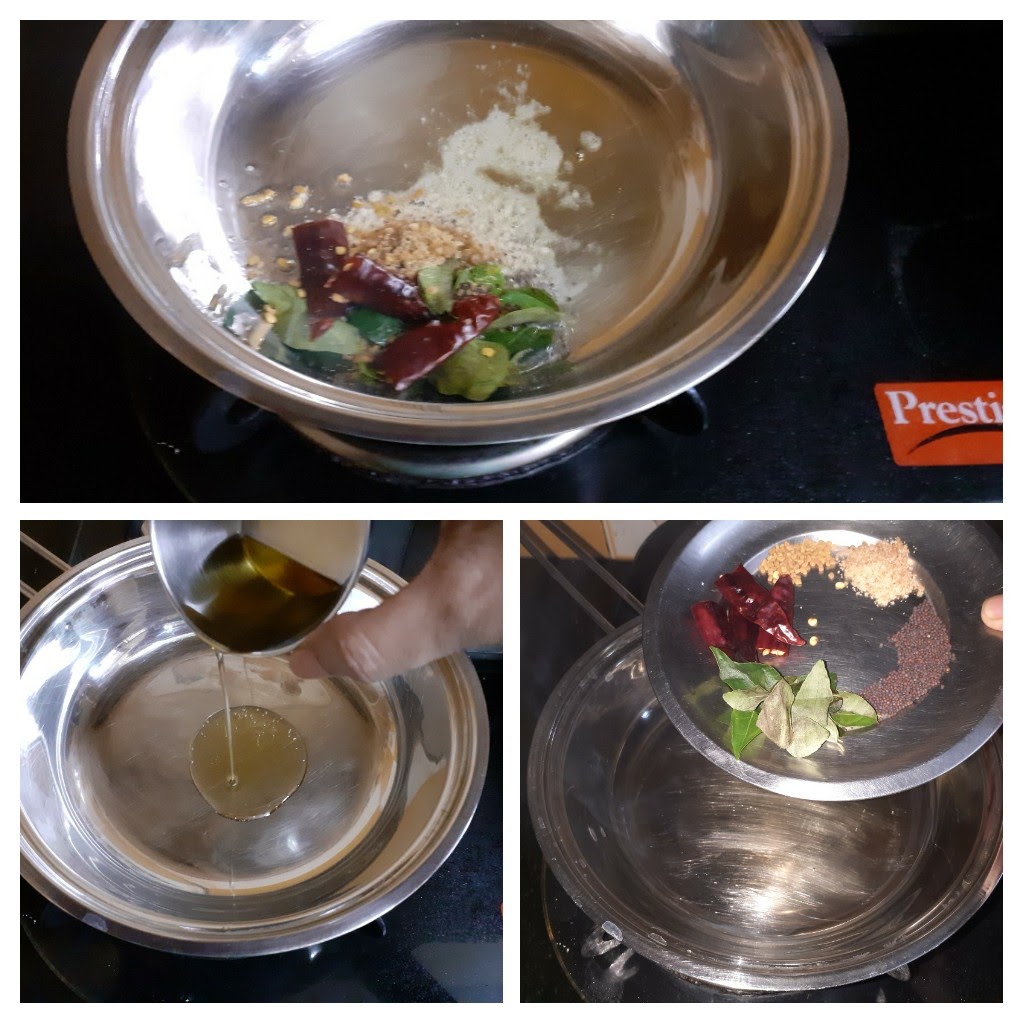
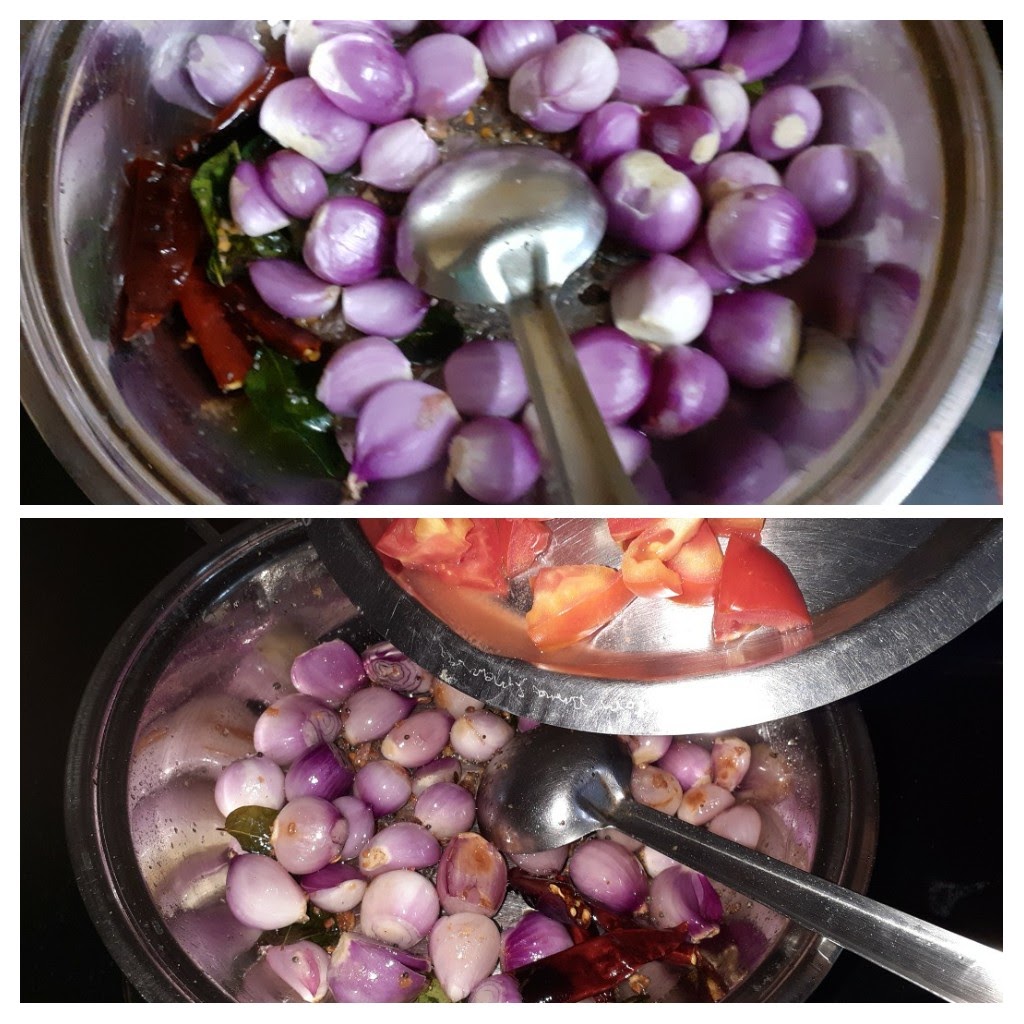
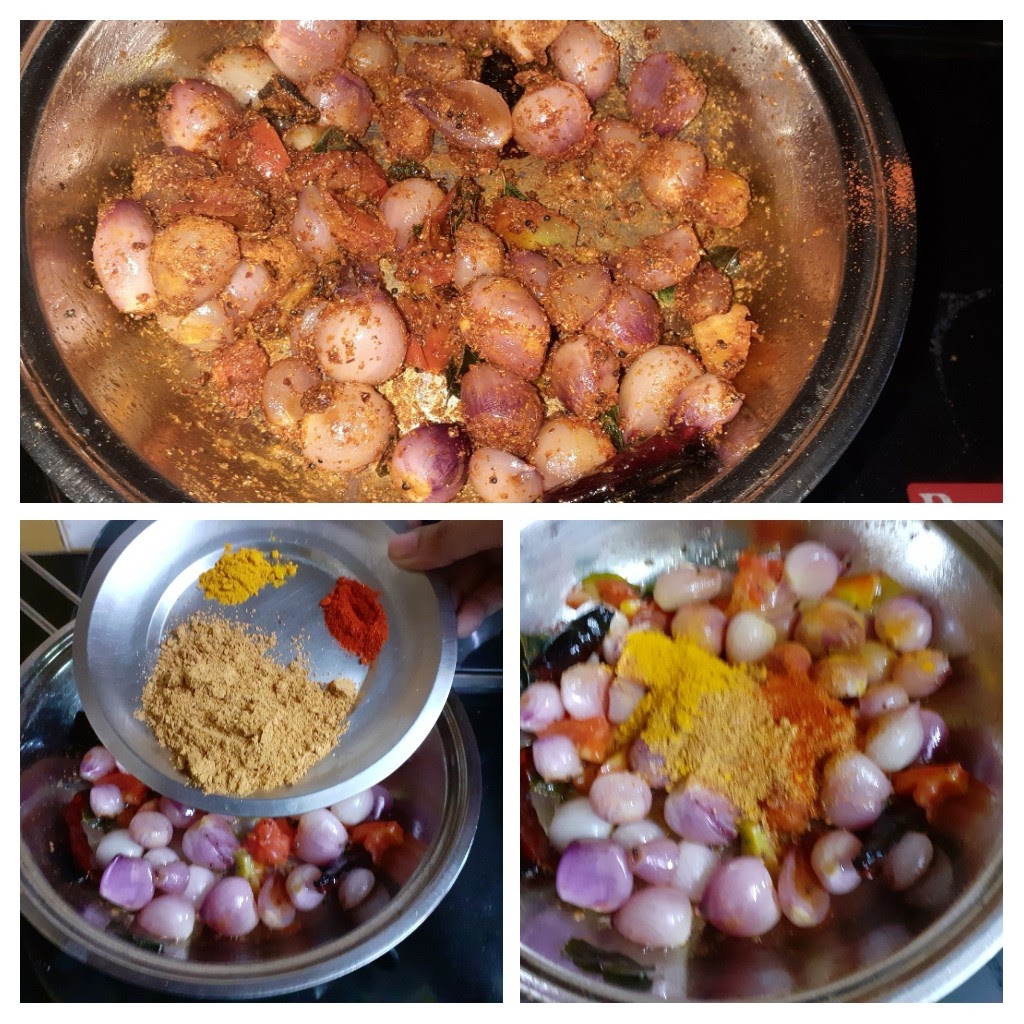
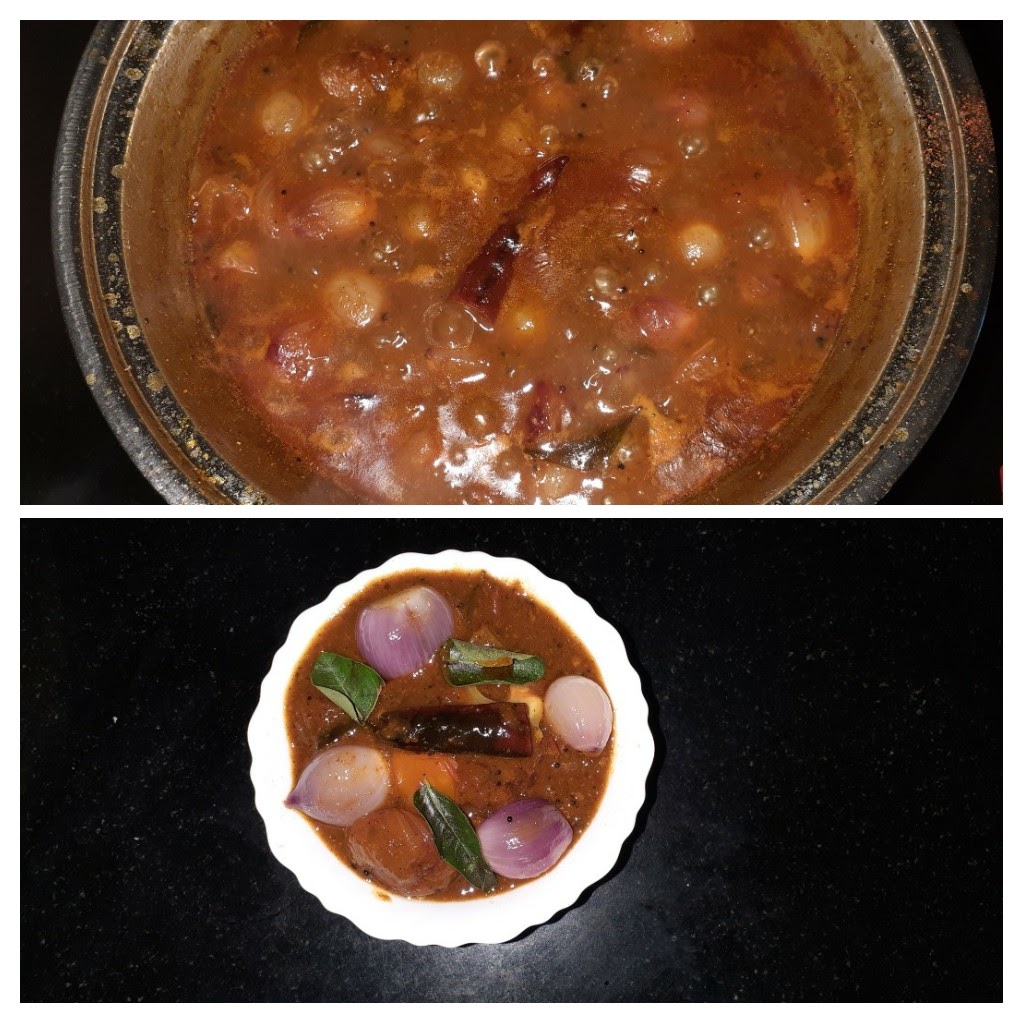
Peel the skin off the Shallots and keep ready. Chop the tomatoes. Soak a lemon sized ball of tamarind in a little warm water, let it cool and extract the pulp. Now in a pan or karahi take a tablespoon of Sesame/Til oil and heat. Add the mustard seeds, fenugreek seeds, asafoetida, dry red chillies, and curry leaves and saute for a minute. Add the Shallots and saute until they start turning translucent. Now add the tomatoes and continue to saute for a minute. Add the dry spices- Sambar powder, turmeric powder, and red chilli powder and continue to stir fry. If the mixture is too dry add another 2 teaspoons of oil, otherwise the masala may burn. Saute for another minute and pour the tamarind pulp and add the salt. Stir well and allow it to simmer on low flame until it thickens and reduces a bit. The oil will form a layer on top and the mixture will reduce, at this stage put off the stove. The Shallot Vatha Kozhambu is ready to serve with hot rice, Dosas, Idlis etc.
Direction to make Sambar powder is given under the label powders.
STEPWISE RECIPE FOLLOWS:
1. Assemble all ingredients. Shallots skinned and tomatoes chopped. Soak tamarind(lemon sized ball) and get the pulp.
2. In a pan/karahi heat some Til oil(preferable, if not continue with refined oil). Add mustard seeds, fenugreek seeds, dry red chillies, asafoetida, curry leaves, and fry.
3. Add the shallots and stir well so that the oil coats all the shallots. Fry until they turn translucent. Add the tomatoes and continue to stir fry for another minute.
4. Now add in all the dry spices- Sambar powder, red chilli powder, turmeric powder, and continue to fry. If the mixture is too dry after adding the powders, then add 2 tsp of oil and fry, until the raw taste of the masalas is gone.
5. Pour the tamarind pulp and in the salt and stir well and allow the mixture to boil. Let it simmer until the mixture thickens and reduces in quantity. The oil will form a layer on top. At this stage put off the stove. The Shallot Vatha Kozhambu is ready to serve with hot rice and ghee.
NOTES:
1. I have used Shallots here, other vegetables that can be used are Drumsticks, Ladies finger, Onions, dehydrated berries like Turkey berry(Sundakai), and even dehydrated vegetables like Cluster beans, Bitter gourd, etc.
2. Sesame oil enhances the flavour of the dish, so I highly recommend it.
3. Frying the dry masalas in the oil well(step4), gives the dish the perfect flavour.
4. The fenugreek seeds also impart the aroma a lovely flavour to this dish, but they should be used in the quantity mentioned and not more, as they can turn the dish bitter.
If you tried this recipe and liked it please comment below. I would love to hear from you.
Veg Kothu Parotta
This is a south Indian street food recipe, made form Parathas(called Parotta in the South) and sauteed vegetables in a spicy tomato base. The Parottas are shredded(minced)and added to the gravy and further stir-fried to a crispy flaky dish. There are many variations to this dish, but I am keeping it simple. This dish can be served with sauce or raita. Usually, leftover parathas or chapatis can be used for making this dish. Store-bought Parathas can be used too. Let’s get to the recipe.
PREP TIME: 20 Mins COOK TIME: 25Mins
TOTAL TIME: 45 Mins COURSE: MAIN
CUISINE: SOUTH INDIAN SERVINGS: 4
AUTHOR: Rajni Ram
Ingredients:
Parathas 5
Onion 2 medium diced and petals separated
Carrot 1 grated coarse
Capsicum 1 diced to cubes
Tomato 1 diced
Tomato puree 1 cup
Cashewnuts 10
Cloves 4
Cinnamon 1 small stick
Green chillies 3 split lengthwise
ginger-garlic paste 1 tsp
Cumin seeds 1 tsp
Curry leaves few
Turmeric powder 1/2 tsp
Red chilli powder 1 tsp
Coriander powder 1 tsp
Biriyani masala(powder) 1.5 tsp
Garam masala 1/2 tsp
Salt as per taste
Oil for stir fry
Directions:
If the Parathas are store-bought, heat them on the tava/girdle with a little oil, cooking both sides. Cool them and using kitchen scissors tear them to pieces or use your fingers to tear them into 1 inch long pieces. keep this aside. In a pan/ Karahi take 4 tsp oil, heat and add the cumin seeds. Put in the turmeric powder and drop the green chillies and curry leaves into the oil, followed by the onions and fry at high heat for 1 minute. Now add the capsicum and continue to fry on high heat. Add the carrot, reduce heat and fry for 30 seconds. Now add the tomatoes, fry for another 30 seconds and pour the tomato puree and give a good stir. Now add the masalas- coriander powder, red chilli powder, Biriyani masala and salt. Stir well and cook for a few minutes, grind the cashew nuts to a loose paste and add it to the gravy. Continue to cook until the gravy thickens and starts getting dry, add the garam masala powder and put off the heat and let the mixture cool a bit. After 5 minutes add in the minced paratha pieces, switch on the stove and mix the parathas well with the gravy. The gravy should coat all the pieces and not turn them soggy. While mixing keep mashing the paratha will a flat spatula so that the parathas can further get minced. Stop once you have a dry mixture. The Kothu Parotta is ready to serve. Tastes best when served immediately. Any variety of Raita is a good accompaniment for this. Enjoy. Bon Appetit.
STEPWISE RECIPE FOLLOWS:
1. Assemble all ingredients and cook the parathas ahead if store bough, as they have to cool.
2. Tear the parathas into 1-inch pieces.
3. In a pan/karahi take 4 tsp oil and heat. Put in the cumin seeds and allow to splutter. Add in the green chillies and curry leaves. Also add 3 Cloves and 1 small stick Cinnamon.
4. Add in the onions and saute at high heat. Add the ginger-garlic paste, put in the capsicum and continue to stir fry, follow up with carrots. Reduce heat.
5. Add the chopped tomatoes, fry for 30 seconds and the tomato puree. Stir and cook for a few minutes.
6. Add all the masalas(dry spice powders), add 2 tbsp water and continue to cook.
7. Powder the cashew nuts then add 2 tbsp water and grind them to a loose paste. Add this to the tomato gravy. Cook until the mixture thickens. the consistency should be like tomato sauce. Put off at this stage. Add chopped coriander and garam masala powder.
8. Let this cool for 5 minutes. Now add the paratha pieces and switch on the stove and mix the contents well. while mixing keep mashing the parathas with a flipper, so that they get minced further. When the paratha resembles a mince and the mixture is dry, put off the stove. the Kothu Paratha is now ready to serve.
NOTES:
1. The consistency of the gravy should neither be too thick nor too thin. It should resemble tomato sauce in consistency.
2. ou can other vegetables too if you like.
3. If you have ready-made biriyani mix paste you can use that too, but add a lesser quantity.
4. This recipe should be served immediately or else the paratha will turn chewy.
5. If you want to make it ahead, you can make the gravy ahead and add the paratha pieces just before you serve.
If you tried this recipe and liked it please do comment below. I would love to hear from you.
Pineapple Rasam
Rasam is a popular South Indian dish prepared with tamarind, tomatoes, and Rasam powder. There are many variations of this dish, and each South Indian household has its own recipe for the proportions of the ingredients of the rasam powder. Therefore though Rasam is almost a regular feature in all South Indian households its taste is unique to each. No two Rasam recipes taste the same.
The following recipe has Pineapples along with tomatoes and is very flavourful. It makes for a good soup/ appetizer, for wintertime get-togethers. As you make the Pineapple Rasam the aroma of the pineapple fills the house and you’ll have people at home making trips to the kitchen. The secret of a good Pineapple rasam rests in the extraction of the juice in 3 stages. Follow the recipe closely for instruction on juicing the Pineapples. Let’s get to the recipe right away
PREP TIME: 20 Mins COOK TIME: 20 Mins
TOTAL TIME: 35 Mins COURSE: MAIN / APPETISER
CUISINE: SOUTH INDIAN SERVINGS: 4
AUTHOR: Rajni Ram
Ingredients:
Pineapple 3/4 of a medium-sized one
Tomatoes 2 medium chopped
Tuvar dal 1/2 cup( 1 cup= 150 gm)
Fresh coriander sprigs few
Green chilies 2
Ginger 1 inch piece
Fennel seeds 1 tsp
Turmeric powder 1/2 tsp
Rasam powder 3 tsp
Salt as per taste
Asafoetida 1 tsp
Mustard seeds 1 tsp
Roasted Pepper & Cumin powder 1 tsp( dry roast in the ratio 2:1 and grind coarse)
Curry leaves few
Ghee/ clarified butter for tempering
Sugar 2 tsp(optional)
Directions for Pineapple Juice:
Stage 1: chop the pineapples and put them in a liquidizer/juicer and extract juice. It should be a concentrate. Add no water at all at this stage. This is extract 1.
Stage 2: Add 1 to 1.5 cups of water and juice again to get the second extract.
Stage 3: Add 2 cups of water and juice again to get the 3rd extract. Strain the pulp at this stage into the 3rd extract and discard the fiber.
Directions for Pineapple Rasam:
Wash the Tuvar dal and pressure cook for 5 whistles, set aside. Now put the chopped tomatoes, coriander leaves, green chillies and ginger in a blender and puree them. Take a 1.5-litre vessel and pour this tomato coriander puree into it. Now add the 3rd extract juice to the above puree. Also add in the salt, Rasam powder, 1/2 tsp asafoetida, turmeric powder, and boil this mixture. Allow it to boil for some time until it reduces to 1/2( Please note that 3rd extract had 2 cups water so that plus the tomato puree, has to boil and reduce to half). At this stage add the cooked dal ( mash lightly) along with the water. If there is no water remaining in the dal add up to a cup to the dal, mix nicely and add to the reduced extract. Now add the 2nd extract juice and continue to boil. Boil until the rasam starts frothing in the vessel and starts brimming up. Keep stirring in between. Now add another 1.5 cups of plain water and continue to boil for another 2 minutes. Finally, add the 1st extract juice, 2 tsp sugar( optional), and put off the stove immediately. The rasam should not be allowed to boil after adding the first extract, as it will lose all flavour. Now temper the Rasam in ghee. Take 2 tsp ghee in a small tadka kadai and heat it. Add mustard seeds and as they crackle add the cumin-pepper powder, 1/2 tsp asafoetida, switch off the stove, and drop in the curry leaves. Pour the tempering into the rasam. Garnish with finely chopped fresh coriander leaves. The flavourful Pineapple Rasam is ready to serve. Serve it as an appetizer/soup or with rice for some yummy comfort food.
STEPWISE RECIPE FOLLOWS:
1. Extract the Pineapple juice following the method mentioned above and keep ready.
2. Gather all other ingredients and keep ready.
3. In a blender put in the tomatoes, coriander leaves, green chilies, ginger, and fennel seeds and blend to a smooth puree.
4. Take a big vessel that can fit around 1.5 litres of liquid. Put the 3rd extract of juice into the vessel and add in the tomato puree. Switch on the stove.
5. Add the salt, turmeric powder, asafoetida, Rasam powder, and boil. Continue to boil until it reduces to 1/2 the quantity.
6. Now add the cooked dal along with the water into the boiling soup and also add the 2nd extract juice now. Continue to boil until it froths and begins rising. Keep heat at medium throughout.
7. Now add another 1.5 cups of plain water and continue to boil. When it brims up, add the 1st extract juice, add sugar(optional) and put off the stove immediately. Avoid boiling the Rasam once you add the 1st extract as flavour will be lost.
8. Now in a small tempering pan/tadka kadai, add 2 tsp ghee and heat. Add the mustard seeds, when they crackle, add the roasted pepper-cumin powder, asafoetida, and put off the stove. Finally, add the curry leaves to the tempering and pour the tempering into the Pineapple Rasam. Serve hot as a soup or along with hot rice and a dollop of ghee.
NOTES:
1. Follow instructions for Pineapple juice carefully as it affects the flavour of the Rasam.
2. You can increase or decrease the Rasam powder as per your spice preference. But don’t go below 2 tsp for 1.5 litres of Rasam.
3. Sugar is optional, add only if the pineapples are not sweet enough.
4. The roasted cumin -pepper powder is common to all Rasam varieties. You can store this powder in an airtight jar to add to Rasam, Pongal, etc;
Akkaravadisal
This is a very traditional South Indian sweet dish. Lord Mahavishnu is offered this sweet as prasad(holy offering). The main ingredients are Rice, moong dal, jaggery, milk and ghee. The ingredients are similar to the Sweet Pongal but both taste very different. It tastes heavenly when served a little warm. Without much ado let’s get to the recipe right away.
PREP TIME: 10Mins COOK TIME:30Mins
TOTAL TIME: 40 Mins COURSE: MAIN
CUISINE: SOUTH INDIAN SERVINGS: 4
AUTHOR: Rajni Ram
Ingredients:
Rice 1 cup
Moong dal/ green gram 1/4 cup
Milk 6 cups
Jaggery 1 cup
Water 1/4 cup
Sugar ( optional) 1 tbsp
Ghee 3/4 cup
Cardamom/ elaichi powder 1 tsp
Saffron ( optional) 2 pinches, soaked in warm milk
Raw camphor( optional) 1 pinch powdered
Cashewnuts 8 to 10
Raisins 8 to 10
Directions:
Dry roast the Moong dal to a light brown colour. Stir constantly and take care not to burn the dal. It will give out a nice aroma. Put the jaggery in a separate vessel, add water and bring to a boil. Put off the heat and stir to dissolve the jaggery. Keep aside. Take a vessel that fits inside your pressure cooker and transfer the rice into it. Add in the roasted Moong dal and wash both the rice and dal together. Pour 4 cups milk and arrange the vessel in the cooker. Close lid and cook for around 5 to 6 whistles. After pressure releases open lid, the rice should be well cooked and not grainy. Mash the cooked rice and dal while it’s hot, keep aside. In a pan or Urli( heavy-bottomed brass vessel ) pour 1 tbsp ghee and heat. Fry the cashew nuts and raisins in the ghee to a nice golden colour and keep them aside. To the same pan add the cooked rice and dal. Strain the liquid jaggery into the rice directly and the sugar and the remaining milk( 2cups, to which saffron was added). Stir nicely. Add the cardamom powder and raw camphor powder and stir. Put off the stove and add the ghee finally. The divine tasting Akkaravadisal is ready. Tastes best when hot/ warm. Enjoy. Bone Appetite.
STEPWISE RECIPE FOLLOWS:
1. Assemble all ingredients.
2. Dry roast the Moong dal to a light brown colour. Take rice in a vessel that fits inside the cooker and add the roasted dal to it. Wash them a few times, add 4 cups milk and place the vessel inside the cooker with sufficient water at the bottom. Cook until 5 to 6 whistles. To the remaining 2 cups of milk add saffron and let soak.
3. Until the pressure releases let’s get the jaggery ready. In a small vessel take the jaggery, add 1/4 cup water and bring to a boil, put out the stove and stir the jaggery to dissolve it.
4. Once you open the cooker mash the contents while they are hot as it’s easier to do it then. Set aside.
In a pan/ Urli take a tablespoon of ghee and heat, fry the nuts and raisins in it and keep aside.
5. In the same pan/ Urli transfer the cooked rice and dal and strain the liquid jaggery on it directly. Pour the saffron added milk to the mixture and stir. Add in the cardamom and raw camphor and turn off the stove. Lastly, add the ghee, garnish with the fried nuts and raisins and the Akkaravadisal is ready.
NOTES:
1. We strained the jaggery to remove the impurities from it.
2. Do not cook rice directly in the cooker as we are coking with milk, the milk may stick to the bottom and the dish will give a burnt taste and odour. That’s why we are cooking with a vessel inside the cooker.( to make directly checkout One pot Akkaravadisal recipe)
3. Saffron and raw camphor are optional, they give added flavour.
4. Be liberal with ghee. Cook the rice soft. If grainy add more milk and pressure cook again.
5. I have used normal rice( Sona Masoori/ Ponni). If using Basmathi avoid the raw camphor as both aroma and flavouring of both may clash.
If you made this recipe and liked it, please comment below. I would love to hear from you.
Rava Dosa
Dosas come in many varieties and these Rava Dosas are full of flavour and are crisp too. This is a foolproof recipe. In my family, we have made it this way for years and what’s more, just add any healthy millet flour to this and it will still come out well. In restaurants, this Dosa is made with Maida instead of the wheat flour. You can do that too. I’m partial to what flour so have replaced Maida/ refined flour with it.
Let’s get to the recipe right away.
PREP TIME: 10Mins COOK TIME: 40Mins
TOTAL TIME: 50 Mins COURSE: MAIN
CUISINE: SOUTH INDIAN SERVINGS: 4
AUTHOR: Rajni Ram
Ingredients:
Rava/ Sooji 1 cup( roasting Rava is optional, but I would recommend it) Rice flour 1 cup
Wheat flour 1 cup
Curd 1 cup
Water -around 1 litre or a little more
Roasted cumin and pepper powder
Green chillies 2
Ginger 1 inch piece
Curry leaves- few leaves cut fine
Coriander leaves finely chopped.
Salt as per taste( I used 1.5 tsp)
Directions:
Take a 1-litre vessel. Put in all the three flours.
Add the curd to it. Add in the salt and the roasted cumin pepper powder. Add a little of the water from 1 litre and mix well forming a paste without lumps. Once that’s done mix in the remaining water little by little and stirring every now and then so lumps don’t form. Don’t pour all the water at a time. Depending on the quality of the Sooji, you might use, less too. The batter should neither be too thick nor too watery. It should be a little loose than the normal Dosa batter. Take 3 tsp oil in a small tadka karahi and heat. Add the mustard and Cumin and once they crackle put in the finely cut green chillies, ginger and curry leaves. Also, add 1/2 tsp of Hing/ Asafoetida and turn off the stove. Add this tempering to the batter. Let the batter stand for 10 mins and you are ready to pour the Dosa on the girdle. There your crispy Rava Dosa is ready. Enjoy. Bon Appetit!
STEPWISE RECIPE FOLLOWS:
1. Assemble all ingredients.
2. Take a 1-litre vessel and add in Rava/ Sooji, wheat flour and Rice flour. Add in the curd.
3. Add the salt and the roasted cumin- pepper powder( to make powder take 2 tsp Jeera and 1 tsp pepper and roast on low fire to get the aroma of the spices. Cool and grind coarse).
4. Add water( up to 1 litre) little at a time and stirring constantly so that no lumps are formed. Pour the remaining water until you achieve the consistency shown in the picture( a little thinner than the regular Dosa).
5. Take oil in a small tadka karahi. Add the mustard and cumin seeds. When they crackle add the cut green chillies, ginger and curry leaves. Add Asafoetida too and crush a little. Pour this tempering into the batter. Add the chopped coriander and let the batter stand for 10 mins atleast. There your batter is ready.
6. To make crispy Dosas, put a girdle on the Tava( I used a non-stick one). The girdle has to be really hot or else your dosa will be lumpy.
7. Now pour the batter on the girdle forming a circle. You cannot spread the batter like the regular dosa, you’ll have to pour it as shown in the picture. Drizzle oil over the Dosa and cook.
8. Cook until it becomes crisp and is a golden brown, then flip over and cook again. If you want it crisper be generous with the oil.
Your crisp Rava Dosa is ready. Enjoy with chutney( check out the recipe in chutney section) and idli podi ( check out the recipe in powders section).
NOTES:
1. As said earlier it’s a foolproof batter and won’t let you down. Just stick to the measurements.
2. Rava Dosa is usually made with Maida in restaurants as it gives that extra crispy edge, feel free to use that too. Since I am partial to wheat flour have replaced Maida with it.
3. Instead of wheat flour or Maida, you can use Ragi flour, Jowar flour or any other millet flour and the Dosa will still come out well.
4. If you are sceptical of replacing the wheat flour with any millet flour, just add a cup of millet flour along with the other flours. That works too.
5. Be generous with the oil for crisp Dosas and be patient. Unlike the regular Dosas, they take a little longer to cook and get crisp, and the patience will be worth it.
6. It’s important to get the girdle quite hot. Do the little test of sprinkling water on your girdle when it’s hot. If the water evaporates very quickly, that’s the right heat. You can start pouring the batter on the girdle.
If you tried this recipe and liked it please comment below. Would love to hear from you.