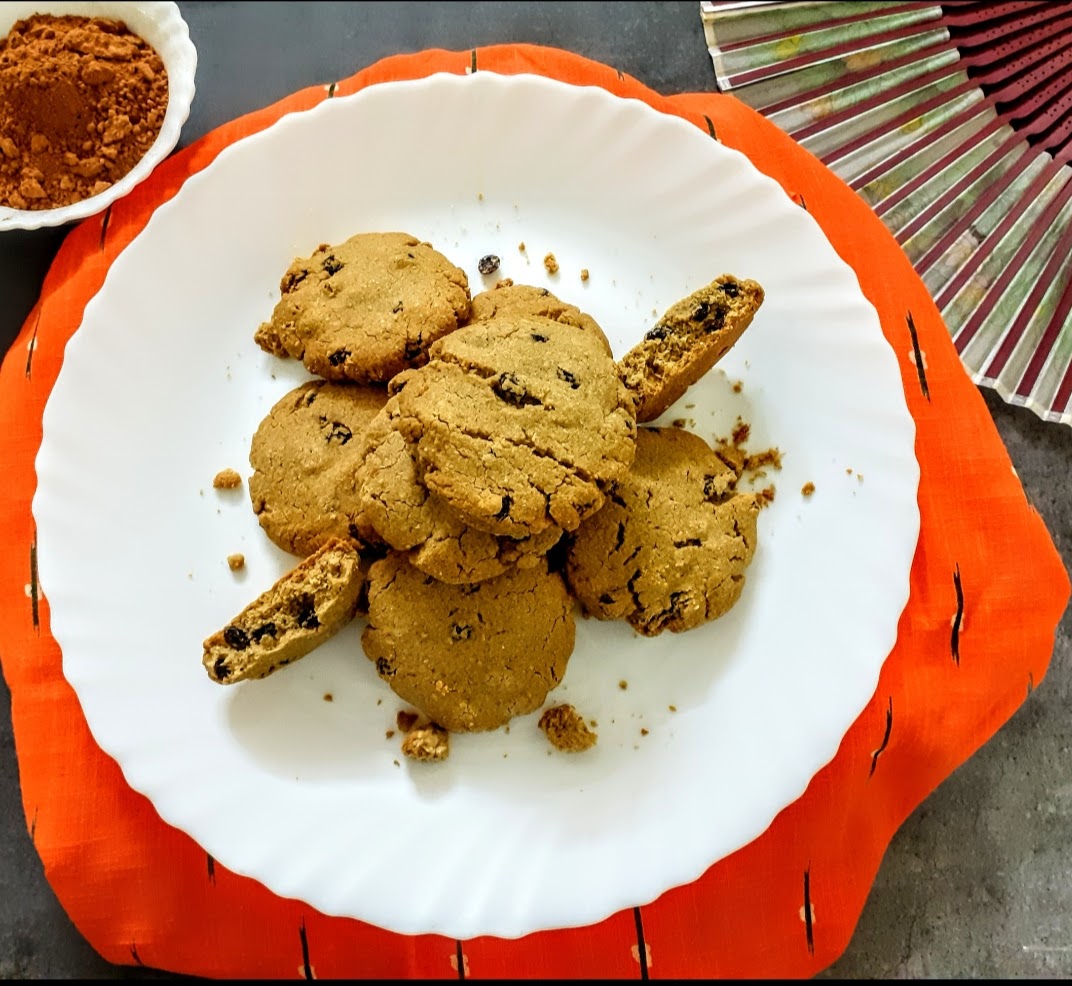
I surfed the internet to find the easiest Cookie recipe with Millet’s (that are trending currently), using ingredients that are easily available in our pantries, I scored and scored but couldn’t find anything that interested me. By now those who are following the blog and my social media handles know that when it comes to baking, I choose the most easiest recipes, which can be mixed in a single bowl and stashed in the oven to bake. Zero mess.
I love baking but I hate the mess that comes with it, so the trials in my kitchen are always on for a fuss free recipe. Though I did not find an ideal cookie recipe with Millet’s that would satisfy the hundreds of queries in my mind(millet’s are not the easiest to work with), I went adding ingredients purely on intuition to arrive at this recipe. As promised, its the easiest and egg free.
Here is the simple recipe of the Bajra Almond Flour Cookies for you-
PREP TIME: 15(+ 30 min resting) COOK TIME: 15 Mins
TOTAL TIME:60 MINS COURSE: DESSERT
CUISINE: WORLD SERVINGS: 12 PIECES
AUTHOR: Rajni Ram
Ingredients:
Bajra flour(Pearl Millet flour) 1.5 cups
Almond flour 1/4 cup
Baking powder 1/2 tsp
Baking soda 1/4 tsp
Desiccated Coconut 1/4 cup
Brown sugar 1/2 cup
Butter 100 gm softened
Salt 2 pinches
Black Currants a hand ful
Vanilla essence 1/2 tsp
Directions:
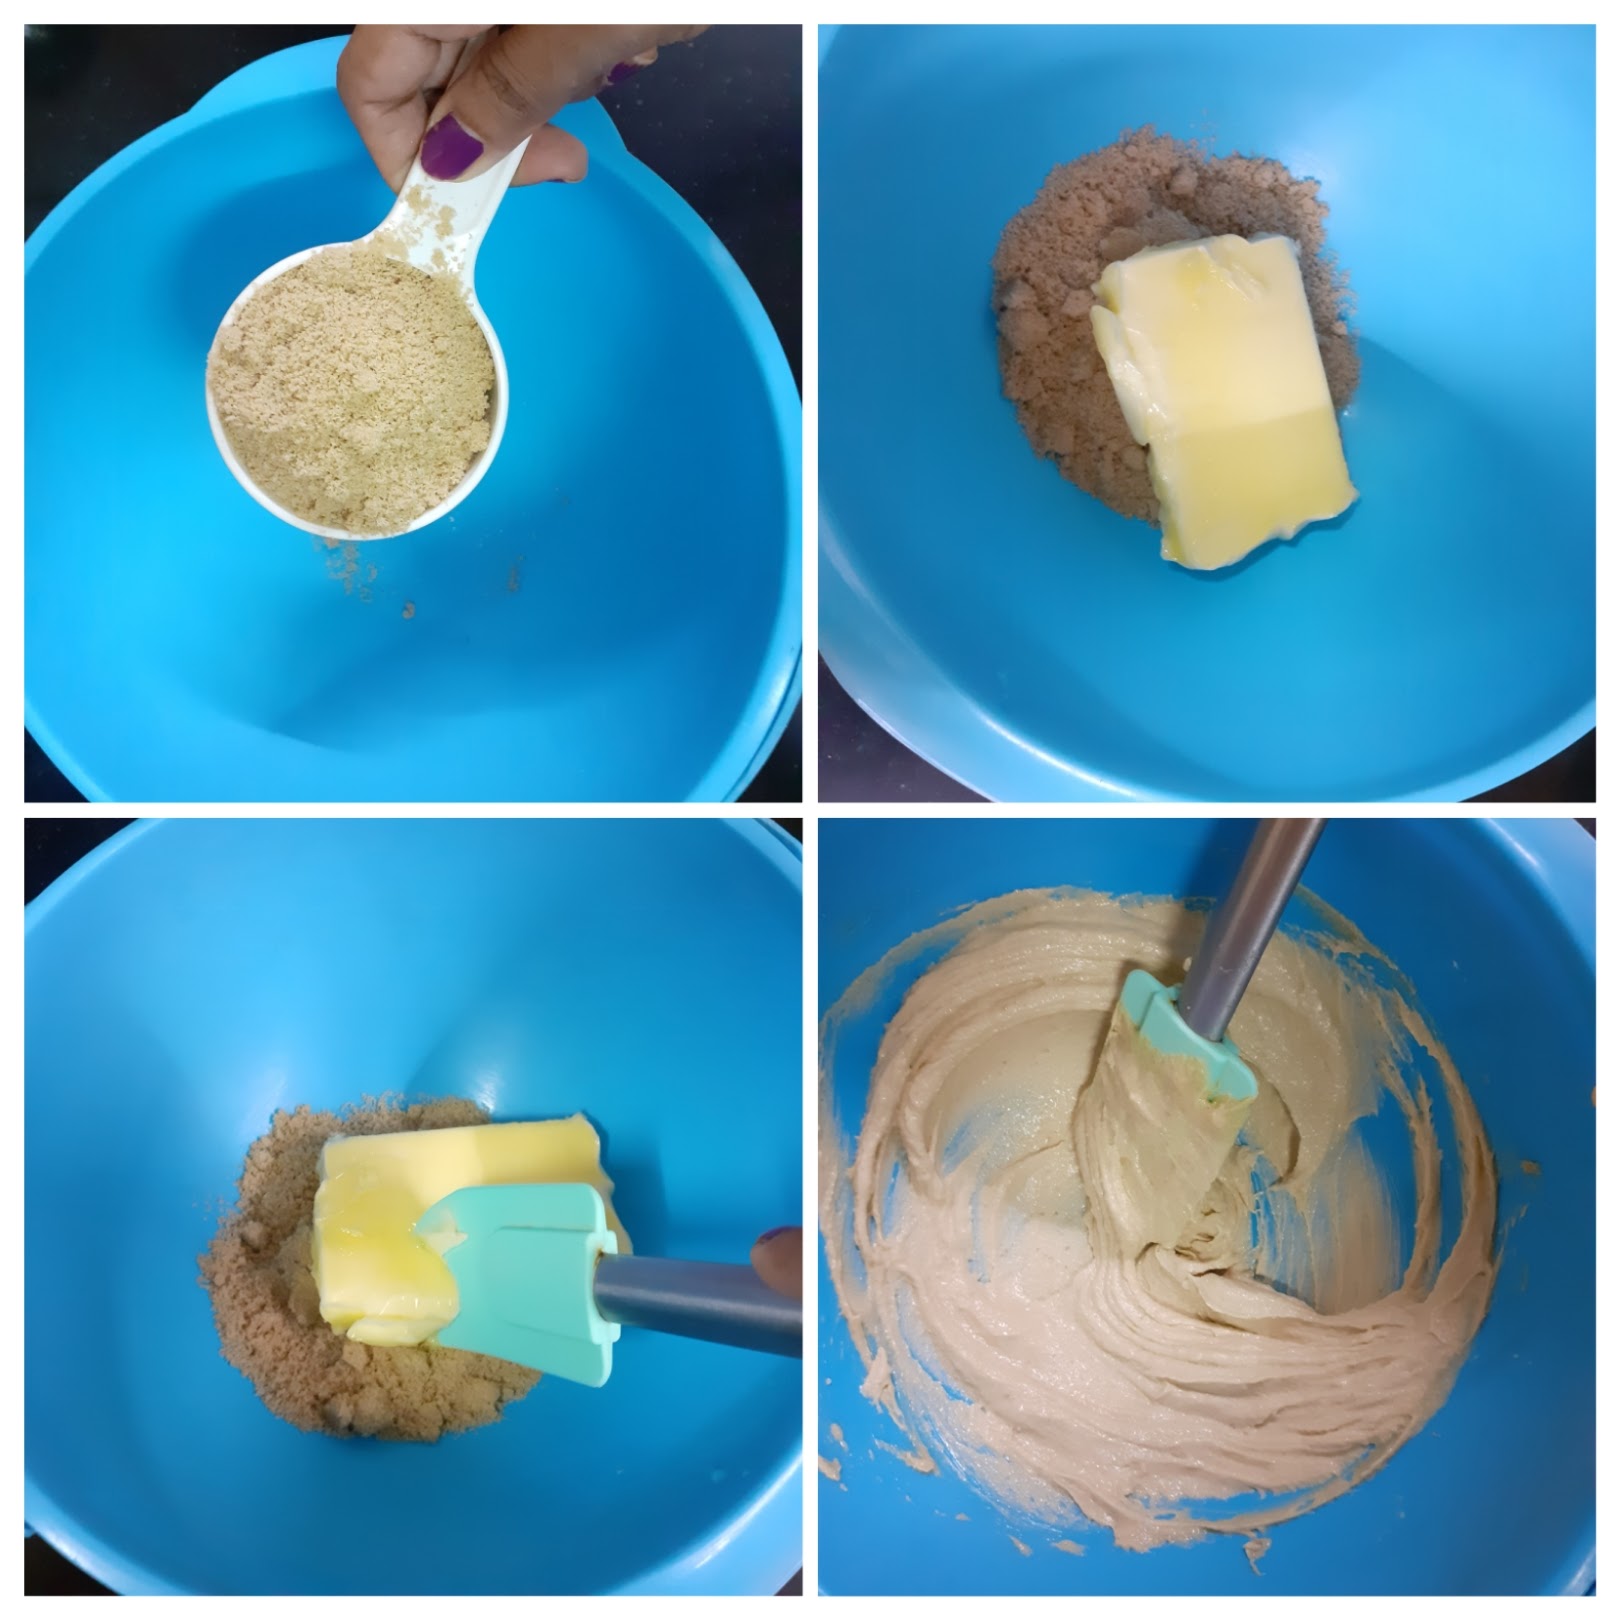
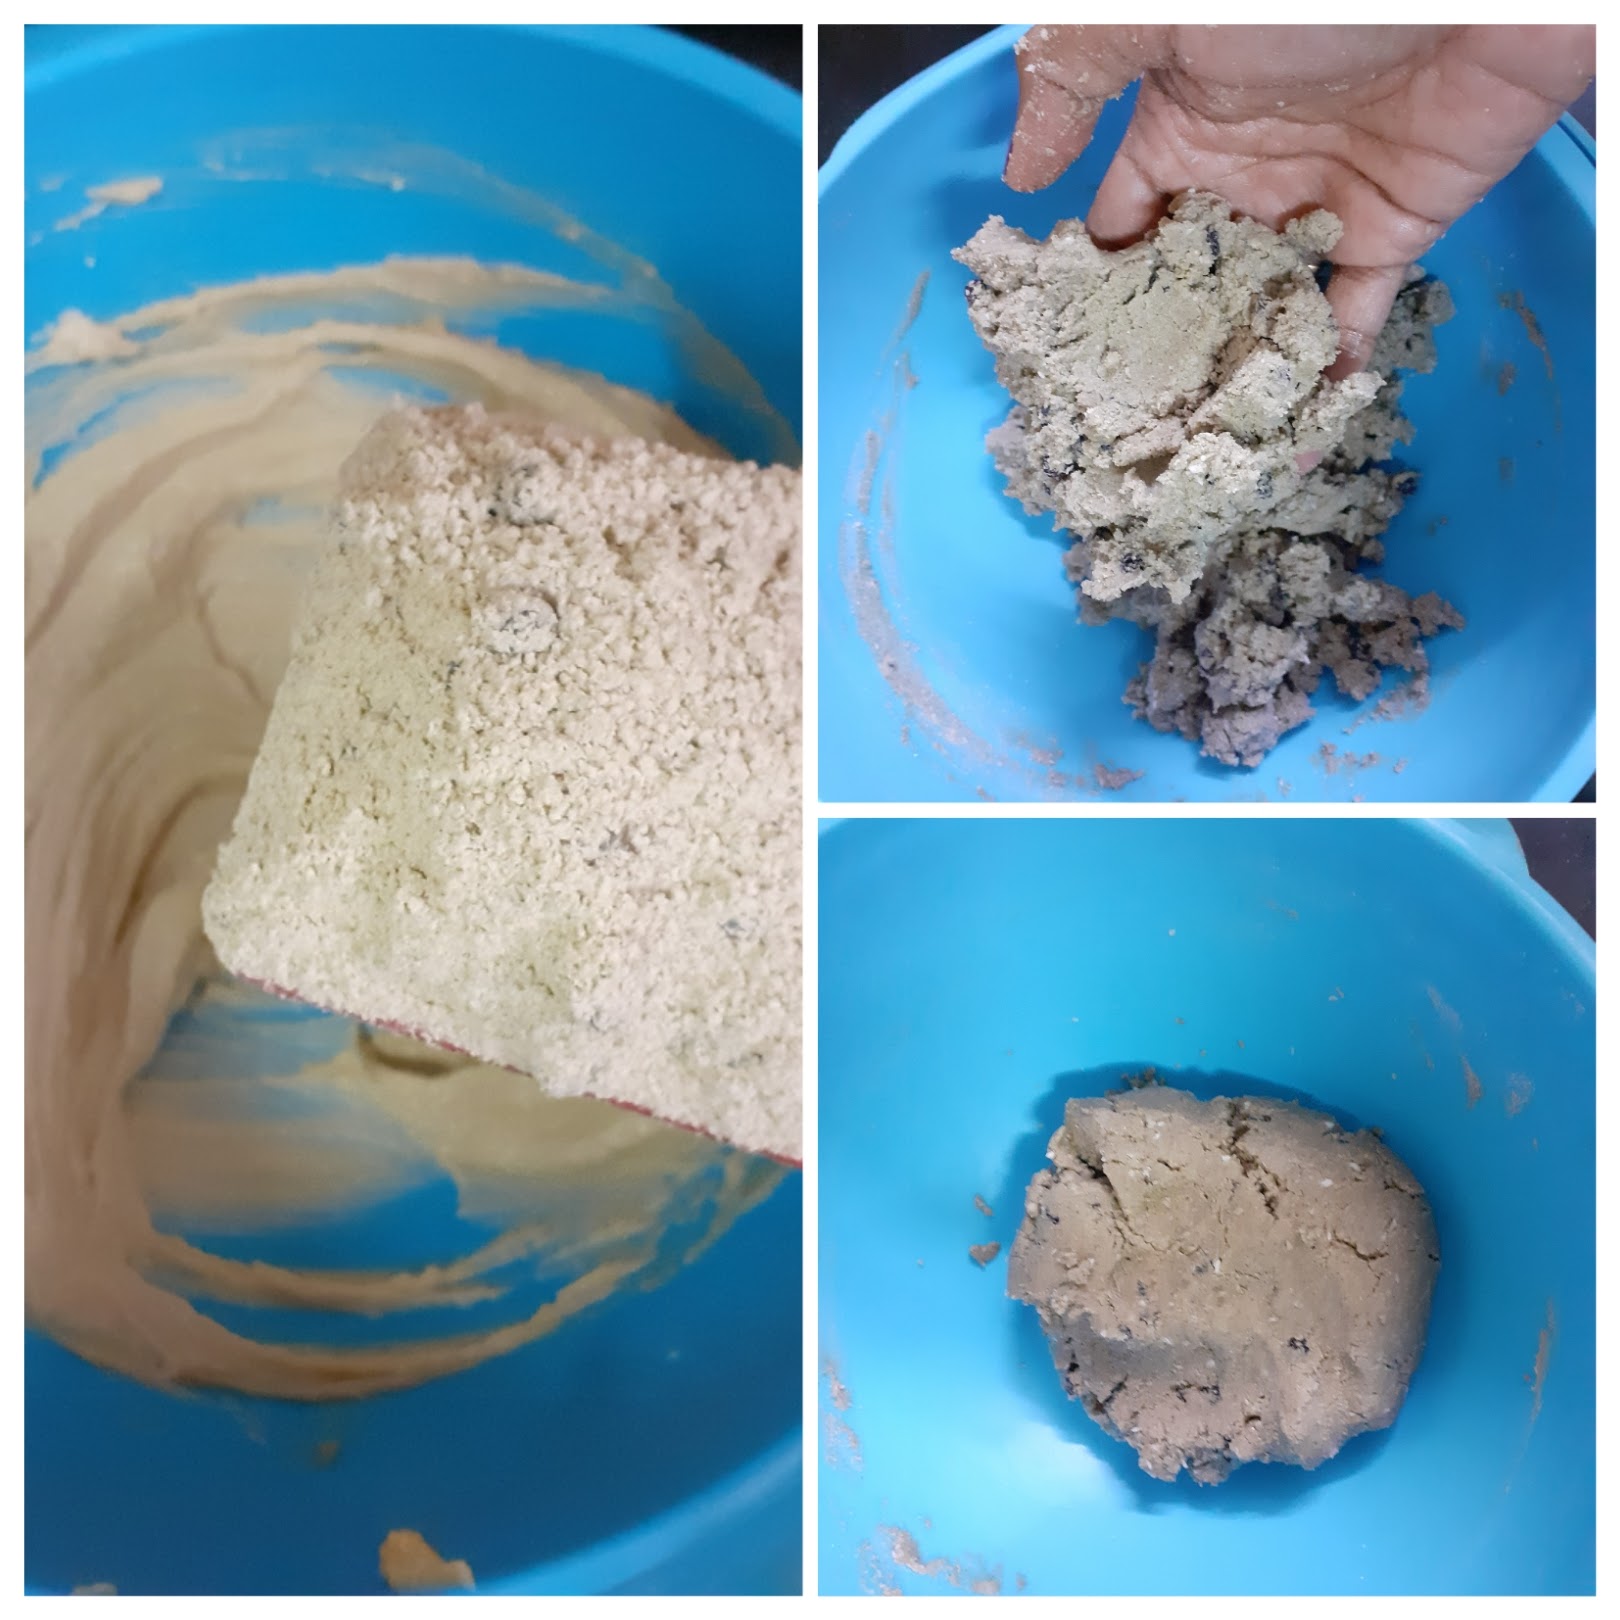
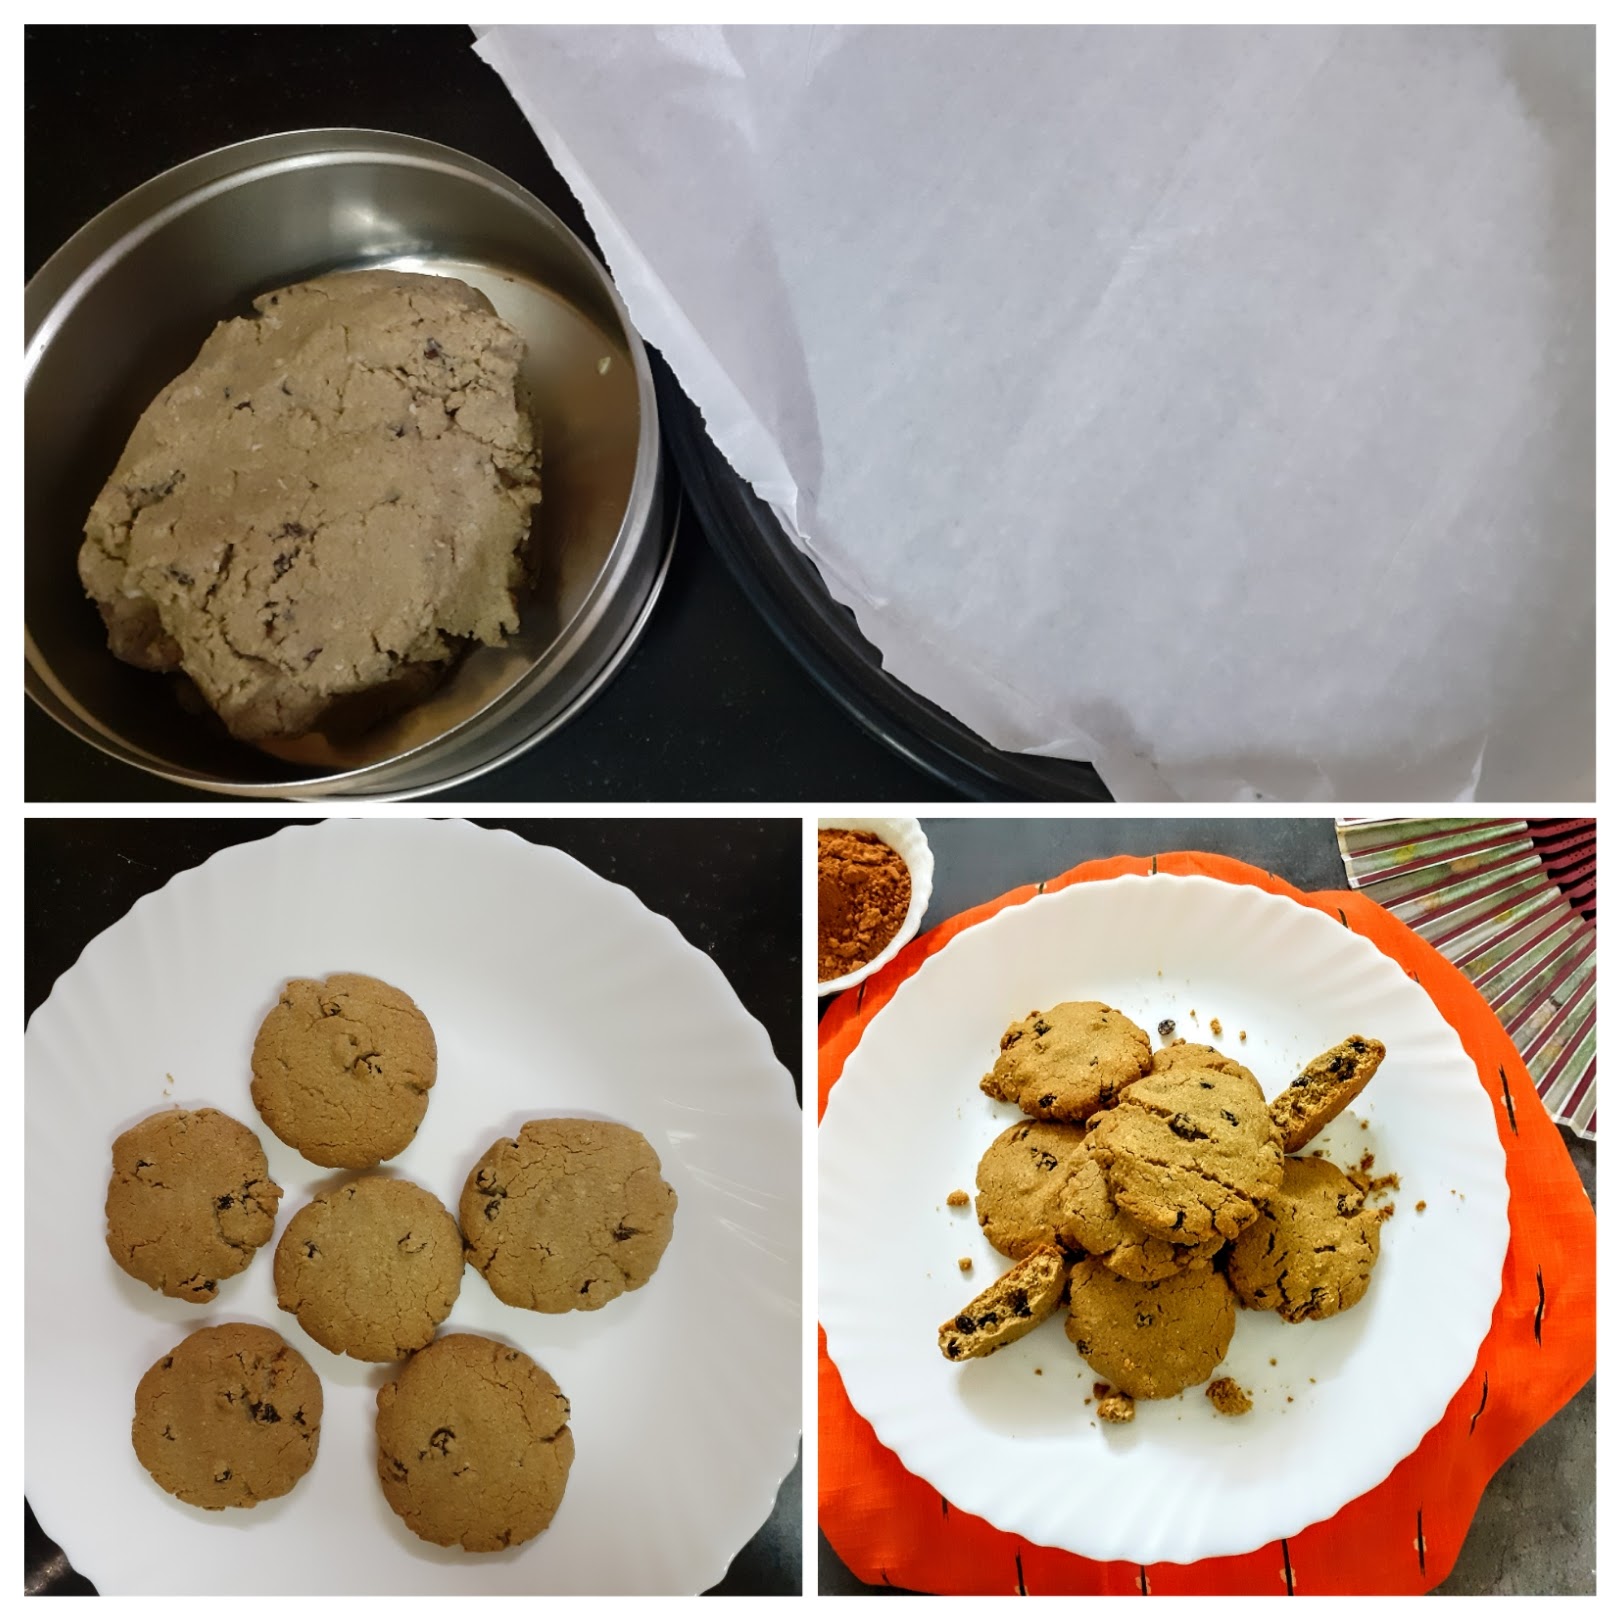
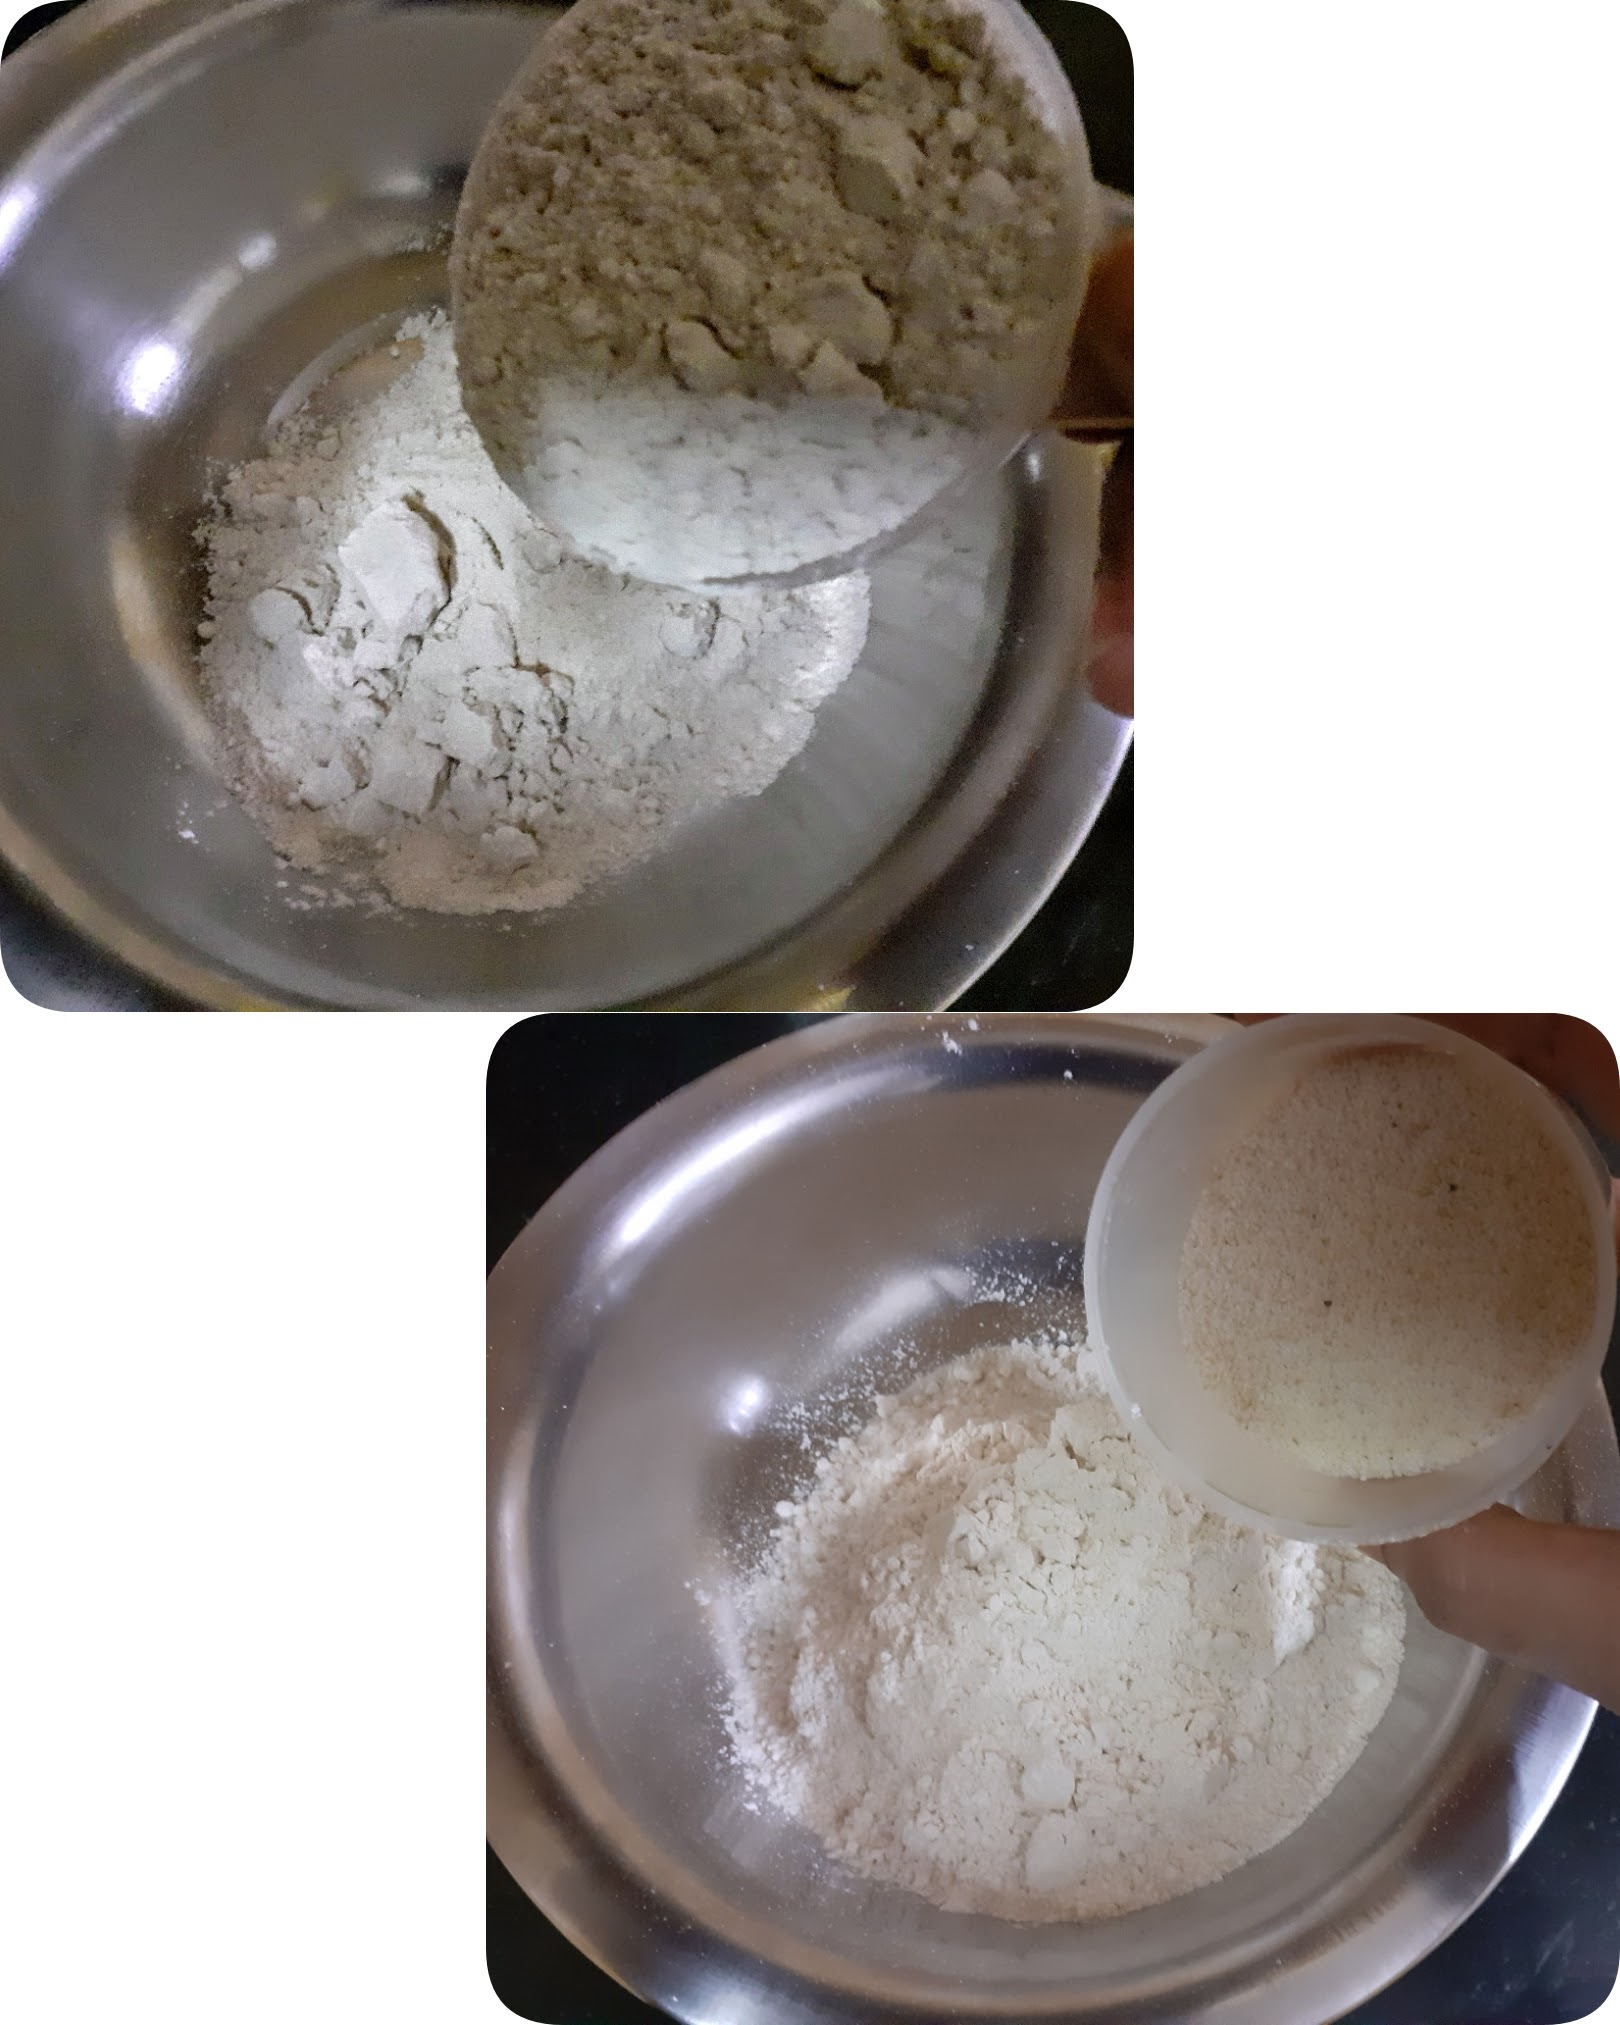
In a bowl add softened butter(keep out of the refrigerator for 1 hr). To this add Brown sugar and combine until smooth and creamy. In another bowl sieve the Bajra flour(Pearl Millet), baking soda and baking powder. To this add the Almond flour,Vanilla essence, desiccated coconut, salt and the Black Currants and mix well. Add this flour mix to the creamed butter and sugar mixture. Use your hand to combine them well to form a soft dough. Check picture for consistency. You will not need any form of liquid, just the said amount of butter will do. Now keep the kneaded dough in the refrigerator for 30 mins. Pre heat the oven at 180 C for 10 minutes. While the oven is on preheat, get the cookie dough out of the fridge and divide them into balls. Flatten them on your palms and place them on the baking tray lined with parchment or butter paper. Space them a little apart. I got 12 cookies from this dough, so baked 6 in one round and another 6 in the other. Bake at 180 C for 15 mins. Oven temperature are different for different ovens so keep a check from 12 mins. Remove the cookies carefully from the baking tray to a plate. The cookies will be soft when just out of the oven. Don’t worry they will turn crunchy on cooling completely. Enjoy the cookies with your favorite beverage. Cheers !!!
STEPWISE RECIPE FOLLOWS:
1. In a bowl add softened butter(keep out of the refrigerator for 1 hr). To this add Brown sugar and combine until smooth and creamy.
2. In another bowl sieve the Bajra flour(Pearl Millet), baking soda and baking powder. To this add the Almond flour,Vanilla essence, desiccated coconut, salt and the Black Currants and mix well.
3. Add this flour mix, little by little to the creamed butter and sugar mixture. Use your hand to combine them well to form a soft dough. Check picture for consistency. You will not need any form of liquid, just the said amount of butter will do.
4. Now keep the kneaded dough in the refrigerator for 30 mins. Preheat the oven at 180 C for 10 minutes. While the oven is on preheat, get the cookie dough out of the fridge and divide them into balls. Flatten them on your palms and place them on the baking tray lined with parchment or butter paper(picture not taken). Space them a little apart. I got 12 cookies from this dough, so baked 6 in one round and another 6 in the other. Bake at 180 C for 15 mins.
NOTES:
1. Since I made this recipe completely on intuition cannot say now if brown sugar can be substituted with white sugar or jaggery. When I try this again with white sugar or jaggery I shall update the recipe here.
2. I have used store bough Almond flour, however almond meal/flour can be made at home by blanching almonds, removing the skin, drying them and then powdering them.
3. Oven temperature are different for different ovens so keep a check from 12 mins.
4. The cookies will be soft when just out of the oven. Don’t worry they will turn crunchy on cooling completely.
5. Also at this point i’m not sure if any other millet flour can be used for this recipe. I shall soon try it out and update here.
If you tried this recipe and liked it please comment below. I would love to hear from you. If you have a query about the recipe email us and ill respond as soon as I can.
If you would like to receive our recipes on your mail please leave your mail id at the homepage. Every time Rajjo’s Kitchen has a new post we will mail the recipe to you.
Dhaniya Wale Namak Pare (Namak Pare)
Namak Para’s are a simple dry snack made from refined flour or whole wheat flour. They make for a good tea time snack too. Here the flour is combined with salt and spices to form a stiff dough. The dough is then rolled out and cut into diamonds and deep-fried in oil. This is an easy savory recipe to make around festivals like Diwali or Janmashtami where the tradition calls for making some flour-based snacks. One can just make it as a regular tea time snack too.
Yesterday when I entered the kitchen, the idea was to make the regular Namak Para. As I went to the refrigerator to fetch some flour(oh yes my fridge is the storehouse of my flours), my eyes fell on a bunch of fresh coriander leaves, and the idea of adding them to my Namak Para struck me. Therefore the recipe of this Dhaniya wale Namak Pare. Which means Coriander flavoured Namak Paras.
In this recipe, I have used a mixture of Multigrain flour(storebought) and Refined flour.
Fresh coriander leaves 1/2 bunch (washed and chopped)
Green chili 1 chopped
Ghee 11/4 tbsp ghee
Oil for deep frying
Directions:
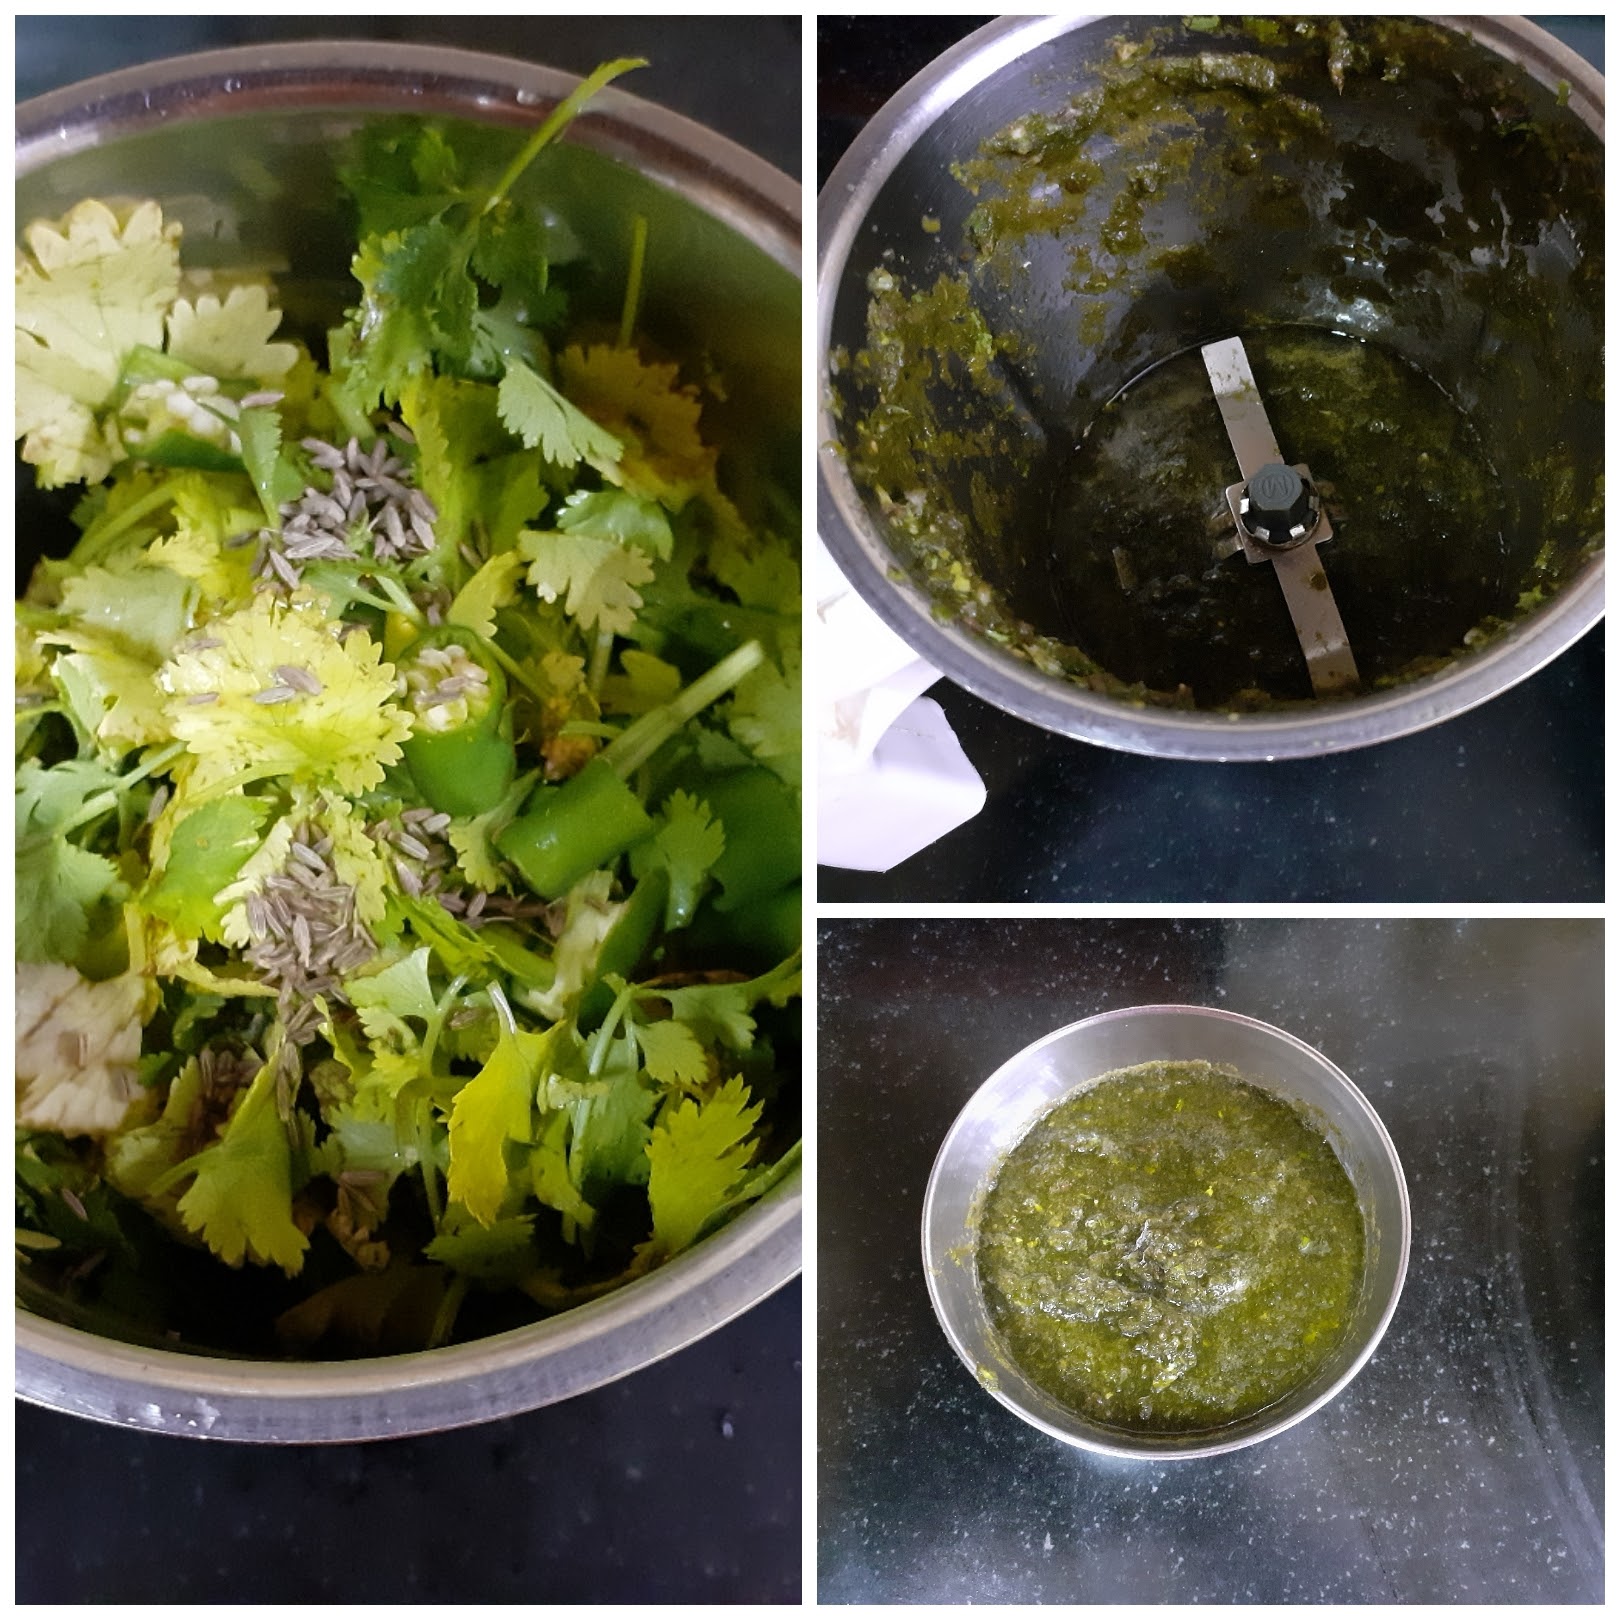
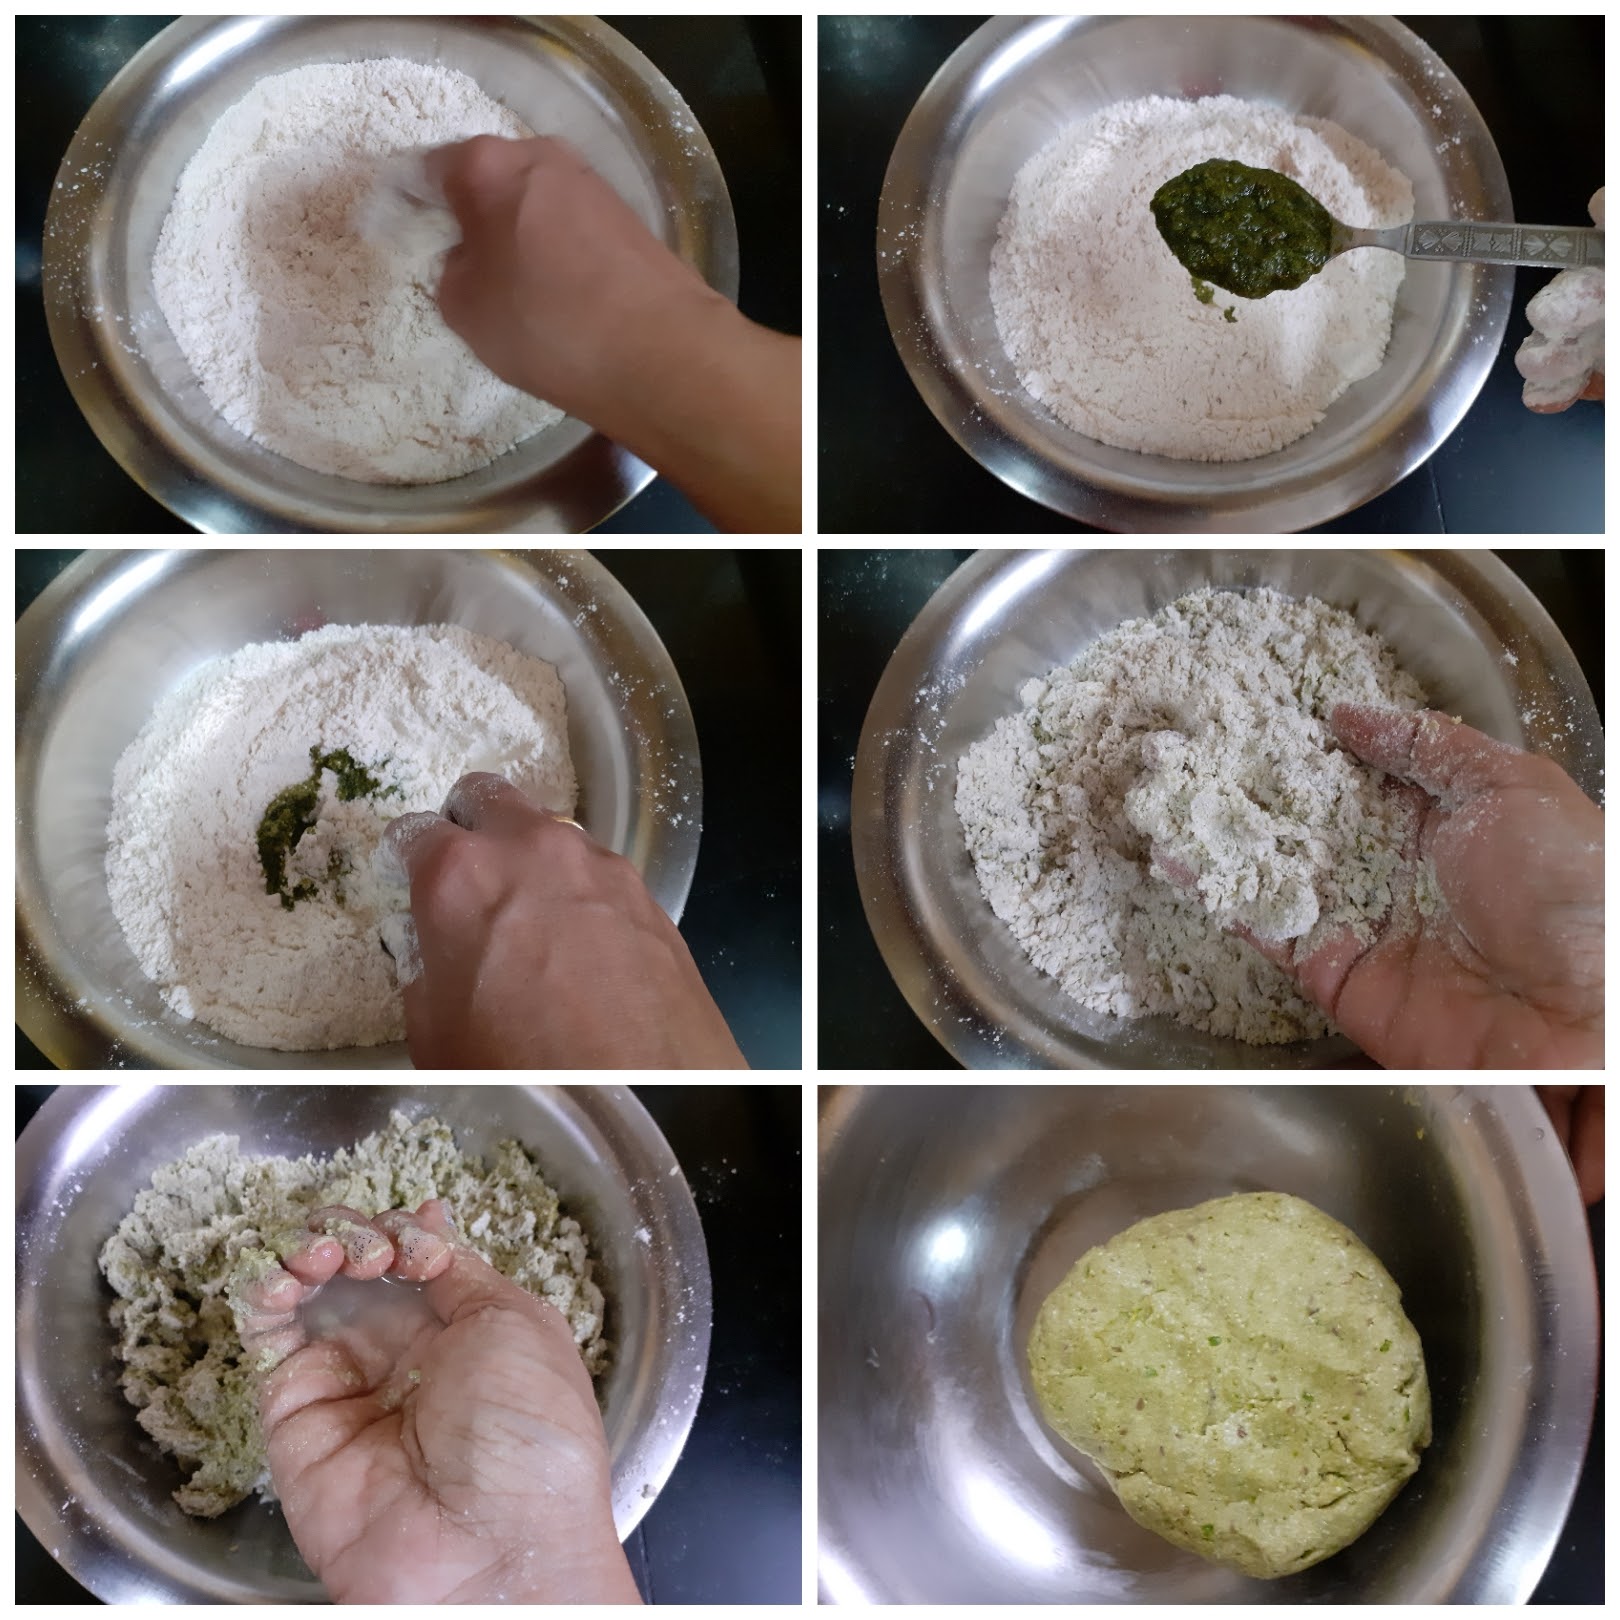
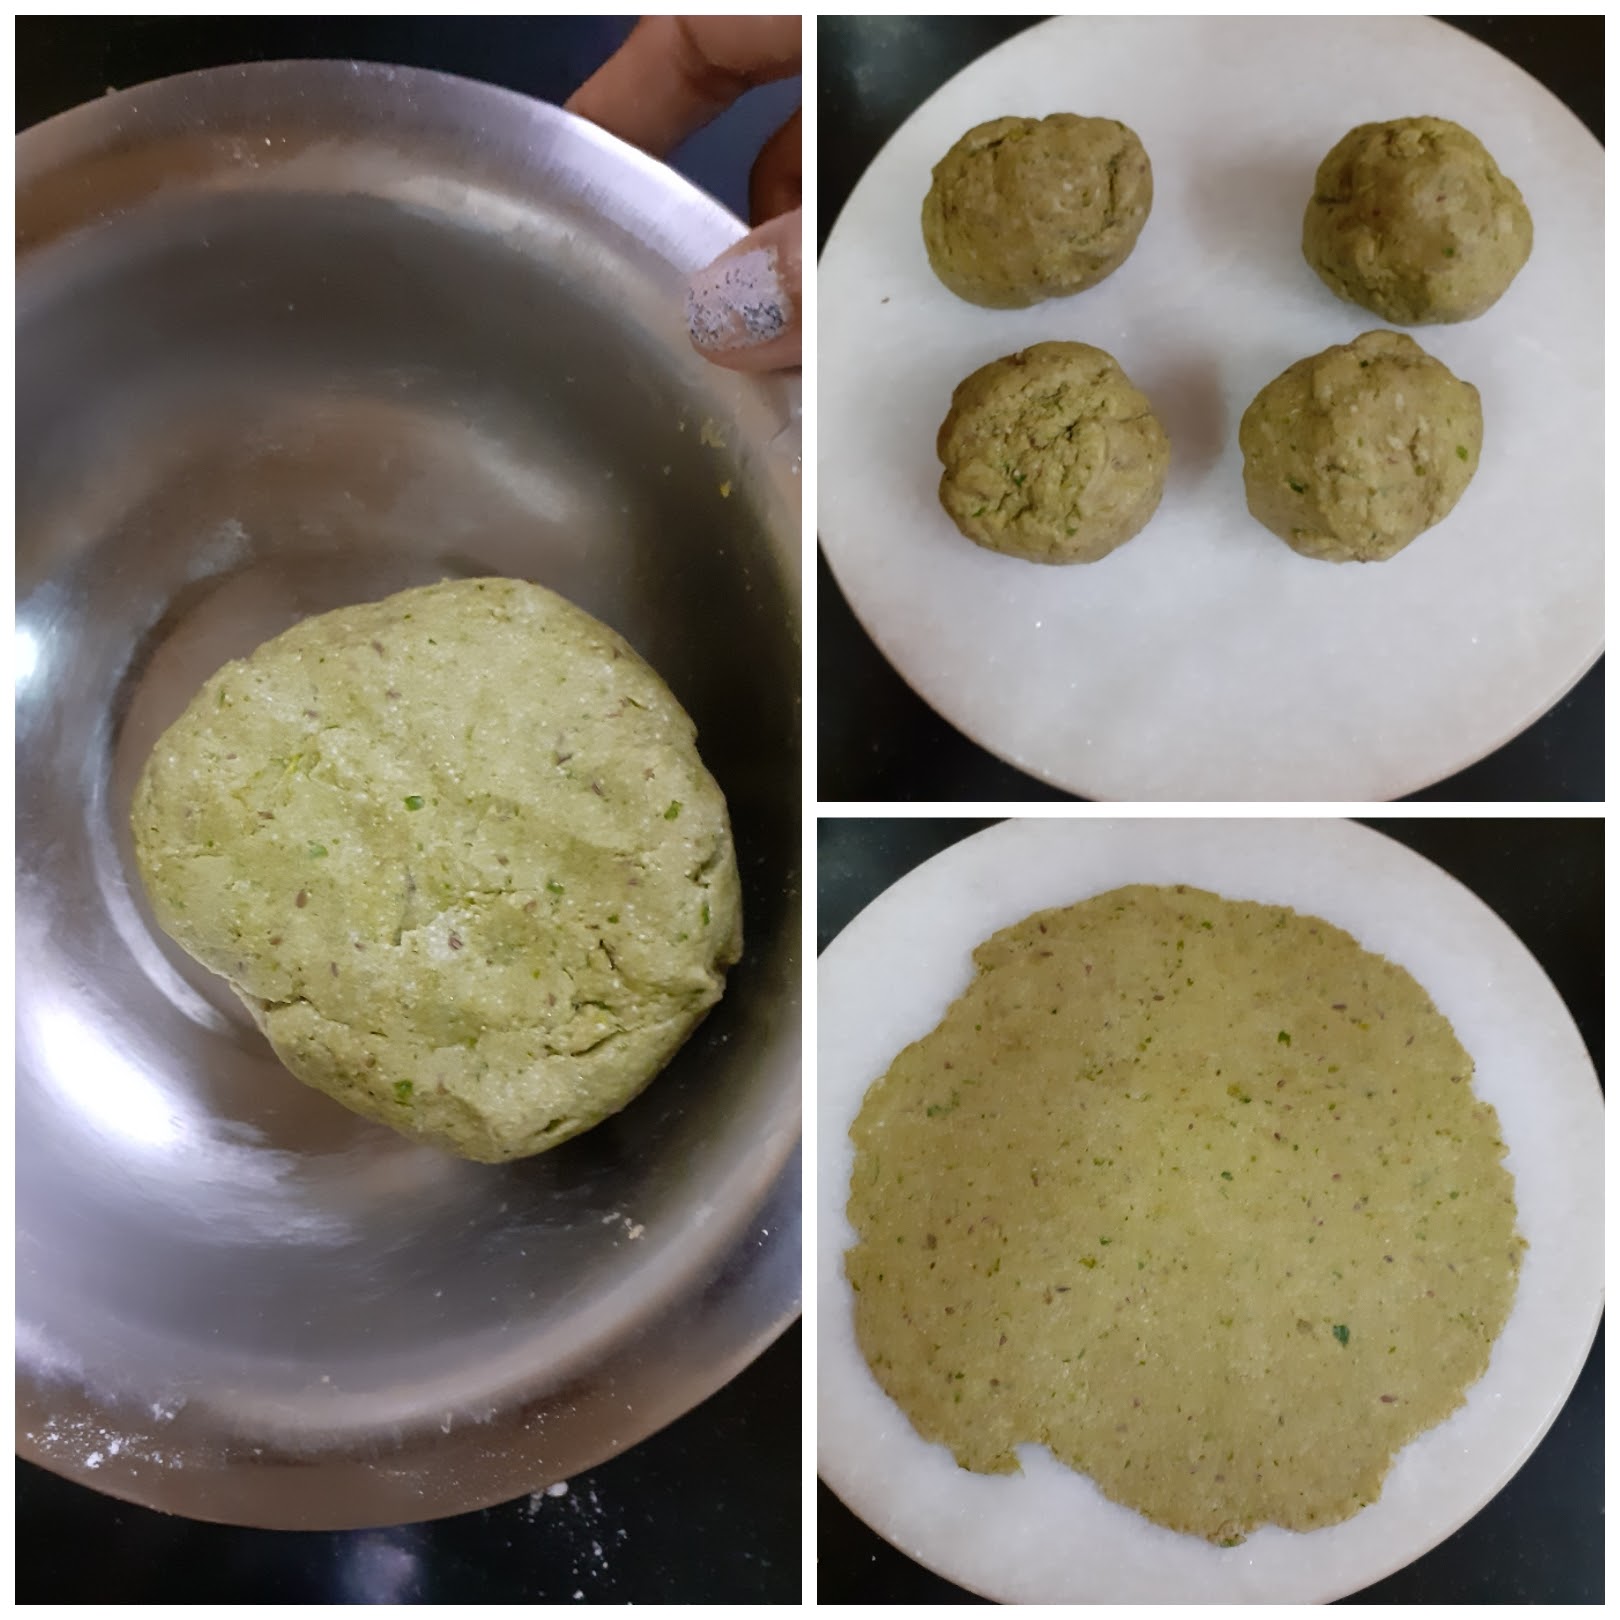
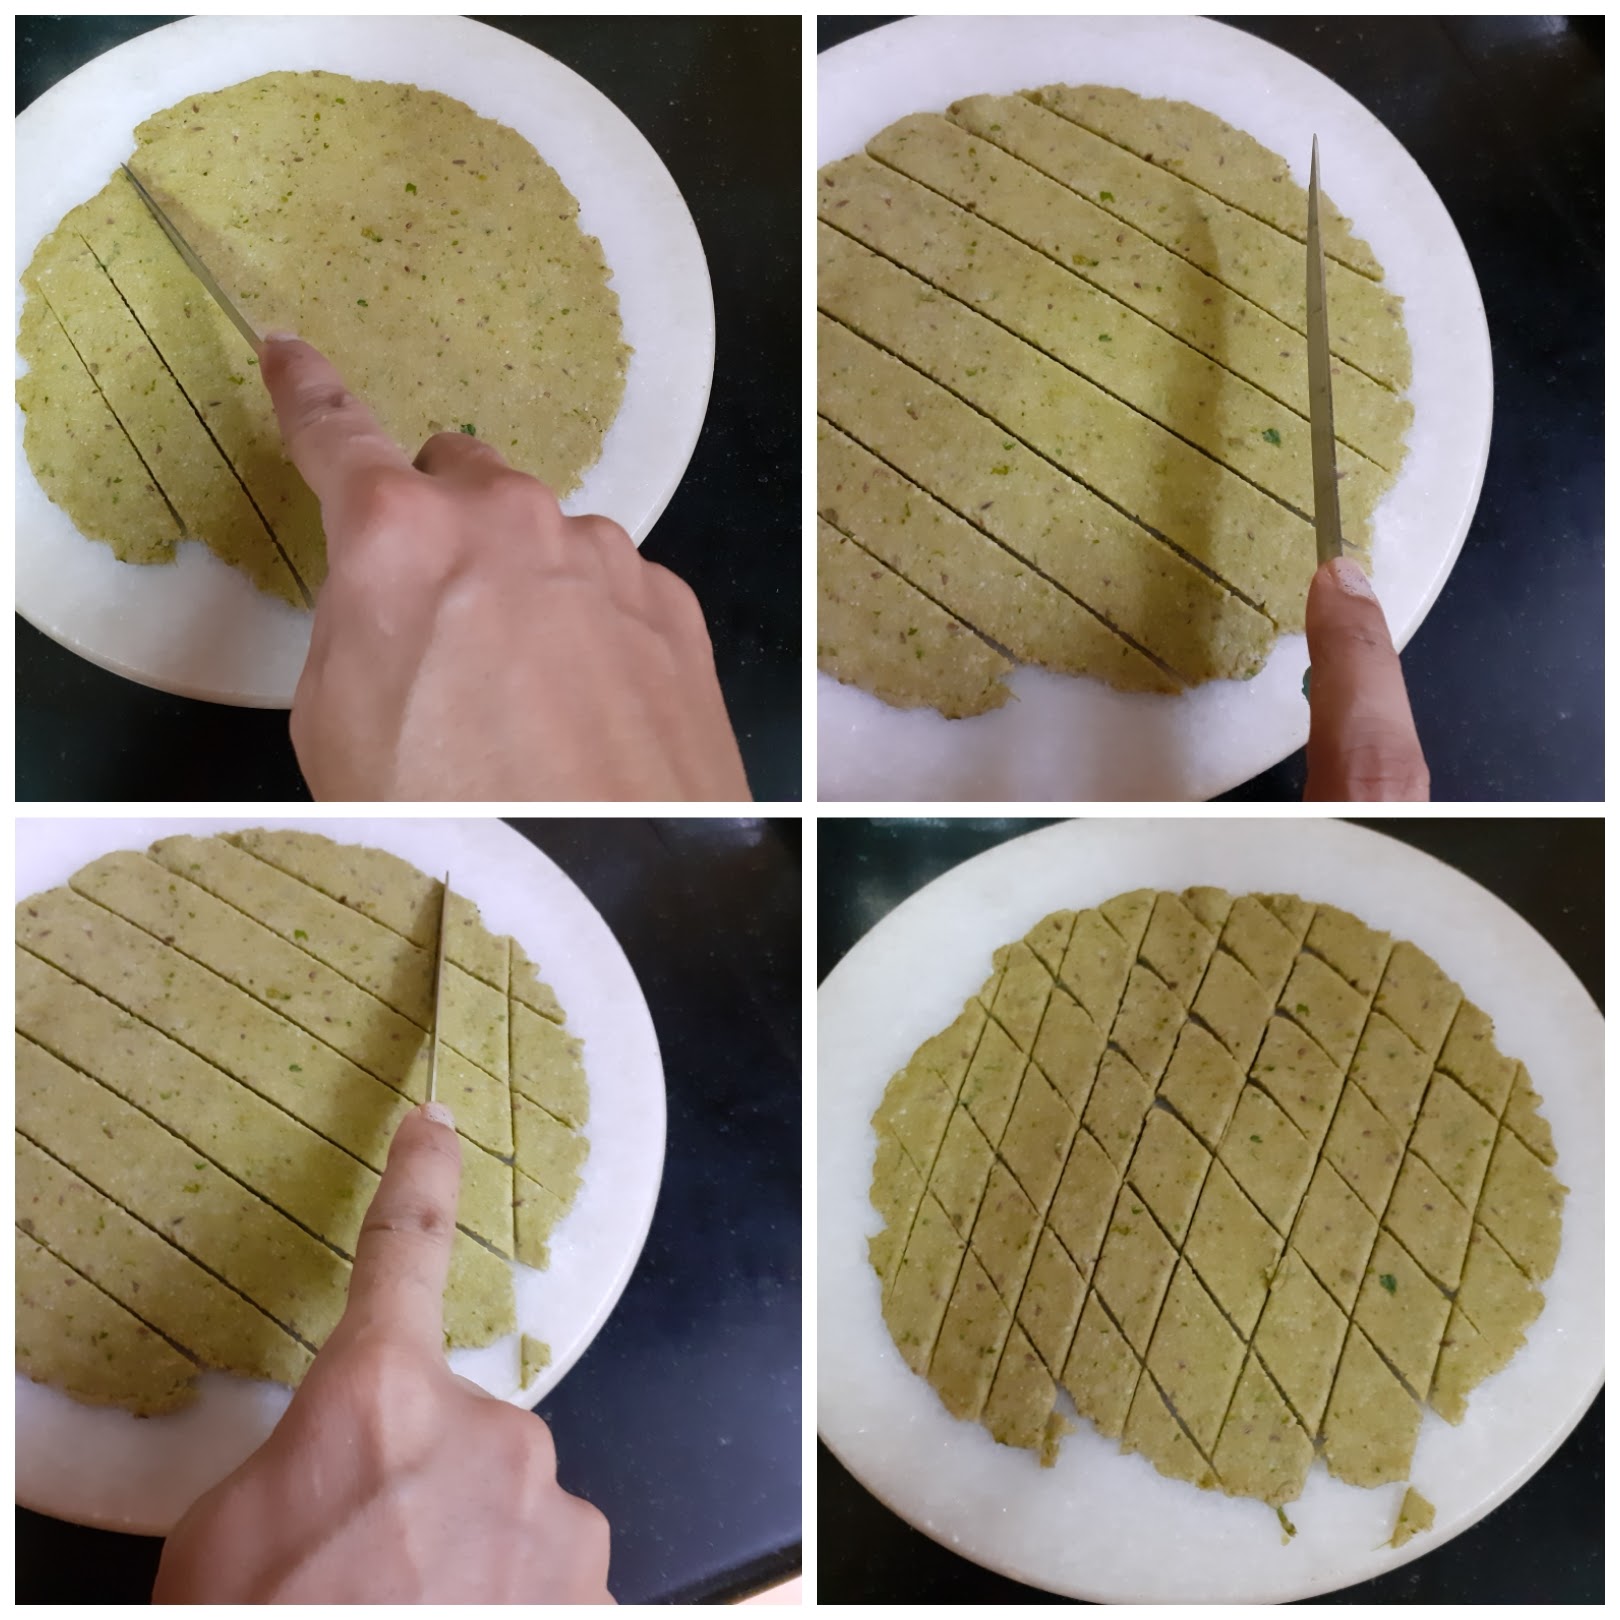
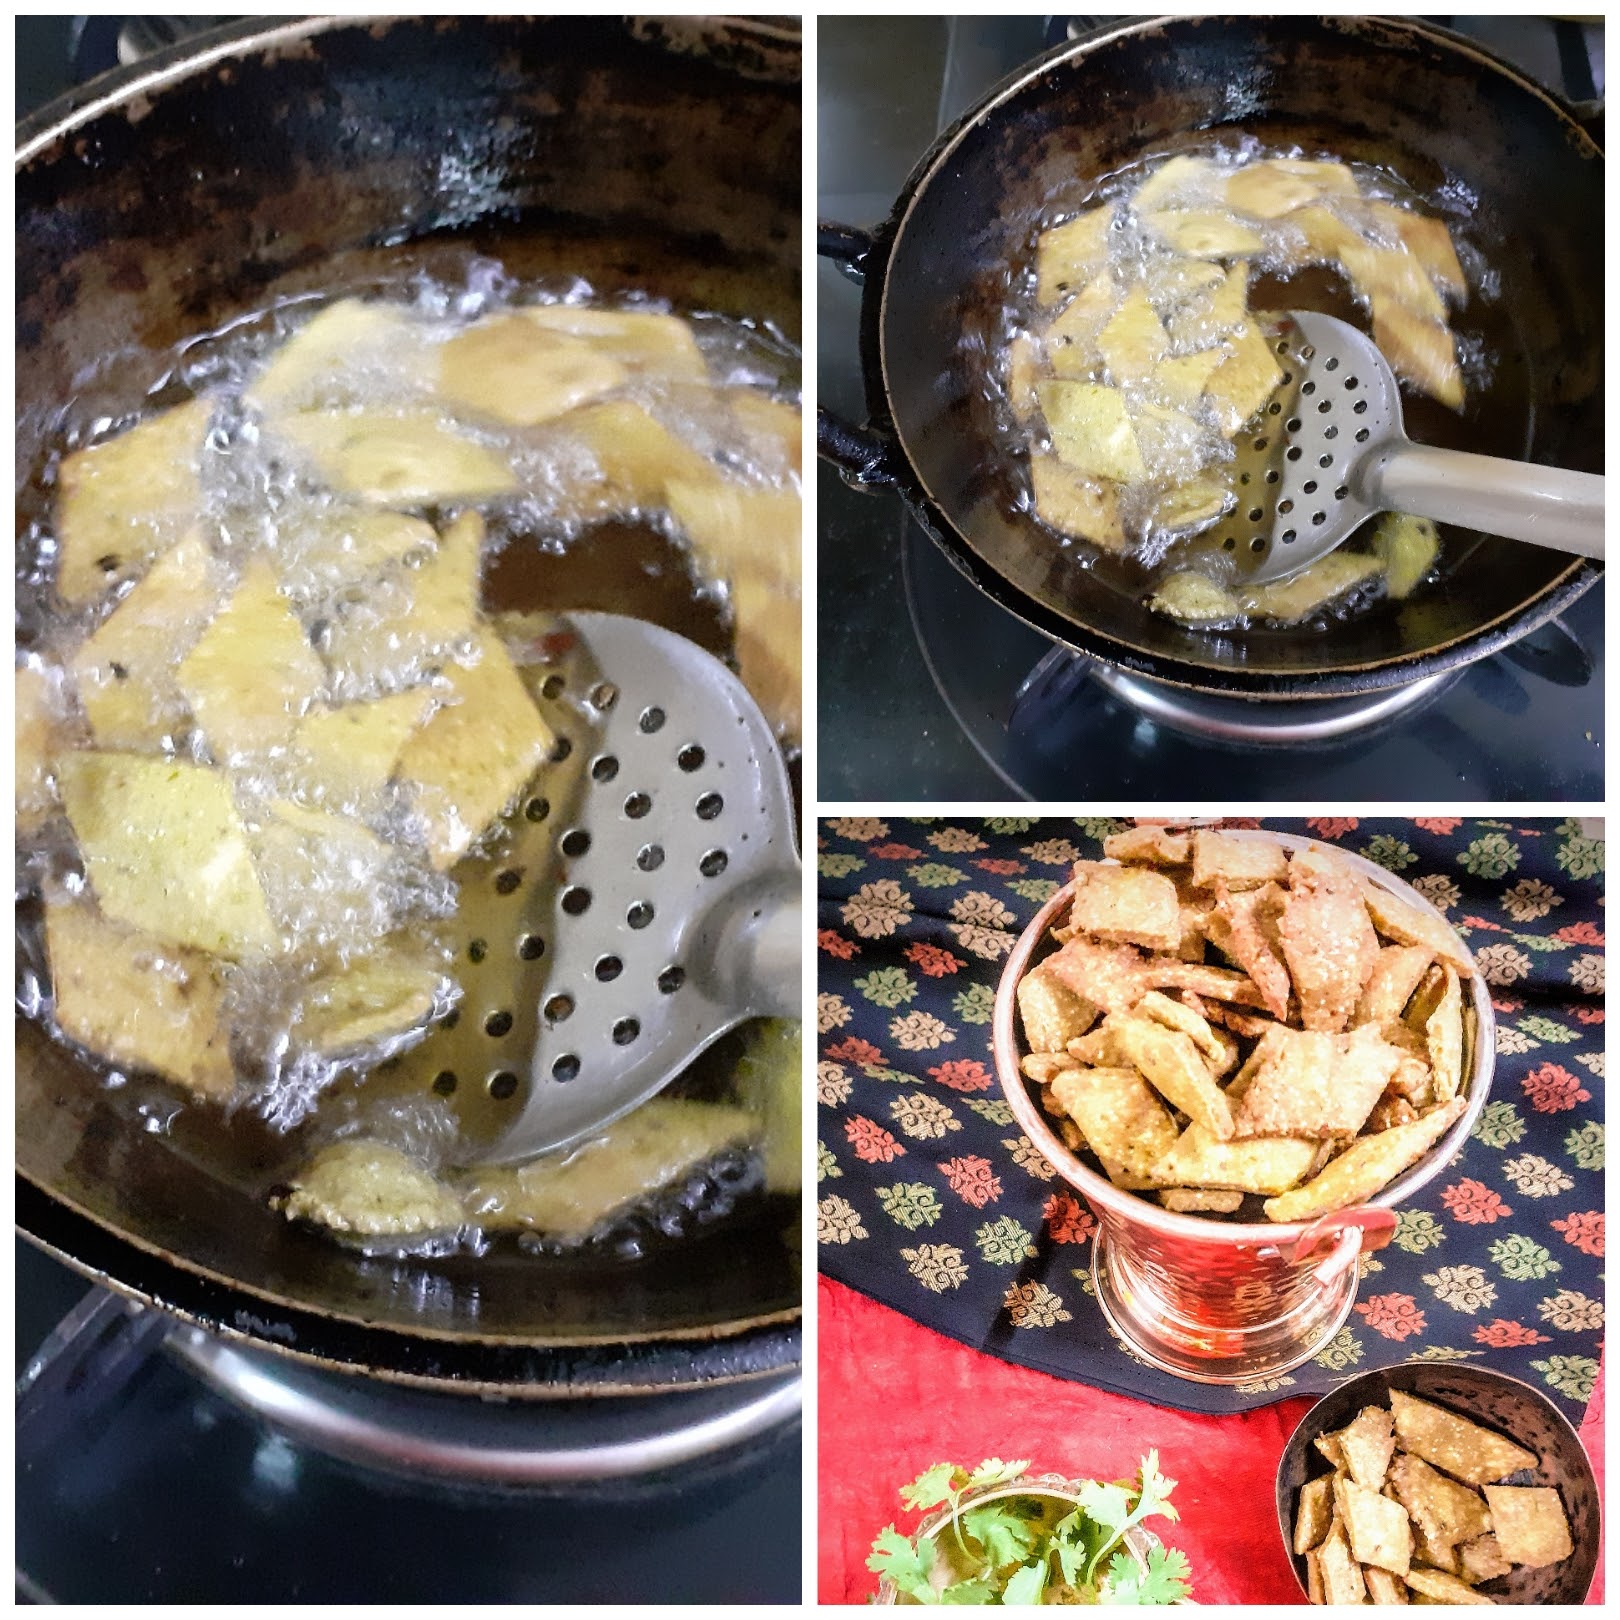
In the blender jar put the chopped coriander leaves, green chilli, and cumin seeds and blend to a smooth paste using as little water as possible. Now in a mixing bowl take both the flours, semolina and add salt, carrom seeds, and ghee. Now start rubbing the ghee into the flour. Once nicely mixed, using a spoon add the coriander paste to the flours little by little and start combining. Use as much paste as required for forming a stiff dough(a puri kind of dough). In case all the paste is used up and the flour is still dry then sprinkle little water and combine to form the dough. Let the dough rest for 15 minutes. Now work the dough again for a minute and divide it into 4 parts(ball it up). Now take one ball smear it with little oil and roll it out like a chapati. Keep the thickness medium and don’t roll it out too thin. Using a knife cut to form diamonds or squares. Heat oil in a Kadai for deep frying. The right temperature is when to put a tiny bit of dough, it should sizzle immediately. Drop in the diamonds/squares gently into the oil, and fry on low flame until all the bubbles subside and the Namak Para turns a golden brown. It is difficult to retain the green color of the coriander as the flour has to cook through thoroughly, but the flavour and aroma of the coriander are retained and this is a flavour max recipe. The Coriander flavoured Nmak Para is ready.
STEPWISE RECIPE FOLLOWS:
1. In the blender jar put the chopped coriander leaves, green chilli, and cumin seeds and blend to a smooth paste using as little water as possible.
2. Now in a mixing bowl take both the flours, semolina and add salt, carrom seeds, and ghee. Now start rubbing the ghee into the flour.
3. Once nicely mixed, using a spoon add the coriander paste to the flours little by little and start combining. Use as much paste as required for forming a stiff dough(a puri kind of dough). Let the dough rest for 15 mins.
4. Now work the dough again for a minute and divide it into 4 parts(ball it up). Now take one ball smear it with little oil and roll it out like a chapati.
5. Keep the thickness medium and don’t roll it out too thin. Using a knife cut to form diamonds or squares. Heat oil in a Kadai for deep frying.
6. The right temperature is when to put a tiny bit of dough, it should sizzle immediately. Drop in the diamonds/squares gently into the oil, and fry on low flame until all the bubbles subside and the Namak Para turns a golden brown.
NOTES:
1. Use as much coriander paste as required for forming a stiff dough(a puri kind of dough). In case all the paste is used up and the flour is still dry then sprinkle little water and combine to form the dough.
2. In case you wish to make the regular Namak Paras then instead of making the dough using the coriander paste, just use water to make the dough, the remaining ingredients and proportions will remain the same.
3. Using Mint/Pudina for this recipe may not work as the Pudina paste changes colour on blending to a paste and may change further on frying.
If you tried this recipe and liked it please comment below. I would love to hear from you. If you have a query about the recipe email us and ill respond as soon as I can.
If you would like to receive our recipes in your mail please leave your mail id at the homepage. Every time Rajjo’s Kitchen has a new post we will mail the recipe to you.
Masala Wheat Flour Papdis (Baked)
Masala Wheat Flour Papdis are crunchy crisps made of wheat flour. The wheat flour here can be easily replaced with maida/refined flour or multigrain flour. I usually fry these Papdis, but this time I have baked them as per the request of friends and followers as they wanted something that was not deep-fried. That said, these Papdis can be fried too and I have given both options in this recipe.
When we bake a snack that is traditionally deep- fried there is always a difference in texture. It would be wrong to say that they taste almost like fried ones. The taste is the same, the papdis are crunchy too, but there is a difference in their textures. I also believe that when we prefer a baked snack over a fried one we are willing to adjust to the minute differences that are bound to be there because the technique used is different. Therefore you will not find phrases like “baked but almost like fried” or “baked but as good as fried”, on this blog. Baked is baked and fried is fried, and somewhere there is a compromise in either, shape, colour, texture, taste of the dish. I am not saying this only about the current recipe but in general. When a deep-fried dish is baked there are differences.
This is why I try to keep the fried ones fried, but sometimes I do give in to a little experimenting. I won’t do something because it is a trend, but if I do experiment and the result is blog-worthy I will certainly share it with you all.
Now, these Papdis can be served with tea, they last for a long time when stored in an airtight container. I also make Papdi Chat(street food delicacy) with these, and since they are firm than the Maida papdis, they hold up the sweet curd and chutneys of the Chaat well.
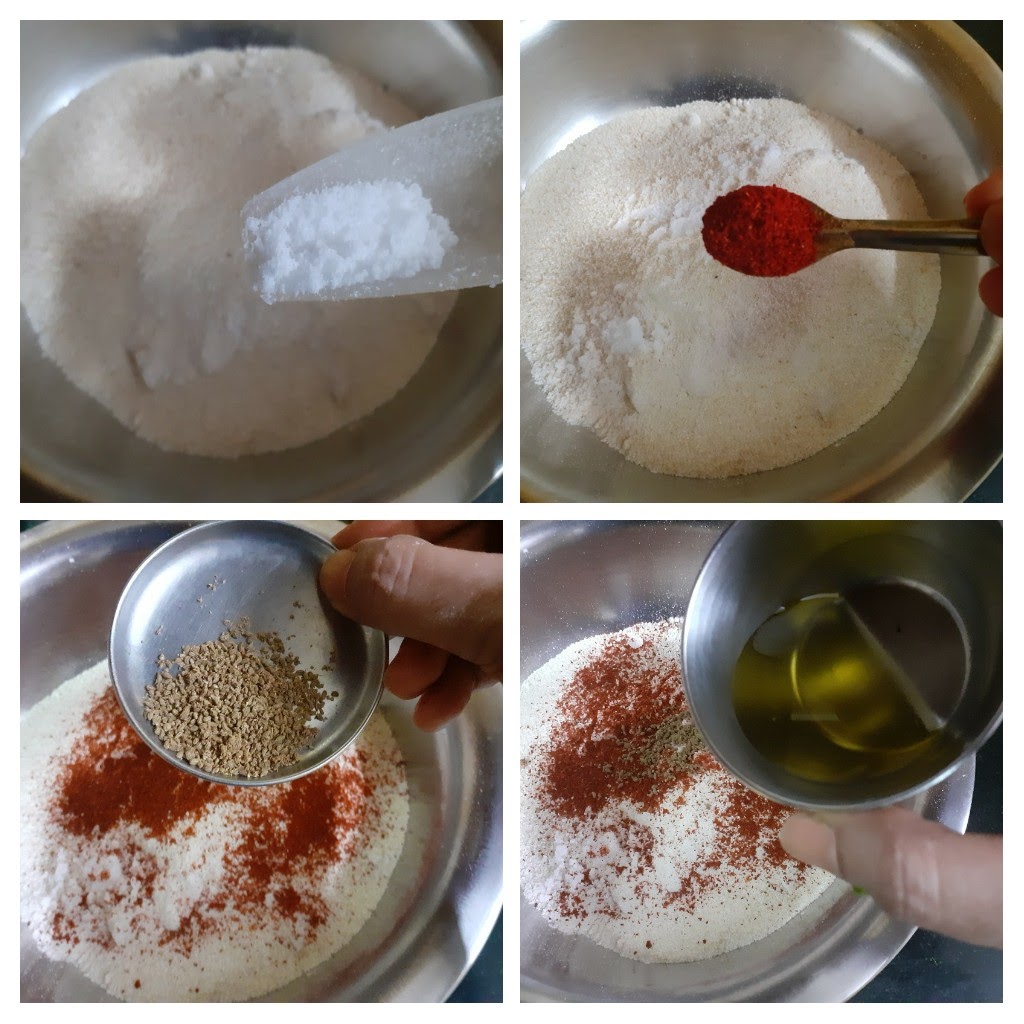
Wheat flour 2 cups (1 cup =150 ml) Suji(semolina) 1/2 cup Salt as per taste Red chilli powder 1 tsp Ajwain(Omam/Carrom seeds) 1 tsp Oil 3 tbsp for flour (refer note1) Fresh Coriander or Methi(fenugreek)leaves 1/2 cup finely chopped White sesame 1 tsp (optional) Water as required
Directions:
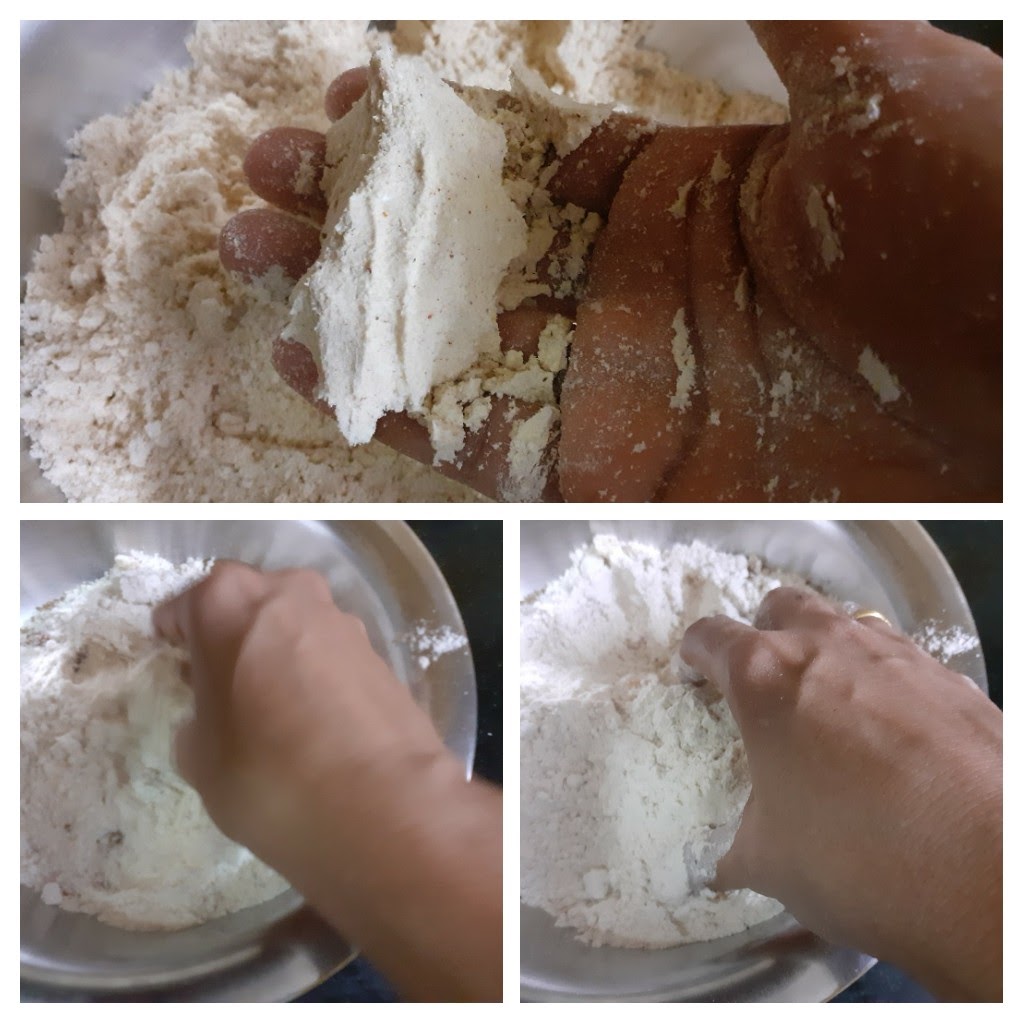
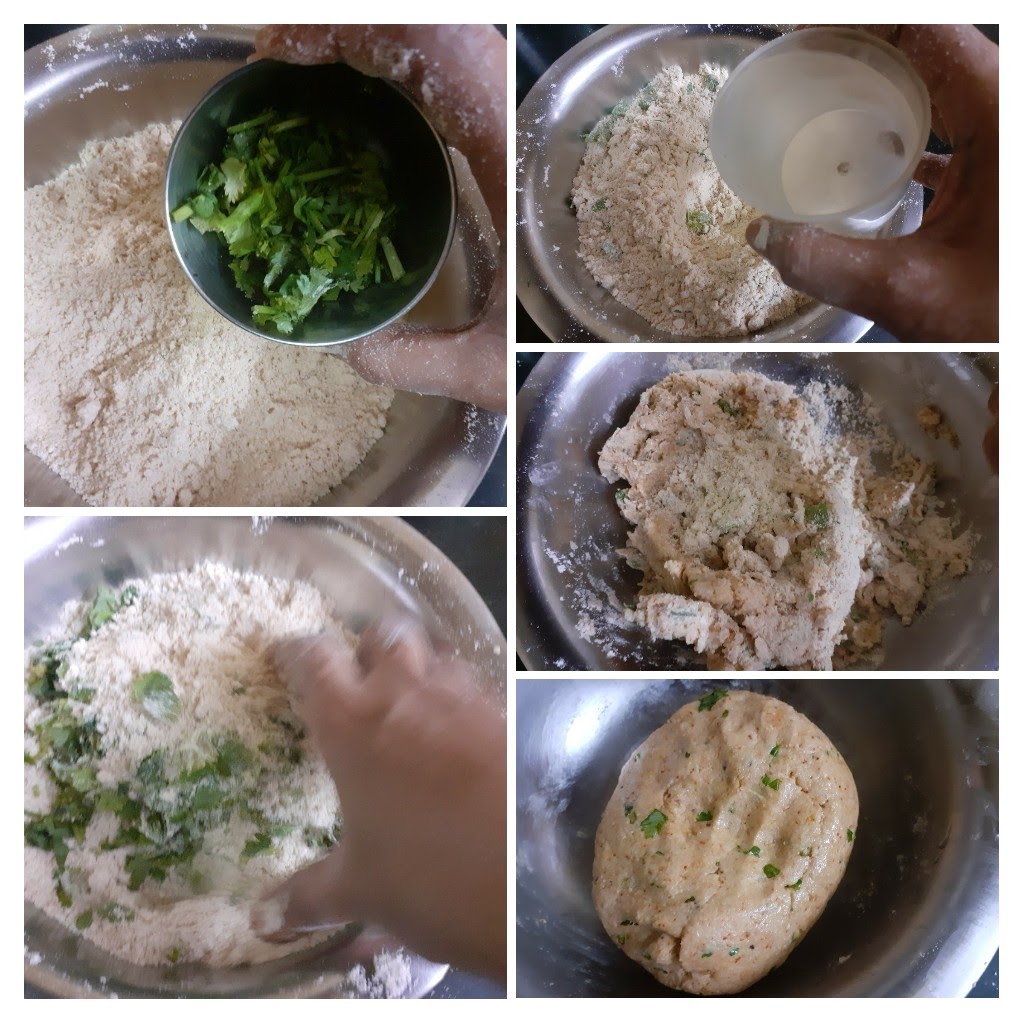
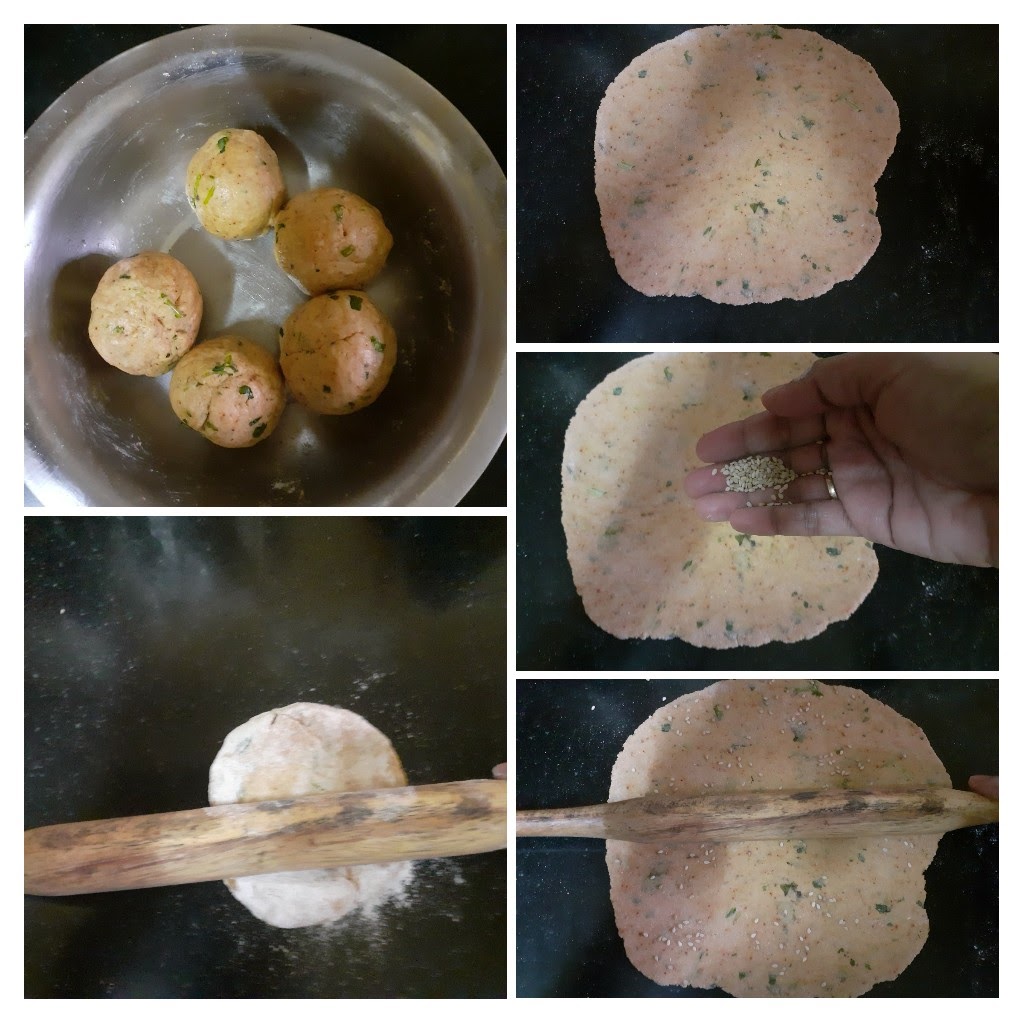
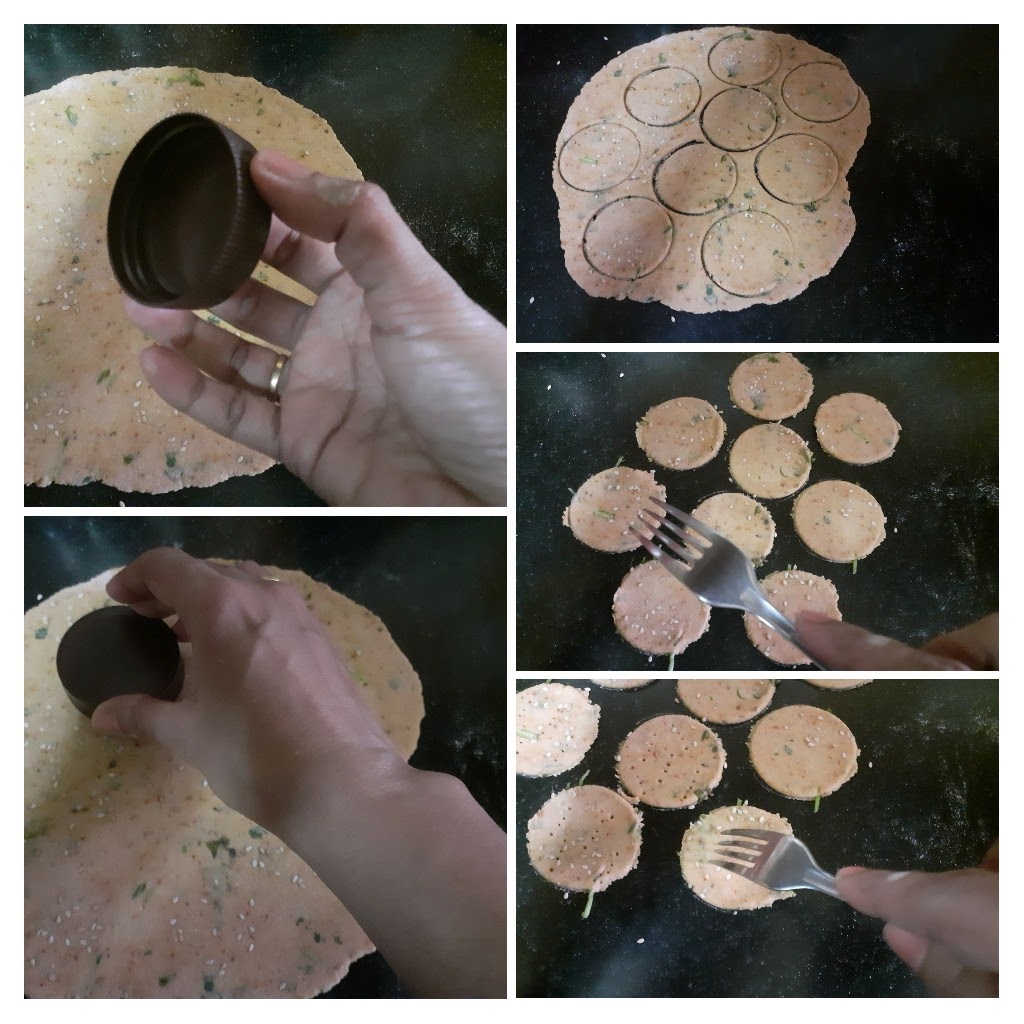
In a dish take the wheat flour and add the suji/semolina to it. Now add the salt, red chilli powder, ajwain followed by the 3 tbsp oil. Start mixing the flour with your fingers, such that the spice powders and oil are well mixed with the flour. Now take some flour in your palm and clamp it together with your fingers. If the flour holds shape, water can be added little by little now. But before that add the chopped coriander/methi leaves, mix it with the flour well and now start adding water little by little. We want a stiff dough here. The consistency should be like the dough for Poorie. Now apply very little oil on the dough and rest it or 15 minutes. Now divide the dough into 4 or 5 balls. Roll out each ball into a thin circle, flour for dusting if required. Sprinkle some sesame seeds on the rolled and flattened dough and roll again so that the sesame seeds stick to the dough. Now with a cookie cutter or lid of a bottle cut into a circle. Remove excess dough from sides. prick holes with a fork on the little papdis.
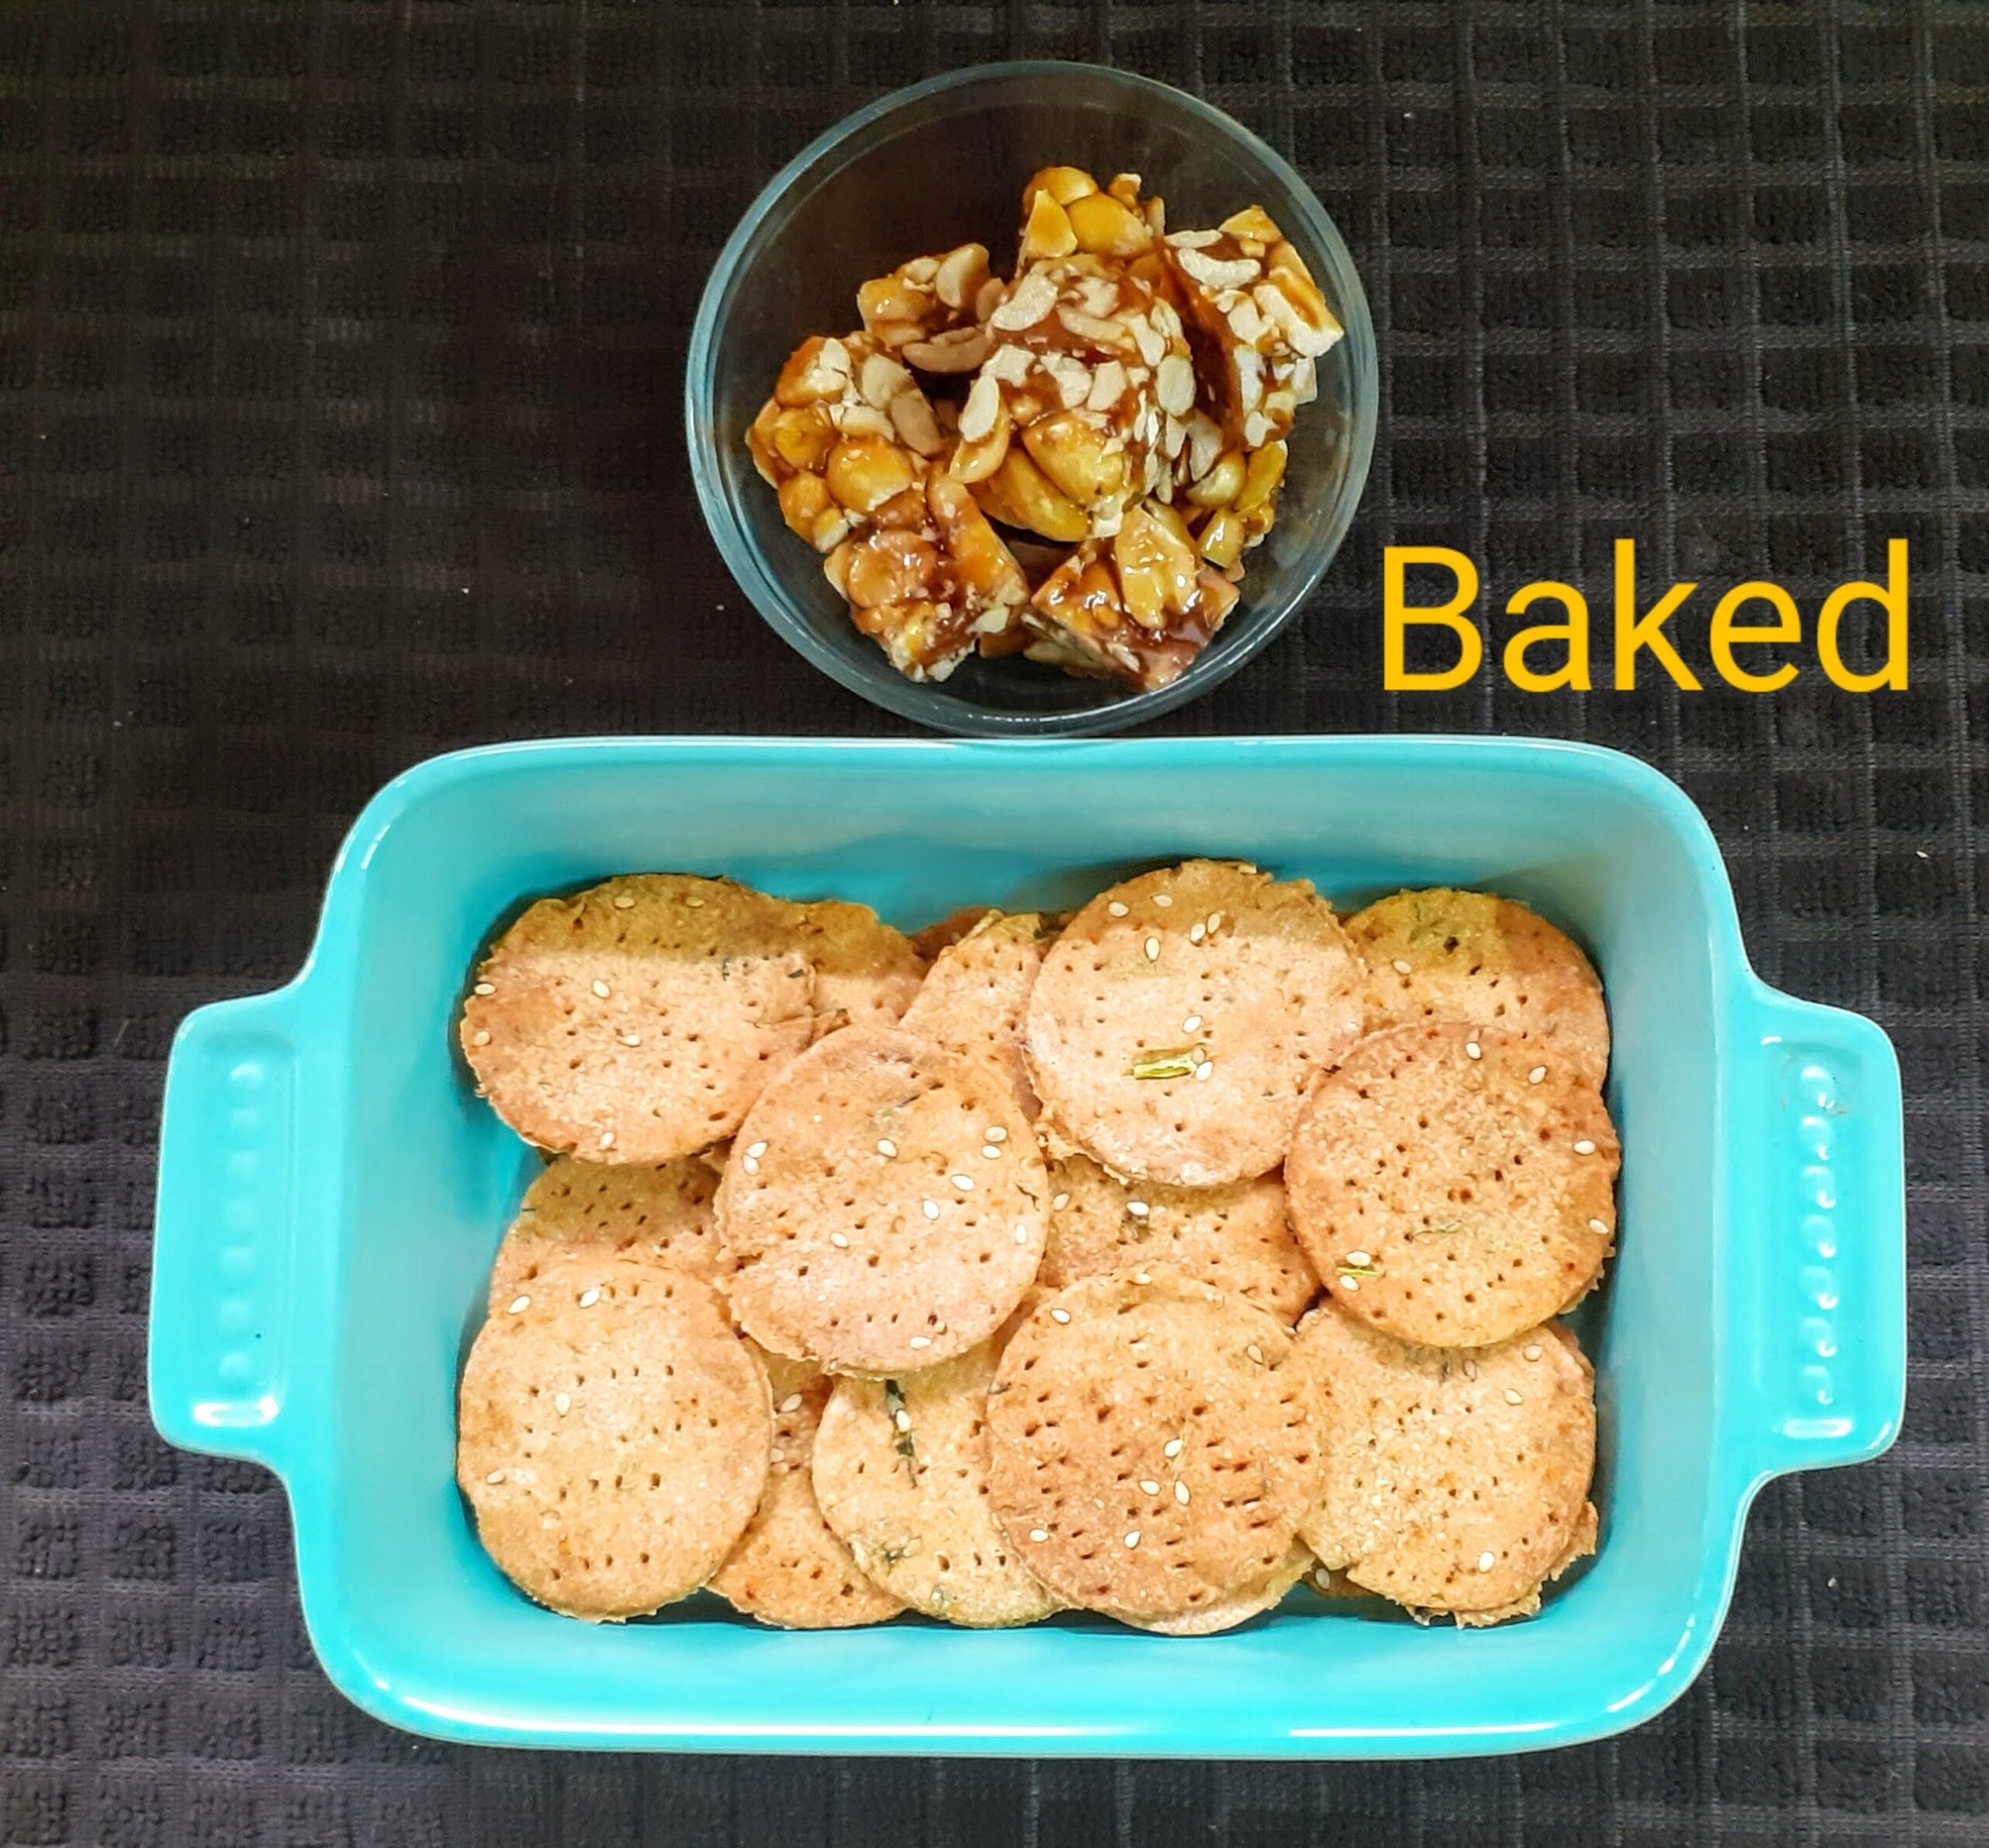
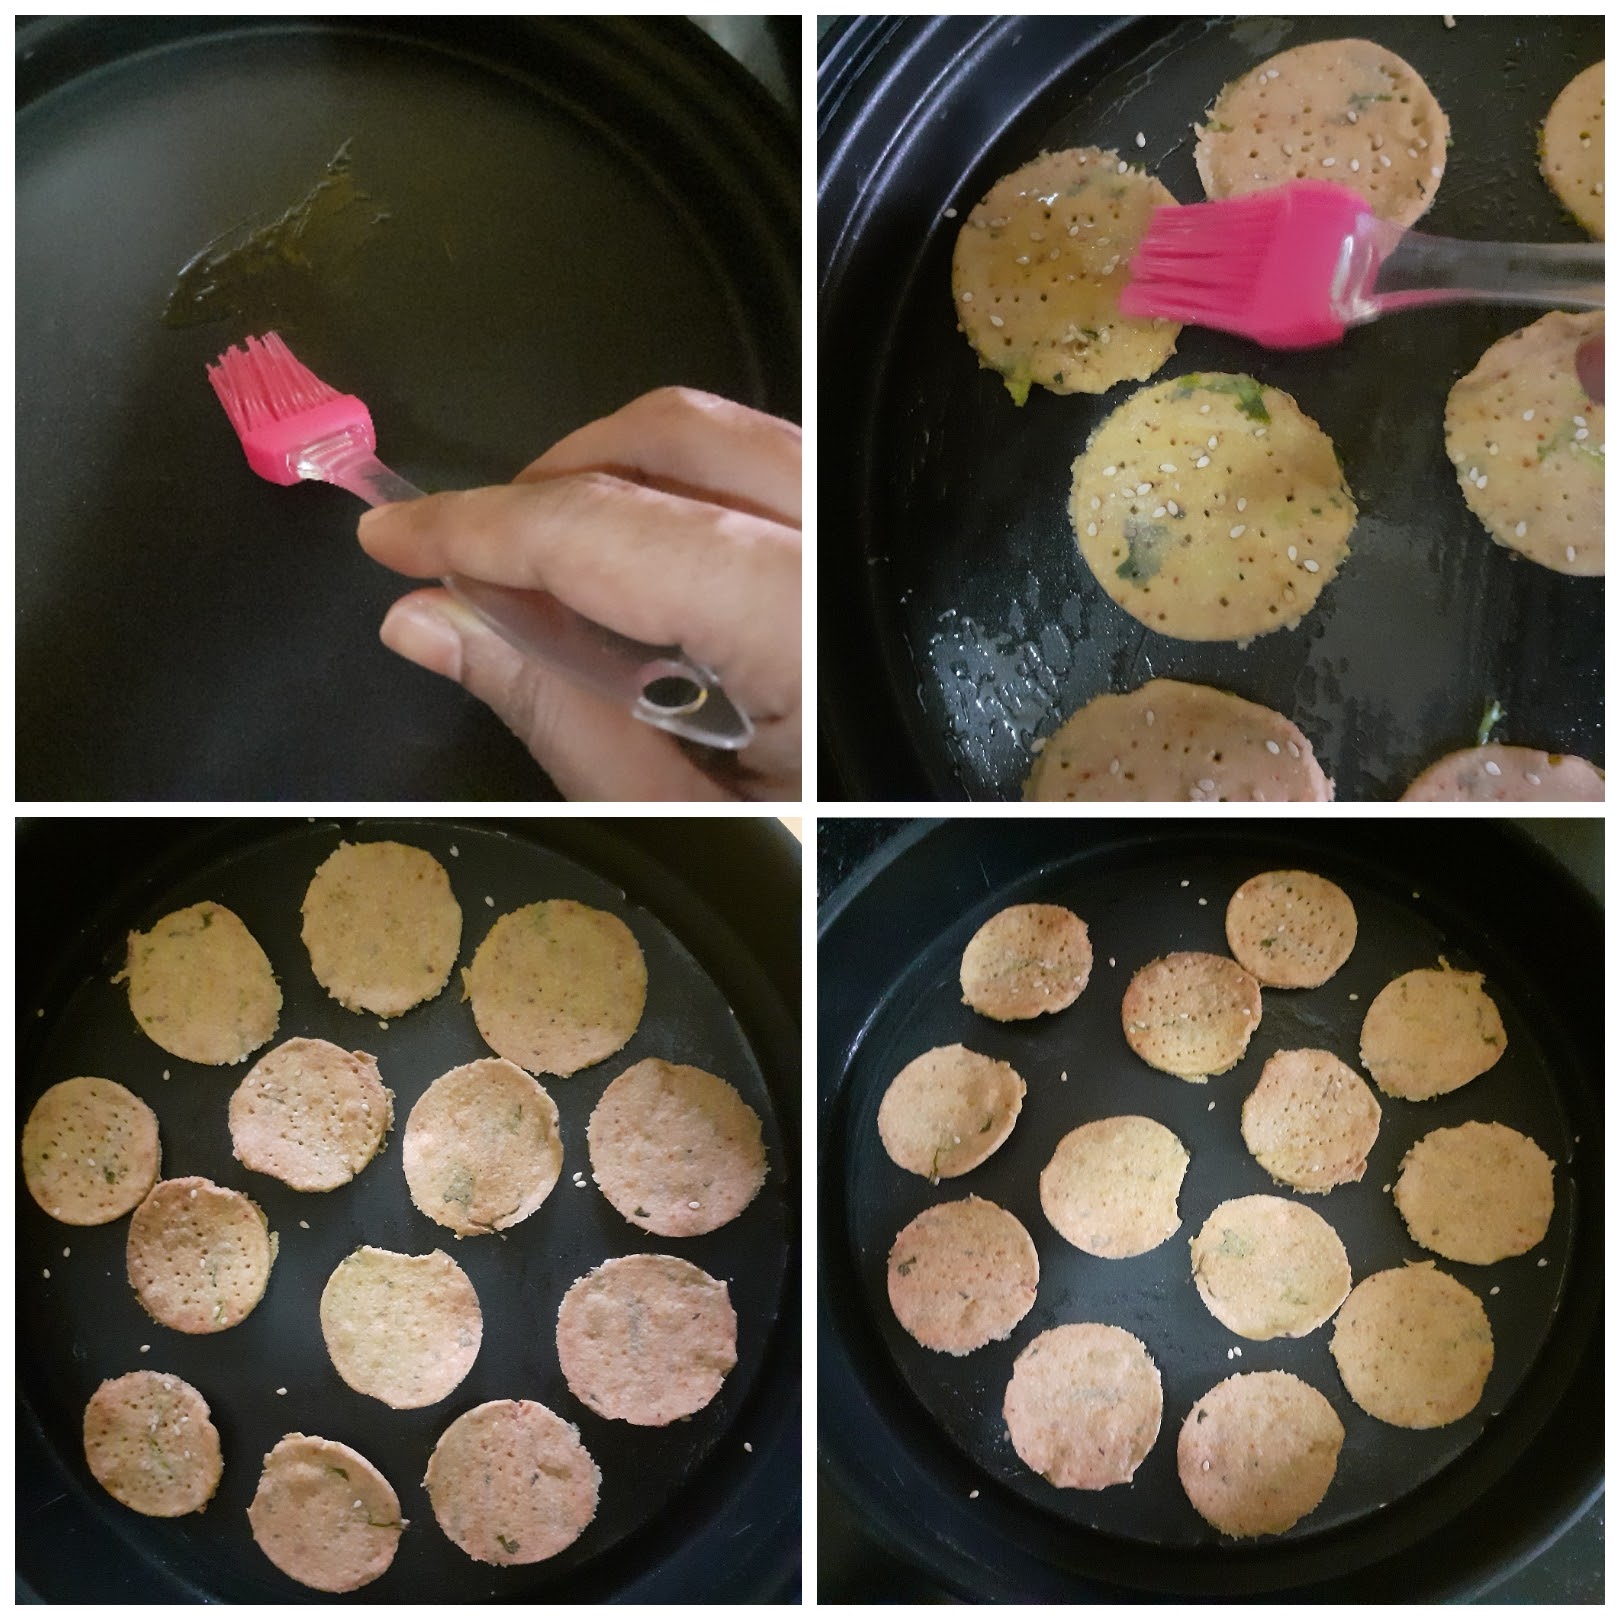
To bake them: Preheat oven to 180 C for 10 minutes. Place the little circles into a baking tray after pricking holes, brush with a little oil(this step is optional), and bake at 180 C for 8 minutes on one side, flip them after 8 minutes and bake again for 8 minutes. Remove from oven, let them cool and store in an airtight container. Repeat this process for the whole amount of dough.
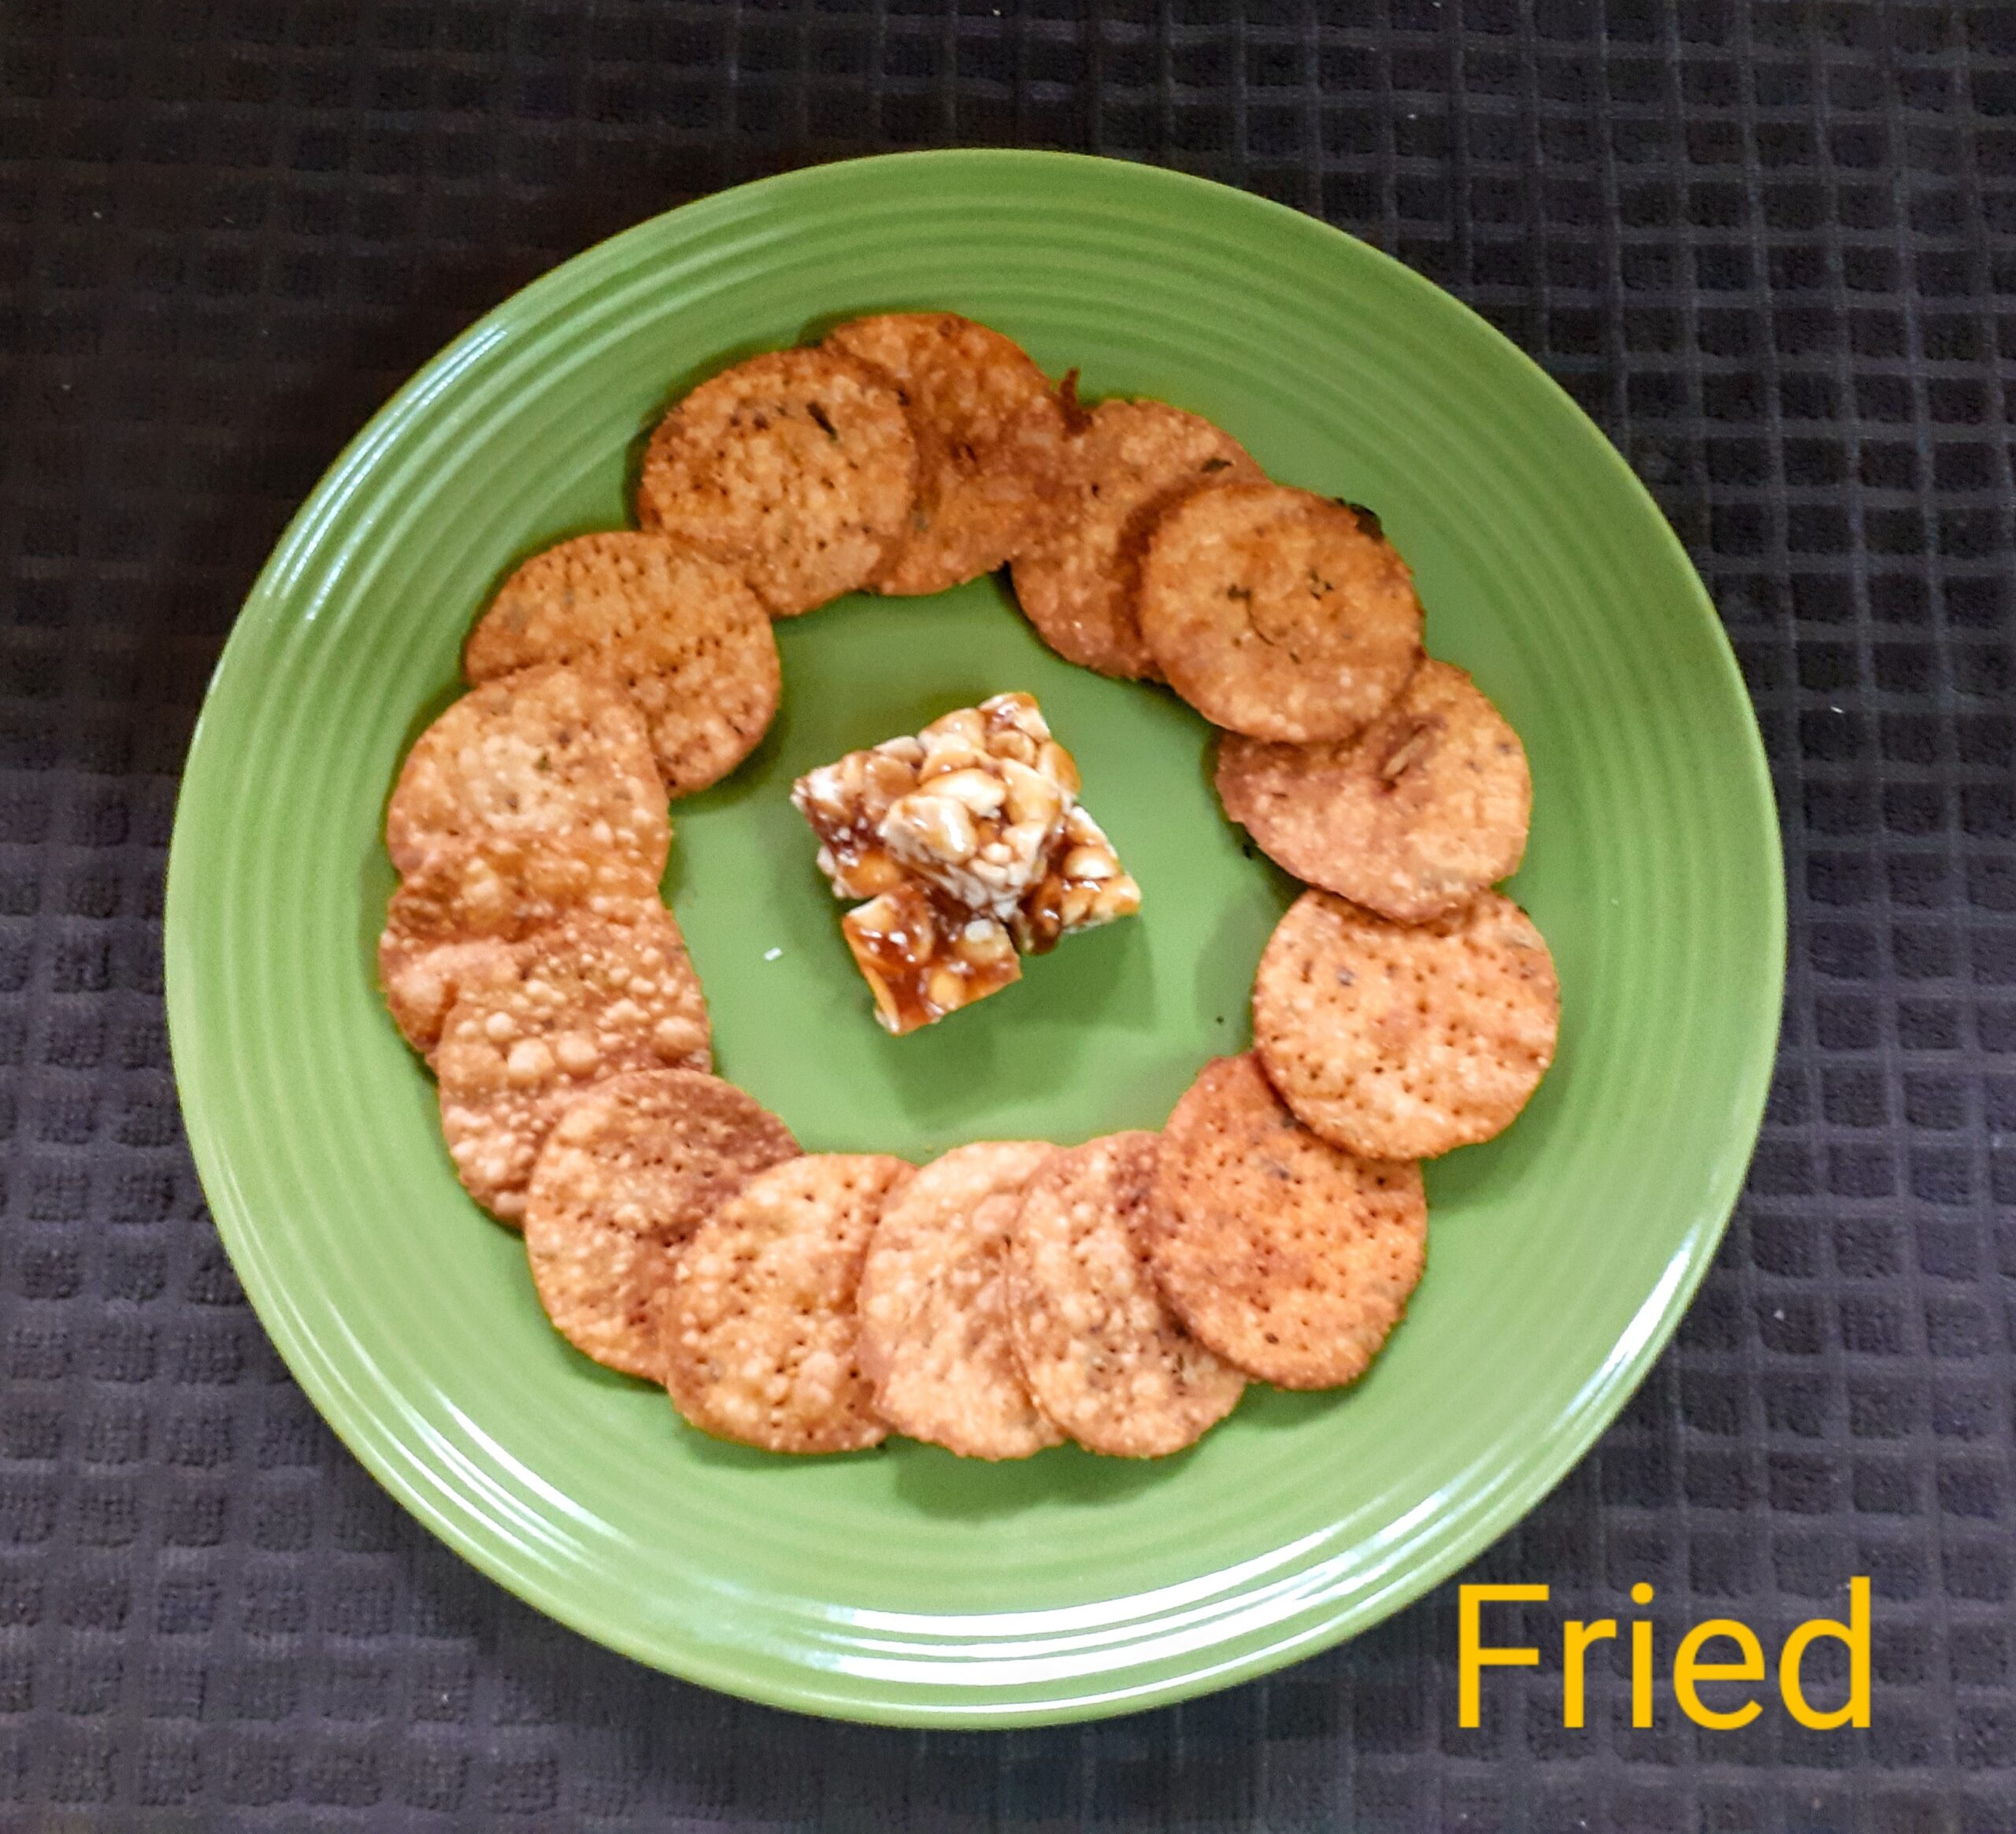
To fry them: Take oil in a Kadai and heat. The oil should be medium hot. The dough when put should sizzle and rise up immediately. This is the right temperature. Prick the papdis with a fork and gently drop them into the oil and fry until all bubbles have subsided and the papdis are light brown in colour. Cool and store in an airtight container.
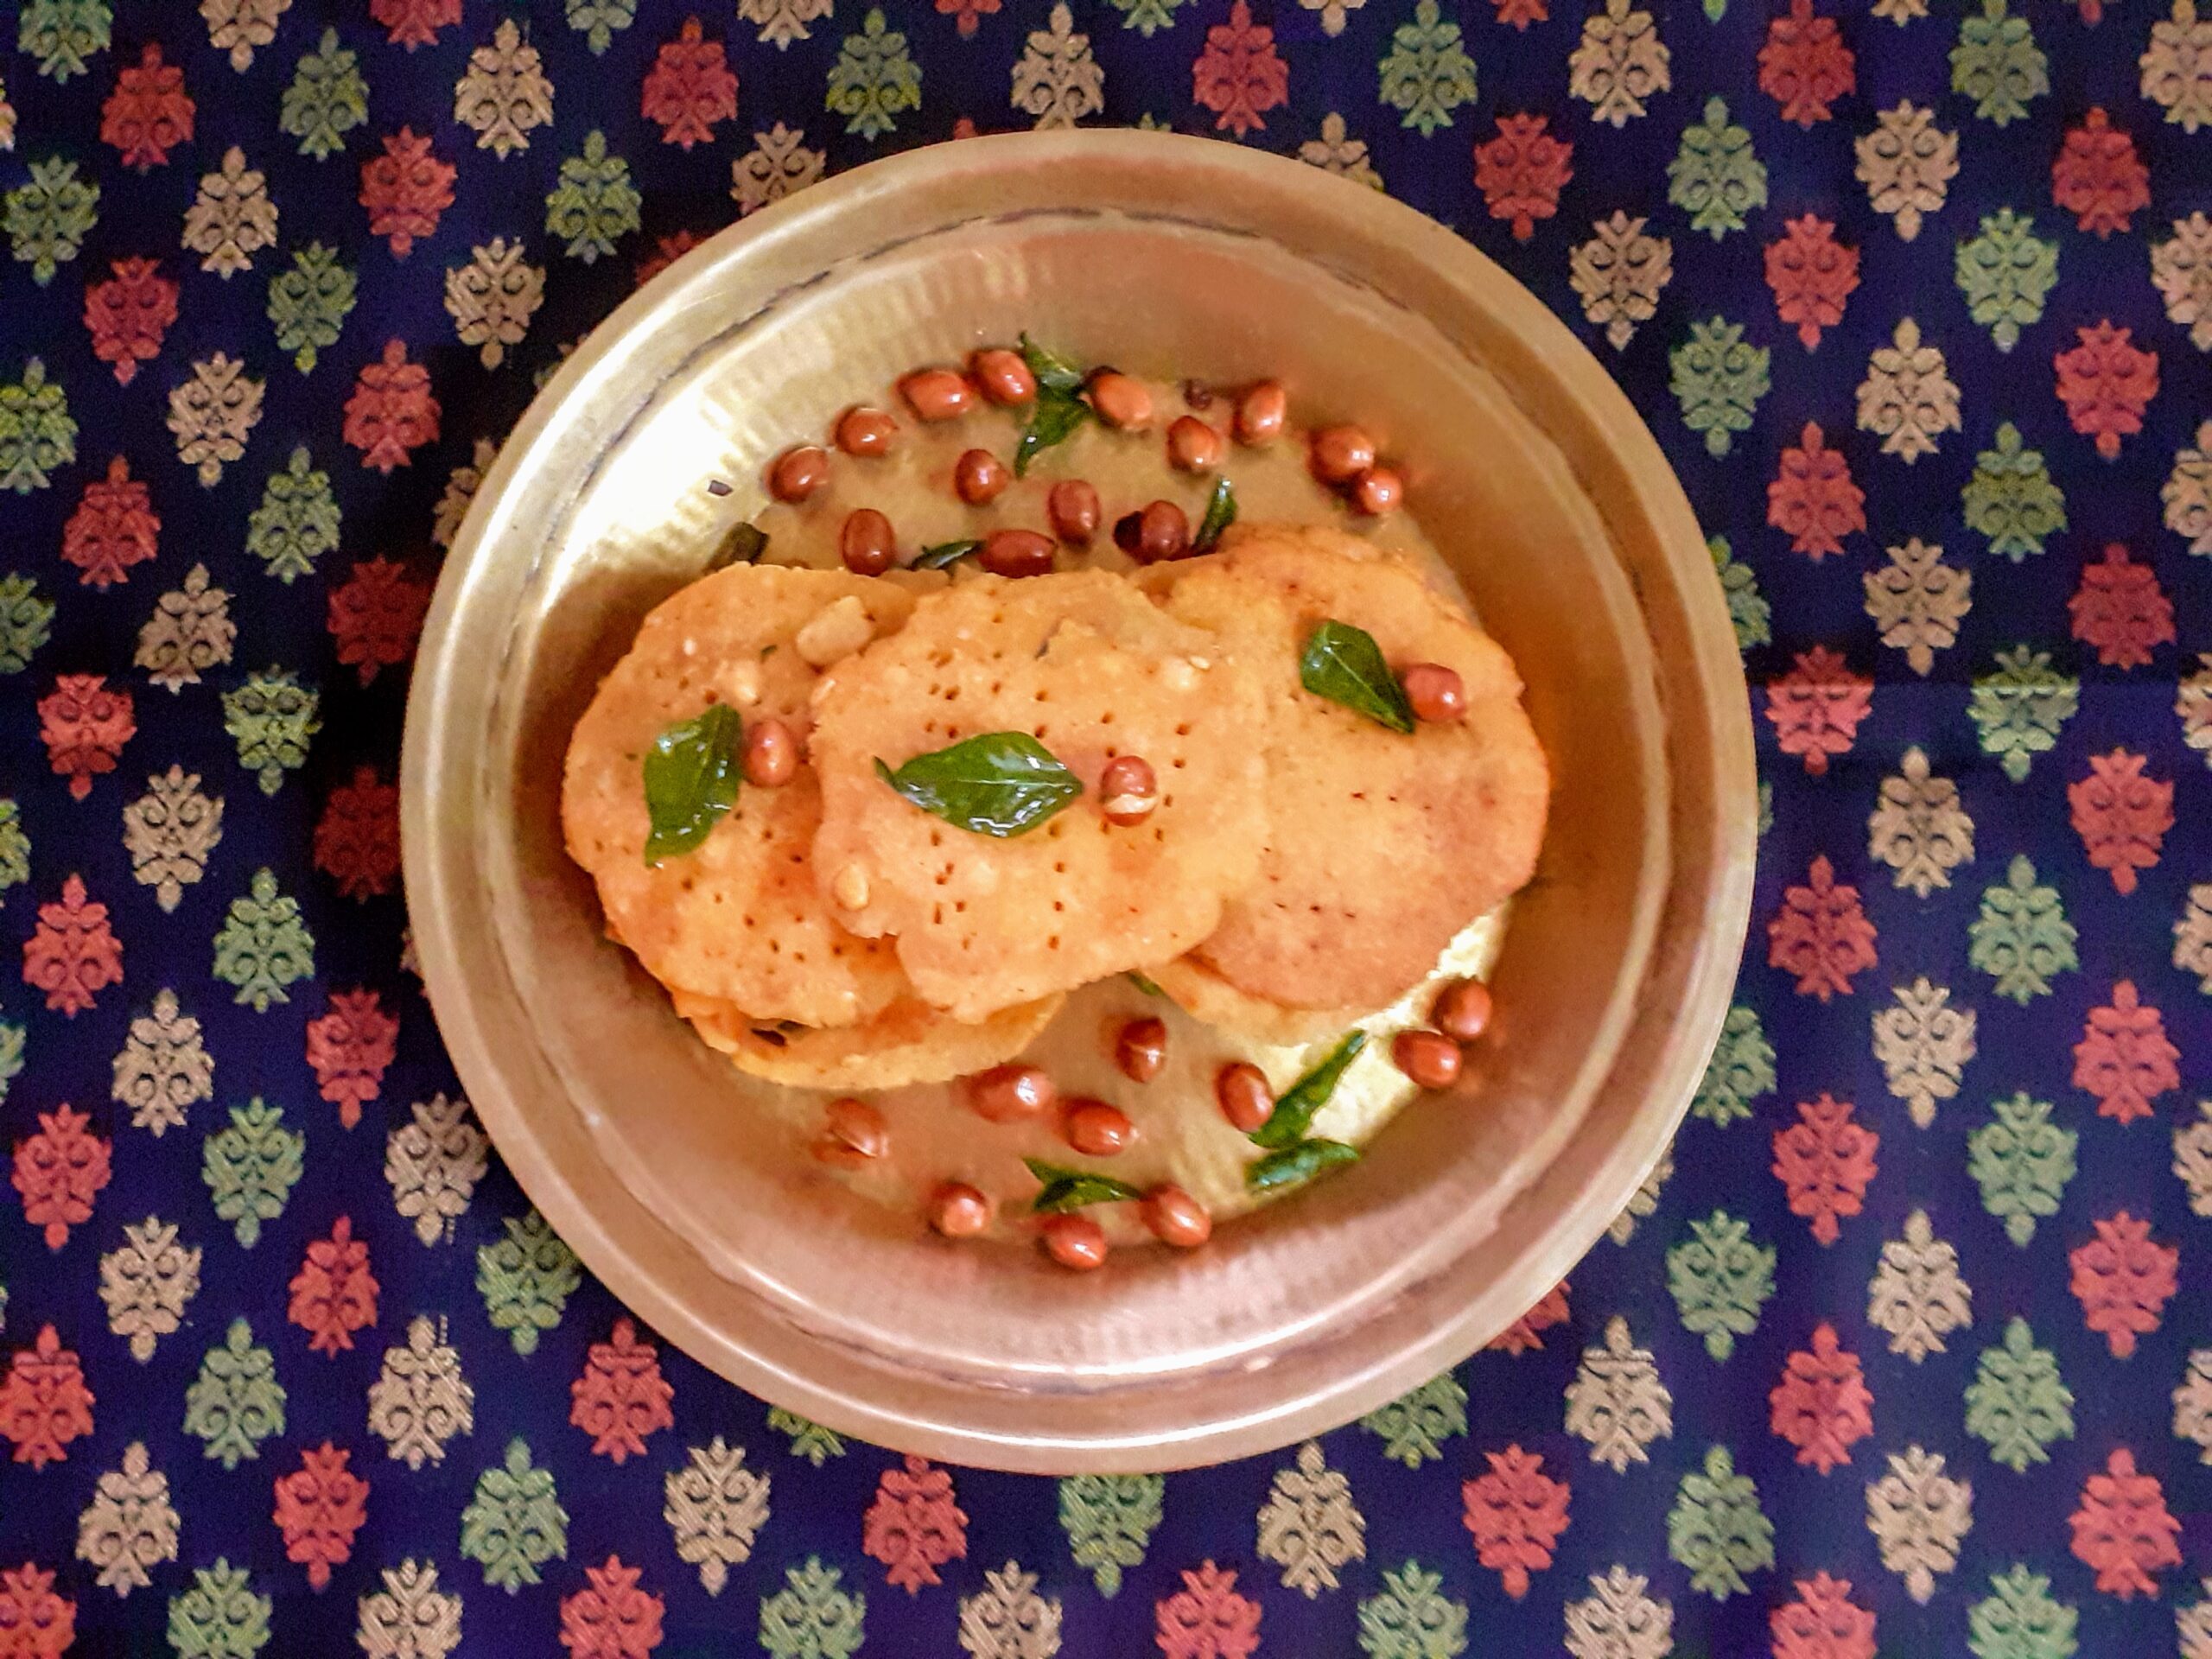
The crunchy and spicy Masala Wheat Flour Papdis are ready to serve with tea or to be made to a Chaat item. Enjoy. Bon Appetit.
STEPWISE RECIPE FOLLOWS:
1. Assemble all ingredients. Take the Wheat flour in a dish and add the Semolina/Suji to it.
2. Now add the salt, red chilli powder, ajwain, and oil to the flour.
3. Start mixing the flour with your fingers(without adding any water at this stage). The spice powders and salt must mix evenly with the flour. Take some flour in your palm and try to clamp it within your fist. When you open your fist the flour should hold shape and not break away.
4. Now add the finely chopped fresh coriander or Methi leaves, and adding water little by little form a stiff dough. The consistency should be like Poori dough. Rest the dough for 15 minutes.
5. Now divide the dough into 4 or 5 equal parts. Take one ball at a time, dust it with flour and roll it out like a chapati, sprinkle some sesame seeds and roll again lightly, so that the seeds stick to the dough.
6. Now with a cookie cutter or lid of a bottle make small circles. Take away the excess dough. Prick the circles all over with a fork.
7. To bake- preheat oven to 180 c for 10 minutes. Brush some oil over the Papdis, place them on a baking tray and bake at 180C for 8 minutes on one side. Remove the tray, flip over the papdis and bake again for 8 minutes. Remove from oven and cool. Store in an airtight container.
8. To fry them- heat oil in a Kadai. Oil should be medium hot. Check the temperature by gently dropping a small bit of dough into the oil. If it sizzles and rises immediately, this is the right temperature. Now fry the papdis in oil at medium heat until all the bubbles subside and the papdis are light brown in colour.
NOTES: 1. Adding adequate oil to the flour is a crucial step, the oil is the one that imparts the crunch to the Papdis. After step 3 if the flour is still not holding shape, then add another teaspoon or two of oil to the flour, rub it into the flour and check if it holds shape now by claiming it in your fist. If it does, start mixing water.
2. It is important to prick the Papdis with a fork before baking or frying as otherwise, they will rise/puff up thereby losing the crunch. So pricking holes is a crucial step.
3. The temperature of the oil is important, the method to check the temperature is given in step 8, which should be followed.
4. The timing in each oven may vary to bake, so 2 to 3 minutes less or extra time may be required.
Thattai/Nippatu
This savory recipe is a popular South Indian snack and is made during festivals like Janmashtami and Deepawali. In South India festivals are incomplete without making rice-flour based snacks and homemade sweets.
Usually, the rice is soaked, the water drained, dried on a cloth, and then ground to a flour. Nowadays since most of us are busy both at home and work, I have used store-bought rice flour for this recipe, as it saves time. The most important step in this recipe is the proportion of rice flour and Urad dal flour, which I have shared below in the recipe. Regarding the use of Butter and its substitutes please refer to the notes.
In this recipe, Rice flour, Urad dal flour, butter, and spices are combined to form a dough, which is flattened and deep-fried in oil.
To give this recipe my twist I have added another ingredient- a little Pottukadalai/Chutney chana(fried gram)flour. This makes the Thattai crunchy. Grated or sliced coconut can be added, but in this recipe, I have not used them.
While you are here please have a look at my other recipes like
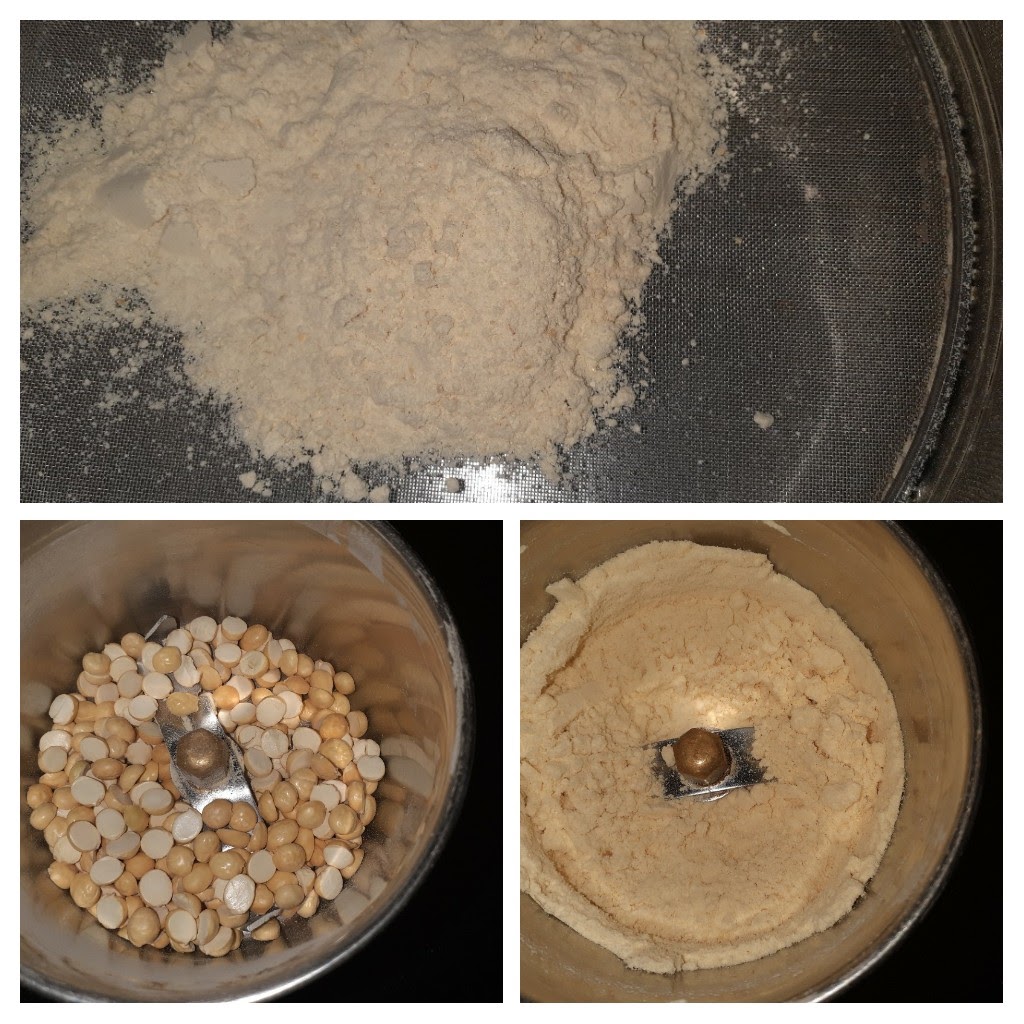
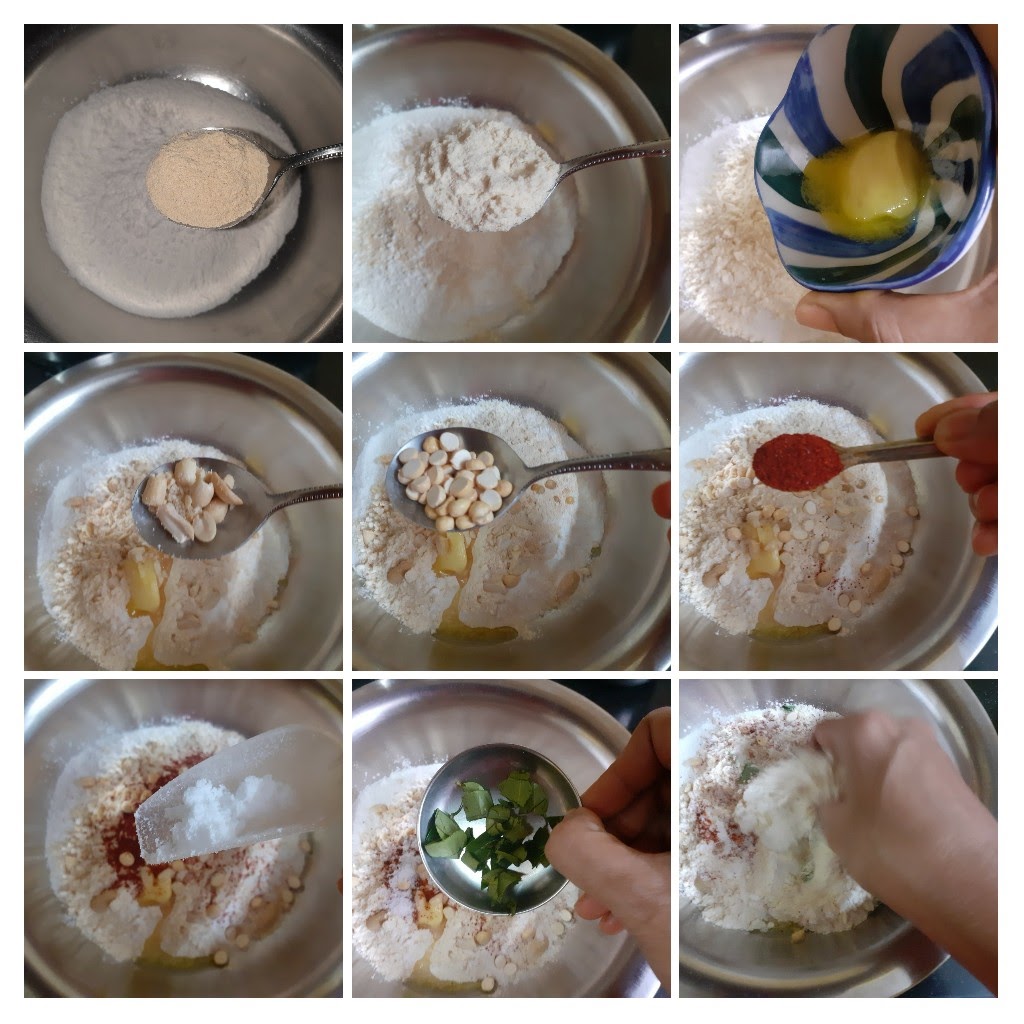
For Urad dal flour–Take a handful of urad dal and dry roast them in a Kadai until light brown and you get a nice aroma. Cool them and grind them to a fine powder and also pass it through a sieve, discard the residue.
For fried Gram flour/Pottukadalai flour- Put a handful in a blender and grind them to a fine powder. Pass it through a sieve and discard residue if any.
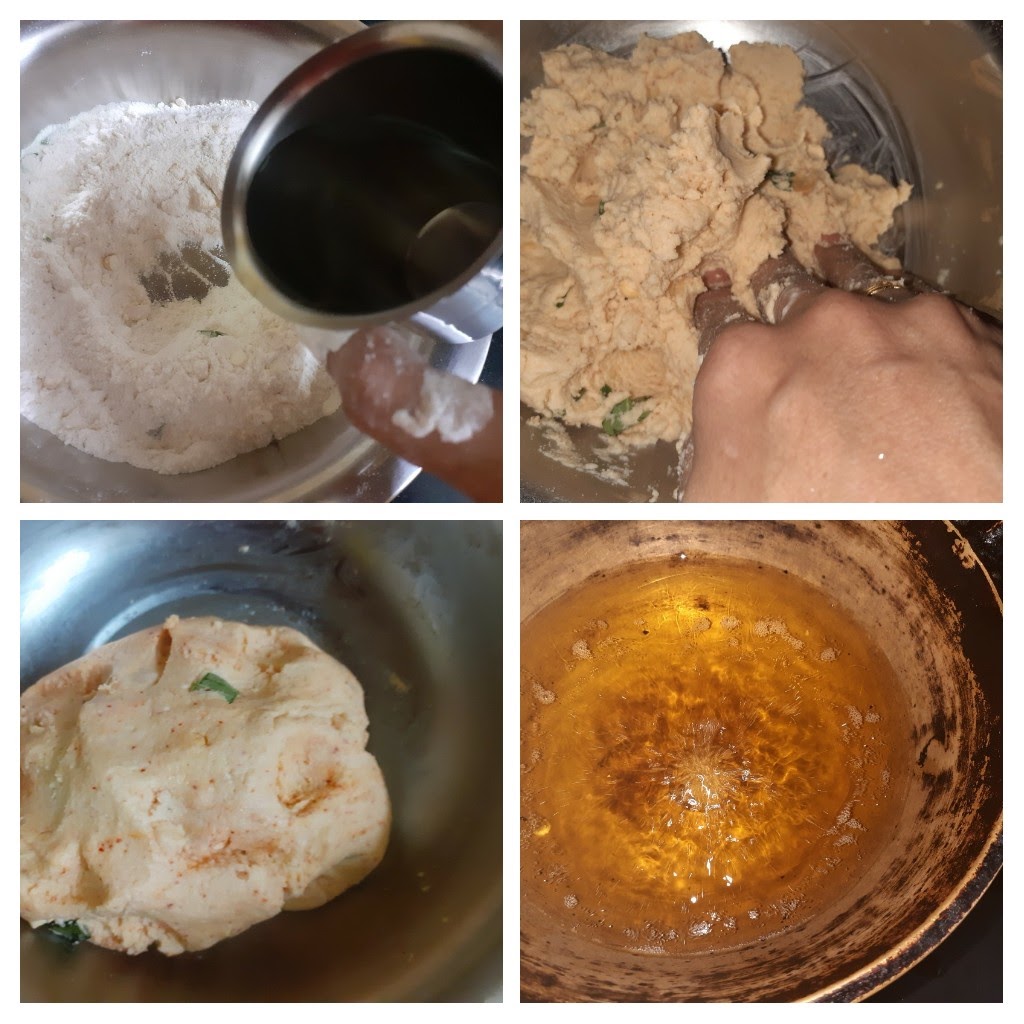
Now in a dish take the rice flour and add the urad dal flour and fried gram flour. Add the butter, salt, chilli powder, asafoetida, coarsely broken peanuts, fried gram, curry leaves, white Sesame, and mix nicely. The flours, spice powders, and butter should combine well. Now add water little by little to make a stiff dough.
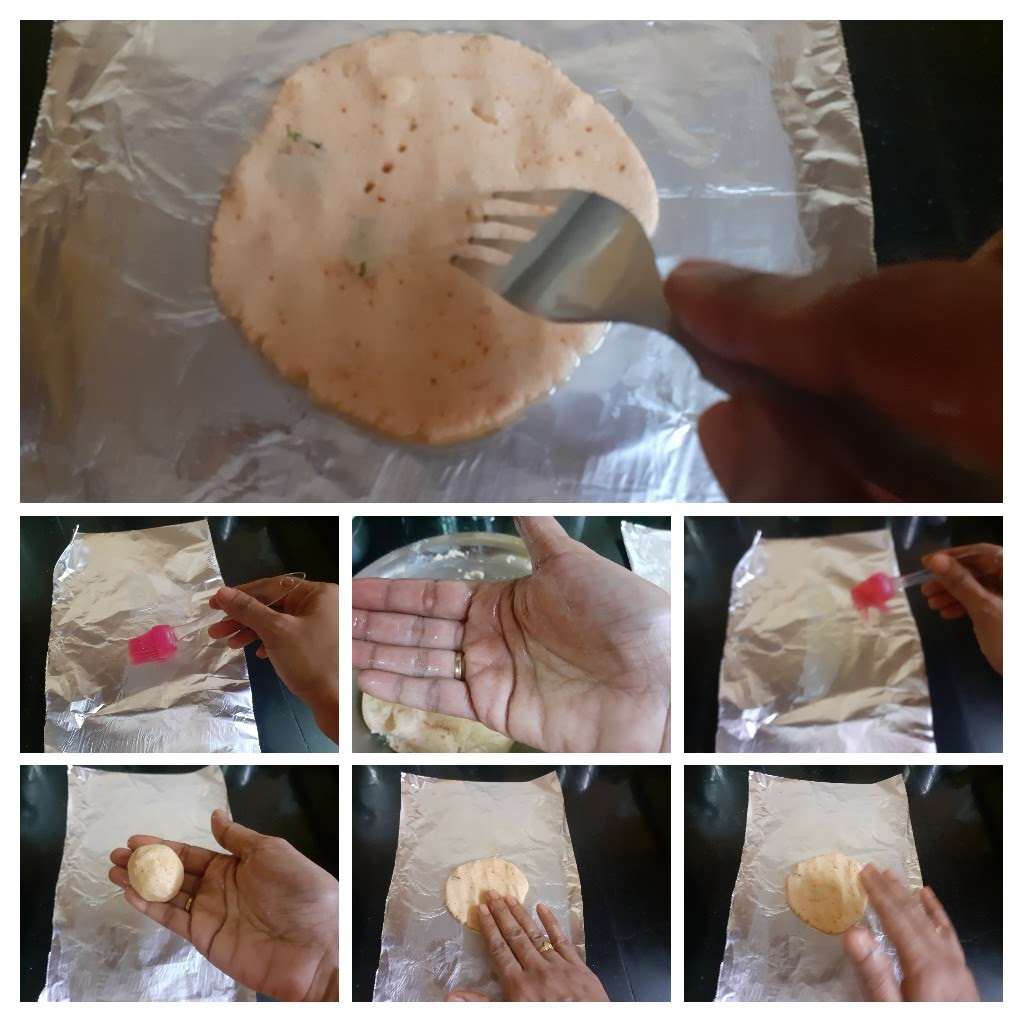
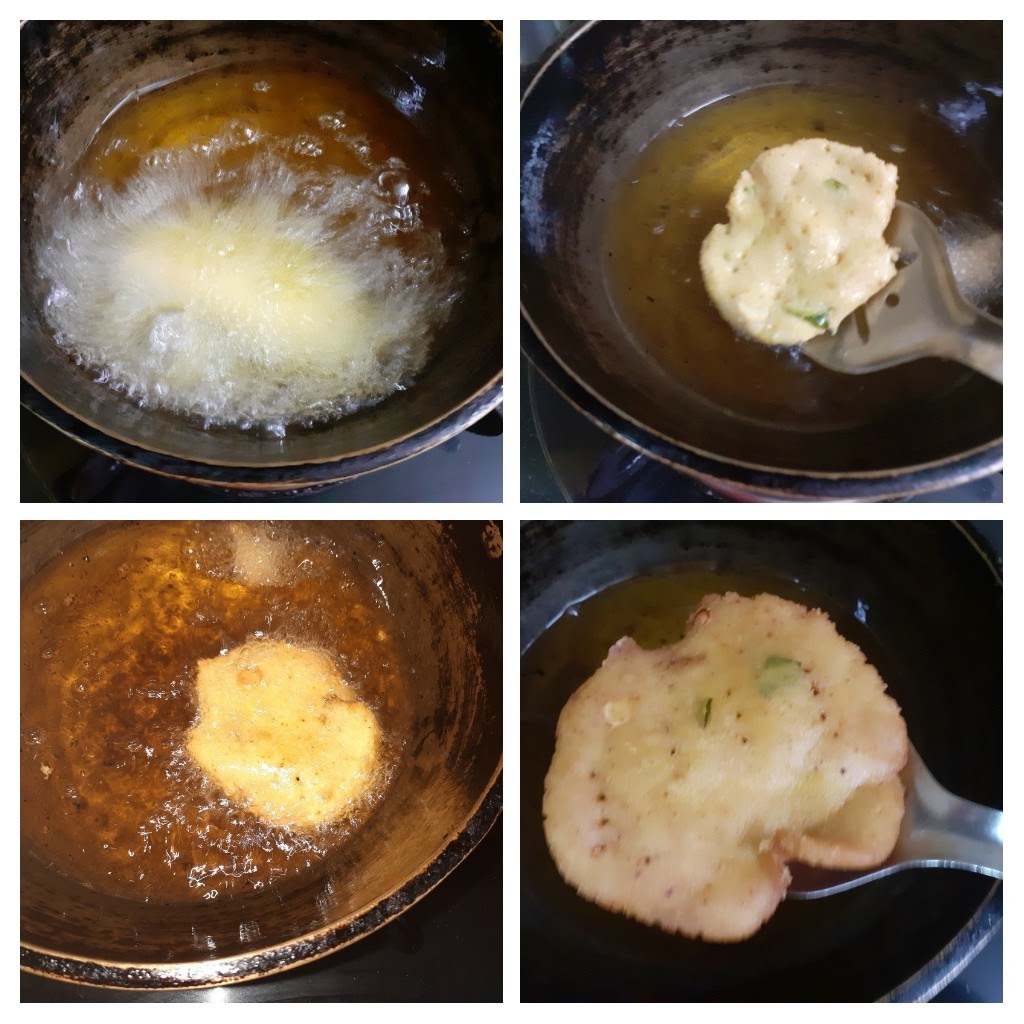
Now in a Karahi take oil for deep frying and heat. While the oil heats up start shaping the Thattai. Take a plastic sheet or Aluminium foil and grease it with oil well. Grease your palms also with oil. Now pinch a small amount of dough(little bigger than lemon) and place it on the plastic/aluminum sheet and using your fingers flatten the ball to a thin circle. Take a fork or toothpick and prick holes all over the dough. Check if the oil is hot enough. To test take a small piece of dough and put it in the oil. If it sizzles and rises immediately then the oil is ready for frying. Now gently lift the foil in your left hand and ease the flattened dough into your right hand by reversing the foil and gently peeling it away. Now gently drop the flattened dough into the oil and fry flipping both sides. Keep flipping and frying until all bubbles in the oil subside and the Thattai is golden in colour. The Spicy and crunchy Thattai is ready to munch as it is or serve as a tea time snack or to offer guests during festivals. Enjoy. Bon Appetit.
STEPWISE RECIPE FOLLOWS:
1. Assemble all ingredients. Follow the method given above for Urad dal flour and fried gram/Porikadalai flour. Coarsely pulse the peanuts too.
2. In a dish take the rice flour, Urad dal flour, fried gram flour, butter, and all other ingredients excluding water and combine nicely.
3. Now add water little by little and form a stiff dough. Take oil ina Karahi to deep fry and heat. heat should be medium-high.
4. To form the Thattai, take a plastic sheet or aluminium foil and grease it with oil. Grease your palms also with oil. Pinch a small portion of dough, form a ball, and place it on the sheet. Flatten it with your fingers to form a thin circle. Take a fork and prick all over the Thattai.
5. To check if the oil is hot enough drop a small bit of dough in the oil if it rises immediately then the oil is ready for frying. Using your left hand lift the foil and reverse it on your right palm and gently peel away the foil in a backward motion.
Now gently release the flattened dough into the oil and fry flipping both sides, until all the bubbles in the oil subside and the Thattai is a golden colour. Repeat this process for all the dough and store the Thattai/ Nippatu/Chekkalu in an airtight container.
NOTES:
1. Butter is one ingredient that gives the Thattai its crunch and also it’s colour. So do not exclude it. Some recipes suggest using Ghee or hot oil in the dough. I recommend sticking to butter as ghee and hot oil turn the Thattai hard and also the colour turns too brown.
2. Any butter unsalted or salted is fine.
3. Using Pottukadalai/ fried gram powder gives a nice taste and crunch. If you don’t have it handy, carryon with other ingredients. The Thattai will still turn out fine.
4. Using white sesame also gives a nice taste to the recipe. If you have it handy add some for sure
5. Coconut gratings or small bits of coconut are also added, but this time I have not added them.
If you tried this recipe and liked it please comment below. I would love to hear from you.
If you want the recipes emailed to you leave your id in the homepage near the????
icon. Whenever we have a new post the recipe will be mailed to you. Thank you for showing interest in Rajjo’s Kitchen.
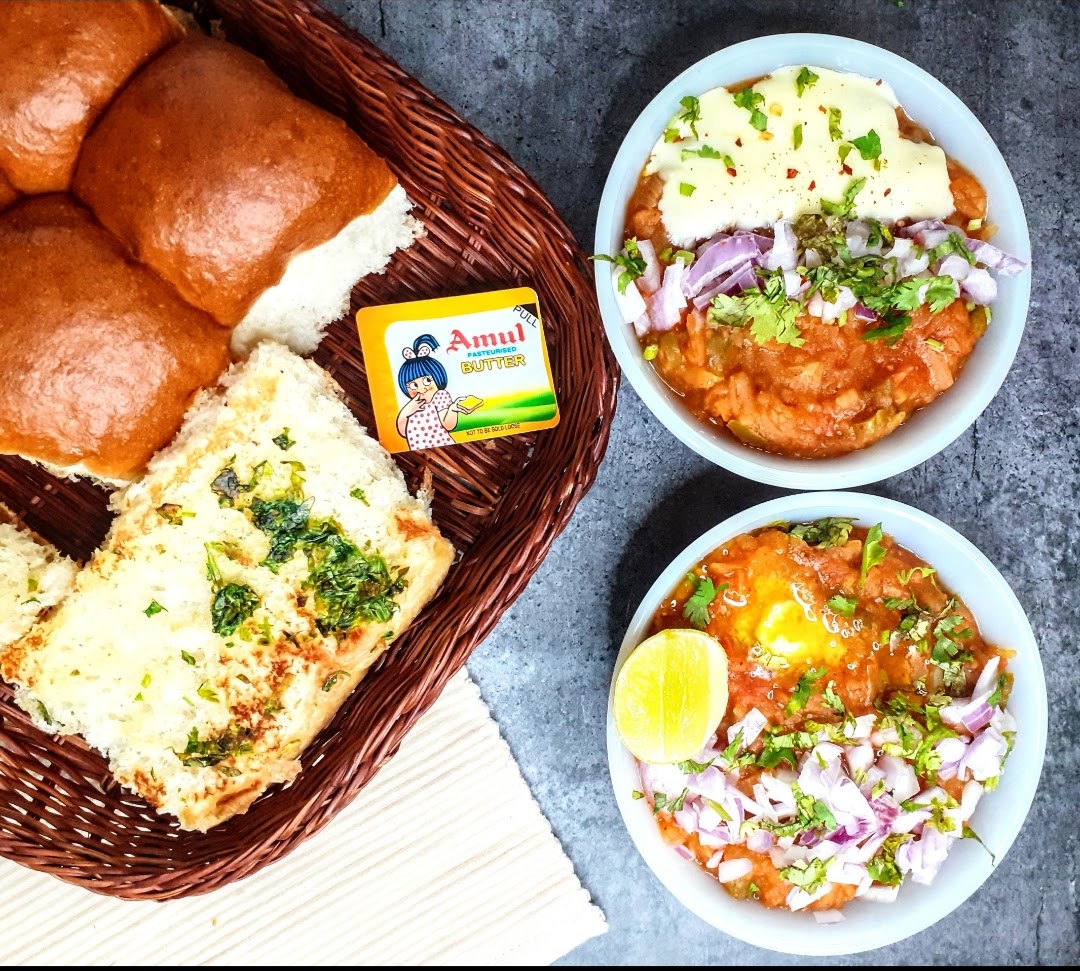
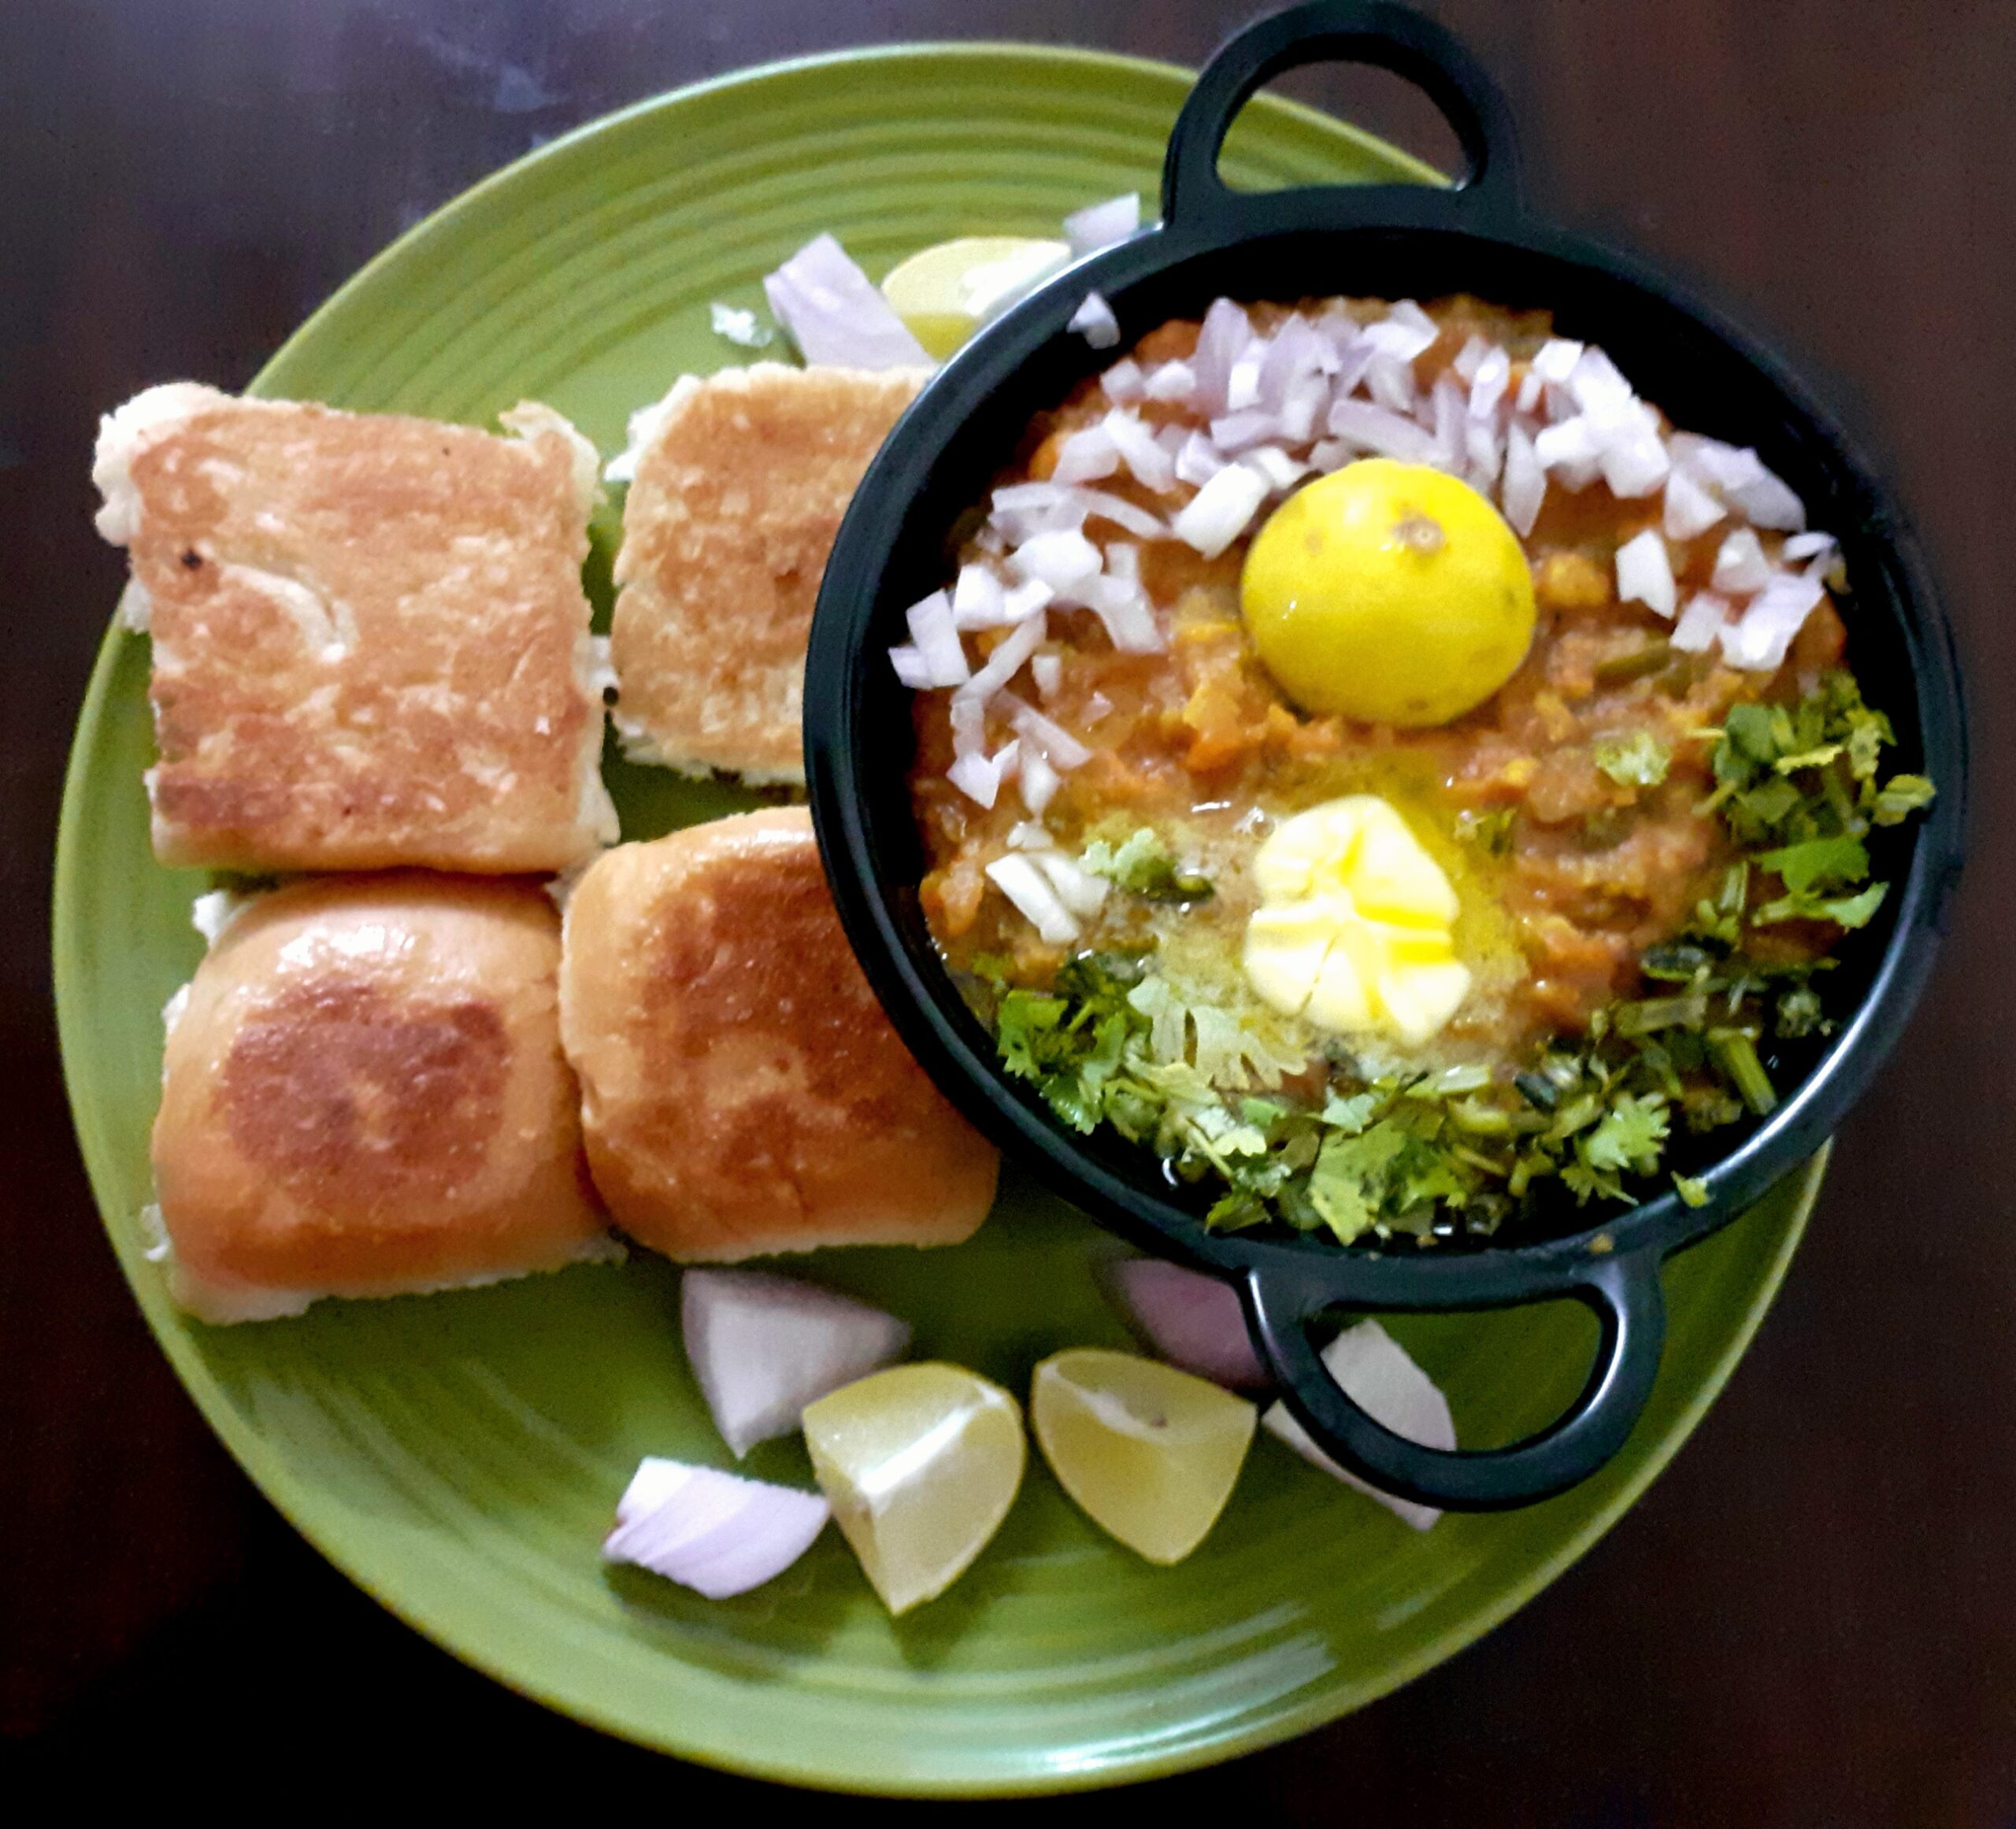
Pav Bhaji
Pav Bhaji the popular food from Maharashtra is everyone’s favourite. It is also the most popular street food. Everyone has their favourite outlet for this yummy street food variety. Mine is Elco Arcade in Mumbai and Gangotree in Chennai. If you visit these places please try them out.
The bread also called the Pav has to be fresh and the Bhaji the Maharashtrian word for Subji, tangy and spicy. Pav is a term that fills me with warmth because I have many childhood memories associated with it. When in Mumbai my aunt would decide to make us her yummy Pav Bhaji, we kids would be sent to these narrow bylanes in Bandra where the Pav was made fresh. here was this whole colony of Pav(bread) bakers and the whole area would smell so good. Just for this fact we kids would never refuse to go. This place was very close to my aunt’s house and we would take a morning walk to this place and would be handed over a fresh and hot batch of Pav for our evening Pav Bhaji. I just cannot forget the aroma of fresh bread just out of the oven.
In this dish, mashed potatoes are the main ingredient along with a tomato base. Onions and spices are also added which gives it the iconic taste. Topped with a dollop of butter a squeeze of some lime, this is could the best food ever.
I like to add more vegetables apart from the Potatoes and so I add a tiny carrot, few finely chopped pieces of cauliflower, peas, and capsicum. I also like to add a puree of tomato instead of chopped tomato.
So when the demand at home is to make something special yet simple I mostly opt for Pav Bhaji.
While you are here please do check out my other recipes like Pakode wali Dal, Semolina Cheese balls, Dahi Pohe, Pineapple rasam, Chinese paratha, and more…
Here is the recipe of Pav Bhaji for you-
PREP TIME: 20 Mins COOK TIME: 20 Mins
TOTAL TIME: 40 Mins COURSE: SNACK
CUISINE: MAHARASHTRIAN SERVINGS: 4
AUTHOR: Rajni Ram
Ingredients:
Pav- Store-bought
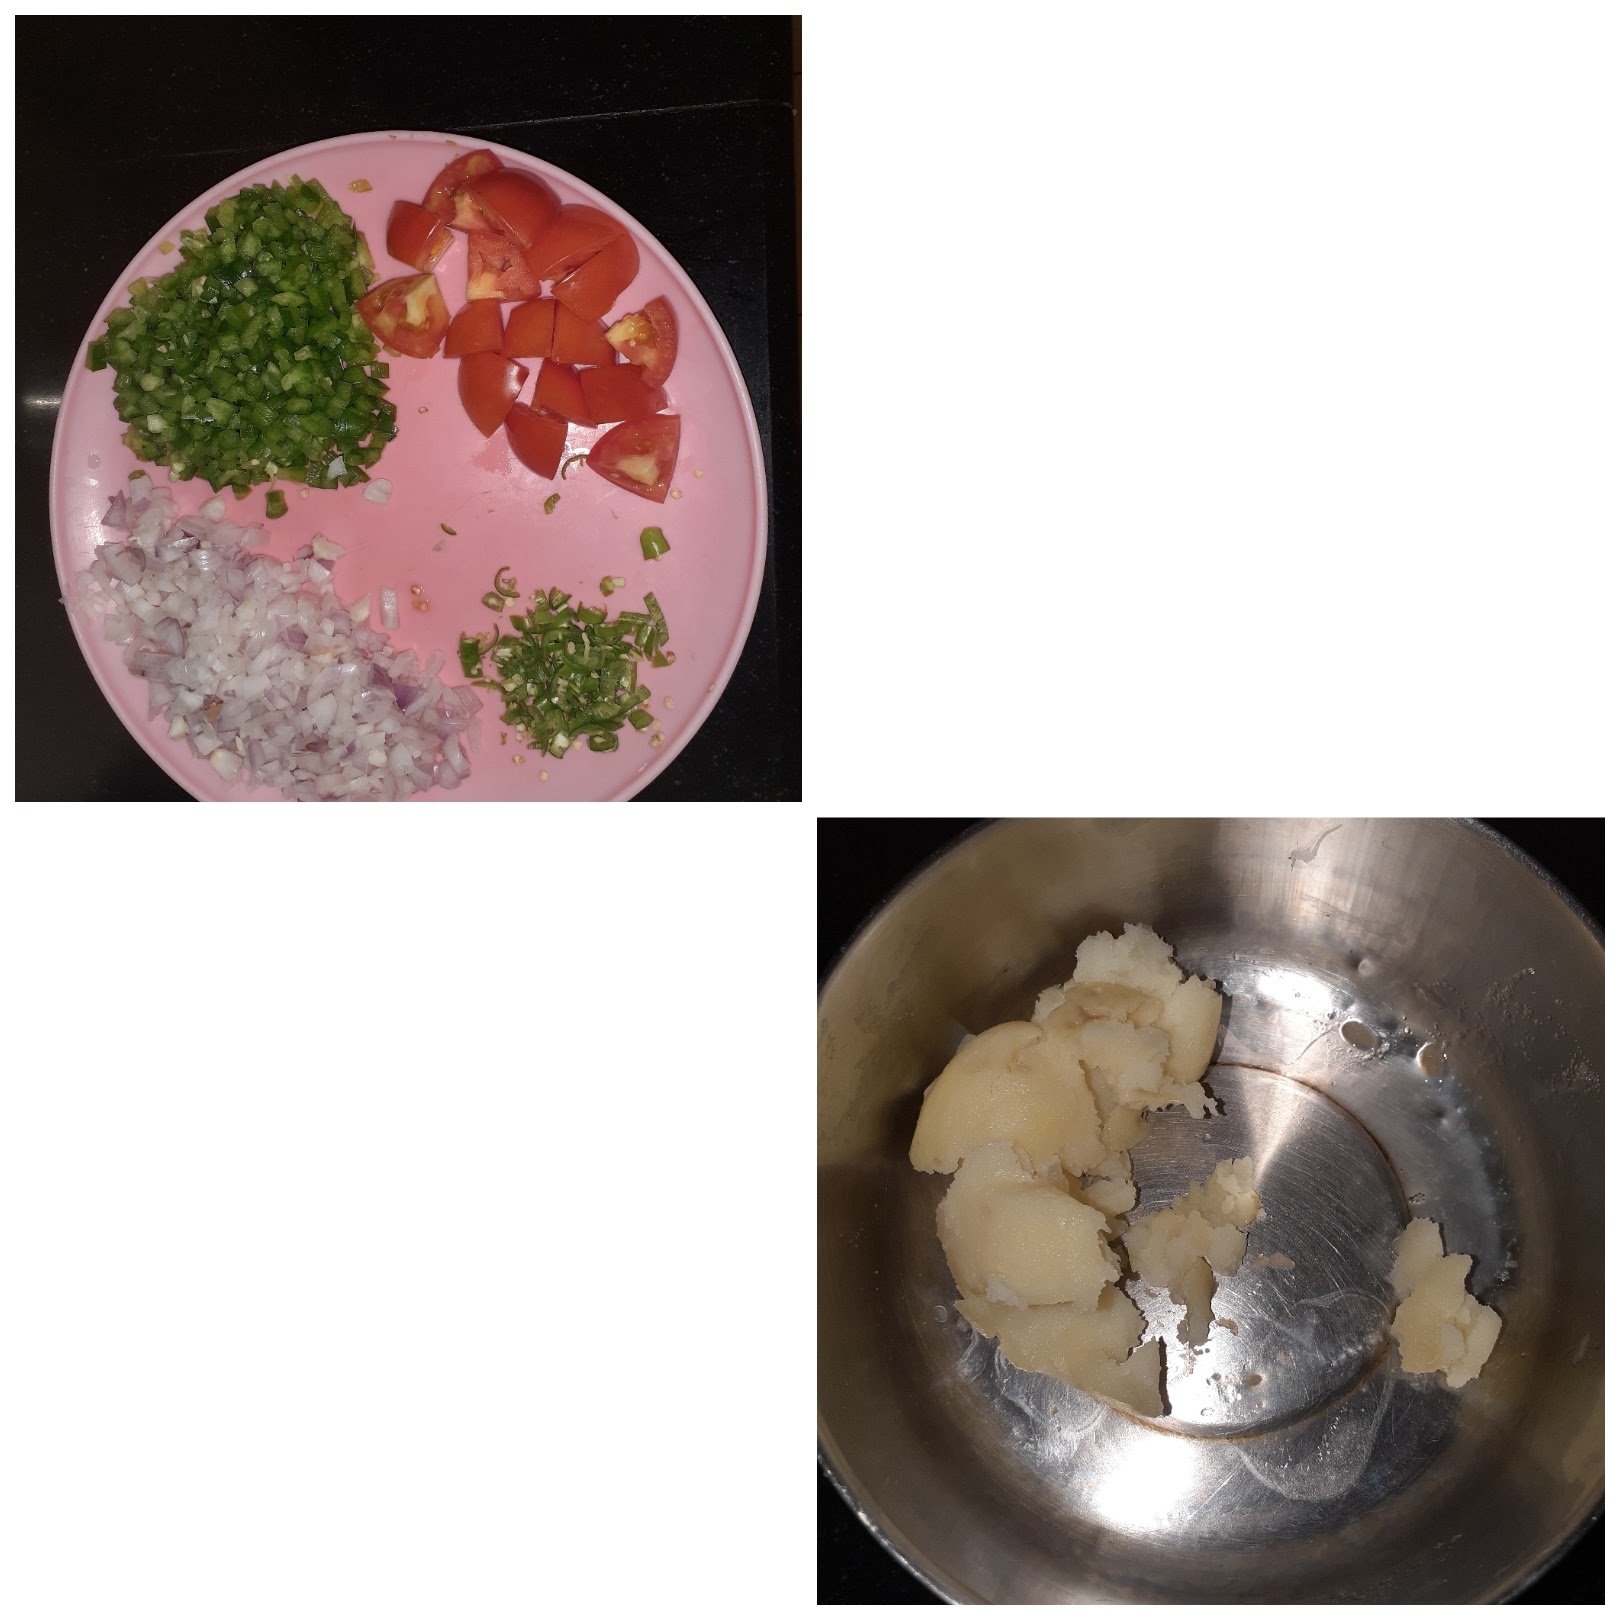
Potatoes 4 medium boiled and mashed
Tomatoes 2 large(pureed) used the local variety(desi) if available
Onion 1 large finely chopped
Green chillies 3 finely chopped
Cauliflower 3 florets finely chopped
Carrot 1 medium finely chopped
Capsicum 1 medium finely chopped
Green peas 1/2 cup ( I have not used here as could not find fresh ones)
Ginger -garlic paste 1/2 tsp
Cumin seeds 1 tsp
Turmeric powder 1/2 tsp
Red chilli powder 1 tsp(or more if you prefer)
Coriander powder 1 tsp
Fennel powder 1 tsp
Amchur powder 1 tsp
Salt as required
Garam masala powder 1/2 tsp
Oil for sauteeing
Butter for toasting the pav and a dollop for the bhaji
Directions:
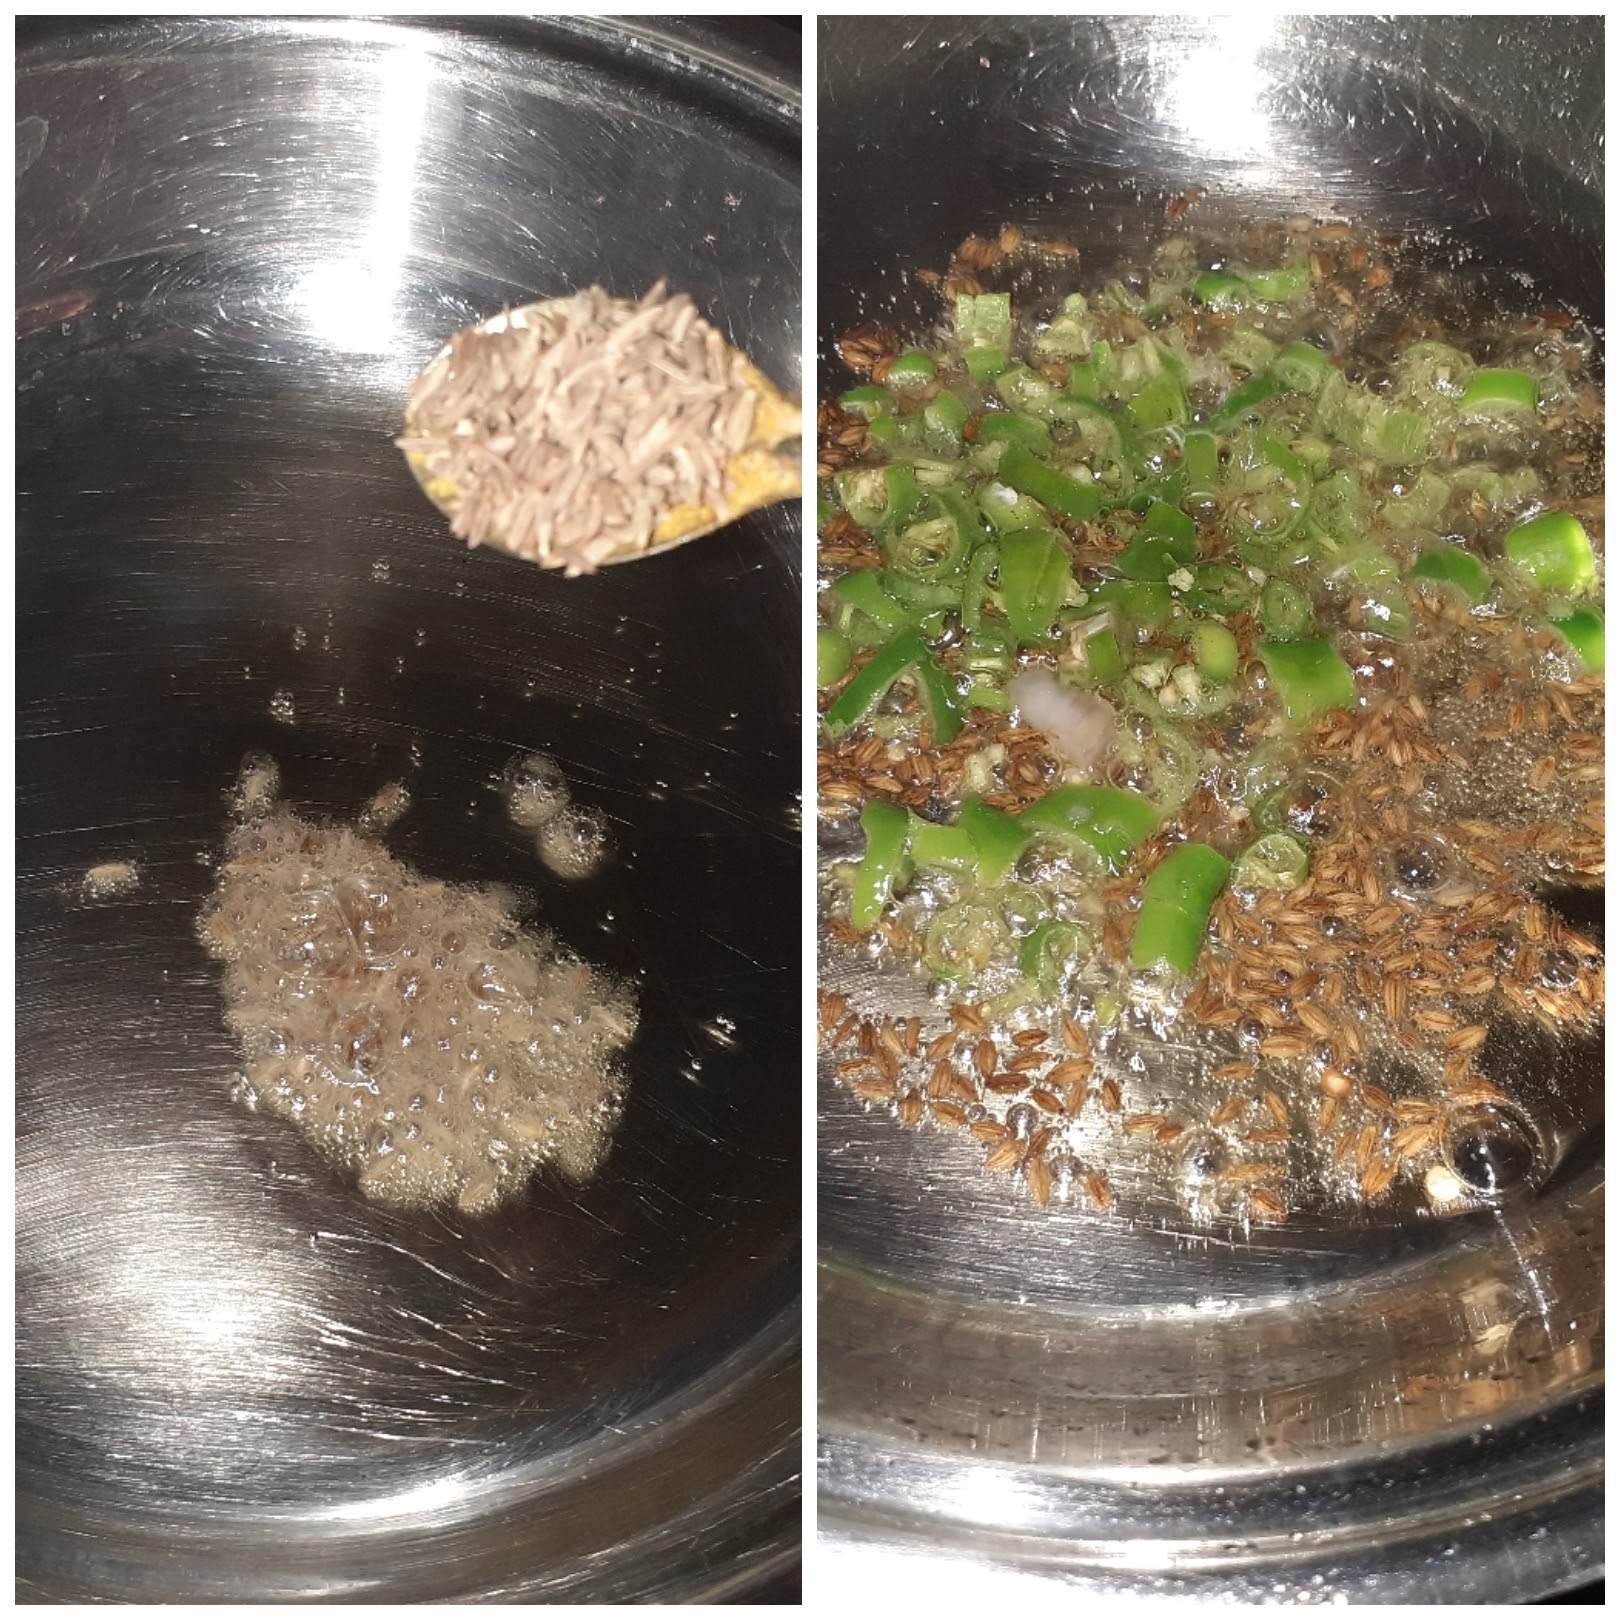
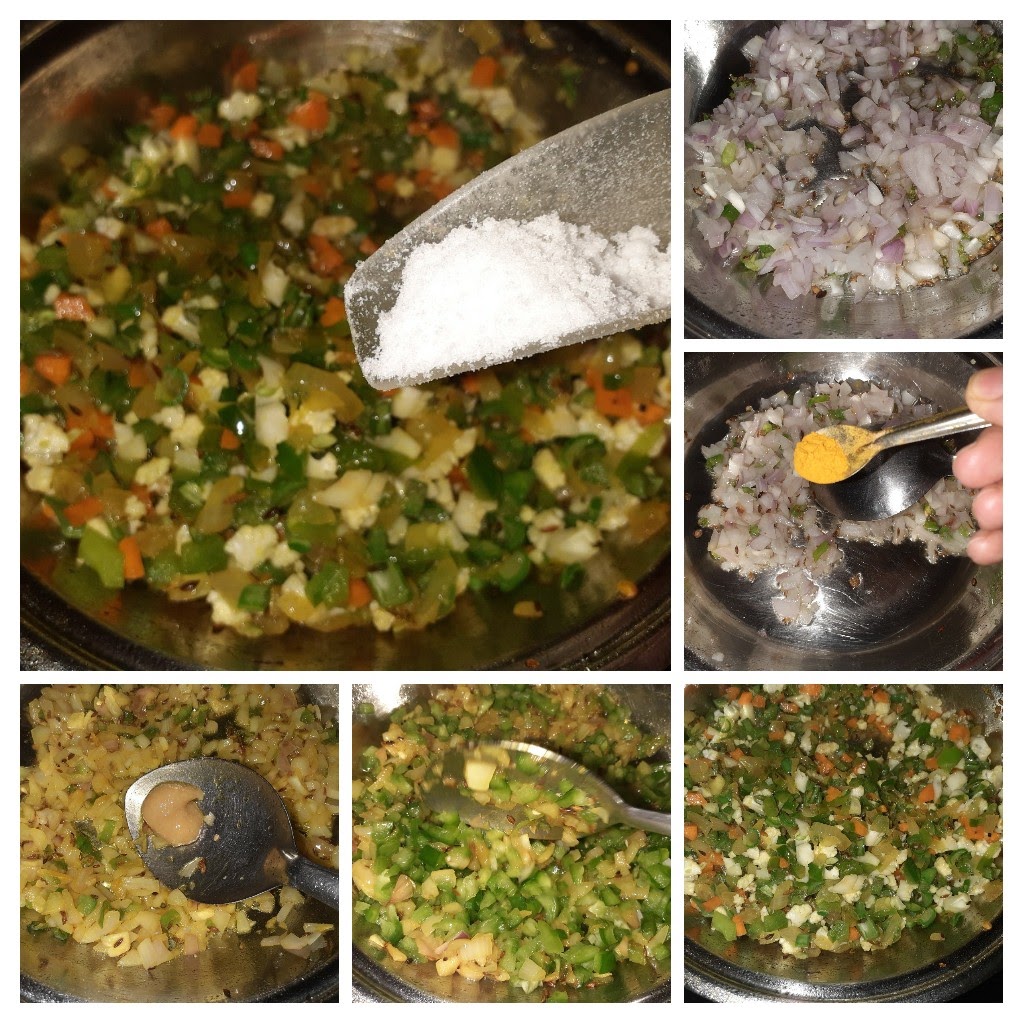
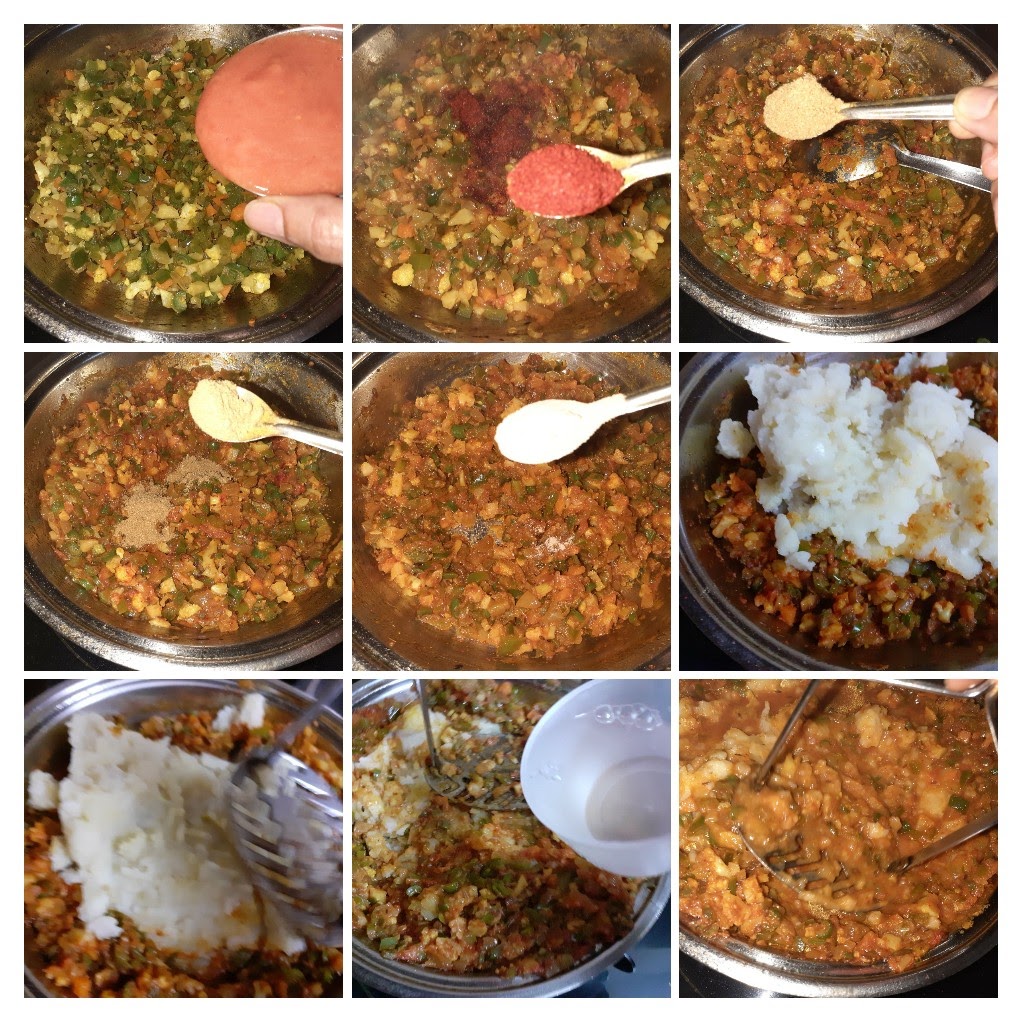
Boil the potatoes and mash them. Puree the tomatoes in a blender. In a karahi/pan take 1 tbsp oil and heat. Add the cumin seeds and as they crackle add the green chillies and saute for 30 seconds. Now add the onions and saute for a minute. Add the turmeric powder and continue to saute for 30 seconds, now add the ginger-garlic paste and saute until the onions start turning light brown. Now add in the capsicum and saute for a 1 minute. Remember that all sauteeing to be done on high flame. Now add the cauliflower and carrot and saute for 2 minutes. Now add the tomato puree, followed by red chilli powder, coriander powder, fennel powder, and salt and stir nicely. Cook for a minute. Now add the mashed potato and using a masher keep mashing and mixing all the veggies in the pan. Repeat the process until all are well combined. Now add 1 cup(can add up to 1.5 cups) of water and cook for 2 minutes on low flame. Now add Garam masala powder and turn off the flame. Garnish with finely chopped coriander leaves, finely chopped onions and a dollop of butter. Toast the fresh Pav with a liberal amount of butter and serve hot with the Bhaji. Enjoy. Bon Appetit.
STEPWISE RECIPE FOLLOWS:
1. Assemble all ingredients. Boil and mash Potatoes, puree the tomatoes. Chop onions and green chillies.
2. In a pan take 1 tbsp oil and heat. Add in the cumin seeds and as they crackle add the green chillies and saute for 30 seconds.
3. Now add the onions and saute on high flame for 30 seconds followed by turmeric powder, ginger-garlic paste and saute for 1 minute. Now add in the capsicum and saute for a minute. Add in the cauliflower and carrots and green peas(if using), add salt and continue to saute for 2 minutes.
4. Now pour the tomato puree, followed by red chilli powder, coriander powder, fennel powder, amchur powder and stir nicely. Cook for 1 minute and add in the mashed potatoes and mix well. Using a masher mash the potato-veggie mixture in the pan until all are well combined. Now add about 1 cup water and continue to cook for 2 minutes. Check for salt and spice and if less add at this stage.
5. Finally, add the garam masala powder and turn off the flame. The bhaji should not be lumpy nor should it be runny. The spicy and tangy Pav Bhaji is ready to feast on. Toast some fresh Pav with a liberal amount of butter and serve the bhaji topped with finely chopped onion, coriander and a dollop of butter.
NOTES:
1. I recommend you use some green peas. As I could not find any on that said day I have made my Bhaji without it. If using boil them ahead.
2. Be liberal with the butter it really enhances the taste.
3. one can also sprinkle some grated cheese over the Bhaji, to make Cheese pav bhaji.
4. If you don’t want to add other vegetables it is fine and the dish will still taste the same.
If you tried this recipe and liked it please comment below. I would love to hear from you.
If you want the recipes emailed to you leave your id in the homepage near the????
icon. Whenever we have a new post the recipe will be mailed to you. Thank you for showing interest in Rajjo’s Kitchen.
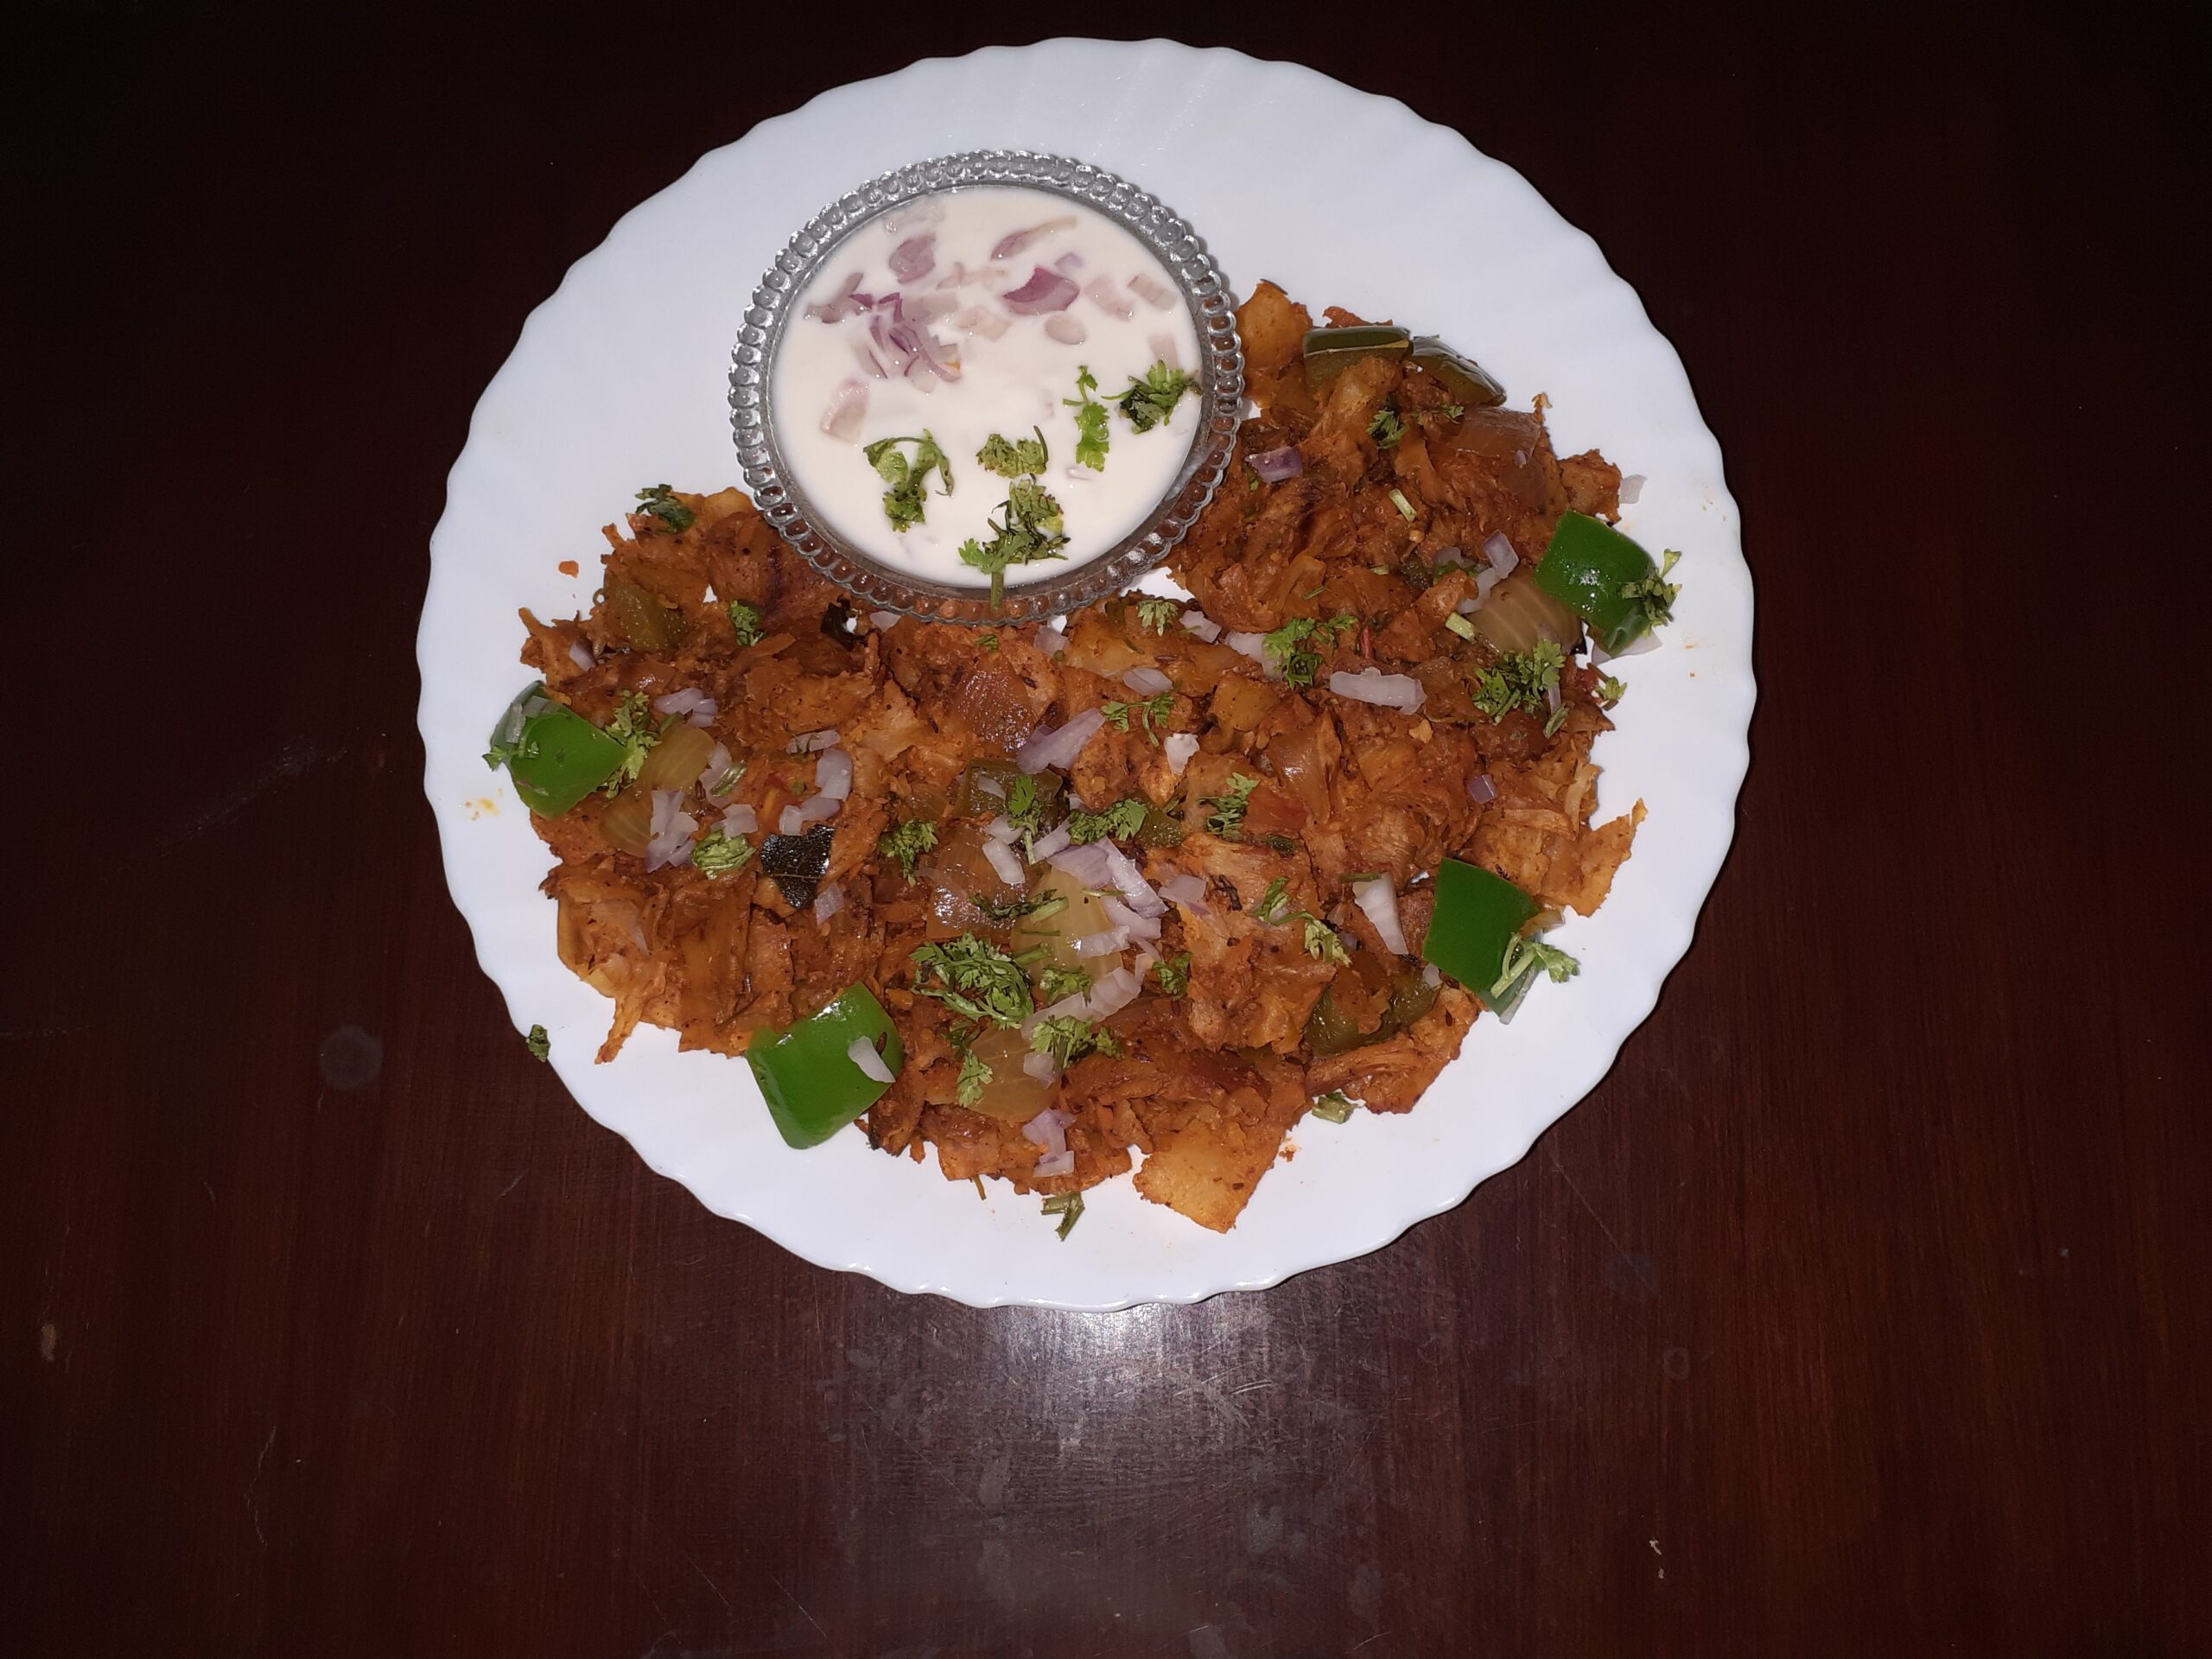
Veg Kothu Parotta
This is a south Indian street food recipe, made form Parathas(called Parotta in the South) and sauteed vegetables in a spicy tomato base. The Parottas are shredded(minced)and added to the gravy and further stir-fried to a crispy flaky dish. There are many variations to this dish, but I am keeping it simple. This dish can be served with sauce or raita. Usually, leftover parathas or chapatis can be used for making this dish. Store-bought Parathas can be used too. Let’s get to the recipe.
PREP TIME: 20 Mins COOK TIME: 25Mins
TOTAL TIME: 45 Mins COURSE: MAIN
CUISINE: SOUTH INDIAN SERVINGS: 4
AUTHOR: Rajni Ram
Ingredients:
Parathas 5
Onion 2 medium diced and petals separated
Carrot 1 grated coarse
Capsicum 1 diced to cubes
Tomato 1 diced
Tomato puree 1 cup
Cashewnuts 10
Cloves 4
Cinnamon 1 small stick
Green chillies 3 split lengthwise
ginger-garlic paste 1 tsp
Cumin seeds 1 tsp
Curry leaves few
Turmeric powder 1/2 tsp
Red chilli powder 1 tsp
Coriander powder 1 tsp
Biriyani masala(powder) 1.5 tsp
Garam masala 1/2 tsp
Salt as per taste
Oil for stir fry
Directions:
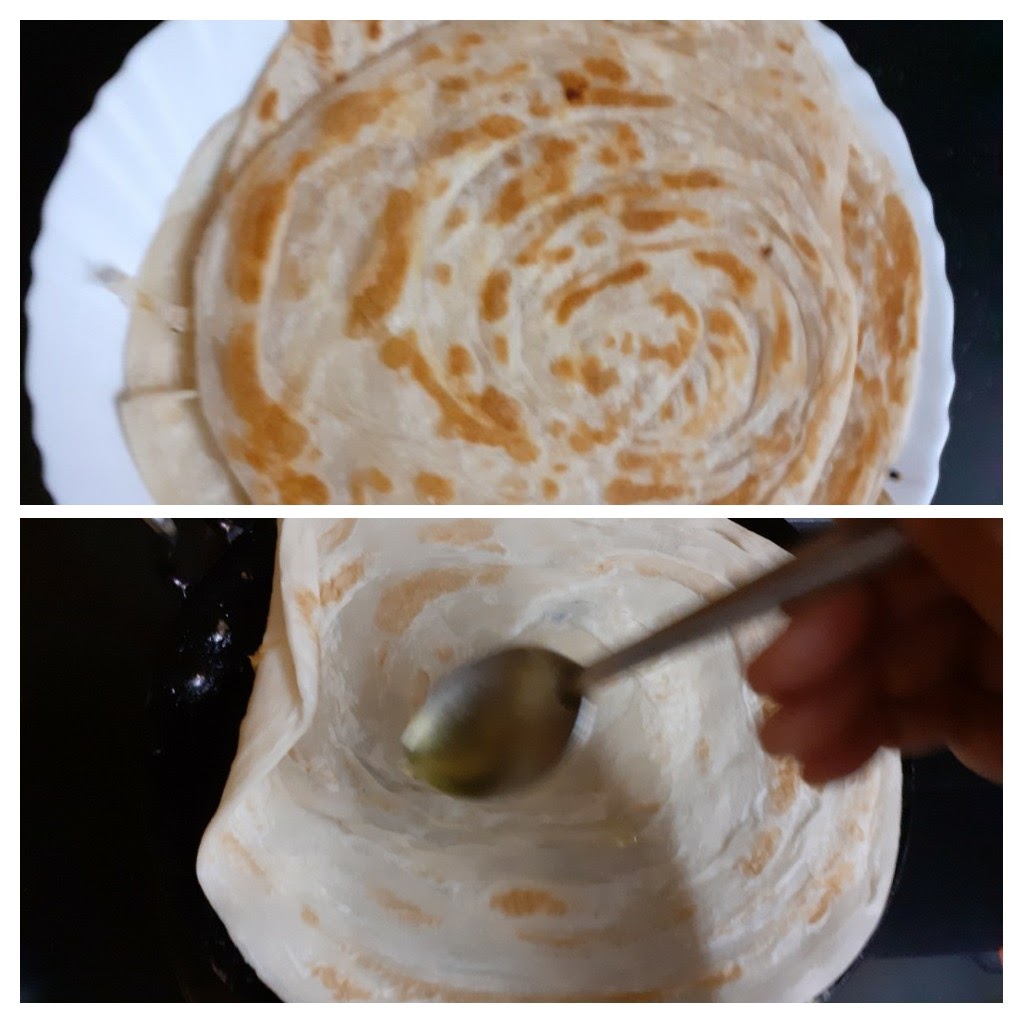
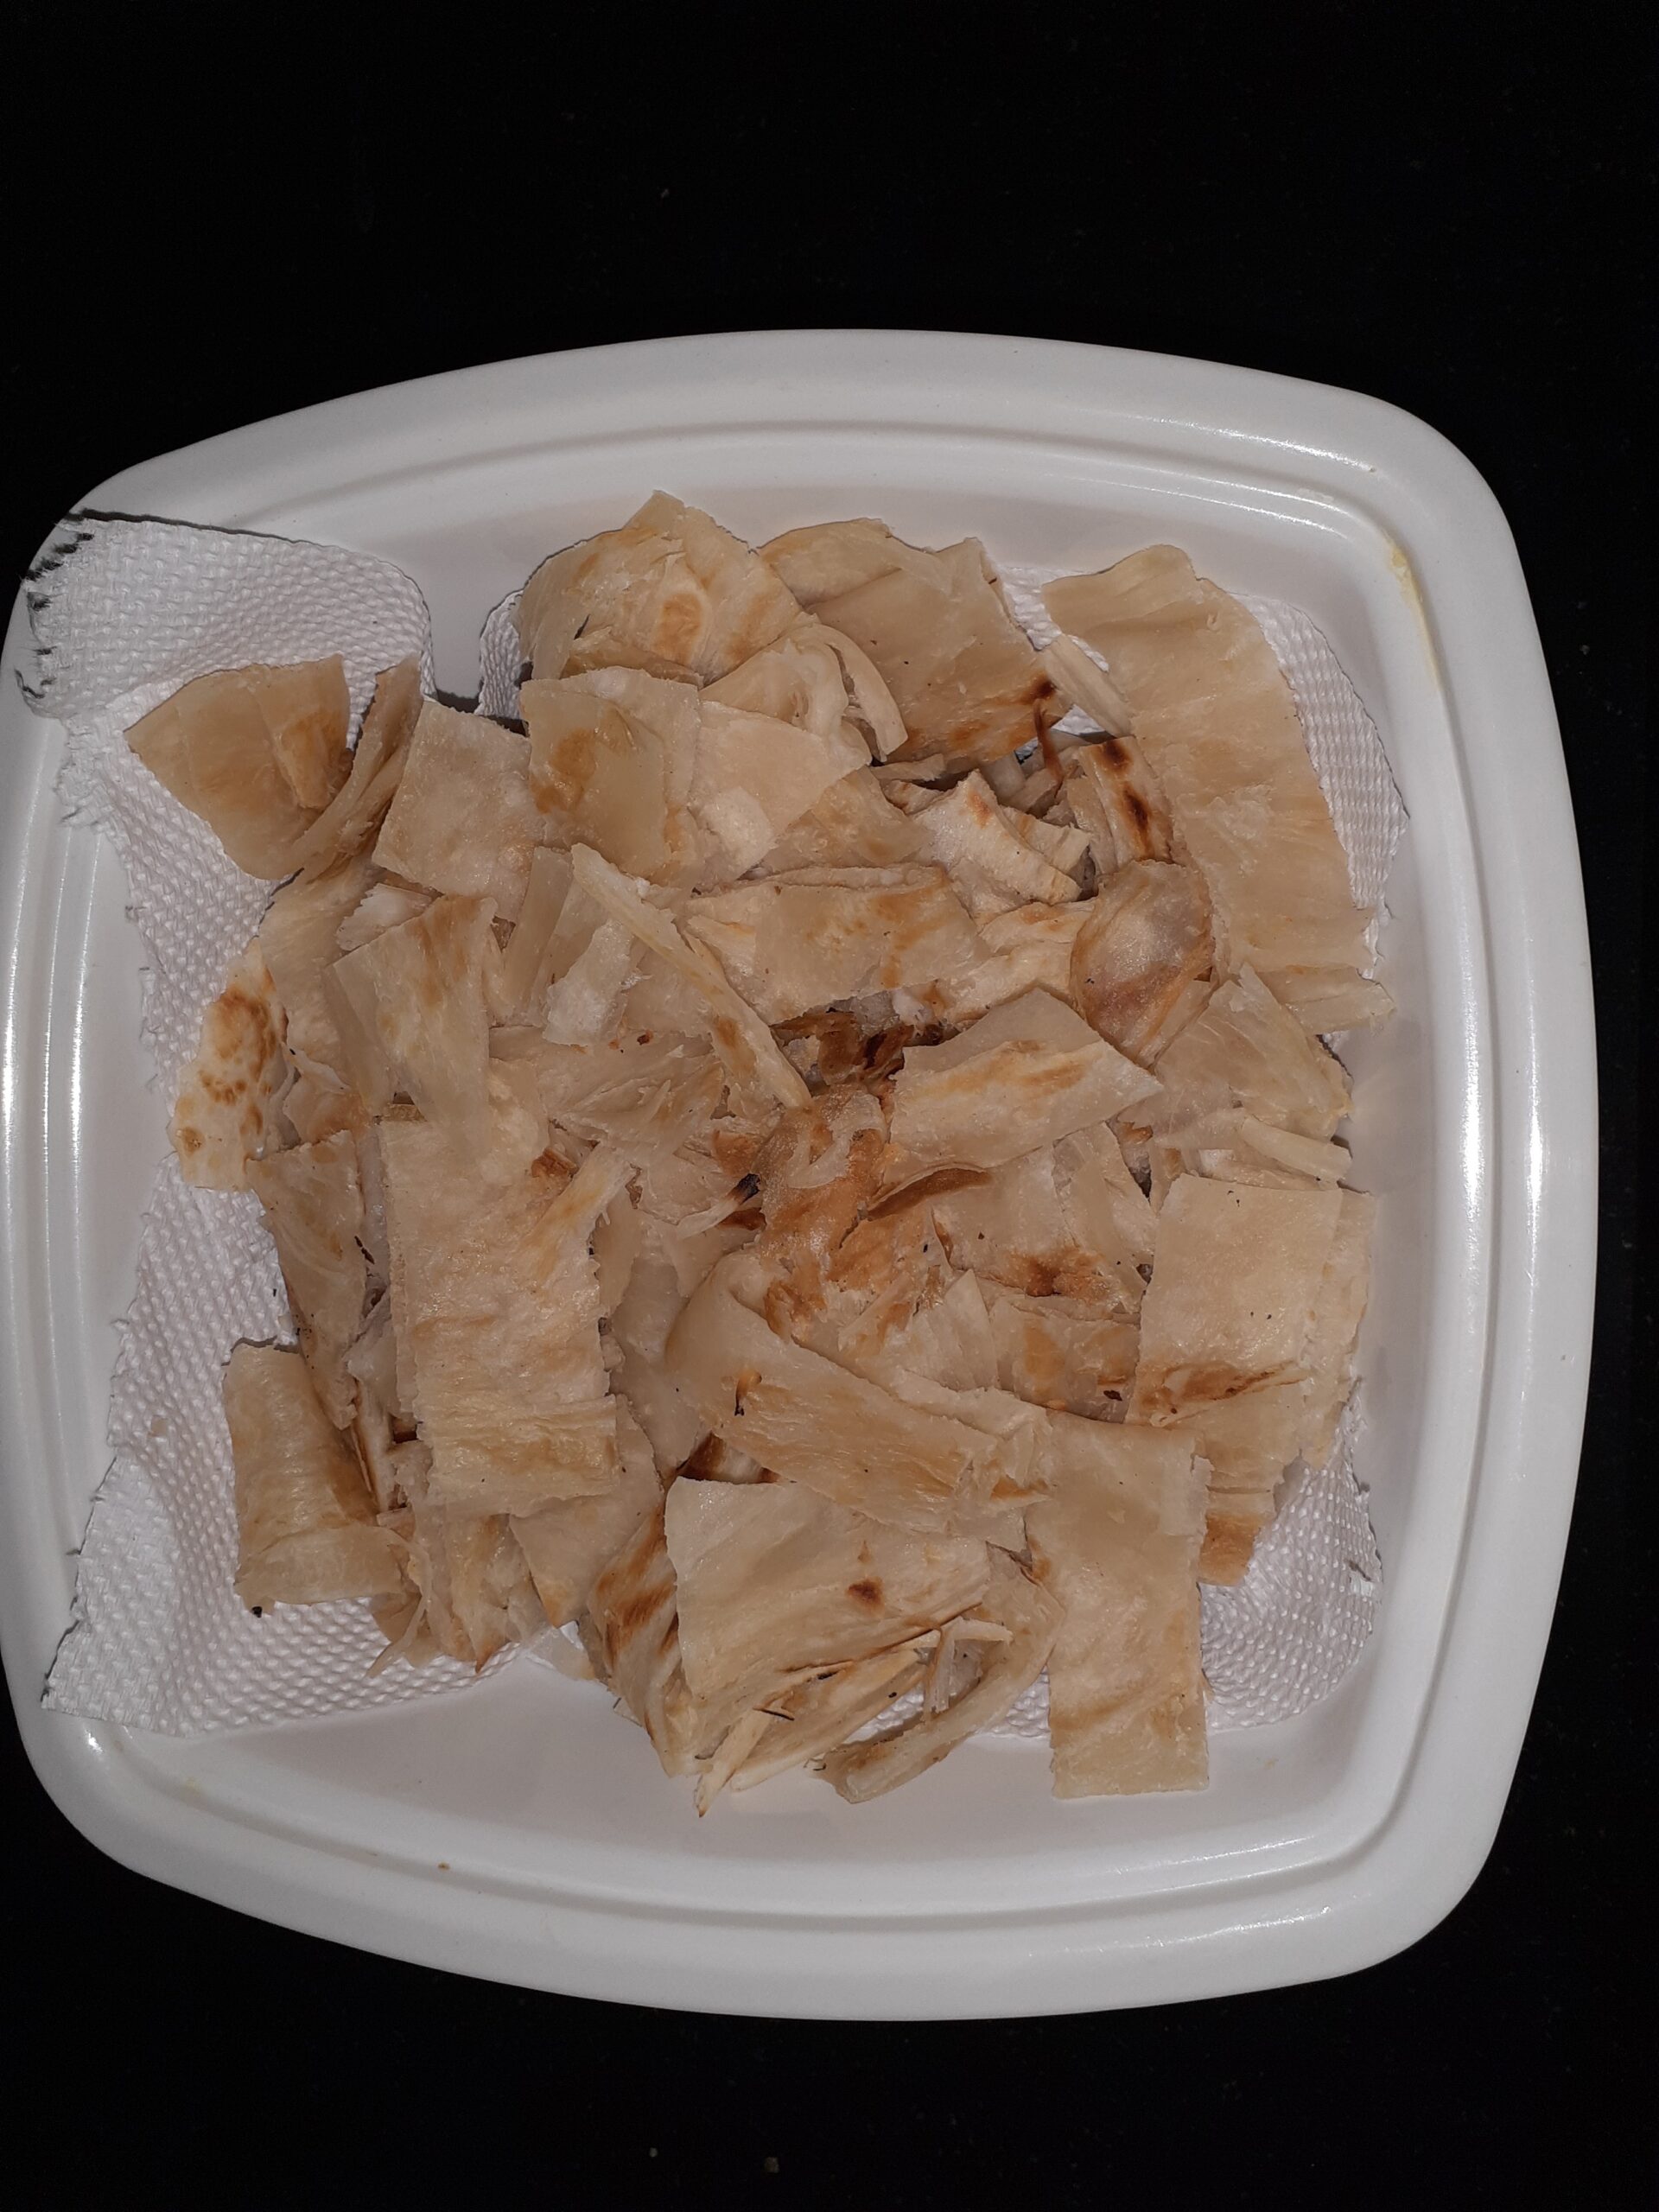
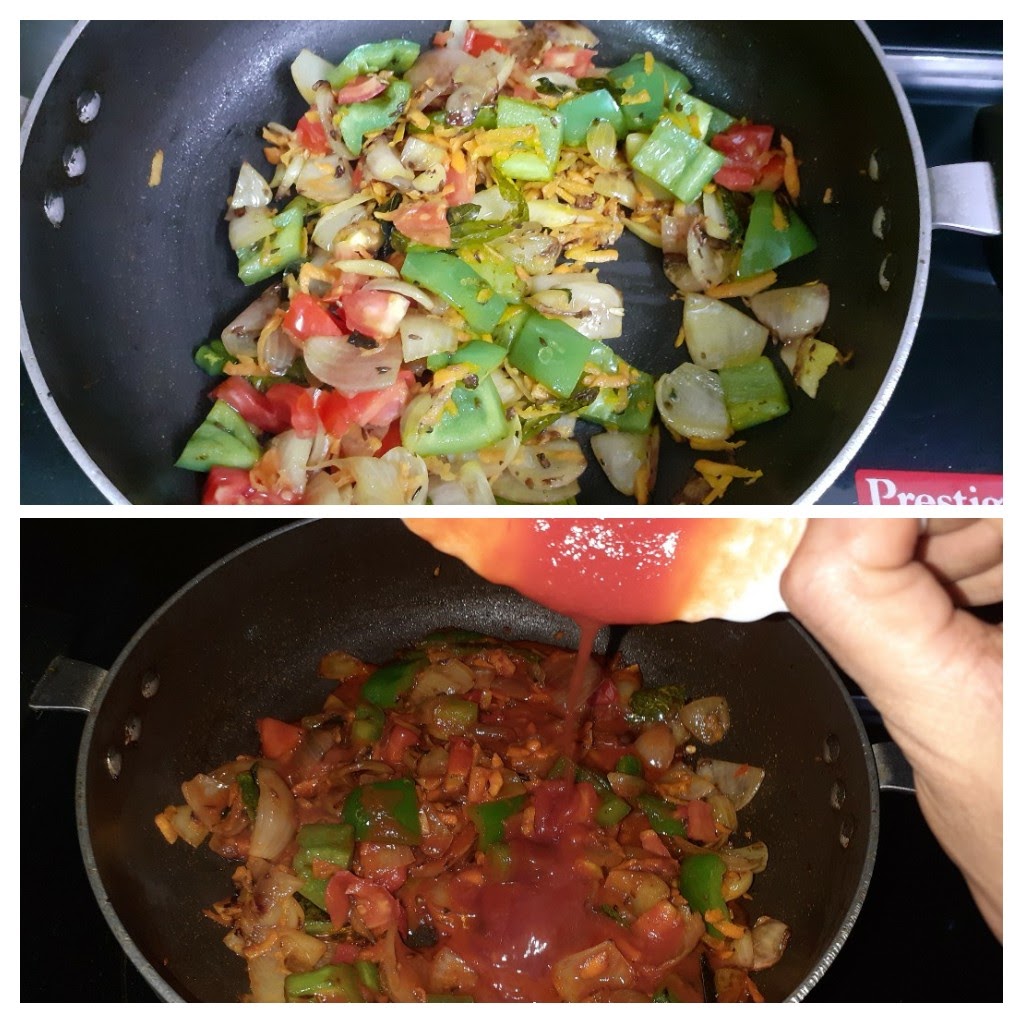
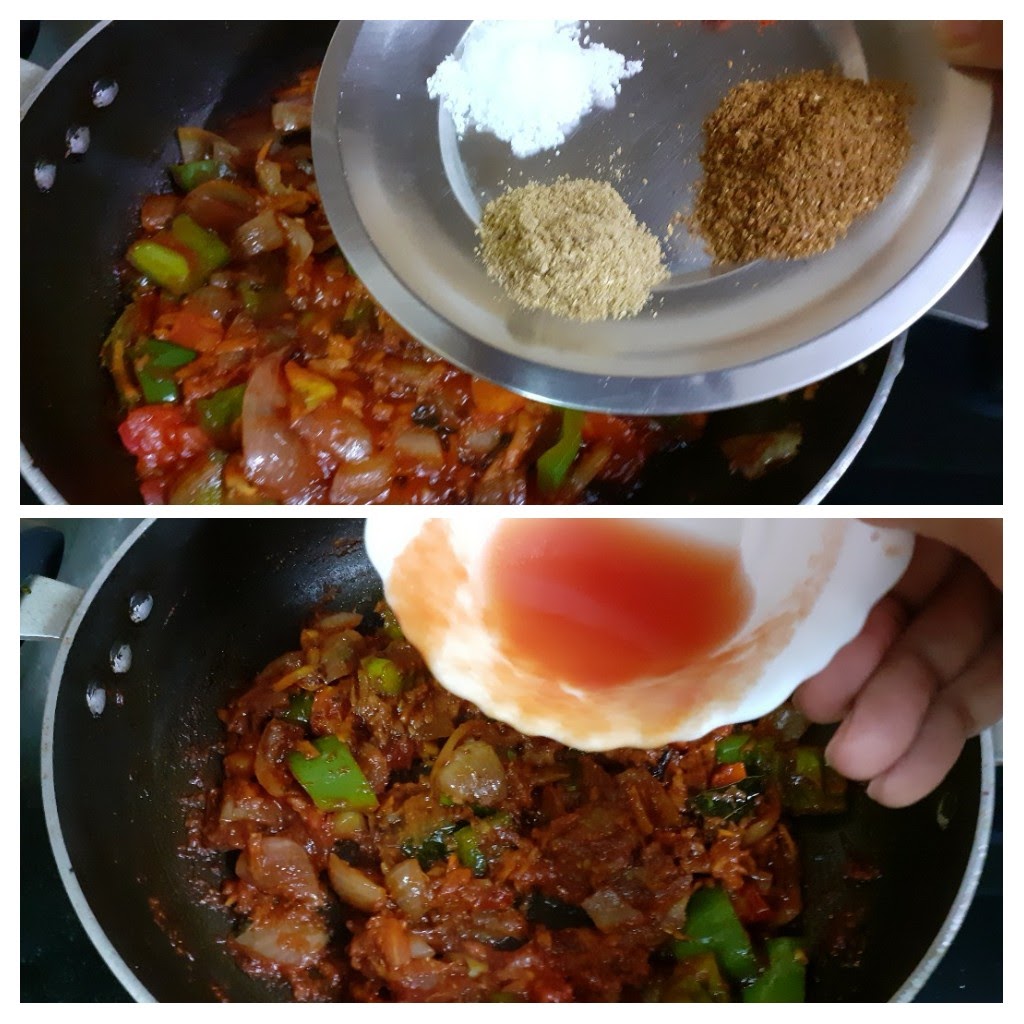
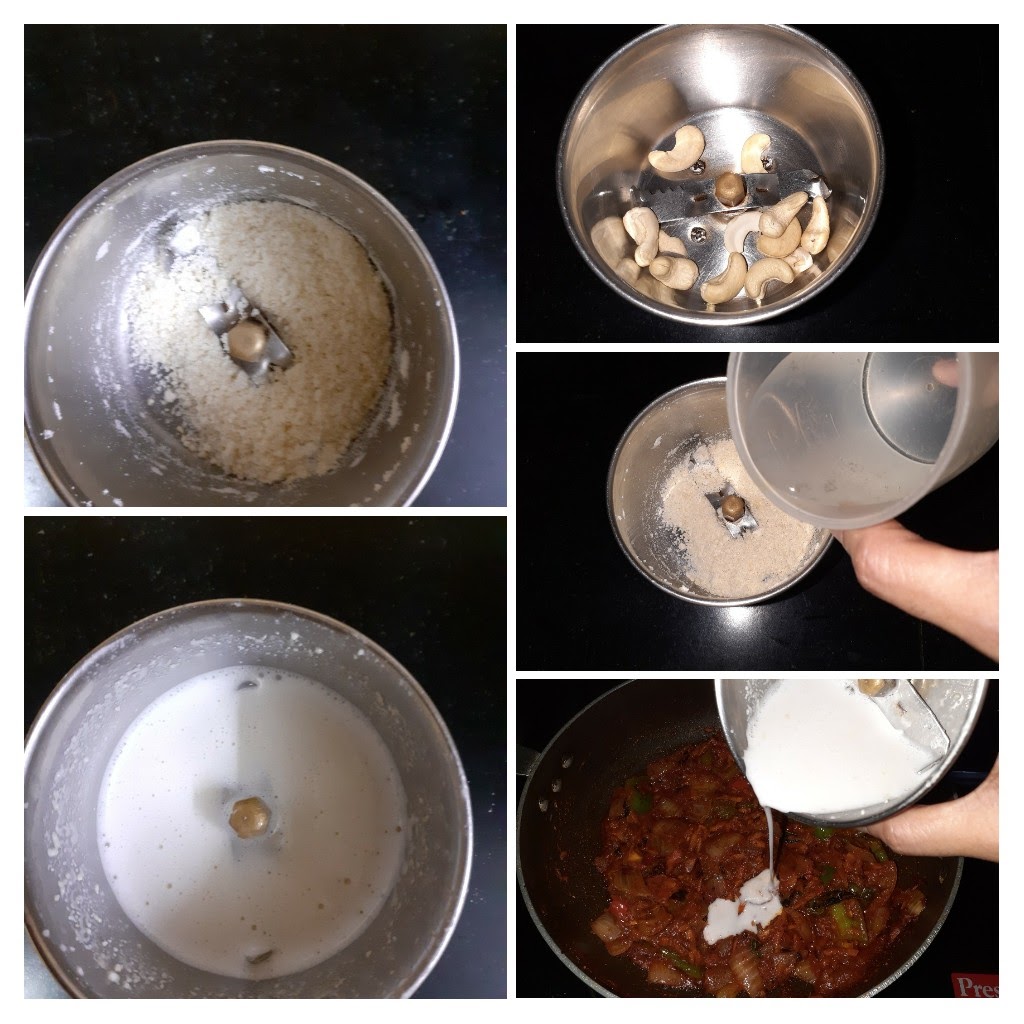
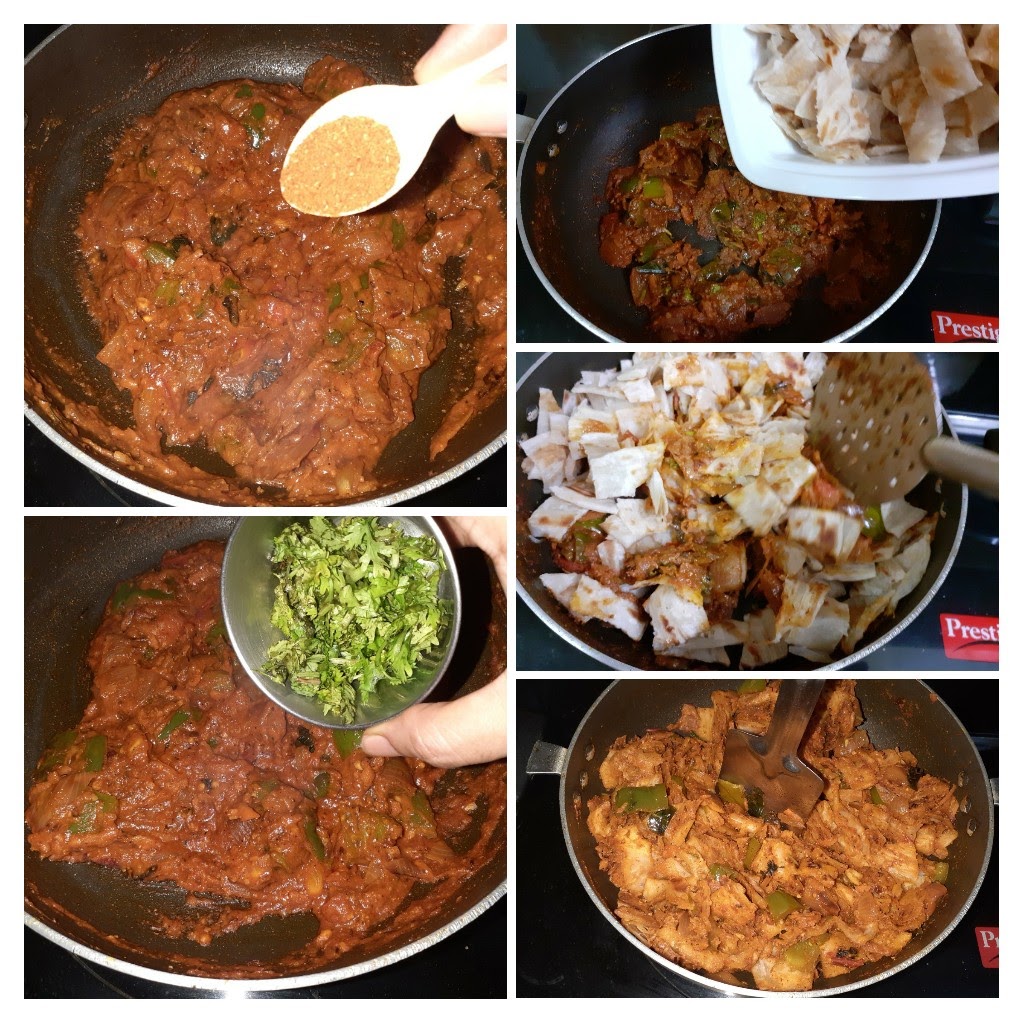
If the Parathas are store-bought, heat them on the tava/girdle with a little oil, cooking both sides. Cool them and using kitchen scissors tear them to pieces or use your fingers to tear them into 1 inch long pieces. keep this aside. In a pan/ Karahi take 4 tsp oil, heat and add the cumin seeds. Put in the turmeric powder and drop the green chillies and curry leaves into the oil, followed by the onions and fry at high heat for 1 minute. Now add the capsicum and continue to fry on high heat. Add the carrot, reduce heat and fry for 30 seconds. Now add the tomatoes, fry for another 30 seconds and pour the tomato puree and give a good stir. Now add the masalas- coriander powder, red chilli powder, Biriyani masala and salt. Stir well and cook for a few minutes, grind the cashew nuts to a loose paste and add it to the gravy. Continue to cook until the gravy thickens and starts getting dry, add the garam masala powder and put off the heat and let the mixture cool a bit. After 5 minutes add in the minced paratha pieces, switch on the stove and mix the parathas well with the gravy. The gravy should coat all the pieces and not turn them soggy. While mixing keep mashing the paratha will a flat spatula so that the parathas can further get minced. Stop once you have a dry mixture. The Kothu Parotta is ready to serve. Tastes best when served immediately. Any variety of Raita is a good accompaniment for this. Enjoy. Bon Appetit.
STEPWISE RECIPE FOLLOWS:
1. Assemble all ingredients and cook the parathas ahead if store bough, as they have to cool.
2. Tear the parathas into 1-inch pieces.
3. In a pan/karahi take 4 tsp oil and heat. Put in the cumin seeds and allow to splutter. Add in the green chillies and curry leaves. Also add 3 Cloves and 1 small stick Cinnamon.
4. Add in the onions and saute at high heat. Add the ginger-garlic paste, put in the capsicum and continue to stir fry, follow up with carrots. Reduce heat.
5. Add the chopped tomatoes, fry for 30 seconds and the tomato puree. Stir and cook for a few minutes.
6. Add all the masalas(dry spice powders), add 2 tbsp water and continue to cook.
7. Powder the cashew nuts then add 2 tbsp water and grind them to a loose paste. Add this to the tomato gravy. Cook until the mixture thickens. the consistency should be like tomato sauce. Put off at this stage. Add chopped coriander and garam masala powder.
8. Let this cool for 5 minutes. Now add the paratha pieces and switch on the stove and mix the contents well. while mixing keep mashing the parathas with a flipper, so that they get minced further. When the paratha resembles a mince and the mixture is dry, put off the stove. the Kothu Paratha is now ready to serve.
NOTES:
1. The consistency of the gravy should neither be too thick nor too thin. It should resemble tomato sauce in consistency.
2. ou can other vegetables too if you like.
3. If you have ready-made biriyani mix paste you can use that too, but add a lesser quantity.
4. This recipe should be served immediately or else the paratha will turn chewy.
5. If you want to make it ahead, you can make the gravy ahead and add the paratha pieces just before you serve.
If you tried this recipe and liked it please do comment below. I would love to hear from you.