Stuffed Sweet Peppers
Patra/Patrode With Bok Choy Leaves (Alu Wadi)
Patra or Patrode is a simple and healthy snack from western India. It is also called Alu Wadi in some regions. This dish is popular in karnataka too. Different regions, different names same dish.
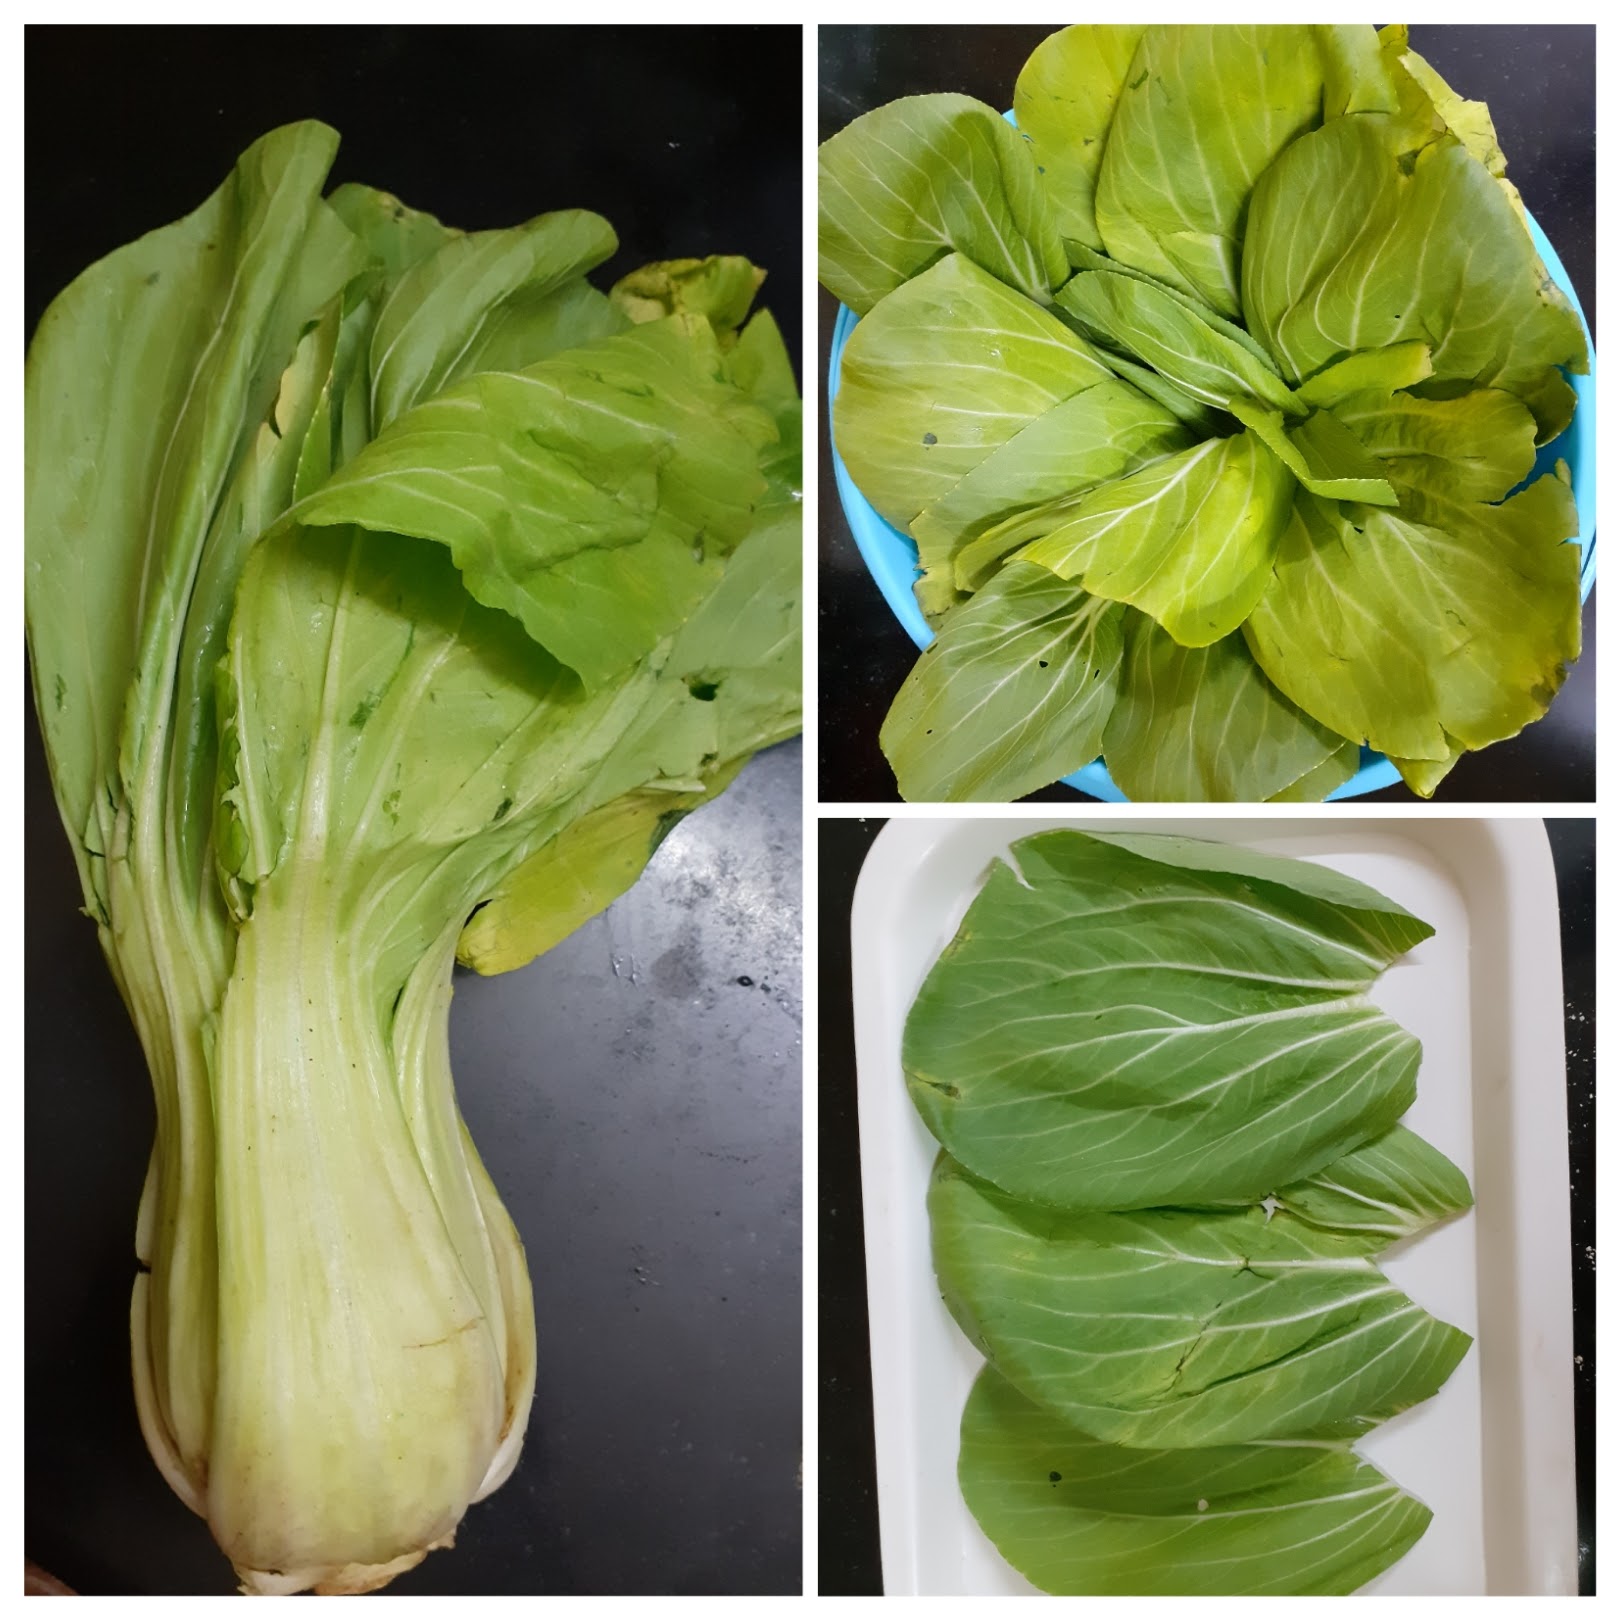
In this healthy snack usually the Arbi or Colacassia leaves are used. Spinach leaves can also be used, but they have to be big and thick. Since that variety is not available all the time I decided to give the dish a twist by using a different leaf altogether. Bok Choy, or Pok choy is a type of chinese cabbage. The leaves are thick and nice so I decided to give the Patra a try with these leaves. It was a huge hit in my house and everyone came back for more.
Since I was making this the first time, I made only a small quantity and with my folks asking for more have promised to make some again very soon. So, what I’m driving at is that if you are one of those people who loves this dish and wait for the Arbi leaves to arrive in the market, well don’t wait. Grab some Pok Choy and try it out. The Pok Choy is closer in taste to Spinach with which Patra are made, if not for Arbi/Colaccssia leaves.
This is a steamed snack just like the Kothimbir Vadi, it can be fried too of you prefer. I have steamed and pan roasted them.
While you are here check out my other snack recipes like Mirchi Bajji, Semolina Cheese balls, Samosa Pie, Potato Cheddar Bake, Dhania wale Namak Parey and more…
Here is the recipe ot Patra with Bok Choy Leaf-
PREP TIME: 15MINS COOK TIME: 30MINS
TOTAL TIME: 45 MINS CUISINE: INDIAN
COURSE :SNACK SERVINGS: 5
AUTHOR: RAJNI RAM
Bok choy/ Pok choy 2 heads ( clip leaves carefully, wash and dab dry with towel)
Besan/ Chickpea flour 2 cups
Salt as required
Red chilli powder 1 tsp
Coriander powder 1 tsp
Fennel powder 1 tsp
Turmeric powder 1/2 tsp
Sugar 1/2 tsp
Tamarind pulp 2 tsp diluted in 1/2 cup water or make pulp with Gooseberry size tamarind ball.
Green chilli 1 finely chopped
Ginger 1/2 inch piece finely chopped
Sesame seeds a few
Kopra / desiccated coconut 2 tsp
Oil 3 tsp for tempering
Directions:
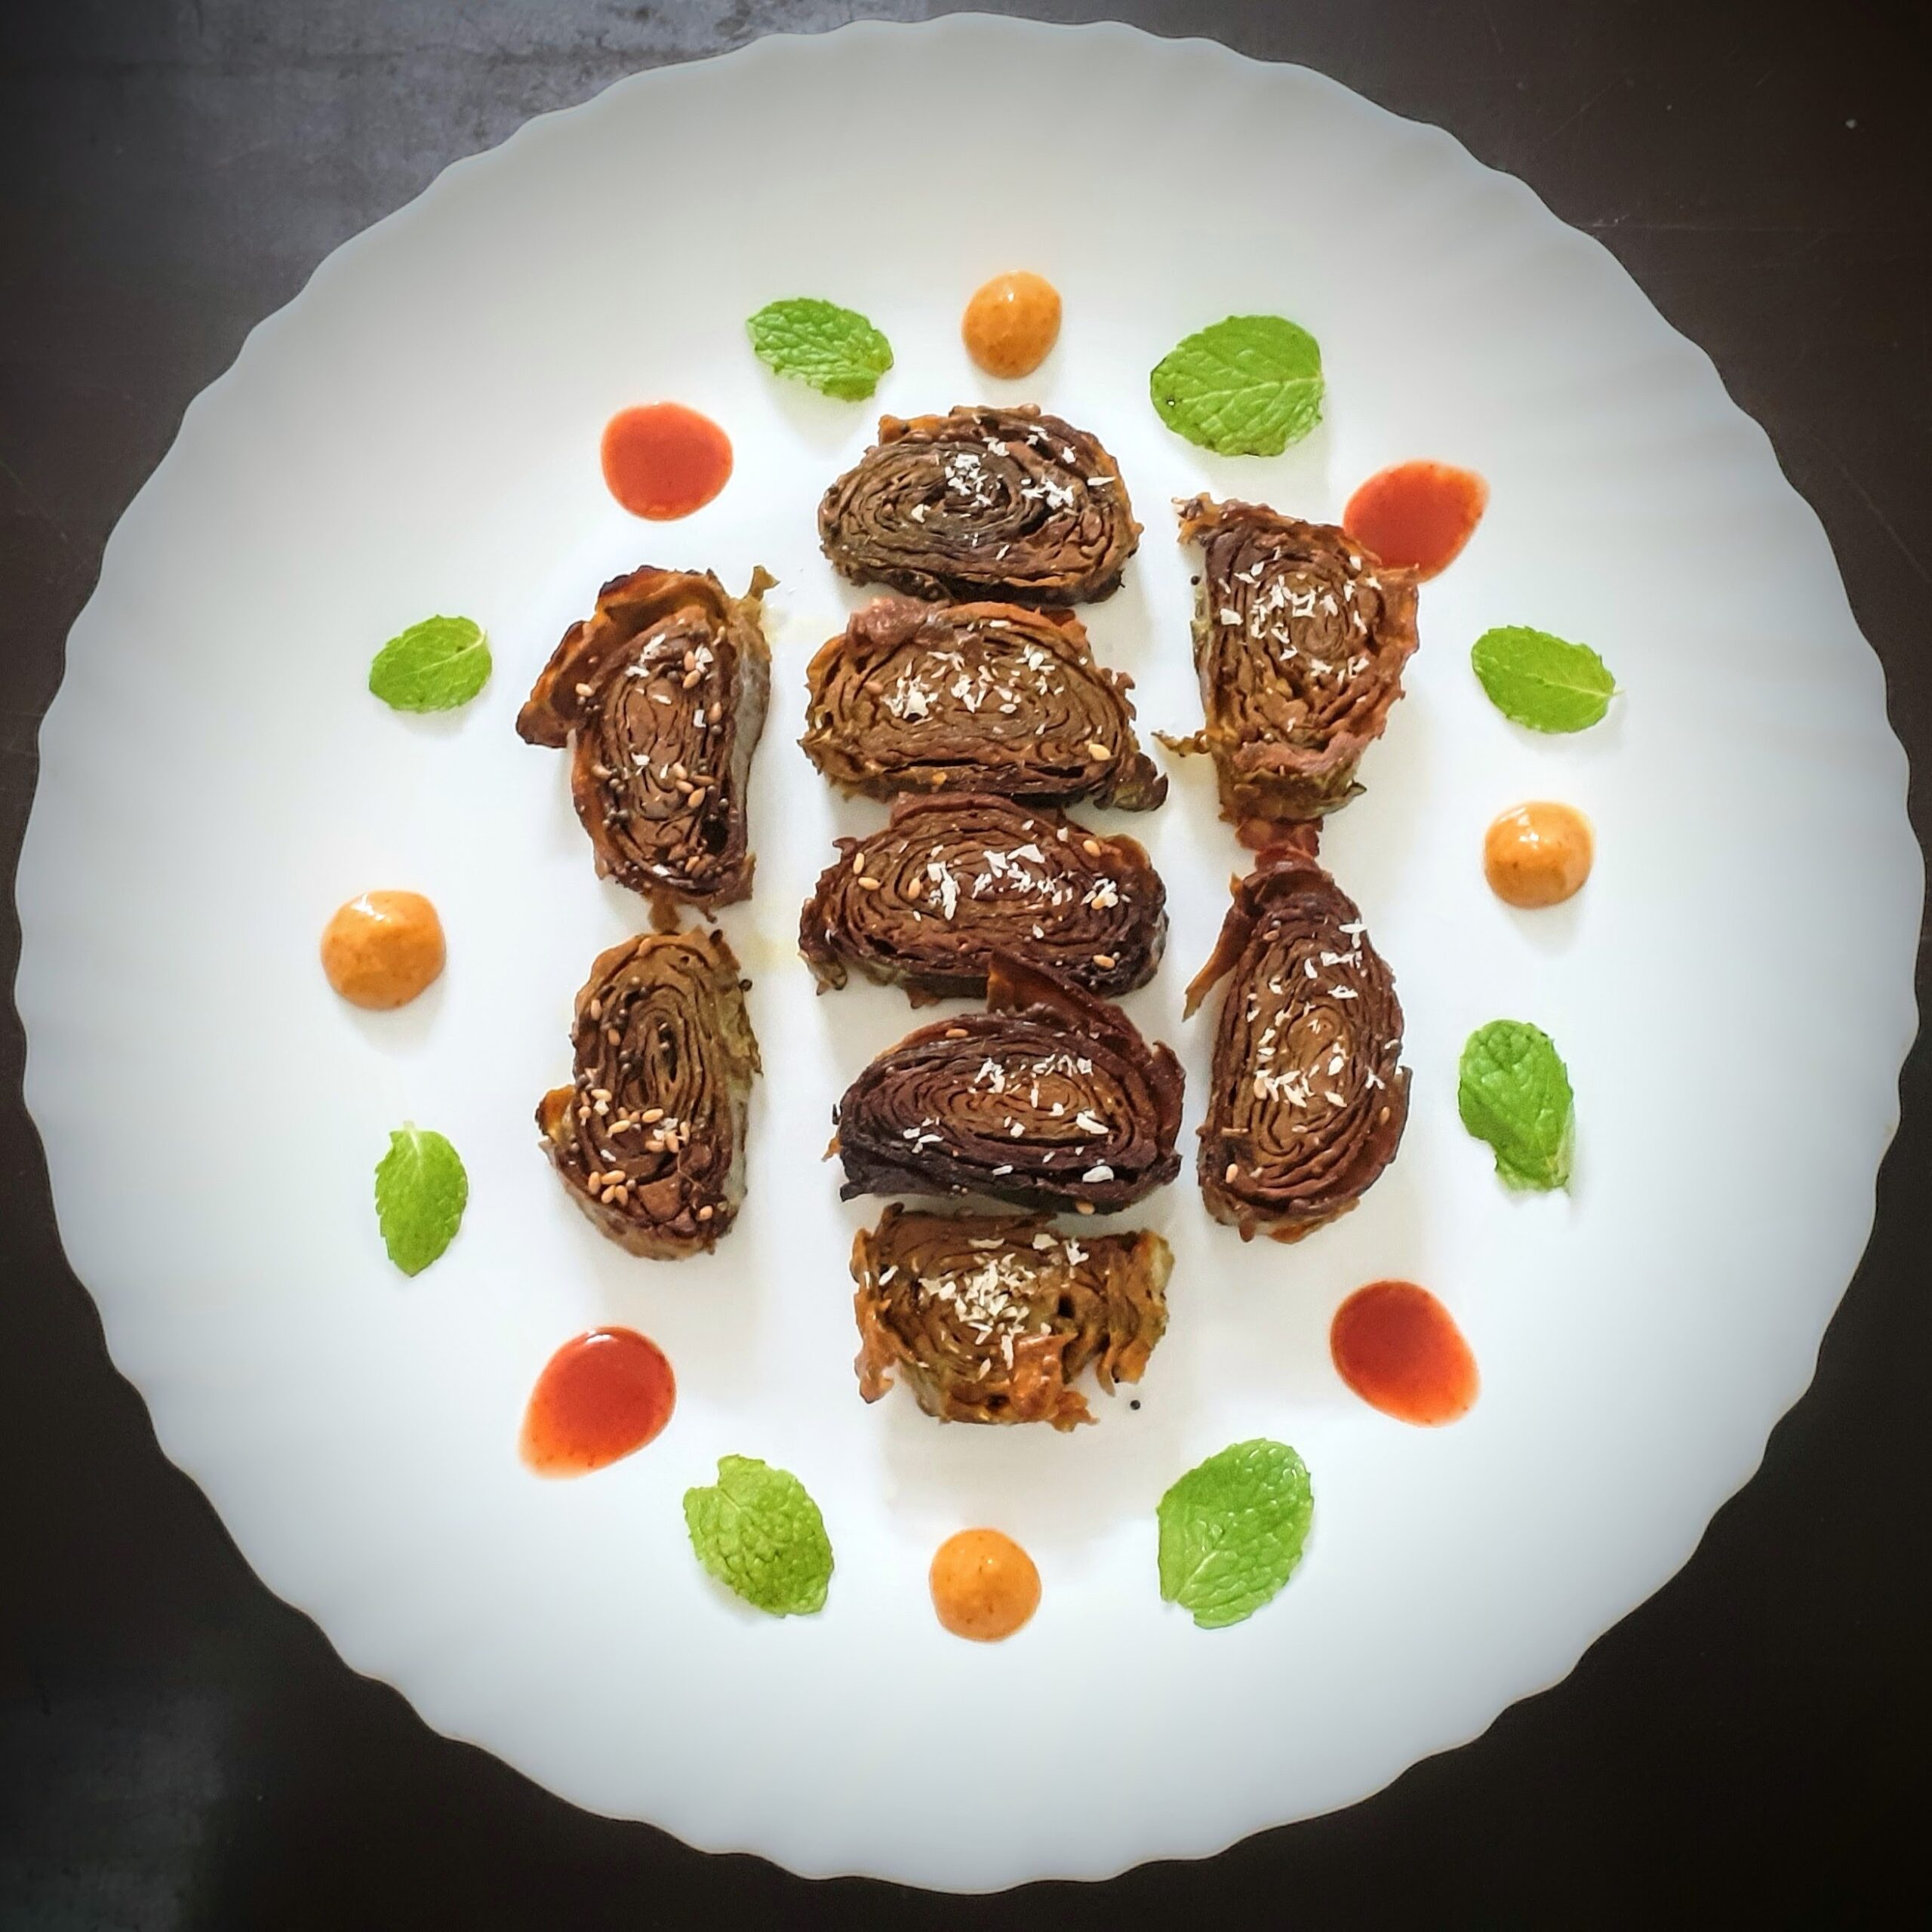
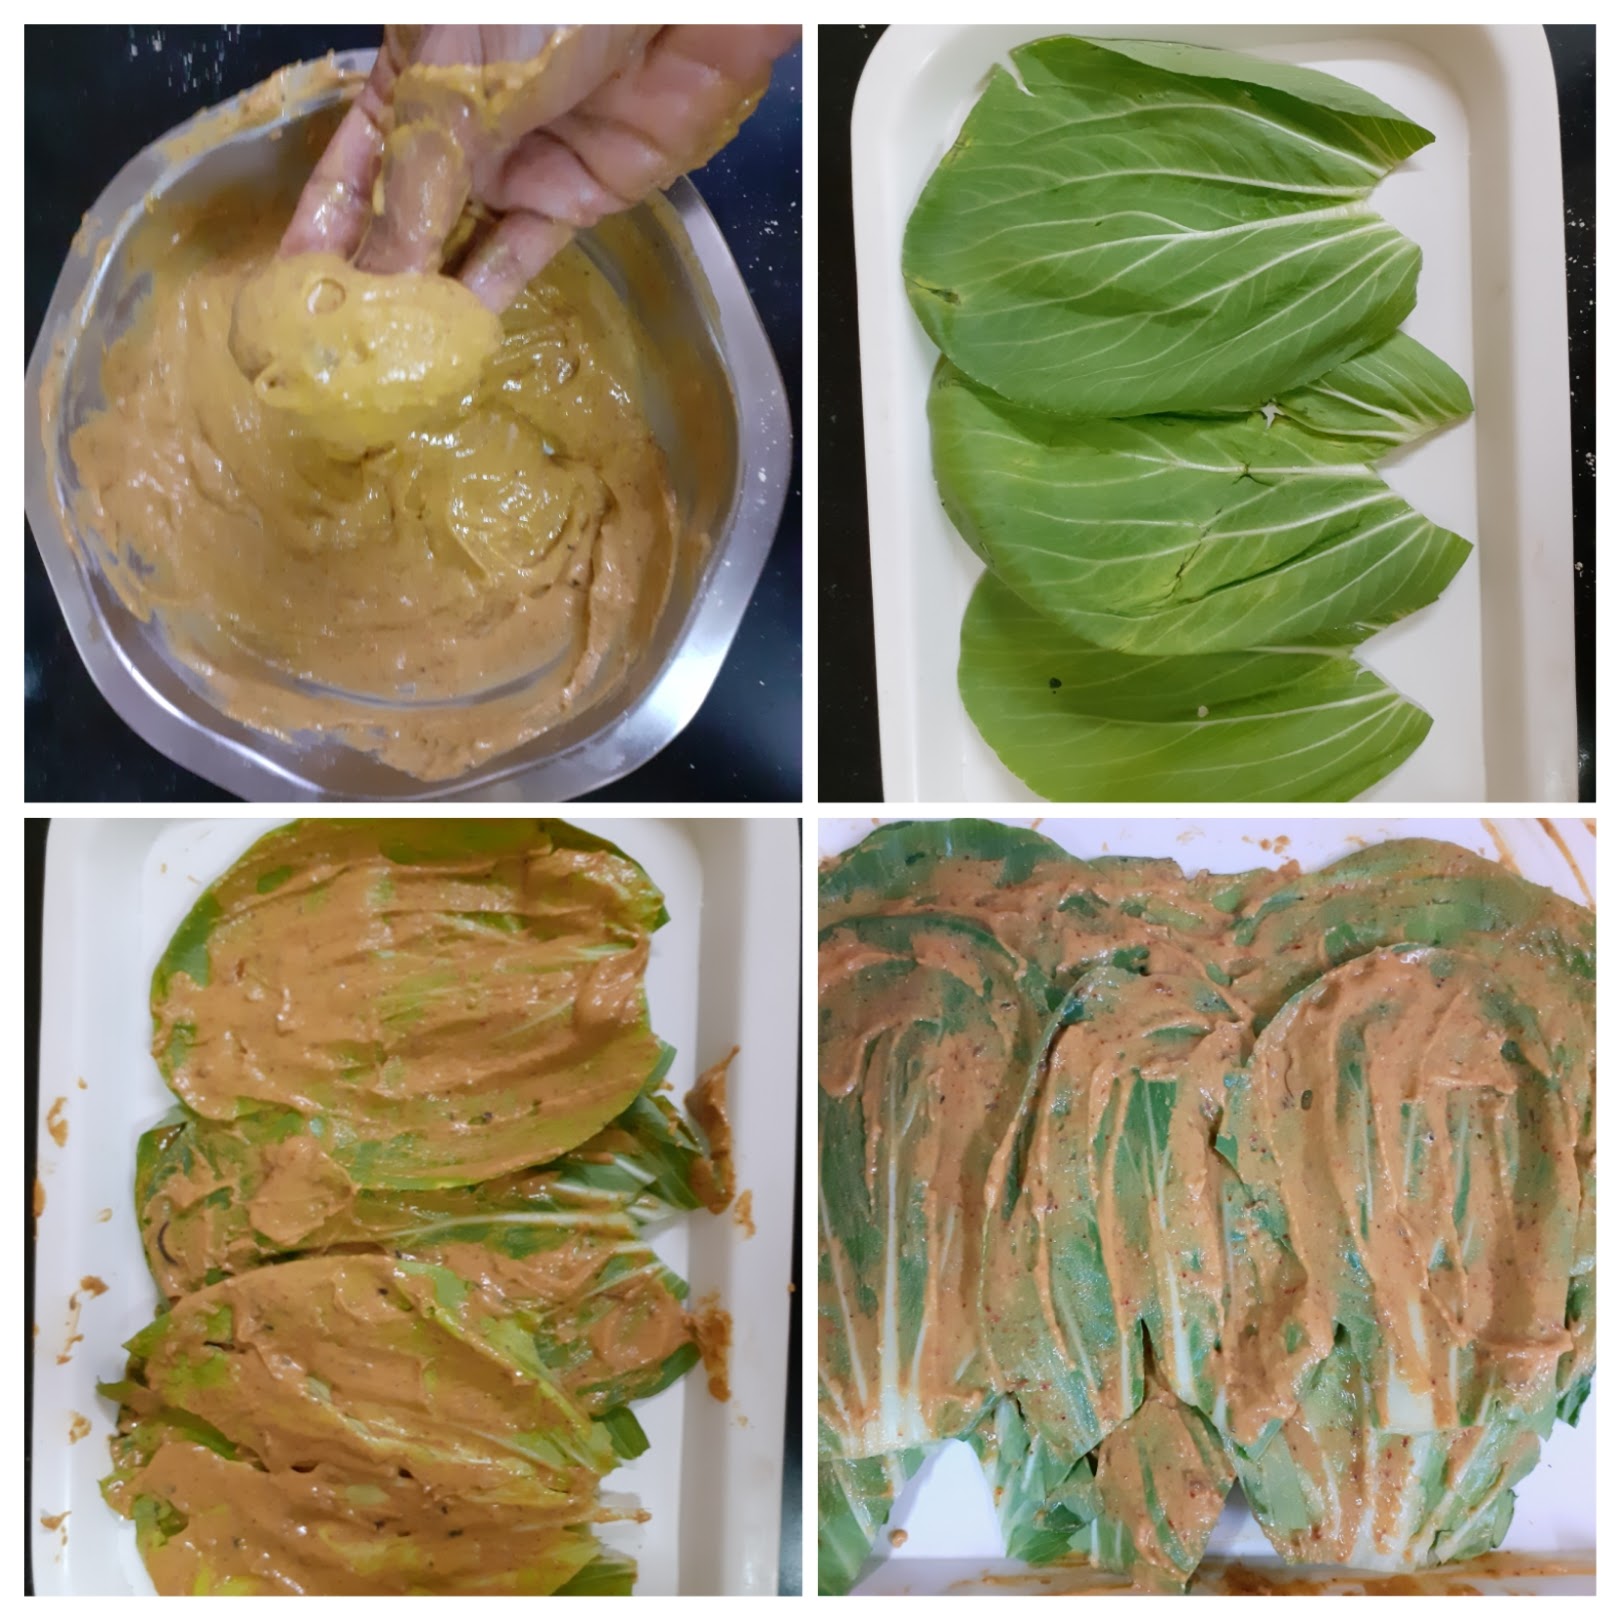
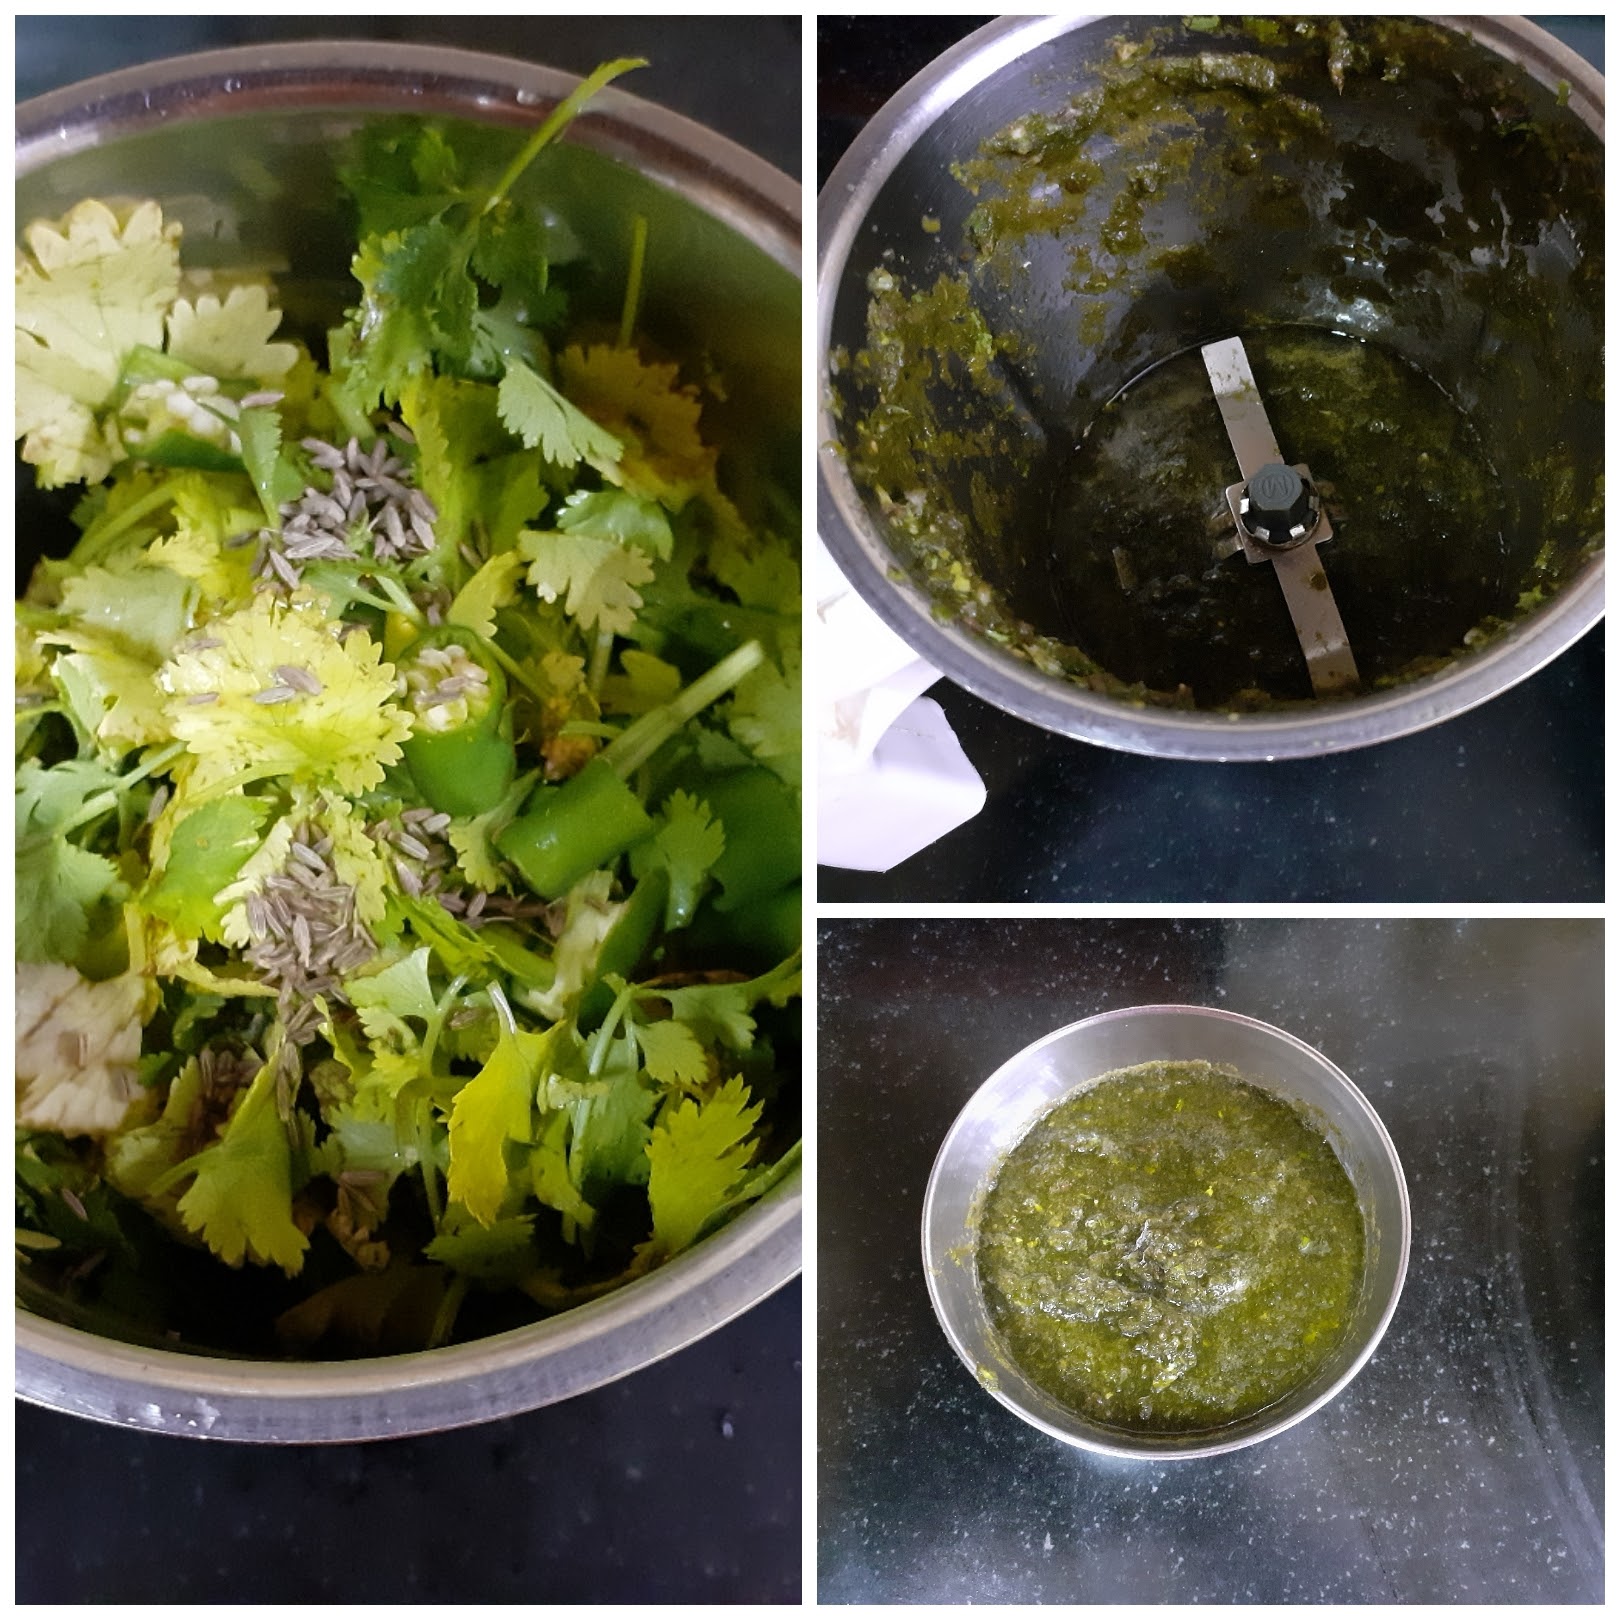
Carefully cut the leaves from the Bok choy, wash them in water and pat dry. Keep aside. Now in a bowl take the besan and add all the masala powders and salt. Mix well with fingers and now start adding the tamarind water little by little to make a thick paste/ batter. If using tamarind paste add paste along with masalas, mix and then use water to make the paste. The batter has to be smooth and thick that it sticks to the leaves and does not slide off. Now take the leaves, bigger ones. Apply the paste to 3 leaves, and arrange 3 of them over lapping the other as shown in the picture. This is the first layer. On this another 3 paste applied leaves have to be arranged. If the leaves are in different sizes, keep bigger ones below and smaller ones on top. Like this for 3 layers. Now start rolling the leaves from left to right, and as you role more of the paste has to be applied each time you roll the leaf. After rolling completely, apply the besan paste all over the rolled leaf. Place this in a greased cooker vessel. Repeat for remaining leaves. I made two such rolls. Place the second roll also in the cooker vessel and keep the vessel in the cooker to steam. Steam for 20 to 25 minutes. Put off the cooker and wait 2 minutes. Now open and cool the steams rolls completely. Once cooled cut them into 1/2 inch thick circles and keep aside. Take oil in a Tava or Pan and heat. Add mustard seeds, Jeera, asafoetida, green chillies, sesame seeds and ginger. When the mustard pops arrange the cut circles on the tava and roast on one side. When it turns a golden brown, flip and roast the other side. Sprinkle some Kopra/ desiccated coconut and remove the Parta off the Tava. Enjoy with some green chutney and chai. Bon Appetit!!!
STEPWISE RECIPE FOLLOWS:
1.Carefully cut the leaves from the Bok choy, wash them in water and pat dry. Keep aside.
2. Now in a bowl take the besan and add all the masala powders and salt. Mix well with fingers and now start adding the tamarind water little by little to make a thick paste/ batter. The batter has to be thick and smooth.

3. Apply the paste to 3 leaves, and arrange 3 of them over lapping the other as shown in the picture. This is the first layer. On this another 3 paste applied leaves have to be arranged. Make 3 such layers.
4. Now start rolling the leaves from left to right, and as you role more of the paste has to be applied each time you roll the leaf. After rolling completely, apply the besan paste all over the rolled leaf. Place this in a greased cooker vessel. Repeat the process and put both rolls in cooker vessel.
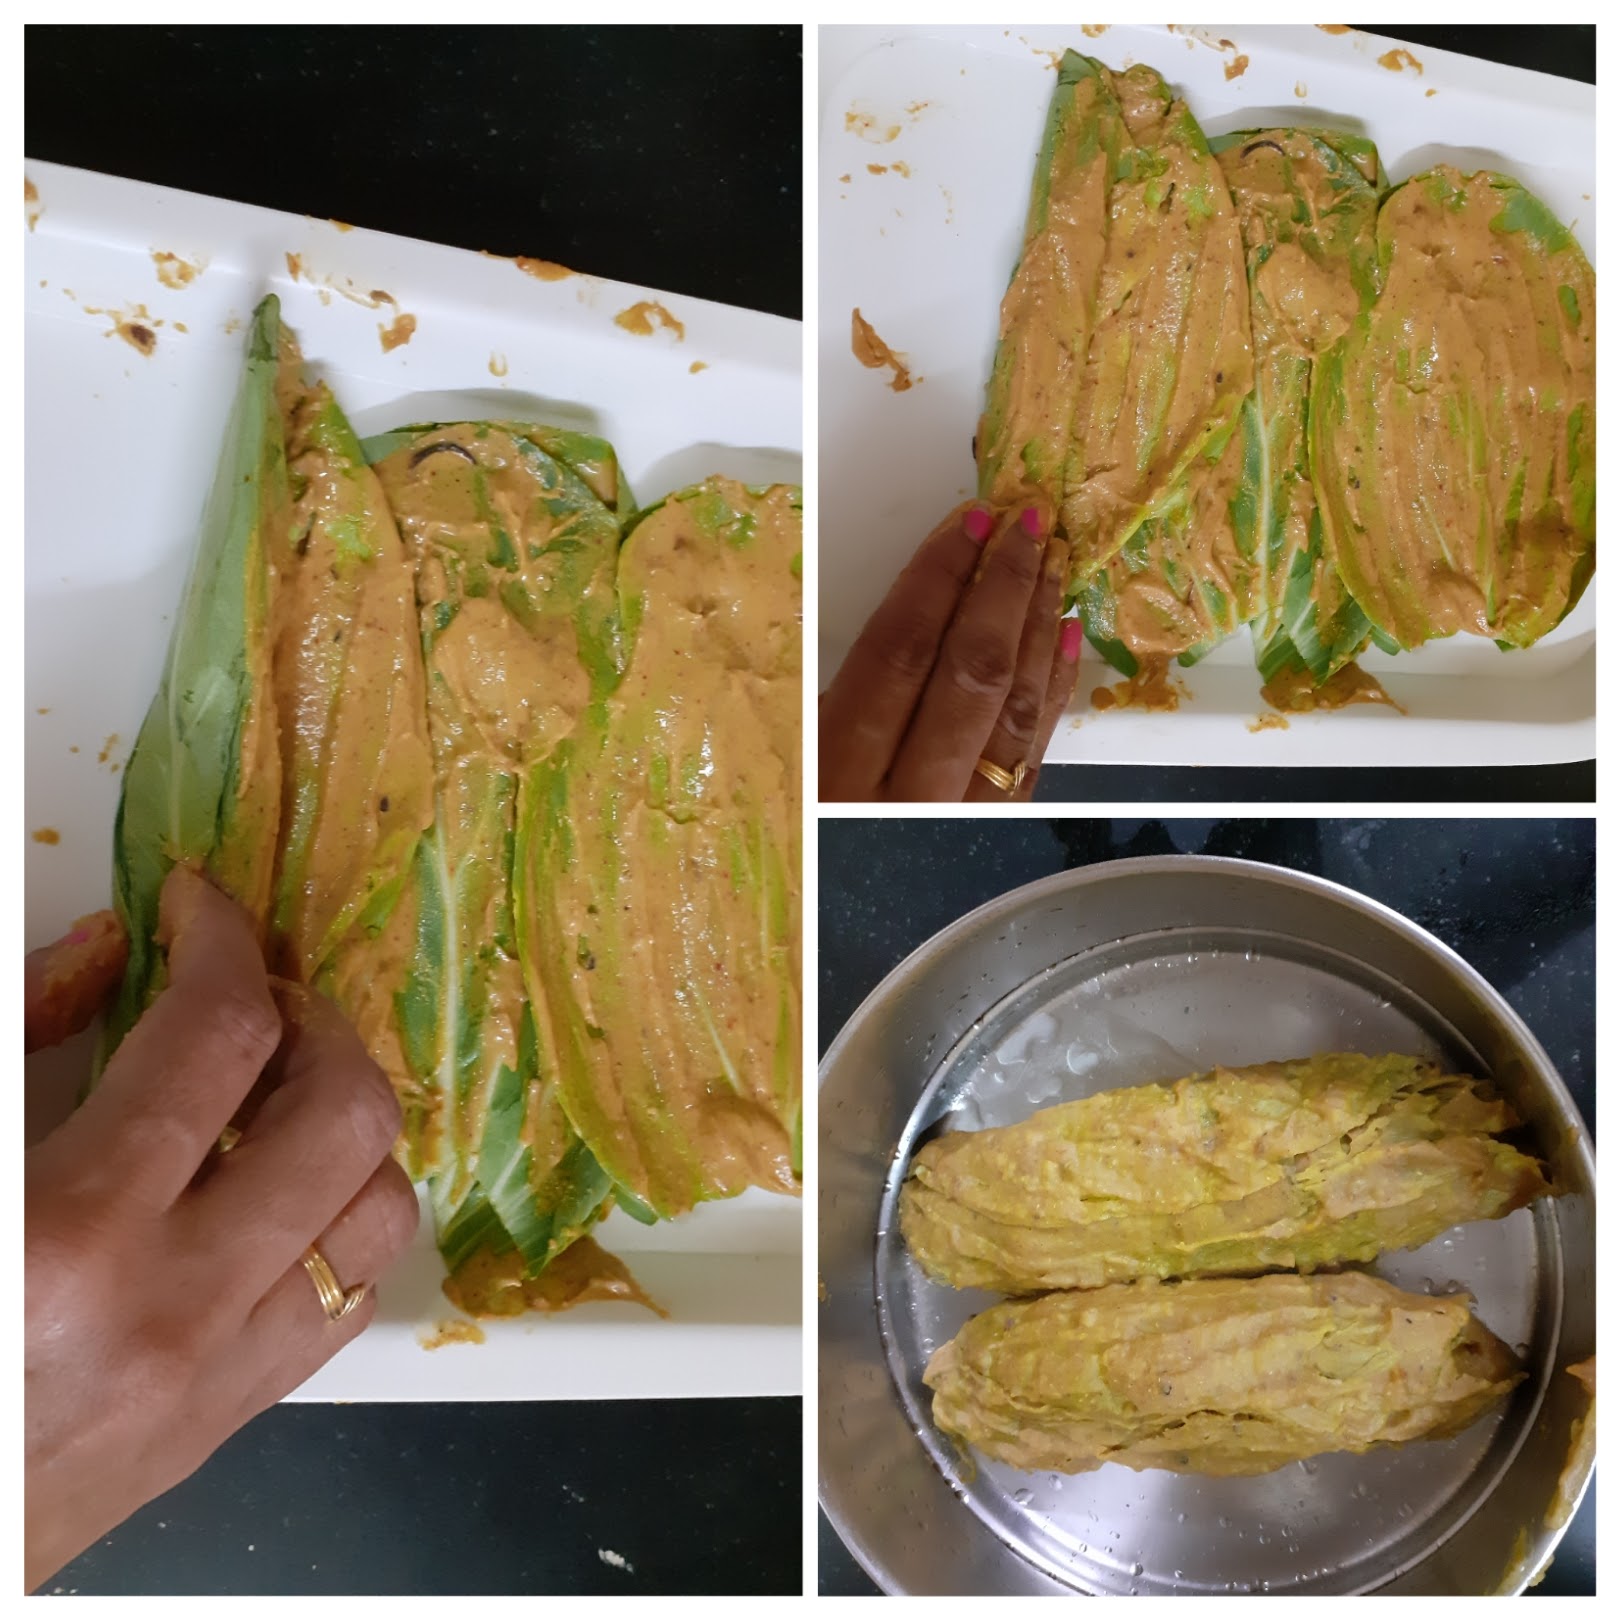
5. Keep the vessel in the cooker to steam. Steam for 20 to 25 minutes. Put off the cooker and wait 2 minutes. Now open and cool the steams rolls completely. Once cooled cut them into 1/2 inch thick circles and keep aside.
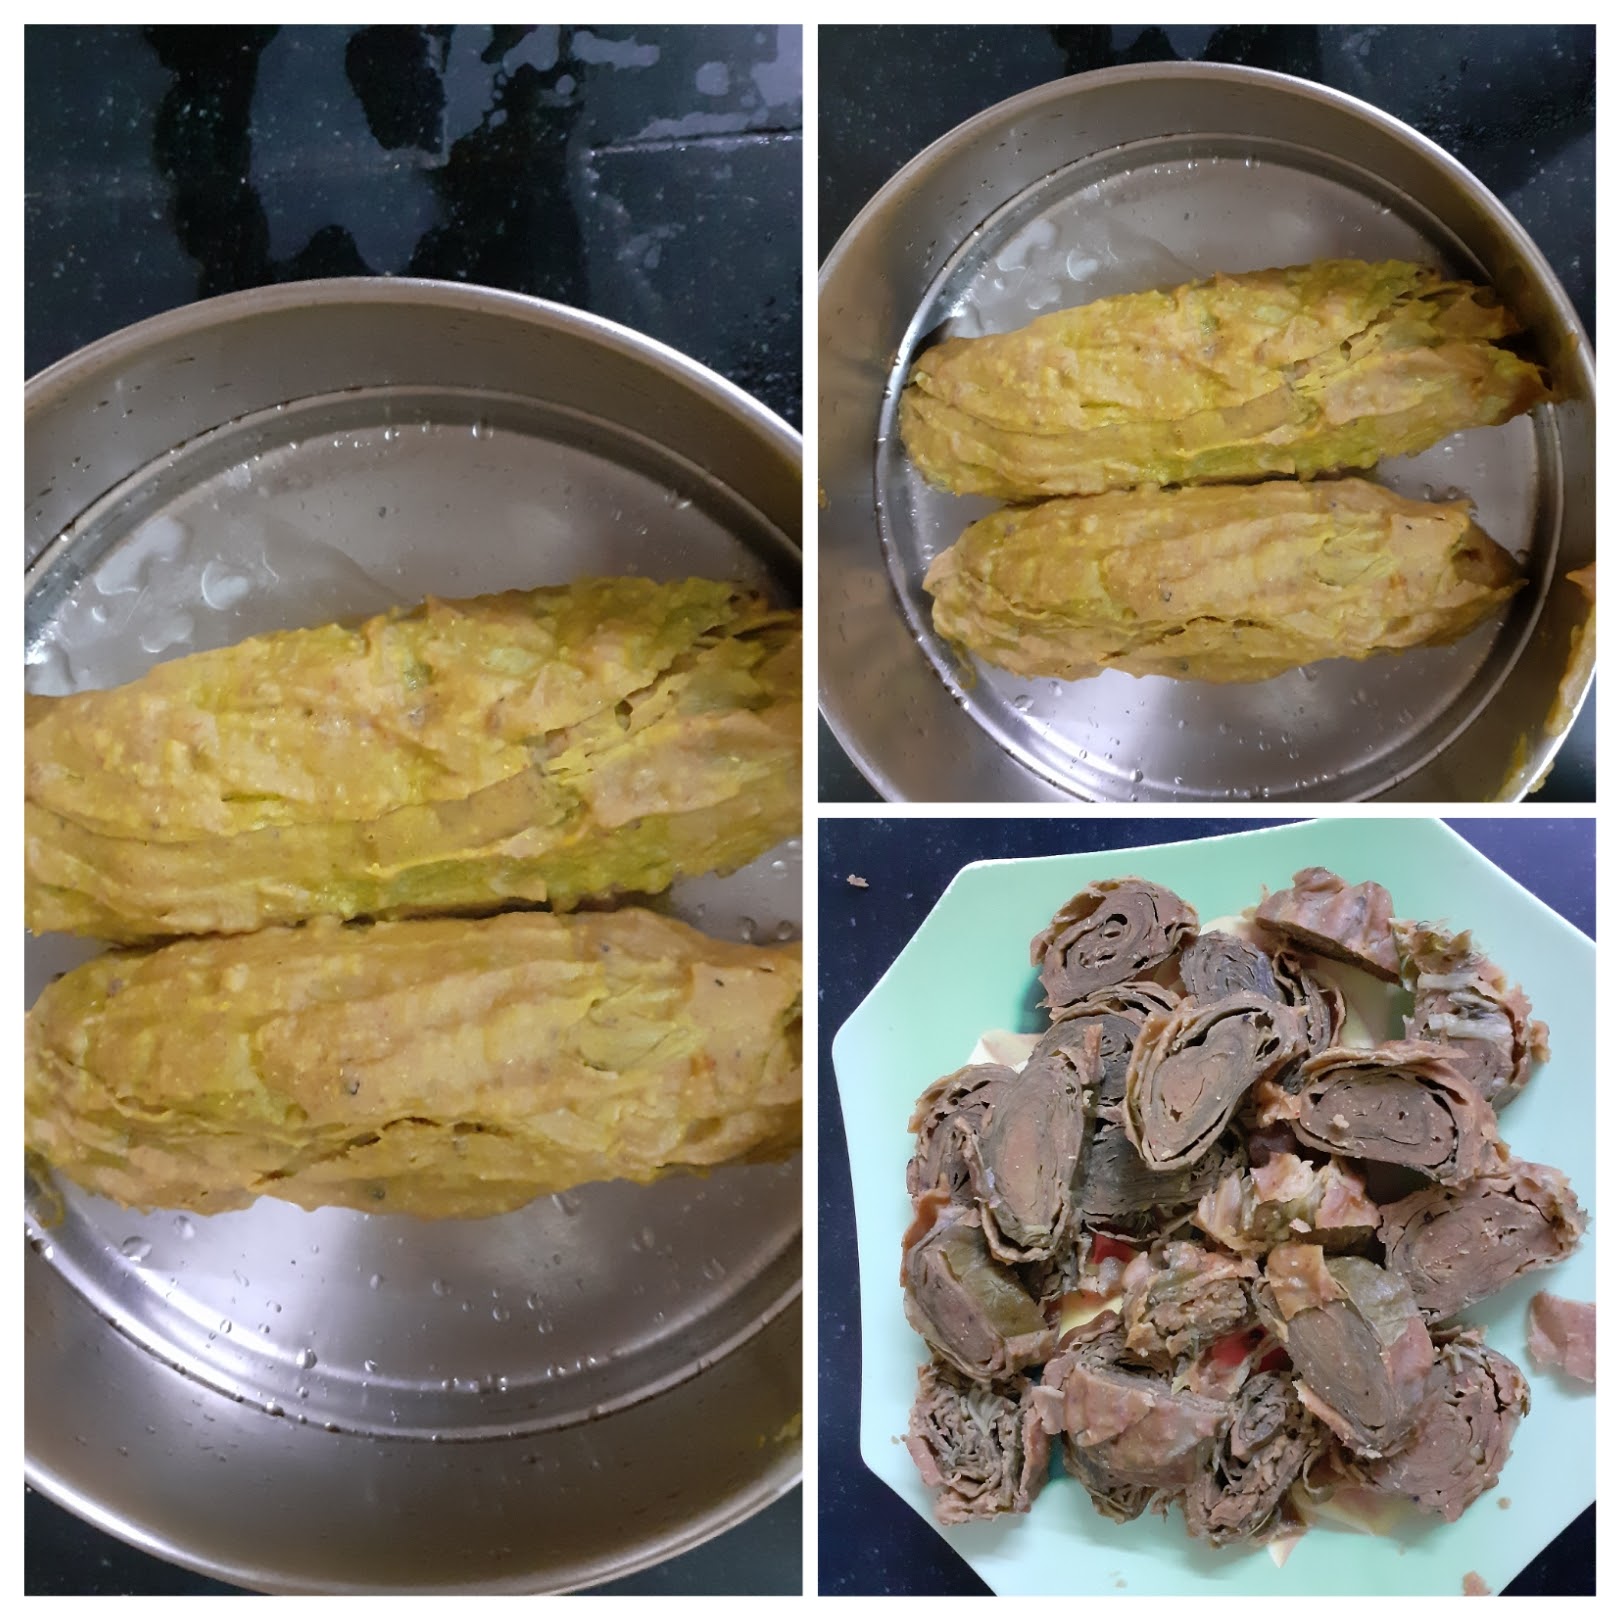
6. Take oil in a Tava or Pan and heat. Add mustard seeds, Jeera, asafoetida, green chillies, sesame seeds and ginger. When the mustard pops arrange the cut circles on the tava and roast on one side. When it turns a golden brown, flip and roast the other side. Sprinkle some Kopra/ desiccated coconut and remove the Parta off the Tava. Enjoy.


NOTES:
1. Select leaves which are fresh and big.
2. At the base of the leaf if the stem is hard, make a V shape cut to remove the hard veins.
3. Ensure the batter is thick like a paste or else it won’t stick to the leaf. Incase the batter turns runny add more besan and adjust spice and continue with the recipe.
4. While toasting on the Tava take care not to burn them or the taste will change.
Dhaniya Wale Namak Pare (Namak Pare)
Namak Para’s are a simple dry snack made from refined flour or whole wheat flour. They make for a good tea time snack too. Here the flour is combined with salt and spices to form a stiff dough. The dough is then rolled out and cut into diamonds and deep-fried in oil. This is an easy savory recipe to make around festivals like Diwali or Janmashtami where the tradition calls for making some flour-based snacks. One can just make it as a regular tea time snack too.


If you tried this recipe and liked it please comment below. I would love to hear from you. If you have a query about the recipe email us and ill respond as soon as I can.
Ratlami Sev
Usually every Diwali I make the usual Omapodi( sev) , Tenkozhal and Ribbon Pakoda. This time I have tried something different. This is called the Ratlami Sev and though we get it at the sweet shops and some brands also market it, I have never tried making it at home. The credit to this recipe goes to @indiankhana.net , where I found this while browsing for something new.
This is a simple recipe( oh yes, I mostly pick simple, as that’s what we all want). Very similar to the Kara Sev of South India, but different in taste because of the masalas used and the Ratlami Sev does not have rice flour, while the Kara Sev does.
This savory gets its name from a place in Madhya Pradesh, India, called Ratlam, where it is famous. As I mentioned it is a quick recipe and difficult to resist munching.
While you are here checkout my other Diwali Sweet and Savoury recipes like Maa Ladoo, Thattai, Gajar Halwa Barfi, Masala wheat flour Papdis, Baked Samosa pie, and more…
Here is the recipe of Ratlami Sev
Ingredients:
Besan/ chickpea flour 1 cup
Cooking Soda 1 pinch
Hot oil 3 tbsp
Salt as required
Red chilli powder 3/4 to 1 tsp depending on taste
Turmeric powder 1/2 tsp
Clove powder 1/4 tsp
Fennel powder 1/4 tsp
Pepper powder 1/4 tsp
Ginger powder 1/4tsp
Black salt 1/4 tsp
Cinnamon powder 1/4 tsp
Ajwain powder 1/4 tsp
Roasted Cumin powder 1/2 tsp
Asafoetida 1/2 tsp
Dry ginger powder 1/4 tsp
Lemon juice 2 tsp
Oil for deep frying
Directions:
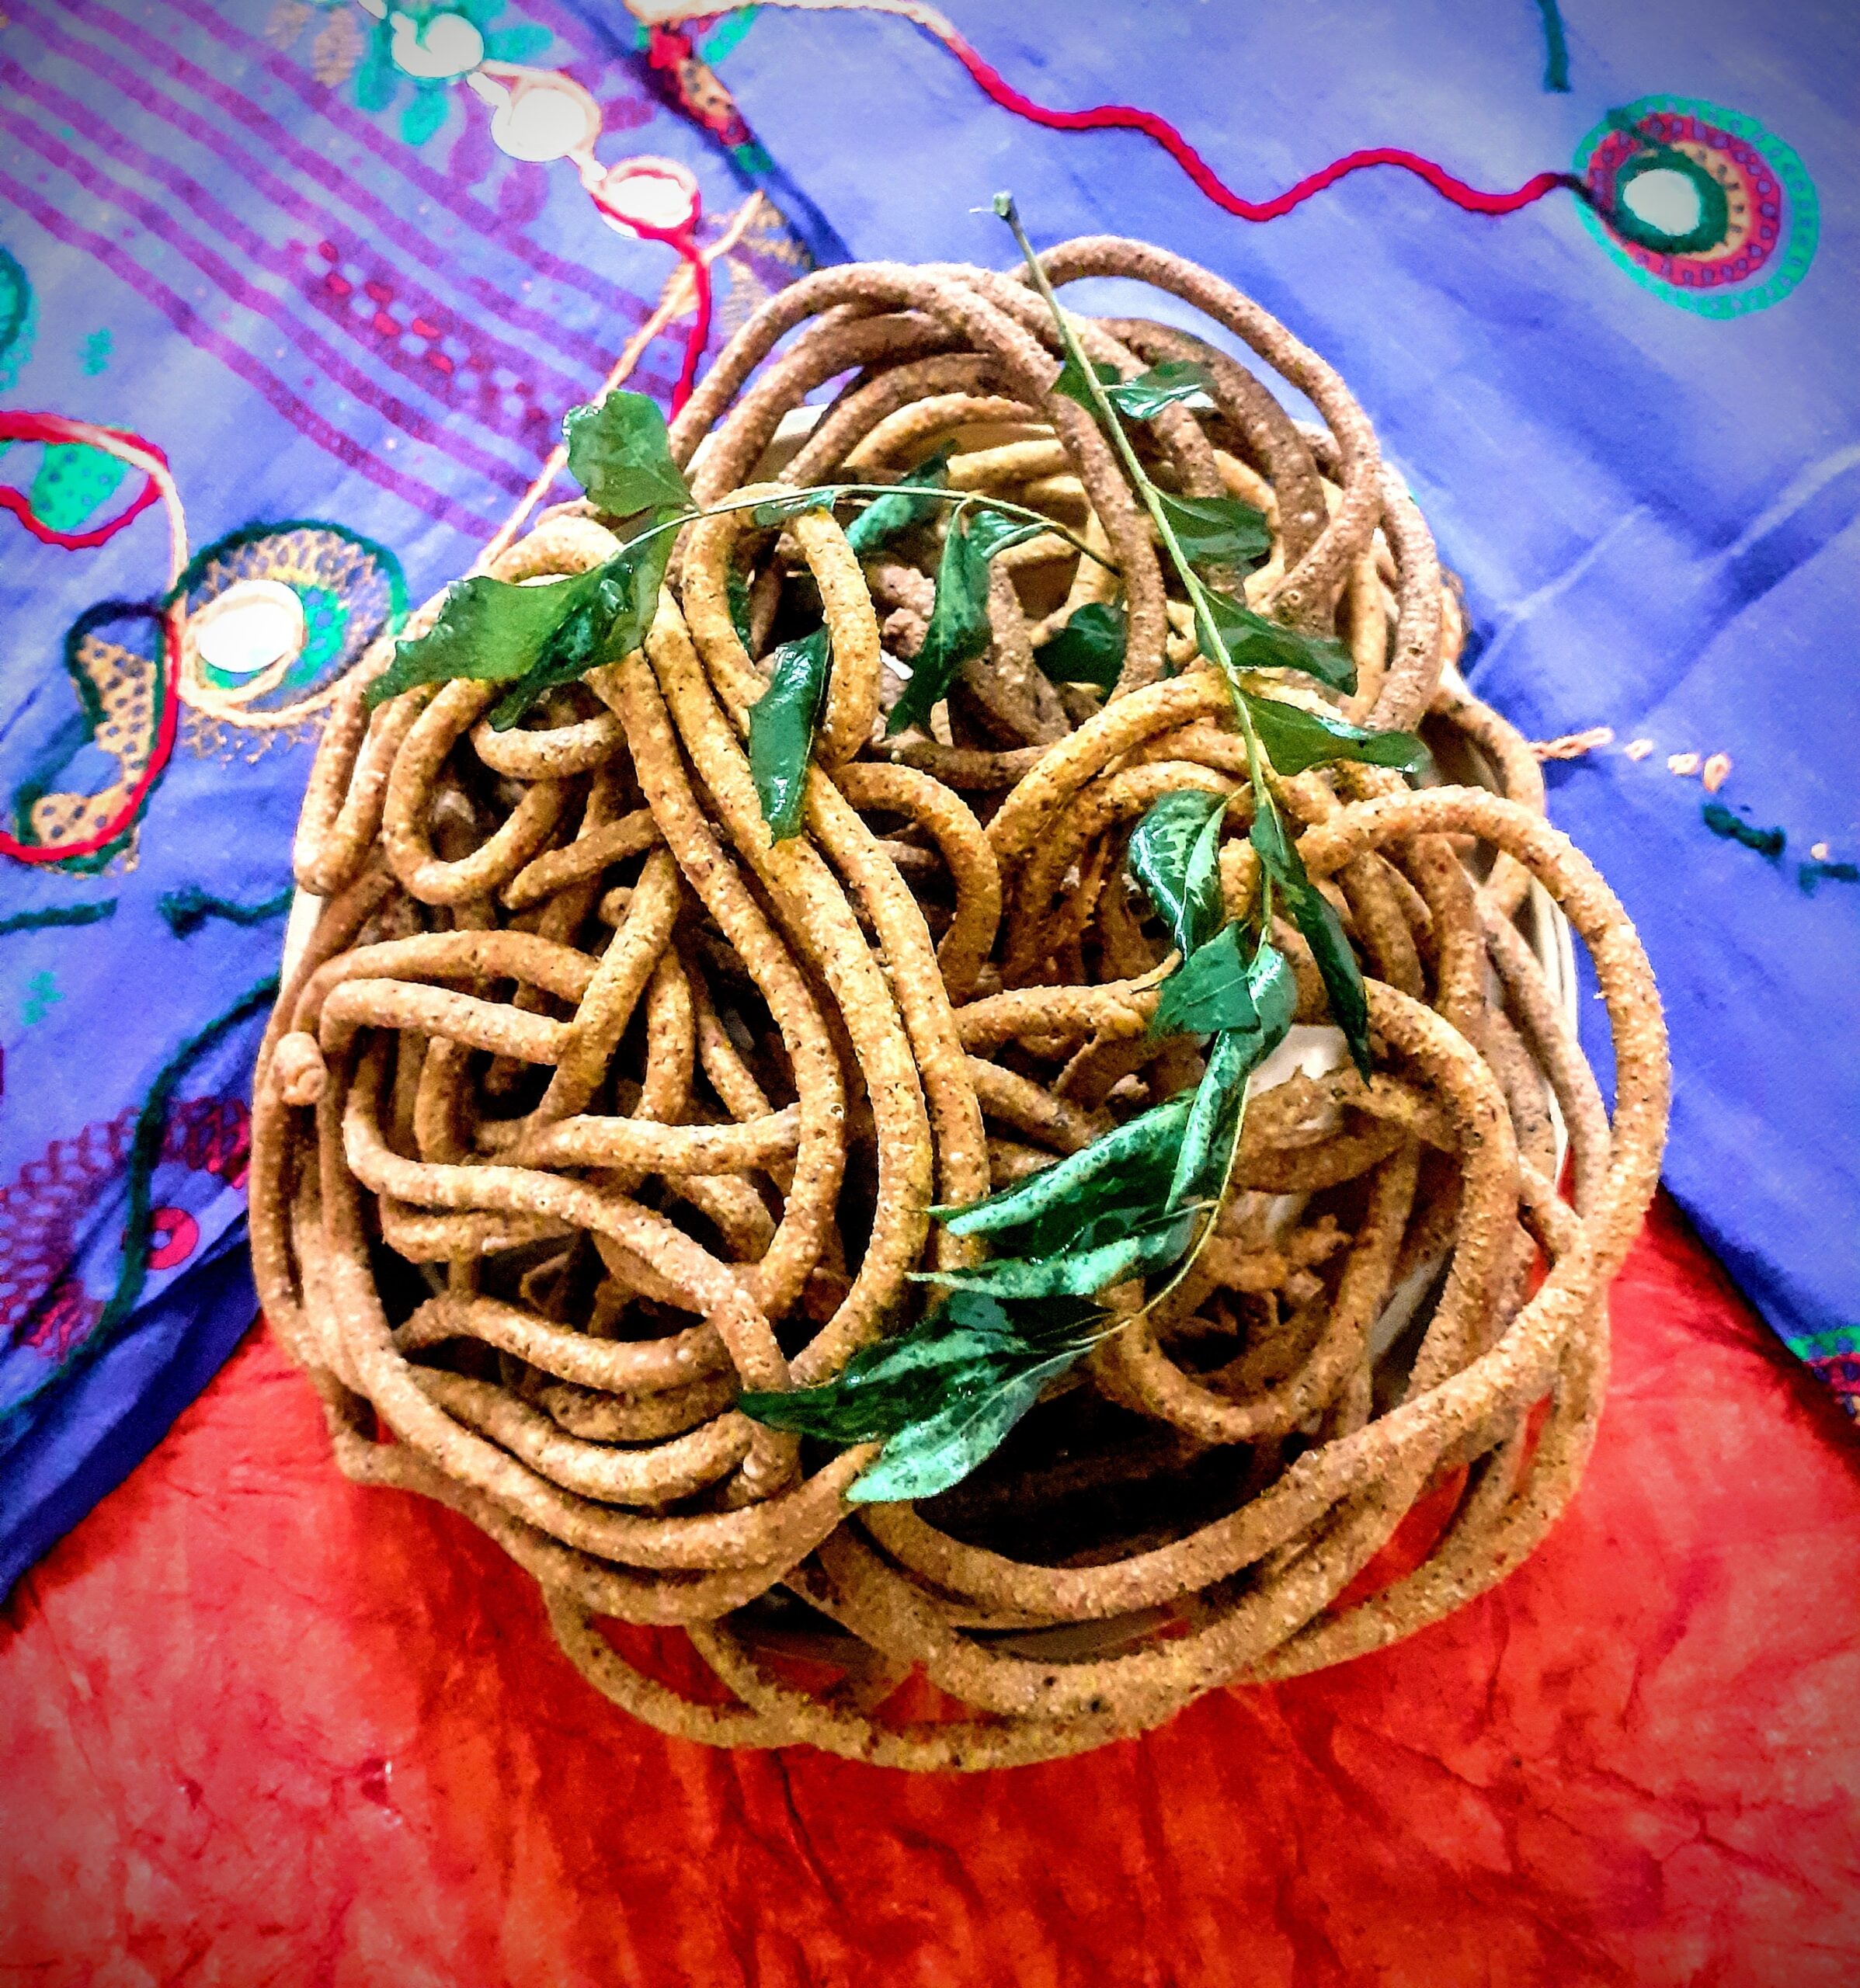
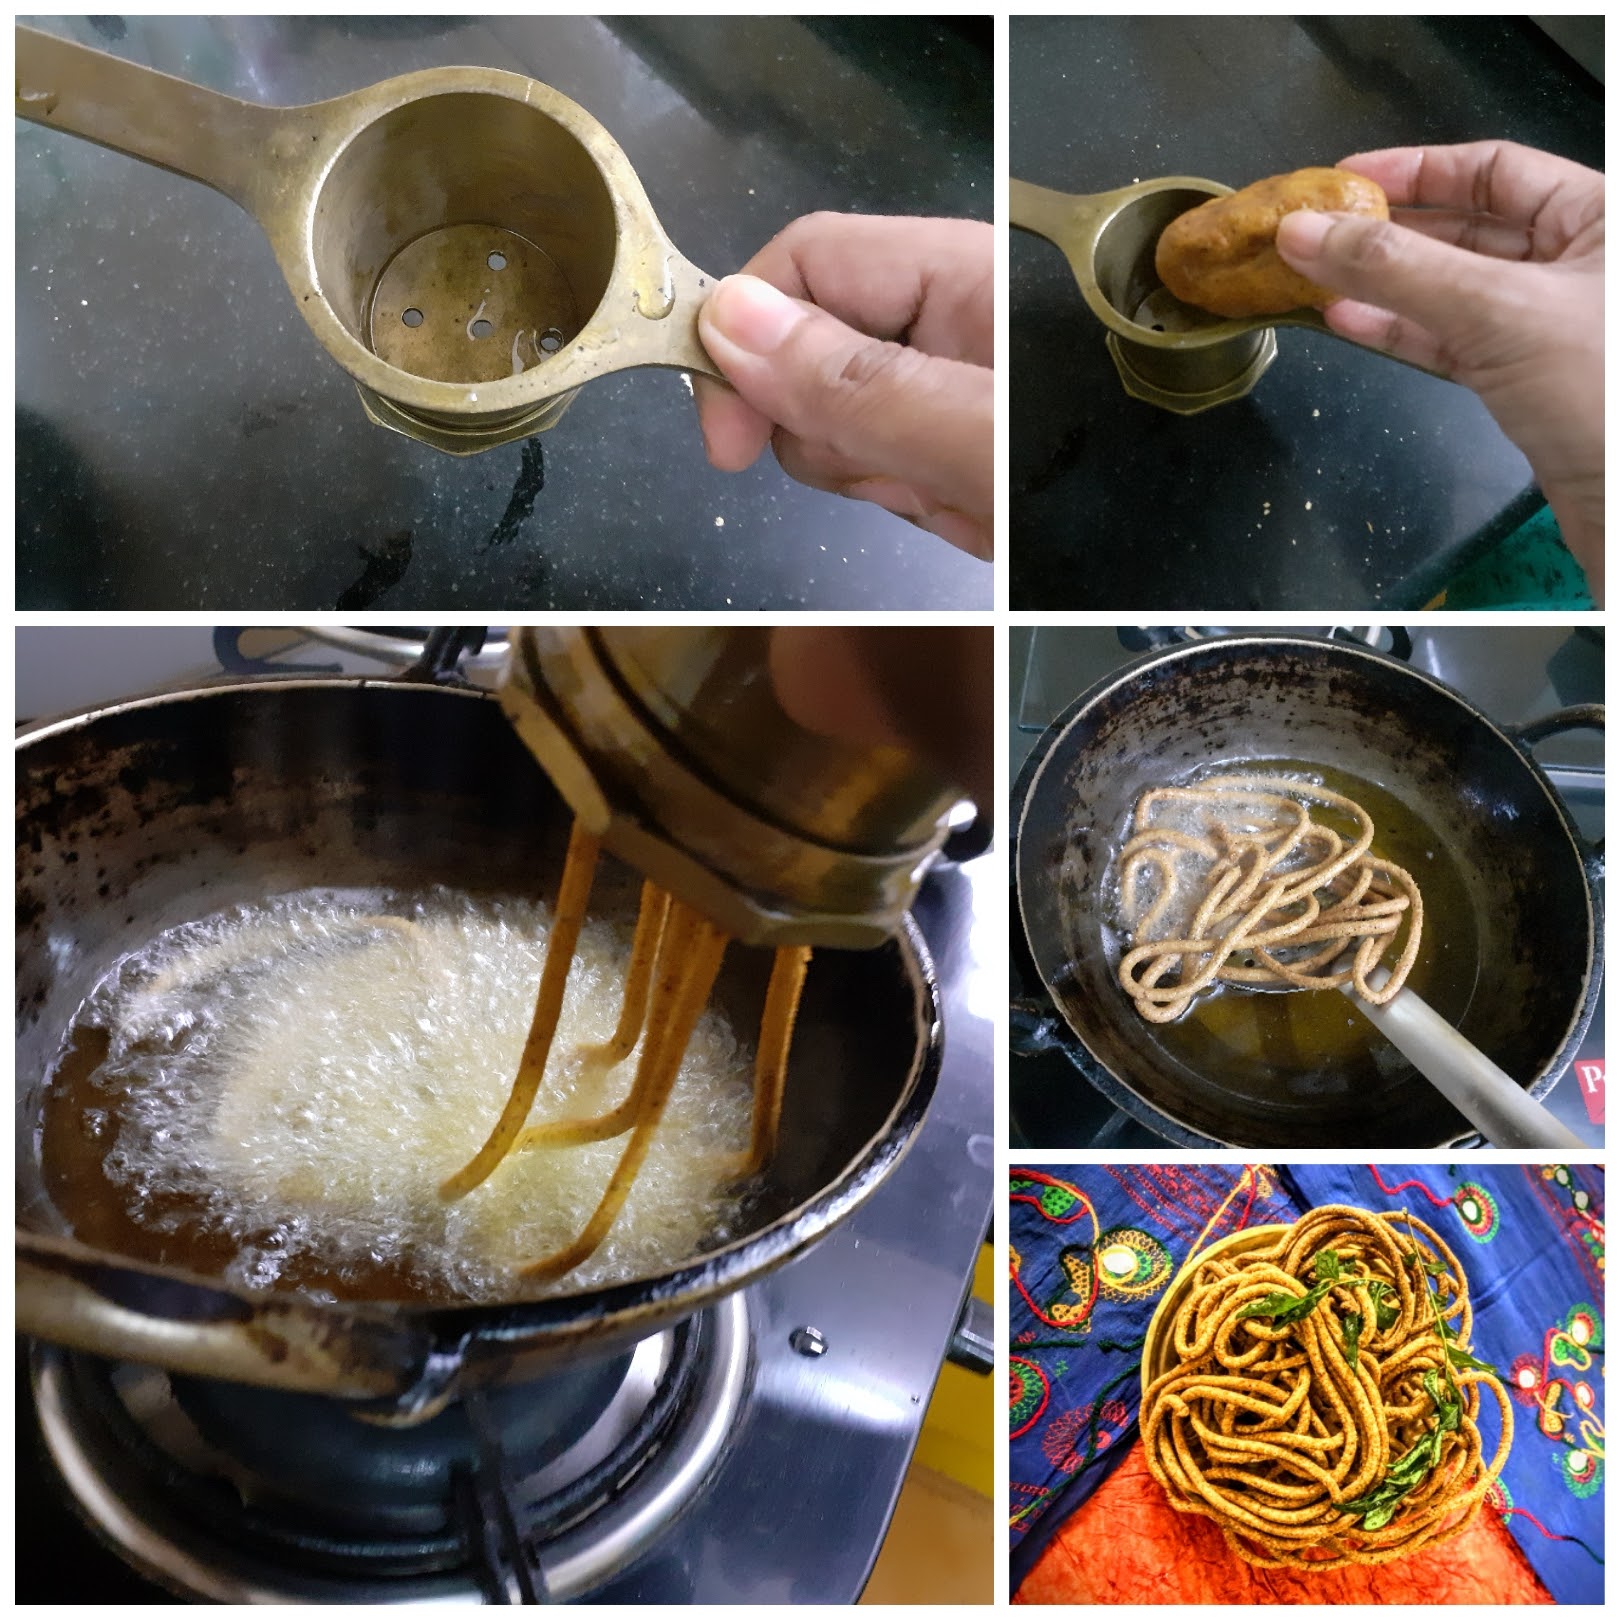
In a mixing bowl take the Besan/ Chickpea flour. To it add Salt, red chilli powder, turmeric powder and all the other powders like clove, fennel, cinnamon, Ajwain/ carrot seeds, black salt and asafoetida , cooking soda,and 2 tsp of lemon juice. To this add 3 tbsp of hot oil and mix nicely with a spoon( as the oil will be hot), when it turns warm mix nicely with your fingers to form a crumbly mixture. Now adding water 1 tbsp at a time make a soft but stiff dough. Heat oil in a Karahi for deep frying. Grease the Chakli/ Muruku press with oil and put in a little dough into it and squeeze into the oil when it is hot. Oil should be medium hot. Fry on medium heat, until the bubbles subside and the Sev turns a golden brown. Repeat for the whole mixture. The spicy and flavorful Ratlami Sev is ready.
I have combined the Cinnamon Powder, pepper powder, Roasted cumin powder, dry ginger powder, fennel powder, clove powder, Ajwain powder, and black salt, in the given measures and made it as a single powder, and am calling it the Ratlami spice mix.
Some of these powders we might not have at home readily, for which one can roast 1 tsp of all the given ingredients under Ratlami spice mix as a whole and powder them. Use 1 to 1.5 tsp of this for the recipe.
STEPWISE RECIPE FOLLOWS:
1. In a mixing bowl take the Besan/ Chickpea flour. To it add salt, red chilli powder, turmeric powder, and Ratlami spice mix( refer paragraph above). Also, add the asafoetida, Cooking soda, and 2 tsp lemon juice. (I forgot to add salt in the beginning and have added towards the end as you will see in one of the pictures).
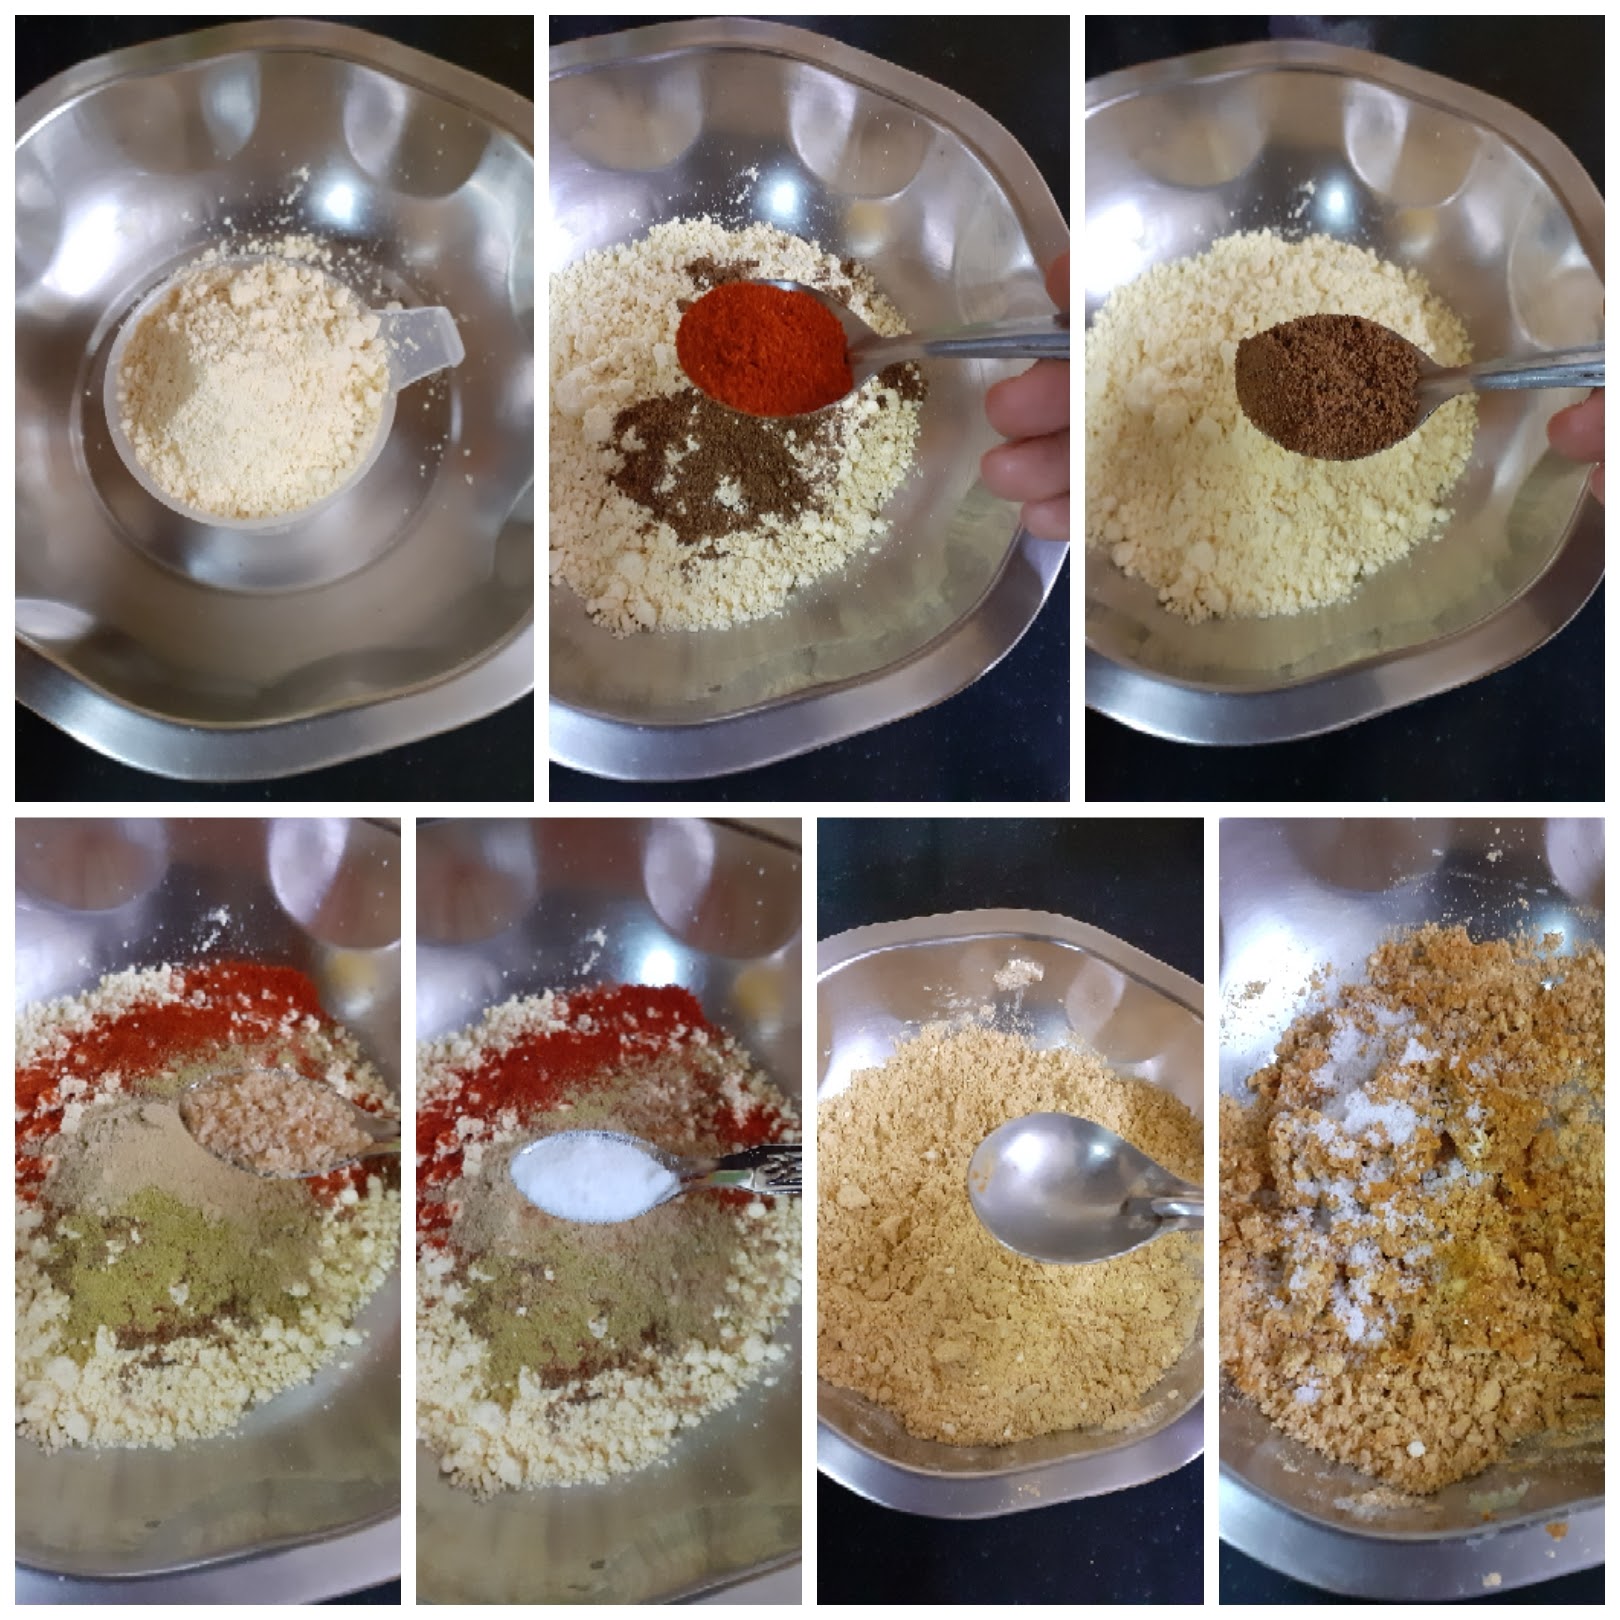
2. Now heat 3 tbsp oil in a Kadai ( heat it well, but don’t turn it smoky) and pour it into the Besan and spice mixture. Using a spoon combine well(do not use your hand now as the oil is hot).
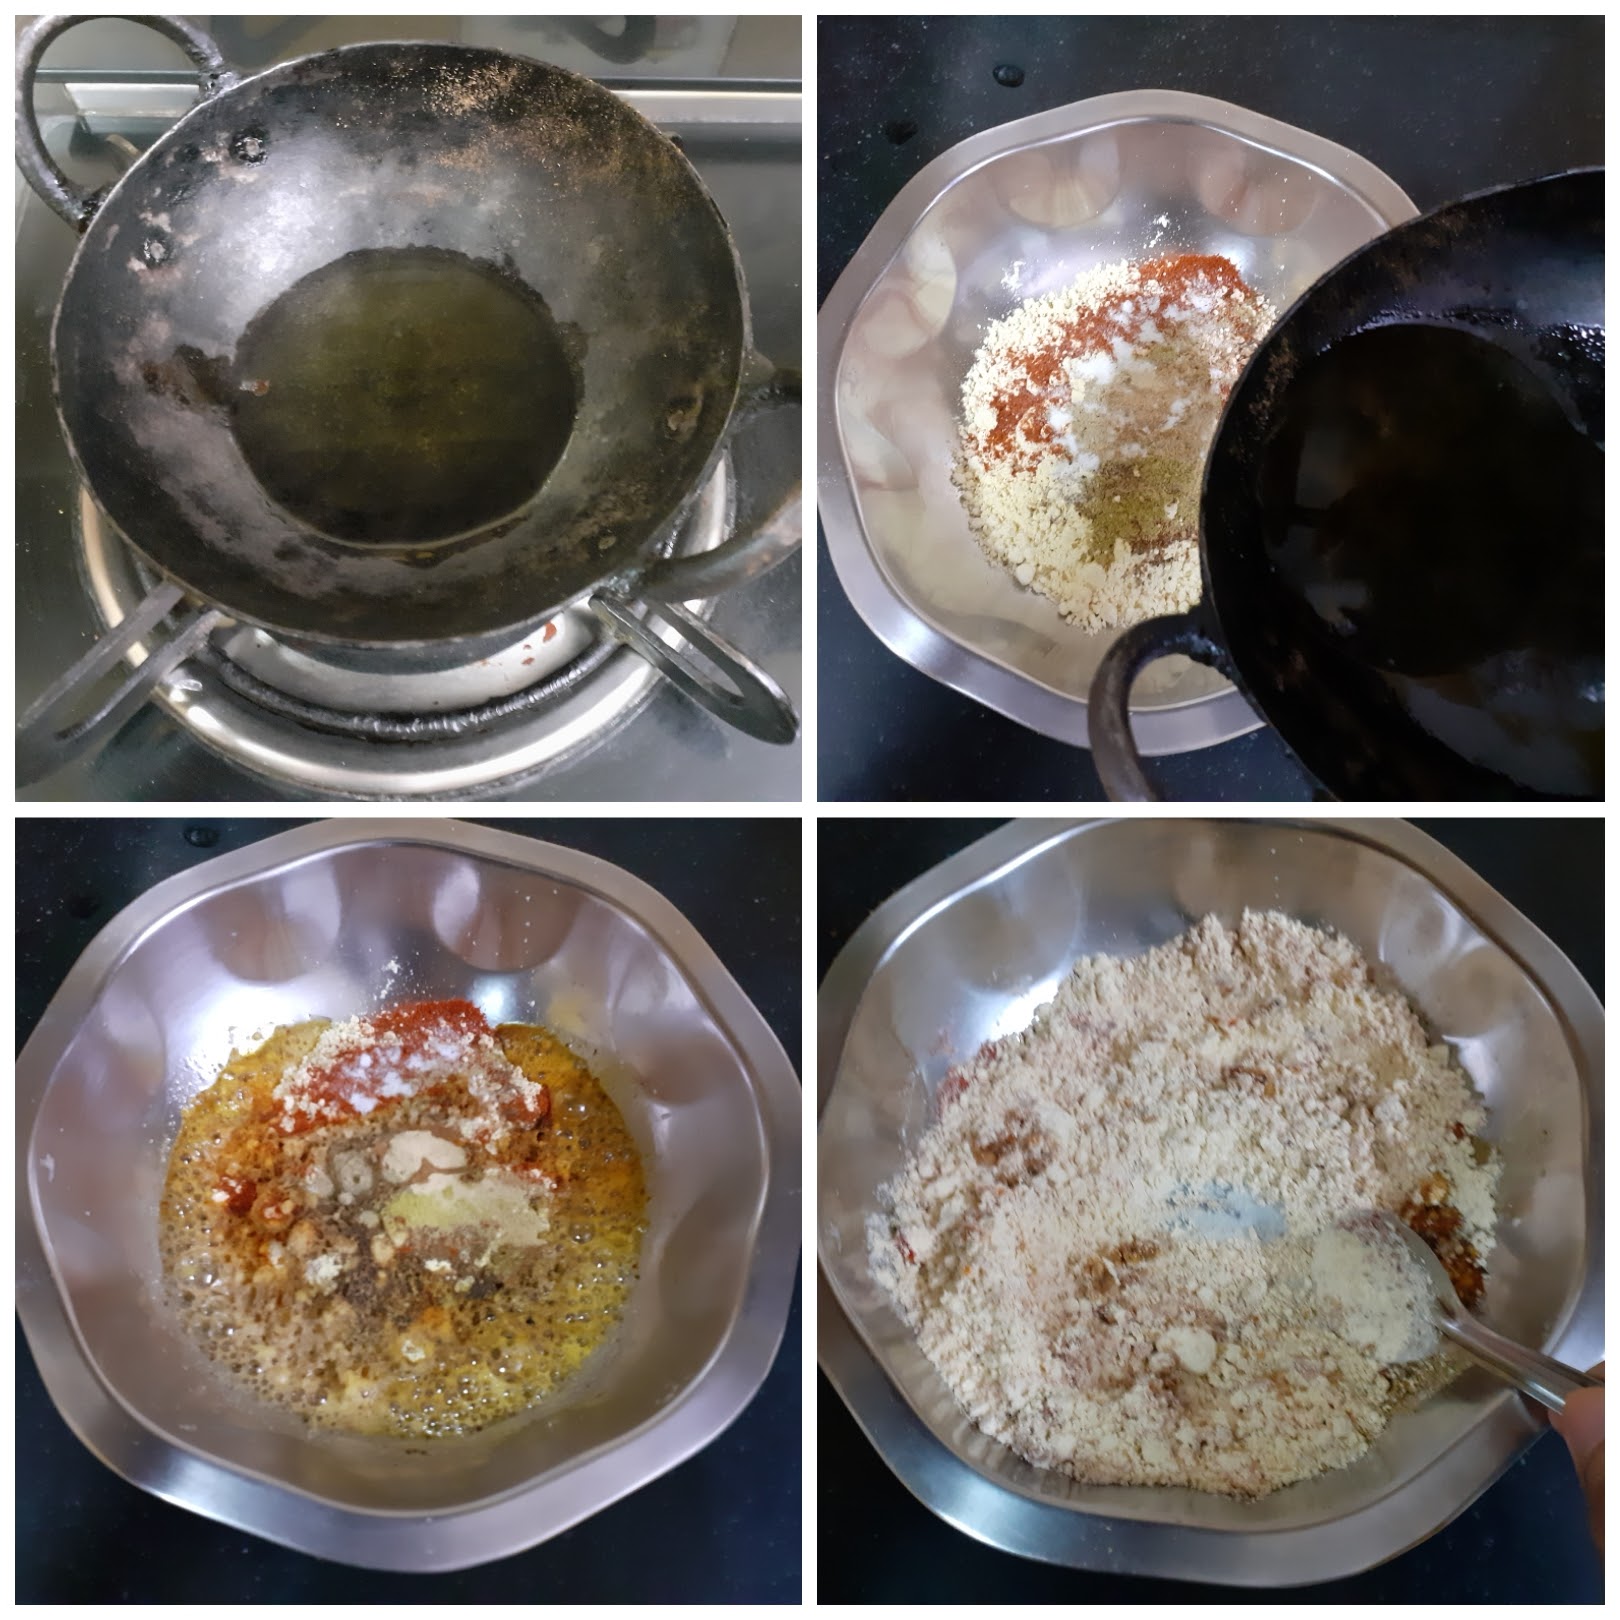
3. After it turns a little warm, using your fingers nicely mix the mixture until it turns crumbly. Now adding water one tablespoon at a time start combining it to form a soft but stiff dough. We want a dough that is easy to squeeze through, but also stiff enough to retain shape. I used about 3 tbsp water to make my dough.
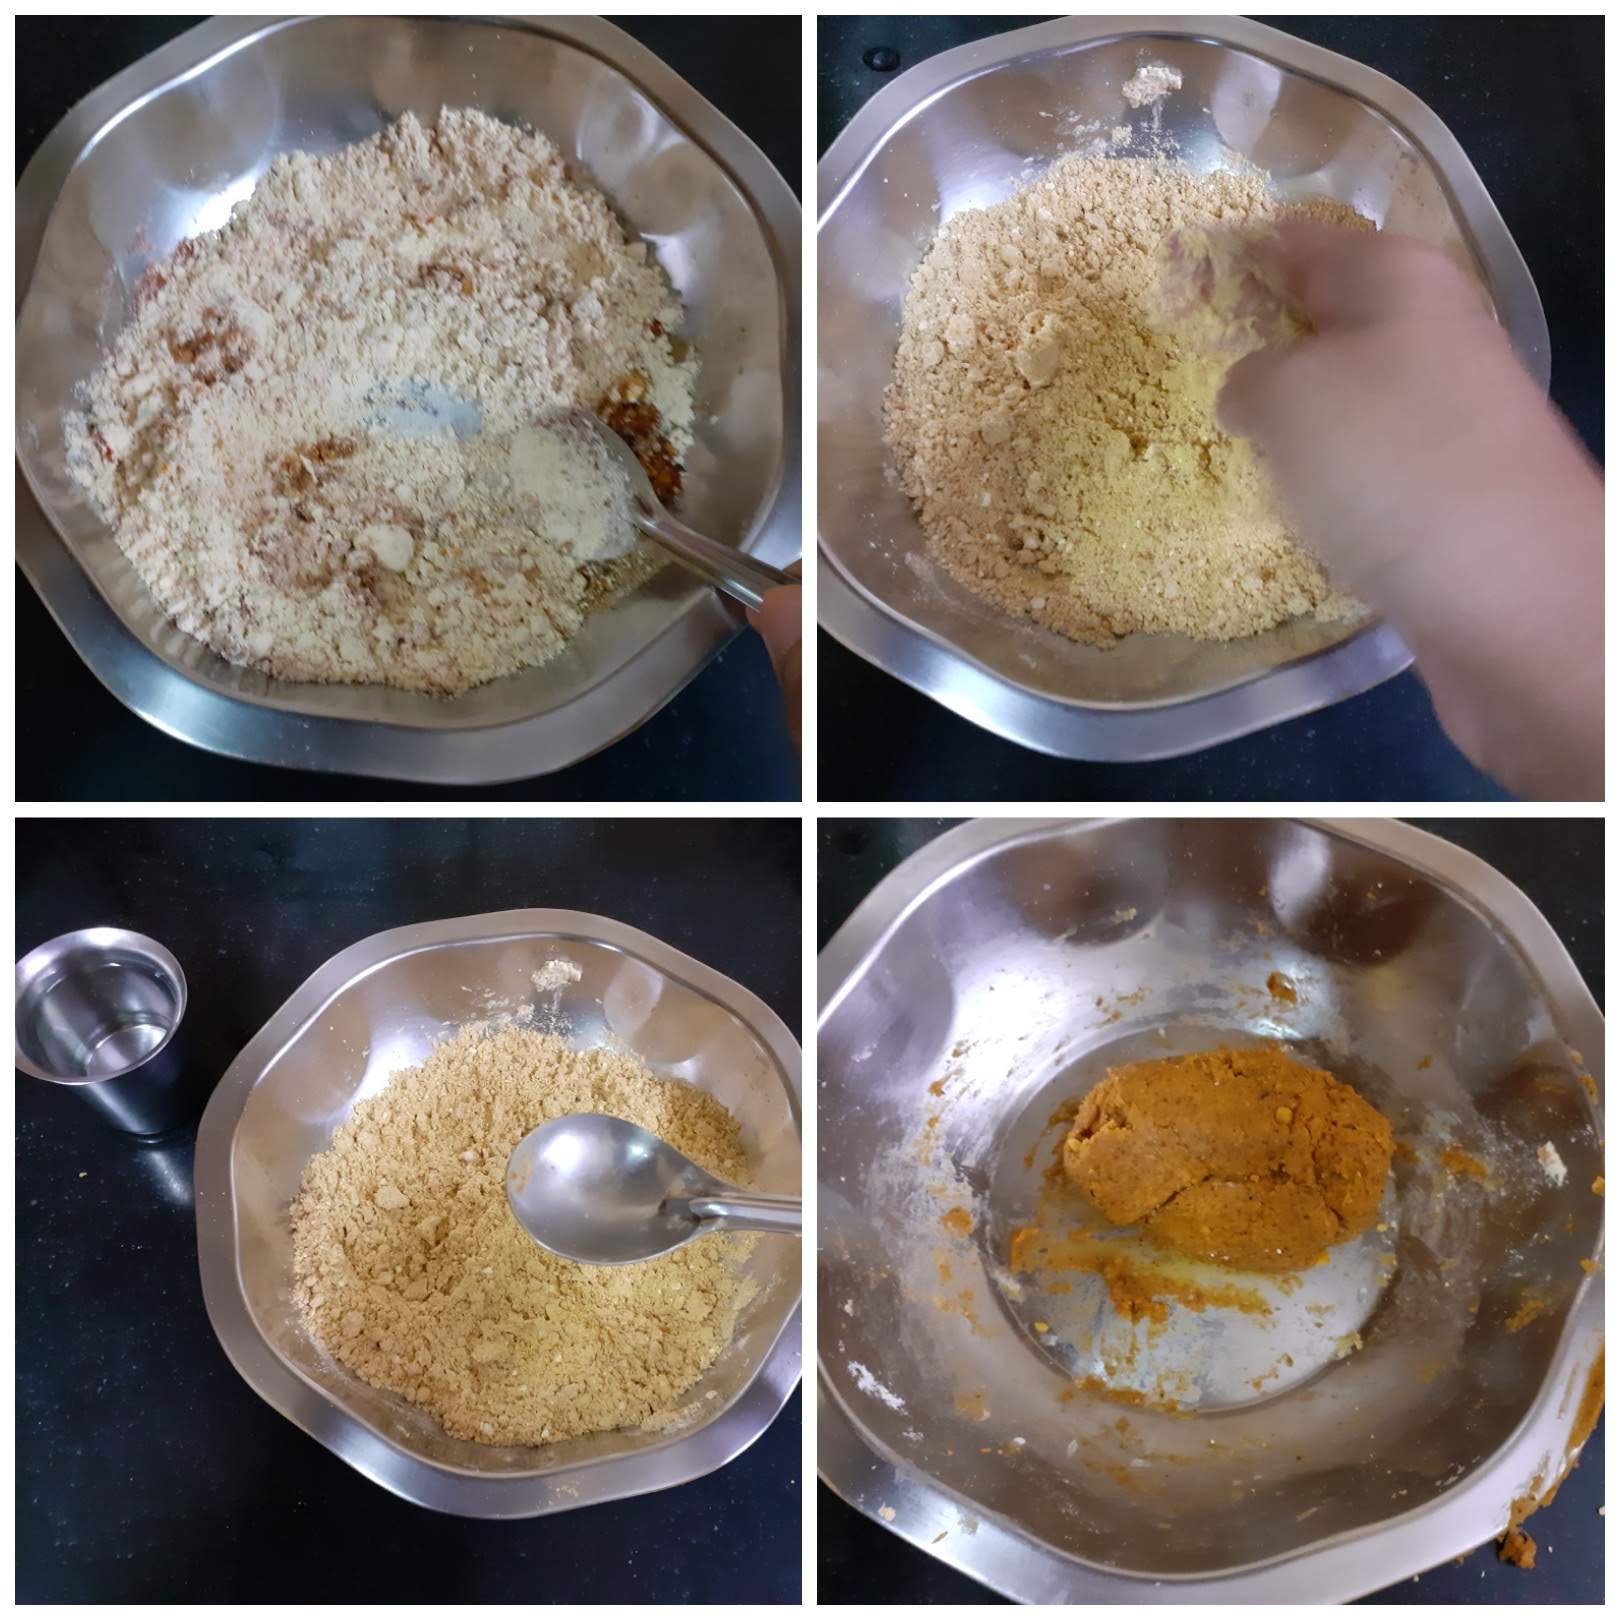
4. Heat oil for deep frying on medium-high. Grease the Chakli/ Muruku press with oil and put in a little dough into it and squeeze into the oil when it is hot. Oil should be medium hot. Fry on medium heat, until the bubbles subside and the Sev turns a golden brown. Repeat for the whole mixture. The tasty and spicy Ratlami Sev is ready.
NOTES:
1. Some of these powders we might not have at home readily, for which one can roast 1 tsp of all the given ingredients under Ratlami spice mix as a whole and powder them. Use 1 to 1.5 tsp of this for the recipe.
2. I used 3 tbsp water, one can use more as required as different qualities of Besan absorb water differently.
3. Take care not to use your fingers as soon as you pour hot oil in the mix. Let it become warm and then use your fingers to combine.
If you tried this recipe and liked it please comment below. I would love to hear from you. If you have a query about the recipe email us and ill respond as soon as I can.
Masala Wheat Flour Papdis (Baked)
Masala Wheat Flour Papdis are crunchy crisps made of wheat flour. The wheat flour here can be easily replaced with maida/refined flour or multigrain flour. I usually fry these Papdis, but this time I have baked them as per the request of friends and followers as they wanted something that was not deep-fried. That said, these Papdis can be fried too and I have given both options in this recipe.
When we bake a snack that is traditionally deep- fried there is always a difference in texture. It would be wrong to say that they taste almost like fried ones. The taste is the same, the papdis are crunchy too, but there is a difference in their textures. I also believe that when we prefer a baked snack over a fried one we are willing to adjust to the minute differences that are bound to be there because the technique used is different. Therefore you will not find phrases like “baked but almost like fried” or “baked but as good as fried”, on this blog. Baked is baked and fried is fried, and somewhere there is a compromise in either, shape, colour, texture, taste of the dish. I am not saying this only about the current recipe but in general. When a deep-fried dish is baked there are differences.
This is why I try to keep the fried ones fried, but sometimes I do give in to a little experimenting. I won’t do something because it is a trend, but if I do experiment and the result is blog-worthy I will certainly share it with you all.
Now, these Papdis can be served with tea, they last for a long time when stored in an airtight container. I also make Papdi Chat(street food delicacy) with these, and since they are firm than the Maida papdis, they hold up the sweet curd and chutneys of the Chaat well.
While you are here please do look at other snack recipes by Rajjo’s kitchen like Semolina Cheese Balls, Kothimbir vadi, Stuffed kuzhi Paniyarams, Kachori, Savory Muffins and more…
Here is the recipe of Wheat flour Papdis for you–
TOTAL TIME: 60Mins COURSE: SNACK
Ingredients:
Wheat flour 2 cups (1 cup =150 ml) Suji(semolina) 1/2 cup Salt as per taste Red chilli powder 1 tsp Ajwain(Omam/Carrom seeds) 1 tsp Oil 3 tbsp for flour (refer note1) Fresh Coriander or Methi(fenugreek)leaves 1/2 cup finely chopped White sesame 1 tsp (optional) Water as required
Directions:
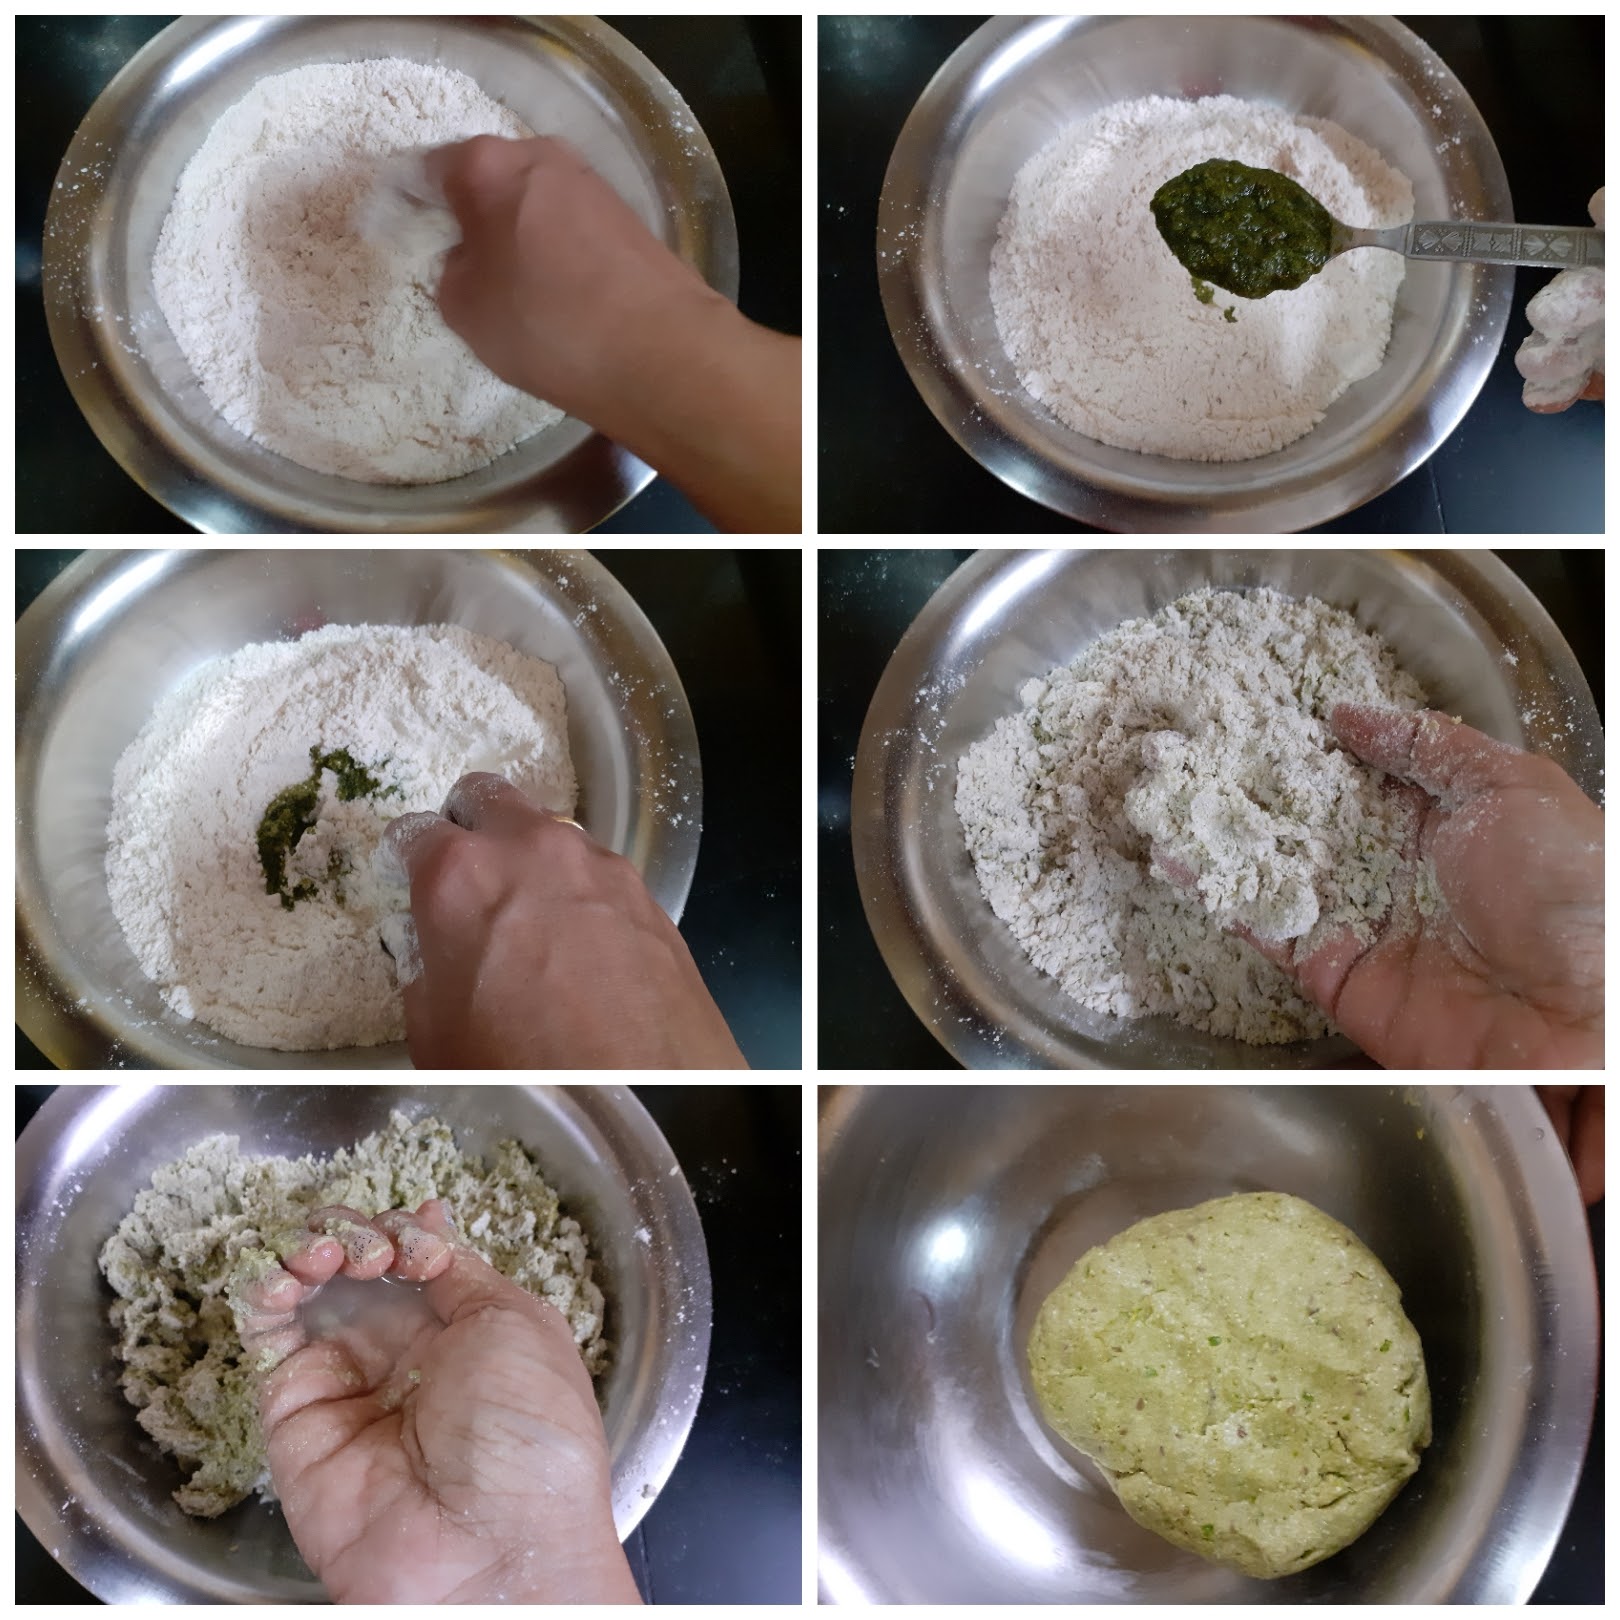
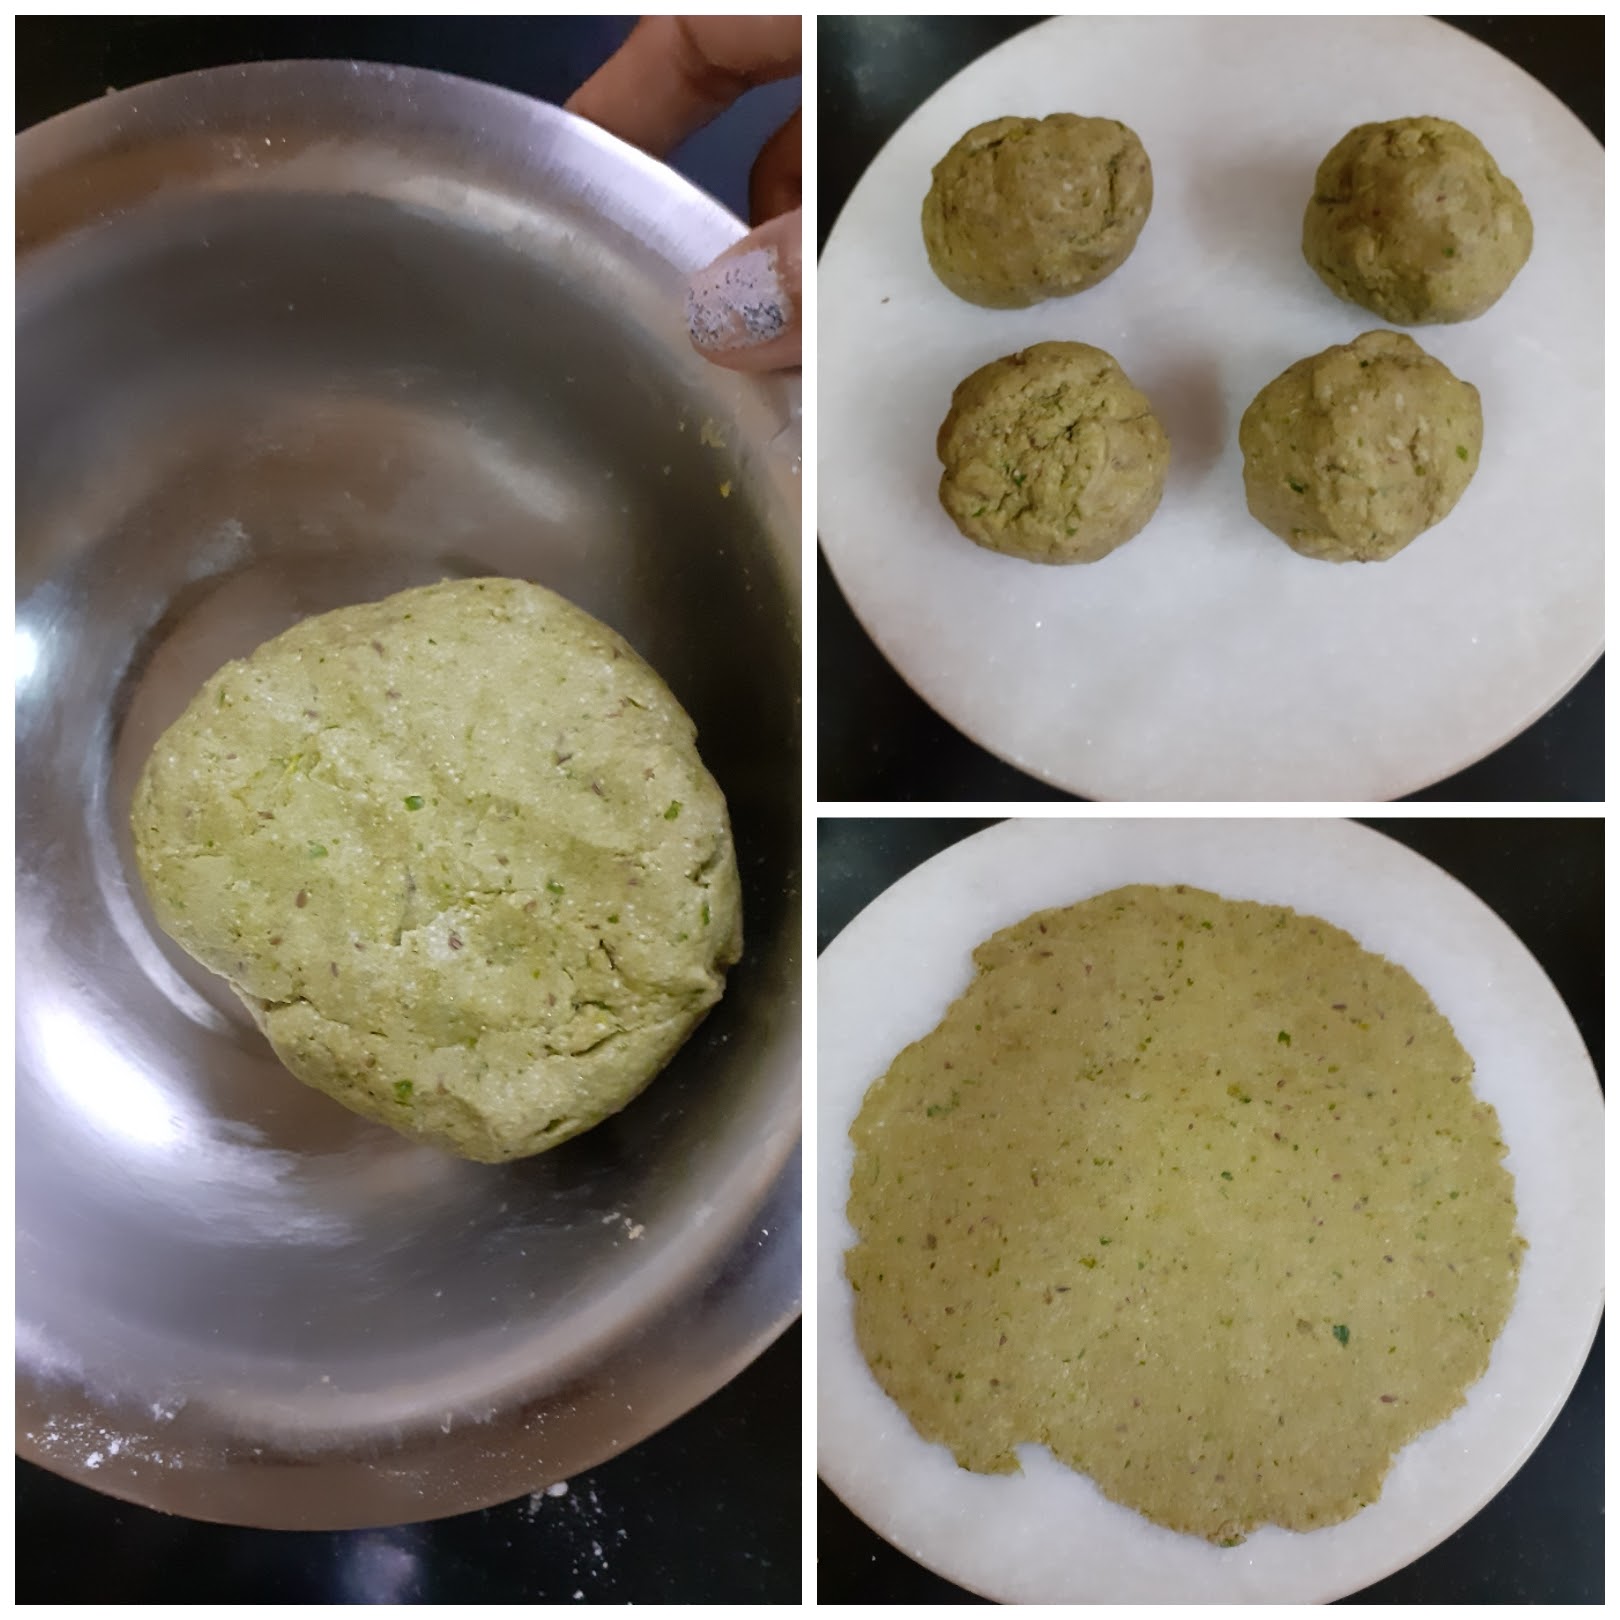
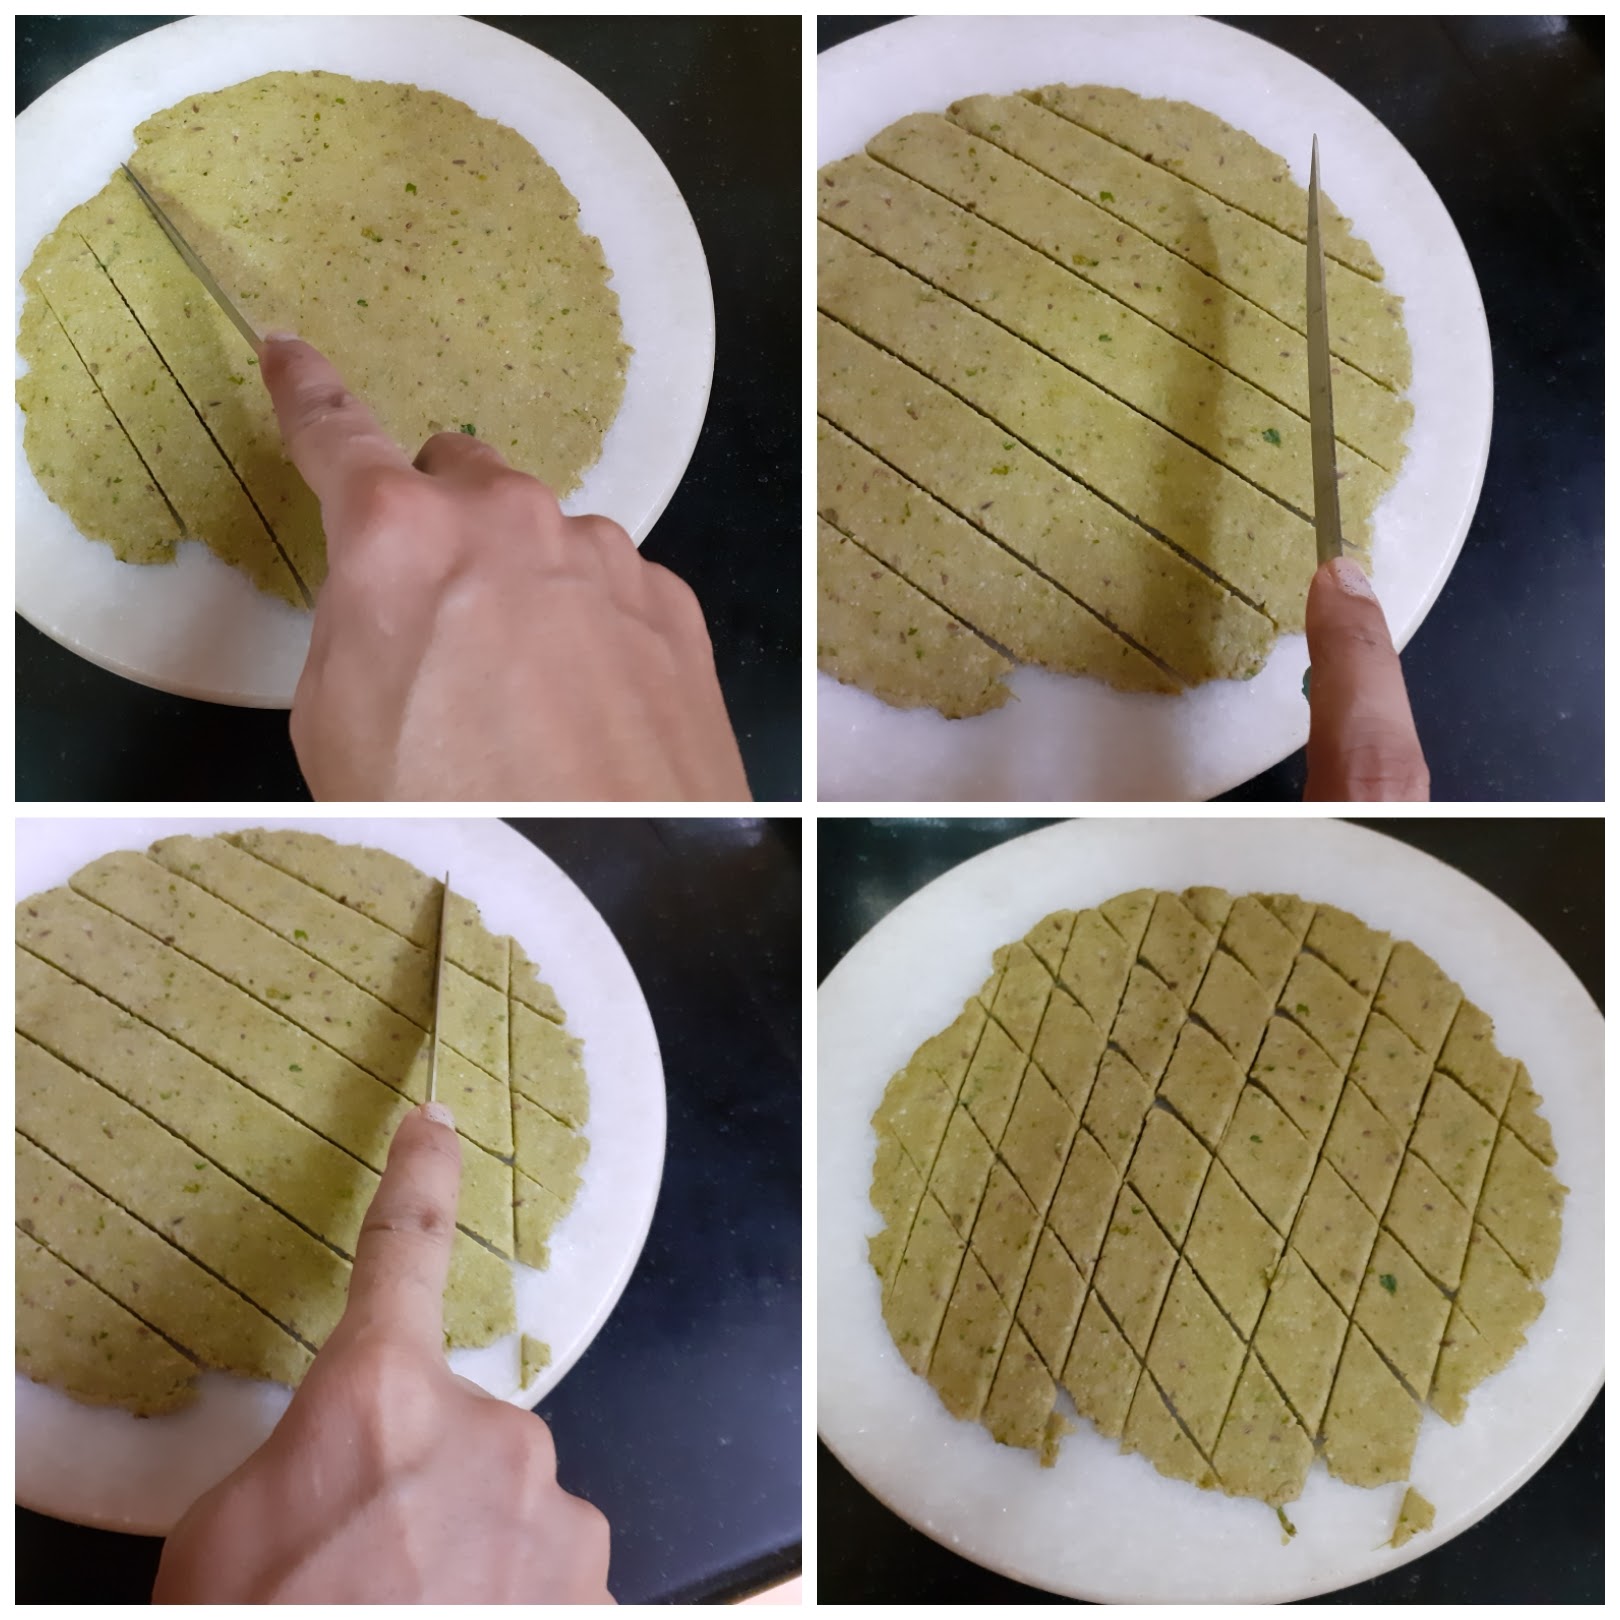
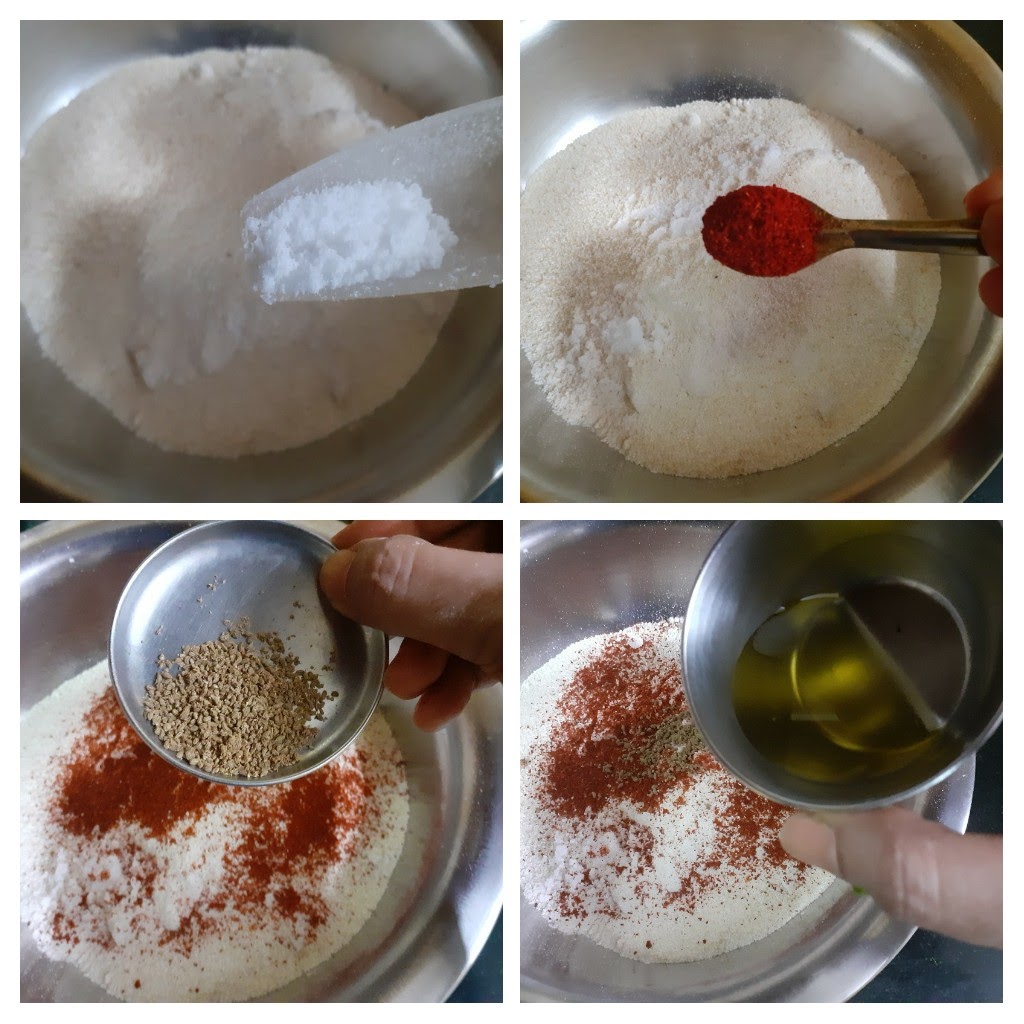
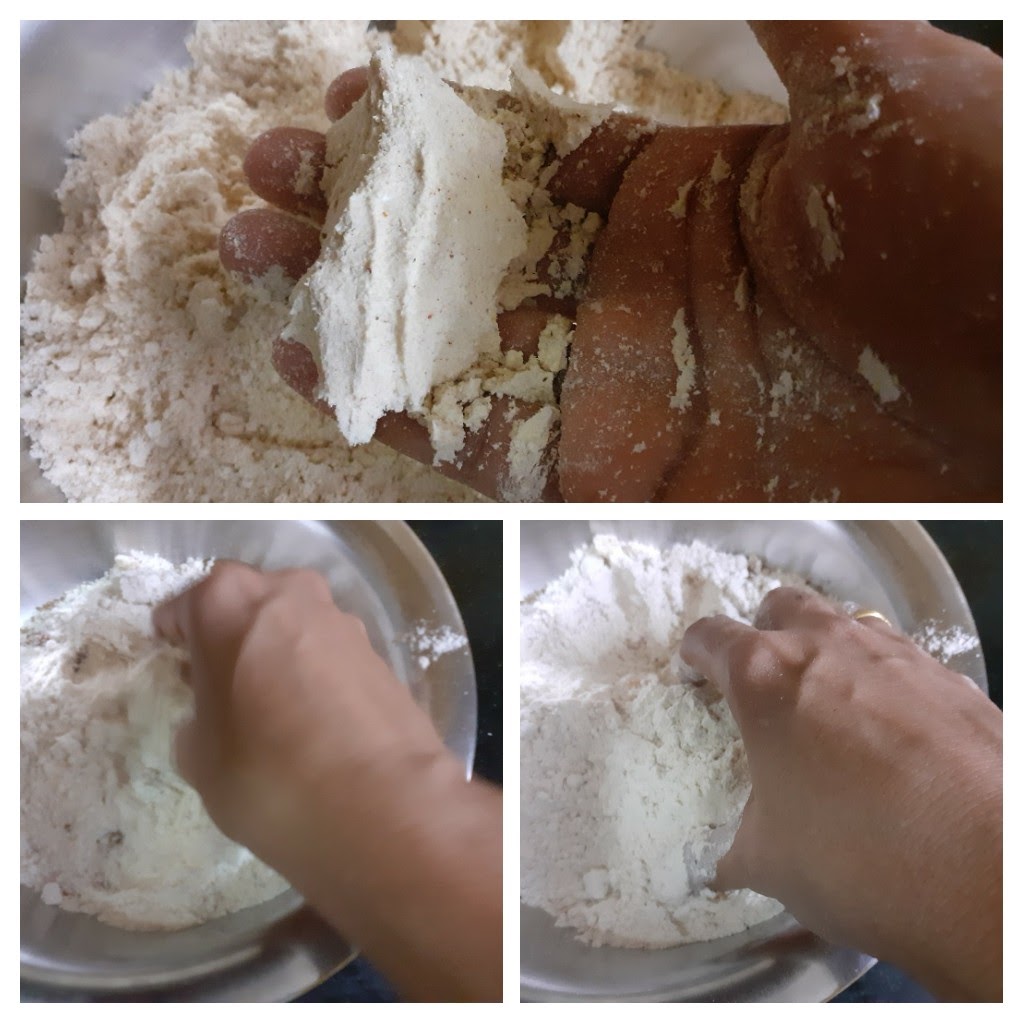
In a dish take the wheat flour and add the suji/semolina to it. Now add the salt, red chilli powder, ajwain followed by the 3 tbsp oil. Start mixing the flour with your fingers, such that the spice powders and oil are well mixed with the flour. Now take some flour in your palm and clamp it together with your fingers. If the flour holds shape, water can be added little by little now. But before that add the chopped coriander/methi leaves, mix it with the flour well and now start adding water little by little. We want a stiff dough here. The consistency should be like the dough for Poorie. Now apply very little oil on the dough and rest it or 15 minutes. Now divide the dough into 4 or 5 balls. Roll out each ball into a thin circle, flour for dusting if required. Sprinkle some sesame seeds on the rolled and flattened dough and roll again so that the sesame seeds stick to the dough. Now with a cookie cutter or lid of a bottle cut into a circle. Remove excess dough from sides. prick holes with a fork on the little papdis.
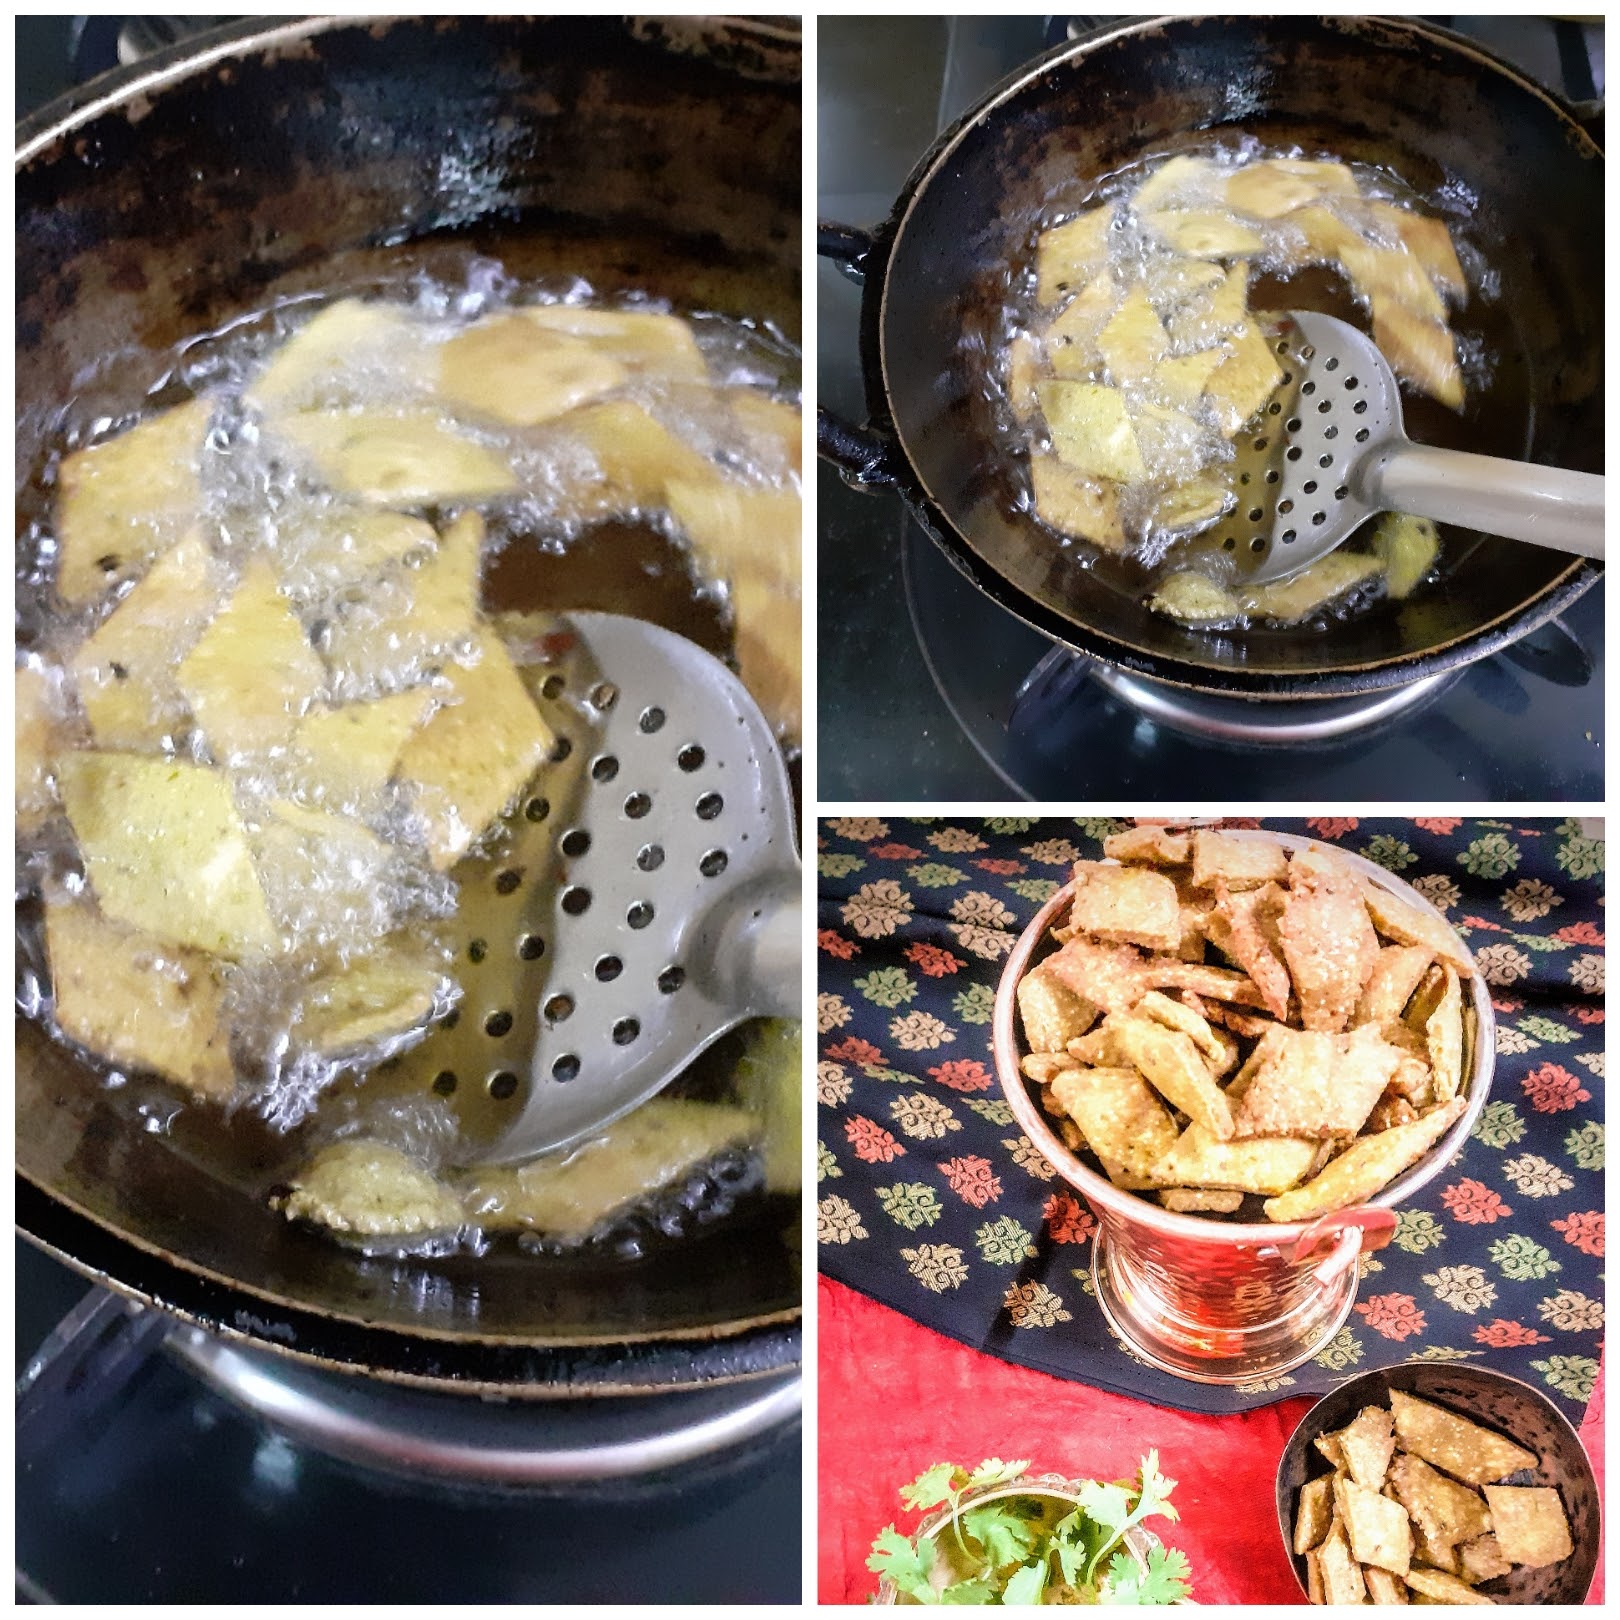
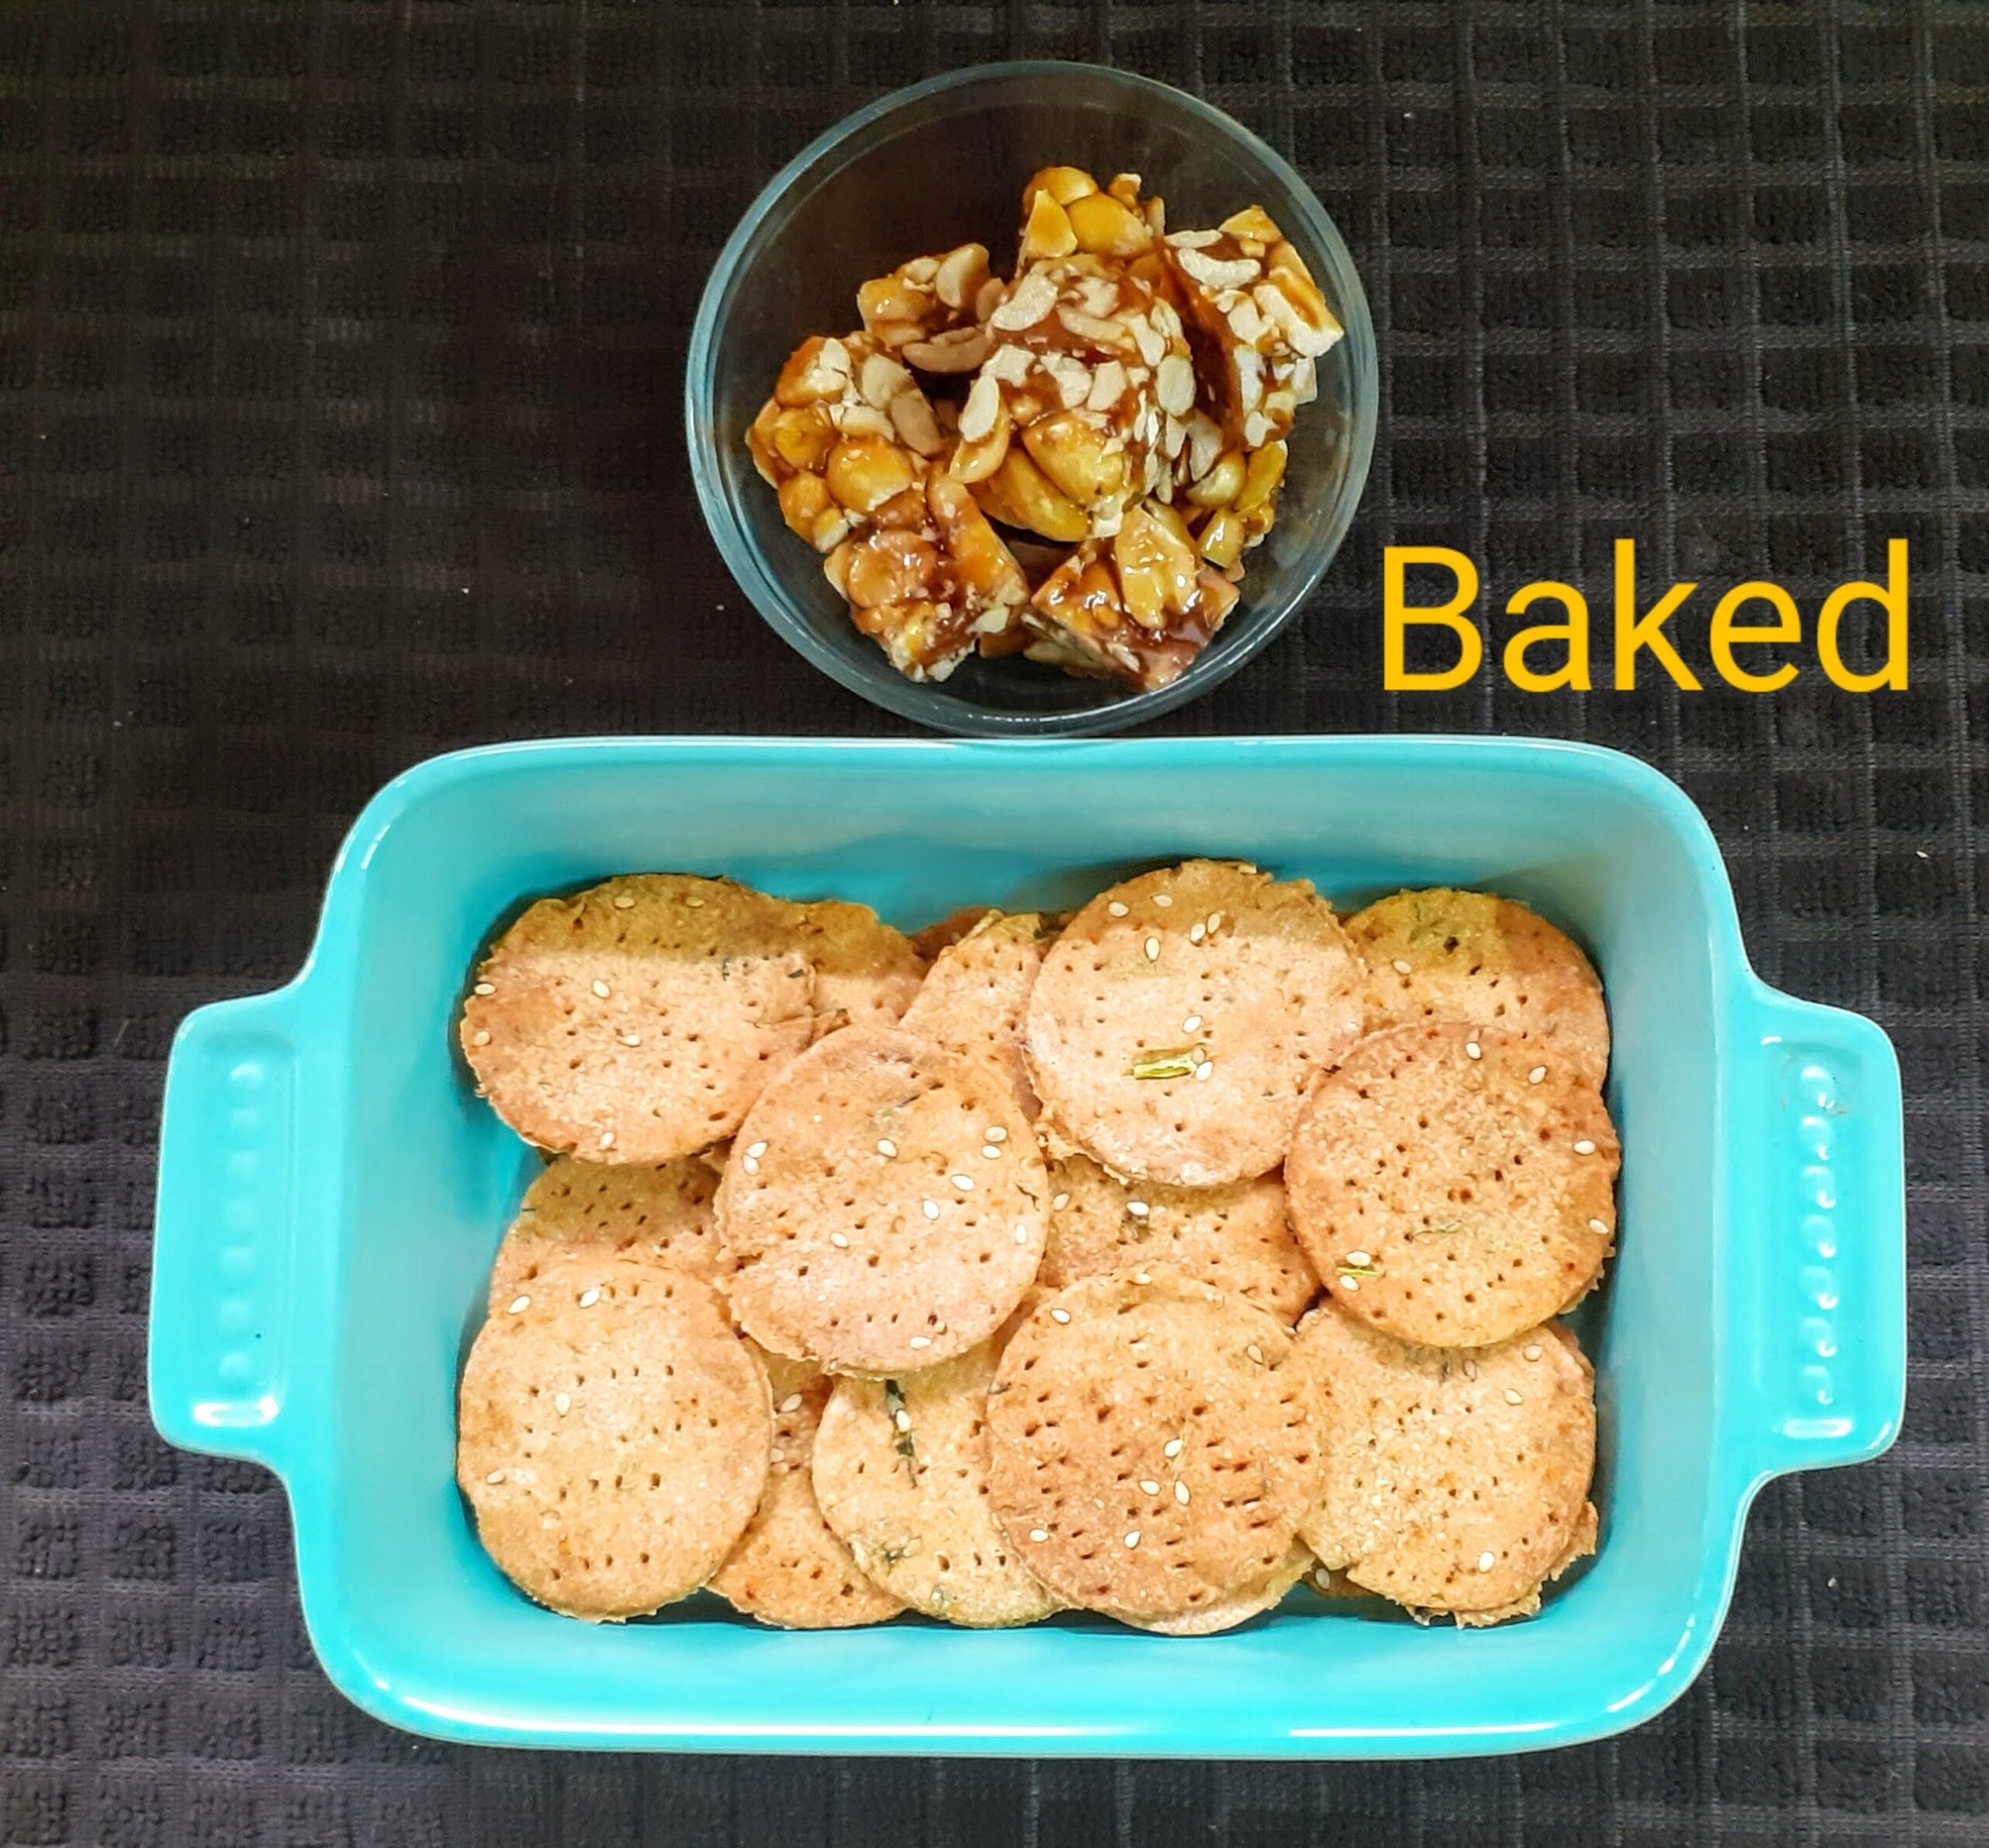
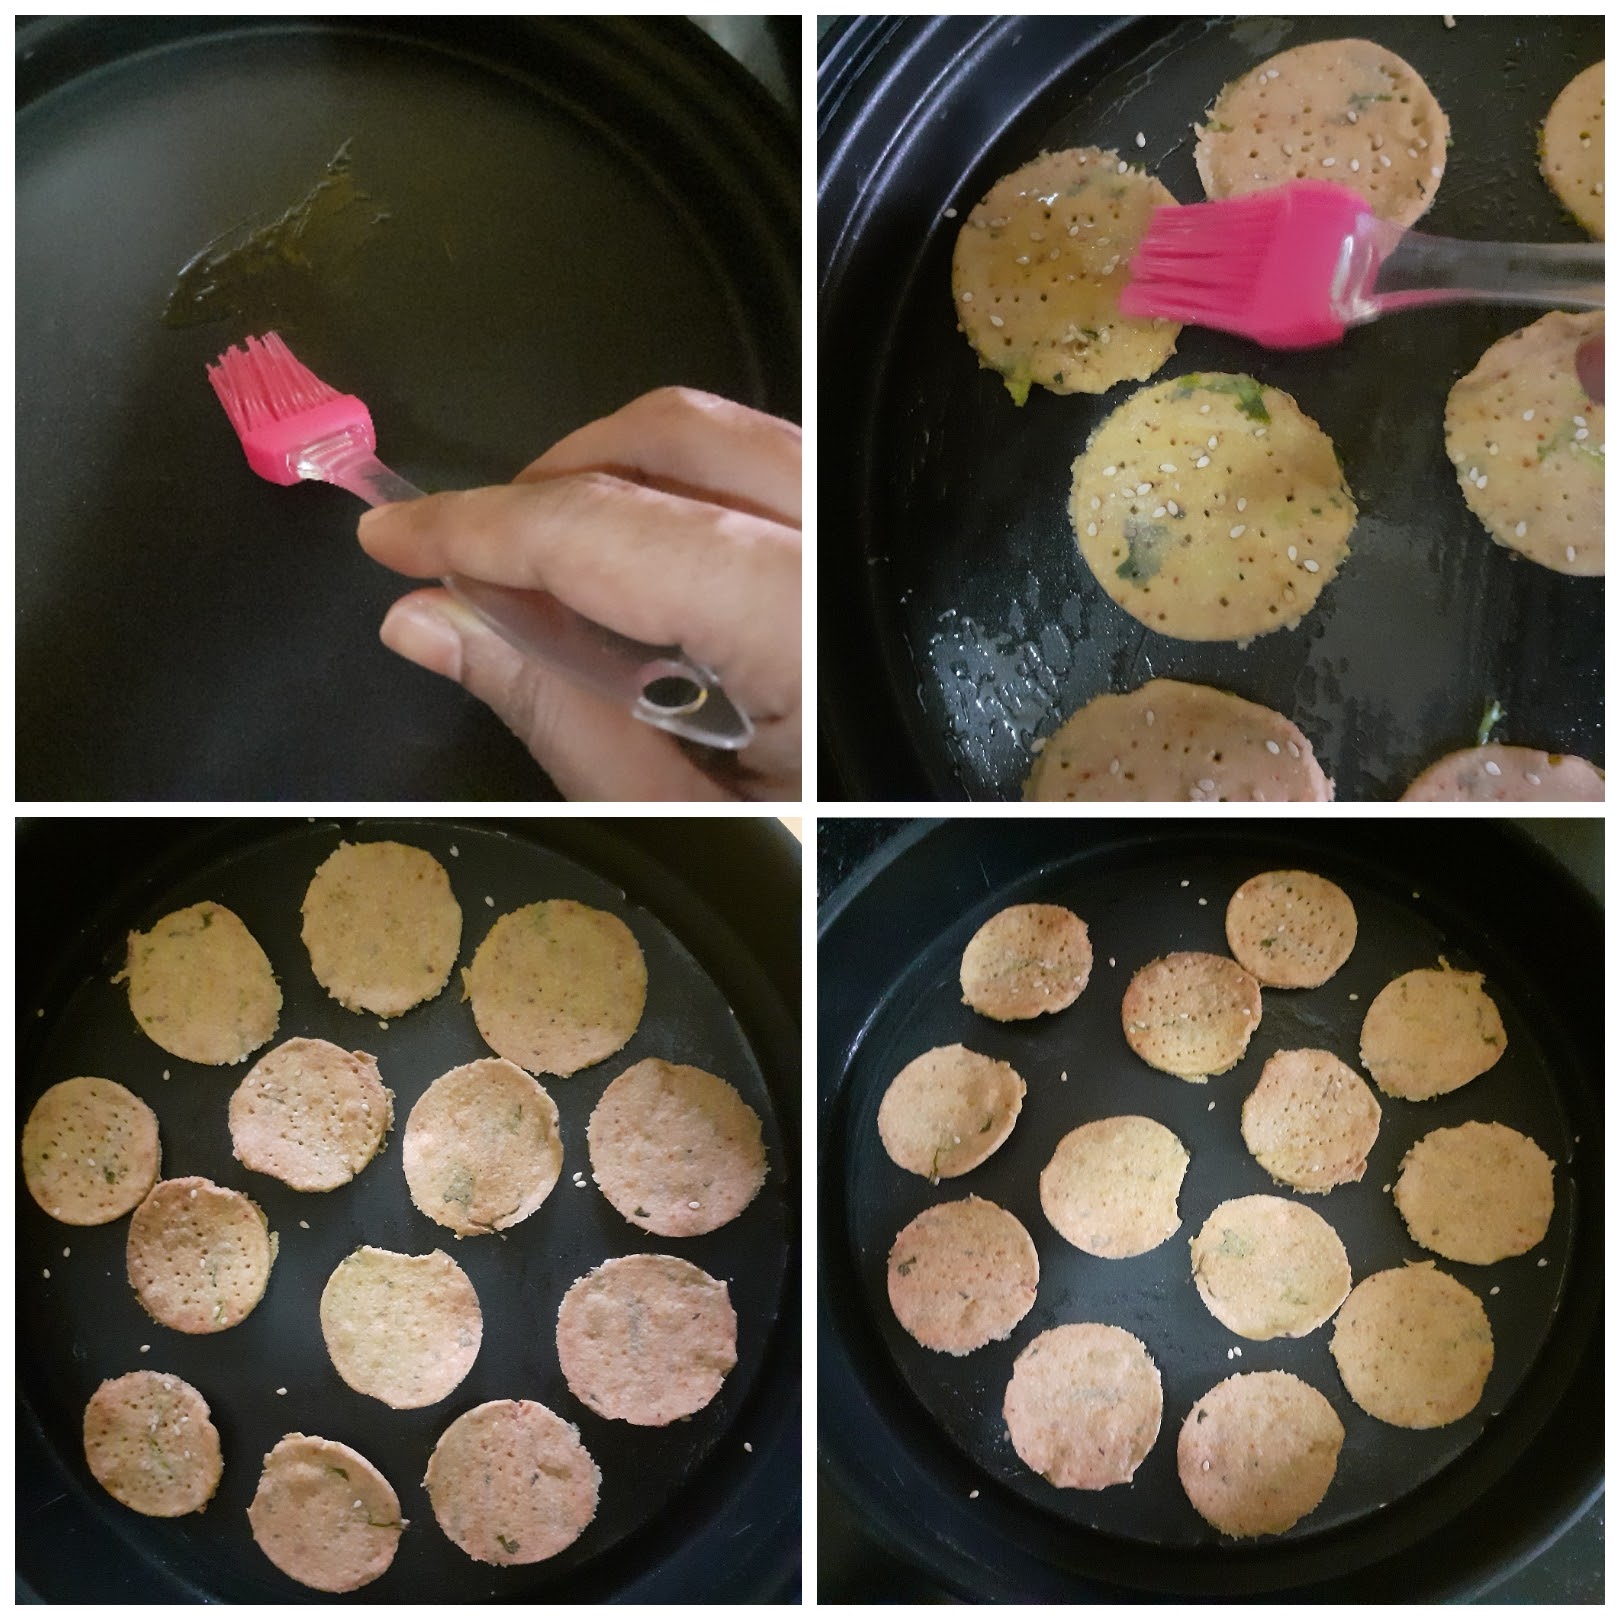
To bake them: Preheat oven to 180 C for 10 minutes. Place the little circles into a baking tray after pricking holes, brush with a little oil(this step is optional), and bake at 180 C for 8 minutes on one side, flip them after 8 minutes and bake again for 8 minutes. Remove from oven, let them cool and store in an airtight container. Repeat this process for the whole amount of dough.
To fry them: Take oil in a Kadai and heat. The oil should be medium hot. The dough when put should sizzle and rise up immediately. This is the right temperature. Prick the papdis with a fork and gently drop them into the oil and fry until all bubbles have subsided and the papdis are light brown in colour. Cool and store in an airtight container.
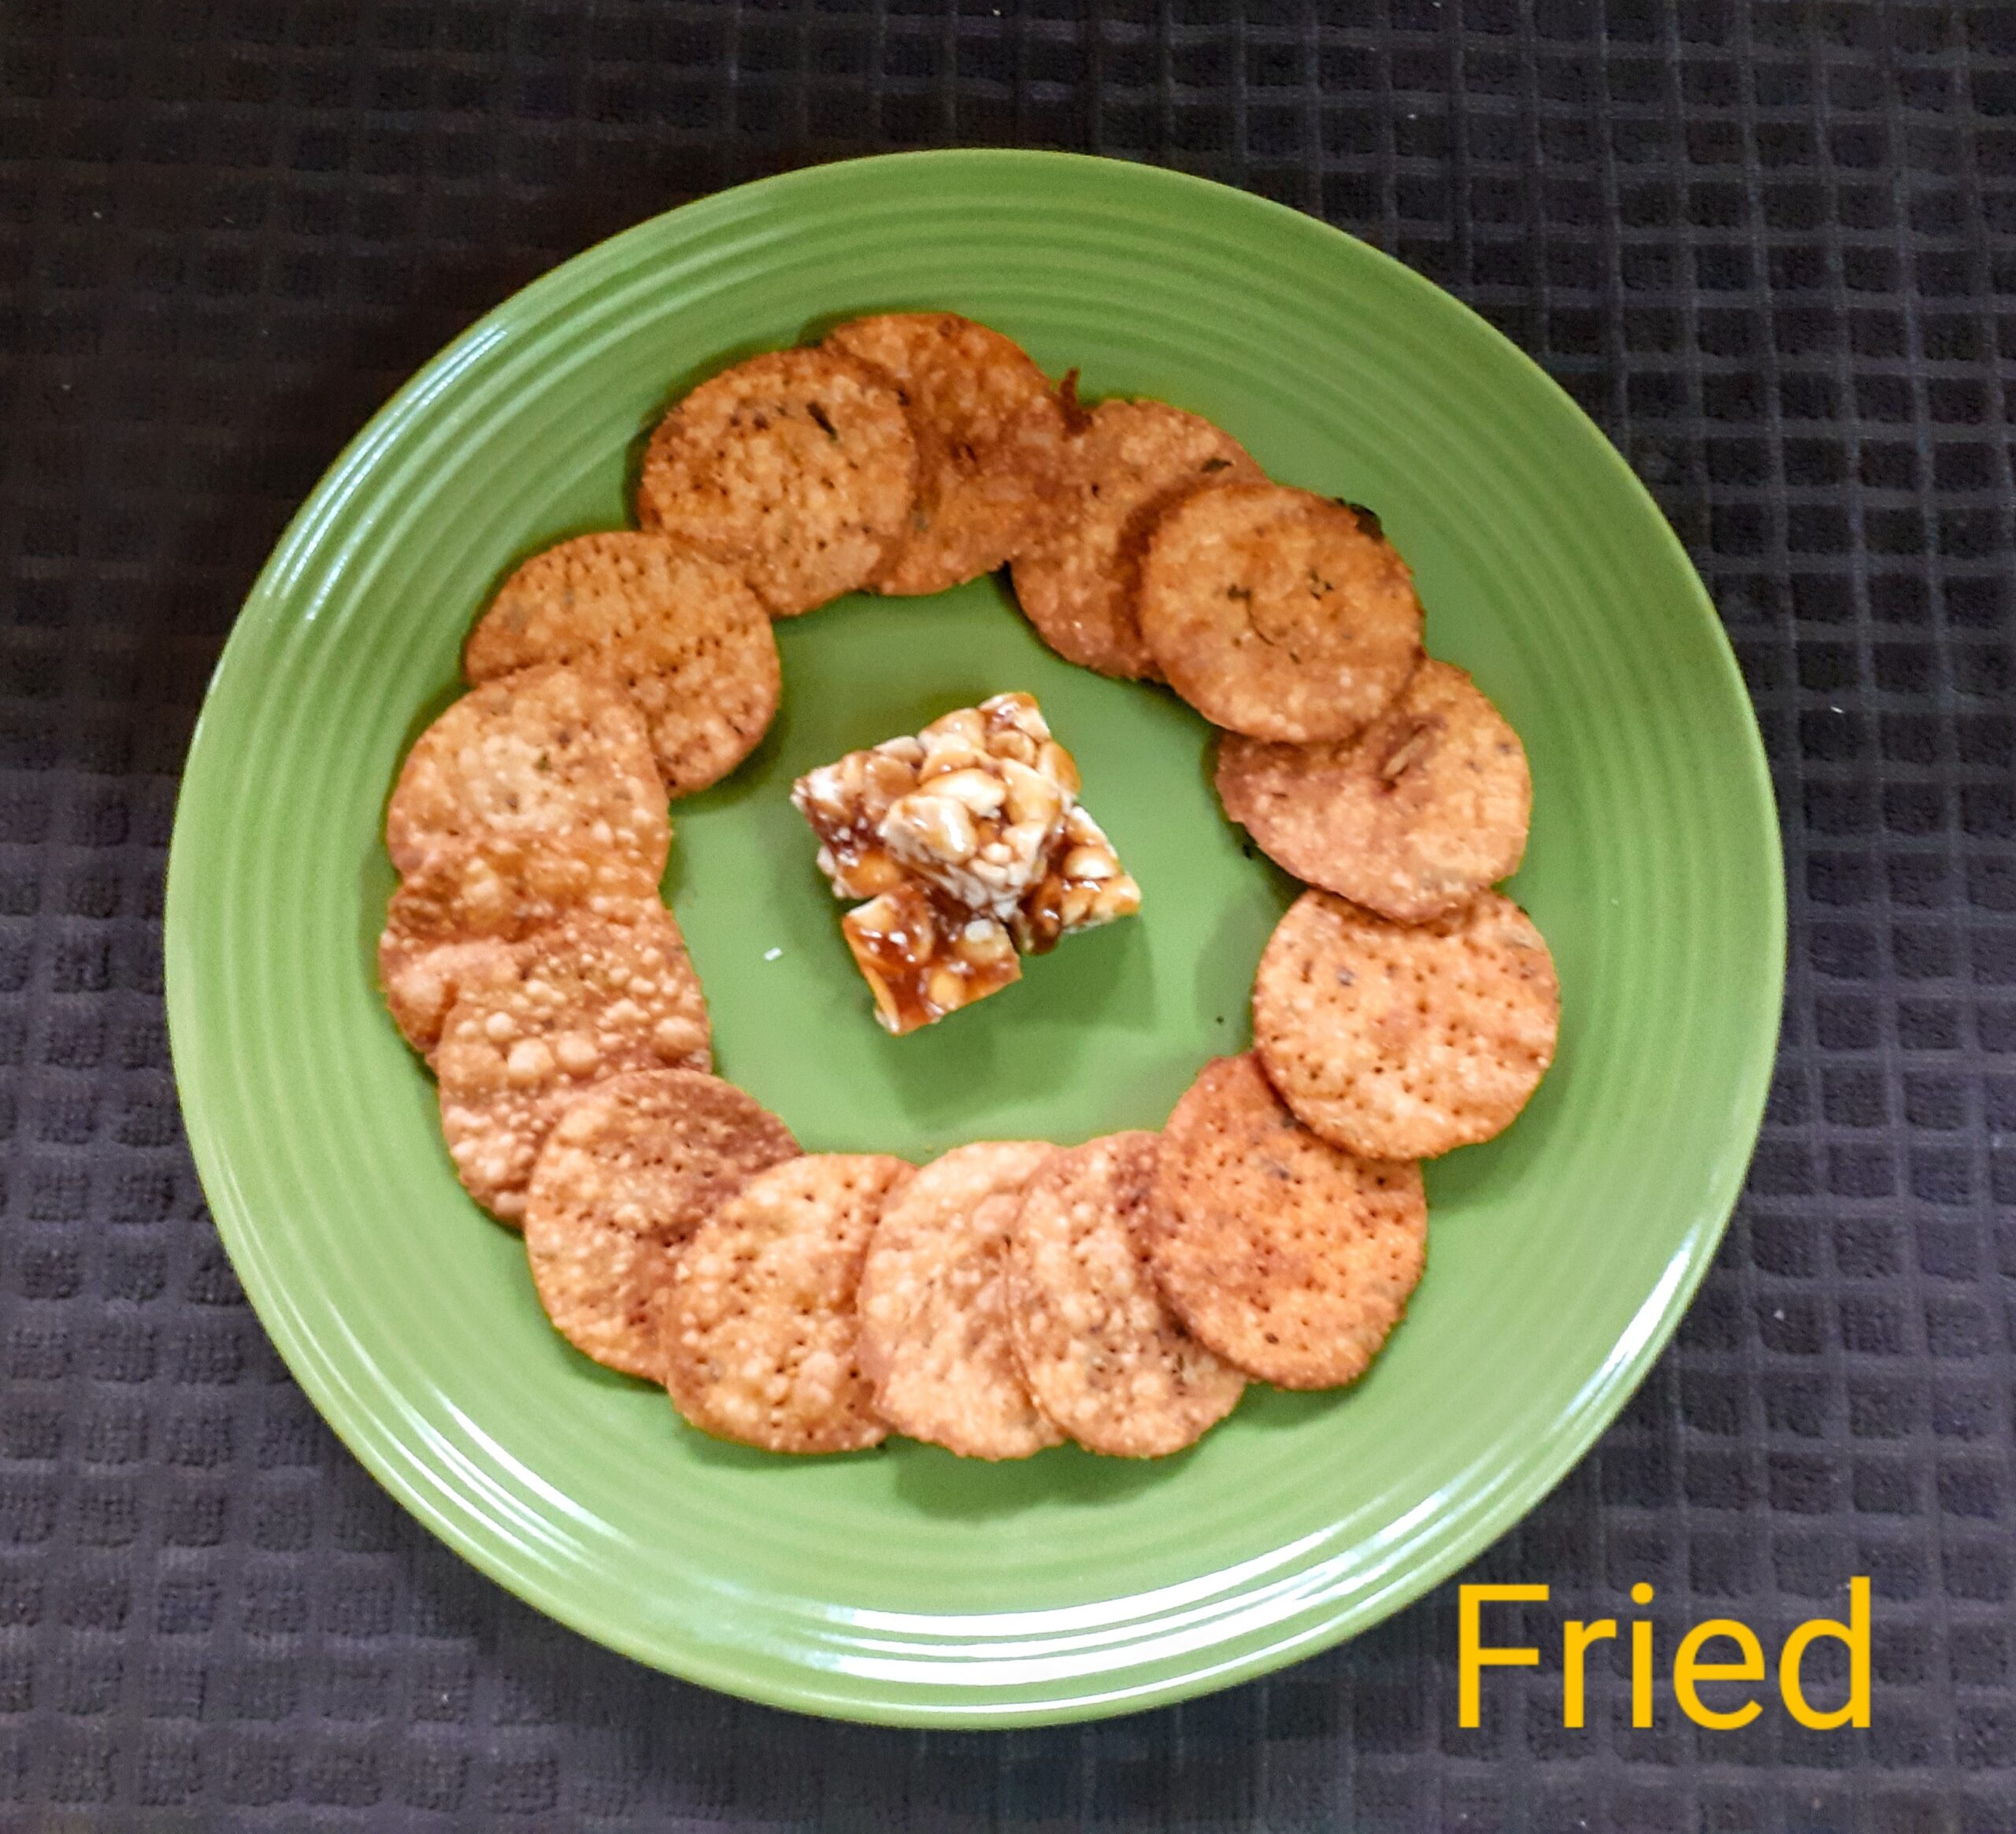
The crunchy and spicy Masala Wheat Flour Papdis are ready to serve with tea or to be made to a Chaat item. Enjoy. Bon Appetit.
STEPWISE RECIPE FOLLOWS:
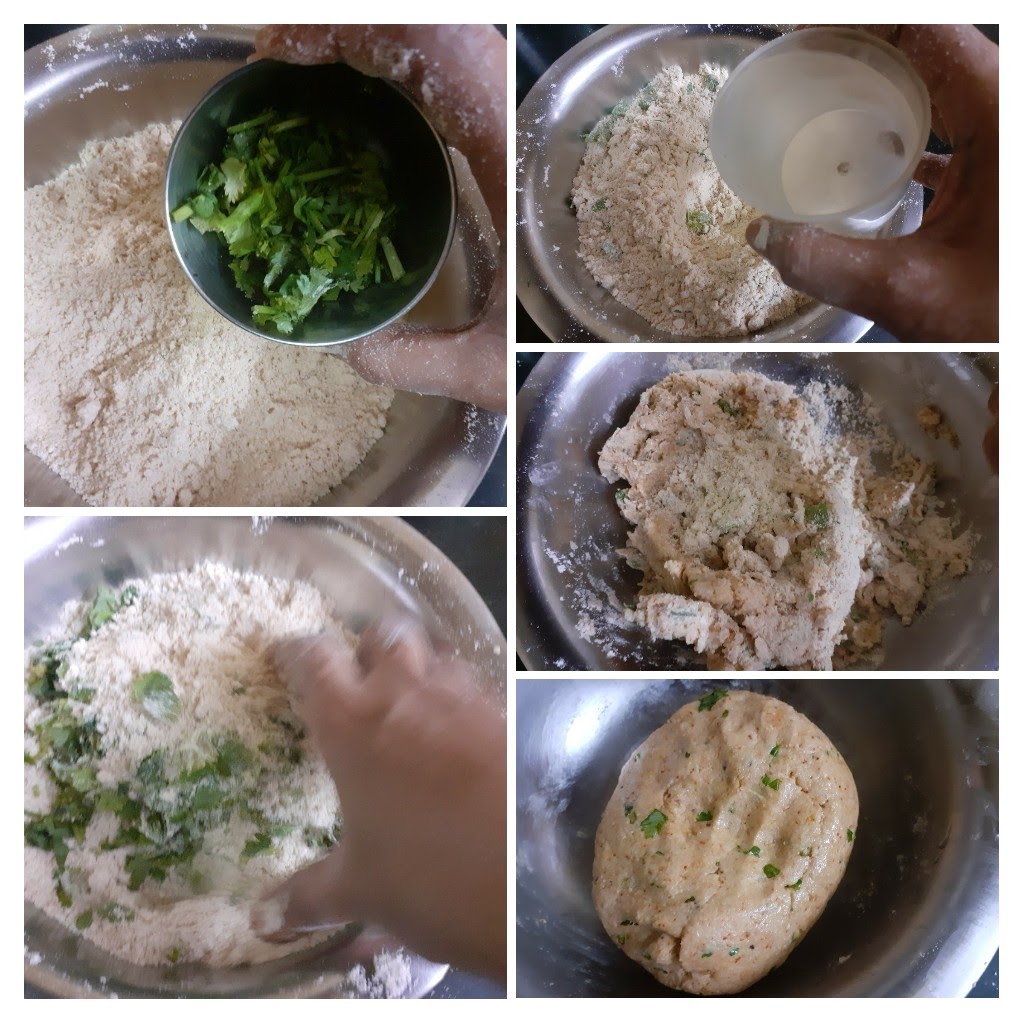
1. Assemble all ingredients. Take the Wheat flour in a dish and add the Semolina/Suji to it.
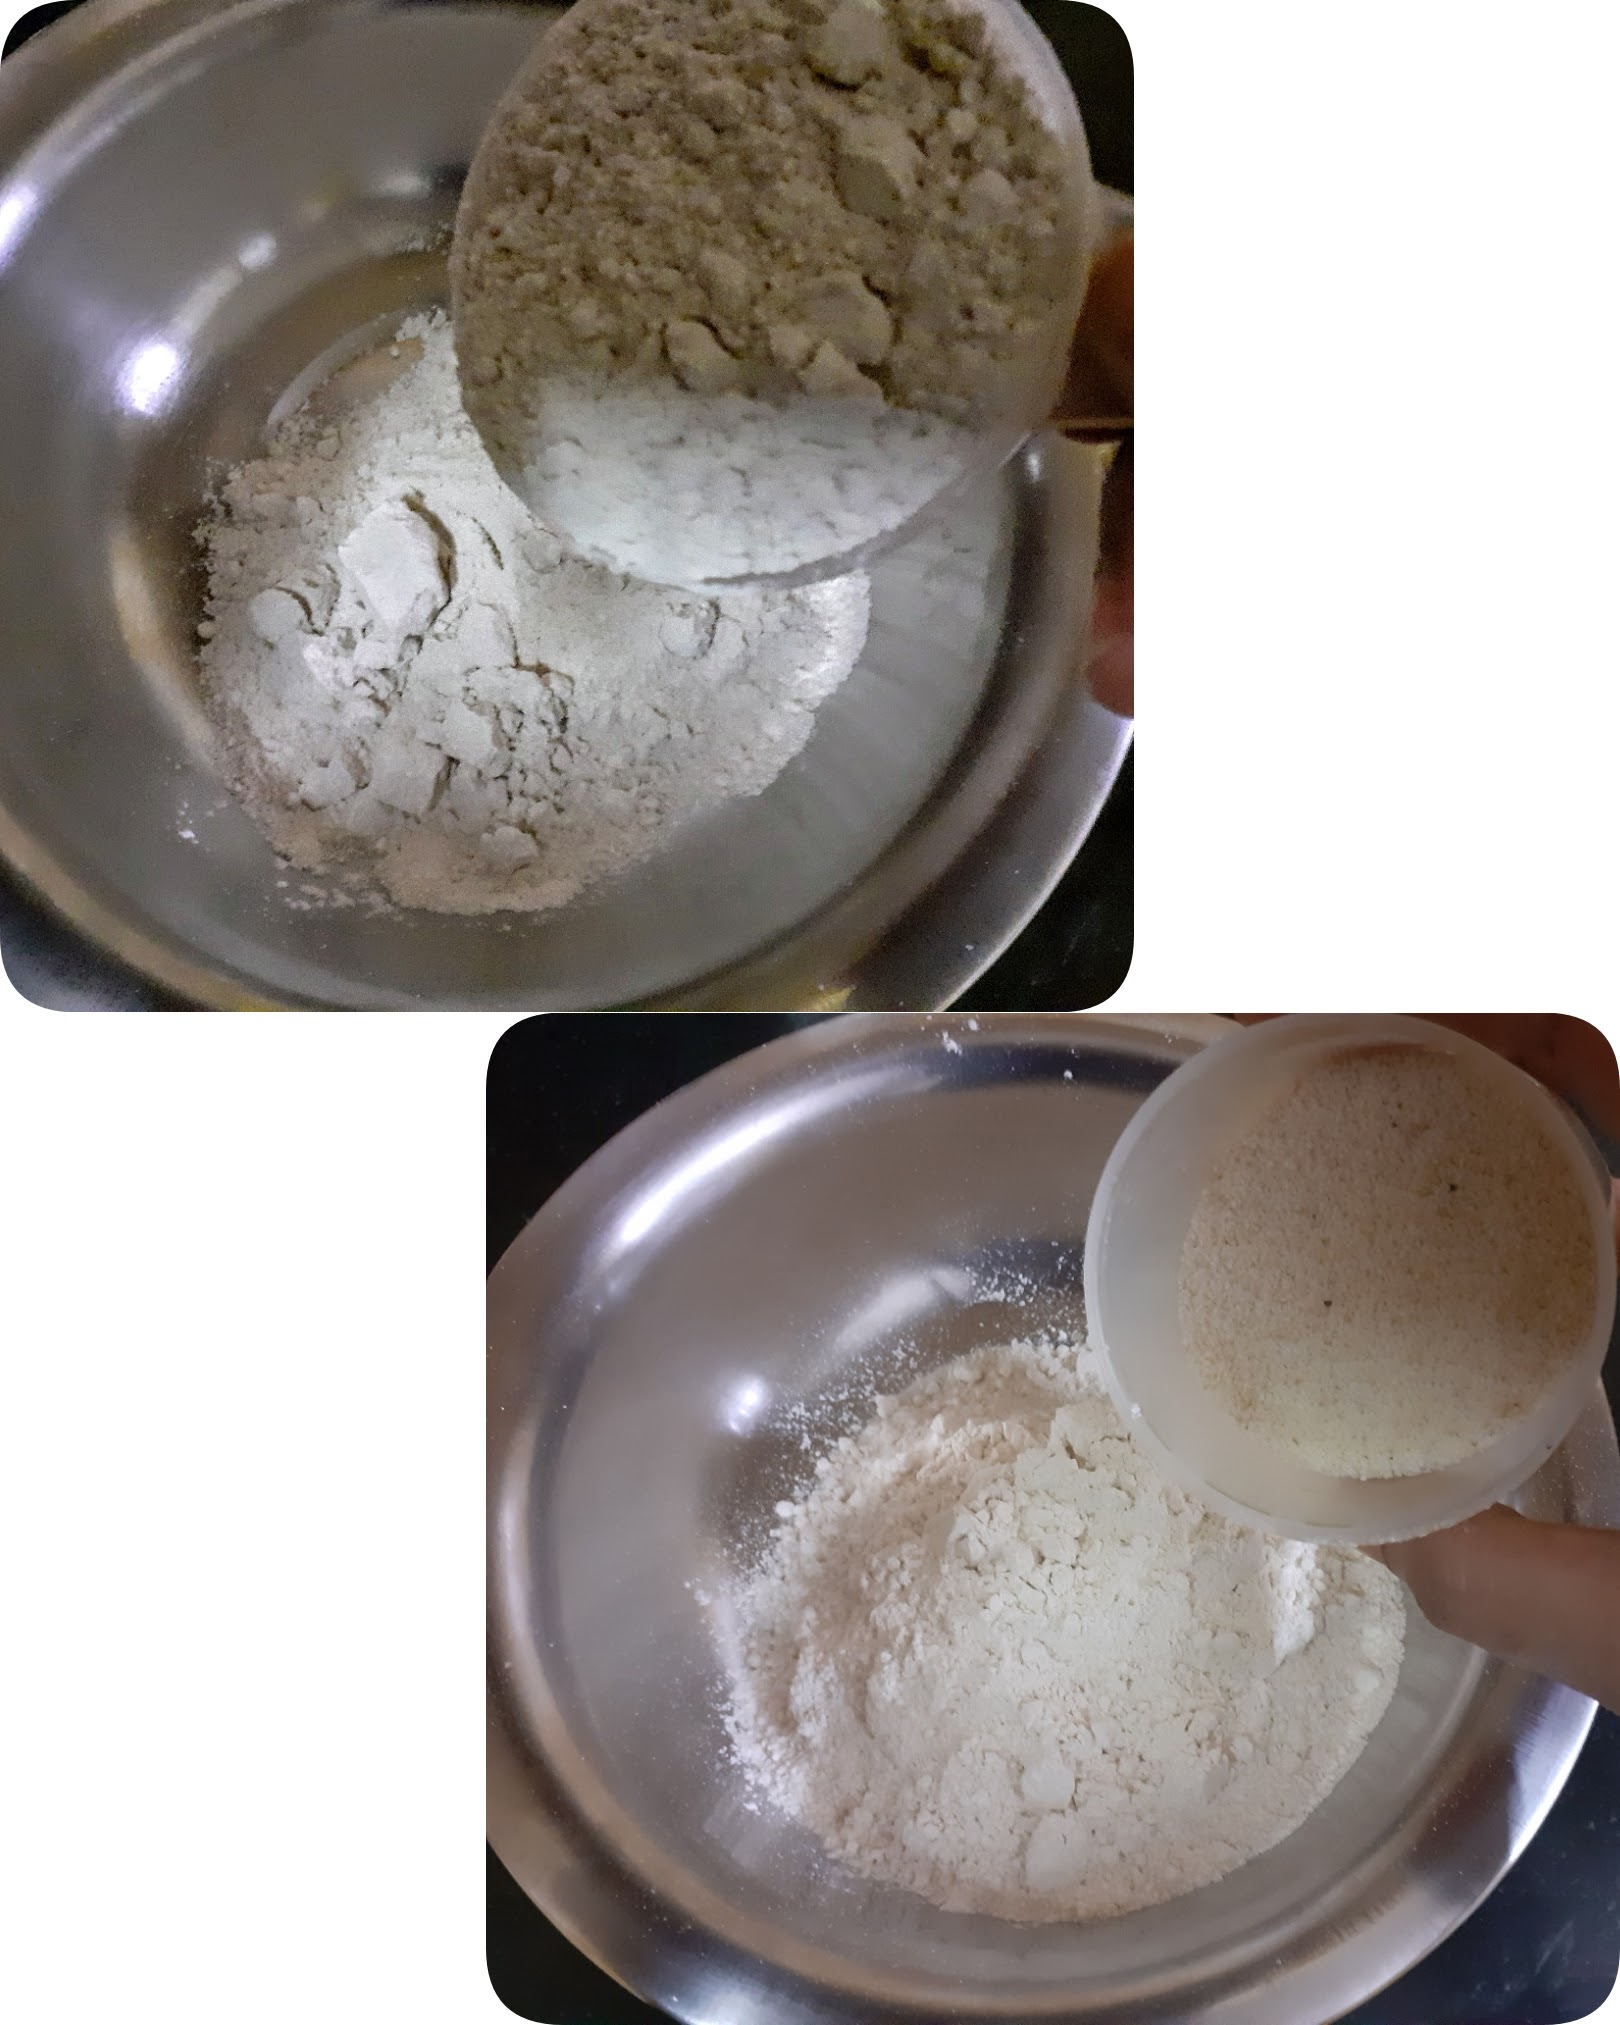
2. Now add the salt, red chilli powder, ajwain, and oil to the flour.
3. Start mixing the flour with your fingers(without adding any water at this stage). The spice powders and salt must mix evenly with the flour. Take some flour in your palm and try to clamp it within your fist. When you open your fist the flour should hold shape and not break away.
4. Now add the finely chopped fresh coriander or Methi leaves, and adding water little by little form a stiff dough. The consistency should be like Poori dough. Rest the dough for 15 minutes.
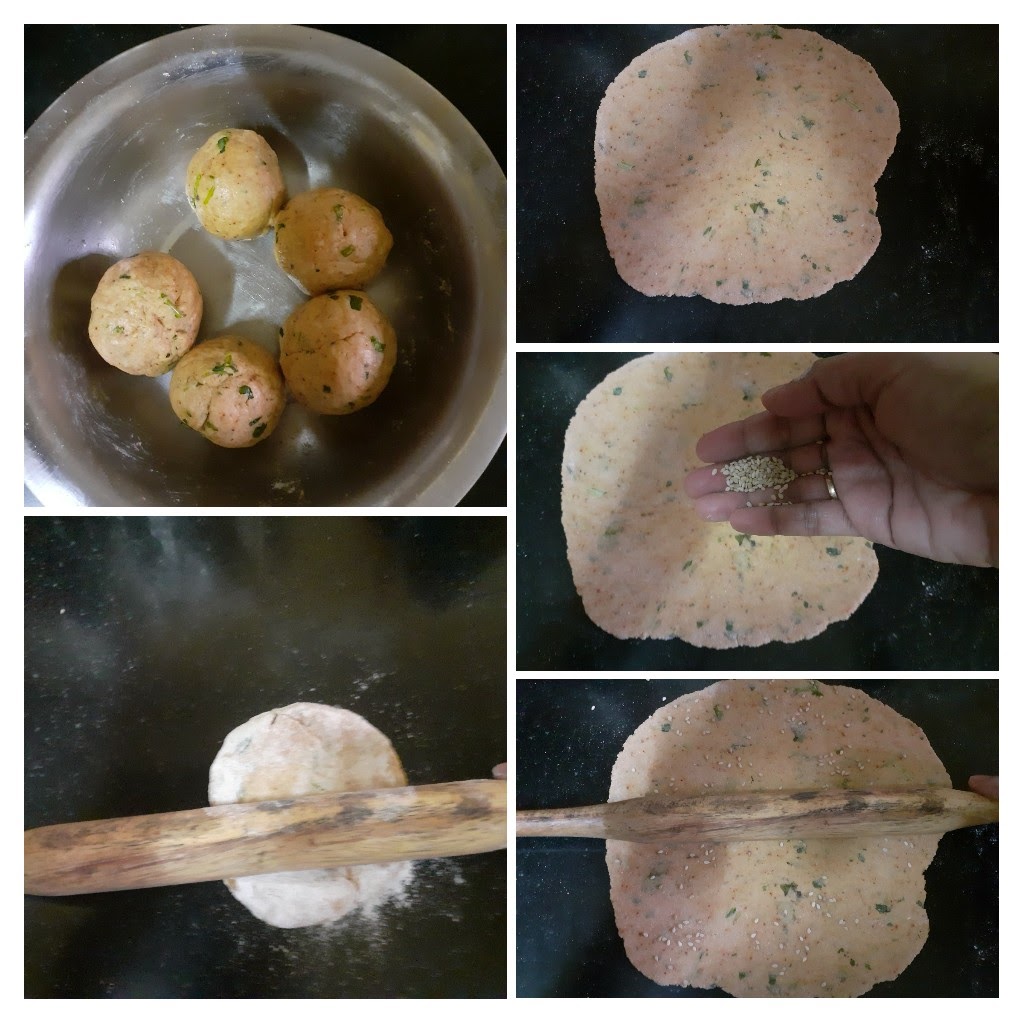
5. Now divide the dough into 4 or 5 equal parts. Take one ball at a time, dust it with flour and roll it out like a chapati, sprinkle some sesame seeds and roll again lightly, so that the seeds stick to the dough.
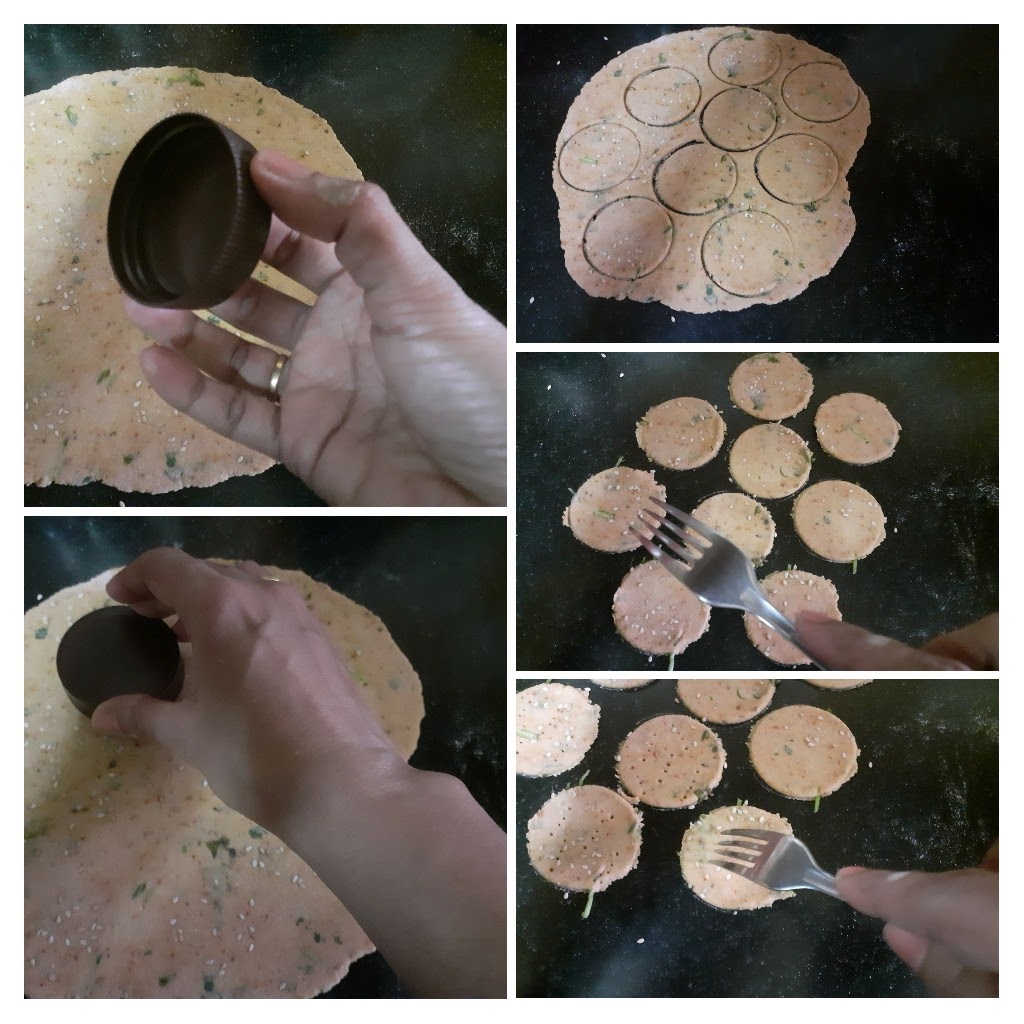
6. Now with a cookie cutter or lid of a bottle make small circles. Take away the excess dough. Prick the circles all over with a fork.
7. To bake- preheat oven to 180 c for 10 minutes. Brush some oil over the Papdis, place them on a baking tray and bake at 180C for 8 minutes on one side. Remove the tray, flip over the papdis and bake again for 8 minutes. Remove from oven and cool. Store in an airtight container.
8. To fry them- heat oil in a Kadai. Oil should be medium hot. Check the temperature by gently dropping a small bit of dough into the oil. If it sizzles and rises immediately, this is the right temperature. Now fry the papdis in oil at medium heat until all the bubbles subside and the papdis are light brown in colour.

NOTES: 1. Adding adequate oil to the flour is a crucial step, the oil is the one that imparts the crunch to the Papdis. After step 3 if the flour is still not holding shape, then add another teaspoon or two of oil to the flour, rub it into the flour and check if it holds shape now by claiming it in your fist. If it does, start mixing water.
2. It is important to prick the Papdis with a fork before baking or frying as otherwise, they will rise/puff up thereby losing the crunch. So pricking holes is a crucial step.
3. The temperature of the oil is important, the method to check the temperature is given in step 8, which should be followed.
4. The timing in each oven may vary to bake, so 2 to 3 minutes less or extra time may be required.