This recipe of the humble Poha(beaten rice flakes)/Aval cooked in Jaggery syrup is one of my favourites. I make it whenever I have a sweet craving or as an offering(Prasad) for Pujas at home. Healthy and filling at the same time. It makes for a good mid-evening snack(Tiffin) option. Sometimes I make with a combination of other Pohe recipes, to serve during Navarathri when guests visit home.
Poha is also one of the main offerings during Janmashtami and Ganesh Chaturthi. Lord Krishna is known to have loved them and Pohe is what his friend Sudama got him as a gift.
Usually, during these two festivals, people just offer the Pohe and jaggery with coconut scraping as a dry mixture for Prasad. I have observed that though there are few who like it this way, many don’t enjoy it dry. So what I prefer doing is putting it in a jaggery syrup and stirring it dry, with a dash of ghee, cardamom powder and coconut scrapings it tastes just like Sweet Pongal, but it is dry in texture.
There are many variations of the Pohe like Kanda Poha(onion Poha), Masala Poha(tomatoes and onions), Lemon Poha, Puli Aval(tamarind Poha), Vella Aval(Sweet Poha) and Dahi Pohe/Moru Aval. The Poha can be either thick or thin. For this recipe, I have used the thin one, but the same can be done with the thick one too, just that the soak time will vary. Thick Poha is used for recipes where the Poha is going to cook in a sauce so that it doesn’t become soggy. The Sweet Pohe makes for a good and healthy recipe for kids too.
While you are here please visit my other Indian sweet recipes such as
This Janmashtami or Ganesh Chaturthi try out this recipe of Sweet Poha or Vella Aval.
PREP TIME: 10Mins COOK TIME: 15 Mins
TOTAL TIME: 25Mins COURSE: DESSERT/SWEET
CUISINE: SOUTH INDIAN SERVINGS: 4
AUTHOR: Rajni Ram
Ingredients:
Poha/Aval( Thin ) 1 cup
Jaggery 1 cup
Coconut gratings 1 tbsp
Ghee 1tbsp
Cardamom powder 1/2 tsp
Cashewnuts around 5 broken to bits
Raisins around 8
Directions:
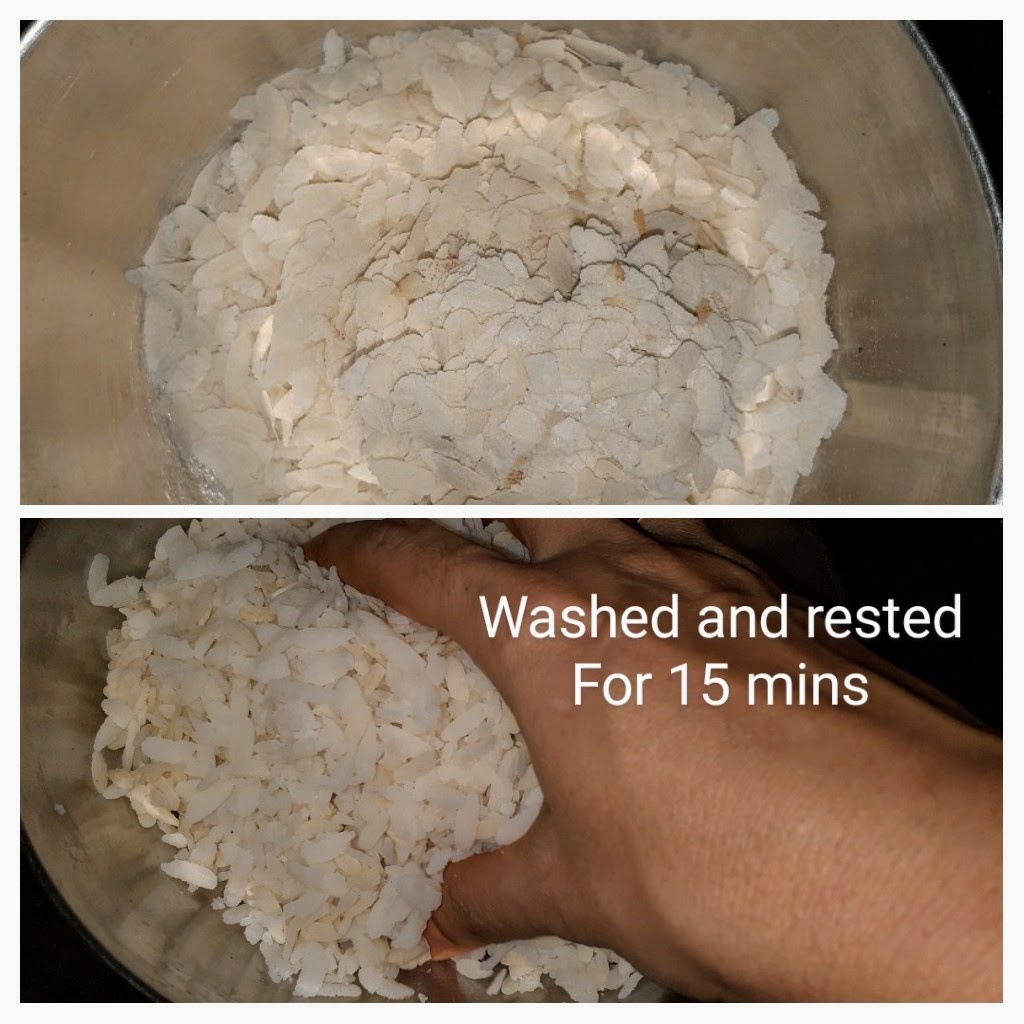
Pass the Poha through a sieve that has medium-sized perforations, such that the Poha remains in the sieve and the dust and small flakes fall away. Now wash the Poha just once(may become soggy if done more than once)and drain all the water. Let the Poha rest for 10 minutes.
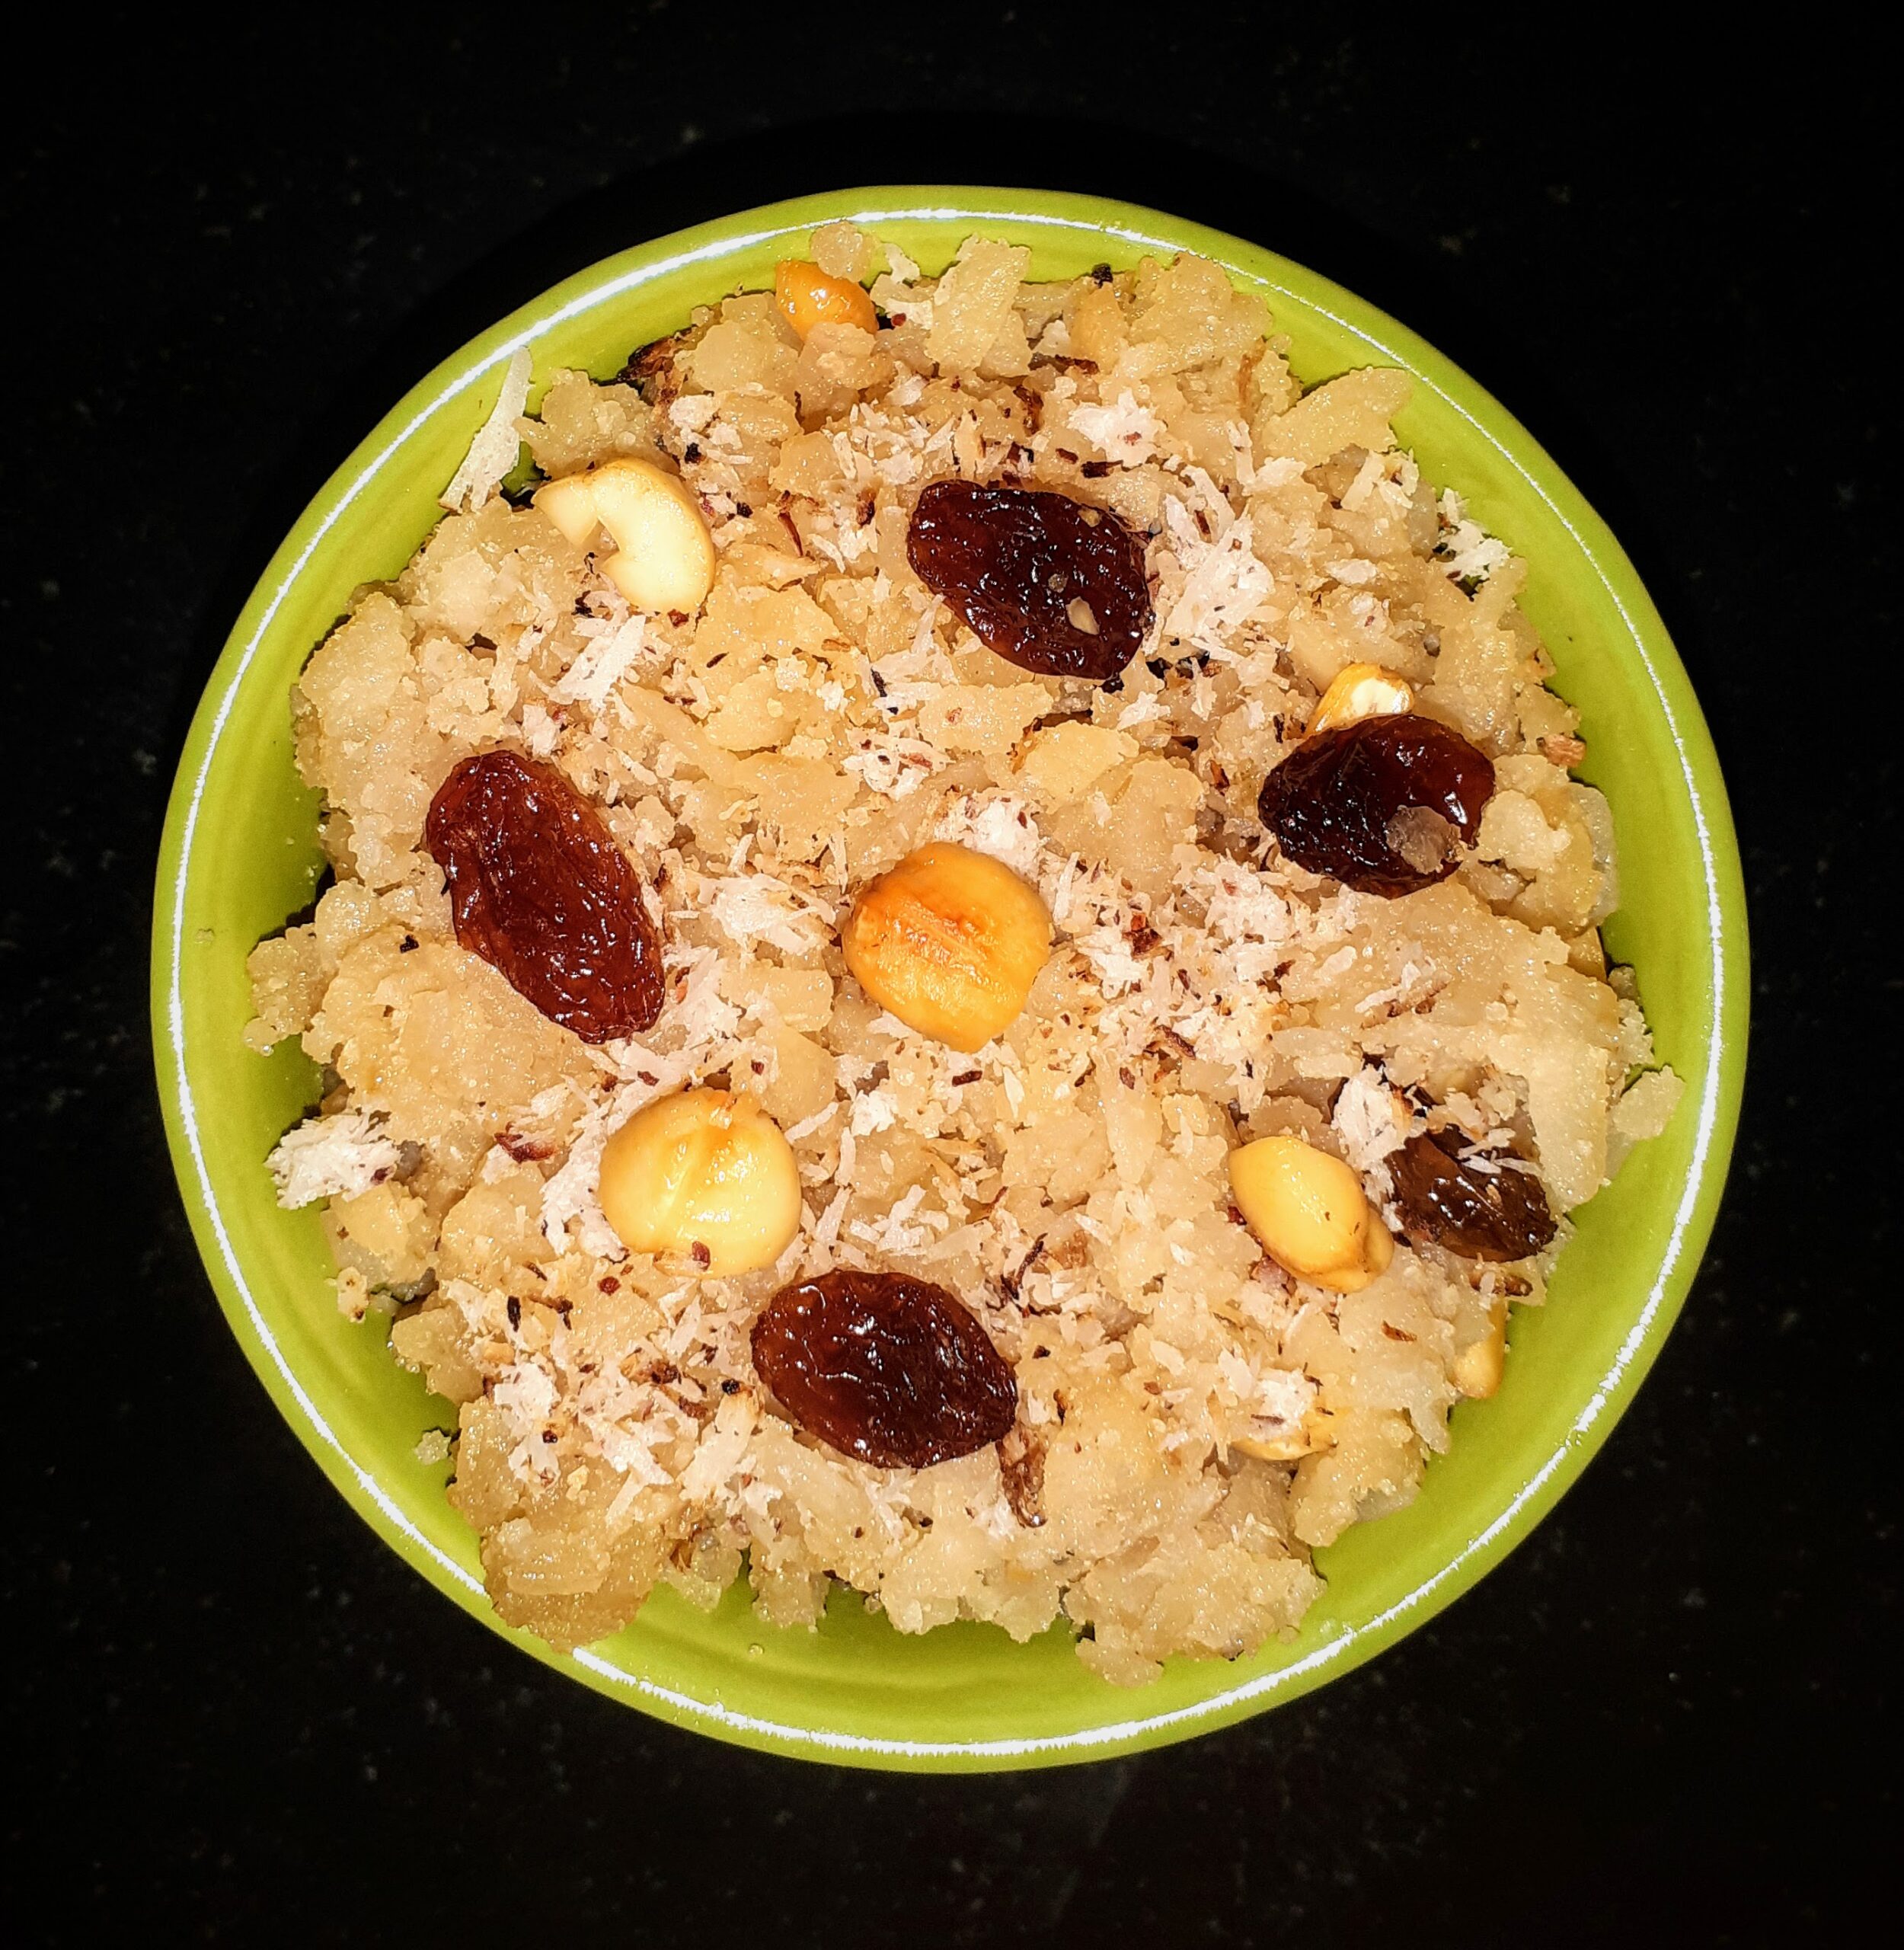
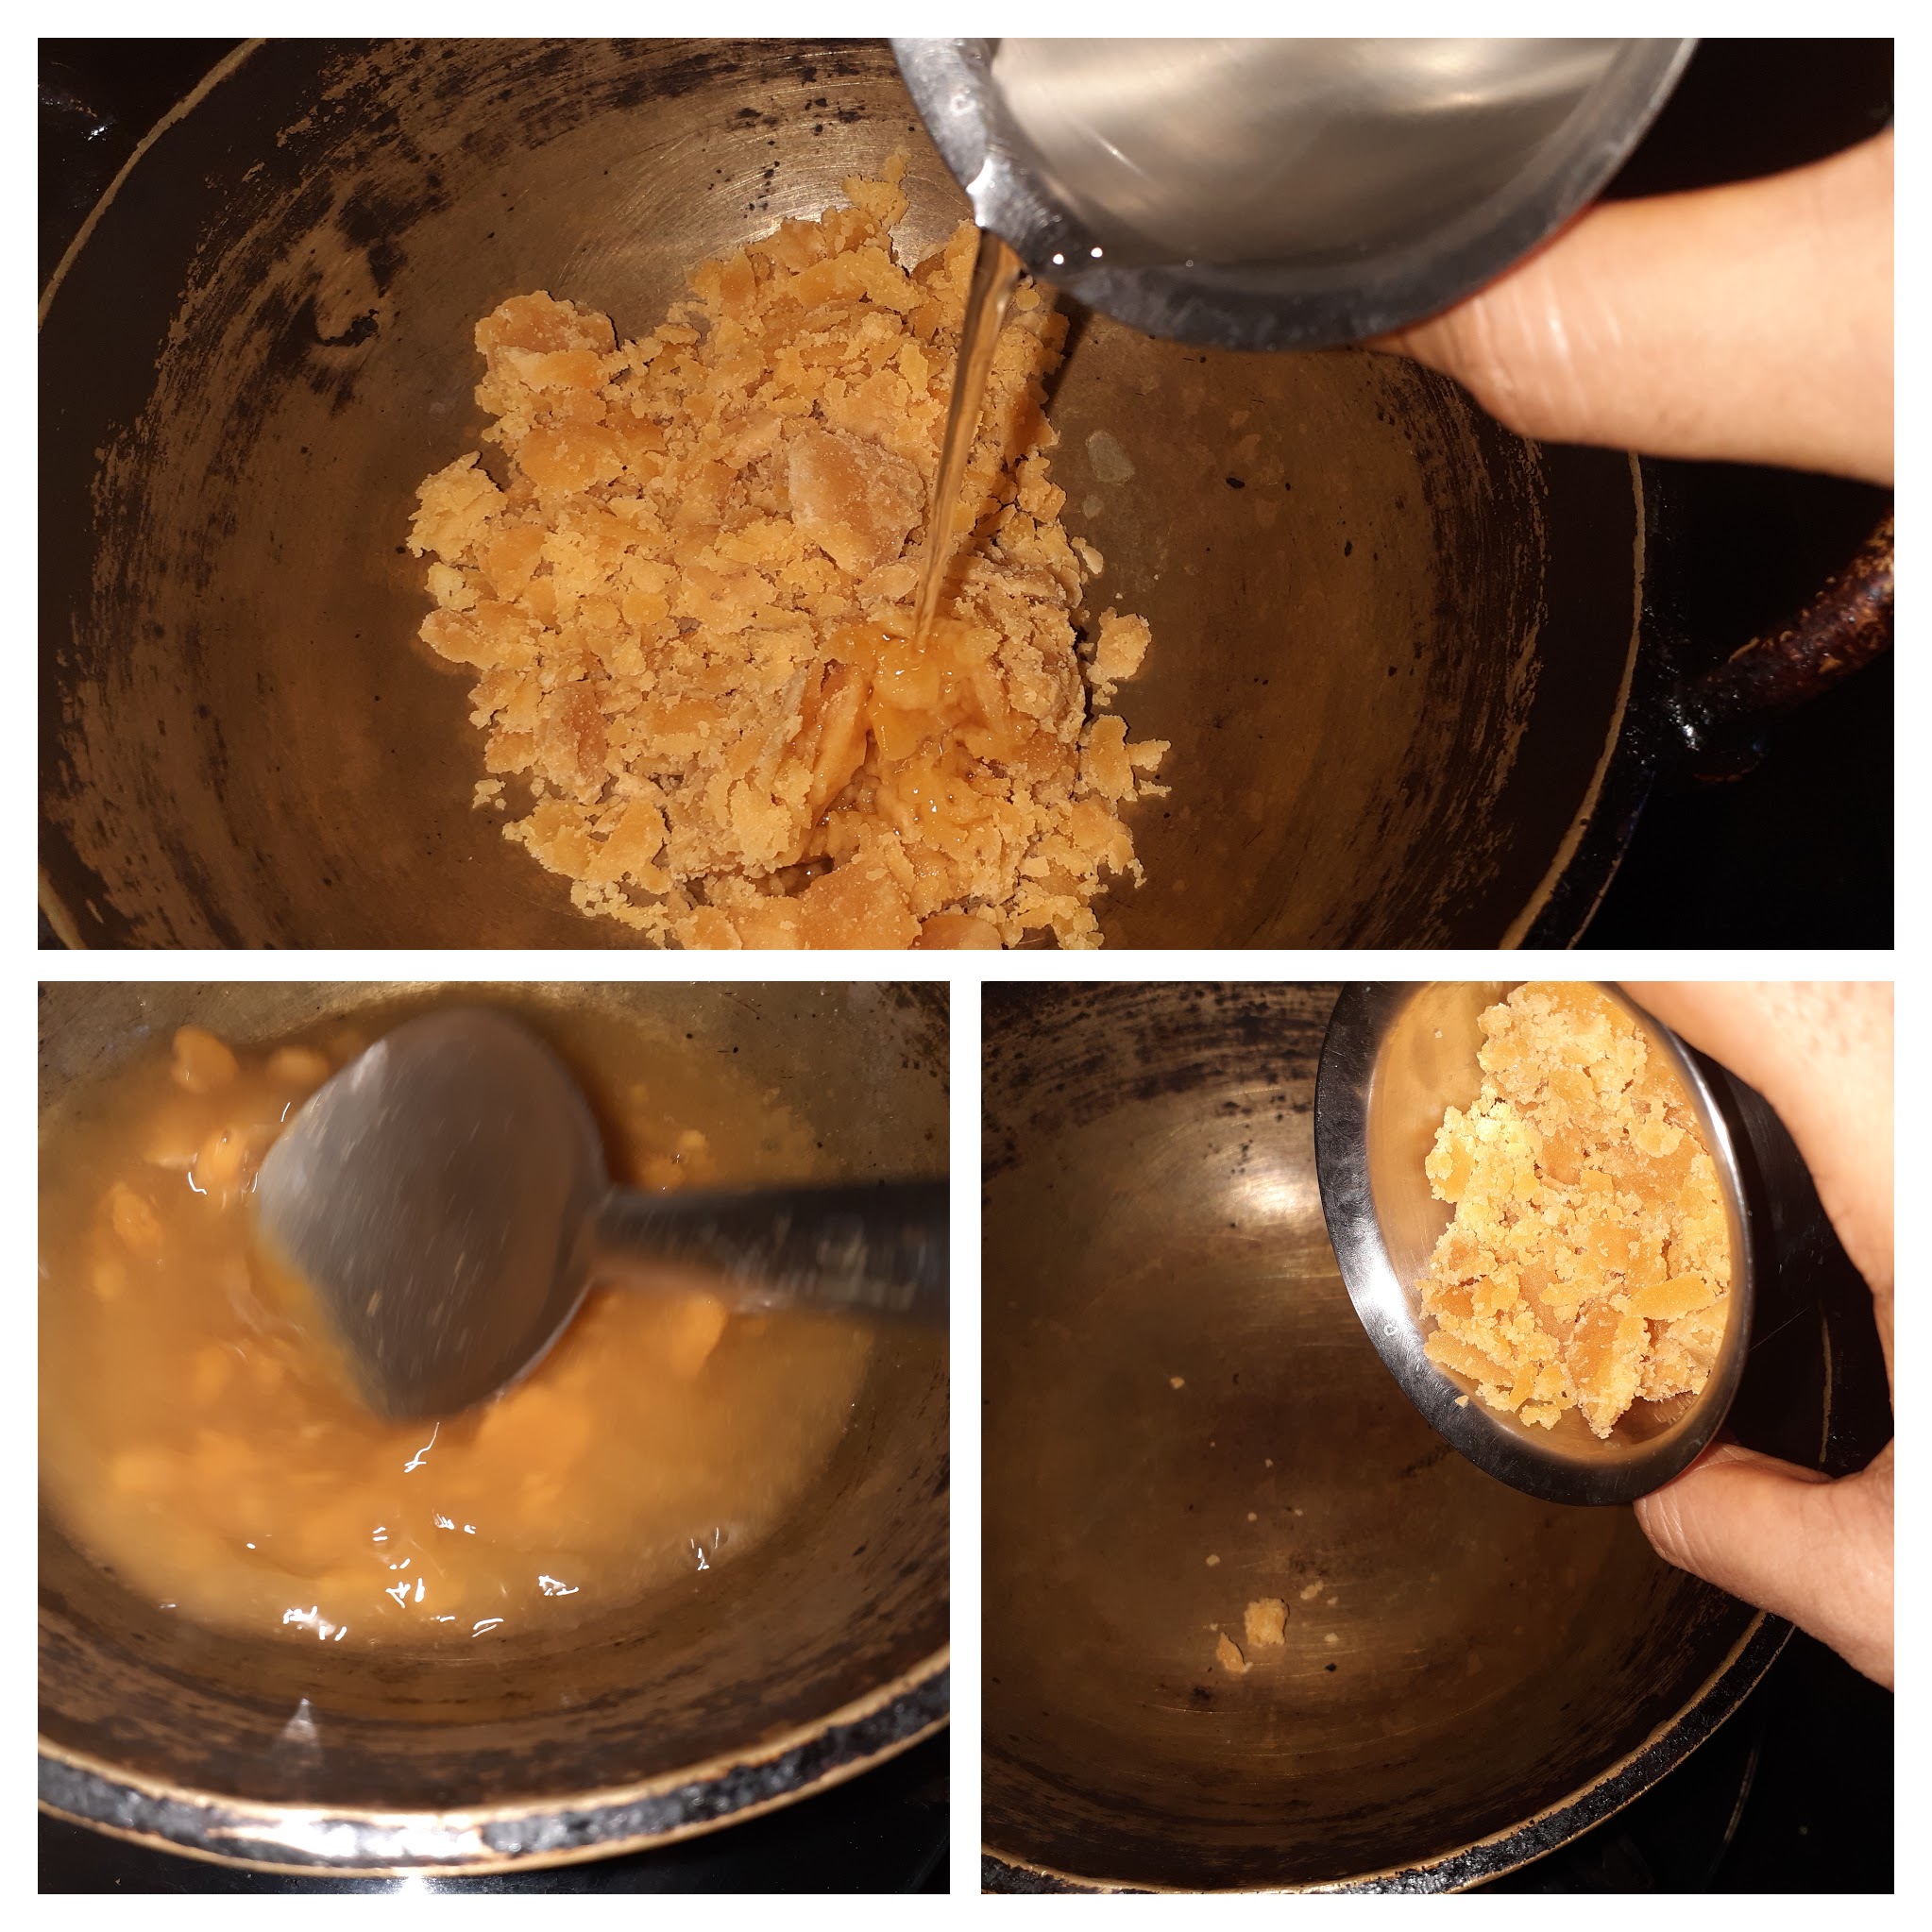
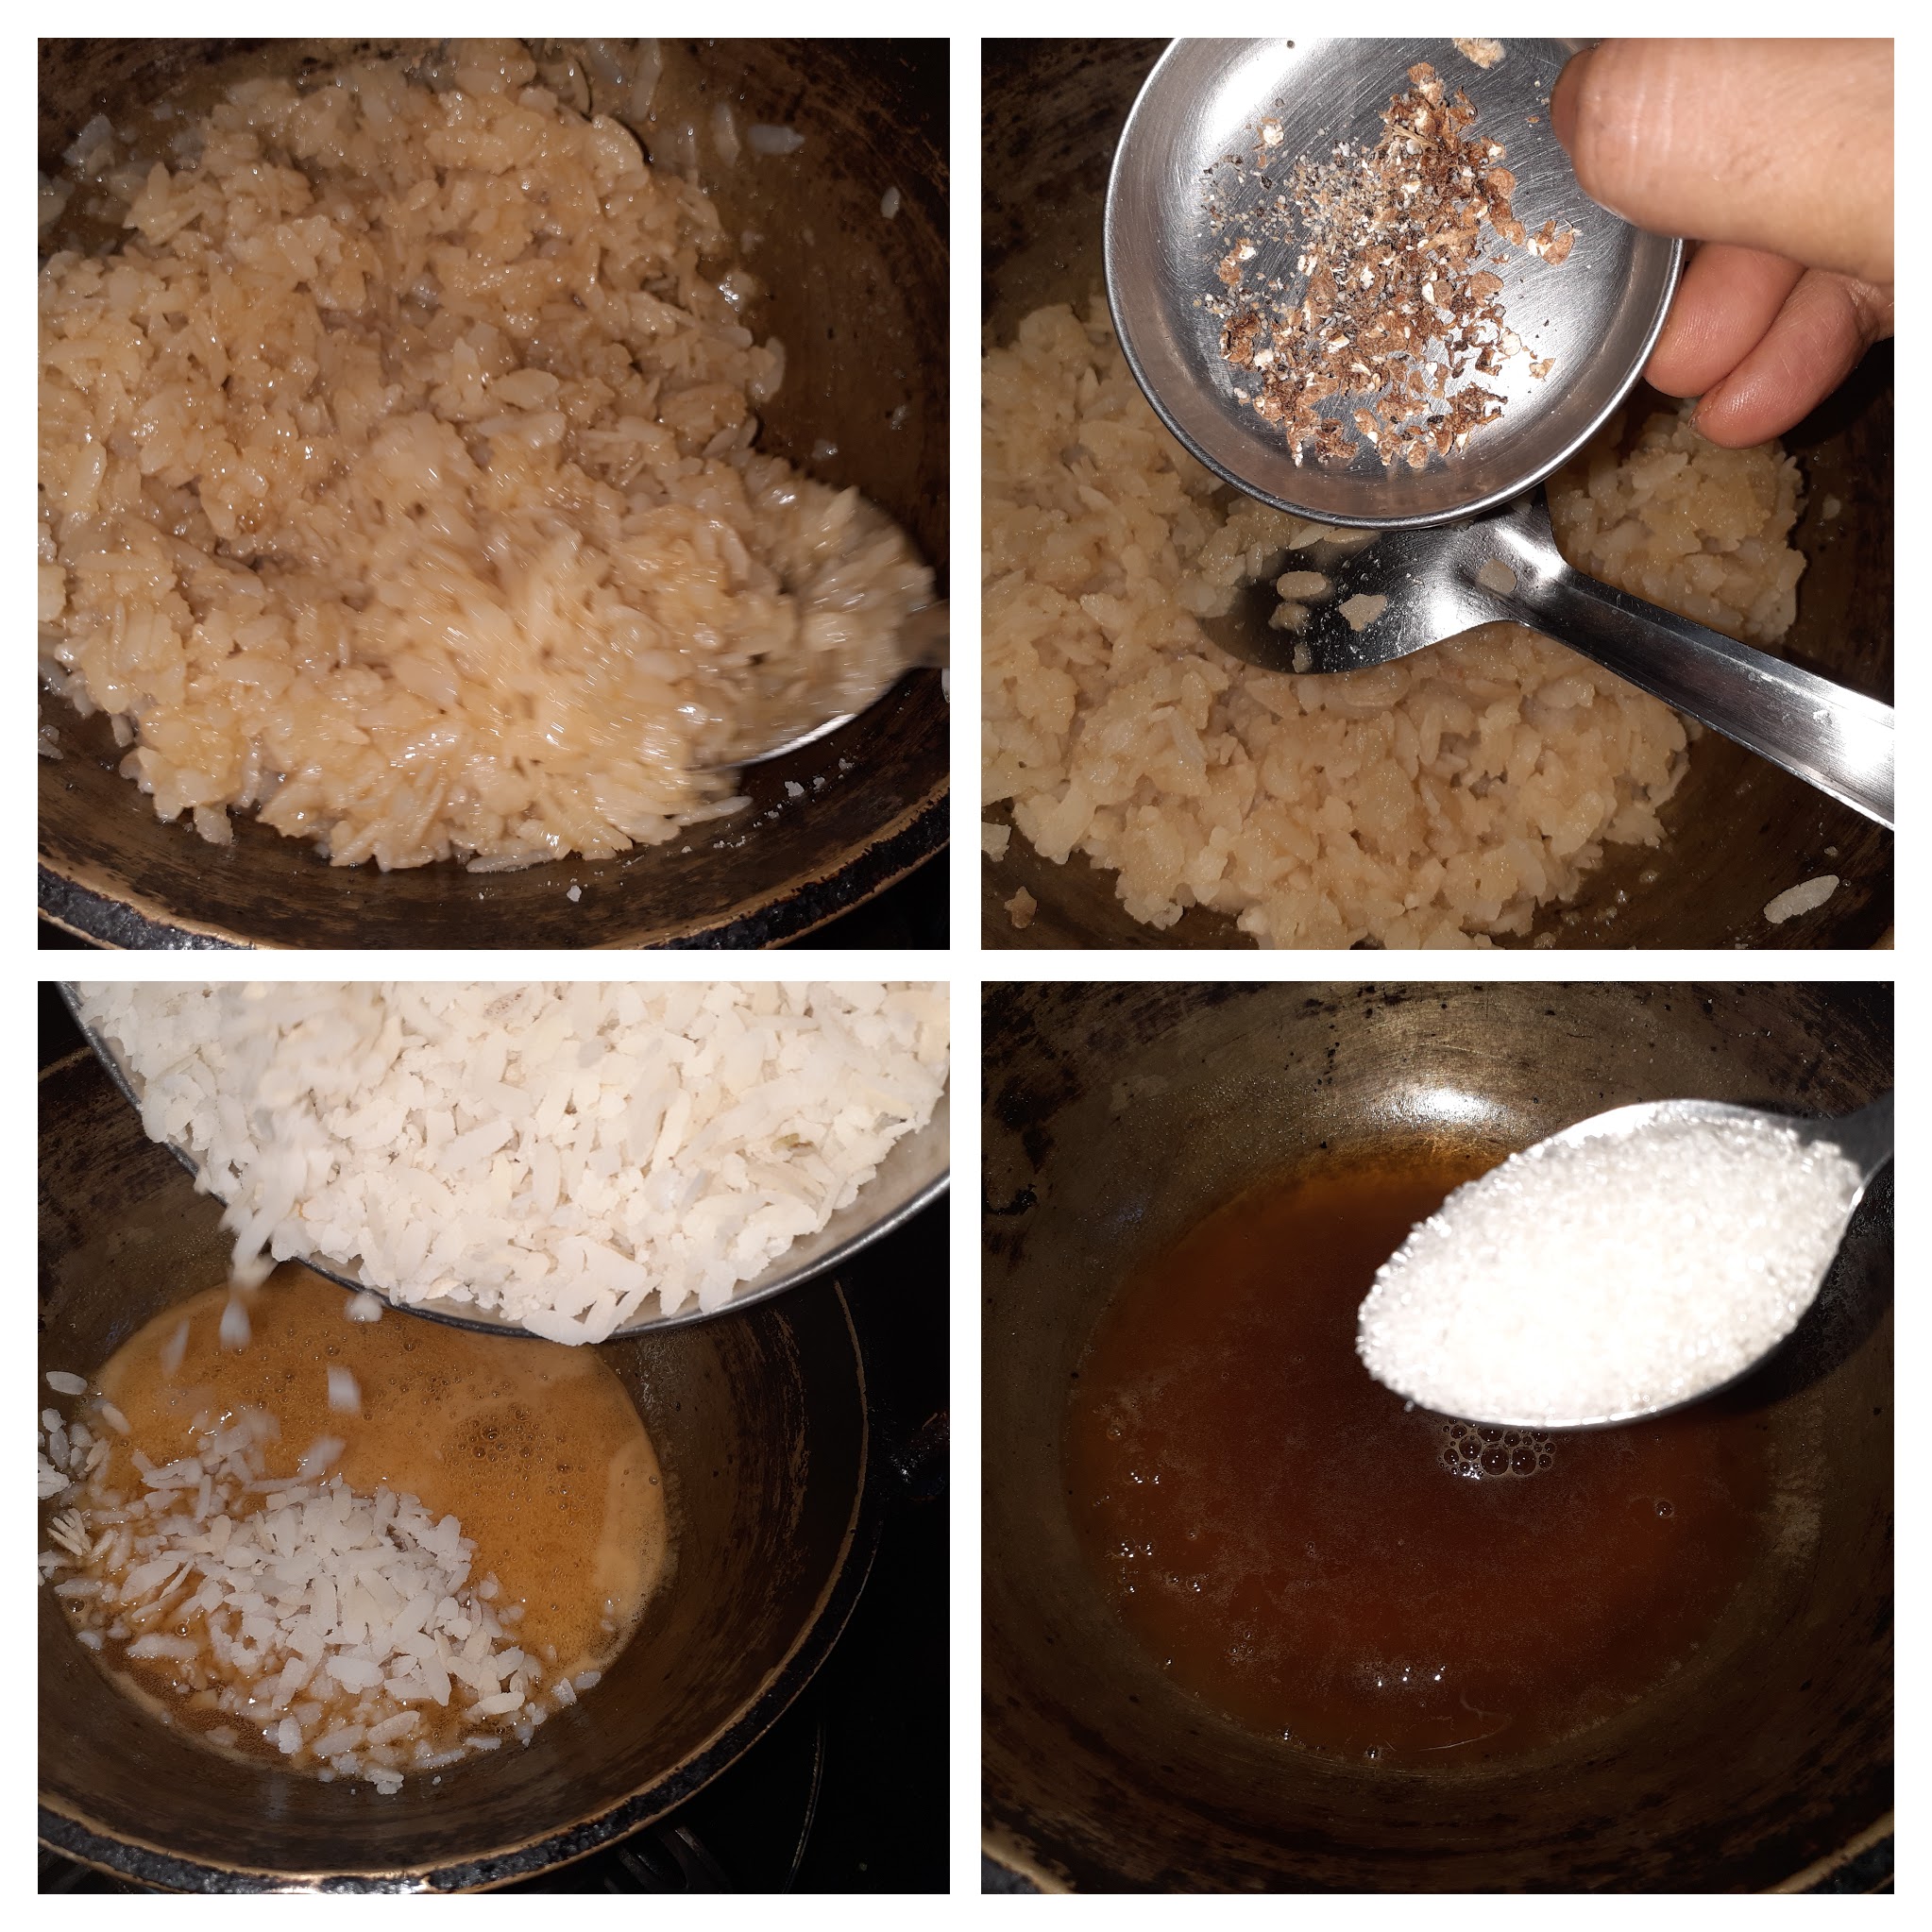
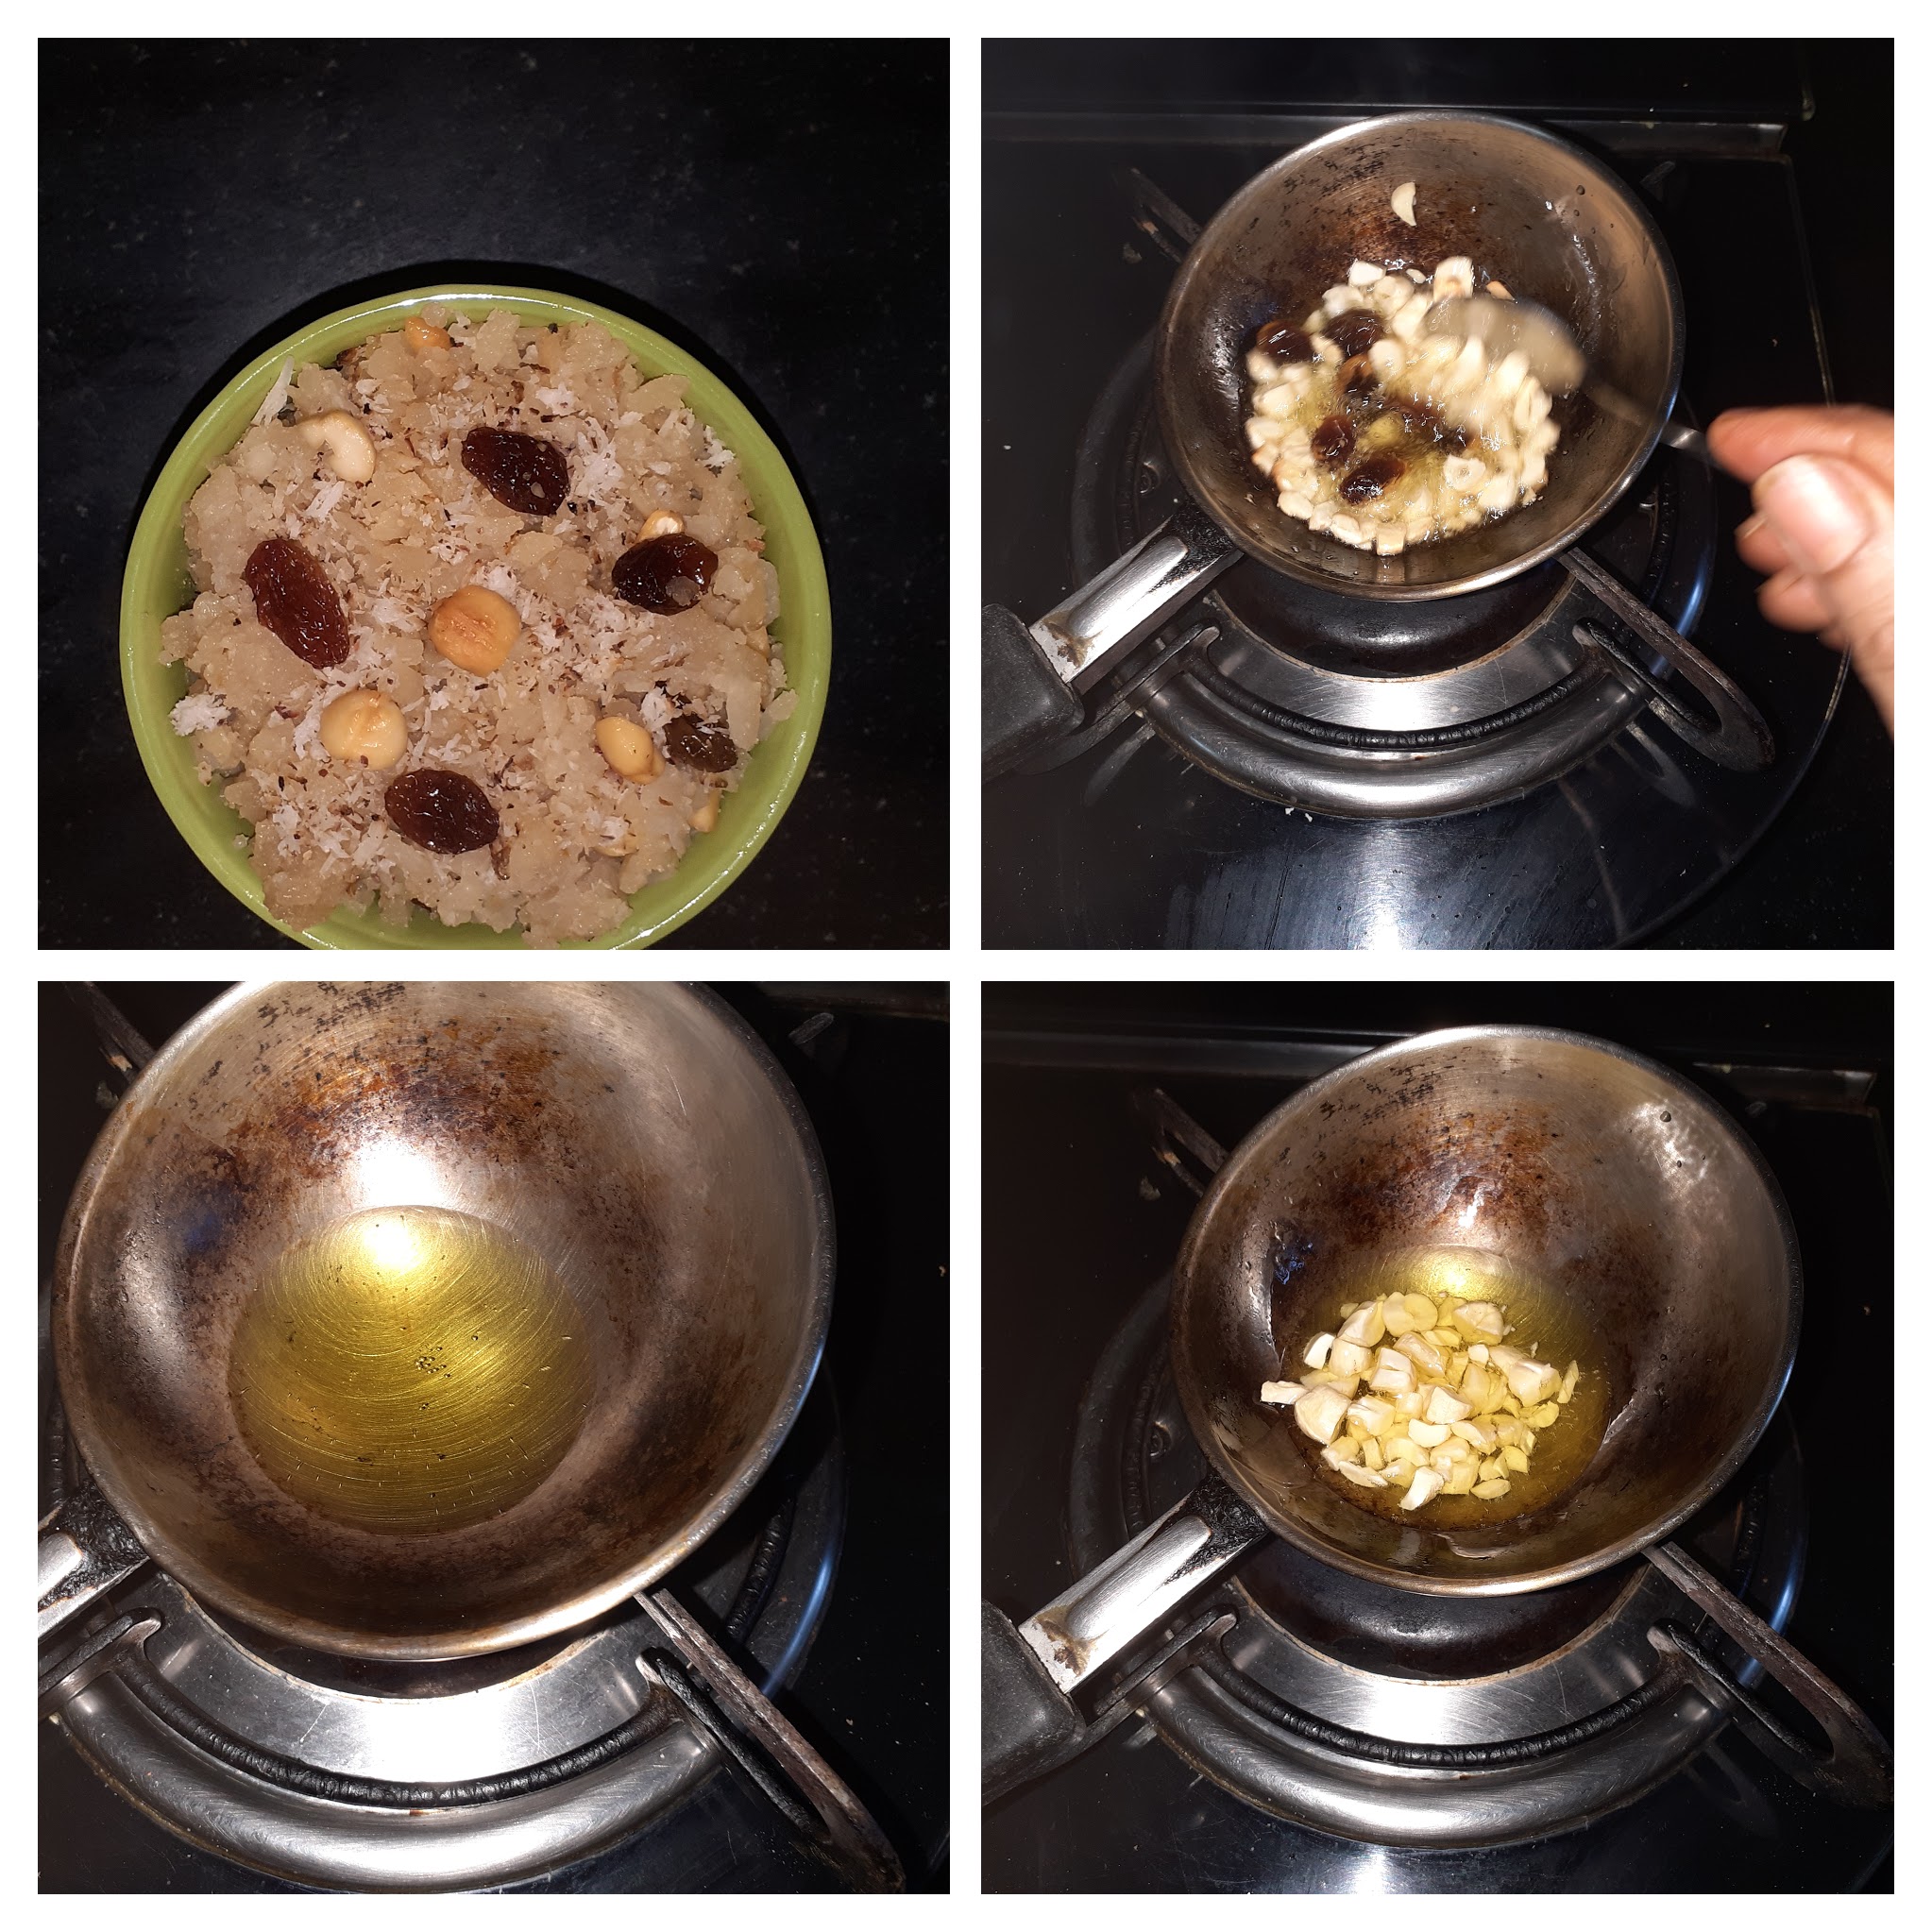
In a thick bottomed vessel put in the jaggery and 1/4 cup water and place it on the flame. Stirring continuously dissolve the jaggery. The syrup should boil for about 2 minutes. Now strain this syrup into a Kadai or thick bottomed pan and add a teaspoon of sugar and add the washed Poha. Turn on the flame and mix the jaggery and Poha well, such that the jaggery syrup has evenly coated the poha. Cook on low flame until all the moisture is absorbed. Now add the cardamom powder and put off the flame. In a small tadka, Kadai heat the ghee and fry the nuts and raisins and drop them into the Sweet Poha and give it a stir. The Sweet Poha/Vella Aval is ready to offer as Prasad or to your guests. This can be made ahead and warmed just before you serve. Enjoy.
STEPWISE RECIPE FOLLOWS:
1. Assemble all ingredients. Powder the jaggery and cardamom and keep ready. Break the Cashewnuts to bits.
2. Sieve, wash the Poha twice drain the water and let it rest for 10 minutes.
3. Now in a thick bottomed vessel put in the jaggery, add 1/4 cup water and switch on the flame. Stirring continuously dissolve the jaggery. The syrup should cook for 2 minutes on low flame.
4. Now strain this syrup into the Kadai or pan in which you are going to make the Poha. Add a teaspoon of sugar. Add the washed and soaked Poha to the syrup in the Kadai, and switch on the flame. Start stirring and cooking this mixture until the jaggery syrup coats the poha well. Continue to stir until the moisture dries up and the Poha is almost dry. Add the cardamom powder and switch off the flame.
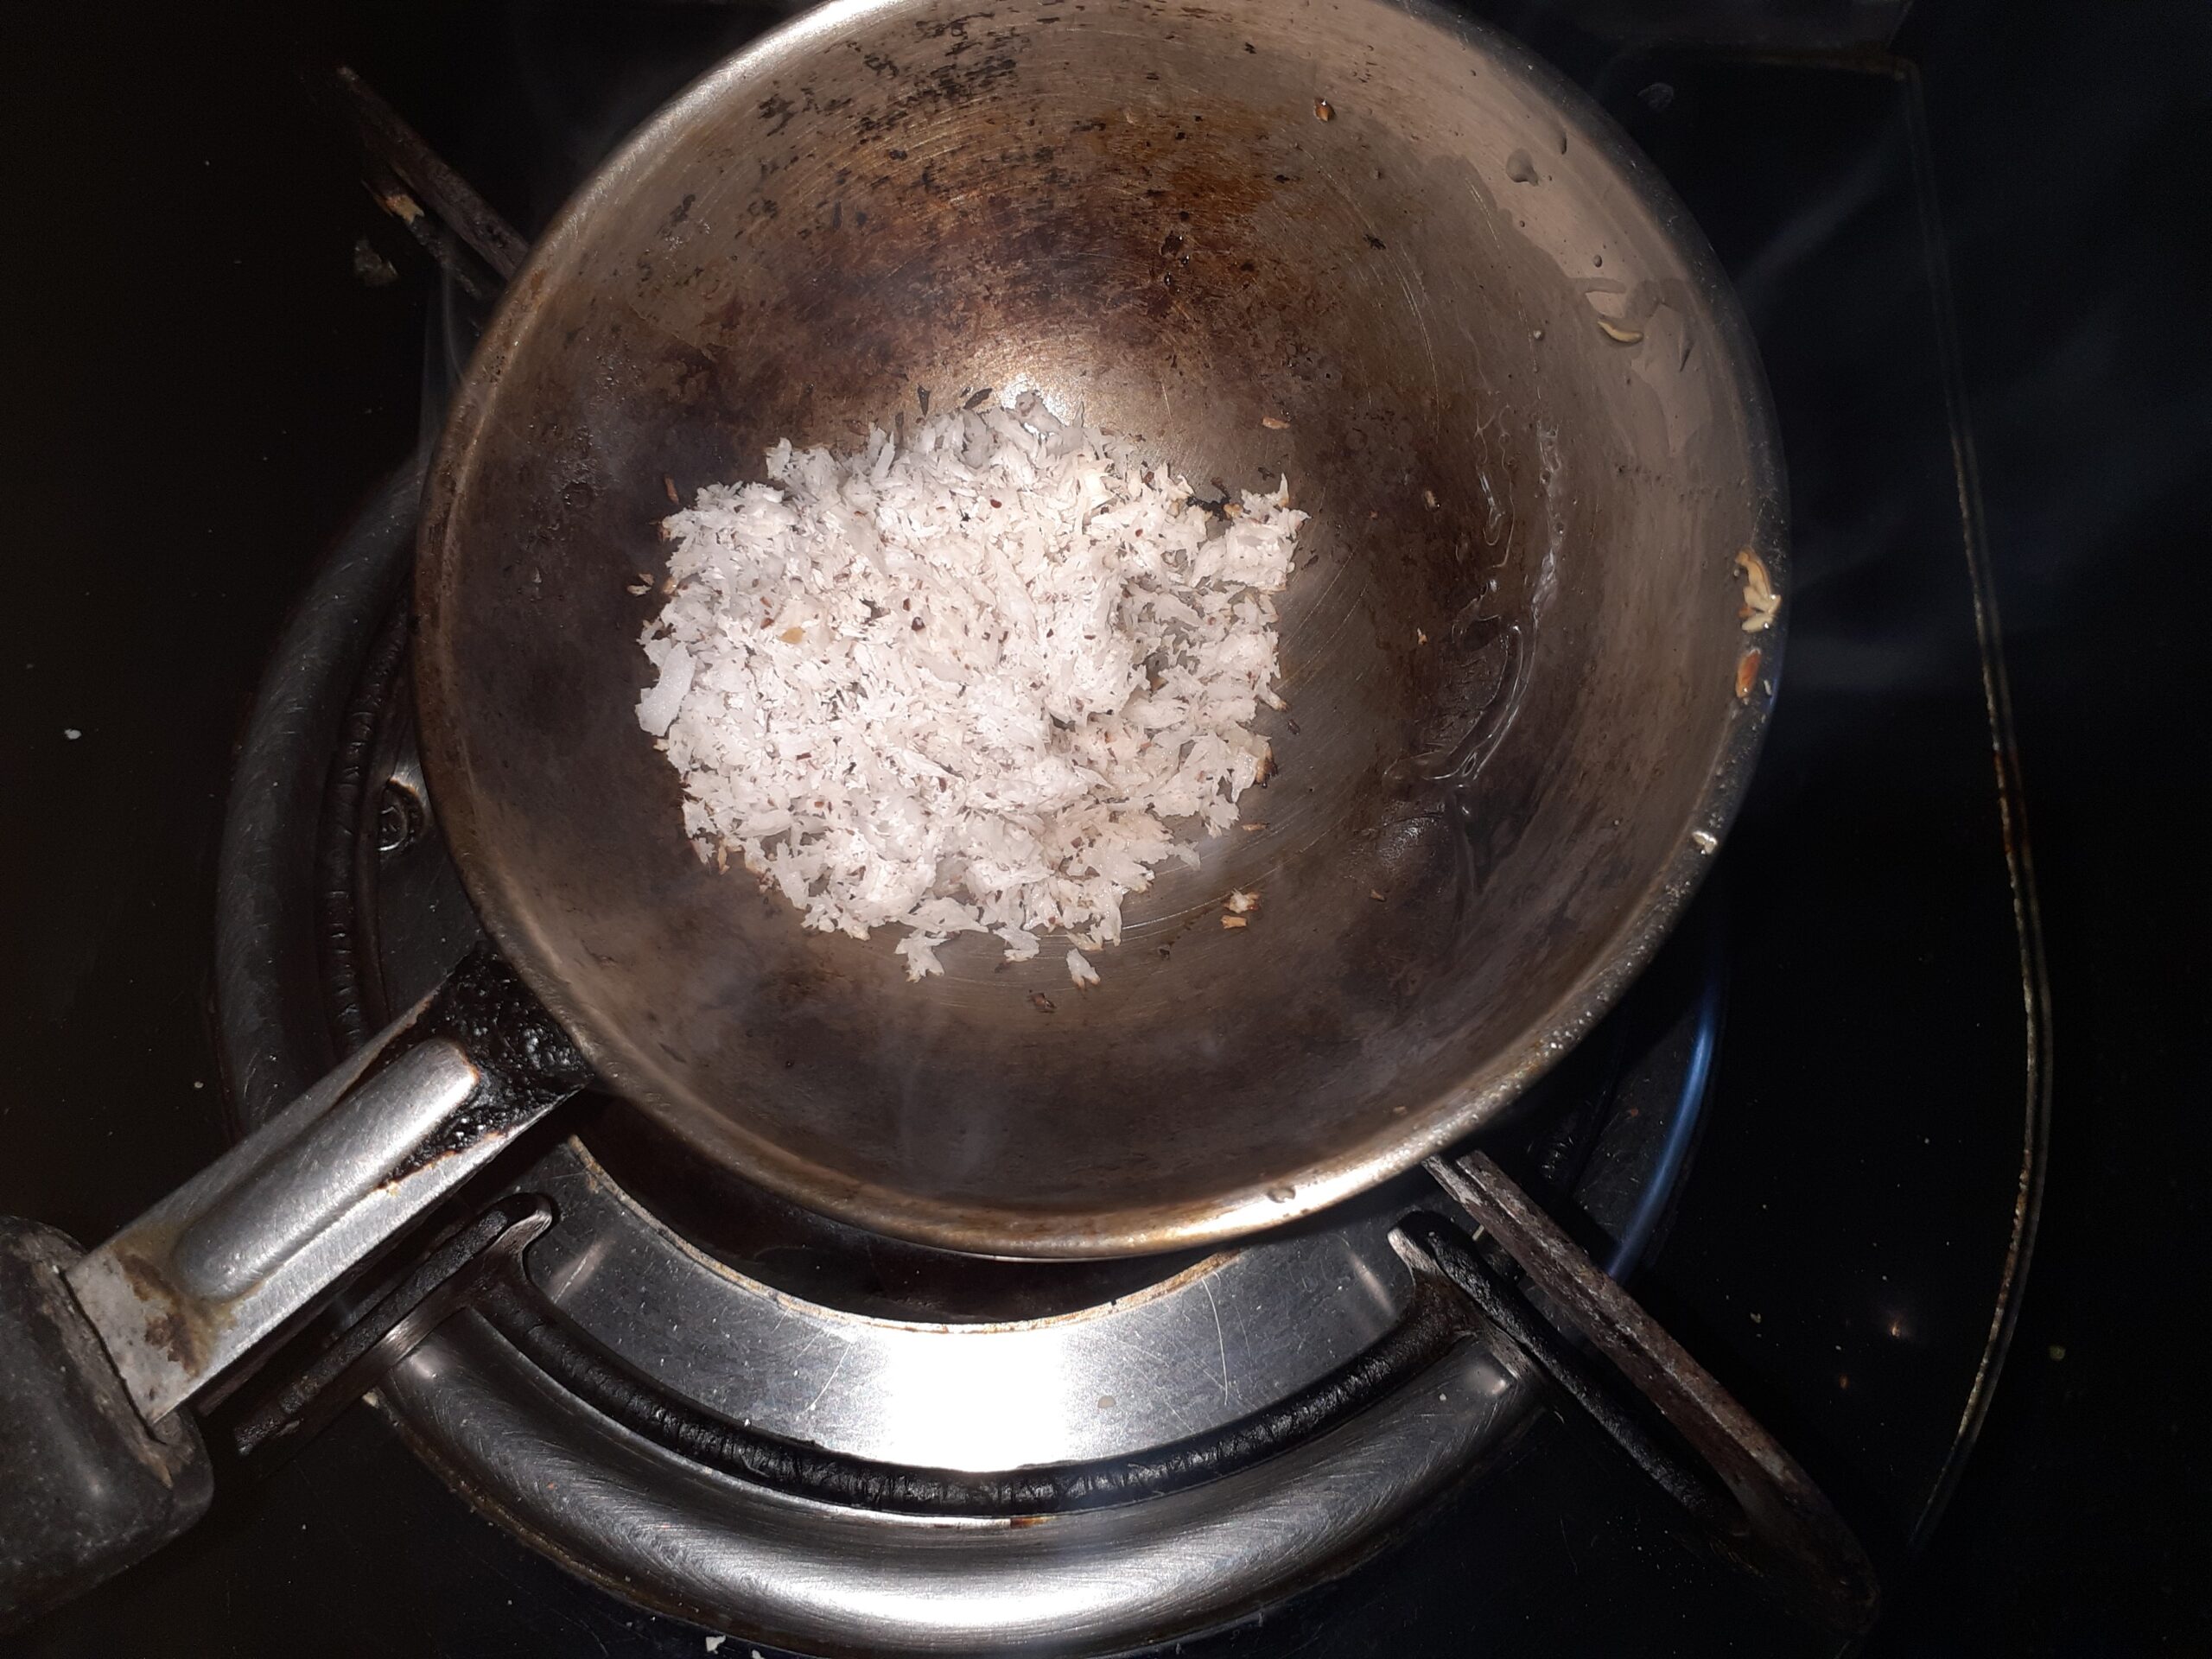
5. In a small tadka, Kadai dry roast the grated coconut gratings until light brown. One has to stir continuously as the coconut will burn if left unattended. Add the roasted coconut to the Sweet Poha and mix well.
6. Now in the same Kadai, the coconut was roasted, add the ghee and fry the nuts and raisins. Put this into the Sweet Poha. The dish is now ready to offer for Puja or to serve guests.
NOTES:
1. If using thick Poha there is no need to sieve the Poha, just wash it around 3 times and then rest it for 10 minutes.
2. Sometimes this recipe I also made by soaking the poha in jaggery water, but I personally do not recommend this as the dish does not last long. The jaggery water is not cooked like unlike the recipe above, so the chances are the Poha will give out a fermented smell in a short time.
3. Since in this recipe, I have boiled the jaggery and made a syrup the Poha can be made ahead, if you have made extra, it can be put in the refrigerator and warmed up the next day. So this method stays good longer.
4. Adding a teaspoon or two of sugar accentuates the taste of jaggery. I always follow this in my jaggery based recipes.
5. More grated coconut can be added if you like the flavour.
If you tried this recipe and liked it please comment below. I would love to hear from you.
If you want the recipes emailed to you leave your id in the homepage near the????
icon. Whenever we have a new post the recipe will be mailed to you. Thank you for showing interest in Rajjo’s Kitchen.
Kothimbir Vadi
Kothimbir Vadi is a savory Maharashtrian snack. It is made of Fresh coriander leaves and Besan/gram flour. Coriander as I have mentioned in my previous posts is my favourite herb. So when there is a recipe predominantly with coriander leaves how could I let it go and hence the post.
This recipe is very simple, flavourful( this word is used many times across this blog if you notice, as I believe the flavour is a very important entity to any food.) and healthy. This snack has a strong resemblance to Gujarath’s Muthias( will blog this soon).
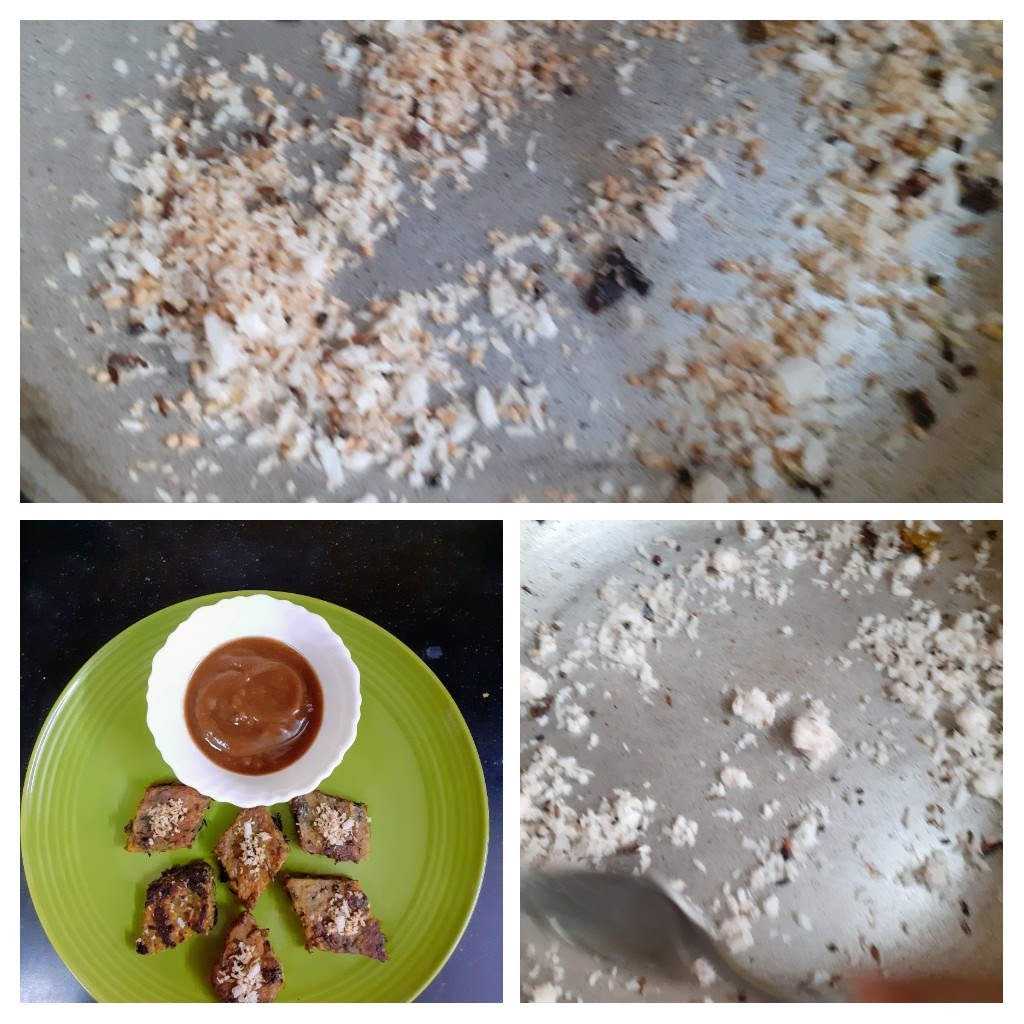
Traditionally this snack is deep-fried, but now one can shallow fry or saute in a small amount of oil too. This dish is cooked twice as it is steamed first and then shallow fried. It is soft and moist when steamed and develops a nice crunch when fried. It goes very well with the sweet chutney and garlic chutney and makes for a great tea time snack. Made to bite-size pieces can be served as a starter in get-togethers. I have really wanted to try this recipe for a long while and I’m happy I did. Everyone at home was pleased by this dish????.
While you are here please view other recipes by Rajjos kitchen like
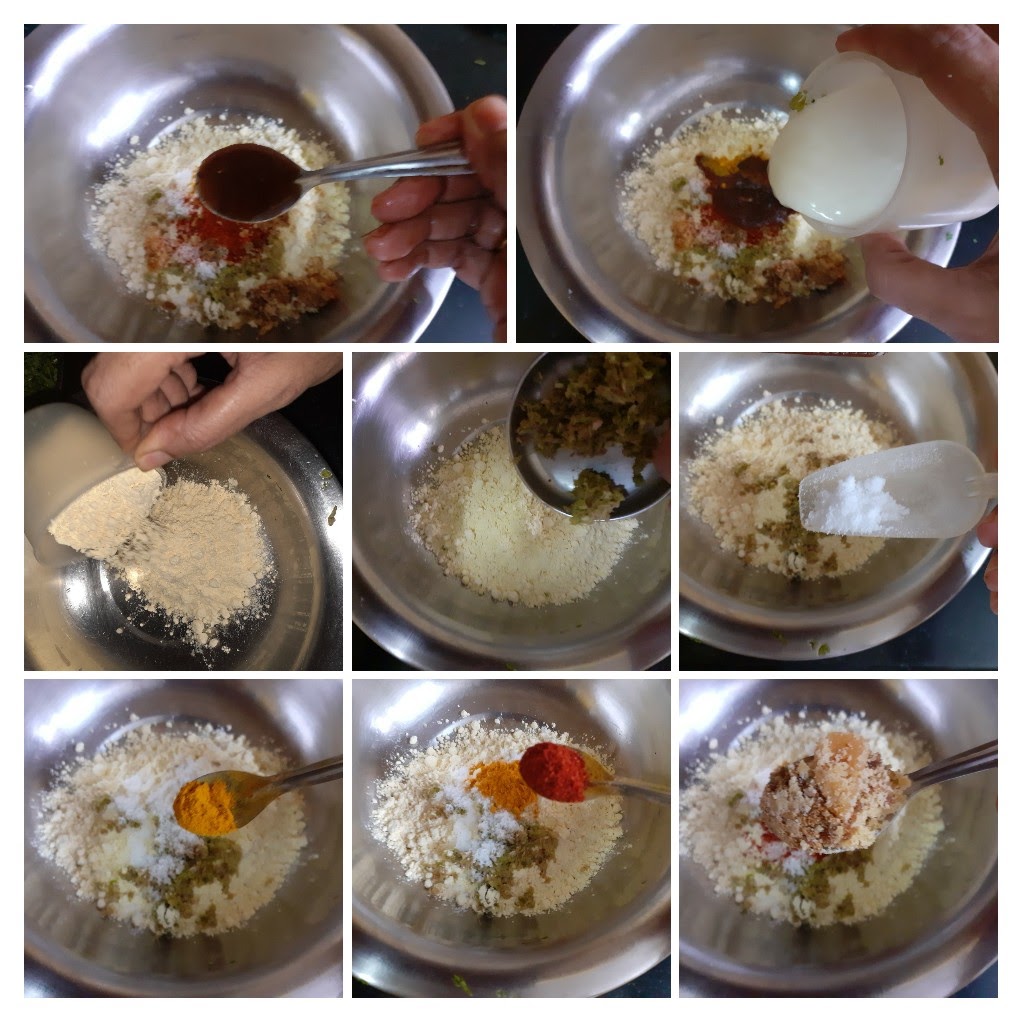
Get the steamer/ pressure cooker ready for steaming. By the time the batter gets ready, the water would have heated and the batter can be steamed immediately, after mixing.
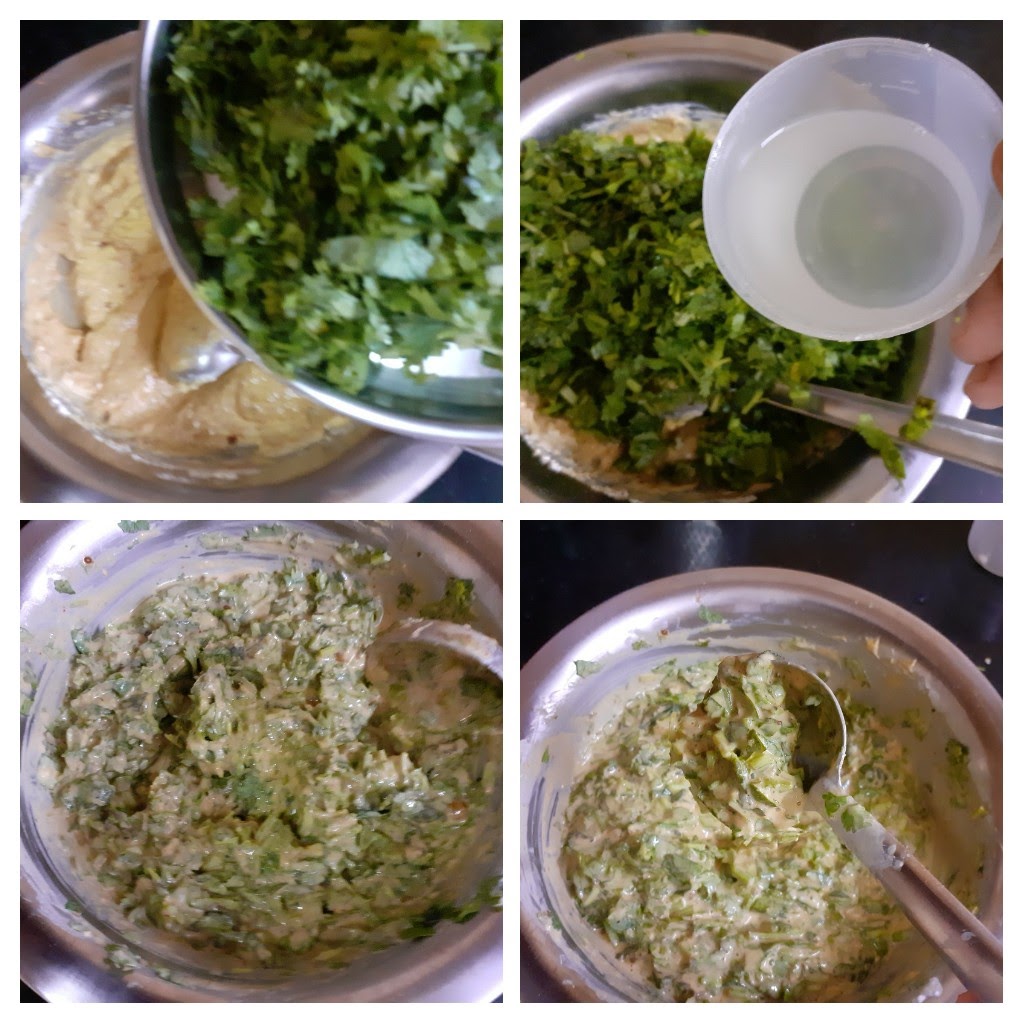
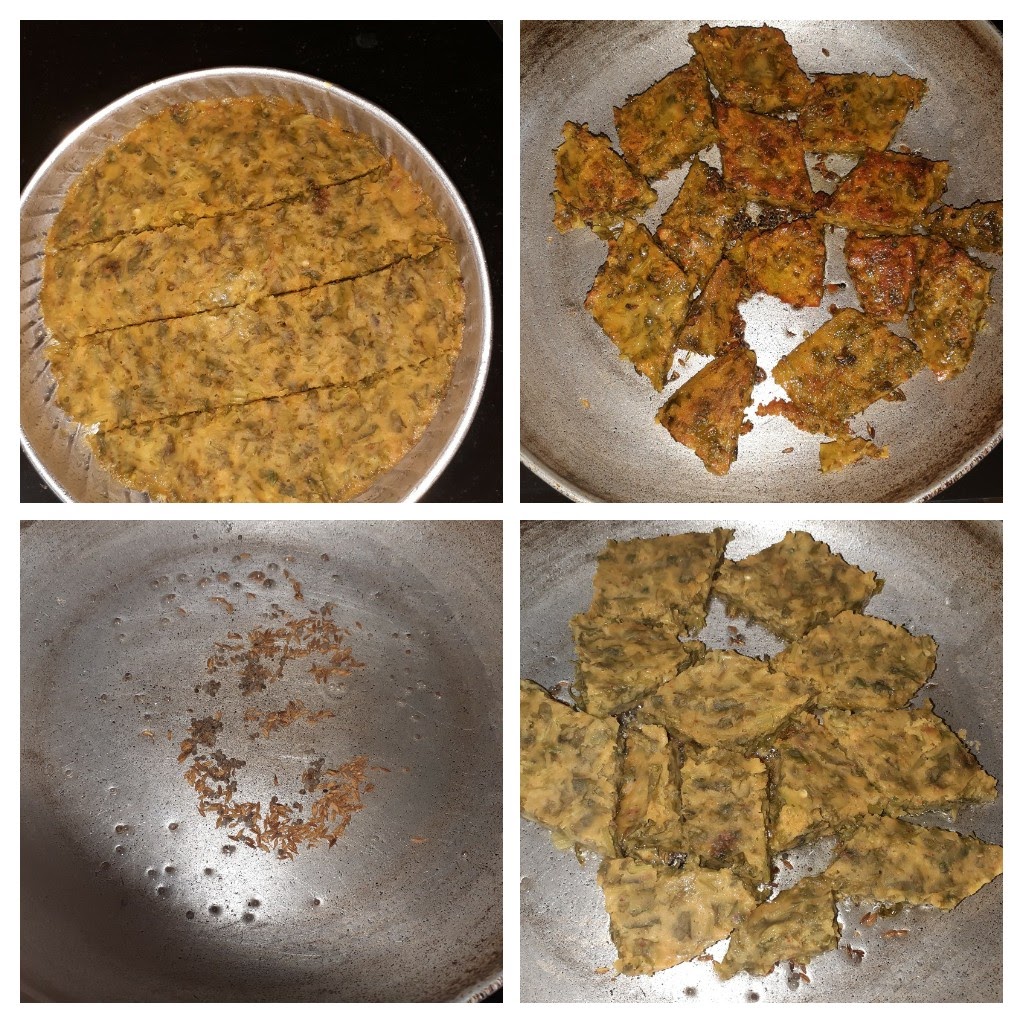
Make a coarse paste of green chillies, ginger, and garlic(if using).In a dish take the Gram flour/besan, add the ginger-green chilli paste, followed by salt, turmeric powder, red chilli powder, jaggery, tamarind pulp. Mix nicely. Now add the curd and stir with a spatula. It will be a semi-wet mixture. Add in the chopped coriander leaves followed by a little water( around 1/2 cup) and make a thick batter. The batter should not be runny, so add water little at a time. Grease a plate or flat vessel with oil and before pouring the batter into the greased plate/ vessel add the cooking soda and stir nicely so that the soda combines well with the batter. Immediately pour the batter into the greased plates, tap the plate lightly, so that the batter settles evenly and place it into the steamer. Steam for 15 minutes. After steaming, remove and cool completely. Cut them into squared or diamonds and keep aside. Heat sufficient oil in a flat pan and put in the tempering of mustard and cumin seeds. As they splutter, add asafoetida and place the cut vadi pieces and fry until they turn brown. Keep turning sides for equal cooking. Remove when all sides are lightly brown and crisp. In the same pan drop the grated coconut and seame and roast until they turn light brown. Now scatter this on the fried Kothimbir Vadi for nice flavour. Kothimbir Vadi is ready to serve with garam chai…Enjoy. Bon Appetit.
STEPWISE RECIPE FOLLOWS:
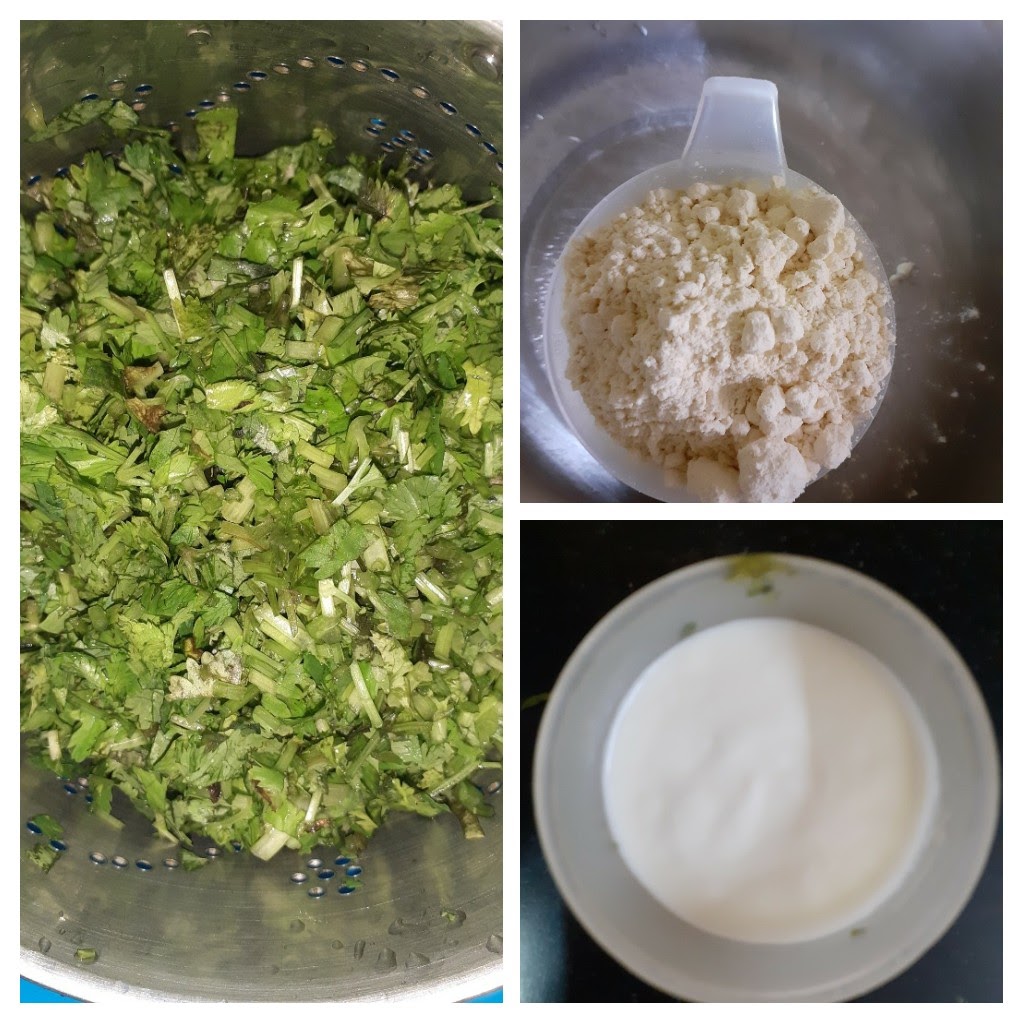
1. Assemble all ingredients. Wash the coriander leaves well and drain all moisture, chop them finely.
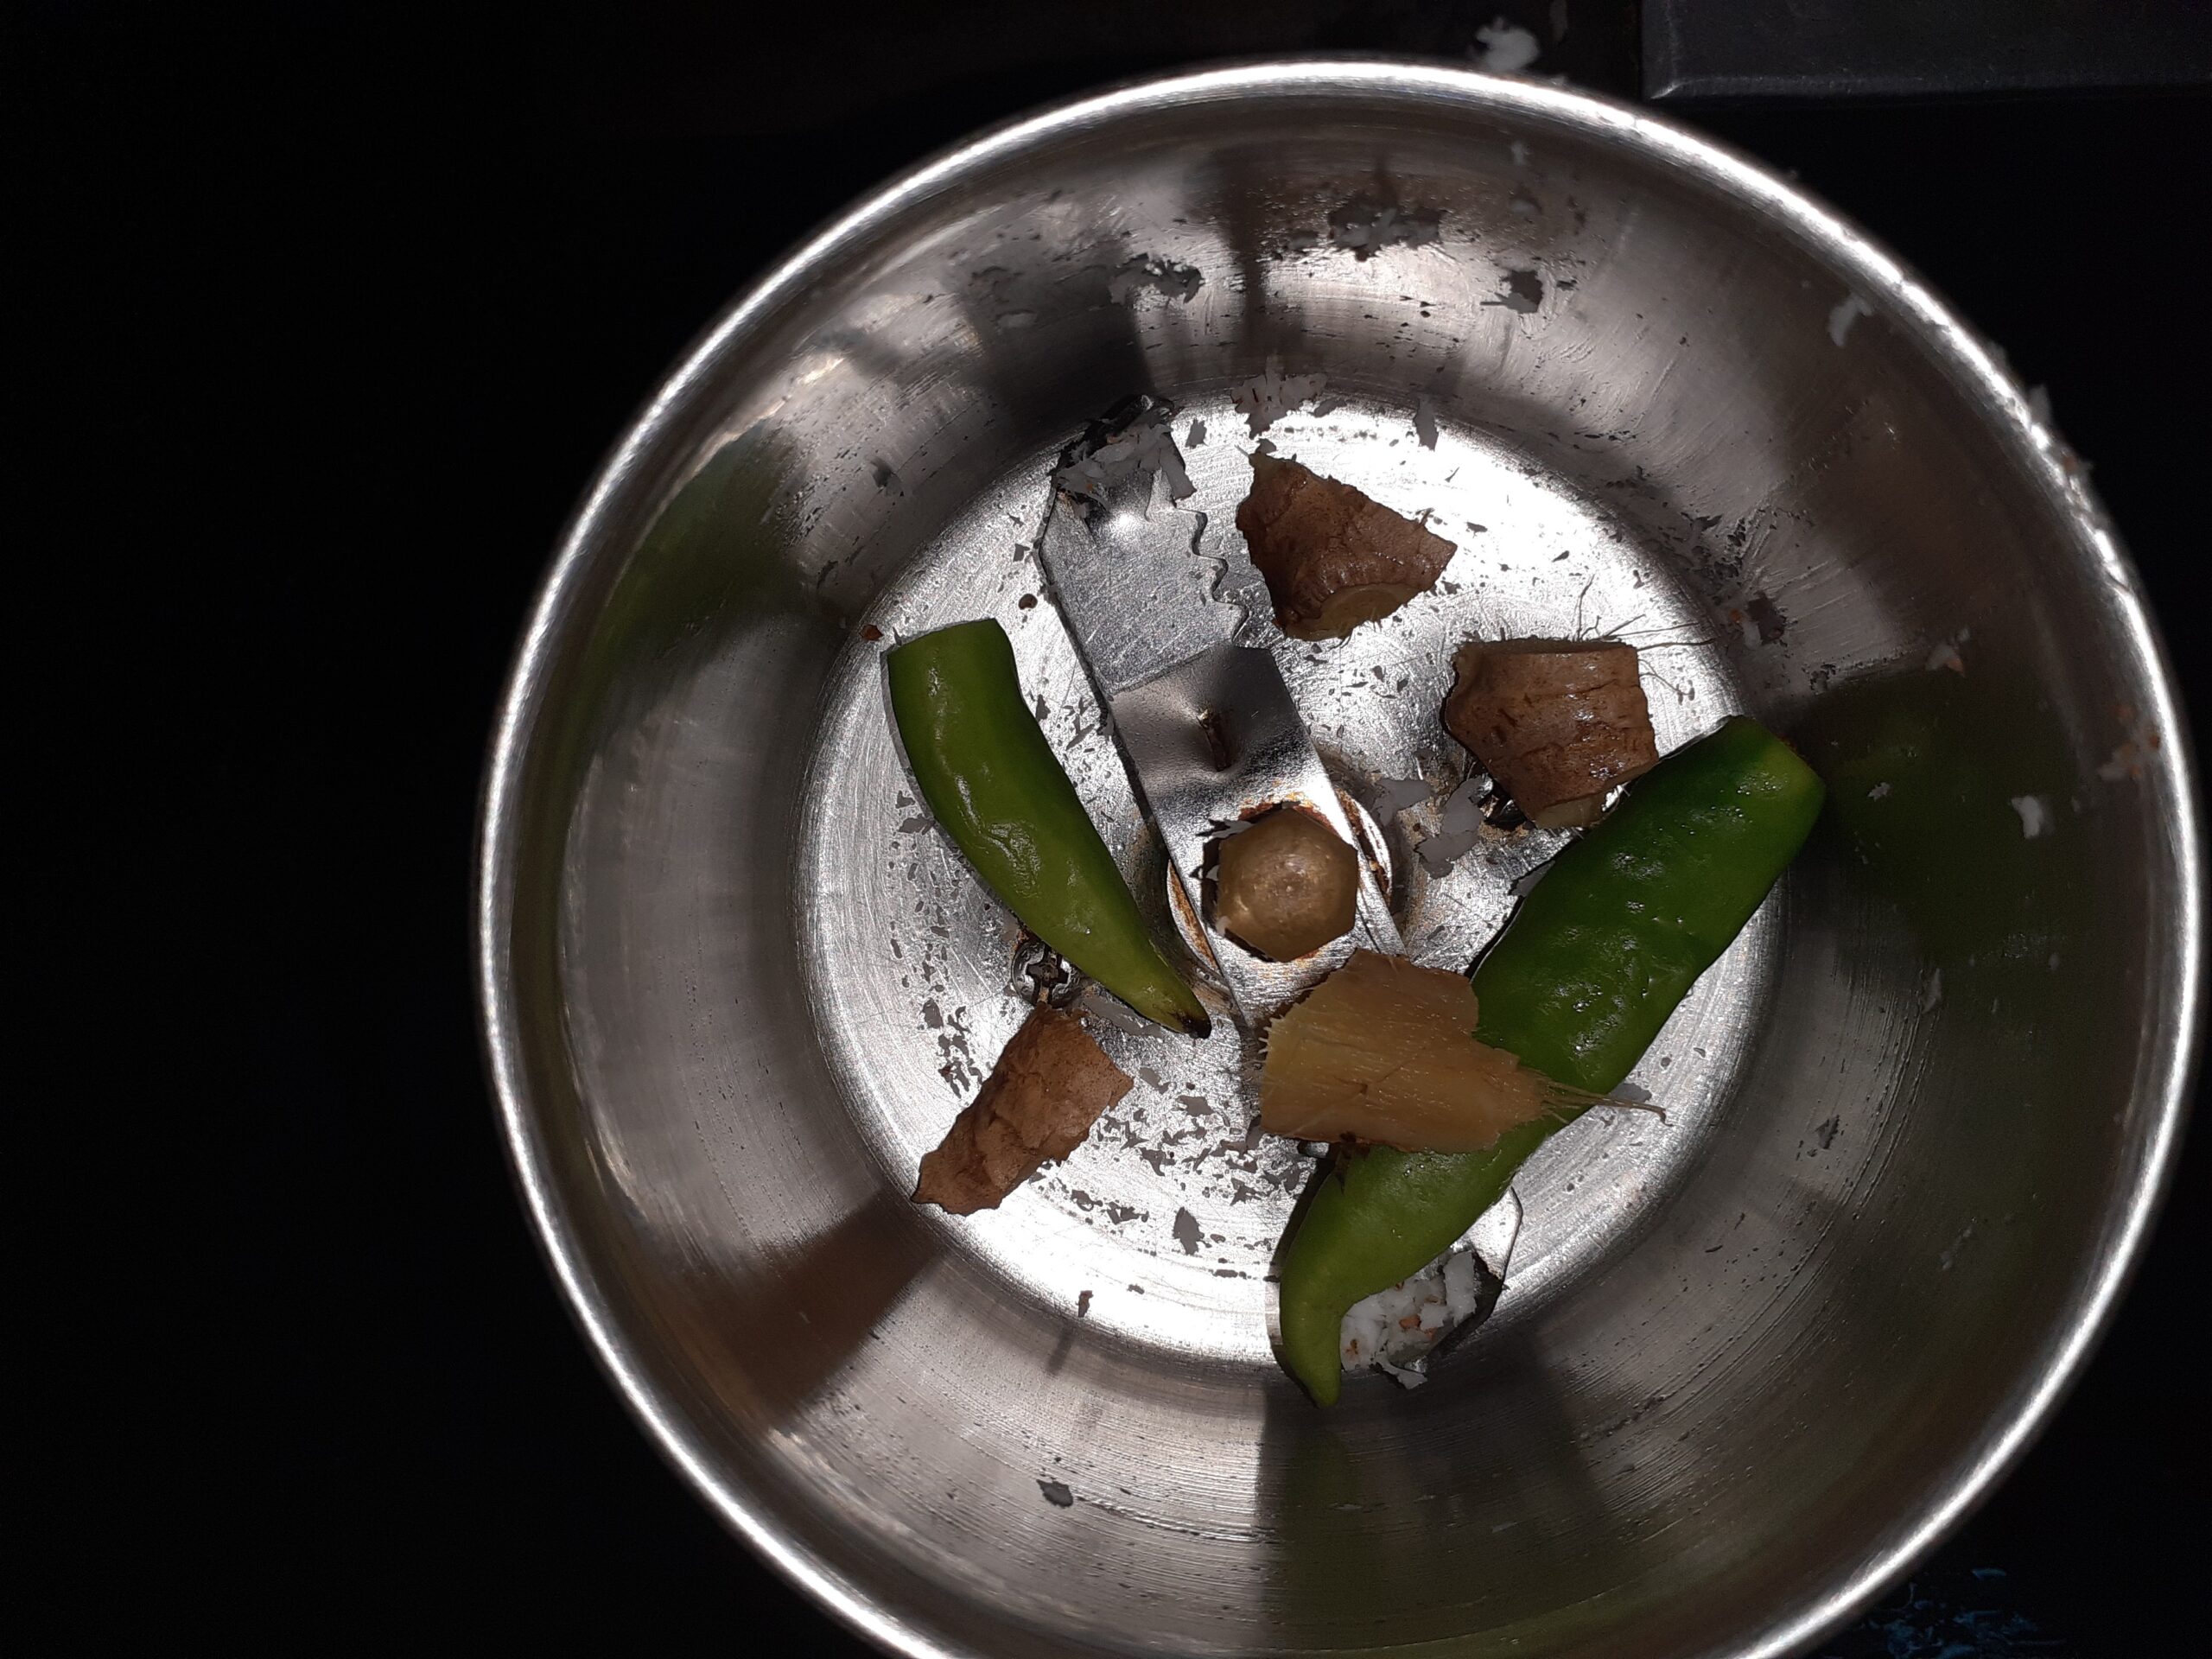
2. Pour water into a steamer and get it going, so that by the time the batter is ready the steamer is ready. Make a coarse paste of the chilli and ginger(and garlic too if using) and keep ready.
3. Now in a dish take the besan and add the green chilli and ginger paste, salt, followed by turmeric powder, red chilli powder, jaggery, tamarind pulp. Add the curd and mix well with a spatula. It should be a semi-wet mixture.
4. Now put in the chopped coriander and mix well. Add water little at a time to make a smooth, yet thick batter. The batter should not be runny. Grease a plate or a flat dish with oil.
5. Now just before pouring the batter into the plate, add the cooking soda and mix well. Pour the batter into the greased plate and set it in the steamer for 15 minutes.
6. After steaming, remove the plate and cool completely. Cut into squares or diamonds and set aside. In a flat pan, pour sufficient oil for shallow frying. Add the mustard seeds, cumin seeds and asafoetida and place the cut Vadi pieces into the oil. Fry each side until light brown and crisp. Remove from pan. Repeat for all the pieces.
7. Now in the same pan put in the grated coconut and Sesame seeds and saute until light brown. Put this on tempering on the vadi for a nice flavour. The Kothimbir Vadi is ready.
NOTES:
1. The ratio of coriander leaf to Besan is 2:1, stick to that. More quantity scale up the measures in the same proportion.
2. Wash and drain the coriander leaves well before chopping.
3. I have not used garlic, but it can be added.
4. If you like the Vadis deep-fried, go ahead and fry them.
If you tried this recipe and liked it please comment below. I would love to hear from you.
If you want the recipes emailed to you leave your id in the homepage near the????
icon. Whenever we have a new post the recipe will be mailed to you. Thank you for showing interest in Rajjo’s Kitchen.
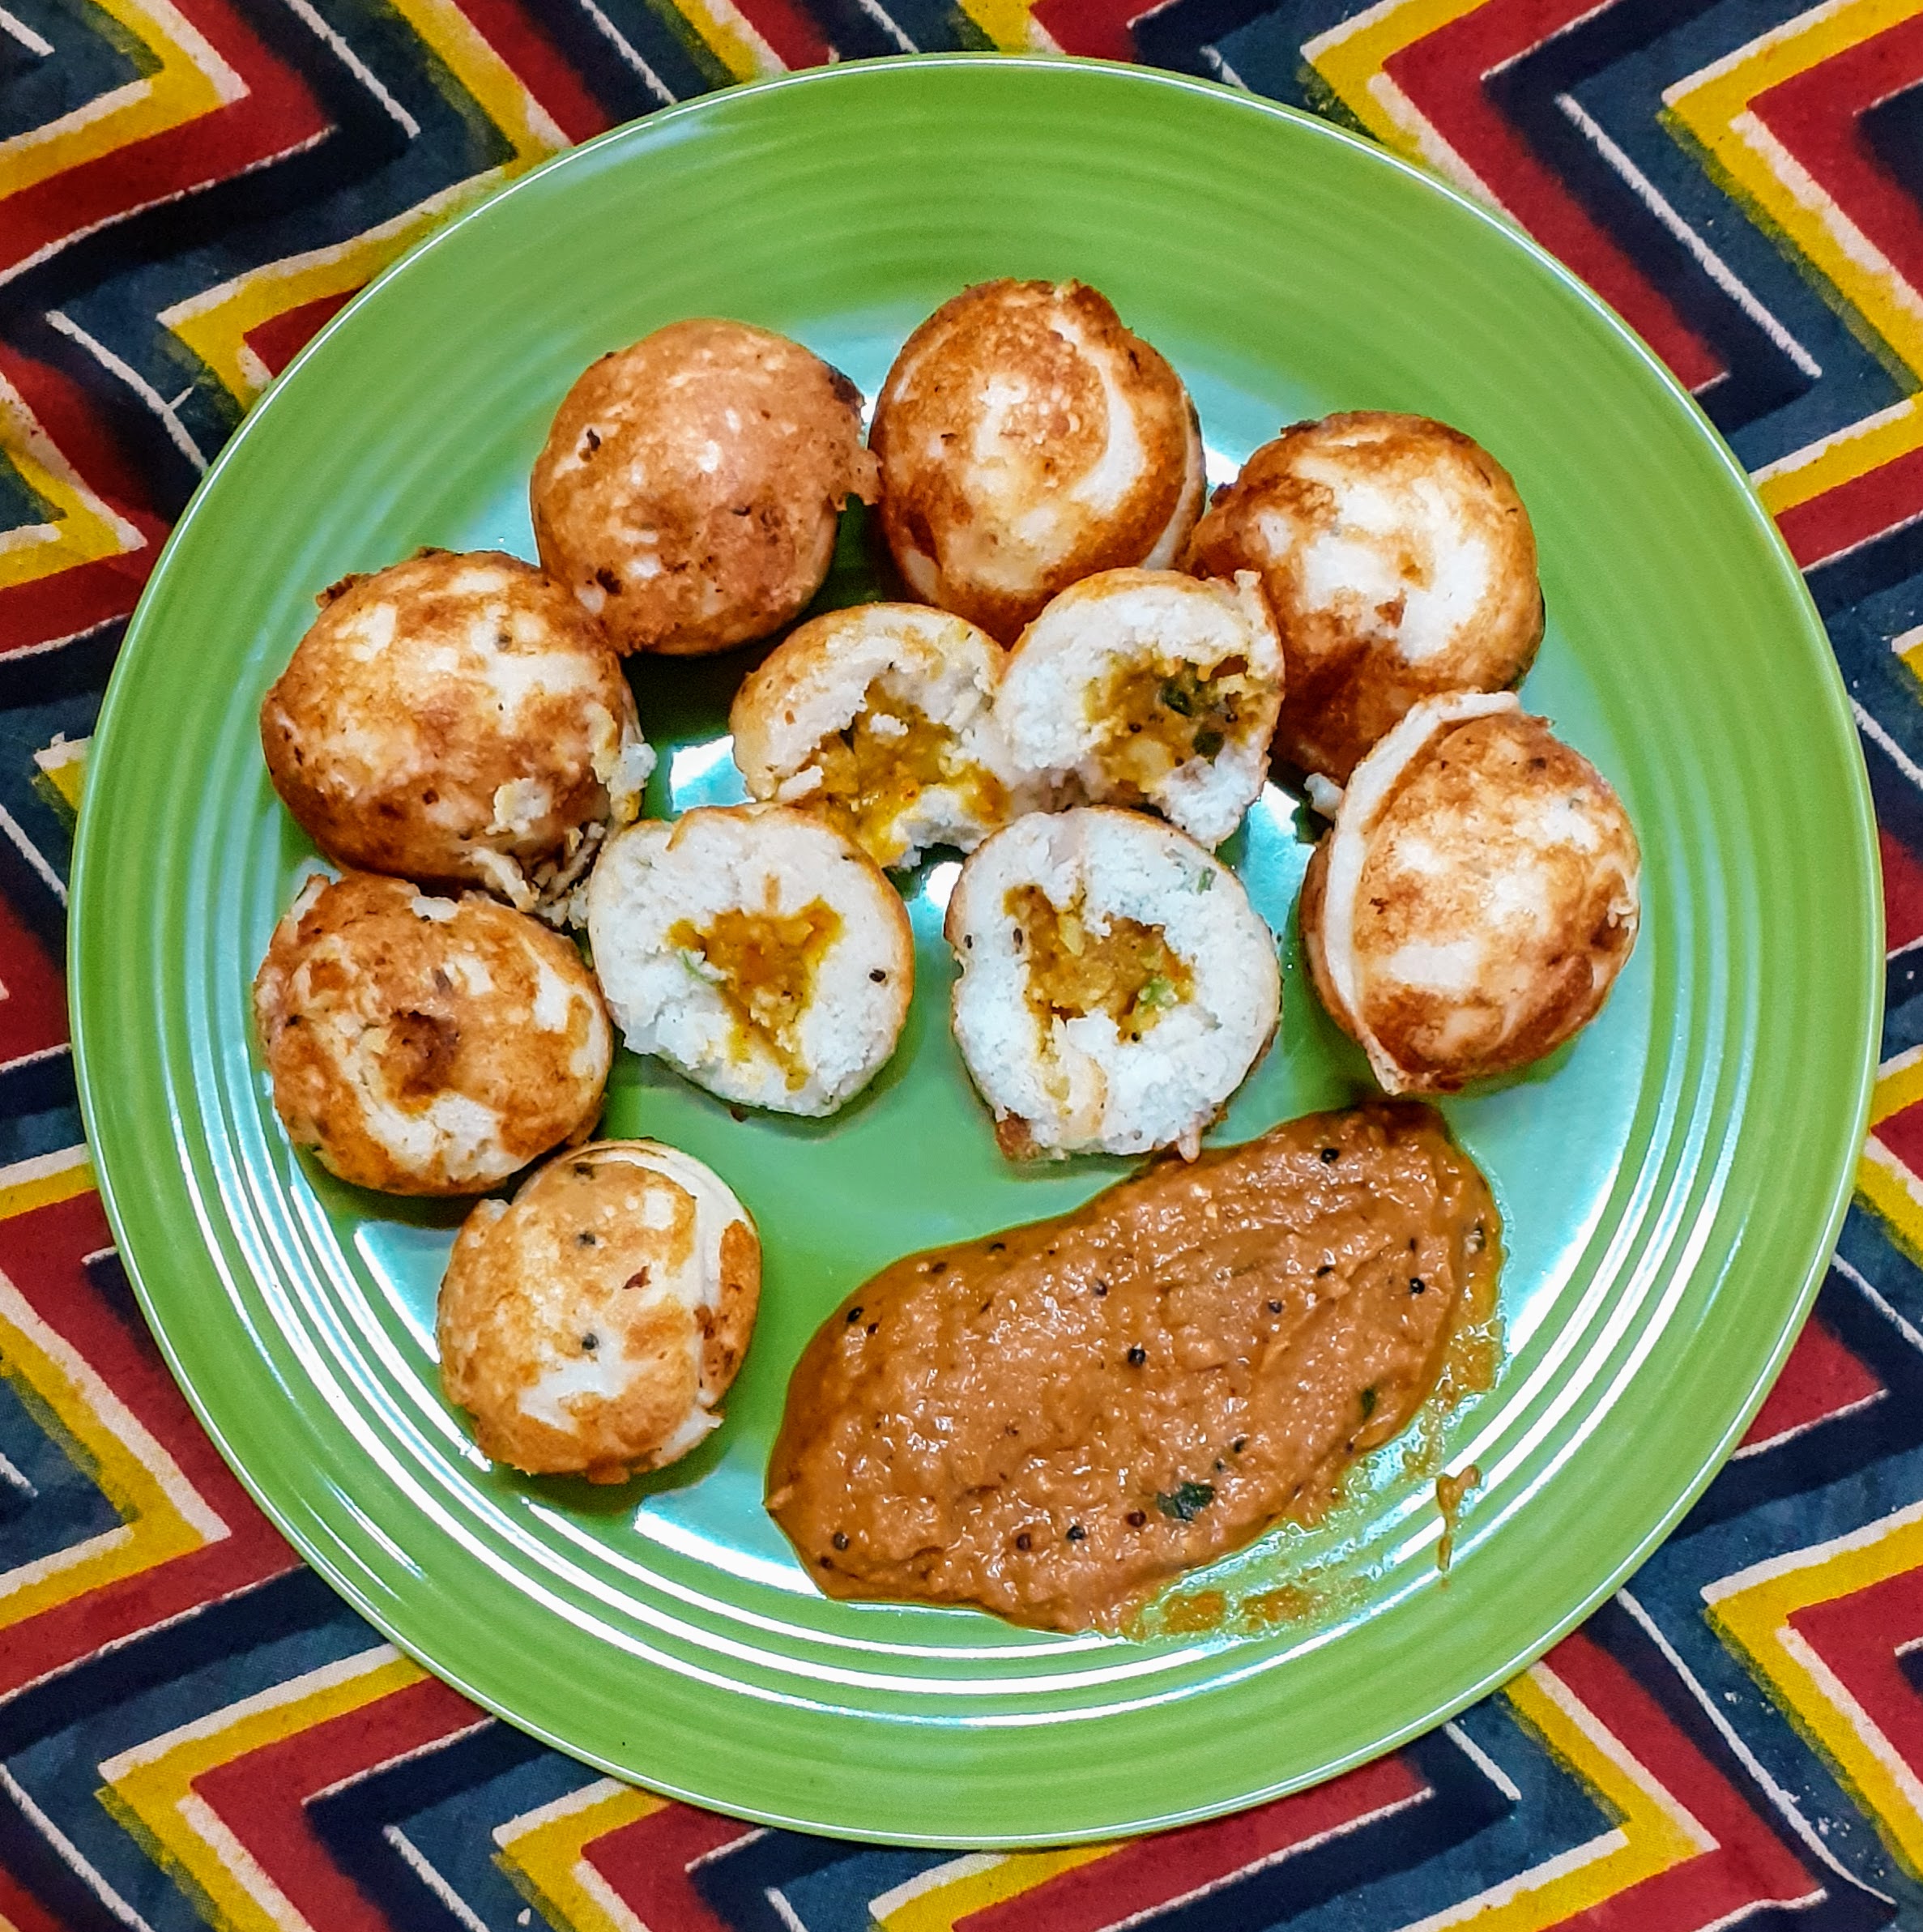
Stuffed Kuzhi Paniyaram (Savory)
Kuzhi Paniyarams are basically Lentil and rice batter dumplings. The batter is fermented and then poured into a Paniyaram pan which gives them the shape. Most often in South Indian homes the Kuzhi Paniyaram or Kuzhi appam as we call it is made from the Idli batter itself. When the batter becomes a little sour it is made into Paniyaram. That is because the Idli/Dosa batter is made for a whole week as a quick breakfast or dinner option. So day 1 is Idli, day 2 Dosa and day 3 onwards its Paniyaram and dosa with the batter, as sour Idlis are not that great to taste. However, when I have guests over I prefer making the batter especially for this as it makes the crust crisp and enhances the taste of the Paniyaram to a different level and the texture on the inside of the Paniyaram is lovely.
There are many variations of the Paniyaram batter. It is usually made with Urad dal and rice, Raagi(Finger millet)flour, Jowar(Sorghum) flour, Bajra(Pearl millet) flour, etc can also be used in the batter. The proportions of the Dal and rice also vary from home to home. The Paniyaram batter is used as it is or sometimes, finely chopped Onion, grated Carrots, and other vegetables can also be added.
I have stuffed the Paniyaram with a mashed potato spicy stuffing which tastes wonderful, I have also added finely chopped onions, green chillies, ginger and curry leaves to the batter. This combination of onion in the batter and the Potato stuffing within is a perfect one.
I personally don’t like using the non-stick Paniyaram pan for this dish, as the traditional brass or iron ones give the Paniyaram its crispy exterior. If you have only the non-stick one with you, that’s fine too.
Kuzhi Paniyarams can be served as Breakfast, starters or even for dinner with any chutney.
While you are here please check out other recipes of mine like Dahi Pohe, Adai,
PREP TIME: 20 Mins(+4 hrs soak) COOK TIME: 40 Mins
TOTAL TIME: 60 Mins COURSE: SNACK/TIFFIN
CUISINE: SOUTH INDIAN SERVINGS: 4
AUTHOR: Rajni Ram
Here is the recipe of Stuffed Kuzhi Paniyaram–
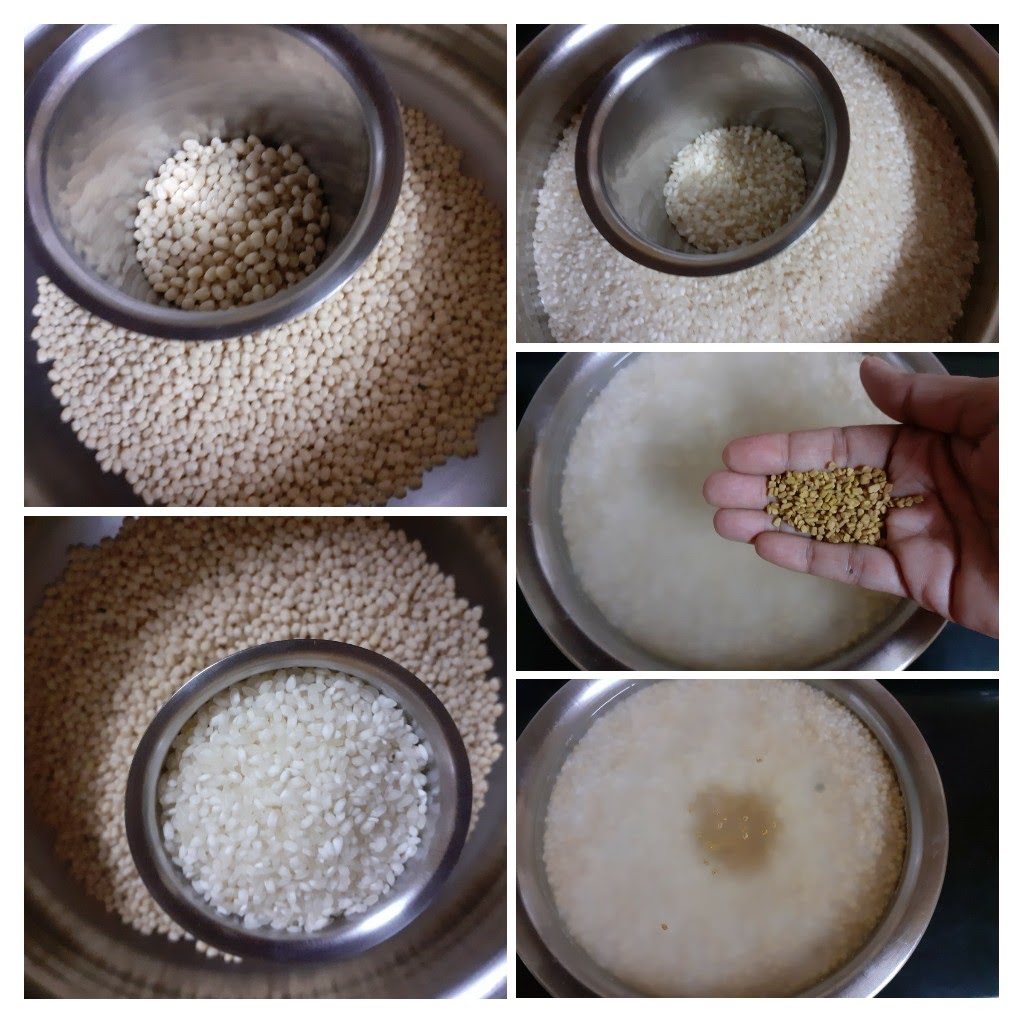
Ingredients for batter:
Urad dal/black gram(whole without skin) 1 cup
Idli Rice/Boiled rice 1.5 cup
Raw rice(any variety except Basmathi) 1.5 cup
Methi seeds/fenugreek seeds 1 tsp
Ingredients for stuffing:
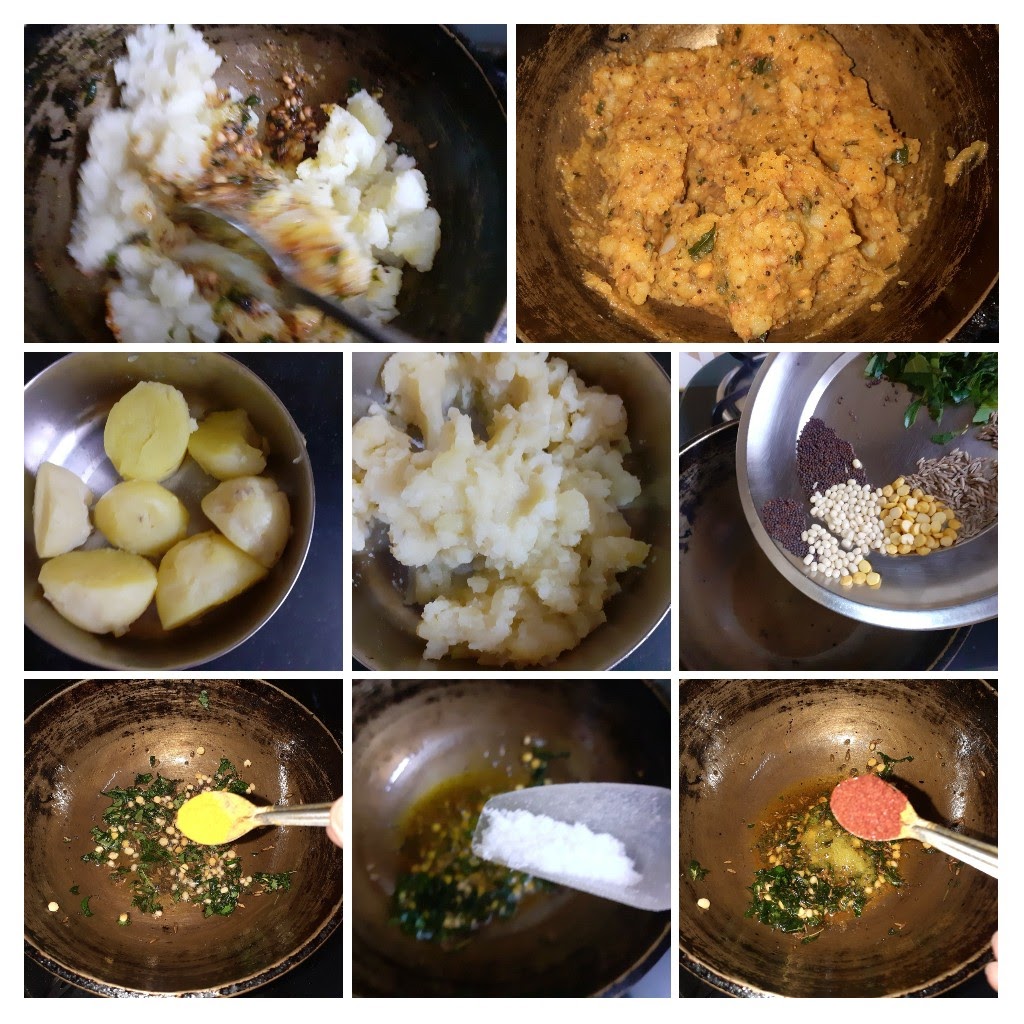
Potatoes 4 medium(boiled)
Turmeric powder 1/2 tsp
Red chilli powder 1 tsp
Mustard seeds/Rai 1 tsp
Cumin seeds/jeera 1 tsp
Asafoetida 1/4 tsp
Curry leaves a few (finely chopped)
Salt as per taste
oil for tempering and for greasing the Paniyaram pan.
Directions for Batter:
Soak the dal and both rice varieties along with a teaspoon of methi seeds in a huge vessel for 3-4 hours and grind to a smooth paste to a batter of medium consistency(should resemble Idli batter). Add salt, and leave to ferment for 6-8 hours for a perfect texture of the Paniyaram. While grinding add little water at a time, the batter should be a smooth one, but not runny.
Directions for Stuffing:
Boil the potatoes, peel the skin and mash them well. Now in a pan pour some oil and heat. Add the mustard seeds, as they crackle, add the Cumin followed by turmeric powder, red chilli powder, salt, asafoetida and curry leaves. Nicely fry the masala in the oil for 30 seconds and drop the mashed potato into the tempering and mix nicely, so that the tempering is evenly distributed. Cool the mixture.
After it ferments temper the batter with mustard seeds and asafoetida.
Directions for Paniyaram:
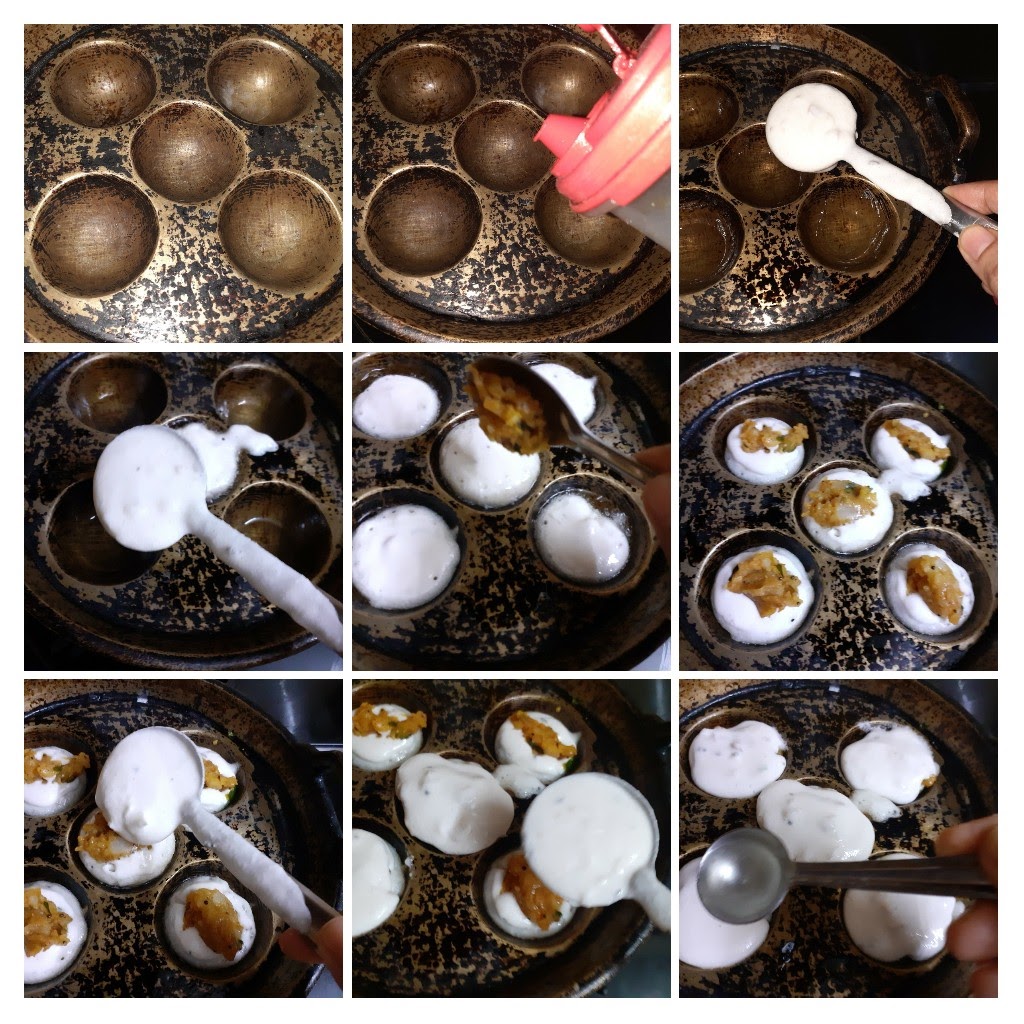
Chop Onions, green chillies, ginger and curry leaves finely and add them to the fermented batter and stir well.
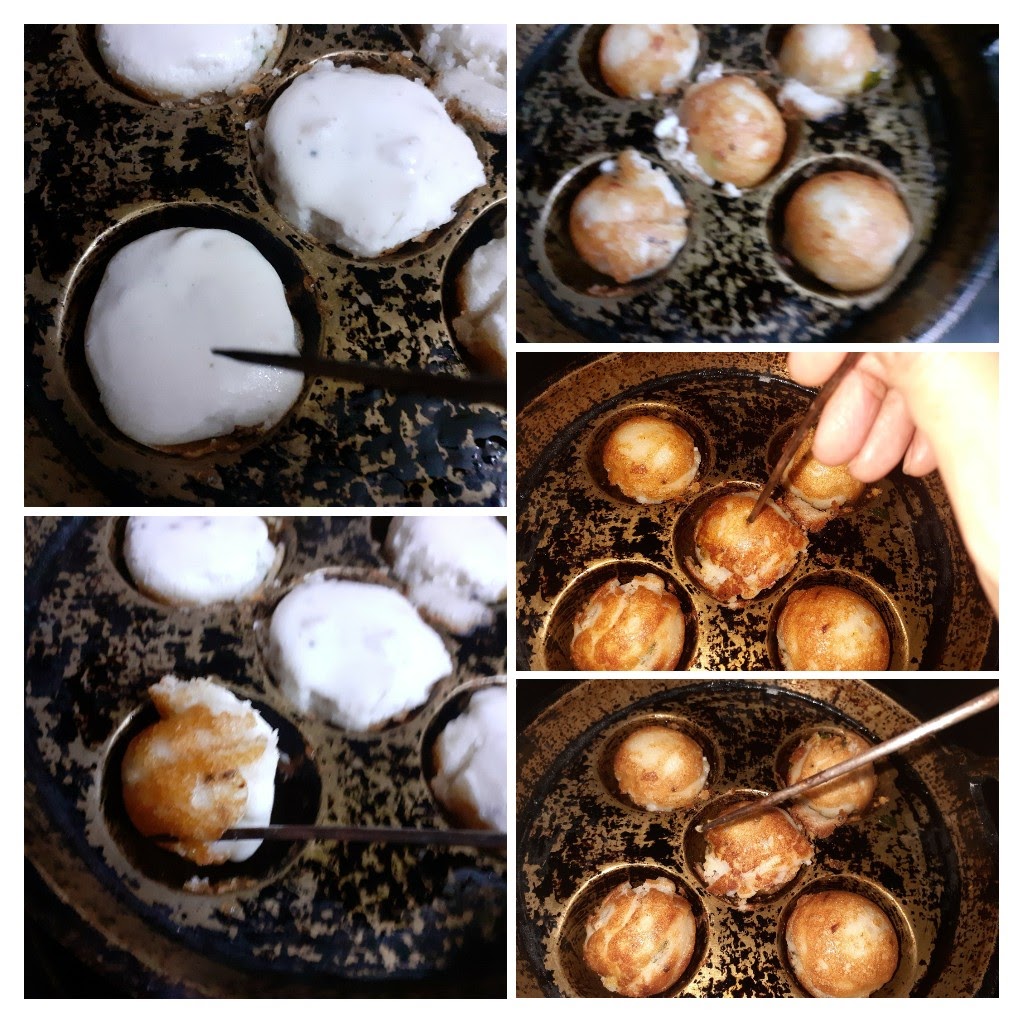
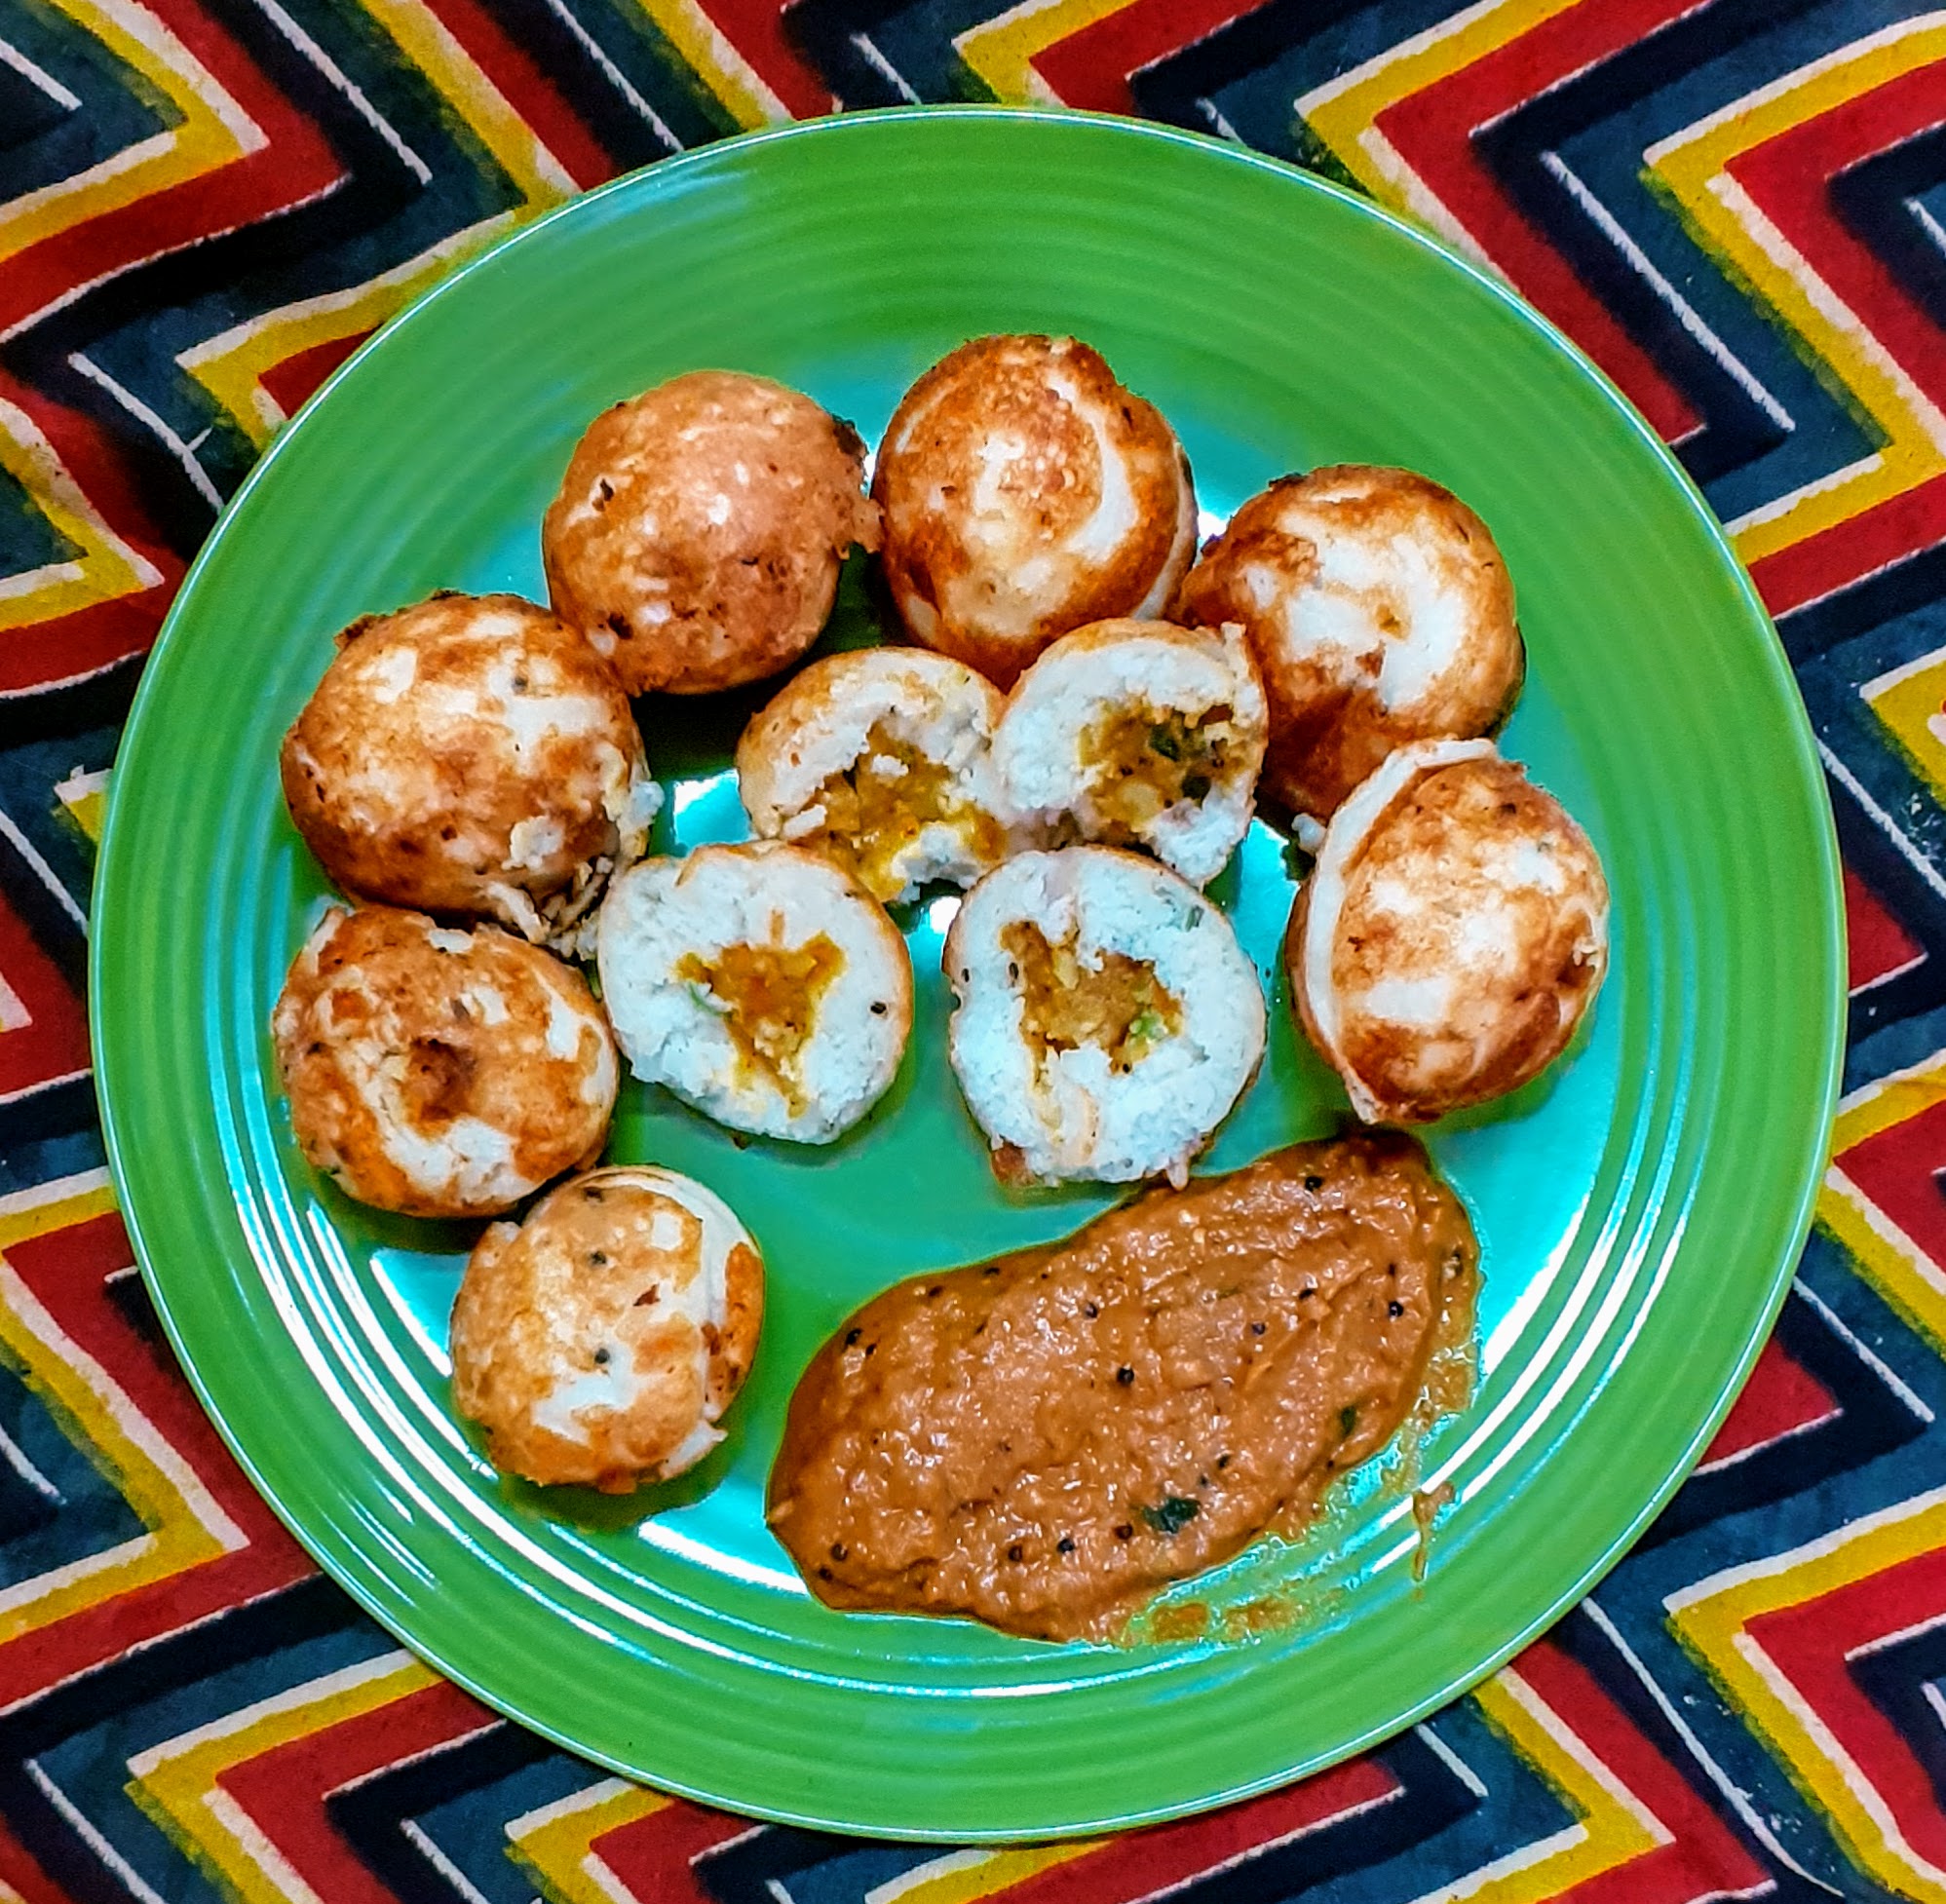
Put the Paniyaram pan on the flame and let it heat up. Pour oil into the moulds(if using a traditional metal pan, only the first round will need 1 tsp oil per mould, rest of the batches will need only a few drops). Wait for 1/2 a minute, let the oil heat up, now reduce the flame and with a small round ladle pour 1 scoop of batter into each mould, now take the stuffing little at a time with a spoon and drop it in the centre of the batter. Now cover up the stuffing with 1/2 scoop of batter and increase heat. Drizzle little oil around the corners of each mould, reduce the flame and slowly loosen them from the sides. Now flip each Paniyaram and cook the other side. When done loosen it from the mould and remove it. The crispy and tasty Kuzhi Paniyarams are ready..serve them with Tomato Coconut chutney or Tomato onion chutney. Enjoy. Bon Appetit.
STEPWISE RECIPE FOLLOWS:
1. Soak the dal and rice along with 1 tsp methi seeds for 3 hours minimum and grind to a smooth paste of medium consistency(Idli batter consistency). Add the salt, mix and allow to ferment for 6 to 8 hours.
2. Preparation of stuffing–Boil Potatoes, peel and mash them. In a pan take 1 tbsp oil and heat. Now add the mustard, followed by cumin, turmeric powder, salt, red chilli powder, asafoetida and curry leaves. Fry the masala for 30 seconds and add the mashed potato to the tempering and mix well. The tempering should have coated the potatoes well. Check for salt and spice. The stuffing should be a little spicy.
3. To the fermented batter add finely chopped onions, ginger, green chillies and curry leaves and stir nicely. Temper the batter with mustard seeds, cumin seeds and asafoetida.
4. Now put the Paniyaram pan on the flame and heat. Pour 1 tsp oil in each mould. Once the oil is heated, using a small round ladle, pour 1 scoop of batter into each mould. Now with a spoon drop little of the stuffing in the centre of the batter, now pour more batter to cover the stuffing. Drizzle some oil in the corners and cook for 1/2 a minute. Now loosen the edges of the paniyaram using a fork/ spoon or thin metal wire to flip them around, cook them and remove them from the pan when done. For doneness when you stick the metal wire or toothpick in the centre of the paniyaram, it should come out clean.
(I have included a short video so that you understand the process of cooking the Paniyaram in the pan.)
5. Repeat this process for the entire batter or how many ever you wish to serve, the remaining batter can be stored in the fridge and used to make uthappam.
The Paniyaram is ready to serve. It goes well with all chutneys or just by itself as it has a stuffing. It can be served with Sambar too.
How do make this recipe without a Paniyaram pan?
well, make a thicker batter, and also make small balls of the stuffing. Now take the stuffing and drop it in the batter, use your hands to coat the stuffing with batter and deep fry them in a Kadai of oil.
NOTES:
1. As the recipe involves soaking and fermentation, plan your time. In winters give more time for fermentation.
2. The onion, green chillies, ginger and curry leaves can also be sauteed in oil and added to the batter.
3. If using a nonstick paniyaram pan, I recommend drizzling it with some oil for a crunchy exterior.
4. Only small amounts of the stuffing as to put in the center of the batter, not too much of it.
If you tried this recipe and liked it please comment below. I would love to hear from you.