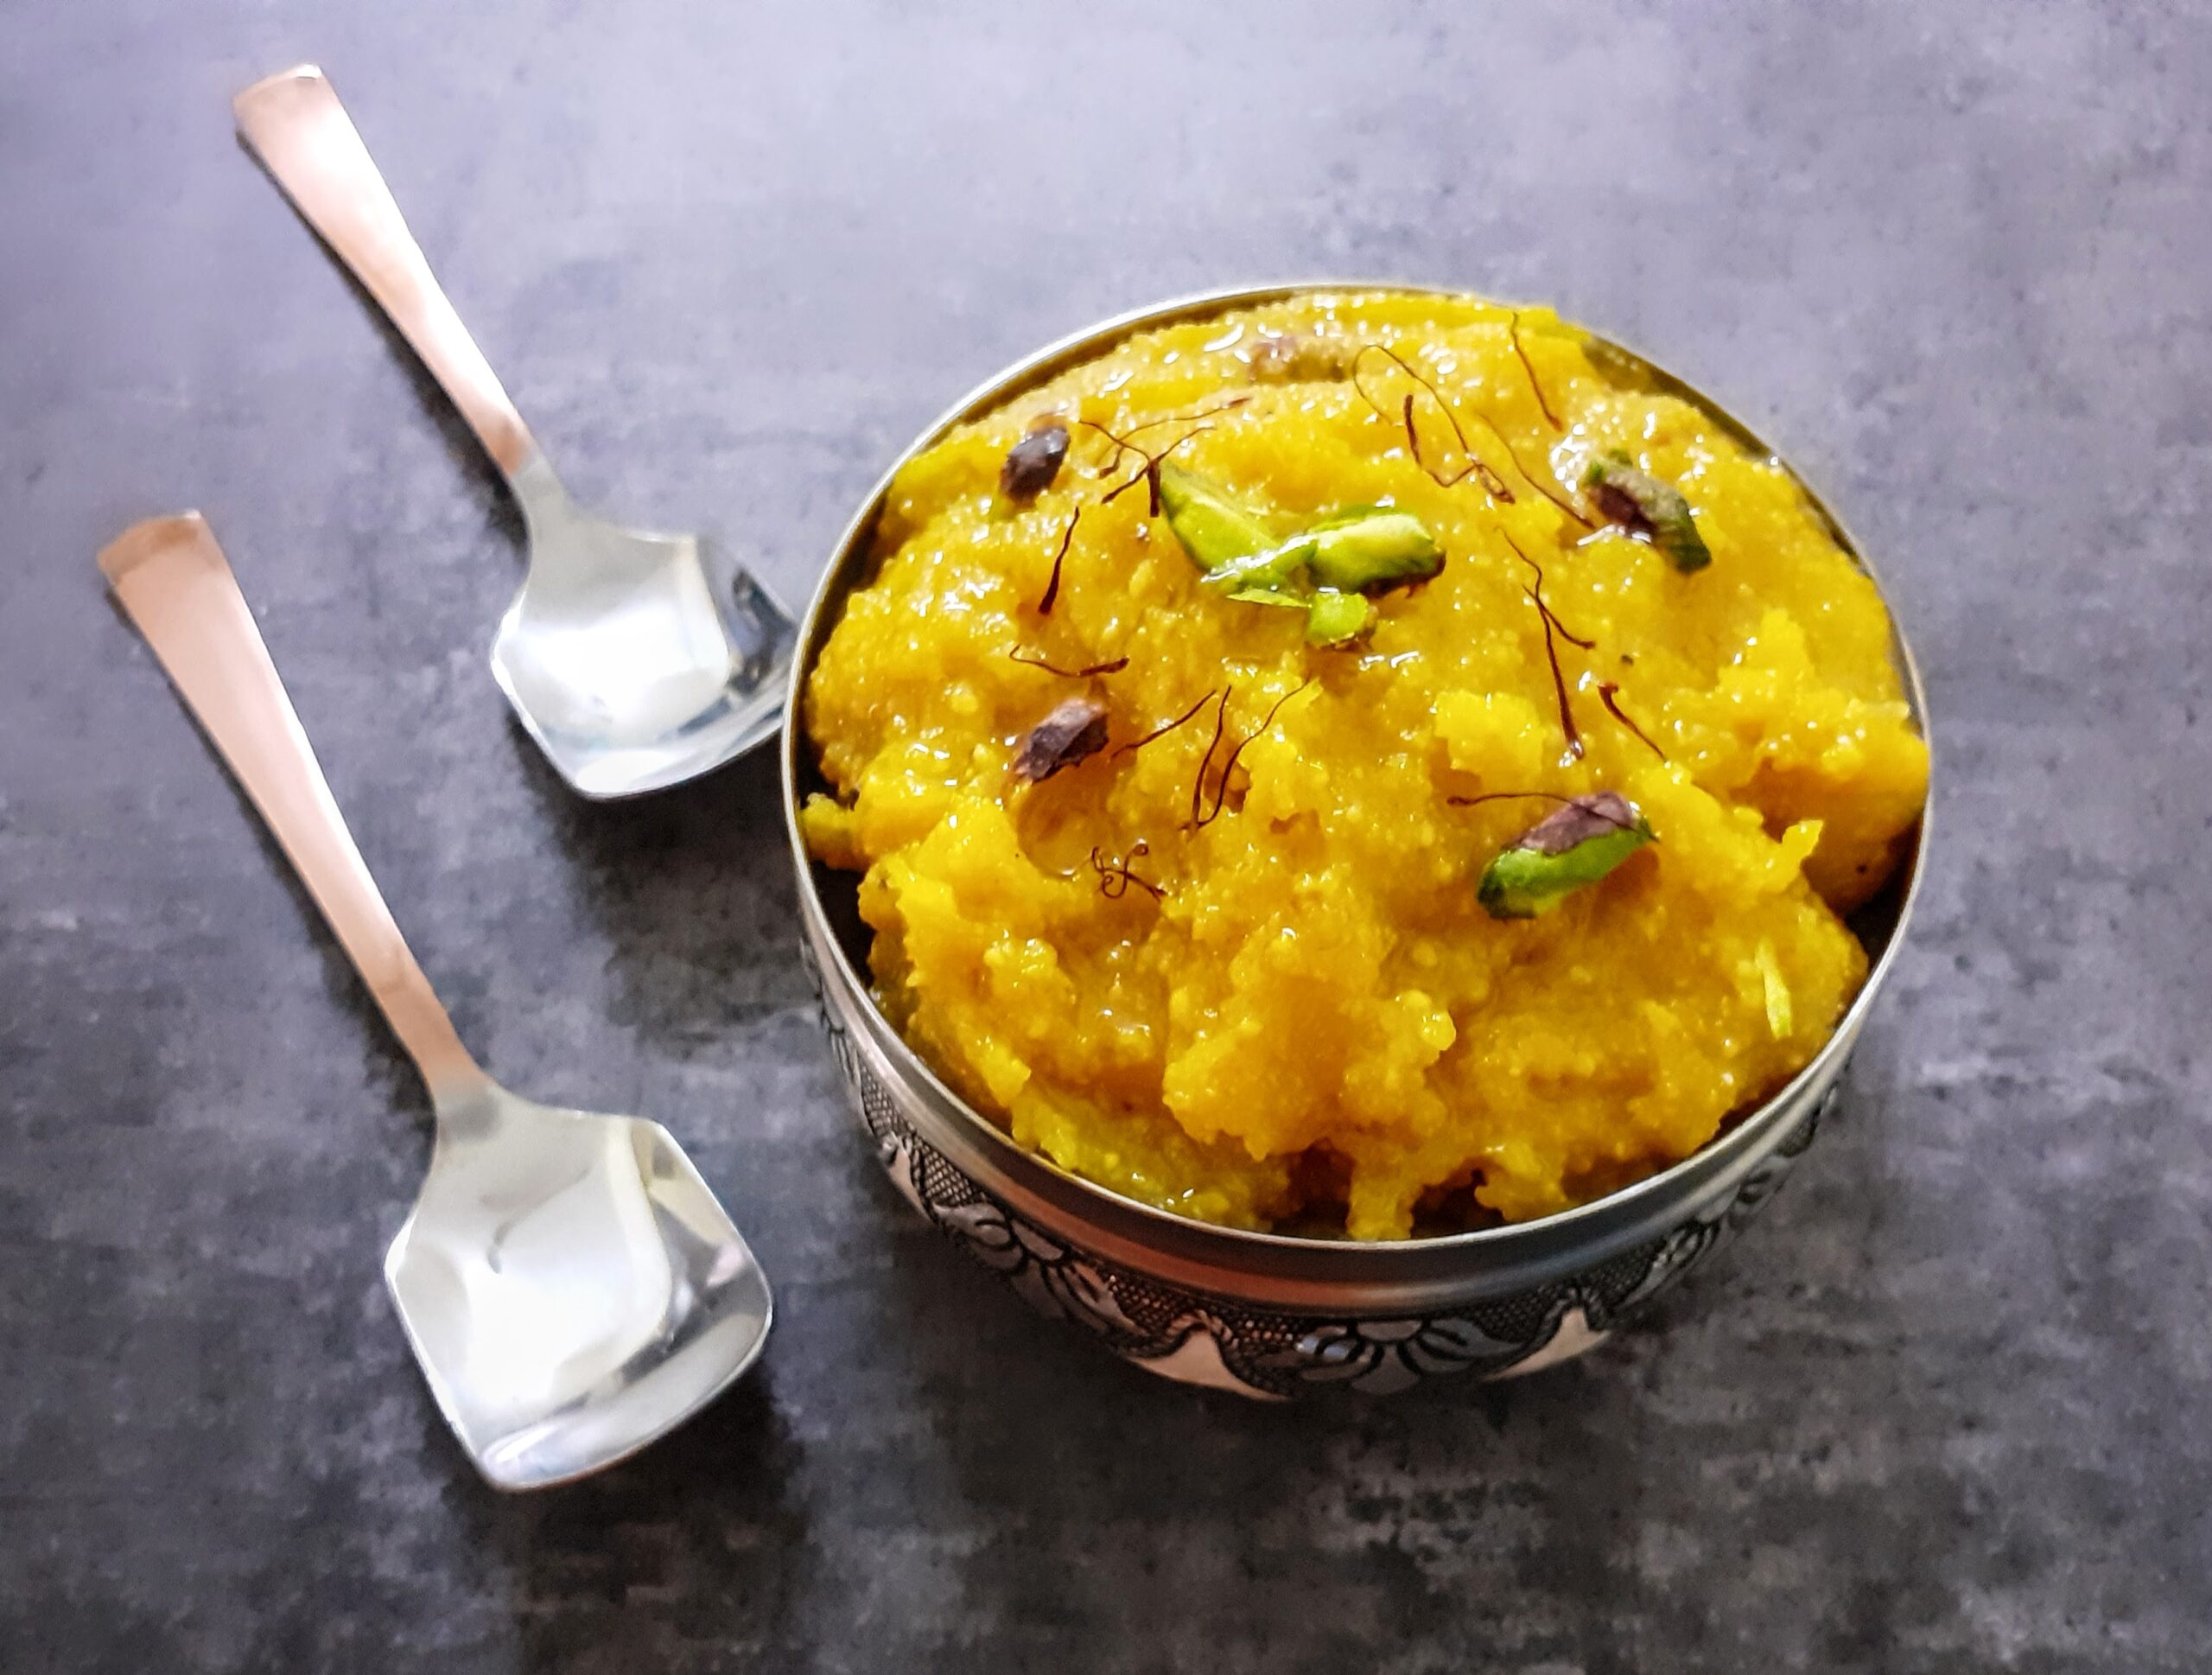
Moong dal Halwa is an Indian dessert made from yellow lentils. It is basically a fudge and is very rich because of the amount ghee/ clarified butter added to it. Though I make many sweet varieties and desserts, I’m not generally the one who will stay until dessert. I’m immensely intuitive while I create sweet dishes, but I don’t crave sweets much. But this halwa is very close to my heart because it probably is the first sweet dish I ever liked. Thanks to our stint in Delhi, I have got to taste the best ones.
Infact, I liked this sweet dish so much that I have attempted to make it in the past, failed miserably and had given up on ever trying it again. But last year during the pandemic lockdown I was craving it badly, and as you know “ when you want something very badly, the universe conspires to make it happen” ????. So I had a viola moment during Diwali, while I was documenting the sweets and savoury prepared by me, when a simple method to make this halwa struck m
If you have attempted making this halwa any time or have searched the net for the recipe, all of them will tell you it takes 3 to 4 hours to get this sweet dish done. The actual recipe asks to soak and grind the lentils and them cook it in milk/ water and then add the sweetening agent. As I have claimed here on the blog before, I will take a short cut as long as it does not alter the taste, flavour and texture of the dish. And I took a short cut to this recipe and I don’t regret it because the outcome was just like the original.
If you follow the procedure as given here by me without altering I’m sure it’s a no fail recipe. And why stand by the stove for hours when you can get the same taste and flavour in an hour’s time? Having failed at this recipe many times, and knowing what went wrong each time, this time the recipe was made with so much conviction of technique that it turned out wonderfully.
Yellow food colour/turmeric powder for colour 2 pinches
Ghee 100 GM approx
Cardamom/ Elaichi powder 1/4 tsp
Almonds and Pistachio chopped a few
Directions:
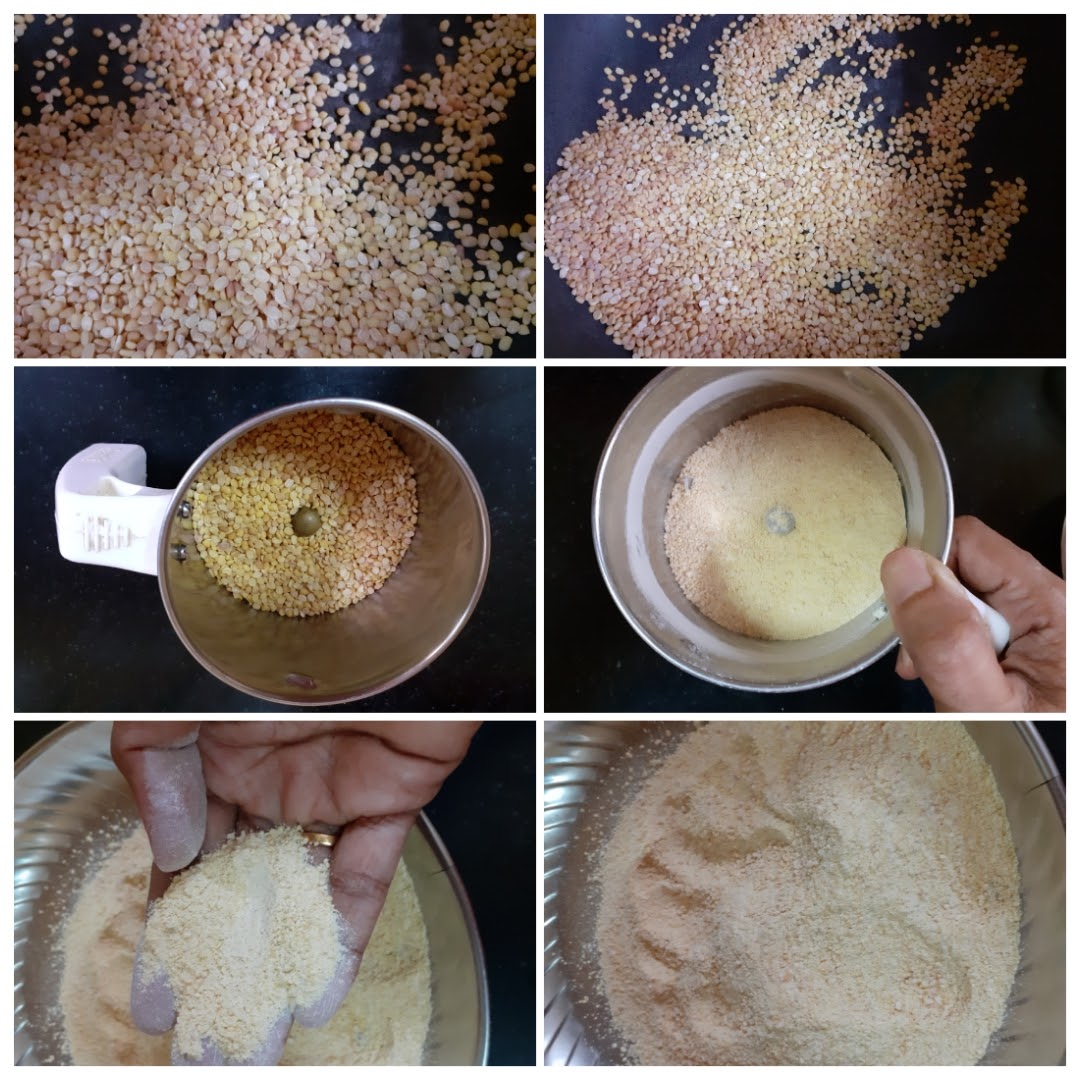
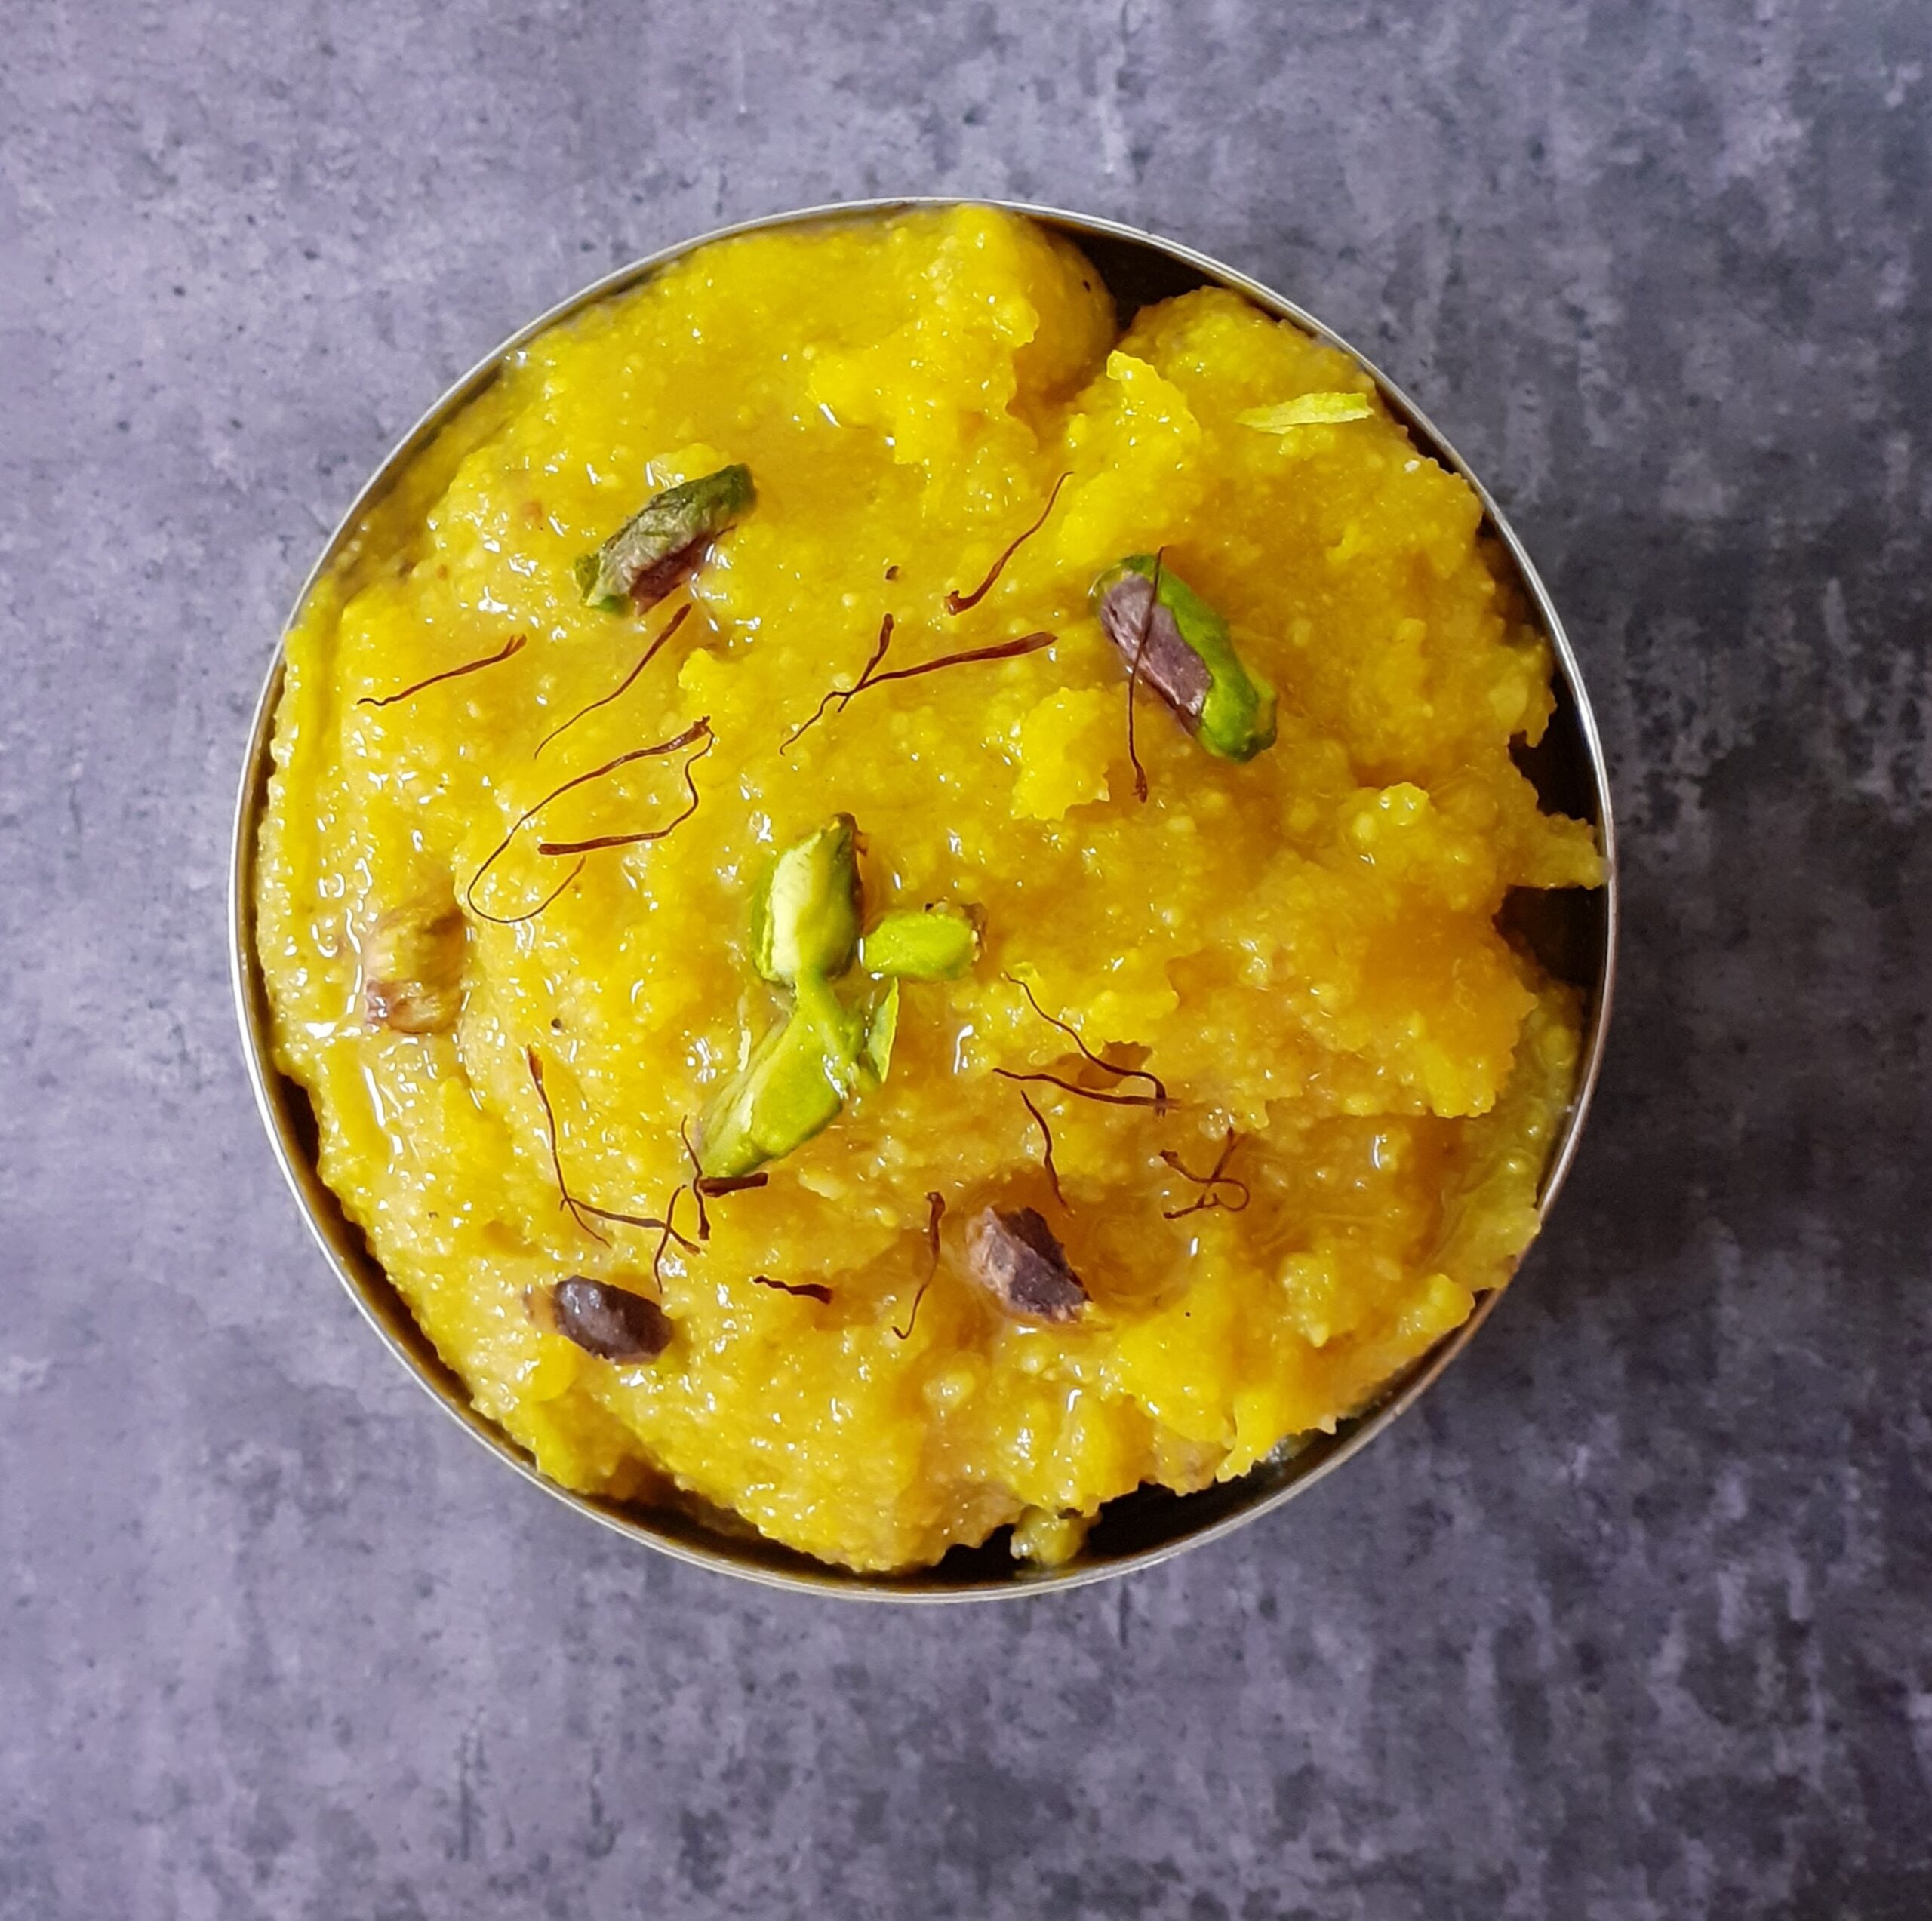
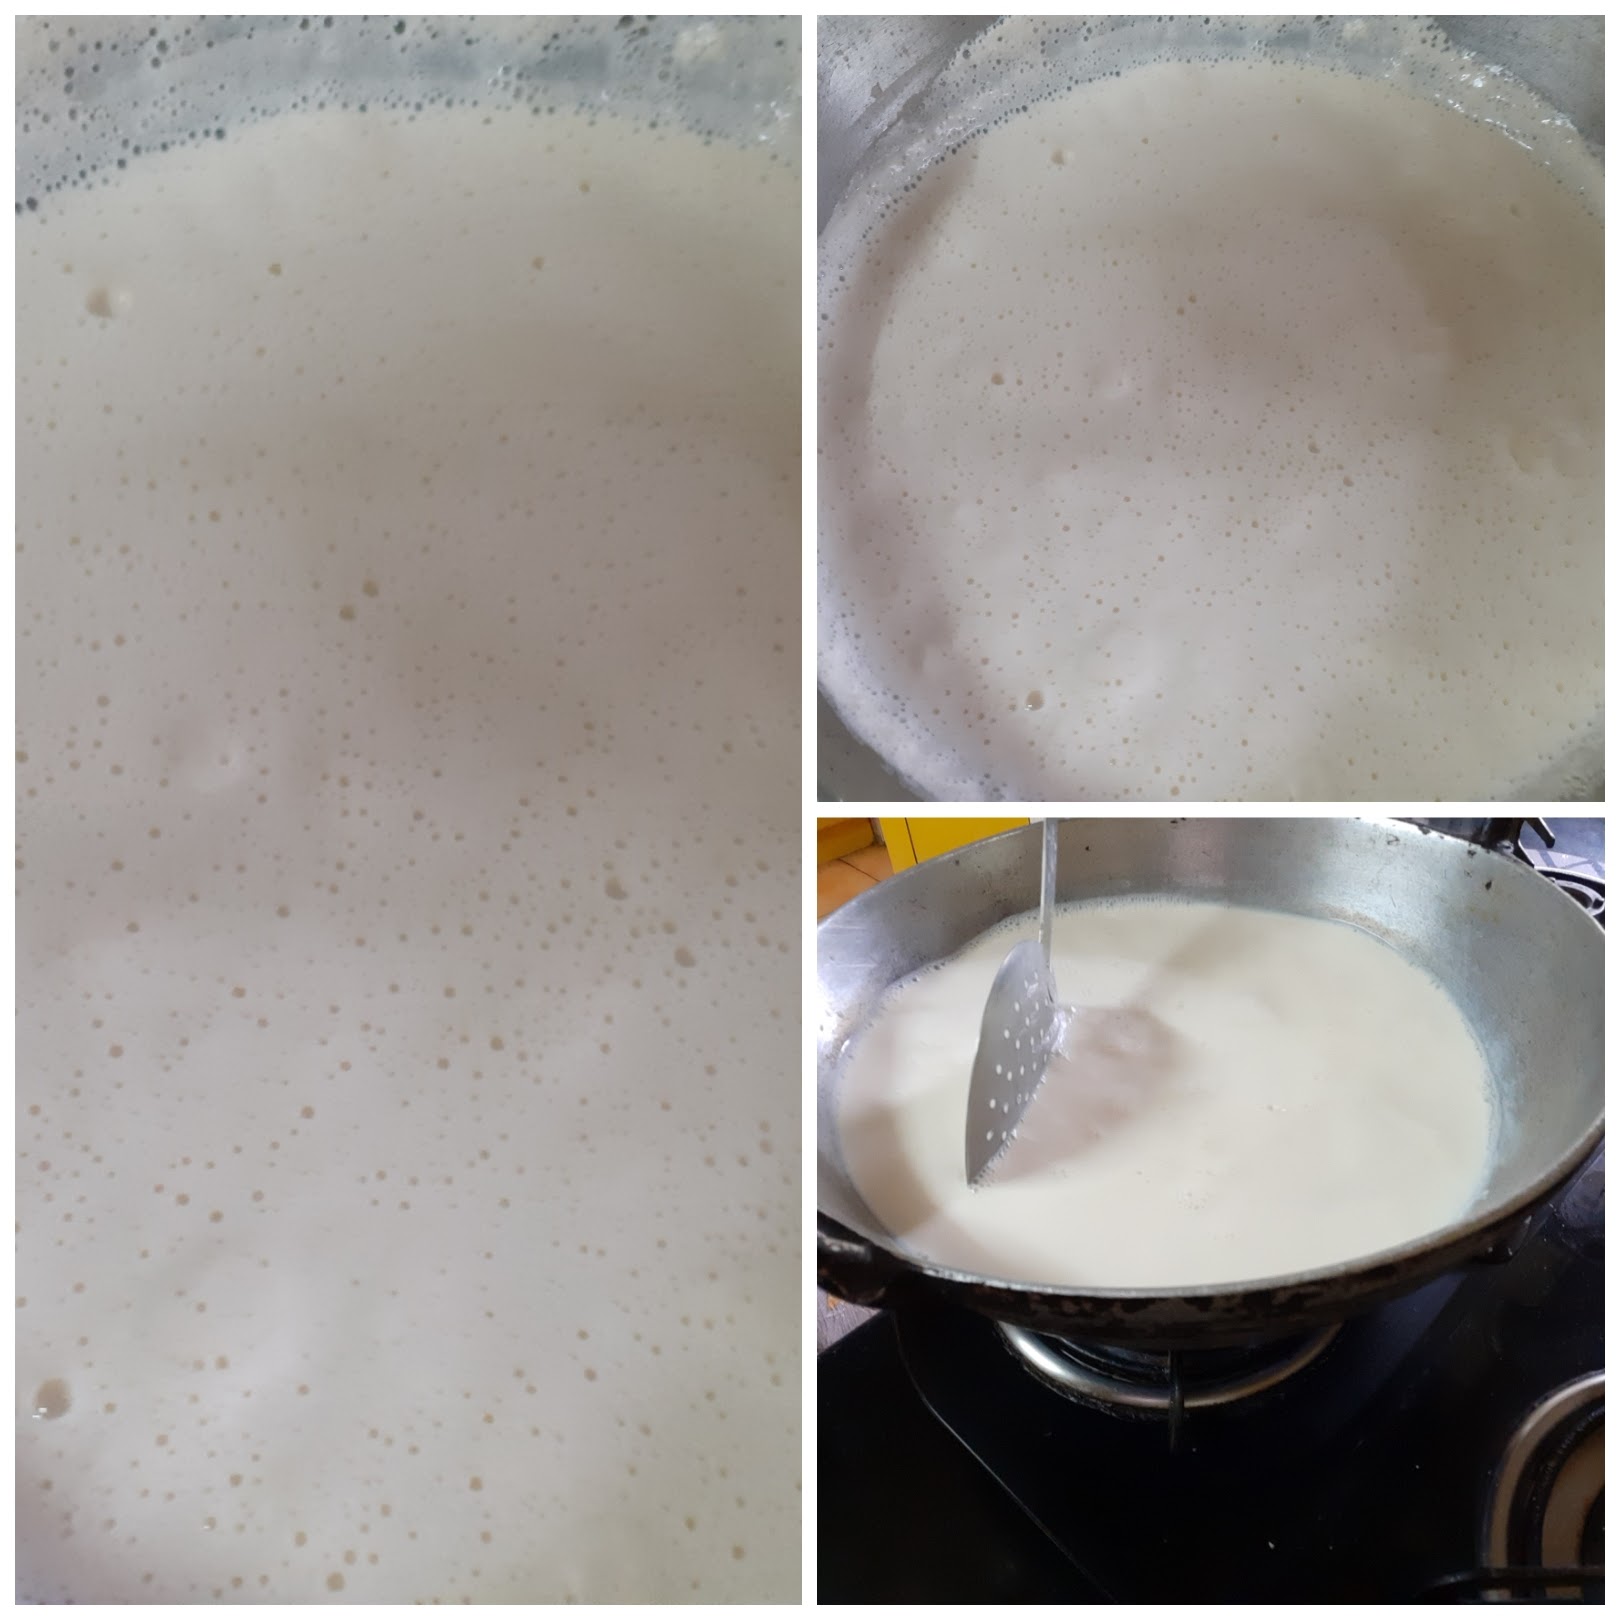
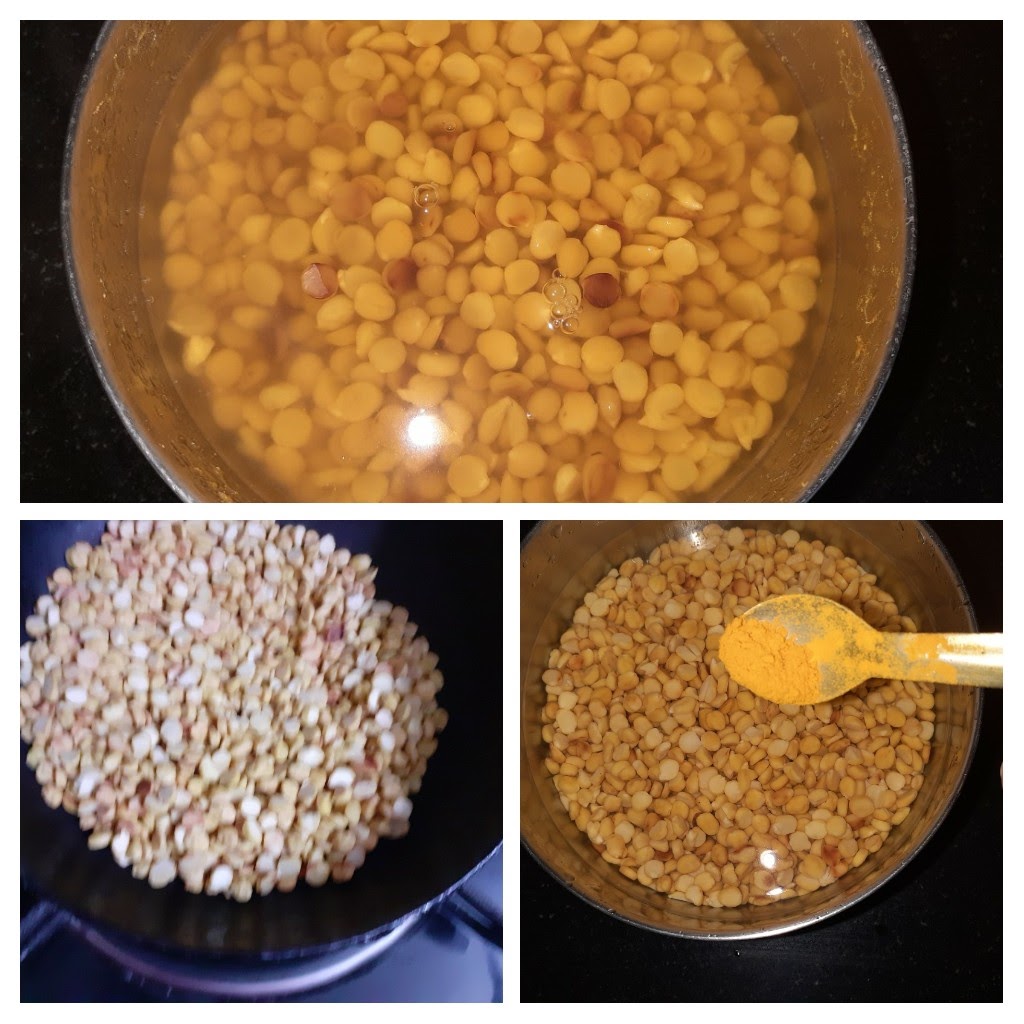
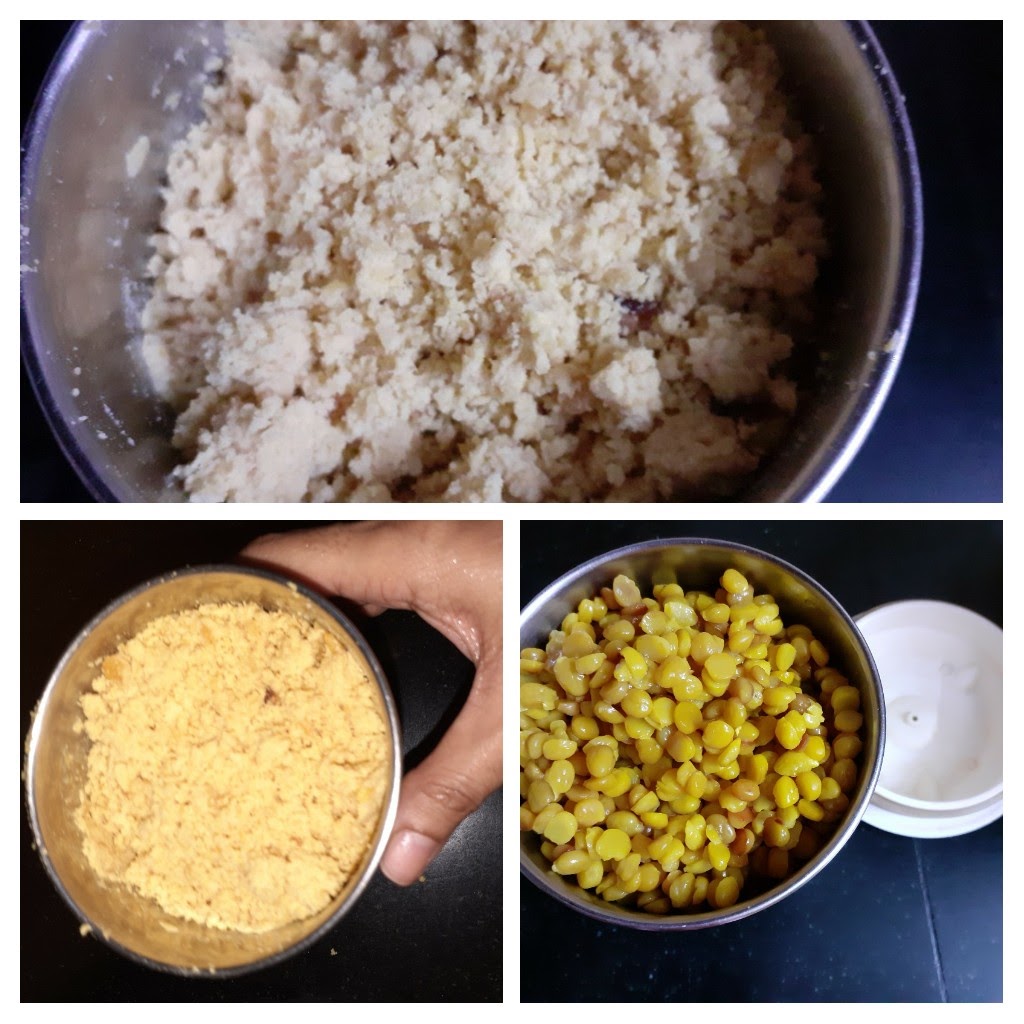
The foremost and important step is dry roasting the dal to a light brown colour. This has to be done patiently on low heat. On this depends the entire recipe. First put a pan/ kadai on flame and warm it. Now put the dal and start the roasting procedure by stirring constantly. This step can be done ahead. Cool the roasted dal and grind it in a blender. For a smooth texture of halwa grind it finely, for a grainy texture grind it coarse. Whole dal should not be visible. Now put this ground dal powder in a pan, add one cup milk, followed by 2 cups water, and stir to make it lump free. Now put the pan on the flame, add the food colour/turmeric powder, and start cooking the mixture on medium flame. Slowly the mixture will start thickening. If adding saffron strands, add now. Keep stirring gently, scraping the sides of the pan from time to time. Once the mixture thickens, check if there is any rawness in the smell. That is, if the dal smell/ taste is still coming. If yes, add another ladle of milk and continue to stir again. If your mixture has thickened and there is no raw smell or taste, add the sugar gently and start stirring again. As the sugar melts the dal mixture will liquefy. Don’t worry and continue to stir. The mixture will start thickening again. Now is the time to start pouring the ghee. Pour one ladle at a time and stir until the ghee is absorbed. Continue this process until no more ghee gets absorbed, but remains on the halwa. You will also notice that at this stage your mixture/ halwa no longer sticks to the pan/ kadai bottom, but comes out clean while stirring. Another way to tell the Halwa is done, is when you take a little of it in your fingers and try to form a ball, you should be able to do it. Add the cardamom powder and nuts and transfer the halwa to a container. The delicious Moong dal halwa is ready to relish .
STEPWISE RECIPE FOLLOWS:
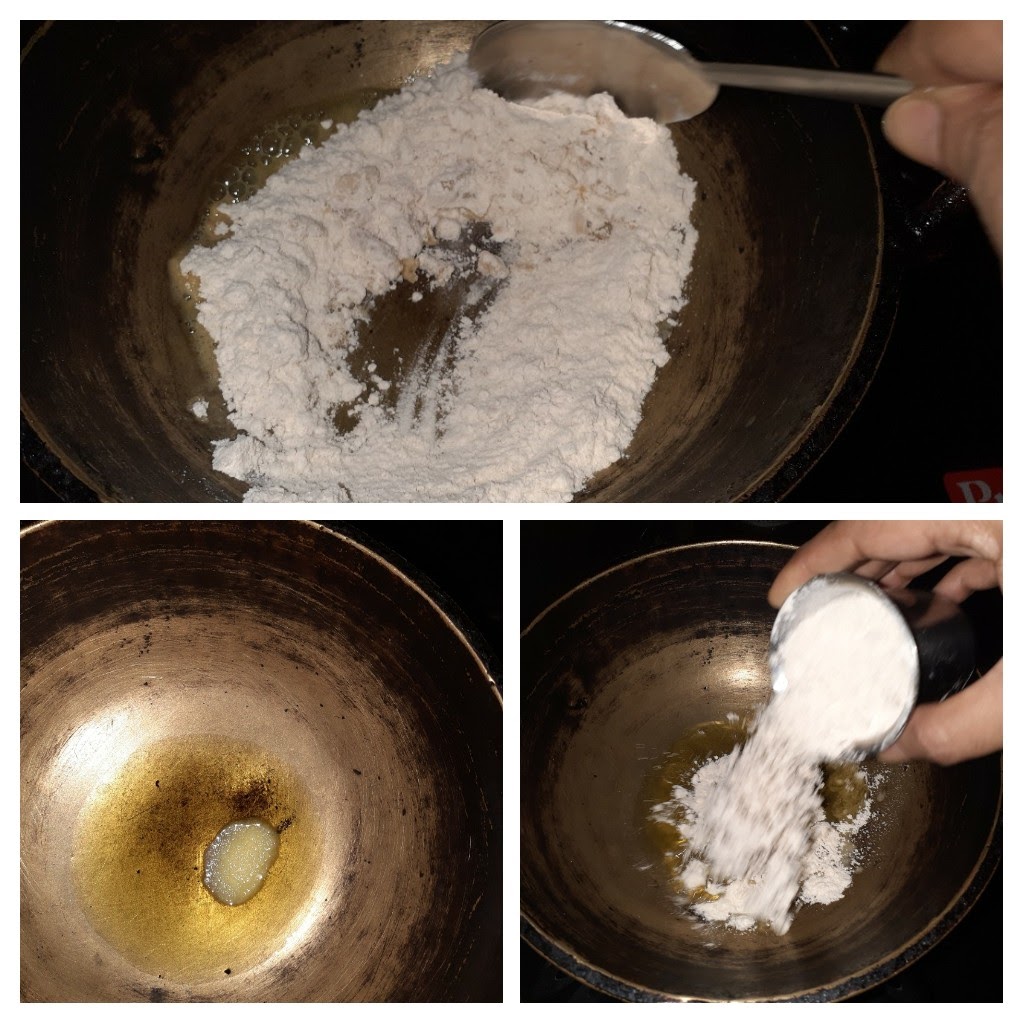
1. First out a pan/ kadai on flame and warm it. Now put the dal and start the roasting procedure by stirring constantly. This step can be done ahead. Cool the roasted dal and grind it in a blender. For a smooth texture of halwa grind it finely, for a grainy texture grind it coarse.
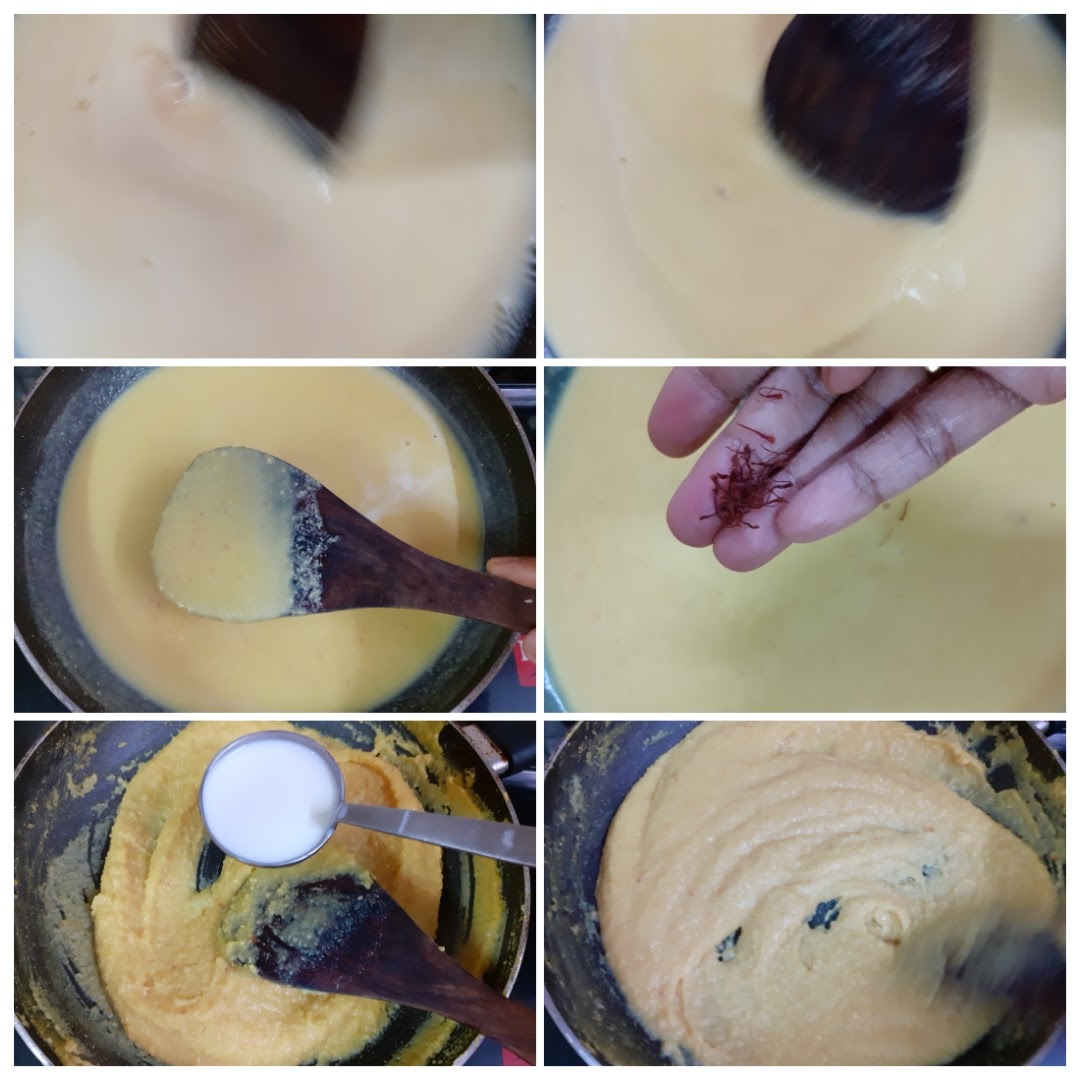
2. Now put this ground dal powder in a pan, add one cup milk, followed by 2 cups water, and stir to make it lump free. Now put the pan on the flame, add the food colour/turmeric powder, and start cooking the mixture on medium flame.
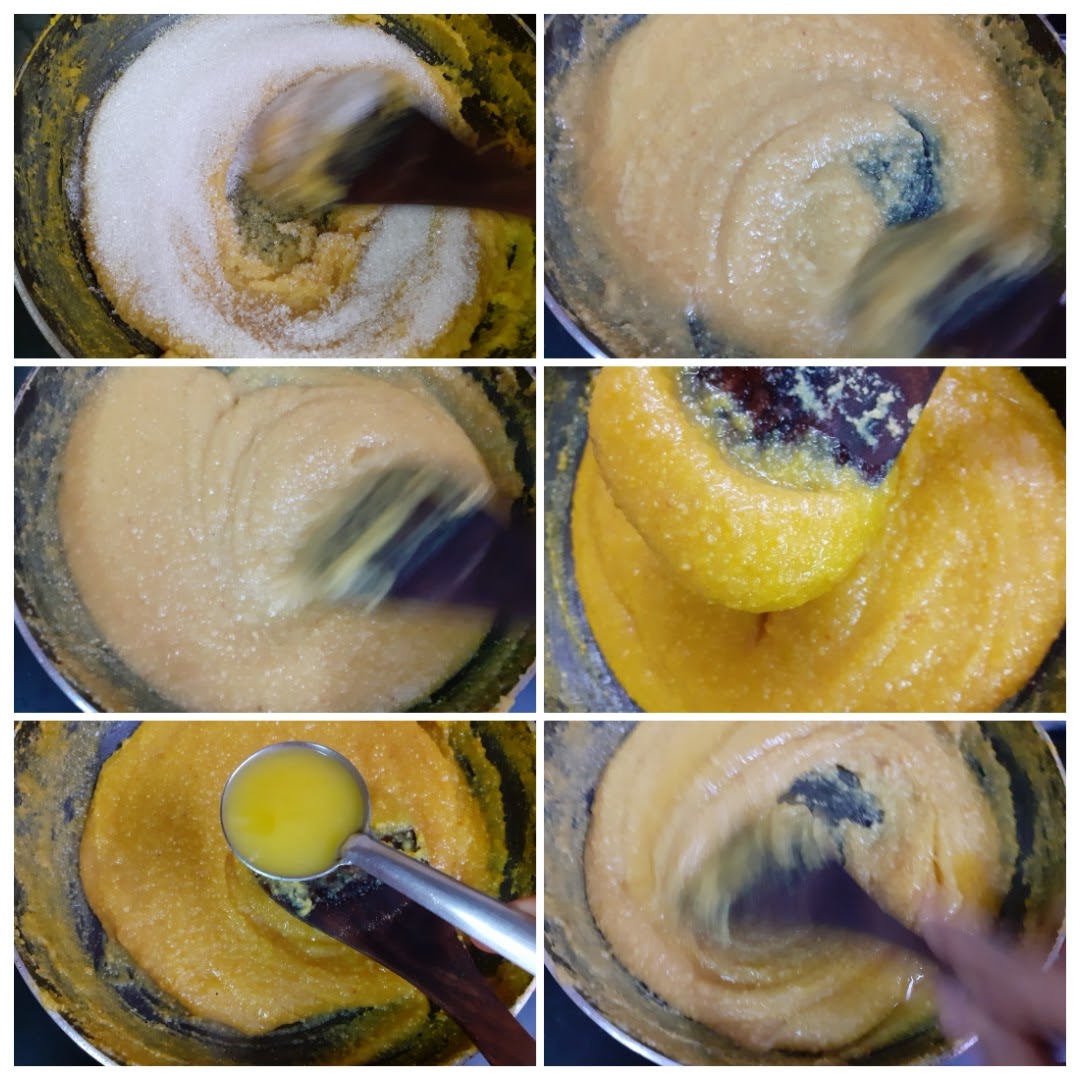
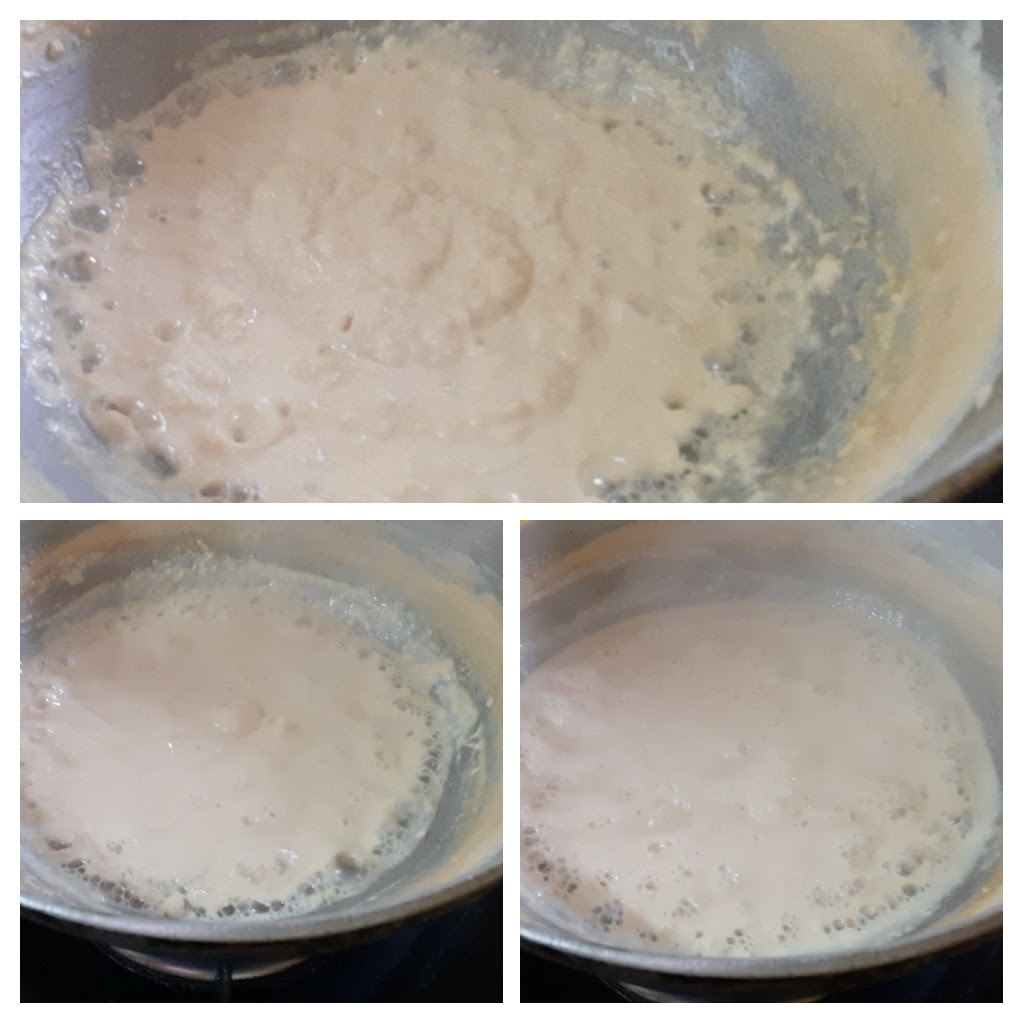
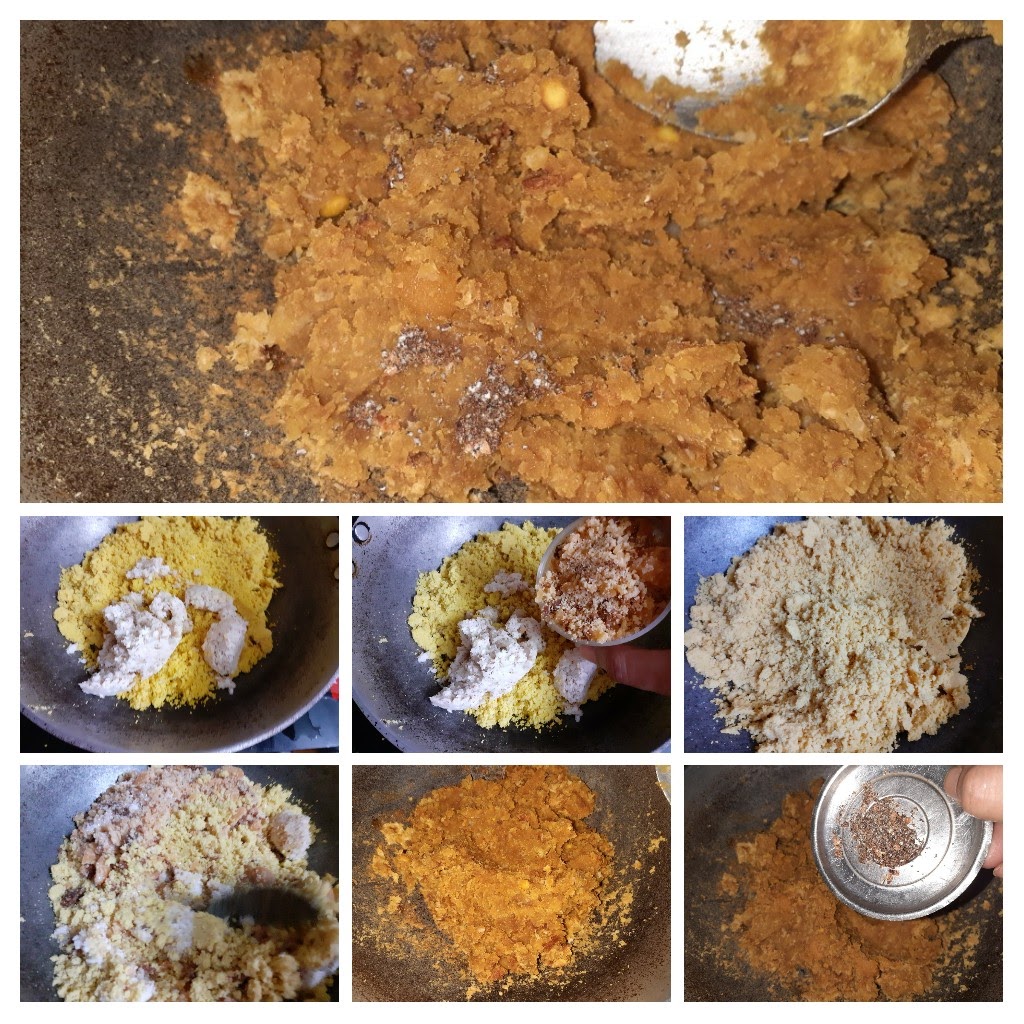
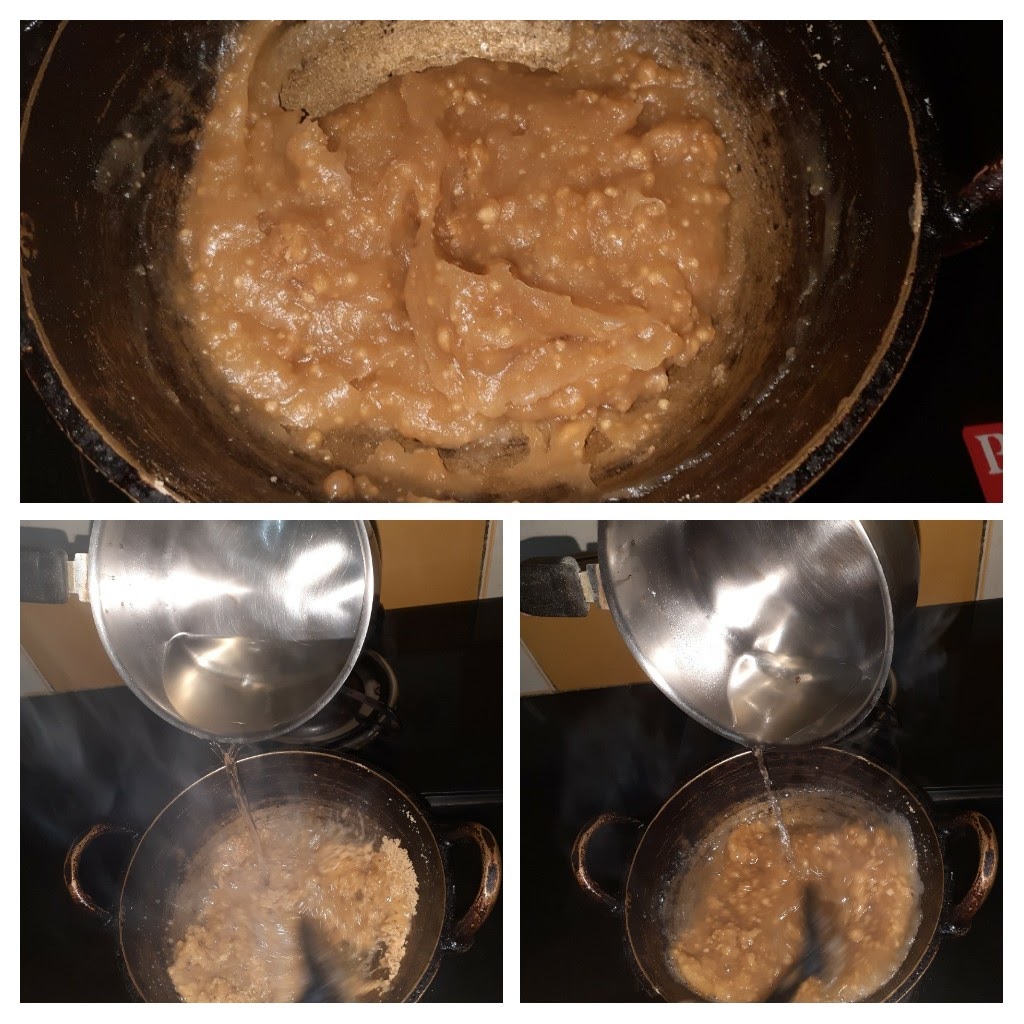
3. Slowly the mixture will start thickening. Keep stirring gently, scraping the sides of the pan from time to time. If adding saffron strands, add now. Once the mixture thickens, check if there is any rawness in the smell. That is, if the dal smell/ taste is still coming. If yes, add another ladle of milk and continue to stir again. If your mixture has thickened and there is no raw smell or taste, add the sugar gently and start stirring again.
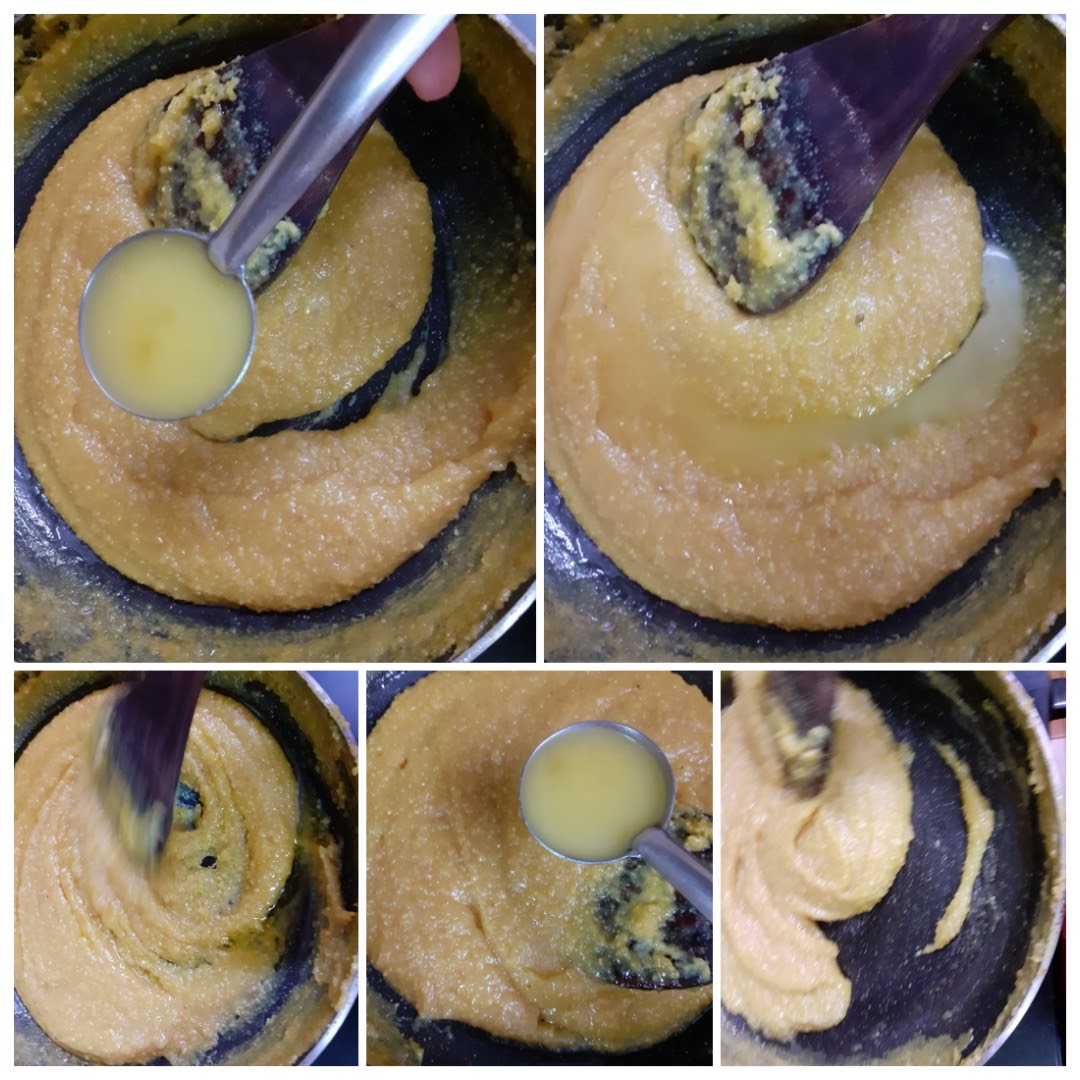
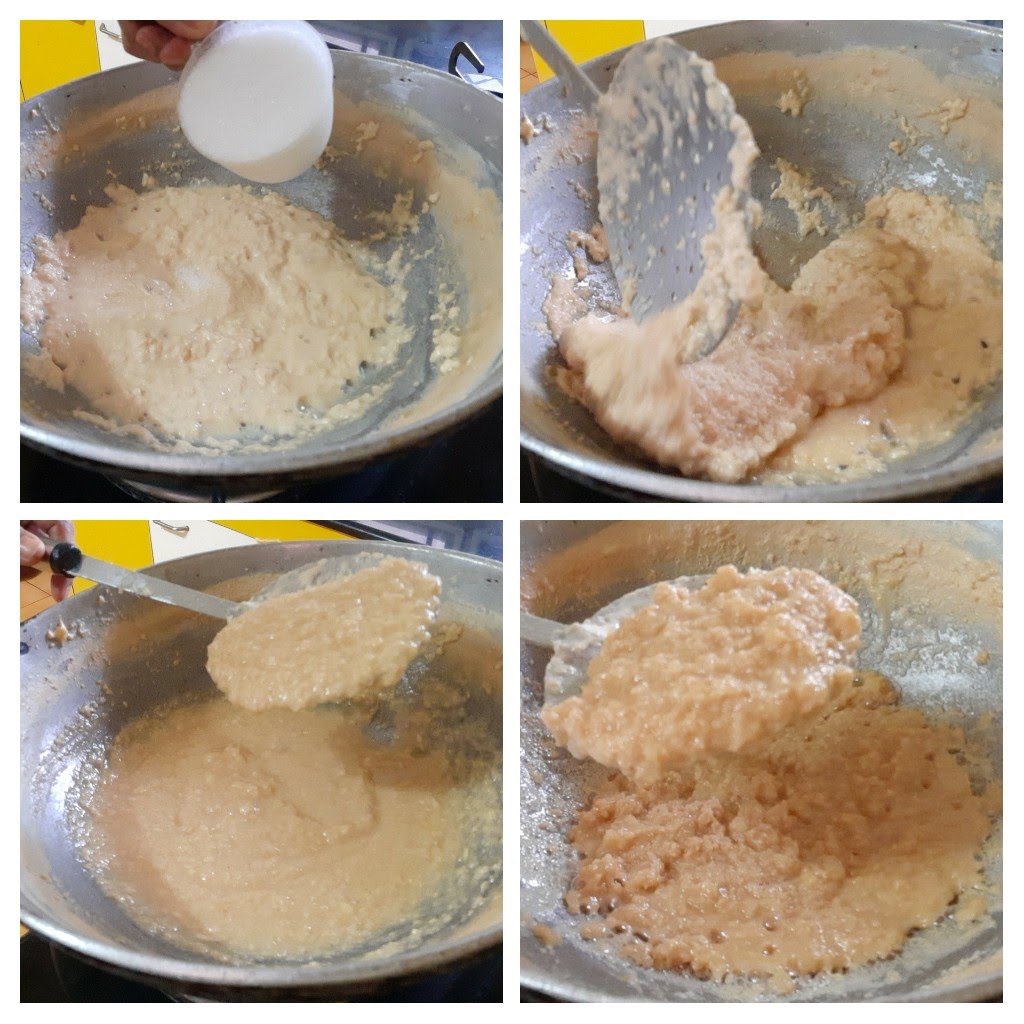
4. As the sugar melts the dal mixture will liquefy. Don’t worry and continue to stir. The mixture will start thickening again. Now is the time to start pouring the ghee. Pour one ladle at a time and stir until the ghee is absorbed. Continue this process until no more ghee gets absorbed, but remains on the halwa.
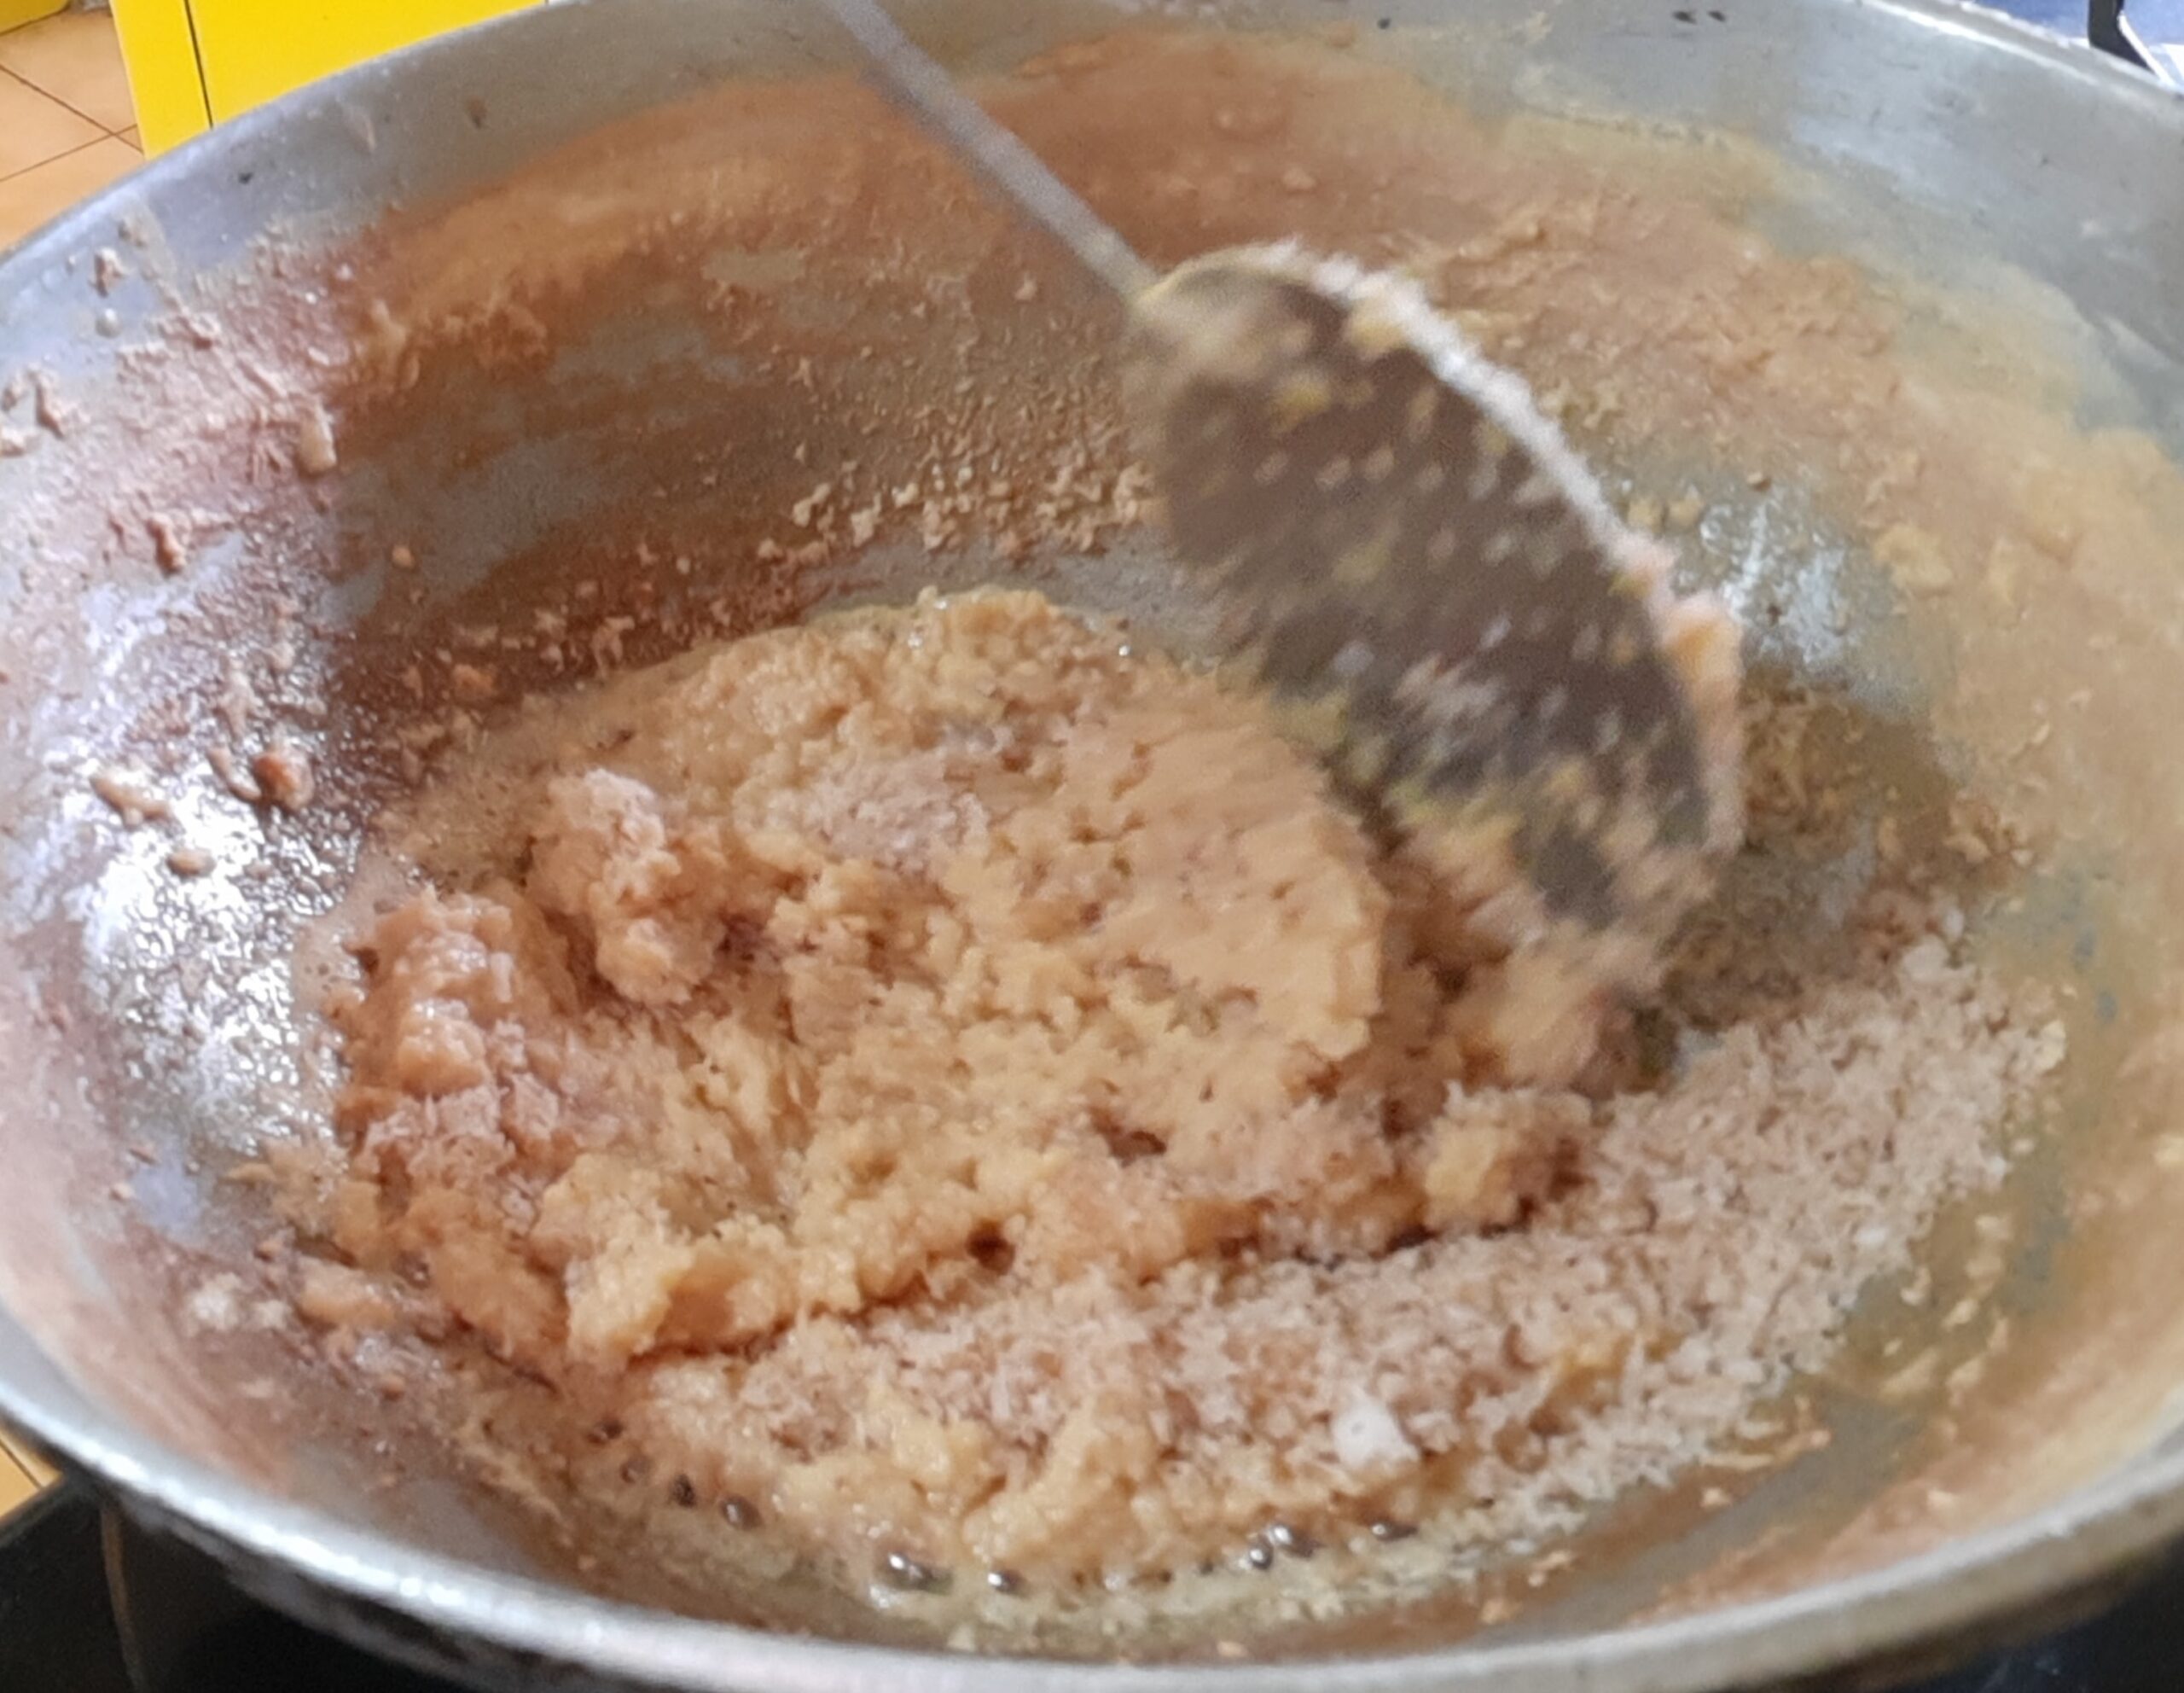
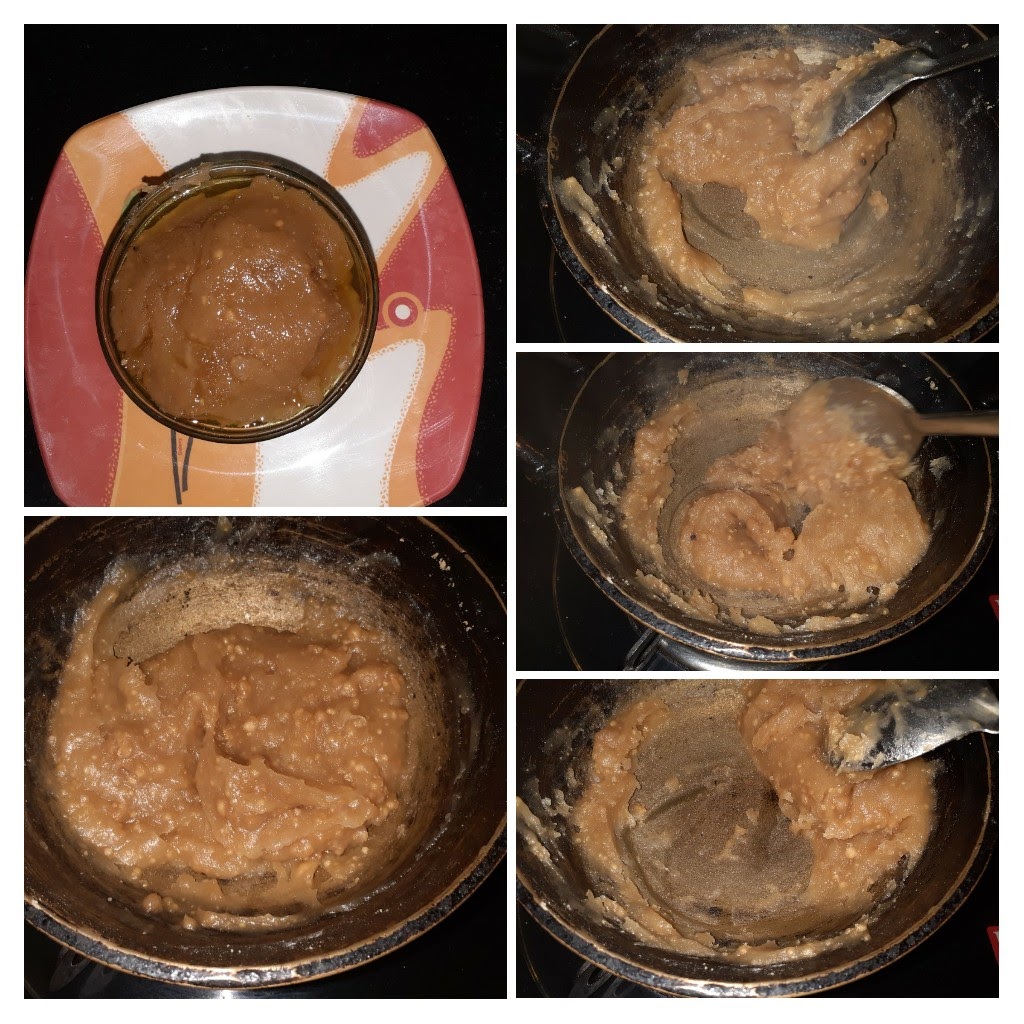
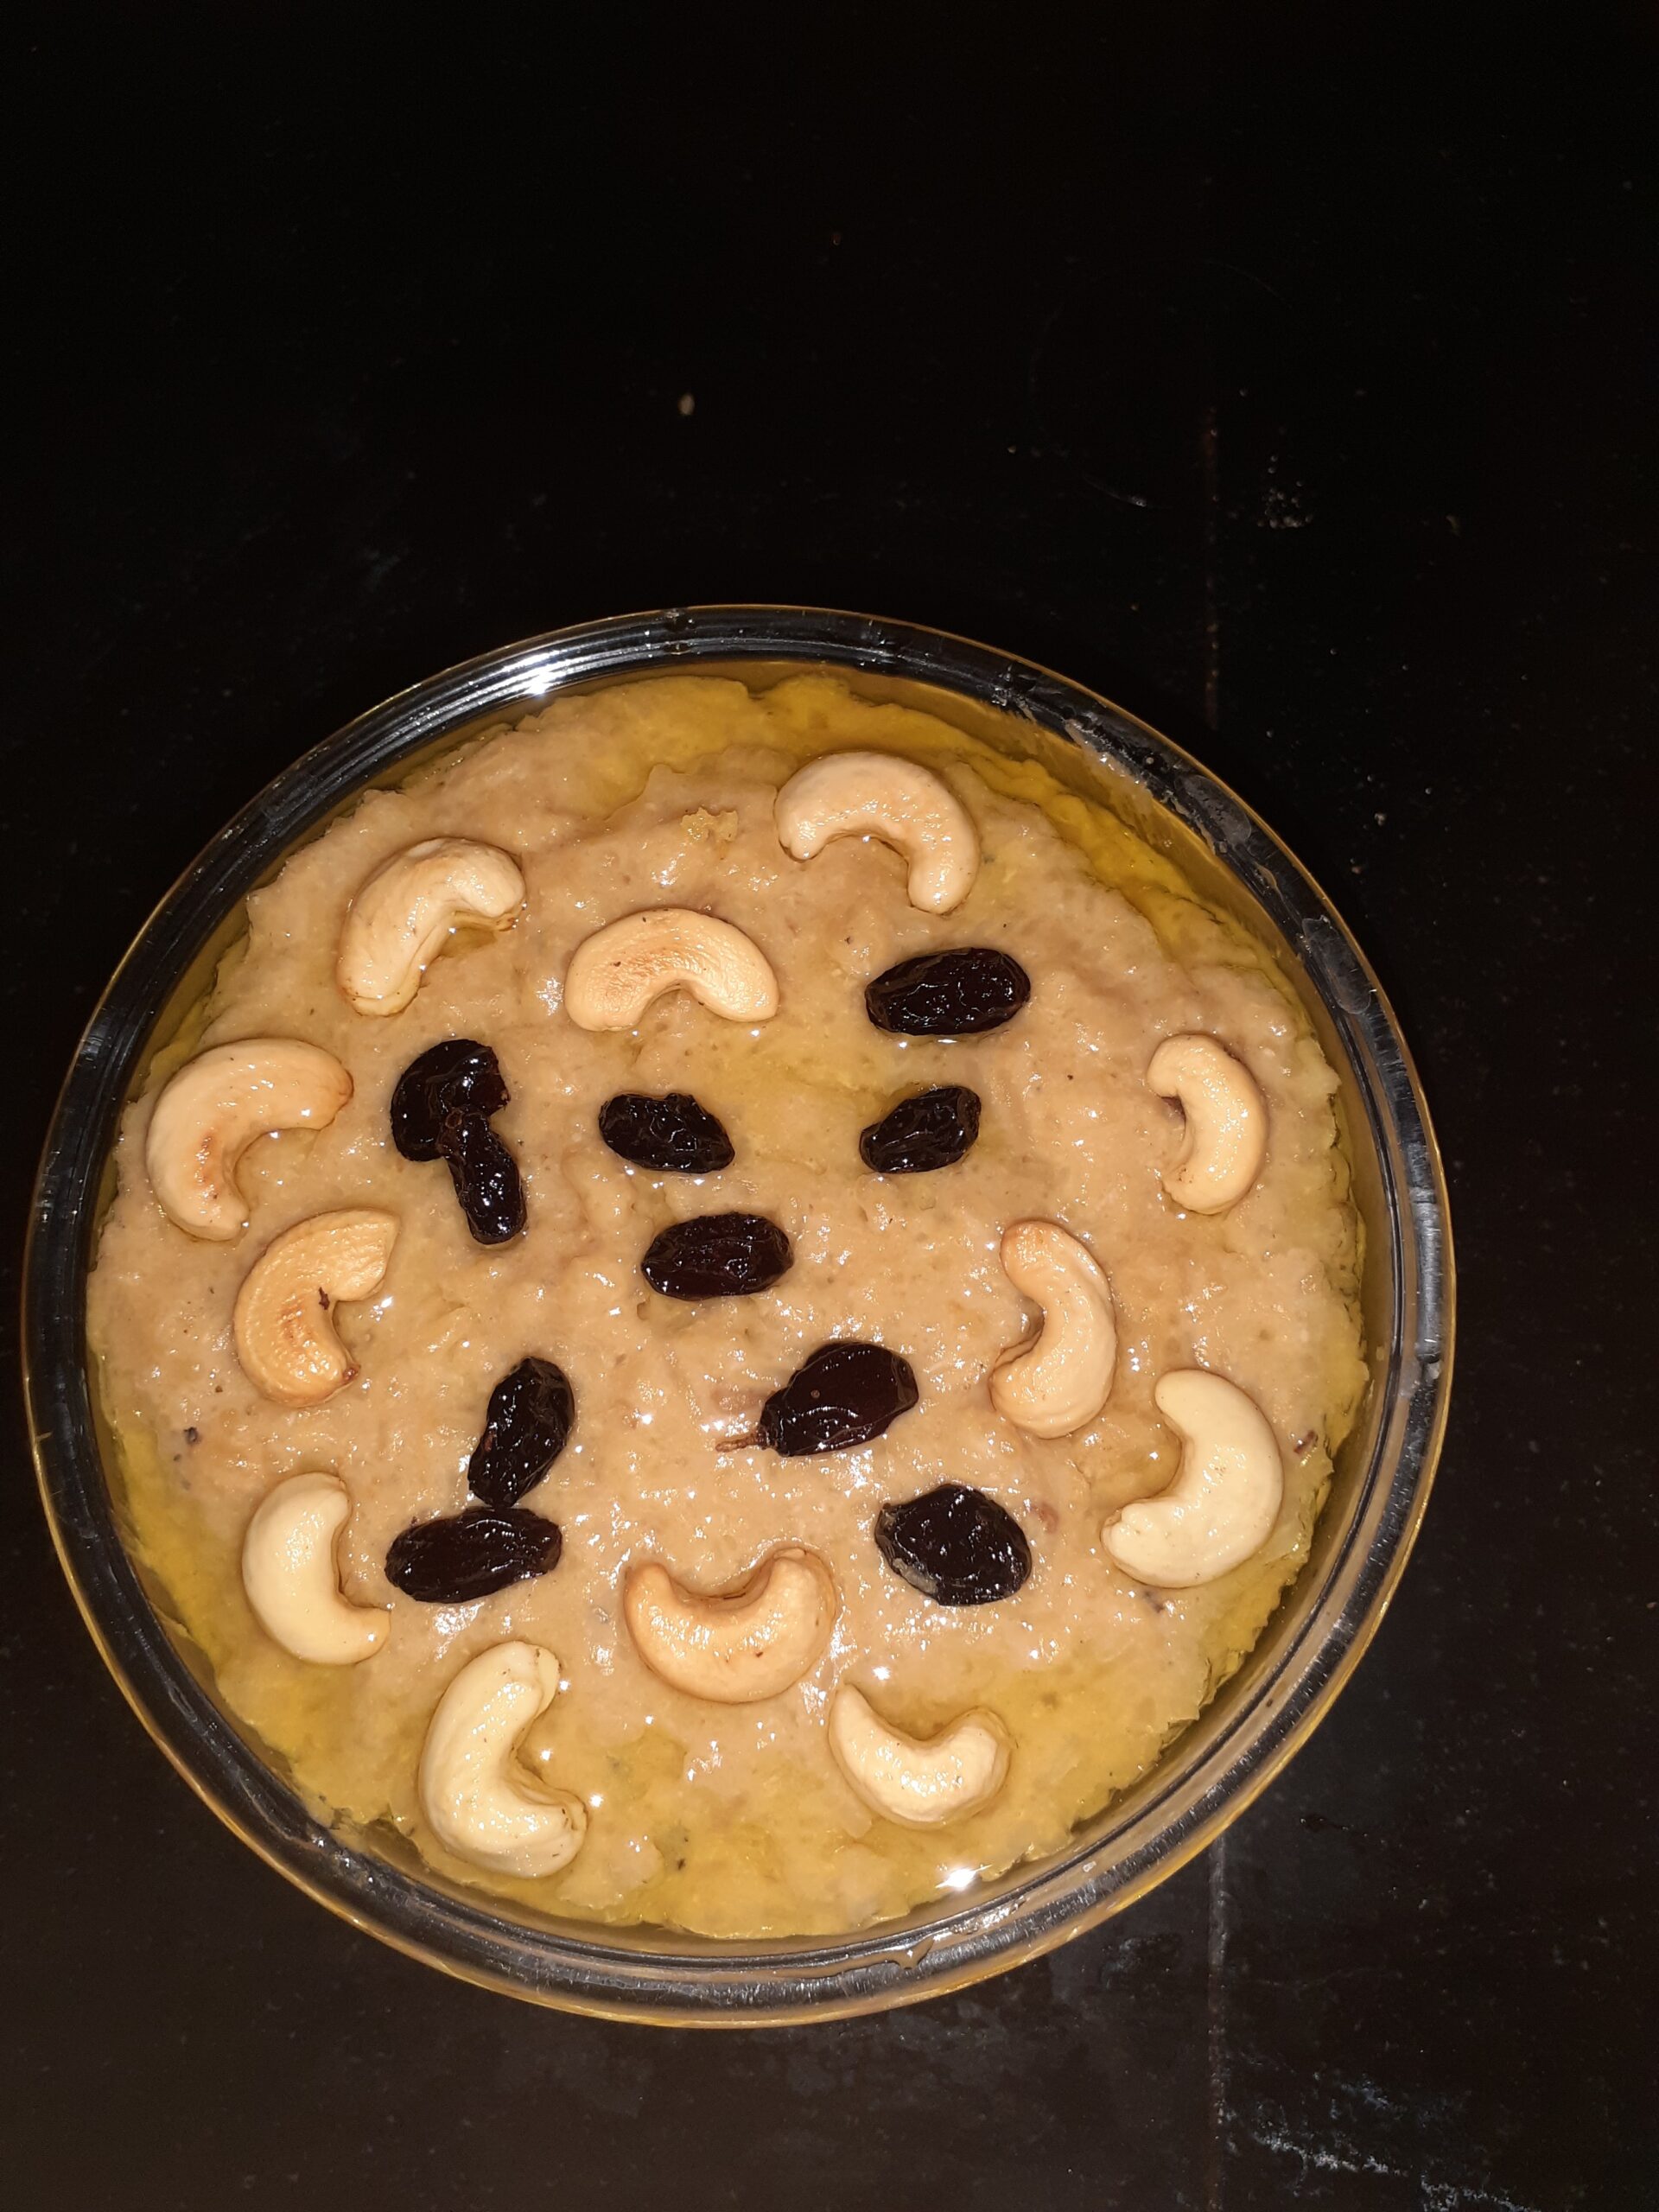
5. You will also notice that at this stage your mixture/ halwa no longer sticks to the pan/ kadai bottom, but comes out clean while stirring. Another way to tell the Halwa is done, is when you take a little of it in your fingers and try to form a ball, you should be able to do it. Add the cardamom powder and nuts and transfer the halwa to a container. The delicious Moong dal halwa is ready to relish .
NOTES:
1. The foremost and important step is dry roasting the dal to a light brown colour. This has to be done patiently on low heat. On this depends the entire recipe.
2. Ensure the Kadai is warm before you put in the dal for roasting. This way the Dal will get roasted evenly and quickly.
3. I like a grainy texture, so while grinding, I stopped just before super fine.
4. Adding more ghee than required will subdue the taste of the dal. When the dal mixture no longer takes in the ghee, as soon as poured and stirred, stop adding any more ghee.
5. I used a non stick pan for making the Halwa and recommend the same for now. I will soon be trying in a regular kadai and shall update the recipe then.
6. I have kept my Halwa colour yellow, by frying it to a light brown and then adding turmeric powder(which is a natural colour). If you prefer a browner version, roast the dal to a deeper brown and proceed with the recipe.
7. I have used turmeric powder instead of food colour, as it is natural and two pinches of it do not make a difference to the taste of the halwa.
If you tried this recipe and liked it please comment below. I would love to hear from you. If you have a query about the recipe email us and ill respond as soon as I can.
If you would like to receive our recipes on your mail please leave your mail id at the homepage. Every time Rajjo’s Kitchen has a new post we will mail the recipe to you.
GAJAR HALWA/ CARROT HALWA
Gajar Halwa/ Carrot Halwa is a very popular Indian dessert. Mostly a winter dessert. Though it is made frequently with the regular carrots ( English Carrots), using the Delhi Carrots or Red Carrots as they are called gives the best results.
This is one dessert I love and consider it very sacred, so if you are looking for an easy, one pot or microwave recipe, you are going to be disappointed. As far as Gajar Halwa is concerned I am old school. I cook it in milk( and a whole lot of milk) so that the raw taste of the Carrots is gone and the milk crumbles to a Rabri like texture. The taste of such a Halwa is divine. This is one recipe I have never made with regular carrot except in my dessert recipe- Gajar halwa Barfi where I was shaping it like fudge( Barfi) and using Khoya to speed up the process. Whereas this recipe of Gajar Halwa is a slow cook process. The slower it cooks the better it tastes. Am I disappointing you? Well, make it like this and you will be hooked to it for life. Remember the best things in life come with a lot of patience.
My belief is that when I wait a whole year for the Red Carrots to appear in the Market and then make the Halwa, then it should be made the authentic way. Which does not involve adding condensed milk or Koya or milk powder but in cooking the carrots in milk( whole cream), to perfection.
I use only whole cream milk to make this dessert. So the taste of the Halwa depends entirely on the quality of milk. A full/whole cream milk Halwa will give you better taste and I can say this because I have tried it will all milk varieties available in the market and what works best is whole/full cream milk.
So after the whole mega write up, taking you to the recipe. While you are here do check out my other carrot based desserts like Carrot Kheer( another speciality from Rajjo’s Kitchenn) and Gajar Halwa Barfi.
PREP TIME:30 COOK TIME: 1hr
TOTAL TIME:1hr.30Mins COURSE: DESSERT
CUISINE: INDIAN SERVINGS: 6
AUTHOR: Rajni Ram
Ingredients:
Carrots ( Preferably Red ones) 1.5 kilo grated
Milk whole cream/ full cream 2 litres
Sugar 300 gm
Cardamom/ Elaichi powder
Ghee 4 tbsp
Cashews a new broken
Directions:
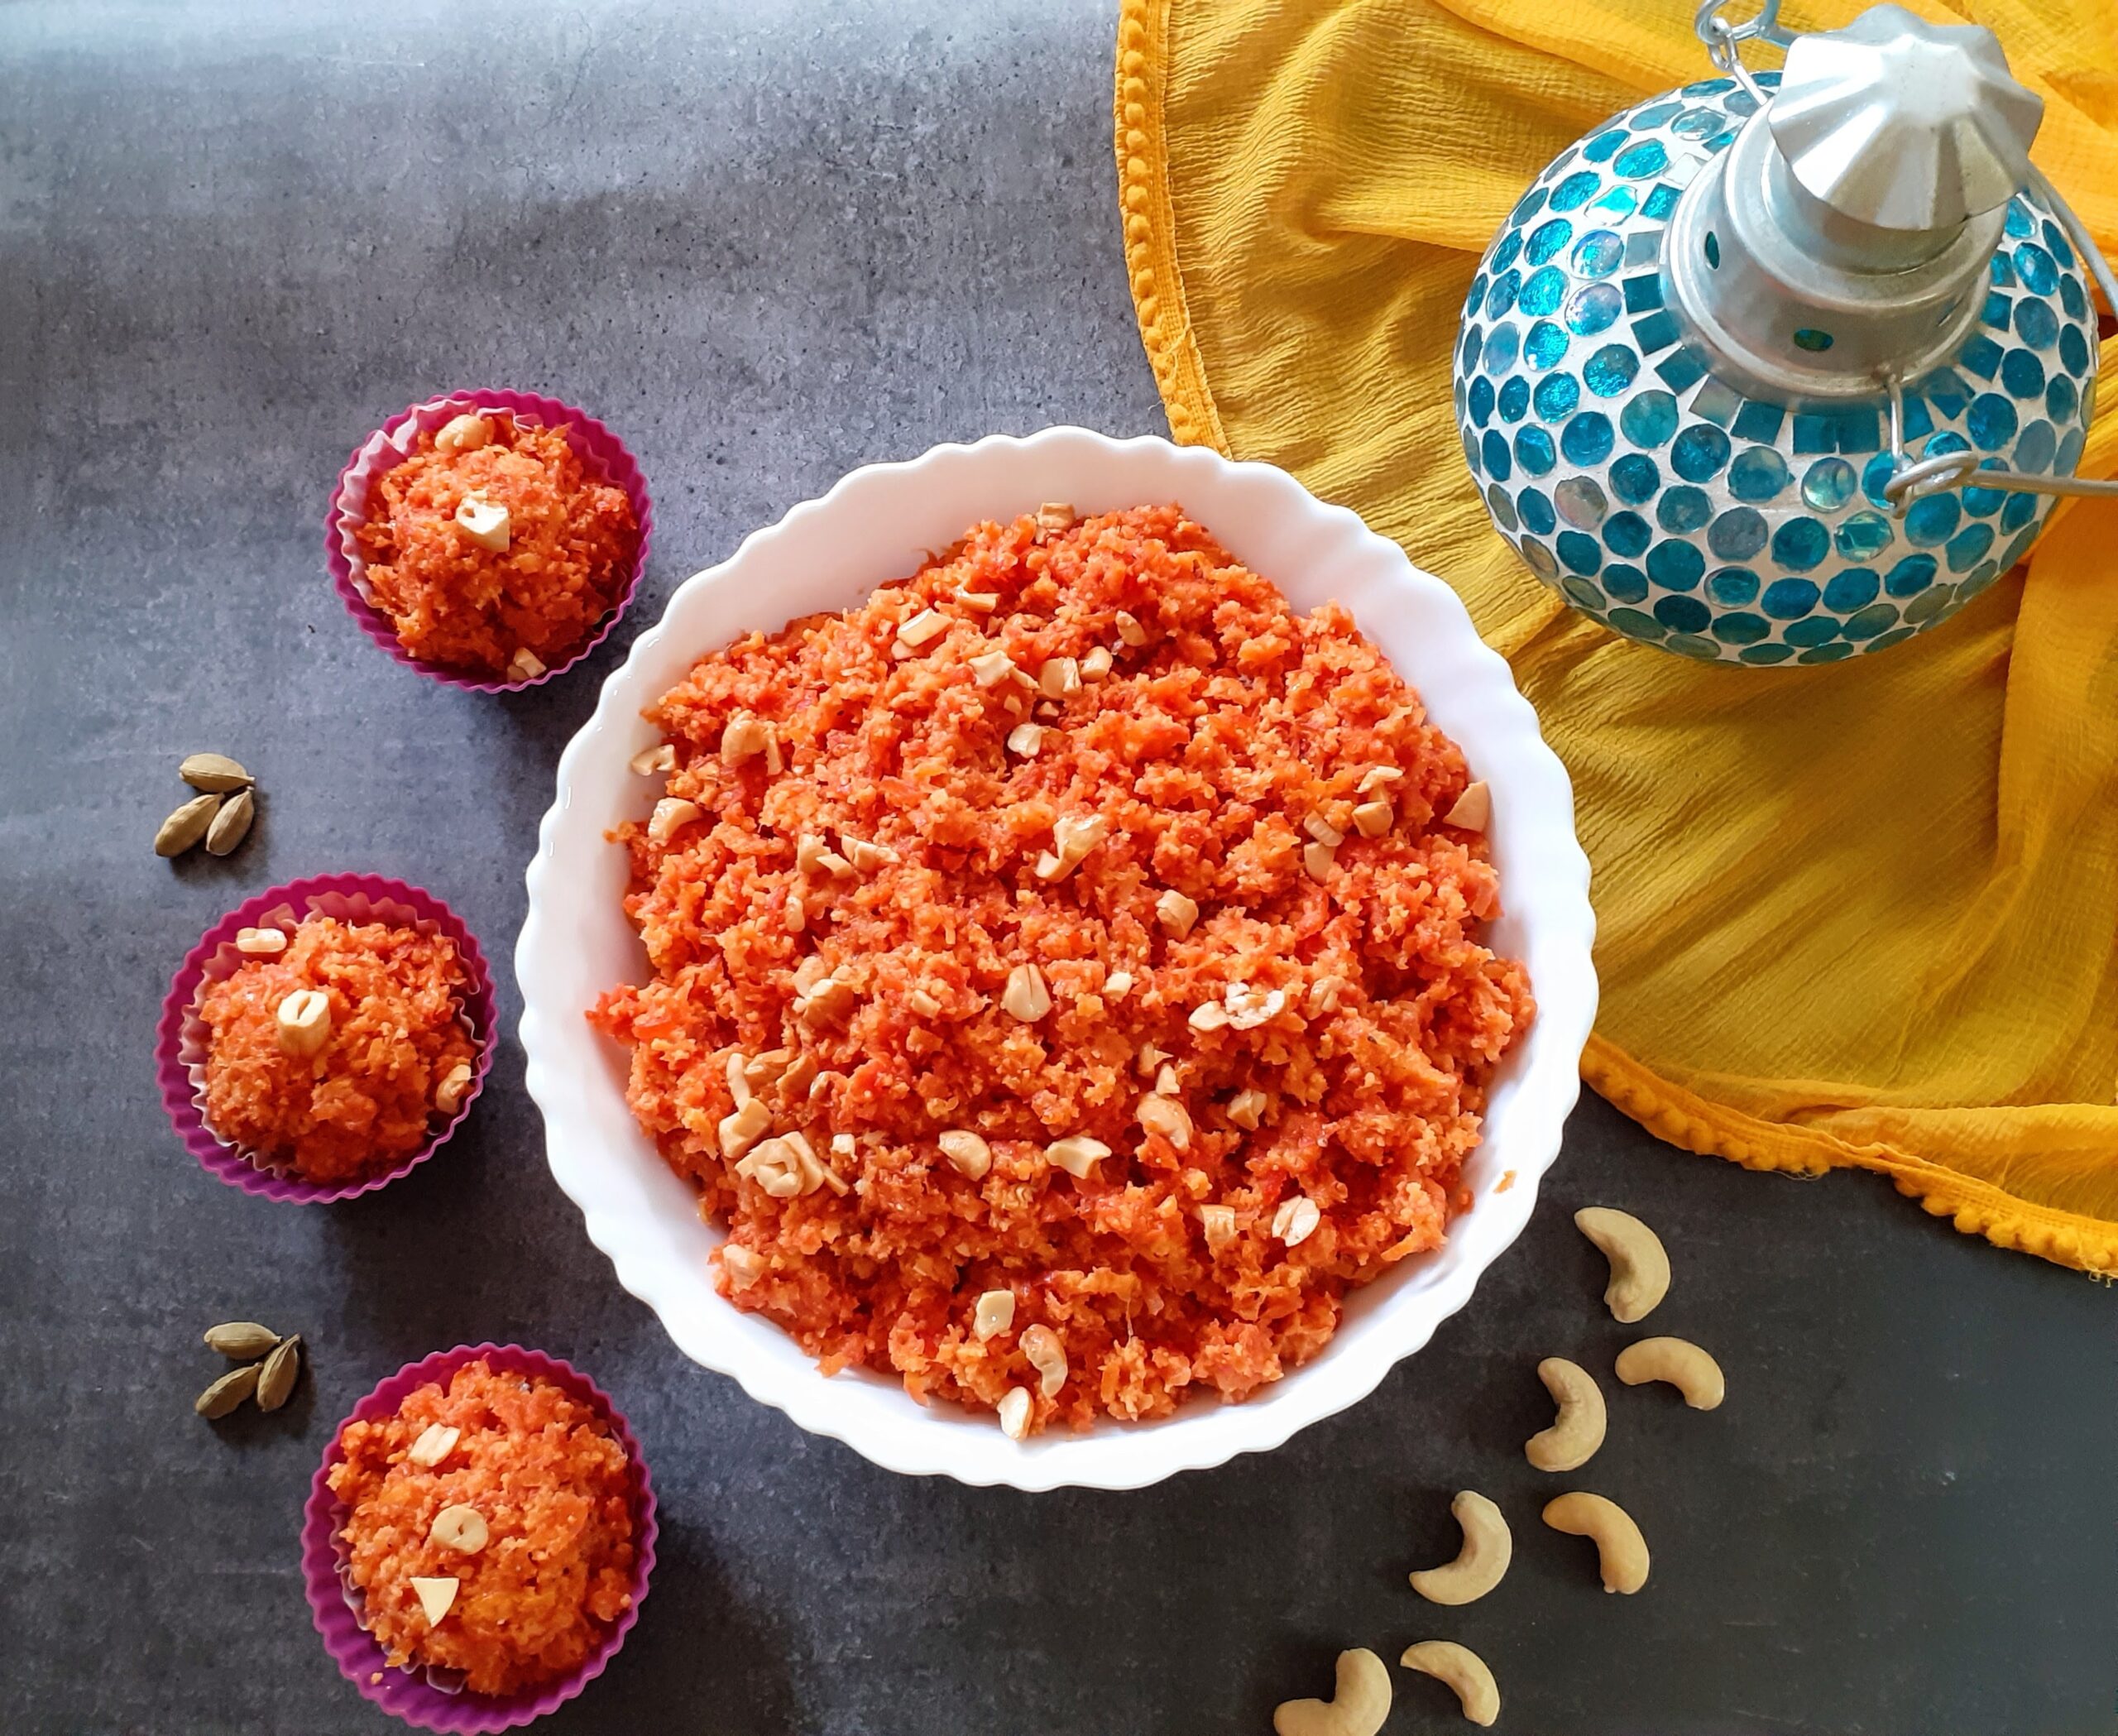
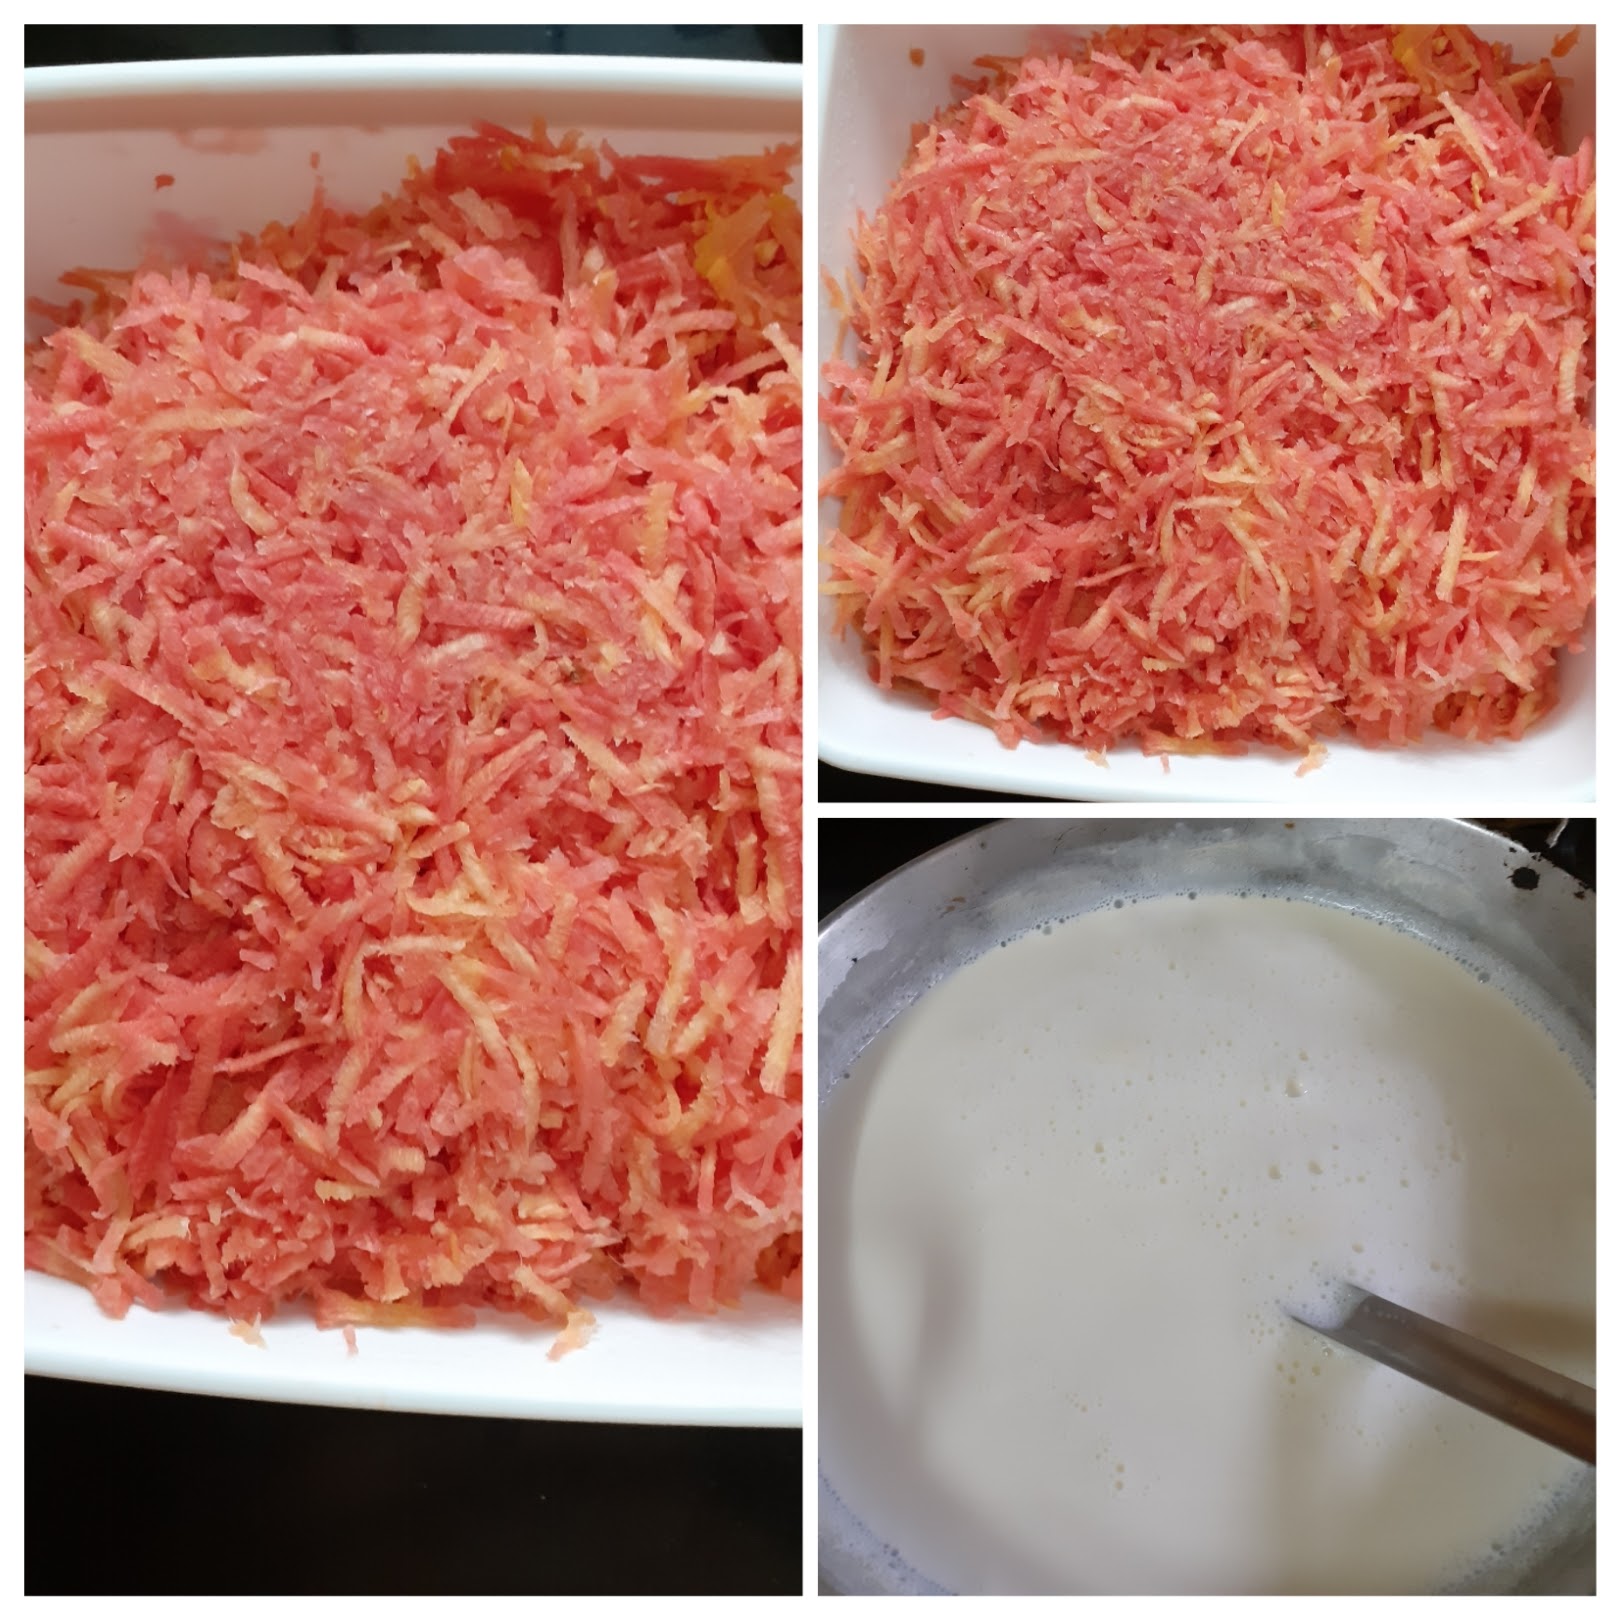
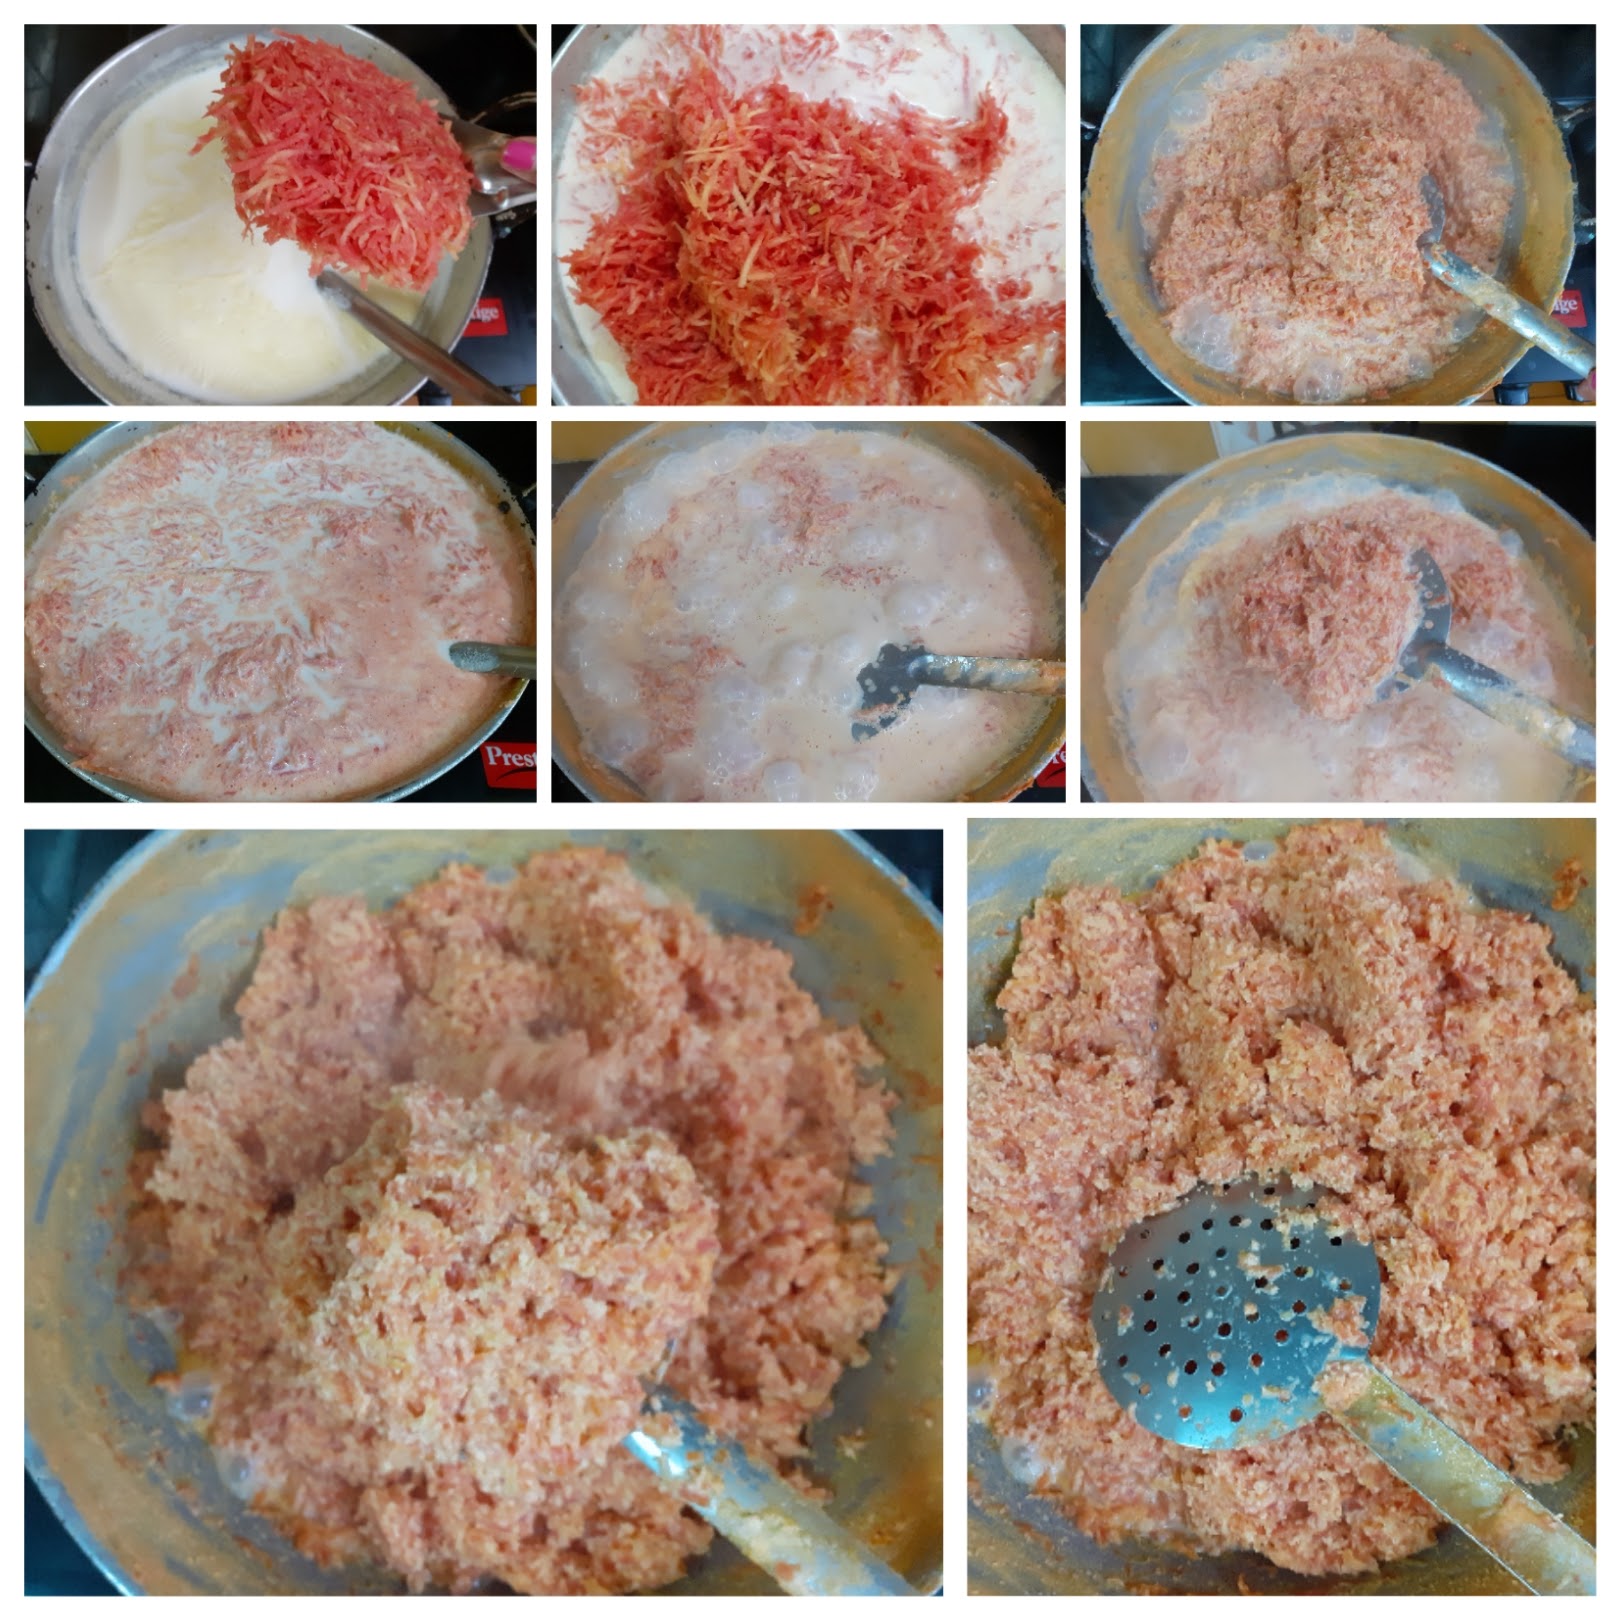
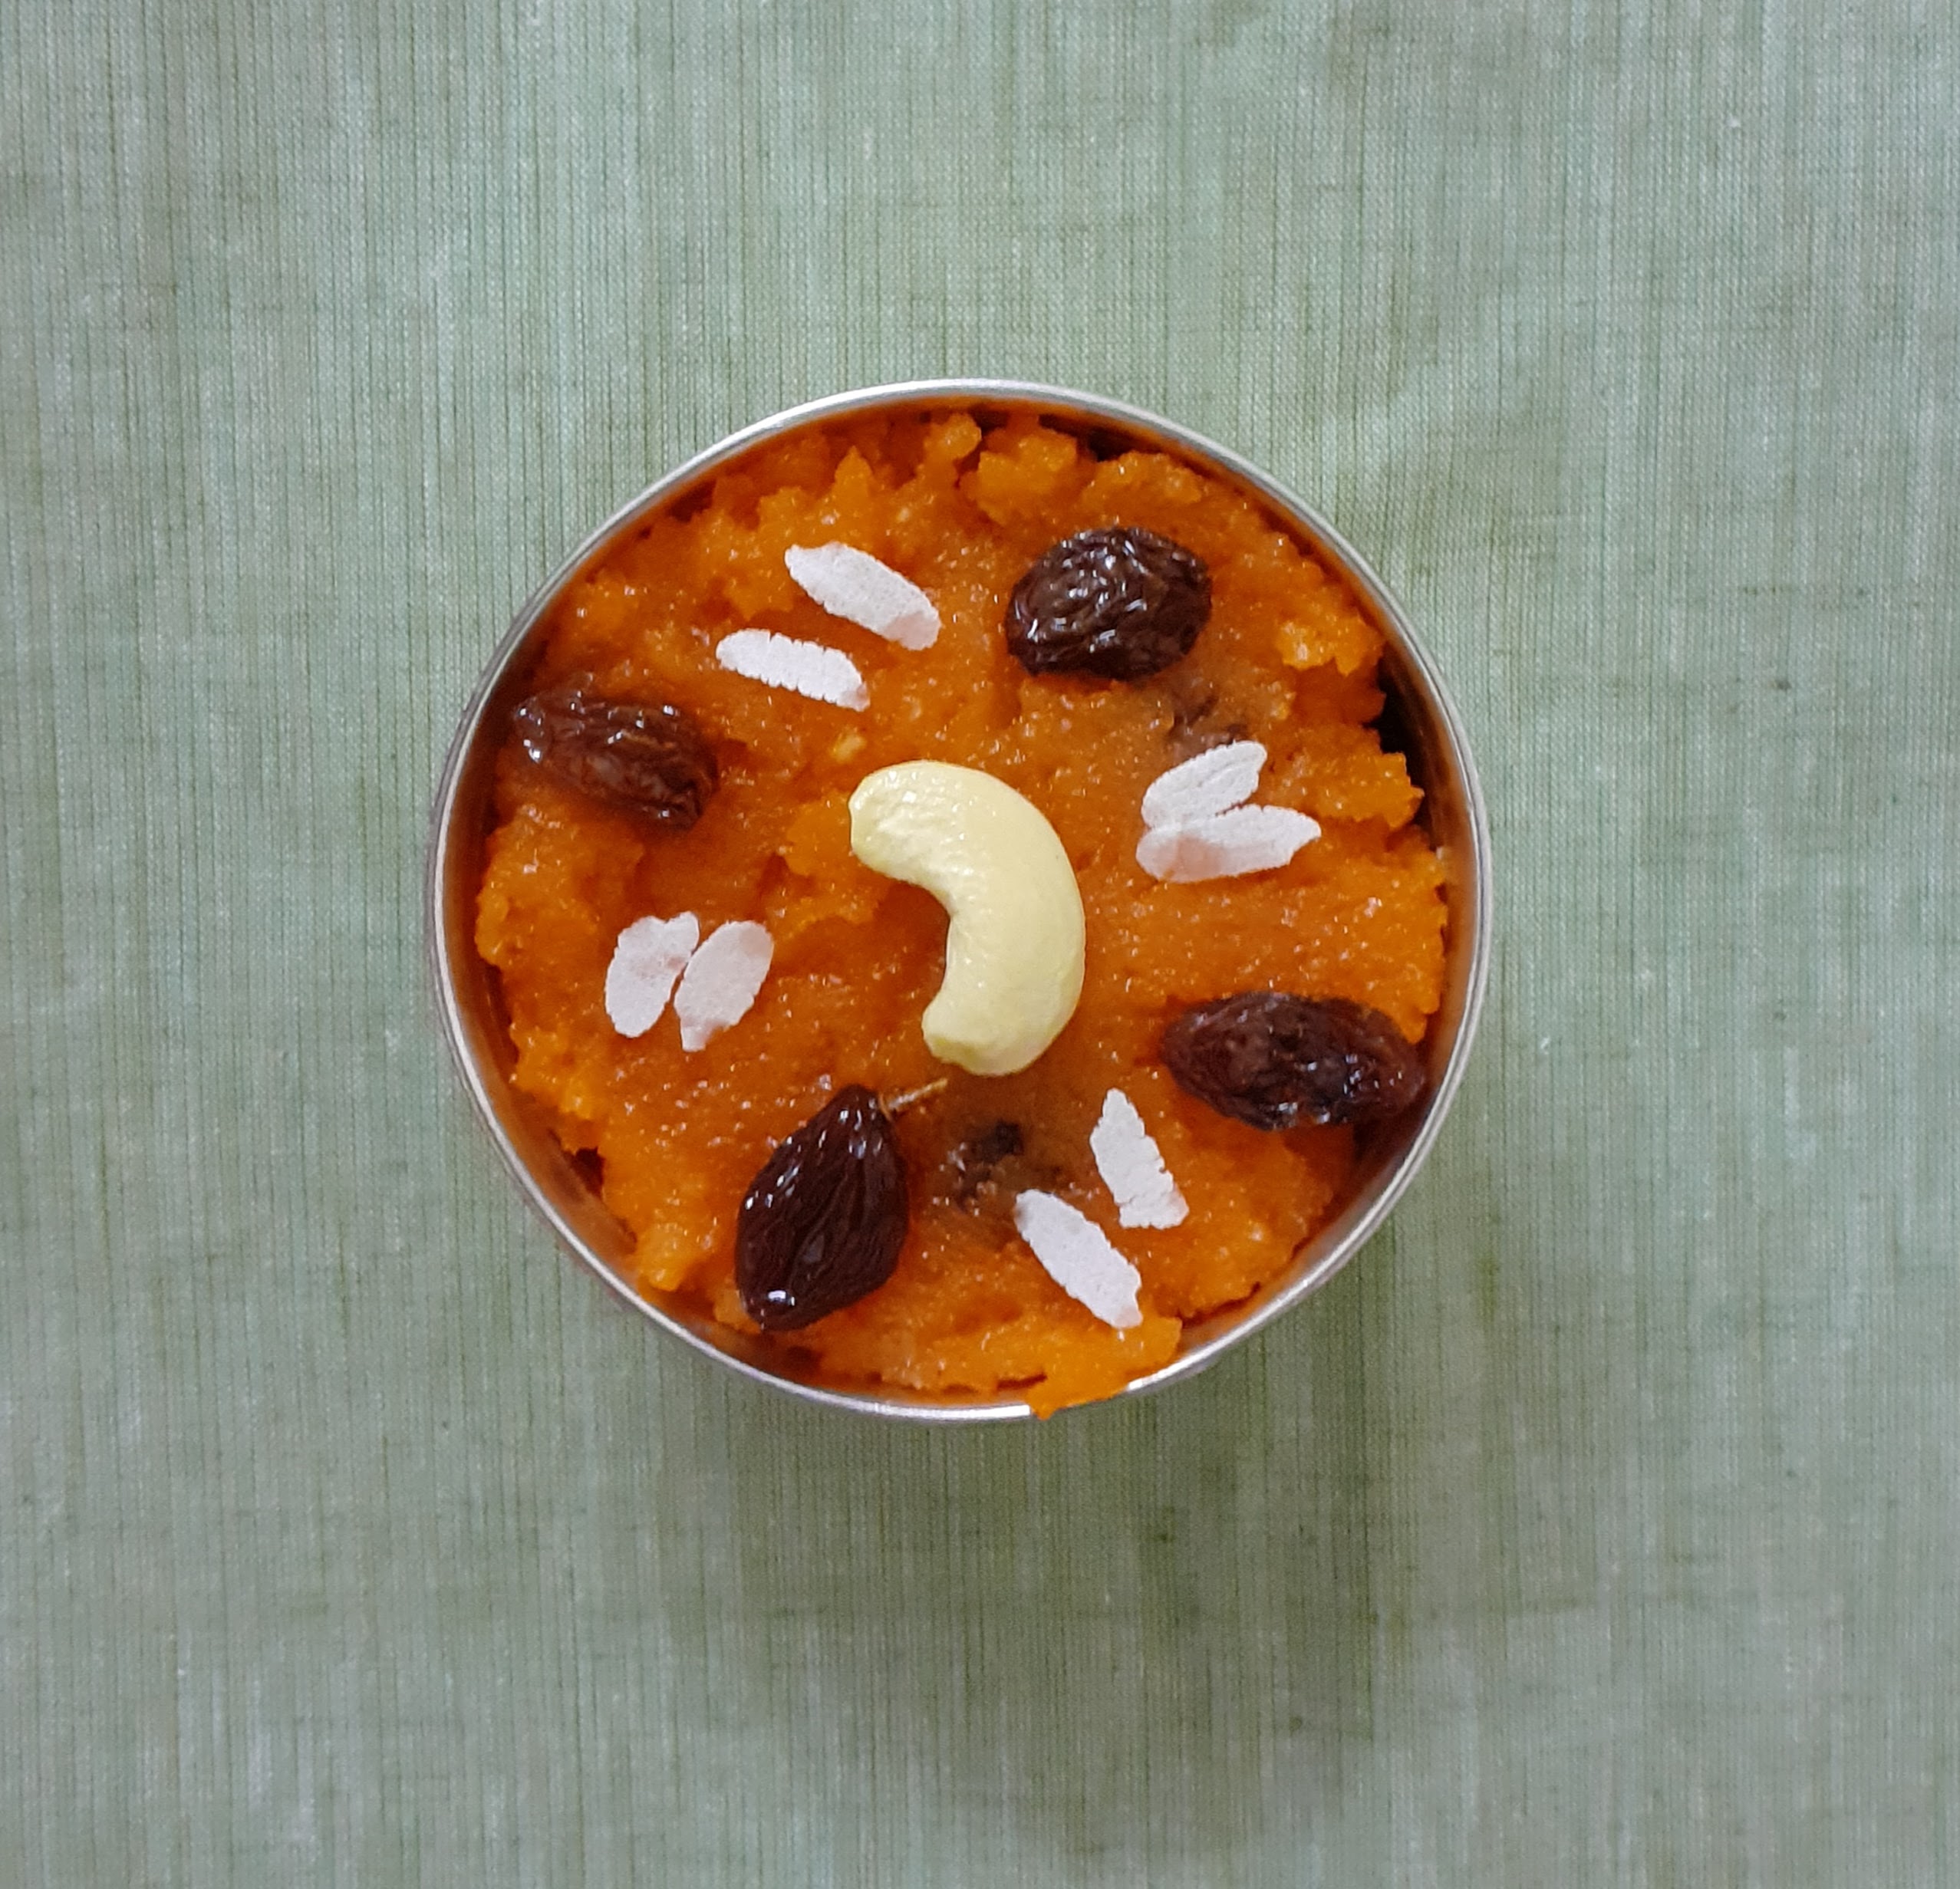
Wash, peel and grate the carrots and keep aside. In a huge thick bottomed vessel/ kadai/ or urli boil the milk. When it comes to a boil, reduce the flame and put in the grated carrots. Start stirring the mixture. The flame can be increased now but constant stirring is required . This process has to continue until almost all the milk dries up. The texture will look like Rabri stickng to carrot. Once all milk dries up, reduce the flame and add the sugar. Continue to stir again. Once the sugar is added the mixture will liquify, continue to stir until all the moisture is absorbed. The halwa will come together but it will not be gooey. Now add the cardamom powder. Fry the nuts in ghee and pour it over the halwa along with the nuts. The healthy and delicious Gajar Halwa is ready. Serve warm. Bon Appetite.
STEPWISE RECIPE FOLLOWS:
1. Wash, peel and grate the carrots and keep aside. In a huge thick bottomed vessel/ kadai/ or Urli boil the milk.
2. When it comes to a boil, reduce the flame and put in the grated carrots. Start stirring the mixture. The flame can be increased now but constant stirring is required . This process has to continue until almost all the milk dries up. Showing you the stages of reduction in pictures below that are self explanatory.
3. Once all milk dries up, reduce the flame and add the sugar. Continue to stir again. Once the sugar is added the mixture will liquefy, continue to stir until all the moisture is absorbed. The Halwa will come together but it will not be gooey. (forgot to click a picture finally to show the final consistency, so have included the one showing the cardamom powder. Please follow that texture for final consistency of Halwa).
4. Now add the cardamom powder. Fry the nuts in ghee and pour it over the Halwa along with the nuts. The healthy and delicious Gajar Halwa is ready. Serve warm.
NOTES:
1. While cooking at high heat keep stirring constantly to avoid burning the contents at the bottom of the pan.
2. Actually after sometime of cooking the milk and carrot mixture , it does not overflow from the vessel. That time the stirring can be relaxed a bit, but stir every couple of minutes. If you are following this reduce flame when not stirring.
3. Good quality full cream milk yields the best result, the Halwa can be made with milk of any consistency though. The results may not be what I have described .
4. Feel free to try this with regular Carrots too. Method being the same.
5. Sometimes people try to over power the subtle carrot flavour by adding huge amounts of ghee. This is not required. Pouring ghee at the right time is very important, such that the flavour is enhanced and a lot of ghee is not poured unnecessarily. Check out my Cakkara Pongal post for the directions on how to pour the ghee.
If you tried this recipe and liked it please comment below. I would love to hear from you. If you have a query about the recipe email us and ill respond as soon as I can.
If you would like to receive our recipes in your mail please leave your mail id at the homepage. Every time Rajjo’s Kitchen has a new post we will mail the recipe to you.
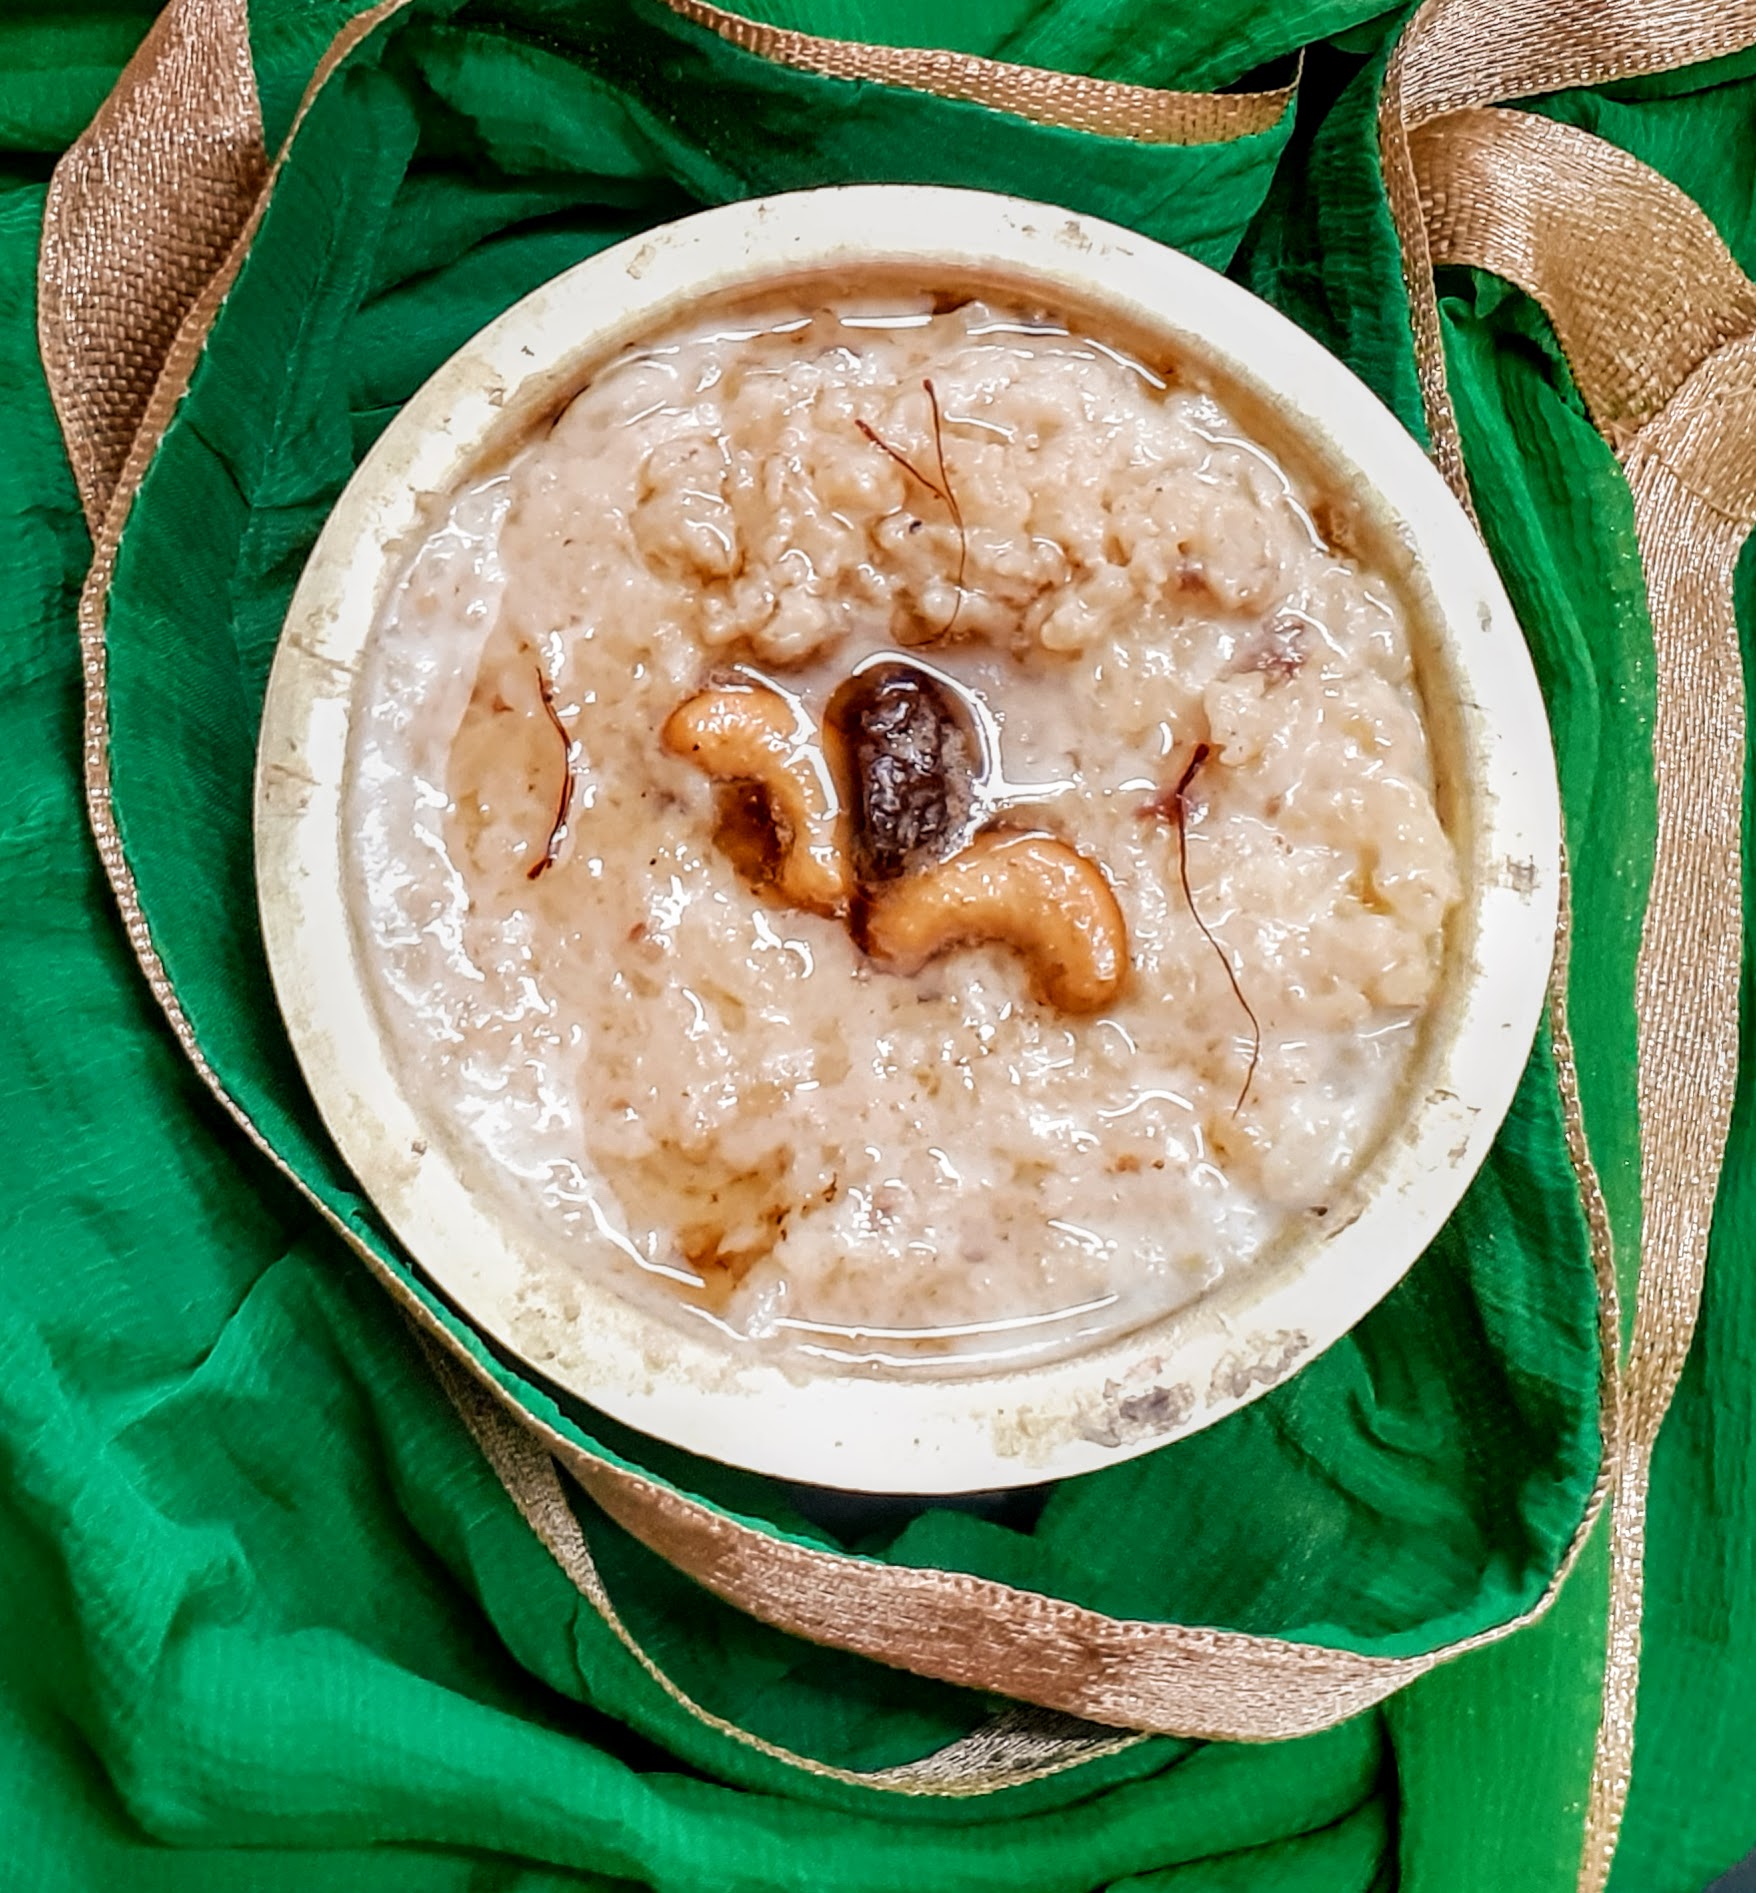
Akkaravadisal One Pot
This is a very traditional South Indian sweet dish. Lord Mahavishnu is offered this sweet as prasad(holy offering). The main ingredients are Rice, moong dal, jaggery, milk, and ghee. The ingredients are similar to the Sweet Pongal but both taste very different. It tastes heavenly when served a little warm. Without much ado let’s get to the recipe right away.
This recipe already exists on this blog, but I am adding another method to make it, which is the one-pot method. One can choose whichever method they find doable. The results are the same for both, just a few steps vary which I will guide you through here.
While you are here check out my other Indian Sweet recipes like Malpua, Pineapple Rabri, Atte ka Sheera, Chakkarai Pongal, Aval Kesari, Unni appam, Sugiyan, and many more…
Here is the recipe of One -Pot Akkaravadisal for you-
PREP TIME: 15 COOK TIME: 20Mins
TOTAL TIME:40Mins COURSE: DESSERT
CUISINE: SOUTH INDIAN SERVINGS: 5
AUTHOR: Rajni Ram
Ingredients:
Rice 1 cup
Moong dal/ green gram 1/4 cup
Milk 6 cups
Jaggery 1 cup
Water 1/4 cup
Sugar ( optional) 1 tbsp
Ghee 3/4 cup
Cardamom/ elaichi powder 1 tsp
Saffron ( optional) 2 pinches, soaked in warm milk
Raw camphor( optional) 1 pinch powdered
Cashewnuts 8 to 10
Raisins 8 to 10
DIRECTIONS:
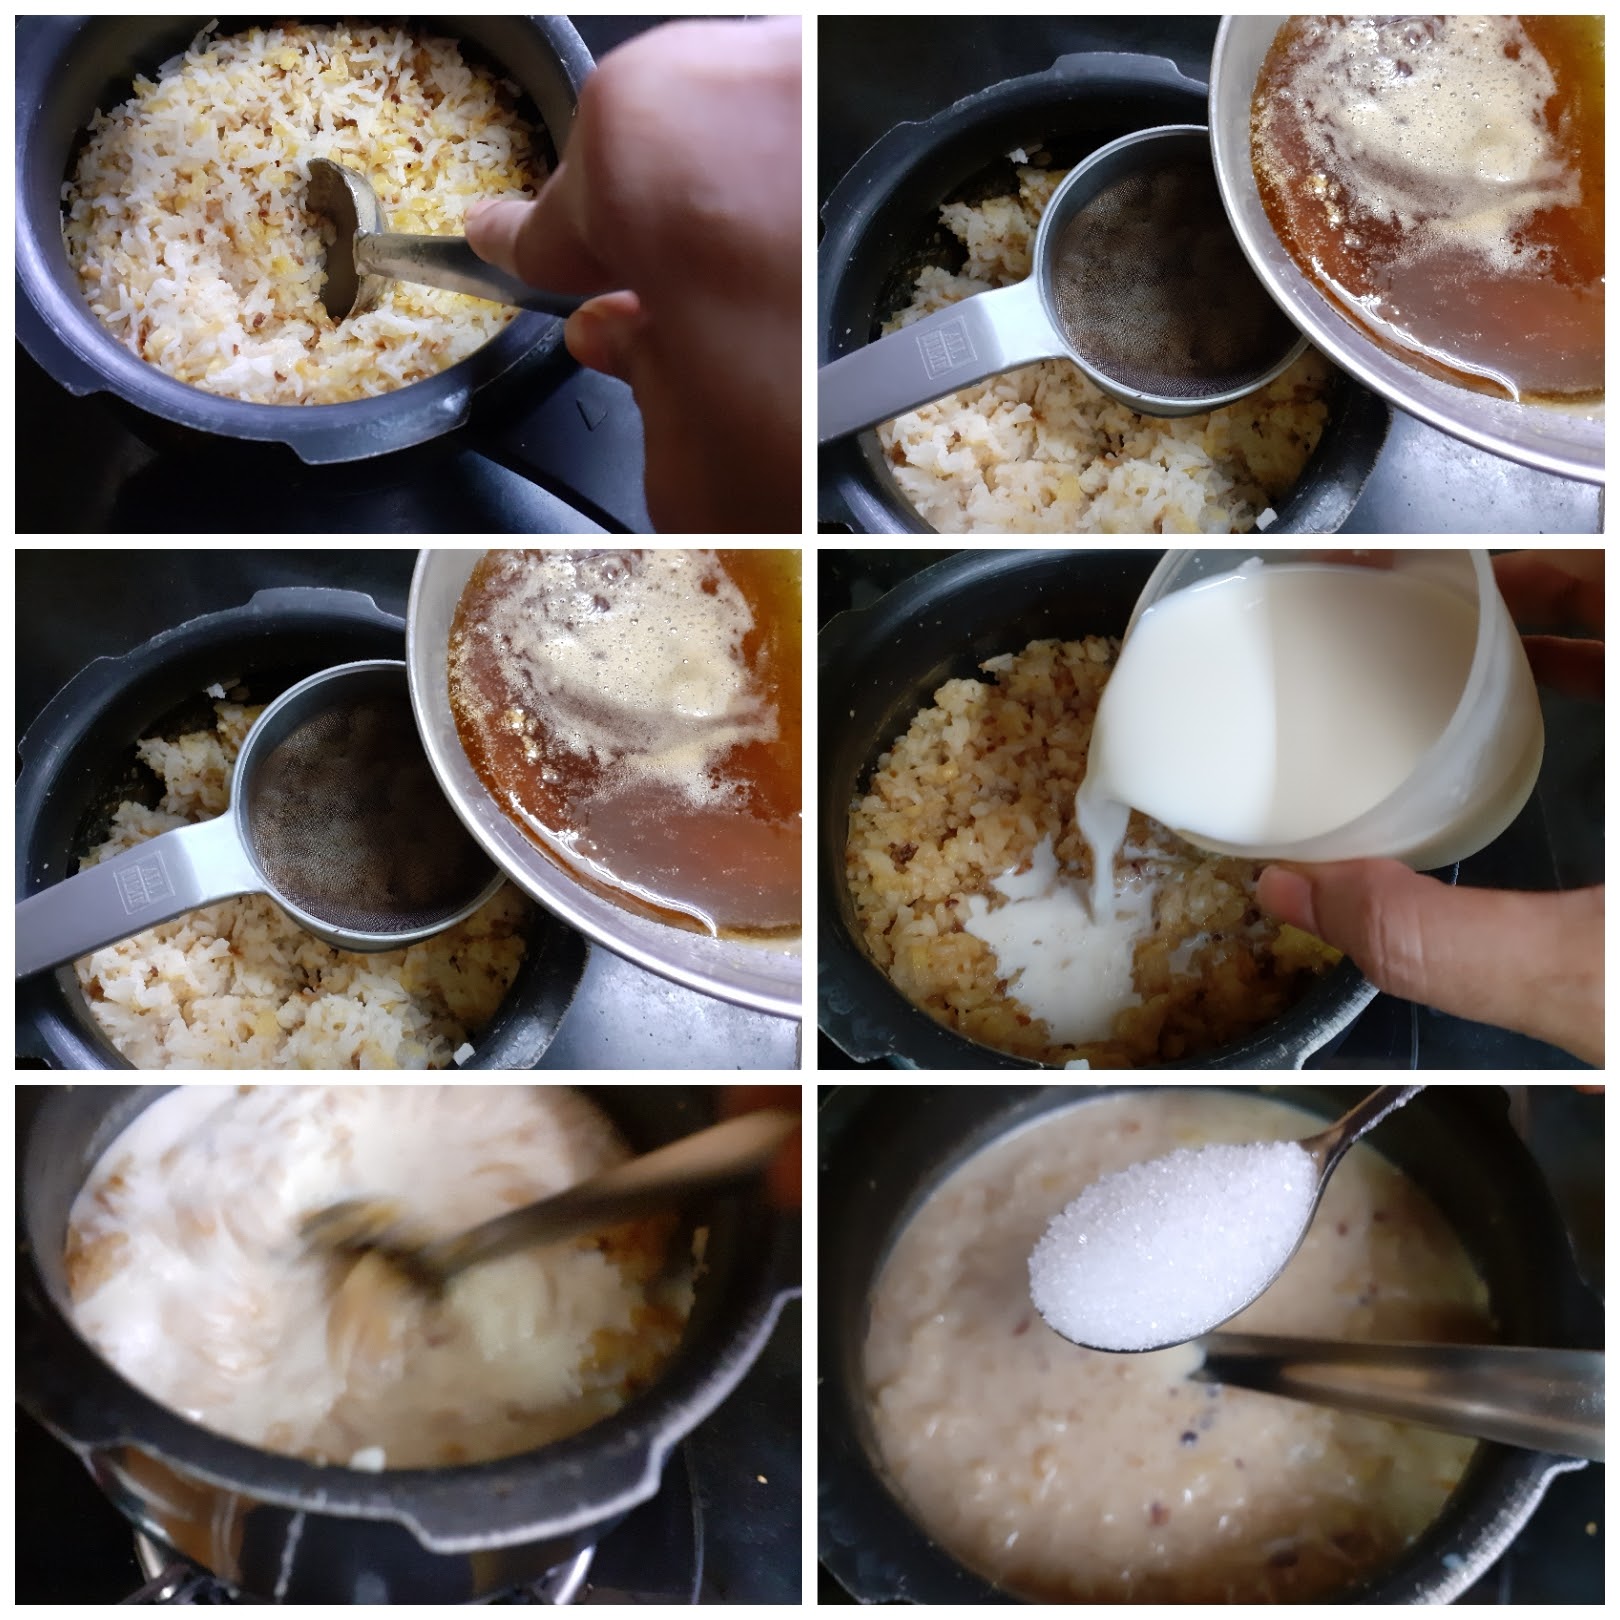
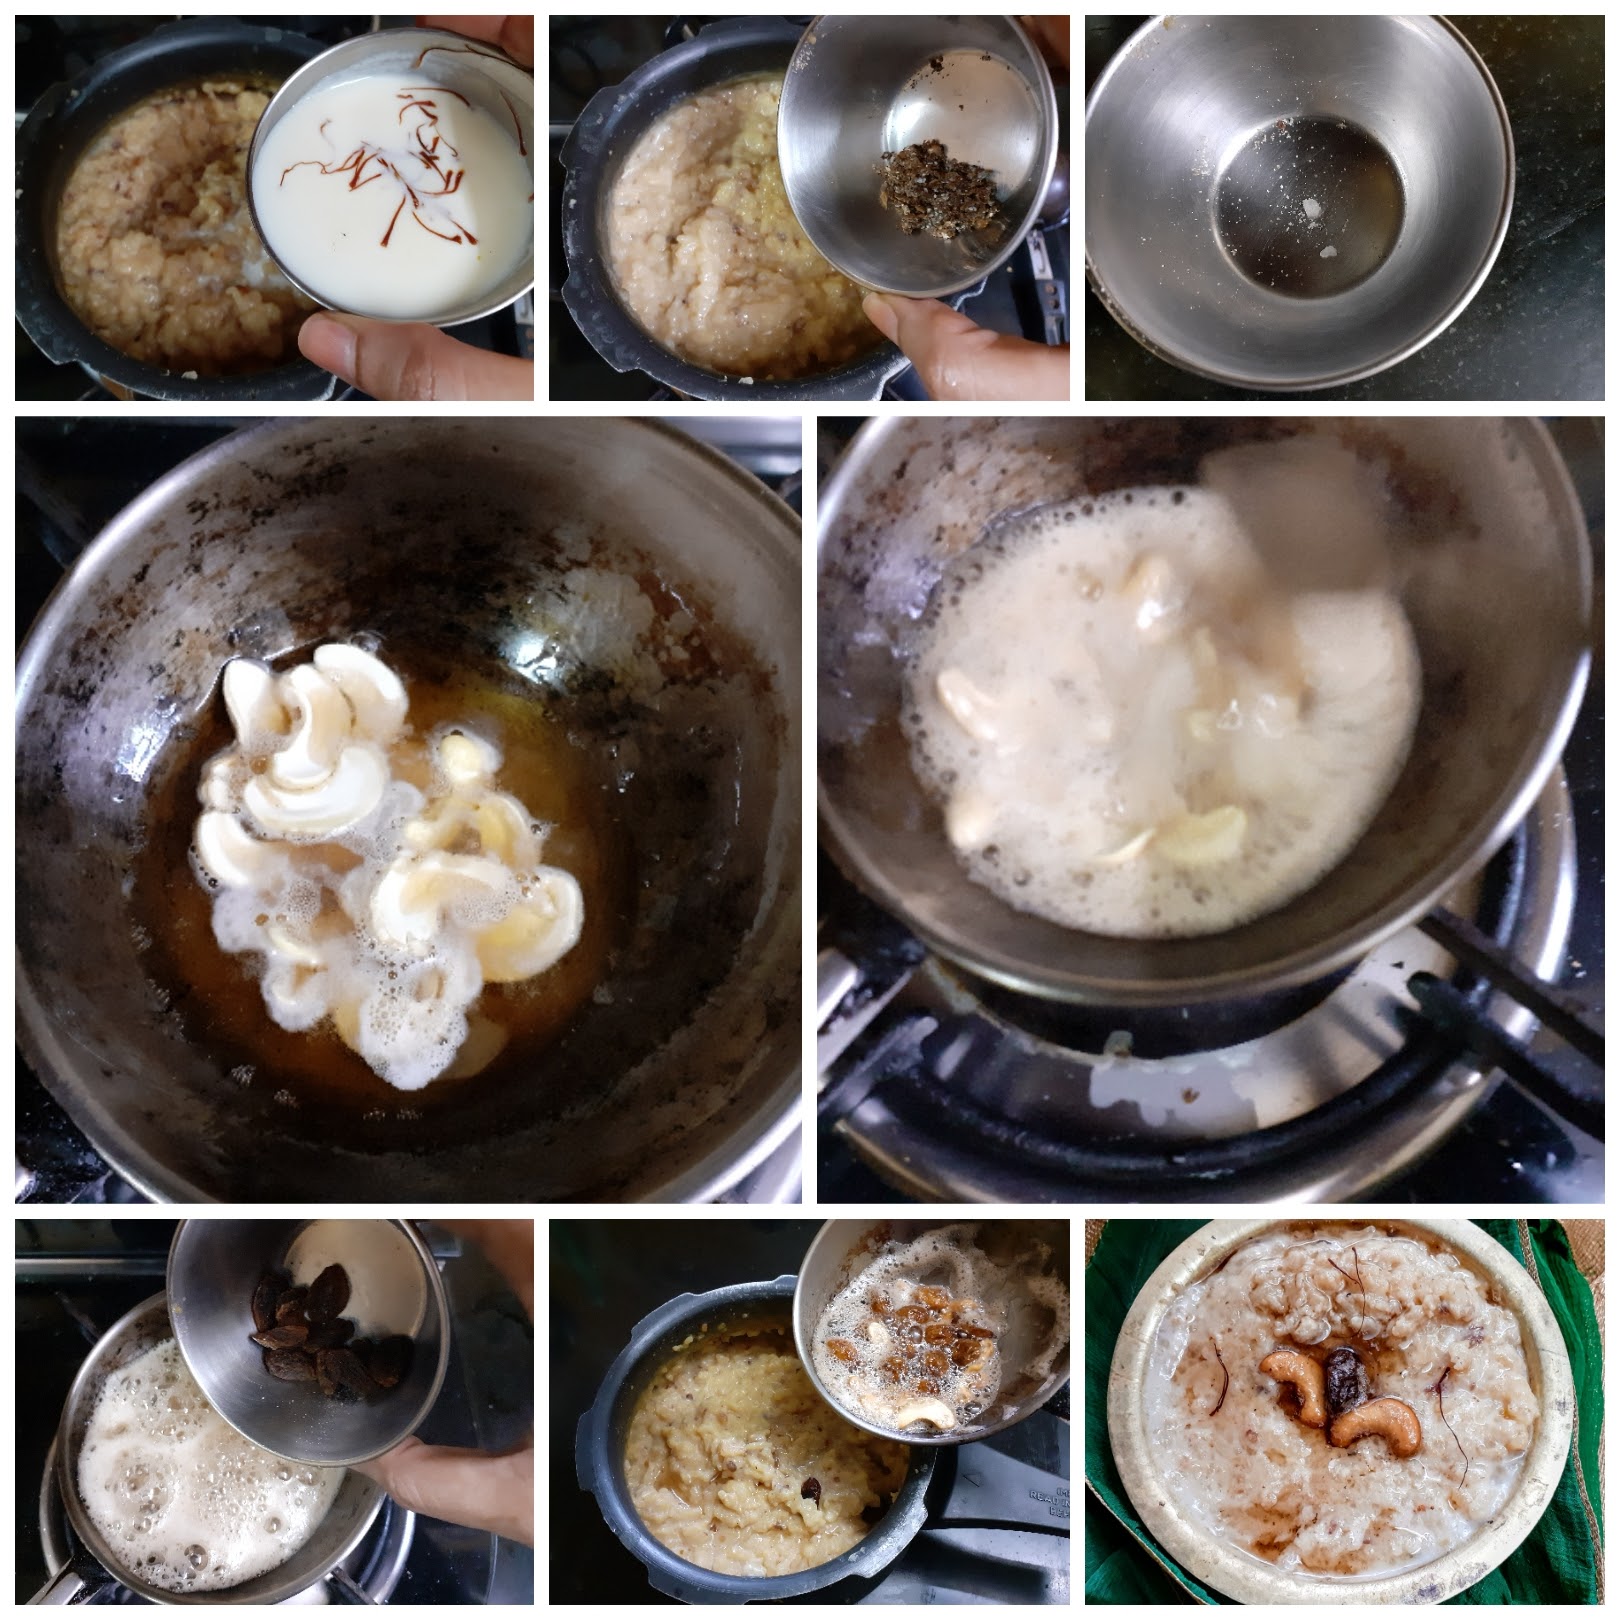
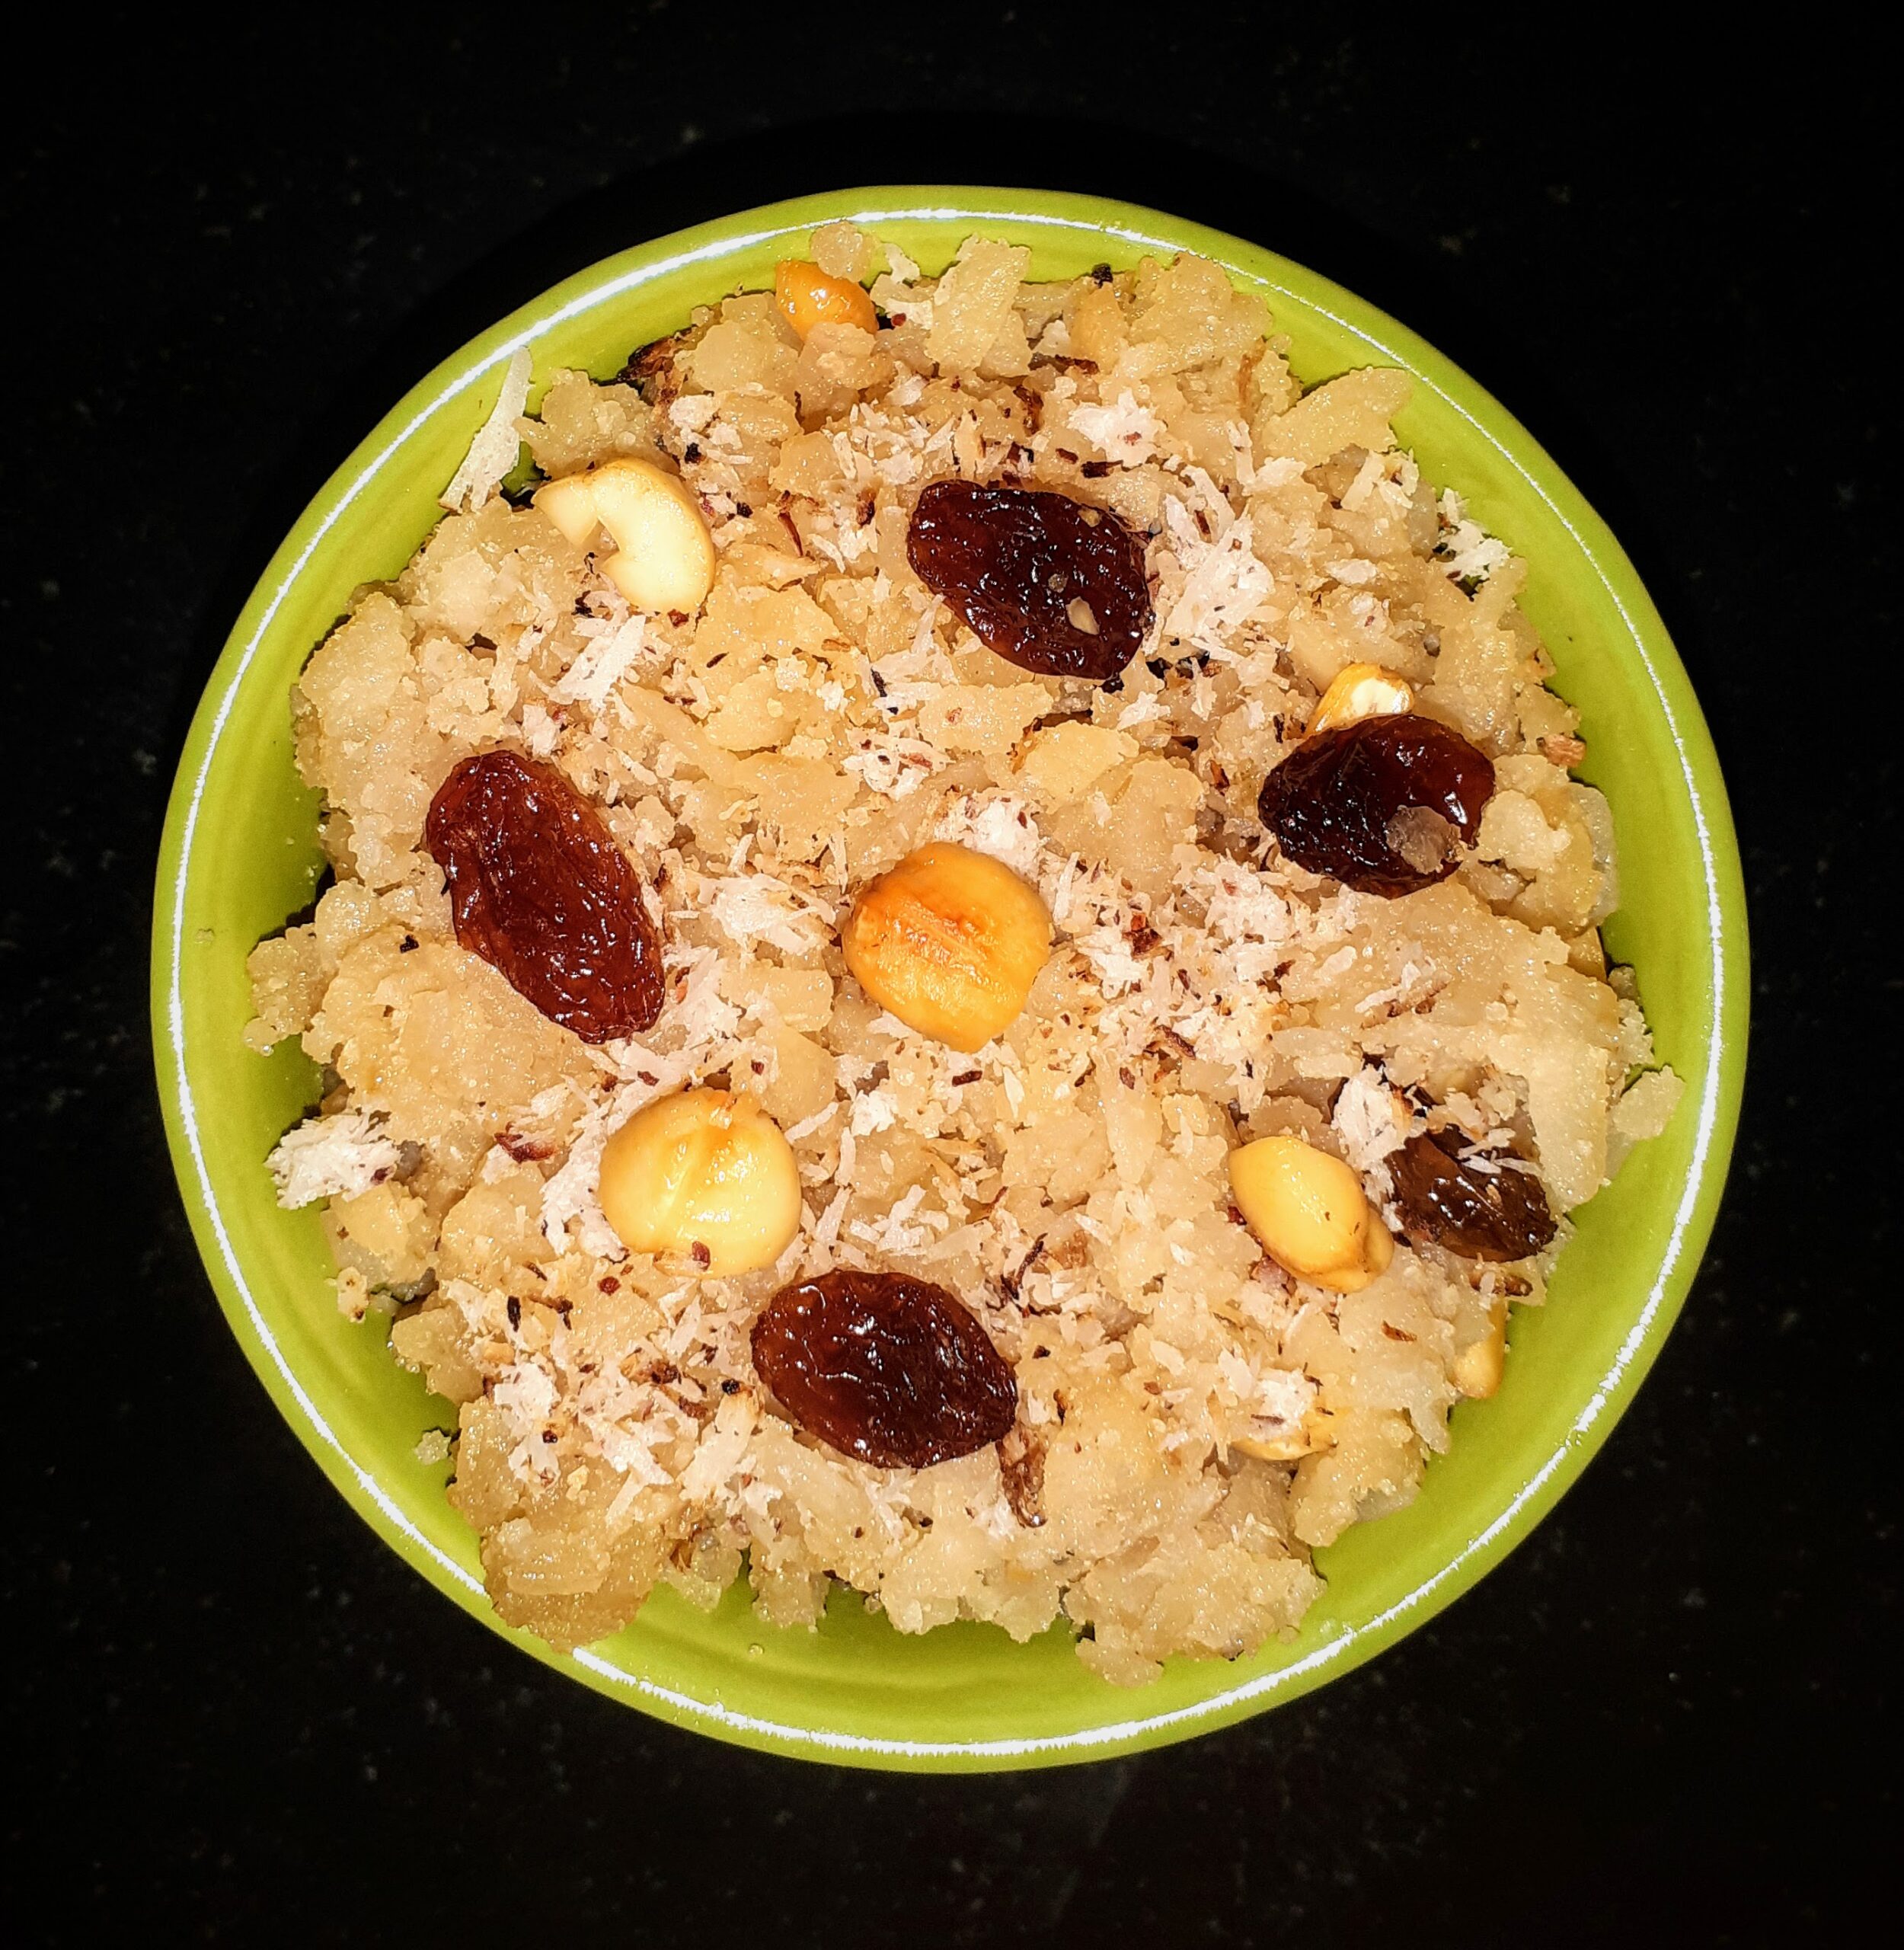
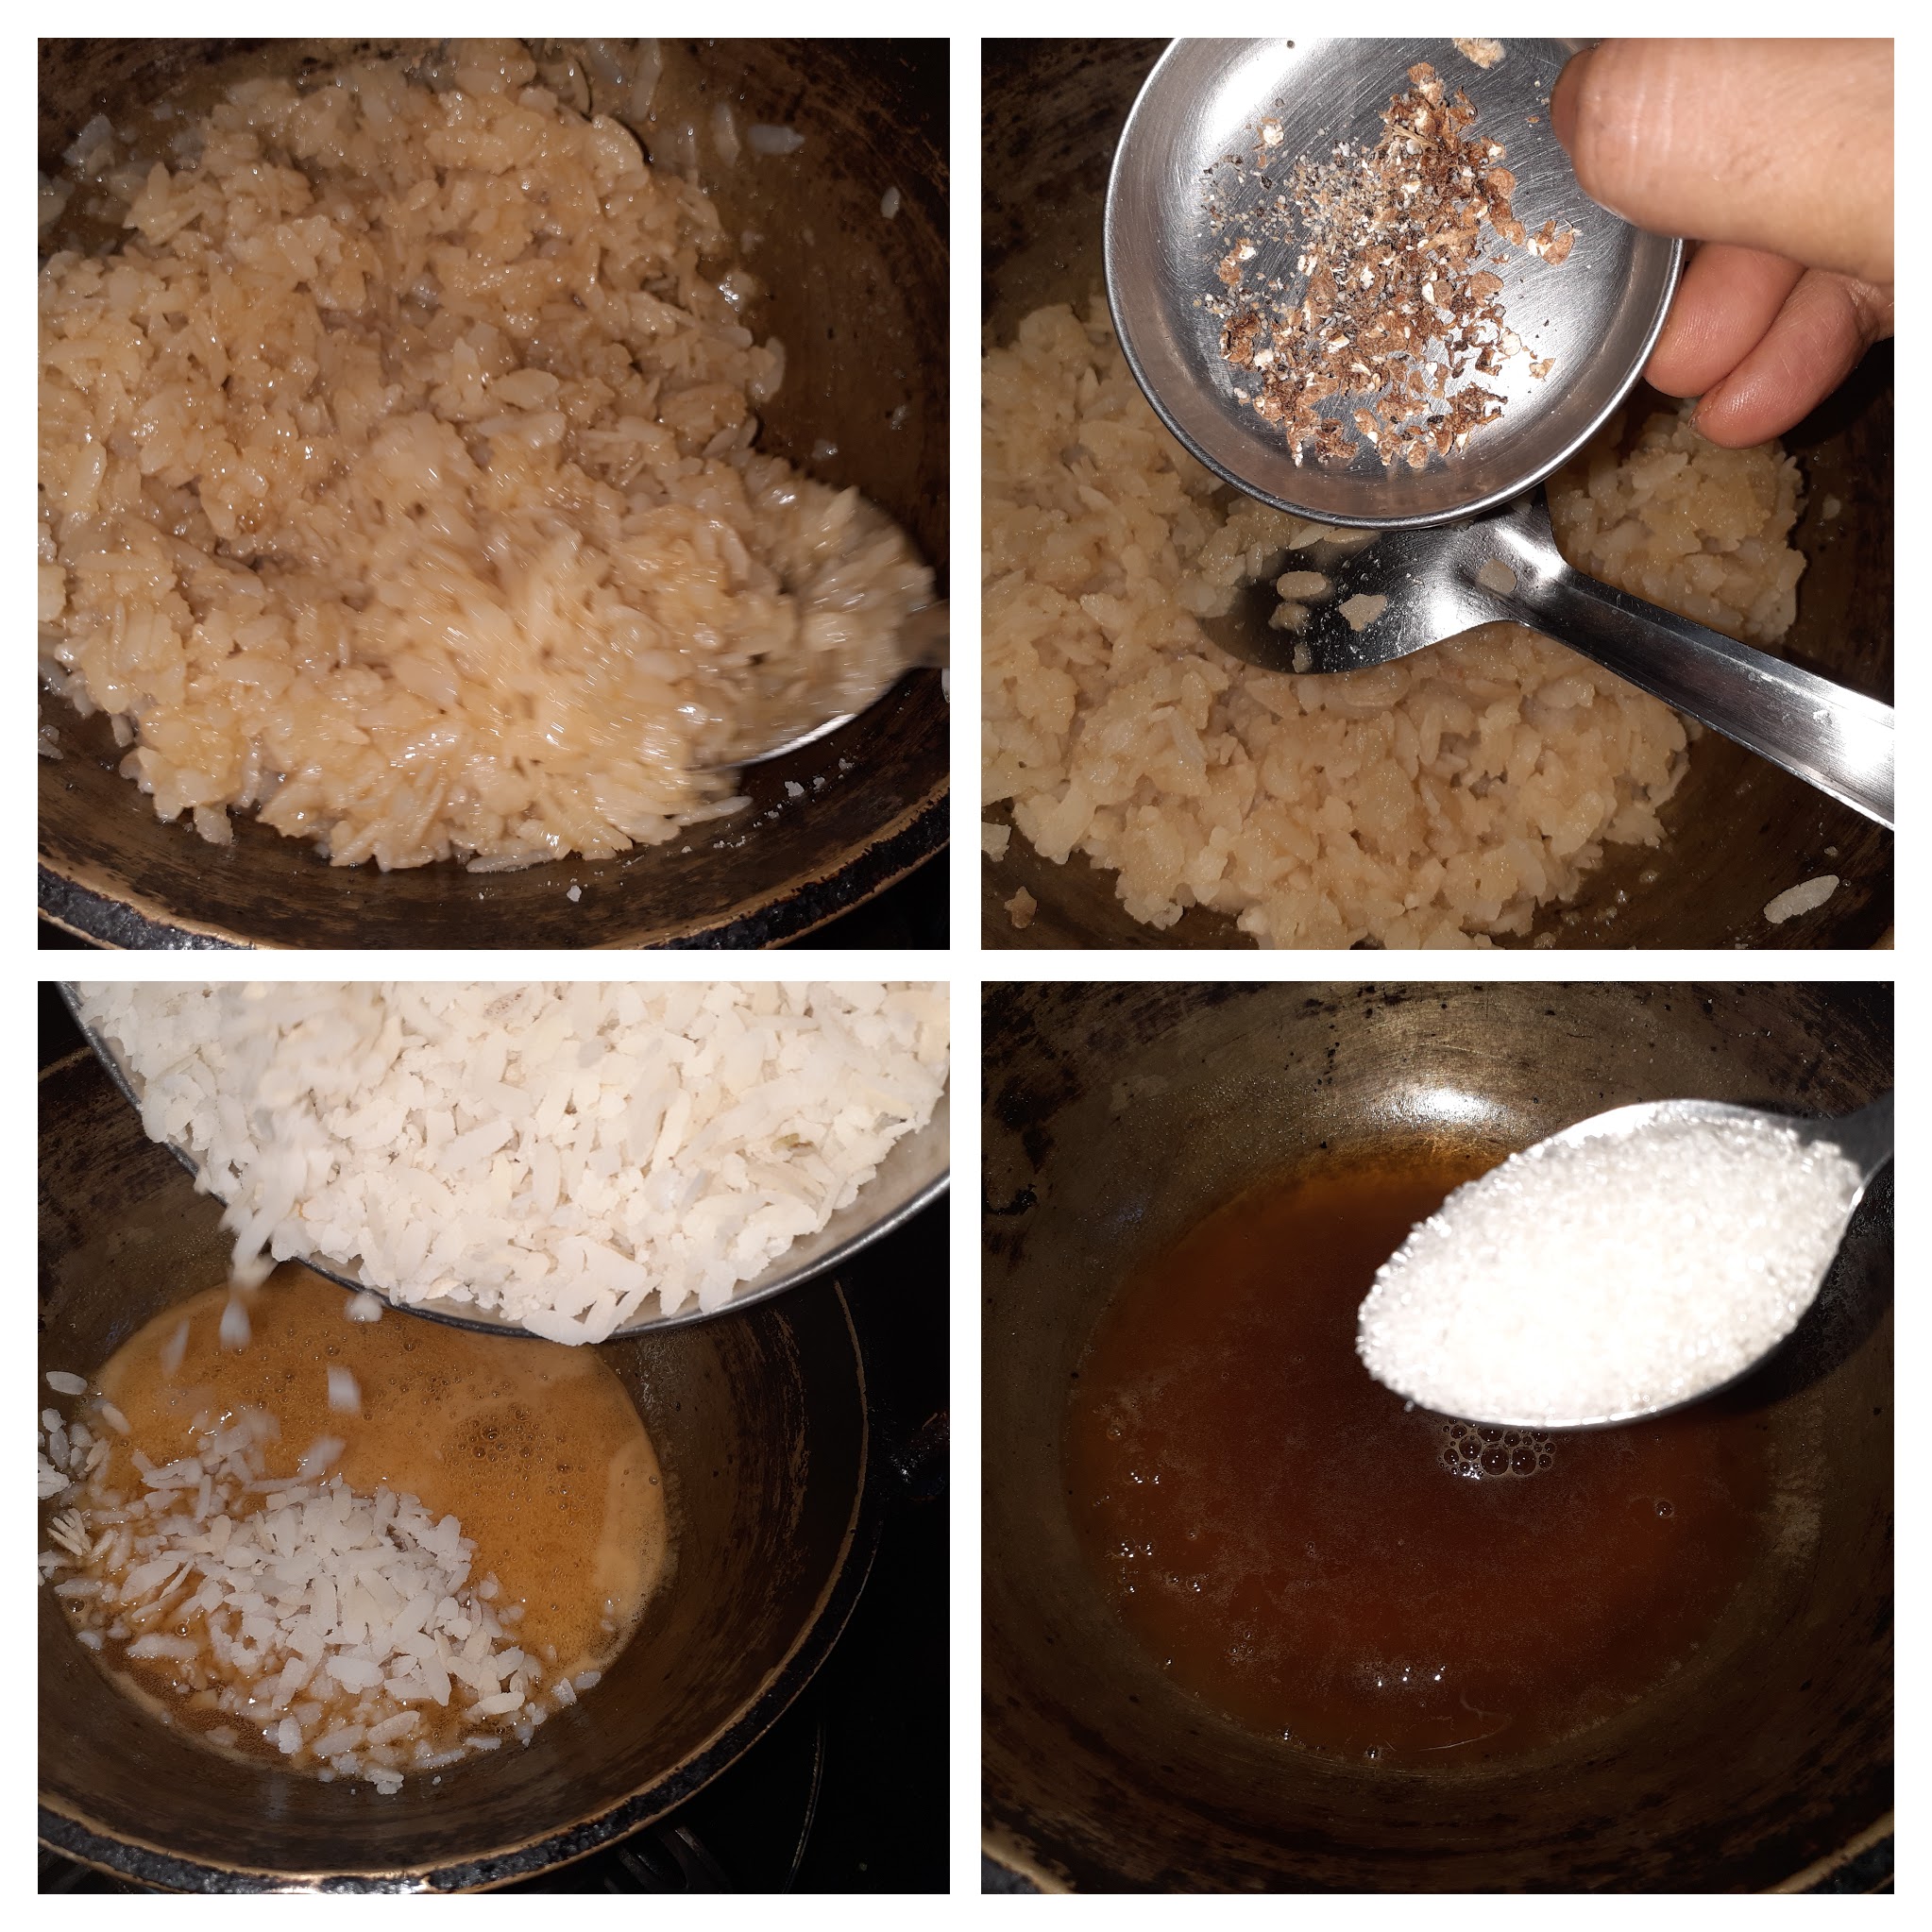
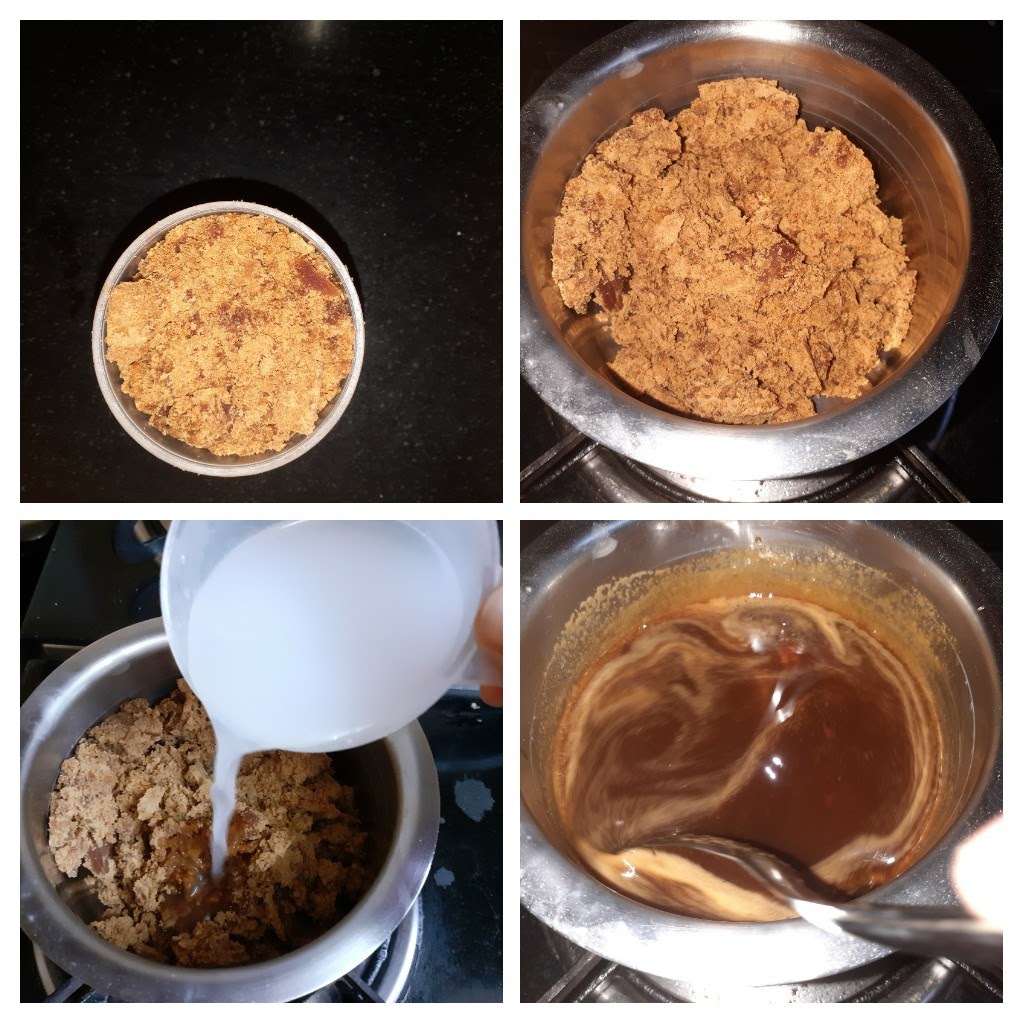
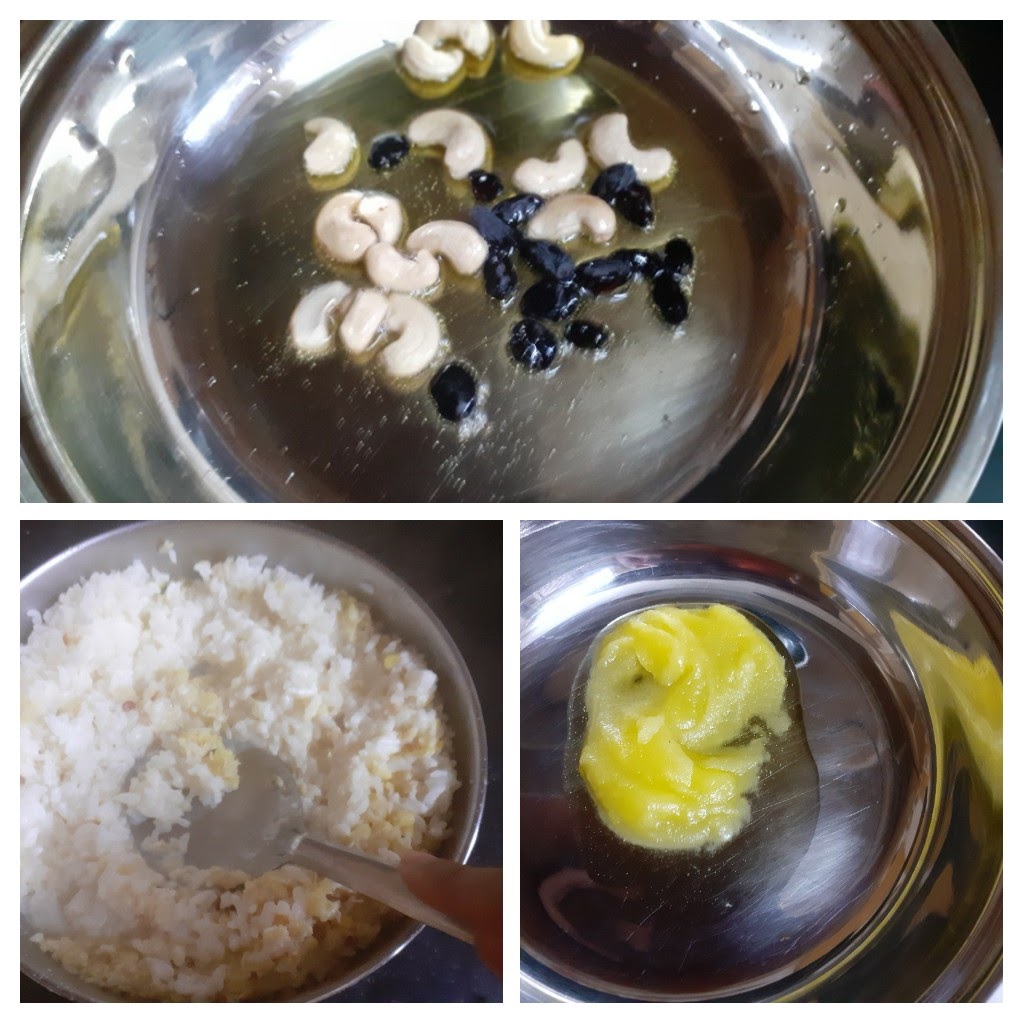
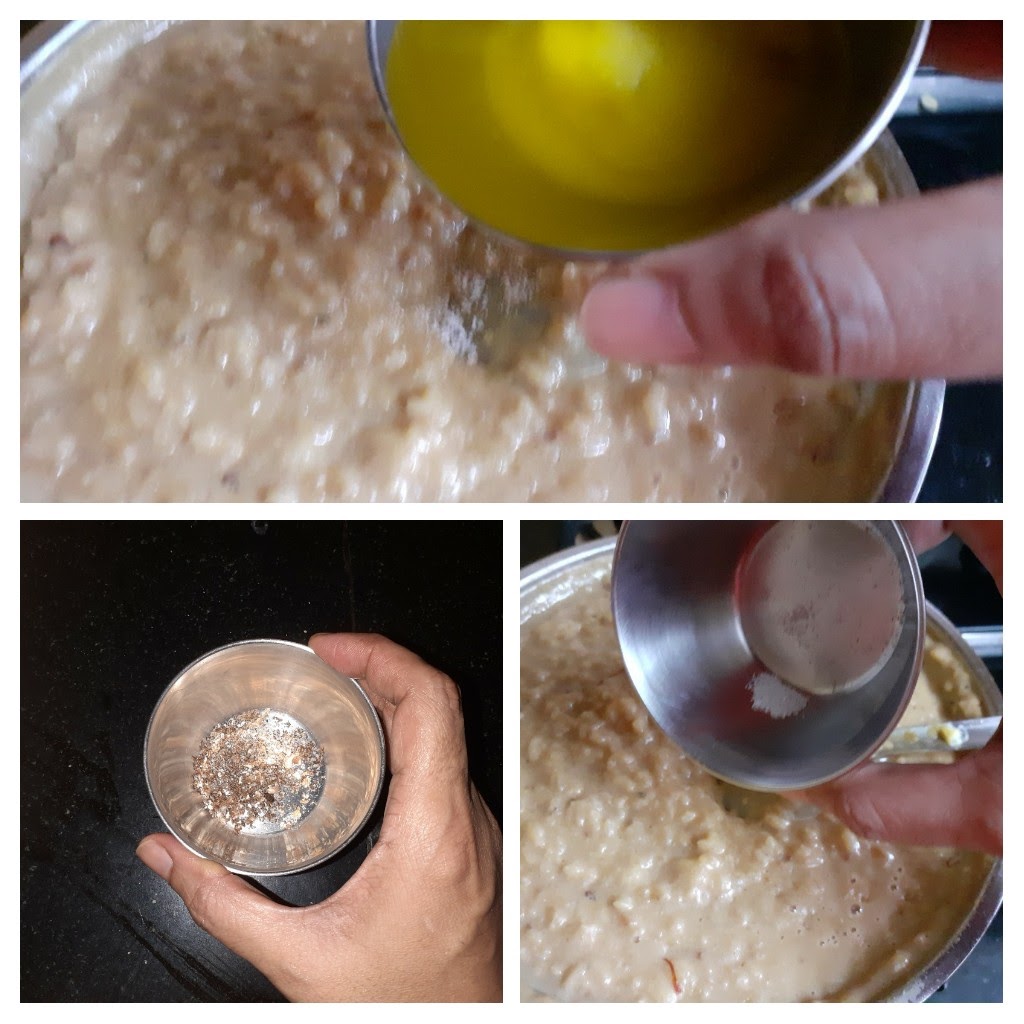
Dry roast the Moong dal directly in the cooker to a light brown colour. Stir constantly and take care not to burn the dal. It will give out a nice aroma. Put the jaggery in a separate vessel, add water, and bring to a boil. Put off the heat and stir to dissolve the jaggery. Keep aside. Now to the roasted moong dal in the cooker, add the washed rice. Pour 2 cups milk and 1 cup water, close the cooker and cook for 5 to 6 whistles ( flame should be on low throughout, otherwise there are chances of the milk overflowing through the sides). Once pressure releases open the cooker and mash the contents well. Put the cooker on flame again and strain the liquid jaggery into the cooker directly. Pour another 2 cups milk and stir nicely. There may be lumps, break them down patiently by stirring. Like I always say add 2 teaspoons of sugar to any jaggery dish to enhance the taste of jaggery. Add more milk if the 2 cups of milk get absorbed. We want a texture that is semi-solid and smooth, not lumpy. Now add the cardamom powder, raw camphor(optional), and add in the raisins and nuts fried in ghee. The one-pot Akkaravadisal is ready to serve. Enjoy BonAppetit. This is a popular Prasad(holy offering) dish that can be offered during Pujas.
STEPWISE RECIPE FOLLOWS:
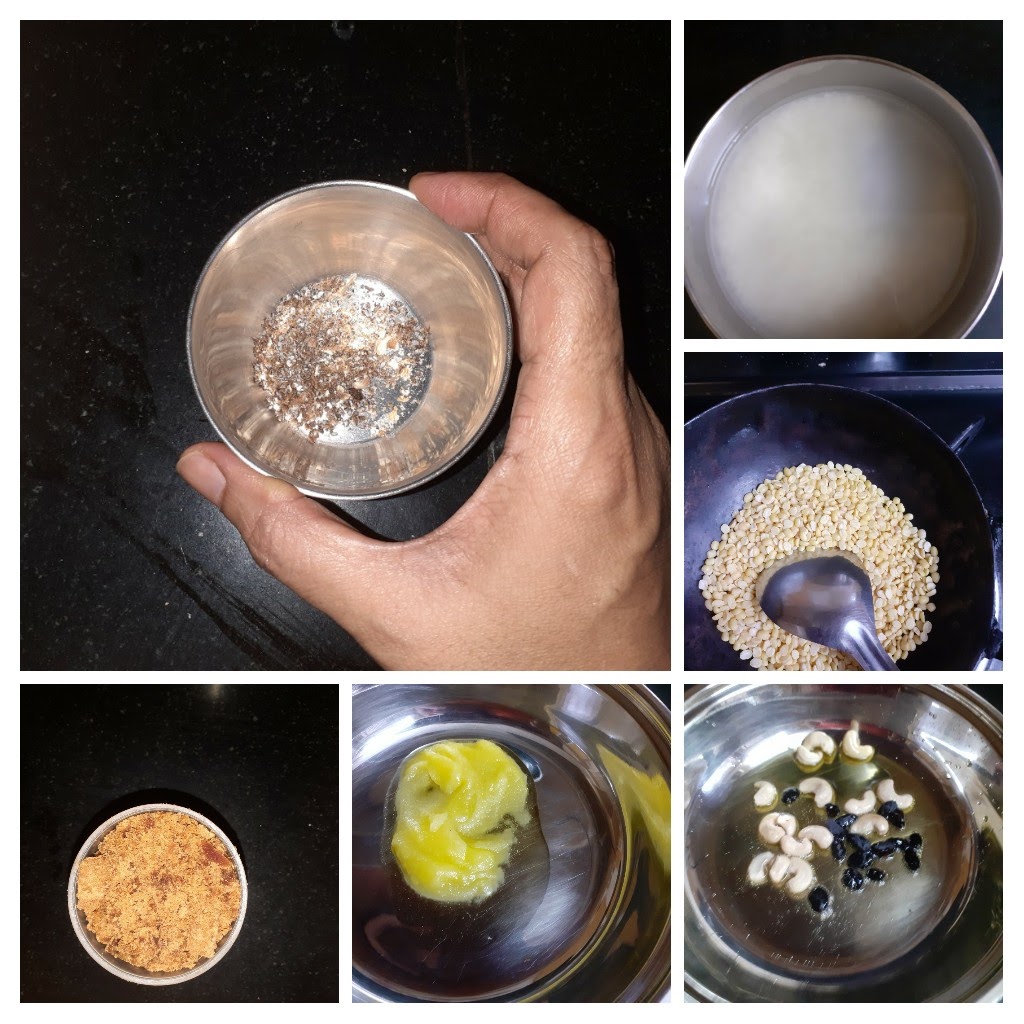
1. Assemble all ingredients.
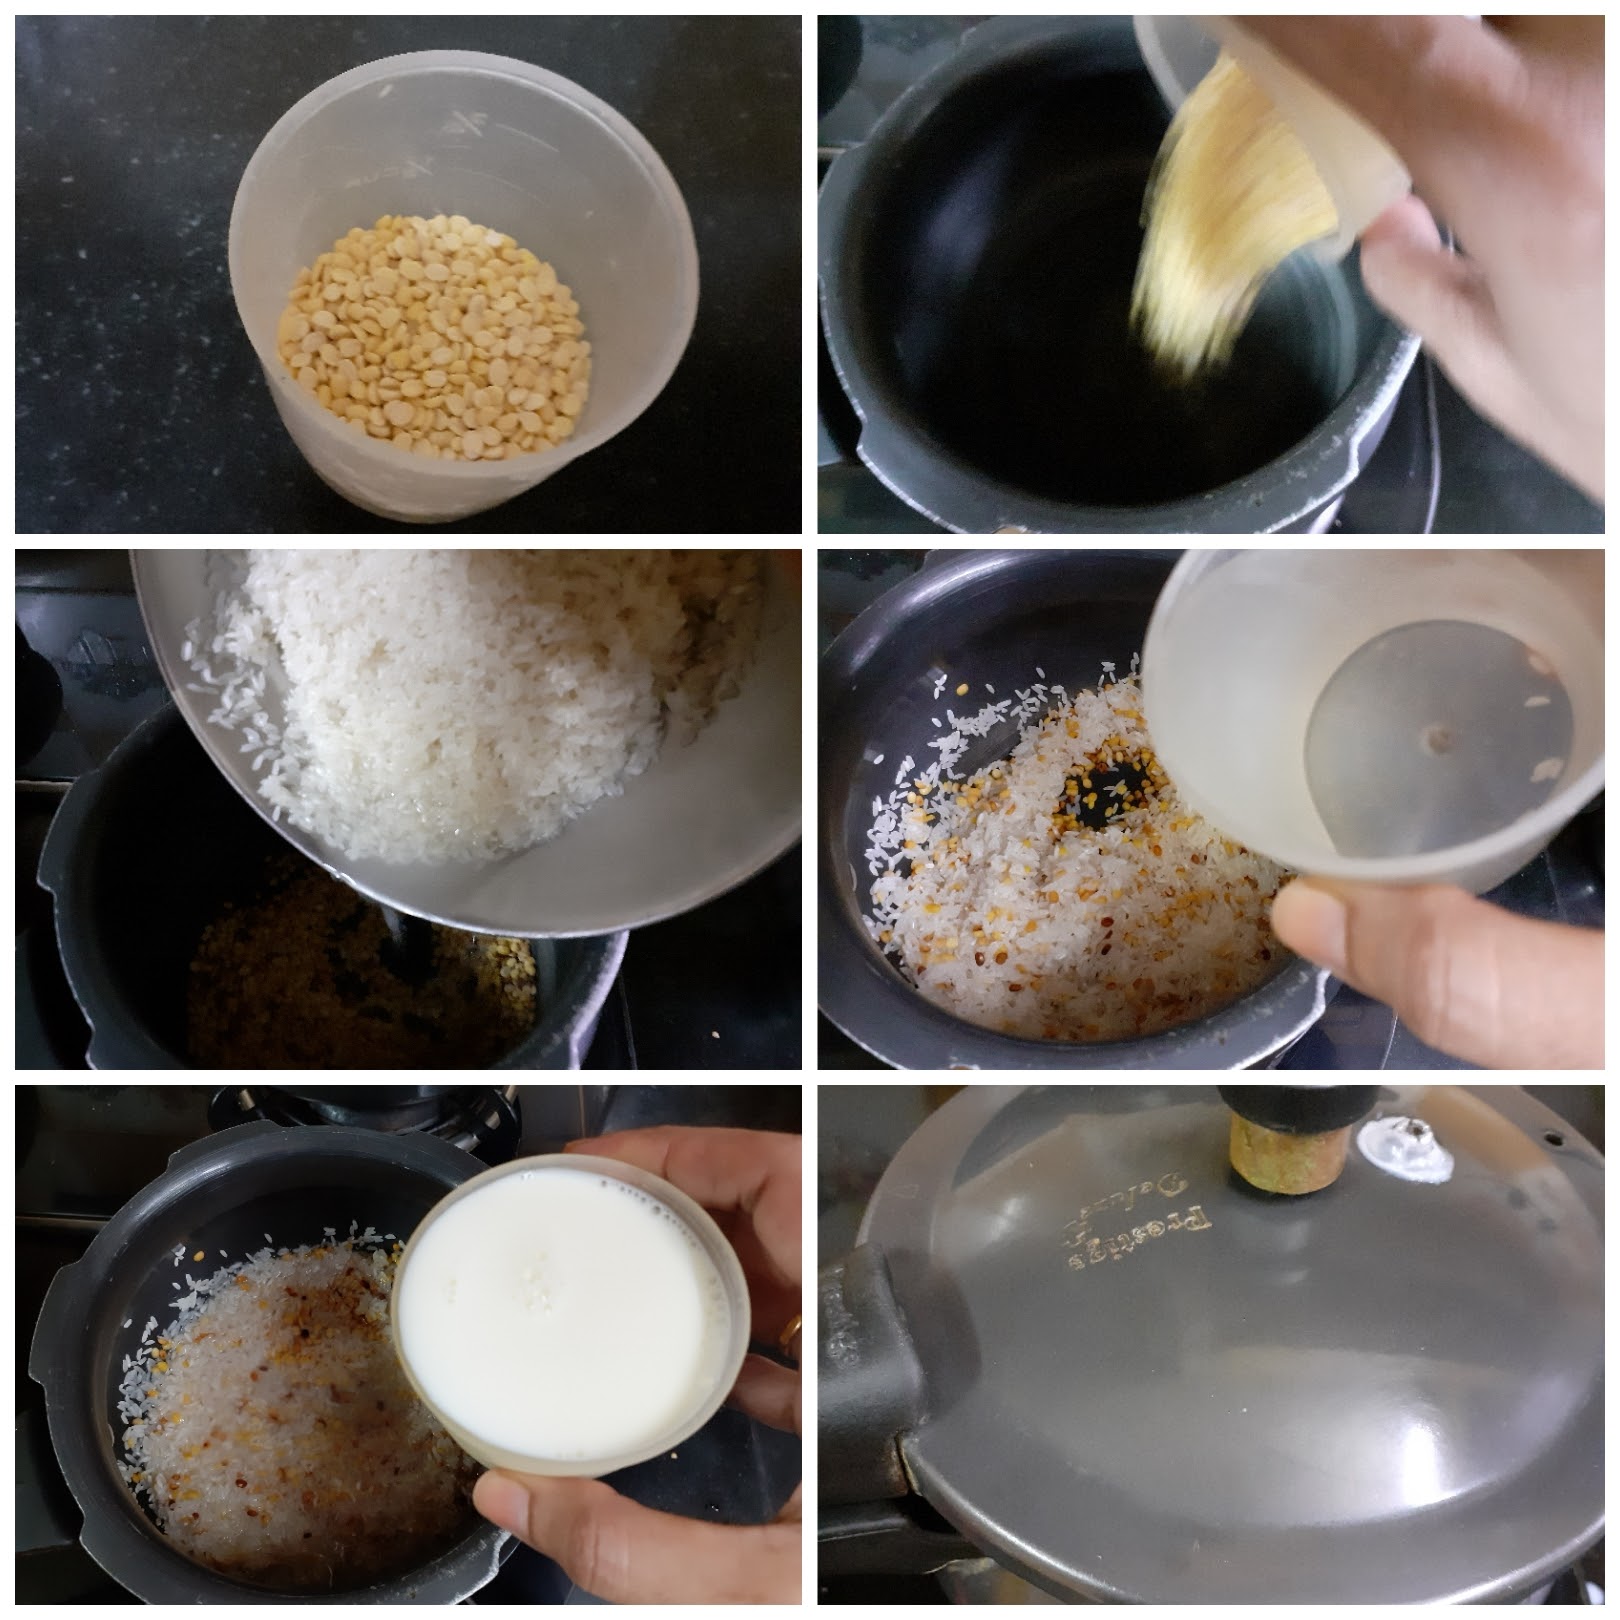
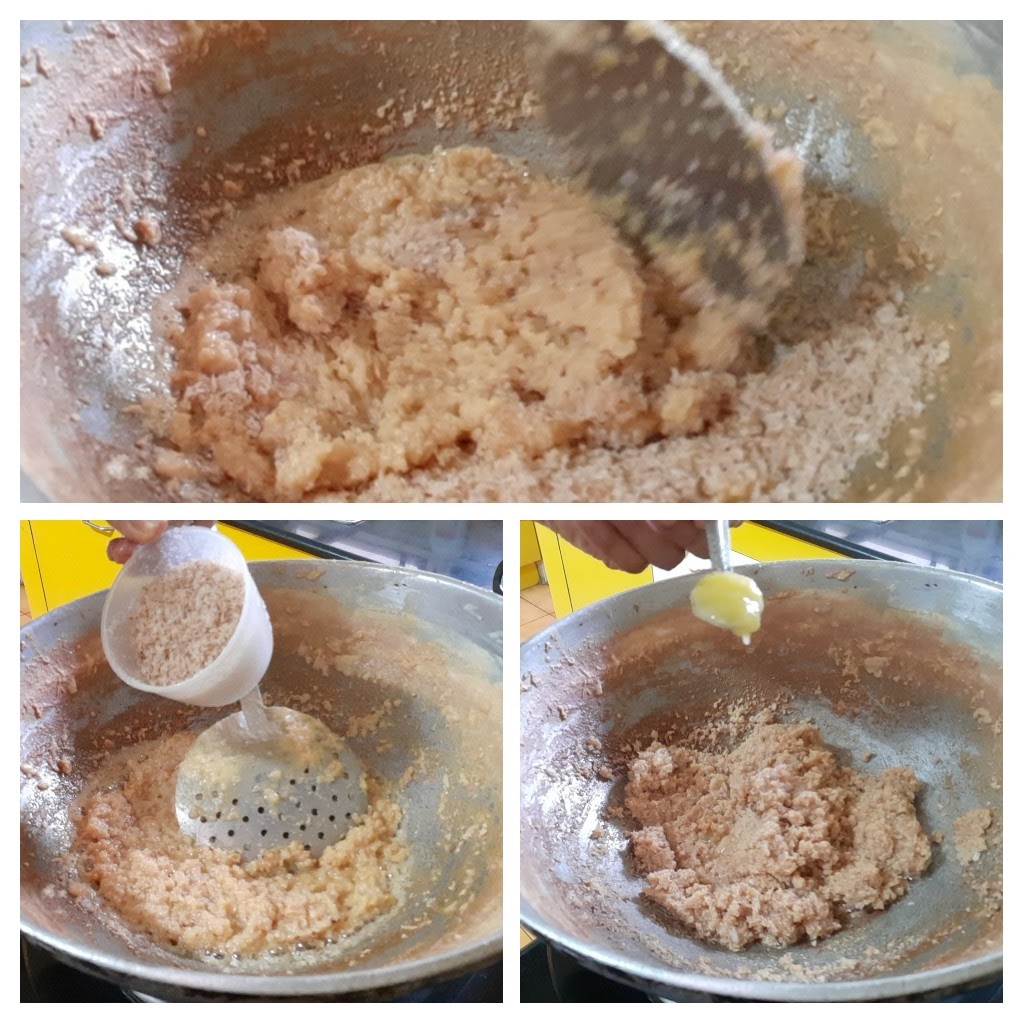
2.Dry roast the Moong dal directly in the cooker to a light brown colour. Stir constantly and take care not to burn the dal. It will give out a nice aroma. Now to the roasted moong dal in the cooker, add the washed rice. Pour 2 cups milk and 1 cup water, close the cooker and cook for 5 to 6 whistles ( flame should be on low throughout, otherwise there are chances of the milk overflowing through the sides).
3. Until the pressure releases let’s get the jaggery ready. In a small vessel take the jaggery, add 1/4 cup water and bring to a boil, put out the stove, and stir the jaggery to dissolve it.
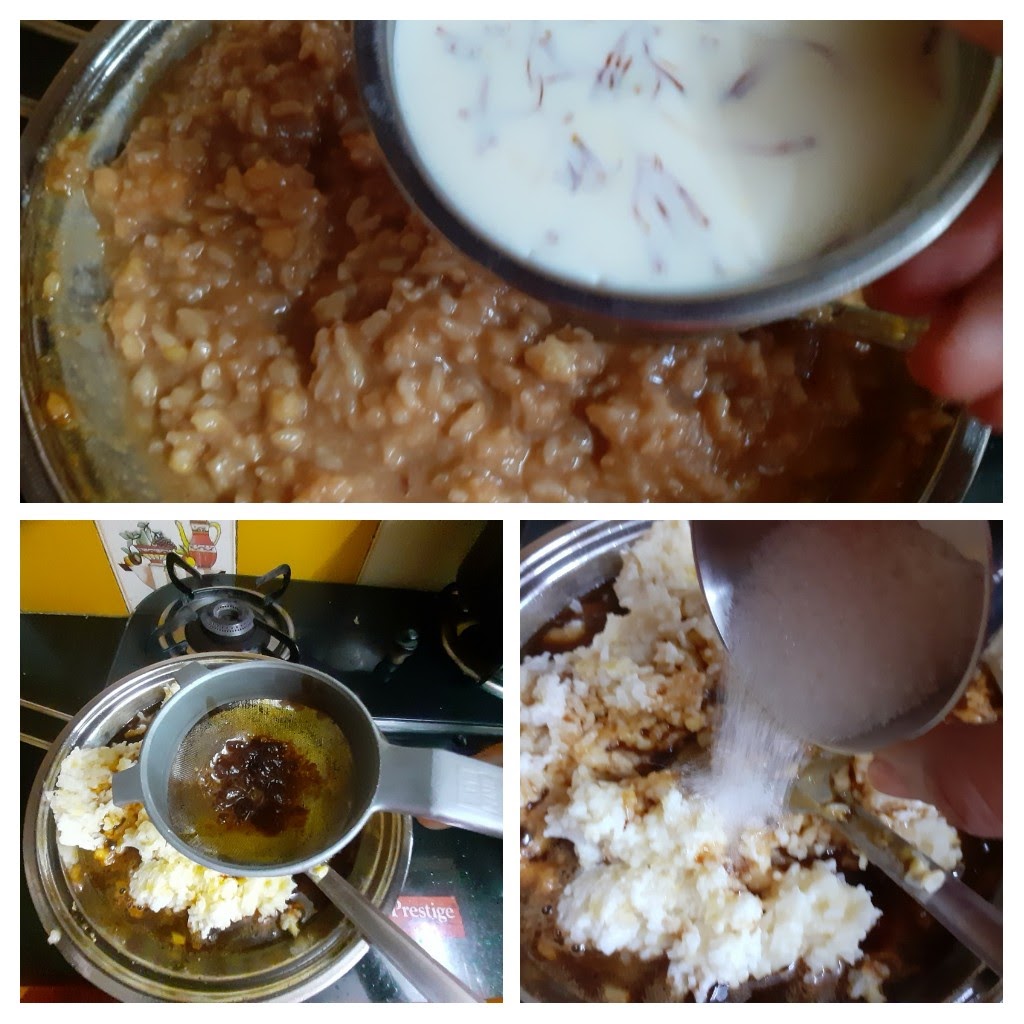
4. Once pressure releases open the cooker and mash the contents well. Put the cooker on flame again and strain the liquid jaggery into the cooker directly. Pour another 2 cups milk and stir nicely. There may be lumps, break them down patiently by stirring. Add two spoons sugar.
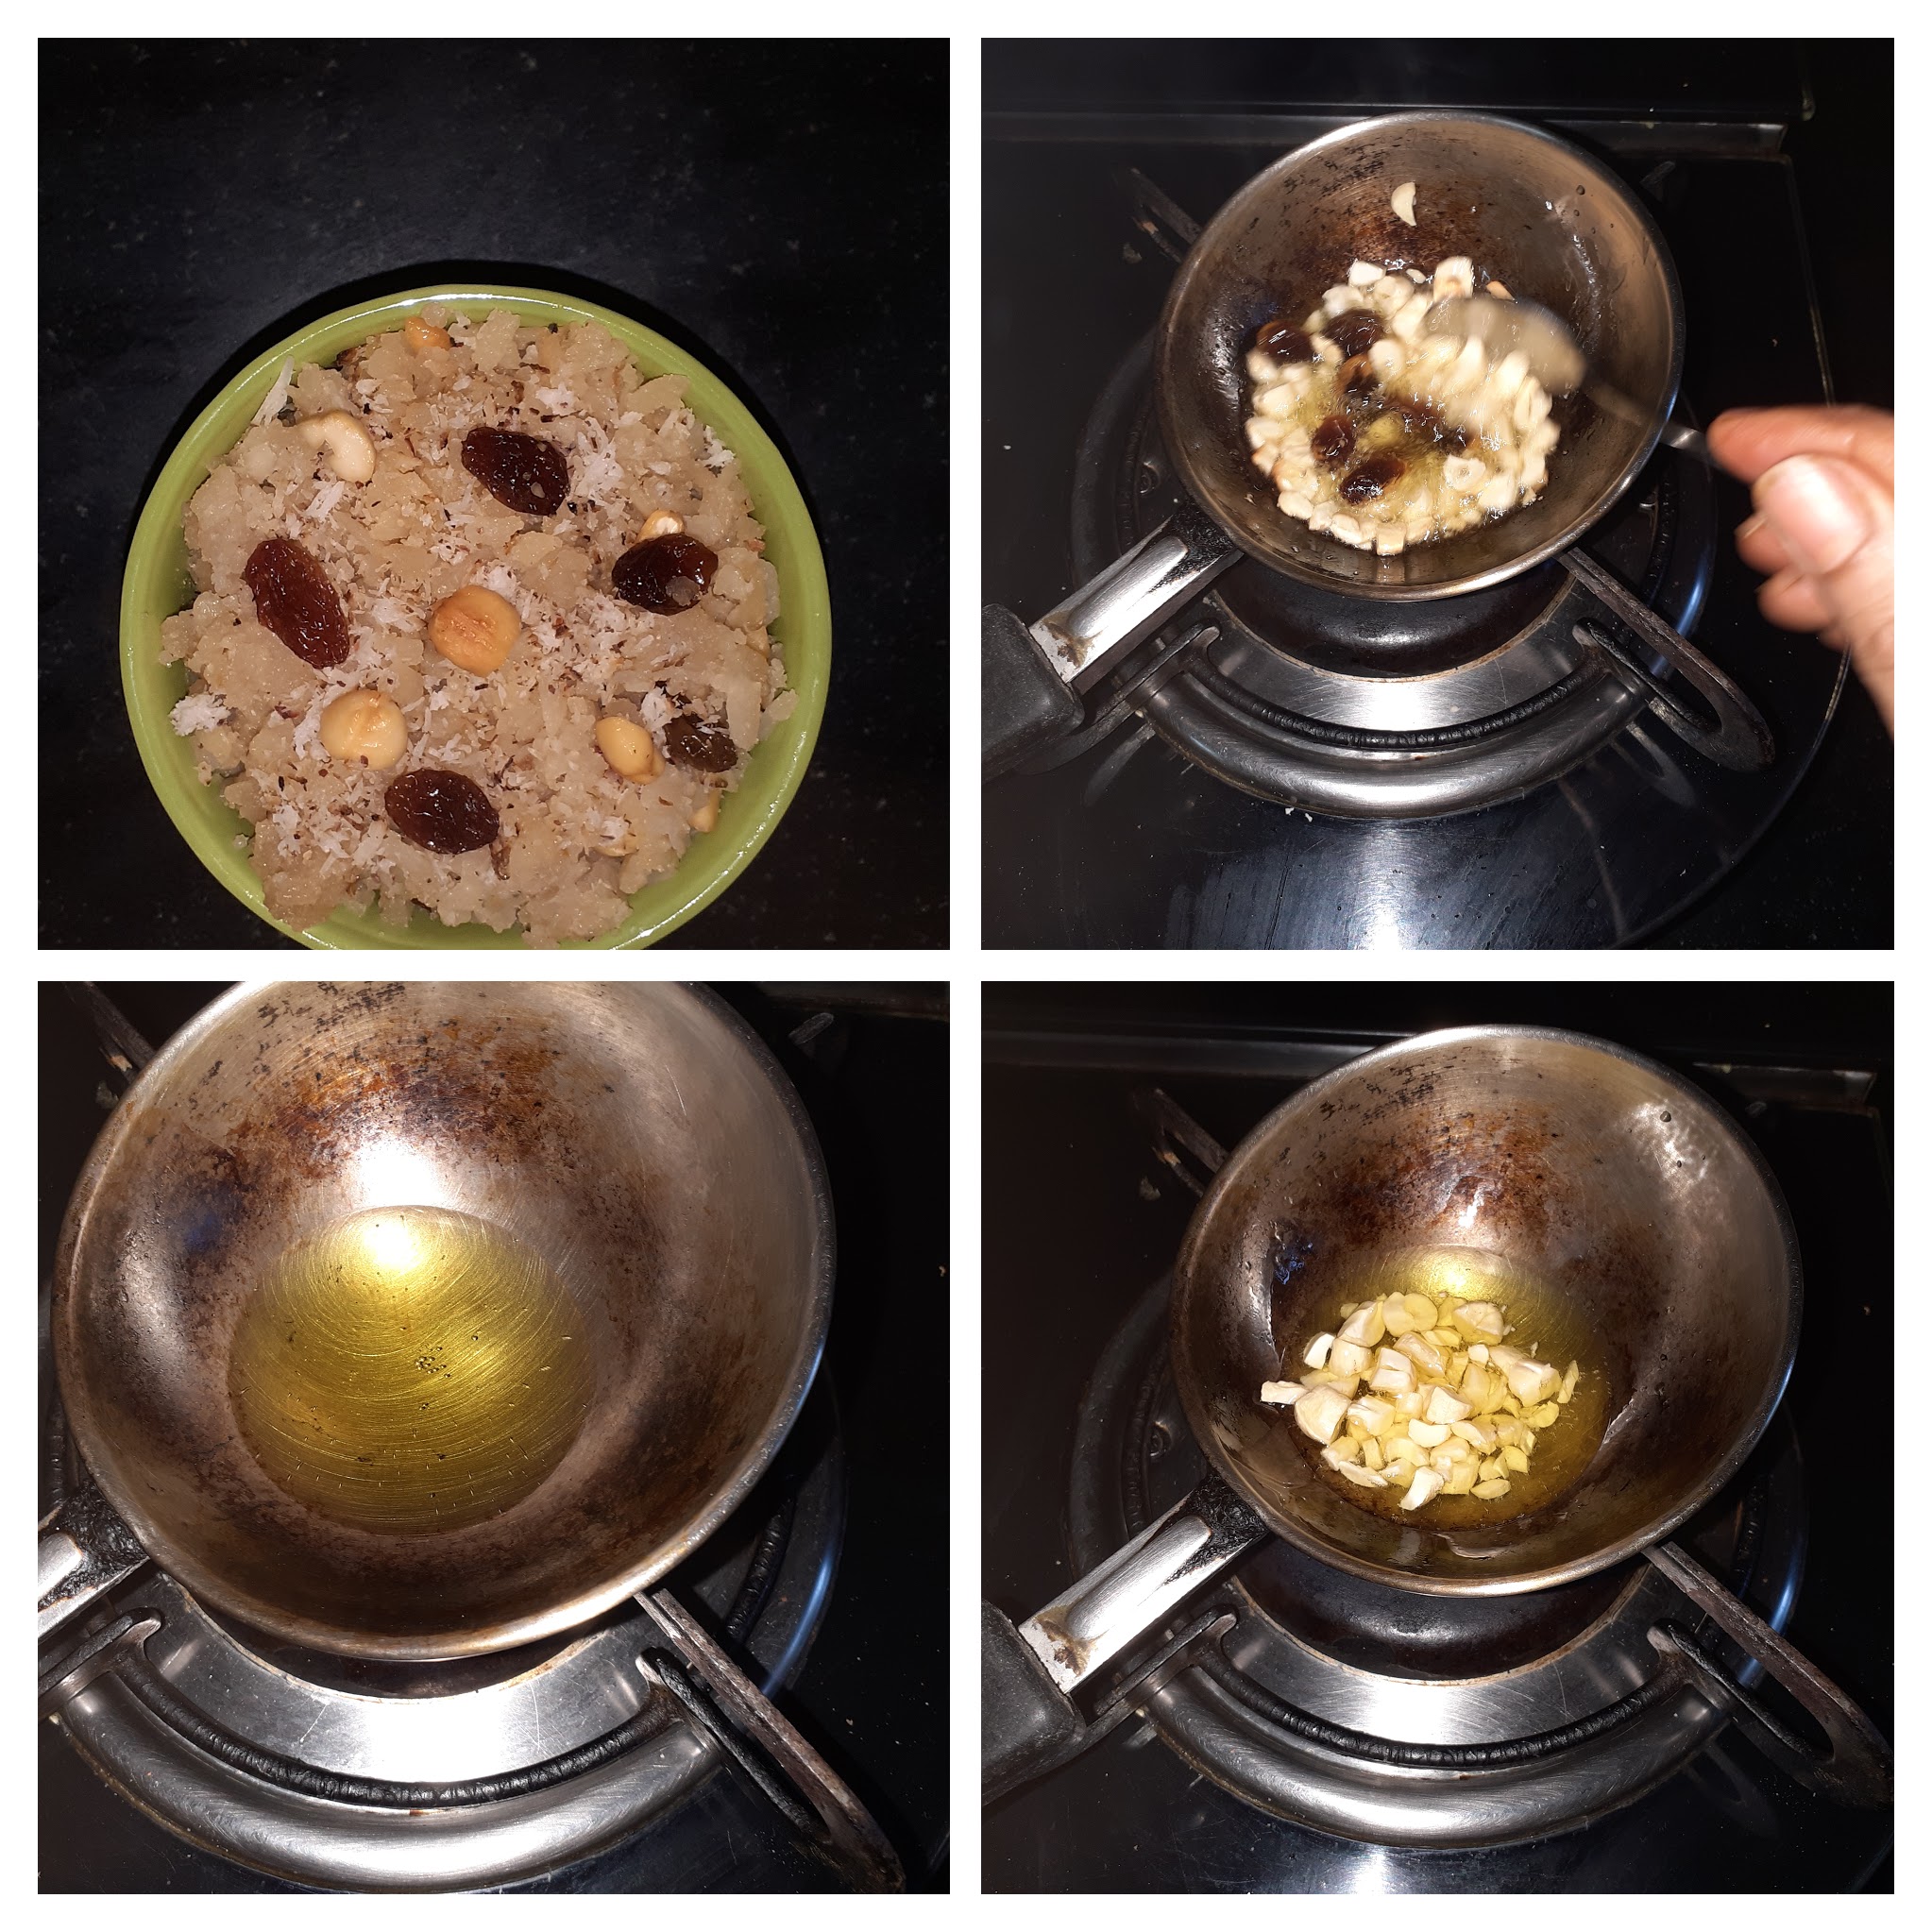
5. Add milk in which the saffron strands were soaked followed by Cardamom powder, raw camphor(optional). Finally, add the nuts and raisins fried in ghee.
NOTES:
1. The only glitch in this method is the milk overflowing from the cooker or the milk sticking to the bottom of the cooker. To manage this the flame should be on low through out until the whistles are over.
2. We are straining the jaggery to remove impurities in the jaggery. I recommend not missing this step.
3. To get that smooth texture and consistency add more milk if required.
If you tried this recipe please do comment below, we would love to hear fom you.
If you leave us your mail id, recipes can directly be mailed to you, whenever we have a new post.
Show some love-like and follows us on Instagram and Facebook.
Aval Kesari/Poha Kesari
This recipe of the humble Poha(beaten rice flakes)/Aval cooked in sugar syrup is one of my favourites. I make it whenever I have a sweet craving or as an offering(Prasad) for Pujas at home. It is similar to the Kesari Bath made with Sooji/Rava Sometimes I make with a combination of other Pohe recipes, to serve during Navarathri when guests visit home.
Poha is also one of the main offerings during Janmashtami and Ganesh Chaturthi. Lord Krishna is known to have loved them and Pohe is what his friend Sudama got him as a gift.
Usually, during these two festivals, people just offer the Pohe and jaggery with coconut scraping as a dry mixture for Prasad. I have observed that though there are few who like it this way, many don’t enjoy it dry. So what I prefer doing is putting it in sugar syrup and stirring it dry, with a dash of ghee, cardamom powder and raw camphor, it tastes absolutely divine.
This recipe is a simple one and gets done in 15 minutes. As I always say the tastiest dishes are usually the simplest. Let’s get to the recipe right away.
While you are here please visit my other Indian sweet recipes such as
Here is the recipe of Aval Kesari/ Poha Kesari for you-
PREP TIME: 10Mins COOK TIME: 10 Mins
TOTAL TIME: 20Mins COURSE: DESSERT/SWEET
CUISINE: SOUTH INDIAN SERVINGS: 4
AUTHOR: Rajni Ram
Ingredients:
Poha ( thin) 1 cup
Sugar 1/2 cup ( if you prefer less reduce to 1/4cup)
Ghee 1.5 tbsp
Water 1.5 cup
Raisins a few
Cardamom powder 1/4 tsp
Kesari colouring/ orange food colouring 1 pinch
Raw camphor a pinch ( optional)
Directions:
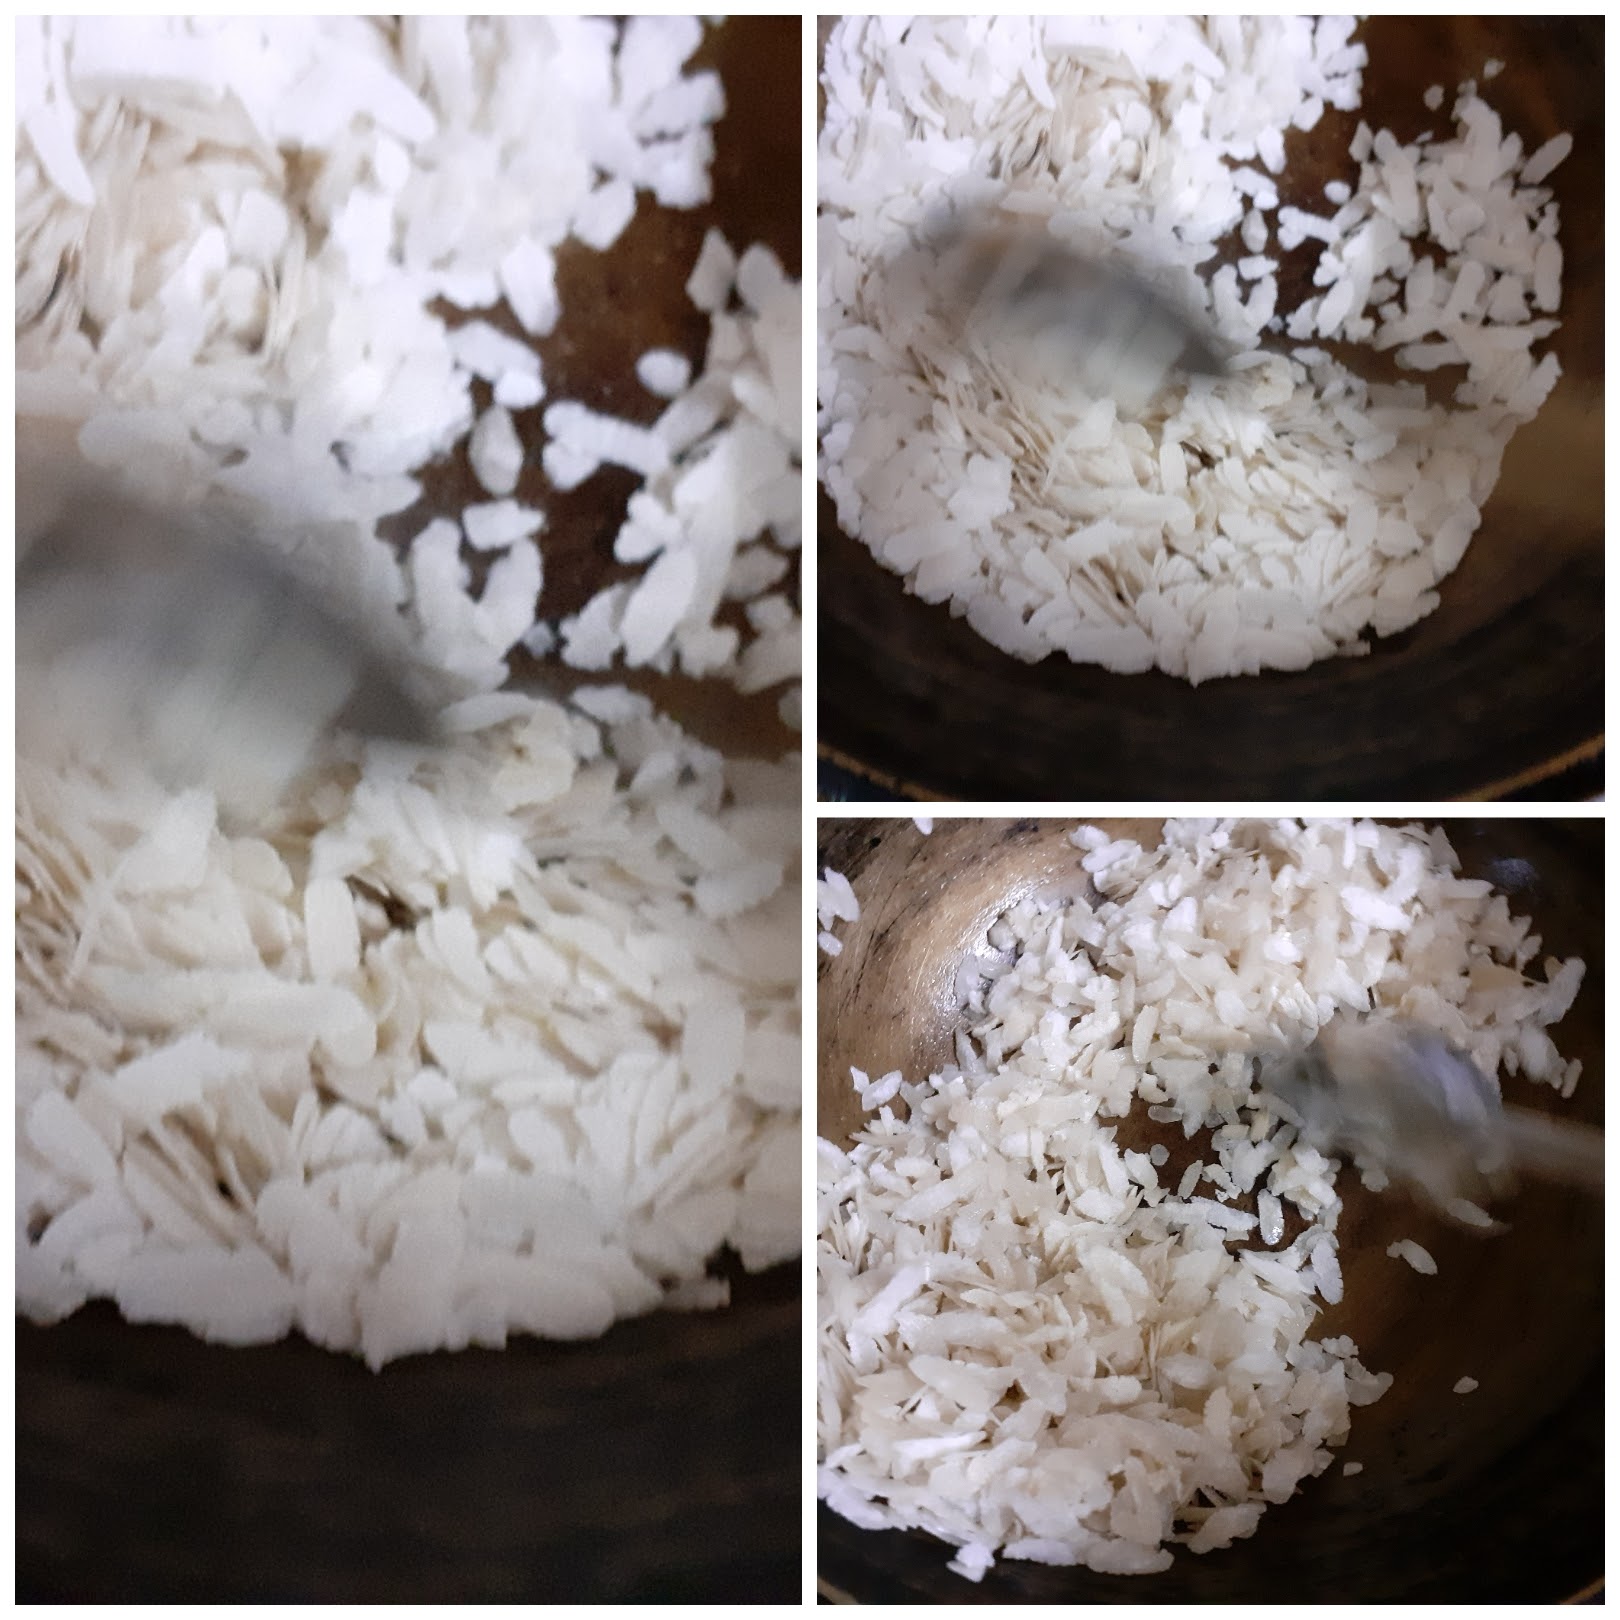
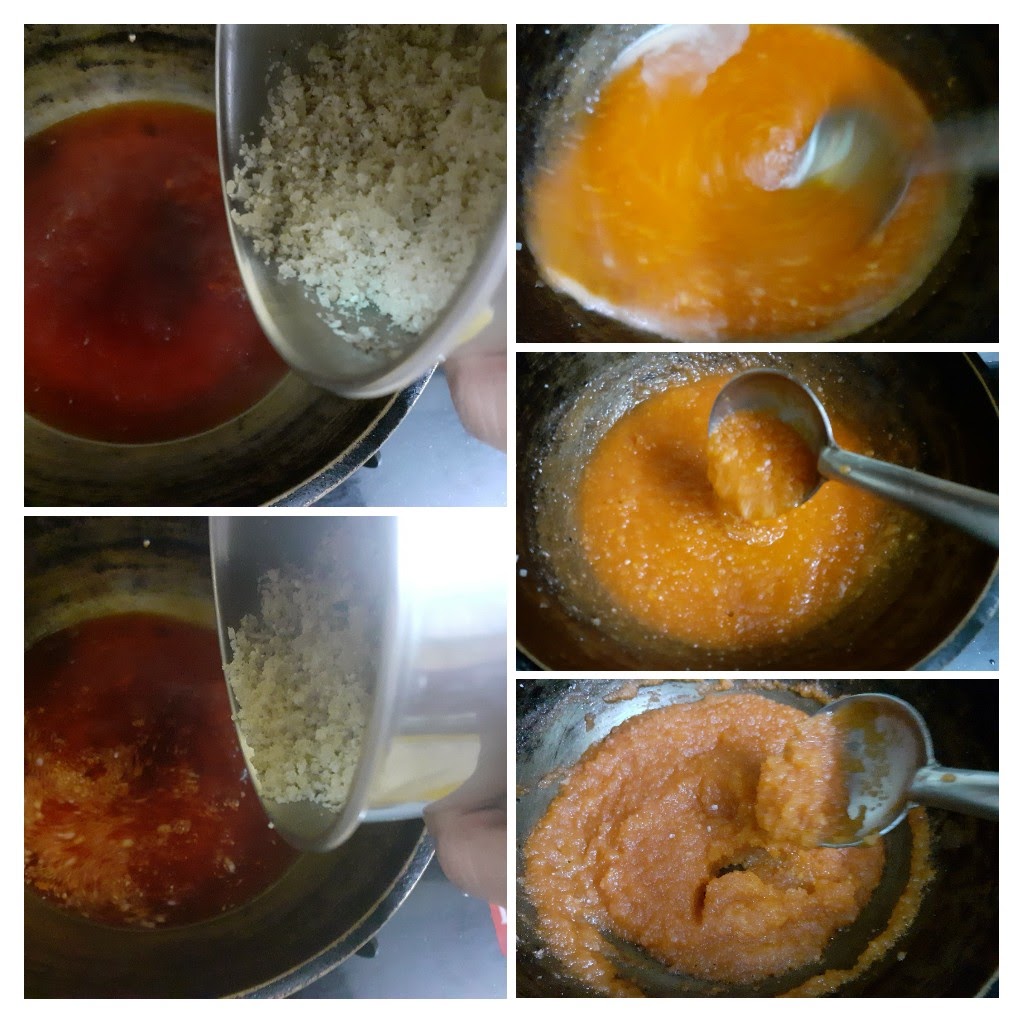
Take 1 tbsp ghee in a Karahi and heat. Add the raisins and fry them until they fluff up. Remove from flame and keep aside. To the same ghee in Karahi add the Poha/ Aval and fry nicely until crisp. To be roasted on low flame, without burning them. Transfer to the dry mixer and cool for 5 mins. Grind it to a Rava/ Sooji like texture and keep aside. Now in the same Karahi add 1.5 cups of water and heat. Add the Kesari powder/ colouring and the sugar and bring it to a boil. Add the raw camphor nos if using. When the water starts boiling slowly drop in the grounded Poha while stirring constantly. Keep stirring until the mixture thickens and the Piha leaves the sides of the Karahi. Add the cardamom powder, followed by the raisins and 1/2 tbsp ghee and mix well. The Aval Kesari is ready to serve.
STEPWISE RECIPE FOLLOWS:
1. Assemble all ingredients. Take 1 tbsp ghee, fry the raisins and keep aside.
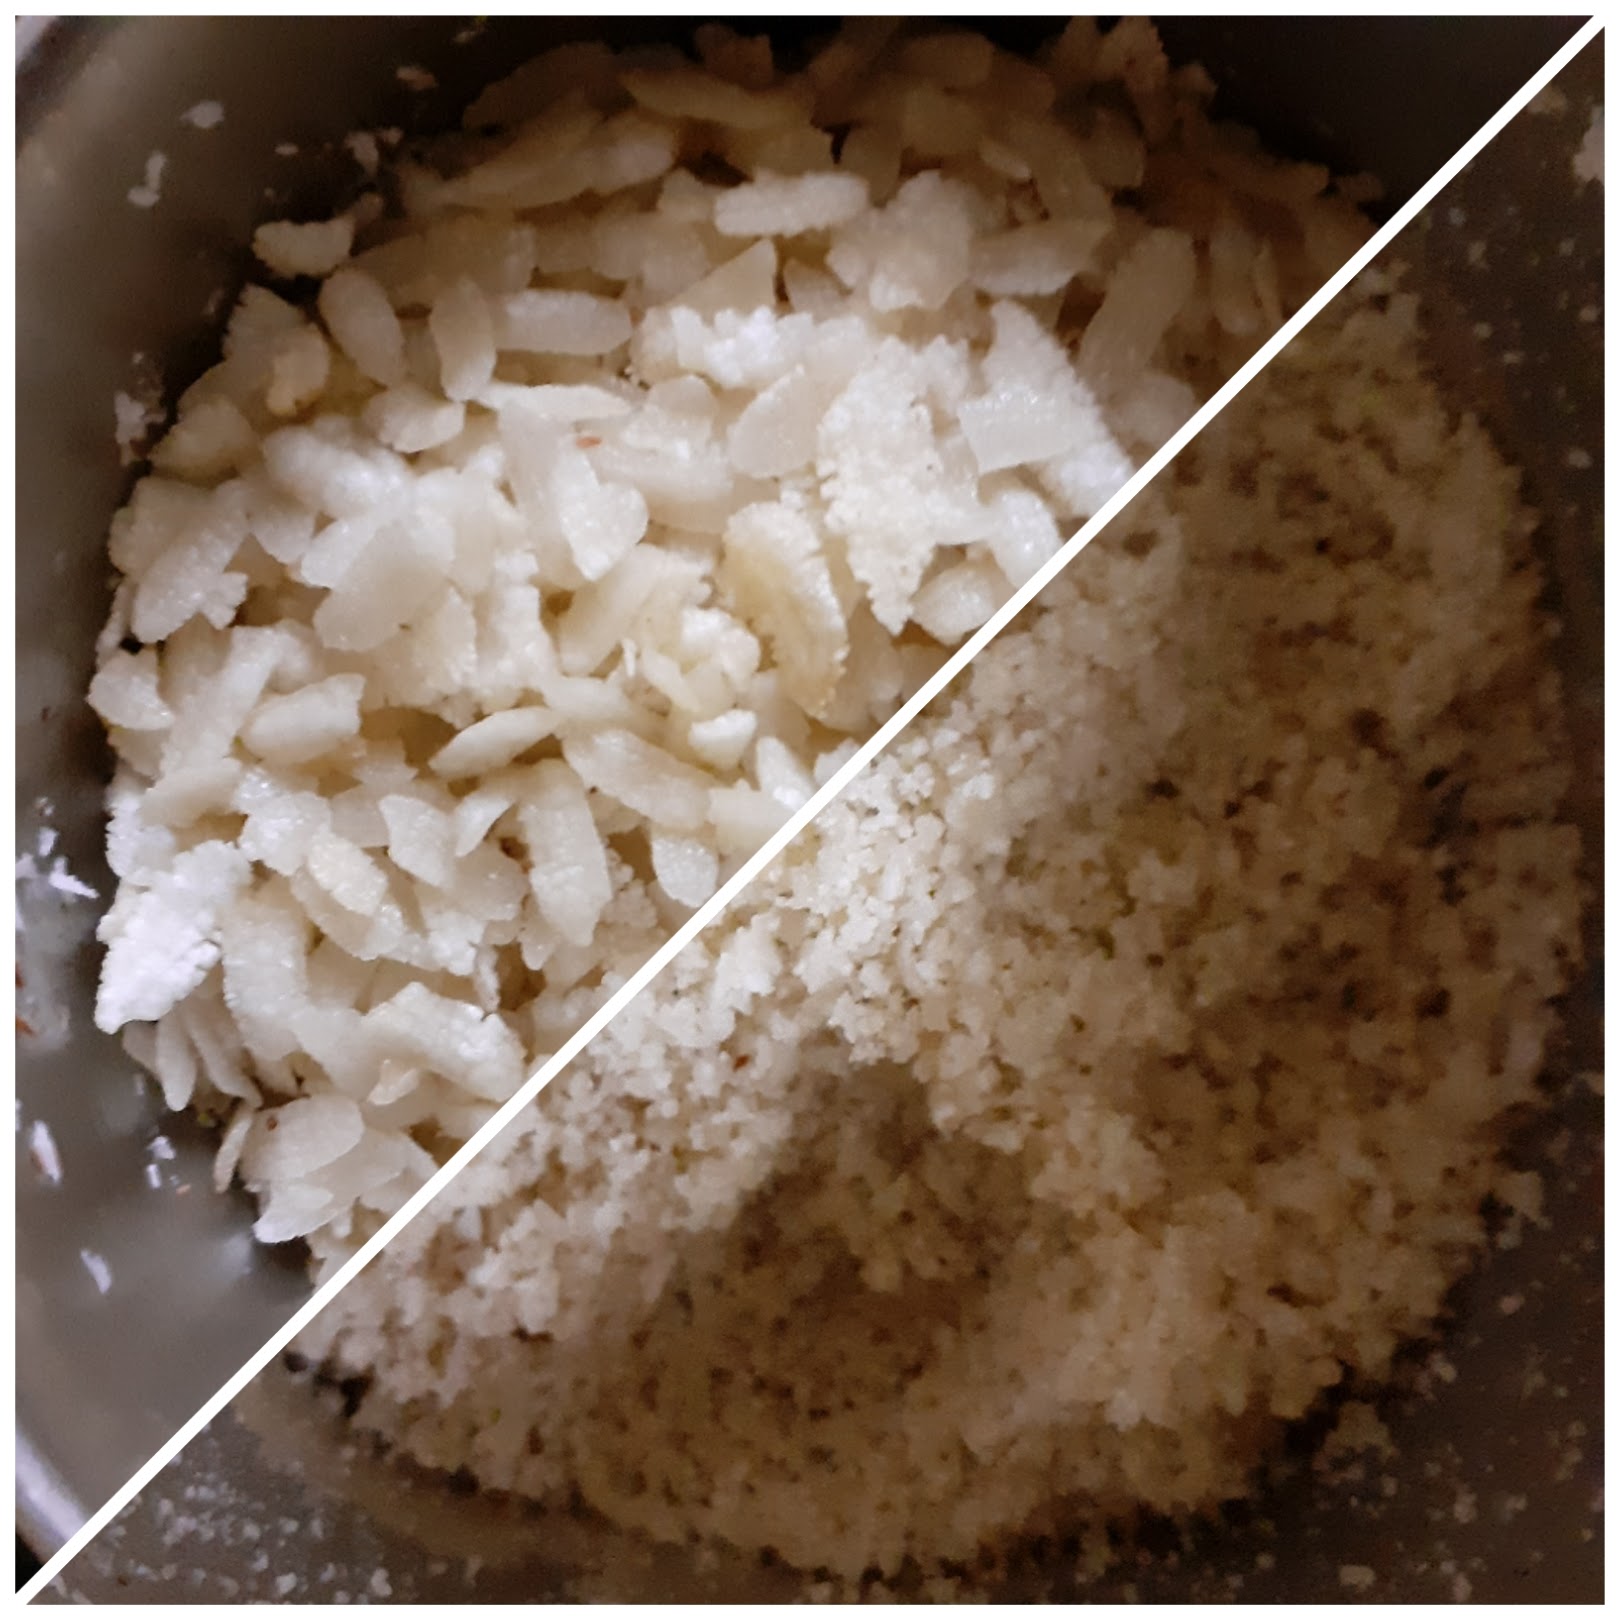
2. To the same ghee add the Poha and fry nicely until crisp. Transfer it to a dry mixer and cool.
3. Now grind it to a Rava/ Sooji like texture and keep aside.
4. Now to the same karahi add 1.5 cup water, Kesari colour and sugar and bring to a boil. Add the raw camphor now if using.
5. When the water boils, slowly drop in the ground Aval/ Poha little by little and stir constantly. Keep stirring until the mixture thickens.
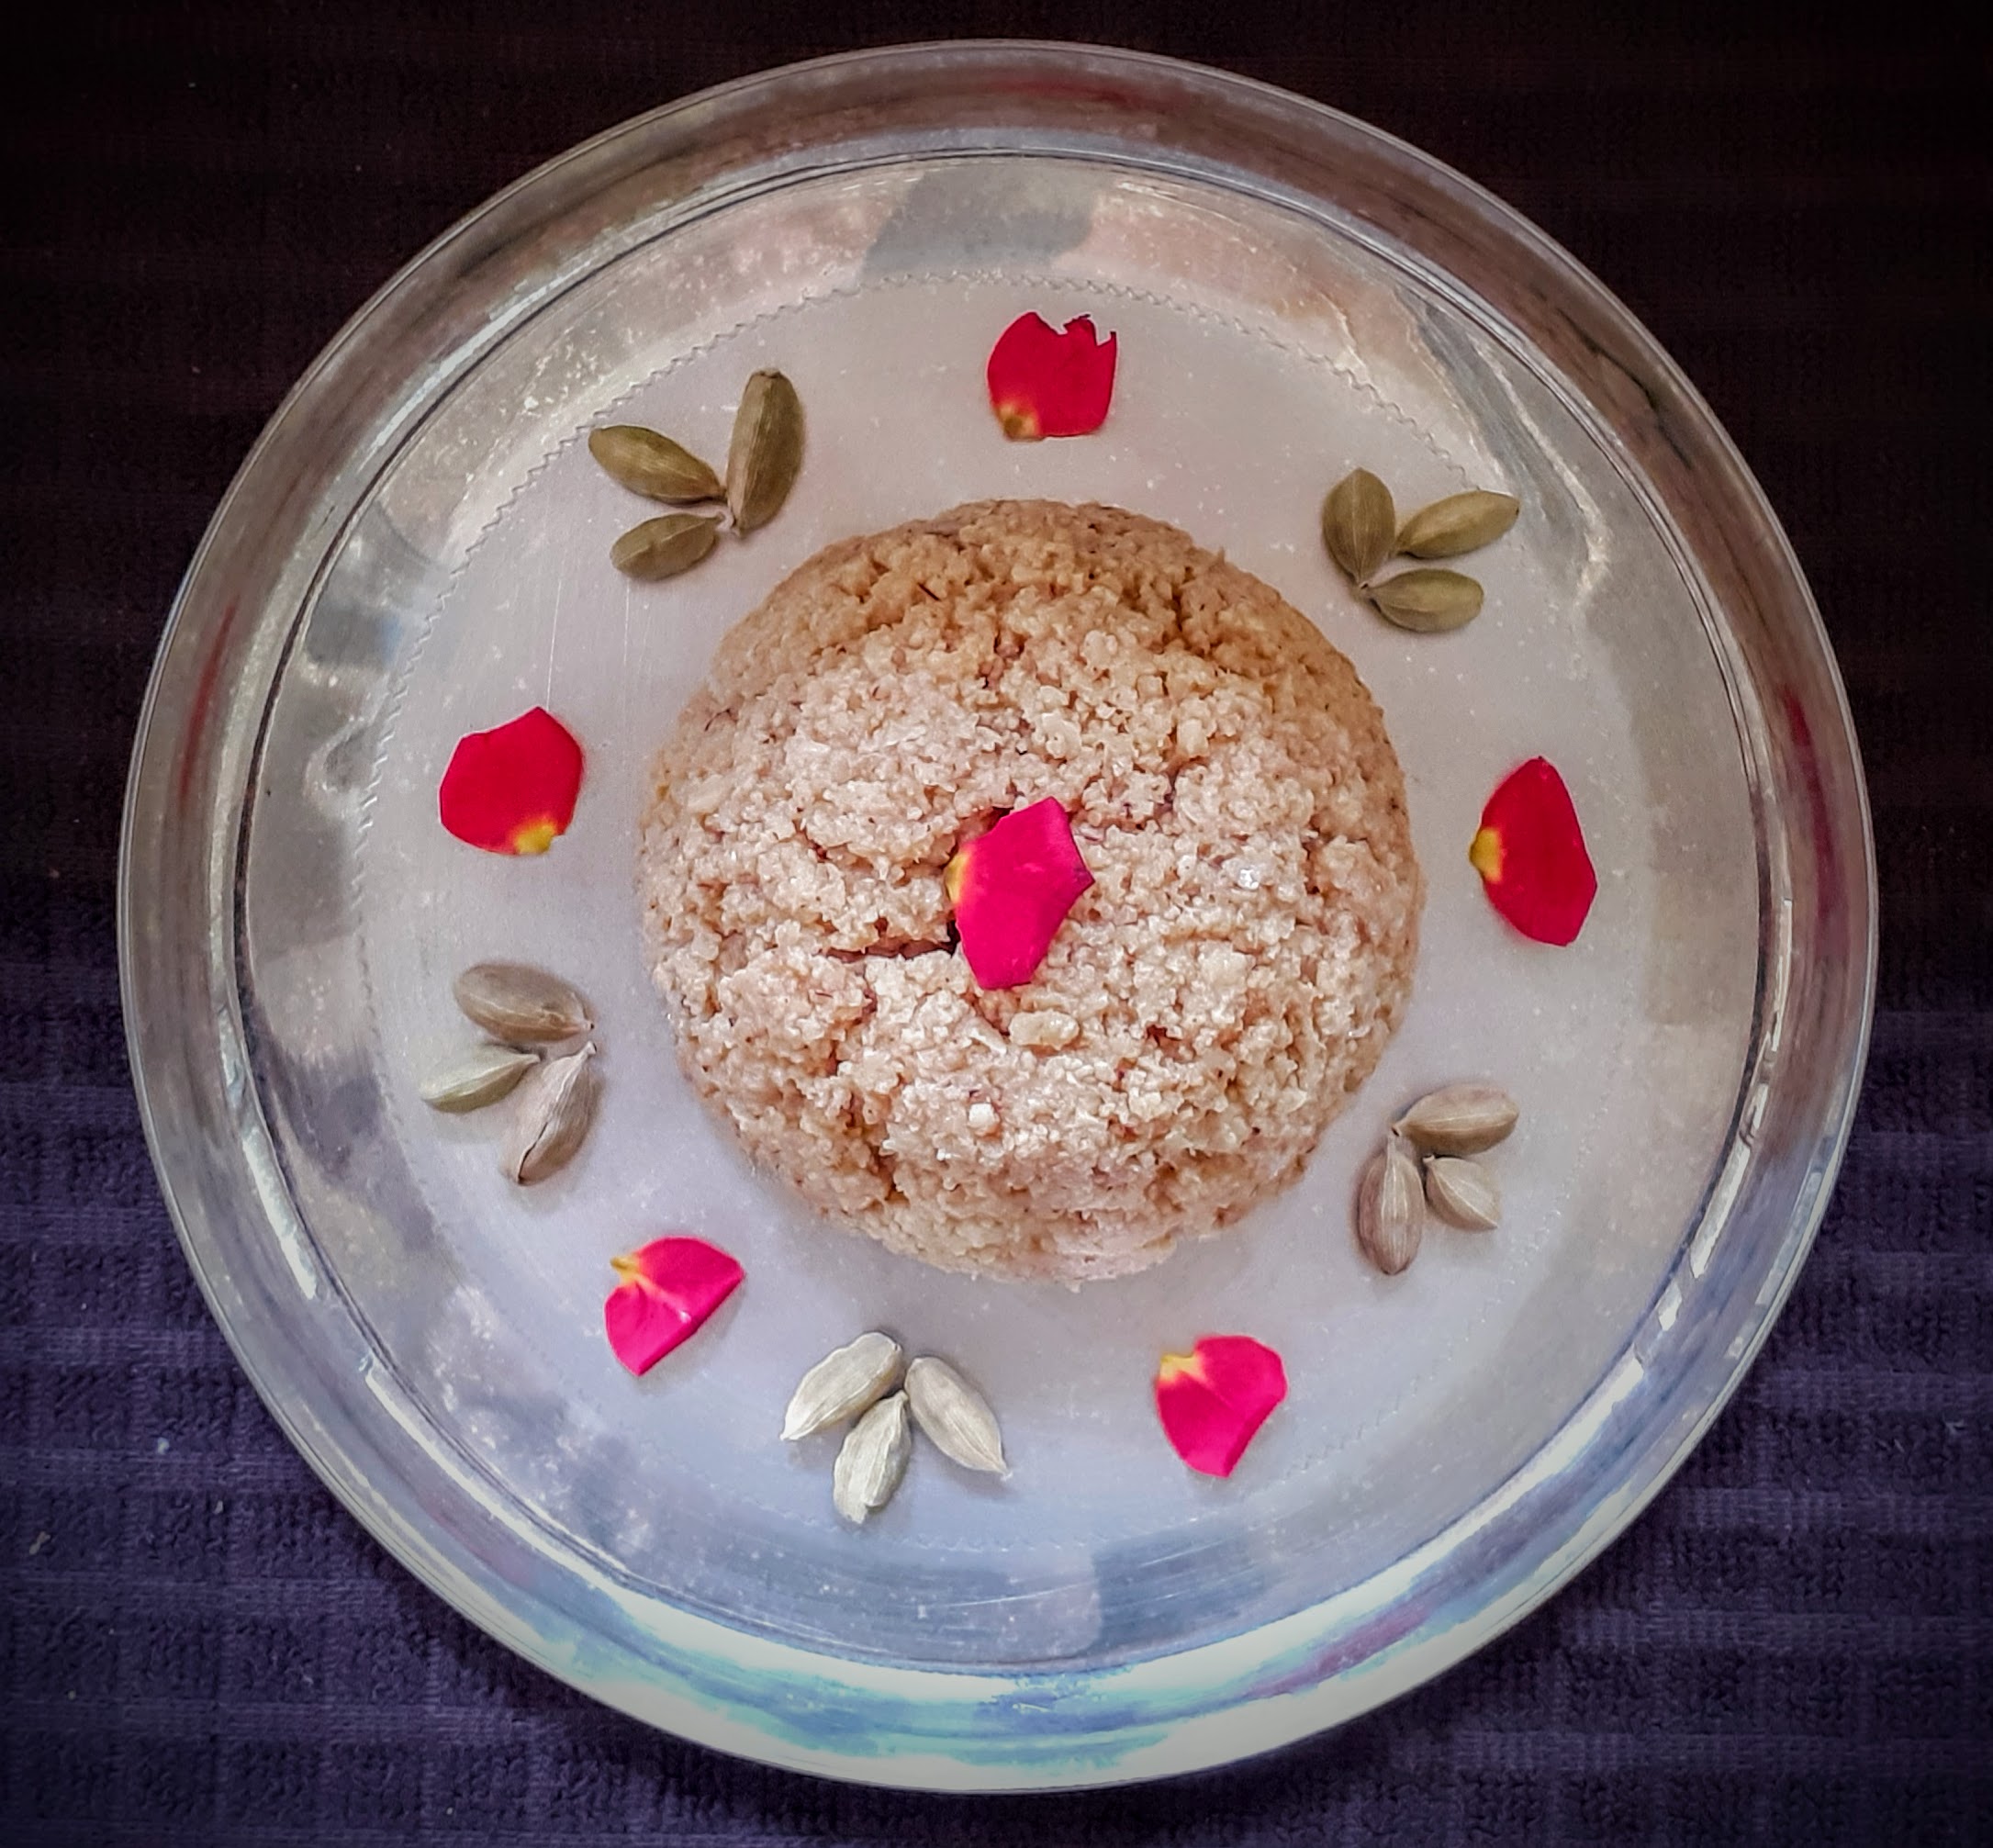
6. Now add the Raisins, cardamom powder and 1/2 spoon ghee to the Poha and mix well. The Aval Kesari is ready to serve to the guest, or to give as an offering.
NOTES:
1. Thick Poha/ Aval can also be used for this but the amount of ghee, water will double up.
2. The Aval is not to be soaked but roasted to get the desired texture.
3. I added 1/4 cup sugar which might be a little less sweet, so up to 1/2 cup sugar can be added.
If you tried this recipe and liked it please comment below. I would love to hear from you.
If you want the recipes emailed to you leave your id in the homepage near the????
icon. Whenever we have a new post the recipe will be mailed to you. Thank you for showing interest in Rajjo’s Kitchen.
Thengai Therattipal/ Palkova (Coconut Infused)
Therattipal or Palkova is a dehydrated milk sweet, made with only two ingredients-Milk and Sugar. Therattipal is a traditional recipe made for festivals like Janmashtami and Deepawali. In our house, Therattipal is the main offering to Krishna apart from Sweet Appam and for Deepawali too we start the festival with a spoon of the Therattipal immediately after Ganga Snanam.
This time I have given a twist to the Therattipal and added roasted coconut gratings to it, which enhances the taste of this sweet dish. Anyway until we add the coconut the method of the recipe is the same. Usually, no cardamom powder is added to this sweet as the milk taste is what should pervade, but if one does prefer, it can always be added.
The coconut flavour is mild and not very intense. The milk and the coconut combine really well to give a different taste which is a welcome change from the regular Therattipal.
This recipe if made with pure organic cows milk tastes divine, as while the milk reduces you can see the natural fat bubbling out. And it tastes as though ghee has been added to it. These days since we all use milk packets or tetra pack cartons of milk we don’t see this process happening naturally and so we add a teaspoon of ghee at the end. its an optional step and the sweet will still taste the same, if not added.
While you are here please check out my other Sweet dish recipes like –
The same recipe can be followed for regular Therattipal/Palkova too. Only the coconut doesn’t have to be added.
Here is the recipe for Thengai Therattipal/Palkova(coconut-infused)-
PREP TIME: 5Mins COOK TIME: 1 hr
TOTAL TIME: 1 hr 05Mins COURSE: DESSERT
CUISINE: SOUTH INDIAN SERVINGS: 4
AUTHOR: Rajni Ram
Ingredients:
Milk (toned milk) 1.5 litres (refer to note1) Sugar 140 gm approx (reduce if you prefer less) Coconut (grated) 1 cup
Directions:
Pour the milk into a heavy-bottomed vessel or Kadai and begin to boil. It has to be reduced by almost 3/4 of the quantity by stirring constantly. For the first 10-15 minutes, constant stirring is required, thereafter keep flame on medium heat and keep stirring from time to time. As the moisture from the milk evaporates the consistency of the milk becomes denser and the texture also starts becoming granular/thready. Keep stirring until the milk has lost almost all moisture(check picture for reference) and now add in the sugar and start stirring again. Once the sugar is added the reduced milk mixture liquifies a little, it is normal and nothing to worry about. Continue stirring until the mixture loses all the moisture al does not stick to the bottom of the pan anymore. Another way to check is to put a little Palkova in a plate, just wet your hands with water, and try to take a small bit of the Palkova and shape it to a mini ball. If the ball forms, you can turn off the flame. Now in In another Kadai, put 1/2 tsp ghee and drop in the coconut gratings and start roasting it until it becomes dry and it is a nice brown in colour. Transfer it to a plate and cool it. Once cooled, add to the Palakova/Therattipal, switch on the flame and mix nicely until the coconut and the Therattipal are well integrated and switch off the flame. After adding the coconut the mixture turns a little drier. It is natural so nothing to worry. Offer it to Krishna or just have it as dessert. Enjoy. Bon Appetit. If you want just regular Therattipal stop the procedure after adding sugar and reducing it again. Add a teaspoon of ghee for a nice sheen.
STEPWISE RECIPE FOLLOWS:
1. Start by boiling the milk in a heavy-bottomed vessel or Kadai.
2. Keep stirring constantly for the first 10 to 15 minutes and keep scraping the sides of the vessel as the milk solids keep depositing there.
3. Now on medium heat and stirring every once in awhile reduce the milk until almost all moisture gets evaporated.
4. Now add in the sugar and start stirring again. The mixture liquified a little again but it is natural and again will solidify.
5. Keep stirring until the mixture does not stick to the bottom of the vessel any more. Another method to check for doneness is to take a little amount of the Therattipal and put it on a plate. Wet your fingers and take a small quantity and try to form a ball. If you are able to form a ball, that is the right consistency. Put off the flame.
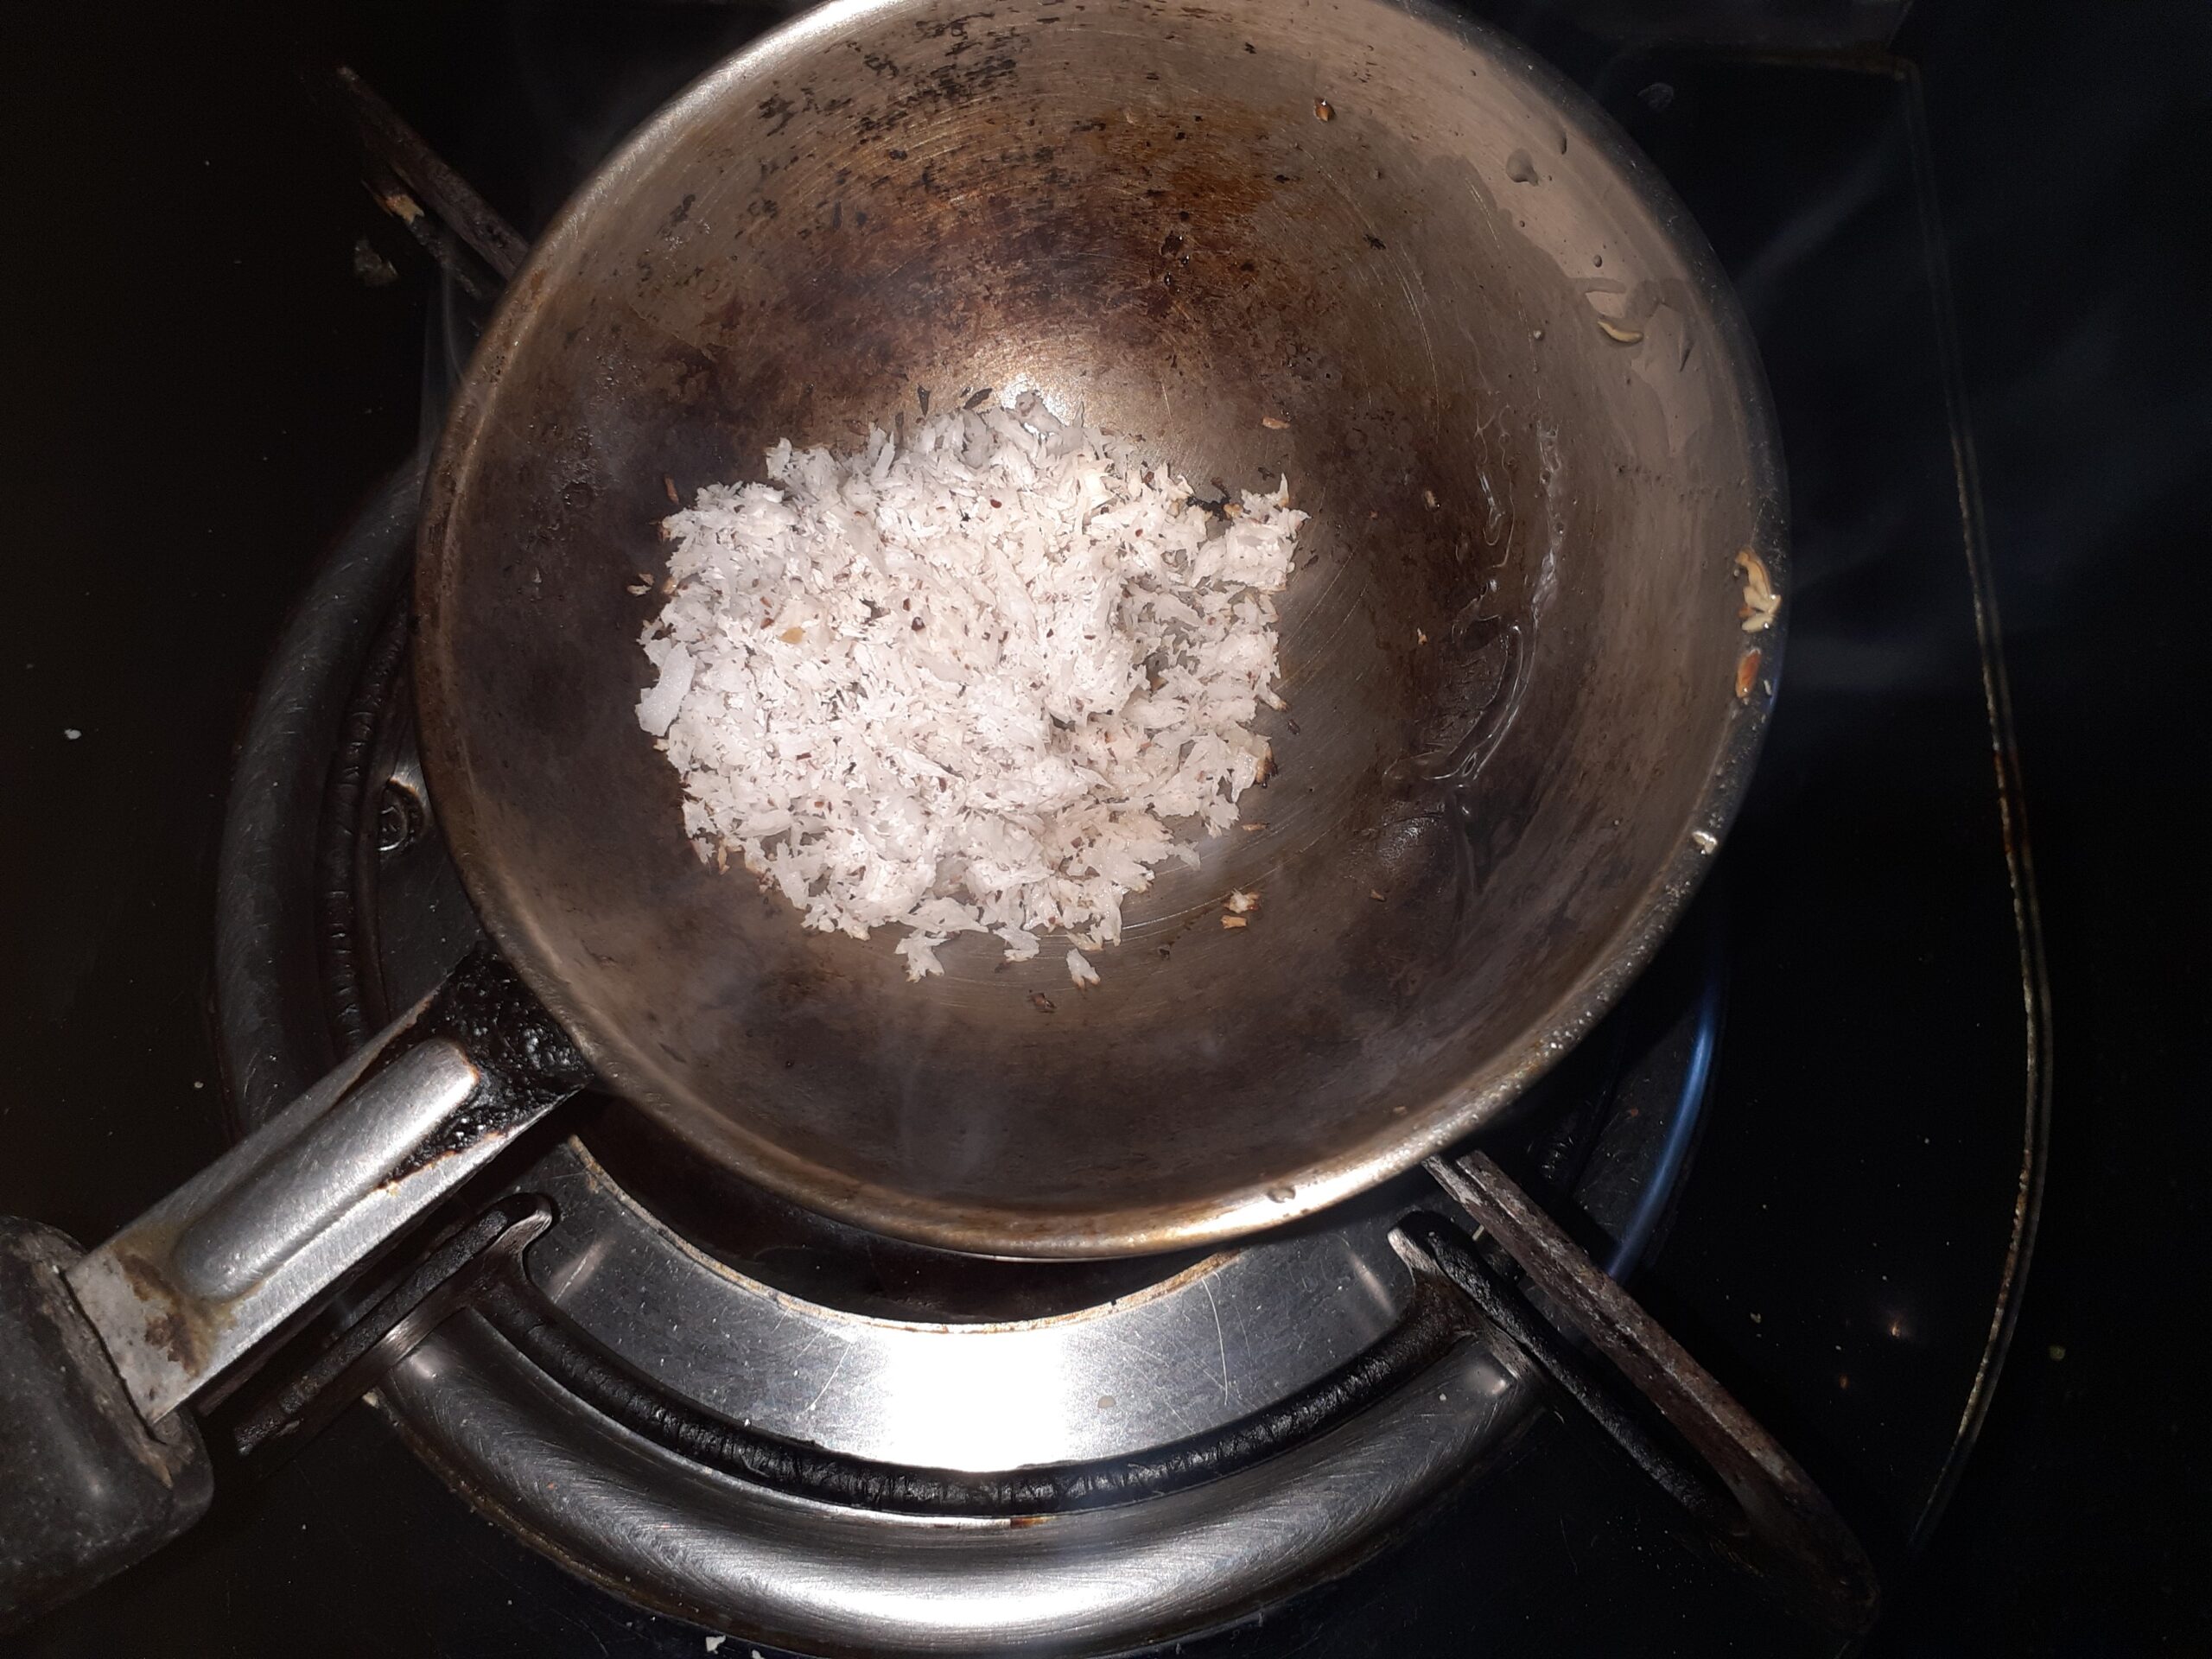
6. In a small Kadai take little ghee and add a cup of grated coconut and start roasting until it becomes dry and turns a nice brown in colour. When the coconut is dry, it will not stick to the Kadai anymore. Transfer it to a plate and cool.
7. After it cools completely add it to the Therattipal, switch on the flame and stir nicely until the coconut is well integrated with the Therattipal. Once the coconut is absorbed, the mixture will become drier, this is natural and there is no need to worry. Add a teaspoon of ghee finally, just for some sheen. The Thengai Therattipal is now ready.
QUICK VIDEO OF METHOD HERE:
NOTES:
1. I have used Tetrapack toned milk. The more fat content in the milk the lesser the evaporation time. You can use full cream milk too.
2. It took around 1 hour to reduce 1.5 litres of milk.
3. If you don’t wish to add the coconut, the process can be stopped after adding sugar, reducing further and performing the test to see if a ball is formed.
4. If one prefers less sugar, it can be reduced a little.
5. There are many short cut methods to evaporate milk by adding milk powder etc; I use this method for making small amounts of Rabri for jalebis and other such dishes, but I don’t recommend the shortcut method for Therattipal, as this whole sweet dish is about the texture and taste.
6. Cheese too is used for quick evaporation, but again it changes the taste and texture.
Sweet Poha/Vella Aval
This recipe of the humble Poha(beaten rice flakes)/Aval cooked in Jaggery syrup is one of my favourites. I make it whenever I have a sweet craving or as an offering(Prasad) for Pujas at home. Healthy and filling at the same time. It makes for a good mid-evening snack(Tiffin) option. Sometimes I make with a combination of other Pohe recipes, to serve during Navarathri when guests visit home.
Poha is also one of the main offerings during Janmashtami and Ganesh Chaturthi. Lord Krishna is known to have loved them and Pohe is what his friend Sudama got him as a gift.
Usually, during these two festivals, people just offer the Pohe and jaggery with coconut scraping as a dry mixture for Prasad. I have observed that though there are few who like it this way, many don’t enjoy it dry. So what I prefer doing is putting it in a jaggery syrup and stirring it dry, with a dash of ghee, cardamom powder and coconut scrapings it tastes just like Sweet Pongal, but it is dry in texture.
There are many variations of the Pohe like Kanda Poha(onion Poha), Masala Poha(tomatoes and onions), Lemon Poha, Puli Aval(tamarind Poha), Vella Aval(Sweet Poha) and Dahi Pohe/Moru Aval. The Poha can be either thick or thin. For this recipe, I have used the thin one, but the same can be done with the thick one too, just that the soak time will vary. Thick Poha is used for recipes where the Poha is going to cook in a sauce so that it doesn’t become soggy. The Sweet Pohe makes for a good and healthy recipe for kids too.
While you are here please visit my other Indian sweet recipes such as
This Janmashtami or Ganesh Chaturthi try out this recipe of Sweet Poha or Vella Aval.
PREP TIME: 10Mins COOK TIME: 15 Mins
TOTAL TIME: 25Mins COURSE: DESSERT/SWEET
CUISINE: SOUTH INDIAN SERVINGS: 4
AUTHOR: Rajni Ram
Ingredients:
Poha/Aval( Thin ) 1 cup
Jaggery 1 cup
Coconut gratings 1 tbsp
Ghee 1tbsp
Cardamom powder 1/2 tsp
Cashewnuts around 5 broken to bits
Raisins around 8
Directions:
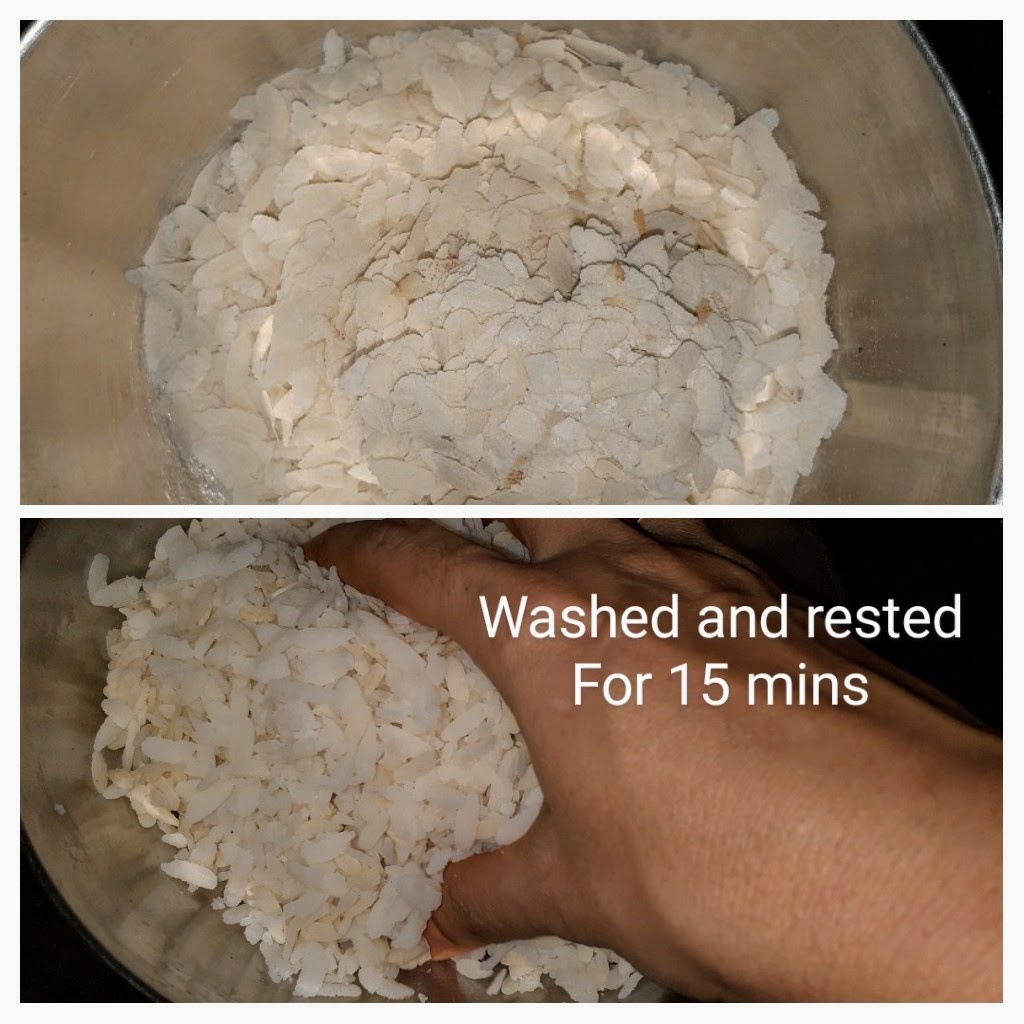
Pass the Poha through a sieve that has medium-sized perforations, such that the Poha remains in the sieve and the dust and small flakes fall away. Now wash the Poha just once(may become soggy if done more than once)and drain all the water. Let the Poha rest for 10 minutes.
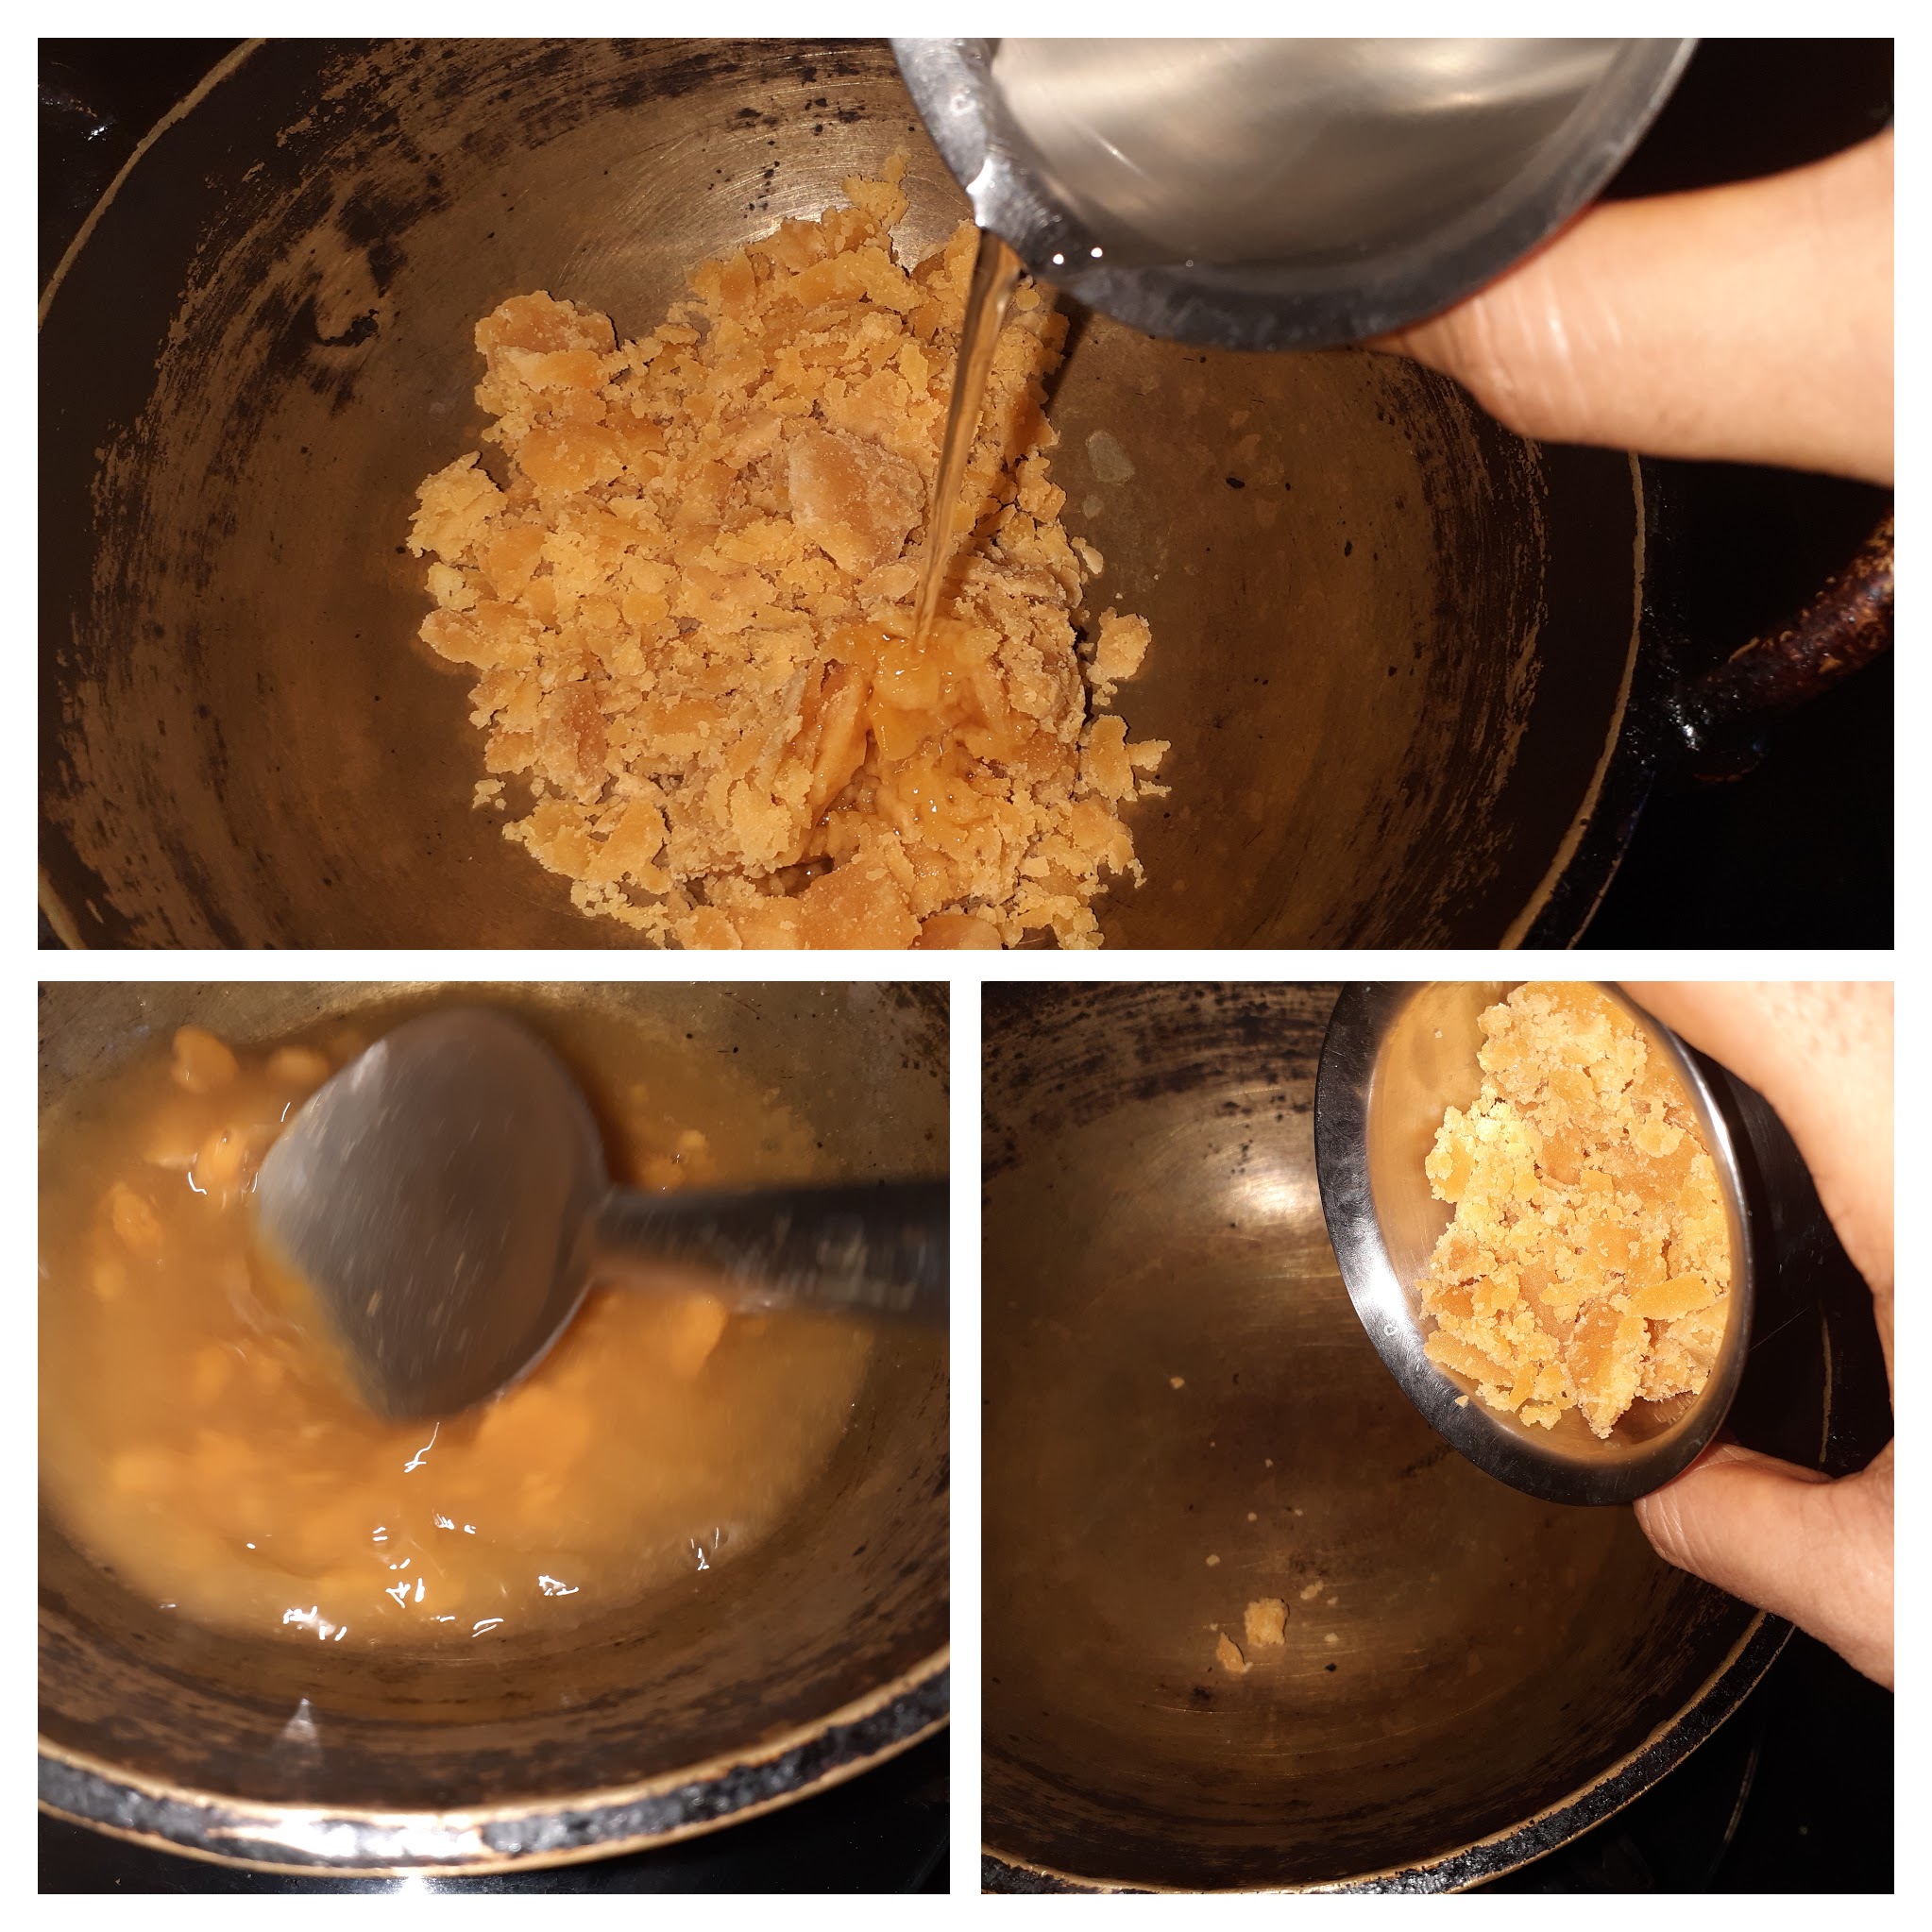
In a thick bottomed vessel put in the jaggery and 1/4 cup water and place it on the flame. Stirring continuously dissolve the jaggery. The syrup should boil for about 2 minutes. Now strain this syrup into a Kadai or thick bottomed pan and add a teaspoon of sugar and add the washed Poha. Turn on the flame and mix the jaggery and Poha well, such that the jaggery syrup has evenly coated the poha. Cook on low flame until all the moisture is absorbed. Now add the cardamom powder and put off the flame. In a small tadka, Kadai heat the ghee and fry the nuts and raisins and drop them into the Sweet Poha and give it a stir. The Sweet Poha/Vella Aval is ready to offer as Prasad or to your guests. This can be made ahead and warmed just before you serve. Enjoy.
STEPWISE RECIPE FOLLOWS:
1. Assemble all ingredients. Powder the jaggery and cardamom and keep ready. Break the Cashewnuts to bits.
2. Sieve, wash the Poha twice drain the water and let it rest for 10 minutes.
3. Now in a thick bottomed vessel put in the jaggery, add 1/4 cup water and switch on the flame. Stirring continuously dissolve the jaggery. The syrup should cook for 2 minutes on low flame.
4. Now strain this syrup into the Kadai or pan in which you are going to make the Poha. Add a teaspoon of sugar. Add the washed and soaked Poha to the syrup in the Kadai, and switch on the flame. Start stirring and cooking this mixture until the jaggery syrup coats the poha well. Continue to stir until the moisture dries up and the Poha is almost dry. Add the cardamom powder and switch off the flame.
5. In a small tadka, Kadai dry roast the grated coconut gratings until light brown. One has to stir continuously as the coconut will burn if left unattended. Add the roasted coconut to the Sweet Poha and mix well.
6. Now in the same Kadai, the coconut was roasted, add the ghee and fry the nuts and raisins. Put this into the Sweet Poha. The dish is now ready to offer for Puja or to serve guests.
NOTES:
1. If using thick Poha there is no need to sieve the Poha, just wash it around 3 times and then rest it for 10 minutes.
2. Sometimes this recipe I also made by soaking the poha in jaggery water, but I personally do not recommend this as the dish does not last long. The jaggery water is not cooked like unlike the recipe above, so the chances are the Poha will give out a fermented smell in a short time.
3. Since in this recipe, I have boiled the jaggery and made a syrup the Poha can be made ahead, if you have made extra, it can be put in the refrigerator and warmed up the next day. So this method stays good longer.
4. Adding a teaspoon or two of sugar accentuates the taste of jaggery. I always follow this in my jaggery based recipes.
5. More grated coconut can be added if you like the flavour.
If you tried this recipe and liked it please comment below. I would love to hear from you.
If you want the recipes emailed to you leave your id in the homepage near the????
icon. Whenever we have a new post the recipe will be mailed to you. Thank you for showing interest in Rajjo’s Kitchen.
Sugiyan
Sugiyan or Sukhiyan as it is called is a traditional snack in Kerala and Tamilnadu. It is also made in Andhra Pradesh and is called Boorelu. This snack is like a sweet version of the Aloo Bonda where the Aloo is replaced with a sweet Chana dal or Moong dal and Jaggery filling and instead of Besan Urad dal and rice flour are used as a batter to cover the filling(Poornam). Coconut is also added to the filling that enhances the taste. This is also a snack that people make for festivals. As the festival time is nearing blogging this recipe may be helpful. I usually make it around Navarathri and Diwali to serve it to guests who visit home.
As I had mentioned that the poornam (filling) is made with Moong dal too, but I personally feel the chana dal filling is tastier. Some also use whole moong(payaru) to make the filling.
I use this filling of Sugiyan to make Puran Poli(Boli/Bobbatlu/Hoolige) also. So what I usually do is make them both simultaneously. I use wheat flour majorly with a hint of maida to make Puran Poli, the Sugiyan is had the same day as it doesn’t taste fresh or hold good the next day, it is like an instant snack, whereas Puran Poli can be consumed with 2-3 days if stored properly.
One needs to grind the batter carefully and the rest of the recipe is quite easy. In this recipe, I will also show you an easy way to make the filling.
While you are here check out my other dessert recipes like Pineapple Rabdi,
Carrot Kheer, Chakkara Pongal, Atte Ka Sheera, Akkara vadisal, and more.
Here is the recipe of Sugiyan for you–
PREP TIME: 20 Mins(1 hr soak) COOK TIME: 40 Mins
TOTAL TIME: 60 Mins COURSE: SNACK
CUISINE: SOUTH INDIAN SERVINGS: 6
AUTHOR: Rajni Ram
Ingredients:
Urad dal 1 cup soaked for 1-hour
Chana dal 1 cup roasted to light brown
Turmeric powder 1/2 tsp
Rice flour 2 tbsp
Jaggery 1 cup powdered
Coconut grated 1/2 cup
Cardamom powder 1 tsp
Oil for frying
Directions: for the filling:
Dry roast the Chana dal to a light brown, you will get a nice aroma of the dal. Switch off the flame, remove and cook in a pressure cooker with 1/2 tsp turmeric powder and adequate water for 2-3 whistles(not more), as we want the dal to be rightly cooked, not mushy. Once the dal is cooked and the pressure in the cooker has subsided, remove the dal and put it in a strainer for all the water to drain off for about 5 minutes. Now put the dal into the dry grinding unit of the processor and blitz. Open stir the contents well and blitz again to a fine powder. After grinding it will resemble wet sand. Now in a Karahi put in the jaggery and the ground dal, followed by grated coconut( add no water) and keep stirring, in low flame. The jaggery will start melting and within 5 minutes of stirring the filling will become well combined. Even if it seems a little dry, don’t be tempted to add water. The jaggery will be enough to bind it. Add the Cardamom powder and keep stirring and when it forms a lump, put off the flame and let it cool. Once the filling has cooled, make small balls of them and keep aside.
Directions for the outer crust:
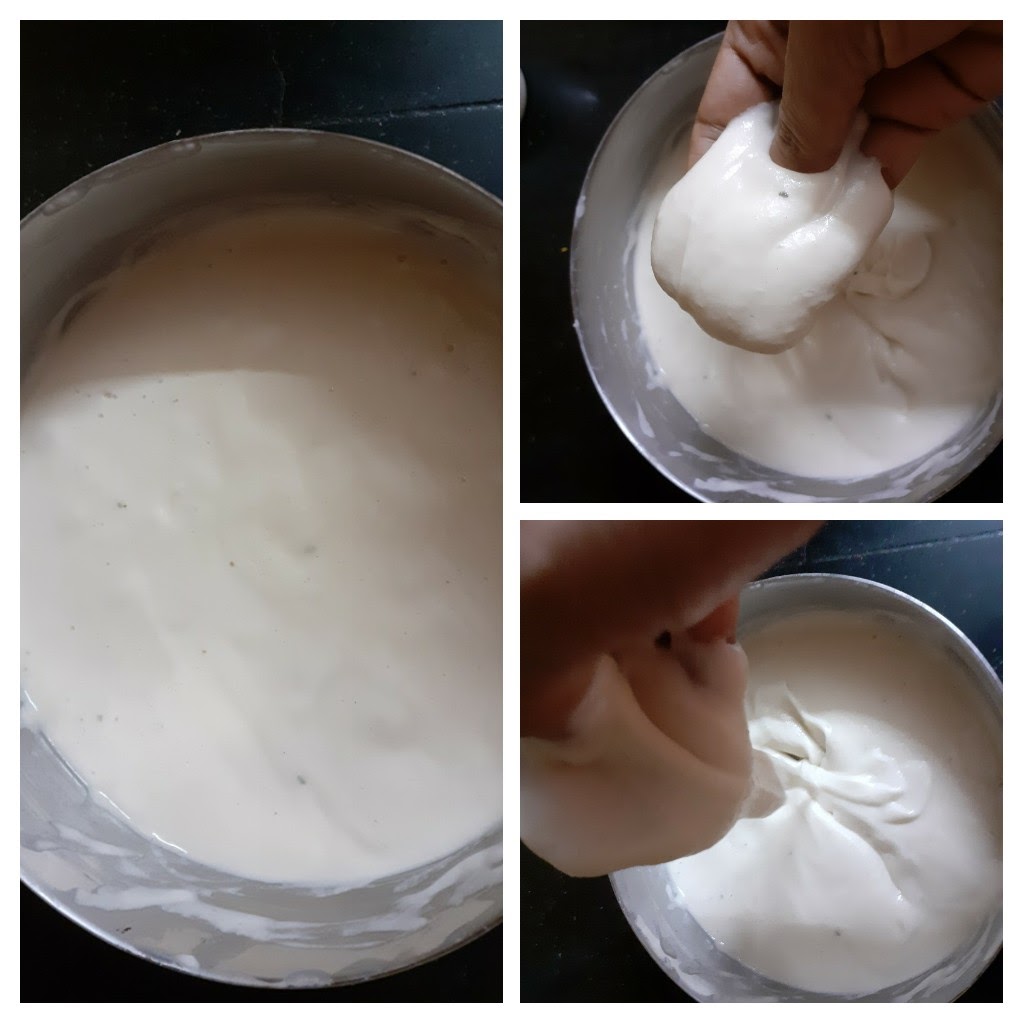
Soak the Urad dal for 1 hour and grind. Don’t allow it to soak for a long time, as then it soaks up a lot of oil while frying. The dal has to be ground to a smooth and thick batter, with water as required. The batter should stick to the filling and not roll off it, that should be the consistency. A runny or flowy batter will not stick to the filling. After grinding transfer to a dish, add 2 tablespoons of rice flour and 1/2 tsp salt. Now add little water if required as the rice flour would have absorbed all moisture from the urad dal paste.
Directions to make Sugiyan:
Heat oil for frying to medium-high. Now take one ball at a time, roll it in the batter, or smear the batter all over the filling, it should be a thick coating or it will split in the oil and, drop them gently into the oil. Fry 4-5 of them at a time. Remove when golden brown in colour. Drain them on an absorbent paper. Repeat for the entire lot of filling. The delicious Sugiyan is ready. Serve with tea or make it as Prasad(offering) for Puja and enjoy it. Bon Appetit.
STEPWISE RECIPE FOLLOWS:
1. Assemble all ingredients. Soak the dal for an hour. Dry roast the Chana dal and pressure cook for 2 -3 whistles and no more.
2. For the Outer crust(cover)- Grind the soaked Urad dal by adding little water to a smooth but thick paste(idli batter consistency or a little thicker also is fine). Stir in 1.5 to 2 tablespoons of rice flour. If the batter gets too thick, add a little amount of water to get it back to the right consistency, given above. ( I forgot to take a picture of adding Rice flour, so please keep in mind and ad it).
3. For filling- Dry roast the Chana dal until light brown in colour, you will get a nice sweet aroma when you are getting to that stage. Pour required water and add turmeric powder and pressure cook it for 2-3 whistles, and not more. Once the pressure reduces, take the dal and drain it completely of all the water and allow it to cool for 5 minutes.
4. Now put the warm Dal into the dry grinding jar and blend to a powdery texture, without any water. Give it a mix and spin again, the mixture should be fine and should resemble wet sand.
5. Put this ground Dal mixture in a Kadai and add the jaggery and grated coconut to it. Switch on the flame on low and start stirring this mixture. Do not add any water, the jaggery will start melting in the heat and help in combining. Add the cardamom and keep stirring until the mixture comes together and forms a lump. Put off the flame and cool the mixture.
6. To make the Sugiyan- Heat oil in a karahi for frying. Heat should be medium-high. Now make lemon sized(or a little bigger too is ok) balls of the filling and keep it aside. Check if the oil is hot by dropping little of the batter into it. If it sizzles and rises immediately, it is ready for frying.
7. Now take the Urad dal – Rice flour batter and dunk each ball into it gently, use your hands to smear the batter on the filling if required ad cover the ball. Gently drop it into the oil and fry to a golden brown colour. 4-5 Sugiyans can be fried at a time. Drain them on absorbent paper. Repeat for the entire filling and enjoy them hot.
NOTE:
1. I recommend not soaking the Urad dal for more than an hour as it soaks in lot of oil while frying.
2. The jaggery can be reduced to 3/4 cup depending on how sweet it is.
3. I forgot to take a picture of adding the rice flour, so don’t forget to add it if following only the pictures.
If you tried this recipe and liked it please comment/ tag Rajjo’s kitchen on Facebook and Instagram and please follow us on my blog https://rajnirams.blogspot.com/
If you wish to receive the recipes as an email please leave your id on the homepage near the mail icon. Whenever Rajjo’s Kitchen has a new post it will be mailed to you.
Atte Ka Sheera (Insant Wheat Halwa)
Halwa is a popular dish in the Indian subcontinent and there are many varieties of Halwa like Rava/Suji Halwa, Moong dal halwa, Chana dal halwa, Lauki halwa, Carrot halwa, and many more. This recipe Atte Ka Sheera is very popular in North India during both the Navrathras, as it is offered to little girls on the Ashtami day( day 8 of Navrathri) as Prasad(holy offering).
This Halwa gets done in no time and is healthy and tasty at the same time. My girl loves it and whenever any of us craves sweet at home I make it instantly, like today.
The smooth texture of the Halwa lies in roasting the Wheat flour correctly, as an under roasted flour can make the halwa lumpy. There are many variations to making this Halwa and I chanced upon this one in an old recipe book and have always made it that way ever since. Do check out my other sweet and dessert recipes.
PREP TIME: 10 Mins COOK TIME: 20Mins
TOTAL TIME: 30Mins COURSE: DESSERT
CUISINE: NORTH INDIAN SERVINGS: 4
AUTHOR: Rajni Ram
Ingredients:
Wheat flour 1 cup( any size is fine, but use the same cup for all measures in this recipe).
Sugar 1 cup
water 2 cups
Ghee 1/2 cup
Cardamom powder 1/4 tsp
Directions:
Take a heavy-bottomed pan /Karahi/Urli and heat it. Add 1 tbsp ghee and add in the wheat flour and start roasting it, stirring continuously. after 5 minutes add another tablespoon of ghee and continue to roast. Don’t forget to keep stirring, as the flour can get burnt. as the roasting continues the atta/wheat flour will give a nice aroma, keep roasting until the flour turns golden brown. Once it is nicely browned turn off the flame. In another saucepan heat water, and drop the sugar into it, dissolve it and allow it to boil. Once the sugar is dissolved switch off the flame. Now slowly pour the sugar water into the roasted wheat flour and keep stirring continuously(remember to keep the flame off while pouring the sugar water). Once you have poured all the water, switch on the flame and continue to stir, until the halwa starts leaving the bottom of the pan/karahi. turn off the flame add the nuts and remaining ghee. Atte Ka Sheera is ready. Enjoy this wholesome goodness. Bon Appetit.
STEPWISE RECIPE FOLLOWS:
1. Assemble all ingredients.
2. In a heavy-bottomed pan/karahi pour 1 tablespoon ghee, add the wheat flour and start roasting. Keep stirring continuously.
3. After 5 minutes of roasting add another tablespoon of ghee and continue to roast. The flour starts turning brown and also starts giving out a nice aroma. Continue to roast until the flour turns golden brown. (Remember to keep flame at low or medium). Once browned switch off the flame.
4. Now in a saucepan pour the water and drop in the sugar and boil, add a few pods of cardamom to this(later it can be fished out). Once the water starts boiling and the sugar has completely dissolved put off the flame.
5. Now slowly pour the sugar water into the roasted wheat flour, while stirring simultaneously. Remember to keep the flame of while pouring the water into the Atta. If the flame is not switched off the water can splutter on the hand, and the halwa can get lumpy too.
6. Once you have poured in all the water, switch on the flame and continue stirring, until the halwa starts leaving the pan bottom and swirls along with the ladle. At this stage add the remaining ghee and garnish with some dry nuts.
Atte Ka Sheera is ready to serve.
NOTES:
1. Roasting the flour is the most critical step to get a smooth and creamy Halwa.
2. Roasting must be done in low to medium flame and not high as this could burn the flour.
3. After roasting the flour and while preparing the sugar water, keep the flame of the flour off.
4. While pouring the sugar water into the Ata also the flame must be off. Switch on after pouring all the water.
5. I have used only 1/2 a cup of ghee, more can be added if required.
If you tried this recipe and liked it please comment below. I would love to hear from you.
Akkaravadisal
This is a very traditional South Indian sweet dish. Lord Mahavishnu is offered this sweet as prasad(holy offering). The main ingredients are Rice, moong dal, jaggery, milk and ghee. The ingredients are similar to the Sweet Pongal but both taste very different. It tastes heavenly when served a little warm. Without much ado let’s get to the recipe right away.
PREP TIME: 10Mins COOK TIME:30Mins
TOTAL TIME: 40 Mins COURSE: MAIN
CUISINE: SOUTH INDIAN SERVINGS: 4
AUTHOR: Rajni Ram
Ingredients:
Rice 1 cup
Moong dal/ green gram 1/4 cup
Milk 6 cups
Jaggery 1 cup
Water 1/4 cup
Sugar ( optional) 1 tbsp
Ghee 3/4 cup
Cardamom/ elaichi powder 1 tsp
Saffron ( optional) 2 pinches, soaked in warm milk
Raw camphor( optional) 1 pinch powdered
Cashewnuts 8 to 10
Raisins 8 to 10
Directions:
Dry roast the Moong dal to a light brown colour. Stir constantly and take care not to burn the dal. It will give out a nice aroma. Put the jaggery in a separate vessel, add water and bring to a boil. Put off the heat and stir to dissolve the jaggery. Keep aside. Take a vessel that fits inside your pressure cooker and transfer the rice into it. Add in the roasted Moong dal and wash both the rice and dal together. Pour 4 cups milk and arrange the vessel in the cooker. Close lid and cook for around 5 to 6 whistles. After pressure releases open lid, the rice should be well cooked and not grainy. Mash the cooked rice and dal while it’s hot, keep aside. In a pan or Urli( heavy-bottomed brass vessel ) pour 1 tbsp ghee and heat. Fry the cashew nuts and raisins in the ghee to a nice golden colour and keep them aside. To the same pan add the cooked rice and dal. Strain the liquid jaggery into the rice directly and the sugar and the remaining milk( 2cups, to which saffron was added). Stir nicely. Add the cardamom powder and raw camphor powder and stir. Put off the stove and add the ghee finally. The divine tasting Akkaravadisal is ready. Tastes best when hot/ warm. Enjoy. Bone Appetite.
STEPWISE RECIPE FOLLOWS:
1. Assemble all ingredients.
2. Dry roast the Moong dal to a light brown colour. Take rice in a vessel that fits inside the cooker and add the roasted dal to it. Wash them a few times, add 4 cups milk and place the vessel inside the cooker with sufficient water at the bottom. Cook until 5 to 6 whistles. To the remaining 2 cups of milk add saffron and let soak.
3. Until the pressure releases let’s get the jaggery ready. In a small vessel take the jaggery, add 1/4 cup water and bring to a boil, put out the stove and stir the jaggery to dissolve it.
4. Once you open the cooker mash the contents while they are hot as it’s easier to do it then. Set aside.
In a pan/ Urli take a tablespoon of ghee and heat, fry the nuts and raisins in it and keep aside.
5. In the same pan/ Urli transfer the cooked rice and dal and strain the liquid jaggery on it directly. Pour the saffron added milk to the mixture and stir. Add in the cardamom and raw camphor and turn off the stove. Lastly, add the ghee, garnish with the fried nuts and raisins and the Akkaravadisal is ready.
NOTES:
1. We strained the jaggery to remove the impurities from it.
2. Do not cook rice directly in the cooker as we are coking with milk, the milk may stick to the bottom and the dish will give a burnt taste and odour. That’s why we are cooking with a vessel inside the cooker.( to make directly checkout One pot Akkaravadisal recipe)
3. Saffron and raw camphor are optional, they give added flavour.
4. Be liberal with ghee. Cook the rice soft. If grainy add more milk and pressure cook again.
5. I have used normal rice( Sona Masoori/ Ponni). If using Basmathi avoid the raw camphor as both aroma and flavouring of both may clash.
If you made this recipe and liked it, please comment below. I would love to hear from you.