Quinoa Idli
Kachchi Haldi Paratha With Sarson Ka Raita
Brahmi Leaves Chutney/ Vallarai Keerai Chutney
Alu Palak
Apple Cinnamon Oatmeal Porridge
Nendran Pazham Halwa/ Banana Halwa
Besan Oats Cheela With Carrot Greens
Gongura Pappu/ Red Sorrel Leaves Dal
Sundal Recipes
Buckwheat and Raw Banana Flour Hariyali Paratha
Beet Falafel/ Beetroot Falafel
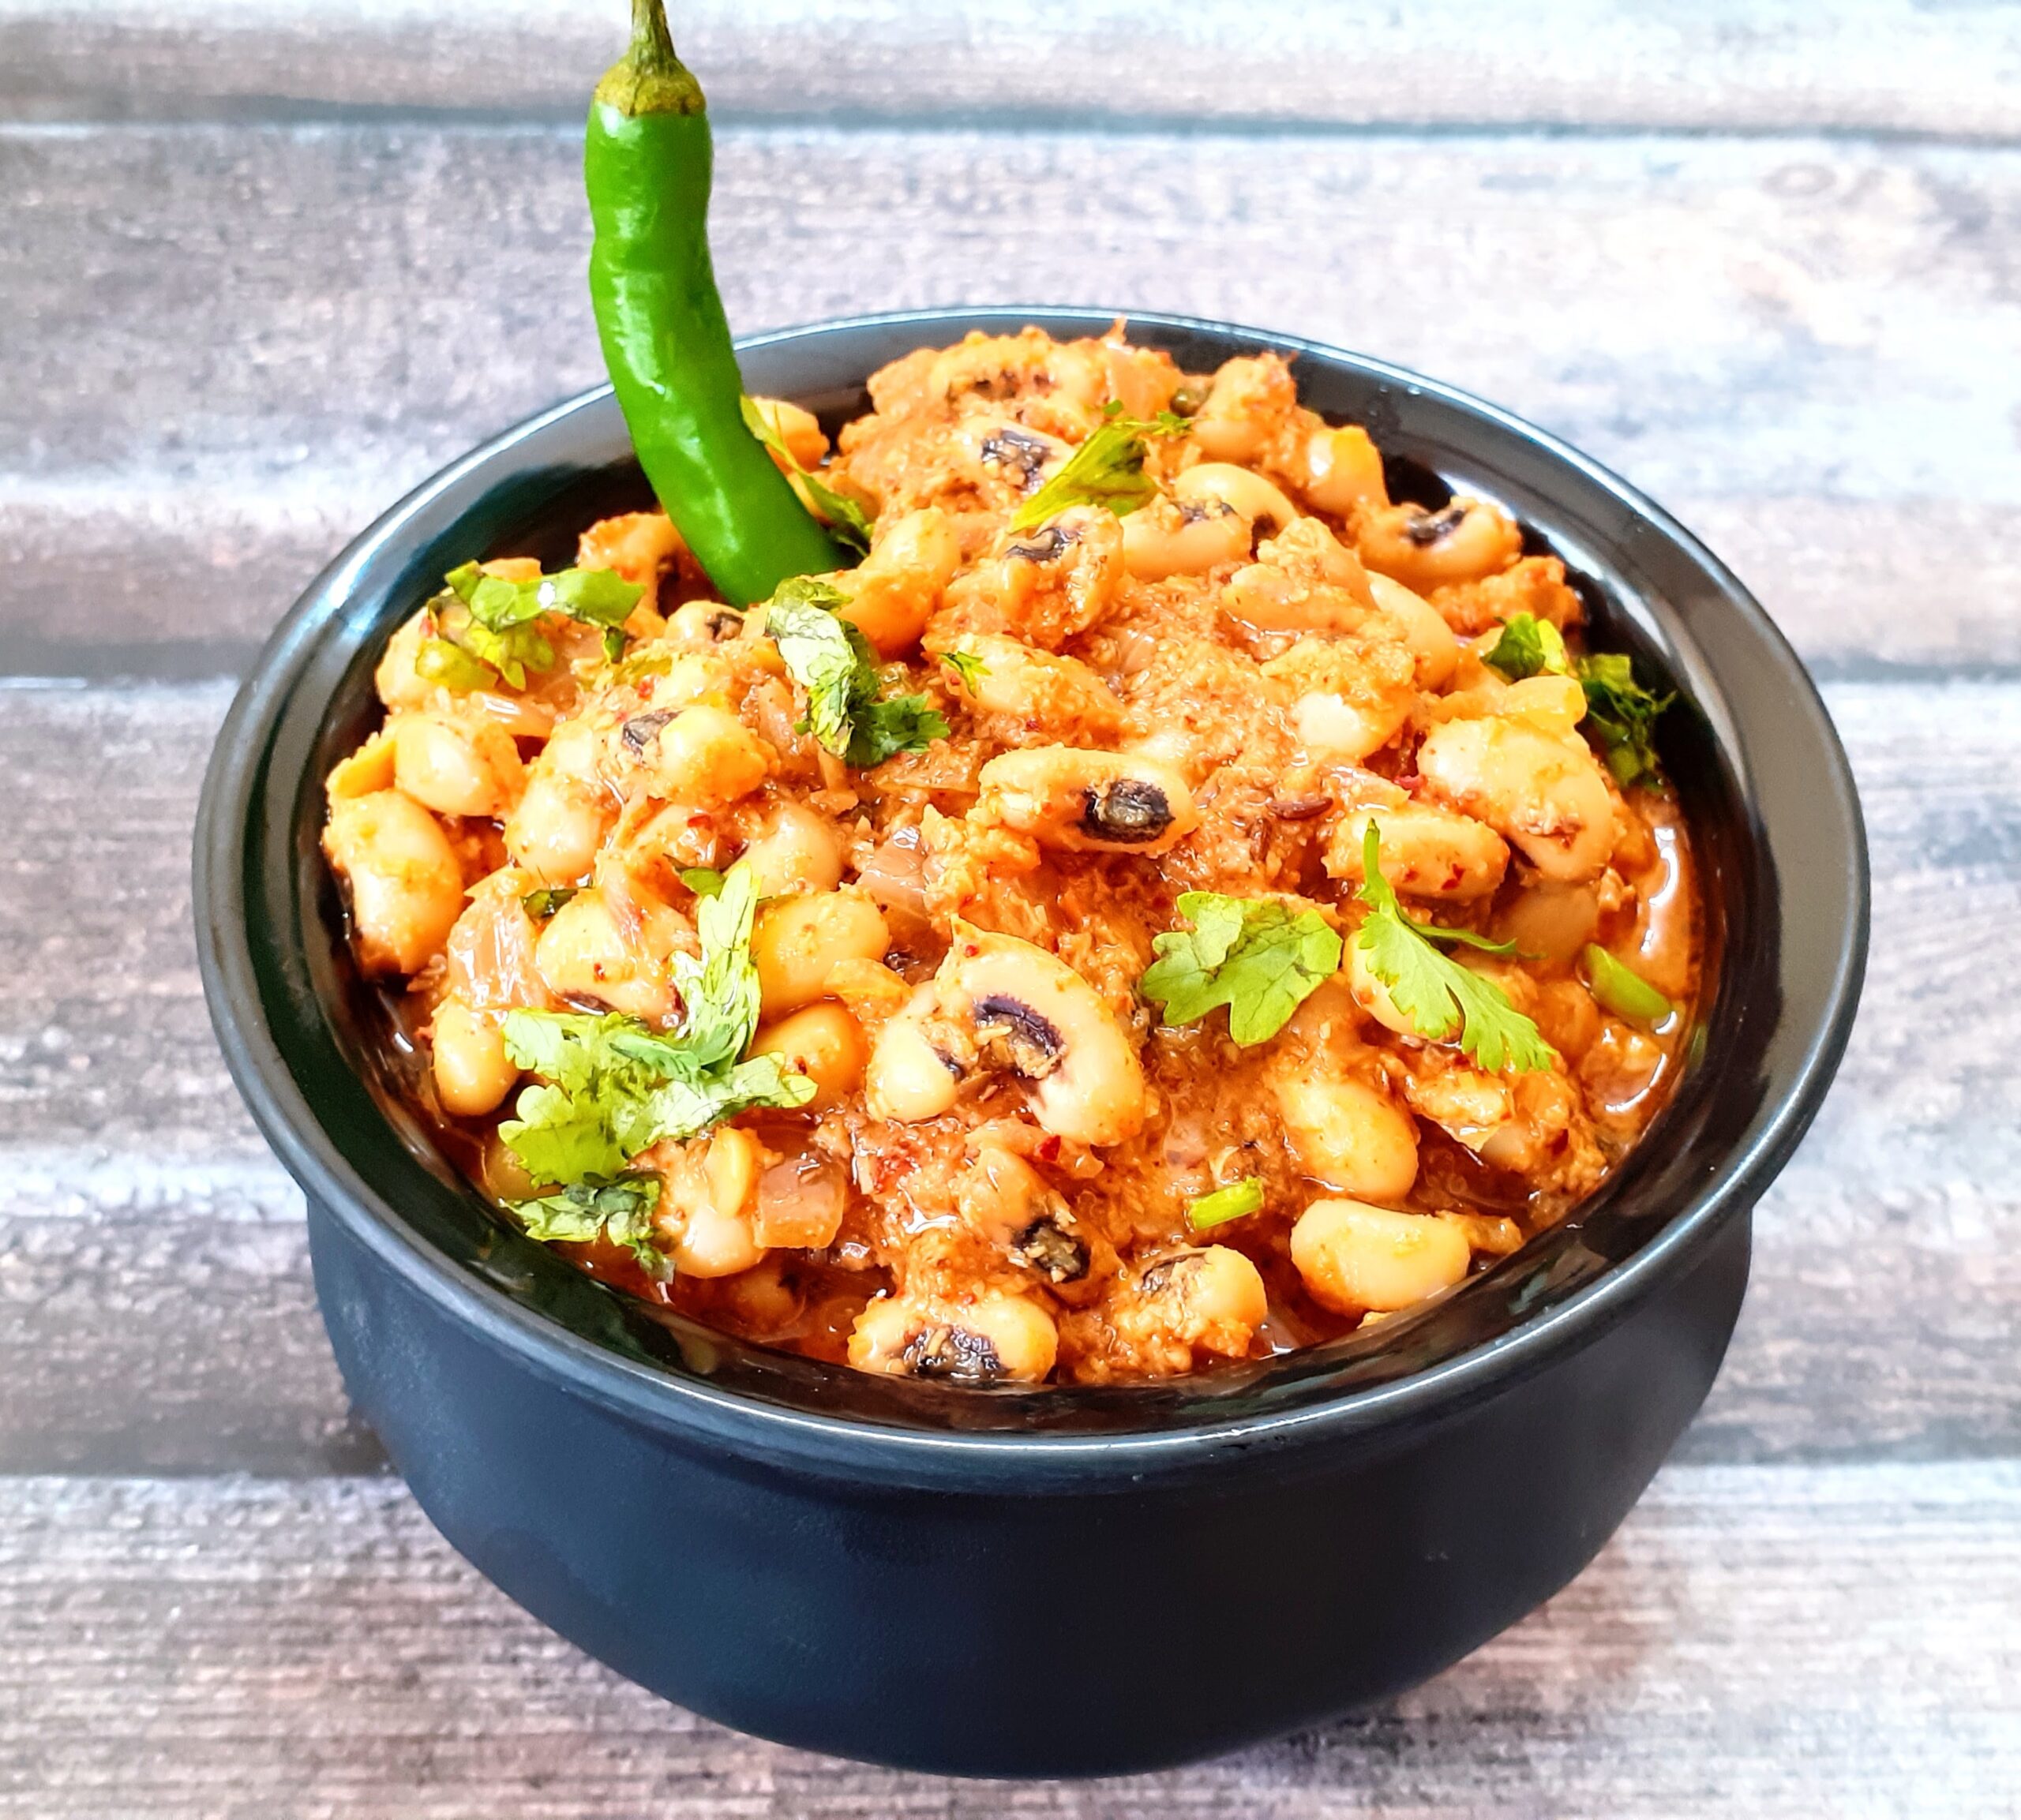
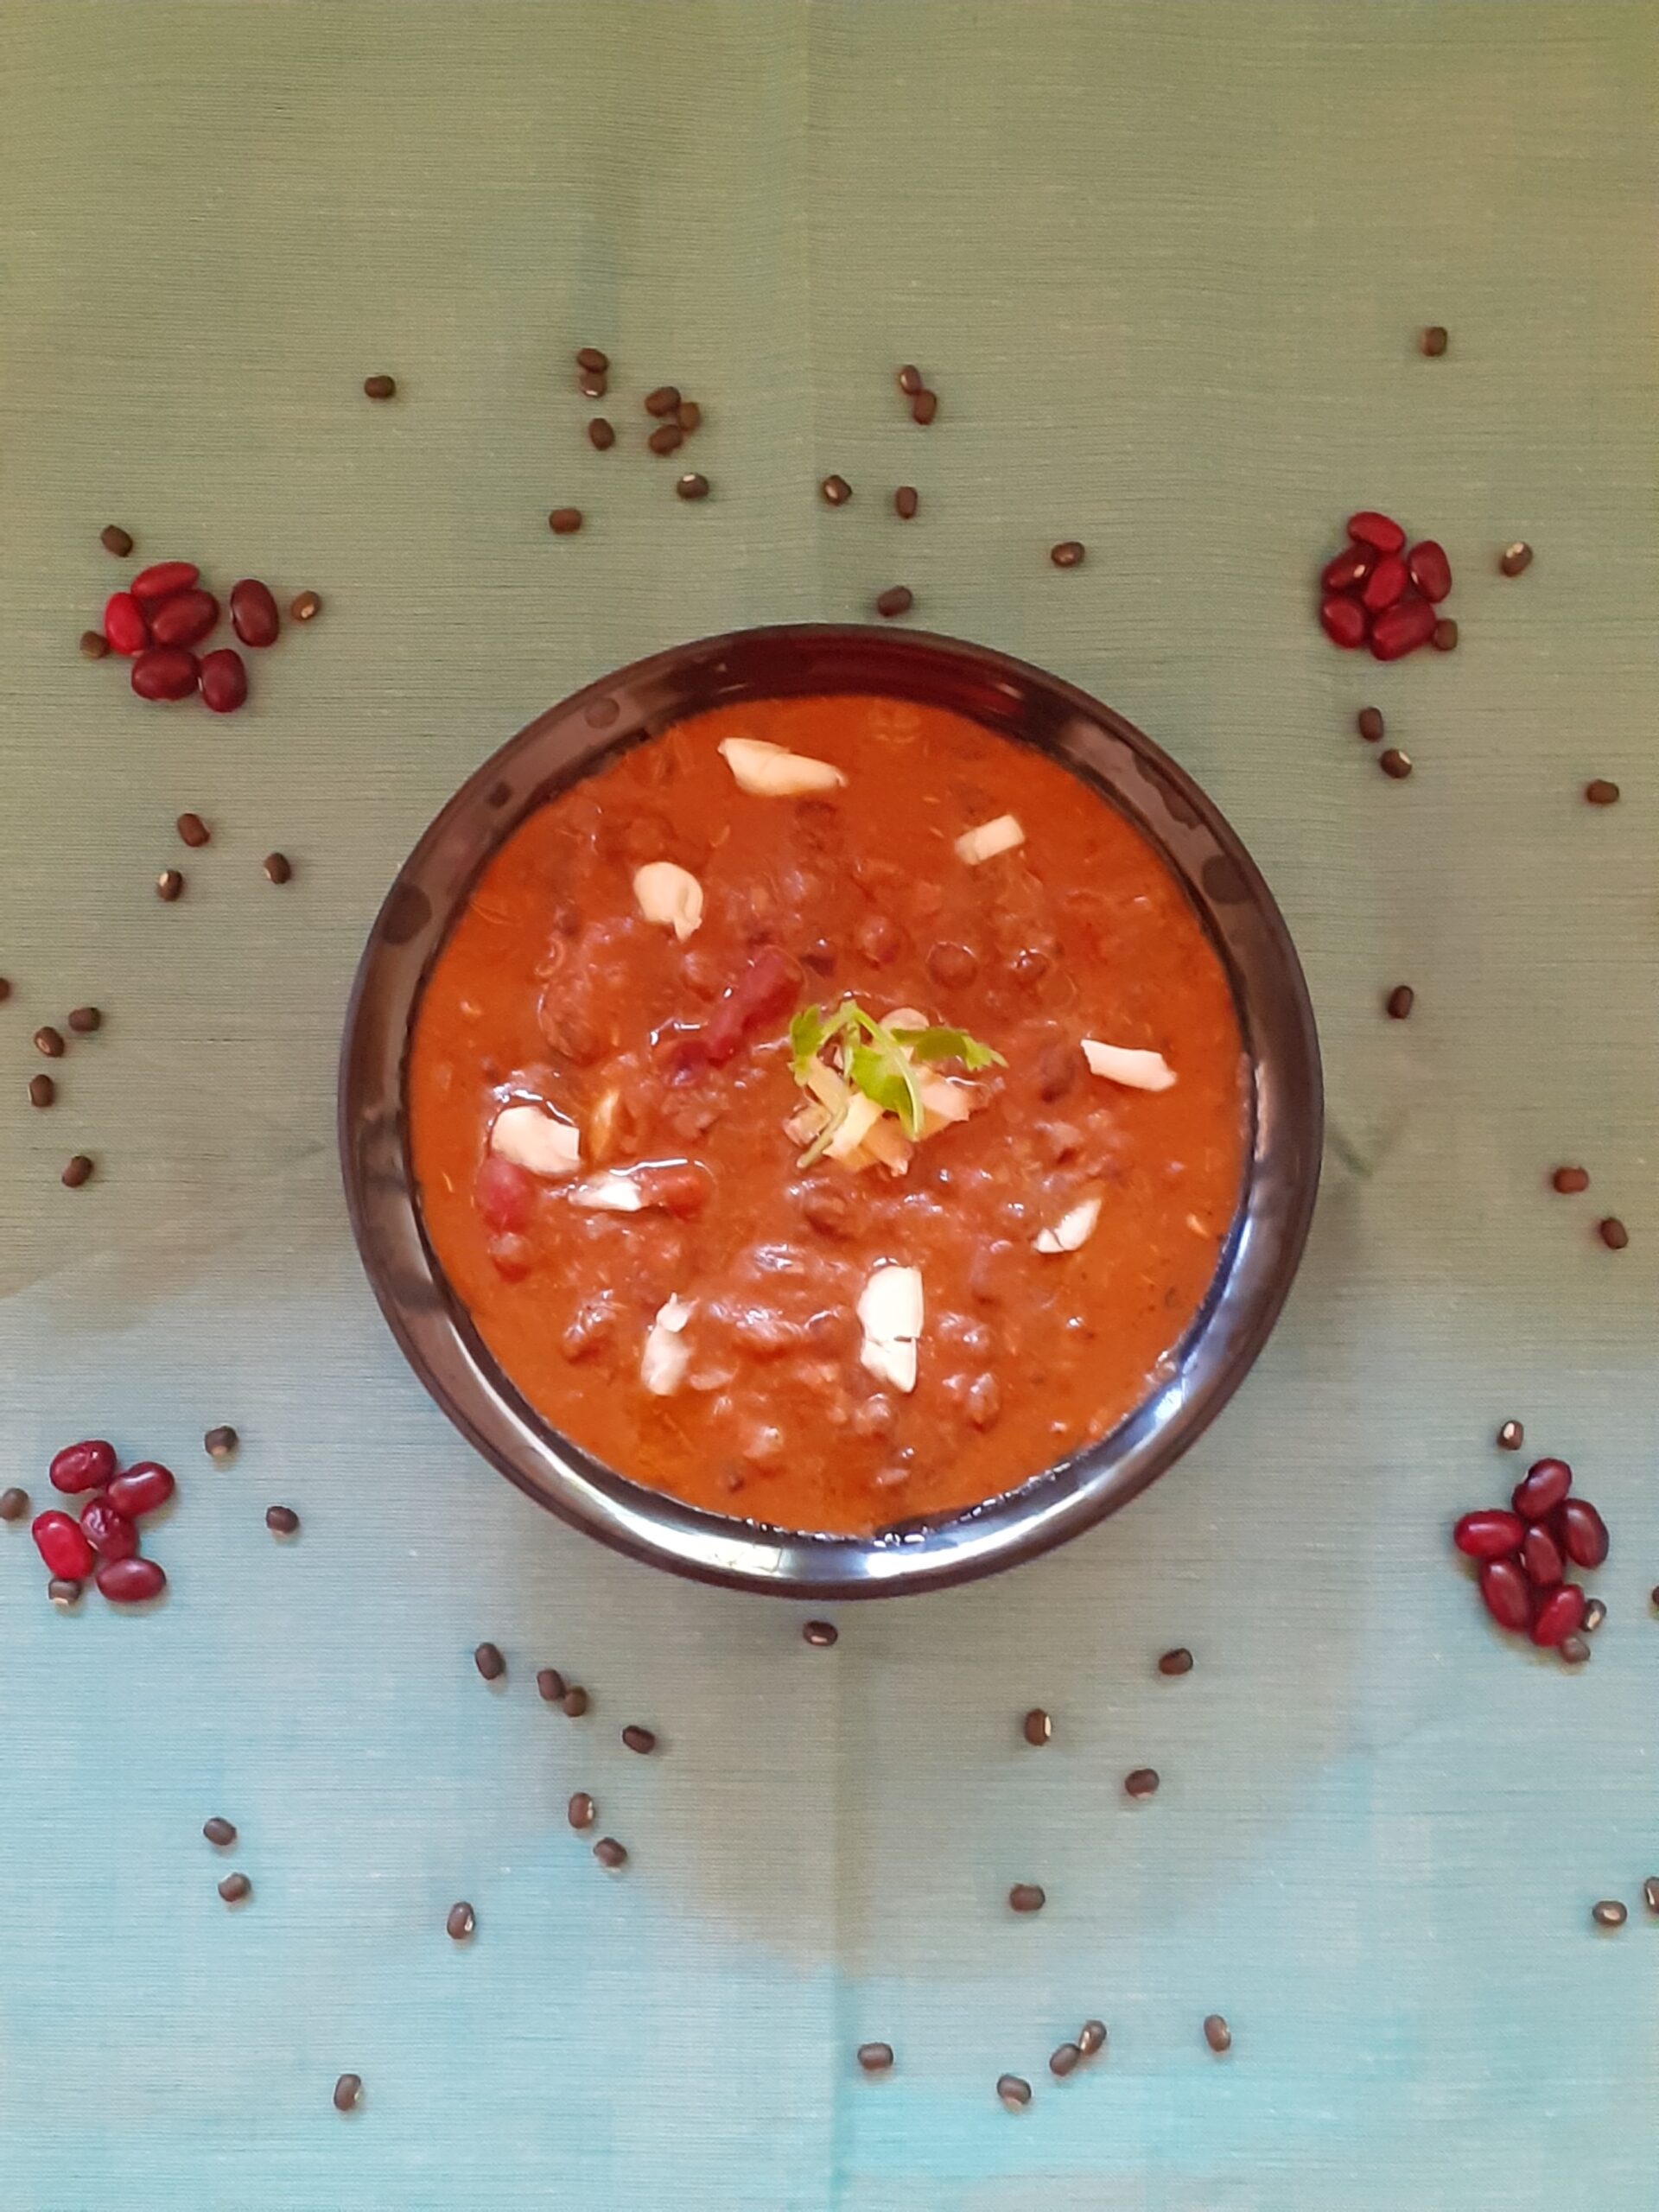
Goan Style Lobia Curry/Goan Style Black Eyed Bean Curry
Black eyed beans or Cow peas as they are called, are legumes that are available all over the globe. In India they are used in many regional cuisines. The Lobia masala is a popular dish in north India, and so is the Eriserry from Kerala cuisine that uses the legume along with Ash gourd and Yam. In Tamilnadu is it made into a Sundal(salad), or used with other vegetables to make a curry. In the Andhra cuisine It is made into a Vada (fritter), the Gujarati cuisine also has its version of the Lobia curry, called Chawli masala. That’s how wide the usage of these beans is across India.
Cow Peas/ black eyed beans have a soluble fibre that helps in reducing cholesterol, it is said. These are nutrient dense legumes with the richness of Vitamins- A, B1, B2, B3, B6, C , that helps in healthy cell development. They also are rich in micro nutrients like Magnesium, zinc, iron, and copper(source net.med). These legumes also support weight loss and boost digestive health. That I guess is reason enough to include them in your diet, if you haven’t already.
Though the Lobia Sundal (salad) is a regular feature in my house, and so is the Erissery, and Lobia masala, I recently tried a Goan style Lobia curry and it turned out so good. The Goan spice combination of Coriander seeds, Cumin seeds and coconut, gave a very good dimension to the dish, and it tasted different from the regular Lobia masala. Hence documenting this recipe for you all to try.
There is also a Lobia Pulav recipe on the blog, do check it out here. Some other interesting and healthy recipes for you to try are- Daliya Mushroom Risotto, Drumstick Rasam, Curry leaves Powder, Dry fruit ladoo, Vegetable Oats Kichdi, Rajma Masala, and more…
Here is the recipe of Goan style Lobia curry-
PREP TIME: 10Mins+(soak time 4-5 hrs) COOK TIME: 30 Mins
TOTAL TIME: 40Mins COURSE: MAIN
CUISINE: INDIAN SERVINGS: 4
AUTHOR: Rajni Ram
Ingredients:
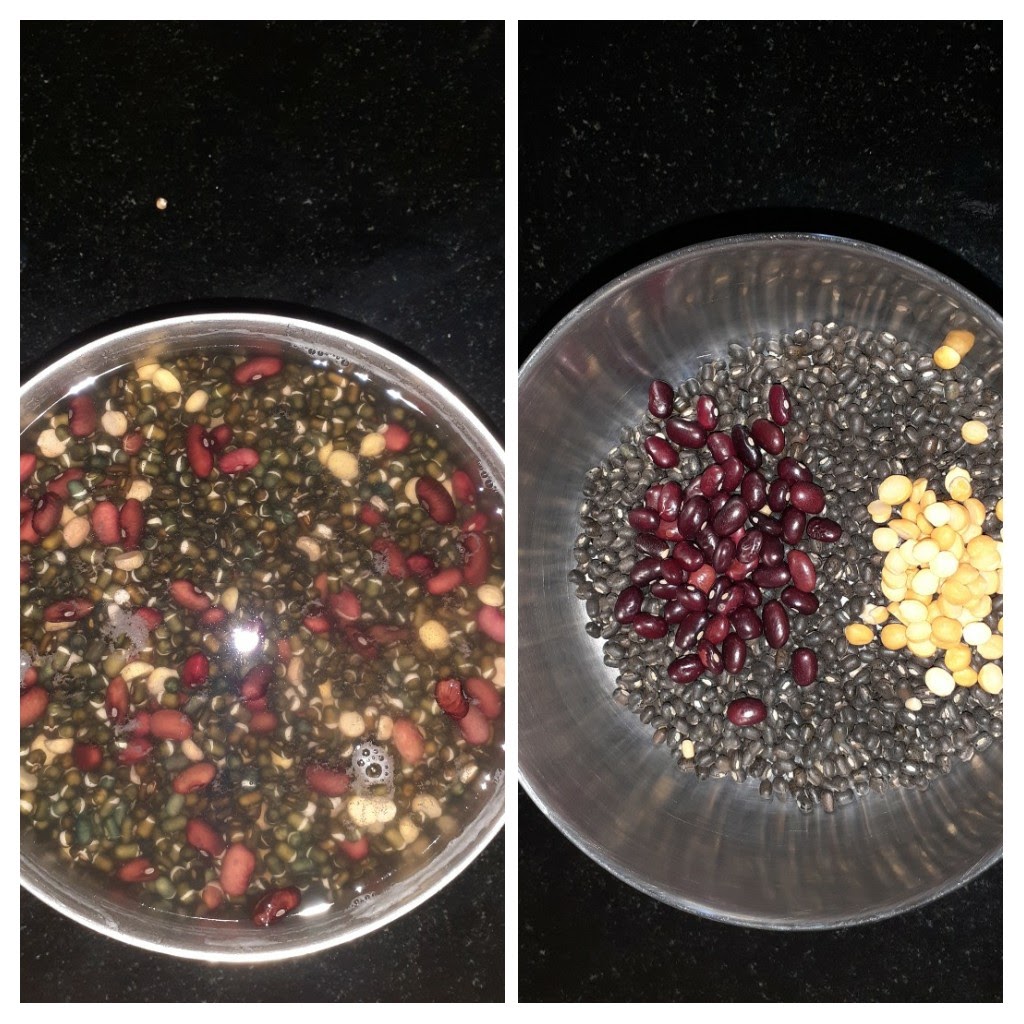
Lobia/cow peas/black eyed beans/ 1 cup soak for 4-5 hrs
Onion 1 medium chopped fine
Tomatoes 2 large pureed
Coconut 2 tbsp
Tamarind paste 1 tsp or pulp from a tiny bit of tamarind
Green chillies 2 split
Bay leaf 1
Coriander seeds/dhania 2 tsp
Cumin seeds/Jeera 1 tsp
Dry red chillies (regular/spicy ones)1
Kashmiri or Byadagi chillies 1
Turmeric powder 1/2 tsp
Ginger garlic paste 1tsp
Red chilli powder(regular) 1 tsp
Kashmiri red chilli powder 1 tsp
Oil for sauteing
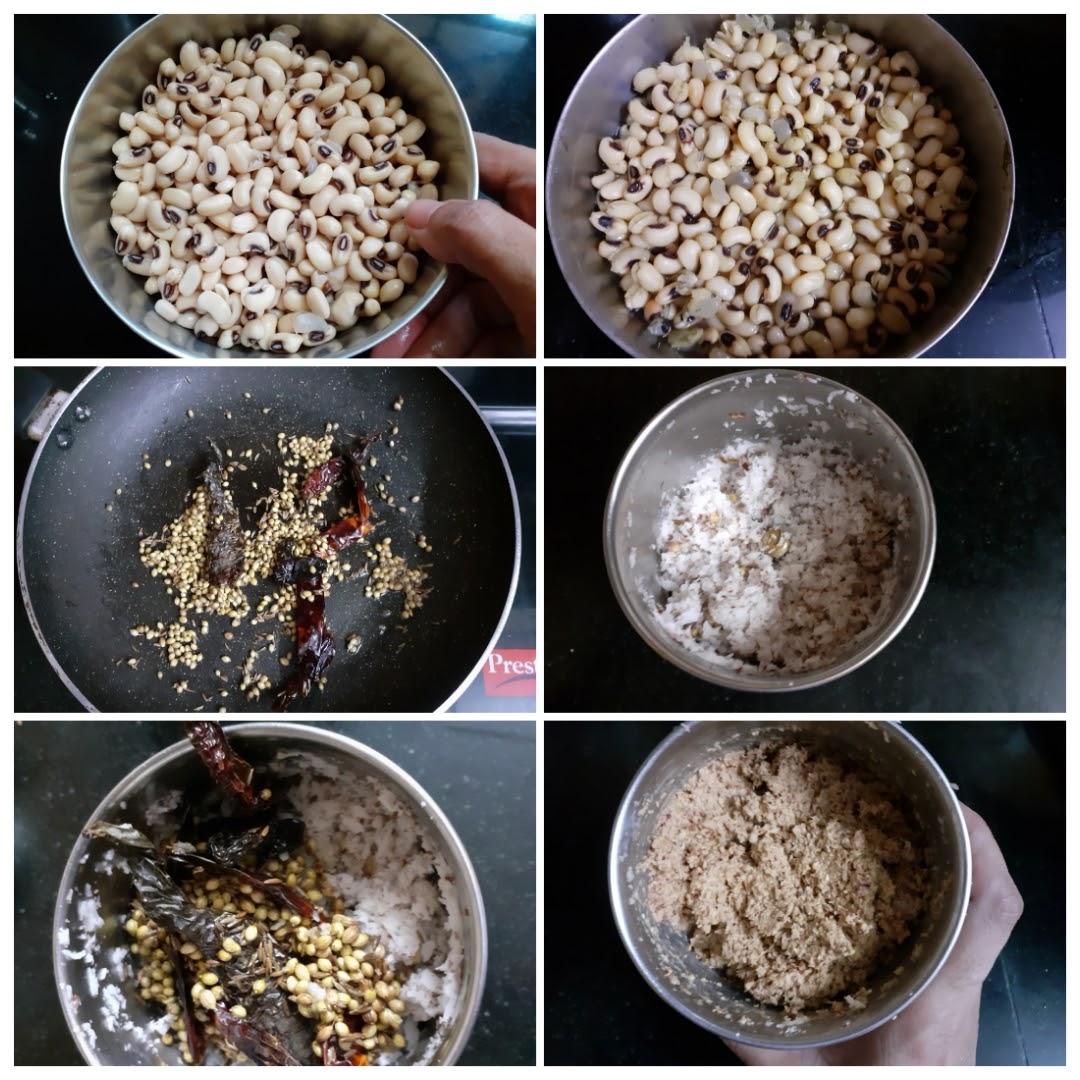
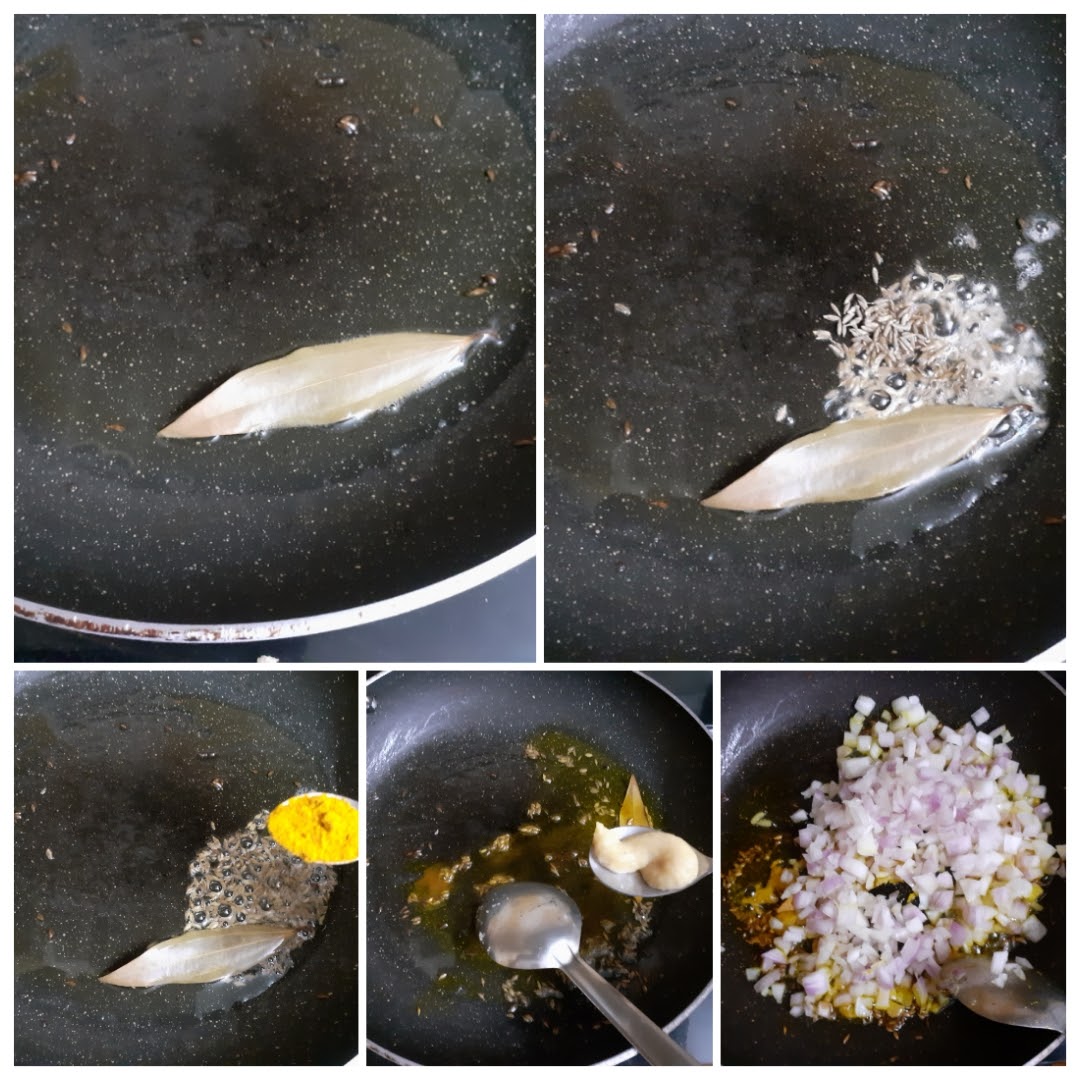
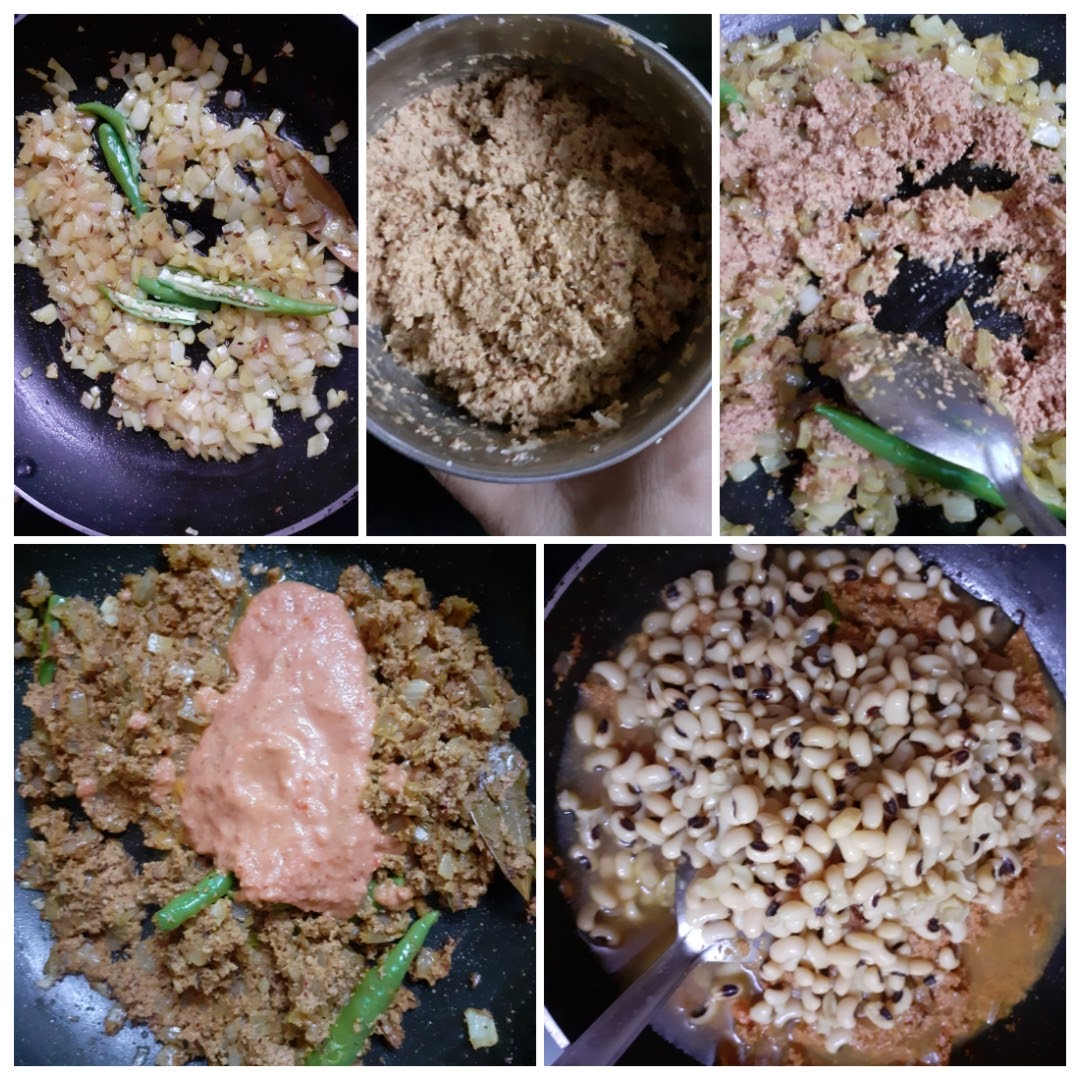
Directions: Wash and drain the water from Lobia, add fresh water and pressure cook for whistles or until soft. In a pan, roast the coriander seeds, cumin seeds, dry red chillies, and Kashmiri red chillies until crisp. cool. Now put them in a blender jar along with coconut and grind to a fine paste using little water. Set aside. Now in the same pan take some oil and heat. Add the Bay leaf, followed by cumin seeds, and turmeric powder. When the cumin seeds splutter, add the ginger-garlic paste, and fry. Now drop in the chopped onions and saute. When the onions turn light brown, add the split green chillies and saute another 30 secs. Now add the ground masala paste and fry nicely in the oil. When the mixture becomes dry, add the tomato paste, followed by the cooked Lobia/Black eyed beans, along with the water in which the lobia was cooked. Let the mixture simmer for 5 minutes. Now add, salt, red chilli powder, Kashmiri chilli powder, and further simmer for 10 minutes. Add water if required to adjust consistency. After 5 minutes, add the tamarind paste, and cook for just a minute and switch off the flame. Garnish with finely chopped coriander leaves and serve hot with Rotis or rice.
STEPWISE RECIPE FOLLOWS:
1. Wash and drain the water from Lobia, add fresh water and pressure cook for whistles or until soft. In a pan, roast the coriander seeds, cumin seeds, dry red chillies, and Kashmiri red chillies until crisp. cool. Now put them in a blender jar along with coconut and grind to a fine paste using little water. Set aside.
2. Now in the same pan take some oil and heat. Add the Bay leaf, followed by cumin seeds, and turmeric powder. When the cumin seeds splutter, add the ginger-garlic paste, and fry. Now drop in the chopped onions and saute.
3. When the onions turn light brown, add the split green chillies and saute another 30 secs. Now add the ground masala paste and fry nicely in the oil. When the mixture becomes dry, add the tomato paste, followed by the cooked Lobia/Black eyed beans, along with the water in which the lobia was cooked. Let the mixture simmer for 5 minutes.
4. Now add, salt, red chilli powder, Kashmiri chilli powder, and further simmer for 10 minutes. Add water if required to adjust consistency. After 5 minutes, add the tamarind paste, and cook for just a minute and switch off the flame. Garnish with finely chopped coriander leaves and serve hot with Rotis or rice.
NOTES:
1. There is another variety of the Lobia which are red in colour and resemble kidney beans/Rajma. This curry can be made with those red coloured beans too.
2. The spice level of this curry is medium. Feel free to increase or decrease as per taste.
3. Usually when i refer to “oil of sauteing” in the ingredient list, I mean the regular refined oil. When i use a specific oil like Coconut or Sesame, I always specify.
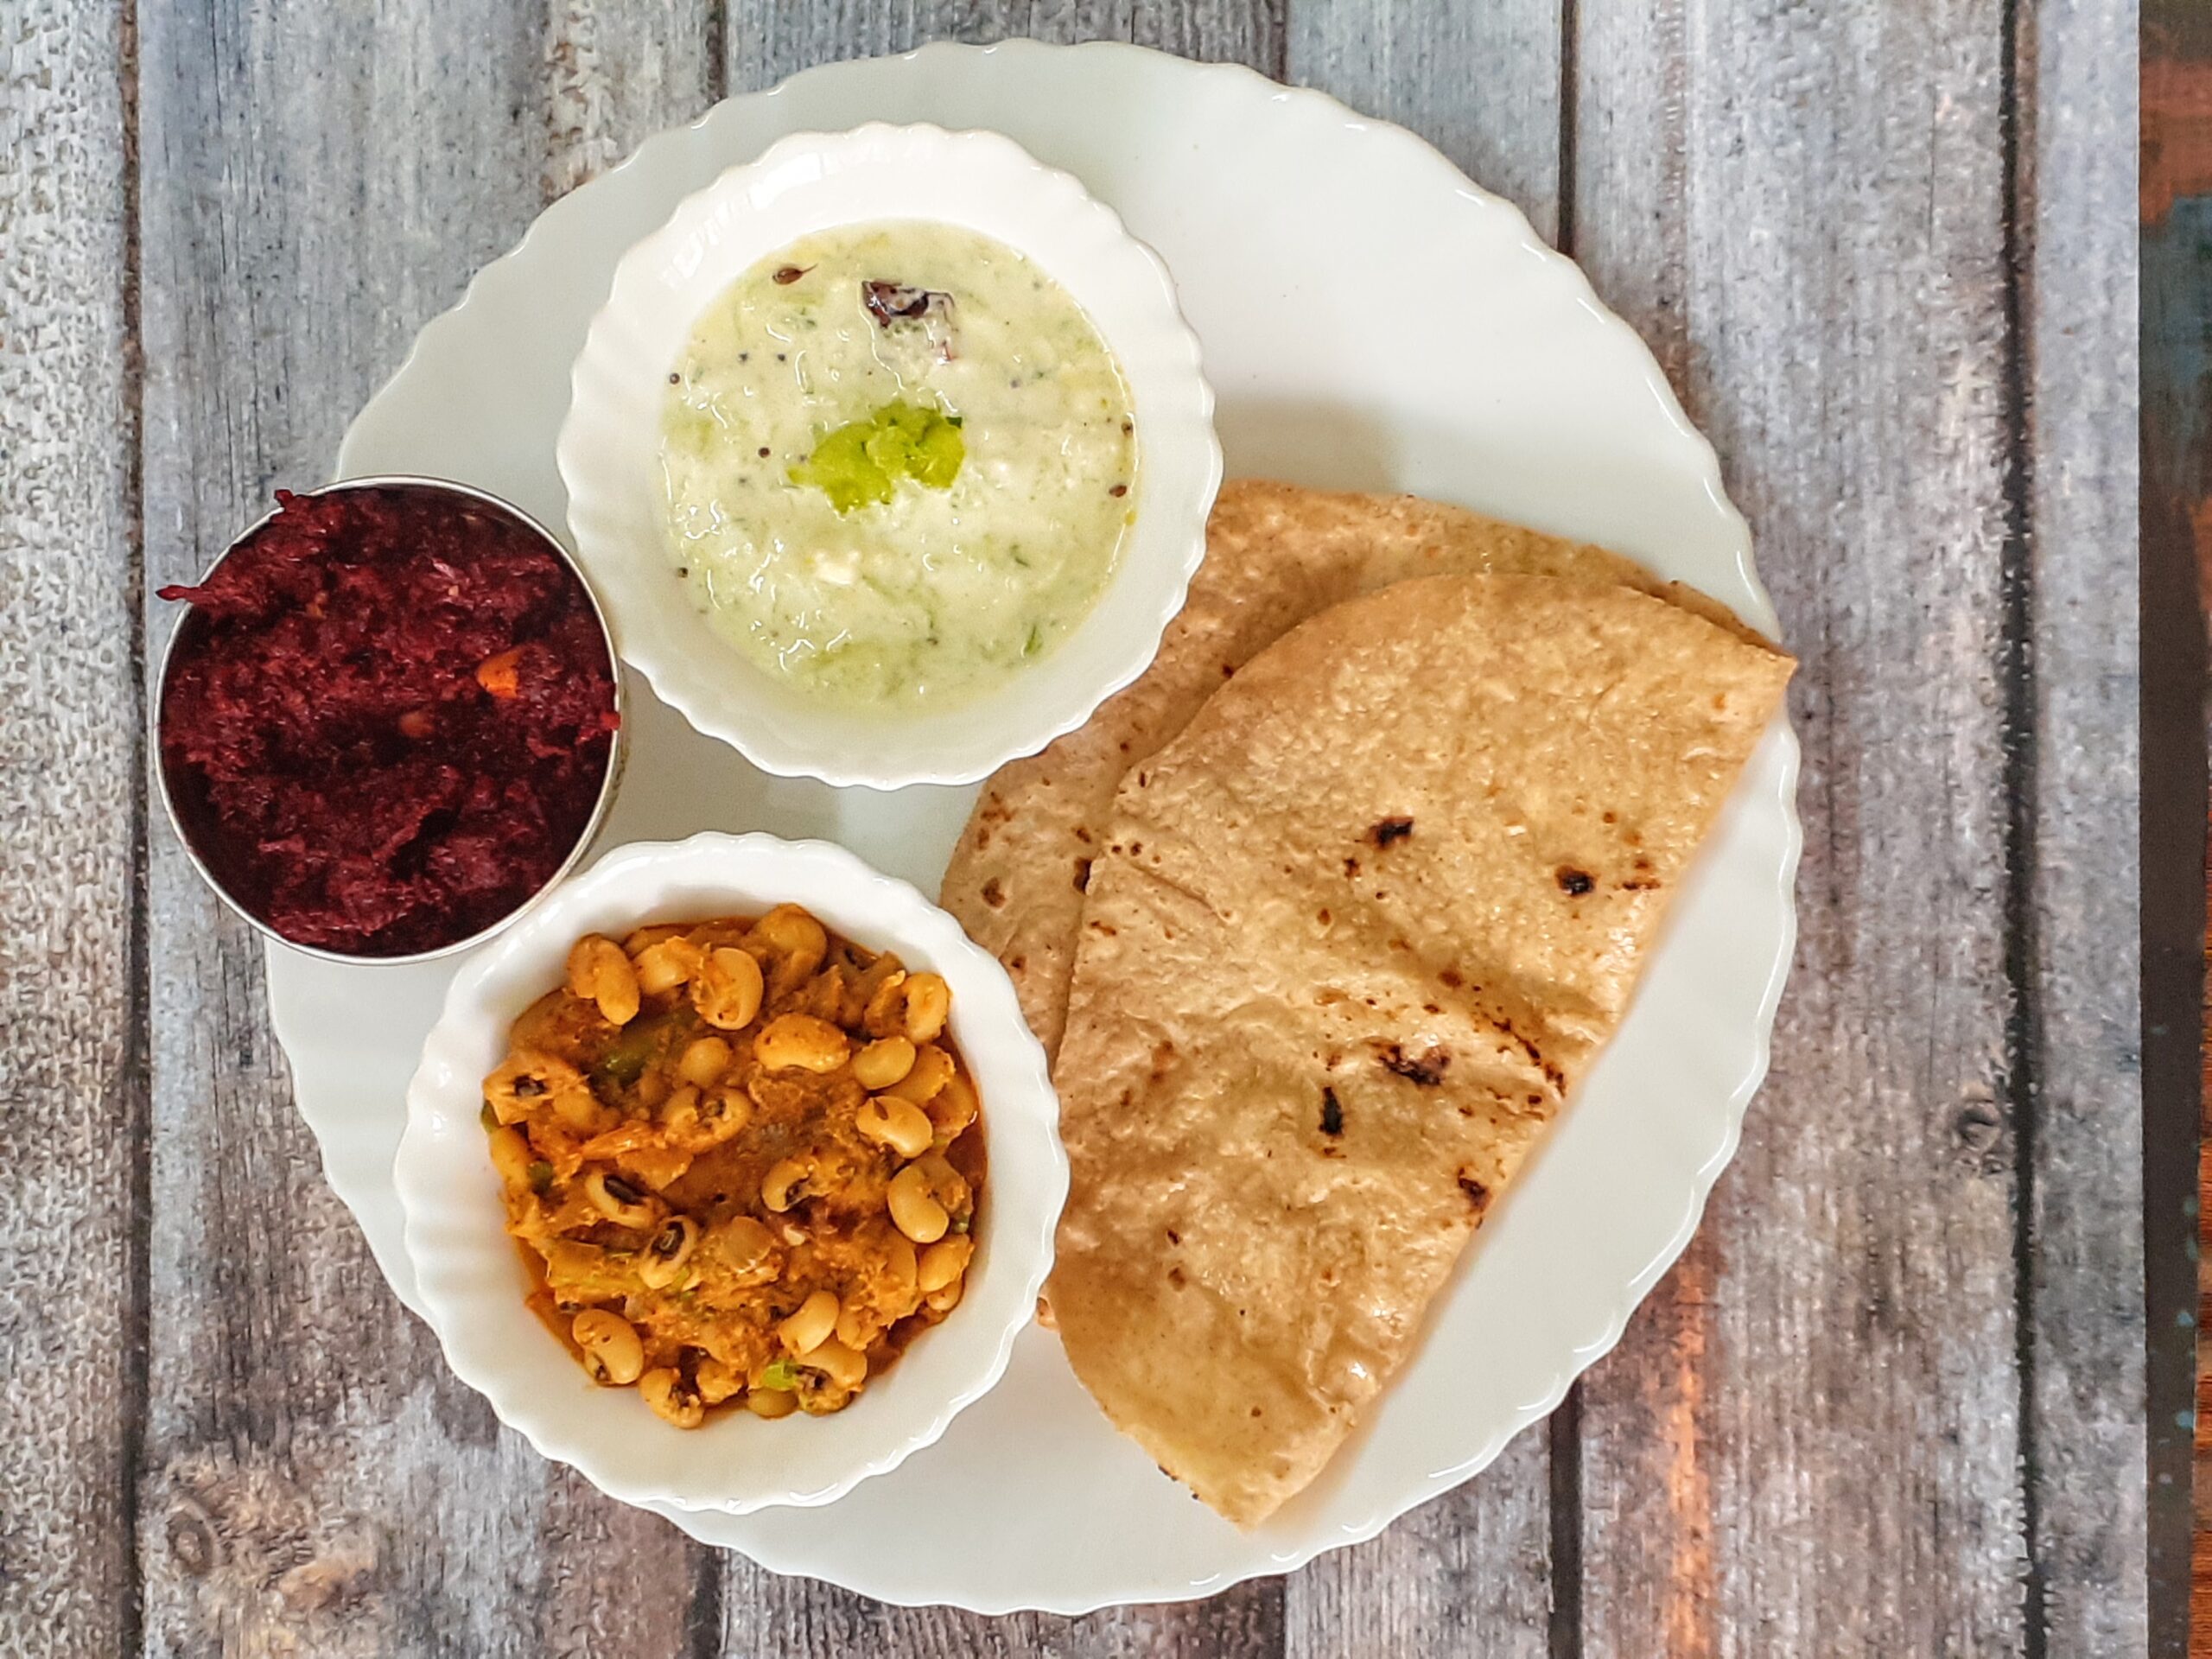
This is how I served my Goan style Lobia curry with Roti, Cucumber
Raita, and
Beetroot Halwa to make it a complete meal.
If you tried this recipe and liked it please comment below. I would love to hear from you. If you have a query about the recipe email us and ill respond as soon as I can.
If you would like to receive our recipes on your mail please leave your mail id at the homepage. Every time Rajjo’s Kitchenn has a new post we will mail the recipe to you.
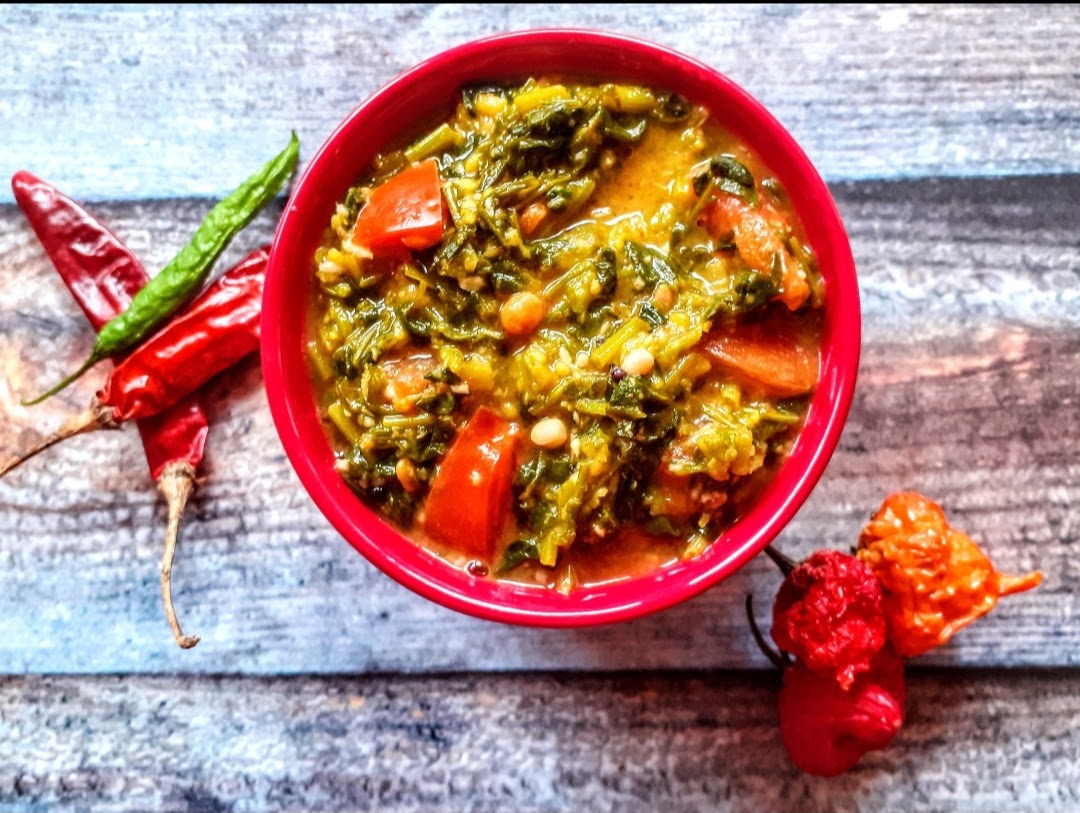
Menthiya Keerai Kootu/South Indian Methi Dal
Fenugreek or Methi green are my most favorite greens and i wish they were perennial. That said, even though they can be grown at home perennially, its always good to eat seasonal food, to get the maximum benefits out of them. These slightly bitter greens have loads of benefits to offer and one should make the most of it.
As said earlier I love these greens, so even in my regular North Indian subji’s I use a few sprigs for flavour. On my blog you will find Methi used in different ways like the Aloo Methi Paratha, Methi Wale Baingan and more…
Today I am posting a simple everyday South Indian recipe which is Menthiya Keerai kootu or Methi dal. This is different from the North Indain version as here ground coconut paste is used for flavouring, which reduces the bitterness of the Methi and ehances its flavour. I prefer using Moongdal for this kootu though Tuvar dal also can be used. Let’s get to the recipe right away.
This is a simple recipe that gets done in under 30 minutes. The dal can be pre cooked to make quick dinner after a long day at work. Just this Kootu and some Rice and one is in for a super healthy and satiating meal.
Here is the recipe for Menthiya Keerai Kootu
PREP TIME: 10 MINS COOK TIME:15 MINS
TOTAL TIME: 25 MINS COURSE: MAIN
CUISINE: SOUTH INDIAN SERVINGS: 4
AUTHOR: RAJNI RAM
Ingredients:
Methi green/Fenugreek greens 1 bunch
Moong dal 1/2 cup Roasted to light brown
Tomato 1 finely chopped
Grated Coconut 2 tbsp
Cumin 1 tsp
Turmeric powder 1 tsp
Sambar powder 1 tsp
Red chilli powder 1 tsp
Dry red chillies 2 whole
Mustard seeds 1 tsp
Urad dal 2 tsp
Chana dal 1 tsp
Oil for tempering (I used coconut oil)
Directions:
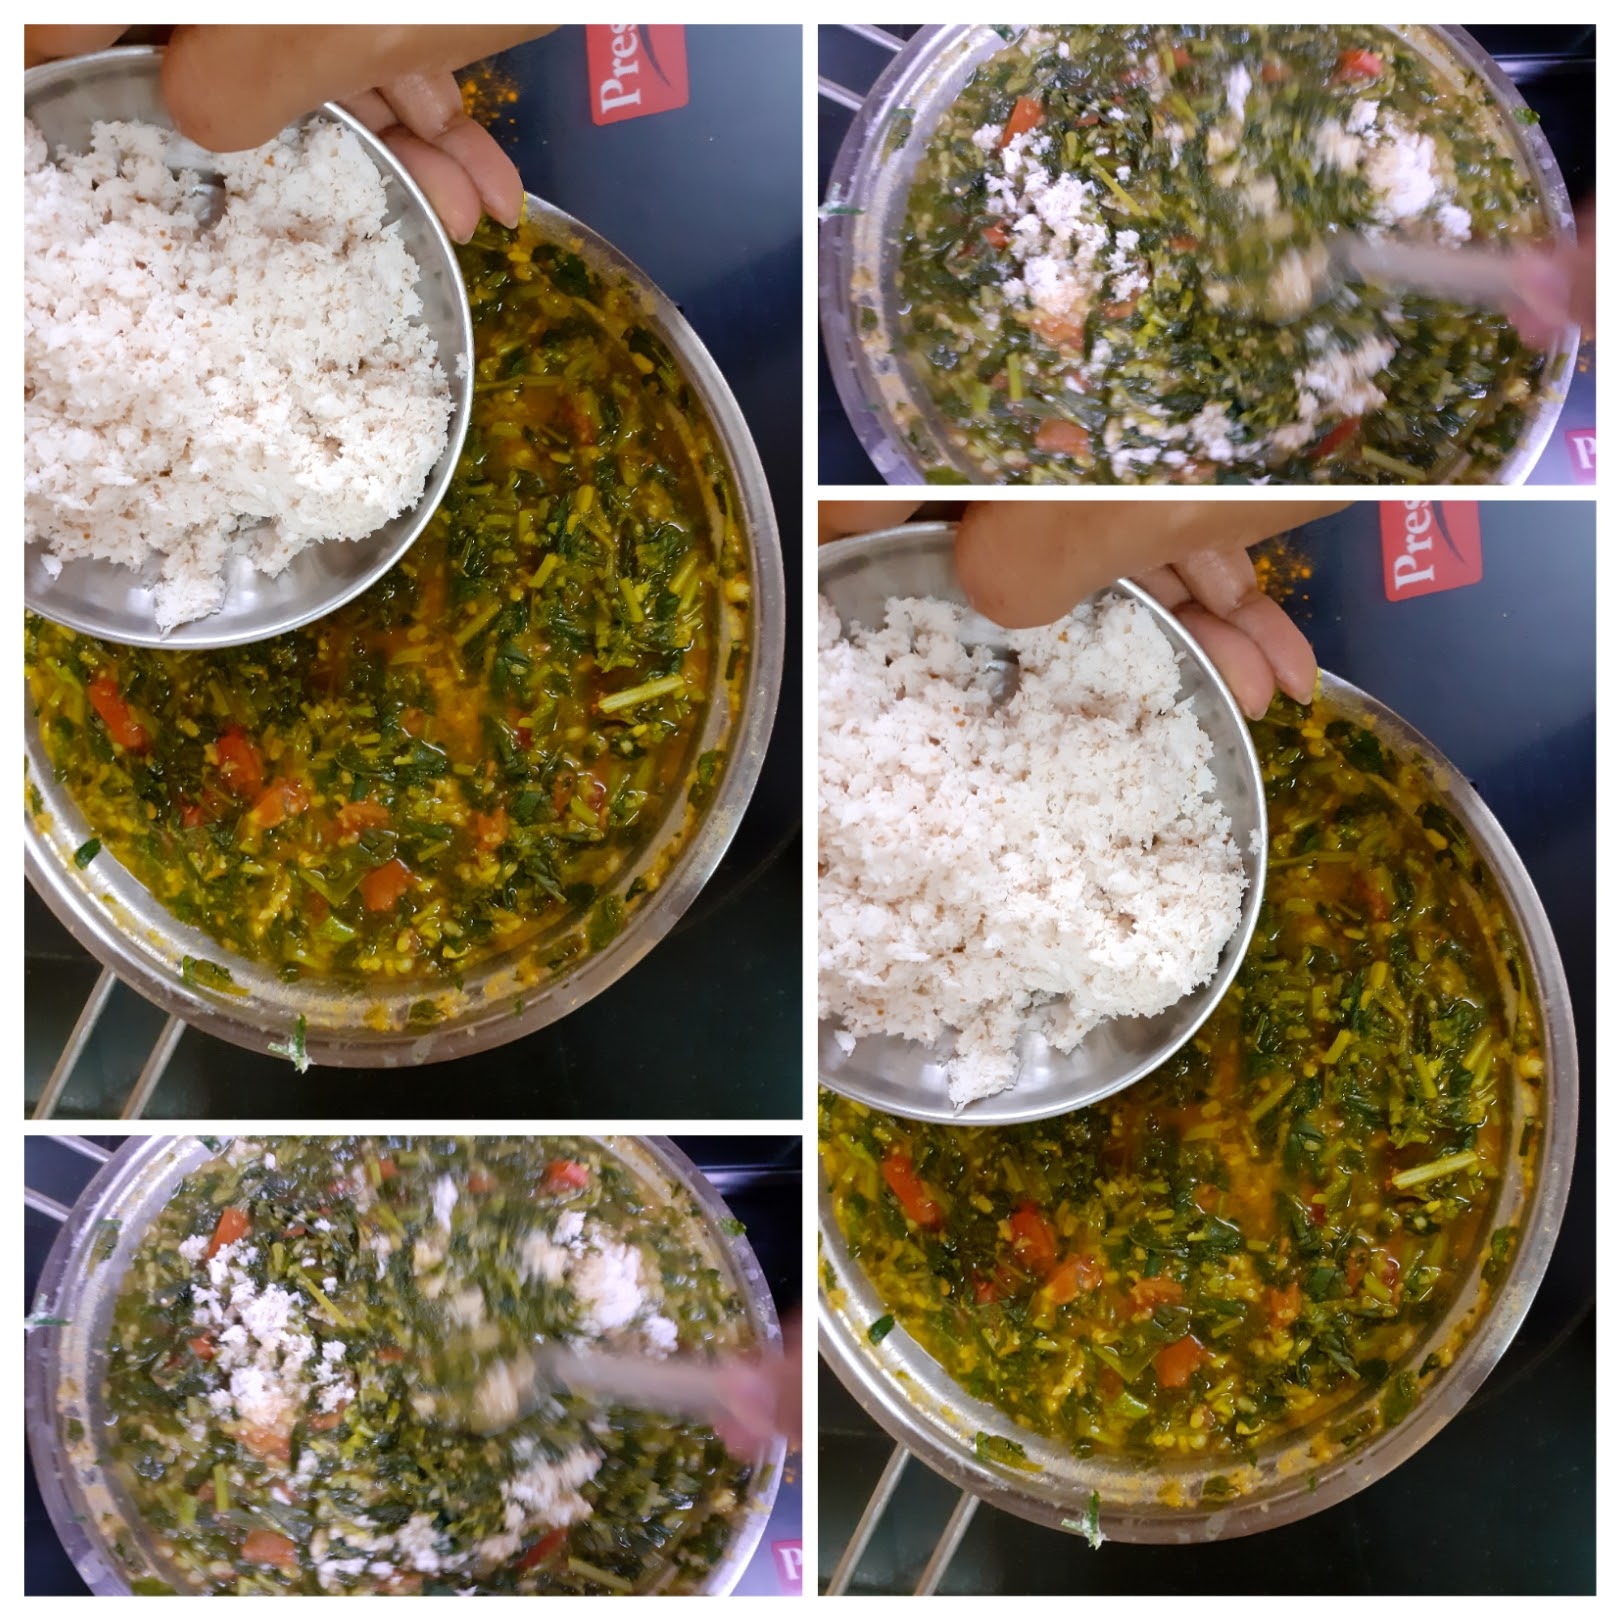
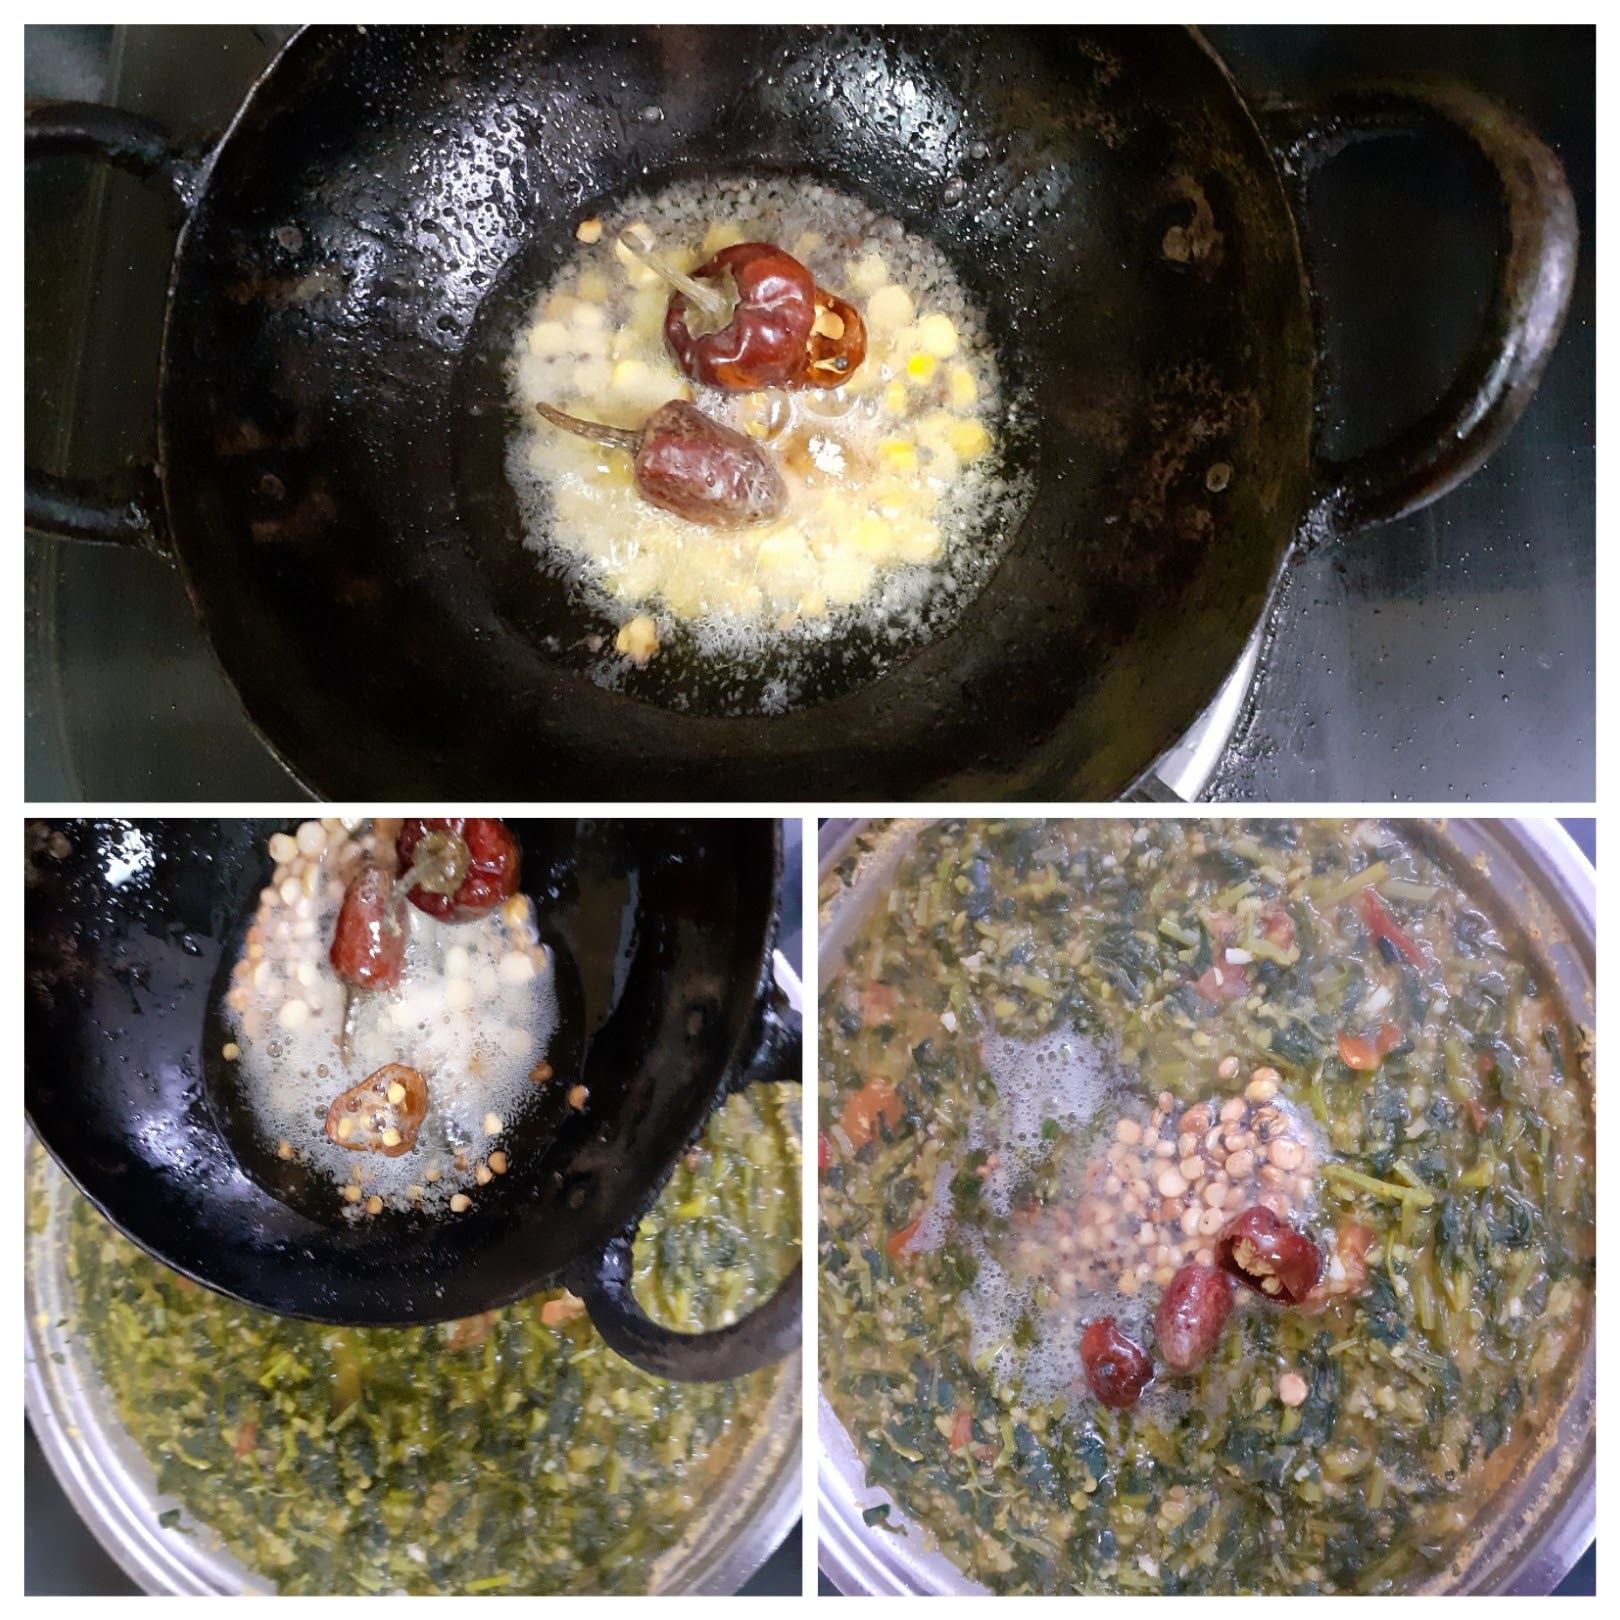
In a Karahi dry roast the Moong Dal to a light brown colour and pressure cook for 4 whistles. In a pan, take the Methi leaves and add 1 cup water followed by turmeric powder and salt and cook. When the leaves are half done add Sambar powder and red chilli powder and continue to cook. Add chopped tomatoes and cook for another minute. Now add the cooked dal and give it a nice mix. Add grated coconut, mix well, cook for 2 minutes and put off the flame. In a small Tadka Kadai take some oil for tempering. When oil is hot add the mustard seeds, followed by Urad dal, Chana dal , broken dry red chilli, and asafoetida. Pour the tempering in to the Methi dal and the delicious and healthy Menthiya Keerai kootu is ready.
Serving Suggestions: This Methi dal or Menthiya Keerai kootu goes very well with Vathakuzhambu rice, Rasam rice, Paruppu podi. And me, I love them with Rotis too.
STEPWISE RECIPE FOLLOWS:
1. In a Karahi dry roast the Moong Dal to a light brown colour and pressure cook for 4 whistles, with a little turmeric powder. In a pan, take the Methi leaves and add 1 cup water followed by turmeric powder and salt and cook.
2. In a pan, take the Methi leaves and add 1 cup water followed by turmeric powder and salt and cook. When the leaves are half done add Sambar powder and red chilli powder and continue to cook. Add chopped tomatoes and cook for another minute.
3. Now add the cooked dal and give it a nice mix. Add grated coconut, mix well, cook for 2 minutes and put off the flame.
4. In a small tadka Kadai take some oil for tempering. When oil is hot add the mustard seeds, followed by Urad dal, Chana dal , broken dry red chilli, and asafoetida. Pour the tempering in to the Methi dal and the delicious and healthy Menthiya Keerai kootu is ready.
NOTES:
1. Dry roasting the Moong dal gives a good flavour, aroma and texture to the Kootu. I always have a roasted batch ready.
2. I have used Coconut oil for enhanced flavour as i used it for all south Indian tempering except Sambar and Rasam. One can use refined oil too.
3. Not over cooking the Methi greens is important, other wise the taste is lost.
If you tried this recipe and liked it please comment below. I would love to hear from you. If you have a query about the recipe email us and ill respond as soon as I can.
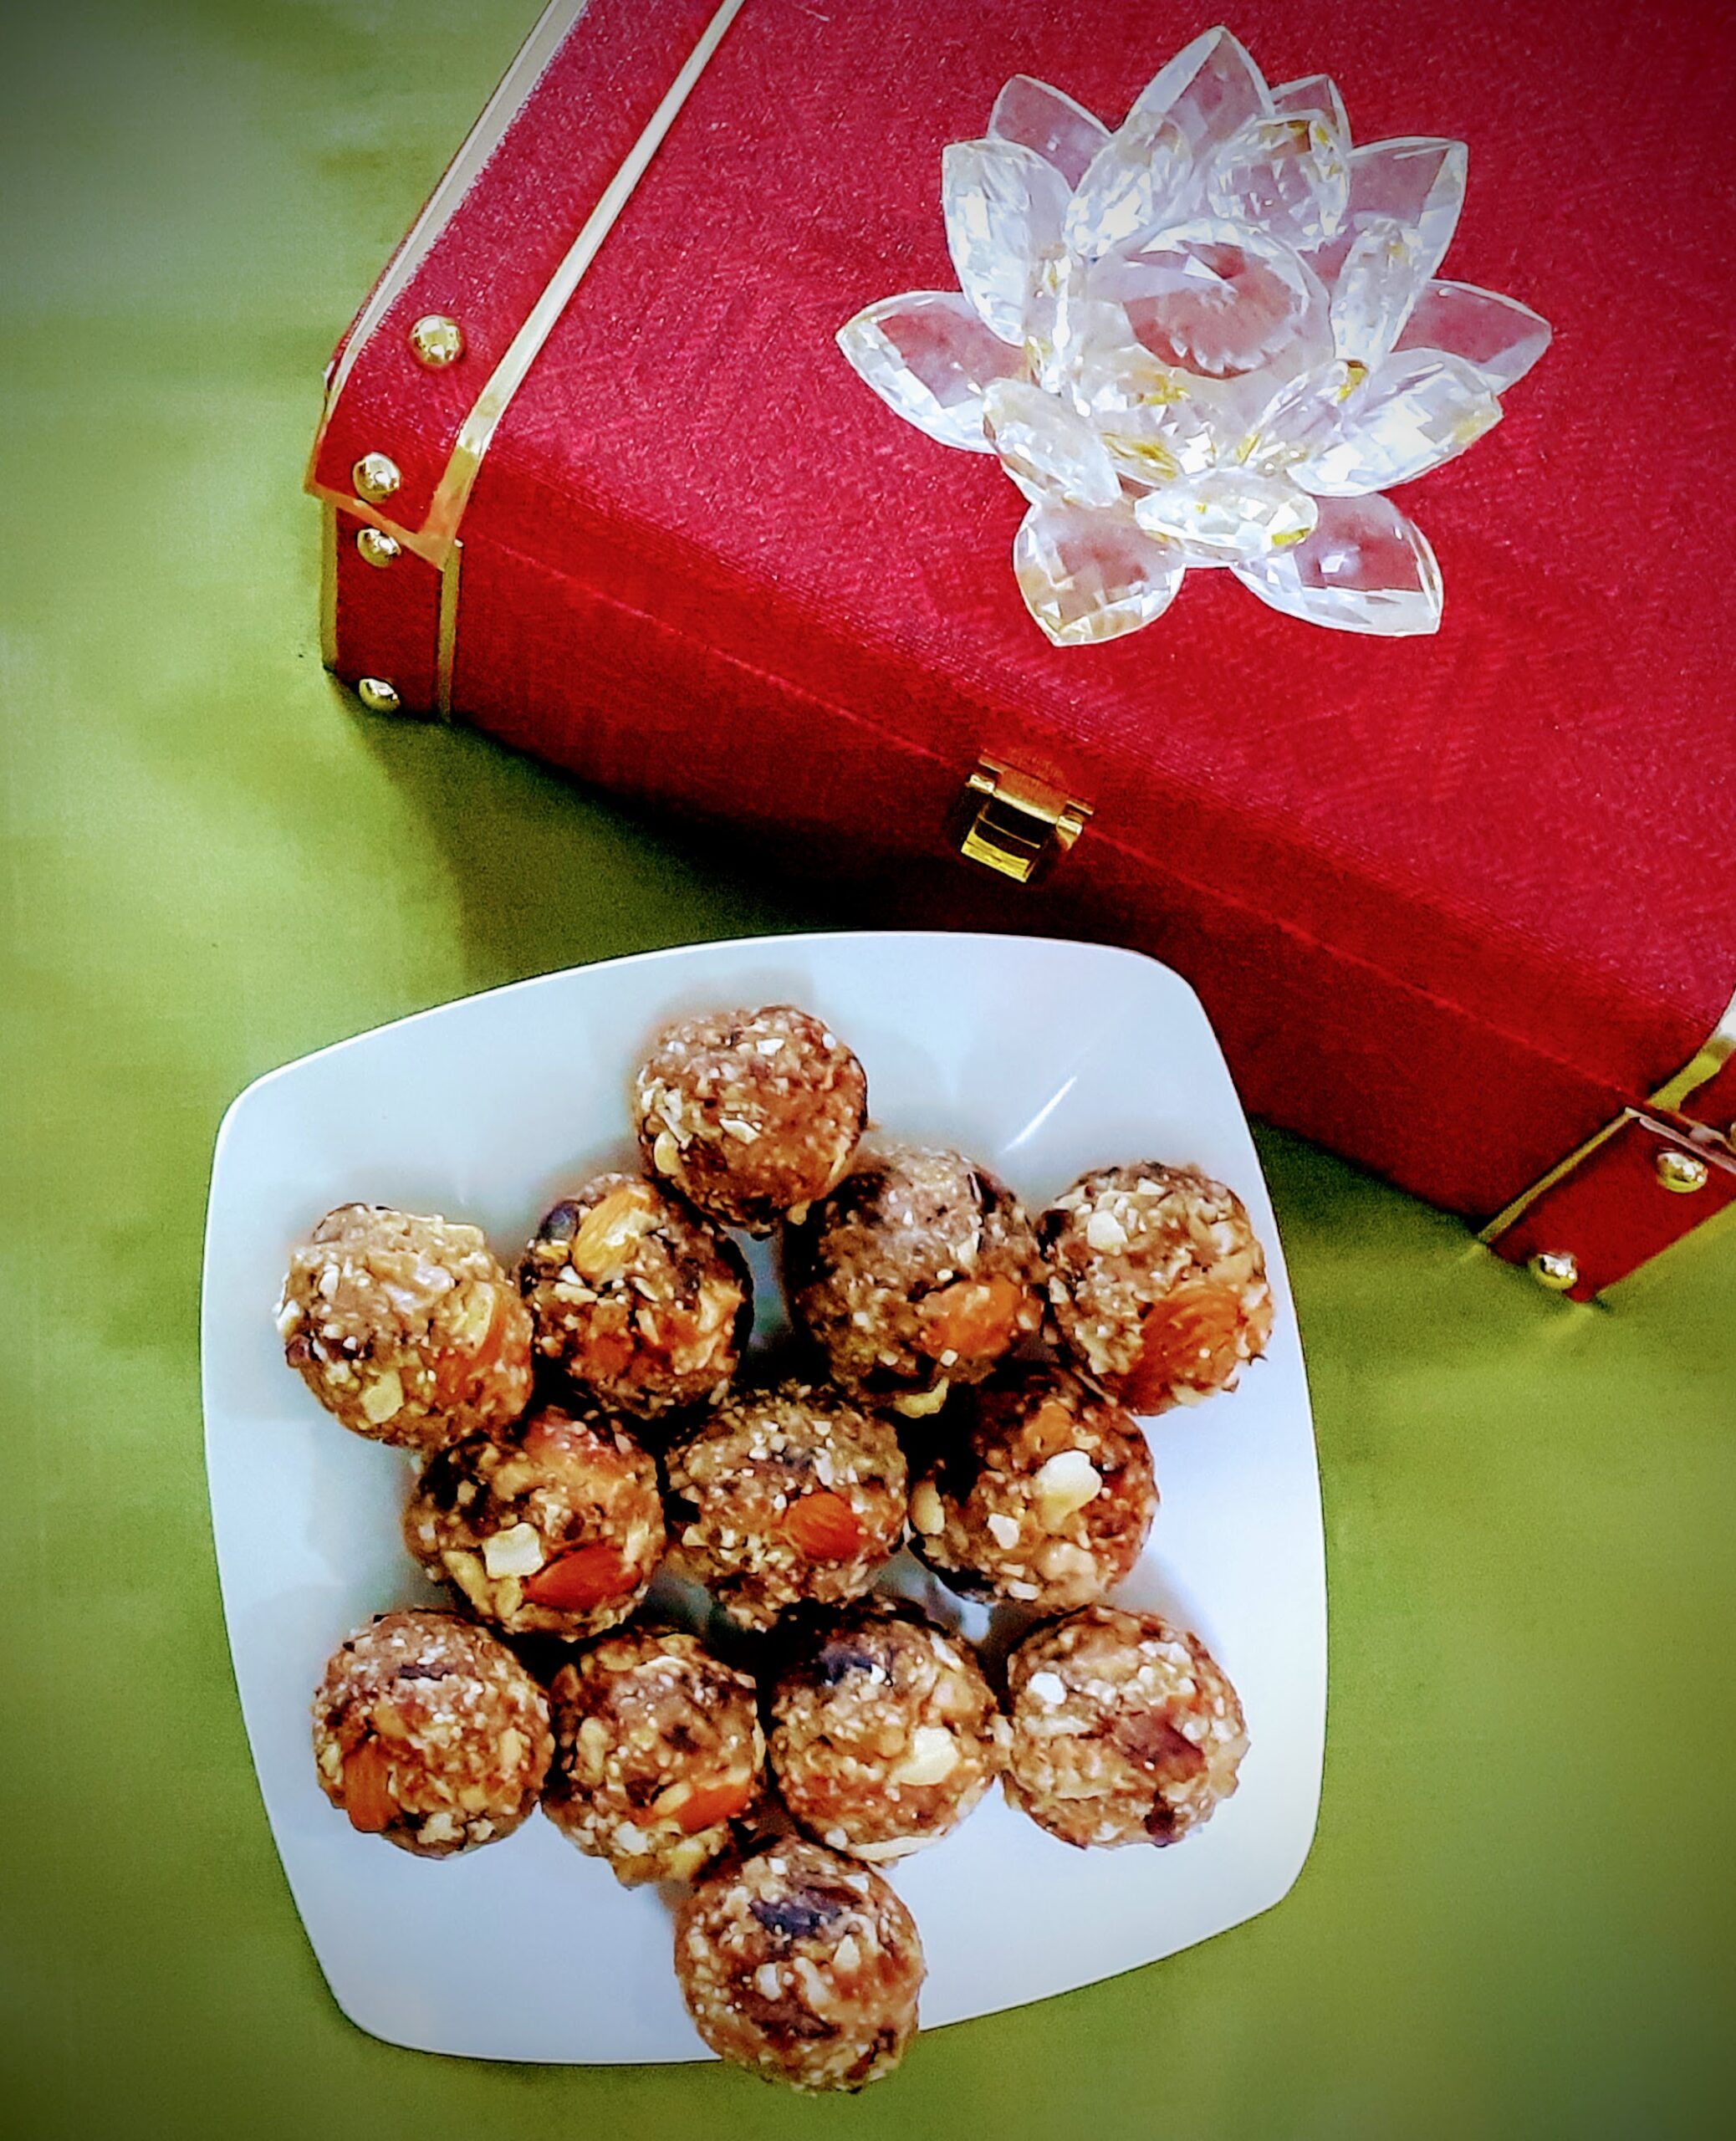
Dry Fruit Ladoo
These Ladoos are absolutely delicious and healthy. In my house, these are made not only during Diwali but all year through. They have a long shelf life and can sometimes substitute for breakfast. People who fast can rely on this for some quick energy. No sugar or honey or jaggery is added and I use minimum ghee(about 3 teaspoons). Yes! this is a whole package of health. Remember good things always come in small packages? This is that package????.
My daughter gets it packed for hostel without fail every time she comes homes on her break. According to her, whenever she gets up late and is late for breakfast at the mess, she pops in 2 of these ladoos and grabs a glass of milk and her breakfast is taken care of for that day. I don’t recommend this on a daily basis, but we all have times when we are running against time, this healthy ladoo comes in handy, it also takes care of sudden hunger pangs. My home always has a stock of these ladoos. And the best part you can customize them as per your desired dry fruits and nuts.
While you are here please check out my other sweet/dessert recipes like- Red Poha Ladoo, Carrot Kheer, Gajar halwa barfi, Maa Ladoo, and more…
Here is the recipe for Dry fruit ladoo-
PREP TIME: 20 COOK TIME: 20 MINS
TOTAL TIME:40Mins COURSE: SWEET
CUISINE: INDIAN SERVINGS: 15 PCS
AUTHOR: Rajni Ram
Ingredients:
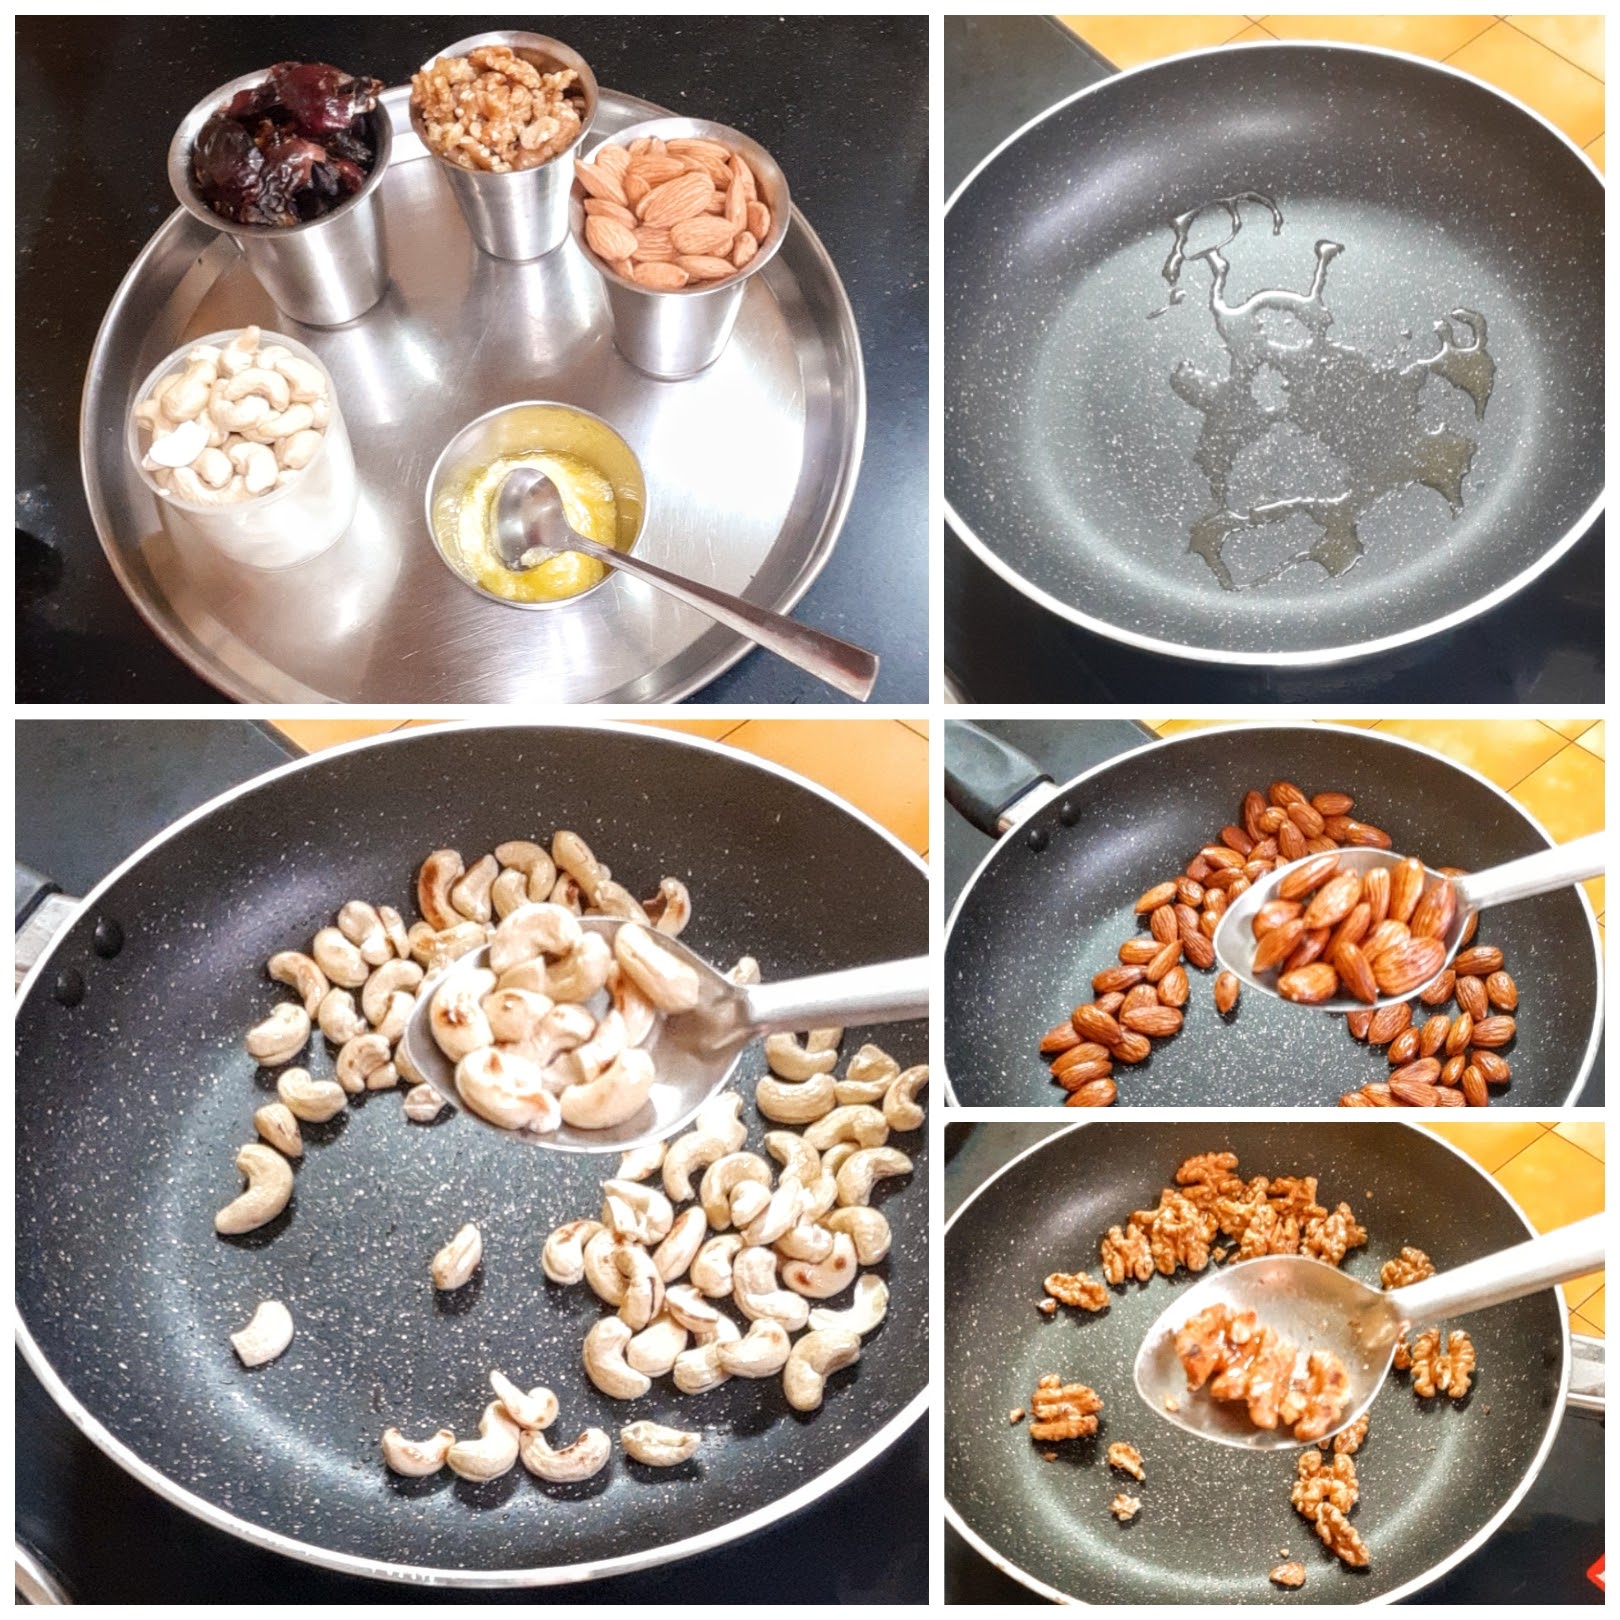
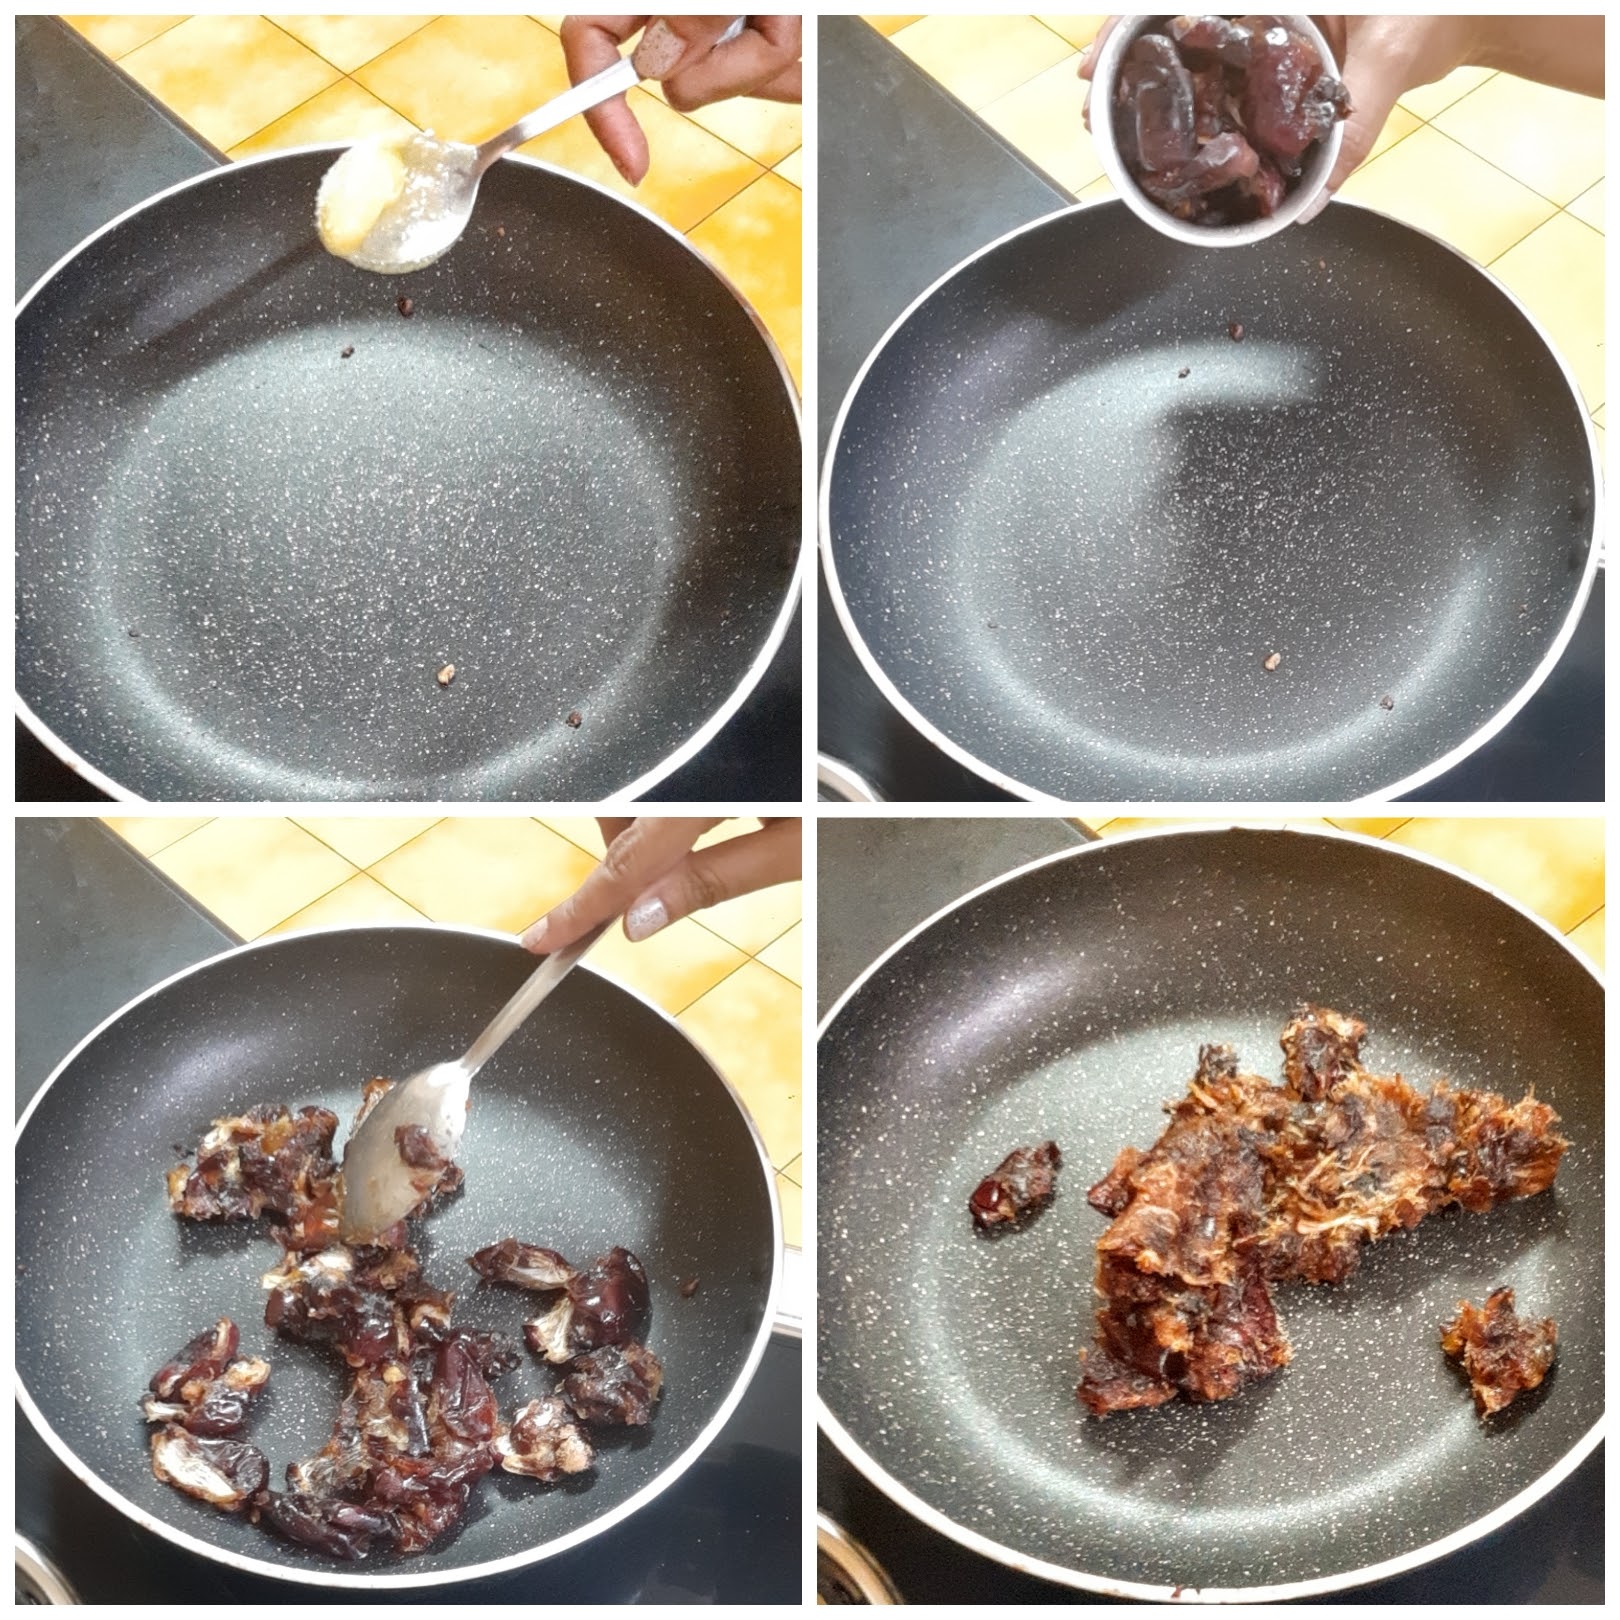
Dates ( juicy, fleshy ones) 250 gms deseeded
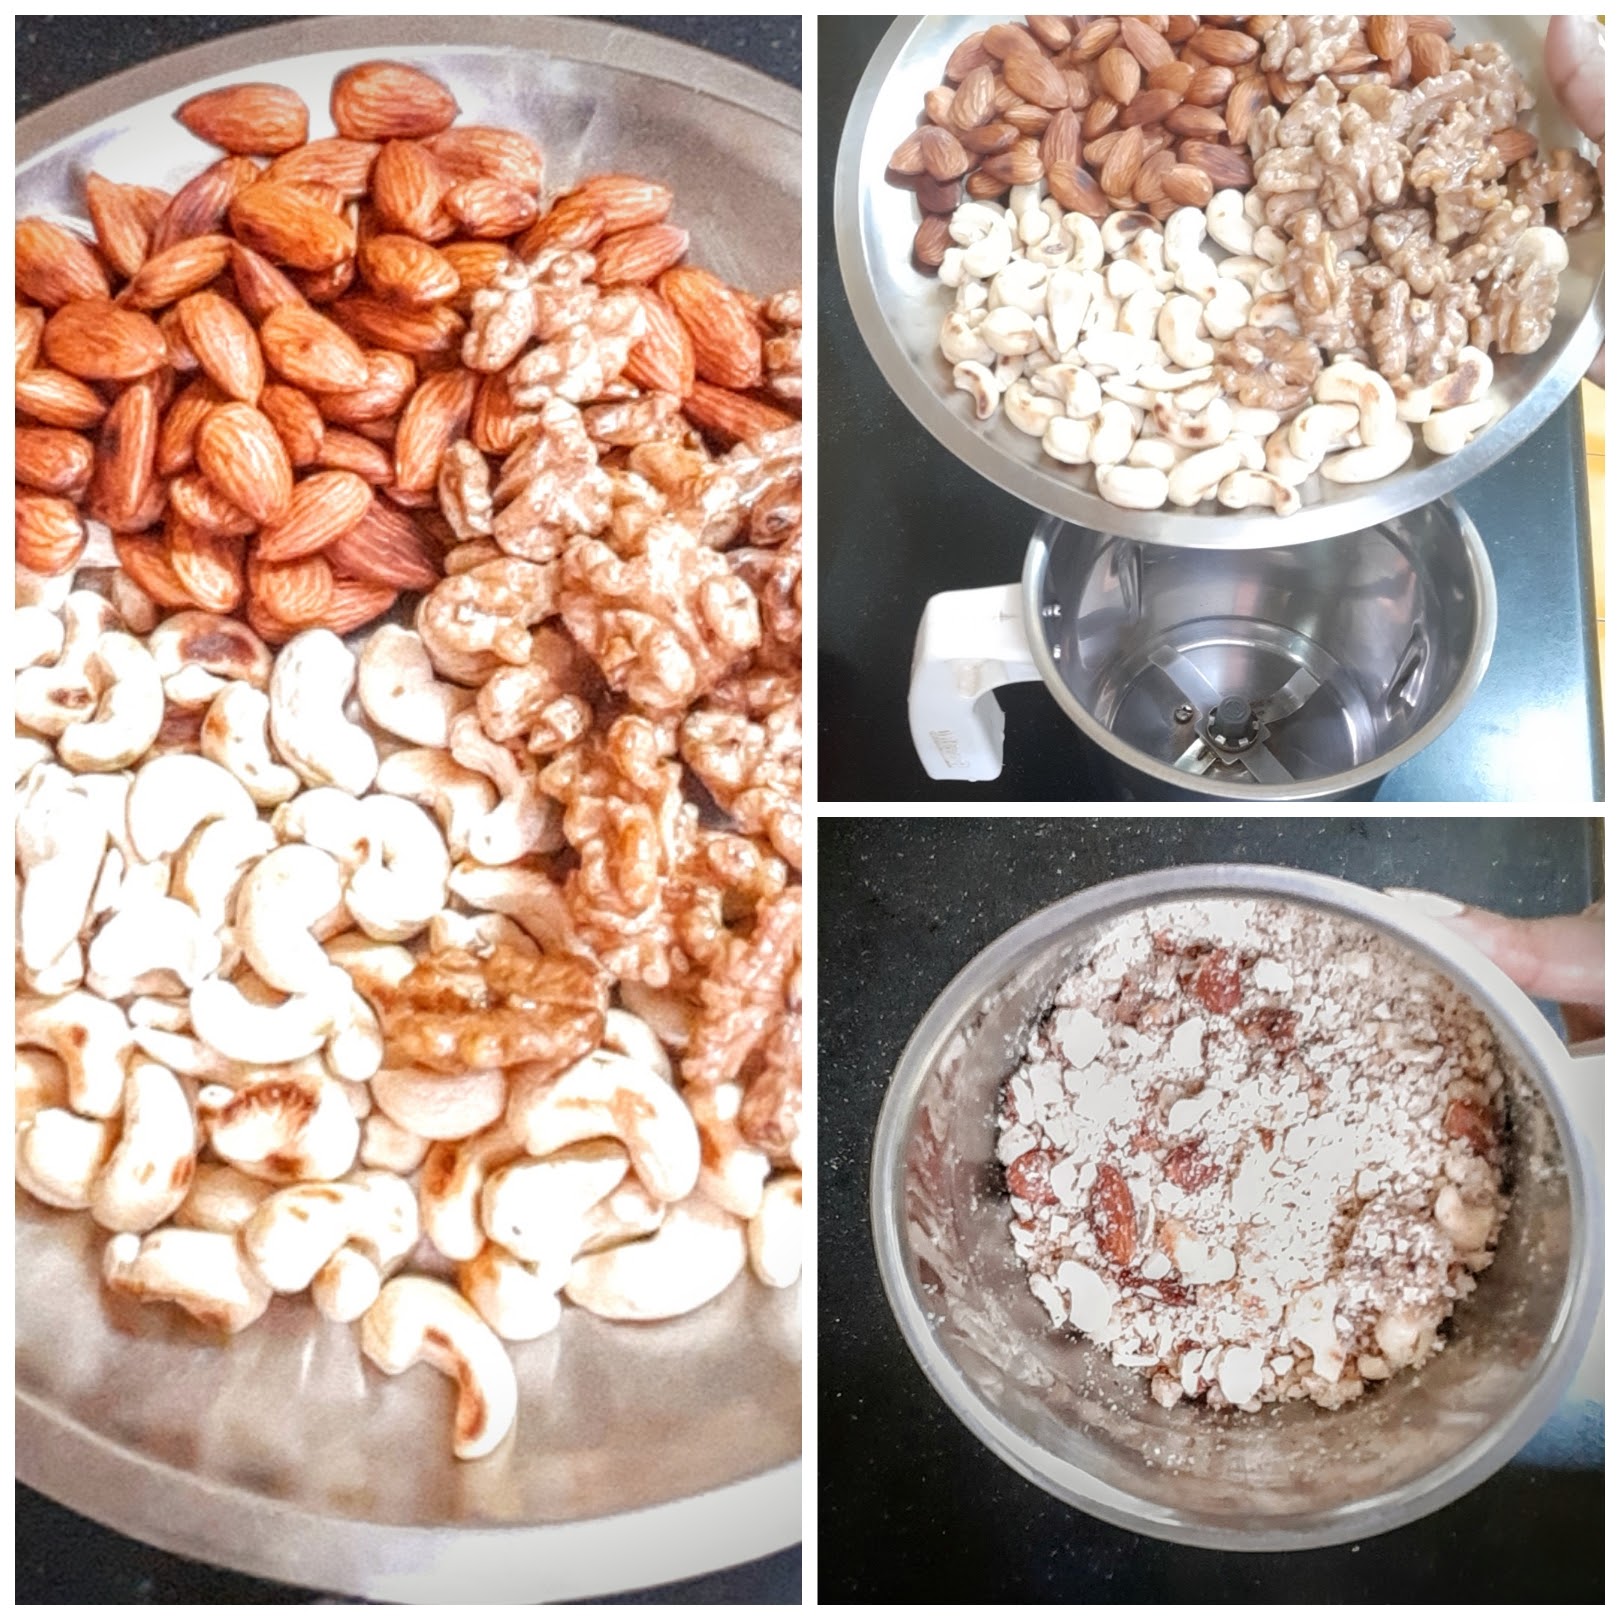
Cashewnuts 100 -125 gms
Almonds 100 gm
Walnut 75 gm
Ghee 1 tbsp
Directions:
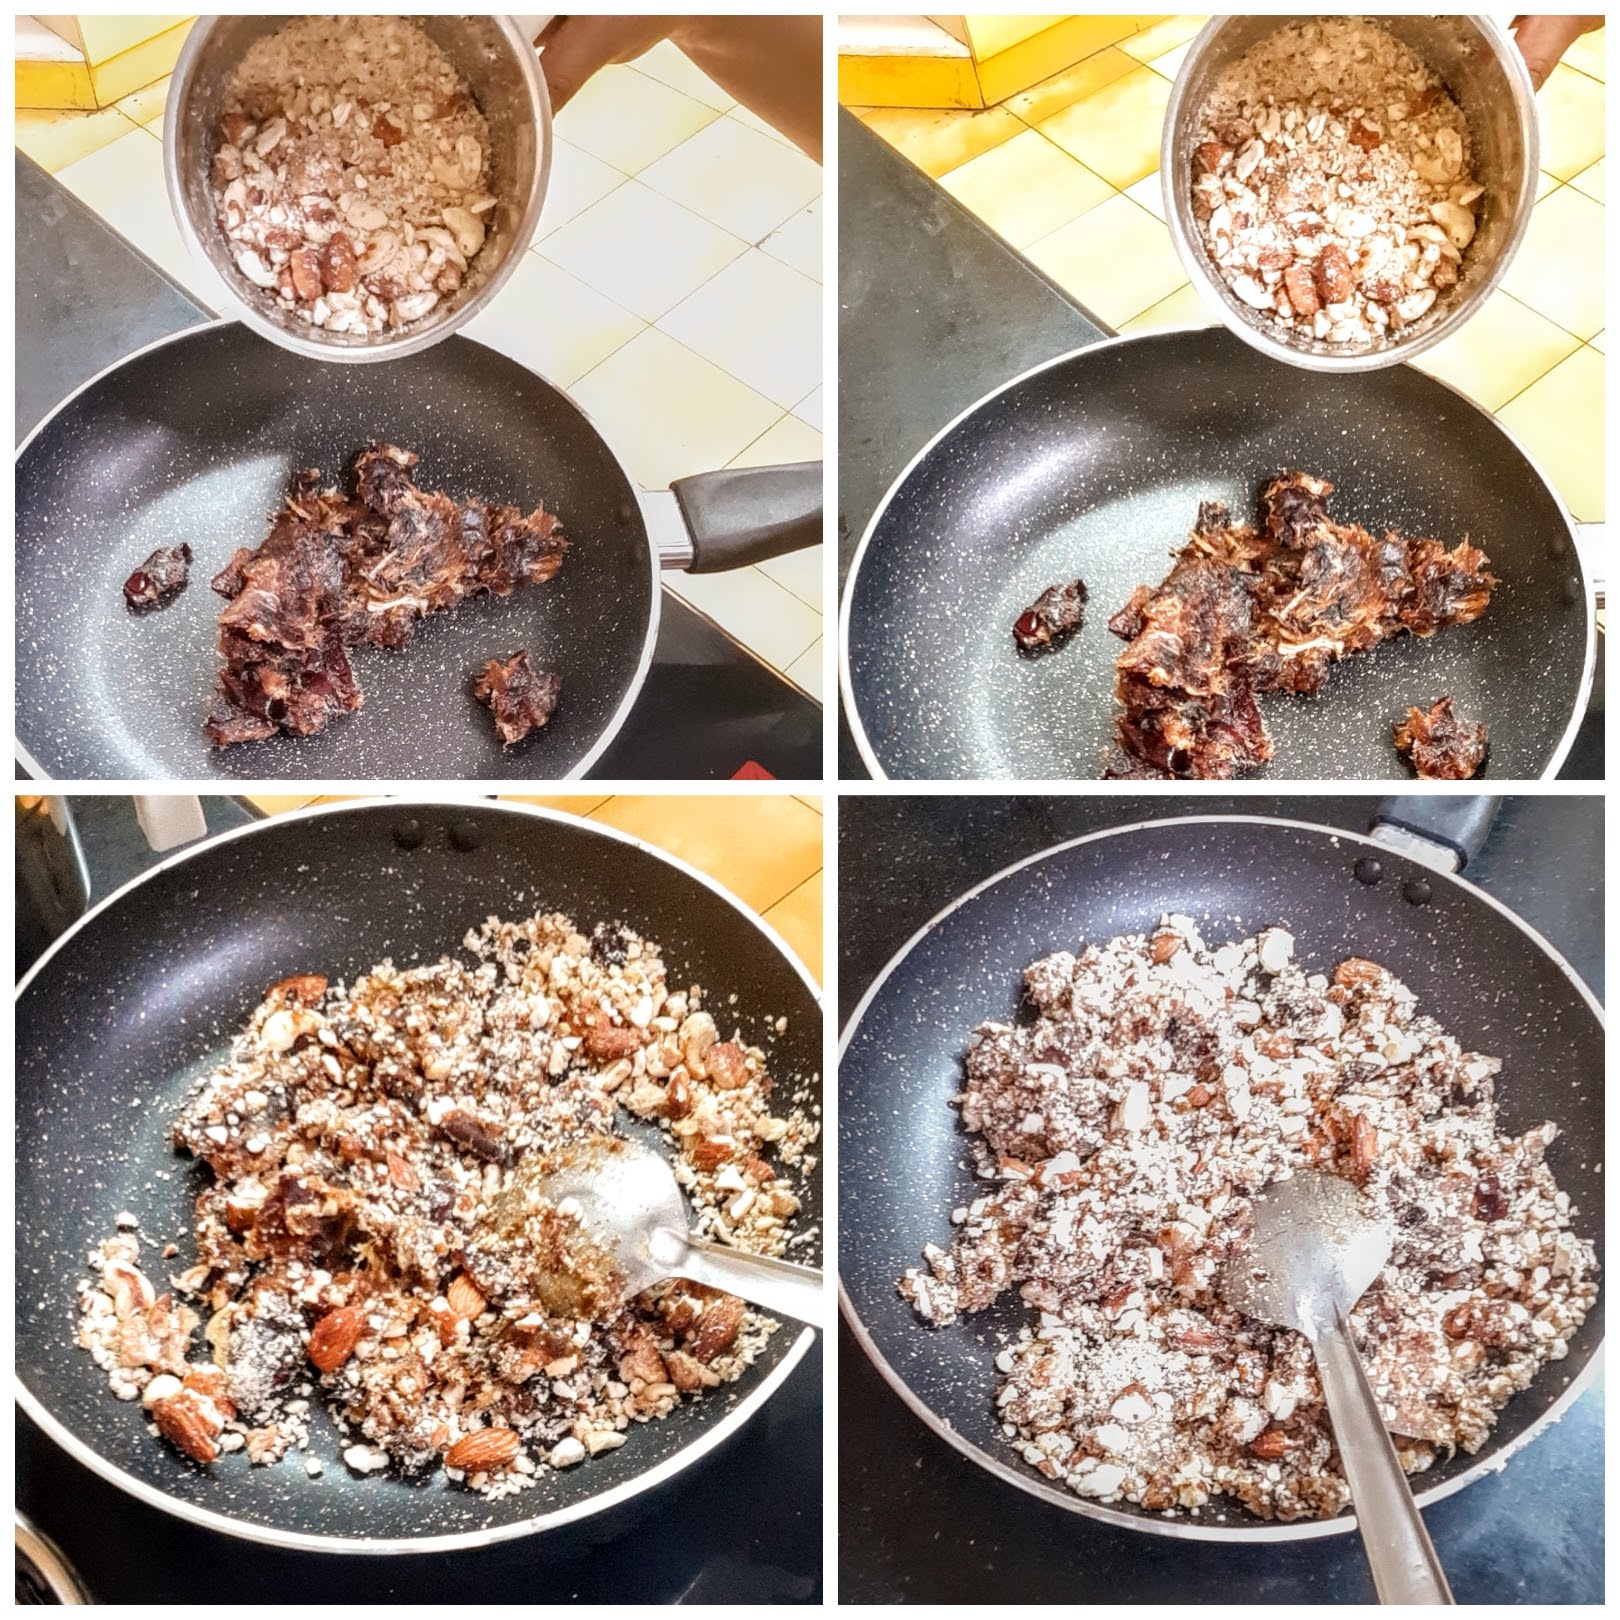
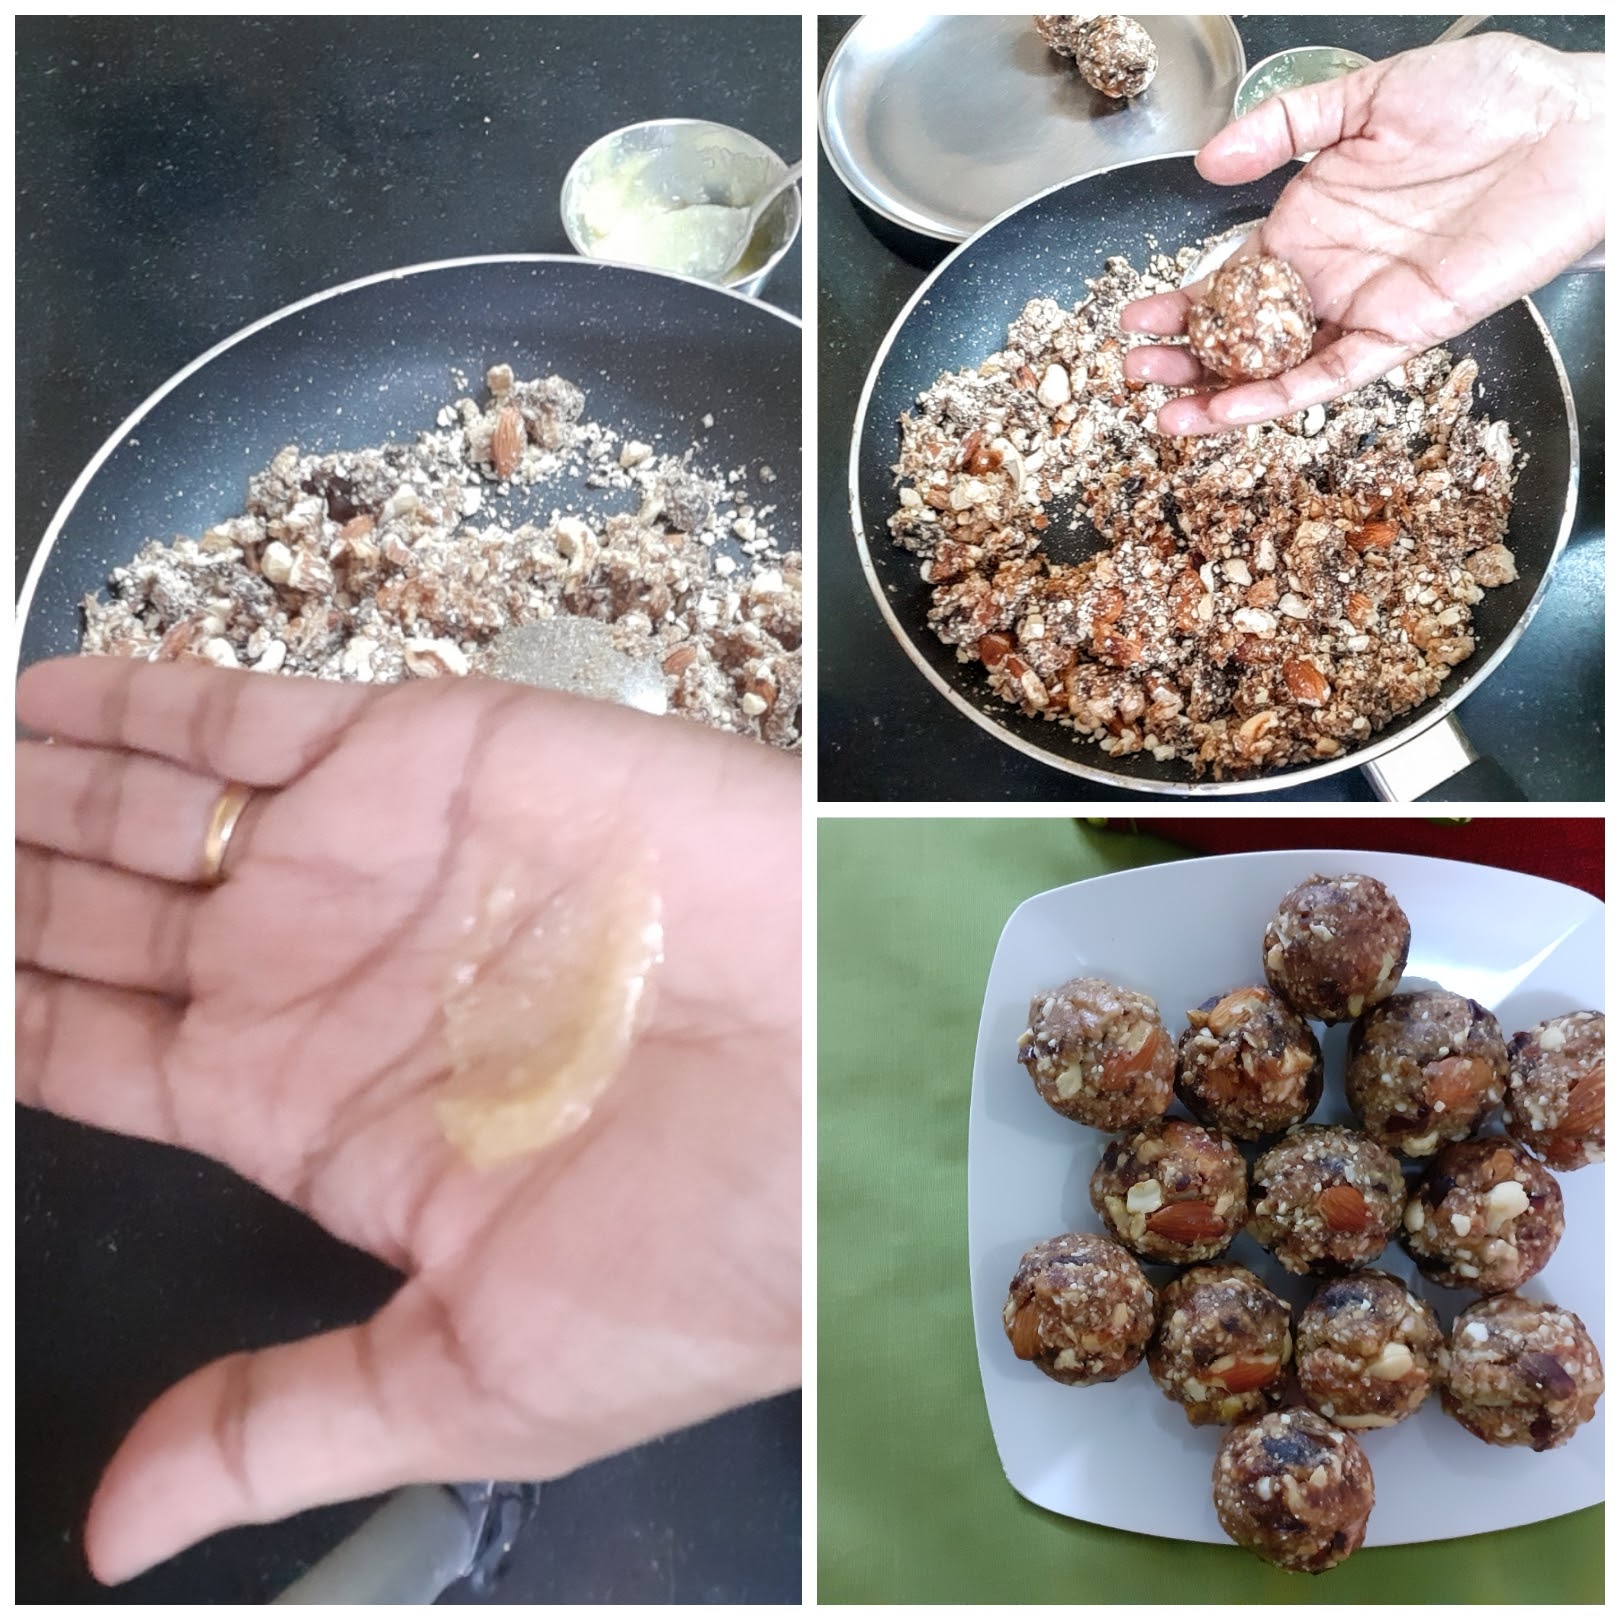
Put a pan over the flame and add 1 tsp ghee to it. Now roast all the nuts separately to a nice golden colour. Take care not to burn them, as the burnt smell will reduce the taste and flavour of the ladoo. Transfer them to a plate and cool them. On cooling using the “pulse mode” of your blender, blend them to a coarse mixture. Now to the same pan add another teaspoon ghee and put in the deseeded dates. Keep stirring and mashing them with the back of a spatula. As it turns warm, the dates start getting a little gooey. Now start adding the coarse nut mixture, little by little, until the gooey date paste absorbs most of it( mixture will look semi-dry). All through this process, the flame should be on low. Once your date and nut mixture is combined, remove from flame and cool for 5 minutes. We want a little warmth for binding, so don’t let it go too cold. Grease your palms with a little ghee and start making ladoo of them. Repeat for the entire mixture. The yummy and tasty Dry fruit ladoo are ready. Store them in an airtight jar once they are completely cool.
STEPWISE RECIPE FOLLOWS:
1. Assemble all ingredients. Put a pan over the flame and add 1 tsp ghee to it. Now roast all the nuts separately to a nice golden colour. Take care not to burn them, as the burnt smell will reduce the taste and flavour of the ladoo.
2. Transfer them to a plate and cool them. On cooling using the “pulse mode” of your blender, blend them to a coarse mixture.
3. Now to the same pan add another teaspoon ghee and put in the deseeded dates. Keep stirring and mashing them with the back of a spatula. As it turns warm, the dates start getting a little gooey.
4. Now start adding the coarse nut mixture, little by little, until the gooey date paste absorbs most of it( mixture will look semi-dry). All through this process, the flame should be on low. Once your date and nut mixture is combined, remove from flame and cool for 5 minutes.
5. Grease your palms with a little ghee and start making ladoo of them. Repeat for the entire mixture. The yummy and tasty Dry fruit ladoo are ready.
NOTES:
1. The amount of nuts required depends upon the juiciness of the dates. The juicier the dates the more nuts will be required.
2. Good quality nuts and dates always give the best taste.
3. During Diwali we all receive lots of dry fruits and nuts and have to stuff everything into our refrigerators to avoid insects accessing them. These ladoos are a great idea to use up all those dry fruits in the best possible way.
4. After adding the required amount of coarse nuts to the dates, if it is still gooey then add more nut mixture after roasting and coarsely grinding them.
5. After adding the nut mixture to dates if you find it is too dry and are not able to make ladoos, them warm up more dates and add to them.
If you tried this recipe and liked it please comment below. I would love to hear from you. If you have a query about the recipe email us and ill respond as soon as I can.
If you would like to receive our recipes in your mail please leave your mail id at the homepage. Every time Rajjo’s Kitchenn has a new post we will mail the recipe to you.
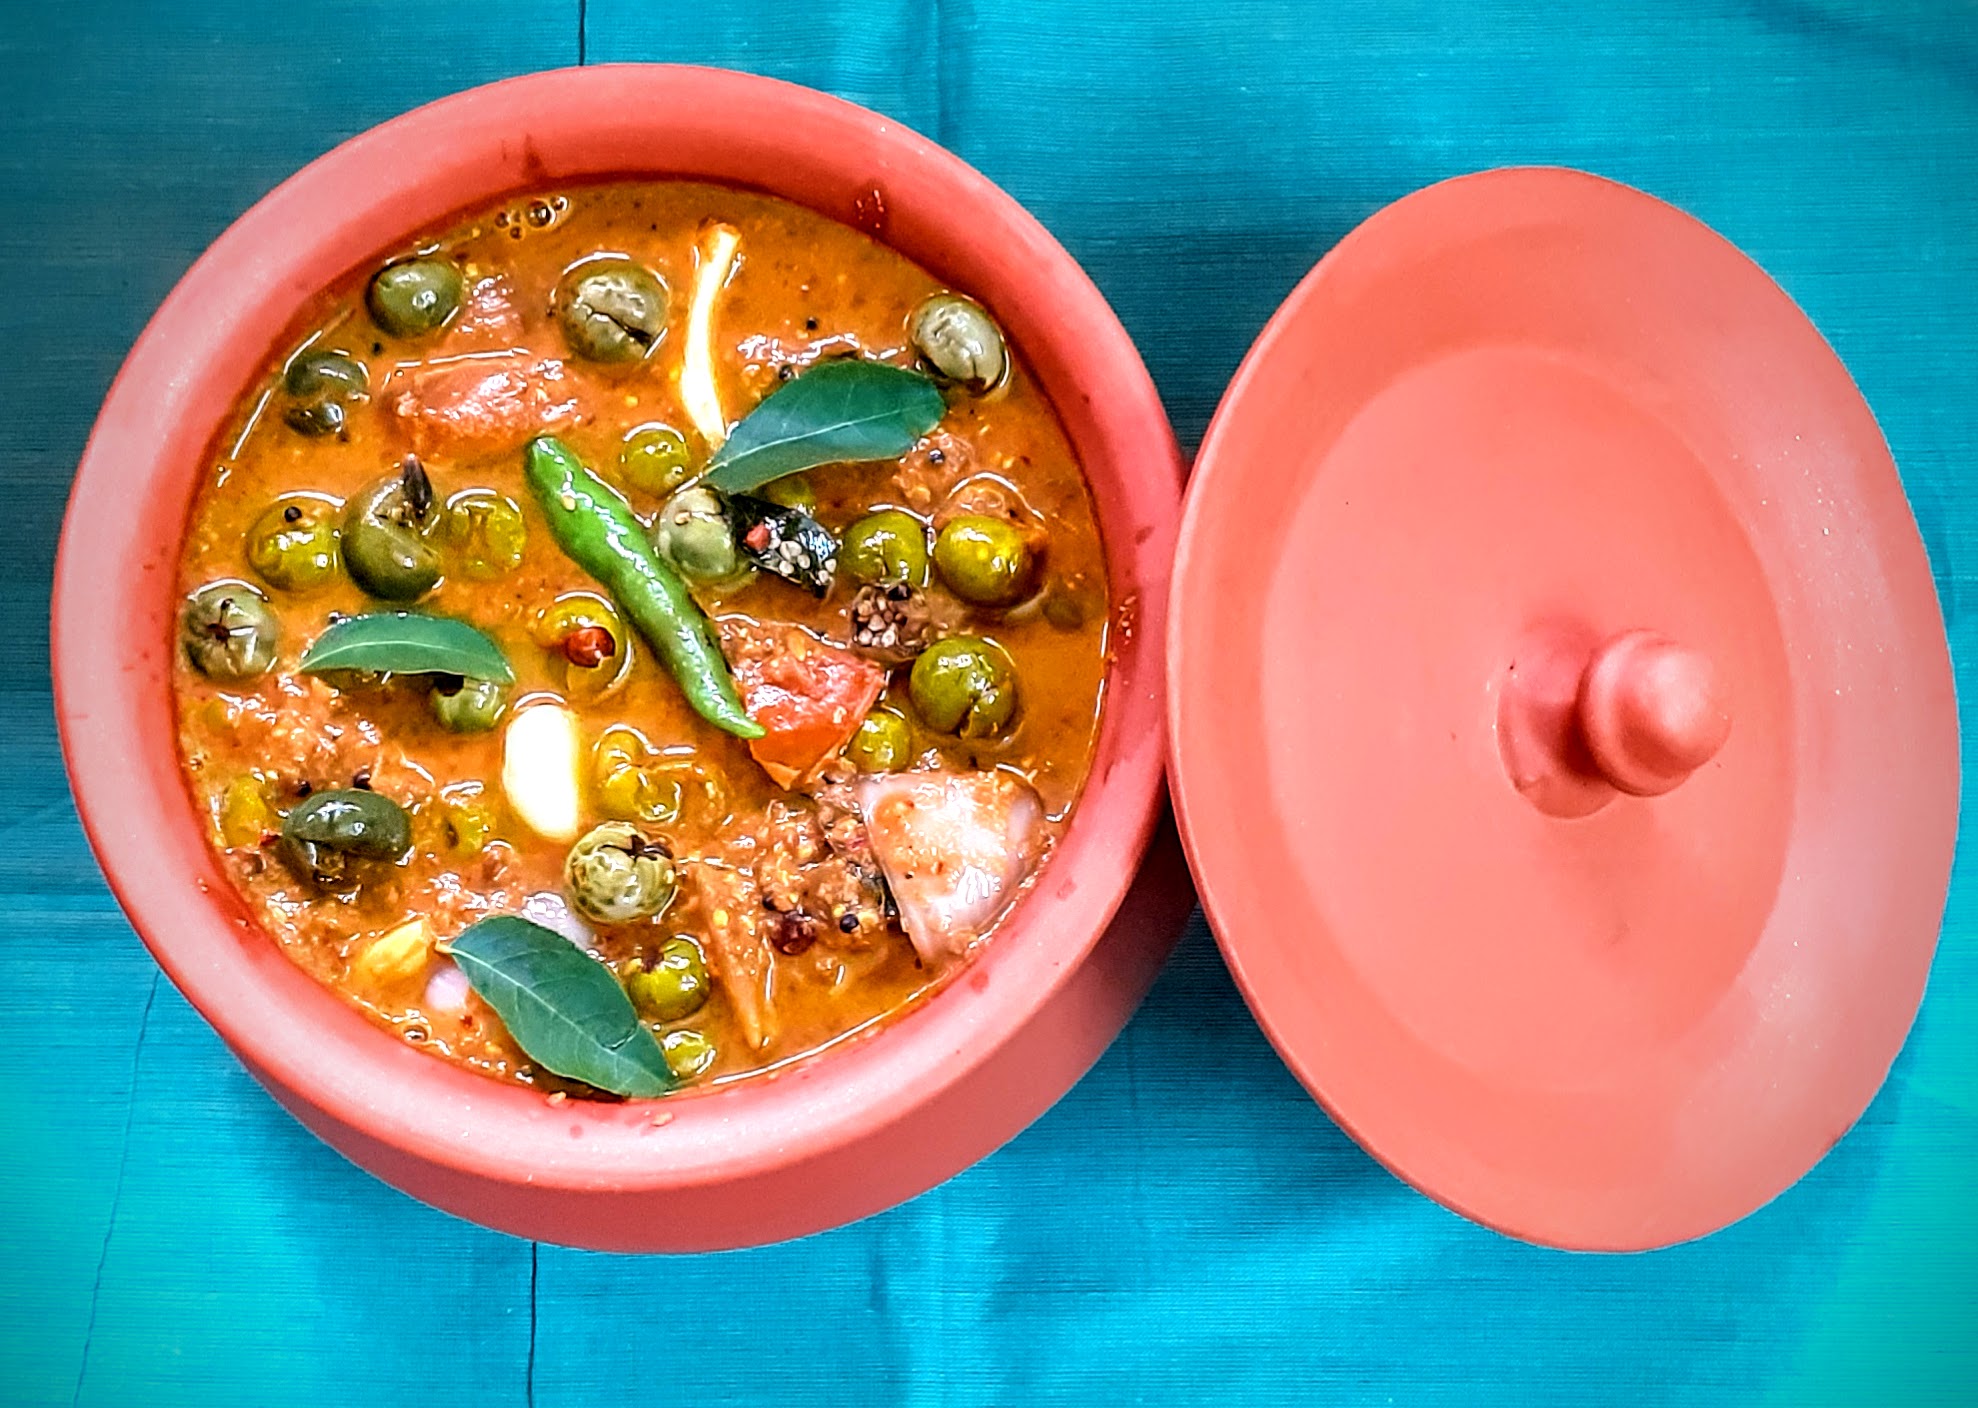
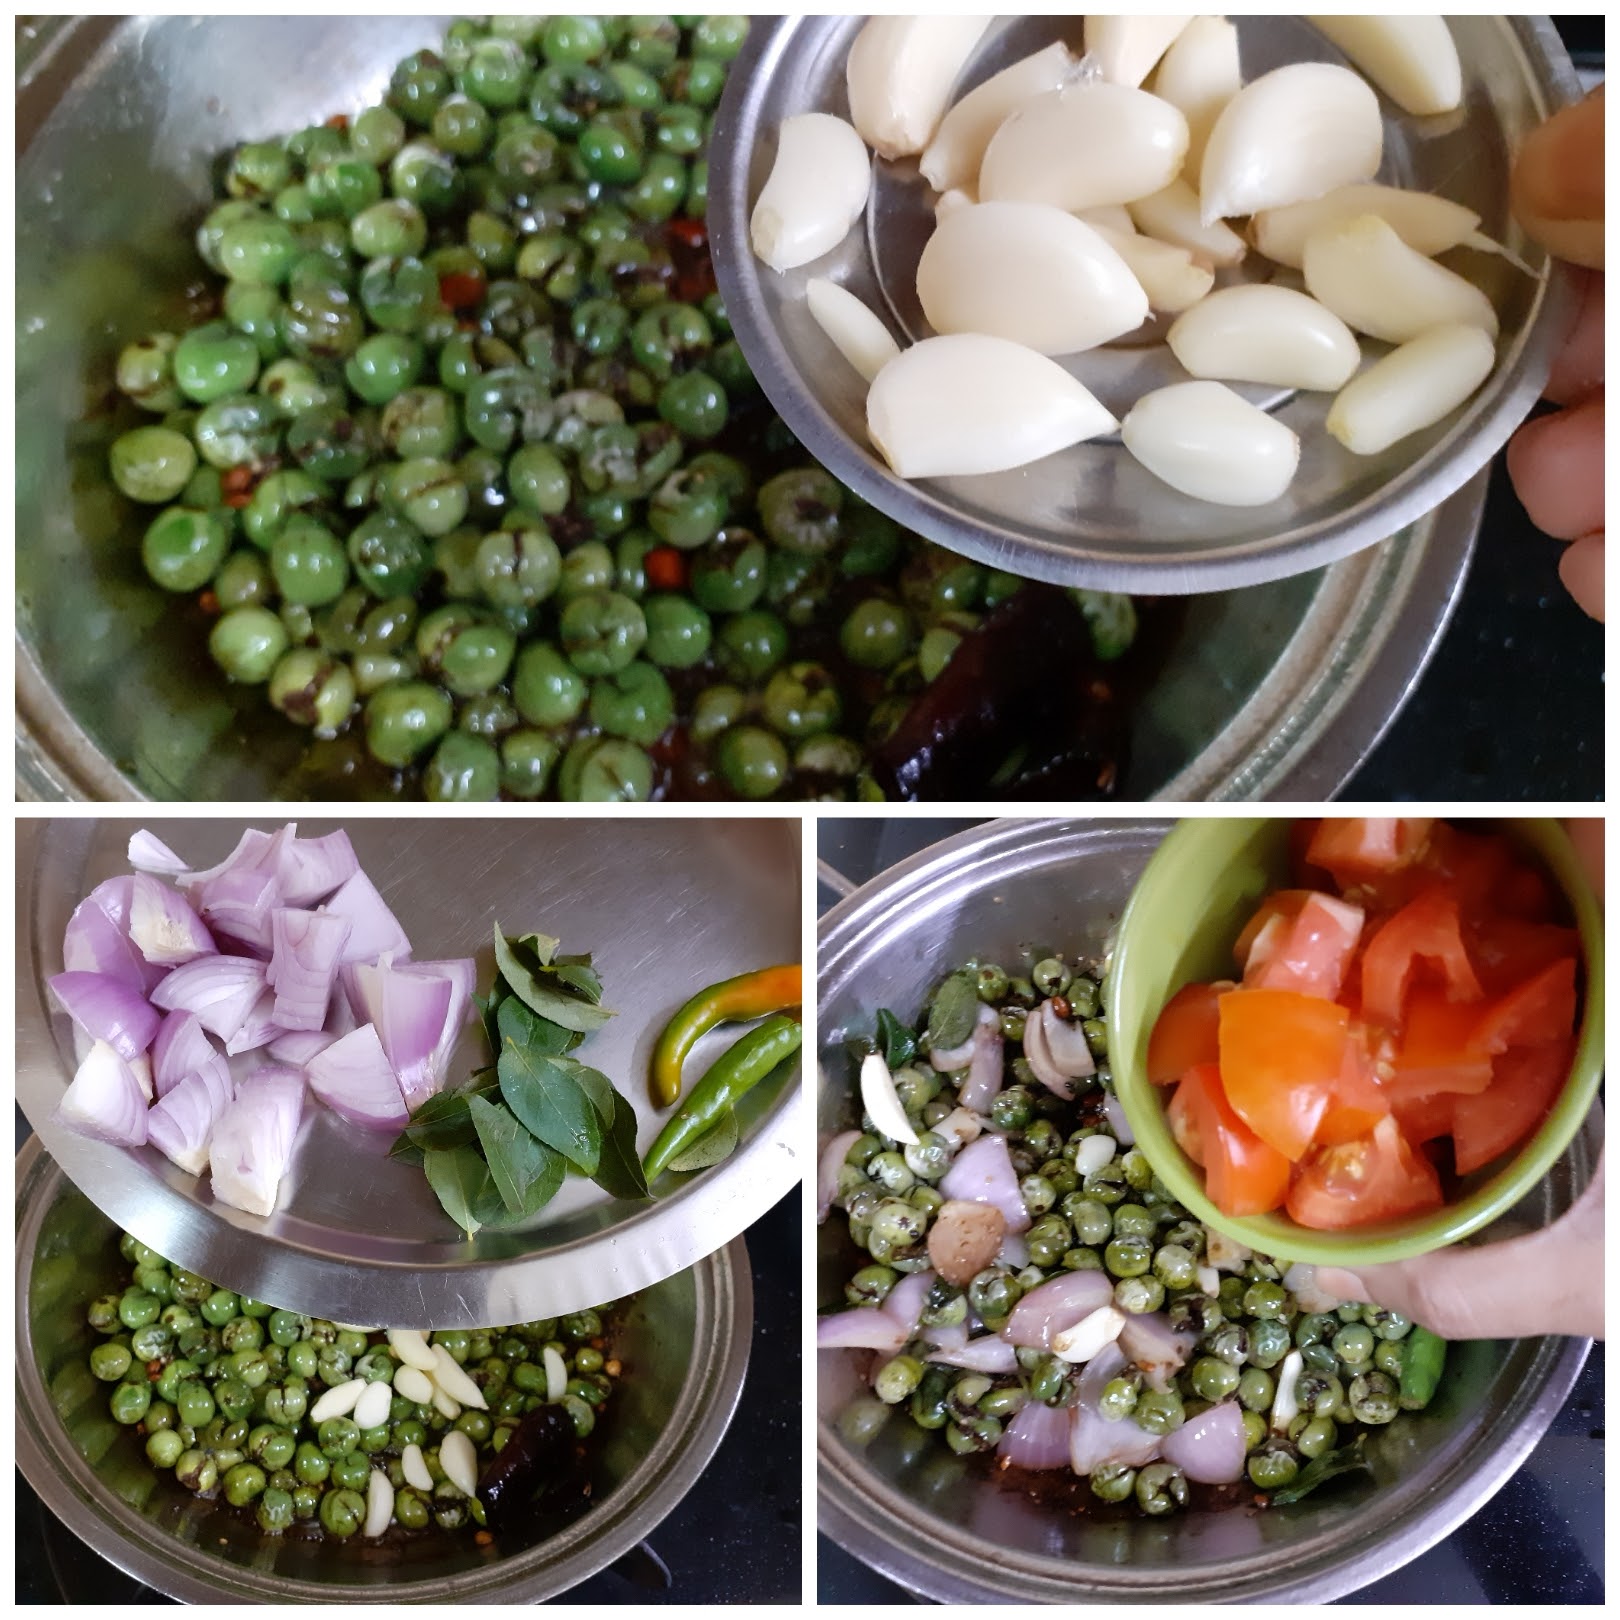
Pachai Sundakkai Kuzhambu (Chettinad Style)
Sundakkai/ Chundakkai in Tamil or Turkery Berry in English, as it is widely known, is a vegetable used in South Indian cooking to make a Kuzhambu or a gravy in which these berries are simmered with spices. As tasty as the Kuzhambu tastes, the berries are slightly bitter and have many medicinal benefits. This Vegetable is also known as Kudenekayi in Kannada or Usthikaya in Telugu. In Hindi it is called Bankatiya. I am giving here different names so that if you know this vegetable, one must try out recipes made of it because of its medicinal properties.
In SouthIndia the berries are blanched and then dried in the sun for a few days until it changes colour and is completely dry. The dried berries are then stored in an airtight jar then used to make the Sundakkai Vathakuzhambu. The dried berries are also fried in ghee and make an yummy accompaniment for curd rice. The berries fried in ghee are also mixed with hot rice and eaten as it is believed that it helps in deworming.
Health benefits of Sundakkai/ Turkey Berry- cures common cold, helps in treating kidney related issues, treats Anaemia, helps in treating cough and asthma, clears mucus, help in controlling diabetes, and they heal gastric ulcers.1Berry myriad benefits.
In this recipe I am using the fresh Sundakkai and not the dried ones( Vathal). Here the berries are cooked in tamarind sauce with a spicy, ground masala paste. The fresh berries are little bitter and so have to smashed using a pestle, so that as the Berry gets cooked in the tamarind pulp the bitterness is reduced. I am calling this a Chettinad style Kuzhambu because the masala paste used here is the Chettinad masala paste.
While you are here check out my other recipes like Vathakuzhambu, Rasam, Coriander rice, Karuvepilai Podi and rice, Mor Kuzhambu and more.
Here is the recipe of Pachai Sundakkai Kuzhambu for you-
PREP TIME: 15 MINS COOK TIME: 20 Mins
TOTAL TIME: 35 Mins COURSE: MAIN
CUISINE: SOUTH INDIAN SERVINGS: 5
AUTHOR: Rajni Ram
Ingredients:
Sundakkai/ Turkey Berry (fresh) 150 gm
Tamarind paste 1.5 tbsp ( or pulp of lemon sized ball)
Onion 1 (medium) diced
Tomato 1 large chopped roughly
Garlic 10 to 12 cloves
Curry leaves a few leaves
Green chillies 2
Gingelly/Til/Sesame oil 1.5 tbsp
Asafoetida 1/2 tsp
To grind:
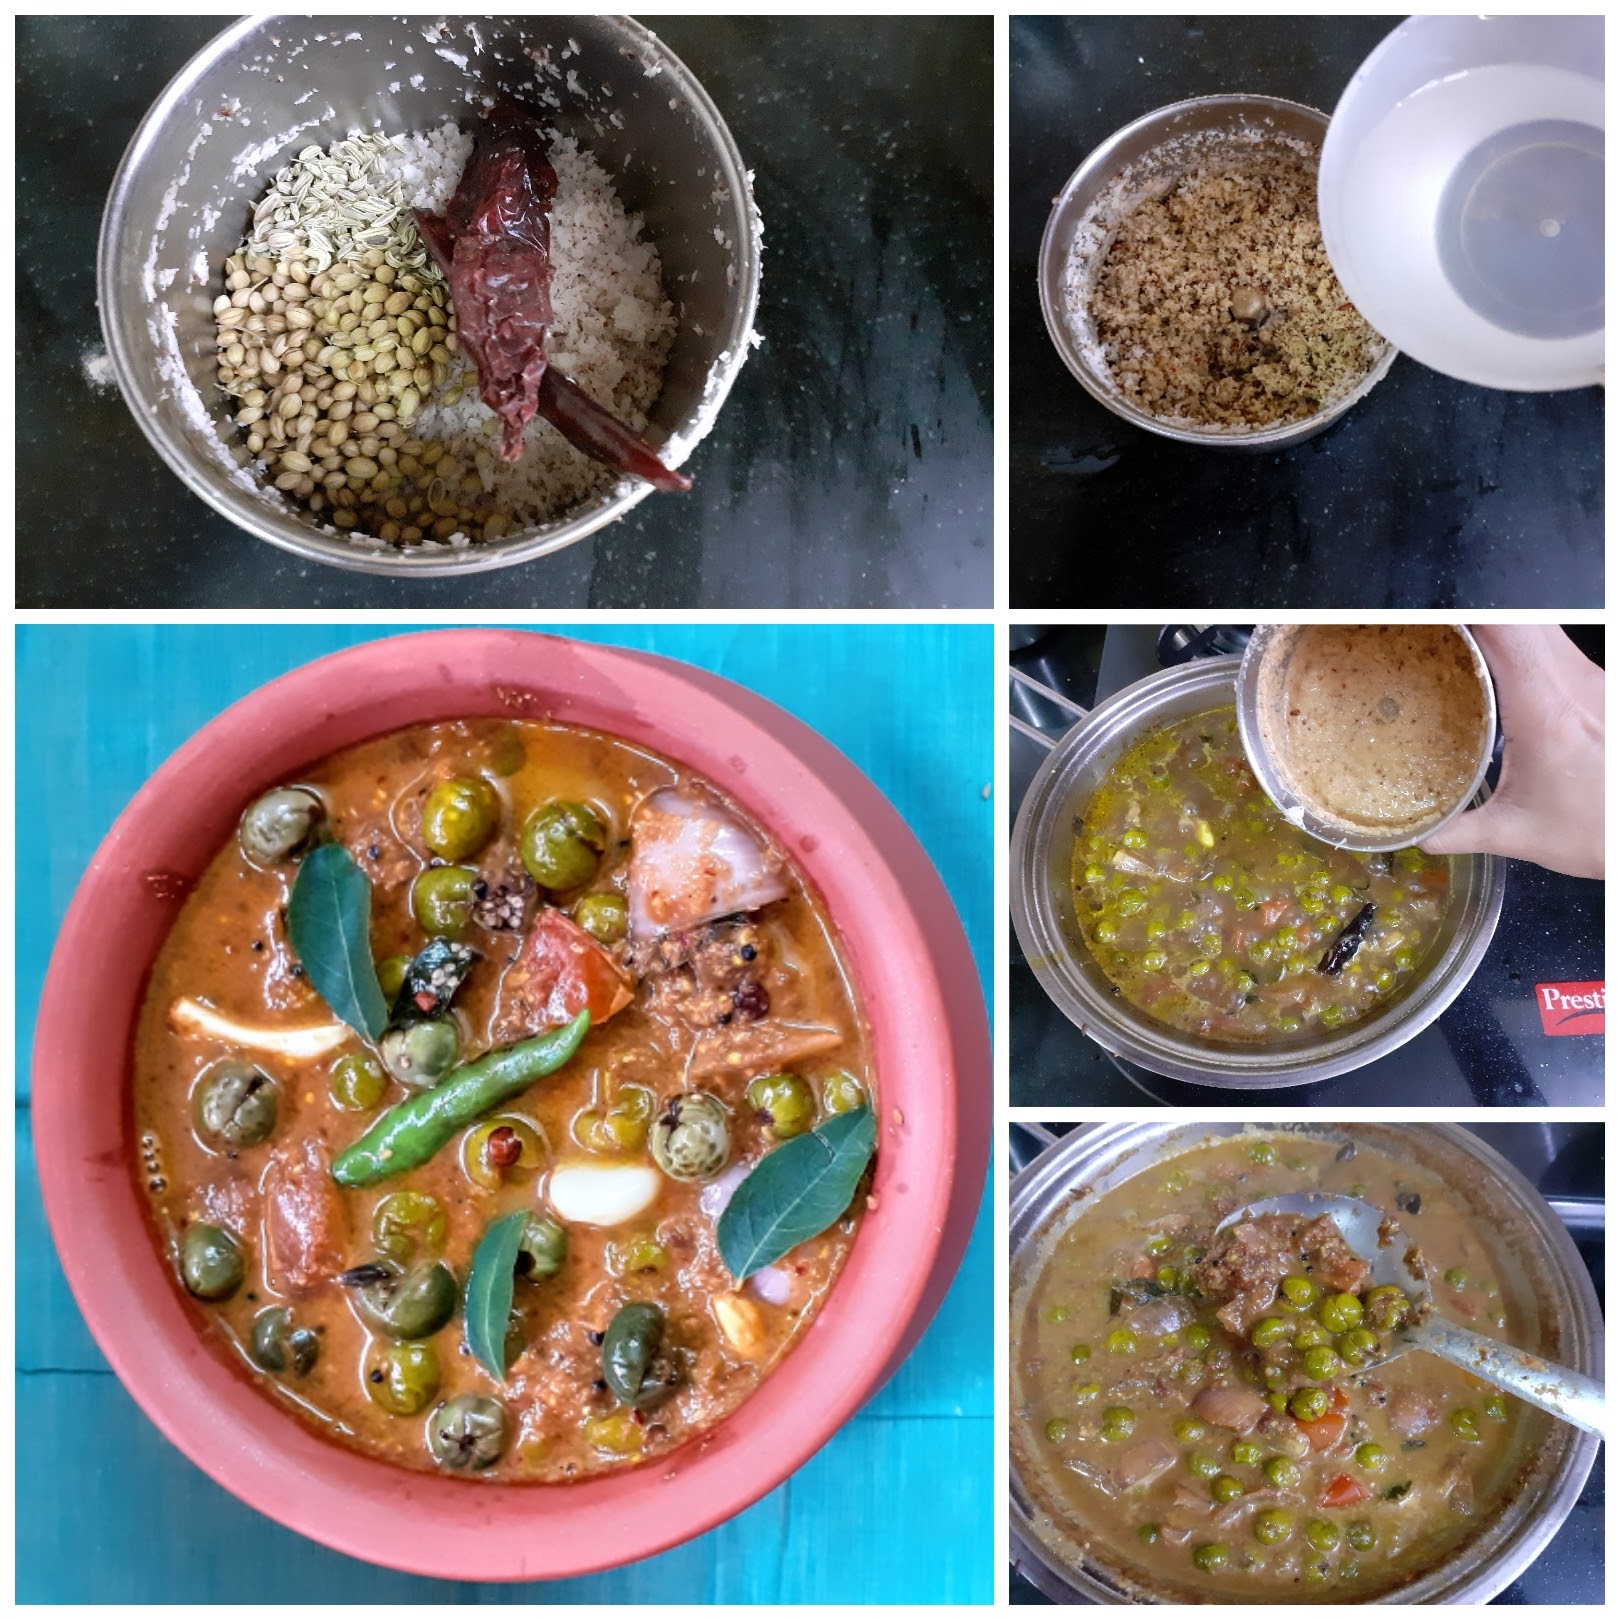
Coriander seeds 1 tbsp
Fennel seeds 1.5 tsp
Dry red chilli 2
Kashmiri dry red chilli 1(optional)
Coconut gratings 1.5 tbsp
To temper:
Mustard seeds 1 tsp
Chana dal(gram) 1 tsp
Dry red chilli 1 broken
Methi/ fenugreek seeds 1 pinch
Asafoetida 1/2 tsp
Method:
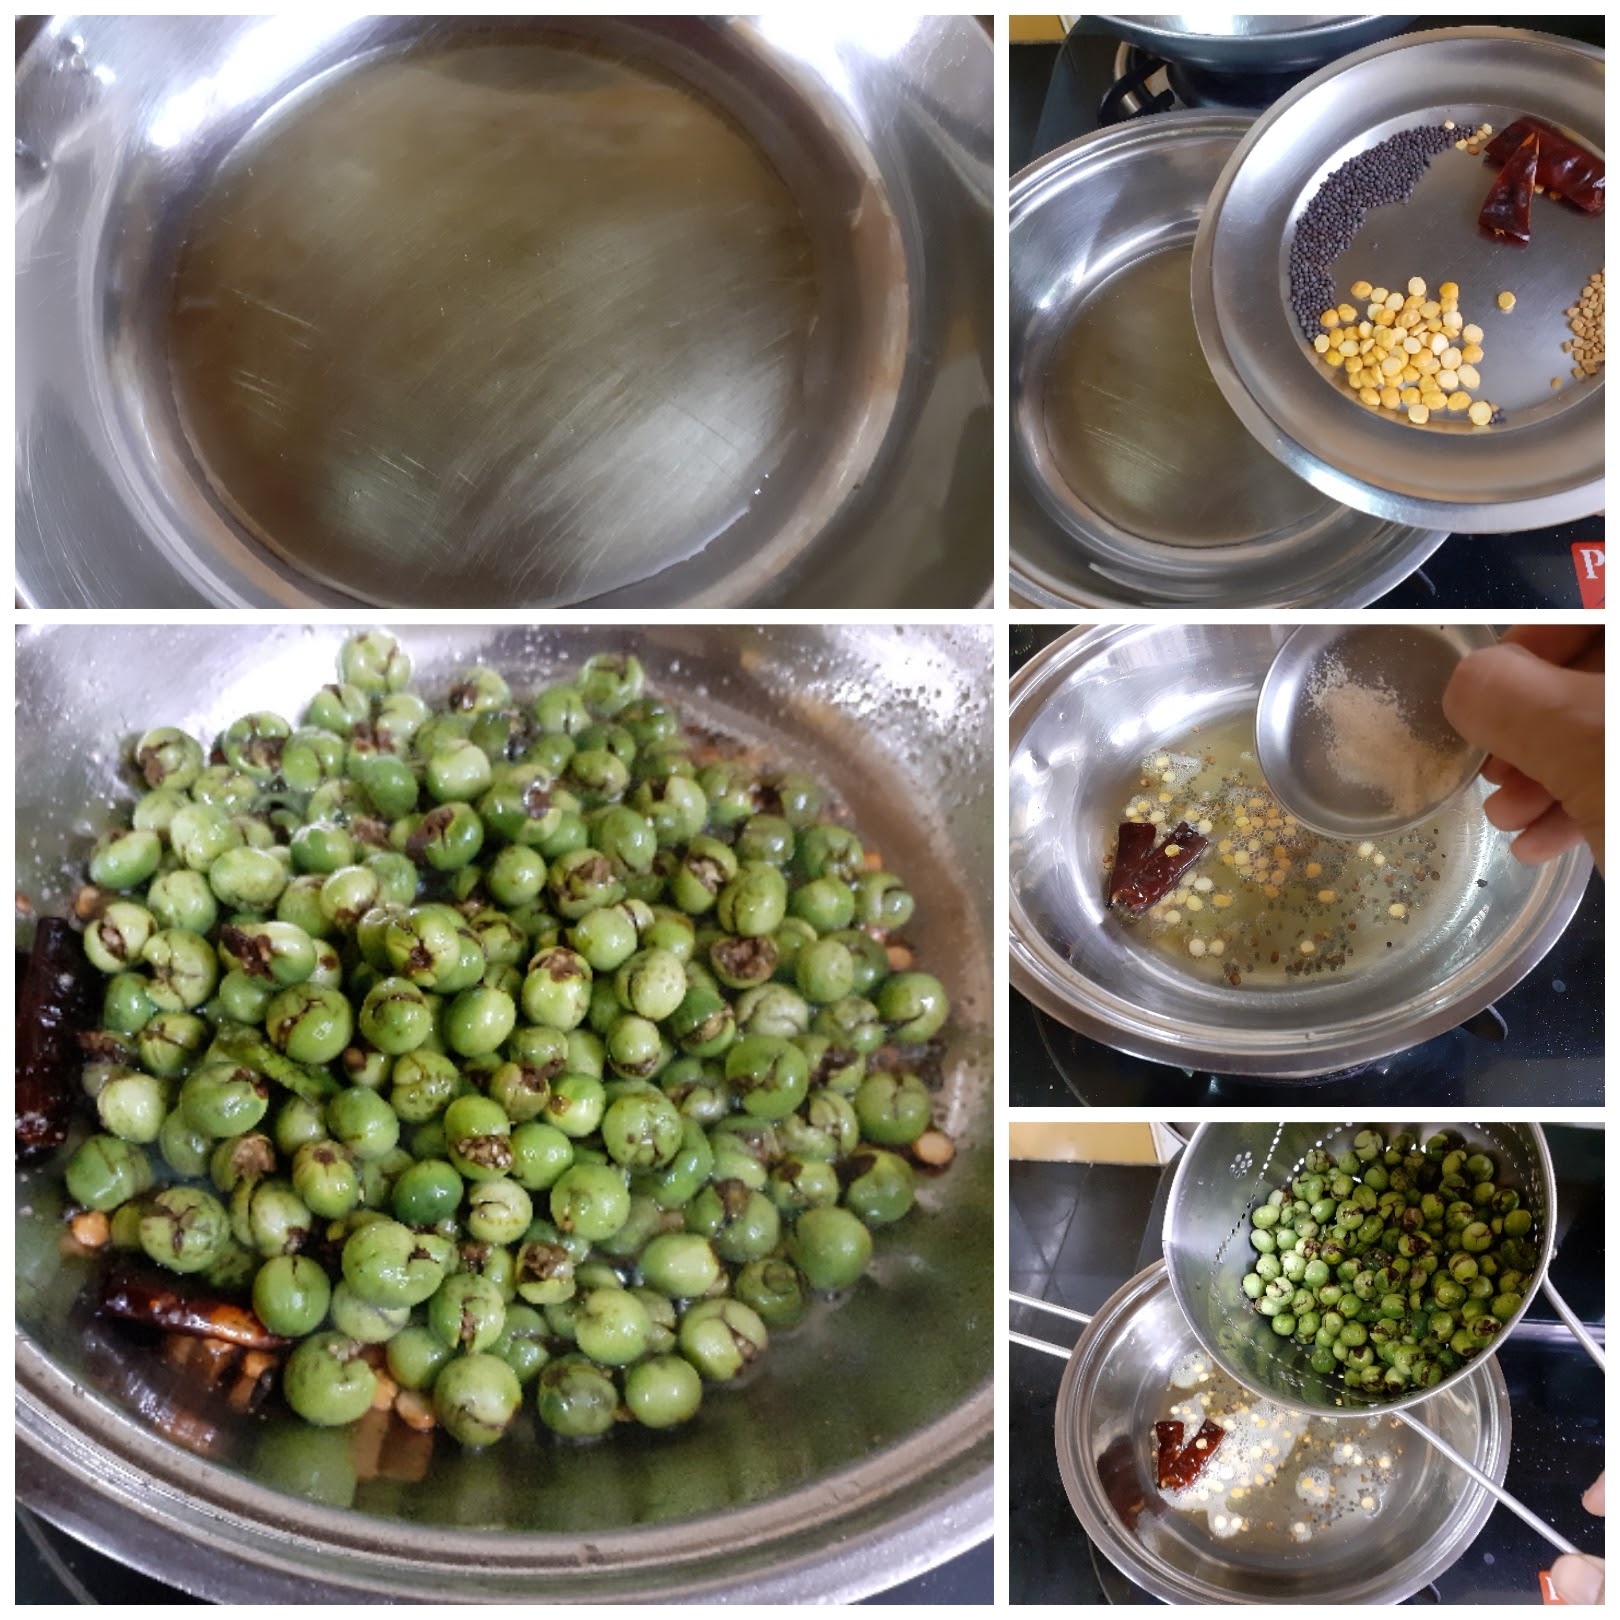
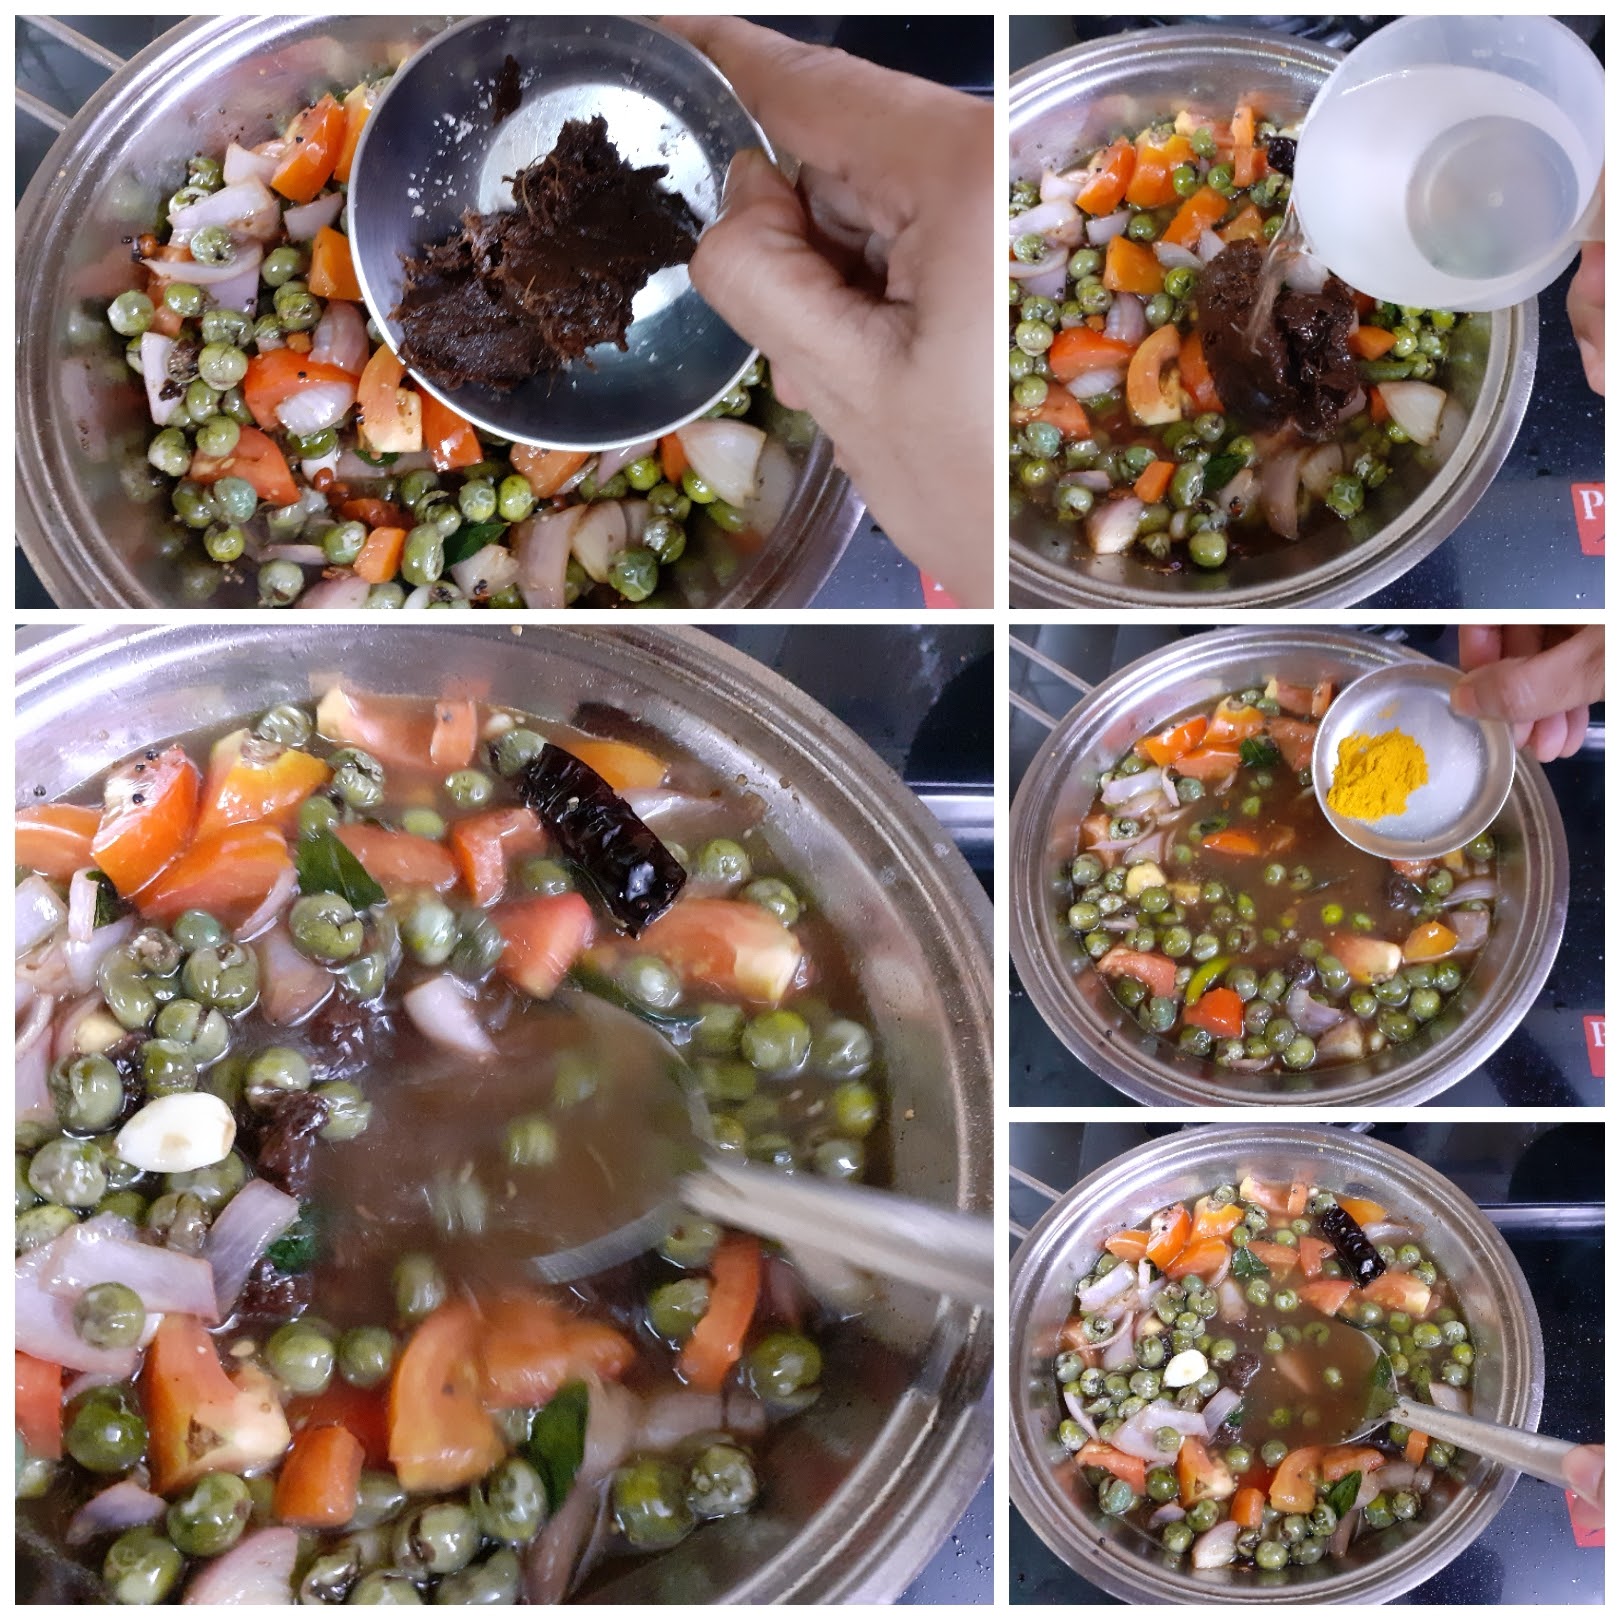
Wash and pat dry the Sundakkai/Turkey berry. Now with a mortar and pestle smash it lightly, such that it splits midway(refer picture). Now in a pan heat oil, add all ingredients under tempering followed by asafoetida and fry for 30 seconds. Now add the lightly crushed Sundakkai to the tempering and fry nicely for a minute.Now add the garlic cloves followed by onion, curry leaves and green chillies and continue to saute for 2 minutes. Now add the tomatoes and saute until the tomatoes turn tender. Add the tamarind paste followed by 2.5 cups water (or) add the pulp extracted from lemon sized ball of tamarind. Stir nicely and begin boiling. Add turmeric powder and cook until the Sundakkai turns tender. Check for doneness of Sundakkai by crushing one with a spoon/ladle. If it mashes easily the berries are cooked. Now grind all the ingredients under “to grind” to a coarse mixture, then add 1/2 cup water and grind to a smooth paste. Add this paste to the Sundakkai simmering in the Tamarind pulp,stir well and allow to cook. Continue cooking until the gravy thickens and the raw small of the masala is gone. The tasty and healthy Chettinad style Sundakkai Kuzhambu is ready.
SERVING SUGGESTIONS: With hot rice, with Dosa, Idli, pongal,
and Curd rice.
STEPWISE RECIPE FOLLOWS:
1. Assemble all ingredients. Wash and pat dry the Sundakkai/Turkey berry. Now with a mortar and pestle smash it lightly, such that it splits midway.
2. Now in a pan heat oil, add all ingredients under tempering followed by asafoetida and fry for 30 seconds. Now add the lightly crushed Sundakkai to the tempering and fry nicely for a minute.
3. Add the garlic cloves followed by onion, curry leaves and green chillies and continue to saute for 2 minutes. Now add the tomatoes and saute until the tomatoes turn tender.
4. Add the tamarind paste followed by 2.5 cups water (or) add the pulp extracted from lemon sized ball of tamarind. Stir nicely and begin boiling. Add turmeric powder and cook until the Sundakkai turns tender.
5. Now grind all the ingredients under “to grind” to a coarse mixture, then add 1/2 cup water and grind to a smooth paste. Add this paste to the Sundakkai simmering in the Tamarind pulp,stir well and allow to cook. Continue cooking until the gravy thickens and the raw small of the masala is gone.
NOTES:
1. Follow the precedure given to split open the berry midway. The kuzhambu will taste to bitter if the berries are not split.
2. After the berries cook in the tamarind sauce, check for doneness by pressing them with a ladle or soon. If they crush easily, they are cooked.
3. I have used Gingelly/Til oil as it adds extra flavour to the dish. Unless one is allergic to sesame oil or does not like the taste I recommend using the oil. Alternately refined oil can be used.
If you tried this recipe and liked it please comment below. I would love to hear from you. If you have a query about the recipe email us and ill respond as soon as I can.
If you would like to receive our recipes in your mail please leave your mail id at the homepage. Every time Rajjo’s Kitchen has a new post we will mail the recipe to you.
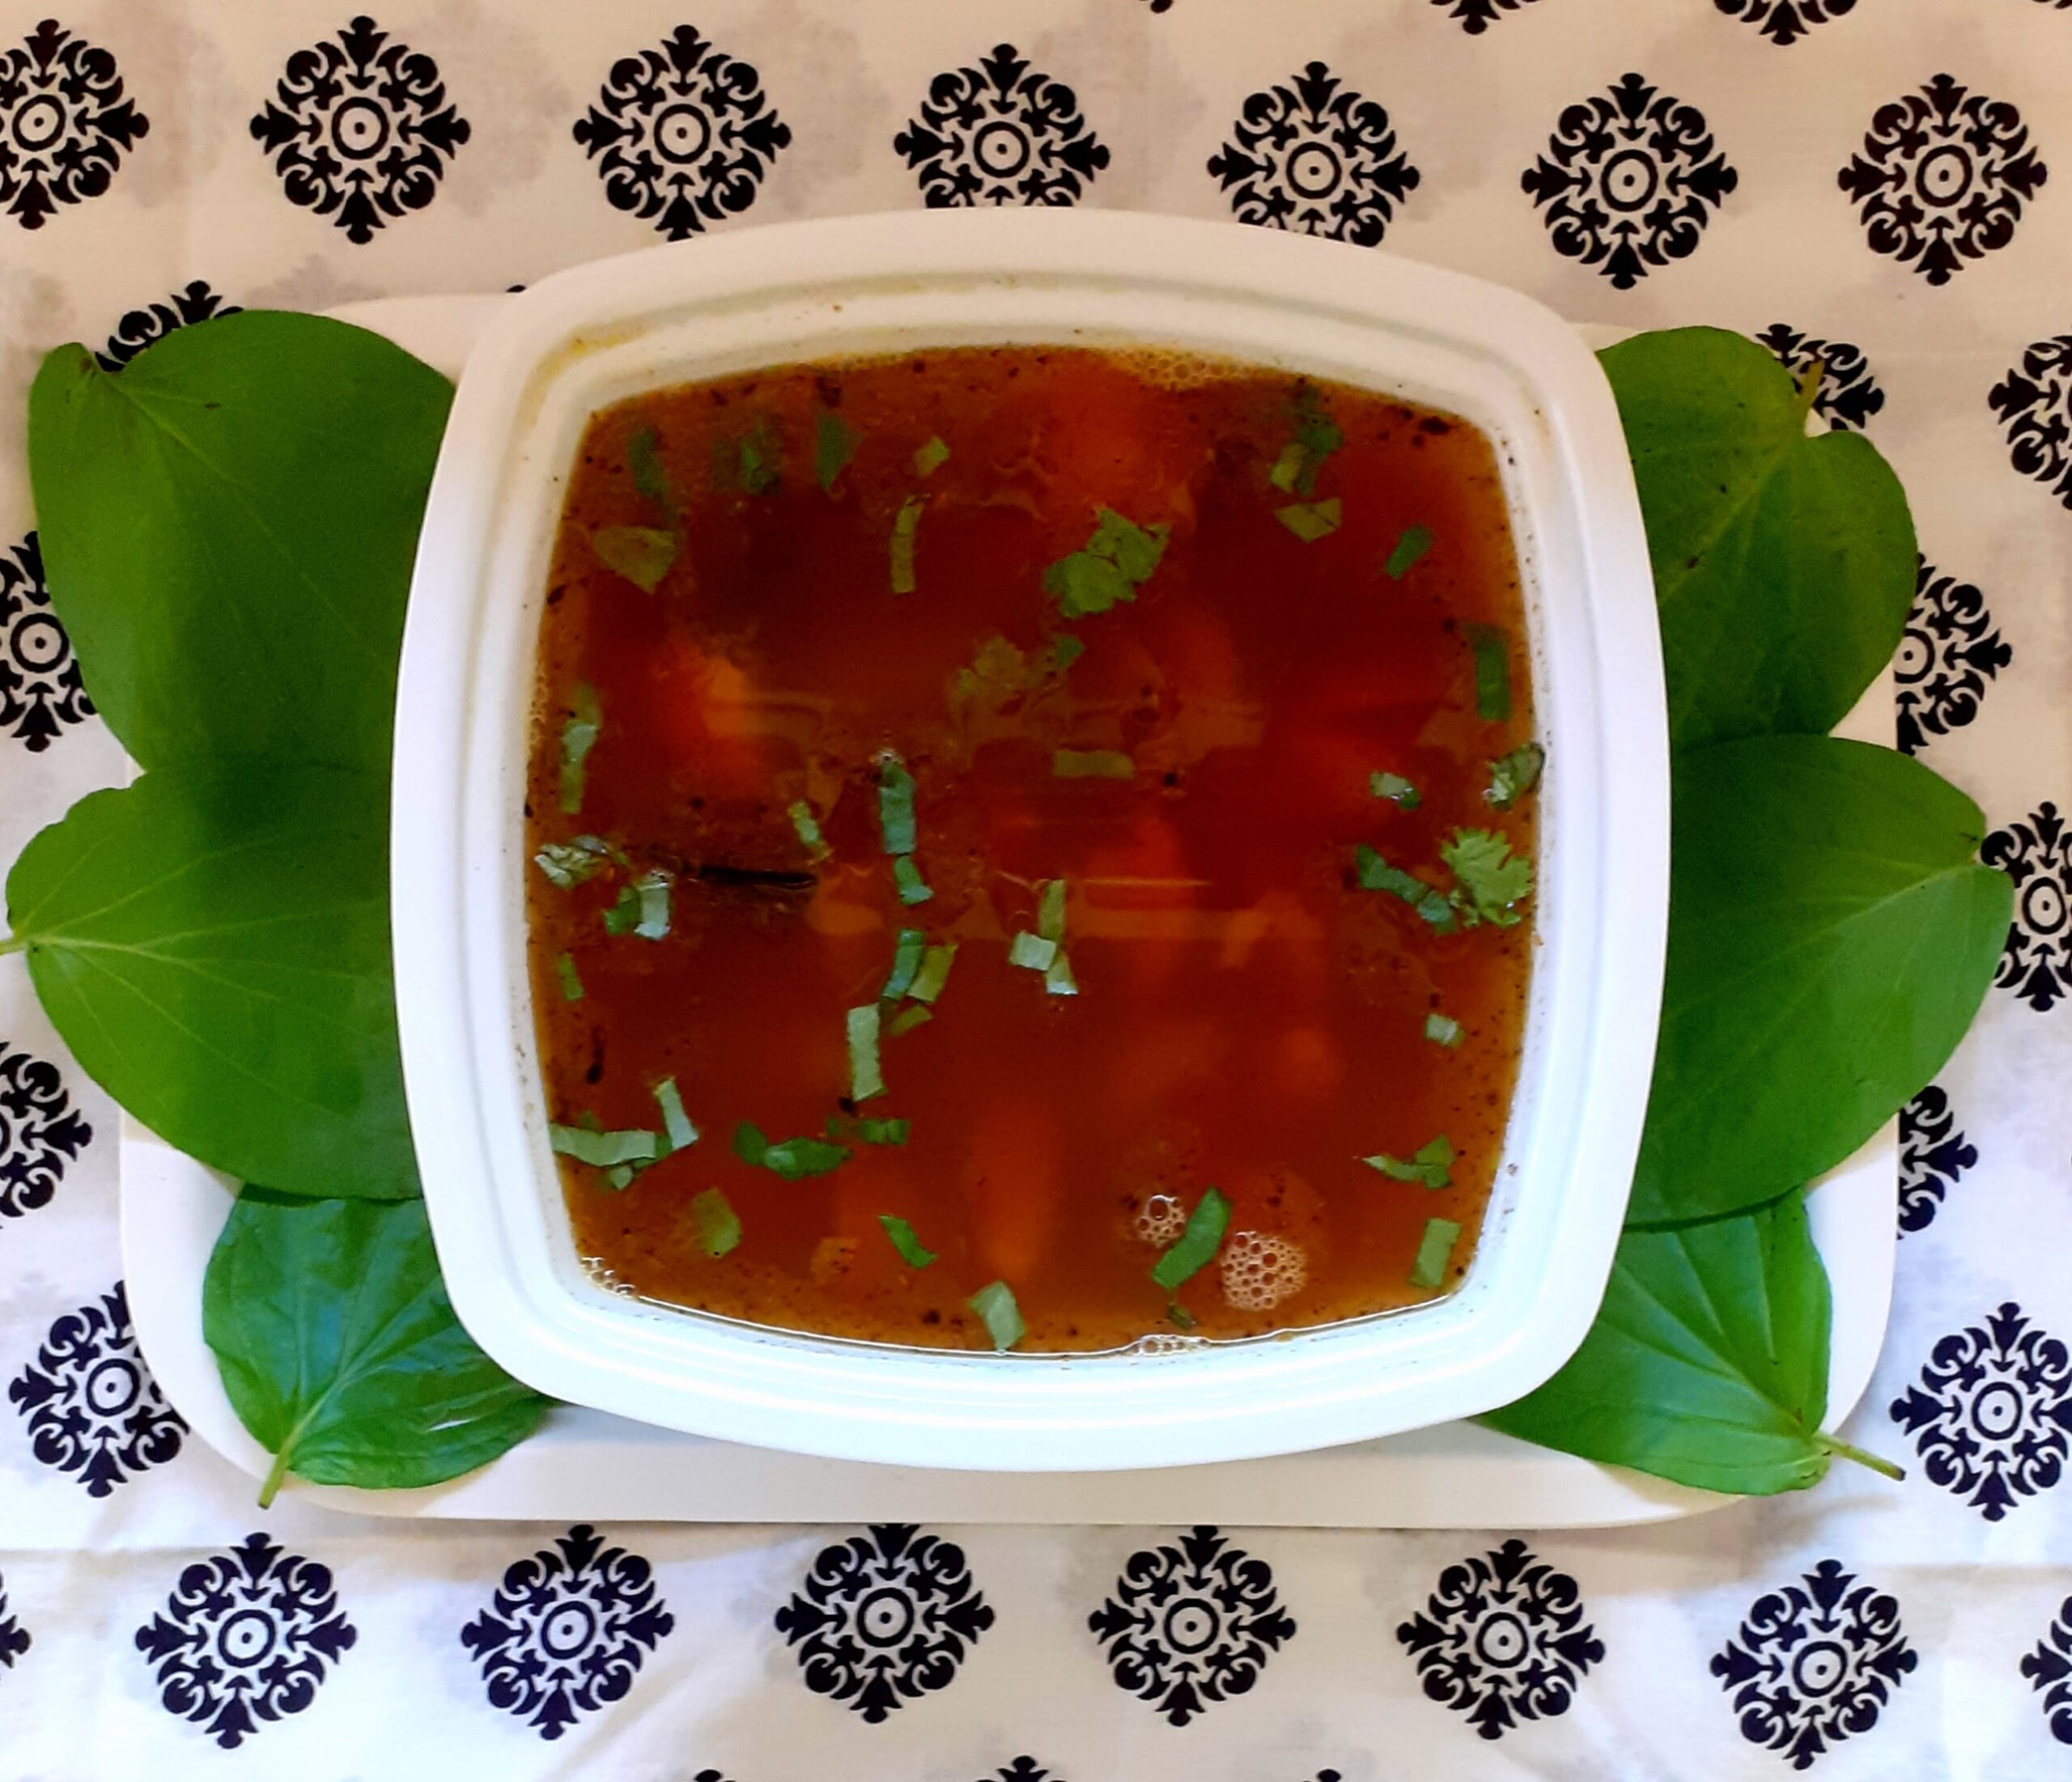
Vetrilai Rasam/Betle Leaf Rasam
Rasam is a popular South Indian dish prepared with tamarind, tomatoes, and Rasam powder. There are many variations of this dish, and each South Indian household has its own recipe for the proportions of the ingredients of the rasam powder. Therefore though Rasam is almost a regular feature in all South Indian households its taste is unique to each. No two Rasam recipes taste the same. Rasam is also a sought after comfort food in South Indian households when one has a Cold(Common Cold) or is a little under the weather because it is made of simple ingredients that are easily digestible and pepper that helps in combating the cold.
Earlier the Rasam was an everyday feature in most South Indian households along with Sambar or Vatha Kozhambu or Moru Kozhambu and a part of the Main course. Some households follow it to this day, but as the eating patterns of people has changed and is now more global the humble Rasam has taken a back seat or is made on a festival day where there is a feast(Elai Sapadu) or sometimes is also being served as a soup in elite gatherings.
There are different types of Rasam Like the Pepper Rasam, Tomato Rasam, Lemon Rasam, Garlic Rasam, Neem Flower (Vepampoo) Rasam, Drumstick Rasam,
Pineapple Rasam and the Vetrilai(Betel leaf) Rasam. I have already posted the recipe of pineapple Rasam and slowly over a period of time plan to cover all the Rasam varieties mentioned here.
The Vetrilai also called Vethalai Rasam is has Betel leaves, Tomatoes, and the Rasam Powder as the main ingredients. This Rasam is a very mildly flavoured rasam. For more intense flavour add more Betel leaves.
I am posting the recipe of the Rasam powder as the powder used makes a great impact on the flavour of the Rasam. This is also the reason why I said that the Rasam of no two households tastes the same as each has its own proportion. That said Rasam in any form is Comfort food????.
While you are here please check out the recipe of Pineapple Rasam.
Here is the recipe of Vetrilai Rasam for you–
PREP TIME: 10 Mins COOK TIME: 20 Mins
TOTAL TIME: 30 Mins COURSE: MAIN / APPETISER
CUISINE: SOUTH INDIAN SERVINGS: 4
AUTHOR: Rajni Ram
Ingredients:
Betel leaves/Vetrilai 10-12 leaves(refer note 1)
Tomatoes 5 (note 3)
Tuvar dal/ Yellow lentils 1/4 cup cooked in a pressure cooker
Rasam powder 3 tsp
Green chilli 1
Lemon 1
Coriander leaves finely chopped
Garlic(optional) (refer note 2)
Asafoetida 1 tsp (split 1/2 while boiling and 1/2 for tempering)
Turmeric powder 1 tsp
Salt as per taste
Roasted Pepper & Cumin powder 1 tsp( dry roast in the ratio 2:1 and grind coarse)
Directions:
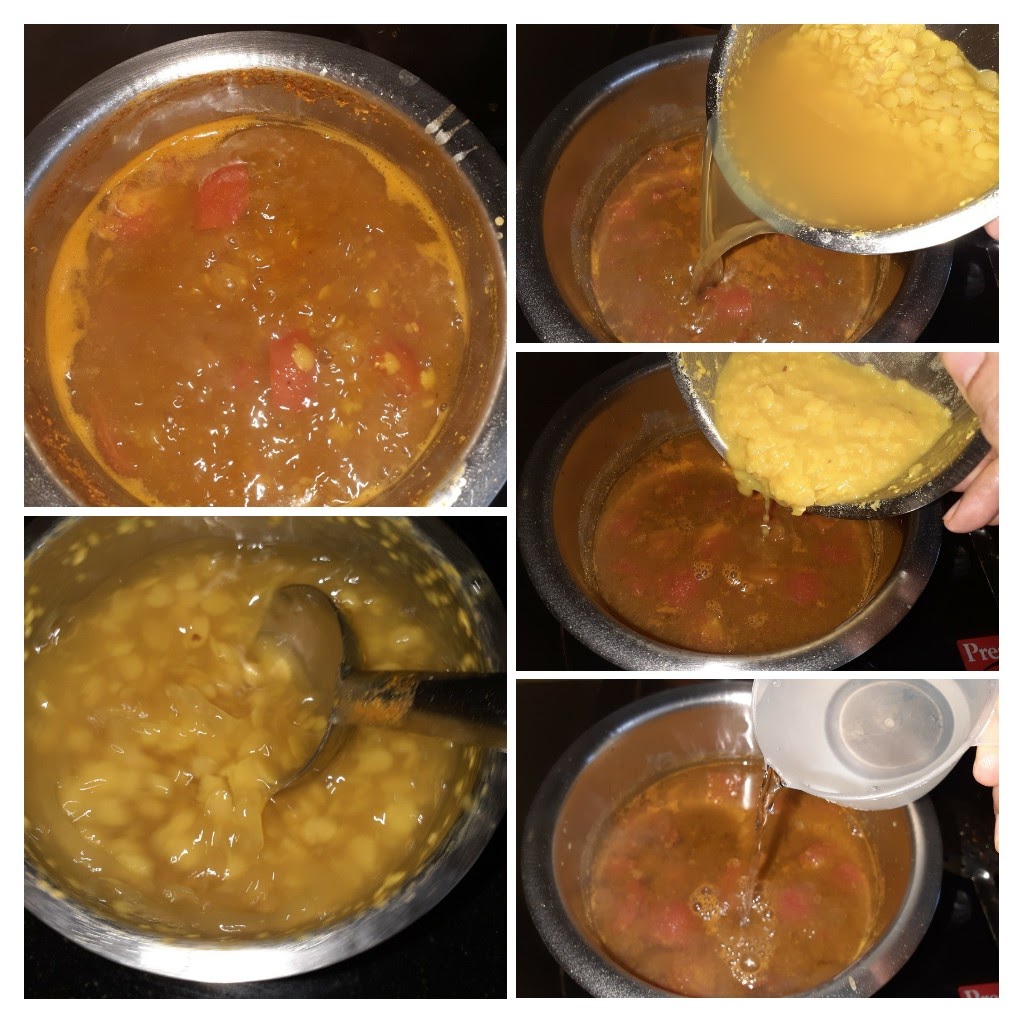
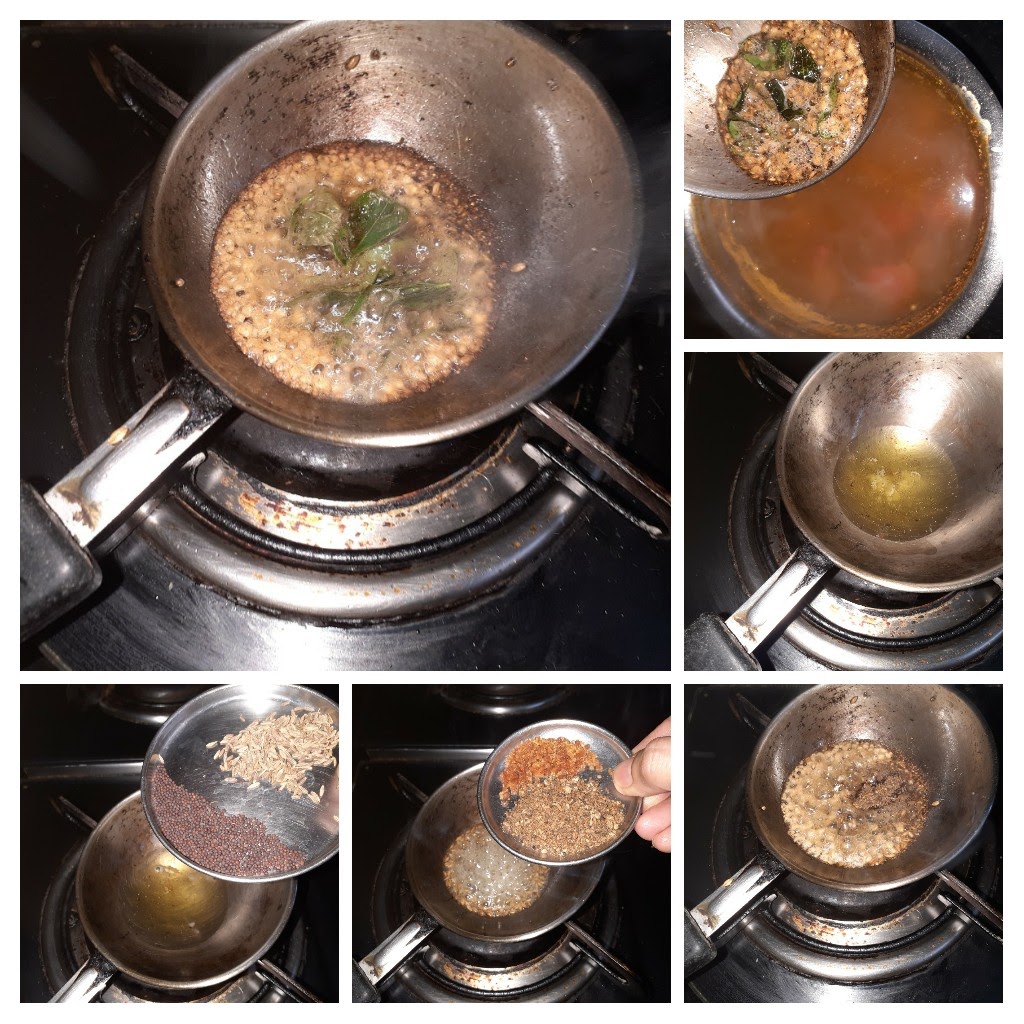
Put the dal in a vessel and cook it in the pressure cooker. I used pot in pot method, you can use whichever is convenient. The dal should have cooked well. Remove the stalks from Betel leaves, reserve one leaf for garnish and put the remaining in a blender, put 2 chopped tomatoes and the green chilli into the blender too, and grind them to a smooth puree. Chop the remaining 3 tomatoes into big cubes and put them in a 1-litre vessel. Add the Betel leaf-tomato puree also to this vessel and pour 3 cups water(1 cup =150 ml). Put the vessel on a medium flame and add the Rasam Powder, followed by turmeric powder, asafoetida and salt. Boil the mixture until the raw smell of the Betel leaves and tomatoes is gone(around 7 minutes from boiling on medium flame). Now separate the water from the cooked dal and reserve. Mash the dal nicely with the back of a ladle. Pour the dal into the boiling mixture followed by the reserved water and add 2 to 3 cups of more plain water. Now continue to boil the mixture on a low flame until the Rasam froths up and boils and starts rising in the vessel( around 10 minutes on low flame). Don’t let it to overflow. When it rises up squeeze the juice of 1 lemon and put off the flame immediately. Now take 2 tsp ghee in a small tempering Kadai and heat. Add mustard seeds, as they crackle add the Asafoetida powder, roasted pepper-cumin powder and put off the stove. Now add the curry leaves to the ghee, and pour the tempering into the Rasam. Garnish with finely cut Betel leaves(only 1 leaf will do) and coriander leaves. The yummy Vetrilai Rasam is ready to slurp. Enjoy and Bon Appetit.
Serving suggestions: Just as a soup, with hot rice and ghee, with Oats porridge(try this it tastes yummy).
Sometimes I also pour it on my chapatis while hot.????
STEPWISE RECIPE FOLLOWS:
1. Assemble all ingredients. Cook the dal and keep ready. Remove the stalks from the Betel leaves, cut them to big bits, chop the tomatoes and keep aside.
2. In a blender put in the cut Betel leaves(reserve 1 for garnish), 2 chopped tomatoes, and green chilli and puree them smooth.
3. In a 1 litre vessel put the remaining 3 chopped tomatoes and the Betel-tomato puree and pour 3 cups of water. Put the vessel on the flame. Now add Rasam powder, Salt, turmeric powder, asafoetida and bring to a boil on medium flame. Keep boiling until the raw smell of the rasam powder and the Betel leaves goes away. This takes approximately 7 minutes on medium flame.
4. Now mash the dal nicely, if the dal has retained water, reserve it. Pour the dal into the boiling Rasam mixture, follow it up with the reserved dal water and add 2-3 more cups of plain water, and start boiling again on low flame.
5. Around about 10 minutes of boiling on a low flame the Rasam should start frothing up and rising in the vessel. When it starts coming towards the brim, add lemon juice and put off the stove immediately.
6. In a tempering Kadai heat 2 tsp of ghee. when it heats up put the mustard seeds into it, as they crackle add the asafoetida and the roasted cumin-pepper powder. Put off the flame and then add the curry leaves. Drop this tempering into the Rasam and serve hot with hot rice and ghee or follow any of the serving suggestions given above.
NOTES:
1. Betel leaves come in many varieties, but 2 of them are popular and in common use. One is light green and thin(the one I have used and you see in my pictures) another is a little deeper shade of green and the leaves are thick. So if using the light green ones use 10 to 12 leaves. If using the darker ones then reduce the quantity by half, use about 6-8 leaves as their flavour is more intense.
2. If using garlic grind it along with the Betel tomato puree. Around 2 pods should be enough or it will overpower the Betel taste.
3. I have used the sweeter hybrid variety of tomatoes(Bangalore ones) which I usually don’t, hence I used 5 of them. If using the country variety(Naatu thakkali) then 3 should be enough. Two to grind and two to put chopped.
4. If you serve Rasam with something unusual do let us, know..we love learning and trying new combinations.
If you tried this recipe and liked it please comment below. I would love to hear from you.
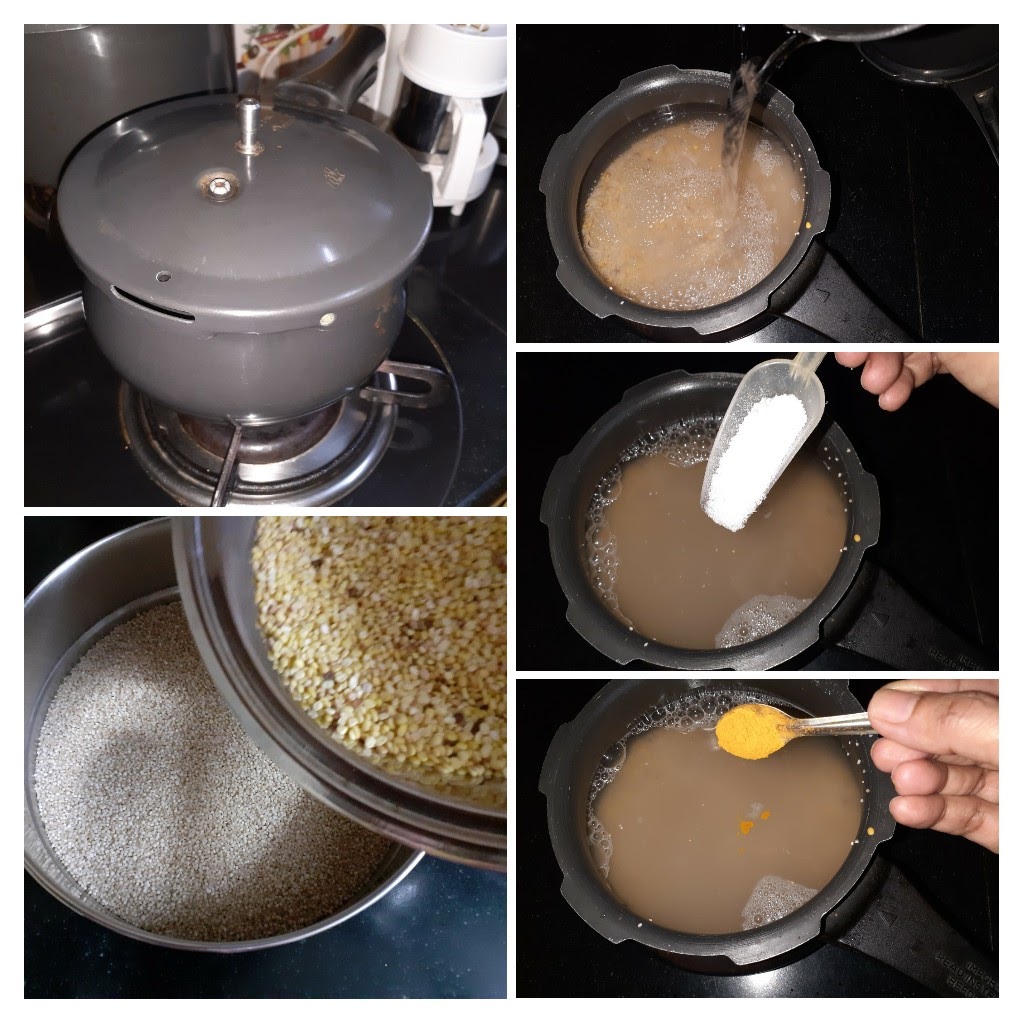
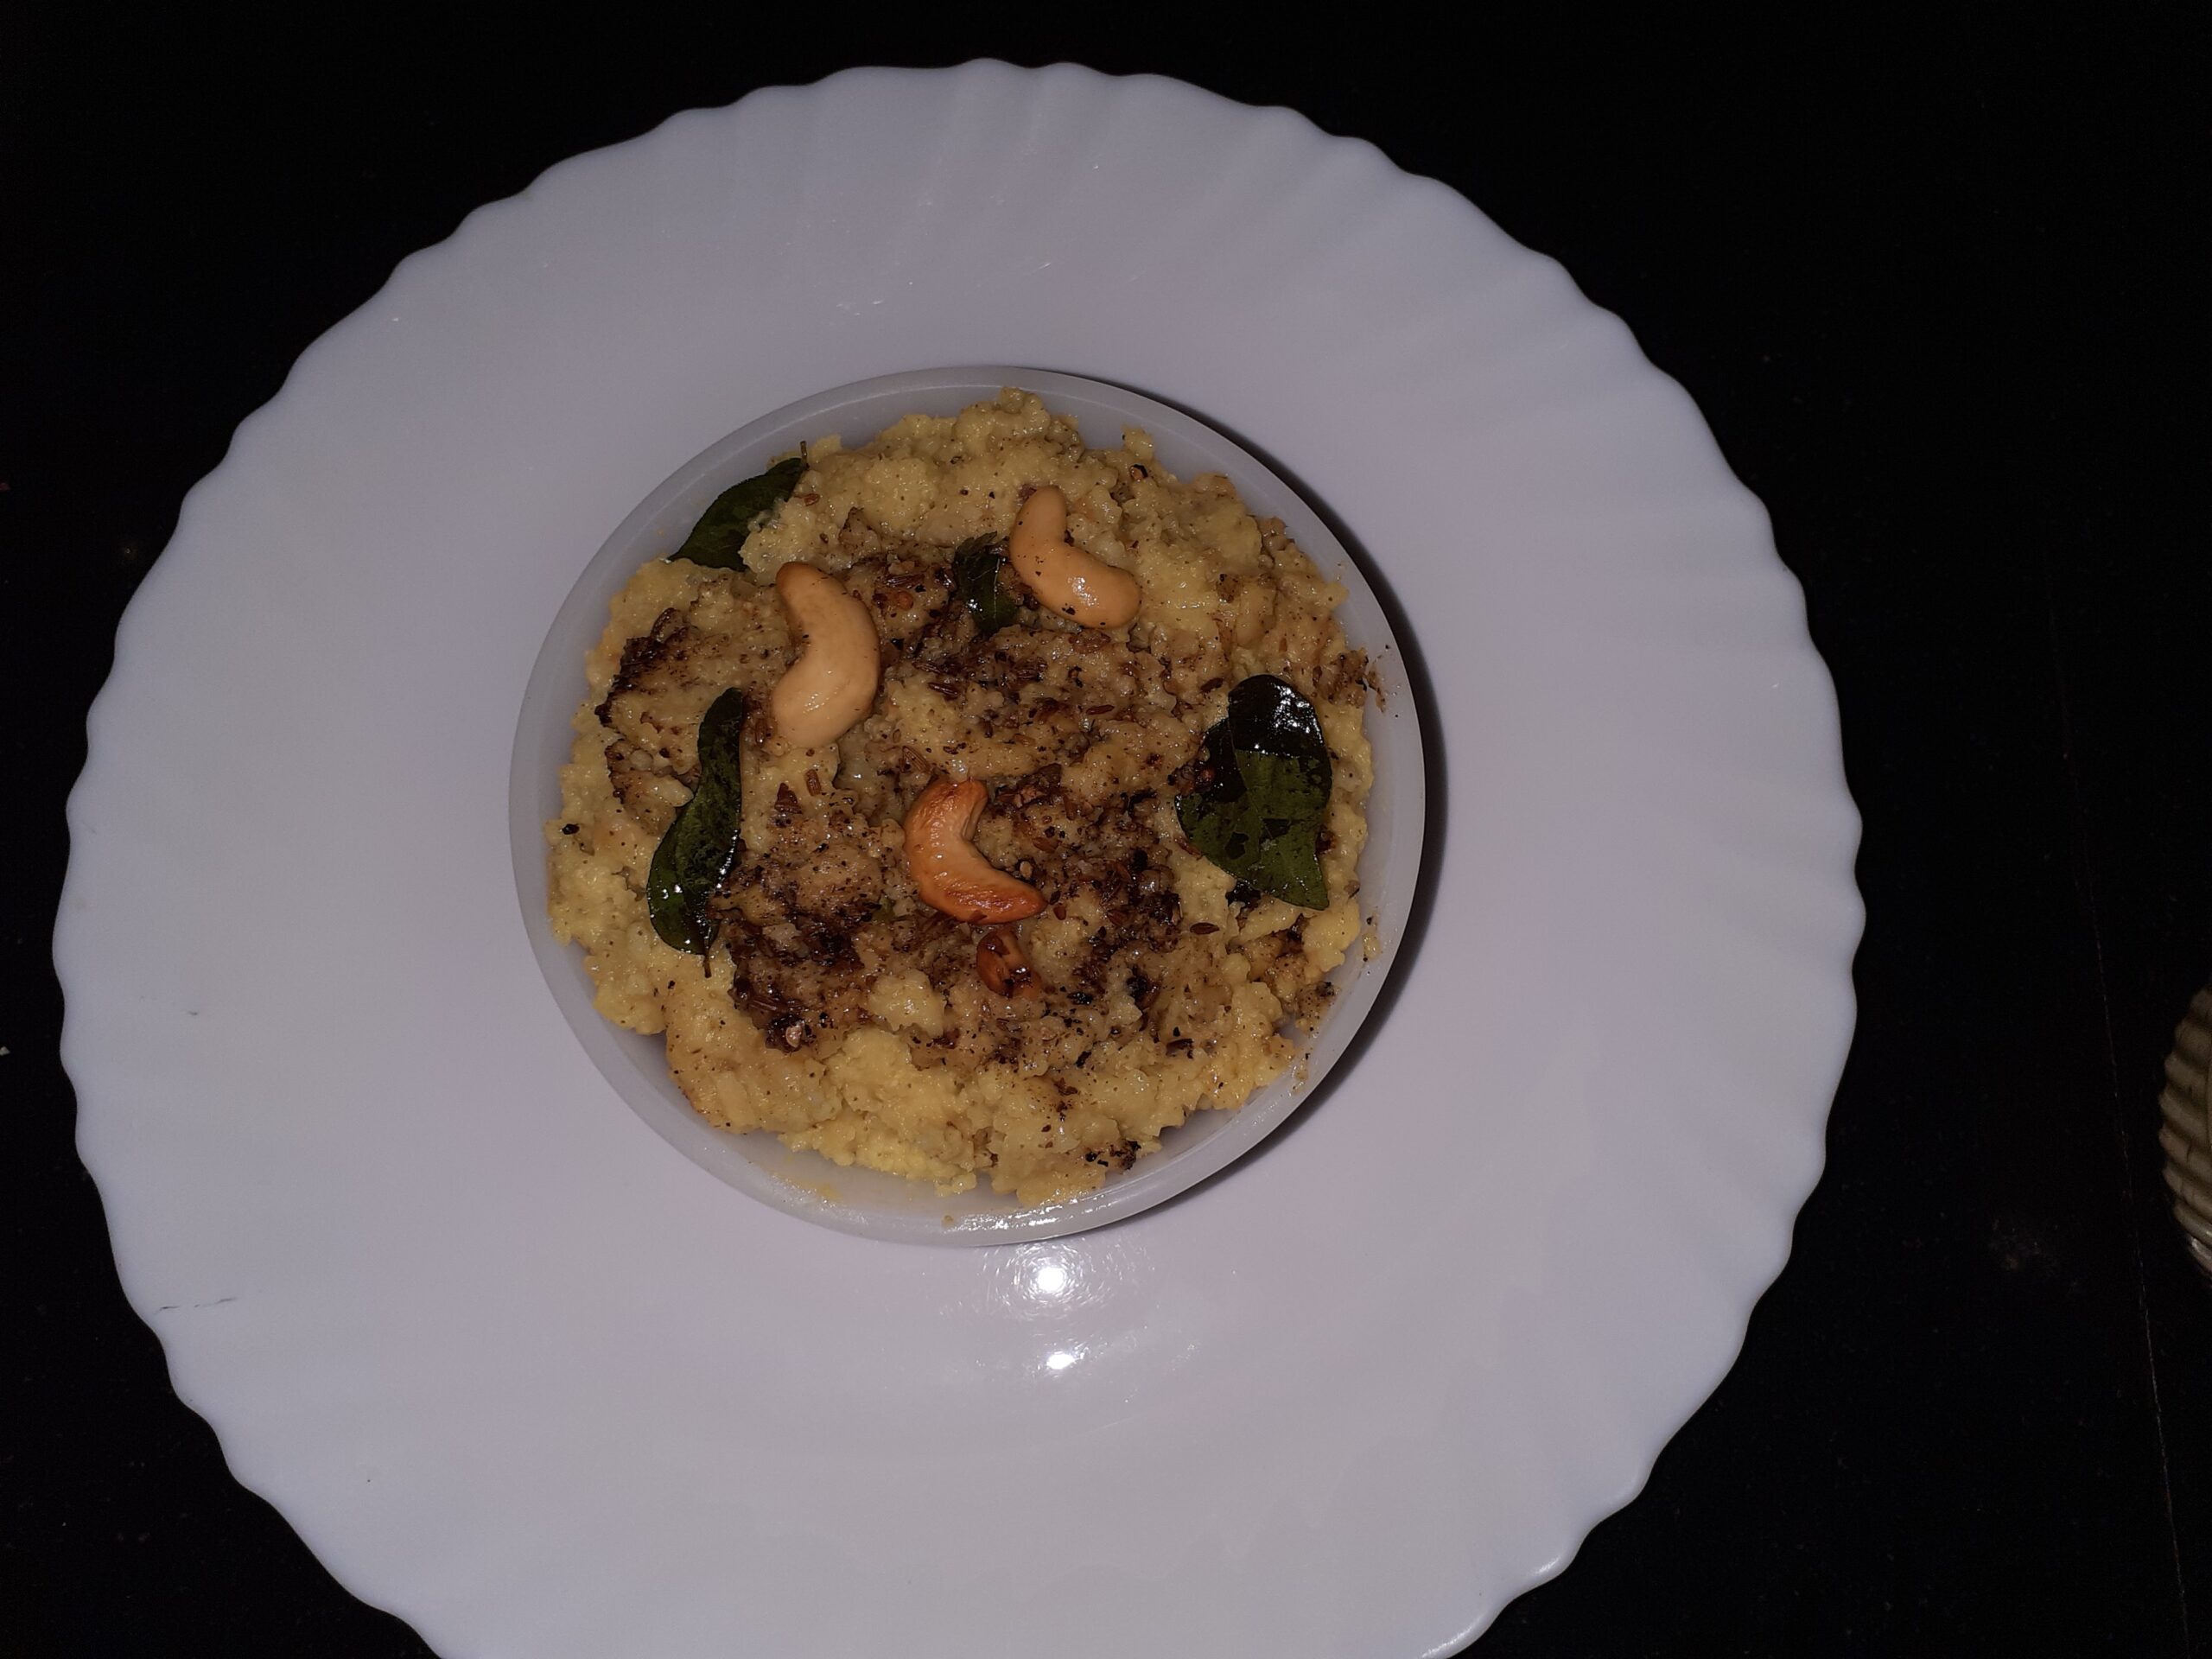
Kuthiraivali (Barnyard Millet) Pongal
Pongal is a savory dish of rice and lentils in South India similar to the Khichdi in the North. I have supplemented the rice with Barnyard Millet, called Kuthiraivali in Tamilnadu. These millets are high in fibre and are gluten-free. So for all the health freaks, here’s the recipe for you. This is a simple one-pot recipe. It makes a great breakfast option as compared to the rice Pongal, as it is lighter.
PREP TIME: 20 Mins COOK TIME: 15 Mins
TOTAL TIME: 35 Mins COURSE: MAIN
CUISINE: NORTH INDIAN SERVINGS: 4
AUTHOR: Rajni Ram
Ingredients:
Kuthiraivali(Barnyard Millet) 1.5 cups
Moong dal/ split green gram 1/2 cup lightly roasted
Pepper-Cumin powder 2 tsp (dry roast in the ratio 2:1 cool and grind coarse)
Salt as per taste
Cashewnuts 6-7
Ghee 1 tbsp
Curry leaves a few
Ginger 1 tsp finely chopped
Asafoetida 1 tsp
Turmeric powder
Directions :
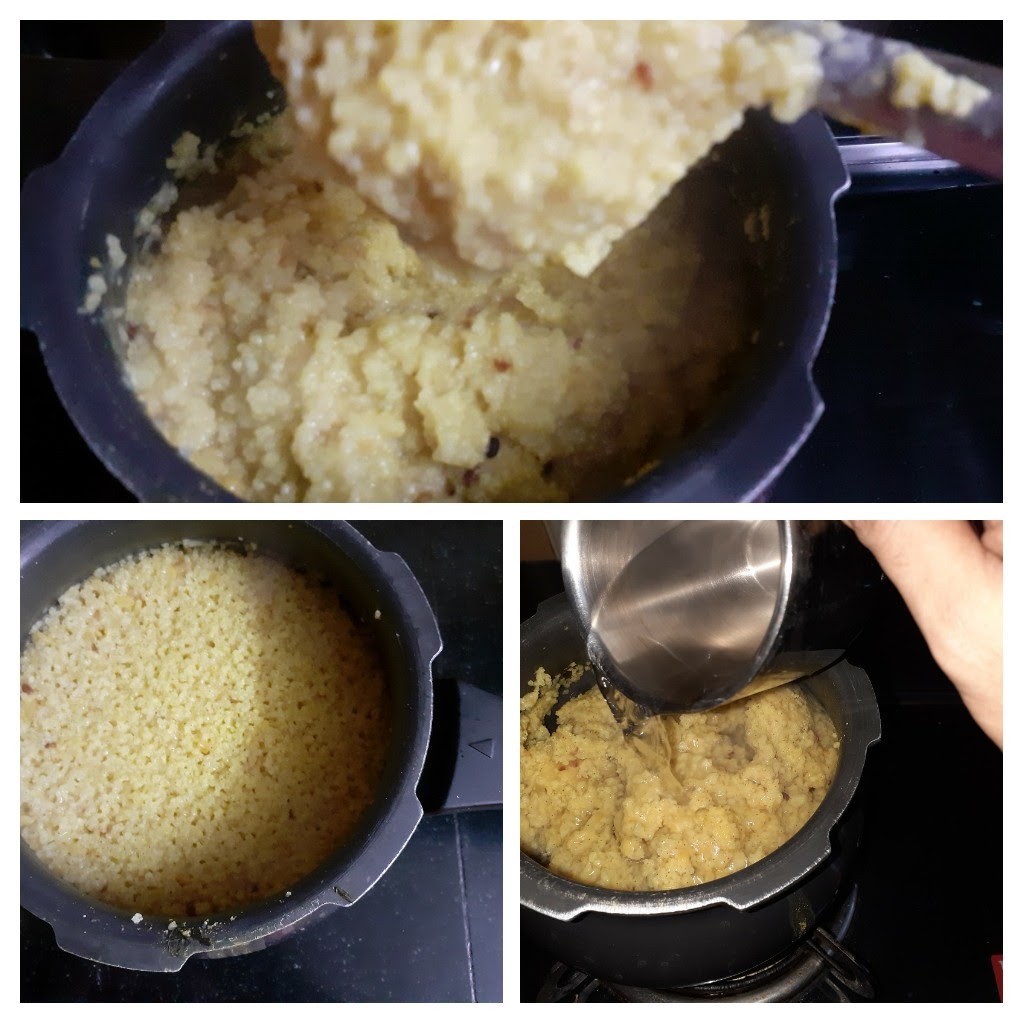
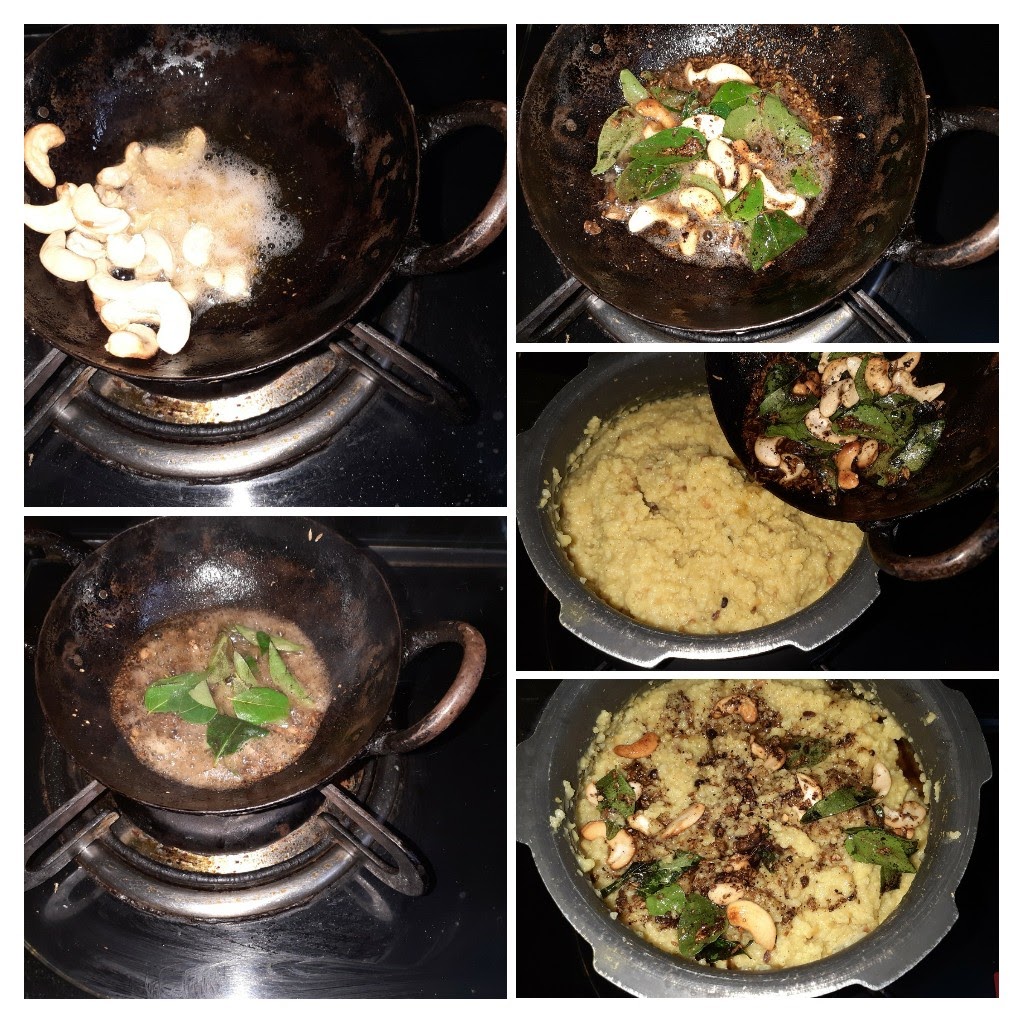
Roast the moong dal to a light brown. Put the Millet in a vessel add the roasted dal to it and wash them nicely. Now put them into a pressure cooker and add 4 cups water, the salt, and turmeric powder and cook for 5 whistles. Let the pressure release. Now open the lid and give a light mash to the millet- dal mixture. It would have absorbed all the water while cooking, so pour another 1 to 1.5 cups of water and stir nicely. Now in a small tadka kadai put in 1 tbsp of Ghee and heat. Put the Cashewnuts in and fry them to a light brown. Remove them from the ghee and set aside. Now to the same ghee add Cumin seeds, let them splutter add-in the ginger, pepper- cumin powder, asafoetida, and curry leaves and fry them well in the ghee. Transfer this into the cooker. The Kuthiraivali Pongal is ready. Serve with some coconut-coriander chutney.
STEPWISE RECIPE FOLLOWS:
1. Assemble all ingredients. Roast the moong dal and keep it ready.
2. Wash the Kuthiraivali/Barnyard millet and moong dal and transfer them to a small pressure cooker. If using big cooker follow pot in pot method( that is putting the contents into a vessel and putting that vessel into the cooker). Pour 4 cups water and pressure for 5 whistles. Once the pressure releases check if the mixture is well cooked. They should be quiet soft, If not put back in the cooker for another 2 whistles.
3. The mixture will be a little solid, add around 1 to 1.5 cups of water, and loosen up the mixture.
4. In a tadka, Kadai, or small tempering pan add the ghee and let it heat. Add the cashews and fry to a light brown. Remove from ghee. To the same ghee add the cumin. Once they splutter add in the ginger, pepper-cumin powder, curry leaves, and asafoetida. fry nicely for a minute and pour it into the dal-millet mixture. The Kuthiraivali Pongal is ready
Notes:
1. If using pot in pot method then after pressure cooking, you can make the tempering in a bigger pan and add the rice dal mixture to the pan.
2. While adding water to the Pongal after pressure cooking to loosen it, you can add hot water instead of room temperature one.
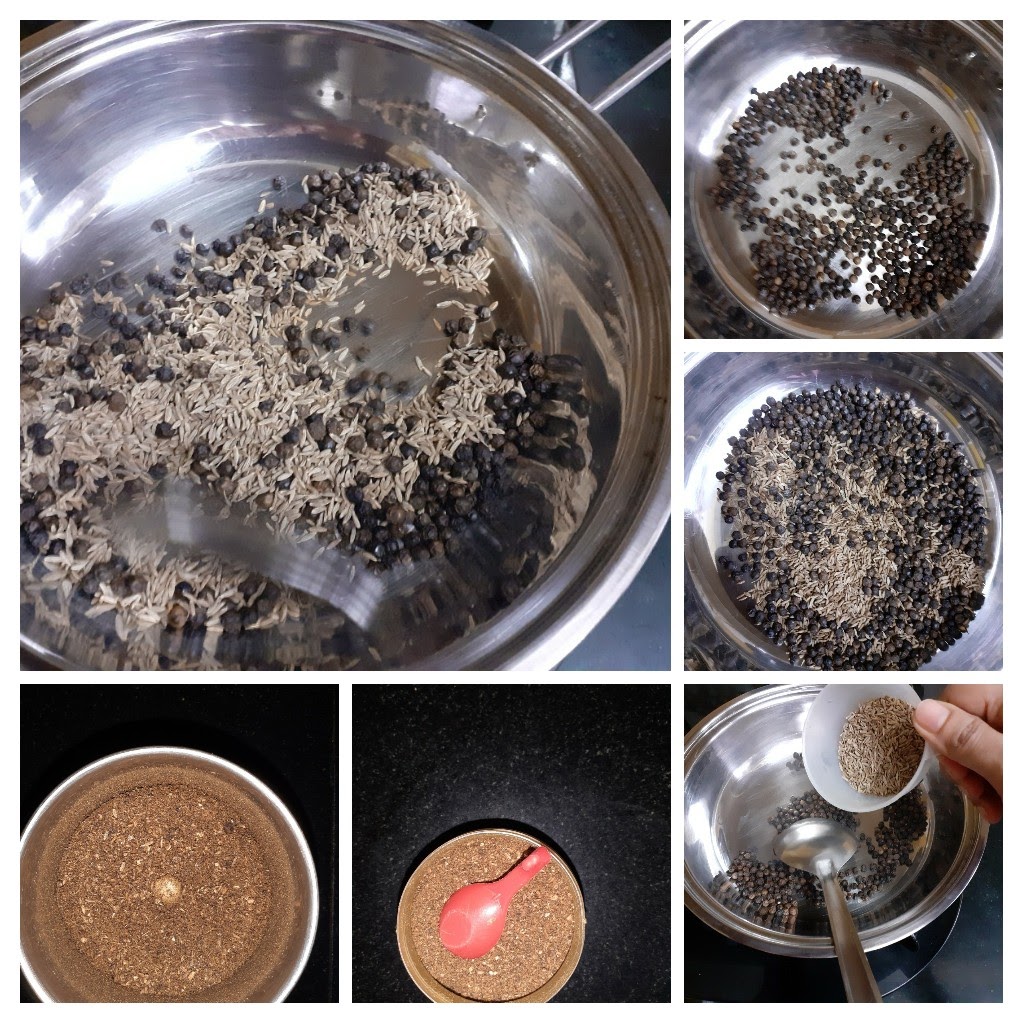
3.Pepper -cumin powder direction pictures below–
If you tried this recipe and liked it please do comment below. I would love to hear from you.
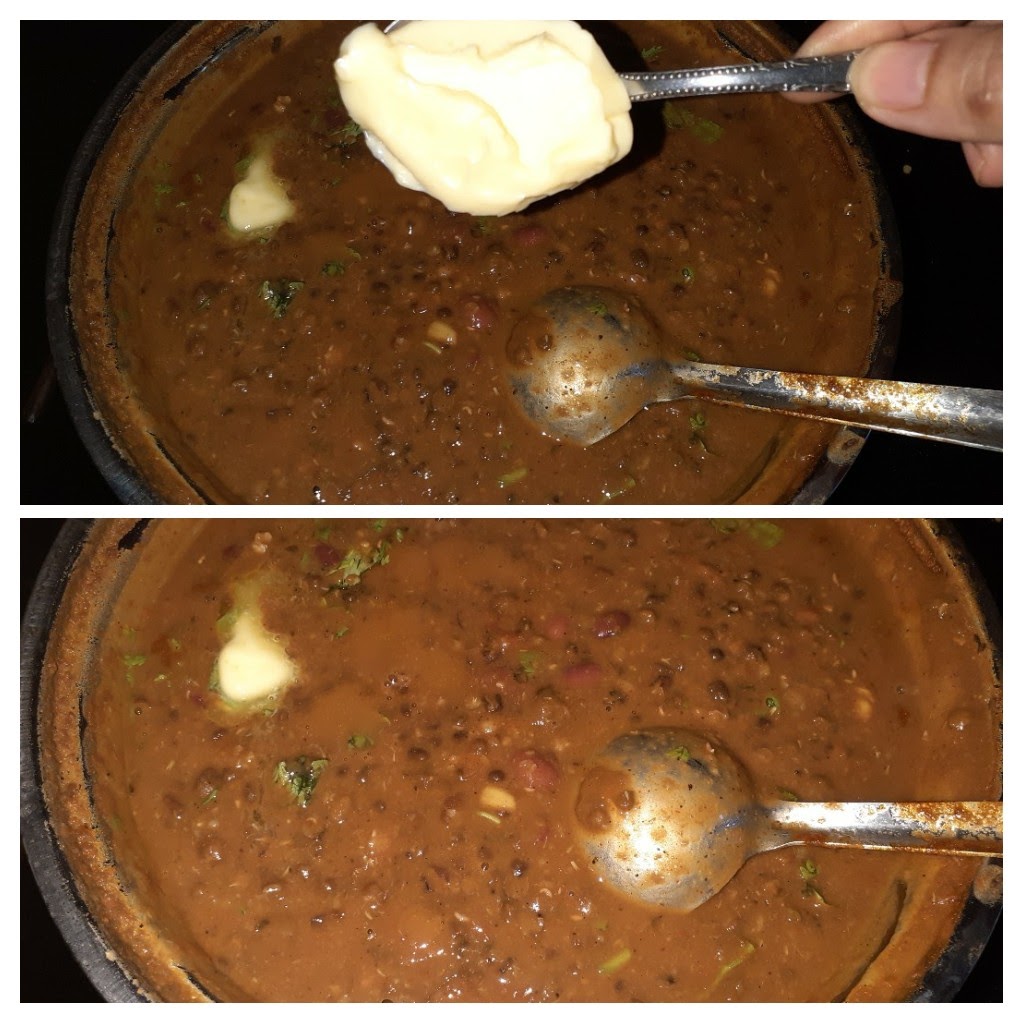
Dal Makhni 2 ways
Dal Makhni or Dal Makhani is one of the all-time favourite dishes of my family, whenever we are at a North Indian joint. So I have tasted many versions of it and used to make this recipe at one point in time with cream, as most recipes suggest. I found the dal to be heavy when made this way and then I chanced upon the recipe for Dal Makhni that I’m blogging now on a spice packet, I tried it and it tasted almost like the restaurant ones, so have been following this recipe for a long time now.
Dal Makhni is a dish from Punjab and the main ingredients are black lentils( Black Urad dal whole) Rajma, butter and other spices and condiments. It gets the creamy texture and taste from butter and slow cooking. The longer you cook it on low fire, the tastier. That said, this dal can be made without butter/ cream too. And it tastes all the same.
While you are here please checkout my other recipes like Choley, Pakode wali Dal,
Hari Moong Dal, Rajma and more…
Here is the recipe of Dal Makhni for you–
PREP TIME: 10Mins+soak time(8hrs) COOK TIME: 1 hour
TOTAL TIME: 1 hr 10 Mins COURSE: MAIN
CUISINE: NORTH INDIAN SERVINGS: 4
AUTHOR: Rajni Ram
Ingredients:
Black Whole Urad 200 gm ( black lentils) Soaked overnight
Rajma 1 handful (soaked overnight)
Chana dal 1 tbsp.
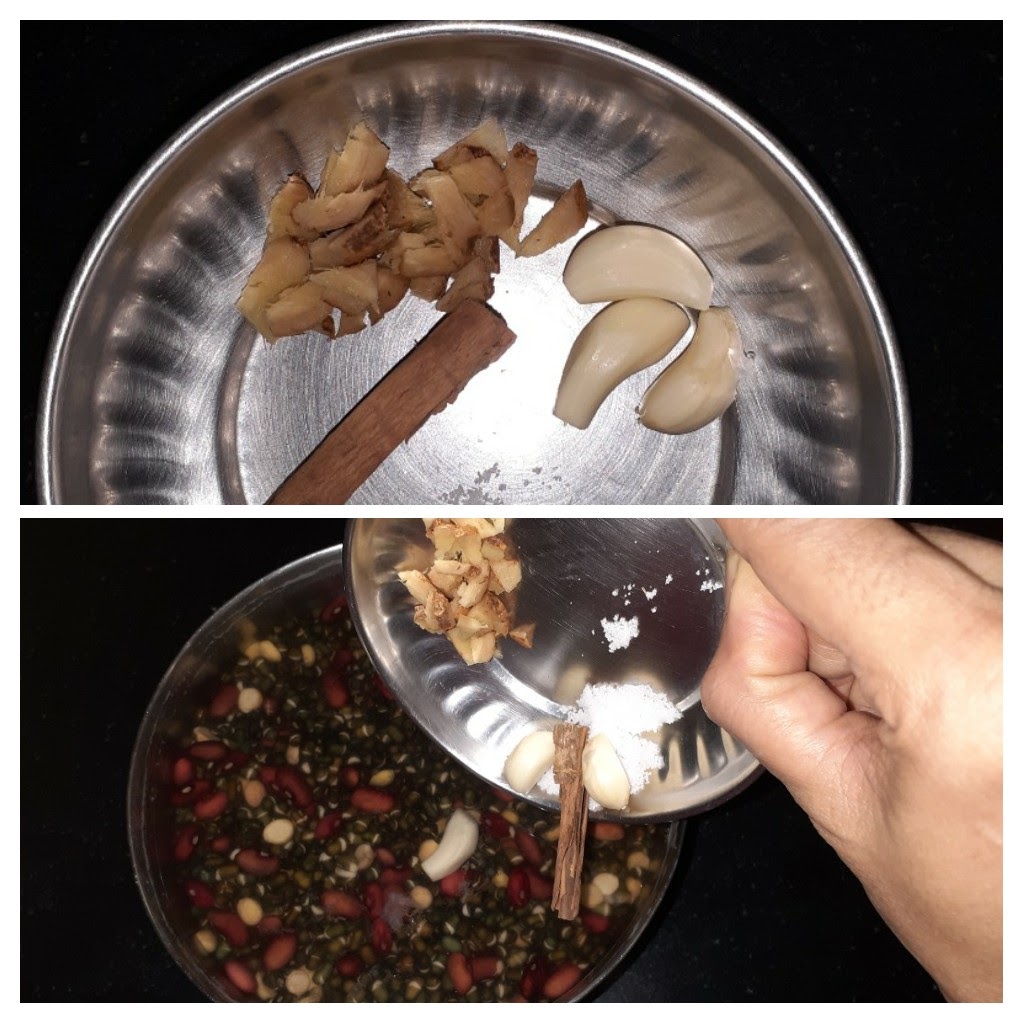
Garlic 8 pods (finely chopped)
ginger 1-inch piece chopped
Butter 2 tbsp
Tomato 3 medium pureed
Salt as per taste
Red chilli powder 1 tsp( more if you like it spicy)
Dal makhani masala 1.5 tbsp
Kasoori Methi 1 tsp crushed
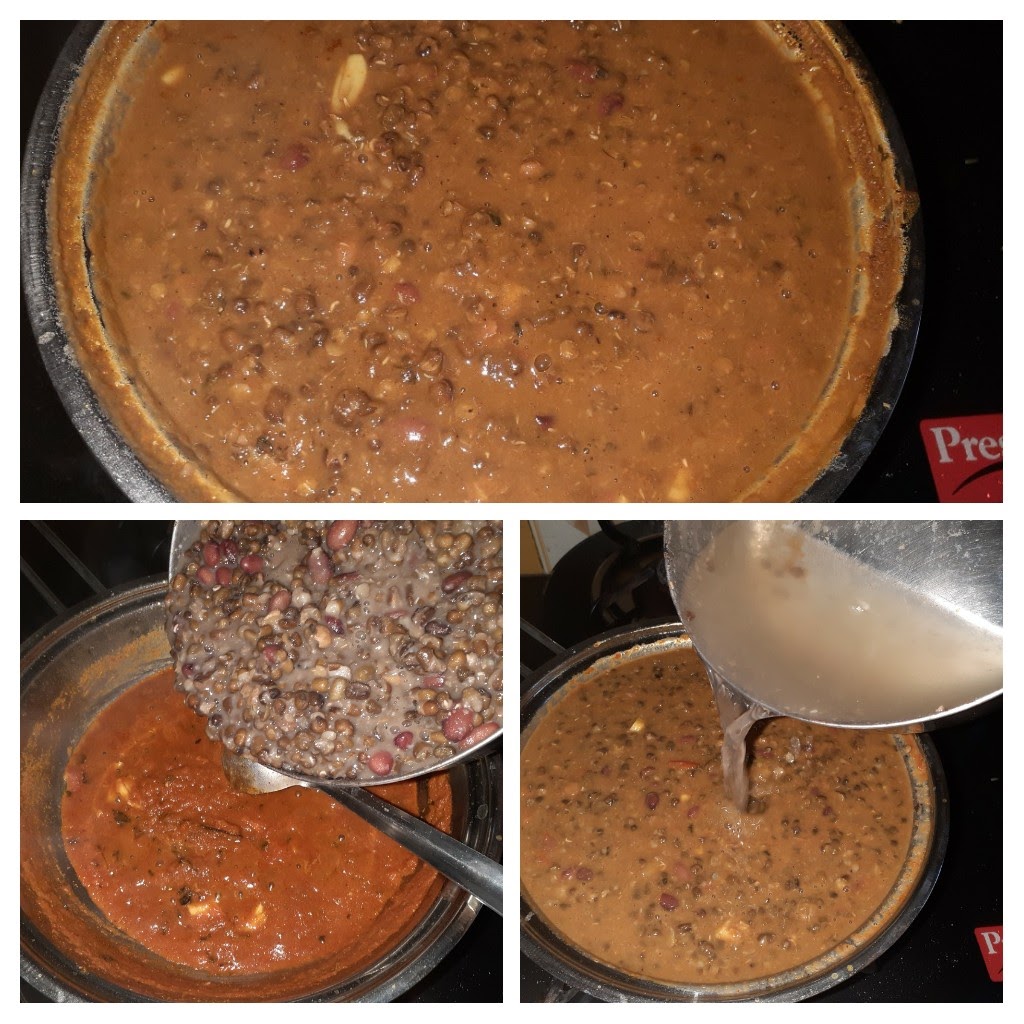
Directions: Soak the Black Urad, Rajma and Chana dal overnight. Once soaked put them in a pressure cooker with 2 pods of garlic and the ginger and cook for 6 to 8 whistles. Heat 1 tbsp butter in a pan and heat. Put in the Cinnamon stick and garlic and fry don’t brown them. Add in the Kasoori Methi and fry for half a minute. Now add the tomato puree and cook for 3 minutes. Add in the Dal Makhni masala, Red chilli powder, salt and cook until the butter floats. Lightly mash the cooked dals and add them to the tomato mixture. Stir nicely and add 2 cups water and reduce the heat and cook on low fire for about 25 to 30 minutes. Switch off the stove and add another tablespoon of butter and garnish with finely chopped coriander. Creamy Dal Makhni is ready to serve. This Dal goes really well with Parathas, Roti, Jeera rice and other Indian bread. Enjoy and Bon Appetit.
STEPWISE RECIPE FOLLOWS:
1. Assemble all ingredients. Soak the dals overnight.
2. Cook the soaked dal in a pressure cooker along with some garlic and the ginger and a piece of cinnamon stick for 8 to 10 whistles.
3. Take some butter in a pan and heat. Put in the Cinnamon stick and garlic and fry for 1/2 a minute. The garlic must not turn brown. Add in the crushed Kasoori Methi and fry for a minute.
4. Now add in the pureed tomatoes followed by salt, red chilli powder and Dal Makhani masala and cook. Cook until the butter floats/ forms a layer on top.
5. Now add the cooked dal, stir nicely and add 2 cups of water and cook on low fire for 25 to 30 minutes.
6. After 30 mins put off the stove and add a tablespoon( or more)of butter to the dal and garnish with chopped coriander.
NOTES:
1. The Chana dal gives the creaminess to this dish, so don’t do away with it, at the same time don’t put too much of it or the taste may vary.
2. If you don’t have Dal Makhni Masala, use a small quantity of garam masala. For the measures that are given above 2 tsp garam masala should be sufficient.
3. Adding Kashmiri red chilli powder will give the dish a good colour. I have added a mix of both regular red chilli powder and Kashmiri red chilli powder, so that spice and colour are balanced.
If you tried this recipe and liked it please comment below. I would love to hear from you.