Ragi Laddu/ Nachni Ladoo
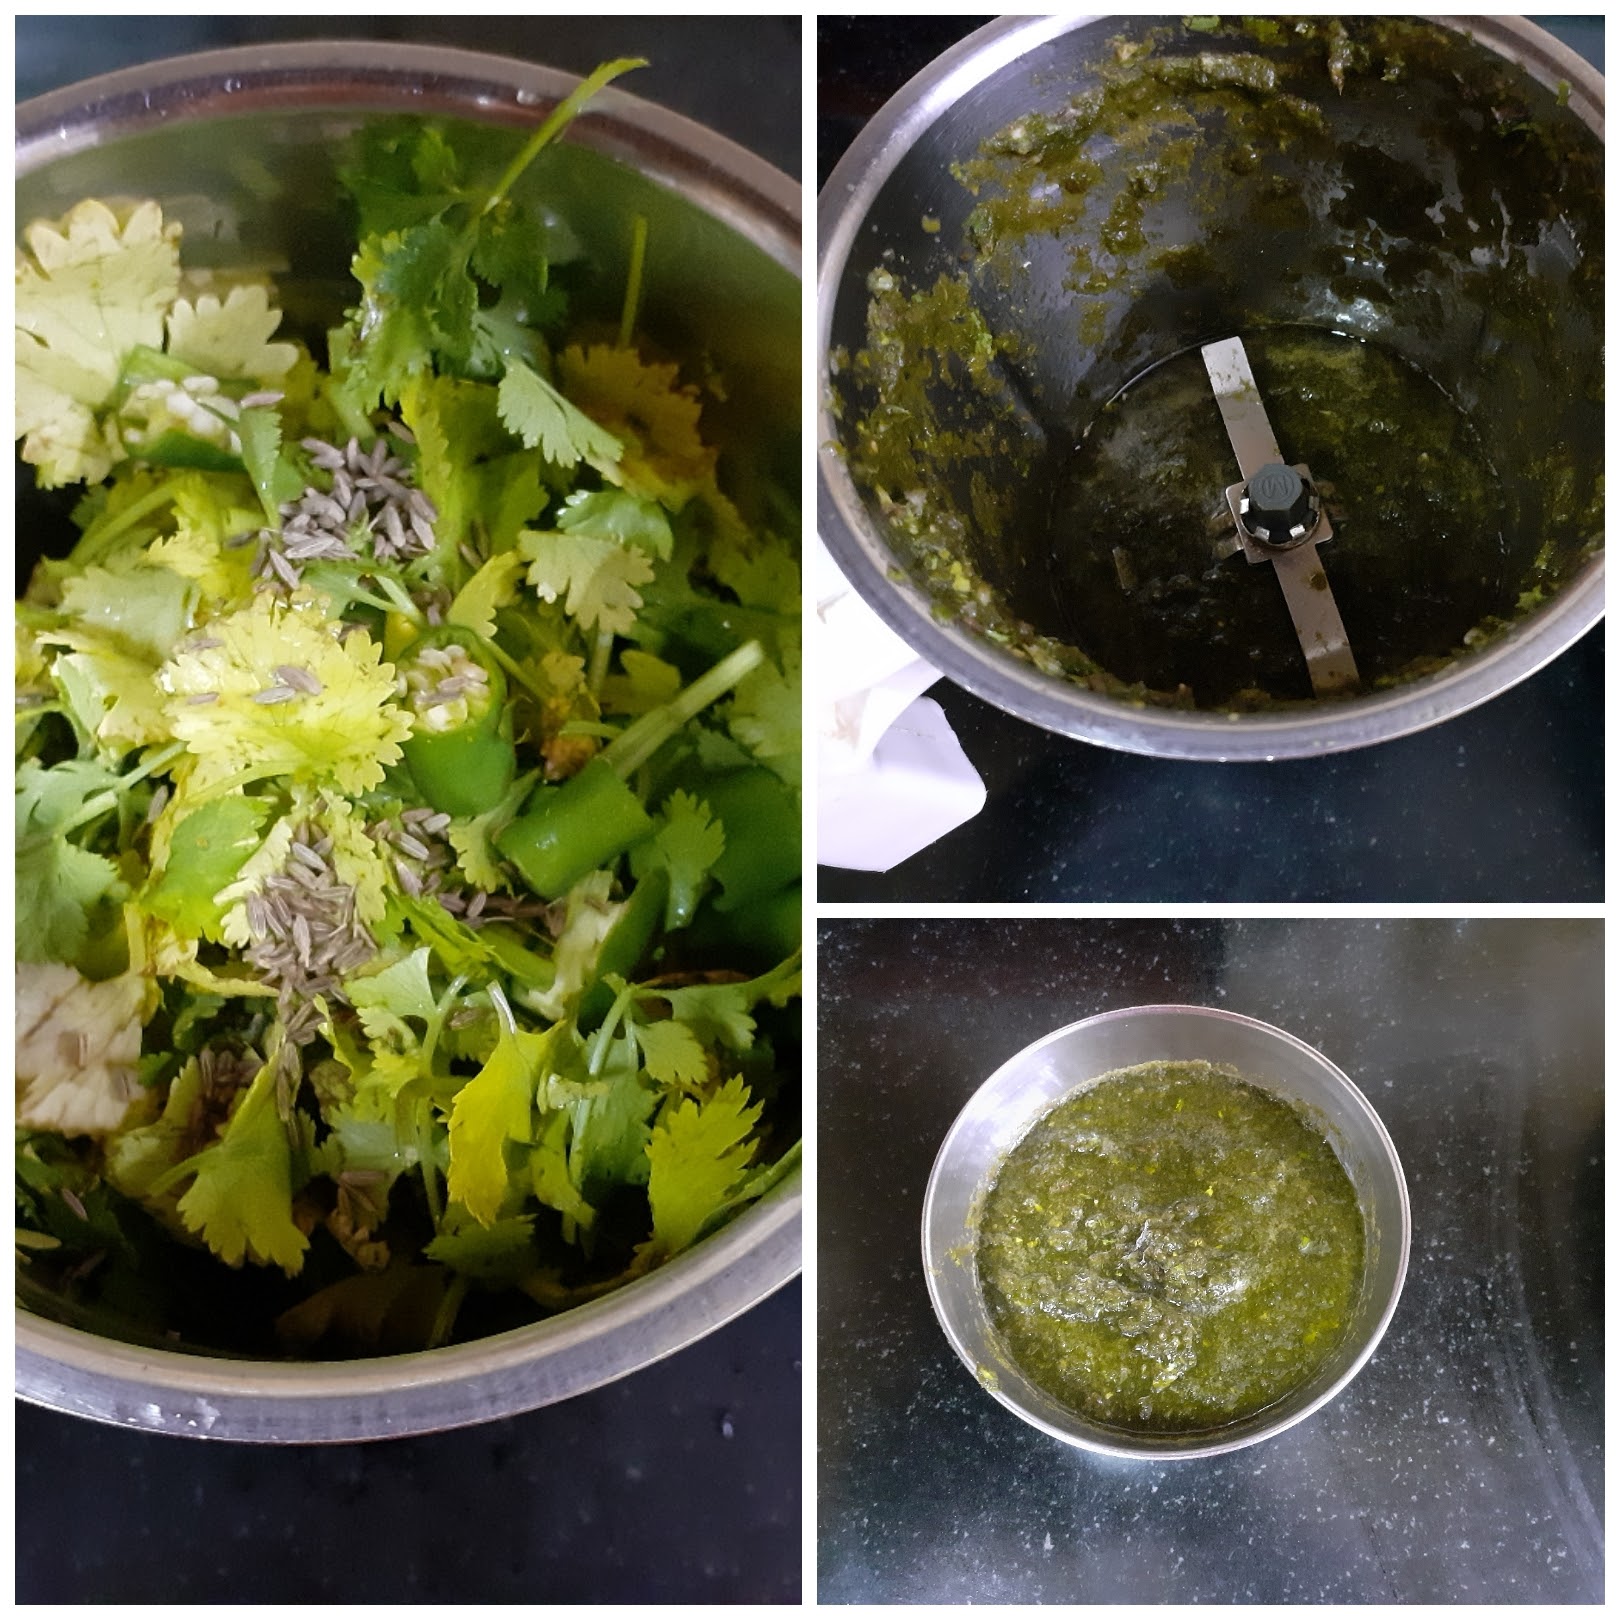
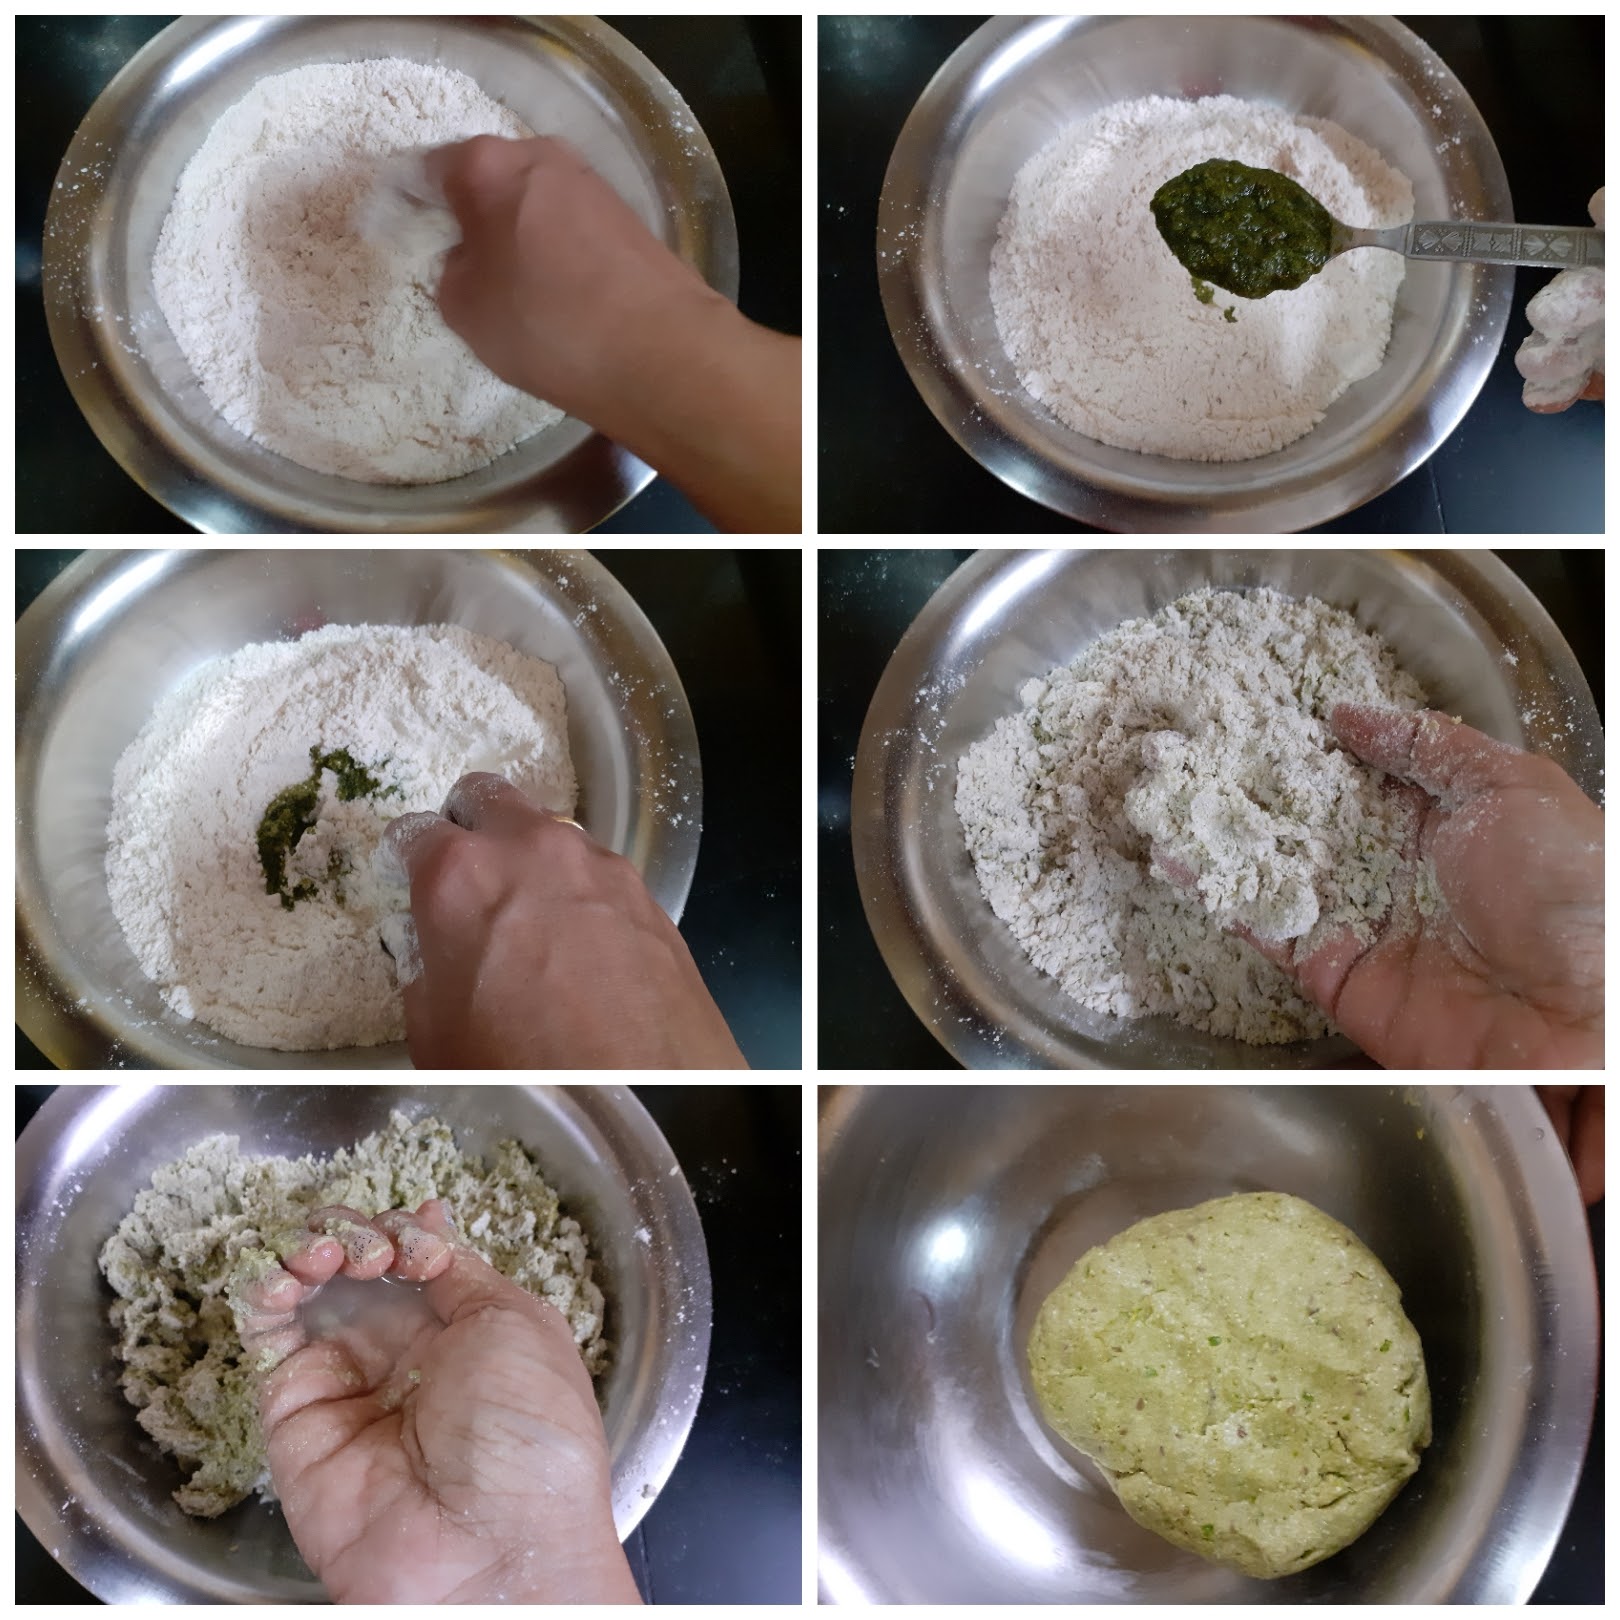
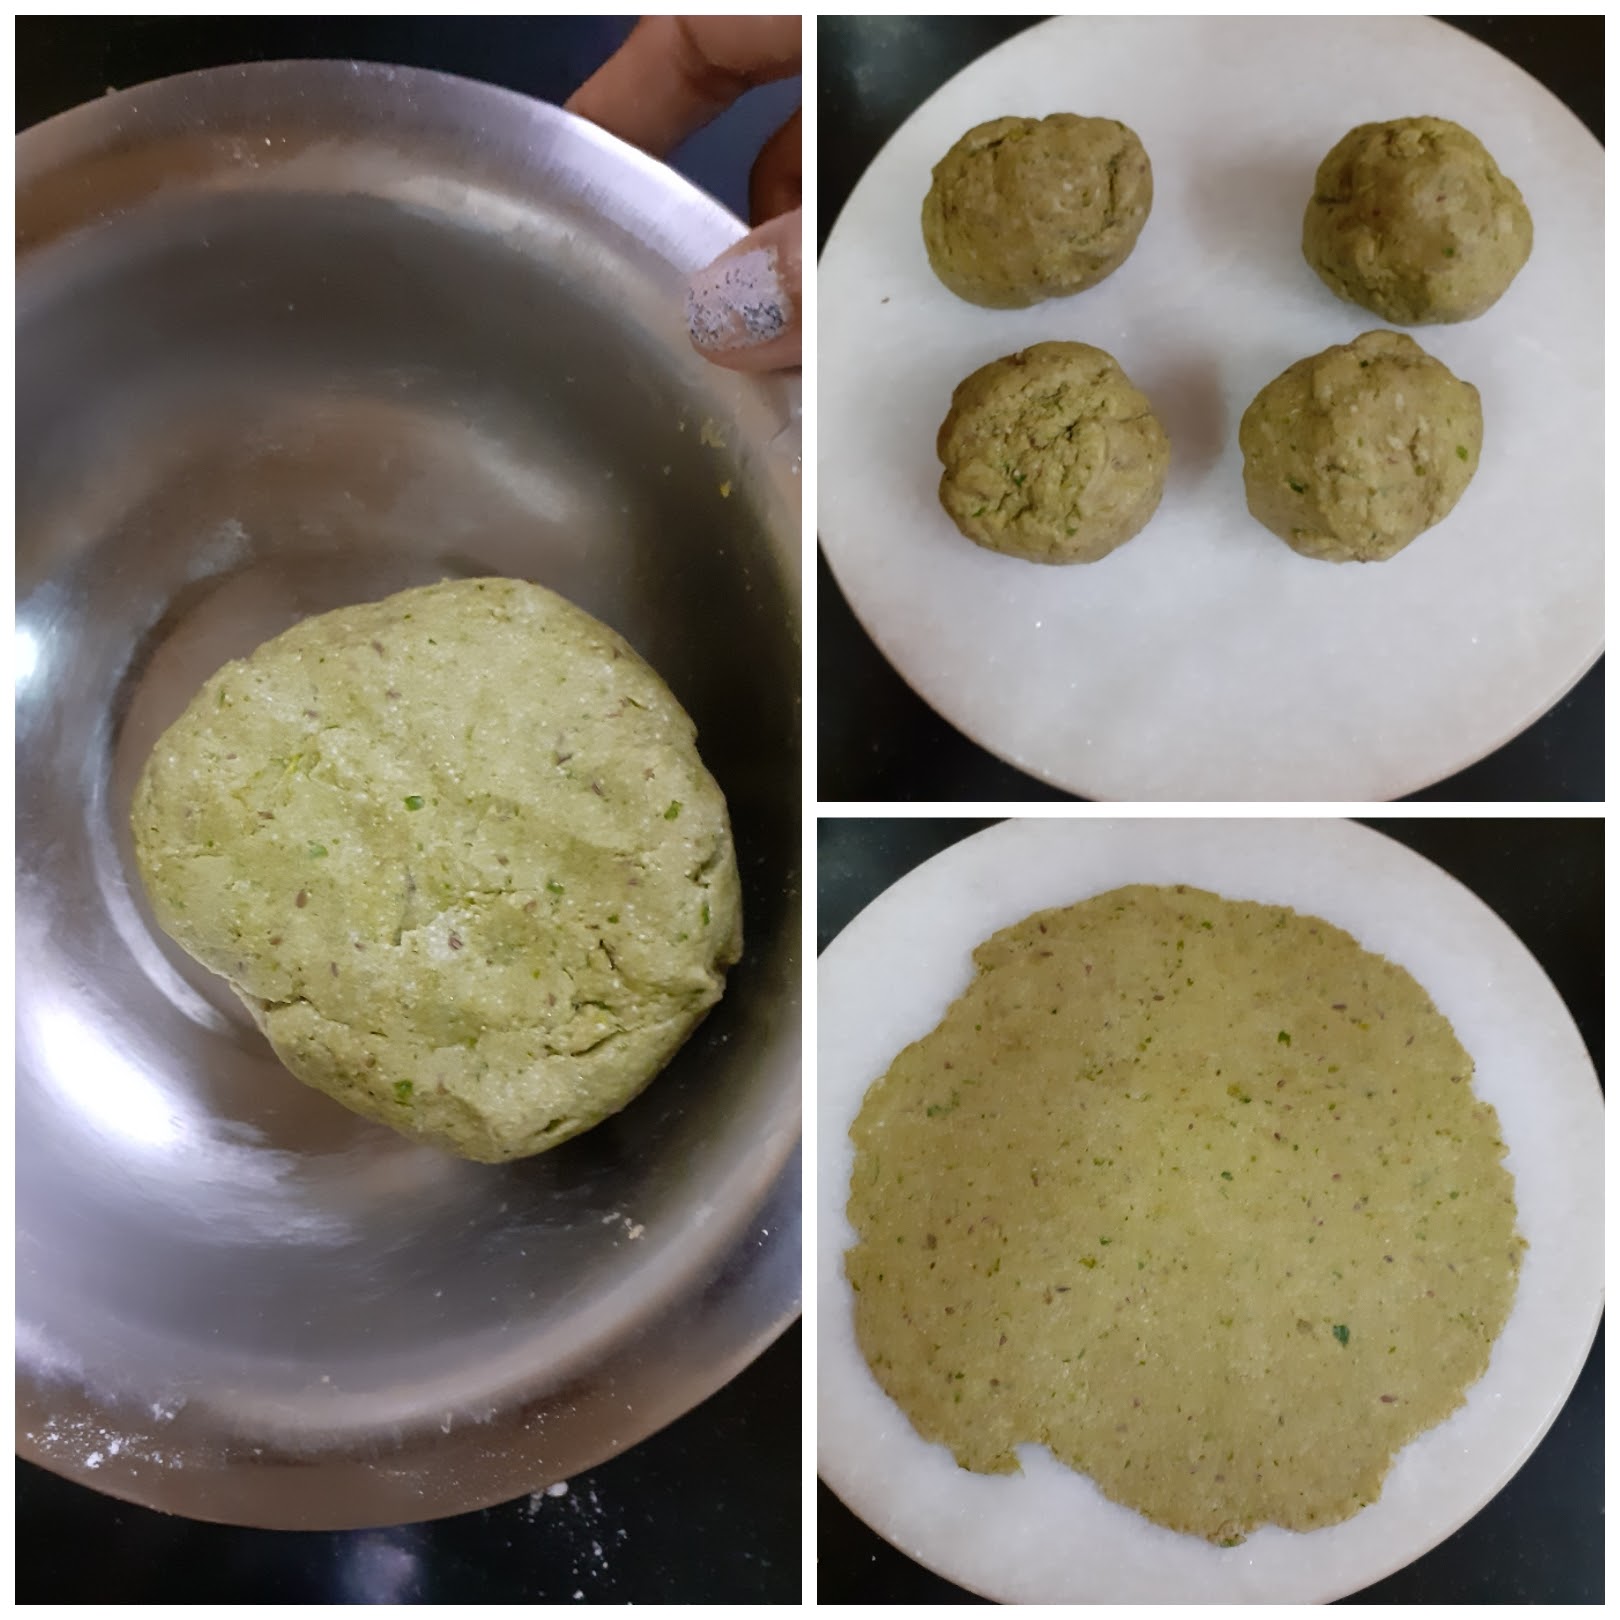
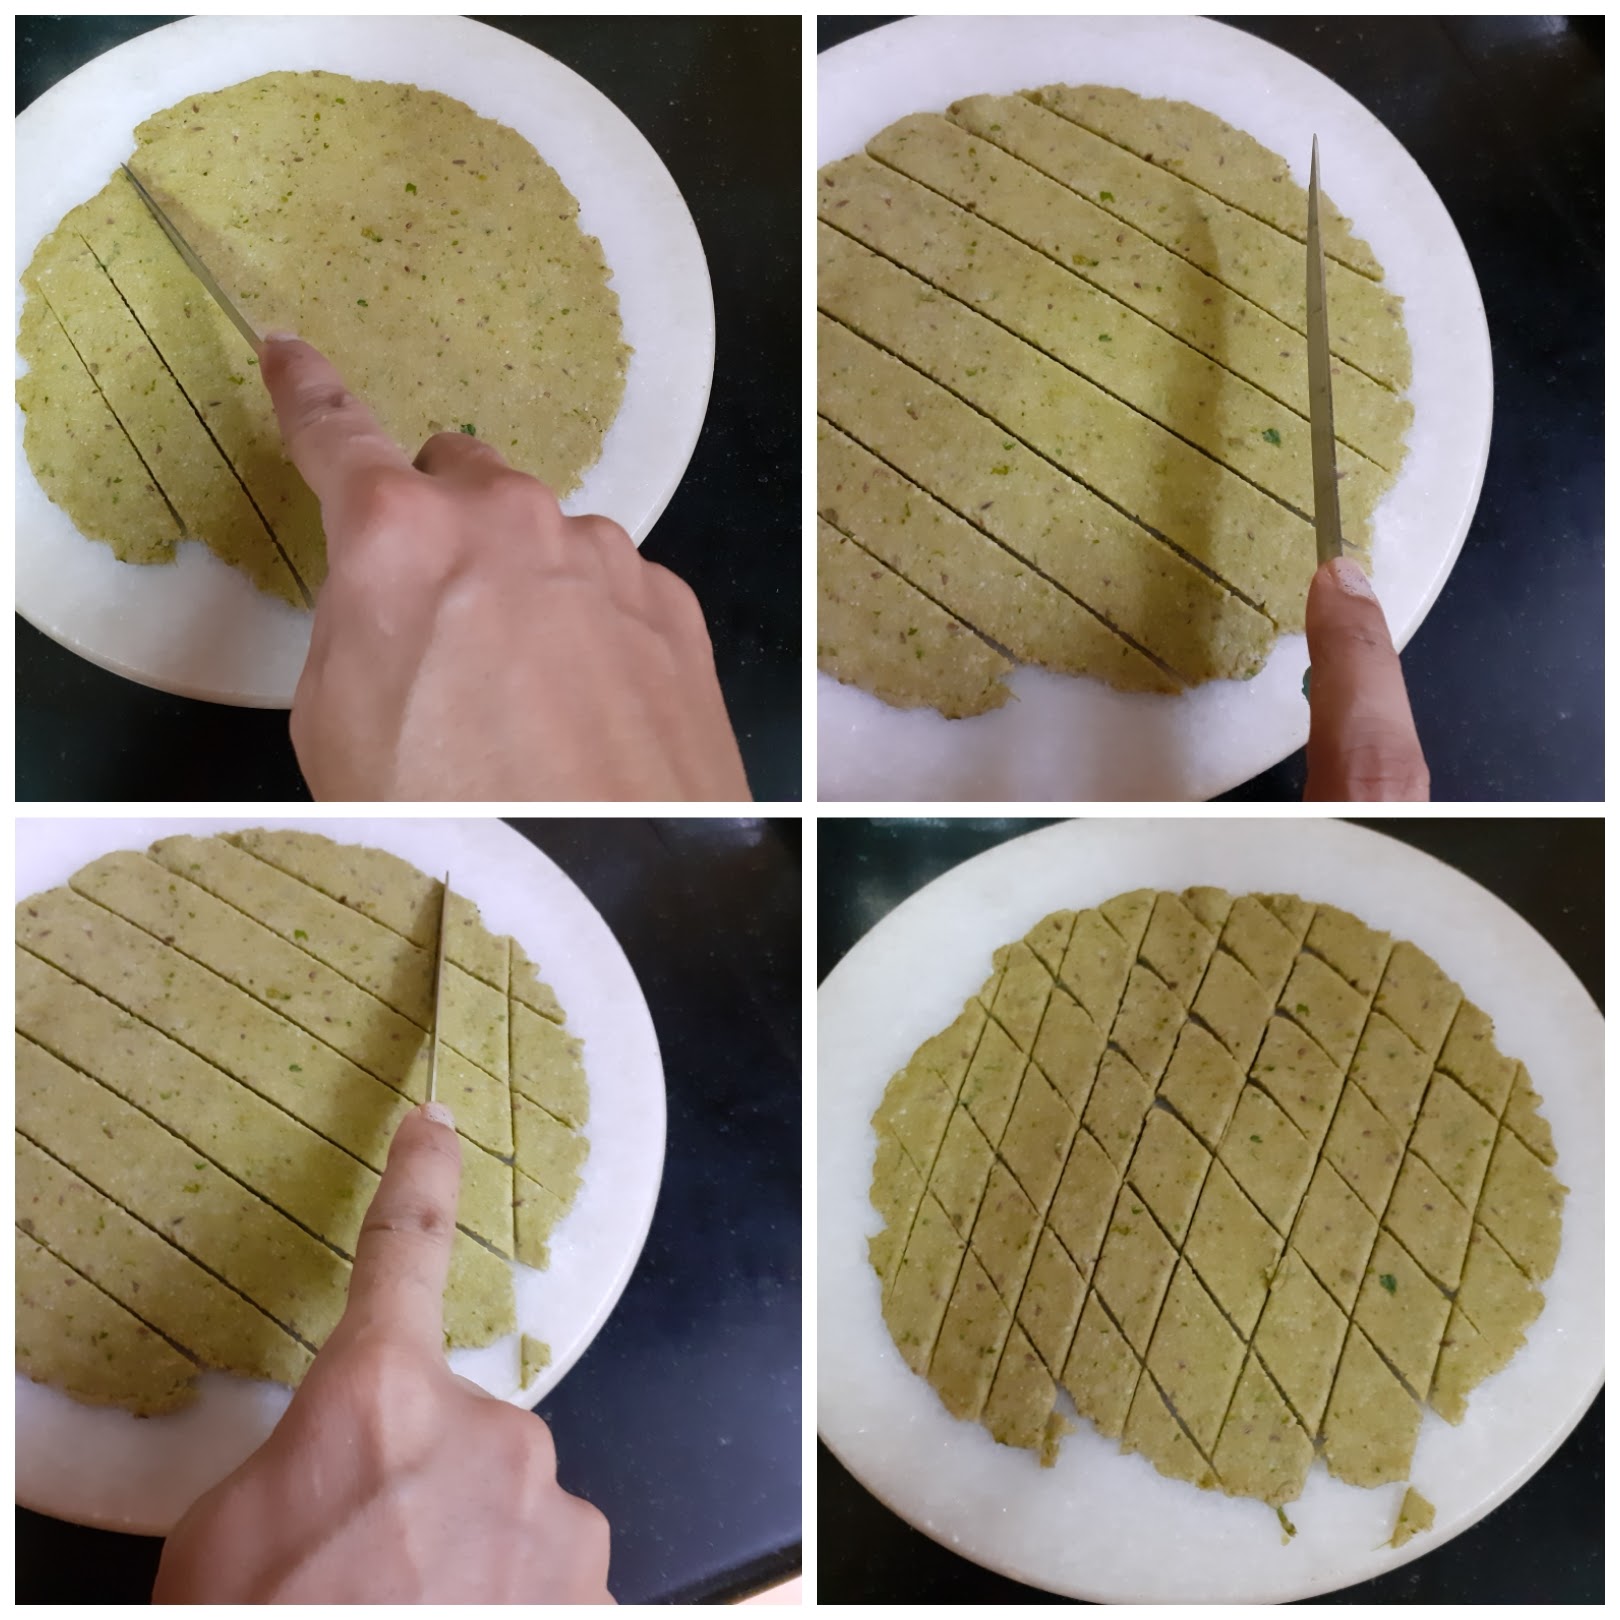
Bajra Methi Crackers
Sooji Halwa/Semolina Pudding/Sheera
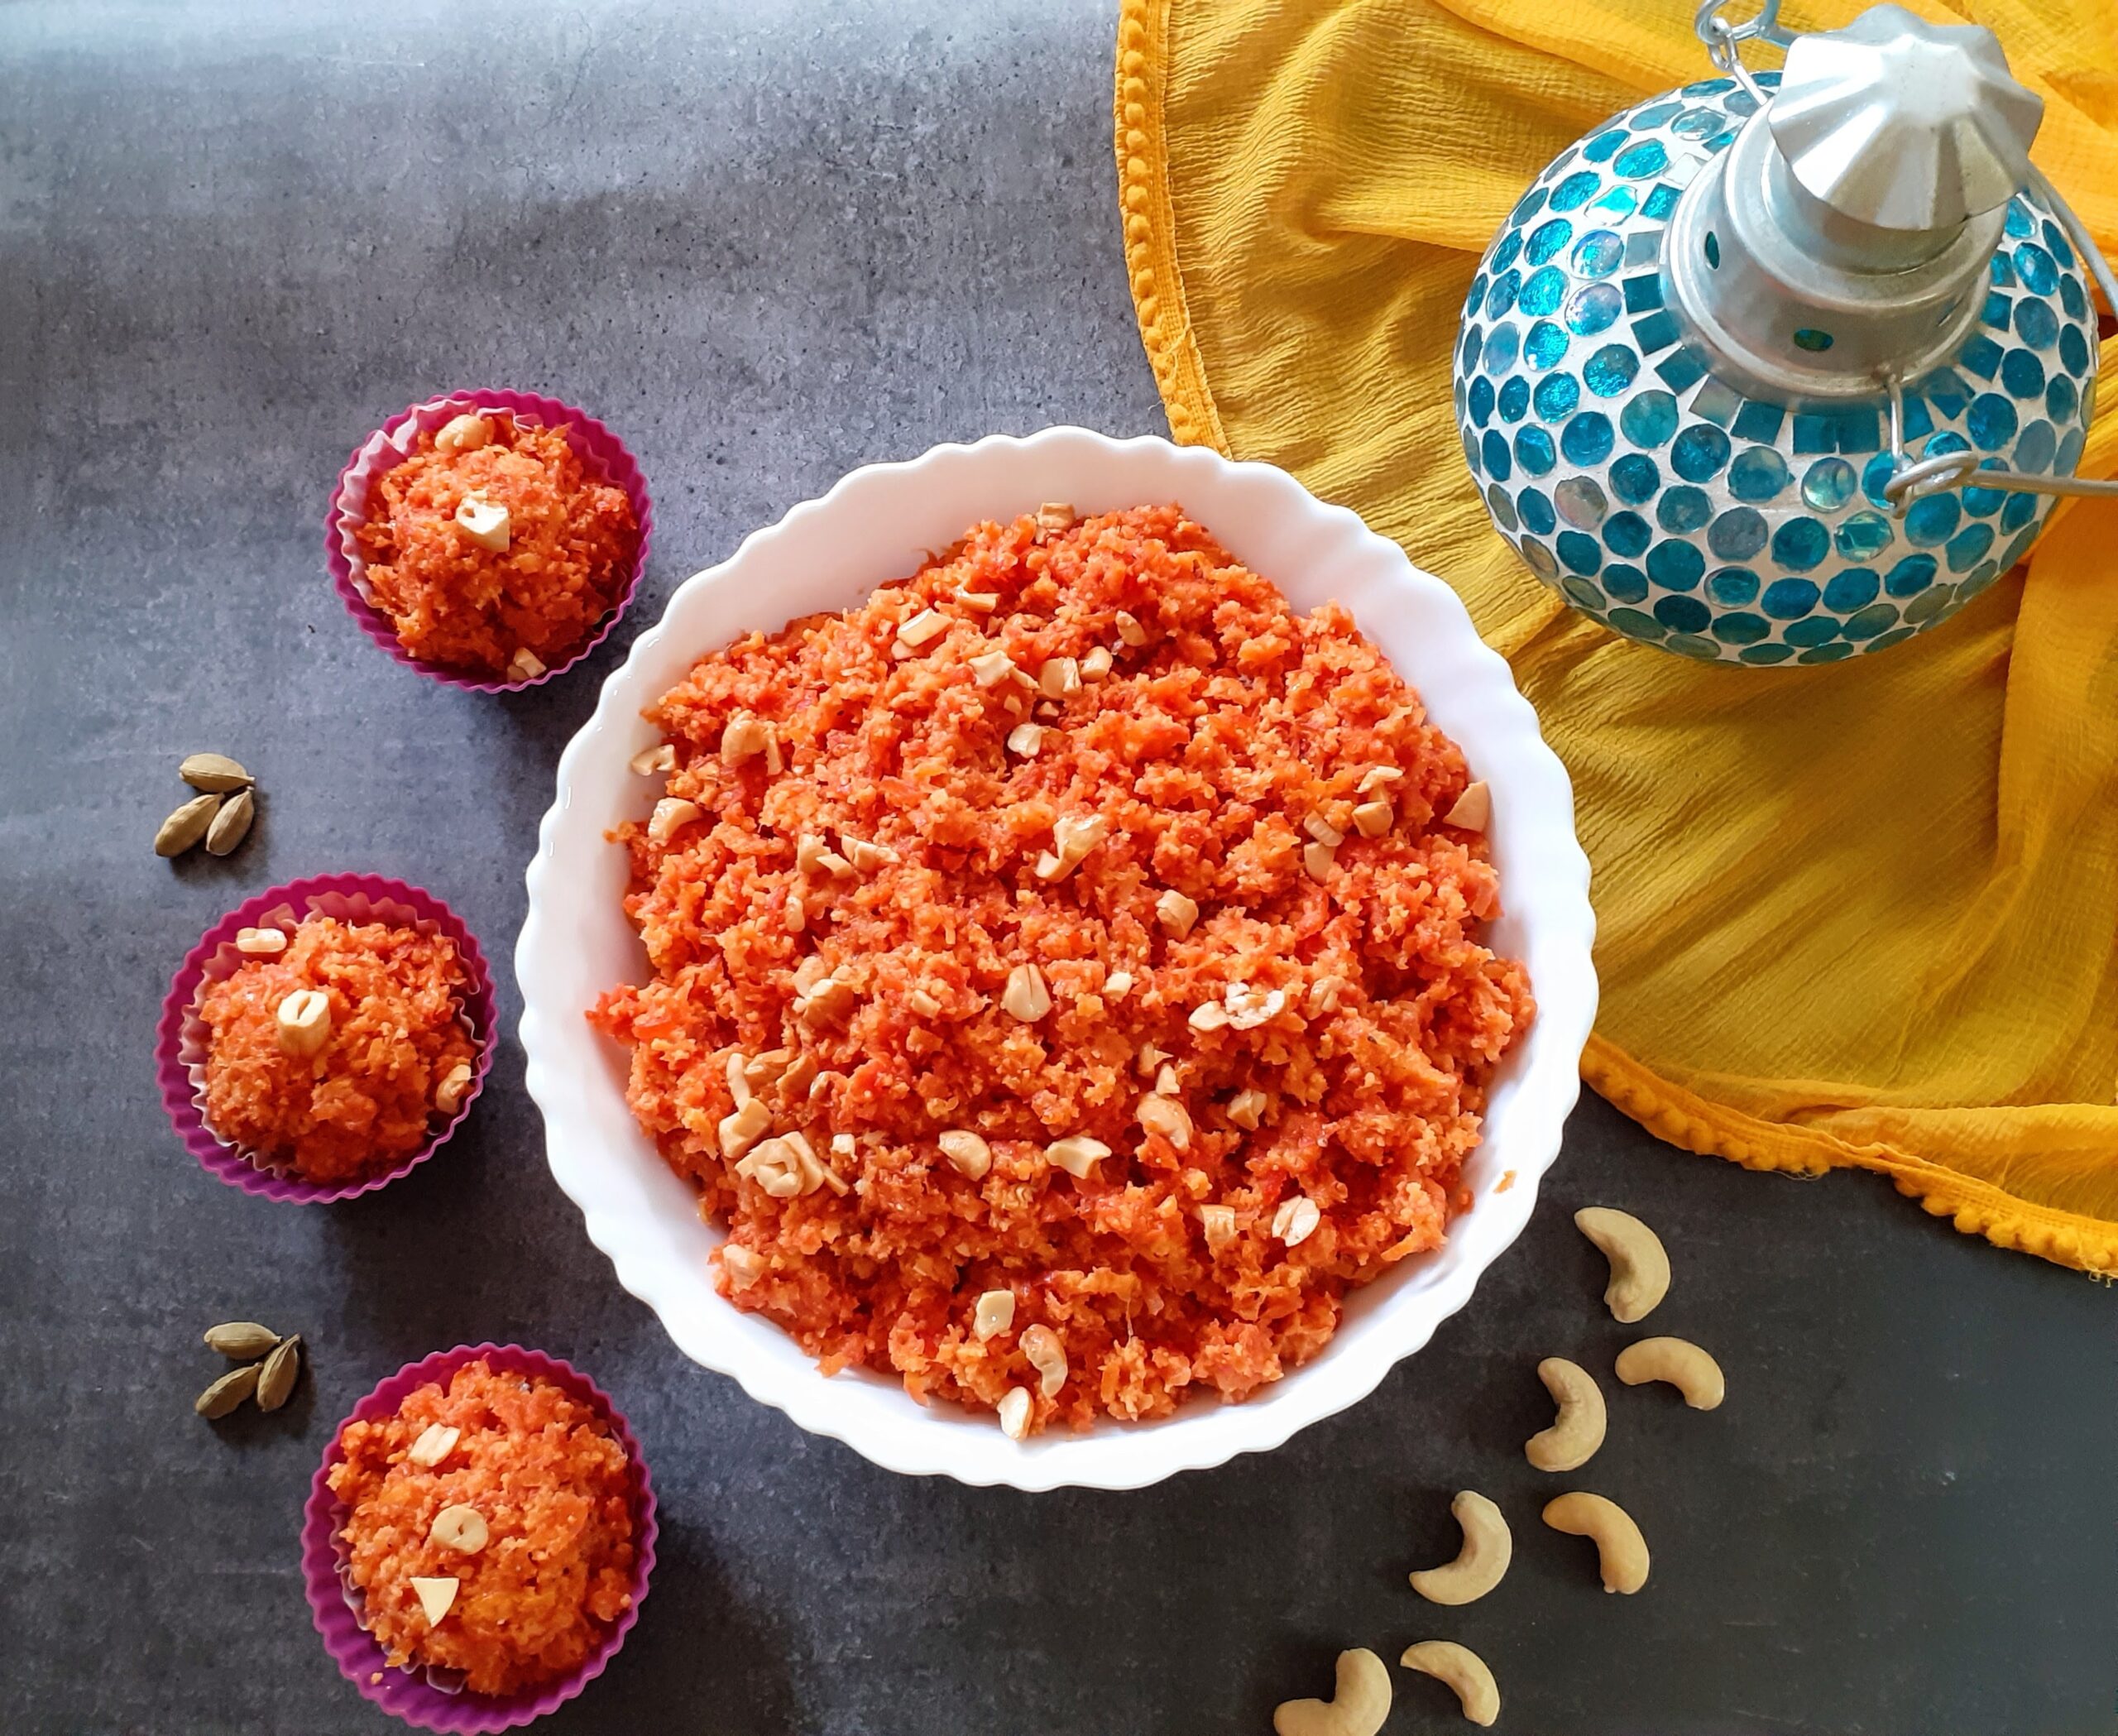
GAJAR HALWA/ CARROT HALWA
Gajar Halwa/ Carrot Halwa is a very popular Indian dessert. Mostly a winter dessert. Though it is made frequently with the regular carrots ( English Carrots), using the Delhi Carrots or Red Carrots as they are called gives the best results.
This is one dessert I love and consider it very sacred, so if you are looking for an easy, one pot or microwave recipe, you are going to be disappointed. As far as Gajar Halwa is concerned I am old school. I cook it in milk( and a whole lot of milk) so that the raw taste of the Carrots is gone and the milk crumbles to a Rabri like texture. The taste of such a Halwa is divine. This is one recipe I have never made with regular carrot except in my dessert recipe- Gajar halwa Barfi where I was shaping it like fudge( Barfi) and using Khoya to speed up the process. Whereas this recipe of Gajar Halwa is a slow cook process. The slower it cooks the better it tastes. Am I disappointing you? Well, make it like this and you will be hooked to it for life. Remember the best things in life come with a lot of patience.
My belief is that when I wait a whole year for the Red Carrots to appear in the Market and then make the Halwa, then it should be made the authentic way. Which does not involve adding condensed milk or Koya or milk powder but in cooking the carrots in milk( whole cream), to perfection.
I use only whole cream milk to make this dessert. So the taste of the Halwa depends entirely on the quality of milk. A full/whole cream milk Halwa will give you better taste and I can say this because I have tried it will all milk varieties available in the market and what works best is whole/full cream milk.
So after the whole mega write up, taking you to the recipe. While you are here do check out my other carrot based desserts like Carrot Kheer( another speciality from Rajjo’s Kitchenn) and Gajar Halwa Barfi.
Ingredients:
Carrots ( Preferably Red ones) 1.5 kilo grated
Milk whole cream/ full cream 2 litres
Sugar 300 gm
Cardamom/ Elaichi powder
Ghee 4 tbsp
Cashews a new broken
Directions:
Wash, peel and grate the carrots and keep aside. In a huge thick bottomed vessel/ kadai/ or urli boil the milk. When it comes to a boil, reduce the flame and put in the grated carrots. Start stirring the mixture. The flame can be increased now but constant stirring is required . This process has to continue until almost all the milk dries up. The texture will look like Rabri stickng to carrot. Once all milk dries up, reduce the flame and add the sugar. Continue to stir again. Once the sugar is added the mixture will liquify, continue to stir until all the moisture is absorbed. The halwa will come together but it will not be gooey. Now add the cardamom powder. Fry the nuts in ghee and pour it over the halwa along with the nuts. The healthy and delicious Gajar Halwa is ready. Serve warm. Bon Appetite.
STEPWISE RECIPE FOLLOWS:
1. Wash, peel and grate the carrots and keep aside. In a huge thick bottomed vessel/ kadai/ or Urli boil the milk.
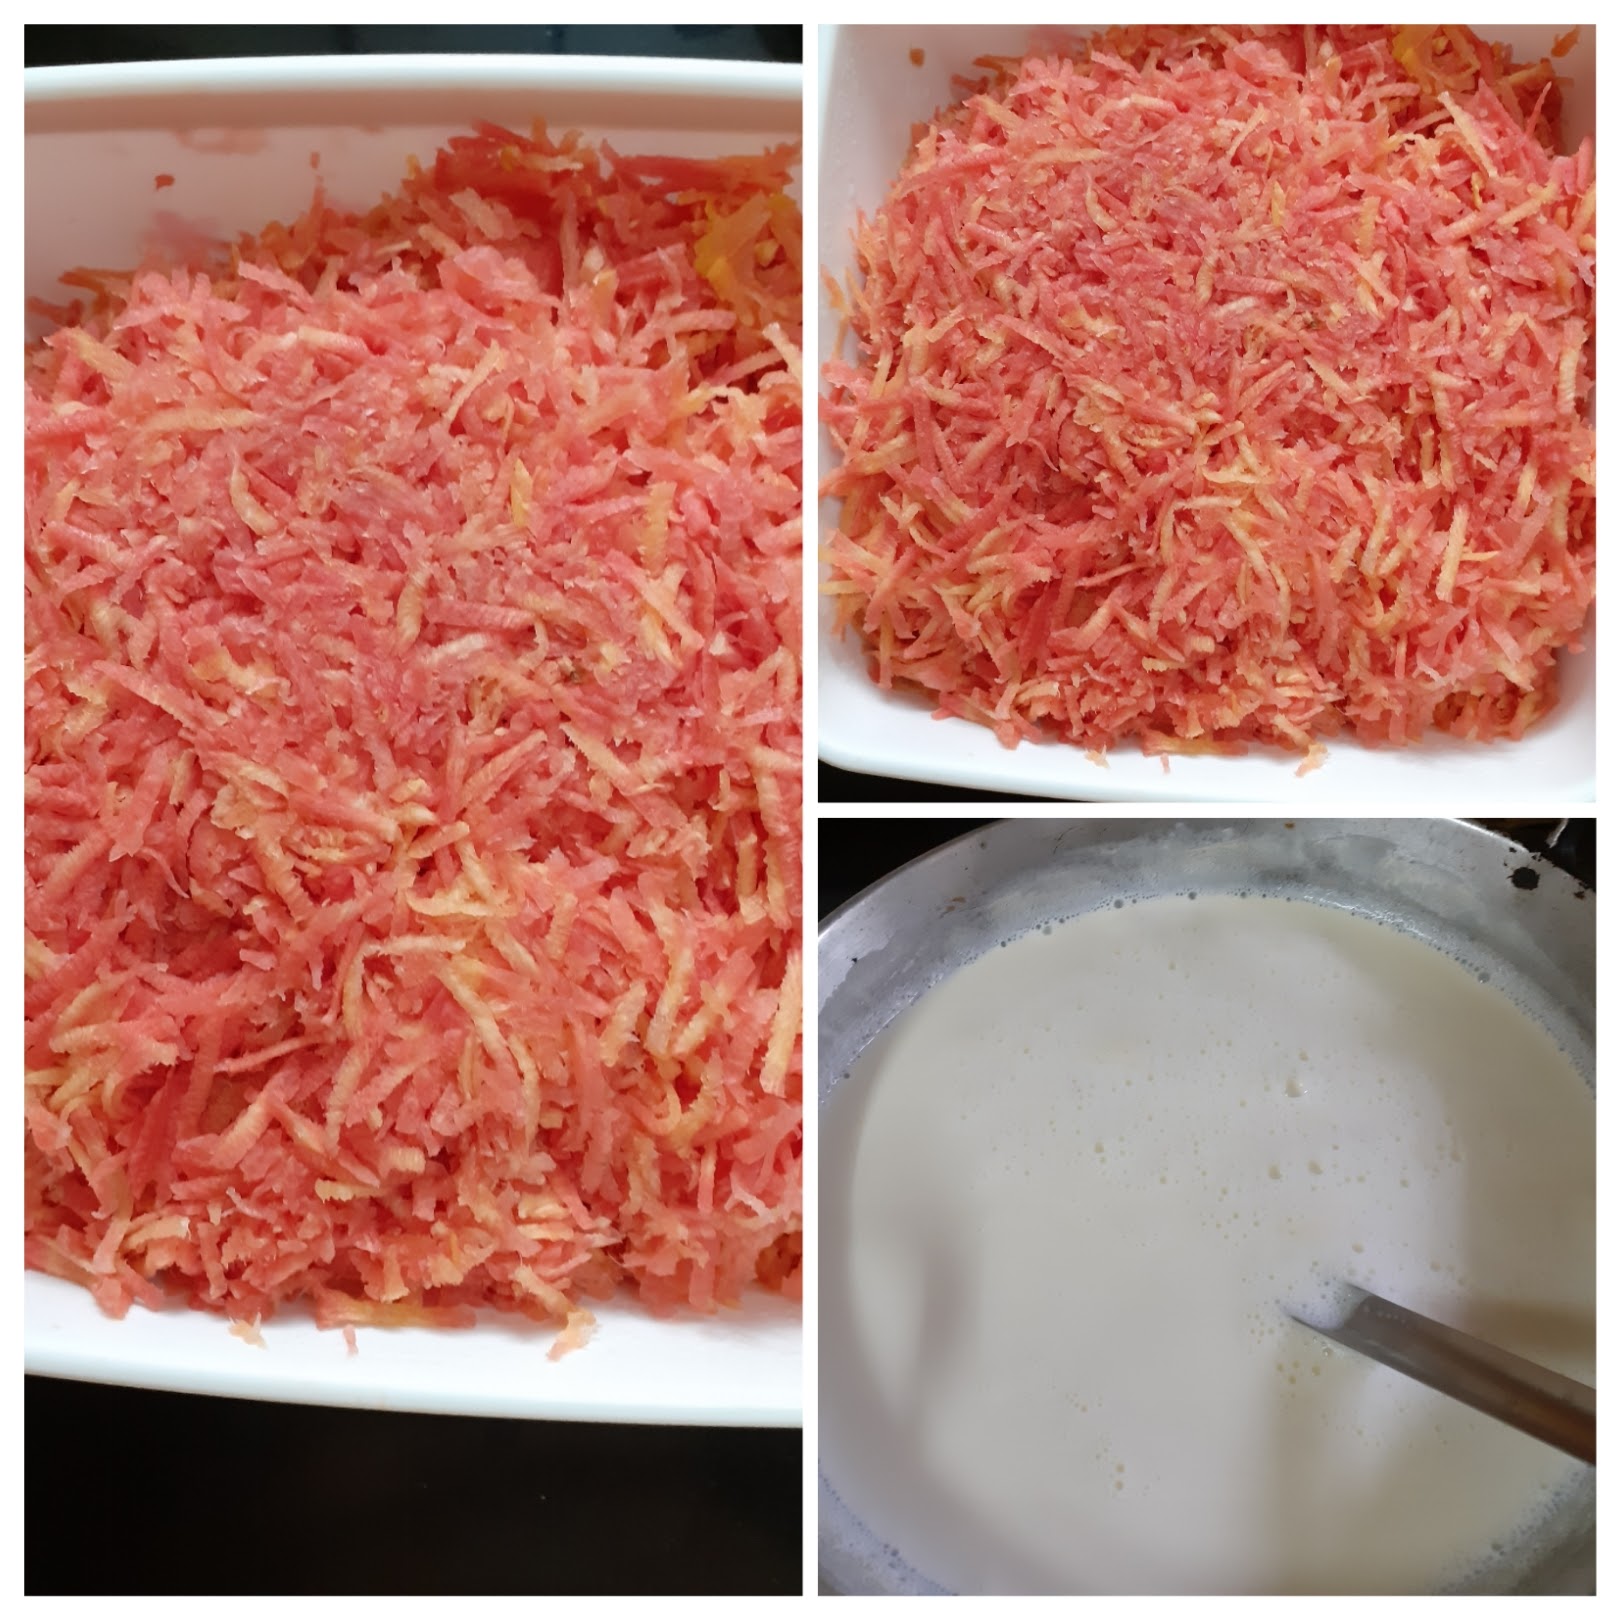
2. When it comes to a boil, reduce the flame and put in the grated carrots. Start stirring the mixture. The flame can be increased now but constant stirring is required . This process has to continue until almost all the milk dries up. Showing you the stages of reduction in pictures below that are self explanatory.
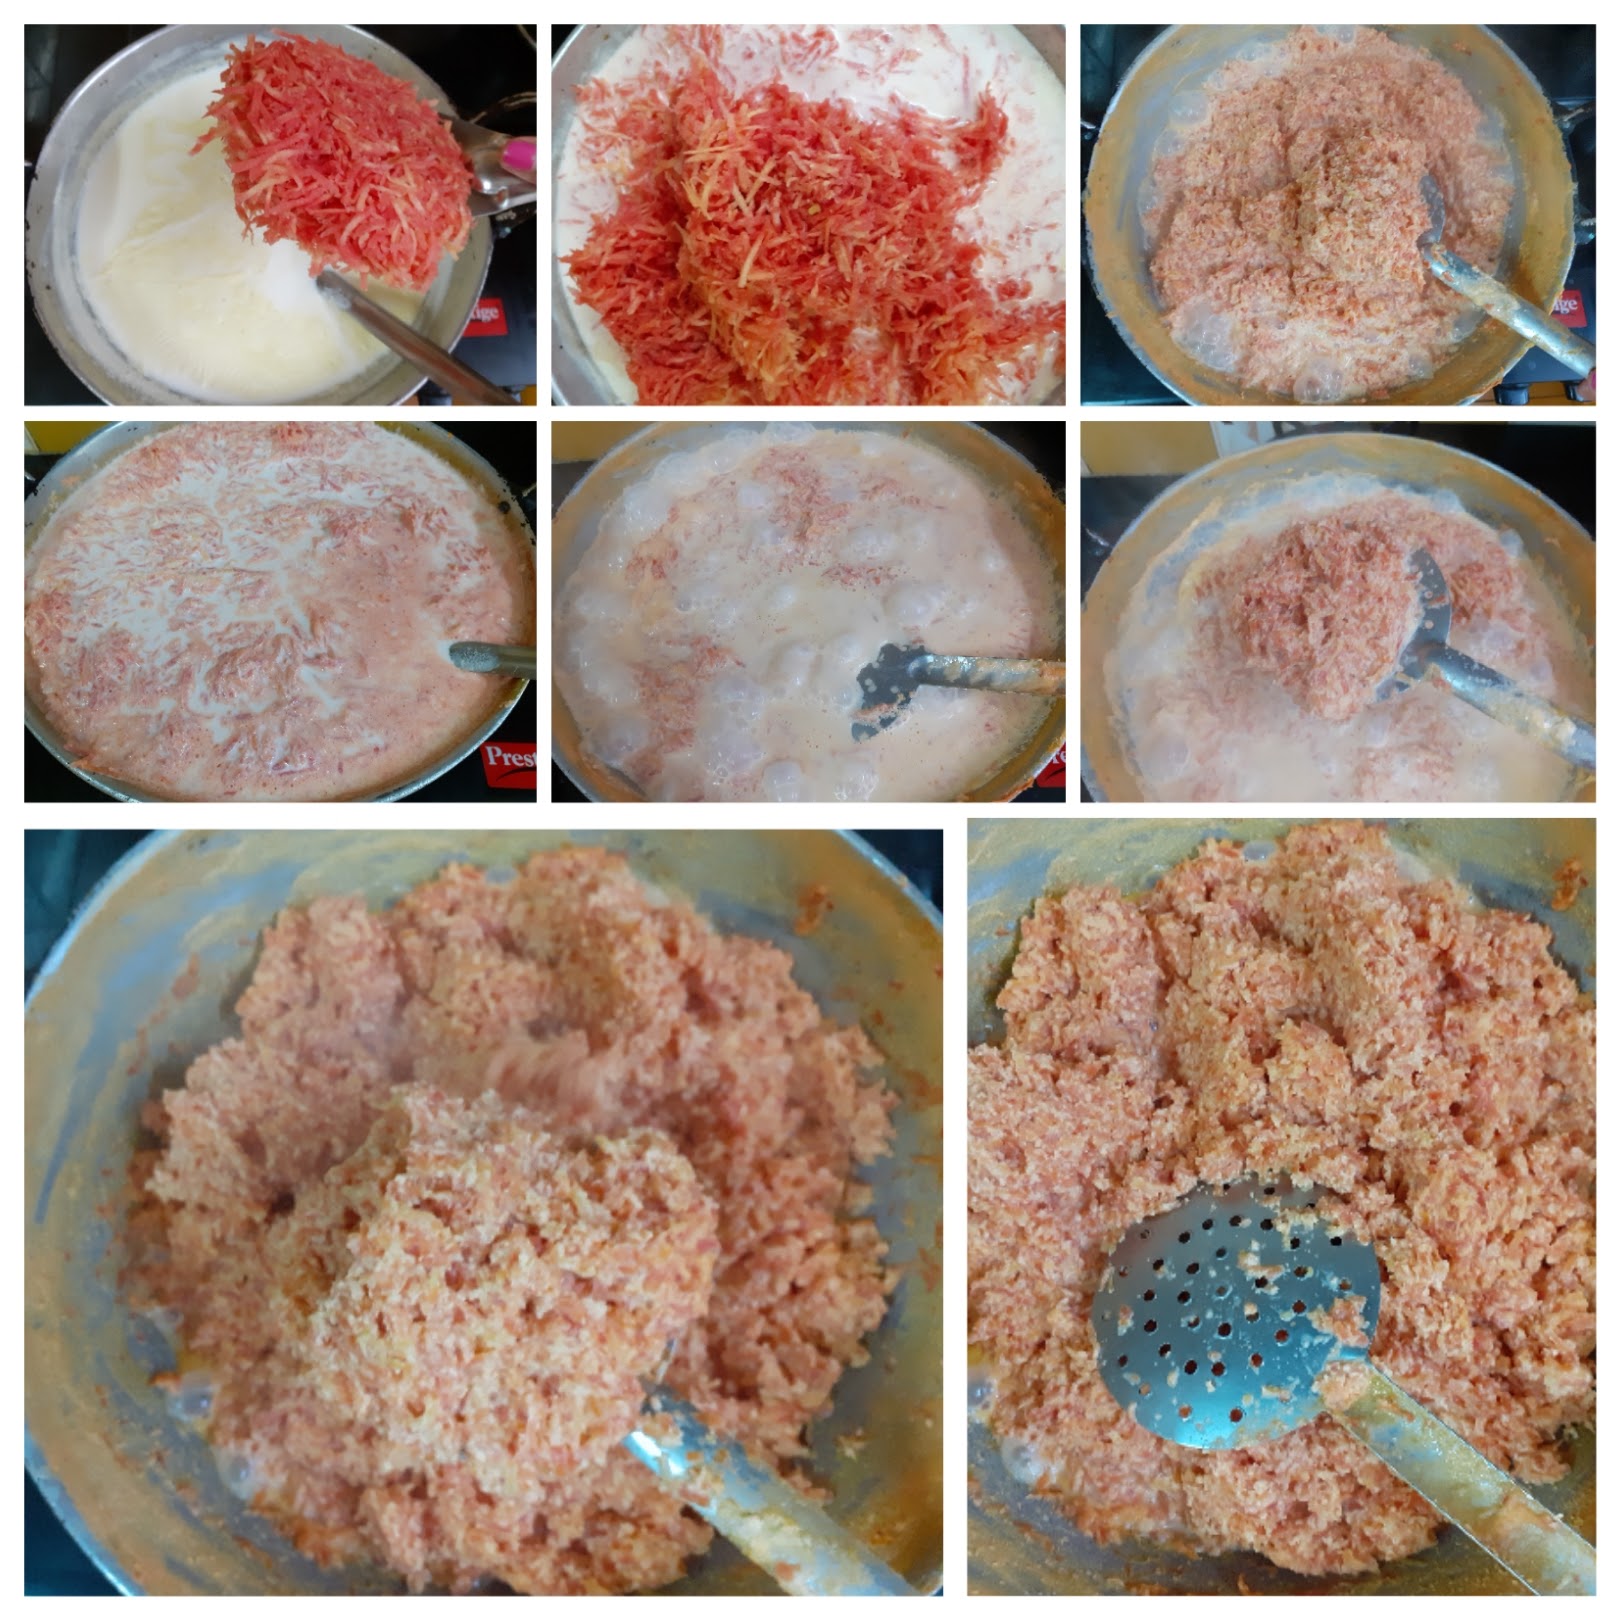
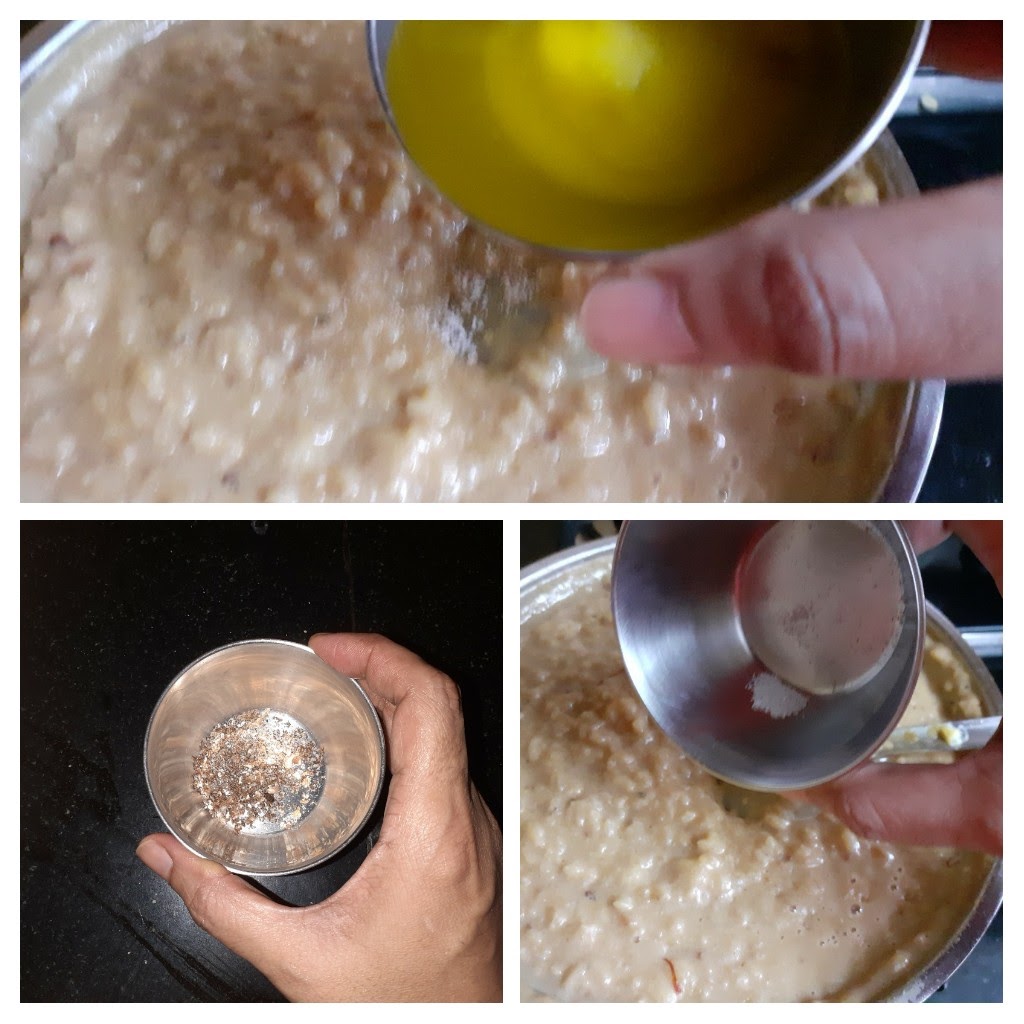
3. Once all milk dries up, reduce the flame and add the sugar. Continue to stir again. Once the sugar is added the mixture will liquefy, continue to stir until all the moisture is absorbed. The Halwa will come together but it will not be gooey. (forgot to click a picture finally to show the final consistency, so have included the one showing the cardamom powder. Please follow that texture for final consistency of Halwa).

4. Now add the cardamom powder. Fry the nuts in ghee and pour it over the Halwa along with the nuts. The healthy and delicious Gajar Halwa is ready. Serve warm.

NOTES:
1. While cooking at high heat keep stirring constantly to avoid burning the contents at the bottom of the pan.
2. Actually after sometime of cooking the milk and carrot mixture , it does not overflow from the vessel. That time the stirring can be relaxed a bit, but stir every couple of minutes. If you are following this reduce flame when not stirring.
3. Good quality full cream milk yields the best result, the Halwa can be made with milk of any consistency though. The results may not be what I have described .
4. Feel free to try this with regular Carrots too. Method being the same.
5. Sometimes people try to over power the subtle carrot flavour by adding huge amounts of ghee. This is not required. Pouring ghee at the right time is very important, such that the flavour is enhanced and a lot of ghee is not poured unnecessarily. Check out my Cakkara Pongal post for the directions on how to pour the ghee.
If you tried this recipe and liked it please comment below. I would love to hear from you. If you have a query about the recipe email us and ill respond as soon as I can.
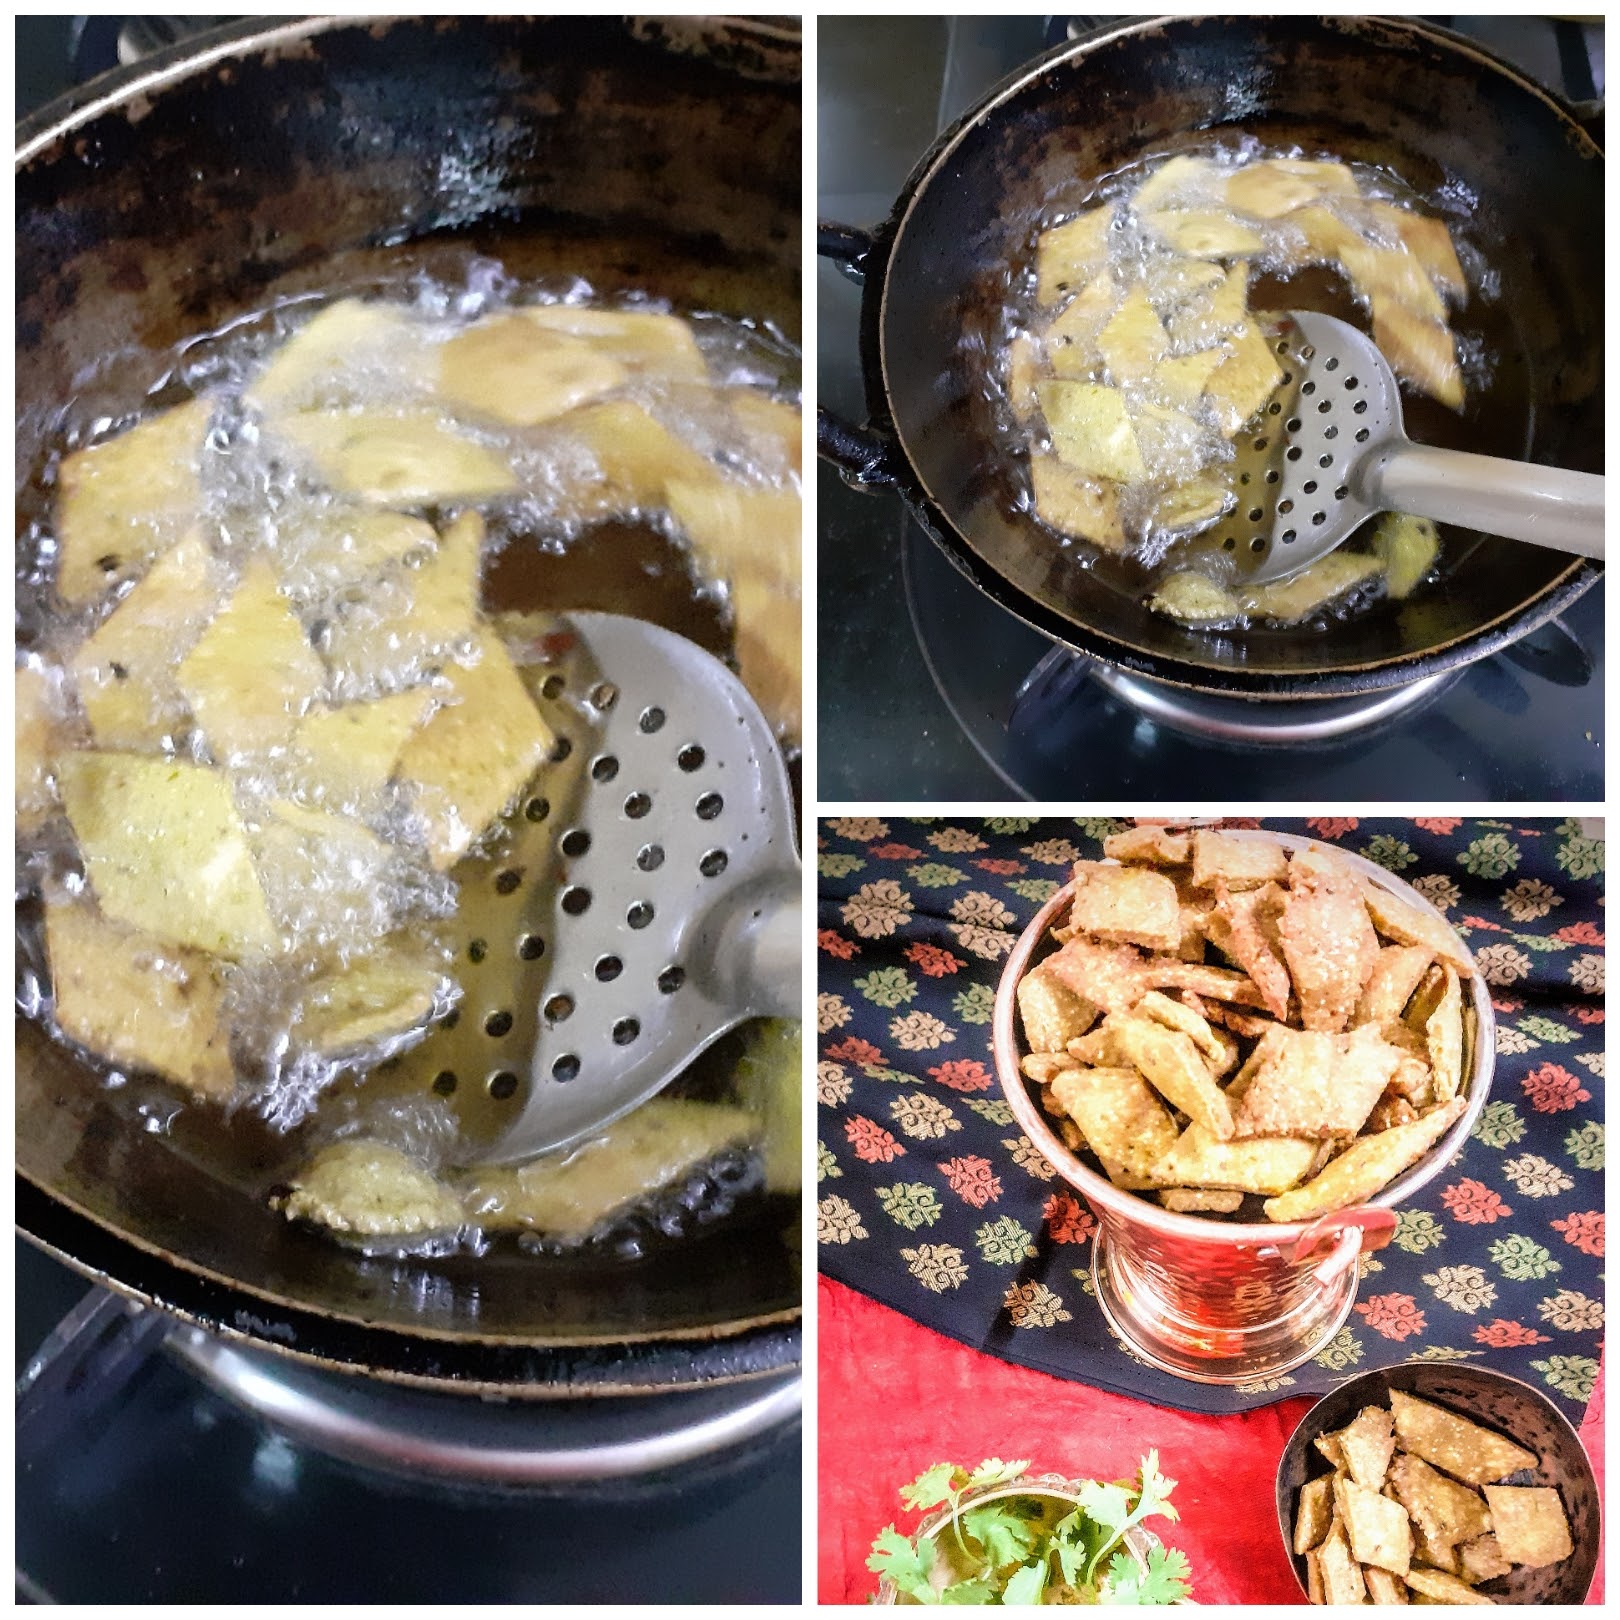
Dhaniya Wale Namak Pare (Namak Pare)
Namak Para’s are a simple dry snack made from refined flour or whole wheat flour. They make for a good tea time snack too. Here the flour is combined with salt and spices to form a stiff dough. The dough is then rolled out and cut into diamonds and deep-fried in oil. This is an easy savory recipe to make around festivals like Diwali or Janmashtami where the tradition calls for making some flour-based snacks. One can just make it as a regular tea time snack too.


If you tried this recipe and liked it please comment below. I would love to hear from you. If you have a query about the recipe email us and ill respond as soon as I can.
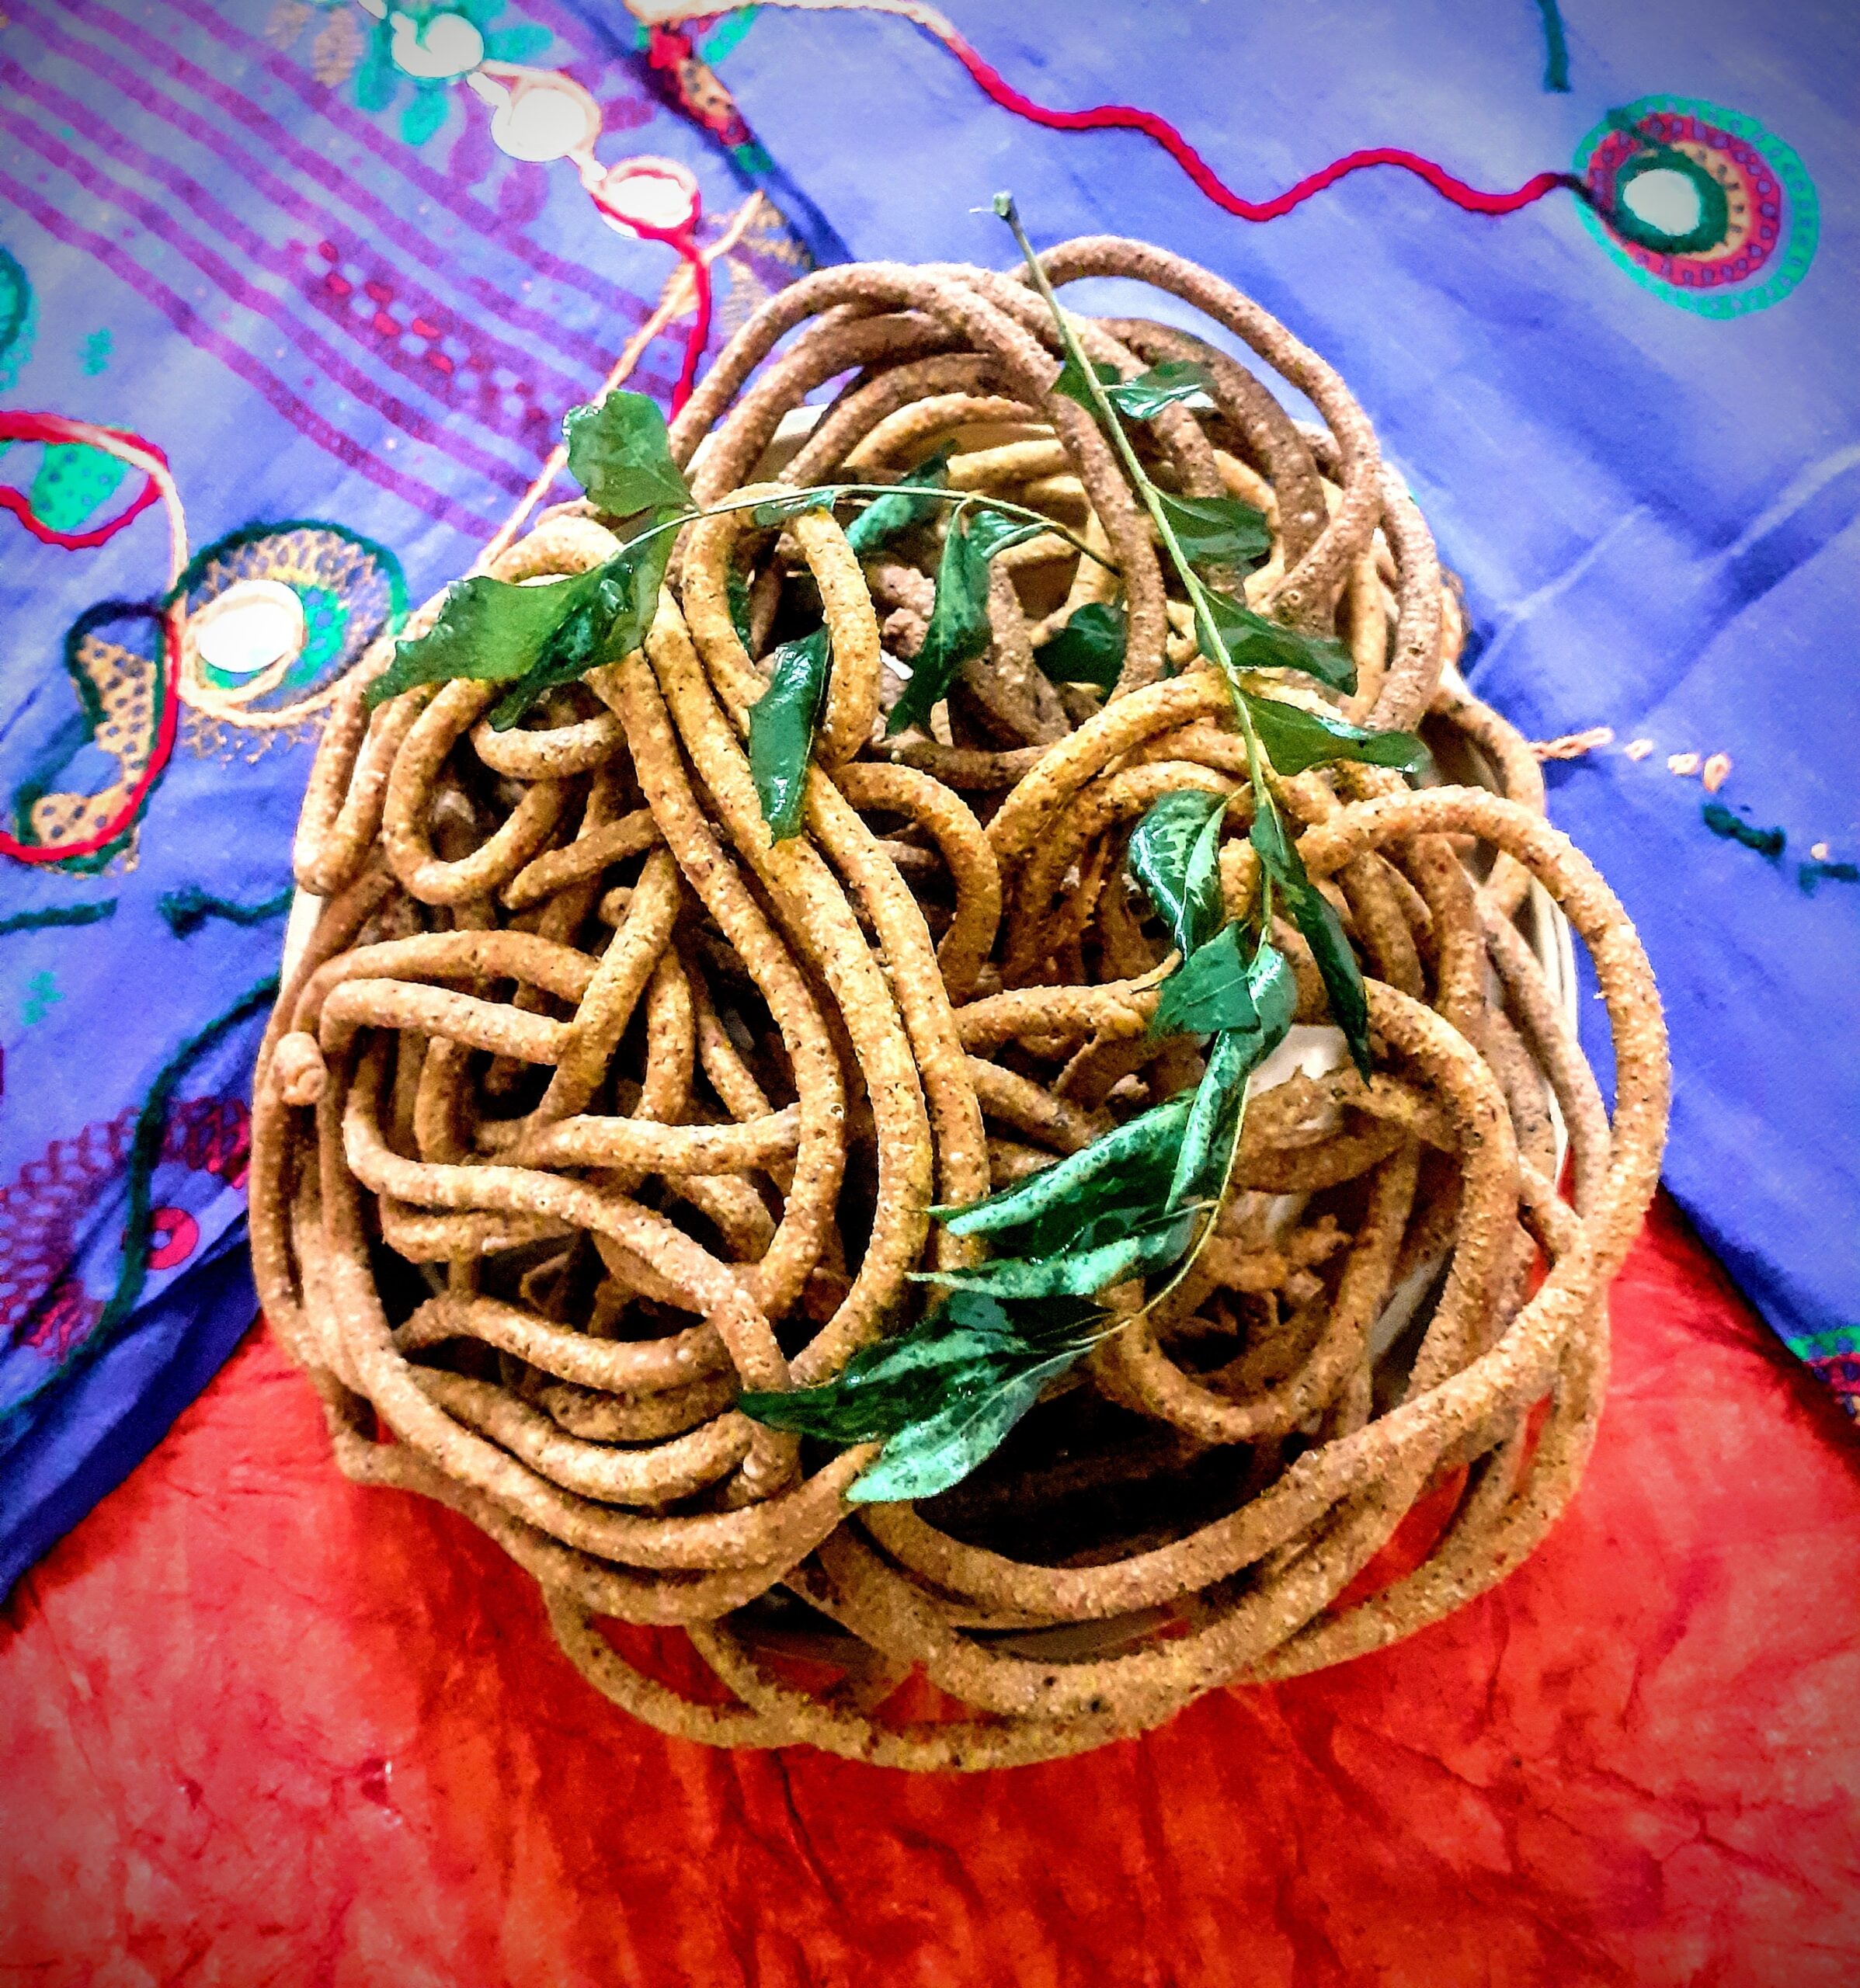
Ratlami Sev
Usually every Diwali I make the usual Omapodi( sev) , Tenkozhal and Ribbon Pakoda. This time I have tried something different. This is called the Ratlami Sev and though we get it at the sweet shops and some brands also market it, I have never tried making it at home. The credit to this recipe goes to @indiankhana.net , where I found this while browsing for something new.
This is a simple recipe( oh yes, I mostly pick simple, as that’s what we all want). Very similar to the Kara Sev of South India, but different in taste because of the masalas used and the Ratlami Sev does not have rice flour, while the Kara Sev does.
This savory gets its name from a place in Madhya Pradesh, India, called Ratlam, where it is famous. As I mentioned it is a quick recipe and difficult to resist munching.
While you are here checkout my other Diwali Sweet and Savoury recipes like Maa Ladoo, Thattai, Gajar Halwa Barfi, Masala wheat flour Papdis, Baked Samosa pie, and more…
Here is the recipe of Ratlami Sev
Ingredients:
Besan/ chickpea flour 1 cup
Cooking Soda 1 pinch
Hot oil 3 tbsp
Salt as required
Red chilli powder 3/4 to 1 tsp depending on taste
Turmeric powder 1/2 tsp
Clove powder 1/4 tsp
Fennel powder 1/4 tsp
Pepper powder 1/4 tsp
Ginger powder 1/4tsp
Black salt 1/4 tsp
Cinnamon powder 1/4 tsp
Ajwain powder 1/4 tsp
Roasted Cumin powder 1/2 tsp
Asafoetida 1/2 tsp
Dry ginger powder 1/4 tsp
Lemon juice 2 tsp
Oil for deep frying
Directions:
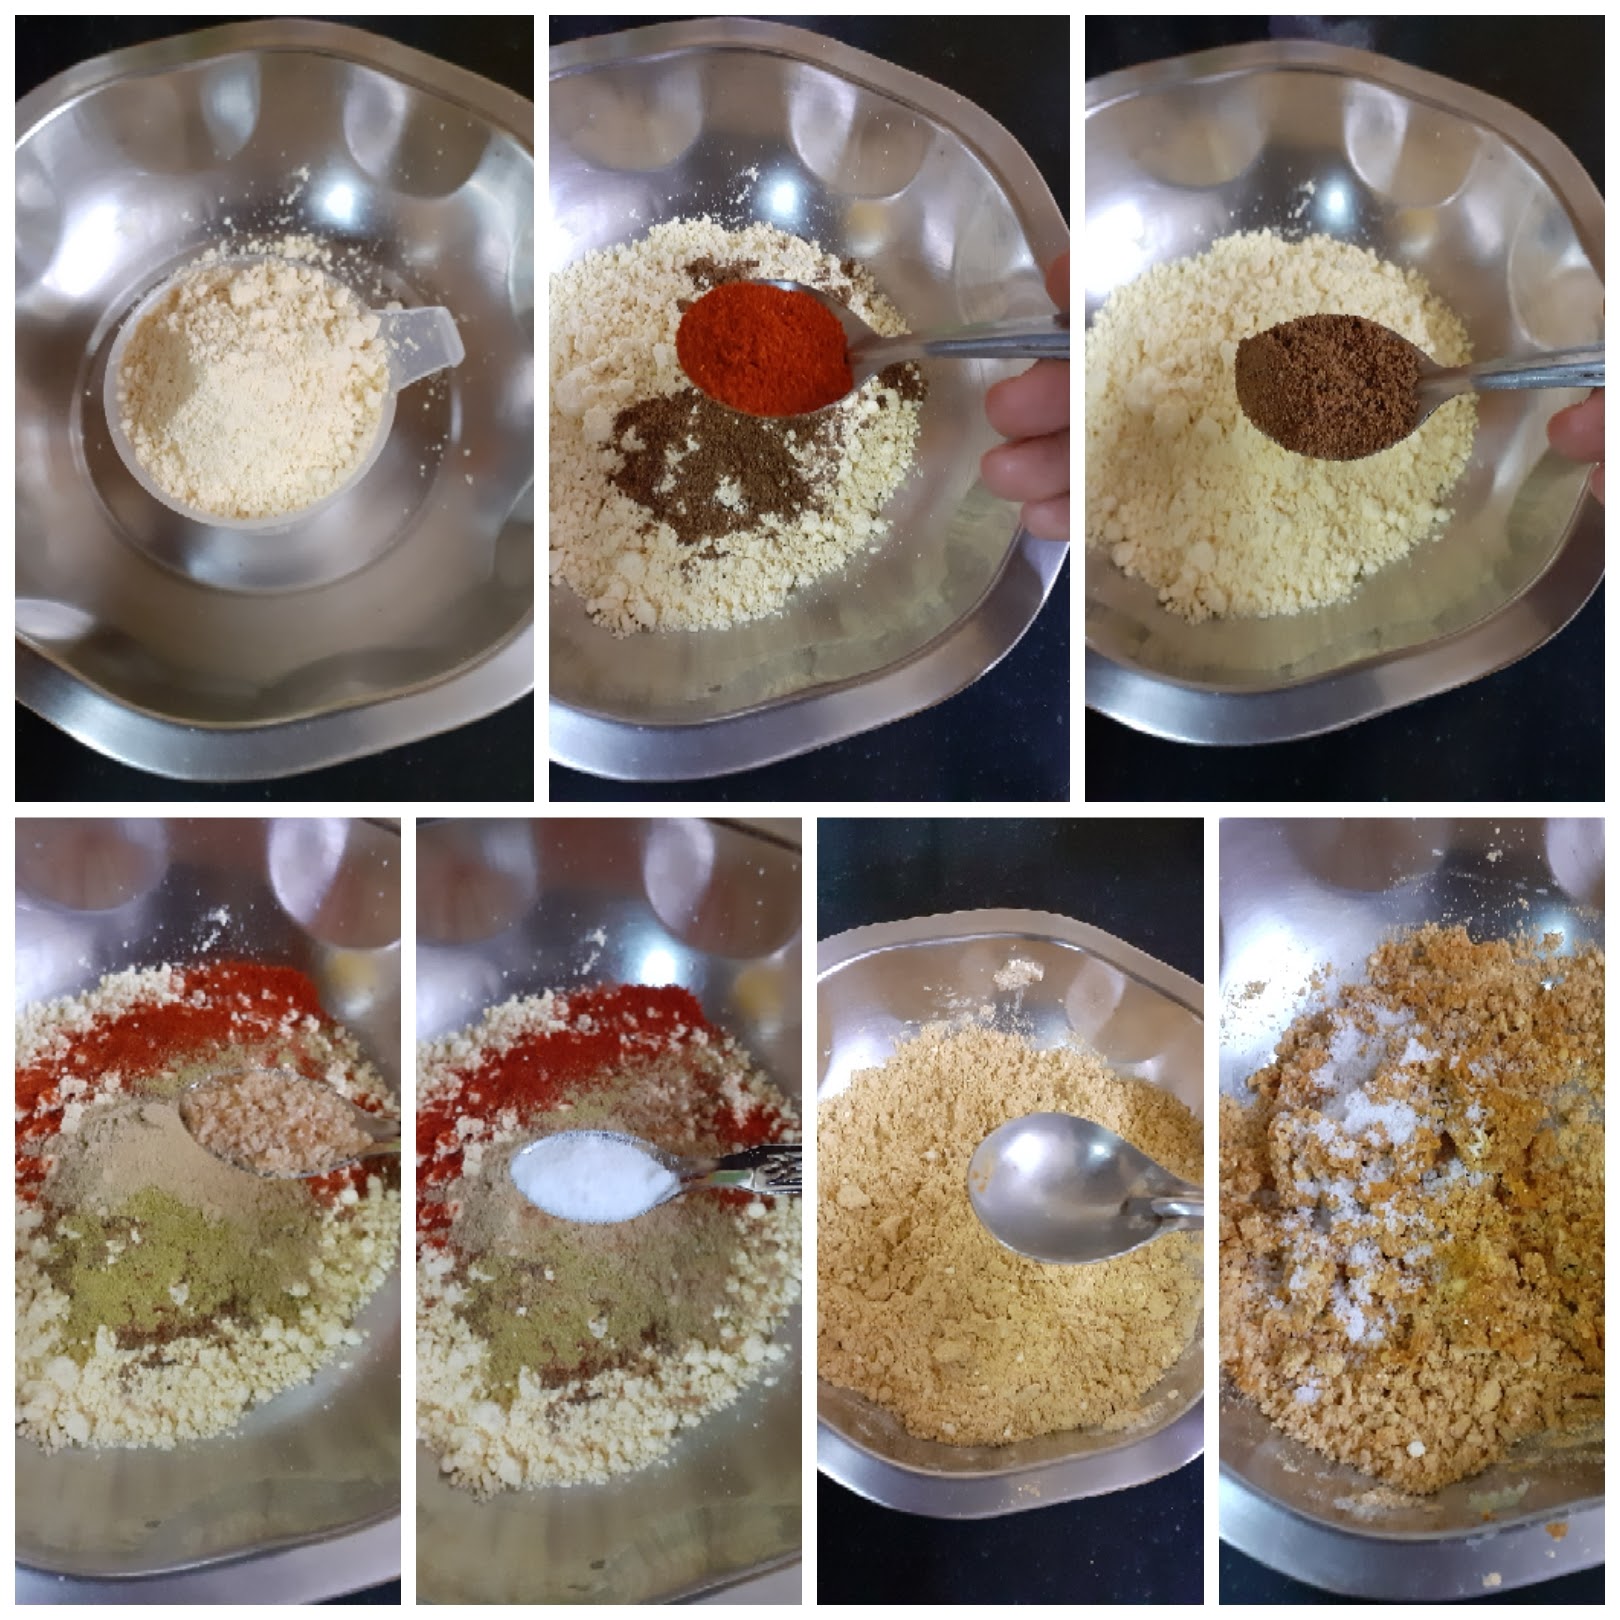
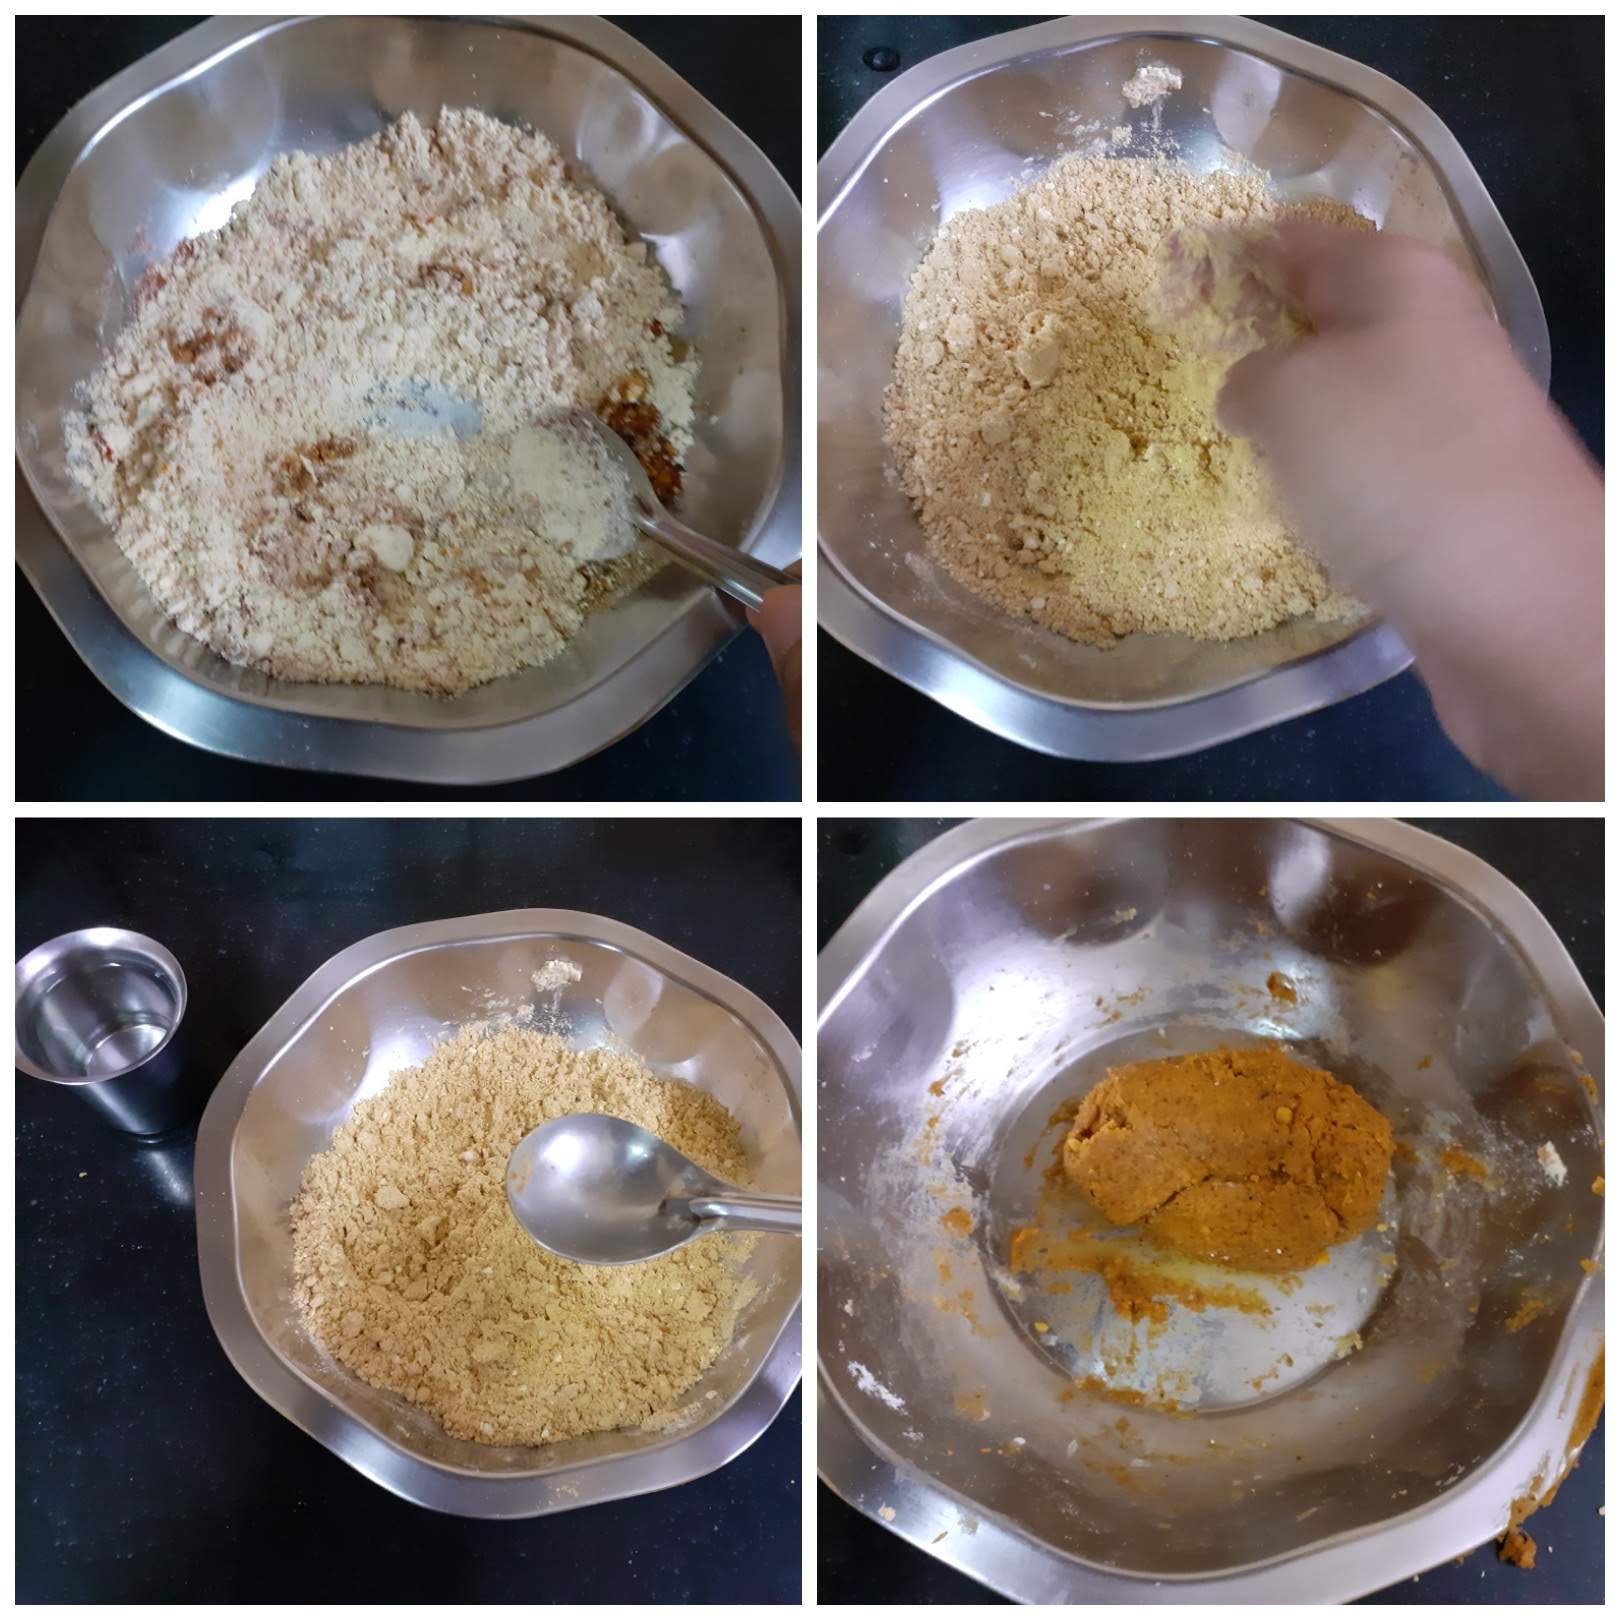
In a mixing bowl take the Besan/ Chickpea flour. To it add Salt, red chilli powder, turmeric powder and all the other powders like clove, fennel, cinnamon, Ajwain/ carrot seeds, black salt and asafoetida , cooking soda,and 2 tsp of lemon juice. To this add 3 tbsp of hot oil and mix nicely with a spoon( as the oil will be hot), when it turns warm mix nicely with your fingers to form a crumbly mixture. Now adding water 1 tbsp at a time make a soft but stiff dough. Heat oil in a Karahi for deep frying. Grease the Chakli/ Muruku press with oil and put in a little dough into it and squeeze into the oil when it is hot. Oil should be medium hot. Fry on medium heat, until the bubbles subside and the Sev turns a golden brown. Repeat for the whole mixture. The spicy and flavorful Ratlami Sev is ready.
I have combined the Cinnamon Powder, pepper powder, Roasted cumin powder, dry ginger powder, fennel powder, clove powder, Ajwain powder, and black salt, in the given measures and made it as a single powder, and am calling it the Ratlami spice mix.
Some of these powders we might not have at home readily, for which one can roast 1 tsp of all the given ingredients under Ratlami spice mix as a whole and powder them. Use 1 to 1.5 tsp of this for the recipe.
STEPWISE RECIPE FOLLOWS:
1. In a mixing bowl take the Besan/ Chickpea flour. To it add salt, red chilli powder, turmeric powder, and Ratlami spice mix( refer paragraph above). Also, add the asafoetida, Cooking soda, and 2 tsp lemon juice. (I forgot to add salt in the beginning and have added towards the end as you will see in one of the pictures).
2. Now heat 3 tbsp oil in a Kadai ( heat it well, but don’t turn it smoky) and pour it into the Besan and spice mixture. Using a spoon combine well(do not use your hand now as the oil is hot).
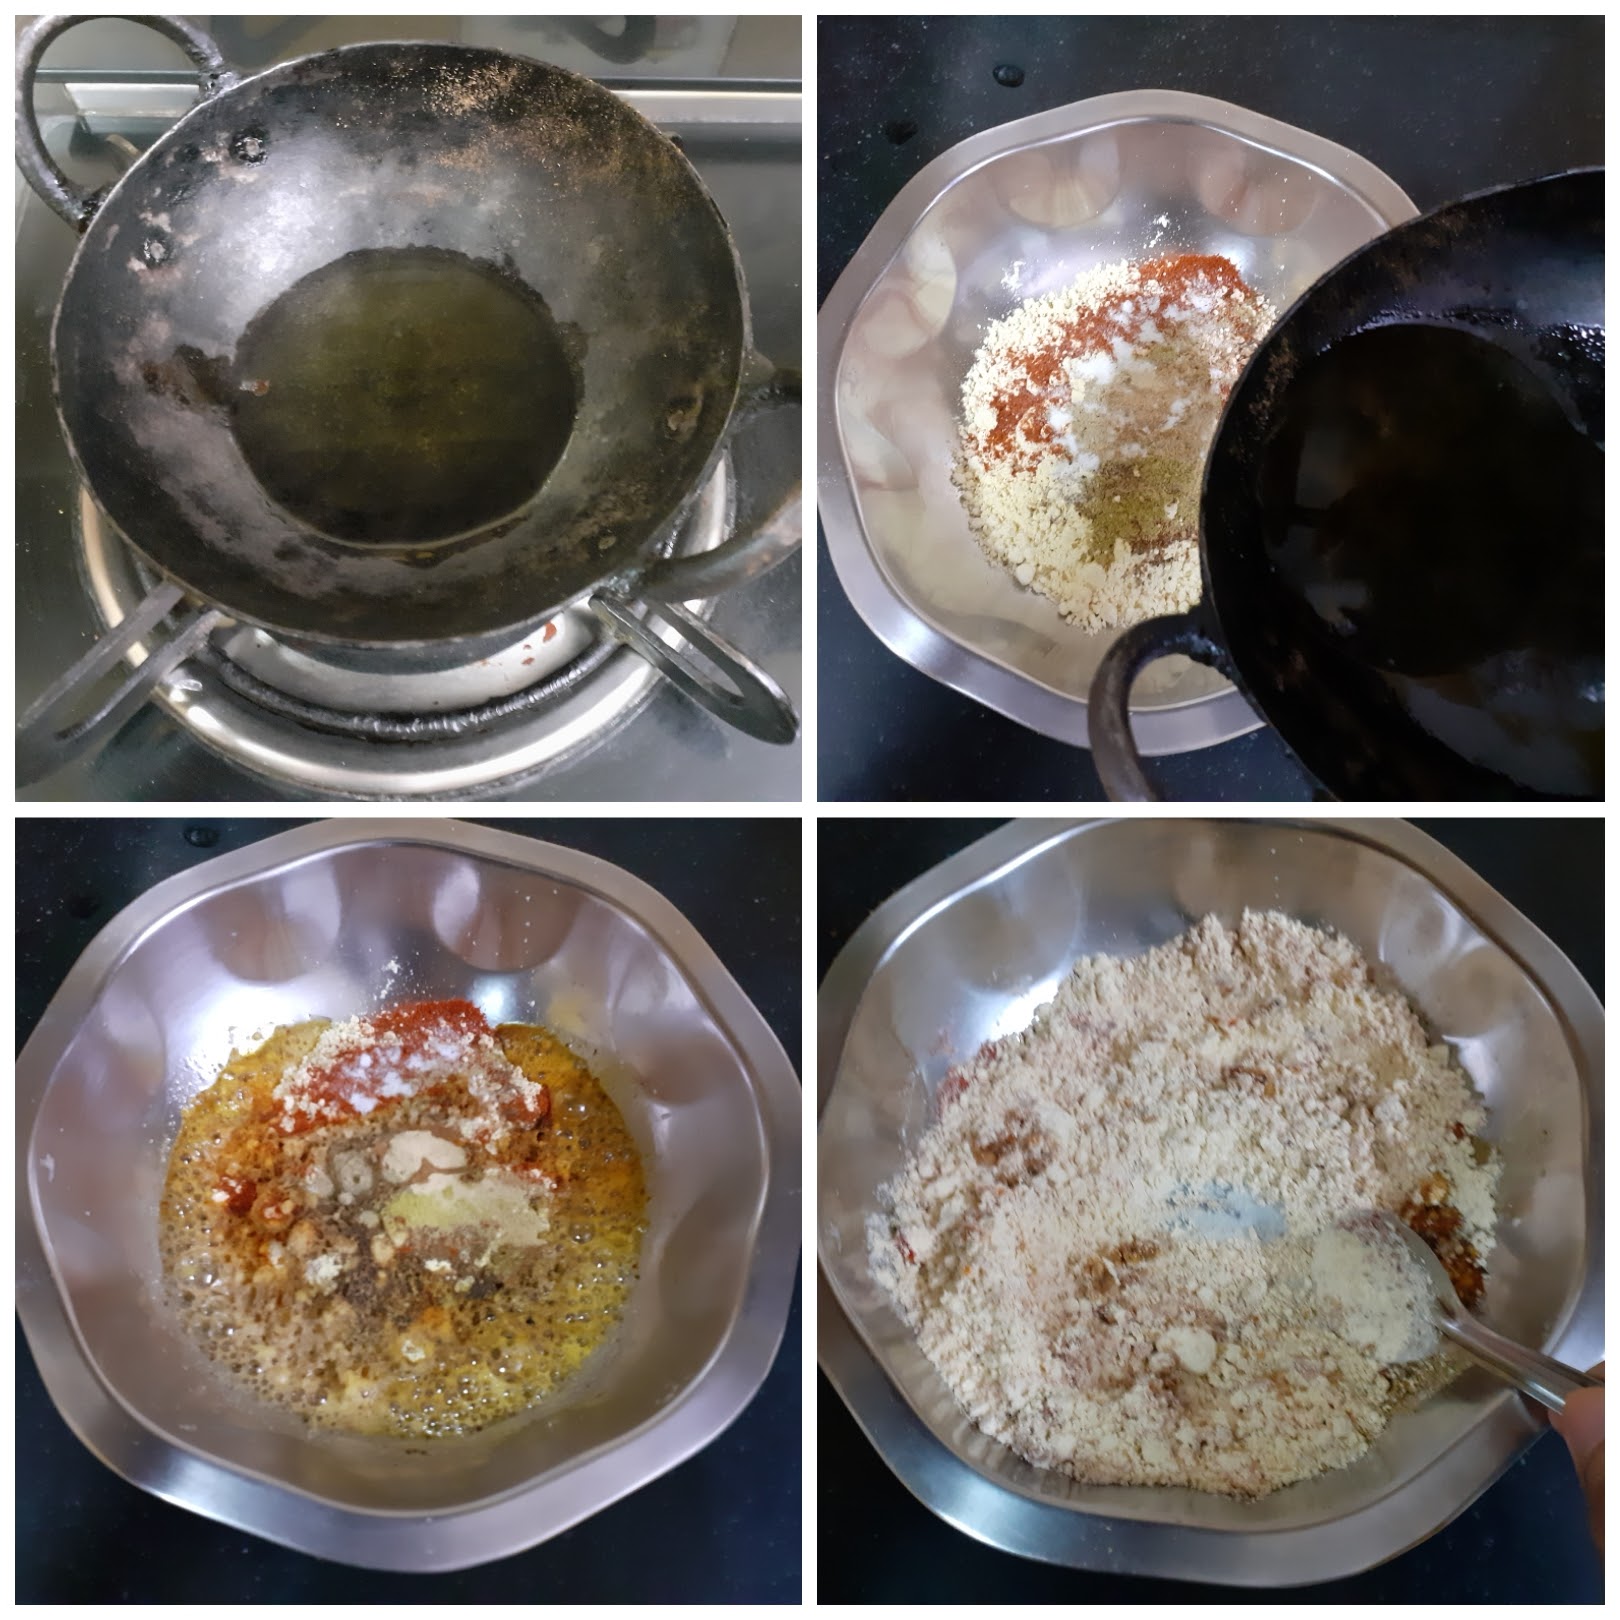
3. After it turns a little warm, using your fingers nicely mix the mixture until it turns crumbly. Now adding water one tablespoon at a time start combining it to form a soft but stiff dough. We want a dough that is easy to squeeze through, but also stiff enough to retain shape. I used about 3 tbsp water to make my dough.
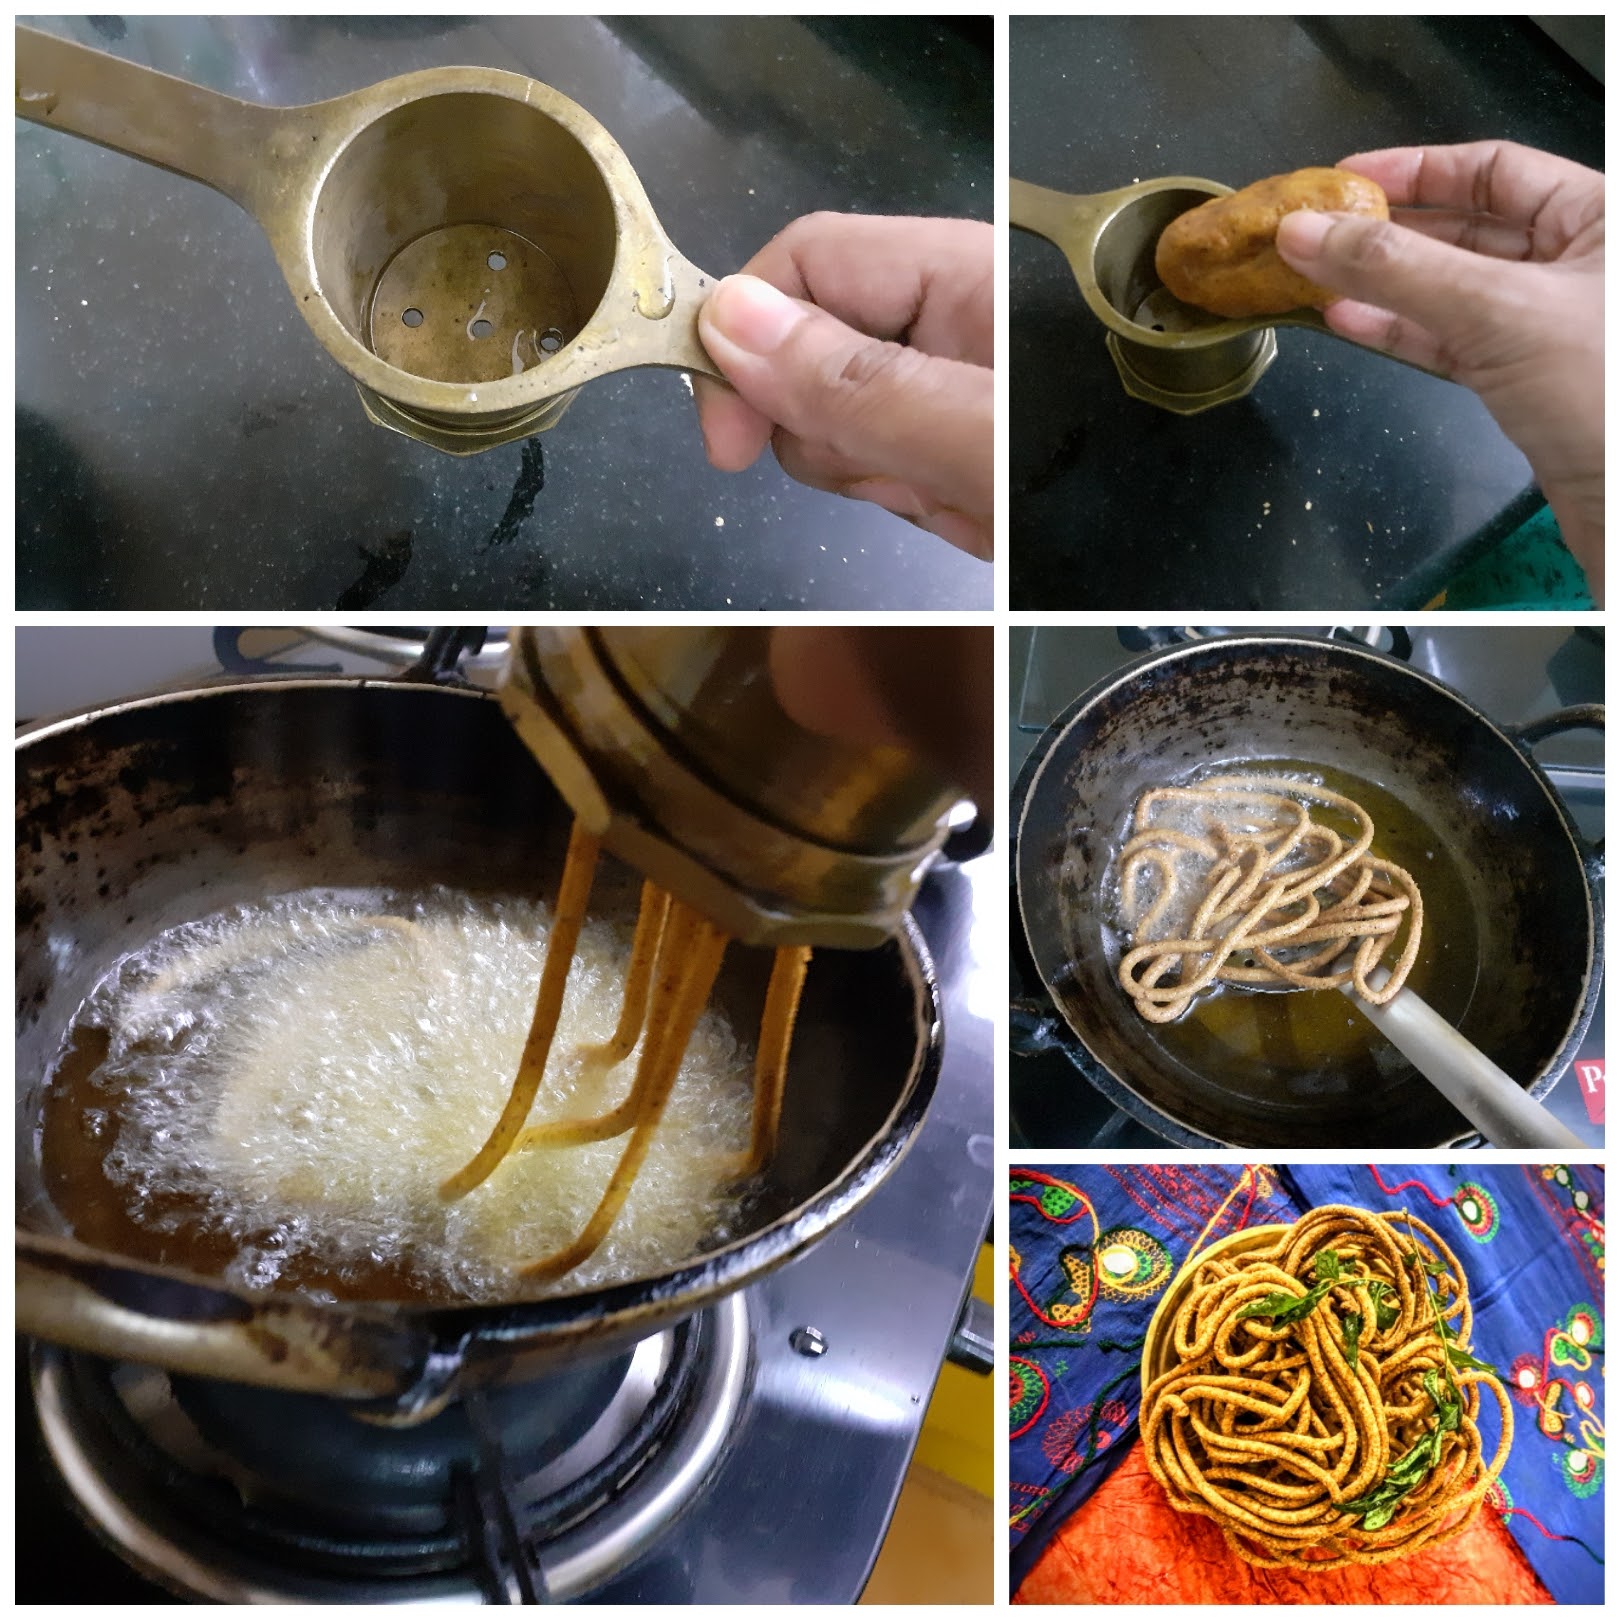
4. Heat oil for deep frying on medium-high. Grease the Chakli/ Muruku press with oil and put in a little dough into it and squeeze into the oil when it is hot. Oil should be medium hot. Fry on medium heat, until the bubbles subside and the Sev turns a golden brown. Repeat for the whole mixture. The tasty and spicy Ratlami Sev is ready.
NOTES:
1. Some of these powders we might not have at home readily, for which one can roast 1 tsp of all the given ingredients under Ratlami spice mix as a whole and powder them. Use 1 to 1.5 tsp of this for the recipe.
2. I used 3 tbsp water, one can use more as required as different qualities of Besan absorb water differently.
3. Take care not to use your fingers as soon as you pour hot oil in the mix. Let it become warm and then use your fingers to combine.
If you tried this recipe and liked it please comment below. I would love to hear from you. If you have a query about the recipe email us and ill respond as soon as I can.
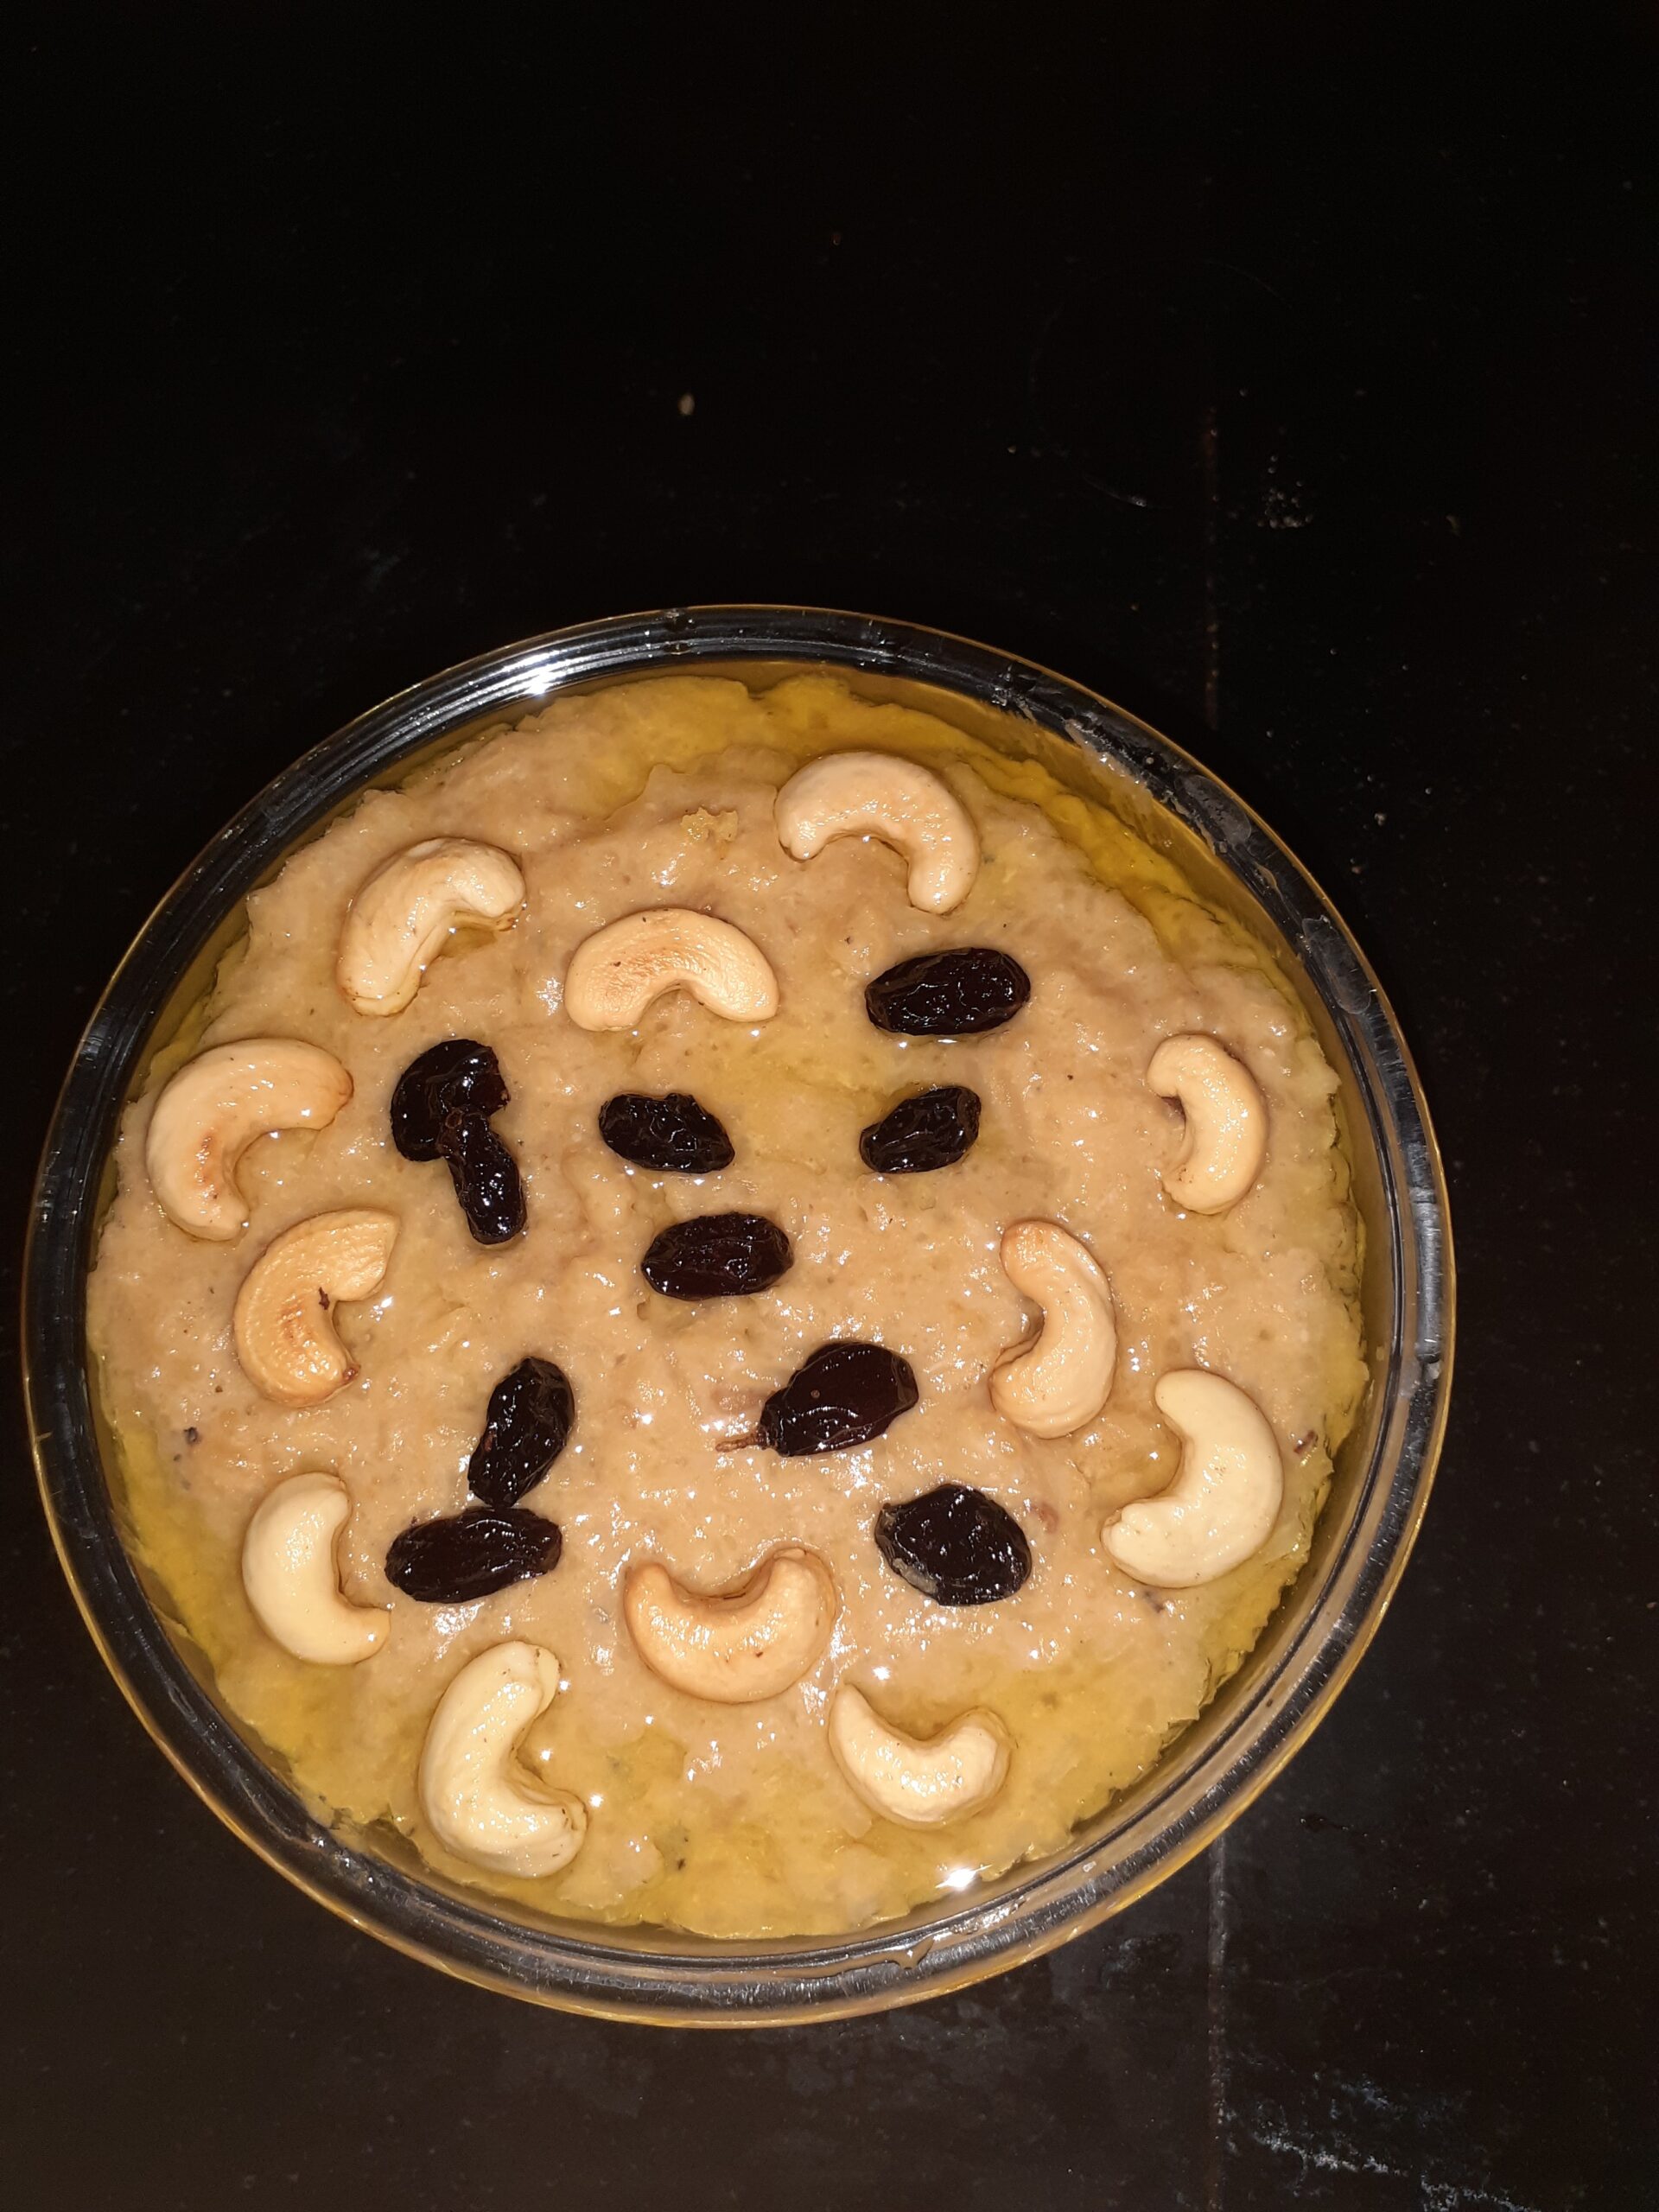
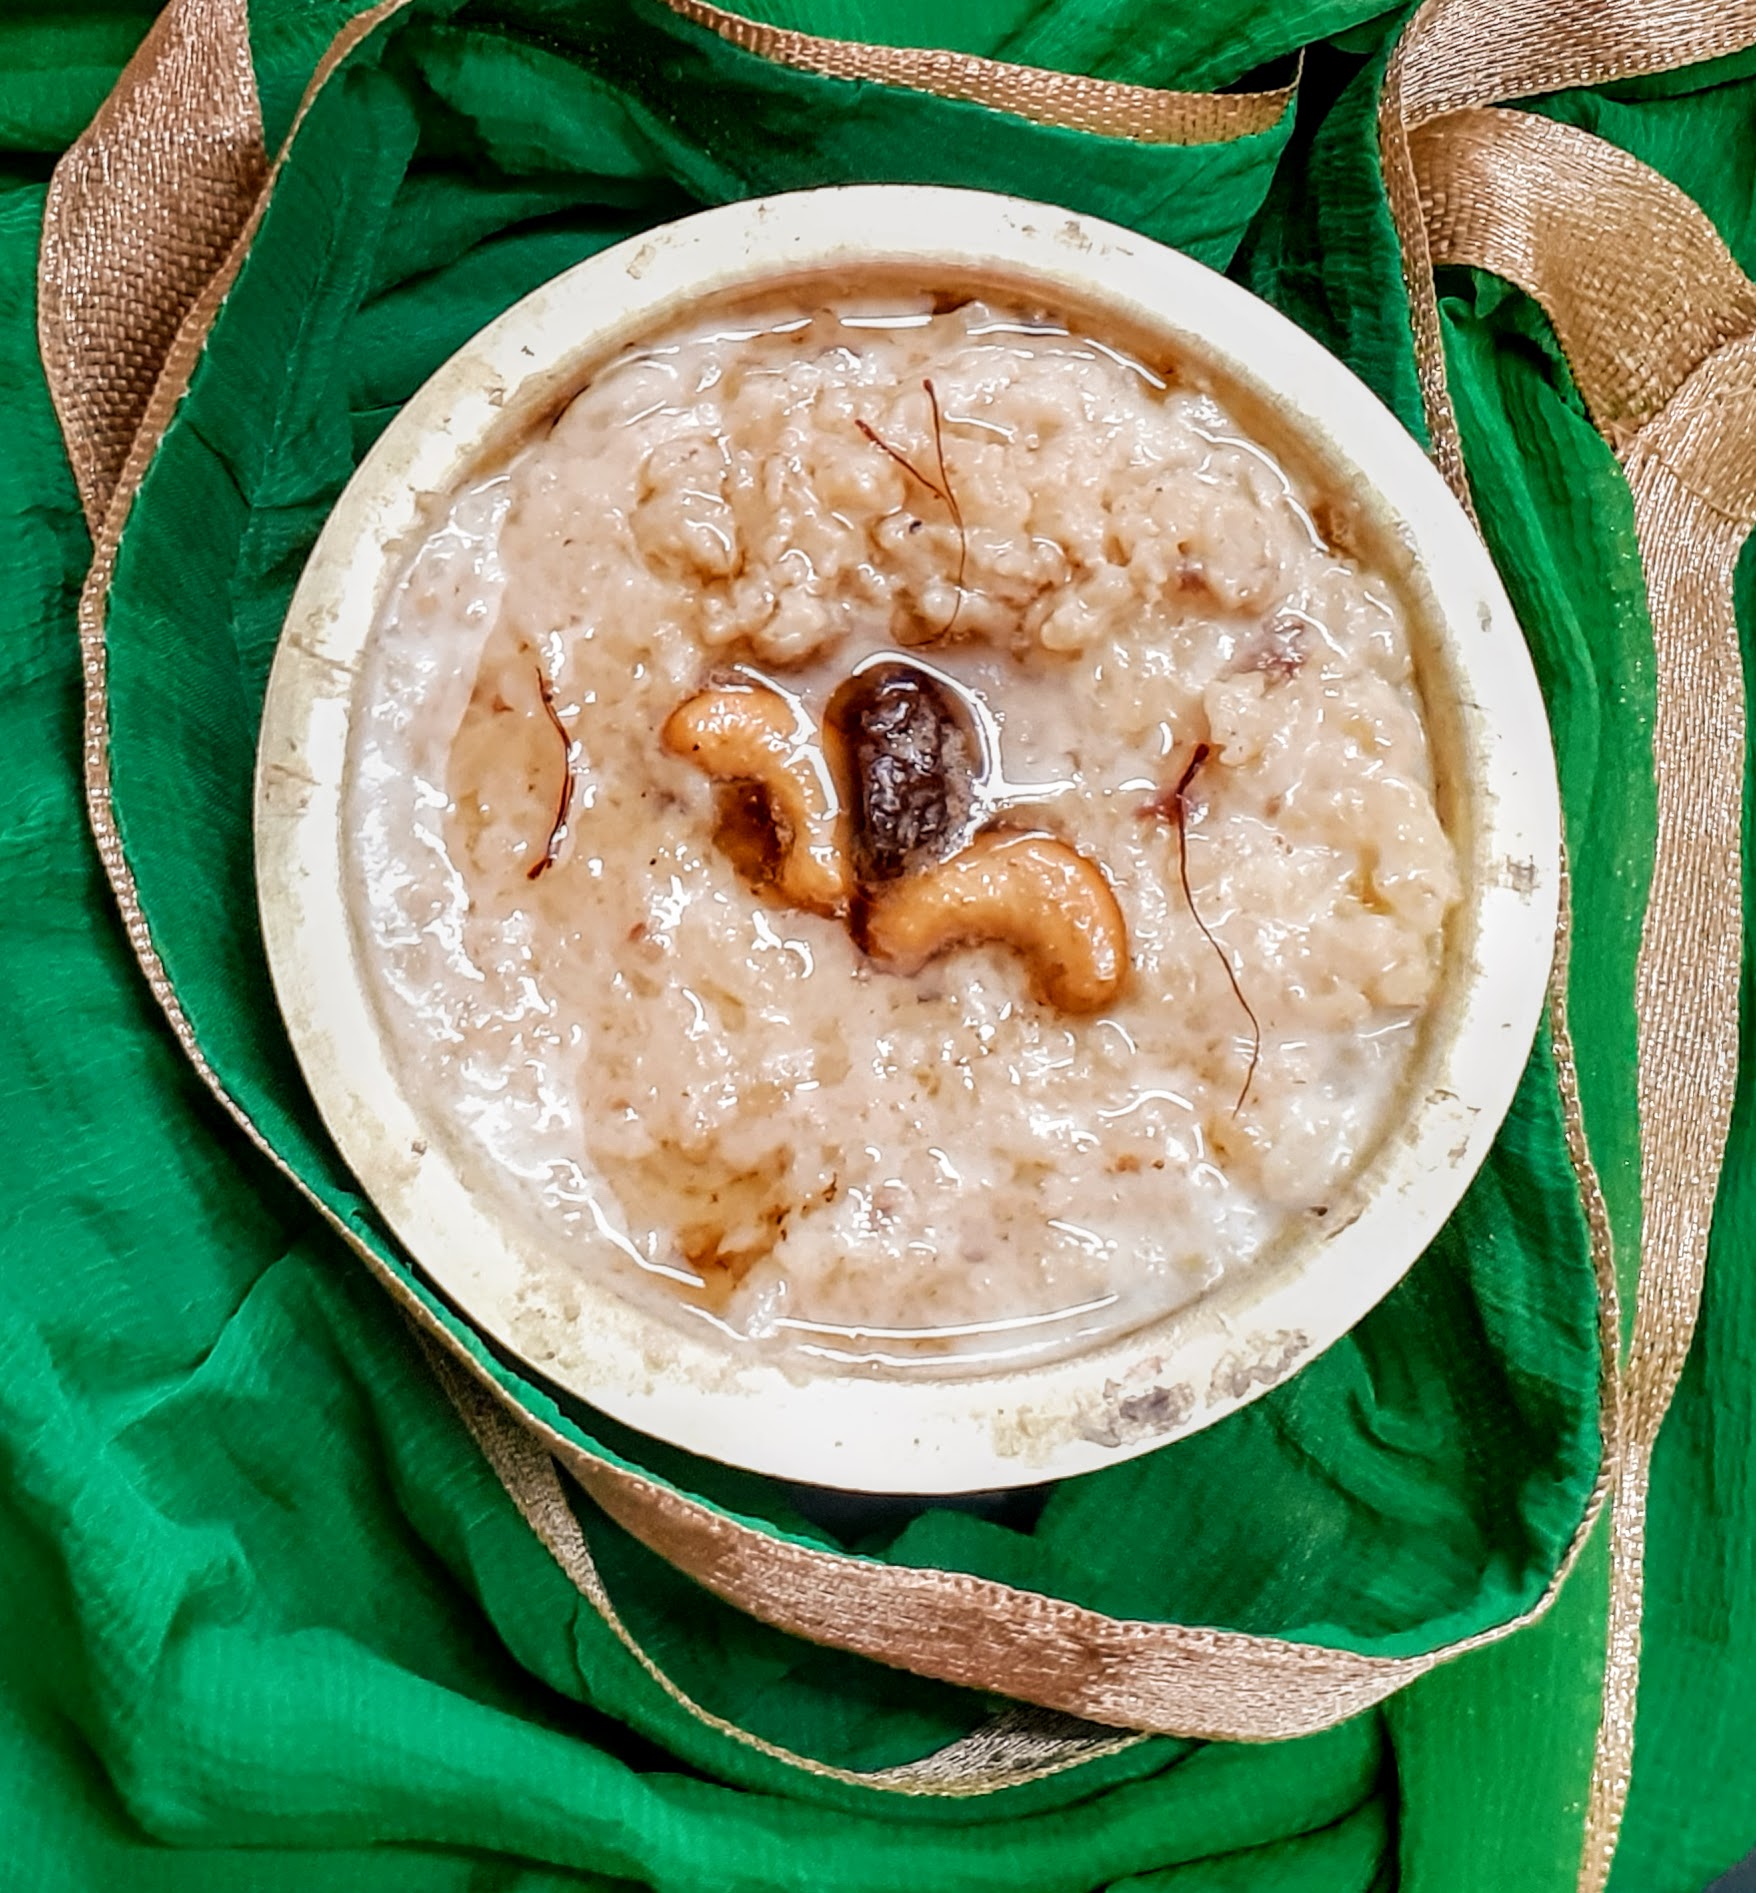
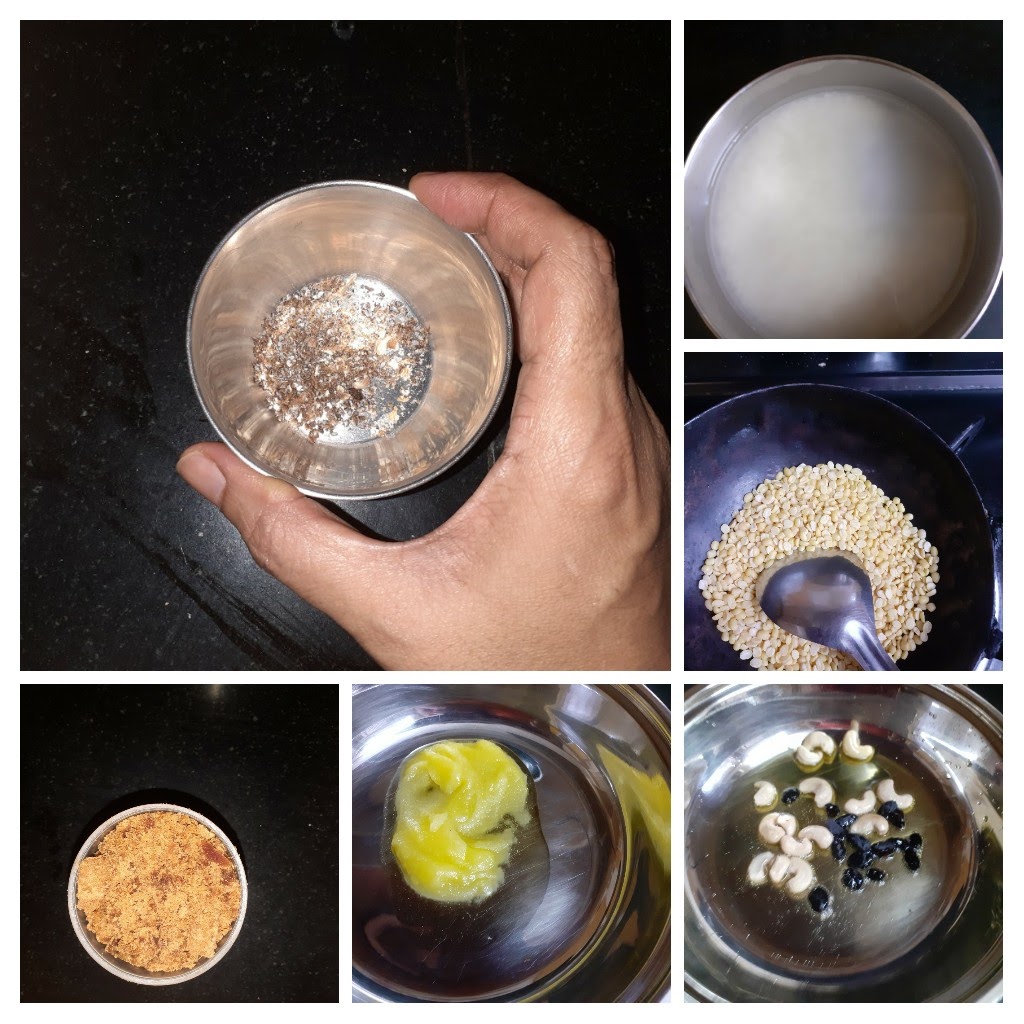
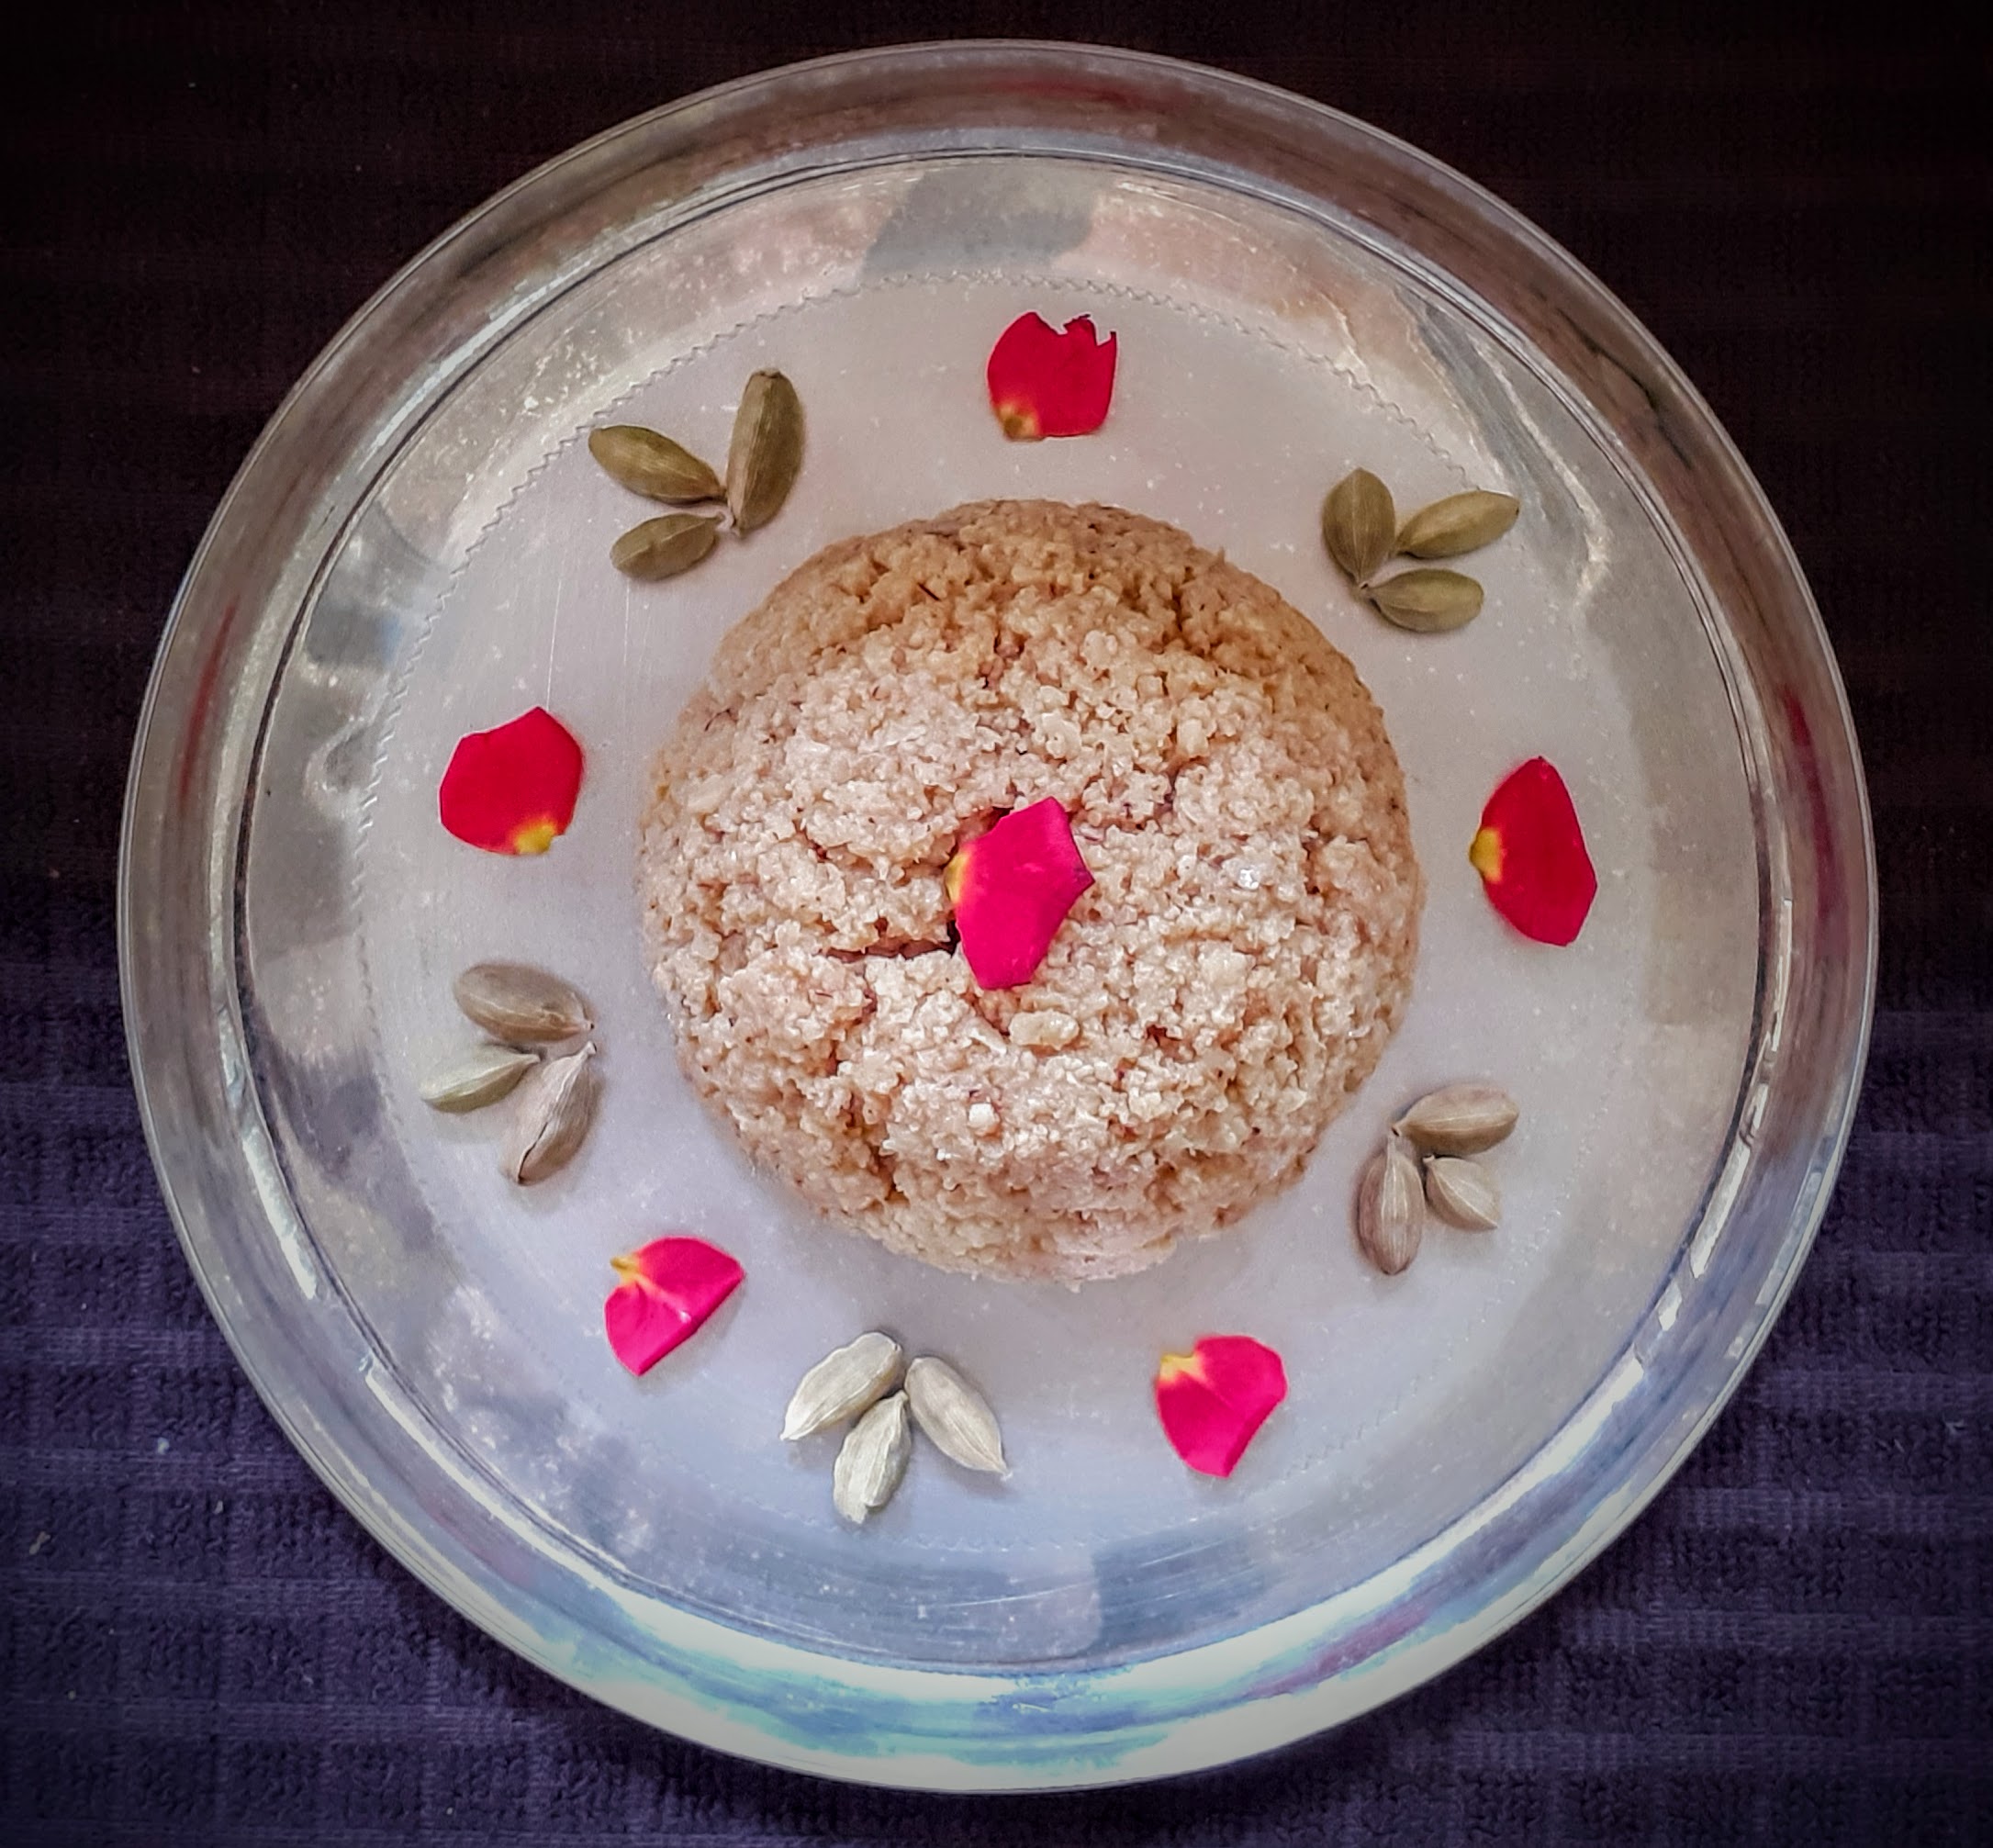
Akkaravadisal One Pot
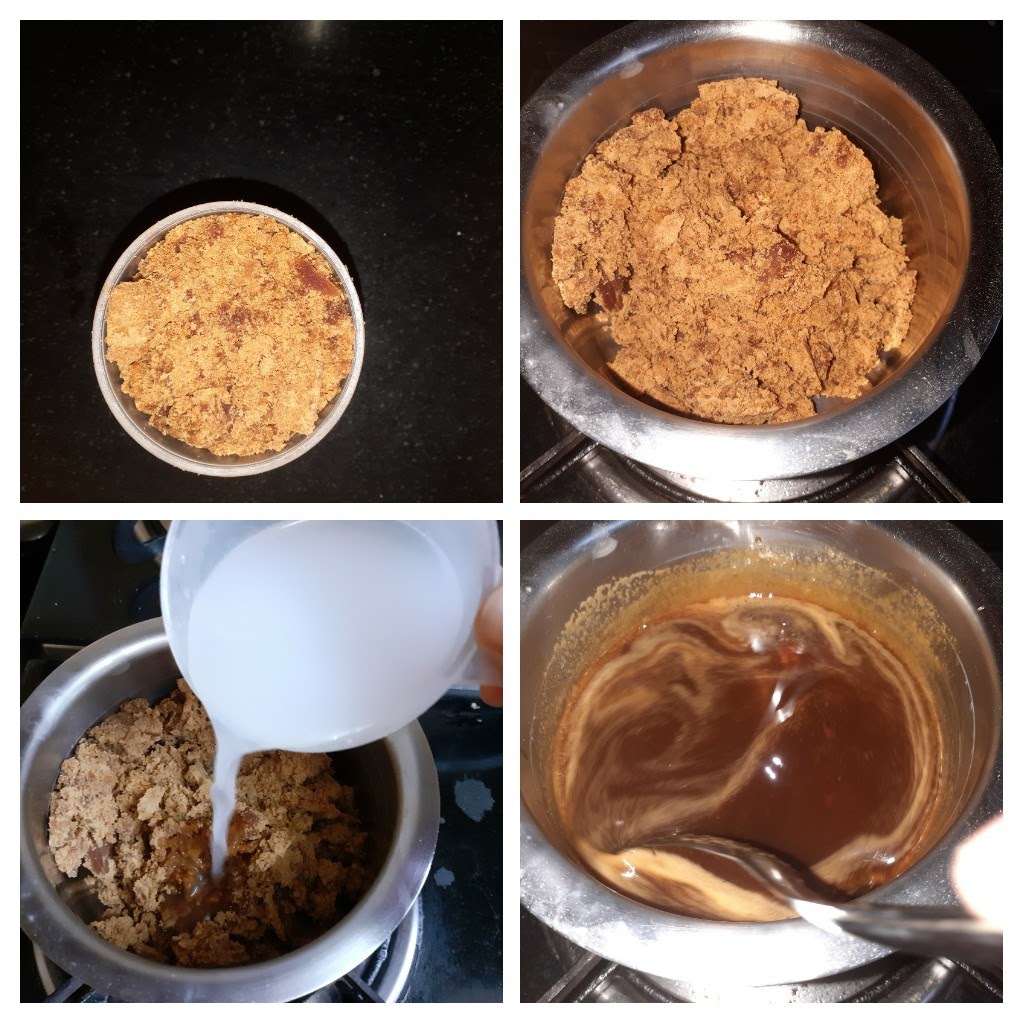
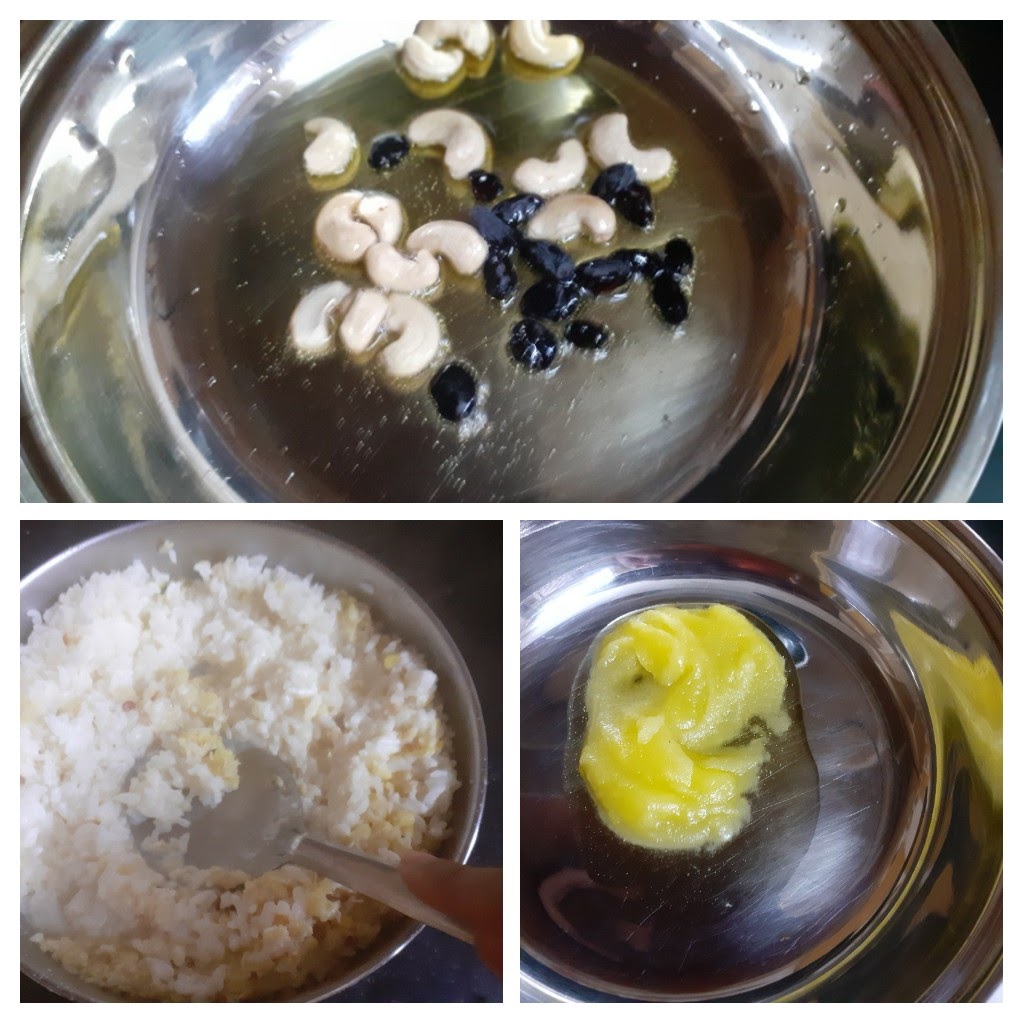
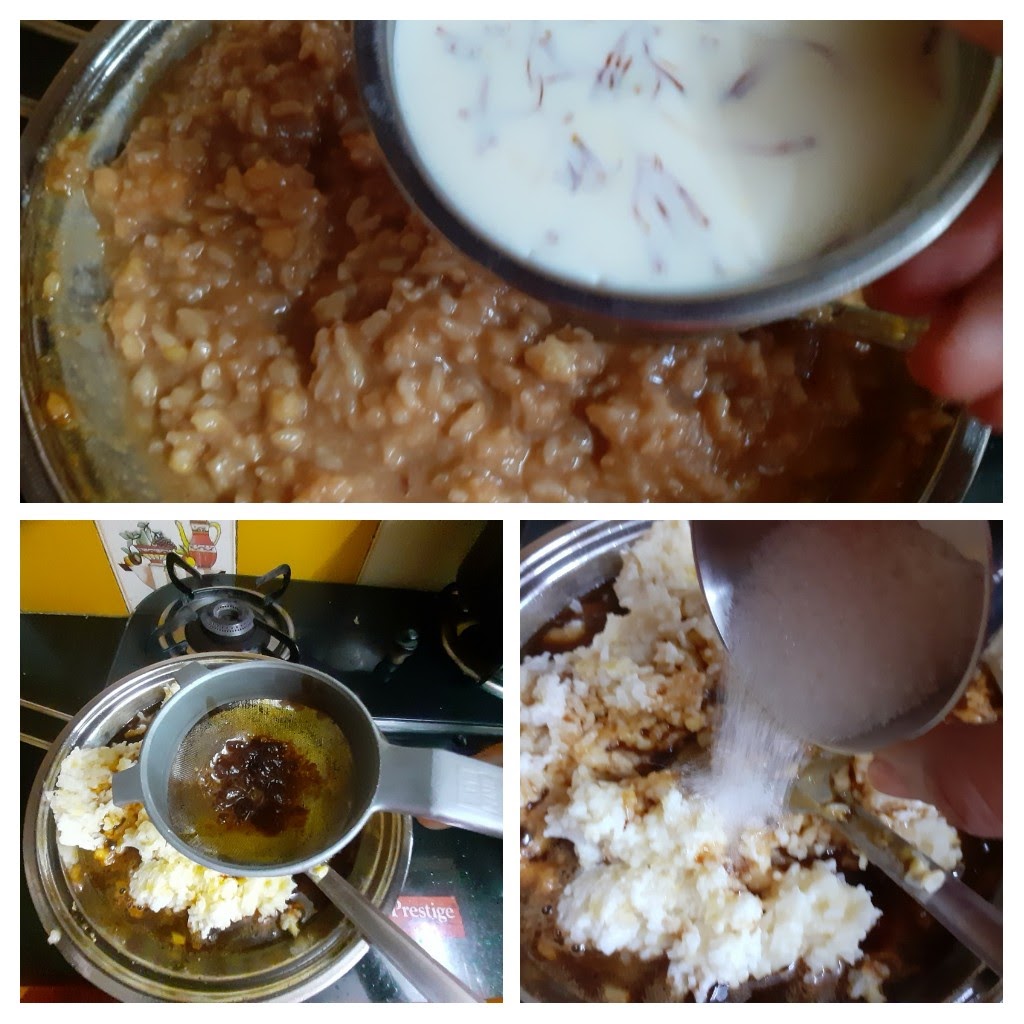
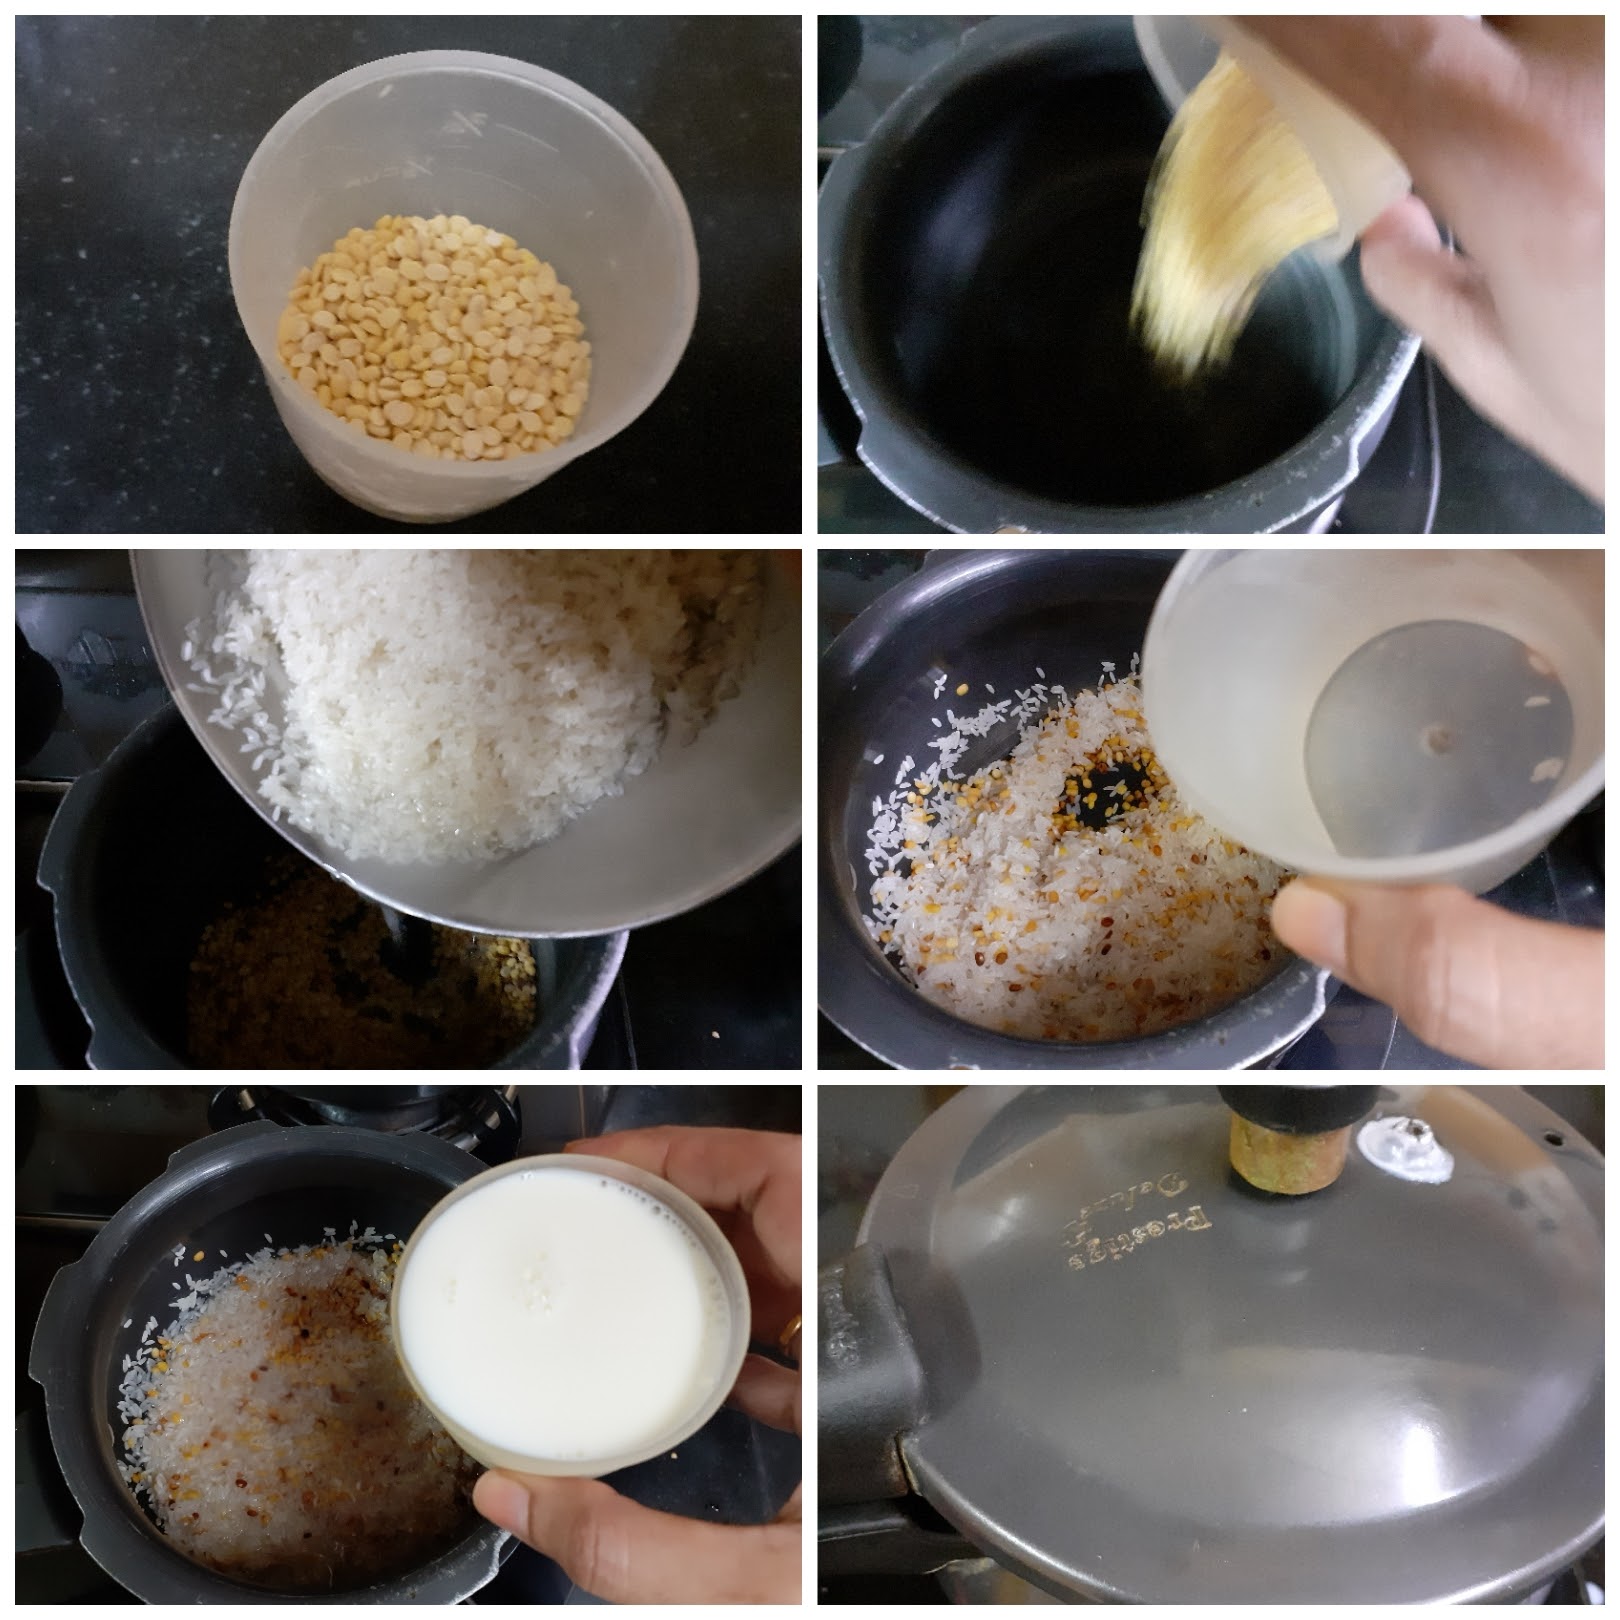
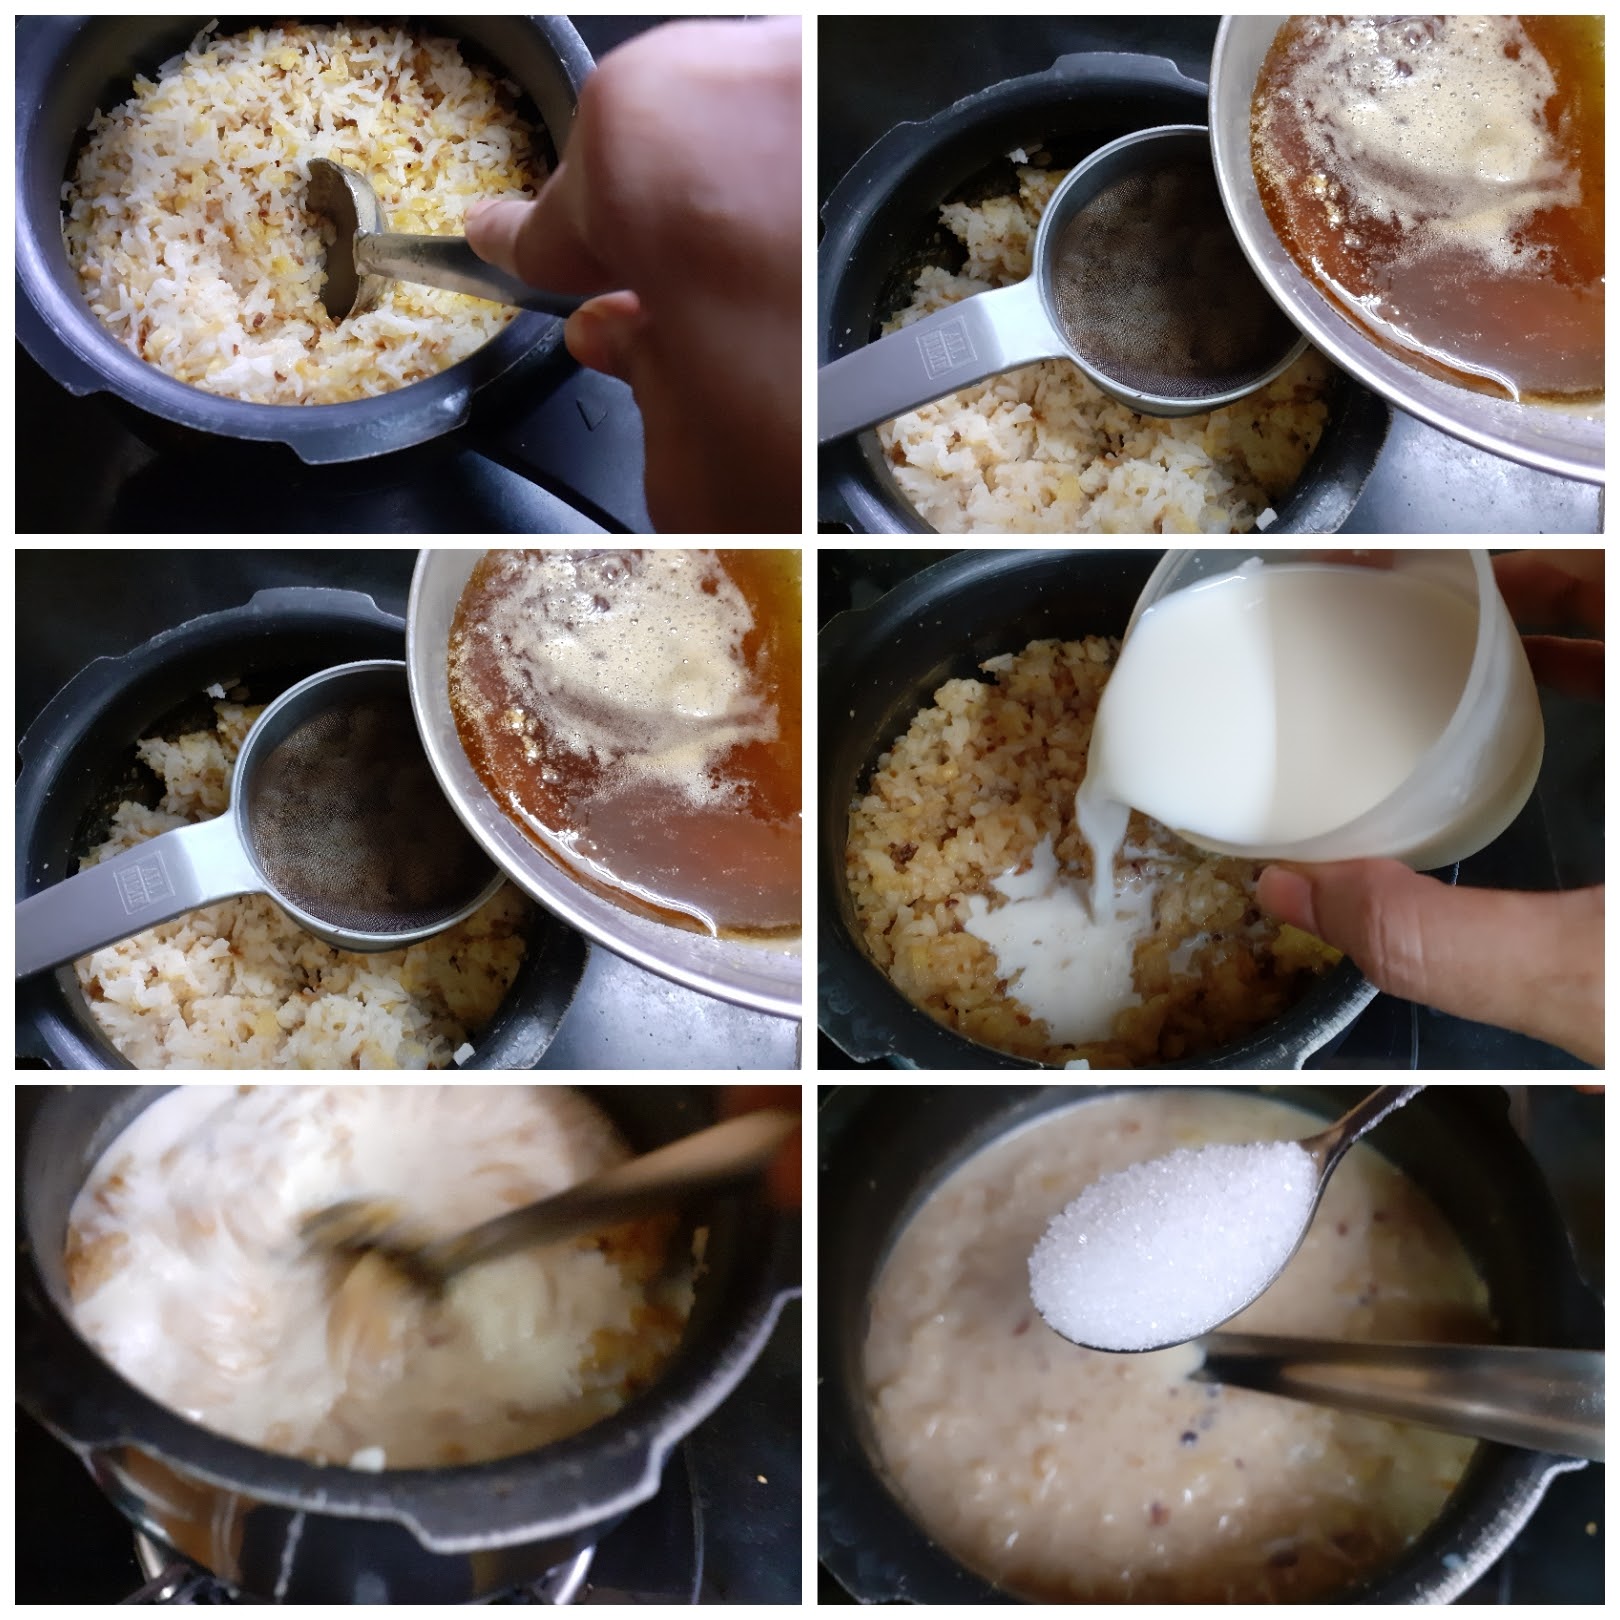
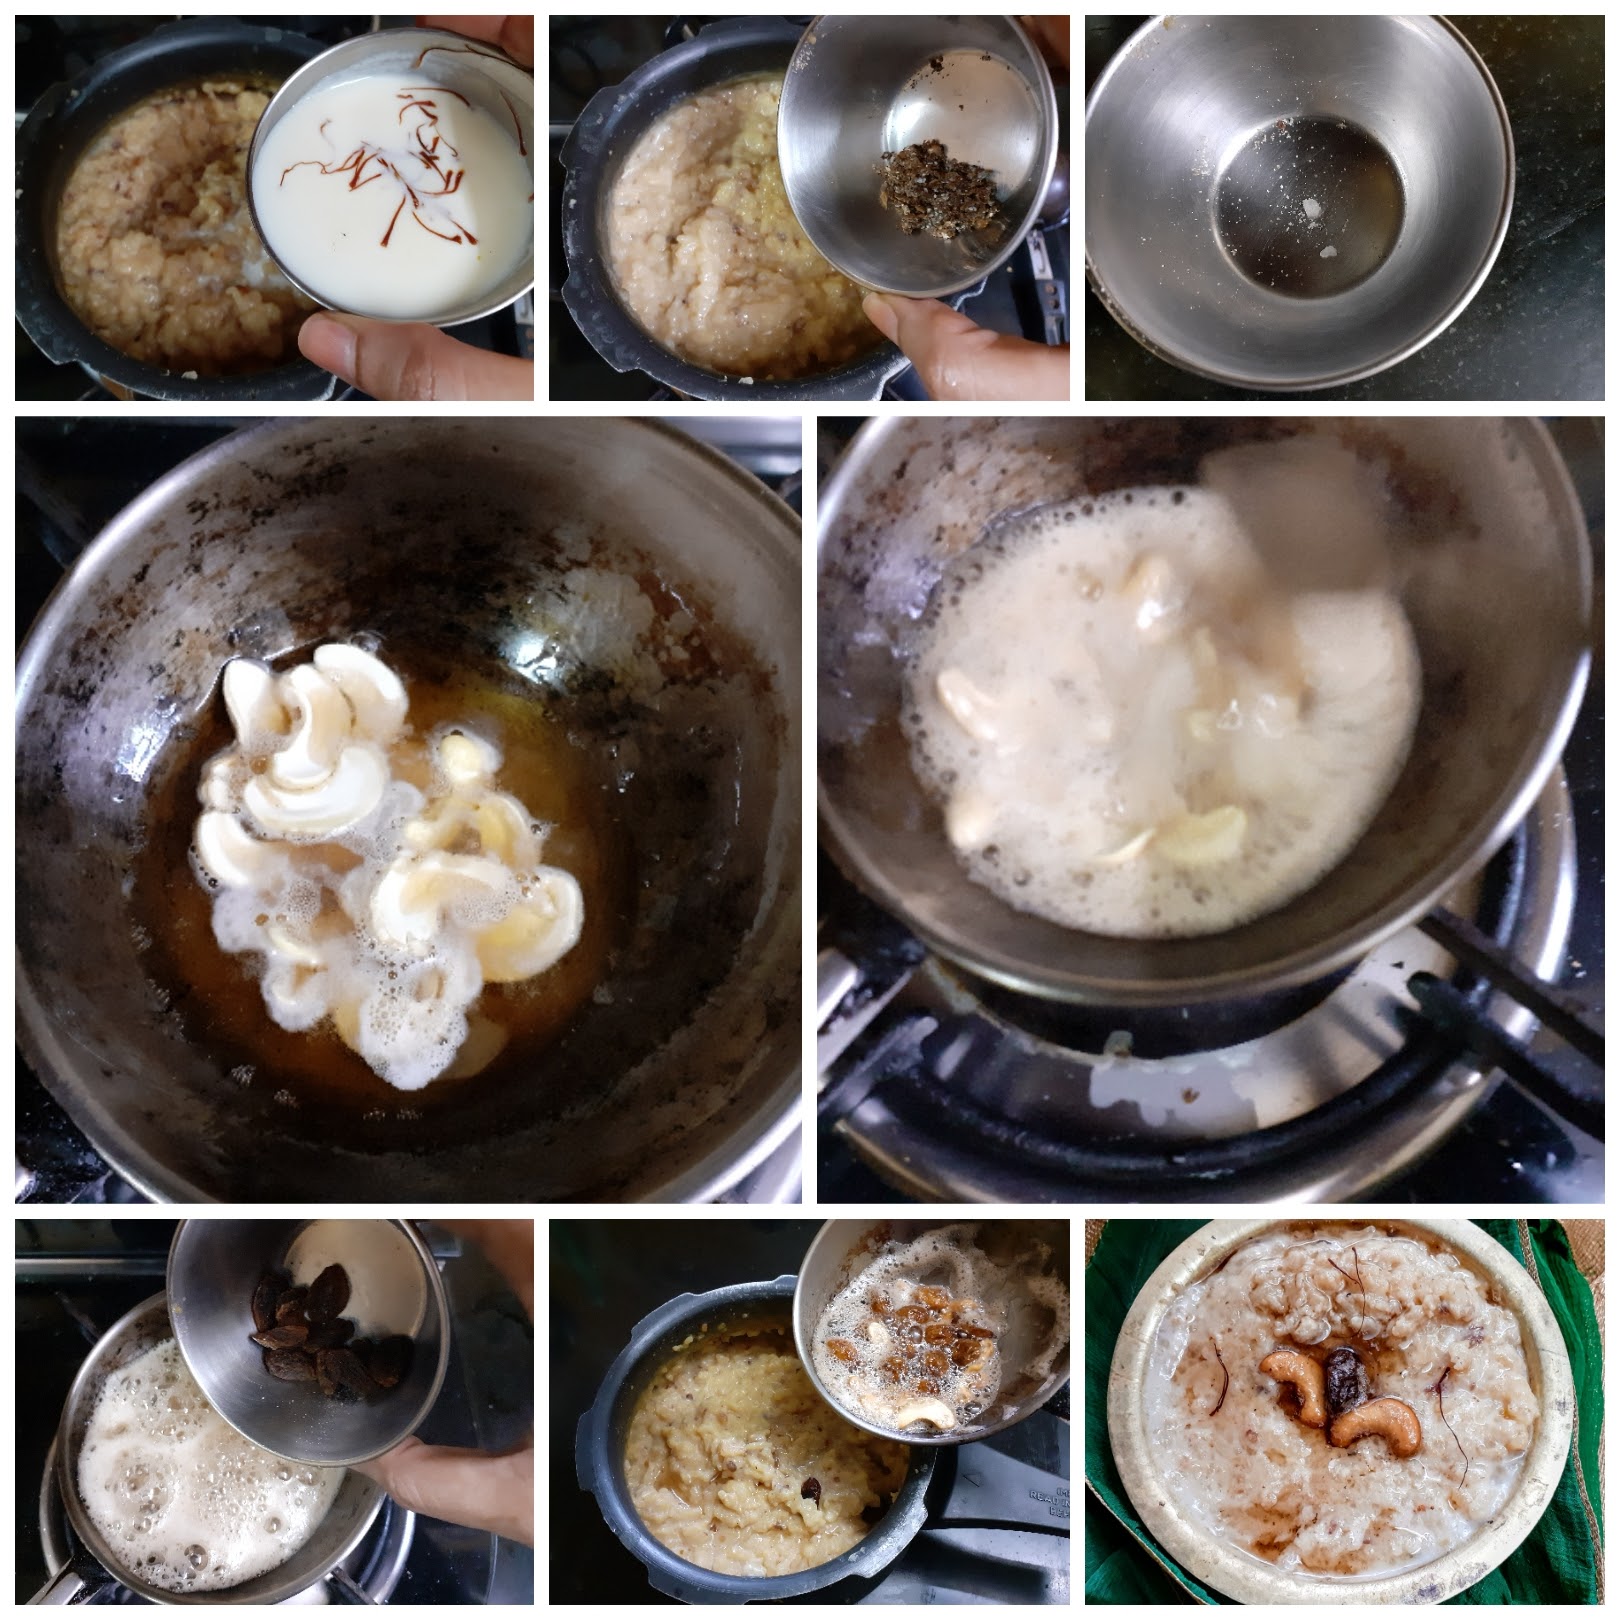
This is a very traditional South Indian sweet dish. Lord Mahavishnu is offered this sweet as prasad(holy offering). The main ingredients are Rice, moong dal, jaggery, milk, and ghee. The ingredients are similar to the Sweet Pongal but both taste very different. It tastes heavenly when served a little warm. Without much ado let’s get to the recipe right away.
This recipe already exists on this blog, but I am adding another method to make it, which is the one-pot method. One can choose whichever method they find doable. The results are the same for both, just a few steps vary which I will guide you through here.
While you are here check out my other Indian Sweet recipes like Malpua, Pineapple Rabri, Atte ka Sheera, Chakkarai Pongal, Aval Kesari, Unni appam, Sugiyan, and many more…
Here is the recipe of One -Pot Akkaravadisal for you-
Ingredients:

NOTES:
Thengai Therattipal/ Palkova (Coconut Infused)
Therattipal or Palkova is a dehydrated milk sweet, made with only two ingredients-Milk and Sugar. Therattipal is a traditional recipe made for festivals like Janmashtami and Deepawali. In our house, Therattipal is the main offering to Krishna apart from Sweet Appam and for Deepawali too we start the festival with a spoon of the Therattipal immediately after Ganga Snanam.
This time I have given a twist to the Therattipal and added roasted coconut gratings to it, which enhances the taste of this sweet dish. Anyway until we add the coconut the method of the recipe is the same. Usually, no cardamom powder is added to this sweet as the milk taste is what should pervade, but if one does prefer, it can always be added.
The coconut flavour is mild and not very intense. The milk and the coconut combine really well to give a different taste which is a welcome change from the regular Therattipal.
This recipe if made with pure organic cows milk tastes divine, as while the milk reduces you can see the natural fat bubbling out. And it tastes as though ghee has been added to it. These days since we all use milk packets or tetra pack cartons of milk we don’t see this process happening naturally and so we add a teaspoon of ghee at the end. its an optional step and the sweet will still taste the same, if not added.
While you are here please check out my other Sweet dish recipes like –
Atte ka Sheera, Sugiyan, Carrot Kheer, Vella Aval, Maa Ladoo, Pineapple Rabri, Chakkara Pongal and many more…
The same recipe can be followed for regular Therattipal/Palkova too. Only the coconut doesn’t have to be added.
Here is the recipe for Thengai Therattipal/Palkova(coconut-infused)-
Ingredients:
Milk (toned milk) 1.5 litres (refer to note1) Sugar 140 gm approx (reduce if you prefer less) Coconut (grated) 1 cup
Directions:
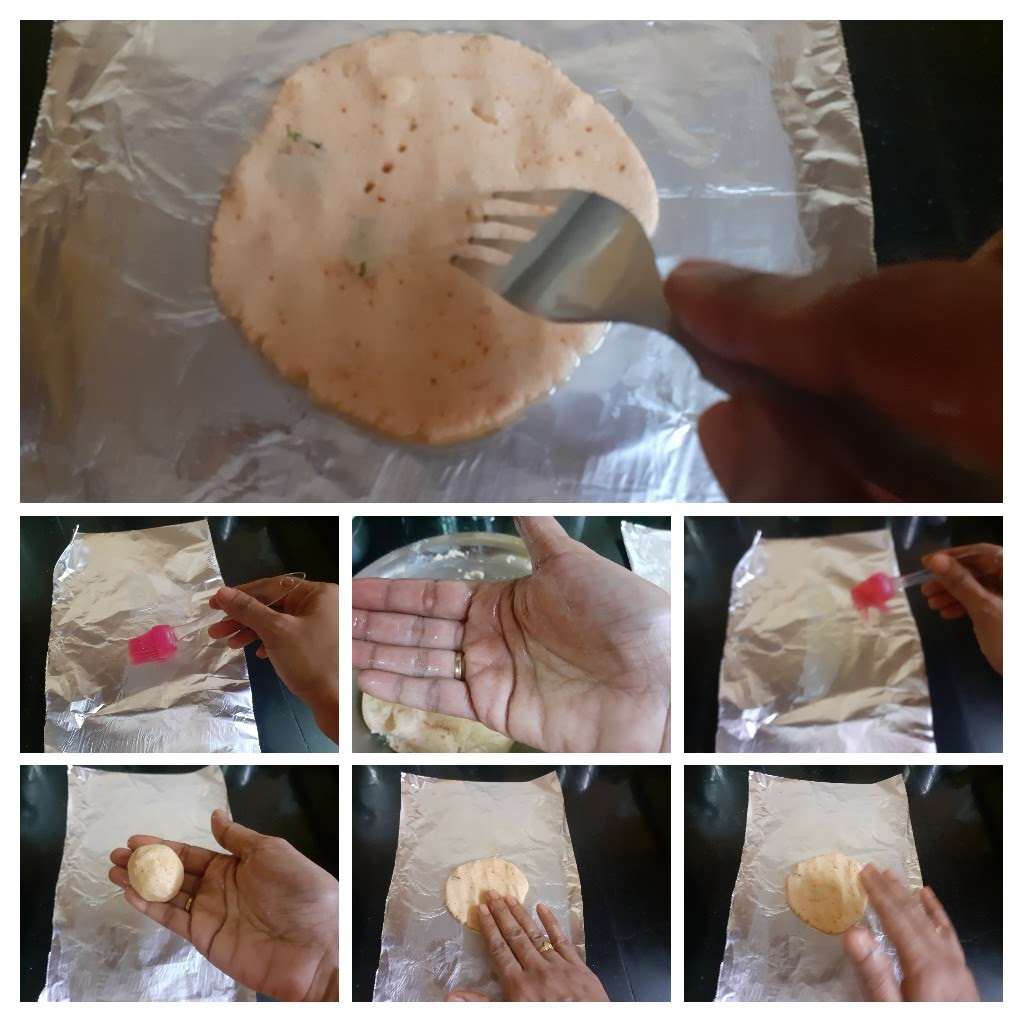
Pour the milk into a heavy-bottomed vessel or Kadai and begin to boil. It has to be reduced by almost 3/4 of the quantity by stirring constantly. For the first 10-15 minutes, constant stirring is required, thereafter keep flame on medium heat and keep stirring from time to time. As the moisture from the milk evaporates the consistency of the milk becomes denser and the texture also starts becoming granular/thready. Keep stirring until the milk has lost almost all moisture(check picture for reference) and now add in the sugar and start stirring again. Once the sugar is added the reduced milk mixture liquifies a little, it is normal and nothing to worry about. Continue stirring until the mixture loses all the moisture al does not stick to the bottom of the pan anymore. Another way to check is to put a little Palkova in a plate, just wet your hands with water, and try to take a small bit of the Palkova and shape it to a mini ball. If the ball forms, you can turn off the flame. Now in In another Kadai, put 1/2 tsp ghee and drop in the coconut gratings and start roasting it until it becomes dry and it is a nice brown in colour. Transfer it to a plate and cool it. Once cooled, add to the Palakova/Therattipal, switch on the flame and mix nicely until the coconut and the Therattipal are well integrated and switch off the flame. After adding the coconut the mixture turns a little drier. It is natural so nothing to worry. Offer it to Krishna or just have it as dessert. Enjoy. Bon Appetit. If you want just regular Therattipal stop the procedure after adding sugar and reducing it again. Add a teaspoon of ghee for a nice sheen.
STEPWISE RECIPE FOLLOWS:
1. Start by boiling the milk in a heavy-bottomed vessel or Kadai.

2. Keep stirring constantly for the first 10 to 15 minutes and keep scraping the sides of the vessel as the milk solids keep depositing there.
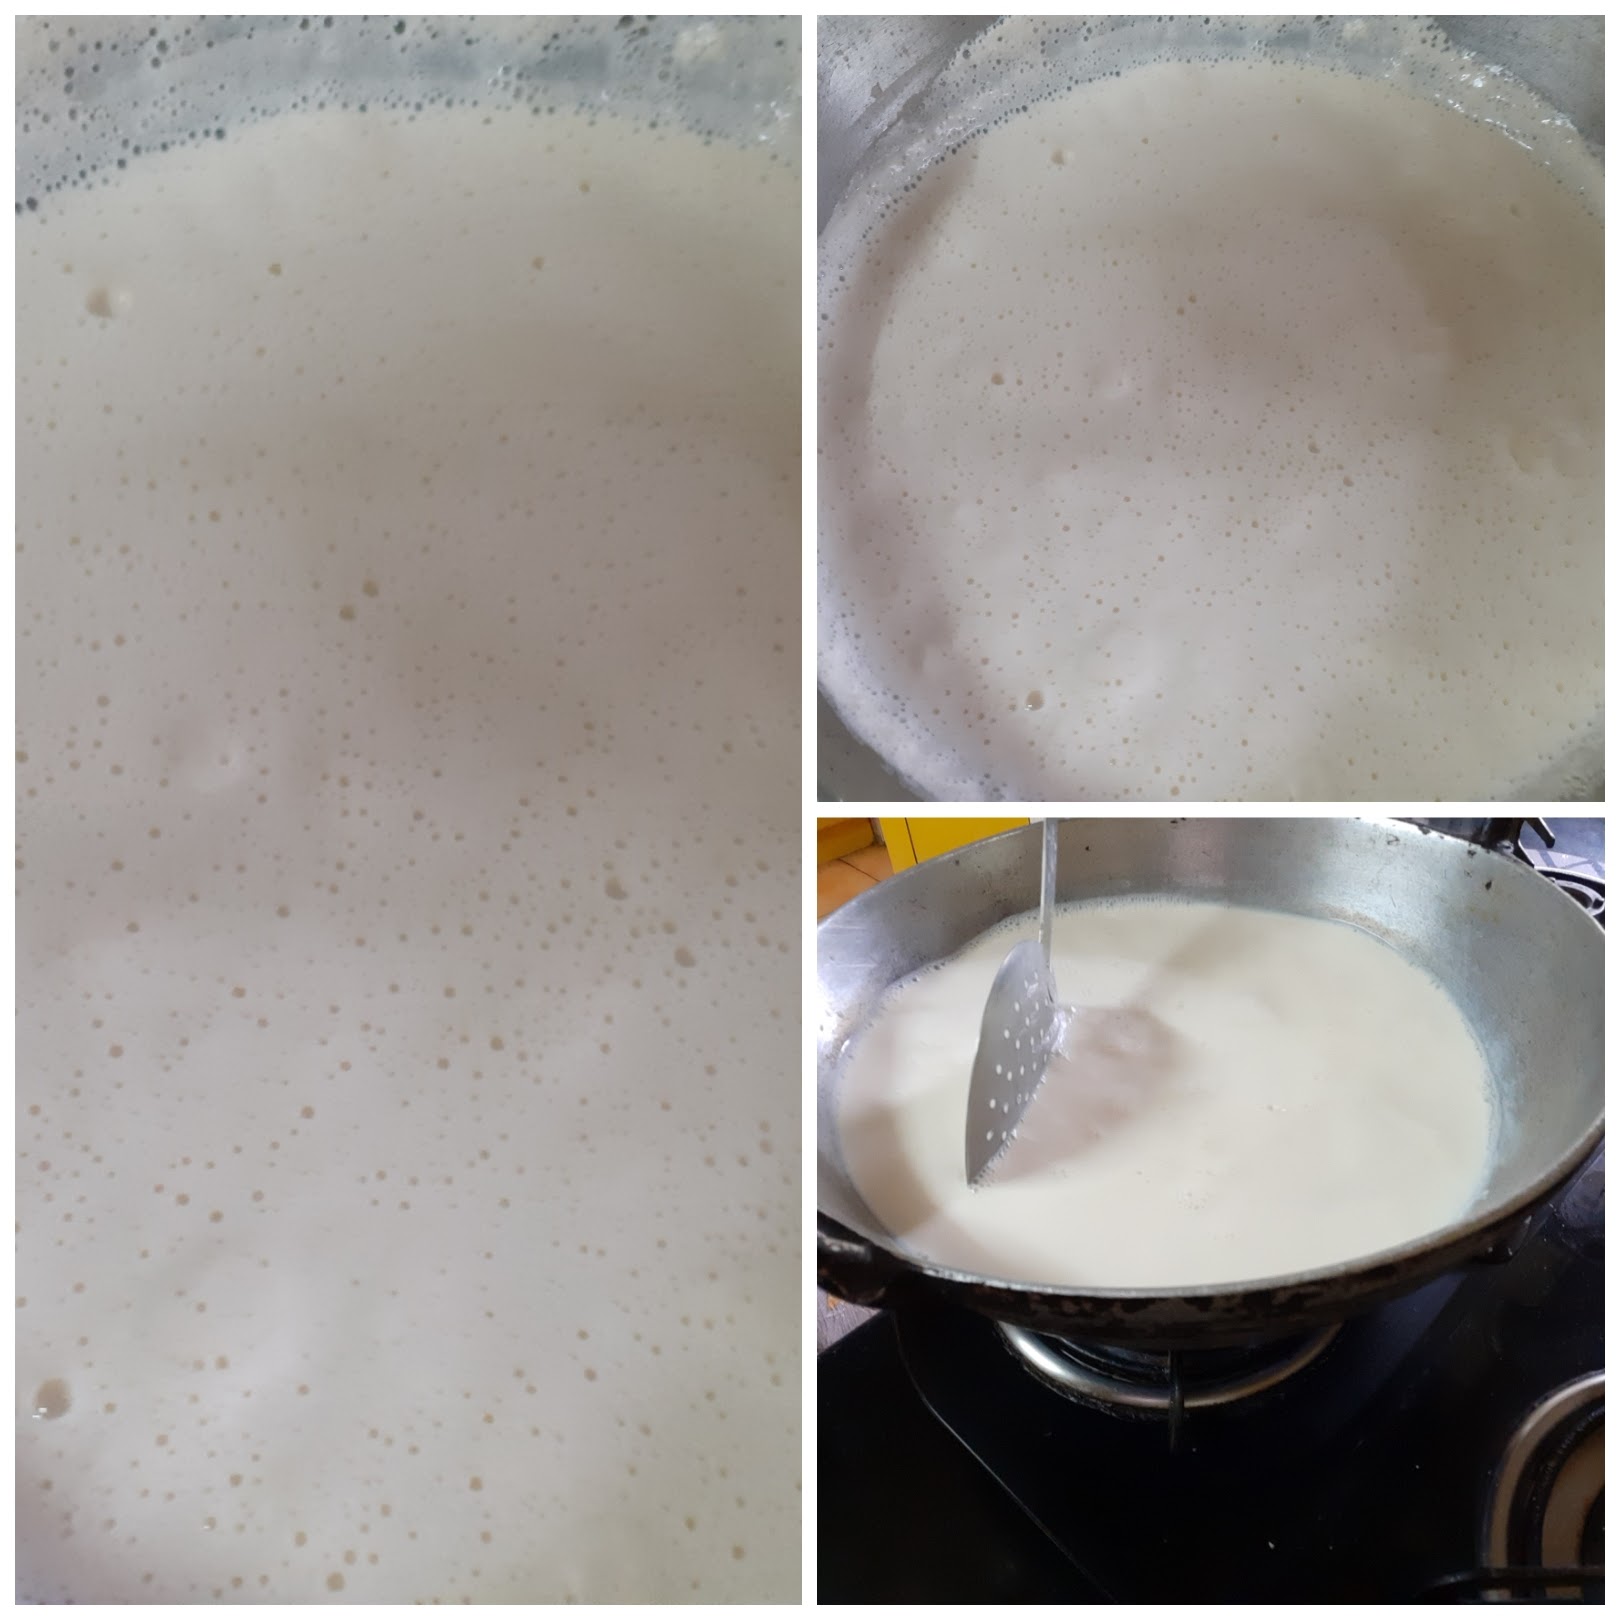
3. Now on medium heat and stirring every once in awhile reduce the milk until almost all moisture gets evaporated.
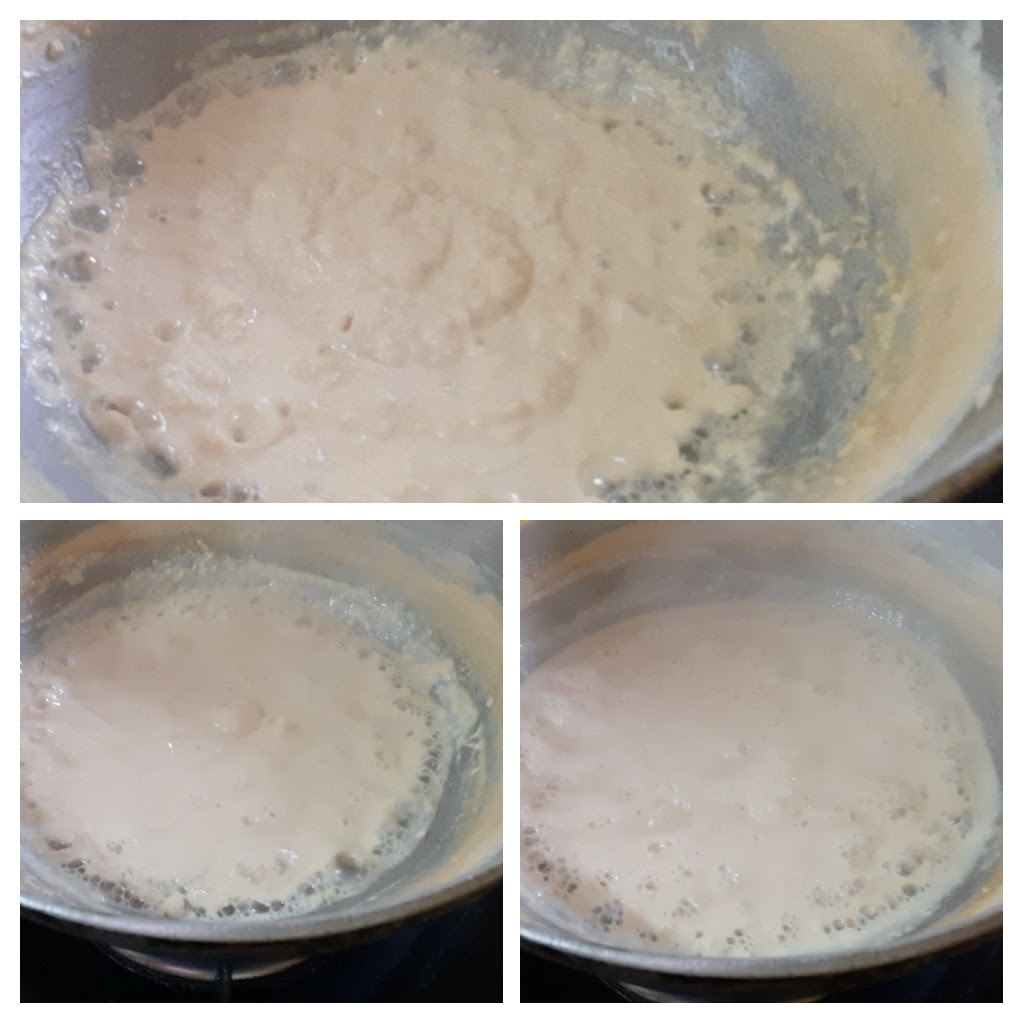
4. Now add in the sugar and start stirring again. The mixture liquified a little again but it is natural and again will solidify.
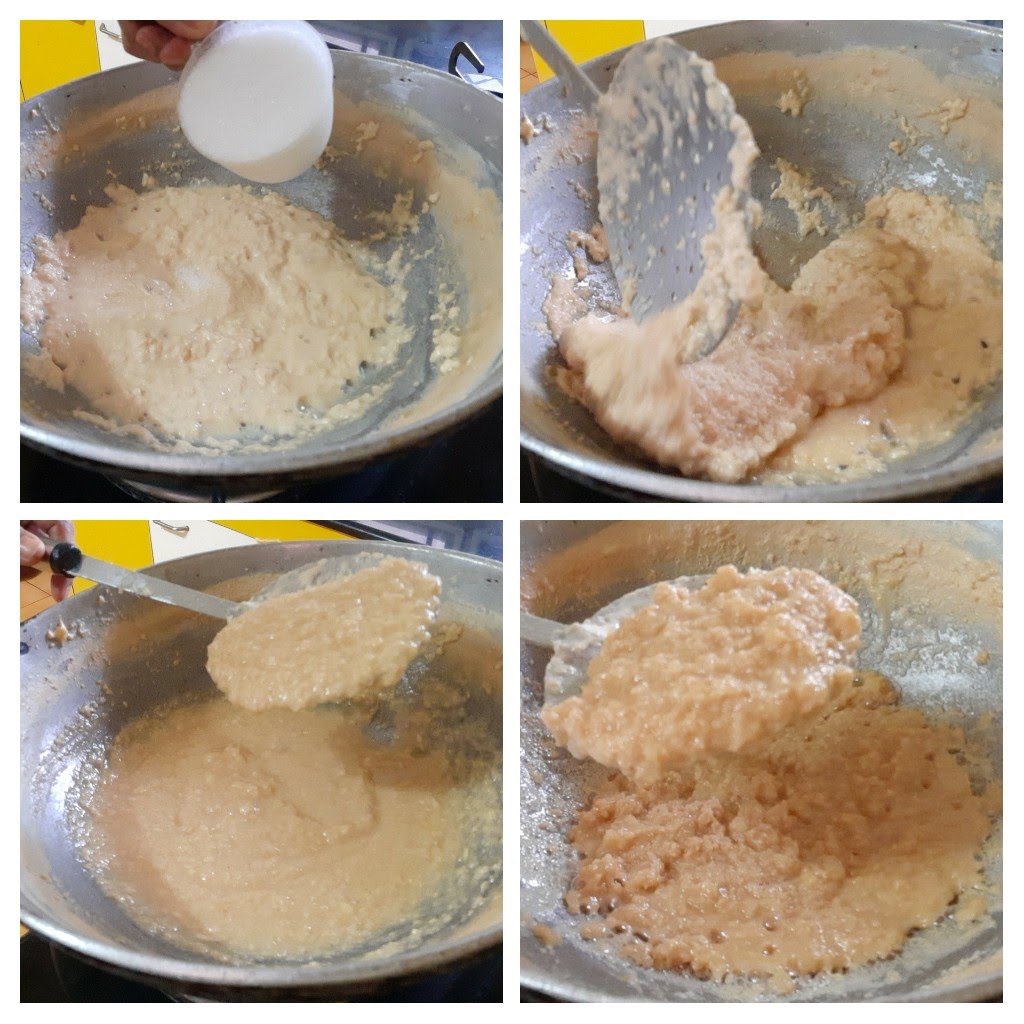
5. Keep stirring until the mixture does not stick to the bottom of the vessel any more. Another method to check for doneness is to take a little amount of the Therattipal and put it on a plate. Wet your fingers and take a small quantity and try to form a ball. If you are able to form a ball, that is the right consistency. Put off the flame.
6. In a small Kadai take little ghee and add a cup of grated coconut and start roasting until it becomes dry and turns a nice brown in colour. When the coconut is dry, it will not stick to the Kadai anymore. Transfer it to a plate and cool.

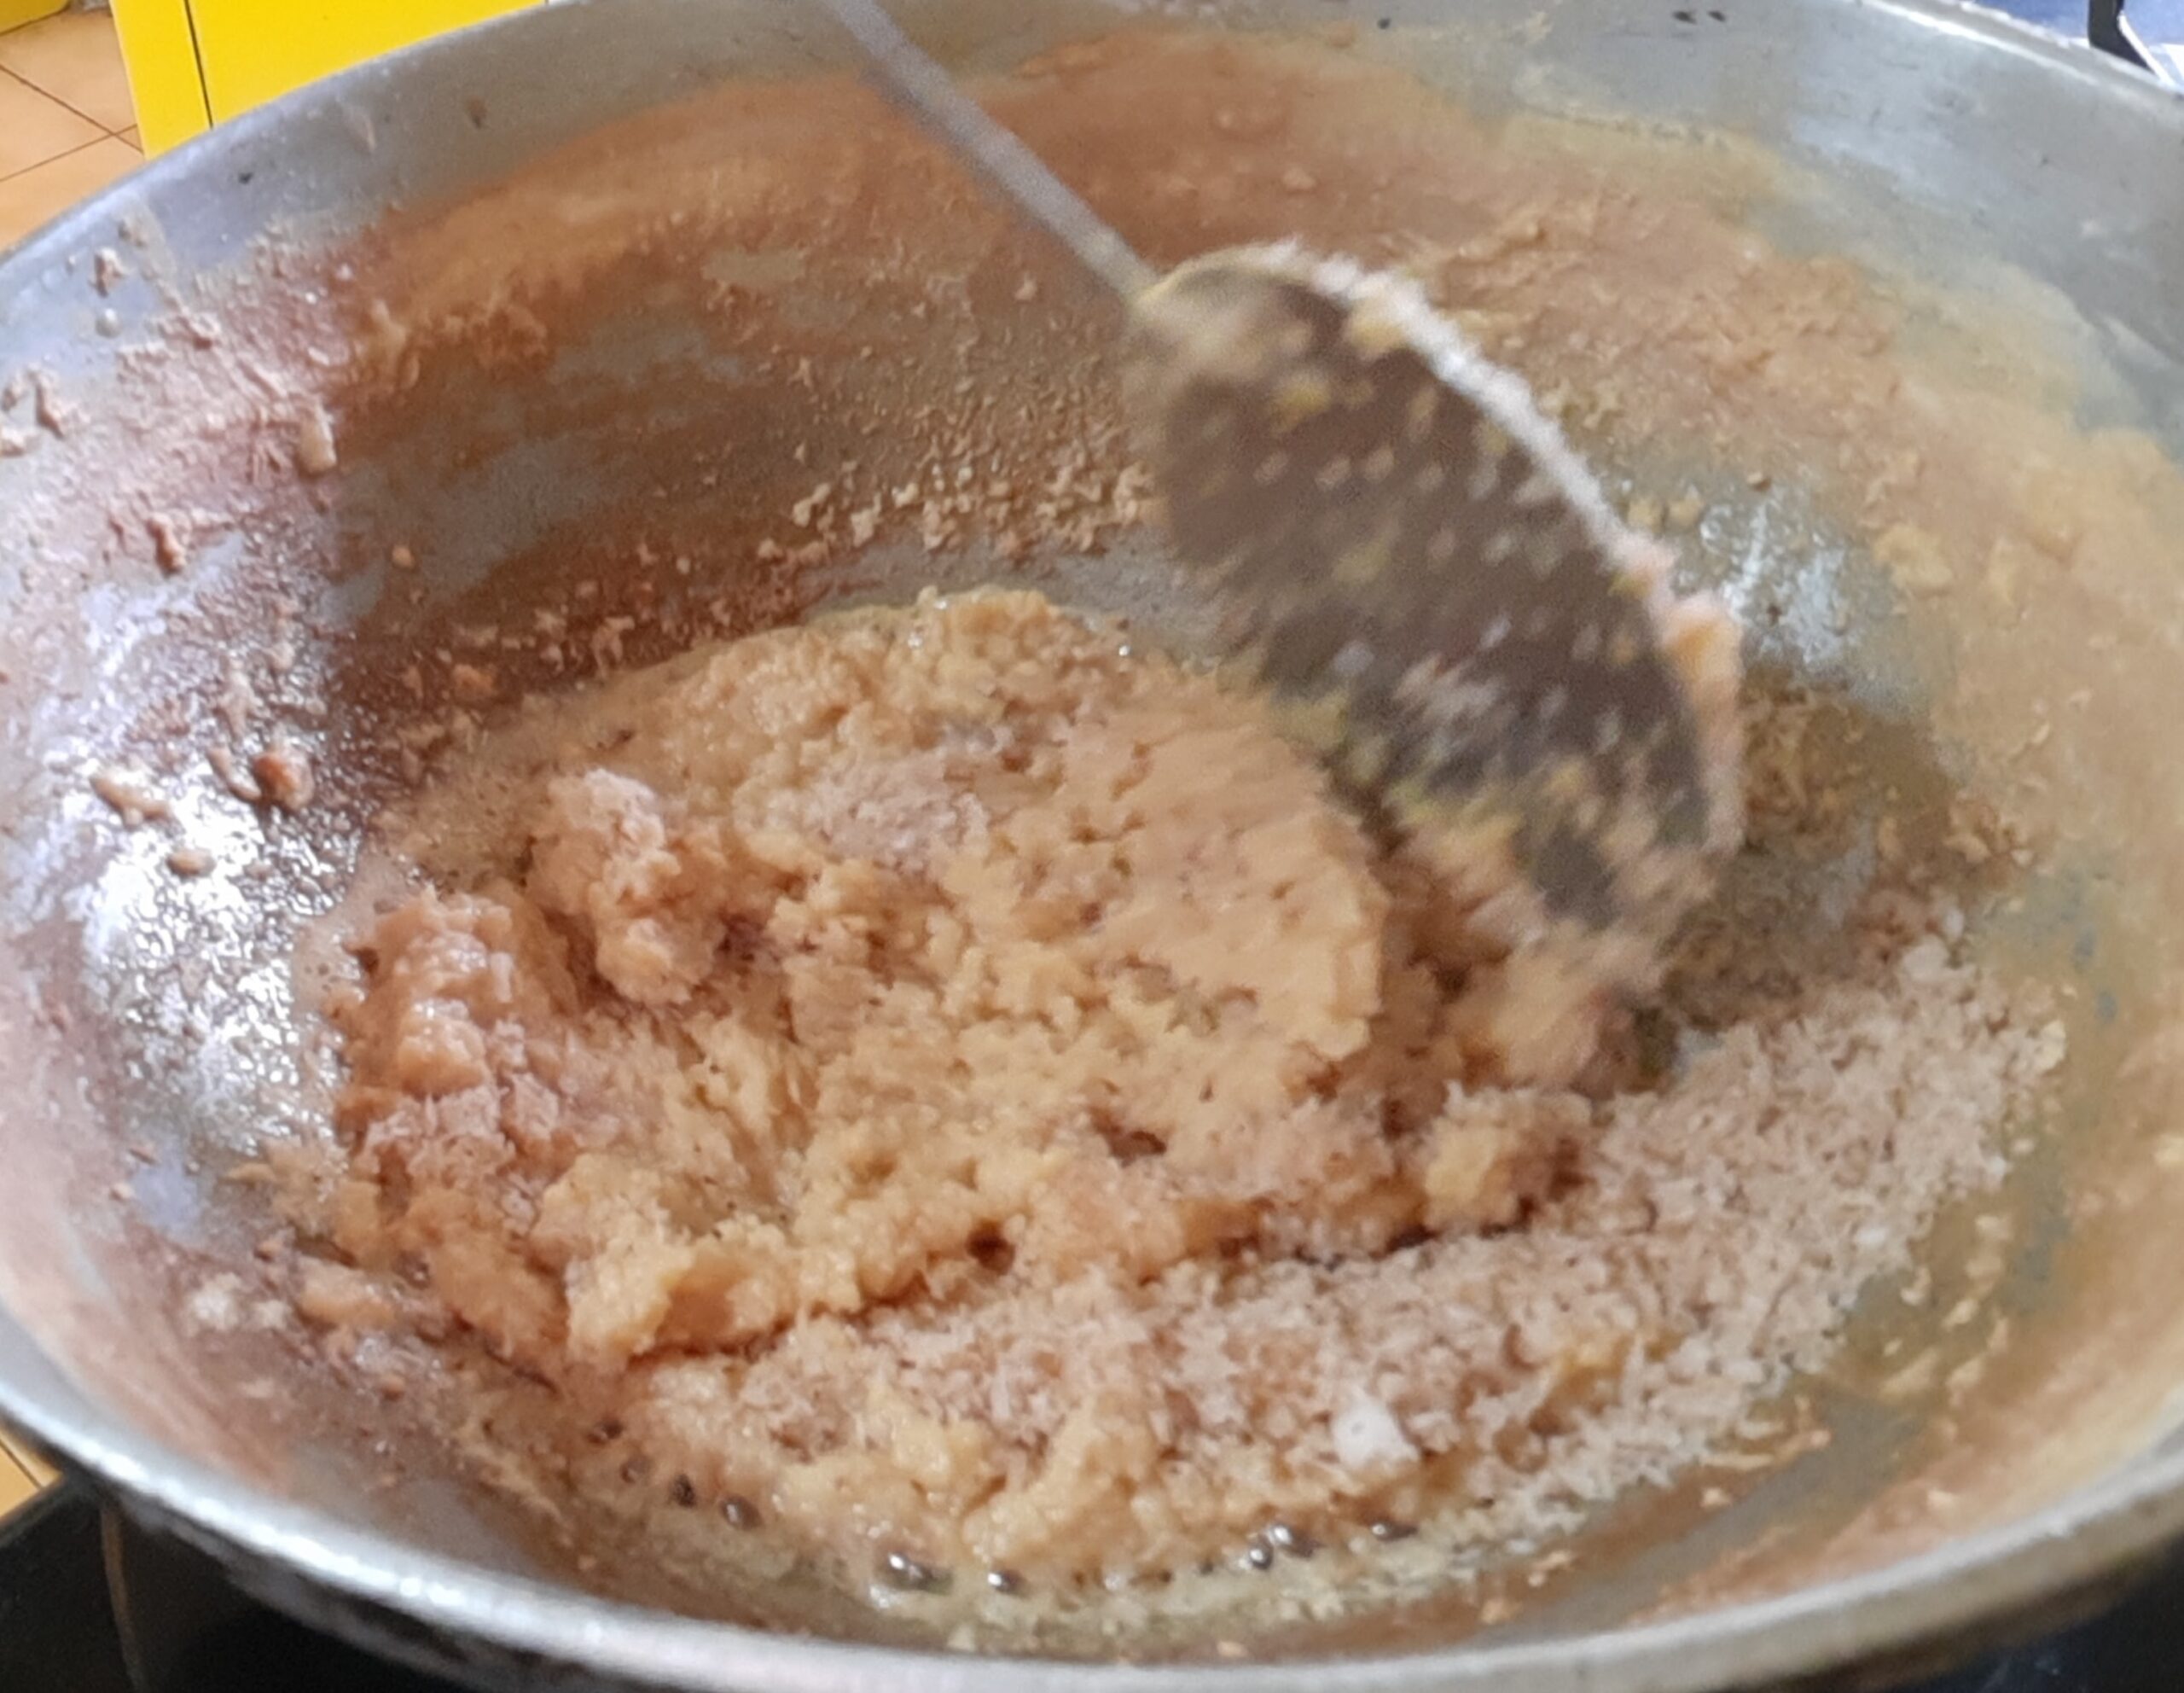
7. After it cools completely add it to the Therattipal, switch on the flame and stir nicely until the coconut is well integrated with the Therattipal. Once the coconut is absorbed, the mixture will become drier, this is natural and there is no need to worry. Add a teaspoon of ghee finally, just for some sheen. The Thengai Therattipal is now ready.
QUICK VIDEO OF METHOD HERE:
NOTES:
1. I have used Tetrapack toned milk. The more fat content in the milk the lesser the evaporation time. You can use full cream milk too.
2. It took around 1 hour to reduce 1.5 litres of milk.
3. If you don’t wish to add the coconut, the process can be stopped after adding sugar, reducing further and performing the test to see if a ball is formed.
4. If one prefers less sugar, it can be reduced a little.
5. There are many short cut methods to evaporate milk by adding milk powder etc; I use this method for making small amounts of Rabri for jalebis and other such dishes, but I don’t recommend the shortcut method for Therattipal, as this whole sweet dish is about the texture and taste.
6. Cheese too is used for quick evaporation, but again it changes the taste and texture.
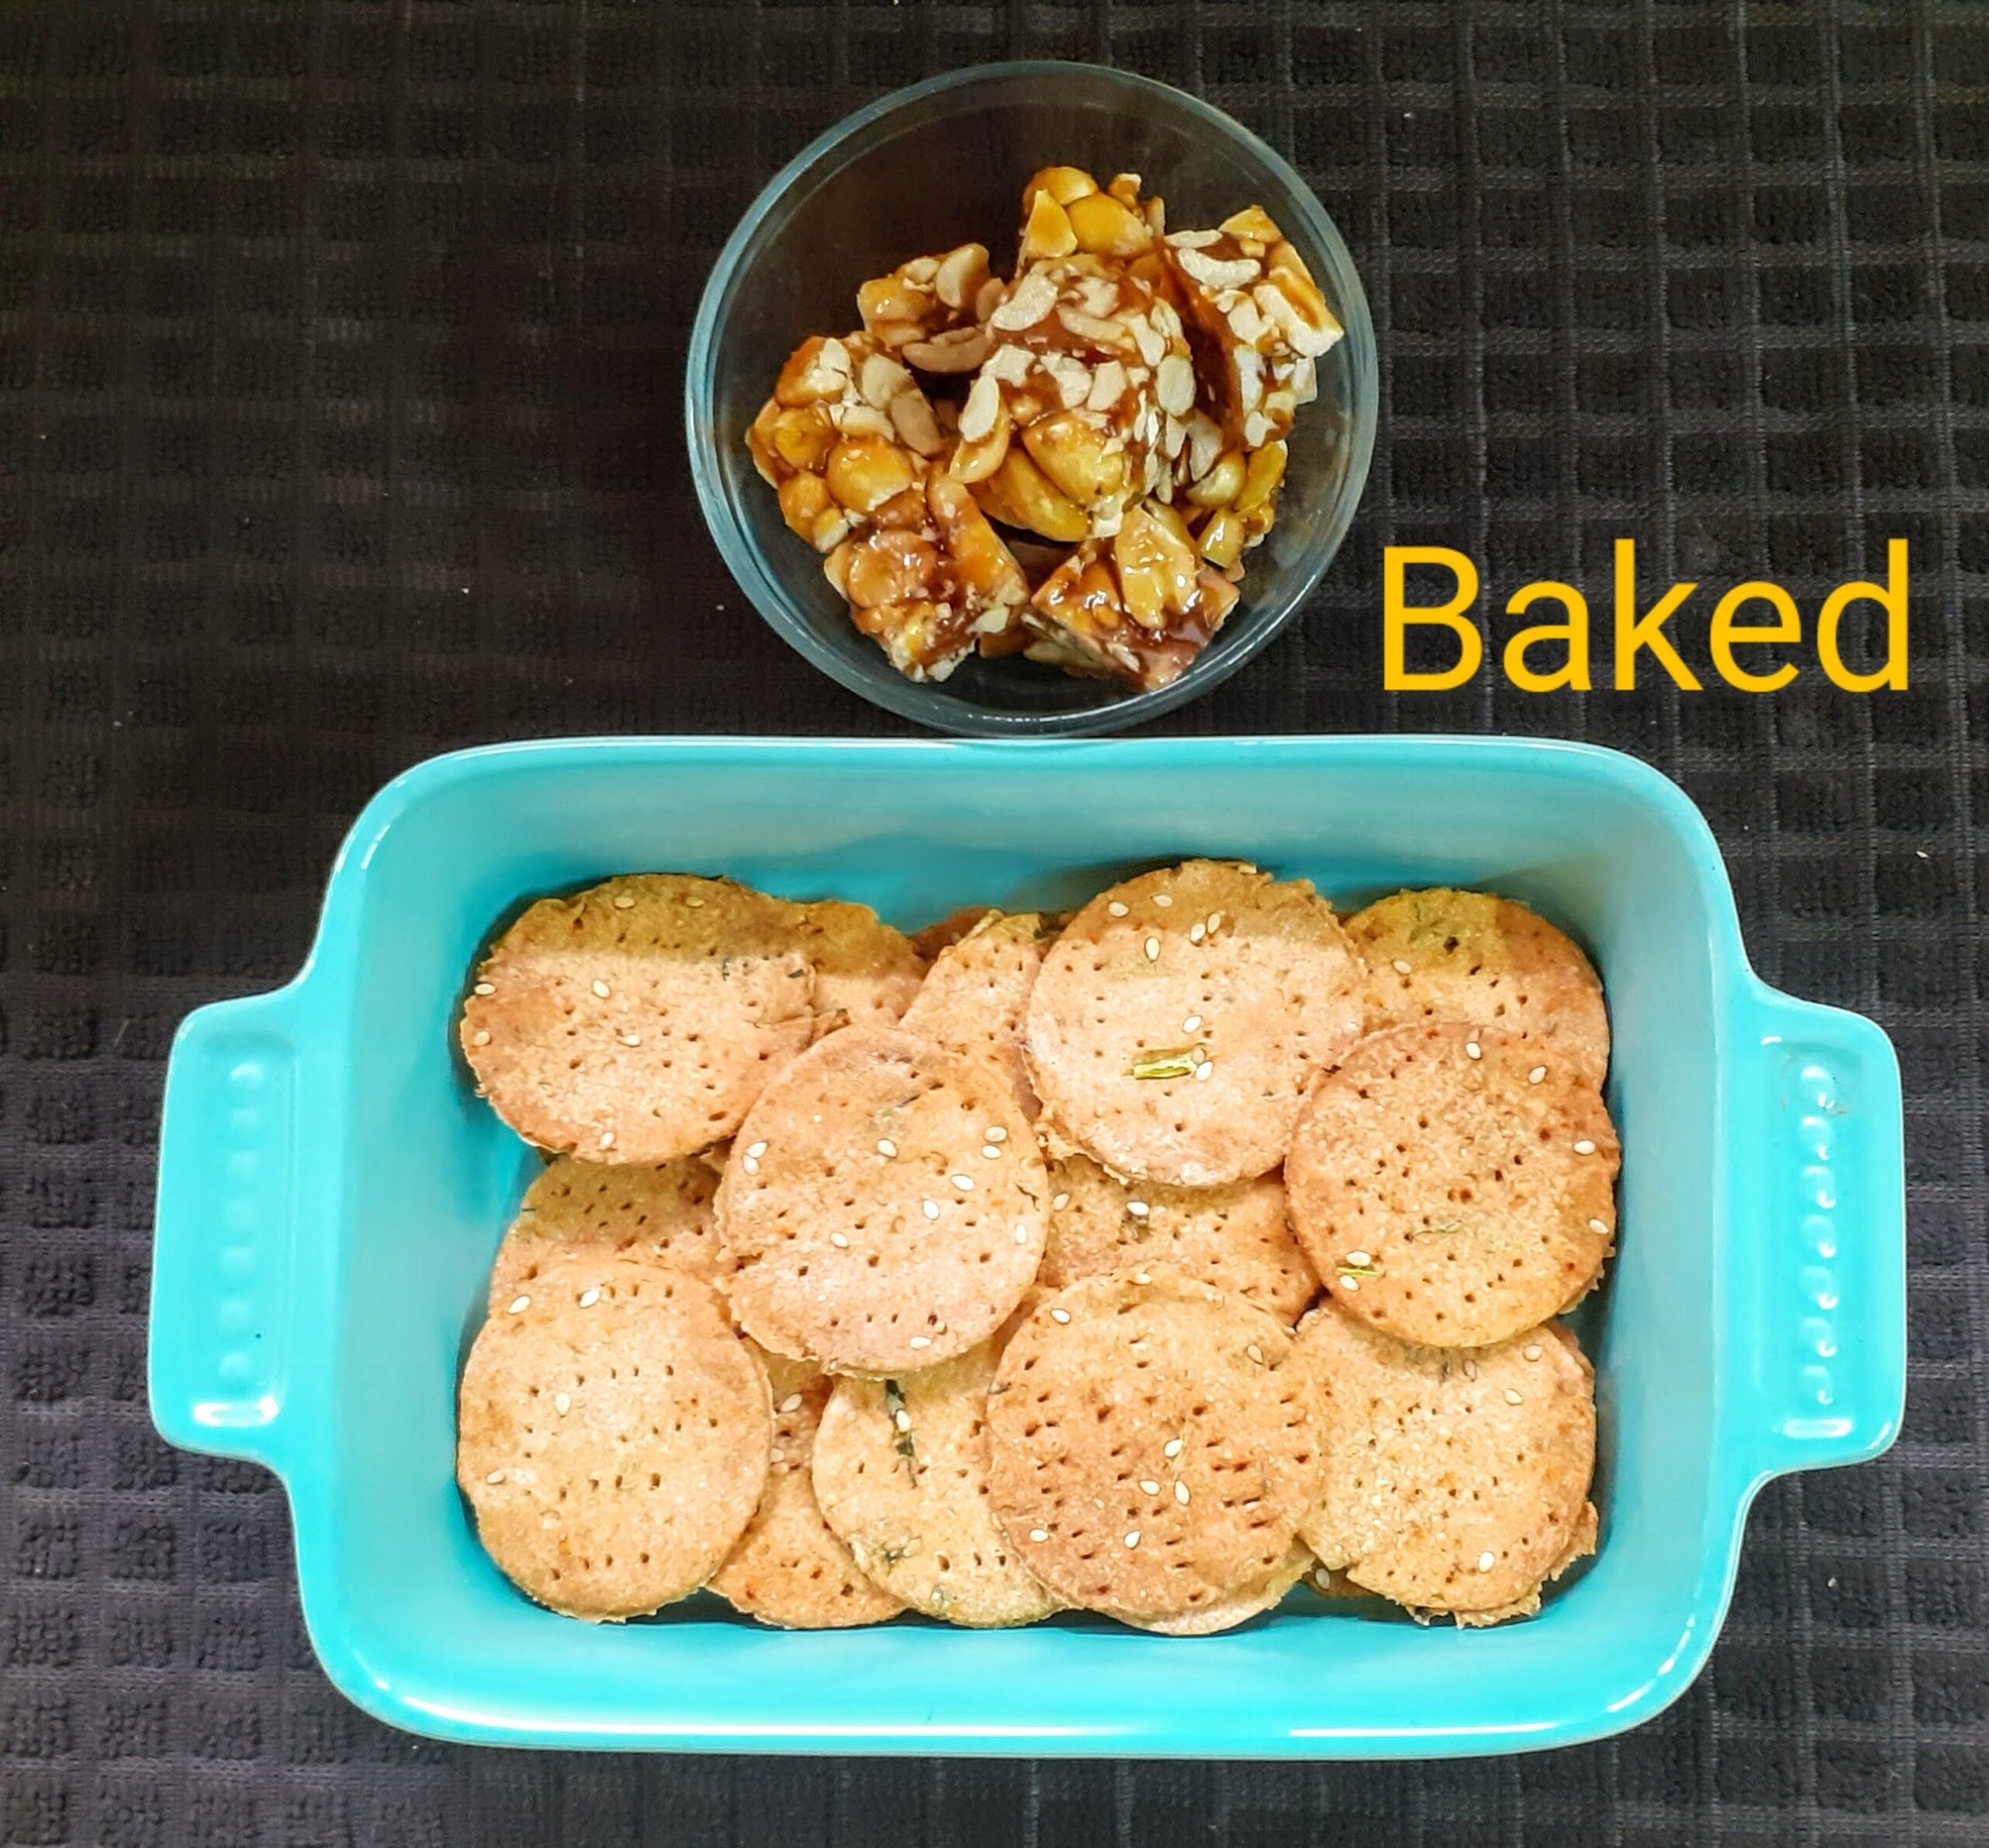
Masala Wheat Flour Papdis (Baked)
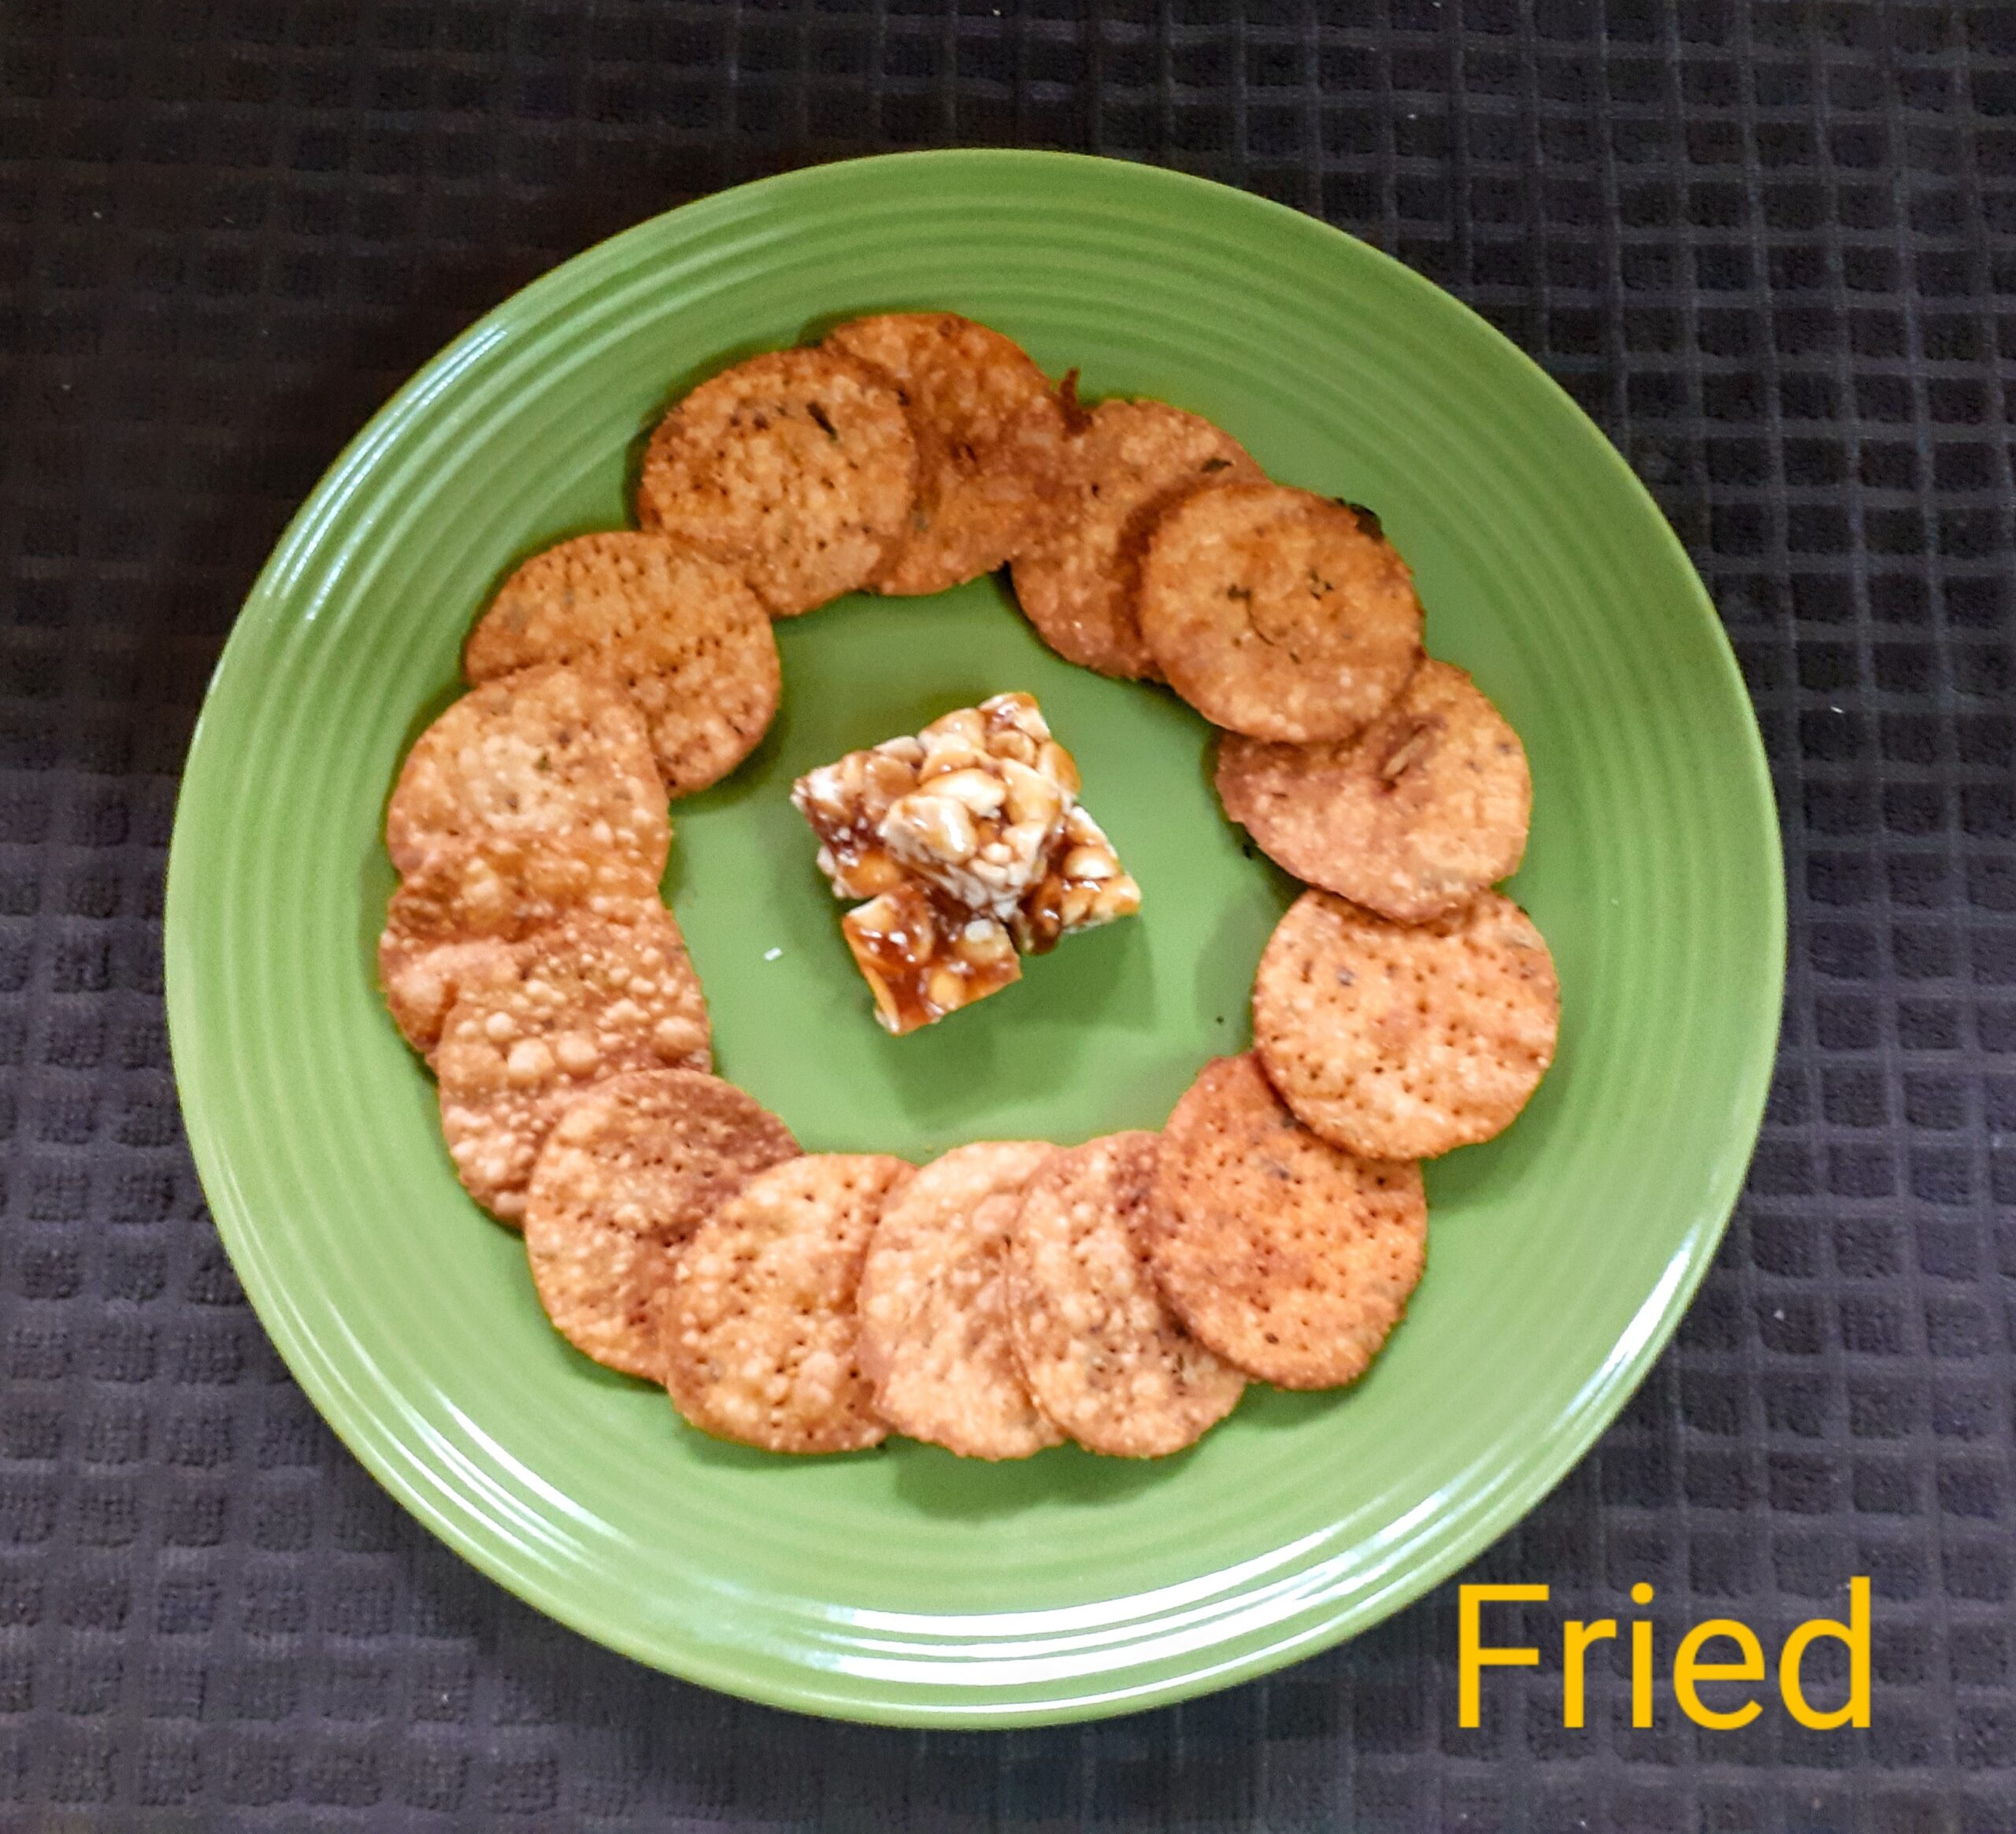
Masala Wheat Flour Papdis are crunchy crisps made of wheat flour. The wheat flour here can be easily replaced with maida/refined flour or multigrain flour. I usually fry these Papdis, but this time I have baked them as per the request of friends and followers as they wanted something that was not deep-fried. That said, these Papdis can be fried too and I have given both options in this recipe.
When we bake a snack that is traditionally deep- fried there is always a difference in texture. It would be wrong to say that they taste almost like fried ones. The taste is the same, the papdis are crunchy too, but there is a difference in their textures. I also believe that when we prefer a baked snack over a fried one we are willing to adjust to the minute differences that are bound to be there because the technique used is different. Therefore you will not find phrases like “baked but almost like fried” or “baked but as good as fried”, on this blog. Baked is baked and fried is fried, and somewhere there is a compromise in either, shape, colour, texture, taste of the dish. I am not saying this only about the current recipe but in general. When a deep-fried dish is baked there are differences.
This is why I try to keep the fried ones fried, but sometimes I do give in to a little experimenting. I won’t do something because it is a trend, but if I do experiment and the result is blog-worthy I will certainly share it with you all.
Now, these Papdis can be served with tea, they last for a long time when stored in an airtight container. I also make Papdi Chat(street food delicacy) with these, and since they are firm than the Maida papdis, they hold up the sweet curd and chutneys of the Chaat well.
While you are here please do look at other snack recipes by Rajjo’s kitchen like Semolina Cheese Balls, Kothimbir vadi, Stuffed kuzhi Paniyarams, Kachori, Savory Muffins and more…
Here is the recipe of Wheat flour Papdis for you–
TOTAL TIME: 60Mins COURSE: SNACK
Ingredients:
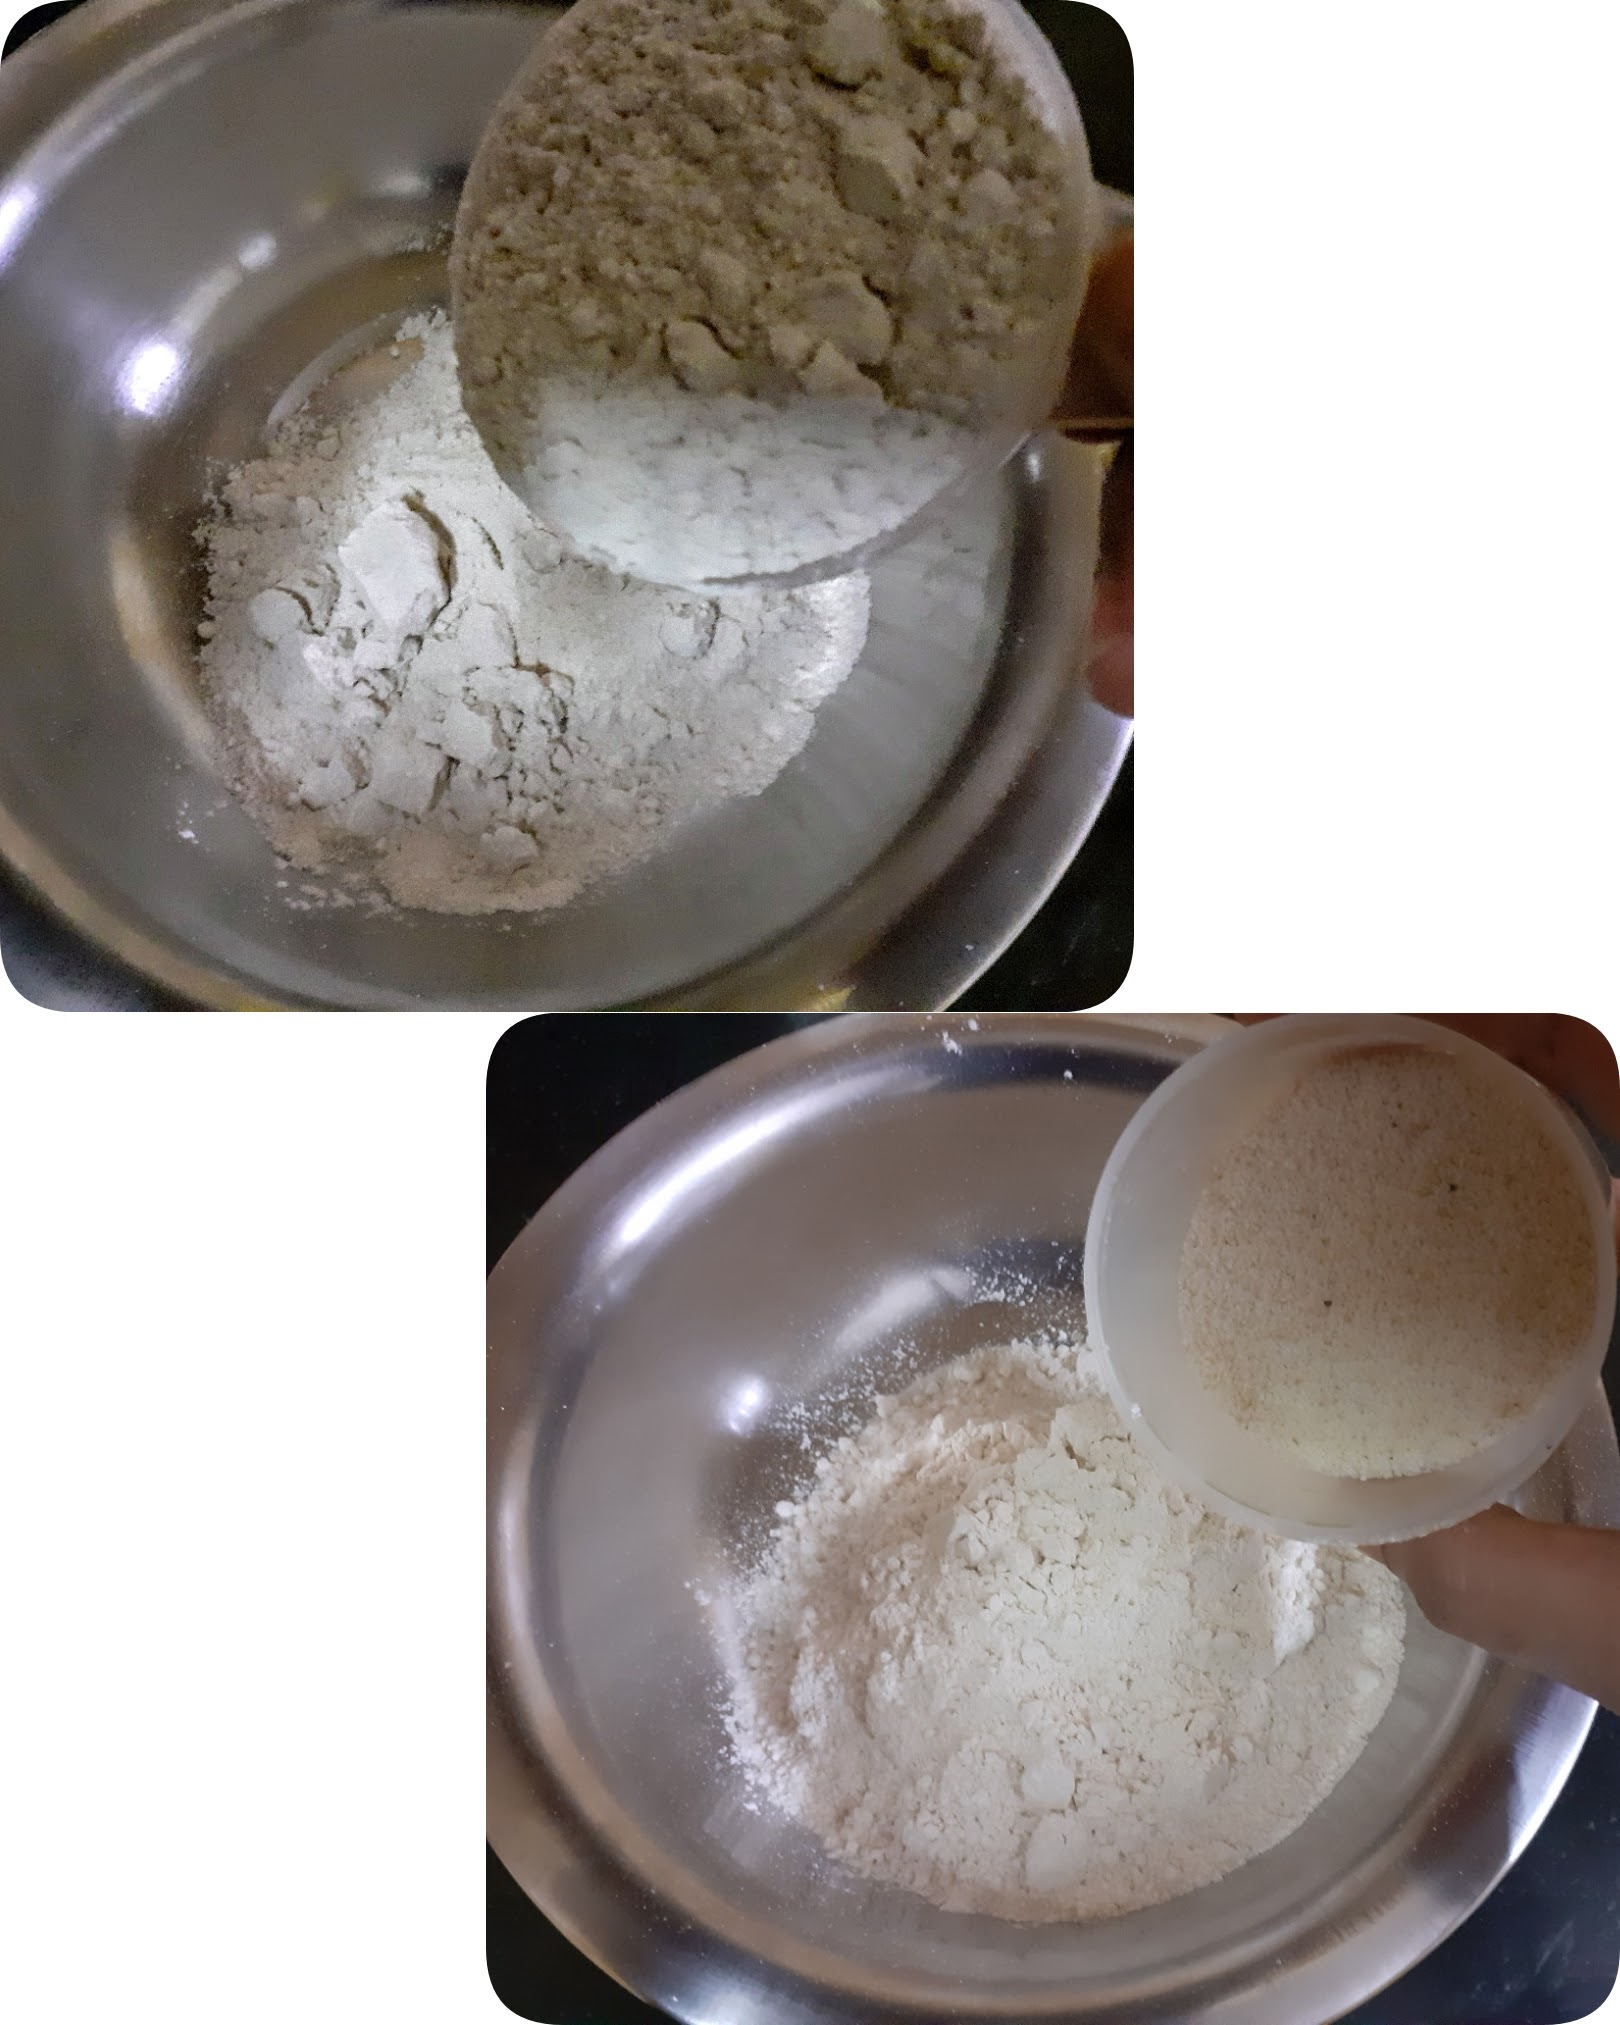
Wheat flour 2 cups (1 cup =150 ml) Suji(semolina) 1/2 cup Salt as per taste Red chilli powder 1 tsp Ajwain(Omam/Carrom seeds) 1 tsp Oil 3 tbsp for flour (refer note1) Fresh Coriander or Methi(fenugreek)leaves 1/2 cup finely chopped White sesame 1 tsp (optional) Water as required
Directions:
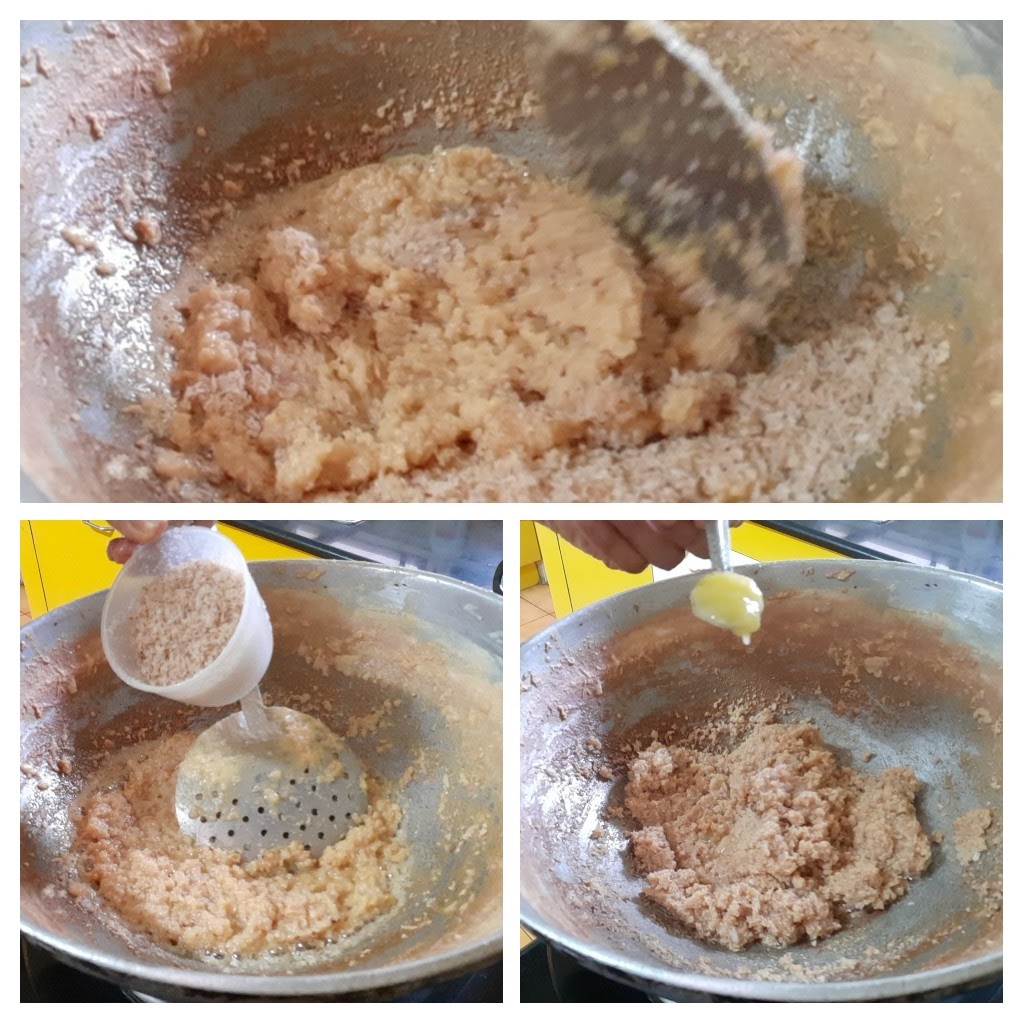
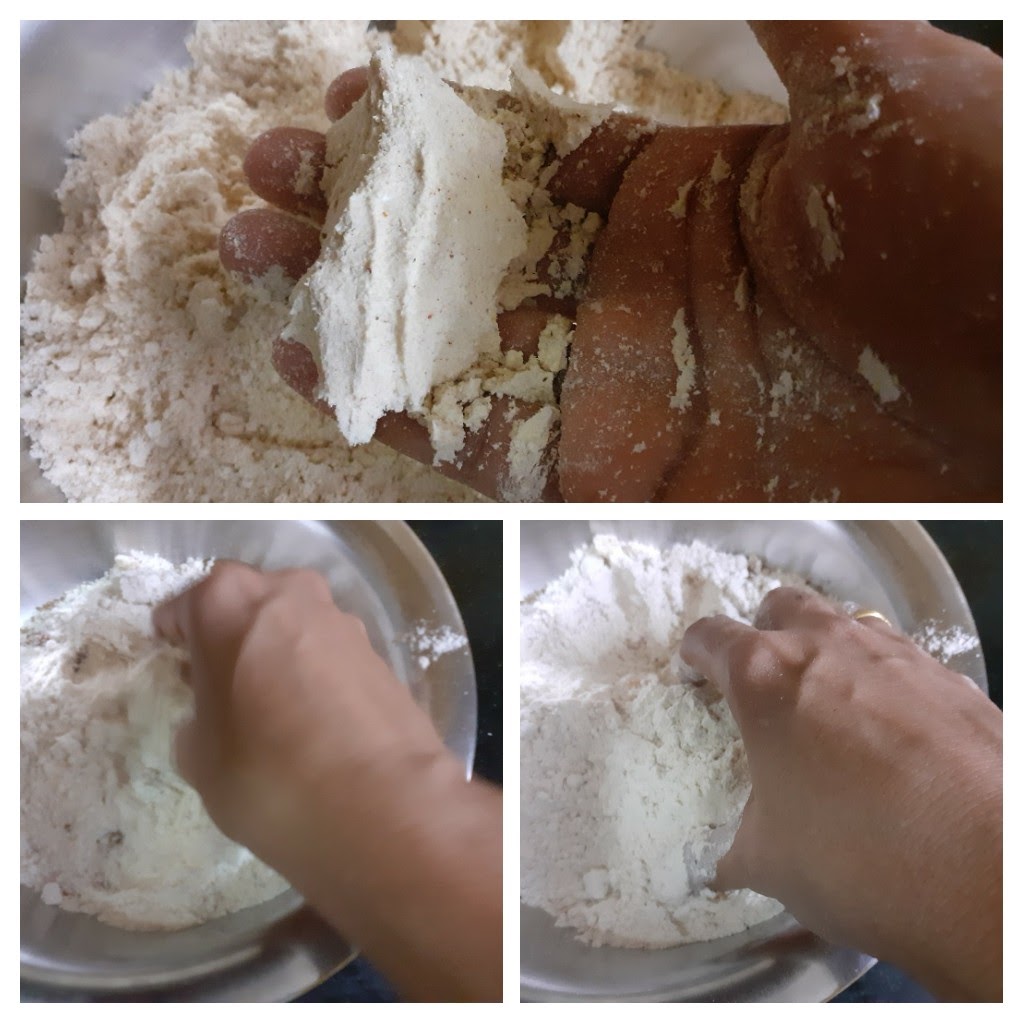
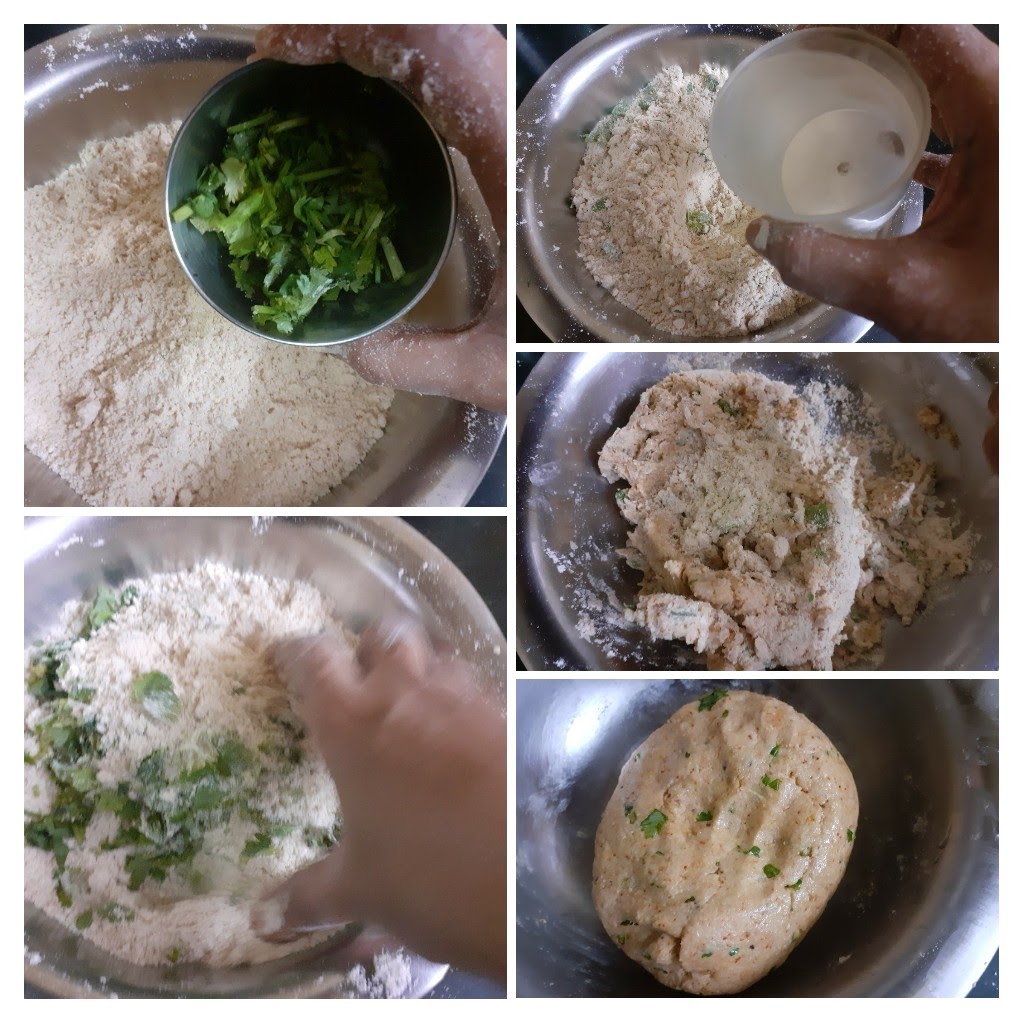
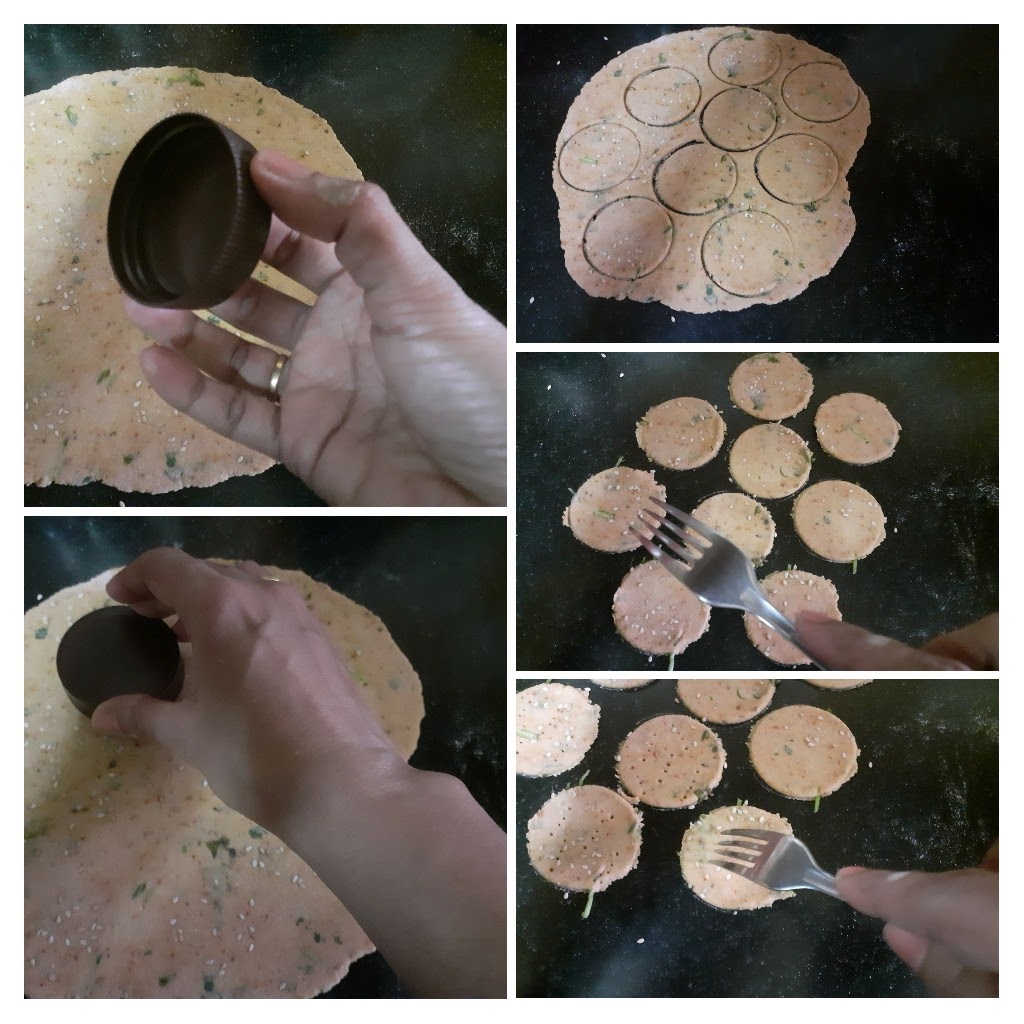
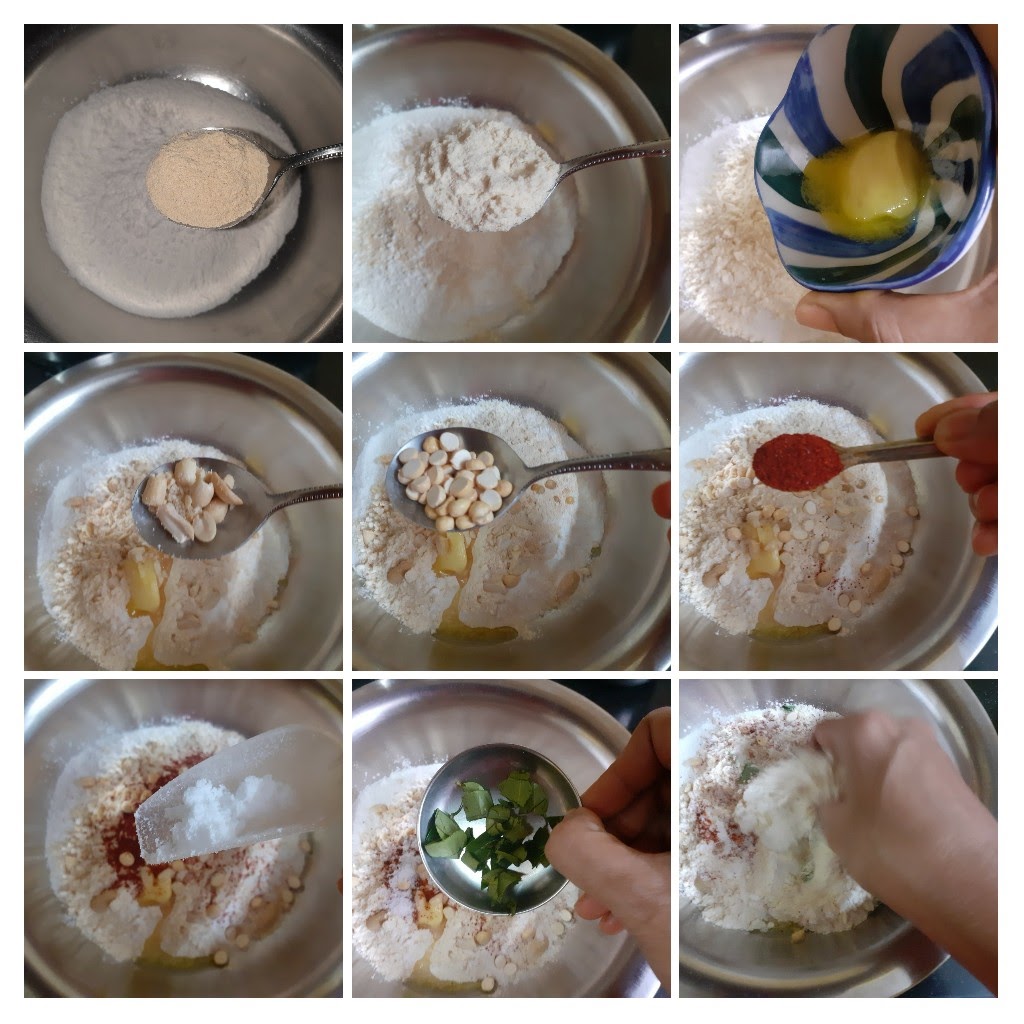
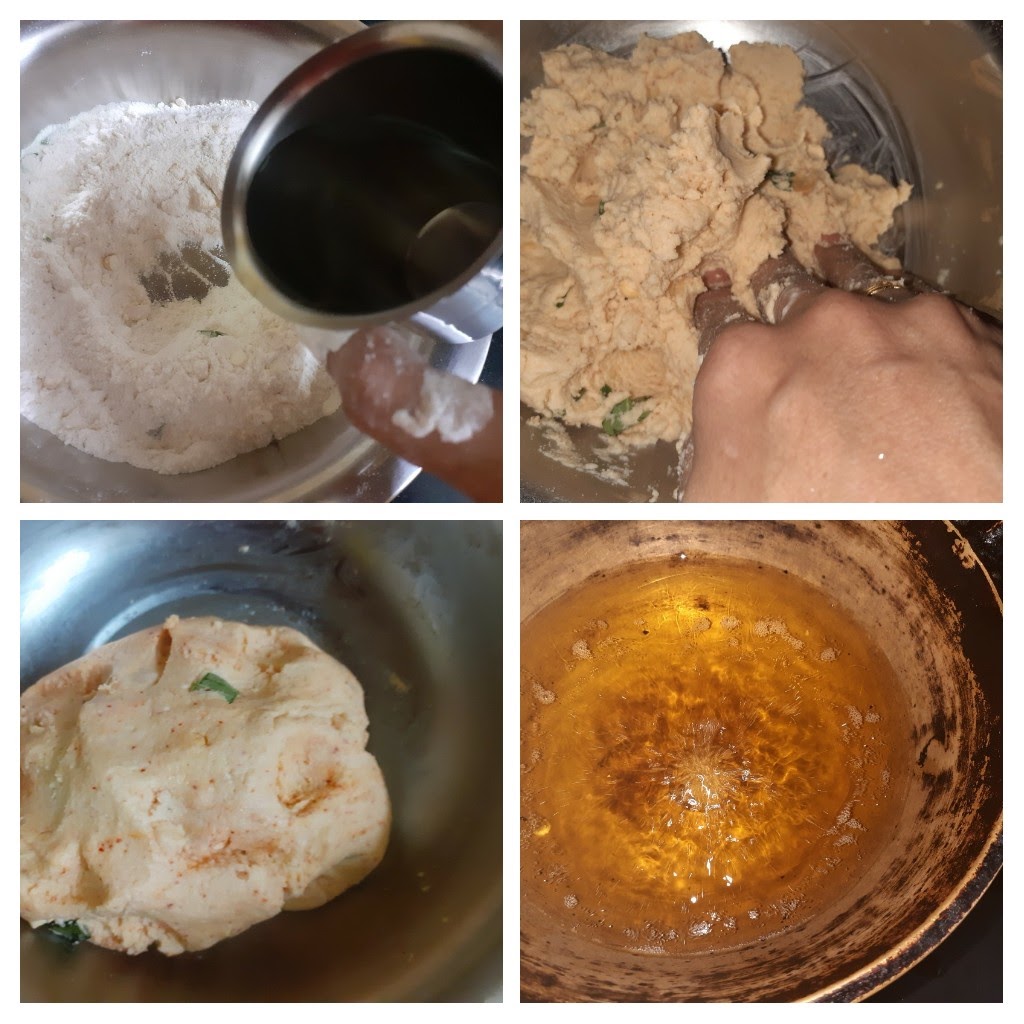
In a dish take the wheat flour and add the suji/semolina to it. Now add the salt, red chilli powder, ajwain followed by the 3 tbsp oil. Start mixing the flour with your fingers, such that the spice powders and oil are well mixed with the flour. Now take some flour in your palm and clamp it together with your fingers. If the flour holds shape, water can be added little by little now. But before that add the chopped coriander/methi leaves, mix it with the flour well and now start adding water little by little. We want a stiff dough here. The consistency should be like the dough for Poorie. Now apply very little oil on the dough and rest it or 15 minutes. Now divide the dough into 4 or 5 balls. Roll out each ball into a thin circle, flour for dusting if required. Sprinkle some sesame seeds on the rolled and flattened dough and roll again so that the sesame seeds stick to the dough. Now with a cookie cutter or lid of a bottle cut into a circle. Remove excess dough from sides. prick holes with a fork on the little papdis.
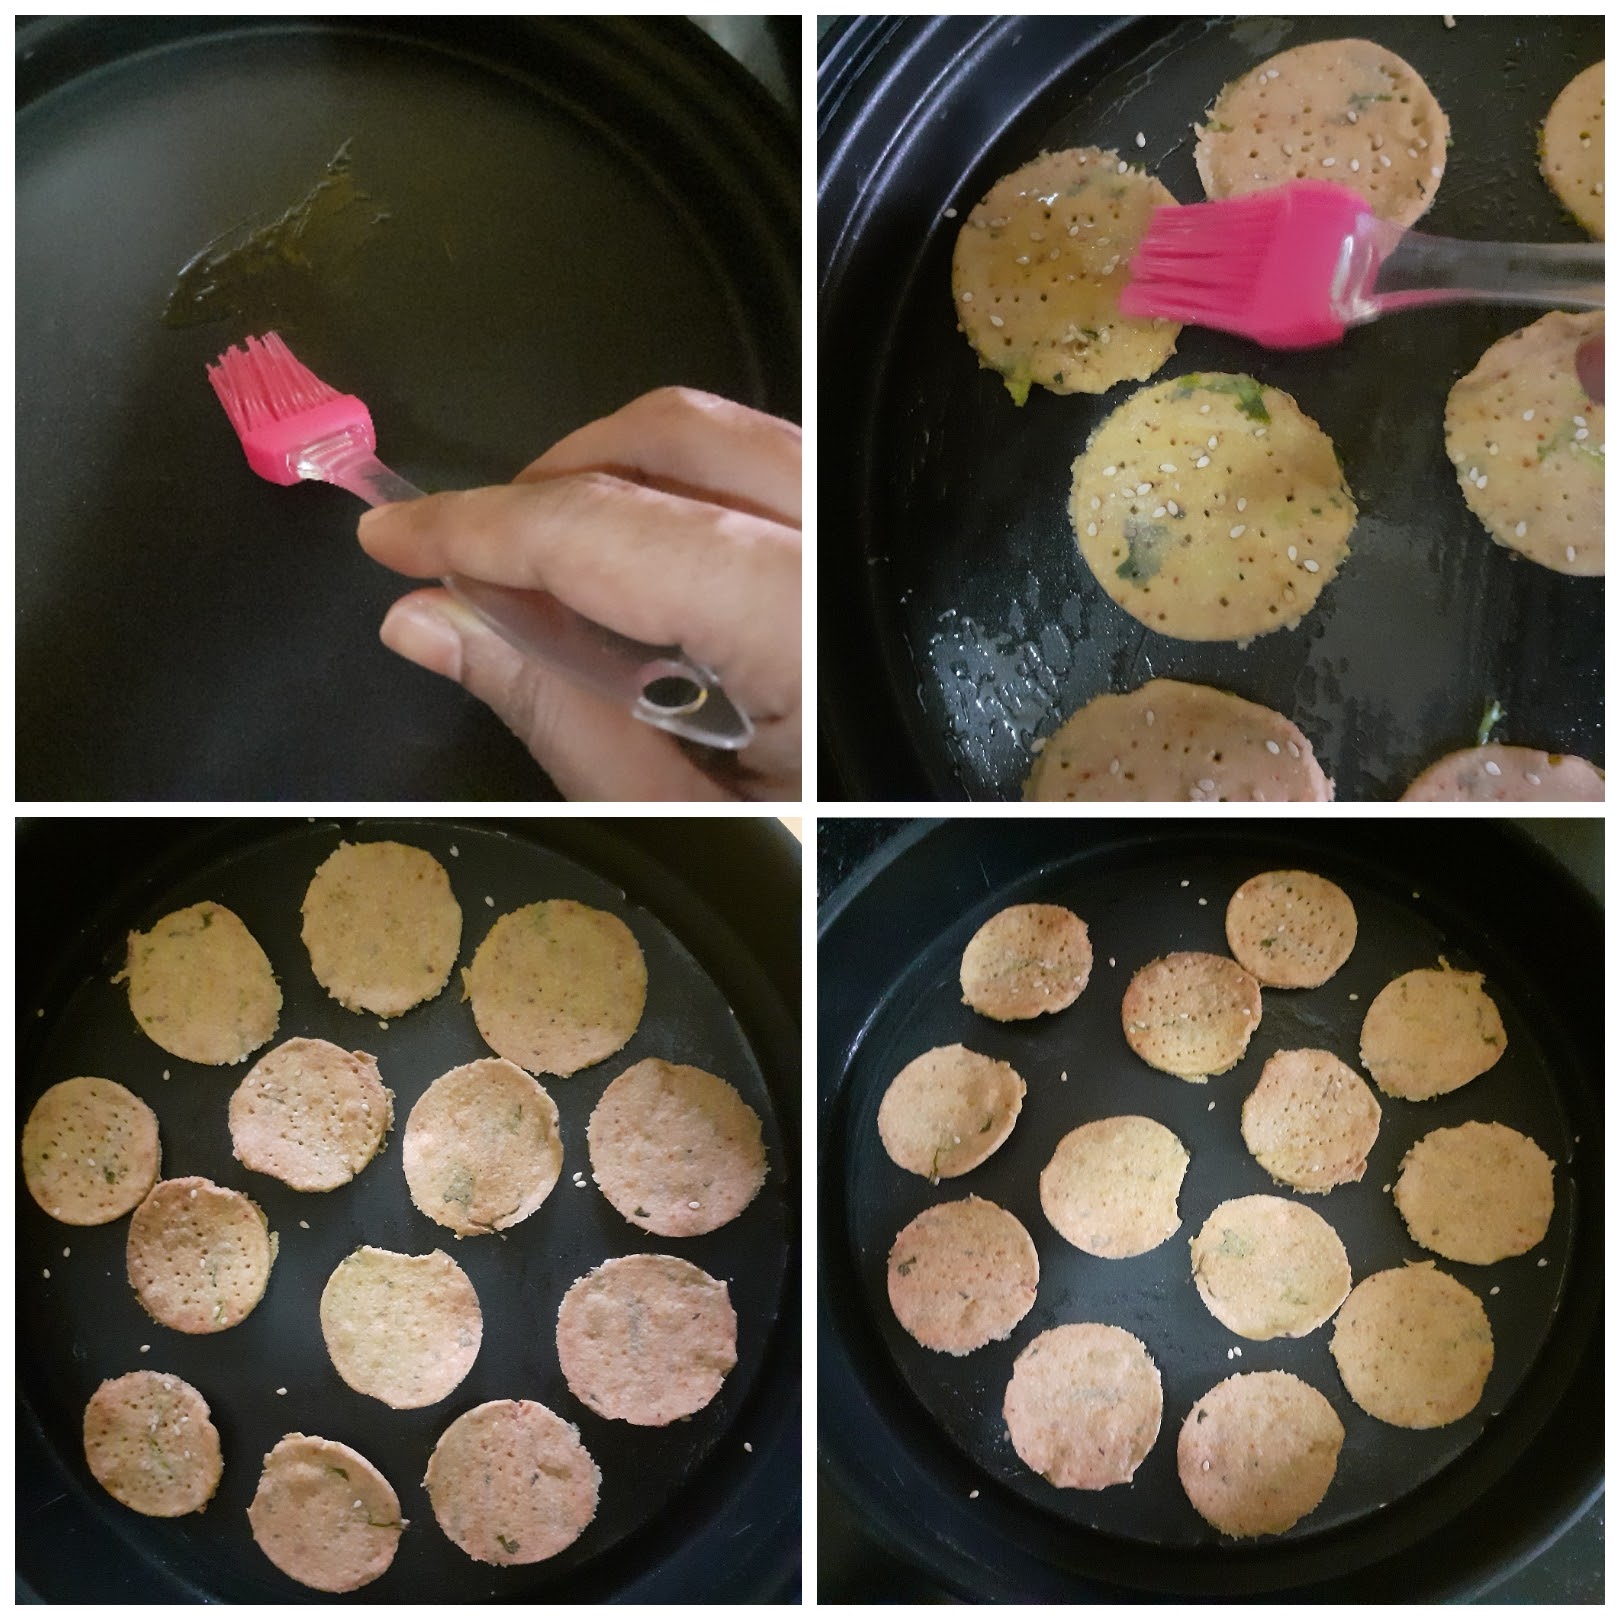
To bake them: Preheat oven to 180 C for 10 minutes. Place the little circles into a baking tray after pricking holes, brush with a little oil(this step is optional), and bake at 180 C for 8 minutes on one side, flip them after 8 minutes and bake again for 8 minutes. Remove from oven, let them cool and store in an airtight container. Repeat this process for the whole amount of dough.
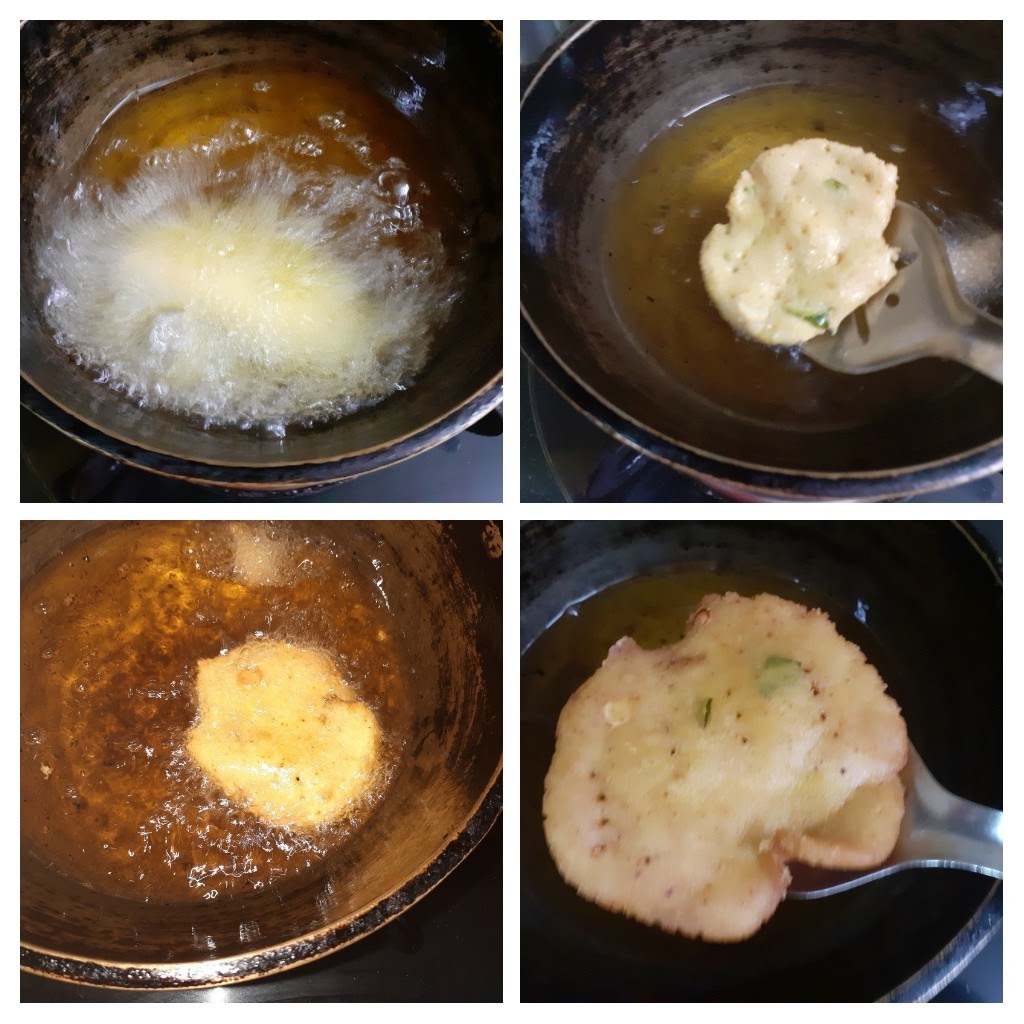
To fry them: Take oil in a Kadai and heat. The oil should be medium hot. The dough when put should sizzle and rise up immediately. This is the right temperature. Prick the papdis with a fork and gently drop them into the oil and fry until all bubbles have subsided and the papdis are light brown in colour. Cool and store in an airtight container.
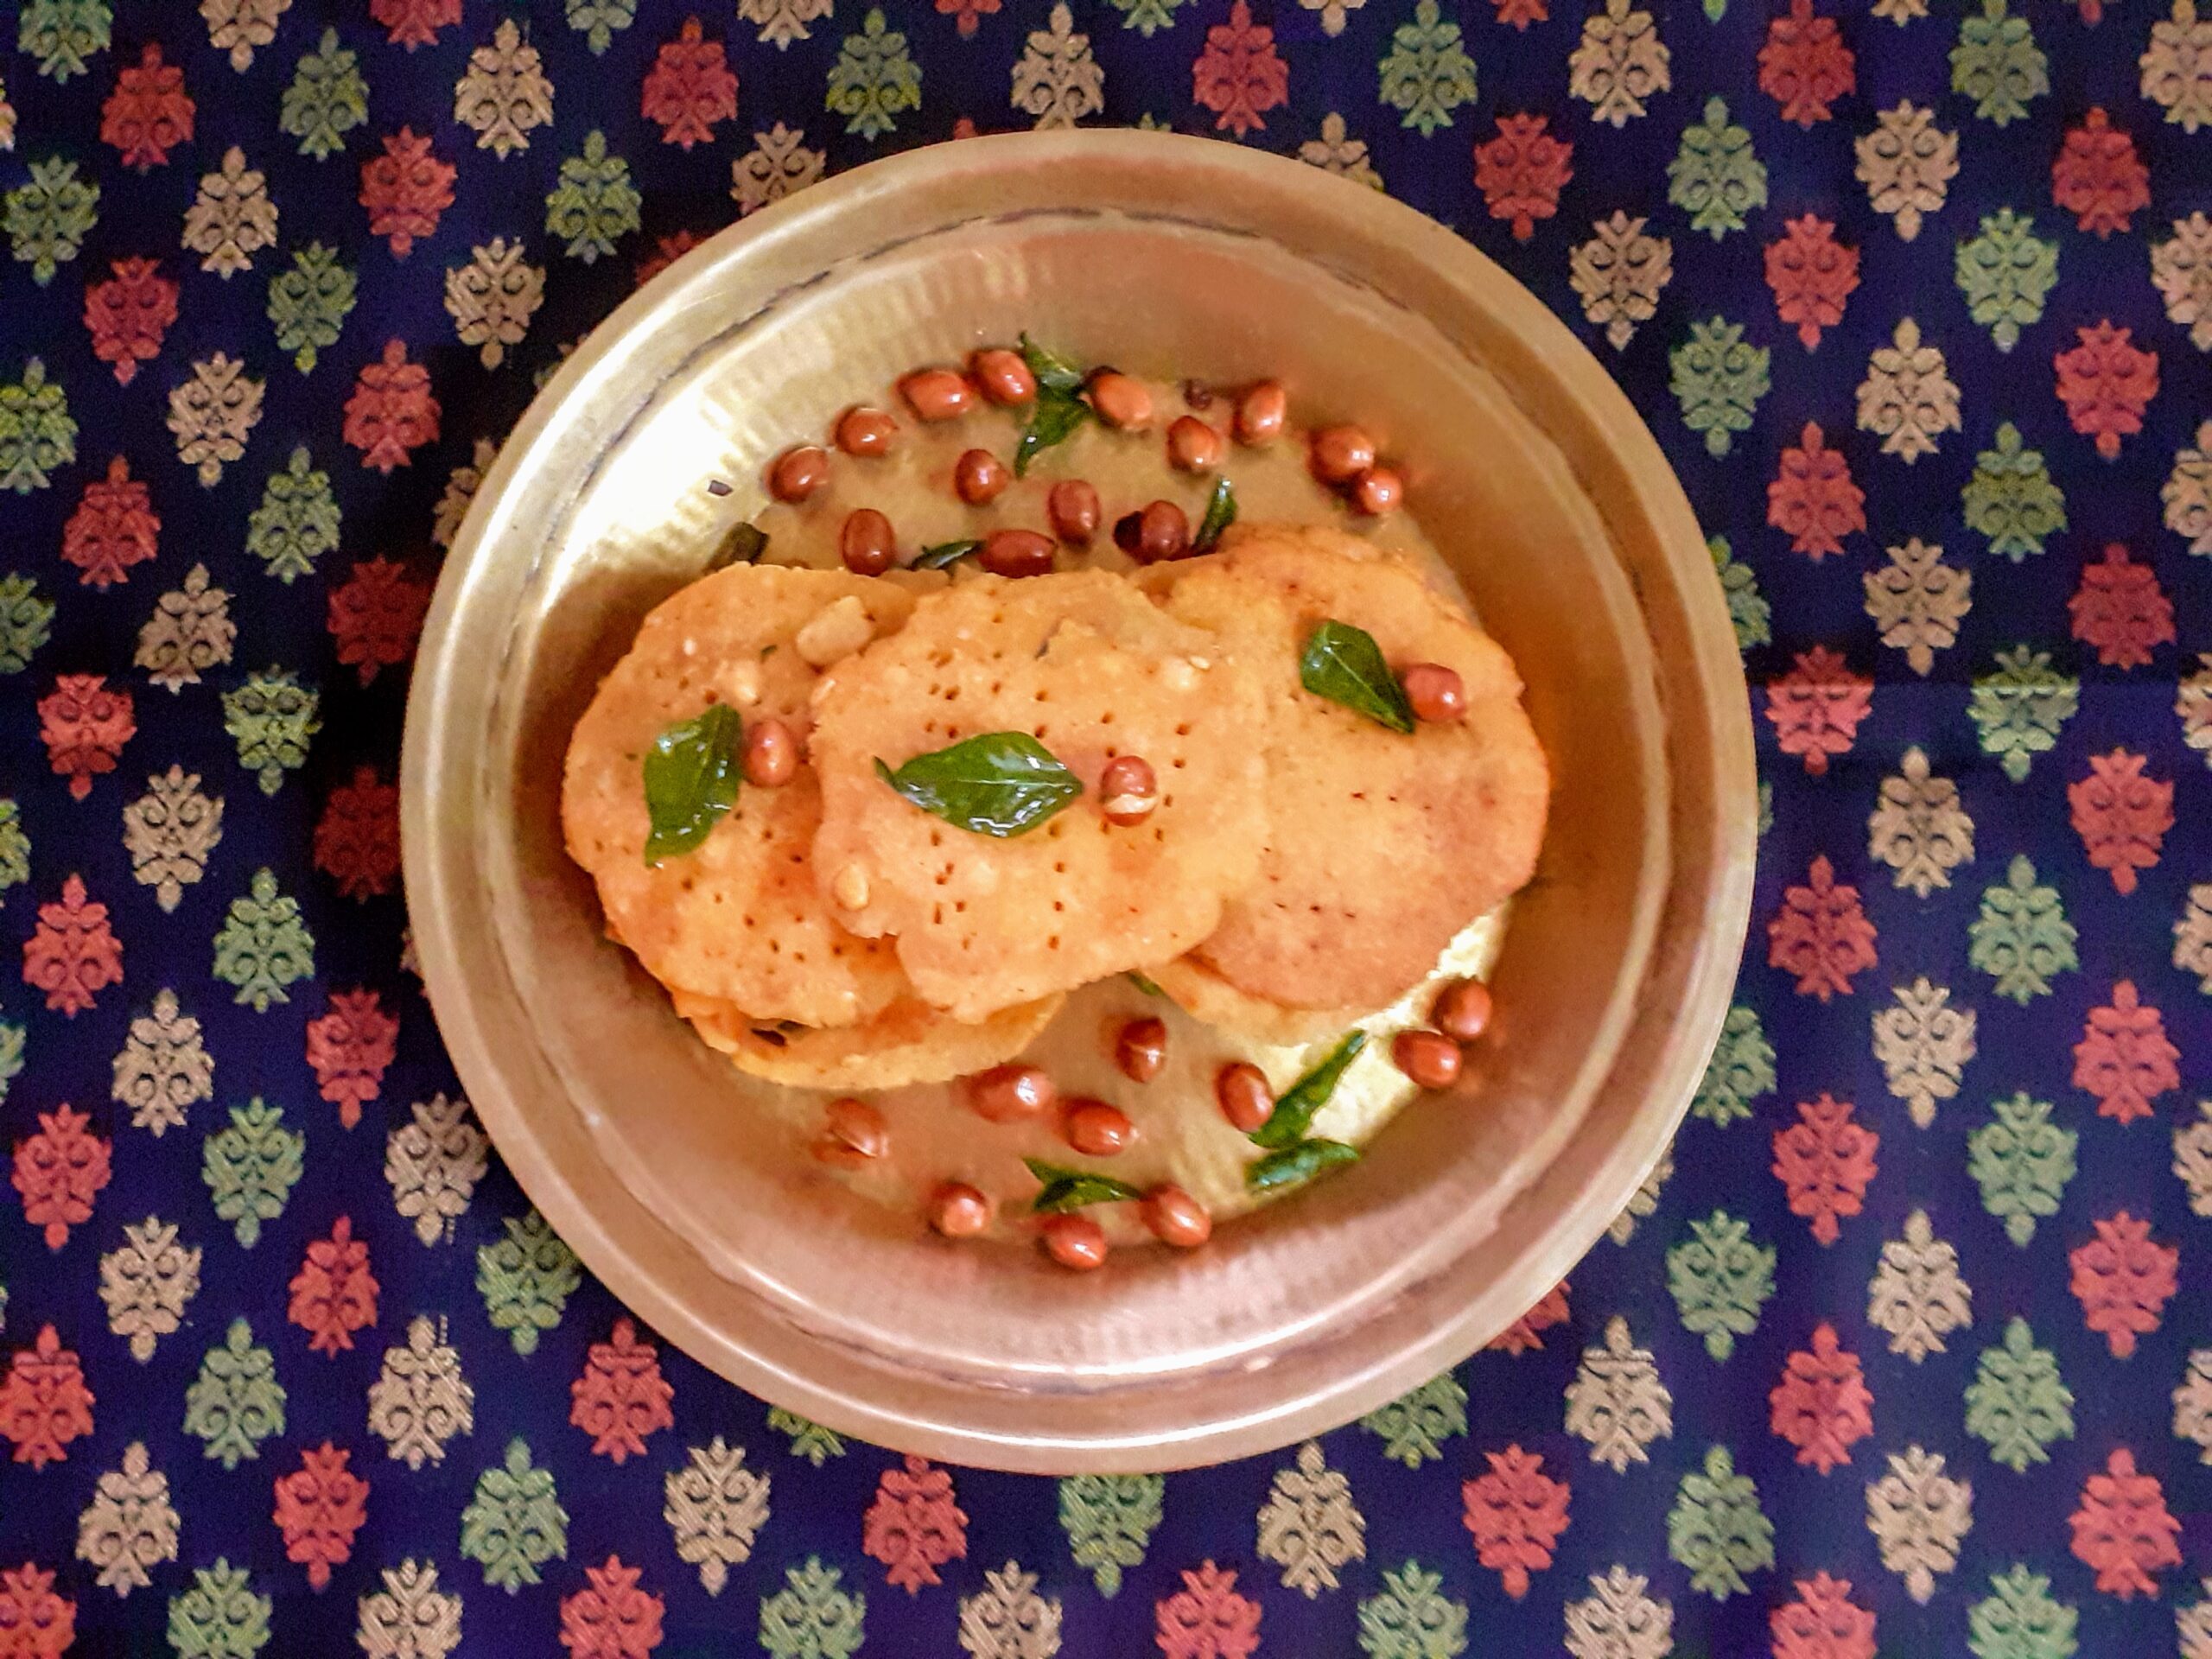
The crunchy and spicy Masala Wheat Flour Papdis are ready to serve with tea or to be made to a Chaat item. Enjoy. Bon Appetit.
STEPWISE RECIPE FOLLOWS:
1. Assemble all ingredients. Take the Wheat flour in a dish and add the Semolina/Suji to it.
2. Now add the salt, red chilli powder, ajwain, and oil to the flour.
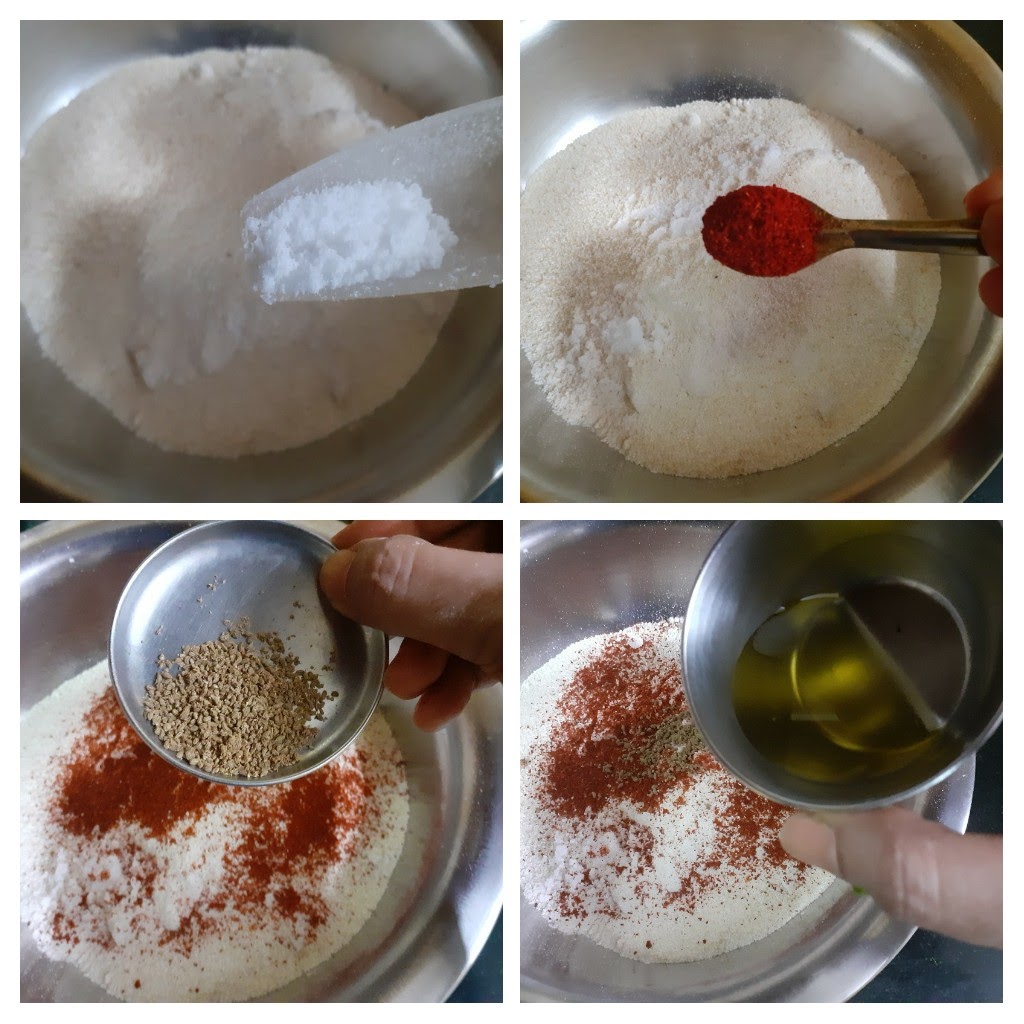
3. Start mixing the flour with your fingers(without adding any water at this stage). The spice powders and salt must mix evenly with the flour. Take some flour in your palm and try to clamp it within your fist. When you open your fist the flour should hold shape and not break away.
4. Now add the finely chopped fresh coriander or Methi leaves, and adding water little by little form a stiff dough. The consistency should be like Poori dough. Rest the dough for 15 minutes.
5. Now divide the dough into 4 or 5 equal parts. Take one ball at a time, dust it with flour and roll it out like a chapati, sprinkle some sesame seeds and roll again lightly, so that the seeds stick to the dough.
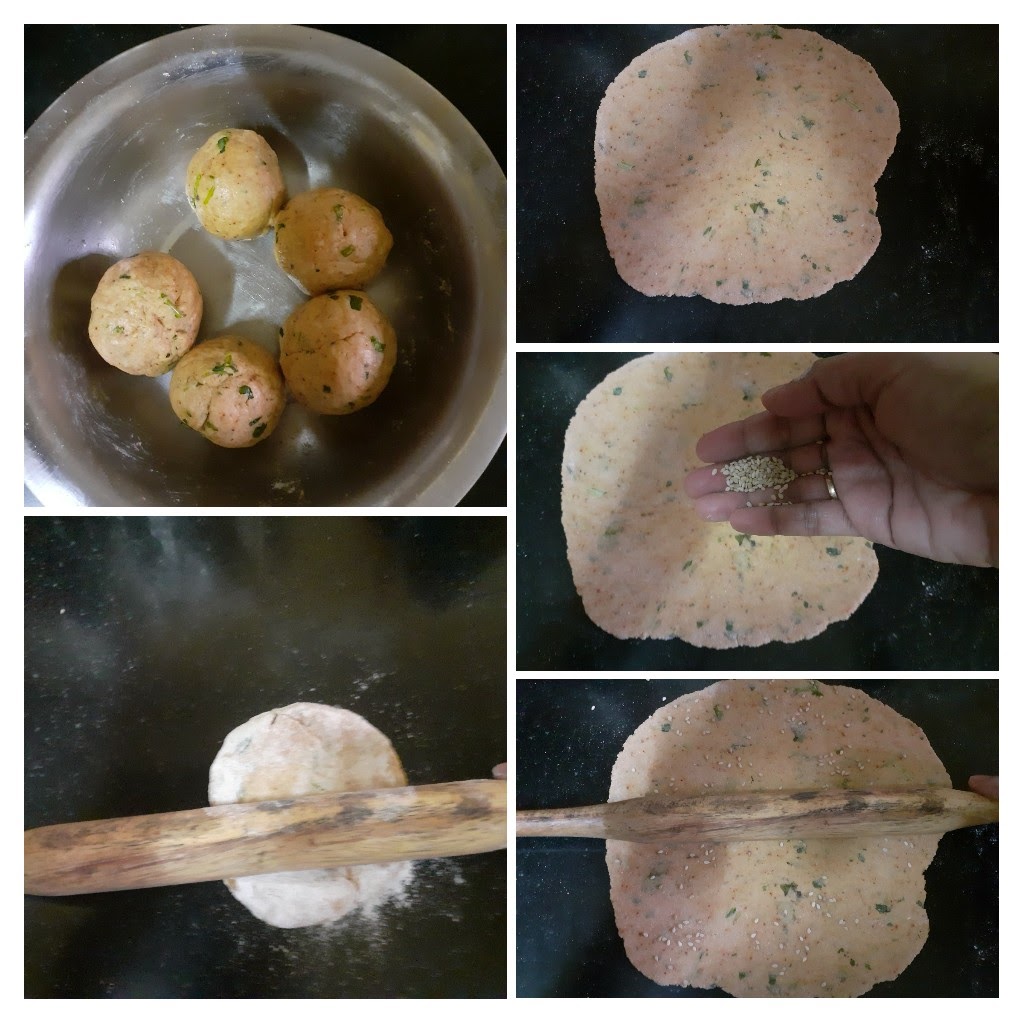
6. Now with a cookie cutter or lid of a bottle make small circles. Take away the excess dough. Prick the circles all over with a fork.
7. To bake- preheat oven to 180 c for 10 minutes. Brush some oil over the Papdis, place them on a baking tray and bake at 180C for 8 minutes on one side. Remove the tray, flip over the papdis and bake again for 8 minutes. Remove from oven and cool. Store in an airtight container.
8. To fry them- heat oil in a Kadai. Oil should be medium hot. Check the temperature by gently dropping a small bit of dough into the oil. If it sizzles and rises immediately, this is the right temperature. Now fry the papdis in oil at medium heat until all the bubbles subside and the papdis are light brown in colour.

NOTES: 1. Adding adequate oil to the flour is a crucial step, the oil is the one that imparts the crunch to the Papdis. After step 3 if the flour is still not holding shape, then add another teaspoon or two of oil to the flour, rub it into the flour and check if it holds shape now by claiming it in your fist. If it does, start mixing water.
2. It is important to prick the Papdis with a fork before baking or frying as otherwise, they will rise/puff up thereby losing the crunch. So pricking holes is a crucial step.
3. The temperature of the oil is important, the method to check the temperature is given in step 8, which should be followed.
4. The timing in each oven may vary to bake, so 2 to 3 minutes less or extra time may be required.
Thattai/Nippatu
This savory recipe is a popular South Indian snack and is made during festivals like Janmashtami and Deepawali. In South India festivals are incomplete without making rice-flour based snacks and homemade sweets.
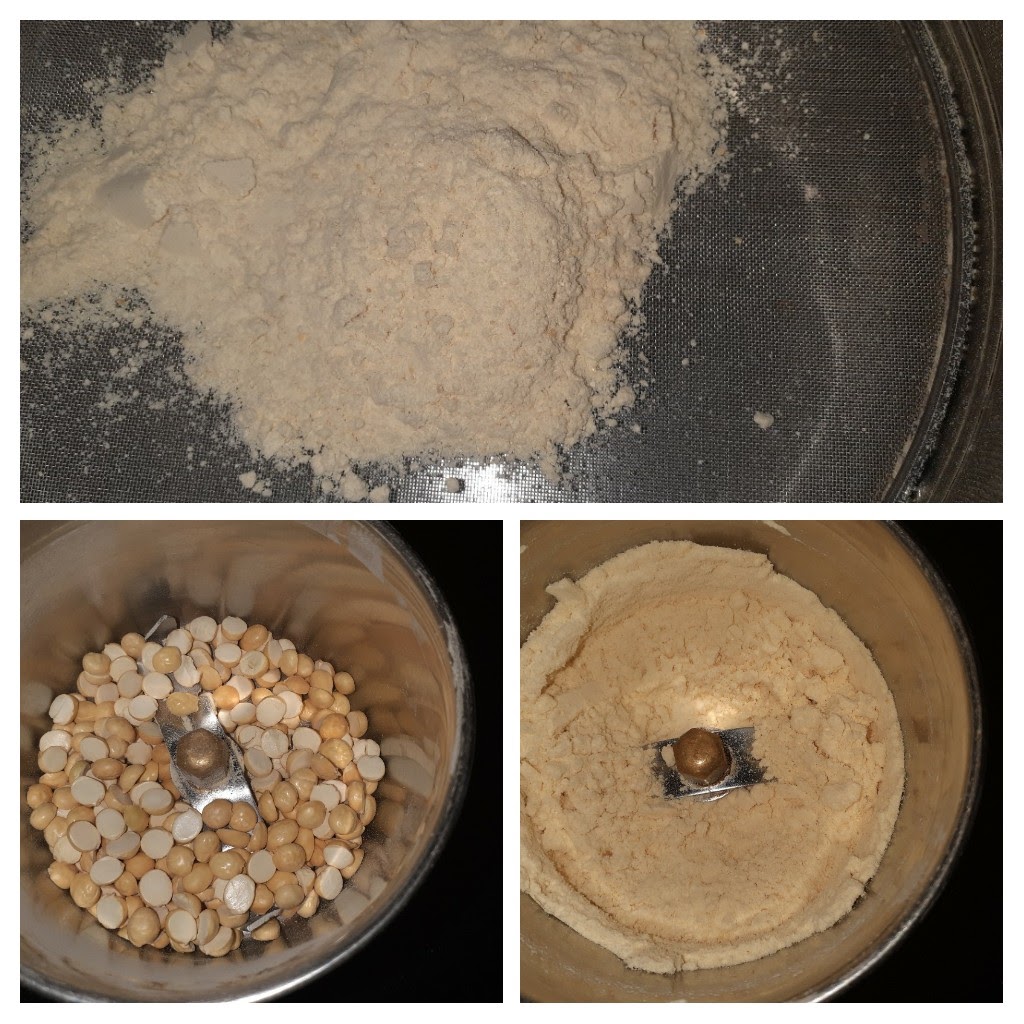
Usually, the rice is soaked, the water drained, dried on a cloth, and then ground to a flour. Nowadays since most of us are busy both at home and work, I have used store-bought rice flour for this recipe, as it saves time. The most important step in this recipe is the proportion of rice flour and Urad dal flour, which I have shared below in the recipe. Regarding the use of Butter and its substitutes please refer to the notes.
In this recipe, Rice flour, Urad dal flour, butter, and spices are combined to form a dough, which is flattened and deep-fried in oil.
TOTAL TIME: 60Mins COURSE: SNACK
AUTHOR: Rajni Ram

Akkaravadisal
This is a very traditional South Indian sweet dish. Lord Mahavishnu is offered this sweet as prasad(holy offering). The main ingredients are Rice, moong dal, jaggery, milk and ghee. The ingredients are similar to the Sweet Pongal but both taste very different. It tastes heavenly when served a little warm. Without much ado let’s get to the recipe right away.