Apple Cake (Tea Cake)
Until recently I did not know that such delicious cakes could be made using Apples. I mostly stuck to making the Apple Crumble. I came across this recipe some time ago, and as you know I have to try it thrice without errors for it to feature on the blog. So here is the recipe that is foolproof, also no whisking, just mixing, so mess at all.
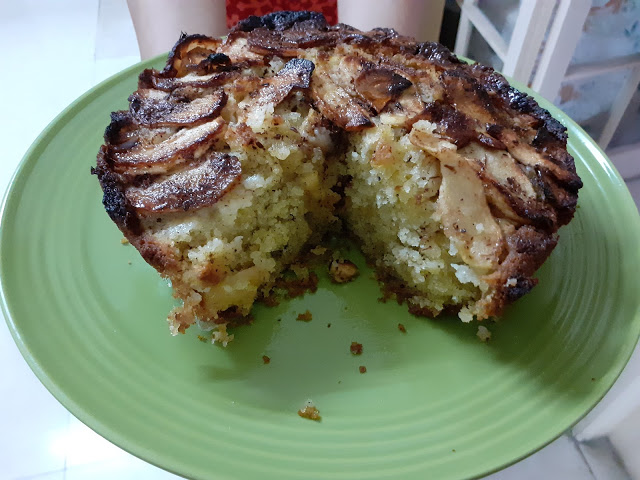
This cake has a very delicate flavour and is a crumbly cake, it is very light and a great tea time cake. What more, it is healthy and kids will love it( you could just drizzle chocolate sauce or Nutella over it for them). It tastes best when warm and keeps good for 2 days at room temperature. Just warm before you serve and it is fresh again.
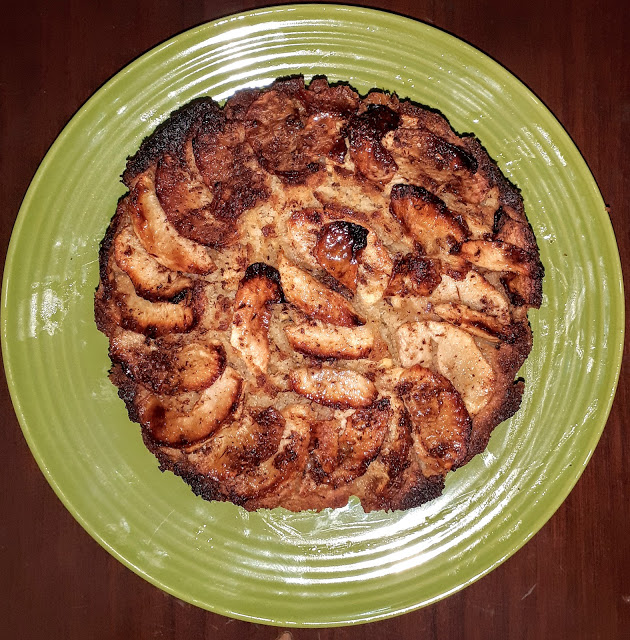
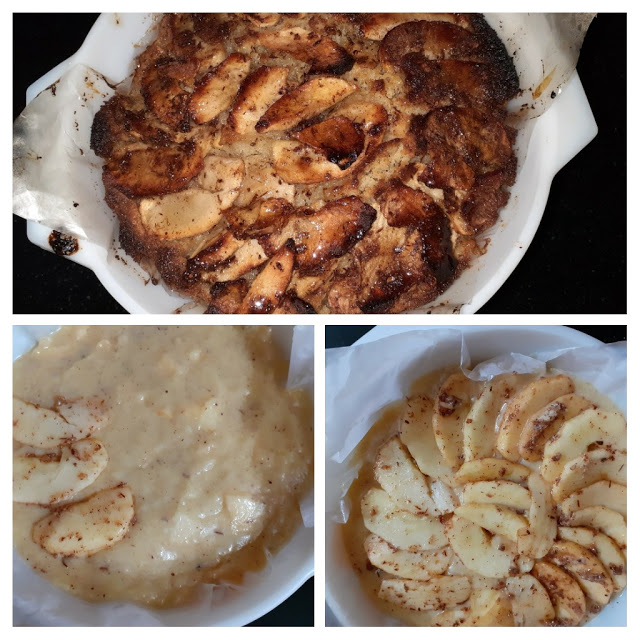
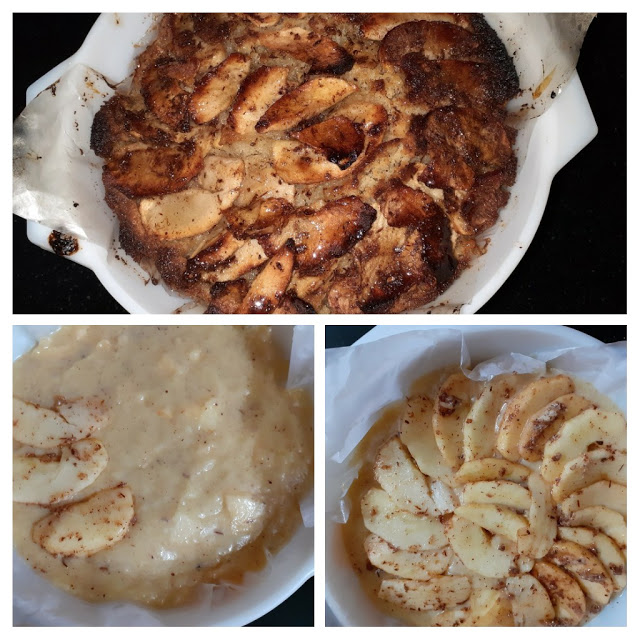
The apple slices that you see in the picture make it look sophisticated, but it is not such a difficult cake to make. The apple slices on top can be excluded altogether, as the cake batter has them already, but I like them with a lot of apples and the glaze and hence I make it this way.
While you are here please check out my other cake recipes like Blueberry Cheesecake, Nutella Fudge brownies, Apple Crumble and Pineapple Jam Tart.
Here is the recipe of Apple Cake for you-
PREP TIME: 20 Mins COOK TIME: 40 Mins
TOTAL TIME:60Mins COURSE: DESSERT
CUISINE: WORLD FOOD SERVINGS: 6
AUTHOR: Rajni Ram
Ingredients for coating apples:
Apples 3 large( any variety) cut half to cubes and half of them in slices.
Cinnamon powder 3 tsp( divided)
Butter 3 tbsp ( divided)
Sugar 2 tbsp (divided)
Dry Ingredients:
Flour/ Maida 1.5 cups
Baking powder 2 tsp
Salt 1/2 tsp
Wet Ingredients:
Butter 60 gm melted
Oil ( refined) 1/2 cup
Eggs 2
Sugar ( white) 3/4 cup
Vanilla essence 1 tsp
Glaze:
Honey 2 tbsp.
Directions:
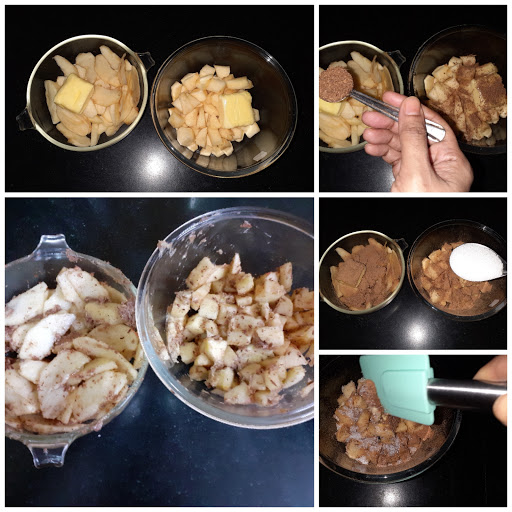
First, peel the apples and chop 1 1/2 apples to small cubes and another 1 1/2 to slices. Pug them in two separate bowls.
Divide and add the cinnamon powder, butter, and sugar between both the bowls equally and mix. Set aside.
Preheat the oven to 200 c and start preparing the cake batter.
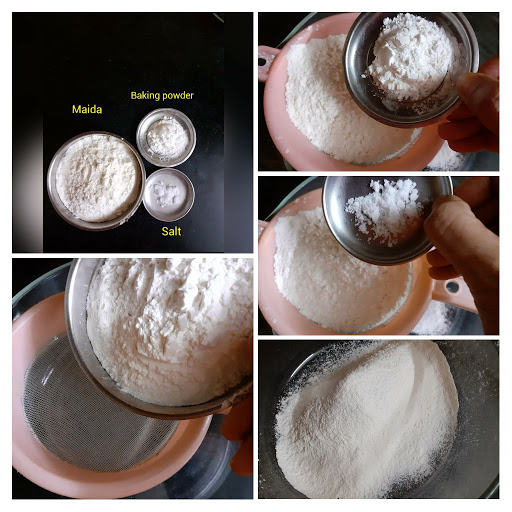
Put all the dry ingredients in one bowl and mix well.
In another bowl combine all wet ingredients( refer to ingredients above)Now add the wet ingredients to the dry ingredients and combine nicely using a spatula. No electric beater required. Once nicely combined, mix in the apples chopped to cubes to the batter and mix gently.
Grease a baking tray and line it with parchment paper/ baking paper. Pour the batter into the tray, tap it once gently and place it in the oven. Bake at 200 C for 50 minutes or until a toothpick comes out clean. Once done remove from oven and leave to cool down a bit. Cut when still warm and serve. The delicious Apple cake is ready to serve.
STEPWISE RECIPE FOLLOWS:
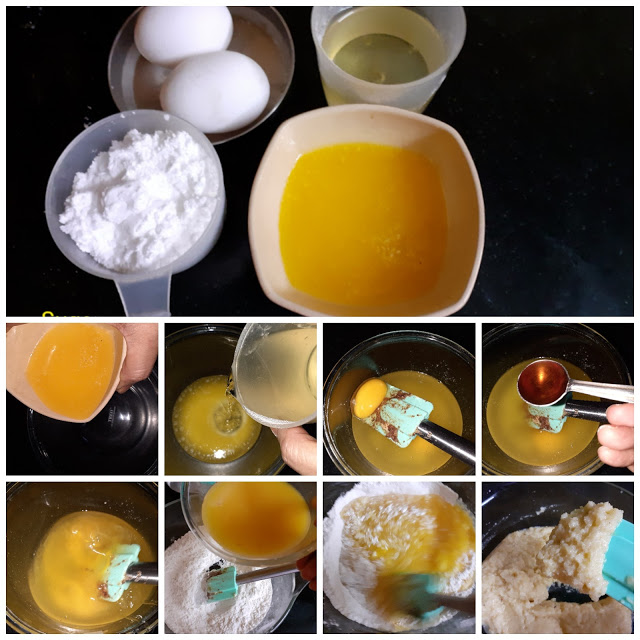
1. Assemble all ingredients. Chop 1 half of the Apples to cubes and the other half to slices. Put them in 2 separate bowls.
2. Divide and add the butter, cinnamon powder, and sugar in both bowls, mix nicely and set aside.
3. Preheat oven to 200 C. Now put all dry ingredients in a separate bowl and mix.
4. Take all wet ingredients in another bowl and combine well. Now mix the wet ingredients to the dry ingredients and combine well.
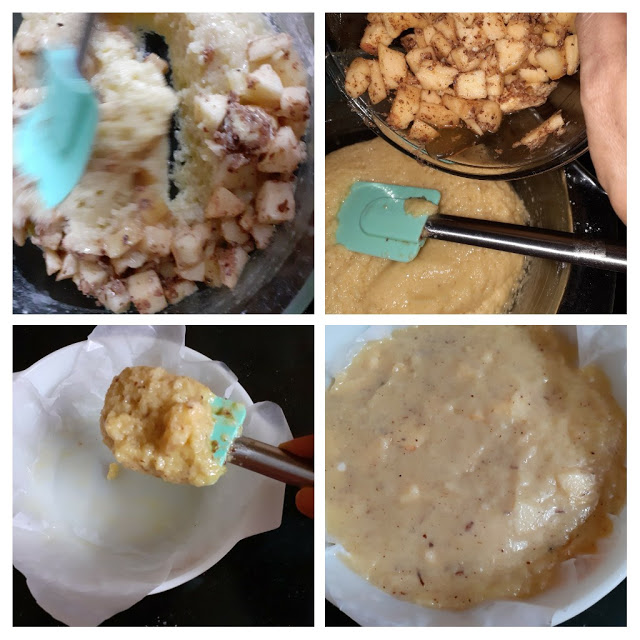
5. Now add the cubed apples to the batter and fold gently. Grease a circular cake mould and line with parchment/baking paper. Now scoop in the batter into the mould.
6. Take the sliced apples and arrange them like a fan on the batter. Now it is ready to be popped into the oven. Bake at 200C for 50 minutes or until a skewer comes out clean.
Allow it to cool for 5 minutes and apply the honey over it with a brush and cool it. The honey gives the apples a beautiful glaze. Serve them a little warm.
NOTES:
1. Any variety of apples can be used for this recipe.
2. This cake has a crumbly texture, you will know if you look at the picture. It is super moist.
3. It holds good for 3 days at room temperature, for long storage put it in the fridge and warm just before serving.
4. It is also a good snack box idea for kids as it can be made ahead, just remove from the refrigerator, warm it and allow it to sweat, then pack.
5. This cake can be made without the sliced apples on top too. Just mix the chopped apple and scoop mixture into the baking tin/ tray and bake.
If you tried this recipe and liked it please comment below. I would love to hear from you. If you have a query about the recipe email us and ill respond as soon as I can.
If you would like to receive our recipes on your mail please leave your mail id at the homepage. Every time Rajjo’s Kitchen has a new post we will mail the recipe to you.
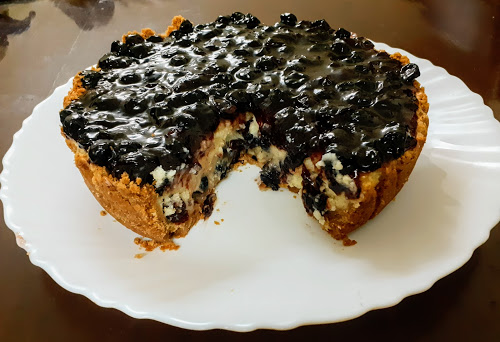
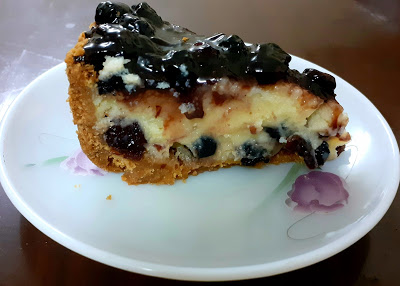
Blueberry Cheesecake (Baked)
This is an epic post because I love Blueberries(any berry for that matter) and I have perfected this Blueberry cheesecake finally. And for a recipe to feature on my blog, I should have perfected it before I put it out before you, and that is when I have tried it out 3 times without any mishaps.
Over the years I have tried this recipe quite many times and it would taste fine but, consistency wise there would be some glitch or the other. Also in India, we don’t get fresh Blueberries very often, and even if we do they are expensive. So in this recipe, I have used dried Blueberries that are available in all departmental stores. I wanted to give you a recipe in which things are accessible. The Cream Cheese I have used here is also available at all outlets with a Chiller isle. The recommended one is Philadelphia Cream cheese but I have not used that, just to try if other brands work fine, and yes they do.
This Cheesecake turning out so well is a dream come true for me, as its always been my wish to make one. Since I love berries I have loaded my Cheesecake with a lot of them, one can reduce the quantity too if they desire.
This recipe is a no-mess, one-bowl recipe so not much of clean up is required. It is light and creamy with a blueberry topping. The thing about them being baked is that they hold well at room temperature, but since I am using a blueberry topping I had to refrigerate for 2 hours. The topping is just an option and is not at all mandatory.
I have simplified the recipe quite a bit. In this recipe, I’m giving stepwise instructions directly.
while you are here please try my other recipes like Apple Crumble,
Pineapple Jam tarts, Nutella fudge brownies, Berry Smoothie Icecream, and more…
Here is the recipe of Blueberry Cheesecake for you-
PREP TIME: 20 Mins COOK TIME: 40 Mins
TOTAL TIME:60Mins COURSE: DESSERT
CUISINE: WORLD FOOD SERVINGS: 6
AUTHOR: Rajni Ram
Ingredients for Base:
Marie Biscuit 1 sheet(20 nos)
Unsalted butter 100 gm
Sugar 2 tbsp(powdered or fine sugar)
Ingredients for Filling:
Creamcheese 320 gm softened(keep out of the refrigerator for 1 hour)
Plain flour/Maida 1 tbsp
Sourcream/Curd 1/3 cup
White Sugar 1/2 cup
Vanilla extract 1.5 tsp
Zest of Lemon- Grate the rind of one whole lemon
Eggs 2
Blueberries(dried) 250 gm (soak in warm water for 30 mins and drain the water)
Icing Sugar for dusting(optional) (refer note2)
* Reserve some blueberries(unsoaked) for later.
Ingredients for Blueberry topping/Sauce:
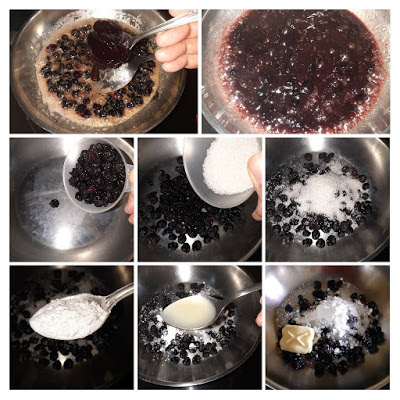
Blueberries(dried) 1 cup (soaked for 30 mins in warm water and drain water)
Sugar1/4 cup
Cornflour 1 tbsp
Lemon Juice 1 tbsp
Butter 1 tbsp
Blueberry preserve 3/4 of a 240 gm bottle(around 180 gm)
Directions for Sauce:
Place the Blueberries and remaining ingredients(except the preserve) in a saucepan and cook over medium flame. Bring them to a simmer and cook until few of the blueberries burst, around 3 minutes. Keep stirring. Now add the preserve ad stir again. The sauce will come together and become jammy. Remove from flame and cool completely.
Directions for Base:
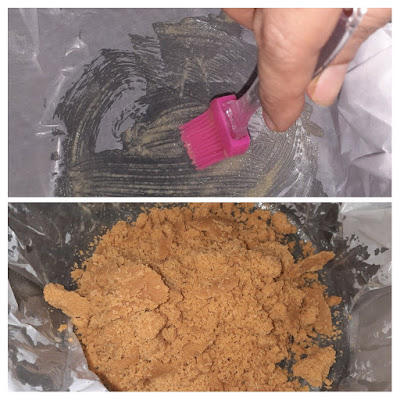
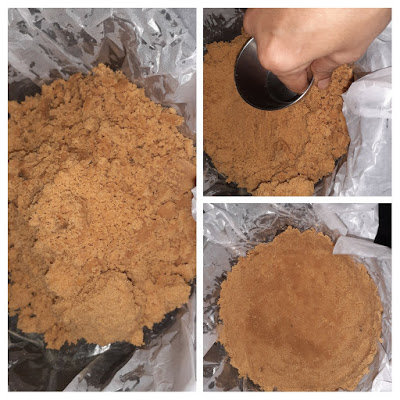
1.Grease or spray a round baking tray/mould with oil and line with parchment paper/butter paper. Place the biscuits in a blender and powder them. Add the butter and sugar to the powdered biscuits and blitz again. It should look like wet sand.
2. Put this mixture into the baking mould and using something flat press it down into the base and also rise in the sides, as this is going to hold the filling and topping, it needs some height. See pictures for reference.
Directions for filling:
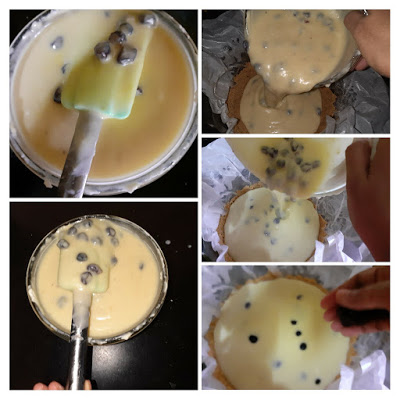
1. Firstly preheat the oven to 160 C or 320F. Now start making the filling. Beat Creamcheese(just a spatula will do, stand mixer or electric beater not required, remember I said it a one-bowl recipe????) until smooth, it need not become fluffy. Now add the flour and beat again until just combined.
2. Add sour cream/curd, sugar, vanilla and the lemon zest and beat until combined. Add the eggs one by one beating in between, until just combined. Do not overbeat.
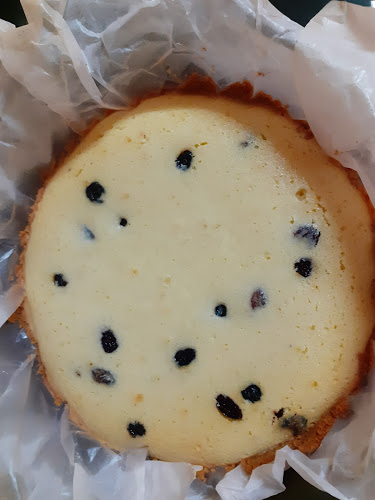
3. Now ensure you have drained all water from the soaked blueberries and add the berries to the cream cheese batter and fold gently. Now pour this batter into the prepared base and top with the reserved unsoaked blueberries.
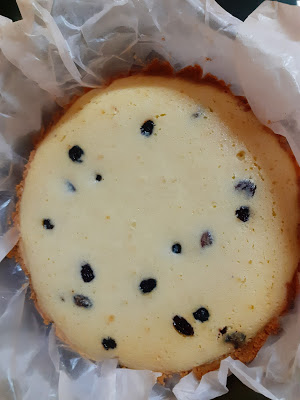
4. Bake for 40 minutes at 180 C or until the cheesecake is set, but the middle of the cake should wobble when you shake it and when you stick in a toothpick it should come out clean. There can be little cracks on the cake, so don’t worry.
5. Cool the cake completely and spread the Blueberry sauce over it( the sauce might have thickened, just microwave it for 20 seconds and it will be spreadable again). Refrigerate for 2 hours and its ready. Enjoy the Berrilicious flavour. Bon Appetit.
NOTES:
1. If using Fresh Blueberries use 1/2 cup sugar for the filling and the entire bottle of the preserve.
2. Topping the cake with Blueberry sauce is optional. If not topping it dust icing sugar over the cake before storing.
3. Try using a spatula for beating as we don’t want the batter to air up and rise. If the batter becomes fluffy, the cake will rise while baking and then go limp on removing it from the oven.
4. If topping the cake with sauce, don’t forget to refrigerate it, only then the topping will set, otherwise when you cut the cake it will drop everywhere.
If you tried this recipe and liked it please comment below. I would love to hear from you. If you have a query about the recipe email us and ill respond as soon as I can.
If you would like to receive our recipes on your mail please leave your mail id at the homepage. Every time Rajjo’s Kitchen has a new post we will mail the recipe to you.
