Gulkand Shrikhand (Flavored Yogurt Dessert)
Coconut Rose Modak/ Coconut Rose Kozhukattai
Bhindi Kolhapuri
Homemade Kolhapuri Masala
Gongura Pappu/ Red Sorrel Leaves Dal
Sooji Halwa/Semolina Pudding/Sheera
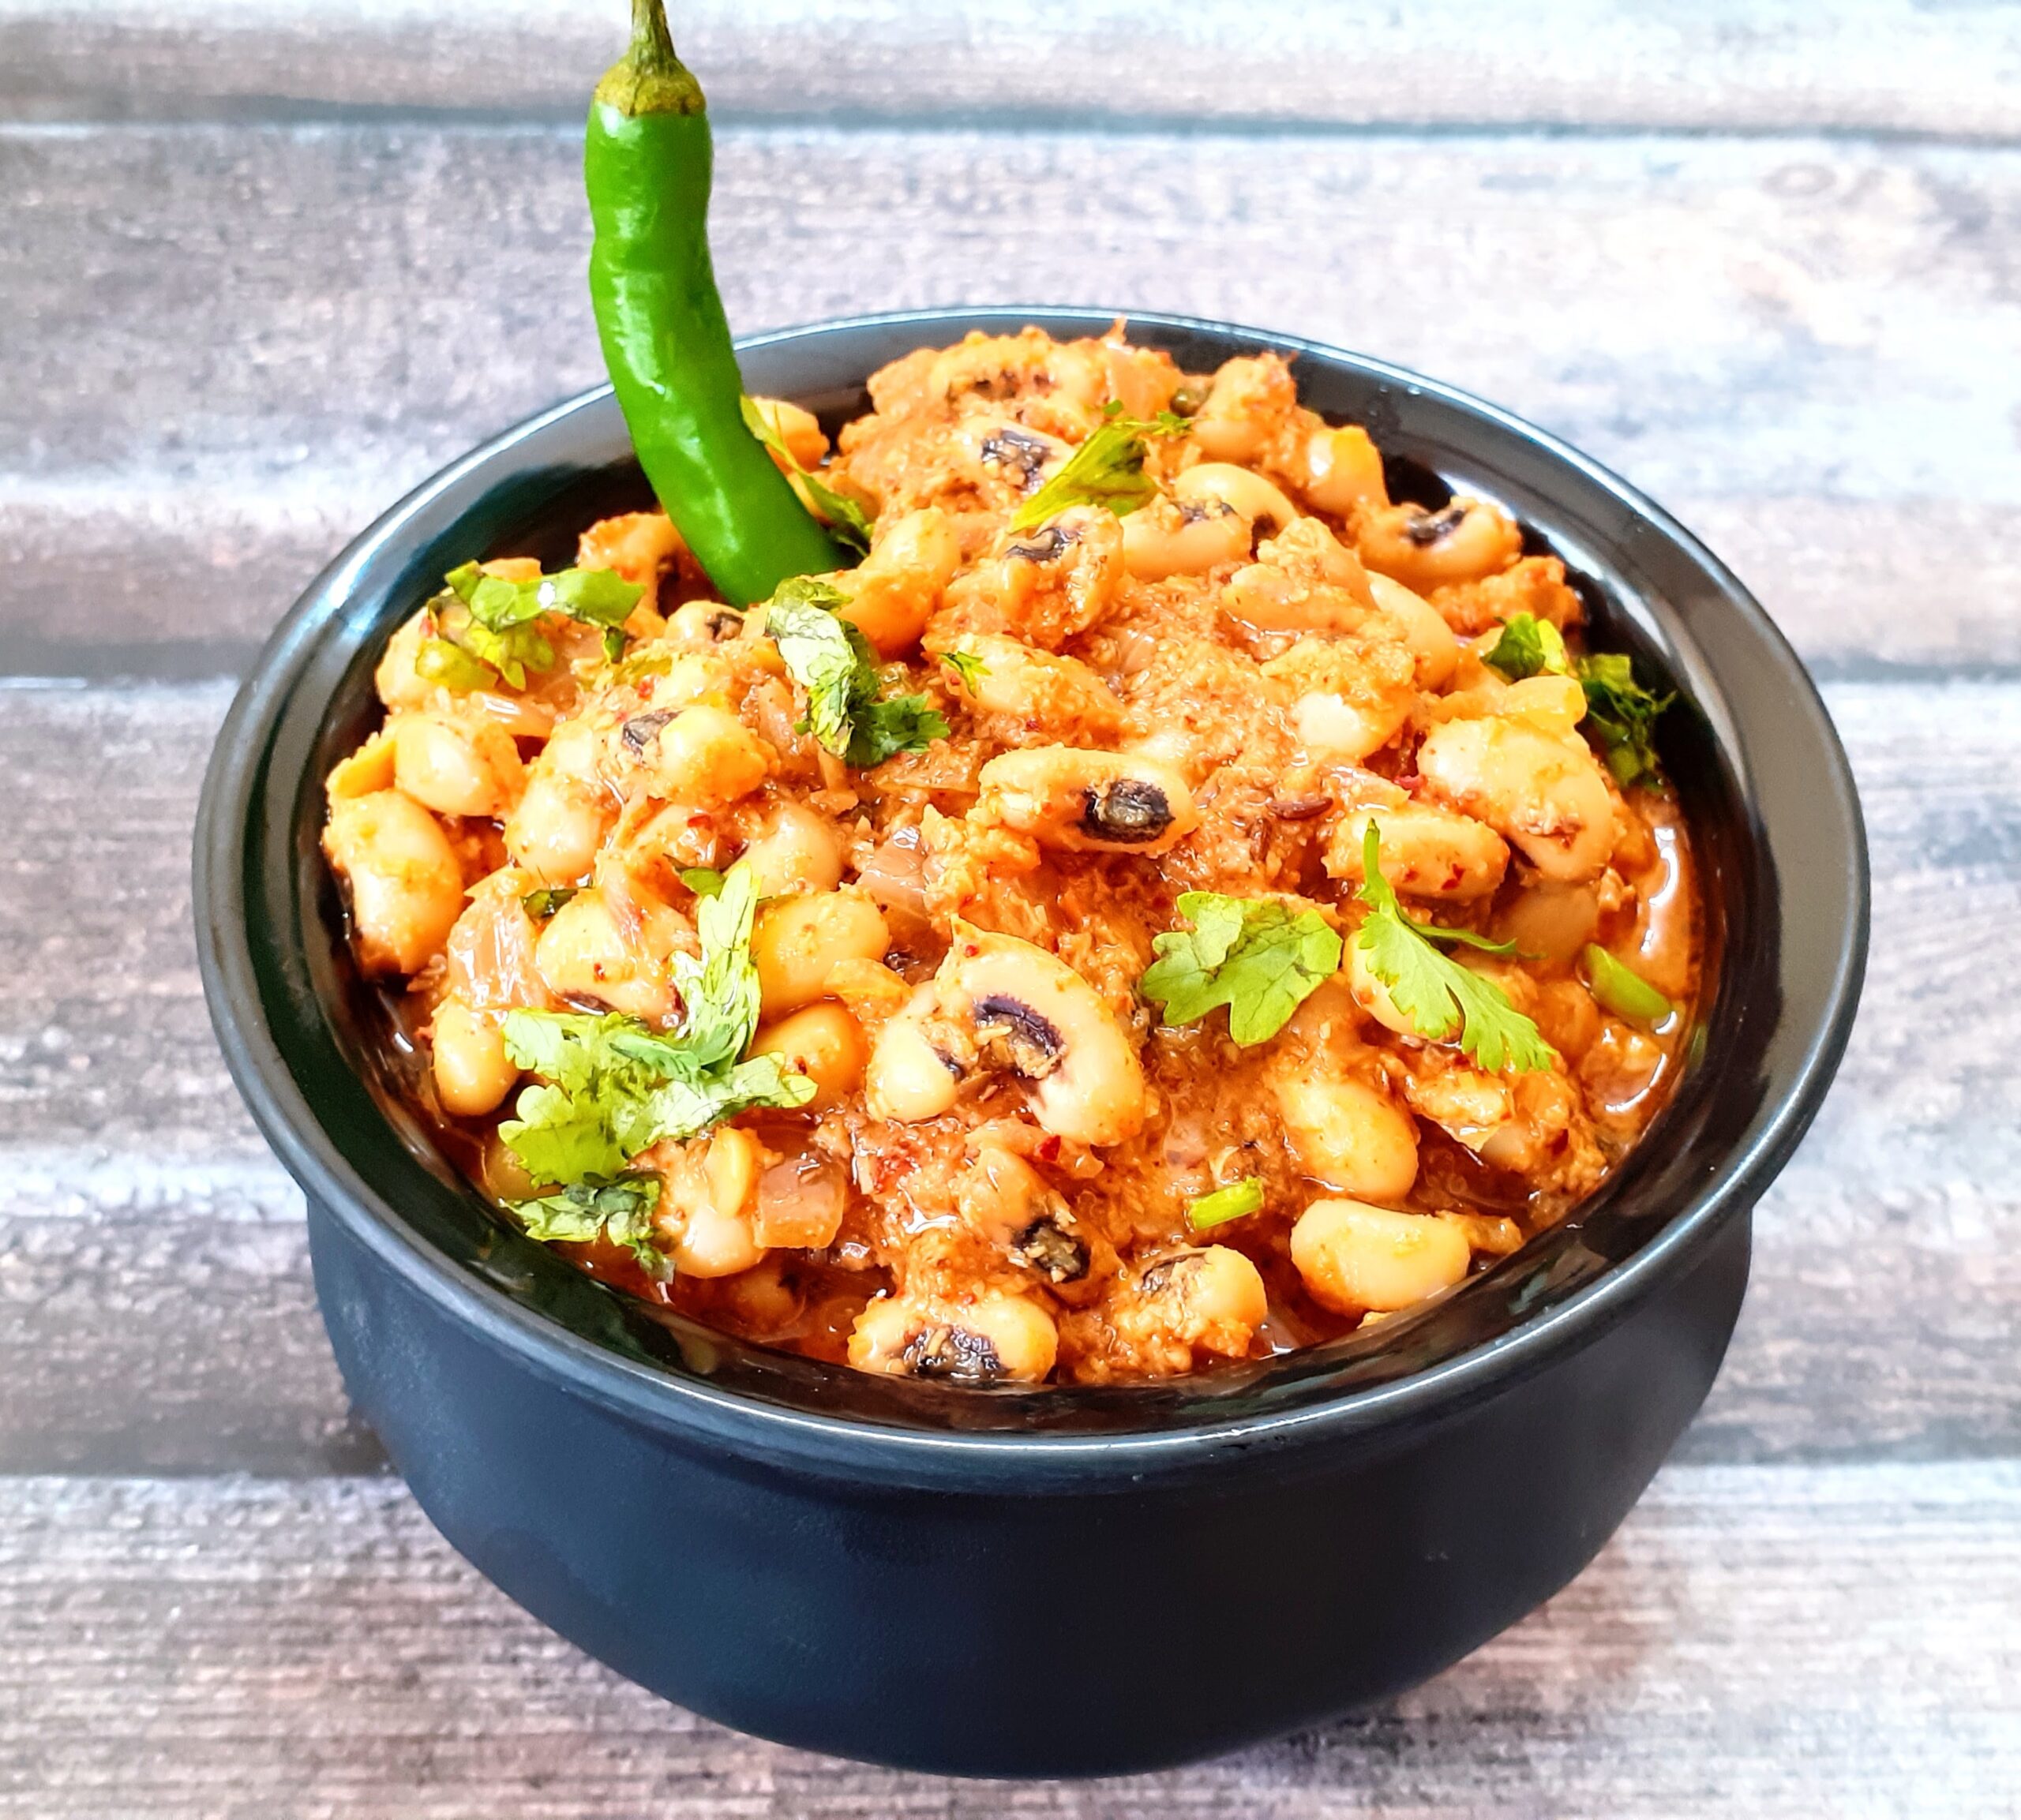
Goan Style Lobia Curry/Goan Style Black Eyed Bean Curry
Black eyed beans or Cow peas as they are called, are legumes that are available all over the globe. In India they are used in many regional cuisines. The Lobia masala is a popular dish in north India, and so is the Eriserry from Kerala cuisine that uses the legume along with Ash gourd and Yam. In Tamilnadu is it made into a Sundal(salad), or used with other vegetables to make a curry. In the Andhra cuisine It is made into a Vada (fritter), the Gujarati cuisine also has its version of the Lobia curry, called Chawli masala. That’s how wide the usage of these beans is across India.
Cow Peas/ black eyed beans have a soluble fibre that helps in reducing cholesterol, it is said. These are nutrient dense legumes with the richness of Vitamins- A, B1, B2, B3, B6, C , that helps in healthy cell development. They also are rich in micro nutrients like Magnesium, zinc, iron, and copper(source net.med). These legumes also support weight loss and boost digestive health. That I guess is reason enough to include them in your diet, if you haven’t already.
Though the Lobia Sundal (salad) is a regular feature in my house, and so is the Erissery, and Lobia masala, I recently tried a Goan style Lobia curry and it turned out so good. The Goan spice combination of Coriander seeds, Cumin seeds and coconut, gave a very good dimension to the dish, and it tasted different from the regular Lobia masala. Hence documenting this recipe for you all to try.
There is also a Lobia Pulav recipe on the blog, do check it out here. Some other interesting and healthy recipes for you to try are- Daliya Mushroom Risotto, Drumstick Rasam, Curry leaves Powder, Dry fruit ladoo, Vegetable Oats Kichdi, Rajma Masala, and more…
Here is the recipe of Goan style Lobia curry-
PREP TIME: 10Mins+(soak time 4-5 hrs) COOK TIME: 30 Mins
TOTAL TIME: 40Mins COURSE: MAIN
CUISINE: INDIAN SERVINGS: 4
AUTHOR: Rajni Ram
Ingredients:
Lobia/cow peas/black eyed beans/ 1 cup soak for 4-5 hrs
Onion 1 medium chopped fine
Tomatoes 2 large pureed
Coconut 2 tbsp
Tamarind paste 1 tsp or pulp from a tiny bit of tamarind
Green chillies 2 split
Bay leaf 1
Coriander seeds/dhania 2 tsp
Cumin seeds/Jeera 1 tsp
Dry red chillies (regular/spicy ones)1
Kashmiri or Byadagi chillies 1
Turmeric powder 1/2 tsp
Ginger garlic paste 1tsp
Red chilli powder(regular) 1 tsp
Kashmiri red chilli powder 1 tsp
Oil for sauteing
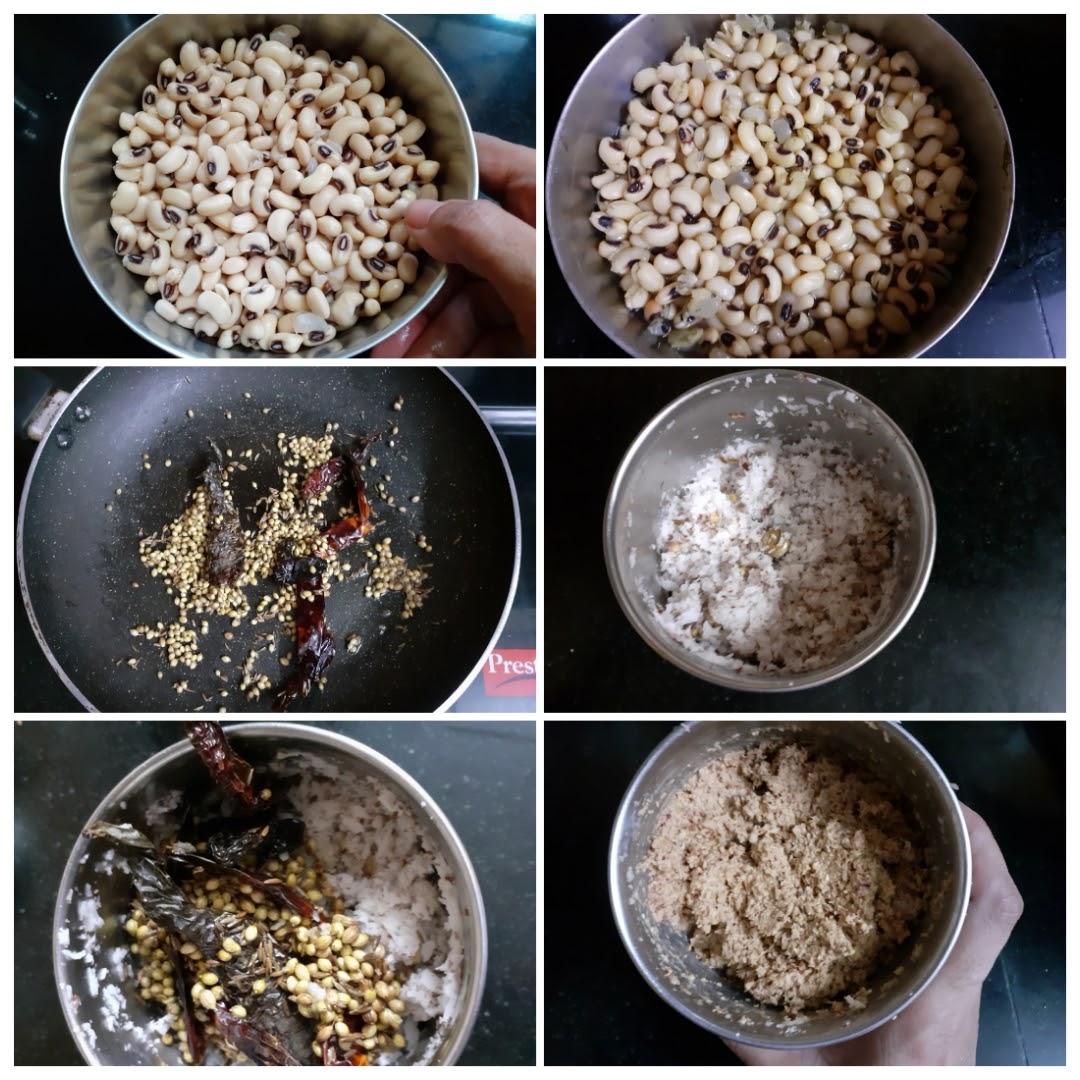
Directions: Wash and drain the water from Lobia, add fresh water and pressure cook for whistles or until soft. In a pan, roast the coriander seeds, cumin seeds, dry red chillies, and Kashmiri red chillies until crisp. cool. Now put them in a blender jar along with coconut and grind to a fine paste using little water. Set aside. Now in the same pan take some oil and heat. Add the Bay leaf, followed by cumin seeds, and turmeric powder. When the cumin seeds splutter, add the ginger-garlic paste, and fry. Now drop in the chopped onions and saute. When the onions turn light brown, add the split green chillies and saute another 30 secs. Now add the ground masala paste and fry nicely in the oil. When the mixture becomes dry, add the tomato paste, followed by the cooked Lobia/Black eyed beans, along with the water in which the lobia was cooked. Let the mixture simmer for 5 minutes. Now add, salt, red chilli powder, Kashmiri chilli powder, and further simmer for 10 minutes. Add water if required to adjust consistency. After 5 minutes, add the tamarind paste, and cook for just a minute and switch off the flame. Garnish with finely chopped coriander leaves and serve hot with Rotis or rice.
STEPWISE RECIPE FOLLOWS:
1. Wash and drain the water from Lobia, add fresh water and pressure cook for whistles or until soft. In a pan, roast the coriander seeds, cumin seeds, dry red chillies, and Kashmiri red chillies until crisp. cool. Now put them in a blender jar along with coconut and grind to a fine paste using little water. Set aside.
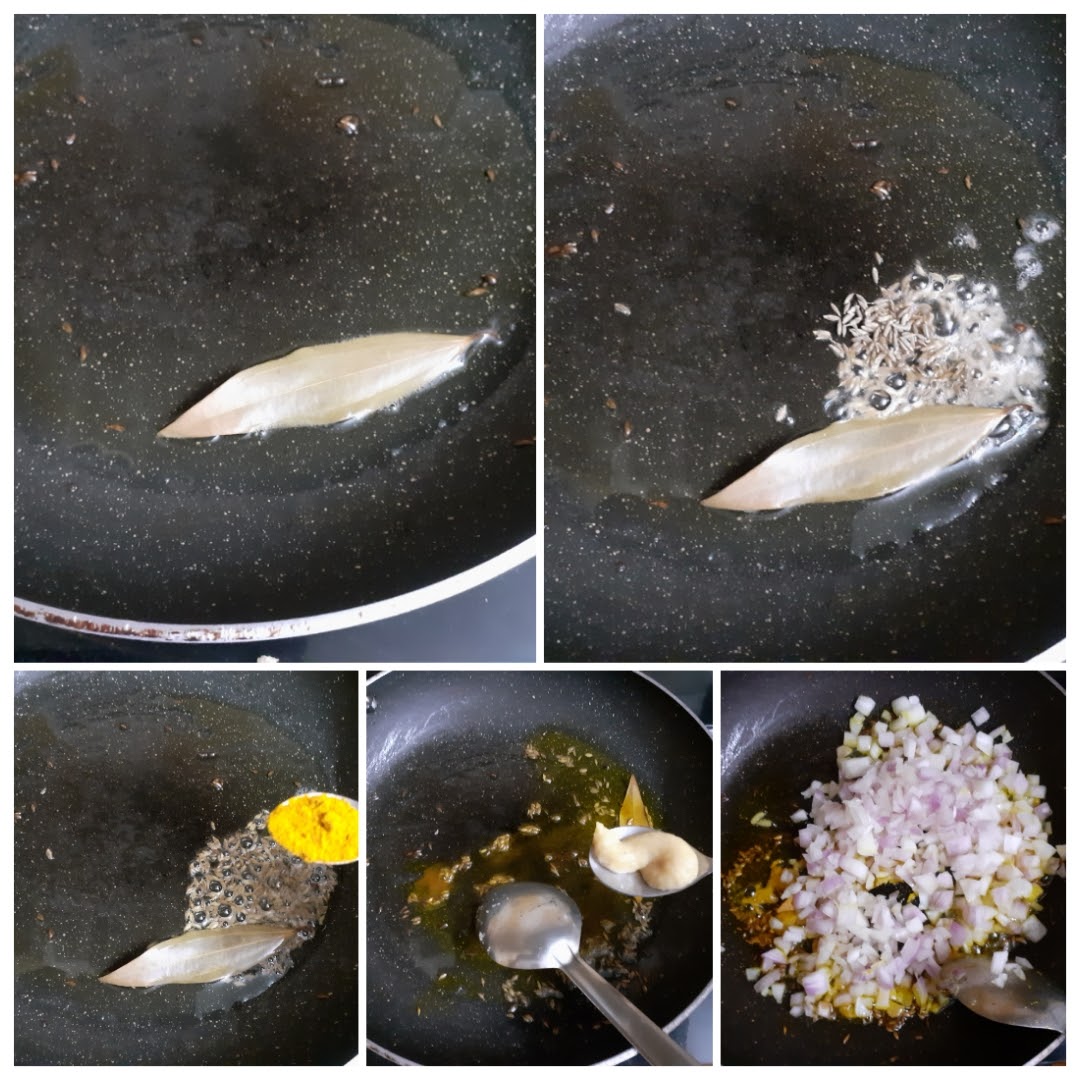
2. Now in the same pan take some oil and heat. Add the Bay leaf, followed by cumin seeds, and turmeric powder. When the cumin seeds splutter, add the ginger-garlic paste, and fry. Now drop in the chopped onions and saute.
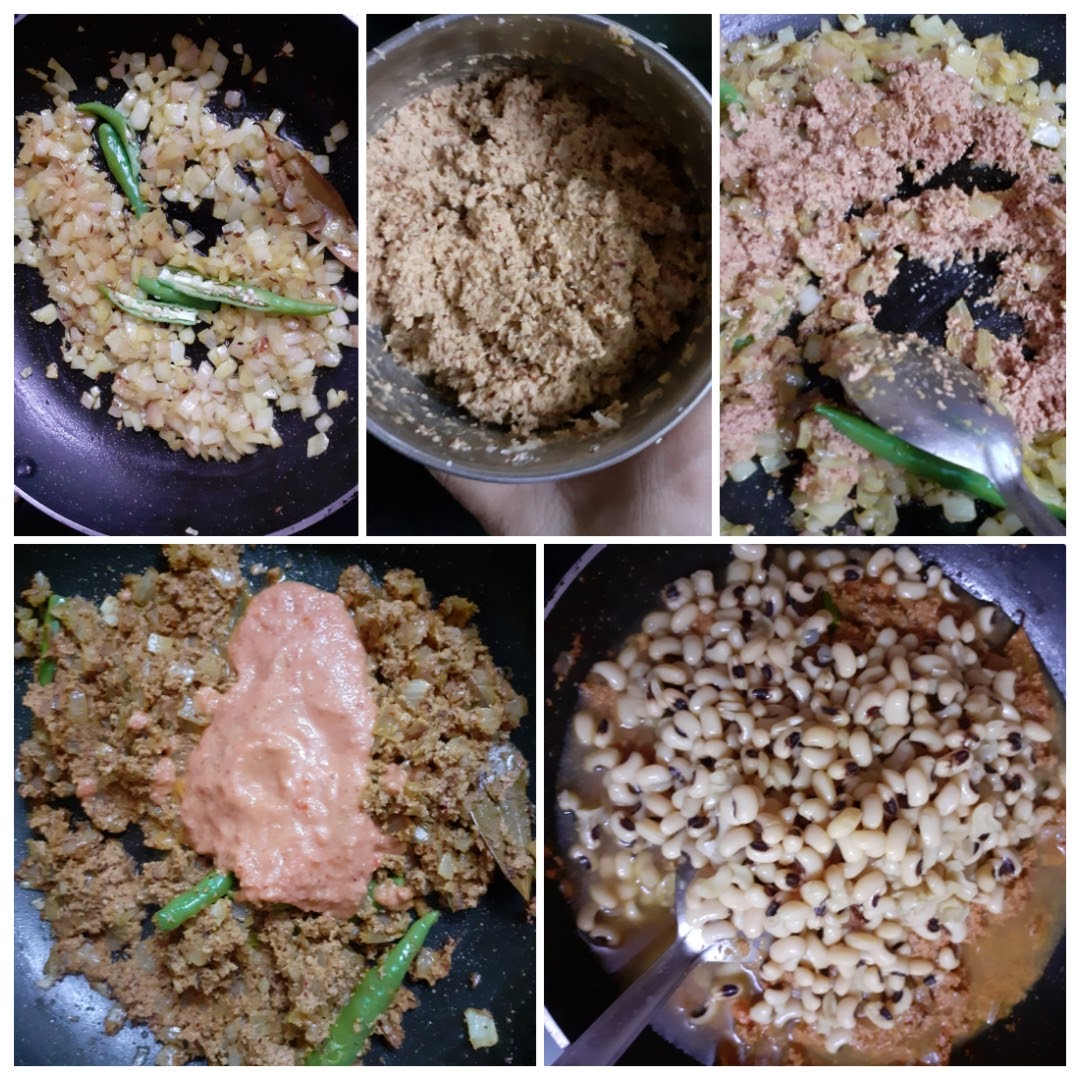
3. When the onions turn light brown, add the split green chillies and saute another 30 secs. Now add the ground masala paste and fry nicely in the oil. When the mixture becomes dry, add the tomato paste, followed by the cooked Lobia/Black eyed beans, along with the water in which the lobia was cooked. Let the mixture simmer for 5 minutes.
4. Now add, salt, red chilli powder, Kashmiri chilli powder, and further simmer for 10 minutes. Add water if required to adjust consistency. After 5 minutes, add the tamarind paste, and cook for just a minute and switch off the flame. Garnish with finely chopped coriander leaves and serve hot with Rotis or rice.
NOTES:
1. There is another variety of the Lobia which are red in colour and resemble kidney beans/Rajma. This curry can be made with those red coloured beans too.
2. The spice level of this curry is medium. Feel free to increase or decrease as per taste.
3. Usually when i refer to “oil of sauteing” in the ingredient list, I mean the regular refined oil. When i use a specific oil like Coconut or Sesame, I always specify.
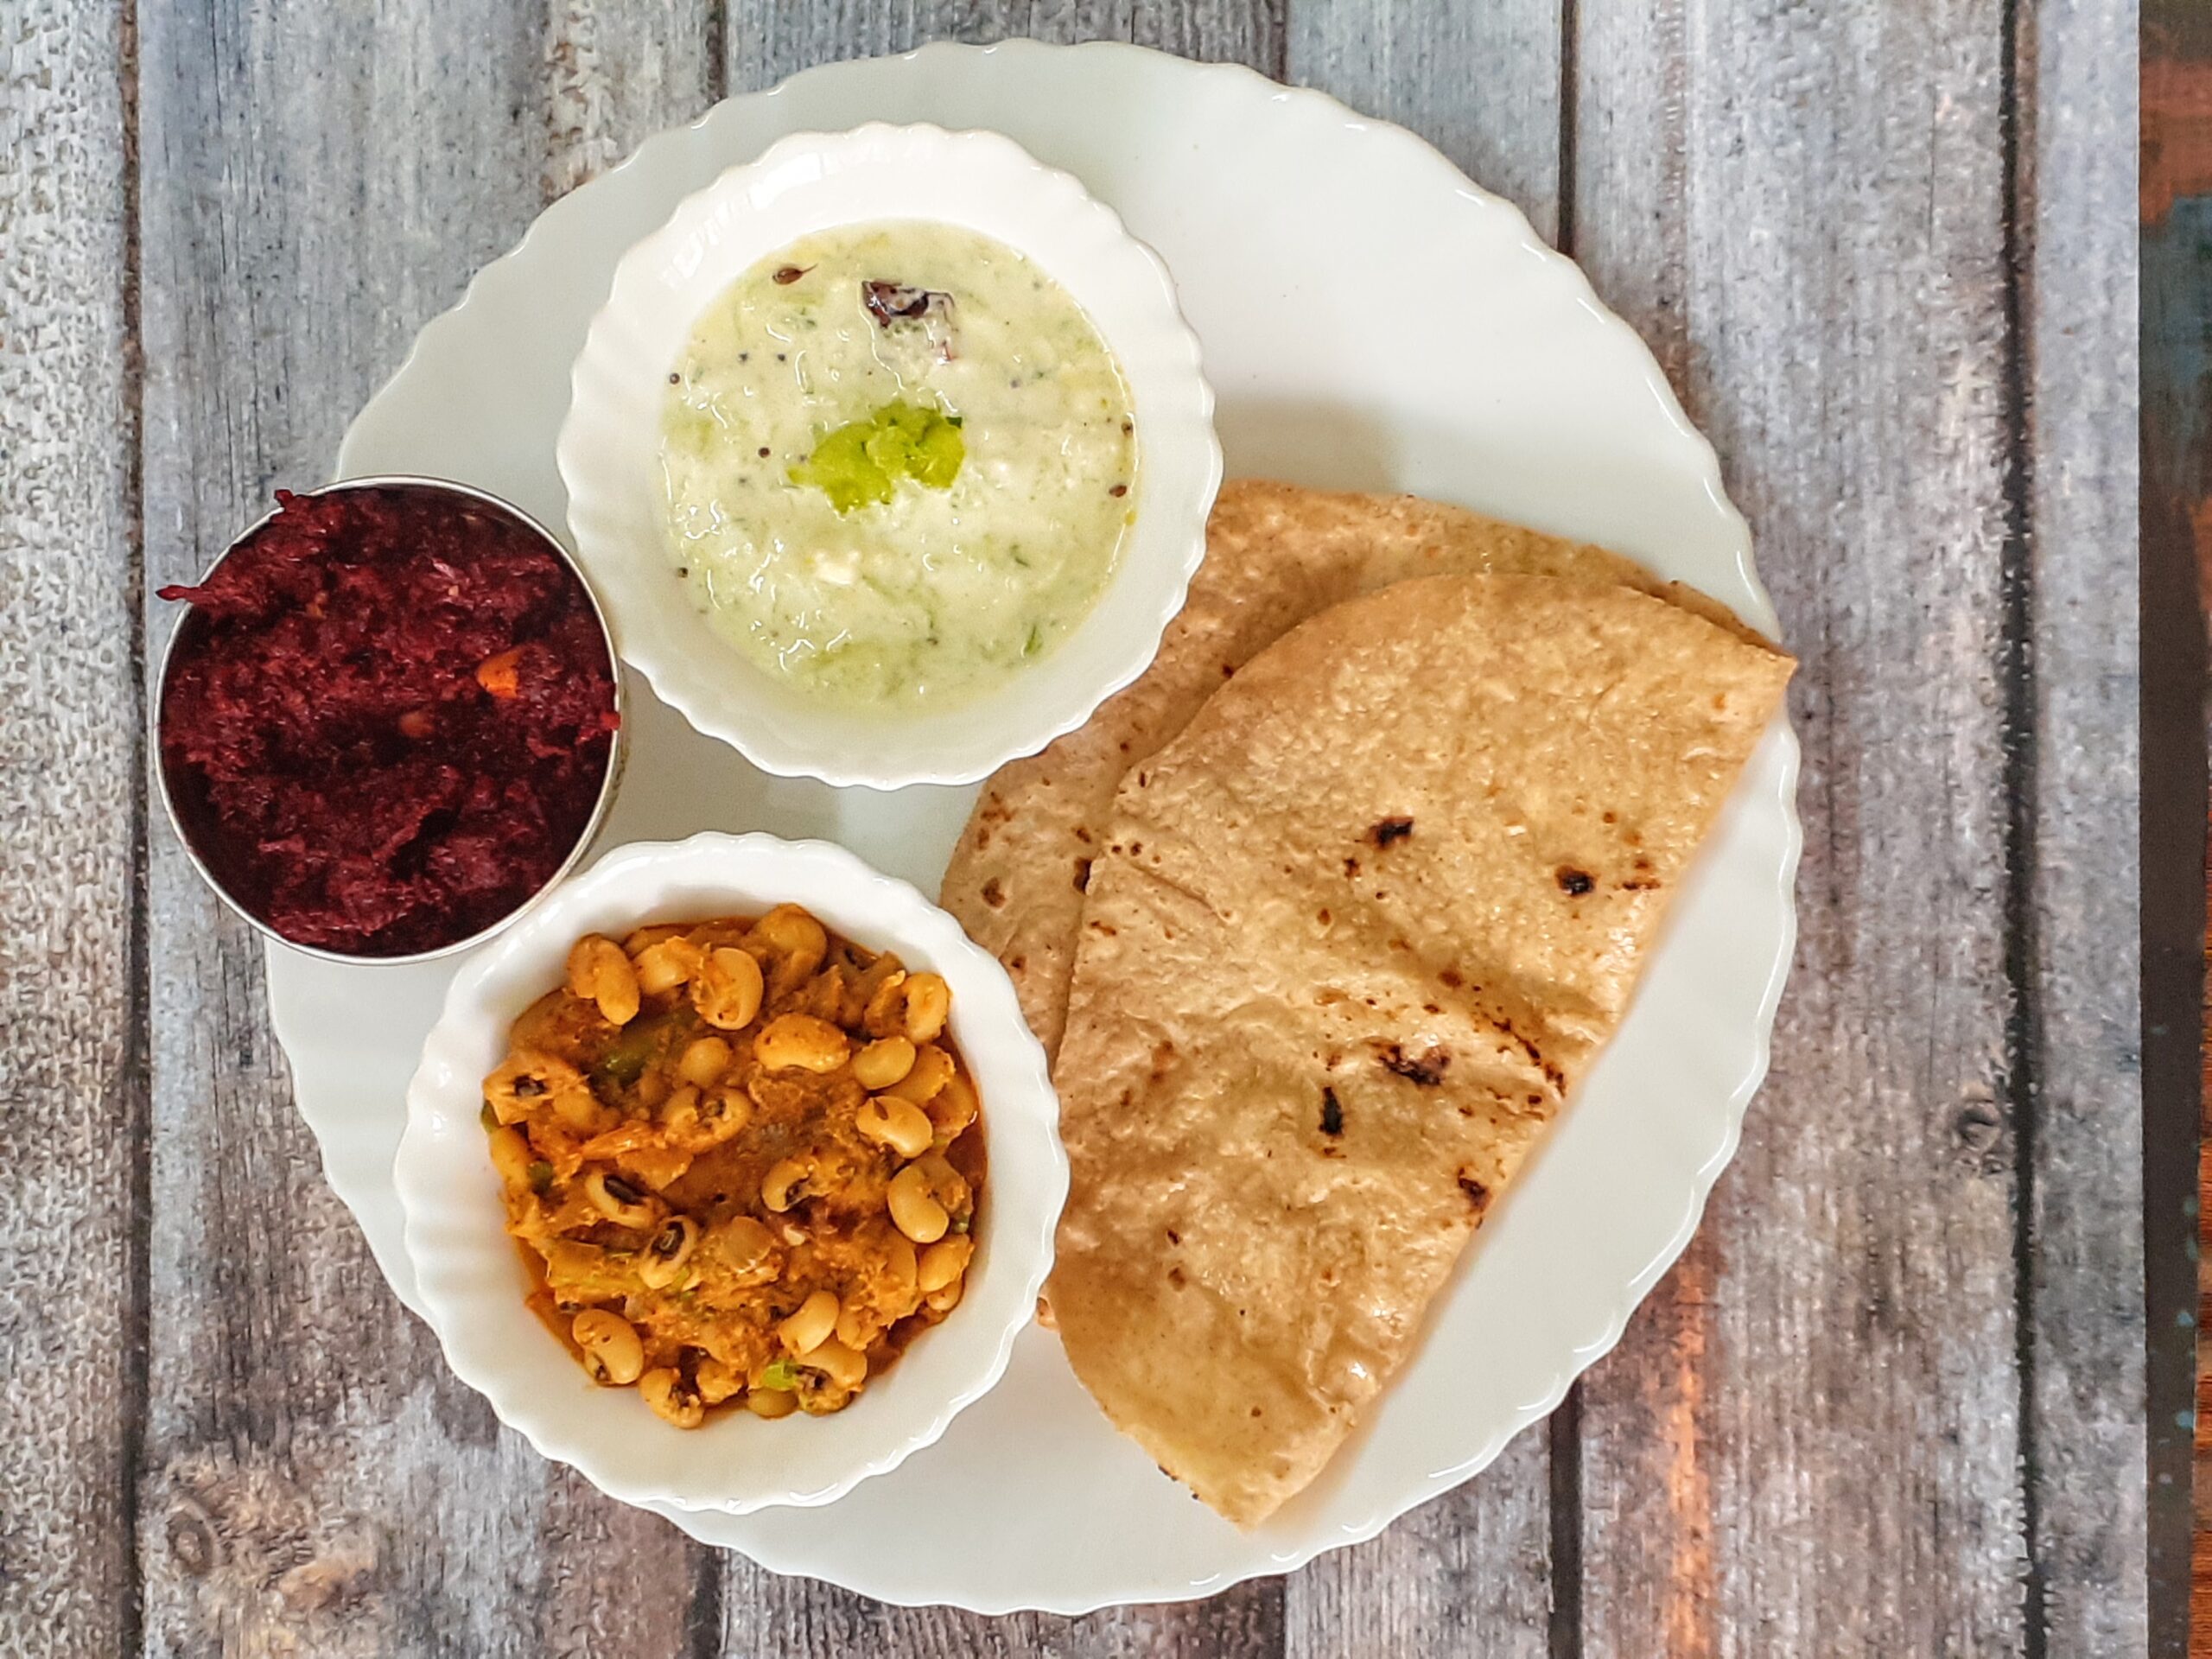
This is how I served my Goan style Lobia curry with Roti, Cucumber
Raita, and
Beetroot Halwa to make it a complete meal.
If you tried this recipe and liked it please comment below. I would love to hear from you. If you have a query about the recipe email us and ill respond as soon as I can.
If you would like to receive our recipes on your mail please leave your mail id at the homepage. Every time Rajjo’s Kitchenn has a new post we will mail the recipe to you.
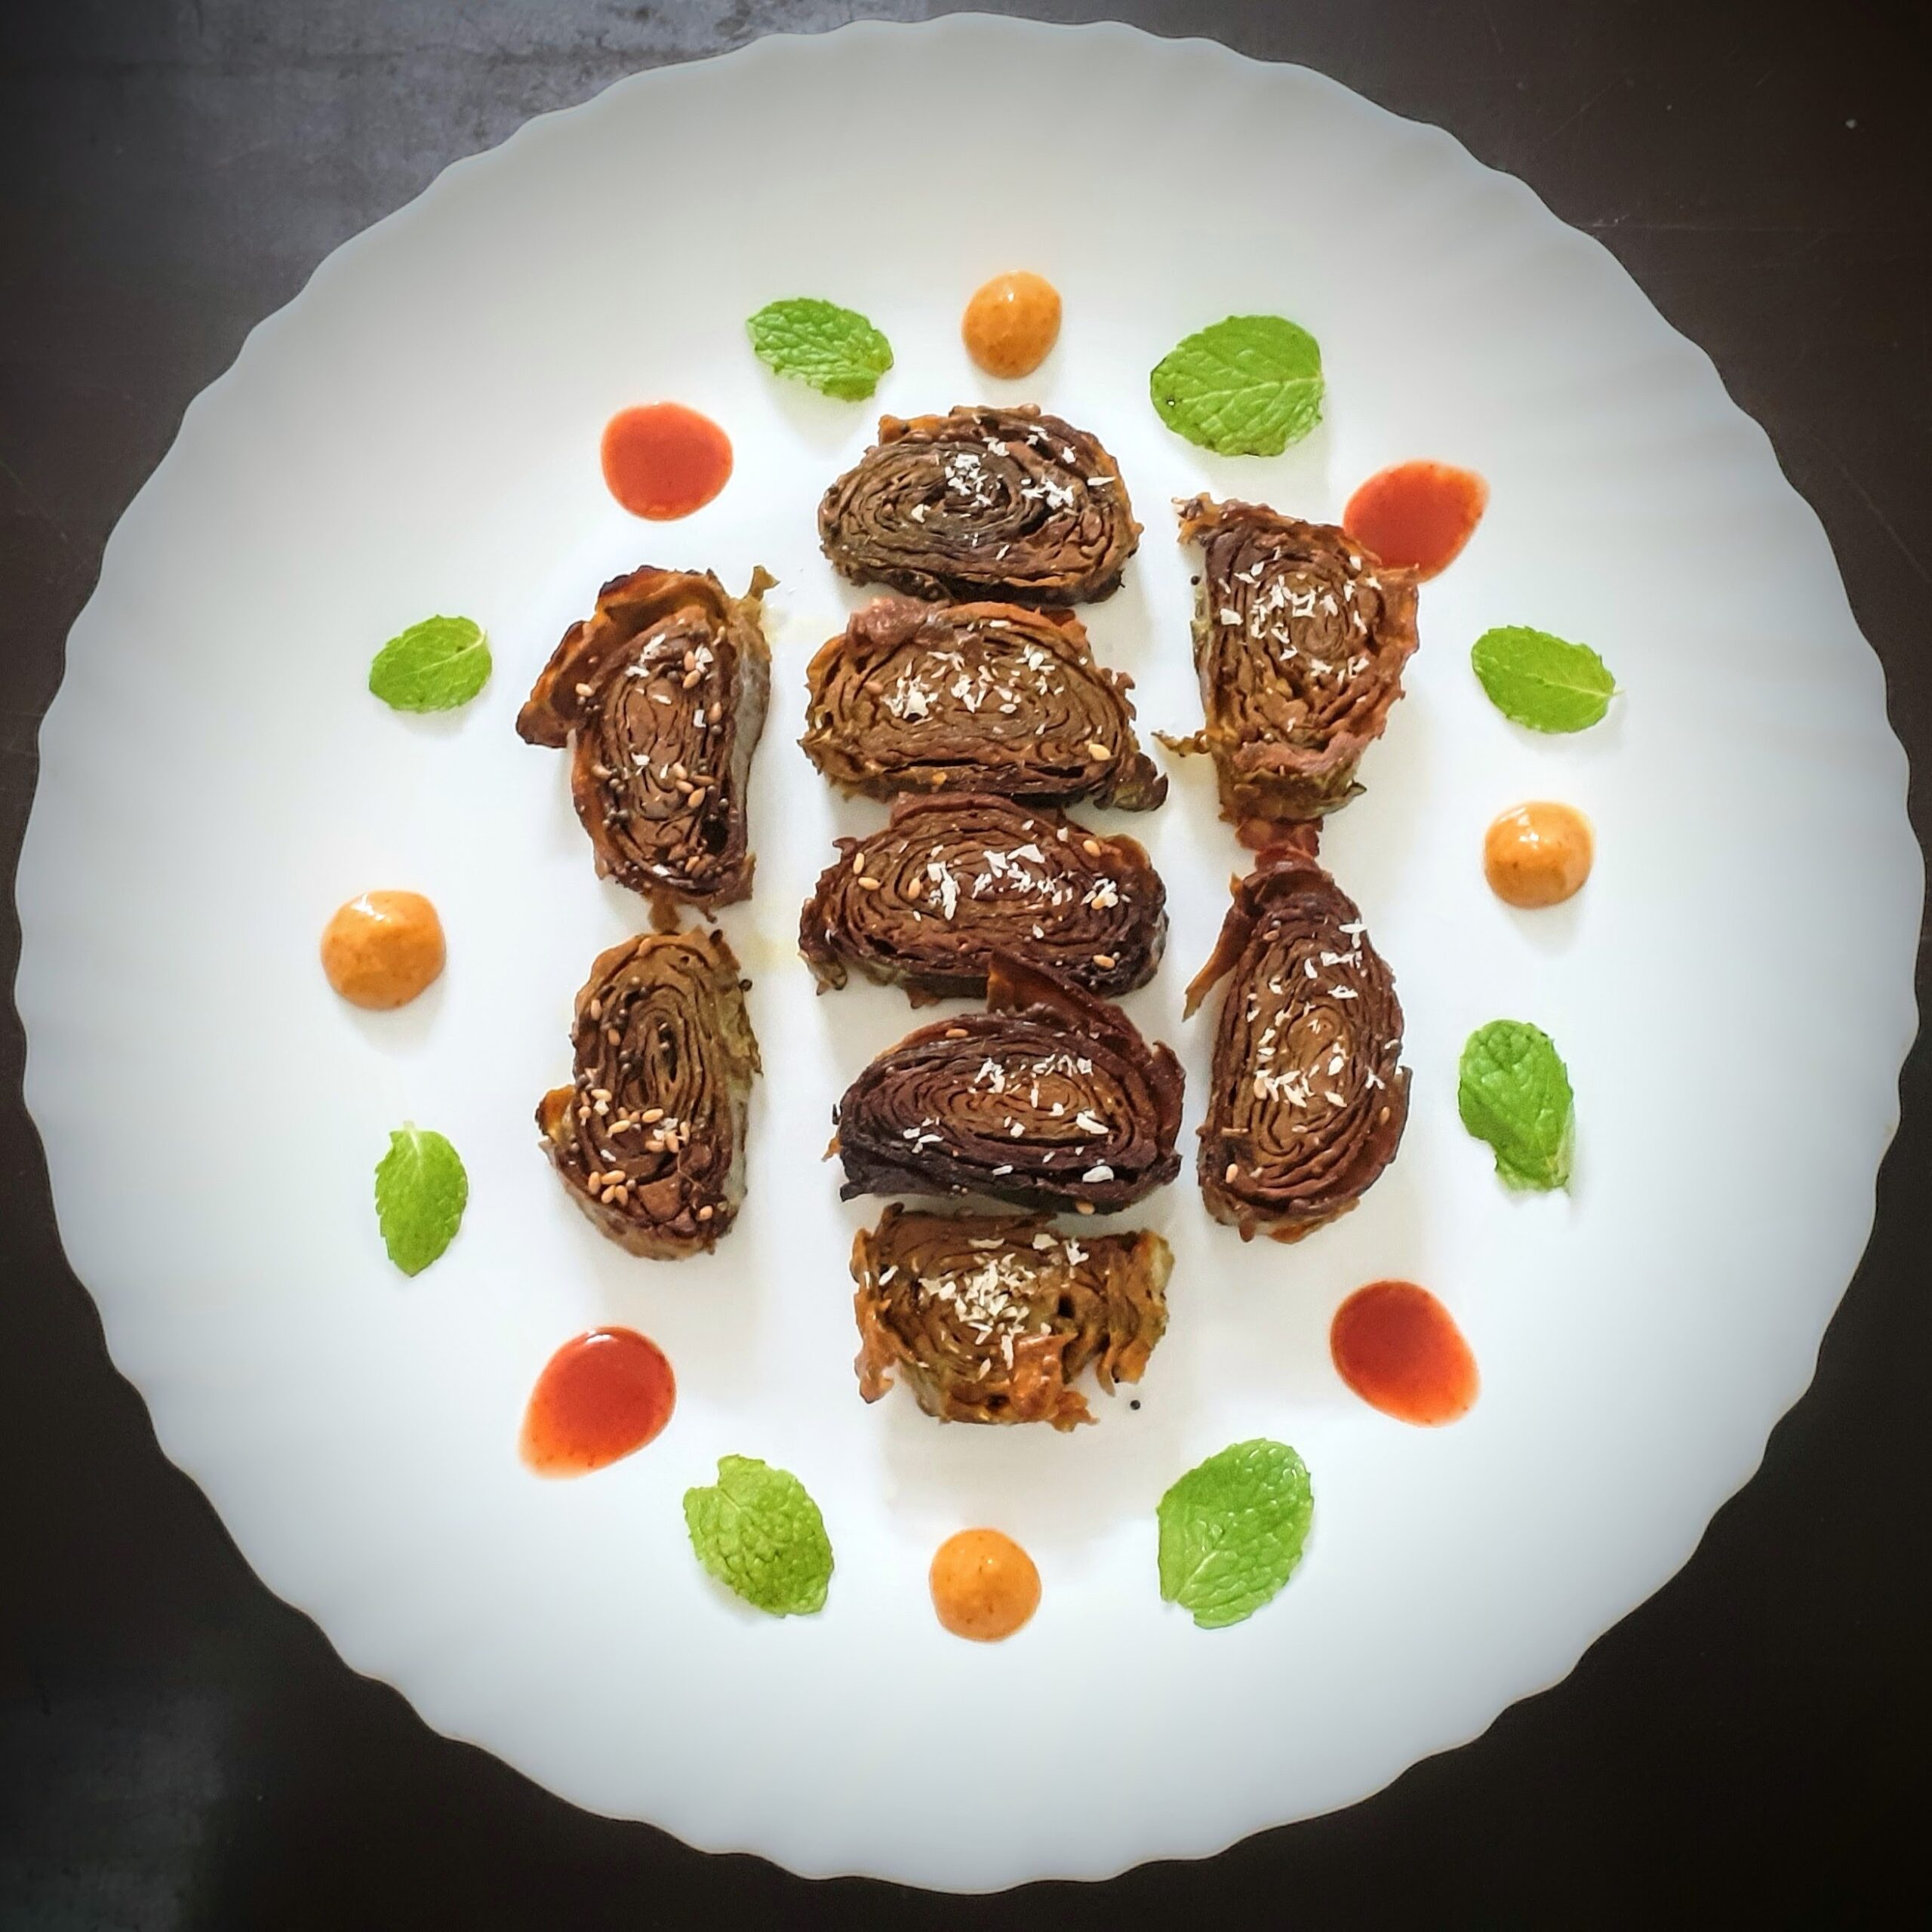
Patra/Patrode With Bok Choy Leaves (Alu Wadi)
Patra or Patrode is a simple and healthy snack from western India. It is also called Alu Wadi in some regions. This dish is popular in karnataka too. Different regions, different names same dish.
In this healthy snack usually the Arbi or Colacassia leaves are used. Spinach leaves can also be used, but they have to be big and thick. Since that variety is not available all the time I decided to give the dish a twist by using a different leaf altogether. Bok Choy, or Pok choy is a type of chinese cabbage. The leaves are thick and nice so I decided to give the Patra a try with these leaves. It was a huge hit in my house and everyone came back for more.
Since I was making this the first time, I made only a small quantity and with my folks asking for more have promised to make some again very soon. So, what I’m driving at is that if you are one of those people who loves this dish and wait for the Arbi leaves to arrive in the market, well don’t wait. Grab some Pok Choy and try it out. The Pok Choy is closer in taste to Spinach with which Patra are made, if not for Arbi/Colaccssia leaves.
This is a steamed snack just like the Kothimbir Vadi, it can be fried too of you prefer. I have steamed and pan roasted them.
While you are here check out my other snack recipes like Mirchi Bajji, Semolina Cheese balls, Samosa Pie, Potato Cheddar Bake, Dhania wale Namak Parey and more…
Here is the recipe ot Patra with Bok Choy Leaf-
PREP TIME: 15MINS COOK TIME: 30MINS
TOTAL TIME: 45 MINS CUISINE: INDIAN
COURSE :SNACK SERVINGS: 5
AUTHOR: RAJNI RAM
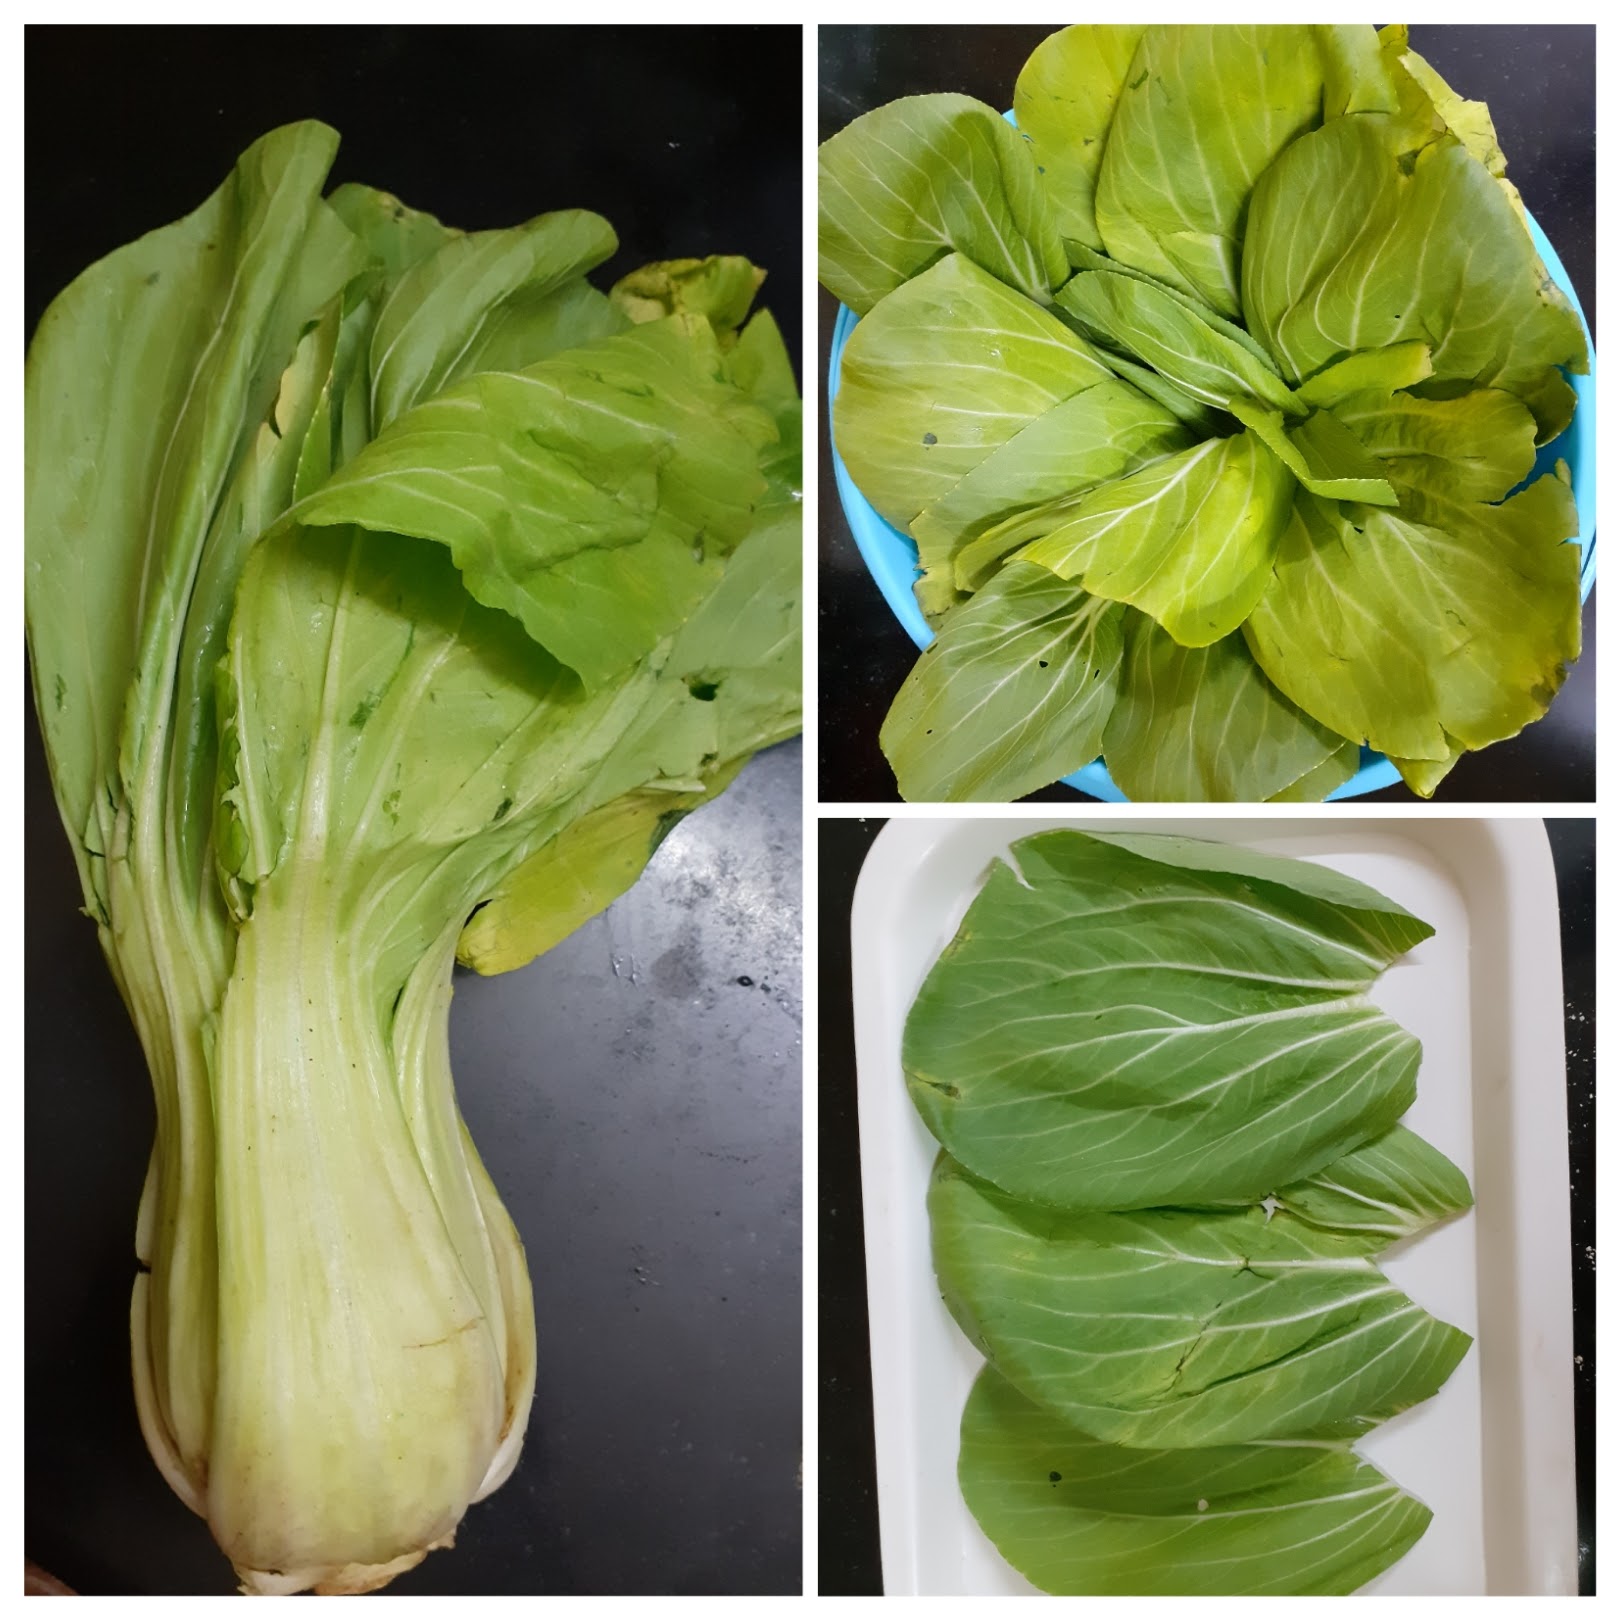
Bok choy/ Pok choy 2 heads ( clip leaves carefully, wash and dab dry with towel)
Besan/ Chickpea flour 2 cups
Salt as required
Red chilli powder 1 tsp
Coriander powder 1 tsp
Fennel powder 1 tsp
Turmeric powder 1/2 tsp
Sugar 1/2 tsp
Tamarind pulp 2 tsp diluted in 1/2 cup water or make pulp with Gooseberry size tamarind ball.
Green chilli 1 finely chopped
Ginger 1/2 inch piece finely chopped
Sesame seeds a few
Kopra / desiccated coconut 2 tsp
Oil 3 tsp for tempering
Directions:
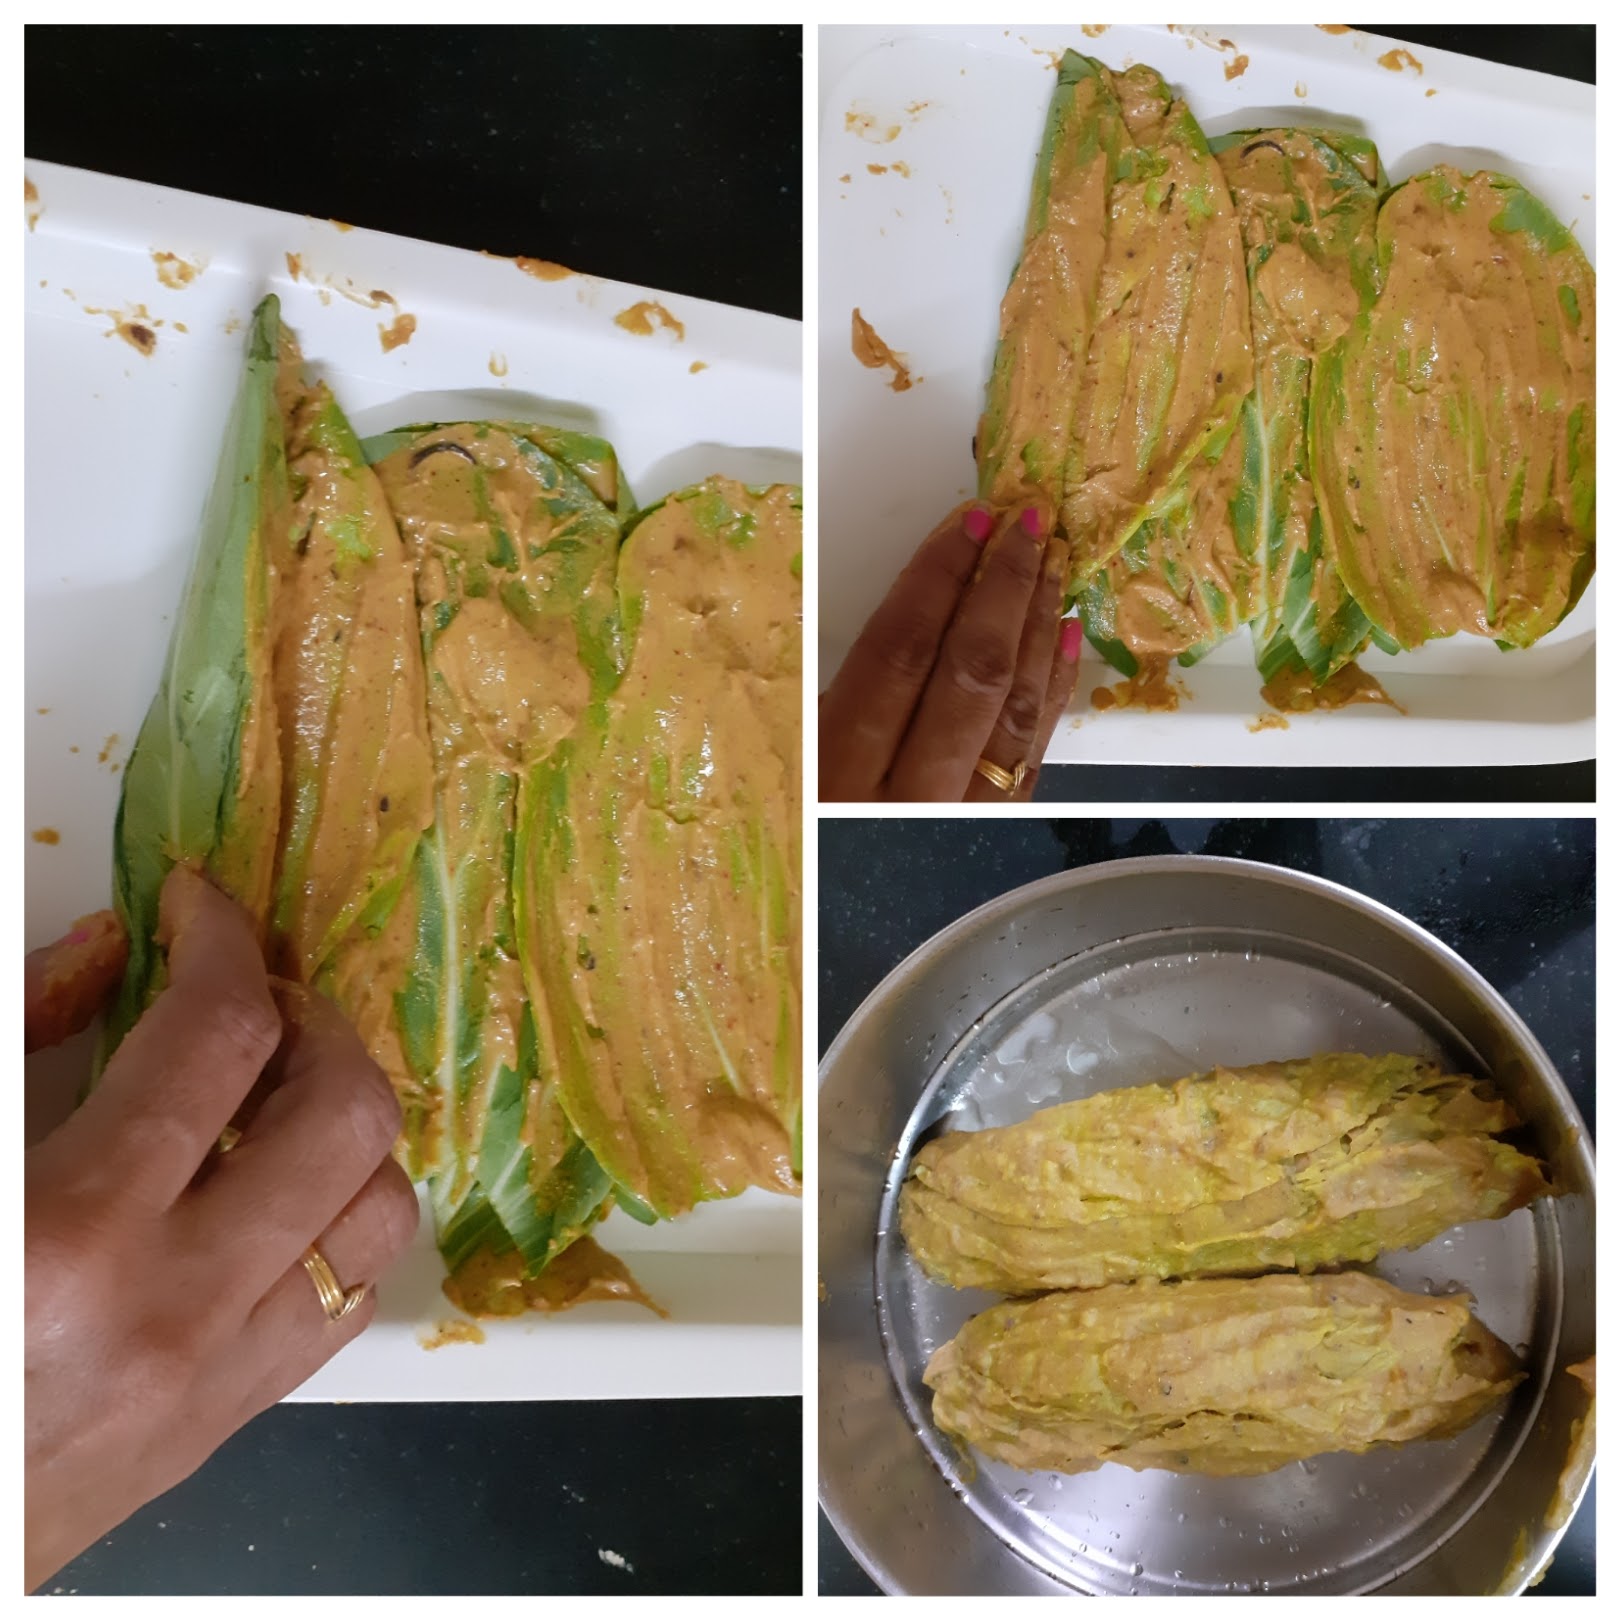
Carefully cut the leaves from the Bok choy, wash them in water and pat dry. Keep aside. Now in a bowl take the besan and add all the masala powders and salt. Mix well with fingers and now start adding the tamarind water little by little to make a thick paste/ batter. If using tamarind paste add paste along with masalas, mix and then use water to make the paste. The batter has to be smooth and thick that it sticks to the leaves and does not slide off. Now take the leaves, bigger ones. Apply the paste to 3 leaves, and arrange 3 of them over lapping the other as shown in the picture. This is the first layer. On this another 3 paste applied leaves have to be arranged. If the leaves are in different sizes, keep bigger ones below and smaller ones on top. Like this for 3 layers. Now start rolling the leaves from left to right, and as you role more of the paste has to be applied each time you roll the leaf. After rolling completely, apply the besan paste all over the rolled leaf. Place this in a greased cooker vessel. Repeat for remaining leaves. I made two such rolls. Place the second roll also in the cooker vessel and keep the vessel in the cooker to steam. Steam for 20 to 25 minutes. Put off the cooker and wait 2 minutes. Now open and cool the steams rolls completely. Once cooled cut them into 1/2 inch thick circles and keep aside. Take oil in a Tava or Pan and heat. Add mustard seeds, Jeera, asafoetida, green chillies, sesame seeds and ginger. When the mustard pops arrange the cut circles on the tava and roast on one side. When it turns a golden brown, flip and roast the other side. Sprinkle some Kopra/ desiccated coconut and remove the Parta off the Tava. Enjoy with some green chutney and chai. Bon Appetit!!!
STEPWISE RECIPE FOLLOWS:
1.Carefully cut the leaves from the Bok choy, wash them in water and pat dry. Keep aside.
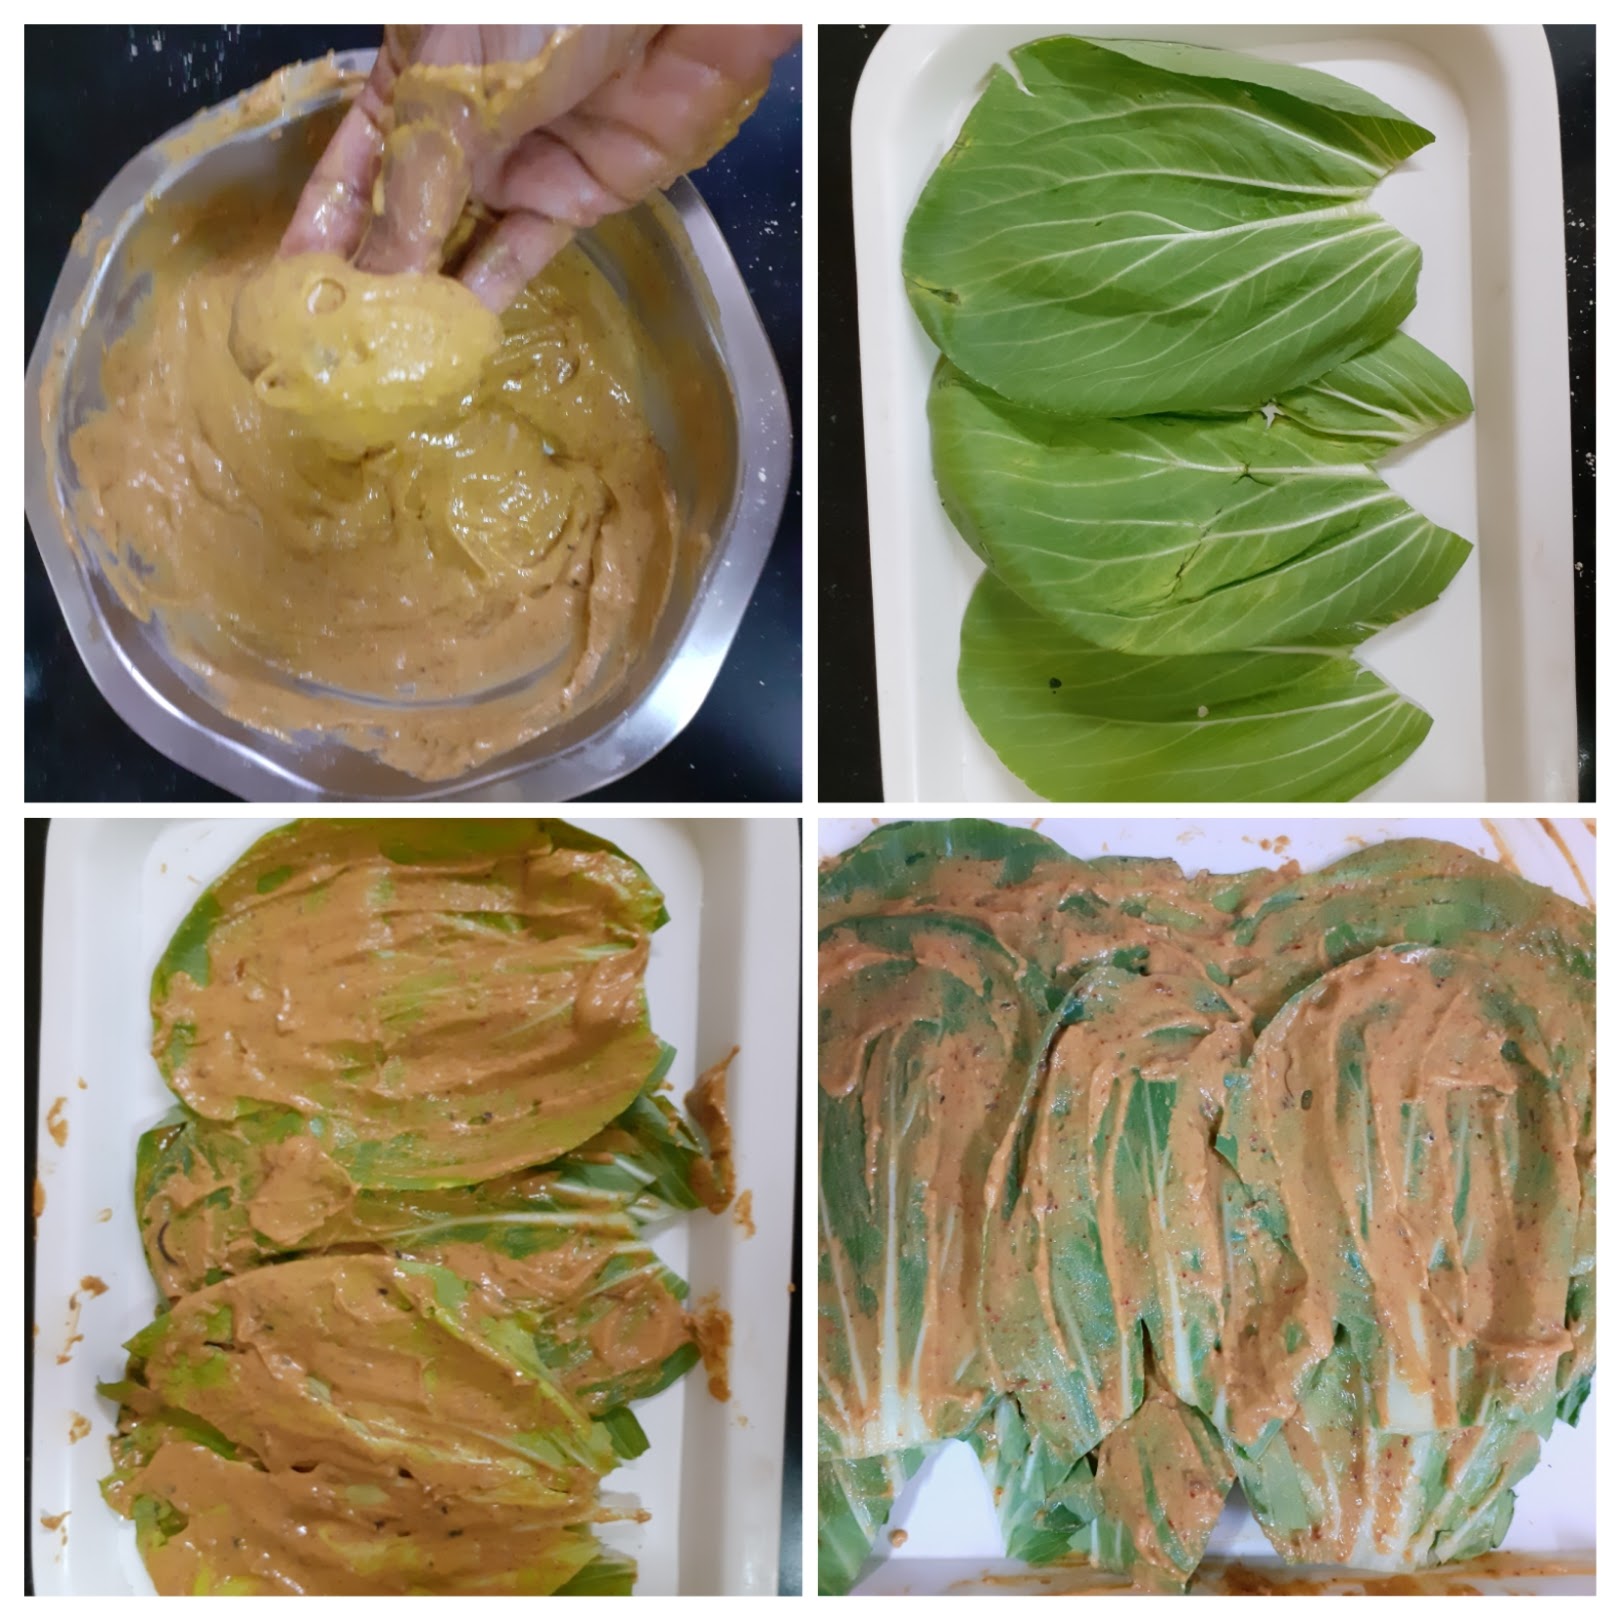
2. Now in a bowl take the besan and add all the masala powders and salt. Mix well with fingers and now start adding the tamarind water little by little to make a thick paste/ batter. The batter has to be thick and smooth.
3. Apply the paste to 3 leaves, and arrange 3 of them over lapping the other as shown in the picture. This is the first layer. On this another 3 paste applied leaves have to be arranged. Make 3 such layers.
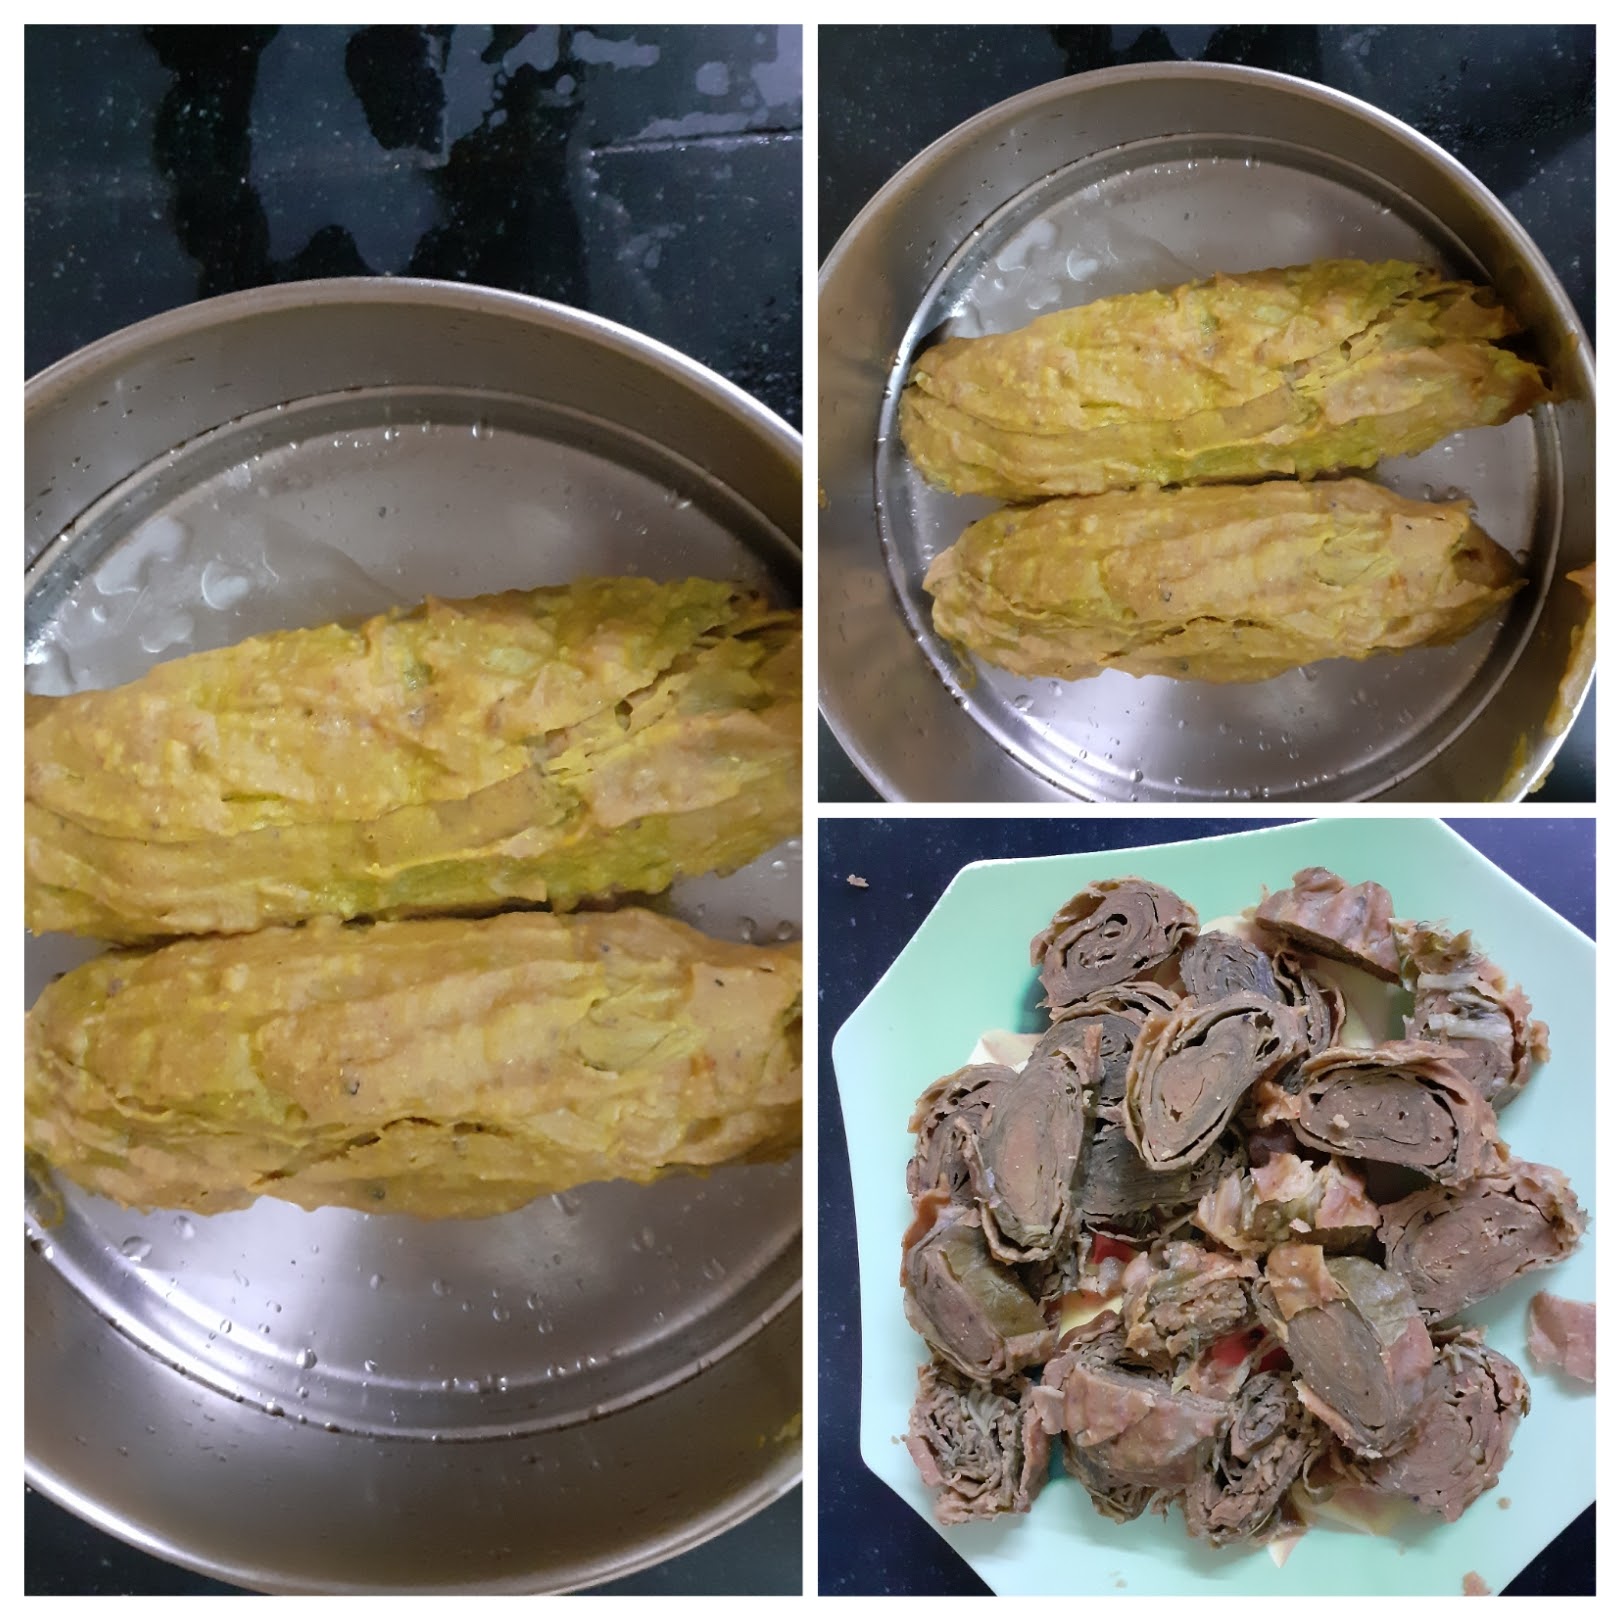
4. Now start rolling the leaves from left to right, and as you role more of the paste has to be applied each time you roll the leaf. After rolling completely, apply the besan paste all over the rolled leaf. Place this in a greased cooker vessel. Repeat the process and put both rolls in cooker vessel.
5. Keep the vessel in the cooker to steam. Steam for 20 to 25 minutes. Put off the cooker and wait 2 minutes. Now open and cool the steams rolls completely. Once cooled cut them into 1/2 inch thick circles and keep aside.
6. Take oil in a Tava or Pan and heat. Add mustard seeds, Jeera, asafoetida, green chillies, sesame seeds and ginger. When the mustard pops arrange the cut circles on the tava and roast on one side. When it turns a golden brown, flip and roast the other side. Sprinkle some Kopra/ desiccated coconut and remove the Parta off the Tava. Enjoy.
NOTES:
1. Select leaves which are fresh and big.
2. At the base of the leaf if the stem is hard, make a V shape cut to remove the hard veins.
3. Ensure the batter is thick like a paste or else it won’t stick to the leaf. Incase the batter turns runny add more besan and adjust spice and continue with the recipe.
4. While toasting on the Tava take care not to burn them or the taste will change.
Shrikhand (Kesar)
It is a double whammy when you get a probiotic as dessert. Under this category come sweet dishes like Misthti Doi, Bappa Doi, and Shrikhand. The previous two I am yet to try and blog. But the Shrikhand is something that I love making and relish eating.
This is one recipe that used to make in our Delhi days when curd was in excess or a little sour. Then there was a period when I entirely stopped making Shrikhand and relied on the store-bought one. Until recently when Aishu( pointed out that ” amma you haven’t made Shrikhand in ages”), that I decided to whip it up again. (The advantage of homemade Shrikhand is that we can customize the sugar, as per requirement. I find the store-bought ones very sweet).
But this time the Mantra was to make it in a much simpler way, in the past, this was a half-day procedure for me as it involved making hung curd, and that took anywhere between 3 to 5 hours, depending on the milk we use.
So I improvised my previous method to a smarter one, by using a mix of Greek Yogurt and homemade curd.
While you are here try out my other Indian dessert recipes like Pineapple Rabri, Thengai Therattipal, Atte ka Sheera, Gajar Halwa Barfi, Akkaravadisal, Sweet Poha, Carrot Kheer, and more…
Here is the recipe for Shrikhand( very detailed pictures are missing because this was supposed to be a causal post for social media and turned out that many people requested the recipe). So I am blogging it with minimum pictures, but I shall compensate for that with a good set of instructions.
PREP TIME: 5 MINS PROCESS TIME: 45 MINS
TOTAL TIME: 60 MINS COURSE: DESSERT
CUISINE: INDIAN SERVINGS: 6
AUTHOR: RAJNI RAM
Ingredients:
Greek yogurt( any brand) 400 gm
Homemade Curd 400 gm
Sugar 1/2 cup powdered ( add more if you prefer it sweeter)
Kesar powder a pinch
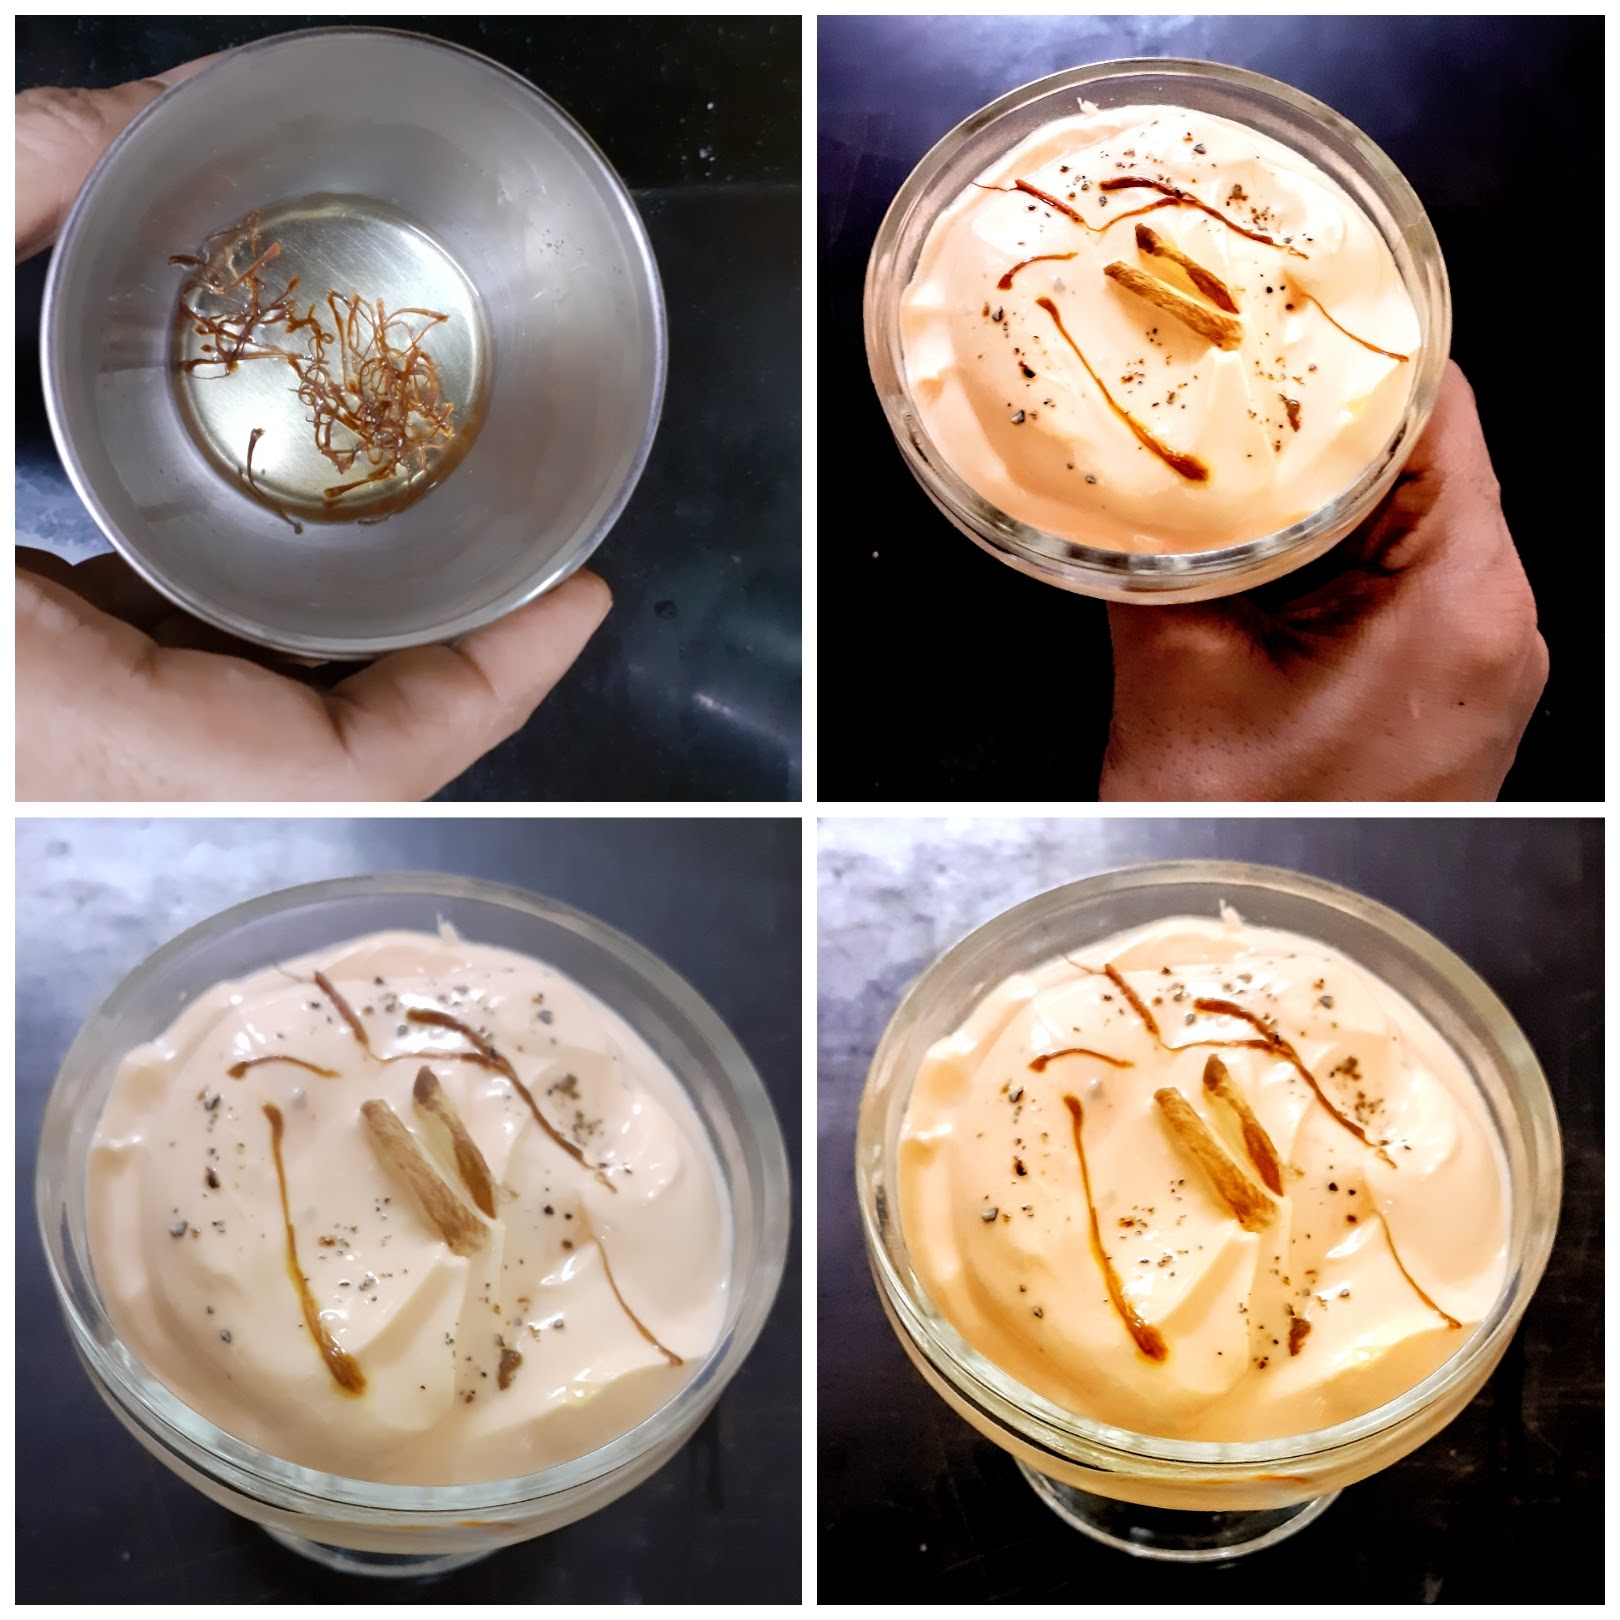
Kesar stands soaked in warm water a pinch
Elaichi/ Cardamom
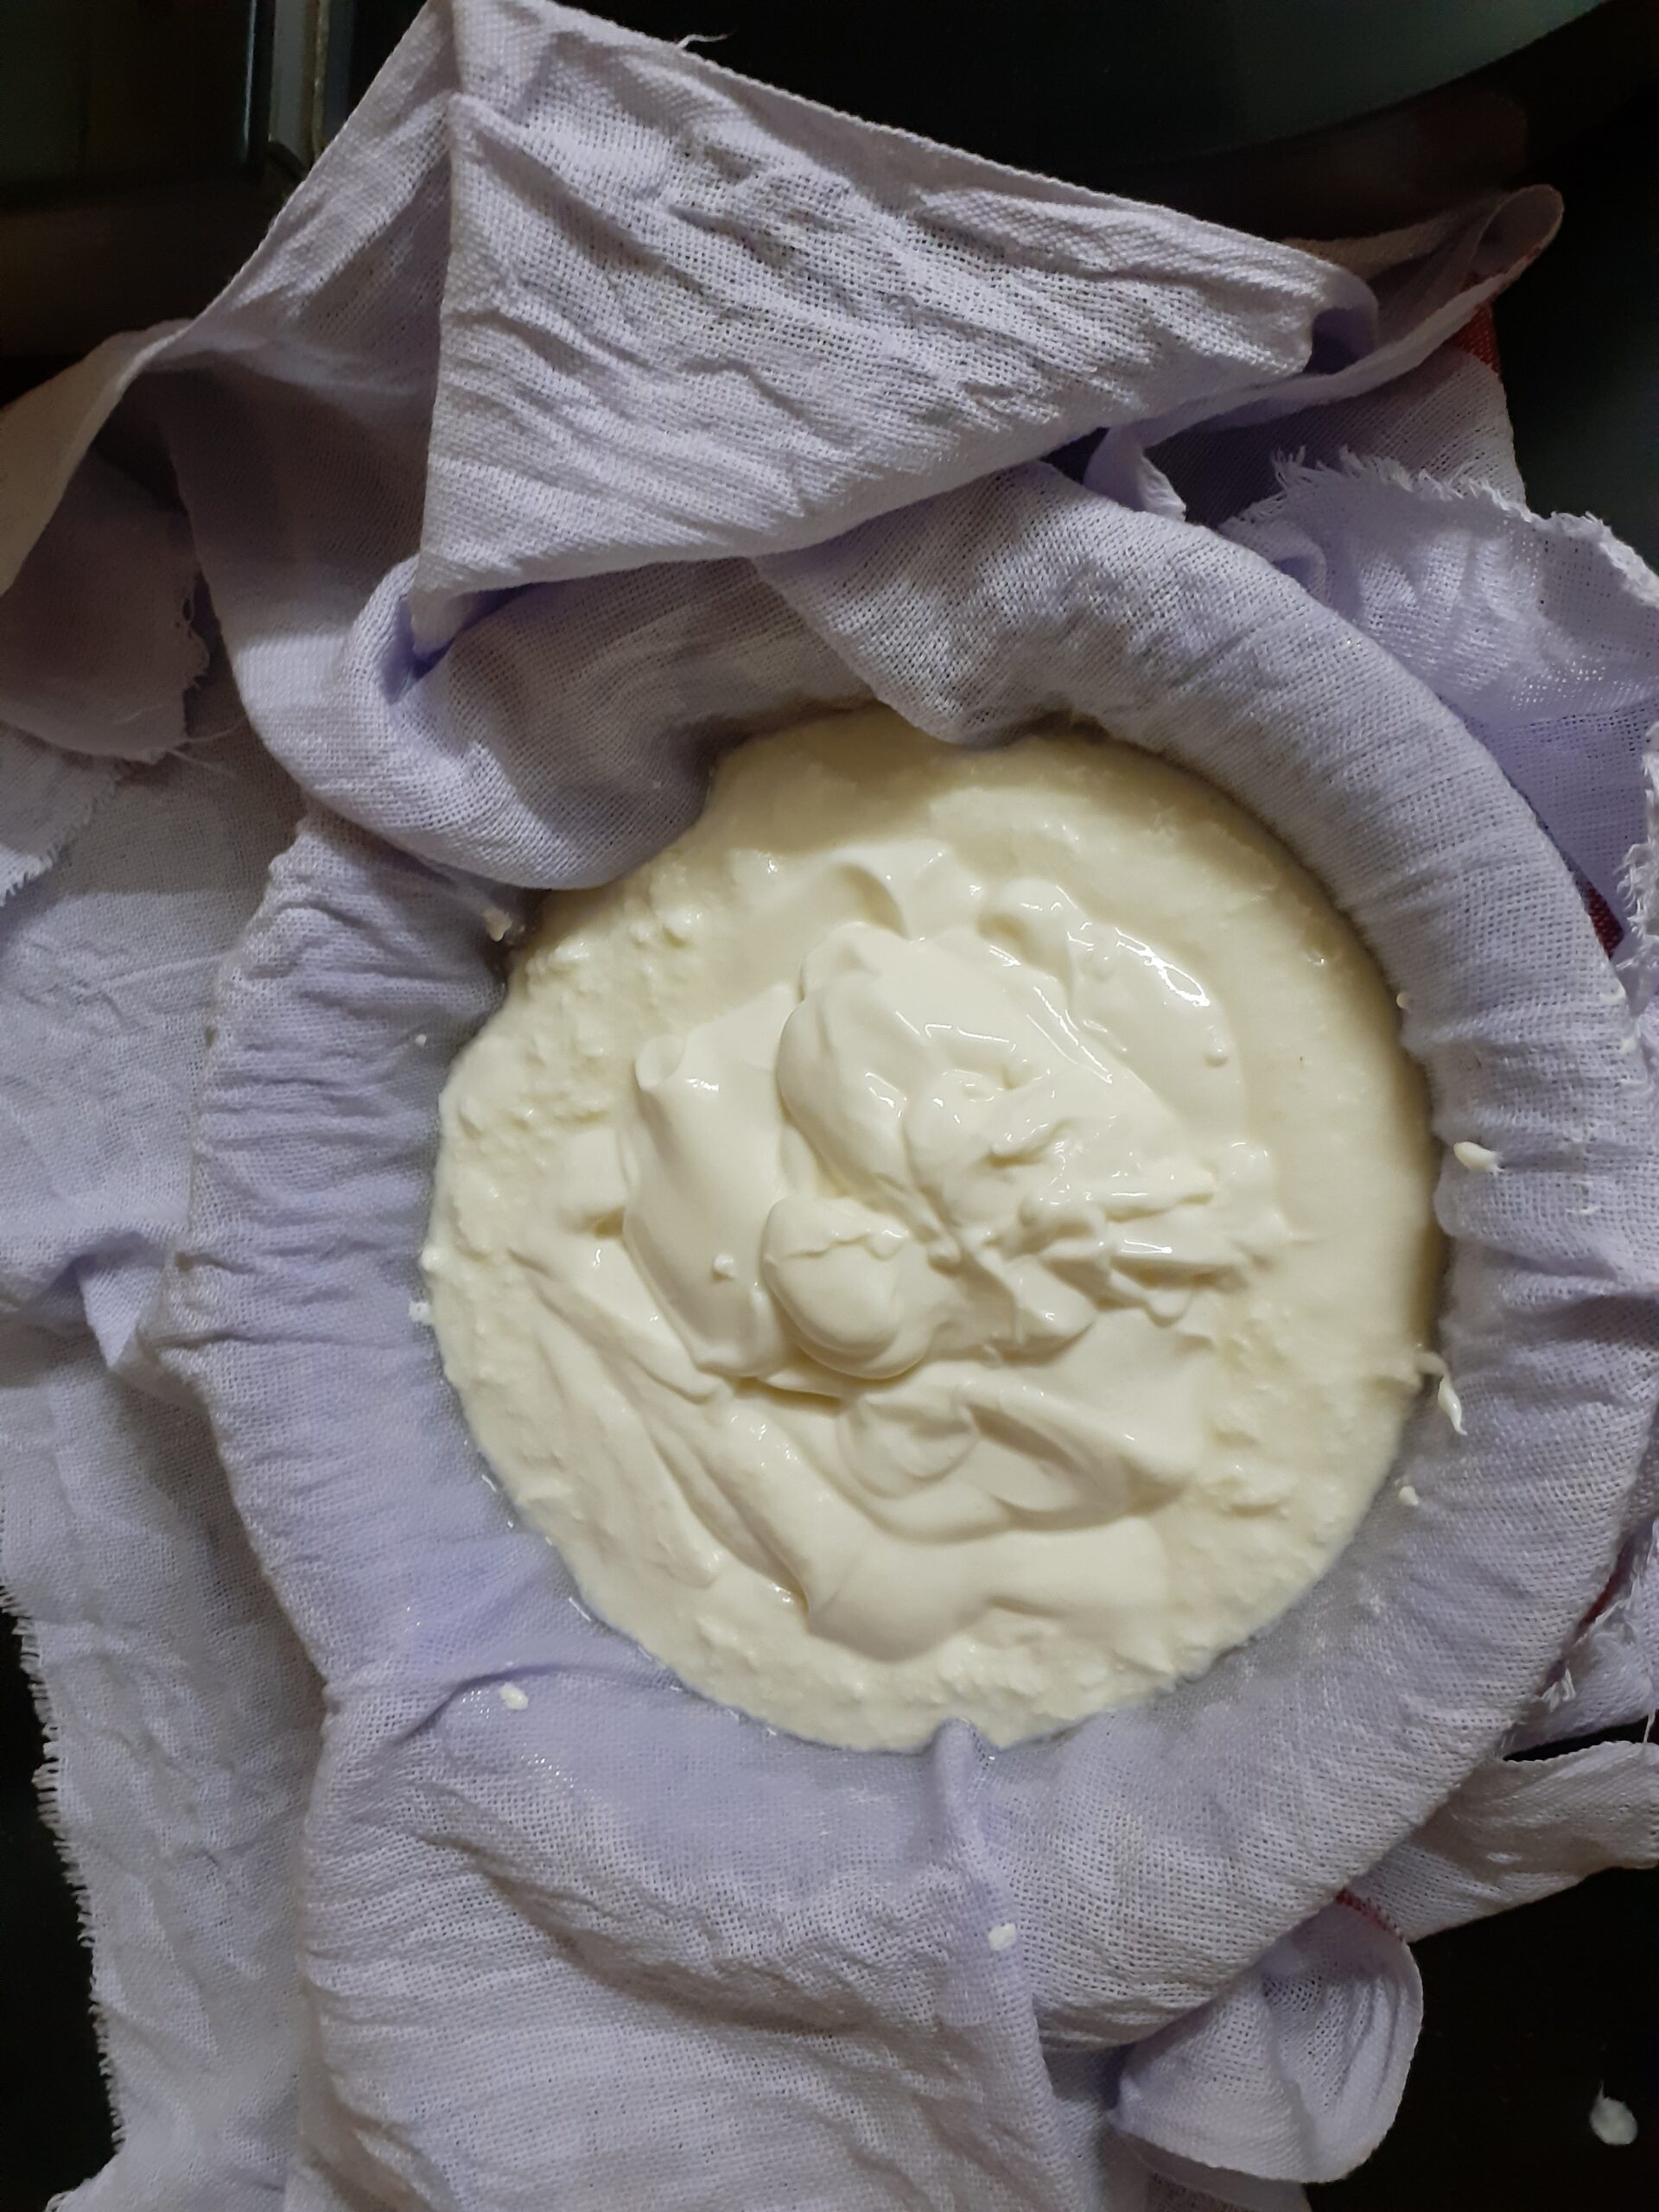
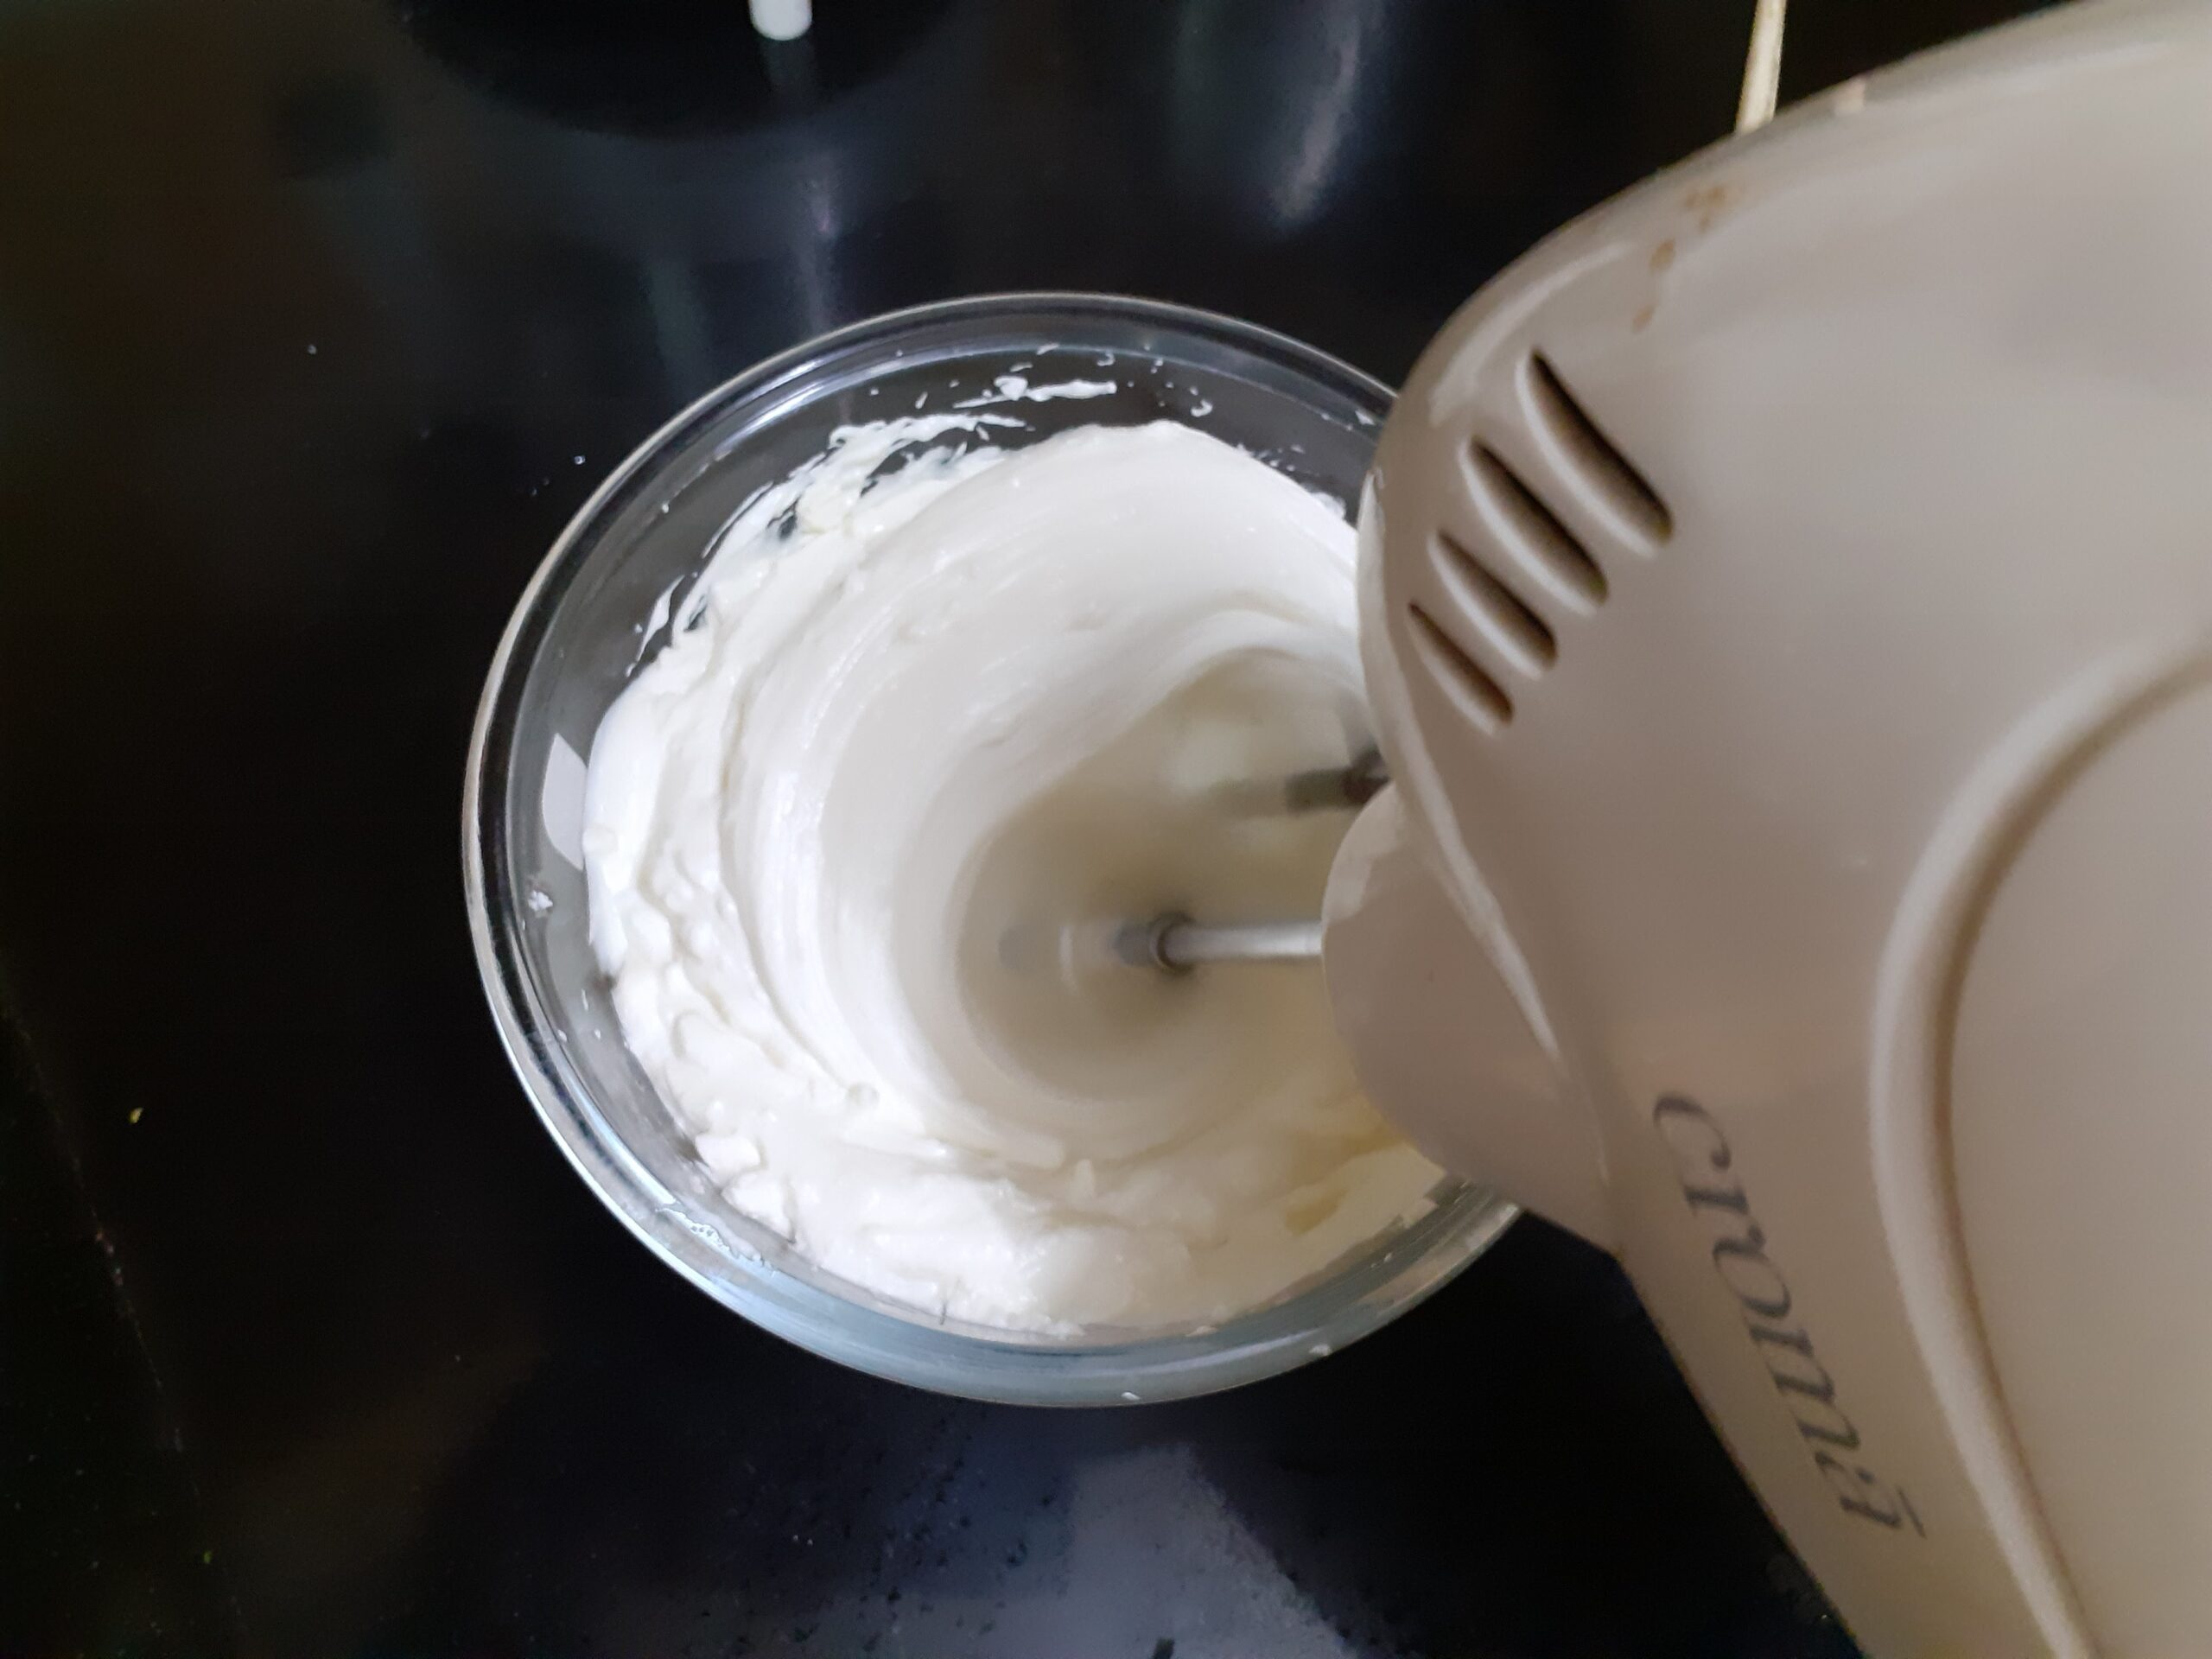
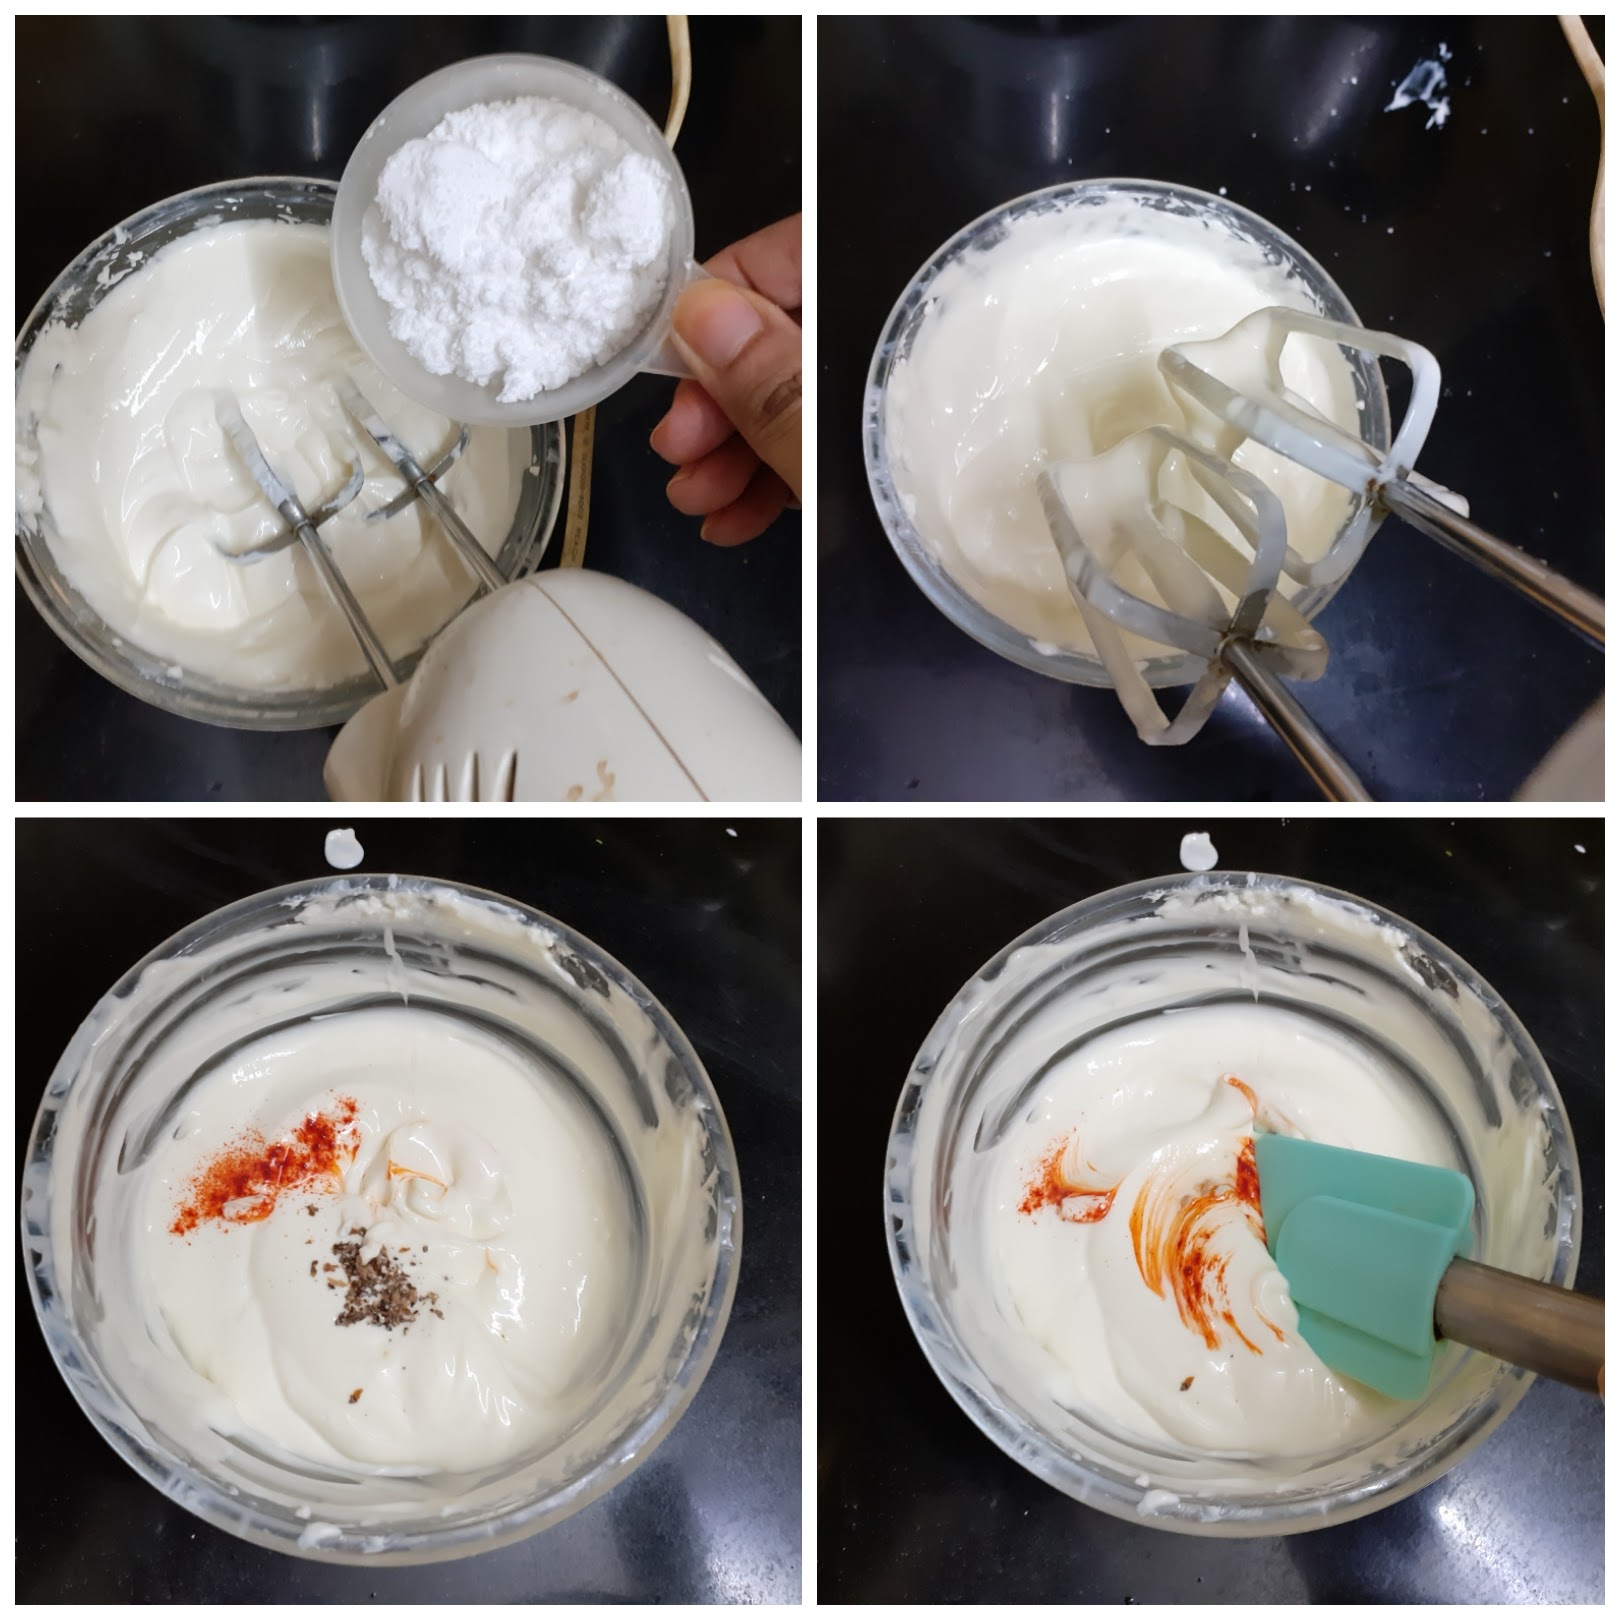
Directions: Take a clean Muslin or cotton cloth, which will allow water to pass out. Spread the cloth into a bowl and empty the Greek yogurt plus homemade curd into it. Collect the edges and tie it such that all the water is able to drain away. I usually tie it to the Kitchen sink tap, so that the excess water from the curd drains away into the sink. Allow 45 minutes to pass. Now untie the cloth from the dripping arrangement. Almost all the excess water from the curd must have dripped away and the hung curd is now ready. Transfer the hung curd to a bowl in which you can whip/beat it. Now with an electric beater, at low speed start beating the hung curd. Beat for a minute until the hung curd looks like cream. Now add the powdered sugar and beat again for 30 seconds. Add in the colour, the cardamom powder, and a little of the water in which the kesar strands were soaked( about 2 tsp). Use a spatula to combine well until the kesar colour is evenly spread. Garnish with Kesar strands and the yummy probiotic Shrikhand is ready. Put it in the refrigerator until ready to serve.
Serving Suggestions: Puri and Shrikhand is a match made in heaven. In my house, we like it with Parathas and Rotis too.
STEPWISE RECIPE FOLLOWS:
1. Take a clean Muslin or cotton cloth and spread it into a bowl and empty the Greek yogurt plus homemade curd into it.
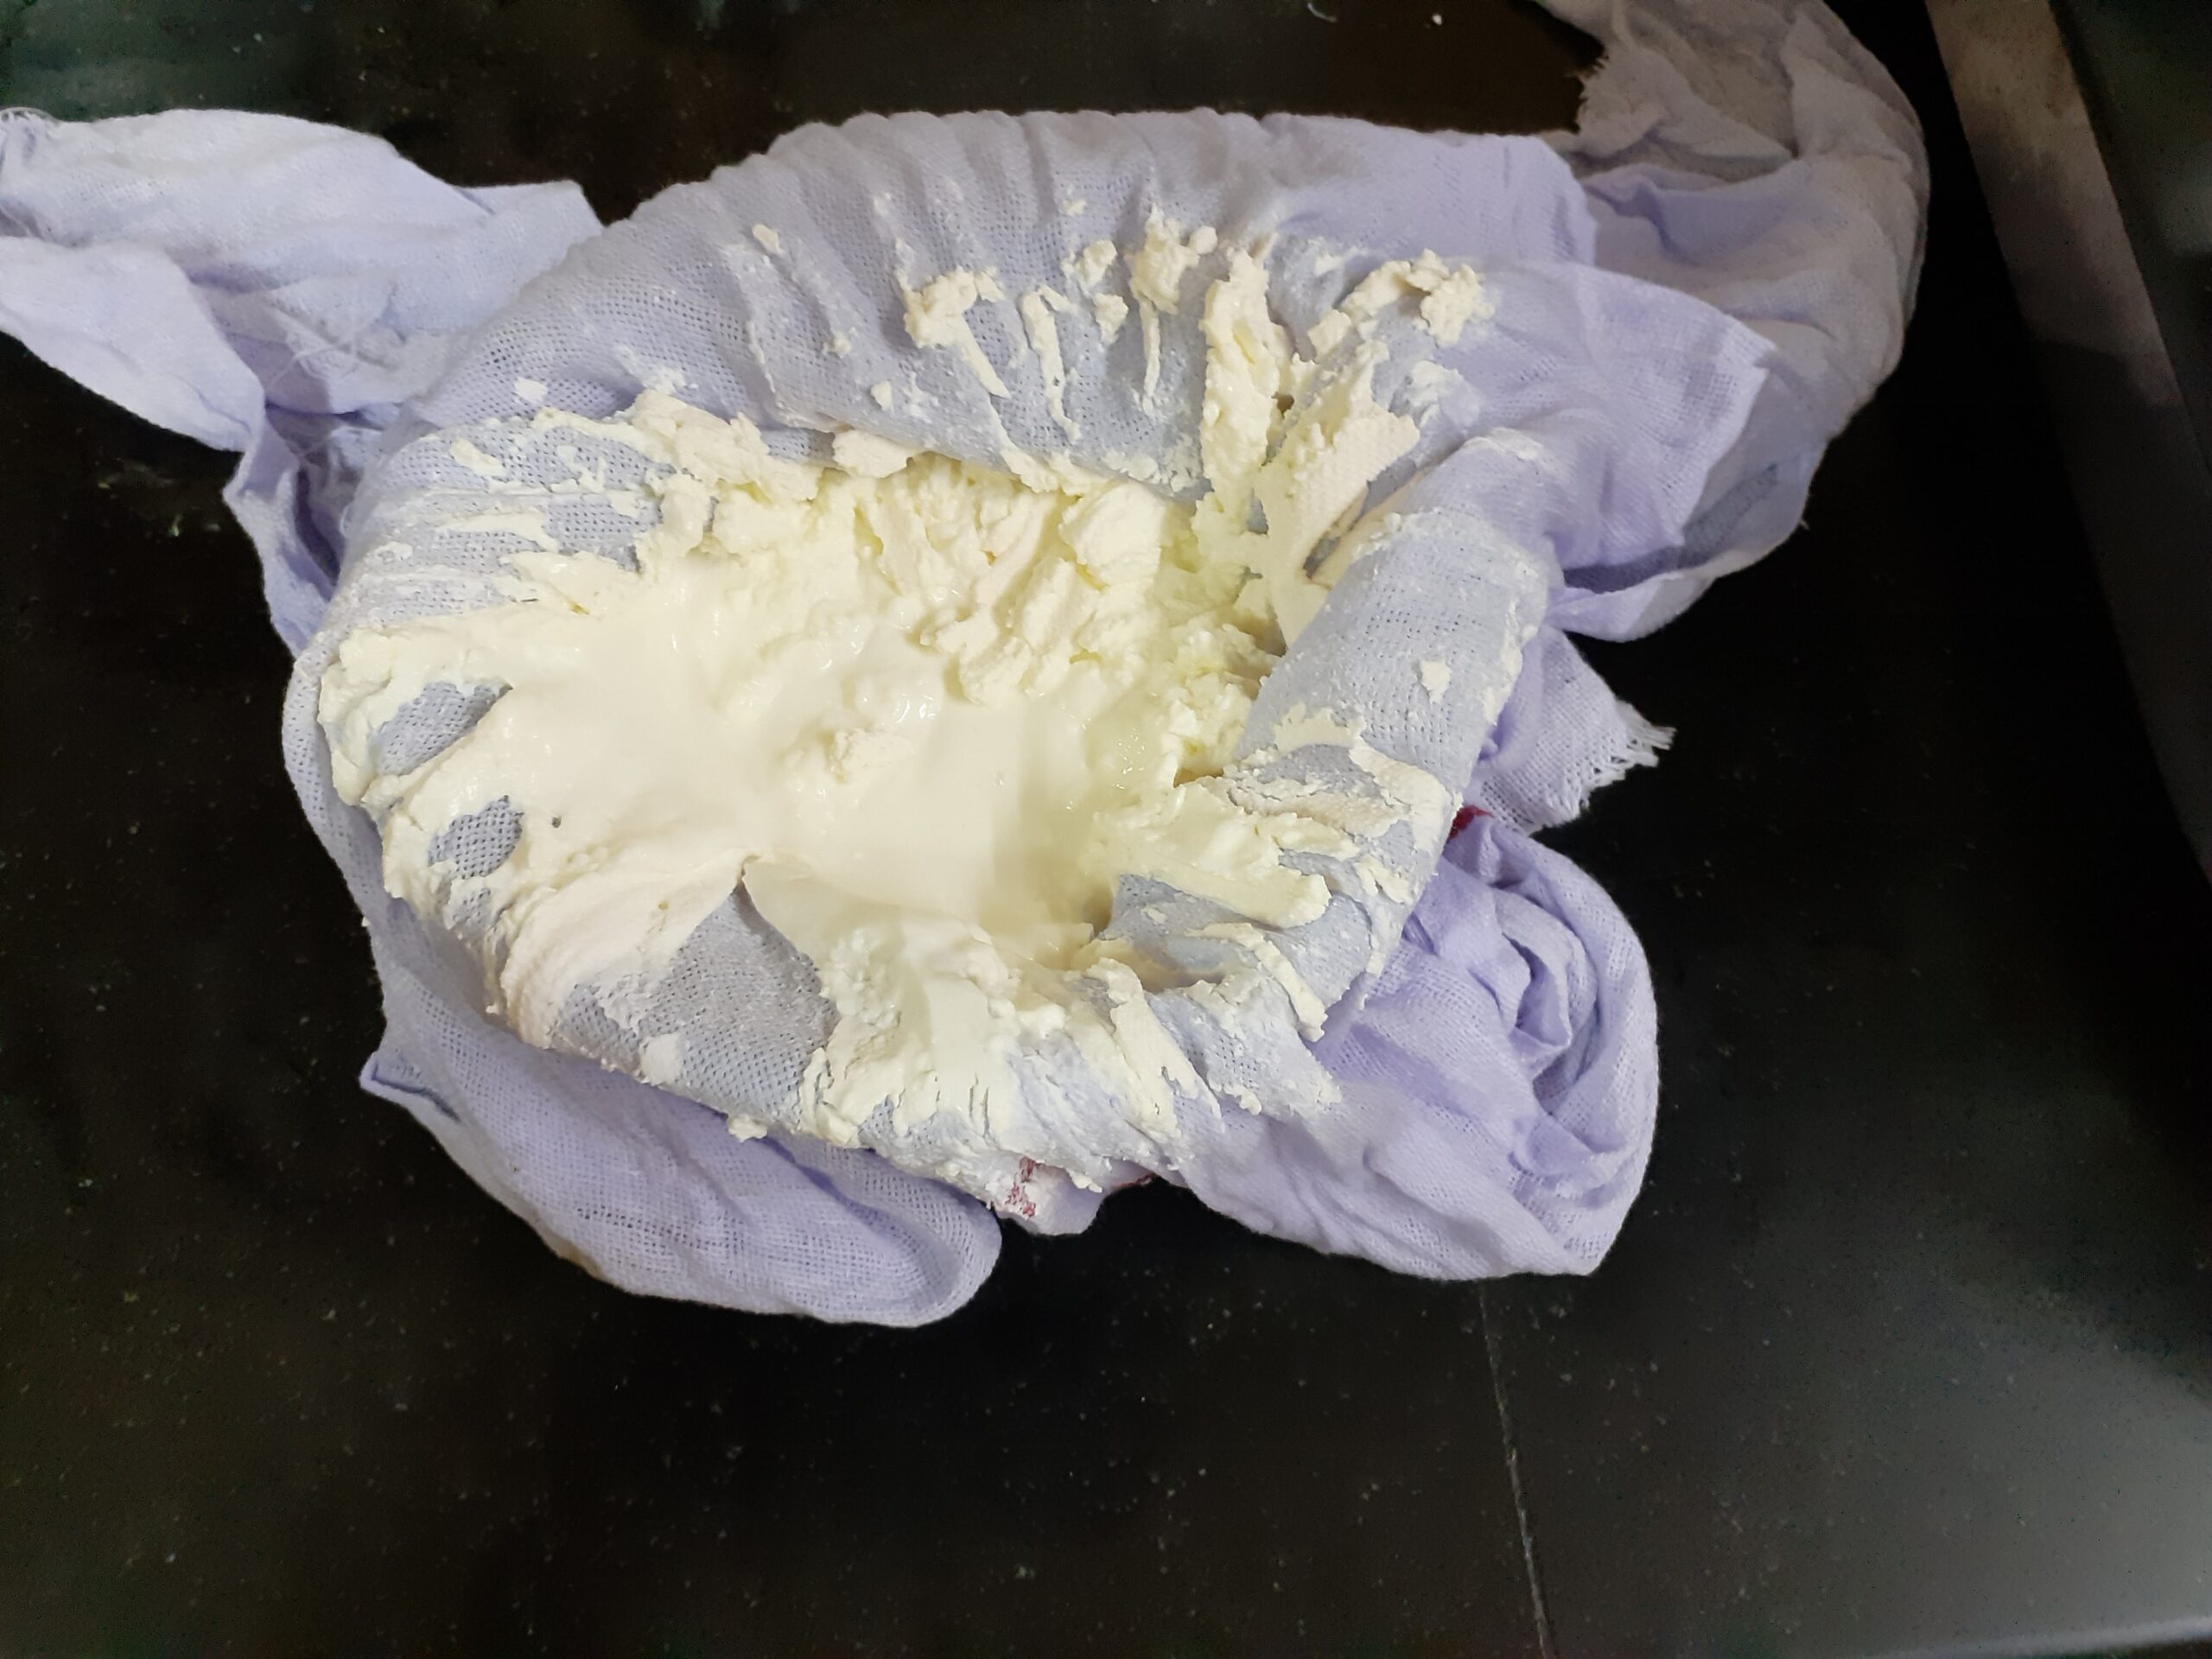
2. Collect the edges and tie it such that all the water is able to drain away. Allow 45 minutes to pass. Now untie the cloth from the dripping arrangement. Almost all the excess water from the curd must have dripped away and the hung curd is now ready.
3. Transfer the hung curd to a bowl in which you can whip/beat it. Now with an electric beater, at low speed start beating the hung curd. Beat for a minute until the hung curd looks like cream.
4. Now add the powdered sugar and beat again for 30 seconds. Add in the colour, the cardamom powder, and a little of the water in which the kesar strands were soaked( about 2 tsp). Use a spatula to combine well until the kesar colour is evenly spread.
5. Garnish with Kesar strands and the yummy probiotic Shrikhand is ready. Put it in the refrigerator until ready to serve.
NOTES:
1. Always add powdered sugar, so that the consistency of the Shrikhand does not go runny.
2. I have made a variant of Rose flavour too. I had some homemade Rose syrup, so tried it out. One can buy storebought ones and try. Use the rose syrup in place of the kesar colour and proceed.
3. This recipe can be made with homemade curd too. It takes longer for the water from the curd to drain. The rest of the recipe is the same.
If you tried this recipe and liked it please comment below. I would love to hear from you. If you have a query about the recipe email us and ill respond as soon as I can.
If you would like to receive our recipes in your mail please leave your mail id at the homepage. Every time Rajjo’s Kitchen has a new post we will mail the recipe to you.
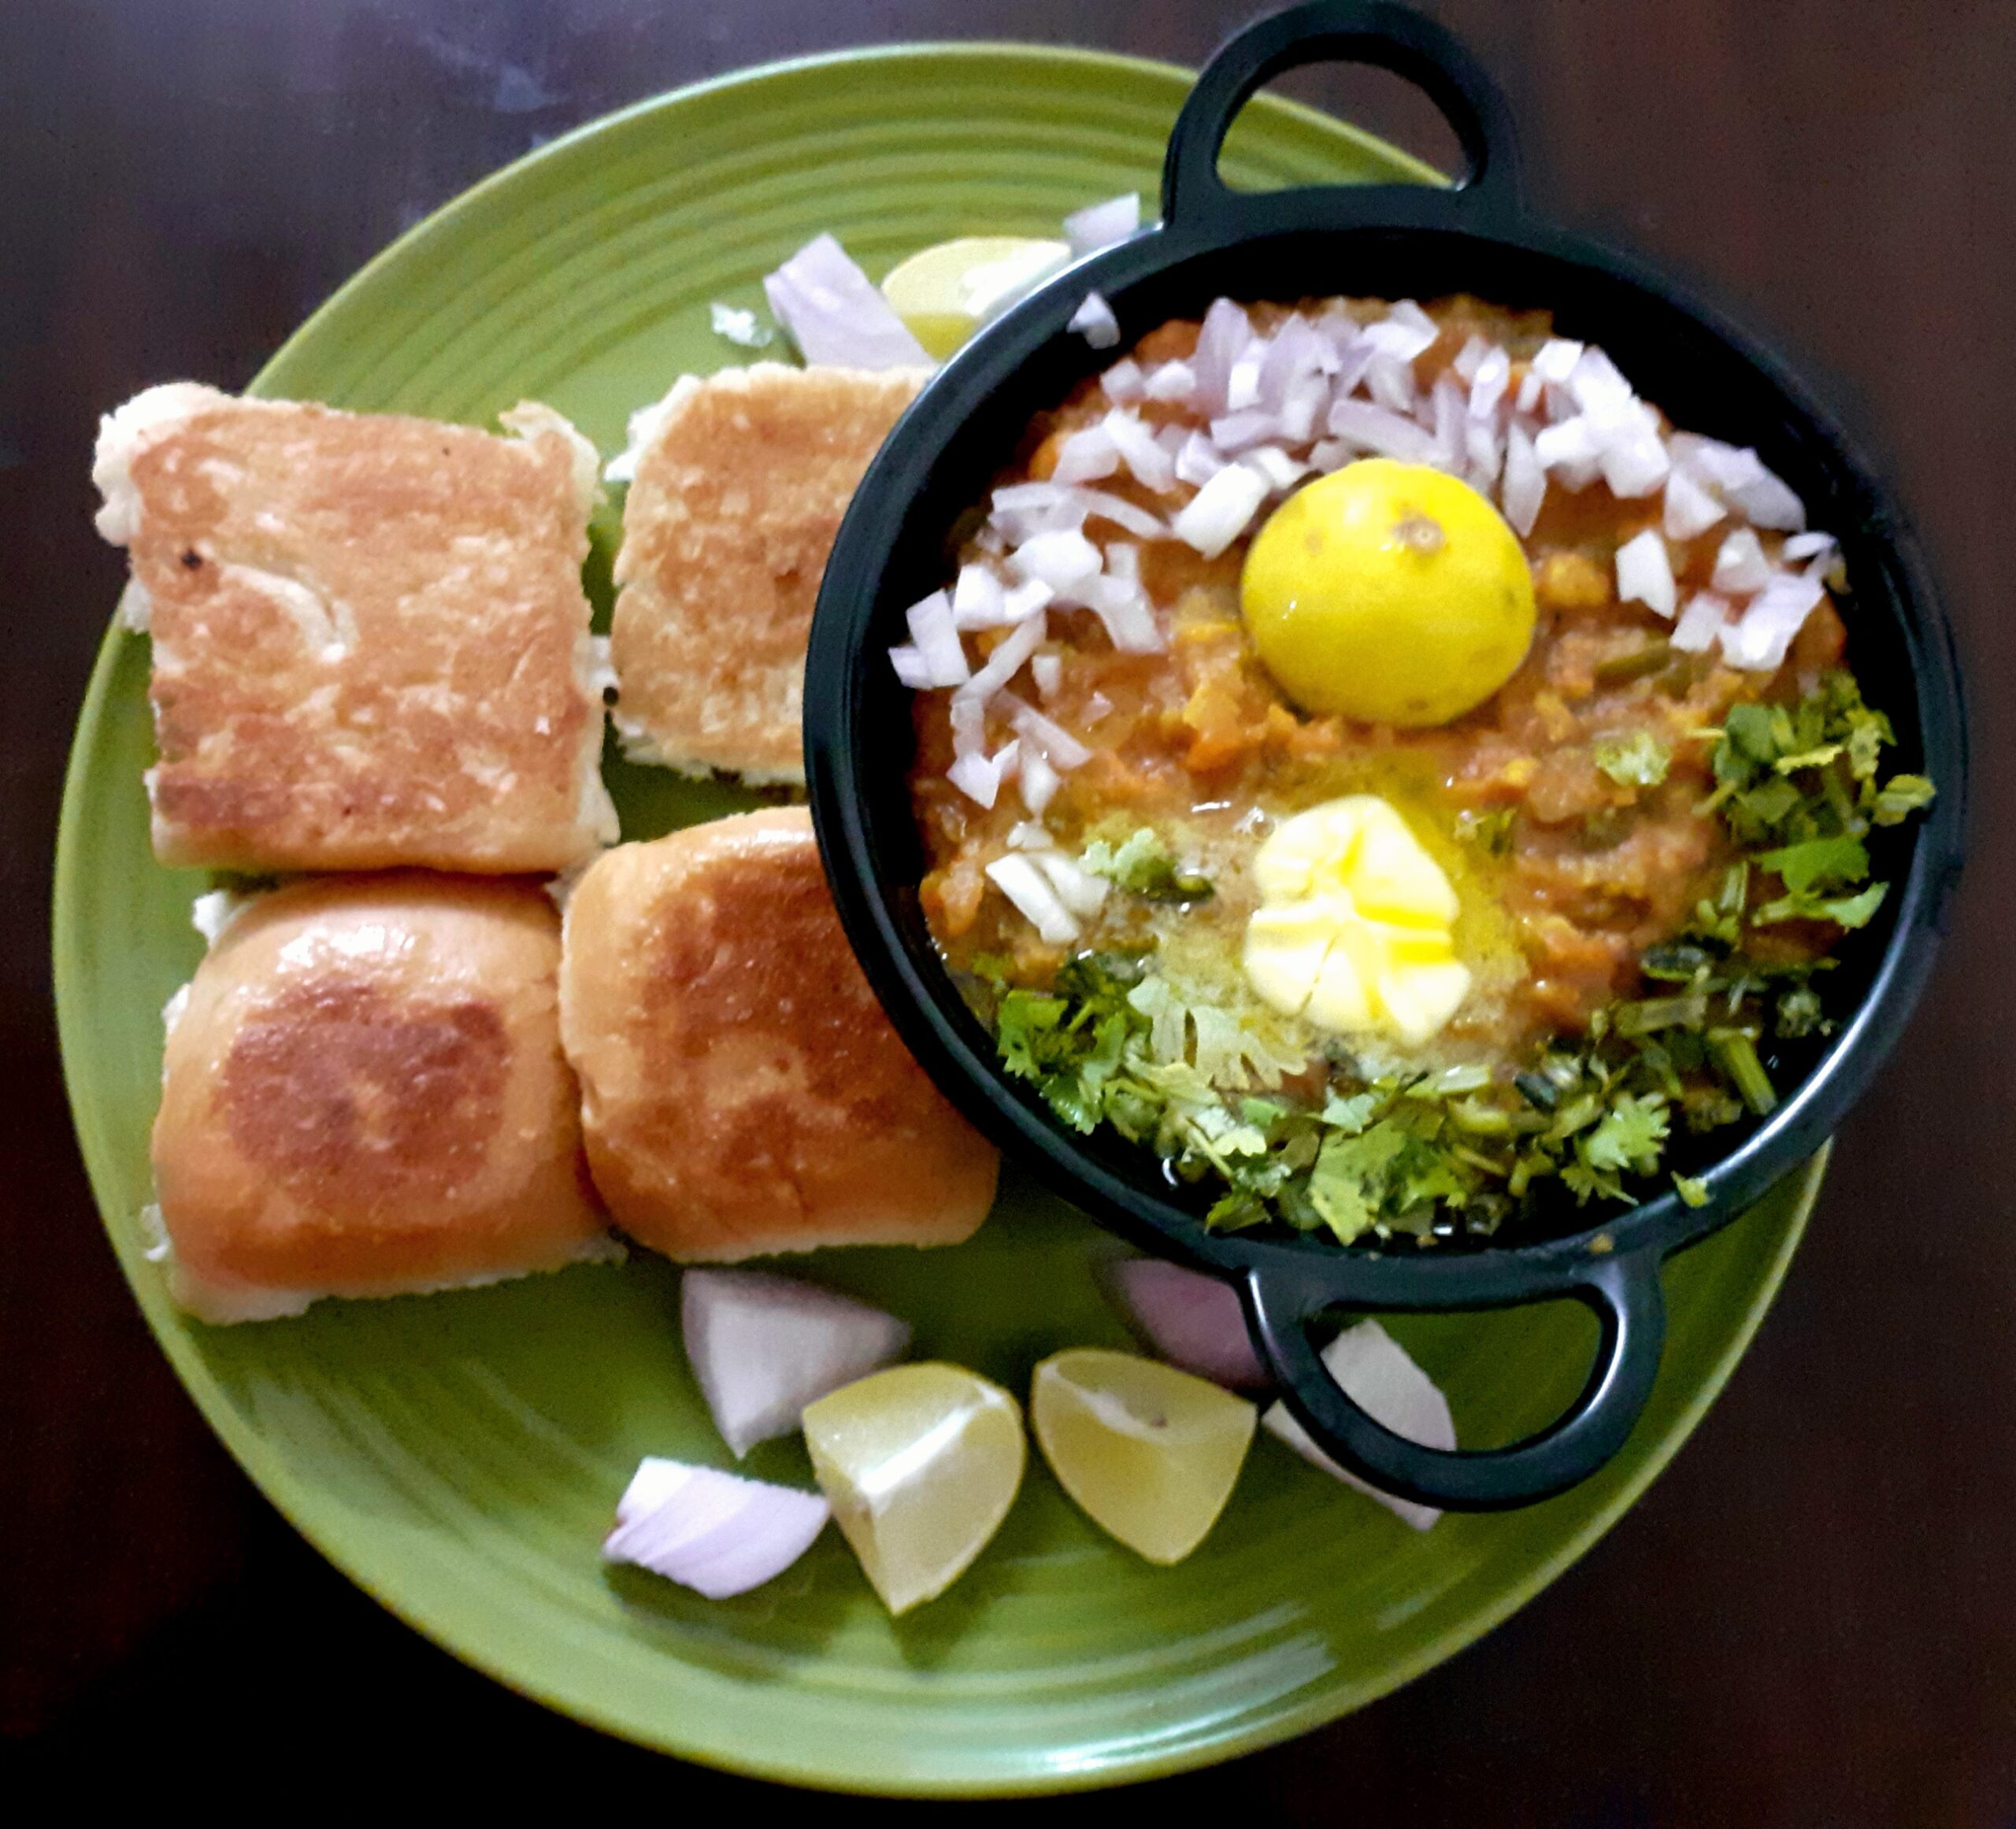
Pav Bhaji
Pav Bhaji the popular food from Maharashtra is everyone’s favourite. It is also the most popular street food. Everyone has their favourite outlet for this yummy street food variety. Mine is Elco Arcade in Mumbai and Gangotree in Chennai. If you visit these places please try them out.
The bread also called the Pav has to be fresh and the Bhaji the Maharashtrian word for Subji, tangy and spicy. Pav is a term that fills me with warmth because I have many childhood memories associated with it. When in Mumbai my aunt would decide to make us her yummy Pav Bhaji, we kids would be sent to these narrow bylanes in Bandra where the Pav was made fresh. here was this whole colony of Pav(bread) bakers and the whole area would smell so good. Just for this fact we kids would never refuse to go. This place was very close to my aunt’s house and we would take a morning walk to this place and would be handed over a fresh and hot batch of Pav for our evening Pav Bhaji. I just cannot forget the aroma of fresh bread just out of the oven.
In this dish, mashed potatoes are the main ingredient along with a tomato base. Onions and spices are also added which gives it the iconic taste. Topped with a dollop of butter a squeeze of some lime, this is could the best food ever.
I like to add more vegetables apart from the Potatoes and so I add a tiny carrot, few finely chopped pieces of cauliflower, peas, and capsicum. I also like to add a puree of tomato instead of chopped tomato.
So when the demand at home is to make something special yet simple I mostly opt for Pav Bhaji.
While you are here please do check out my other recipes like Pakode wali Dal, Semolina Cheese balls, Dahi Pohe, Pineapple rasam, Chinese paratha, and more…
Here is the recipe of Pav Bhaji for you-
PREP TIME: 20 Mins COOK TIME: 20 Mins
TOTAL TIME: 40 Mins COURSE: SNACK
CUISINE: MAHARASHTRIAN SERVINGS: 4
AUTHOR: Rajni Ram
Ingredients:
Pav- Store-bought
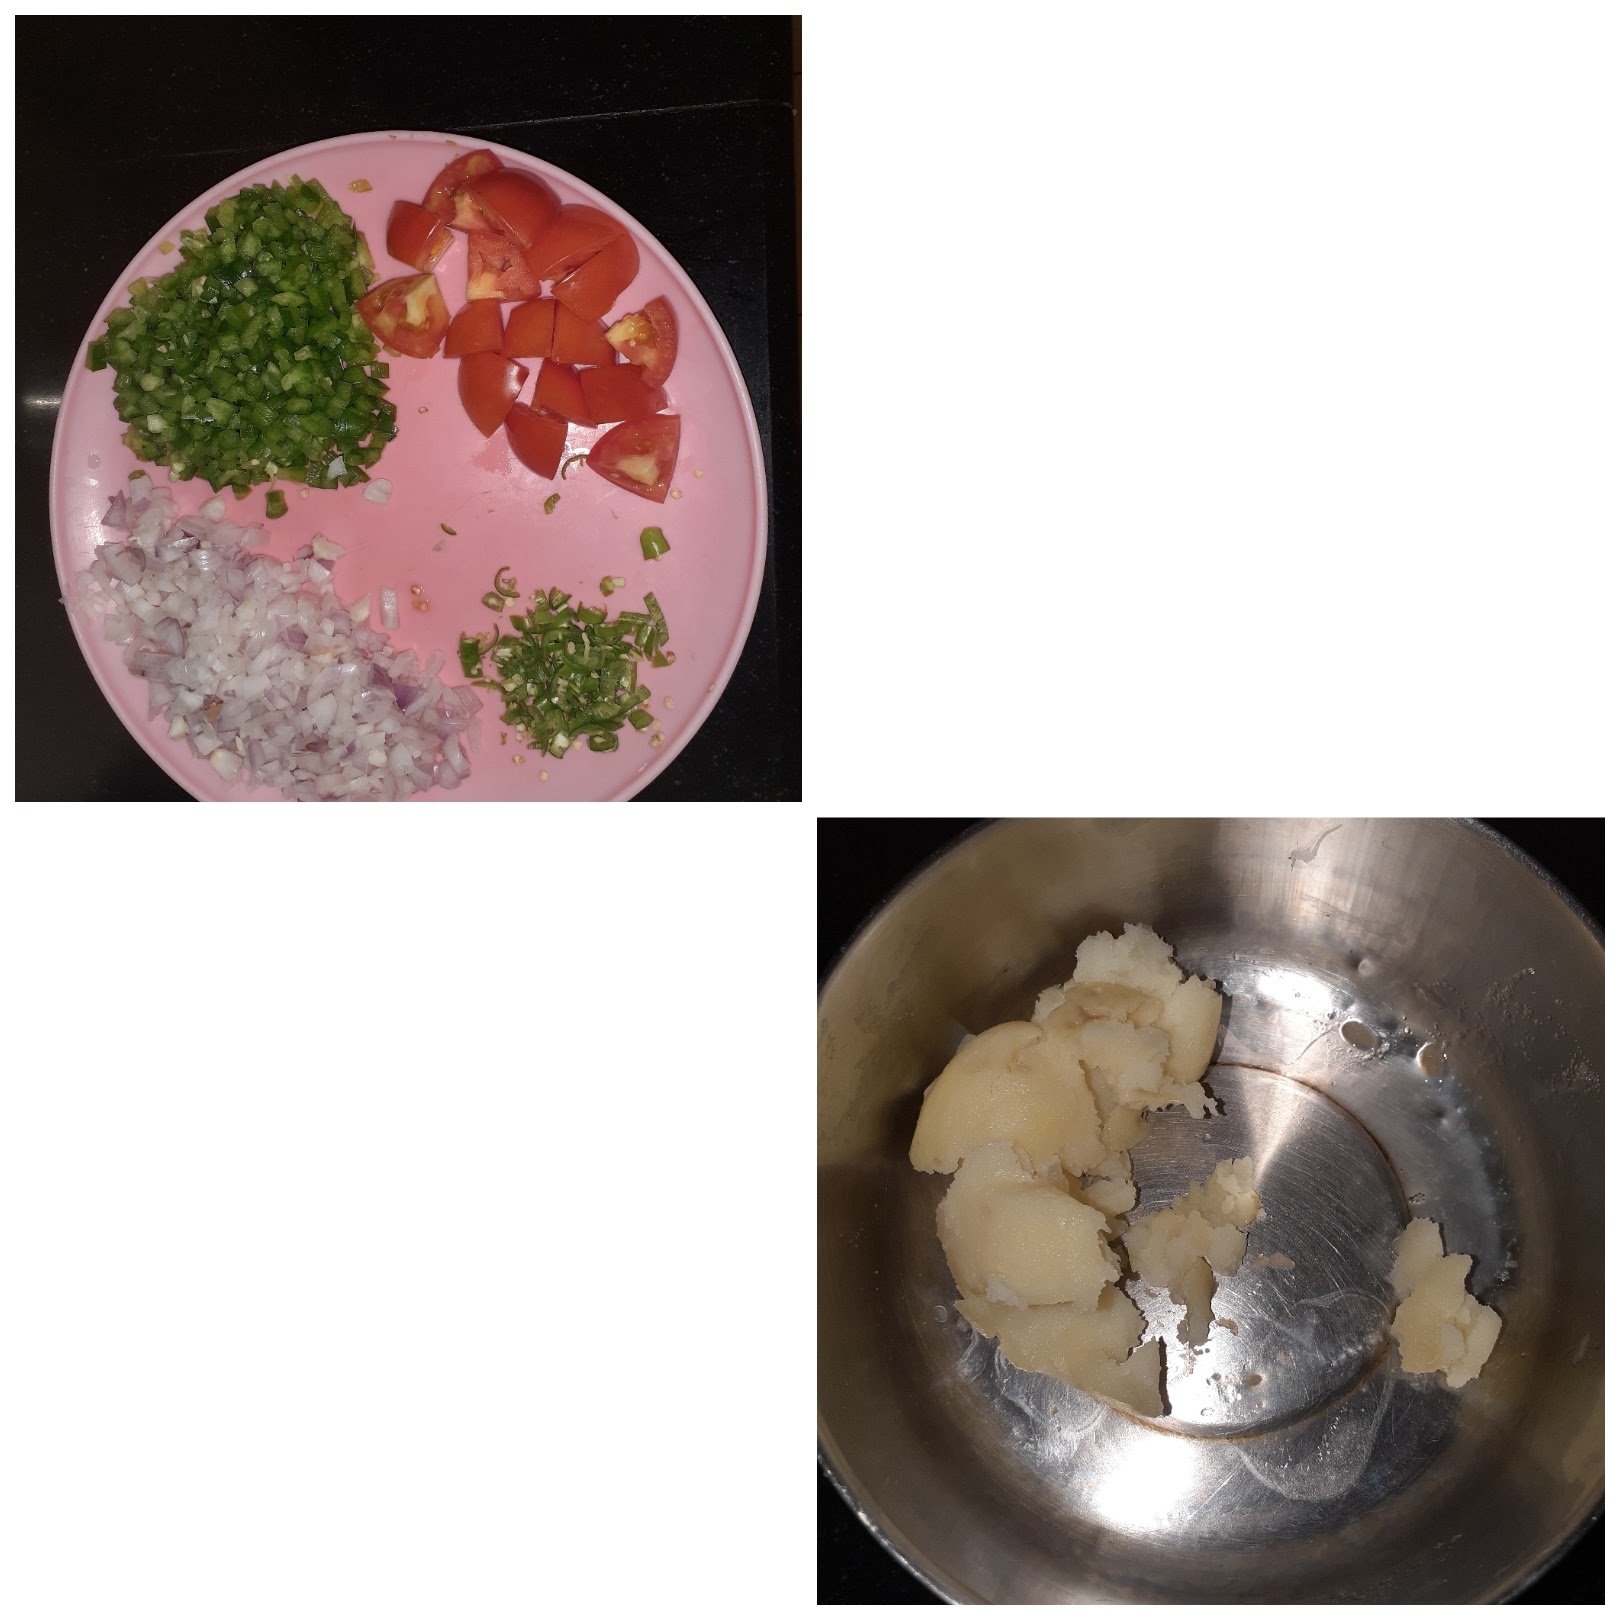
Potatoes 4 medium boiled and mashed
Tomatoes 2 large(pureed) used the local variety(desi) if available
Onion 1 large finely chopped
Green chillies 3 finely chopped
Cauliflower 3 florets finely chopped
Carrot 1 medium finely chopped
Capsicum 1 medium finely chopped
Green peas 1/2 cup ( I have not used here as could not find fresh ones)
Ginger -garlic paste 1/2 tsp
Cumin seeds 1 tsp
Turmeric powder 1/2 tsp
Red chilli powder 1 tsp(or more if you prefer)
Coriander powder 1 tsp
Fennel powder 1 tsp
Amchur powder 1 tsp
Salt as required
Garam masala powder 1/2 tsp
Oil for sauteeing
Butter for toasting the pav and a dollop for the bhaji
Directions:
Boil the potatoes and mash them. Puree the tomatoes in a blender. In a karahi/pan take 1 tbsp oil and heat. Add the cumin seeds and as they crackle add the green chillies and saute for 30 seconds. Now add the onions and saute for a minute. Add the turmeric powder and continue to saute for 30 seconds, now add the ginger-garlic paste and saute until the onions start turning light brown. Now add in the capsicum and saute for a 1 minute. Remember that all sauteeing to be done on high flame. Now add the cauliflower and carrot and saute for 2 minutes. Now add the tomato puree, followed by red chilli powder, coriander powder, fennel powder, and salt and stir nicely. Cook for a minute. Now add the mashed potato and using a masher keep mashing and mixing all the veggies in the pan. Repeat the process until all are well combined. Now add 1 cup(can add up to 1.5 cups) of water and cook for 2 minutes on low flame. Now add Garam masala powder and turn off the flame. Garnish with finely chopped coriander leaves, finely chopped onions and a dollop of butter. Toast the fresh Pav with a liberal amount of butter and serve hot with the Bhaji. Enjoy. Bon Appetit.
STEPWISE RECIPE FOLLOWS:
1. Assemble all ingredients. Boil and mash Potatoes, puree the tomatoes. Chop onions and green chillies.
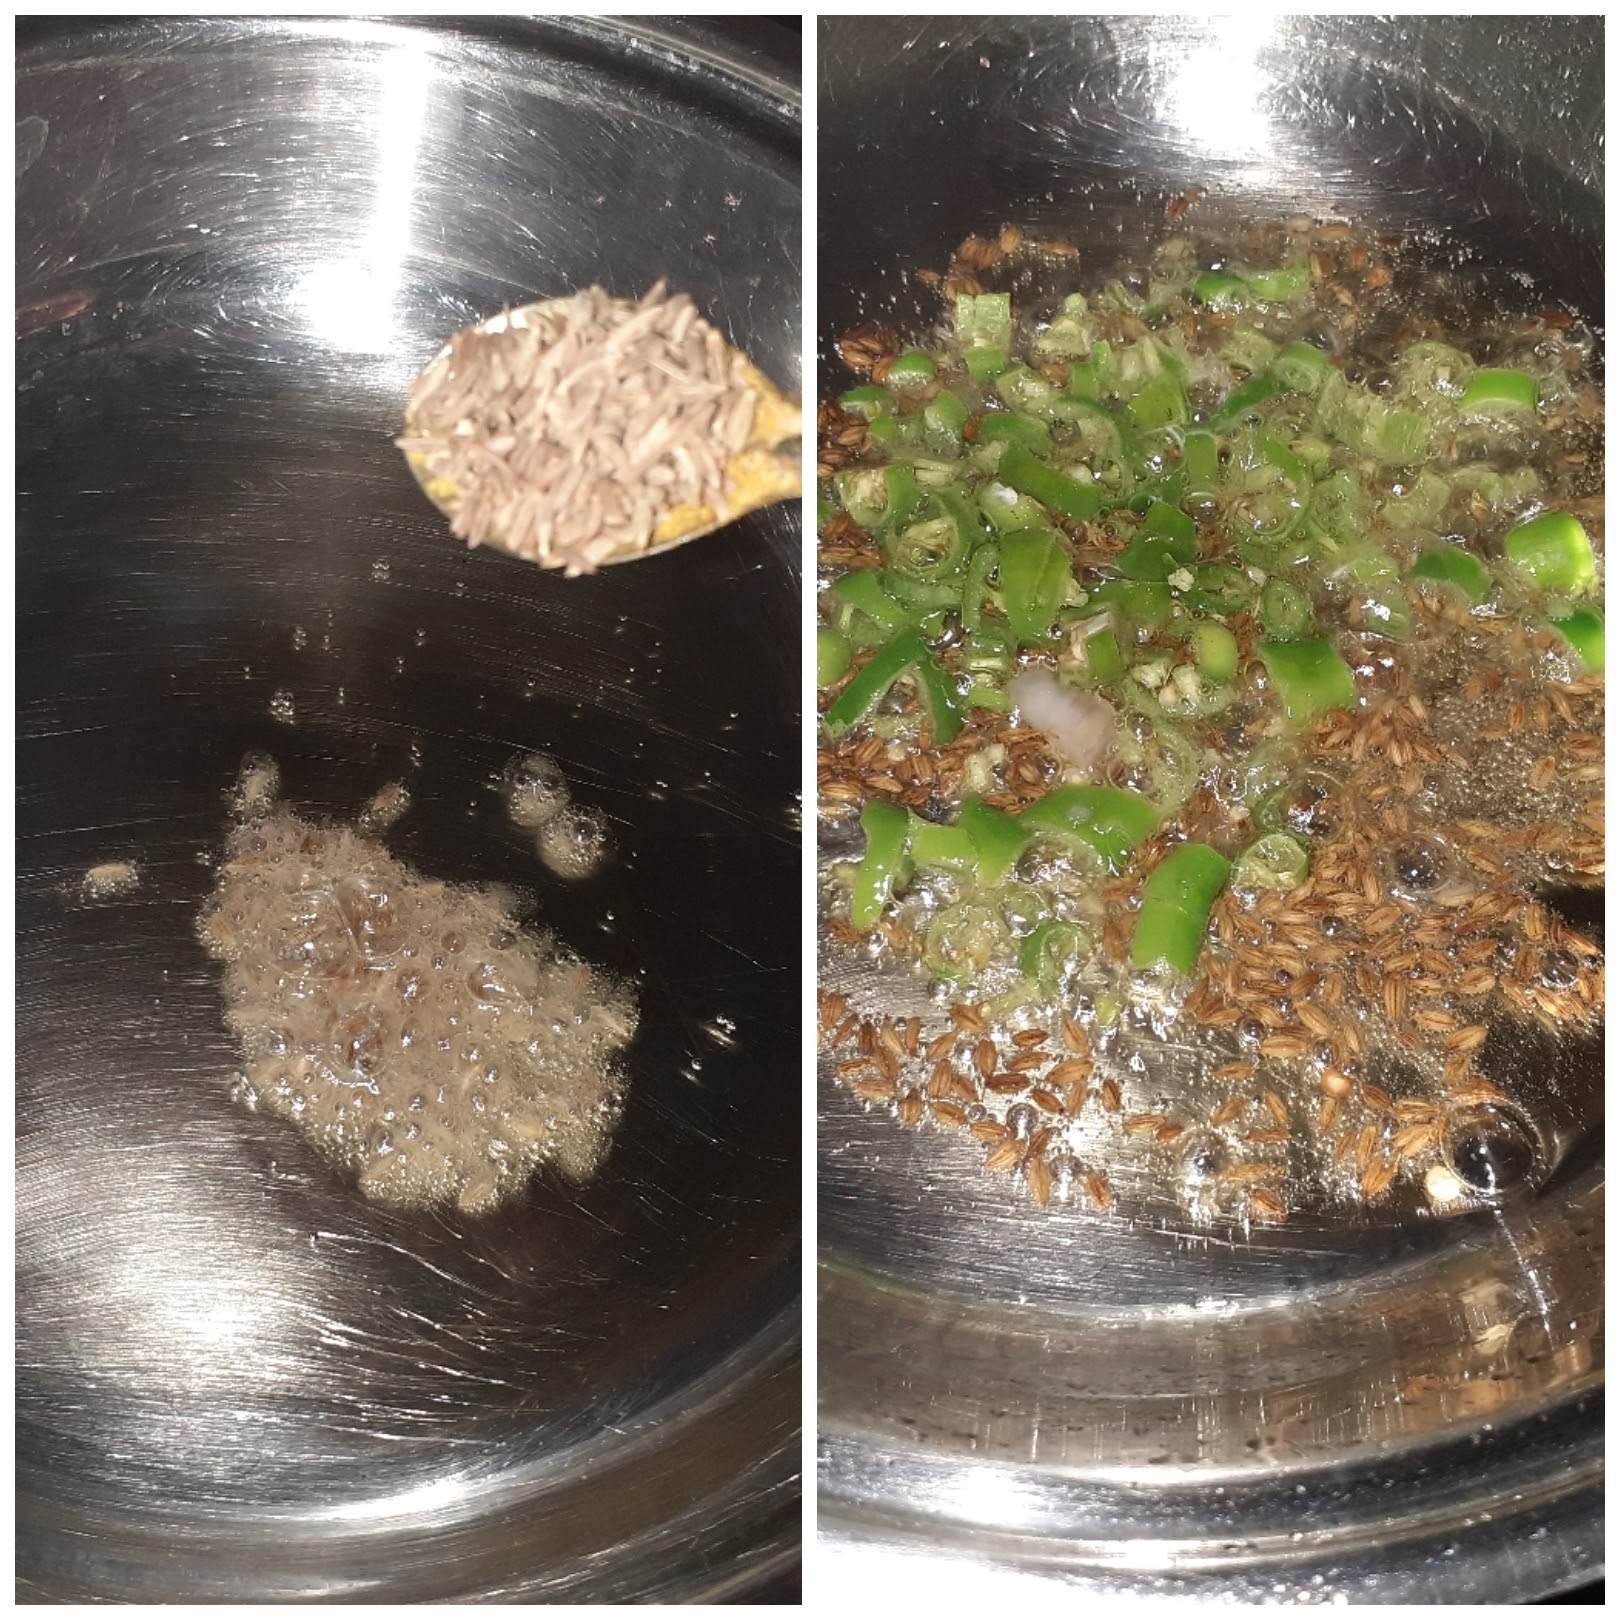
2. In a pan take 1 tbsp oil and heat. Add in the cumin seeds and as they crackle add the green chillies and saute for 30 seconds.
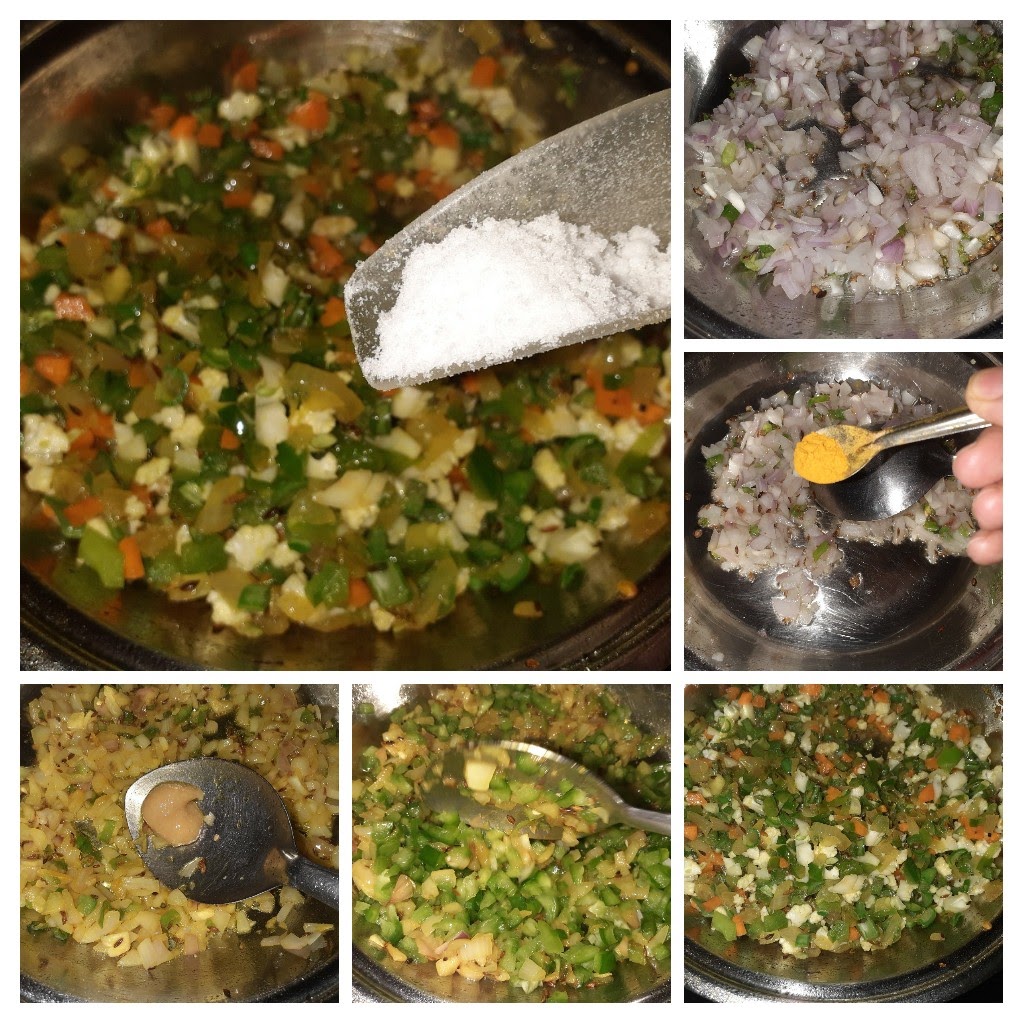
3. Now add the onions and saute on high flame for 30 seconds followed by turmeric powder, ginger-garlic paste and saute for 1 minute. Now add in the capsicum and saute for a minute. Add in the cauliflower and carrots and green peas(if using), add salt and continue to saute for 2 minutes.
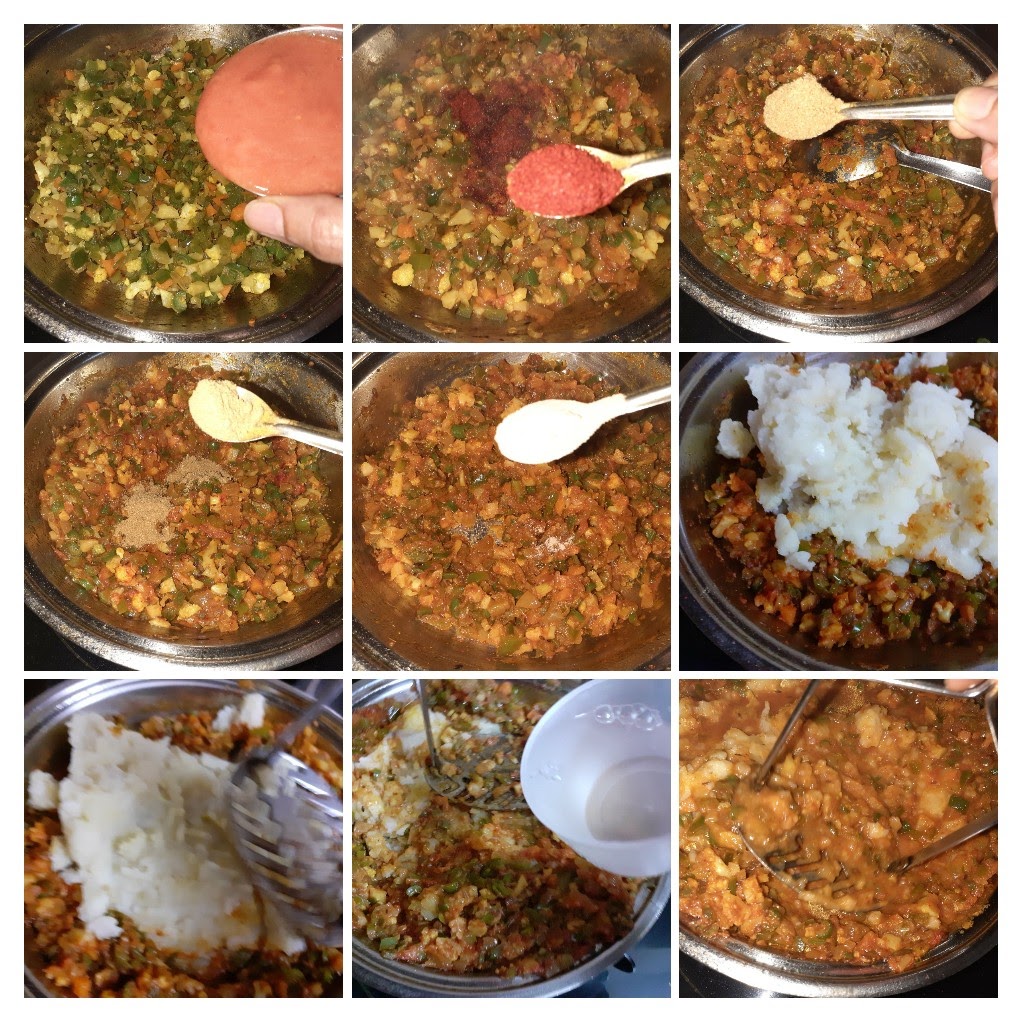
4. Now pour the tomato puree, followed by red chilli powder, coriander powder, fennel powder, amchur powder and stir nicely. Cook for 1 minute and add in the mashed potatoes and mix well. Using a masher mash the potato-veggie mixture in the pan until all are well combined. Now add about 1 cup water and continue to cook for 2 minutes. Check for salt and spice and if less add at this stage.
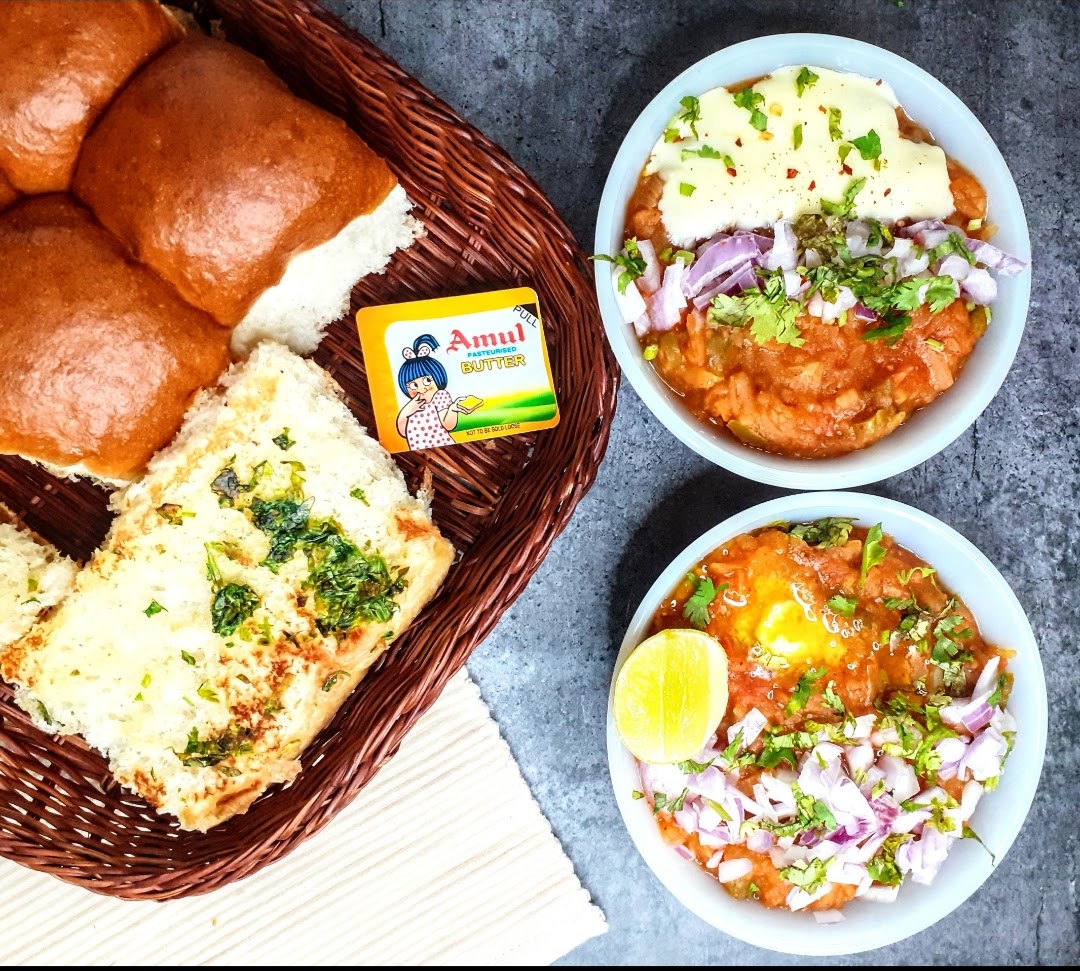
5. Finally, add the garam masala powder and turn off the flame. The bhaji should not be lumpy nor should it be runny. The spicy and tangy Pav Bhaji is ready to feast on. Toast some fresh Pav with a liberal amount of butter and serve the bhaji topped with finely chopped onion, coriander and a dollop of butter.
NOTES:
1. I recommend you use some green peas. As I could not find any on that said day I have made my Bhaji without it. If using boil them ahead.
2. Be liberal with the butter it really enhances the taste.
3. one can also sprinkle some grated cheese over the Bhaji, to make Cheese pav bhaji.
4. If you don’t want to add other vegetables it is fine and the dish will still taste the same.
If you tried this recipe and liked it please comment below. I would love to hear from you.
If you want the recipes emailed to you leave your id in the homepage near the????
icon. Whenever we have a new post the recipe will be mailed to you. Thank you for showing interest in Rajjo’s Kitchen.
Kothimbir Vadi
Kothimbir Vadi is a savory Maharashtrian snack. It is made of Fresh coriander leaves and Besan/gram flour. Coriander as I have mentioned in my previous posts is my favourite herb. So when there is a recipe predominantly with coriander leaves how could I let it go and hence the post.
This recipe is very simple, flavourful( this word is used many times across this blog if you notice, as I believe the flavour is a very important entity to any food.) and healthy. This snack has a strong resemblance to Gujarath’s Muthias( will blog this soon).
Traditionally this snack is deep-fried, but now one can shallow fry or saute in a small amount of oil too. This dish is cooked twice as it is steamed first and then shallow fried. It is soft and moist when steamed and develops a nice crunch when fried. It goes very well with the sweet chutney and garlic chutney and makes for a great tea time snack. Made to bite-size pieces can be served as a starter in get-togethers. I have really wanted to try this recipe for a long while and I’m happy I did. Everyone at home was pleased by this dish????.
While you are here please view other recipes by Rajjos kitchen like
here is the recipe of Kothimbir Vadi for you–
PREP TIME: 15 Mins COOK TIME: 25 Mins
TOTAL TIME: 40 Mins COURSE: SNACK
CUISINE: MAHARASHTRIAN SERVINGS: 4
AUTHOR: Rajni Ram
Ingredients:
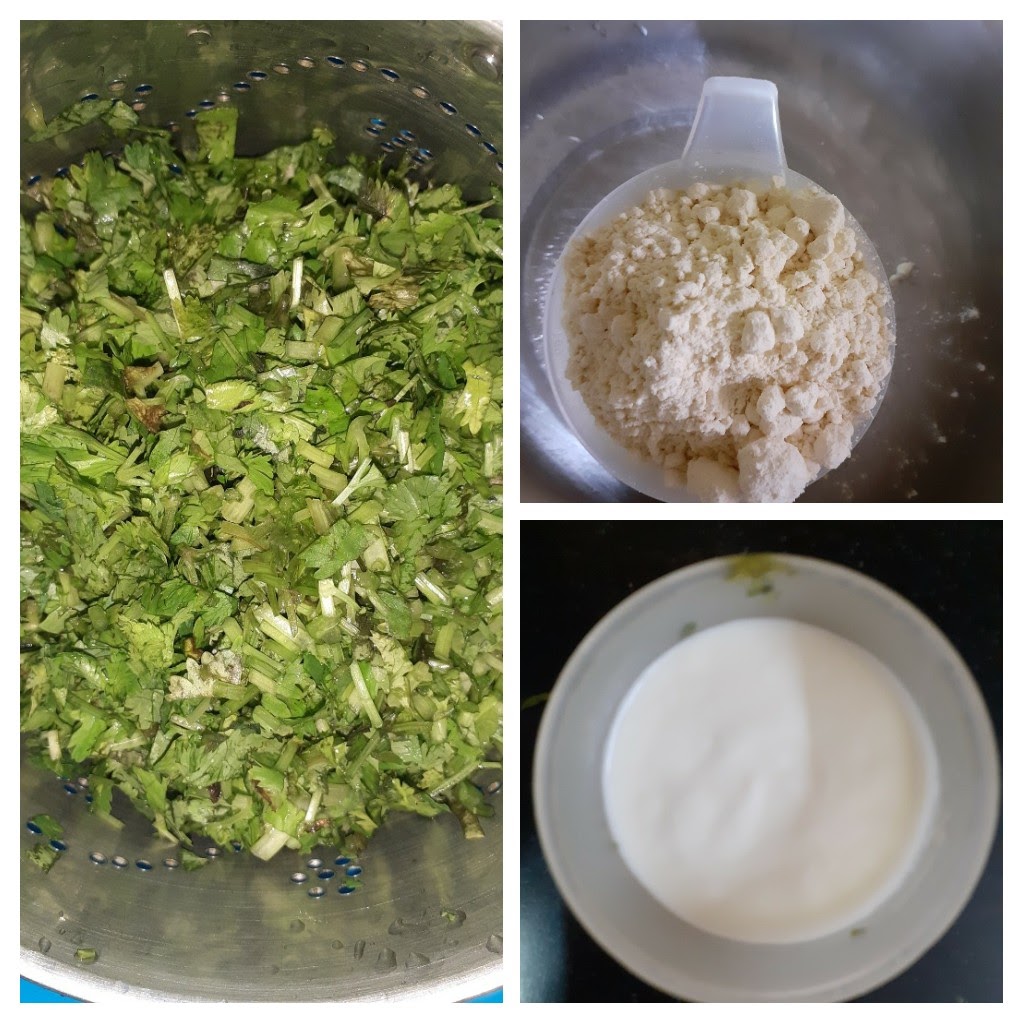
Fresh Coriander finely chopped 2 cups
Besan/Gram flour 1 cup
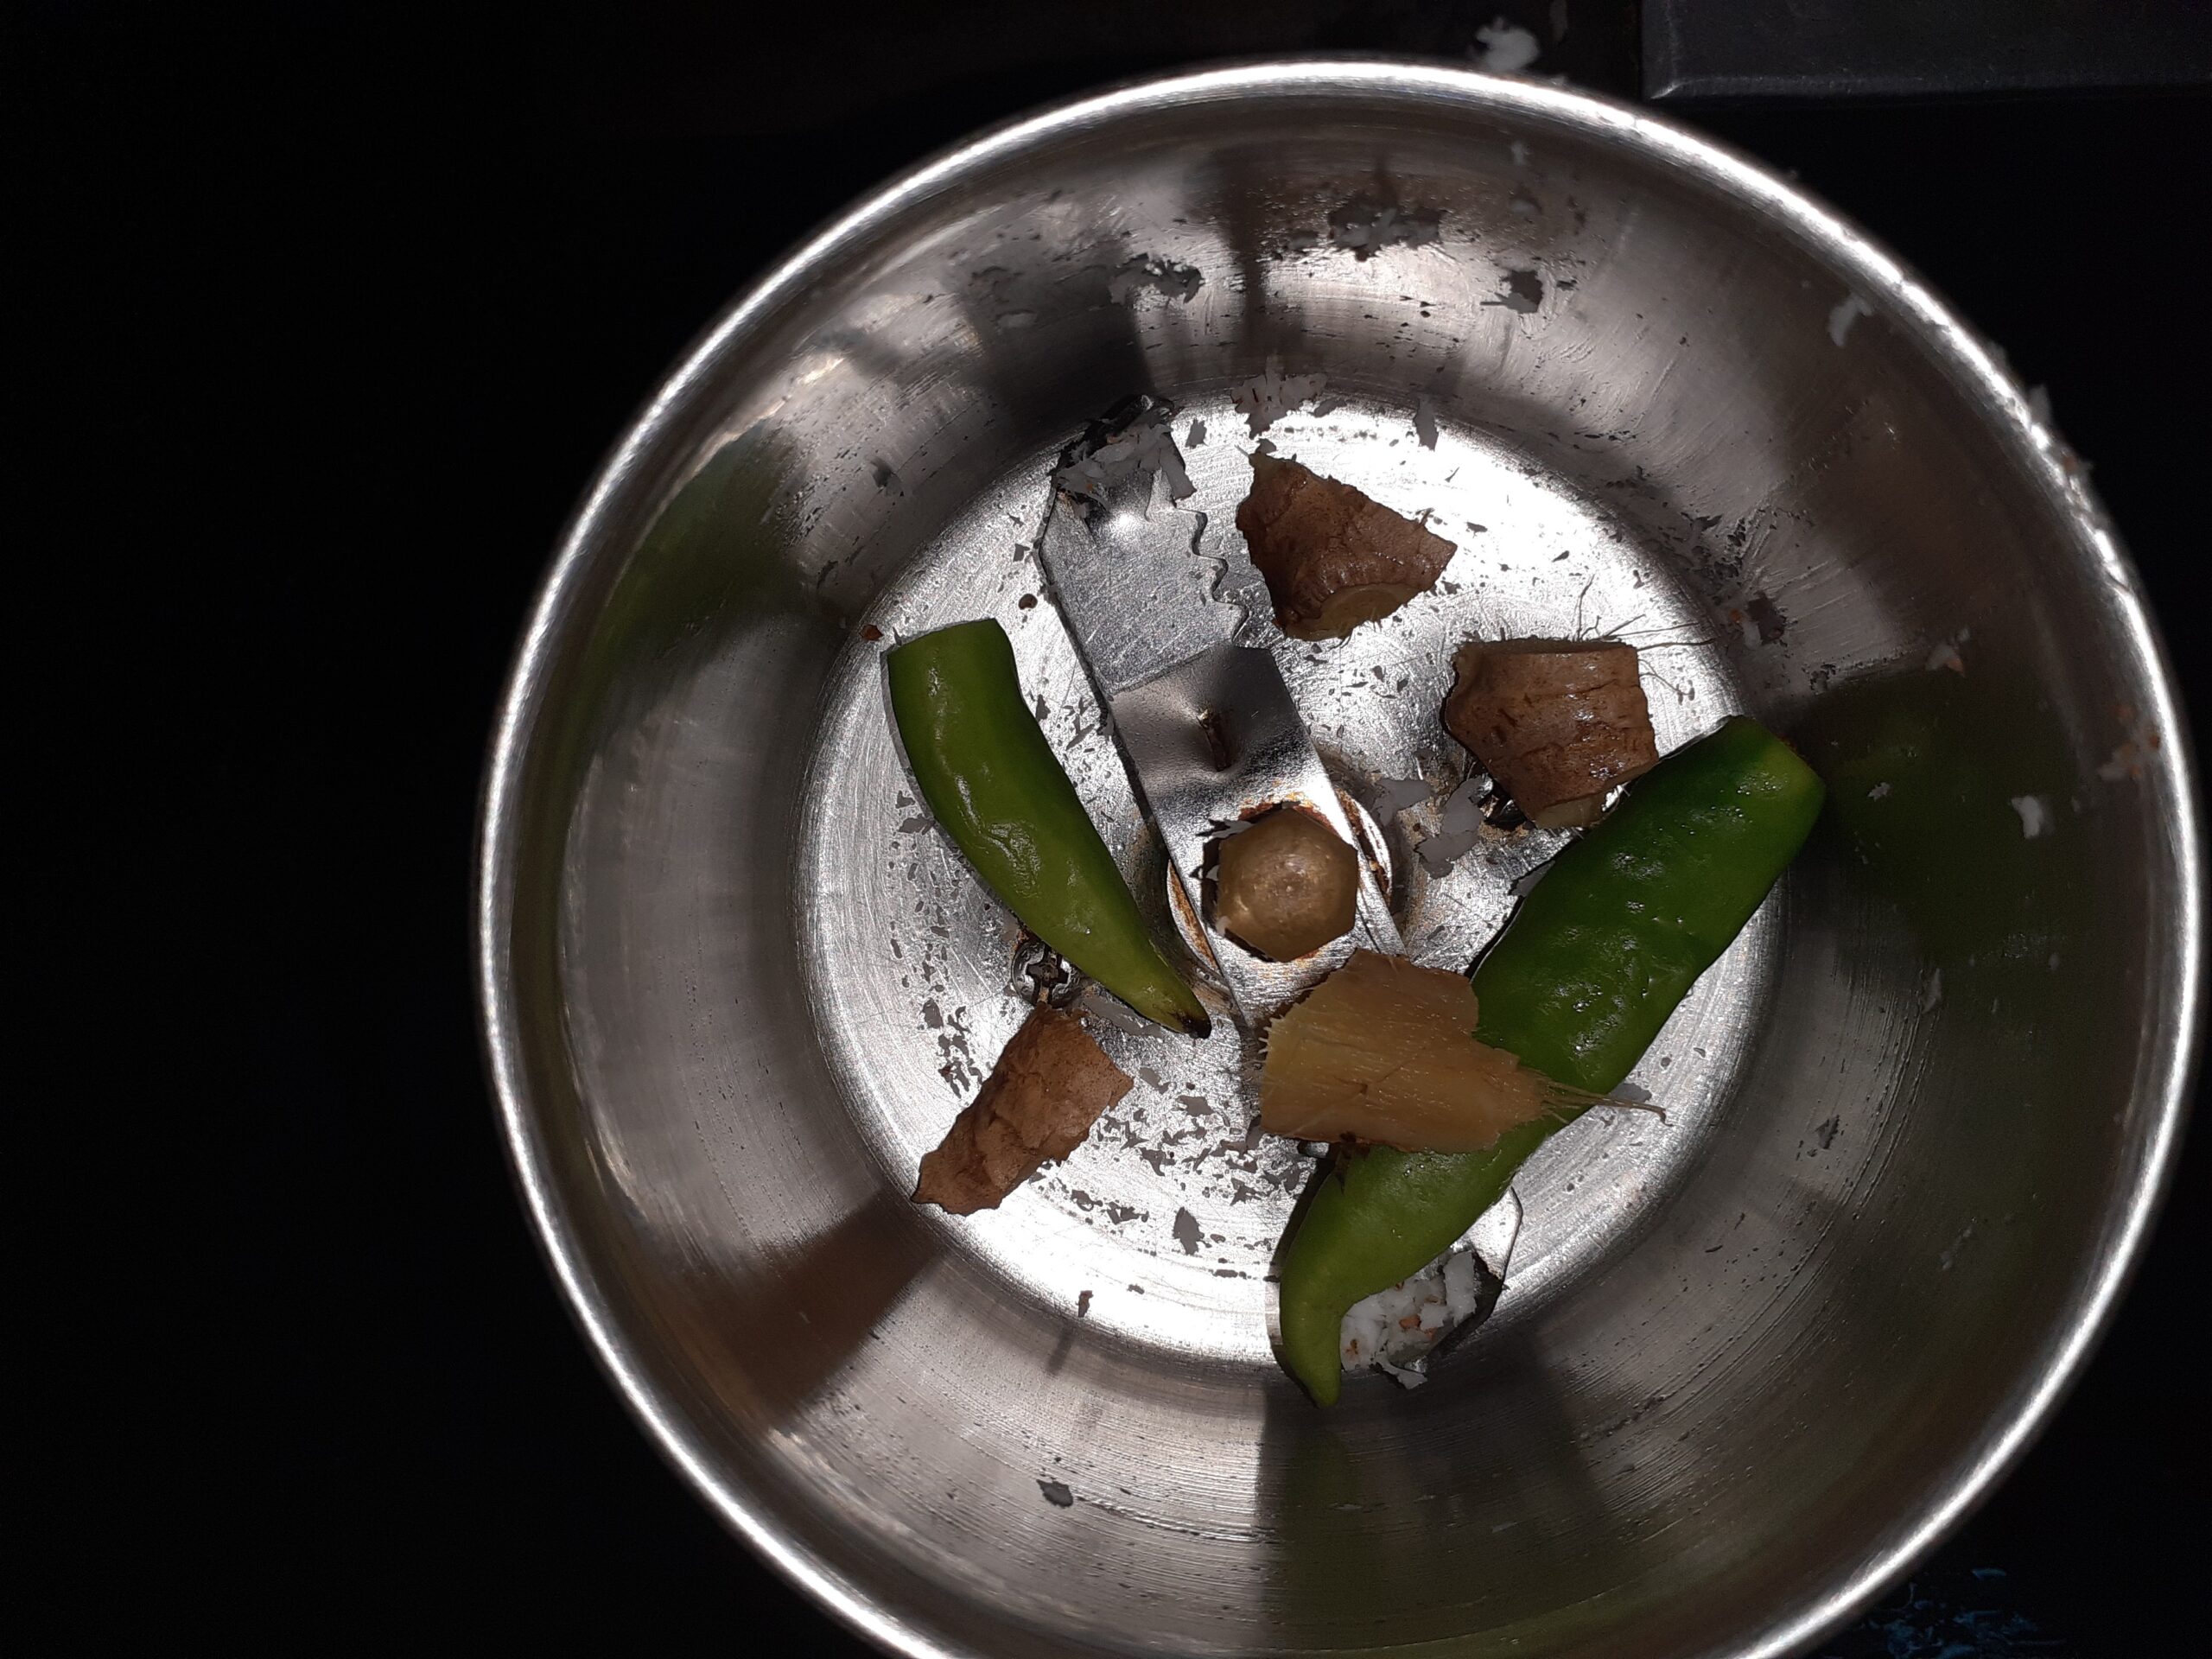
Green chillies 2-3
Ginger 1 inch piece
Garlic(optional)
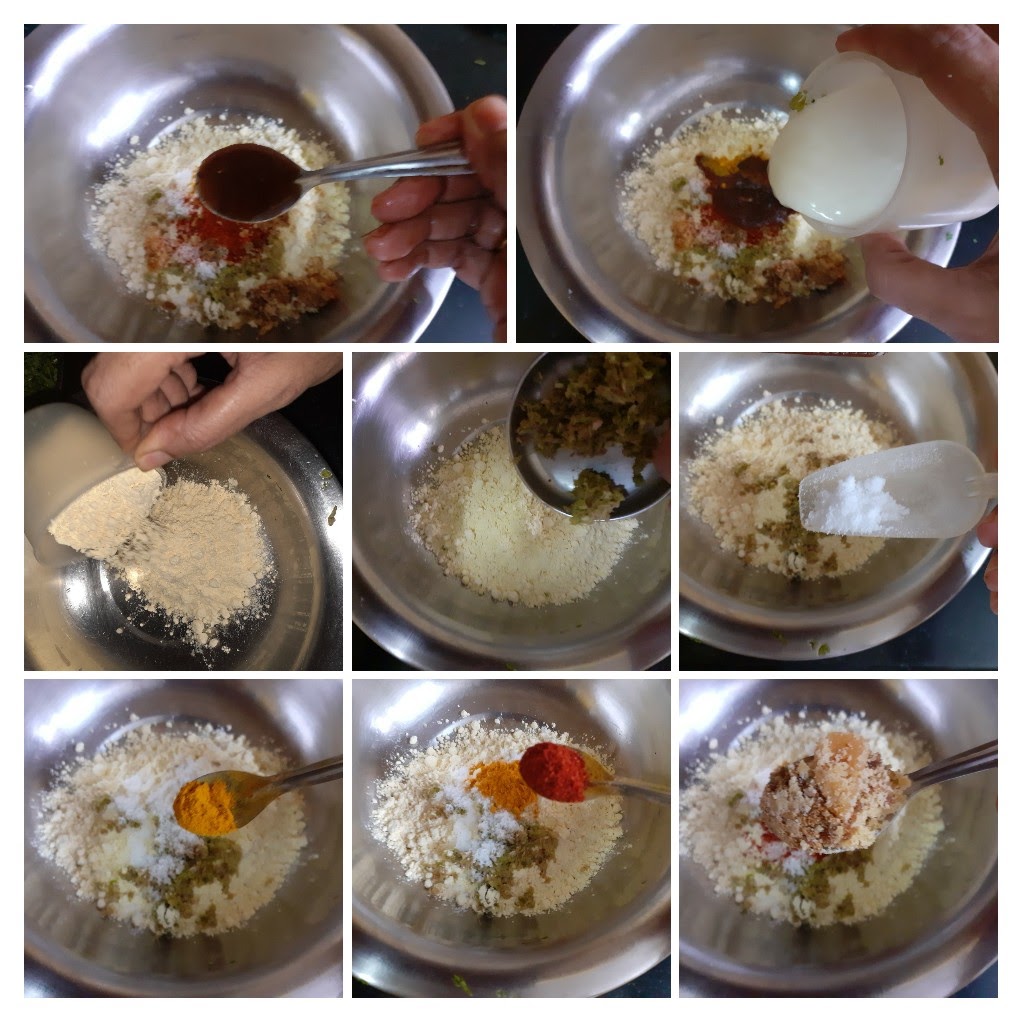
Salt as per taste
Turmeric powder 1/2 tsp
Red Chilli powder 1 tsp( or as per taste)
Jaggery 1 tsp
Tamarind pulp 1 tsp
Curd 1/2 cup
Water as required
cooking soda 1/2 tsp
Mustard seeds 1 tsp
Jeera/cumin seeds 1tsp
Asafoetida 1 tsp
Grated coconut 1 tbsp
sesame seeds(white) 1 tsp
Directions:
Get the steamer/ pressure cooker ready for steaming. By the time the batter gets ready, the water would have heated and the batter can be steamed immediately, after mixing.
Make a coarse paste of green chillies, ginger, and garlic(if using).In a dish take the Gram flour/besan, add the ginger-green chilli paste, followed by salt, turmeric powder, red chilli powder, jaggery, tamarind pulp. Mix nicely. Now add the curd and stir with a spatula. It will be a semi-wet mixture. Add in the chopped coriander leaves followed by a little water( around 1/2 cup) and make a thick batter. The batter should not be runny, so add water little at a time. Grease a plate or flat vessel with oil and before pouring the batter into the greased plate/ vessel add the cooking soda and stir nicely so that the soda combines well with the batter. Immediately pour the batter into the greased plates, tap the plate lightly, so that the batter settles evenly and place it into the steamer. Steam for 15 minutes. After steaming, remove and cool completely. Cut them into squared or diamonds and keep aside. Heat sufficient oil in a flat pan and put in the tempering of mustard and cumin seeds. As they splutter, add asafoetida and place the cut vadi pieces and fry until they turn brown. Keep turning sides for equal cooking. Remove when all sides are lightly brown and crisp. In the same pan drop the grated coconut and seame and roast until they turn light brown. Now scatter this on the fried Kothimbir Vadi for nice flavour. Kothimbir Vadi is ready to serve with garam chai…Enjoy. Bon Appetit.
STEPWISE RECIPE FOLLOWS:
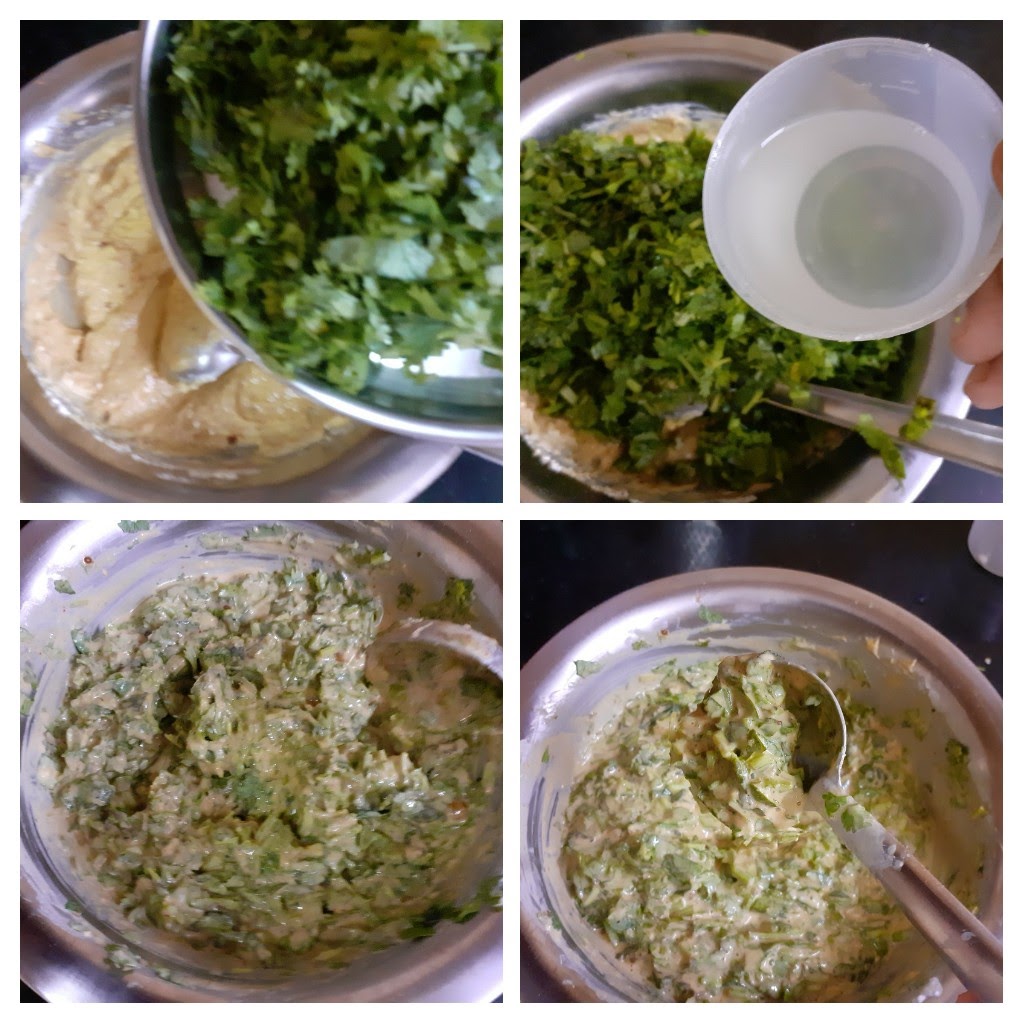
1. Assemble all ingredients. Wash the coriander leaves well and drain all moisture, chop them finely.
2. Pour water into a steamer and get it going, so that by the time the batter is ready the steamer is ready. Make a coarse paste of the chilli and ginger(and garlic too if using) and keep ready.
3. Now in a dish take the besan and add the green chilli and ginger paste, salt, followed by turmeric powder, red chilli powder, jaggery, tamarind pulp. Add the curd and mix well with a spatula. It should be a semi-wet mixture.
4. Now put in the chopped coriander and mix well. Add water little at a time to make a smooth, yet thick batter. The batter should not be runny. Grease a plate or a flat dish with oil.
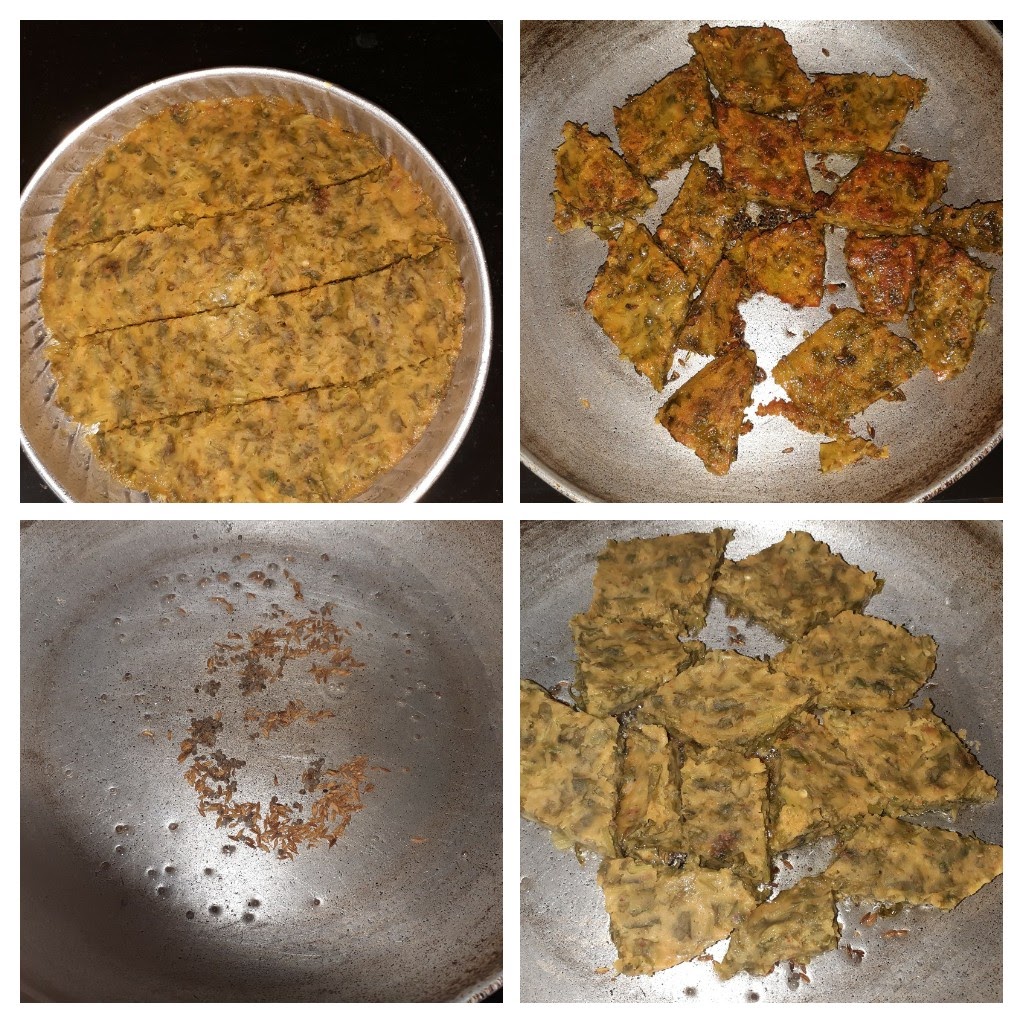
5. Now just before pouring the batter into the plate, add the cooking soda and mix well. Pour the batter into the greased plate and set it in the steamer for 15 minutes.
6. After steaming, remove the plate and cool completely. Cut into squares or diamonds and set aside. In a flat pan, pour sufficient oil for shallow frying. Add the mustard seeds, cumin seeds and asafoetida and place the cut Vadi pieces into the oil. Fry each side until light brown and crisp. Remove from pan. Repeat for all the pieces.
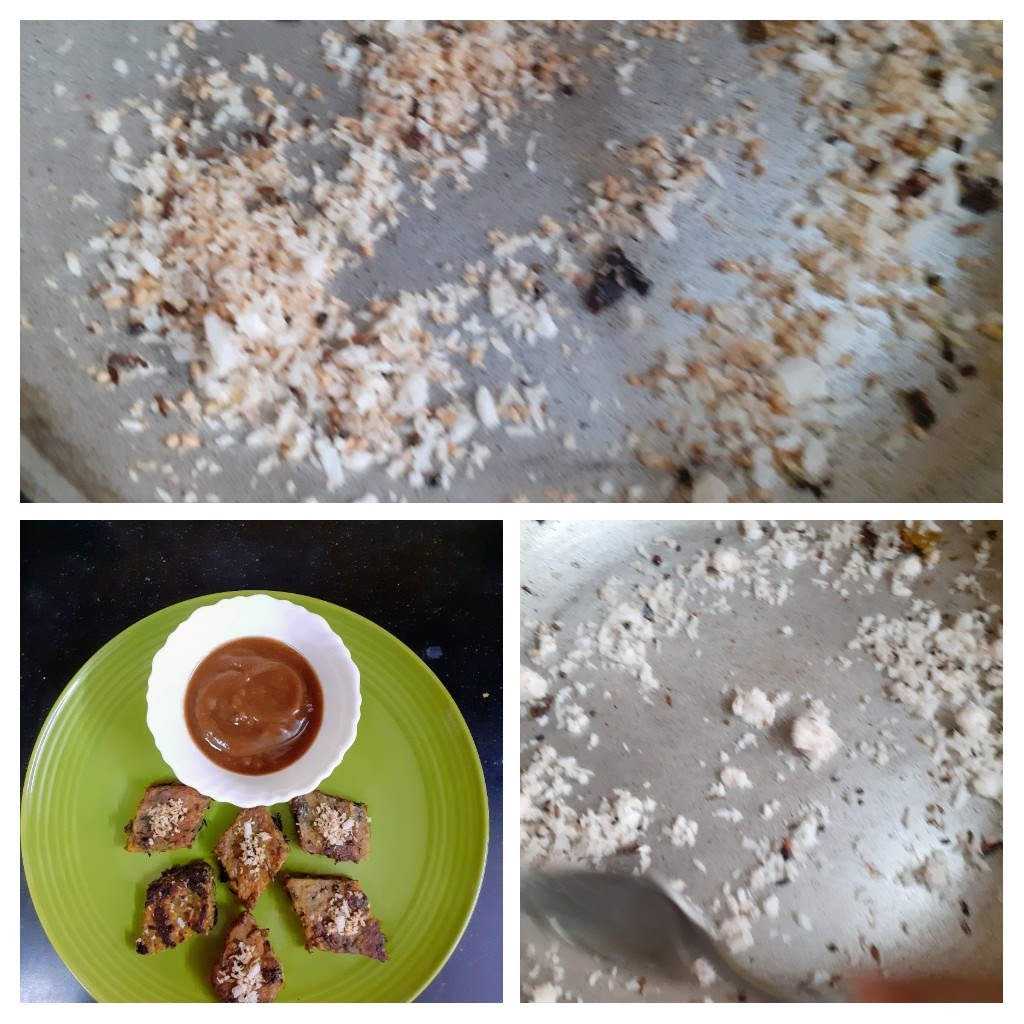
7. Now in the same pan put in the grated coconut and Sesame seeds and saute until light brown. Put this on tempering on the vadi for a nice flavour. The Kothimbir Vadi is ready.
NOTES:
1. The ratio of coriander leaf to Besan is 2:1, stick to that. More quantity scale up the measures in the same proportion.
2. Wash and drain the coriander leaves well before chopping.
3. I have not used garlic, but it can be added.
4. If you like the Vadis deep-fried, go ahead and fry them.
If you tried this recipe and liked it please comment below. I would love to hear from you.
If you want the recipes emailed to you leave your id in the homepage near the????
icon. Whenever we have a new post the recipe will be mailed to you. Thank you for showing interest in Rajjo’s Kitchen.
Dahi Pohe/Moru Aval
This recipe of the humble Poha(beaten rice flakes)/Aval soaked in curd is one of my favourites. I make it whenever I have a lot of sour curd. Healthy and filling at the same time. It makes for a good breakfast or mid-evening snack(Tiffin) option. I make it for dinner too when lunch is heavy. There are many variations of the Pohe like Kanda Poha(onion Poha), Masala Poha(tomatoes and onions), Lemon Poha, Puli Aval(tamarind Poha), Vella Aval(Sweet Poha) and Dahi Pohe/Moru Aval. The Poha can be either thick or thin. For this recipe, I have used the thin one, but the same can be done with the thick one too, just that the soak time will vary. Thick Poha is used for recipes where the Poha is going to cook in a sauce so that it doesn’t become soggy. The Dahi Pohe makes for a good and healthy lunchbox recipe for kids. While you are here please have a look at other recipes by Rajjo’s Kitchen like Semolina Cheese Balls, Rava Dosa, Savoury Muffins and more…
Here is the recipe for Dahi Pohe/Moru Aval.
PREP TIME: 10Mins COOK TIME: 15 Mins
TOTAL TIME: 25Mins COURSE: BREAKFAST/TIFFIN
CUISINE: INDIAN SERVINGS: 4
AUTHOR: Rajni Ram
Ingredients:
Poha (thin) 250 gms
Sour curd 1 to 1.5 cups
Salt as per taste
Grated Coconut 2 tbsp
Peanuts 1 tbsp
Green chillies 2 finely chopped
Ginger 1 inch piece finely chopped
Dry red chillies 2 broken
Mustard seeds 1 tsp
Chana dal(gram dal) 2 tsp
Urad dal(black gram)2 tsp
Curry leaves a few
Asafoetida 1/2 tsp
Oil for tempering
Directions:
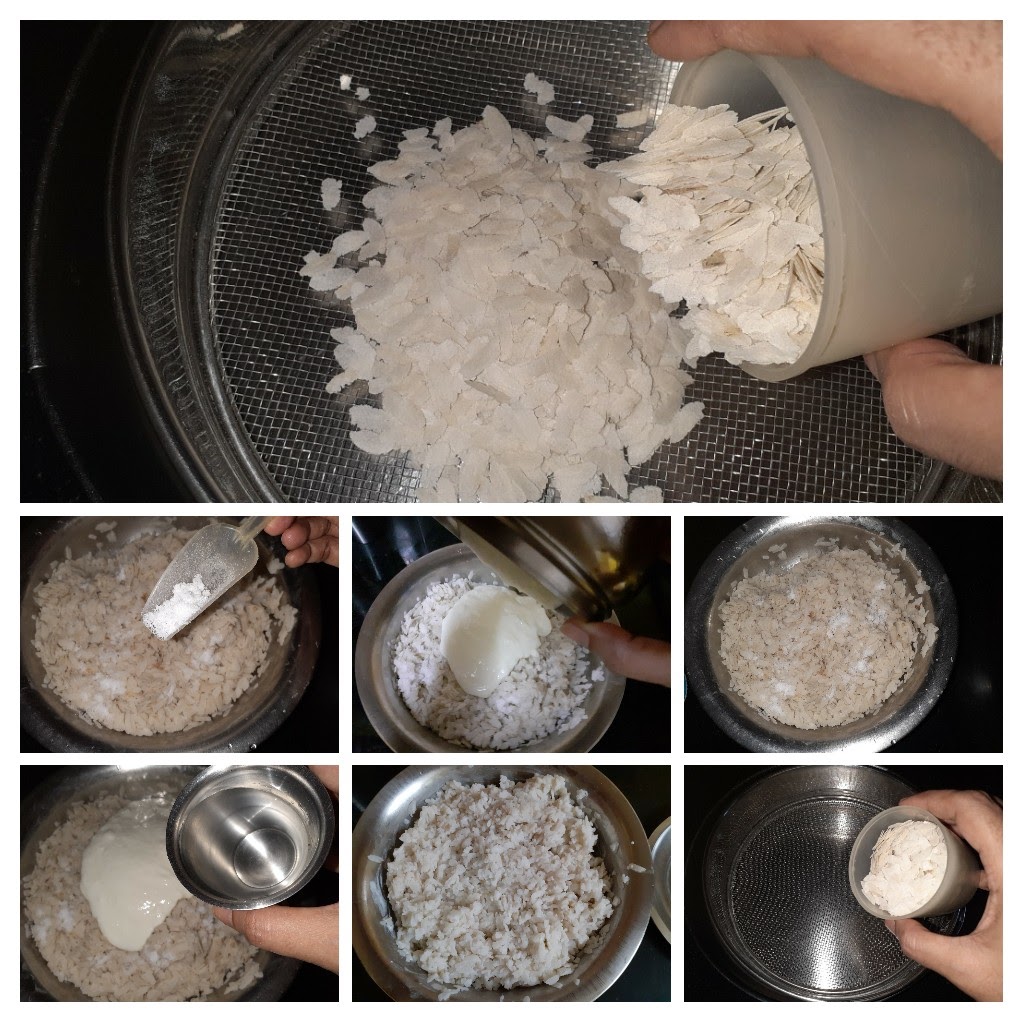
Pass the Poha through a sieve that has medium-sized perforations, such that the Poha remains in the sieve and the dust and small flakes fall away. Now wash the Poha just once(may become soggy if done more than once)and drain all the water. Put it into a flat bowl and add the sour curd and salt to it. Mix gently but evenly so that all the Poha are coated with the curd. Set aside for 10 to 15 minutes.
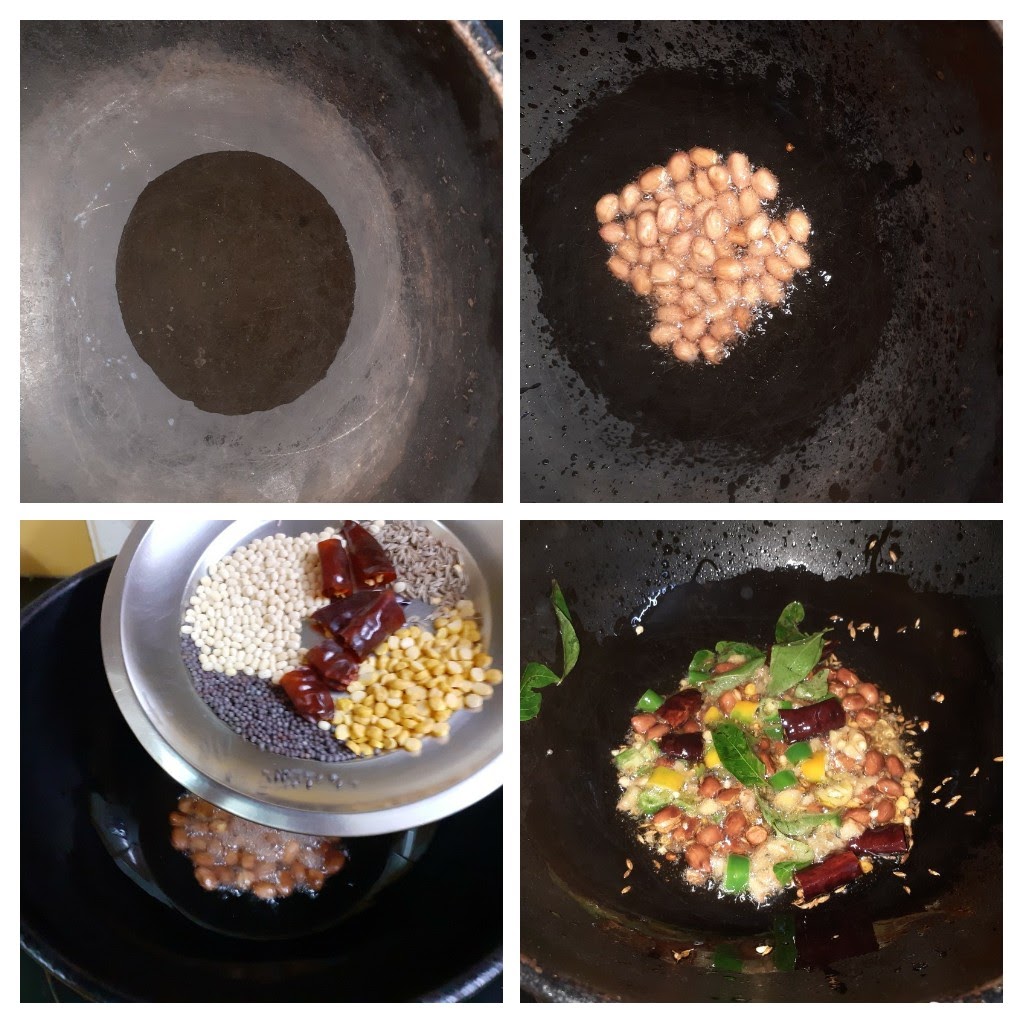
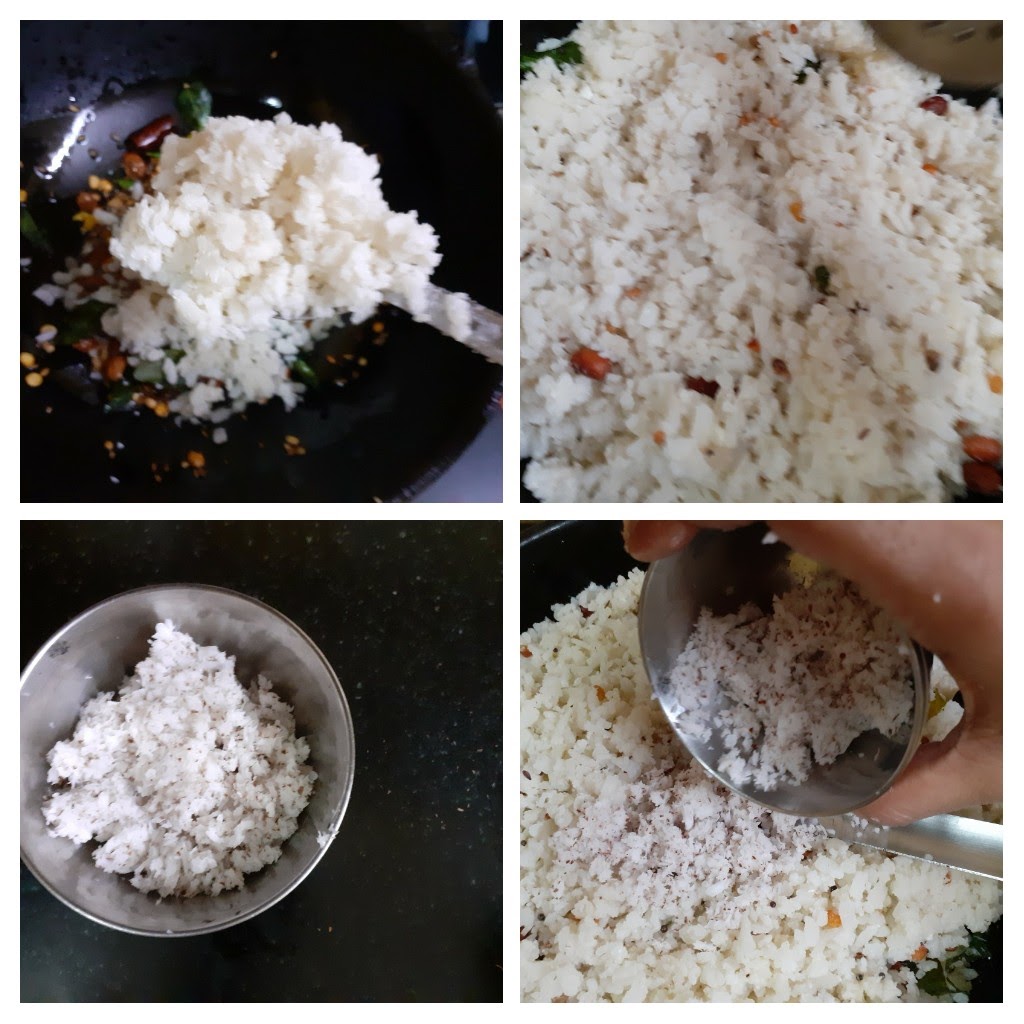
Now using your hands separate the soaked Poha gently and set aside. Take a Pan or Karahi and pour the oil. Once it heats up add the peanuts and fry them. Once they are golden in colour remove and set aside. Now to the oil add the mustard seeds, as they crackle add the chana dal, urad dal, dry red chillies, ginger, green chillies, curry leaves and asafoetida and fry them until golden in colour. Now add the Poha to the tempering and mix nicely. Check and adjust the salt. Keep stirring the Poha on a low to medium flame for 3 minutes. Now add the grated coconut and stir for another 2 minutes on low flame. Add in the fried peanuts and put off the flame. Enjoy the simple, healthy, tasty Dahi Pohe. Bon Appetit.
STEPWISE RECIPE FOLLOWS:
1. Assemble all ingredients.
2. Sieve, wash and soak the Poha in Curd. Add salt to poha before pouring the curd. Dilute the curd with little water(1/4 cup) if required. Rest the soaked Poha for 10 to 15 minutes. After the poha have soaked, separate them gently with your hands.
3. In a pan/karahi pour oil for tempering, around 2 tbsp and heat. Drop in the peanuts and fry until golden in colour. Now add the mustard seeds, as they crackle add the chana dal, urad dal, dry red chillies, ginger, green chillies and asafoetida and fry until golden in colour.
4.. Now add the Poha little by little and mix nicely so that the tempering is mixed evenly. Stir on a medium flame for 3minutes. Check salt and adjust if required. Add the grated coconut and stir for another 3 minutes over a medium to low flame.
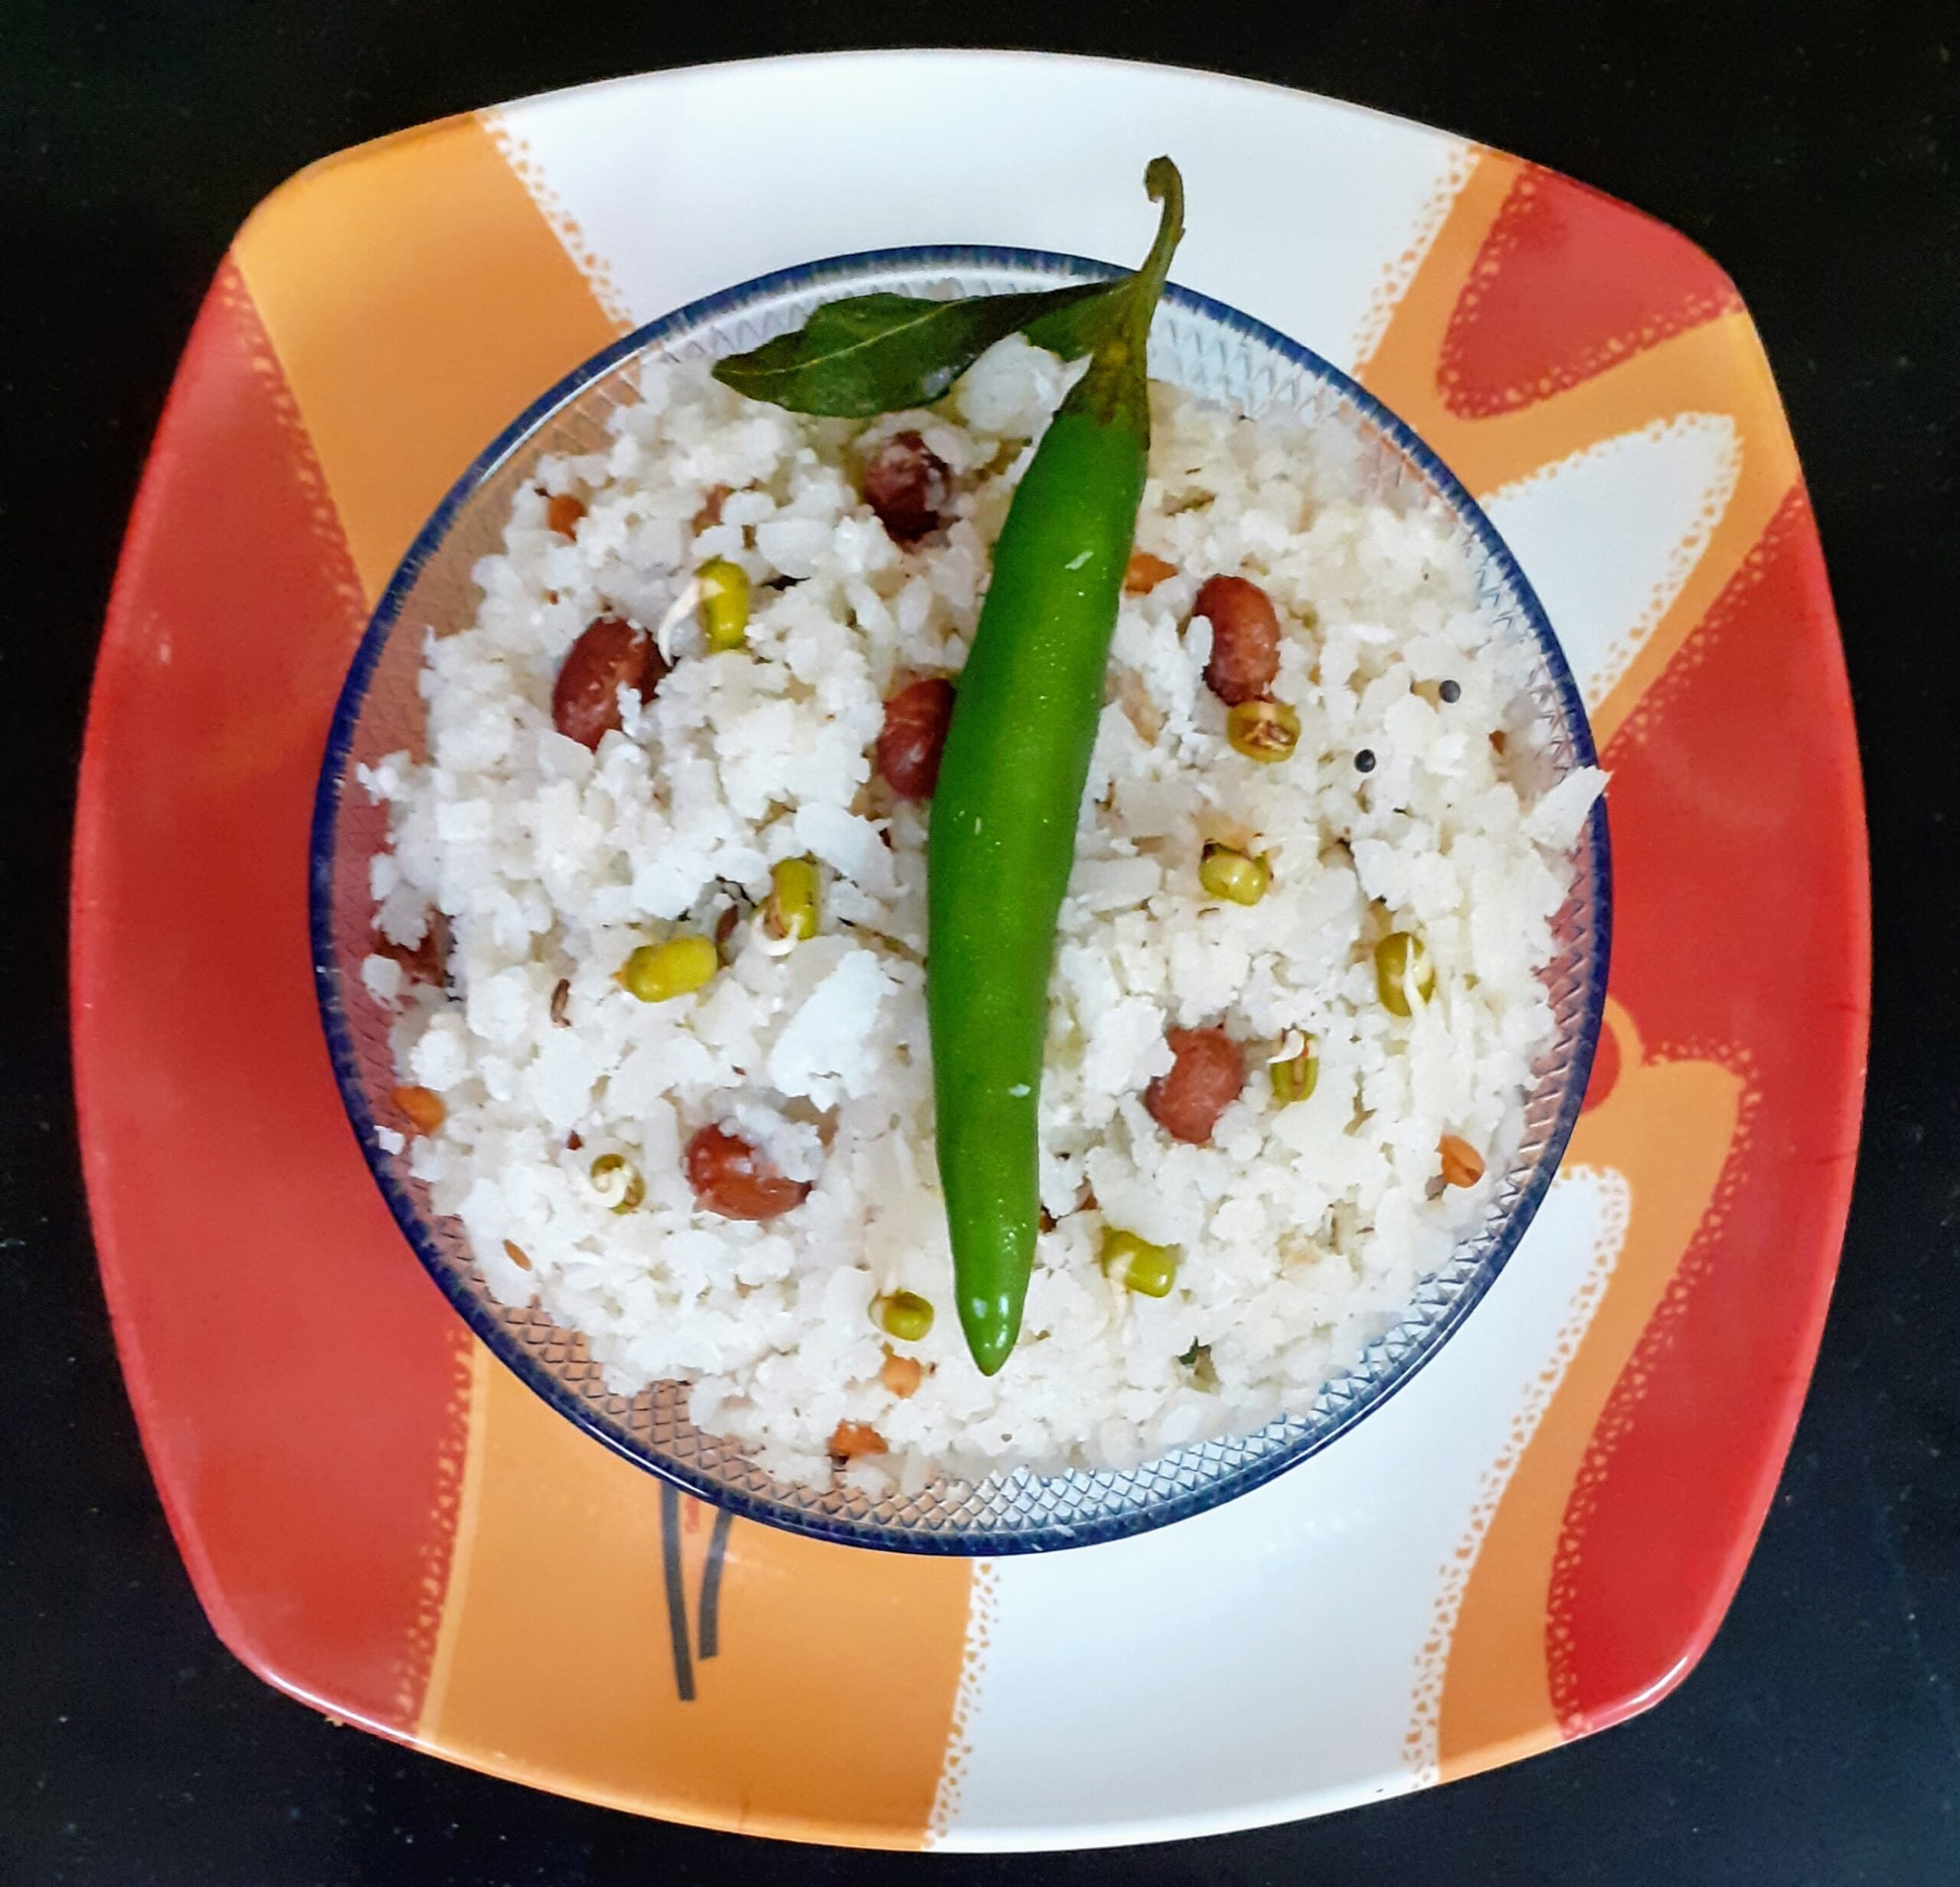
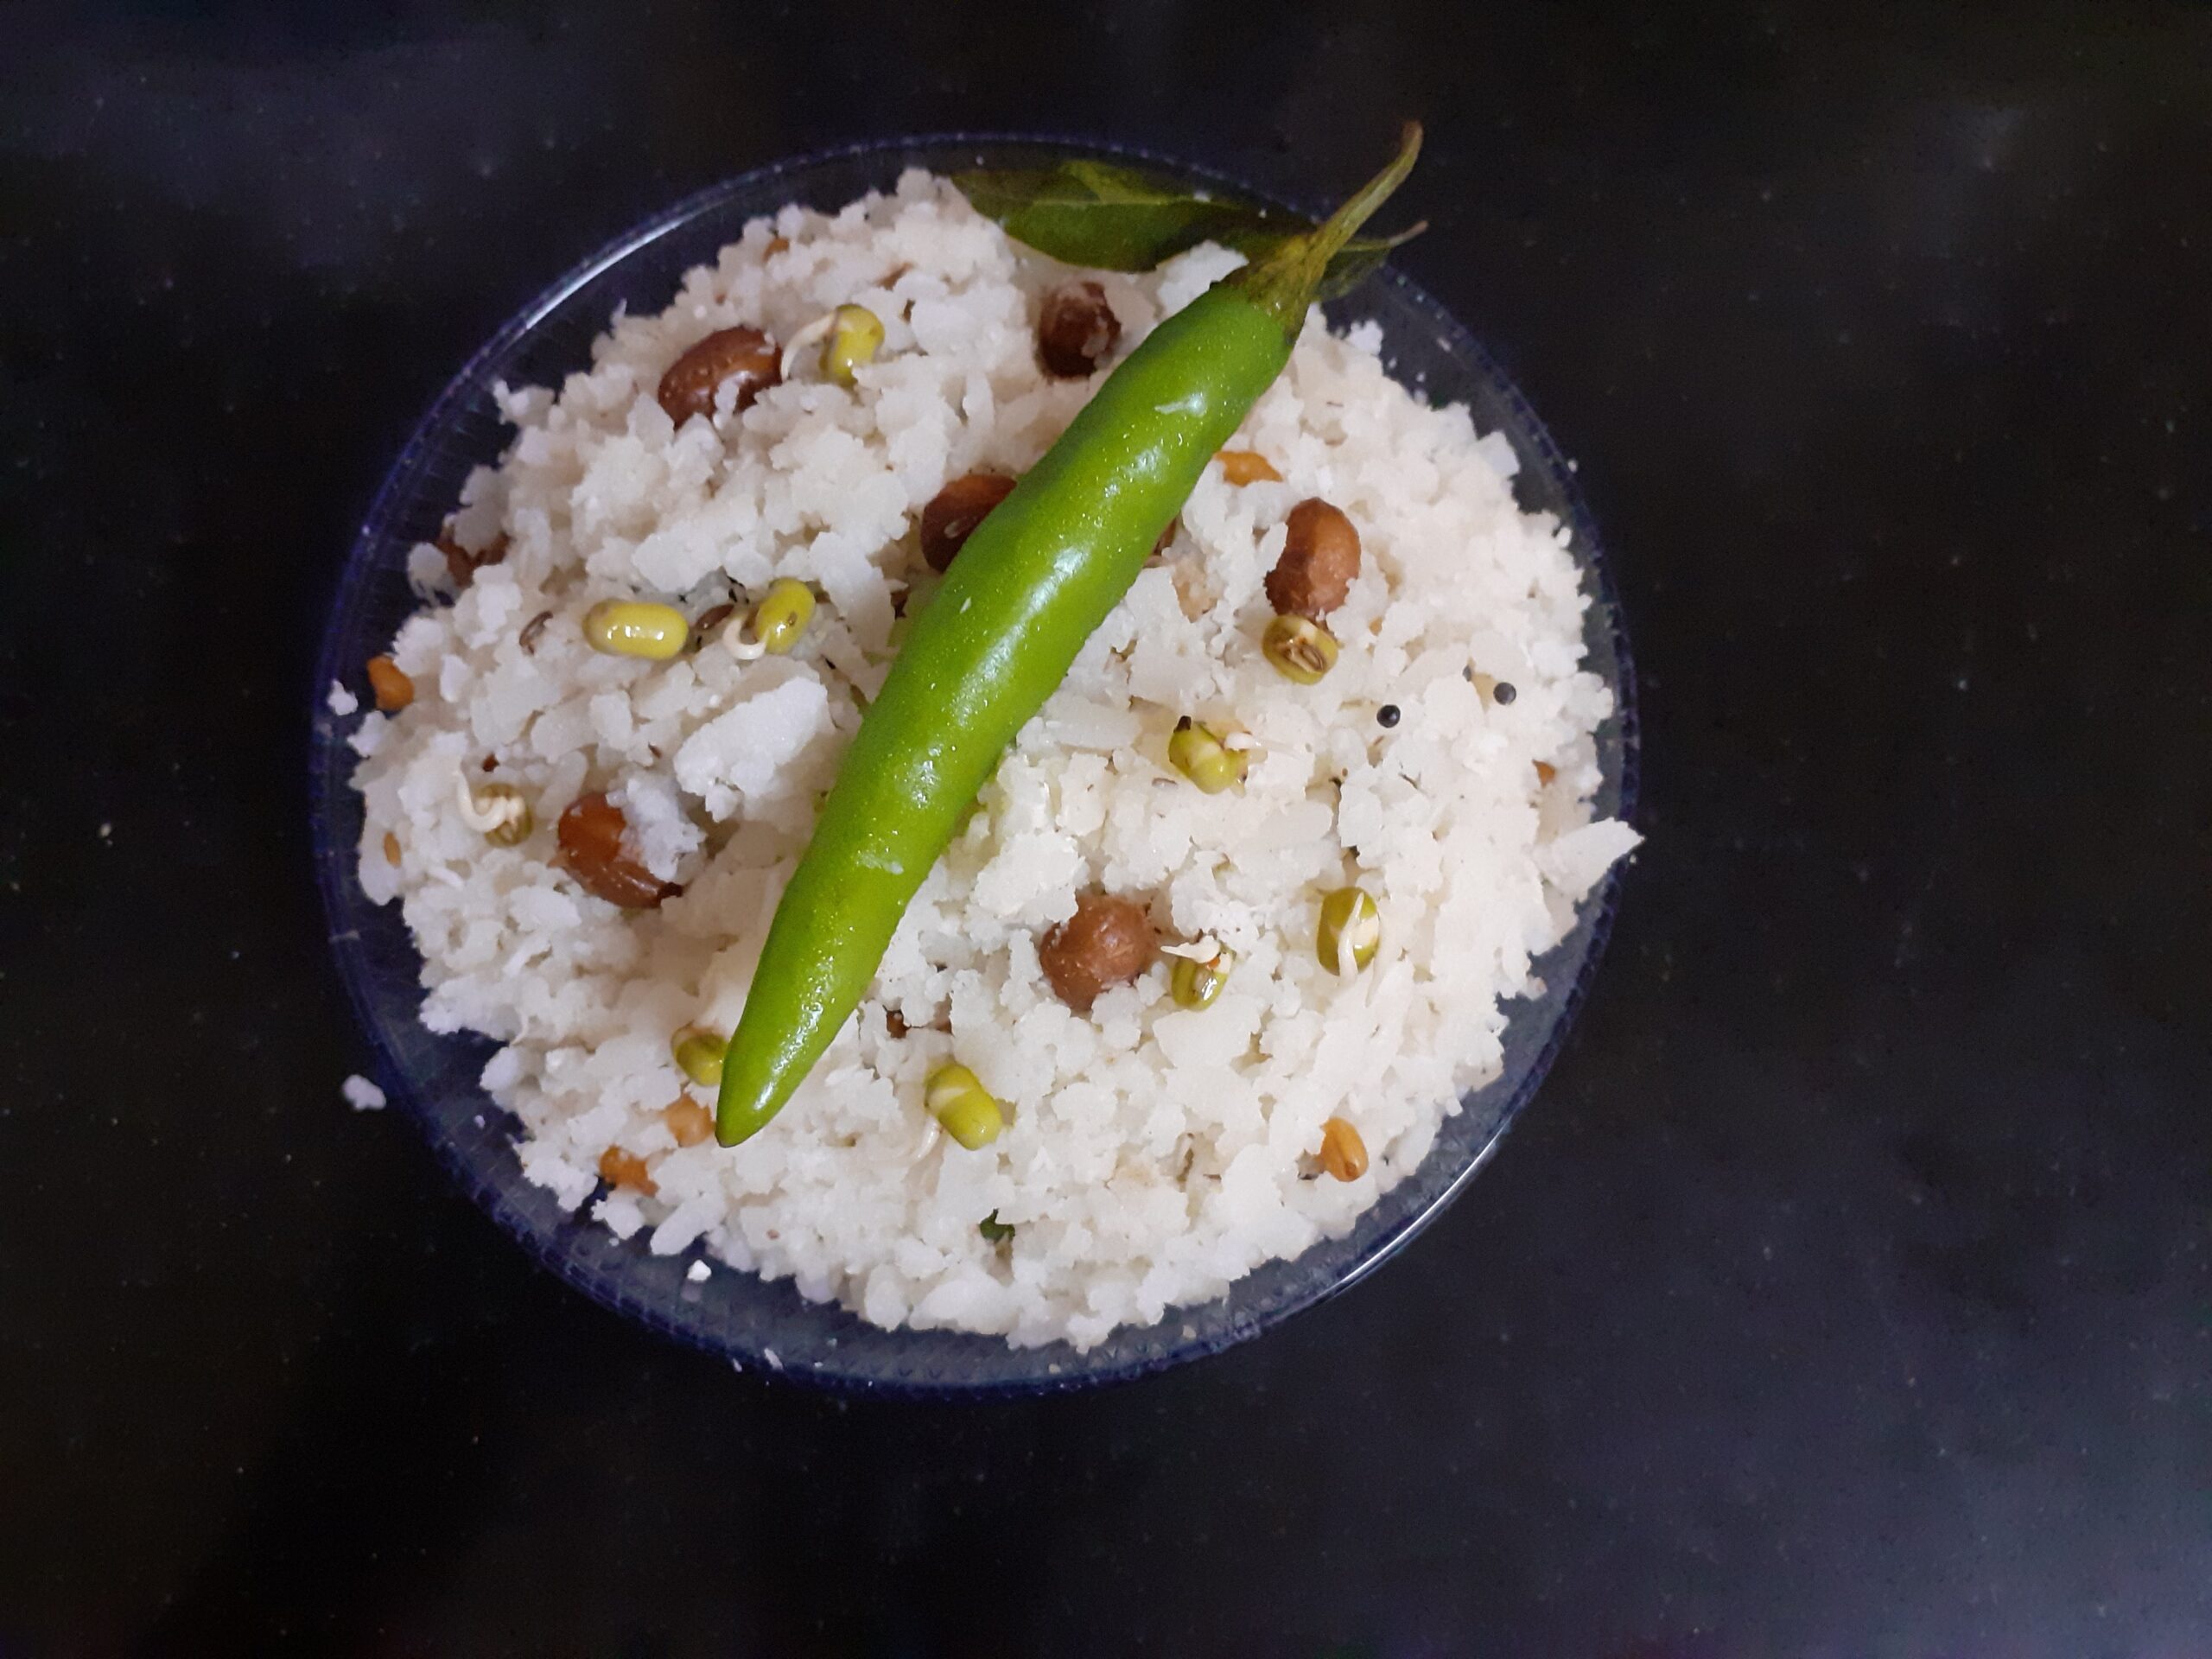
5.. The Dahi Pohe are ready to pack in the lunch box or to serve.
1. If using thick Poha there is no need to sieve the Poha, just wash it around 3 times and then soak it in curd.
2. Fresh curd can also be used, but the recipe tastes best with slightly sour curd.
3. More grated coconut can be added if you like the flavour.
If you tried this recipe and liked it, please comment below. I would love to hear from you.