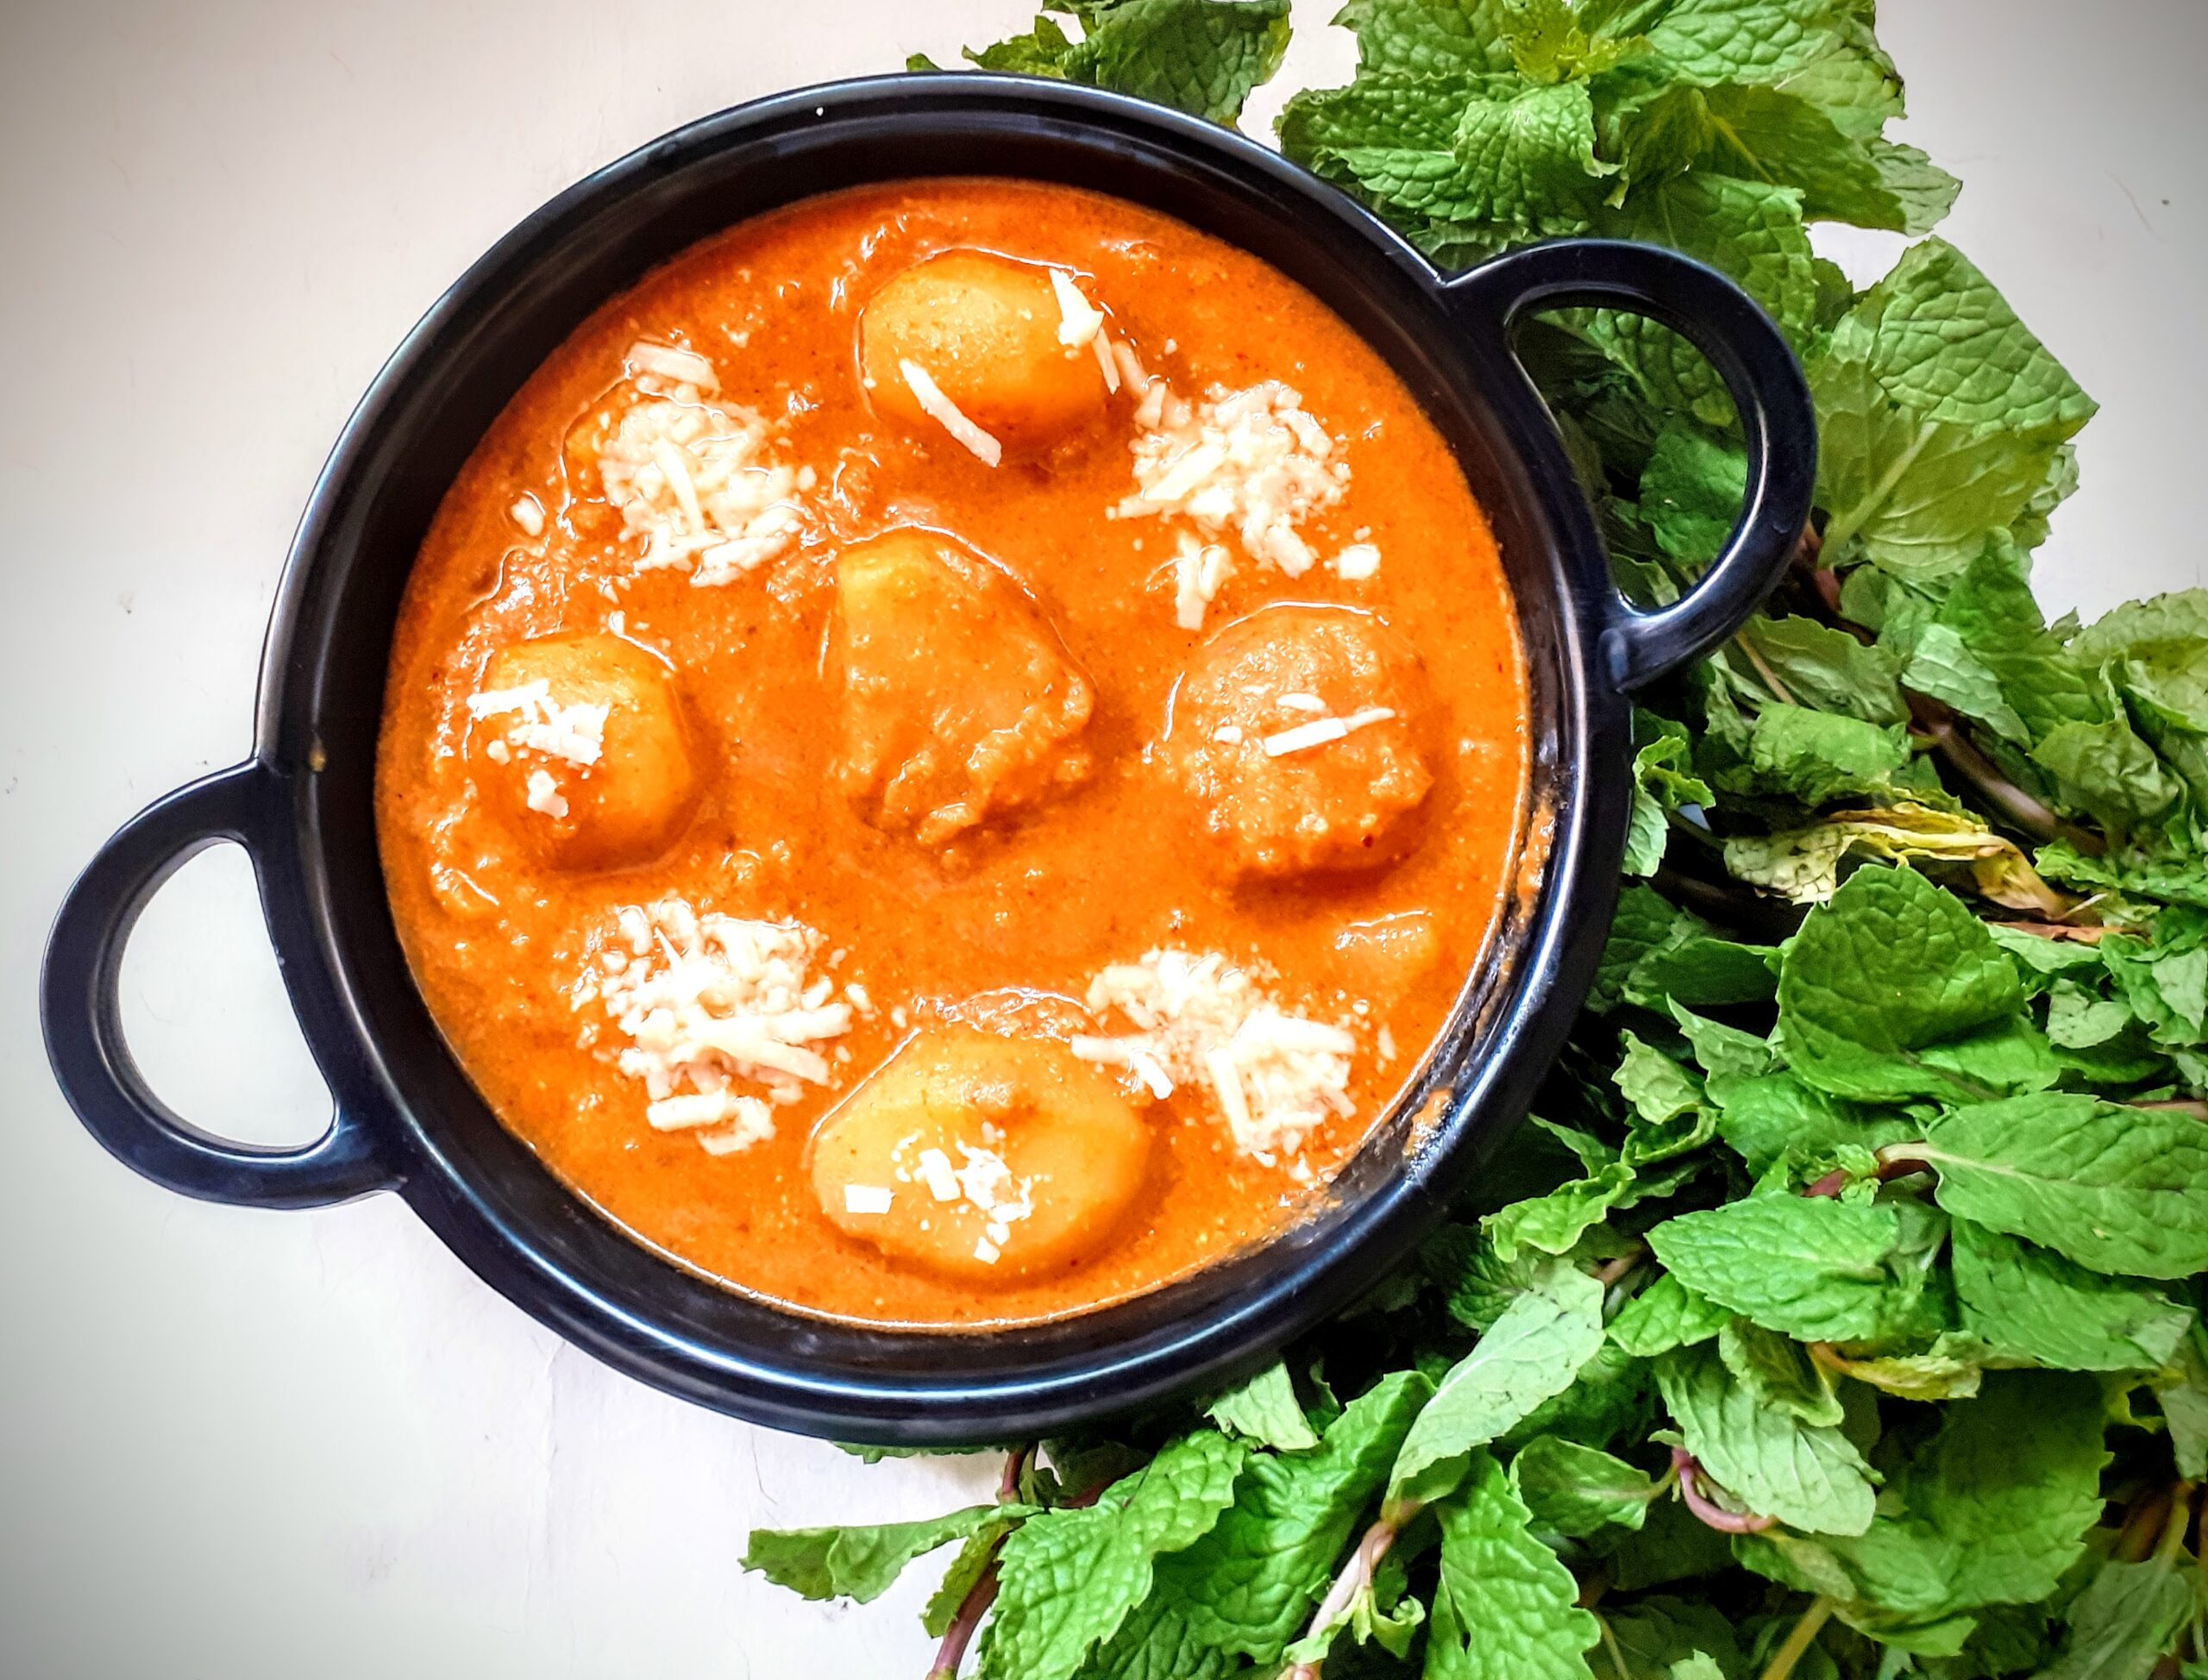
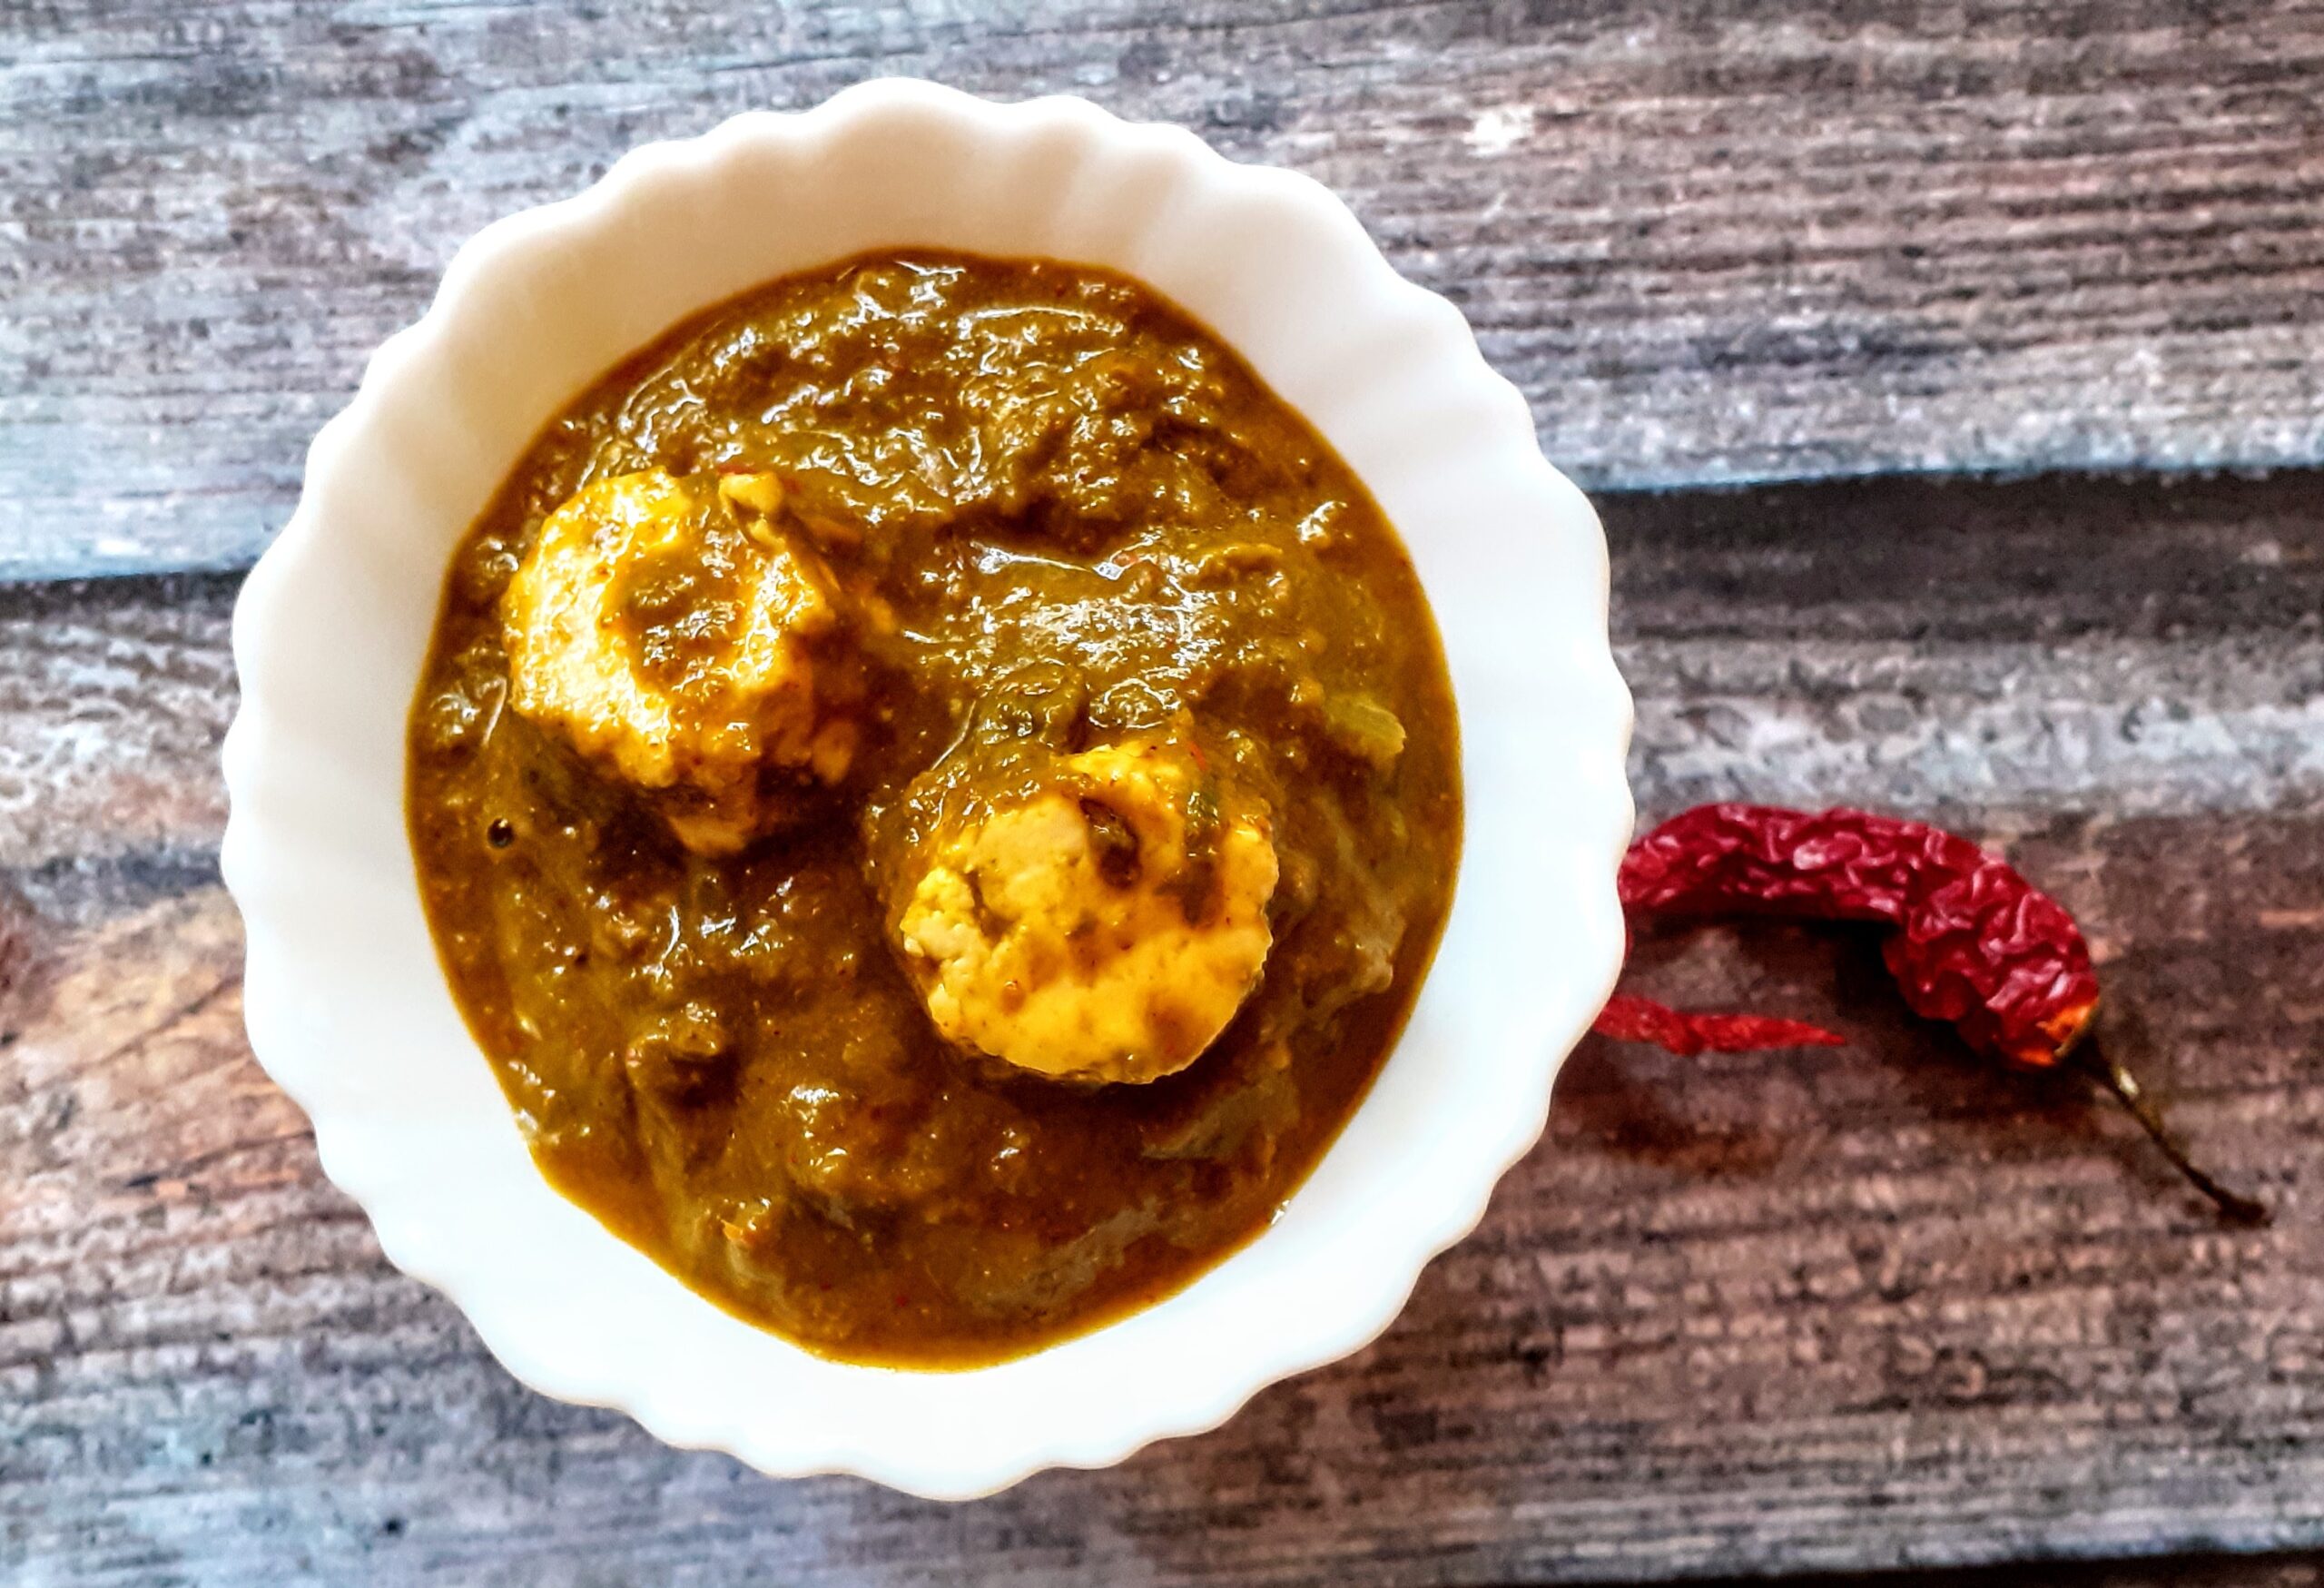
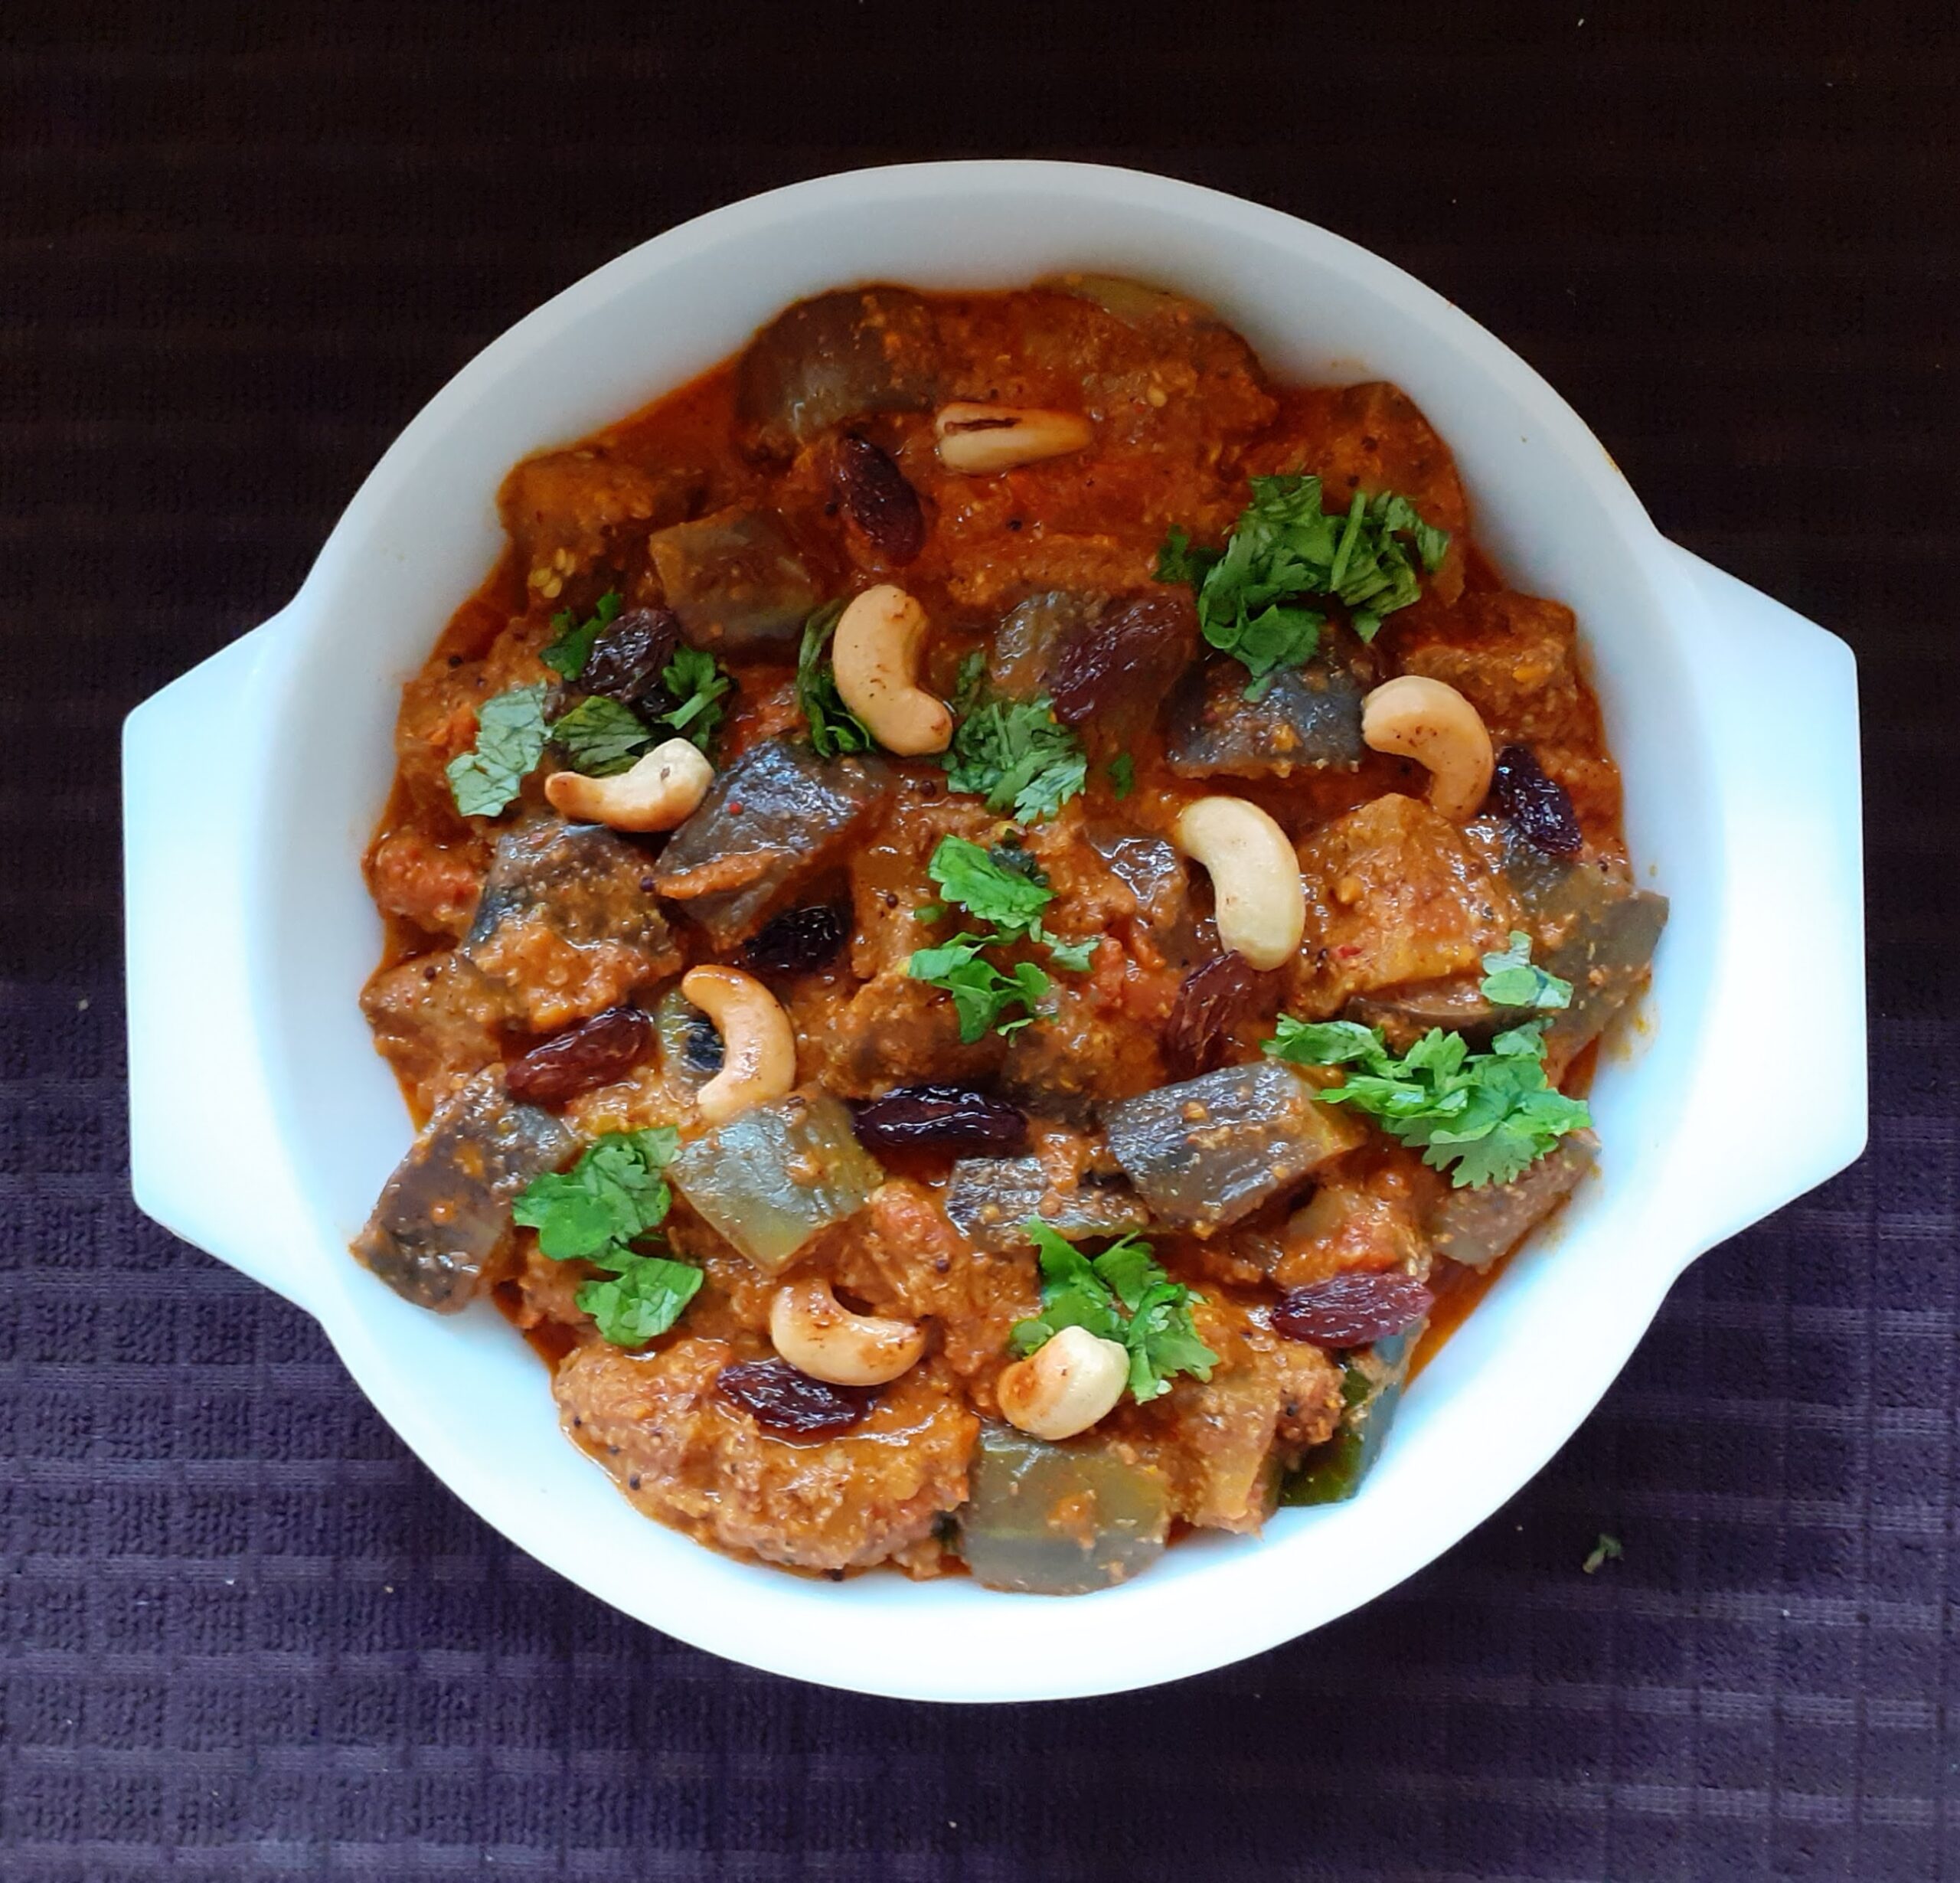
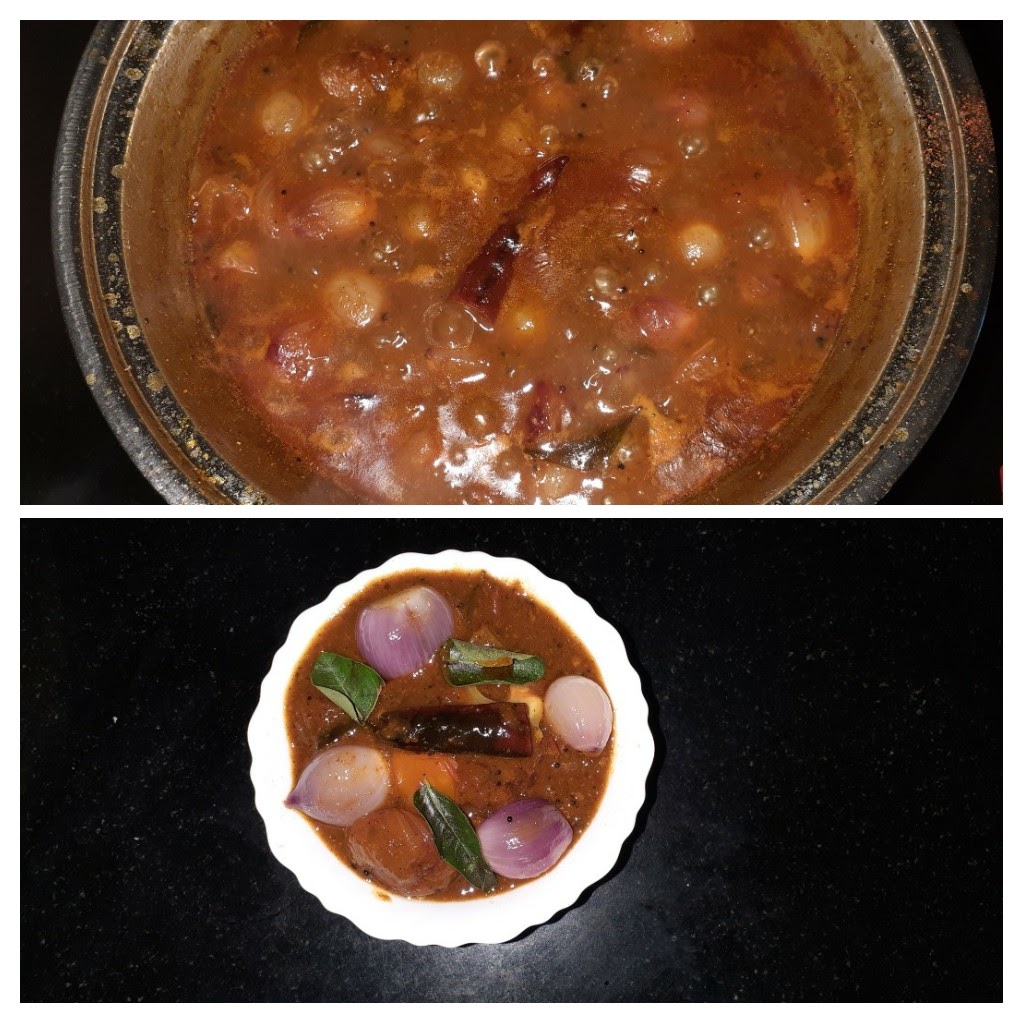
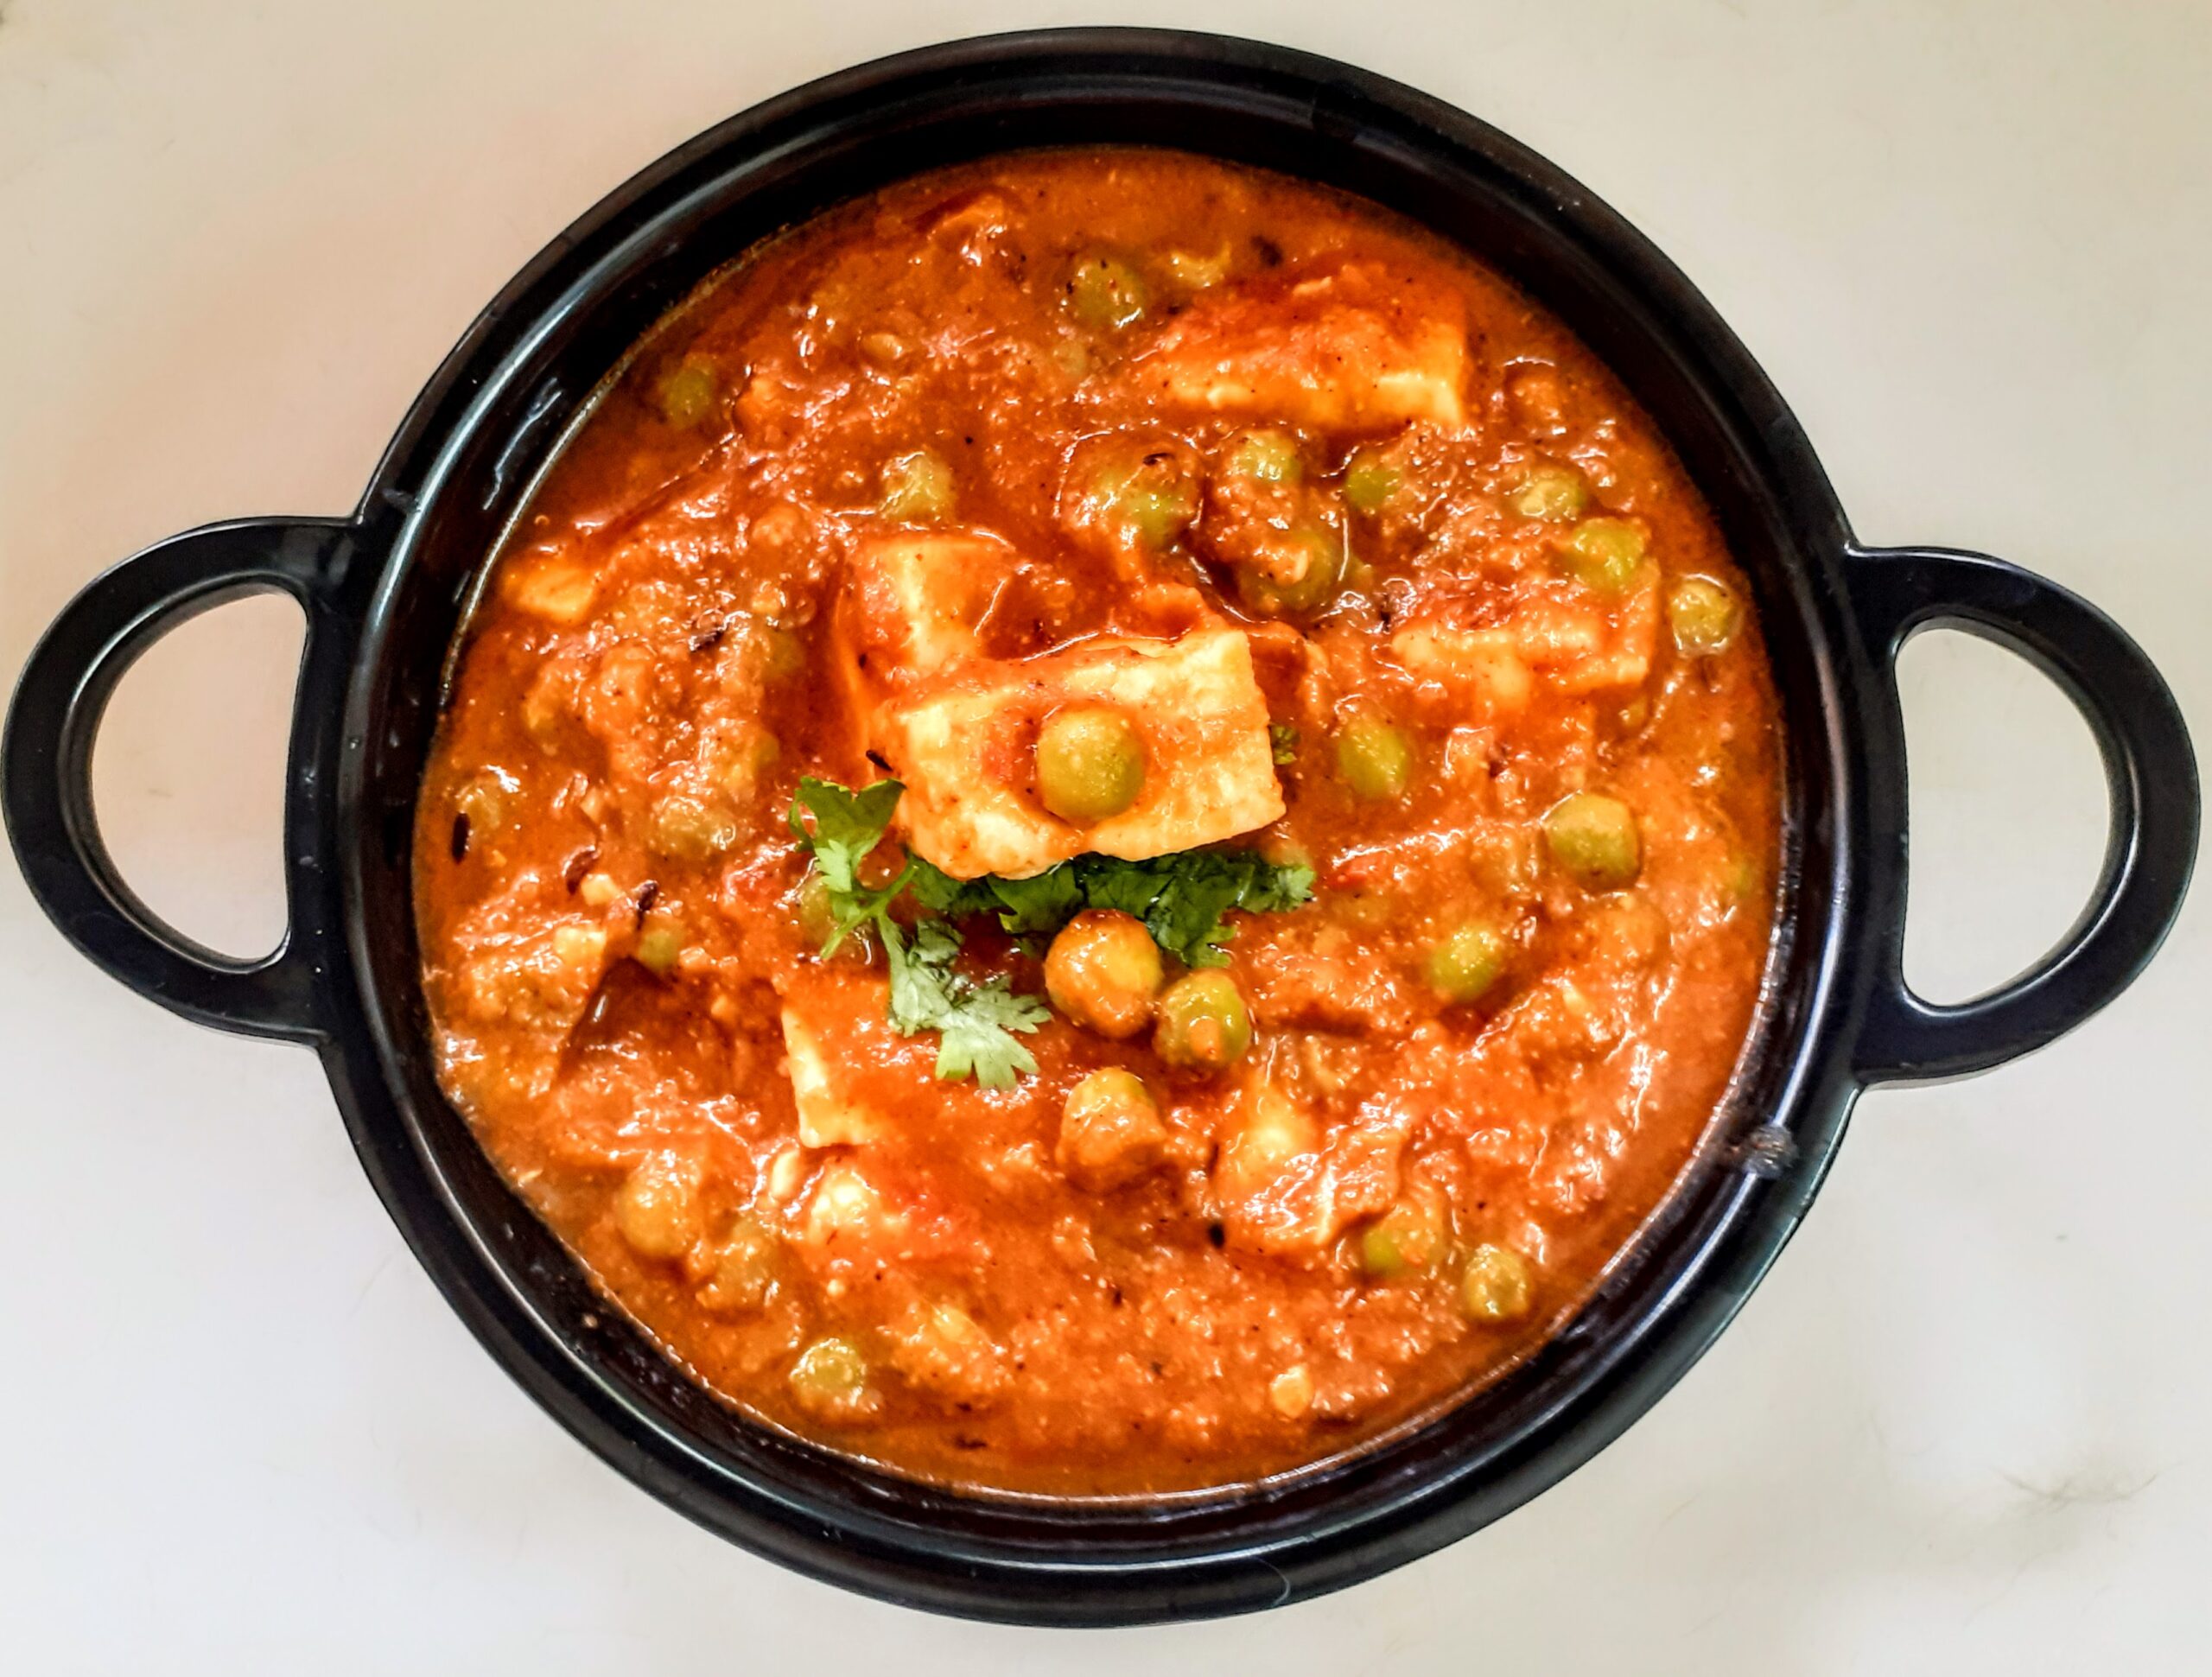
Dum Aloo Ajwaini is a recipe that is a little different from the regular Dum Aloo, because of a “magical masala paste’ I add just before turning off the flame and that masala is what makes this a flavour blast dish, that goes very well with Pulav, plain rice and all types of flatbreads.
I spotted this recipe in a flights inhouse magazine many many years ago and I have always made it this way ever since, with small creative bursts from time to time.
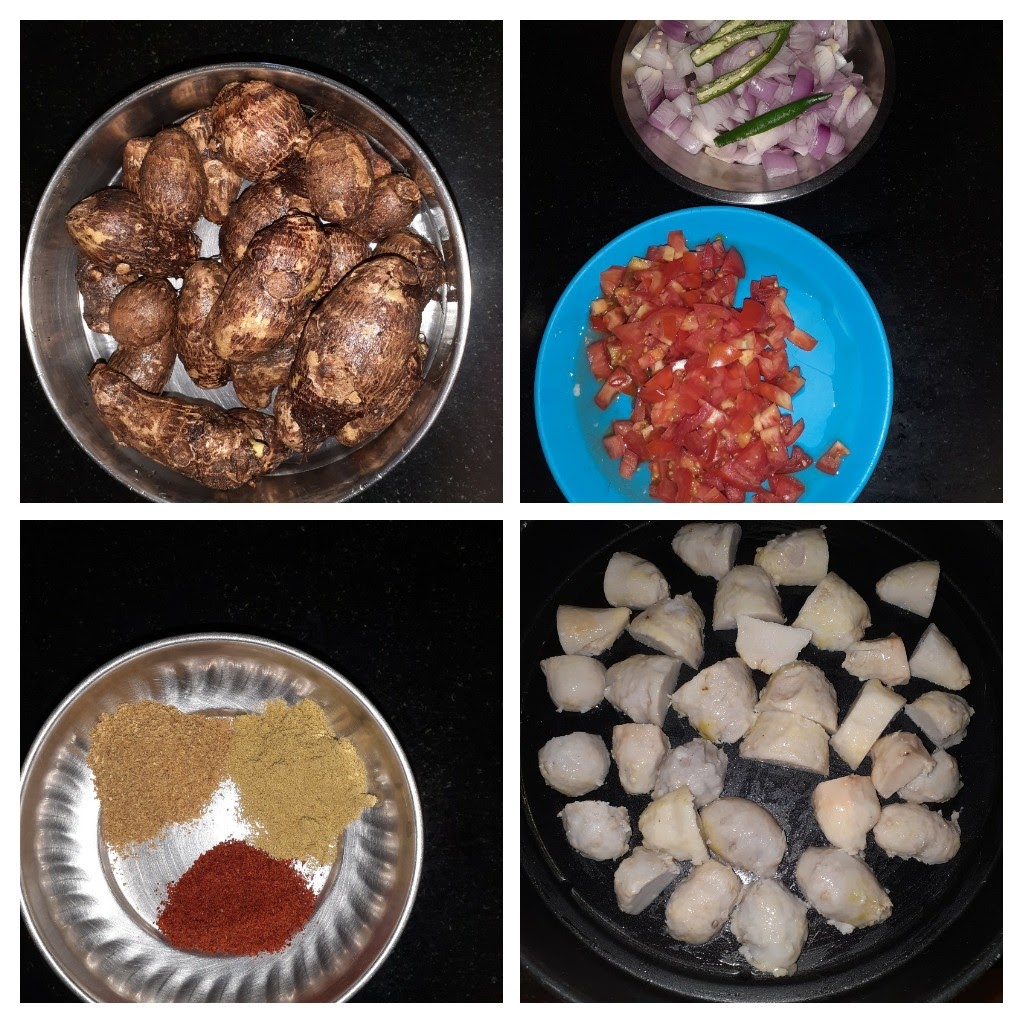
I have also adapted this recipe to the one-pot style. The only time-consuming factor is scraping the peels of the baby potatoes. Don’t worry though, you can easily make the same with regular potatoes, by dicing them to cubes. The one-pot style also helps in better absorption of the masalas by the potatoes than pan cooking, hence for this particular recipe, I always follow the one-pot style.
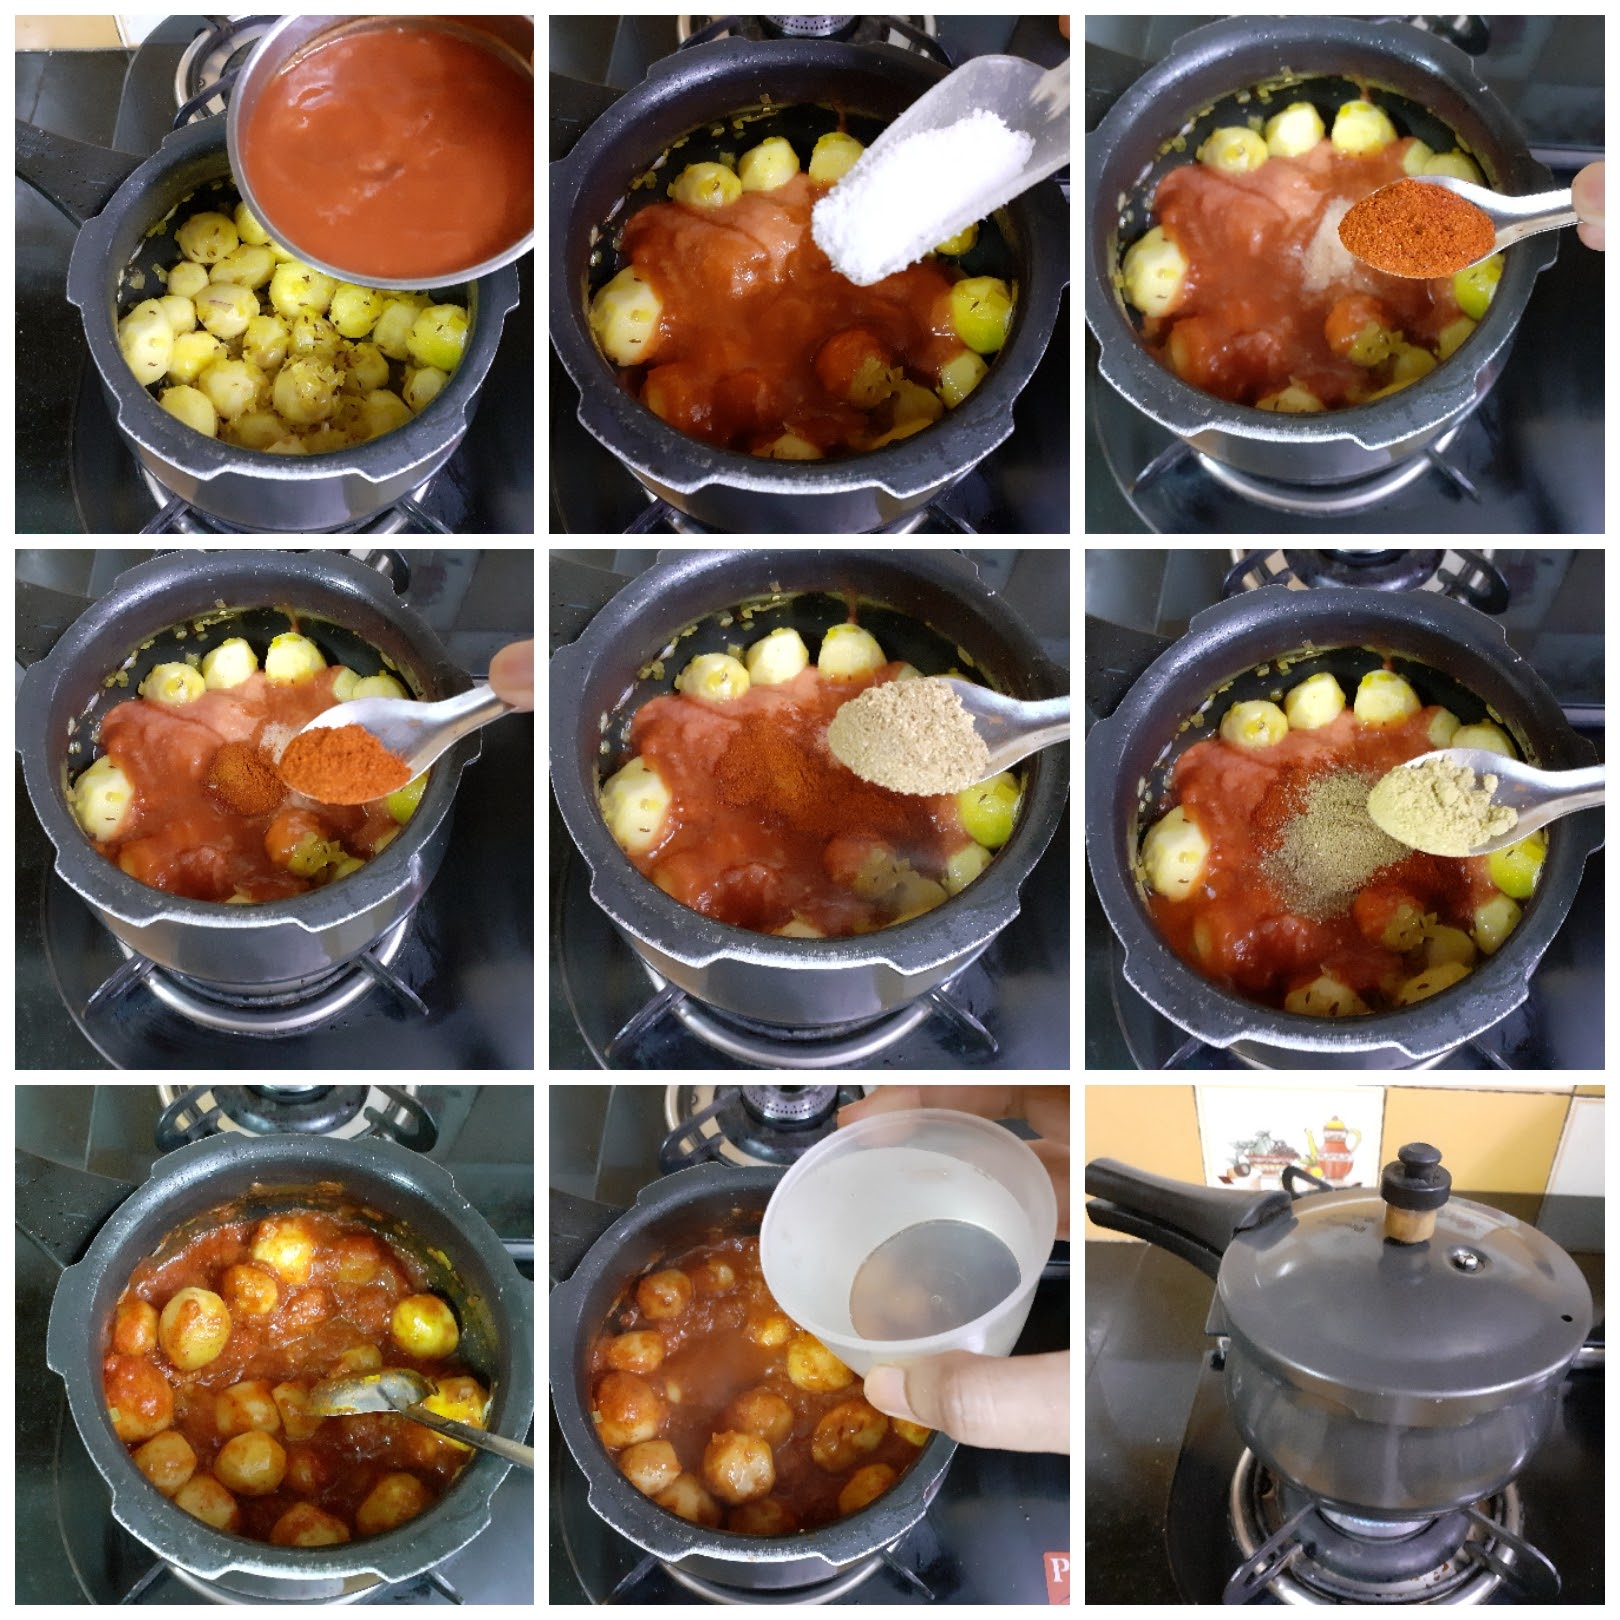
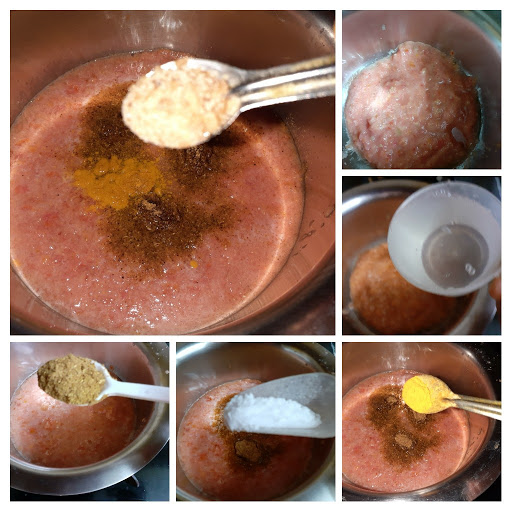
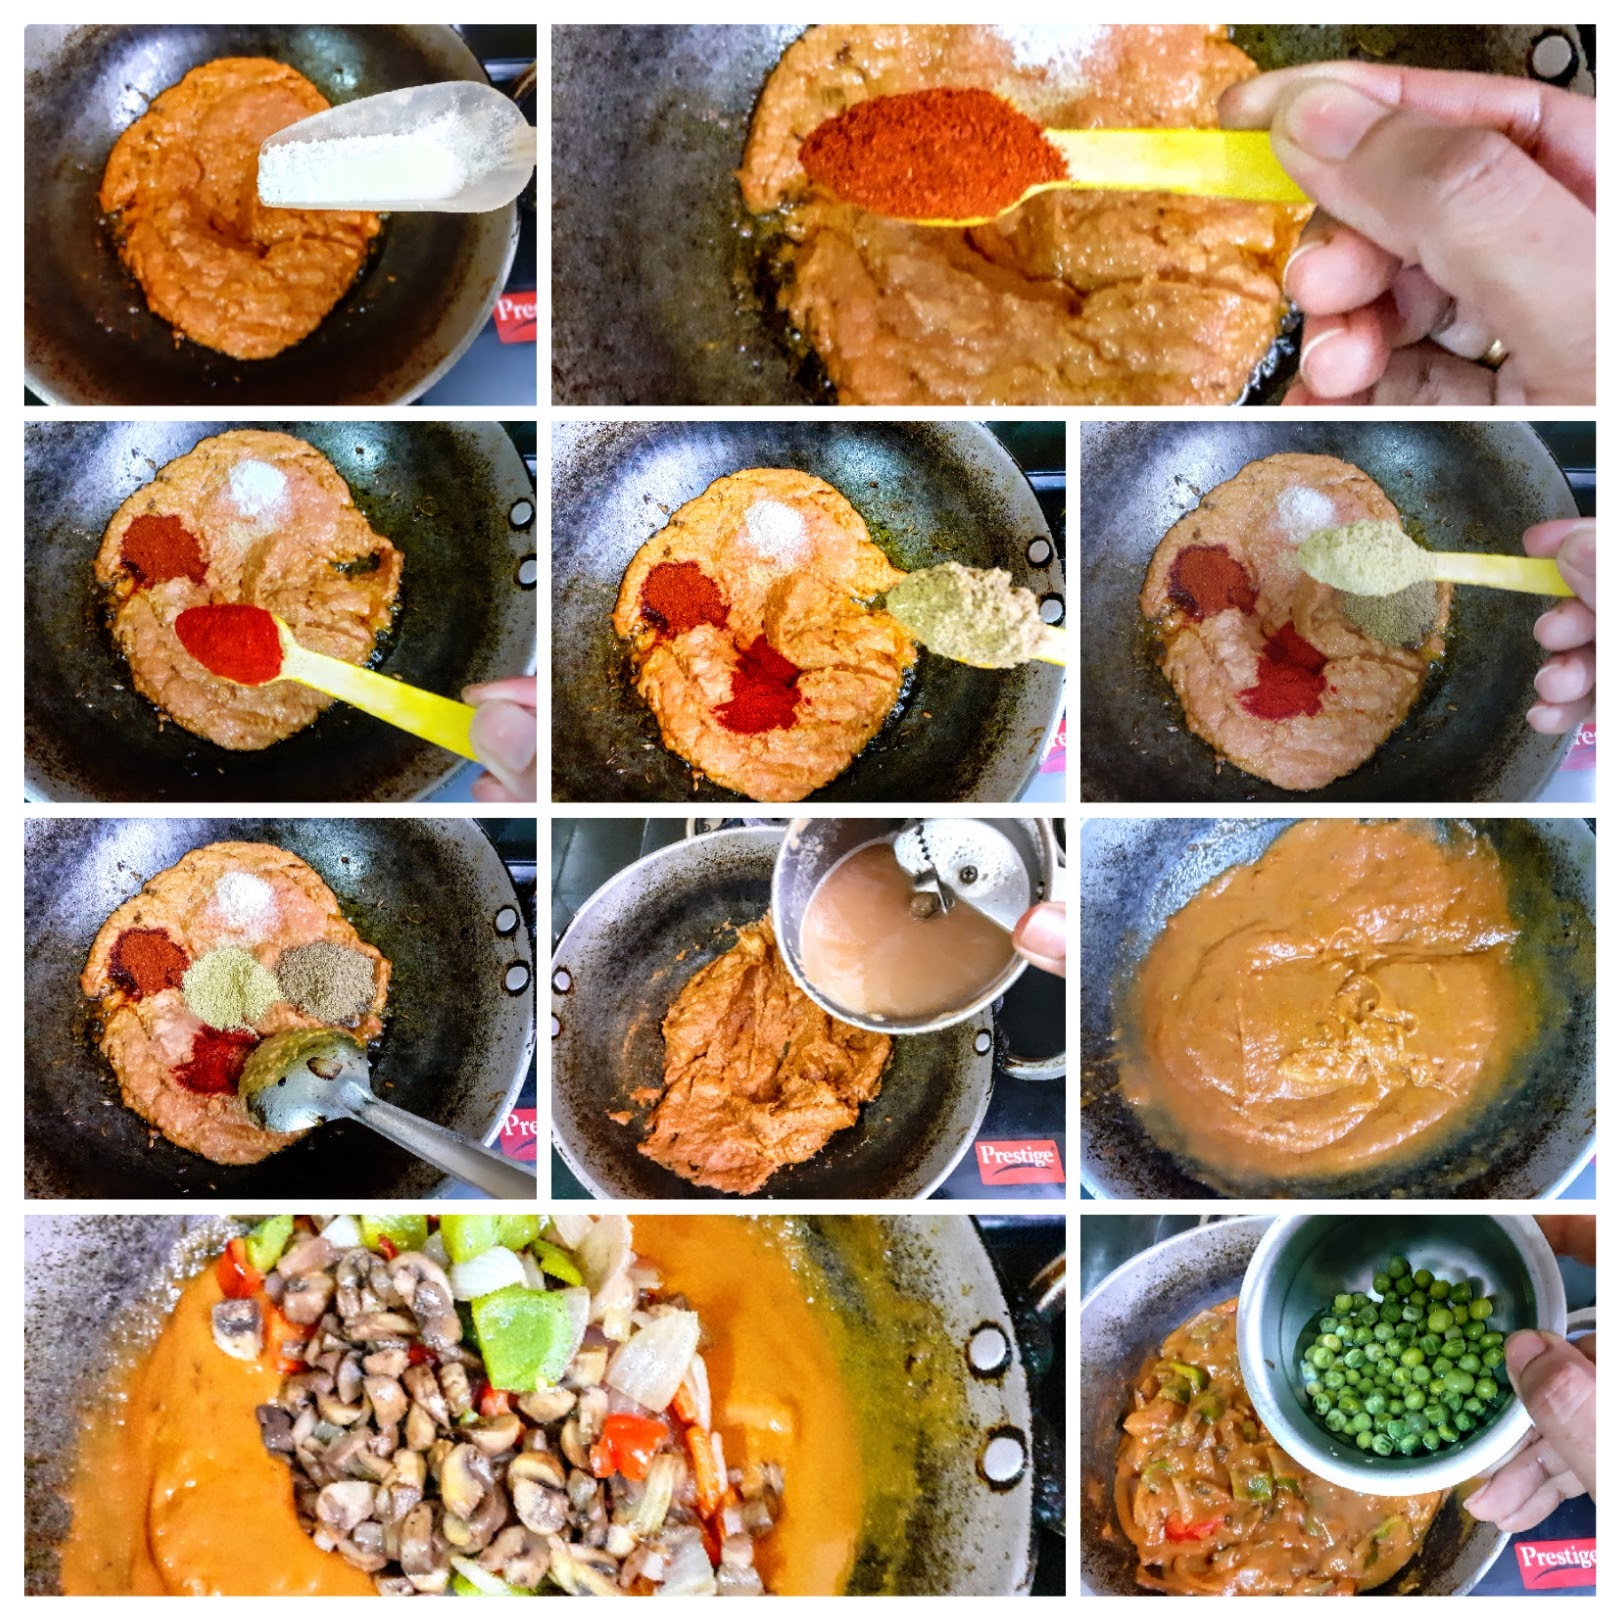
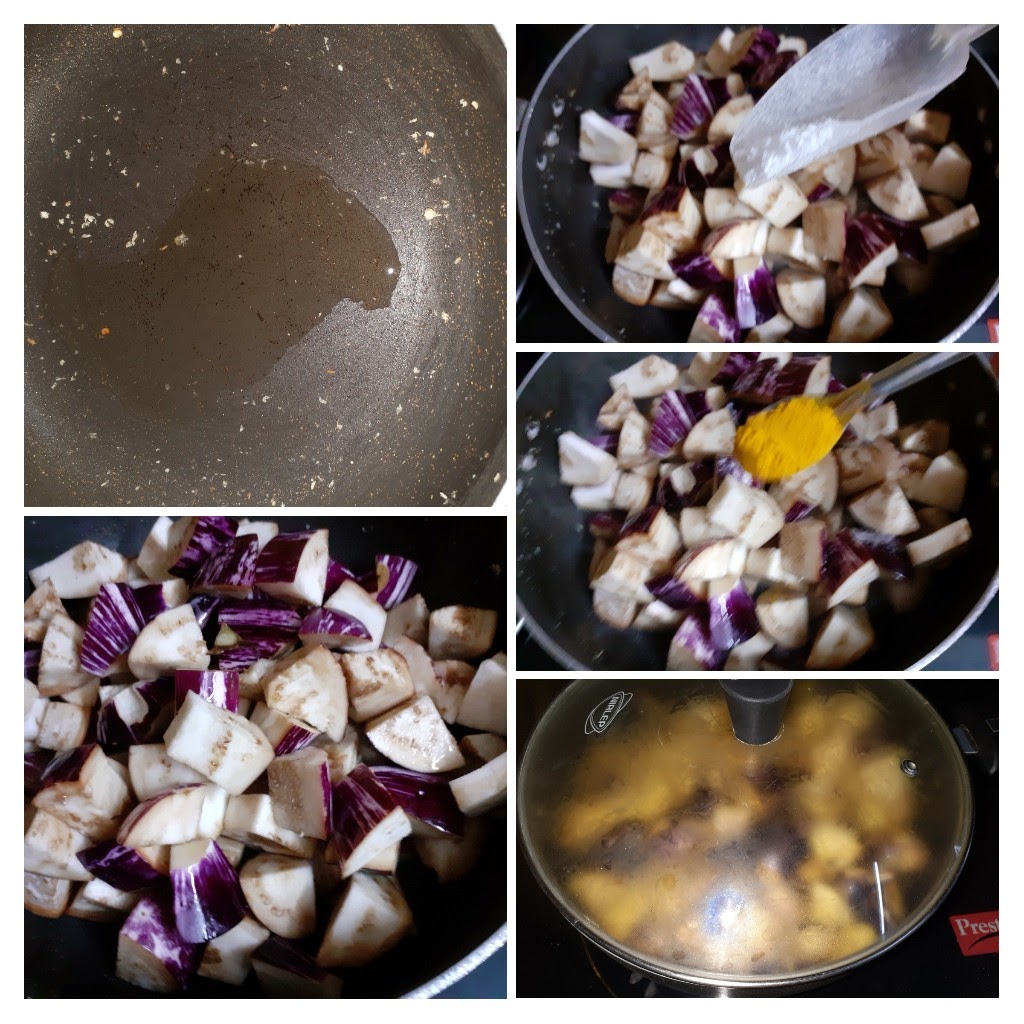
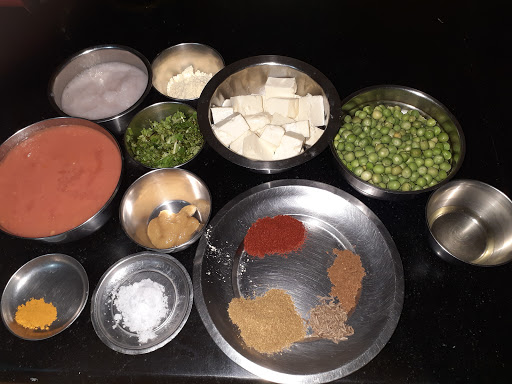
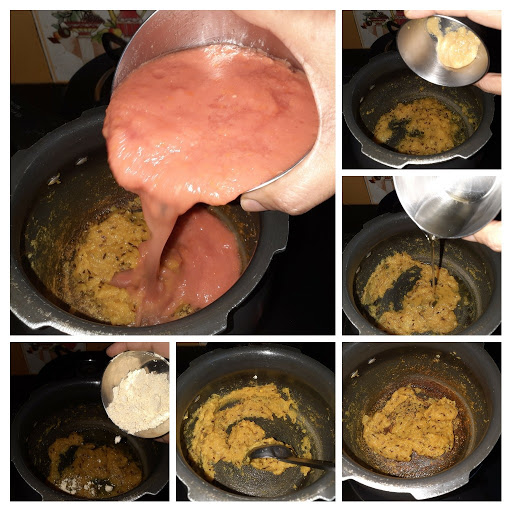
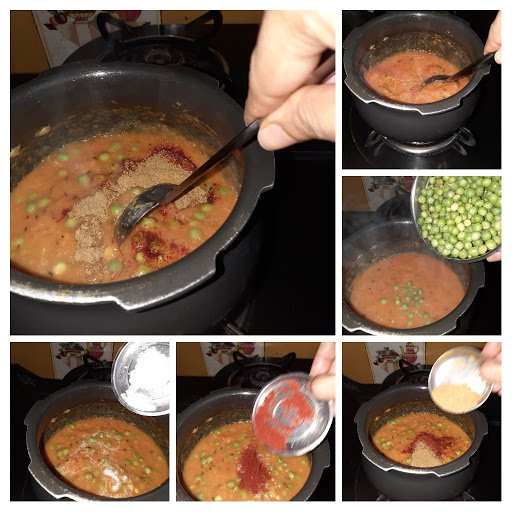
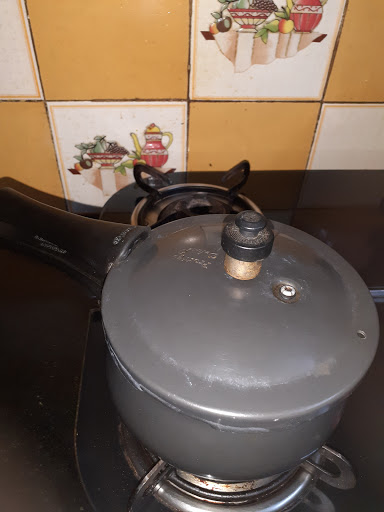
In a small pressure cooker take oil for tempering and heat. Add the Jeera and fry for 30 seconds. When they crackle add the ginger garlic paste and fry for 30 seconds. Now add the chopped onions and saute until they start turning light brown. Add the turmeric powder and saute another 30 seconds. Now add the peeled Baby potatoes and saute nicely until the oil coats all the potatoes. Now add the tomato puree followed by salt, Regular red chilli powder, Kashmiri red chilli powder, Coriander powder, fennel powder, and stir everything together nicely. Pour about 1 to 1.5 cups of water and close the cooker. Allow 3 to 4 whistles to come and put off the cooker immediately. We don’t want overcooked potatoes, so take care to switch off on time(refer notes).
While the pressure releases lets grind the “magic masala”????.
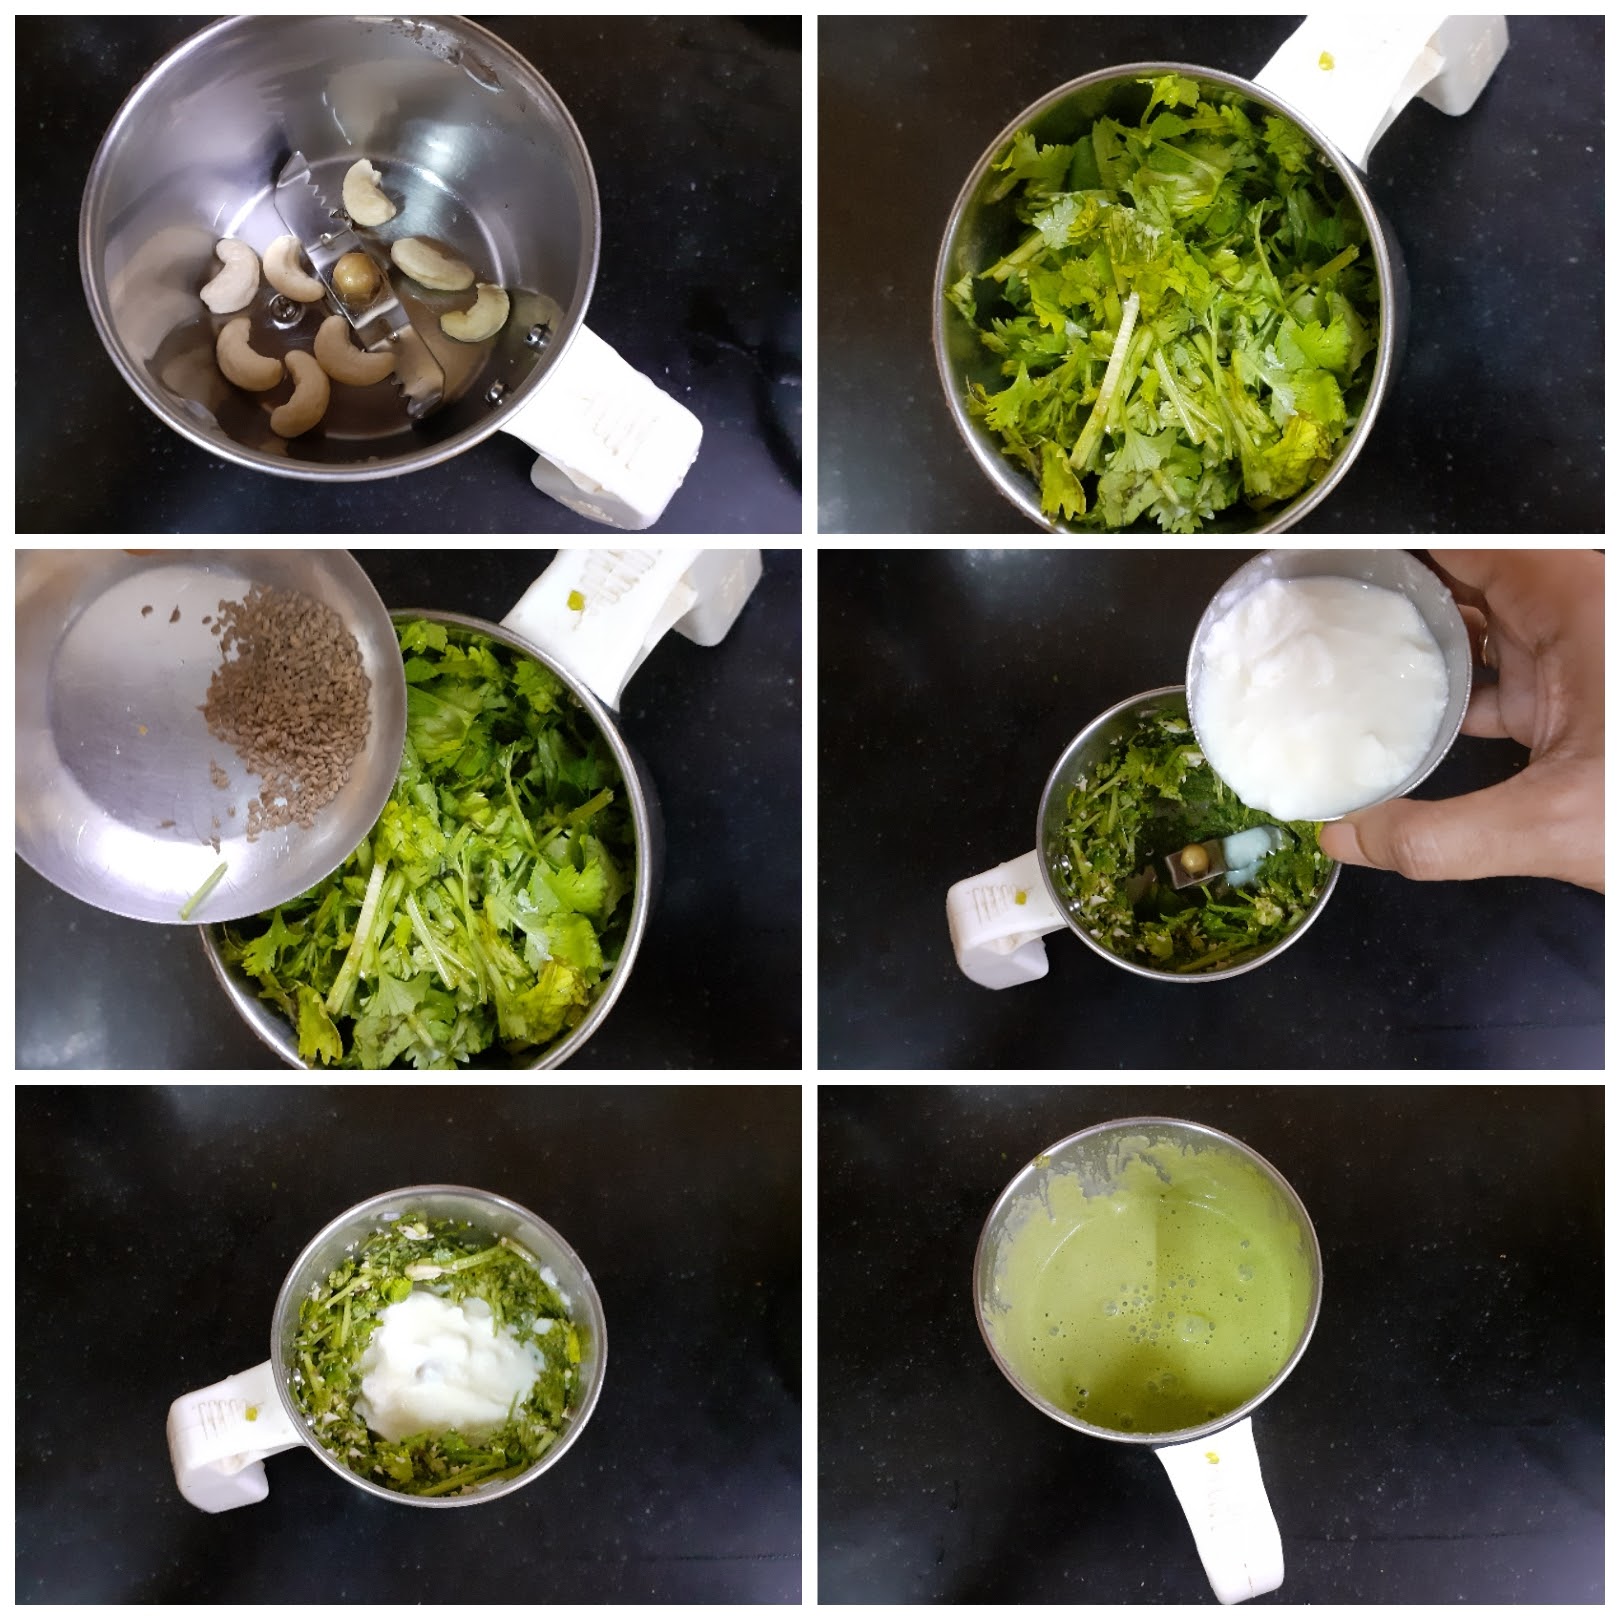
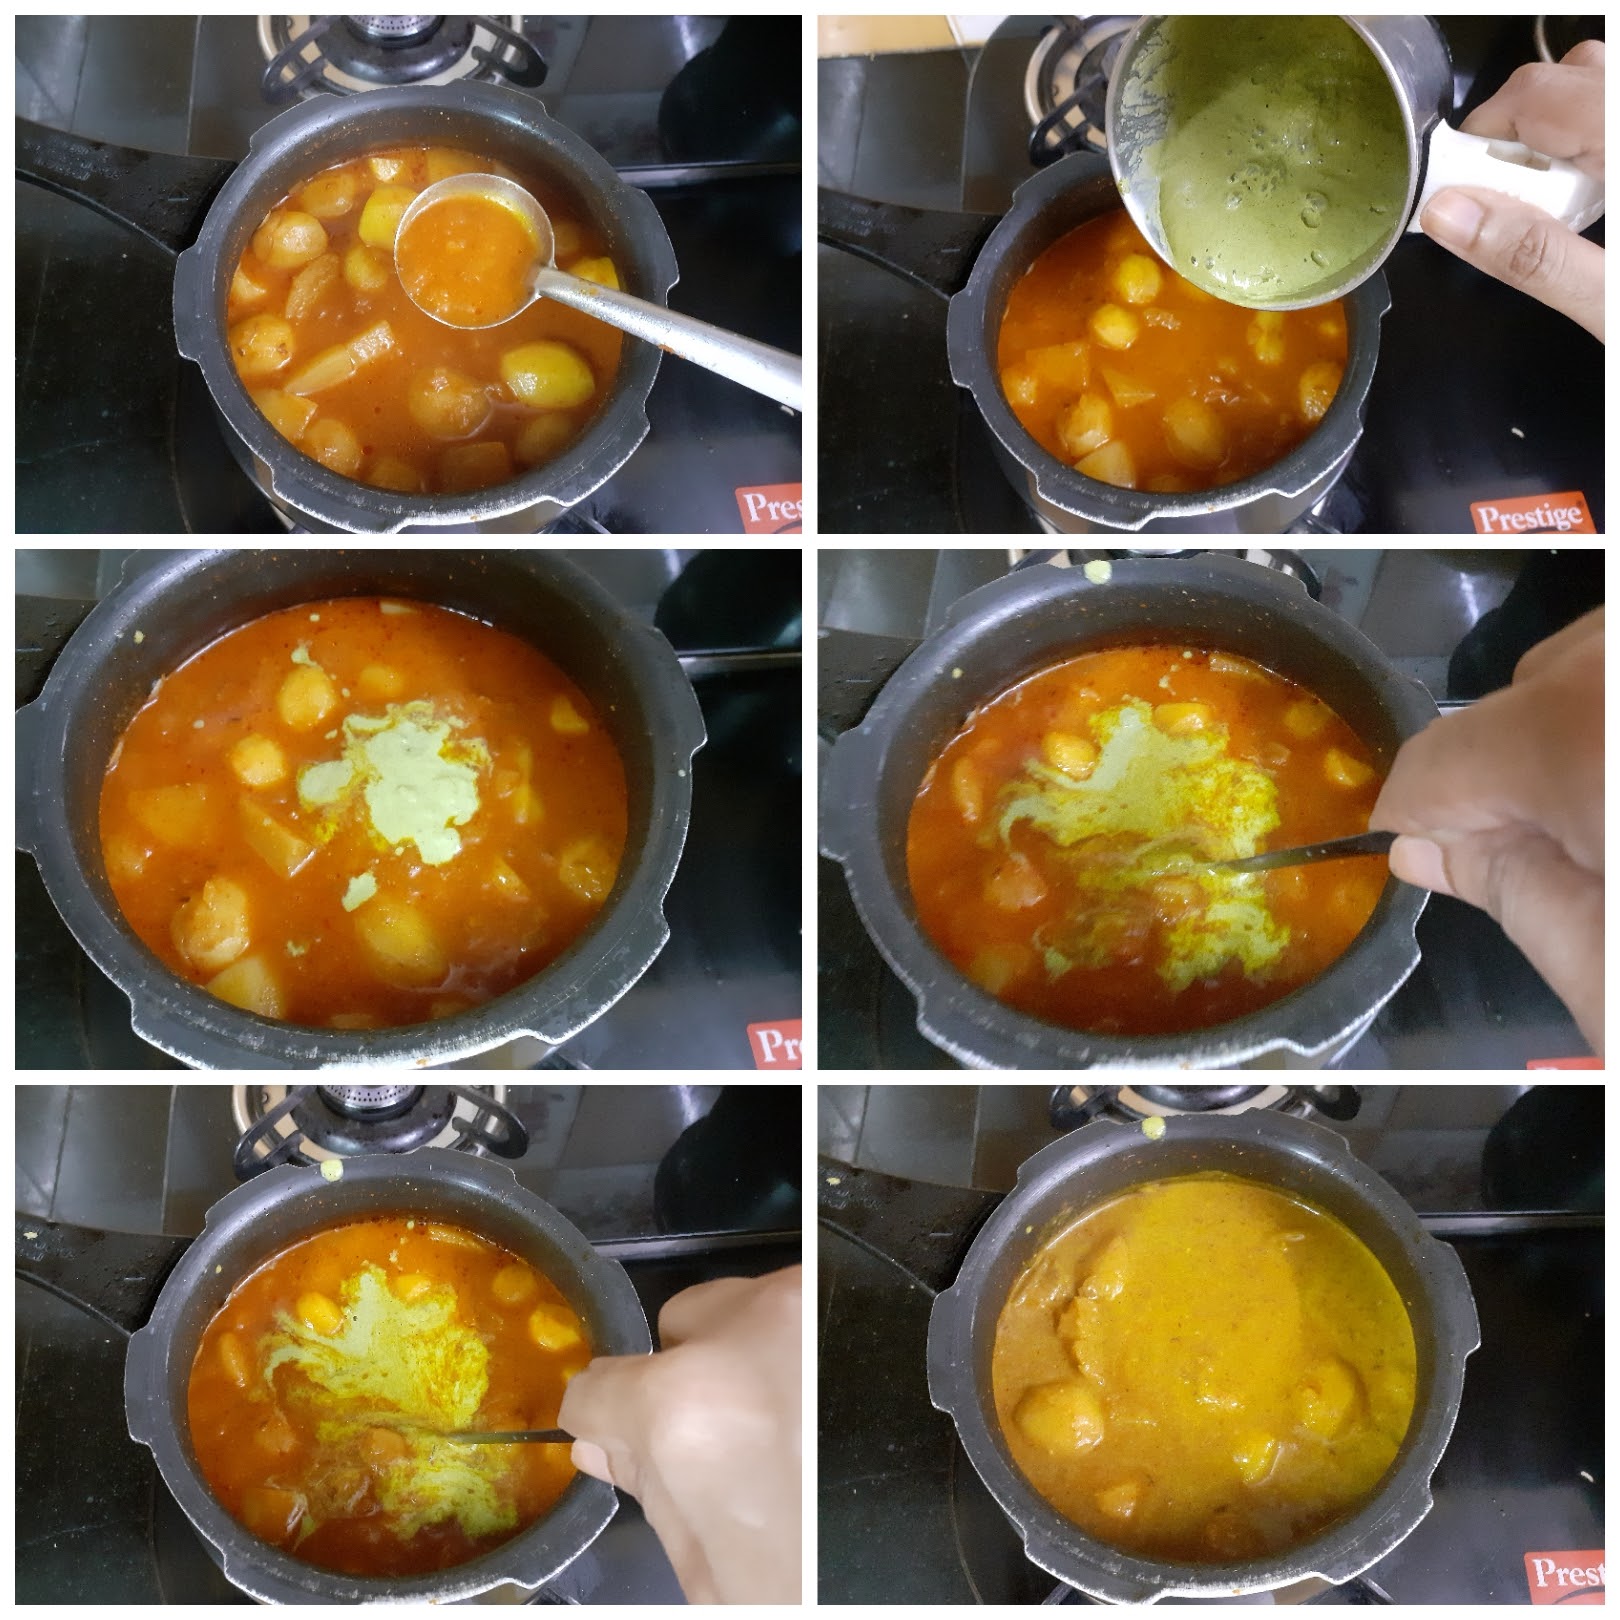
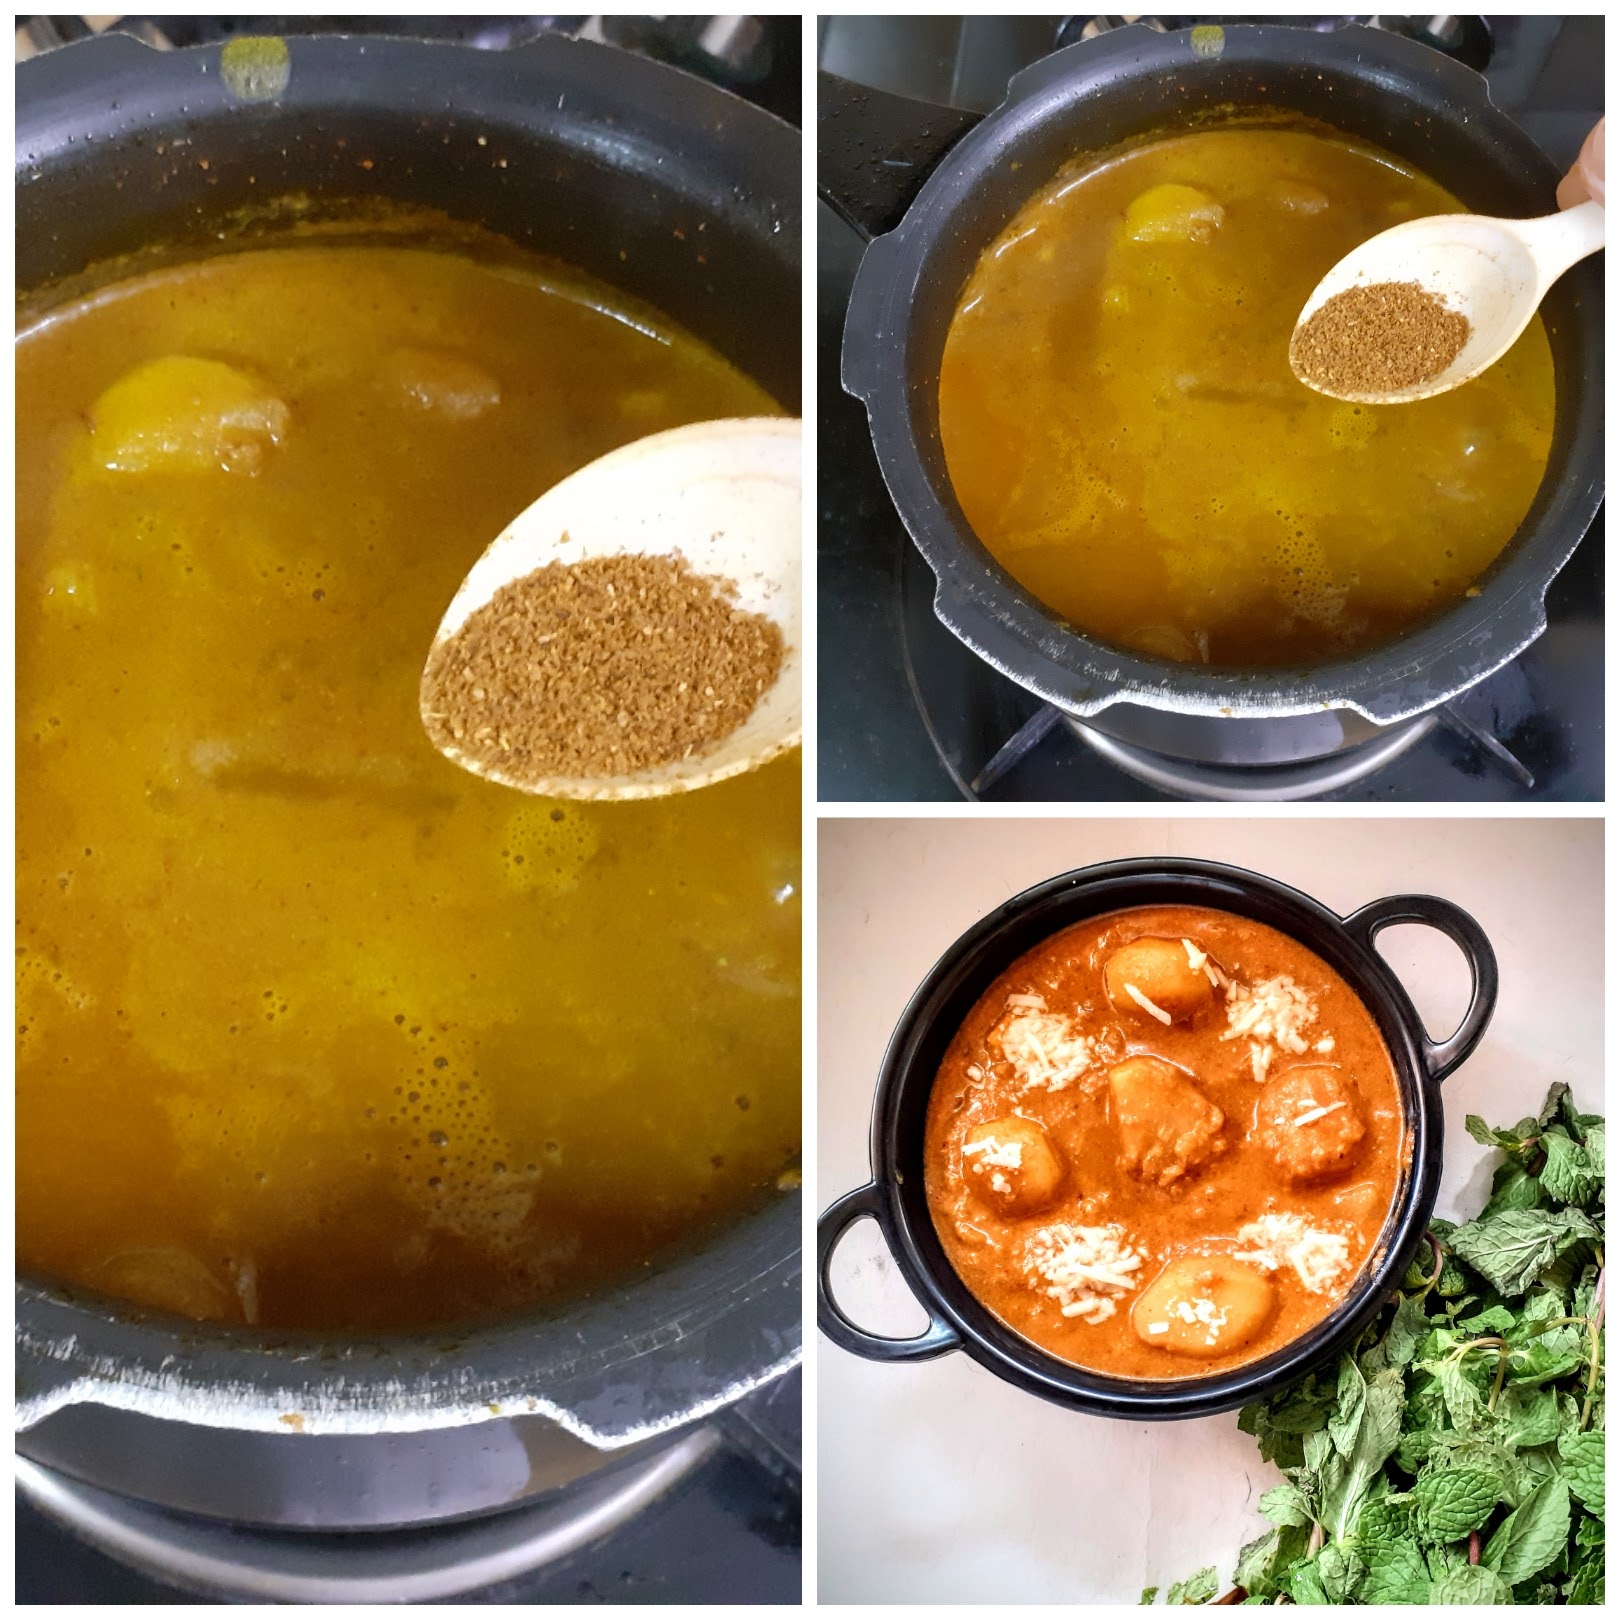
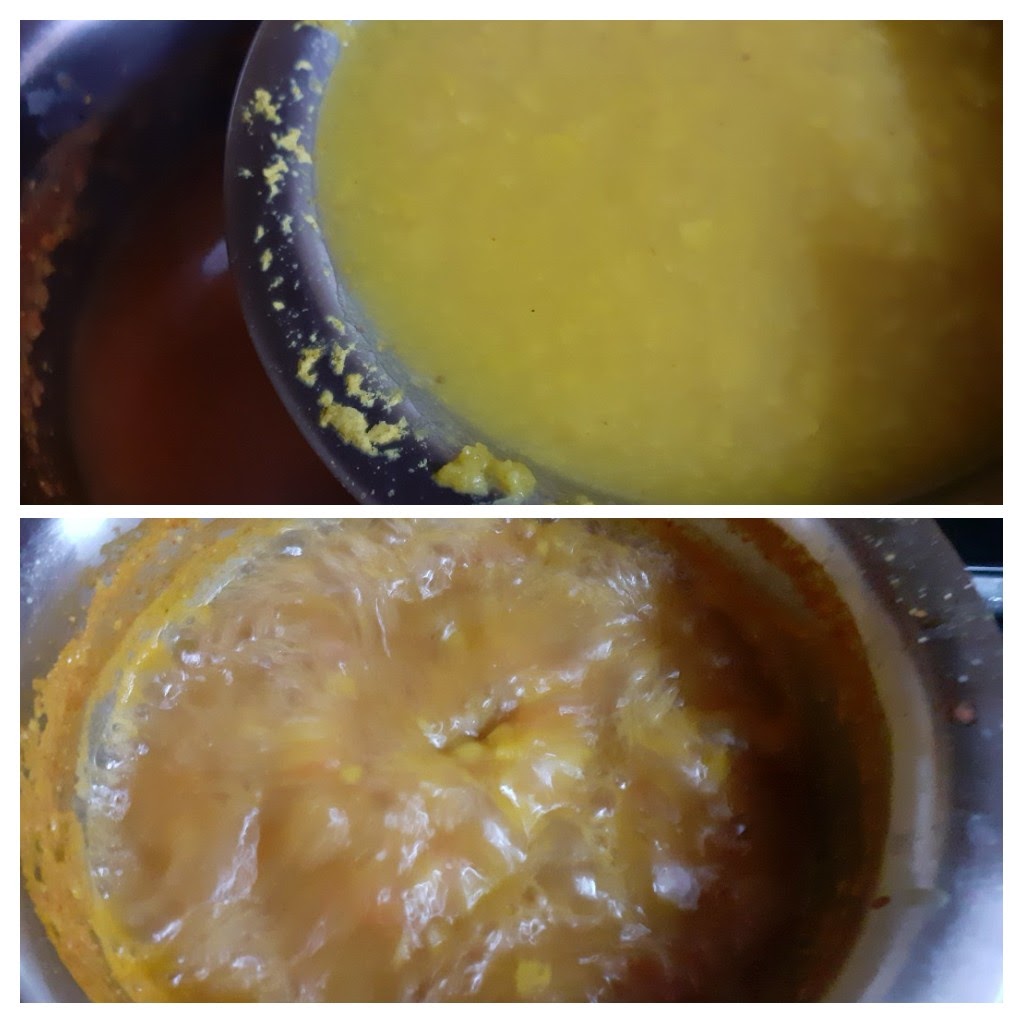
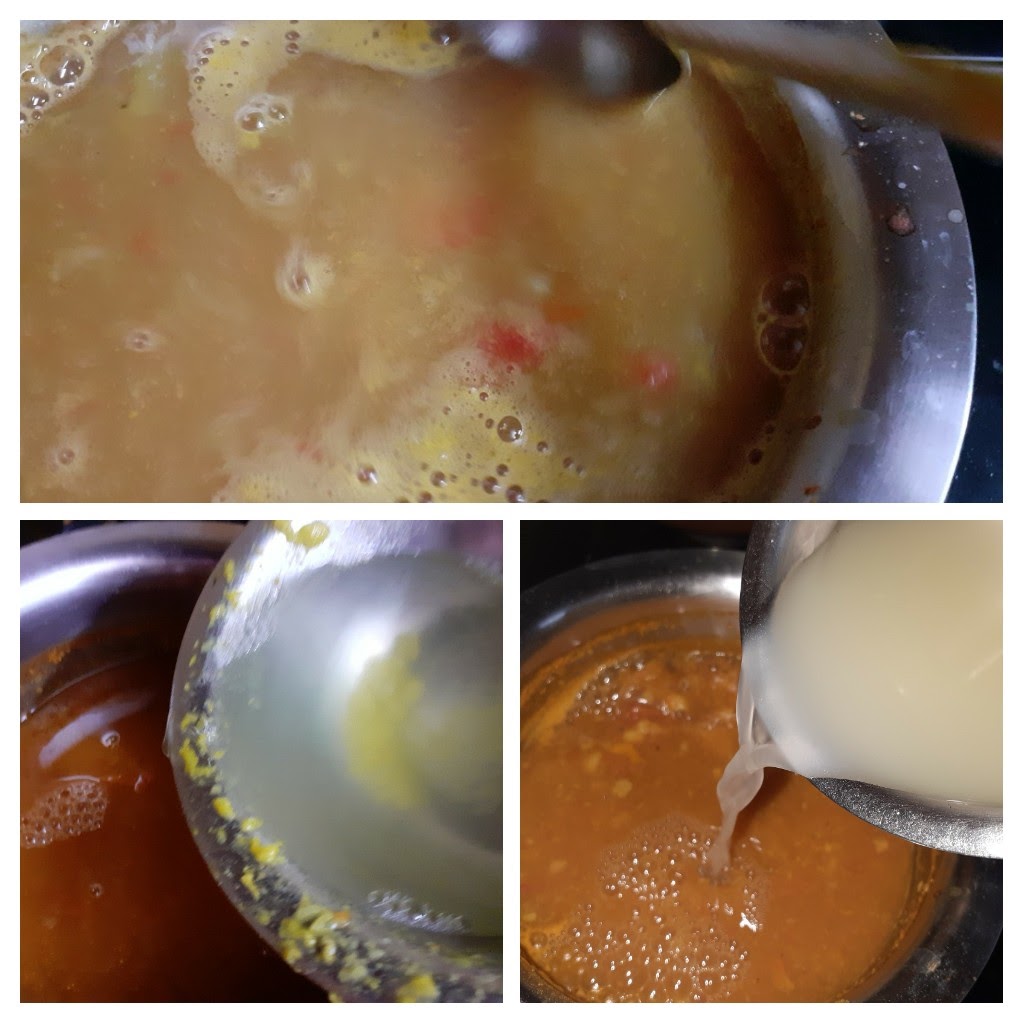
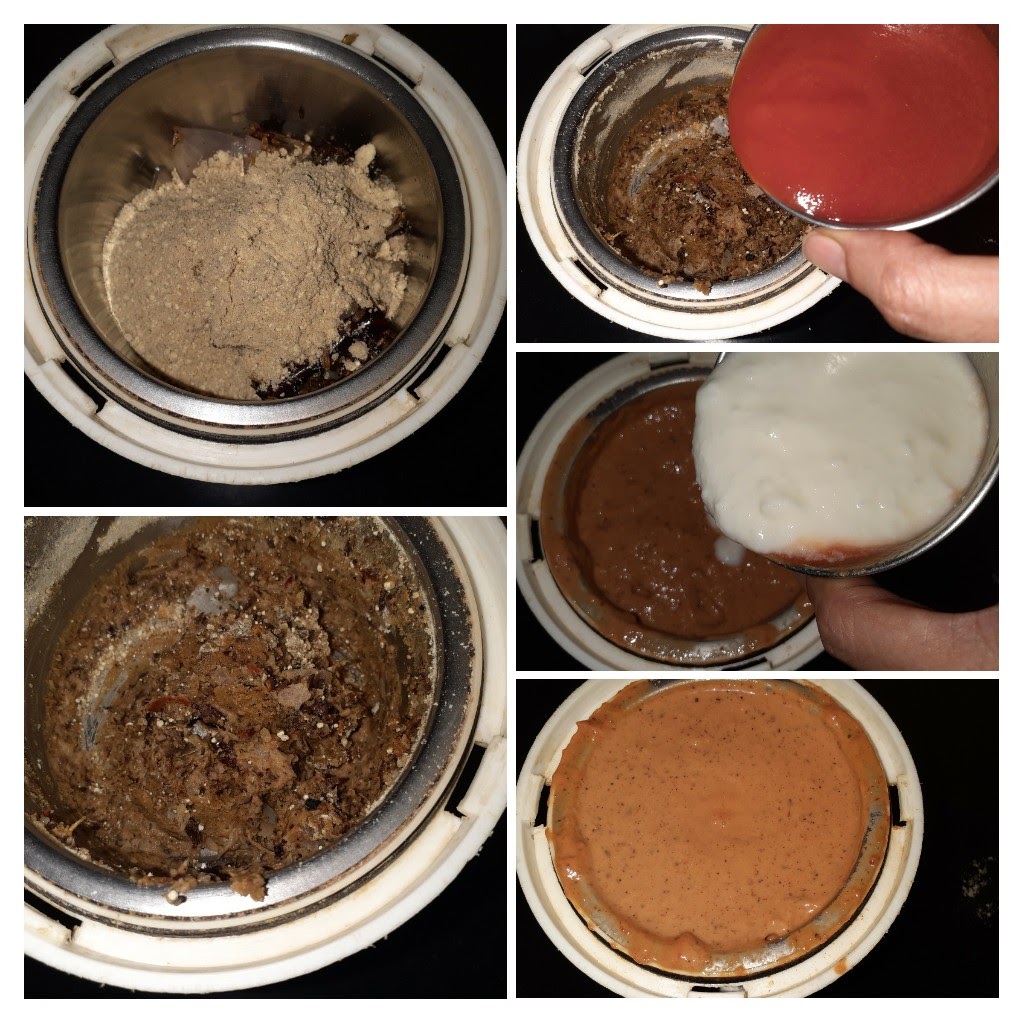
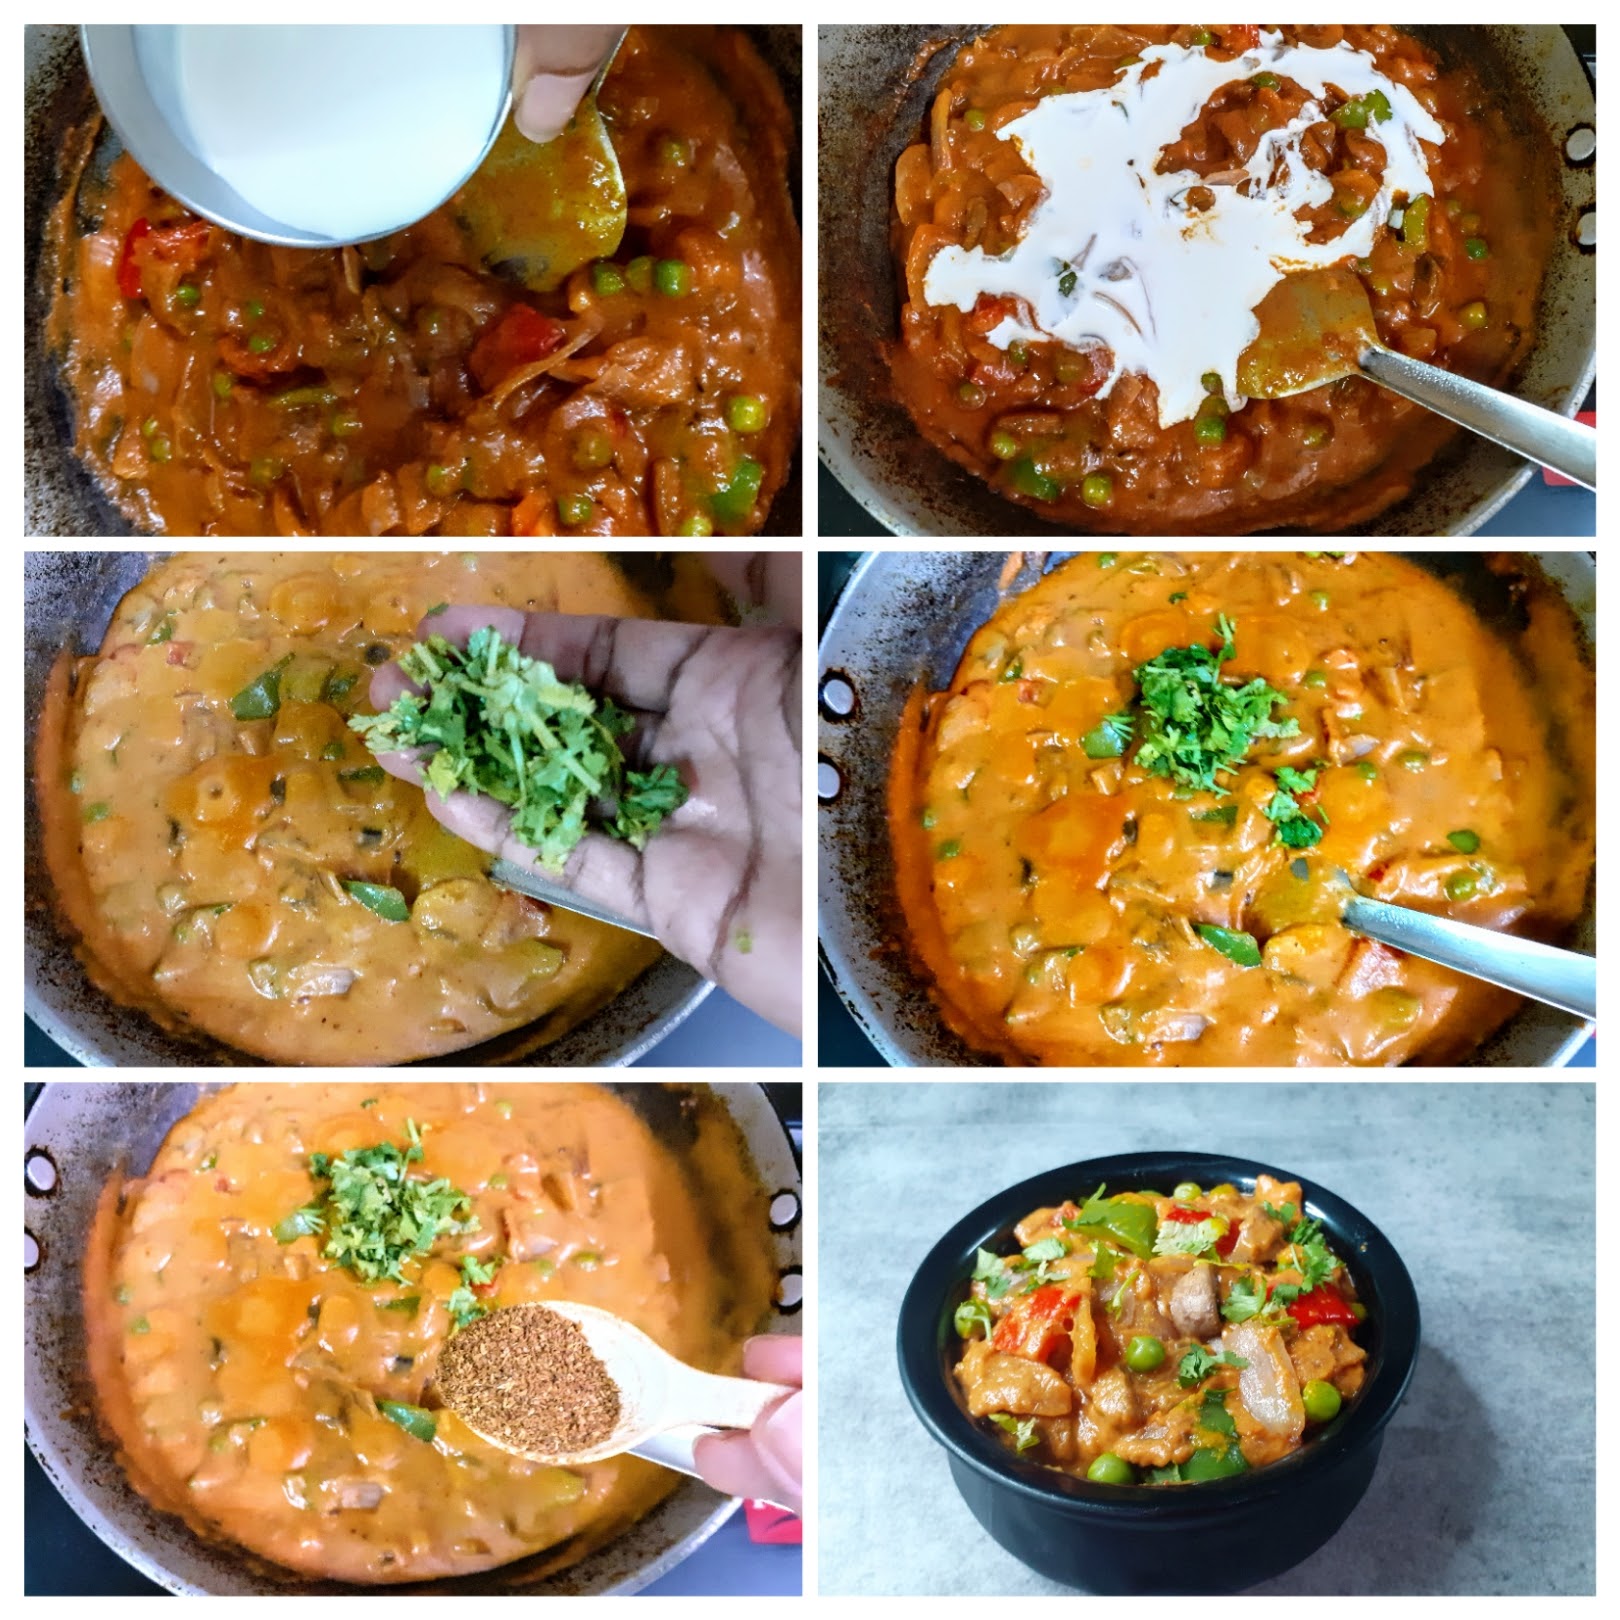
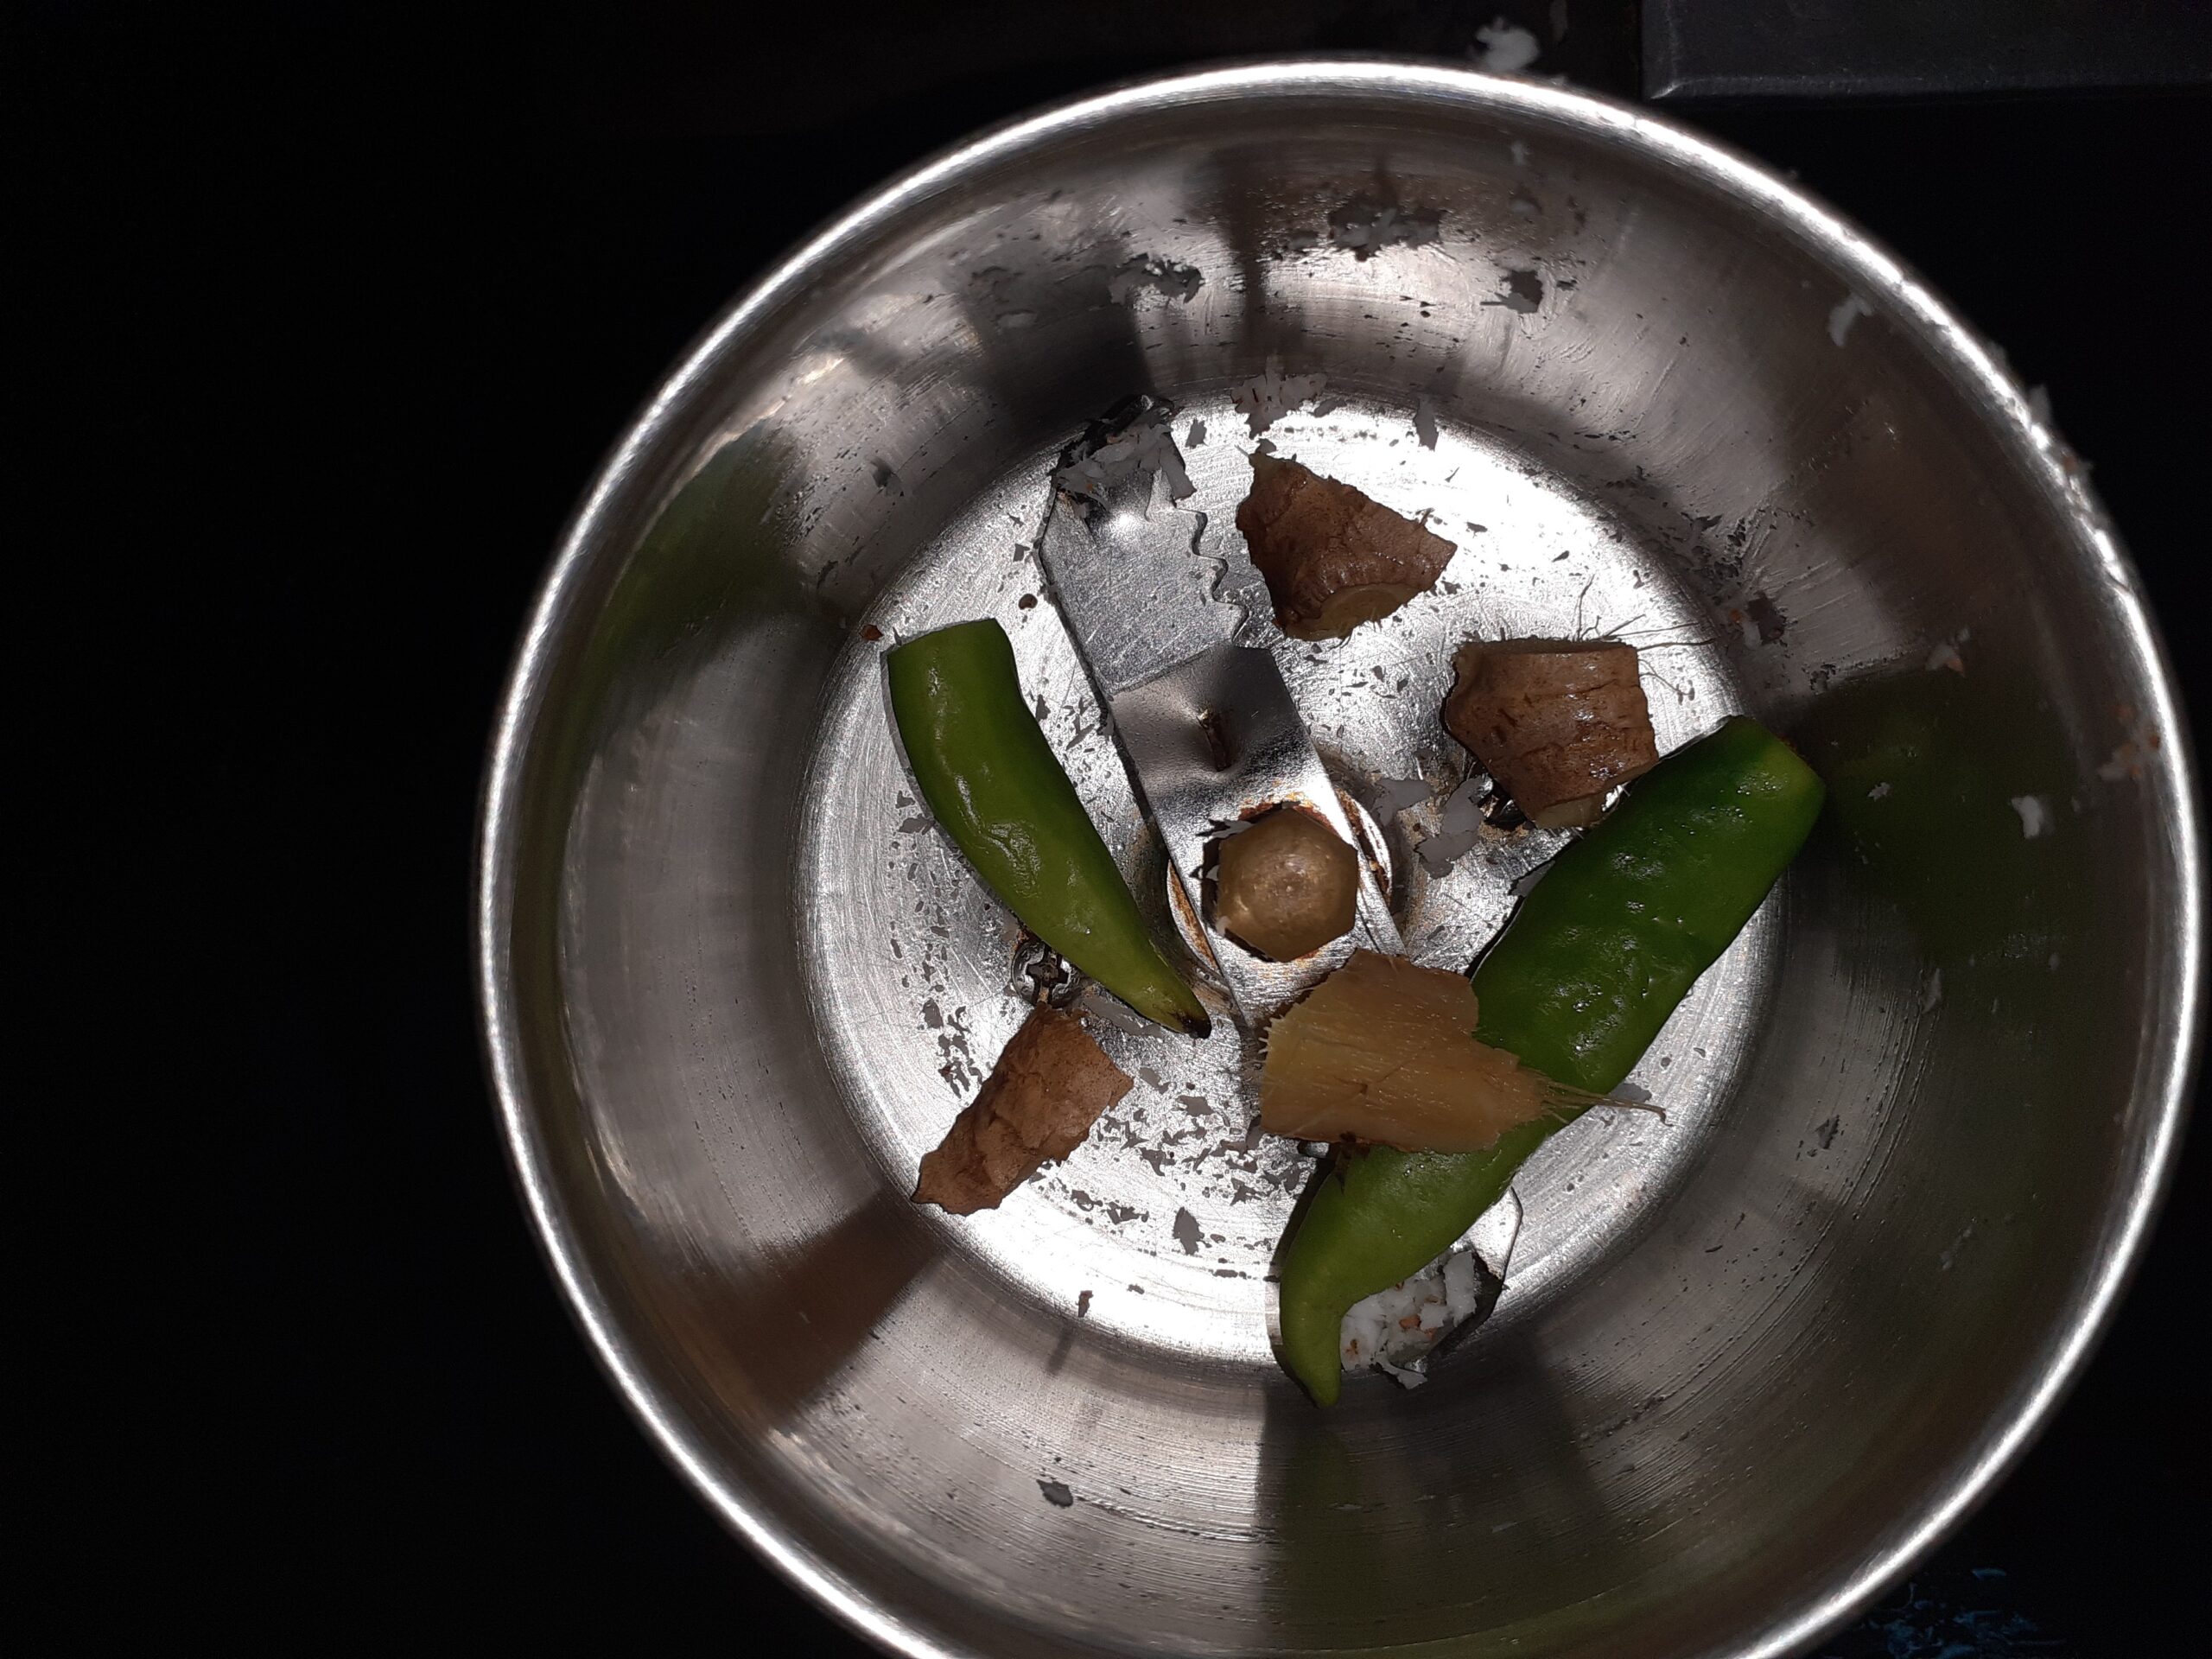
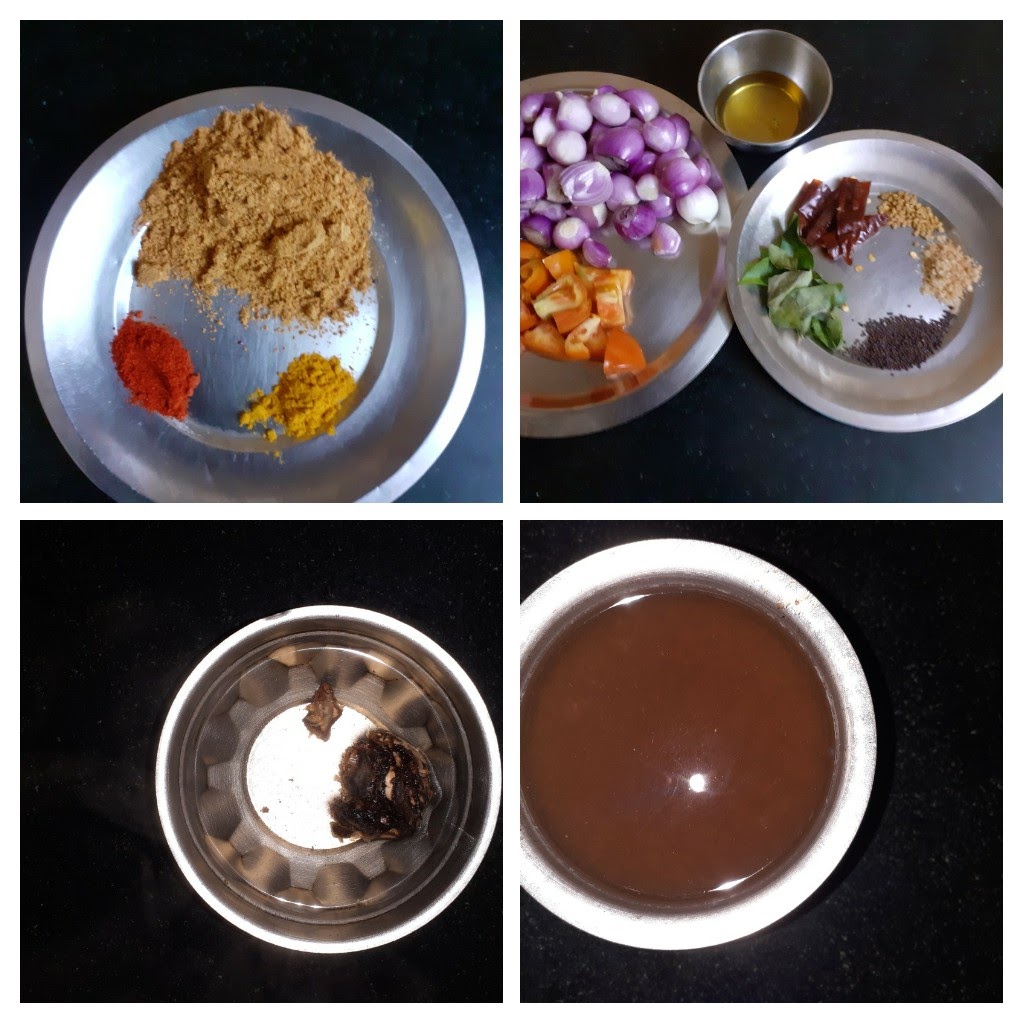
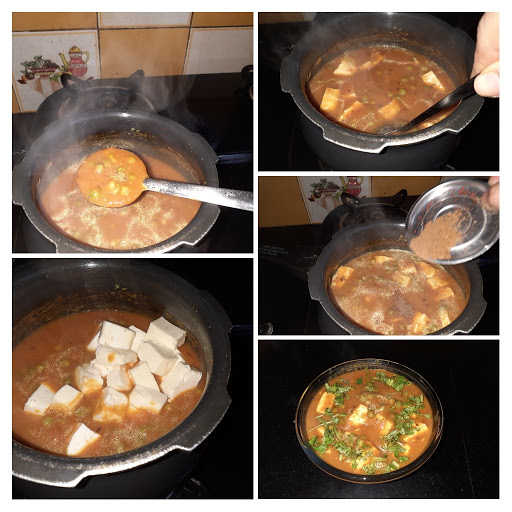
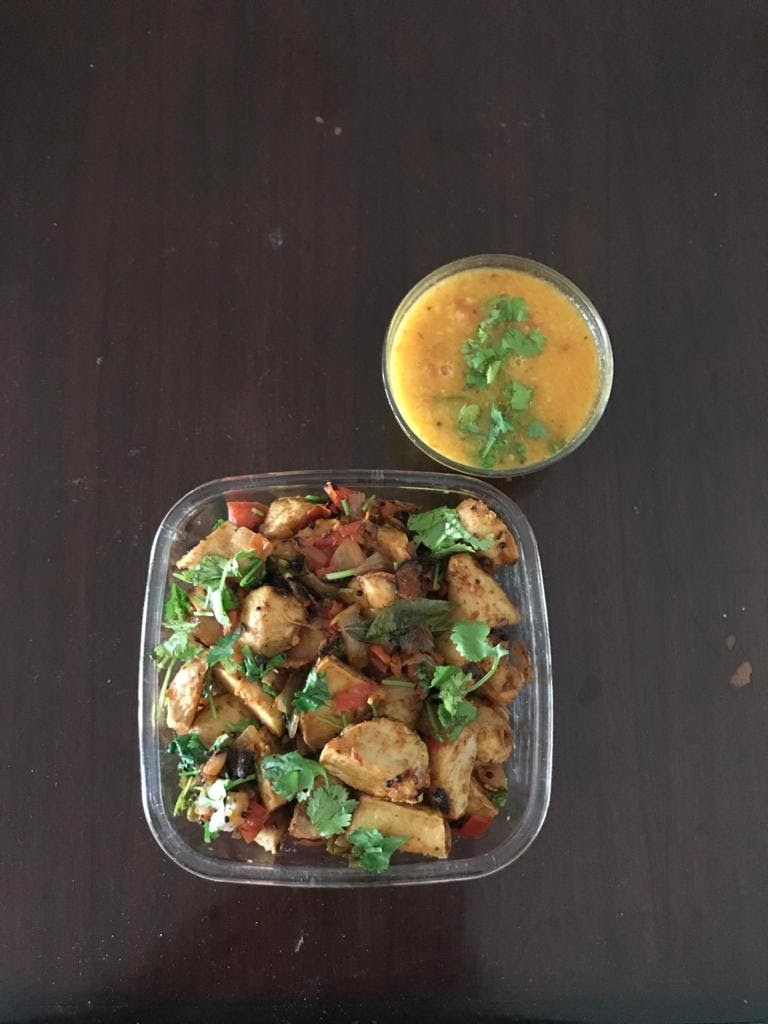
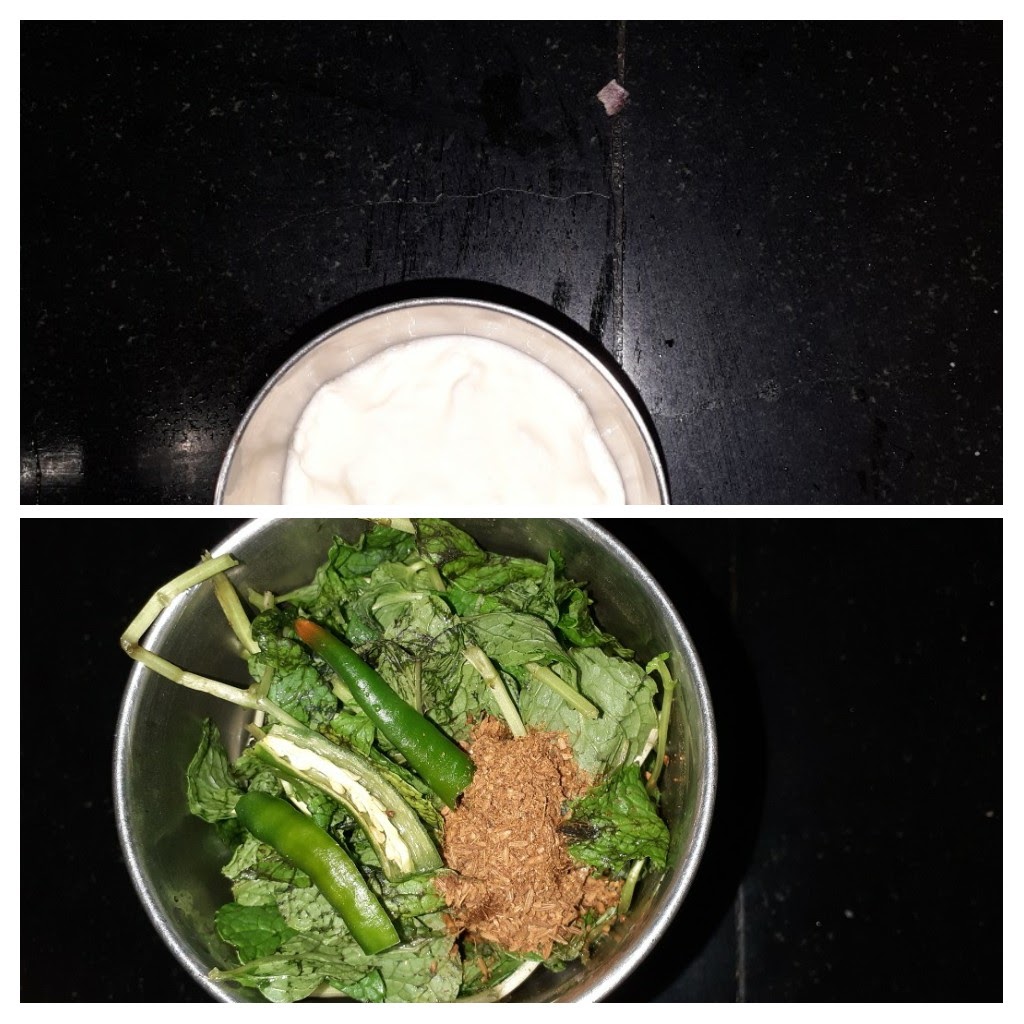
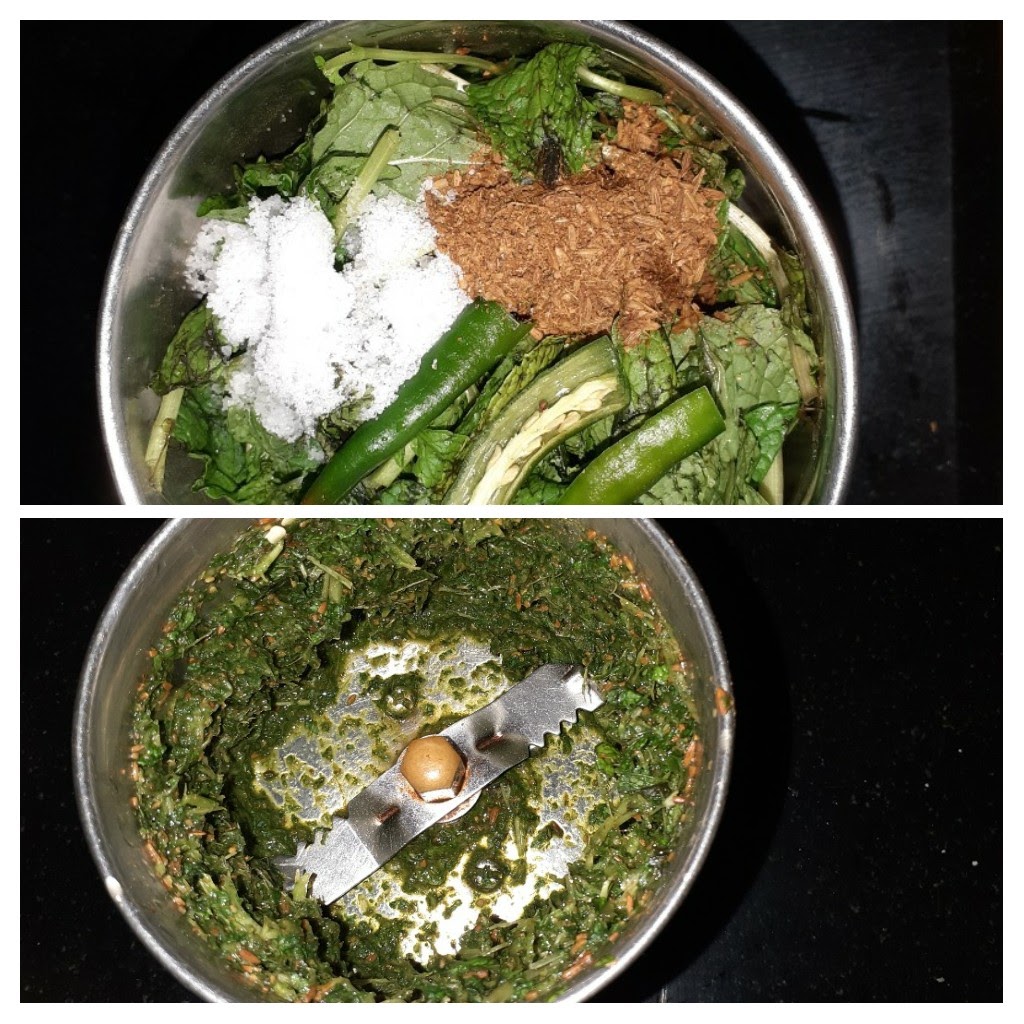
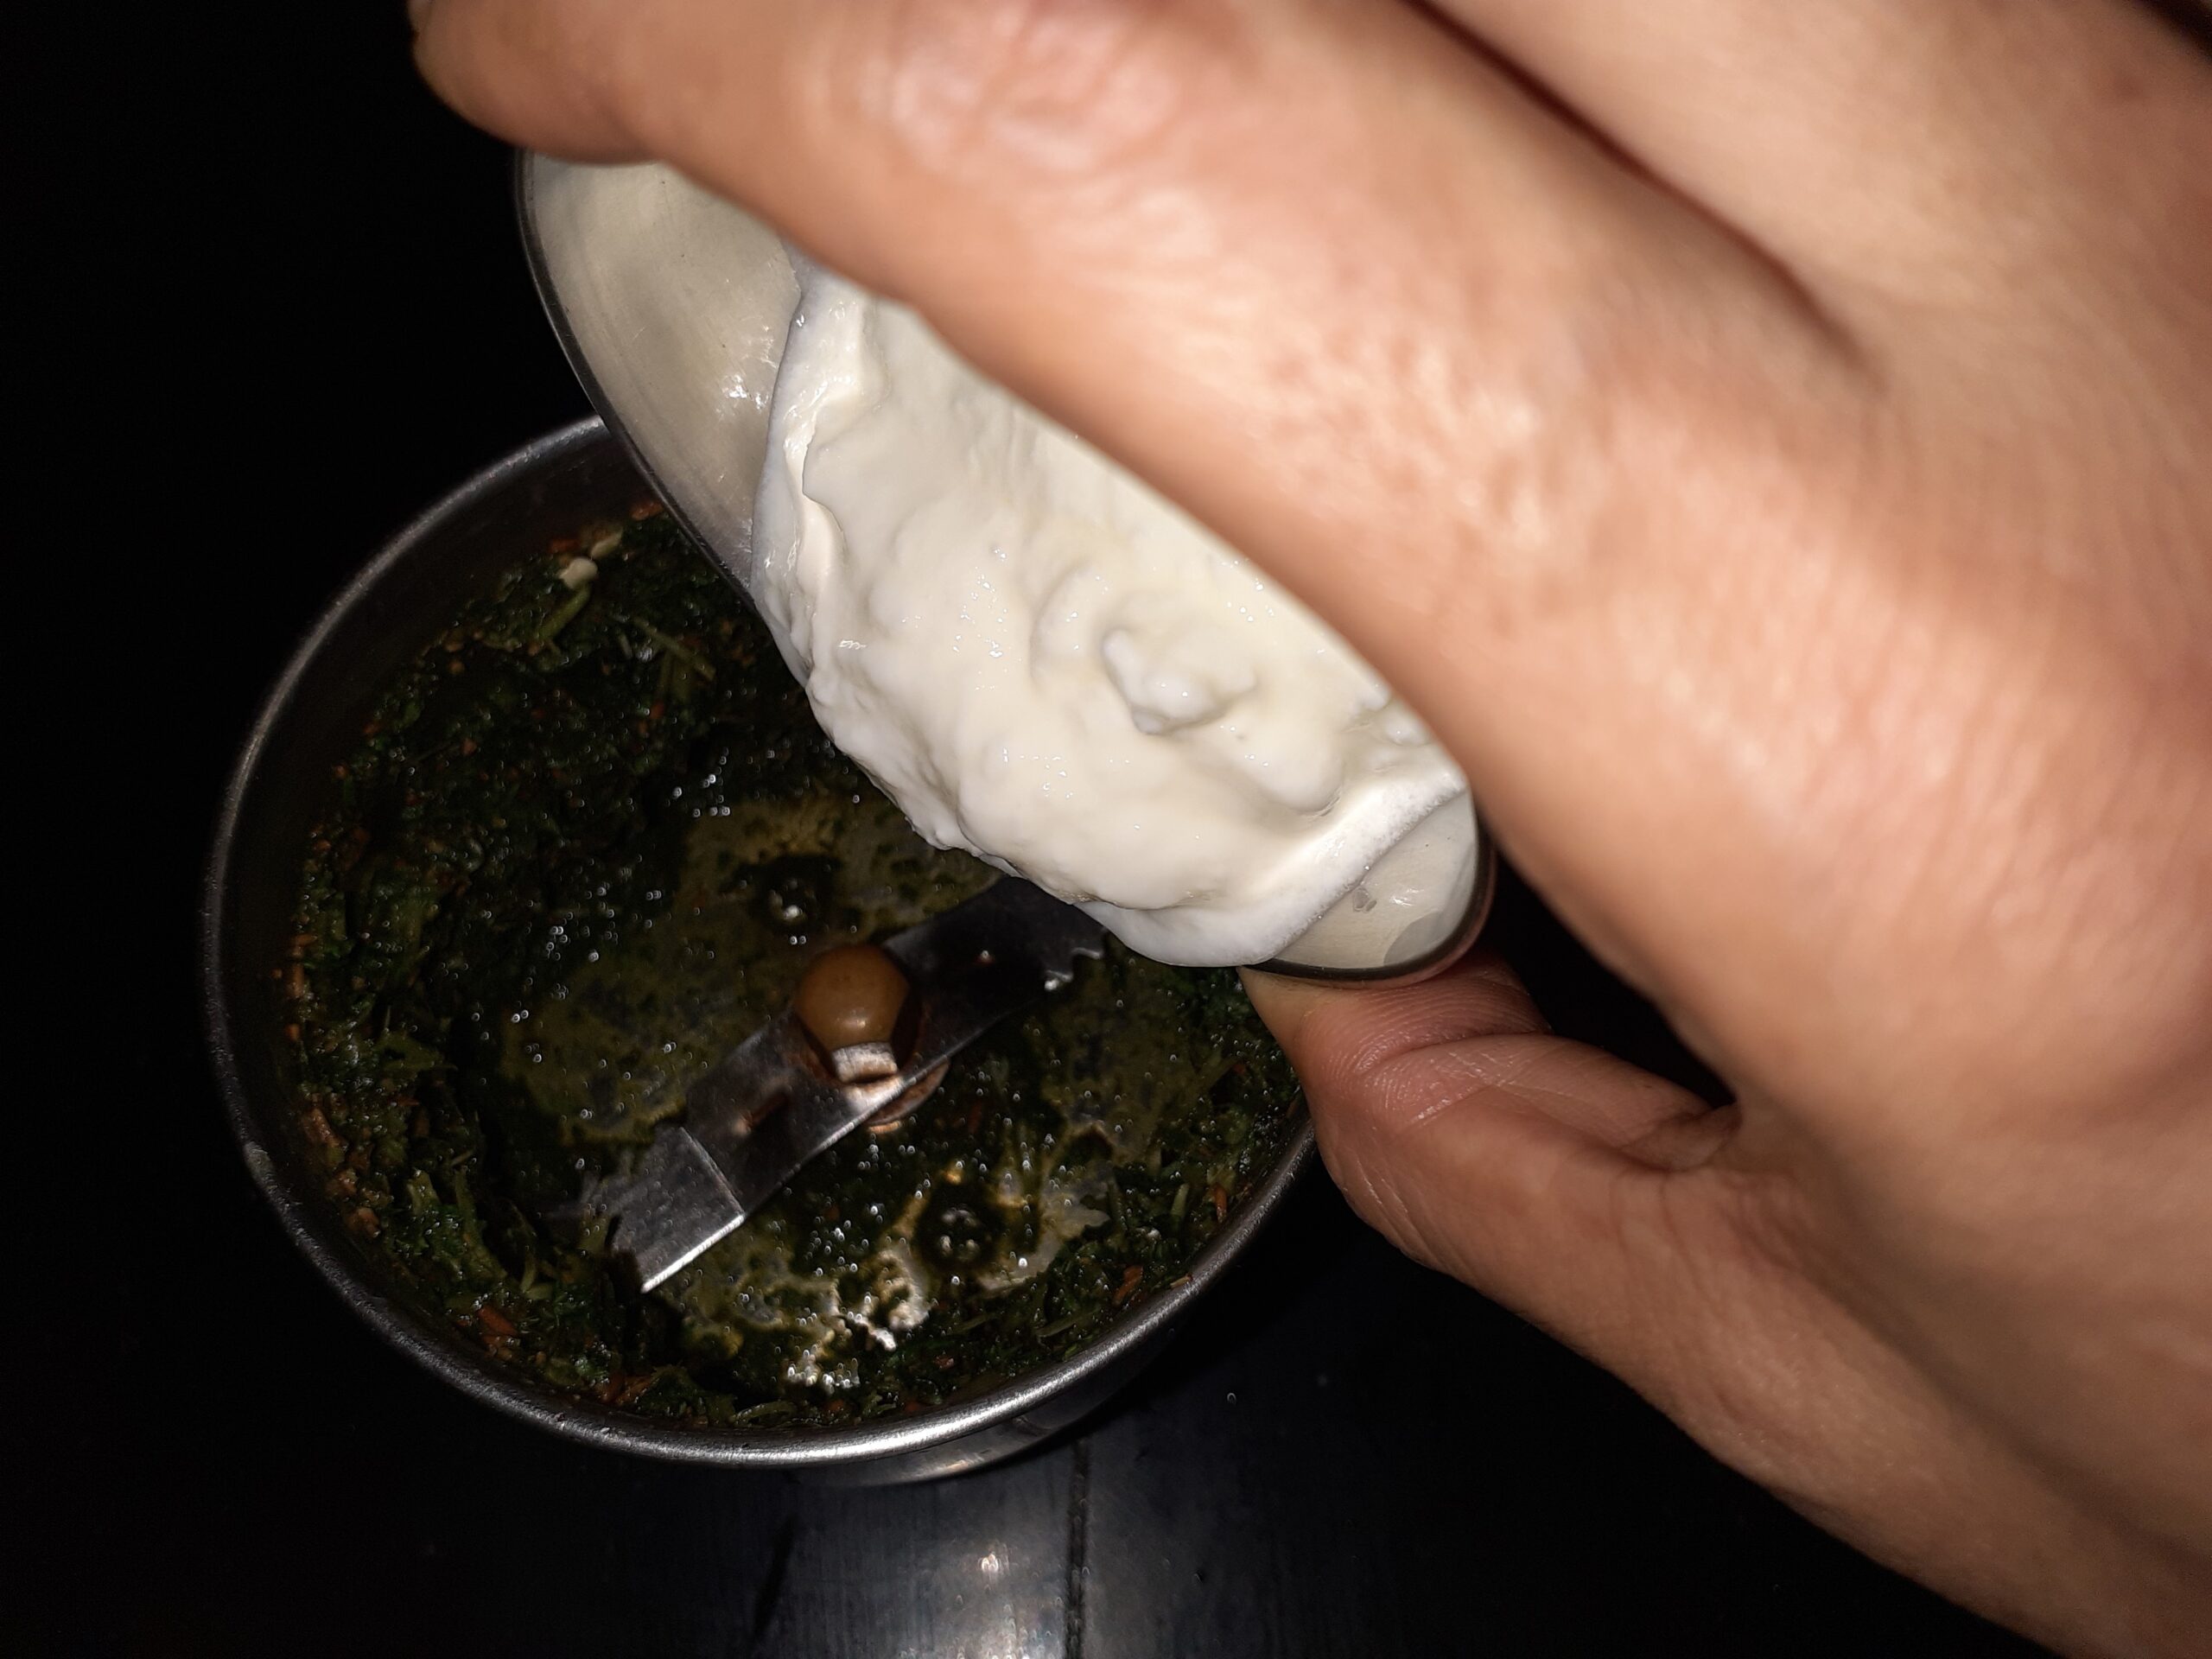
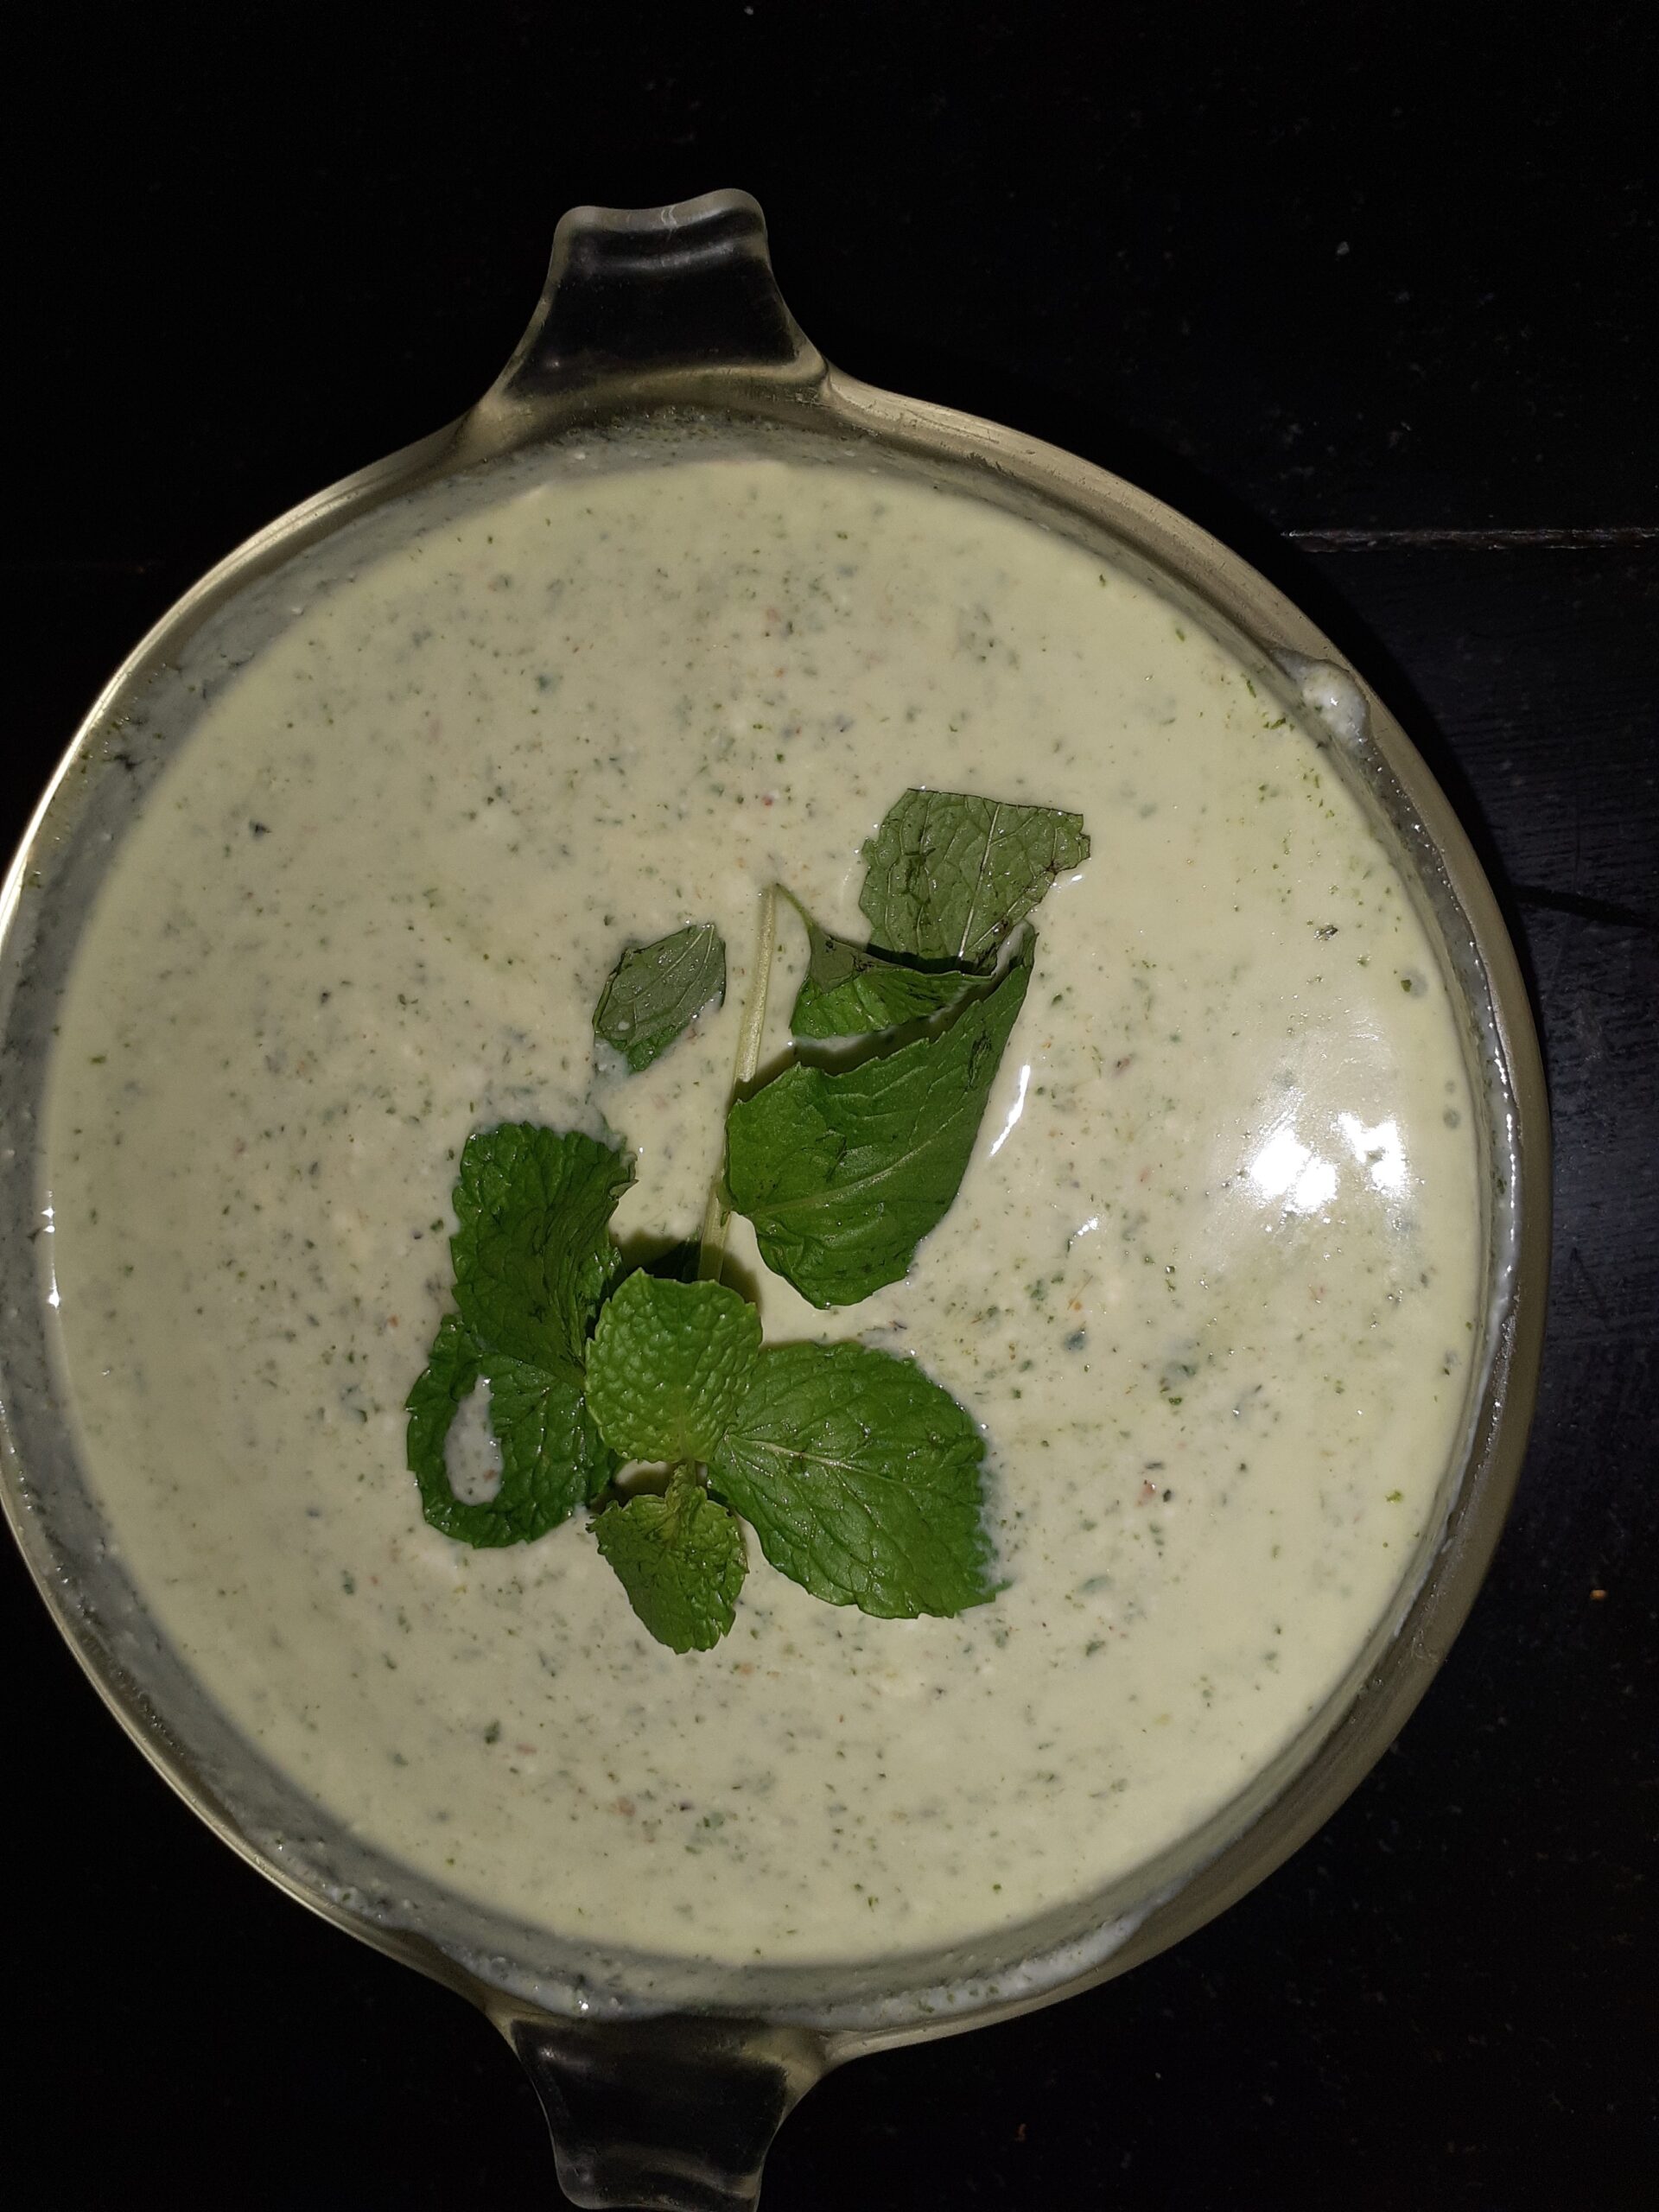
Put all ingredients mentioned under ‘to be ground to a paste’, except curd, into the blender jar, and give it a good spin. Now add the curd and blitz to a smooth paste. When the pressure from the cooker releases, open the cooker pour this paste in, switch on the flame on low and cook for 3 minutes, stirring in the masala paste nicely, such that it gets evenly mixed in the gravy. Add the garam masala and put off the flame. The spicy, tangy and flavourful Ajwaini Dum Aloo is ready.
Serving Suggestion: with Rotis, Paratha, Kulcha, Pulav, vegetable rice or with plain rice.
STEPWISE RECIPE FOLLOWS:
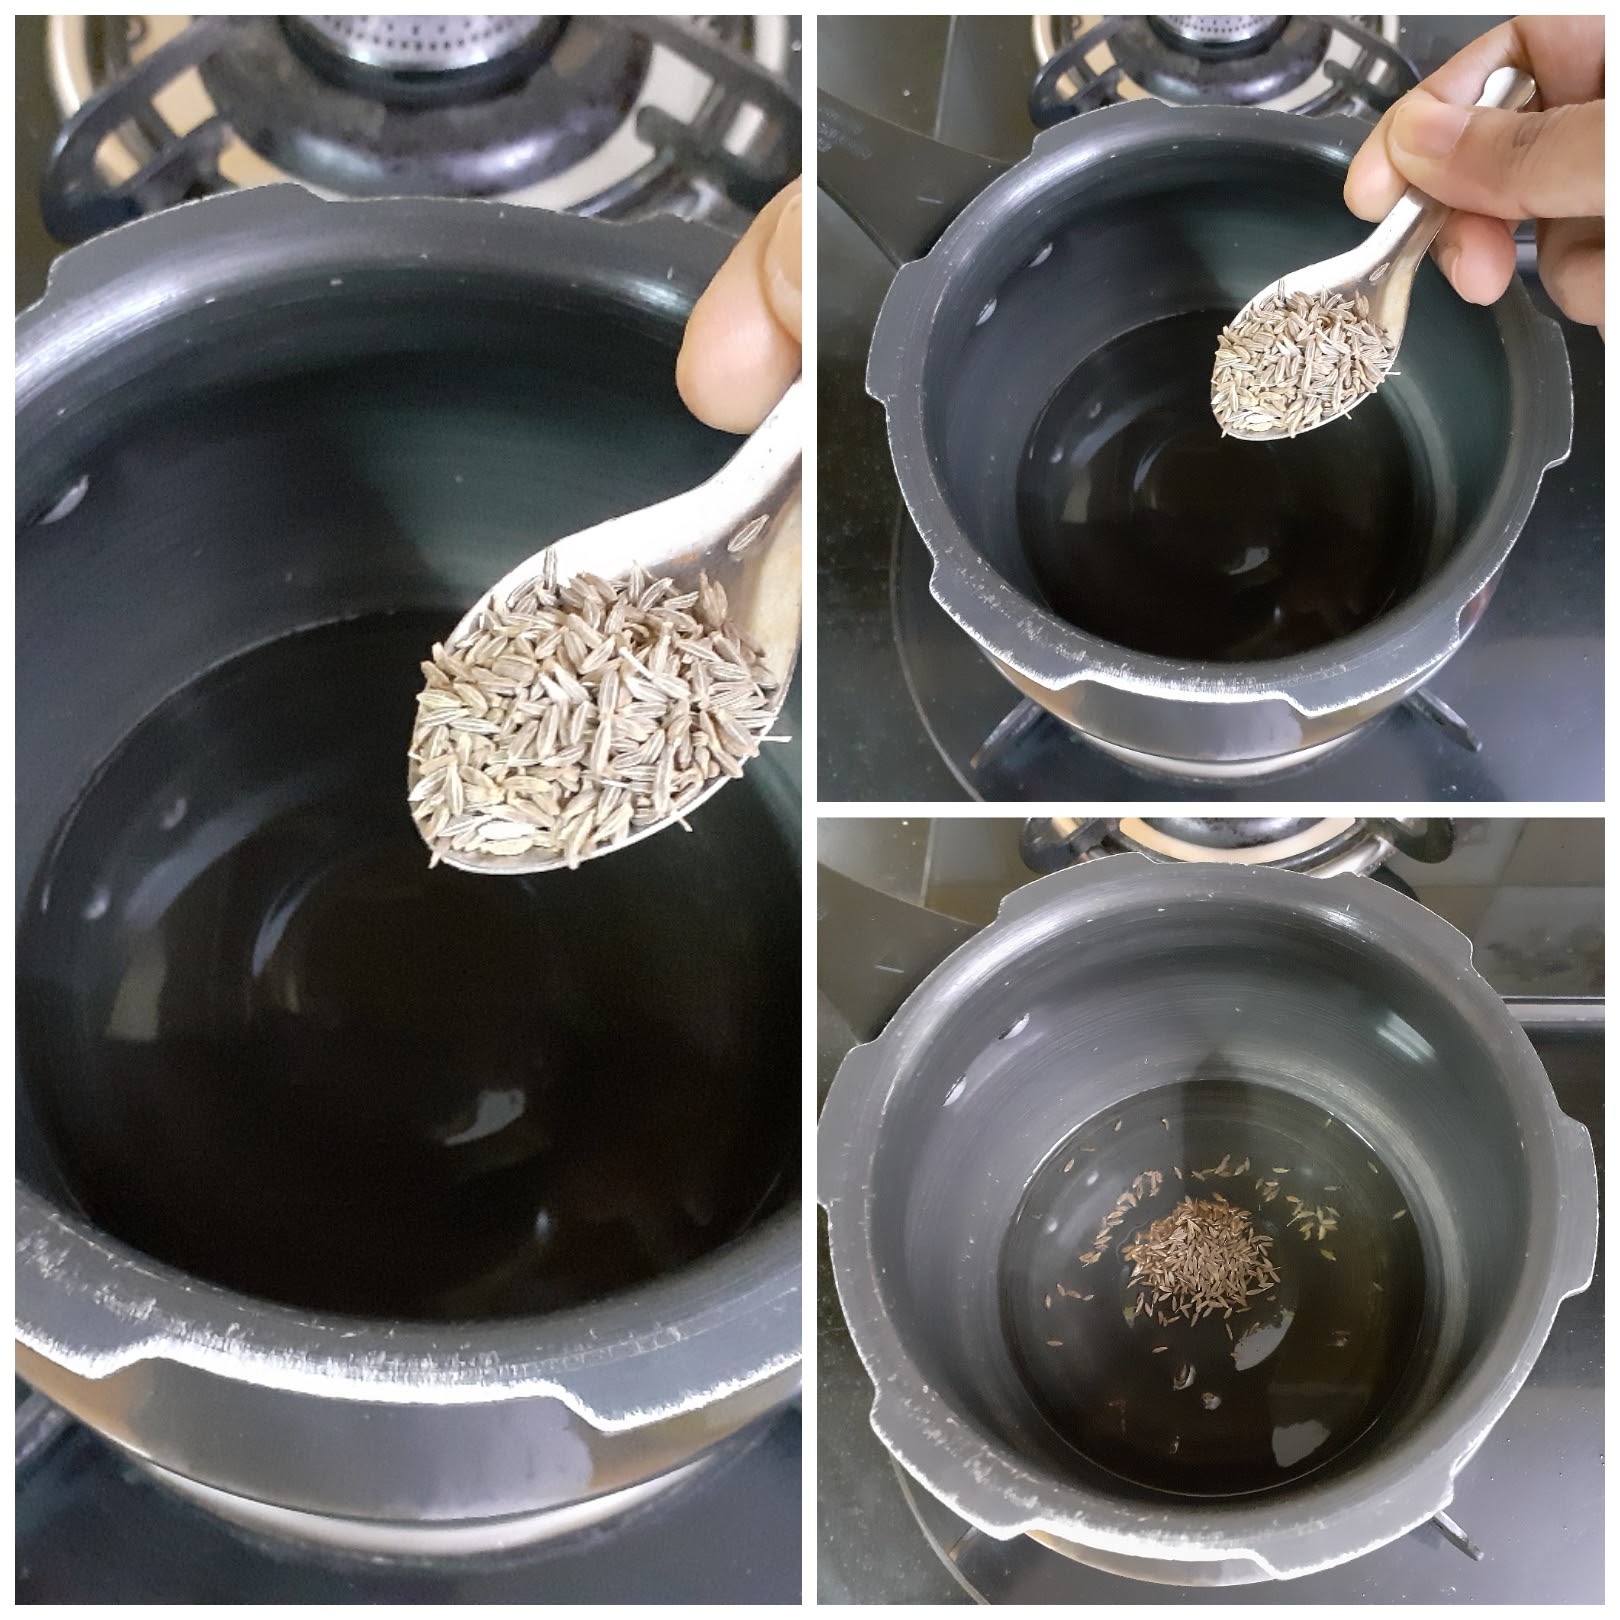
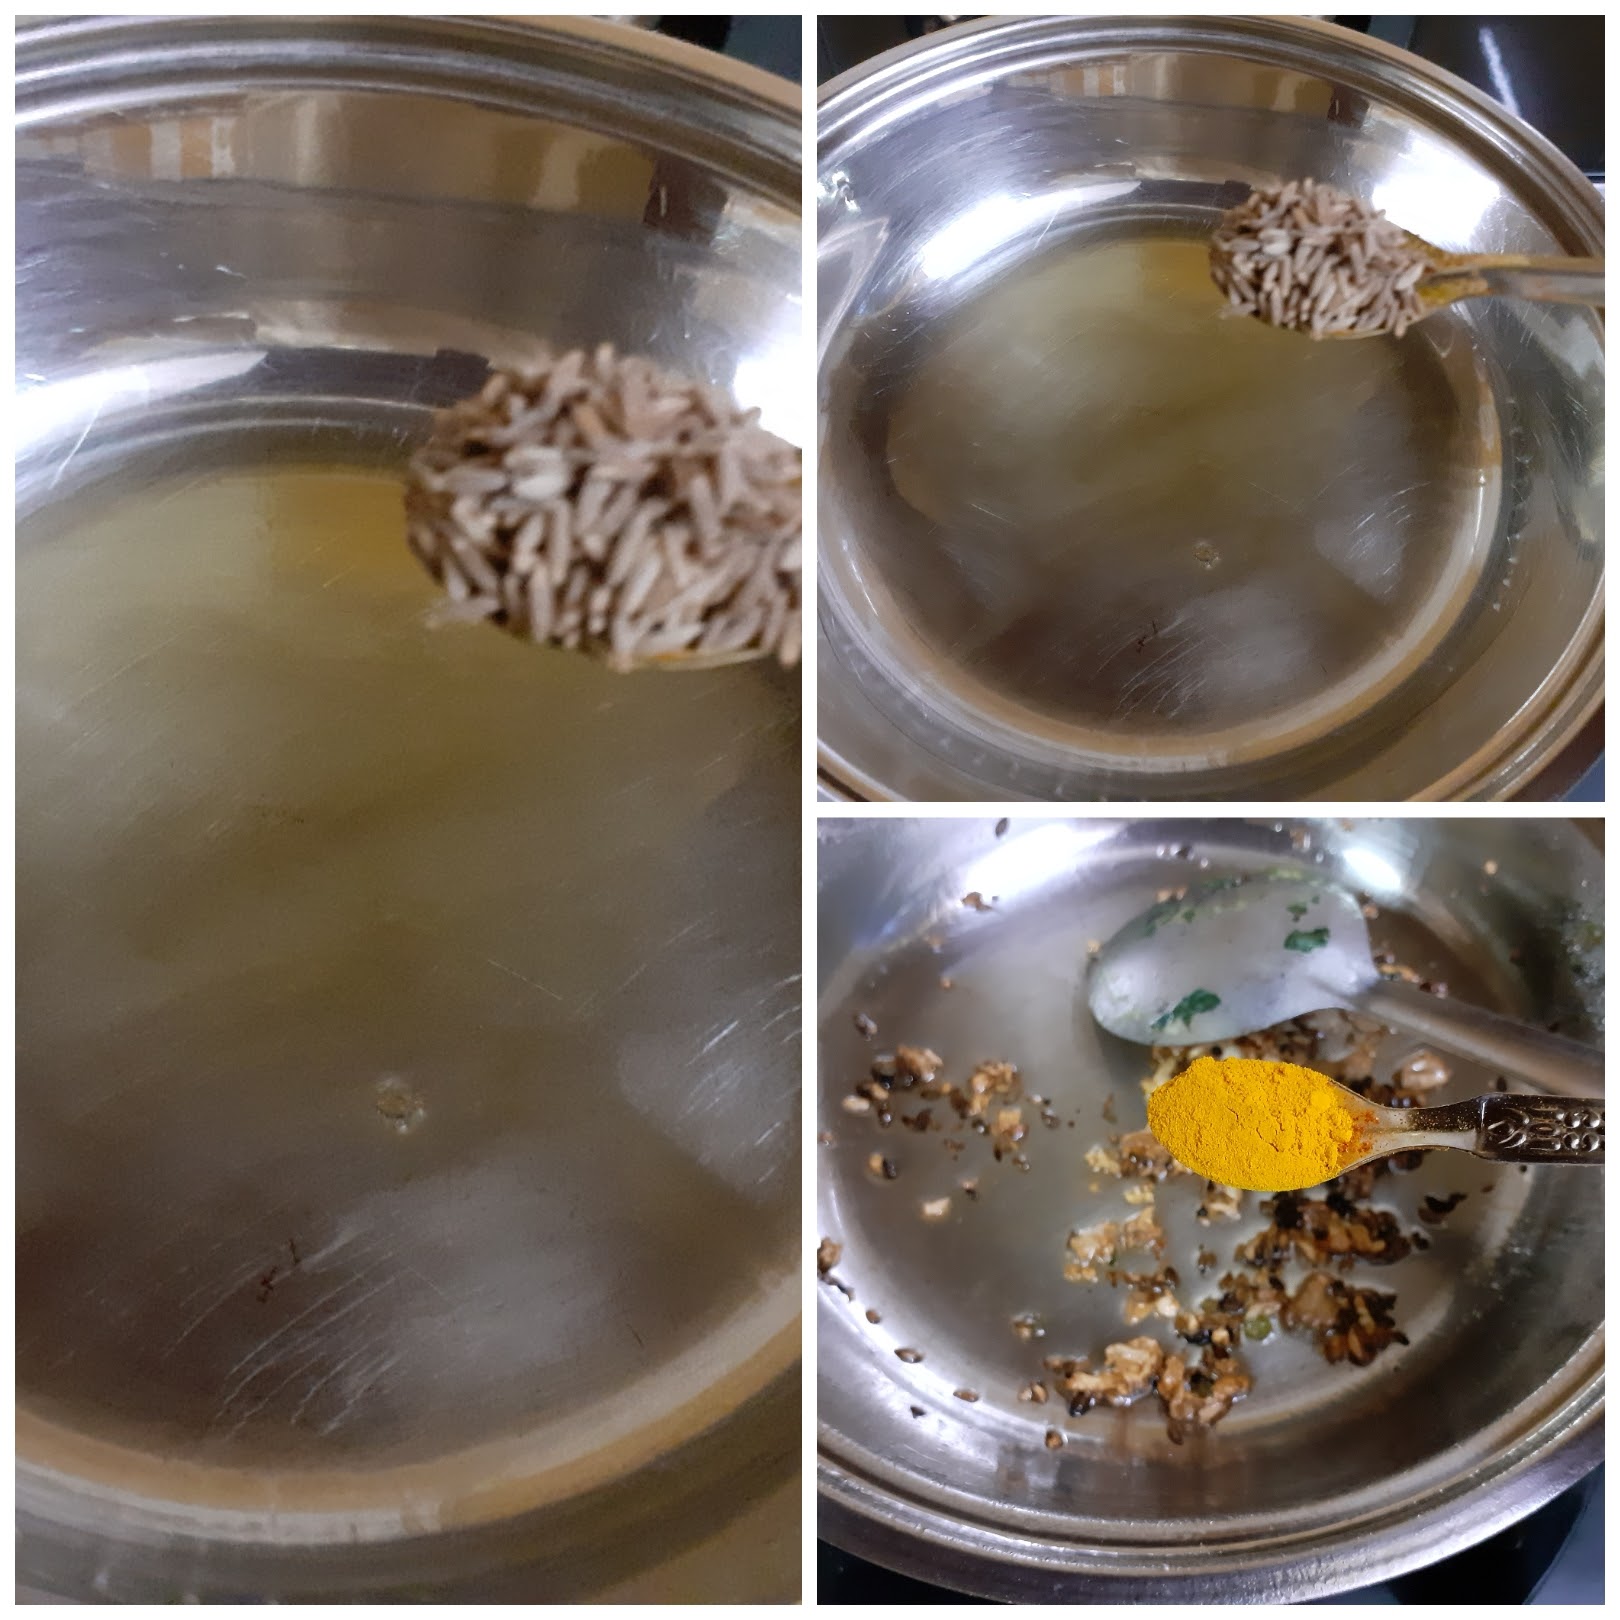
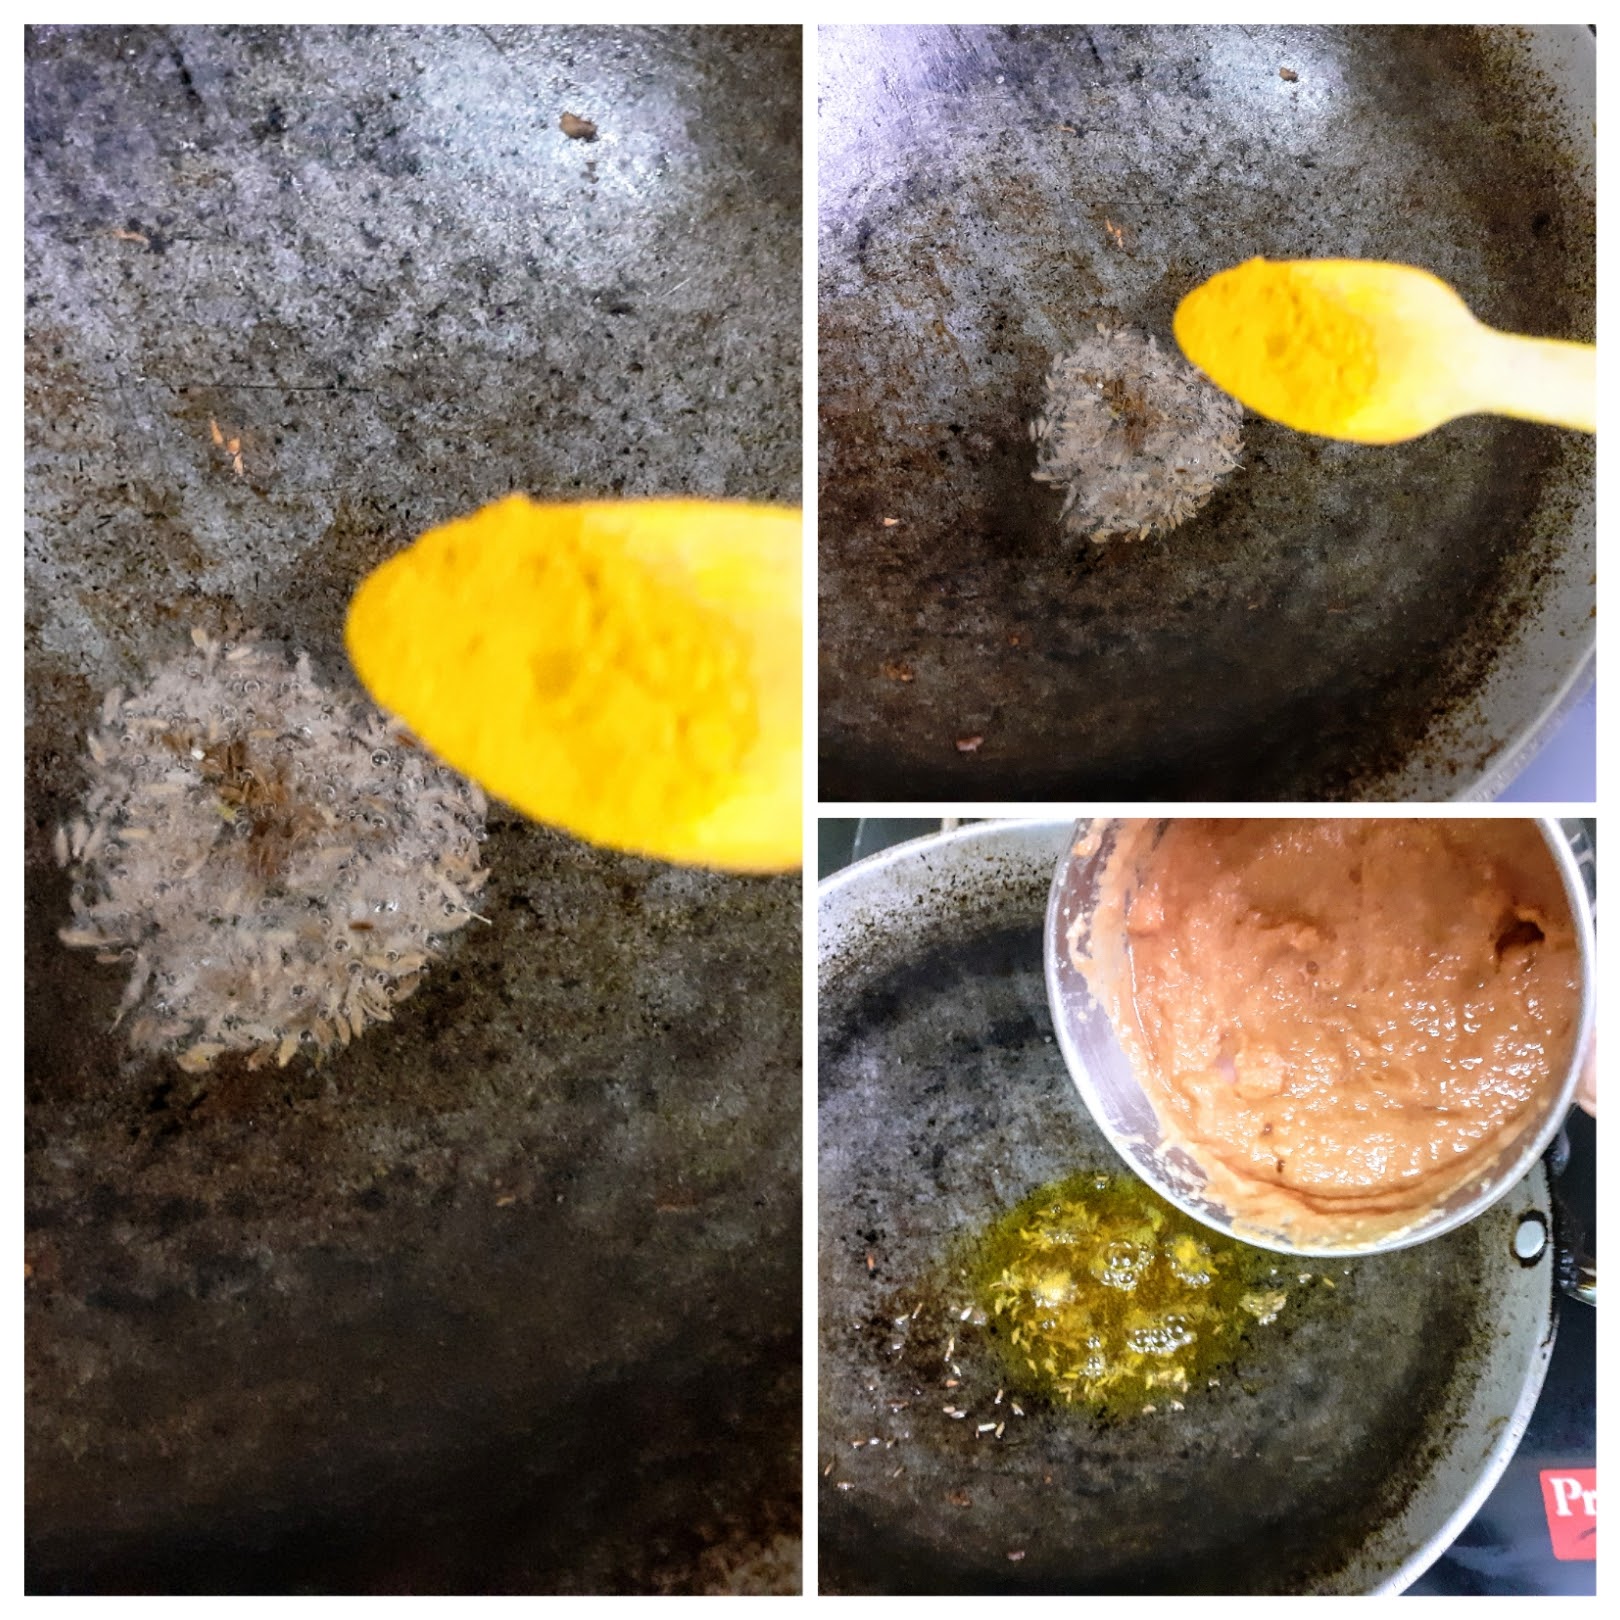
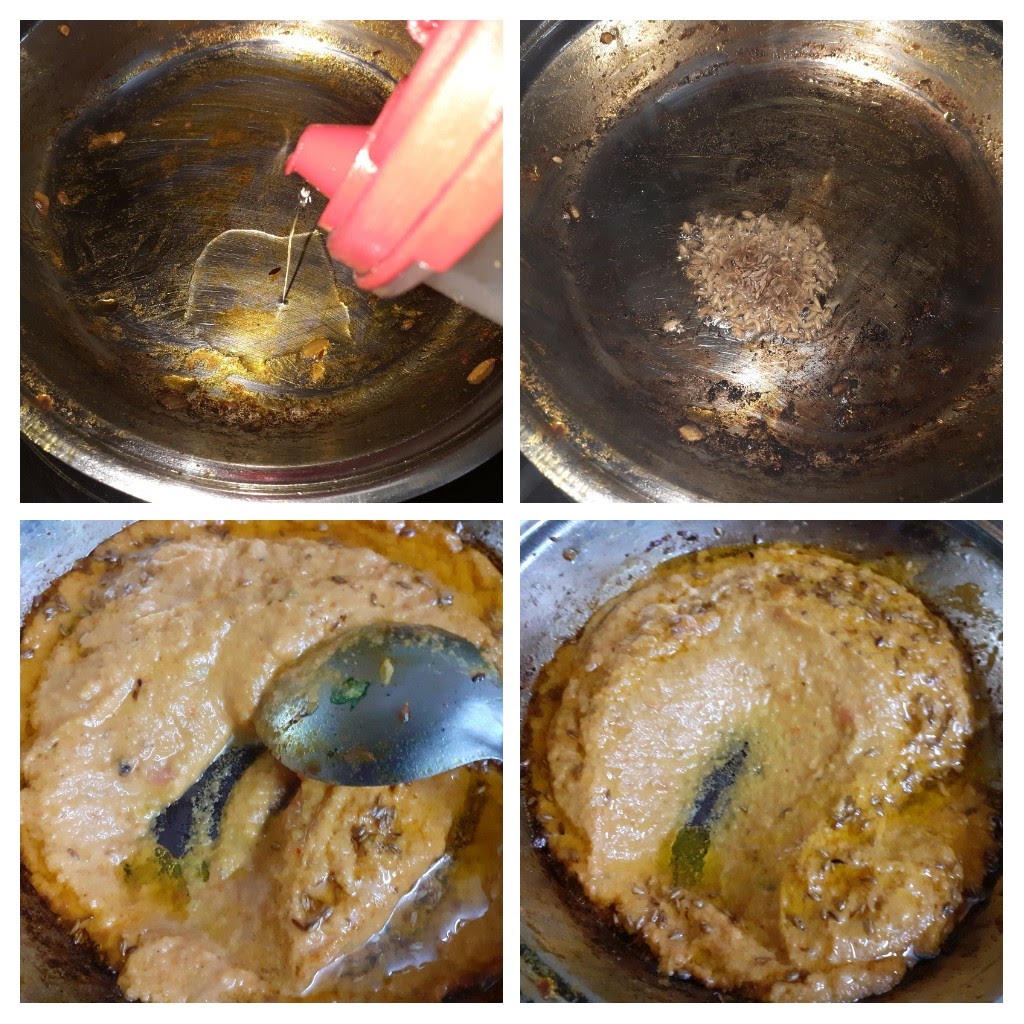
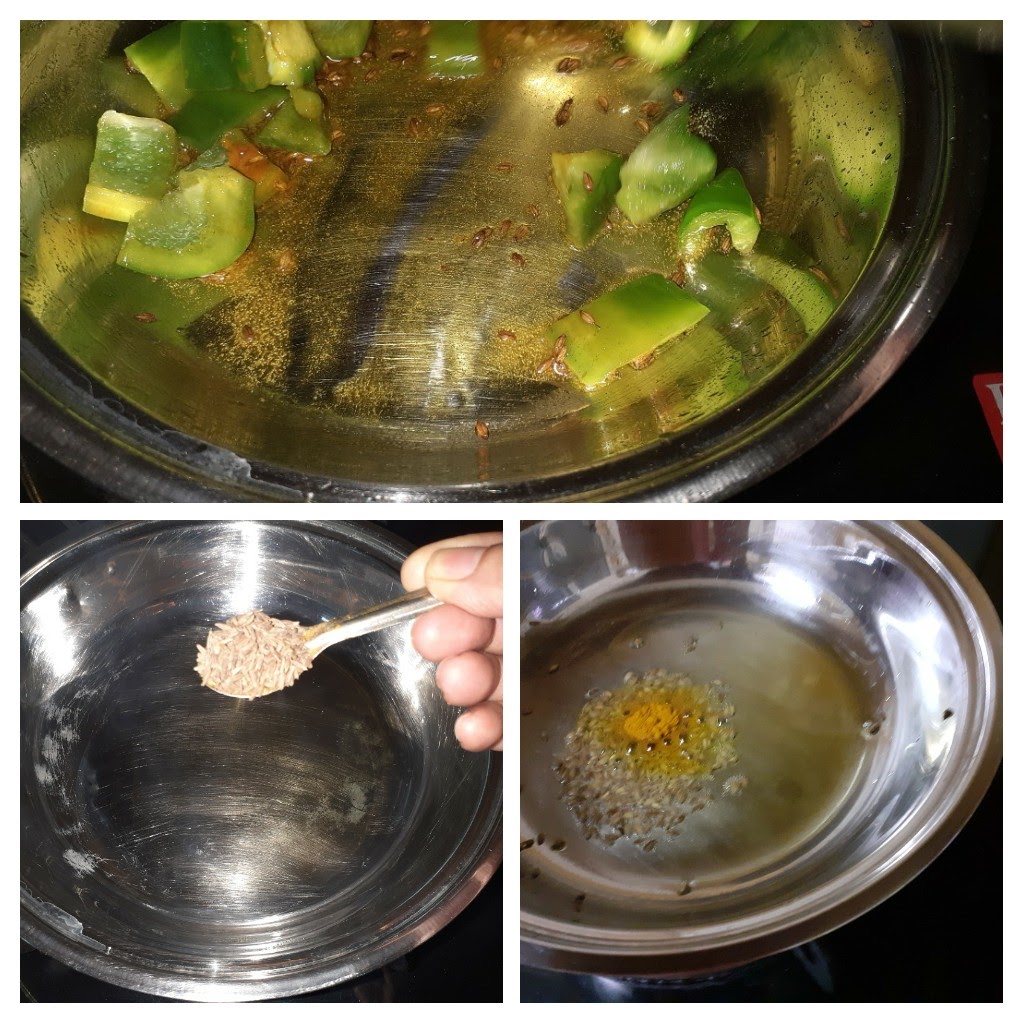
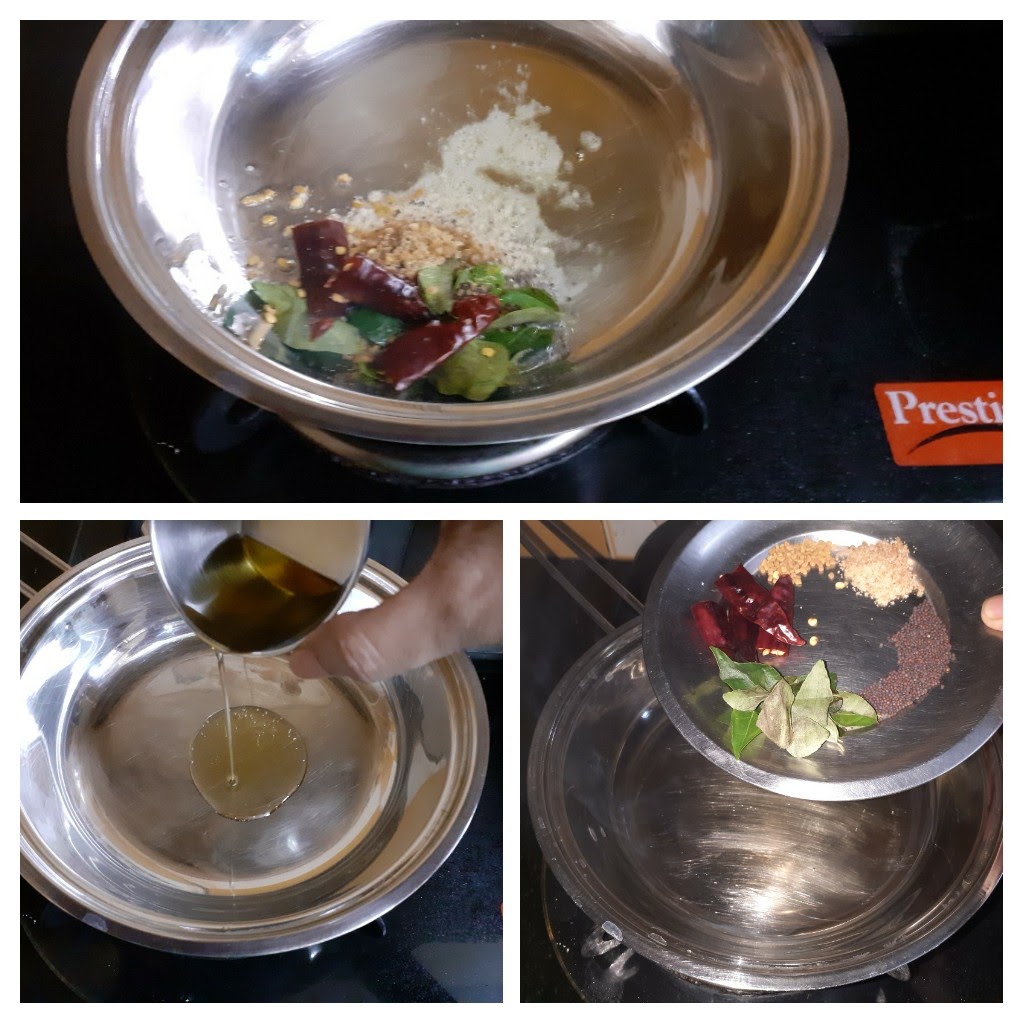
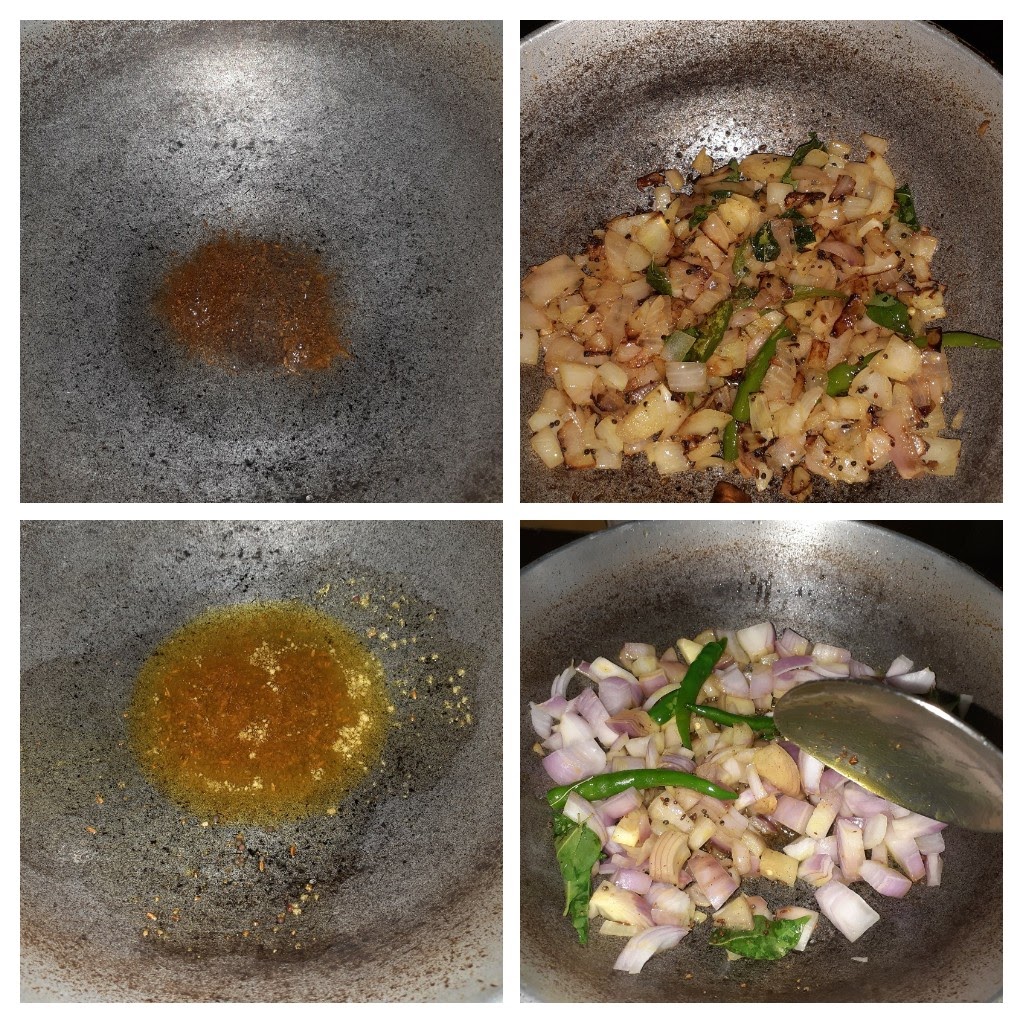
1. In a small pressure cooker take oil for tempering and heat. Add the Jeera and fry for 30 seconds.
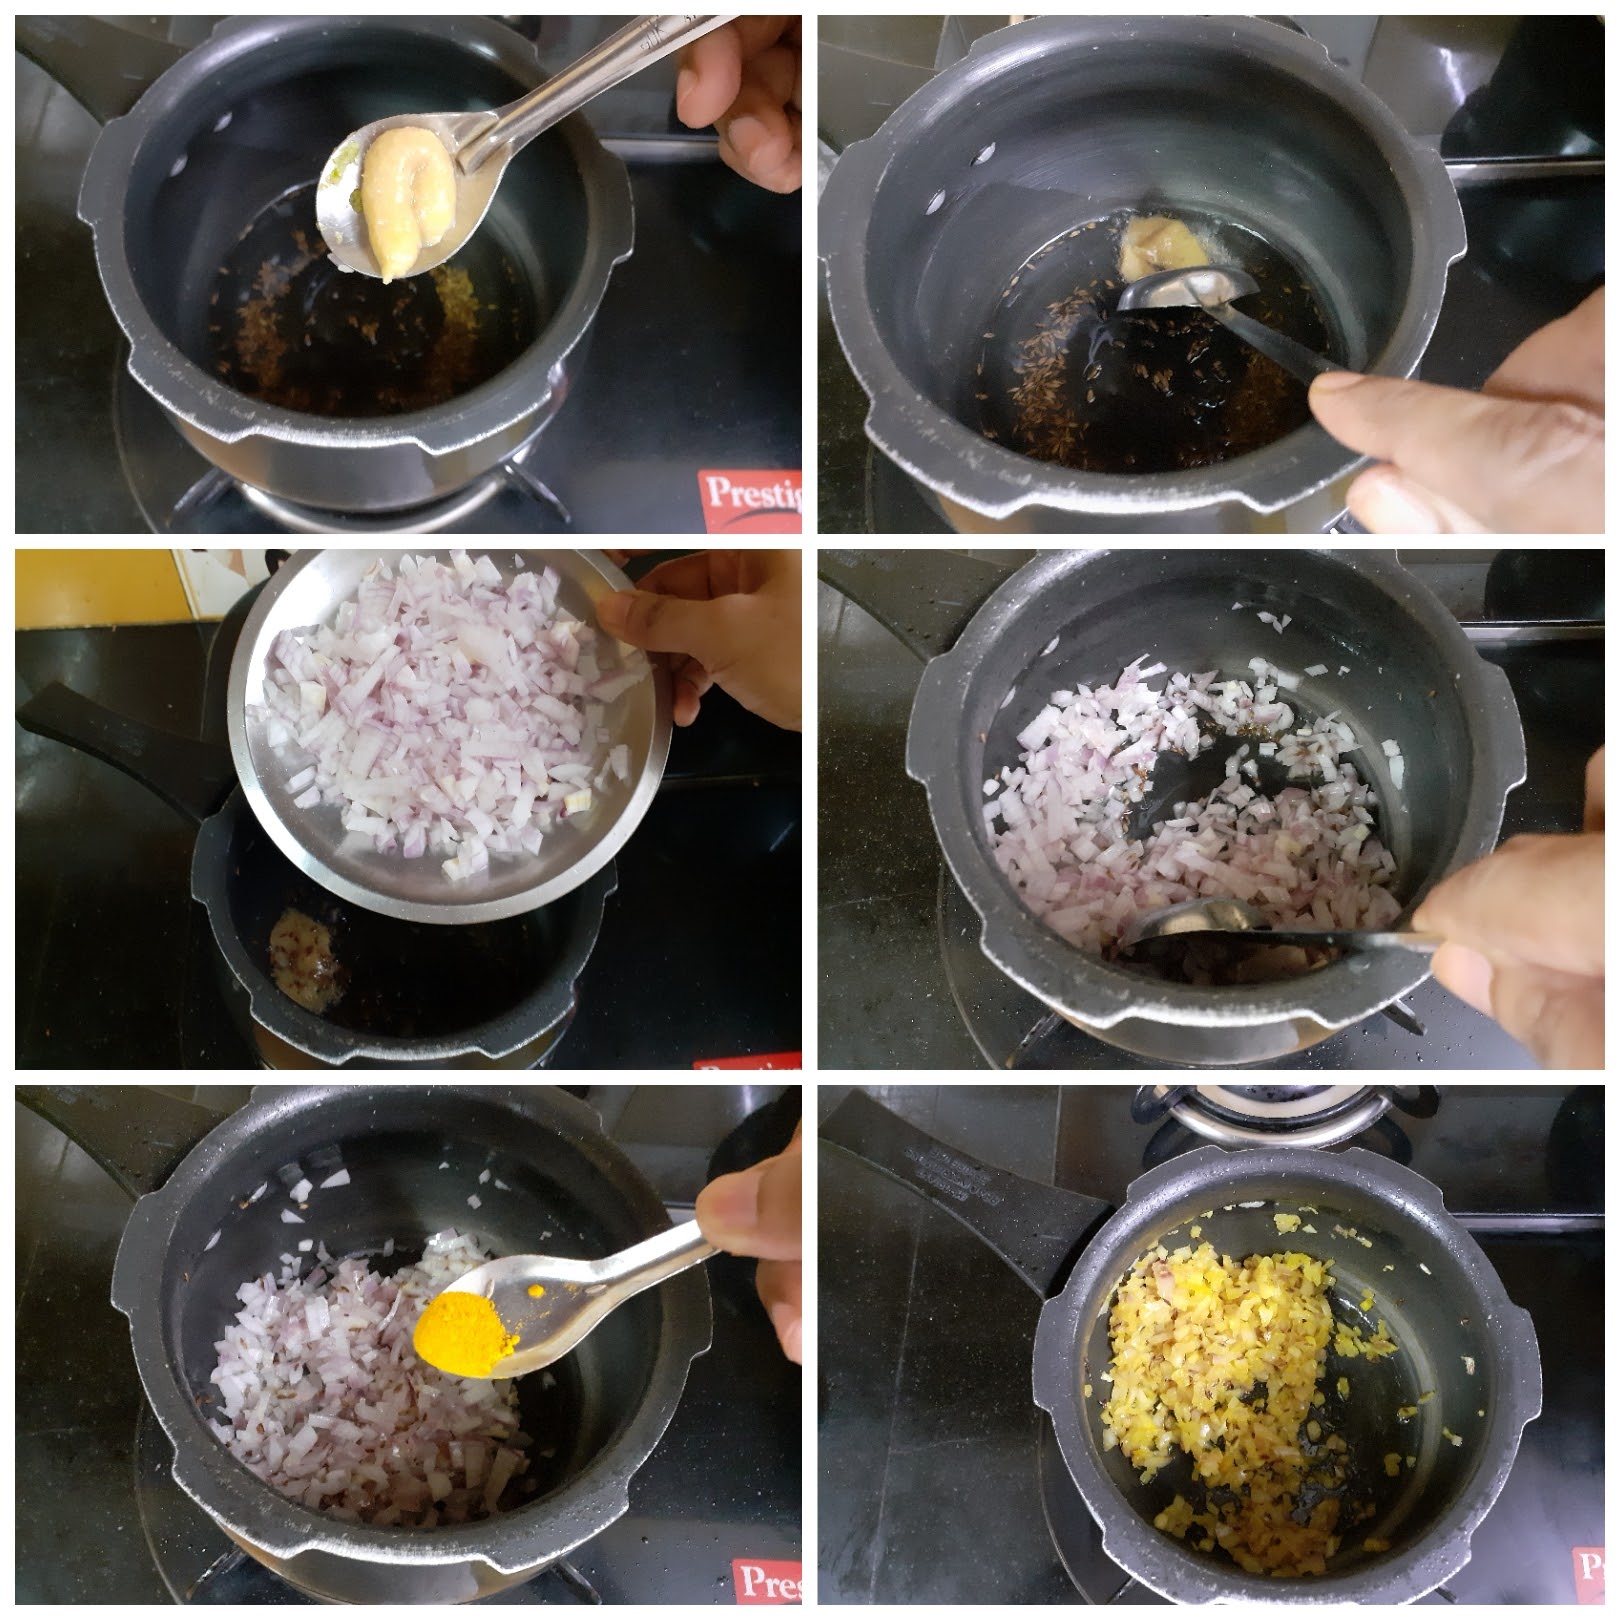
2.When they crackle add the ginger garlic paste and fry for 30 seconds. Now add the chopped onions and saute until they start turning light brown. Add the turmeric powder and saute another 30 seconds.
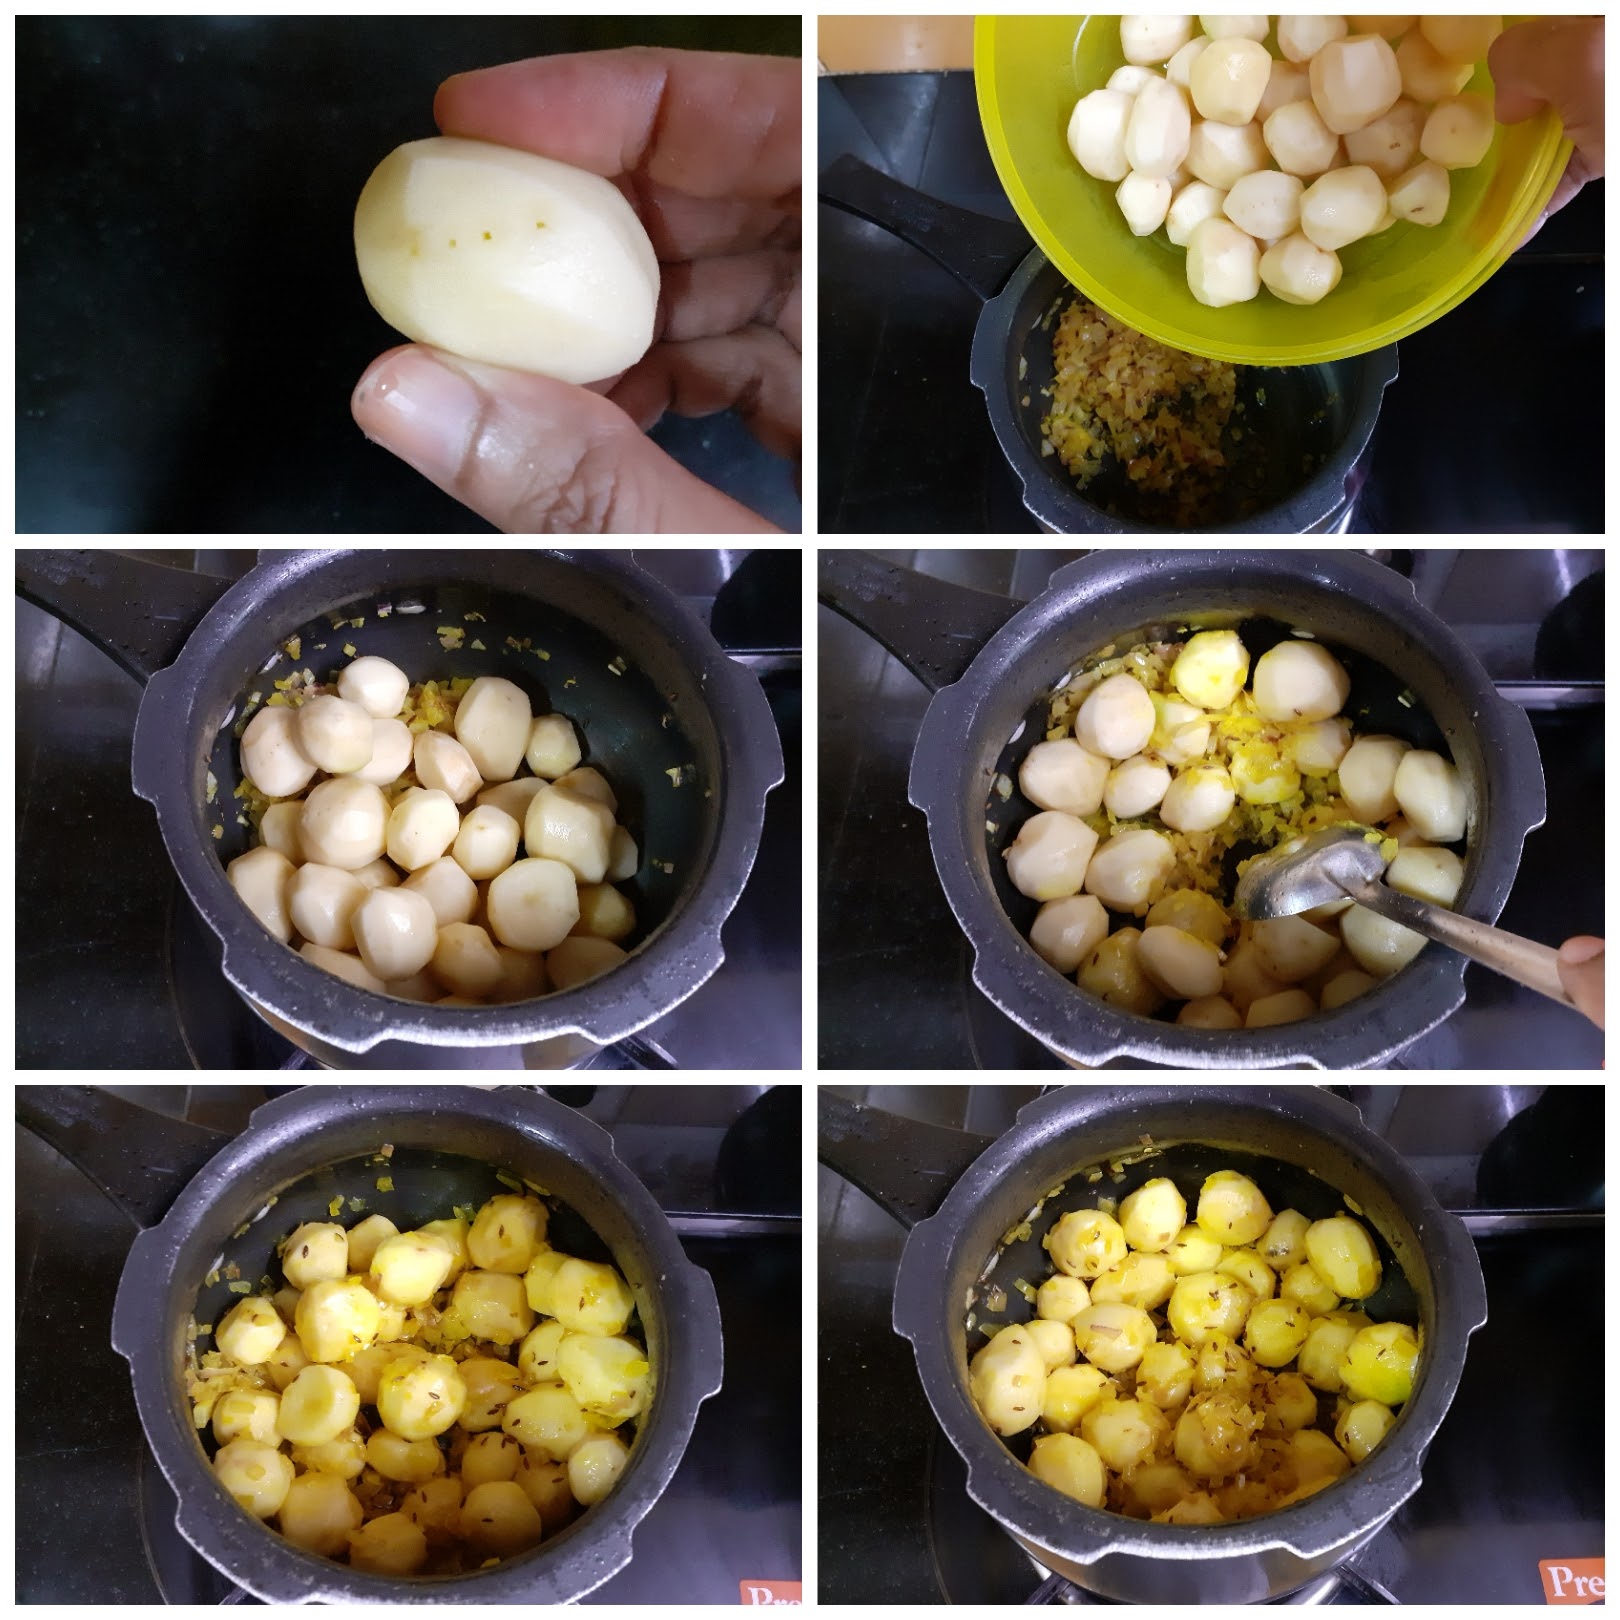
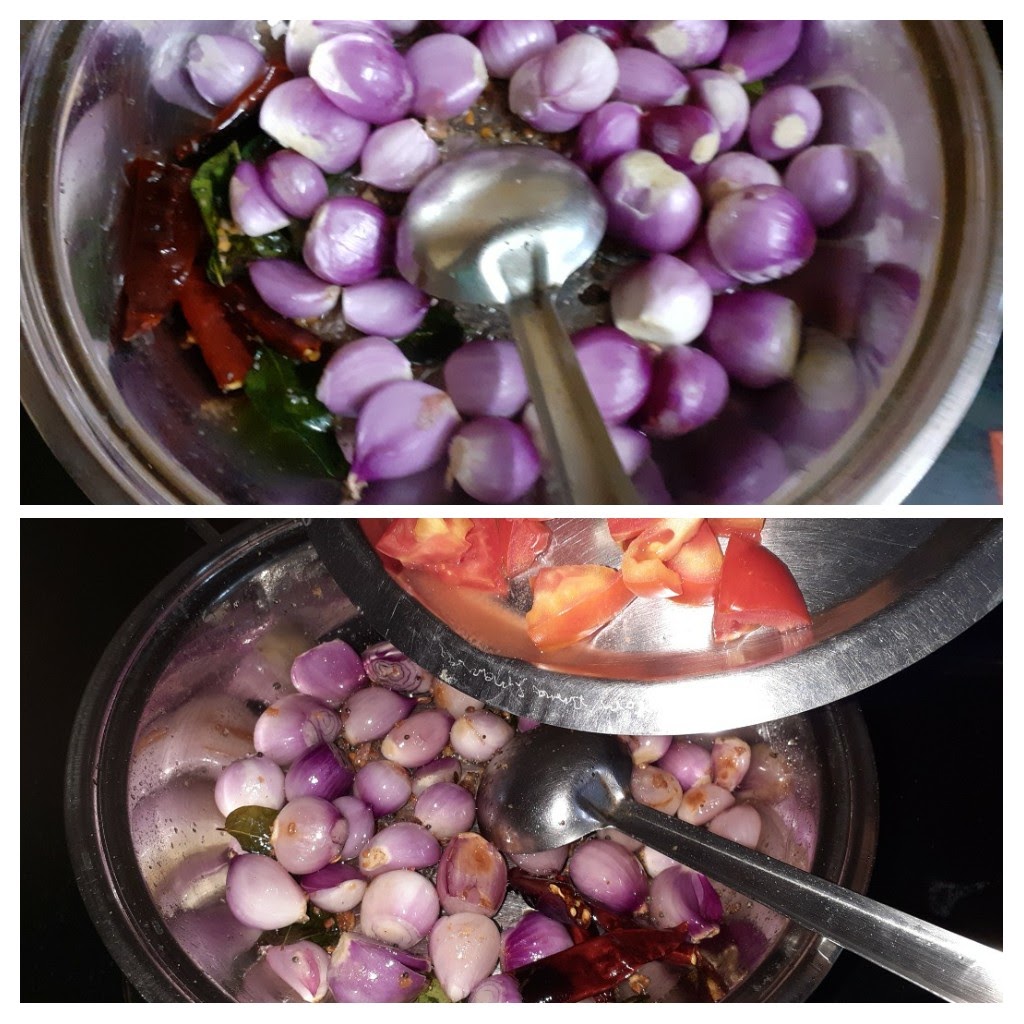
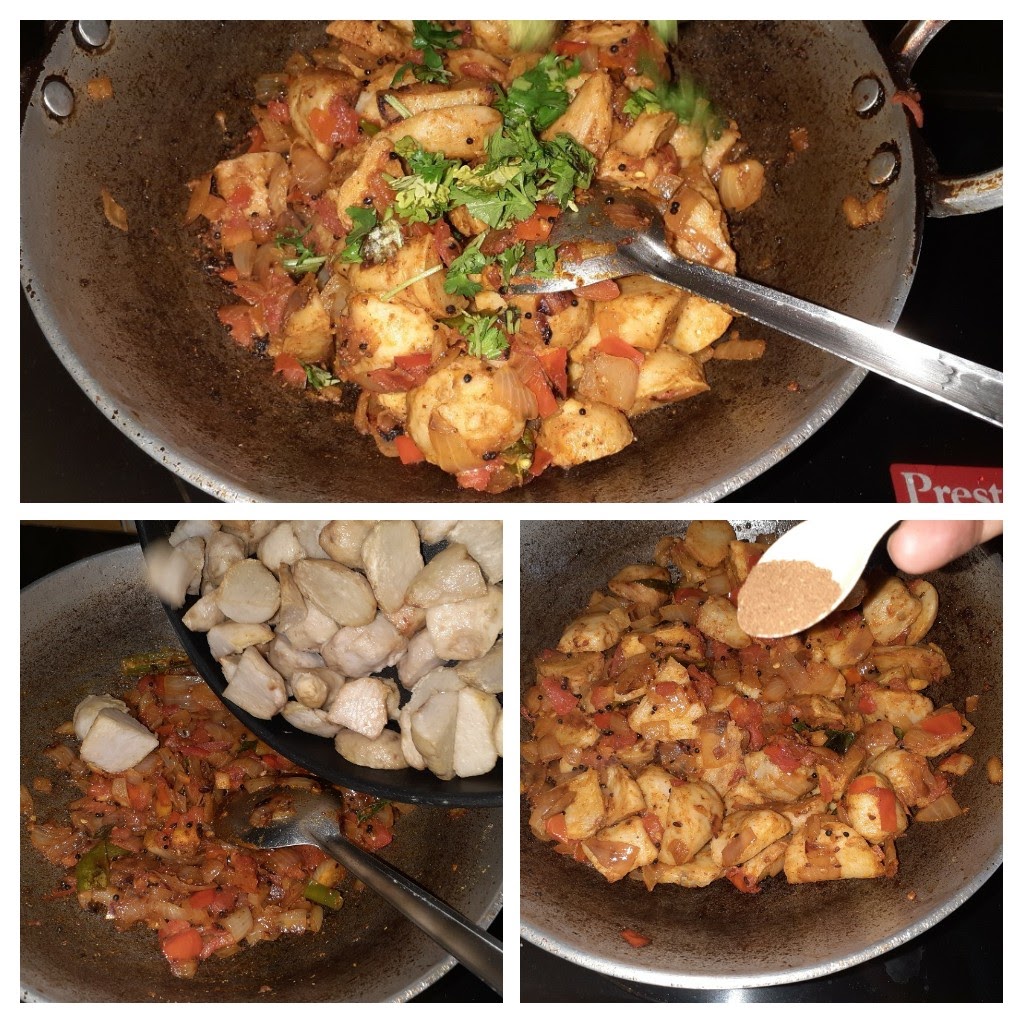
3. Now add the peeled Baby potatoes and saute nicely until the oil coats all the potatoes.
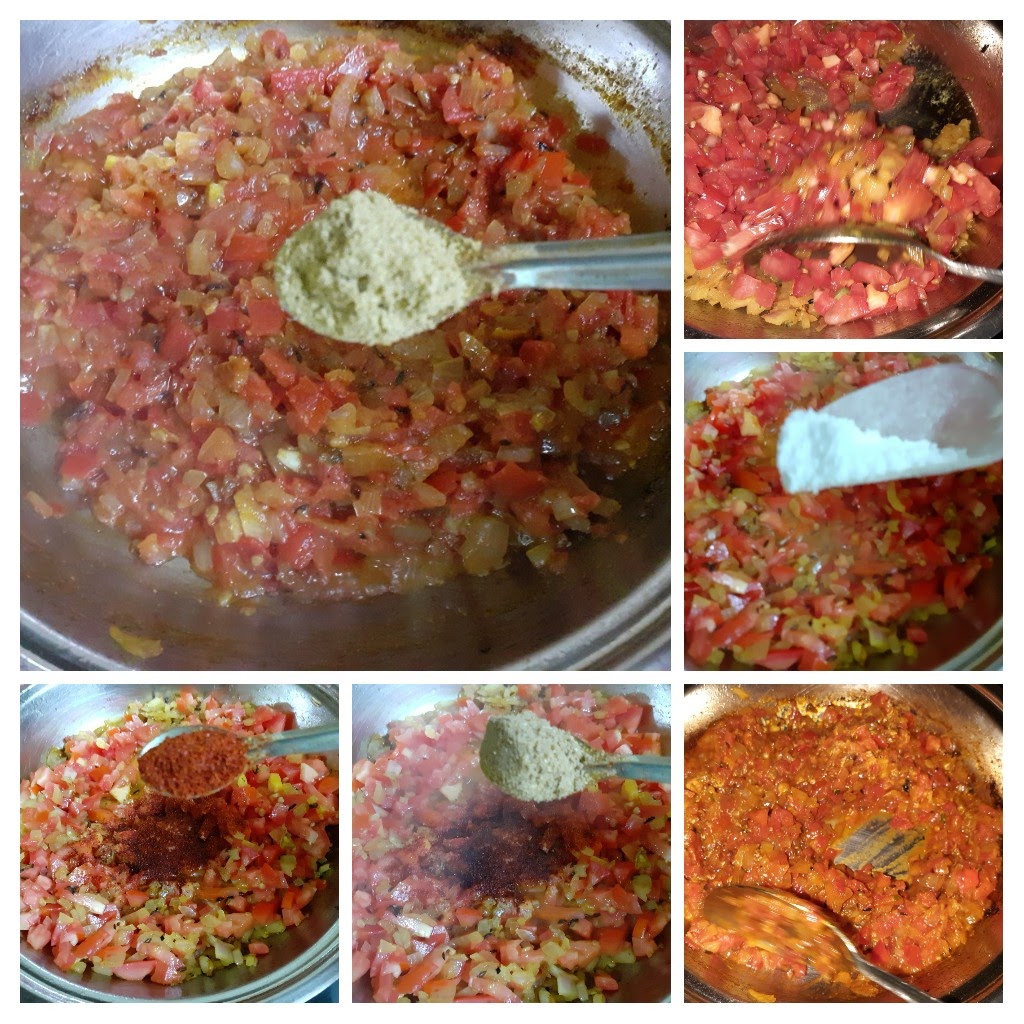
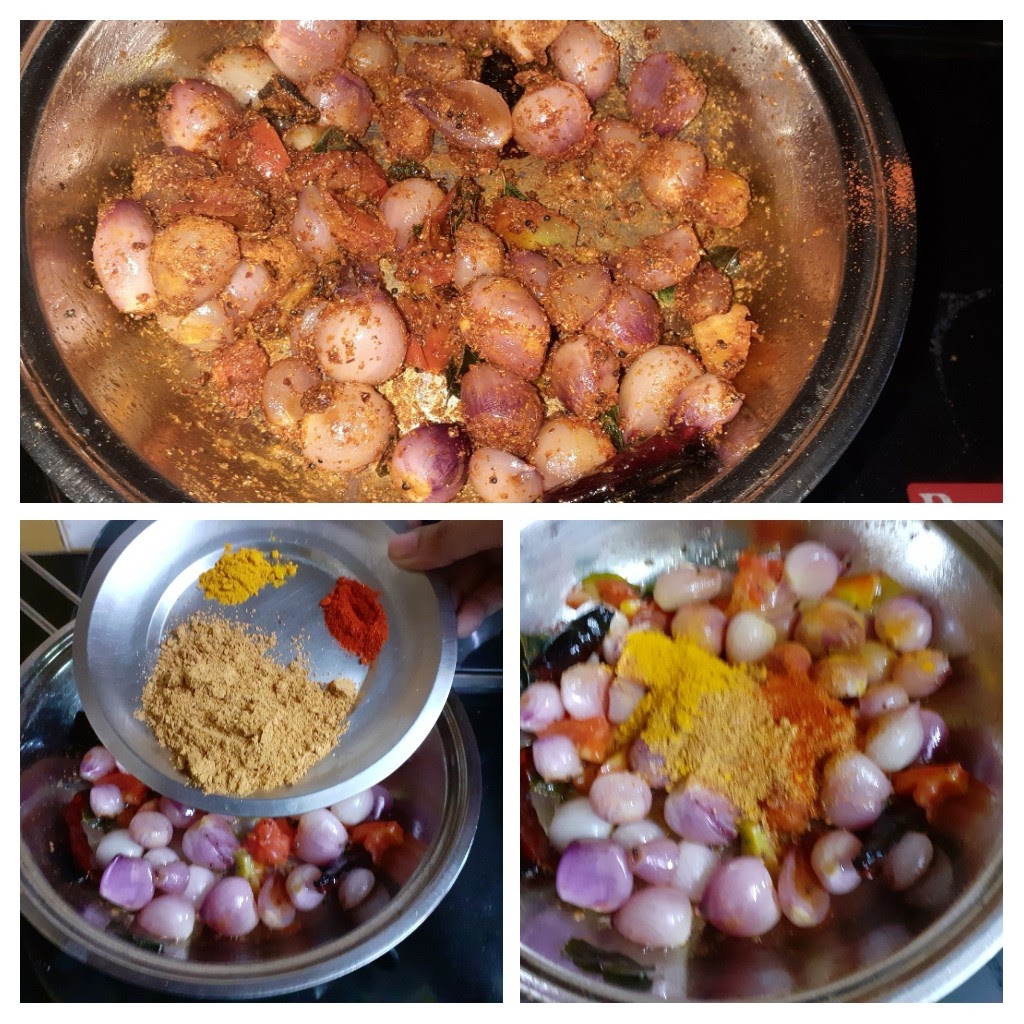
4. Now add the tomato puree followed by salt, Regular red chilli powder, Kashmiri red chilli powder, Coriander powder, fennel powder, and stir everything together nicely. Pour about 1 to 1.5 cups of water and close the cooker. Allow 3 to 4 whistles to come and put off the cooker immediately.
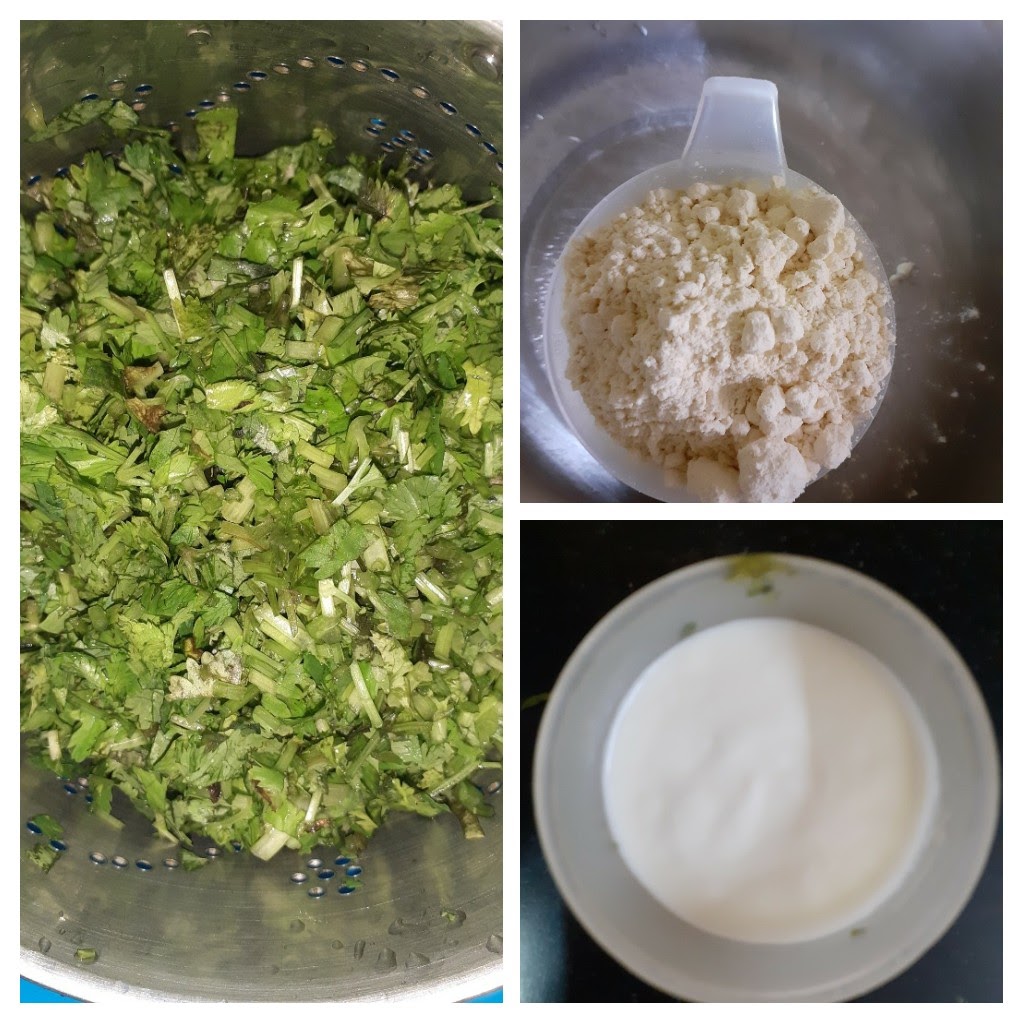
5. Put all ingredients mentioned under ‘to be ground to a paste’, except curd, into the blender jar, and give it a good spin. Now add the curd and blitz to a smooth paste.
6. Pour this paste into the cooker once the pressure releases, switch on the flame on low, and let it simmer for just 3 minutes. Stir nicely, so that the masala gets mixed wit the gravy.
7. Finally, add the garam masala powder and put off the flame. The Dum Aloo Ajwaini si ready to serve.
NOTES:
1. If one feels peeling the baby Potatoes is cumbersome the big ones also can be used after dicing them to bigger cubes.
2. If using the big potatoes switch off the flame exactly in 3 whistles, as they cook faster.
3. Mint leaves can also be used in place of coriander leaves, but reduce the quantity as they are more pungent compared to coriander leaves.
If you tried this recipe and liked it please comment below. I would love to hear from you. If you have a query about the recipe email us and ill respond as soon as I can.
If you would like to receive our recipes in your mail please leave your mail id at the homepage. Every time Rajjo’s Kitchen has a new post we will mail the recipe to you.
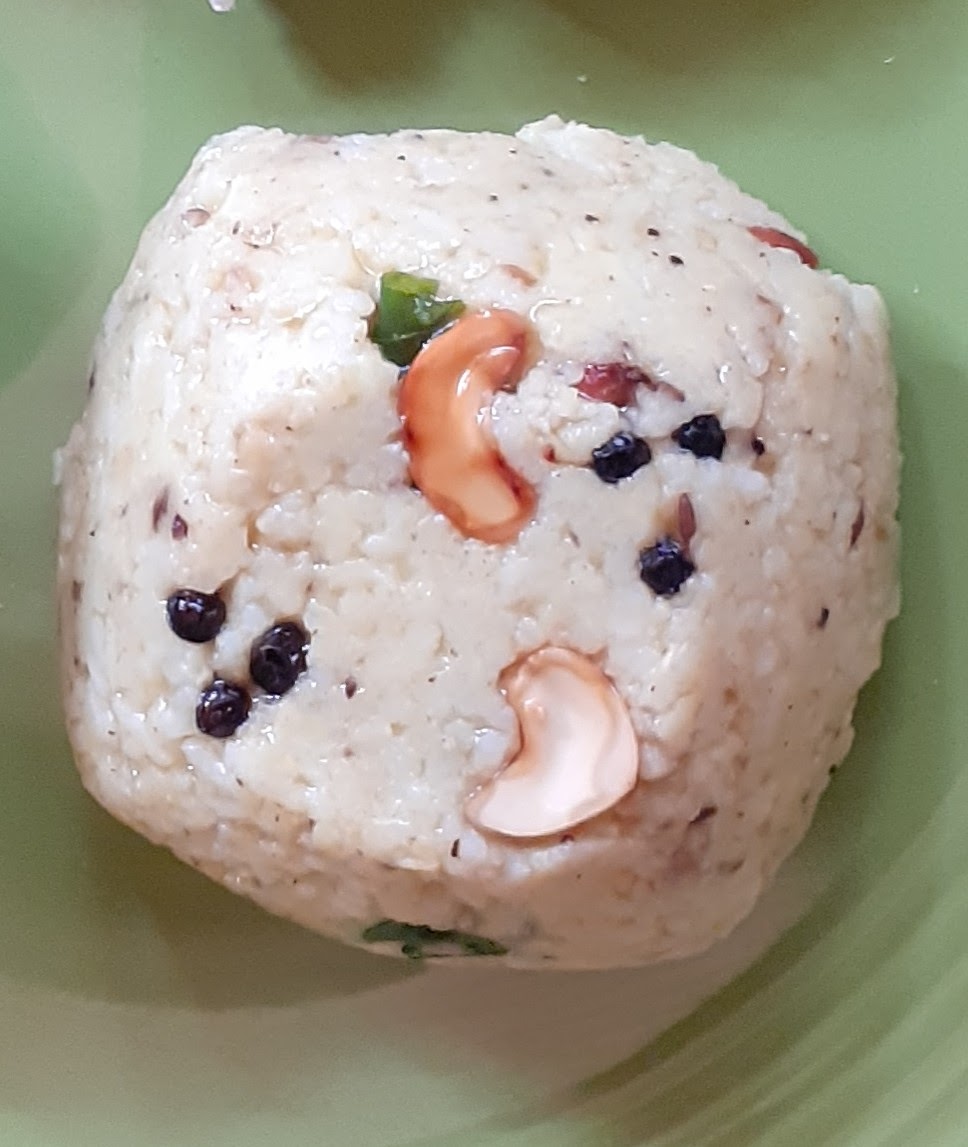
Ven Pongal (Moong Dal Kichdi)
This savory Pongal is a popular breakfast item in Sout India. Like the Rasam, the Ven Pongal too is one recipe, whose taste I find is different from house to house, though the same ingredients are used. The proportion of the rice and dal and the proportions of the pepper and cumin are what make the difference.
This is a simple recipe that can be made as a one-pot recipe or a pot in pot one. I follow both the methods depending on when I am making it. In this recipe, I have followed the pot in pot method.
I prefer the Pongal to be spicy(not the chilli kinda spicy, but the pepper kind of spicy). The quality of pepper we use always makes a difference to the dish. I source my peppers from Kerala, where they are the freshes and spicy.
Though this dish is made as a breakfast dish, in my home I always prefer it for lunch, as I find it too heavy for breakfast. For breakfast, I make a Millet Pongal which is lighter to have in the morning. Like the Chakkara Pongal, this dish too is loaded with ghee, but I prefer adding my ghee in the end and I don’t use too much.
I have mentioned in my previous blog posts how and when to add ghee to a dish, such that it is not too much, but is proportional to the dish. I have shared some tips and tricks for adding ghee in the Chakkara Pongal post, do check it out.
While you are here please view my other recipes like Chakkara Pongal, Barnyard Millet(Kudiraivali)Pongal, Rava Dosa, Lemon Rice, and more…
Here is the recipe for Ven Pongal for you-
PREP TIME: 10 MINS COOK TIME: 25Mins
TOTAL TIME:35Mins COURSE: MAIN
CUISINE: SOUTH INDIAN SERVINGS: 5
AUTHOR: Rajni Ram
Ingredients:
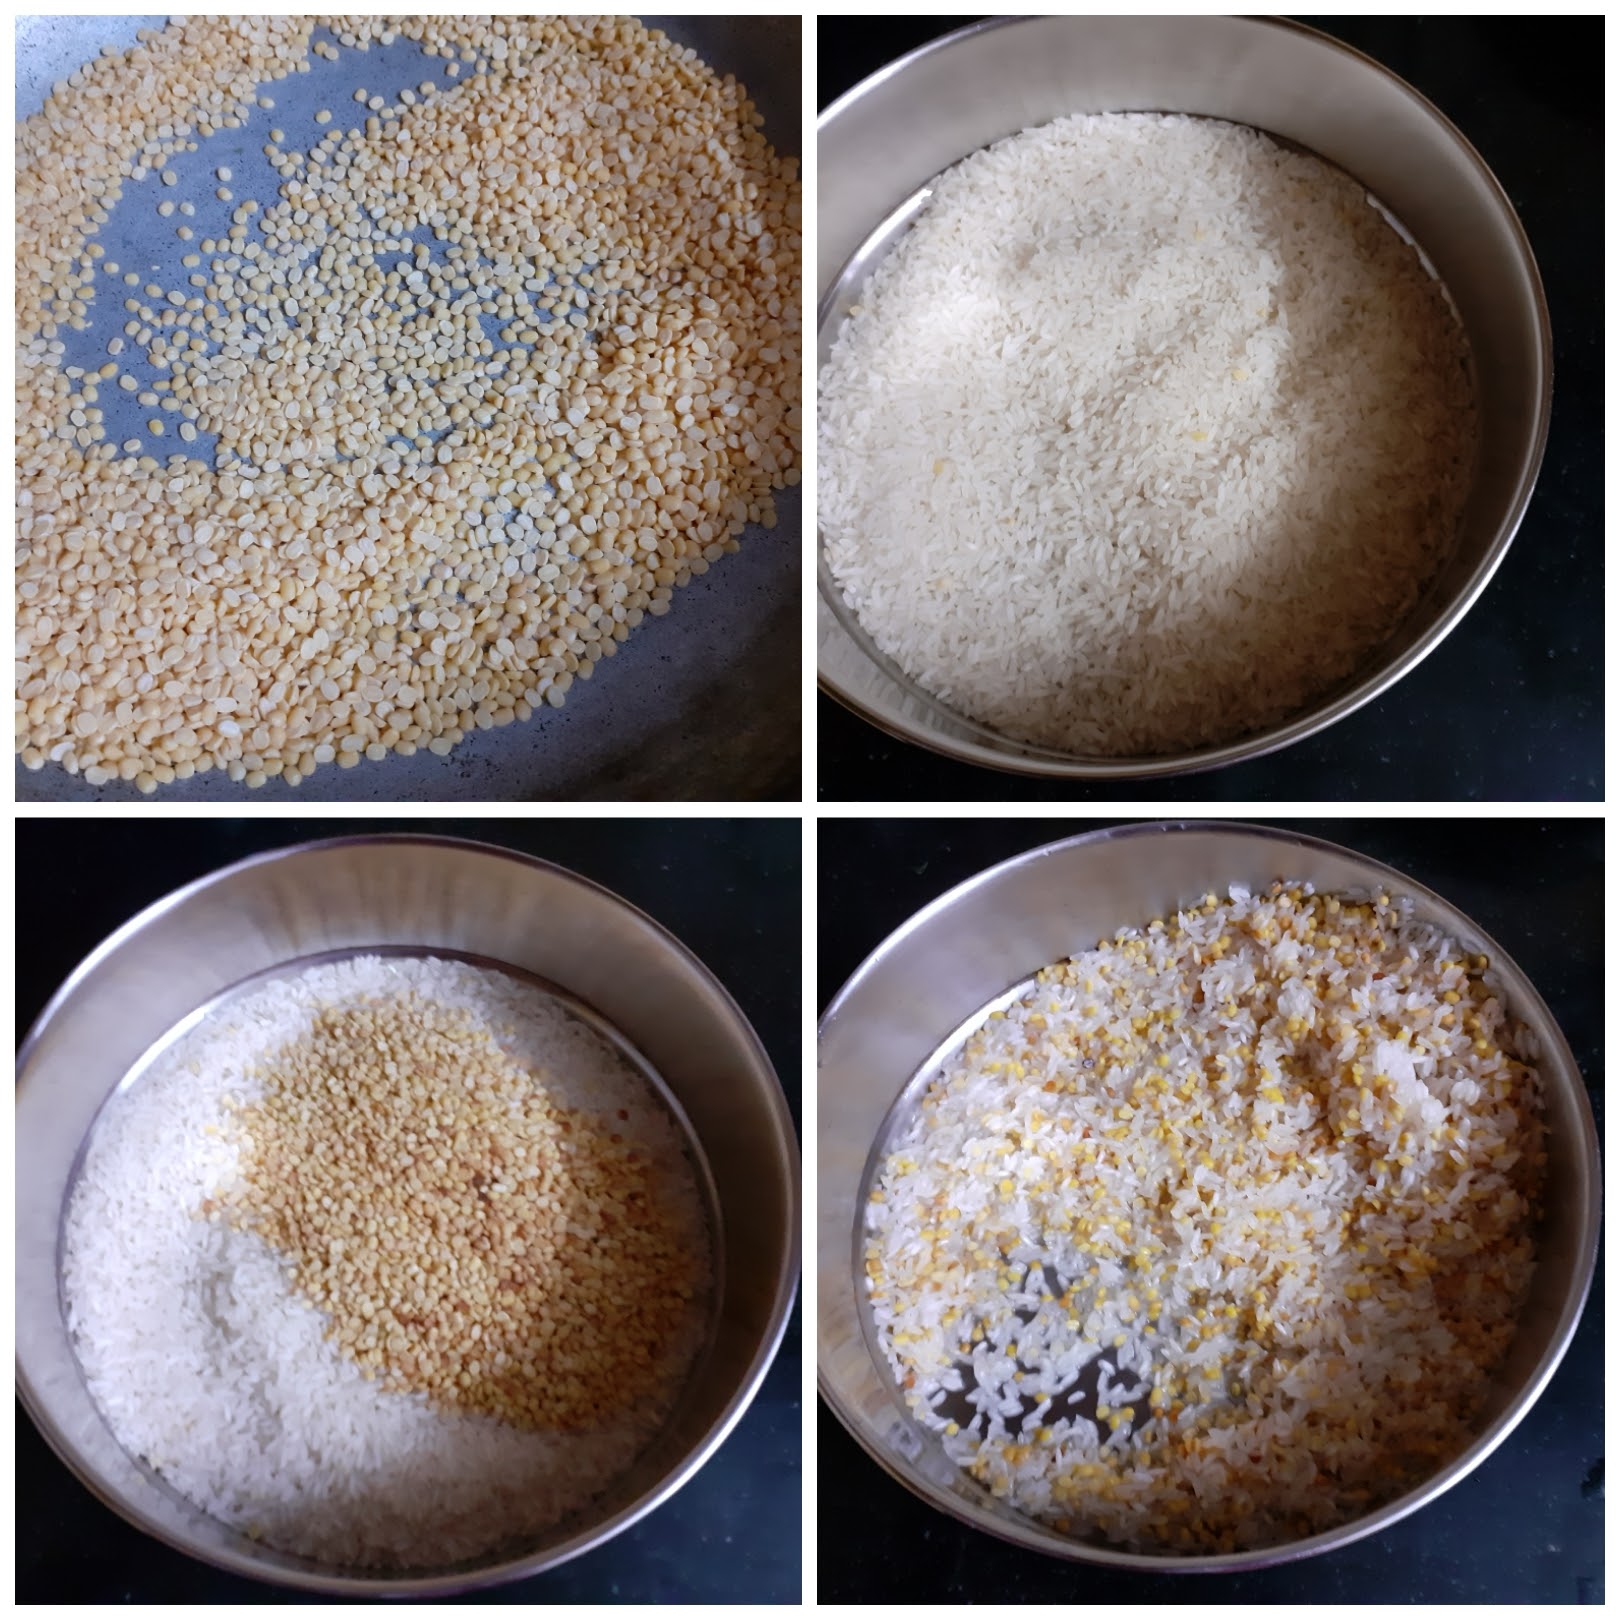
Rice 1 cup washed (regular small-grained rice)
Moong dal 1/2 cup roasted to a light brown
Water 4 to 4.5 cups (more to add later)
Salt as required
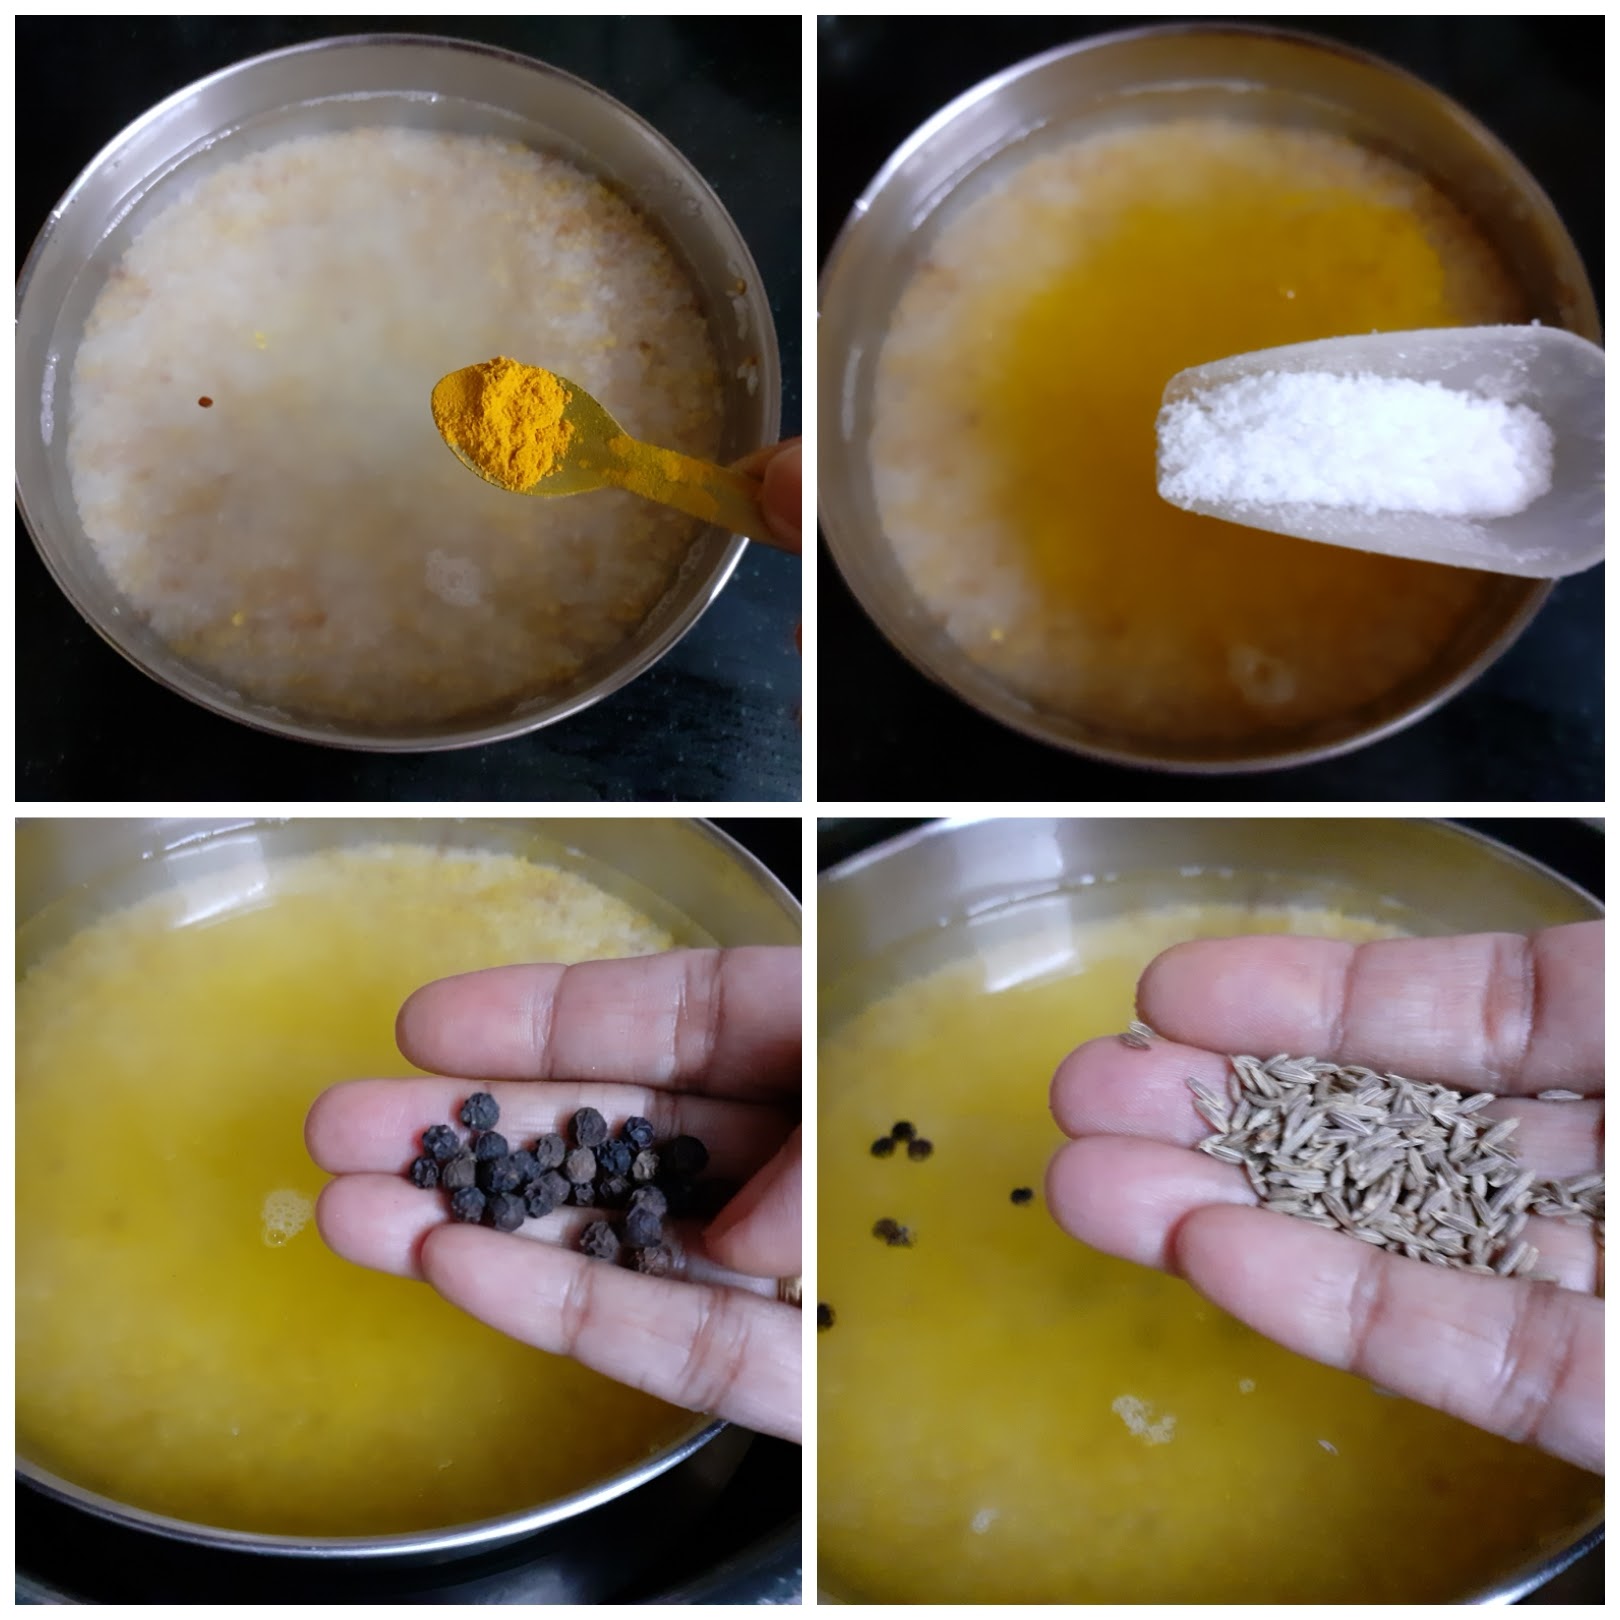
Turmeric powder 1/4 tsp
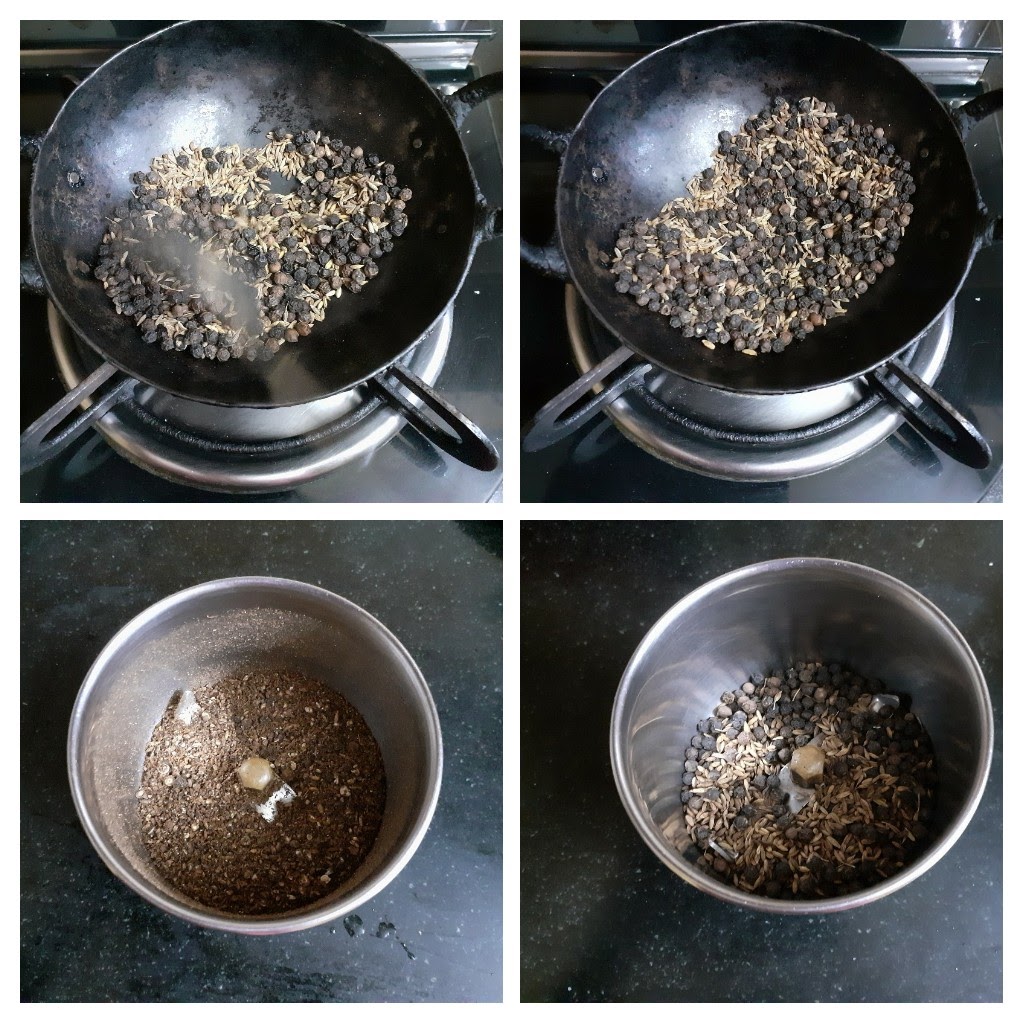
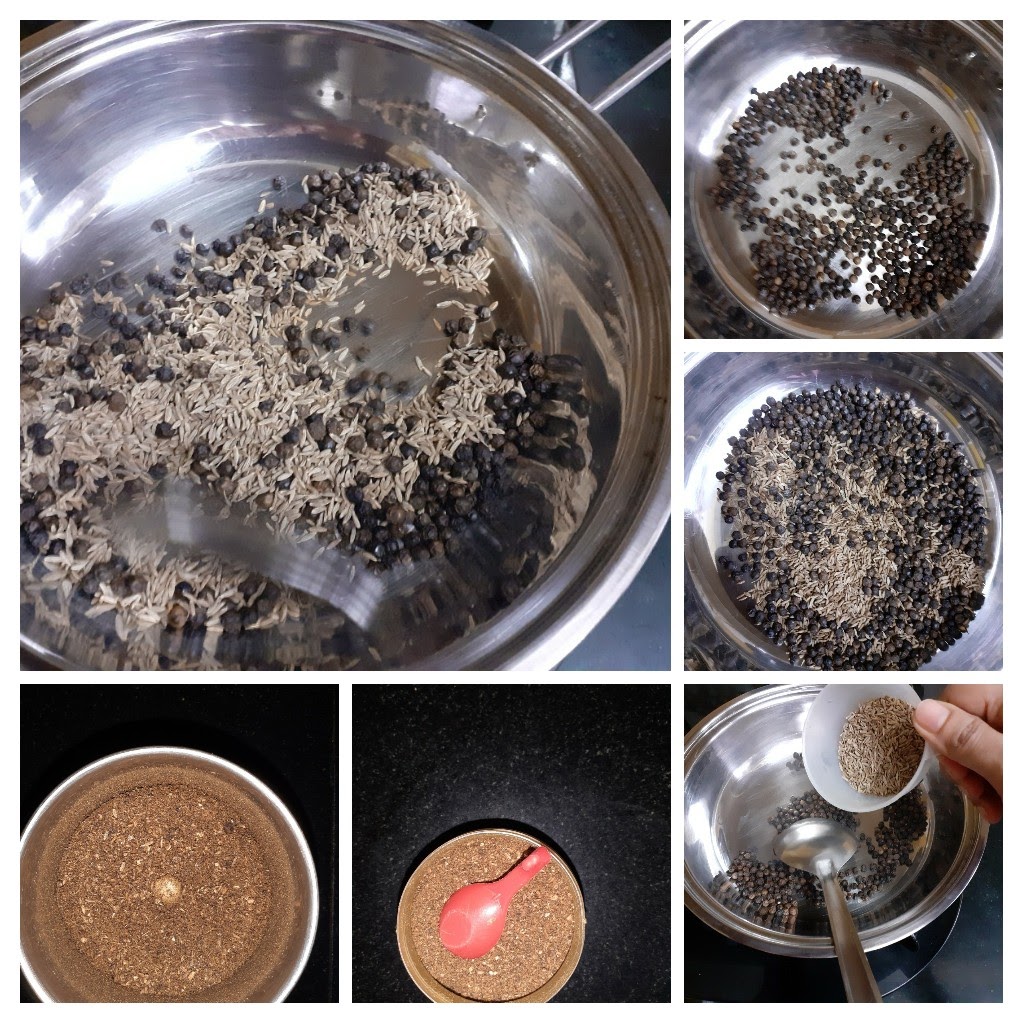
Pepper-cumin powder 3 tsp
Peppercorns 4-5
Cumin 1/2 tsp
Cashewnuts 6 to 8
Curry leaves a few
Ginger 1inch piece chopped fine
Oil for tempering
Ghee 2 to 3 tbsp for garnish
Directions:
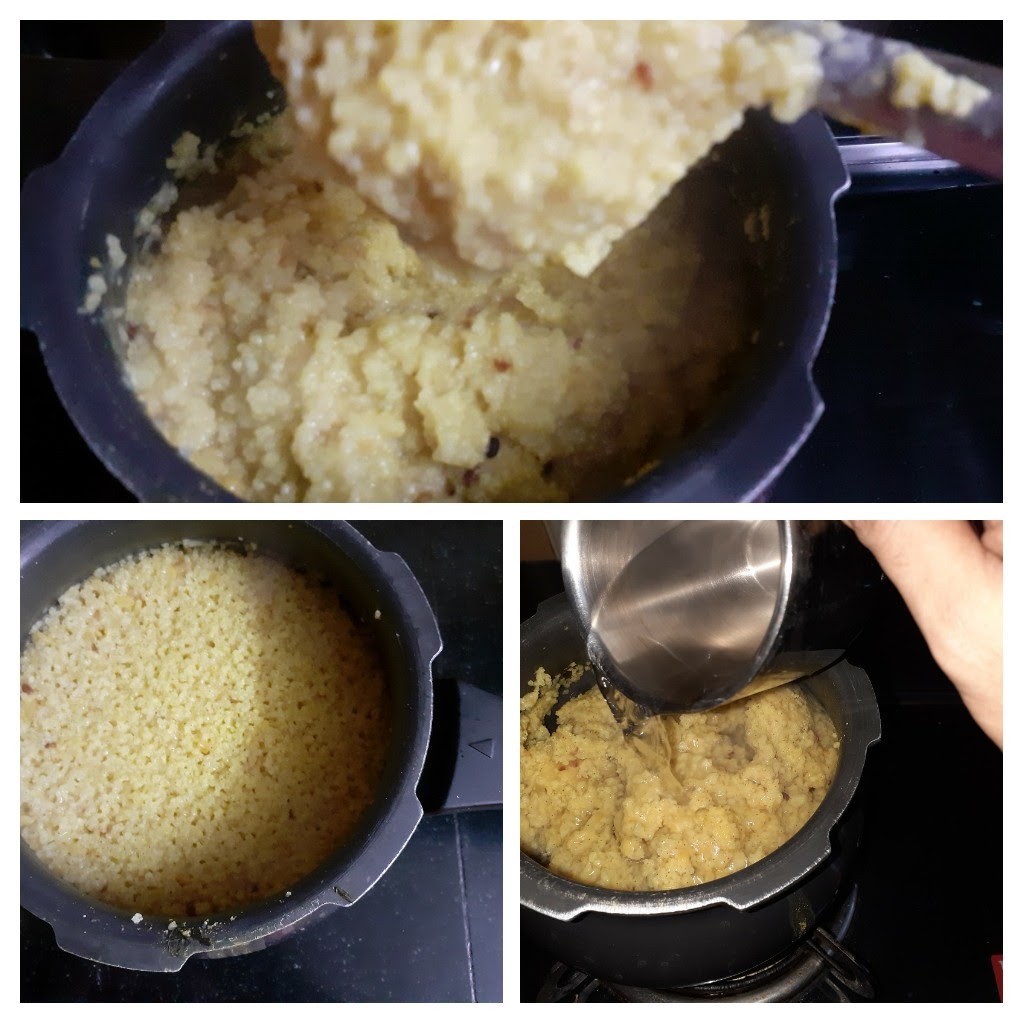
Take the rice in a vessel that fits into the cooker. Dry roast the moong dal in a Kadai to a light brown colour or until you get a nice aroma. Add the roasted moong dal to the rice and wash them well together. Place the vessel into the cooker and add the required water. Add salt and turmeric powder, 1/2 tsp jeera, and 4 to 5 peppercorns and close the cooker. Cook for 5 to 6 whistles.
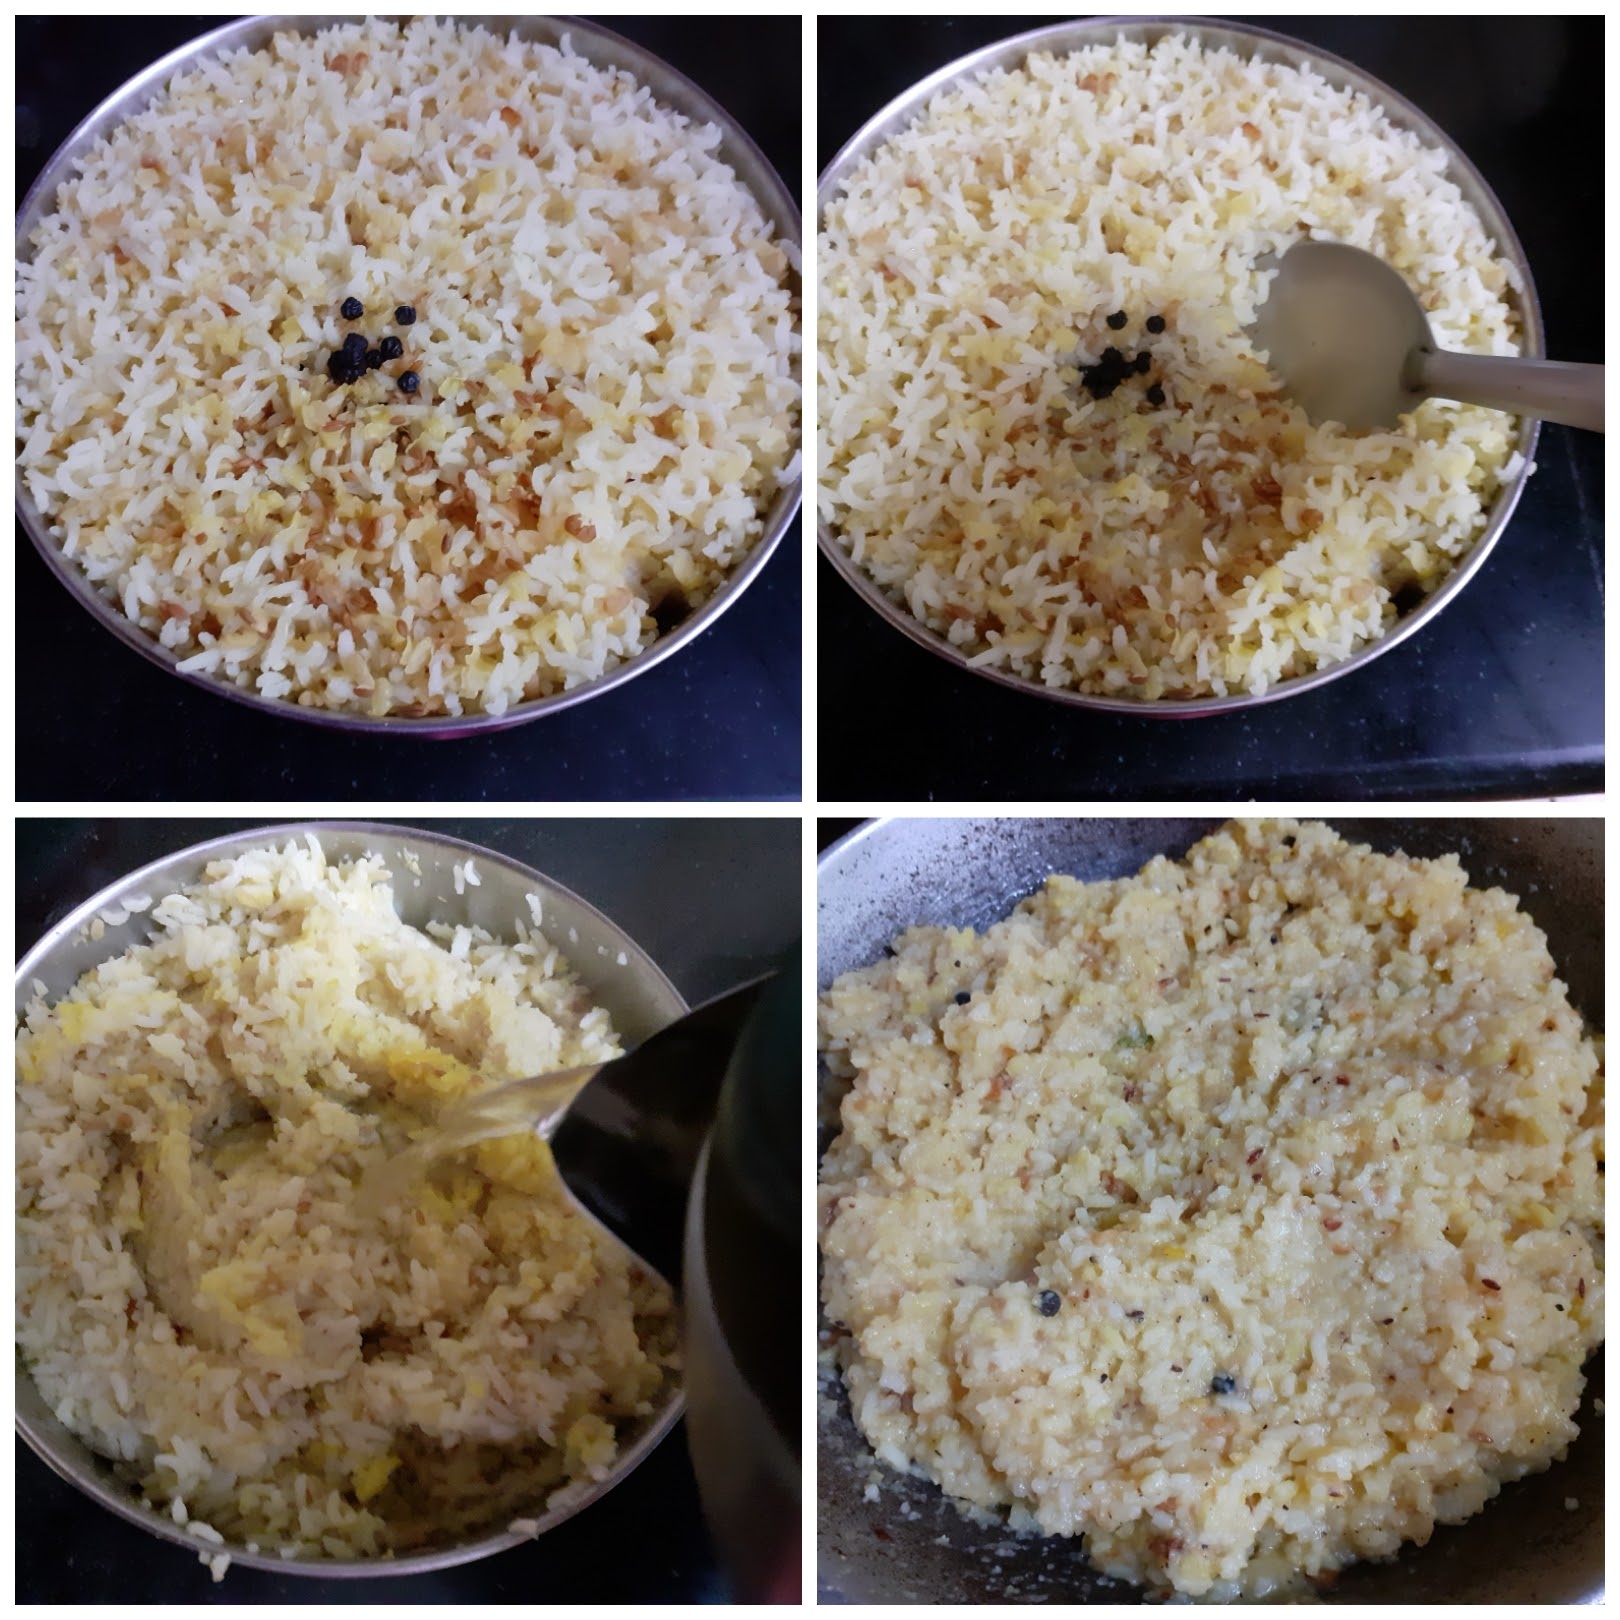
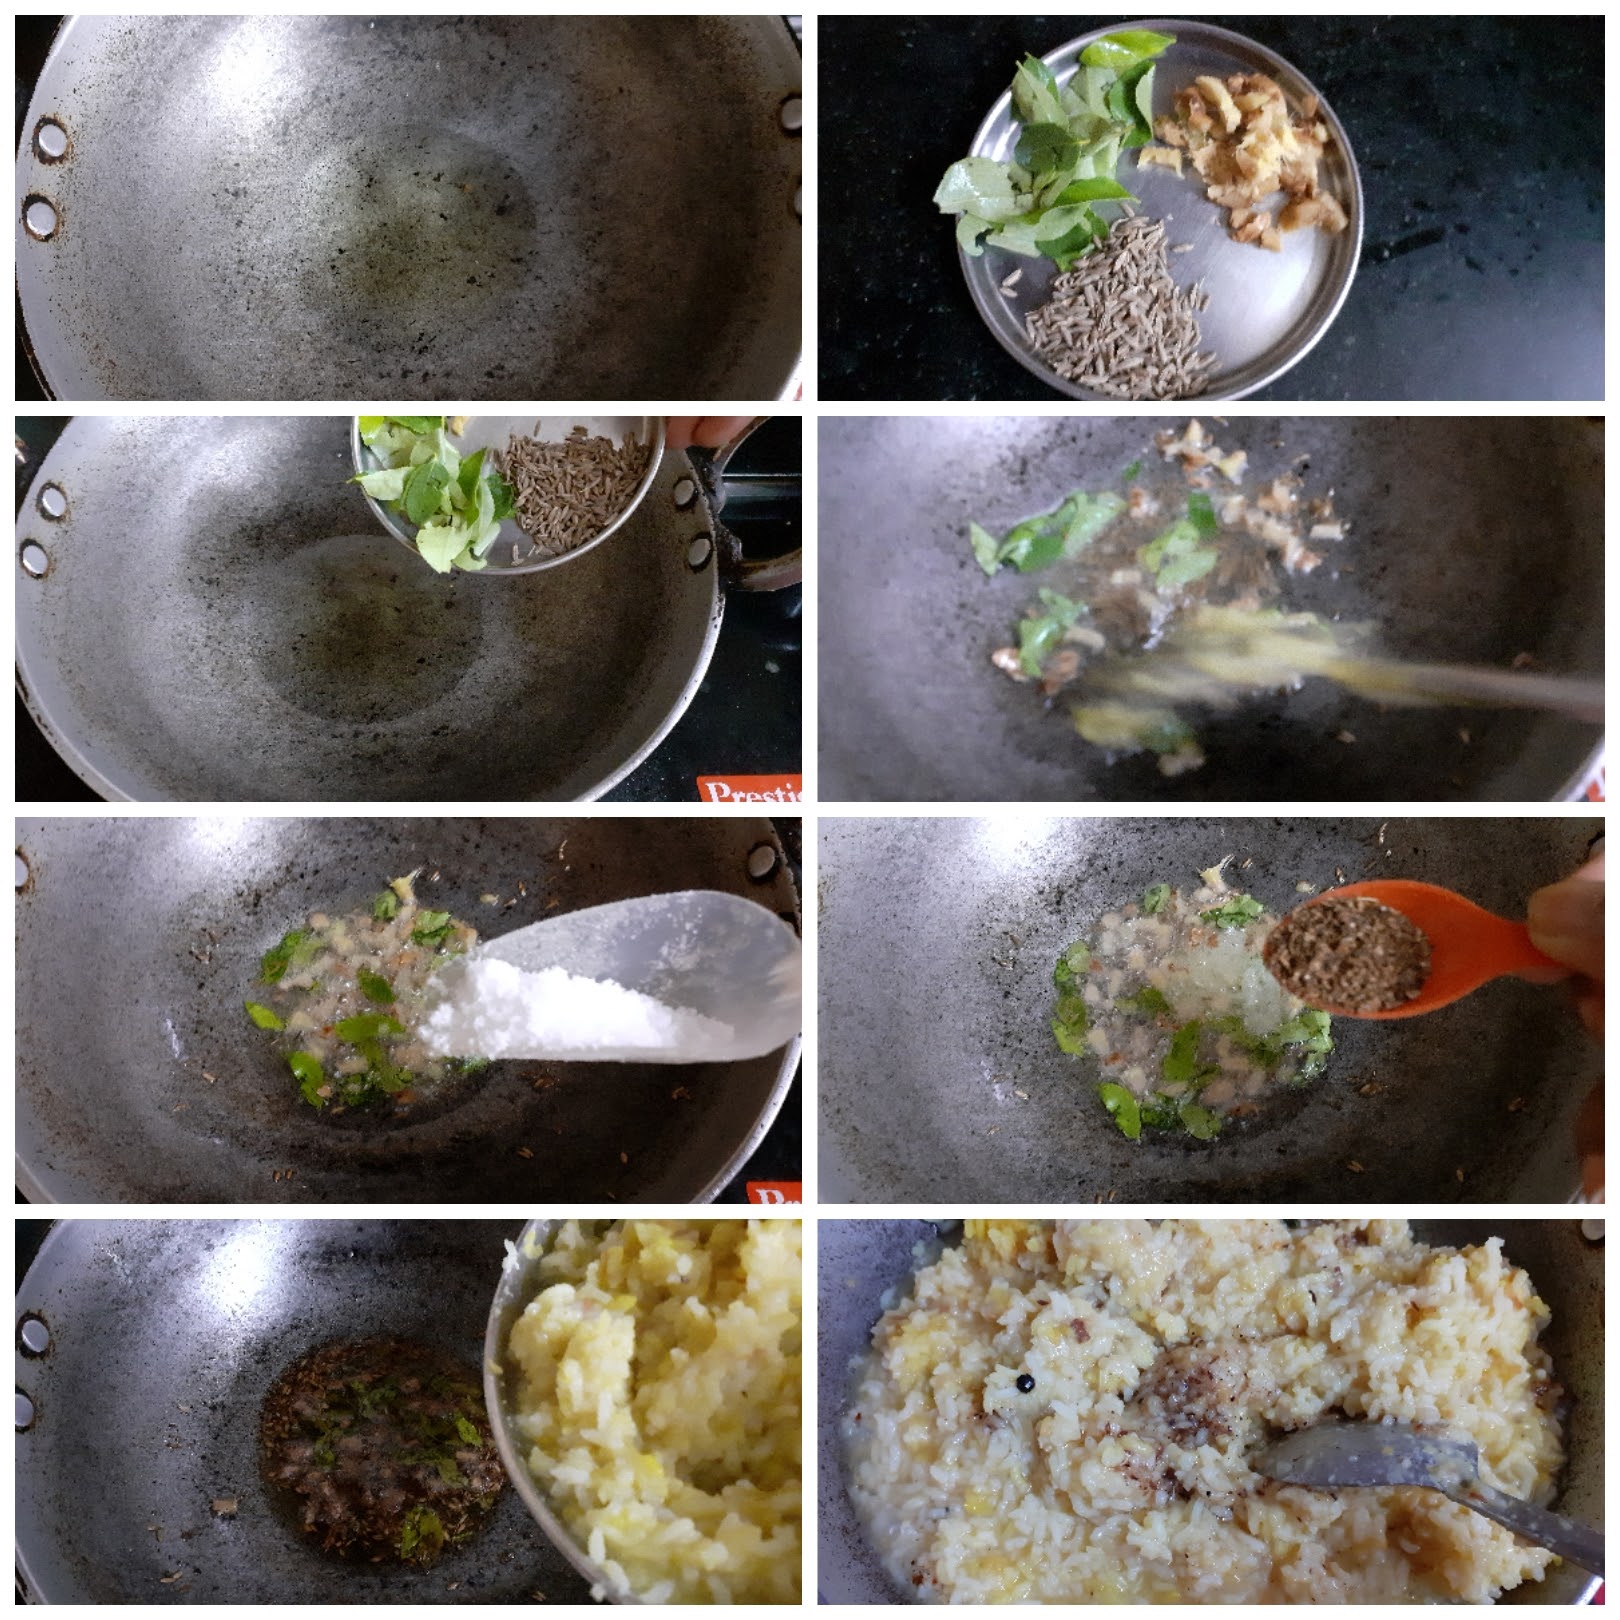
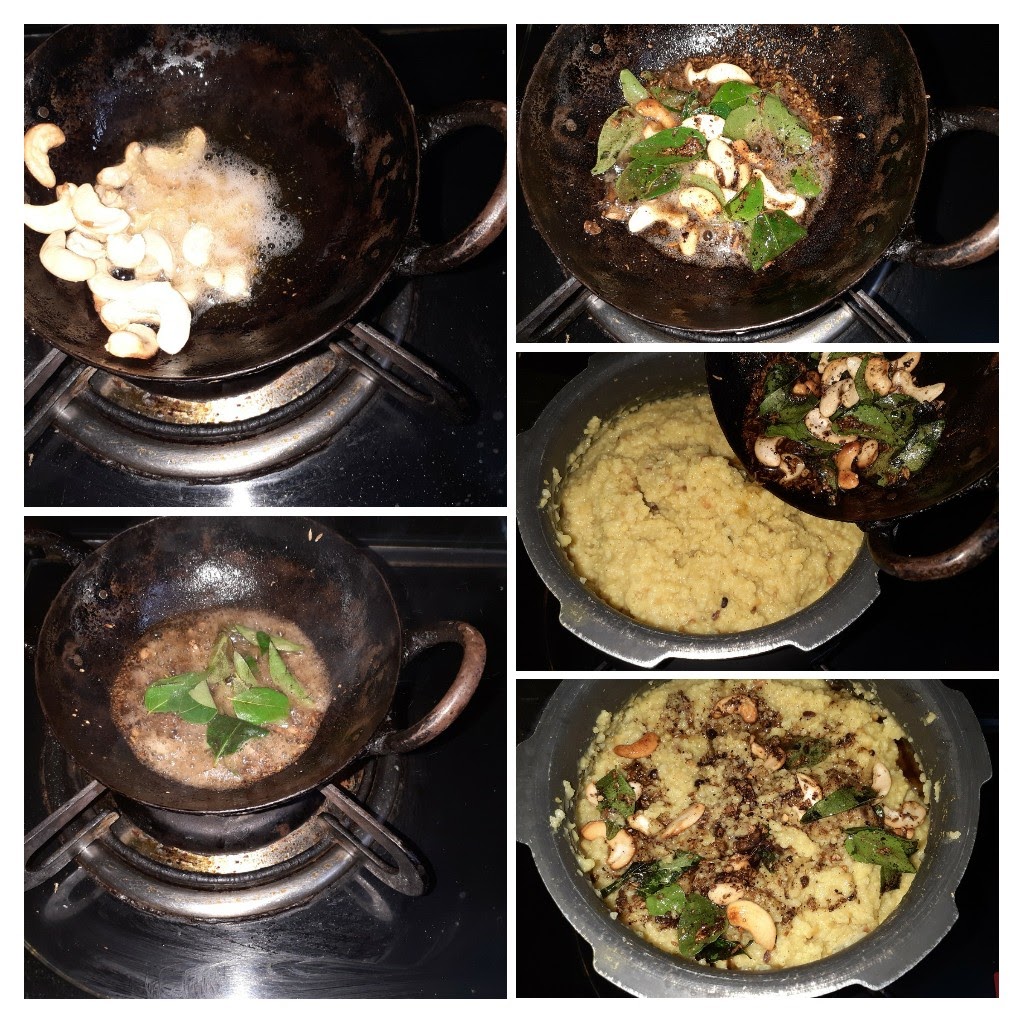
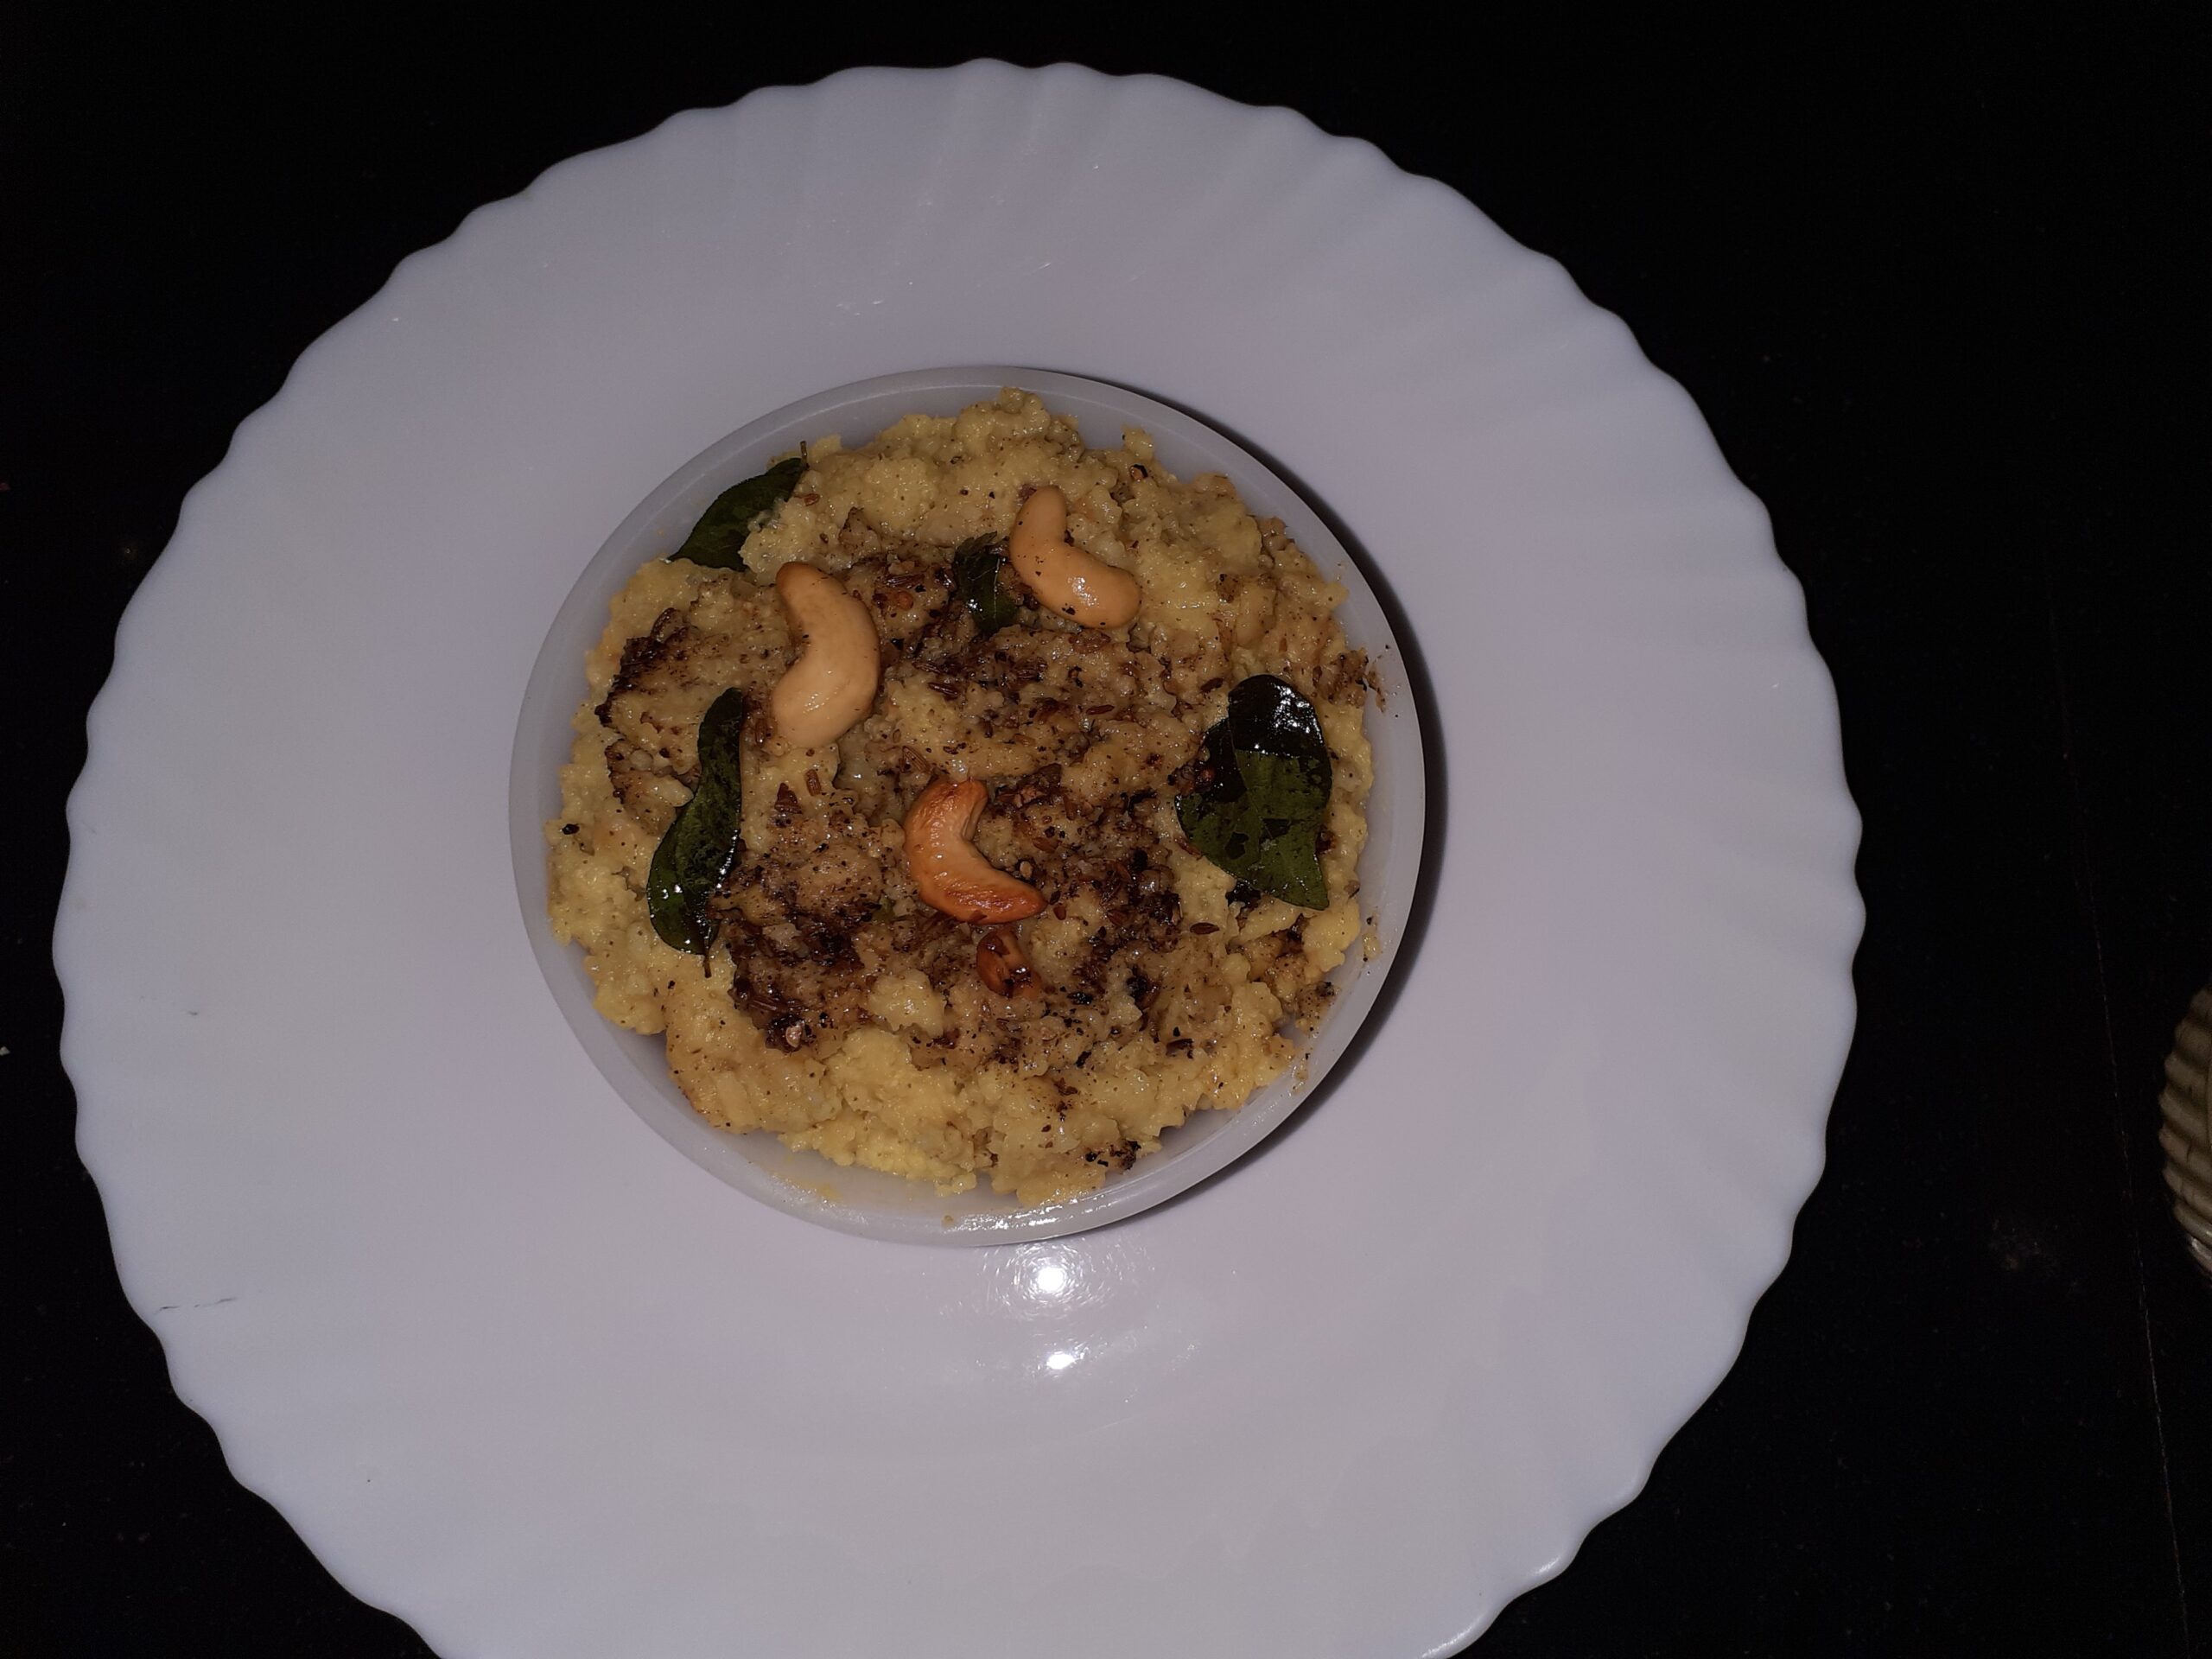
After the pressure from the cooker releases, remove the vessel and mash the rice and dal mixture with the back of a ladle. Keep aside. In a Kadai take some oil and heat. Add the 1 tsp Cumin and drop in the chopped ginger and curry leaves. Fry for 30 seconds and add the Pepper-cumin powder and fry for another 10 seconds. Now add the cooked and, washed rice and dal mixture and mix well. Add some hot water handy to adjust the consistency of Pongal, approximately 1/2 cup to 1 cup. Stir nicely. Adjust salt and spice, add more hot water if the consistency is too solid. The Pongal should be a little gooey, but not runny. Now in another small Kadai take some ghee and heat. Add the cashew nuts and fry until light brown. Pour this into the Pongal mixture. The yummy and spicy Ven Pongal is ready to serve as breakfast or lunch.
Serving suggestions: With Sambar, with chutney, with Gotsu or even Moru Kuzhambu(kadi). I like it just as it is and needs no accompaniment.
To make pepper- cumin powder, dry roast pepper, and cumin in the proportion of 3 tsp of pepper and 1 tsp of cumin. Cool and make a coarse powder. I always have this handy as I use it to temper Rasam too.
STEPWISE RECIPE FOLLOWS:
1. Dry roast the moong dal in a Kadai to a light brown colour or until you get a nice aroma. Add the roasted moong dal to the rice and wash them well together.
2. Place the vessel into the cooker and add the required water. Add salt and turmeric powder, 1/2 tsp jeera, and 4 to 5 peppercorns and close the cooker. Cook for 5 to 6 whistles.
3. After the pressure from the cooker releases, remove the vessel and mash the rice and dal mixture with the back of a ladle. Add around 1 to 1.5 cups of hot water and adjust consistency.
4. In a Kadai take some oil and heat. Add 1tsp Cumin and drop in the chopped ginger and curry leaves. Fry for 30 seconds and add the Pepper-cumin powder and fry for another 10 seconds. Add a little more salt, if required. Now add the cooked and, washed rice and dal mixture and mix well.
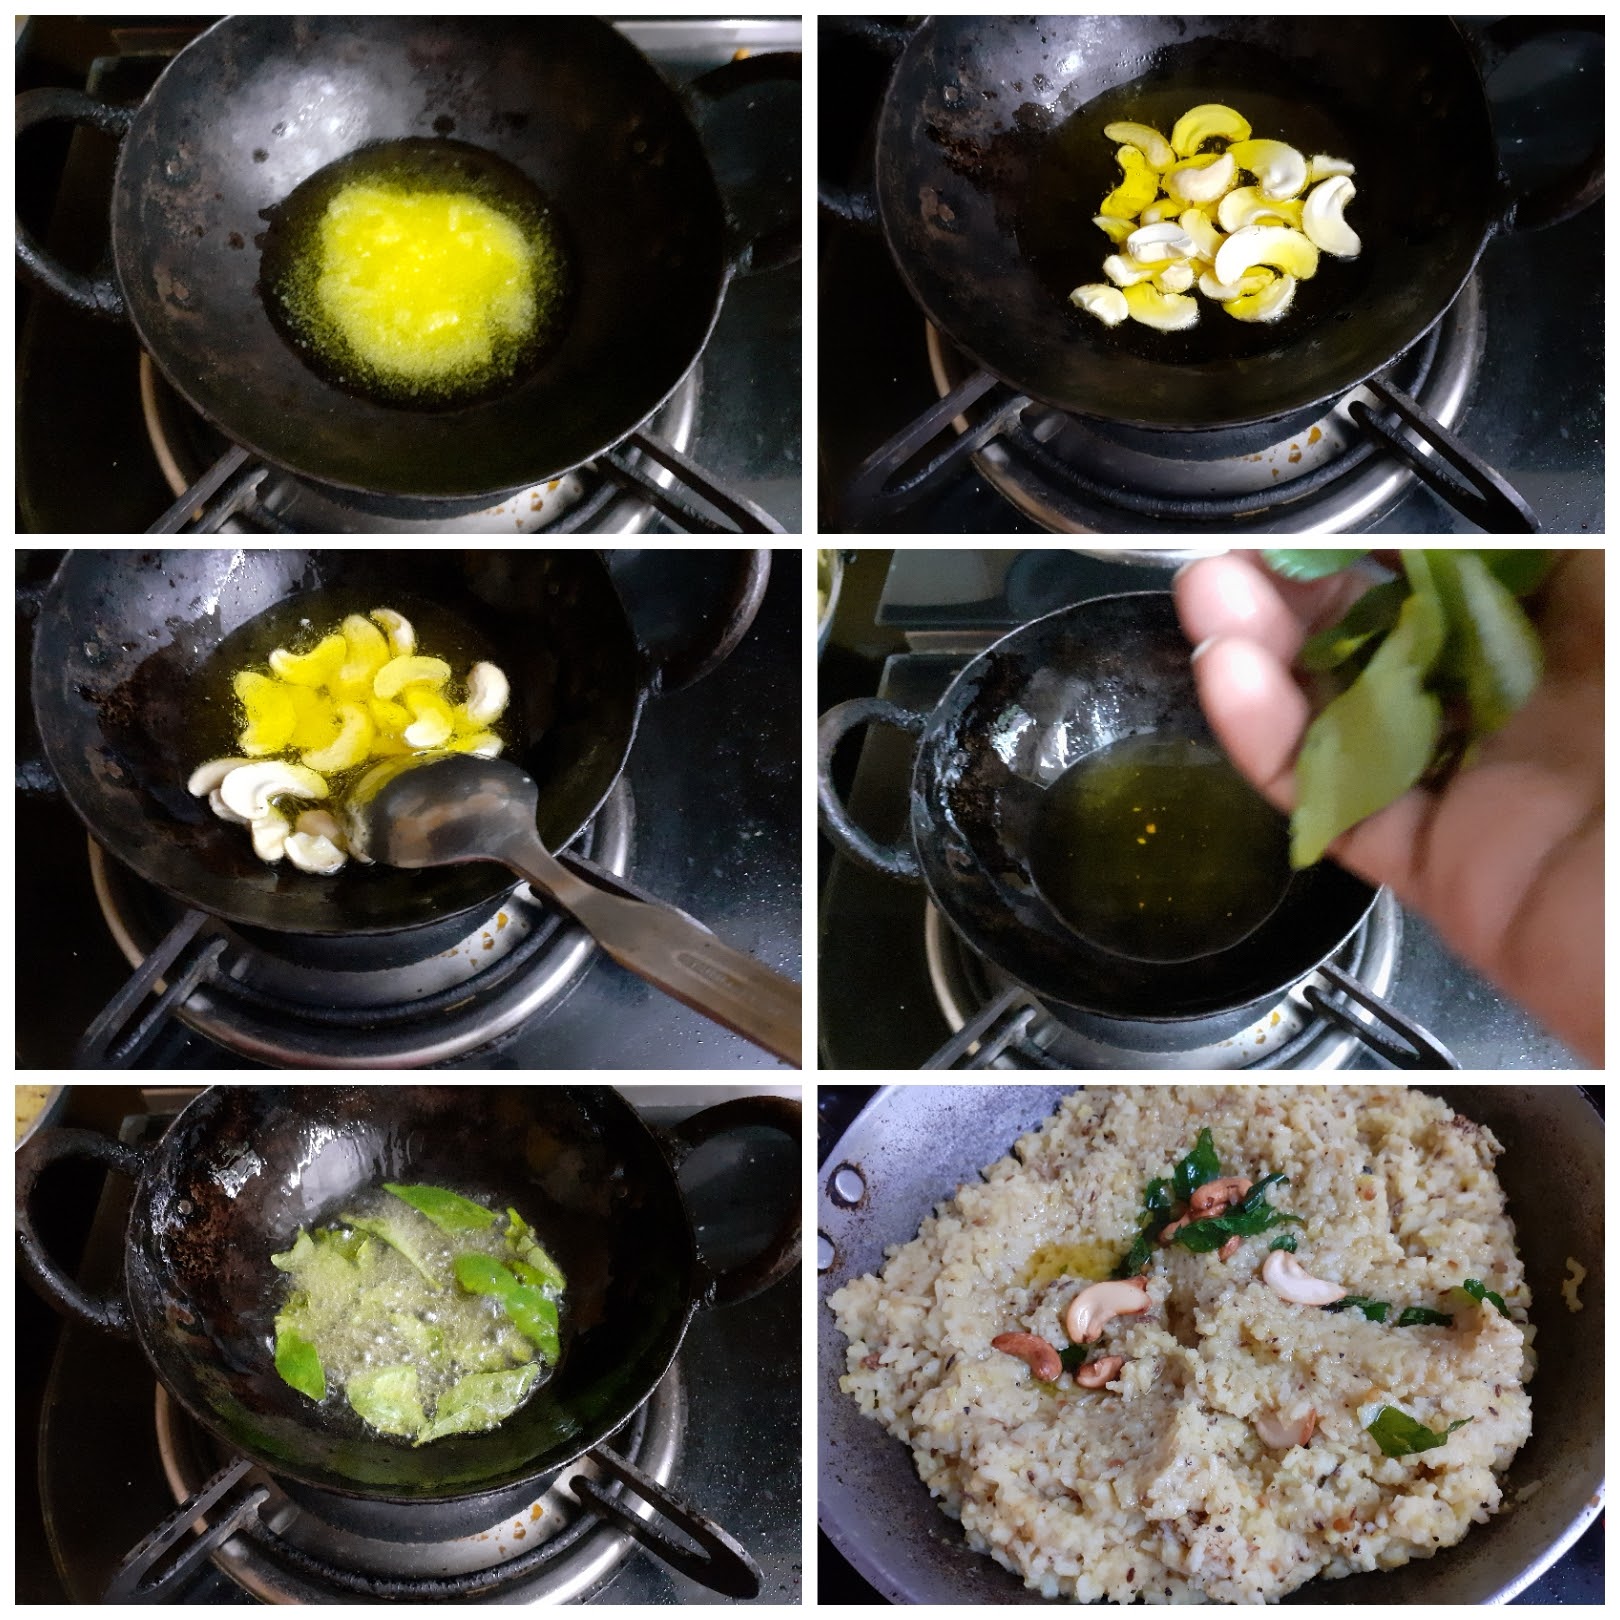
5. Now in another small Kadai take some ghee and heat. Add the cashew nuts and some more curry leaves and fry until light brown. Pour this into the Pongal mixture. The yummy and spicy Ven Pongal is ready to serve
NOTES:
1. The cashewnuts can be fried in ghee before adding the regular tempering too.
2. The softer the rice and dal cook the better will be the texture of the Pongal.
3. Asafoetida can also be added while tempering. I have not added in this recipe, but it definitely can be done.
If you tried this recipe and liked it please comment below. I would love to hear from you. If you have a query about the recipe email us and ill respond as soon as I can.
If you would like to receive our recipes on your mail please leave your mail id at the homepage. Every time Rajjo’s Kitchen has a new post we will mail the recipe to you.
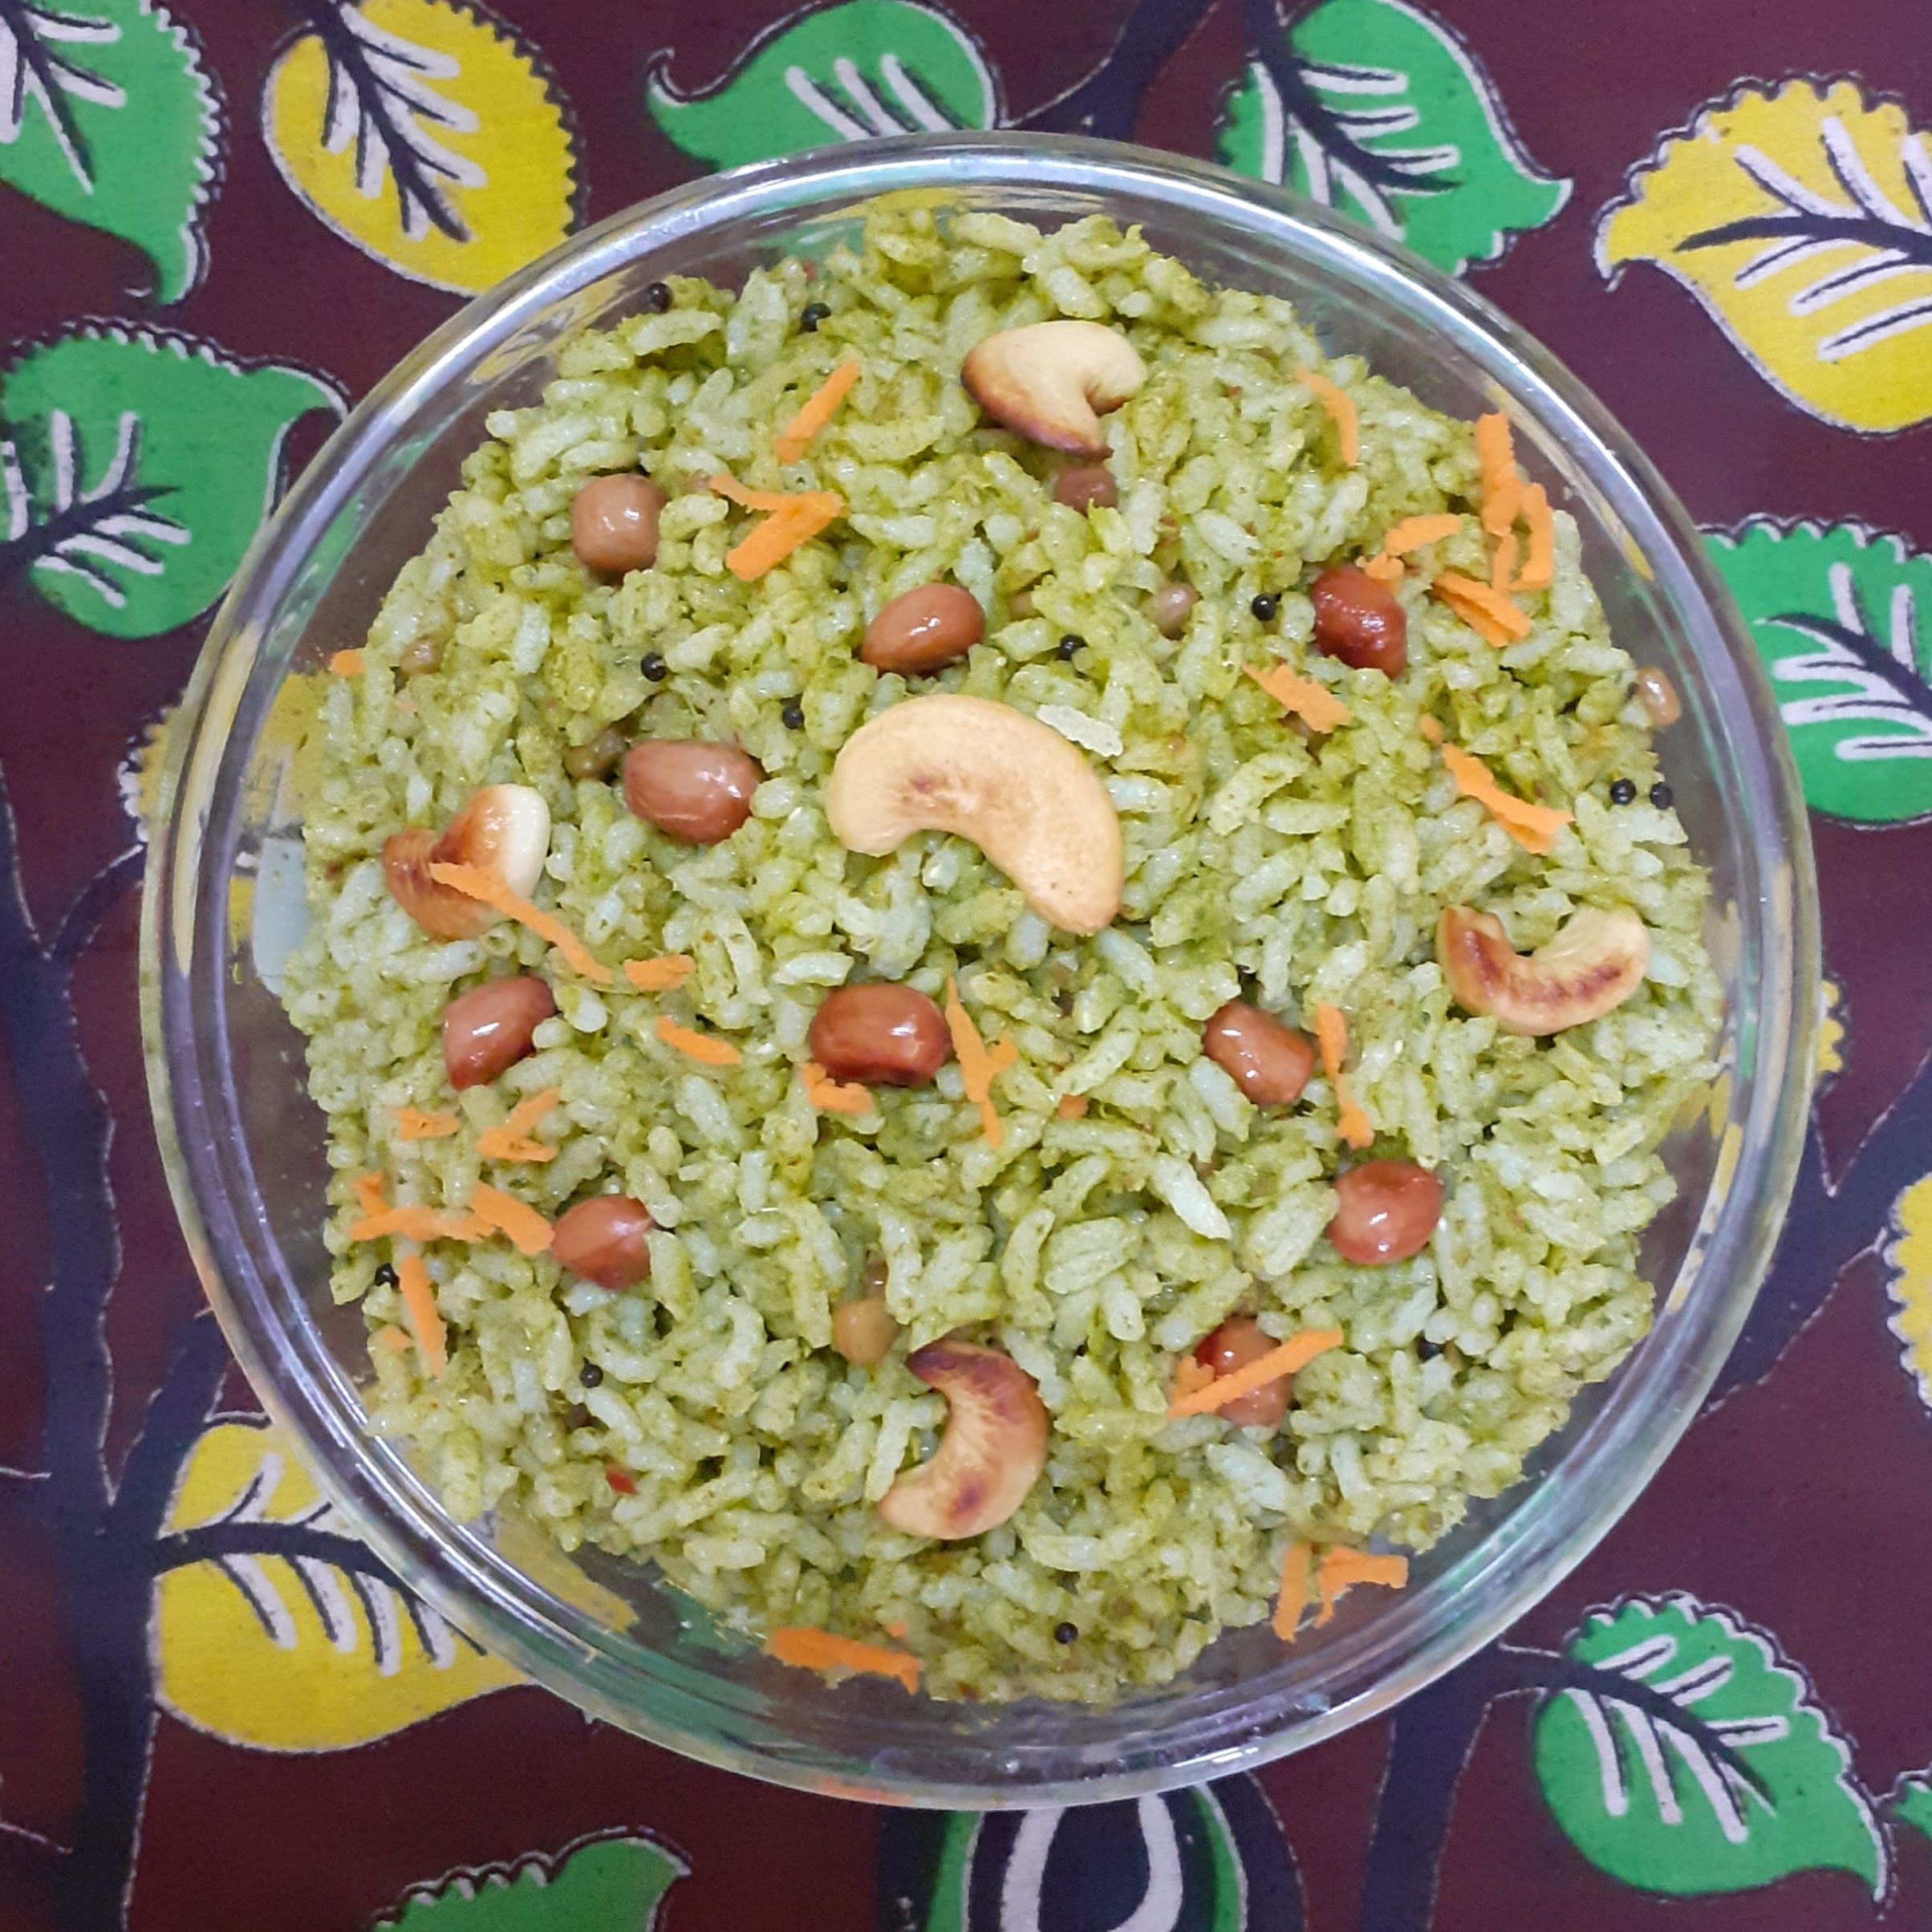
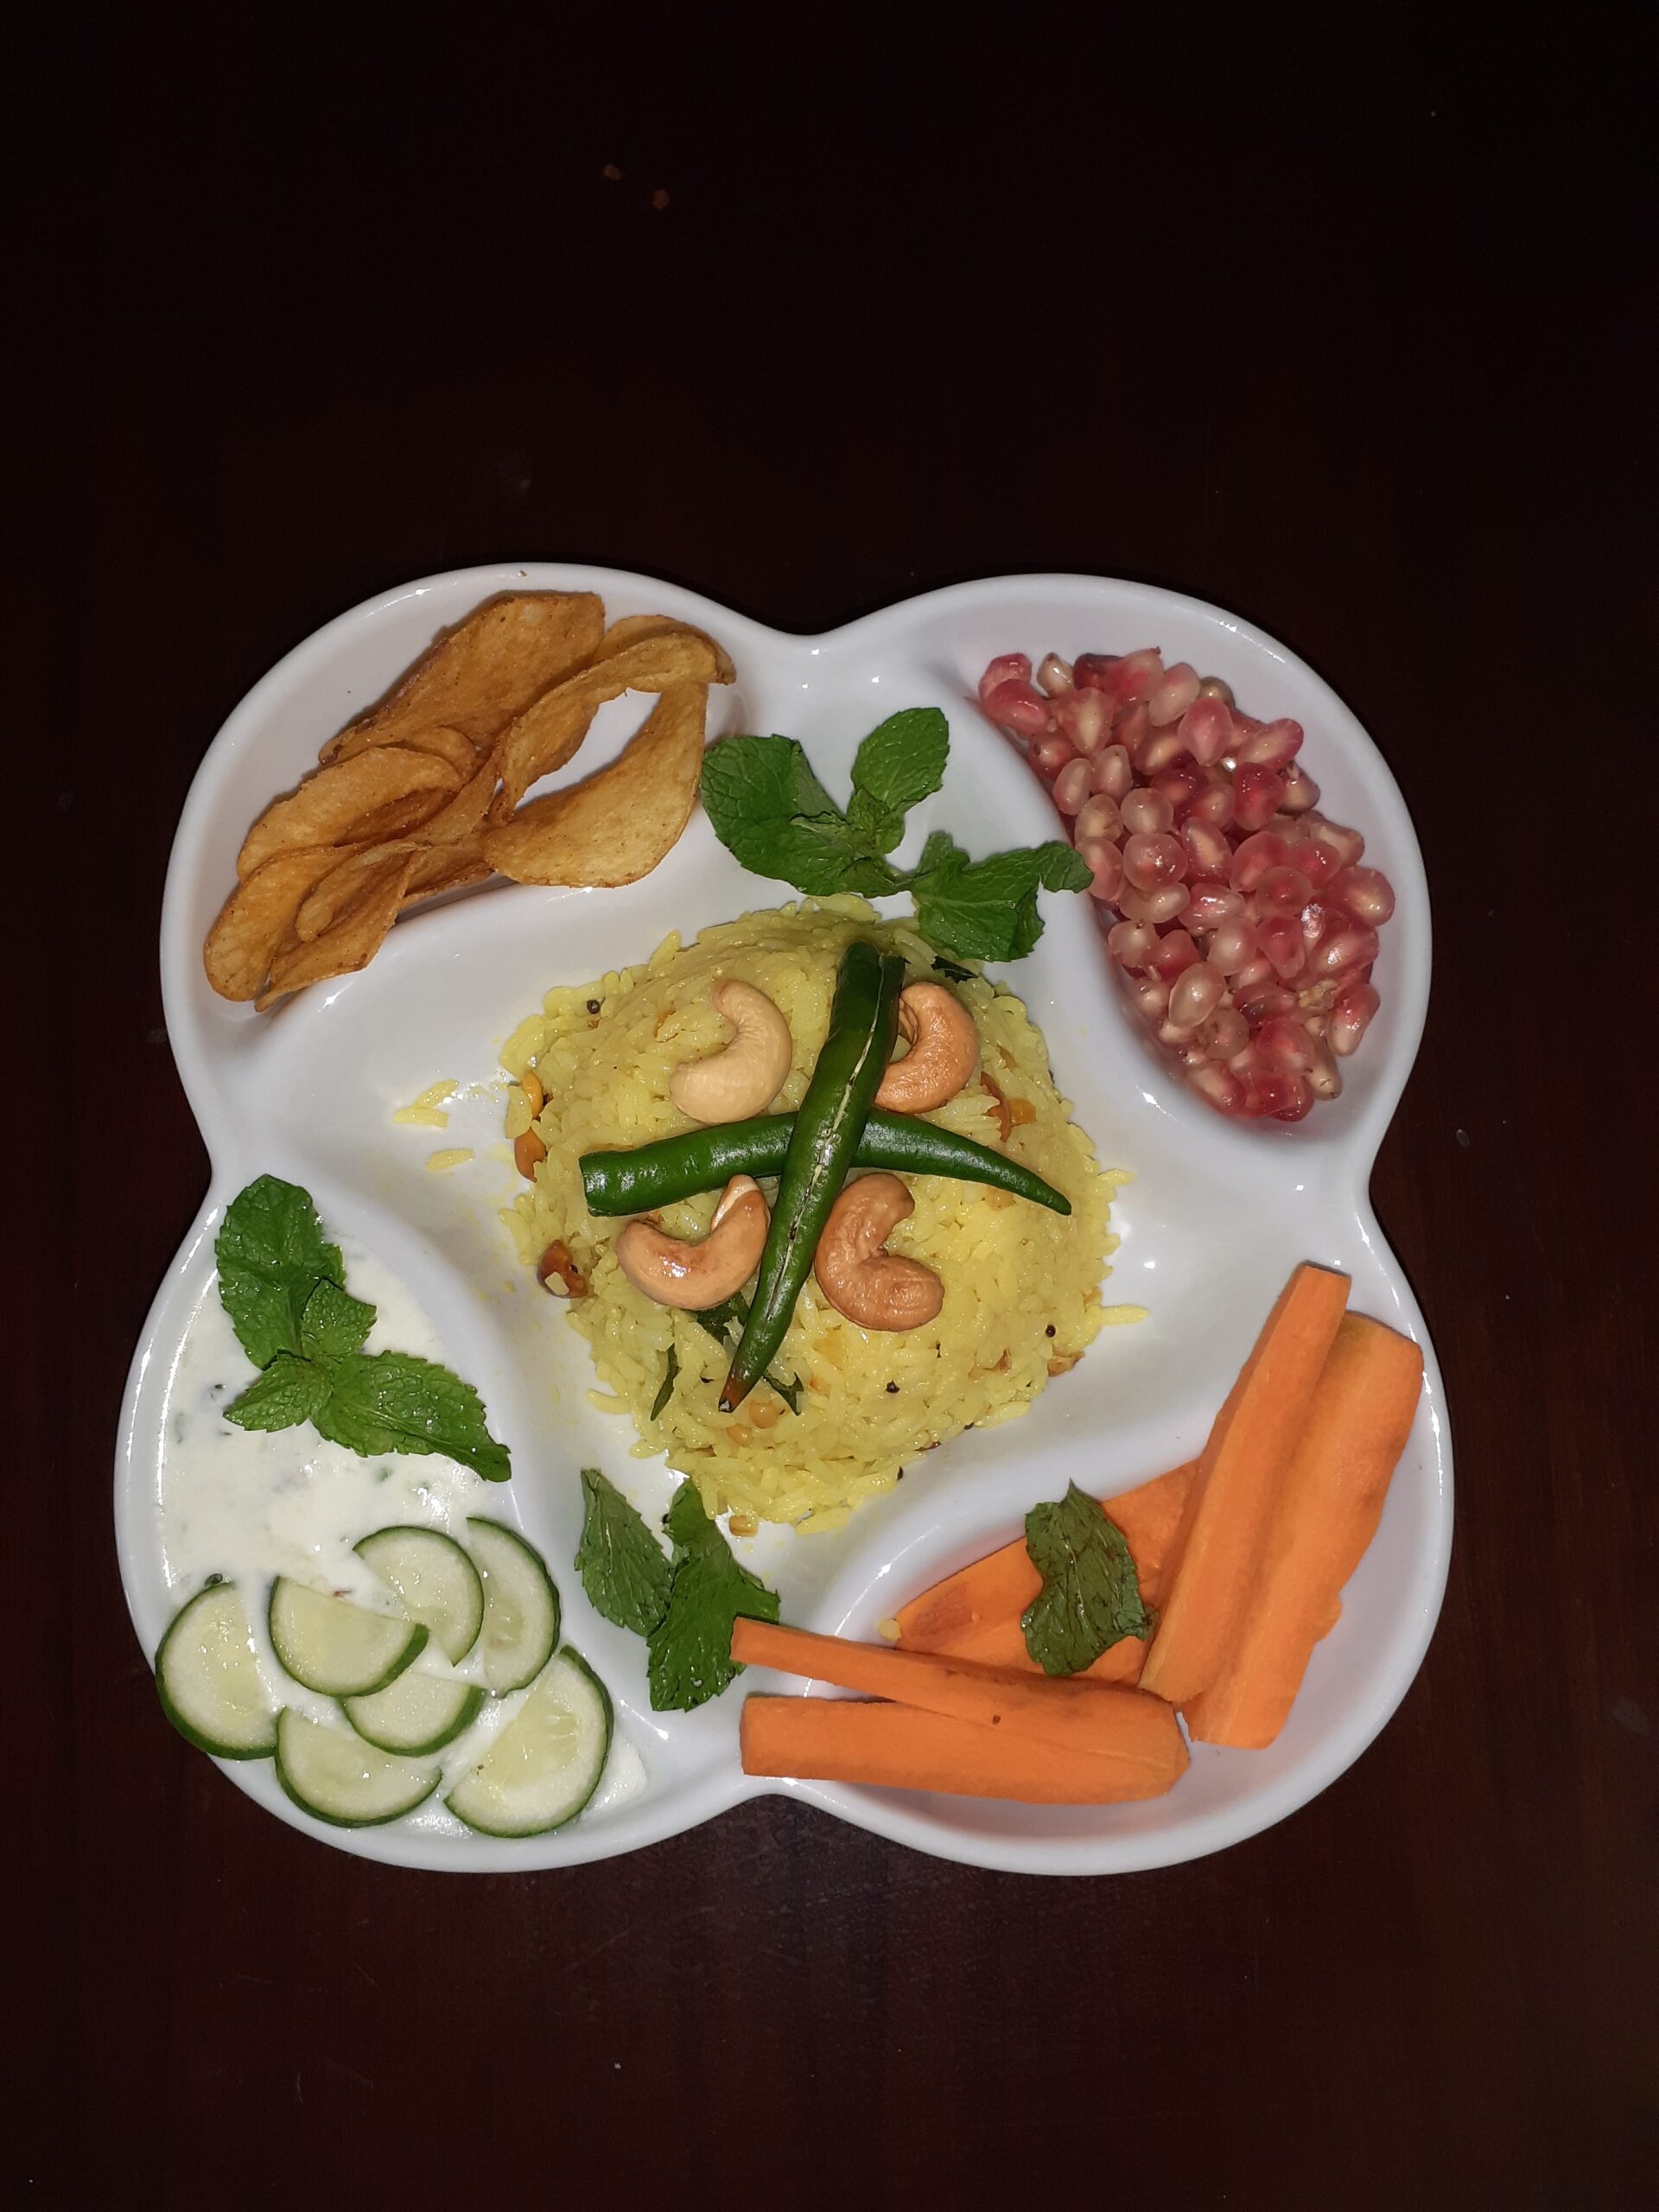
Tomato Rice/Tamatar Pulav
Tomato Rice is a very simple recipe and I love making it just for this reason. It is a quick fix in many ways. Whether I have to head out in a hurry or have to fix a lunchbox in a short time, this dish is always my option. This dish also necessarily does not need a side dish to go with it. Any stir fry will do, or just by itself, it is great too. This dish has all the goodness of tomatoes, so it is rich in vitamin C, in lycopene that is good for the skin, a decent amount of fibre.
I keep my tomato rice very simple, subtly flavoured with the minimum of spices. In this dish, I don’t use any pungent spice like cloves, cardamom, cinnamon, or even onion, garlic, or ginger. I just let the Tomatoes do all the talking????and the flavor is always bang on. The most concession I can make is adding fresh green peas to the rice. I don’t puree my tomatoes too, I love to keep it rustic.
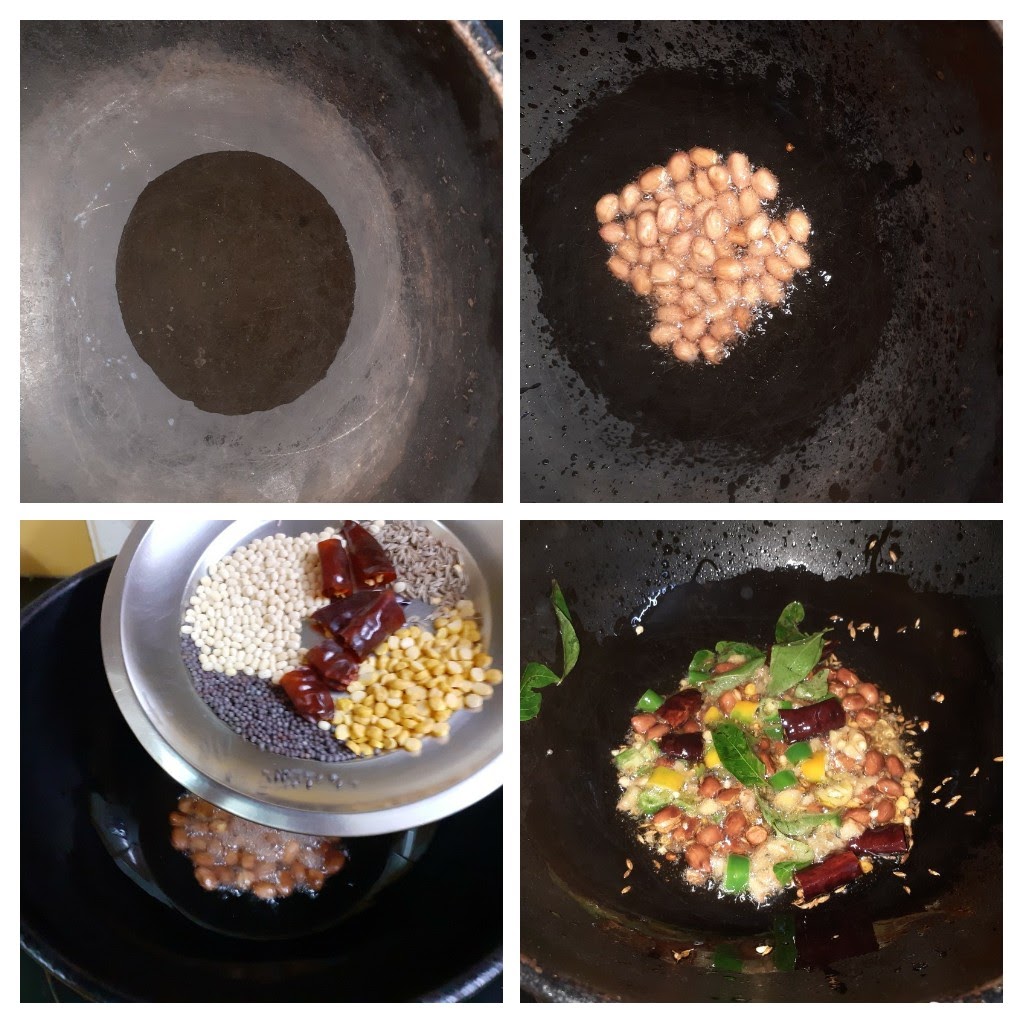
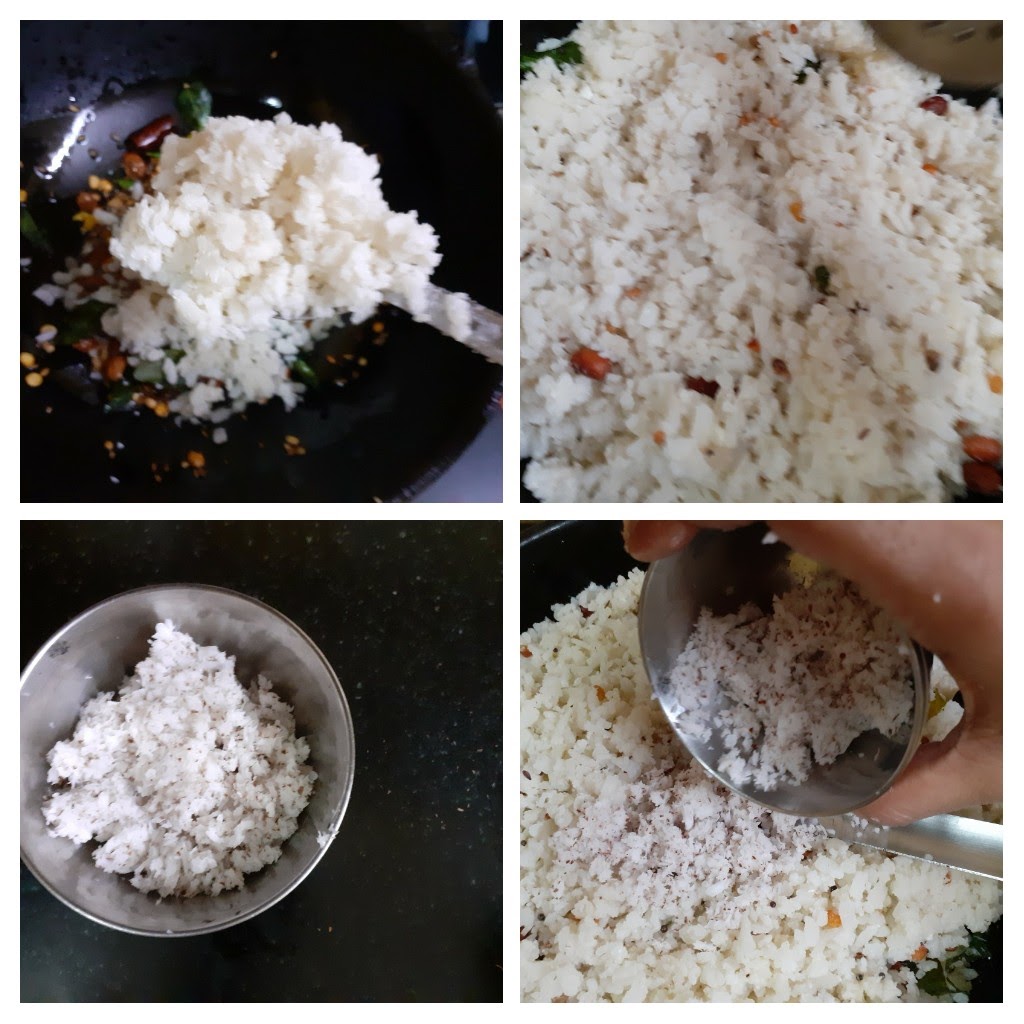
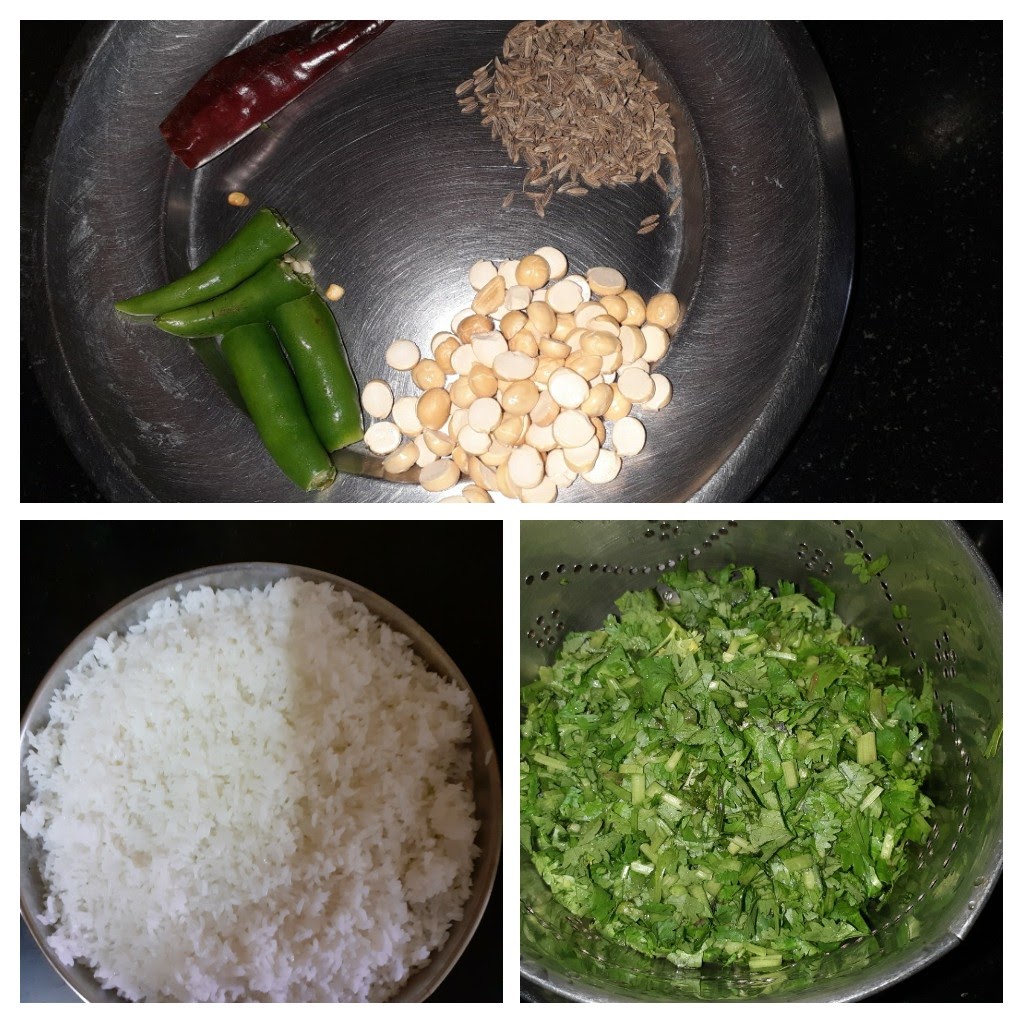
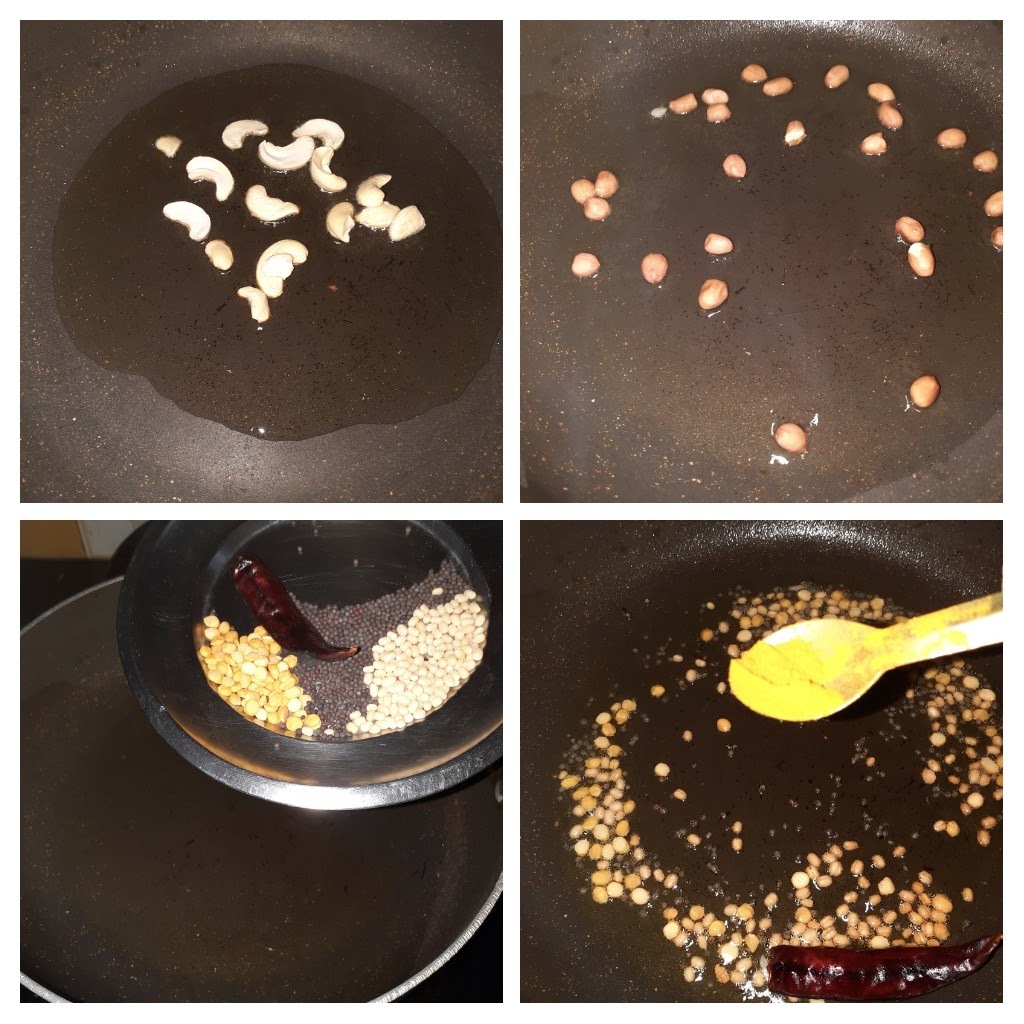
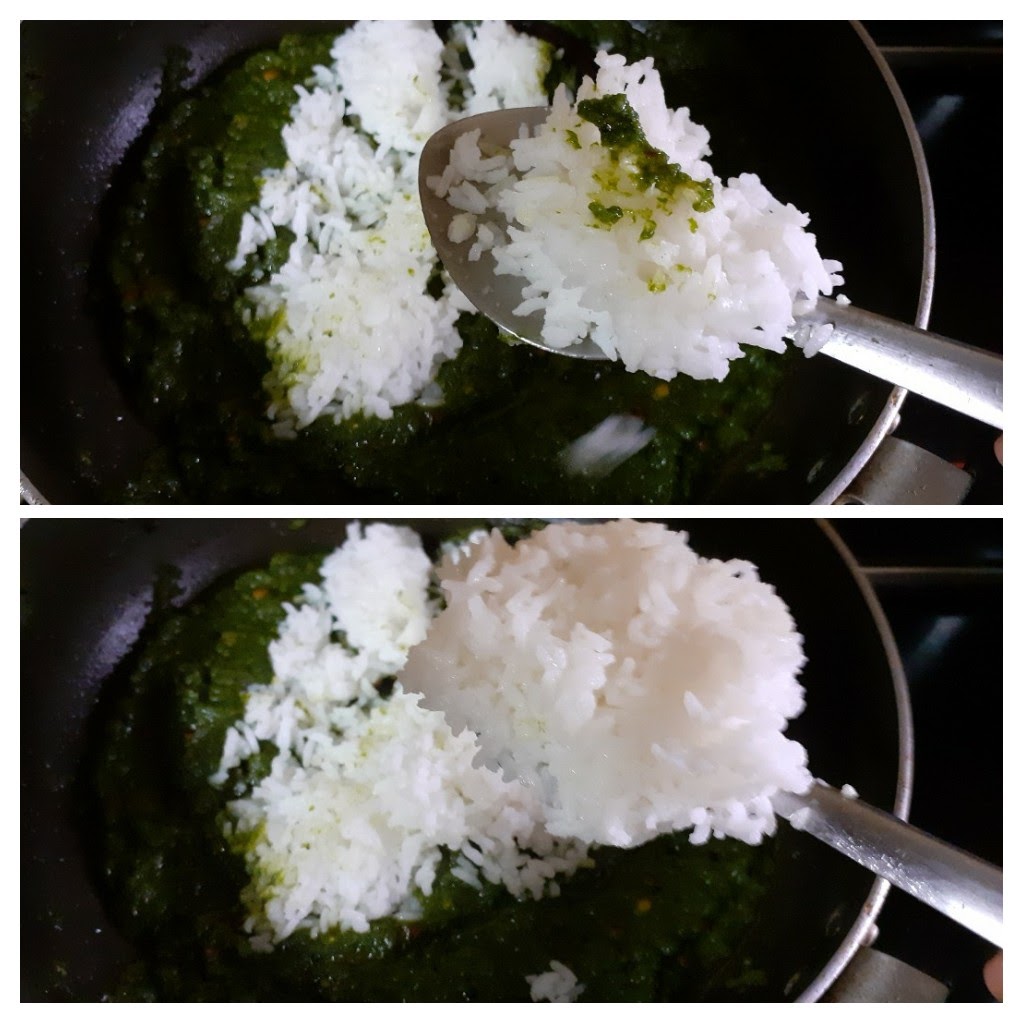
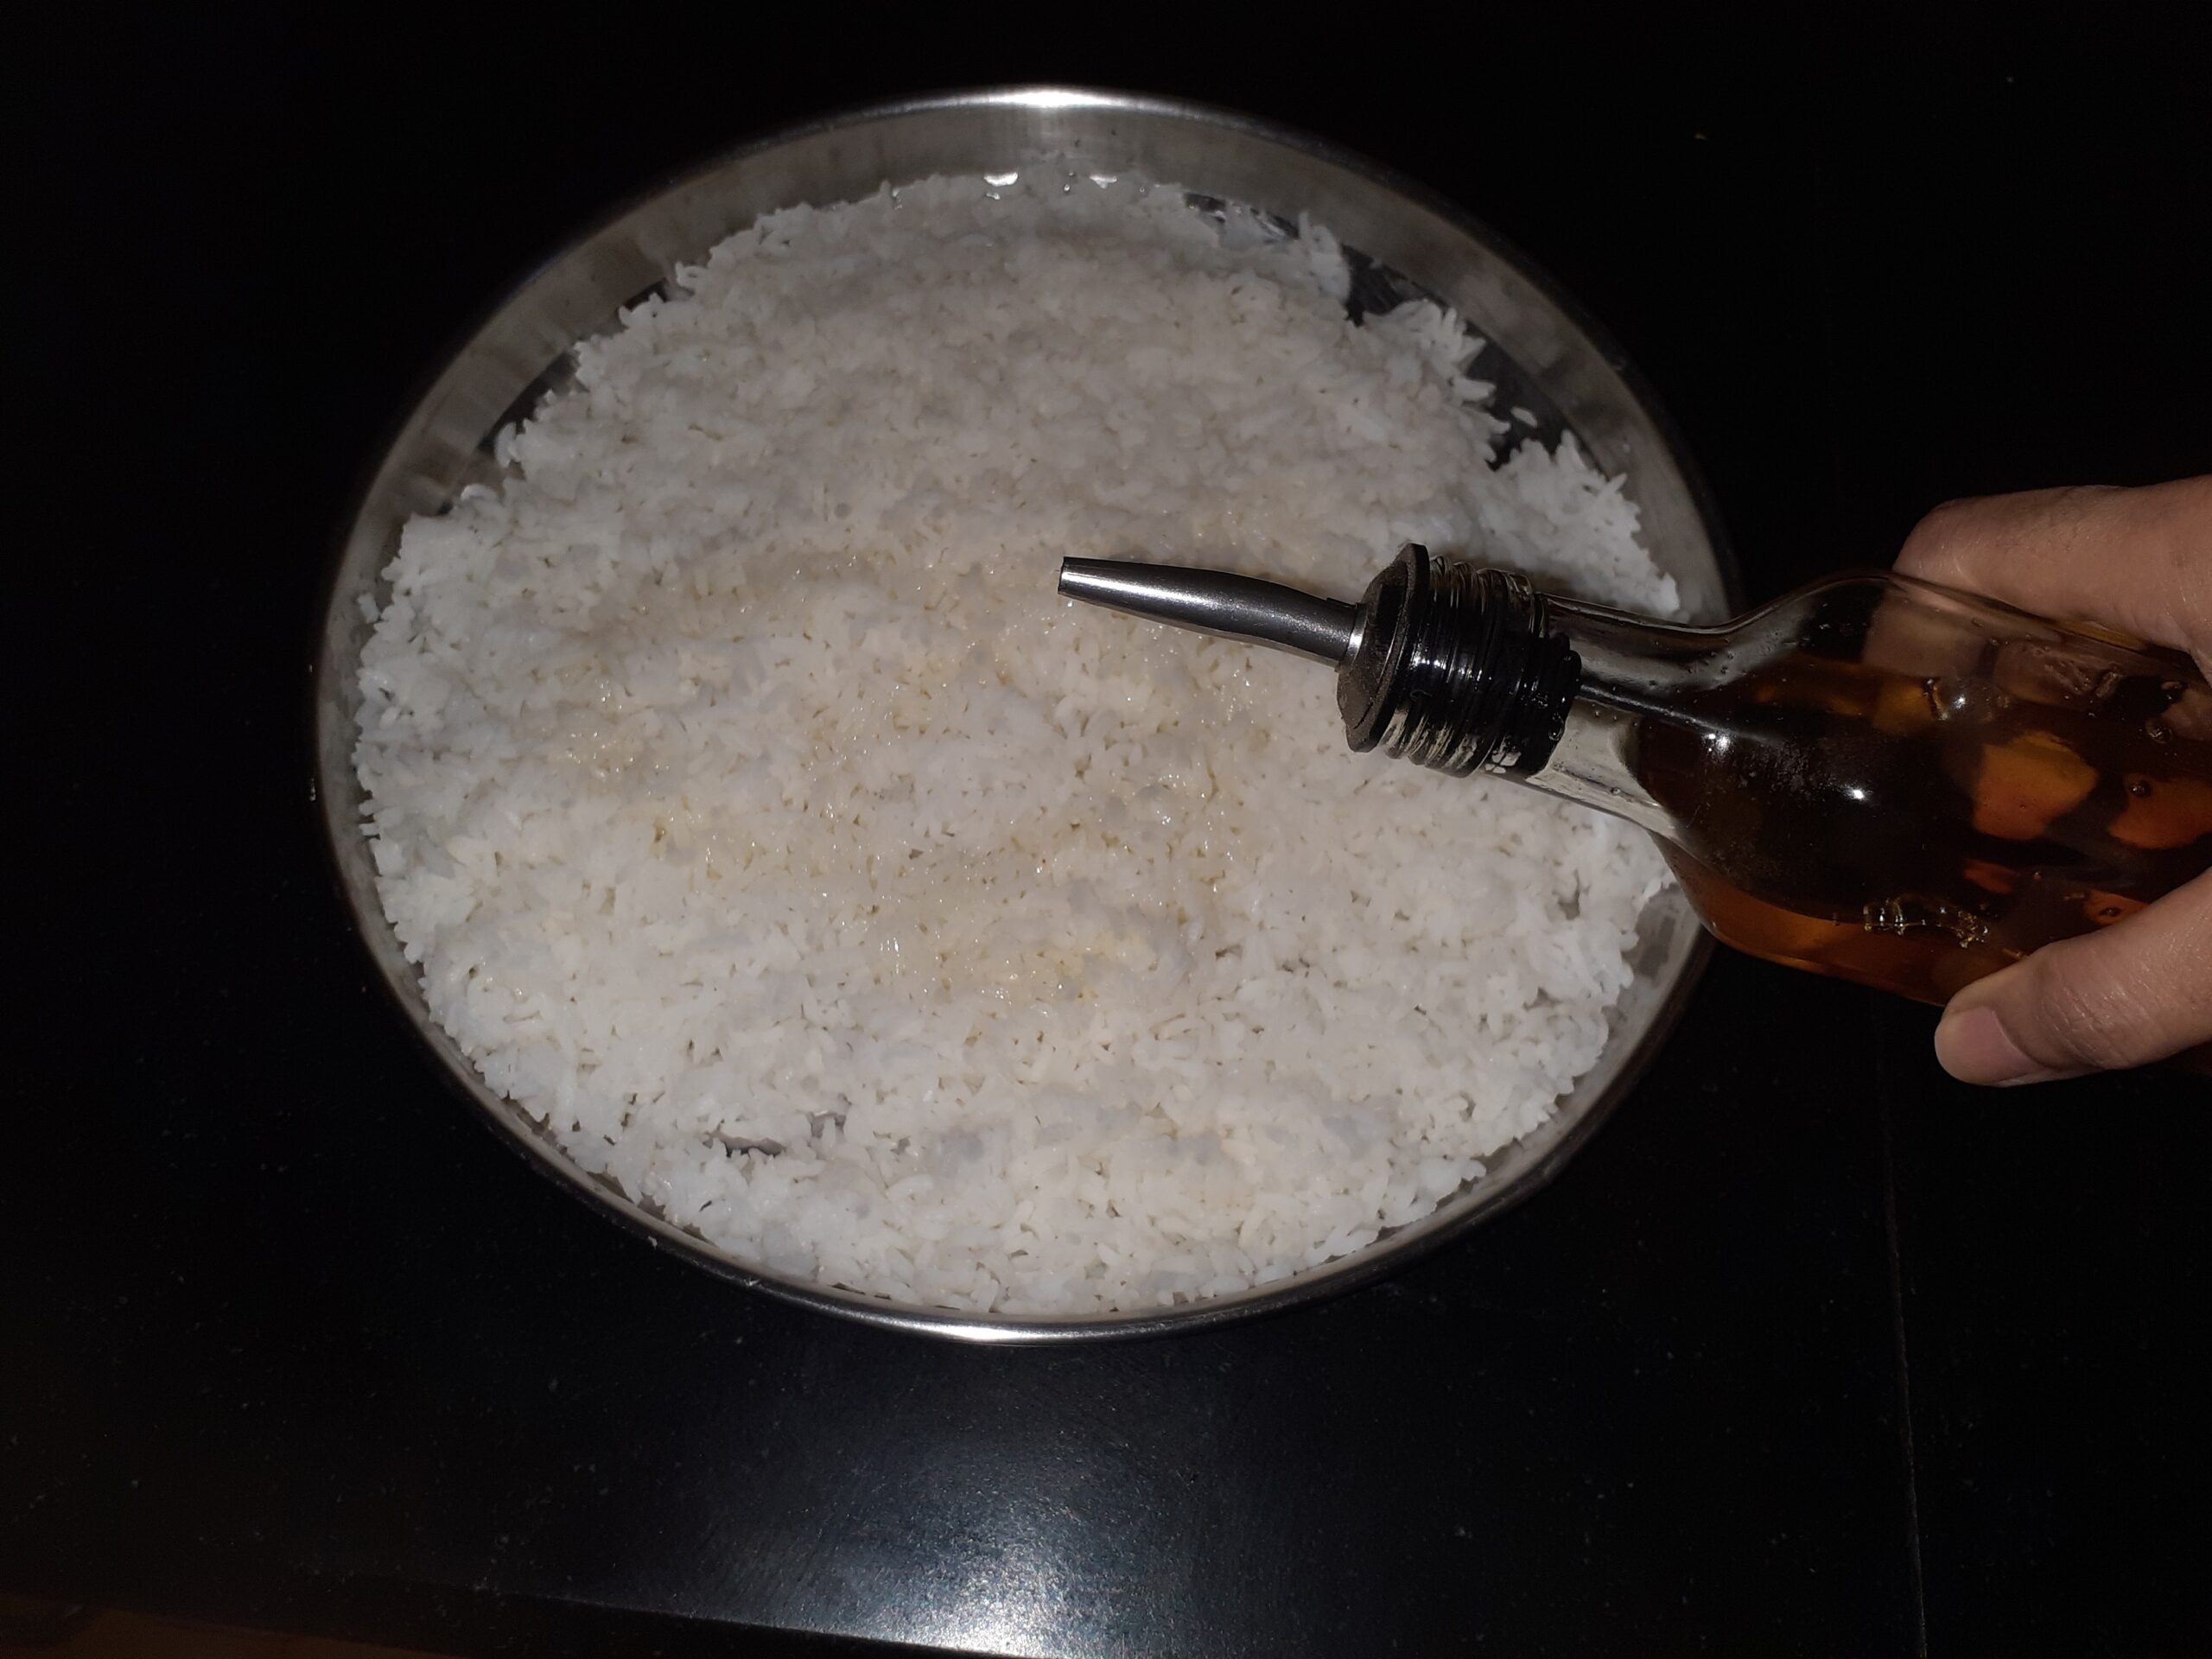
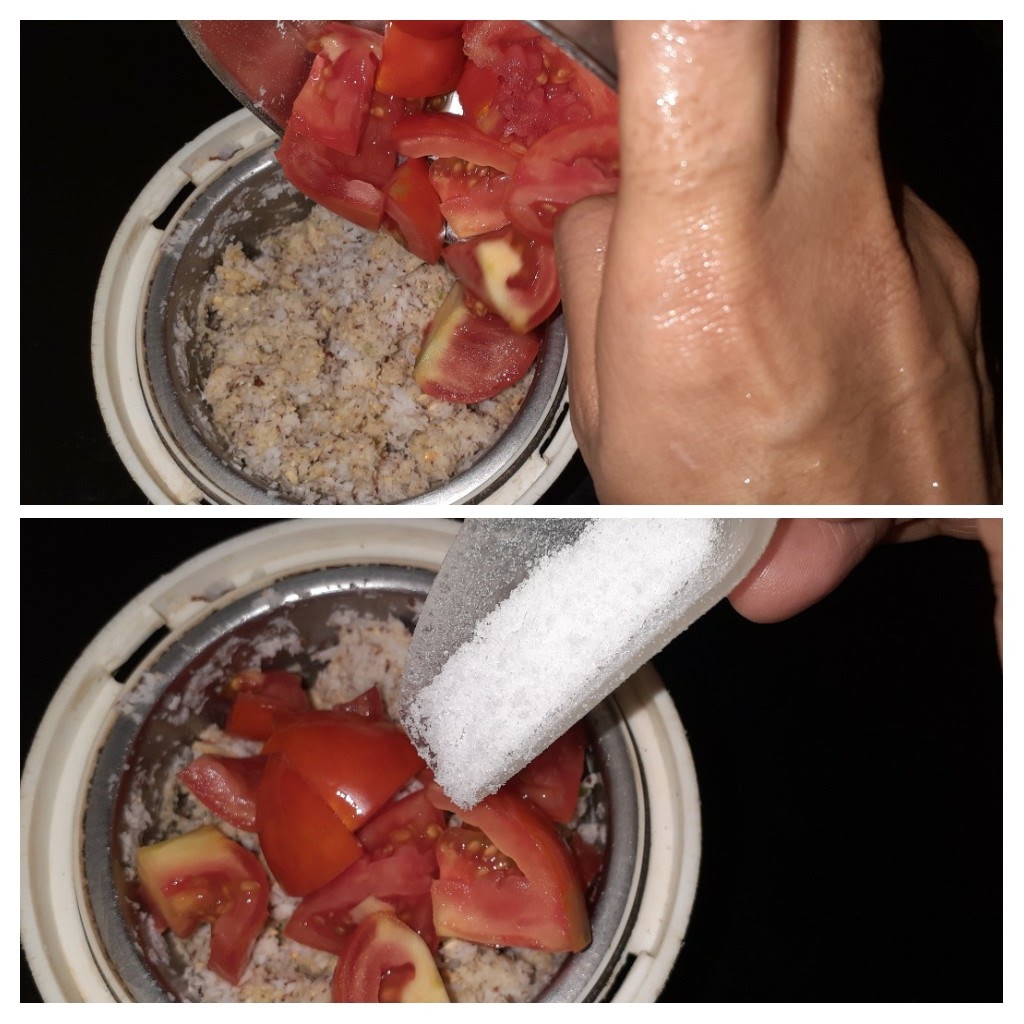
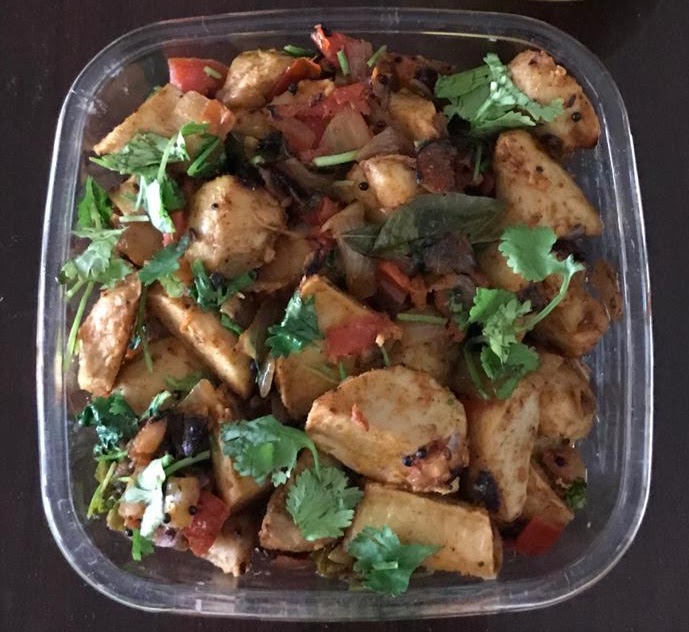
Cook 1 cup rice, spread it on a plate to cool, and drizzle some oil over it so that the grains do not stick. Now in a Karahi heat oil and add the Cashewnuts to it and fry until light brown. Remove them onto a plate. Now to the same oil add the mustard seeds, Chana dal, urad dal, dry red chillies, and fry until the dals turn light brown. To this add the slit green chillies and curry leaves. Saute for 30 secs. Now add the turmeric powder and chopped tomatoes and saute for a minute. Now add salt, followed by red chilli powder and coriander powder, and cover the Karahi and cook until the tomatoes become mushy and the oil is released. Remove the lid and mash the tomatoes with the back of a ladle, so that it turns saucy. Now add the rice little by little and mix well. The tomato gravy must nicely coat the rice. Check for salt and spice and adjust if required. Put off the flame and add the fried Cashews. The yummy and tangy Tomato rice is ready.
Serving Suggestions: With any stir fry vegetable or Potato roast, Sepankazhangu(Colaccasia)roast, or just by itself.
STEPWISE RECIPE FOLLOWS:
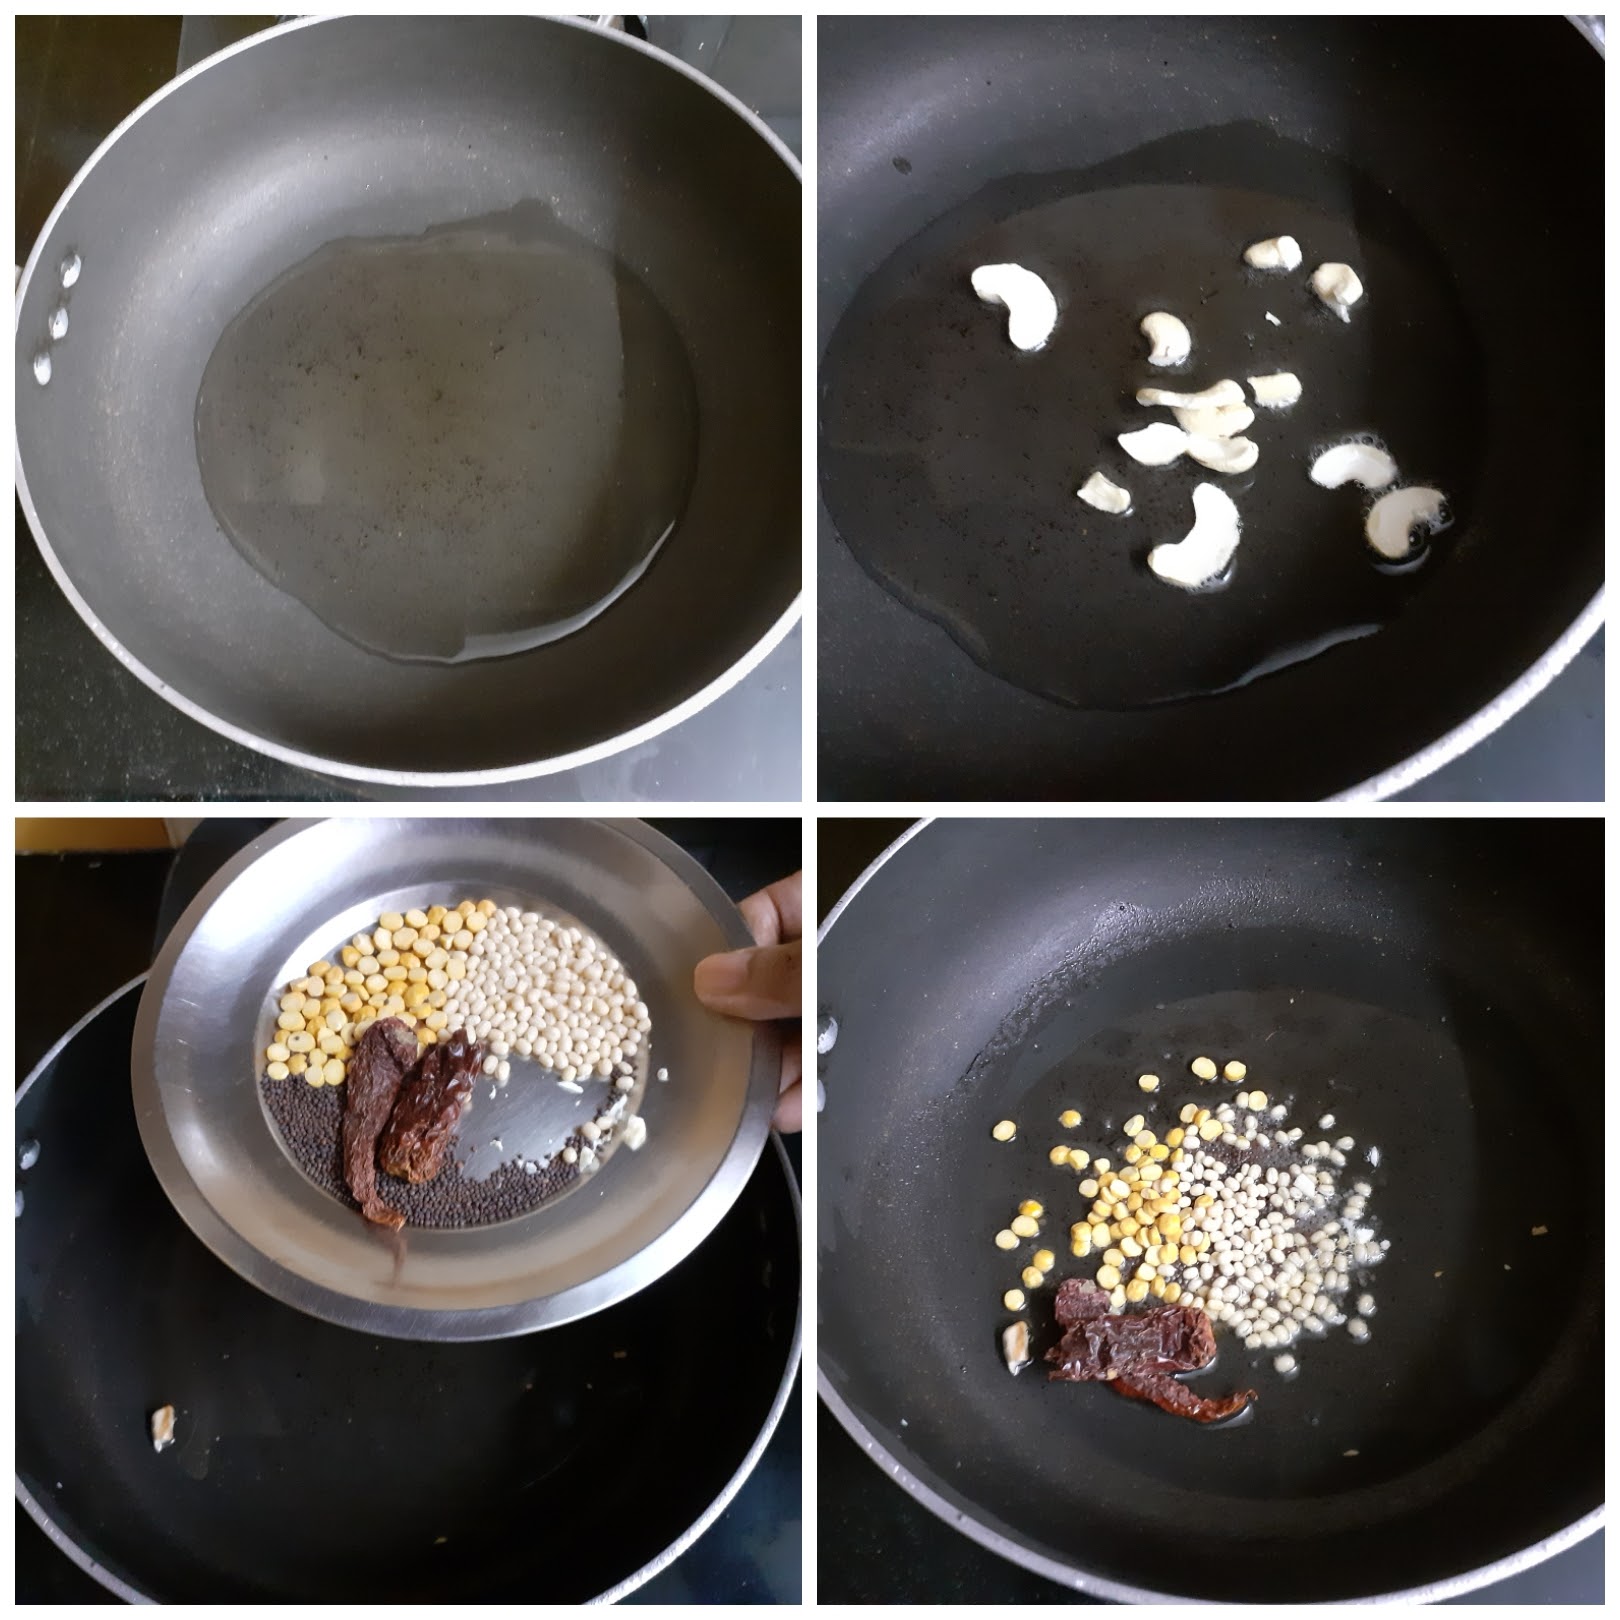
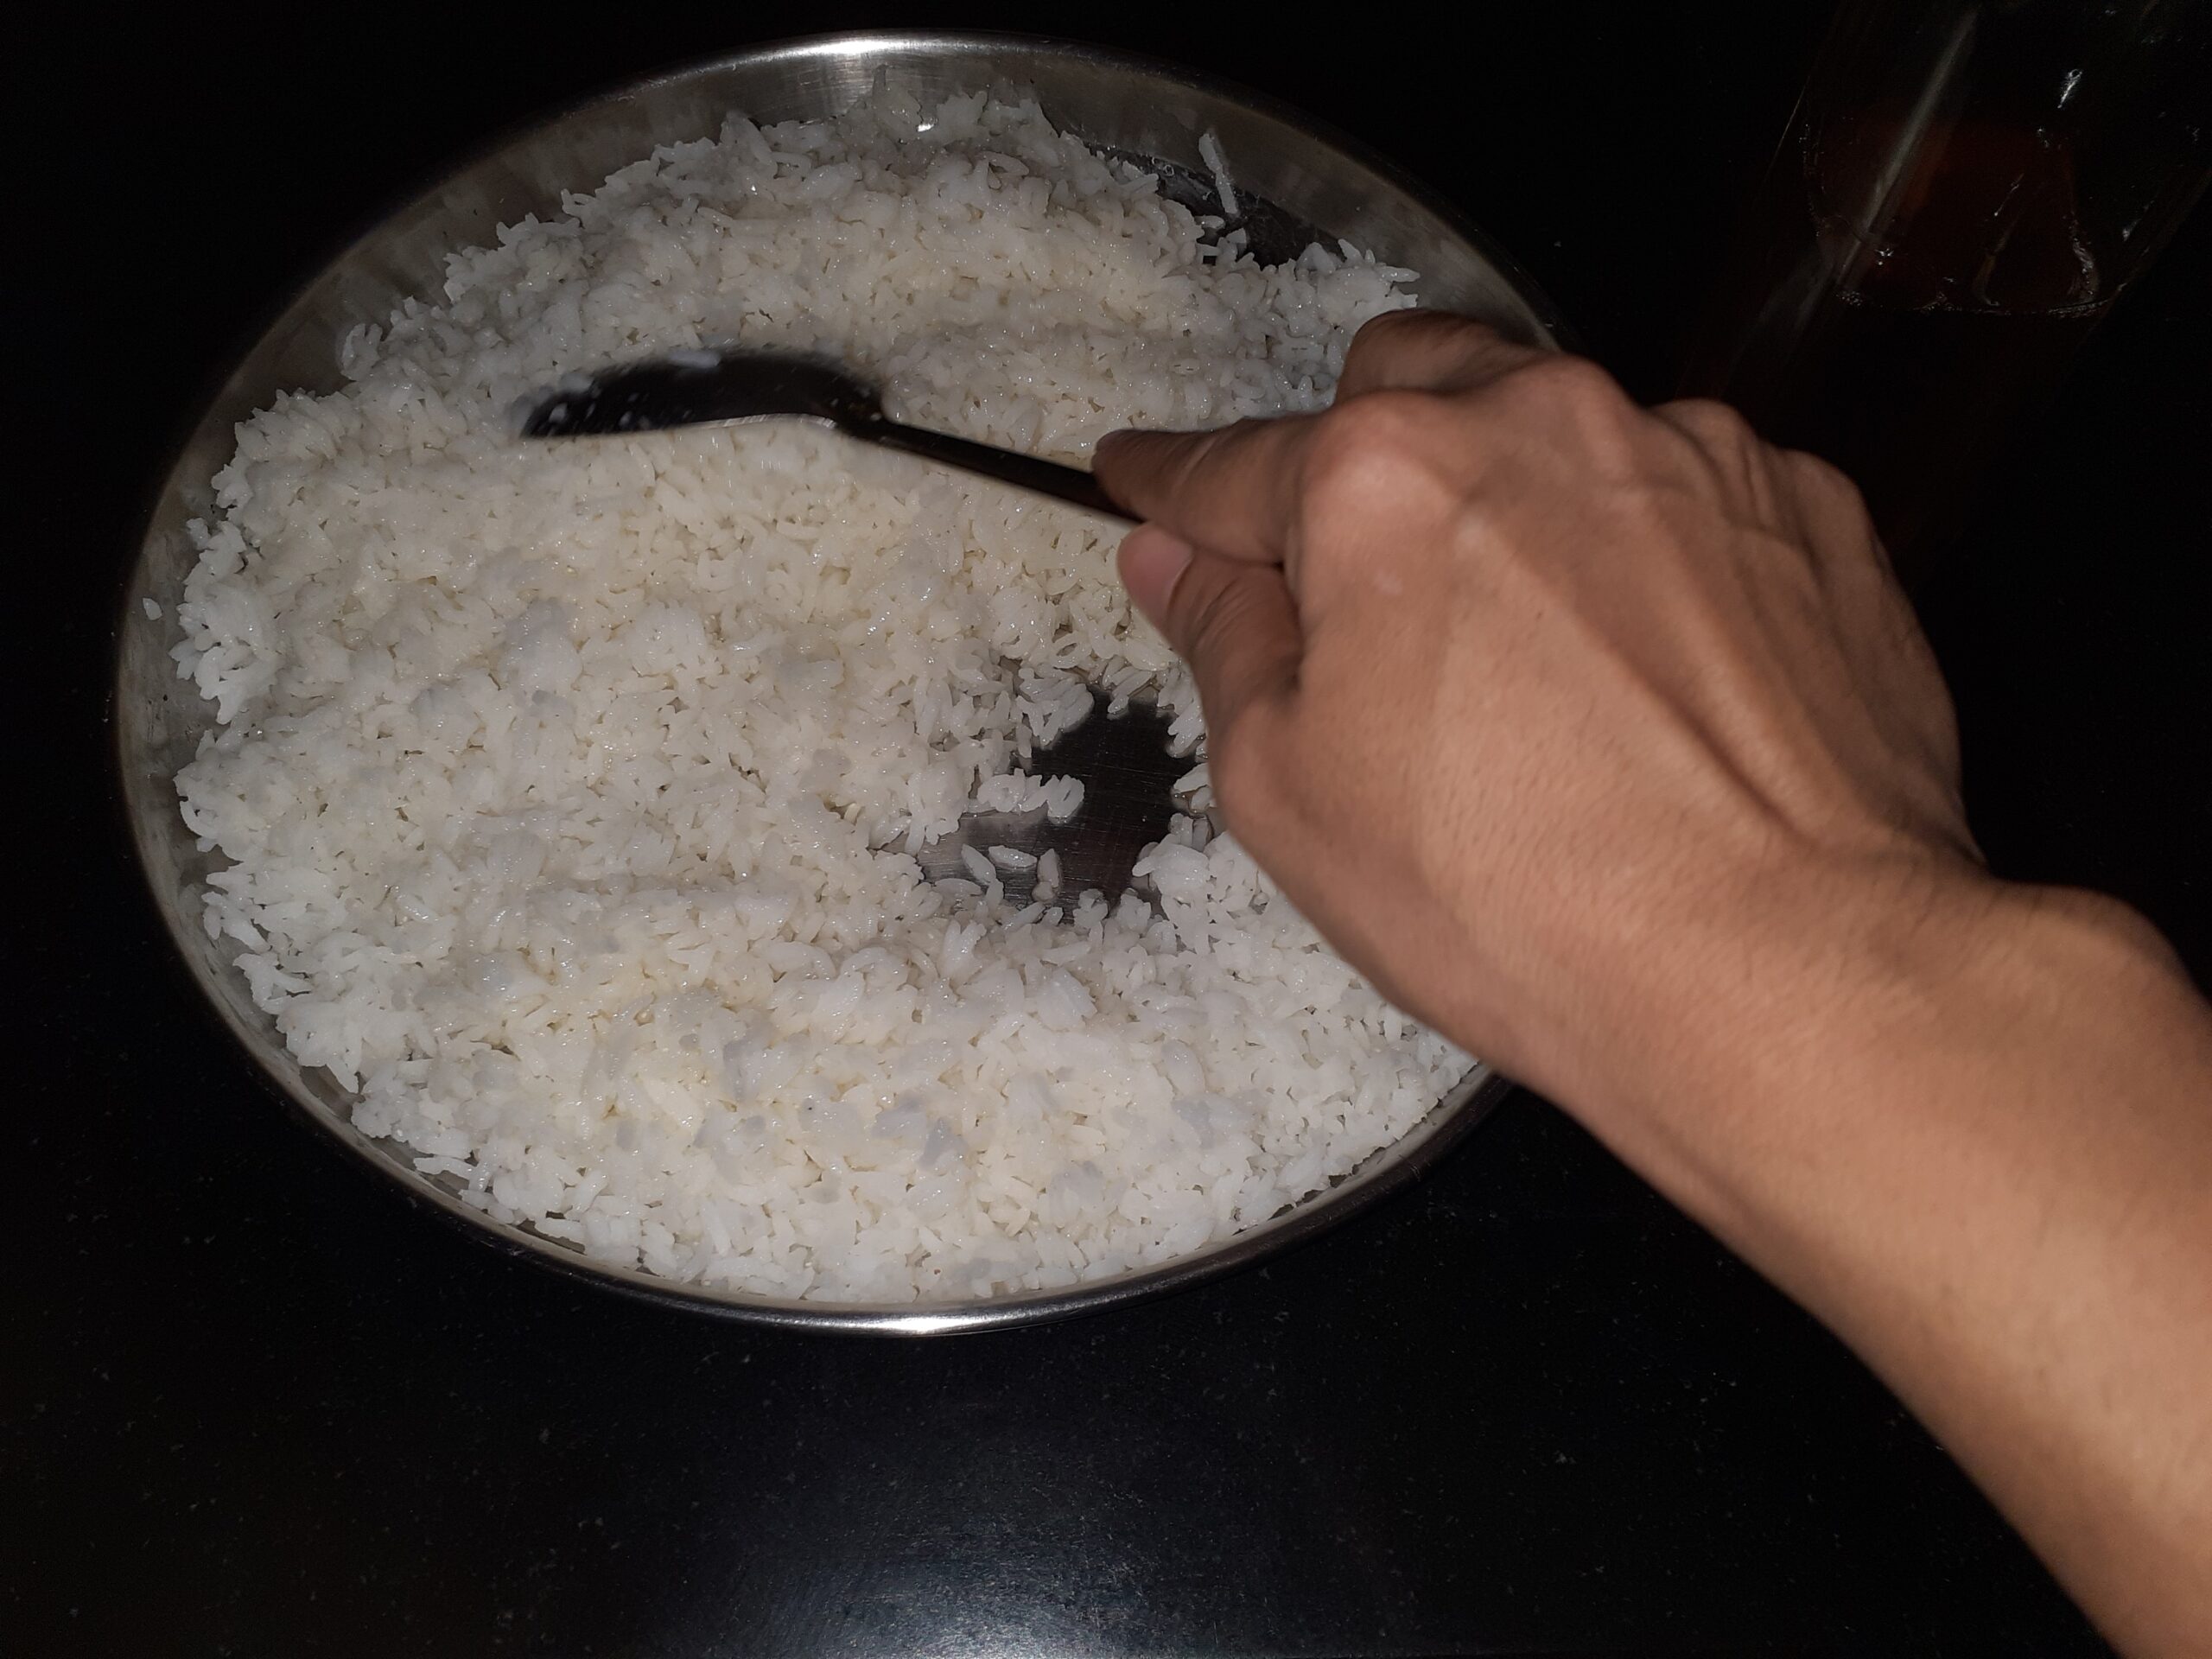
1. Assemble all ingredients. Cook 1 cup rice, spread it on a plate to cool and drizzle some oil over it so that the grains do not stick.
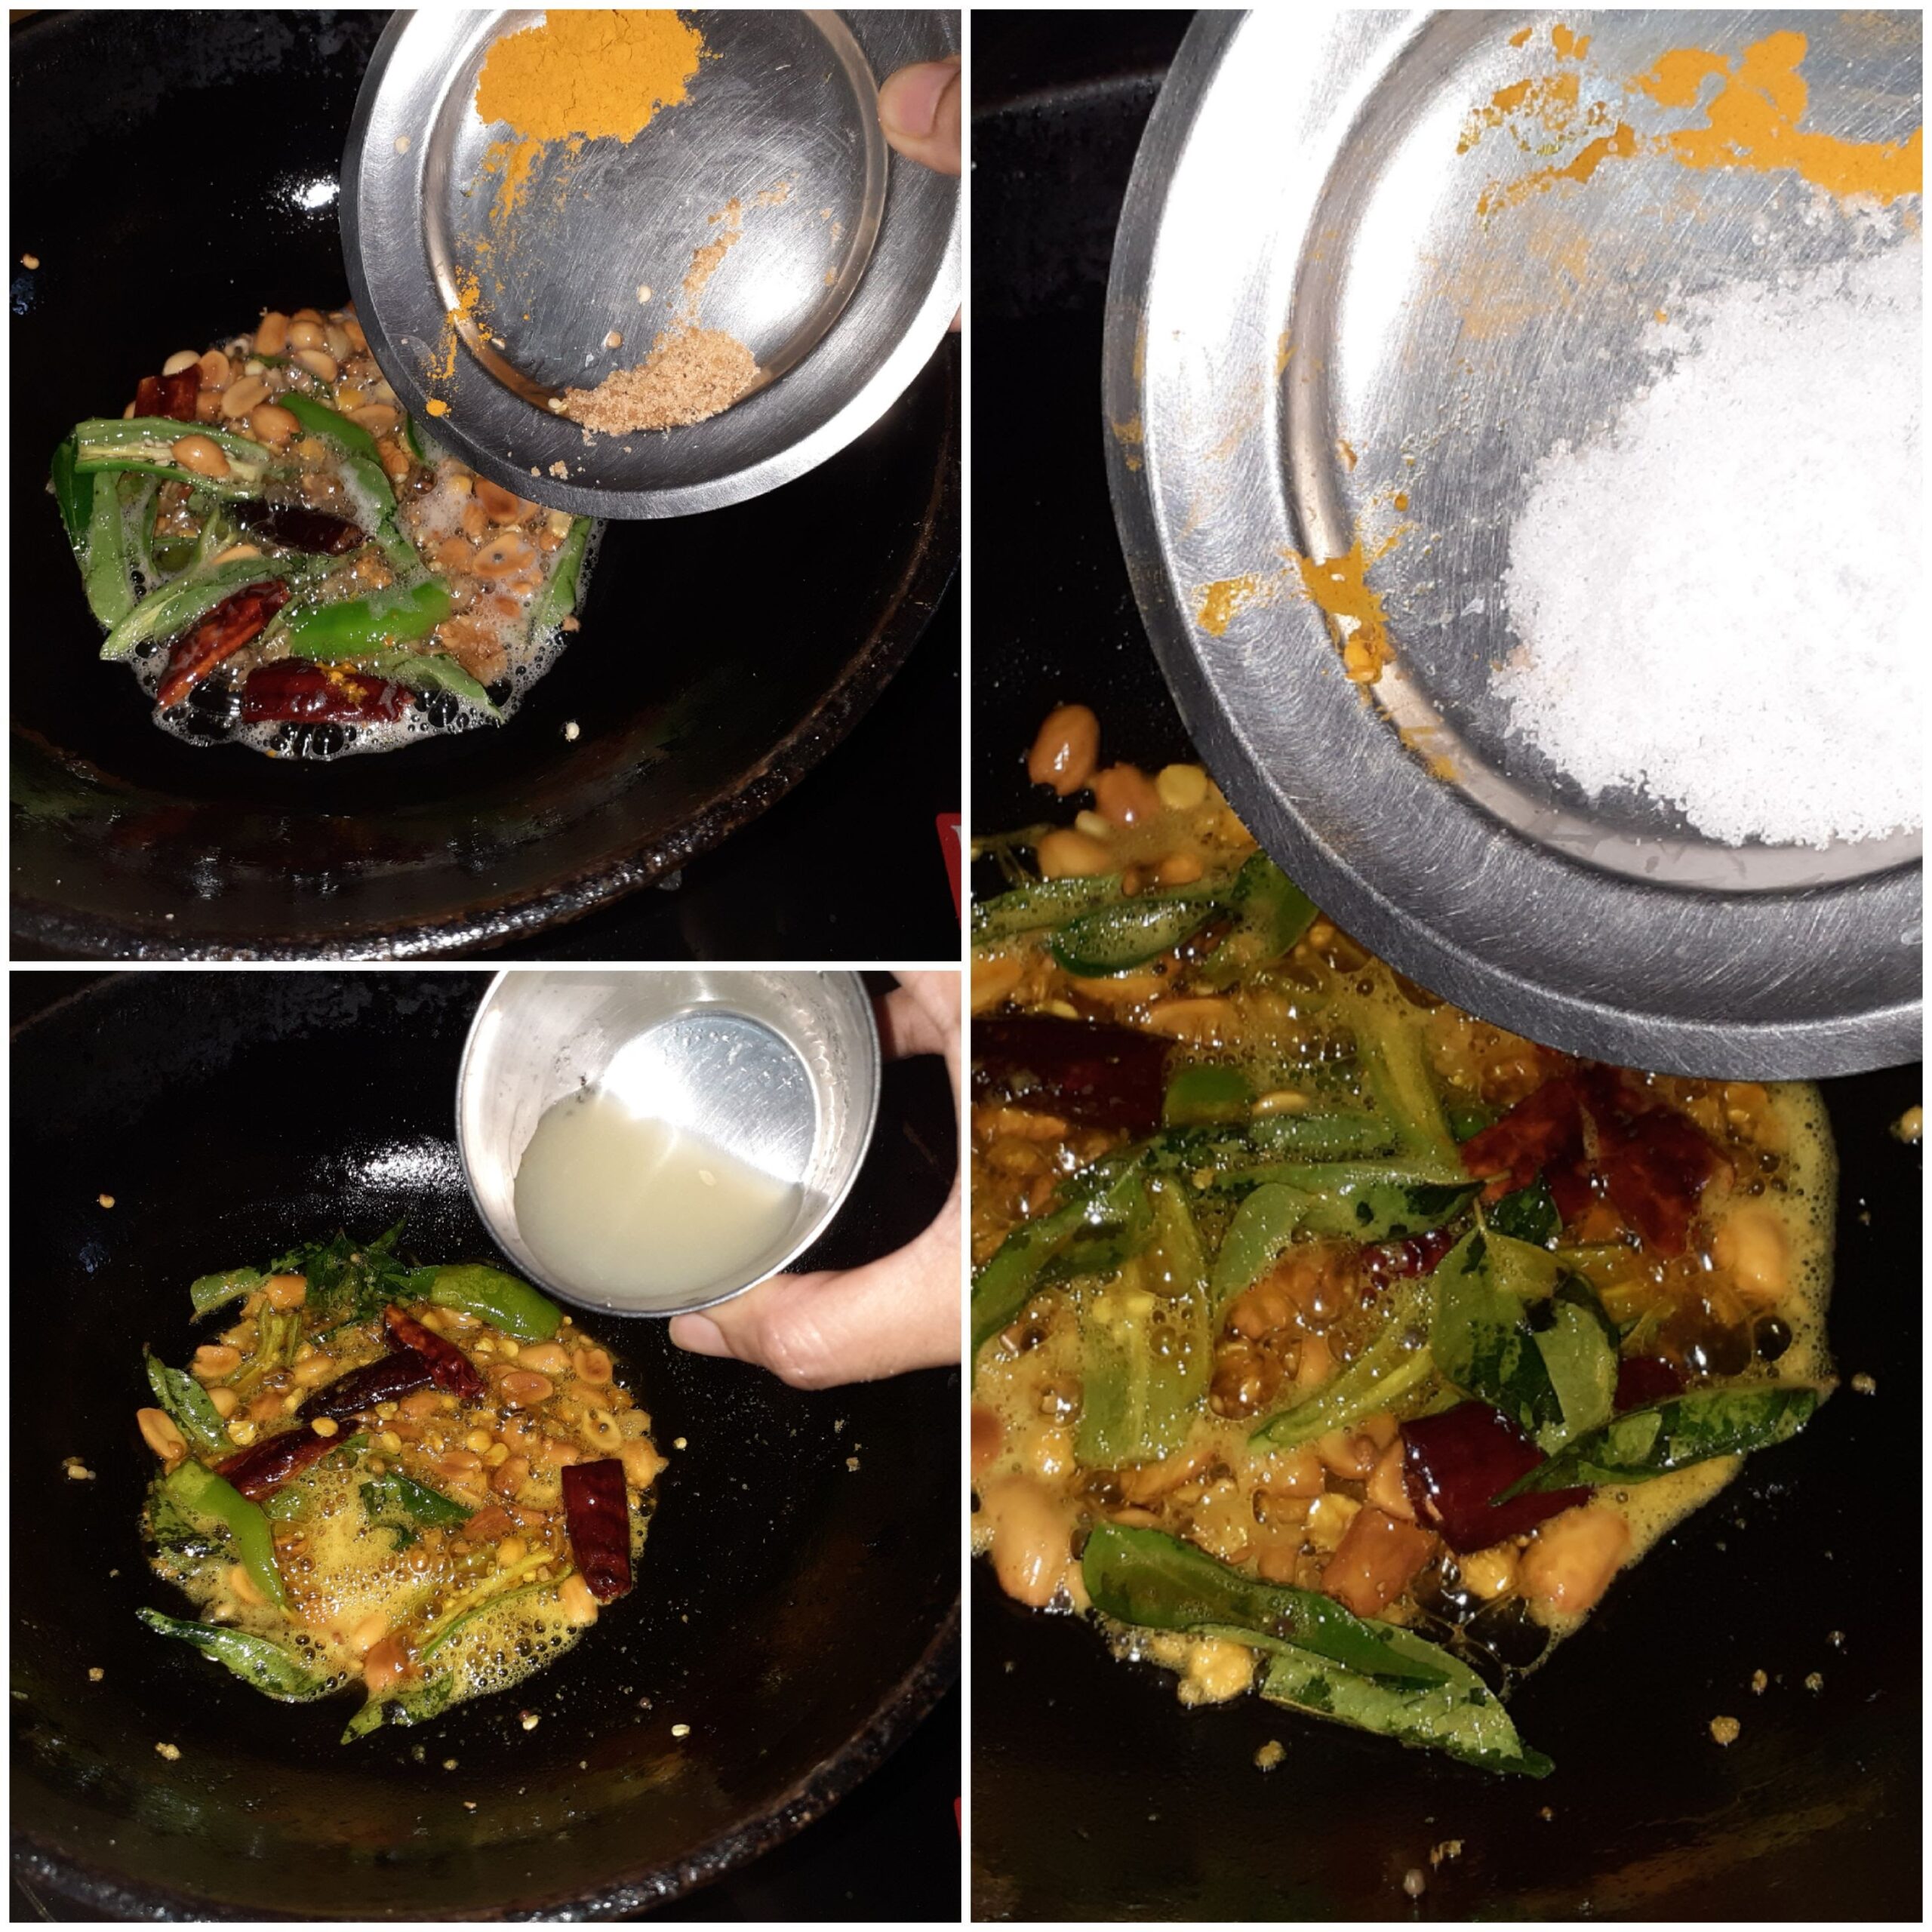
2. Now in a Karahi heat oil and add the Cashewnuts to it and fry until light brown. Remove them onto a plate. Now to the same oil add the mustard seeds, Chana dal, urad dal, dry red chillies, and fry until the dals turn light brown.
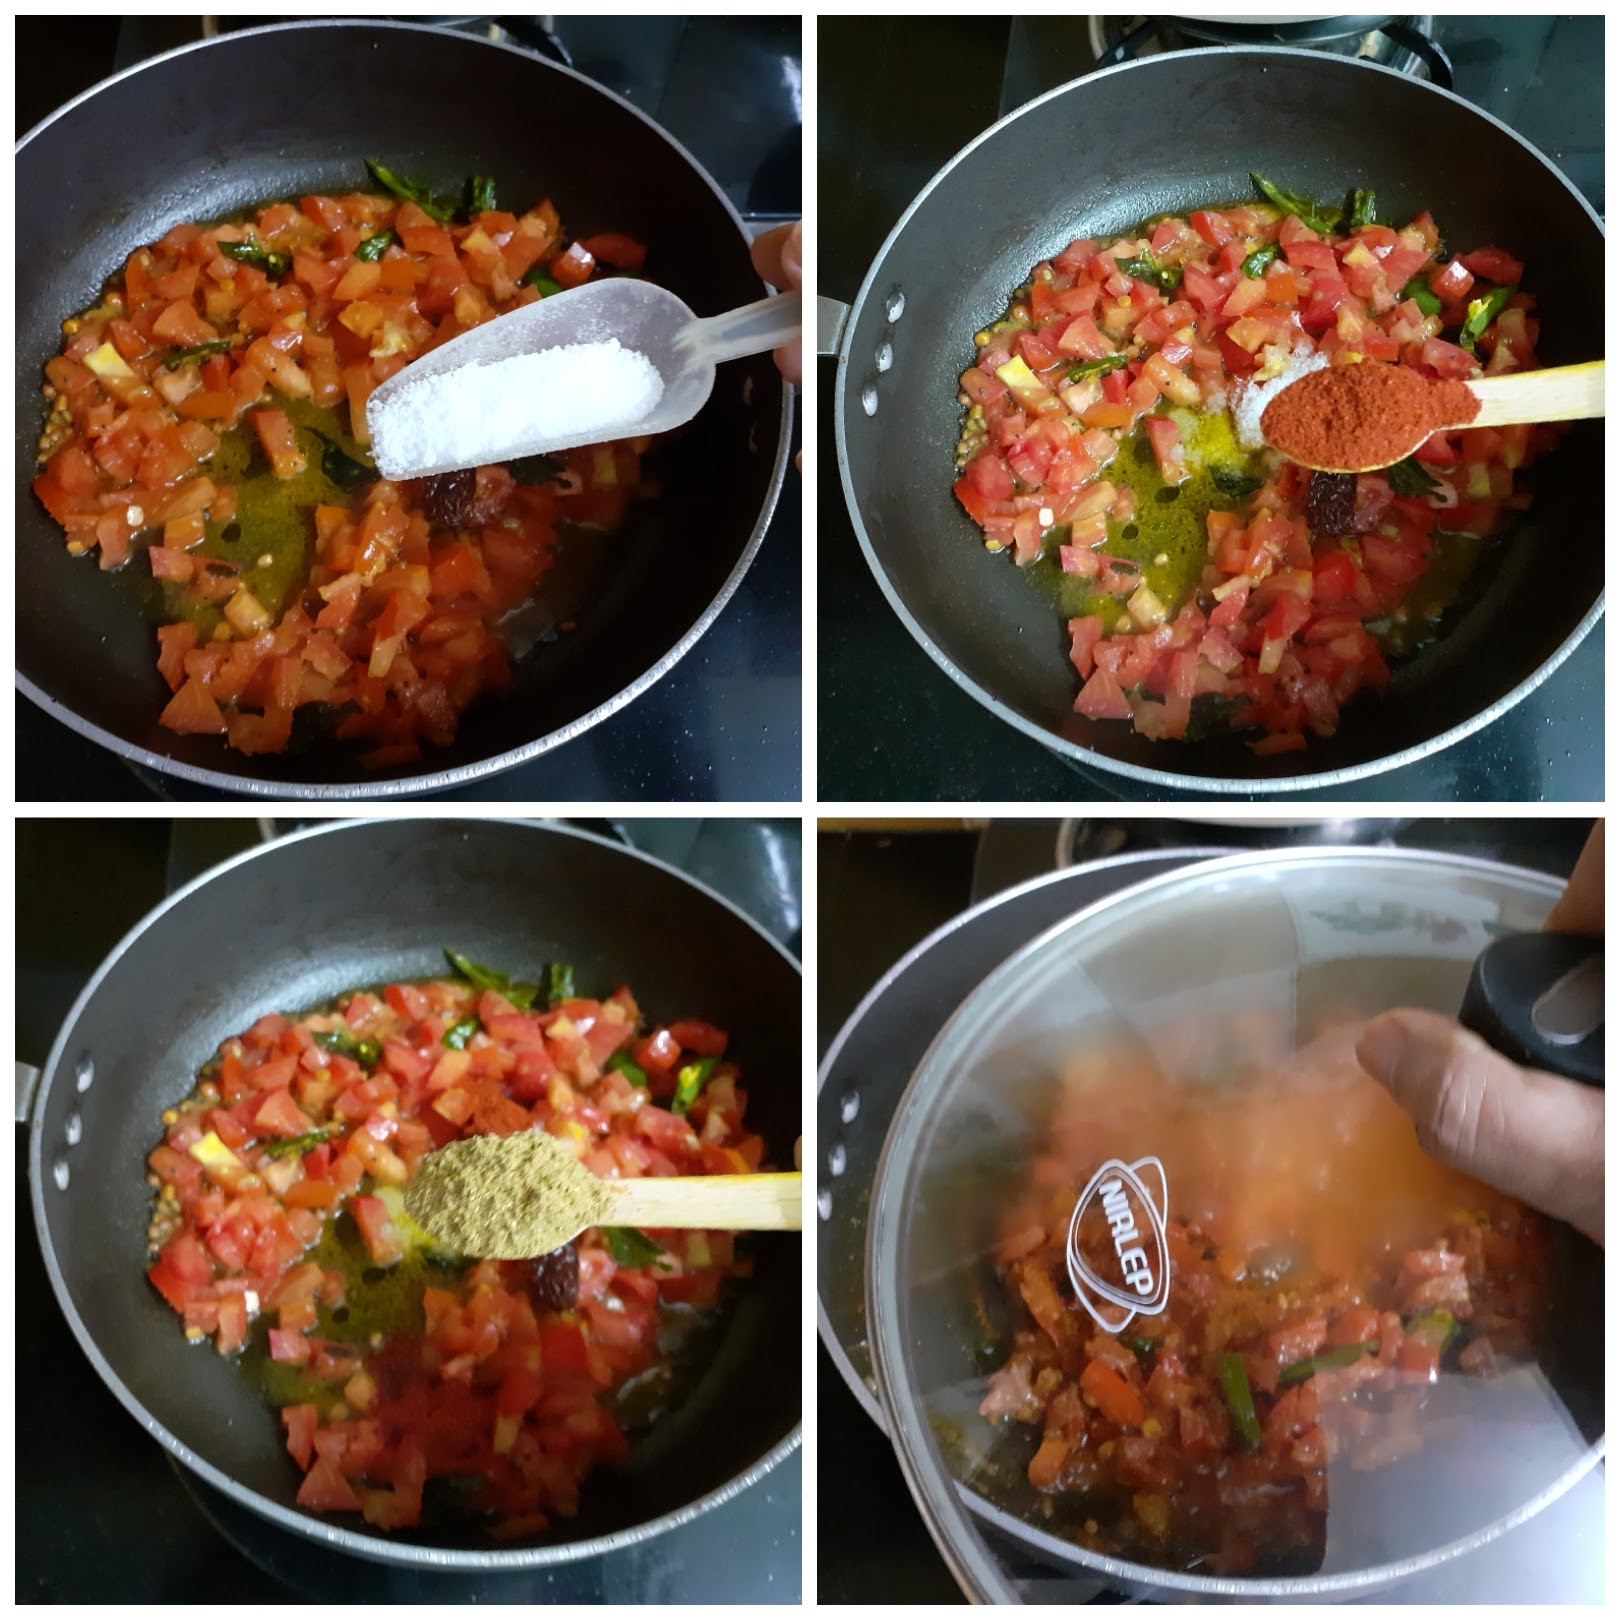
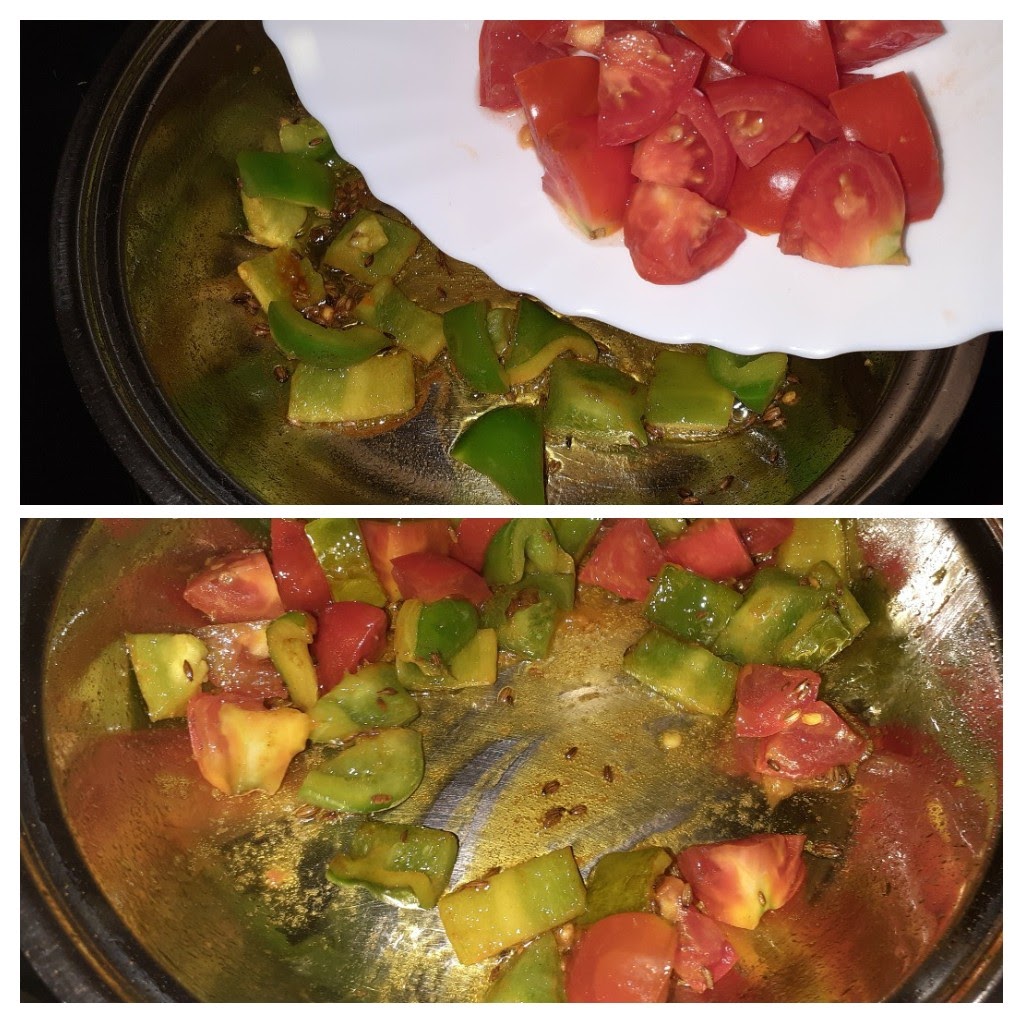
3. Now add the slit green chillies and curry leaves. Saute for 30 secs. Now add the turmeric powder and chopped tomatoes and saute for a minute.
4. Now add salt, followed by red chilli powder and coriander powder, and cover the Karahi and cook until the tomatoes become mushy and the oil is released.
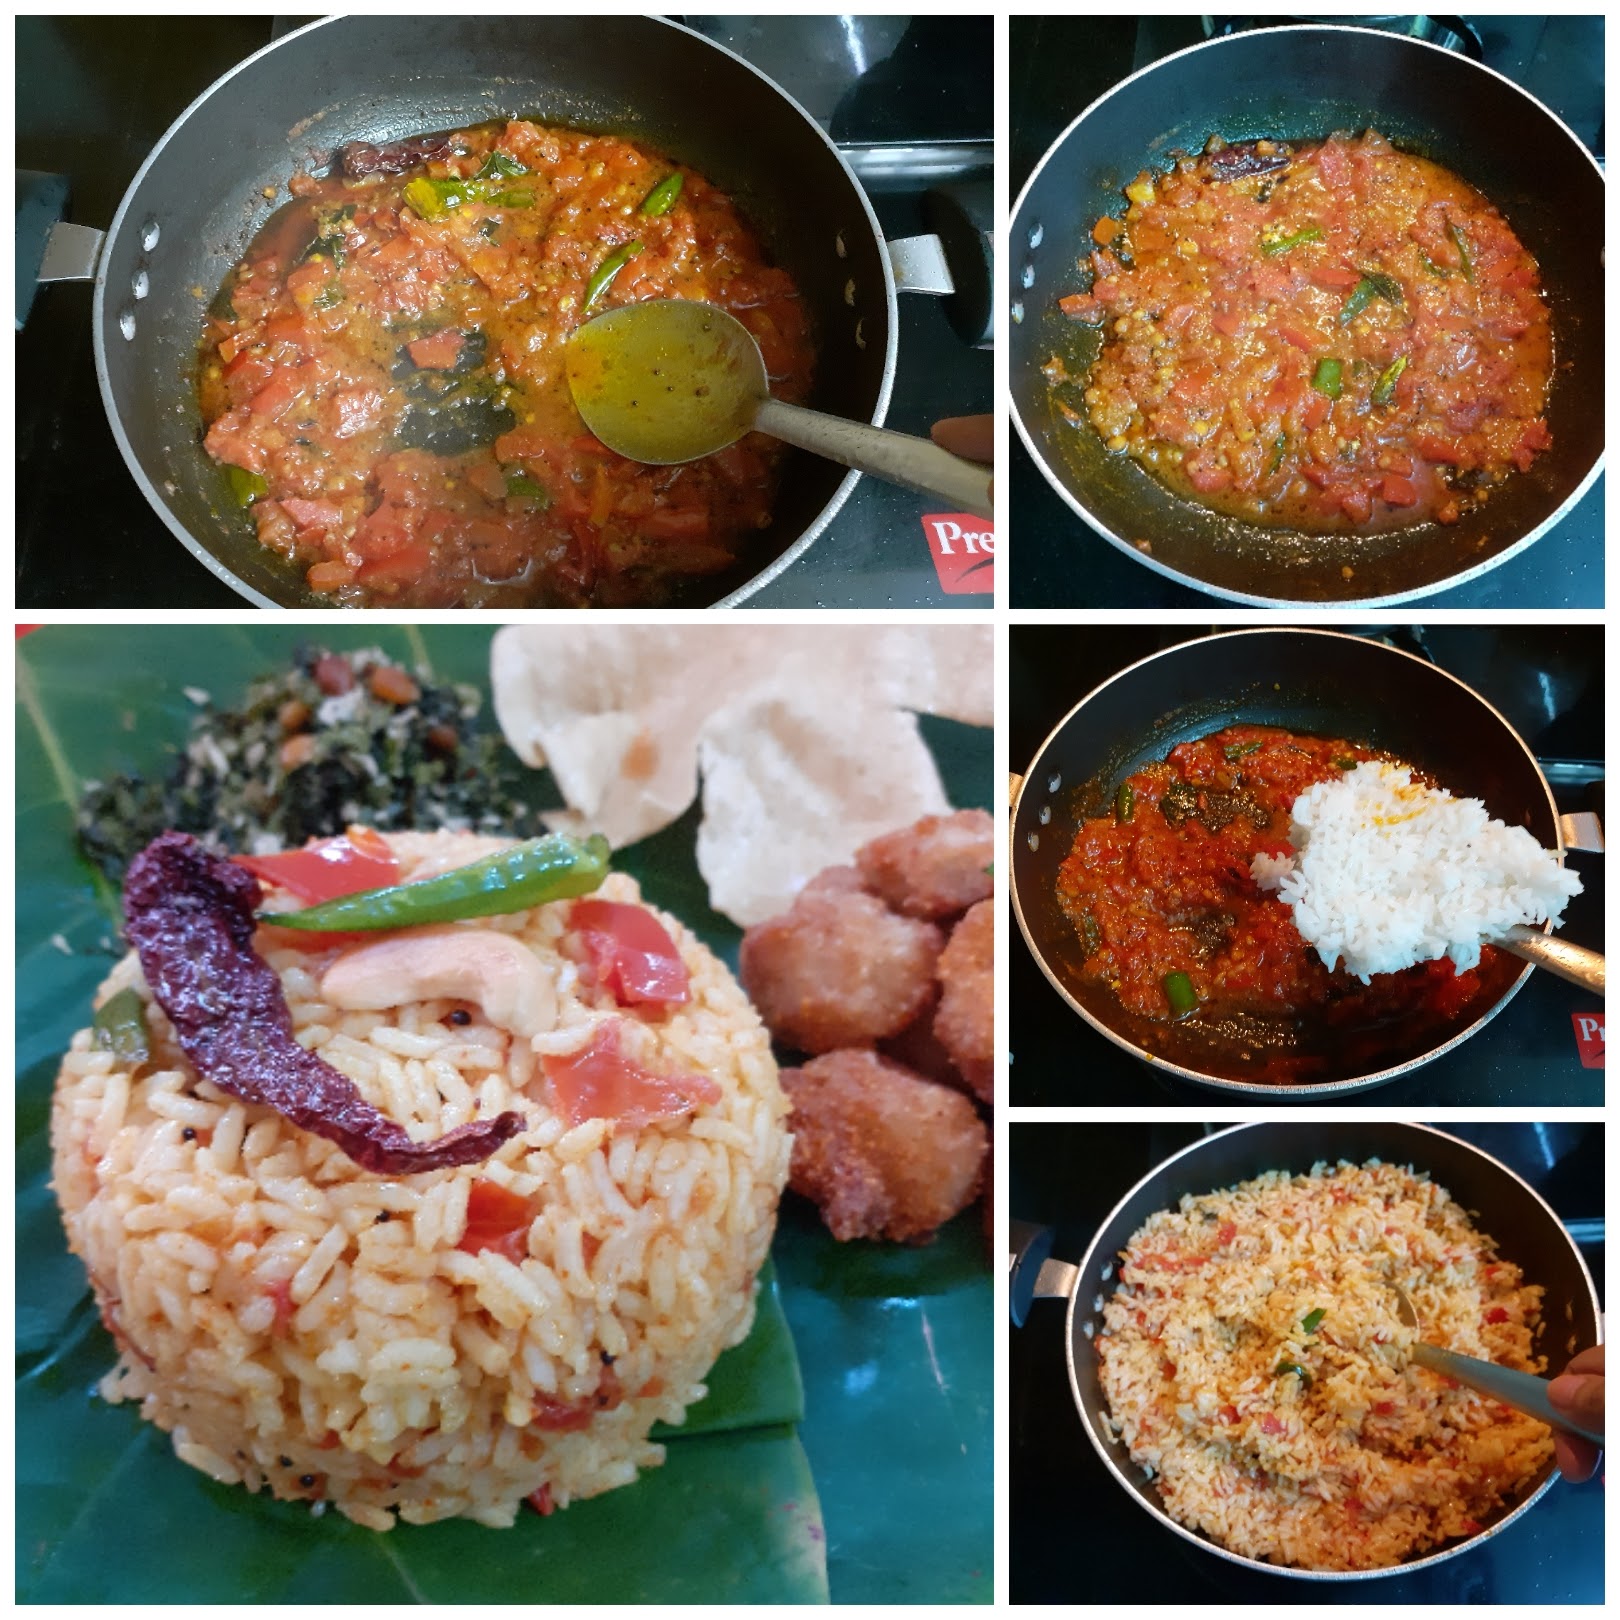
5. Remove the lid and mash the tomatoes with the back of a ladle, so that it turns saucy. Now add the rice little by little and mix well. The tomato gravy must nicely coat the rice.
NOTES:
1. One can use Basmathi rice if they prefer. I have used regular raw rice.
2. I have kept the rice simple in flavour, if one wants onion and garlic can be added after adding the green chillies and sauteed well before adding the tomatoes.
3. Along with regular chilli powder, Kashmiri chilli powder can also be used for colour. I have used 1tsp regular red chilli powder and half teaspoon Kashmiri powder.
If you tried this recipe and liked it please comment below. I would love to hear from you. If you have a query about the recipe email us and ill respond as soon as I can.
If you would like to receive our recipes on your mail please leave your mail id at the homepage. Every time Rajjo’s Kitchen has a new post we will mail the recipe to you.
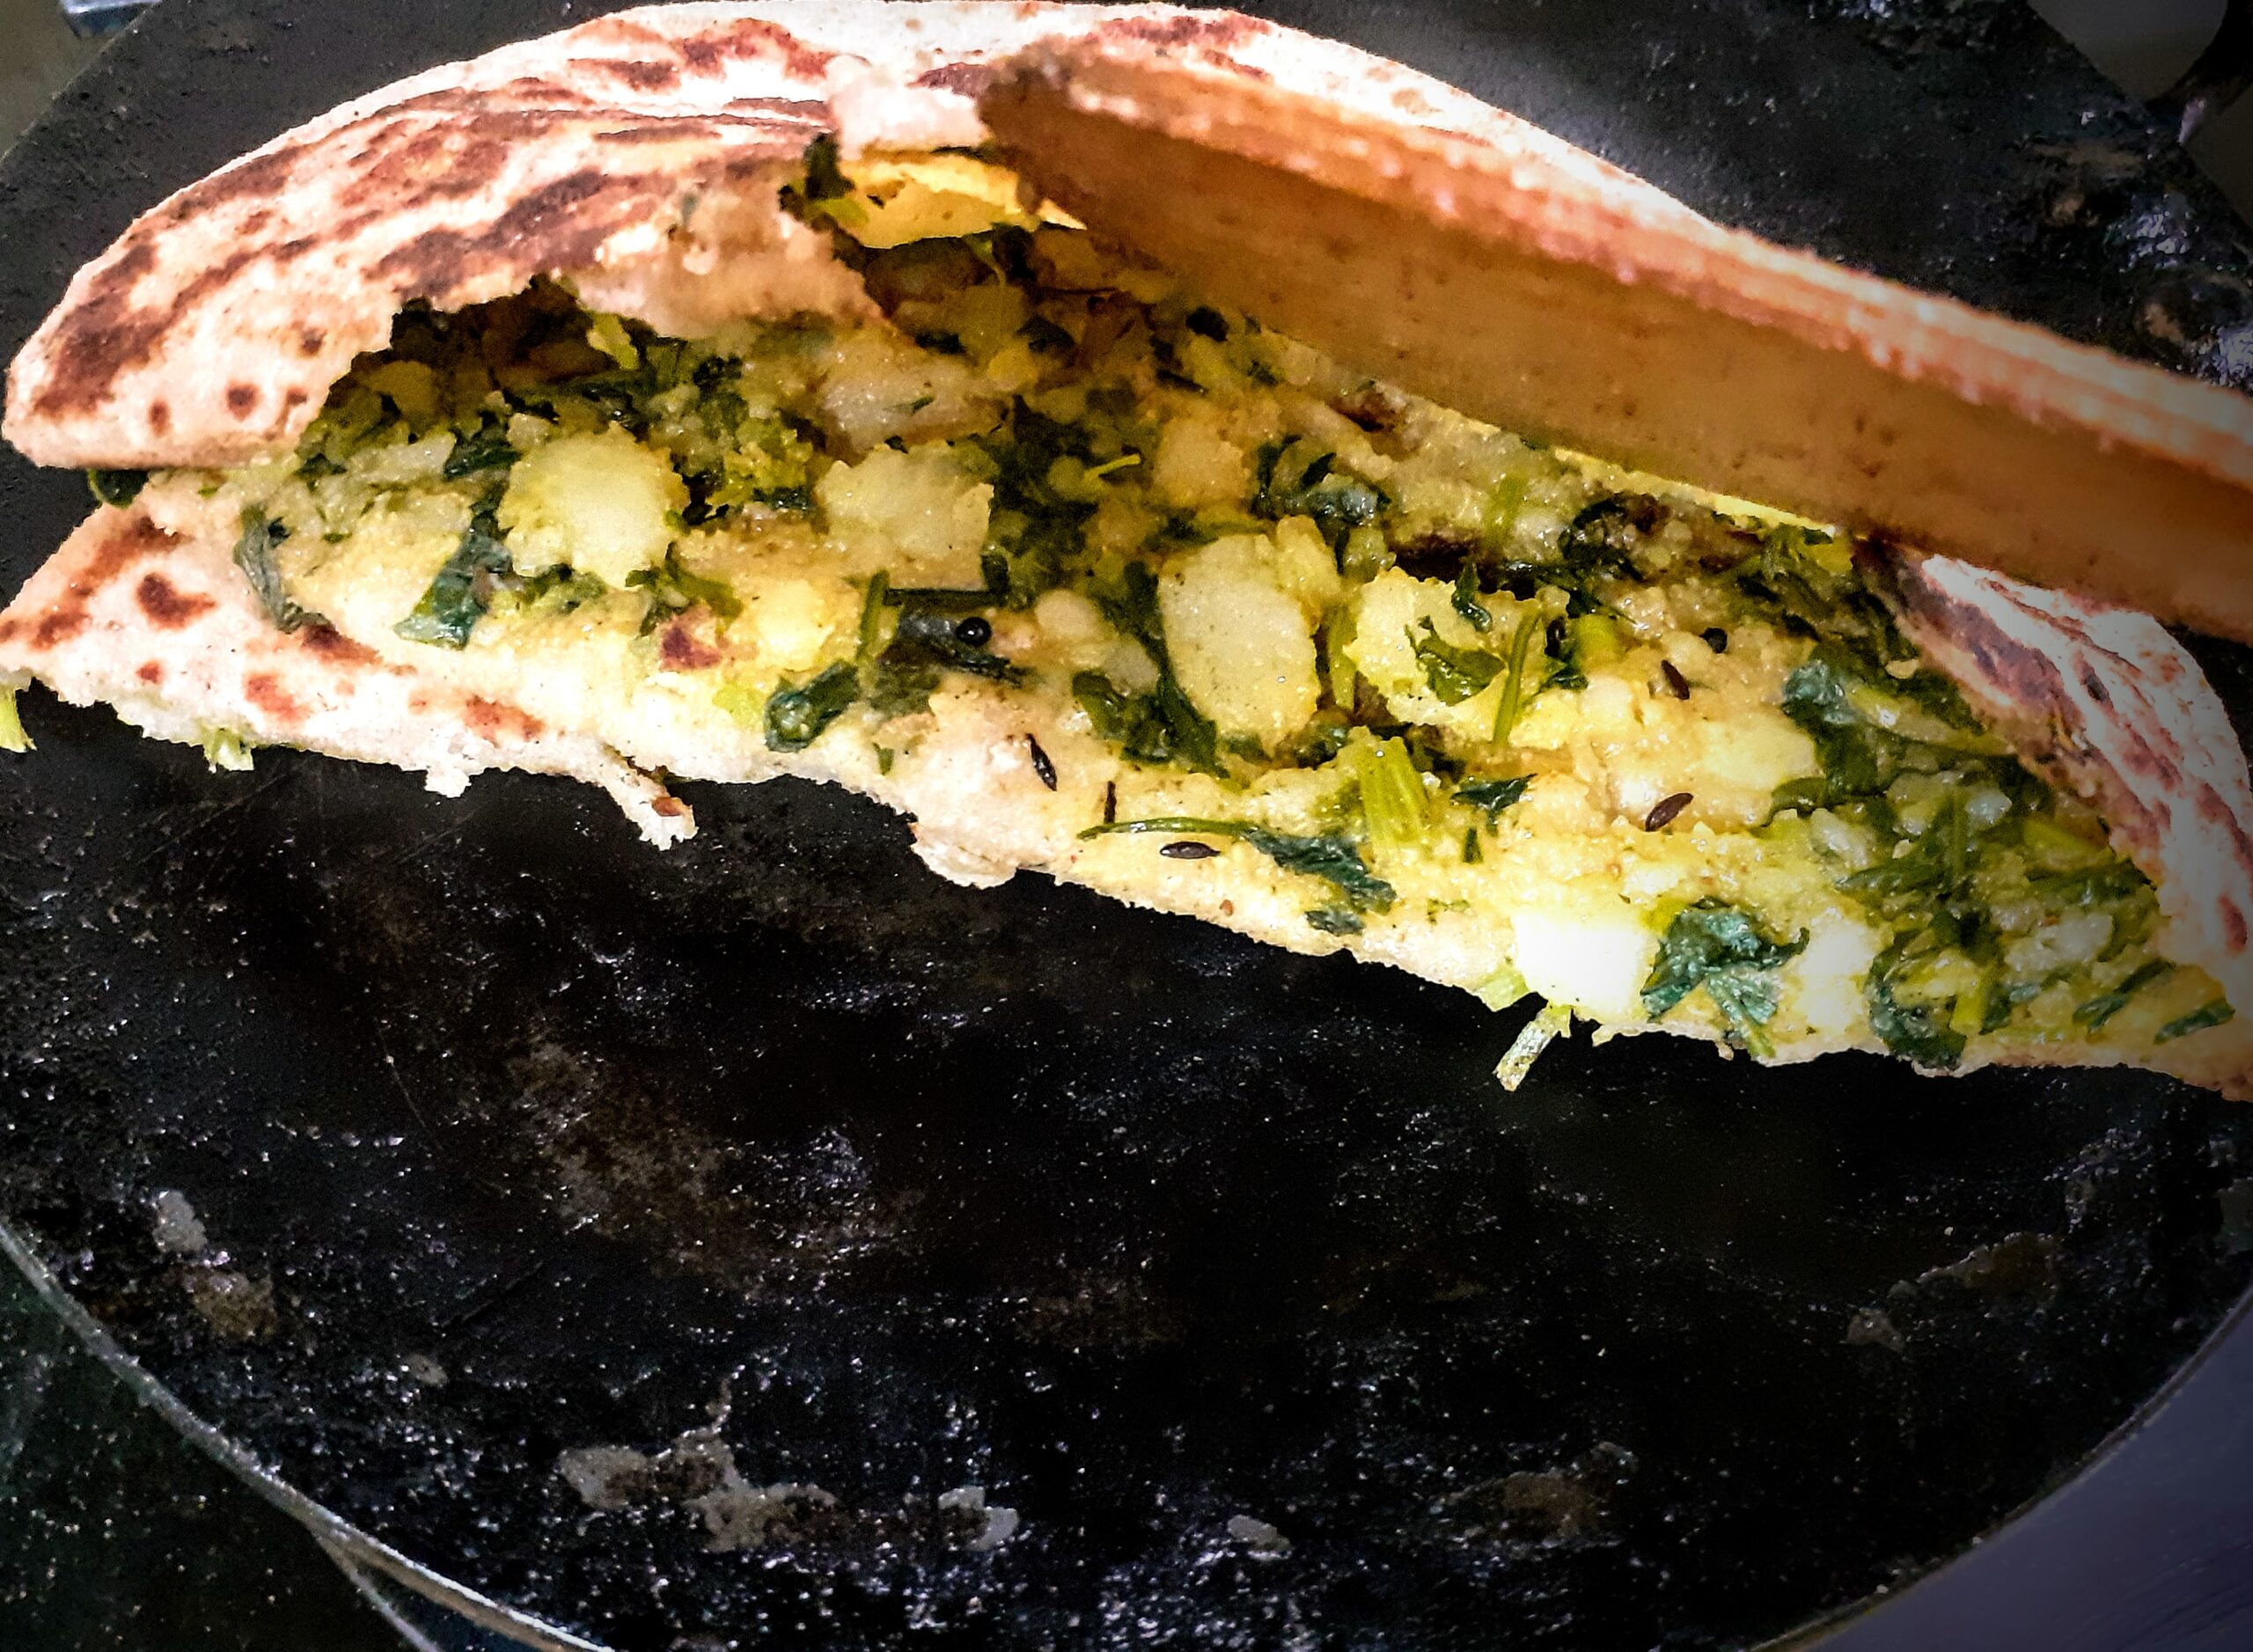
Aloo Methi Paratha
There is no doubt that Aloo Parathas are the king of Parathas. But once the Methi leaves season comes, I make these Aloo Methi Parathas which are healthy as the Methi leaves are rich in iron and fiber. They lift the regular Aloo paratha to a different level. The Methi leaves themselves are very aromatic and when added to any dish they enhance the flavour and aroma of that dish manifold.
Aloo Methi is a popular north Indian subji that I have stuffed into these Parathas. which makes this dish a wholesome lunchbox option for kids and adults alike. It is also a good way to make kids eat the Methi leaves.
Using fresh methi leaves also gives the Parathas wonderful texture. I have not tried this paratha with Kasoori methi as firstly a huge amount of it will be required because dried leaves will lack volume, and secondly nothing can compensate for the taste of fresh methi leaves.
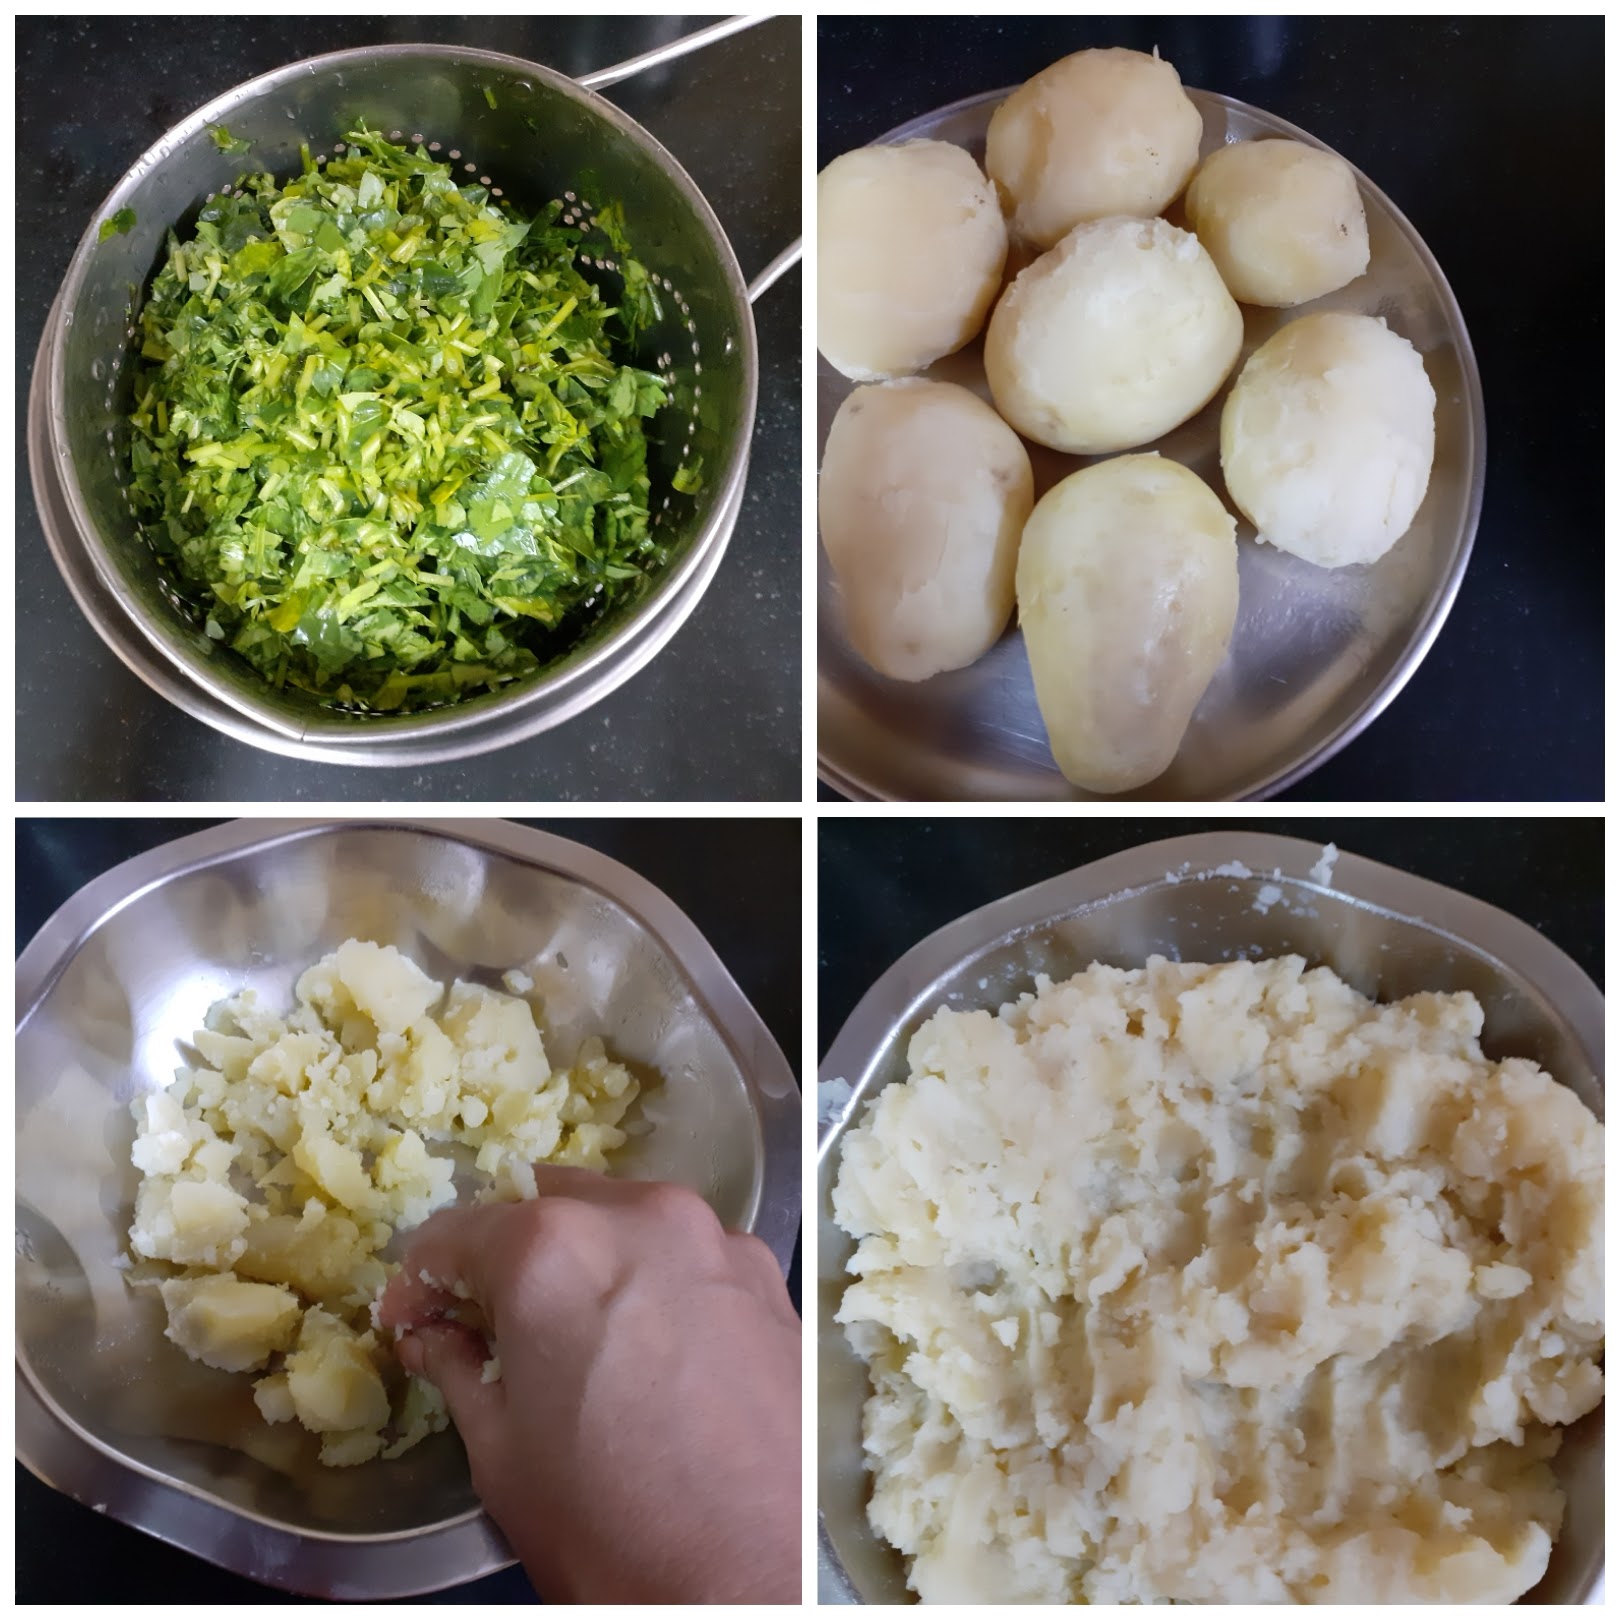
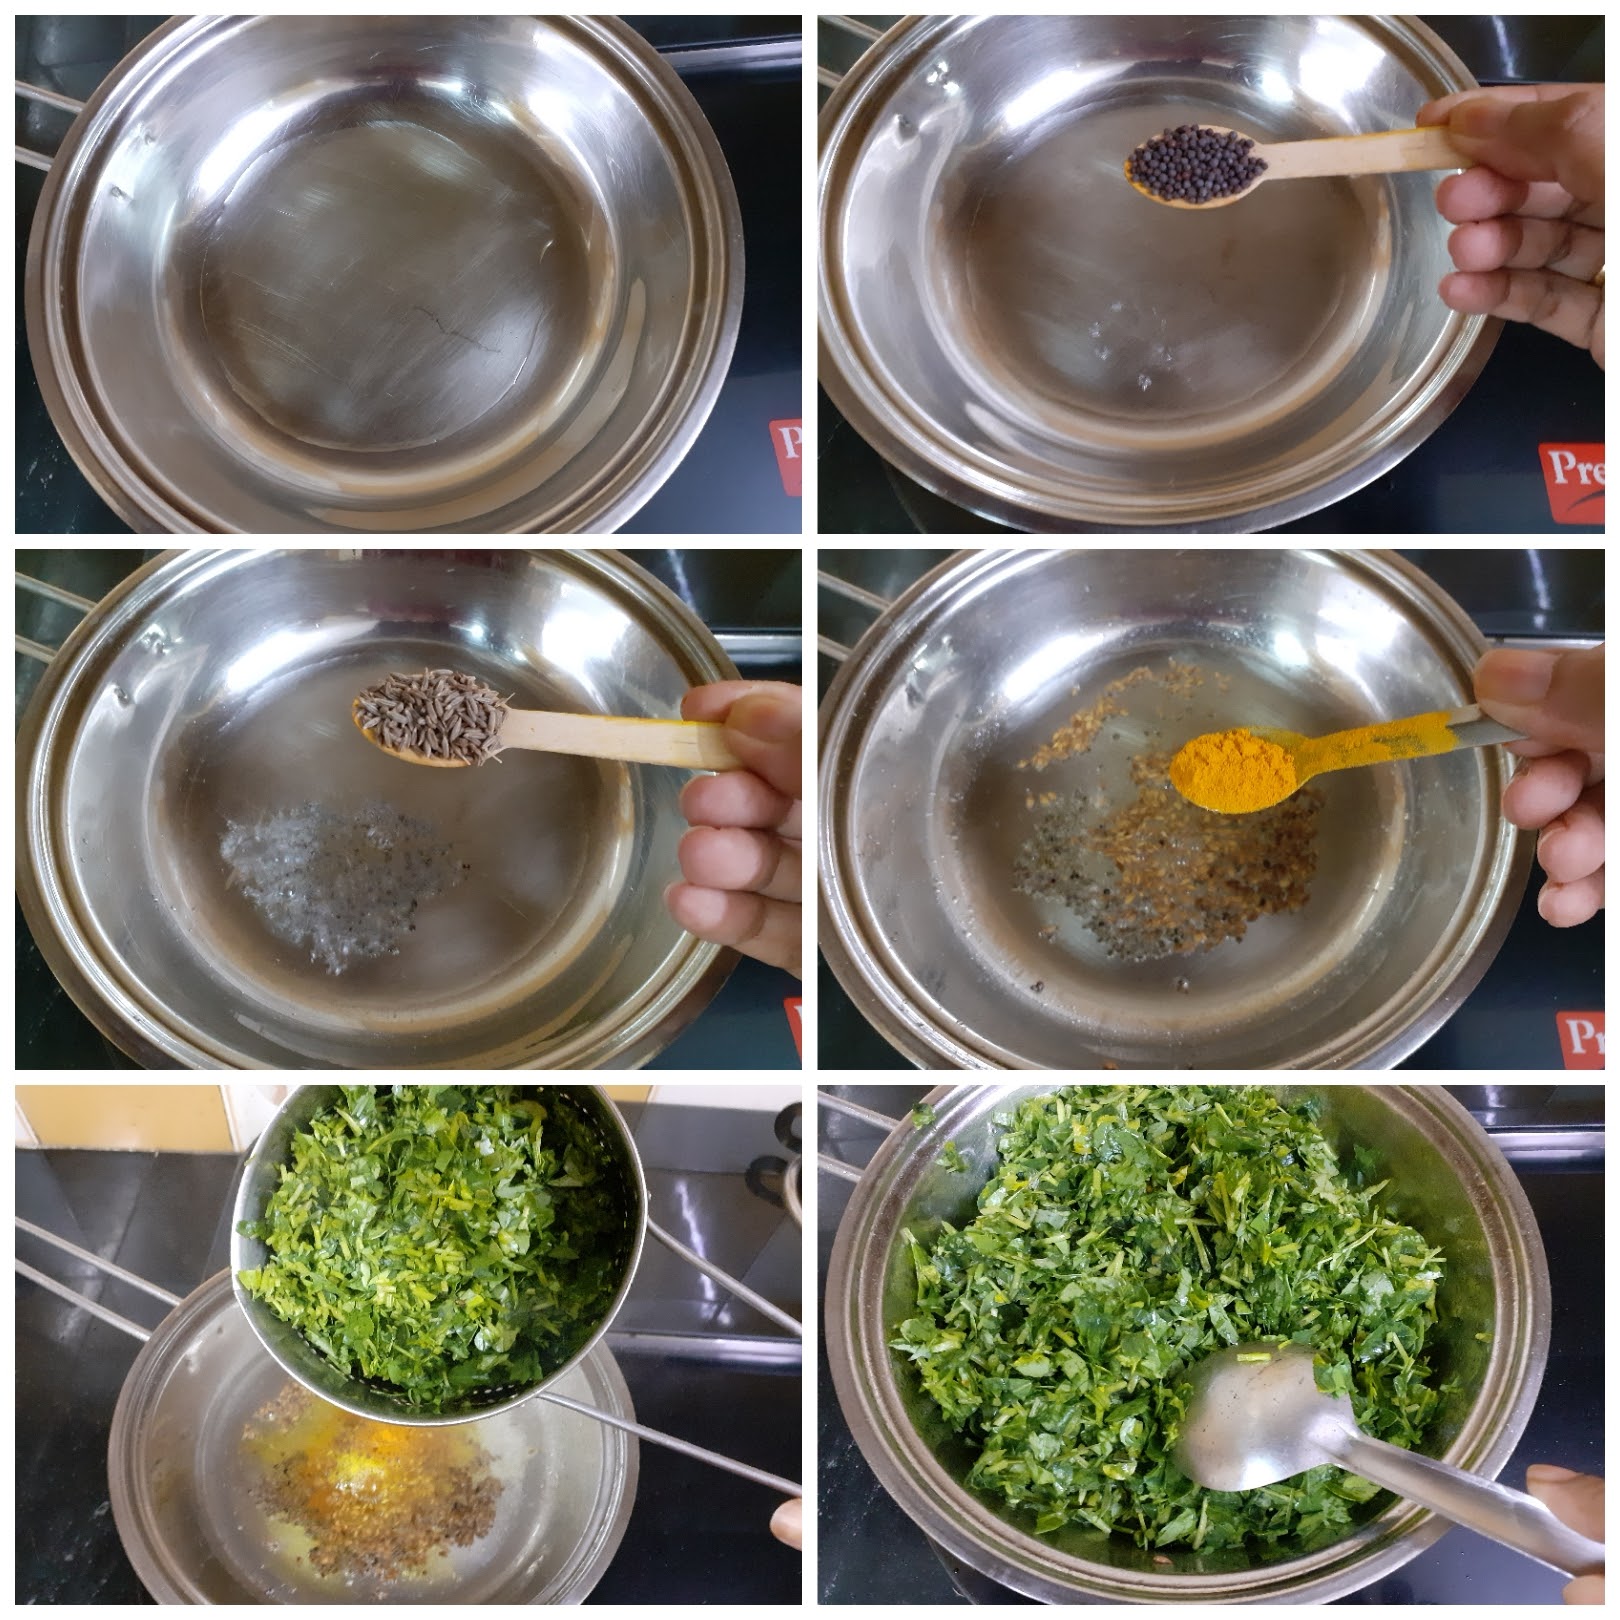
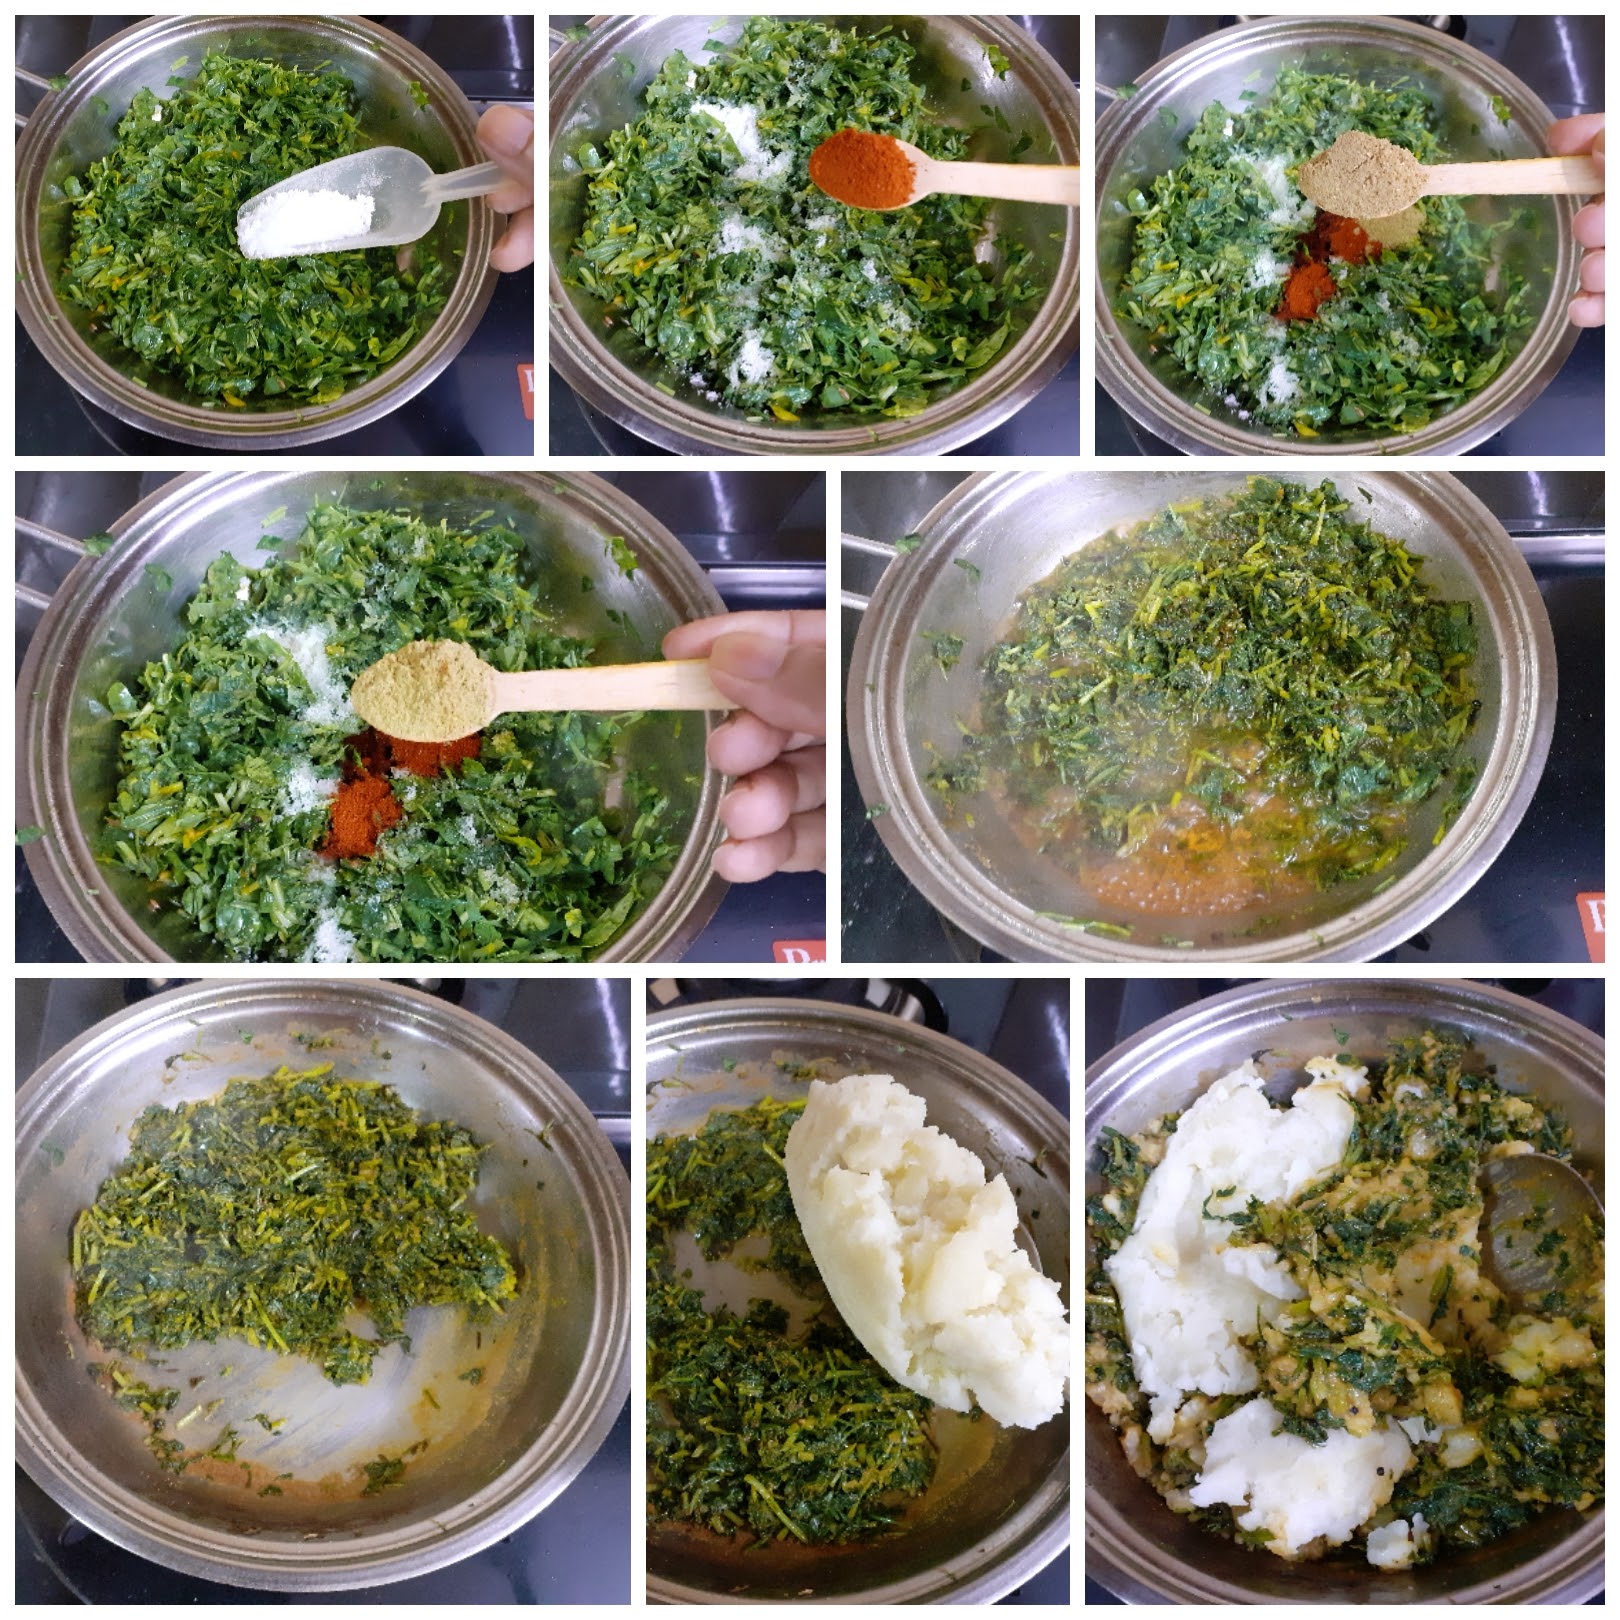
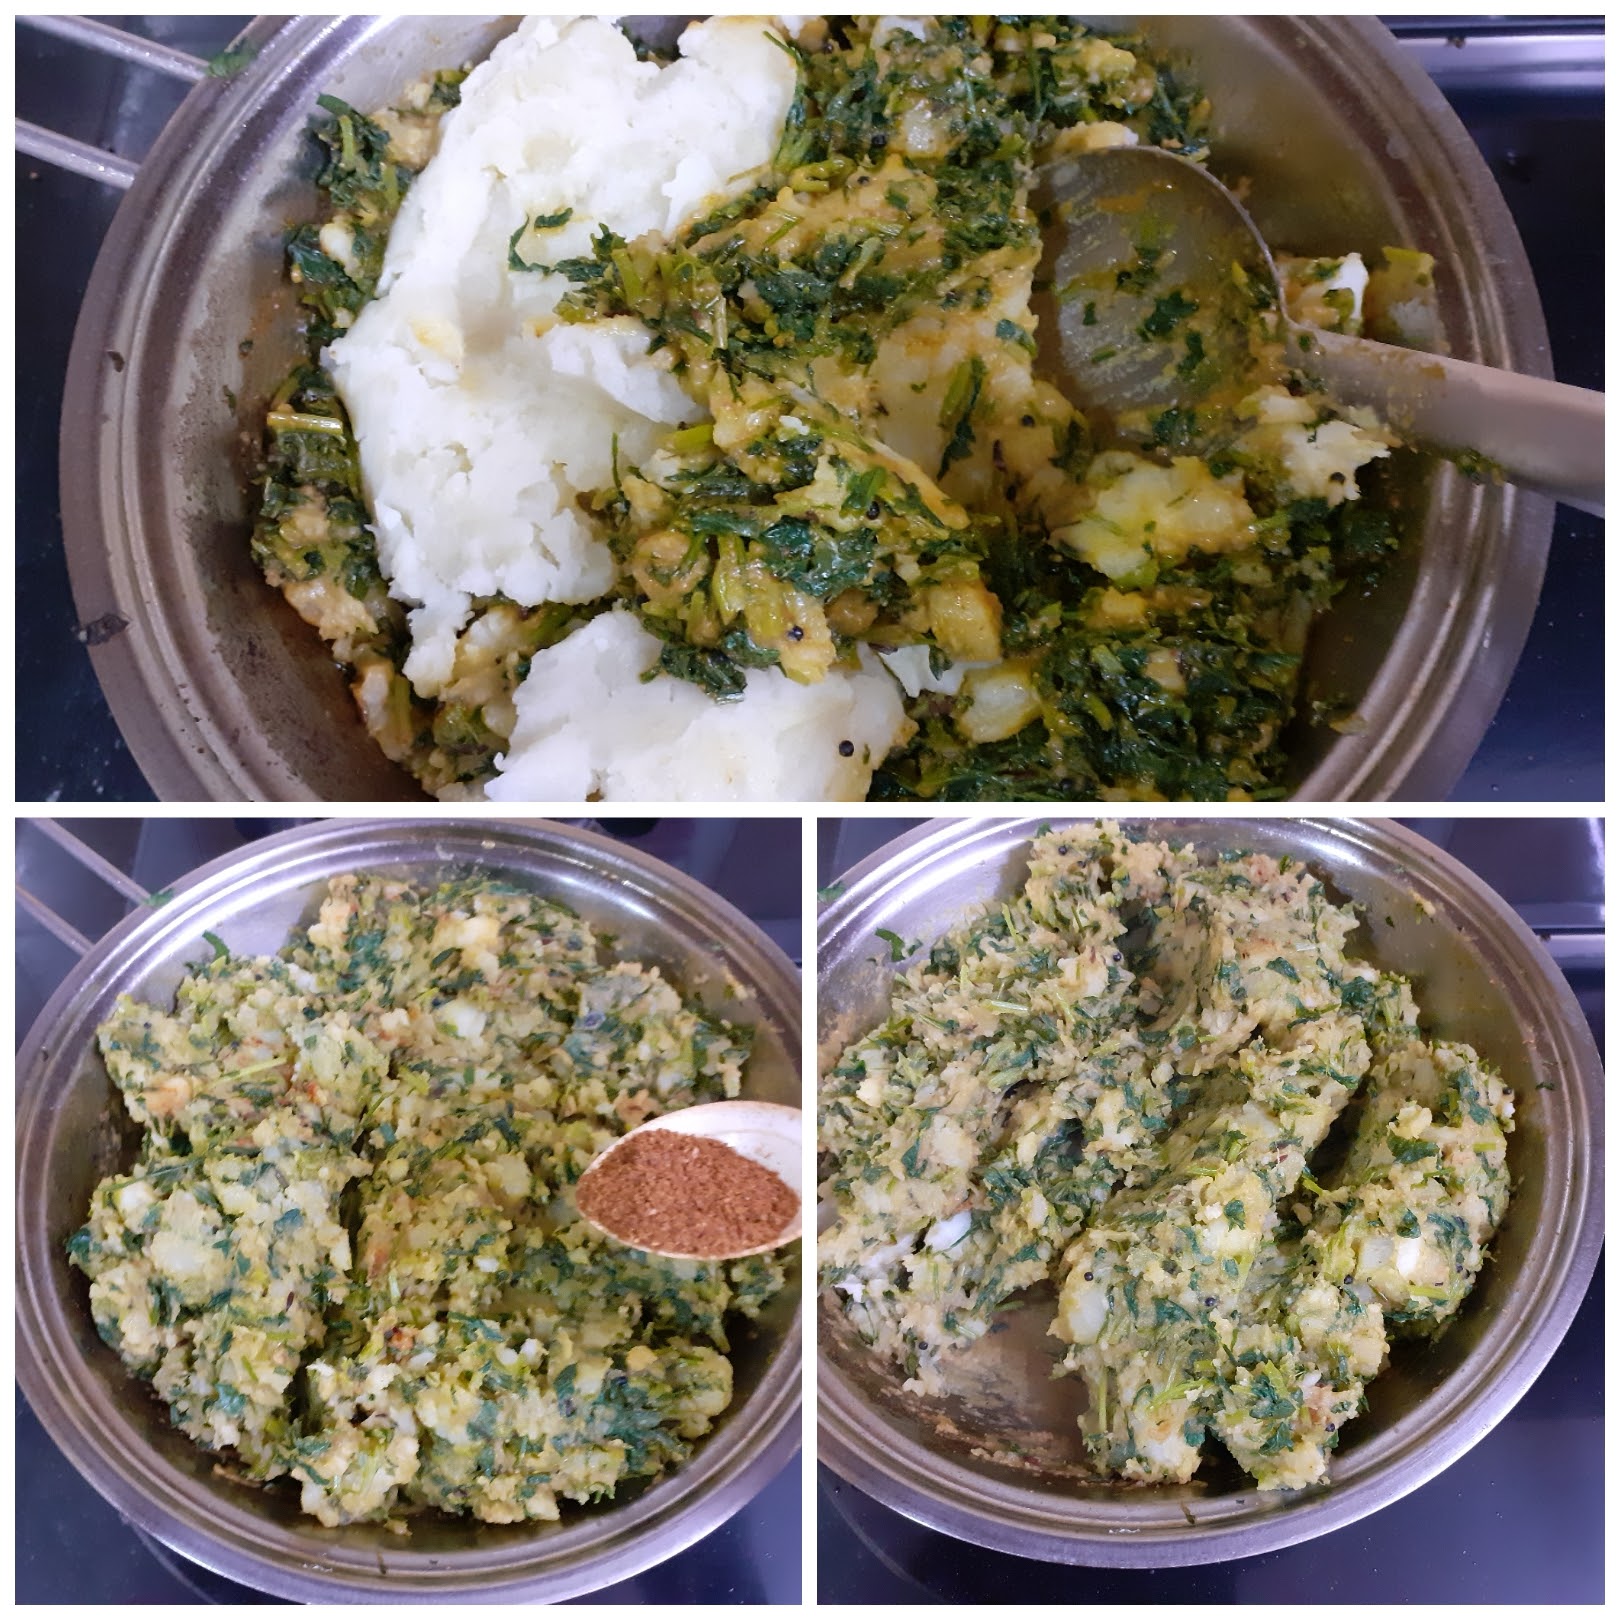
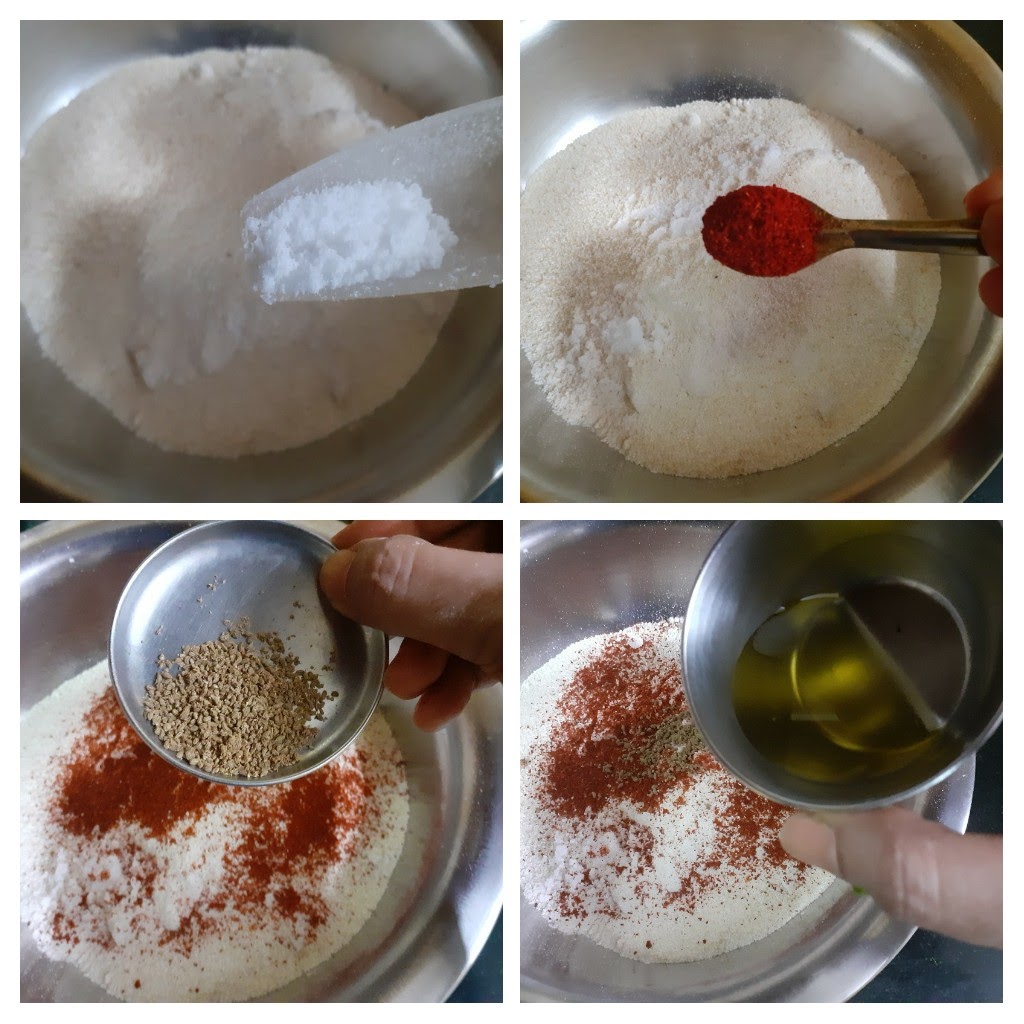
Chop the Methi leaves finely and wash them thoroughly. Drain all the water and keep aside. Boil the potatoes, peel the skin, and mash them. In a pan or Kadai take 1 tbsp oil and heat. Drop the mustard seeds and as they crackle add the cumin seeds and turmeric powder. Now add the washed and drained Methi leaves and saute. Add salt followed by red chilli powder, coriander powder, fennel powder and continue to saute. The methi leaves will release moisture, keep sauteeing and let the moisture dry out. Now add the mashed potato to the Methi leaves, little by little, and mix them nicely. The Methi leaves should have combined evenly with the potato mash. Finally, add some Garam masala powder, mix once again, and allow the mixture to cool.
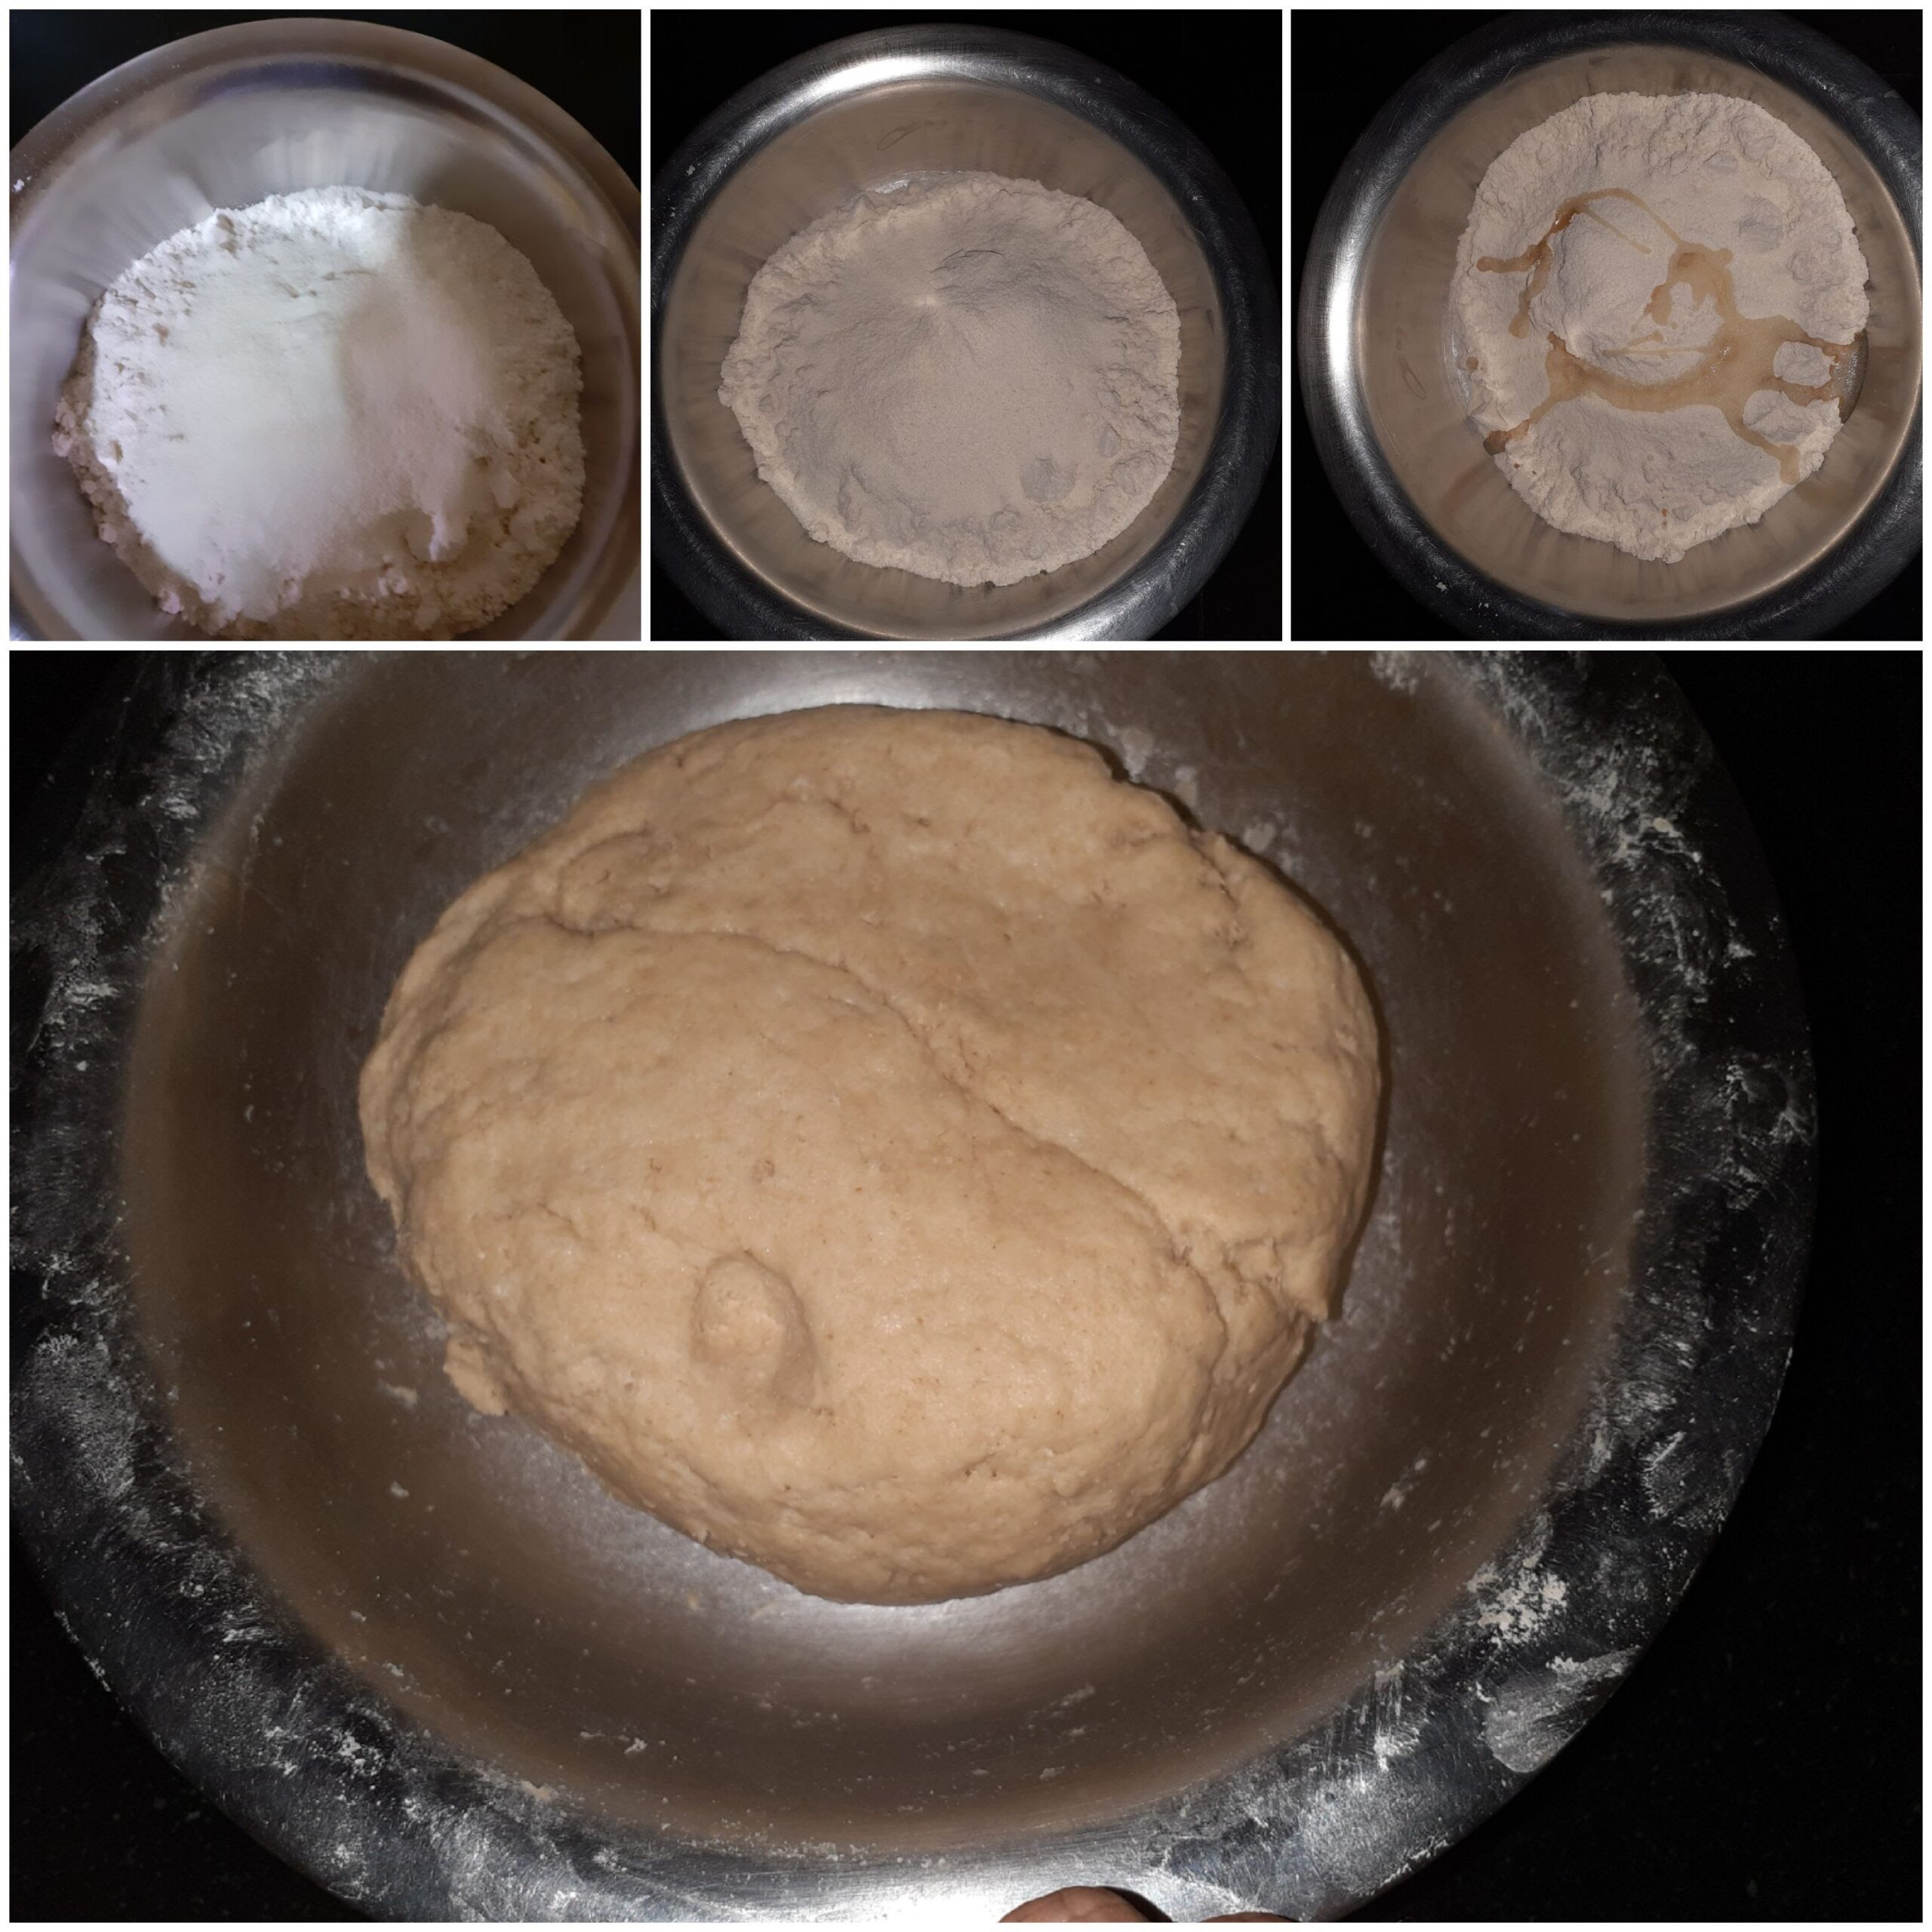
Directions to make the dough:
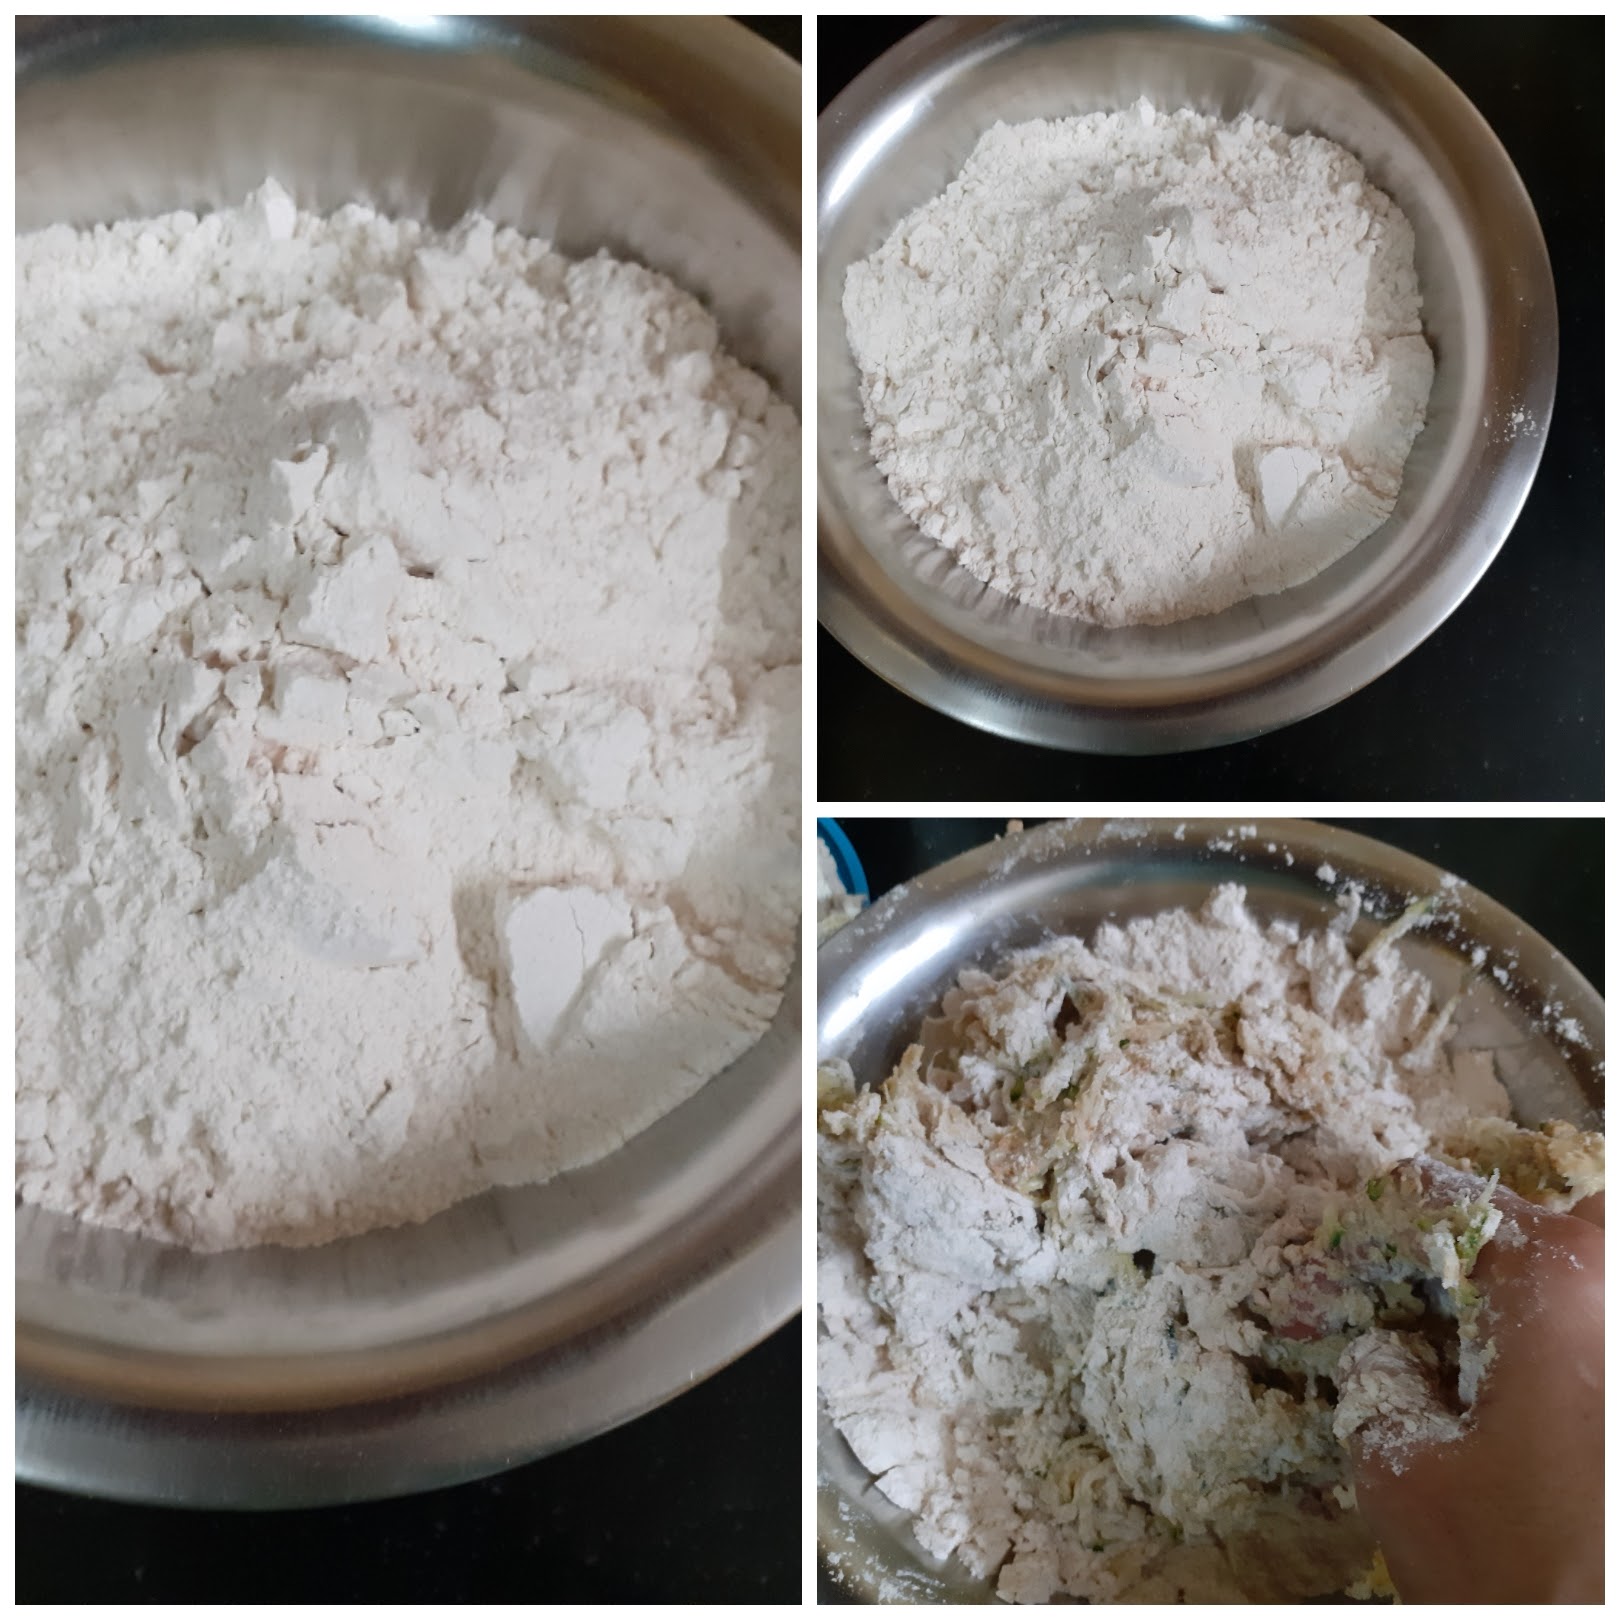
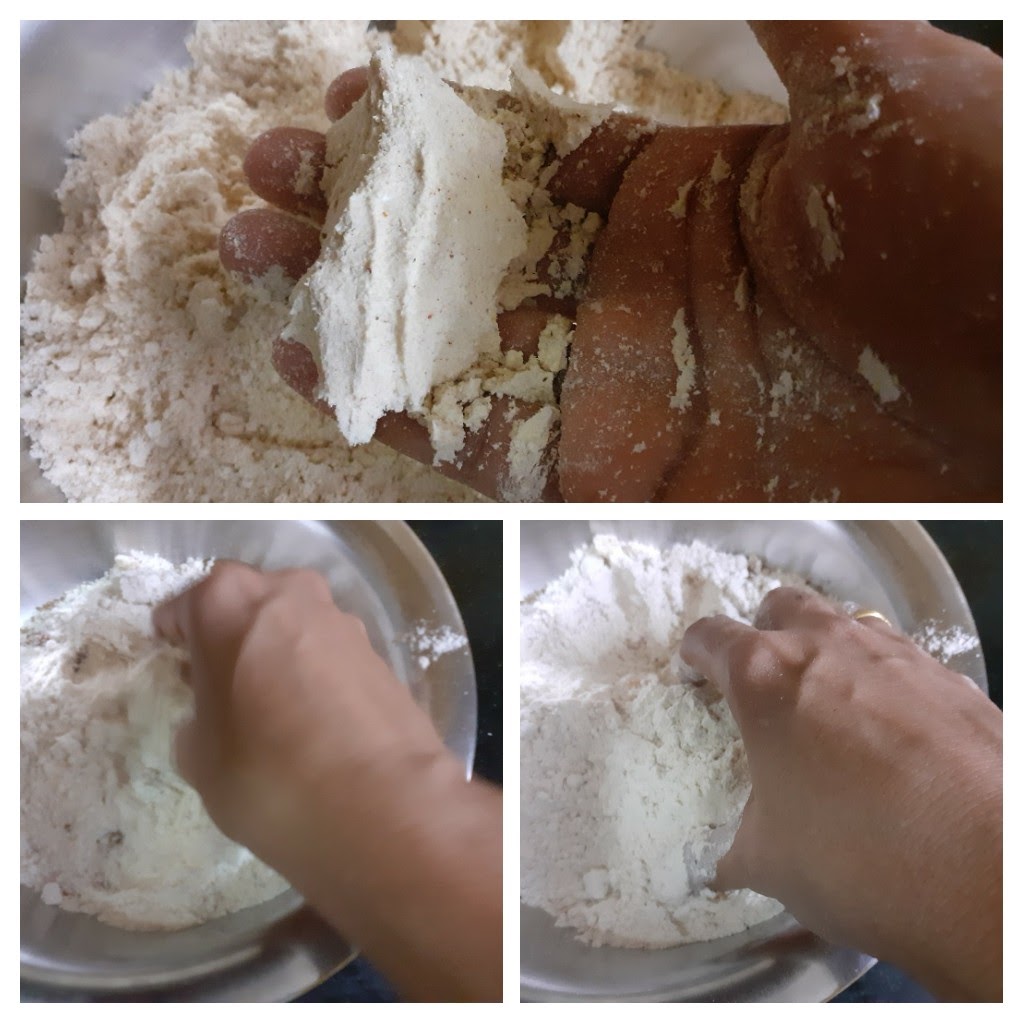
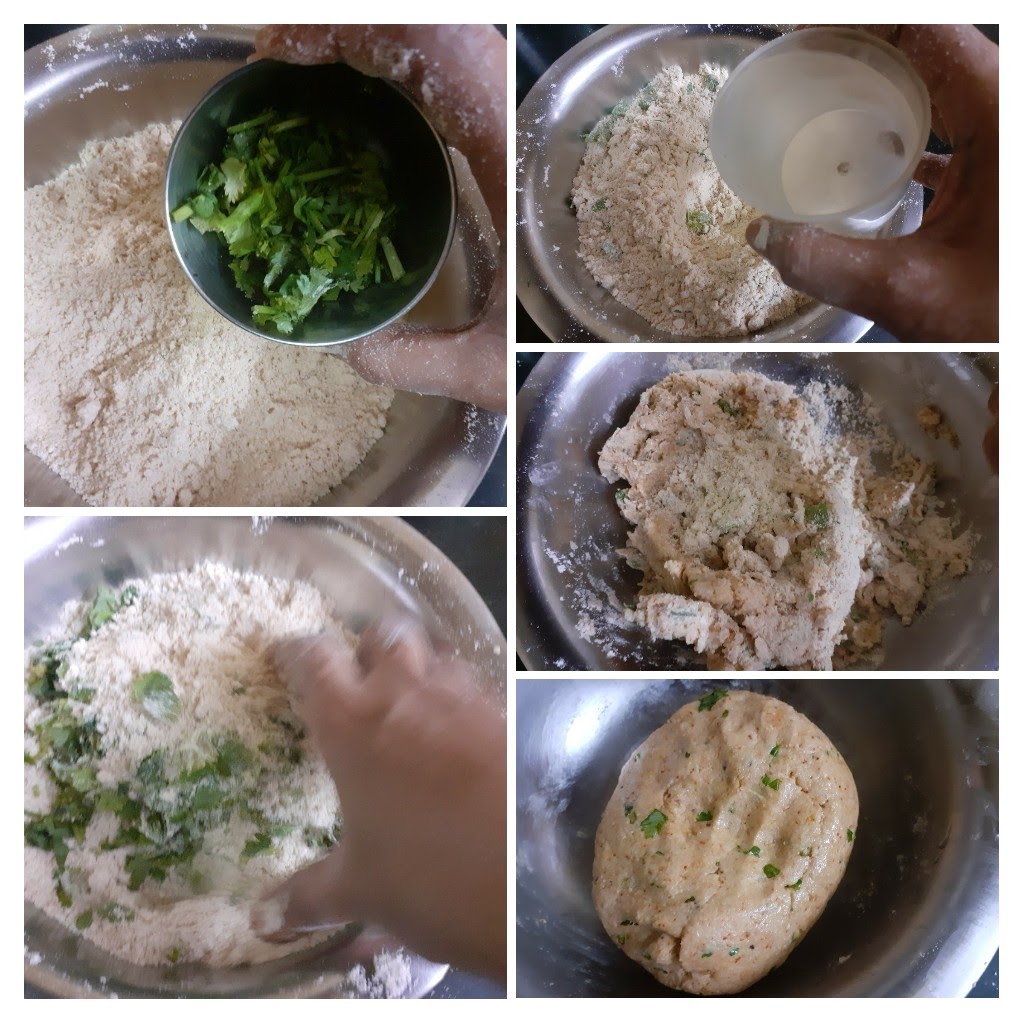
Take 3 cups whole wheat flour in a big mixing bowl, add a pinch of salt, a teaspoon of oil and mix well. Now adding water, a little at a time, combine to follow a slightly tough dough. A loose dough will not help in spreading the filling well. Rest the dough for 20 minutes.
Directions to make the Paratha:
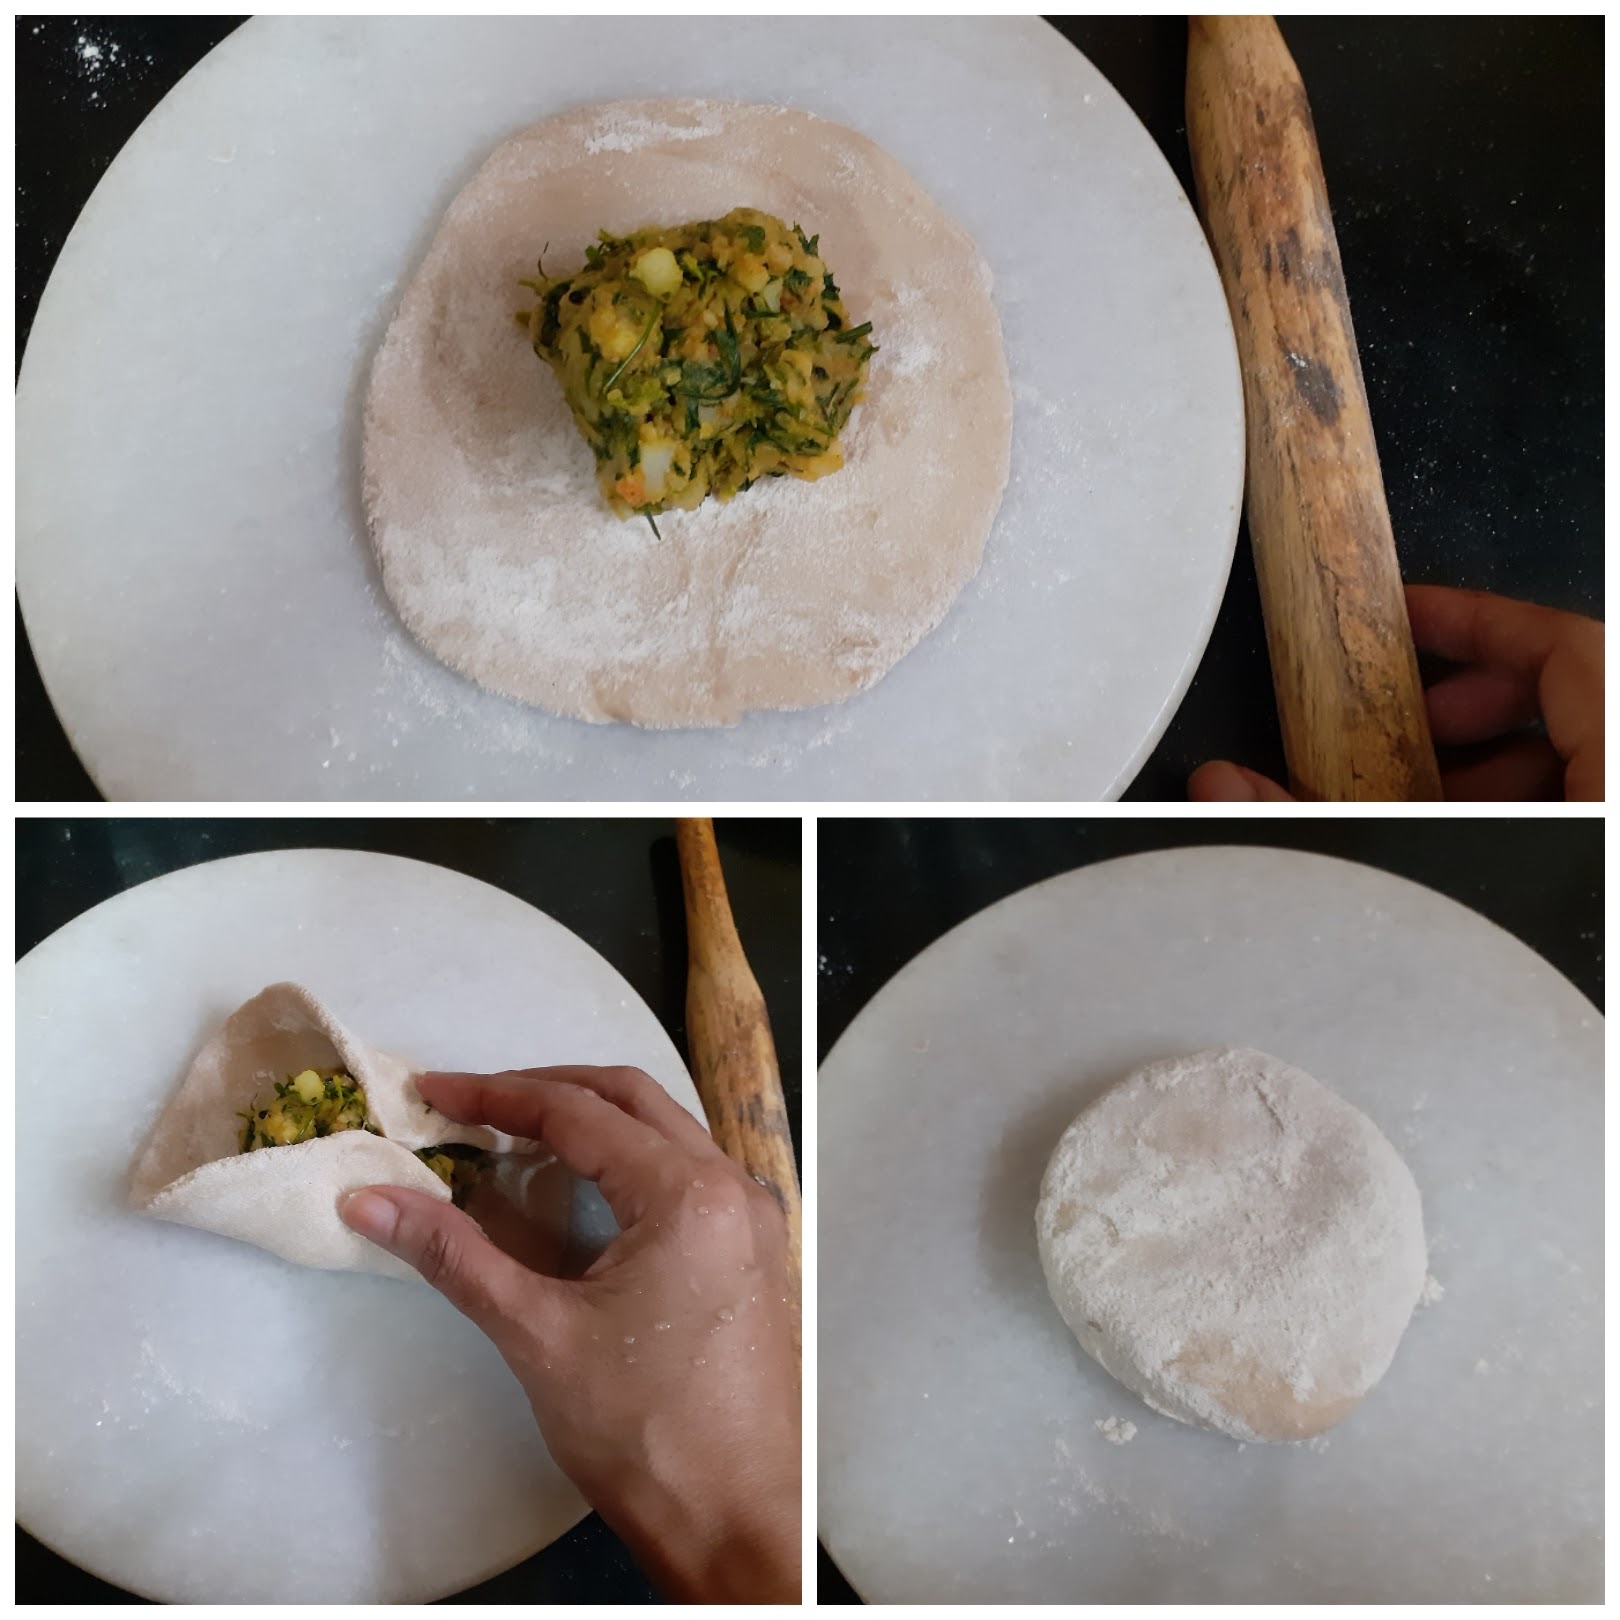
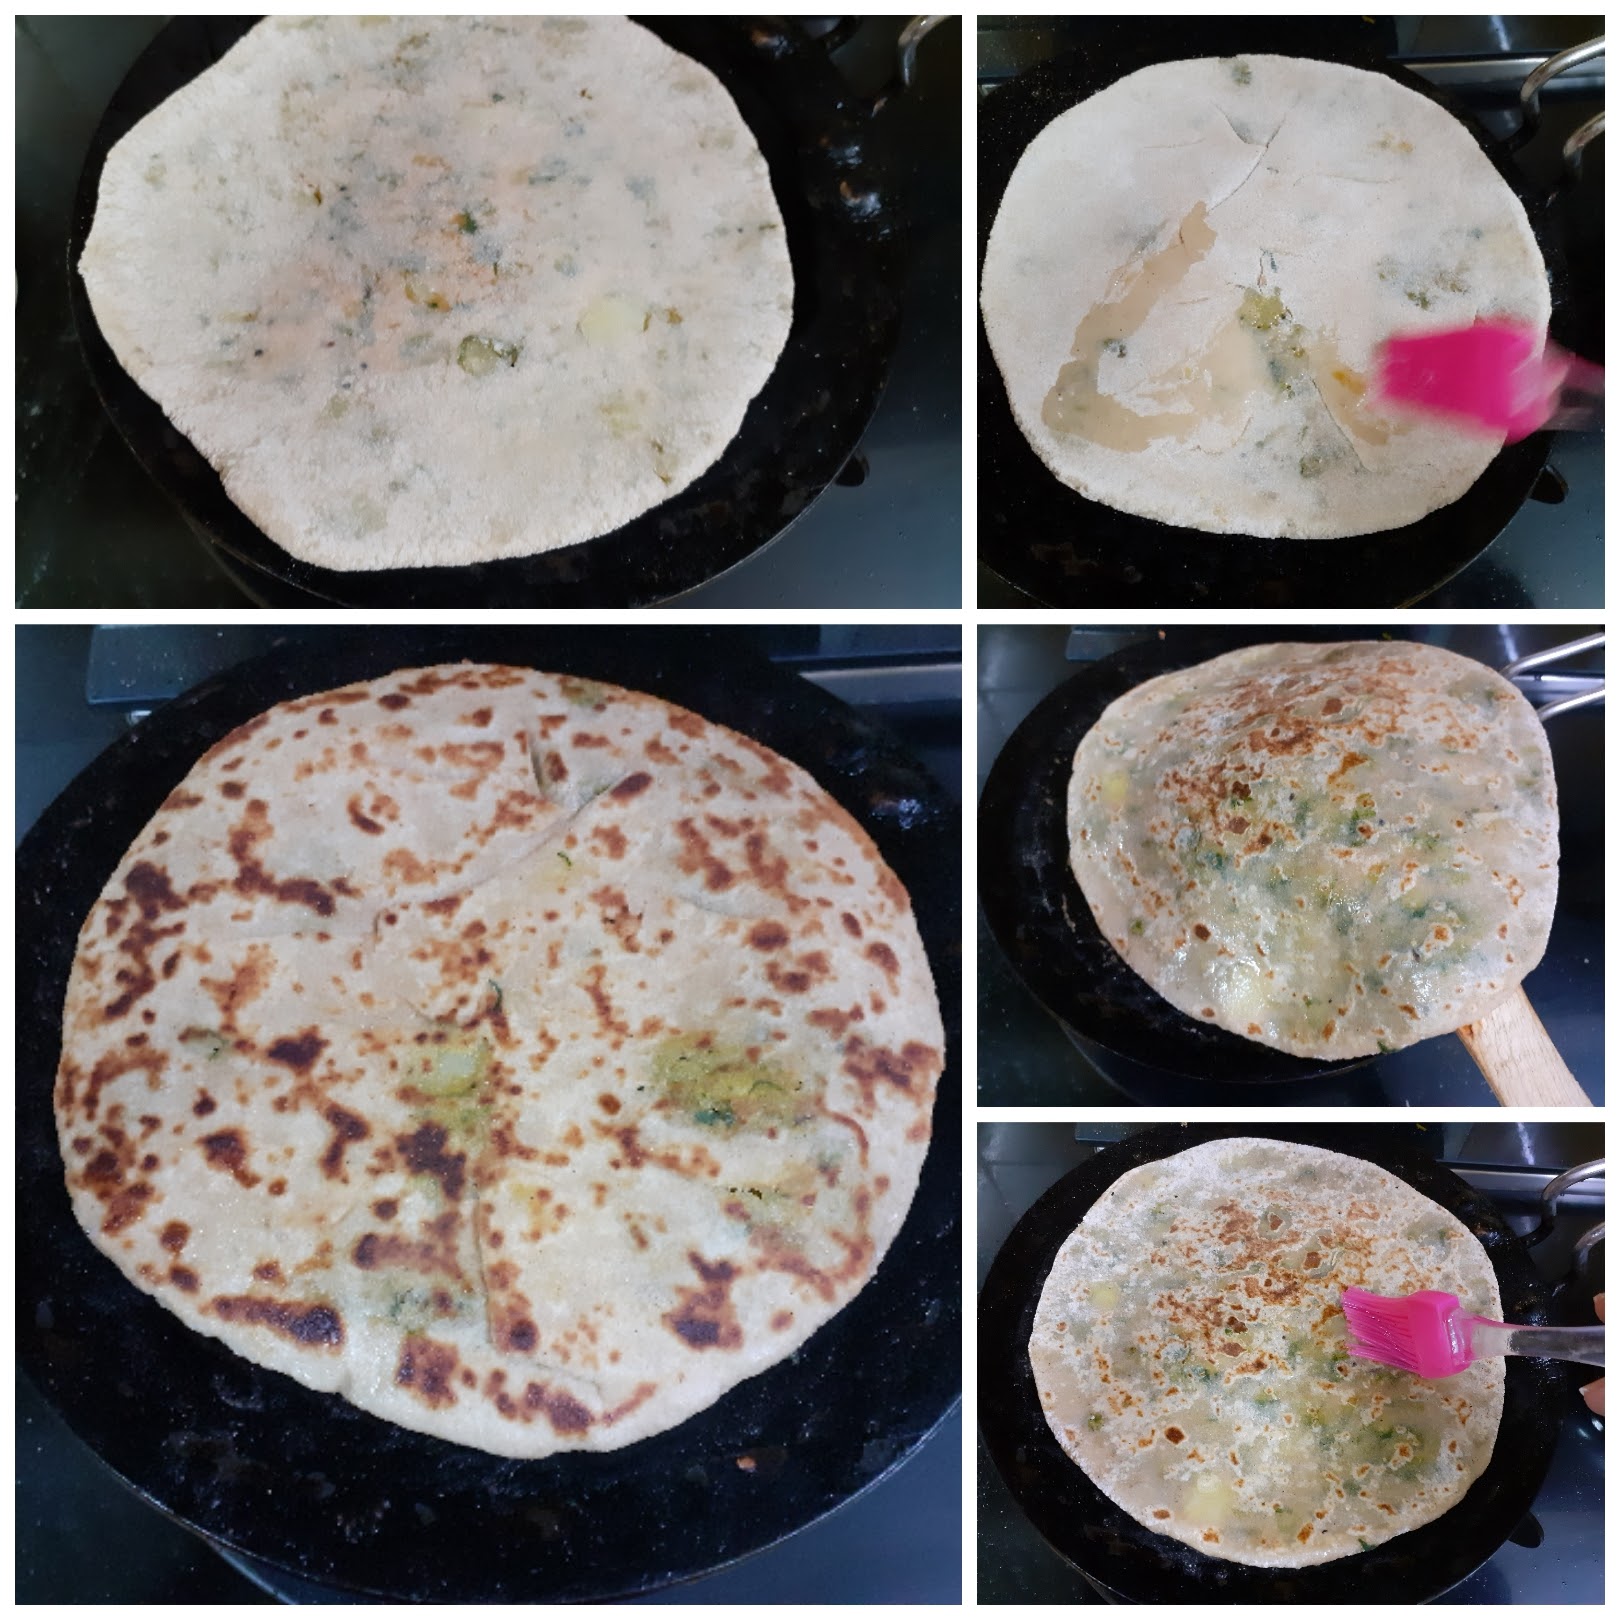
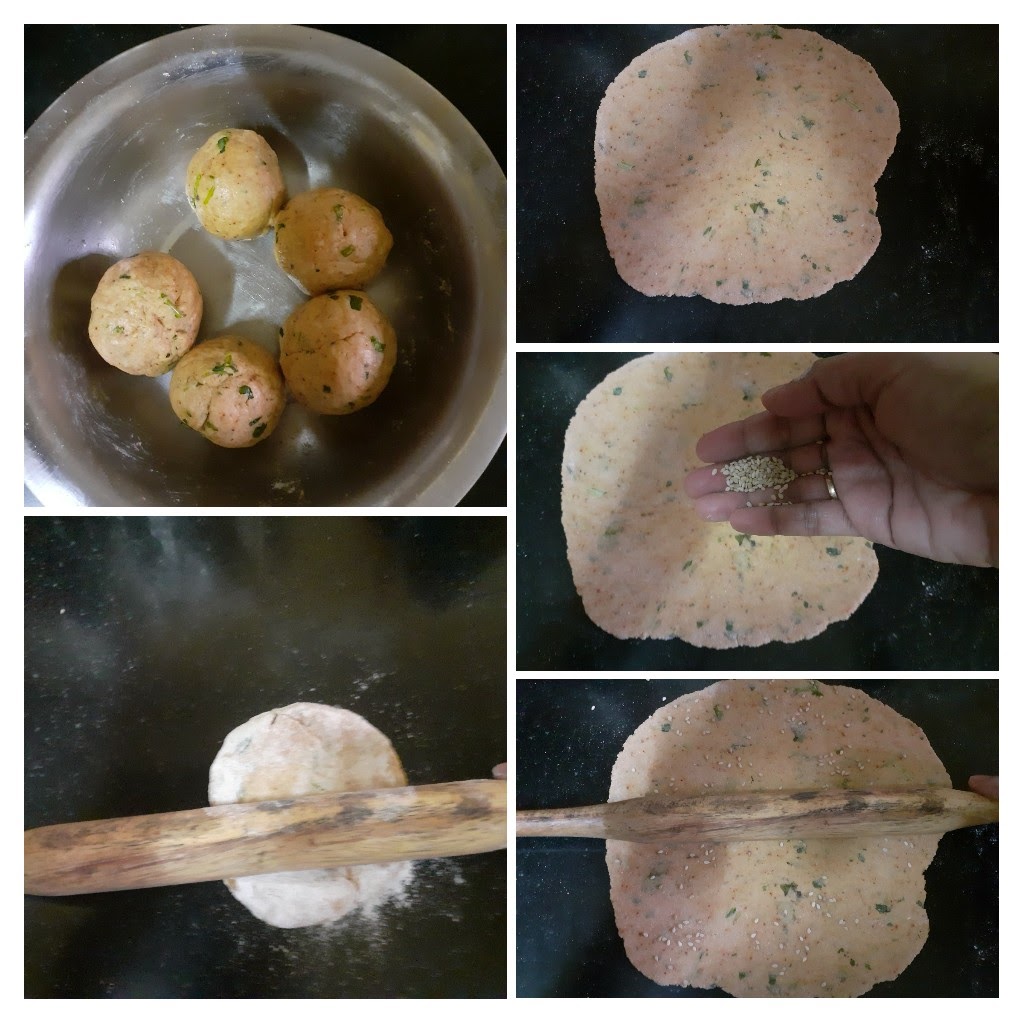
Take the dough and pinch it into balls and divide it into 12 equal portions. Now dust one ball at a time in flour and roll it out into a palm-sized circle. Take about 2 tbsp of stuffing and put it in the center of the circle. Bring all the sides together and seal the stuffing. Now dust the stuffing filled ball in flour again and roll it out into a thick and medium-sized circle. Heat a girdle/tava and put the Paratha on it. Drizzle some oil over it and cook on one side. Flip over and cook on the other side too, drizzling a little oil on it. Cook both sides until brown dots appear. Repeat for all the dough and stuffing. The yummy and wholesome, one meal parathas are ready. Enjoy. Bon Appetit.
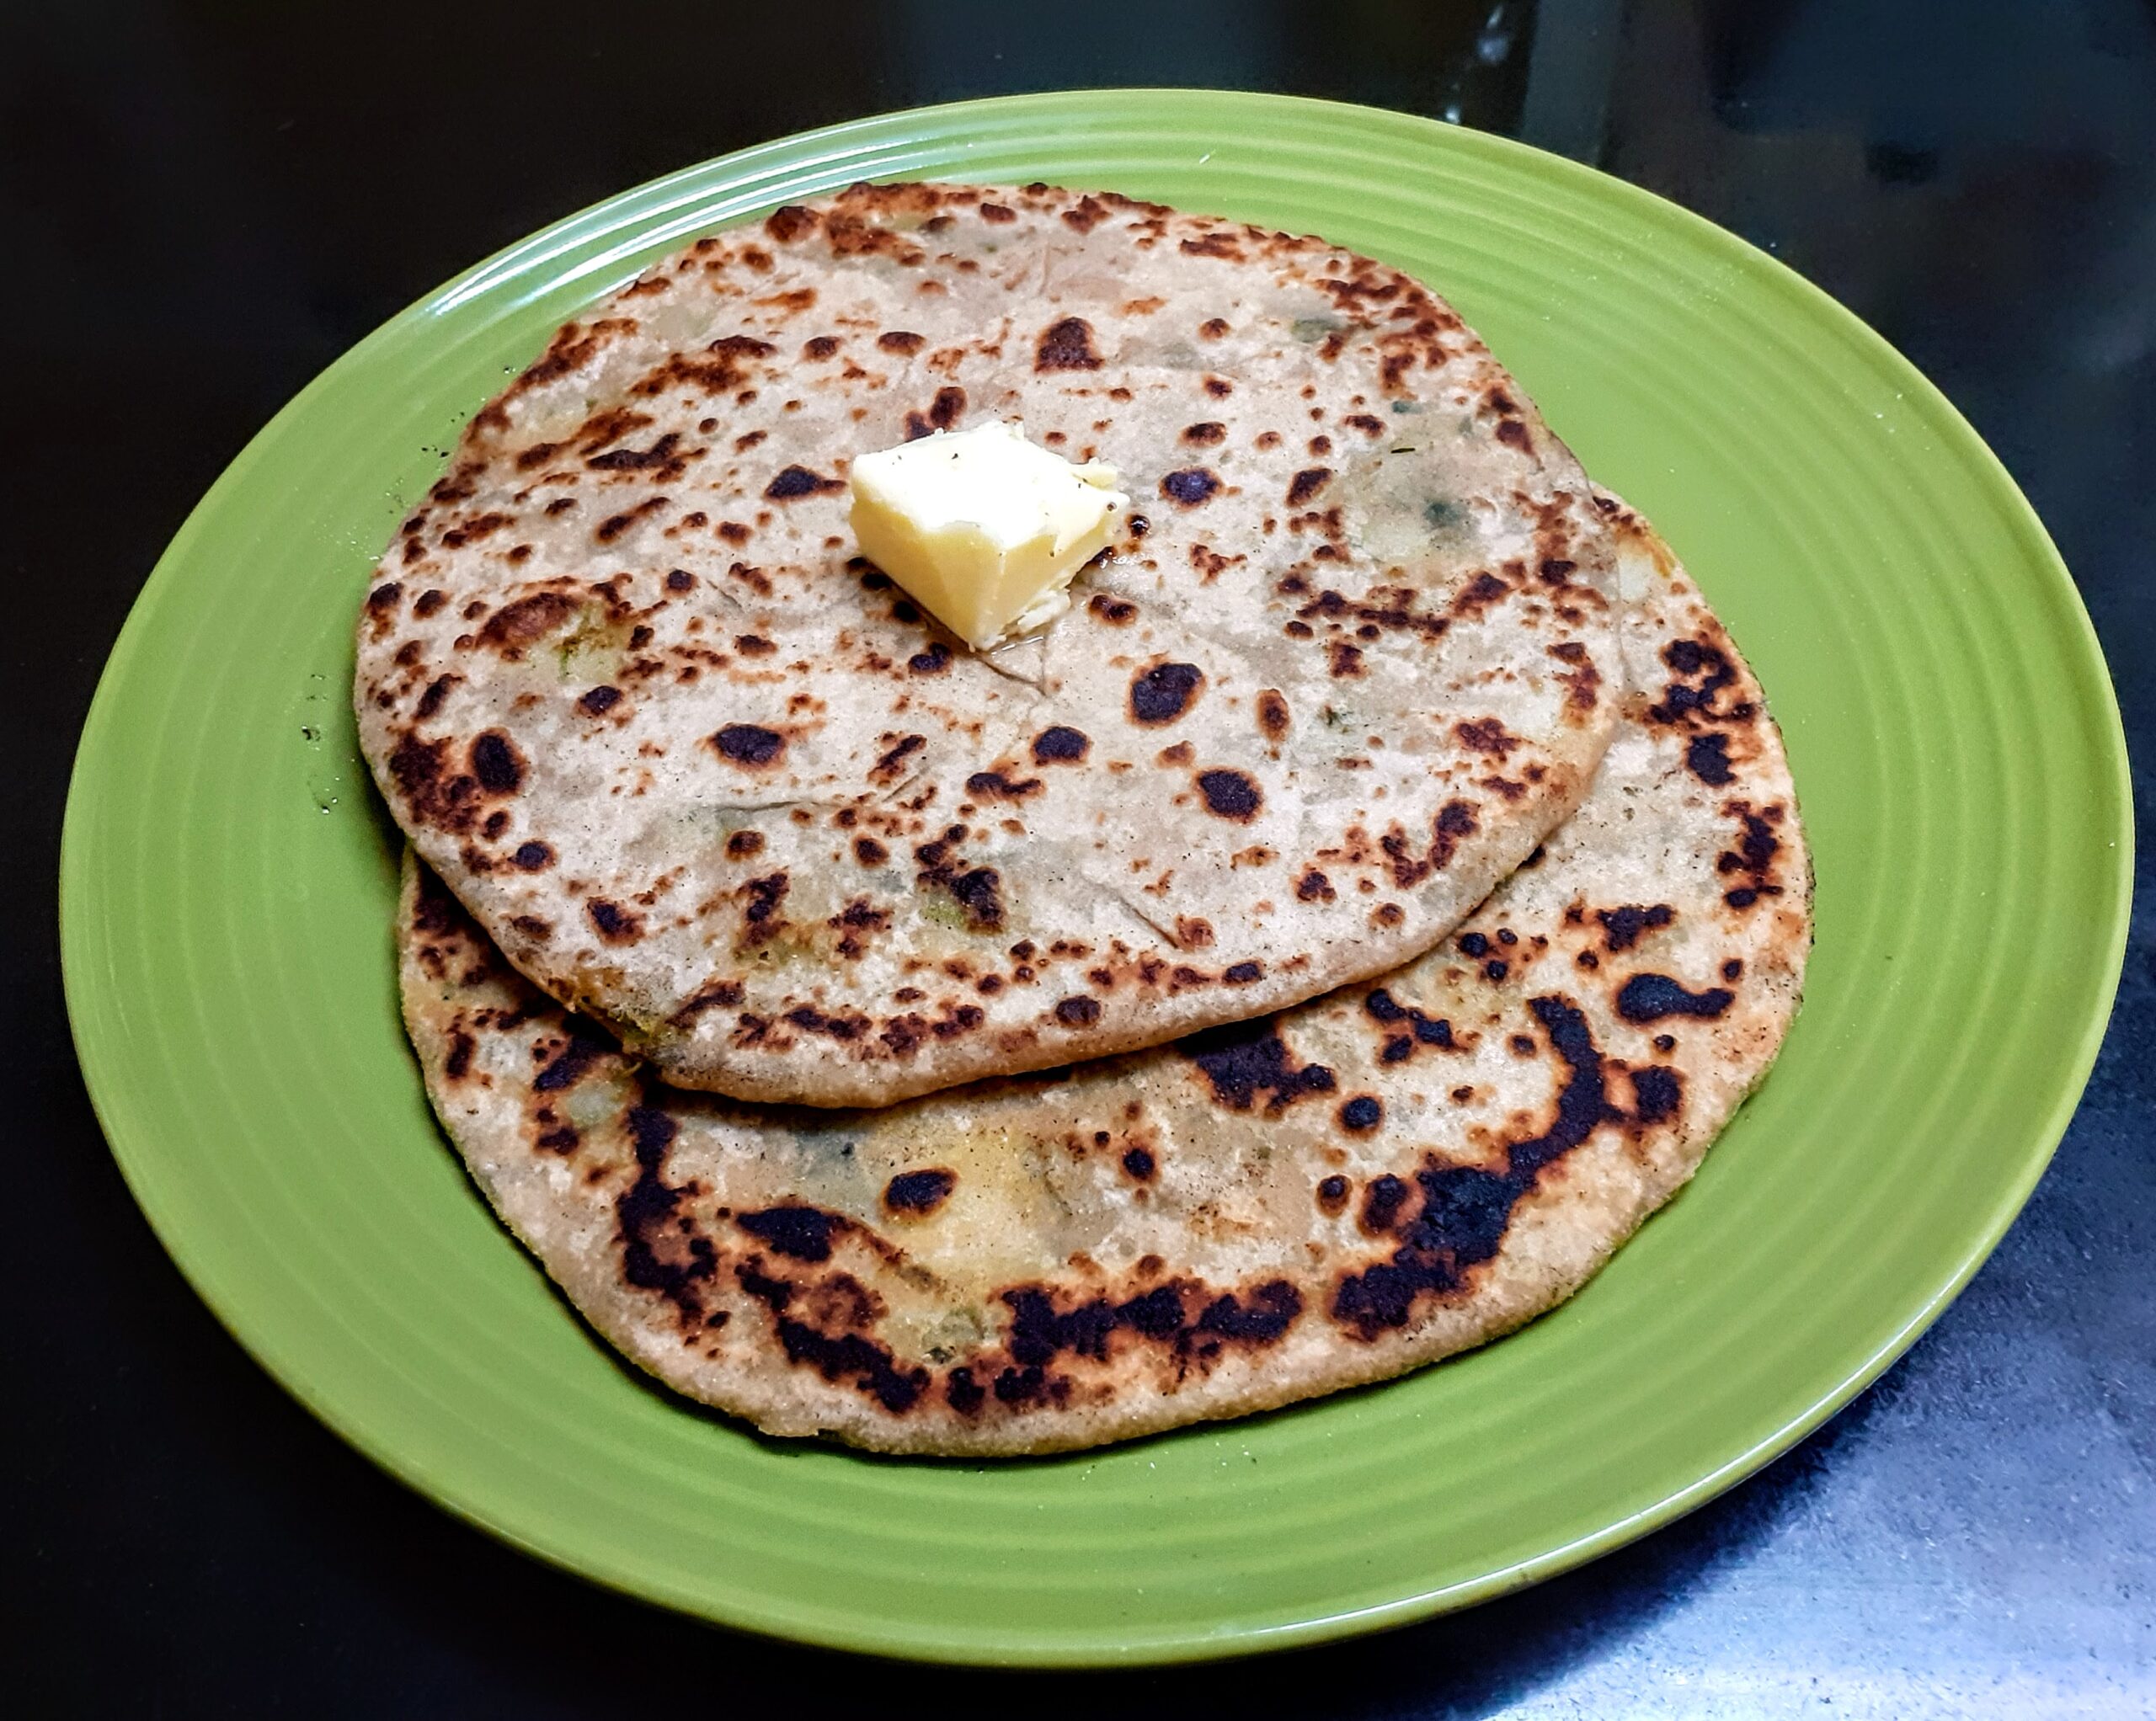
Serving suggestions– as it is filled with a proper subji it actually doesn’t need anything to go with. One can just enjoy them with a dollop of butter and plain curd.
STEPWISE RECIPE FOLLOWS:
1. Chop the Methi leaves finely and wash them thoroughly. Drain all the water and keep aside. Boil the potatoes, peel the skin, and mash them.
2. In a pan or Kadai take 1 tbsp oil and heat. Drop the mustard seeds and as they crackle add the cumin seeds and turmeric powder. Now add the washed and drained Methi leaves and saute.
3. Add salt followed by red chilli powder, coriander powder, fennel powder and continue to saute. The methi leaves will release moisture, keep sauteeing and let the moisture dry out. Now add the mashed potato to the Methi leaves, little by little, and mix them nicely.
4. The Methi leaves should have combined evenly with the potato mash. Finally, add some Garam masala powder, mix once again, and allow the mixture to cool.
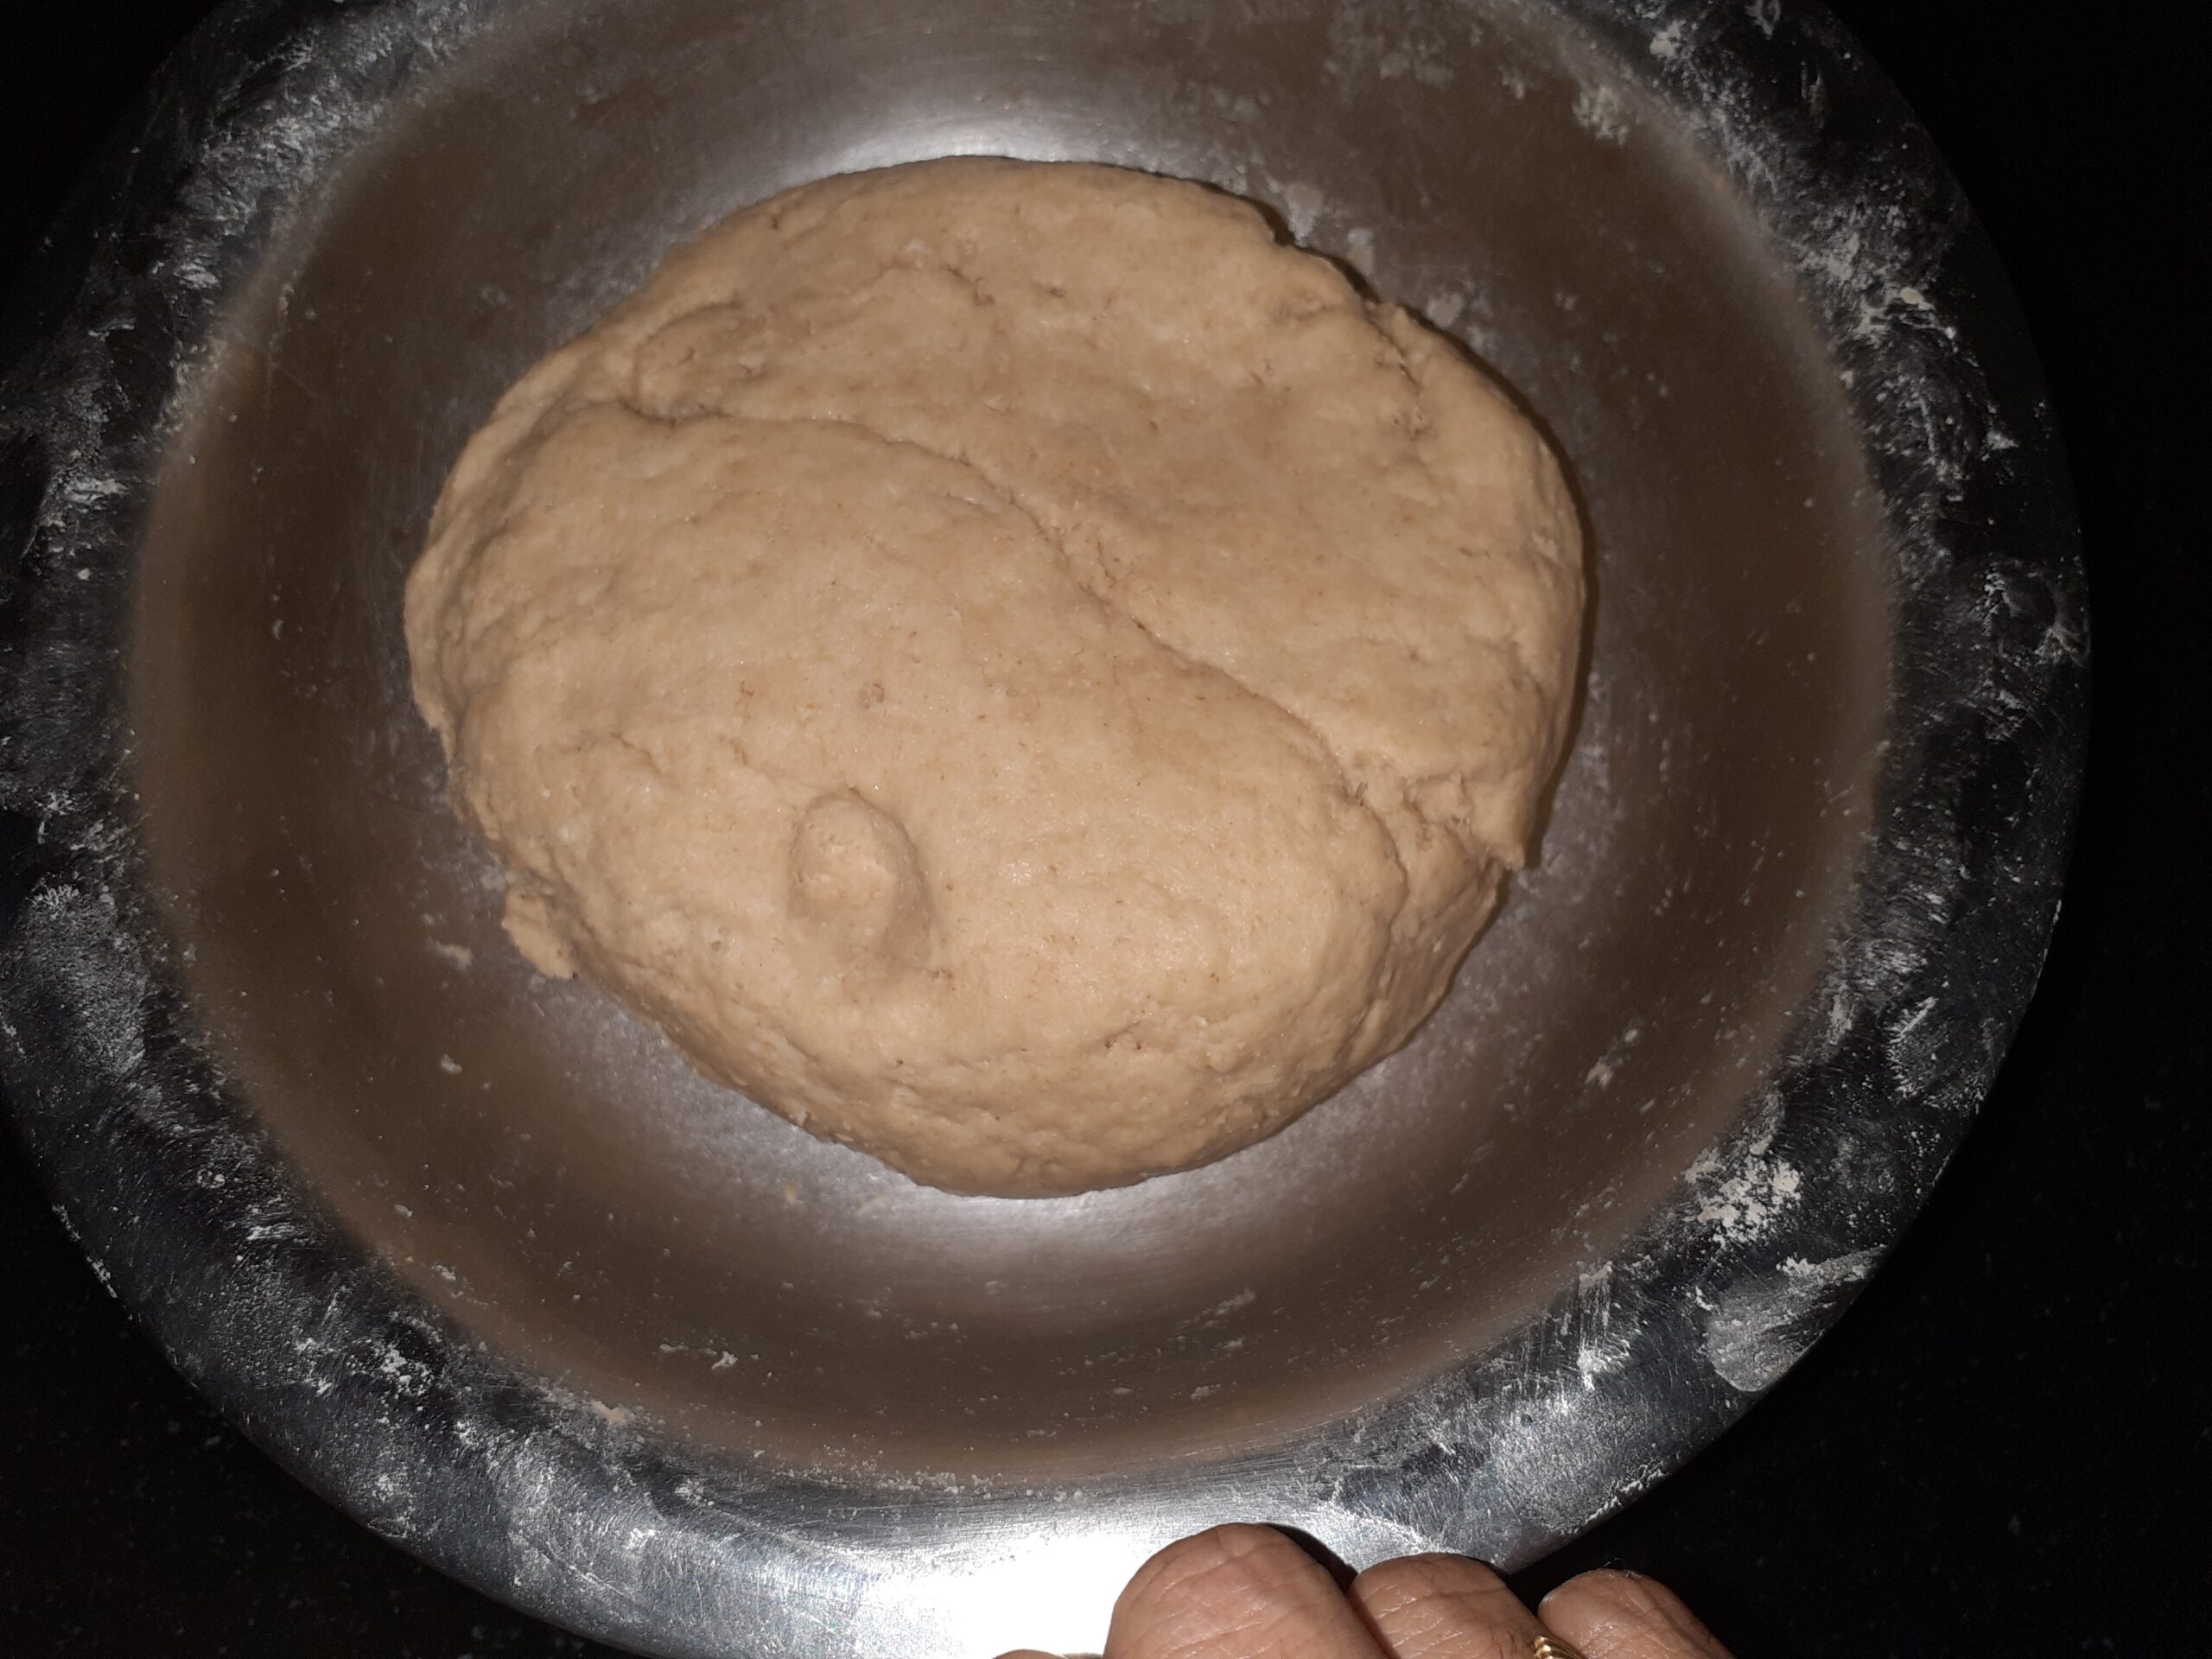
5. Take 3 cups whole wheat flour in a big mixing bowl, add a pinch of salt, a teaspoon of oil and mix well. Now adding water, a little at a time, combine to follow a slightly tough dough. Rest the dough for 20 minutes.
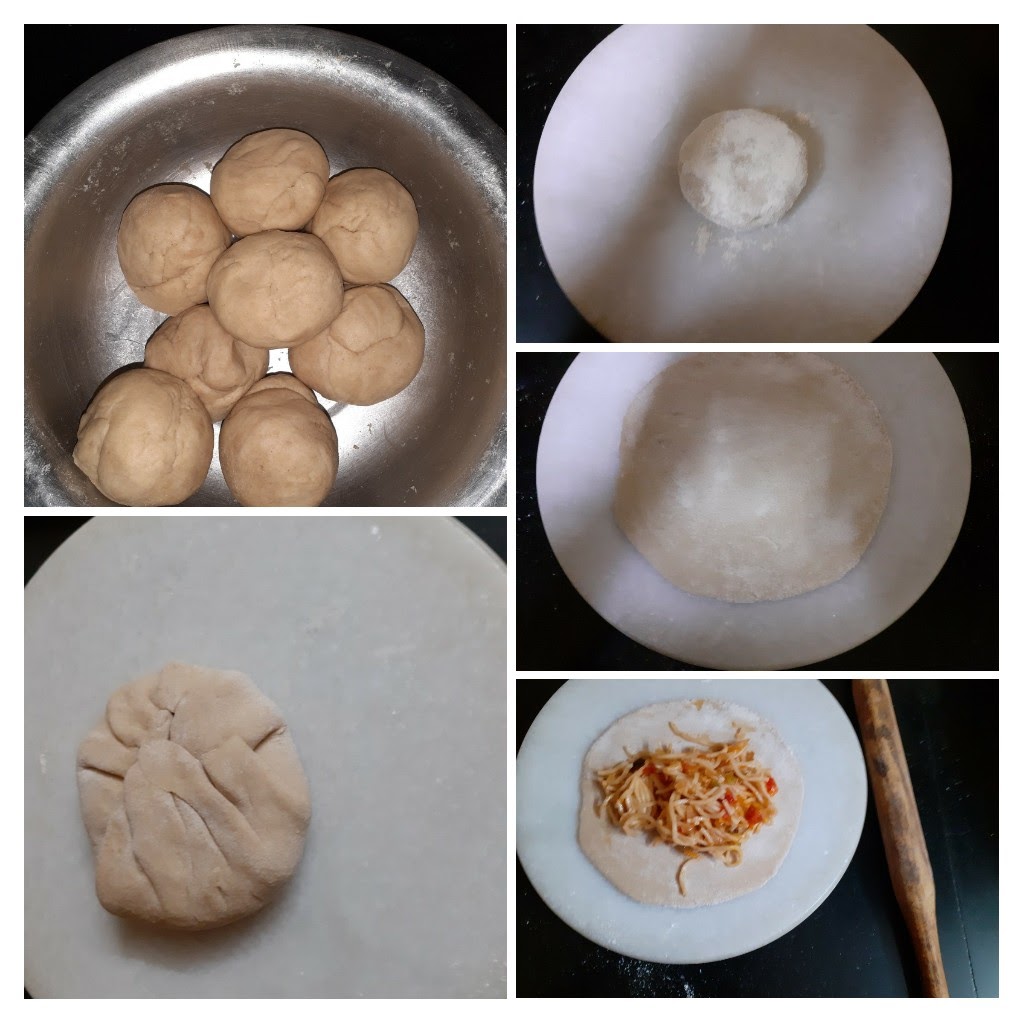
6. Take the dough and pinch it into balls and divide it into 12 equal portions. Now dust one ball at a time in flour and roll it out into a palm-sized circle. Take about 2 tbsp of stuffing and put it in the center of the circle. Bring all the sides together and seal the stuffing.
7. Now dust the stuffing filled ball in flour again and roll it out into a thick and medium-sized circle.
8. Heat a girdle/tava and put the Paratha on it. Drizzle some oil over it and cook on one side. Flip over and cook on the other side too, drizzling a little oil on it. Cook both sides until brown dots appear. Repeat for all the dough and stuffing.
NOTES:
1. One can try the paratha using Kasoori Methi, but I have not tested this method, as I have mentioned above, it might not give the right texture and flavor.
2. Some potatoes absorb a lot of water while cooking, therefore choose ones that cook a little dry. Alternately don’t overcook the potatoes. Cook them adequately and grate them through. I don’t mind a few potato lumps in between, so I don’t process them so much.
3. I don’t use garlic or onions in this recipe and so cannot tell how the taste will be.
If you tried this recipe and liked it please comment below. I would love to hear from you. If you have a query about the recipe email us and ill respond as soon as I can.
If you would like to receive our recipes in your mail please leave your mail id at the homepage. Every time Rajjo’s Kitchen has a new post we will mail the recipe to you.
Vegetable Manchurian (With Gravy)
Who doesn’t like Vegetable Manchurian? This is the most Indianised Chinese dish, that has been customized to the Indian palette. The dry version of this dish aka Vegetable Manchurian dry is one of the most popular Starters offered at all weddings, get-togethers, parties, and the like. This also happens to be my most favourite starter. I also have a recipe on this blog for Fried rice with these dry Manchurians, do check it out. The only difference is that I have used Cauliflowers instead of cabbage in the fried rice recipe. Fried rice and Manchurian with gravy are a match made in heaven, so do try out the combination from the recipes in my blog.
This is a no-fail recipe and turns out well every time that I make it, which is why I make it frequently. In this recipe, I have used 1 whole medium-sized cabbage( oh yes that’s how much we like this dish), one can customize it as per their requirements though.
Here is the recipe for Vegetable Manchurian(with gravy) for you-
PREP TIME: 20 Mins COOK TIME: 40 Mins
TOTAL TIME:60Mins COURSE: MAIN
CUISINE: FUSION SERVINGS: 5
AUTHOR: RAJNI RAM
Ingredients for the Manchurian dough:
Cabbage 1 medium-sized (shredded)
Carrot 1 (shredded)
Spring onions 1 bunch chopped finely
Onion 1 finely chopped
Green chillies 2 finely chopped
Ginger 1/2 inch piece finely chopped
Salt as per taste
Pepper powder 1 tsp
Maida 1/2 to 3/4 of a cup
Rice flour 1/4 cup
Ingredients for the gravy:
Garlic 3 cloves finely chopped(reserve some for garnish)
Ginger 1/2 inch piece
Green chillies 2 finely chopped
Spring onion greens 1 tbsp finely chopped
Onion 1 small finely chopped
Tomato puree 1/4 cup or puree of 1 large Tomato
Green Capsicum 1/4 of a whole chopped medium-sized
Red Bell pepper 1/4 of a whole chopped medium-sized
Tomato sauce 2 tbsp
Chilli sauce 2 tsp(add for more spice)
Soy sauce 1 tbsp
Vinegar 1 tbsp
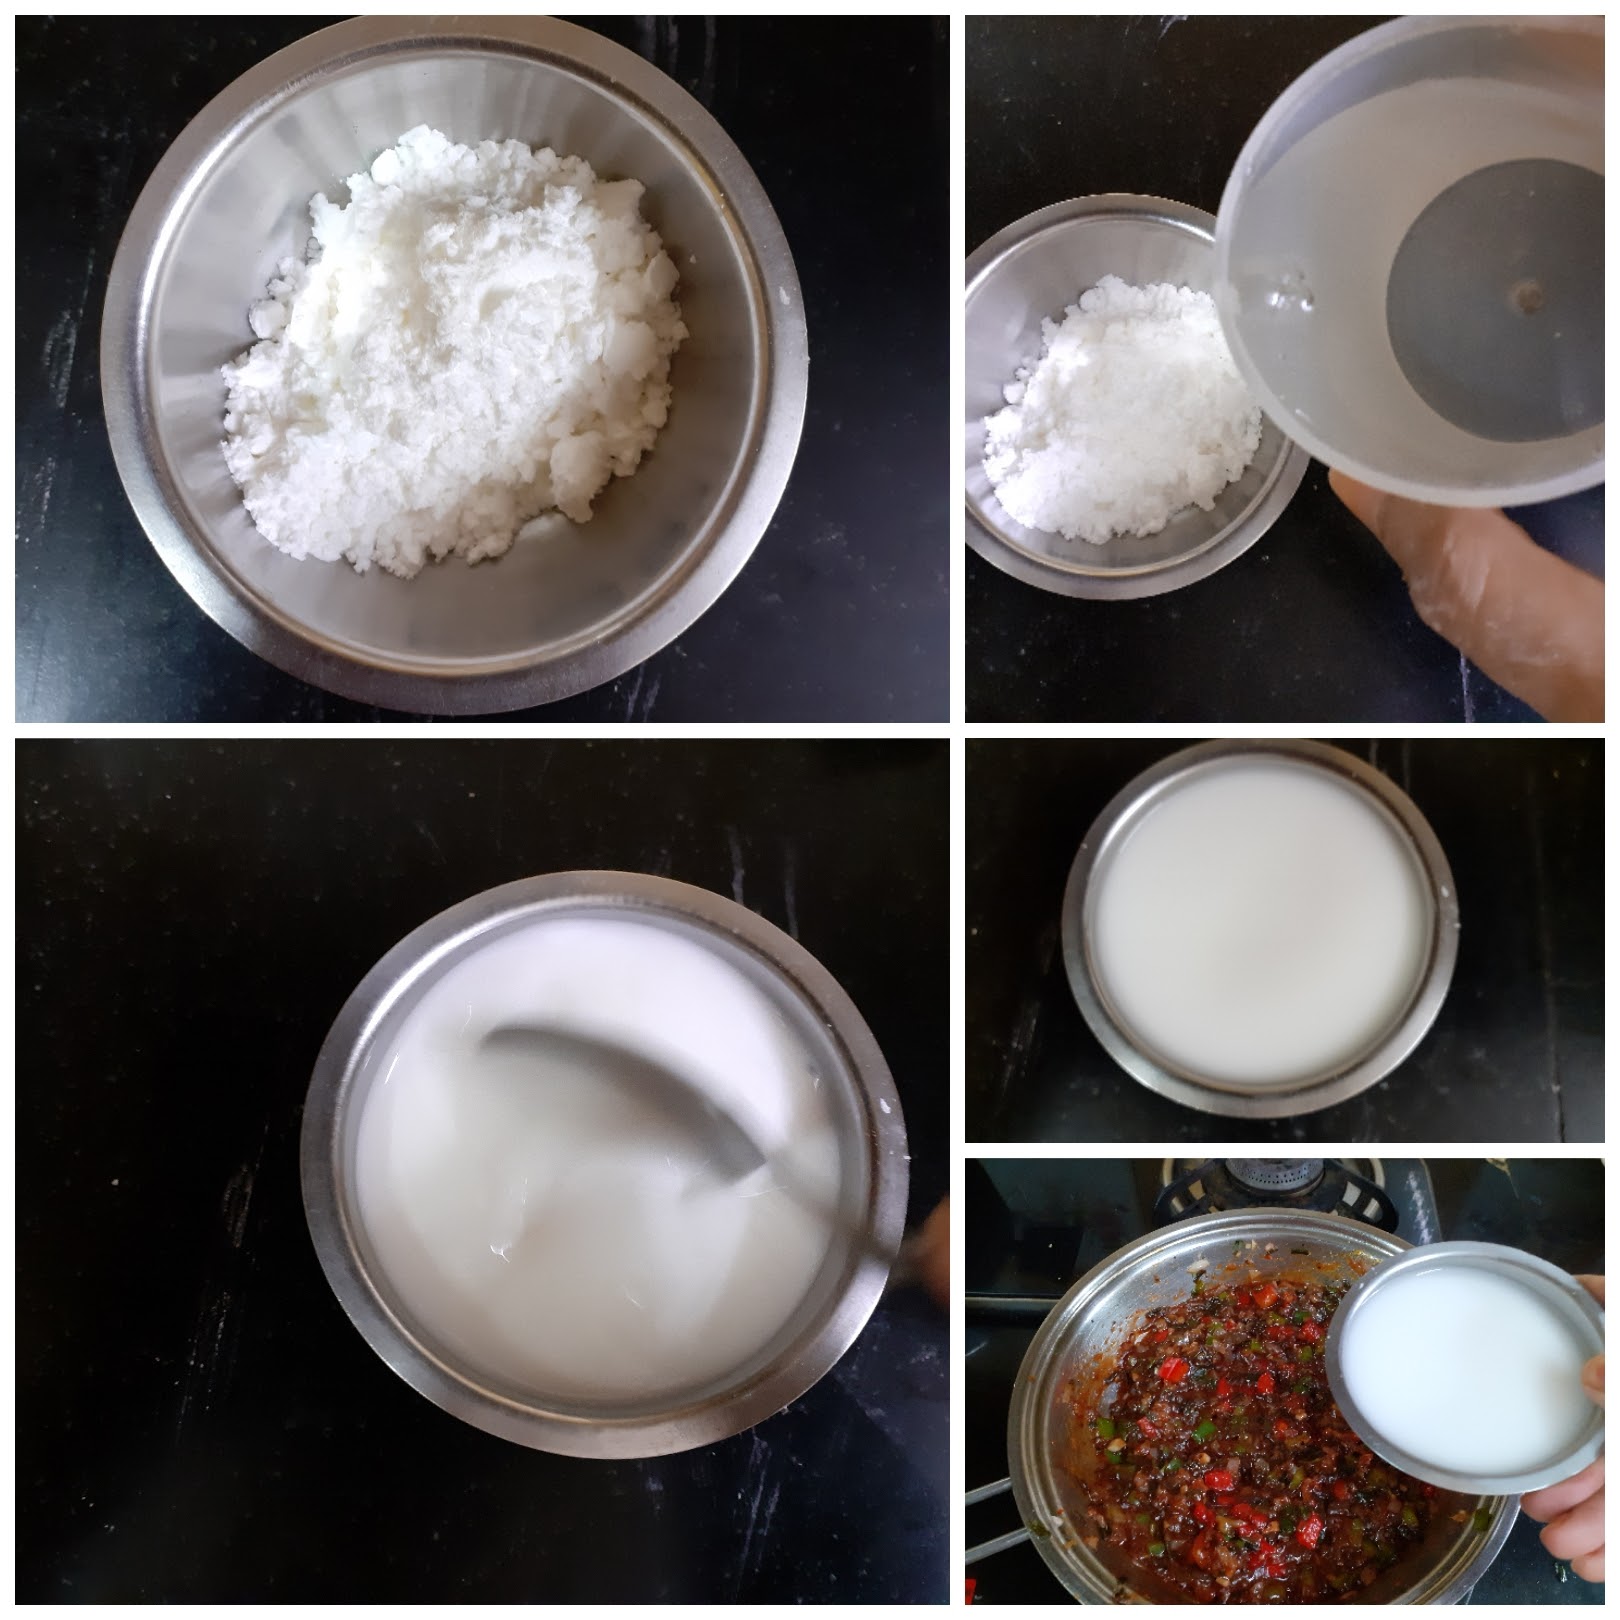
Cornflour 2 tbsp
Salt as required
Pepper powder 1tsp
Oil for frying the Manchurian
Directions to make the Manchurian:
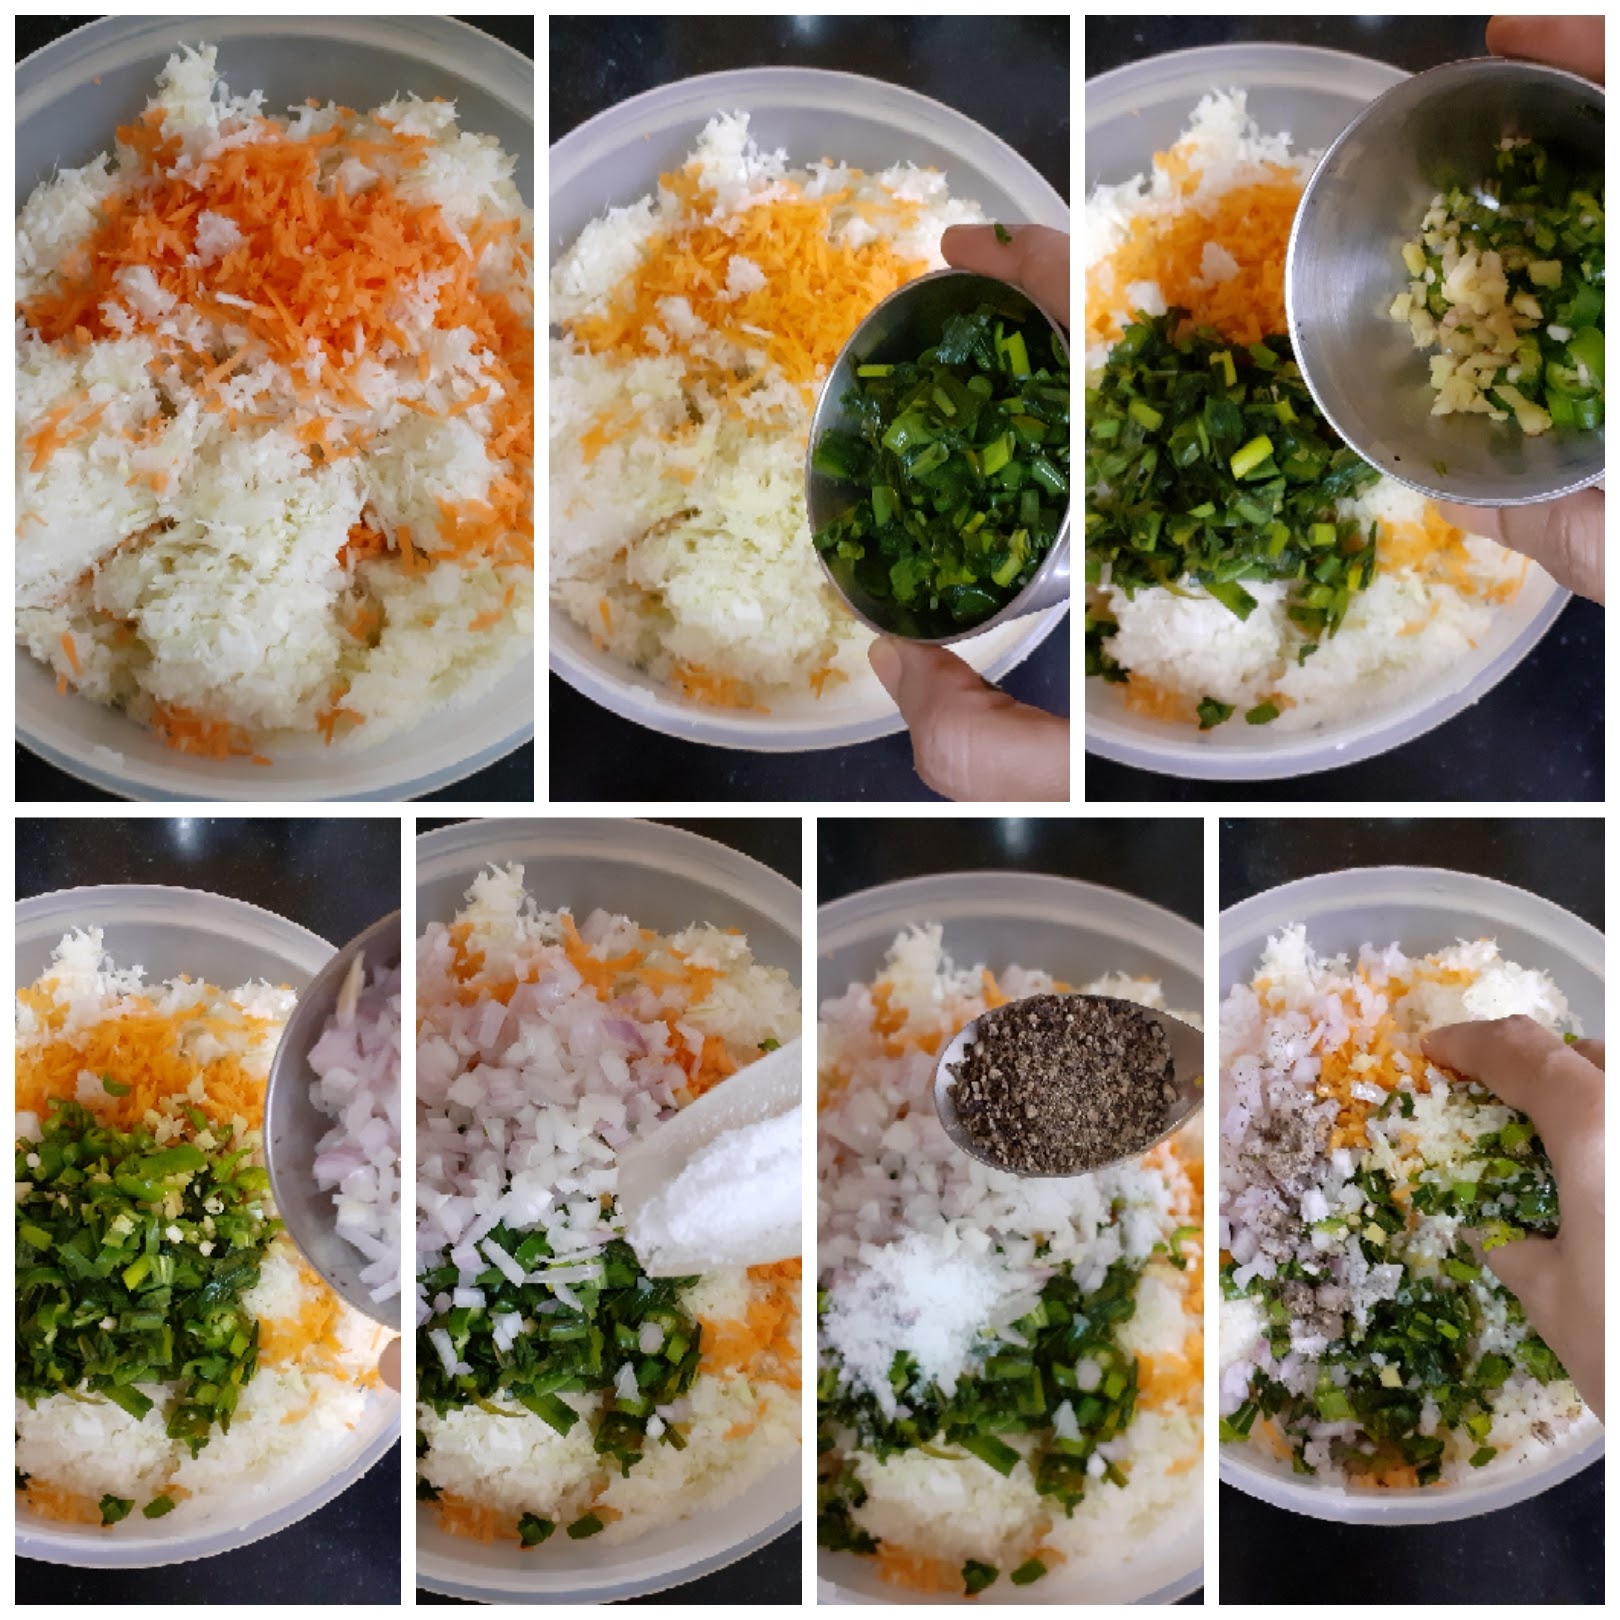
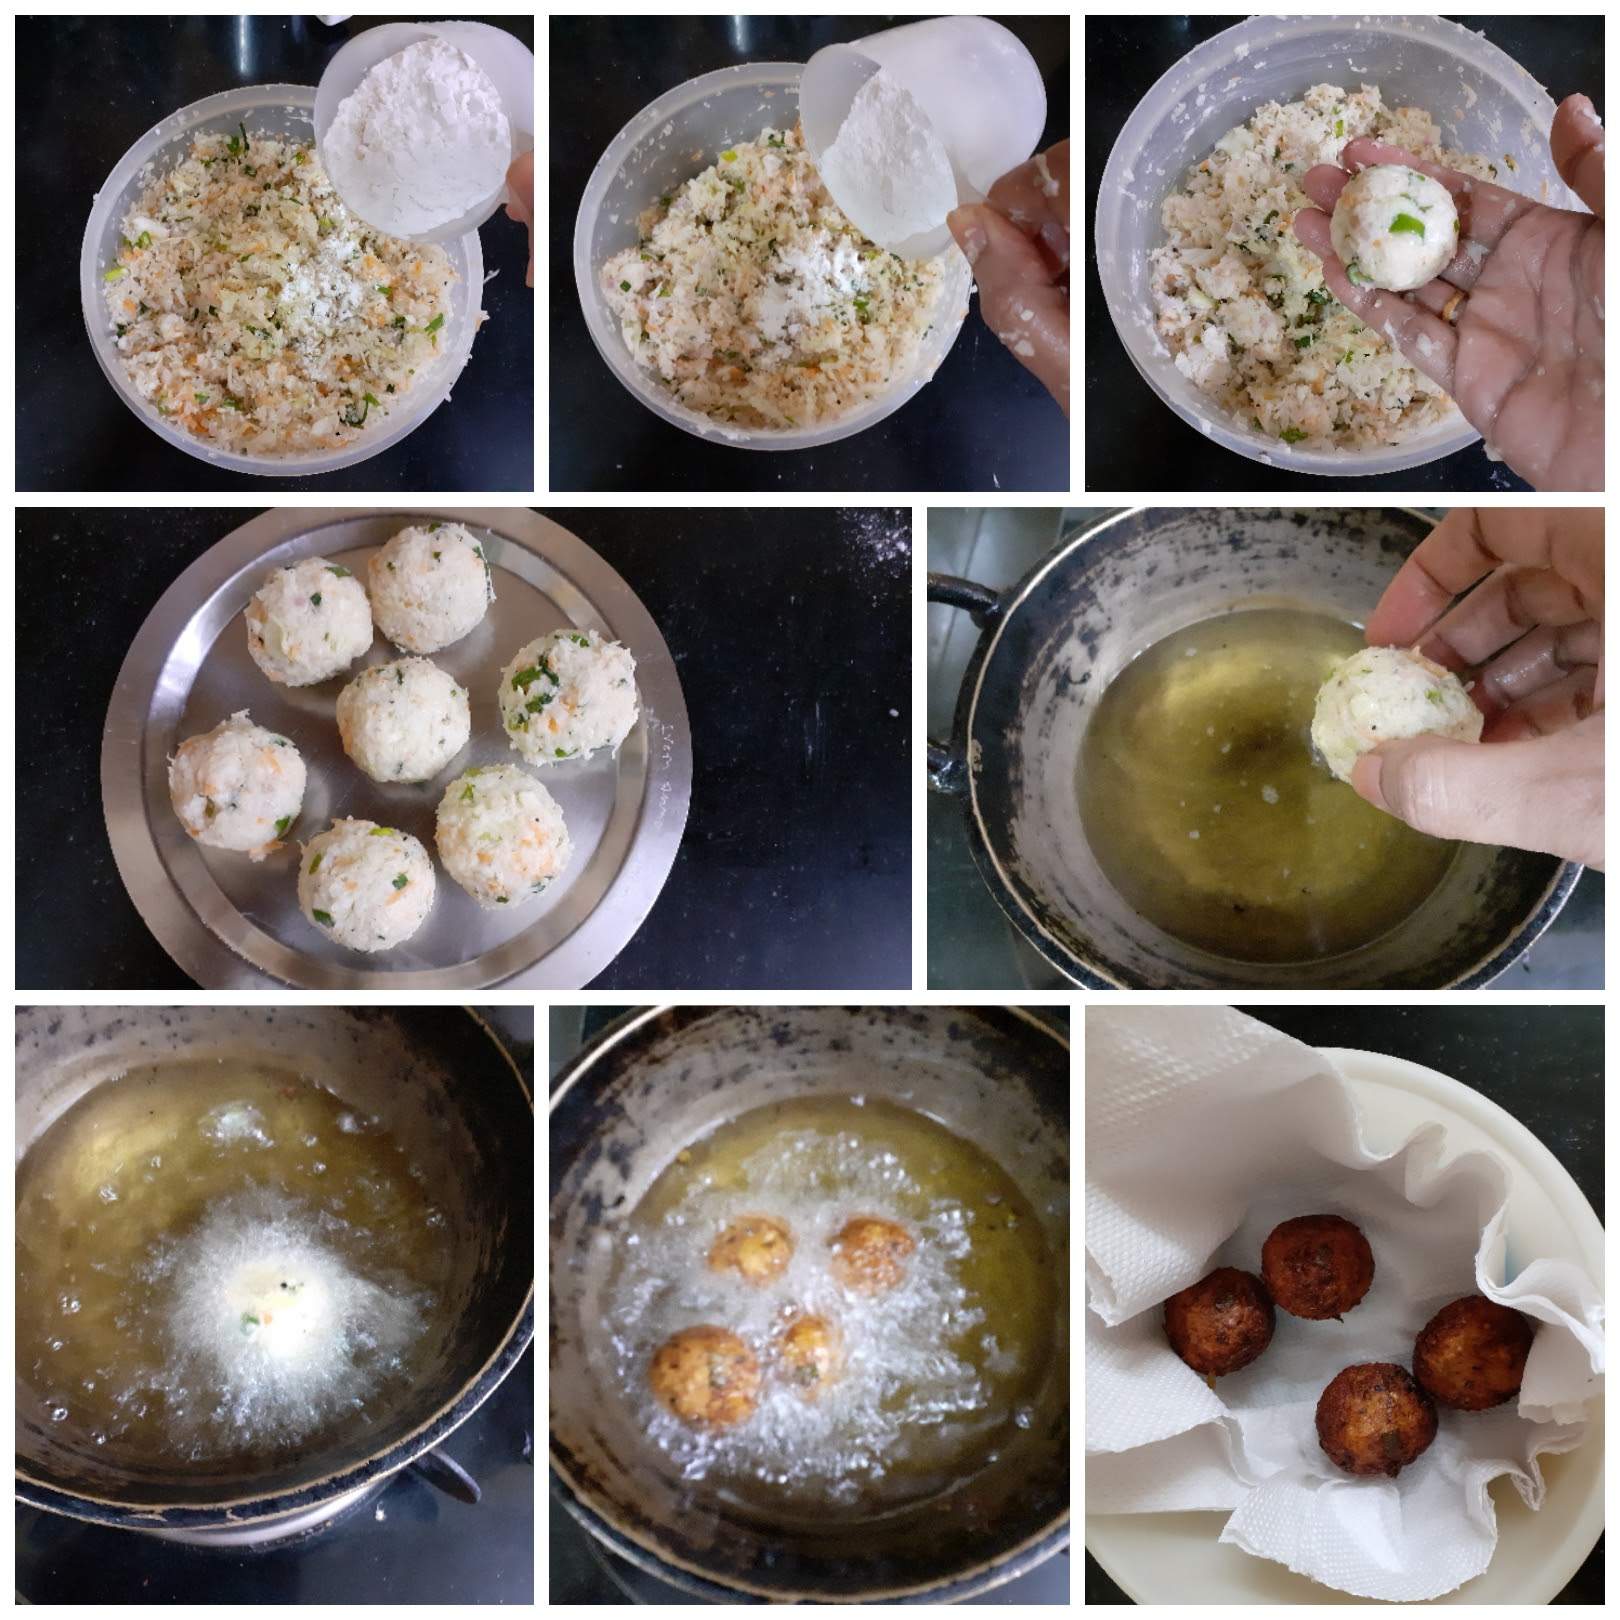
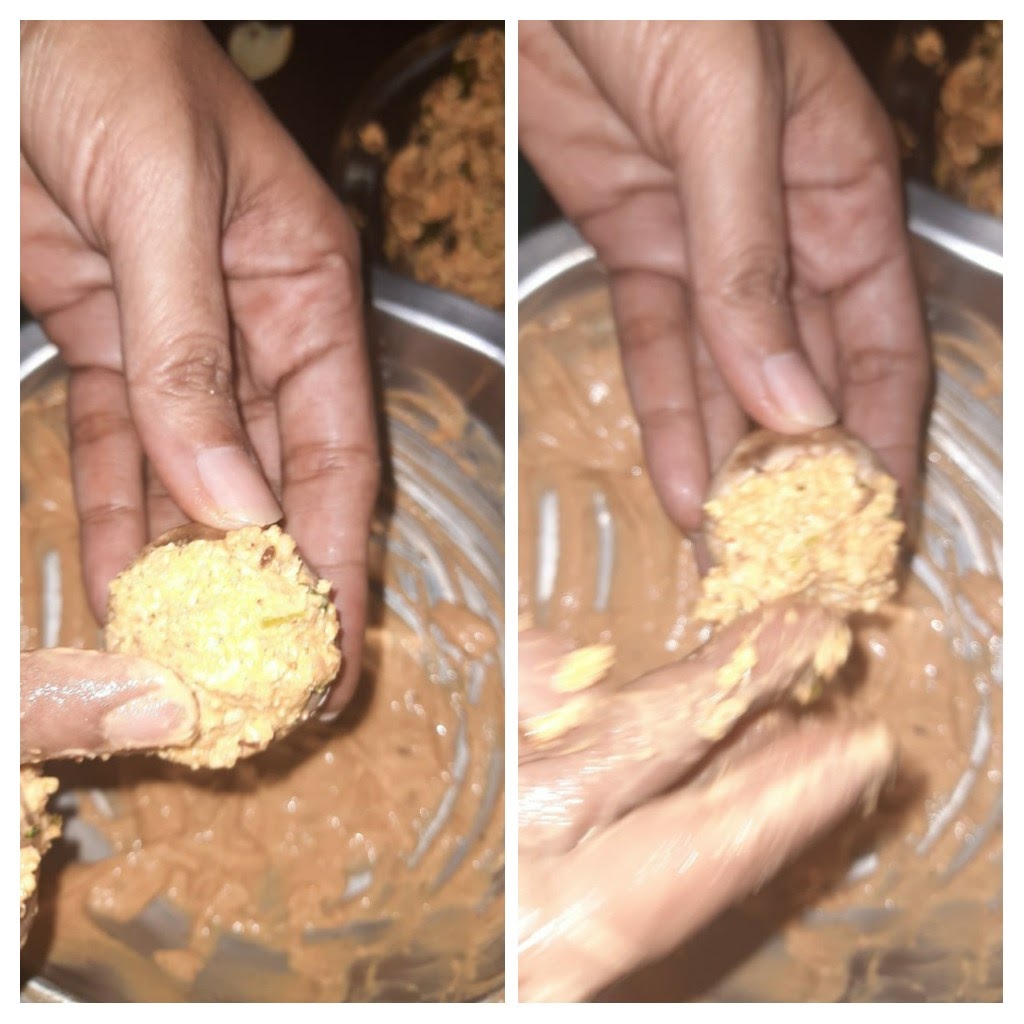
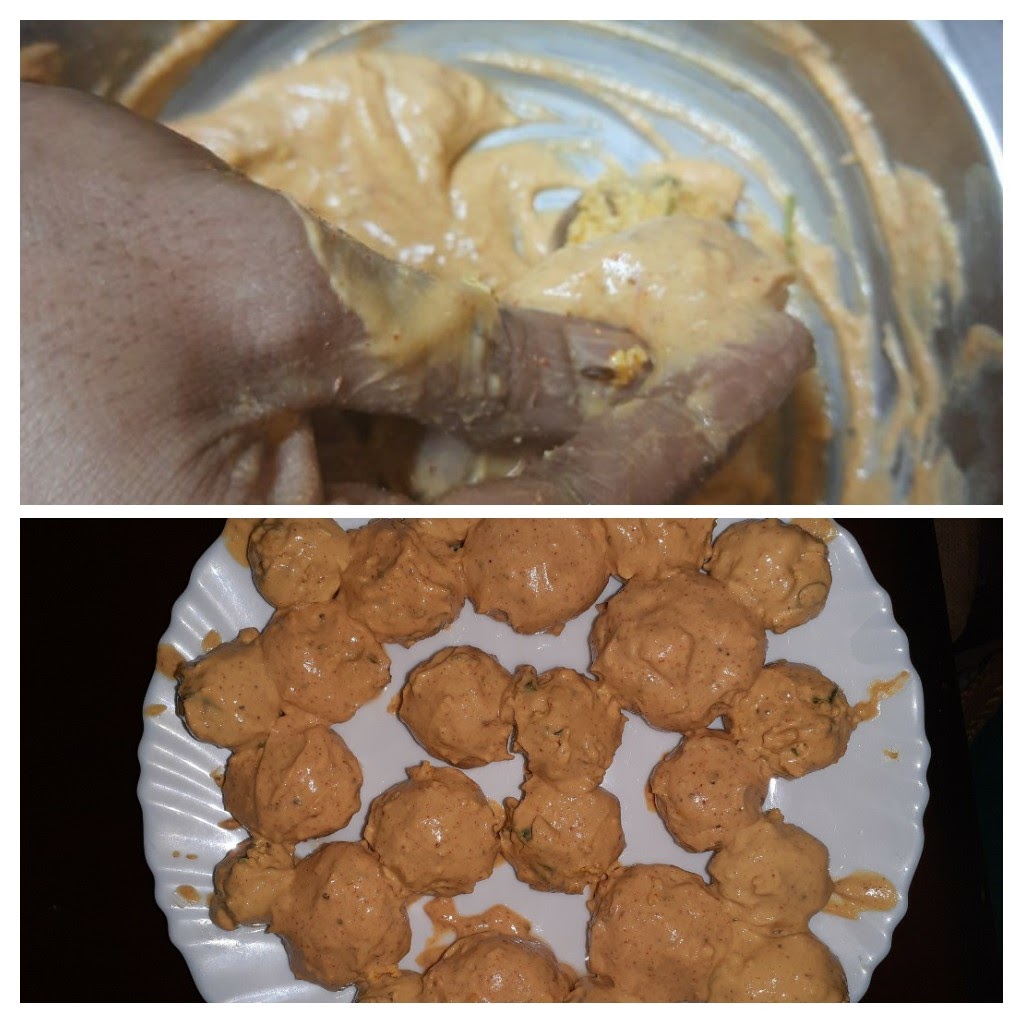
In a bowl take the shredded Cabbage, add to it rest of the vegetables like shredded carrot, spring onions, onions, green chillies and ginger. Add salt and pepper powder and combine well using your fingers. Now add Maida/refined flour, followed by rice flour and combine nicely. It needn’t become a dough, but you should be able to form a ball that doesn’t go flat or break. Now divide the mixture into lemon sized balls( I got around 20 of them with this quality). Heat oil in a wok or Kadai and fry the balls in medium heat until a golden brown. Keep them aside.
Directions for making the gravy:
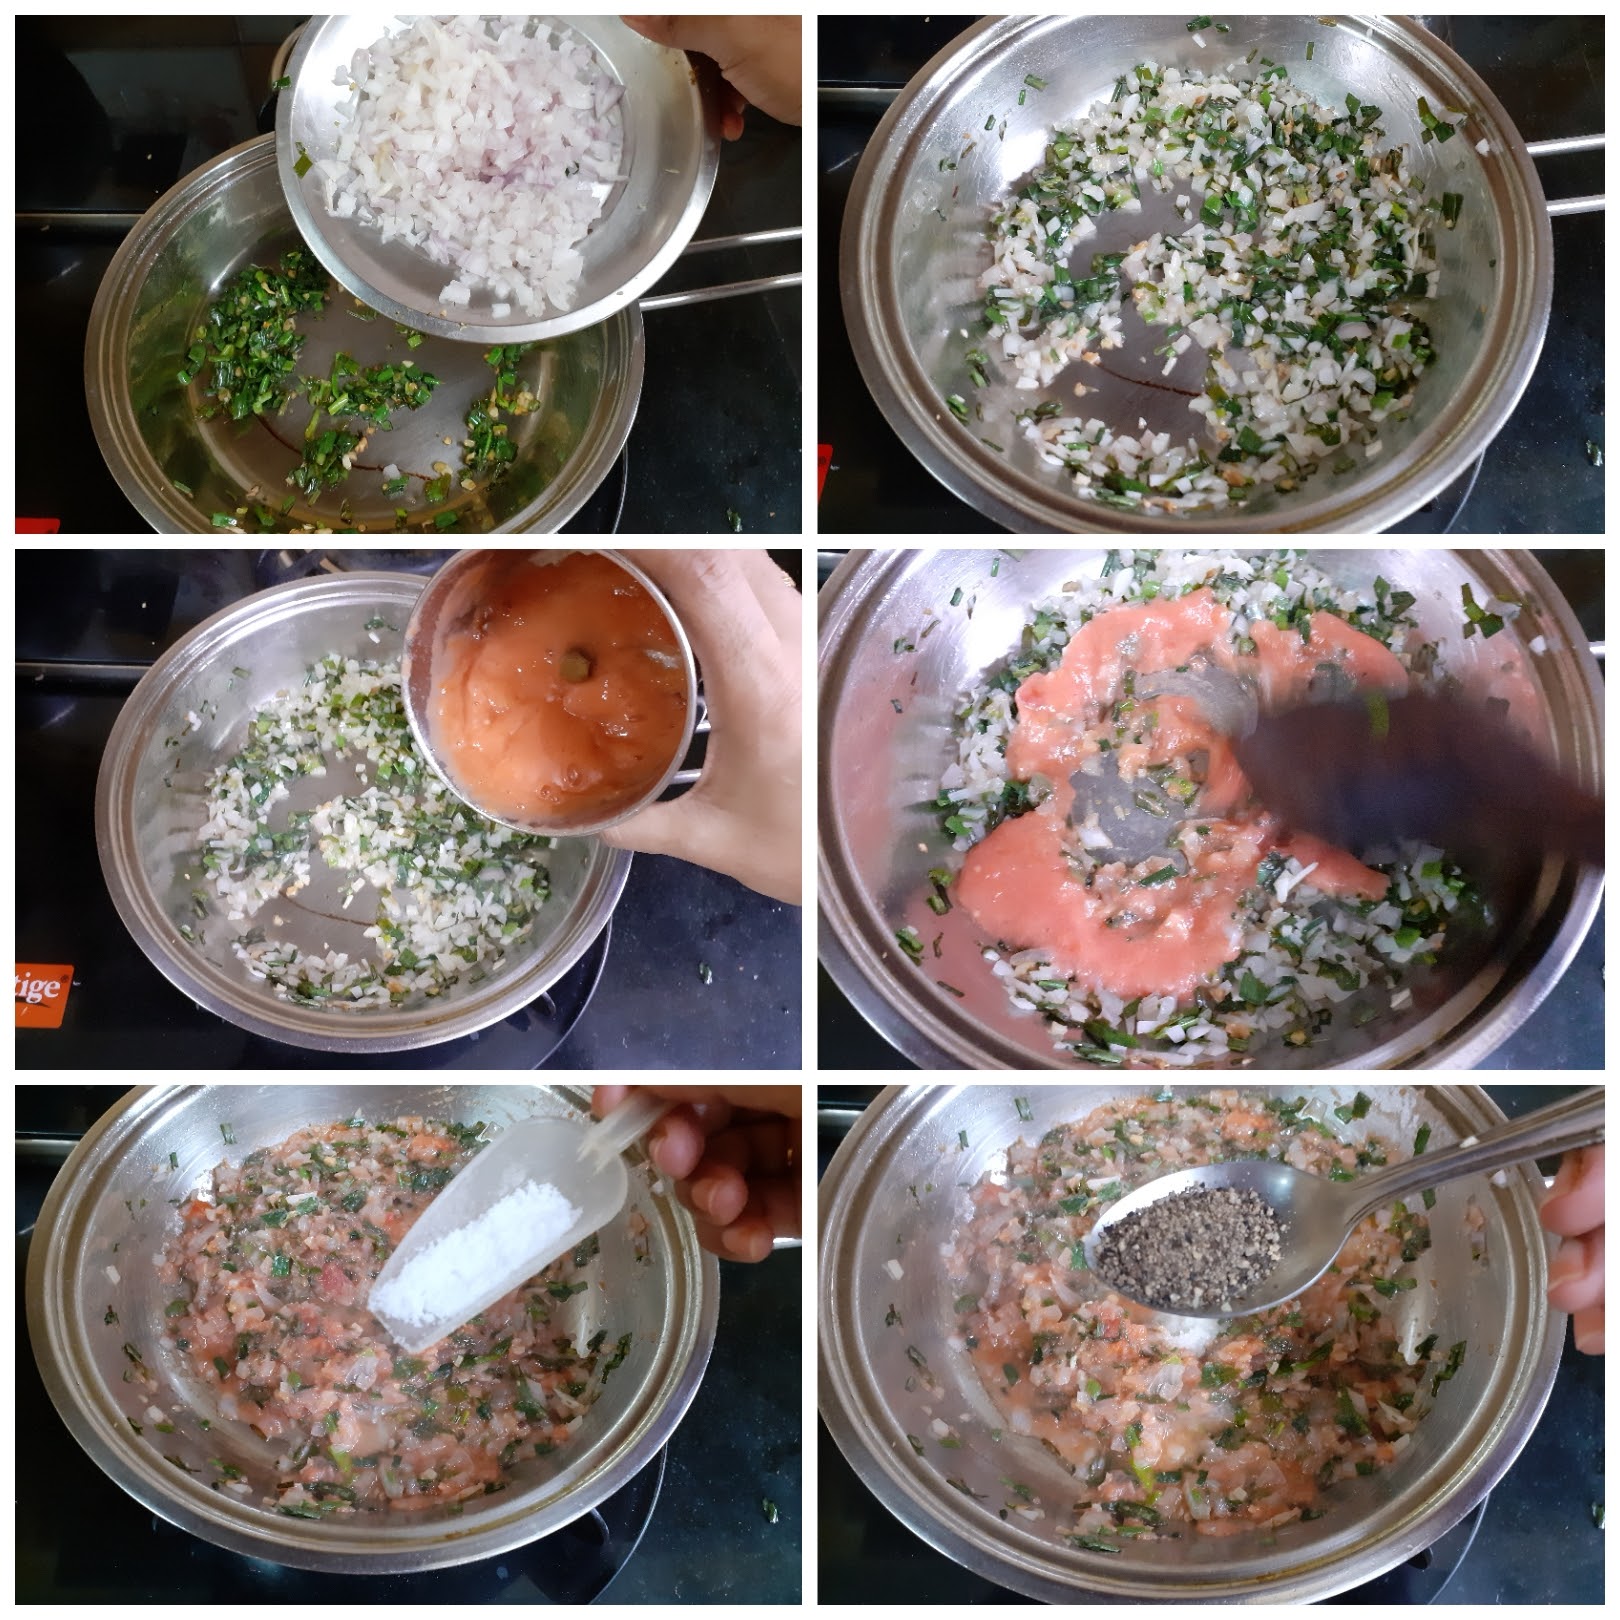
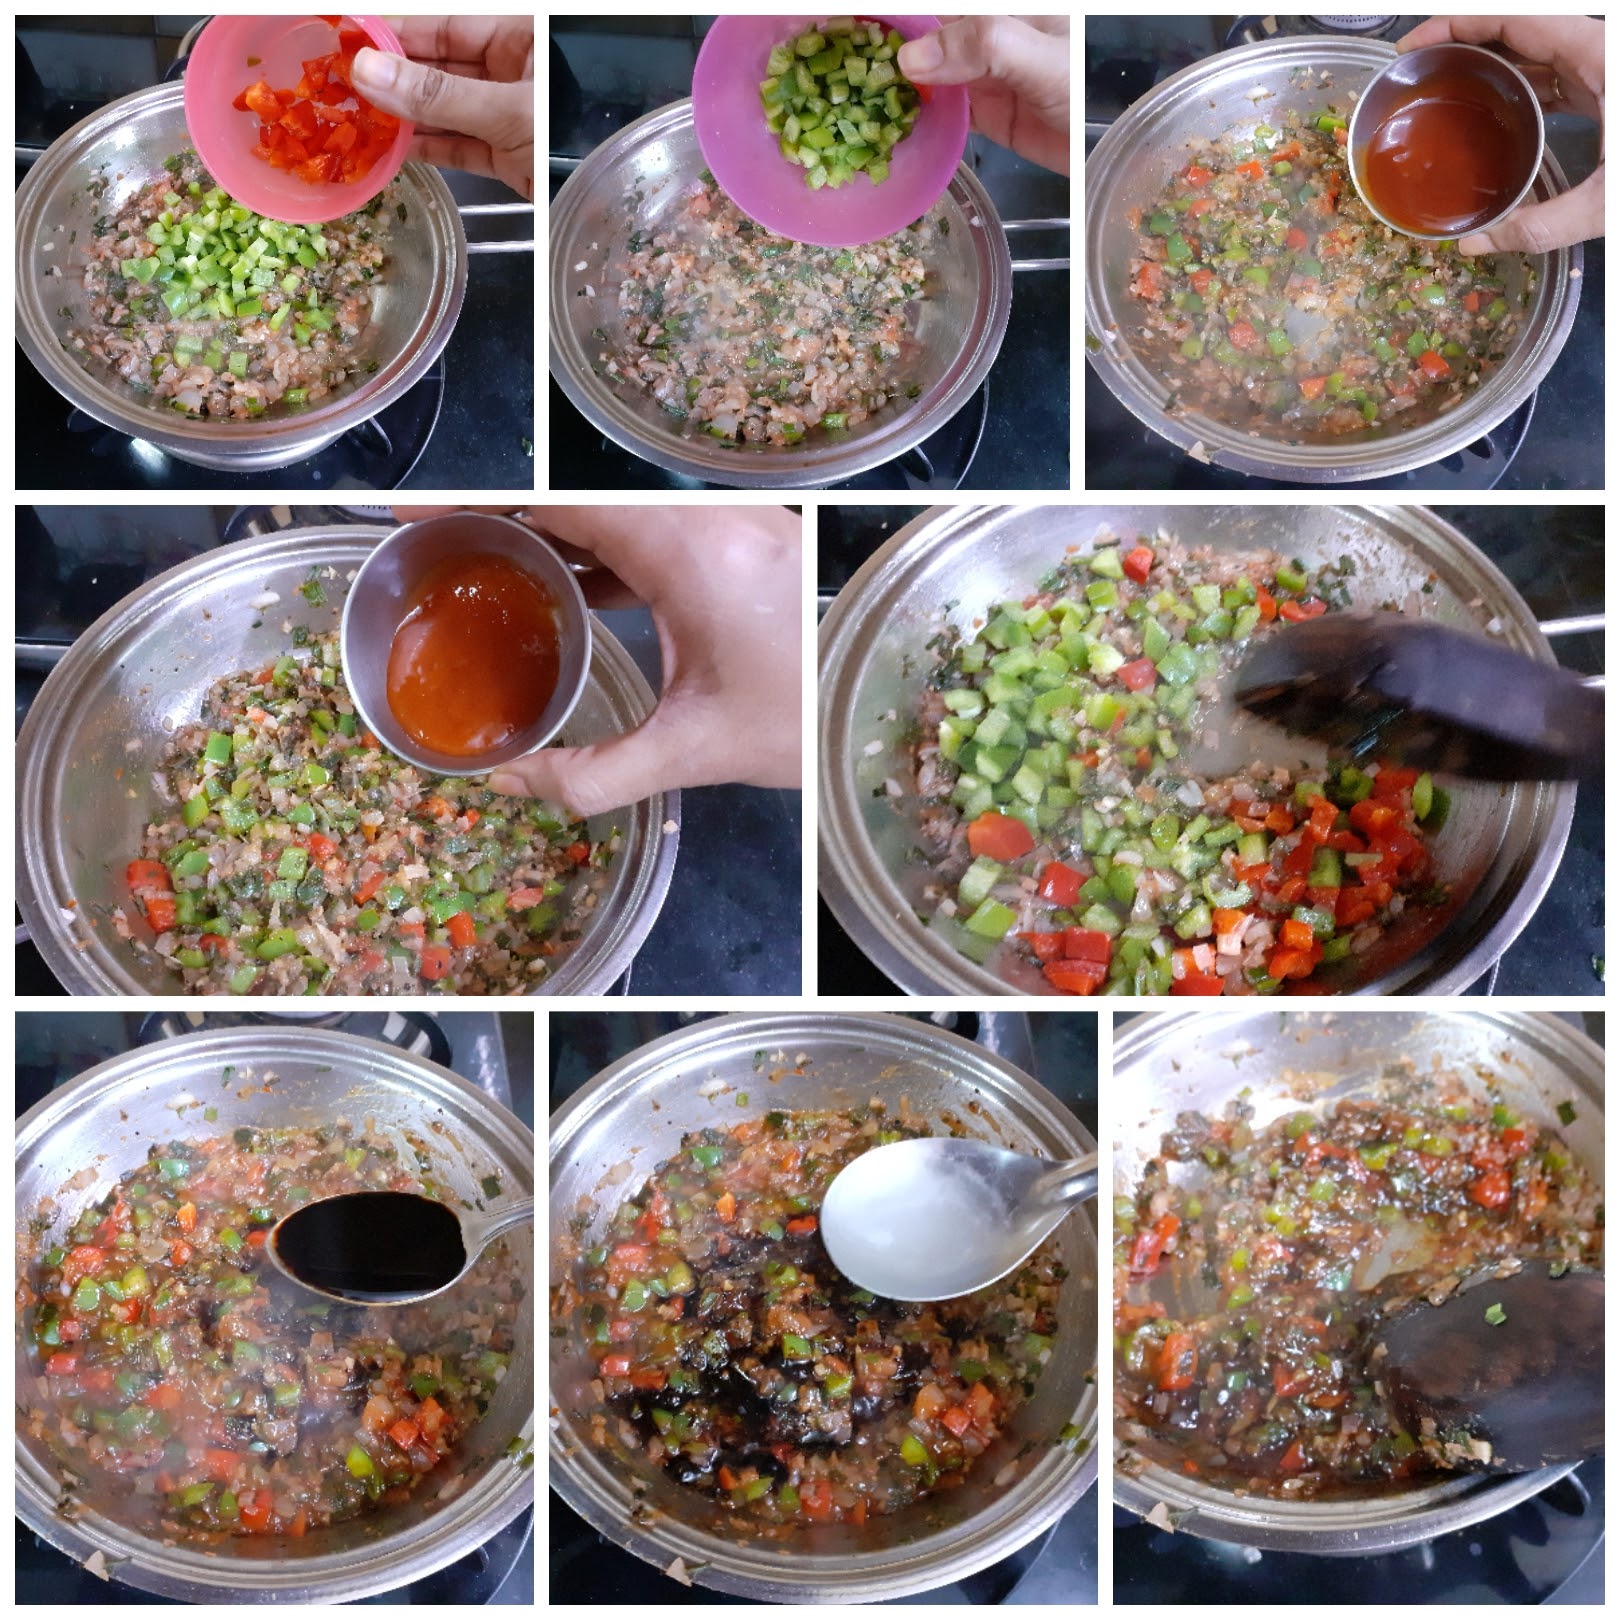
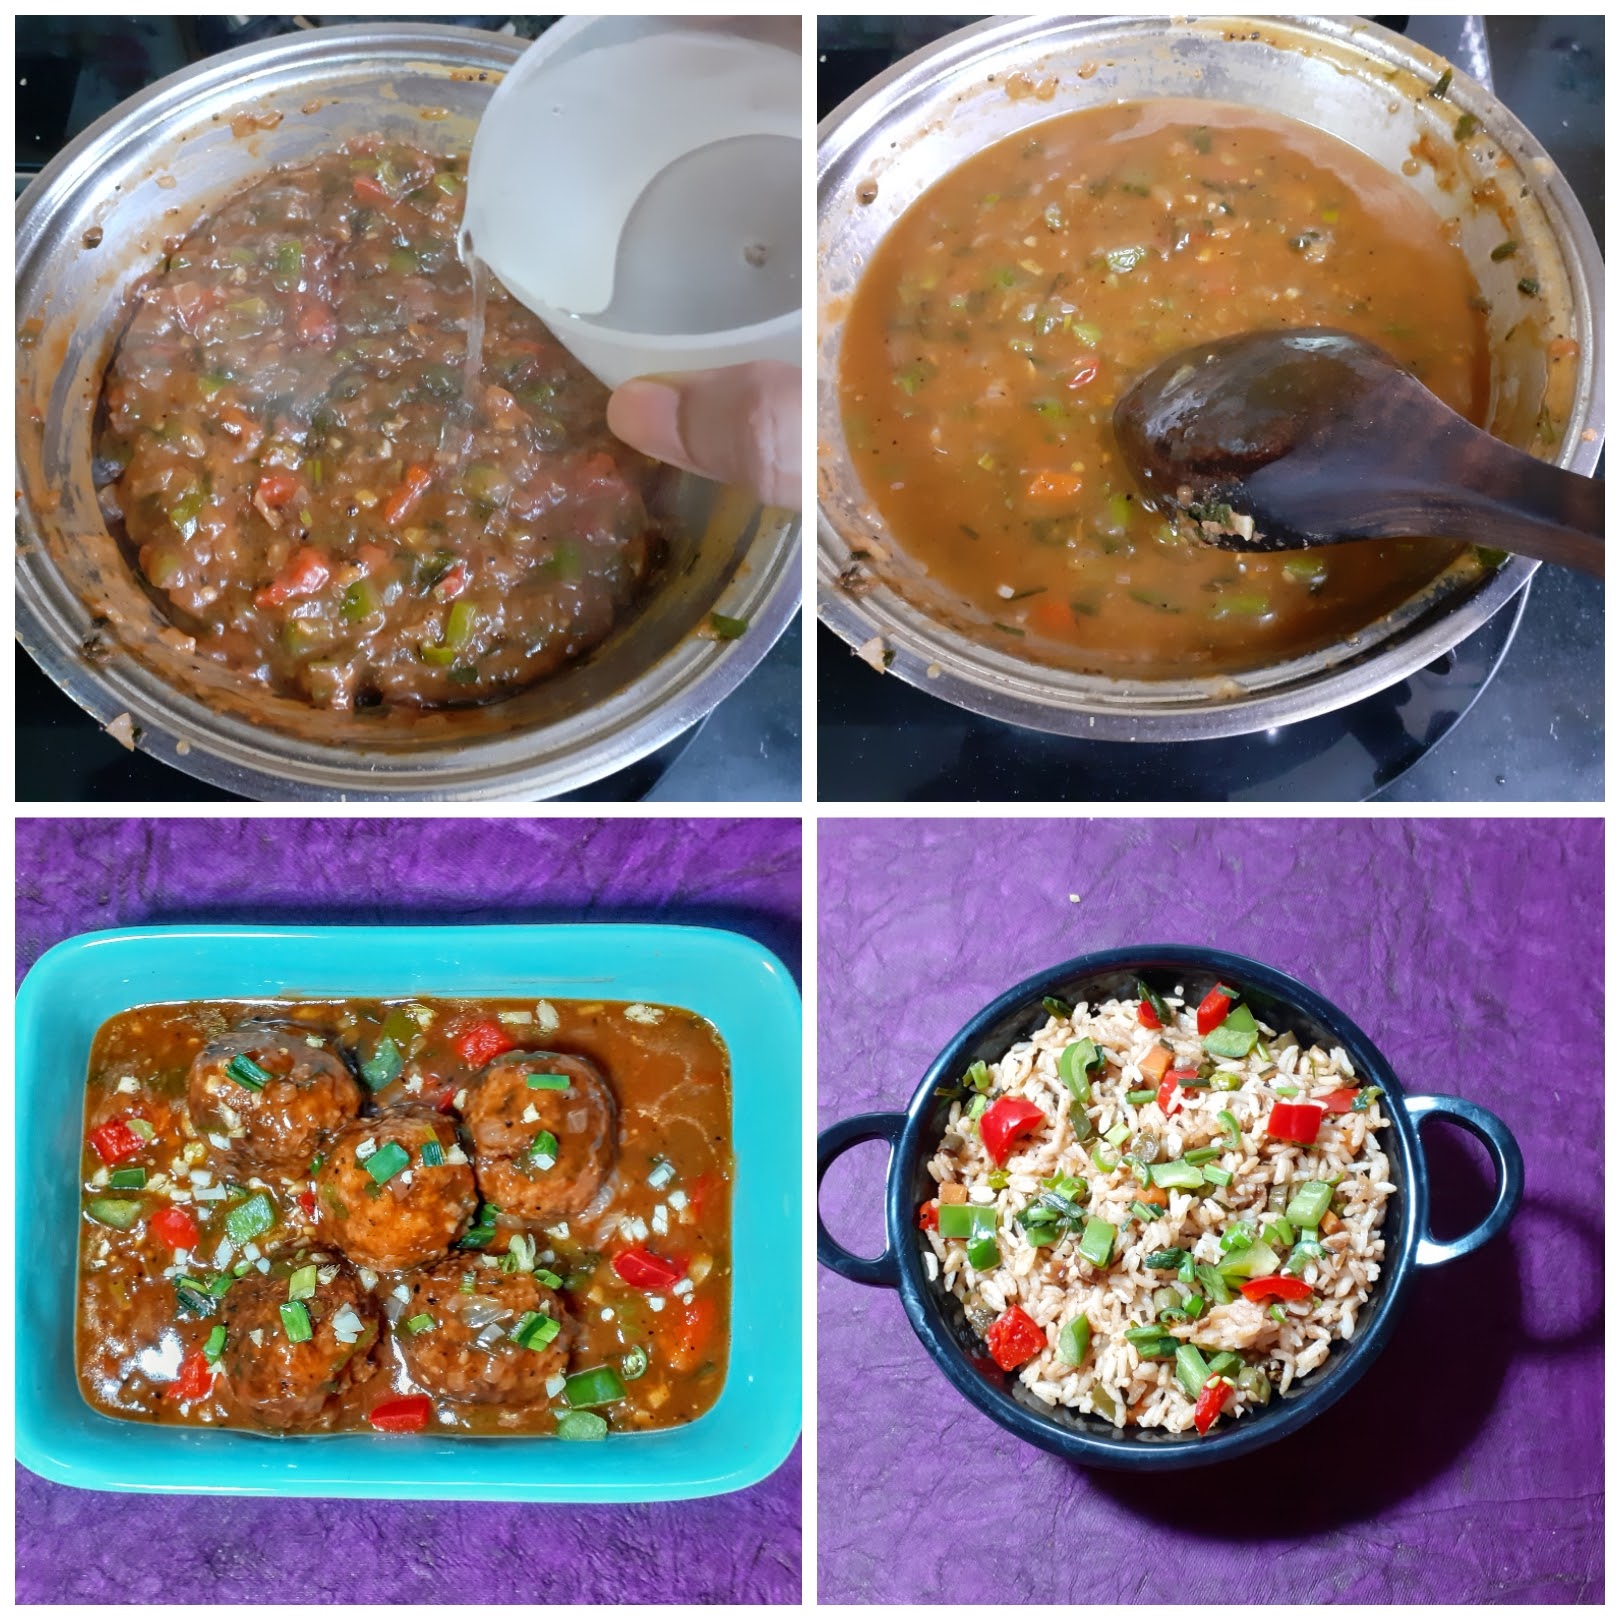
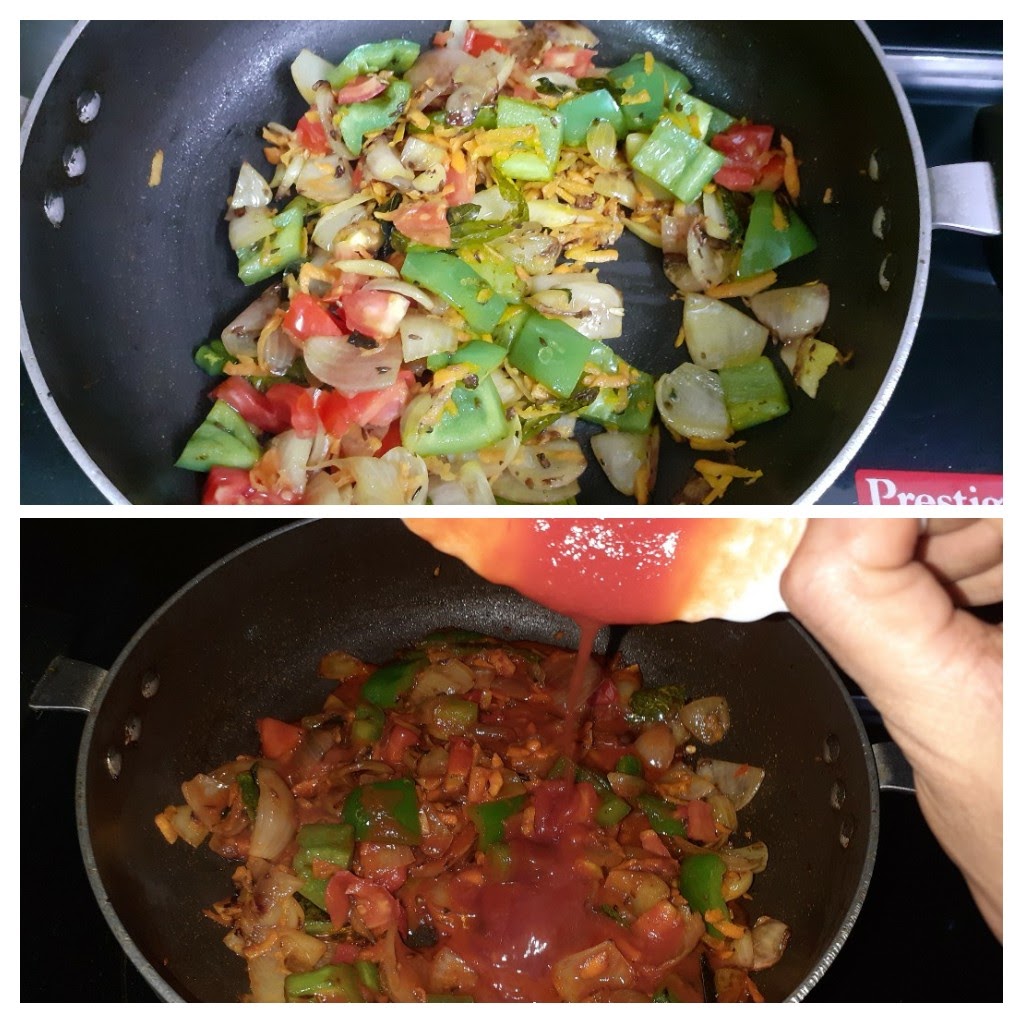
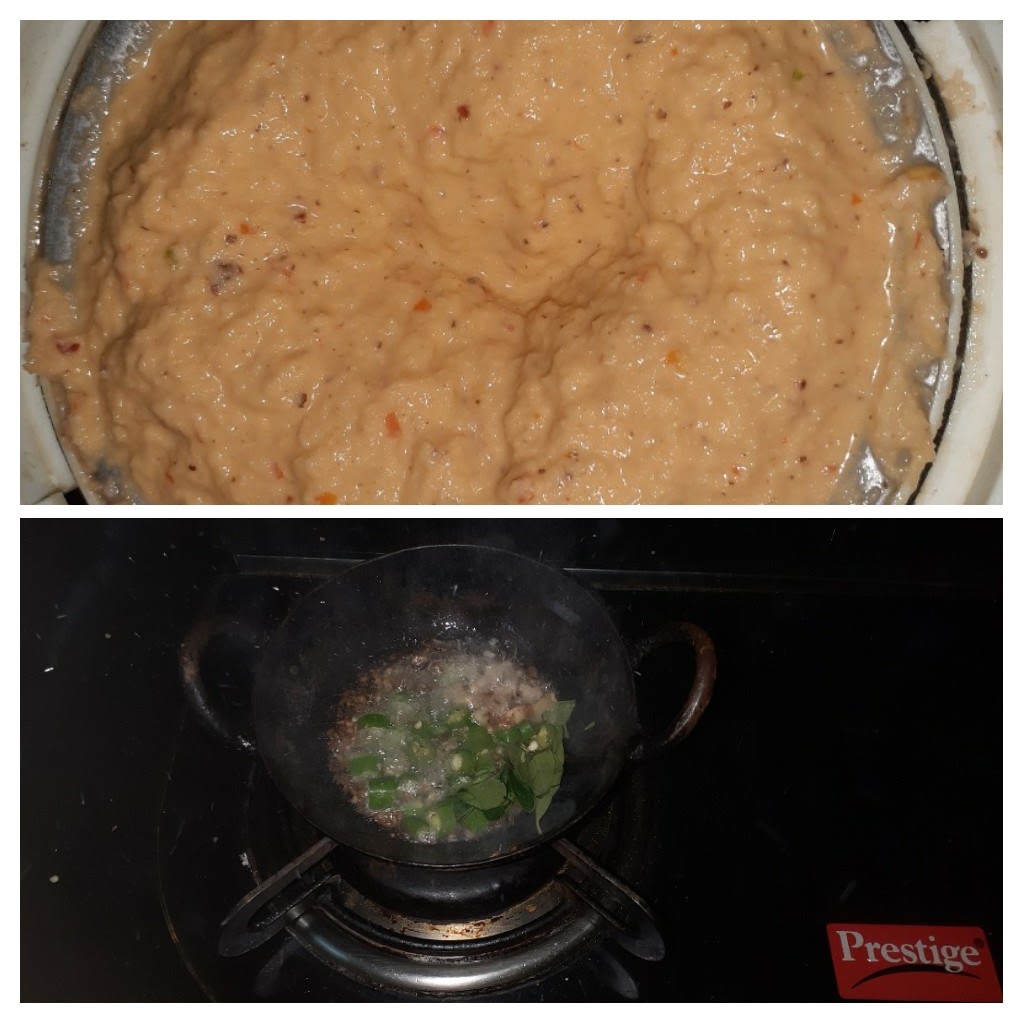
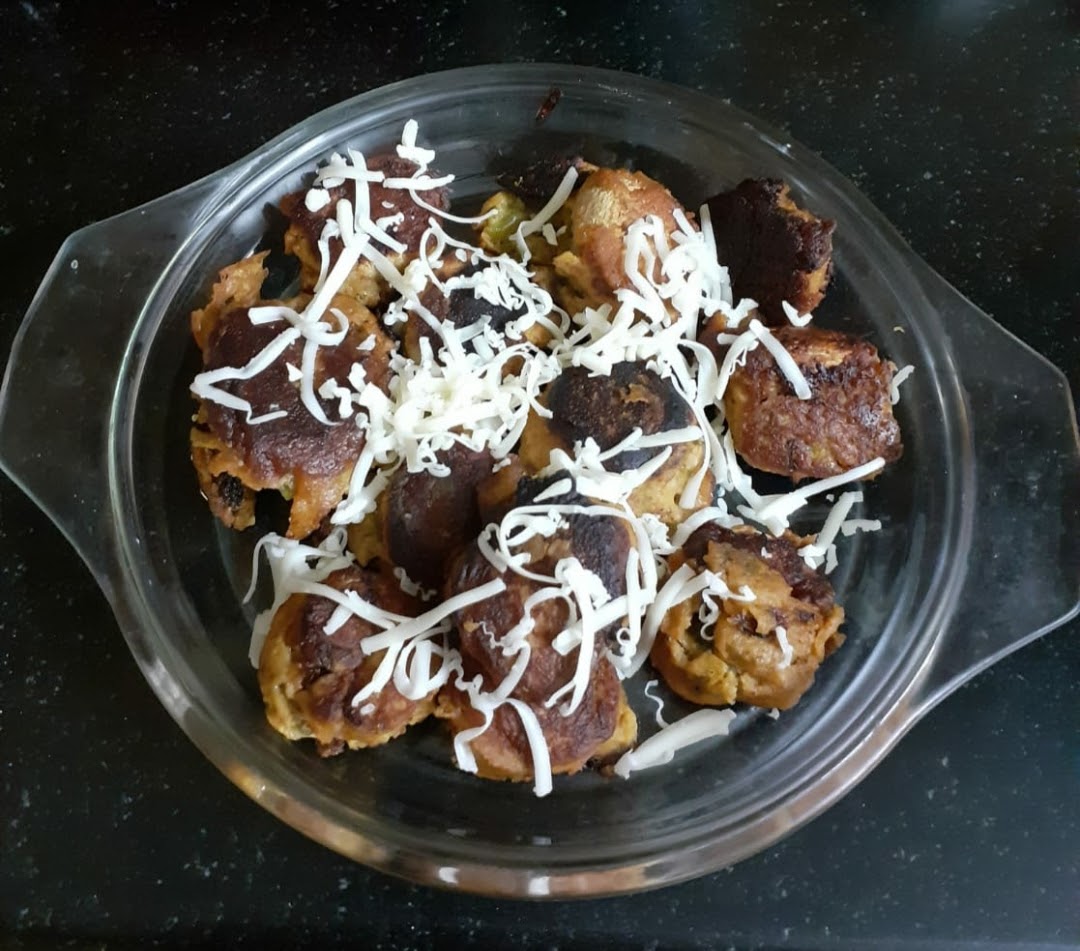
Heat oil in a pan and add the finely chopped green chillies, ginger and garlic to it. Saute for 30 seconds. Now add the spring onion greens and saute. Add the onions and continue to saute, until the sweat a bit. Remember all sauteeing to be done in high heat and with constant stirring. Now add the tomato puree and cook for a minute. Add salt and pepper powder and continue to cook for another minute. When the raw smell from the tomato puree is gone, drop in the both the Red and Green capsicum. Saute for another 30 seconds. You can add a teaspoon of sugar at this stage(optional). Now add the tomato sauce, followed by the red chilli sauce. Stir nicely. Now add the soya sauce followed by Vinegar, stir and cook for a minute. Prepare the cornflour mix by adding 1/2 cup water to 2 tbsp of cornflour. Pour this mix into the prepared sauce and stir continuously for a minute. Now dilute the sauce to the consistency you prefer by adding water. I have added 1 cup as I like a thick gravy. Simmer for 2 minutes on low heat and the gravy is ready. Now arrange the Manchurian balls in a serving dish and pour the gravy over it. Enjoy hot with any Fried rice varieties. Bon Appetit.
STEPWISE RECIPE FOLLOWS:
1. In a bowl take the shredded Cabbage, add to it rest of the vegetables like shredded carrot, spring onions, onions, green chillies and ginger. Add salt and pepper powder and combine well using your fingers.
2. Now add Maida/refined flour, followed by rice flour and combine nicely. Now divide the mixture into lemon sized balls( I got around 20 of them with this quality). Heat oil in a wok or Kadai and fry the balls in medium heat until a golden brown. Keep them aside.
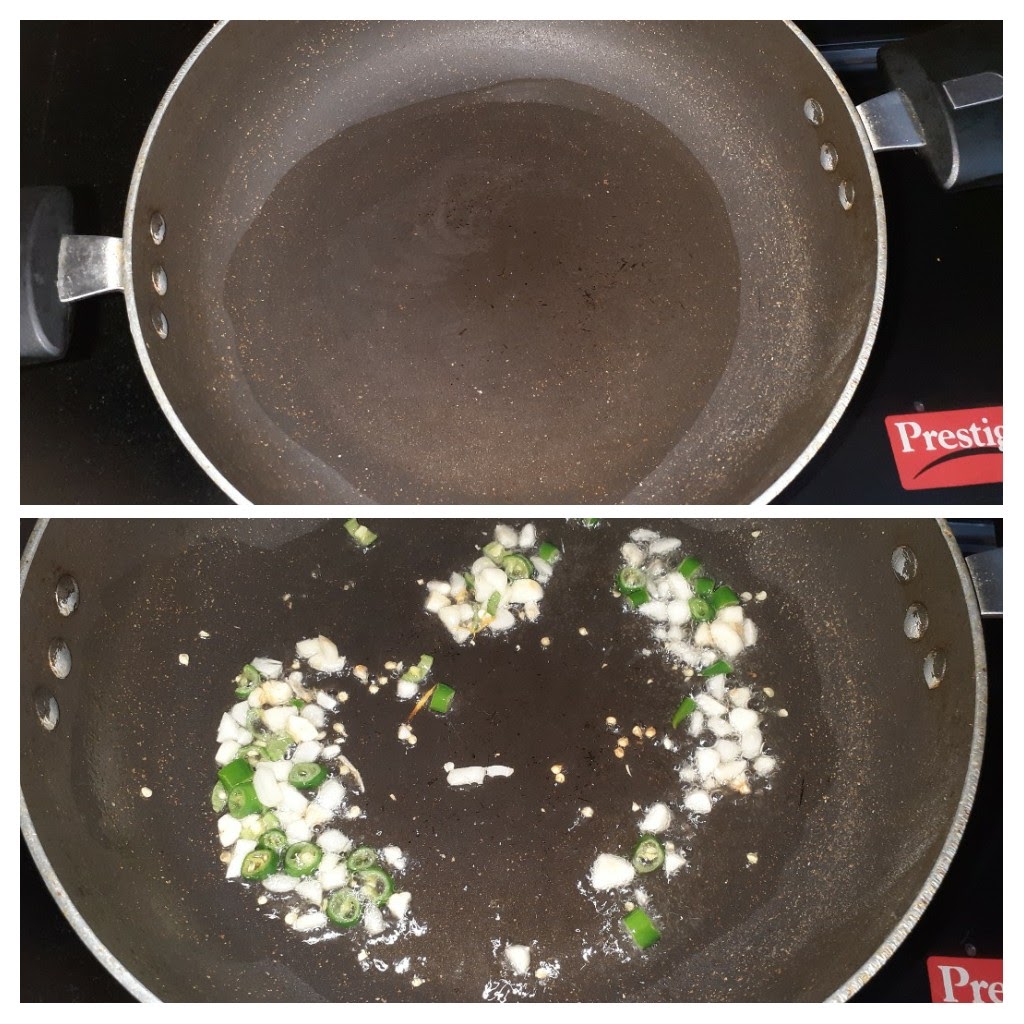
3. Heat oil in a pan and add the finely chopped green chillies, ginger and garlic to it. Saute for 30 seconds. Now add the spring onion greens and saute.
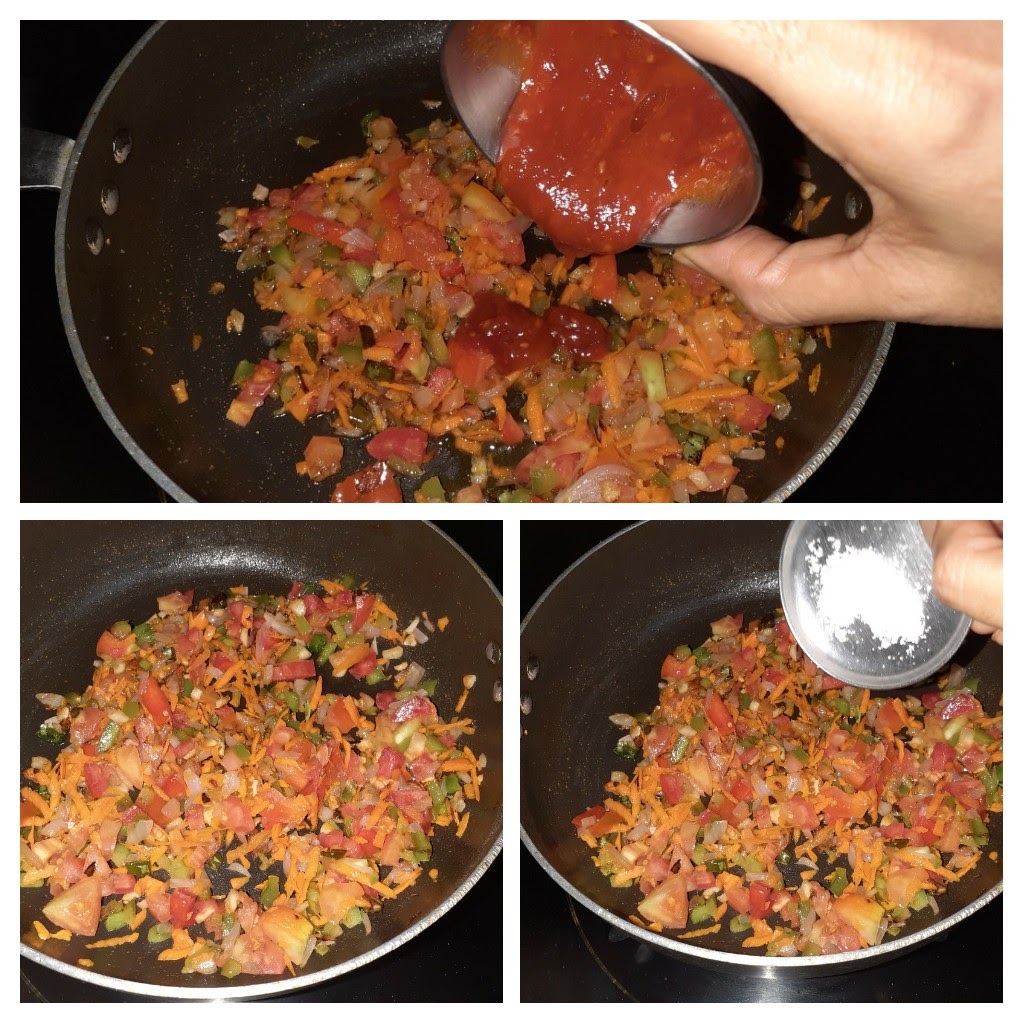
4. Add the onions and continue to saute, until the sweat a bit. Remember all sauteeing to be done in high heat and with constant stirring. Now add the tomato puree and cook for a minute. Add salt and pepper powder and continue to cook for another minute.
5. When the raw smell from the tomato puree is gone, drop in the both the Red and Green capsicum. Saute for another 30 seconds.Now add the tomato sauce, followed by the red chilli sauce. Stir nicely. Now add the soya sauce followed by Vinegar, stir and cook for a minute.
6. Prepare the cornflour mix by adding 1/2 cup water to 2 tbsp of cornflour. Pour this mix into the prepared sauce and stir continuously for a minute.
7. Now dilute the sauce to the consistency you prefer by adding water. Simmer for 2 minutes on low heat and the gravy is ready. Now arrange the Manchurian balls in a serving dish and pour the gravy over it. Enjoy hot with any Fried rice varieties.
Notes:
1. The gravy for any wet Manchurian is the same, so one can experiment with other vegetables like Cauliflower, Potato, Brocolli, Soya Chunks beside others. If you make Manchurian with any other interesting vegetable do let us know. We love learning.
2. I usually make a slightly thick gravy as that’s how we like this dish. If you prefer a lighter one, feel free to dilute the gravy by adding little warm water.
3. If you make an excess of the Manchurian balls, don’t fret, as you can mix them ina onion tomato paste, add some spices, add Schezwan sauce and get it to the consistency of a dry paste. Toss in the balls into this paste, mix nicely and stir fry and you have a dry Manchurian at hand???? to relish.
If you tried this recipe and liked it please comment below. I would love to hear from you. If you have a query about the recipe email us and ill respond as soon as I can.
If you would like to receive our recipes in your mail please leave your mail id at the homepage. Every time Rajjo’s Kitchen has a new post we will mail the recipe to you.
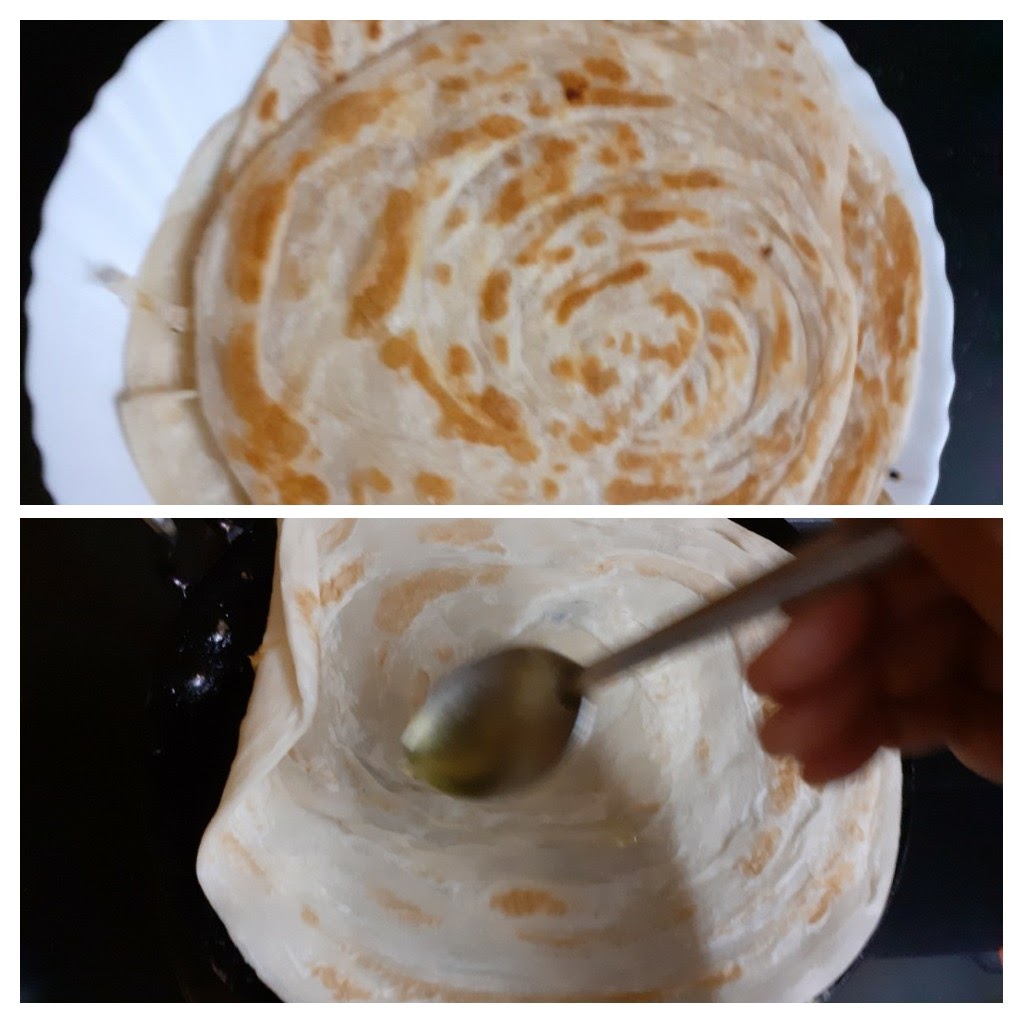
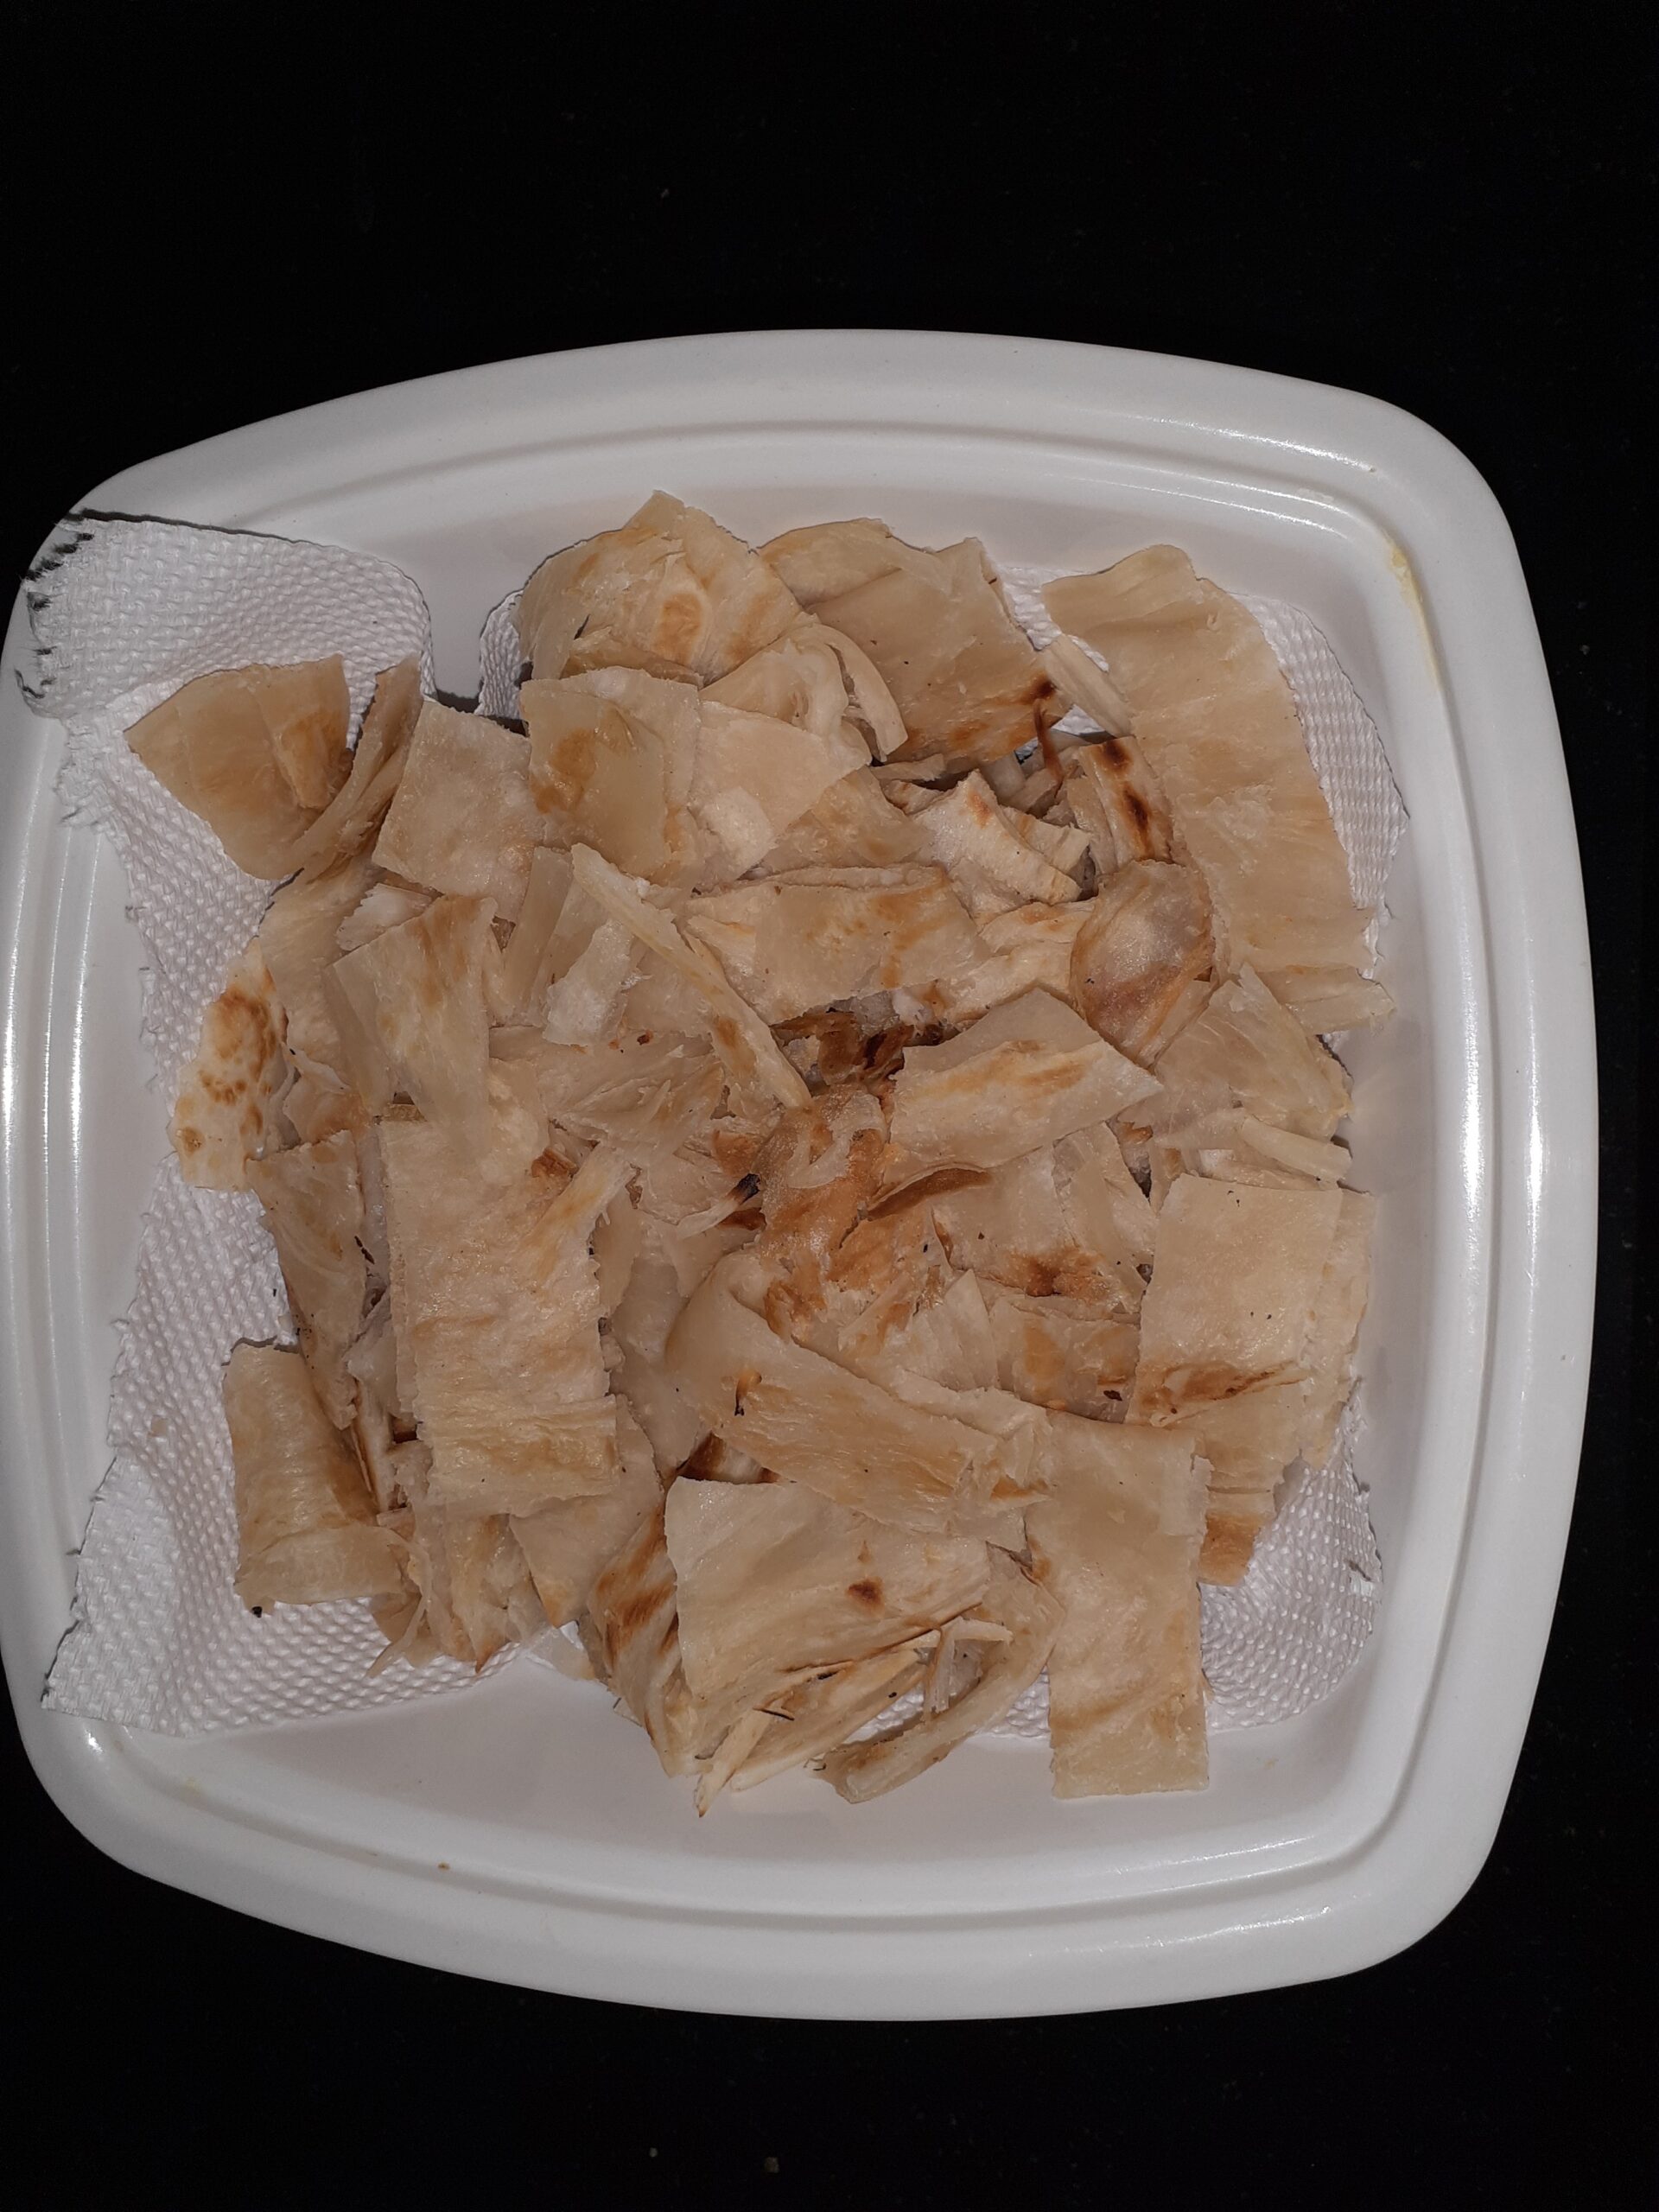
Garlic Lachcha Paratha (Multigrain Flour)
Lachcha Paratha is a popular Paratha variety that we find at all Indian/North Indian restaurants. Earlier I would be very intrigued by the way the layers were created and had my own theory of how they must be done????(this was before the internet took over us and all recipes became household). The recipes at that time showed a very complicated process and as a person just venturing into cooking(more than 20 years back), I found the process very intimidating. Then as time passed by and I started gaining confidence in the cooking arena I tried out this Lachcha Paratha(had to rely on pictures only) and it turned out fine. The efforts put were greater than the outcome at that time, so I stopped experimenting with it. After a few years, I suddenly developed an interest in recreating it again. But this time I was better equipped with knowledge and practice. Today I can try out this Paratha with any flour, that is Wheat, Maida, or Multigrain and the results are always great. The method I am giving here is a very simple one which even beginners will find easy to follow.
The recipe that I am blogging now uses Multigrain flour(store-bought). I use Wheat flour and Multigrain flour mostly for all my bread/roti/paratha recipes. I am not much of a fan of Maida, though I do use it in some dishes where it is necessary and also in Parathas(just about a tablespoon for the pliability).
There will always be a difference in textures when we experiment with different flours, and one should be open to it. In this recipe, I have not used baking powder or baking soda for the fluffiness, so they may not be entirely fluffy, but will definitely be flaky.
While you are here please check out my other bread recipes like Beetroot Paratha and Missi Roti.
Here is the recipe of Garlic Lachcha Paratha for you-
PREP TIME: 20 Mins COOK TIME: 20 Mins
TOTAL TIME: 40Mins COURSE: BREAD
CUISINE: INDIAN SERVINGS: 5(10 Pcs)
AUTHOR: Rajni Ram
Ingredients:
Multigrain flour 3 cups
Maida 1 tbsp
Oil for kneading 1 tbsp water as required
Butter 50 gm
Garlic 3 cloves finely chopped
Fresh coriander leaves finely chopped 2 tsp
Salt 1/4 tsp
Directions:
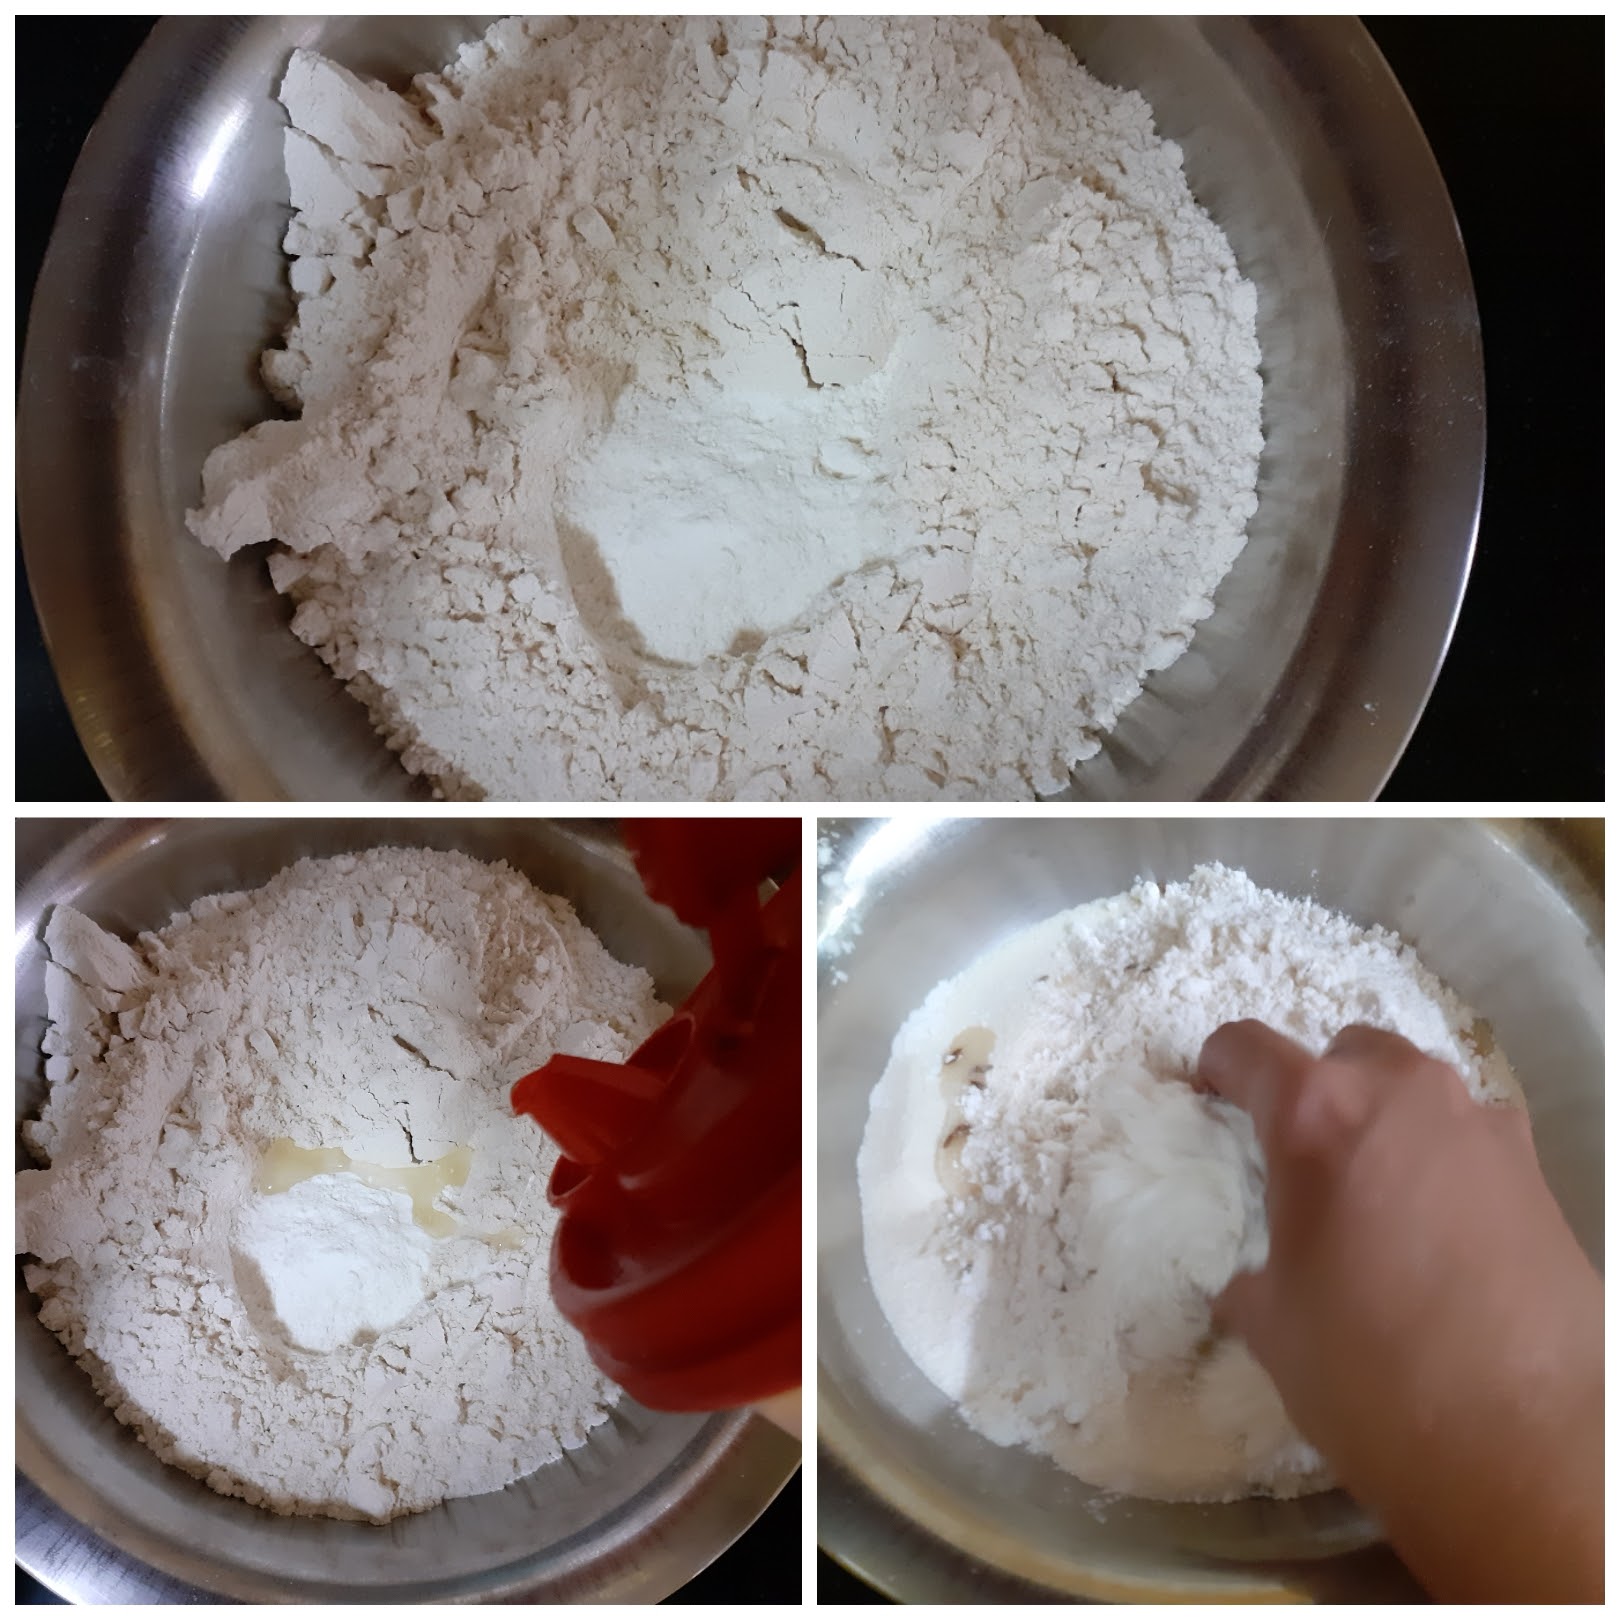
In a big mixing bowl take the multigrain flour, add the tiny amount of maida and salt and mix well. Create a well in the center and pour the oil. Now work the oil into the flour(no water to be added at this stage) nicely. Now create a well in the center again. Now knead the dough adding a little water at a time. We want a dough that is neither too tough nor too soft. The texture should be like Chapati dough. Rest the dough for 20 minutes to half an hour.
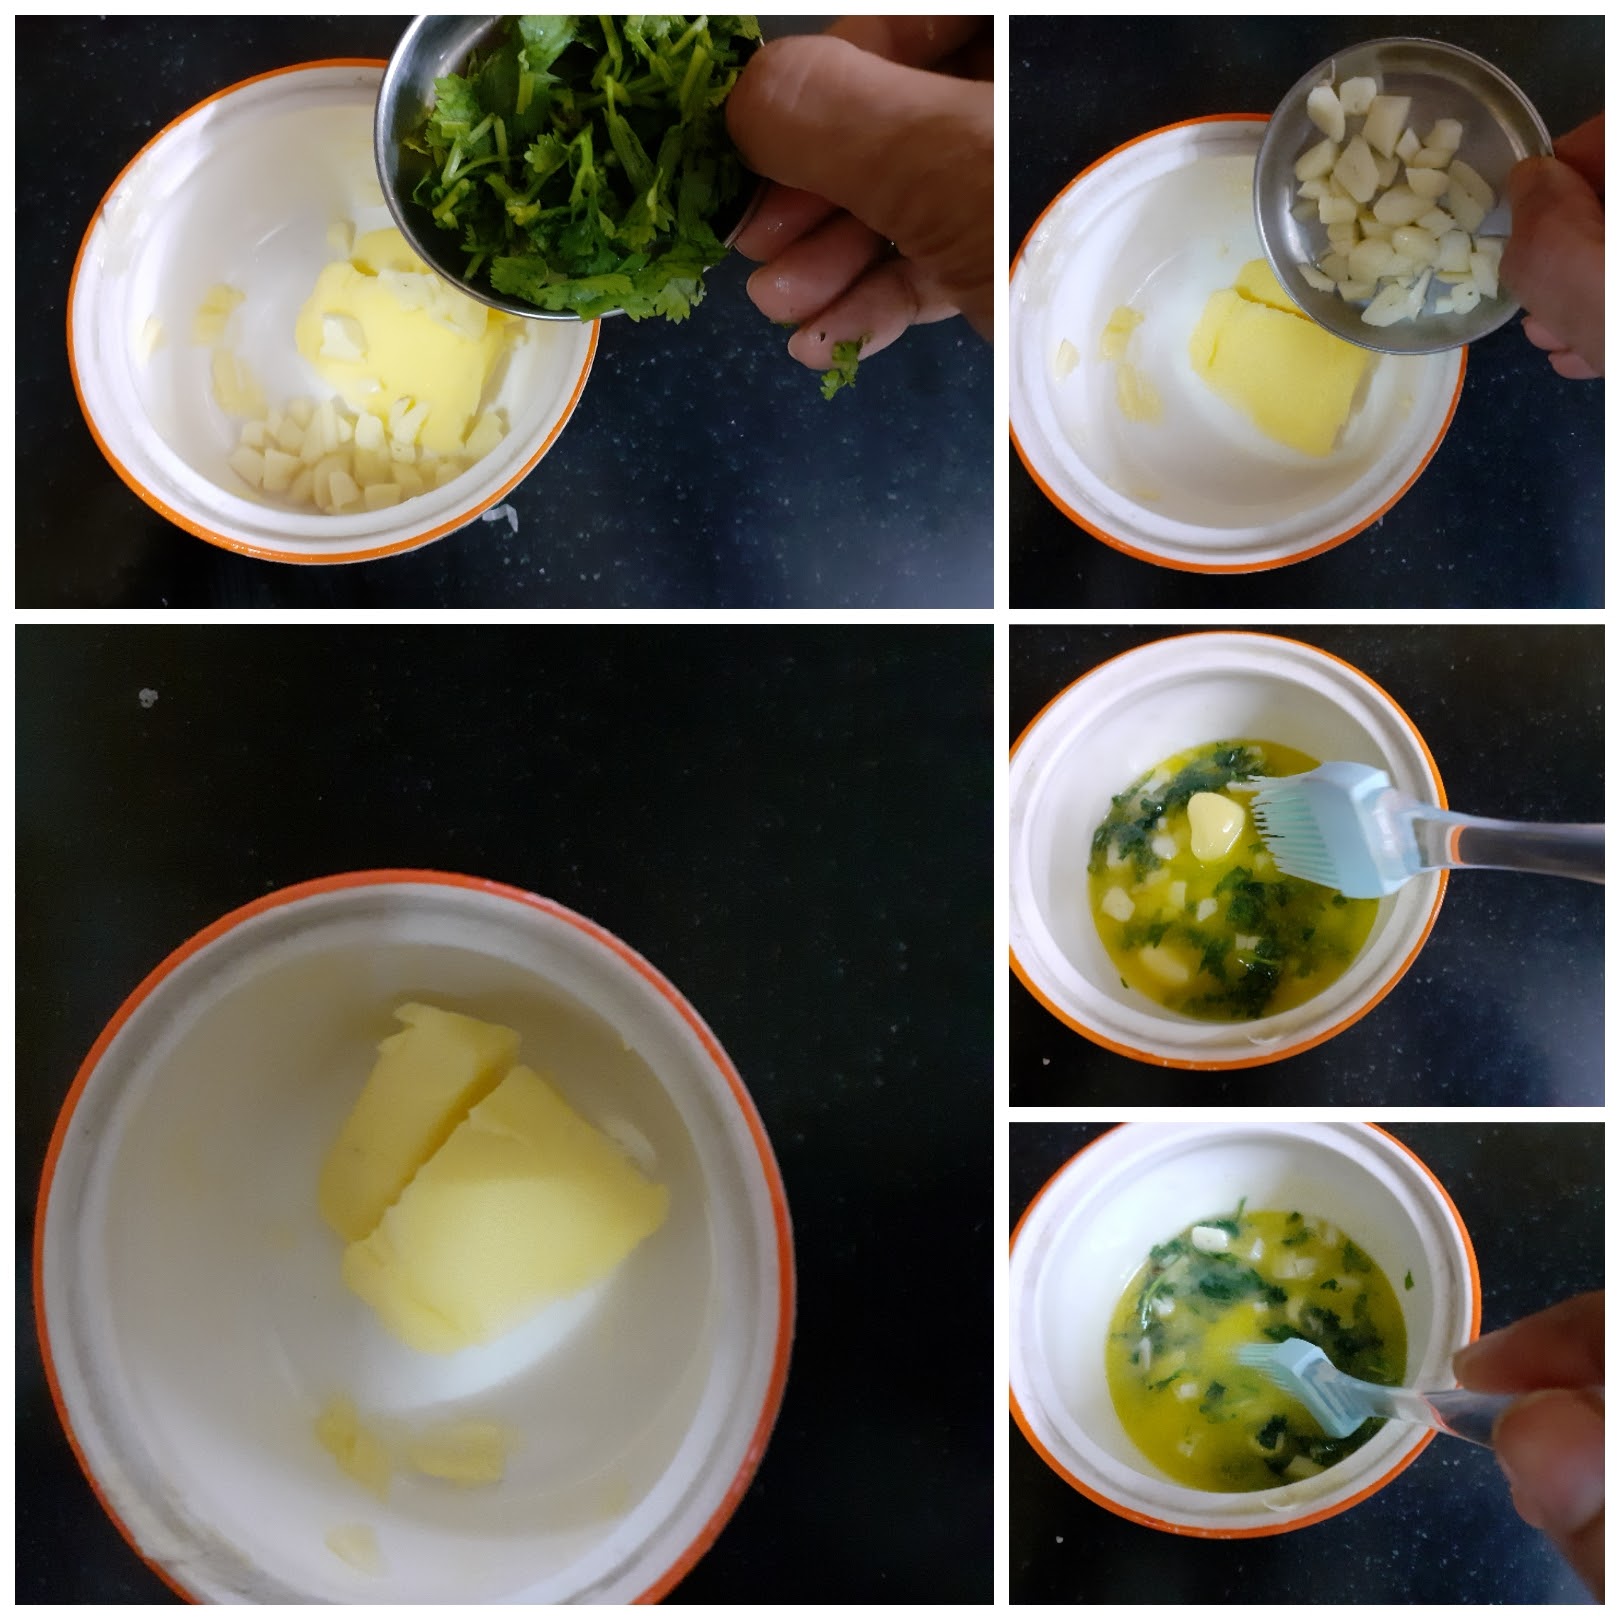
For Garlic Butter:
Take 50 gm butter ina bowl, add the crushed garlic and coriander leaves to it, and microwave for 30 seconds. The butter to only melt and not boil. Alternately you can keep the bowl of butter in some hot water to melt and then add the garlic and coriander.
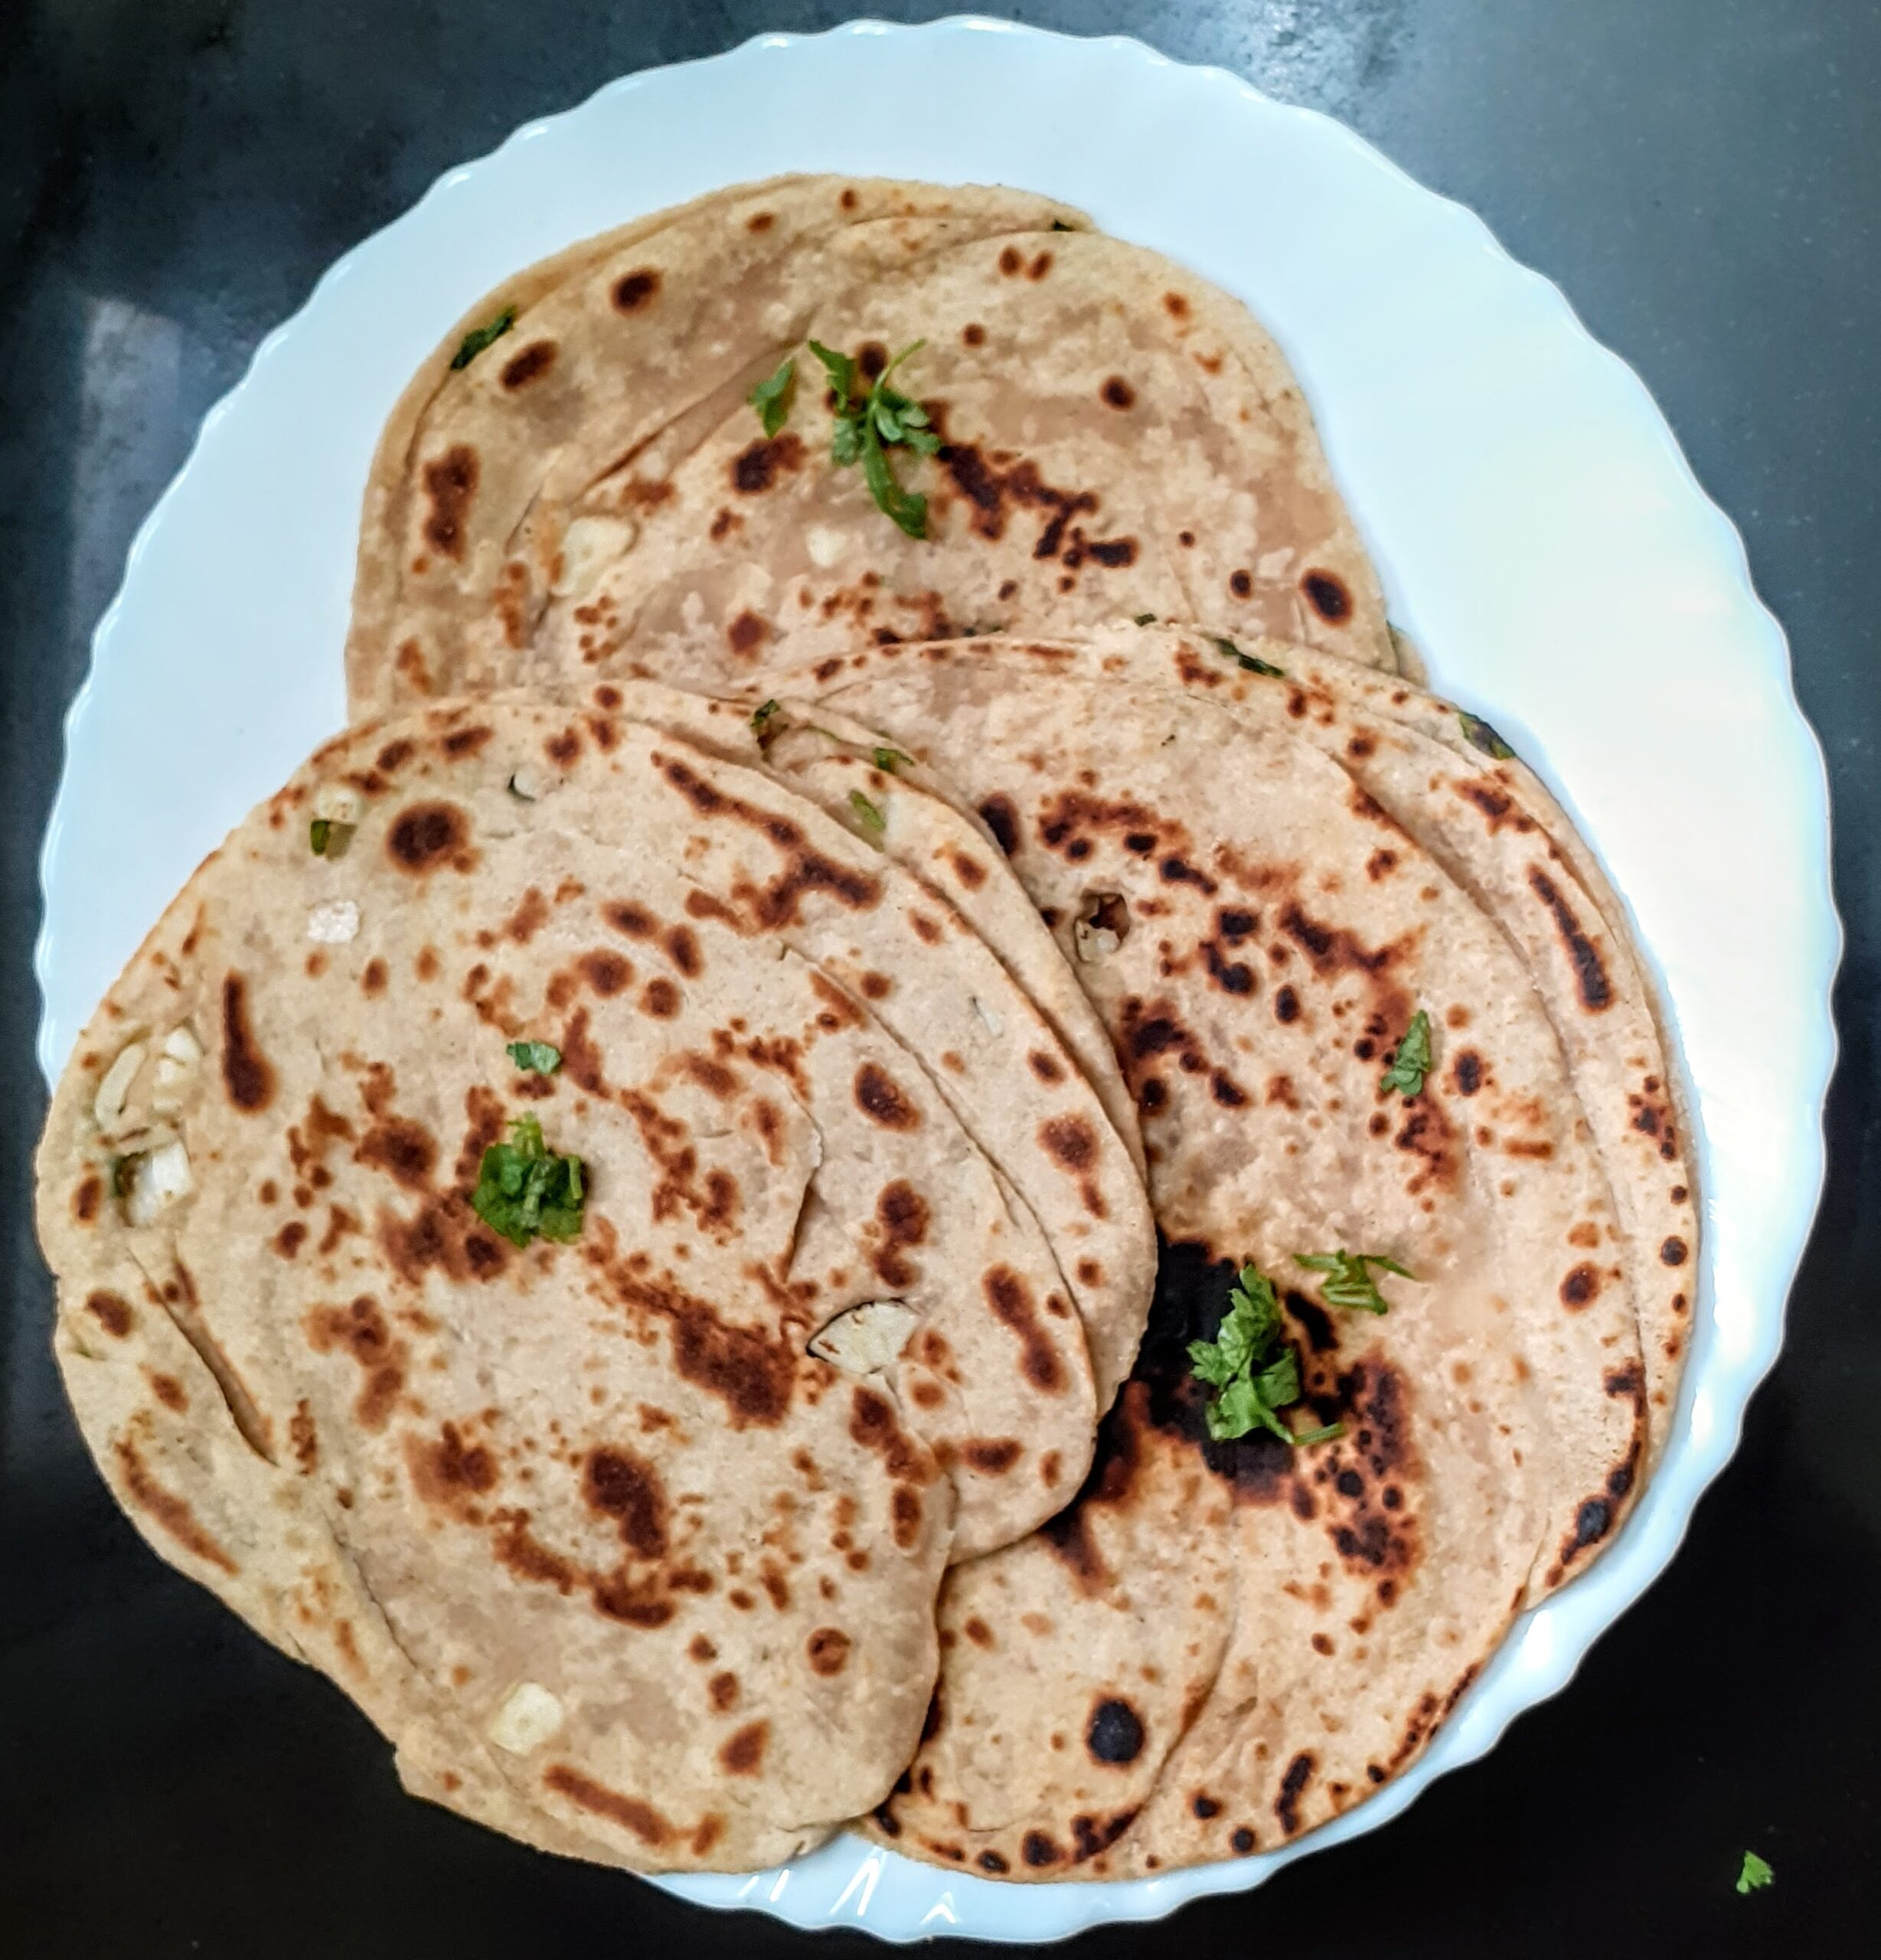
To make Parathas: Divide the dough into 10 big balls. Now take one ball at a time and roll it in dry flour. Place it on your rolling board and roll it out into a big Chapati first. Apply the garlic butter on the chapati with a brush, liberally. Now pleat the Chapati or fold like a fan( refer video). Arrange the pleated dough into a roll, press it down with your fingers, dust it with a little flour and start rolling it out again gently. Roll it out a little thick and medium-sized. Now heat a girdle/tava and put the rolled out Paratha on it. Drizzle a little oil and cook on one side, flip on the other side, apply oil, and cook. You will see the flakes rising out. Cook until nicely brown and crisp. Serve right out of the girdle. The Lachcha paratha is ready!!!
STEPWISE RECIPE FOLLOWS:
1. In a big mixing bowl take the multigrain flour, add the tiny amount of maida and salt and mix well. Create a well in the center and pour the oil. Now work the oil into the flour(no water to be added at this stage) nicely.
2. Now create a well in the center again. Now knead the dough adding a little water at a time. We want a dough that is neither too tough nor too soft. Rest the dough for 20 minutes to half an hour.
3. Take 50 gm butter in a bowl, add the crushed garlic and coriander leaves to it, and microwave for 30 seconds. The butter to only melt and not boil. Alternately you can keep the bowl of butter in some hot water to melt and then add the garlic and coriander.
4. Method to make Garlic Lachcha Paratha video given here????
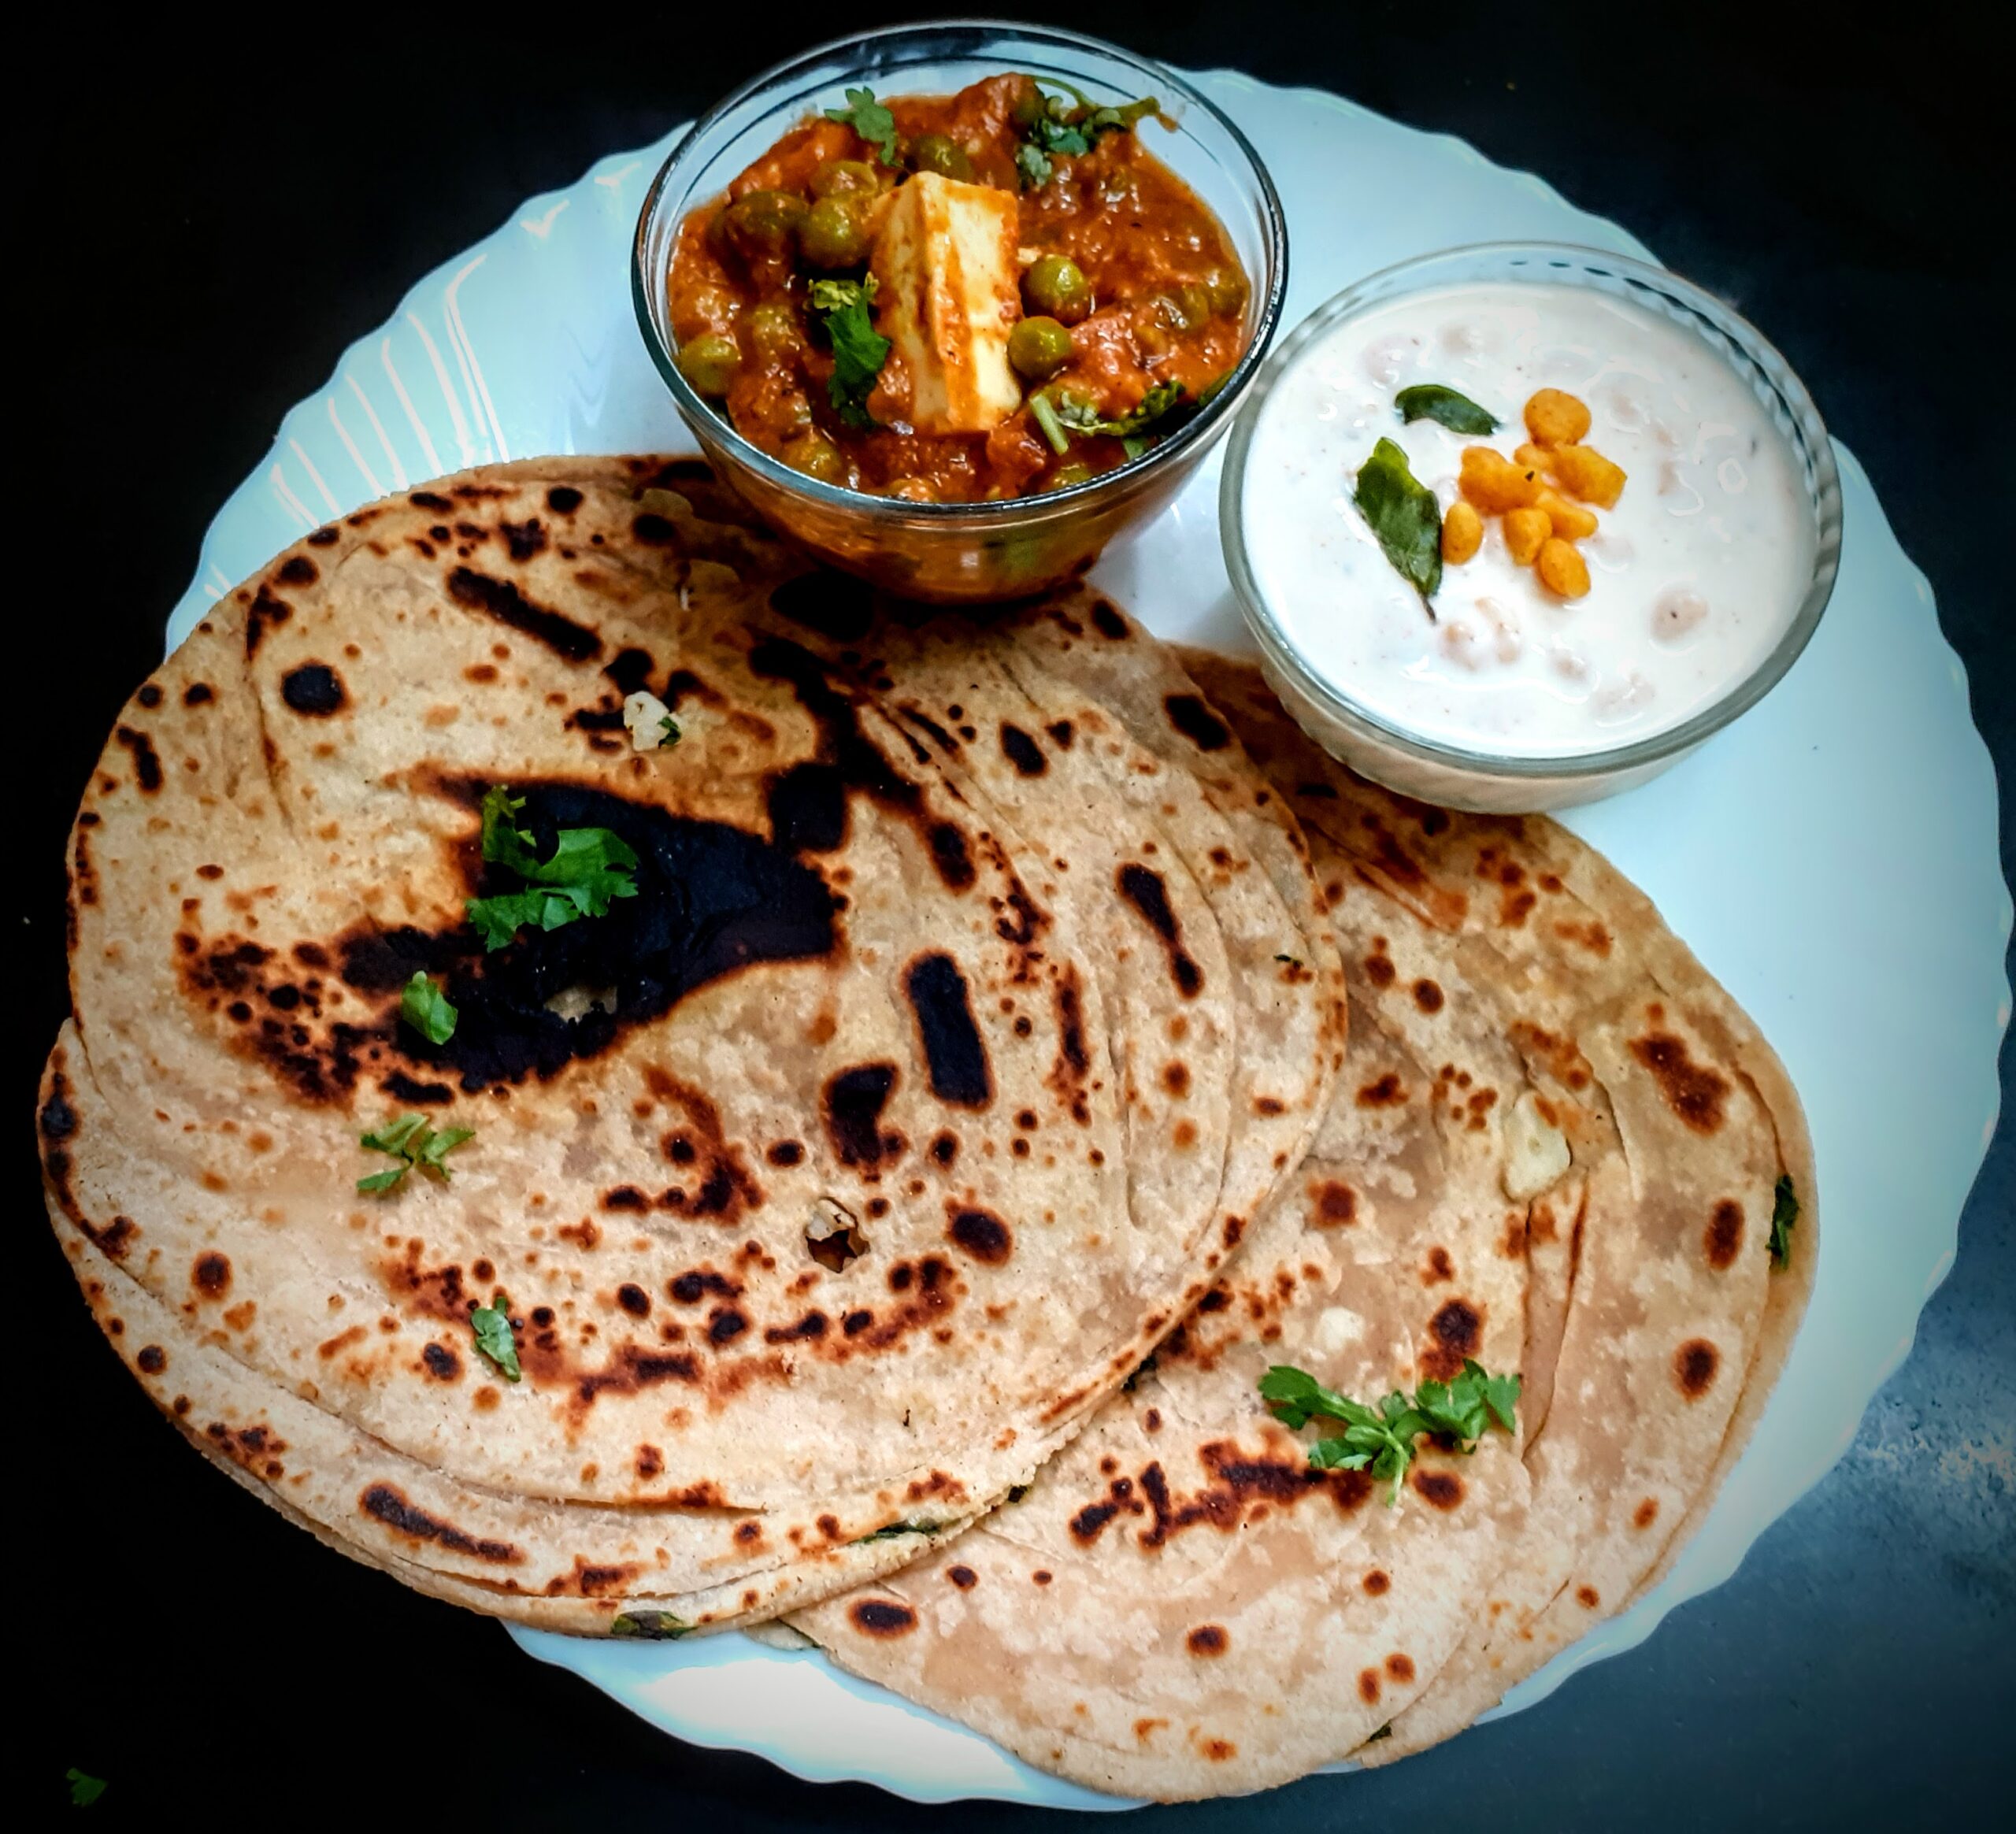
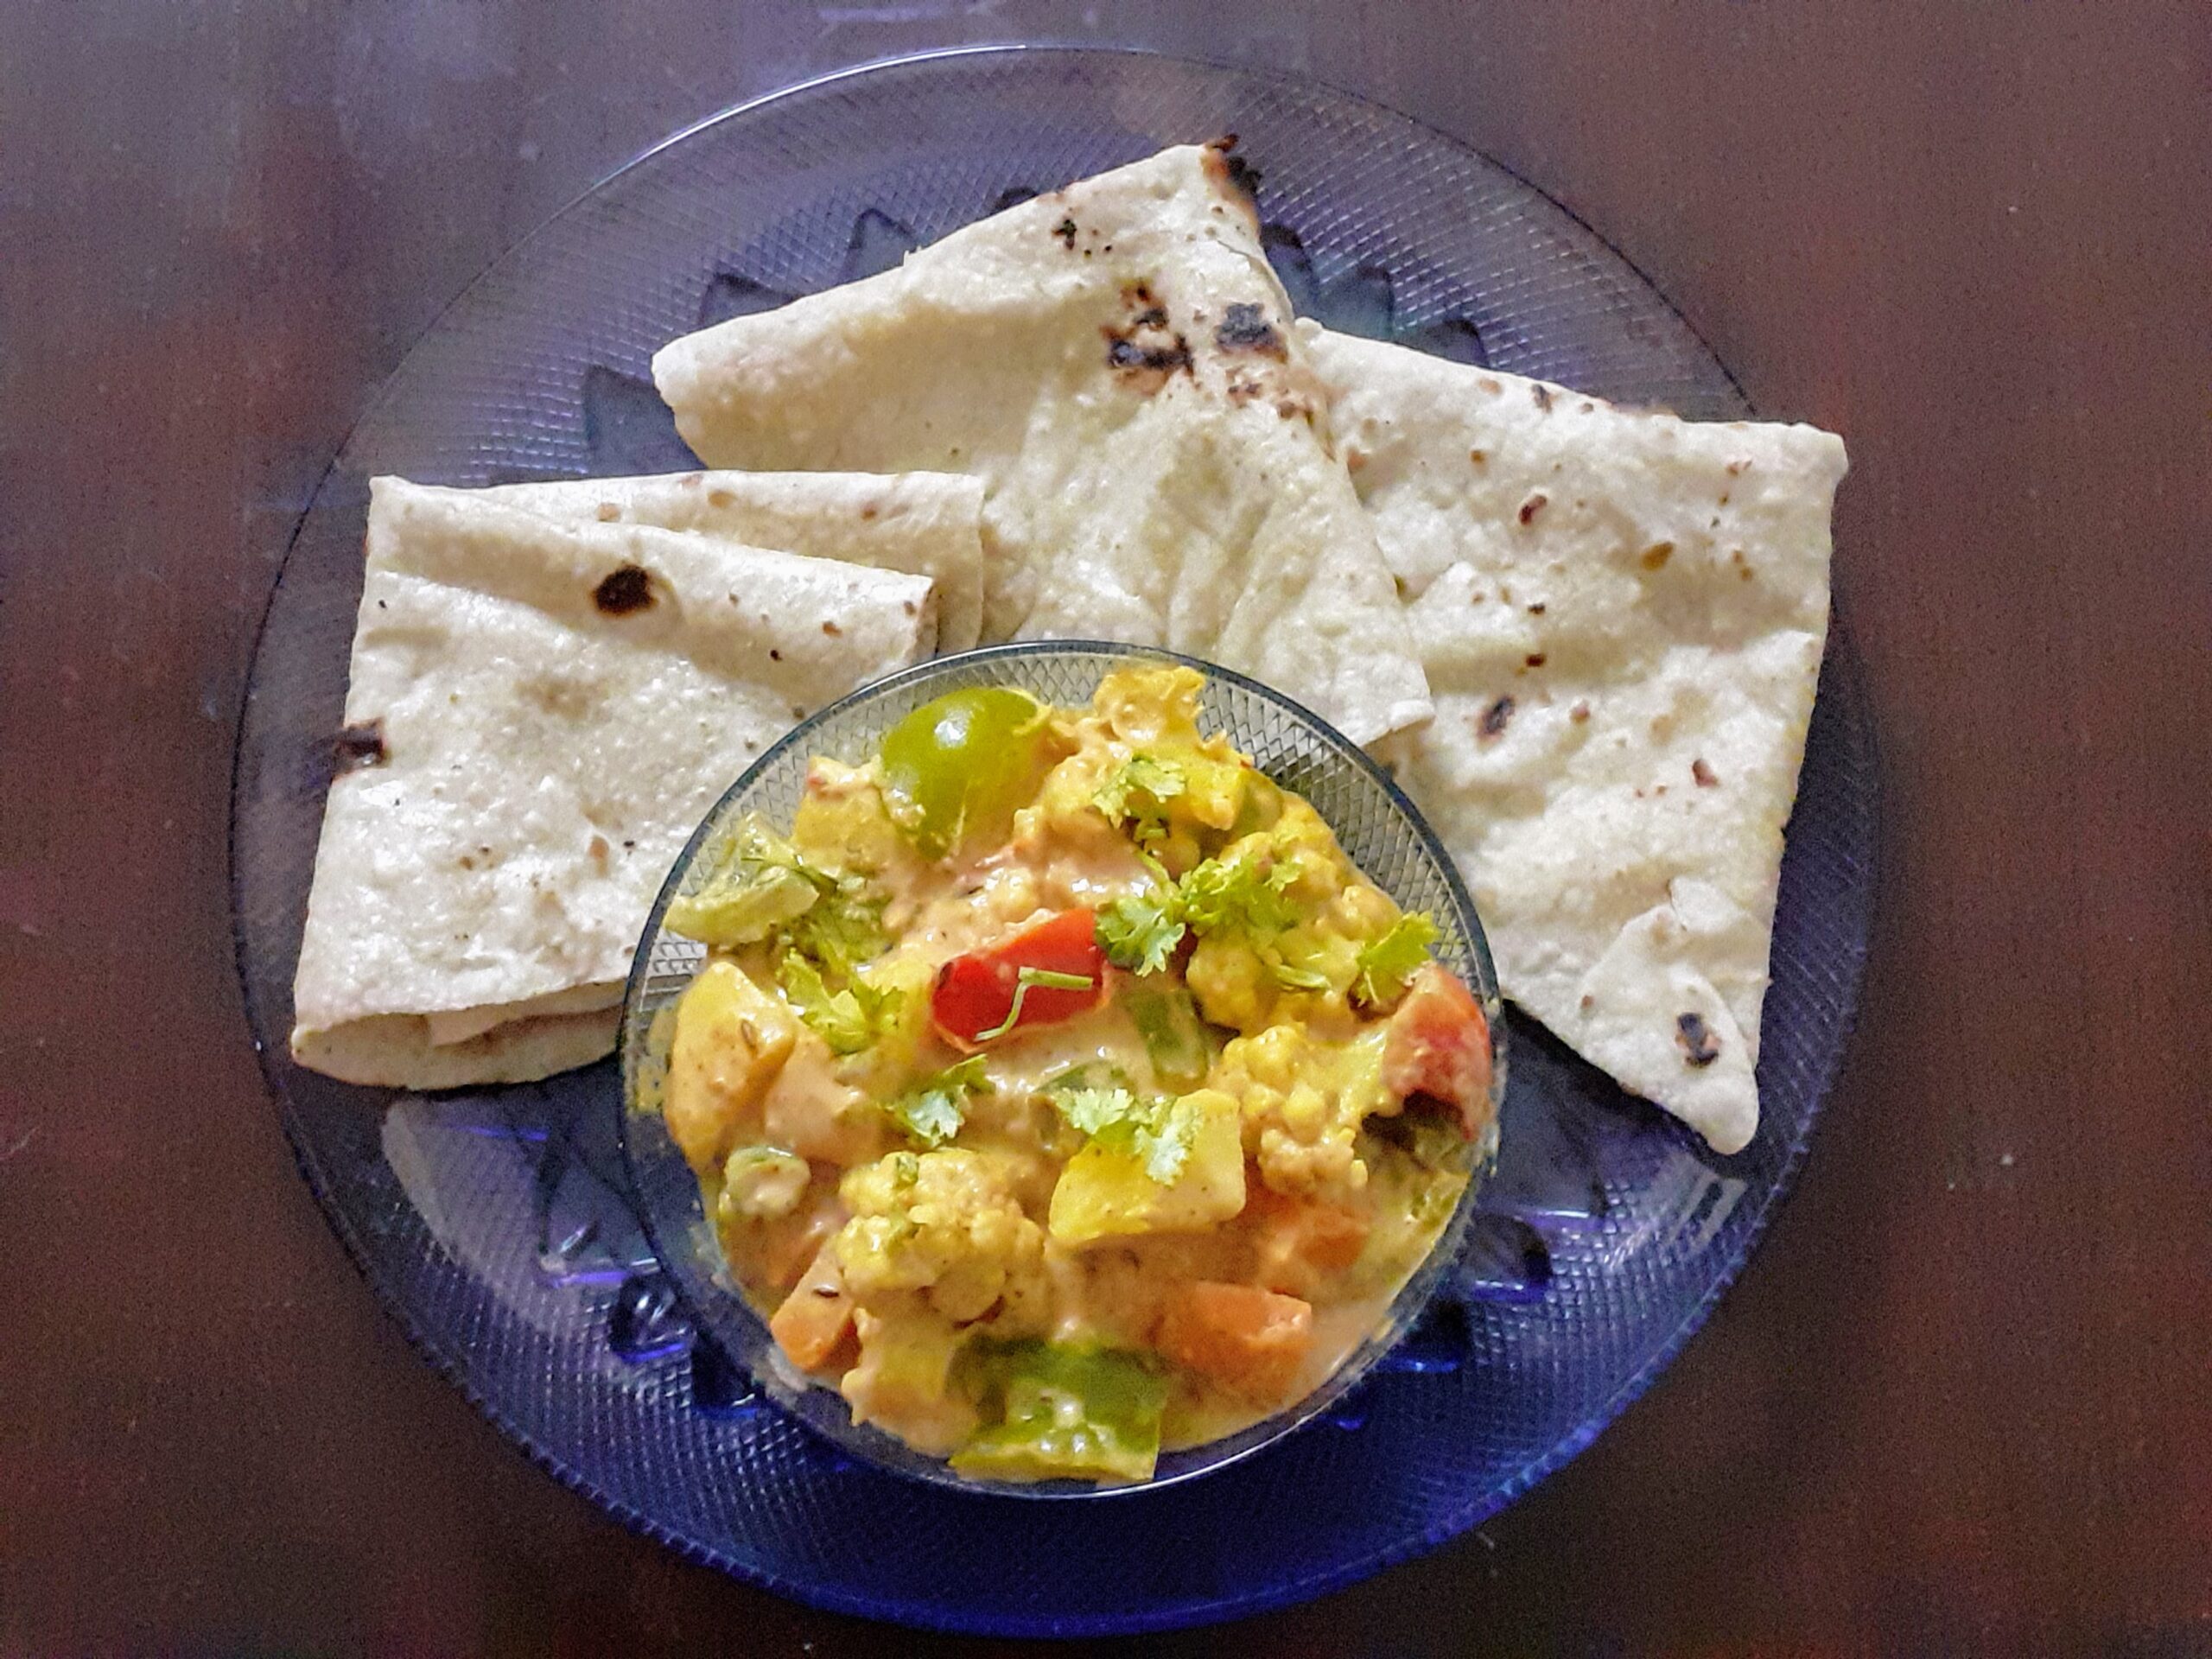
My platter of flaky Garlic Paratha and Matar Paneer with Boondi Raita
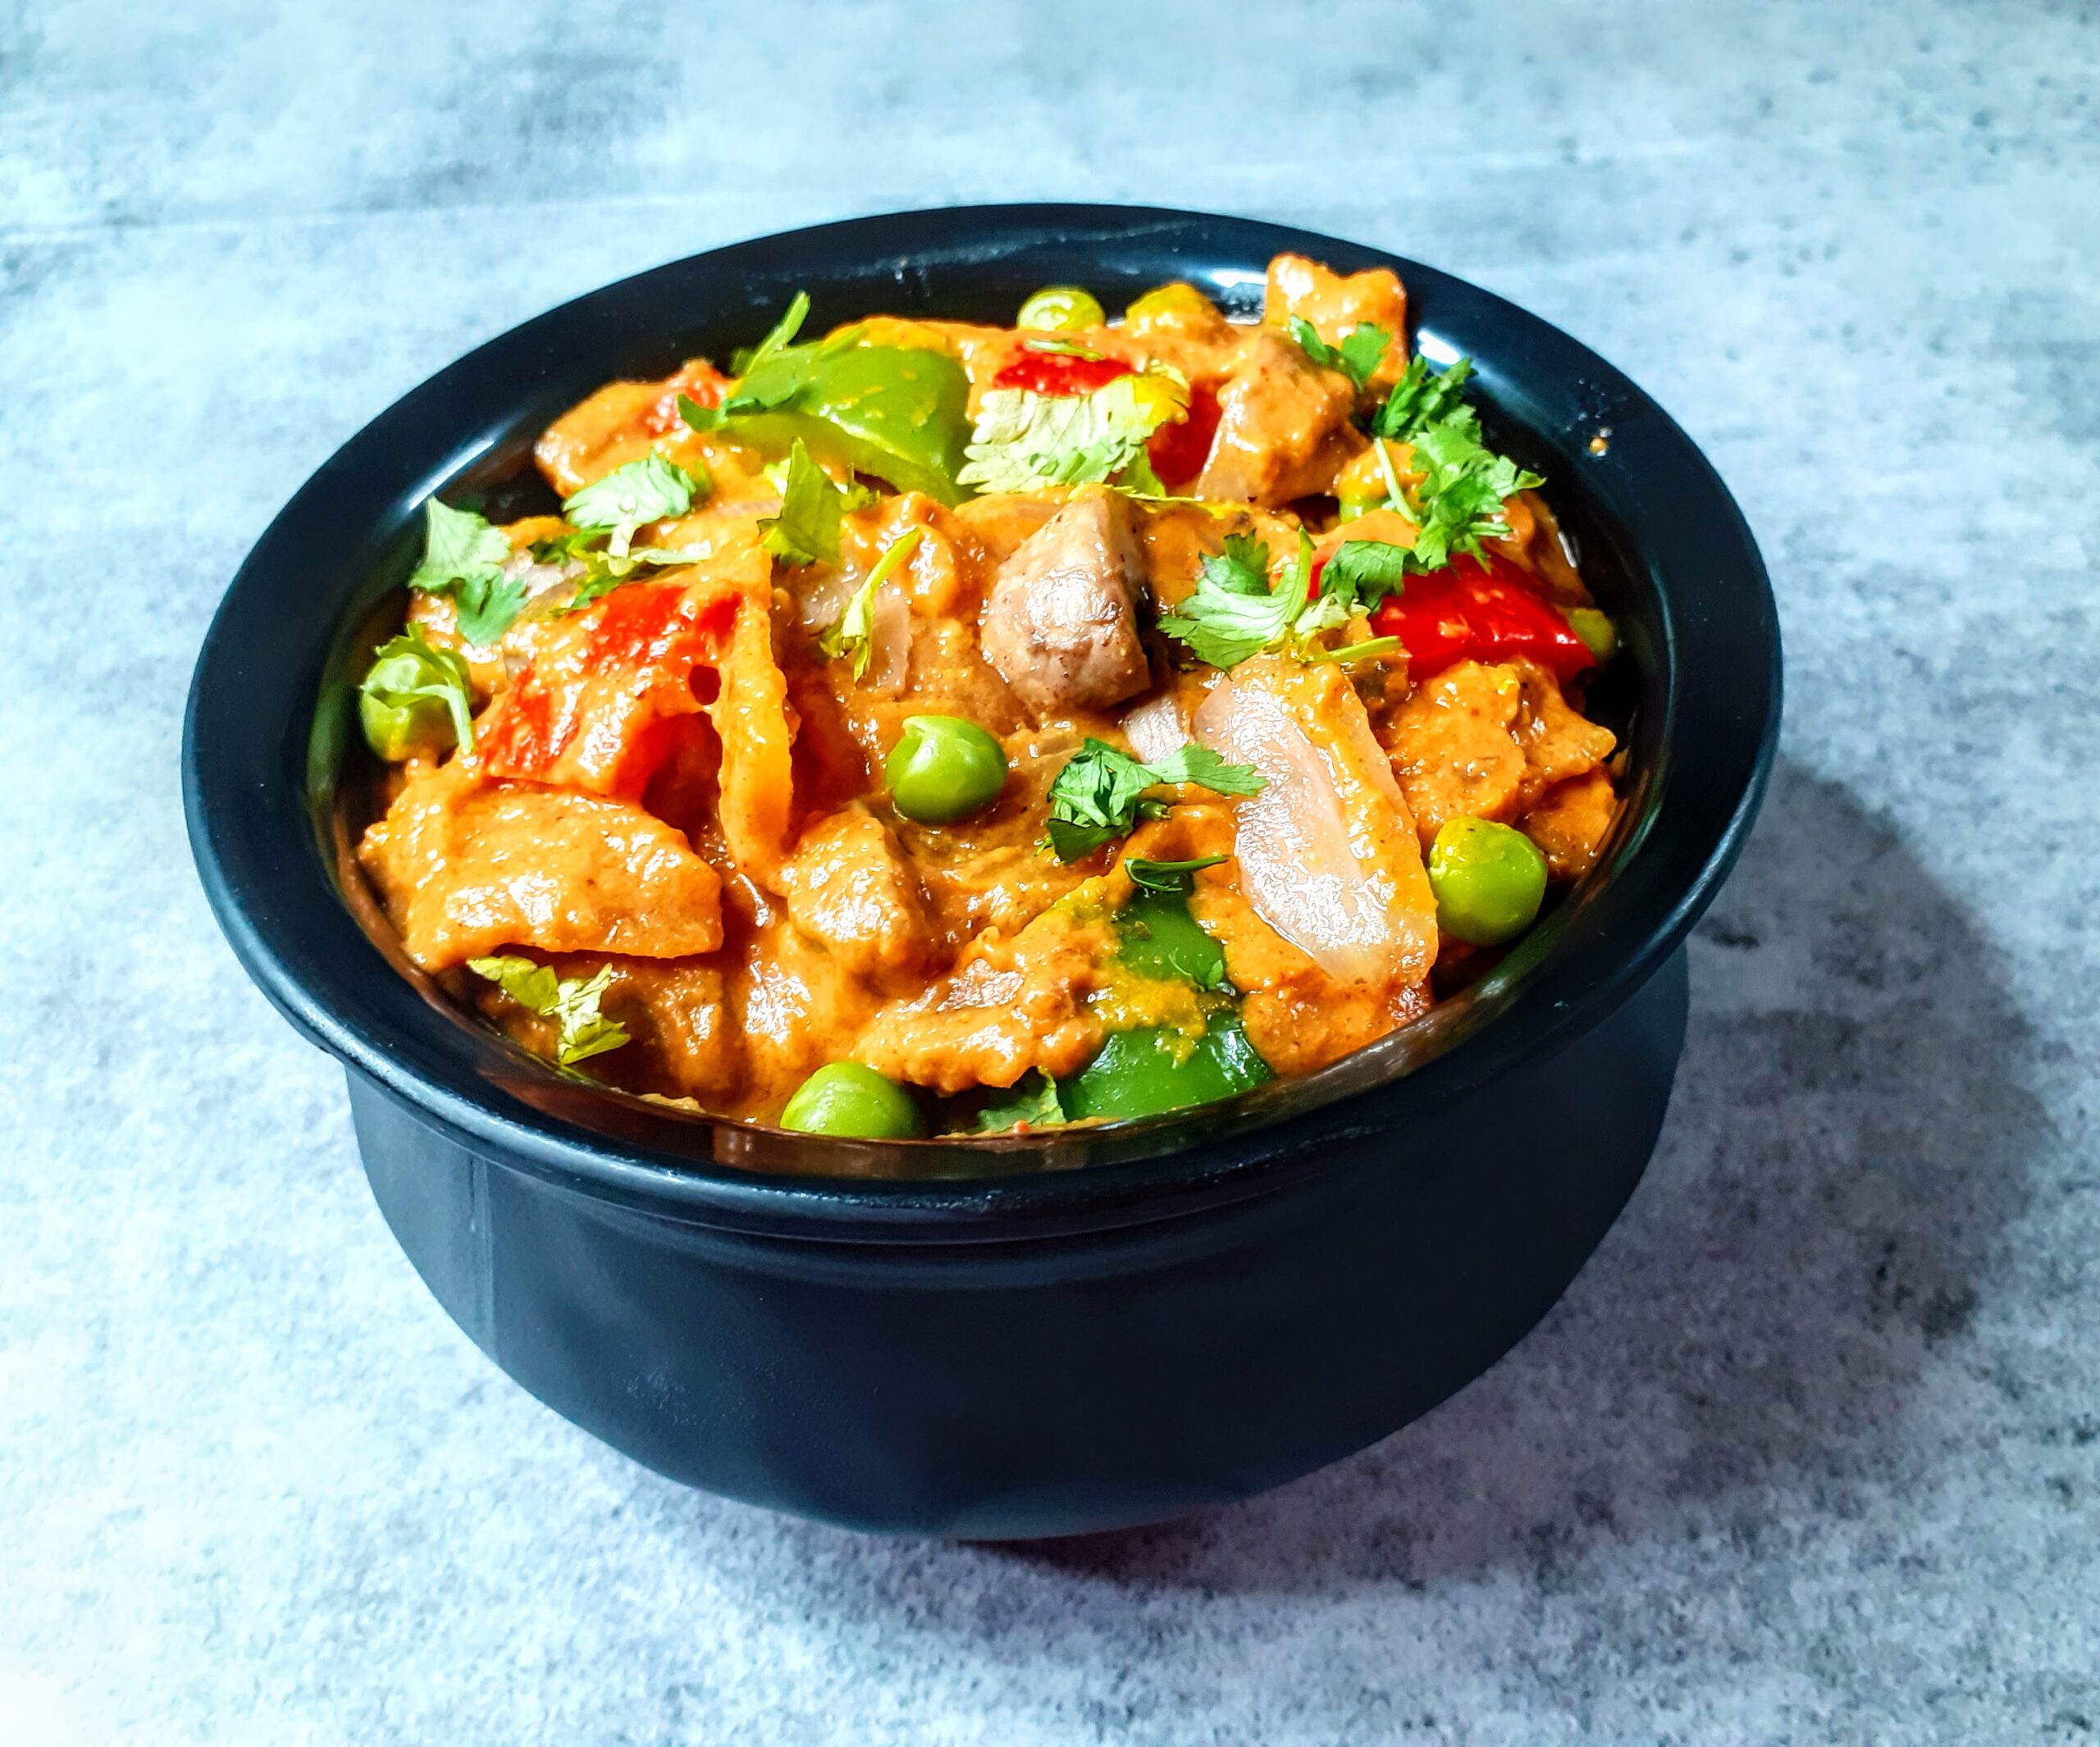
Mava Paneer Curry
Mava or Khoya when added in a recipe gives it a rich texture, flavour and taste. Mava is mostly used in sweet dishes, but can be used in gravies also to add body to a dish. The khoya is available in all stores or can be made at home. Check notes for making at home.
In this recipe, I have used the store-bought Mava. In this recipe, I have used whole spices which make the dish burst with flavours. Mava Paneer can be relished with Rotis, Naans and also rice varieties like Jeera Rice, Pulav, Masala rice and more.
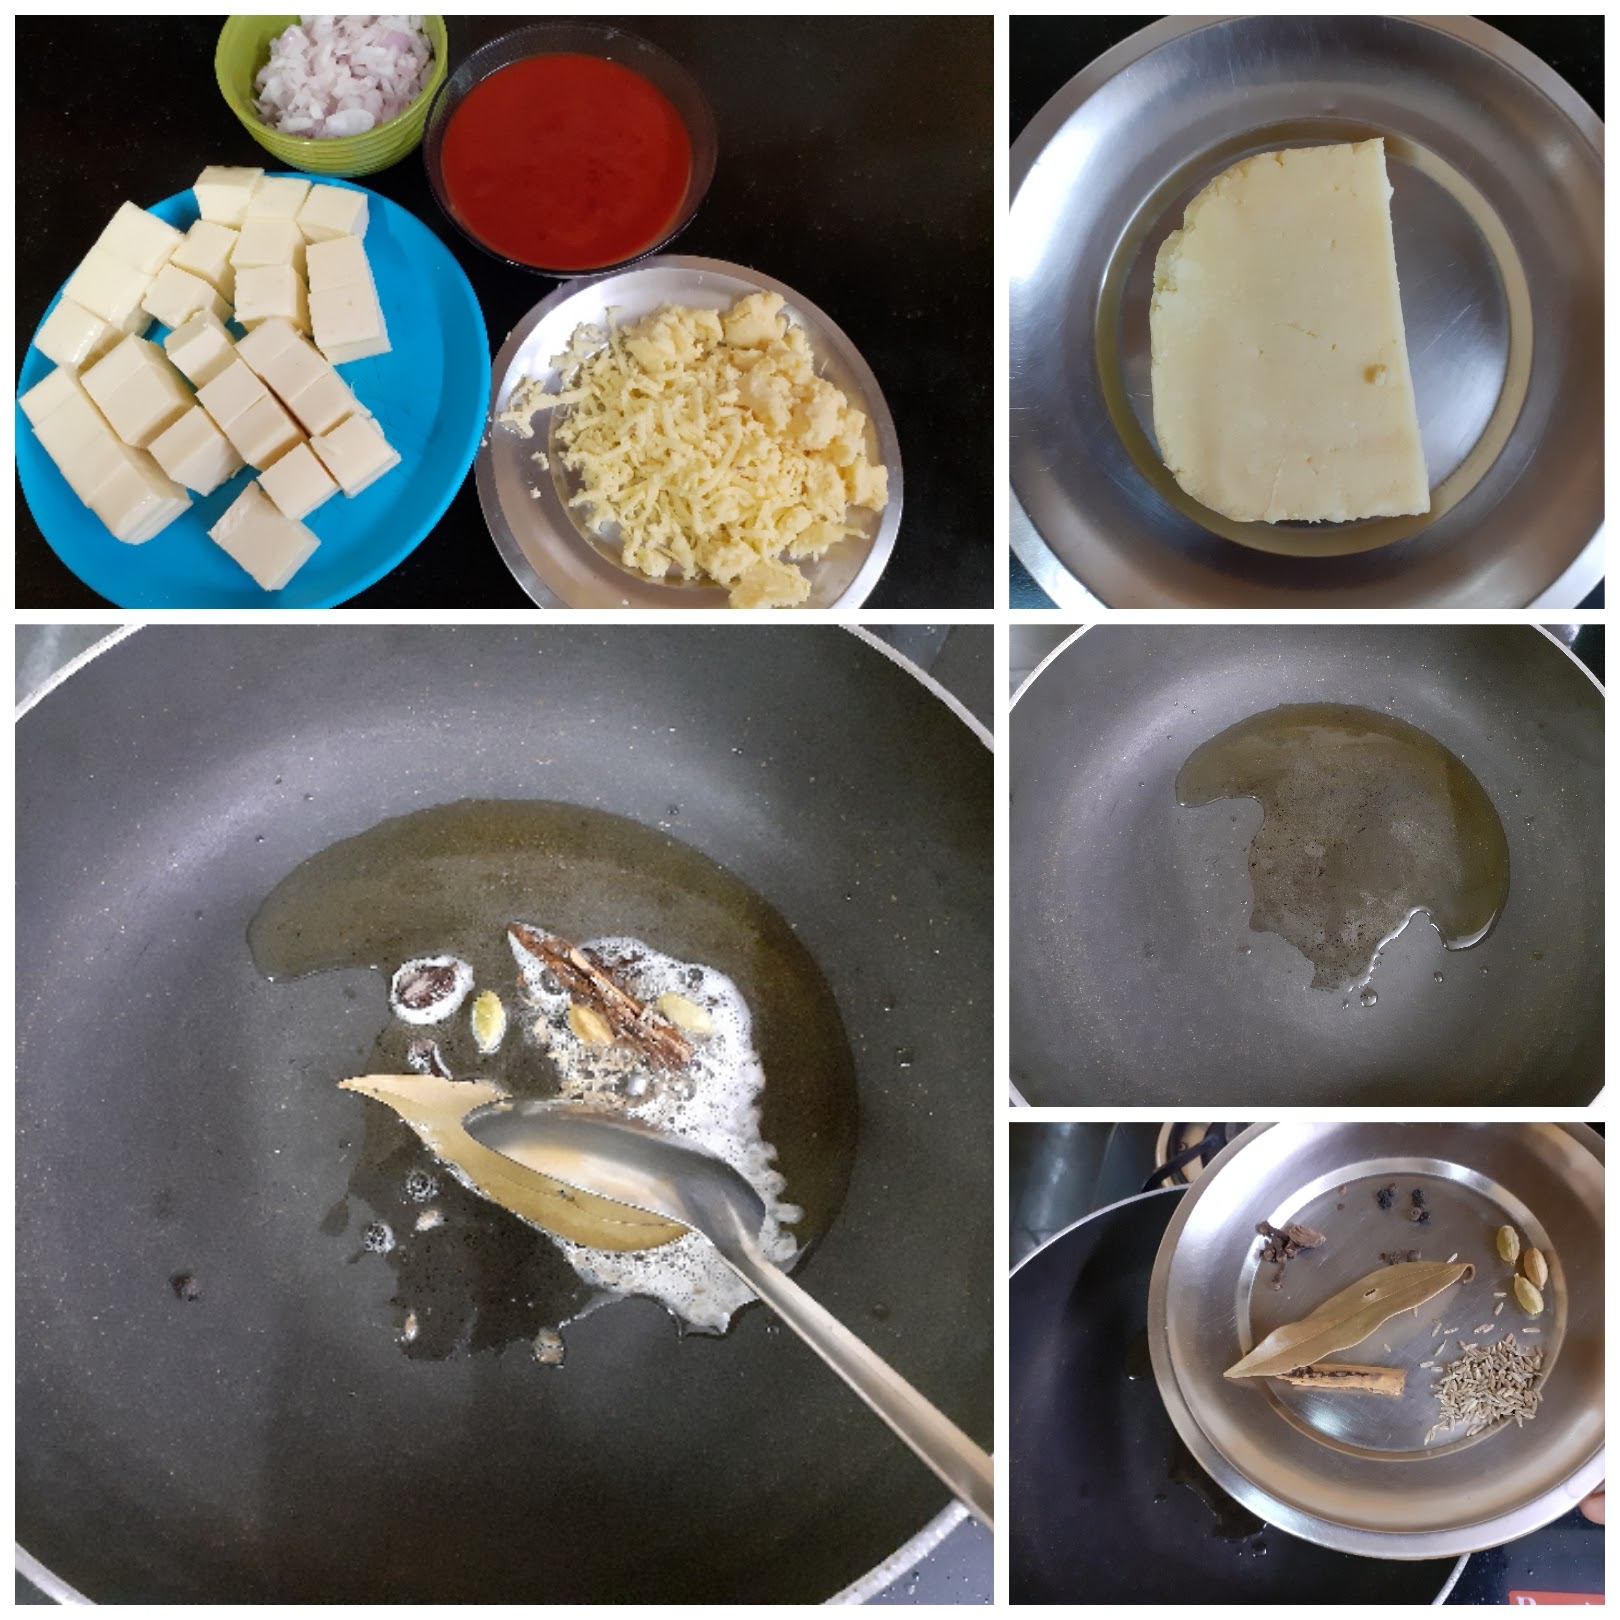
Mava/ Khoya 200 gm (shredded)- divide into 2 halves
Paneer 400 gm cubed
Cloves 5 -6
Jeera/ Cumin seeds 1 tsp
Peppercorns 1/2 tsp
Badi Elaichi/ Black Cardamom 1
Cinnamon 1/2 inch stick
Bay leaf/ Tej patha 1
Elaichi/ Green Cardamom 2-3
Coriander powder 2 tsp
Fennel powder 1 tsp
Red chilli powder 1 to 1.5 tsp
Salt to taste
Onion 1 chopped fine
Tomato Puree 2 cups or 3 large tomatoes pureed
Ginger Garlic paste 1 tsp
Kasoori Methi/ dry fenugreek leaves 1 tsp
Coriander leaves finely chopped 1 tbsp
Directions:
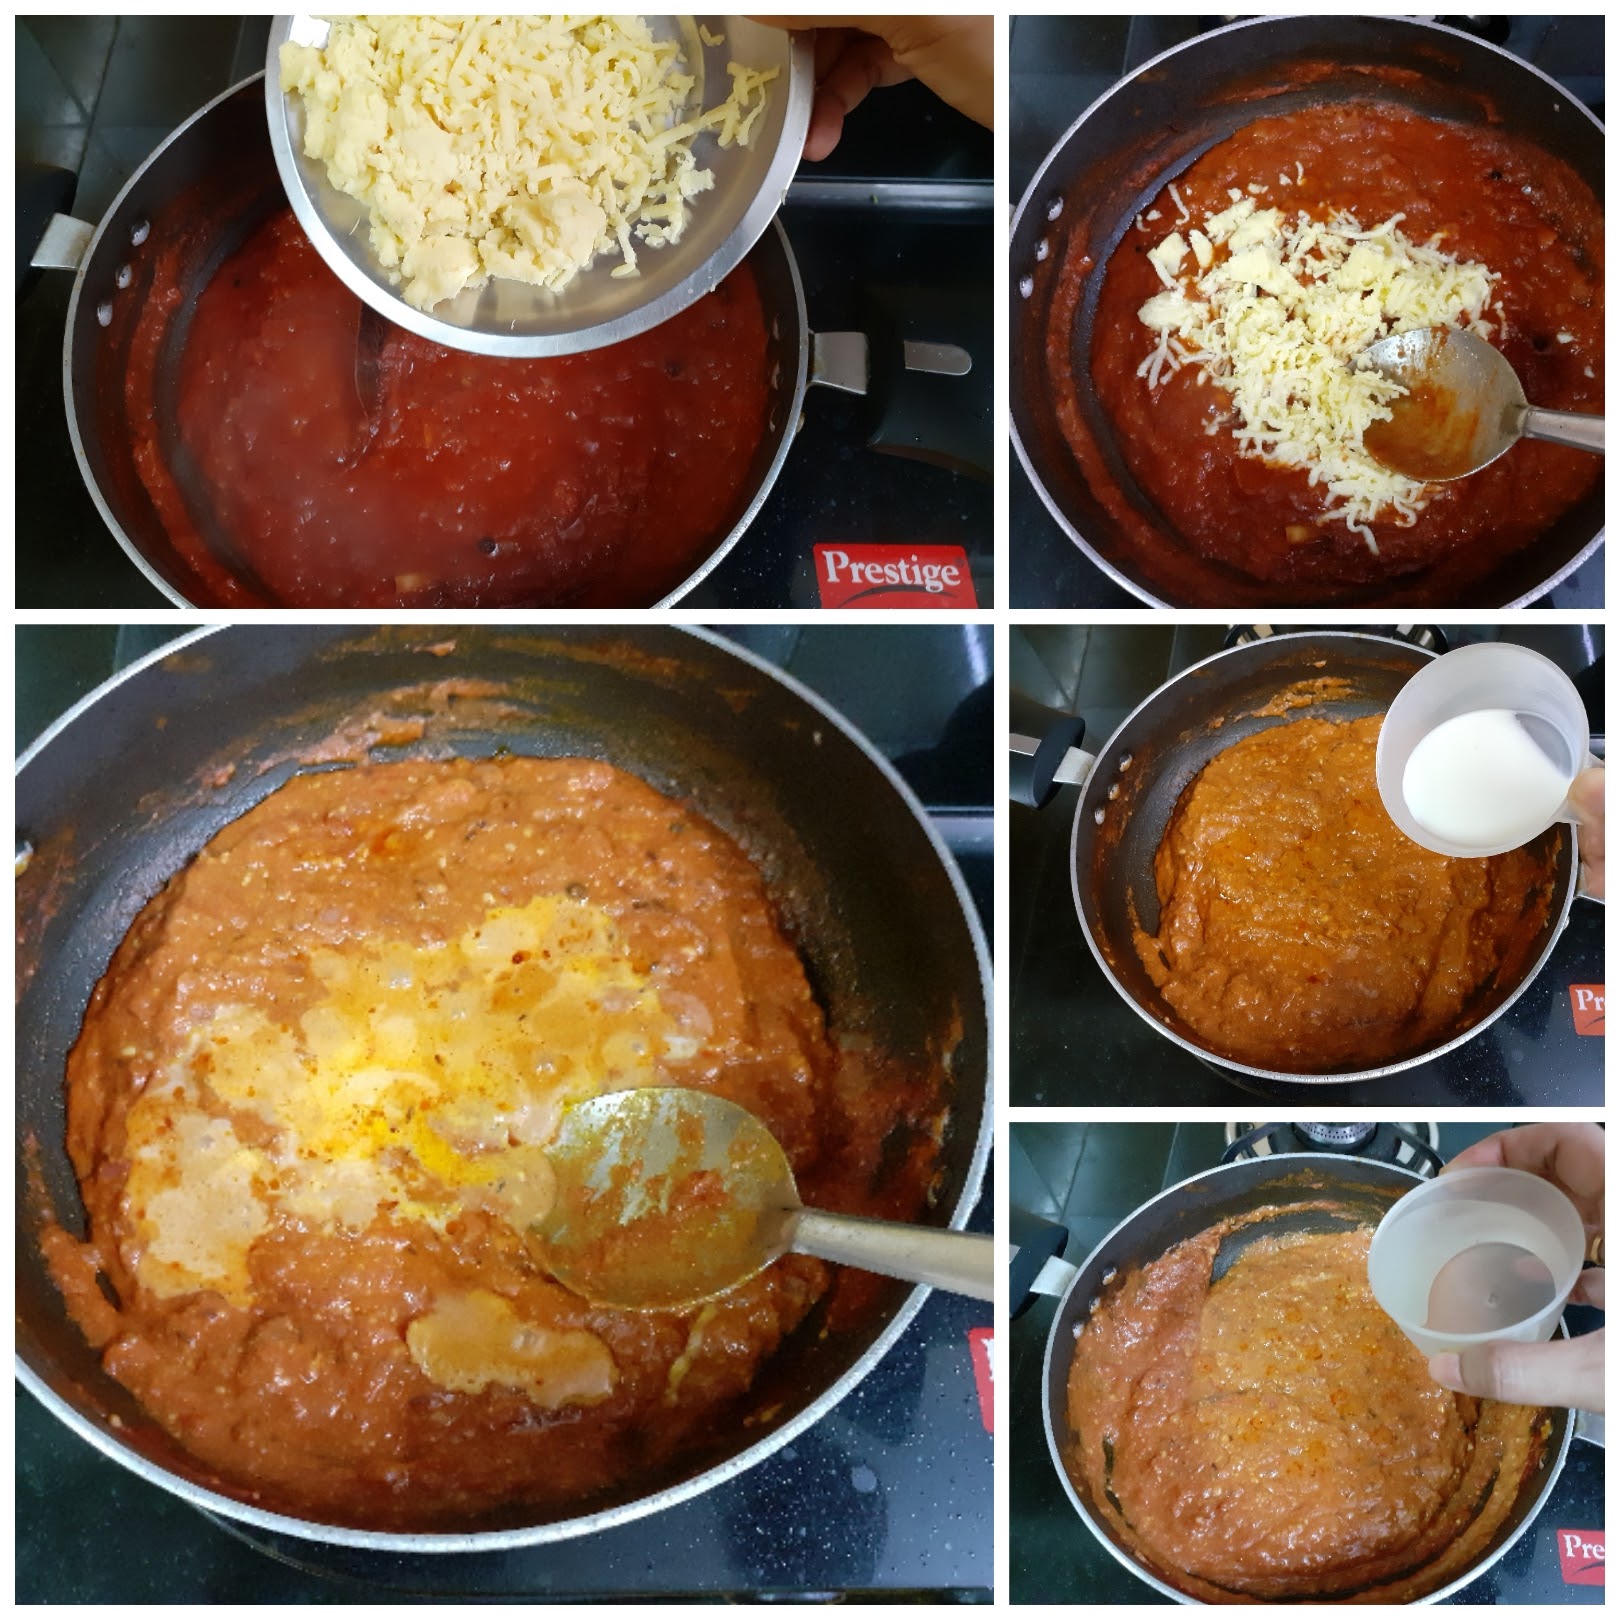
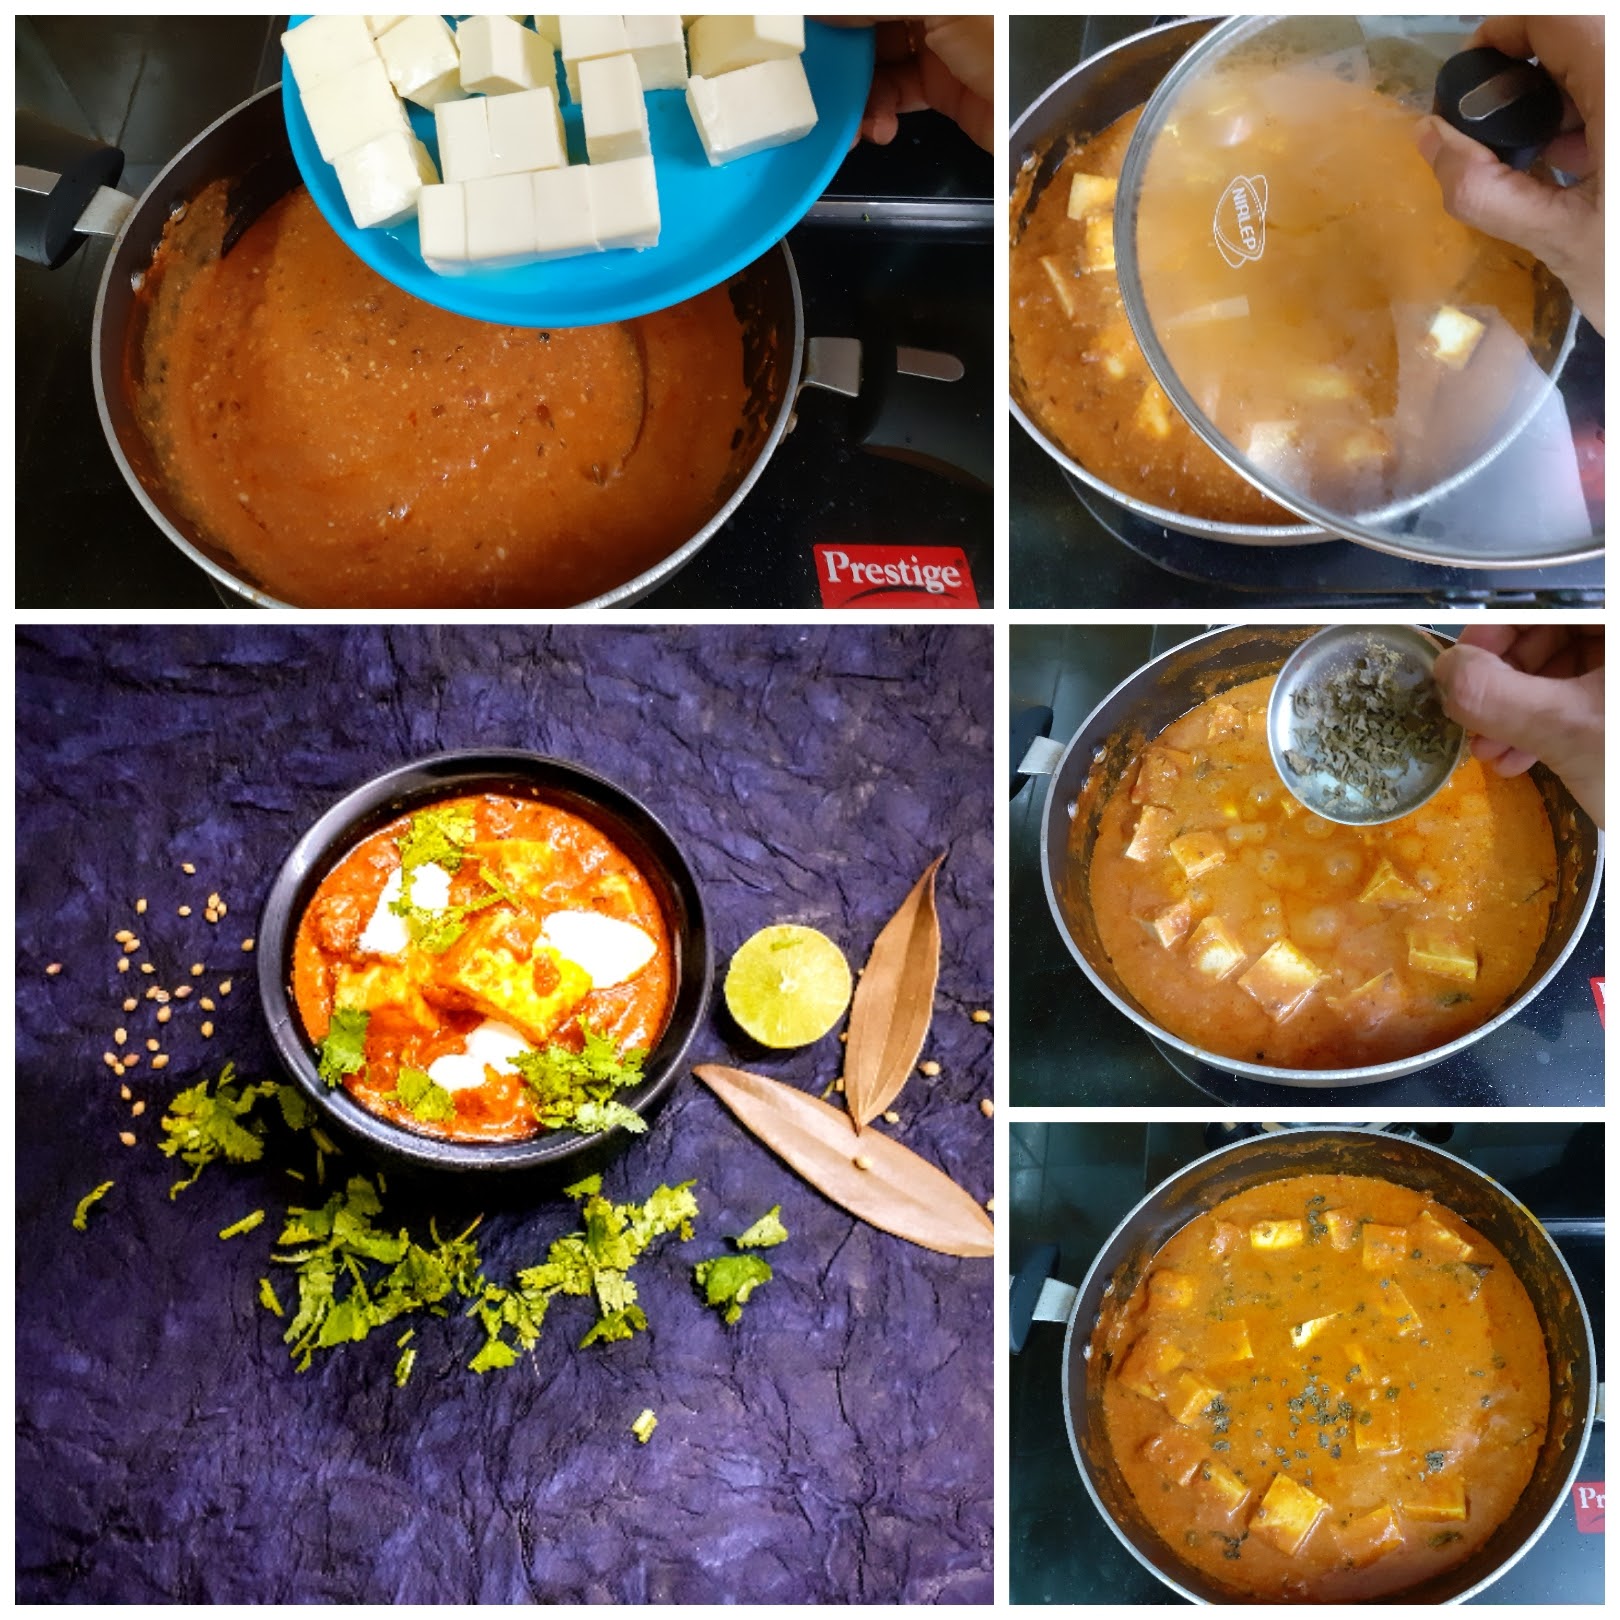
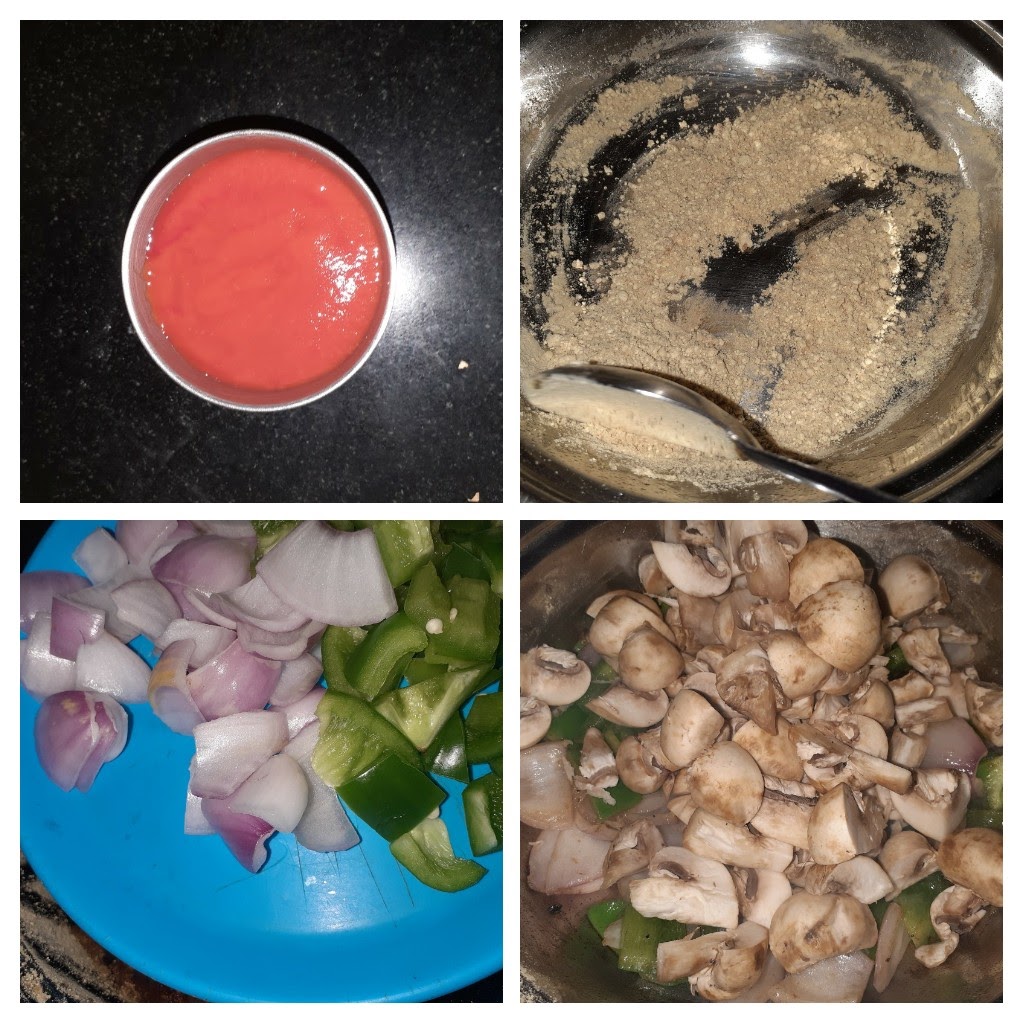
In a Karahi heat 2 tbsp oil. Add all the whole masalas(spices) -Bay leaves, Cinnamon stick, Green cardamom, cloves, Black cardamom and Cumin seeds, and fry them for 30 seconds or until aromatic. Now add the ginger-garlic paste to it and fry for 10 seconds, Follow it up by adding the finely chopped onions. Fry until the onions turn a light brown and now add the tomato puree. Add the salt, red chilli powder, coriander powder, fennel powder and stir nicely. Cook for a minute or two until the raw smell of the masalas and tomato puree is gone. Now add one half of the shredded Mava/khoya and mix it in such that it combines well with the tomato puree. Once the Mava is added the mixture thickens, So dilute with 1/4 to 1/2 cup milk, followed by 2 cups water. Allow the gravy to cook for 2 minutes and add the remaining the Mava and stir well. Now add the Paneer cubes and cover and cook for a minute or two, or until the gravy thickens. Open the lid and garnish with some crushed Kasoori Methi(dried fenugreek leaves) and the Mava Paneer curry is ready.
Serving Suggestions: with Rotis, Naans, Parathas, Jeera rice or even plain rice.
STEPWISE RECIPE FOLLOWS:
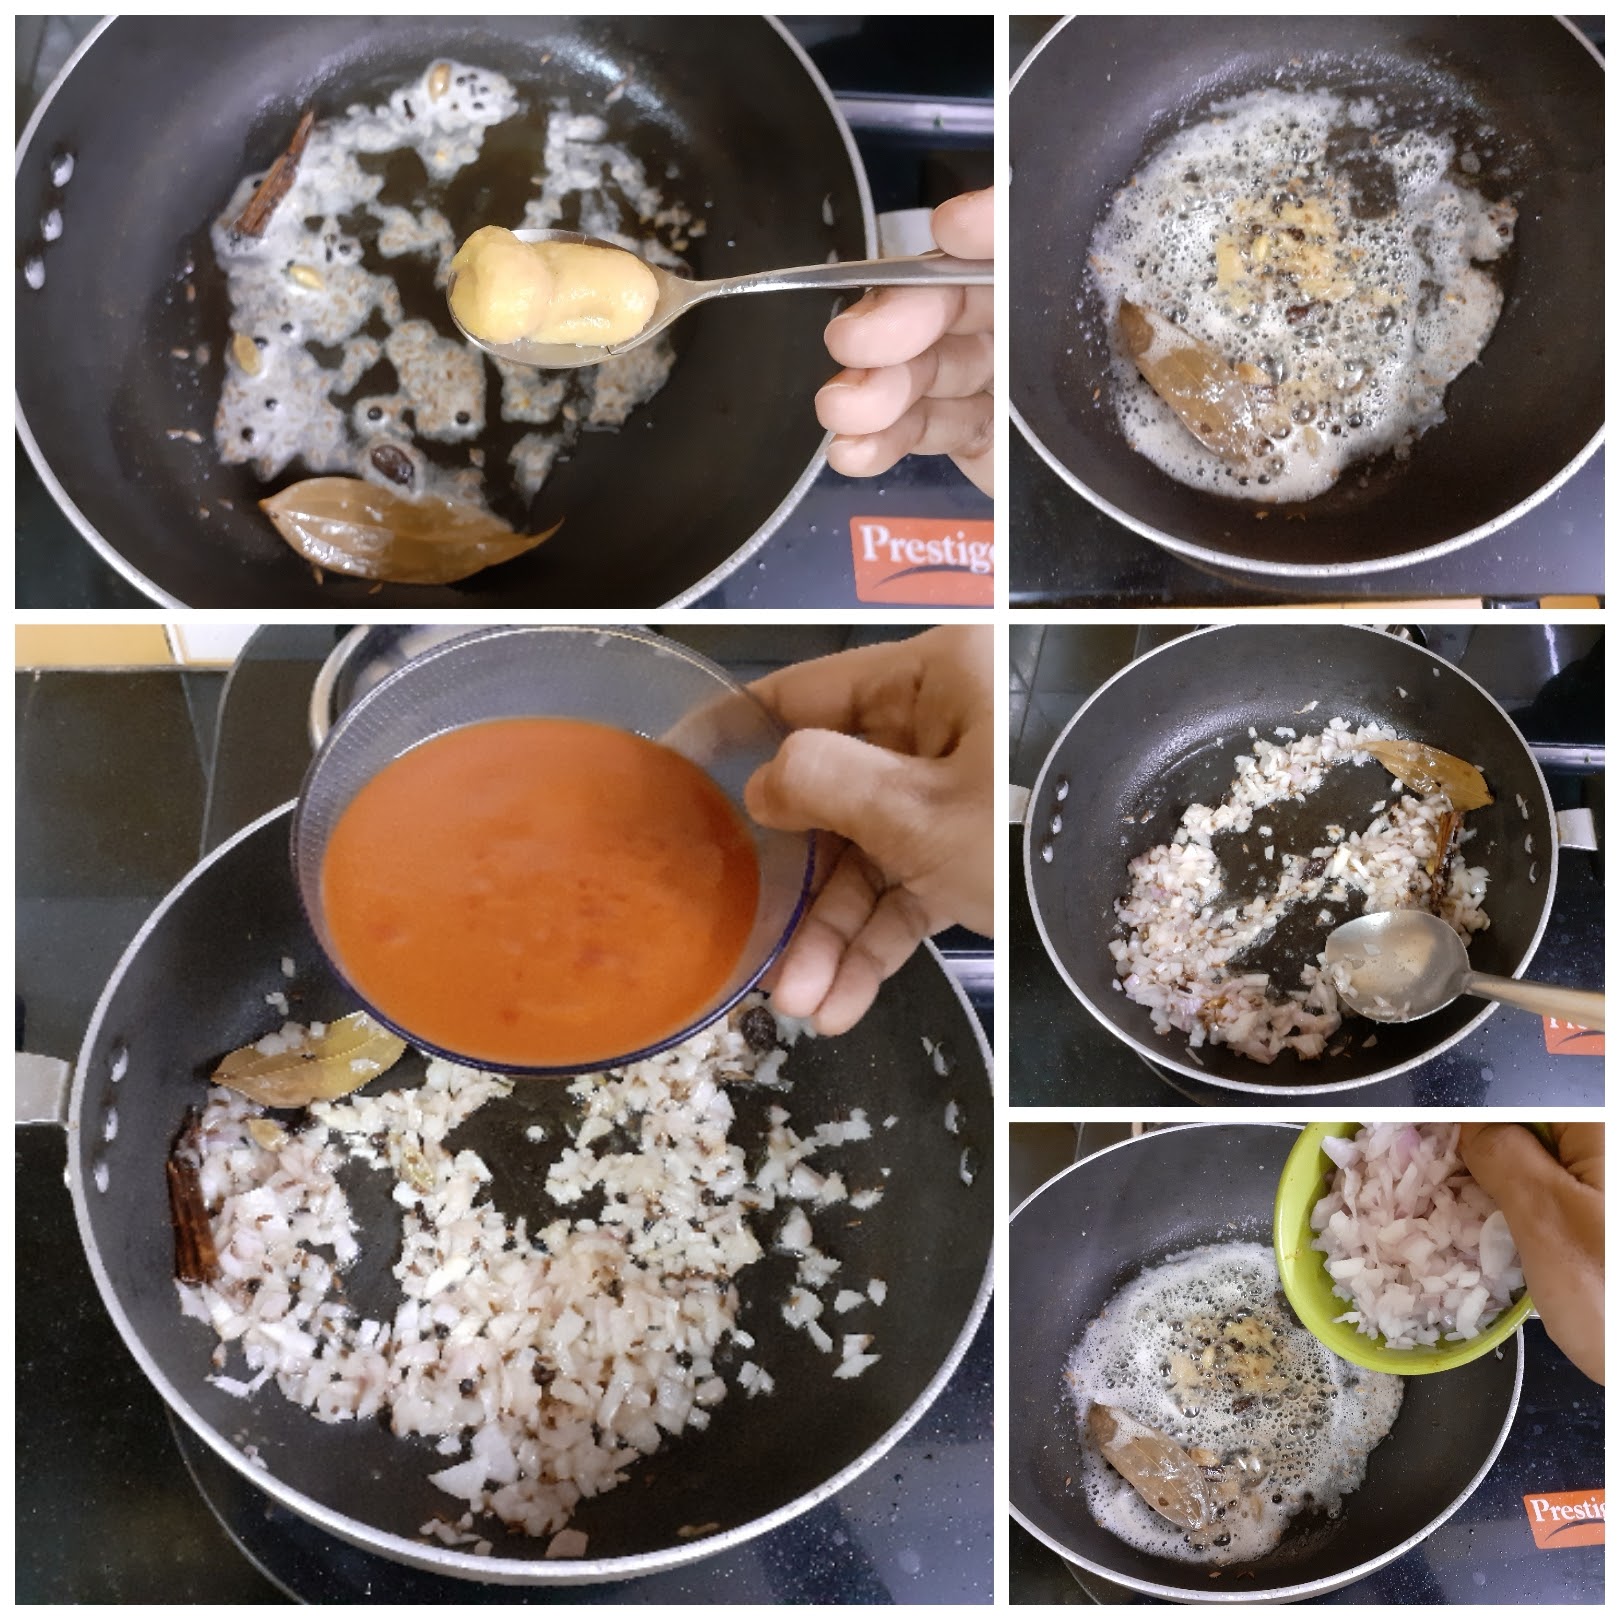
1. Assemble all ingredients. In a Karahi heat 2 tbsp oil. Add all the whole masalas(spices) -Bay leaves, Cinnamon stick, Green cardamom, cloves, Black cardamom and Cumin seeds, and fry them for 30 seconds or until aromatic.
2. Now add the ginger-garlic paste to it and fry for 10 seconds, Follow it up by adding the finely chopped onions. Fry until the onions turn a light brown and now add the tomato puree.
3. Add the salt, red chilli powder, coriander powder, fennel powder and stir nicely. Cook for a minute or two until the raw smell of the masalas and tomato puree is gone.
4. Now add one half of the shredded Mava/khoya and mix it in such that it combines well with the tomato puree. Once the Mava is added the mixture thickens, So dilute with 1/4 to 1/2 cup milk, followed by 2 cups water. allow the gravy to cook for 2 minutes.
5. Now add the paneer cubes, cover the Karahi and cook for another 2 minutes or so, or until the gravy thickens. Open the lid, add crushed Kasuri Methi and put off the flame. Garnish with finely chopped coriander leaves and a drizzle of cream if required. The Mava Paneer curry is ready to savour.
NOTES:
1. In this recipe I have used 400 gm Paneer and 200 gm of Mava/Khoya. This can be scaled down conveniently for a lesser quantity of curry.
2. To make instant Khoya/Mava- take 1 cup milk and boil. Reduce it(evaporate by boiling) to half and add 2 tablespoons of milk powder and 1 tsp ghee. Homemade instant Mava is ready. For this recipe, you may need twice the amount of this quantity.
If you tried this recipe and liked it please comment below. I would love to hear from you. If you have a query about the recipe email us and ill respond as soon as I can.
If you would like to receive our recipes in your mail please leave your mail id at the homepage. Every time Rajjo’s Kitchen has a new post we will mail the recipe to you.
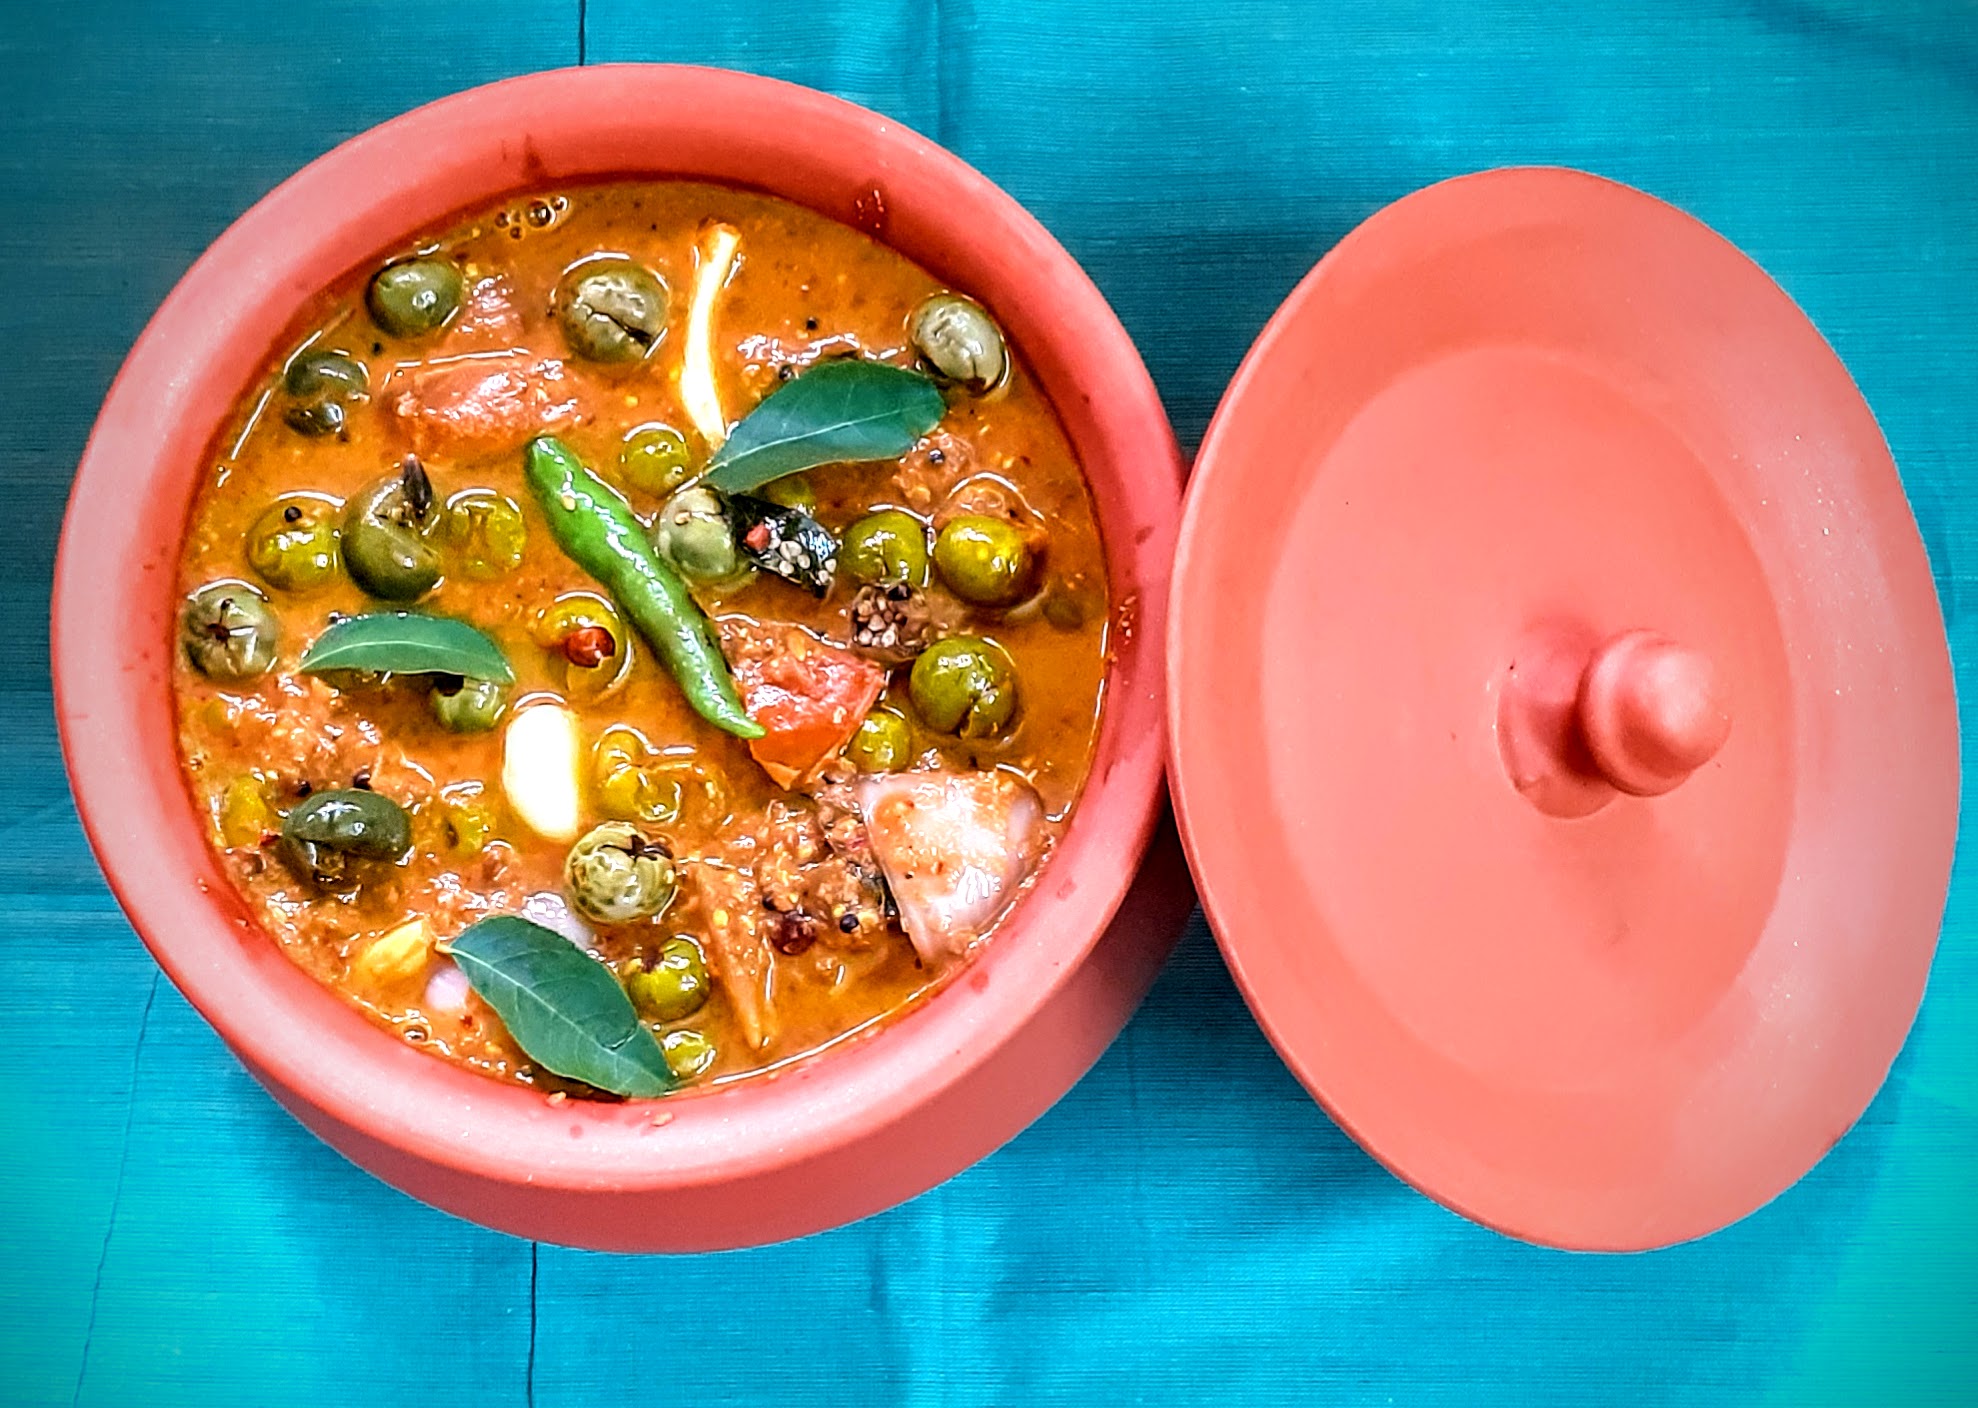
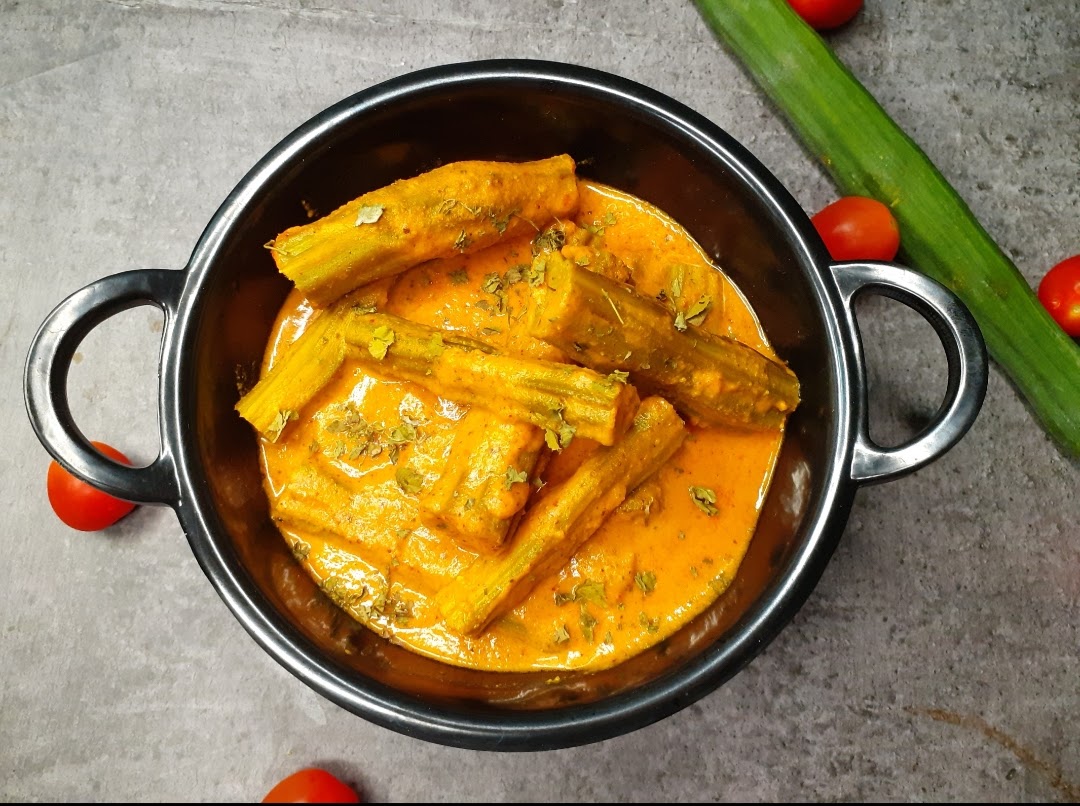
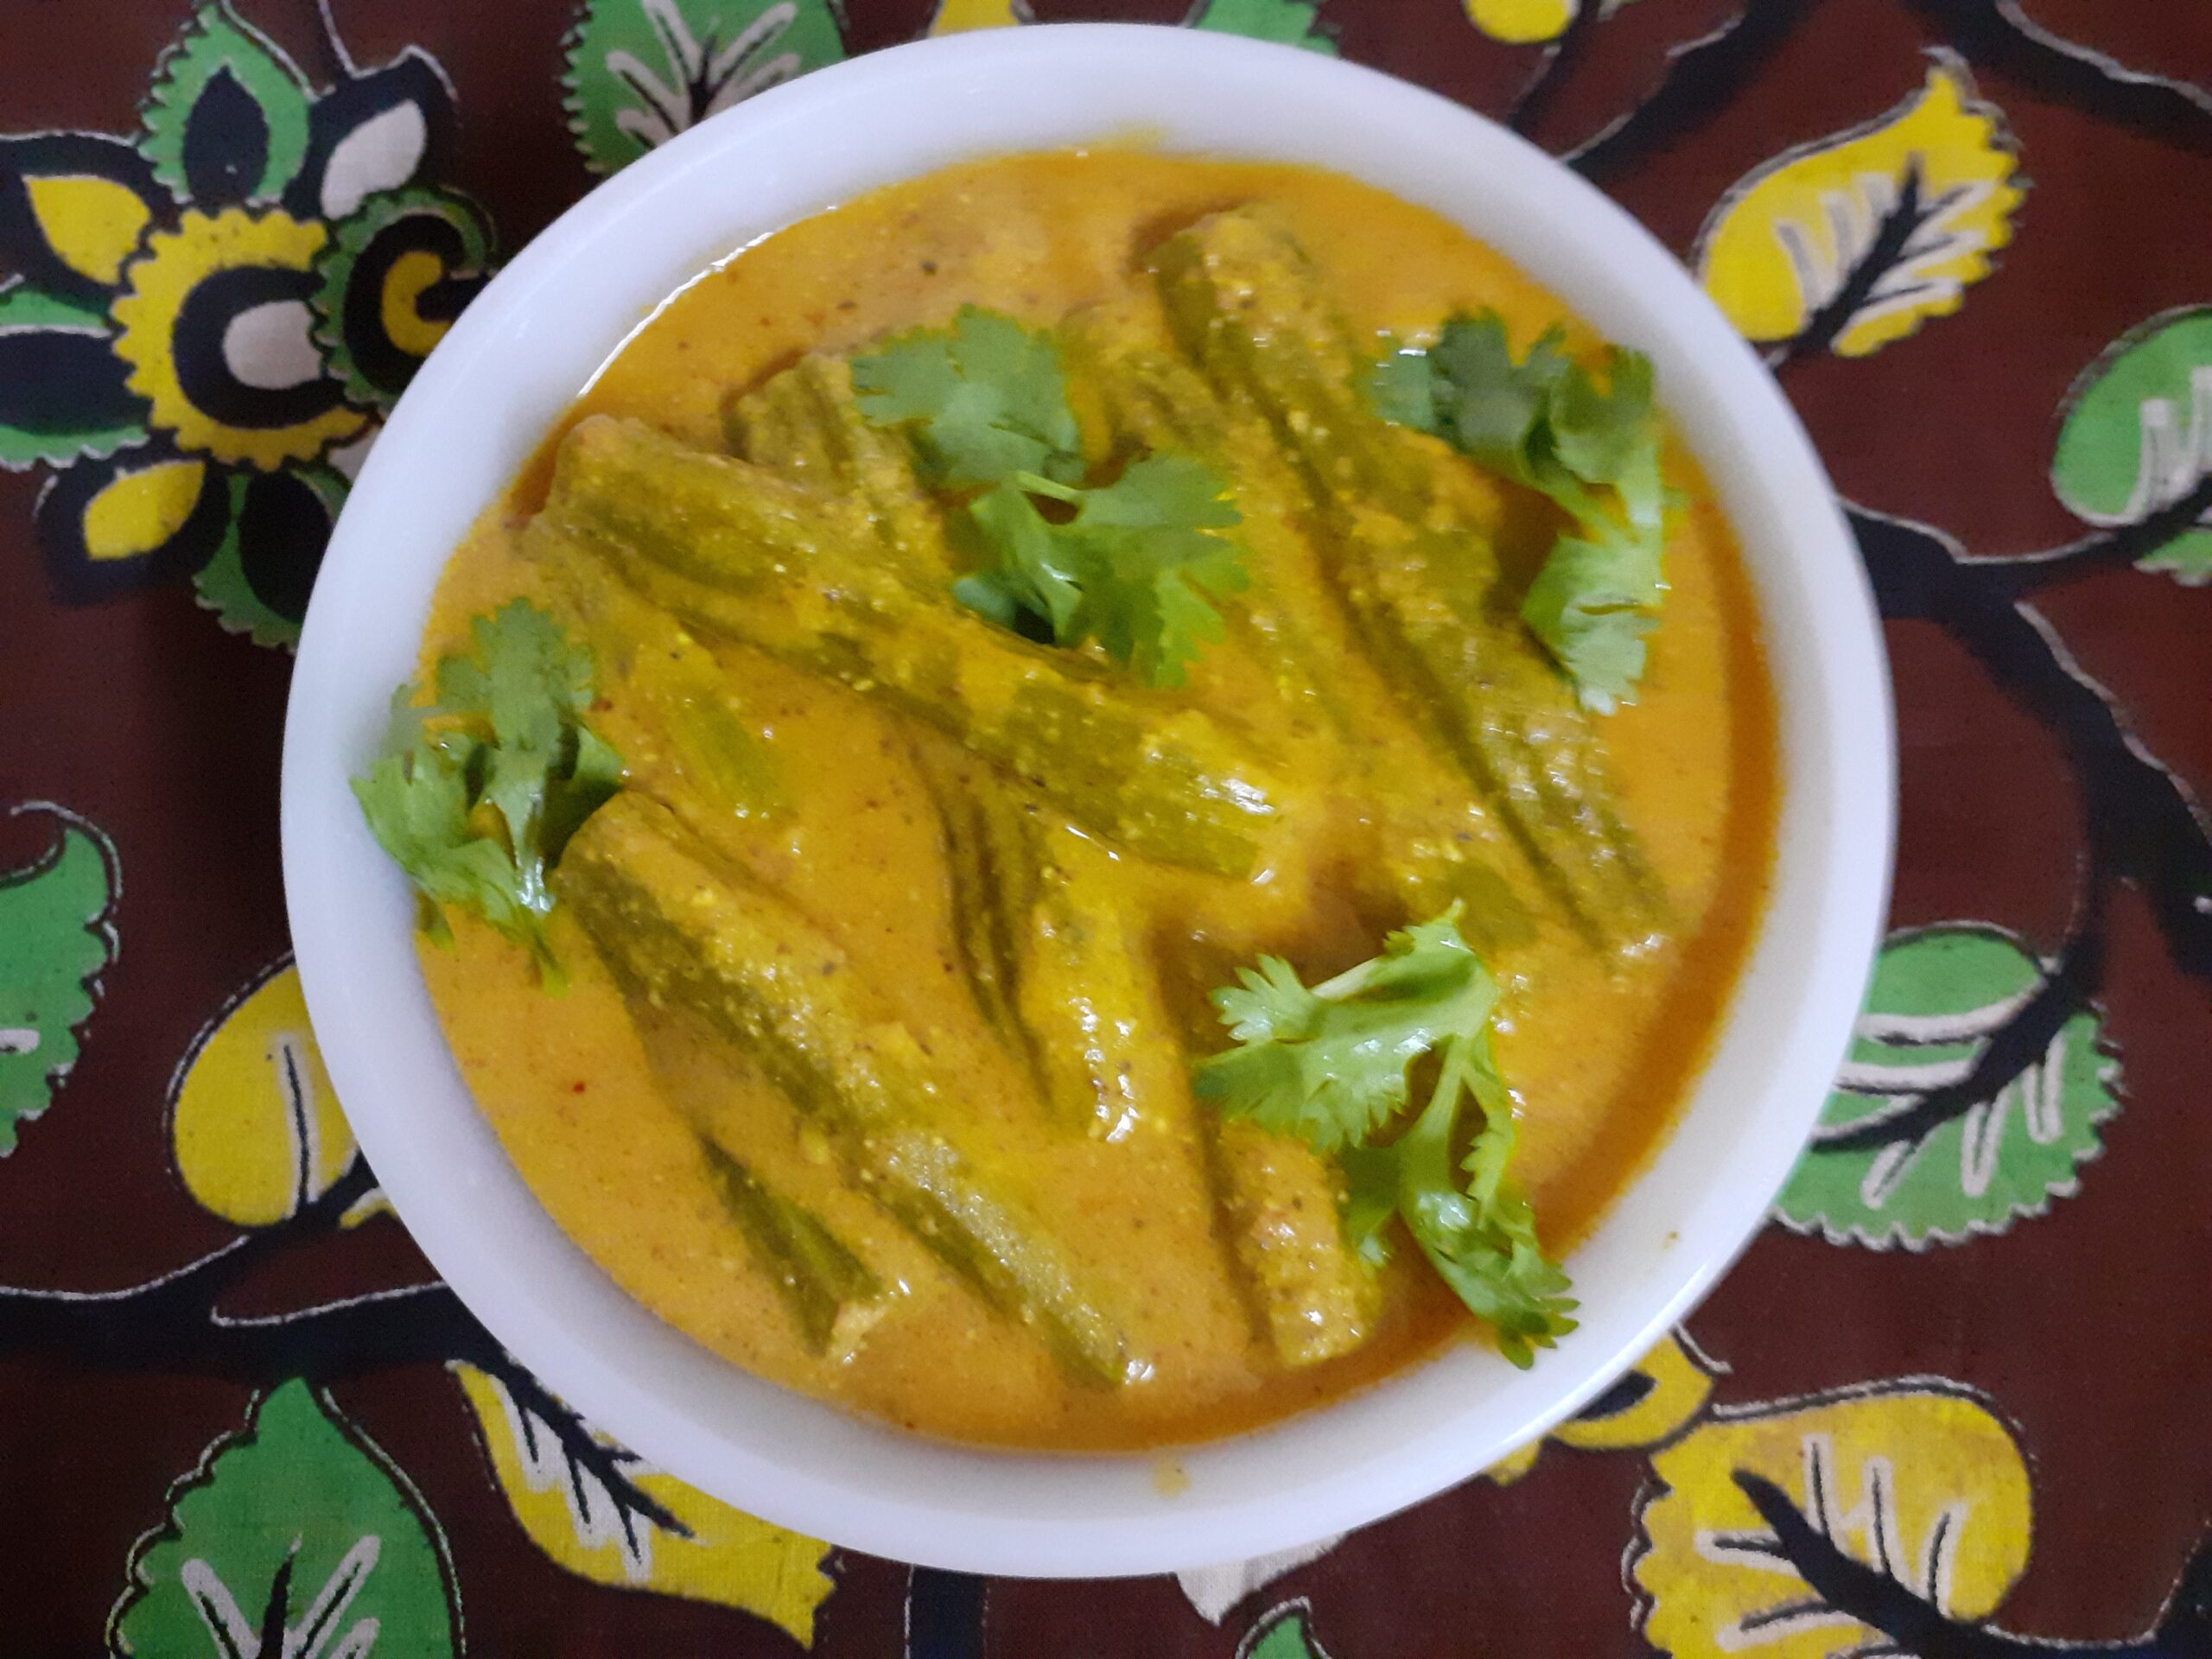
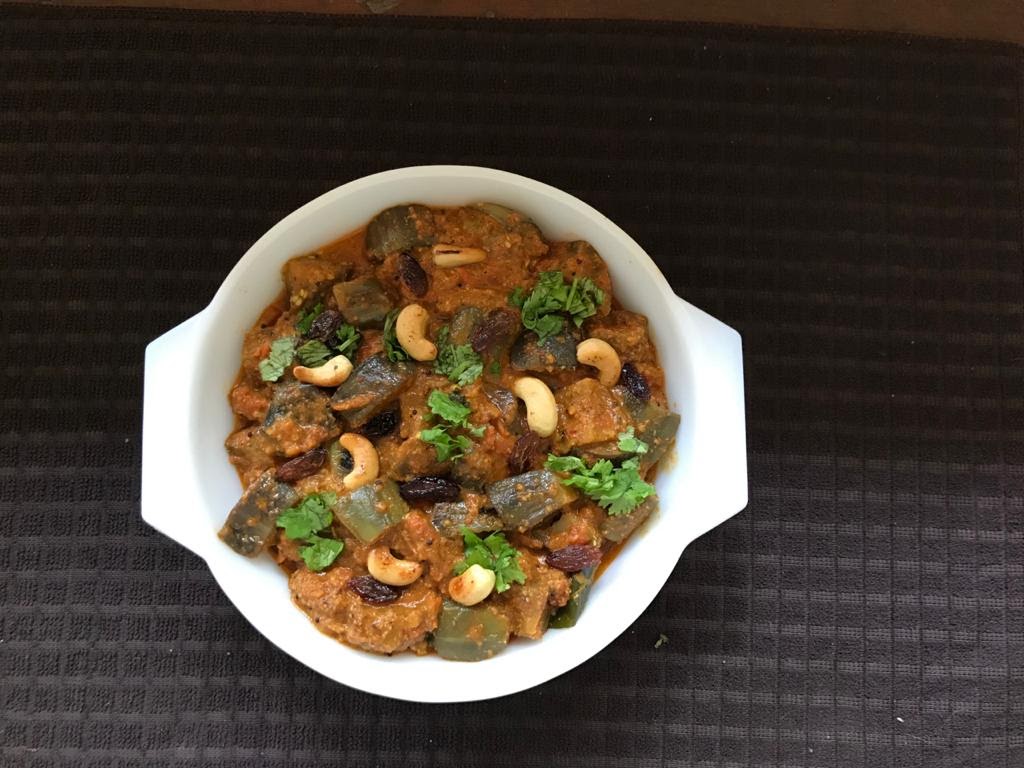
Pachai Sundakkai Kuzhambu (Chettinad Style)
Sundakkai/ Chundakkai in Tamil or Turkery Berry in English, as it is widely known, is a vegetable used in South Indian cooking to make a Kuzhambu or a gravy in which these berries are simmered with spices. As tasty as the Kuzhambu tastes, the berries are slightly bitter and have many medicinal benefits. This Vegetable is also known as Kudenekayi in Kannada or Usthikaya in Telugu. In Hindi it is called Bankatiya. I am giving here different names so that if you know this vegetable, one must try out recipes made of it because of its medicinal properties.
In SouthIndia the berries are blanched and then dried in the sun for a few days until it changes colour and is completely dry. The dried berries are then stored in an airtight jar then used to make the Sundakkai Vathakuzhambu. The dried berries are also fried in ghee and make an yummy accompaniment for curd rice. The berries fried in ghee are also mixed with hot rice and eaten as it is believed that it helps in deworming.
Health benefits of Sundakkai/ Turkey Berry- cures common cold, helps in treating kidney related issues, treats Anaemia, helps in treating cough and asthma, clears mucus, help in controlling diabetes, and they heal gastric ulcers.1Berry myriad benefits.
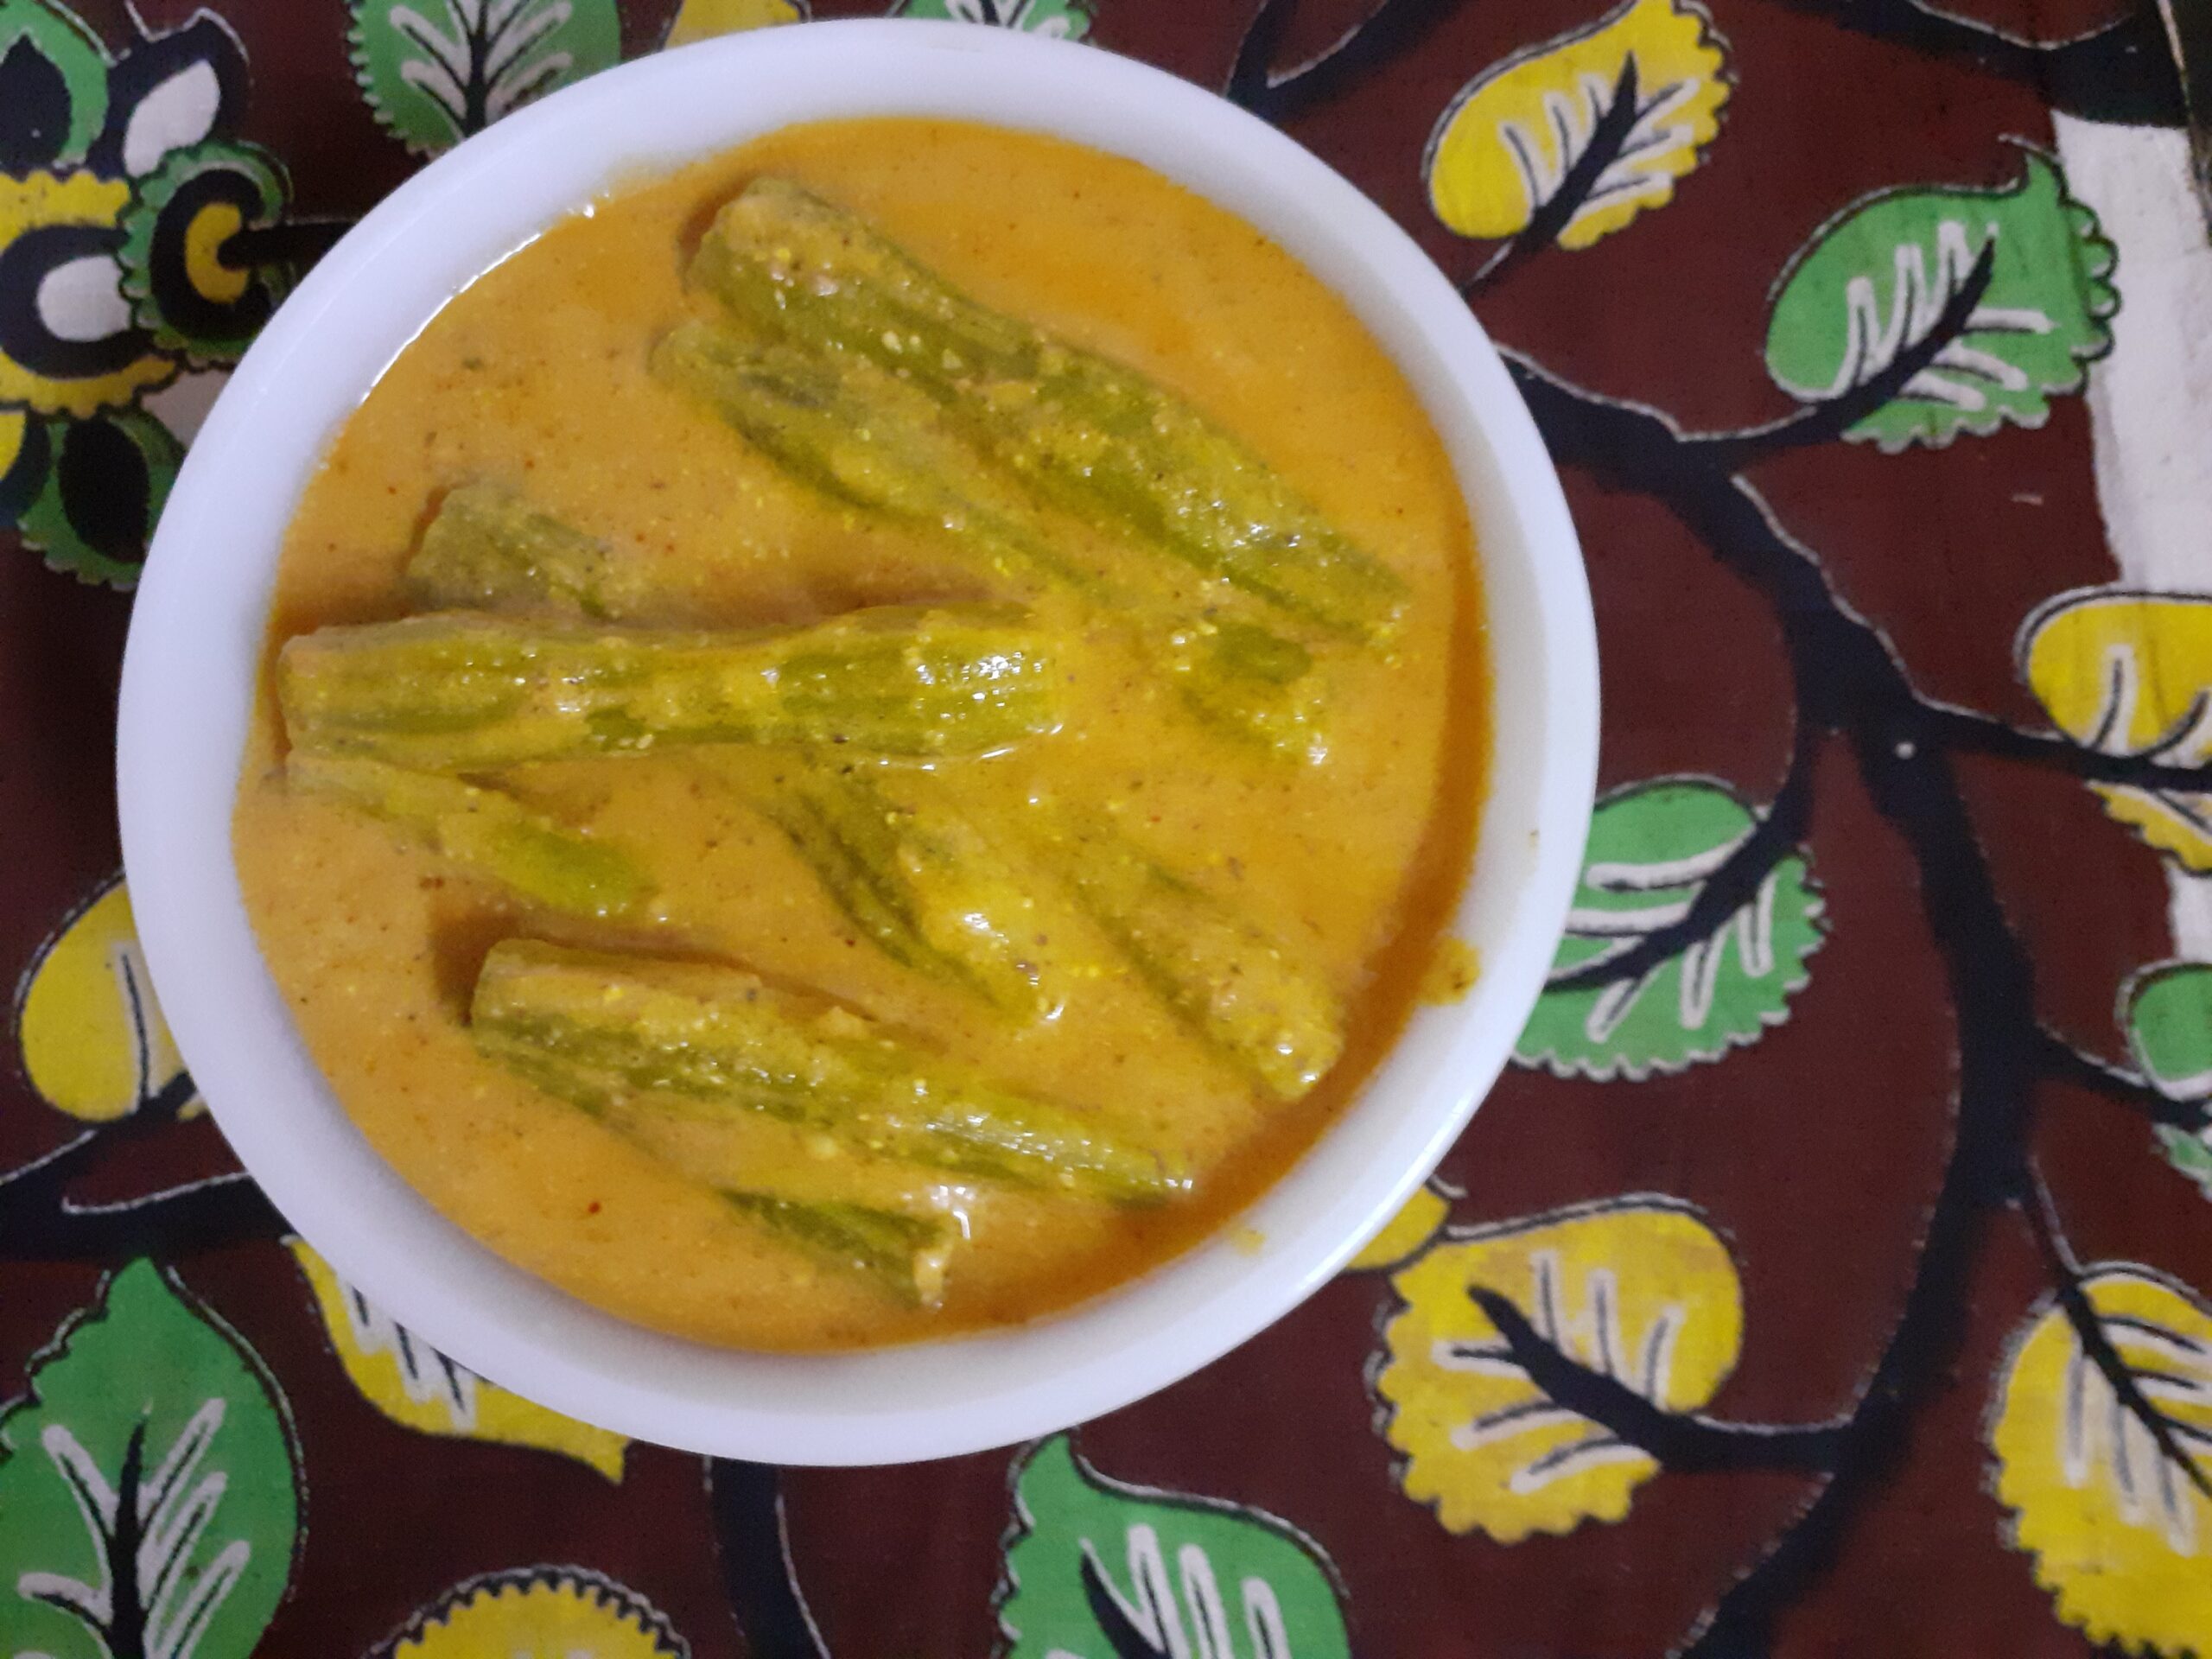
In this recipe I am using the fresh Sundakkai and not the dried ones( Vathal). Here the berries are cooked in tamarind sauce with a spicy, ground masala paste. The fresh berries are little bitter and so have to smashed using a pestle, so that as the Berry gets cooked in the tamarind pulp the bitterness is reduced. I am calling this a Chettinad style Kuzhambu because the masala paste used here is the Chettinad masala paste.
Here is the recipe of Pachai Sundakkai Kuzhambu for you-
PREP TIME: 15 MINS COOK TIME: 20 Mins
TOTAL TIME: 35 Mins COURSE: MAIN
CUISINE: SOUTH INDIAN SERVINGS: 5
AUTHOR: Rajni Ram
Ingredients:
Sundakkai/ Turkey Berry (fresh) 150 gm
Tamarind paste 1.5 tbsp ( or pulp of lemon sized ball)
Onion 1 (medium) diced
Tomato 1 large chopped roughly
Garlic 10 to 12 cloves
Curry leaves a few leaves
Green chillies 2
Gingelly/Til/Sesame oil 1.5 tbsp
Asafoetida 1/2 tsp
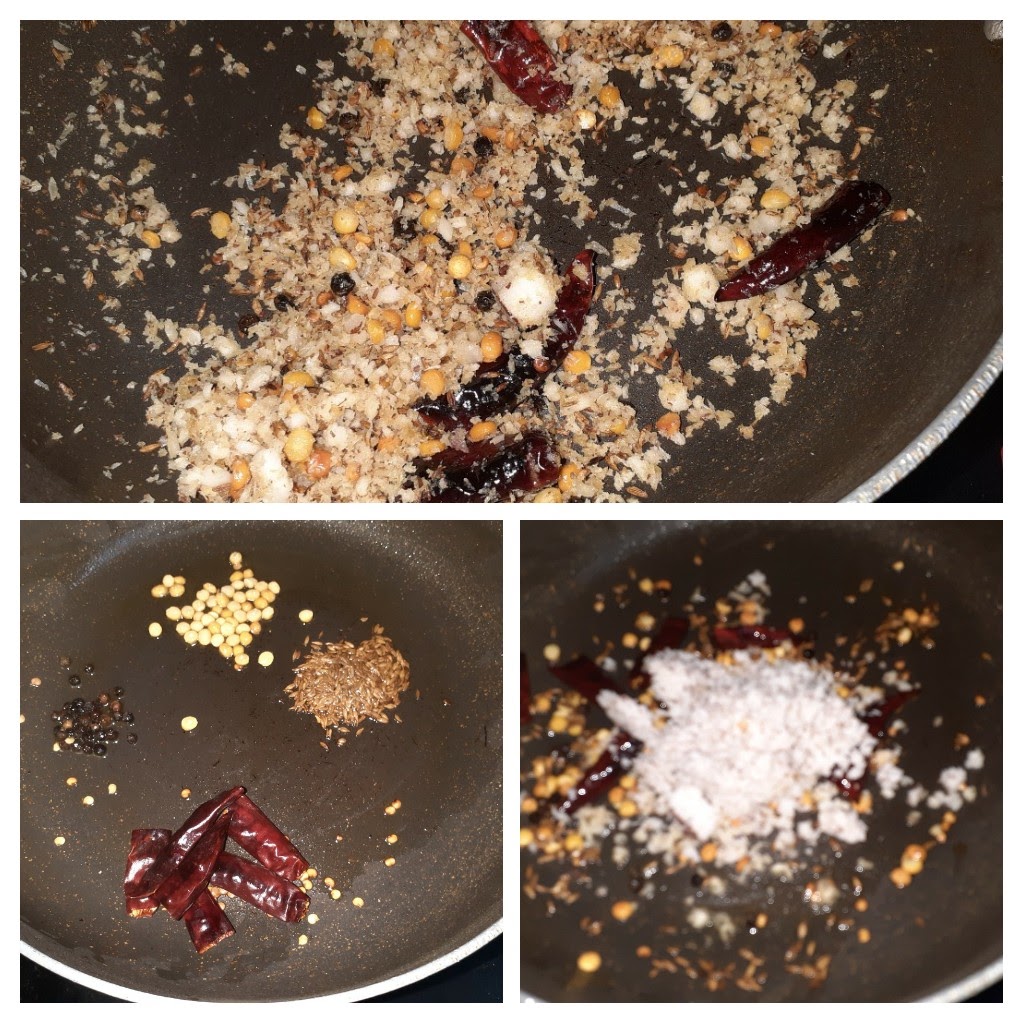
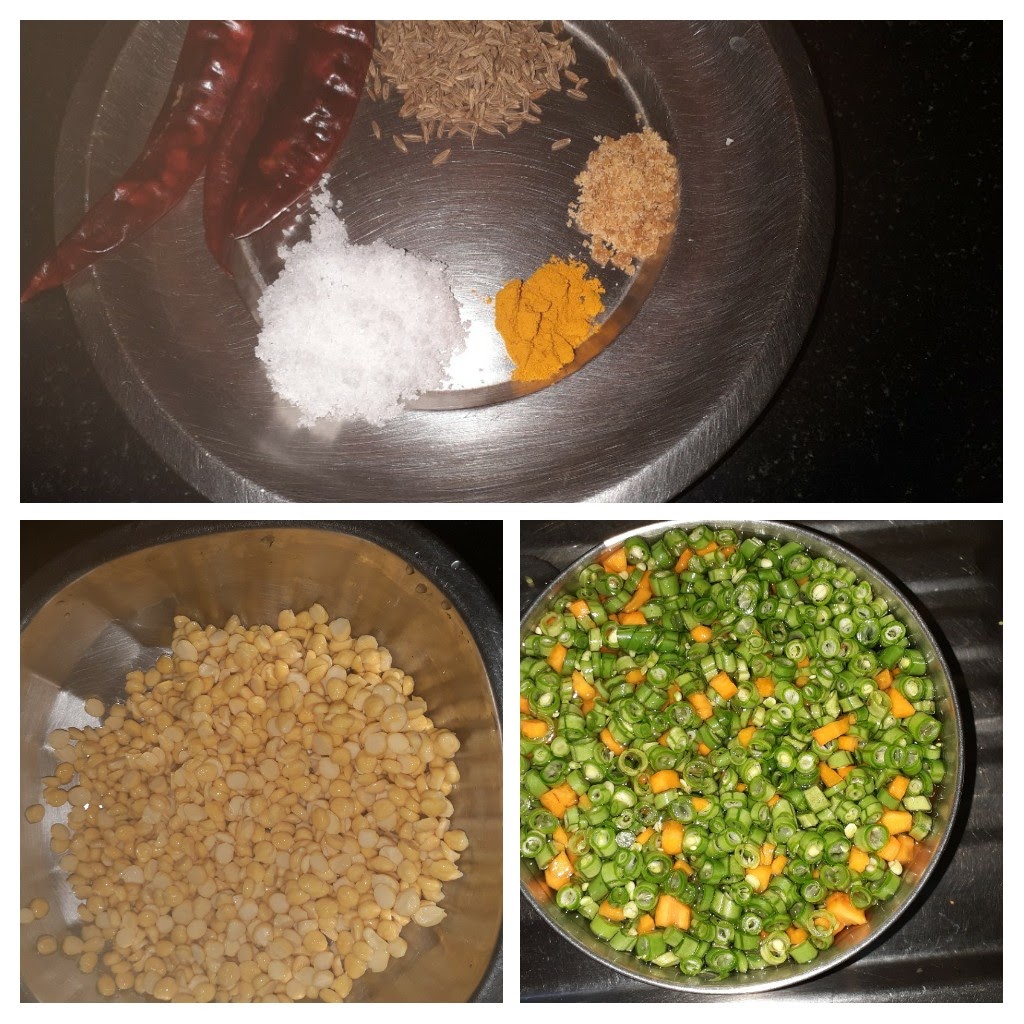
To grind:
Coriander seeds 1 tbsp
Fennel seeds 1.5 tsp
Dry red chilli 2
Kashmiri dry red chilli 1(optional)
Coconut gratings 1.5 tbsp
To temper:
Mustard seeds 1 tsp
Chana dal(gram) 1 tsp
Dry red chilli 1 broken
Methi/ fenugreek seeds 1 pinch
Asafoetida 1/2 tsp
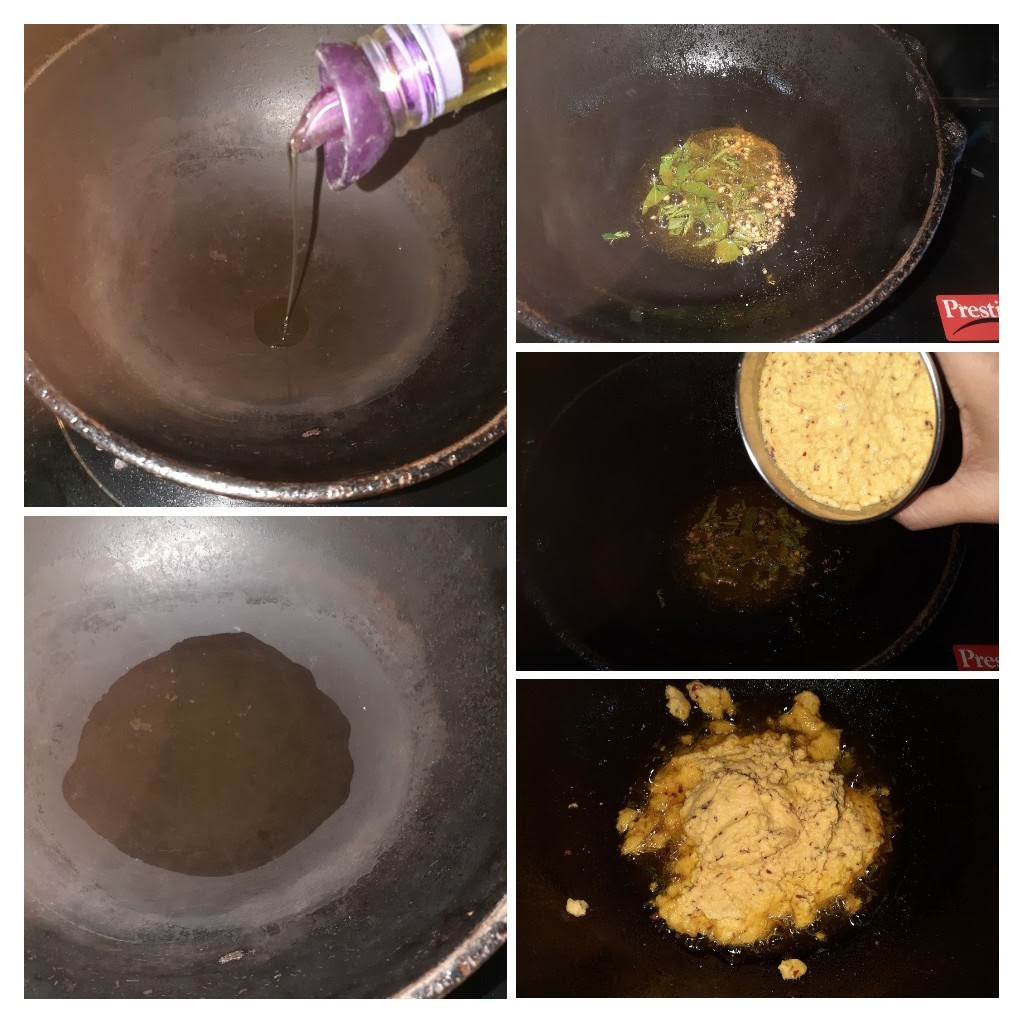
Method:
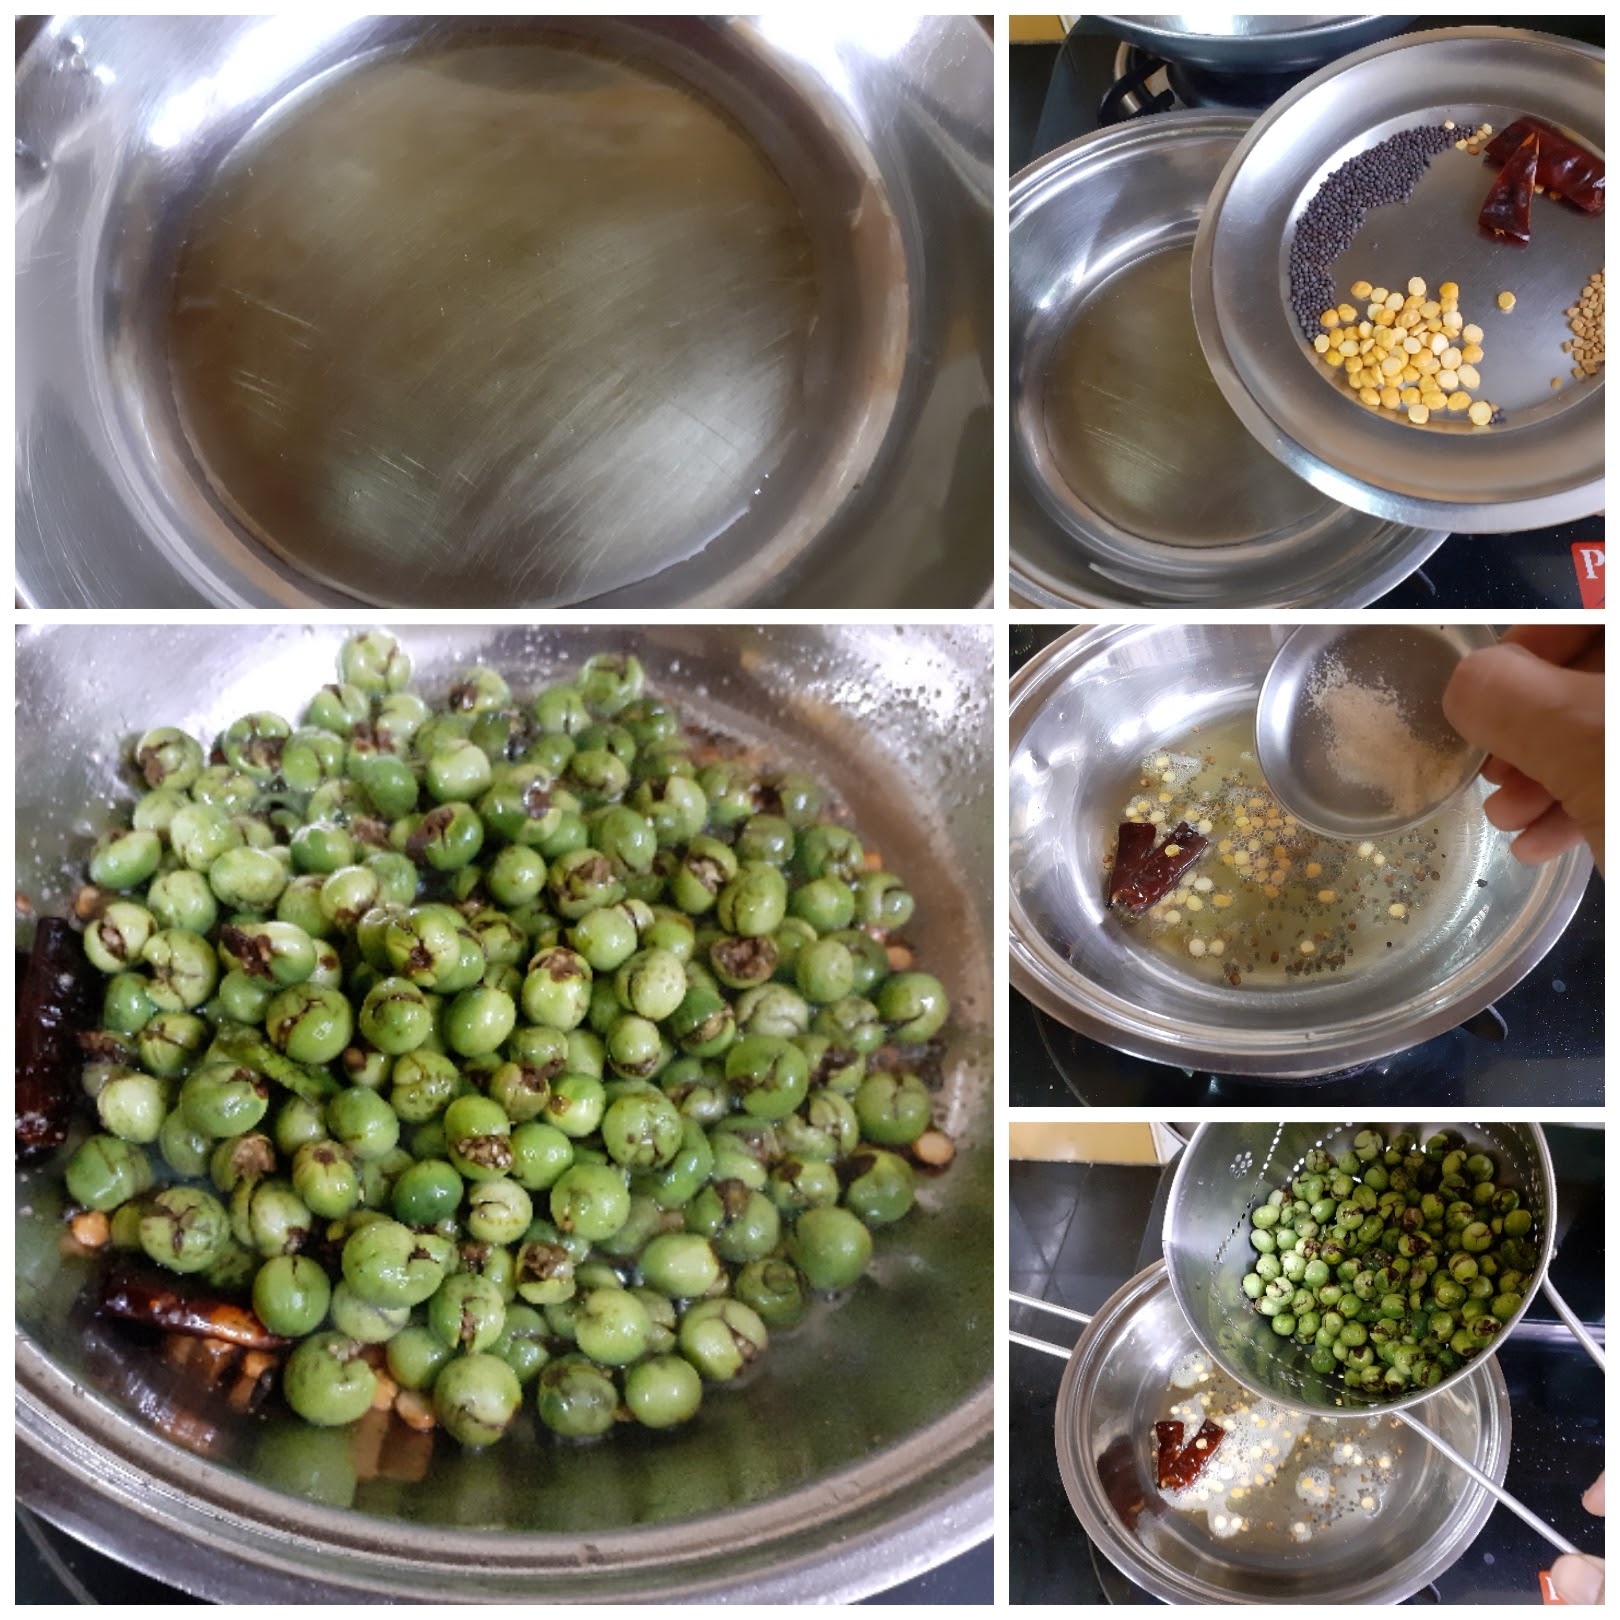
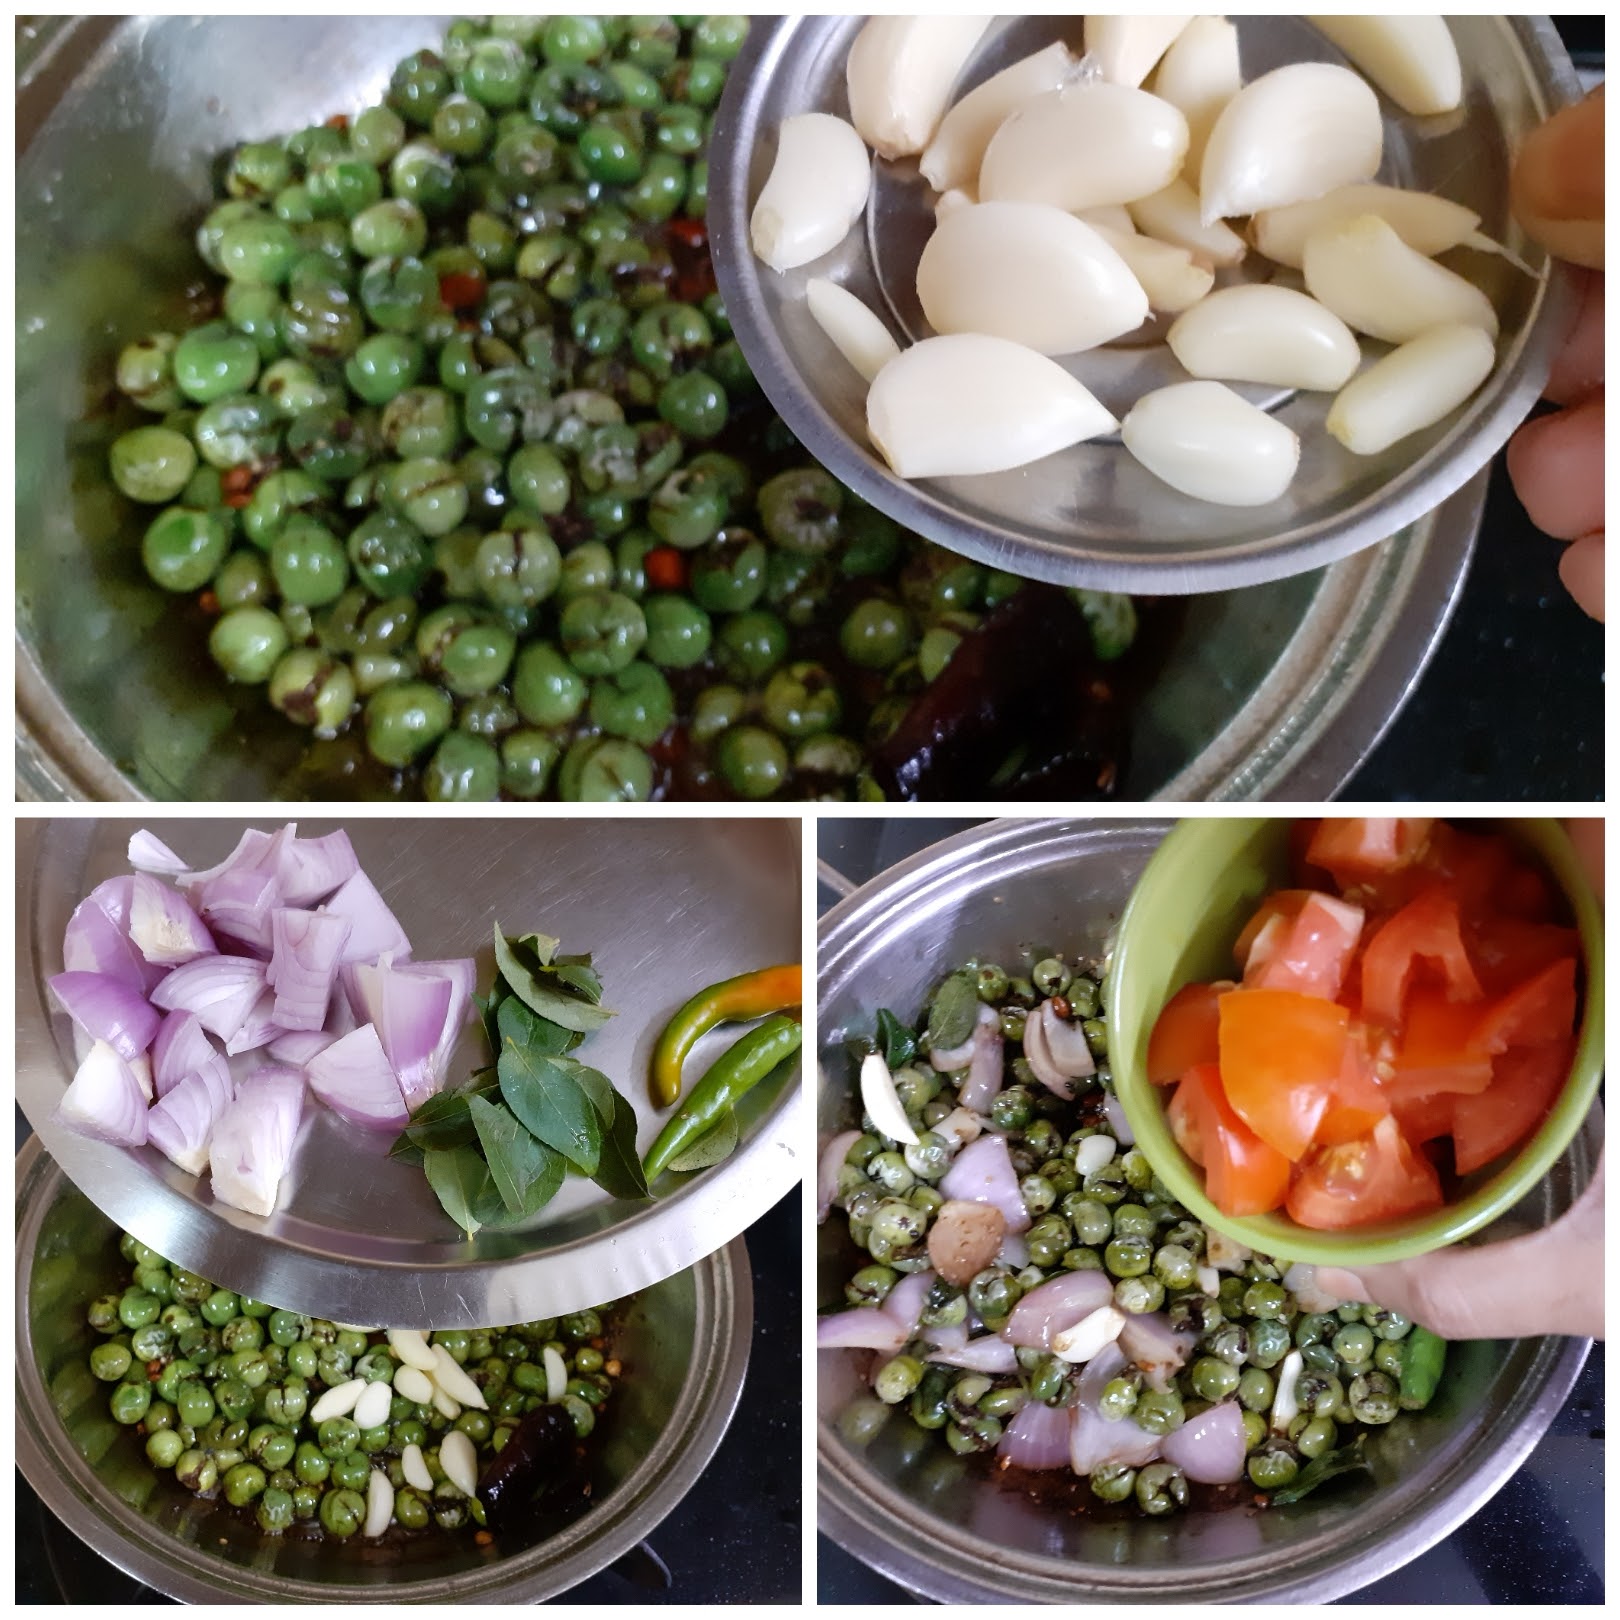
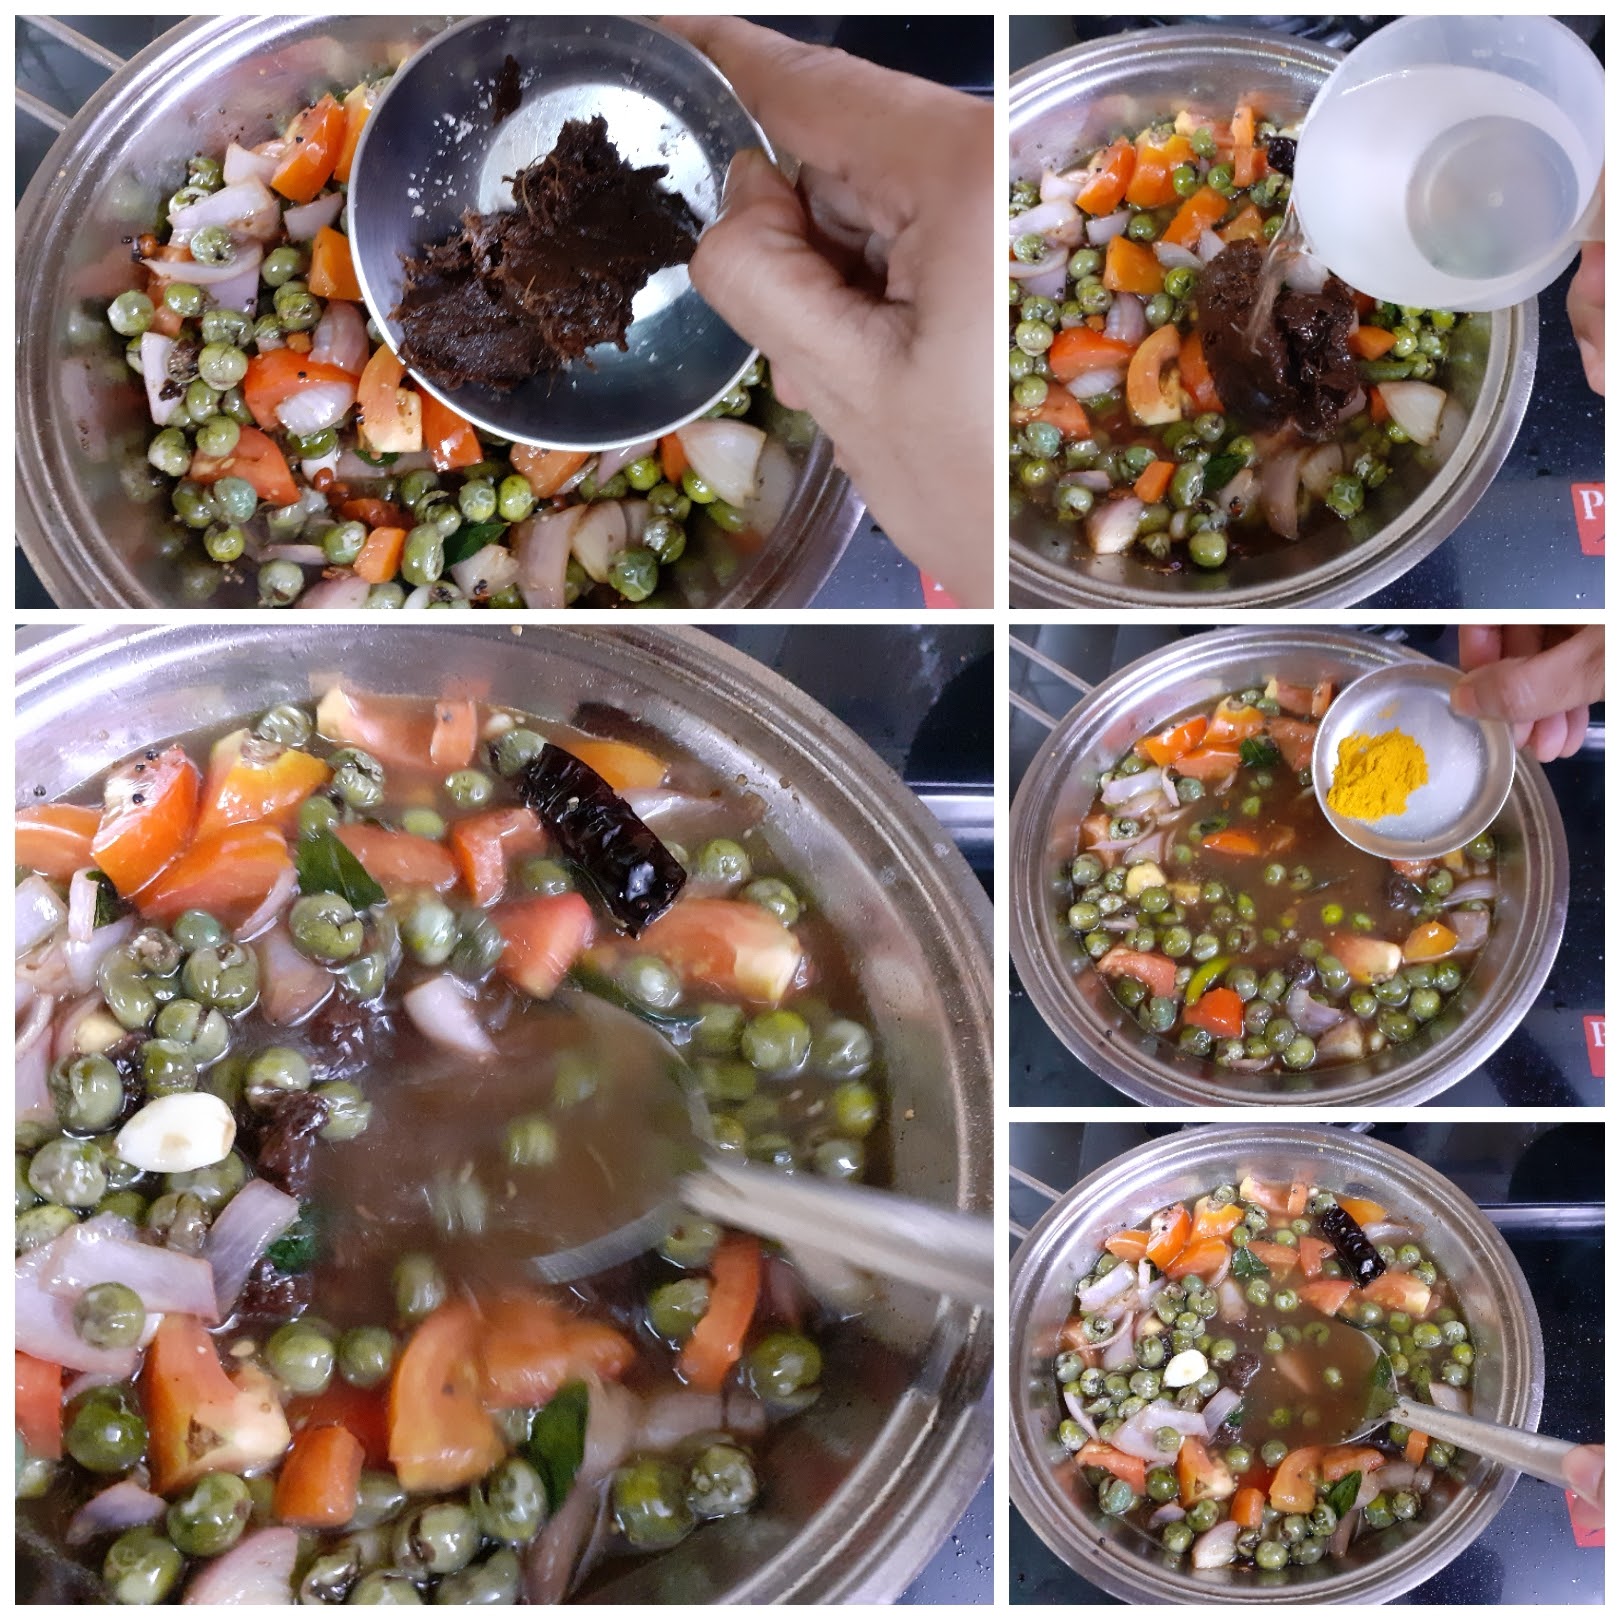
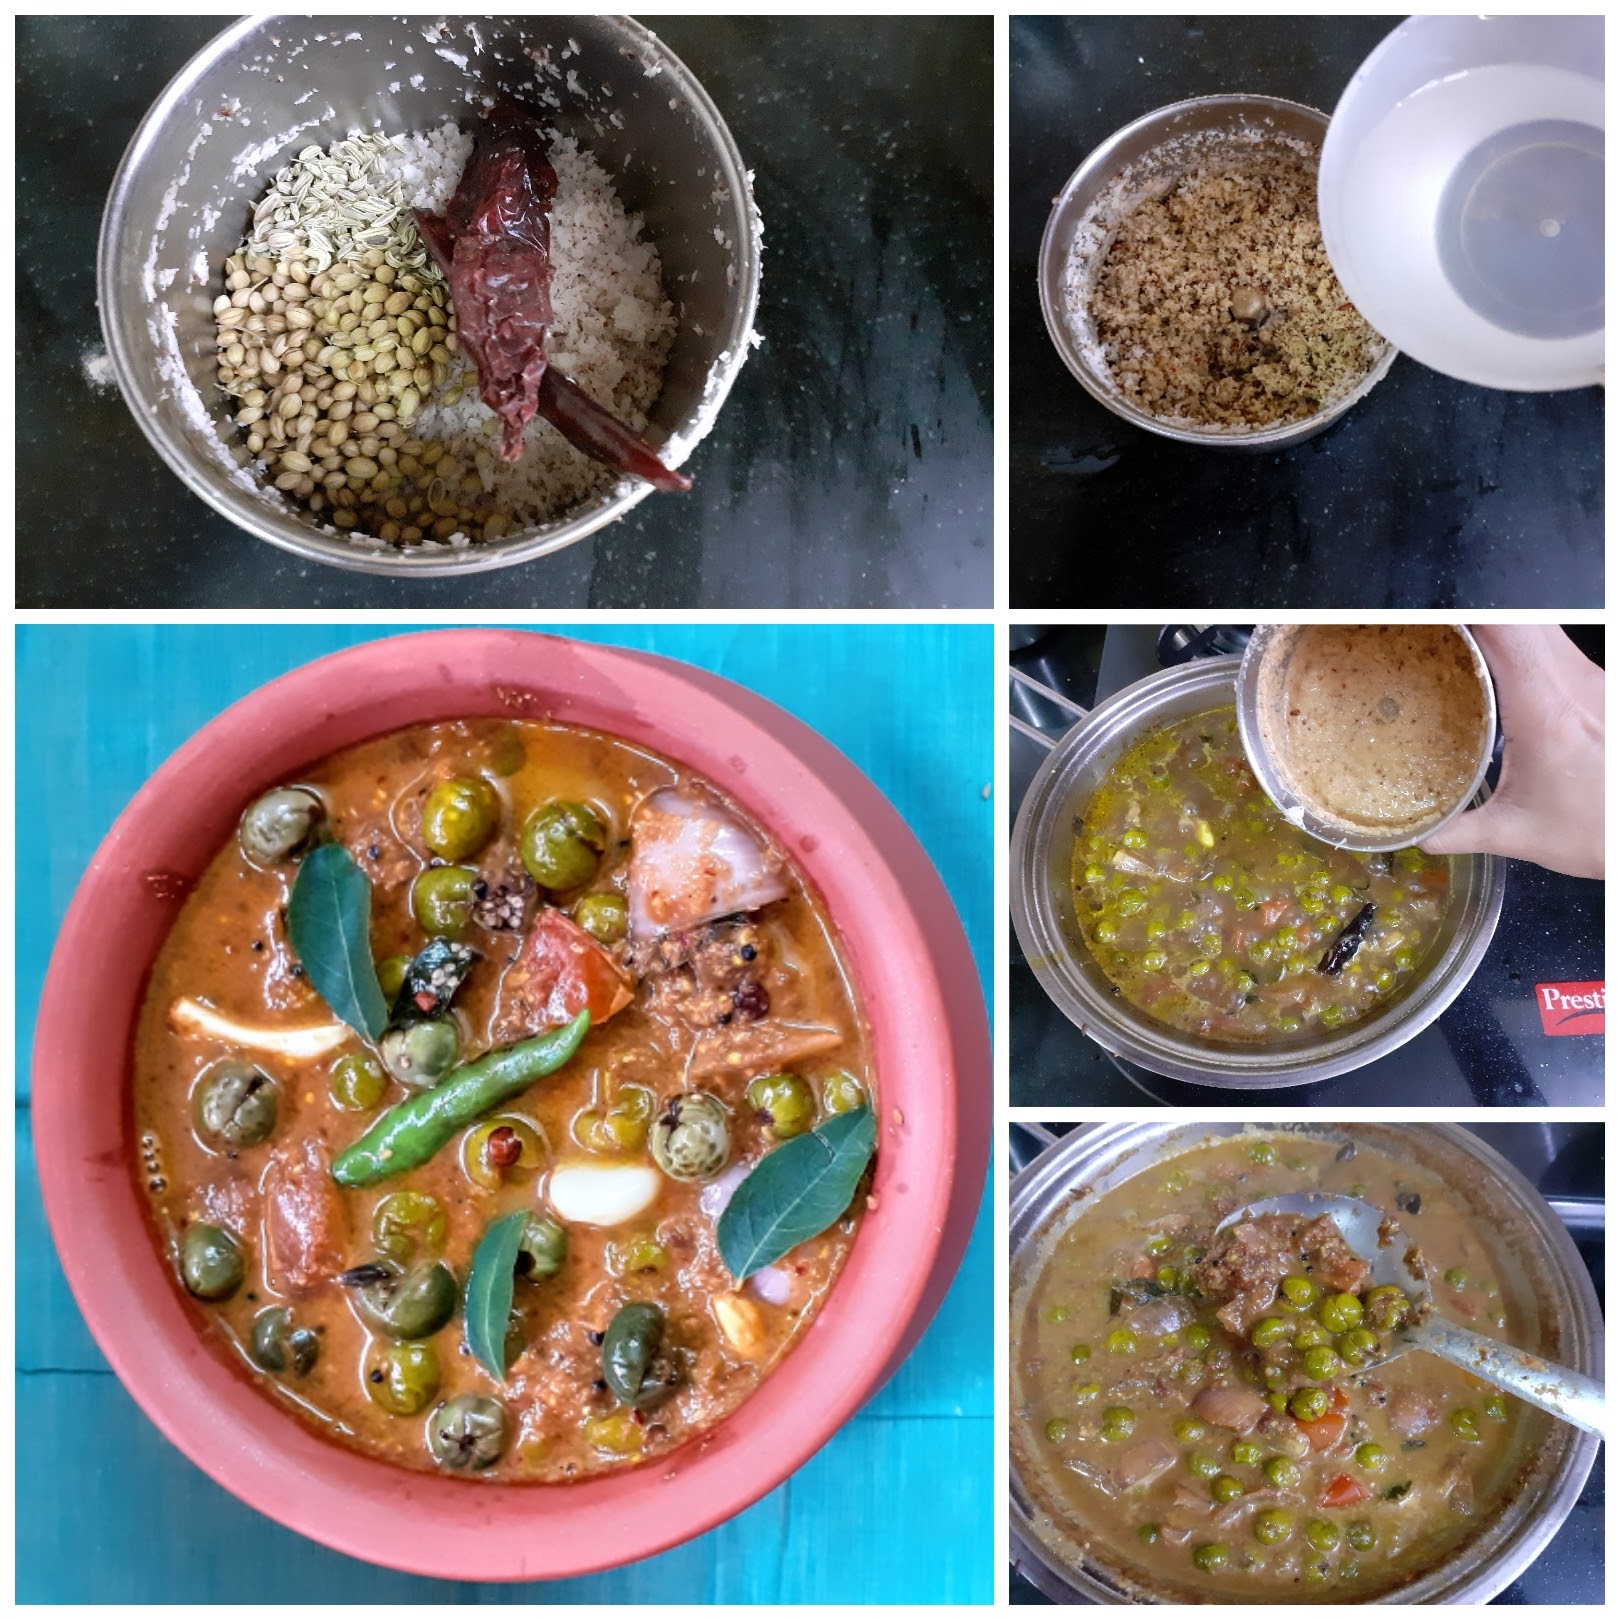
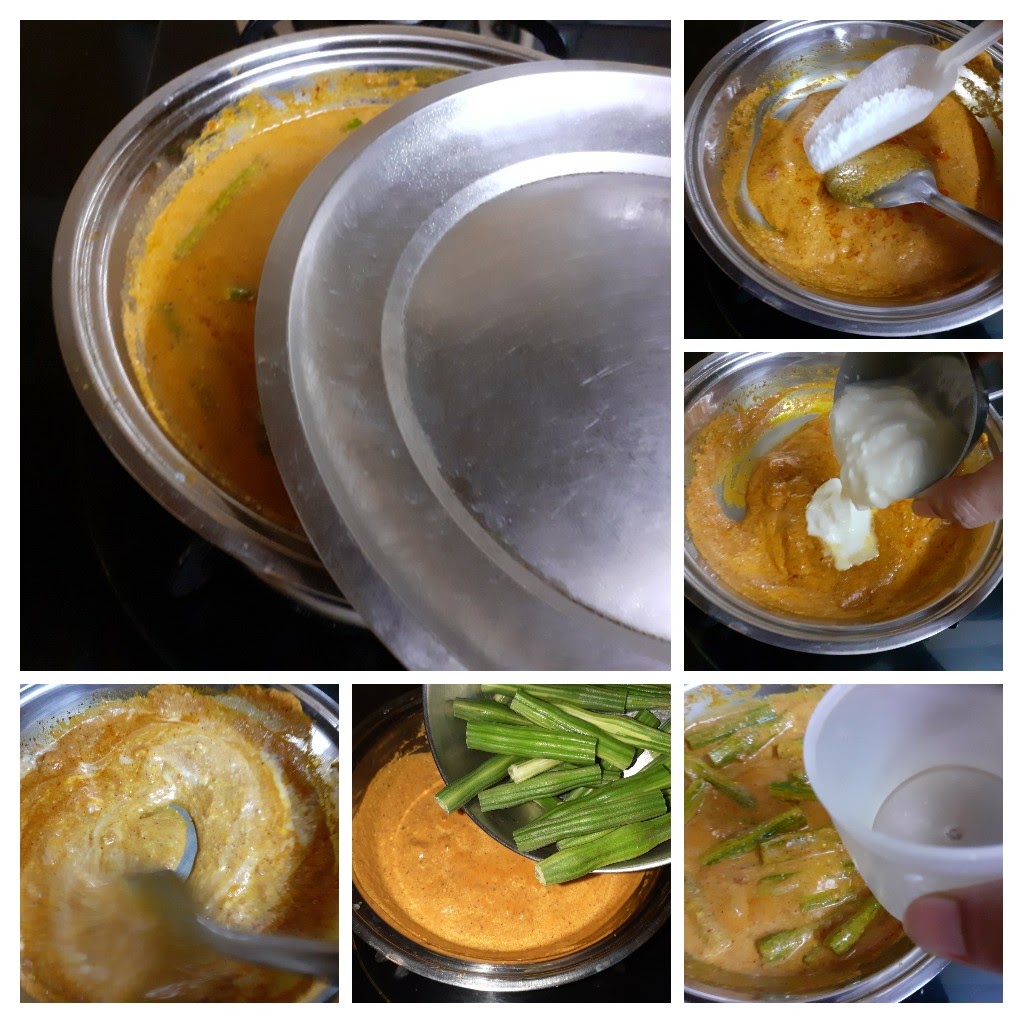
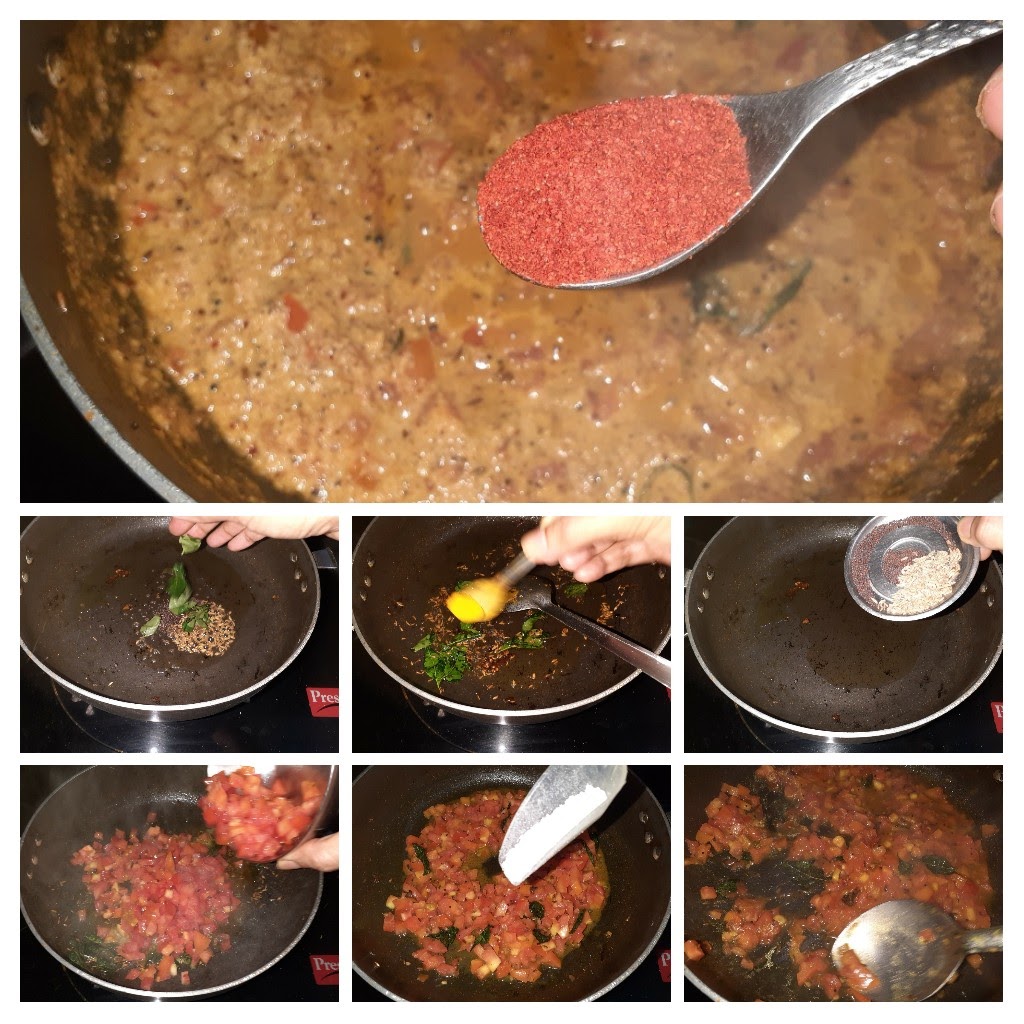
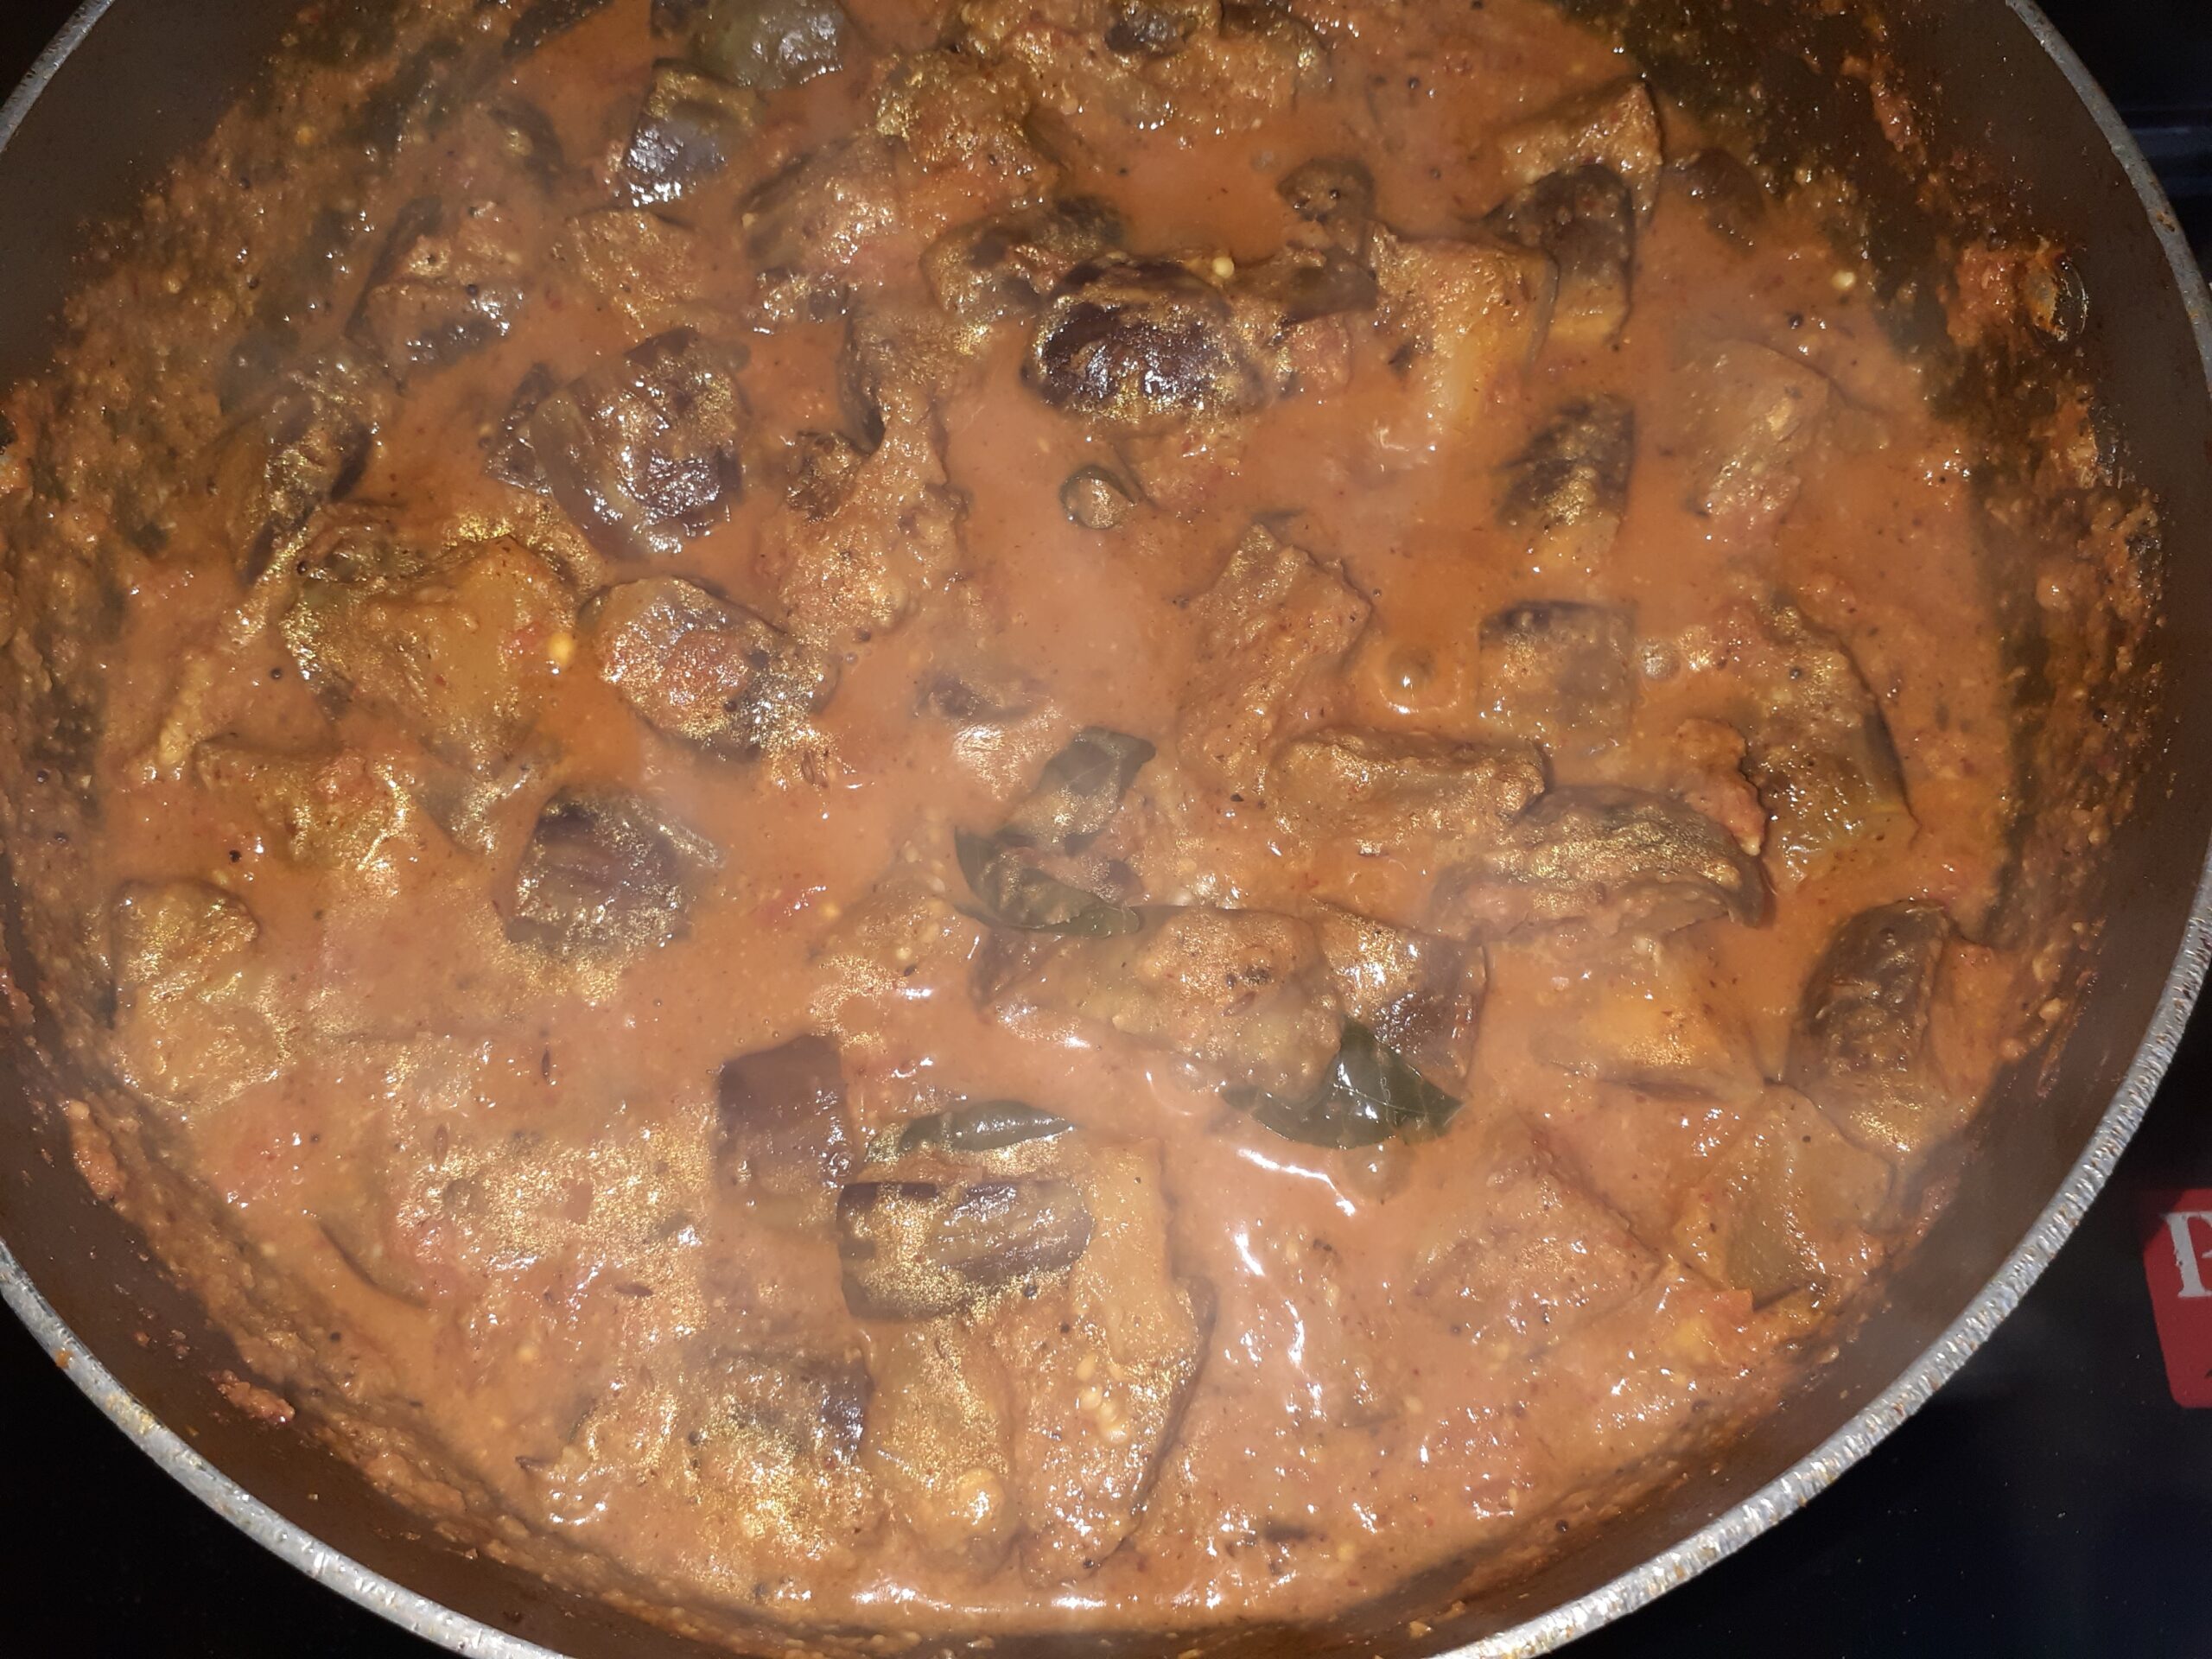
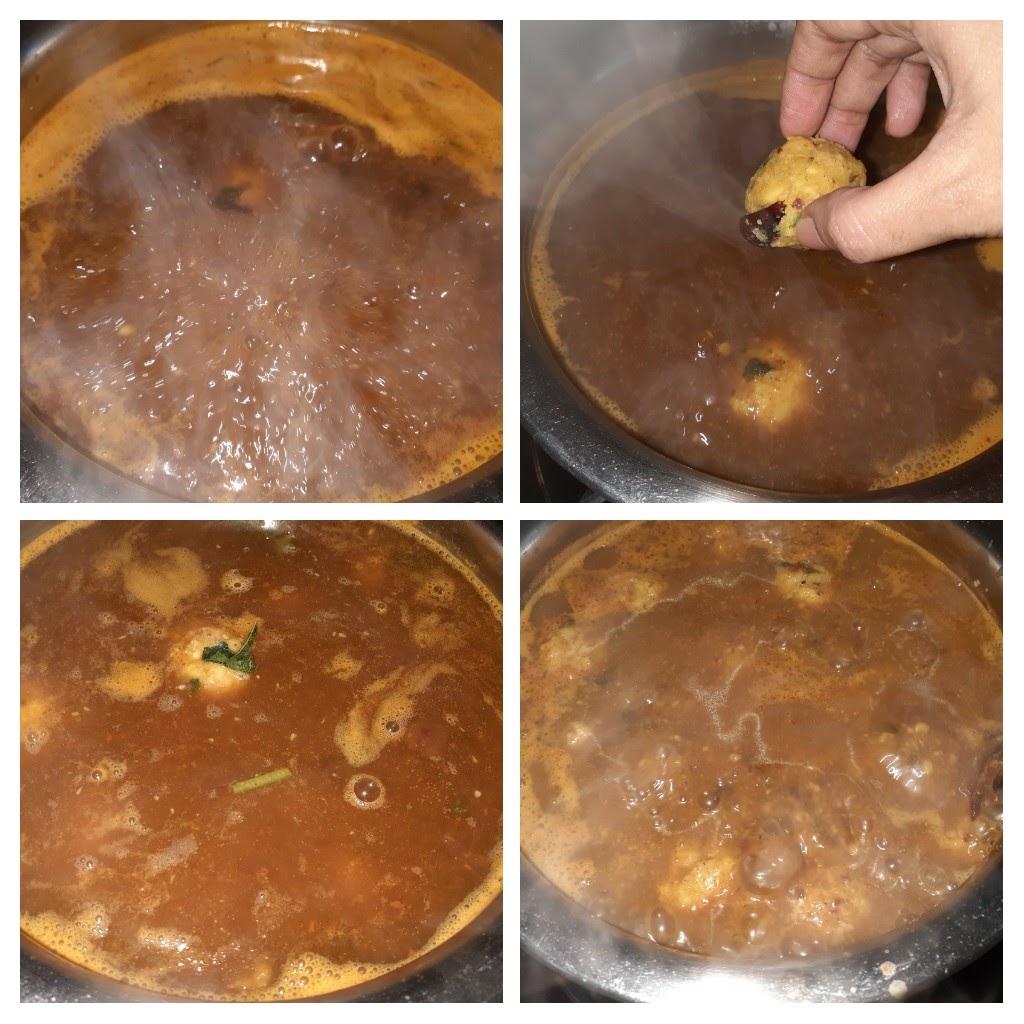
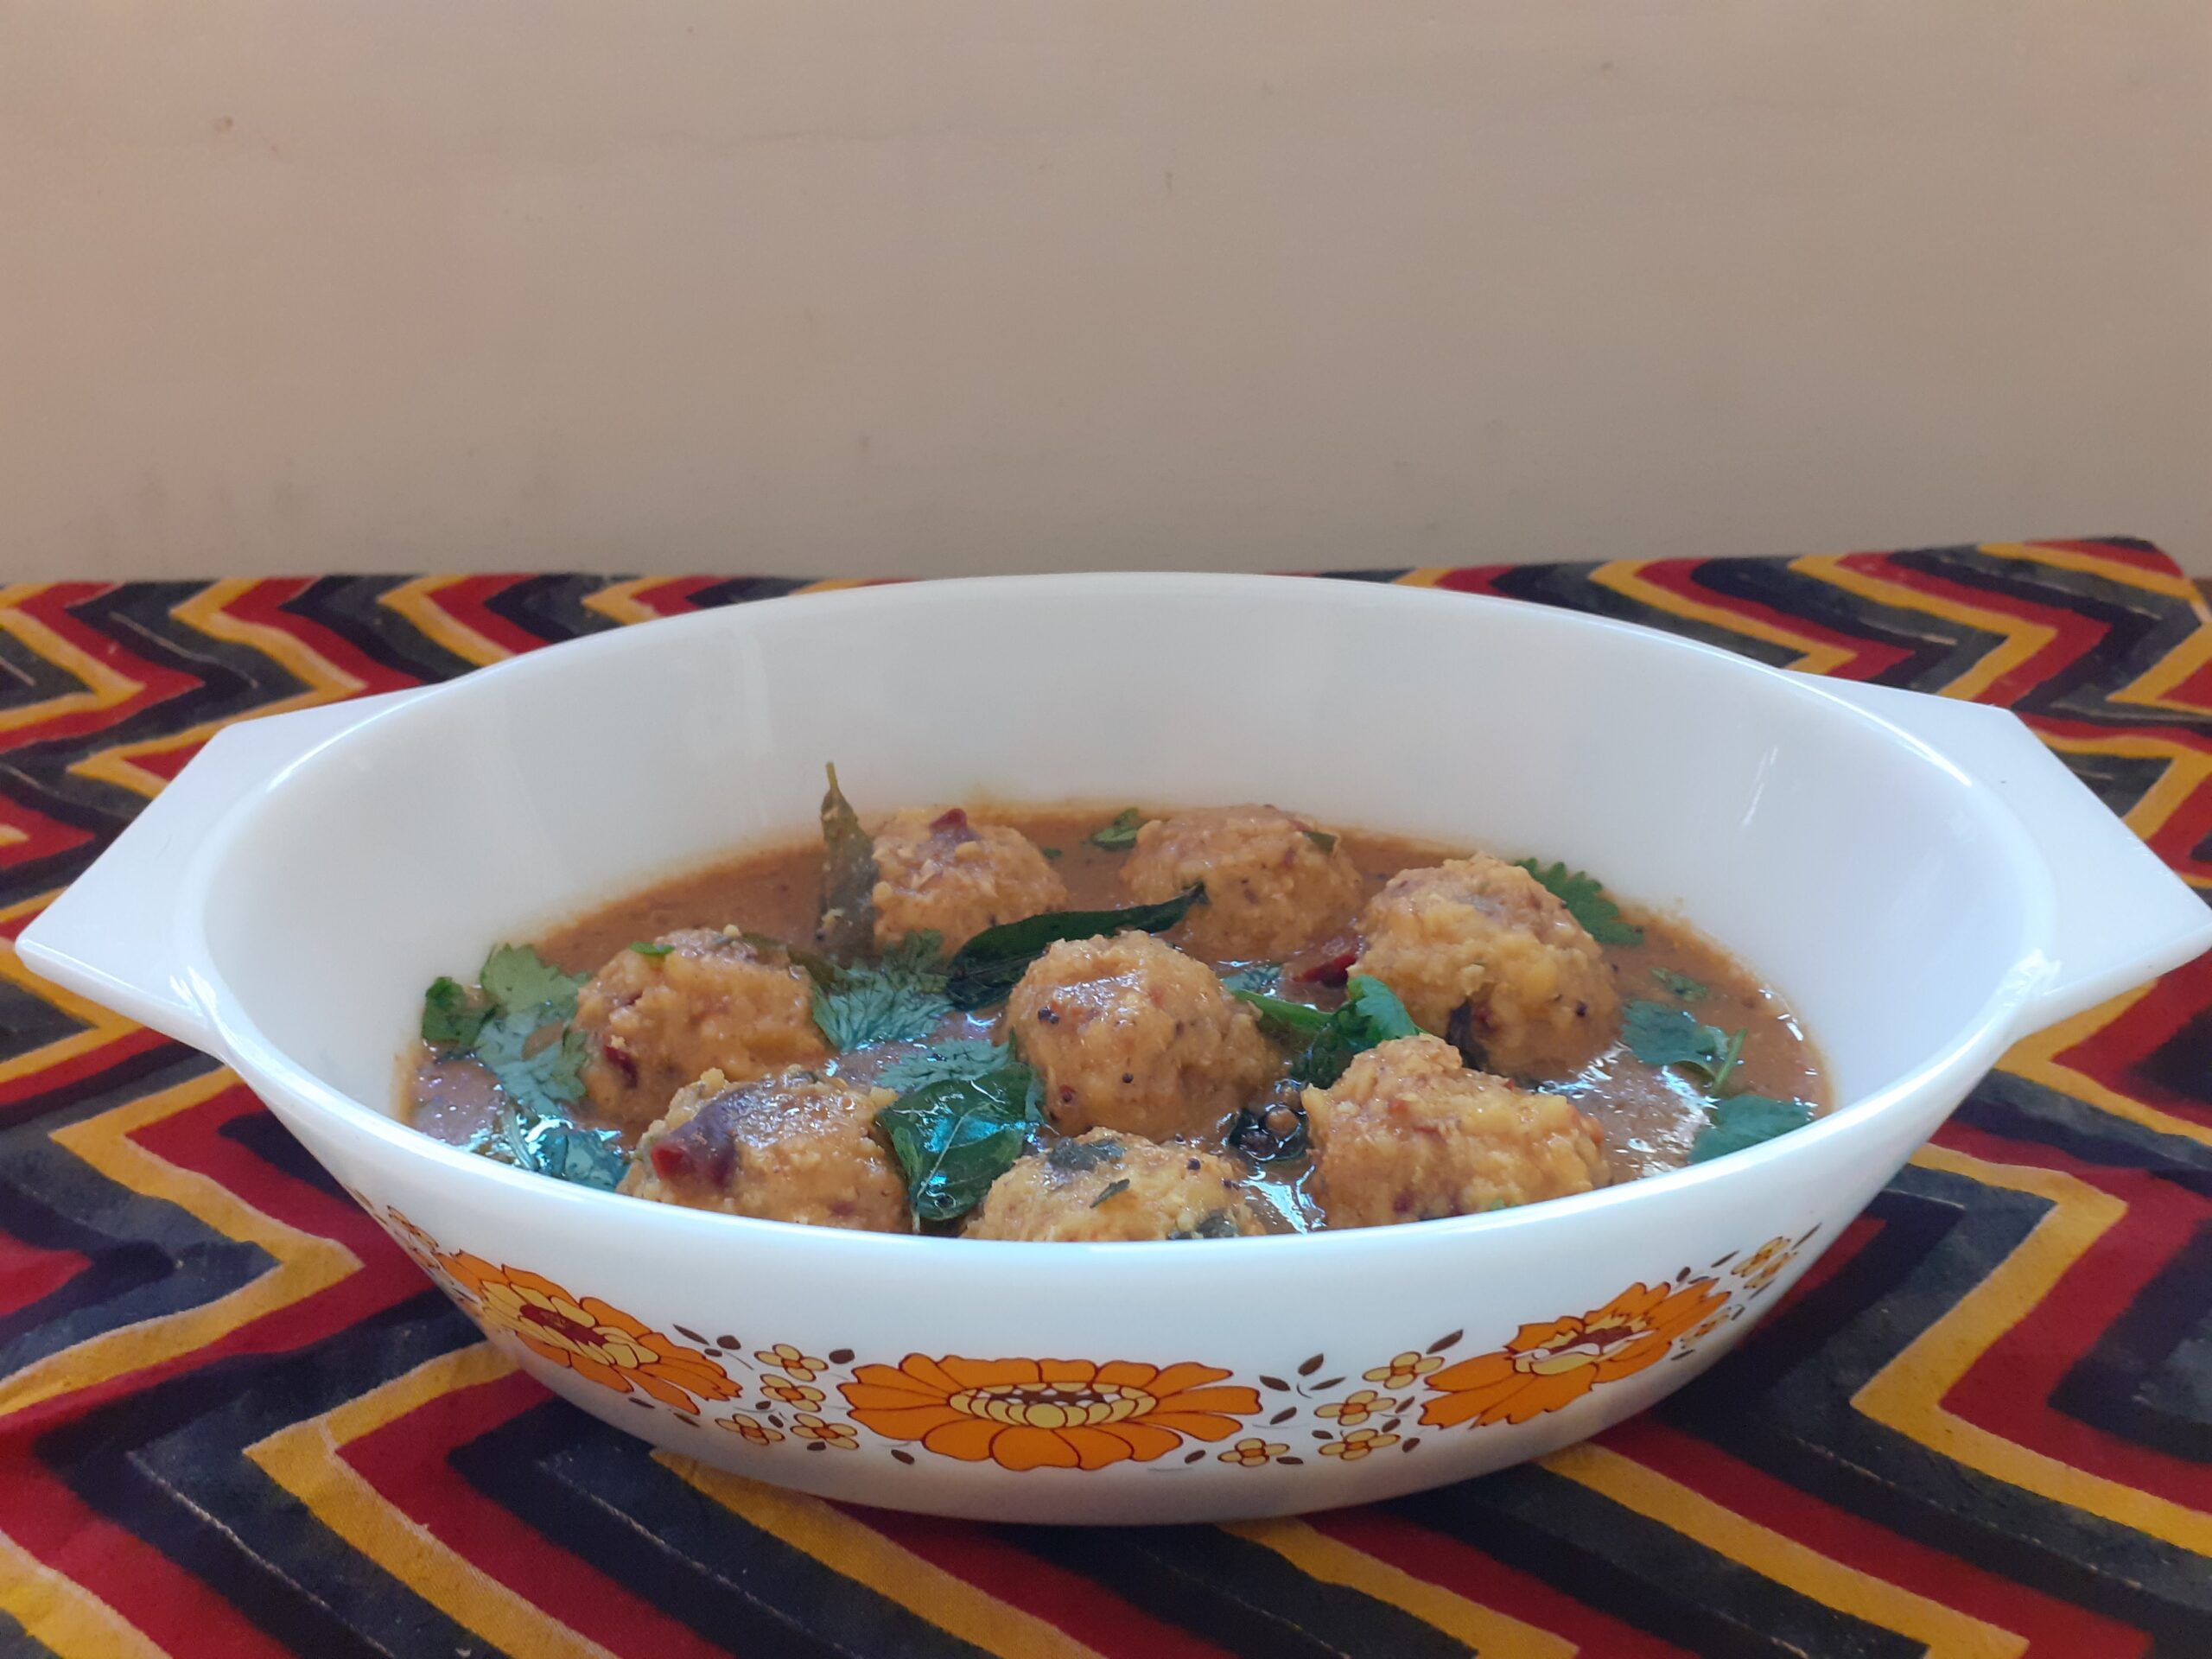
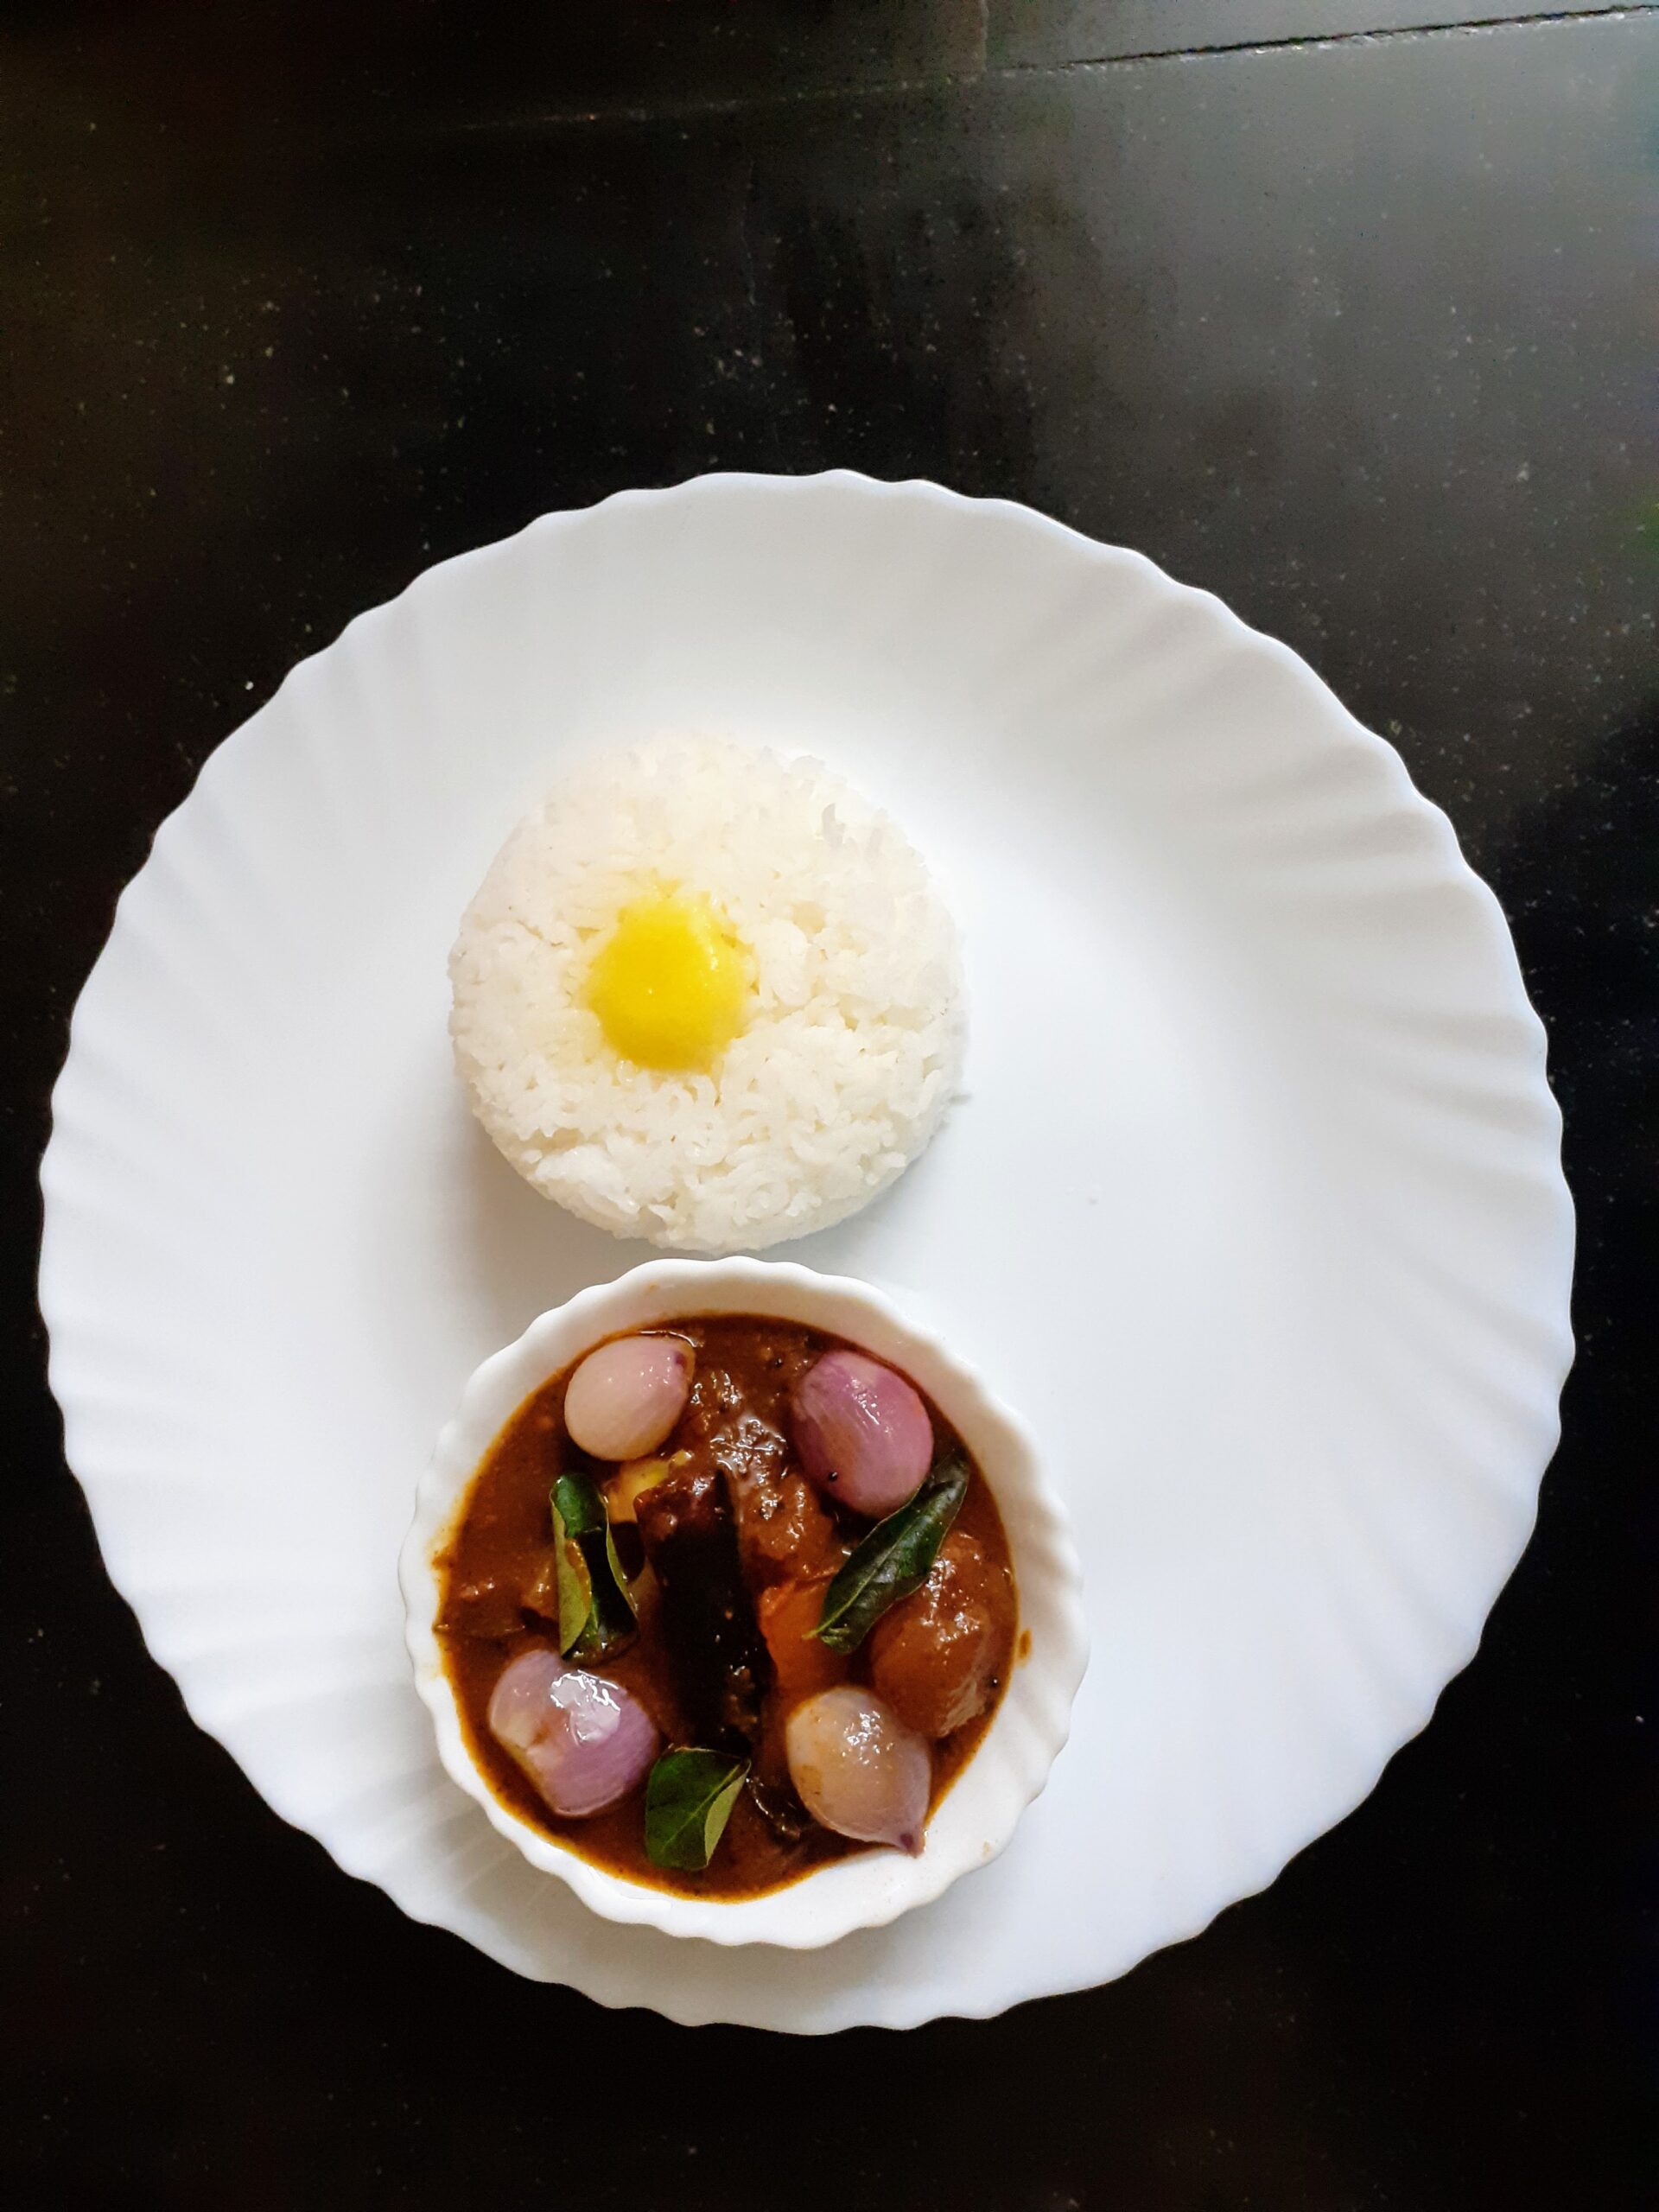
Wash and pat dry the Sundakkai/Turkey berry. Now with a mortar and pestle smash it lightly, such that it splits midway(refer picture). Now in a pan heat oil, add all ingredients under tempering followed by asafoetida and fry for 30 seconds. Now add the lightly crushed Sundakkai to the tempering and fry nicely for a minute.Now add the garlic cloves followed by onion, curry leaves and green chillies and continue to saute for 2 minutes. Now add the tomatoes and saute until the tomatoes turn tender. Add the tamarind paste followed by 2.5 cups water (or) add the pulp extracted from lemon sized ball of tamarind. Stir nicely and begin boiling. Add turmeric powder and cook until the Sundakkai turns tender. Check for doneness of Sundakkai by crushing one with a spoon/ladle. If it mashes easily the berries are cooked. Now grind all the ingredients under “to grind” to a coarse mixture, then add 1/2 cup water and grind to a smooth paste. Add this paste to the Sundakkai simmering in the Tamarind pulp,stir well and allow to cook. Continue cooking until the gravy thickens and the raw small of the masala is gone. The tasty and healthy Chettinad style Sundakkai Kuzhambu is ready.
SERVING SUGGESTIONS: With hot rice, with Dosa, Idli, pongal,
and Curd rice.
STEPWISE RECIPE FOLLOWS:
1. Assemble all ingredients. Wash and pat dry the Sundakkai/Turkey berry. Now with a mortar and pestle smash it lightly, such that it splits midway.
2. Now in a pan heat oil, add all ingredients under tempering followed by asafoetida and fry for 30 seconds. Now add the lightly crushed Sundakkai to the tempering and fry nicely for a minute.
3. Add the garlic cloves followed by onion, curry leaves and green chillies and continue to saute for 2 minutes. Now add the tomatoes and saute until the tomatoes turn tender.
4. Add the tamarind paste followed by 2.5 cups water (or) add the pulp extracted from lemon sized ball of tamarind. Stir nicely and begin boiling. Add turmeric powder and cook until the Sundakkai turns tender.
5. Now grind all the ingredients under “to grind” to a coarse mixture, then add 1/2 cup water and grind to a smooth paste. Add this paste to the Sundakkai simmering in the Tamarind pulp,stir well and allow to cook. Continue cooking until the gravy thickens and the raw small of the masala is gone.
NOTES:
1. Follow the precedure given to split open the berry midway. The kuzhambu will taste to bitter if the berries are not split.
2. After the berries cook in the tamarind sauce, check for doneness by pressing them with a ladle or soon. If they crush easily, they are cooked.
3. I have used Gingelly/Til oil as it adds extra flavour to the dish. Unless one is allergic to sesame oil or does not like the taste I recommend using the oil. Alternately refined oil can be used.
If you tried this recipe and liked it please comment below. I would love to hear from you. If you have a query about the recipe email us and ill respond as soon as I can.
If you would like to receive our recipes in your mail please leave your mail id at the homepage. Every time Rajjo’s Kitchen has a new post we will mail the recipe to you.
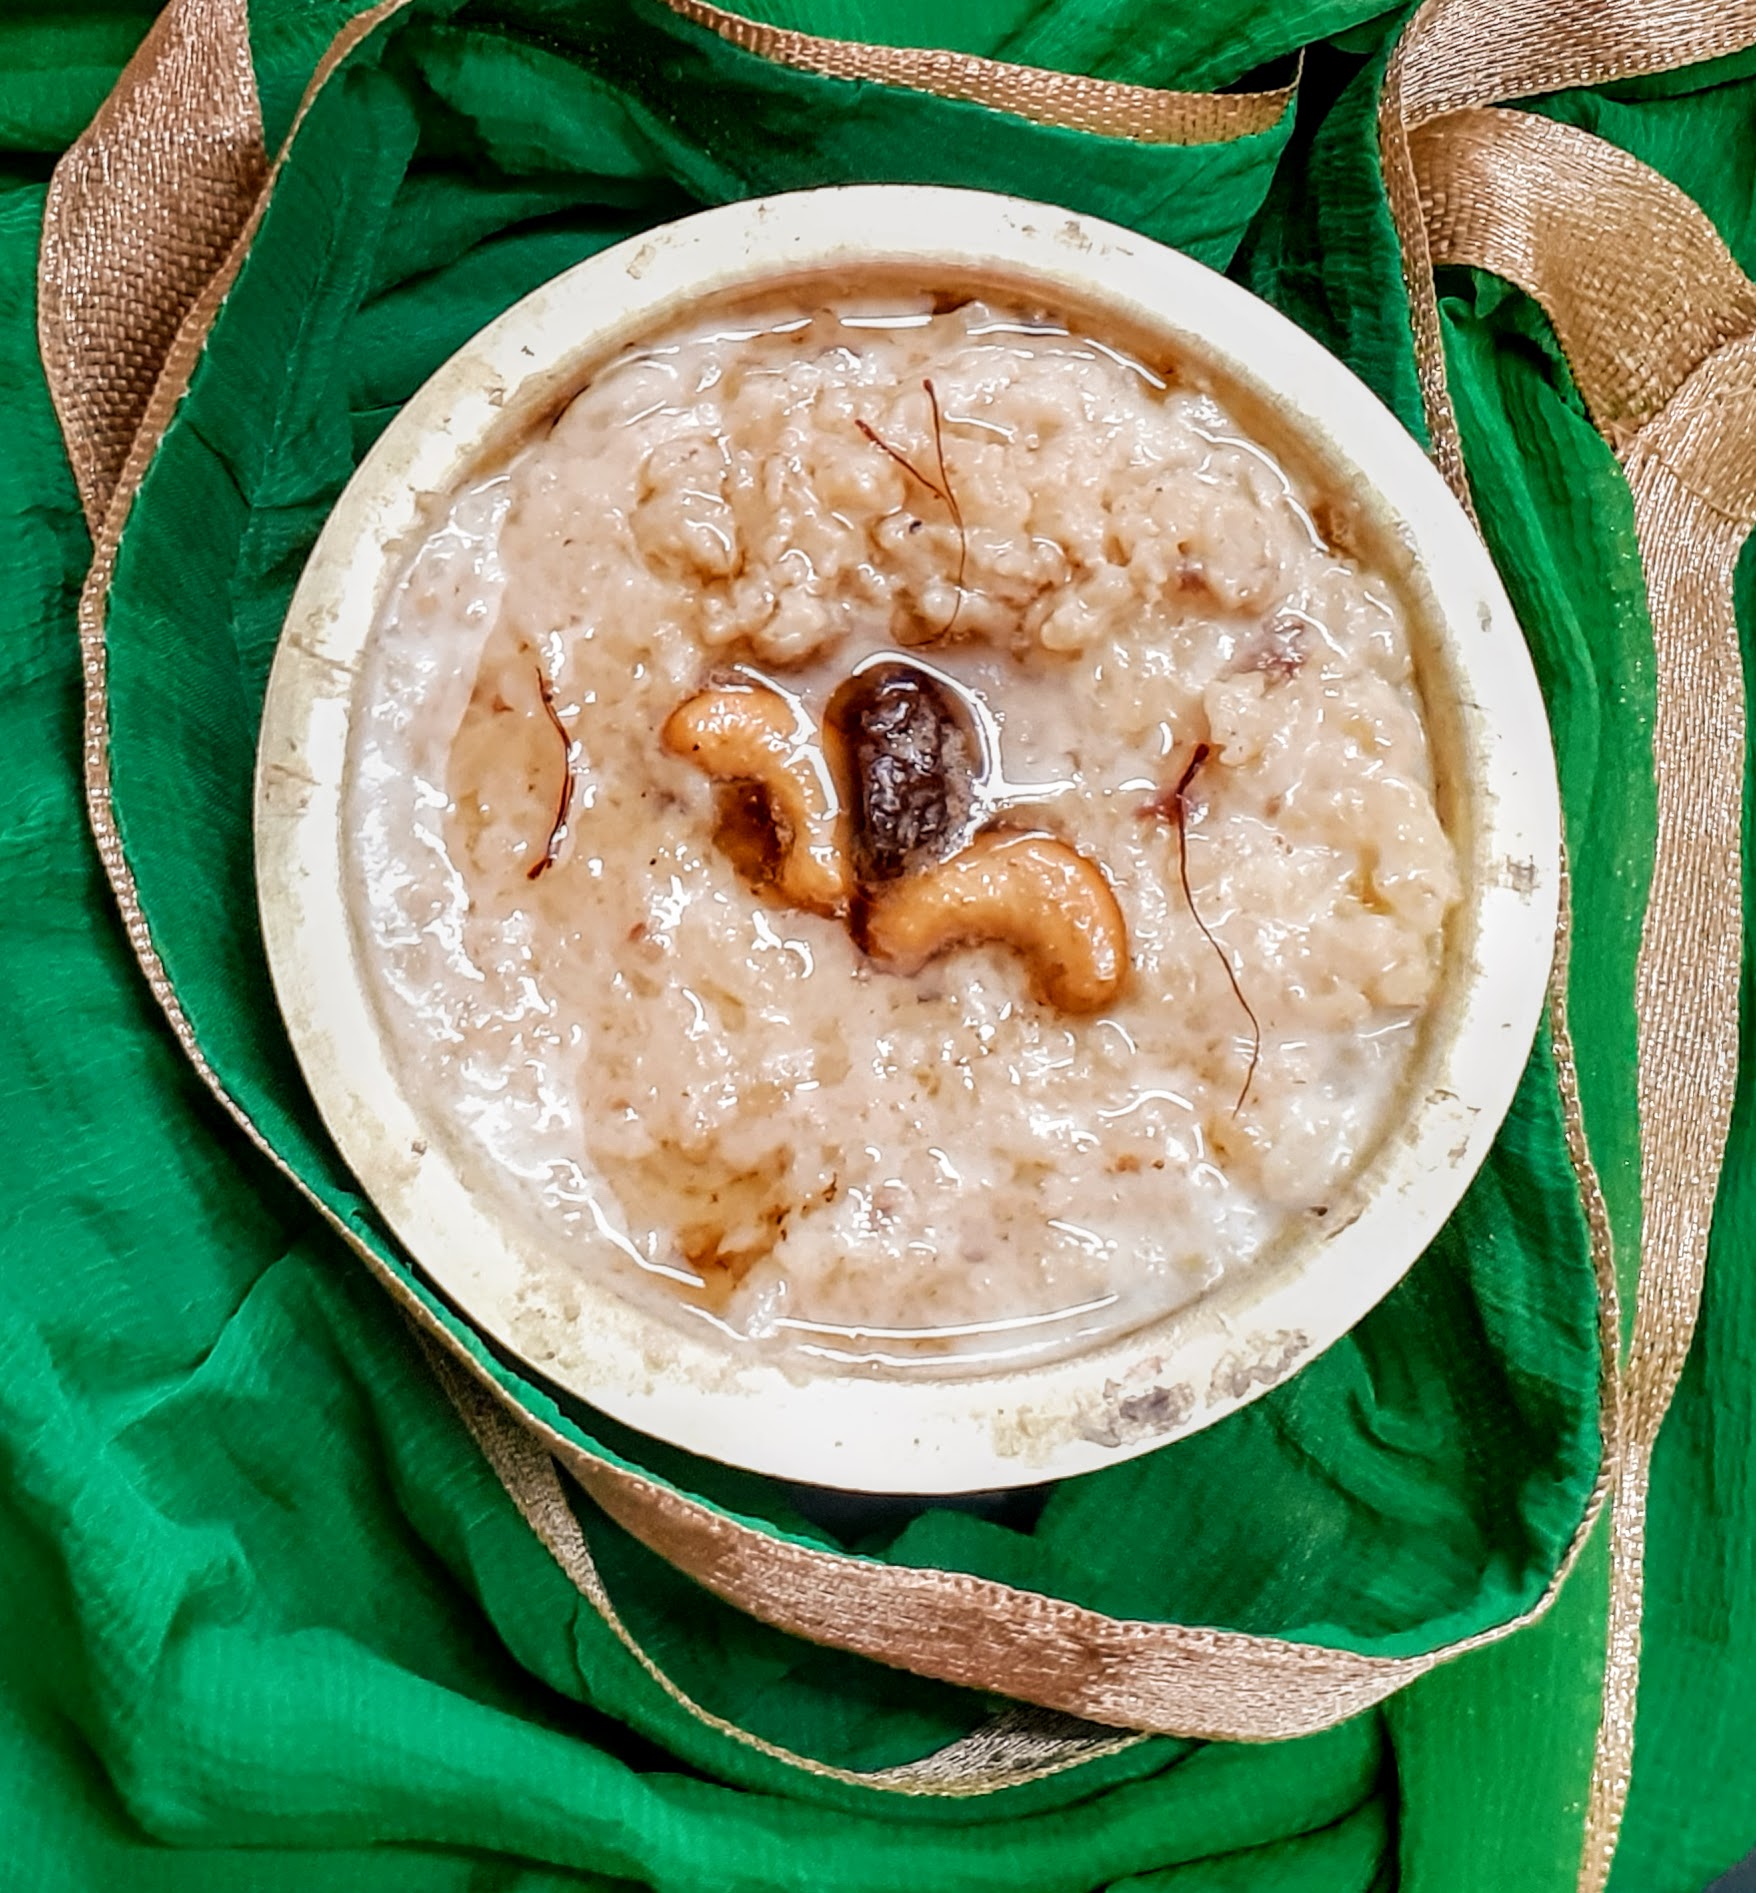
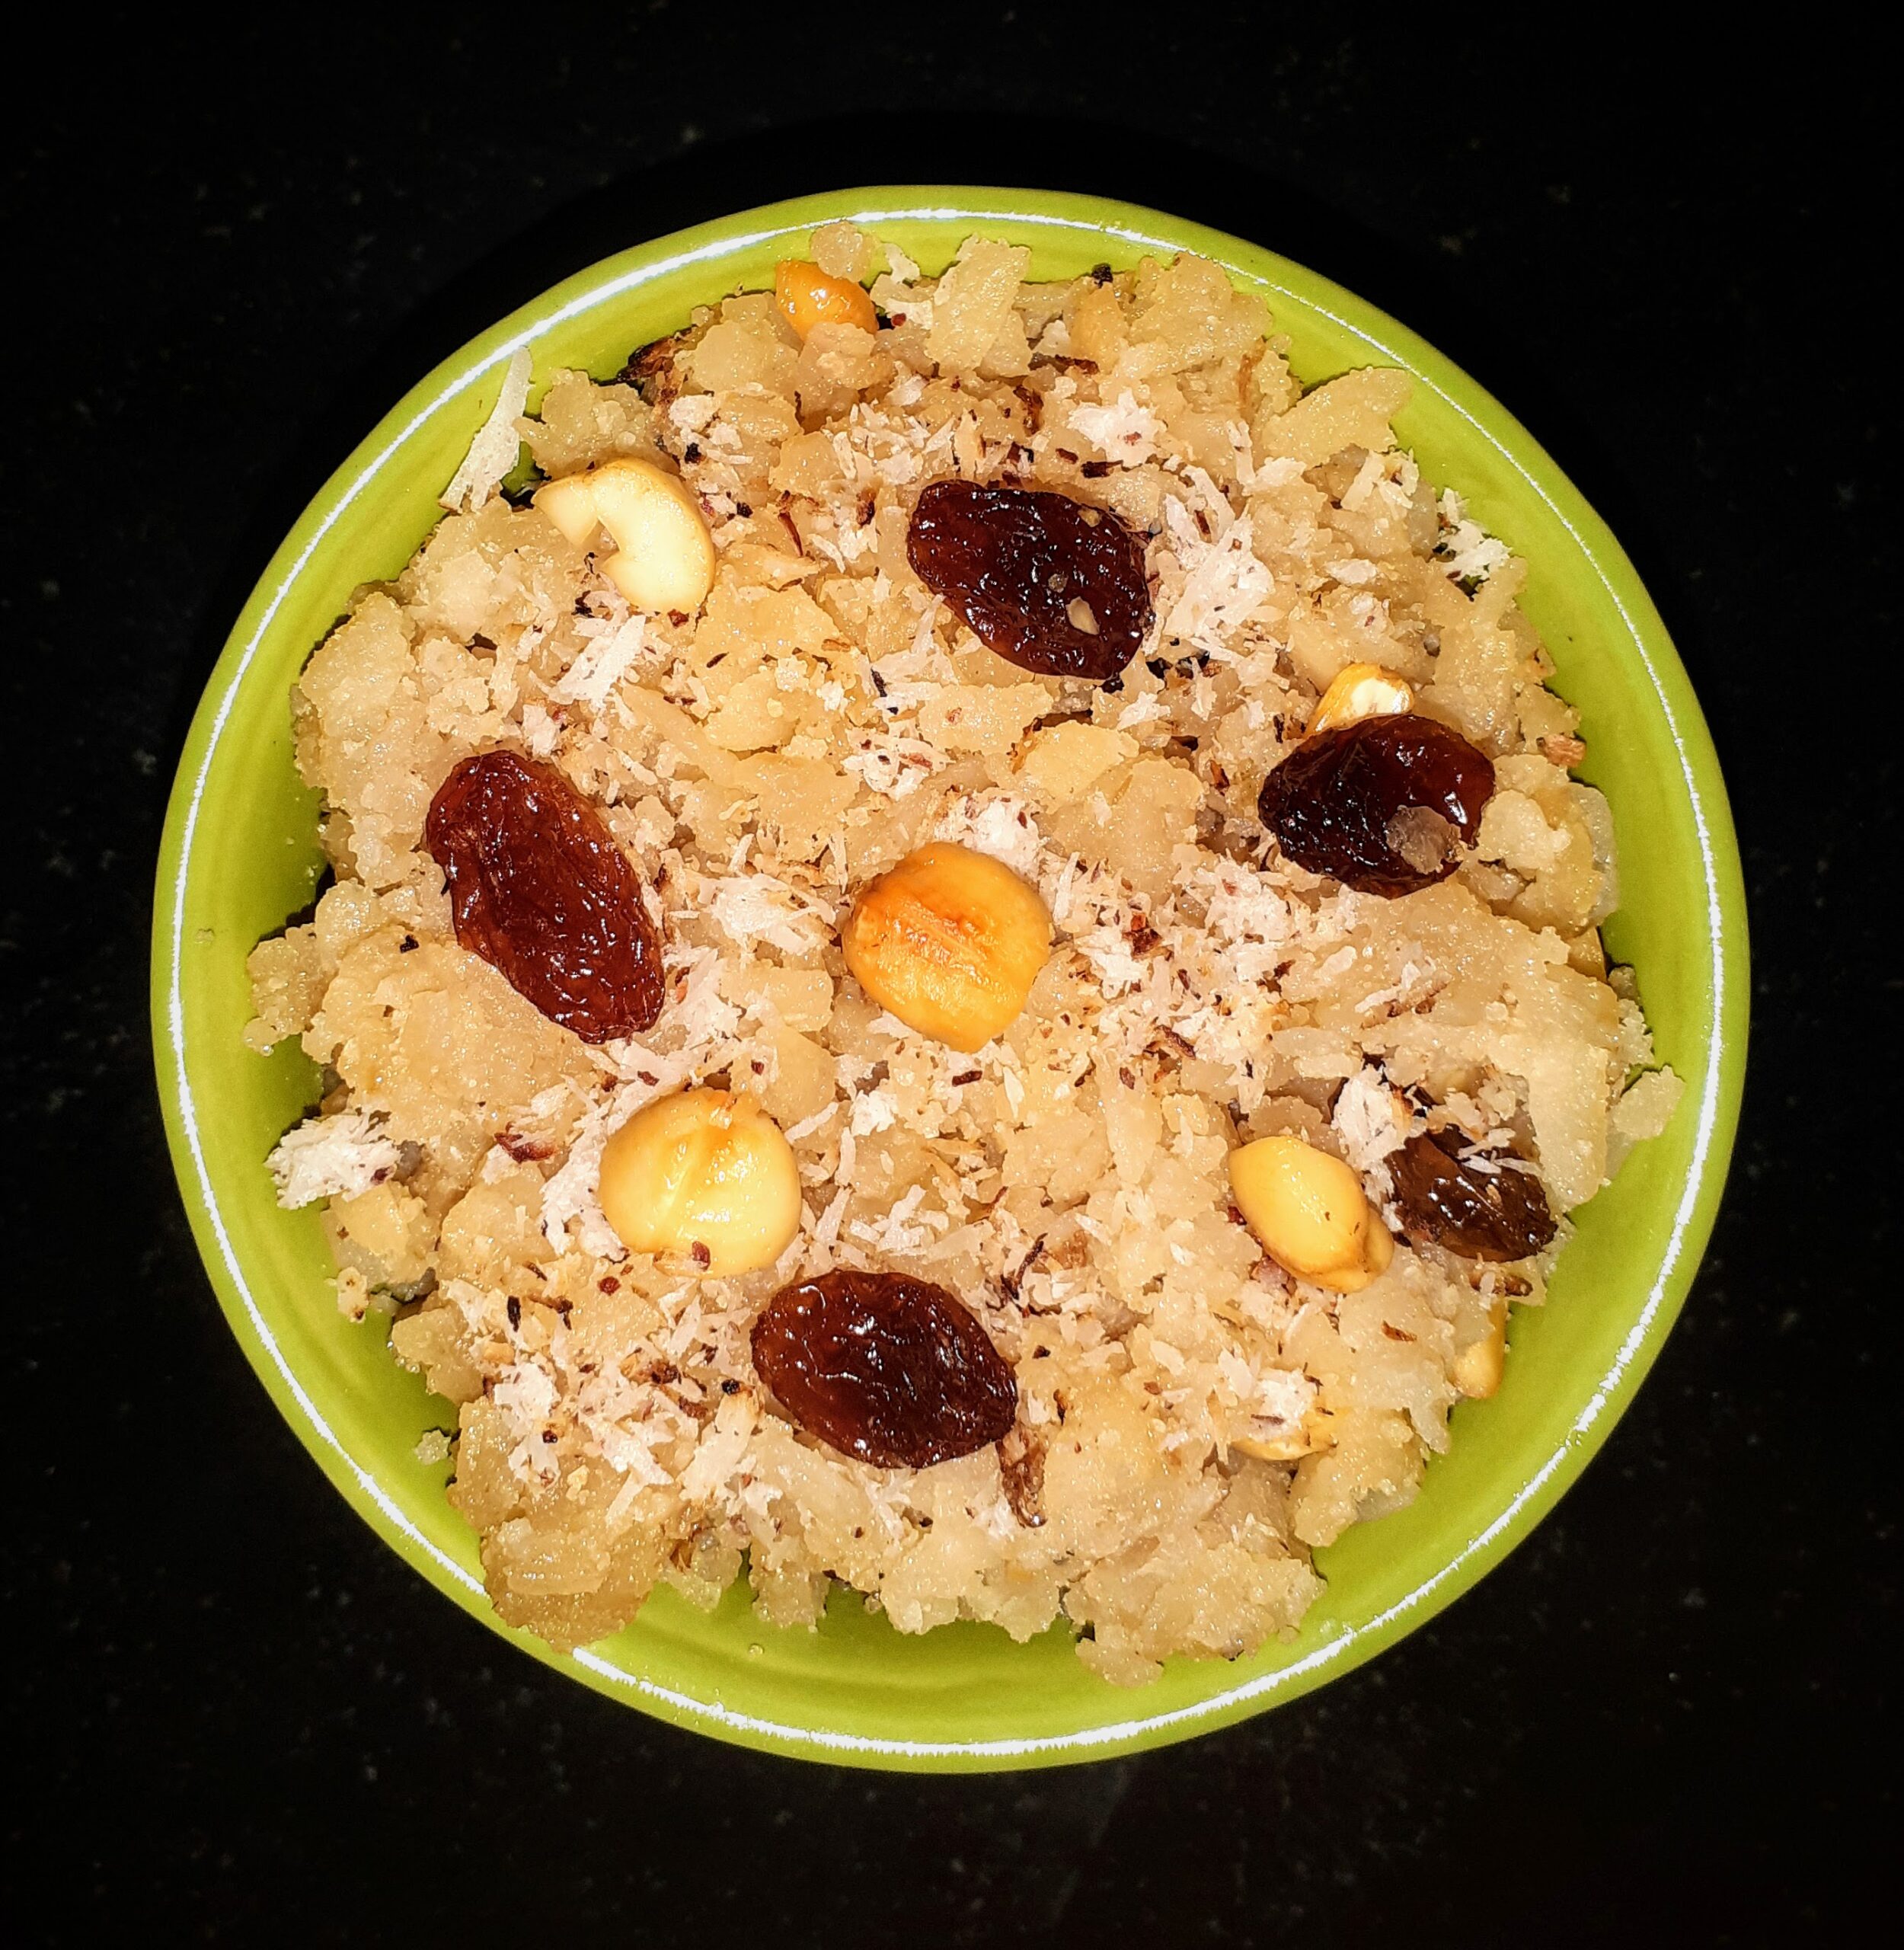
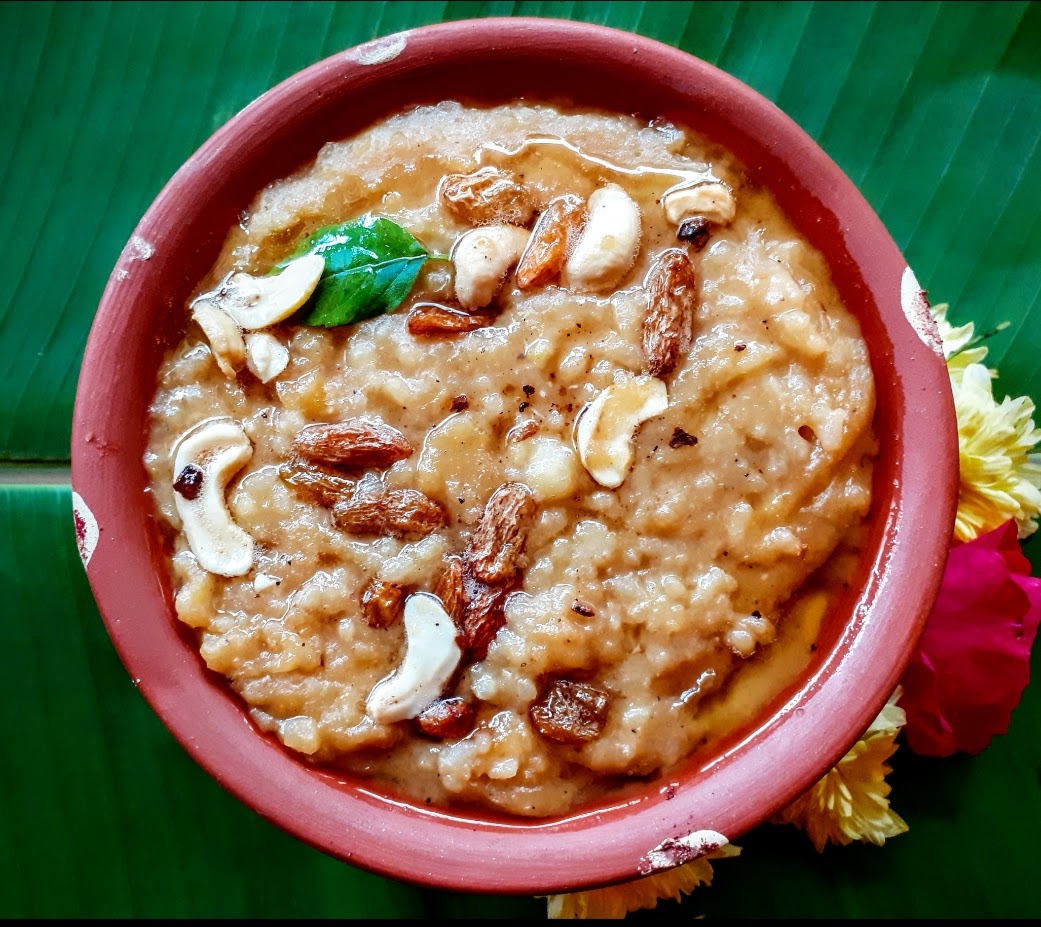
Akkaravadisal One Pot
This is a very traditional South Indian sweet dish. Lord Mahavishnu is offered this sweet as prasad(holy offering). The main ingredients are Rice, moong dal, jaggery, milk, and ghee. The ingredients are similar to the Sweet Pongal but both taste very different. It tastes heavenly when served a little warm. Without much ado let’s get to the recipe right away.
This recipe already exists on this blog, but I am adding another method to make it, which is the one-pot method. One can choose whichever method they find doable. The results are the same for both, just a few steps vary which I will guide you through here.
While you are here check out my other Indian Sweet recipes like Malpua, Pineapple Rabri, Atte ka Sheera, Chakkarai Pongal, Aval Kesari, Unni appam, Sugiyan, and many more…
Here is the recipe of One -Pot Akkaravadisal for you-
PREP TIME: 15 COOK TIME: 20Mins
TOTAL TIME:40Mins COURSE: DESSERT
CUISINE: SOUTH INDIAN SERVINGS: 5
AUTHOR: Rajni Ram
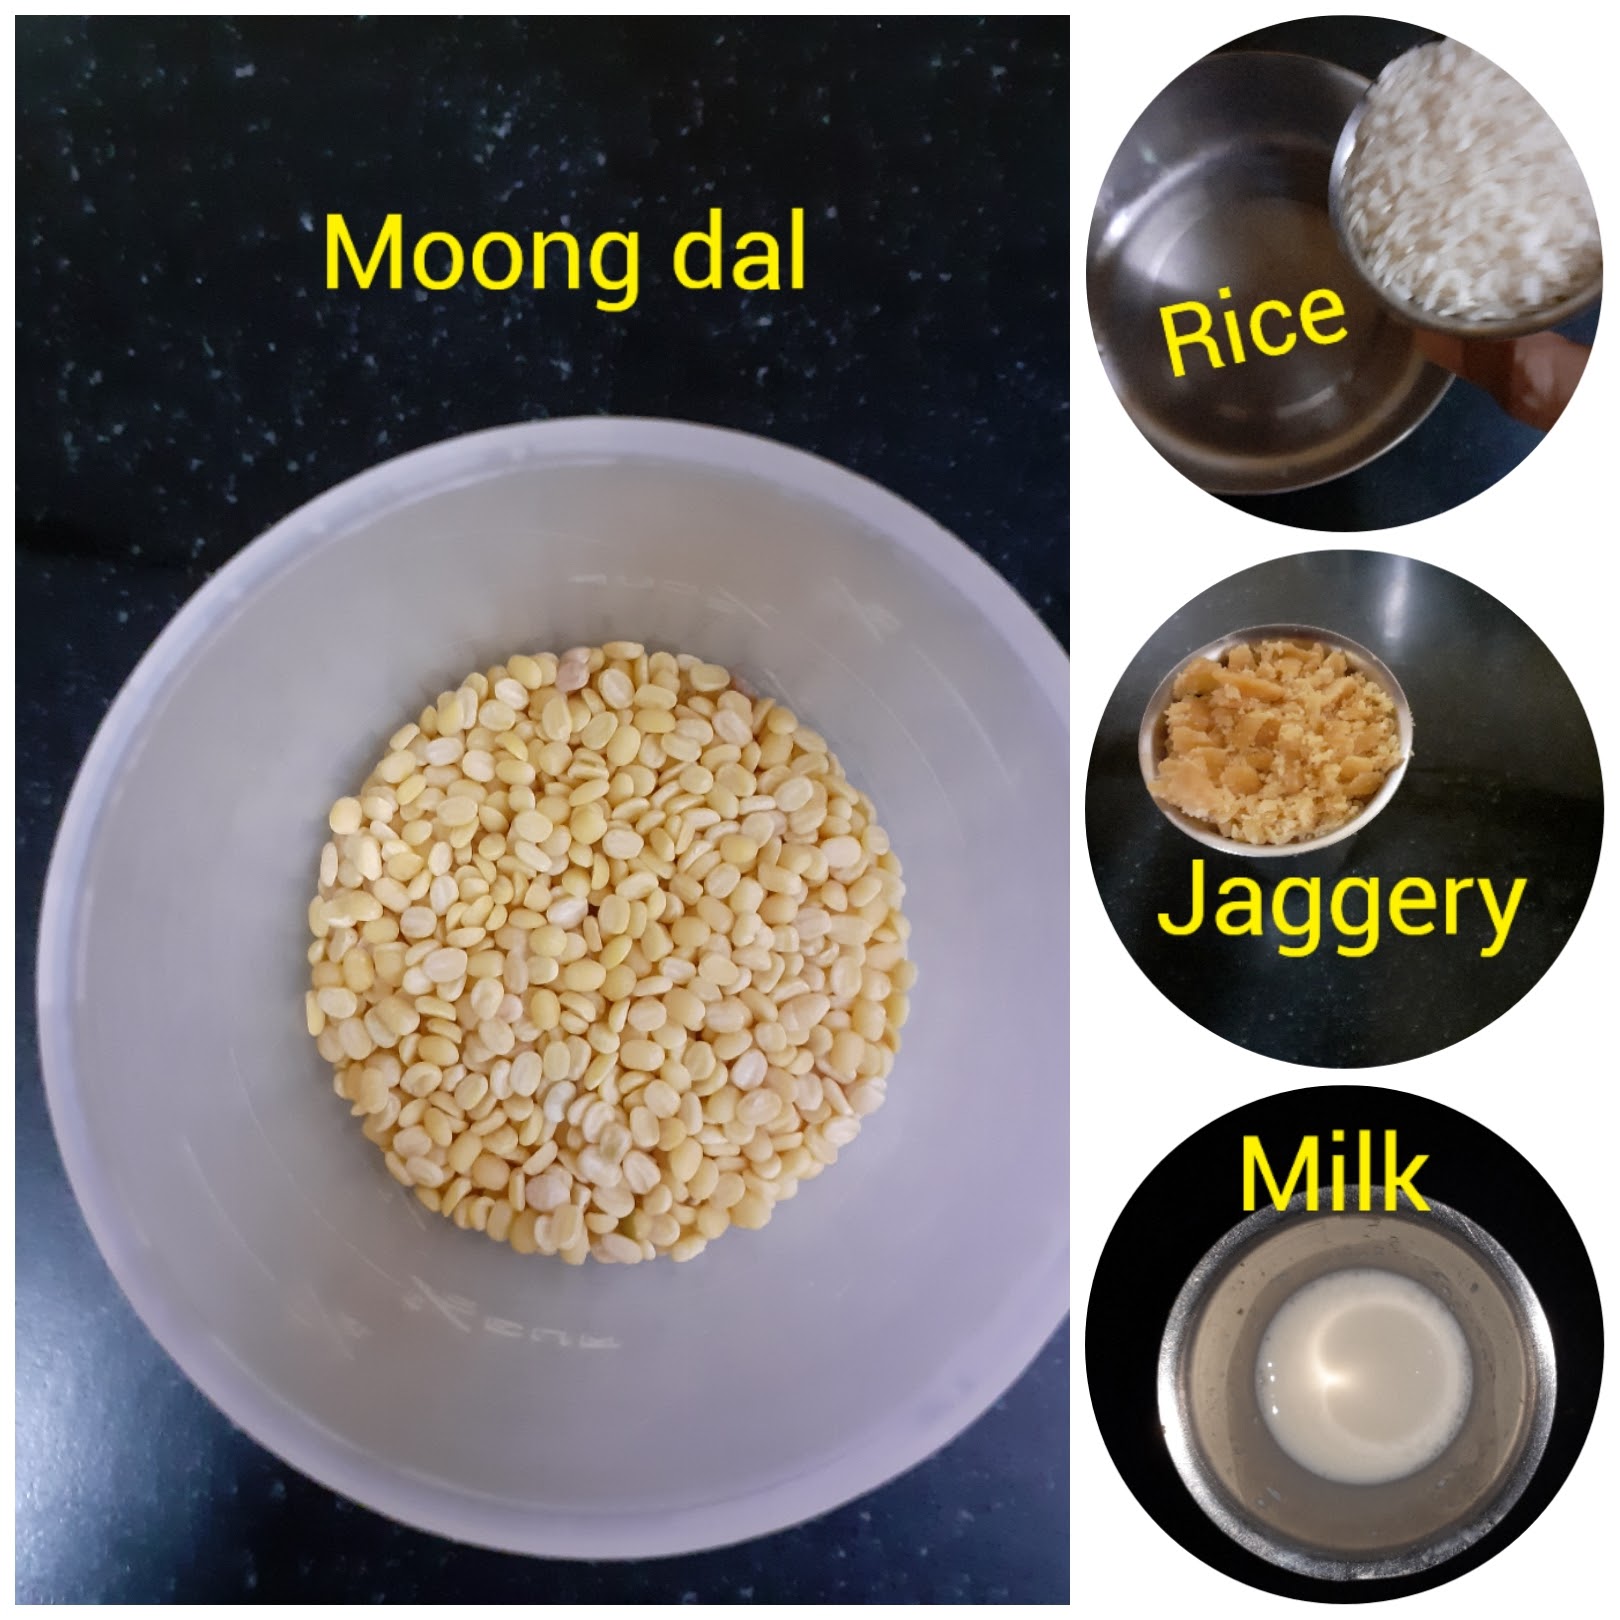
Ingredients:
Rice 1 cup
Moong dal/ green gram 1/4 cup
Milk 6 cups
Jaggery 1 cup
Water 1/4 cup
Sugar ( optional) 1 tbsp
Ghee 3/4 cup
Cardamom/ elaichi powder 1 tsp
Saffron ( optional) 2 pinches, soaked in warm milk
Raw camphor( optional) 1 pinch powdered
Cashewnuts 8 to 10
Raisins 8 to 10
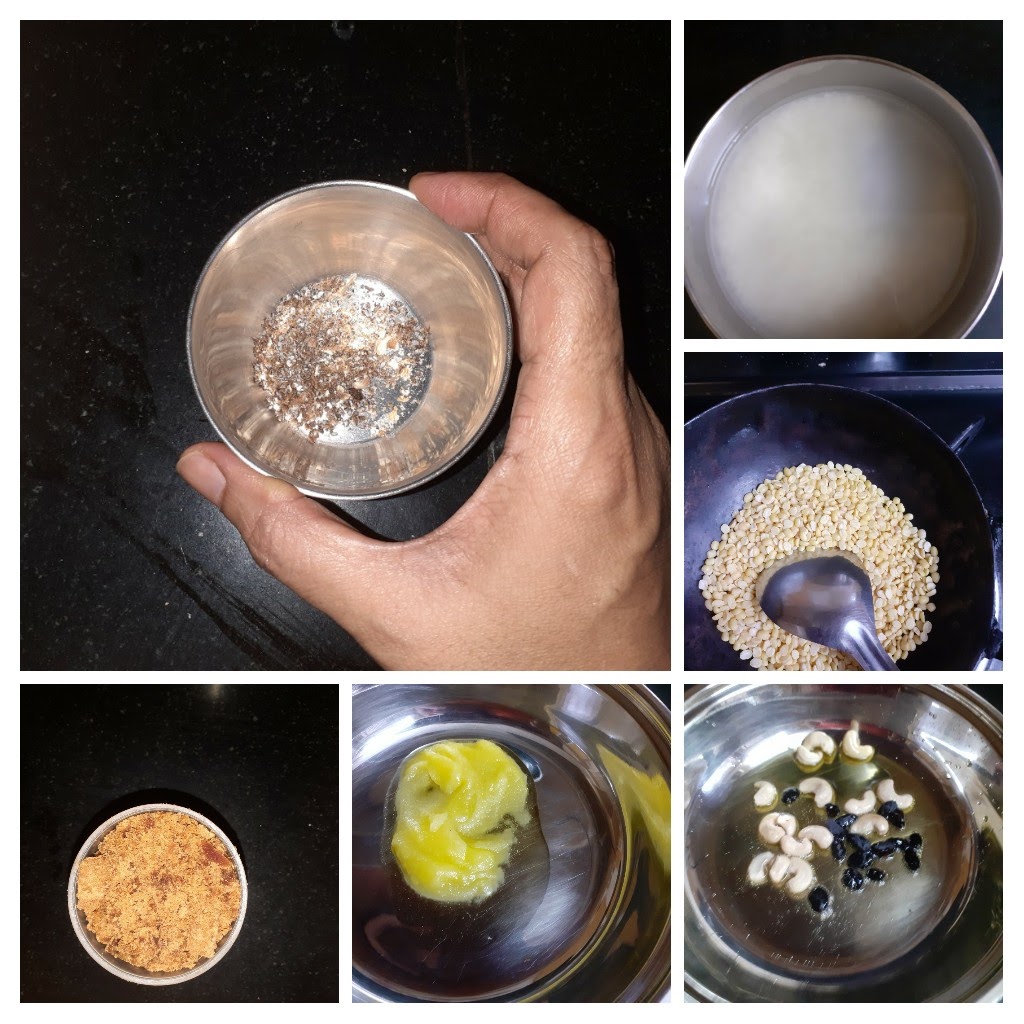
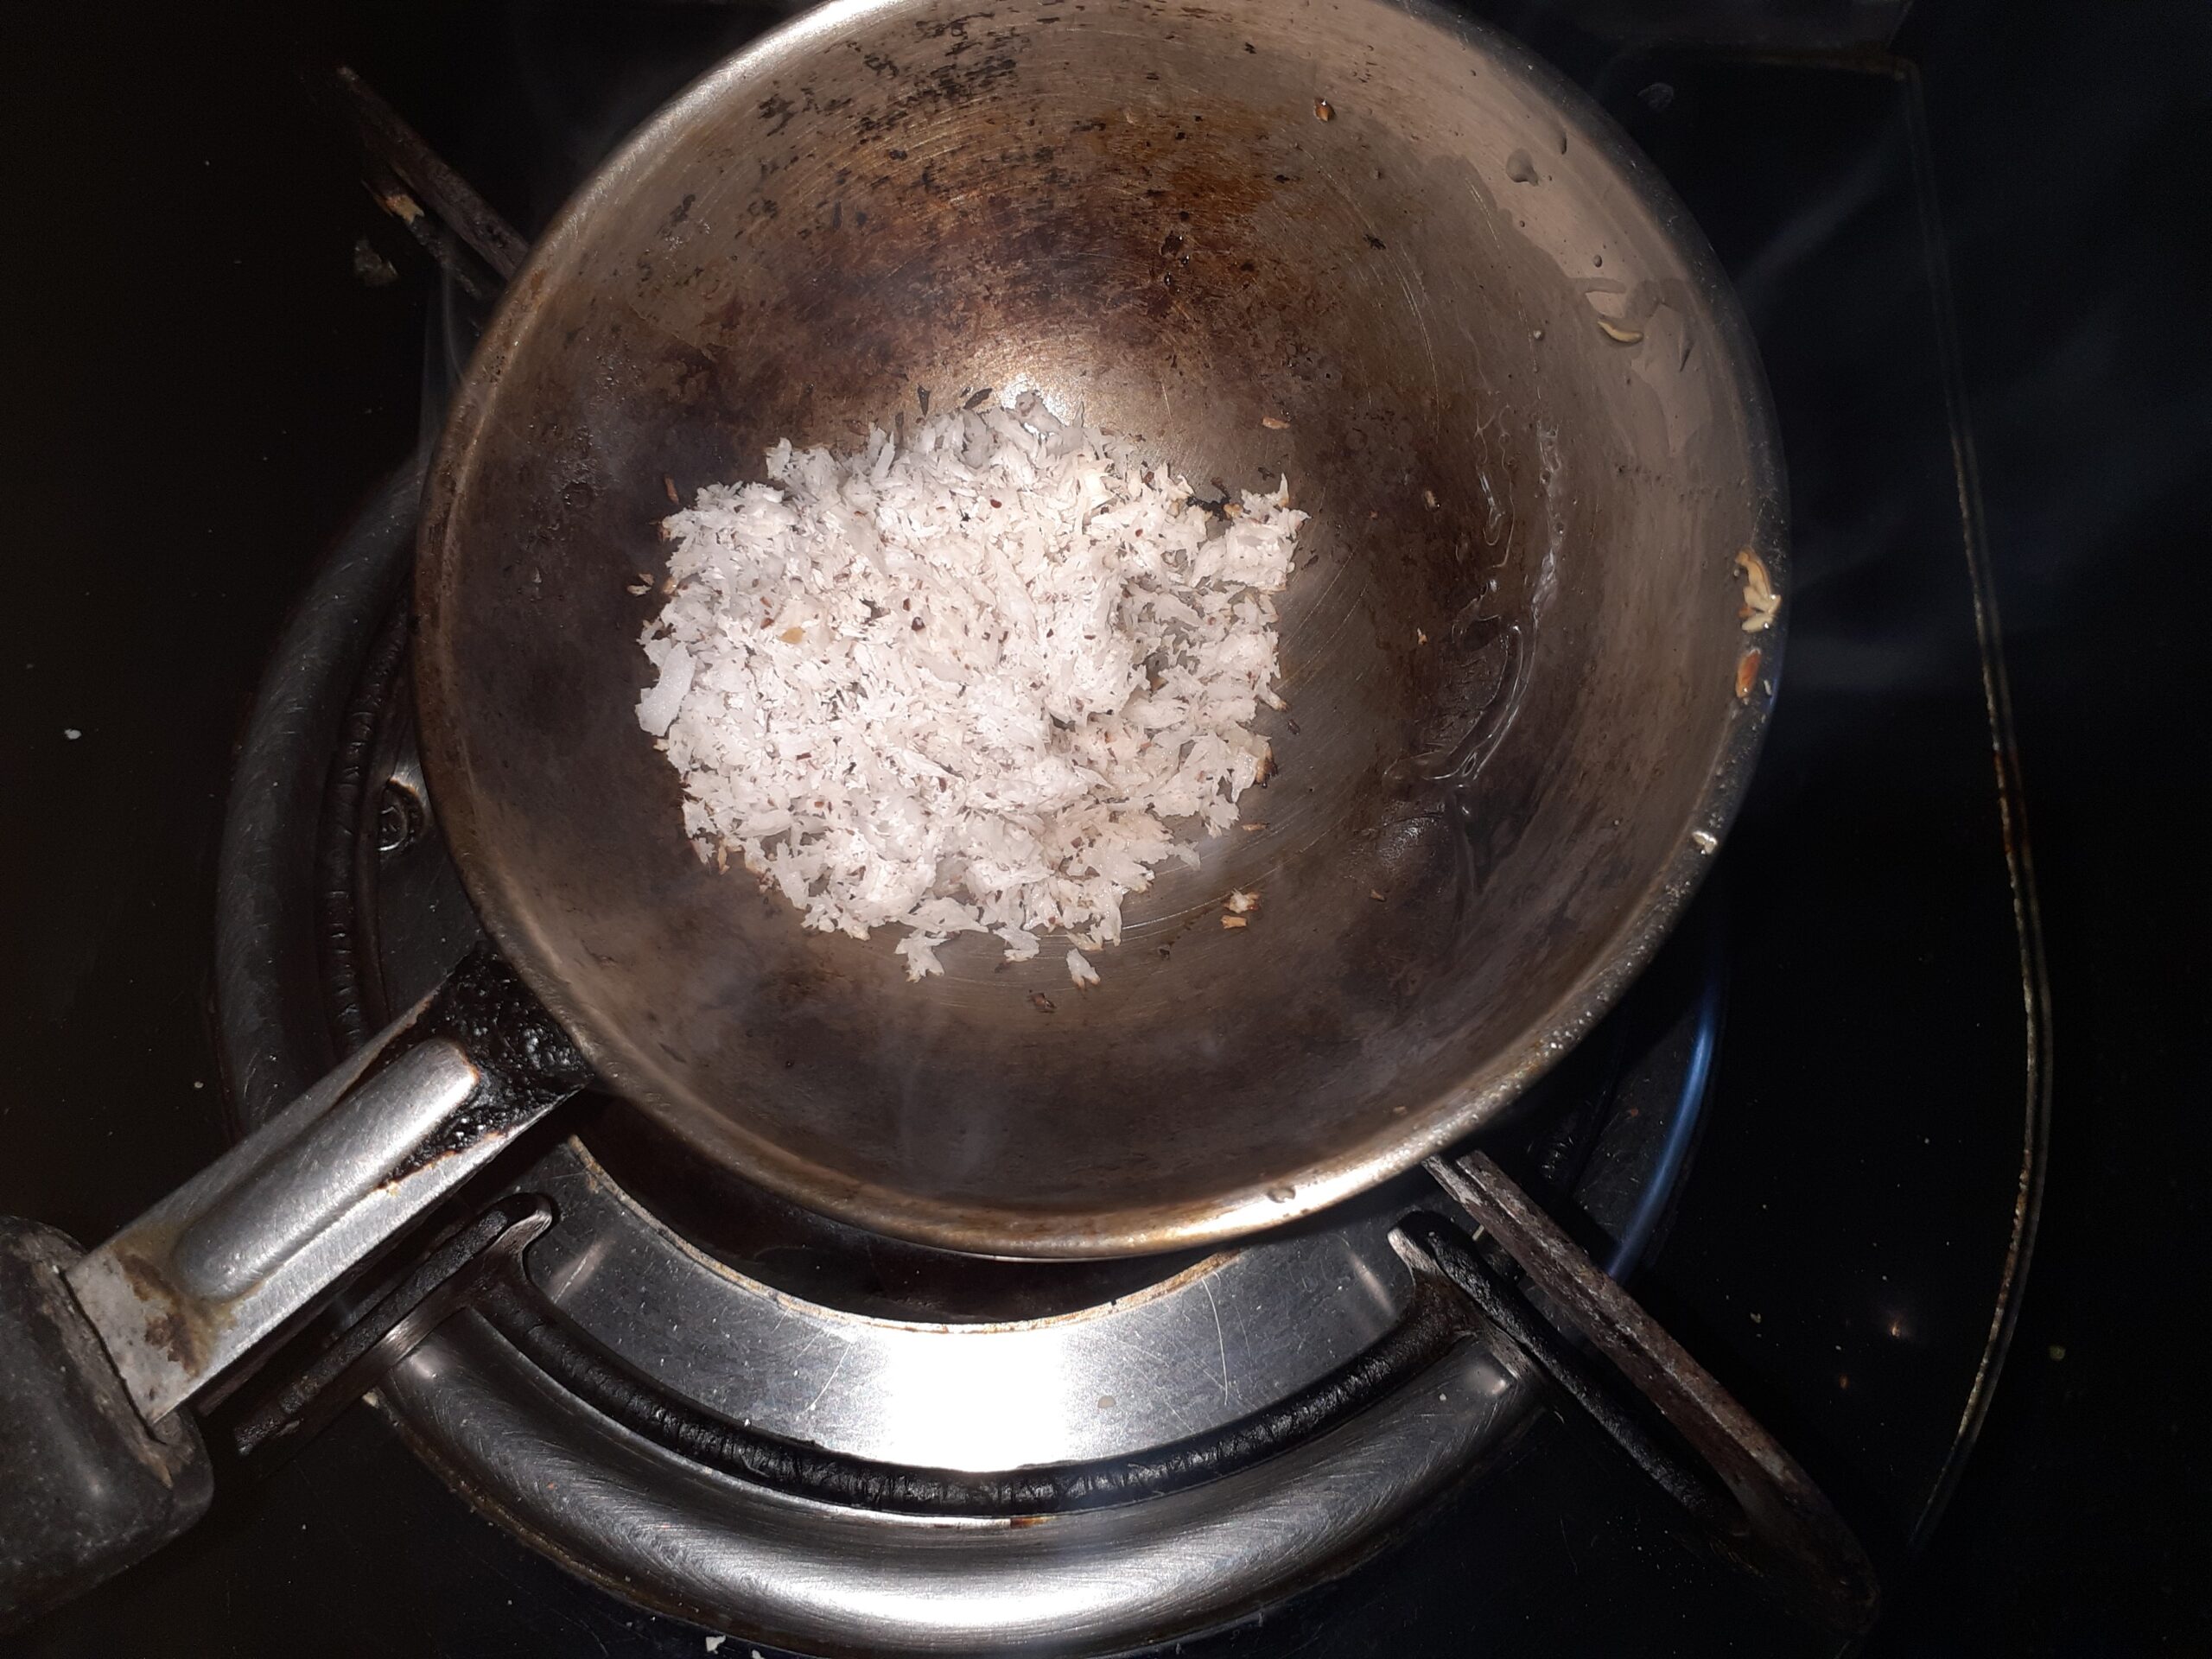
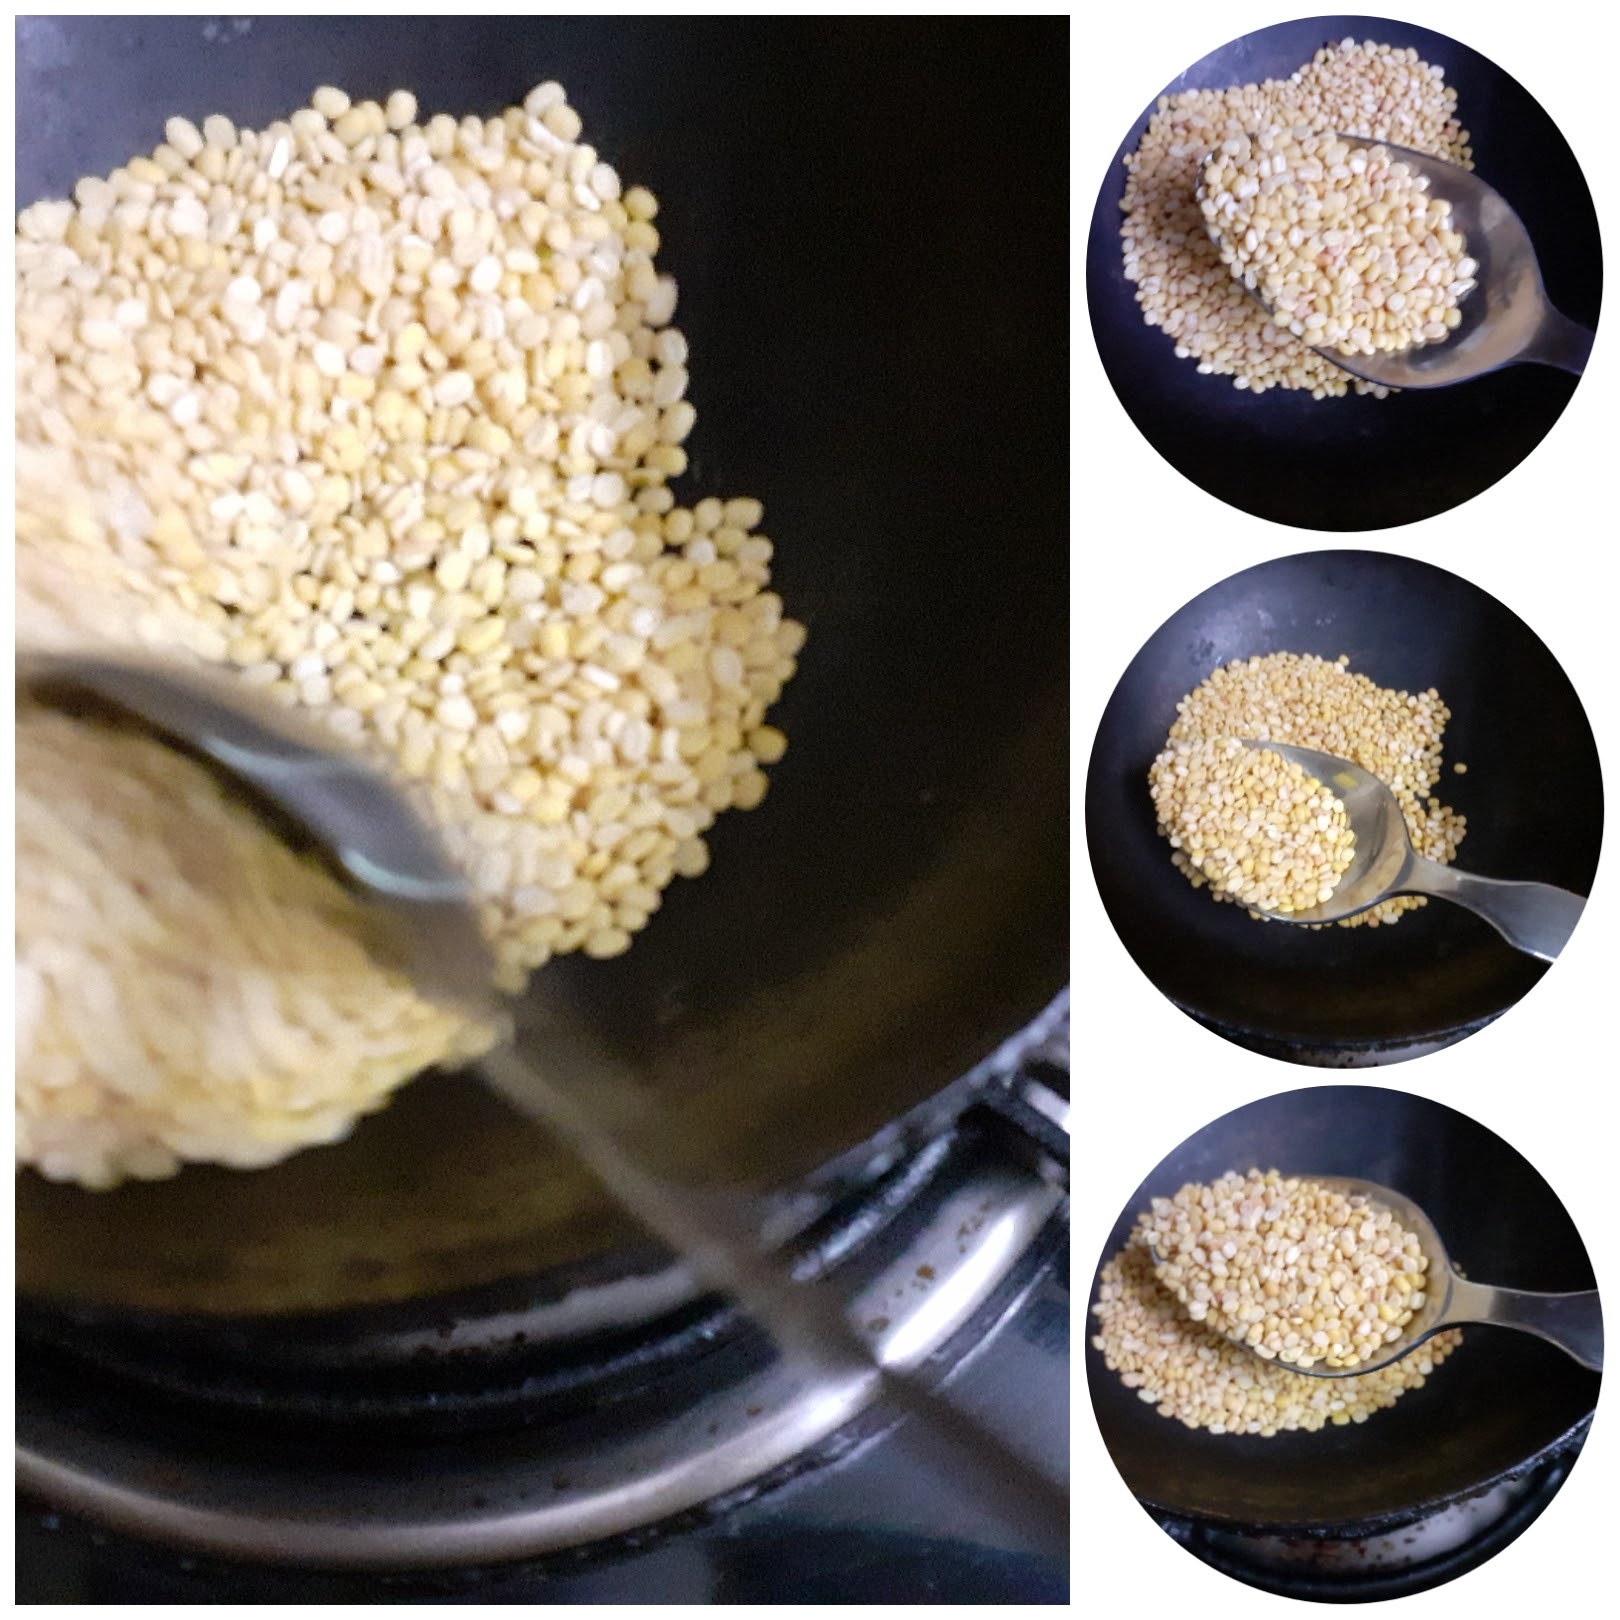
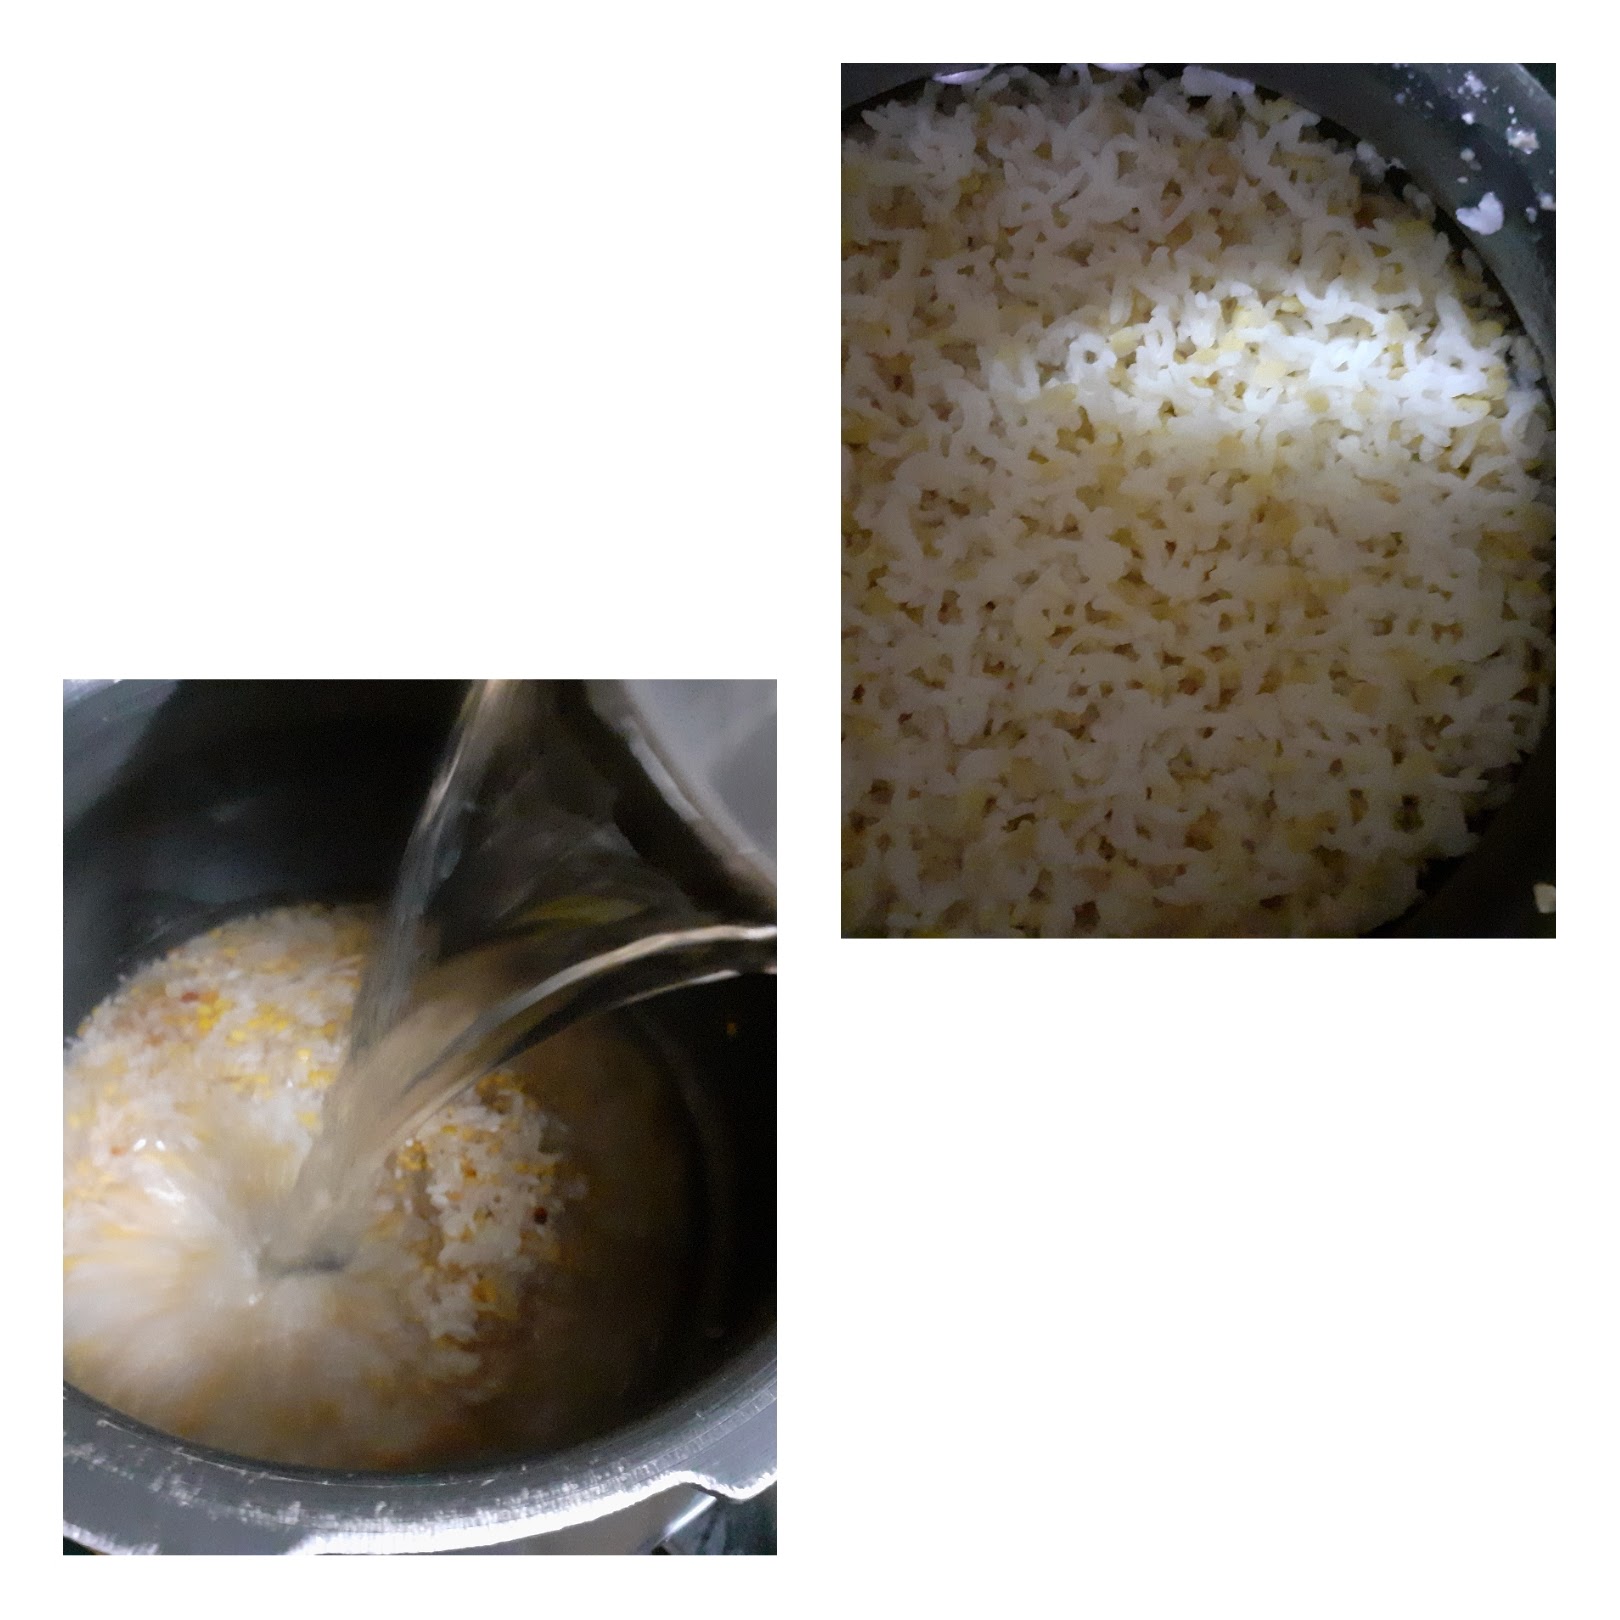
DIRECTIONS:
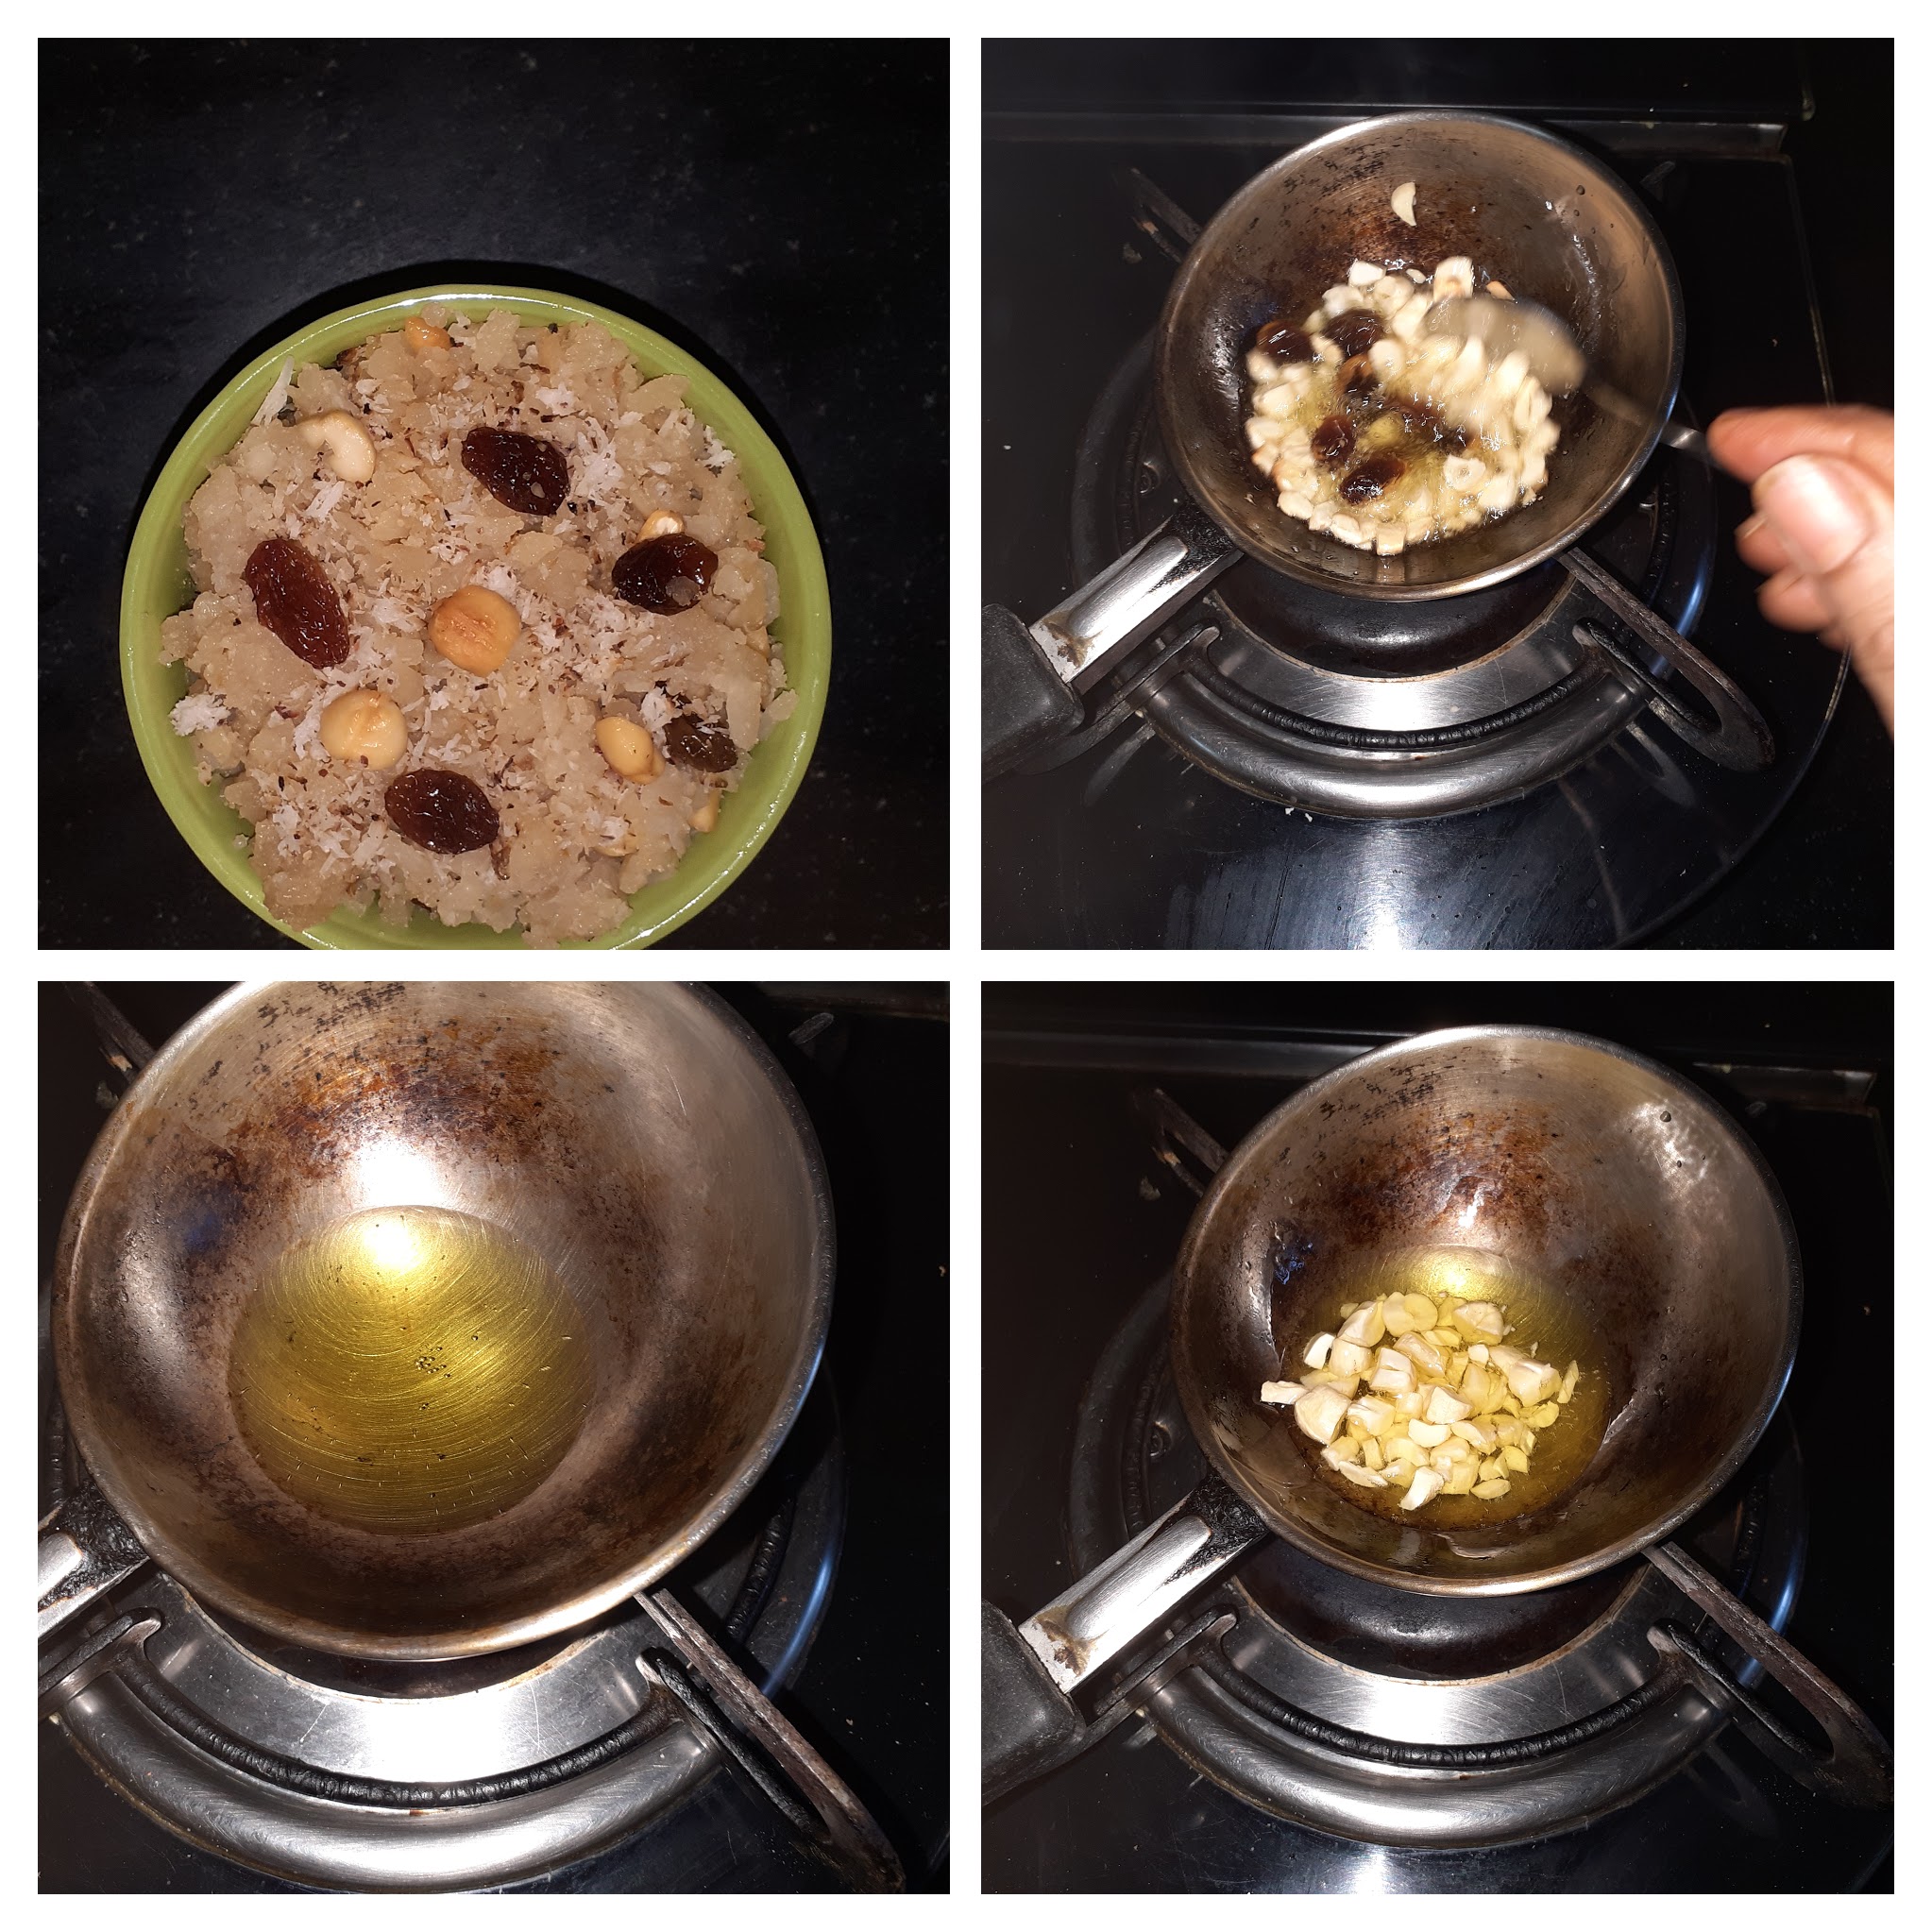
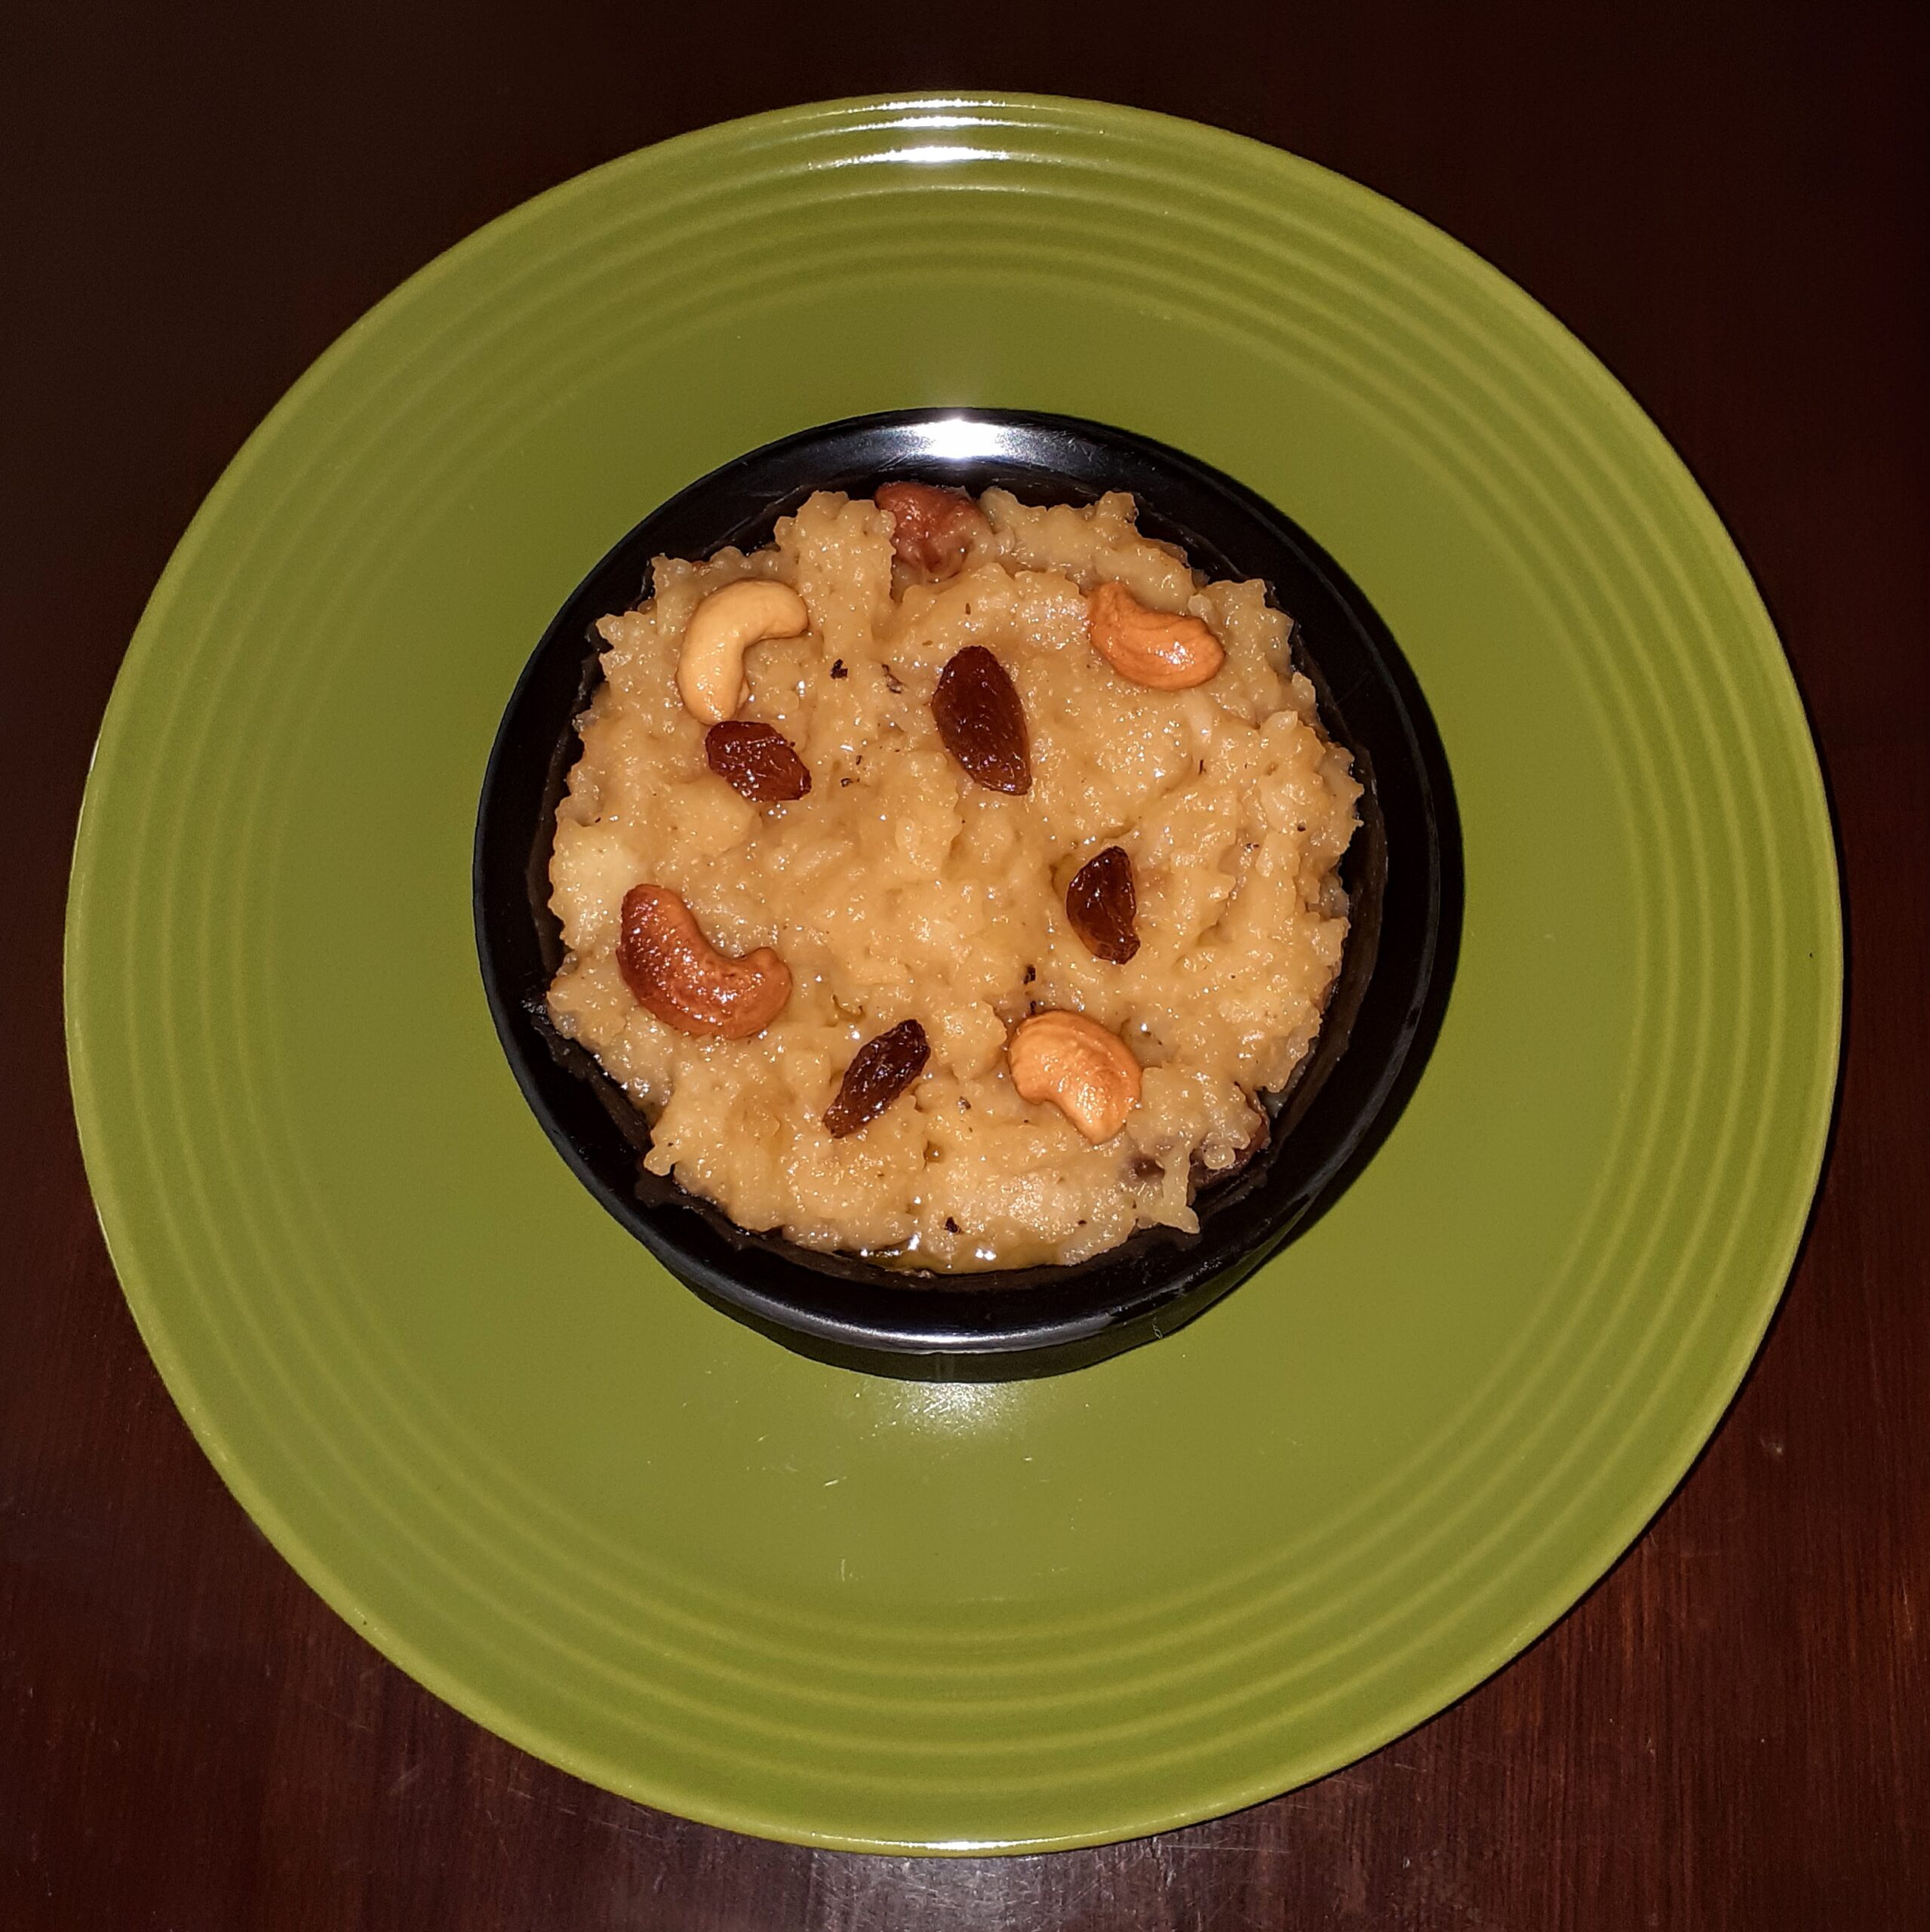
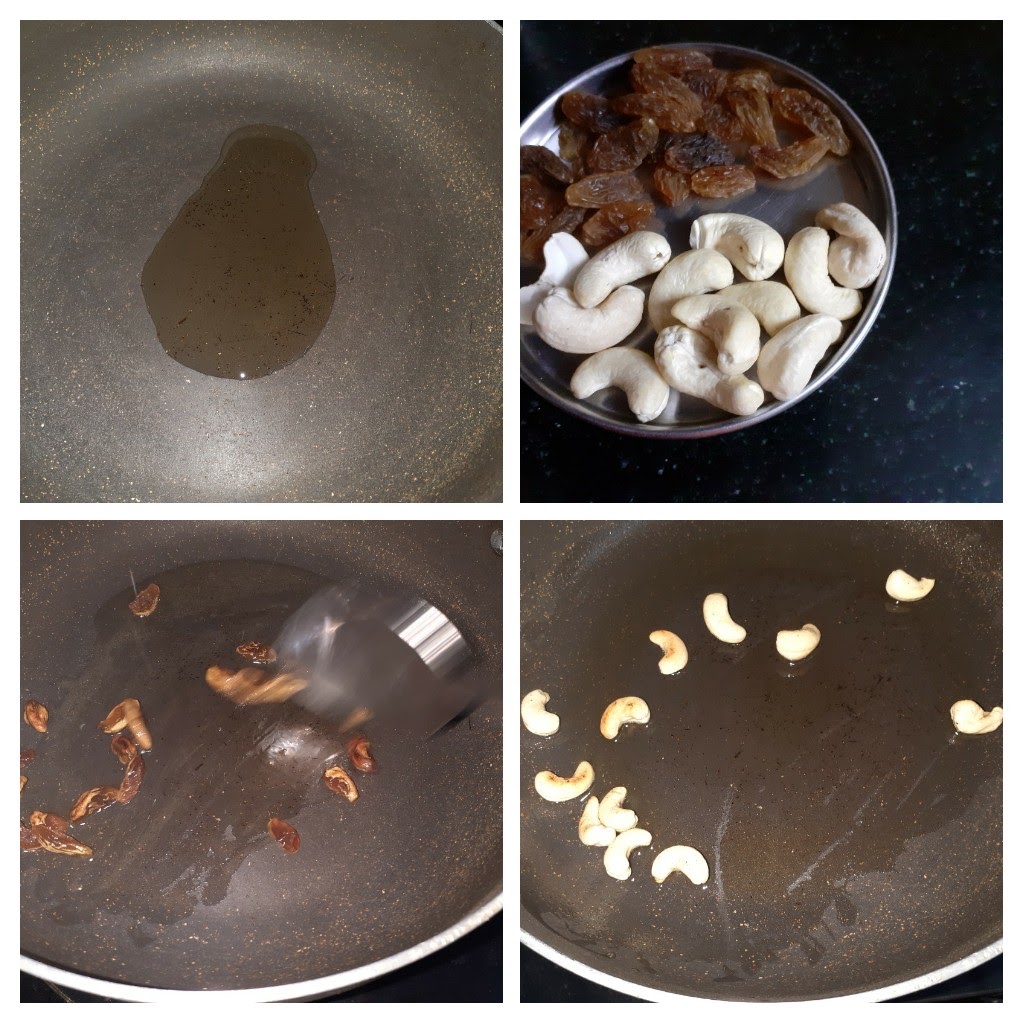
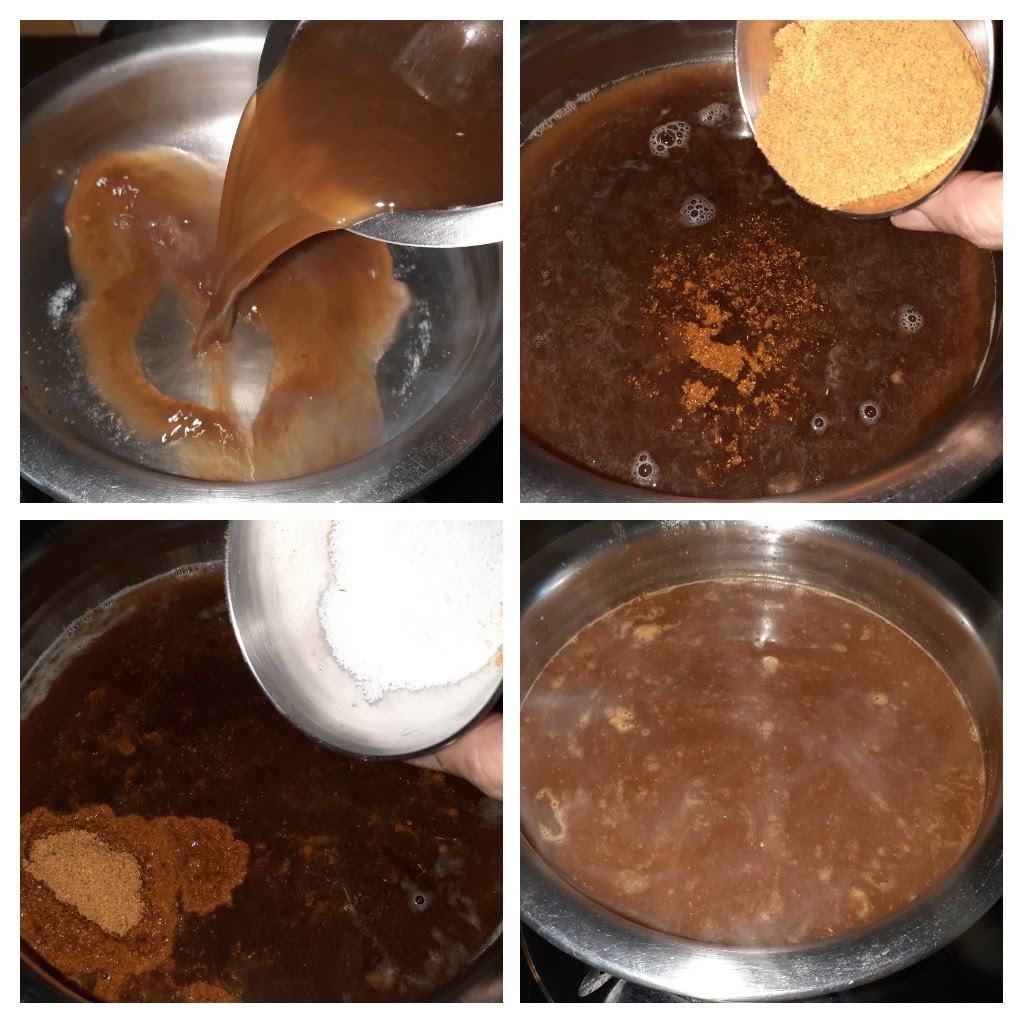
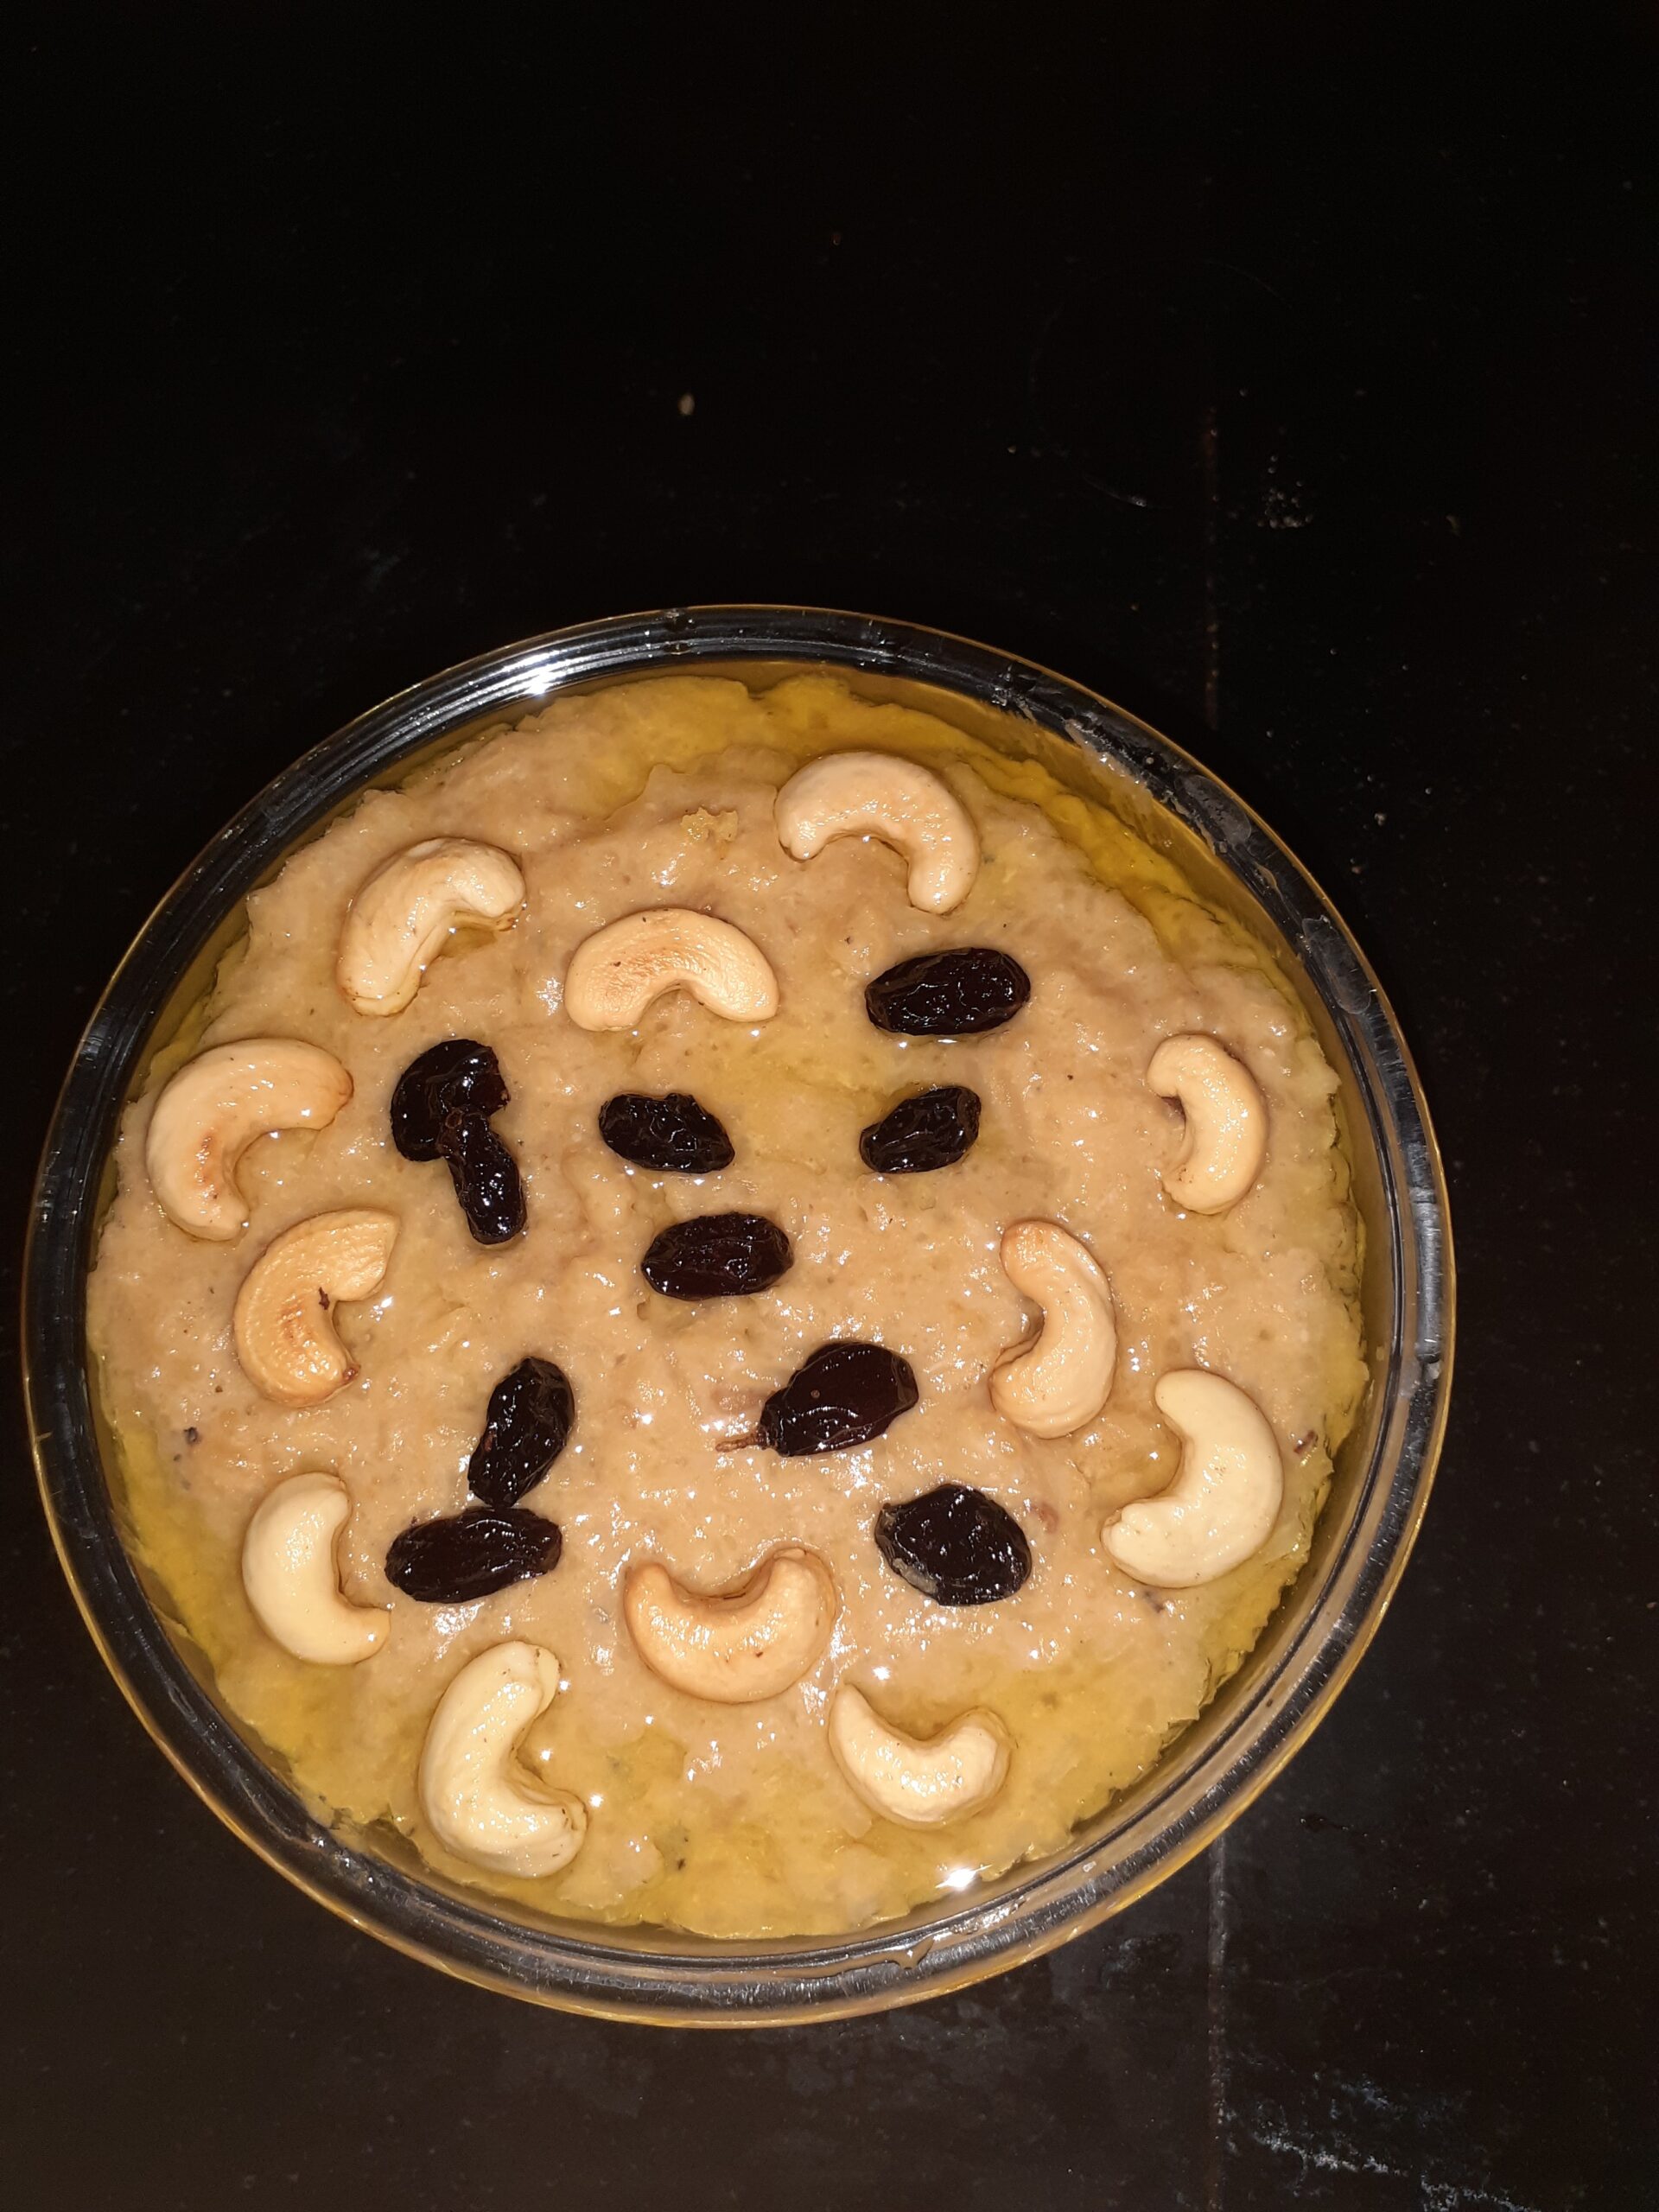
Dry roast the Moong dal directly in the cooker to a light brown colour. Stir constantly and take care not to burn the dal. It will give out a nice aroma. Put the jaggery in a separate vessel, add water, and bring to a boil. Put off the heat and stir to dissolve the jaggery. Keep aside. Now to the roasted moong dal in the cooker, add the washed rice. Pour 2 cups milk and 1 cup water, close the cooker and cook for 5 to 6 whistles ( flame should be on low throughout, otherwise there are chances of the milk overflowing through the sides). Once pressure releases open the cooker and mash the contents well. Put the cooker on flame again and strain the liquid jaggery into the cooker directly. Pour another 2 cups milk and stir nicely. There may be lumps, break them down patiently by stirring. Like I always say add 2 teaspoons of sugar to any jaggery dish to enhance the taste of jaggery. Add more milk if the 2 cups of milk get absorbed. We want a texture that is semi-solid and smooth, not lumpy. Now add the cardamom powder, raw camphor(optional), and add in the raisins and nuts fried in ghee. The one-pot Akkaravadisal is ready to serve. Enjoy BonAppetit. This is a popular Prasad(holy offering) dish that can be offered during Pujas.
STEPWISE RECIPE FOLLOWS:
1. Assemble all ingredients.
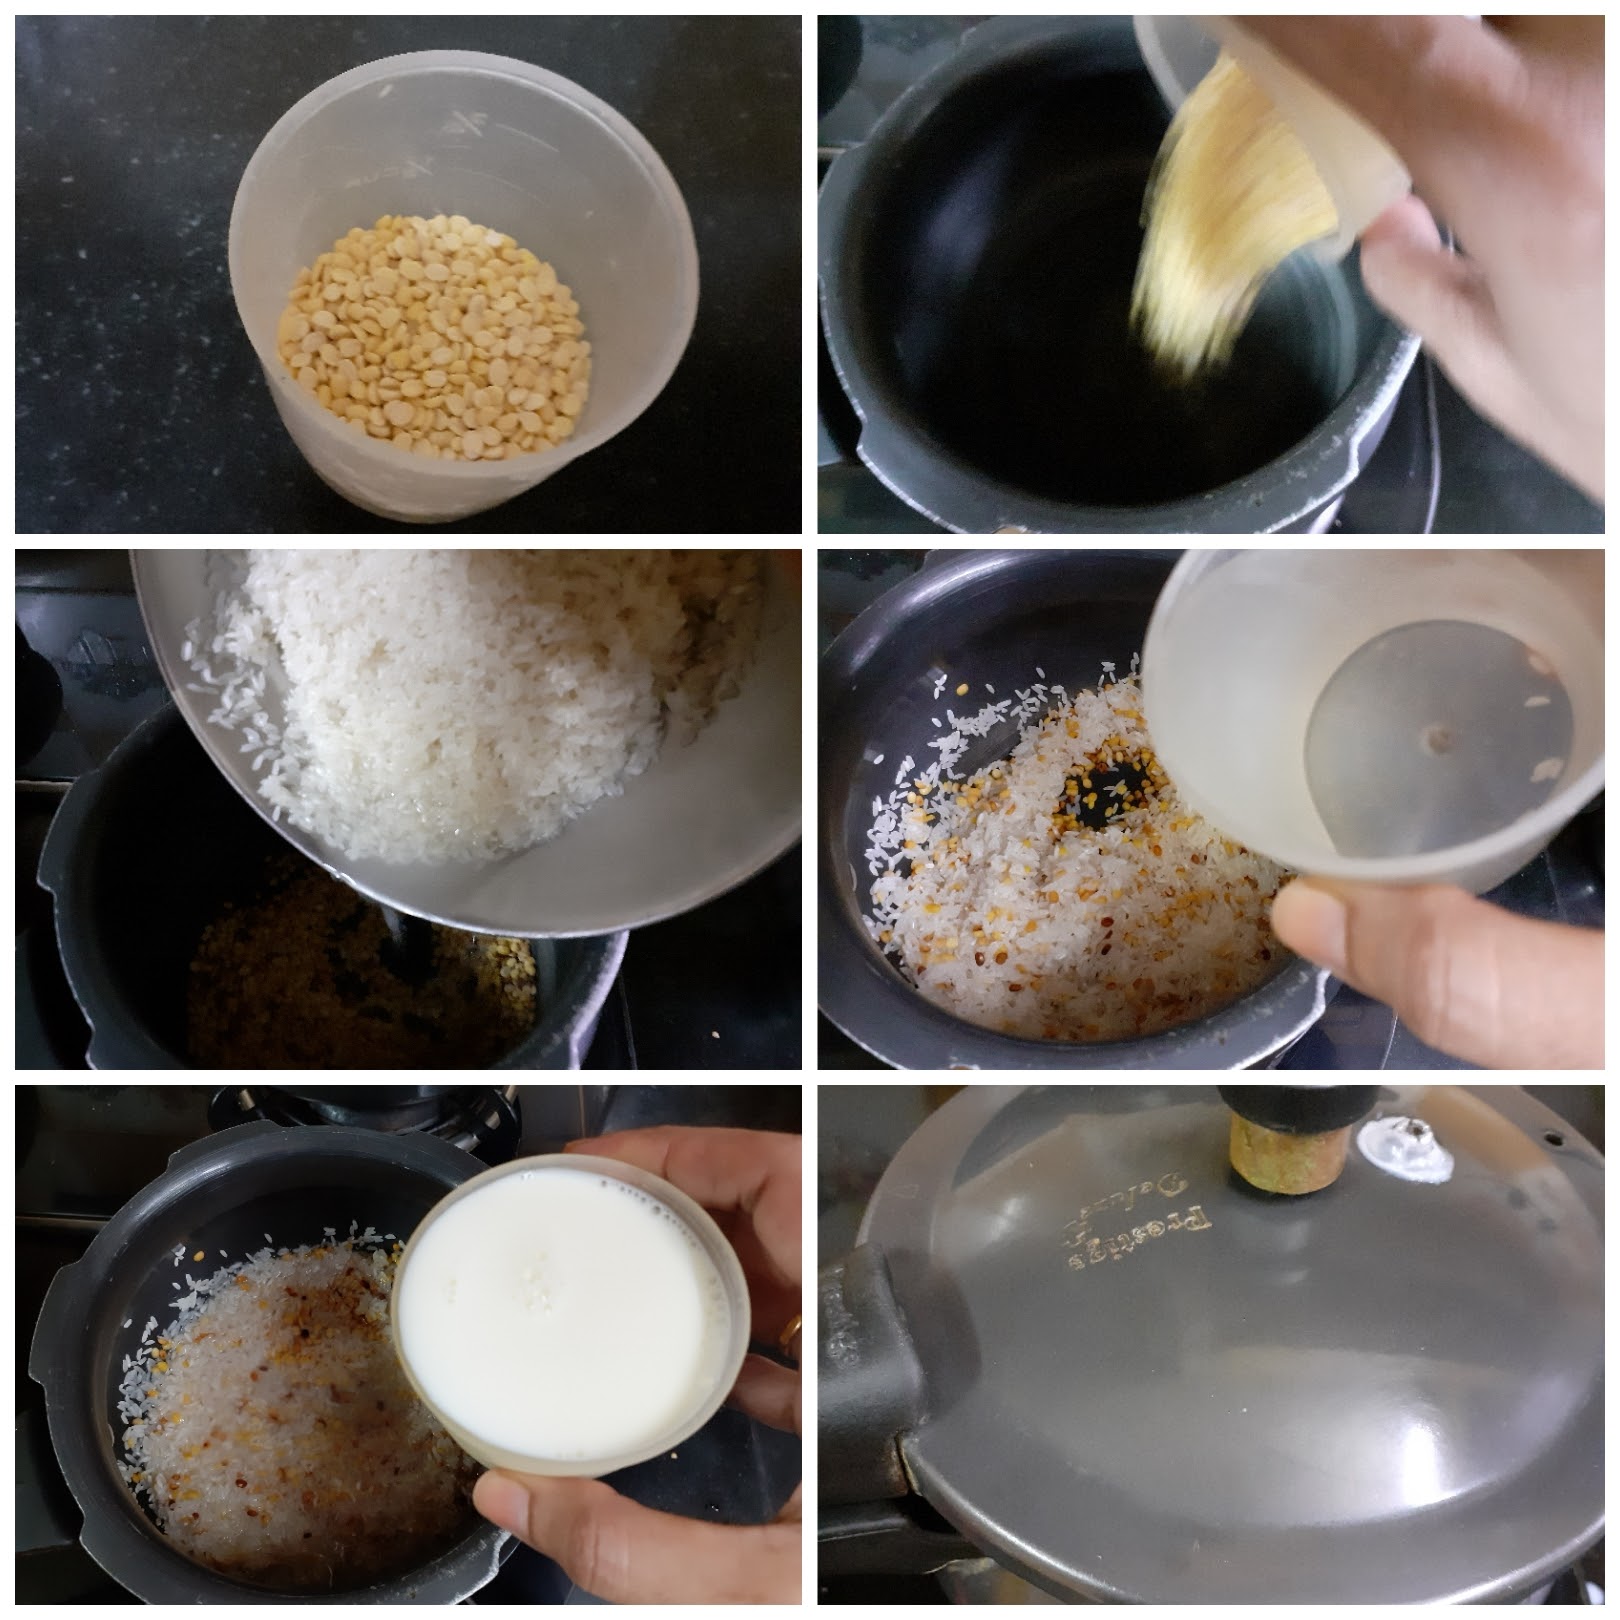
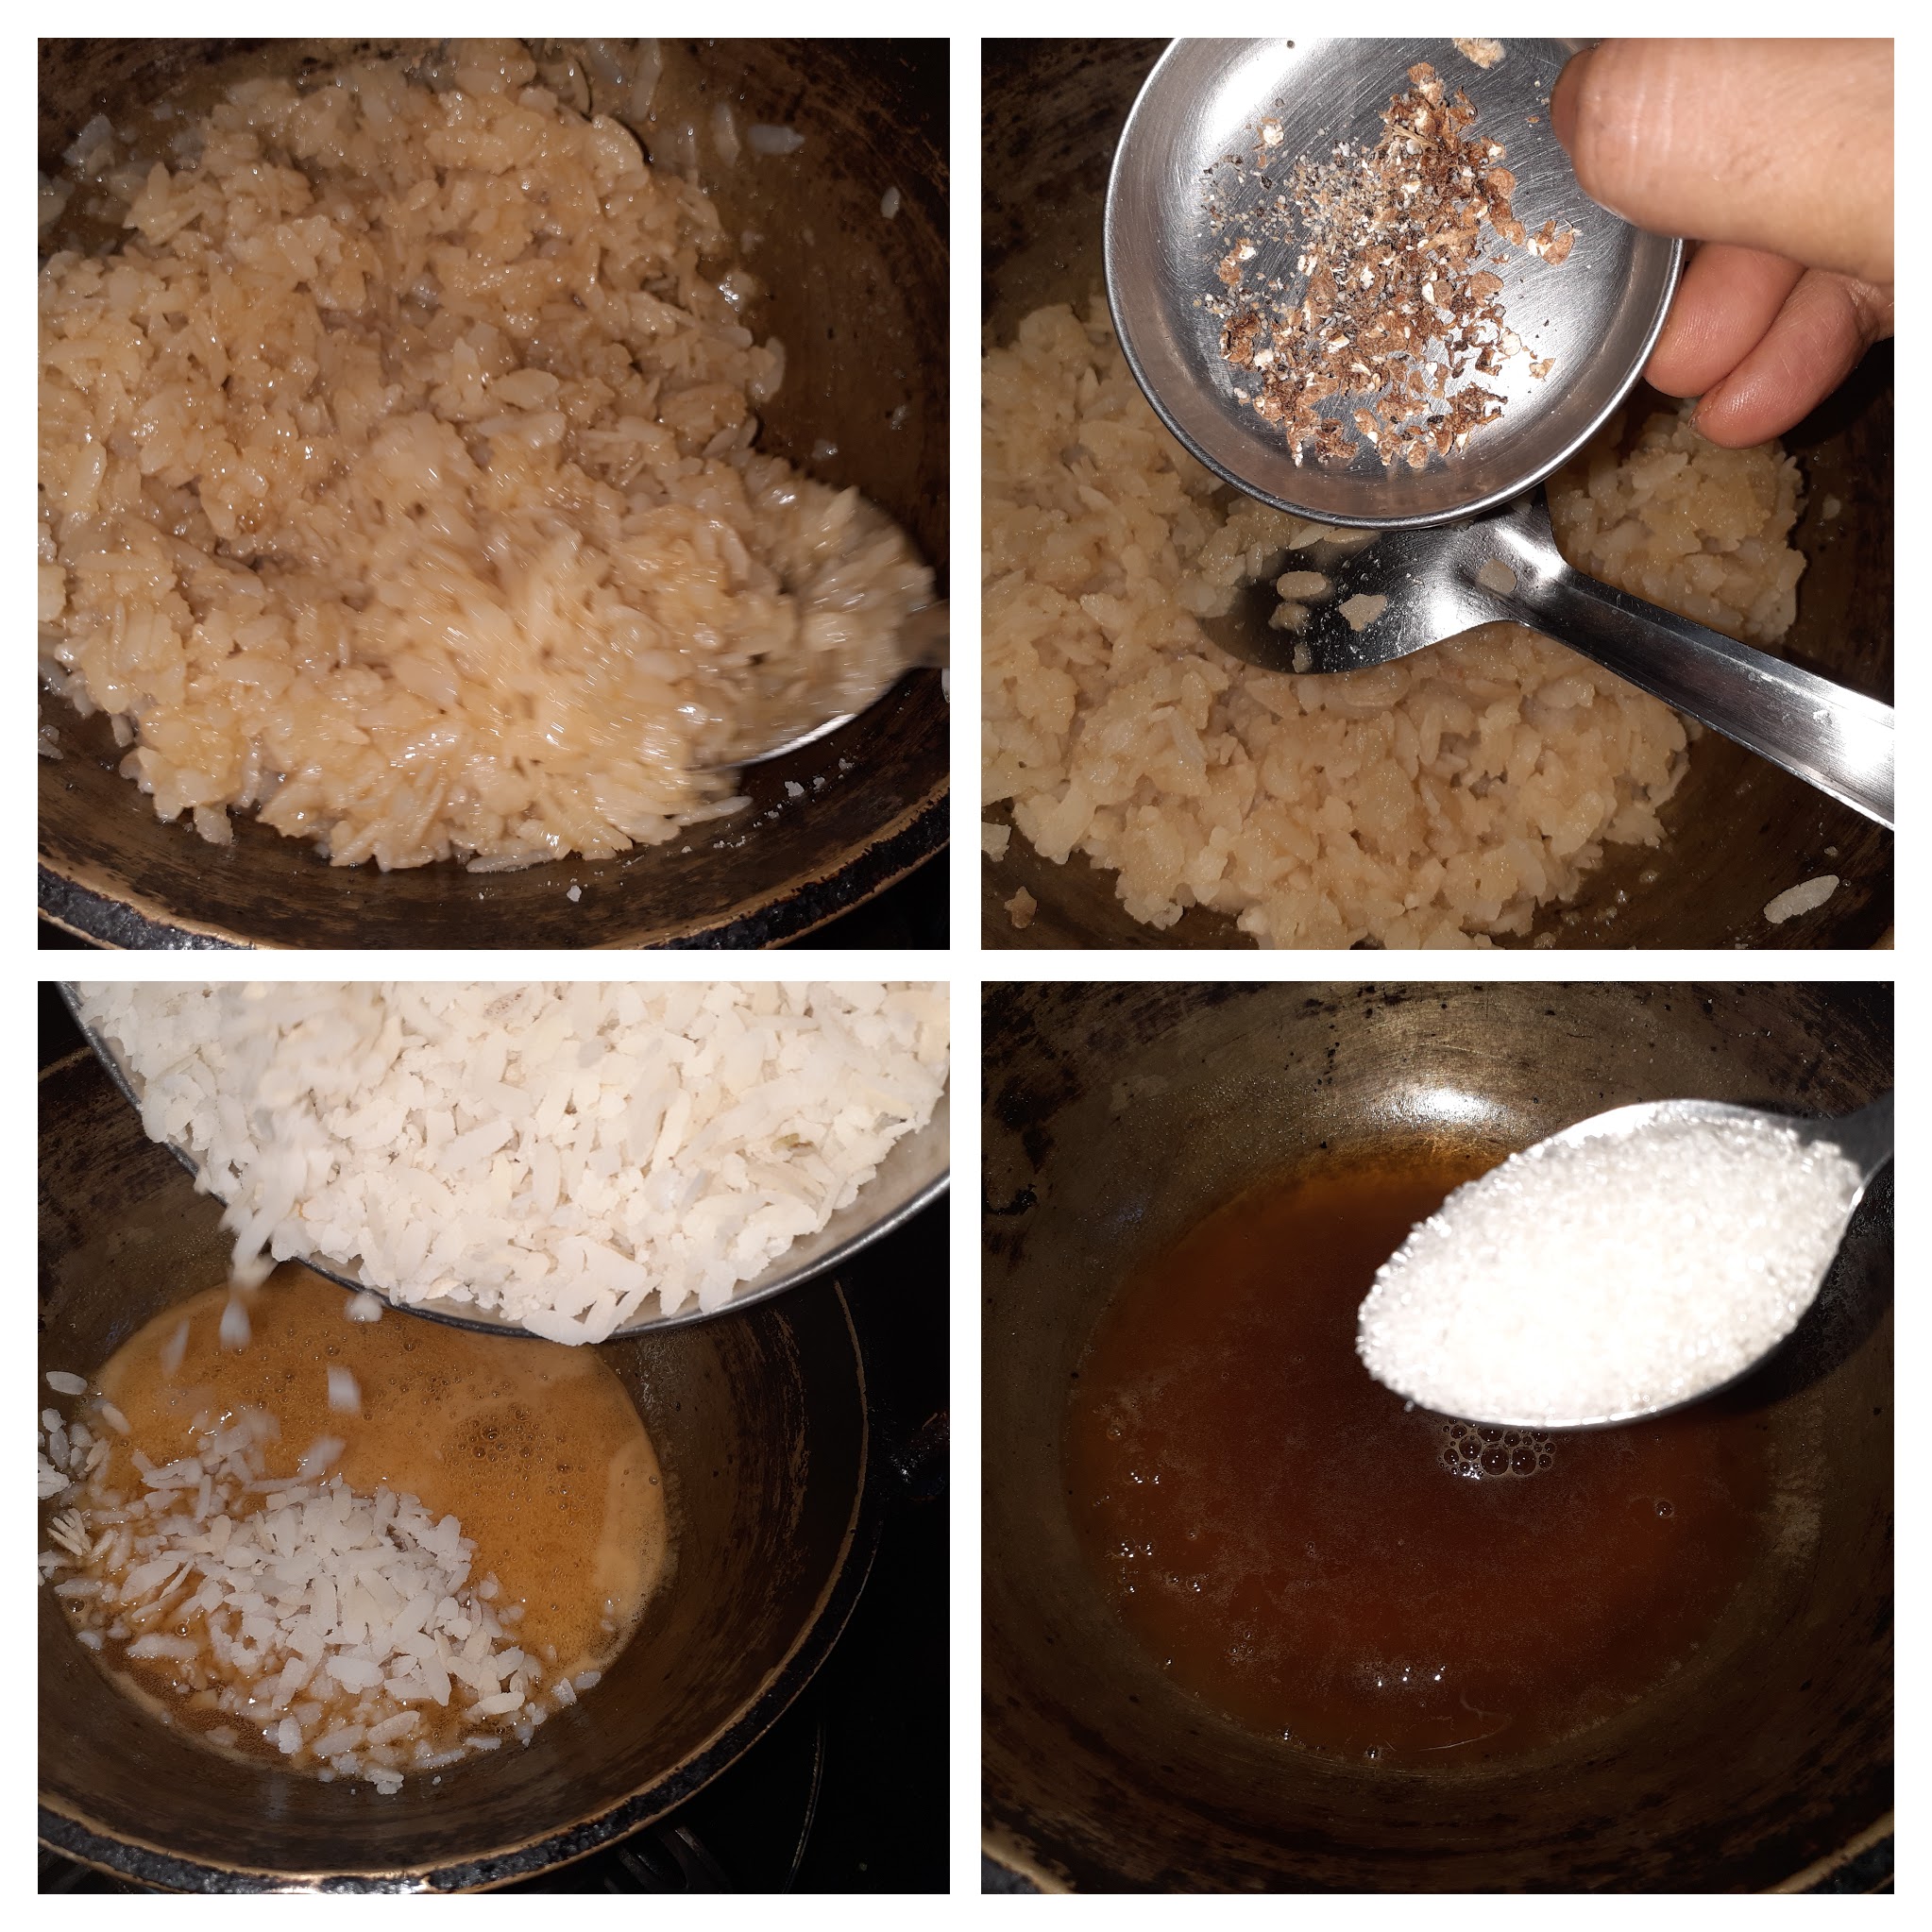
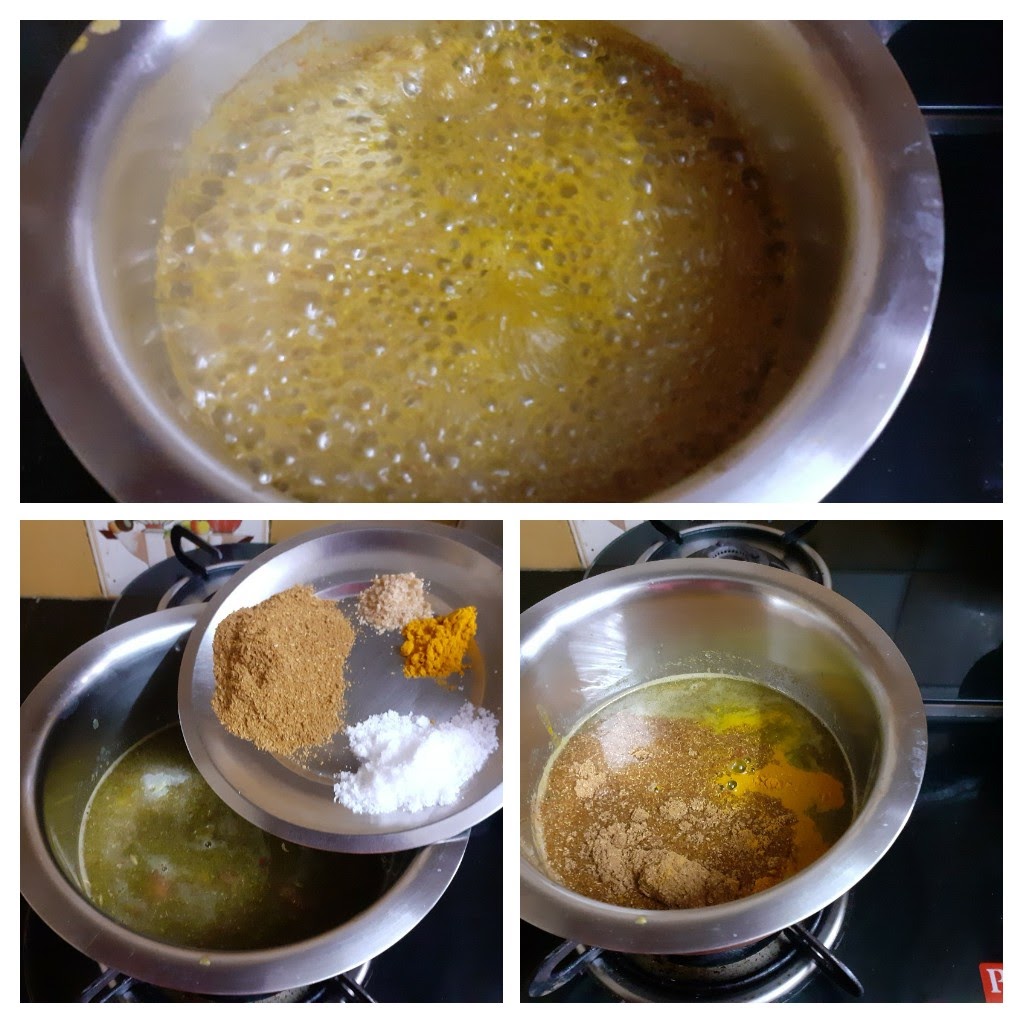
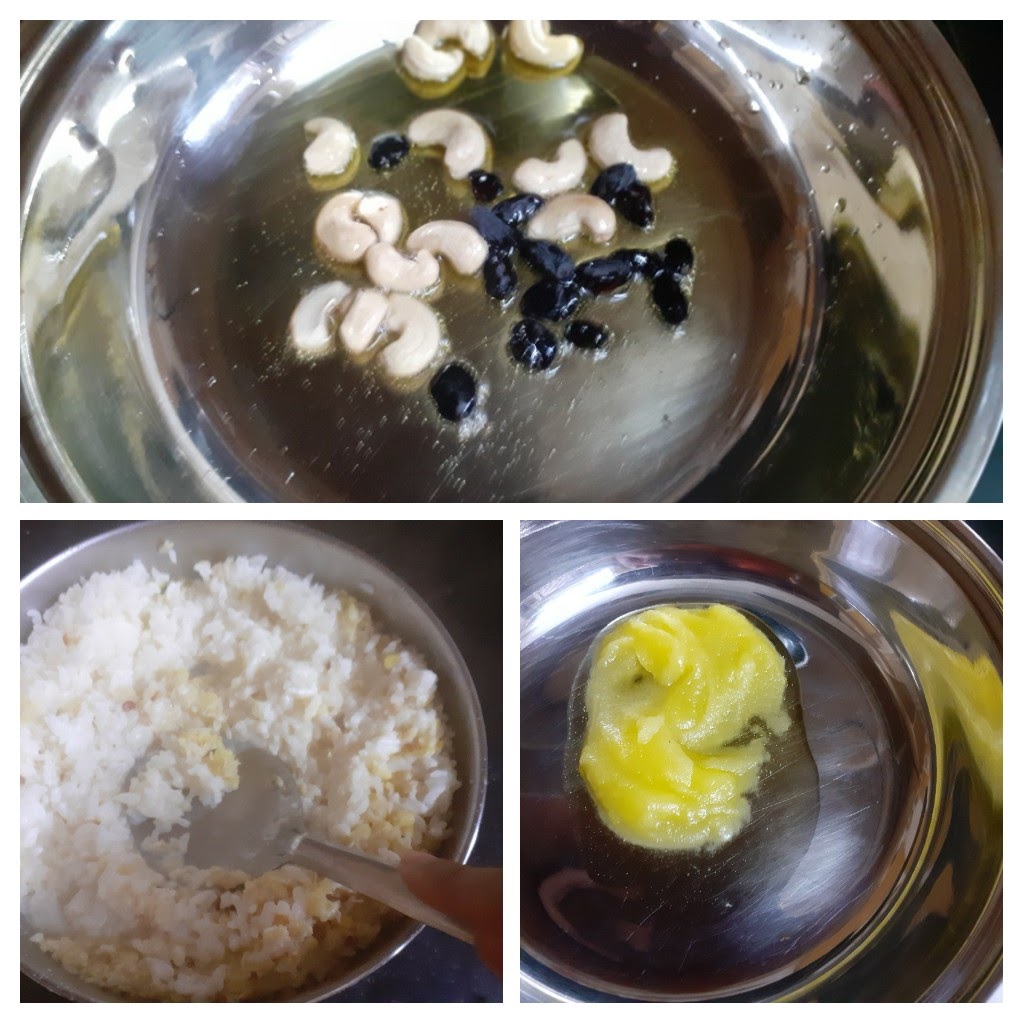
2.Dry roast the Moong dal directly in the cooker to a light brown colour. Stir constantly and take care not to burn the dal. It will give out a nice aroma. Now to the roasted moong dal in the cooker, add the washed rice. Pour 2 cups milk and 1 cup water, close the cooker and cook for 5 to 6 whistles ( flame should be on low throughout, otherwise there are chances of the milk overflowing through the sides).
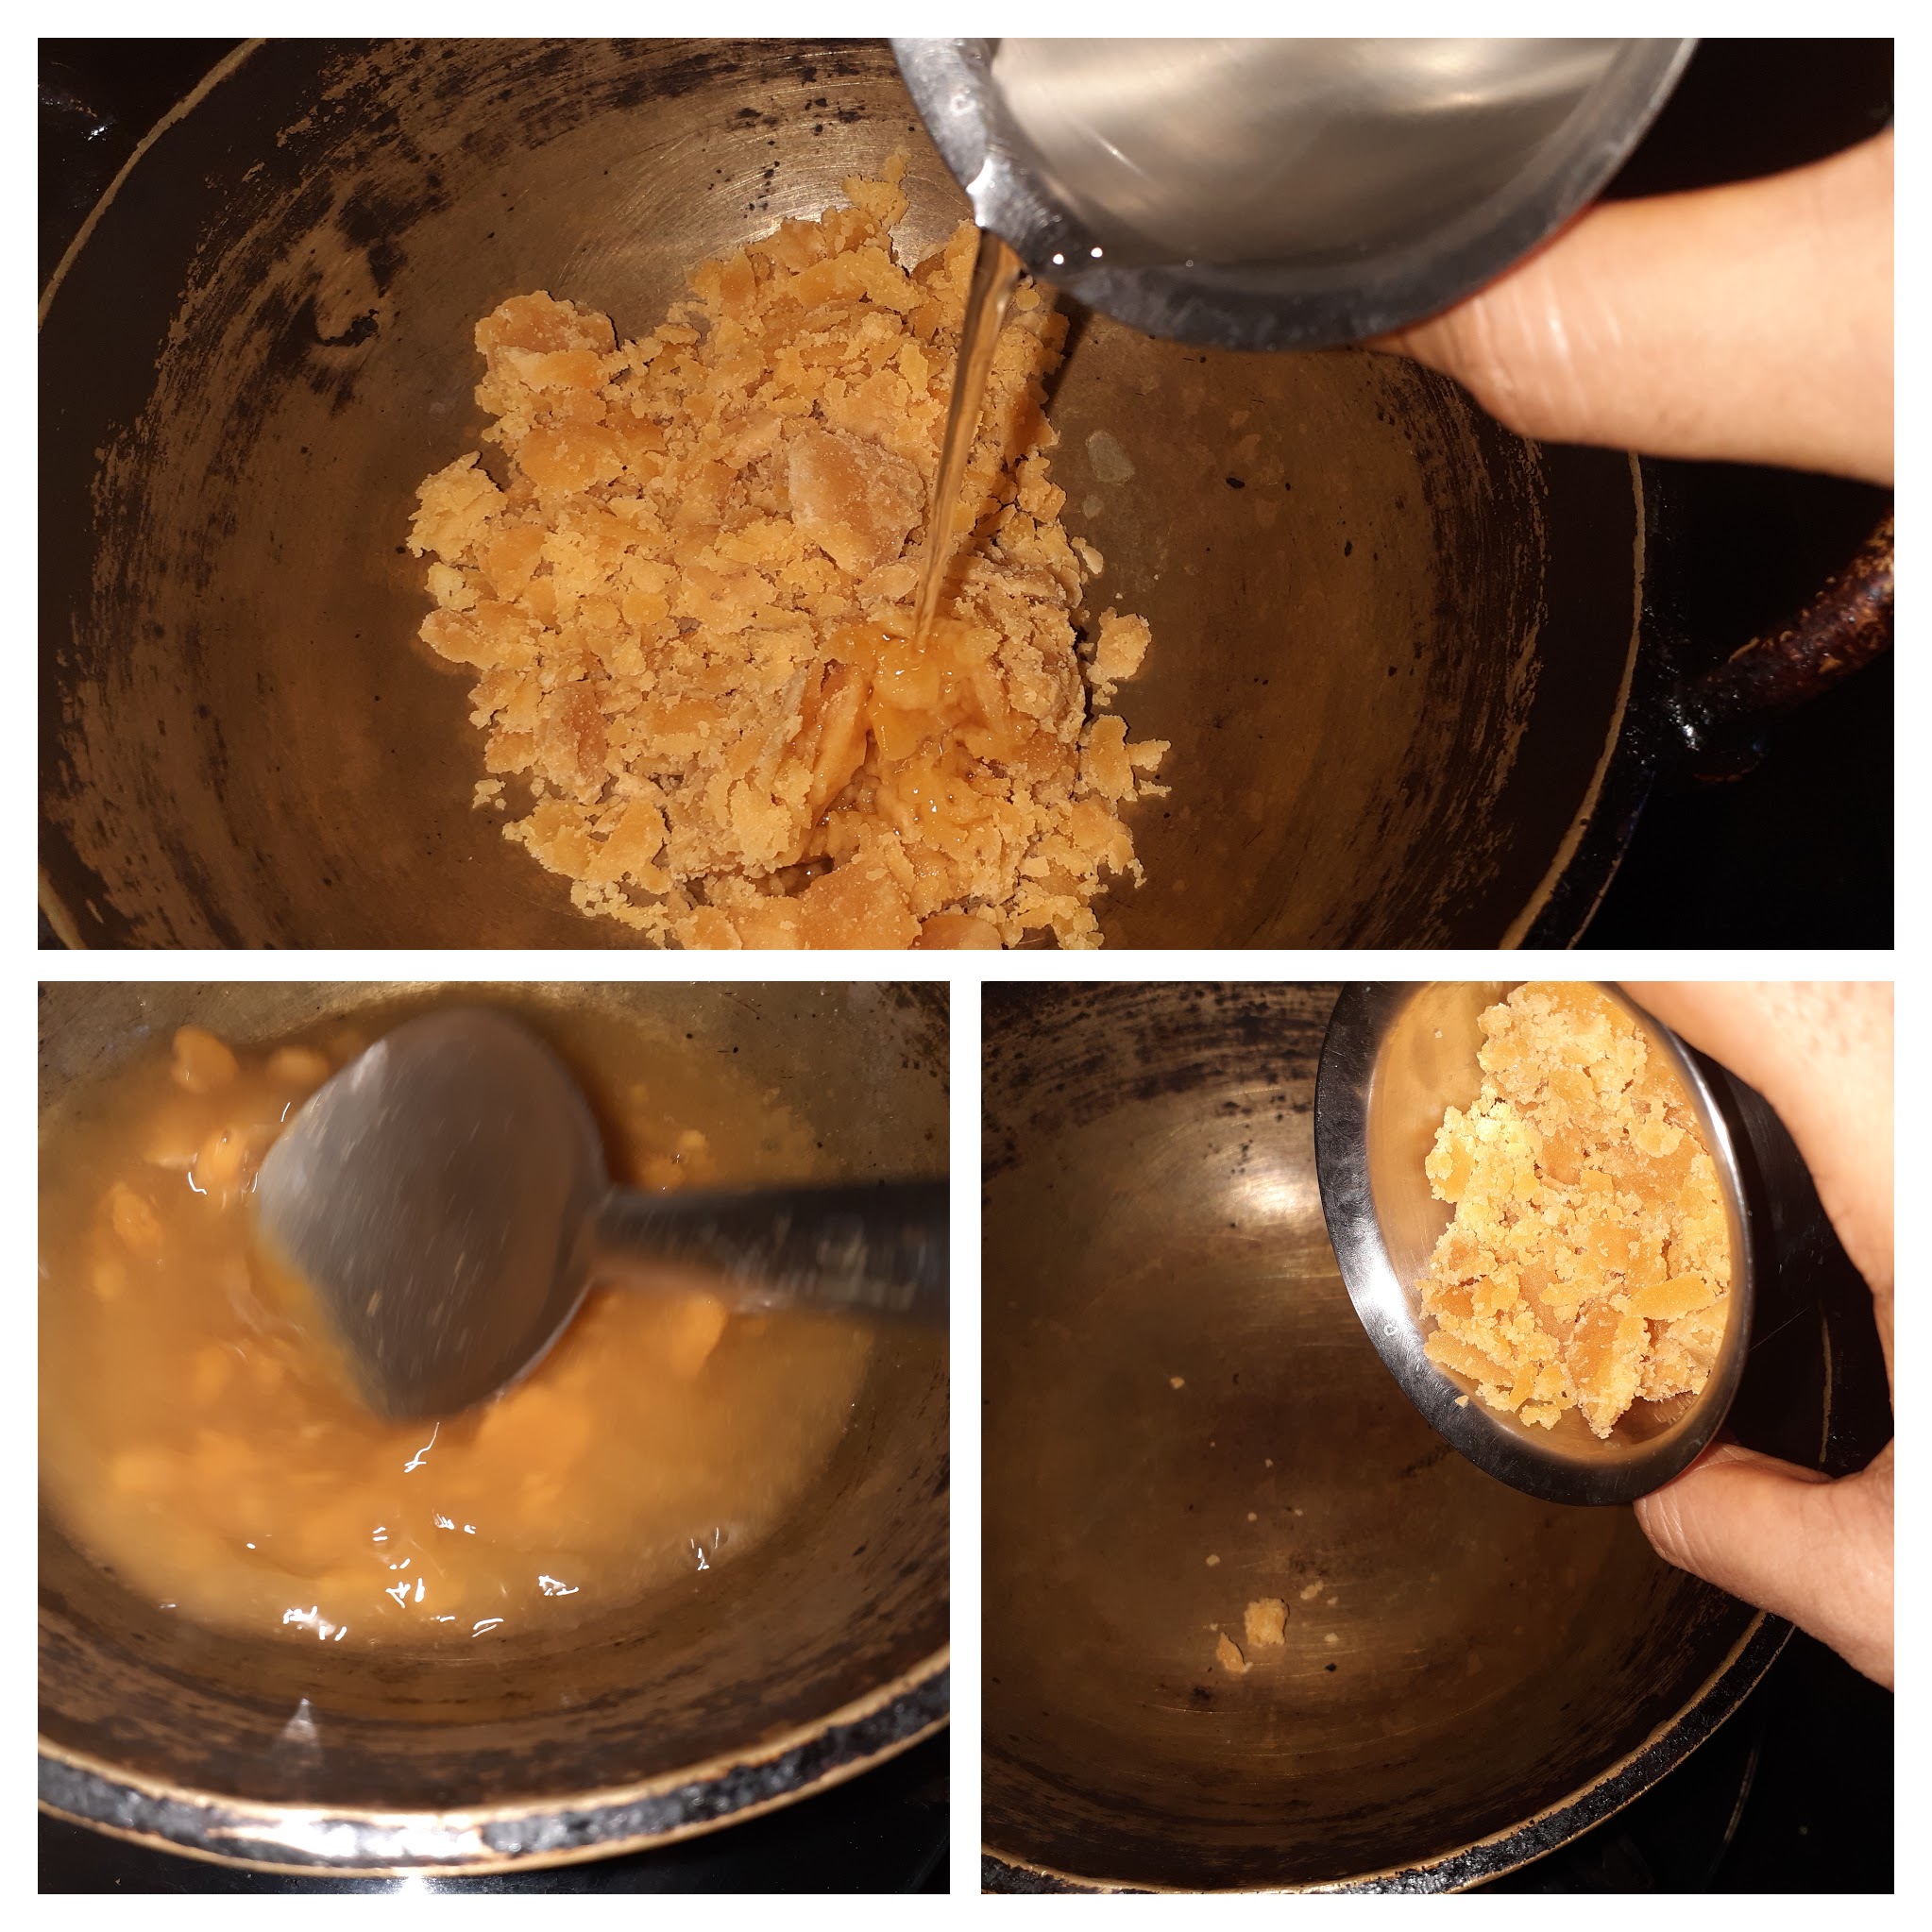
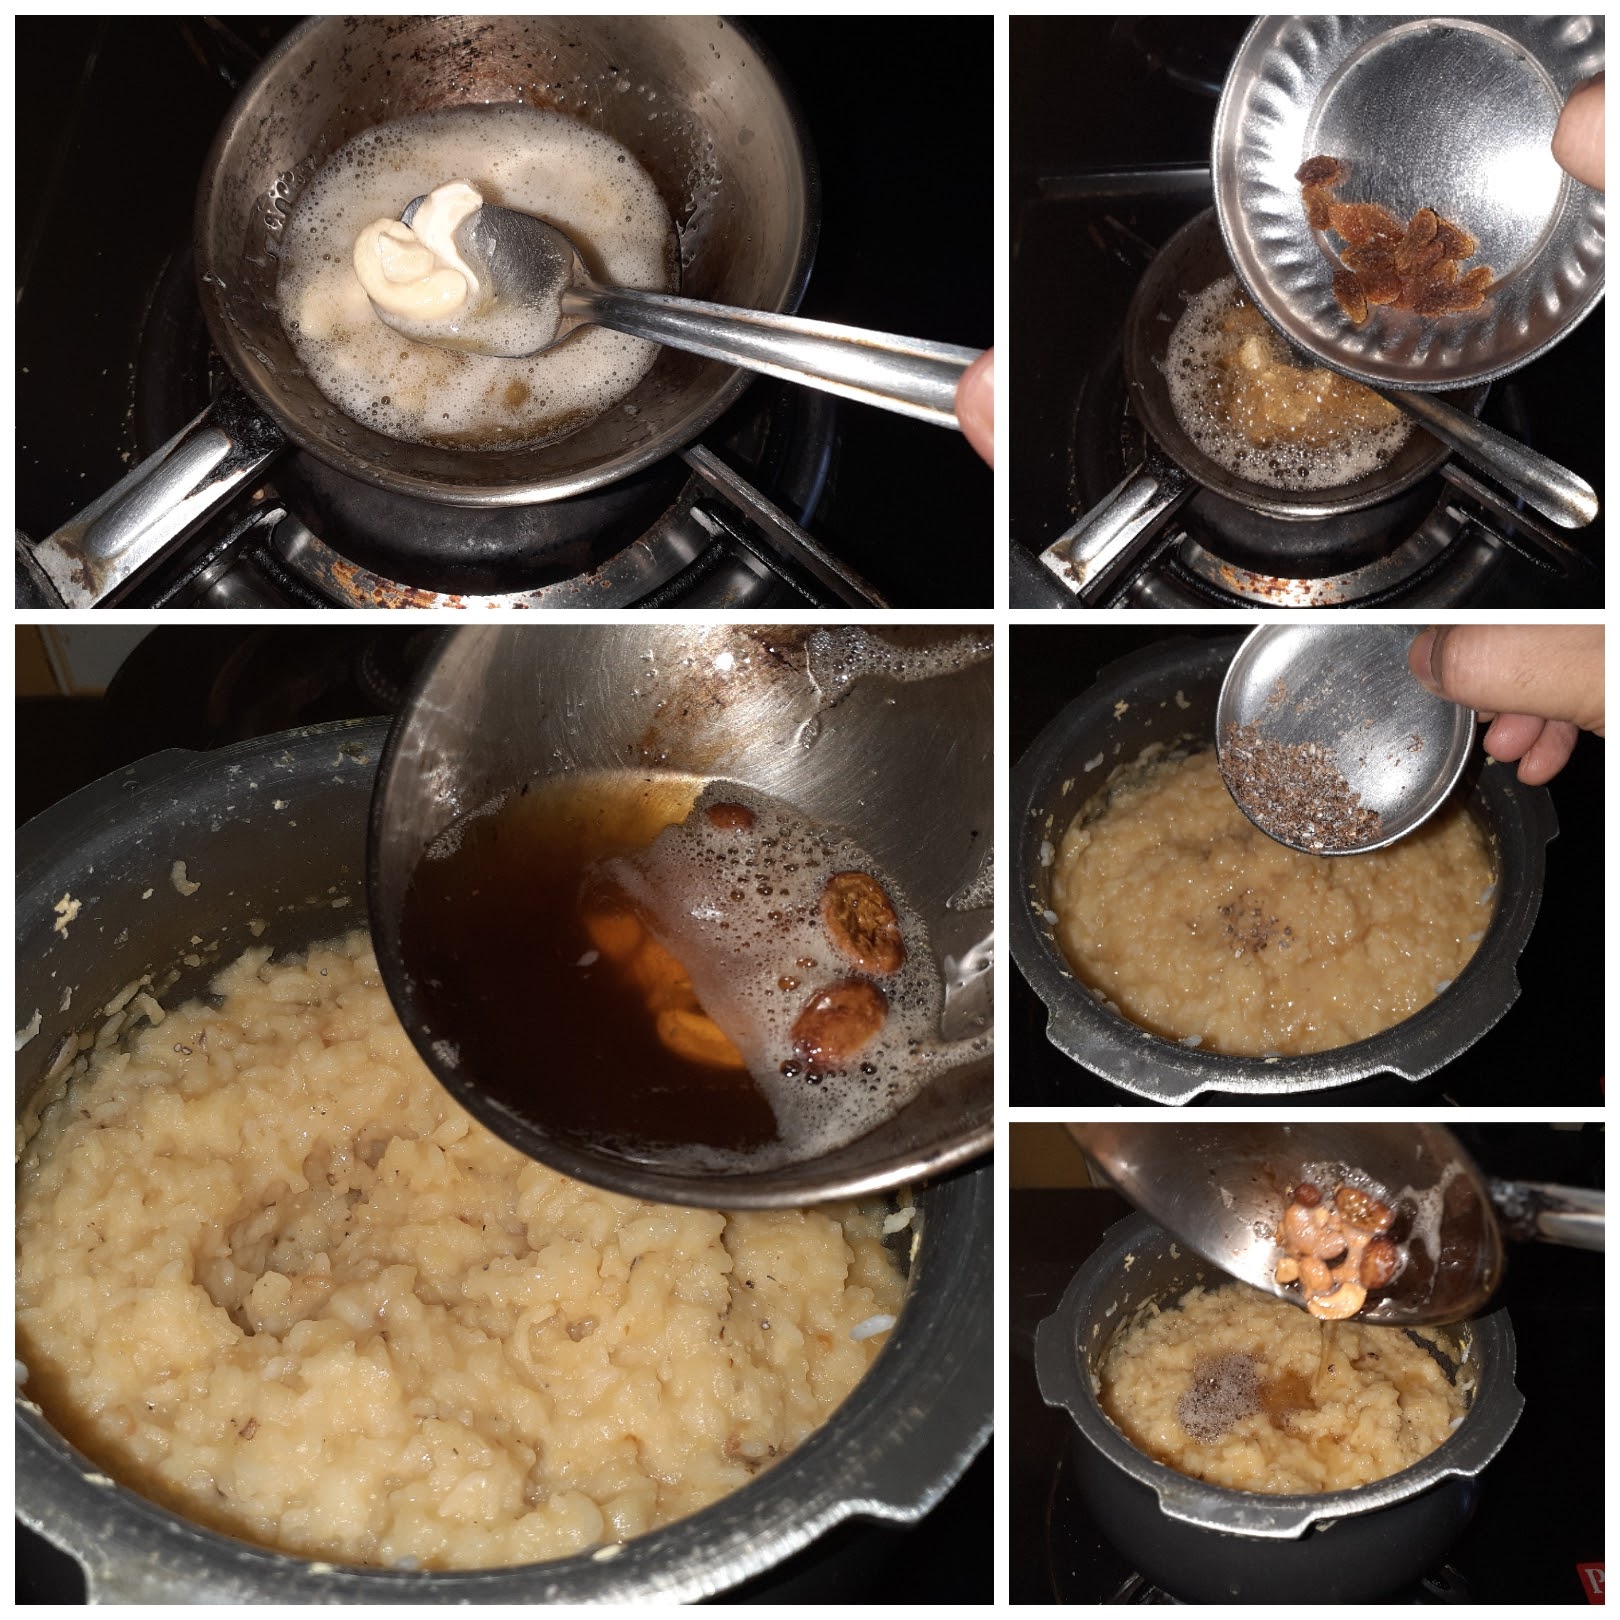
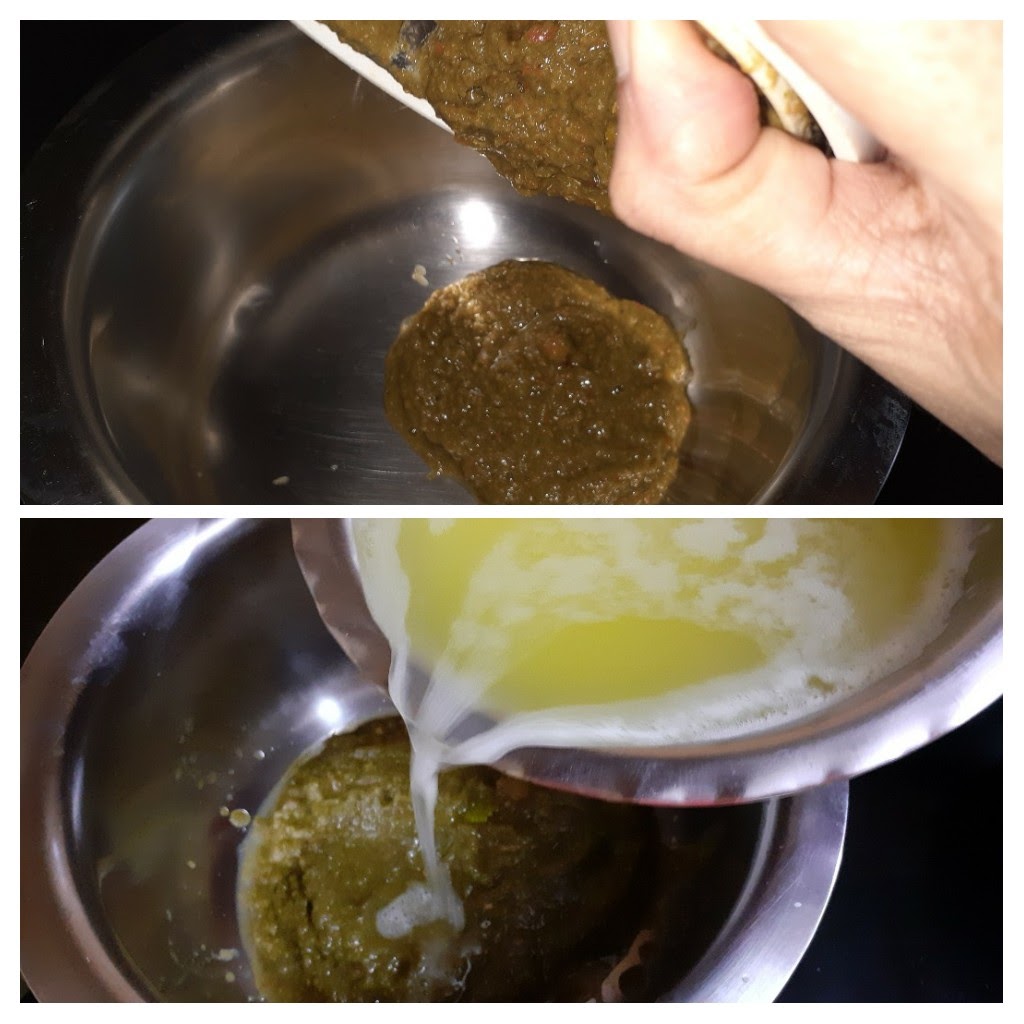
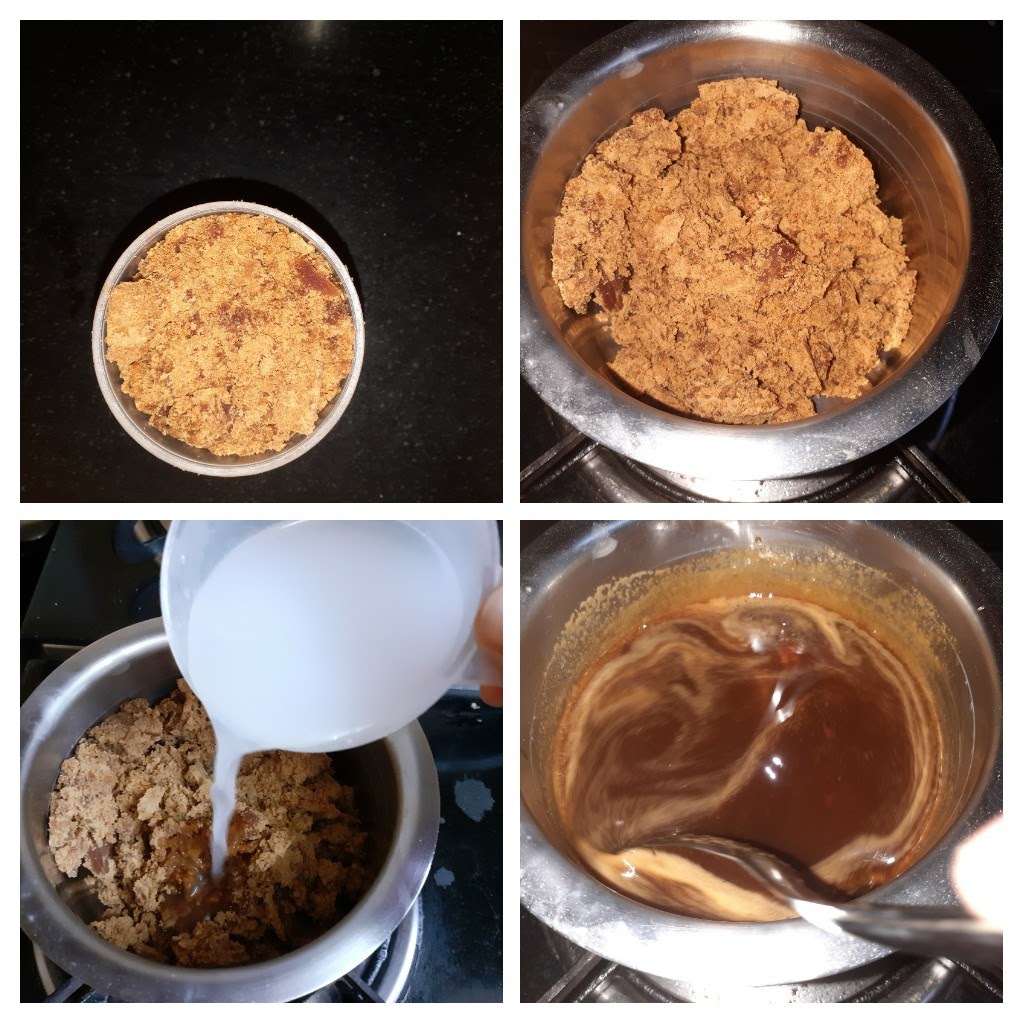
3. Until the pressure releases let’s get the jaggery ready. In a small vessel take the jaggery, add 1/4 cup water and bring to a boil, put out the stove, and stir the jaggery to dissolve it.
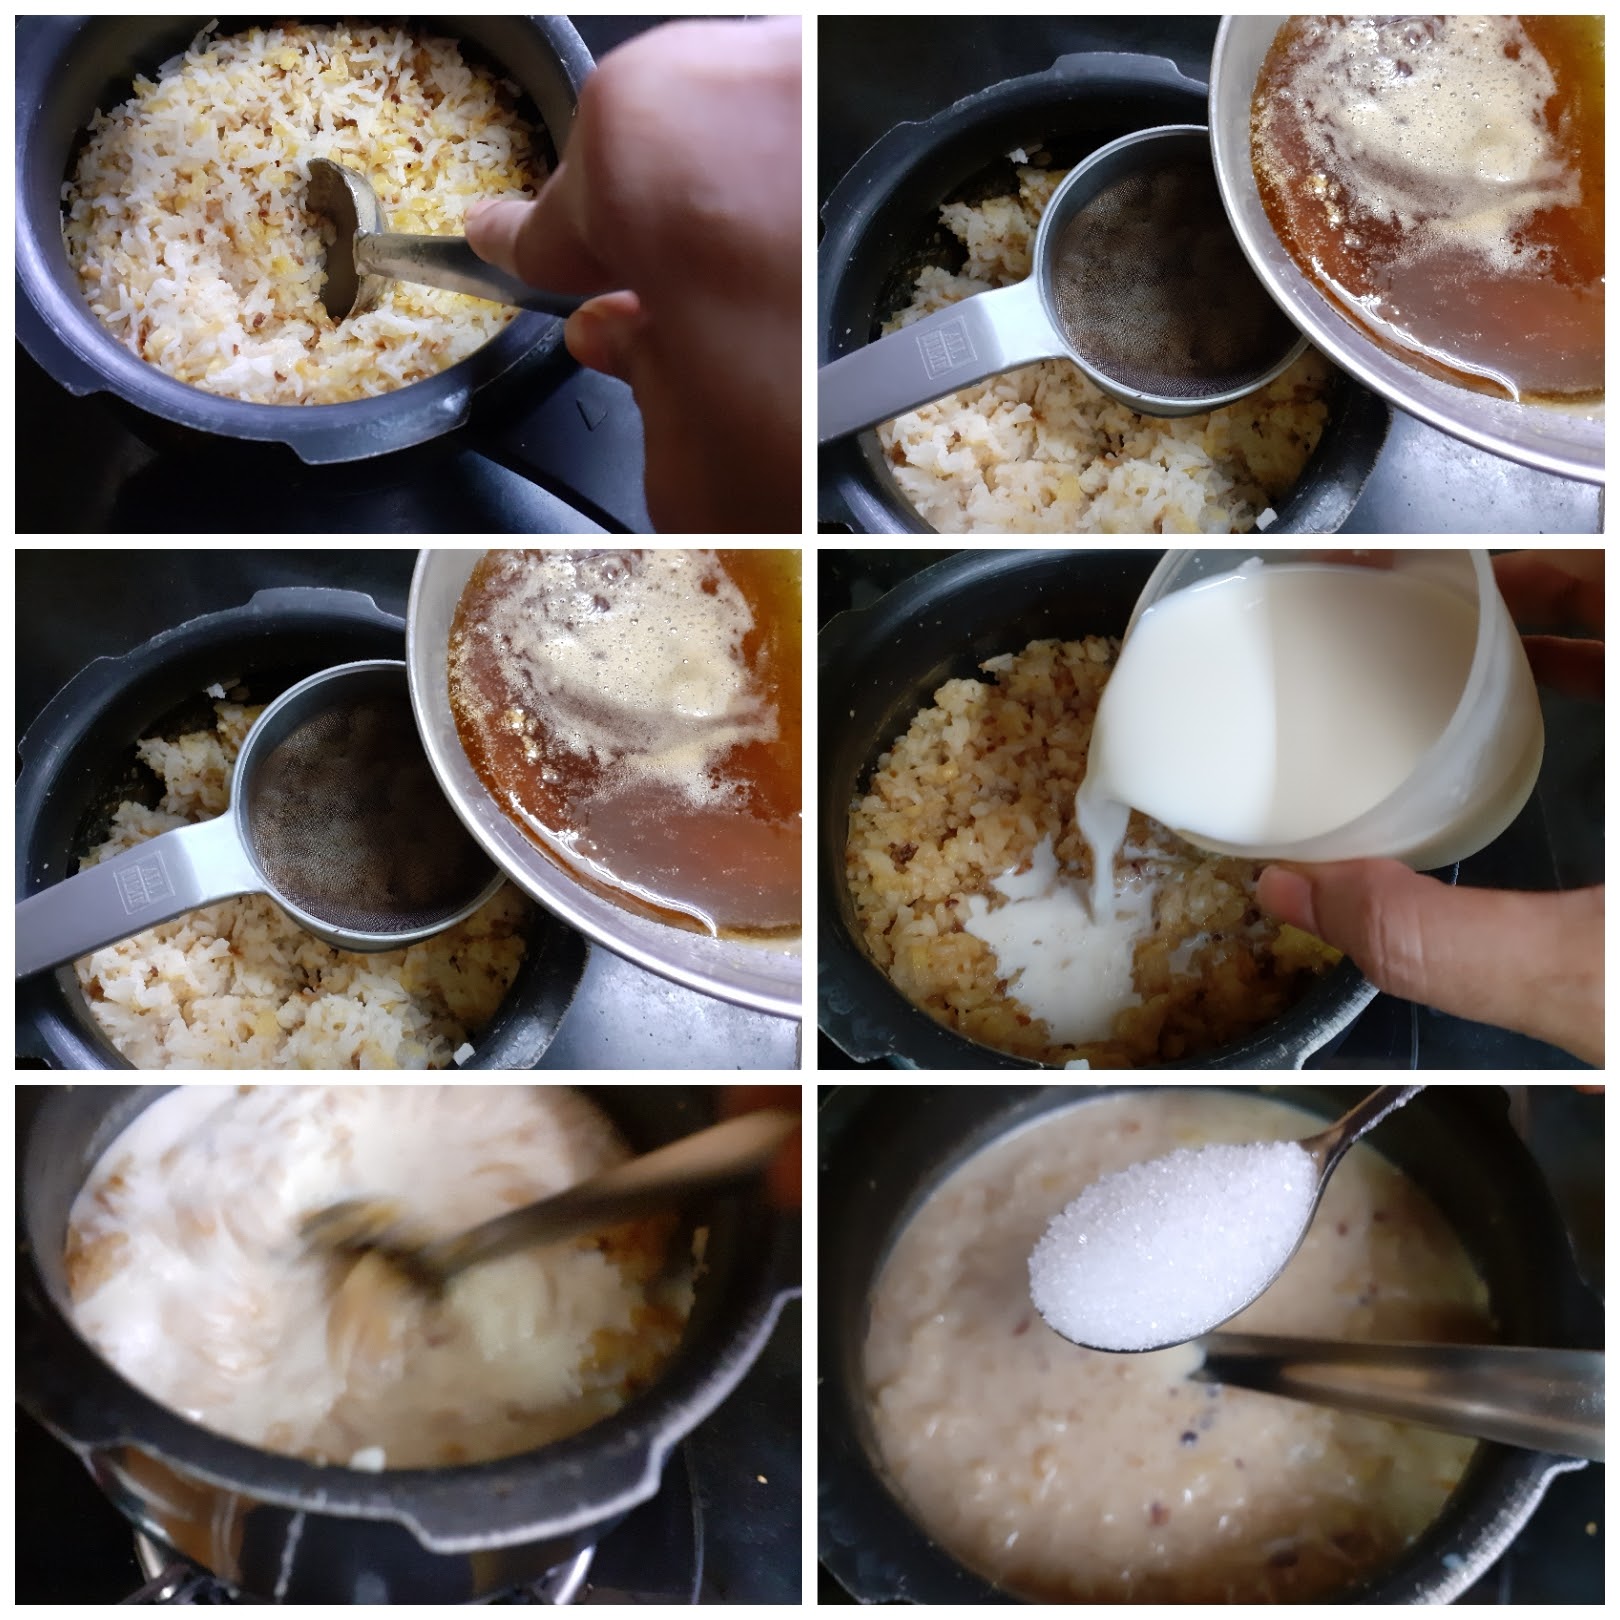
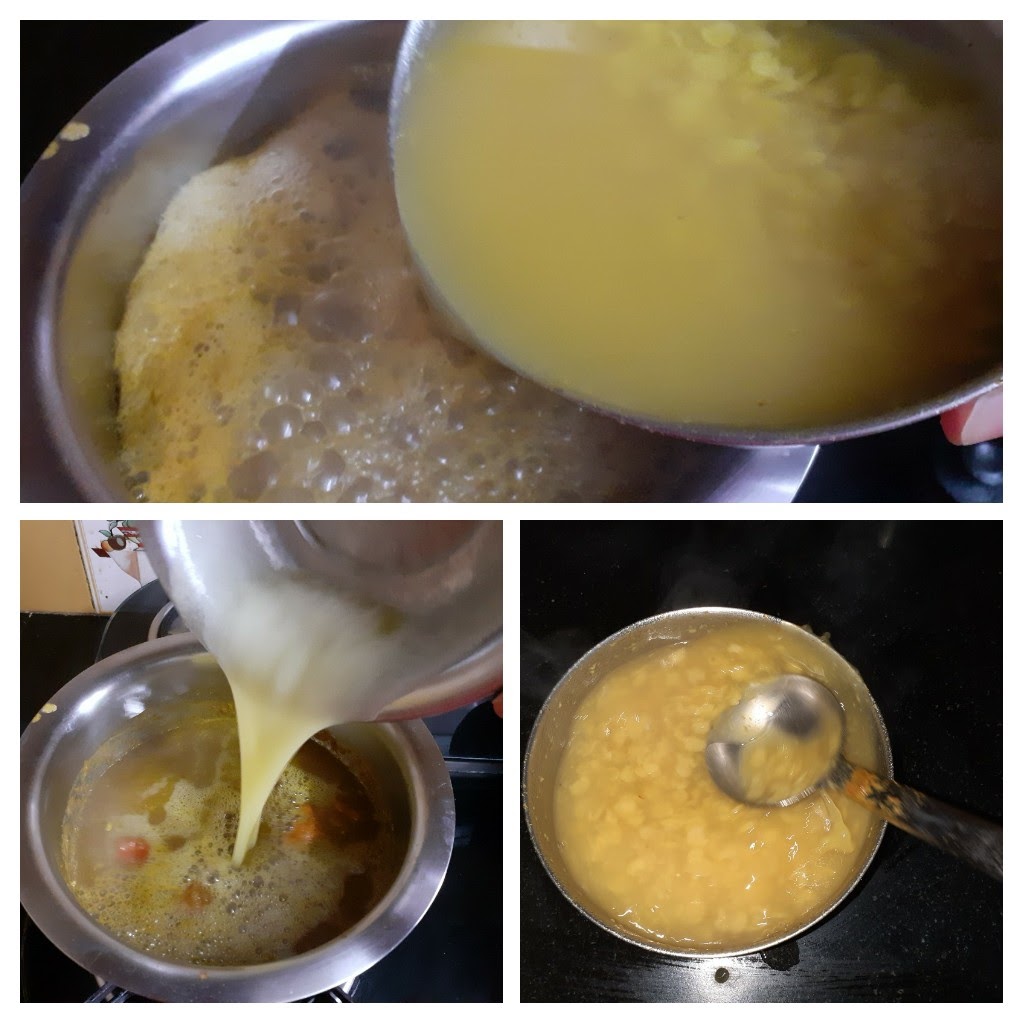
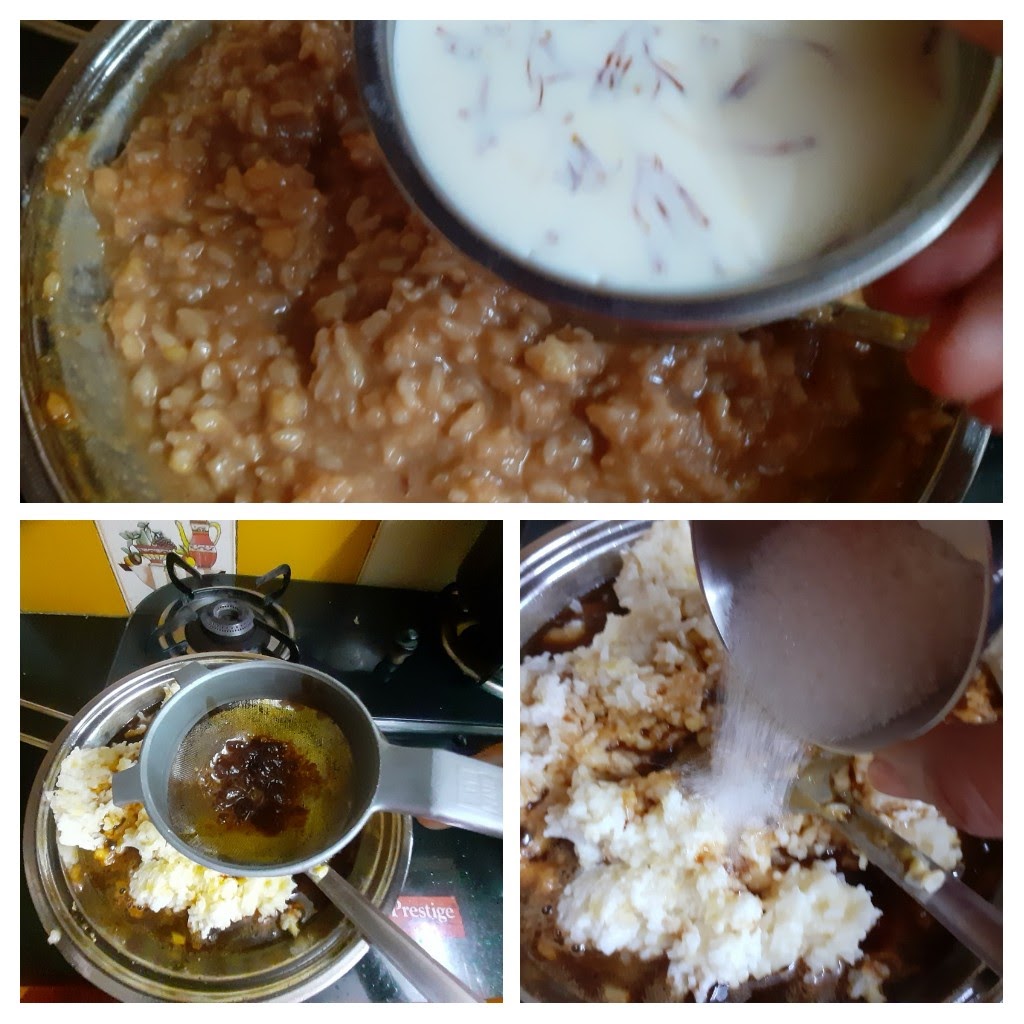
4. Once pressure releases open the cooker and mash the contents well. Put the cooker on flame again and strain the liquid jaggery into the cooker directly. Pour another 2 cups milk and stir nicely. There may be lumps, break them down patiently by stirring. Add two spoons sugar.
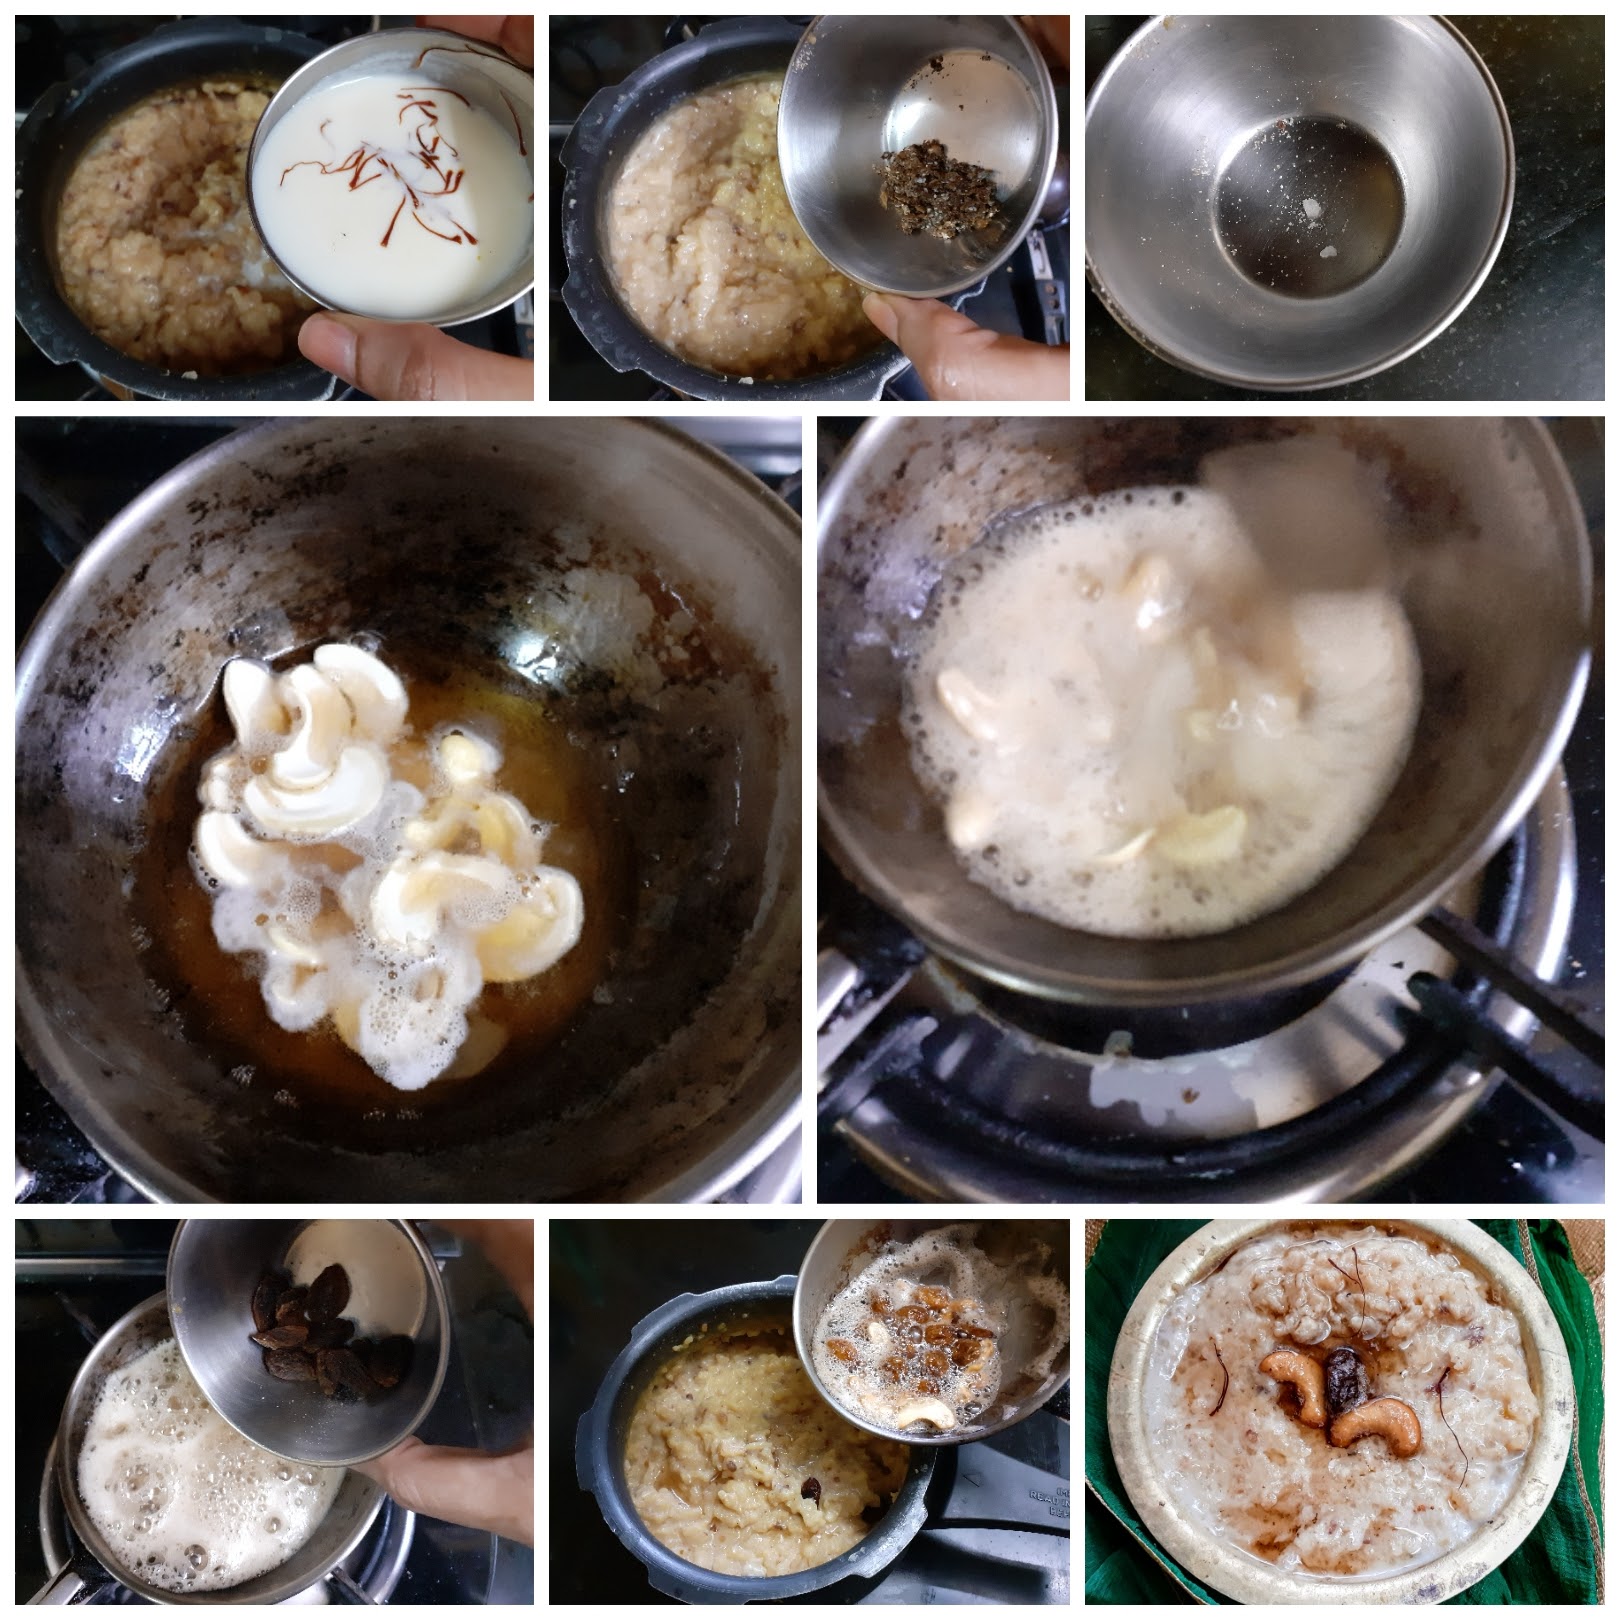
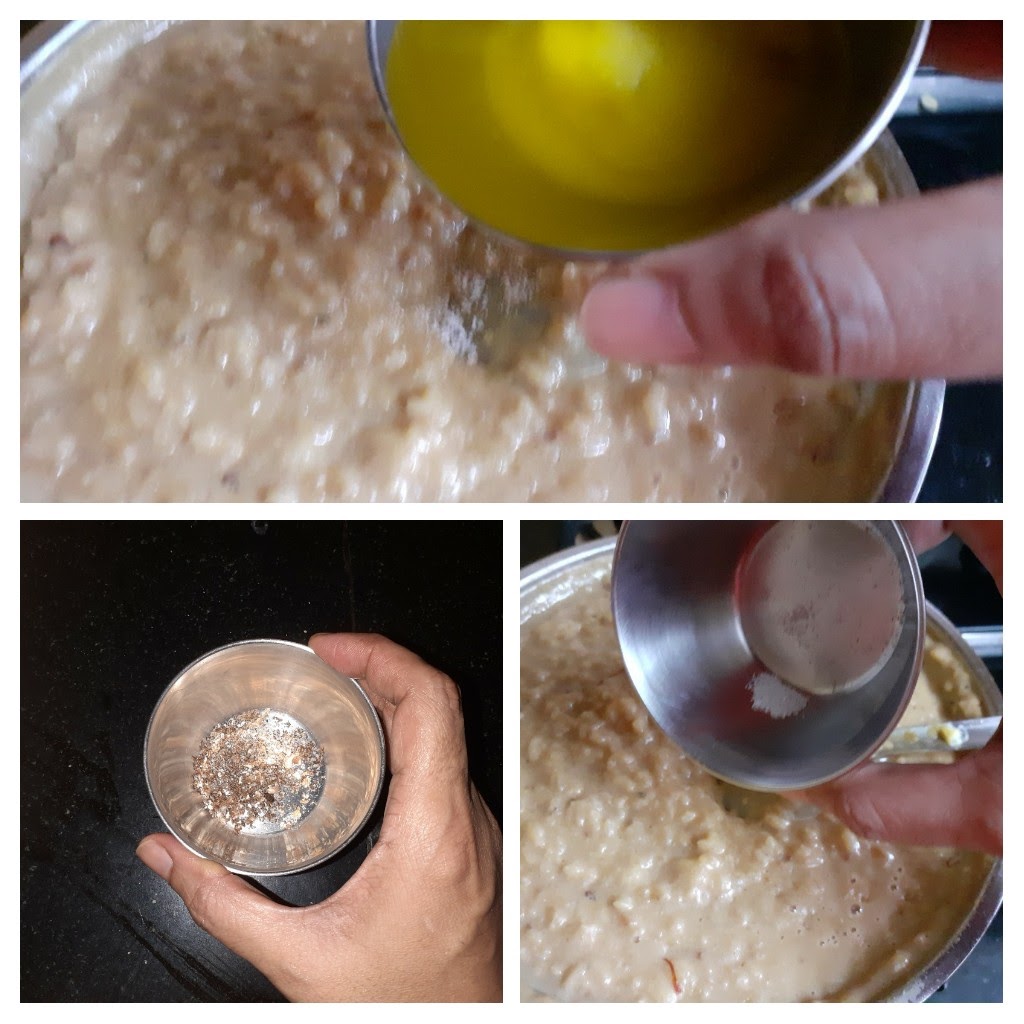
5. Add milk in which the saffron strands were soaked followed by Cardamom powder, raw camphor(optional). Finally, add the nuts and raisins fried in ghee.
NOTES:
1. The only glitch in this method is the milk overflowing from the cooker or the milk sticking to the bottom of the cooker. To manage this the flame should be on low through out until the whistles are over.
2. We are straining the jaggery to remove impurities in the jaggery. I recommend not missing this step.
3. To get that smooth texture and consistency add more milk if required.
If you tried this recipe please do comment below, we would love to hear fom you.
If you leave us your mail id, recipes can directly be mailed to you, whenever we have a new post.
Show some love-like and follows us on Instagram and Facebook.
Karuvepilai Podi/Curry Leaves Powder (For Rice)
Karuvepilai or curry leaf plant is an aromatic plant the leaves of which are used in seasoning dishes. Most south Indian dishes have Curry leaves as their common tempering element. Apart from imparting their aroma to a dish they also add a huge amount of flavour. These leaves have many medicinal properties like- high calcium content, rich in Iron, aids in digestion, improves vision, rich in Vitamin A, and many more such benefits.
In our house, we make this powder with fresh curry leaves and other spices that can be mixed with hot rice and ghee, or it can be added to rice tempered with peanuts and spices and made into Karuvepilai Sadam or Curry leaves rice.
Karuvepilai powder can be stored in an airtight container for 3 months and more.
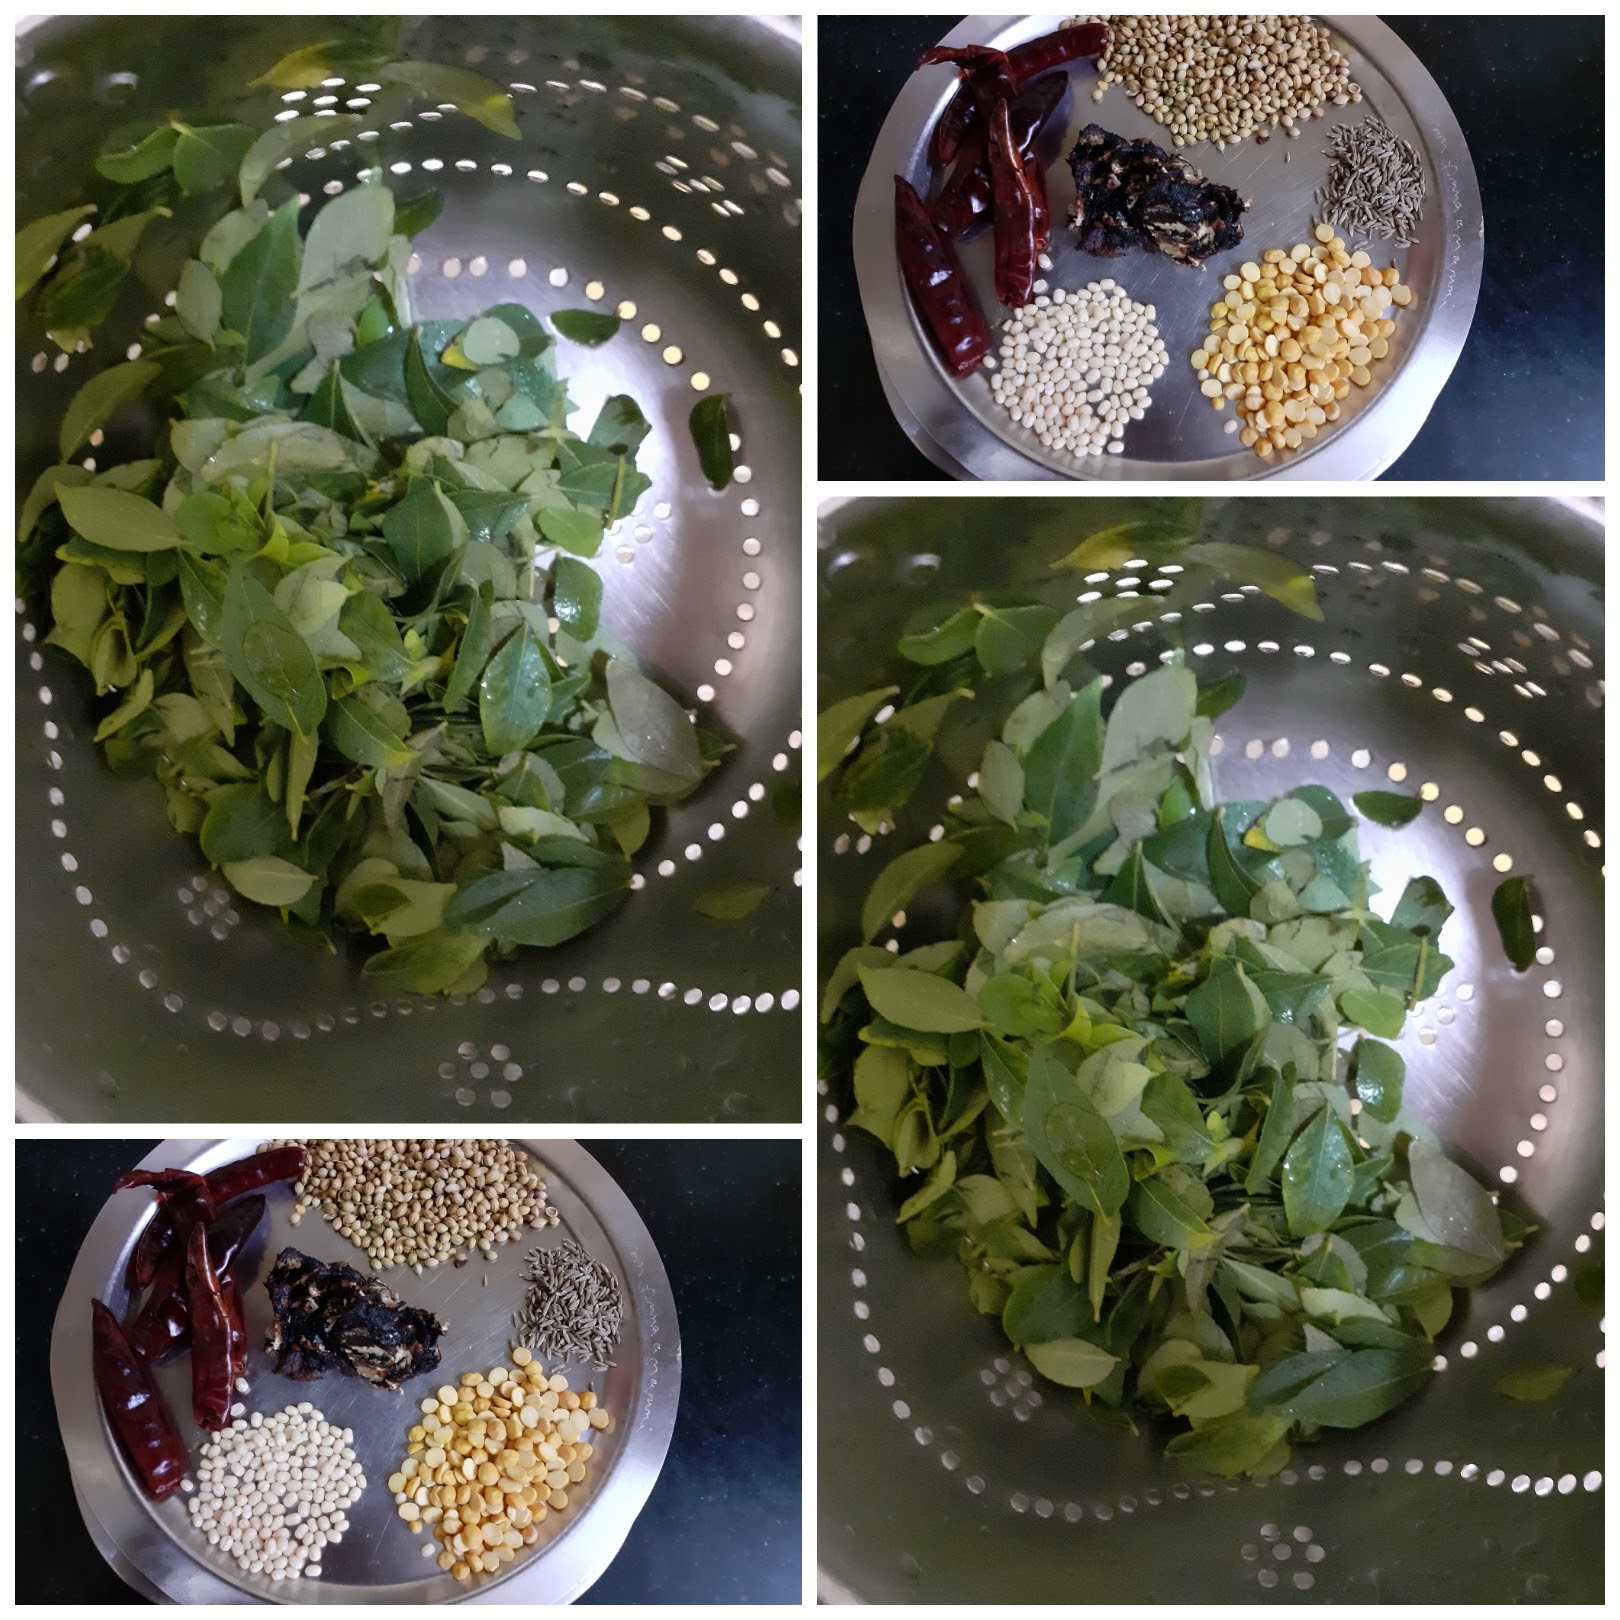
Curry leaves 2 cups(stalks removed) washed and pat dried
Coriander seeds/Dhania 2 tbsp
Chana dal/ Gram 1 tbsp
Urad dal 1/2 tbsp
Jeera/ Cumin seeds 1 tsp
Dry red chillies 5 big ones
Tamarind lemon sized ball
Salt to taste.
Asafoetida 1 tsp
Oil for frying spices 1 tbsp
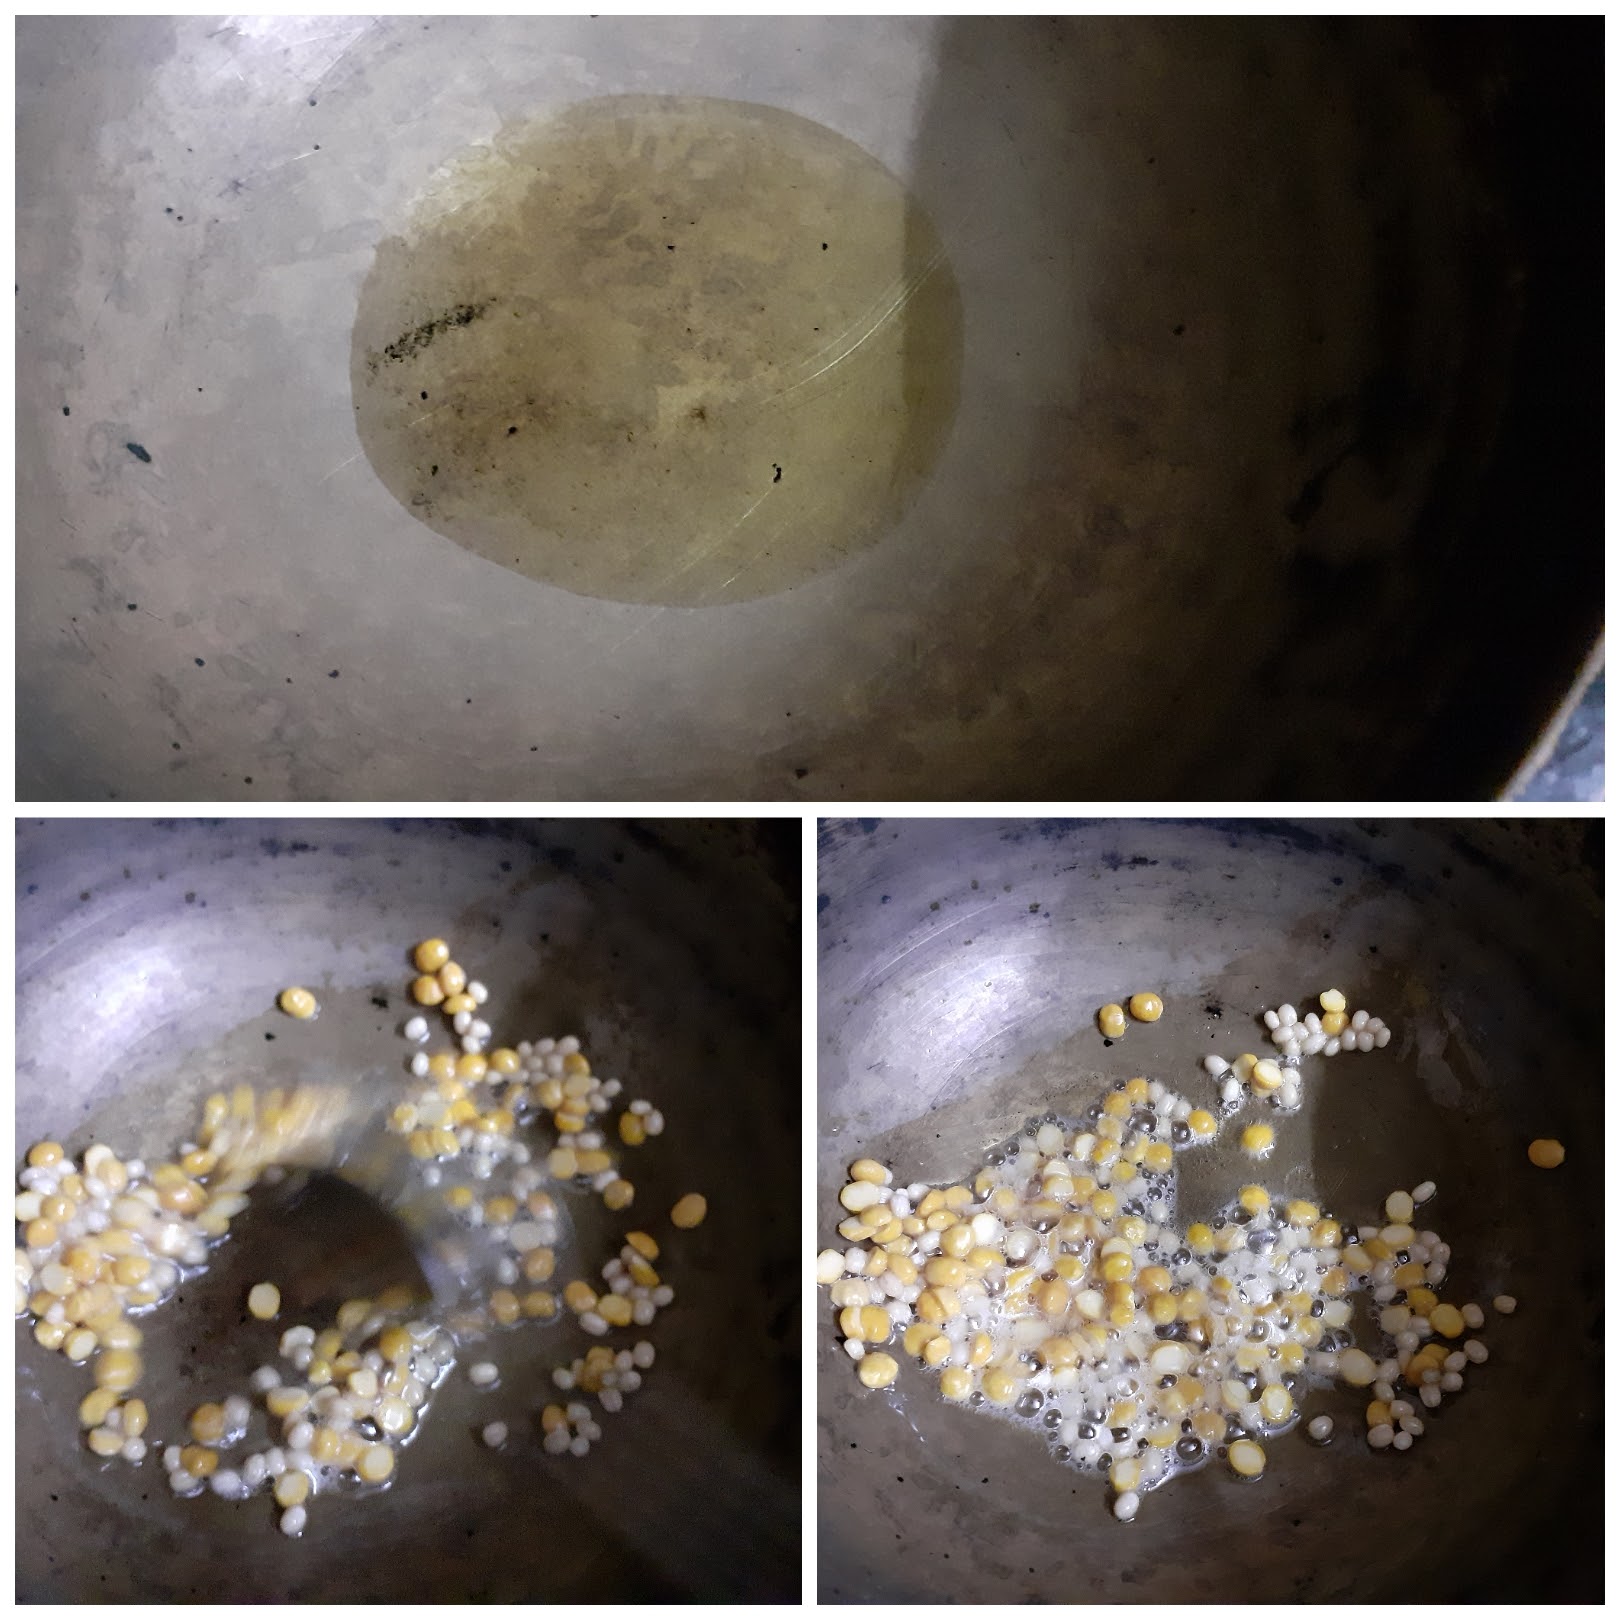
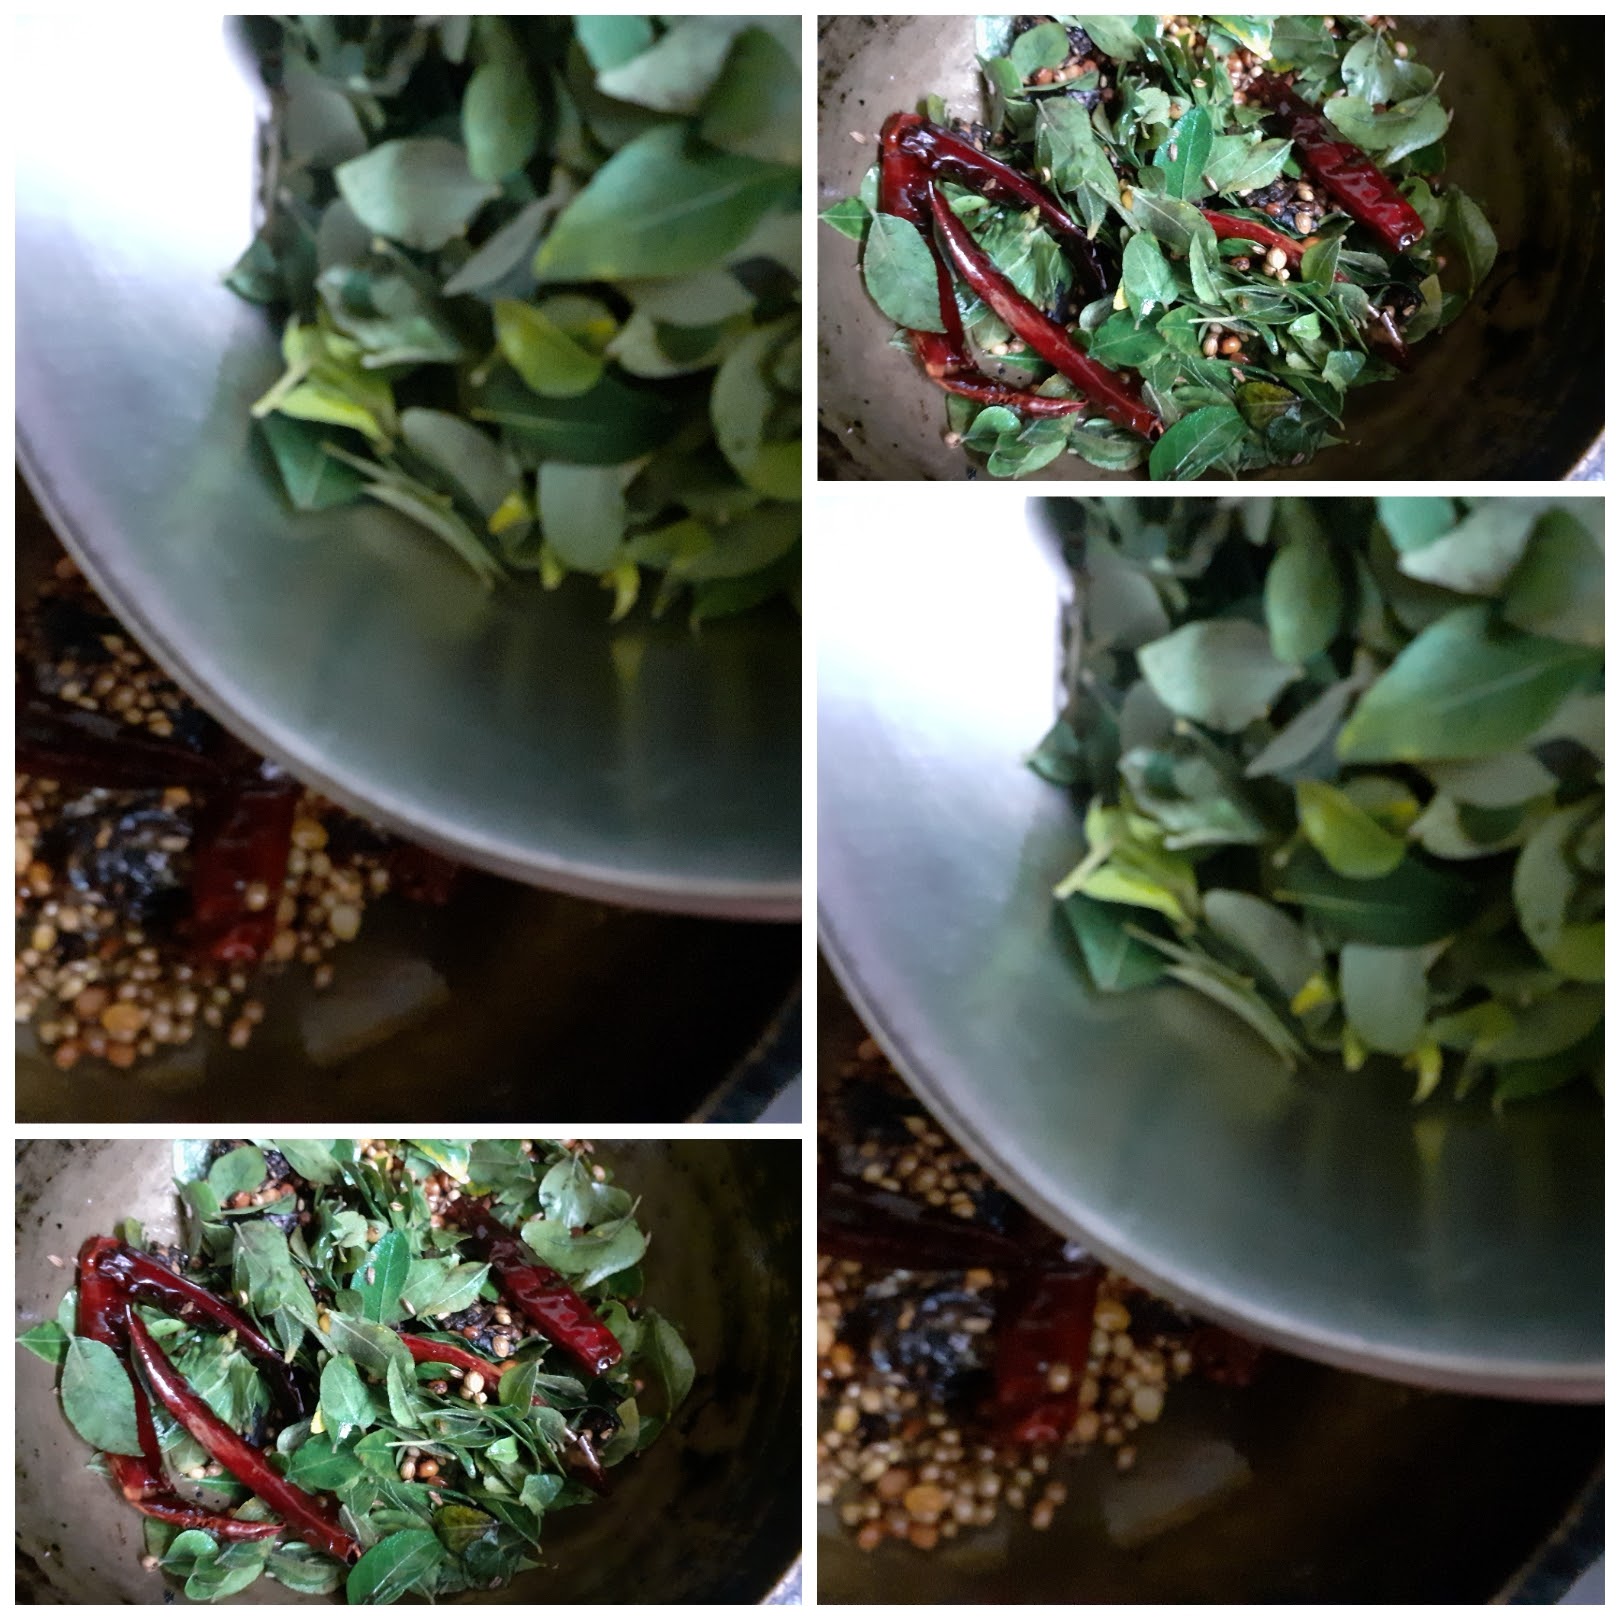
Directions:
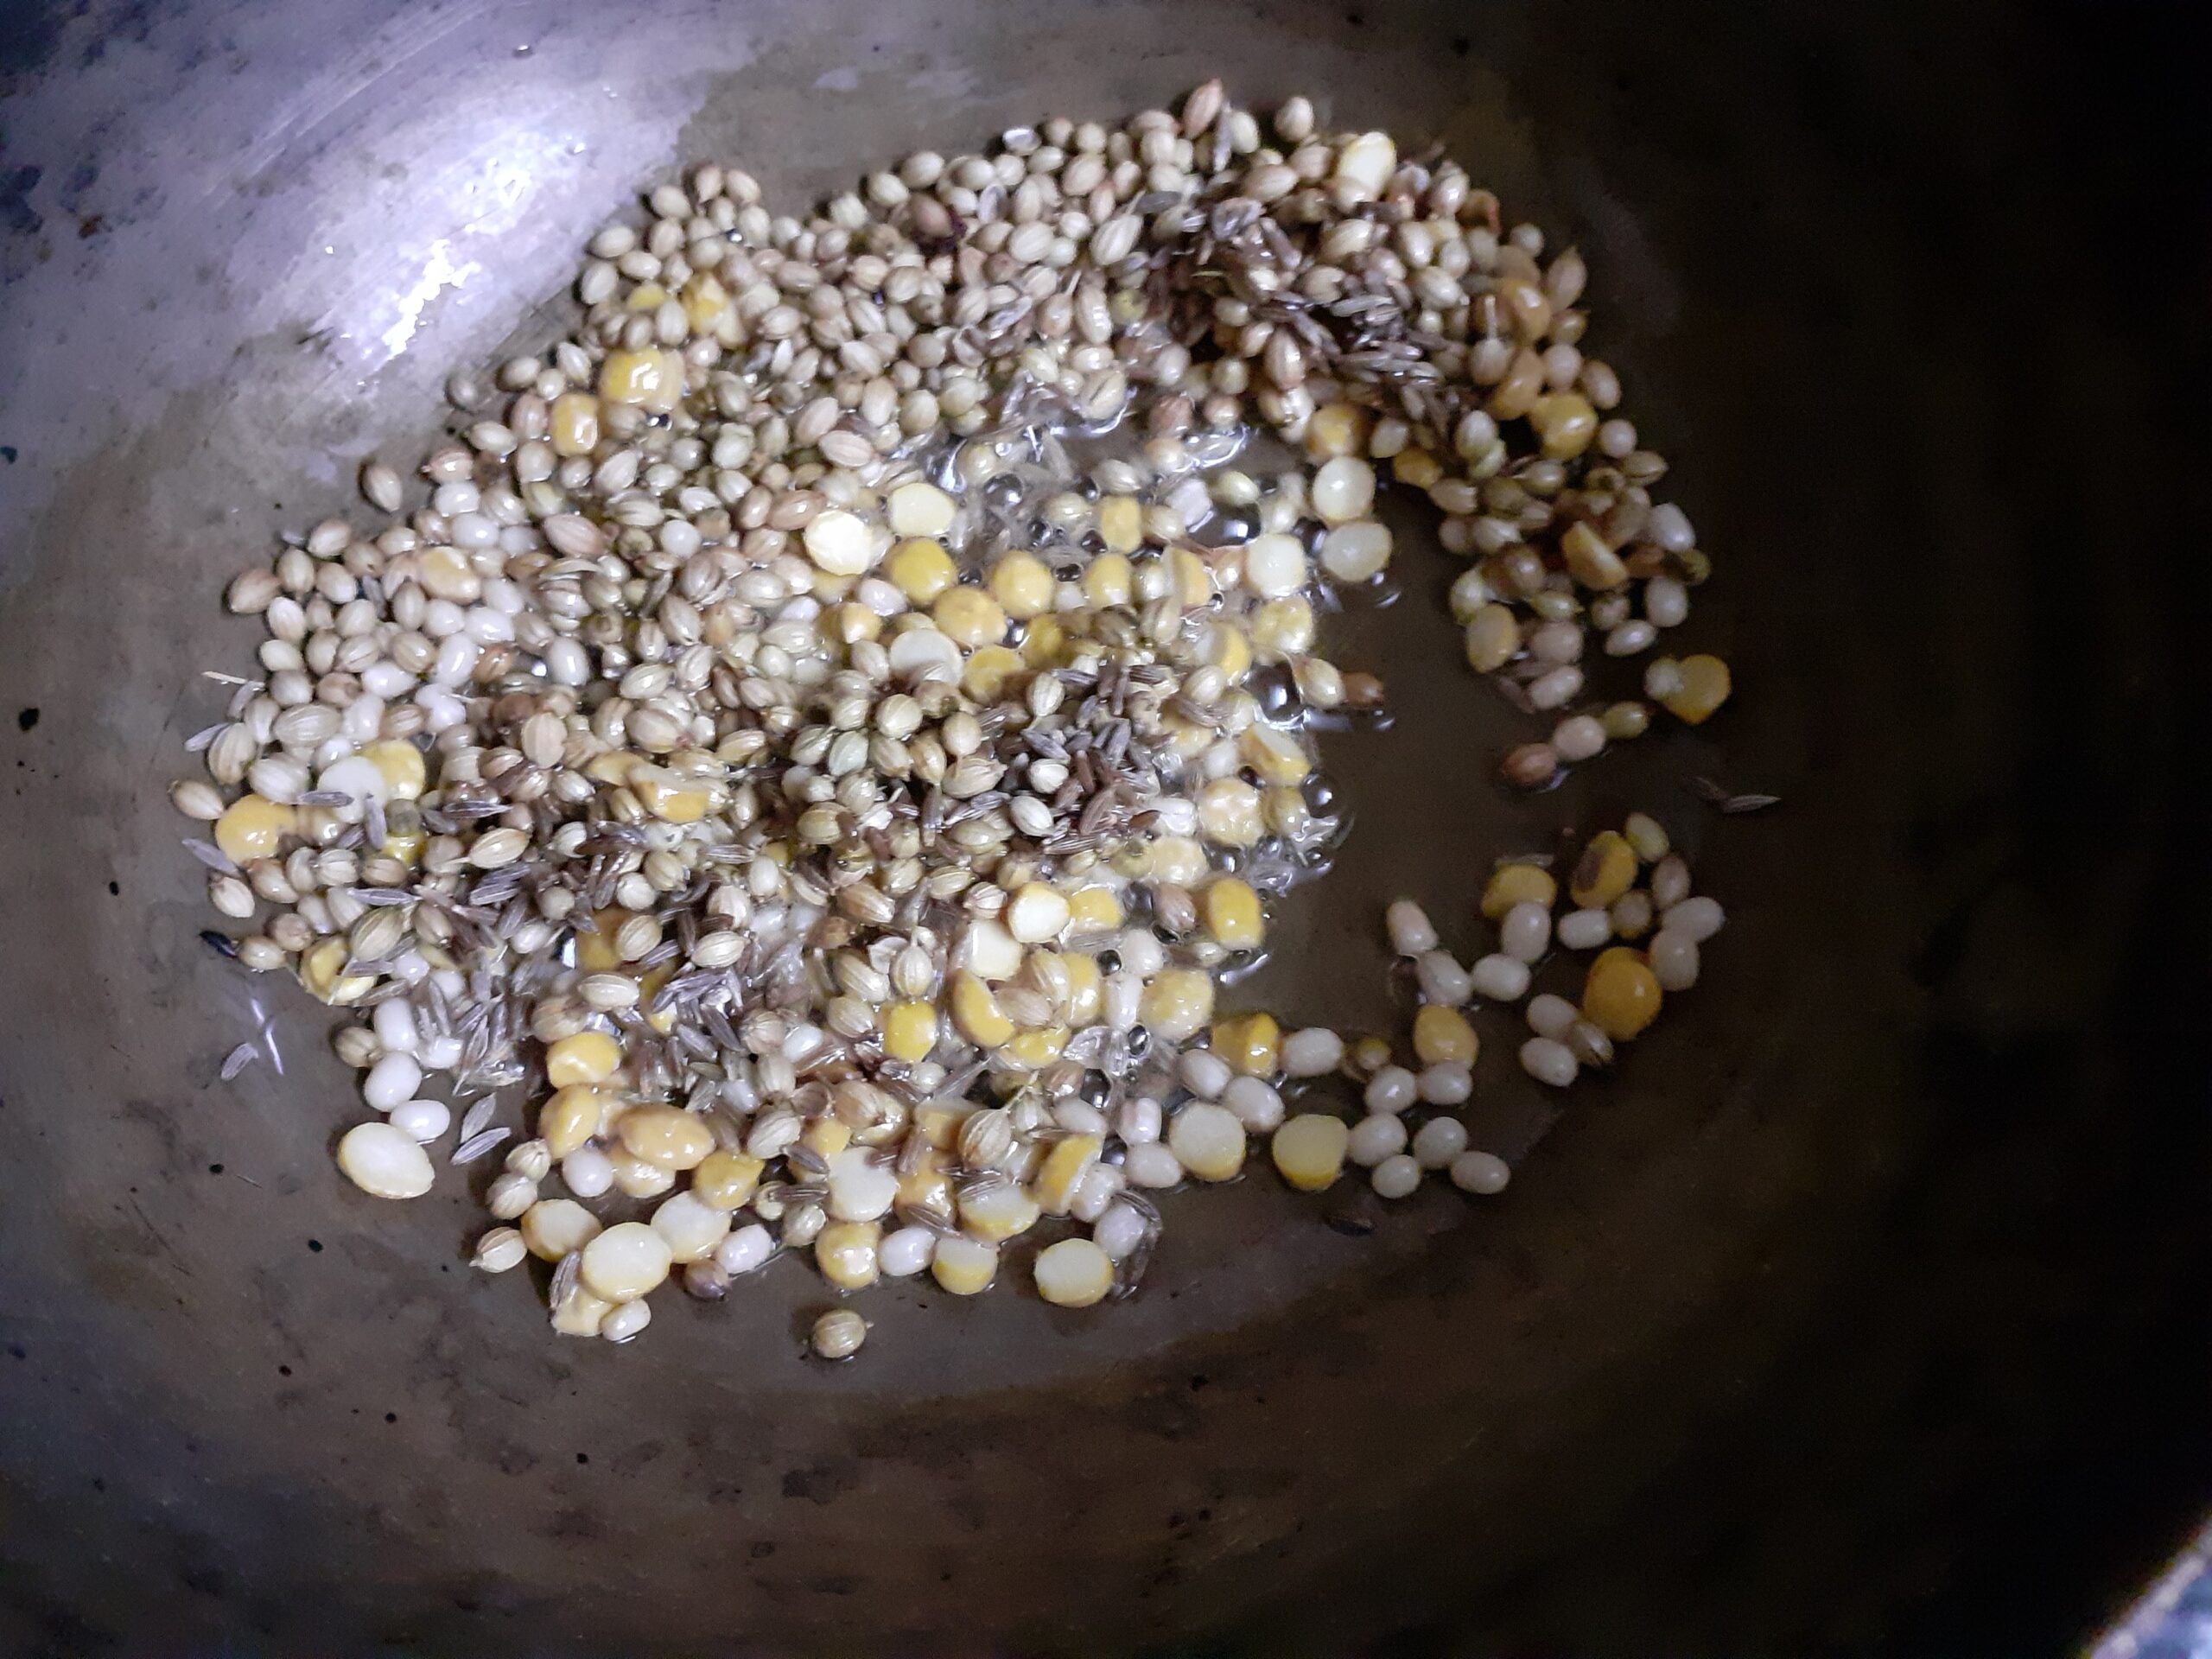
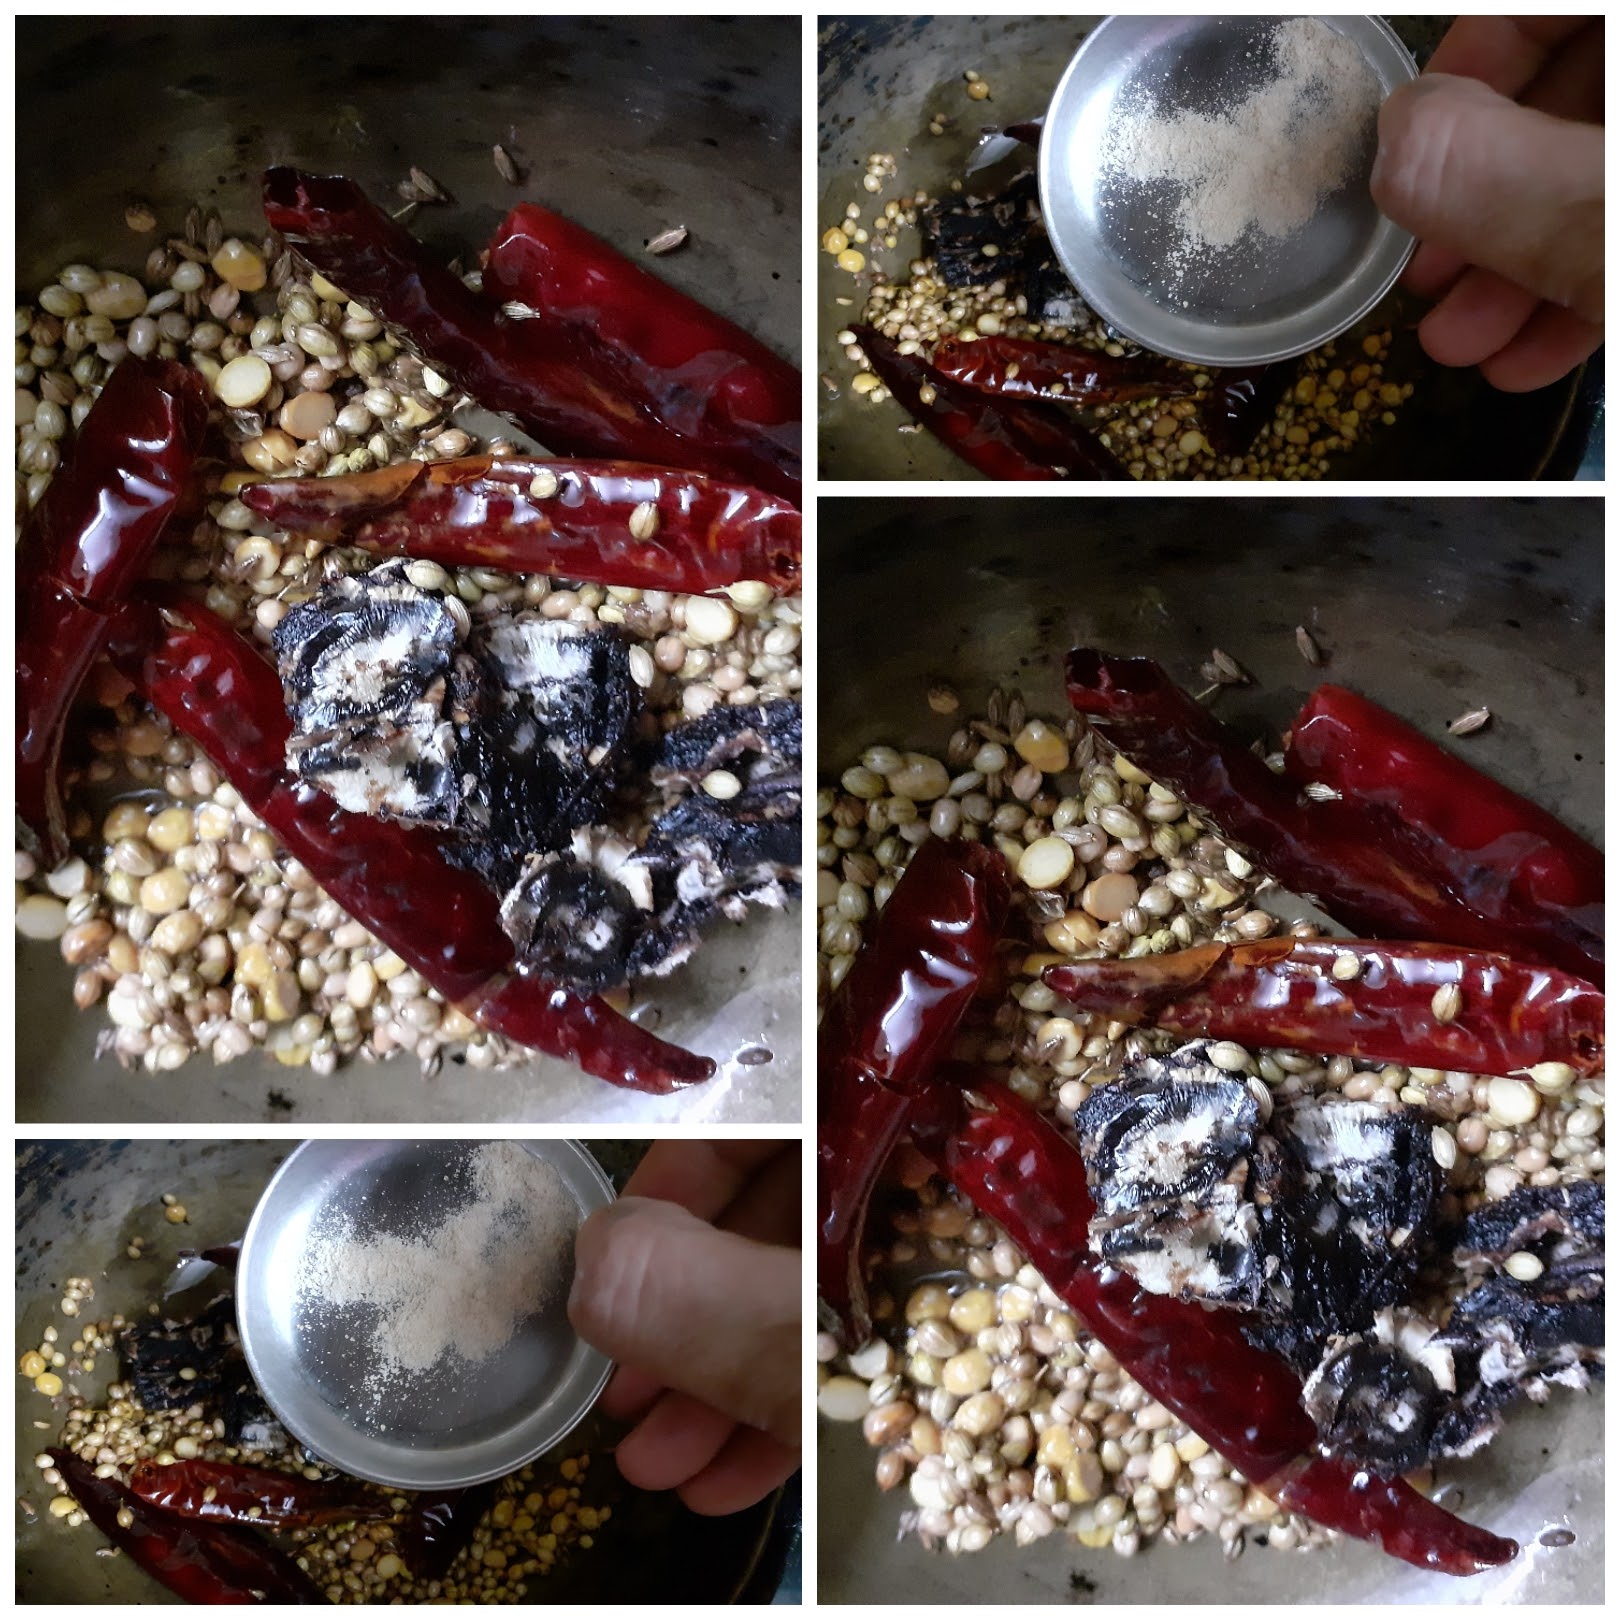
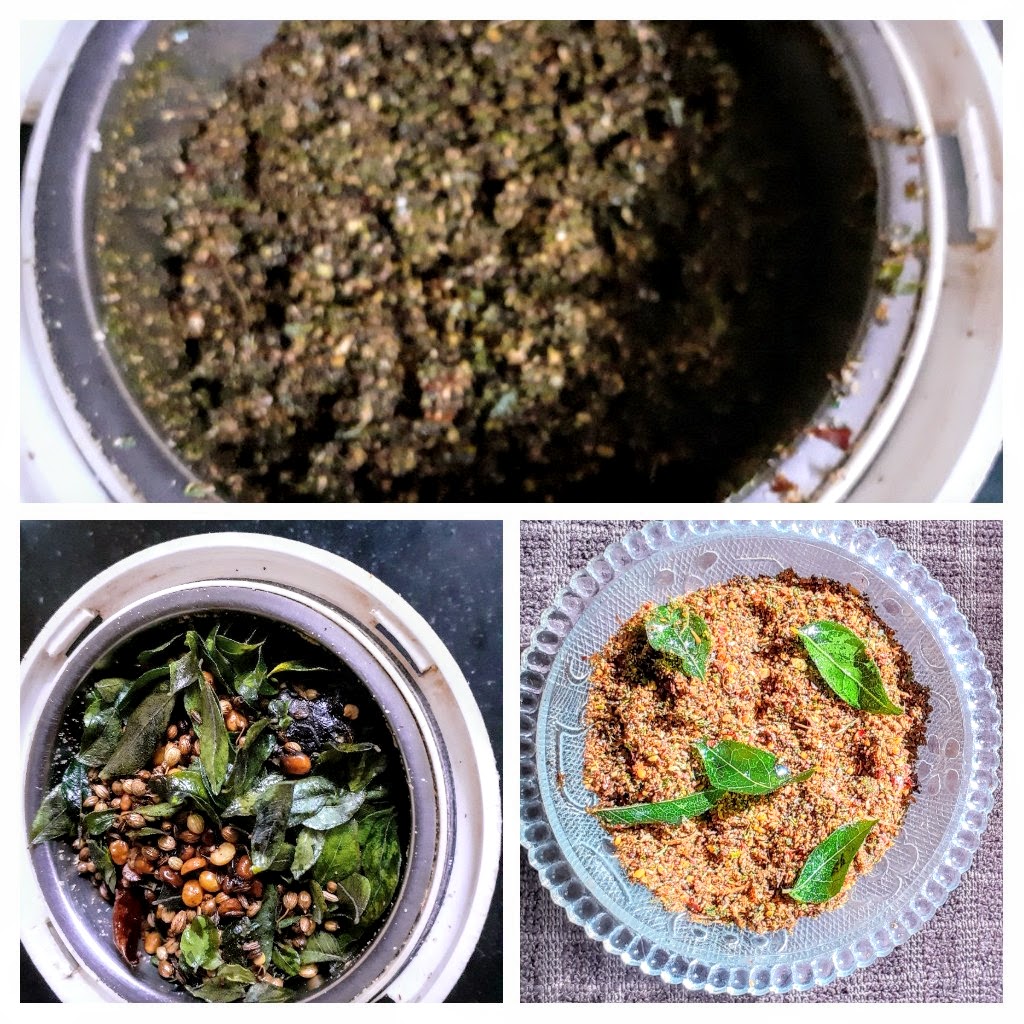
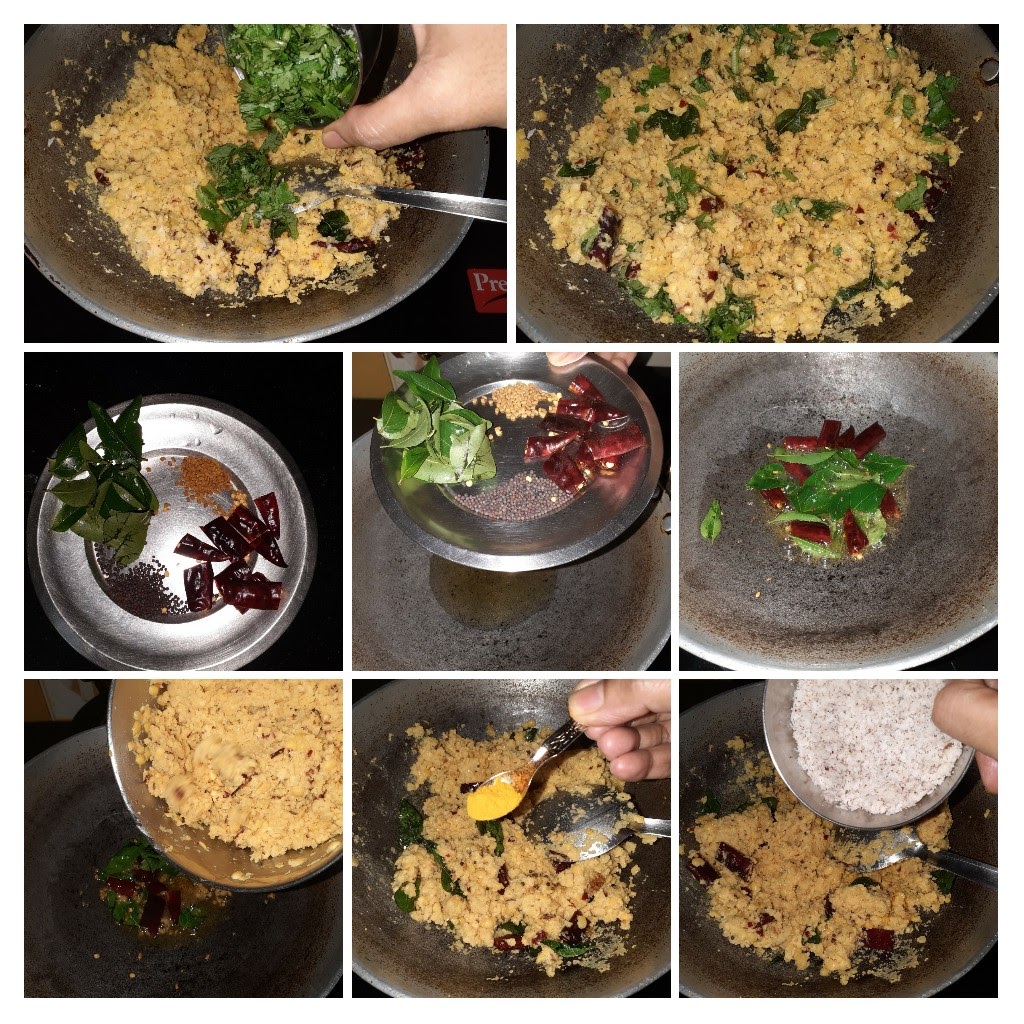
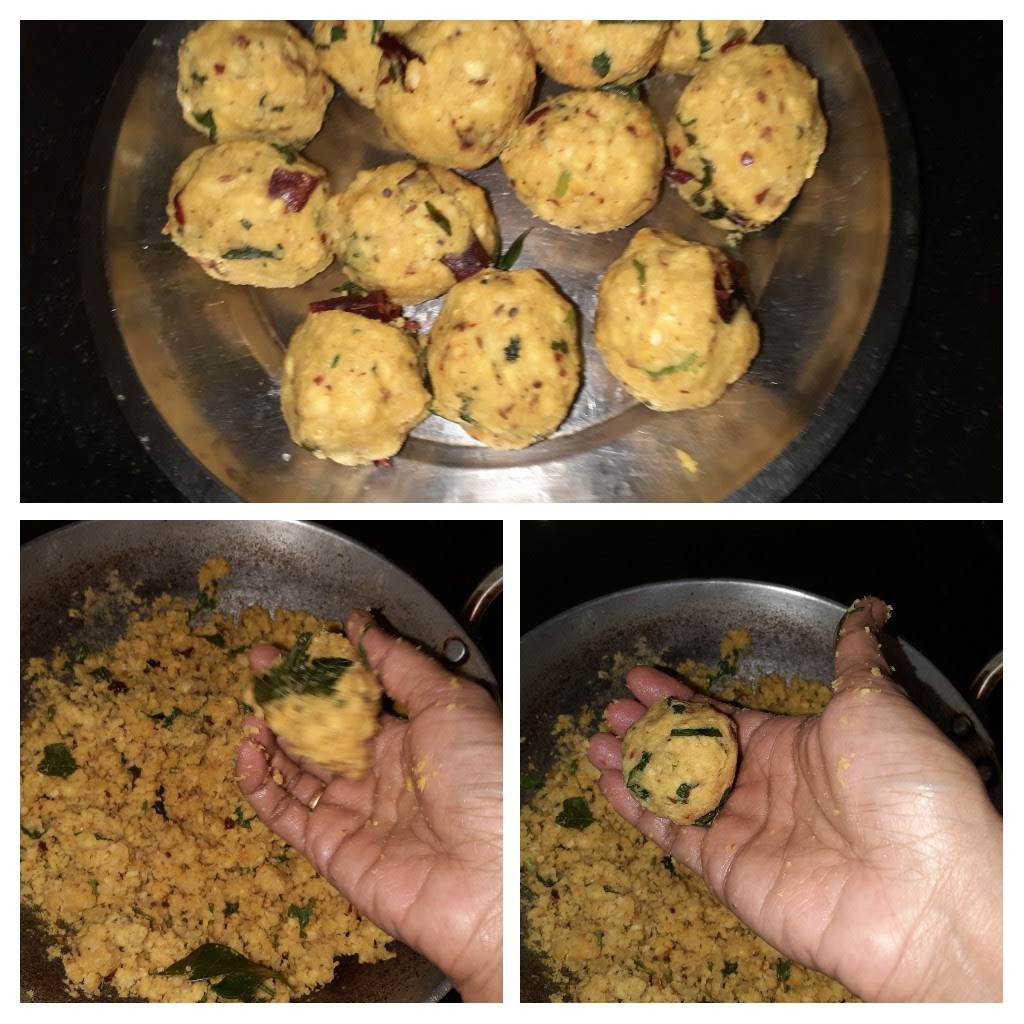
In a Kadai heat the oil and add the chana dal and urad dal and fry until they turn golden brown. Now add the coriander seeds and Cumin and continue to fry. When the coriander turns aromatic add the dry red chillies and continue to fry. Now add the tamarind followed by asafoetida and fry until the tamarind turn a little crisp, about 30 seconds. Finally, add the washed and pat dried curry leaves and saute for about a minute. Switch off the flame and cool all the roasted ingredients. On cooling, transfer them to the dry mixer jar and grind to a fine powder. Add salt and give another spin the mixture. The Karuvepilai powder is ready for storing. Enjoy with hot rice and ghee. One ball of rice with this powder helps maintain iron levels, good for hair growth and has many more benefits.
STEPWISE RECIPE FOLLOWS:
1. Assemble all ingredients.
2. Heat oil in a Kadai and add the urad dal and chana dal and fry until they turn light brown.
3. Add the coriander seeds and cumin seeds and continue to fry until the coriander seeds turn aromatic.
4. Now add the dry red chillies, tamarind, followed by the asafoetida and continue frying until the tamarind turns a little crisp.
5. Now add the washed and dried curry leaves and saute for a few minutes and put off the stove. Cool the roasted ingredients.
6. Put all of them in a dry grinder jar and grind to a fine powder. Add salt as required and the Kruvepilai powder is ready to store.
NOTES:
1. The curry leaves must be separated from the stalks, washed and pat dried.
2. Salt can be added while grinding or after grinding.
3. Store ina dry container.
4. More dry red chillies can be added for more spiciness.
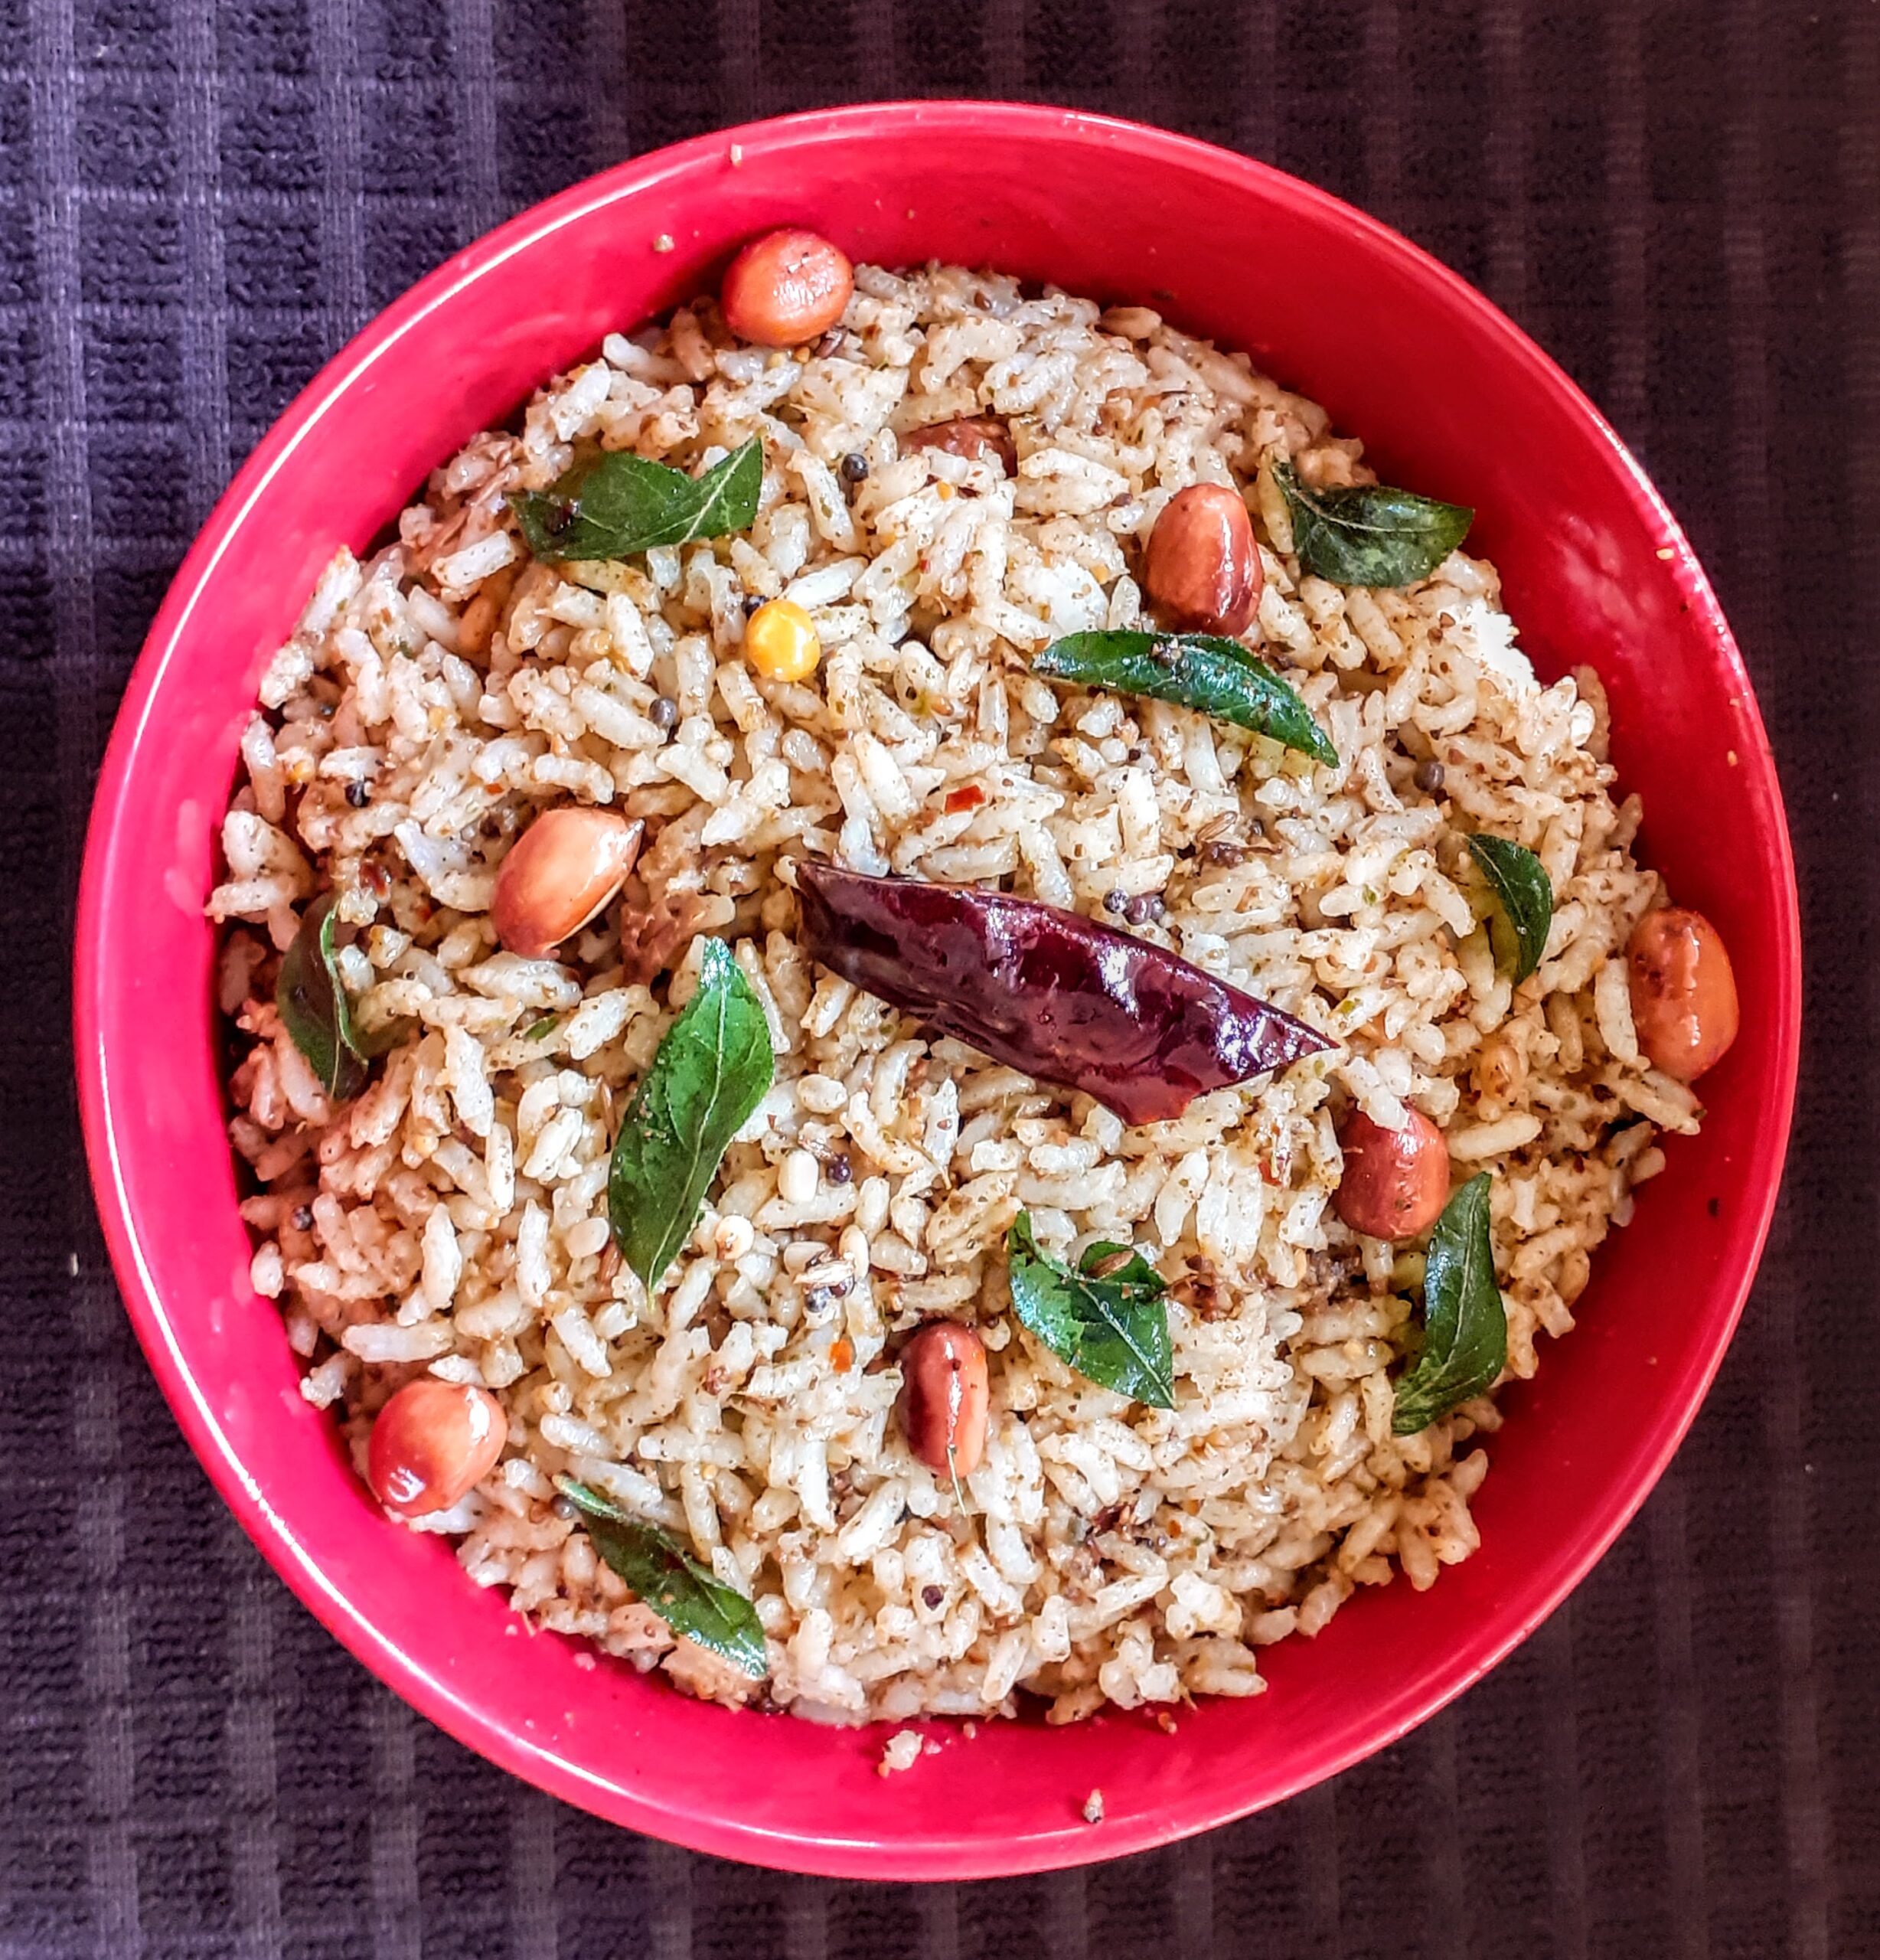
Karuvepilai Rice made from the Karuvepilai Podi
To make Karuvepilai Rice- In a Kadai heat oil. When hot add peanuts and fry until light brown. Now add mustard seeds 1 tsp, chana dal 1 tsp, Urad dal 1 tsp, followed by broken dry red chillies and aasafoetida. Fry until the dals turn light brown. Add Cooked rice made from 1 cup rice, followed by 2 to 3 tbsp of Karuvepilai Podi. Check and adjust salt. The yummy and healthy Karuvepilai Rice is ready. Enjoy. Bon Appetit.
If you tried this recipe and liked it please comment below. We would love to hear from you.
Want our recipes on your mail box? Leave your mail id in the homepage and we shall mail them to you.
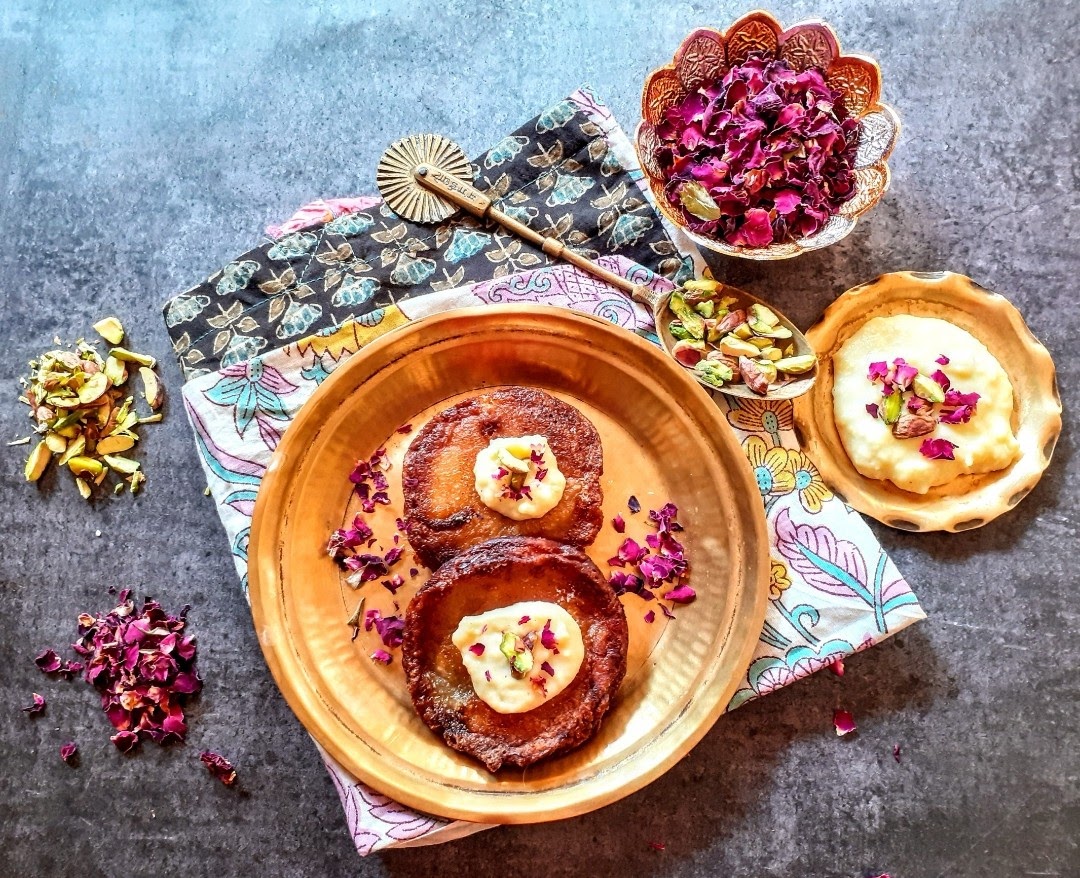
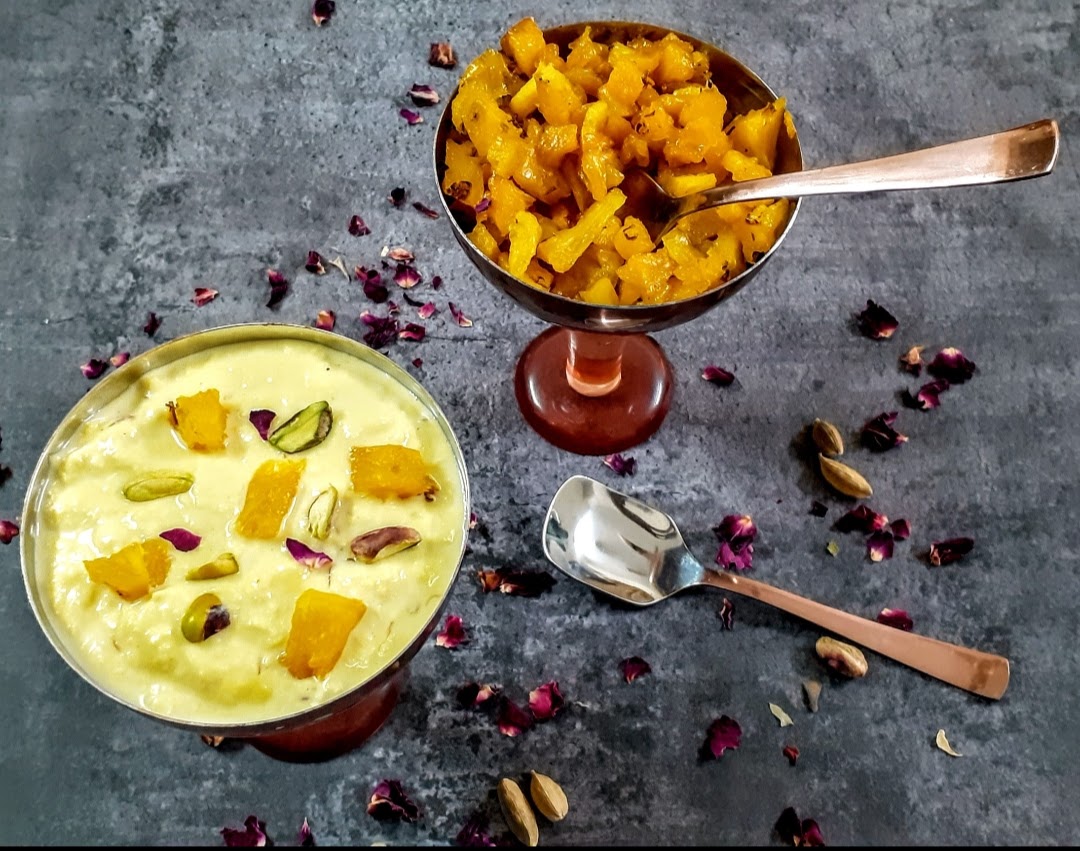
Malpua With Gulab Jamun Mix & Paneer
Malpua is a sweet dish close to my heart and I have taste both the Bengali version and the ones made in the north. I like both of them equally. My hands have been itching to try out this recipe that I thought of and scoured the internet to find if such a one exists. There are a hundred recipes of Malpua with Gulab Jamun mix, but what makes this one different is the use of Paneer(cottage cheese) and Wheat flour. Using Paneer makes the Malpuas soft and fluffy on the inside and wheat flour gives it a little crunch on the exterior.
This is the first time I’m trying out this version and I am happy that it turned out well. Sometimes our hunches do work, and this time the hunch was to use paneer with the mix. The Bengali version of Malpua uses Chenna or paneer along with refined flour though.
The sugar syrup here is a very thin one as it is only to keep the Malpuas moist. I have also made an instant Rabri, the recipe of which I am posting, but I am not uploading the pictures as I couldn’t click any, since the Rabri here was made as an afterthought.
I have a Pineapple Rabri recipe here on the blog which you can refer to. This is the authentic way of making Rabri. Whereas what I have made with the Malpua is a shortcut one, which was made as an accompaniment with the Malpua.
Here is the recipe of Malpua from Gulab Jamun Mix-
PREP TIME: 10Mins COOK TIME: 30 Mins
TOTAL TIME: 40Mins COURSE: DESSERT/SWEET
CUISINE: INDIAN SERVINGS: 4
AUTHOR: Rajni Ram
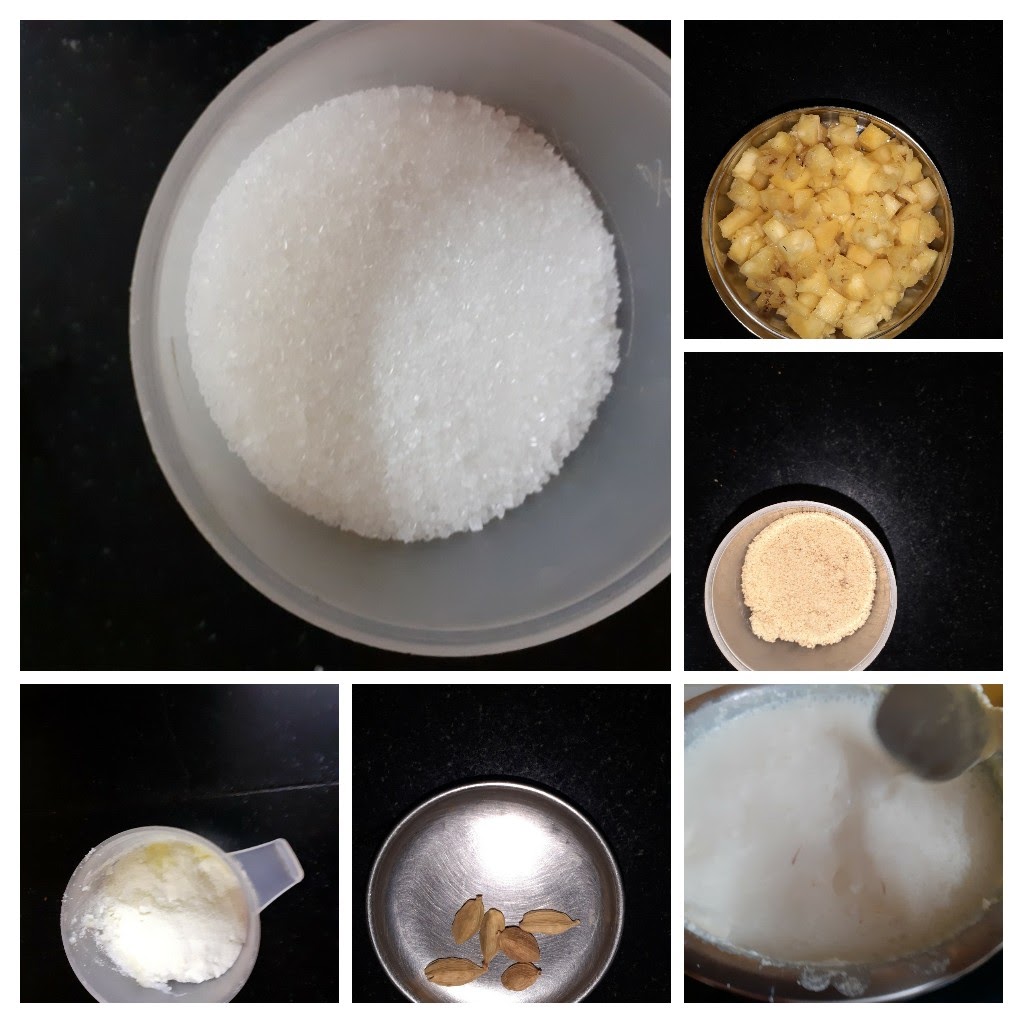
Ingredients:
Gulab Jamun Mix 1 cup
Paneer 100 gm minced
wheat flour 1/2 cup
Sugar 1 tbsp( for batter)
Milk 1 cup (or more if required)
Sugar for syrup 1 cup
Water for sugar syrup 1/2 cup
Elaichi/green cardamom 2 pods
Fennel seeds 2 pinches
Oil for frying
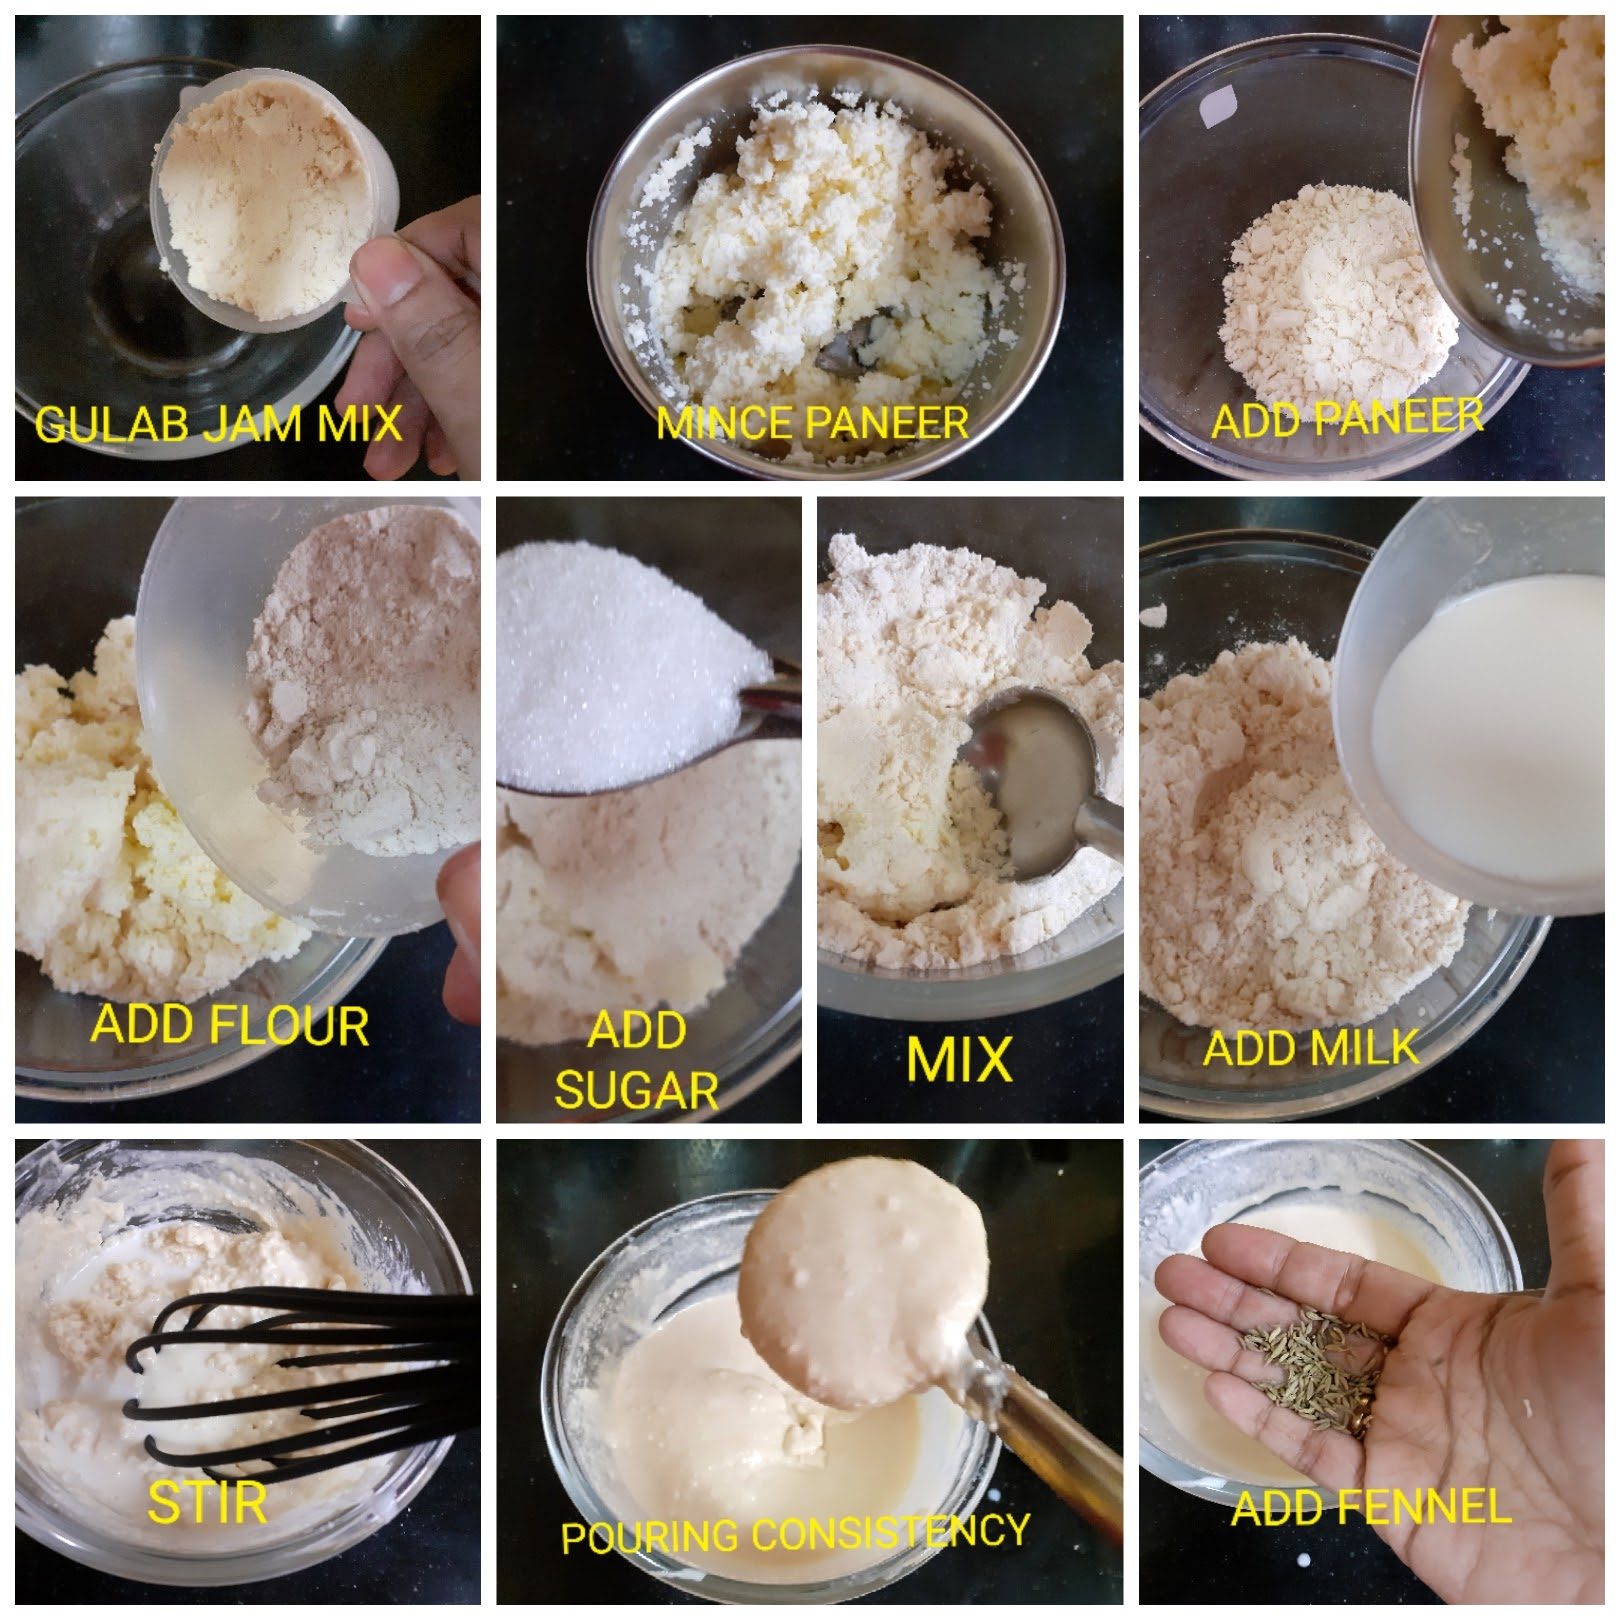
Directions for making the batter:
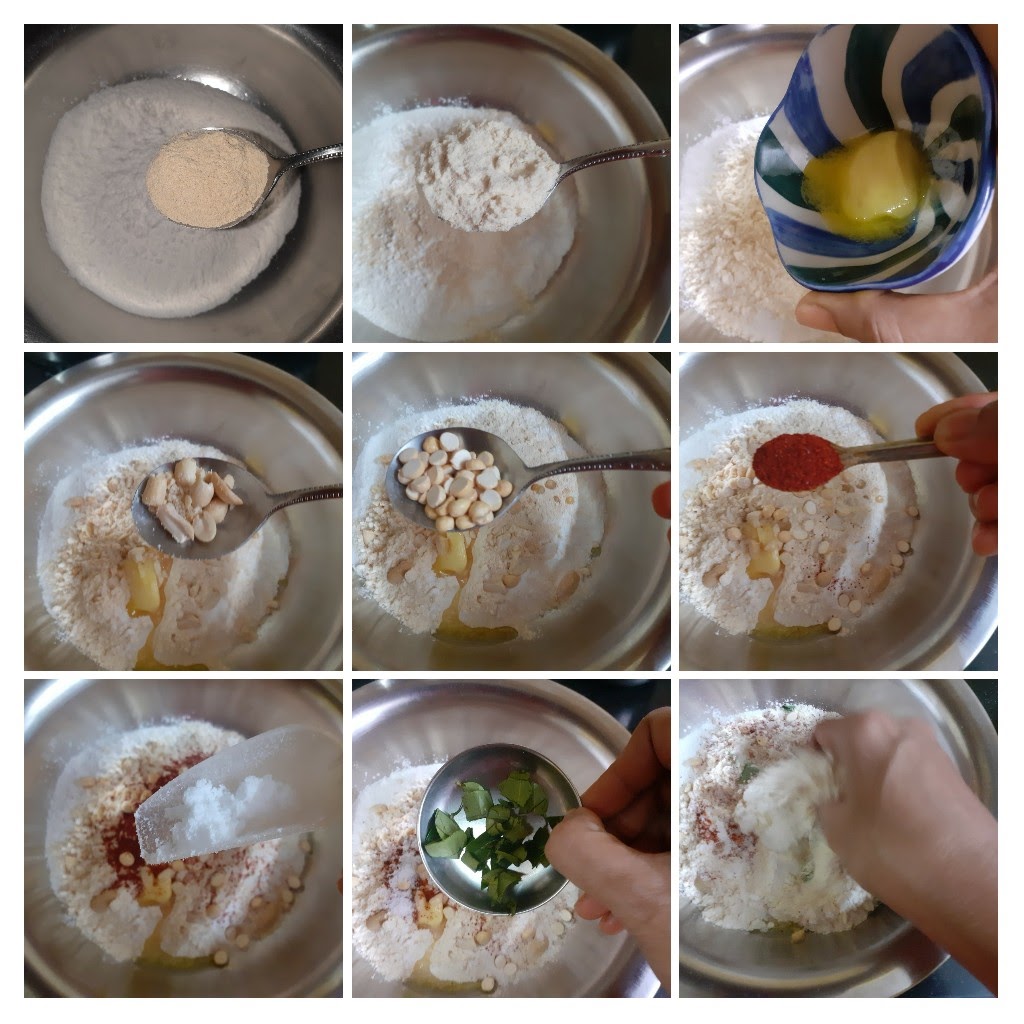
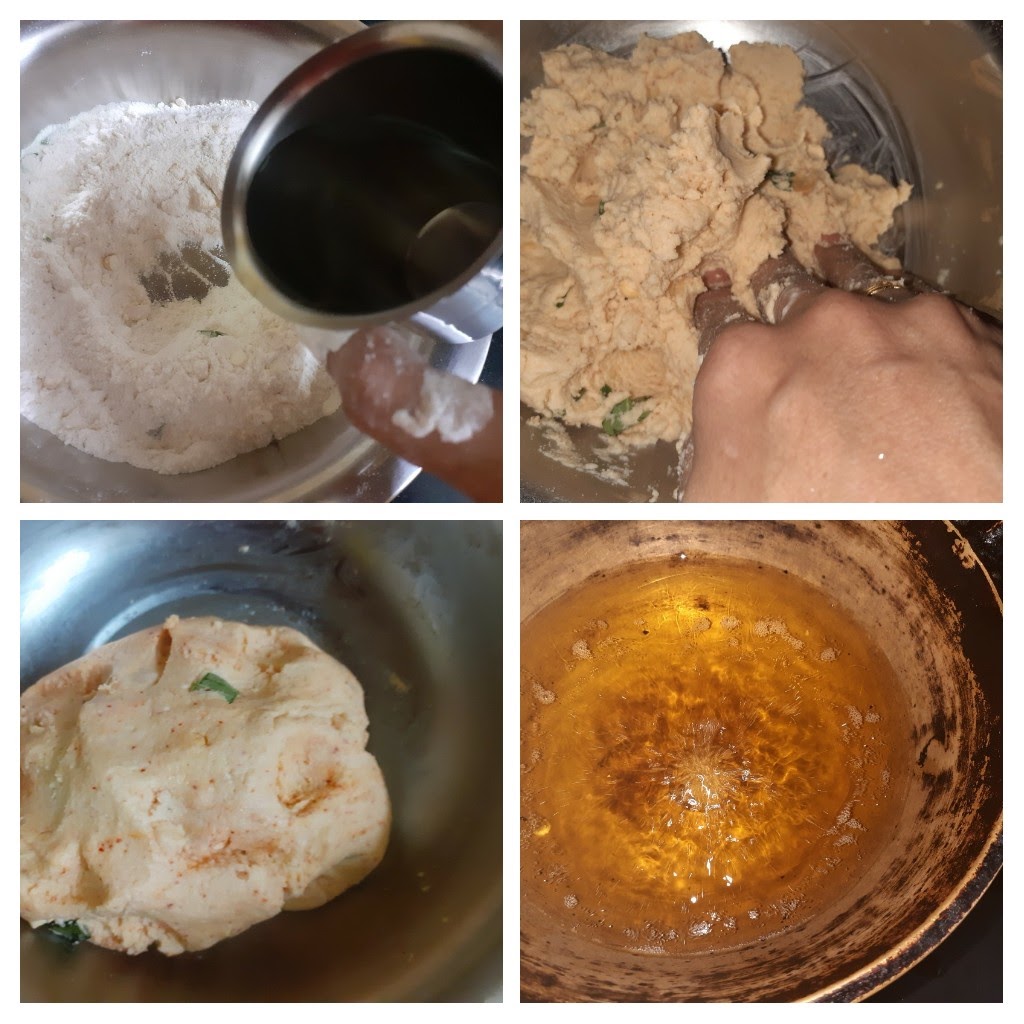
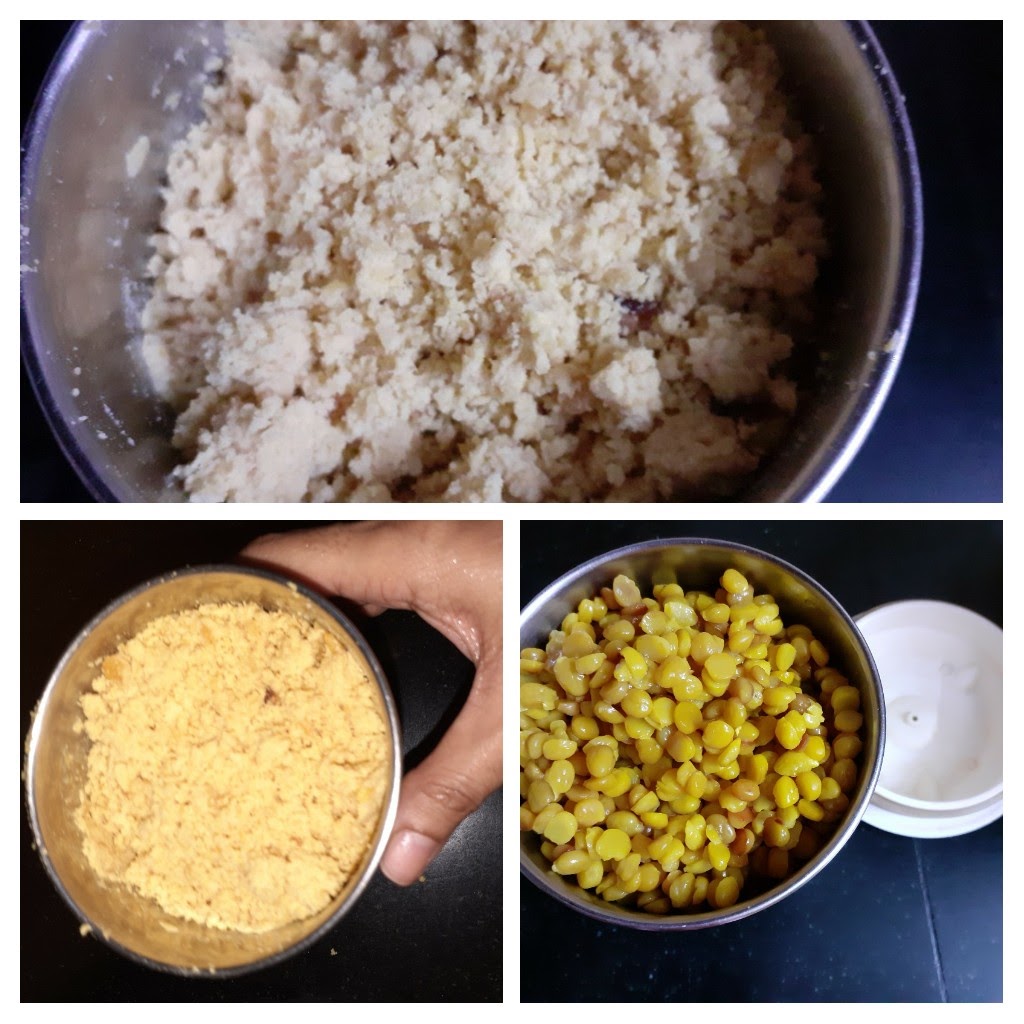
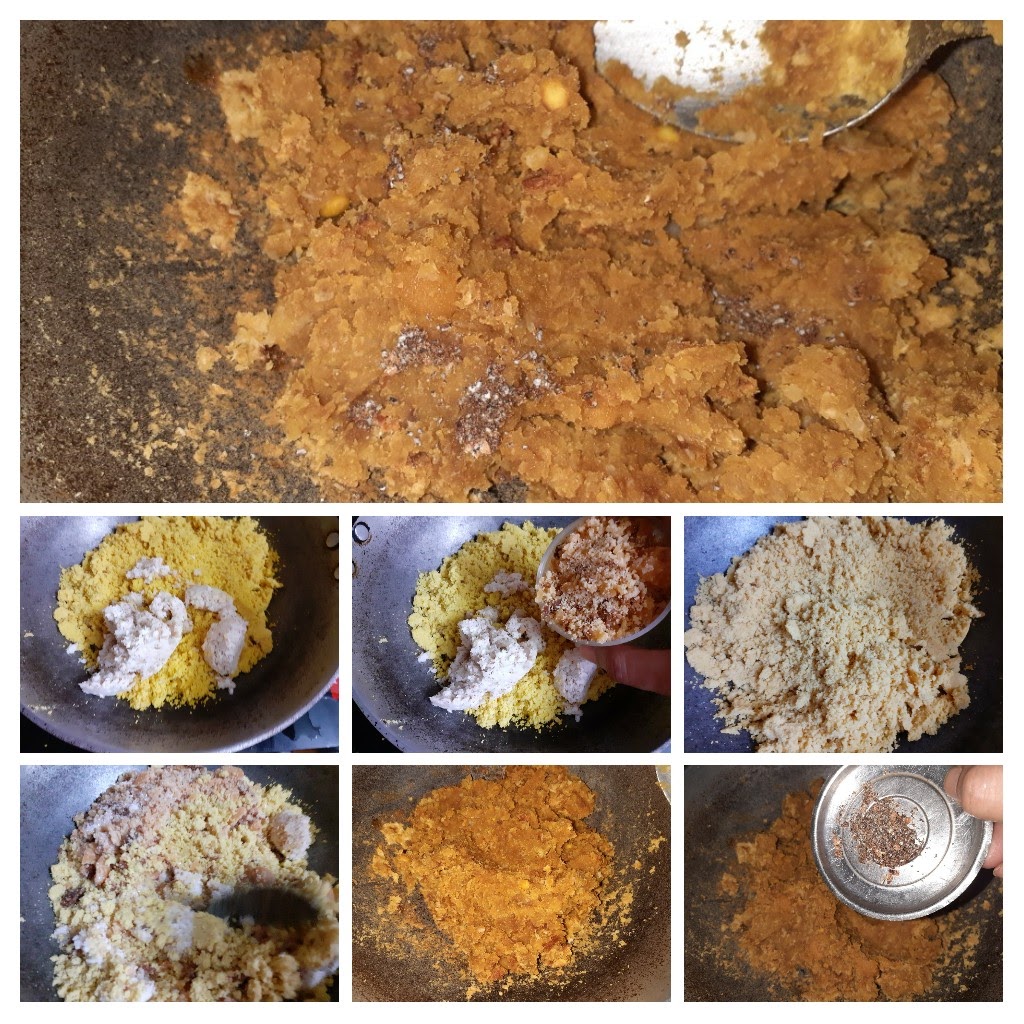
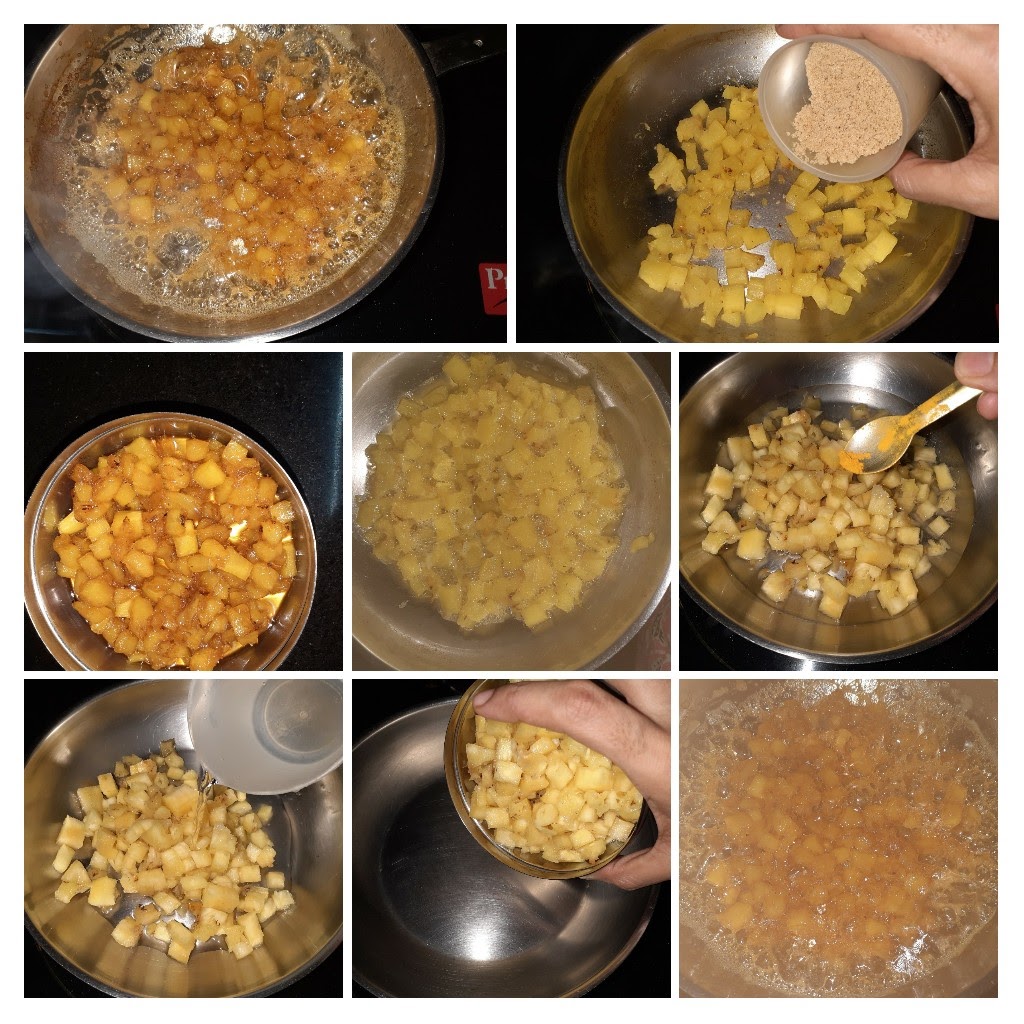
In a bowl take the Gulab Jamun Mix. Mince the paneer in a blender and add it to the Gulab Jamun mix in the bowl, add the wheat flour followed by the 1 tablespoon sugar. Nicely mix them all together to a dry mixture. Now adding milk little by little whisk to form a pouring consistency batter( like dosa batter or a little thicker). Now add the fennel seeds to the batter and mix.
Directions to make the sugar syrup:
In a pan/ flat vessel take one cup sugar, add 1/2 cup water, and put it on the flame. Stirring continuously so that the sugar dissolves, allow it to boil for 2 to 3 minutes, and put off the flame. String consistency of the syrup is not required in this recipe. Add 2 cardamom pods while boiling the syrup.
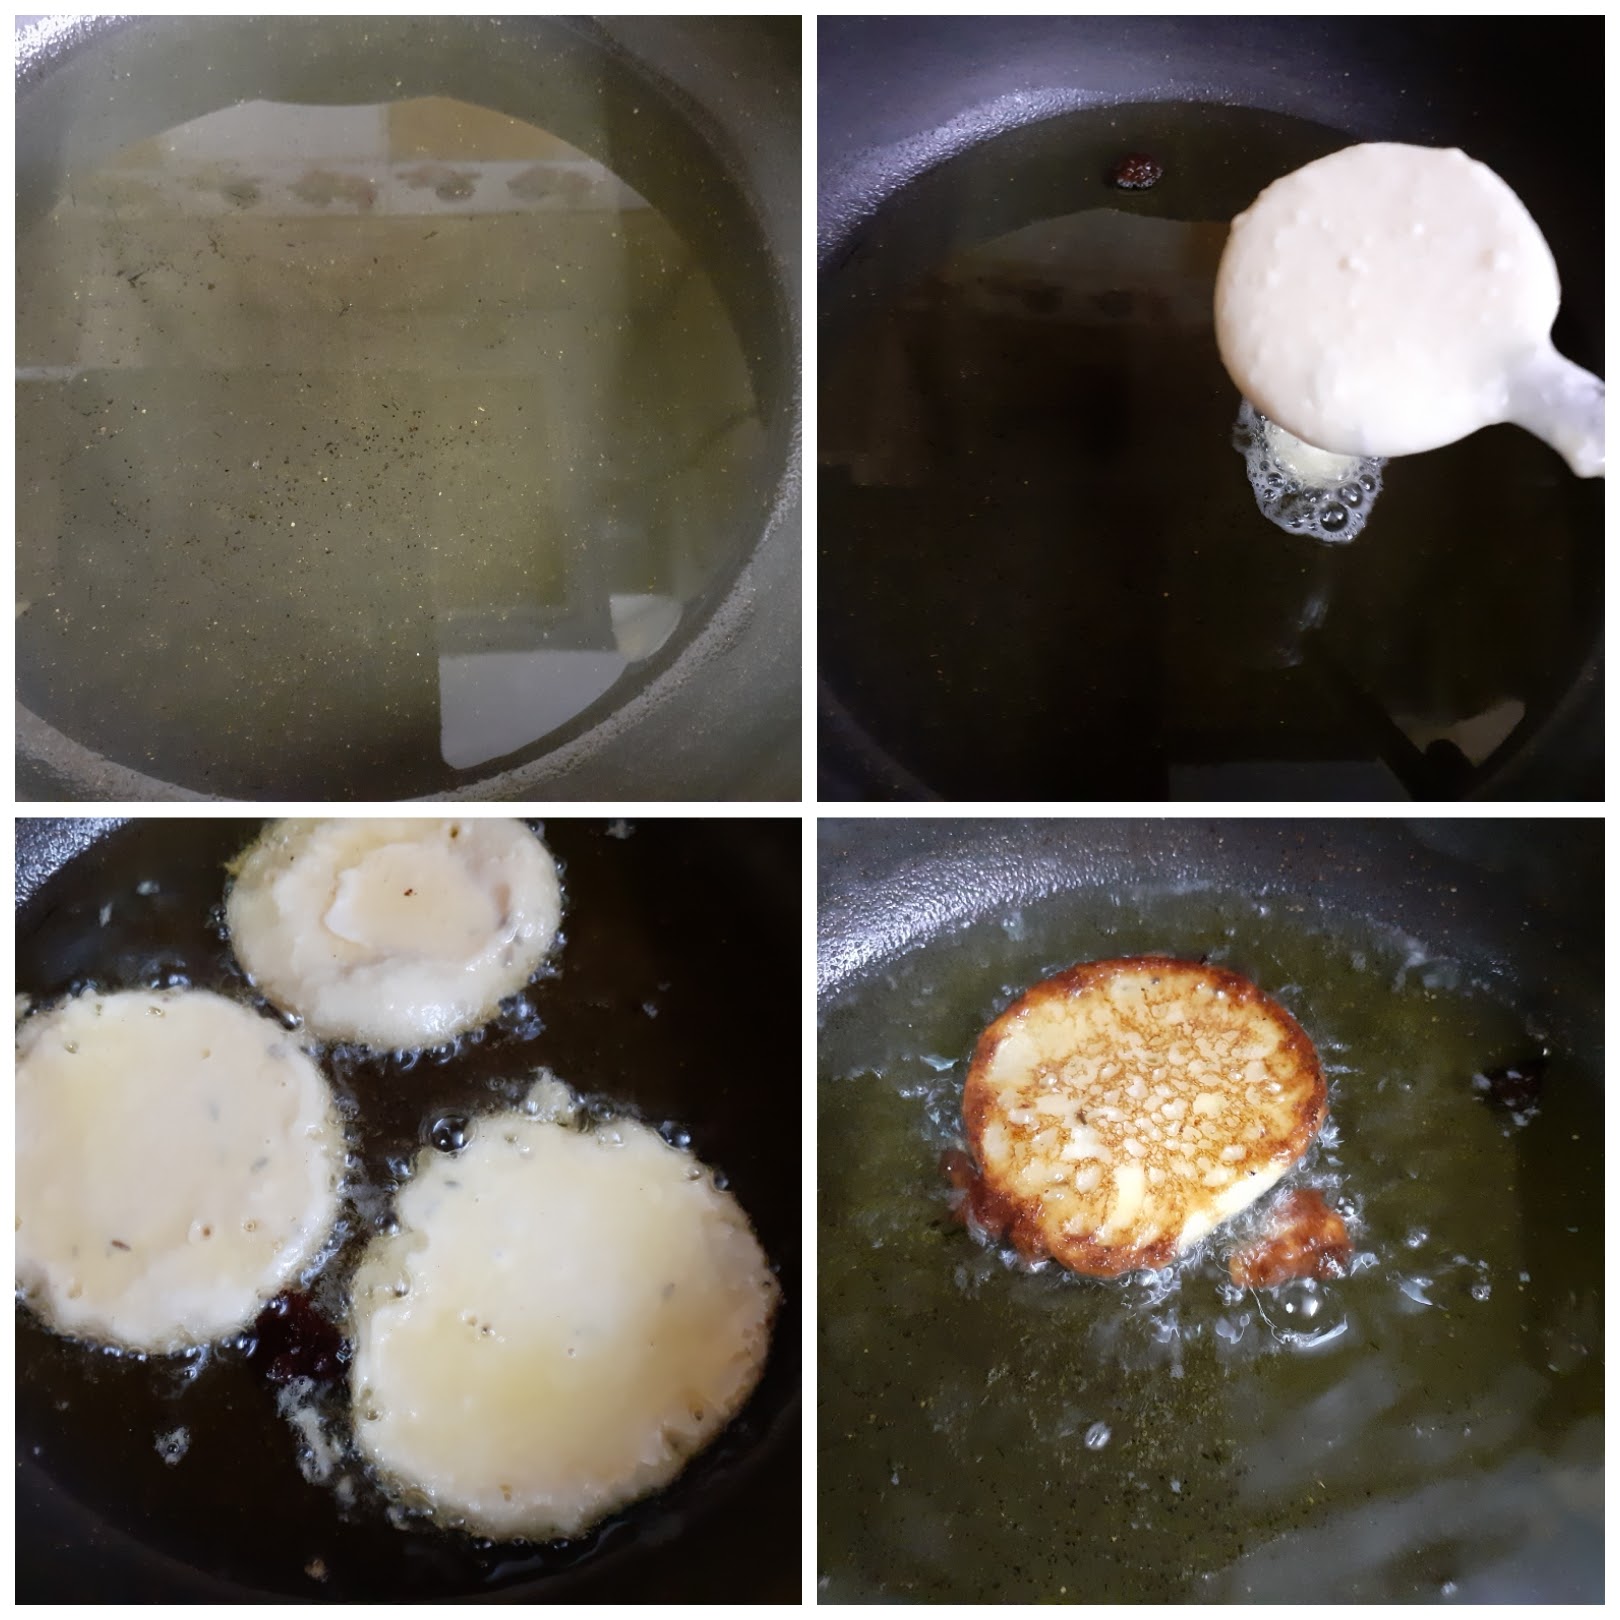
Directions for making the Malpua:
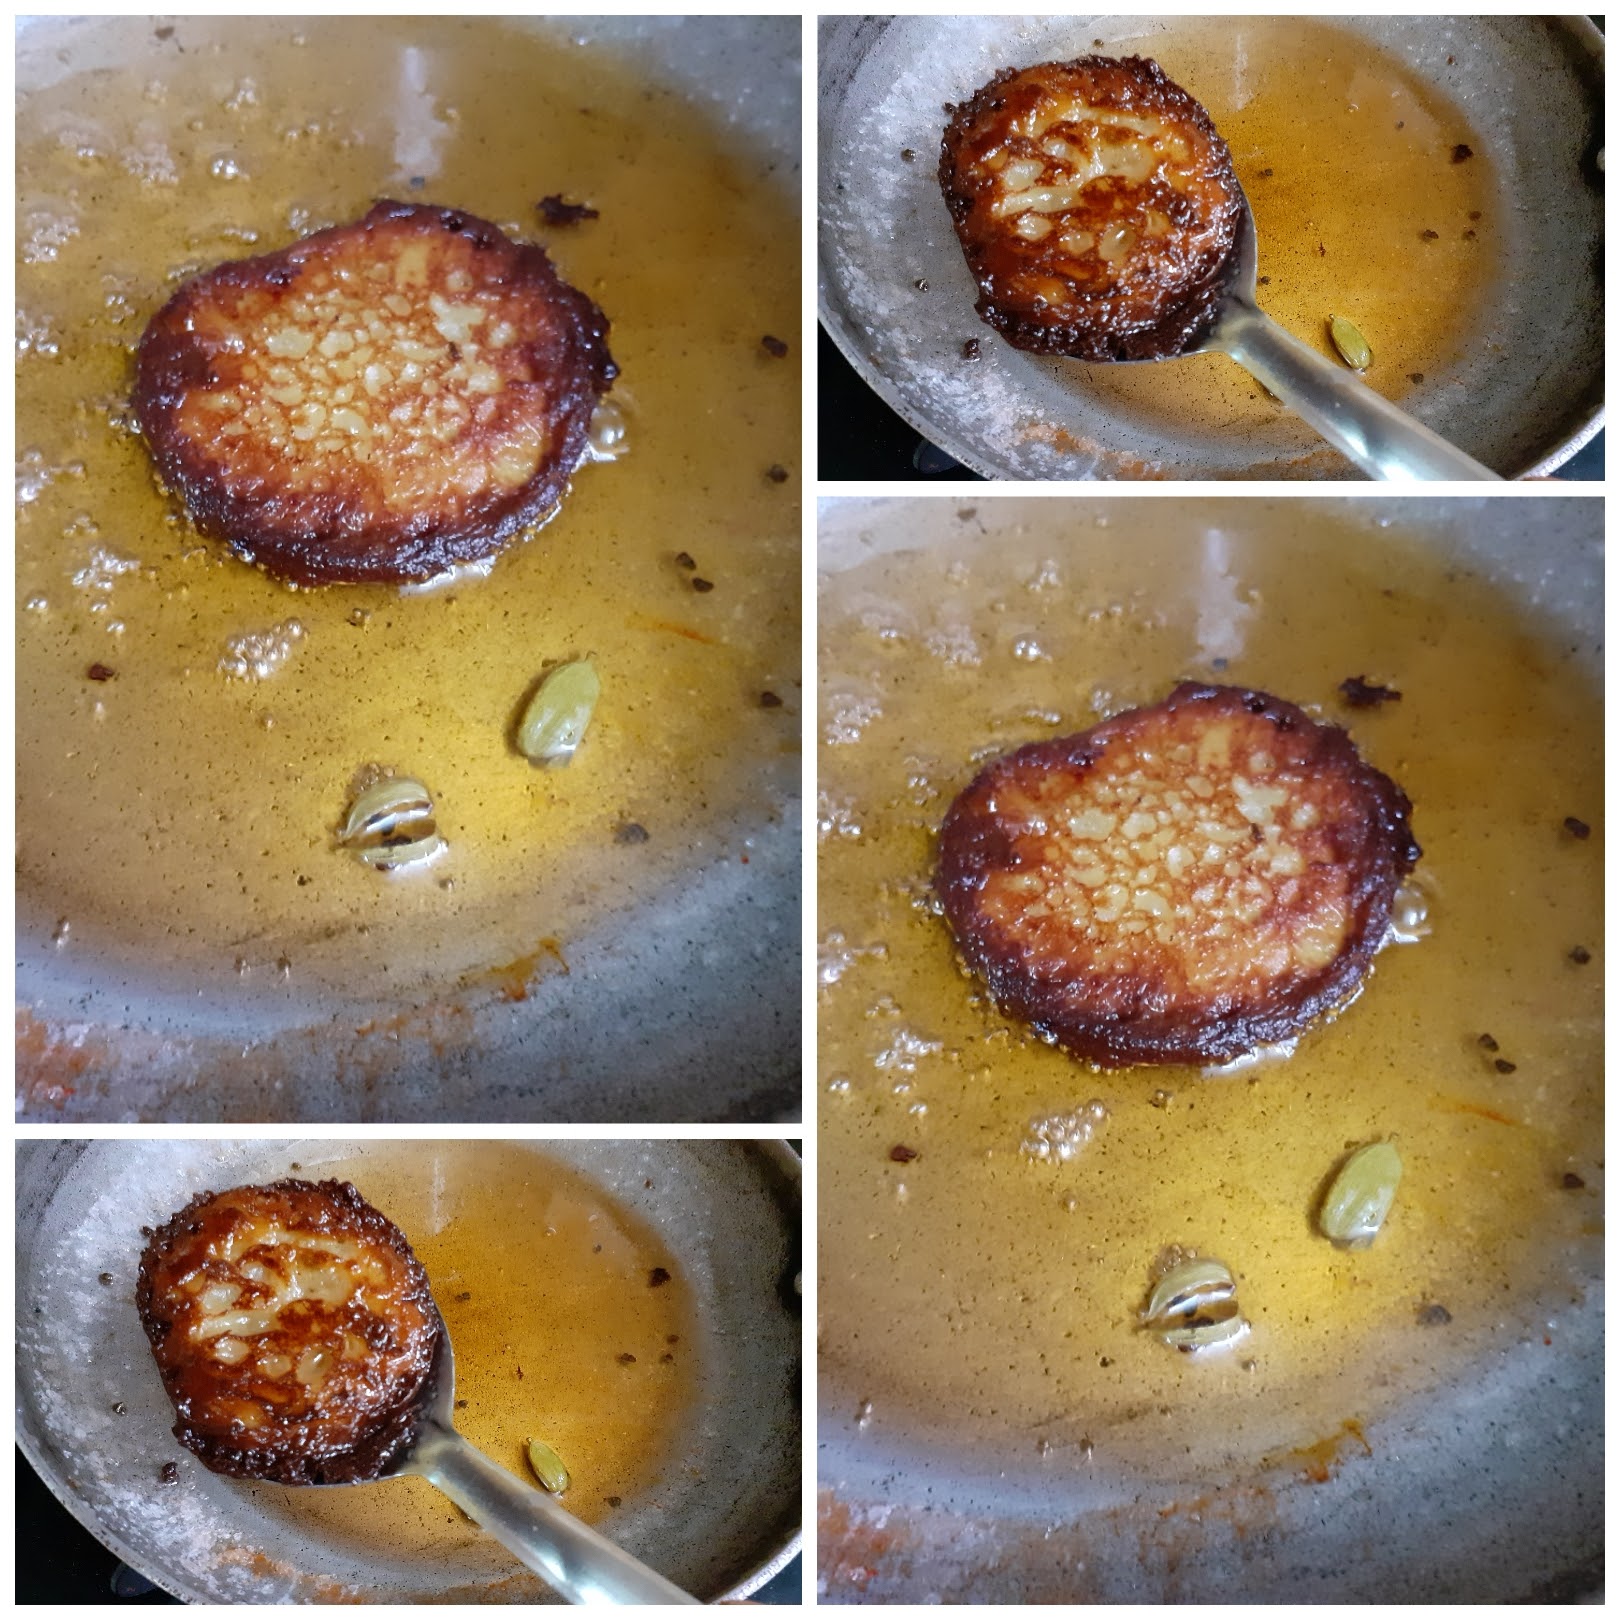
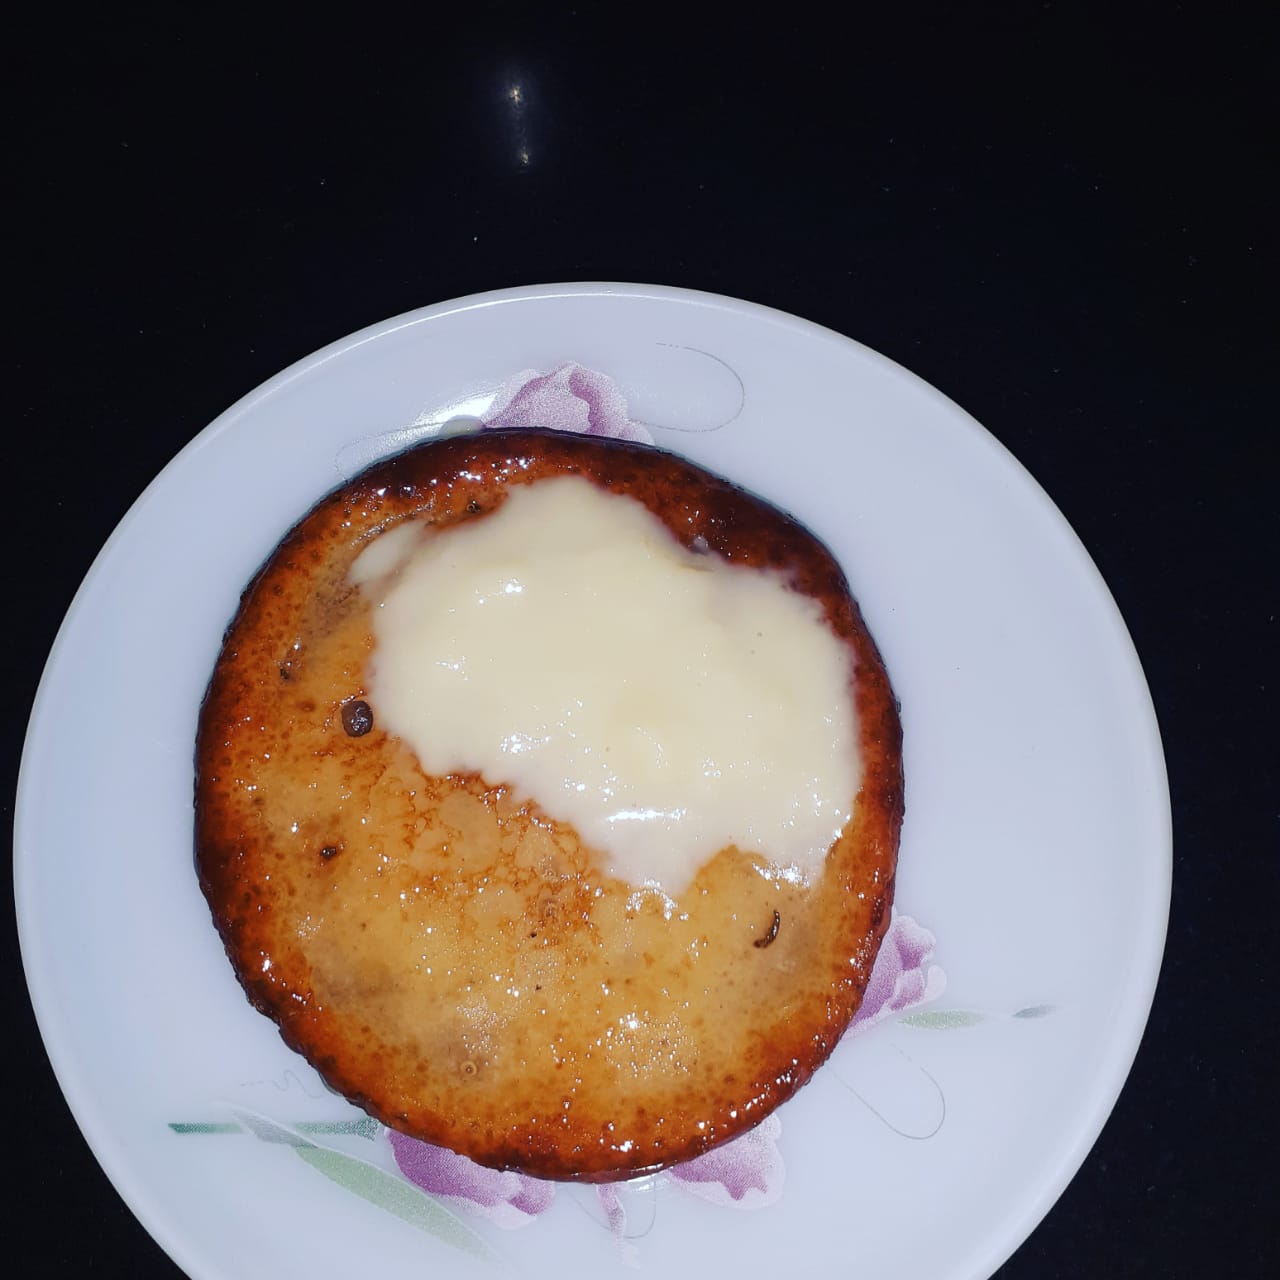
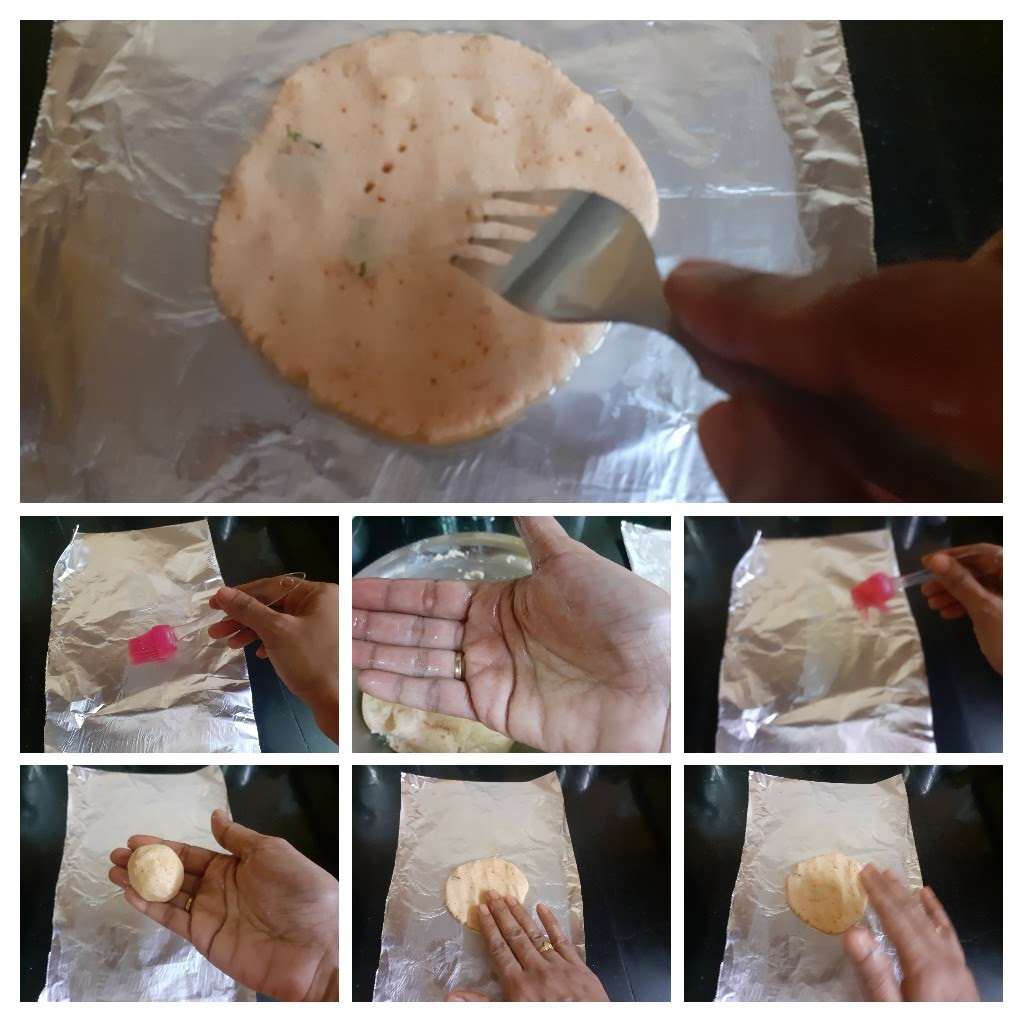
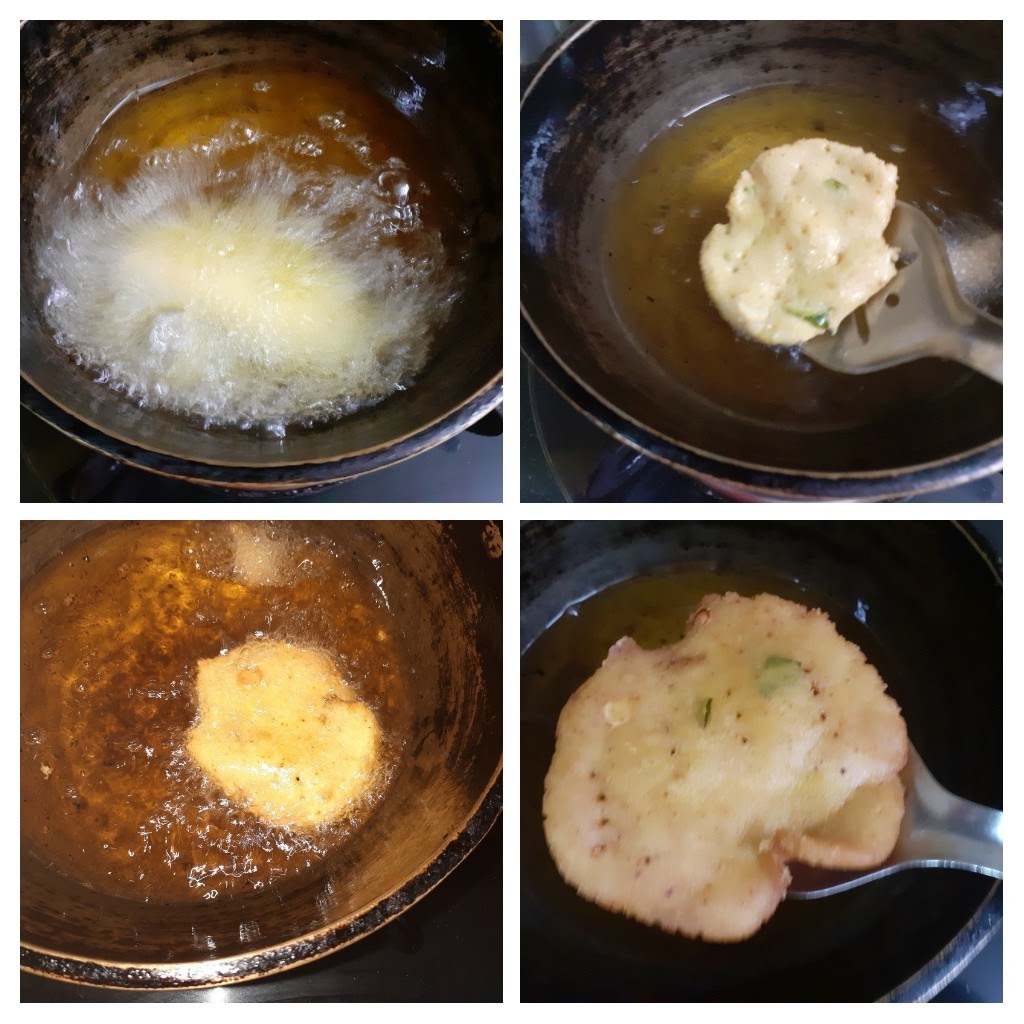
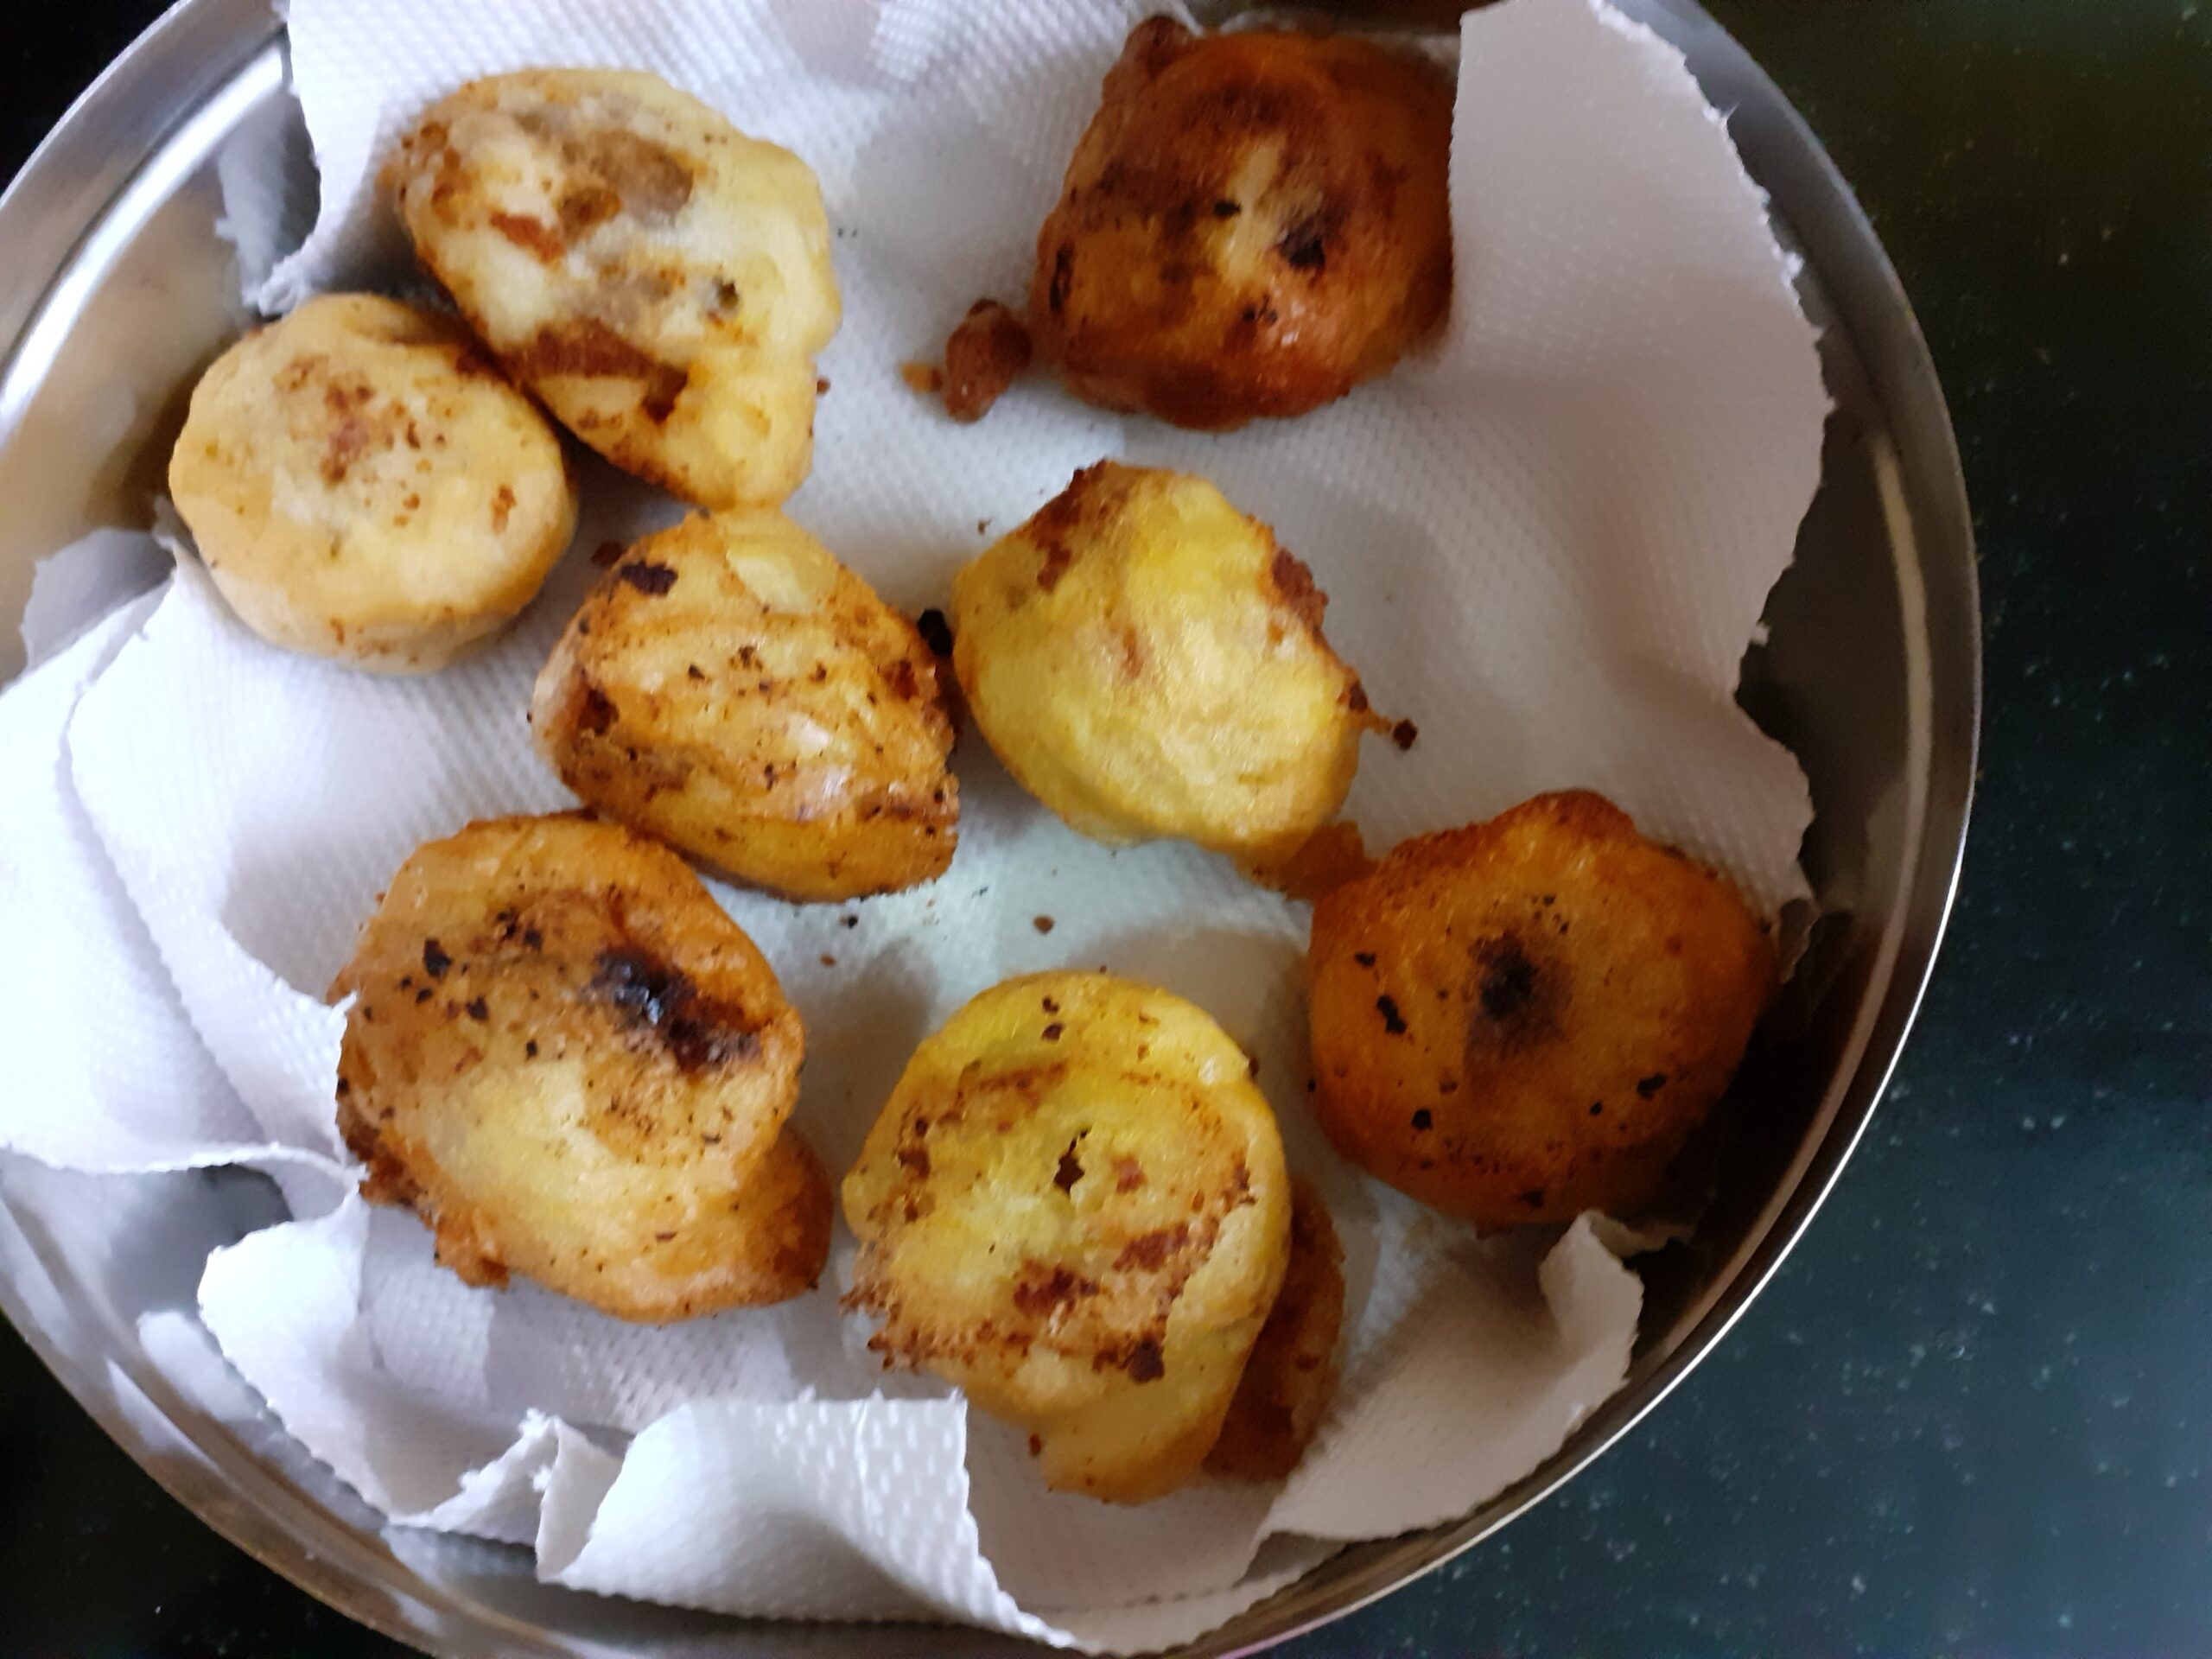
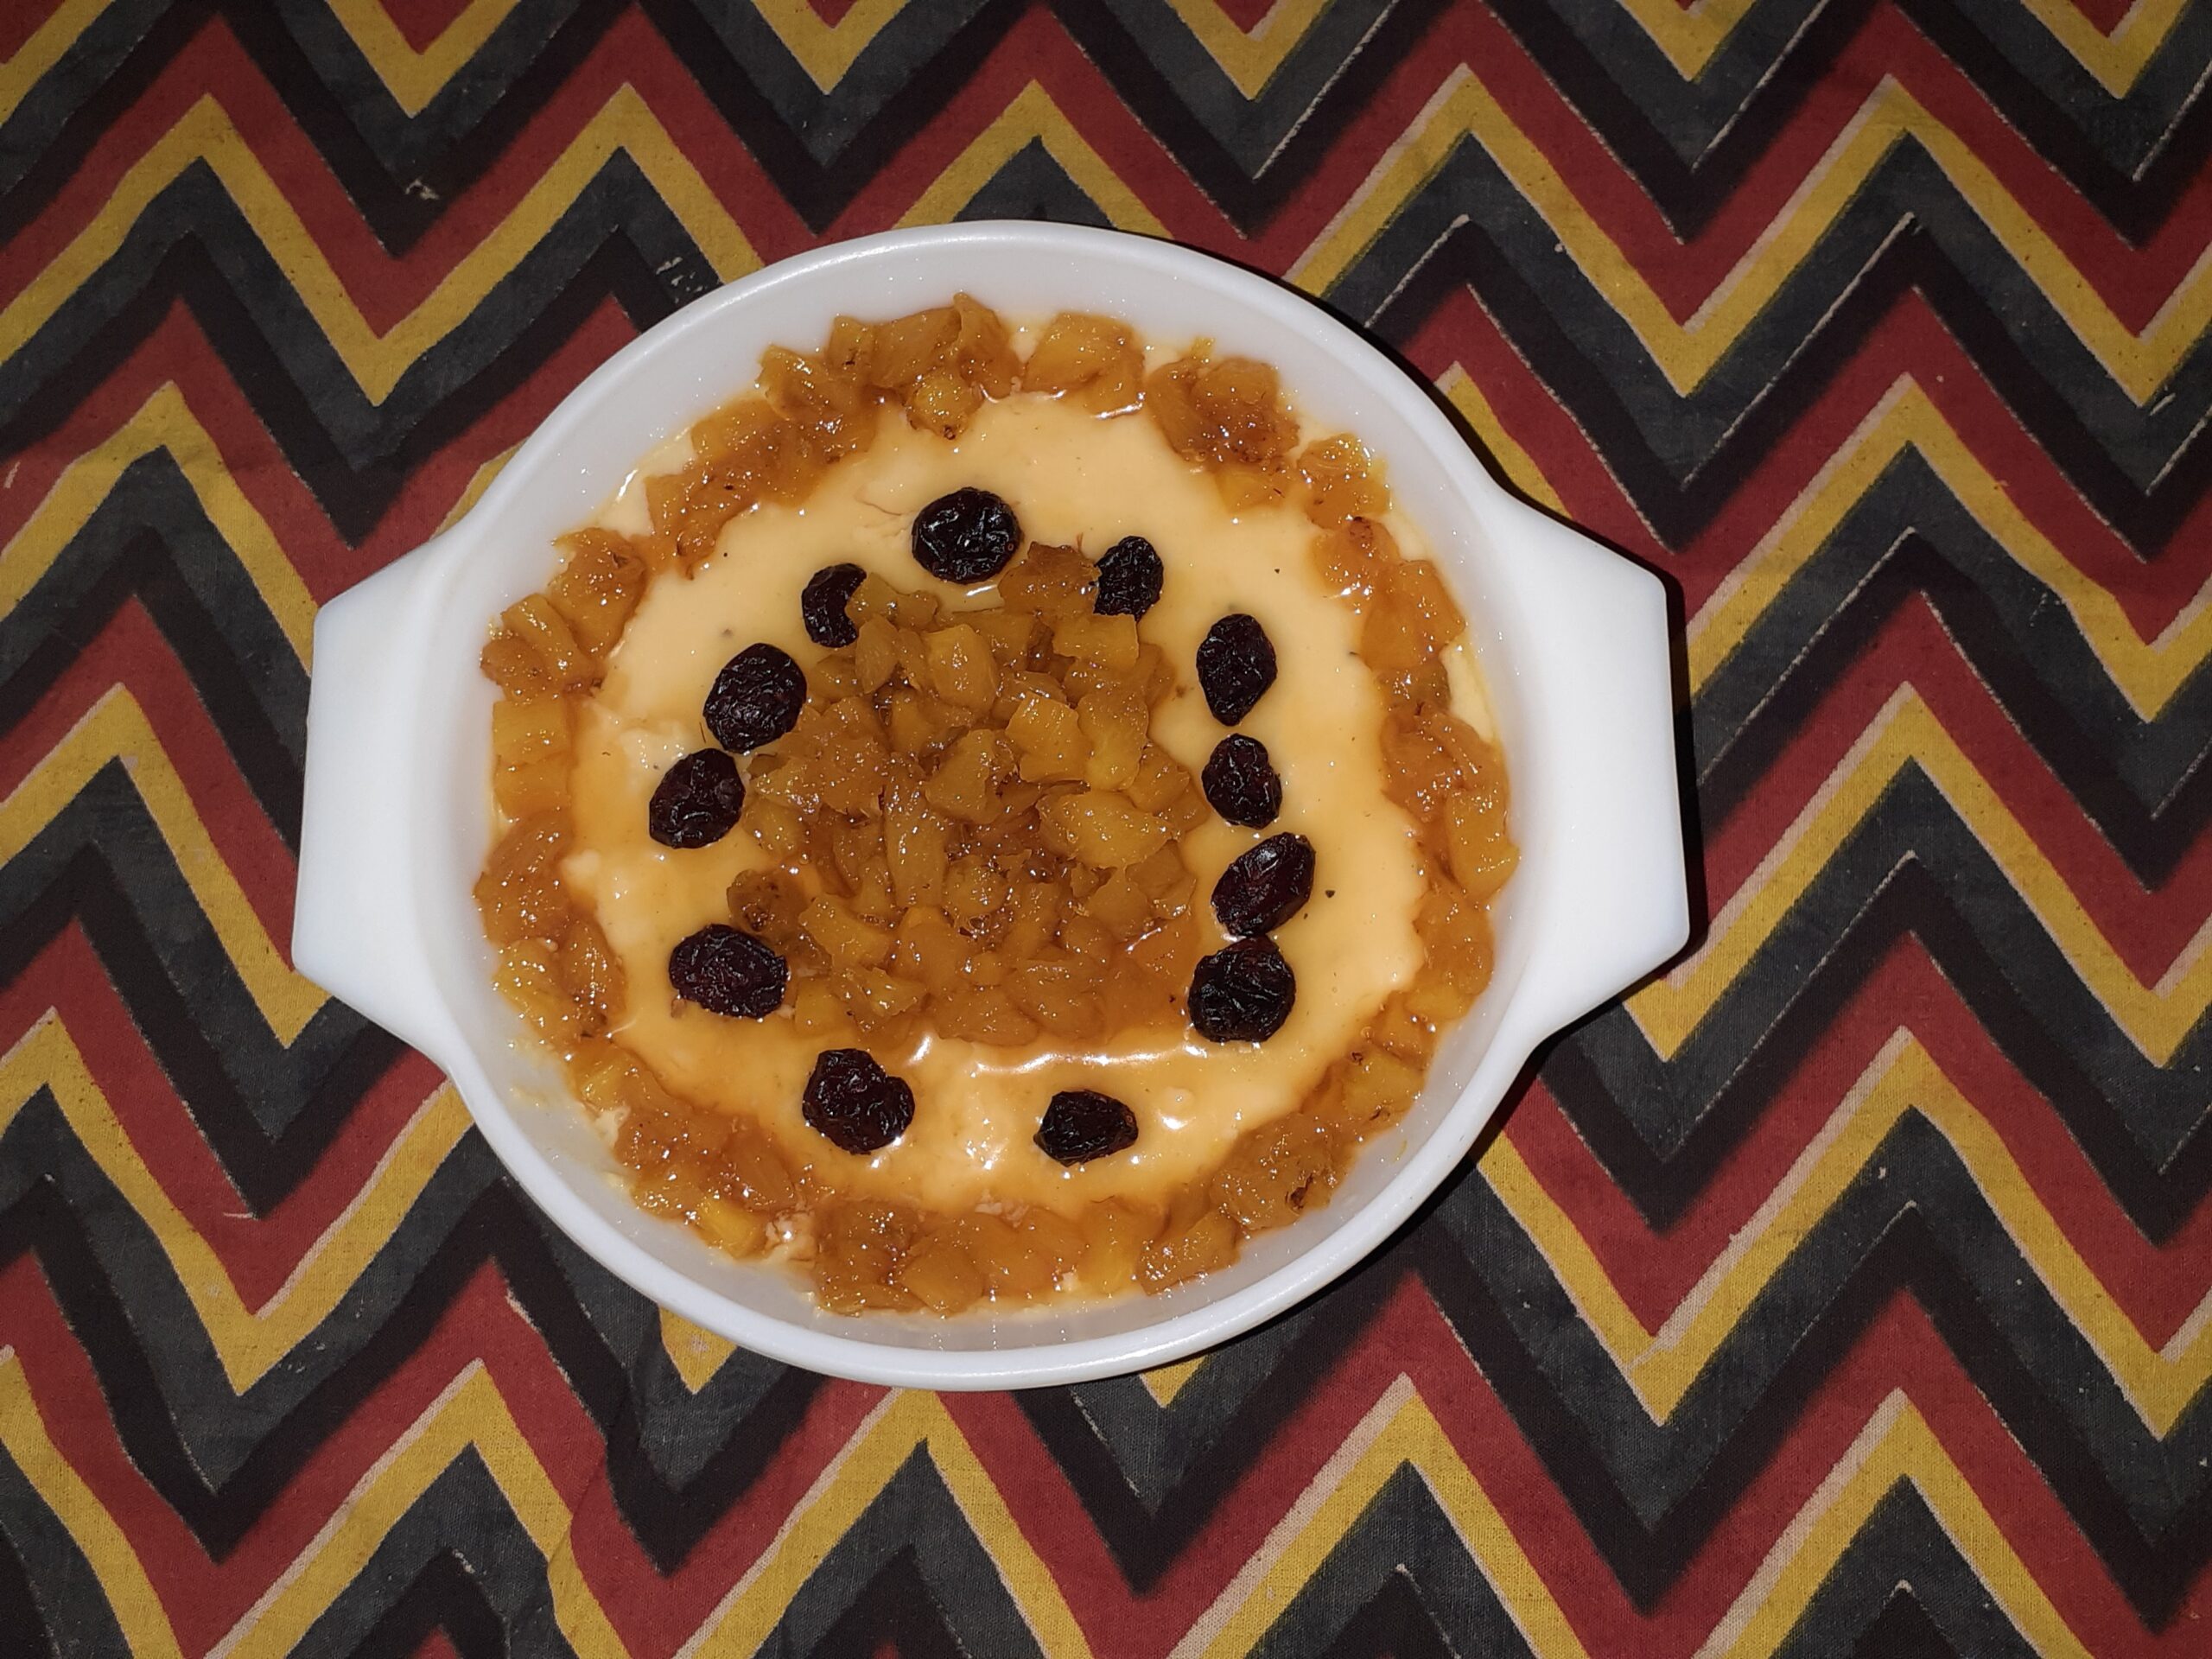
Next, take oil for frying in a flat Karahi or pan preferably and heat. The flame should be medium-high. The oil should not be too hot, nor warm. When you put a little batter, it should sizzle. Now take a scoop of batter in a ladle and pour it into the hot oil. The batter will spread out by itself, like pancakes. Cook on one side and flip it over and cook on the other until both sides are equally golden brown. Remove from oil and drop in the sugar syrup for 10 seconds. Remove and store in a container. If storing for more than a day, let the Malpuas remain in the sugar syrup itself, so that they stay moist. Enjoy the sweet dish. Bon Appetit.
Directions to make instant Rabri ( optional) No pictures for this.
Ingredients:
Milk 1 cup
Sugar 2 tsp
Milk powder 2 tbsp
Directions for Rabri: Take one cup of milk and boil. When it reduces to half, add 2 tsp sugar and 2 tablespoons of milk powder and stir nicely. Within 2 minutes it will reach the desired consistency. Put off the flame and let it cool completely before plating.
STEPWISE RECIPE FOLLOWS:
1. Assemble all ingredients. In a bowl add the Gulab Jamun mix, Paneer, wheat flour, sugar, and mix. Now add milk little by little to make a batter of flowing consistency. Add fennel seeds, mix it in, and keep the batter aside.
2. To prepare the sugar syrup, add 1/2 cup water to 1 cup sugar and put it on the flame to boil. Keep stirring for the sugar to dissolve and boil for 2 to 3 minutes, not more. Put off flame and cool. Add 2 cardamom pods while boiling.
3. In a flat pan/Karahi take oil for deep frying and heat. The flame should be medium-high and the oil should be hot, but not smoking hot. When the batter is poured, it should sizzle. Now take a scoop full of batter and pour it in the oil. Let it spread by itself. Fry until it turns golden brown on one side and then flip it and fry until golden brown on the other side too.
4. Now put the fried Malpua into the sugar syrup and remove after a few seconds if serving immediately. If storing for a day, let the Malpuas remain in the syrup so that they remain moist.
5. Serve warm with Rabri or just as it is.
NOTES:
1. If the sugar syrup solidifies after some time, add a tablespoon of water and put it on the flame and keep the flame very low. The syrup will loosen. Put off the flame. You can keep repeating this process until all the Malpuas are fried, if required.
2. A flat pan or Kadai is the perfect one for frying this sweet as in a curved Kadai the batter may turn to a ball and roundish, instead of a flat pancake-like shape.
3. Before pouring the batter, check if the oil is hot, by dropping some batter gently into the oil. If it sizzles immediately, the oil is ready for frying.
If you tried this recipe and liked it please comment below. I would love to hear from you. If you have a query about the recipe email us and ill respond as soon as I can.
If you would like to receive our recipes in your mail please leave your mail id at the homepage. Every time Rajjo’s Kitchen has a new post we will mail the recipe to you.
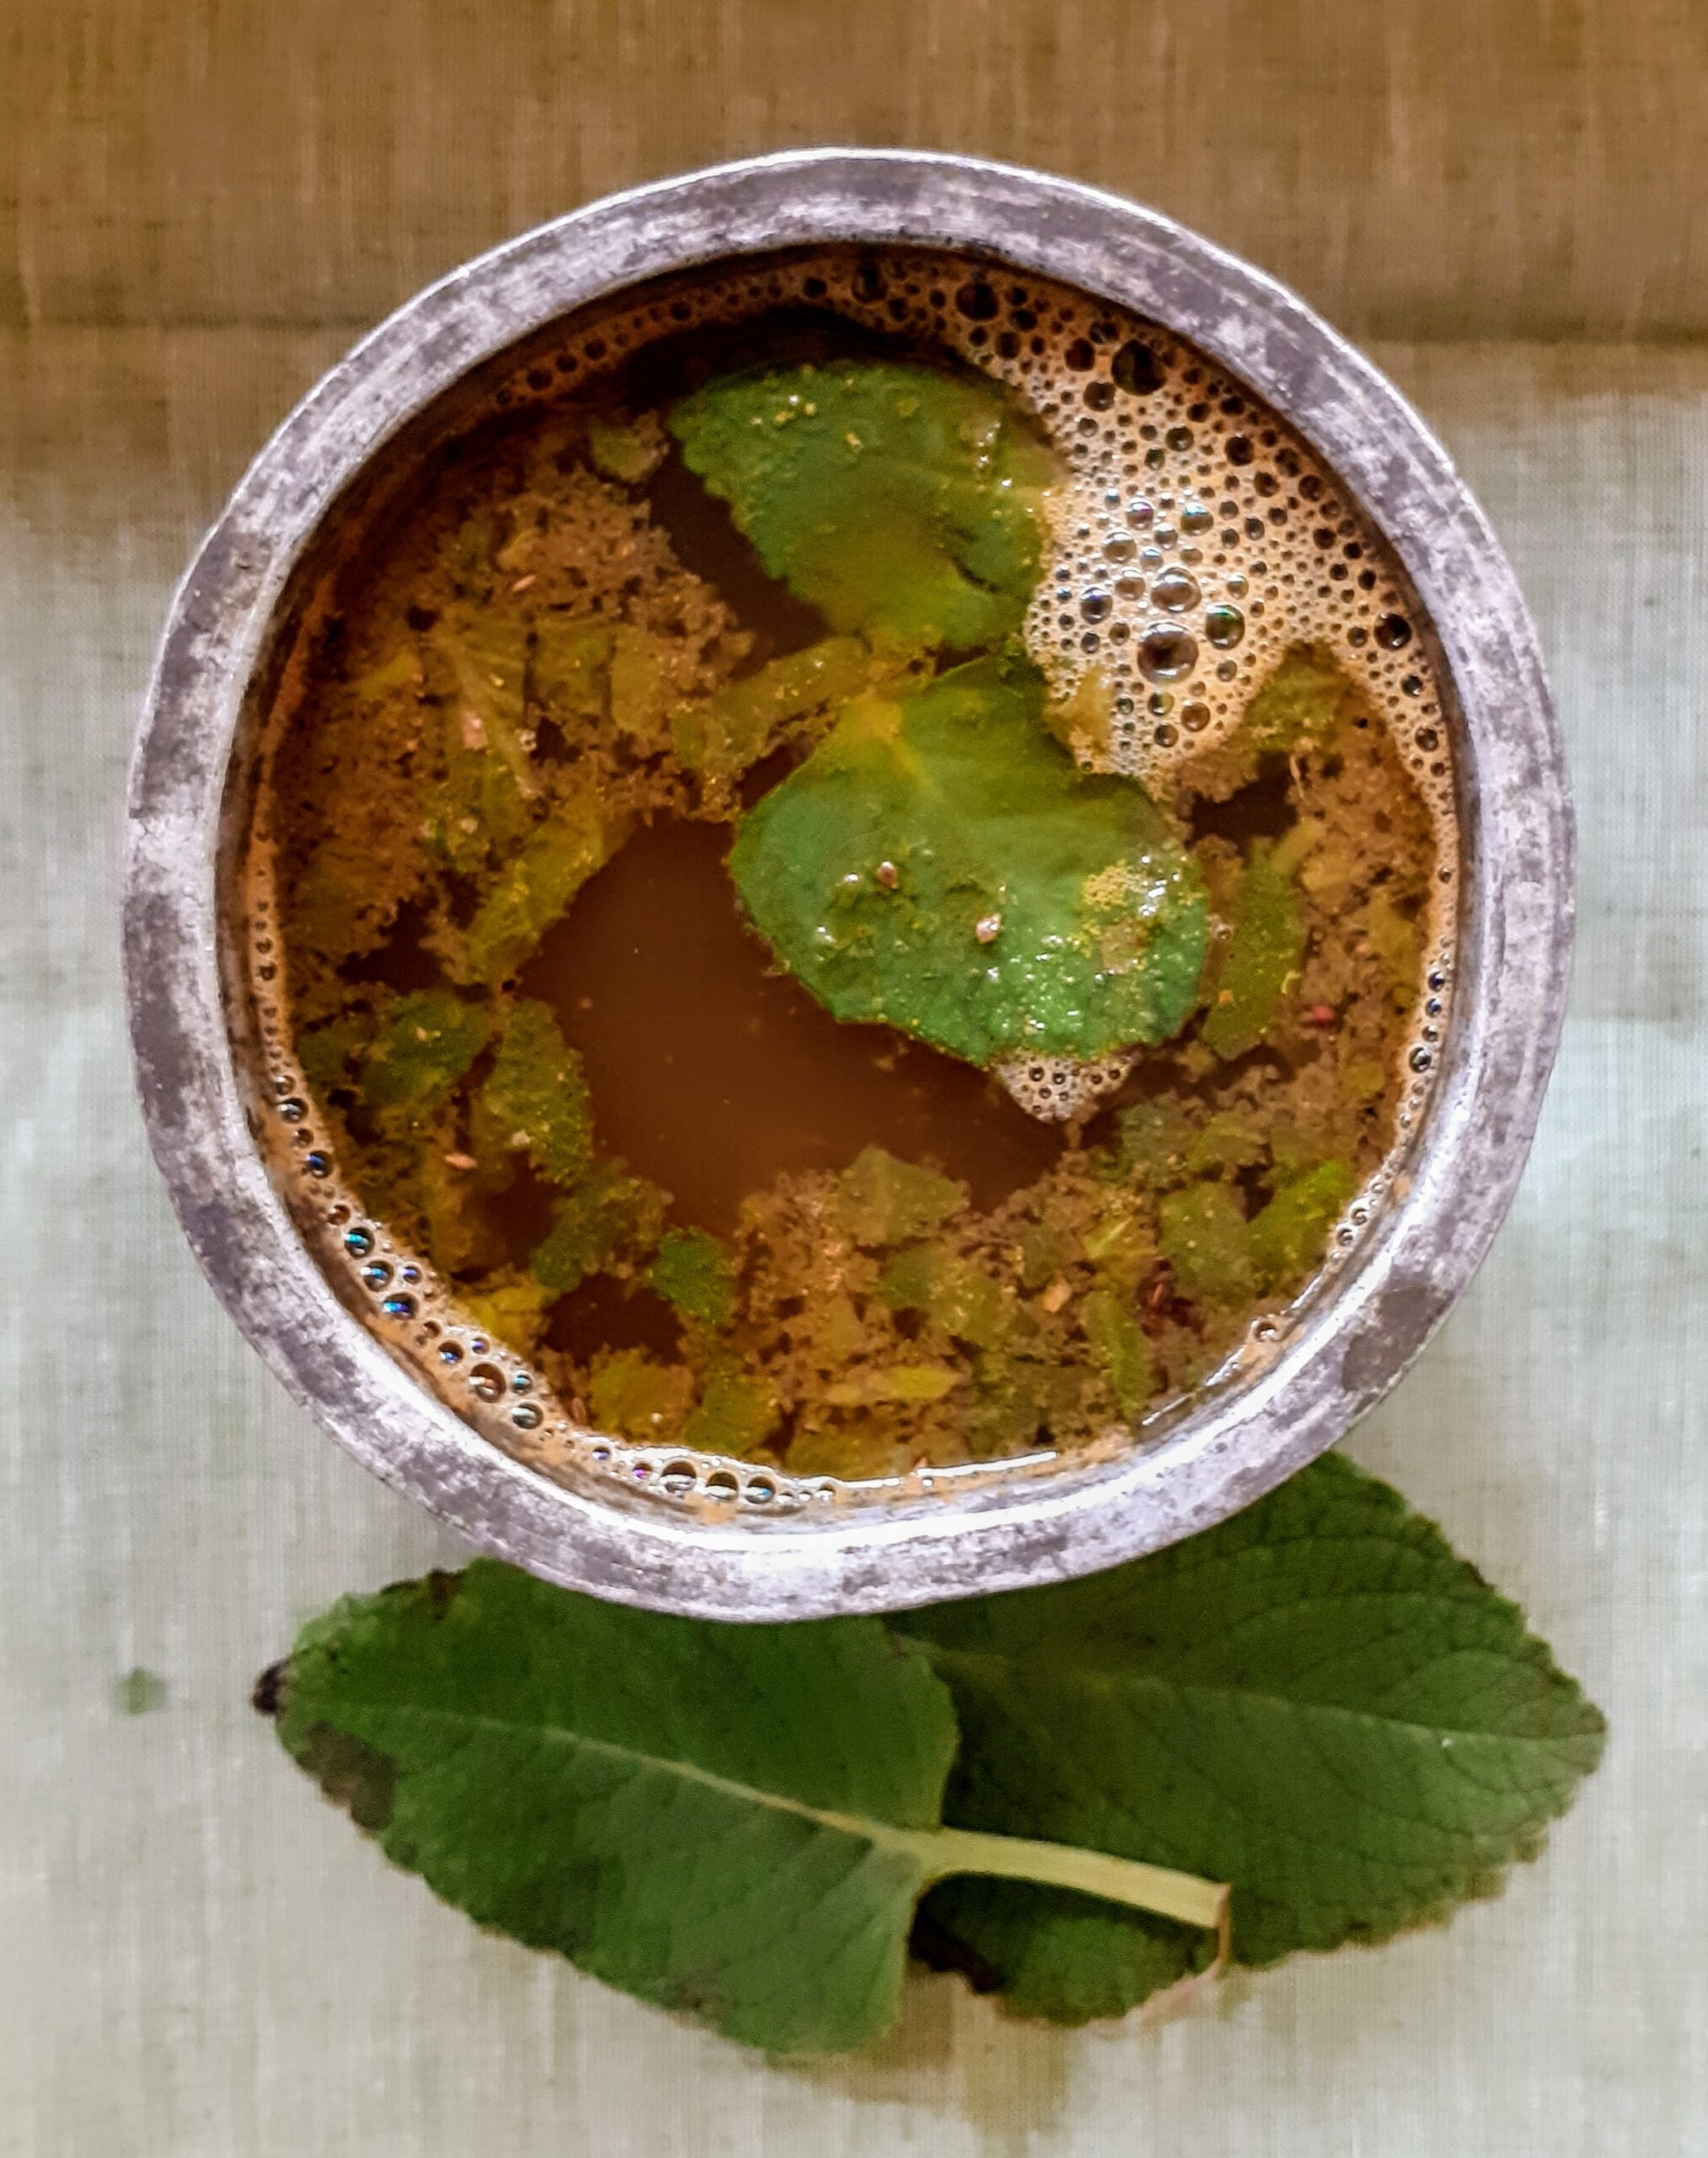
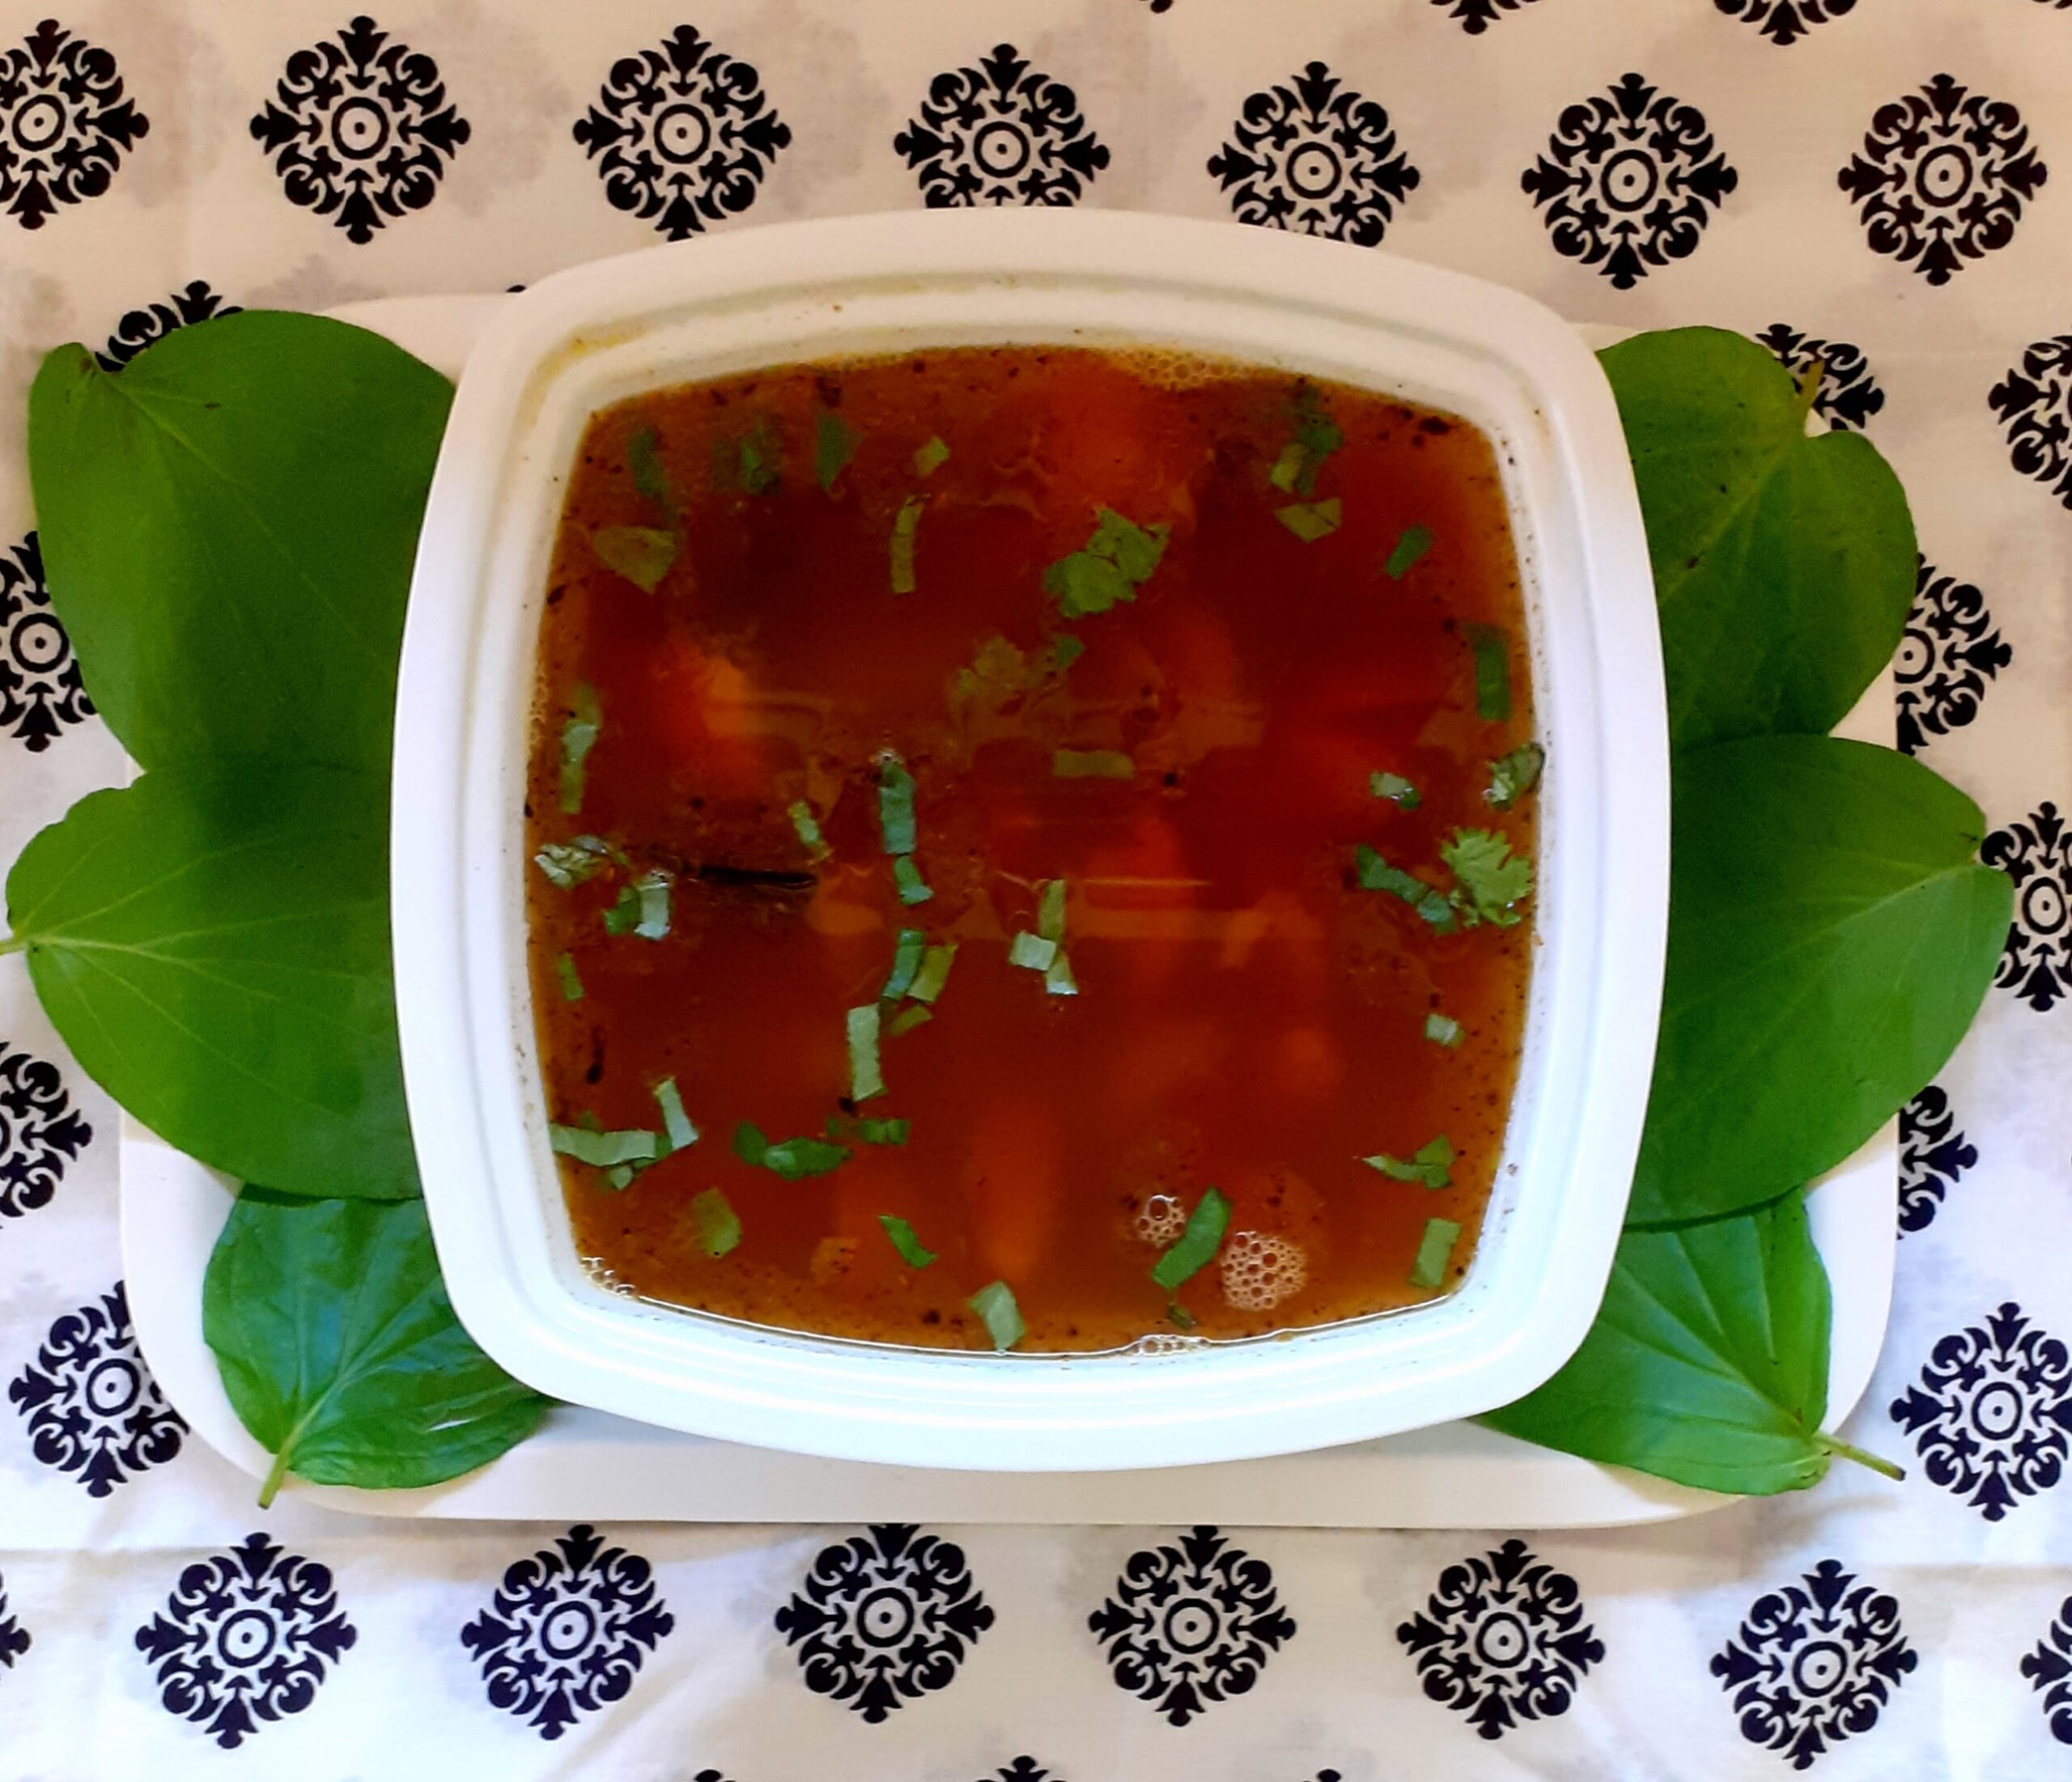
Omavalli Rasam/Ajwain Leaves Rasam
Rasam is a popular South Indian dish prepared with tamarind, tomatoes, and Rasam powder. There are many variations of this dish, and each South Indian household has its own recipe for the proportions of the ingredients of the rasam powder. Therefore though Rasam is almost a regular feature in all South Indian households its taste is unique to each. No two Rasam recipes taste the same. Rasam is also a sought after comfort food in South Indian households when one has a Cold(Common Cold) or is a little under the weather because it is made of simple ingredients that are easily digestible and pepper that helps in combating the cold. A good Rasam powder makes for a flavourful Rasam, the recipe for the Rasam Powder has been included here.
Earlier the Rasam was an everyday feature in most South Indian households along with Sambar or Vatha Kozhambu or Moru Kozhambu and a part of the Main course. Some households follow it to this day, but as the eating patterns of people has changed and is now more global the humble Rasam has taken a back seat or is made on a festival day where there is a feast(Elai Sapadu) or sometimes is also being served as a soup in elite gatherings.
The Omavalli/Ajwain leaves are medical and are believed to cure a common cold and boost immunity. These leaves are also used in making Pakodas and are really flavourful. Other than Rasam and pakodas the Ajwain leaves are also used to make a raita. This Omavalli rasam can be relished with hot rice and ghee or can just be sipped as a soup.
Here is the recipe for Omavalli/Ajwain leaves Rasam. I have not given a stepwise picture for this recipe as I have included a video with important steps for guidance.
PREP TIME: 10 Mins COOK TIME: 20 Mins
TOTAL TIME: 30 Mins COURSE: MAIN / APPETISER
CUISINE: SOUTH INDIAN SERVINGS: 4
AUTHOR: Rajni Ram
Ingredients:
Omavalli/Ajwain leaves 5 big ones (2 small ones chopped fine)
Tomatoes 2 large
Green chilli 1
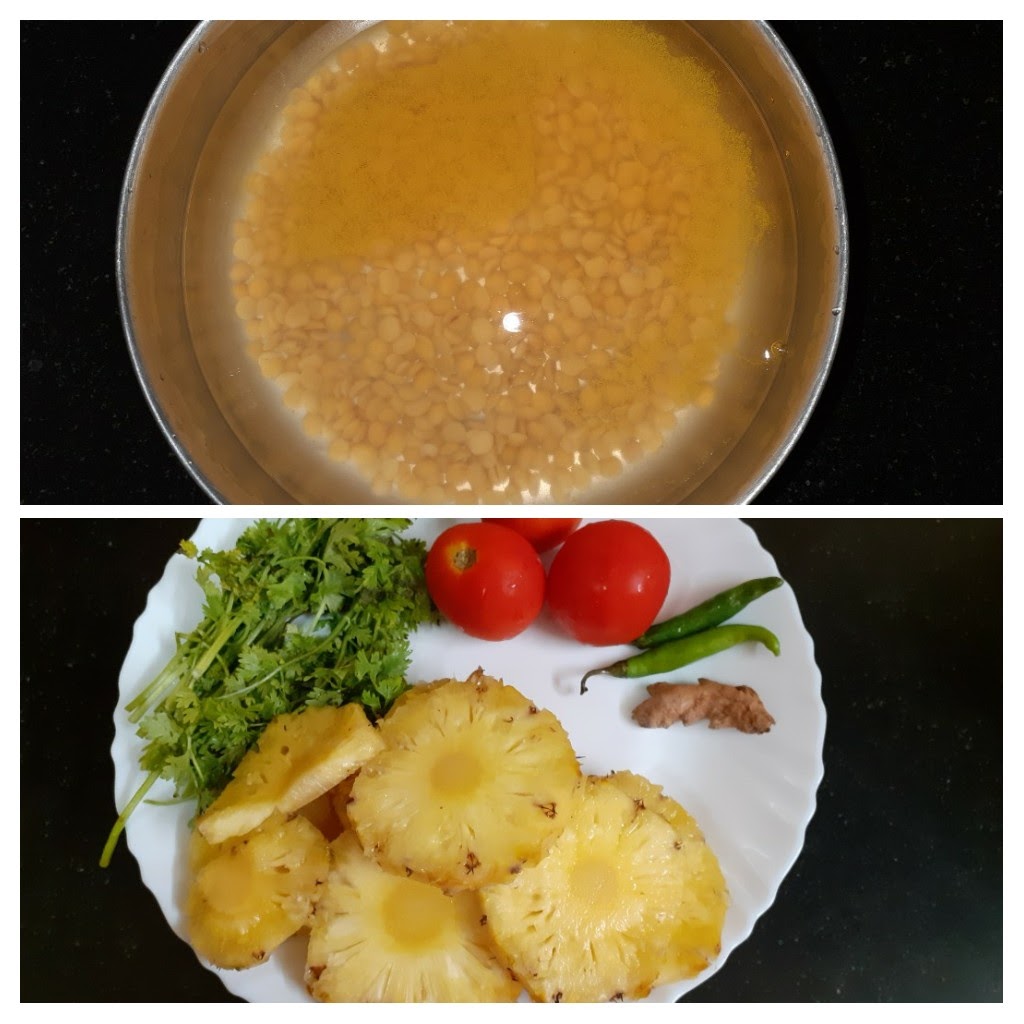
Tuvar dal/ Yellow lentils 1/4 cup cooked in a pressure cooker
Rasam powder 3 tsp
Lemon 1/2
Coriander leaves finely chopped
Asafoetida 1 tsp (split 1/2 while boiling and 1/2 for tempering)
Turmeric powder 1 tsp
Salt as per taste
Mustard seeds 1/2 tsp
Roasted Pepper & Cumin powder 1 tsp( dry roast in the ratio 2:1 and grind coarse)
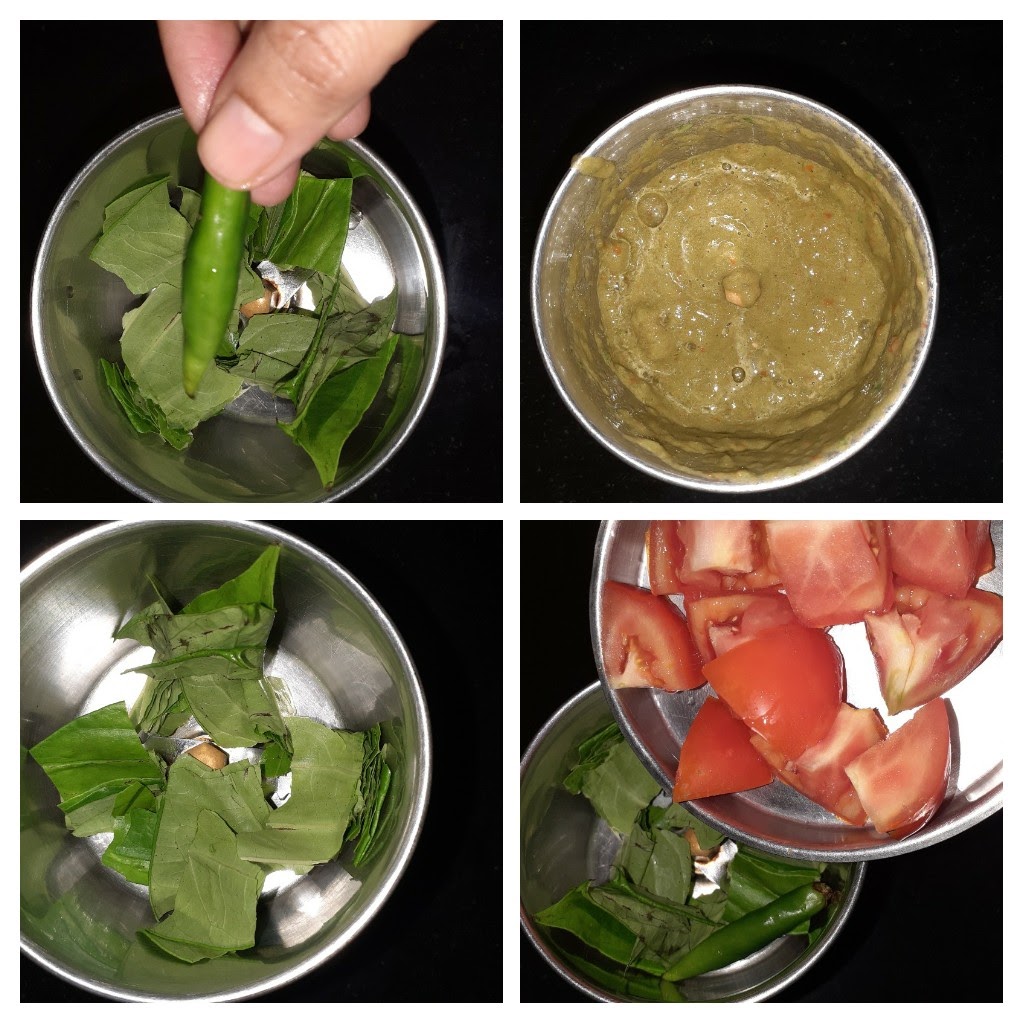
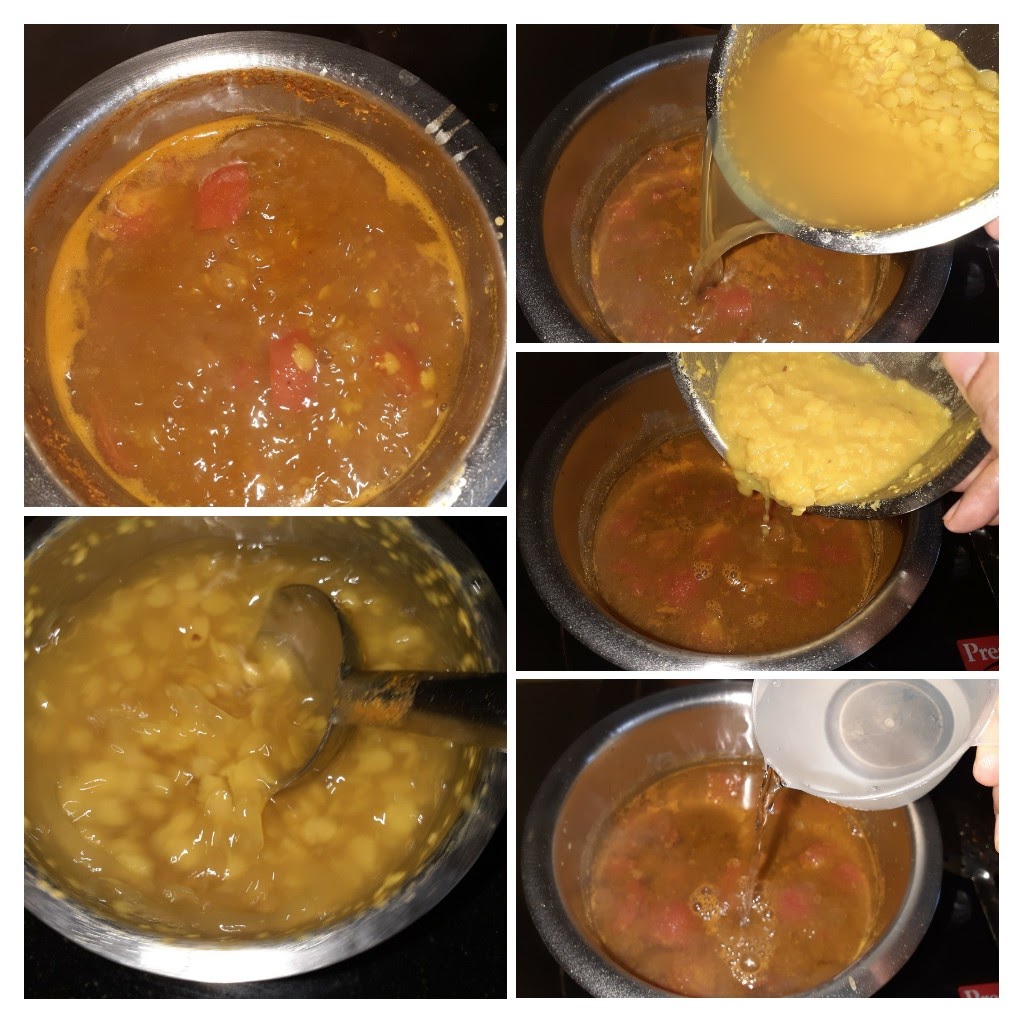
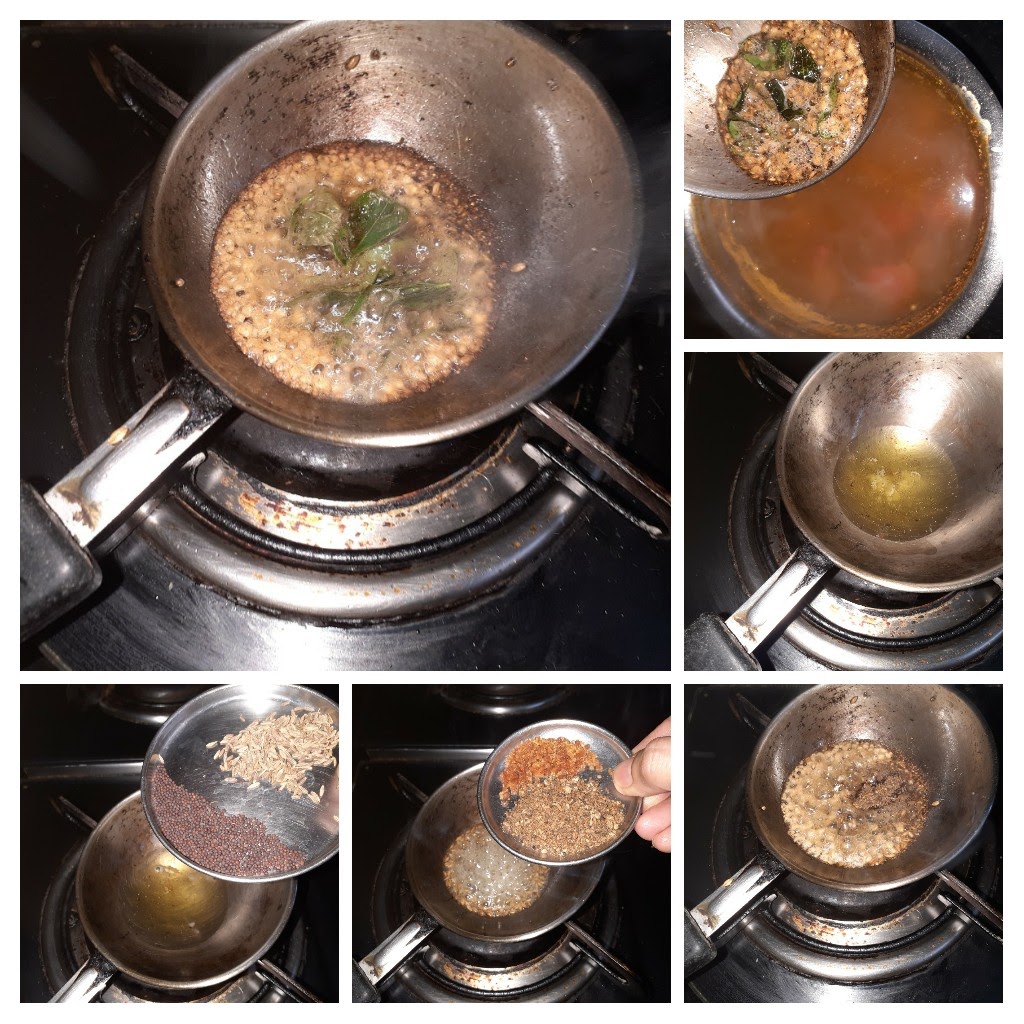
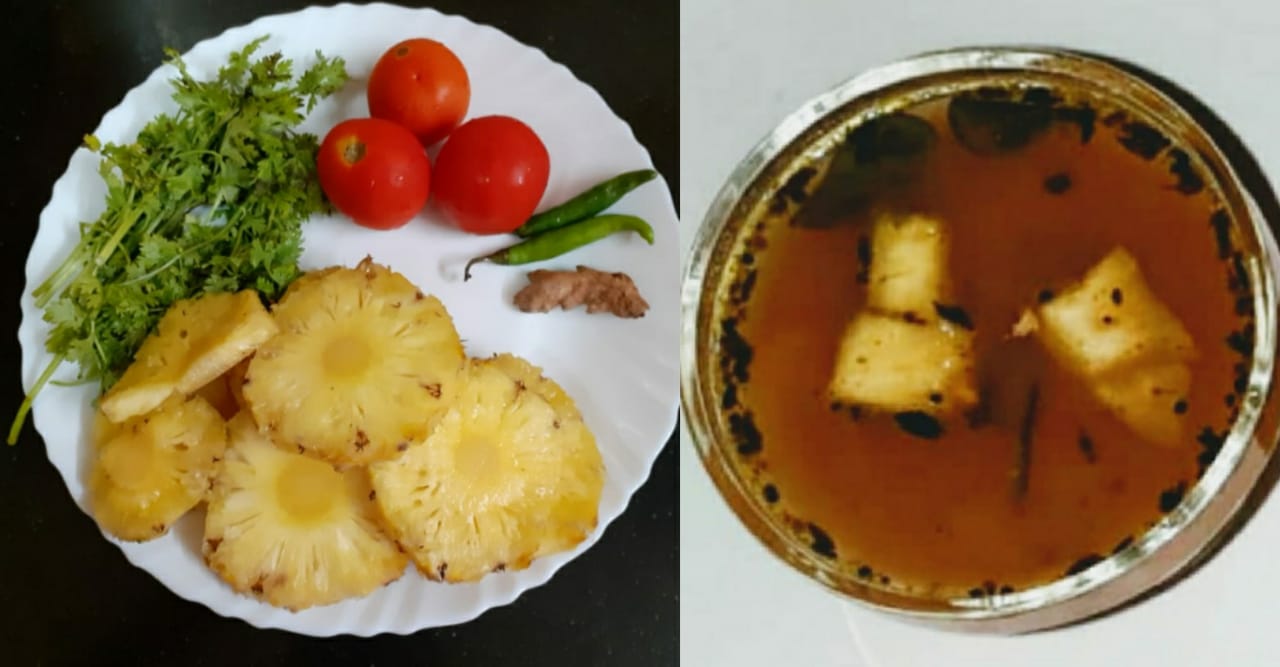
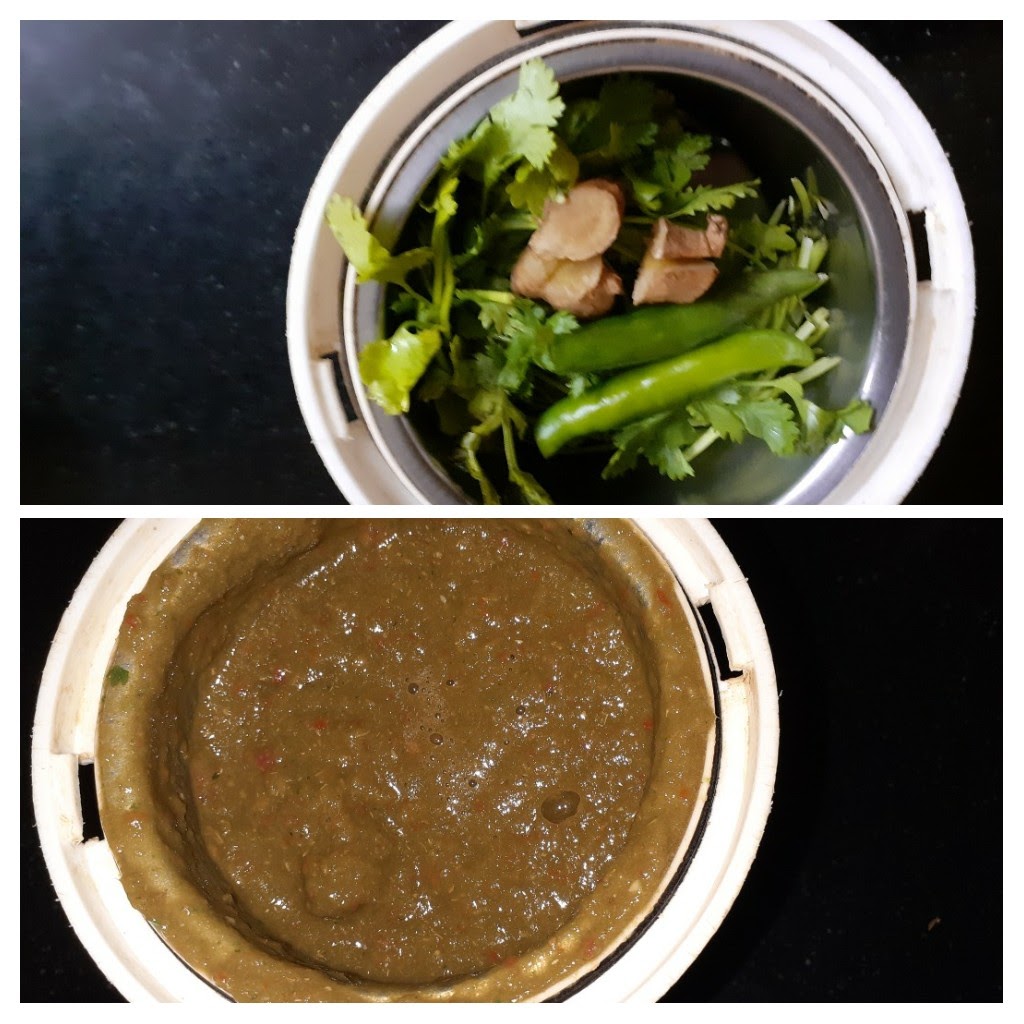
Directions: Grind the Omavalli/Ajwain leaves, tomatoes, and green chilli to a puree. Pour this puree into a 1-liter vessel and add 2 cups water. Put the vessel over the flame and add the Rasam powder, Salt, turmeric powder, and asafoetida and bring it to a boil. Keep boiling until the rawness of the tomatoes and the powders is gone. Now add a few chopped Omavalli leaves and continue to boil for 30 seconds. Add the dal water along with the mashed dal to the boiling puree. Add another 2 cups plain water and continue boiling until the rasam froths up and rises to the brim of the vessel. This should be done on low flame. When the rasam froths and rises, switch off the flame and add the juice of half a lemon. Now in a small tadka Kadai/pan take ghee/oil for tempering and heat. Add mustard seeds, as they crackle, add some Ajwain/Omam seeds, followed by asafoetida, cumin-pepper powder, and a few chopped Omavalli. Fry the tempering for 10 seconds. Put off the flame. Add curry leaves to the tadka/tempering. Now pour this tempering into the rasam, serve hot with rice and ghee or sip as soup.
Directions for making the Omavalli Rasam video here????
NOTES:
1. More Omavalli leaves can be used for an intense flavour.
2. I have also used the seeds while tempering, as it gives a nice aroma and flavouring to the dish.
3. I usually don’t use tamarind for variety Rasam recipes like Vetrilai Rasam, Pineapple Rasam, Murungakkai Rasam and Omavalli Rasam, as I feel the acidity of the tamarind will suppress the flavours of these vegetables and herbs. So lime juice is a subtler option for the tanginess. But if one prefers tamarind to lemon, go ahead, but since I have not used tamarind anytime for these recipes, I’m not sure about the taste.
If you tried this recipe and liked it please comment below. I would love to hear from you. If you have a query about the recipe email us and ill respond as soon as I can.
If you would like to receive our recipes on your mail please leave your mail id at the homepage. Every time Rajjo’s Kitchen has a new post we will mail the recipe to you.
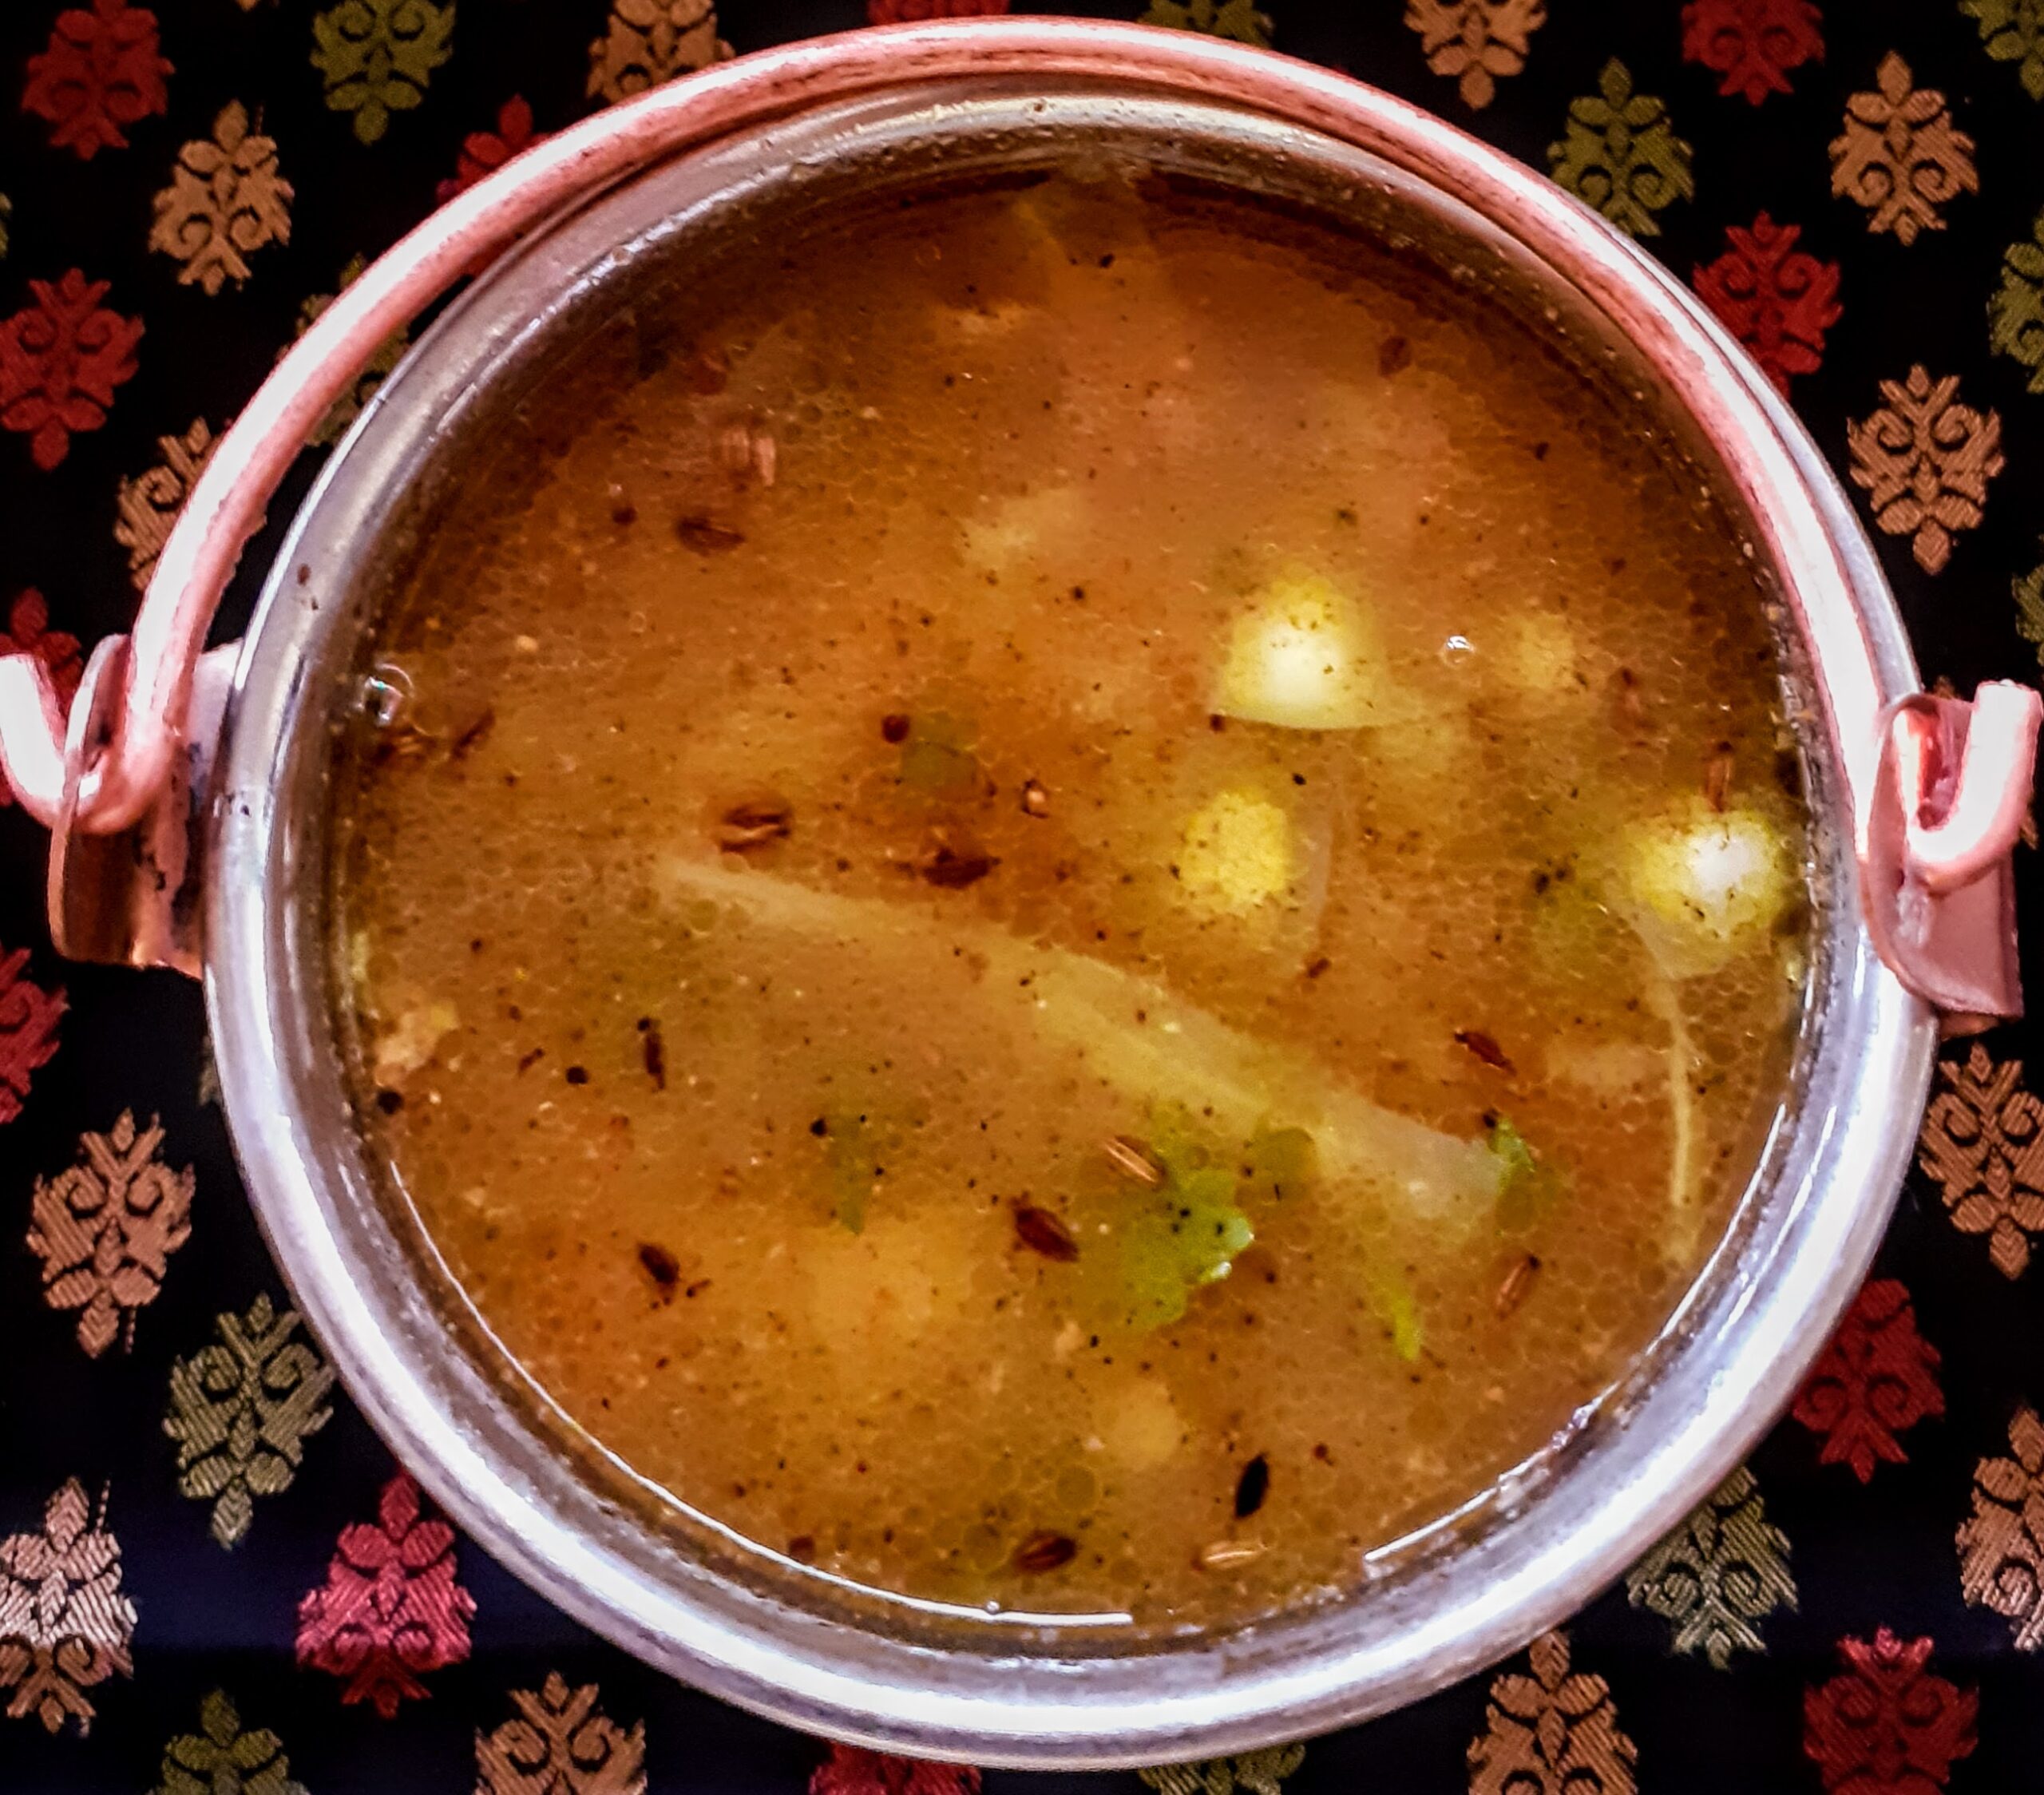
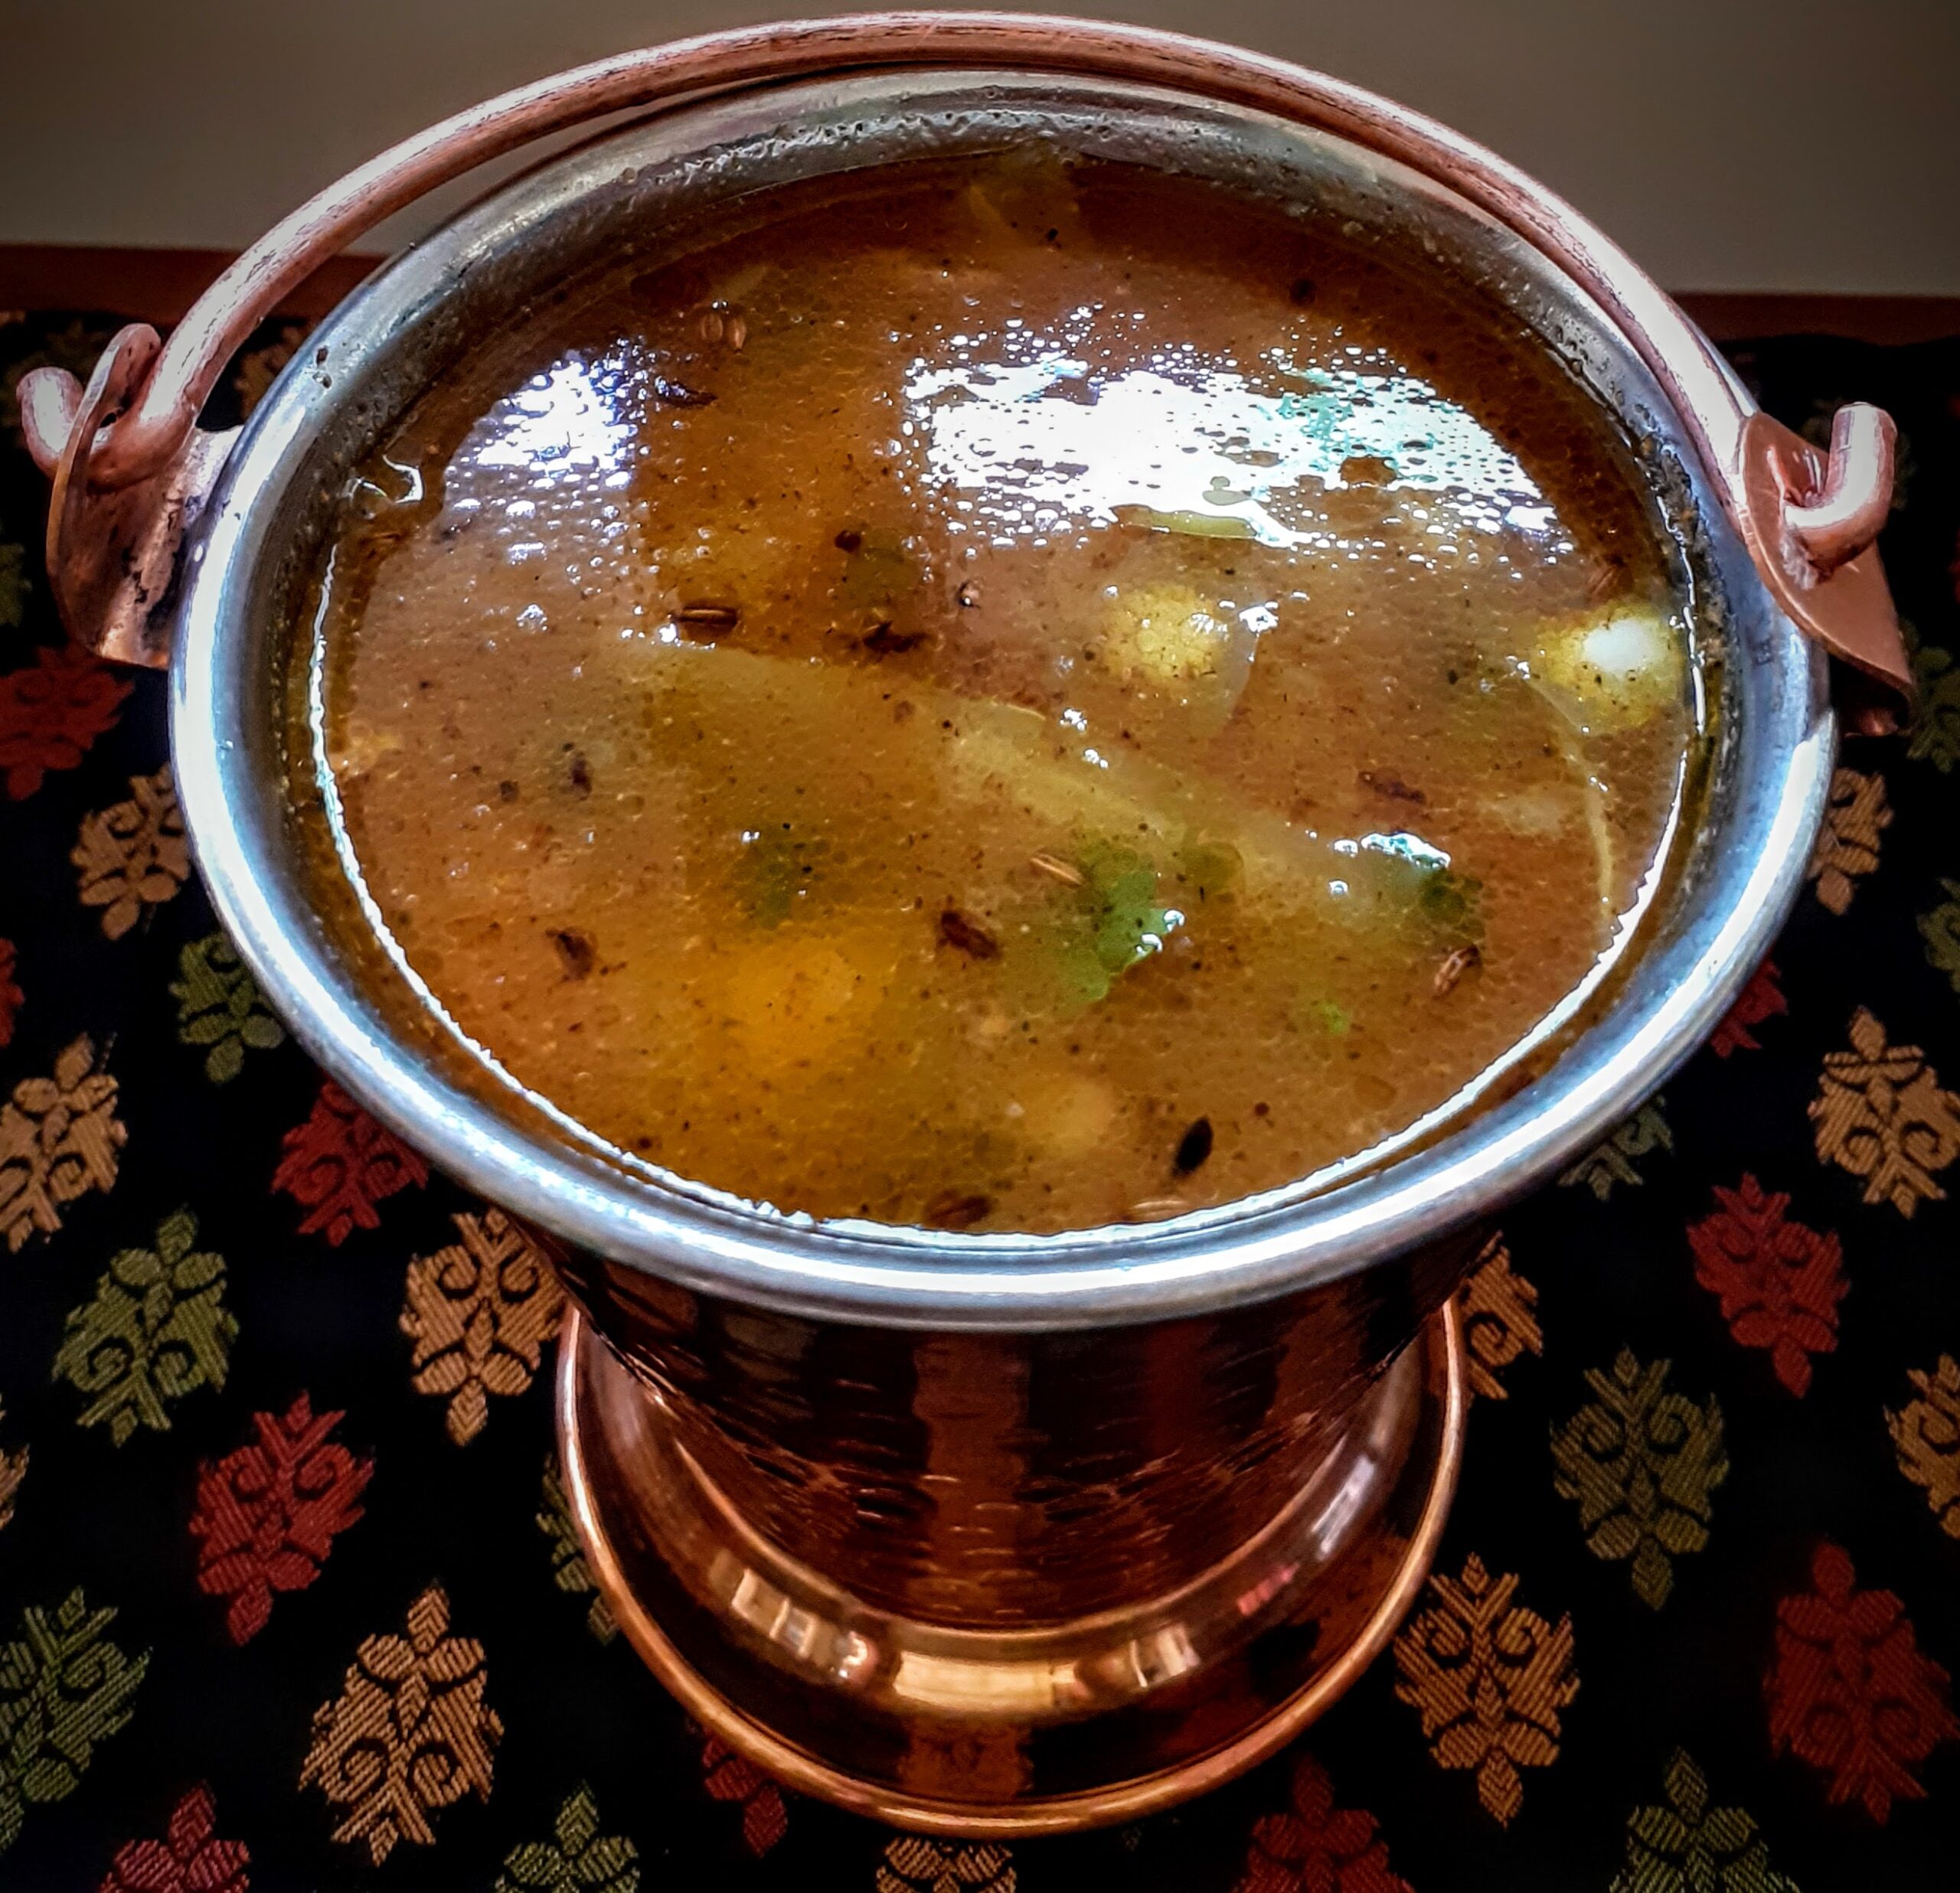
Drumstick Rasam/Murungakkai Rasam
Rasam is a popular South Indian dish prepared with tamarind, tomatoes, and Rasam powder. There are many variations of this dish, and each South Indian household has its own recipe for the proportions of the ingredients of the rasam powder. Therefore though Rasam is almost a regular feature in all South Indian households its taste is unique to each. No two Rasam recipes taste the same. Rasam is also a sought after comfort food in South Indian households when one has a Cold(Common Cold) or is a little under the weather because it is made of simple ingredients that are easily digestible and pepper that helps in combating the cold.
Earlier the Rasam was an everyday feature in most South Indian households along with Sambar or Vatha Kozhambu or Moru Kozhambu and a part of the Main course. Some households follow it to this day, but as the eating patterns of people has changed and is now more global the humble Rasam has taken a back seat or is made on a festival day where there is a feast(Elai Sapadu) or sometimes is also being served as a soup in elite gatherings.
Drumstick Rasam is a very flavourful Rasam, as Drumsticks by themselves have a wonderful fragrance and flavour.
Moringa is the latest buzz word everywhere. What with Moringa leaves powder trending the healthy list. Well, the Moringa tree and dishes cooked from its fruit, flowers and leaves have been in India for ages. We have used its fruit, the drumstick in Subjis, Sambar, dal, etc; the leaves too are very aromatic and used as an add-in in Dosas, chilas, and more. The flowers too when added while making ghee, give the ghee a nice flavour and make it aromatic. My grandmother always added a few flowers just before putting off the flame while making ghee and would remove the flowers later, while bottling the ghee. My mother makes a pickle of it too, which is just as wonderful.
There are many different types of Rasam Like the Pepper Rasam, Tomato Rasam, Lemon Rasam, Garlic Rasam, Neem Flower (Vepampoo) Rasam, Drumstick Rasam,Pineapple Rasamand the Vetrilai(Betel leaf) Rasam. I have already posted the recipe of pineapple Rasam and slowly over a period of time plan to cover all the Rasam varieties mentioned here. I have also given the recipe to a perfect Rasam Powder here. It yields an aromatic and flavourful Rasam.
Here is the recipe of Drumstick/Murungakkai Rasam for you-
PREP TIME: 10 Mins COOK TIME: 20 Mins
TOTAL TIME: 30 Mins COURSE: MAIN / APPETISER
CUISINE: SOUTH INDIAN SERVINGS: 4
AUTHOR: Rajni Ram
Ingredients:
Drumsticks 3 big fleshy ones chopped to 3-inch pieces (refer note 1)
Tomatoes 2 large (note 3)
Tuvar dal/ Yellow lentils 1/4 cup cooked in a pressure cooker
Rasam powder 3 tsp
Lemon 1
Coriander leaves finely chopped
Asafoetida 1 tsp (split 1/2 while boiling and 1/2 for tempering)
Turmeric powder 1 tsp
Salt as per taste
Roasted Pepper & Cumin powder 1 tsp( dry roast in the ratio 2:1 and grind coarse)
Directions:
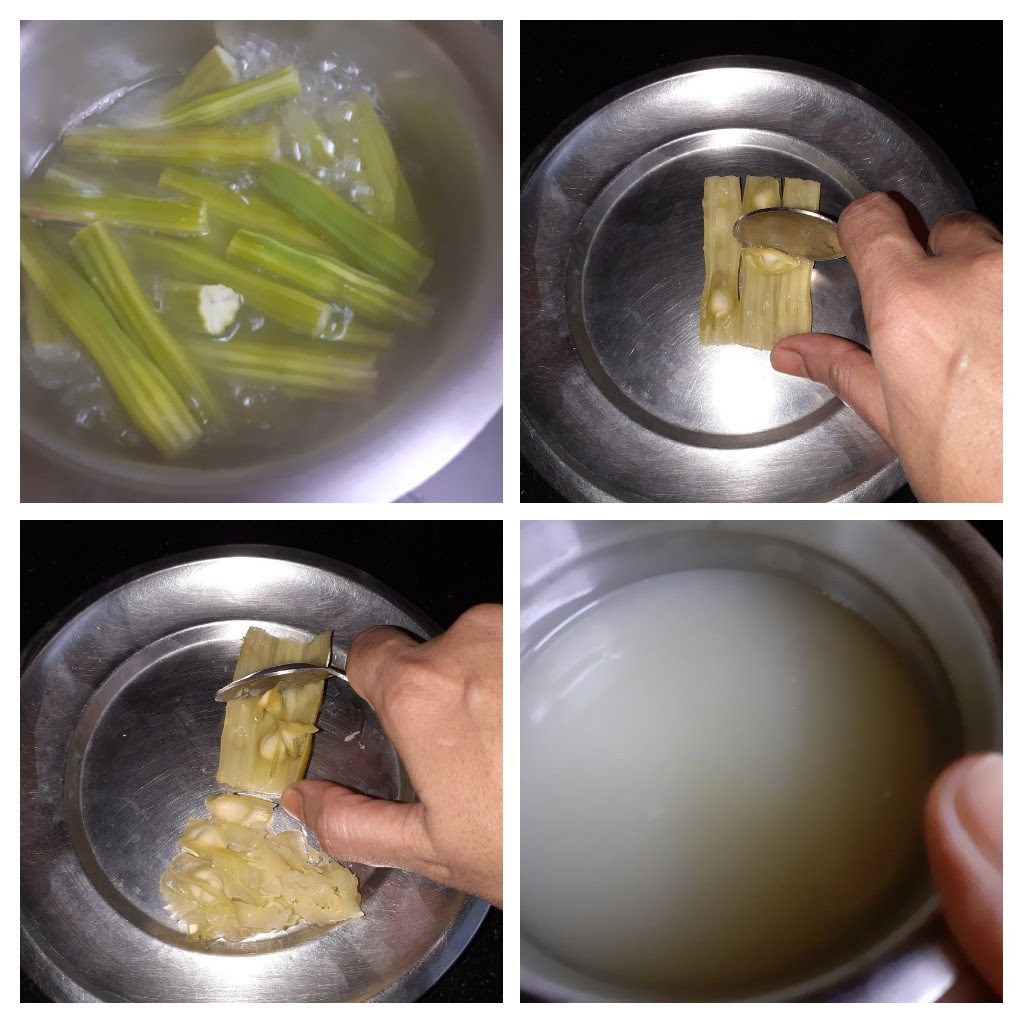
Put the dal in a vessel and cook it in the pressure cooker. I used pot in pot method, you can use whichever is convenient. The dal should have cooked well. Now cut the Drumsticks, put them in a vessel and boil. Cook until the flesh inside turns tender(approx 10 minutes). Reserve the water in which the drumsticks cooked. Cool the cooked drumsticks and scrape out the fleshy part with a spoon(refer picture). Don’t discard the seeds unless they are very hard. Keep aside. Now grind 2 tomatoes to a puree and pour it in a 1-litre vessel. Add 2 cups water, followed by 3 tsp Rasam Powder, adequate salt, turmeric powder and asafoetida and bring to a boil. Continue to boil until the rawness of the powders is gone. Now mash the cooked dal nicely and pour it into the boiling mixture along with any water the dal may have retained. Cook for two minutes and now its time to add the water reserved after cooking the drumsticks. After pouring the drumstick broth if you find the Rasam(soupy), dilute by adding 1 to 1.5 cups of hot water and continue to boil the Rasam for another 2 minutes, now add the drumstick scrappings(seeds and all) and continue to boil until the Rasam froths up and rises in the vessel and comes to the brim. Switch off the flame and squeeze a lemon into it. Now take 2 tsp ghee in a small tempering Kadai and heat. Add mustard seeds, as they crackle add the Asafoetida powder, roasted pepper-cumin powder and put off the stove. Now add the curry leaves to the ghee, and pour the tempering into the Rasam. Garnish with finely chopped coriander leaves. The healthy, flavourful and fragrant Drumstick rasam is ready. Enjoy and Bon Appetit.
Serving suggestions: Just as a soup, with hot rice and ghee, with Oats porridge(try this it tastes yummy).
Sometimes I also pour it on my chapatis while hot.????
STEPWISE RECIPE FOLLOWS:
1. Assemble all ingredients. Cook the dal and keep ready. Cut the Drumsticks into 3-inch pieces and cook them in water with a little salt. Cool them scrape out the flesh with a spoon and reserve the water in which they cooked.
2. Pour the puree of 2 tomatoes into a 1-litre vessel and add 2 cups water, followed by 3 tsp Rasam powder, adequate salt, turmeric powder, asafoetida and bring to a boil.
3. Now add the cooked and mashed dal along with the water to the boiling mixture and continue to cook until the rawness of the powders is gone(approx. 5minutes).
4. Now add the Drumstick broth(water in which the drumsticks cooked) to the mixture and if the consistency is too dense add 1 to 1.5 cups of hot water and bring to a boil.
5. Now add the drumstick scrapings to the boiling rasam and continue to boil until the rasam froths up and rises to the brim. Put off the flame and squeeze a lemon into it, or add 3 tsp lemon juice to it.
6. In a tempering Kadai heat 2 tsp of ghee. when it heats up, put the mustard seeds into it, as they crackle add the asafoetida and the roasted cumin-pepper powder. Put off the flame and then add the curry leaves. Drop this tempering into the Rasam and serve hot with hot rice and ghee or follow any of the serving suggestions given above.
NOTES:
1. Picking the Drumsticks well is critical, pick thick but tender ones. After cooking the seeds also can be used, don’t discard them as they have the most flavour.
2. I have used the Country variety of tomatoes(Naatu Thakkali) instead of the Hybrid ones as they give the rasam some tang when not using tamarind.
3. If you serve Rasam with something unusual do let us, know..we love learning and trying new combinations.
If you tried this recipe and liked it please comment below. I would love to hear from you. If you have a query about the recipe email us and ill respond as soon as I can.
If you would like to receive our recipes on your mail please leave your mail id at the homepage. Every time Rajjo’s Kitchen has a new post we will mail the recipe to you.
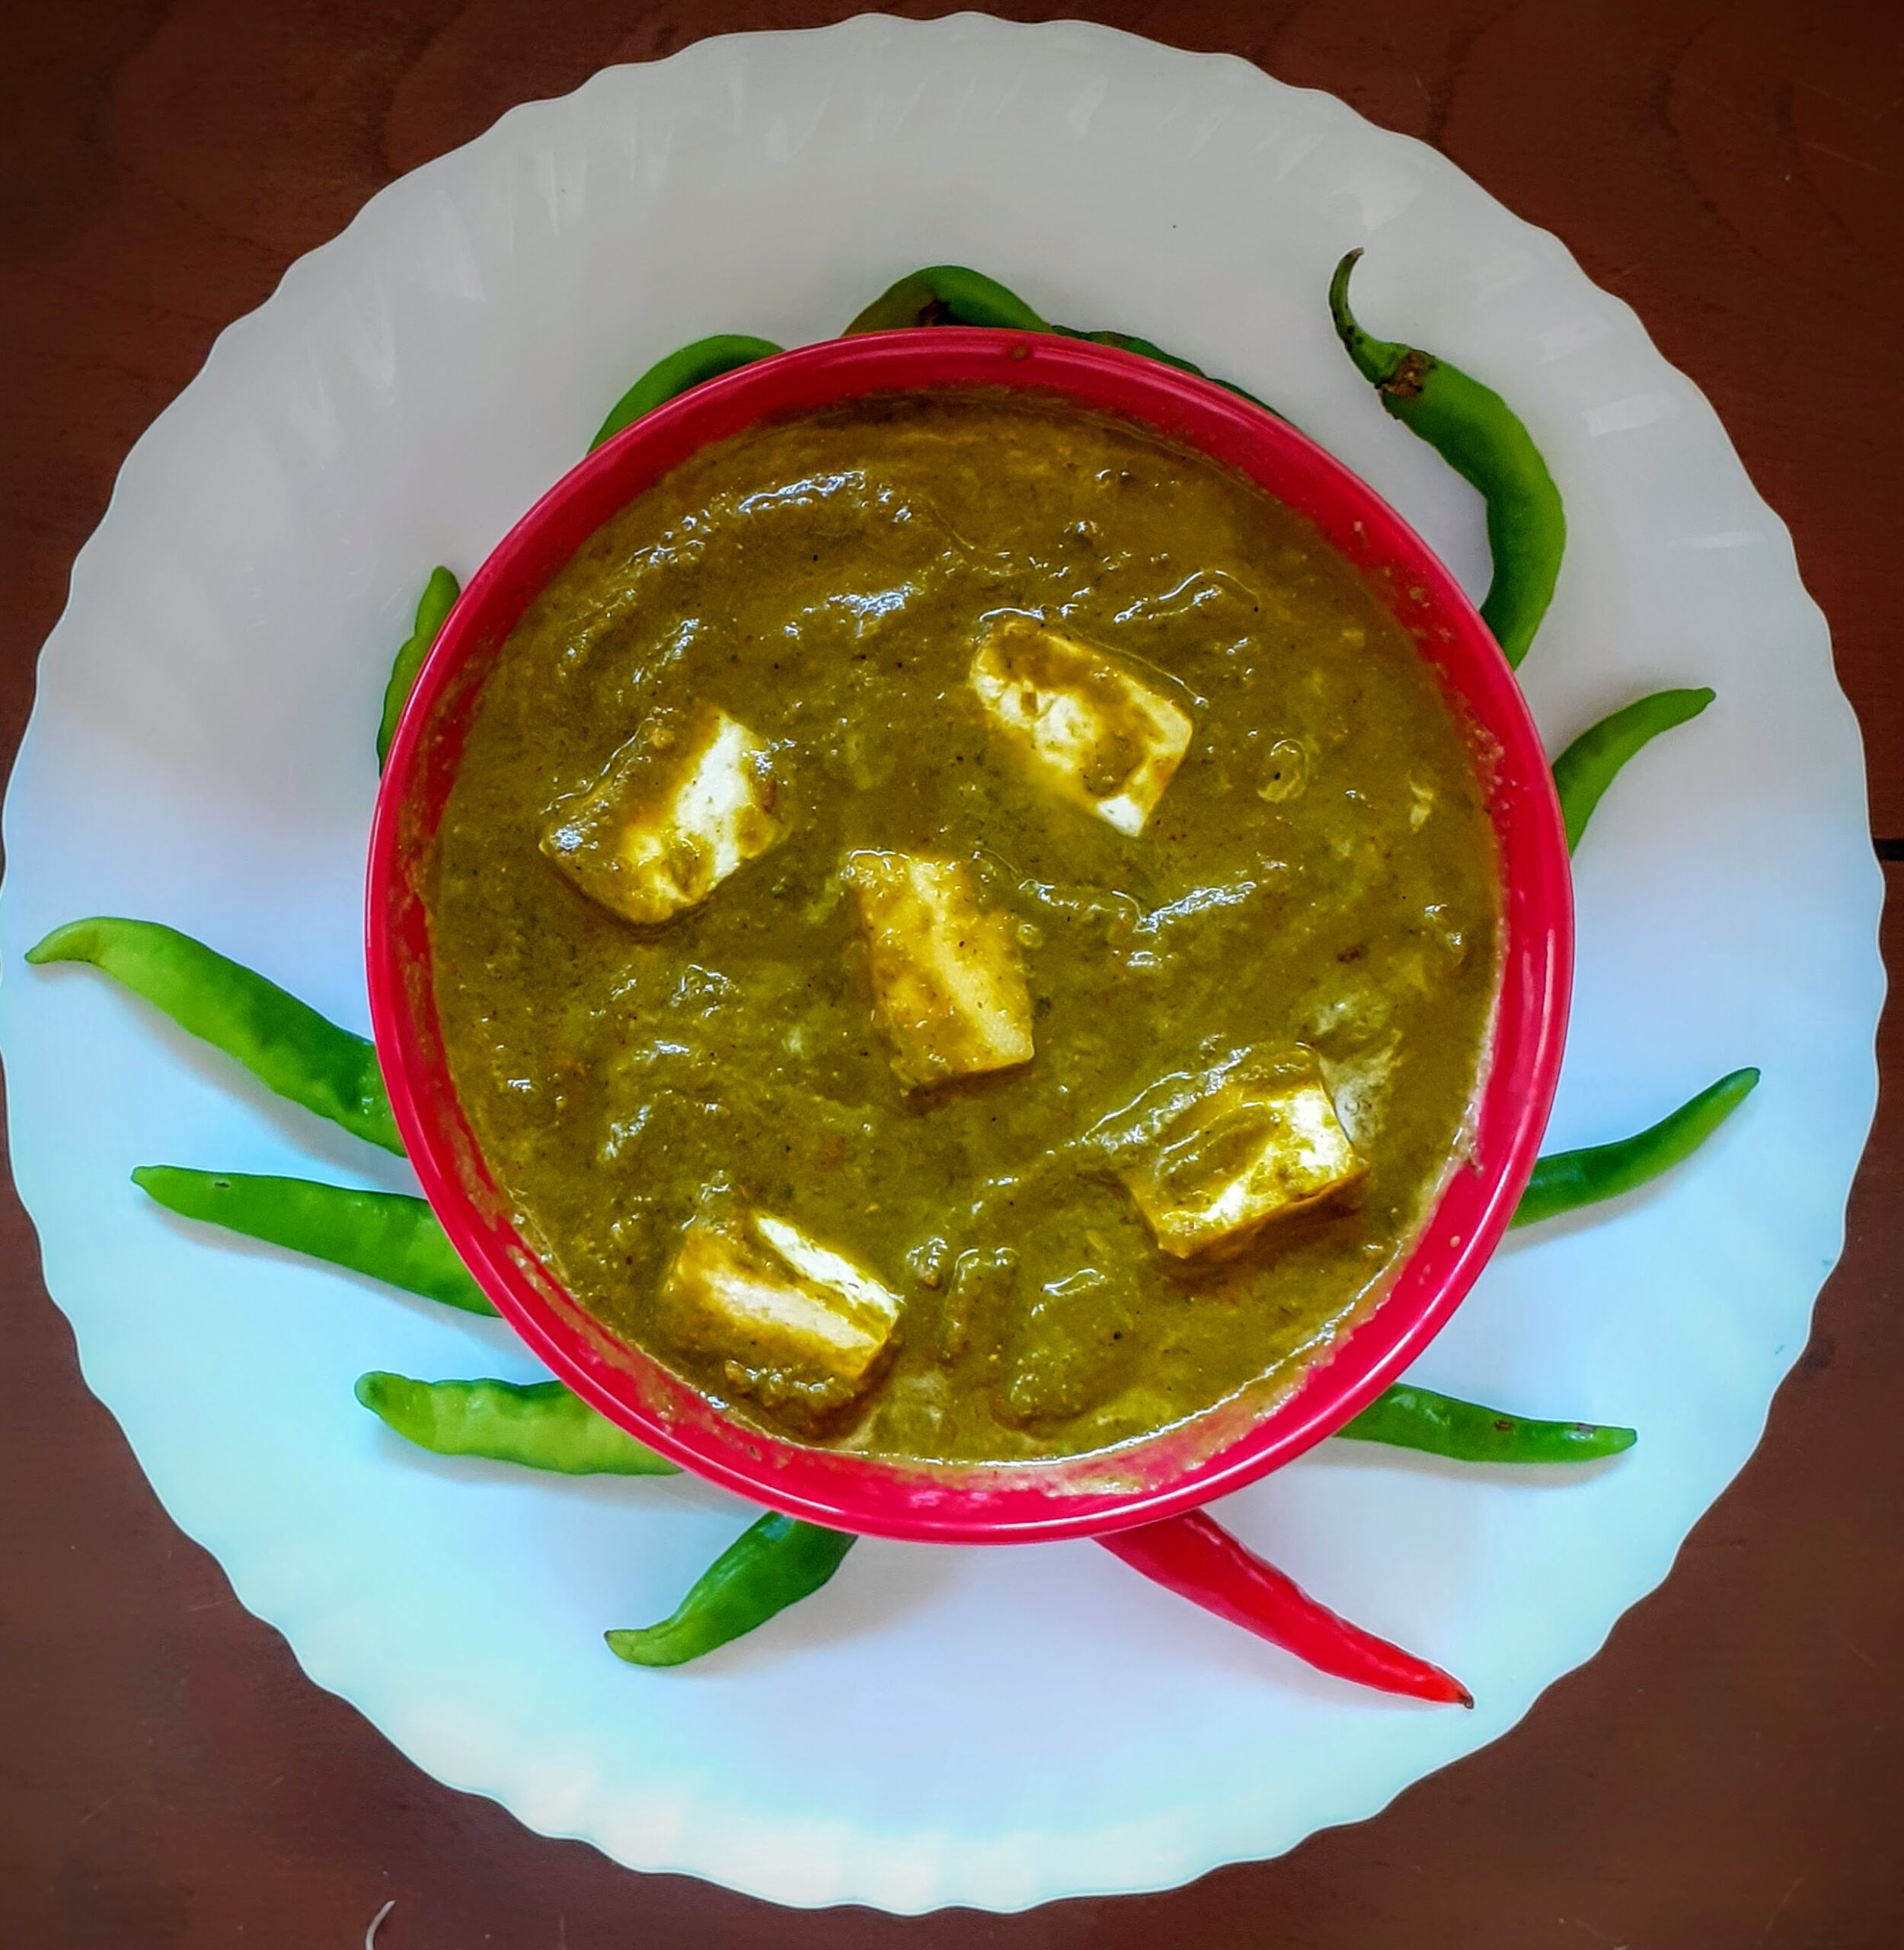
Creamy Palak In Coconut Milk
This recipe is really worth a try. It is different from the Palak recipes that we usually come across. As the name suggests the Palak/Spinach had been cooked in coconut milk. Surprised? Well, the flavor of the coconut is very subtle and does not overpower the palak at all. The coconut milk gives a creamy texture to the dish. This dish goes well with rotis, paratha, and rice. It is a simple and healthy recipe with loads of flavour. This is an excellent way to add palak to your diet, as Palak/spinach is rich in iron and fibre. This recipe is adapted from a similar recipe I spotted on @ budgetbytes.com. I have also added a small video for this recipe for easy reference.
When I made this dish I had only 1 bunch of Spinach and then when I tasted the dish I regretted making it with just a bunch as it tasted so good, that we all craved for more. So made it again within a week’s time. If you feel this dish might be very bland because of the coconut milk, let me assure you that on the contrary, it holds on to how much ever spice you put. So one could increase or decrease the spice as per their preference.
Here is the recipe of Creamy Palak in Coconut milk for you-
PREP TIME: 15 Mins COOK TIME: 15 Mins
TOTAL TIME: 30 Mins COURSE: MAIN
CUISINE: NORTH INDIAN SERVINGS: 4
AUTHOR: Rajni Ram
Ingredients:
Palak/Spinach 1 bunch
Coconut milk 1 pouch (200 ml)
Onion 1 large finely chopped
1 Tomato large finely chopped
Garlic 5 cloves finely chopped
Cumin seeds 1/2 tsp
Turmeric powder 1/2 tsp
Salt as required
Red chilli powder 1 tsp( add more for more spice)
Coriander powder 1 tsp
Fennel powder 1 tsp
Garam Masala powder 1/2 tsp
Directions:
Chop the Palak finely and wash. Drain all the water and put the Palak in a pan. Pour 200 ml coconut milk to the palak and switch on the flame. Keep stirring and cooking the Palak. While cooking keep mashing the Spinach with the back of a ladle from time to time. Cook on low flame until most of the coconut milk is evaporated and the mixture resembles a mash. Transfer to another plate/ vessel. Now in another pan/ kadai heat some oil. Add the cumin seeds and as they splutter add the chopped garlic and saute for 30 seconds or until nicely brown. Now add the turmeric powder followed by chopped onion and saute until the onions start turning brown. Now add the chopped tomatoes and saute for a minute. Now add the salt and cook until the tomatoes start turning mushy. Keep mashing the tomatoes as you stir them. Add the chilli powder followed by coriander powder and fennel powder and stir. Now add the cooked Palak and mix well. Cook for a minute or 2 on low flame, add the garam masala and put off the flame. The Creamy Palak in Coconut Milk is ready to serve.
Serving Suggestions: Rotis, Parathas, Rice and also works as a dip for bread. To use as a dip just blitz in a blender for a single spin after cooking.
STEPWISE RECIPE FOLLOWS:
1. Assemble all ingredients. Chop the Palak, wash and drain all the water.
2. Put the Palak into a pan and add the coconut milk and put it on the flame. Add salt.
3. Cook on low flame until most of the coconut milk gets evaporated. Keep mashing the Palak with the back of a ladle while cooking. The mixture should resemble a mash when cooked. Transfer to a plate or vessel.
4. Now in a karahi or pan heat some oil and add the cumin seeds. As they splutter add the chopped garlic and saute for 30 seconds.
5. Now add the turmeric powder followed by chopped onions and saute until the onions start turning brown.
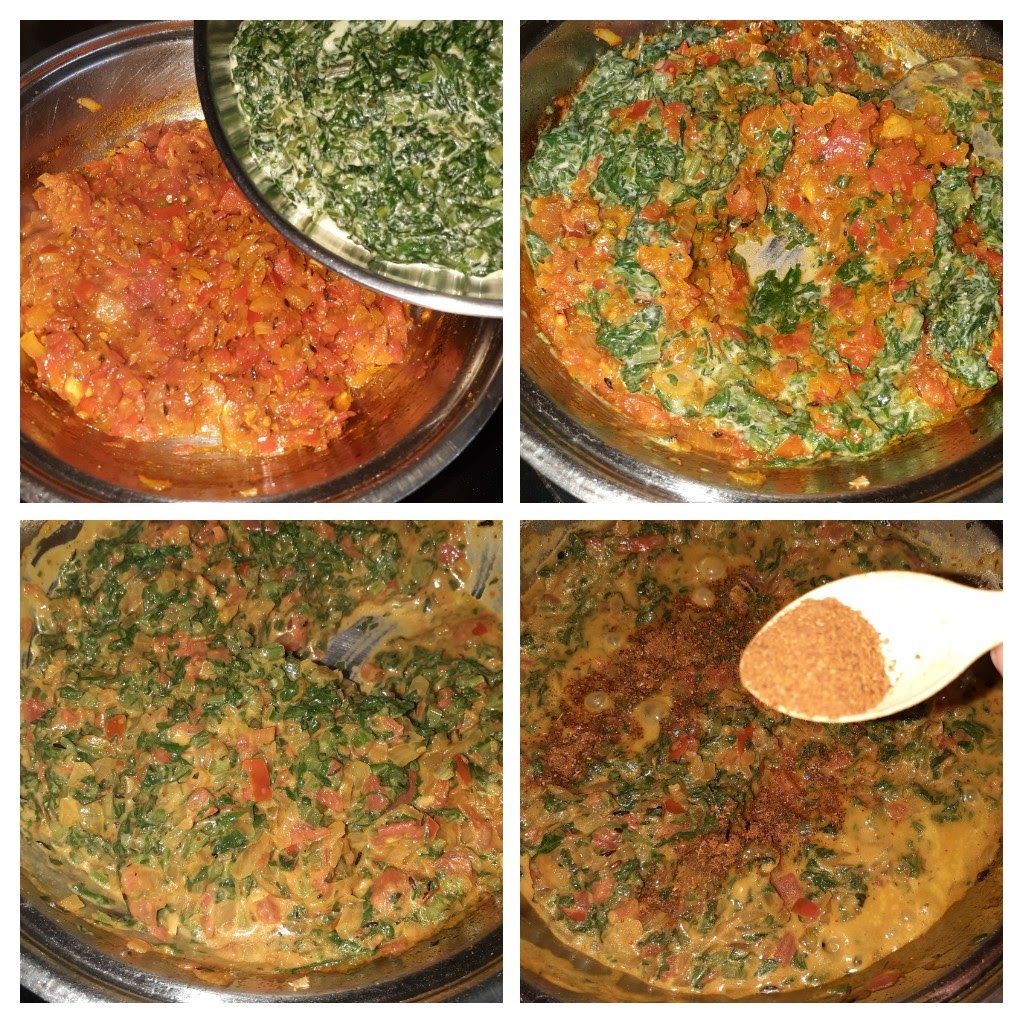
6. Now add the tomatoes and saute for a minute. Add the salt and continue to cook for a minute. Keep mashing the tomatoes as you cook. Now add the red chilli powder, followed by coriander powder and fennel powder and cook until the tomatoes turn mushy and the mixture looks like a paste.
7. Now add the Palak cooked in coconut milk and mix nicely. Lower the flame and let it cook for a minute. Finally, add the garam masala powder and switch off the flame. The Creamy Palak curry is ready to serve.
NOTES:
1. I have used only 1 carton of coconut milk and hence the flavour of coconut was mild. For a more intense flavour add more coconut milk. You can use up to 250 ml for a bunch of spinach.
2. As mentioned in serving suggestions this recipe works well as a sauce or dip for bread. Just blitz the curry through a blender after cooking it to use as a sauce.
SHORT VIDEO OF RECIPE HERE????
If you tried this recipe and liked it please comment below. I would love to hear from you. If you have a query about the recipe email us and ill respond as soon as I can.
If you would like to receive our recipes on your mail please leave your mail id at the homepage. Every time Rajjo’s Kitchen has a new post we will mail the recipe to you.
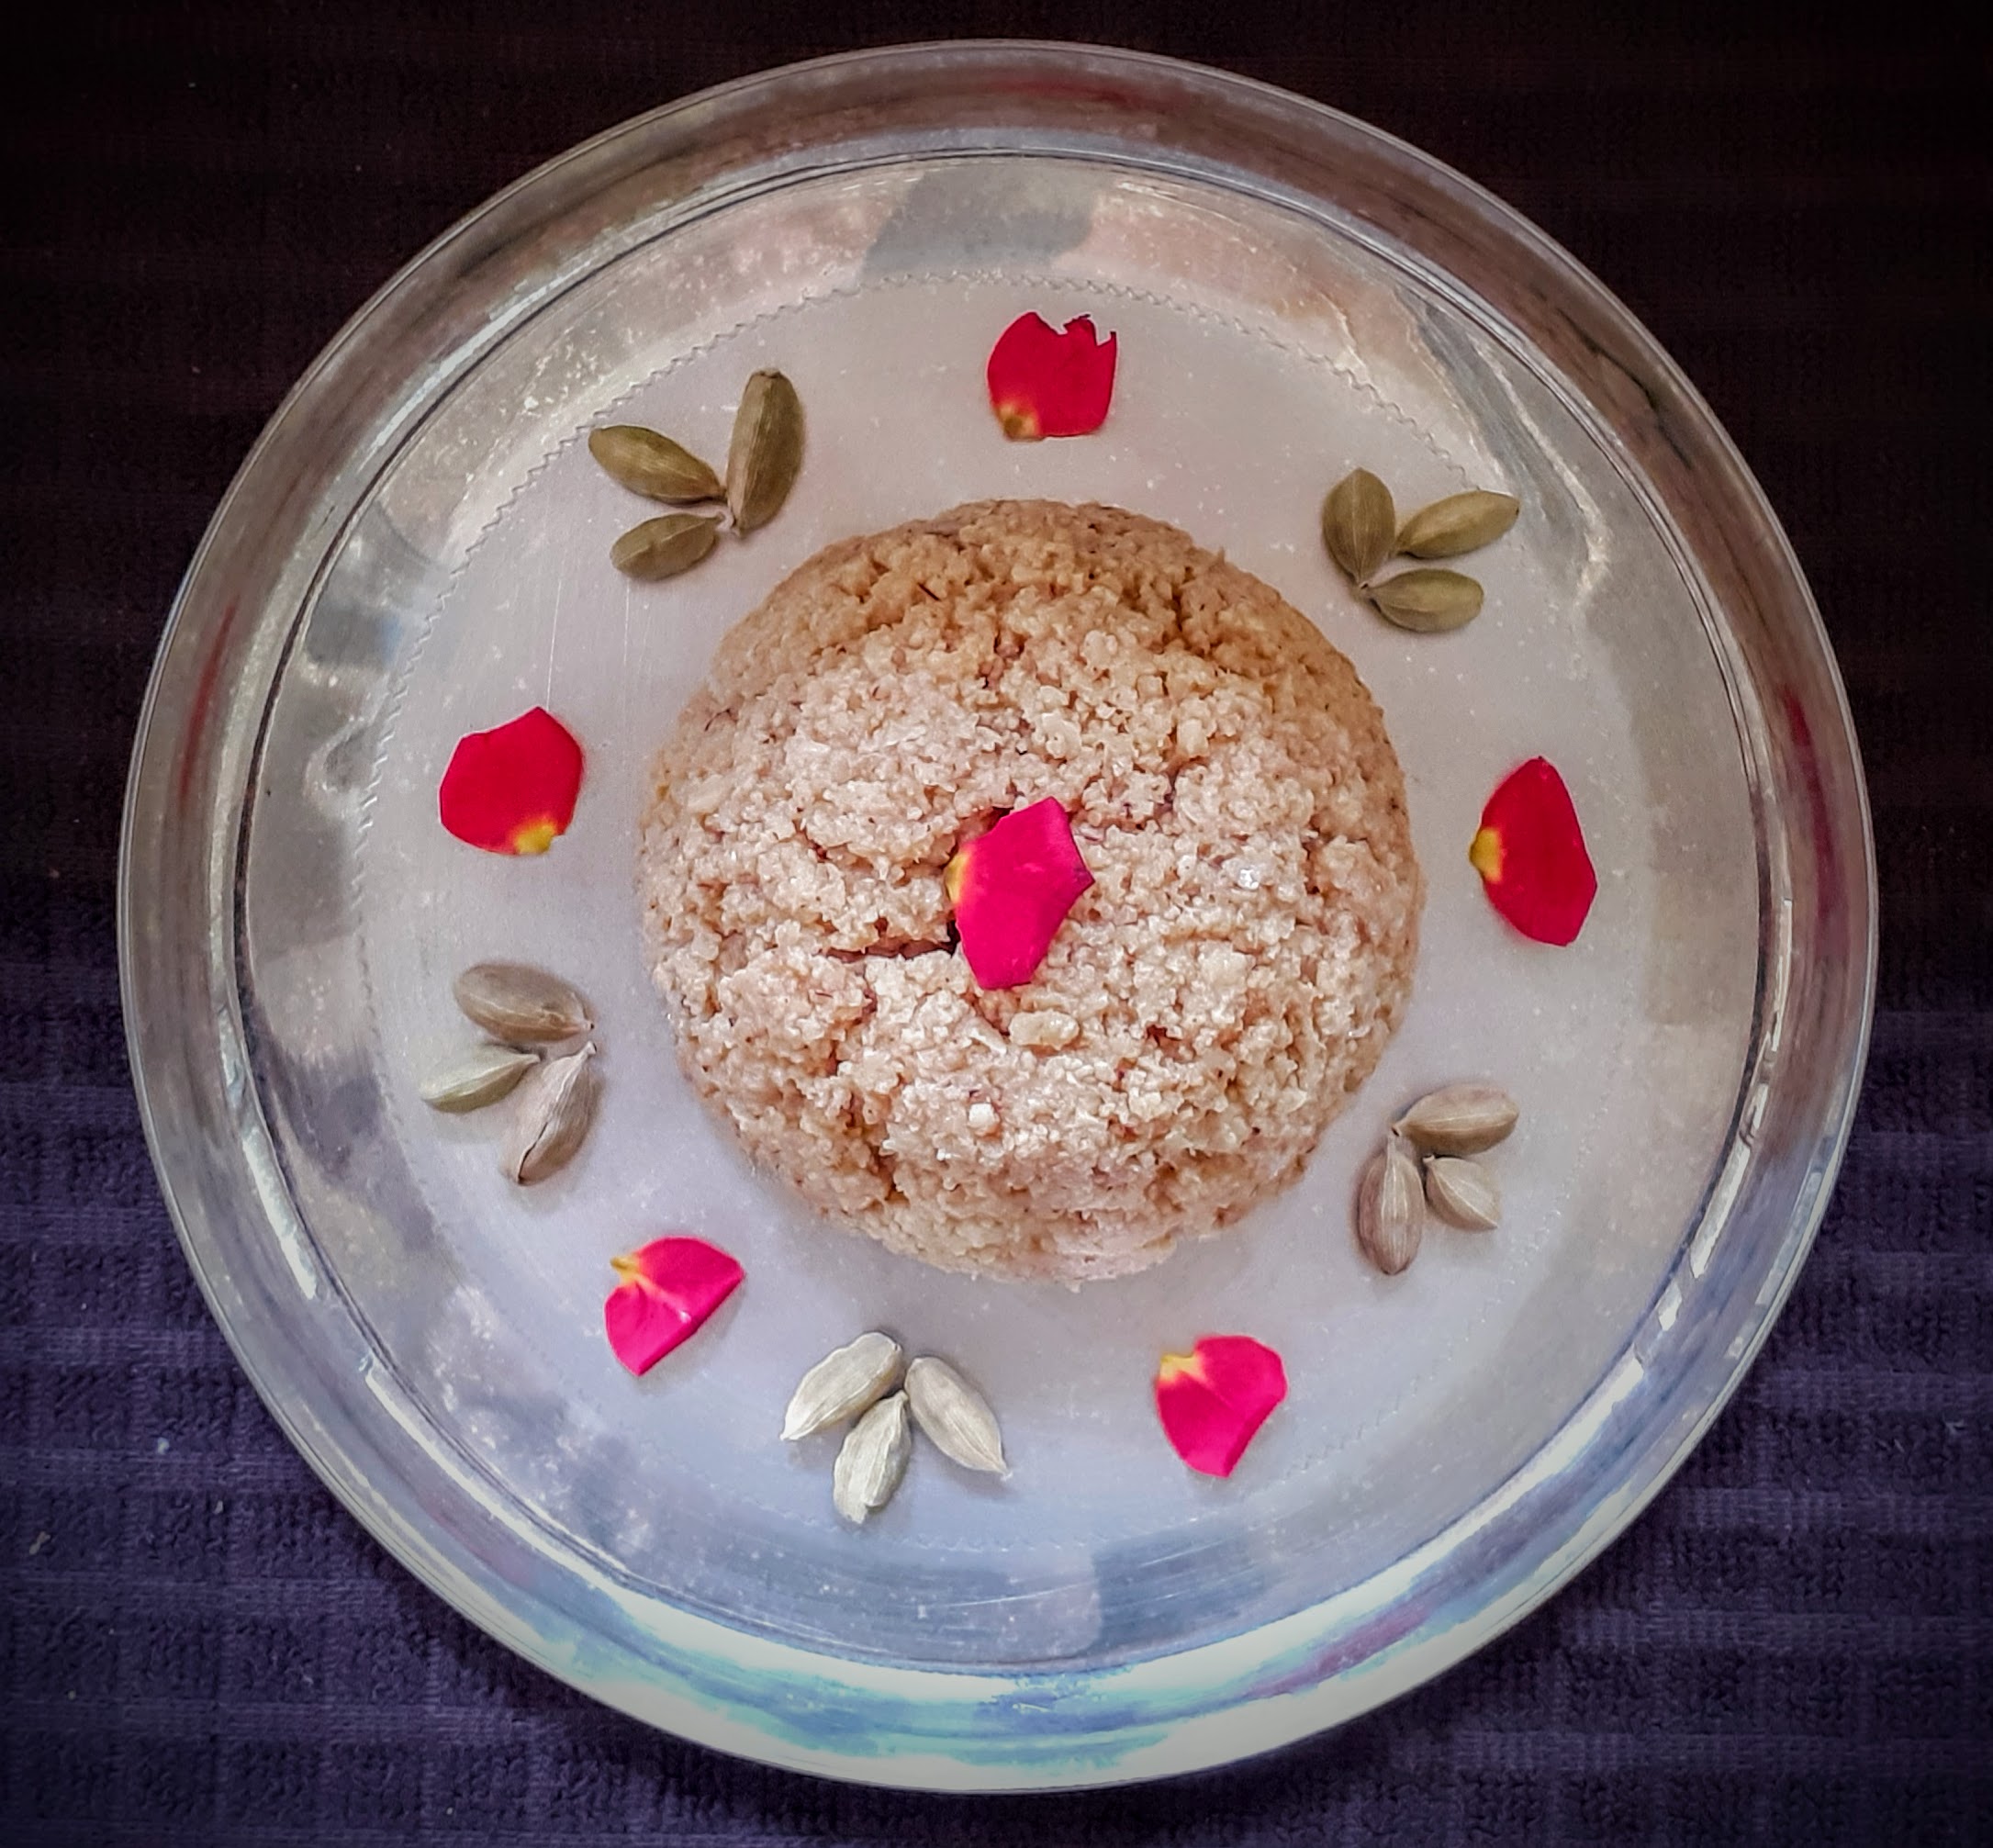
Unni Appam/Nei Appam/Sweet Appam
This Appam recipe is the Kerala style Appam, made with soaked raw Rice, Jaggery, Banana and Cardamom. It is one of the most simple recipes and is also one of the main offerings in festivals like Janmashtami, and Ganesh Chaturthi. In our house, it is also an instant snack that my mother would make in a jiffy apart from the soak time. Usually, an Appam mould/ Appa karai is required for this, but some also make it by directly pouring a ladle of batter into the oil and deep-frying. If fried without a mould the shape is flat like that of a Pancake, whereas the one made in a mould is round. It is best made with ghee, though oil too can be substituted for ghee.
Grinding the batter to the right consistency is a critical step, as too dilute a batter will affect the moulding of the appam and the batter may just scatter away in the oil. Therefore I have mentioned the right way to grind the batter in the recipe. Once the batter is ground we are just five minutes away from yummy tasting Nei Appams.
Here is the recipe of Sweet Appam/ Unni Appam for you–
PREP TIME: 10Mins+ 1 hr(soak) COOK TIME: 30Mins
TOTAL TIME: 40Mins COURSE: DESSERT/SWEET
CUISINE: SOUTH INDIAN SERVINGS:15 pcs
AUTHOR: Rajni Ram
Ingredients:
Raw Rice 1 cup soaked for 1-hour minimum ( 1 cup equals 200 gm) ( refer note1)
Jaggery 1 cup powdered/shredded
Banana 1/2 to 3/4 th of 1 large
Cardamom powder 1/2 tsp
Coconut grated or cut to small pieces 2 Tbsp
Directions:
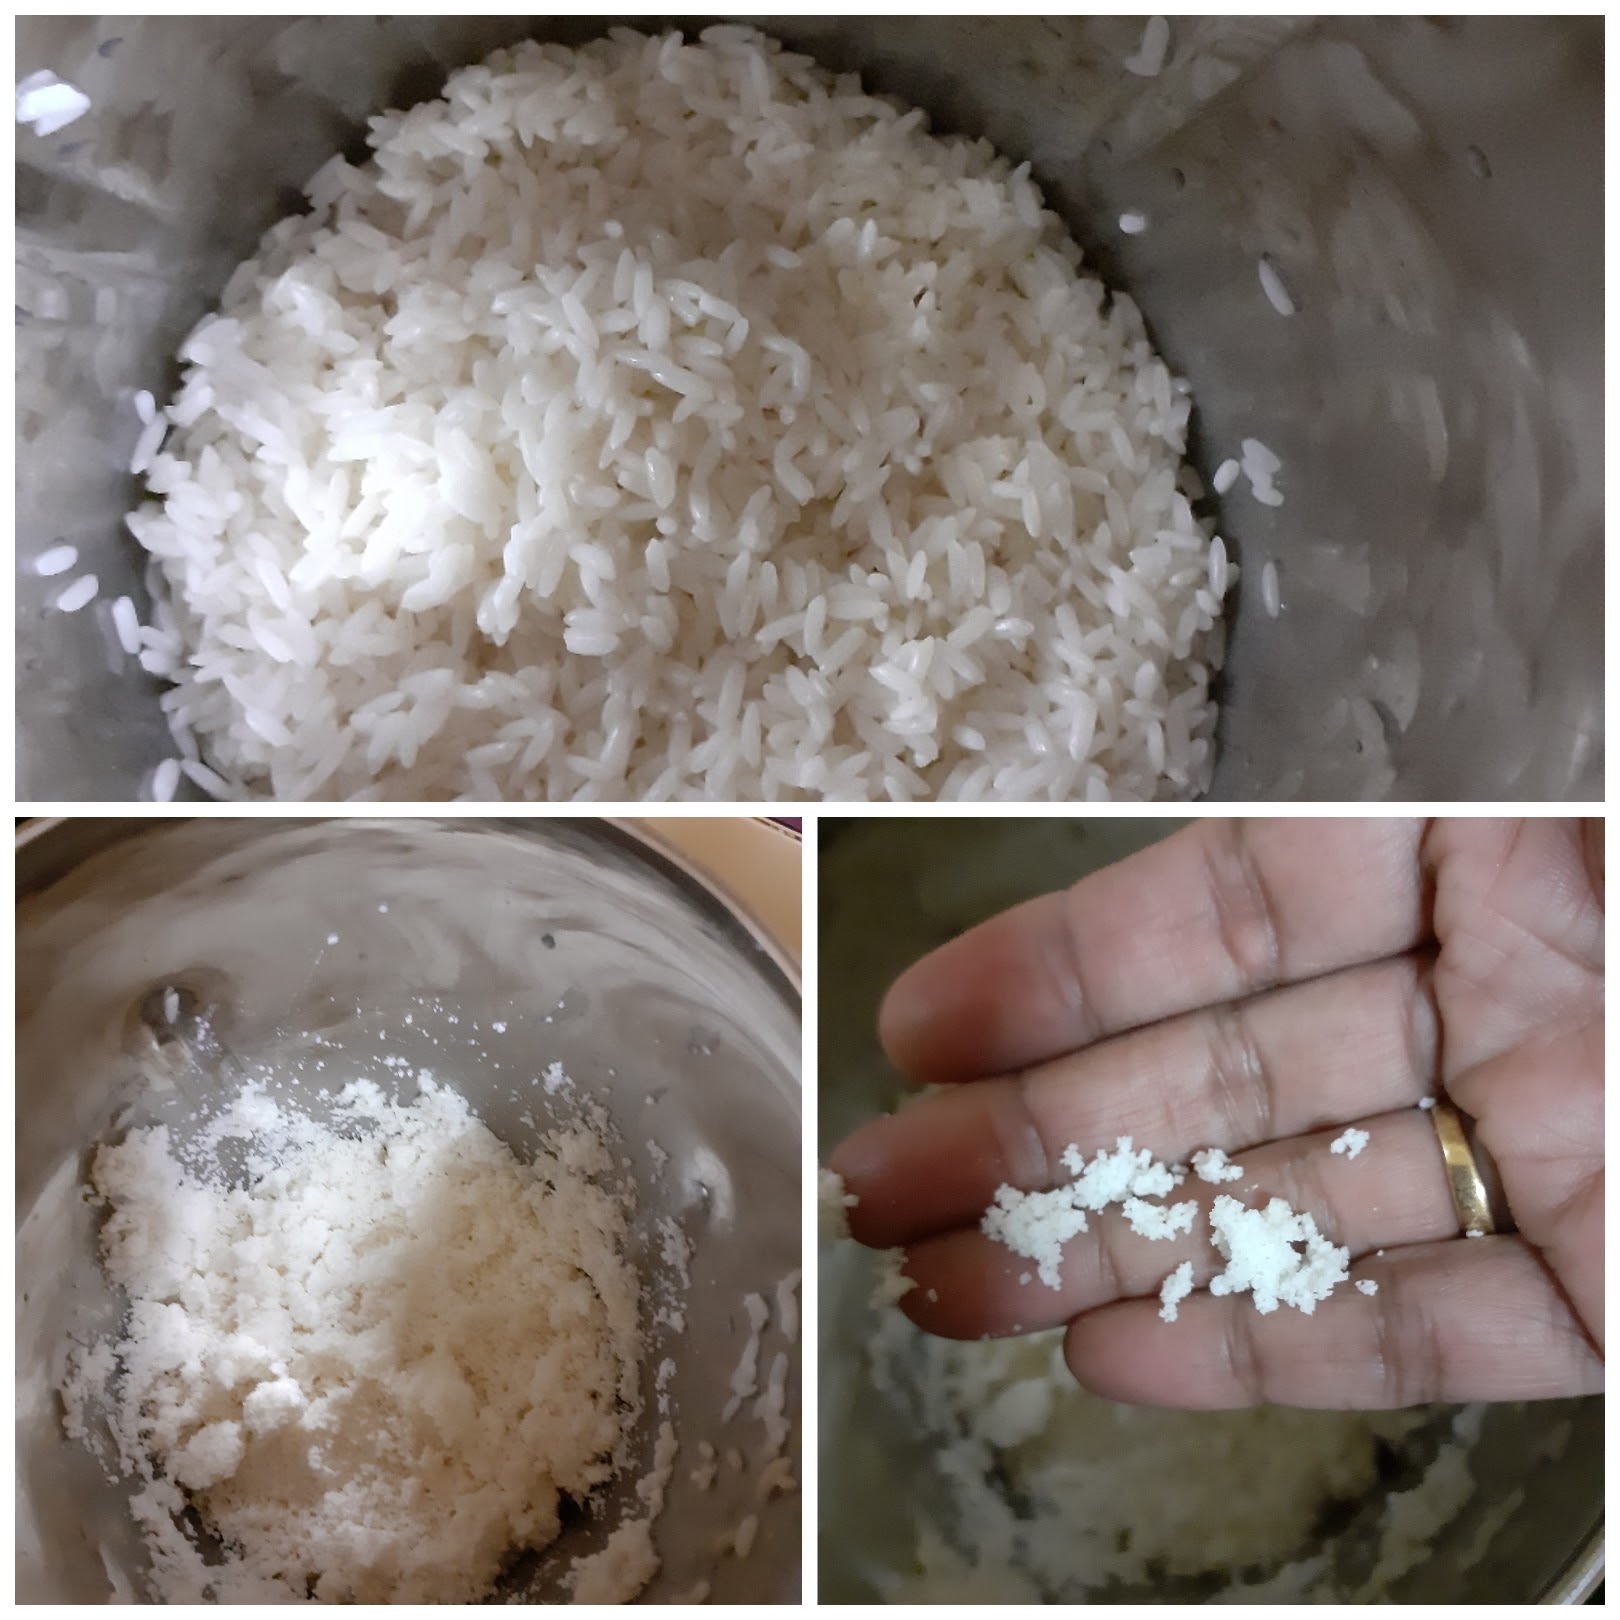
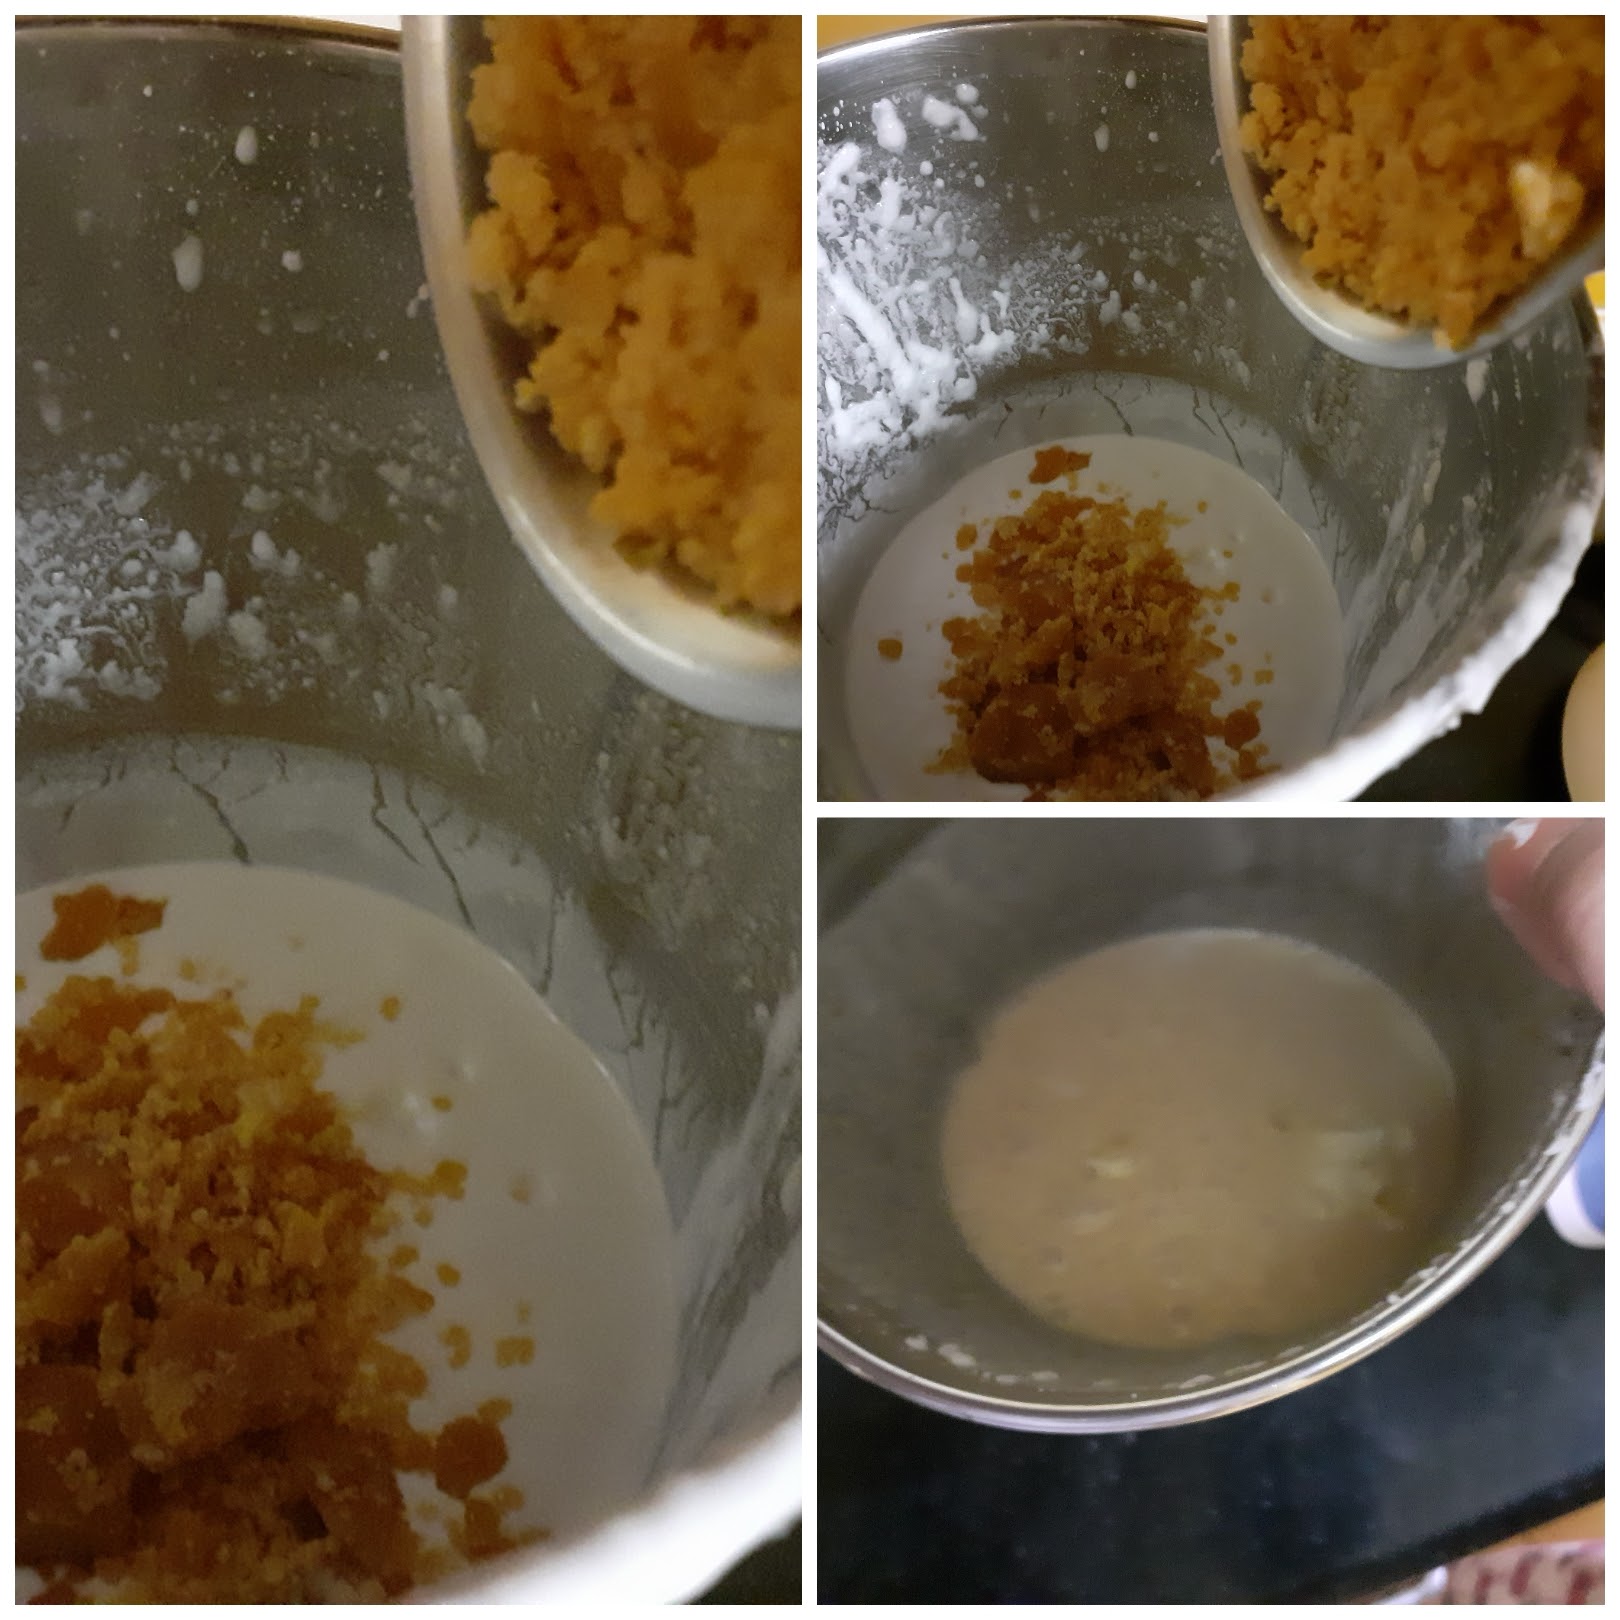
Soak the Rice for a minimum of 1 hour and up to a maximum of 1.5 hours. After soaking, drain all water and out the rice into a blender. Grind it first to a Rava/Sooji like texture without adding water, now add little water and grind to a smooth paste. Take care not to add too much water, as adding jaggery will liquify it further. So try to use only 1/4 cup water to get a smooth texture. Now add the Jaggery and grind again. Add coconut grating and blitz. Mash the bananas with your fingers and add them to the batter and bring again to a smooth batter. Transfer to a vessel and add the cardamom powder. The Appam batter is now ready.
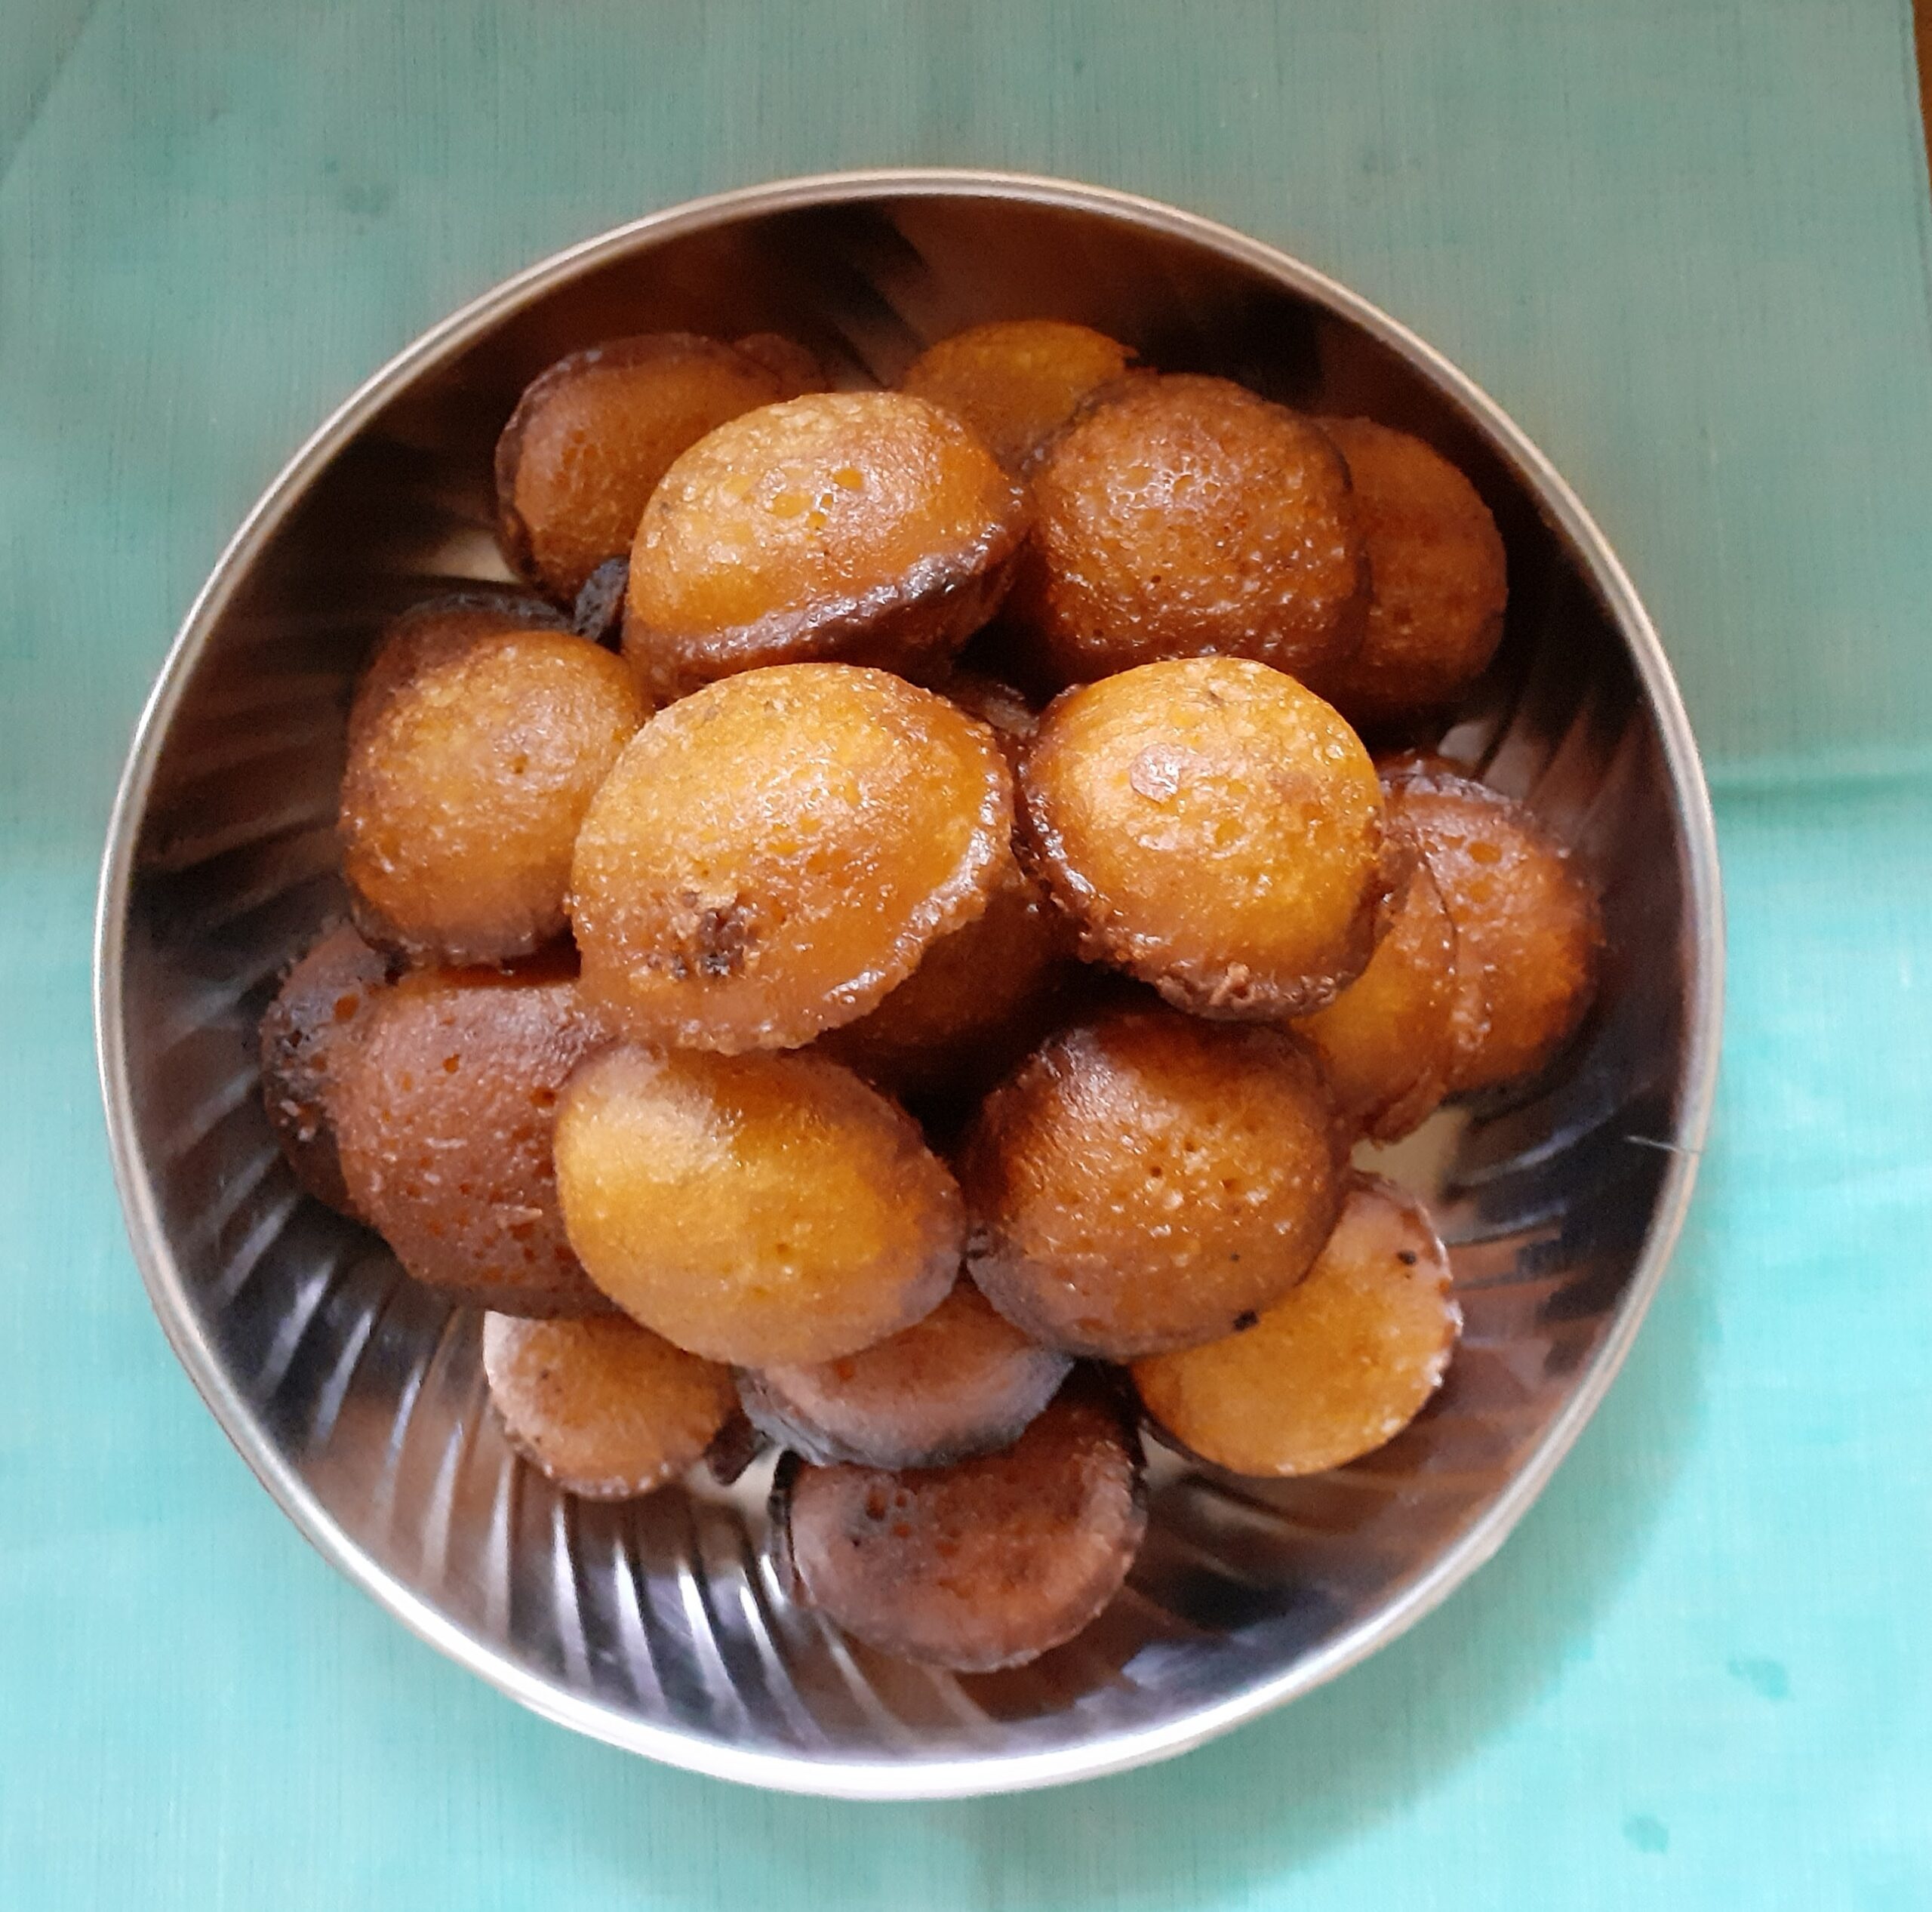
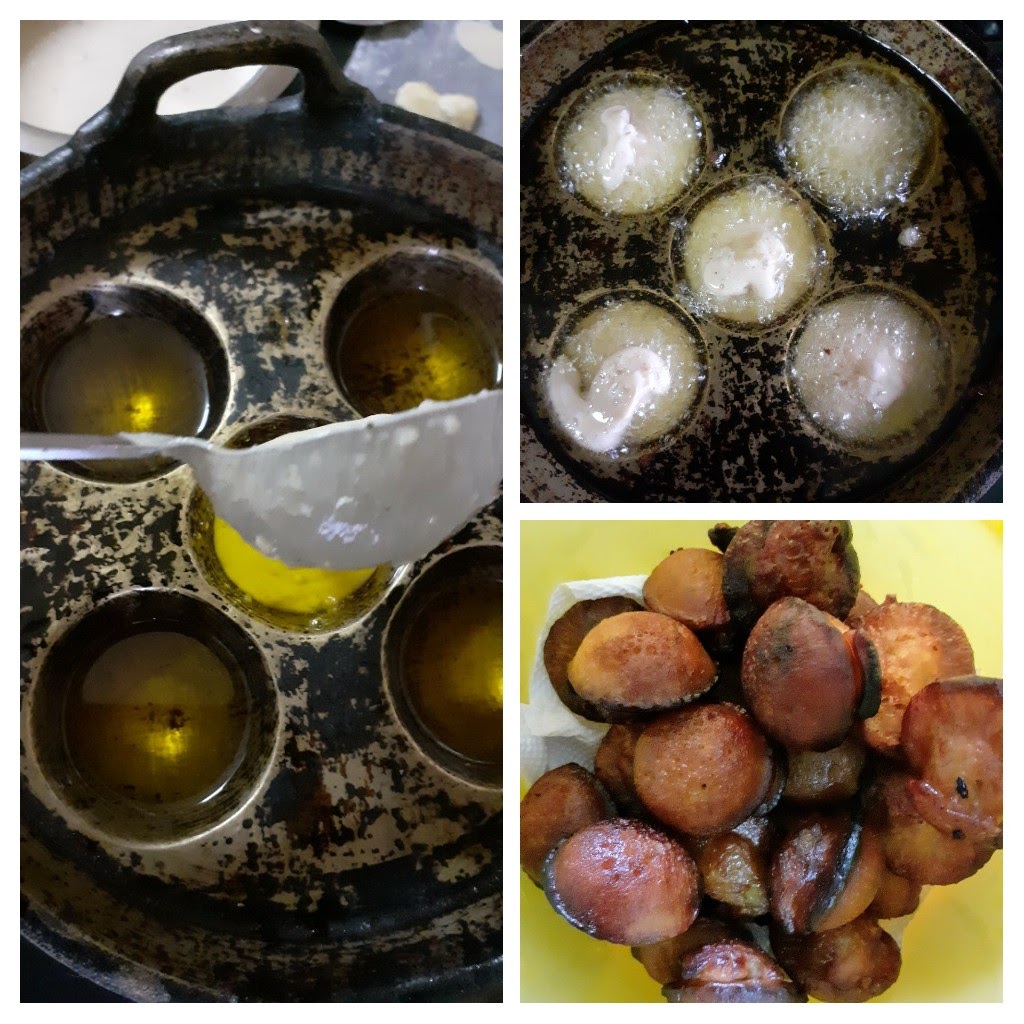
Now put the Appam mould/Appam Chetty or Appa Karal on flame and heat it well. Spoon in the ghee into the moulds liberally. Let the ghee heat up, now spoon the batter into the moulds and fry on one side until golden brown, using a kambi/skewer or a fork, to loosen the edges of the Appam and flip it to the other side and fry until golden brown. To check for doneness, pierce the appam with the skewer/toothpick or fork in the center, if it comes out clean, remove appams from the mould. The delicious Unni appam/ Sweet Paniyarams/ Nei Appams are ready. Enjoy. Bon Appetit.
STEPWISE RECIPE FOLLOWS:
1. Soak rice for 1 hour. It can be soaked up to a maximum of 1.5 hours.
2. After an hour drain all the water and put the rice ina blender and grind it without any water at first to a Rava/Sooji like texture.
3. Now add water little by little and grind it to a smooth paste. Water should be used minimally. I used around 1/4 cup water to grind. Check cup measurement given above.
4. Now add the jaggery again and grind to a smooth paste, add the coconut gratings and blitz again.
5. Now mash 3/4 of a Banana with your fingers and add it to the paste, grind once again to a smooth batter. The consistency should be that of dosa batter. Transfer it to a vessel and add the cardamom powder. The appam batter is ready. Have added a mini video to show the consistency of the batter.
6. Put an Appam Chetty on the flame. Spoon in the ghee and heat it. Now spoon in the batter into the moulds and fry on now side until a golden brown. Using a skewer or fork loosen the edges of the appam and gently flip it to the other side and fry again to a golden colour. Repeat for all batter. The Sweet Appams are now ready.
NOTES:
1. Any raw rice variety can be used other than Basmathi as the Basmathi rice does not have a lot of starch content that is required for binding. The appams turn out rubbery with it.
2. While grinding if you end up with a runny batter accidentally, then add rice flour a tablespoon at a time until you achieve the right consistency.
3. If the batter splits or breaks apart in the ghee either your batter is runny or too much jaggery has been added. So modify accordingly and fry.
4. It is ideal to fry these appams in ghee/clarified butter as it tastes best. But oil also can be used.
5. Banana varieties that are sweet can be used. Avoid the slight sour ones like Poovan.
6. Always start with frying a single Appam first so that if something needs to be adjusted it can be done and then the rest can be fried.
If you tried this recipe and liked it please comment below. I would love to hear from you. If you have a query about the recipe email us and ill respond as soon as I can.
If you would like to receive our recipes on your mail please leave your mail id at the homepage. Every time Rajjo’s Kitchen has a new post we will mail the recipe to you.
Thengai Therattipal/ Palkova (Coconut Infused)
Therattipal or Palkova is a dehydrated milk sweet, made with only two ingredients-Milk and Sugar. Therattipal is a traditional recipe made for festivals like Janmashtami and Deepawali. In our house, Therattipal is the main offering to Krishna apart from Sweet Appam and for Deepawali too we start the festival with a spoon of the Therattipal immediately after Ganga Snanam.
This time I have given a twist to the Therattipal and added roasted coconut gratings to it, which enhances the taste of this sweet dish. Anyway until we add the coconut the method of the recipe is the same. Usually, no cardamom powder is added to this sweet as the milk taste is what should pervade, but if one does prefer, it can always be added.
The coconut flavour is mild and not very intense. The milk and the coconut combine really well to give a different taste which is a welcome change from the regular Therattipal.
This recipe if made with pure organic cows milk tastes divine, as while the milk reduces you can see the natural fat bubbling out. And it tastes as though ghee has been added to it. These days since we all use milk packets or tetra pack cartons of milk we don’t see this process happening naturally and so we add a teaspoon of ghee at the end. its an optional step and the sweet will still taste the same, if not added.
While you are here please check out my other Sweet dish recipes like –
The same recipe can be followed for regular Therattipal/Palkova too. Only the coconut doesn’t have to be added.
Here is the recipe for Thengai Therattipal/Palkova(coconut-infused)-
PREP TIME: 5Mins COOK TIME: 1 hr
TOTAL TIME: 1 hr 05Mins COURSE: DESSERT
CUISINE: SOUTH INDIAN SERVINGS: 4
AUTHOR: Rajni Ram
Ingredients:
Milk (toned milk) 1.5 litres (refer to note1) Sugar 140 gm approx (reduce if you prefer less) Coconut (grated) 1 cup
Directions:
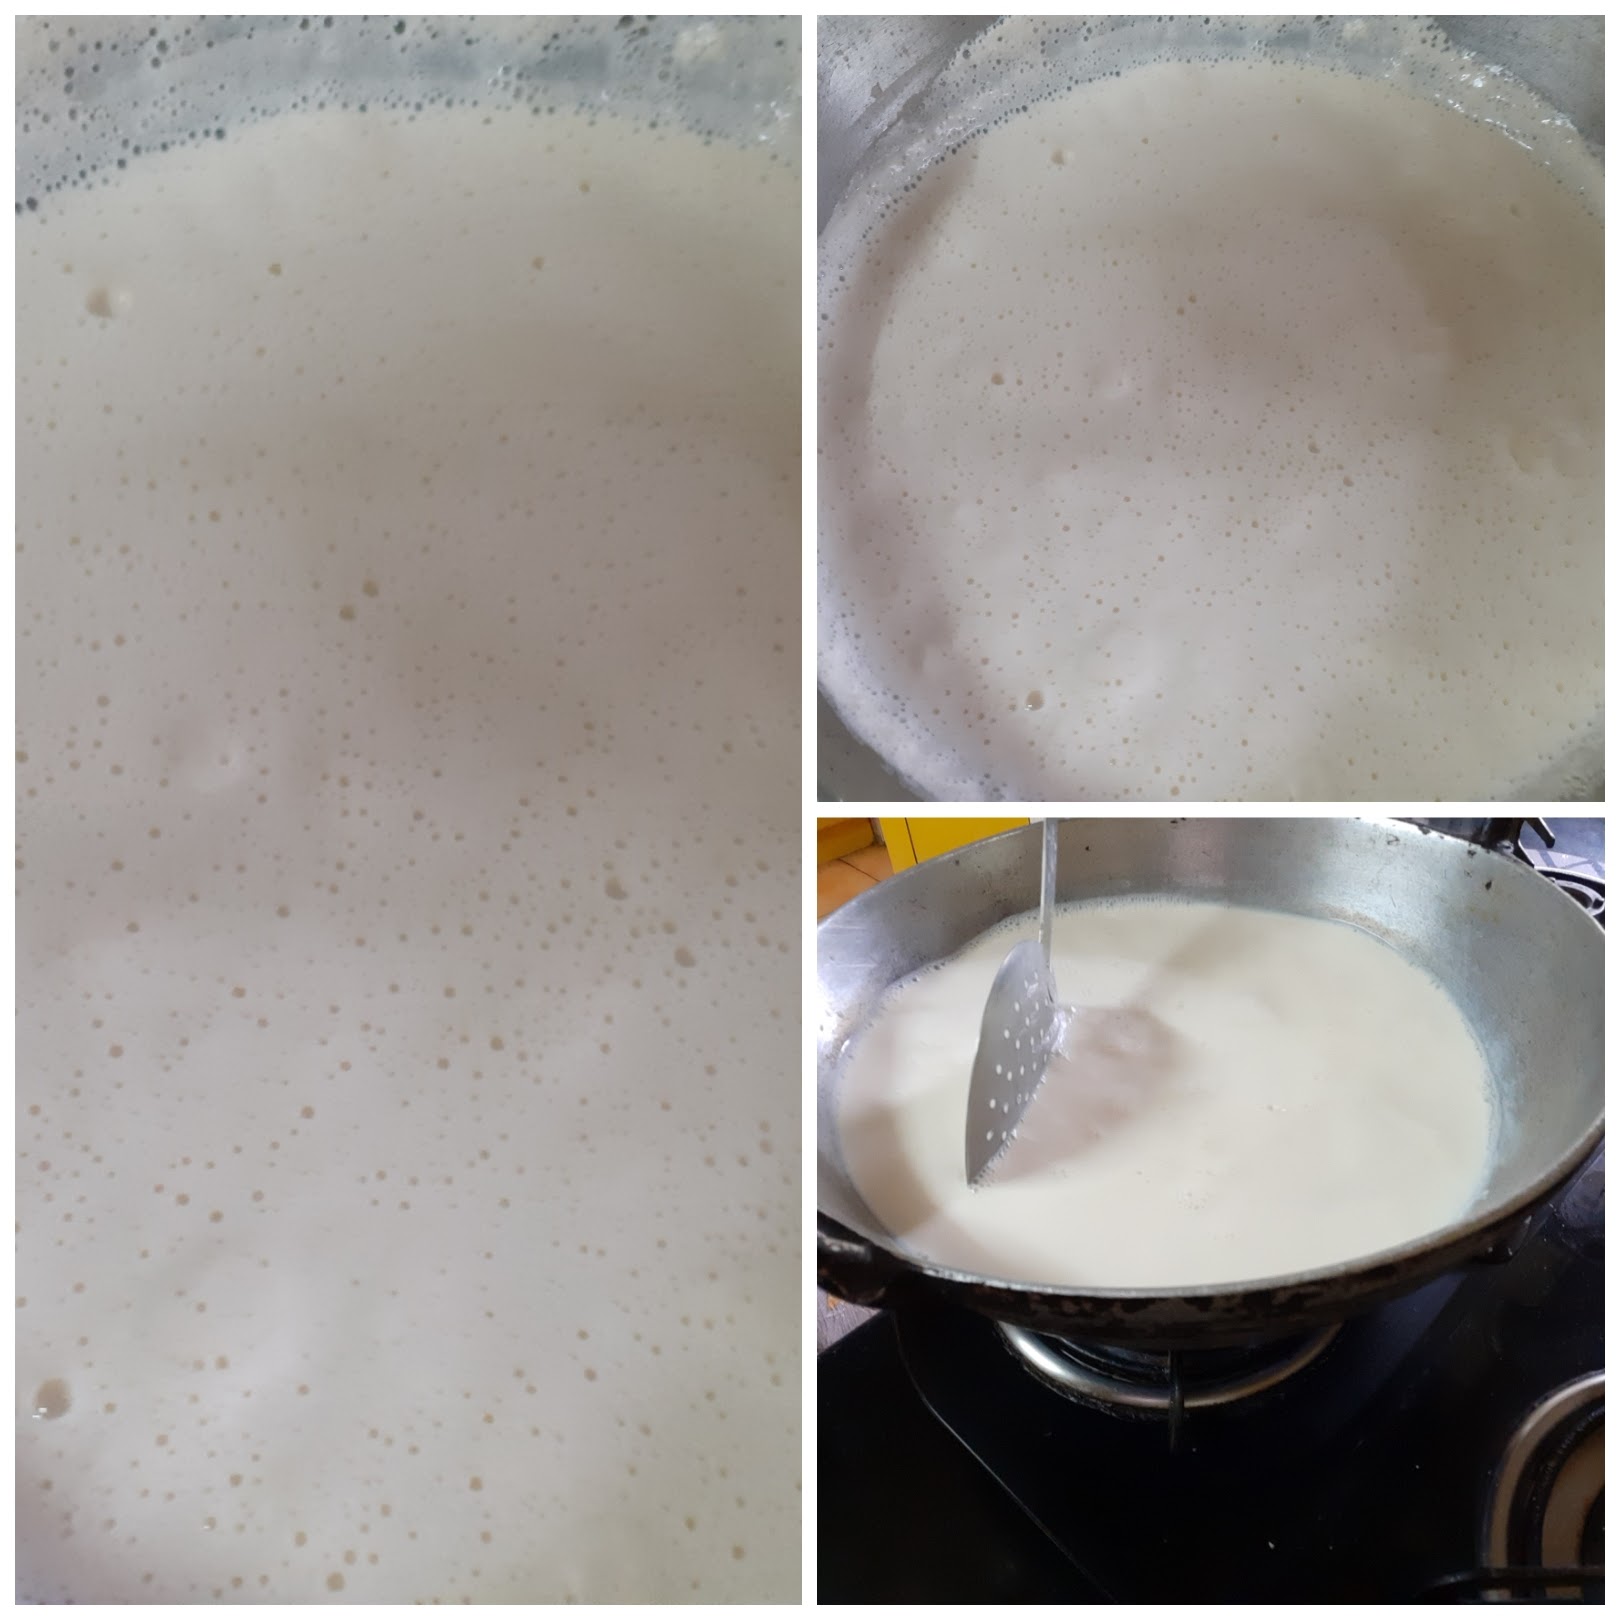
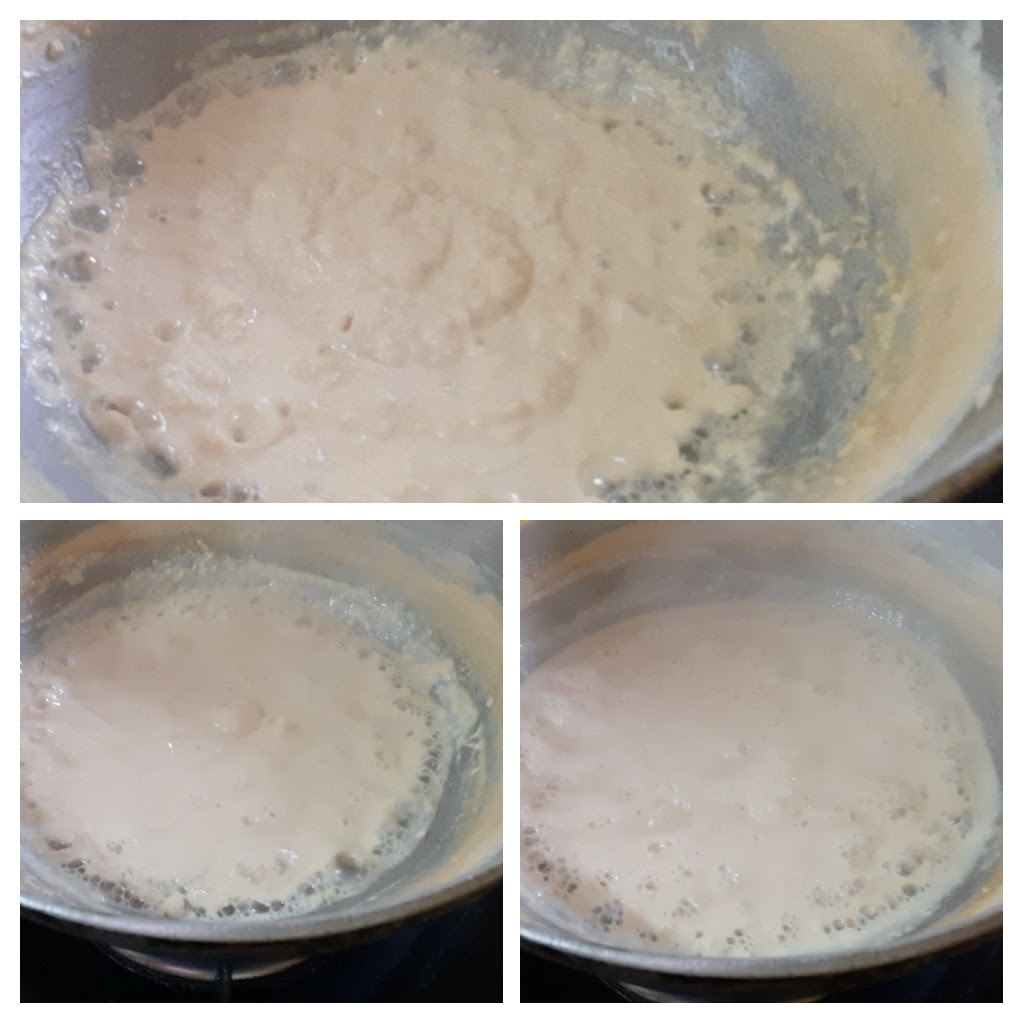
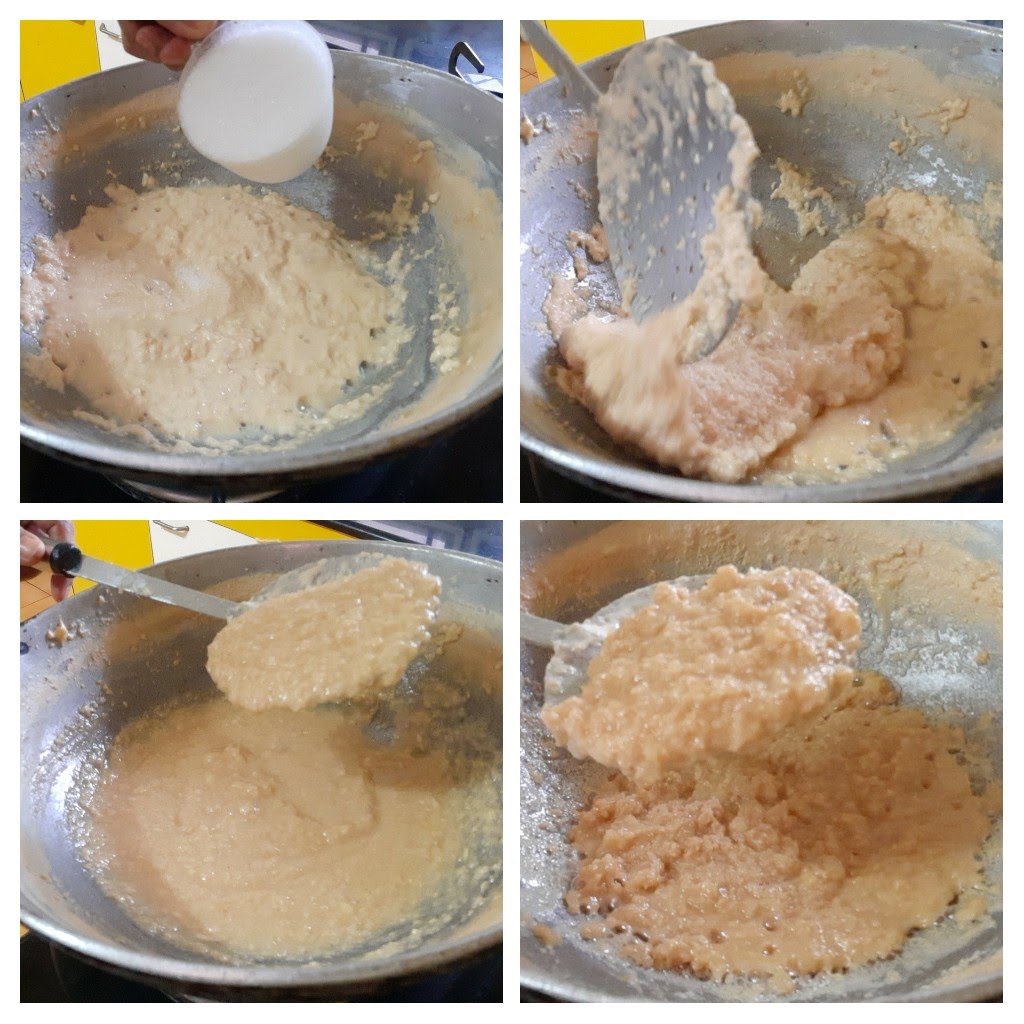
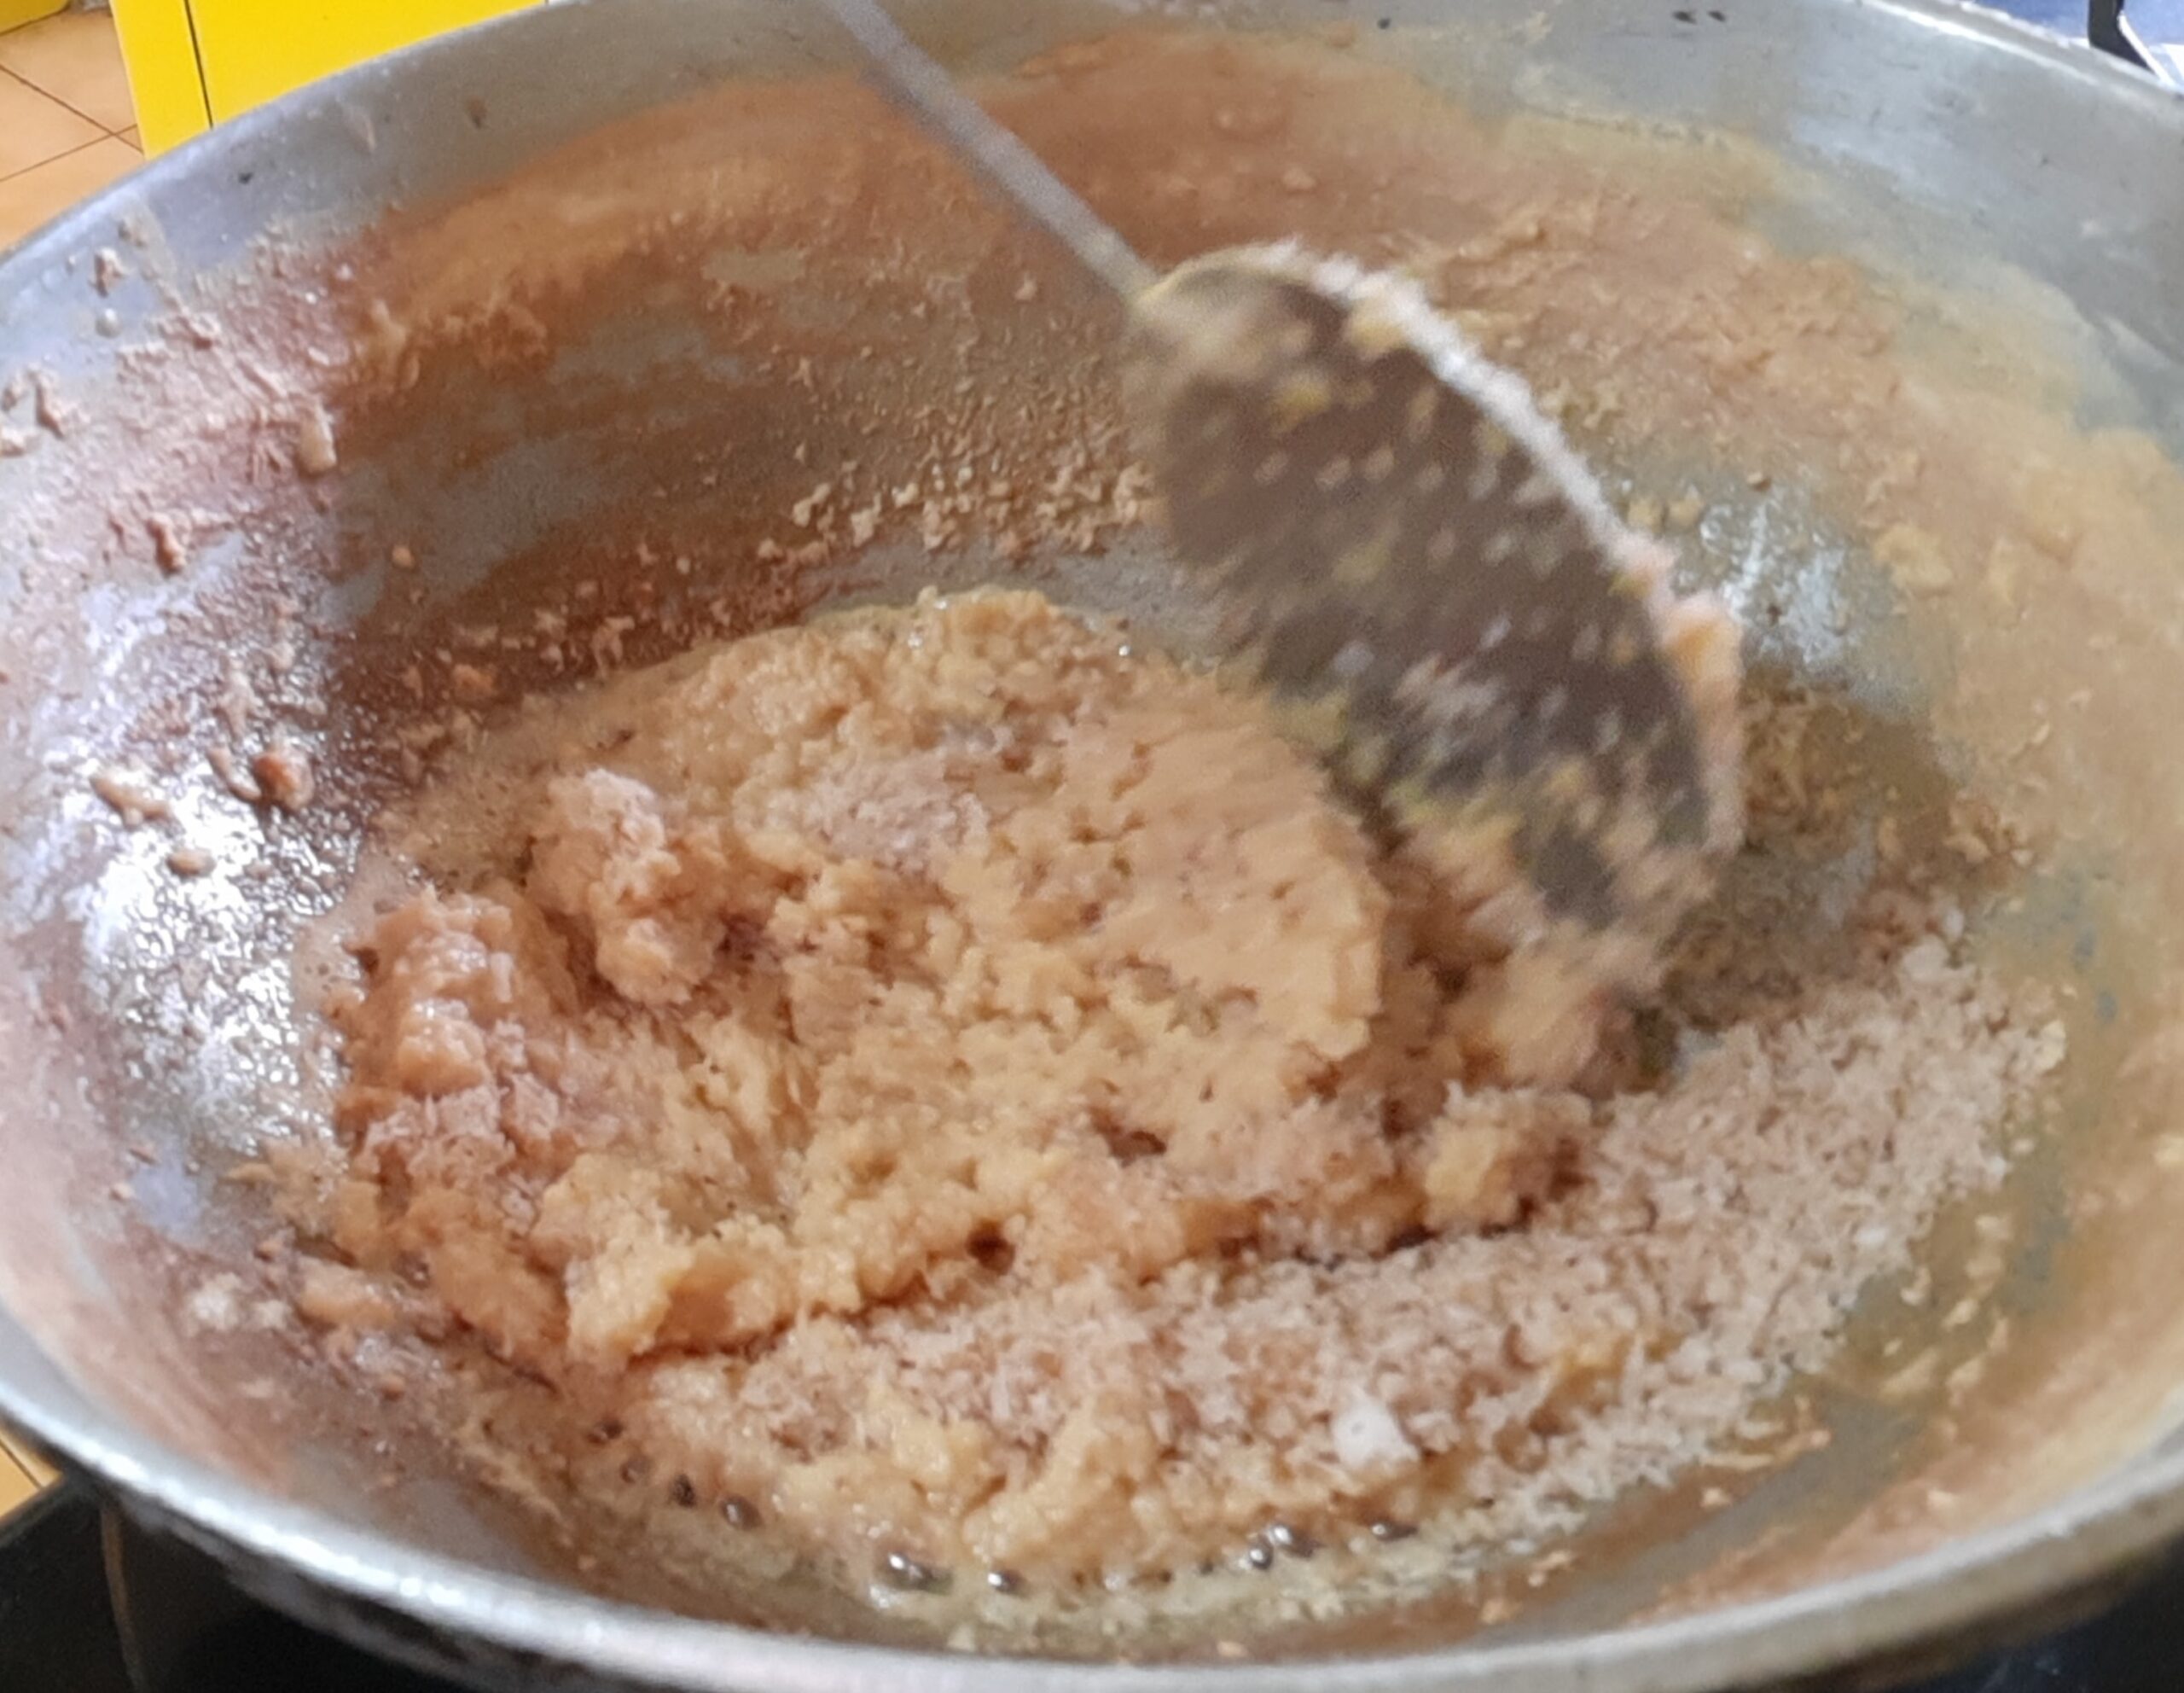
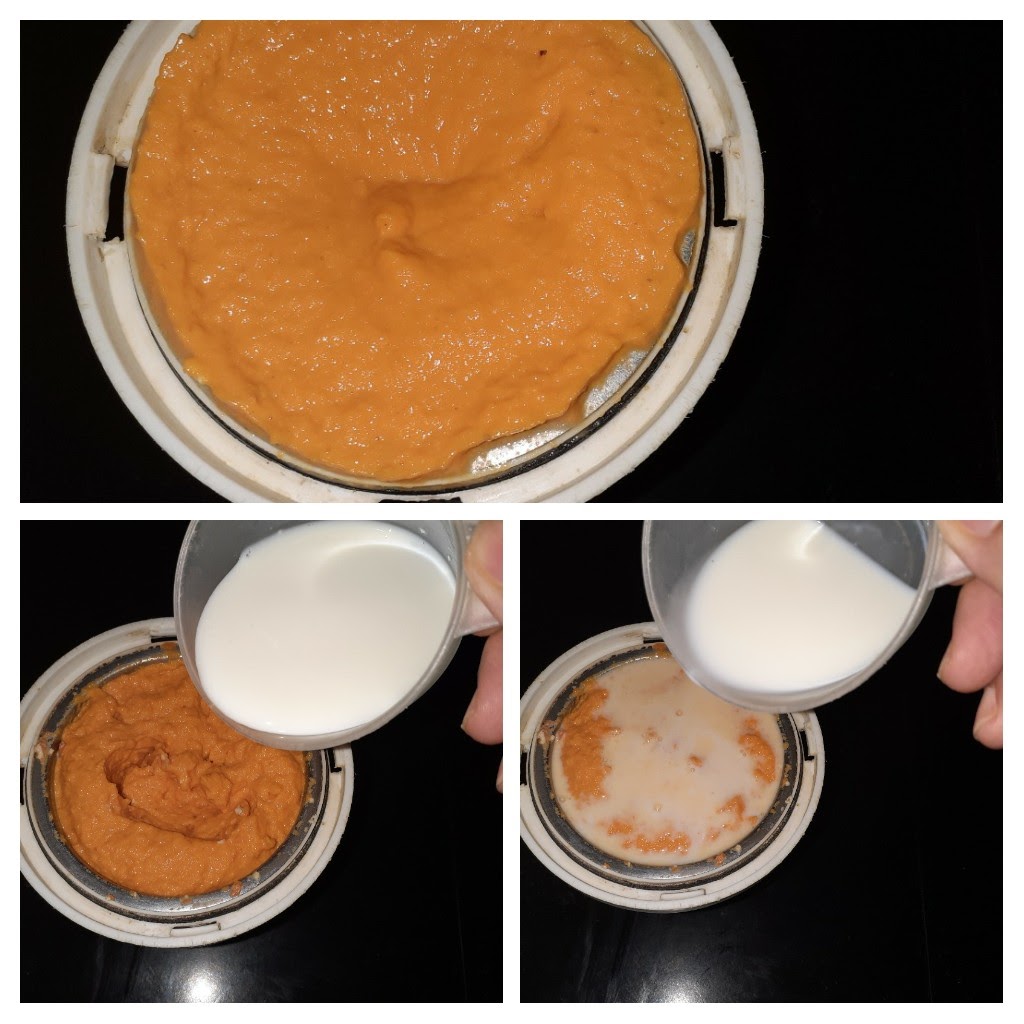
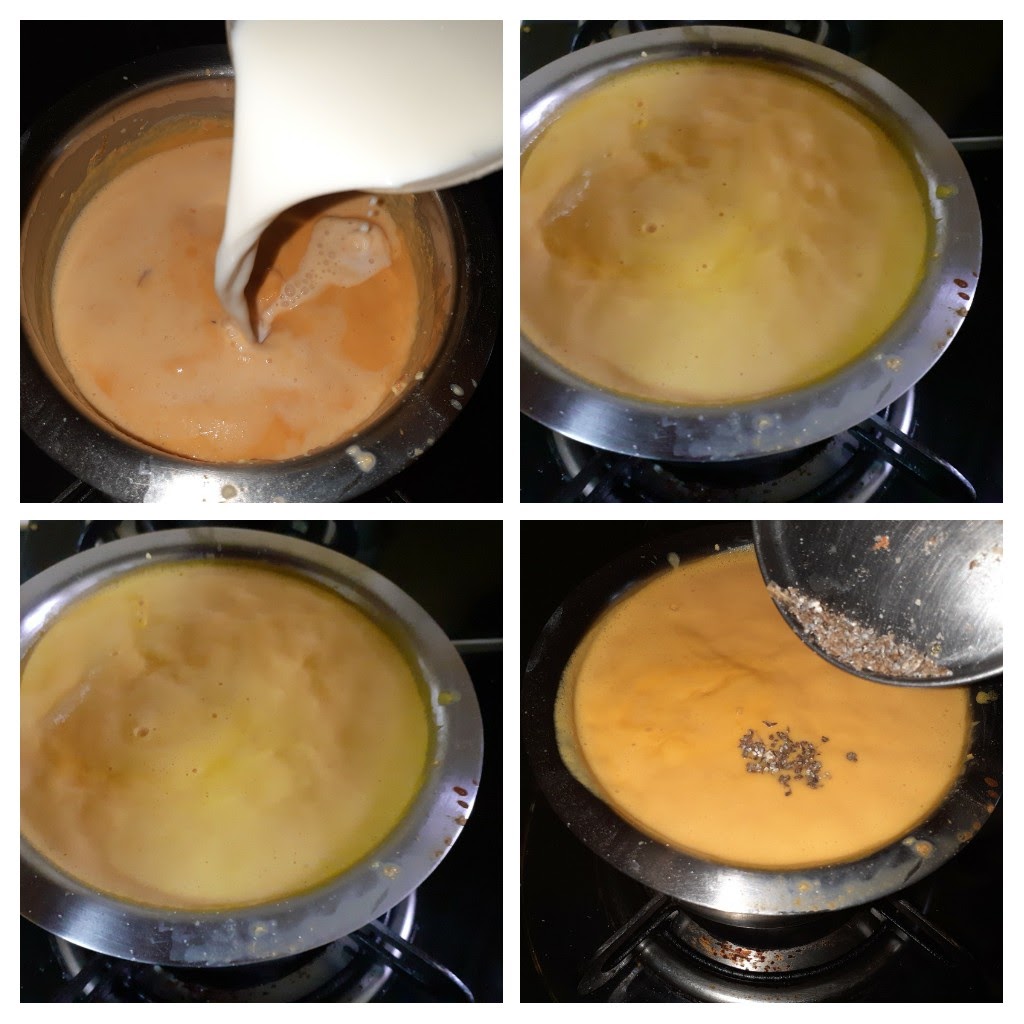
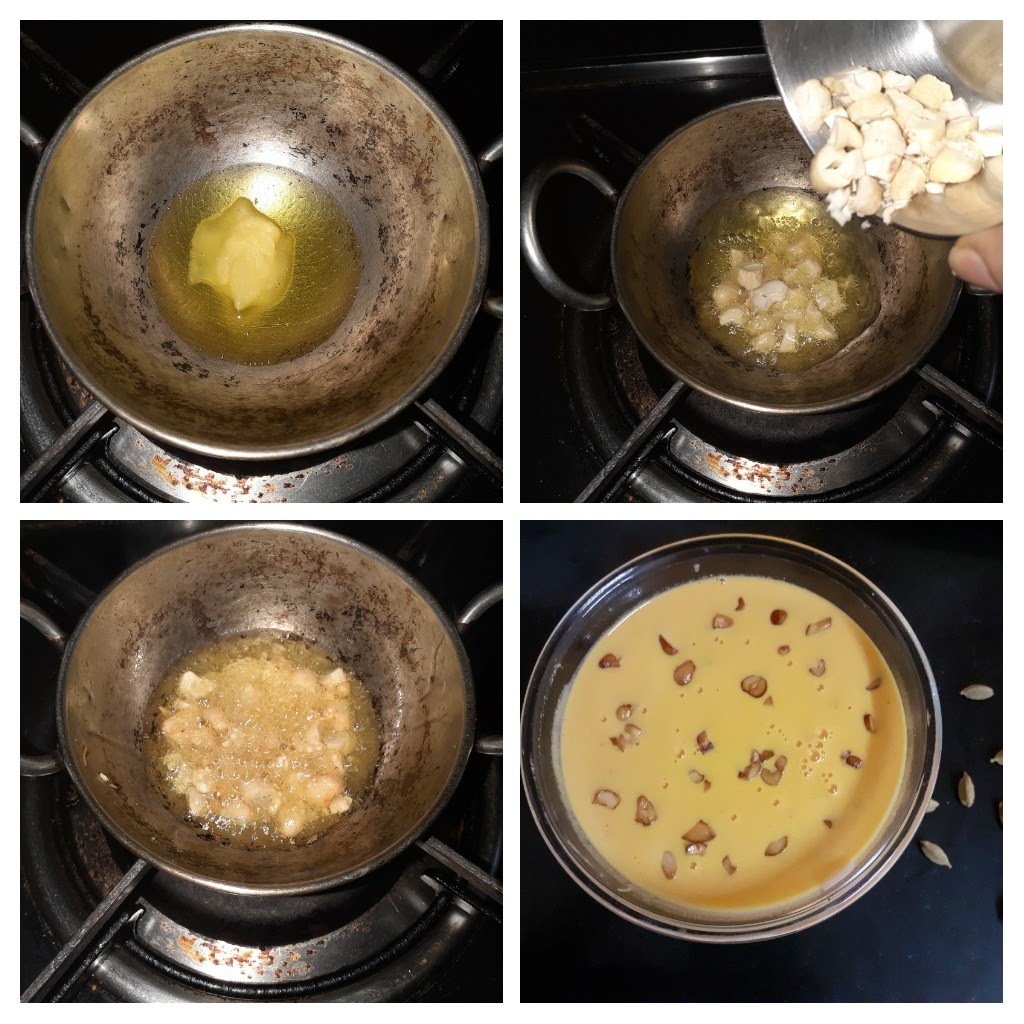
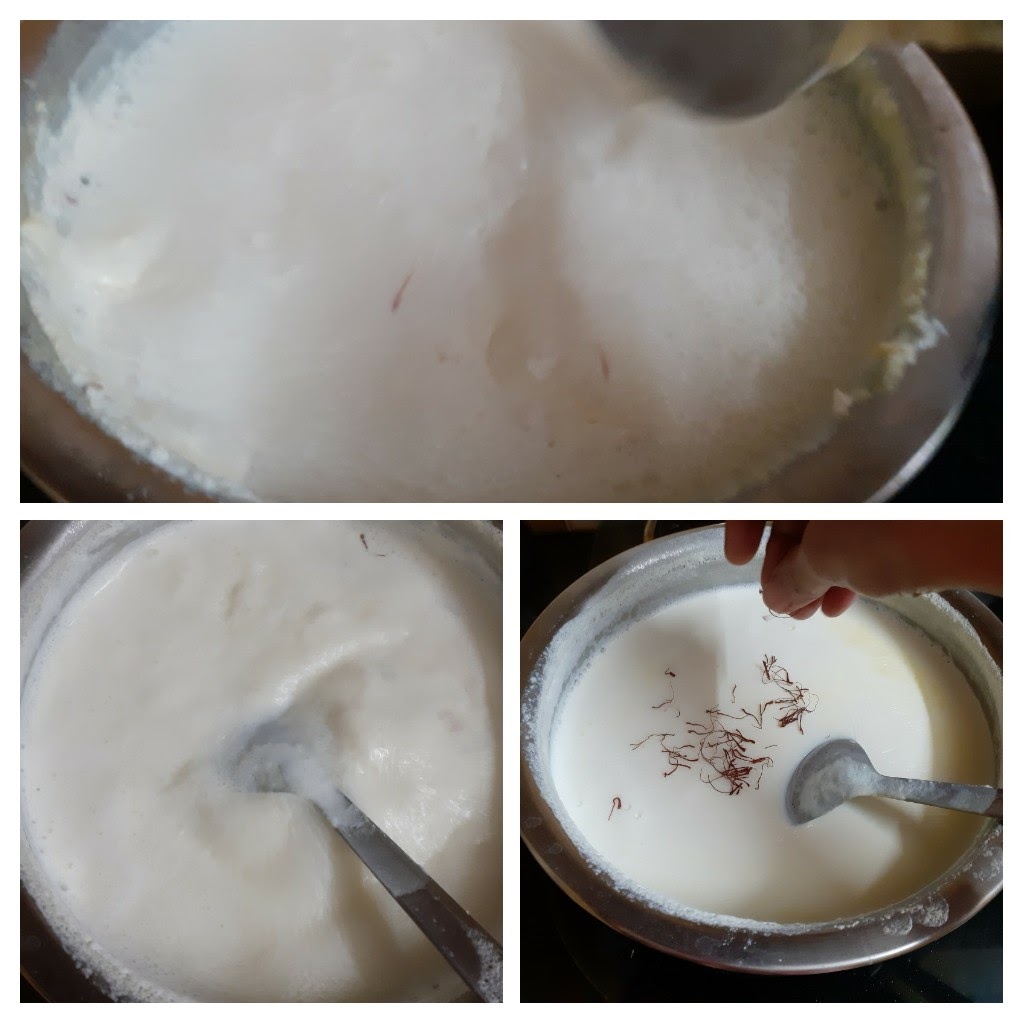
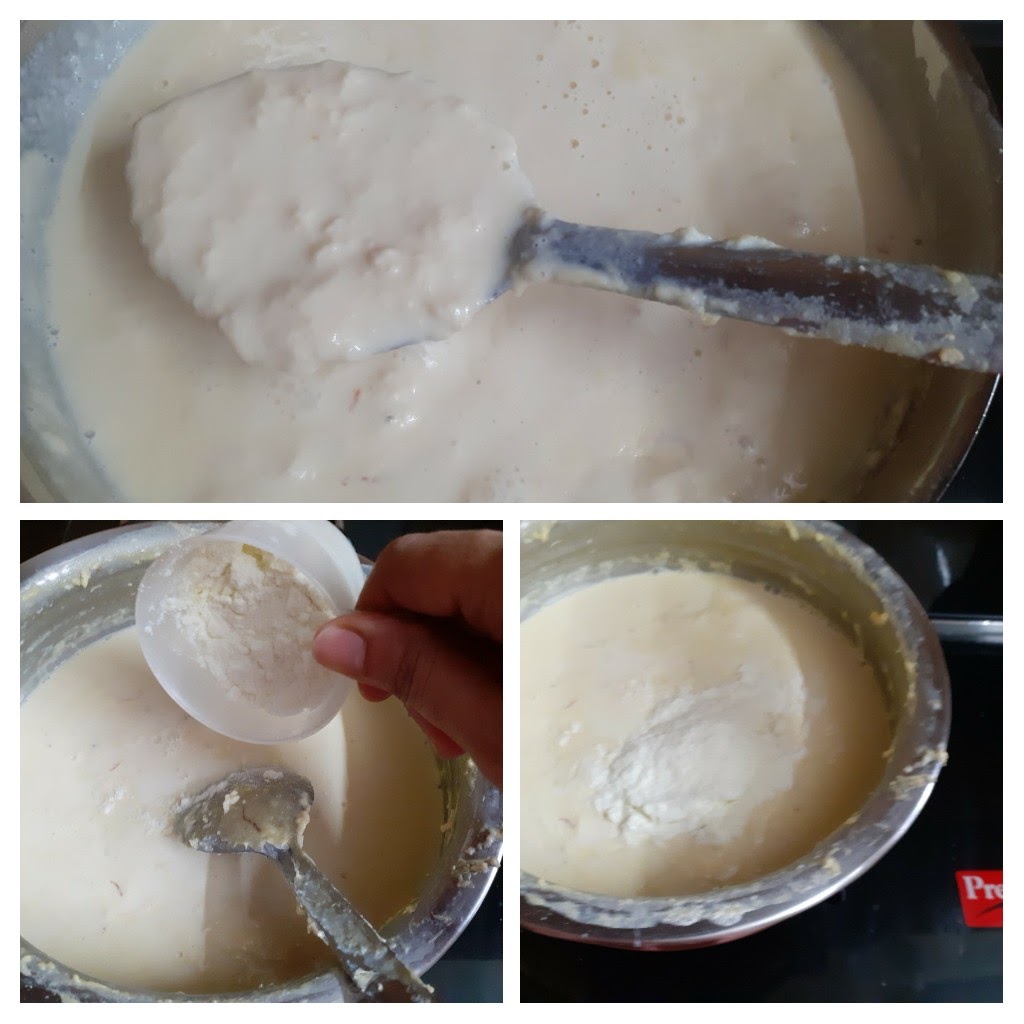
Pour the milk into a heavy-bottomed vessel or Kadai and begin to boil. It has to be reduced by almost 3/4 of the quantity by stirring constantly. For the first 10-15 minutes, constant stirring is required, thereafter keep flame on medium heat and keep stirring from time to time. As the moisture from the milk evaporates the consistency of the milk becomes denser and the texture also starts becoming granular/thready. Keep stirring until the milk has lost almost all moisture(check picture for reference) and now add in the sugar and start stirring again. Once the sugar is added the reduced milk mixture liquifies a little, it is normal and nothing to worry about. Continue stirring until the mixture loses all the moisture al does not stick to the bottom of the pan anymore. Another way to check is to put a little Palkova in a plate, just wet your hands with water, and try to take a small bit of the Palkova and shape it to a mini ball. If the ball forms, you can turn off the flame. Now in In another Kadai, put 1/2 tsp ghee and drop in the coconut gratings and start roasting it until it becomes dry and it is a nice brown in colour. Transfer it to a plate and cool it. Once cooled, add to the Palakova/Therattipal, switch on the flame and mix nicely until the coconut and the Therattipal are well integrated and switch off the flame. After adding the coconut the mixture turns a little drier. It is natural so nothing to worry. Offer it to Krishna or just have it as dessert. Enjoy. Bon Appetit. If you want just regular Therattipal stop the procedure after adding sugar and reducing it again. Add a teaspoon of ghee for a nice sheen.
STEPWISE RECIPE FOLLOWS:
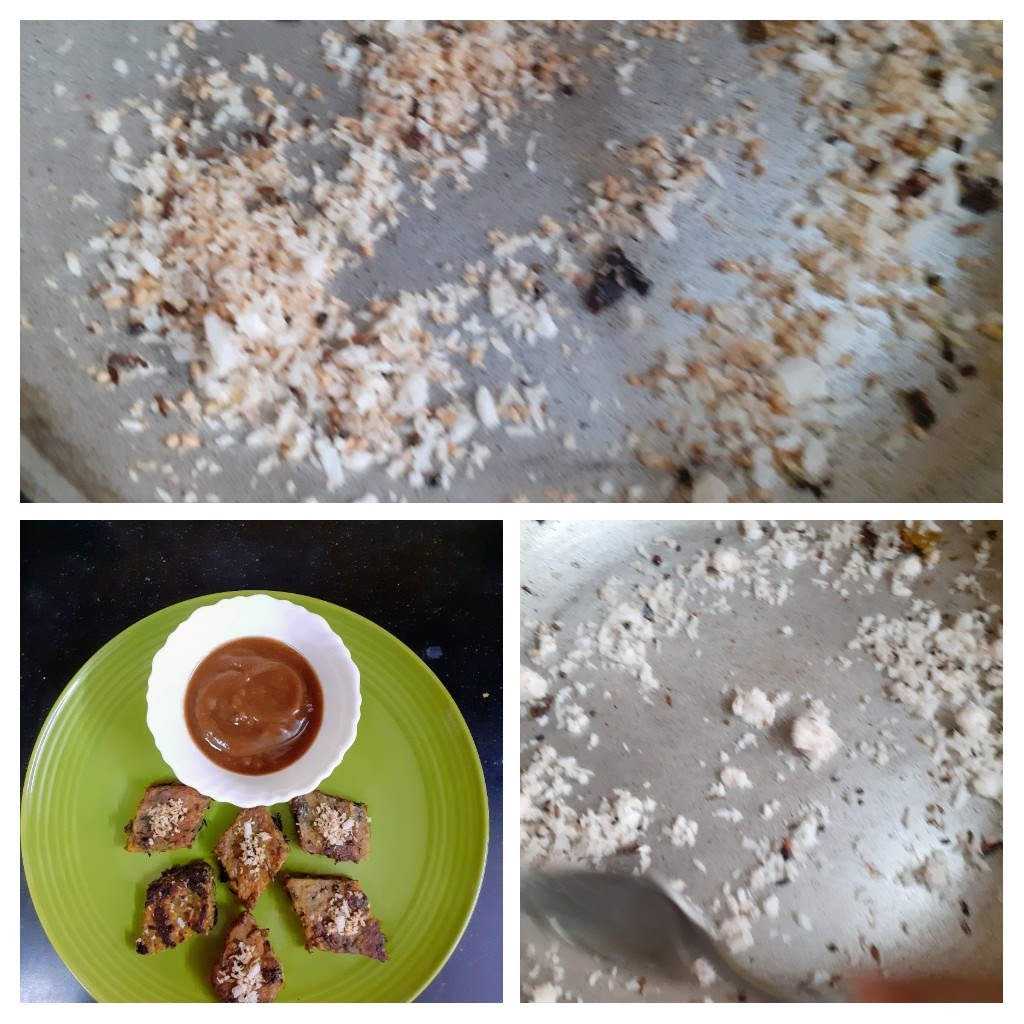
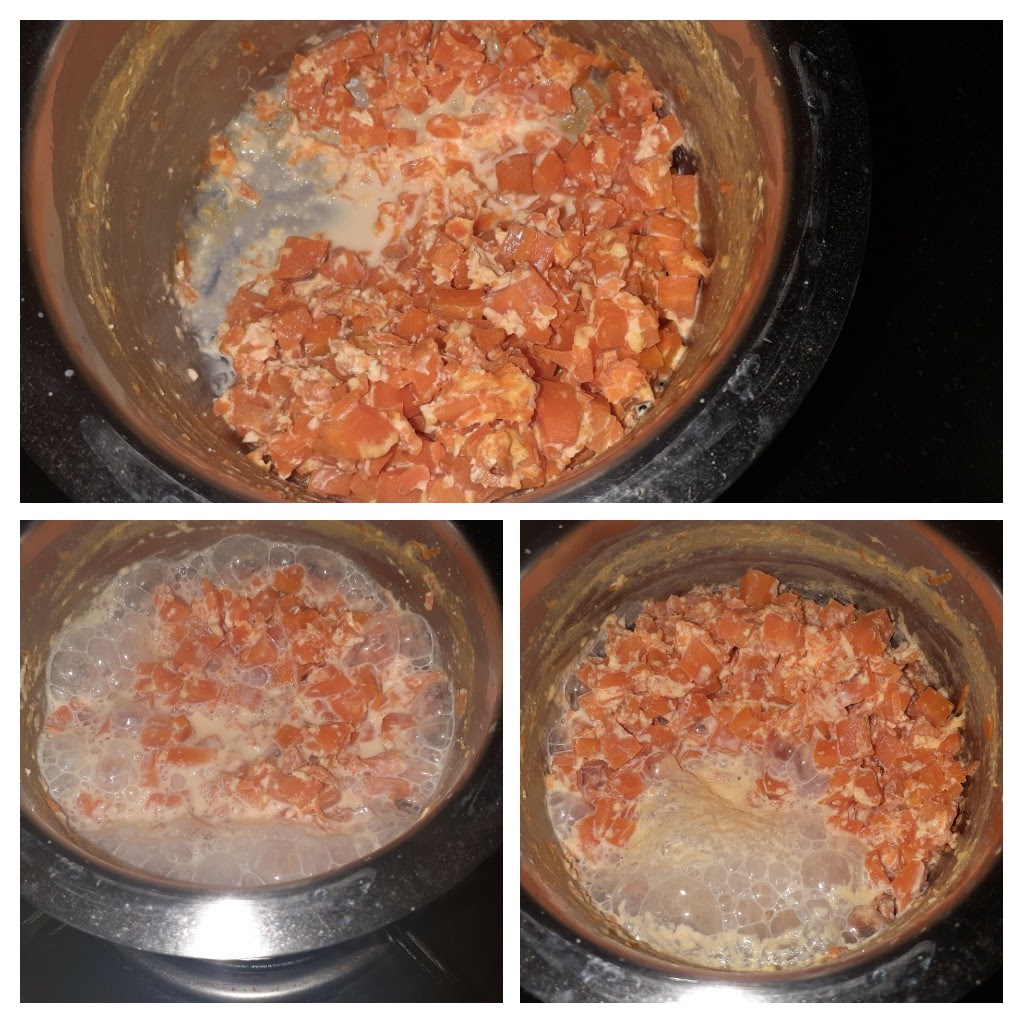
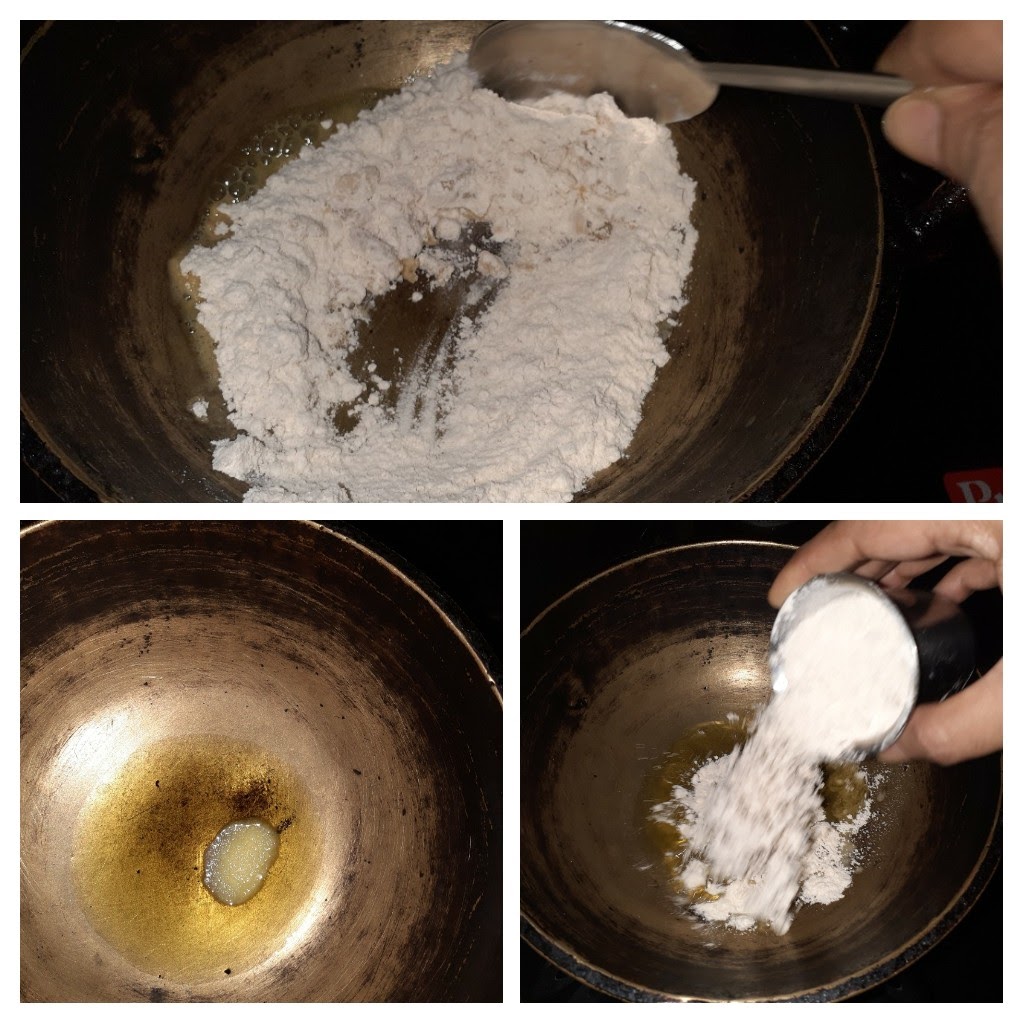
1. Start by boiling the milk in a heavy-bottomed vessel or Kadai.
2. Keep stirring constantly for the first 10 to 15 minutes and keep scraping the sides of the vessel as the milk solids keep depositing there.
3. Now on medium heat and stirring every once in awhile reduce the milk until almost all moisture gets evaporated.
4. Now add in the sugar and start stirring again. The mixture liquified a little again but it is natural and again will solidify.
5. Keep stirring until the mixture does not stick to the bottom of the vessel any more. Another method to check for doneness is to take a little amount of the Therattipal and put it on a plate. Wet your fingers and take a small quantity and try to form a ball. If you are able to form a ball, that is the right consistency. Put off the flame.
6. In a small Kadai take little ghee and add a cup of grated coconut and start roasting until it becomes dry and turns a nice brown in colour. When the coconut is dry, it will not stick to the Kadai anymore. Transfer it to a plate and cool.
7. After it cools completely add it to the Therattipal, switch on the flame and stir nicely until the coconut is well integrated with the Therattipal. Once the coconut is absorbed, the mixture will become drier, this is natural and there is no need to worry. Add a teaspoon of ghee finally, just for some sheen. The Thengai Therattipal is now ready.
QUICK VIDEO OF METHOD HERE:
NOTES:
1. I have used Tetrapack toned milk. The more fat content in the milk the lesser the evaporation time. You can use full cream milk too.
2. It took around 1 hour to reduce 1.5 litres of milk.
3. If you don’t wish to add the coconut, the process can be stopped after adding sugar, reducing further and performing the test to see if a ball is formed.
4. If one prefers less sugar, it can be reduced a little.
5. There are many short cut methods to evaporate milk by adding milk powder etc; I use this method for making small amounts of Rabri for jalebis and other such dishes, but I don’t recommend the shortcut method for Therattipal, as this whole sweet dish is about the texture and taste.
6. Cheese too is used for quick evaporation, but again it changes the taste and texture.
Masala Wheat Flour Papdis (Baked)
Masala Wheat Flour Papdis are crunchy crisps made of wheat flour. The wheat flour here can be easily replaced with maida/refined flour or multigrain flour. I usually fry these Papdis, but this time I have baked them as per the request of friends and followers as they wanted something that was not deep-fried. That said, these Papdis can be fried too and I have given both options in this recipe.
When we bake a snack that is traditionally deep- fried there is always a difference in texture. It would be wrong to say that they taste almost like fried ones. The taste is the same, the papdis are crunchy too, but there is a difference in their textures. I also believe that when we prefer a baked snack over a fried one we are willing to adjust to the minute differences that are bound to be there because the technique used is different. Therefore you will not find phrases like “baked but almost like fried” or “baked but as good as fried”, on this blog. Baked is baked and fried is fried, and somewhere there is a compromise in either, shape, colour, texture, taste of the dish. I am not saying this only about the current recipe but in general. When a deep-fried dish is baked there are differences.
This is why I try to keep the fried ones fried, but sometimes I do give in to a little experimenting. I won’t do something because it is a trend, but if I do experiment and the result is blog-worthy I will certainly share it with you all.
Now, these Papdis can be served with tea, they last for a long time when stored in an airtight container. I also make Papdi Chat(street food delicacy) with these, and since they are firm than the Maida papdis, they hold up the sweet curd and chutneys of the Chaat well.
Wheat flour 2 cups (1 cup =150 ml) Suji(semolina) 1/2 cup Salt as per taste Red chilli powder 1 tsp Ajwain(Omam/Carrom seeds) 1 tsp Oil 3 tbsp for flour (refer note1) Fresh Coriander or Methi(fenugreek)leaves 1/2 cup finely chopped White sesame 1 tsp (optional) Water as required
Directions:
In a dish take the wheat flour and add the suji/semolina to it. Now add the salt, red chilli powder, ajwain followed by the 3 tbsp oil. Start mixing the flour with your fingers, such that the spice powders and oil are well mixed with the flour. Now take some flour in your palm and clamp it together with your fingers. If the flour holds shape, water can be added little by little now. But before that add the chopped coriander/methi leaves, mix it with the flour well and now start adding water little by little. We want a stiff dough here. The consistency should be like the dough for Poorie. Now apply very little oil on the dough and rest it or 15 minutes. Now divide the dough into 4 or 5 balls. Roll out each ball into a thin circle, flour for dusting if required. Sprinkle some sesame seeds on the rolled and flattened dough and roll again so that the sesame seeds stick to the dough. Now with a cookie cutter or lid of a bottle cut into a circle. Remove excess dough from sides. prick holes with a fork on the little papdis.
To bake them: Preheat oven to 180 C for 10 minutes. Place the little circles into a baking tray after pricking holes, brush with a little oil(this step is optional), and bake at 180 C for 8 minutes on one side, flip them after 8 minutes and bake again for 8 minutes. Remove from oven, let them cool and store in an airtight container. Repeat this process for the whole amount of dough.
To fry them: Take oil in a Kadai and heat. The oil should be medium hot. The dough when put should sizzle and rise up immediately. This is the right temperature. Prick the papdis with a fork and gently drop them into the oil and fry until all bubbles have subsided and the papdis are light brown in colour. Cool and store in an airtight container.
The crunchy and spicy Masala Wheat Flour Papdis are ready to serve with tea or to be made to a Chaat item. Enjoy. Bon Appetit.
STEPWISE RECIPE FOLLOWS:
1. Assemble all ingredients. Take the Wheat flour in a dish and add the Semolina/Suji to it.
2. Now add the salt, red chilli powder, ajwain, and oil to the flour.
3. Start mixing the flour with your fingers(without adding any water at this stage). The spice powders and salt must mix evenly with the flour. Take some flour in your palm and try to clamp it within your fist. When you open your fist the flour should hold shape and not break away.
4. Now add the finely chopped fresh coriander or Methi leaves, and adding water little by little form a stiff dough. The consistency should be like Poori dough. Rest the dough for 15 minutes.
5. Now divide the dough into 4 or 5 equal parts. Take one ball at a time, dust it with flour and roll it out like a chapati, sprinkle some sesame seeds and roll again lightly, so that the seeds stick to the dough.
6. Now with a cookie cutter or lid of a bottle make small circles. Take away the excess dough. Prick the circles all over with a fork.
7. To bake- preheat oven to 180 c for 10 minutes. Brush some oil over the Papdis, place them on a baking tray and bake at 180C for 8 minutes on one side. Remove the tray, flip over the papdis and bake again for 8 minutes. Remove from oven and cool. Store in an airtight container.
8. To fry them- heat oil in a Kadai. Oil should be medium hot. Check the temperature by gently dropping a small bit of dough into the oil. If it sizzles and rises immediately, this is the right temperature. Now fry the papdis in oil at medium heat until all the bubbles subside and the papdis are light brown in colour.
NOTES: 1. Adding adequate oil to the flour is a crucial step, the oil is the one that imparts the crunch to the Papdis. After step 3 if the flour is still not holding shape, then add another teaspoon or two of oil to the flour, rub it into the flour and check if it holds shape now by claiming it in your fist. If it does, start mixing water.
2. It is important to prick the Papdis with a fork before baking or frying as otherwise, they will rise/puff up thereby losing the crunch. So pricking holes is a crucial step.
3. The temperature of the oil is important, the method to check the temperature is given in step 8, which should be followed.
4. The timing in each oven may vary to bake, so 2 to 3 minutes less or extra time may be required.
Thattai/Nippatu
This savory recipe is a popular South Indian snack and is made during festivals like Janmashtami and Deepawali. In South India festivals are incomplete without making rice-flour based snacks and homemade sweets.
Usually, the rice is soaked, the water drained, dried on a cloth, and then ground to a flour. Nowadays since most of us are busy both at home and work, I have used store-bought rice flour for this recipe, as it saves time. The most important step in this recipe is the proportion of rice flour and Urad dal flour, which I have shared below in the recipe. Regarding the use of Butter and its substitutes please refer to the notes.
In this recipe, Rice flour, Urad dal flour, butter, and spices are combined to form a dough, which is flattened and deep-fried in oil.
To give this recipe my twist I have added another ingredient- a little Pottukadalai/Chutney chana(fried gram)flour. This makes the Thattai crunchy. Grated or sliced coconut can be added, but in this recipe, I have not used them.
While you are here please have a look at my other recipes like
For Urad dal flour–Take a handful of urad dal and dry roast them in a Kadai until light brown and you get a nice aroma. Cool them and grind them to a fine powder and also pass it through a sieve, discard the residue.
For fried Gram flour/Pottukadalai flour- Put a handful in a blender and grind them to a fine powder. Pass it through a sieve and discard residue if any.
Now in a dish take the rice flour and add the urad dal flour and fried gram flour. Add the butter, salt, chilli powder, asafoetida, coarsely broken peanuts, fried gram, curry leaves, white Sesame, and mix nicely. The flours, spice powders, and butter should combine well. Now add water little by little to make a stiff dough.
Now in a Karahi take oil for deep frying and heat. While the oil heats up start shaping the Thattai. Take a plastic sheet or Aluminium foil and grease it with oil well. Grease your palms also with oil. Now pinch a small amount of dough(little bigger than lemon) and place it on the plastic/aluminum sheet and using your fingers flatten the ball to a thin circle. Take a fork or toothpick and prick holes all over the dough. Check if the oil is hot enough. To test take a small piece of dough and put it in the oil. If it sizzles and rises immediately then the oil is ready for frying. Now gently lift the foil in your left hand and ease the flattened dough into your right hand by reversing the foil and gently peeling it away. Now gently drop the flattened dough into the oil and fry flipping both sides. Keep flipping and frying until all bubbles in the oil subside and the Thattai is golden in colour. The Spicy and crunchy Thattai is ready to munch as it is or serve as a tea time snack or to offer guests during festivals. Enjoy. Bon Appetit.
STEPWISE RECIPE FOLLOWS:
1. Assemble all ingredients. Follow the method given above for Urad dal flour and fried gram/Porikadalai flour. Coarsely pulse the peanuts too.
2. In a dish take the rice flour, Urad dal flour, fried gram flour, butter, and all other ingredients excluding water and combine nicely.
3. Now add water little by little and form a stiff dough. Take oil ina Karahi to deep fry and heat. heat should be medium-high.
4. To form the Thattai, take a plastic sheet or aluminium foil and grease it with oil. Grease your palms also with oil. Pinch a small portion of dough, form a ball, and place it on the sheet. Flatten it with your fingers to form a thin circle. Take a fork and prick all over the Thattai.
5. To check if the oil is hot enough drop a small bit of dough in the oil if it rises immediately then the oil is ready for frying. Using your left hand lift the foil and reverse it on your right palm and gently peel away the foil in a backward motion.
Now gently release the flattened dough into the oil and fry flipping both sides, until all the bubbles in the oil subside and the Thattai is a golden colour. Repeat this process for all the dough and store the Thattai/ Nippatu/Chekkalu in an airtight container.
NOTES:
1. Butter is one ingredient that gives the Thattai its crunch and also it’s colour. So do not exclude it. Some recipes suggest using Ghee or hot oil in the dough. I recommend sticking to butter as ghee and hot oil turn the Thattai hard and also the colour turns too brown.
2. Any butter unsalted or salted is fine.
3. Using Pottukadalai/ fried gram powder gives a nice taste and crunch. If you don’t have it handy, carryon with other ingredients. The Thattai will still turn out fine.
4. Using white sesame also gives a nice taste to the recipe. If you have it handy add some for sure
5. Coconut gratings or small bits of coconut are also added, but this time I have not added them.
If you tried this recipe and liked it please comment below. I would love to hear from you.
If you want the recipes emailed to you leave your id in the homepage near the????
icon. Whenever we have a new post the recipe will be mailed to you. Thank you for showing interest in Rajjo’s Kitchen.
Sweet Poha/Vella Aval
This recipe of the humble Poha(beaten rice flakes)/Aval cooked in Jaggery syrup is one of my favourites. I make it whenever I have a sweet craving or as an offering(Prasad) for Pujas at home. Healthy and filling at the same time. It makes for a good mid-evening snack(Tiffin) option. Sometimes I make with a combination of other Pohe recipes, to serve during Navarathri when guests visit home.
Poha is also one of the main offerings during Janmashtami and Ganesh Chaturthi. Lord Krishna is known to have loved them and Pohe is what his friend Sudama got him as a gift.
Usually, during these two festivals, people just offer the Pohe and jaggery with coconut scraping as a dry mixture for Prasad. I have observed that though there are few who like it this way, many don’t enjoy it dry. So what I prefer doing is putting it in a jaggery syrup and stirring it dry, with a dash of ghee, cardamom powder and coconut scrapings it tastes just like Sweet Pongal, but it is dry in texture.
There are many variations of the Pohe like Kanda Poha(onion Poha), Masala Poha(tomatoes and onions), Lemon Poha, Puli Aval(tamarind Poha), Vella Aval(Sweet Poha) and Dahi Pohe/Moru Aval. The Poha can be either thick or thin. For this recipe, I have used the thin one, but the same can be done with the thick one too, just that the soak time will vary. Thick Poha is used for recipes where the Poha is going to cook in a sauce so that it doesn’t become soggy. The Sweet Pohe makes for a good and healthy recipe for kids too.
While you are here please visit my other Indian sweet recipes such as
This Janmashtami or Ganesh Chaturthi try out this recipe of Sweet Poha or Vella Aval.
PREP TIME: 10Mins COOK TIME: 15 Mins
TOTAL TIME: 25Mins COURSE: DESSERT/SWEET
CUISINE: SOUTH INDIAN SERVINGS: 4
AUTHOR: Rajni Ram
Ingredients:
Poha/Aval( Thin ) 1 cup
Jaggery 1 cup
Coconut gratings 1 tbsp
Ghee 1tbsp
Cardamom powder 1/2 tsp
Cashewnuts around 5 broken to bits
Raisins around 8
Directions:
Pass the Poha through a sieve that has medium-sized perforations, such that the Poha remains in the sieve and the dust and small flakes fall away. Now wash the Poha just once(may become soggy if done more than once)and drain all the water. Let the Poha rest for 10 minutes.
In a thick bottomed vessel put in the jaggery and 1/4 cup water and place it on the flame. Stirring continuously dissolve the jaggery. The syrup should boil for about 2 minutes. Now strain this syrup into a Kadai or thick bottomed pan and add a teaspoon of sugar and add the washed Poha. Turn on the flame and mix the jaggery and Poha well, such that the jaggery syrup has evenly coated the poha. Cook on low flame until all the moisture is absorbed. Now add the cardamom powder and put off the flame. In a small tadka, Kadai heat the ghee and fry the nuts and raisins and drop them into the Sweet Poha and give it a stir. The Sweet Poha/Vella Aval is ready to offer as Prasad or to your guests. This can be made ahead and warmed just before you serve. Enjoy.
STEPWISE RECIPE FOLLOWS:
1. Assemble all ingredients. Powder the jaggery and cardamom and keep ready. Break the Cashewnuts to bits.
2. Sieve, wash the Poha twice drain the water and let it rest for 10 minutes.
3. Now in a thick bottomed vessel put in the jaggery, add 1/4 cup water and switch on the flame. Stirring continuously dissolve the jaggery. The syrup should cook for 2 minutes on low flame.
4. Now strain this syrup into the Kadai or pan in which you are going to make the Poha. Add a teaspoon of sugar. Add the washed and soaked Poha to the syrup in the Kadai, and switch on the flame. Start stirring and cooking this mixture until the jaggery syrup coats the poha well. Continue to stir until the moisture dries up and the Poha is almost dry. Add the cardamom powder and switch off the flame.
5. In a small tadka, Kadai dry roast the grated coconut gratings until light brown. One has to stir continuously as the coconut will burn if left unattended. Add the roasted coconut to the Sweet Poha and mix well.
6. Now in the same Kadai, the coconut was roasted, add the ghee and fry the nuts and raisins. Put this into the Sweet Poha. The dish is now ready to offer for Puja or to serve guests.
NOTES:
1. If using thick Poha there is no need to sieve the Poha, just wash it around 3 times and then rest it for 10 minutes.
2. Sometimes this recipe I also made by soaking the poha in jaggery water, but I personally do not recommend this as the dish does not last long. The jaggery water is not cooked like unlike the recipe above, so the chances are the Poha will give out a fermented smell in a short time.
3. Since in this recipe, I have boiled the jaggery and made a syrup the Poha can be made ahead, if you have made extra, it can be put in the refrigerator and warmed up the next day. So this method stays good longer.
4. Adding a teaspoon or two of sugar accentuates the taste of jaggery. I always follow this in my jaggery based recipes.
5. More grated coconut can be added if you like the flavour.
If you tried this recipe and liked it please comment below. I would love to hear from you.
If you want the recipes emailed to you leave your id in the homepage near the????
icon. Whenever we have a new post the recipe will be mailed to you. Thank you for showing interest in Rajjo’s Kitchen.
Mushroom Do Pyaza
Mushroom Do Pyaza is a simple recipe made predominantly of Mushrooms and onions. At our home, I make it frequently to go with Rotis or pulav. Well, this dish is usually semi-dry but I prefer it with a little gravy, so you will find that my recipe is a little different from the other Mushroom Do Pyaz recipes. That said, it still is a very simple one. I have just included 2 ingredients that make it a little creamy.
Mushrooms by nature are a little bland so making this dish with a little gravy gives some texture and flavour to the dish. Even though the Mushrooms are bland they blend really well in Indian gravies and spices. Especially in this recipe of Mushroom Do Pyaza, you will see how surprisingly yummy they can be.
This recipe gets its name “Do Pyaza” from a cooking technique that requires adding Onion in two different stages.
Red chilli powder 1 tsp (1/2 tsp if sensitive to spice)
salt as required
turmeric powder 1/2 tsp
Directions:
Dry roast the gram flour until light brown and a nice aroma emanates. Cool the roasted flour. Now in the blender put in half the amount of chopped onions and the roasted gram flour and blend to a smooth paste. Now add the tomato puree to this onion- gram flour paste and blend again. Add the curd to the paste and blend it again. So now you will have a smooth puree of onion, roasted gram flour, tomato puree, and curd. Keep this aside and heat oil in a Karahi. When the oil is hot drop in the onion petals and saute them until light brown. Now add the Capsicum cubes and continue to saute for 1 to 2 minutes until a light brown tint appears. Remove them on to a plate. Now to the same kadai add the mushrooms and saute on high flame, until all the moisture escapes and it becomes dry. (refer picture). Remember to saute all these vegetables over a high flame or else they will start releasing moisture. Transfer the sauteed vegetables to a separate plate/vessel. Now in the same Kadai pour some more oil and heat it. Put in the cumin seeds and as they splutter add in the puree from the blender jar and stir continuously for a minute so that it doesn’t stick to the pan/karahi. Now add the coriander powder, followed by red chilli powder and turmeric powder and salt, and stir nicely. Let it cook for 2 minutes on medium flame. Now add the sauteed vegetables to the sauce and cook for 2 minutes. Add the cream and stir constantly for 30 seconds so that it doesn’t split. Now put off the flame and add Garam Masala powder if you prefer. Garnish with chopped coriander leaves and its ready to relish. Happy cooking, Enjoy, and Bon Appetit.
STEPWISE RECIPE FOLLOWS:
1. Assemble all the ingredients. Chop the mushrooms in 4, Chop the opinion into petals, and the capsicum to cubes. Dry roast the gram flour, puree the tomatoes.
In addition to the above vegetables, Red Bell peppers/ capsicum and green peas can also be added. However, these are optional and hence have not been mentioned in ingredients.
2. In a blender put in half the amount of chopped onions and the roasted gram flour and blend to a paste. Add the tomato puree and blend again. Now add the cuts and blend once again. You should have a smooth puree of all the above ingredients now. Set it aside.
3. In a pan/Karahi heat, some oil and saute the onion for 1 minute or until it gets a light brown colour, on high flame. Add the Capsicum and continue to saute until they get a light brown tint on them. Remove them on to a plate. Now to the same kadai add the mushrooms and saute on high flame, until all the moisture escapes and it becomes dry. (refer picture).
Sauteed vegetables
4. In the same Pan/karahi Take some more oil and heat. Add the cumin seeds and when they splutter pour the prepared paste into it and stir continuously for a minute.
5. Add the salt, coriander powder, fennel powder, red chilli powder, and turmeric powder, stir and cook for 2 minutes on medium flame. Add little water if the sauce is too thick. Now add the sauteed vegetables and cook for another 2 minutes. If adding green peas, cook them and add at this stage.
6. Finally, add the cream and stir nicely and put off the flame. Add garam masala powder. Garnish with coriander leaves and the Mushroom Do Pyaza is ready to serve.
NOTES:
1. Always saute vegetables such as onions, capsicum, mushroom, etc on high flame or they release a lot of moisture. Mushrooms should be added at the end as they don’t withstand too much heat and become limp quickly.
2. You can add more cream if you prefer.
3. You can add or skip Garam masala powder if you prefer.
This is my meal with Mushroom Do Pyaza. I served it with Warqi Parathas and Mango Chundo.
If you tried this recipe and liked it please comment below. I would love to hear from you.
In case you wish to receive recipes as an email, please leave your id on the homepage near the mail icon. Whenever Rajjo’s Kitchen has a new post the recipe will be mailed to you.
Sugiyan
Sugiyan or Sukhiyan as it is called is a traditional snack in Kerala and Tamilnadu. It is also made in Andhra Pradesh and is called Boorelu. This snack is like a sweet version of the Aloo Bonda where the Aloo is replaced with a sweet Chana dal or Moong dal and Jaggery filling and instead of Besan Urad dal and rice flour are used as a batter to cover the filling(Poornam). Coconut is also added to the filling that enhances the taste. This is also a snack that people make for festivals. As the festival time is nearing blogging this recipe may be helpful. I usually make it around Navarathri and Diwali to serve it to guests who visit home.
As I had mentioned that the poornam (filling) is made with Moong dal too, but I personally feel the chana dal filling is tastier. Some also use whole moong(payaru) to make the filling.
I use this filling of Sugiyan to make Puran Poli(Boli/Bobbatlu/Hoolige) also. So what I usually do is make them both simultaneously. I use wheat flour majorly with a hint of maida to make Puran Poli, the Sugiyan is had the same day as it doesn’t taste fresh or hold good the next day, it is like an instant snack, whereas Puran Poli can be consumed with 2-3 days if stored properly.
One needs to grind the batter carefully and the rest of the recipe is quite easy. In this recipe, I will also show you an easy way to make the filling.
While you are here check out my other dessert recipes like Pineapple Rabdi,
Carrot Kheer, Chakkara Pongal, Atte Ka Sheera, Akkara vadisal, and more.
Here is the recipe of Sugiyan for you–
PREP TIME: 20 Mins(1 hr soak) COOK TIME: 40 Mins
TOTAL TIME: 60 Mins COURSE: SNACK
CUISINE: SOUTH INDIAN SERVINGS: 6
AUTHOR: Rajni Ram
Ingredients:
Urad dal 1 cup soaked for 1-hour
Chana dal 1 cup roasted to light brown
Turmeric powder 1/2 tsp
Rice flour 2 tbsp
Jaggery 1 cup powdered
Coconut grated 1/2 cup
Cardamom powder 1 tsp
Oil for frying
Directions: for the filling:
Dry roast the Chana dal to a light brown, you will get a nice aroma of the dal. Switch off the flame, remove and cook in a pressure cooker with 1/2 tsp turmeric powder and adequate water for 2-3 whistles(not more), as we want the dal to be rightly cooked, not mushy. Once the dal is cooked and the pressure in the cooker has subsided, remove the dal and put it in a strainer for all the water to drain off for about 5 minutes. Now put the dal into the dry grinding unit of the processor and blitz. Open stir the contents well and blitz again to a fine powder. After grinding it will resemble wet sand. Now in a Karahi put in the jaggery and the ground dal, followed by grated coconut( add no water) and keep stirring, in low flame. The jaggery will start melting and within 5 minutes of stirring the filling will become well combined. Even if it seems a little dry, don’t be tempted to add water. The jaggery will be enough to bind it. Add the Cardamom powder and keep stirring and when it forms a lump, put off the flame and let it cool. Once the filling has cooled, make small balls of them and keep aside.
Directions for the outer crust:
Soak the Urad dal for 1 hour and grind. Don’t allow it to soak for a long time, as then it soaks up a lot of oil while frying. The dal has to be ground to a smooth and thick batter, with water as required. The batter should stick to the filling and not roll off it, that should be the consistency. A runny or flowy batter will not stick to the filling. After grinding transfer to a dish, add 2 tablespoons of rice flour and 1/2 tsp salt. Now add little water if required as the rice flour would have absorbed all moisture from the urad dal paste.
Directions to make Sugiyan:
Heat oil for frying to medium-high. Now take one ball at a time, roll it in the batter, or smear the batter all over the filling, it should be a thick coating or it will split in the oil and, drop them gently into the oil. Fry 4-5 of them at a time. Remove when golden brown in colour. Drain them on an absorbent paper. Repeat for the entire lot of filling. The delicious Sugiyan is ready. Serve with tea or make it as Prasad(offering) for Puja and enjoy it. Bon Appetit.
STEPWISE RECIPE FOLLOWS:
1. Assemble all ingredients. Soak the dal for an hour. Dry roast the Chana dal and pressure cook for 2 -3 whistles and no more.
2. For the Outer crust(cover)- Grind the soaked Urad dal by adding little water to a smooth but thick paste(idli batter consistency or a little thicker also is fine). Stir in 1.5 to 2 tablespoons of rice flour. If the batter gets too thick, add a little amount of water to get it back to the right consistency, given above. ( I forgot to take a picture of adding Rice flour, so please keep in mind and ad it).
3. For filling- Dry roast the Chana dal until light brown in colour, you will get a nice sweet aroma when you are getting to that stage. Pour required water and add turmeric powder and pressure cook it for 2-3 whistles, and not more. Once the pressure reduces, take the dal and drain it completely of all the water and allow it to cool for 5 minutes.
4. Now put the warm Dal into the dry grinding jar and blend to a powdery texture, without any water. Give it a mix and spin again, the mixture should be fine and should resemble wet sand.
5. Put this ground Dal mixture in a Kadai and add the jaggery and grated coconut to it. Switch on the flame on low and start stirring this mixture. Do not add any water, the jaggery will start melting in the heat and help in combining. Add the cardamom and keep stirring until the mixture comes together and forms a lump. Put off the flame and cool the mixture.
6. To make the Sugiyan- Heat oil in a karahi for frying. Heat should be medium-high. Now make lemon sized(or a little bigger too is ok) balls of the filling and keep it aside. Check if the oil is hot by dropping little of the batter into it. If it sizzles and rises immediately, it is ready for frying.
7. Now take the Urad dal – Rice flour batter and dunk each ball into it gently, use your hands to smear the batter on the filling if required ad cover the ball. Gently drop it into the oil and fry to a golden brown colour. 4-5 Sugiyans can be fried at a time. Drain them on absorbent paper. Repeat for the entire filling and enjoy them hot.
NOTE:
1. I recommend not soaking the Urad dal for more than an hour as it soaks in lot of oil while frying.
2. The jaggery can be reduced to 3/4 cup depending on how sweet it is.
3. I forgot to take a picture of adding the rice flour, so don’t forget to add it if following only the pictures.
If you tried this recipe and liked it please comment/ tag Rajjo’s kitchen on Facebook and Instagram and please follow us on my blog https://rajnirams.blogspot.com/
If you wish to receive the recipes as an email please leave your id on the homepage near the mail icon. Whenever Rajjo’s Kitchen has a new post it will be mailed to you.
Palak Paneer
Palak Paneer is a dish I have relished since childhood, as I love Palak and Paneer both. This dish is popular in North India and is one of the most popular Paneer dishes. It is usually served with Roti, Parathas, and other Indian Bread. It goes really well with Plain Rice, Jeera rice and Pulav too. In this dish, the Palak is pureed and made into a thick gravy with spices and the Paneer pieces are cooked in it. This dish is a great way to add Palak to your diet.
Spinach/Palak is loaded with Iron and fibre and the Paneer is rich in proteins and so this makes it a healthy recipe.
Well, there are loads of Palak Paneer recipes that recommend using cashewnuts or cream for a thicker or creamier gravy, I feel that this makes the dish heavy. Palak by itself when pureed after blanching has volume, plus the onions and tomatoes sauteed and ground also adds body to the dish, so adding cashew paste or cream is not absolutely necessary, though if one likes the taste of it, then no harm in adding them too. That said it does not make much of a difference to the dish. I usually use the cream only as a garnish, that too around 1 tsp.
Chop the Palak roughly and blanch them, I usually put them in the microwave for 2 mins. Alternately just put them in boiling water for 5 minutes. Drain the water and pour cold water over the Palak, this helps in keeping the green colour intact. Puree the Palak and keep ready.
Now in a karahi pour some oil and heat. Add 2 cloves followed by Cumin seeds and drop in the chopped onions. Saute for a minute, add the green chillies and continue to saute for 30 seconds, finally add the tomatoes and cook until the tomatoes turn mushy. Cool them. Now blend the onion-tomato mixture to a puree. In the same karahi take another 2 tsp of oil and heat. Add the cumin seeds followed by turmeric powder and pour the onion-tomato mixture. Fry it nicely in the oil, now add the Palak puree and stir. Cook for about 3 minutes on medium flame and add salt, followed by coriander powder, red chilli powder, fennel powder and continue to cook. Be careful as the palak splutters a lot while cooking, you can keep the karahi partially covered. After about 3-4 minutes of cooking the Palak and tomato mixture will come together, at that stage add the cubed paneer and cook for another 2 minutes on medium flame so that the Paneer absorbs the masala. The delicious Palak Paneer is ready to serve.
Serving suggestions: with Rotis, Parathas, Kulcha, with rice varieties like Jeera rice, Mayar Pulav,
Flavoured rice, vegetable pilaf etc;
STEPWISE RECIPE FOLLOWS:
1. Assemble all ingredients. Blanch the Palak, cube the Paneer, chop onion and tomatoes.
2. Puree the Palak and set aside. In a karahi take oil and heat. Put in the cloves and cumin seeds, and as the cumin splutters add turmeric powder followed by onions and sauté for a minute. Add the green chillies and sauté for 30 seconds and now add the tomatoes and sauté until mushy. Cool and grind to a purée, along with 1 tsp ginger garlic paste.
3. In the same karahi take 2 tsp oil and heat. Now add the cumin seeds and pour in the tomato and onion paste and fry nicely in the oil.
4. Now pour the Palak purée and stir nicely. Add the salt, red chilli powder, coriander powder, fennel powder and stir. Cook on medium flame until combined, approximately 4 minutes.
5. Now add the cubed Paneer pieces to the gravy and cook covered for 2 minutes. Finally, add garam masala powder and turn off the flame. The delicious Palak Paneer is ready.
NOTES:
1. Blanching ( putting the Palak in hot water) is a critical step followed by dipping it in cold water.
2. I don’t usually fry the paneer before adding it to a subji or gravy unless the recipe demands it. While you are readying the gravy just put the cubed paneer in fresh water until it’s time to put it in the gravy. It will absorb the flavours better.
3. Don’t overcook the Palak, it loses its colour and taste.
If you tried this recipe and liked it please comment below. I would love to hear from you.
In case you wish to receive recipes as email, please leave your id in the homepage near the mail icon. Whenever Rajjo’s Kitchen has a new post the recipe will be mailed to you. Your privacy is important to us and we will not share your id with anyone.
Kothimbir Vadi
Kothimbir Vadi is a savory Maharashtrian snack. It is made of Fresh coriander leaves and Besan/gram flour. Coriander as I have mentioned in my previous posts is my favourite herb. So when there is a recipe predominantly with coriander leaves how could I let it go and hence the post.
This recipe is very simple, flavourful( this word is used many times across this blog if you notice, as I believe the flavour is a very important entity to any food.) and healthy. This snack has a strong resemblance to Gujarath’s Muthias( will blog this soon).
Traditionally this snack is deep-fried, but now one can shallow fry or saute in a small amount of oil too. This dish is cooked twice as it is steamed first and then shallow fried. It is soft and moist when steamed and develops a nice crunch when fried. It goes very well with the sweet chutney and garlic chutney and makes for a great tea time snack. Made to bite-size pieces can be served as a starter in get-togethers. I have really wanted to try this recipe for a long while and I’m happy I did. Everyone at home was pleased by this dish????.
While you are here please view other recipes by Rajjos kitchen like
Get the steamer/ pressure cooker ready for steaming. By the time the batter gets ready, the water would have heated and the batter can be steamed immediately, after mixing.
Make a coarse paste of green chillies, ginger, and garlic(if using).In a dish take the Gram flour/besan, add the ginger-green chilli paste, followed by salt, turmeric powder, red chilli powder, jaggery, tamarind pulp. Mix nicely. Now add the curd and stir with a spatula. It will be a semi-wet mixture. Add in the chopped coriander leaves followed by a little water( around 1/2 cup) and make a thick batter. The batter should not be runny, so add water little at a time. Grease a plate or flat vessel with oil and before pouring the batter into the greased plate/ vessel add the cooking soda and stir nicely so that the soda combines well with the batter. Immediately pour the batter into the greased plates, tap the plate lightly, so that the batter settles evenly and place it into the steamer. Steam for 15 minutes. After steaming, remove and cool completely. Cut them into squared or diamonds and keep aside. Heat sufficient oil in a flat pan and put in the tempering of mustard and cumin seeds. As they splutter, add asafoetida and place the cut vadi pieces and fry until they turn brown. Keep turning sides for equal cooking. Remove when all sides are lightly brown and crisp. In the same pan drop the grated coconut and seame and roast until they turn light brown. Now scatter this on the fried Kothimbir Vadi for nice flavour. Kothimbir Vadi is ready to serve with garam chai…Enjoy. Bon Appetit.
STEPWISE RECIPE FOLLOWS:
1. Assemble all ingredients. Wash the coriander leaves well and drain all moisture, chop them finely.
2. Pour water into a steamer and get it going, so that by the time the batter is ready the steamer is ready. Make a coarse paste of the chilli and ginger(and garlic too if using) and keep ready.
3. Now in a dish take the besan and add the green chilli and ginger paste, salt, followed by turmeric powder, red chilli powder, jaggery, tamarind pulp. Add the curd and mix well with a spatula. It should be a semi-wet mixture.
4. Now put in the chopped coriander and mix well. Add water little at a time to make a smooth, yet thick batter. The batter should not be runny. Grease a plate or a flat dish with oil.
5. Now just before pouring the batter into the plate, add the cooking soda and mix well. Pour the batter into the greased plate and set it in the steamer for 15 minutes.
6. After steaming, remove the plate and cool completely. Cut into squares or diamonds and set aside. In a flat pan, pour sufficient oil for shallow frying. Add the mustard seeds, cumin seeds and asafoetida and place the cut Vadi pieces into the oil. Fry each side until light brown and crisp. Remove from pan. Repeat for all the pieces.
7. Now in the same pan put in the grated coconut and Sesame seeds and saute until light brown. Put this on tempering on the vadi for a nice flavour. The Kothimbir Vadi is ready.
NOTES:
1. The ratio of coriander leaf to Besan is 2:1, stick to that. More quantity scale up the measures in the same proportion.
2. Wash and drain the coriander leaves well before chopping.
3. I have not used garlic, but it can be added.
4. If you like the Vadis deep-fried, go ahead and fry them.
If you tried this recipe and liked it please comment below. I would love to hear from you.
If you want the recipes emailed to you leave your id in the homepage near the????
icon. Whenever we have a new post the recipe will be mailed to you. Thank you for showing interest in Rajjo’s Kitchen.
Stuffed Kuzhi Paniyaram (Savory)
Kuzhi Paniyarams are basically Lentil and rice batter dumplings. The batter is fermented and then poured into a Paniyaram pan which gives them the shape. Most often in South Indian homes the Kuzhi Paniyaram or Kuzhi appam as we call it is made from the Idli batter itself. When the batter becomes a little sour it is made into Paniyaram. That is because the Idli/Dosa batter is made for a whole week as a quick breakfast or dinner option. So day 1 is Idli, day 2 Dosa and day 3 onwards its Paniyaram and dosa with the batter, as sour Idlis are not that great to taste. However, when I have guests over I prefer making the batter especially for this as it makes the crust crisp and enhances the taste of the Paniyaram to a different level and the texture on the inside of the Paniyaram is lovely.
There are many variations of the Paniyaram batter. It is usually made with Urad dal and rice, Raagi(Finger millet)flour, Jowar(Sorghum) flour, Bajra(Pearl millet) flour, etc can also be used in the batter. The proportions of the Dal and rice also vary from home to home. The Paniyaram batter is used as it is or sometimes, finely chopped Onion, grated Carrots, and other vegetables can also be added.
I have stuffed the Paniyaram with a mashed potato spicy stuffing which tastes wonderful, I have also added finely chopped onions, green chillies, ginger and curry leaves to the batter. This combination of onion in the batter and the Potato stuffing within is a perfect one.
I personally don’t like using the non-stick Paniyaram pan for this dish, as the traditional brass or iron ones give the Paniyaram its crispy exterior. If you have only the non-stick one with you, that’s fine too.
Kuzhi Paniyarams can be served as Breakfast, starters or even for dinner with any chutney.
While you are here please check out other recipes of mine like Dahi Pohe, Adai,
PREP TIME: 20 Mins(+4 hrs soak) COOK TIME: 40 Mins
TOTAL TIME: 60 Mins COURSE: SNACK/TIFFIN
CUISINE: SOUTH INDIAN SERVINGS: 4
AUTHOR: Rajni Ram
Here is the recipe of Stuffed Kuzhi Paniyaram–
Ingredients for batter:
Urad dal/black gram(whole without skin) 1 cup
Idli Rice/Boiled rice 1.5 cup
Raw rice(any variety except Basmathi) 1.5 cup
Methi seeds/fenugreek seeds 1 tsp
Ingredients for stuffing:
Potatoes 4 medium(boiled)
Turmeric powder 1/2 tsp
Red chilli powder 1 tsp
Mustard seeds/Rai 1 tsp
Cumin seeds/jeera 1 tsp
Asafoetida 1/4 tsp
Curry leaves a few (finely chopped)
Salt as per taste
oil for tempering and for greasing the Paniyaram pan.
Directions for Batter:
Soak the dal and both rice varieties along with a teaspoon of methi seeds in a huge vessel for 3-4 hours and grind to a smooth paste to a batter of medium consistency(should resemble Idli batter). Add salt, and leave to ferment for 6-8 hours for a perfect texture of the Paniyaram. While grinding add little water at a time, the batter should be a smooth one, but not runny.
Directions for Stuffing:
Boil the potatoes, peel the skin and mash them well. Now in a pan pour some oil and heat. Add the mustard seeds, as they crackle, add the Cumin followed by turmeric powder, red chilli powder, salt, asafoetida and curry leaves. Nicely fry the masala in the oil for 30 seconds and drop the mashed potato into the tempering and mix nicely, so that the tempering is evenly distributed. Cool the mixture.
After it ferments temper the batter with mustard seeds and asafoetida.
Directions for Paniyaram:
Chop Onions, green chillies, ginger and curry leaves finely and add them to the fermented batter and stir well.
Put the Paniyaram pan on the flame and let it heat up. Pour oil into the moulds(if using a traditional metal pan, only the first round will need 1 tsp oil per mould, rest of the batches will need only a few drops). Wait for 1/2 a minute, let the oil heat up, now reduce the flame and with a small round ladle pour 1 scoop of batter into each mould, now take the stuffing little at a time with a spoon and drop it in the centre of the batter. Now cover up the stuffing with 1/2 scoop of batter and increase heat. Drizzle little oil around the corners of each mould, reduce the flame and slowly loosen them from the sides. Now flip each Paniyaram and cook the other side. When done loosen it from the mould and remove it. The crispy and tasty Kuzhi Paniyarams are ready..serve them with Tomato Coconut chutney or Tomato onion chutney. Enjoy. Bon Appetit.
STEPWISE RECIPE FOLLOWS:
1. Soak the dal and rice along with 1 tsp methi seeds for 3 hours minimum and grind to a smooth paste of medium consistency(Idli batter consistency). Add the salt, mix and allow to ferment for 6 to 8 hours.
2. Preparation of stuffing–Boil Potatoes, peel and mash them. In a pan take 1 tbsp oil and heat. Now add the mustard, followed by cumin, turmeric powder, salt, red chilli powder, asafoetida and curry leaves. Fry the masala for 30 seconds and add the mashed potato to the tempering and mix well. The tempering should have coated the potatoes well. Check for salt and spice. The stuffing should be a little spicy.
3. To the fermented batter add finely chopped onions, ginger, green chillies and curry leaves and stir nicely. Temper the batter with mustard seeds, cumin seeds and asafoetida.
4. Now put the Paniyaram pan on the flame and heat. Pour 1 tsp oil in each mould. Once the oil is heated, using a small round ladle, pour 1 scoop of batter into each mould. Now with a spoon drop little of the stuffing in the centre of the batter, now pour more batter to cover the stuffing. Drizzle some oil in the corners and cook for 1/2 a minute. Now loosen the edges of the paniyaram using a fork/ spoon or thin metal wire to flip them around, cook them and remove them from the pan when done. For doneness when you stick the metal wire or toothpick in the centre of the paniyaram, it should come out clean.
(I have included a short video so that you understand the process of cooking the Paniyaram in the pan.)
5. Repeat this process for the entire batter or how many ever you wish to serve, the remaining batter can be stored in the fridge and used to make uthappam.
The Paniyaram is ready to serve. It goes well with all chutneys or just by itself as it has a stuffing. It can be served with Sambar too.
How do make this recipe without a Paniyaram pan?
well, make a thicker batter, and also make small balls of the stuffing. Now take the stuffing and drop it in the batter, use your hands to coat the stuffing with batter and deep fry them in a Kadai of oil.
NOTES:
1. As the recipe involves soaking and fermentation, plan your time. In winters give more time for fermentation.
2. The onion, green chillies, ginger and curry leaves can also be sauteed in oil and added to the batter.
3. If using a nonstick paniyaram pan, I recommend drizzling it with some oil for a crunchy exterior.
4. Only small amounts of the stuffing as to put in the center of the batter, not too much of it.
If you tried this recipe and liked it please comment below. I would love to hear from you.
Vetrilai Rasam/Betle Leaf Rasam
Rasam is a popular South Indian dish prepared with tamarind, tomatoes, and Rasam powder. There are many variations of this dish, and each South Indian household has its own recipe for the proportions of the ingredients of the rasam powder. Therefore though Rasam is almost a regular feature in all South Indian households its taste is unique to each. No two Rasam recipes taste the same. Rasam is also a sought after comfort food in South Indian households when one has a Cold(Common Cold) or is a little under the weather because it is made of simple ingredients that are easily digestible and pepper that helps in combating the cold.
Earlier the Rasam was an everyday feature in most South Indian households along with Sambar or Vatha Kozhambu or Moru Kozhambu and a part of the Main course. Some households follow it to this day, but as the eating patterns of people has changed and is now more global the humble Rasam has taken a back seat or is made on a festival day where there is a feast(Elai Sapadu) or sometimes is also being served as a soup in elite gatherings.
There are different types of Rasam Like the Pepper Rasam, Tomato Rasam, Lemon Rasam, Garlic Rasam, Neem Flower (Vepampoo) Rasam, Drumstick Rasam, Pineapple Rasam and the Vetrilai(Betel leaf) Rasam. I have already posted the recipe of pineapple Rasam and slowly over a period of time plan to cover all the Rasam varieties mentioned here.
The Vetrilai also called Vethalai Rasam is has Betel leaves, Tomatoes, and the Rasam Powder as the main ingredients. This Rasam is a very mildly flavoured rasam. For more intense flavour add more Betel leaves.I am posting the recipe of the Rasam powder as the powder used makes a great impact on the flavour of the Rasam. This is also the reason why I said that the Rasam of no two households tastes the same as each has its own proportion. That said Rasam in any form is Comfort food????.
While you are here please check out the recipe of Pineapple Rasam.
Here is the recipe of Vetrilai Rasam for you–
PREP TIME: 10 Mins COOK TIME: 20 Mins
TOTAL TIME: 30 Mins COURSE: MAIN / APPETISER
CUISINE: SOUTH INDIAN SERVINGS: 4
AUTHOR: Rajni Ram
Ingredients:
Betel leaves/Vetrilai 10-12 leaves(refer note 1)
Tomatoes 5 (note 3)
Tuvar dal/ Yellow lentils 1/4 cup cooked in a pressure cooker
Rasam powder 3 tsp
Green chilli 1
Lemon 1
Coriander leaves finely chopped
Garlic(optional) (refer note 2)
Asafoetida 1 tsp (split 1/2 while boiling and 1/2 for tempering)
Turmeric powder 1 tsp
Salt as per taste
Roasted Pepper & Cumin powder 1 tsp( dry roast in the ratio 2:1 and grind coarse)
Directions:
Put the dal in a vessel and cook it in the pressure cooker. I used pot in pot method, you can use whichever is convenient. The dal should have cooked well. Remove the stalks from Betel leaves, reserve one leaf for garnish and put the remaining in a blender, put 2 chopped tomatoes and the green chilli into the blender too, and grind them to a smooth puree. Chop the remaining 3 tomatoes into big cubes and put them in a 1-litre vessel. Add the Betel leaf-tomato puree also to this vessel and pour 3 cups water(1 cup =150 ml). Put the vessel on a medium flame and add the Rasam Powder, followed by turmeric powder, asafoetida and salt. Boil the mixture until the raw smell of the Betel leaves and tomatoes is gone(around 7 minutes from boiling on medium flame). Now separate the water from the cooked dal and reserve. Mash the dal nicely with the back of a ladle. Pour the dal into the boiling mixture followed by the reserved water and add 2 to 3 cups of more plain water. Now continue to boil the mixture on a low flame until the Rasam froths up and boils and starts rising in the vessel( around 10 minutes on low flame). Don’t let it to overflow. When it rises up squeeze the juice of 1 lemon and put off the flame immediately. Now take 2 tsp ghee in a small tempering Kadai and heat. Add mustard seeds, as they crackle add the Asafoetida powder, roasted pepper-cumin powder and put off the stove. Now add the curry leaves to the ghee, and pour the tempering into the Rasam. Garnish with finely cut Betel leaves(only 1 leaf will do) and coriander leaves. The yummy Vetrilai Rasam is ready to slurp. Enjoy and Bon Appetit.
Serving suggestions: Just as a soup, with hot rice and ghee, with Oats porridge(try this it tastes yummy).
Sometimes I also pour it on my chapatis while hot.????
STEPWISE RECIPE FOLLOWS:
1. Assemble all ingredients. Cook the dal and keep ready. Remove the stalks from the Betel leaves, cut them to big bits, chop the tomatoes and keep aside.
2. In a blender put in the cut Betel leaves(reserve 1 for garnish), 2 chopped tomatoes, and green chilli and puree them smooth.
3. In a 1 litre vessel put the remaining 3 chopped tomatoes and the Betel-tomato puree and pour 3 cups of water. Put the vessel on the flame. Now add Rasam powder, Salt, turmeric powder, asafoetida and bring to a boil on medium flame. Keep boiling until the raw smell of the rasam powder and the Betel leaves goes away. This takes approximately 7 minutes on medium flame.
4. Now mash the dal nicely, if the dal has retained water, reserve it. Pour the dal into the boiling Rasam mixture, follow it up with the reserved dal water and add 2-3 more cups of plain water, and start boiling again on low flame.
5. Around about 10 minutes of boiling on a low flame the Rasam should start frothing up and rising in the vessel. When it starts coming towards the brim, add lemon juice and put off the stove immediately.
6. In a tempering Kadai heat 2 tsp of ghee. when it heats up put the mustard seeds into it, as they crackle add the asafoetida and the roasted cumin-pepper powder. Put off the flame and then add the curry leaves. Drop this tempering into the Rasam and serve hot with hot rice and ghee or follow any of the serving suggestions given above.
NOTES:
1. Betel leaves come in many varieties, but 2 of them are popular and in common use. One is light green and thin(the one I have used and you see in my pictures) another is a little deeper shade of green and the leaves are thick. So if using the light green ones use 10 to 12 leaves. If using the darker ones then reduce the quantity by half, use about 6-8 leaves as their flavour is more intense.
2. If using garlic grind it along with the Betel tomato puree. Around 2 pods should be enough or it will overpower the Betel taste.
3. I have used the sweeter hybrid variety of tomatoes(Bangalore ones) which I usually don’t, hence I used 5 of them. If using the country variety(Naatu thakkali) then 3 should be enough. Two to grind and two to put chopped.
4. If you serve Rasam with something unusual do let us, know..we love learning and trying new combinations.
If you tried this recipe and liked it please comment below. I would love to hear from you.
Chakkara Pongal/Sweet Pongal
The month of Aadi(as per Tamil calender) or Aashad is a very auspicious one in South India as it marks the beginning of festivals which begin with Ganesh Chaturthi and Janmashtami and goes up to Pongal in January which is the month of Thai(Tamil) or Paush. The Chakkara Pongal is considered to be the prime offering to the Mother Goddess. This sweet Pongal is also the offering to the Sun God on the Makara Shankranti day/Pongal festival.
This being the Aadi month I made Chakkara Pongal too and it came out well as always. But there is a lot to tell about the proportions and how I arrived at the current one after a lot of hit and trial methods. Is it that tough you may ask? Certainly not. In fact, it is the most simple one provided the right proportions of Rice, Dal, and jaggery is used.
Chakkara Pongal was my favourite sweet dish as a child(the only one I liked as I was not fond of sweets, now I like most of them) and I would get my mom to make it frequently. As I grew older I learnt to make it from my mother and eventually my mother in law. I believed our’s was the best Chakkara Pongal as compared to most South Indian households(as it is very common to make it here often) until I had it as prasad(offering) in a temple around 10 years ago and that Chakkara Pongal wowed me. I so fell in love with that taste and it was unlike any other Sweet Pongal I had tasted before. From then on started my quest for the right proportions to make this recipe. I asked a lot many people of the proportions they used, I browsed many websites to check out the best recipe, and also tried all these whenever I made the Sweet Pongal but “that” one recipe always eluded me. It is not even that this recipe has many ingredients, whatever it is we have to play around the proportions of Rice, dal(moong dal/ Chana dal) and Jaggery. So I tried many permutations and combinations until I arrived at the current one. I have used the one-pot method, but the same recipe works well for pot in pot method too. Hope you all will find it easy to prepare and also delicious. Looking forward to your comments.
Dry roast the Moong dal until light brown on a low flame. In a vessel take the rice and add the roasted moong dal to it. Wash the rice and dal together and put them in the cooker. Pour 4 cups water and cook for 5 to 6 whistles. Once the pressure releases mash the rice and dal nicely with the back of a ladle or masher. Set aside. Take the jaggery in a vessel or pan and add 1/4 cup water. Switch on the flame to low and dissolve the jaggery until it froths up. switch off and cool for 5 minutes(the jaggery mixture can be prepared when the rice is cooking, it will save time later). Now strain the liquid jaggery directly into the mashed rice-dal mixture in the cooker. Switch on the flame, add 1/4 cup milk and 1/4 cup water. Stir the mixture nicely and cook on low fire for 5 minutes or until the Pongal comes together and the jaggery is not runny anymore. Switch off the flame. In a tempering Kadai take 1 tbsp ghee and heat. Add the Cashewnuts and fry, followed by raisins. Pour this mixture on the cooked Pongal and also add the cardamom powder, raw camphor and the nutmeg powder(optional). Pour the remaining ghee over the Pongal. The delicious Pongal is ready. Enjoy. Bon Appetit.
STEPWISE RECIPE FOLLOWS:
1. Assemble all ingredients.
2. Dry roast moong dal over a low flame until light brown.
3. Take the rice and roasted dal in a vessel and wash nicely and put them in the cooker.
Add caption
4. Add 4 cups water and cook for 5 to 6 whistles. While the rice is cooking take the jaggery in another pan/vessel and add 1/4 cup water and put it on the flame. On low flame dissolve the jaggery and allow to boil until it froths around 2 minutes from dissolving. Switch off the flame.
5. Once the pressure in the cooker releases, strain the liquid jaggery over the rice – dal mixture in the cooker. Pour 1/4 cup milk and 1/4 cup water(warm) and stir nicely such that the jaggery is well mixed with the contents in the cooker, add 1 tbsp sugar. Let it cook for 5 minutes on low flame. The Pongal will come together as a nice gooey mixture. Switch off the flame.
6. In a tempering Kadai or pan add 1 tbsp of ghee and heat. Add in the halved cashew nuts and fry, followed by raisins until they fluff up. Add the cardamom powder, and a pinch of raw camphor(a mini pinch of nutmeg powder too if using). Drop the ghee with nuts and raisins into the Pongal. Top up with remaining ghee. The delicious Chakkara Pongal is ready to serve.
NOTES:
1. I have used 1 cup jaggery, but depending on the sweetness of the jaggery the amount may vary by 1/4 cup.
2. Adding a spoon of sugar to any jaggery based sweet dish they say helps in the jaggery getting integrated into the dish and raises the taste they say. So I have always followed this.
3. Edible Camphor and Nutmeg powder should be used sparingly and only the mentioned amounts. Using more makes the dish bitter.
4. A trick I learnt from my mother in law is to always pour the ghee in the end on top of the sweet dish while it is hot and to not stir it in completely. So when you scoop out the sweet dish the ghee on top will automatically flow down, so you actually won’t have to flood the dish with a lot of ghee.
5. Adding the ghee while it is still hot helps in even spread of the ghee on the dish. Don’t mix the ghee after pouring on the Sweet dish, it makes it heavy and also the dish will keep absorbing how much ever you pour.
If you tried my method of the Chakkara Pongal and liked it please comment below. I would love to hear from you.
Dahi Pohe/Moru Aval
This recipe of the humble Poha(beaten rice flakes)/Aval soaked in curd is one of my favourites. I make it whenever I have a lot of sour curd. Healthy and filling at the same time. It makes for a good breakfast or mid-evening snack(Tiffin) option. I make it for dinner too when lunch is heavy. There are many variations of the Pohe like Kanda Poha(onion Poha), Masala Poha(tomatoes and onions), Lemon Poha, Puli Aval(tamarind Poha), Vella Aval(Sweet Poha) and Dahi Pohe/Moru Aval. The Poha can be either thick or thin. For this recipe, I have used the thin one, but the same can be done with the thick one too, just that the soak time will vary. Thick Poha is used for recipes where the Poha is going to cook in a sauce so that it doesn’t become soggy. The Dahi Pohe makes for a good and healthy lunchbox recipe for kids. While you are here please have a look at other recipes by Rajjo’s Kitchen like Semolina Cheese Balls, Rava Dosa, Savoury Muffins and more…
Here is the recipe for Dahi Pohe/Moru Aval.
PREP TIME: 10Mins COOK TIME: 15 Mins
TOTAL TIME: 25Mins COURSE: BREAKFAST/TIFFIN
CUISINE: INDIAN SERVINGS: 4
AUTHOR: Rajni Ram
Ingredients:
Poha (thin) 250 gms
Sour curd 1 to 1.5 cups
Salt as per taste
Grated Coconut 2 tbsp
Peanuts 1 tbsp
Green chillies 2 finely chopped
Ginger 1 inch piece finely chopped
Dry red chillies 2 broken
Mustard seeds 1 tsp
Chana dal(gram dal) 2 tsp
Urad dal(black gram)2 tsp
Curry leaves a few
Asafoetida 1/2 tsp
Oil for tempering
Directions:
Pass the Poha through a sieve that has medium-sized perforations, such that the Poha remains in the sieve and the dust and small flakes fall away. Now wash the Poha just once(may become soggy if done more than once)and drain all the water. Put it into a flat bowl and add the sour curd and salt to it. Mix gently but evenly so that all the Poha are coated with the curd. Set aside for 10 to 15 minutes.
Now using your hands separate the soaked Poha gently and set aside. Take a Pan or Karahi and pour the oil. Once it heats up add the peanuts and fry them. Once they are golden in colour remove and set aside. Now to the oil add the mustard seeds, as they crackle add the chana dal, urad dal, dry red chillies, ginger, green chillies, curry leaves and asafoetida and fry them until golden in colour. Now add the Poha to the tempering and mix nicely. Check and adjust the salt. Keep stirring the Poha on a low to medium flame for 3 minutes. Now add the grated coconut and stir for another 2 minutes on low flame. Add in the fried peanuts and put off the flame. Enjoy the simple, healthy, tasty Dahi Pohe. Bon Appetit.
STEPWISE RECIPE FOLLOWS:
1. Assemble all ingredients.
2. Sieve, wash and soak the Poha in Curd. Add salt to poha before pouring the curd. Dilute the curd with little water(1/4 cup) if required. Rest the soaked Poha for 10 to 15 minutes. After the poha have soaked, separate them gently with your hands.
3. In a pan/karahi pour oil for tempering, around 2 tbsp and heat. Drop in the peanuts and fry until golden in colour. Now add the mustard seeds, as they crackle add the chana dal, urad dal, dry red chillies, ginger, green chillies and asafoetida and fry until golden in colour.
4.. Now add the Poha little by little and mix nicely so that the tempering is mixed evenly. Stir on a medium flame for 3minutes. Check salt and adjust if required. Add the grated coconut and stir for another 3 minutes over a medium to low flame.
5.. The Dahi Pohe are ready to pack in the lunch box or to serve.
NOTES:
1. If using thick Poha there is no need to sieve the Poha, just wash it around 3 times and then soak it in curd.
2. Fresh curd can also be used, but the recipe tastes best with slightly sour curd.
3. More grated coconut can be added if you like the flavour.
If you tried this recipe and liked it, please comment below. I would love to hear from you.
Carrot Kheer/Payasam
Kheer/Payasam is a popular part of Indian cuisine as a sweet dish. It is sometimes served at the beginning of a meal or as a finish off to the meal. Whenever there are festivities there is always kheer. There are many variations to the payasam, the popular ones being Rice Kheer, Semiya Payasam, Chana dal payasam, and many more.
Carrot Kheer is a dessert I have made time and again for friends and family on popular demand. I will also let you into my little secret that turns this recipe a stunner.
A simple dessert that tastes good both chilled and warm. This is a great recipe to make all the fussy about carrots and milk kids to get to eat both, as it a delicious way to have them. Any variety of carrot can be used for this kheer either Delhi Carrots or the English Carrots.
This kheer or payasam is not a very popular one as generally carrots are not on the favourite list of many, but that’s exactly why it should be popularised. Only when you have this kheer you will understand what I mean. It has a beautiful texture, can be had chilled right out of a glass-like juice or can be had warm on those cosy winter nights. It is also a great after school healthy drink. I can keep singing more praises of its goodness and delicious, but then one has to drink this kheer to experience it.
Chop the carrots to small cubes and put them in a heavy-bottomed vessel. Pour 1.5 cups of milk and cook. This should be done in a low to medium flame and the carrots should cook in the milk until the milk is almost evaporated and the milk sticks to the carrot pieces. Put off the flame and cool completely. Now put them in a blender and grind to a smooth paste. Add around 1/2 cup milk if required while grinding. Now pour the pureed Carrot into the same heavy bottomed vessel and switch on the flame. Dilute the puree with 1 cup milk and start boiling again. As it froths up and starts rising in the vessel add the sugar and reduce the flame. Continue to cook for 2 minutes. Now add another cup of milk and continue to boil on a low flame. Now when the mixture starts rising in the vessel switch off the flame and add the cardamom powder. Take a small tempering Kadai and add 2 teaspoons of ghee to it. when the ghee is warm add the broken Cashewnuts and fry to a light brown colour. The delicious Carrot Kheer is ready to serve. Enjoy the healthy goodness. Bon Appetit.
STEPWISE RECIPE FOLLOWS:
1. Assemble all ingredients. Chop Carrots, cut the Cashewnuts to pieces, make a powder of the Cardamom pods.
2. Put the chopped carrots in a thick bottomed vessel, pour 11/2 cups milk and cook.
3. The milk should evaporate completely while cooking the carrots and should stick to the carrots. The mixture should resemble like Rabdi sticking to carrots. Put off the flame at this stage and cool the mixture.
4. Now put the mixture in a blender and grind it to a smooth puree, add 1/2 cup milk if required while pureeing.
5. Pour the puree into the same heavy bottomed vessel and switch on the flame. Add 1 cup of milk and bring to a boil on a low flame. Ad the puree froths and rises up in the vessel put in the sugar and stir nicely to dissolve.
6. Cook for 2 minutes and pour another cup of milk and continue to cook over a low flame for another 5 minutes. When the mixture starts rising again in the vessel, put off the flame and sprinkle the Cardamom powder over the kheer and mix gently.
7. Fry the Cashewnuts to a golden colour and add them to the kheer. The delicious Carrot Kheer/payasam is ready.
NOTES:
1. Cooking the carrots in the milk until the milk is fully evaporated is critical to recreating this taste( that’s the secret). I find cooking carrots in milk only until the carrots are tender and then putting them in the blender as most recipes recommend, to leave a raw taste of the carrot in the dish. Which finally mars the flavour of the dish.
2. The milk and carrot have to cook over a low to medium flame. Don’t be tempted to raise the flame as the milk can get burnt and leave an after taste.
3. The beauty of this dish is that it needs no artificial colouring as its natural colour is bt itself very inviting.
4. Not much sugar is required for this recipe as carrots are naturally sweet.
5. Condensed milk can also be added instead of sugar, but in a lesser quantity, maybe 1/4 cup first and more if required. I have not tested this method of using condensed milk.
If you tried this recipe and liked it please comment below. I would love to hear from you.
Coriander Rice/Chutney Rice
My love for this herb is perennial. I love adding it to Subjis not just as a garnish but a few springs just as one of the ingredients. There are many condiments made of this humble herb like Chutneys, Dips, Raitas, Pickle, etc; Coriander rice is a simple and healthy rice variety and a great lunch box option for kids. It is healthy too as Coriander is rich in fiber and essential nutrients. It aids in digestion too. So why leave out such a beneficial herb from main course cooking and limit it to just being a condiment. Therefore I thought of adding this Coriander rice recipe to my blog post.
Try adding a few sprigs of it to any subji, not in the end but while cooking and see how the dish gets elevated in taste and flavour.
I’m calling this chutney rice as these are almost the same ingredients we use for green chutney, barring the chutney Chana. Well, tamarind/raw mango is added in green chutney though, I will try that version shortly and post. Here is the recipe for Coriander Rice…
PREP TIME: 10Mins COOK TIME: 30 Mins
TOTAL TIME: 40 Mins COURSE: MAIN
CUISINE: SOUTH INDIAN SERVINGS: 4
AUTHOR: Rajni Ram
Ingredients:
Coriander leaves 1 bunch finely chopped
Rice(regular) 1 cup precooked
Peanuts 1 tbsp
Cashewnuts a few
Green chillies 2
Cumin seeds 1 tsp
Fried gram dal(chutney chana)/Pottukadalai 1 tbsp
Turmeric powder 1 tsp
Mustard seeds1 tsp
Chana Dal(Bengal gram) 1 tsp
Urad dal(black gram) 1 tsp
Dry red chillies 1-2 broken
Oil for tempering 1 tbsp
Directions:
Cook 1 cup rice in a pressure cooker( I used pot in pot method, you can cook directly too) adding 3 cups water for 3-4 whistles. Once pressure releases spread out the rice on a plate to cool and also drizzle 2 tsp oil over the rice so that the grains do not stick together. Put the chopped coriander, cumin seeds, green chillies and the fried chana/ Pottukadalai and grind at first without water, then after a spin or two add little water and grind to a smooth paste. In a karahi or pan pour some oil and heat. Add the mustard seeds, chana dal, urad dal, dry red chilli and fry until golden brown. Now add the turmeric powder, followed by the ground Coriander puree and nicely fry the paste in oil on low heat. The paste will get a little dense. Add salt and fry for another 2 minutes. Now start mixing in the cooled rice little by little into the cooked paste, and mix nicely so that the rice is nicely coated with the paste. Put off flame and garnish with peanuts and cashewnuts. The flavourful Coriander Rice is ready to serve. Enjoy the lovely green of the rice. Bon Appetit.
Serving suggestions: Raita, Potato fry, or Cauliflower roast or Colaccasia(Arbi/Sepankezhangu) roast and papad.
STEPWISE RECIPE FOLLOWS:
1. Assemble all ingredients. Chop coriander leaves finely, Cook the rice for 3 to 4 whistles, cool on a plate and set aside.
2. Put the chopped coriander into the blender along with the green chillies, cumin seeds and fried chana/pottukadalai. Without adding water pulse them once or twice. Now add some water and grind to a smooth paste. Set aside.
3. In a karahi or pan pour some oil for tempering. Fry the peanuts to a golden colour and the cashew too and keep aside. In the same oil put in the mustard seeds. Let them crackle then add Chana dal, urad dal followed by dry red chillies. Fry until golden brown and add the turmeric powder.
4. Now pour the coriander paste into the oil and fry the paste nicely for 2 minutes. Add salt and continue to fry for another 2 minutes. The moisture should evaporate and the paste should become a little dense.
5. Add the cooked and cooled rice little by little to the paste. Mix well and switch off the flame. The flavourful Coriander rice is ready to serve.
NOTES:
1. While frying the paste in oil be careful not to evaporate it completely. The consistency should resemble sauce consistency.
2. Spread out the rice on a plate and drizzle oil or the rice will turn soft and lumpy once added to the paste.
If you tried this recipe and liked it then please comment below. I would love to hear from you.
Drumstick Curry
Moringa is the latest buzz word everywhere. What with Moringa leaves powder trending the healthy list. Well, the Moringa tree and dishes cooked from its fruit, flowers and leaves have been in India for ages. We have used its fruit, the drumstick in Subjis, Sambar, dal, etc; the leaves too are very aromatic and used as an add-in in Dosas, chilas, and more. The flowers too when added while making ghee, give the ghee a nice flavour and make it aromatic. My grandmother always added a few flowers just before putting off the flame while making ghee and would remove the flowers later, while bottling the ghee. My mother makes a pickle of it too, which is just as wonderful.
Here I bring to you a simple curry made from Drumsticks in curd and cashew-based gravy which absorbs all the flavours of the drumstick. A very quick recipe that gets done in 30 minutes. While you are here please have a look at my other Subjis like Mixed vegetable curry, Brinjal Pepper Masala, Kadai Paneer dry and many more
Here is the recipe of Drumstick curry–
PREP TIME: 15 Mins COOK TIME: 15 Mins
TOTAL TIME: 30 Mins COURSE: MAIN
CUISINE: NORTH INDIAN SERVINGS: 4
AUTHOR: Rajni Ram
Ingredients:
Drumsticks 5 long ones cut into pieces
Cashewnuts 15(soaked in warm water)
Poppy seeds 2 tsp(soaked in warm water)
Tomatoes 2 large or 3 medium
Curd 1 cup
Red chilli powder 1.5 tsp
Turmeric powder 1 tsp
cloves 3
Cinnamon 1 small stick
Garam masala powder 1/2 tsp
Directions:
Soak the Cashewnuts and poppy seeds in a little warm after for 10 minutes. Cut the drumsticks to 3 inch long pieces and set aside. Chop the tomatoes. After 10 minutes drain the water off the Cashewnuts and poppy seeds and put them in a blender, add the Cloves and Cinnamon stick and grind without water to a coarse paste. 2 spins in the blender will do. Add the chopped tomatoes to this and blend to a fine paste now. Keep aside. Heat 1 tbsp oil in a karahi, the oil should not be smoking hot. Lower the flame and add 1 tsp turmeric powder the chilli powder and stir immediately, or the masala powders will get burnt. To this add the ground paste and fry it in the oil for a minute nicely, until the rawness of the tomatoes goes away. Now add the curd and stir continuously for 30 seconds, add the salt and 1.5 cups water and put in all the drum stick pieces, cover and cook until the drumsticks are well cooked and the gravy becomes thicker. Test the drumsticks for doneness. If they are cooked, the flame can be turned oof and sprinkle little garam masala powder on top. The Drumstick curry is ready to serve. Enjoy the flavours. I’m sure you will cook this dish whenever you have Drumsticks at home. Bon Appetit.
STEPWISE RECIPE FOLLOWS:
1. Assemble all ingredients. Cut the drumsticks to pieces, soak the cashewnuts and poppy seeds for 10 minutes in warm water, chop the tomatoes.
2. After 10 minutes put the whole spices(cloves and cinnamon) in the blender, drain water from the cashewnuts and poppy seeds and put them in the blender at too and grind them coarse, without adding any water.
3. Now add the tomatoes to the blender and grind all together to a smooth paste.
4. Heat oil in a Karahi(medium hot) and add the turmeric powder, followed by red chilli powder. Oil in the karahi should be sufficient or the spice powders will burn.
Now add the ground paste immediately and fry the paste in oil for a minute, until the rawness of tomatoes is gone.
5. Now add the curd and start stirring continuously for 30 seconds. Now add the salt, and put in the cut drumsticks. Add 1.5 cups water and cover and cook for 10 minutes on medium heat. The drumsticks should have cooked well and the gravy should thicken up, at this stage add 1/2 tsp garam masala and put off the flame.
The drumstick curry is ready. Serve with Rotis, Parathas or even Rice.
NOTES:
1. If the curd is a little sour it adds taste to the curry.
2. Stirring constantly after pouring the curd is crucial or the curd will leave out the moisture and the gravy will be too thin.
3. Check the doneness of the drumsticks before switching off the flame.
4. In case the drumsticks are still raw but the gravy has thickened, add 1/2 cup water, cover and cook until done.
5. Pick tender and fleshy Drumsticks while buying, they will cook faster.
If you tried this recipe and liked it please comment below. I would love to hear from you.
Brinjal Pepper Masala (No Onion-No Garlic Recipe)
An everyday subji made from Brinjals and very simple gravy. Brinjals combined in a tomato and coconut gravy with some black peppers for spice. A very mildly flavoured dish, it has some Cashewnuts and Raisins too which enhance its taste. As I mentioned in one of my earlier posts Brinjals are very versatile vegetables and a large variety of recipes can be made with them from different cuisines. There are many types of Brinjal too and some recipes are specific to the Brinjal.
In this recipe, you can use any variety except the Bhara Baigan( the large fleshy one), as we want the Brinjal pieces to be firm and not mushy.
I learnt this subji from one of the guest house cooks where we stayed during our transfers from city to city. The gravy is of the South Indian style but believe me, it goes perfectly well with any of the rice varieties like Pulav or vegetable rice or even plain rice. It can also be served with Rotis. The Cashews and especially the raisins are like surprise packages in this dish which keep popping every 1 or 2 scoops. If you don’t like nuts or Raisins in your subjis(like I did until I tasted this) then you can always omit their use.
While you are here take a look at Gutti Vankaya Kura, which is also a Brinjal dish with Andhra flavours. Also check out, Methi Wale Baingan, Please look up other subjis too under the label Subjis while you are here.
PREP TIME: 20 Mins COOK TIME: 20 Mins
TOTAL TIME: 40 Mins COURSE: MAIN
CUISINE: SOUTH INDIAN SERVINGS: 4
AUTHOR: Rajni Ram
Here is the recipe of Brinjal Pepper Masala-
Ingredients:
Brinjal (any variety except Bharta Baigan) 250 gm diced medium
Tomatoes 3 large finely chopped
Curry leaves a few
Oil for sauteeing
Turmeric powder
Red chilli powder
Ingredients for paste:
Pepper 1 tsp(add more for more spice)
Cumin 1 tsp
Dry red chillies 3
Grated coconut 2-3 tbsp
Directions for making paste:
Heat a karahi with 1 tsp oil and put in all ingredients mentioned under paste, in the same order and roast them until light brown. Cool it and grind it in a blender to a smooth paste.
Directions:
Dice the brinjals to medium size and put them in some water. Chop tomatoes very fine and set aside. In a Karahi pour some oil-around a tablespoon, let it heat up and put in the Cashewnuts, fry them until they are golden brown, remove them and put in the Raisins. Fry them too until they puff up and remove from oil. Now add the diced Brinjals to the same karahi and add 1/2 tsp turmeric powder, 1/2 tsp salt, stir well and cover it and cook for 3 minutes. Stir again and cover for another 2 minutes. The brinjal should have turned a little tender but still retain shape. Transfer the brinjals to another vessel and set aside. Now in the same karahi take 2 tsp oil and heat. Add the mustard seeds, let them crackle. Add the cumin seeds followed by turmeric powder and curry leaves. Give it a stir and add the chopped tomatoes. Now add some salt followed by red chilli powder and fry nicely in the oil. Let the tomatoes break, keep mashing them with the back of the spatula. When it turns pulpy, add the ground paste, sauteed Brinjals followed by 1 cup of water, cover and cook for 7 minutes. When you open the lid, the brinjals should have cooked fully, but retain shape and the curry should have come together. Now switch off the flame and add in the fried nuts and Raisins. Brinjal Pepper masala is ready to serve. I served it with some Pulav, any rice or Indian bread varieties will go well with it. Enjoy. Bon Appetit.
STEPWISE RECIPE FOLLOWS:
1. Assemble all ingredients. Dice the Brinjals, chop the tomatoes, grate the coconut and keep ready.
2. In a karahi take around 1 tbsp oil, add the nuts and the raisins one after the other and fry. The cashew nuts should turn golden brown and the raisins should fluff up. Remove them into a separate plate.
3. Now to the same karahi add the diced Brinjals followed by salt 1/2 tsp and turmeric powder 1/2 tsp. Stir them and cover the karahi for 3 minutes. Open the lid, stir again and cover and cook for 2 minutes. Open and check the brinjals, they should have turned a little tender but should have retained the shape. Remove them to another vessel. If still undone, then cover and cook for another 2 minutes.
4. Now pour a little oil into the karahi, about 1 tsp and heat. Roast all the masalas , mentioned under paste in the same order. Pepper being first, followed by cumin seeds, dry red chillies and finally add the coconut and fry until they get a nice brown colour. Cool, transfer to a blender and grind to a fine paste.
5. In the same karahi pour 2 tsp oil and heat. Add the mustard seeds followed by cumin seeds, turmeric powder and curry leaves. Fry and put in the tomatoes followed by salt and red chilli powder. Stir and cook the tomatoes. Keep mashing them with the back of the spatula so that they turn mushy.
6. Now add the ground paste, followed by 1 cup water and put in the sauteed brinjals and cover the karahi and cook the brinjals in the paste for 7 minutes approximately, stirring once in between.
7. The Brinjals should be completely cooked by now, but not limp. the gravy too should have come together and should not be runny. Switch off the flame and drop in the fried nuts and raisins. Brinjal pepper masala is now ready. Serve hot with plain rice, Pulavs or with hot Chapatis.
NOTES:
1. Any variety of brinjal can be used except for the big fleshy one(Bharta Baingan).
2. Coriander seeds have been excluded from the paste, to get the same taste as mentioned in the recipe do not add them as they change the flavour of the dish completely.
3. More pepper can be added depending upon your spice levels. Be sure to reduce the red chillies or red chilli powder if increasing the pepper quantity.
4. The Cashewnuts and enhance the taste of the dish but if you don’t like the nuts coming in the way, they can be excluded altogether.
5. Kashmiri red chilli powder can be used instead of the regular one for colour.
If you tried this recipe and liked it please comment below. I would love to hear from you.
Pruppu Urundai Kozhambu (Dal Dumplings In Tamarind Sauce)
I love cooking this dish though it involves some amount of preparation and detail. Paruppu Urundai Kozhambu is a delicious traditional South Indian recipe. I learnt this from my mother in law and she was an expert at it. In this preparation, dumplings of Dal/ lentils are cooked in a tangy tamarind sauce. This dish is served with rice but goes well as a side dish for Dosas, Idli, Pongal etc. As in all recipes, there are different methods of making the dumplings. Some steam the dumplings before adding it to the sauce, while some cook it directly in the tamarind sauce. I prefer and follow the second method. The dumplings are able to absorb the flavours this way. I also love using fresh coriander in the dumplings as it realove cooking this dish though it involves some amount of preparation and detail. Paruppu Urundai Kozhambu is a delicious traditionaand add them to the sauce, whereas other recipes suggest cooking it lly elevates the dish to a different level. So when there are no coriander leaves at home I don’t make the dish. Whether coriander is added or not, this dish is just amazingly tasty. So don’t wait for the coriander, just cook on. While you are here check out the recipe of Vatha Kozhambu A similar recipe with Shallots cooked in a tangy tamarind sauce.
Here is the recipe of Paruppu Urundai Kozhambu.
PREP TIME: 20 Mins+ soak time COOK TIME: 30 Mins
TOTAL TIME: 60 Mins COURSE: MAIN
CUISINE: SOUTH INDIAN SERVINGS: 5
AUTHOR: Rajni Ram
Ingredients:
Tuvar dal/ Pigeon peas 2 cups soaked for 1 hour
Tamarind 2 lemon sized balls( pulp extracted)
Grated Coconut 3 tbsp
Sambar powder 2 tbsp
Dry red chillies 5
Mustard seeds 2 tsp
Asafoetida 2 tsp
Methi seeds/ fenugreek seeds
Curry leaves few
Coriander leaves(optional)
Salt as required
Directions to make Urundai( dumplings)
Drain out the water from the soaked dal and put it in the blender. Add 1 tsp asafoetida, dry red chillies 3, salt ( as per preference) and grind to a coarse mixture. Now in a karahi or pan add 1 tbsp oil to temper and sauté the mixture. As the oil heats up add 1 tsp mustard seeds, as they crackle add a few Methi seeds, broken dry red chillies, asafoetida1 tsp, curry leaves and fry them. Once they are golden brown add the coarsely ground dal mixture and salt and sauté nicely over a medium flame for 5 minutes. Add the grated coconut and keep stirring constantly as the mixture may stick to the pan/karahi bottom. This step is just to take away the moisture, the dal need not be crumbled, just stirred. After sautéing transfer the sautéed dal to another vessel and cool. Once cooled shape them into dumplings. I could make around 13 dumplings from this mixture. The dumplings should be a little bigger than a Lemon. Set the dumplings aside.
Directions for the Kozhambu( gravy/ sauce)
Extract the pulp from the tamarind and dilute it. You should have about 700 ml of tamarind juice if it’s too sour dilute with another 100 ml. Pour this diluted extract into a deep thick bottomed dish and switch on the flame. Add salt, turmeric powder, Sambar powder, asafoetida and boil. As it starts boiling and the raw smell of the masalas is gone( around 7 minutes into the process on medium flame), add one Urundai( dumpling) and test. If it doesn’t break while cooking on medium heat in the next 1 minutes, reserve 1 dumpling and all the other dumplings can be put into the tamarind water one by one after reducing the heat to low. If the first Urundai disintegrates in the water, put off the flame, undo all the dumplings and add 1 tablespoon rice flour and shape them to dumplings again and continue the process mentioned above. Cook the Urundais(dumplings) in low to medium flame while stirring gently every now and then until they start rising to the top. Once cooked the dumplings will float above. Now add about 1 cup water to the reserved dumpling and break it up. Pour this paste into the kozhambu( gravy) after the dumplings have risen and cook for 2 minutes or until the gravy has thickened to a Sambar like consistency. Switch off the flame and temper the Kozhambu with a little oil in a Kadai and put mustard seeds, followed by Asafoetida and curry leaves. The delicious Paruppu Urundai Kozhambu is ready.
Serving Suggestions: with hot rice and ghee, Dosas, Idlis, Ven Pongal, Kuthiravali Pongal( millet Pongal) etc.
STEPWISE RECIPE FOLLOWS:
1. Assemble all ingredients. Soak the Tuvar dal for 1 hour, soak the tamarind in warm water and extract the pulp, dilute pulp, grate the coconut, and keep ready.
2. Drain water from the soaked dal and put it into the blender, followed by red chillies, turmeric powder, salt and asafoetida. Grind them to a coarse paste, without adding water.
3. Now in a karahi pour oil for tempering and heat. Put in mustard seeds. As they crackle add the methi seeds, turmeric powder, broken dry red chillies, asafoetida 1 tsp and curry leaves and fry. Now add in the dal mixture to this and start sauteeing, so that the moisture from the dal gets evaporated. Add the grated coconut, saute for another minute and switch off the flame. Finally, add some finely chopped coriander to the dal mixture. Leave the mixture to cool.
4. In a deep vessel, preferably flat one pour the tamarind extract. It should be a dilute extract of 700 ml. Add turmeric powder 1tsp, asafoetida 1 tsp, Sambar powder 3 tbsp, salt and boil the extract on medium flame.
5. After the extract is put to boil, shape the dumplings of the Dal mixture and keep aside.
6. When the mixture bubbles up and froths( about 5 mins from boiling) and all the raw smell of the powders is gone drop one dumpling gently into the boiling mixture. Flame on medium, wait for 2 minutes. If the dumpling does not disintegrate in this time, retain 1 dumpling and put in all the other dumplings one by one. Reduce flame to low and continue to boil.
7. As the dumplings cook in the tamarind extract they will slowly start rising to the top(I have added a short video). When all have risen, break the single reserved dumpling and add 1 cup water to it. Give it a stir so that it becomes a paste. Add this paste into the boiling tamarind gravy to thicken the gravy. Cook for 2 minutes and switch off the flame.
8. Take a small tempering Kadai and add little oil. heat and add mustard seeds, asafoetida 1/2 tsp and curry leaves. Pour the tempering into the Kozhambu.
The tasty Paruppu Urundai Kozhambu is ready to serve.
NOTES:
1. Definitely soak the dal, helps in binding.
2. Sometimes depending on the dal quality the dumplings can break/disintegrate in the extract while boiling. That is why I have recommended putting only a single one to test.
3. If the tester dumpling disintegrates, break up all the other dumplings and add 1 tbsp rice flour to it. Mix well and shape into dumplings again. Before you do this do not forget to switch off the flame in which the extract is cooking as we dont want it to evaporate now.
4. Some recipes recommend adding rice flour to the dal mixture while shaping them itself. I prefer not doing this as it makes the dumplings tougher or hard. So I prefer adding rice flour only if required.
If you tried this recipe and liked it please comment below. I would love to hear from you.
Beans Paruppu Usli
Paruppu Usli is a South Indian(Tamilian) dish made by crumbling dal. The crumbled dal is then added to cooked vegetables. A wide variety of vegetables like Banana flowers, Cabbage, Capsicum, Radish greens, and Beans can be added to the Usli.
This is a dry(without gravy)side dish which can be served to go with Rasam rice, Vatha Kozhambu rice, More Kozhambu(Kadi)rice, and other varieties.
There are many versions of making the Usli. Some use just a single dal to make the Usli(dal crumble) and some use a combination of dals. I prefer Chana dal(split peas) to make the Usili. It is very easy to crumble this dal and is tastier than the other dals.
The Usli tastes amazing just by itself too. Here’s the recipe of Beans Paruppu Usli.
PREP TIME: 20 Mins COOK TIME: 20 Mins
TOTAL TIME: 40 Mins COURSE: MAIN
CUISINE: SOUTH INDIAN SERVINGS: 4
AUTHOR: Rajni Ram
Ingredients:
French Beans 250 gms chopped fine.
Carrot 1 (just for colour)
Chana dal 1cup soaked for 1/2 an hour
Cumin seeds 1 tsp
Dry red chillies 3
Asafoetida 1/2 tsp
Turmeric powder
Curry leaves a few finely chopped
Oil(refined) for crumbling the dal 2tbsp
Directions:
Chop the French Beans, and carrot and add some salt and turmeric powder and cook them in sufficient water. When you can crush the Beans-carrot between your index and thumb finger, stop cooking. Drain the water and cool. Now put the soaked Chana dal after draining out the water in a blender, add the dry red chillies, cumin seeds, turmeric powder, salt and asafoetida and grind to a coarse paste. Add very little water to grind. Now take oil in a heavy-bottomed Karahi(preferably NOT nonstick) and heat. Add the finely chopped curry leaves and pour the dal mixture into karahi immediately. Start scrambling the dal. A Dosa flipper works best for this while you are scrambling the dal, keep breaking the bigger lumps for them to crumble further. The finer you are able to crumble the better. This takes between 10 to 15 minutes. Once you have fully crumbled the dal it should look like a coarse powder. Transfer the crumbled dal to another vessel from the karahi. Now add the cooked Beans-Carrot to the Karahi and start evaporating any remaining moisture in it, by sautéing it well. When there is no more moisture in the Beans add the crumbled dal mixture to the Beans-Carrot and mix well. Check for salt and adjust if required. The yummy Beans Usli is now ready to serve. Serve it with some Vatha Kuzhambu rice, Rasam rice or More Kozhambu rice. I love it with Rotis too. Enjoy. Bon Appetit.
STEPWISE RECIPE FOLLOWS:
1. Assemble all ingredients. Chop and cook the Beans and Carrot( take care, not to overcook)and soak the Chana dal for 1/2 an hour.
2. Now in a blender put the soaked Chana dal after draining the water, the cumin seeds, dry red chillies, turmeric and asafoetida and grind to a coarse paste. Add as little water as possible.
3. Take a Karahi and pour in oil around 2 tablespoons and heat. Add the chopped curry leaves to the oil and add the ground Chana dal mixture.
4. Start scrambling the mixture using a Dosa flipper( makes the process easier). Keep breaking the bigger lumps into smaller ones and crumble the mixture. It should start becoming dry. By the end of the crumbling procedure, the dal should look like a coarse powder. This takes 10 to 15 minutes and some patience. Flame to be medium to low throughout.
A quick video to show you how to crumble the dal????
5. Once the dal is crumbled, transfer it from the Karahi to another vessel. In the same karahi put in the cooked Beans and Carrot and evaporate any remaining moisture.
6. Once the vegetables become dry add the crumbled dal to them and stir. Mix them nicely so that the vegetables and dal are well combined. The Beans Paruppu Usli is now ready to serve.
NOTES:
1. The dal has to soak at least for half an hour.
2. I have not tempered the Usli while or after making it, anyway no harm in tempering too.
3. The vegetable should be nicely stir-fried and all water evaporated before adding the dal crumble because if there is any moisture it will all turn lumpy.
4. Instead of Beans, any other vegetable given above can also be used. The crumble procedure will be the same.
If you tried this recipe and liked it then please comment below. I would love to hear from you.
Mixed Vegetable Curry (No Onion, No Garlic Recipe)
This recipe is absolute comfort food. On those, no masala days or on days when you are off onion and garlic, or even otherwise this Subji is a great option for Rotis and Rice. It’s a colourful subji that will encourage children to eat vegetables and is also not very spicy. Since I have not used onions or garlic, milk cream forms the base of the subji. A wide variety of vegetables can be used, excluding the high water content ones. I have used vegetables that are easily available and popularly come under the mixed vegetable category. please do visit my other subjis and dals while you are here.
Here’s the recipe for Mixed Vegetable Curry.
PREP TIME: 15Mins COOK TIME: 15 Mins
TOTAL TIME: 30Mins COURSE: MAIN
CUISINE: NORTH INDIAN SERVINGS: 4
AUTHOR: Rajni Ram
Ingredients:
Cauliflower 10-15 florets
Carrot 1 diced
Potato 1 large or 2 small
Capsicum 1 medium diced and seeds removed
Beans 10 approx cut into 1/2 inch pieces
Tomatoes 4 ( 2 chopped & 2 pureed)
Peas shelled( fresh/frozen) 50 gm
Fresh cream 1.5 cups
Salt as per taste
Cumin seeds 1tsp
Red chilli powder 1 tsp
Turmeric powder 1tsp
Fennel/saunf powder
Coriander powder 1 tsp
Garam Masala powder 1/2 tsp
Oil for sauteeing
Directions:
Dice all vegetables and keep ready. Put all the vegetables except Capsicum and tomatoes, in a vessel, pour enough water, salt and turmeric powder and cook. The vegetables should get tender but not turn limp. Switch off flame at this stage and cool the vegetables completely. If any water is remaining drain and keep it aside, it can be used if required later on. Now in a pan heat 1 tbsp oil, add cumin seeds, turmeric powder and put in the diced capsicum and saute on high flame for few minutes. Reduce flame to low and add in the tomatoes. Saute on low flame for a minute. The tomatoes should just get a little tender and not break and release the juice. Now add in the tomato puree and all the dry spice powders and cook for 3 minutes on medium flame. Put in the boiled vegetables now(after draining the water) and cook for another 3 minutes. Ensure that not much water is remaining in the pan, if there is, then drain out some or else the subji will turn too watery. Now pour the fresh cream into the pan and immediately turn off the flame. Once the cream is added the flame should not be on, or the gravy will thin out completely. Stir nicely, add the garam masala powder and garnish with chopped coriander leaves and the Mixed Veg subji is ready to be served with Rotis or rice. Enjoy. Bon Appetit.
STEPWISE RECIPE FOLLOWS:
1. Assemble all ingredients. Chop and boil all vegetables and puree 2 tomatoes.
2. In a pan take 1 tbsp oil and heat it. Add the cumin seeds and once they splutter, add the turmeric powder and capsicum and saute on high flame for few minutes.
3. Lower the flame and add in the chopped tomatoes and saute on low to medium flame for a minute. The tomatoes should not break and become limp.
4. Now add the tomato puree followed by salt and all the dry spice powders except the garam masala powder, stir nicely and cook for 3 minutes or until the raw smell goes away.
5. Now add the boiled vegetables and cook for another 3 minutes. If there is too much water, drain it. A little water is ok and required.
6. Finally, add the cream and switch off the flame immediately. Add the garam masala powder now and mix. Garnish with coriander leaves. The mixed vegetable curry is ready to serve.
NOTES:
1. Any store-bought fresh cream is good enough for the subji. It need not necessarily be full or medium fat. Low fat cream is fine too.
2. Once the cream is added put off flame right away, or the gravy will thin down and the moisture from the cream will separate, making the subji too runny.
3. Saute the capsicum on high flame so that it doesn’t release too much moisture and cooks crisp.
If you tried this recipe and liked it comment below. I would love to hear from you.
Atte Ka Sheera (Insant Wheat Halwa)
Halwa is a popular dish in the Indian subcontinent and there are many varieties of Halwa like Rava/Suji Halwa, Moong dal halwa, Chana dal halwa, Lauki halwa, Carrot halwa, and many more. This recipe Atte Ka Sheera is very popular in North India during both the Navrathras, as it is offered to little girls on the Ashtami day( day 8 of Navrathri) as Prasad(holy offering).
This Halwa gets done in no time and is healthy and tasty at the same time. My girl loves it and whenever any of us craves sweet at home I make it instantly, like today.
The smooth texture of the Halwa lies in roasting the Wheat flour correctly, as an under roasted flour can make the halwa lumpy. There are many variations to making this Halwa and I chanced upon this one in an old recipe book and have always made it that way ever since. Do check out my other sweet and dessert recipes.
PREP TIME: 10 Mins COOK TIME: 20Mins
TOTAL TIME: 30Mins COURSE: DESSERT
CUISINE: NORTH INDIAN SERVINGS: 4
AUTHOR: Rajni Ram
Ingredients:
Wheat flour 1 cup( any size is fine, but use the same cup for all measures in this recipe).
Sugar 1 cup
water 2 cups
Ghee 1/2 cup
Cardamom powder 1/4 tsp
Directions:
Take a heavy-bottomed pan /Karahi/Urli and heat it. Add 1 tbsp ghee and add in the wheat flour and start roasting it, stirring continuously. after 5 minutes add another tablespoon of ghee and continue to roast. Don’t forget to keep stirring, as the flour can get burnt. as the roasting continues the atta/wheat flour will give a nice aroma, keep roasting until the flour turns golden brown. Once it is nicely browned turn off the flame. In another saucepan heat water, and drop the sugar into it, dissolve it and allow it to boil. Once the sugar is dissolved switch off the flame. Now slowly pour the sugar water into the roasted wheat flour and keep stirring continuously(remember to keep the flame off while pouring the sugar water). Once you have poured all the water, switch on the flame and continue to stir, until the halwa starts leaving the bottom of the pan/karahi. turn off the flame add the nuts and remaining ghee. Atte Ka Sheera is ready. Enjoy this wholesome goodness. Bon Appetit.
STEPWISE RECIPE FOLLOWS:
1. Assemble all ingredients.
2. In a heavy-bottomed pan/karahi pour 1 tablespoon ghee, add the wheat flour and start roasting. Keep stirring continuously.
3. After 5 minutes of roasting add another tablespoon of ghee and continue to roast. The flour starts turning brown and also starts giving out a nice aroma. Continue to roast until the flour turns golden brown. (Remember to keep flame at low or medium). Once browned switch off the flame.
4. Now in a saucepan pour the water and drop in the sugar and boil, add a few pods of cardamom to this(later it can be fished out). Once the water starts boiling and the sugar has completely dissolved put off the flame.
5. Now slowly pour the sugar water into the roasted wheat flour, while stirring simultaneously. Remember to keep the flame of while pouring the water into the Atta. If the flame is not switched off the water can splutter on the hand, and the halwa can get lumpy too.
6. Once you have poured in all the water, switch on the flame and continue stirring, until the halwa starts leaving the pan bottom and swirls along with the ladle. At this stage add the remaining ghee and garnish with some dry nuts.
Atte Ka Sheera is ready to serve.
NOTES:
1. Roasting the flour is the most critical step to get a smooth and creamy Halwa.
2. Roasting must be done in low to medium flame and not high as this could burn the flour.
3. After roasting the flour and while preparing the sugar water, keep the flame of the flour off.
4. While pouring the sugar water into the Ata also the flame must be off. Switch on after pouring all the water.
5. I have used only 1/2 a cup of ghee, more can be added if required.
If you tried this recipe and liked it please comment below. I would love to hear from you.
Kuthiraivali (Barnyard Millet) Pongal
Pongal is a savory dish of rice and lentils in South India similar to the Khichdi in the North. I have supplemented the rice with Barnyard Millet, called Kuthiraivali in Tamilnadu. These millets are high in fibre and are gluten-free. So for all the health freaks, here’s the recipe for you. This is a simple one-pot recipe. It makes a great breakfast option as compared to the rice Pongal, as it is lighter.
PREP TIME: 20 Mins COOK TIME: 15 Mins
TOTAL TIME: 35 Mins COURSE: MAIN
CUISINE: NORTH INDIAN SERVINGS: 4
AUTHOR: Rajni Ram
Ingredients:
Kuthiraivali(Barnyard Millet) 1.5 cups
Moong dal/ split green gram 1/2 cup lightly roasted
Pepper-Cumin powder 2 tsp (dry roast in the ratio 2:1 cool and grind coarse)
Salt as per taste
Cashewnuts 6-7
Ghee 1 tbsp
Curry leaves a few
Ginger 1 tsp finely chopped
Asafoetida 1 tsp
Turmeric powder
Directions :
Roast the moong dal to a light brown. Put the Millet in a vessel add the roasted dal to it and wash them nicely. Now put them into a pressure cooker and add 4 cups water, the salt, and turmeric powder and cook for 5 whistles. Let the pressure release. Now open the lid and give a light mash to the millet- dal mixture. It would have absorbed all the water while cooking, so pour another 1 to 1.5 cups of water and stir nicely. Now in a small tadka kadai put in 1 tbsp of Ghee and heat. Put the Cashewnuts in and fry them to a light brown. Remove them from the ghee and set aside. Now to the same ghee add Cumin seeds, let them splutter add-in the ginger, pepper- cumin powder, asafoetida, and curry leaves and fry them well in the ghee. Transfer this into the cooker. The Kuthiraivali Pongal is ready. Serve with some coconut-coriander chutney.
STEPWISE RECIPE FOLLOWS:
1. Assemble all ingredients. Roast the moong dal and keep it ready.
2. Wash the Kuthiraivali/Barnyard millet and moong dal and transfer them to a small pressure cooker. If using big cooker follow pot in pot method( that is putting the contents into a vessel and putting that vessel into the cooker). Pour 4 cups water and pressure for 5 whistles. Once the pressure releases check if the mixture is well cooked. They should be quiet soft, If not put back in the cooker for another 2 whistles.
3. The mixture will be a little solid, add around 1 to 1.5 cups of water, and loosen up the mixture.
4. In a tadka, Kadai, or small tempering pan add the ghee and let it heat. Add the cashews and fry to a light brown. Remove from ghee. To the same ghee add the cumin. Once they splutter add in the ginger, pepper-cumin powder, curry leaves, and asafoetida. fry nicely for a minute and pour it into the dal-millet mixture. The Kuthiraivali Pongal is ready
Notes:
1. If using pot in pot method then after pressure cooking, you can make the tempering in a bigger pan and add the rice dal mixture to the pan.
2. While adding water to the Pongal after pressure cooking to loosen it, you can add hot water instead of room temperature one.
3.Pepper -cumin powder direction pictures below–
If you tried this recipe and liked it please do comment below. I would love to hear from you.
Pineapple Rabri
Rabri is a sweet-dish made by boiling and reducing milk until it gets a thready texture and becomes dense. It is flavoured with cardamom and nuts and served chilled. In this recipe, I have added fruit to the Rabri instead of dry nuts. Usually, Rabri is served as an accompaniment for Jalebi or Malpua, but this recipe of Pineapple Rabri can be relished just by itself. Let’s get to the recipe right away.
PREP TIME: 20 Mins COOK TIME:1 hr 30 Mins
TOTAL TIME: 1 hr 50 Mins COURSE: DESSERT
CUISINE: NORTH INDIAN SERVINGS: 4
AUTHOR: Rajni Ram
Ingredients:
Pineapple 4 slices chopped fine
Milk 1.5 litres
Brown sugar or unrefined sugar 1/4 cup
white sugar 1/2 cup
Cardamom powder of 3 pods
Milk Powder 1/2 cup(optional)
Saffron strands a few(optional)
Directions to make Rabri:
Cut the pineapple into fine cubes, put them in a pan add 1.5 to 2 cups water and cook them on slow fire. The pineapple should be just cooked and not mushy. The water should have dried up, it takes about 15 minutes. After the water dries up add 1/2 cup brown sugar/unrefined sugar and saute. Keep stirring once you add sugar as there are chances of the sugar burning. Let the mixture become dry. Put off the flame and cool it. Now in a thick bottomed vessel pour the 1.5 litres of milk and boil. Keep stirring continuously, otherwise the milk we stick to the bottom of the vessel and burn. Add the Saffron strands now. Keep stirring until the milk reduces to half the quantity. It will start getting denser. The texture also changes. Add 1/2 cup milk powder(if using, at this stage) continue to stir, add the white sugar and continue stirring until the milk becomes semi-dry, that is, it should not be of flowing consistency but a little denser. At this stage put off the flame. Cool the Rabri and put it in the refrigerator. To serve add the candied pineapple pieces to the Rabri, mix, put some pieces on top and the desert is ready.
STEPWISE RECIPE FOLLOWS:
1. Assemble all ingredients. Please note that the pineapple can be cooked a day ahead and put in the refrigerator.
2. To cook the pineapples, cut them into small cubes, put them in a pan add around 2 cups water and cook. They should become soft, but not mushy. Add the brown sugar and continue to cook. Once the mixture dries up, put off the flame and let it cool.
3. Pour the milk into a wide-mouthed, thick-bottomed vessel and begin to boil. Keep stirring constantly as the milk should not stick to the bottom of the pan. Add the saffron strands now.
4. Continue stirring until the milk reduces to half, it will become denser and the texture will start getting thread. Add in the milk powder(this is optional) and continue to reduce the milk.
5. Add the sugar when the threadiness increases and continue to stir. Put in the cardamom powder. Put off the flame when the mixture is no longer in pouring consistency, it has to be scooped out. Cool the mixture and put it in the refrigerator.
6. To serve add the candied Pineapple into the Rabri and mix. Reserve some for putting on top. Decorate with cherries or berries and the refreshing Pineapple Rabri is ready to serve.
NOTES:
1. It takes about 1.5 hrs to make this dish. But don’t be disappointed, it will be worth the effort.
2. The time taken will depend on the fat content in the milk used. I have used toned milk, so it took me more than an hour to reduce the milk. If full cream milk is used the time will be lesser.
3. If making this for a get-together or party, you can make this the previous day and put it in the refrigerator in an airtight container. If doing this keep the fruit separate and add before serving.
4. I have used white sugar for Rabri, unlike the pineapple, as adding brown sugar to the Rabri will change its colour.
If you tried this recipe and liked it pls do comment below. I would love to hear from you.
Vatha Kozhambu (Shallots In A Spicy Tamarind Gravy)
This is a traditional South Indian recipe. There are many variations to this recipe and a large variety of vegetables or dehydrated berries(Turkey berry, cluster beans, etc;) are simmered in a spicy tamarind sauce. Usually served with hot rice and ghee, but goes well with Dosas and Idlis too. I have used Sambar powder here, though Vatha Kozhambu powder is also used, there is not much difference in the taste and Sambar powder works well. For the recipe of Sambar Powder click here. Let’s get to the recipe without much ado.
PREP TIME: 20 Mins COOK TIME: 15 Mins
TOTAL TIME: 35 Mins COURSE: MAIN
CUISINE: SOUTH INDIAN SERVINGS: 4
AUTHOR: Rajni Ram
Ingredients:
Shallots 200 gm skinned
Tomato 1 large
Tamarind lemon sized ball( soaked in water and pulped)
Salt as per taste
Sambar powder 1 tbsp
Red chilli powder 1 tsp
Turmeric powder 1 tsp
Asafoetida 1 tsp
Mustard seeds 1 tsp
Fenugreek seeds 1/2 tsp
Dry red chillies 2 broken
Curry leaves a few
Sesame oil/ Til oil 1 tbsp( can use more if you prefer)
Directions:
Peel the skin off the Shallots and keep ready. Chop the tomatoes. Soak a lemon sized ball of tamarind in a little warm water, let it cool and extract the pulp. Now in a pan or karahi take a tablespoon of Sesame/Til oil and heat. Add the mustard seeds, fenugreek seeds, asafoetida, dry red chillies, and curry leaves and saute for a minute. Add the Shallots and saute until they start turning translucent. Now add the tomatoes and continue to saute for a minute. Add the dry spices- Sambar powder, turmeric powder, and red chilli powder and continue to stir fry. If the mixture is too dry add another 2 teaspoons of oil, otherwise the masala may burn. Saute for another minute and pour the tamarind pulp and add the salt. Stir well and allow it to simmer on low flame until it thickens and reduces a bit. The oil will form a layer on top and the mixture will reduce, at this stage put off the stove. The Shallot Vatha Kozhambu is ready to serve with hot rice, Dosas, Idlis etc.
Direction to make Sambar powder is given under the label powders.
STEPWISE RECIPE FOLLOWS:
1. Assemble all ingredients. Shallots skinned and tomatoes chopped. Soak tamarind(lemon sized ball) and get the pulp.
2. In a pan/karahi heat some Til oil(preferable, if not continue with refined oil). Add mustard seeds, fenugreek seeds, dry red chillies, asafoetida, curry leaves, and fry.
3. Add the shallots and stir well so that the oil coats all the shallots. Fry until they turn translucent. Add the tomatoes and continue to stir fry for another minute.
4. Now add in all the dry spices- Sambar powder, red chilli powder, turmeric powder, and continue to fry. If the mixture is too dry after adding the powders, then add 2 tsp of oil and fry, until the raw taste of the masalas is gone.
5. Pour the tamarind pulp and in the salt and stir well and allow the mixture to boil. Let it simmer until the mixture thickens and reduces in quantity. The oil will form a layer on top. At this stage put off the stove. The Shallot Vatha Kozhambu is ready to serve with hot rice and ghee.
NOTES:
1. I have used Shallots here, other vegetables that can be used are Drumsticks, Ladies finger, Onions, dehydrated berries like Turkey berry(Sundakai), and even dehydrated vegetables like Cluster beans, Bitter gourd, etc.
2. Sesame oil enhances the flavour of the dish, so I highly recommend it.
3. Frying the dry masalas in the oil well(step4), gives the dish the perfect flavour.
4. The fenugreek seeds also impart the aroma a lovely flavour to this dish, but they should be used in the quantity mentioned and not more, as they can turn the dish bitter.
If you tried this recipe and liked it please comment below. I would love to hear from you.
Veg Kothu Parotta
This is a south Indian street food recipe, made form Parathas(called Parotta in the South) and sauteed vegetables in a spicy tomato base. The Parottas are shredded(minced)and added to the gravy and further stir-fried to a crispy flaky dish. There are many variations to this dish, but I am keeping it simple. This dish can be served with sauce or raita. Usually, leftover parathas or chapatis can be used for making this dish. Store-bought Parathas can be used too. Let’s get to the recipe.
PREP TIME: 20 Mins COOK TIME: 25Mins
TOTAL TIME: 45 Mins COURSE: MAIN
CUISINE: SOUTH INDIAN SERVINGS: 4
AUTHOR: Rajni Ram
Ingredients:
Parathas 5
Onion 2 medium diced and petals separated
Carrot 1 grated coarse
Capsicum 1 diced to cubes
Tomato 1 diced
Tomato puree 1 cup
Cashewnuts 10
Cloves 4
Cinnamon 1 small stick
Green chillies 3 split lengthwise
ginger-garlic paste 1 tsp
Cumin seeds 1 tsp
Curry leaves few
Turmeric powder 1/2 tsp
Red chilli powder 1 tsp
Coriander powder 1 tsp
Biriyani masala(powder) 1.5 tsp
Garam masala 1/2 tsp
Salt as per taste
Oil for stir fry
Directions:
If the Parathas are store-bought, heat them on the tava/girdle with a little oil, cooking both sides. Cool them and using kitchen scissors tear them to pieces or use your fingers to tear them into 1 inch long pieces. keep this aside. In a pan/ Karahi take 4 tsp oil, heat and add the cumin seeds. Put in the turmeric powder and drop the green chillies and curry leaves into the oil, followed by the onions and fry at high heat for 1 minute. Now add the capsicum and continue to fry on high heat. Add the carrot, reduce heat and fry for 30 seconds. Now add the tomatoes, fry for another 30 seconds and pour the tomato puree and give a good stir. Now add the masalas- coriander powder, red chilli powder, Biriyani masala and salt. Stir well and cook for a few minutes, grind the cashew nuts to a loose paste and add it to the gravy. Continue to cook until the gravy thickens and starts getting dry, add the garam masala powder and put off the heat and let the mixture cool a bit. After 5 minutes add in the minced paratha pieces, switch on the stove and mix the parathas well with the gravy. The gravy should coat all the pieces and not turn them soggy. While mixing keep mashing the paratha will a flat spatula so that the parathas can further get minced. Stop once you have a dry mixture. The Kothu Parotta is ready to serve. Tastes best when served immediately. Any variety of Raita is a good accompaniment for this. Enjoy. Bon Appetit.
STEPWISE RECIPE FOLLOWS:
1. Assemble all ingredients and cook the parathas ahead if store bough, as they have to cool.
2. Tear the parathas into 1-inch pieces.
3. In a pan/karahi take 4 tsp oil and heat. Put in the cumin seeds and allow to splutter. Add in the green chillies and curry leaves. Also add 3 Cloves and 1 small stick Cinnamon.
4. Add in the onions and saute at high heat. Add the ginger-garlic paste, put in the capsicum and continue to stir fry, follow up with carrots. Reduce heat.
5. Add the chopped tomatoes, fry for 30 seconds and the tomato puree. Stir and cook for a few minutes.
6. Add all the masalas(dry spice powders), add 2 tbsp water and continue to cook.
7. Powder the cashew nuts then add 2 tbsp water and grind them to a loose paste. Add this to the tomato gravy. Cook until the mixture thickens. the consistency should be like tomato sauce. Put off at this stage. Add chopped coriander and garam masala powder.
8. Let this cool for 5 minutes. Now add the paratha pieces and switch on the stove and mix the contents well. while mixing keep mashing the parathas with a flipper, so that they get minced further. When the paratha resembles a mince and the mixture is dry, put off the stove. the Kothu Paratha is now ready to serve.
NOTES:
1. The consistency of the gravy should neither be too thick nor too thin. It should resemble tomato sauce in consistency.
2. ou can other vegetables too if you like.
3. If you have ready-made biriyani mix paste you can use that too, but add a lesser quantity.
4. This recipe should be served immediately or else the paratha will turn chewy.
5. If you want to make it ahead, you can make the gravy ahead and add the paratha pieces just before you serve.
If you tried this recipe and liked it please do comment below. I would love to hear from you.
Pineapple Rasam
Rasam is a popular South Indian dish prepared with tamarind, tomatoes, and Rasam powder. There are many variations of this dish, and each South Indian household has its own recipe for the proportions of the ingredients of the rasam powder. Therefore though Rasam is almost a regular feature in all South Indian households its taste is unique to each. No two Rasam recipes taste the same.
The following recipe has Pineapples along with tomatoes and is very flavourful. It makes for a good soup/ appetizer, for wintertime get-togethers. As you make the Pineapple Rasam the aroma of the pineapple fills the house and you’ll have people at home making trips to the kitchen. The secret of a good Pineapple rasam rests in the extraction of the juice in 3 stages. Follow the recipe closely for instruction on juicing the Pineapples. Let’s get to the recipe right away
PREP TIME: 20 Mins COOK TIME: 20 Mins
TOTAL TIME: 35 Mins COURSE: MAIN / APPETISER
CUISINE: SOUTH INDIAN SERVINGS: 4
AUTHOR: Rajni Ram
Ingredients:
Pineapple 3/4 of a medium-sized one
Tomatoes 2 medium chopped
Tuvar dal 1/2 cup( 1 cup= 150 gm)
Fresh coriander sprigs few
Green chilies 2
Ginger 1 inch piece
Fennel seeds 1 tsp
Turmeric powder 1/2 tsp
Rasam powder 3 tsp
Salt as per taste
Asafoetida 1 tsp
Mustard seeds 1 tsp
Roasted Pepper & Cumin powder 1 tsp( dry roast in the ratio 2:1 and grind coarse)
Curry leaves few
Ghee/ clarified butter for tempering
Sugar 2 tsp(optional)
Directions for Pineapple Juice:
Stage 1: chop the pineapples and put them in a liquidizer/juicer and extract juice. It should be a concentrate. Add no water at all at this stage. This is extract 1.
Stage 2: Add 1 to 1.5 cups of water and juice again to get the second extract.
Stage 3: Add 2 cups of water and juice again to get the 3rd extract. Strain the pulp at this stage into the 3rd extract and discard the fiber.
Directions for Pineapple Rasam:
Wash the Tuvar dal and pressure cook for 5 whistles, set aside. Now put the chopped tomatoes, coriander leaves, green chillies and ginger in a blender and puree them. Take a 1.5-litre vessel and pour this tomato coriander puree into it. Now add the 3rd extract juice to the above puree. Also add in the salt, Rasam powder, 1/2 tsp asafoetida, turmeric powder, and boil this mixture. Allow it to boil for some time until it reduces to 1/2( Please note that 3rd extract had 2 cups water so that plus the tomato puree, has to boil and reduce to half). At this stage add the cooked dal ( mash lightly) along with the water. If there is no water remaining in the dal add up to a cup to the dal, mix nicely and add to the reduced extract. Now add the 2nd extract juice and continue to boil. Boil until the rasam starts frothing in the vessel and starts brimming up. Keep stirring in between. Now add another 1.5 cups of plain water and continue to boil for another 2 minutes. Finally, add the 1st extract juice, 2 tsp sugar( optional), and put off the stove immediately. The rasam should not be allowed to boil after adding the first extract, as it will lose all flavour. Now temper the Rasam in ghee. Take 2 tsp ghee in a small tadka kadai and heat it. Add mustard seeds and as they crackle add the cumin-pepper powder, 1/2 tsp asafoetida, switch off the stove, and drop in the curry leaves. Pour the tempering into the rasam. Garnish with finely chopped fresh coriander leaves. The flavourful Pineapple Rasam is ready to serve. Serve it as an appetizer/soup or with rice for some yummy comfort food.
STEPWISE RECIPE FOLLOWS:
1. Extract the Pineapple juice following the method mentioned above and keep ready.
2. Gather all other ingredients and keep ready.
3. In a blender put in the tomatoes, coriander leaves, green chilies, ginger, and fennel seeds and blend to a smooth puree.
4. Take a big vessel that can fit around 1.5 litres of liquid. Put the 3rd extract of juice into the vessel and add in the tomato puree. Switch on the stove.
5. Add the salt, turmeric powder, asafoetida, Rasam powder, and boil. Continue to boil until it reduces to 1/2 the quantity.
6. Now add the cooked dal along with the water into the boiling soup and also add the 2nd extract juice now. Continue to boil until it froths and begins rising. Keep heat at medium throughout.
7. Now add another 1.5 cups of plain water and continue to boil. When it brims up, add the 1st extract juice, add sugar(optional) and put off the stove immediately. Avoid boiling the Rasam once you add the 1st extract as flavour will be lost.
8. Now in a small tempering pan/tadka kadai, add 2 tsp ghee and heat. Add the mustard seeds, when they crackle, add the roasted pepper-cumin powder, asafoetida, and put off the stove. Finally, add the curry leaves to the tempering and pour the tempering into the Pineapple Rasam. Serve hot as a soup or along with hot rice and a dollop of ghee.
NOTES:
1. Follow instructions for Pineapple juice carefully as it affects the flavour of the Rasam.
2. You can increase or decrease the Rasam powder as per your spice preference. But don’t go below 2 tsp for 1.5 litres of Rasam.
3. Sugar is optional, add only if the pineapples are not sweet enough.
4. The roasted cumin -pepper powder is common to all Rasam varieties. You can store this powder in an airtight jar to add to Rasam, Pongal, etc;
Akkaravadisal
This is a very traditional South Indian sweet dish. Lord Mahavishnu is offered this sweet as prasad(holy offering). The main ingredients are Rice, moong dal, jaggery, milk and ghee. The ingredients are similar to the Sweet Pongal but both taste very different. It tastes heavenly when served a little warm. Without much ado let’s get to the recipe right away.
PREP TIME: 10Mins COOK TIME:30Mins
TOTAL TIME: 40 Mins COURSE: MAIN
CUISINE: SOUTH INDIAN SERVINGS: 4
AUTHOR: Rajni Ram
Ingredients:
Rice 1 cup
Moong dal/ green gram 1/4 cup
Milk 6 cups
Jaggery 1 cup
Water 1/4 cup
Sugar ( optional) 1 tbsp
Ghee 3/4 cup
Cardamom/ elaichi powder 1 tsp
Saffron ( optional) 2 pinches, soaked in warm milk
Raw camphor( optional) 1 pinch powdered
Cashewnuts 8 to 10
Raisins 8 to 10
Directions:
Dry roast the Moong dal to a light brown colour. Stir constantly and take care not to burn the dal. It will give out a nice aroma. Put the jaggery in a separate vessel, add water and bring to a boil. Put off the heat and stir to dissolve the jaggery. Keep aside. Take a vessel that fits inside your pressure cooker and transfer the rice into it. Add in the roasted Moong dal and wash both the rice and dal together. Pour 4 cups milk and arrange the vessel in the cooker. Close lid and cook for around 5 to 6 whistles. After pressure releases open lid, the rice should be well cooked and not grainy. Mash the cooked rice and dal while it’s hot, keep aside. In a pan or Urli( heavy-bottomed brass vessel ) pour 1 tbsp ghee and heat. Fry the cashew nuts and raisins in the ghee to a nice golden colour and keep them aside. To the same pan add the cooked rice and dal. Strain the liquid jaggery into the rice directly and the sugar and the remaining milk( 2cups, to which saffron was added). Stir nicely. Add the cardamom powder and raw camphor powder and stir. Put off the stove and add the ghee finally. The divine tasting Akkaravadisal is ready. Tastes best when hot/ warm. Enjoy. Bone Appetite.
STEPWISE RECIPE FOLLOWS:
1. Assemble all ingredients.
2. Dry roast the Moong dal to a light brown colour. Take rice in a vessel that fits inside the cooker and add the roasted dal to it. Wash them a few times, add 4 cups milk and place the vessel inside the cooker with sufficient water at the bottom. Cook until 5 to 6 whistles. To the remaining 2 cups of milk add saffron and let soak.
3. Until the pressure releases let’s get the jaggery ready. In a small vessel take the jaggery, add 1/4 cup water and bring to a boil, put out the stove and stir the jaggery to dissolve it.
4. Once you open the cooker mash the contents while they are hot as it’s easier to do it then. Set aside.
In a pan/ Urli take a tablespoon of ghee and heat, fry the nuts and raisins in it and keep aside.
5. In the same pan/ Urli transfer the cooked rice and dal and strain the liquid jaggery on it directly. Pour the saffron added milk to the mixture and stir. Add in the cardamom and raw camphor and turn off the stove. Lastly, add the ghee, garnish with the fried nuts and raisins and the Akkaravadisal is ready.
NOTES:
1. We strained the jaggery to remove the impurities from it.
2. Do not cook rice directly in the cooker as we are coking with milk, the milk may stick to the bottom and the dish will give a burnt taste and odour. That’s why we are cooking with a vessel inside the cooker.( to make directly checkout One pot Akkaravadisal recipe)
3. Saffron and raw camphor are optional, they give added flavour.
4. Be liberal with ghee. Cook the rice soft. If grainy add more milk and pressure cook again.
5. I have used normal rice( Sona Masoori/ Ponni). If using Basmathi avoid the raw camphor as both aroma and flavouring of both may clash.
If you made this recipe and liked it, please comment below. I would love to hear from you.
Bhindi Raita
Raita is a yoghurt-based condiment. It usually contains cooked or raw vegetables/fruits/pulses, mixed with the Yogurt/Dahi and tempered with Mustard and Jeera. The Raita is usually served with Biriyani, Pulav, Parathas, Naans or can be served as a dip for Kebabs too.
Today I chose to make Bhindi(Lady’s Finger) Raita as an accompaniment for Masala Rice( recipe given in Rice section), as the crisply cooked Bhindi combines beautifully with the spiced curd and imparts a lovely texture and flavour to the Yoghurt. This Raita goes well with both North Indian and South Indian dishes.
Let’s get to the recipe right away.
PREP TIME: 5 Mins COOK TIME: 15 Mins
TOTAL TIME: 20 COURSE:ACCOMPANIMET CUISINE: NORTH / SOUTH INDIAN AUTHOR: RAJNI RAM
Ingredients:
Curd /Yogurt 400 gm(fresh not sour)
Bhindi /Okra/Lady’s Finger 6 to 8 big ones
Jeera /Cumin powder 1.5 tsp
Red chilli powder 1/2 tsp, for more spice, add 1 tsp
Salt as per taste( some will be added while cooking Bhindi too)
Mustard 1 tsp
Jeera / Cumin whole 1 tsp
Urad dal split 1 tsp
Dry red chilli 1 big broken to bits
Curry leaves few
Asafoetida powder/ Hing 1/2 tsp
Oil 2 tbsp
Directions:
Take 400 gm curd, smoothen it with a ladle, do not whip or churn it. Add the spice powders- red chilli powder, Jeera powder and salt to the curd. Mix gently and keep in the refrigerator to chill. Next, take 2 Tbsp oil in a Karahi/ Pan and heat. Add the tempering of Mustard, Jeera, Urad dal, dry Red chilli, Curry leaves and Hing ( asafoetida), fry to a golden colour and add in the Bhindi. On high flame saute by stirring continuously for 2 mins, add salt and continue to saute. Keep stirring from time to time until the Bhindi is cooked and turns crisp. Put off the stove and cool it. Once cooled it can now be added to the chilled spiced curd. Yummy Bhindi Raita is ready to serve.
STEPWISE RECIPE FOLLOWS:
1. Assemble all ingredients.
2. Take 400 gm Curd and smoothen it out with a ladle, don’t beat or whip it vigorously. To this add the spice mix of cumin powder, red chilli powder and add salt. Stir nicely and put it in the refrigerator to chill
3.In a Karahi/ Pan heat 2 Tbsp oil and add in the tempering of mustard, jeera, hing, urad dal, dry red chilli and fry until golden in colour. Add in the Bhindi.
4. Fry the Bhindi on high flame for 2 mins, add salt and continue to saute. Keep at it until the Bhindi turns crisp(will shrink in size). Put off the stove and cool the Bhindi. Once cool the bhindi can be added to the chilled spiced curd.
5. Bhindi Raita is ready to serve. Serve it will Parathas, Biriyanis, Pulav’s or serve with Masala Rice( recipe in Rice section). Enjoy!
Notes:
1. Ensure you cool the fried Bhindi before you add it to the spiced curd mixture. If it is hot the curd will thin down.
2. Always fry Bhindi on high heat and constant stirring or else it can turn slimy.
3. If in case the Bhindi does turn slimy, then add either Idli Podi( gunpowder that’s used as an accompaniment for Idlis, Check recipes under Masala Powders) or Dal powder(check recipe under powders).
another tip is to cut Bhindi few hours prior and put it in the refrigerator for an hour or two. Remove it from the refrigerator and don’t thaw, put it in the Karahi directly.
3. why am I giving so many instructions on cooking the Bhindi?, because a crunchy Bhindi makes a good Raita.
If you tried this recipe and liked it, comment below. Would love to hear from you.
Lemon Rice
Lemon Rice is one such recipe which is easy to make with minimum ingredients. It doesn’t need any specific accompaniment. It can be had just like that or with Papad. It’s the perfect lunchbox item. The zing and freshness of lemon is enough to bring everyone to your table for their share.
My Grandmom was an expert at making it( not that its rocket science), but her lemon rice always had that freshness of the lemon intact. So over the years I have tried and perfected it, her way and by hit and trial have found her secret of that fresh lemon flavour. I’m stressing on the flavour here because I have seen many a time the lemon flavour fails to standout the sourness is there, but the flavour is missing. This is because of cooking the lemon juice with the tempering. As the recipe proceeds, you’ll understand what I mean.
I usually don’t write so much of an introduction, but this recipe is just so close to my heart that I had to.
Let’s get to the recipe right away.
PREP TIME: 10Mins COOK TIME: 40Mins
TOTAL TIME: 50 Mins COURSE: MAIN
CUISINE: SOUTH INDIAN SERVINGS: 4
Ingredients:
Rice 1 cup ( regular rice not Basmati)
Lemon 2 medium size
Green chillies 2
Red chillies 2
Ginger 1 inch piece
Curry leaves a few
Turmeric powder 1 tsp
Asafoetida powder 1/2 tsp
Salt as per taste
Urad dal 1 tsp
Chana dal soaked in water( for 1/2 an hour) 1 Tbsp.
Mustard 1 tsp
Peanuts 1 Tbsp
Oil 3 Tbsp( refined or sesame) for tempering and 3 tsp for drizzling on cooked rice.
Directions:
Cook the rice in a pressure cooker. You can use 2.5 to 3 cups water for 1 cup of rice. As soon as pressure releases transfer the rice to a large plate/ tray and spread it. Drizzle little refined oil or sesame oil on it, so that the rice doesn’t stick together. Allow it to cool.
In the meanwhile take 3 Tbsp oil in a Karahi/ pan and heat it. Drop the peanuts gently into the oil and fry until you see a nice golden colour. Add the mustard, as it crackles add the green and red chillies, ginger, asafoetida, urad dal, soaked chana Dal after straining the water, curry leaves and fry them till the dals are a nice golden colour. Add the turmeric powder and salt and put off the stove. Now add the juice of 1 lemon to it and mix well. Now add the rice little by little to this tempering. Mix well so that the tempering is evenly distributed. Now squeeze the juice of another lemon on the rice and mix gently( my secret to the freshness). There the yellow beauty is ready to serve…Bon Appetit.
STEPWISE RECIPE FOLLOWS:
1. Assemble all ingredients.
2. Cook the rice in a pressure cooker. After pressure settles, transfer the rice to a large plate and spread it. Drizzle some oil on it. Allow it to cool.
3. In a Karahi take oil for tempering and heat it. Put in the peanuts and fry until golden brown.
Add all tempering ingredients- mustard, soaked chana dal( water strained), urad dal, green chillies, red chillies, ginger, Asafoetida, curry leaves. Fry until they get a nice brown.
4. Add the turmeric powder and salt and put off the stove. Squeeze juice of one lemon. Mix well.
5. Mix the cooked rice little by little to the tempering. Finally, squeeze the juice of another lemon on the rice and mix gently but thoroughly. Lemon rice is ready. Enjoy with some Papads.
NOTES:1. Usually, Lemon rice recipes state adding the lemon juice to the tempering, which gives the taste but not the flavour. some other recipes recommend squeezing the lemon directly over the rice. This ensures the flavour, but not the taste as the juice will not get evenly mixed.
2. In this recipe I have divided the juice into 2 halves and added one half to tempering and another half to the rice, this gave me the perfect balance of flavour and taste.
3. Potato fry(south Indian style) goes very well with the lemon rice too, just in case you aren’t the papad person.
4. You could serve the Rice with Raita too.
If you tried this recipe and liked it please comment below. Would love to hear from you.
Chinese Paratha
This recipe is one that has been sitting in my recipe book for the past 20 years. I made this as a young mother, with no success at making Veg Hakka noodles, as I did not understand what aldente meant.
Over the years as my journey as a budding home cook begun, I mastered the Veg Hakka part, but yet hadn’t tried the fusion recipe, until I started this blog and as I was going through all my recipe collections( a manuscript from the days when digitalization was unknown) with my daughter, she said: “why not try this now”? and I gave in to the idea and don’t regret it at all. That said, this fusion recipe is a Paratha(Indian bread) with stuffed Veg Hakka noodles. Let’s get to the recipe right away.
Onion- 1 medium-sized( can use spring onions too, finely chopped)
Carrot –1 small grated coarsely
Capsicum- 1 finely chopped
Garlic- 5 cloves finely chopped
Green Chillies- 2 finely chopped
Tomato- 1 large finely chopped
Schezwan sauce 3 tsp
Tomato sauce 2 tsp
salt as per taste
Red chilli powder 1 tsp
Directions for Parathas:
Take the wheat flour in a deep dish or a large plate. Add salt and the oil. Mix well and add water little by little as you knead to form a stiff dough. The dough must be stiffer than the Chapati dough. If the dough is loose, add a little more flour and knead again. Form a ball of the dough. Apply a little oil to your palms and spread it on the dough. Cover and rest it for half an hour.
Directions for the Veg Hakka noodles:
Boil around 1.5 litres of water in a wide-mouthed vessel. As the water comes to a boil add the uncooked Hakka noodles( broken to small bits around a fingers length) and a tsp of salt and cook. The noodles must be cooked aldente meaning a little undone( this comes with some practise). Keep stirring so that you know when to switch off the heat. Remove a few strands of noodles from the pot and do the cook test, that is, use a spatula to cut the noodles. If it cuts through easily, put off the heat, drain water from the noodles immediately and rinse the noodles in plain water(room temperature) 2 to 3 times, and drain the water. apply a little oil to the noodles and let it cool a bit.
As the noodles cool off let’s get the vegetables ready. In a wok or Karahi, take the oil and heat. Add the finely chopped garlic and green chillies and fry till you get a good garlicky aroma. Add the finely chopped onions, followed by the capsicum and saute well. Next, add in the grated carrots and cook for a minute. Now add the tomatoes followed by salt and red chilli powder and cook for a few minutes. Once the tomatoes turn mushy add both the sauces( you can mix them ahead in the said ratio) and cook until semi-dry. Add in the cooked Hakka noodles and mix well. Veg Hakka is ready. allow it to cool. This can be made ahead and kept.
Method to stuff the parathas:
Take the resting dough and divide it into 10 equal parts. If you want bigger parathas to divide into 8 portions. Take one ball, dust it with flour and roll out into a small circle. Fill it with the noodles stuffing and seal the ends nicely. Dust it with flour again place it on the counter and flatten it with your palm, so that the stuffing spreads evenly. Now roll it out with a light hand without applying pressure into a little thick circle. Put a girdle on the stove and heat it. Place the paratha on the girdle and cook it, apply a tsp of oil and flip it, apply another tsp oil, and cook both sides well, until you see small brown dots. Repeat for all the 10 balls. The Chinese Parathas are ready, Bon Appetit.
STEPWISE RECIPE FOLLOWS:
1. Assemble all ingredients.
2. For Parathas, Take the flour in a deep dish or big plate. Add the salt and oil. Pour water little by little and start combining the flour. Don’t use too much water as we want a tough but pliable dough. As you combine the flour knead it well. It has to be smooth. Smear a little oil on the dough, cover it and let it rest for half an hour.
2. For the Hakka noodles, boil water in a widemouthed vessel. Break the noodles into finger length pieces and keep ready. When water begins to boil, drop the noodles gently into the water add a little salt and let it cook.
3. Keep stirring as we don’t want the noodles sticking together. Also, we have to cook it aldente( not cook it all the way through). Once done, drain the water and rinse the noodles in plain water(room temperature), smear little oil and let it cool.
4. Prepare the vegetable mixture by heating oil in a wok/ Karahi. Add finely cut garlic to the oil and the green chillies too. Fry nicely.
5. Add the finely chopped onions to this and saute. Add in the capsicum, cook for a minute and, add in the grated carrot. Cook for 2mins on low heat.
6. Add the tomatoes, salt, red chilli powder, and both sauces( i have combined them both in the said ratio) and cook until the mixture is semi-dry.
7. Add the cooked noodles little at a time and combine well. Put off the stove and cool the filling.
8. To make the parathas, divide the dough into 10 equal parts. Take one ball from that and dust it with dry flour. Roll this into a small circle a little smaller than your palm. fill in the filling with a spoon, about 2 tbsp into each circle. bring the edges together and seal them.
9. Dust with flour again and roll it out into a bigger and thick circle. Put a girdle to heat and place the rolled out paratha on the girdle. smear oil on the side facing up and flip it. smear oil again after flipping and cook both sides until brown spots appear.
10. The Chinese Paratha is ready to serve with some raita.
NOTES:
1. I have used only a few vegetables here, you can add spring onion too, but it’s better to not go over the top with vegetables here as rolling the Paratha may become tough.
2. The filling has to be quiet dry or else it will start oozing out of the bread while rolling.
3. Cooking the noodles as mentioned is better, as overcooked noodles will clam together, and rolling the Paratha will be difficult.
4. I have served the paratha with Raita and tomato ketchup and not pickle as most parathas, as this Chinese Paratha being a fusion may not go with pickle. But if you prefer it that way, do go ahead as what the palate demands is what it should get.
If you tried this recipe and liked it please comment below. Would love to hear from you.
Rava Dosa
Dosas come in many varieties and these Rava Dosas are full of flavour and are crisp too. This is a foolproof recipe. In my family, we have made it this way for years and what’s more, just add any healthy millet flour to this and it will still come out well. In restaurants, this Dosa is made with Maida instead of the wheat flour. You can do that too. I’m partial to what flour so have replaced Maida/ refined flour with it.
Let’s get to the recipe right away.
PREP TIME: 10Mins COOK TIME: 40Mins
TOTAL TIME: 50 Mins COURSE: MAIN
CUISINE: SOUTH INDIAN SERVINGS: 4
AUTHOR: Rajni Ram
Ingredients:
Rava/ Sooji 1 cup( roasting Rava is optional, but I would recommend it) Rice flour 1 cup
Wheat flour 1 cup
Curd 1 cup
Water -around 1 litre or a little more
Roasted cumin and pepper powder
Green chillies 2
Ginger 1 inch piece
Curry leaves- few leaves cut fine
Coriander leaves finely chopped.
Salt as per taste( I used 1.5 tsp)
Directions:
Take a 1-litre vessel. Put in all the three flours.
Add the curd to it. Add in the salt and the roasted cumin pepper powder. Add a little of the water from 1 litre and mix well forming a paste without lumps. Once that’s done mix in the remaining water little by little and stirring every now and then so lumps don’t form. Don’t pour all the water at a time. Depending on the quality of the Sooji, you might use, less too. The batter should neither be too thick nor too watery. It should be a little loose than the normal Dosa batter. Take 3 tsp oil in a small tadka karahi and heat. Add the mustard and Cumin and once they crackle put in the finely cut green chillies, ginger and curry leaves. Also, add 1/2 tsp of Hing/ Asafoetida and turn off the stove. Add this tempering to the batter. Let the batter stand for 10 mins and you are ready to pour the Dosa on the girdle. There your crispy Rava Dosa is ready. Enjoy. Bon Appetit!
STEPWISE RECIPE FOLLOWS:
1. Assemble all ingredients.
2. Take a 1-litre vessel and add in Rava/ Sooji, wheat flour and Rice flour. Add in the curd.
3. Add the salt and the roasted cumin- pepper powder( to make powder take 2 tsp Jeera and 1 tsp pepper and roast on low fire to get the aroma of the spices. Cool and grind coarse).
4. Add water( up to 1 litre) little at a time and stirring constantly so that no lumps are formed. Pour the remaining water until you achieve the consistency shown in the picture( a little thinner than the regular Dosa).
5. Take oil in a small tadka karahi. Add the mustard and cumin seeds. When they crackle add the cut green chillies, ginger and curry leaves. Add Asafoetida too and crush a little. Pour this tempering into the batter. Add the chopped coriander and let the batter stand for 10 mins atleast. There your batter is ready.
6. To make crispy Dosas, put a girdle on the Tava( I used a non-stick one). The girdle has to be really hot or else your dosa will be lumpy.
7. Now pour the batter on the girdle forming a circle. You cannot spread the batter like the regular dosa, you’ll have to pour it as shown in the picture. Drizzle oil over the Dosa and cook.
8. Cook until it becomes crisp and is a golden brown, then flip over and cook again. If you want it crisper be generous with the oil.
Your crisp Rava Dosa is ready. Enjoy with chutney( check out the recipe in chutney section) and idli podi ( check out the recipe in powders section).
NOTES:
1. As said earlier it’s a foolproof batter and won’t let you down. Just stick to the measurements.
2. Rava Dosa is usually made with Maida in restaurants as it gives that extra crispy edge, feel free to use that too. Since I am partial to wheat flour have replaced Maida with it.
3. Instead of wheat flour or Maida, you can use Ragi flour, Jowar flour or any other millet flour and the Dosa will still come out well.
4. If you are sceptical of replacing the wheat flour with any millet flour, just add a cup of millet flour along with the other flours. That works too.
5. Be generous with the oil for crisp Dosas and be patient. Unlike the regular Dosas, they take a little longer to cook and get crisp, and the patience will be worth it.
6. It’s important to get the girdle quite hot. Do the little test of sprinkling water on your girdle when it’s hot. If the water evaporates very quickly, that’s the right heat. You can start pouring the batter on the girdle.
If you tried this recipe and liked it please comment below. Would love to hear from you.
Dal Makhni 2 ways
Dal Makhni or Dal Makhani is one of the all-time favourite dishes of my family, whenever we are at a North Indian joint. So I have tasted many versions of it and used to make this recipe at one point in time with cream, as most recipes suggest. I found the dal to be heavy when made this way and then I chanced upon the recipe for Dal Makhni that I’m blogging now on a spice packet, I tried it and it tasted almost like the restaurant ones, so have been following this recipe for a long time now.
Dal Makhni is a dish from Punjab and the main ingredients are black lentils( Black Urad dal whole) Rajma, butter and other spices and condiments. It gets the creamy texture and taste from butter and slow cooking. The longer you cook it on low fire, the tastier. That said, this dal can be made without butter/ cream too. And it tastes all the same.
While you are here please checkout my other recipes like Choley, Pakode wali Dal,
Black Whole Urad 200 gm ( black lentils) Soaked overnight
Rajma 1 handful (soaked overnight)
Chana dal 1 tbsp.
Garlic 8 pods (finely chopped)
ginger 1-inch piece chopped
Butter 2 tbsp
Tomato 3 medium pureed
Salt as per taste
Red chilli powder 1 tsp( more if you like it spicy)
Dal makhani masala 1.5 tbsp
Kasoori Methi 1 tsp crushed
Directions: Soak the Black Urad, Rajma and Chana dal overnight. Once soaked put them in a pressure cooker with 2 pods of garlic and the ginger and cook for 6 to 8 whistles. Heat 1 tbsp butter in a pan and heat. Put in the Cinnamon stick and garlic and fry don’t brown them. Add in the Kasoori Methi and fry for half a minute. Now add the tomato puree and cook for 3 minutes. Add in the Dal Makhni masala, Red chilli powder, salt and cook until the butter floats. Lightly mash the cooked dals and add them to the tomato mixture. Stir nicely and add 2 cups water and reduce the heat and cook on low fire for about 25 to 30 minutes. Switch off the stove and add another tablespoon of butter and garnish with finely chopped coriander. Creamy Dal Makhni is ready to serve. This Dal goes really well with Parathas, Roti, Jeera rice and other Indian bread. Enjoy and Bon Appetit.
STEPWISE RECIPE FOLLOWS:
1. Assemble all ingredients. Soak the dals overnight.
2. Cook the soaked dal in a pressure cooker along with some garlic and the ginger and a piece of cinnamon stick for 8 to 10 whistles.
3. Take some butter in a pan and heat. Put in the Cinnamon stick and garlic and fry for 1/2 a minute. The garlic must not turn brown. Add in the crushed Kasoori Methi and fry for a minute.
4. Now add in the pureed tomatoes followed by salt, red chilli powder and Dal Makhani masala and cook. Cook until the butter floats/ forms a layer on top.
5. Now add the cooked dal, stir nicely and add 2 cups of water and cook on low fire for 25 to 30 minutes.
6. After 30 mins put off the stove and add a tablespoon( or more)of butter to the dal and garnish with chopped coriander.
NOTES:
1. The Chana dal gives the creaminess to this dish, so don’t do away with it, at the same time don’t put too much of it or the taste may vary.
2. If you don’t have Dal Makhni Masala, use a small quantity of garam masala. For the measures that are given above 2 tsp garam masala should be sufficient.
3. Adding Kashmiri red chilli powder will give the dish a good colour. I have added a mix of both regular red chilli powder and Kashmiri red chilli powder, so that spice and colour are balanced.
If you tried this recipe and liked it please comment below. I would love to hear from you.
Coconut Tomato Chutney
This chutney is very easy to make. I have added Tomato for the freshness and tang and so you don’t have to add either tamarind or lemon as in the regular coconut chutney. Goes really well with Idli, Dosa, Pongal, Paniyaram etc.
In a blender put in the fresh coconut, fried chana dal, green chillies and dry grind to a coarse paste. Add some salt as per taste and add in the chopped tomatoes and now grind to a fine paste. Add in some water to adjust consistency and give it a nice spin in the blender. The Coconut tomato chutney is ready to be served with Idli, Dosas, Pongal, etc. Enjoy. Bon Appetit.
STEPWISE RECIPE FOLLOWS:
1. Assemble all ingredients.
2. In a blender put in the coconut and grind coarse. Add the fried chana, green chillies and red chillies and grind without water.
3. Add the chopped tomato and salt and to grind smooth. Add little water to adjust consistency, add salt and give a single spin in the blender.
4. Take 2 tsp oil in small tempering Kadai and add in the mustard seeds, after they splutter add the asafoetida, and curry leaves. Pour the tempering into the chutney.
NOTES:
1. Since we have added tomato there is no need to add any other form of sour ingredients like tamarind or lemon.
2. First, dry grind all ingredients and then only add in the chopped tomato, otherwise, they won’t get ground evenly.
We would love to hear what you think of this recipe. Let us know in the comments.
Matar Paneer (One Pot)
Matar Paneer is an everyday dish made of Green Peas and cottage cheese in a tomato gravy. Usually had with any Indian flatbread or with rice. The sweetness of the Peas, the tanginess of the tomatoes, the texture of the Paneer, and the flavors of the spices all gel so well. It can be directly made in a pressure cooker( which I have done today) or can be made in a karahi.
In Rajjo’s Kitchen whenever I say tomatoes its mostly the local one( desi) and not the hybrid tomatoes ones which are sweeter. When I’m using the Hybrid ones will always specify.
Let’s get to the recipe right away.
PREP TIME: 15 COOK TIME: 15Mins
TOTAL TIME:30Mins COURSE: MAIN
CUISINE: NORTH INDIAN SERVINGS: 6
AUTHOR: Rajni Ram
Ingredients:
Green Peas 100 gm
Paneer 200 gm cut into cubes
Tomatoes 2 large or 3 medium(pureed)
Onions 1 large pureed
Ginger-garlic paste 1 tsp
Refined oil 6 tsp( 3 tsp first and 3 later, follow the recipe)
Besan or Gram flour 1 Tbsp(or) Cashew nuts 6( pre-soaked)
Fresh coriander leaves finely chopped 2 tsp
Salt to taste
Jeera/ Cumin 1/2 tsp
Turmeric powder 1/2 tsp
Red chilli powder 1 tsp ( can add 1/2 tsp more if you need more spice)
Coriander powder
Garam Masala powder
Directions:
If using a pressure cooker you don’t have to precook the peas. If using the Karahi method, precook the peas( they should be cooked soft, but not mushy).
Put the cooker on the stove, heat on medium. once hot, pour oil 3 tsp.
once the oil is hot, add the cumin seeds, as they crackle add the turmeric powder.
Now add the onions puree and cook until transparent, don’t brown them. Add in the Ginger Garlic paste and saute well. The onion and Ginger Garlic paste will start releasing oil once they are cooked. Add another 3 tsp oil, reduce the flame of the stove and put in the Besan, and nicely saute it in the oil. Take care to not burn it. As the Besan browns, add the tomato puree and drop in the peas, add salt followed by all the spice powders( except Garam Masala powder). add about 1.5 cups water, close the cooker, and put on the whistle. cook for 6 whistles and put off the stove. While the pressure reduces in the cooker, let’s get our Paneer ready. Cut them into cubes, and drop them in boiling water with a pinch of salt for 2 minutes. Remove immediately and transfer to a plate. Once the pressure in the cooker releases, open the cooker and drop in the cubed Paneer and switch on the stove on low. check for salt and spices at this stage and adjust it. Add the Garam Masala powder now and put off the stove. Transfer the contents to a bowl and garnish with fresh coriander leaves. You can decorate it with a little grated cheese, for the restaurant effect. Voila, your Matar Paneer is ready. Enjoy!
STEPWISE RECIPE FOLLOWS:
1. Assemble all ingredients.
2. Put the pressure cooker on the stove and let it heat up. Once hot, pour 3 tsp oil and heat. Add Jeera and as it splutters add the onion paste and saute nicely.
3. Add the ginger-garlic paste and saute further until the oil is released. At this stage add the remaining 3 tsp oil and add the besan to this and roast on low flame till it becomes a little brown. It may appear as a paste, keep stirring this paste continuously till you see a light brown color. Add the tomato puree and stir nicely so that no lumps of the paste remain.
4. Let a slight boil come and add the Green Peas followed by all the masala powders( except Garam Masala). Add salt and stir.
5. Add 1 cup water, give a nice stir close the lid of cooker and let 6 whistles come.
6. After the pressure comes down open the cooker. Switch on the stove and add the paneer cubes and let it boil on low heat for two minutes. Add the Garam Masala powder, give it a stir and empty into a bowl. Garnish with fresh coriander. You can also sprinkle some shredded cheese to decorate( I forgot to do so).
Your tasty Matar Paneer is ready. Enjoy with Phulkas, Rotis, or Naan on the side or just rice.
Bon appetit…
NOTES
1. As it’s a simple everyday subji ( side dish) I did not add the whole masala in the beginning. If you are cooking it for a get-together or party, you can add the whole masala like 1 or 2 cloves, 1 Tej Patha( Bay leaf), few Peppercorns along with Jeera.
2. If you want to use cashew nuts instead of the Besan then, after adding Jeera saute onion, ginger garlic paste and cut tomatoes until they turn soft. Cool and blend in mixie. Pour this paste into the cooker and continue from step 4.
3. I usually don’t fry the Paneer in oil, instead, I put it in boiling water for exactly 2 mins, don’t let it stay in hot water for more than that, they may stick to each other.
If following the karahi method, pre-cook the peas and follow the same method.
If you tried this recipe and liked it, comment below. I would love to hear from you.
Stuffed Mushroom Tikka
I have always struggled with cooking Mushrooms in the initial years of my cooking. Every time I made a subji ( side dish), it would run watery and I had almost given up on making the vegetable at home. Then I chanced upon an article on the right way of cooking Mushrooms and I got back to making them again at home, and that too with near perfection. That said, this recipe is a starter and though a lot of steps are involved, they are pretty simple. Serve it at home to make a simple meal special, or serve it at a party for friends asking you the recipe. You can bake, Tava roast or deep fry the tikkas. Let’s get to the recipe right away.
Red chilli powder 2 tsp( 1 tsp each for filling and tikka mix)
Coriander Powder 2 tsp( 1 tsp each for filling and tikka mix)
Turmeric 1/2 tsp
Chat Masala 1/2 tsp
Garam Masala 1/2 tsp
Green Chilli 2 finely chopped
Mushroom stalks finely chopped
Mushroom Preparation:
Wash the Mushrooms well under running water and pat them dry with an absorbent towel. Gently break away the stalks from the mushroom. Chop the stalks finely and keep them aside( we will use it for the filling).
Directions for the tikka mix:
In a dish take the curd and add all the dry spices- salt, red chilli powder, coriander powder, garam masala( don’t add the chat masala), and mix nicely. Add the gram flour little by little and make a thick batter. Don’t add any water the curd will be enough. You can add 1 tsp lemon juice if you like a little sourness, this is totally optional. Don’t add the lemon juice if the curd is sour. Keep aside.
Directions for filling:
Crumble the paneer or grate it. In a Karahi or pan take 1 tbsp oil and heat it. To this add turmeric and chopped green chillies and saute. Put in the chopped Mushroom stalks and saute on high flame. The mushroom will release water and dry out again. Now add the crumbled paneer to this and mix. Add salt, red chilli powder, coriander powder, and chat masala. Saute well. Add the finely chopped coriander and turn off the stove. Allow the mixture to cool.
Overall directions:
Fill the mixture into the mushroom caps. Fill up to the brim and gently press so that they get packed. Coat each mushroom with the prepared batter nicely and arrange on a plate filling side up. If not serving immediately you can refrigerate it and then either bake it, Tava roast it or deep fry it.
If BAKING, Preheat oven to 180 degrees, grease a tray and bake at 180 degrees for 30 minutes. Since microwaves have temperature variations, look out for doneness between 20 to 30 minutes. Arrange mushroom on a baking tray, facing the filling side up. Midway stop and turn over the mushroom to the other side and continue baking. When the mushrooms turn a golden brown and the batter is not raw, the mushrooms are done.
If TAVA ROASTING, drizzle oil on the Tava and heat. Arrange the mushrooms Filling side down. For this method, you should have coated the mushrooms well with the batter. Once a side is done flip it over and cook the other side.
If DEEP FRYING, take a small quantity of oil in a Karahi and heat it. Drop the mushrooms gently a few at a time, the filling side facing up. In a few seconds gently turn over and cook the other side. Once they are golden in colour, remove from oil and place on kitchen tissues. This method needs the batter to be coated well on the mushrooms or the filling could spill into the oil. Arrange the Mushrooms In a tray/ plate and decorate with cheese shreddings. sprinkle some chat masala and the Mushroom Tikkas are ready to pop in. Enjoy. Bon Appetit.
STEPWISE RECIPE FOLLOWS:
1. Assemble all ingredients for the filling, batter and Mushrooms stalk removed.
2. For the filling crumble the paneer. Heat a karahi, pour oil and heat. Put in the green chillies, turmeric, and the mushroom stalks and fry on high heat until mushrooms release water and become dry again. now add the crumbled paneer and all the dry spices, and mix well. Add the finely chopped fresh coriander and put off the stove. allow the mixture to cool.
3. For the batter take the curd in a dish and add all dry spices mentioned in ingredients, add salt, and mix. Add the gram flour/ Besan little by little until you have a thick batter.
4. Fill the mushroom caps with the filling and set aside. Now coat each mushroom well with the batter. Place them Filling side facing up in a tray.
5. To bake them preheat oven to 180 degrees, grease a tray and arrange the mushrooms, filling side up and bake at 180 degrees for approximately 30 mins. Midway turn around the mushrooms and continue to bake until they are done. They will turn golden brown.
You can also cook them on a Tava or deep fry them. The method is mentioned above. I have baked them in this recipe.
Notes:
1. If the mushrooms are large, it’s better so that you can fill them up well.
2. This recipe is good to prepare ahead and bake or fry just before serving.
3. In case you prepare it ahead, then keep them refrigerated until half an hour to serve. From the refrigerator, they can directly be popped into the oven.
4. Serve it as a snack with some green chutney or as a starter with mint curd dip.
5. Garnish with grated cheese.
If you tried this recipe and liked it please comment below. I would love to hear from you.
Arbi Masala (Spicy Colacassia)
A simple everyday subji. I make the Arbi/Arvi as a roast, sometimes a simple fry and it can also be added while making Sambhar or Kadi. This tuber is a little slimy, but that can be managed by dusting the Arbi with a little Besan/ Gram flour or rice flour. In this recipe, I have pre-cooked the Arbi in a pressure cooker and then baked it for the extra crispiness. You can also deep fry it. I do that quite often too. Let’s get to the recipe right away.
PREP TIME: 10Mins COOK TIME: 40Mins
TOTAL TIME: 50 Mins COURSE: MAIN
CUISINE: SOUTH INDIAN SERVINGS: 4
AUTHOR: RAJNI RAM
Ingredients:
Arbi/Colaccasia 250 gm( boiled and skin peeled)
Onions 2 roughly chopped
Tomatoes 2 large finely chopped
Green chilli 2 chopped
Fresh coriander 1 tbsp finely chopped
Salt to taste
Red chilli powder 1 tsp
Coriander powder 1.5 tsp
Fennel powder(optional) 1 tsp
Garam masala powder 1/2 tsp
oil for frying and making the masala.
Cumin 1 tsp
Curry leaves a few
Directions:
Boil the Arbi in a pressure cooker, with a little salt for 2 whistles. Stick to 2 whistles or it will turn soggy and lose the crispness in the subji. Cool it, Peel the skin cut it into medium size pieces( if very small, use as it is), and set aside. To deep-fry, take oil in a Karahi and heat it. drop the cut Arbi gently into the oil and fry until they are a nice brown and crisp.
If baking, then place them on a greased tray, drizzle a little oil over them, or you could use a brush to apply the oil and bake at 180 degrees for half an hour, turning over the Arbi midway, say around 15 mins. Bake until brown and crisp. Set aside.
Now in a pan or Karahi heat 1 tbsp oil. Add the cumin and turmeric and add the green chilli and chopped onion to this and saute well. Fry them well, but don’t get them brown. Now add in the tomatoes, salt, and all the dry spices. cook until the tomatoes break and release water and the mixture looks like a thick paste. Add the garam masala and fresh coriander and mix. Finally, add in the fried/baked Arbi and mix nicely, so that the masala paste coats it evenly. Serve hot with Parathas, Roti, or Dal Chawal.
STEPWISE RECIPE FOLLOWS
1. Assemble all ingredients. Cook Arbi in a pressure cooker for 2 whistles. cool. Peel skin, cut into cubes, and set aside.
2. Fry the cooked and cut Arbi in oil or bake in the oven at 180 degrees for 1/2 an hour. They should be nicely browned and crisp.
3. In a pan or karahi heat oil. Add the cumin and turmeric powder. Add in the green chillies and onion and fry well.
4. Add the tomatoes, salt, and all dry spices mentioned under ingredients. Saute the mixture well. The tomatoes should become soft and the mixture should resemble a semi-dry paste.
5. Add in the garam masala and chopped coriander and finally add the fried/baked Arbi and give a good stir. The masala paste should coat all the Arbi’s well. Sprinkle some more chopped coriander and we are ready to serve.
6. Serve with Rotis, Parathas, or just Dal Chawal. Enjoy. Bon Appetit.
Notes: 1. Amchur/ dry mango powder can be used along with other dry masalas if you prefer a little more tanginess. I have not added as I almost always use the country tomatoes/desi tomatoes/Naatu thakkali. They are naturally sour than the hybrid tomatoes or the Bangalore ones.
2. A little gram flour can be mixed with the dry spices and sprinkled over the Arbi before frying them. I have added besan as the Arbi is going to be mixed into the paste, and so will not taste bland.
If you tried this recipe and liked it please comment below. I would love to hear from you.
Mint/Pudina Raita
Mint by itself is such a flavourful herb, it heightens the taste of everything else. Since it has a strong flavour it should be used in moderation. Here I have made a Raita(curd sauce) with Mint, which goes well with Parathas, Naans, Kebabs and with any mixed rice variety. The lovely green colour and the minty freshness gets the salivary buds in action. This is a simple recipe and takes under 7 minutes to make if you have all ingredients ready.
Well, one may think why am I blogging something so simple, something that anyone can make. Well, its just to establish the fact that something as simple as a well made Raita can lift the effect of a recipe gone wrong. People trying their hand at cooking for the first time will be encouraged by its simplicity to try cooking more often.
Let’s get to the recipe right away.
PREP TIME: 10 Mins COOK TIME: 5 Mins
TOTAL TIME: 15Mins COURSE: MAIN
CUISINE: SOUTH INDIAN/ SERVINGS: 4
NORTH INDIAN
Ingredients: Author: Rajni Ram
Mint leaves 1/2 a bunch
Green chilli 1(if not hot enough can add one more)
Curd 400 gms
Roasted Jeera powder 1/2 tsp
Salt as per taste.
Directions:
Wash the Mint leaves well and let the water drain. Smoothen the curd( do not beat or whip). Put the Mint leaves, Green chillies, roasted Jeera powder and salt in a blender and give it a good spin. Add about a cup of curd from the 400 gms to the blender and grind to a smooth paste. Now add this paste to the remaining curd and mix well. Put it in the refrigerator until ready to serve. Enjoy the Mint Raita with your meal. Bon Appetit.
STEPWISE RECIPE FOLLOWS:
1. Assemble all ingredients. Wash Mint leaves and drain the water.
2. Put the mint leaves(you can put the tender stems too), green chillies, roasted Jeera powder and salt in a blender and blend.
3. Now add a cup of curd to the ground mix and give it a good spin. It should become a fine paste.
4. Add this paste to the remaining curd and mix well. The Mint Raita is ready. Put it in the refrigerator until ready to serve.
Notes:
1. You can temper the raita with mustard and jeera if you wish. I haven’t done it, as I think the Mint by itself is enough.
2. You can add grated Cucumbers, Carrot or finely chopped onion or Boondi to this raita.
3. This Raita can also be used to soak Dahi Vadas.
If you tried this recipe and liked it, comment below. Would love to hear from you.