Tapioca And Amaranth Flour Veggie Pancakes
Sago Idli/ Sabudana Idli/ Sabbaki Idli
Bajra Paneer Cheela
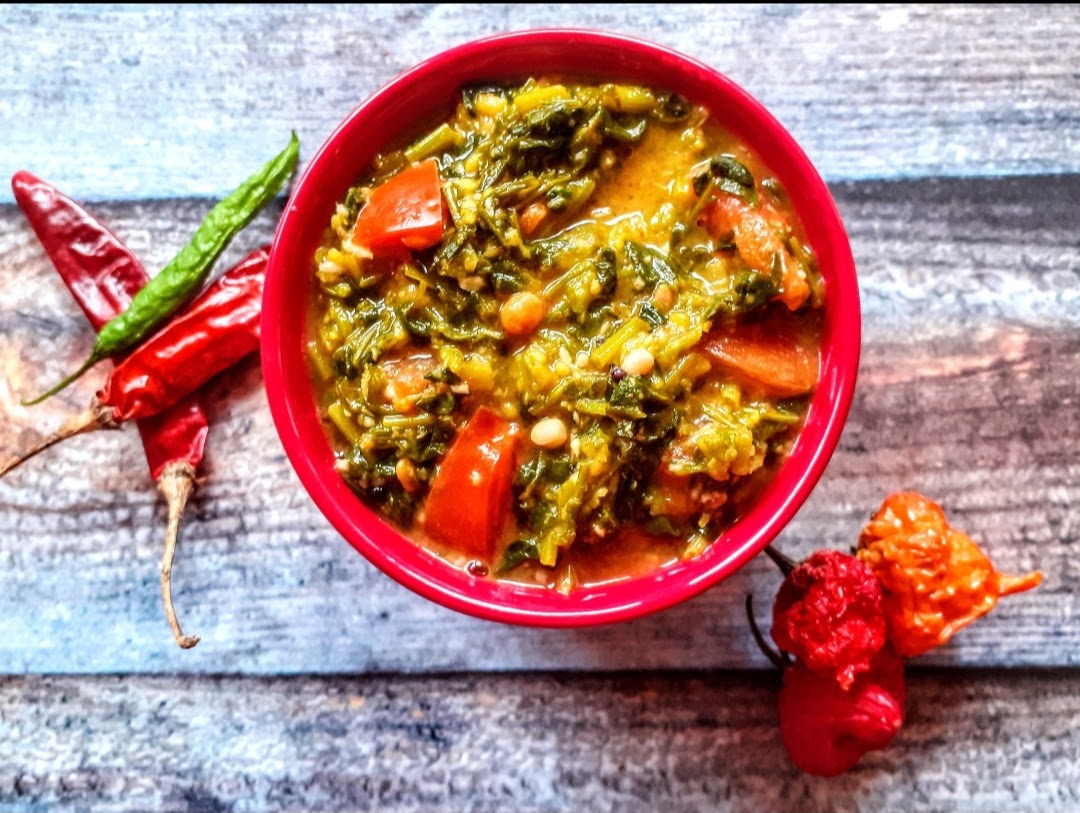
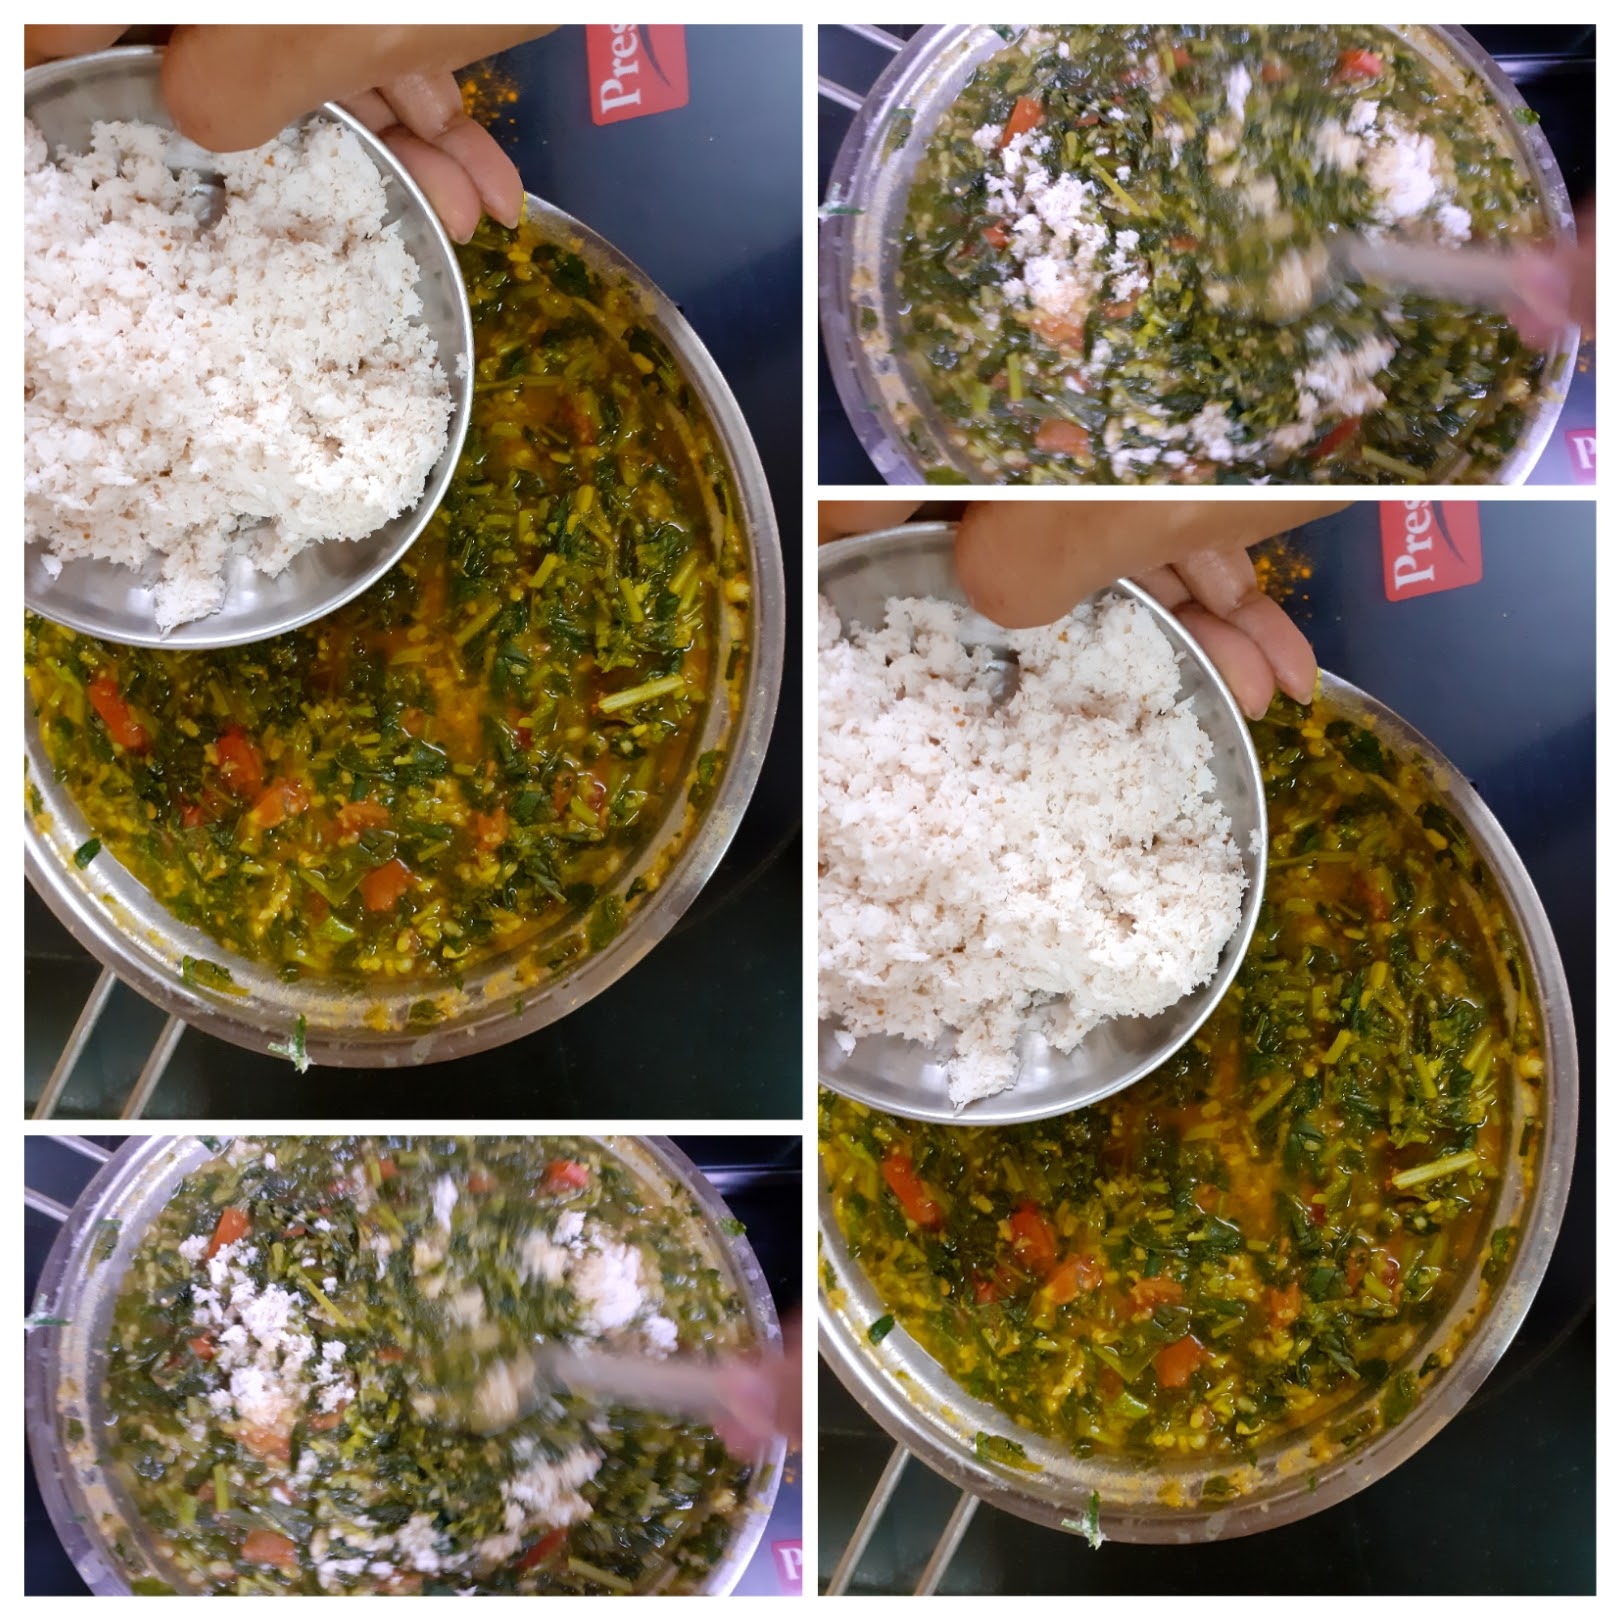
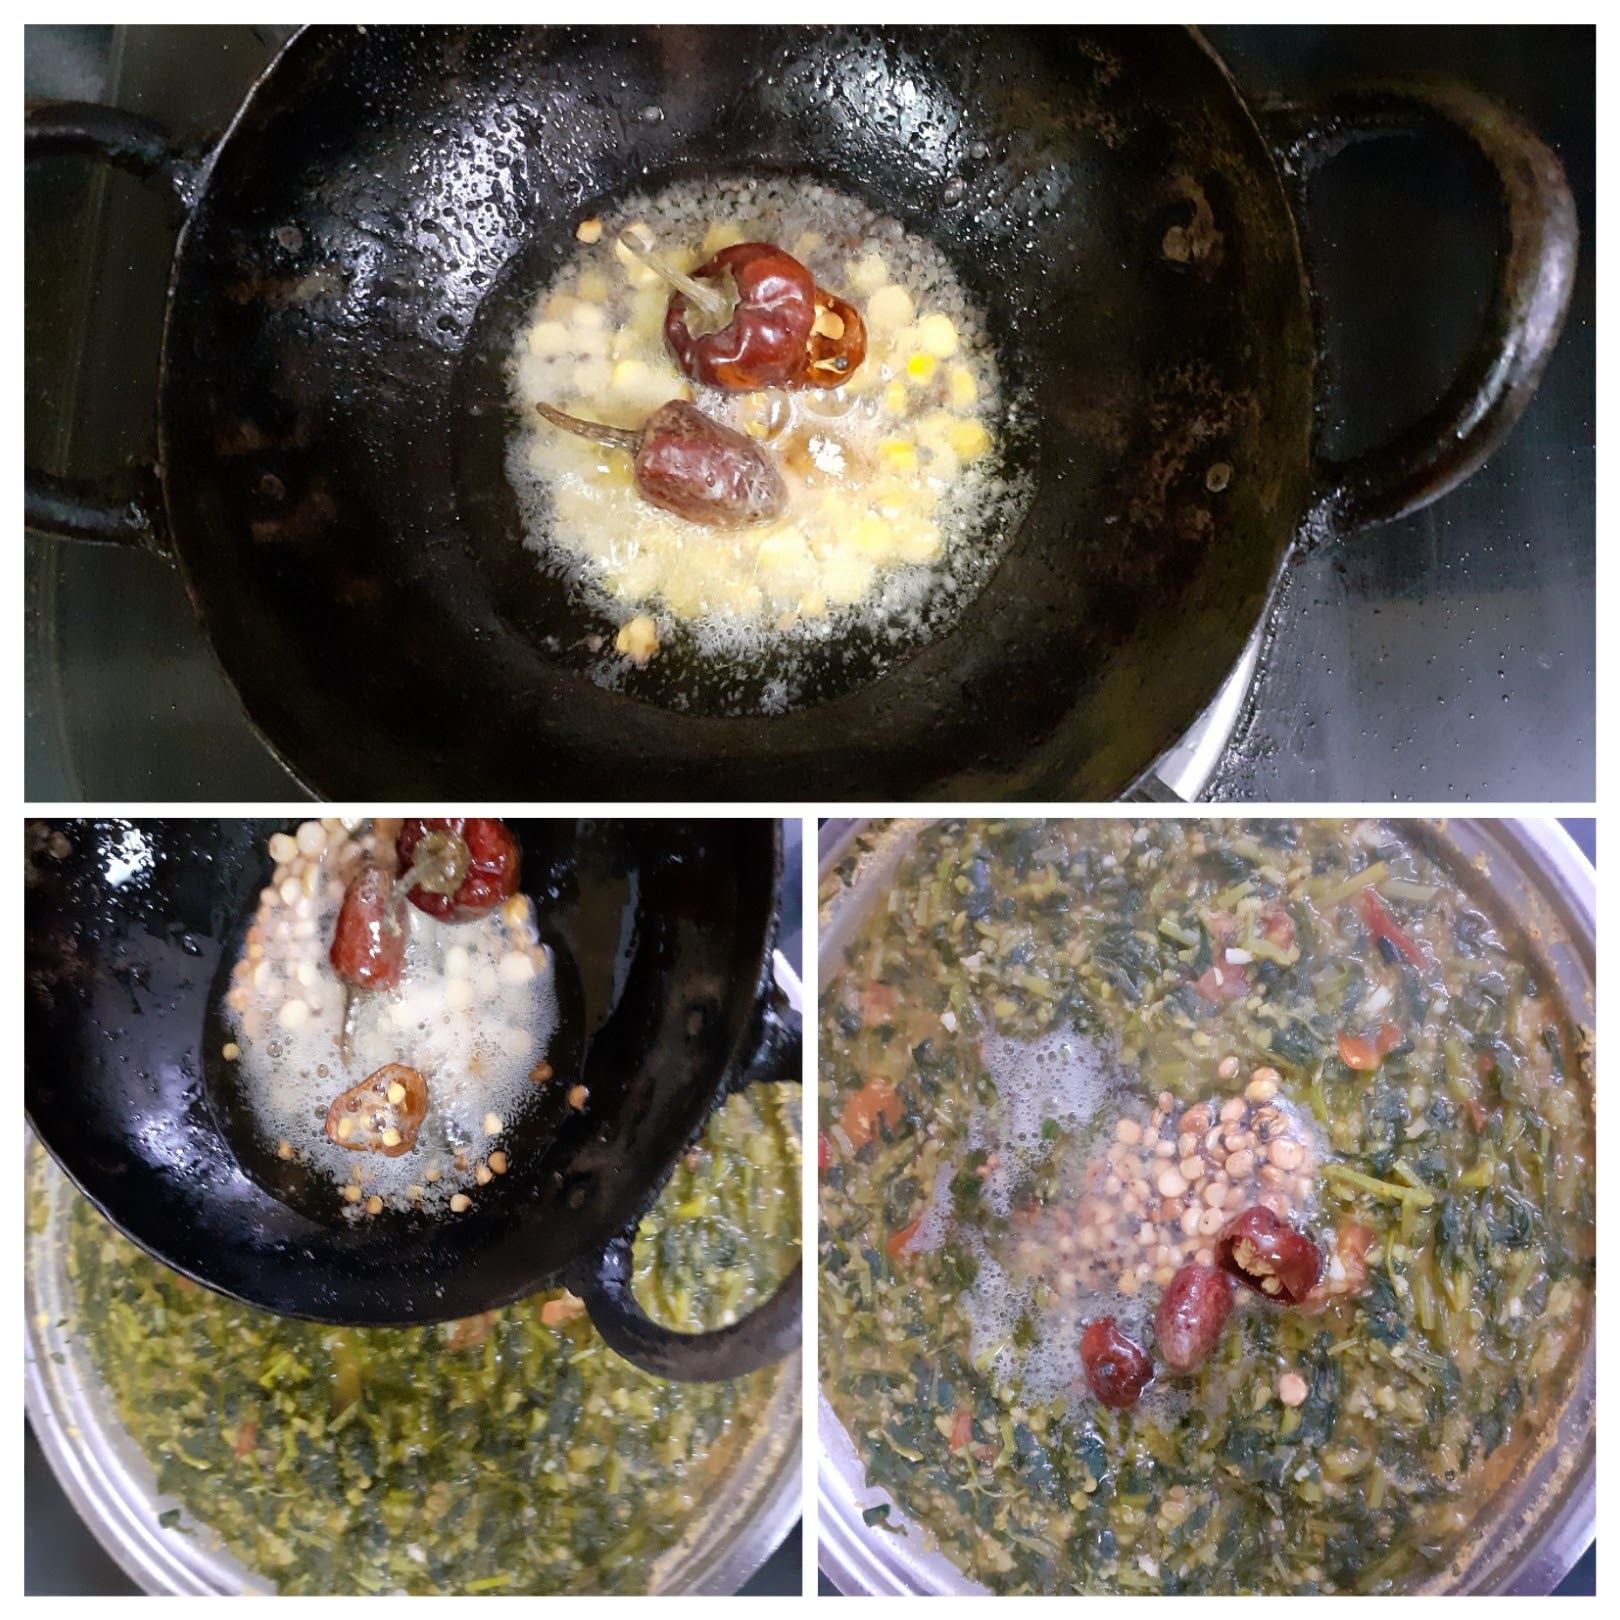
Sarson Ka Saag Aur Makki Ki Roti
Ragi Laddu/ Nachni Ladoo
Cabbage Kunukku With Dosa Batter/ Cabbage And Lentil Fritters
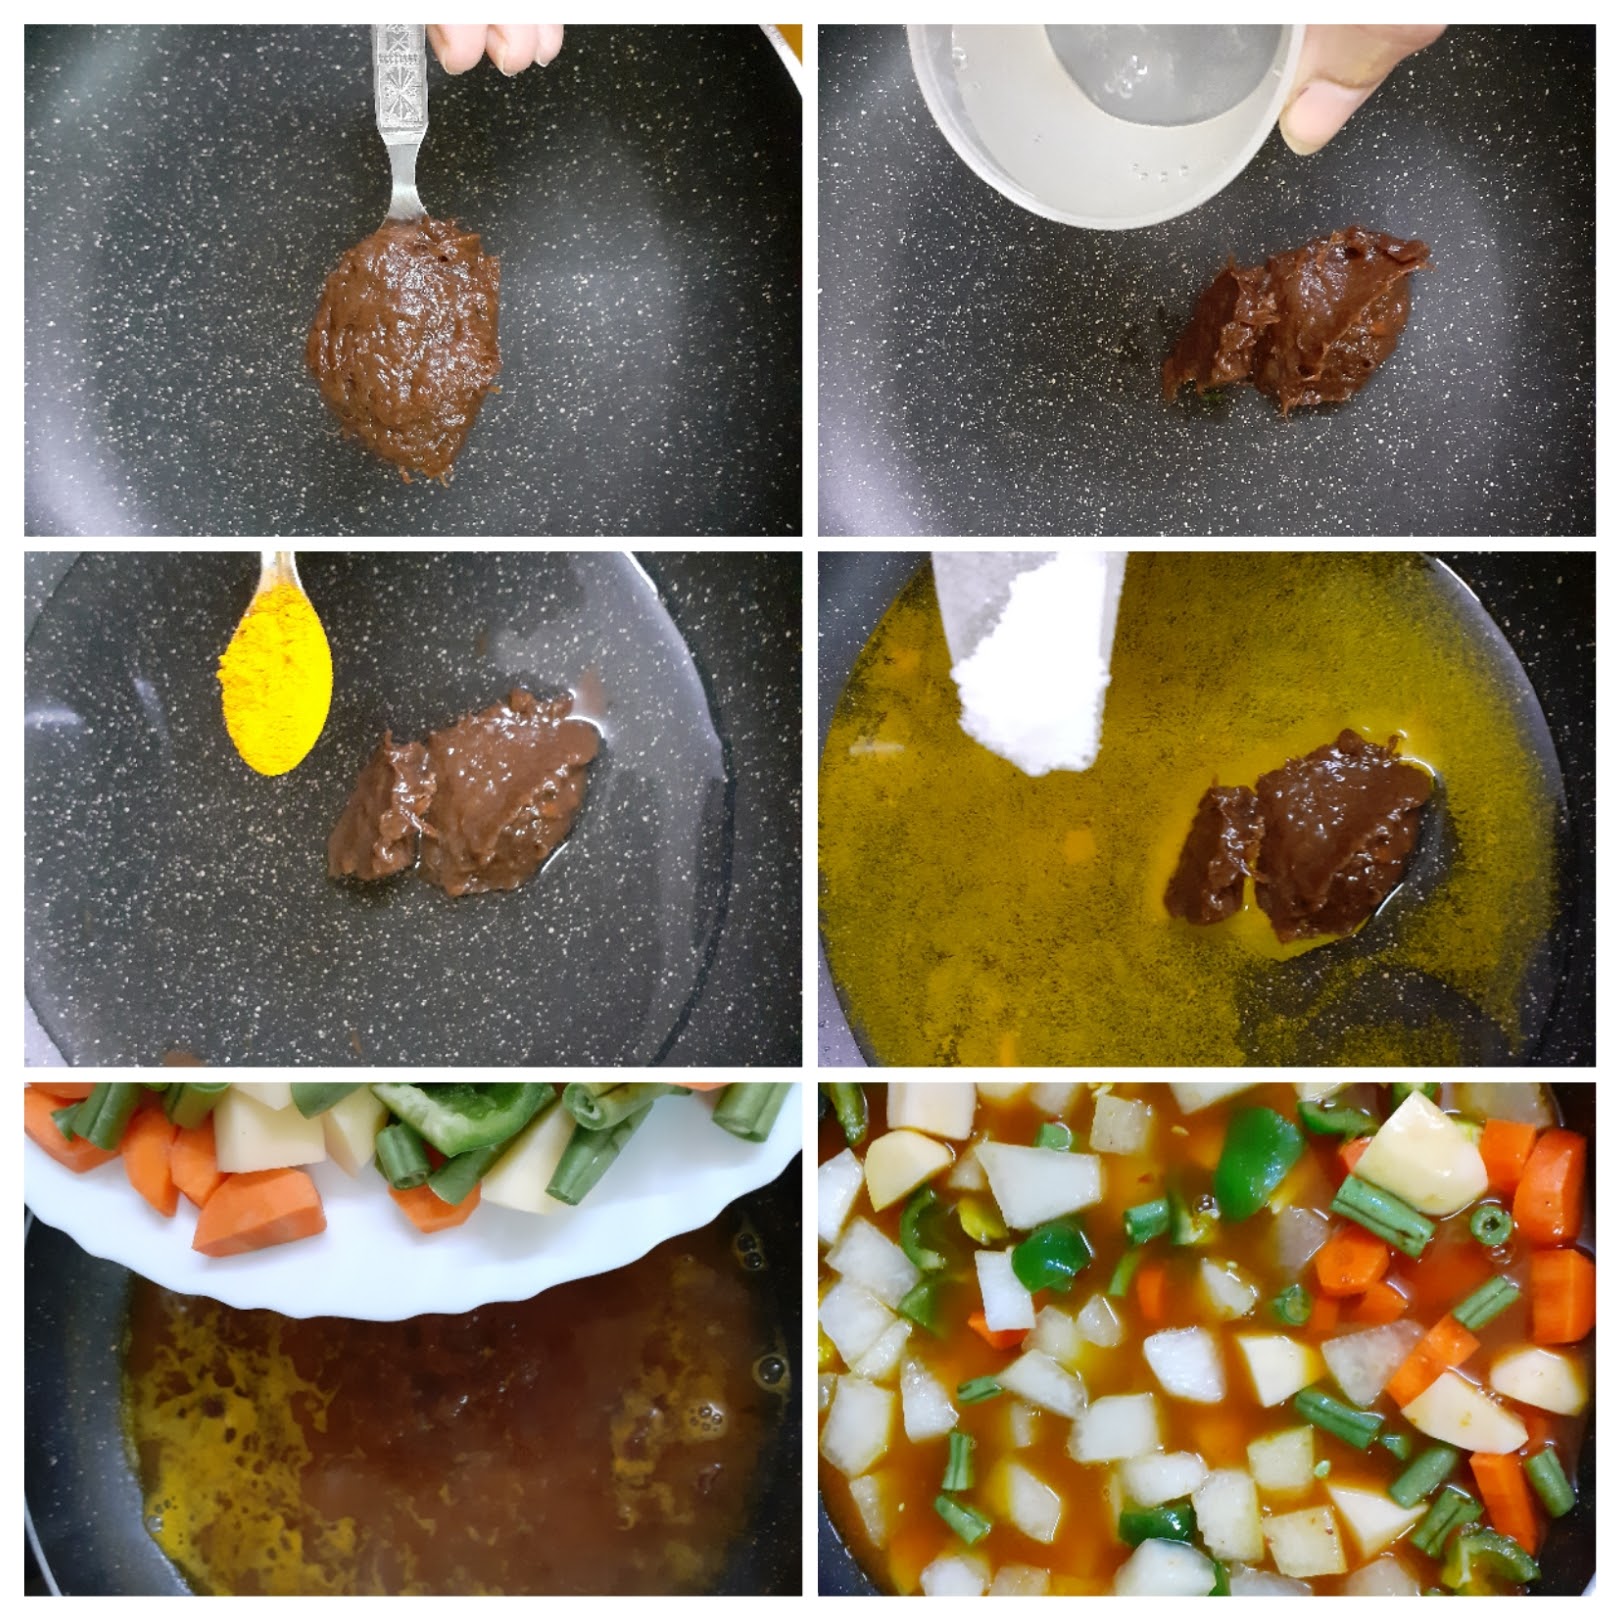
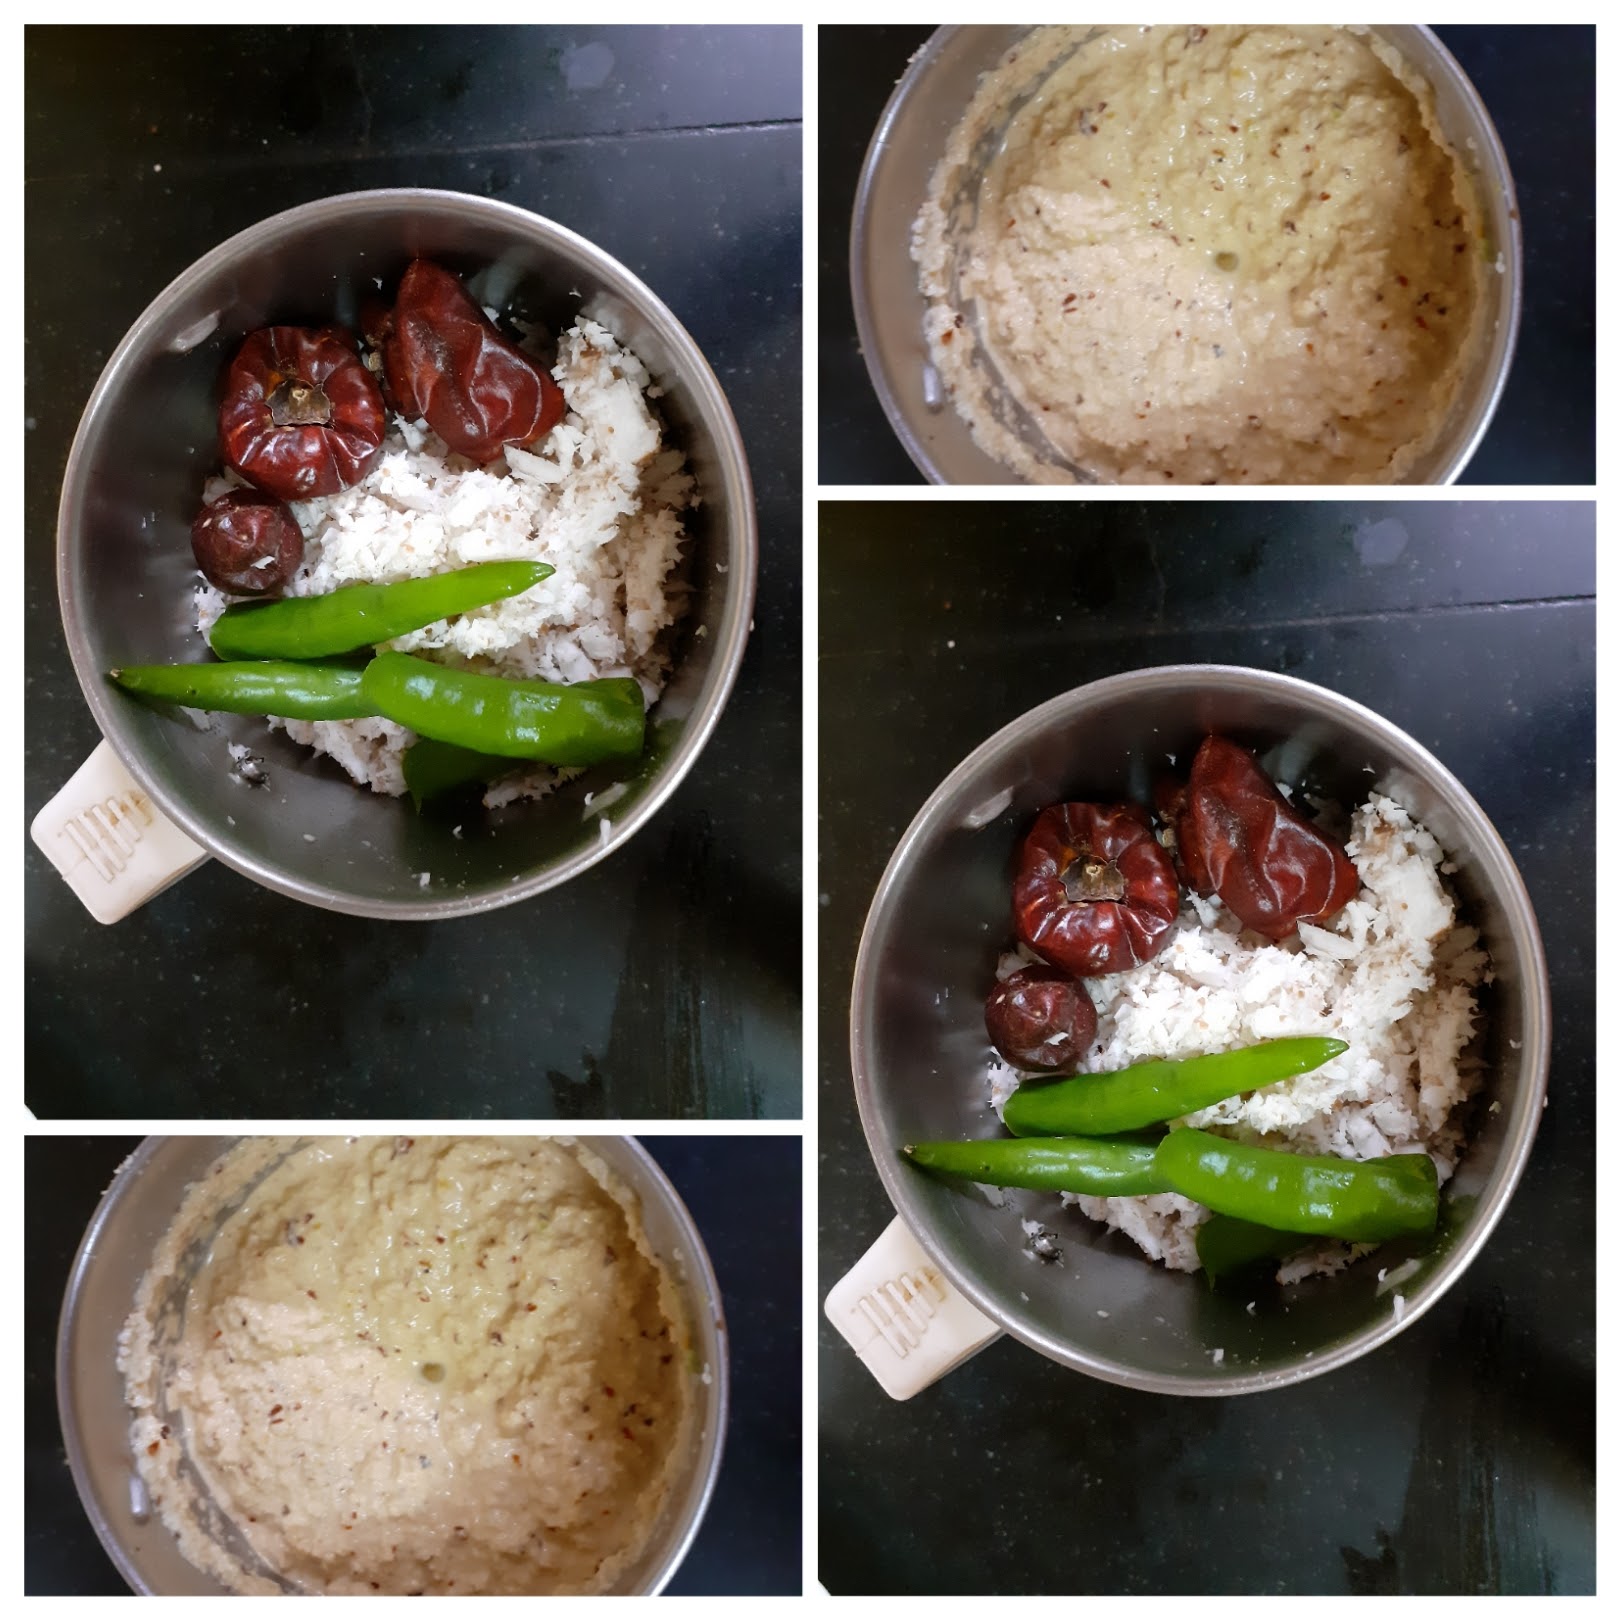
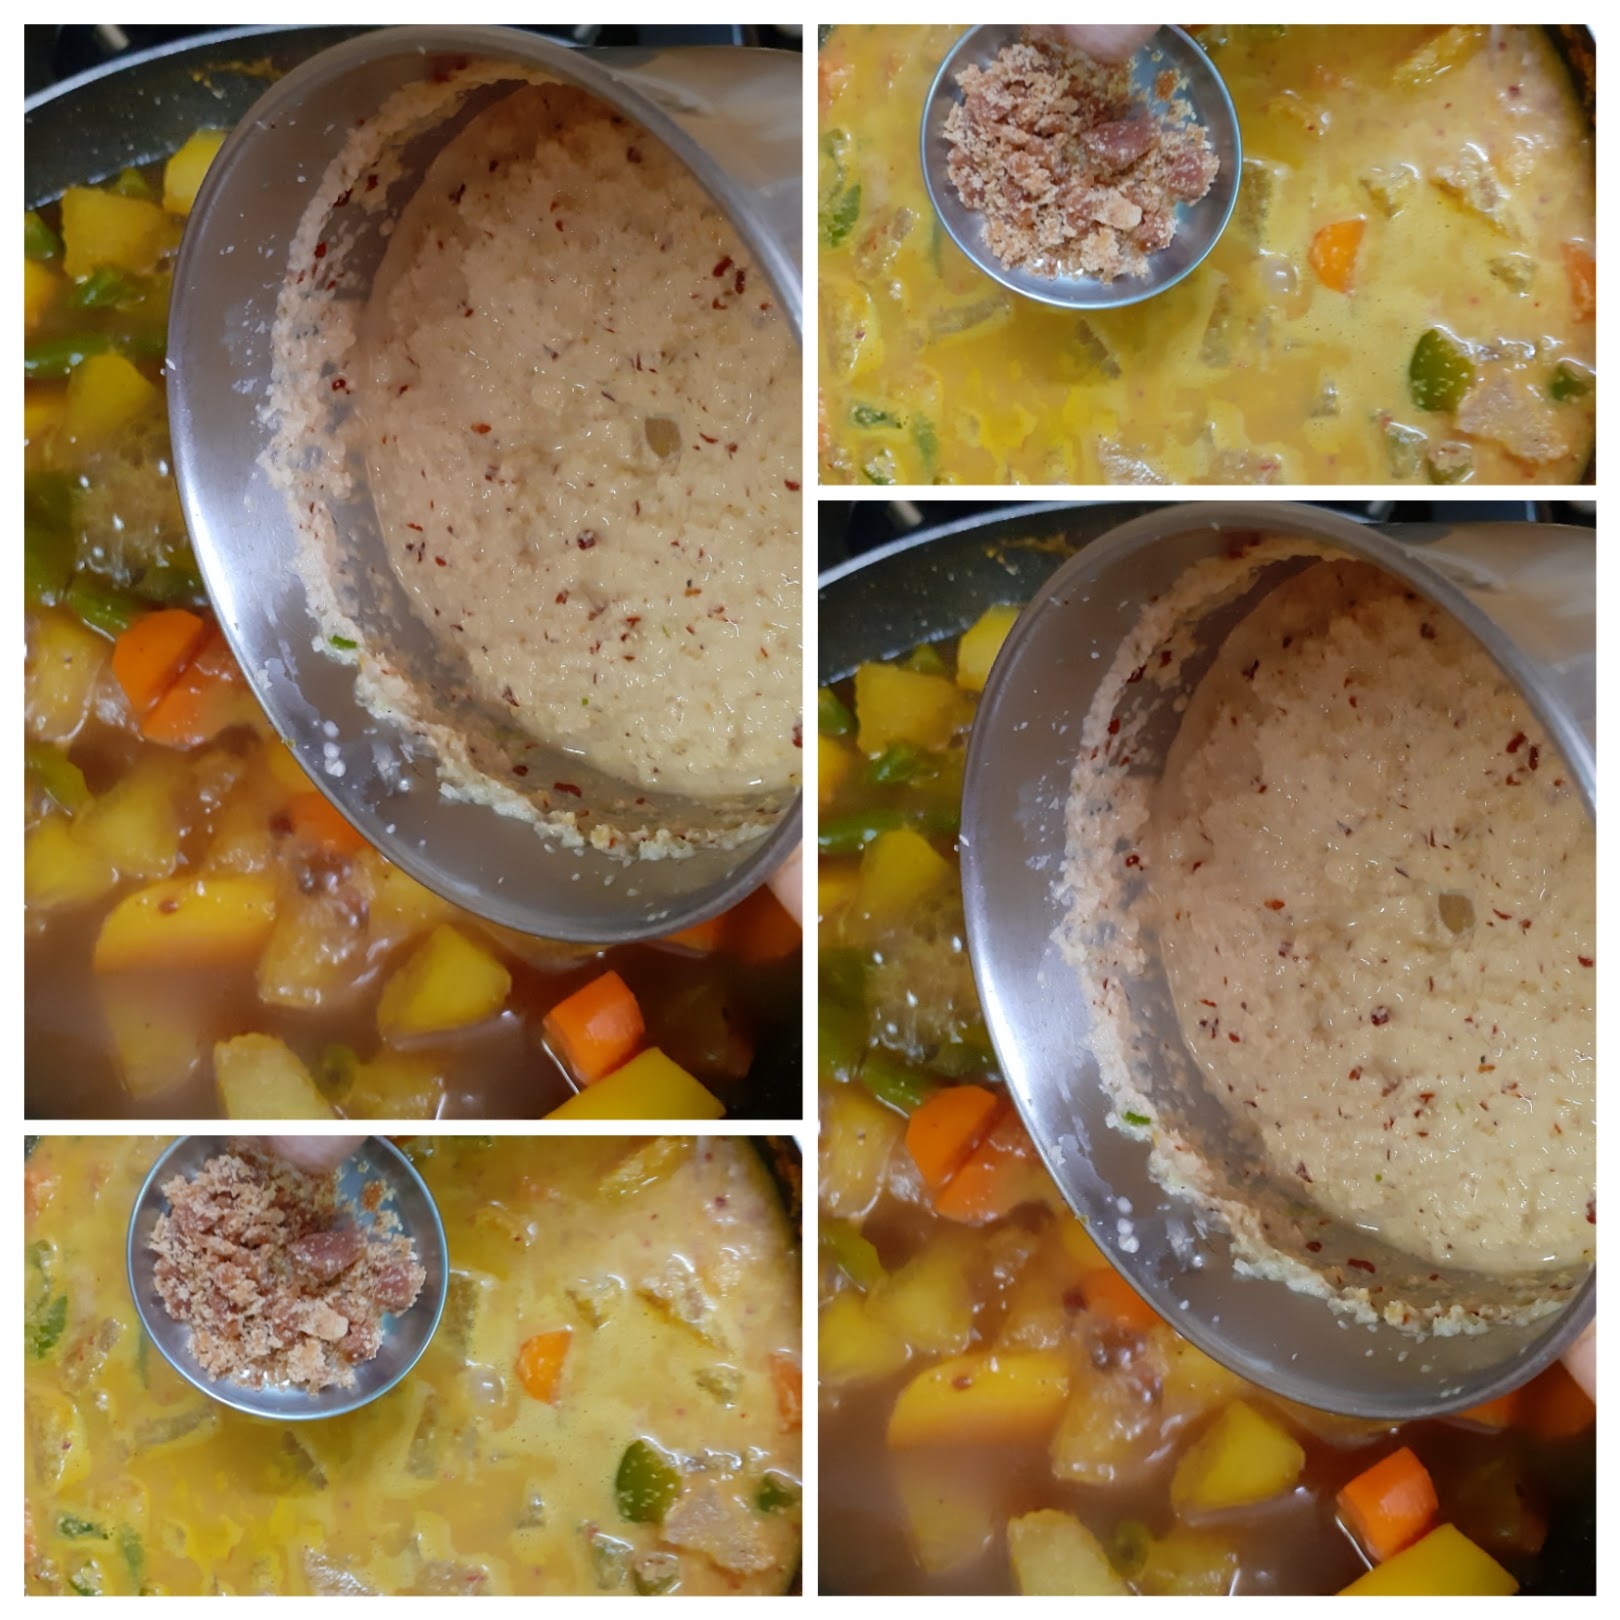
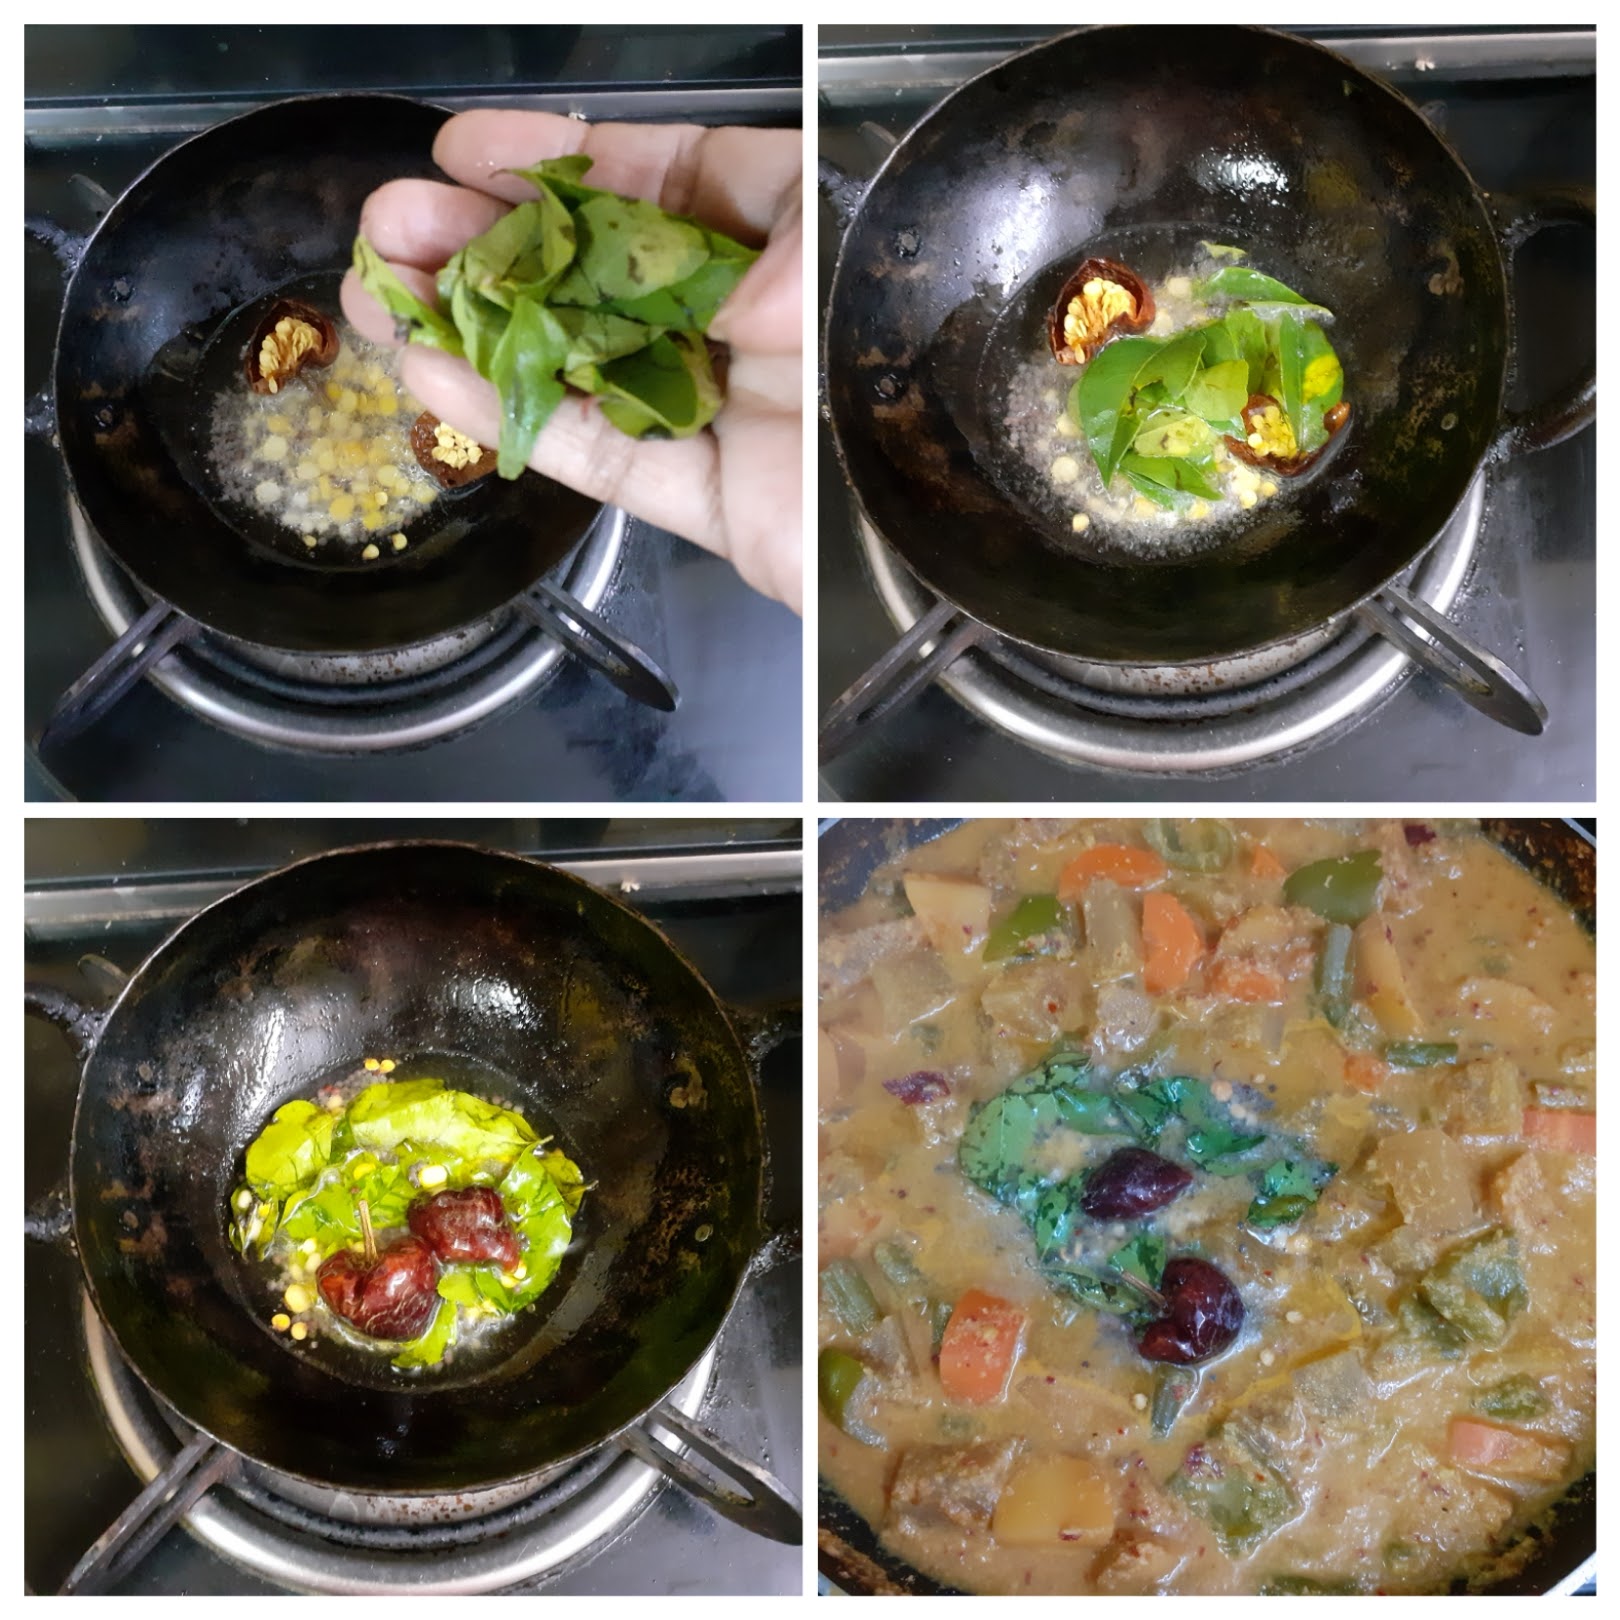
Vegan Vegetable Stew Indian Style
Nei Payasam/ Aravana Payasam
Coriander Seeds Chutney ( Bloating remedy)
Walnut And Smoked Bell Pepper Chutney
Ragi Cheela/ Finger Millet Crepes
Narthangai Kuzhambu/ Citron Curry
Eggless Mava Cake/ Khoya Cake
Gulkand Shrikhand (Flavored Yogurt Dessert)
Mathura Ke Dubki Wale Aloo
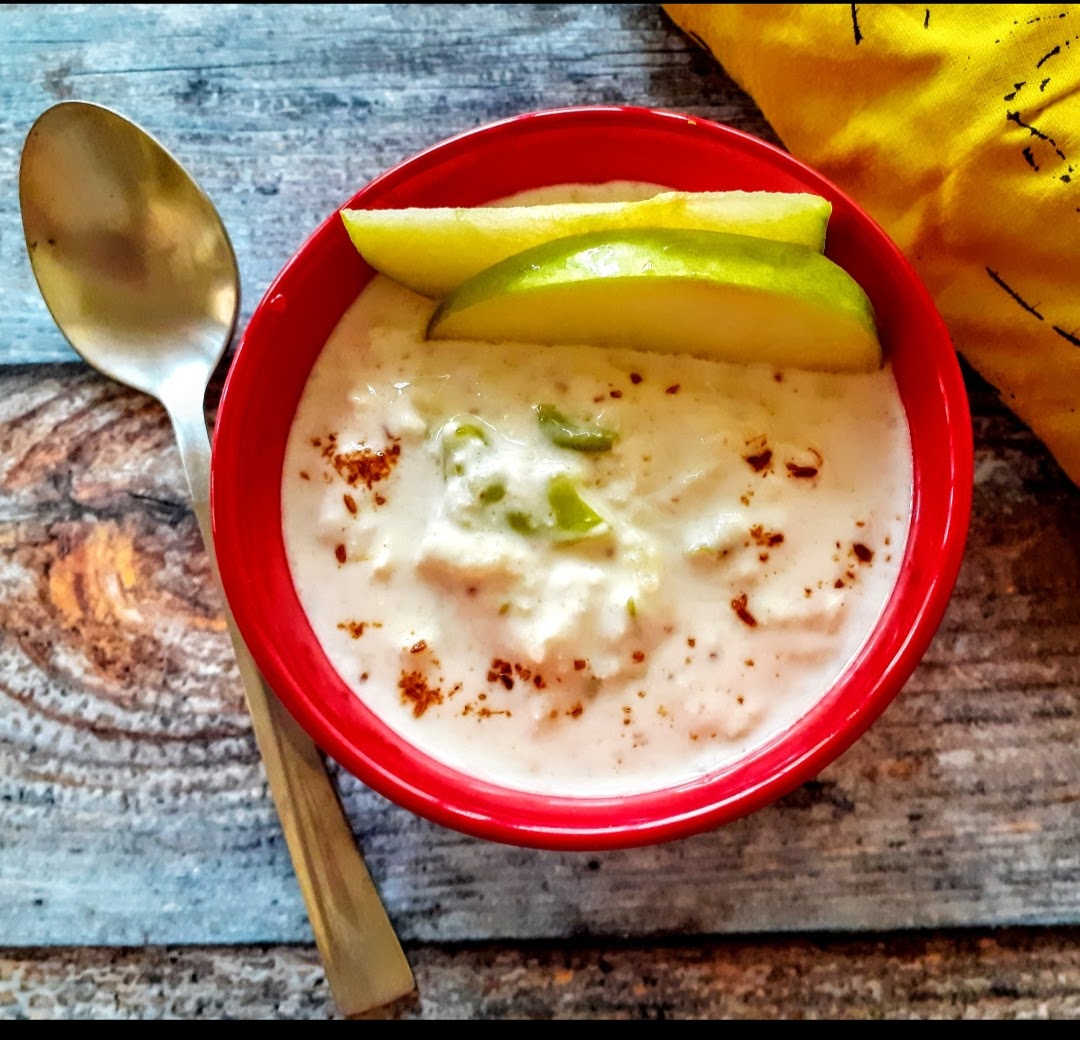
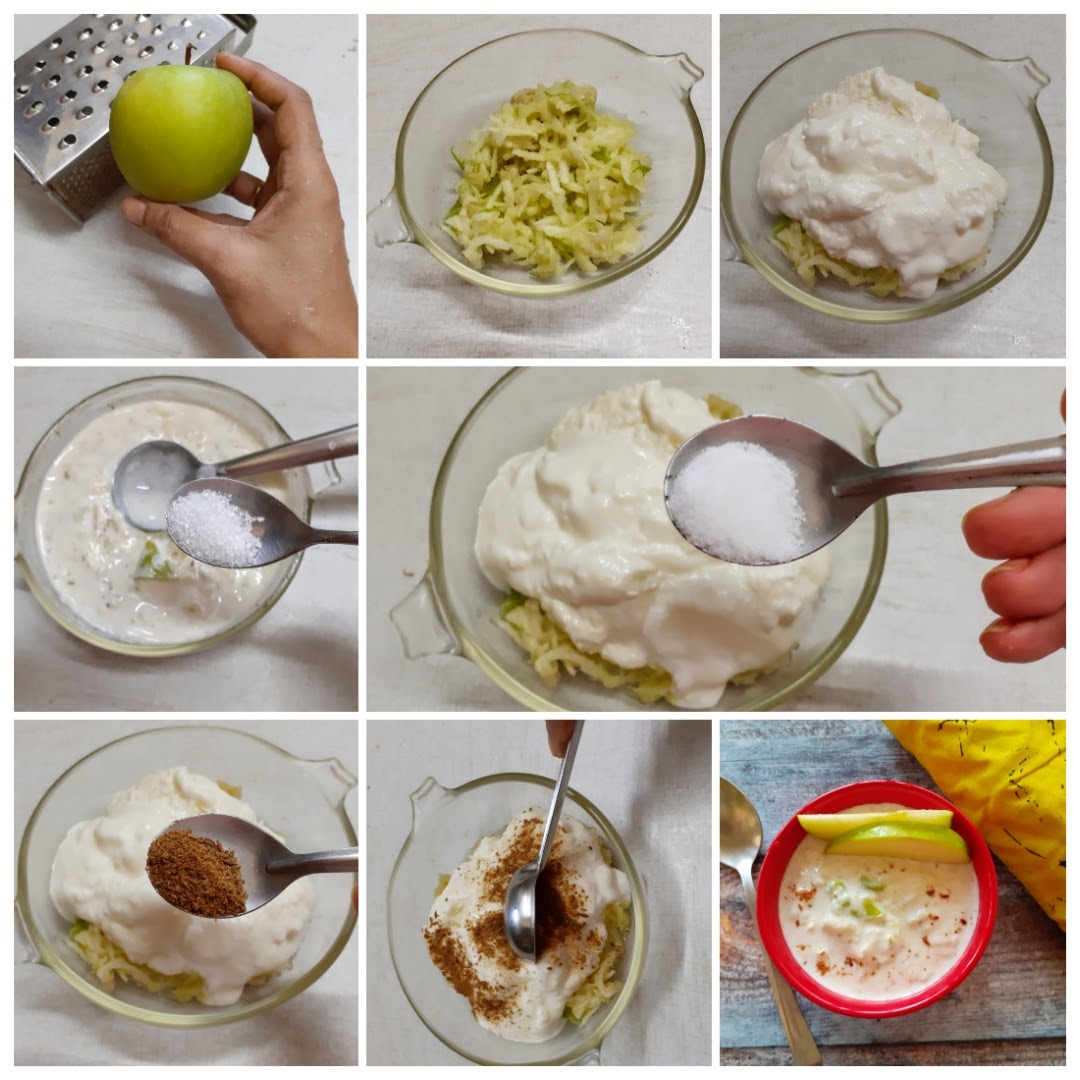
Pumpkin Raita/ Parangikai Thayir Pachadi
Idli Podi/ Idli Milagai Podi/ Gun Powder
Bajra Chana Dosa/ Instant Bajra Dosa
Kubani (Qubani) Ka Meetha
Satvik- No Onion No Garlic Recipes
Kerala Olan Recipe/ Olan
Recipes For Ganesh Chaturthi
Coconut Rose Modak/ Coconut Rose Kozhukattai
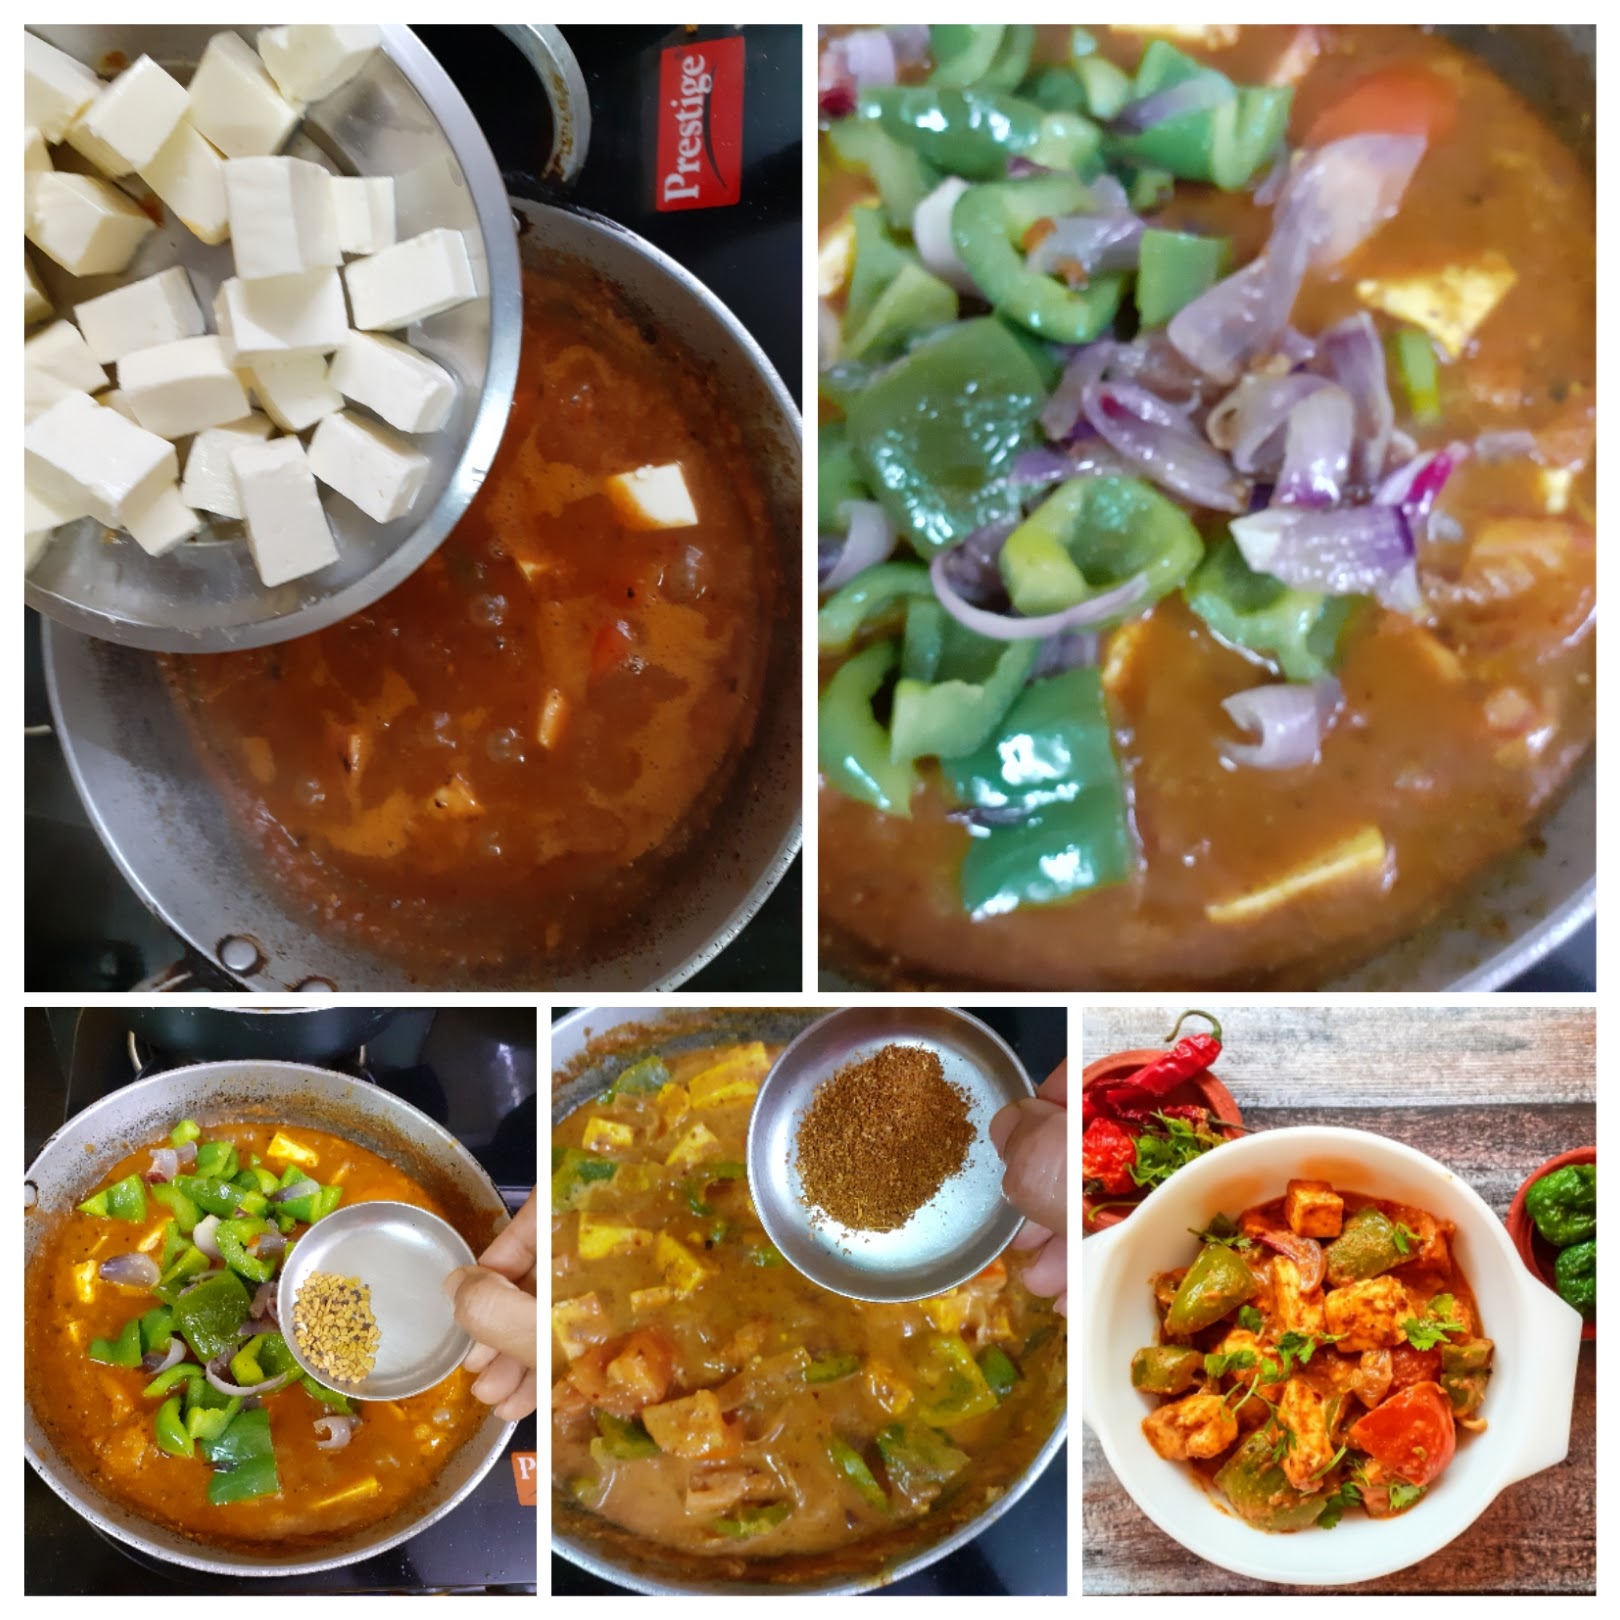
Dhaniya Paneer Korma
Parupu Vadai/ Mixed Dal Vada/ No Onion No Garlic Vadai
Sabudana Kheer / Javvarisi Payasam
Popular Rakshabandhan Recipes
Babycorn Lolipop
Pidi Karunai Kizhangu Masiyal
Bhatura Recipe
Low Carb Recipe Collection
Beetroot Rice Flour Rotis/Beetroot Flatbread
Custard Shahi Toast Pudding
Bhindi Kolhapuri
Homemade Kolhapuri Masala
Vendakai Vatha Kuzhambu/ Tangy Okra Curry
The Paratha Collection
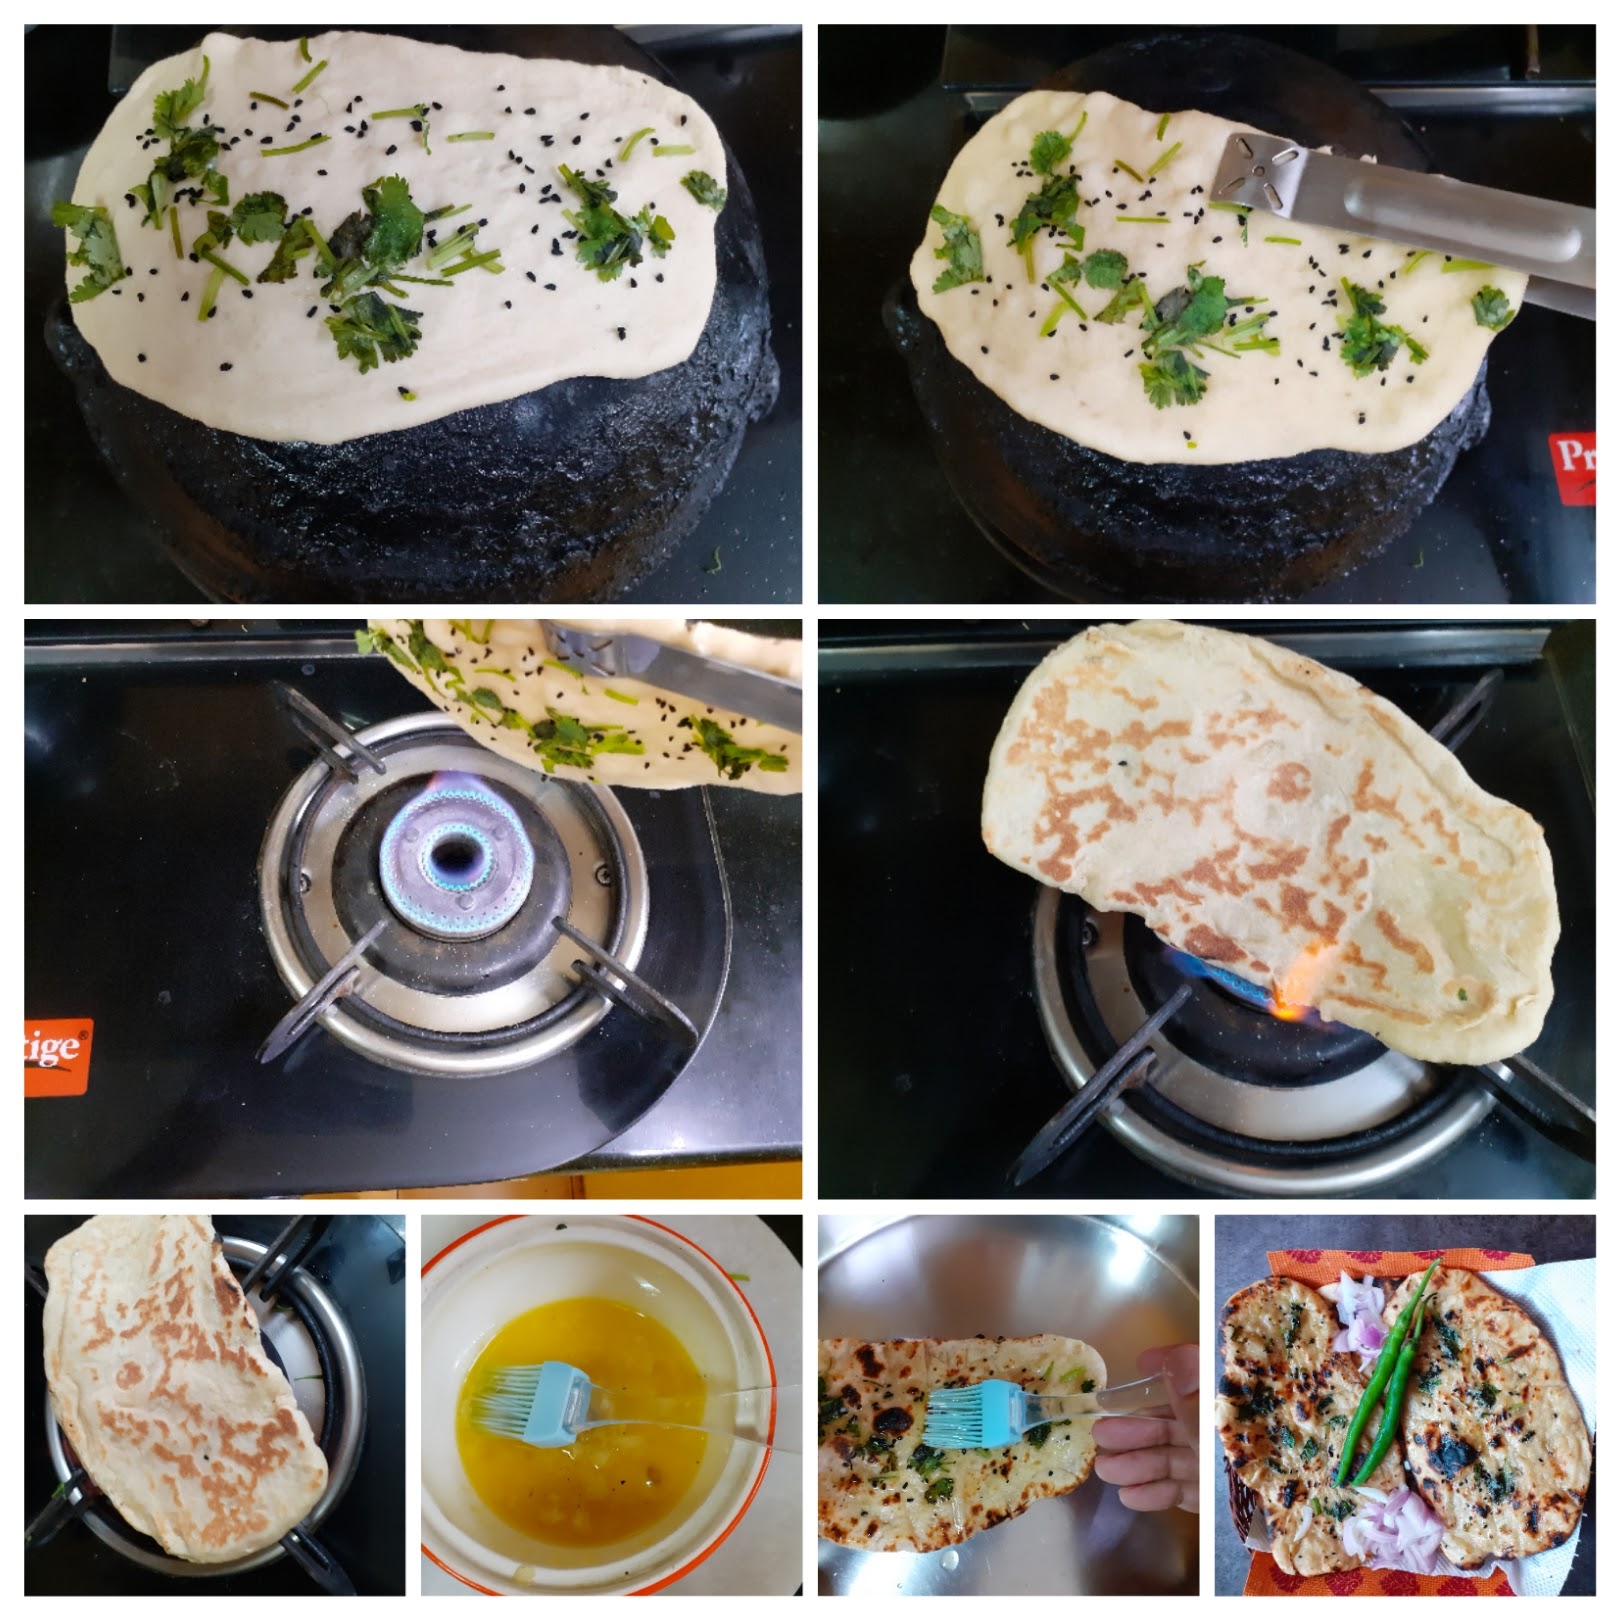
Kachchi Haldi Paratha With Sarson Ka Raita
Brahmi Leaves Chutney/ Vallarai Keerai Chutney
Red Chilli Chutney/ Pandu Mirapakaya Roti Pachadi
Alu Palak
Sweet Corn Seekh Kebab
Nendran Pazham Halwa/ Banana Halwa
Paratha Mini Thali
Aloo Paneer Curry (One Pot)
Besan Oats Cheela With Carrot Greens
Gongura Pappu/ Red Sorrel Leaves Dal
Bajra Methi Crackers
Mohan Puri/ Chandrakala
Pineapple Kesari/Pineapple Sheera/Pineapple Pudding
Sooji Halwa/Semolina Pudding/Sheera
Orange Cauliflower
Pumpkin Halwa/Kaddu Halwa/ Pumpkin Pudding
Sundal Recipes
Sundal Podi
Buckwheat and Raw Banana Flour Hariyali Paratha
Mirchi Ki Sabji ( with Banana Peppers)
Methi Chaman
Paneer Parathas
Aval Sakkarai Pongal/ Poha Sweet Pongal
Ammini Kozhukattai/ Savory Rice Flour Dumplings
Kozhakattai/Modak 2 ways(Coconut Poornam/Stuffing)
Green Tomato Chutney/ Raw Tomato Chutney
Goli Baje/Mysore Bajji
Coconut Barfi/Thengai Burfi (with desiccated coconut)
Instant Milk Peda/Doodh Peda(easy recipe)
Red Rice Sweet Poha (with sugar)
Broccoli Paneer Rice
Til Ki Chutney/ Sesame seeds chutney
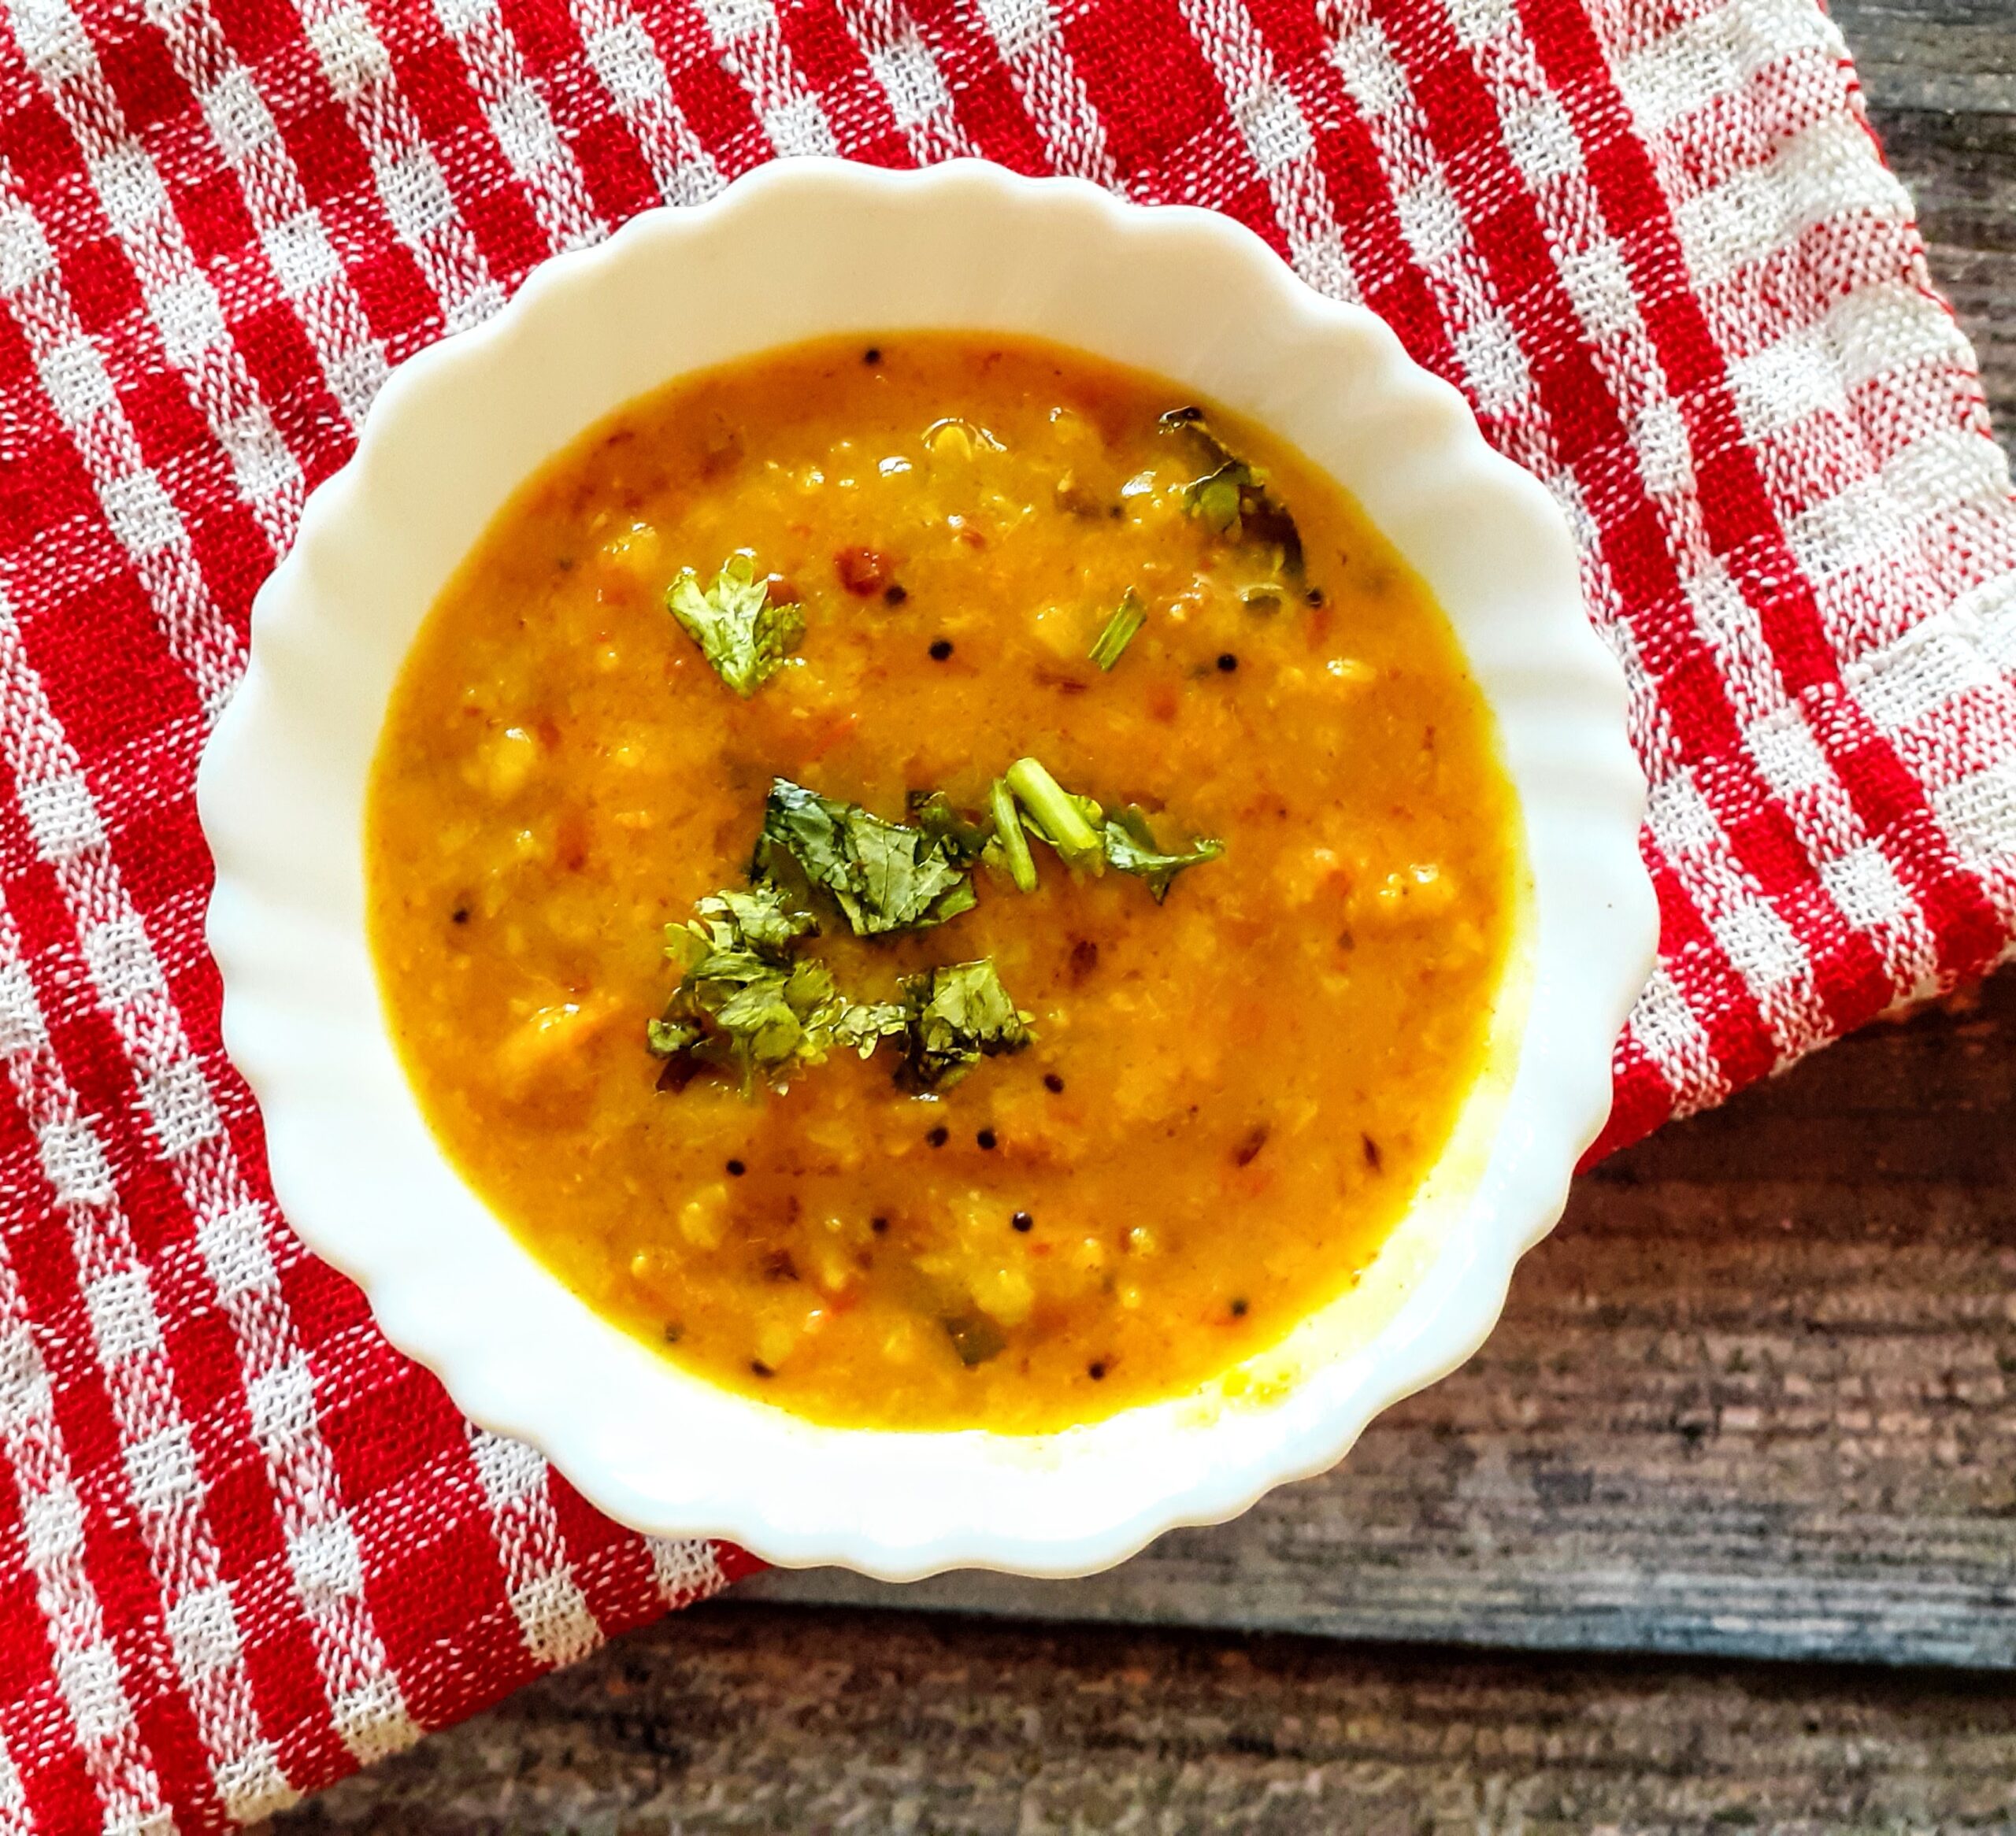
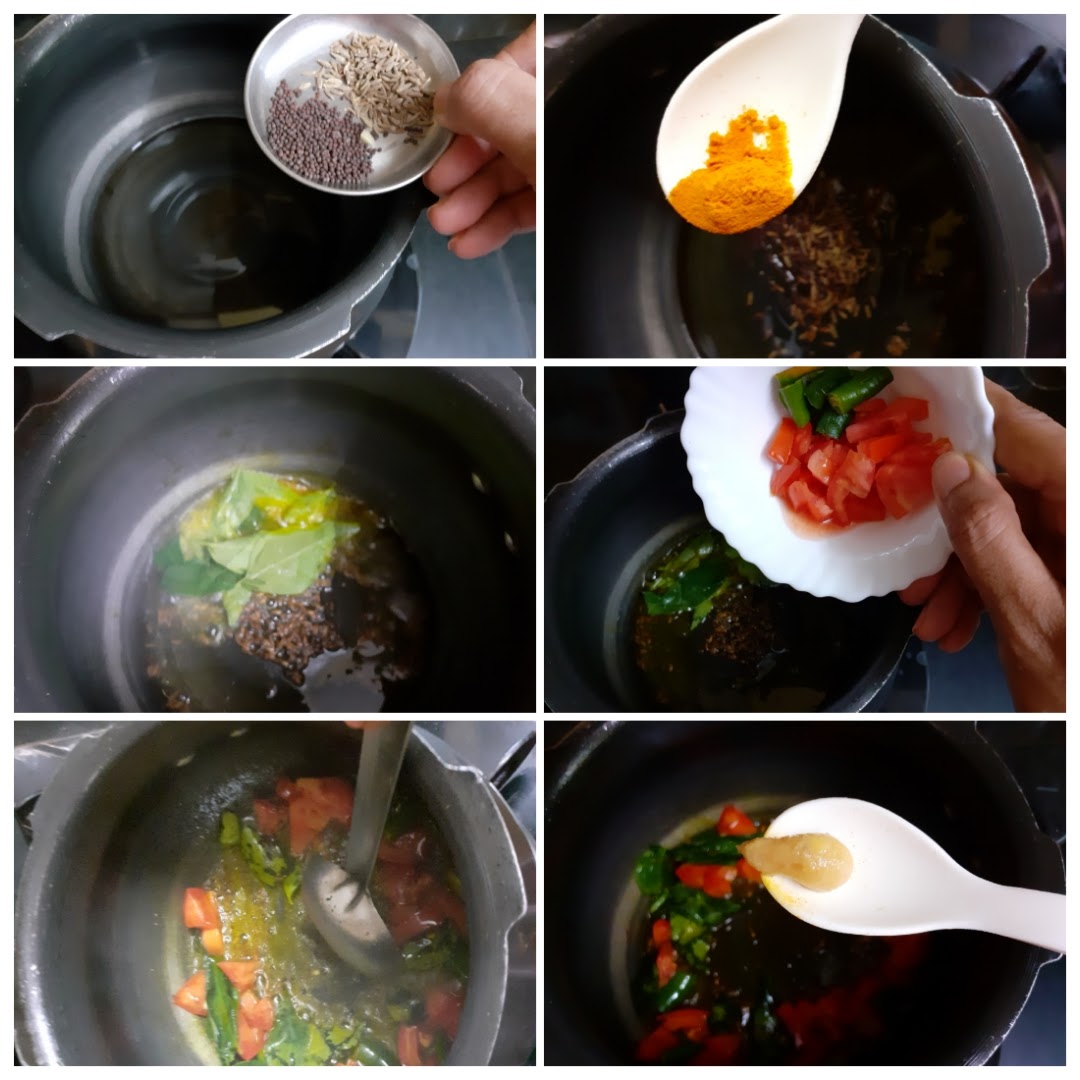
Moringa-Dal Shorba (Moringa leaves Soup)
Bombay Potatoes
Aam Ras ( Mango Pulp)
Palak Paratha ( Spinach Paratha)
Bisi Bele Bath Masala (Powder)
Bisi Bele Bath/ Bisi Bele Huli Anna
Mushroom Soup
Tandoori Peanut Salad
Rice Flour Rotis/Chawal Ki Roti
Roti is a flat bread made with whole wheat flour or refined flour. The dough is unleavened. Rotis form the staple food of most Indians on the northern side. Rotis can be of different kinds like, Chapati, Phulka, Tandoori roti, Roomali roti, Missi roti and more. In all the mentioned varieties differ in either the flour proportions or the method how they are cooked.
Rice Rotis are the softest and are made with steamed rice flour. Unlike the Akki Roti these rotis do not have chopped onions and other spices added to them. If made correctly, they also fluff up like a phulka. Since they are made with rice flour these Rotis are gluten free and perfect for people with gluten resistance.
As I am on a series creating Thaalis from all around India and also documenting the variations to them based on ingredients used or not used, I cooked this Rotis as part of the Gluten free thaali.
The dough for these Rotis is like the one made for Modak/kozhakattai. Having said this, it is important to make the dough well. I have cooked the Rotis with store bough rice flour, so some cracks towards the edge are seen. A smooth flour will ensure no cracks at all. The flour can also be made by pounding rice to a fine flour at home itself in a mixie.
Follow the directions as mentioned to get the best out of the recipe. While you are here also checkout other Roti/Paratha recipes on the blog like- Missi Roti, Garlic Naan, Sweet potato puran poli, Aloo Methi Paratha, Garlic Lachcha paratha, Beetroot Paratha, Chinese Paratha, and more…
Here is the recipe of Rice Roti or Chawal Ki Roti-


Moong Beans Salad
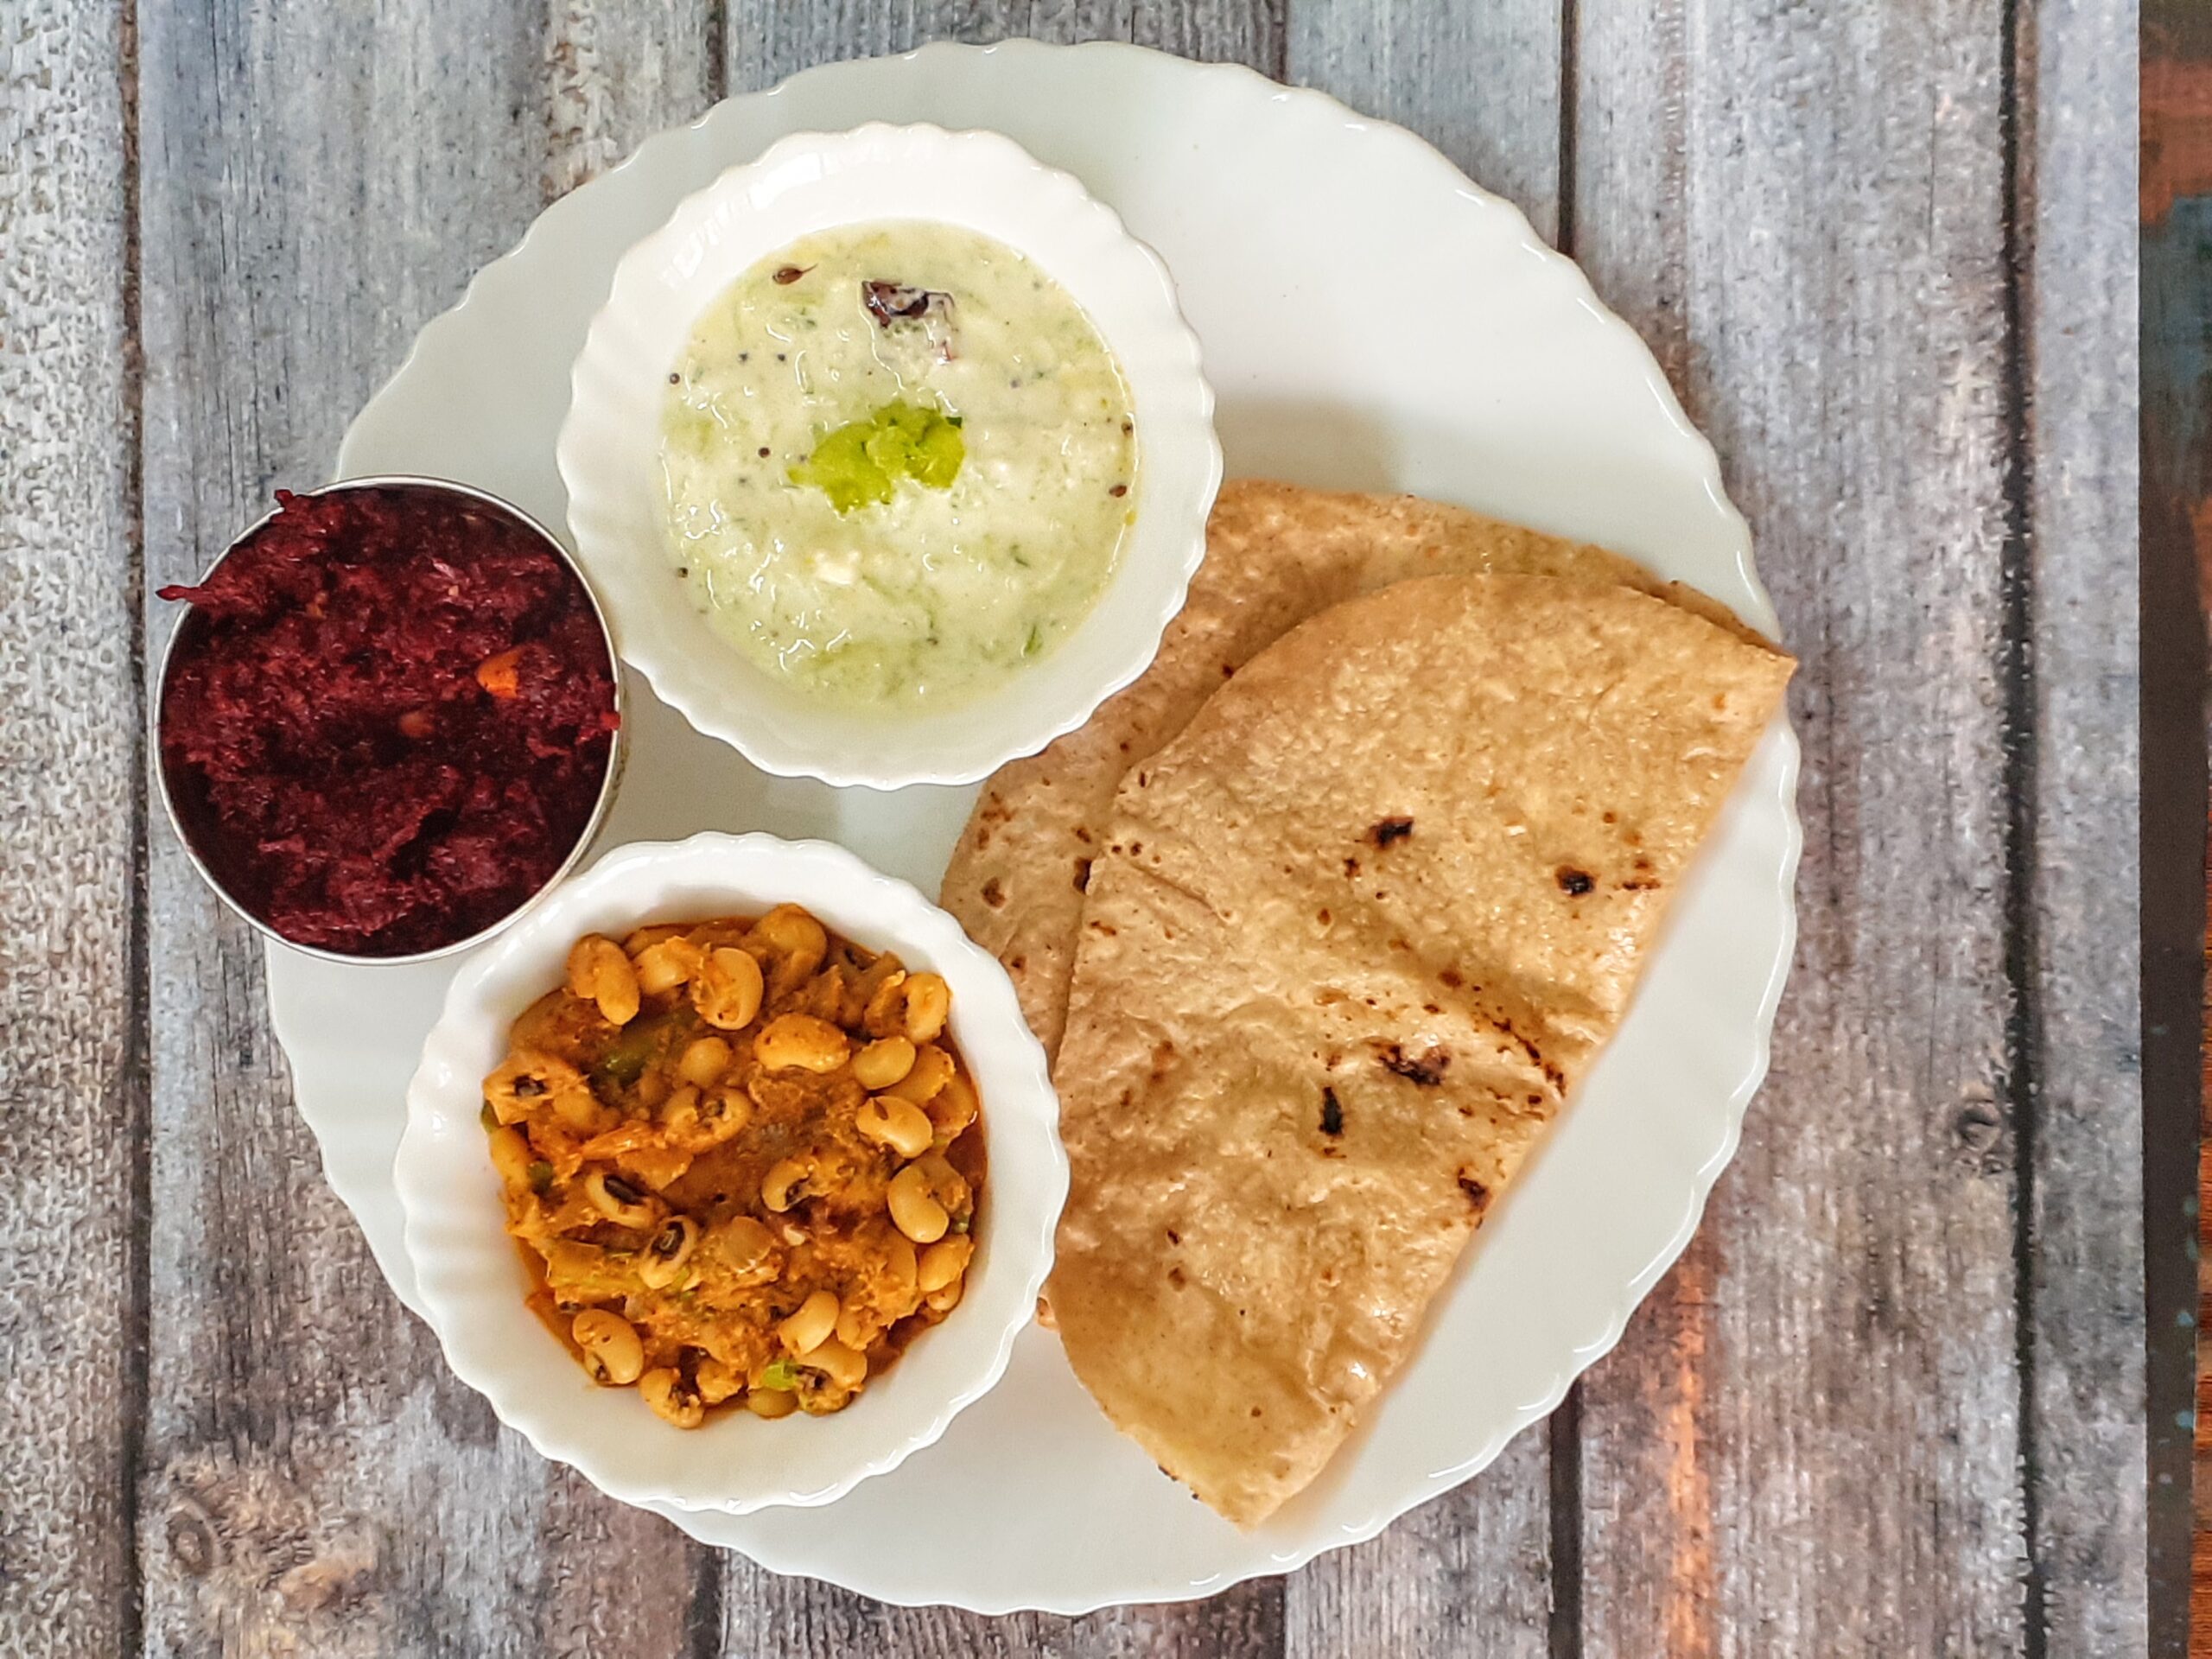
Gluten Free Thaali
Thaali Ideas (North Indian Mini Thaali #1)
A Thaali is a 3 course(and above) Indian meal which features a combination of dishes that are wholesome, mix and match with each other in terms of texture and flavour, and are balanced. India being a country with a huge food culture and heritage there are a great number of thaalis which can be cooked, either within a single cuisine, or a mixture of cuisines that match well.
This is an attempt by me to bring here as many Thaali ideas as possible for you all to create. We all want an balanced meal which takes very little time to create, and this is just that. The Thaalis in this series will range from simple to complex, and festive to on the go.
The below Thaali took me under 60 mins to create. All the recipes mentioned here are also available separately. But here I am giving the whole process of how I went about creating it, and also giving the recipes side by side.
Do let me know in the comment section if I should create more Thaalis like this for you to try. This current one is a simple working day thaali, which one can create before leaving for work(can pack this as lunch as well), or once back home, or any day.
Planning goes a long way in creating a wholesome, and delicious meal. Please go though all recipes to check if you have all ingredients mentioned.
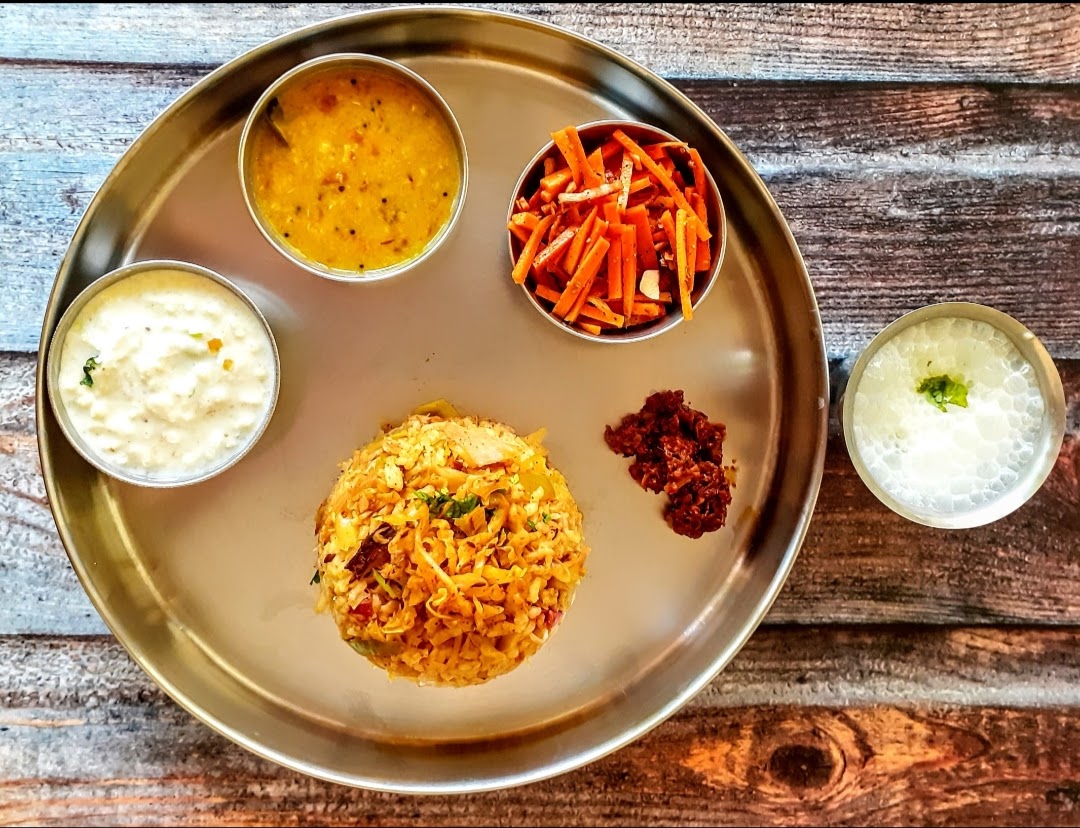
Elements of this Thaali:
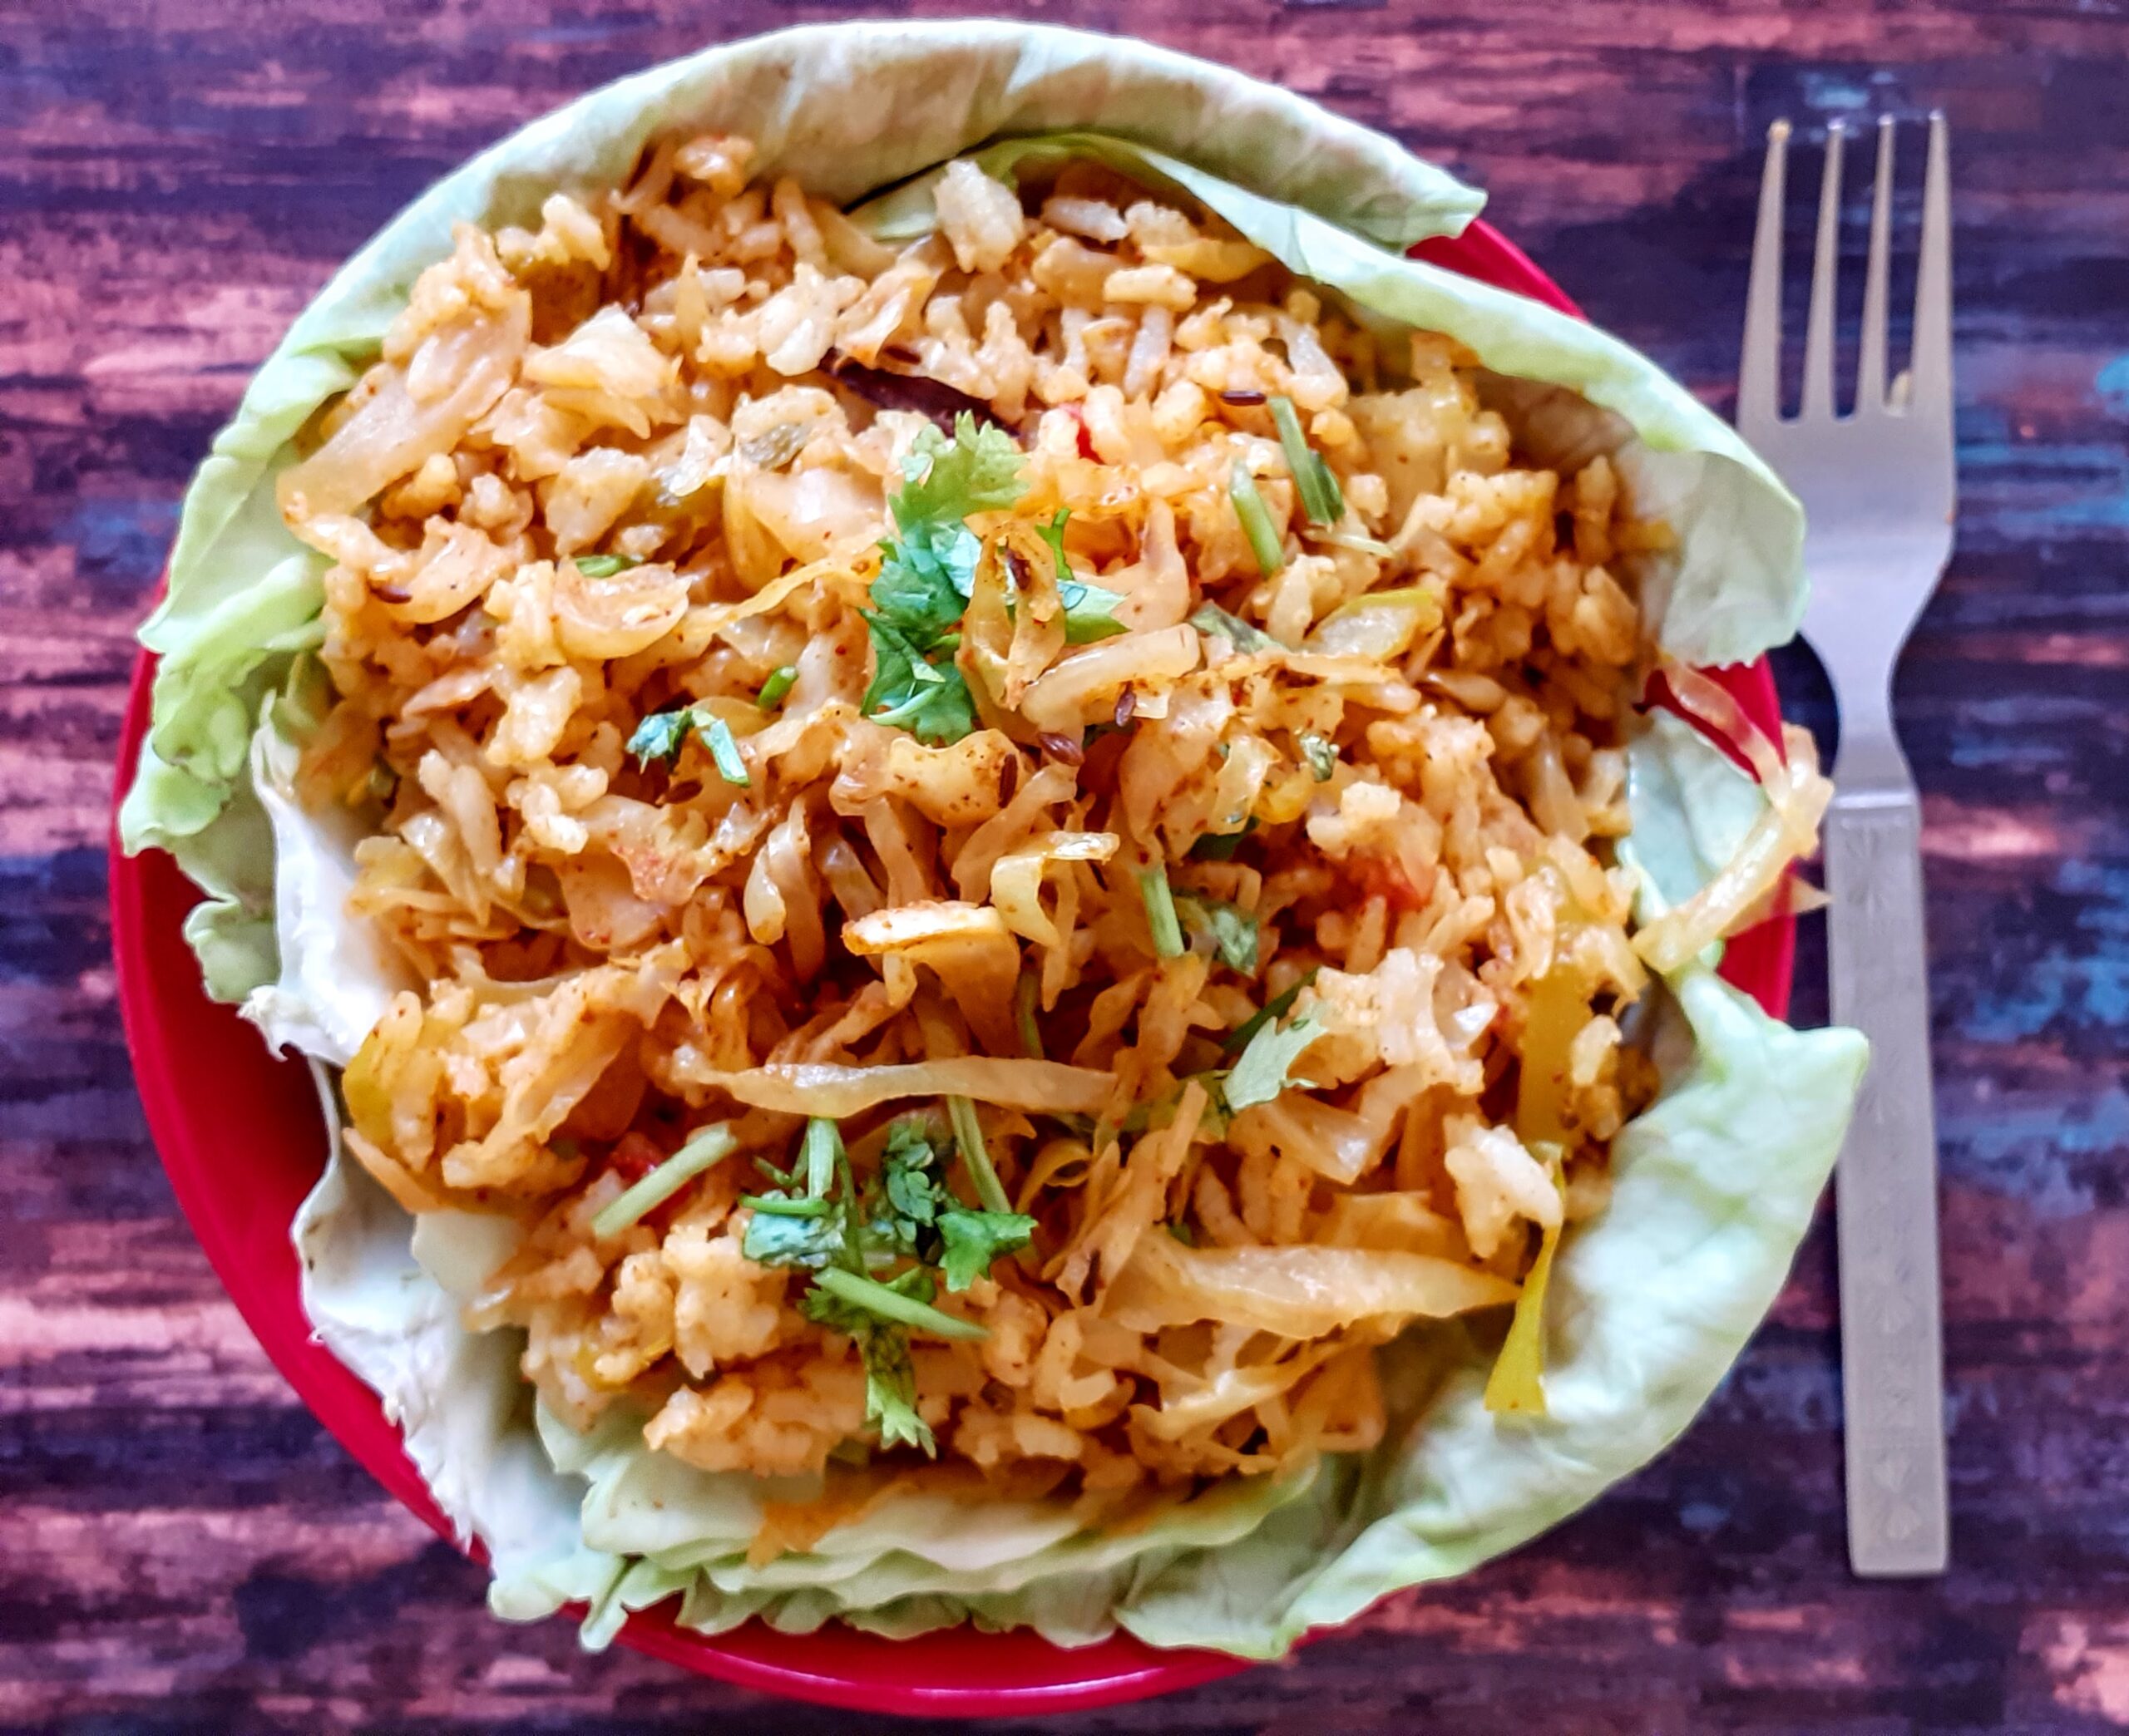
*Korean Carrot Salad, *Cabbage Pulav, *One Pot Tadke wali Dal, *Green Apple Raita, *Pickle, and *Chaach(buttermilk)
Pre prep: All Vegetables were cut the previous day ( Julienne or Grate the carrot for salad. Chop the cabbage into strips, wash, drain, chop Onions, Capsicum, tomatoes, and store in fridge.)
Preperation and cooking:
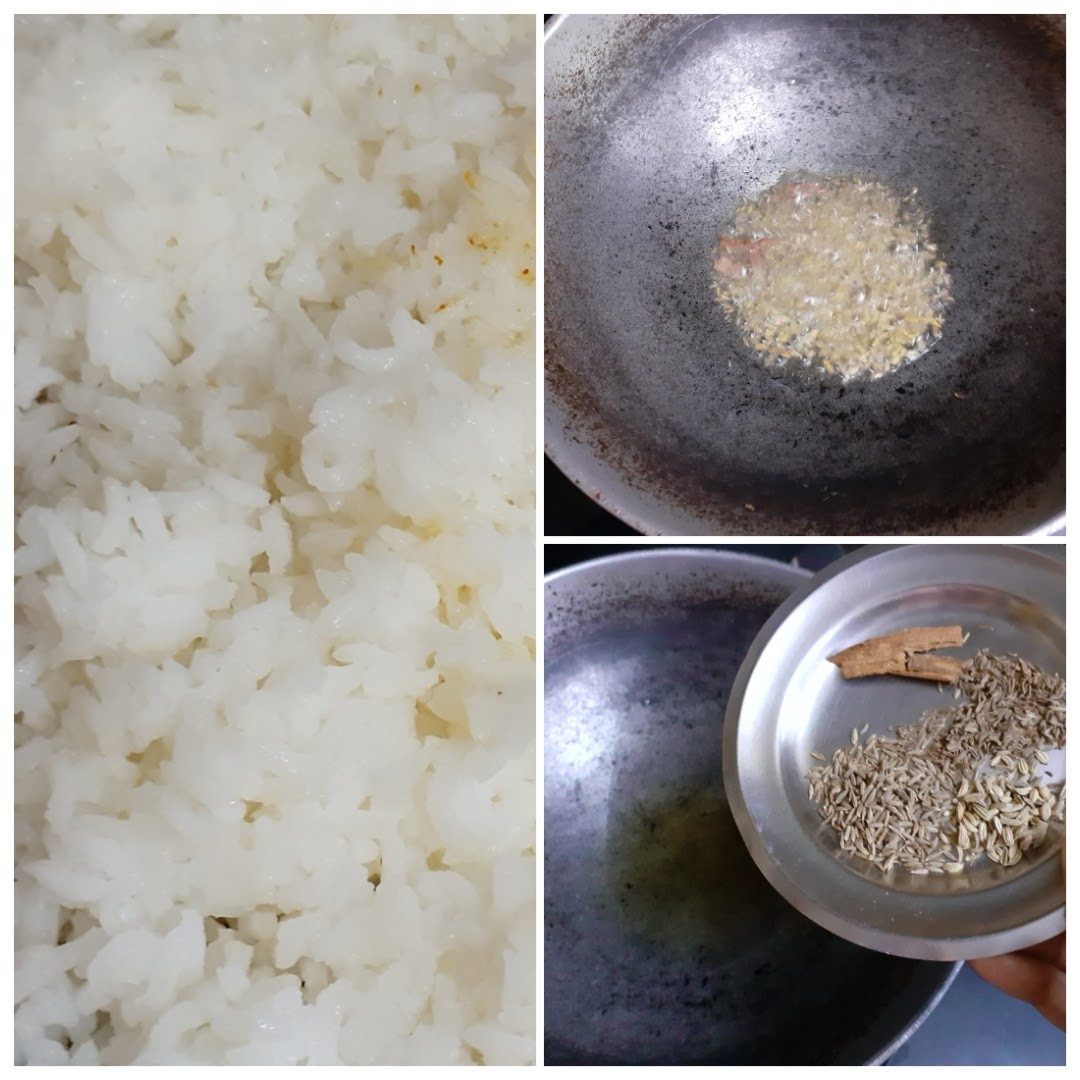
STEP 1 : Wash the rice for the Pulav, add adequate water, and pressure cook. (details in recipe). (15 mins approx to cook)
STEP 2: Wash the dal, drain and rest for 10 minutes.(10 min approx)
STEP 3: Within the 10 minutes of the resting time for Dal, complete the carrot salad.
STEP 4: Start cooking the dal as per recipe.(20 mins from start to end)
STEP 5 : The pressure must have settled in the rice, open cooker and spread out the rice on a plate to cool.
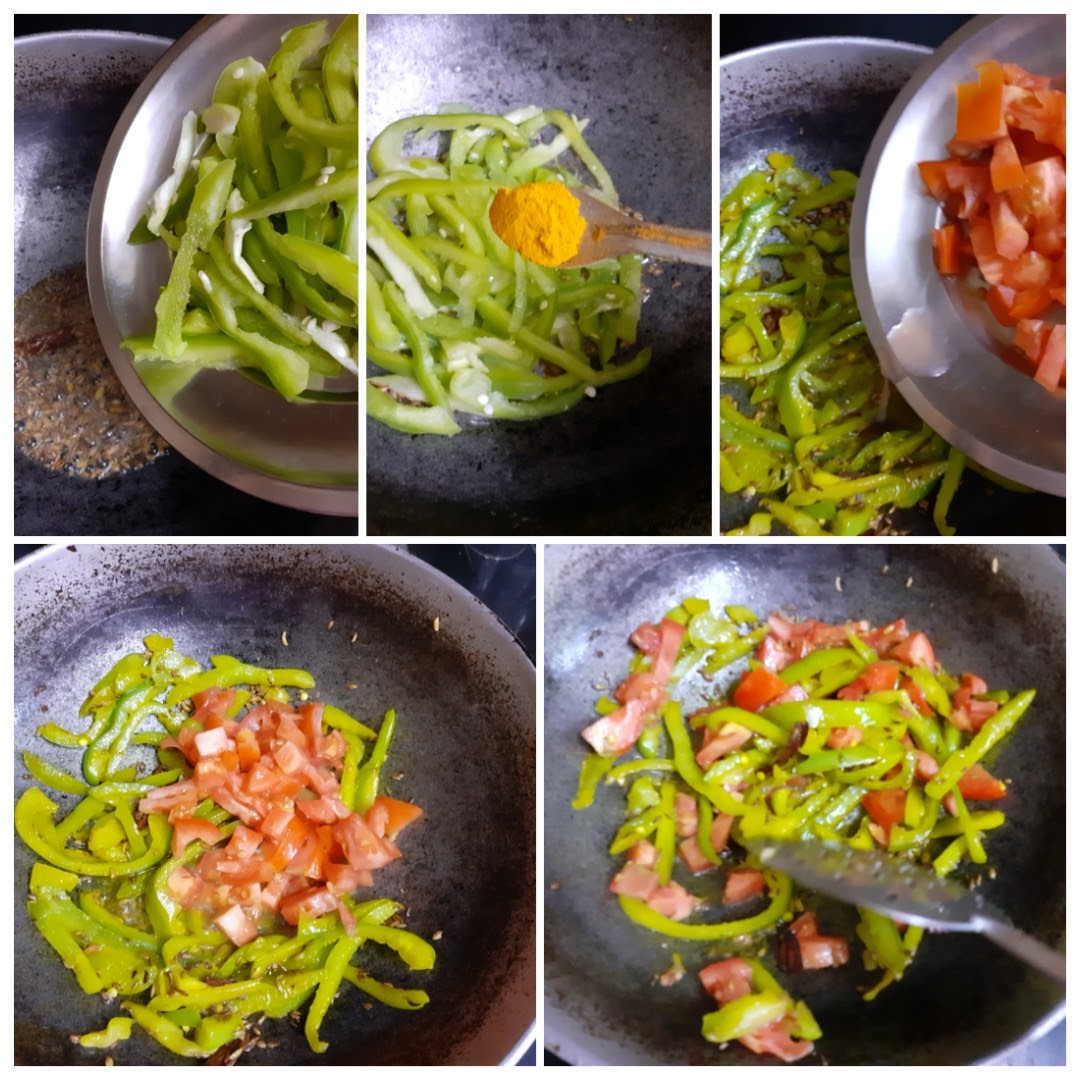
STEP 6: Start cooking the pulav as per recipe.( 15 min approx)
STEP 7: While the cabbage is getting cooked(sauteing) grate the Green apple for Raita and complete the raita.
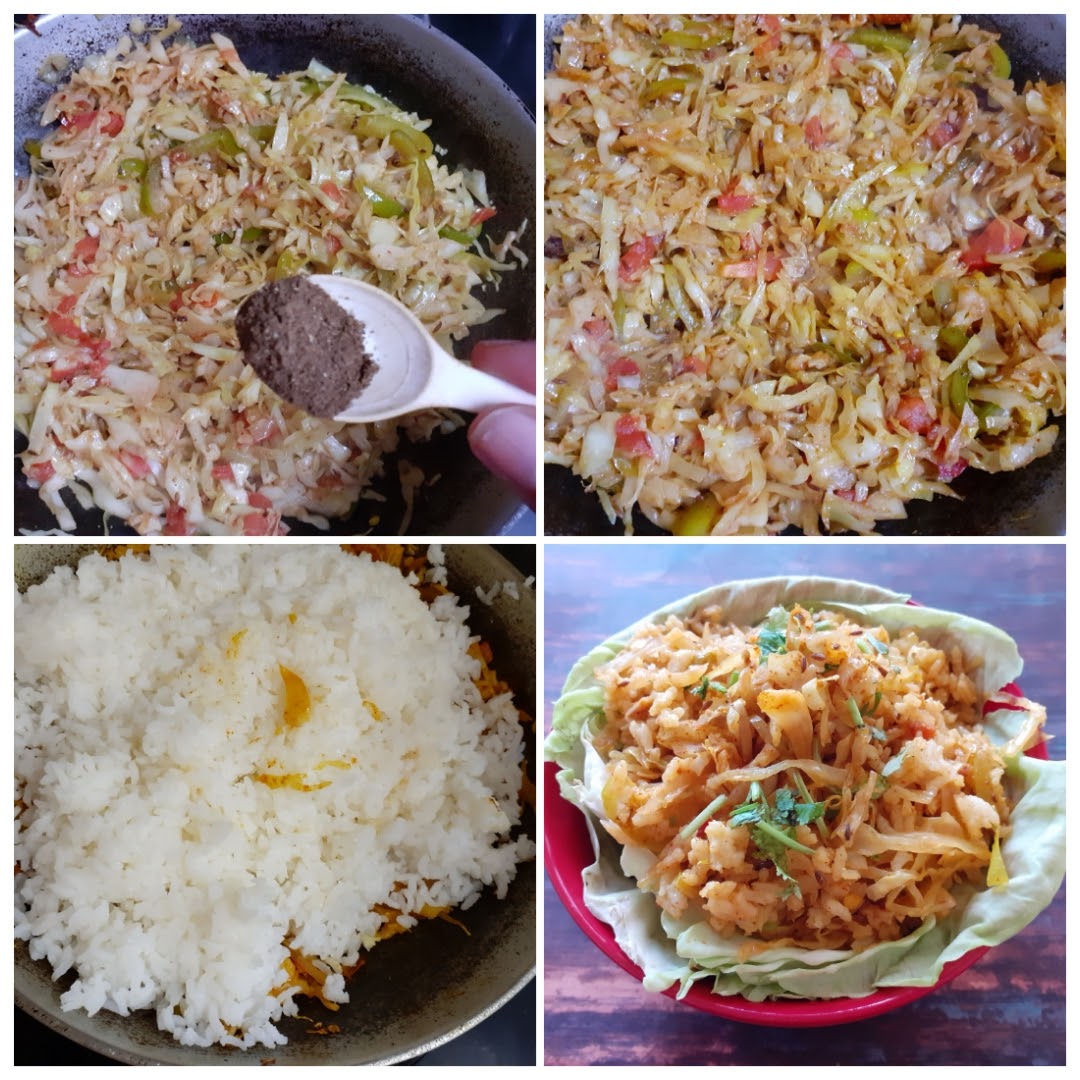
STEP 8: The cooled rice will now be ready to add to the Cabbage mix. Complete the Pulav
RECIPES FOLLOW:
1. Korean Carrot Salad:
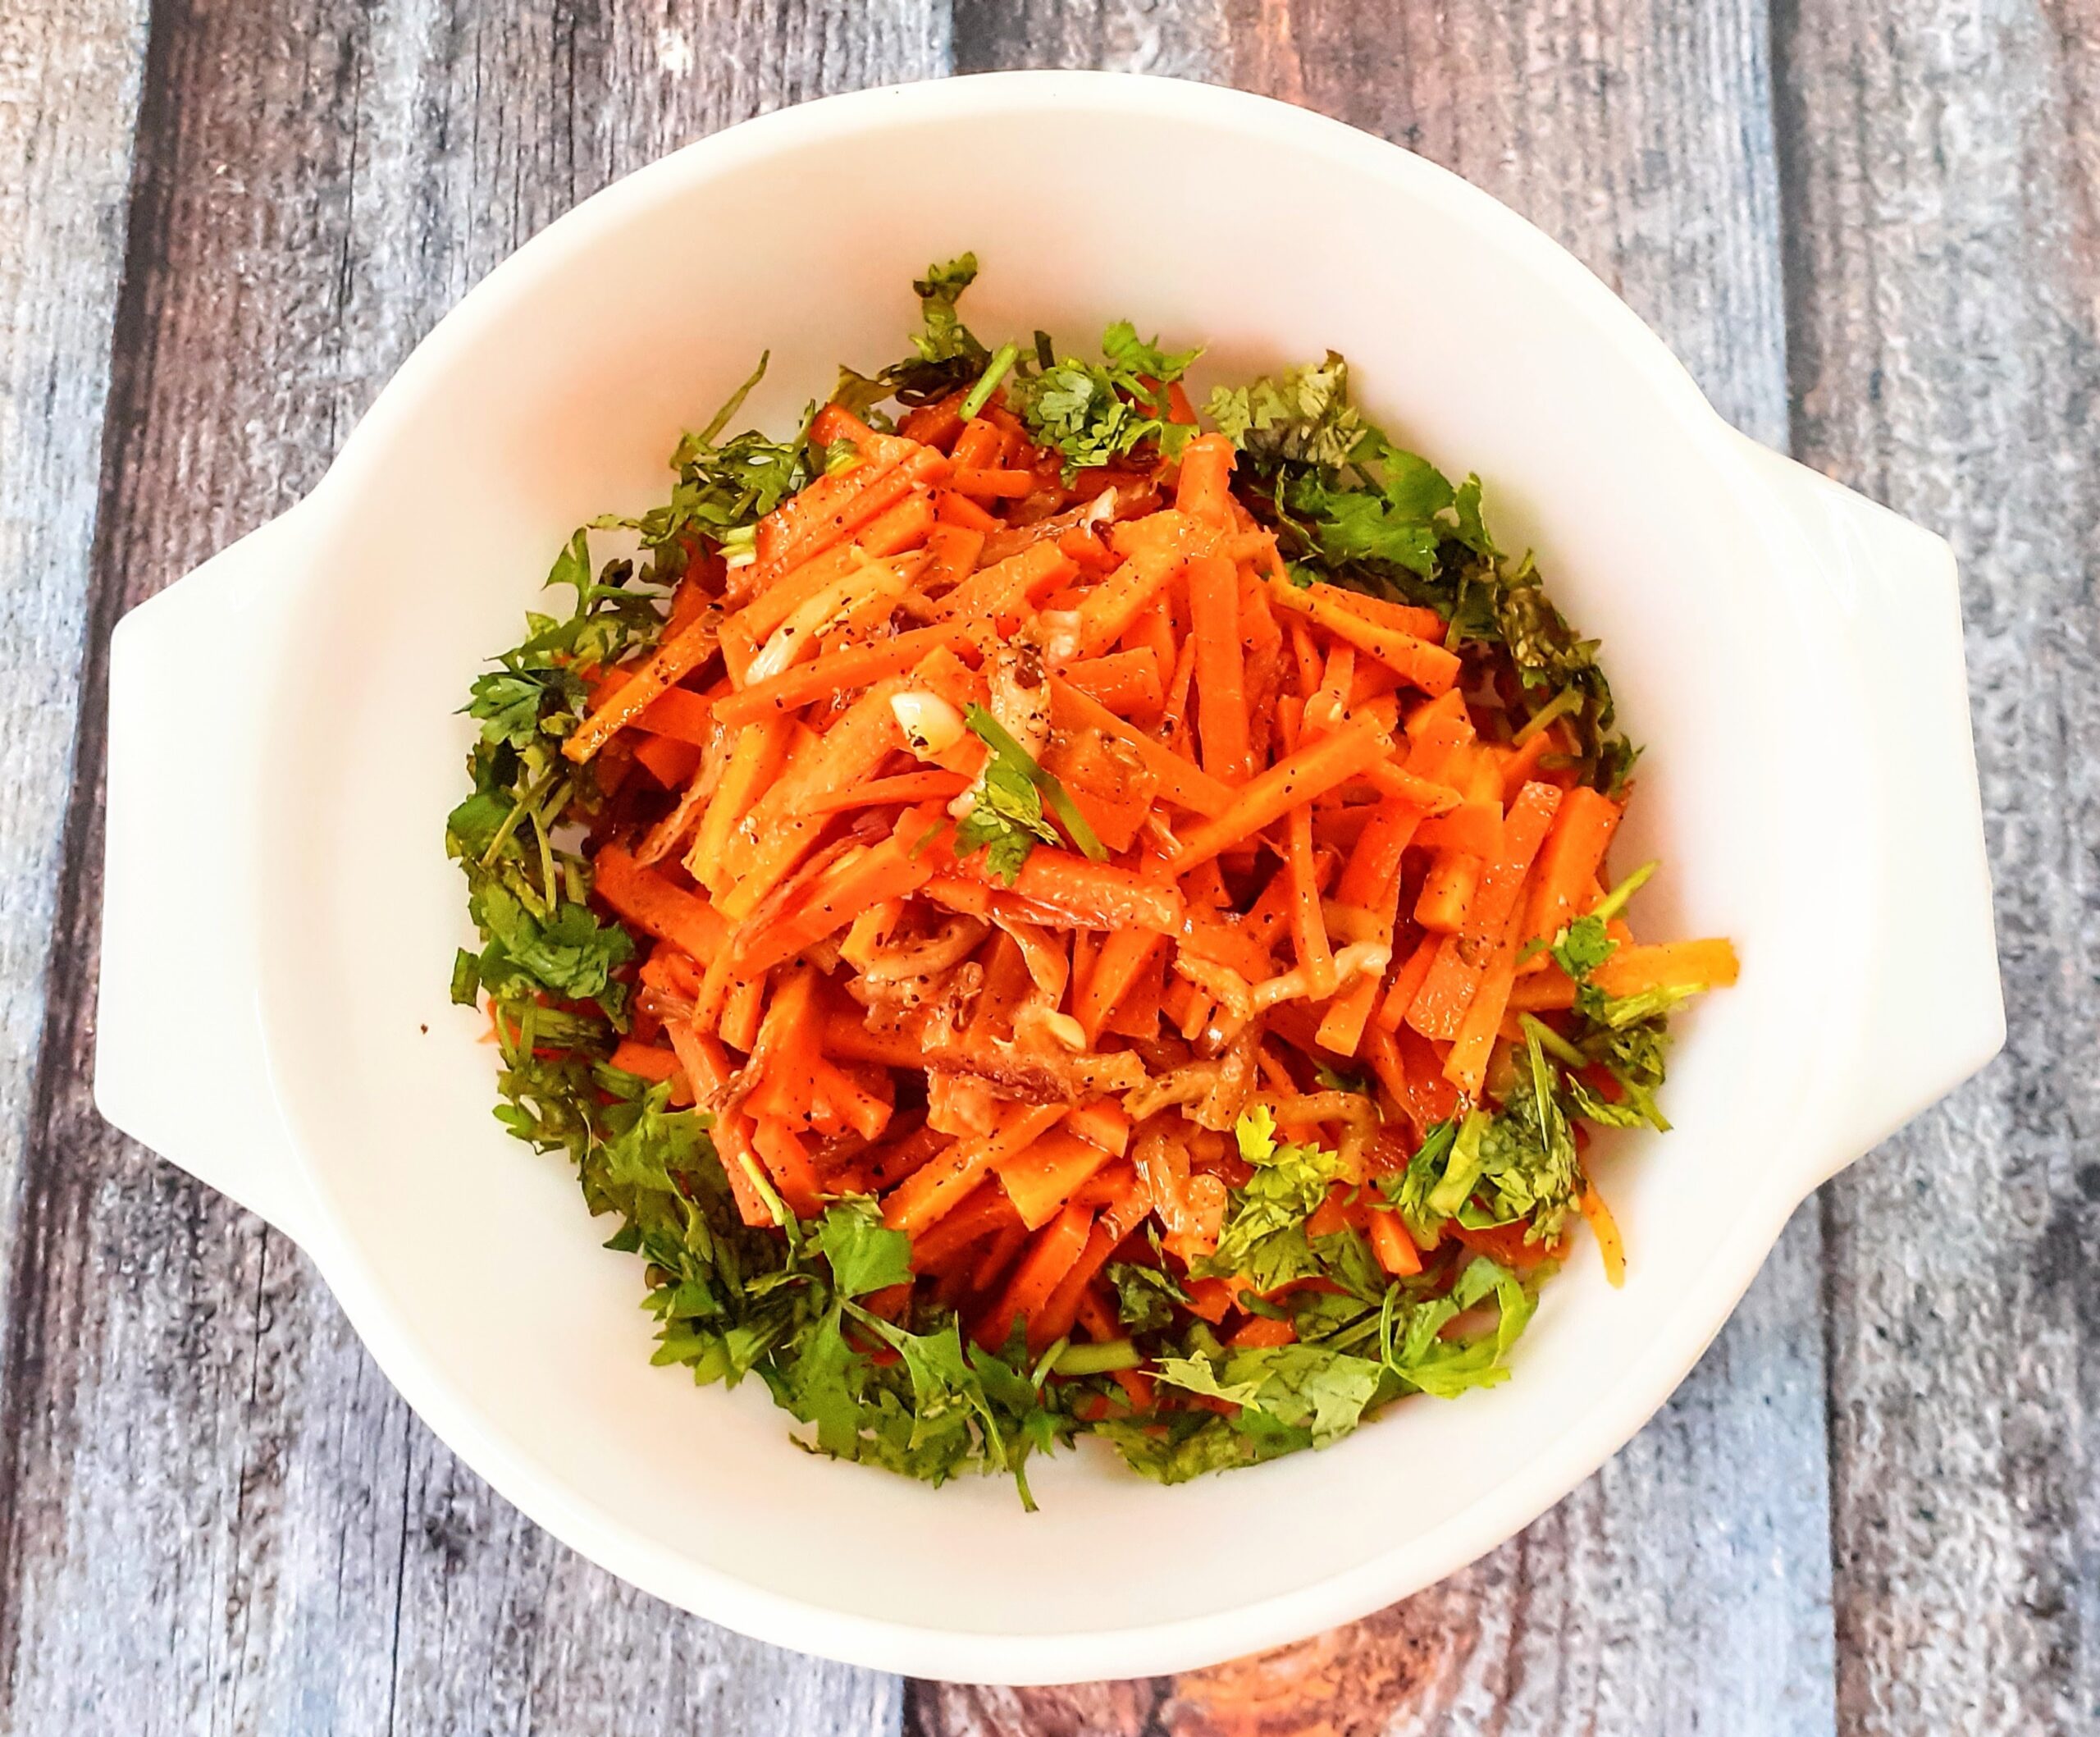
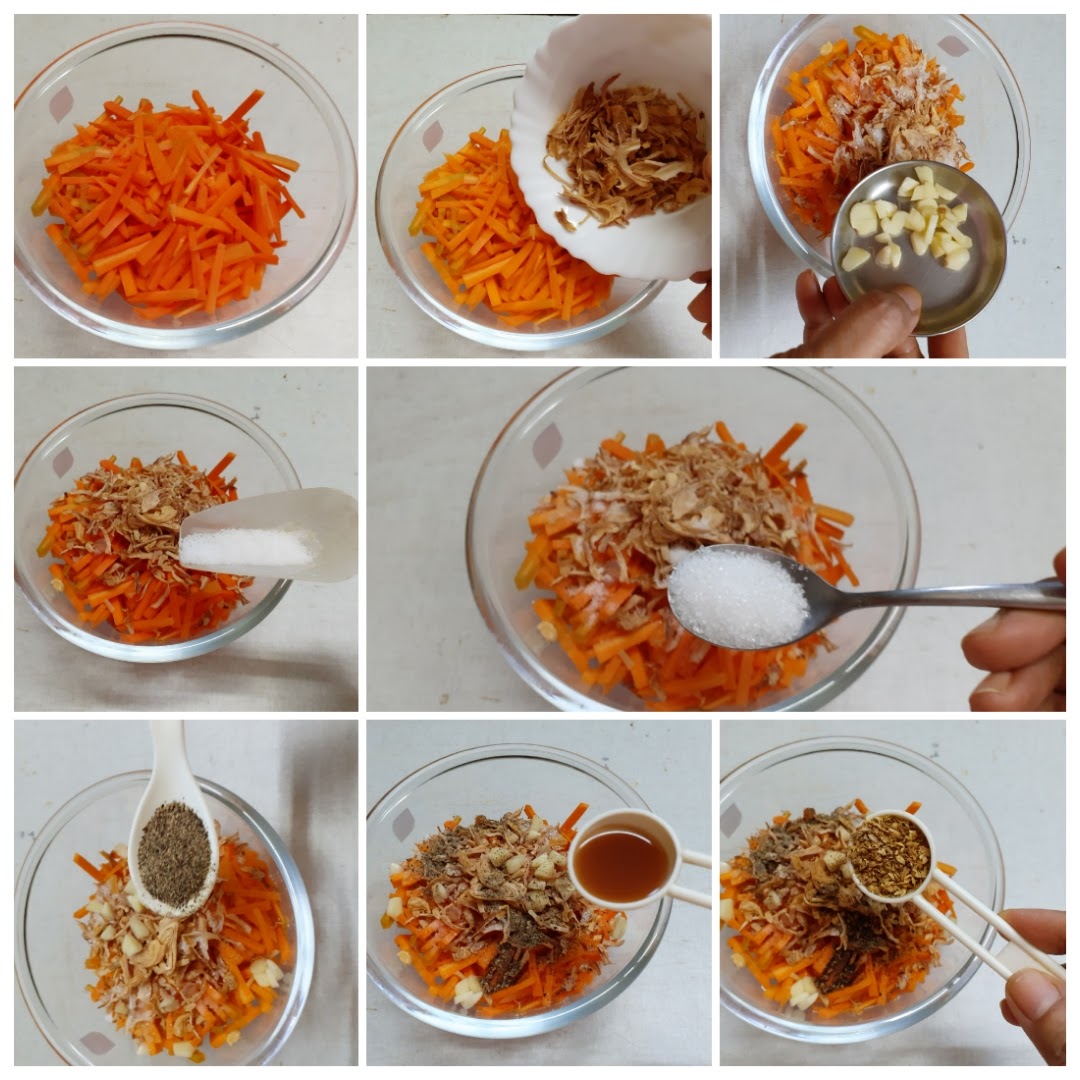
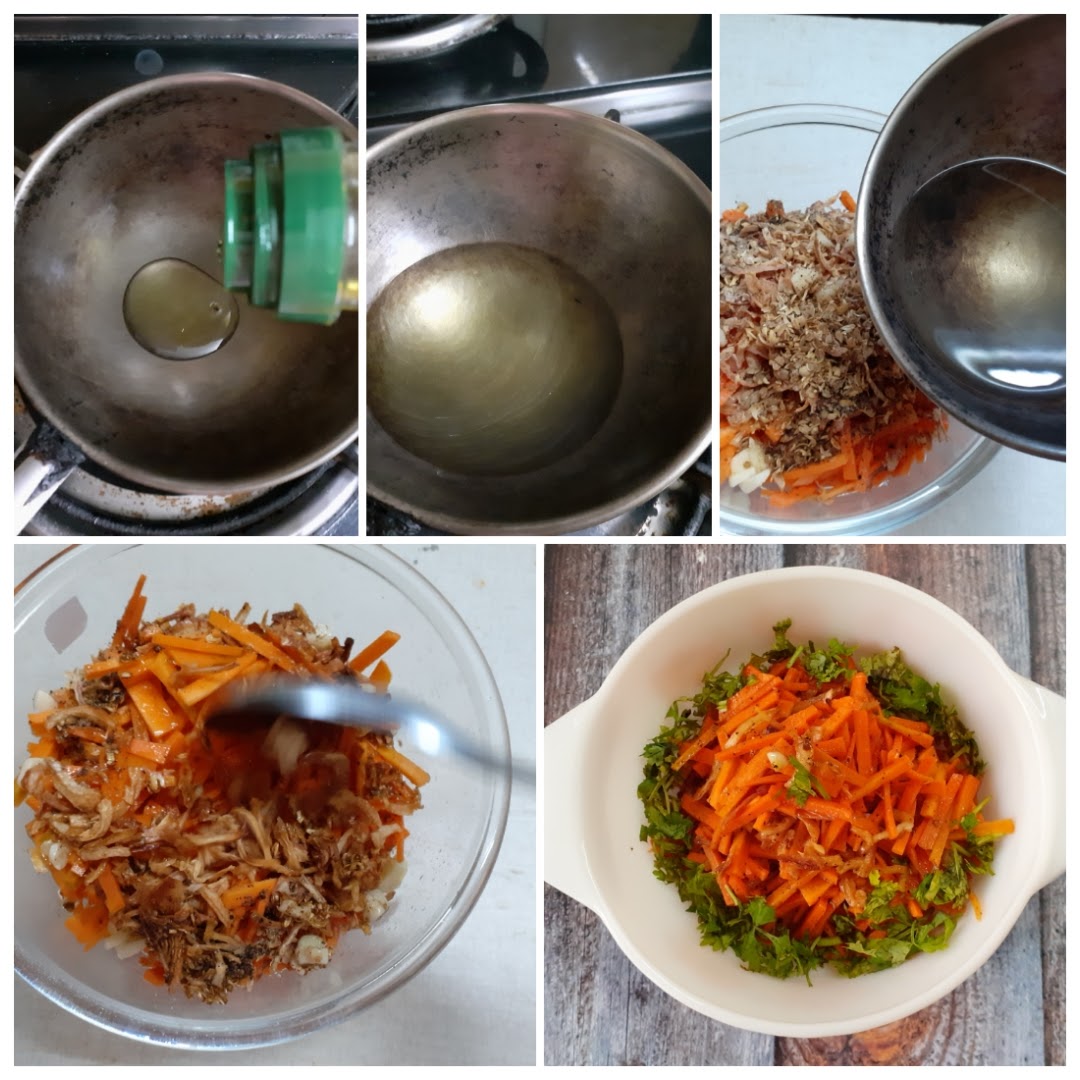
NOTES:

Ingredients:
Moong dal 1/2 cup washed and soaked for 15 minutes
Tomato 1 chopped
Mustard seeds 1 tsp
Cumin seeds 1 tsp
Turmeric powder 1/2 tsp
Curry leaves a few
Green chilli 1 chopped
Ginger -garlic paste 1/2 tsp
Salt as required
Oil for sauteing
Ghee 1 tsp
Lemon juice 1 tsp (optional)
STEPWISE RECIPE FOLLOWS:
1. Rinse and soak the Moong Dal for 15 minutes. Now in a small cooker heat some oil. To this add the mustard and cumin seeds. When the seeds crackle add the turmeric powder, followed by curry leaves, chopped tomatoes and green chilli. Saute this well until the tomatoes start turning a little tender. Add the ginger -garlic paste and fry for 10 seconds.
2. Now drain water from the dal and add the Moong dal to the cooker. Mix everything together nicely, and add 1.5 cups water. Close the cooker and allow 5 to 6 whistles to come. Put off the flame and wait for the pressure to release. Now open the cooker. The water must have been absorbed and dal cooked. The mixture may appear dry.

3. Add 1 cup water and stir everything well. Switch on the flame, add salt and stir again. cook for 1 minute. Switch off the flame, if using lemon juice(optional), add now, pour the ghee and its ready to serve.

NOTES:
1. This recipe can be followed with Tuvar dal(pigeon pea), Chana dal(Bengal gram) or the mix of all three grams together. The cook time will vary.
2. To make this dal in a pan instead of cooker. To pre cooked dal add all the above tempering ingredients and saute tomatoes in the tempering, and pour it into the dal.
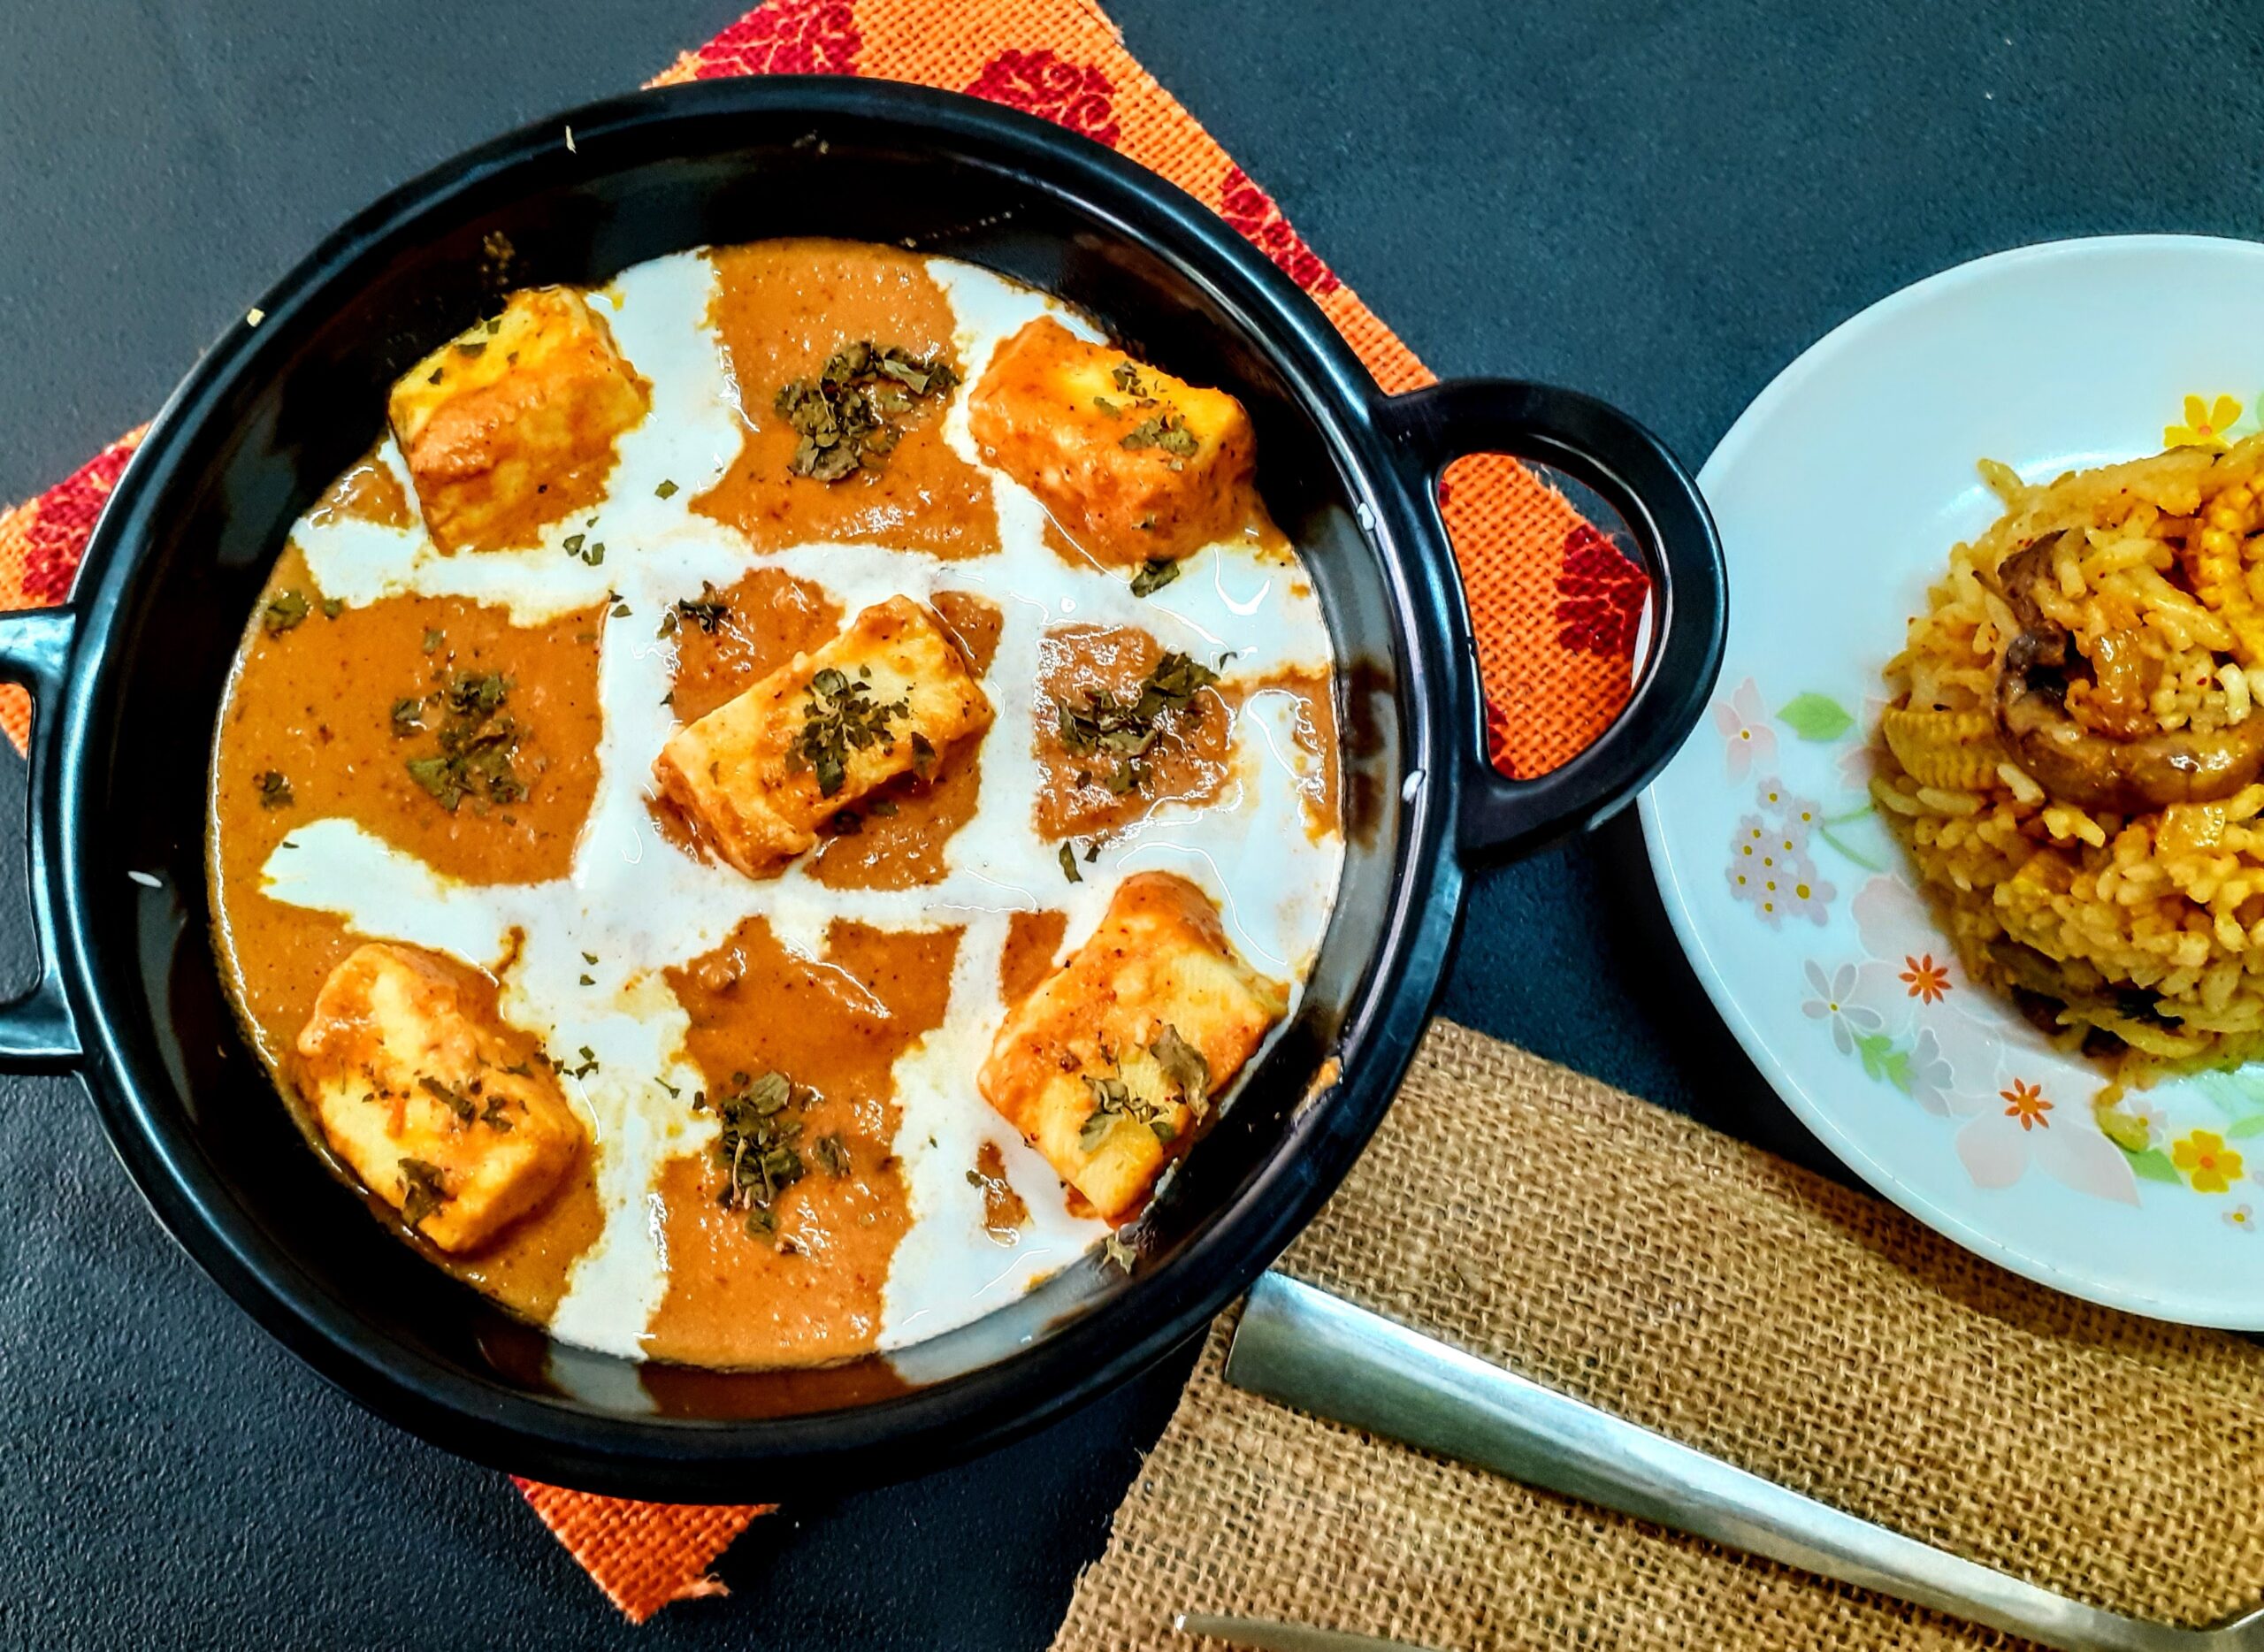
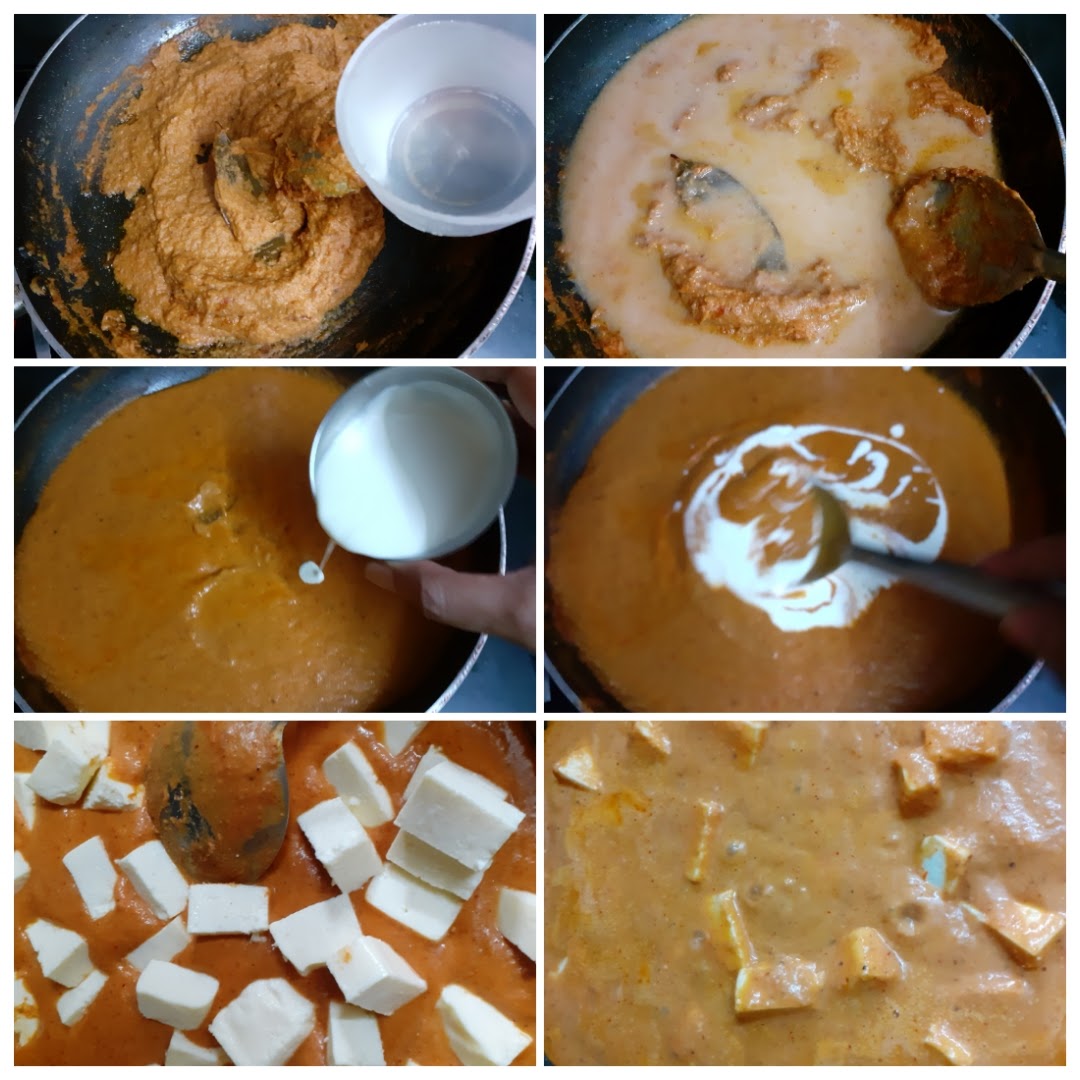
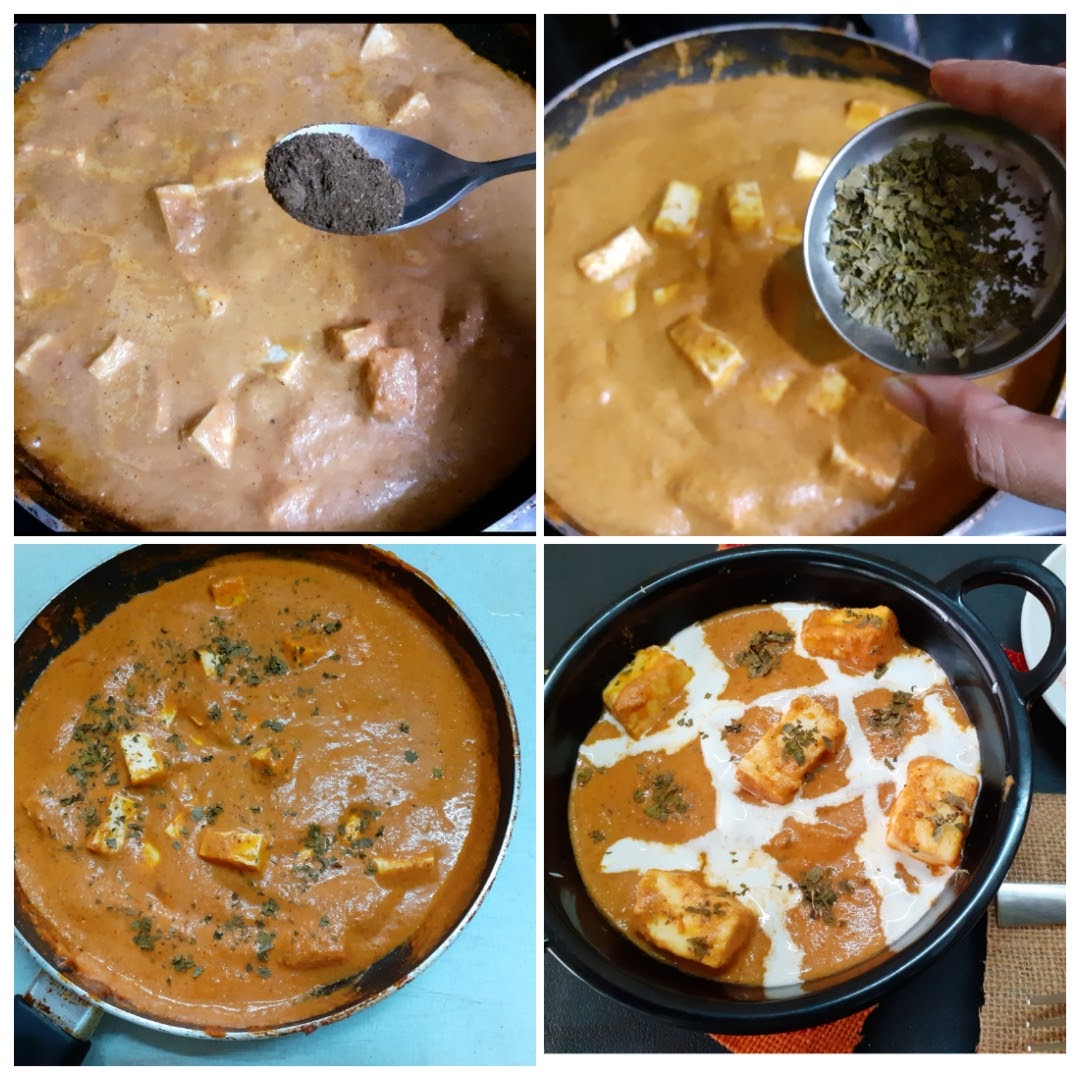
Paneer Makhni
Paneer or Cottage cheese is a acid set cheese got from cow or buffalo milk. It is a non- aged cheese made by curdling milk, disposing the whey, and collecting the fat, which is paneer. It is a rich source of milk protein. Paneer was introduced to India by the Persian and Afghan rulers in the 16th century, it is said. Paneer is a rich source of Calcium, iron, Mangesium, and also makes one feel full for longer.
Paneer is a savior in many ways than one. Do you agree? You want something easy-paneer to the rescue, or want something special for a get together-paneer to the rescue. Paneer is a regularly stocked item in my fridge. Sometimes I do make Paneer at home also, but that is not very frequent. Makhni gravy is a very subtly flavoured base, and while I have a Dal Makhni on the blog, it is but a must to have a Paneer Makhni or Paneer Makhanwala. A few whole spices make a world of difference in terms of flavour and you get the restaurant effect in the gravy.
In this recipe the idea is to go liberal on the butter to get the perfect taste. In my usual paneer recipes you will find that I would have used either cashewnuts or cream, or even none at all. But this dish has both cream and cashewnuts thus making it special and rich. Something you will want to make for an occasion, or to cook for a loved one.
Since I am a paneer lover you will find many paneer recipes on the blog. Do check them out here– Paneer Khurchan, Palak Paneer, Mava Paneer Curry, Malpua with Gulab jamun mix, Kadai Paneer semi-dry, Matar Paneer, Steamed Paneer Palak Koftas, Kadai Paneer gravy, and more…
Here is the recipe for Paneer Makhanwala-
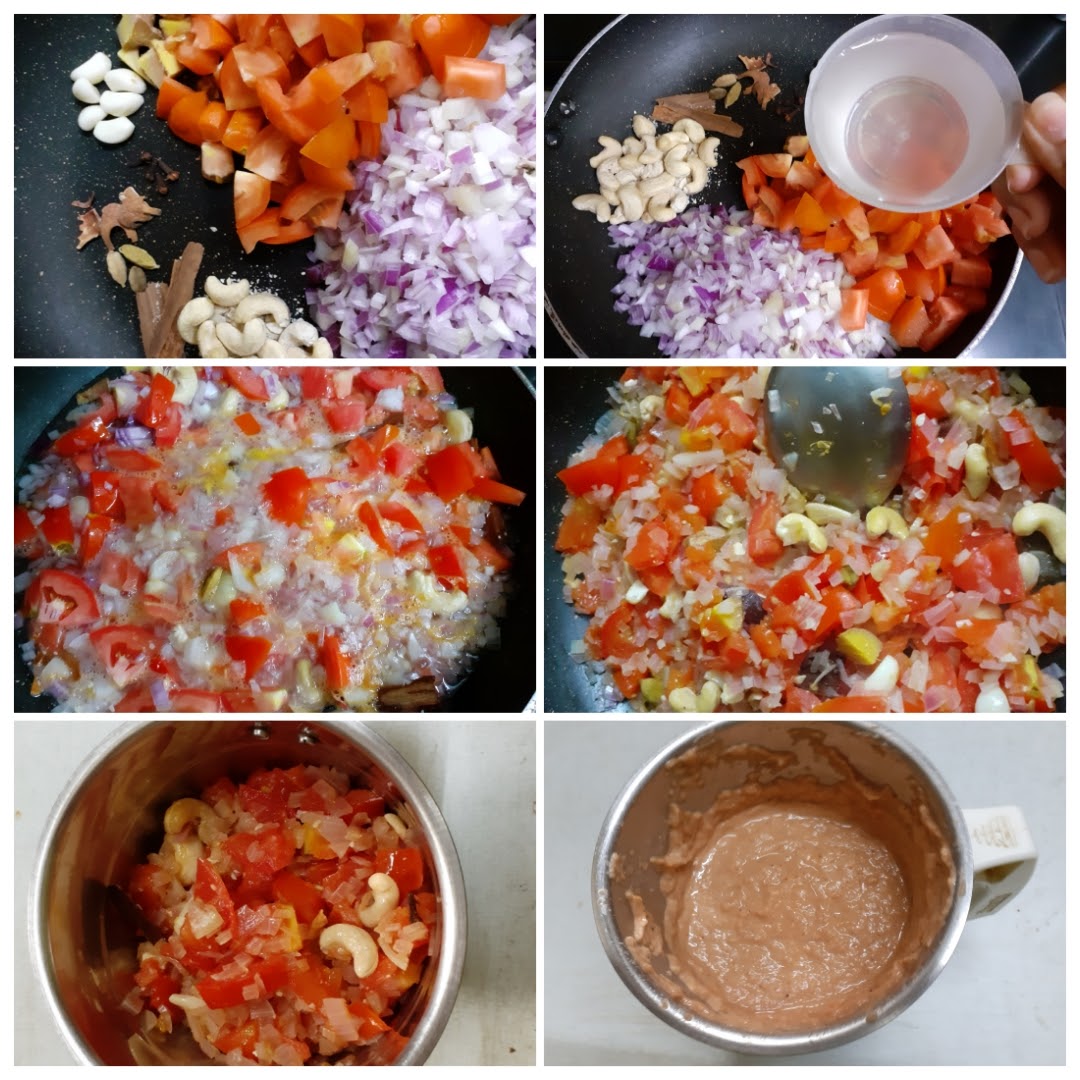
Ingredients to be ground:
If you tried this recipe and liked it please comment below. I would love to hear from you. If you have a query about the recipe email us and ill respond as soon as I can.
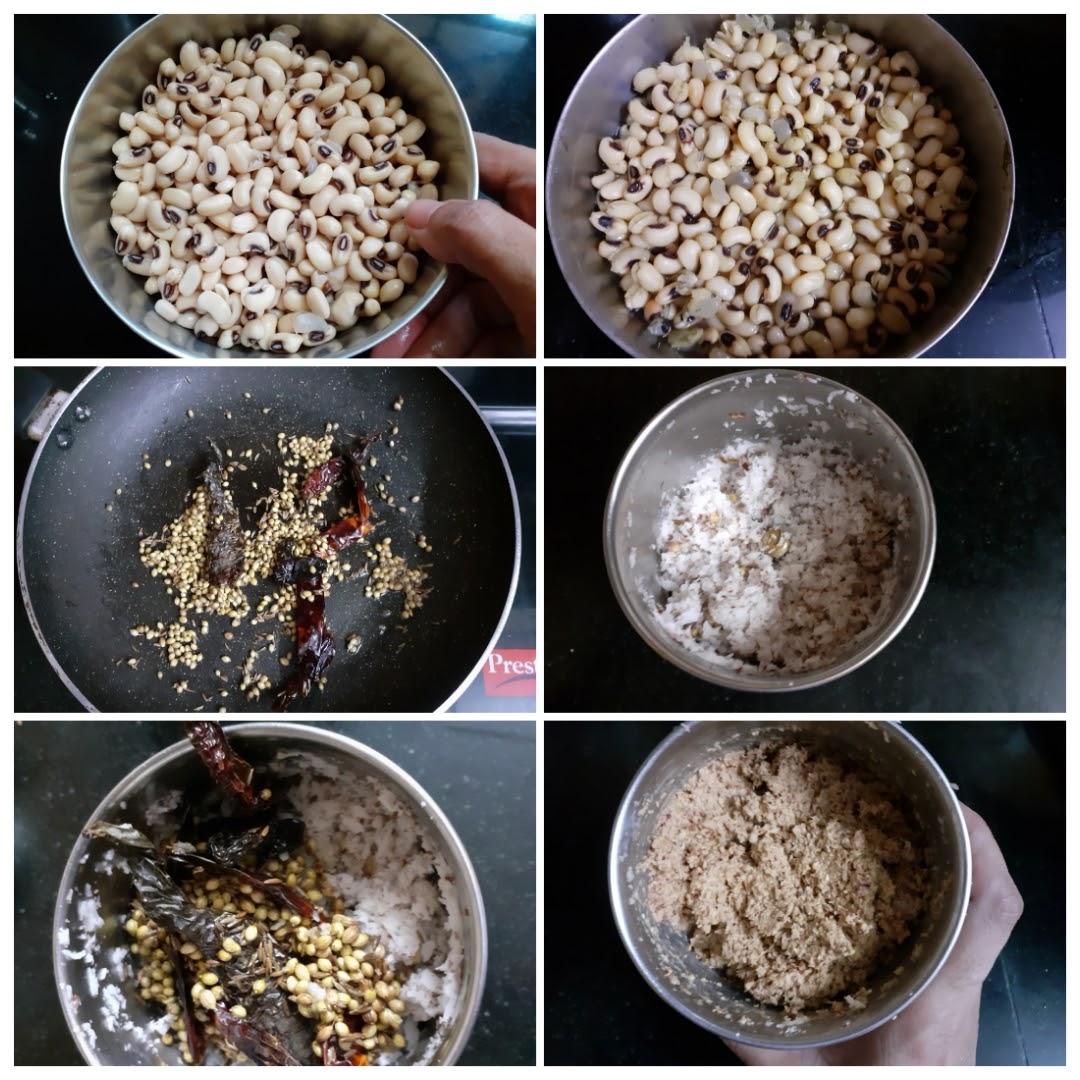
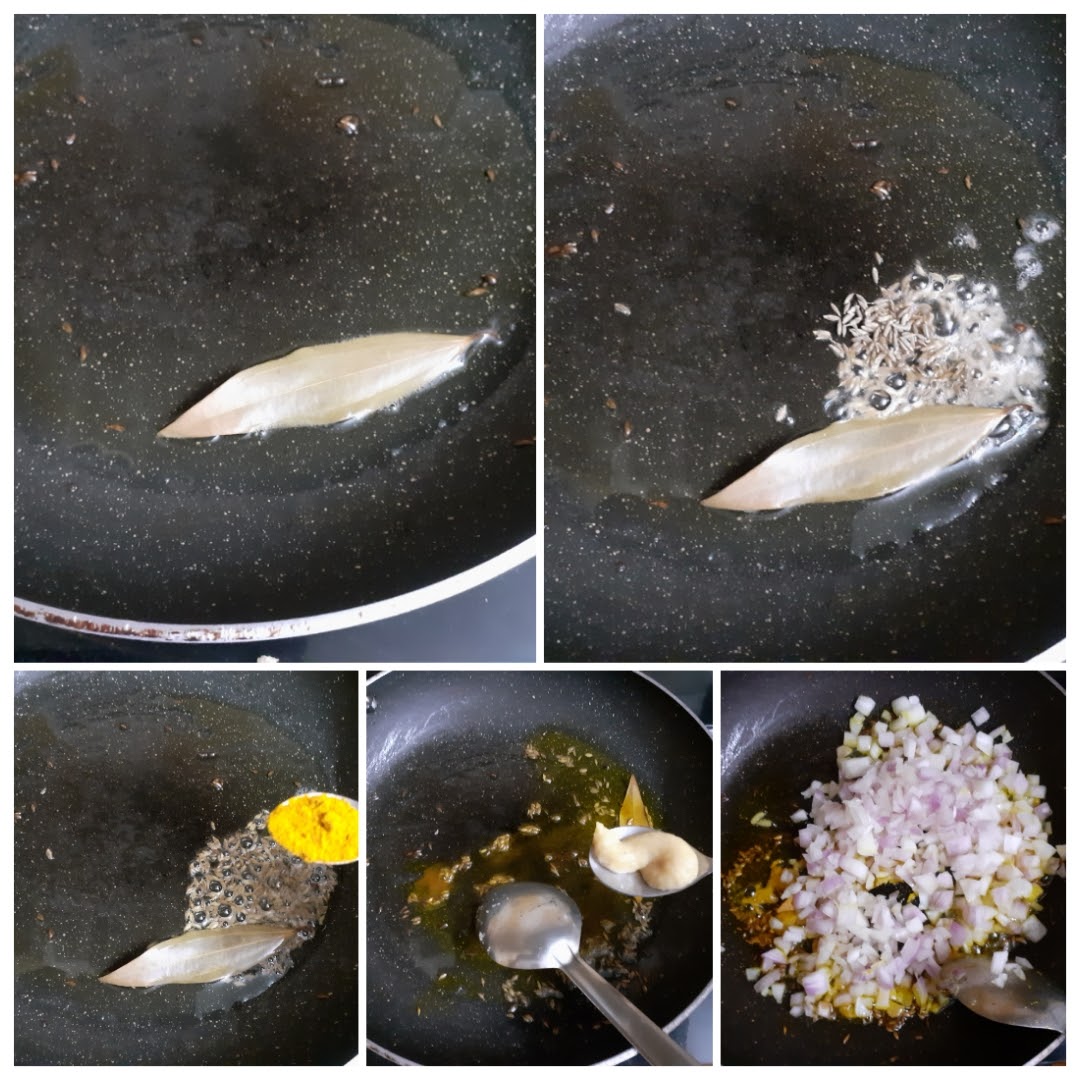
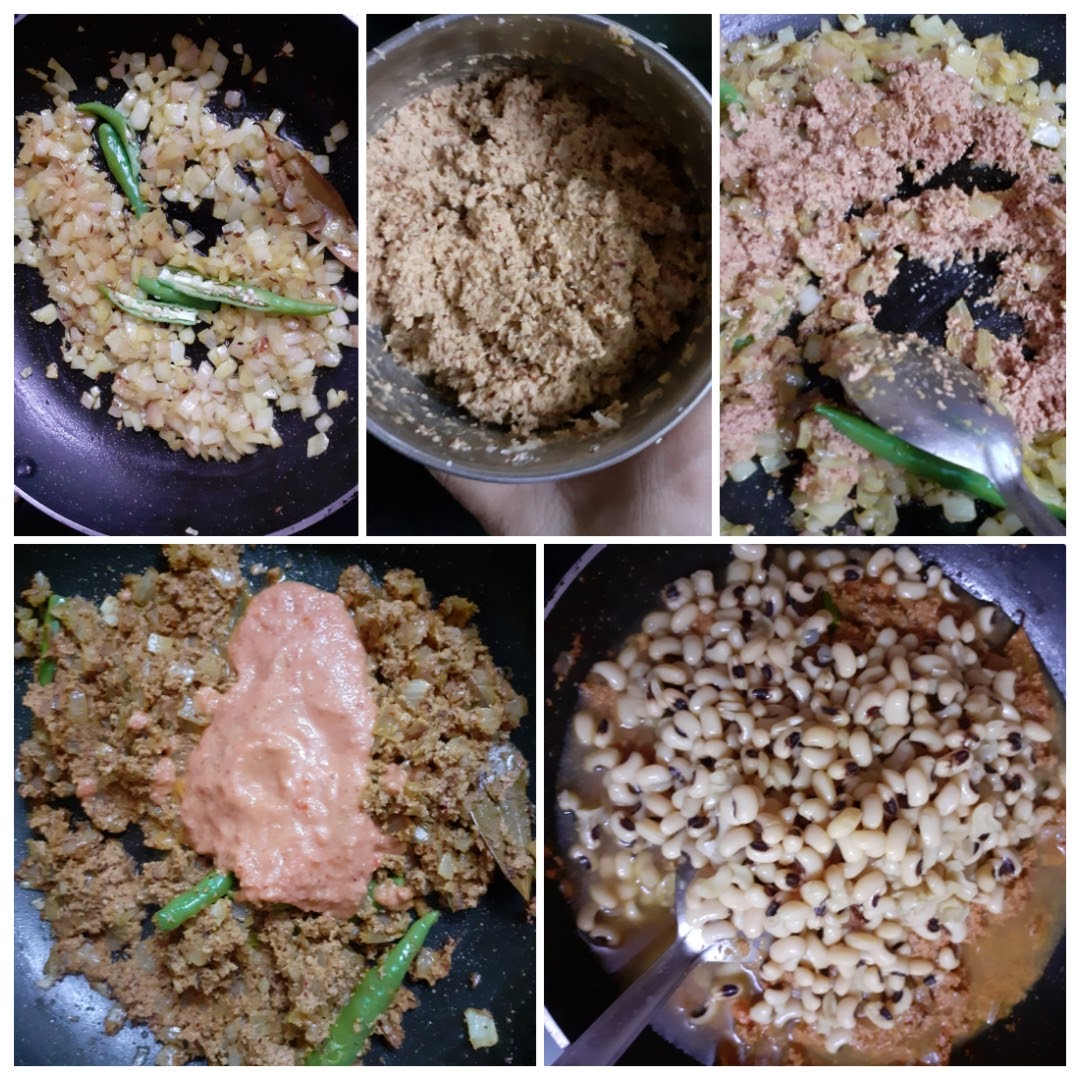
Goan Style Lobia Curry/Goan Style Black Eyed Bean Curry
Black eyed beans or Cow peas as they are called, are legumes that are available all over the globe. In India they are used in many regional cuisines. The Lobia masala is a popular dish in north India, and so is the Eriserry from Kerala cuisine that uses the legume along with Ash gourd and Yam. In Tamilnadu is it made into a Sundal(salad), or used with other vegetables to make a curry. In the Andhra cuisine It is made into a Vada (fritter), the Gujarati cuisine also has its version of the Lobia curry, called Chawli masala. That’s how wide the usage of these beans is across India.
Cow Peas/ black eyed beans have a soluble fibre that helps in reducing cholesterol, it is said. These are nutrient dense legumes with the richness of Vitamins- A, B1, B2, B3, B6, C , that helps in healthy cell development. They also are rich in micro nutrients like Magnesium, zinc, iron, and copper(source net.med). These legumes also support weight loss and boost digestive health. That I guess is reason enough to include them in your diet, if you haven’t already.
Though the Lobia Sundal (salad) is a regular feature in my house, and so is the Erissery, and Lobia masala, I recently tried a Goan style Lobia curry and it turned out so good. The Goan spice combination of Coriander seeds, Cumin seeds and coconut, gave a very good dimension to the dish, and it tasted different from the regular Lobia masala. Hence documenting this recipe for you all to try.
There is also a Lobia Pulav recipe on the blog, do check it out here. Some other interesting and healthy recipes for you to try are- Daliya Mushroom Risotto, Drumstick Rasam, Curry leaves Powder, Dry fruit ladoo, Vegetable Oats Kichdi, Rajma Masala, and more…
Here is the recipe of Goan style Lobia curry-

If you tried this recipe and liked it please comment below. I would love to hear from you. If you have a query about the recipe email us and ill respond as soon as I can.
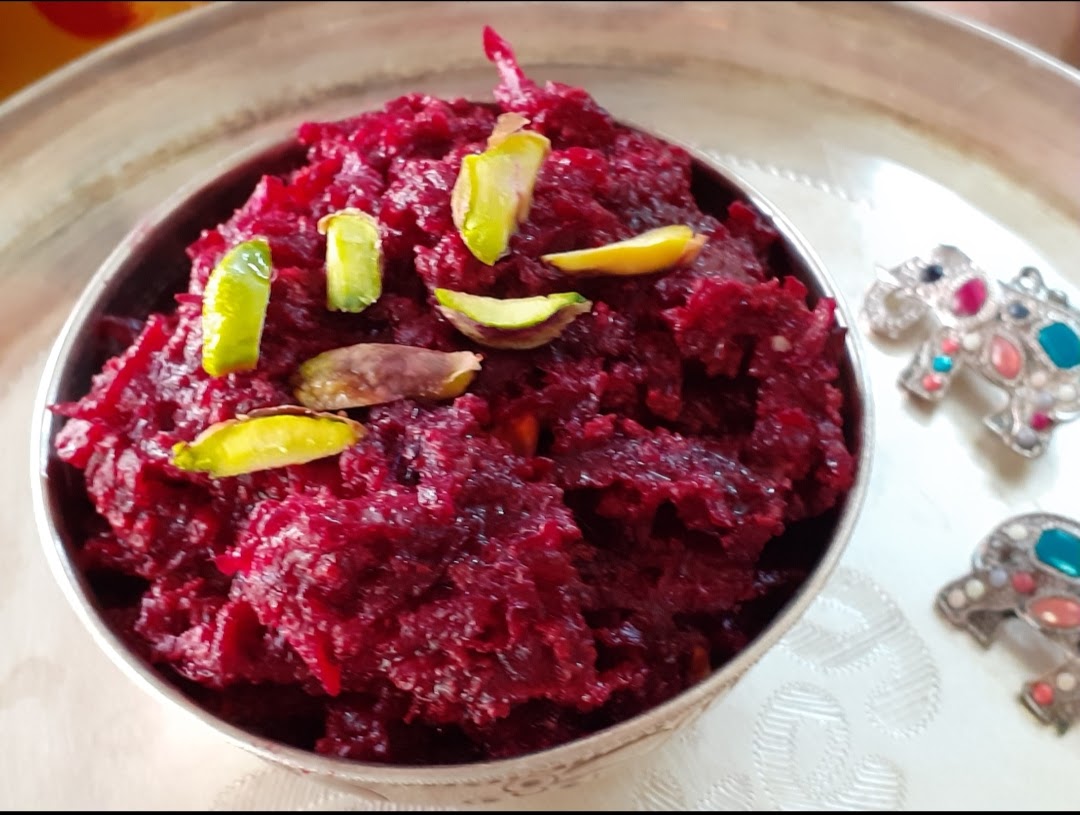
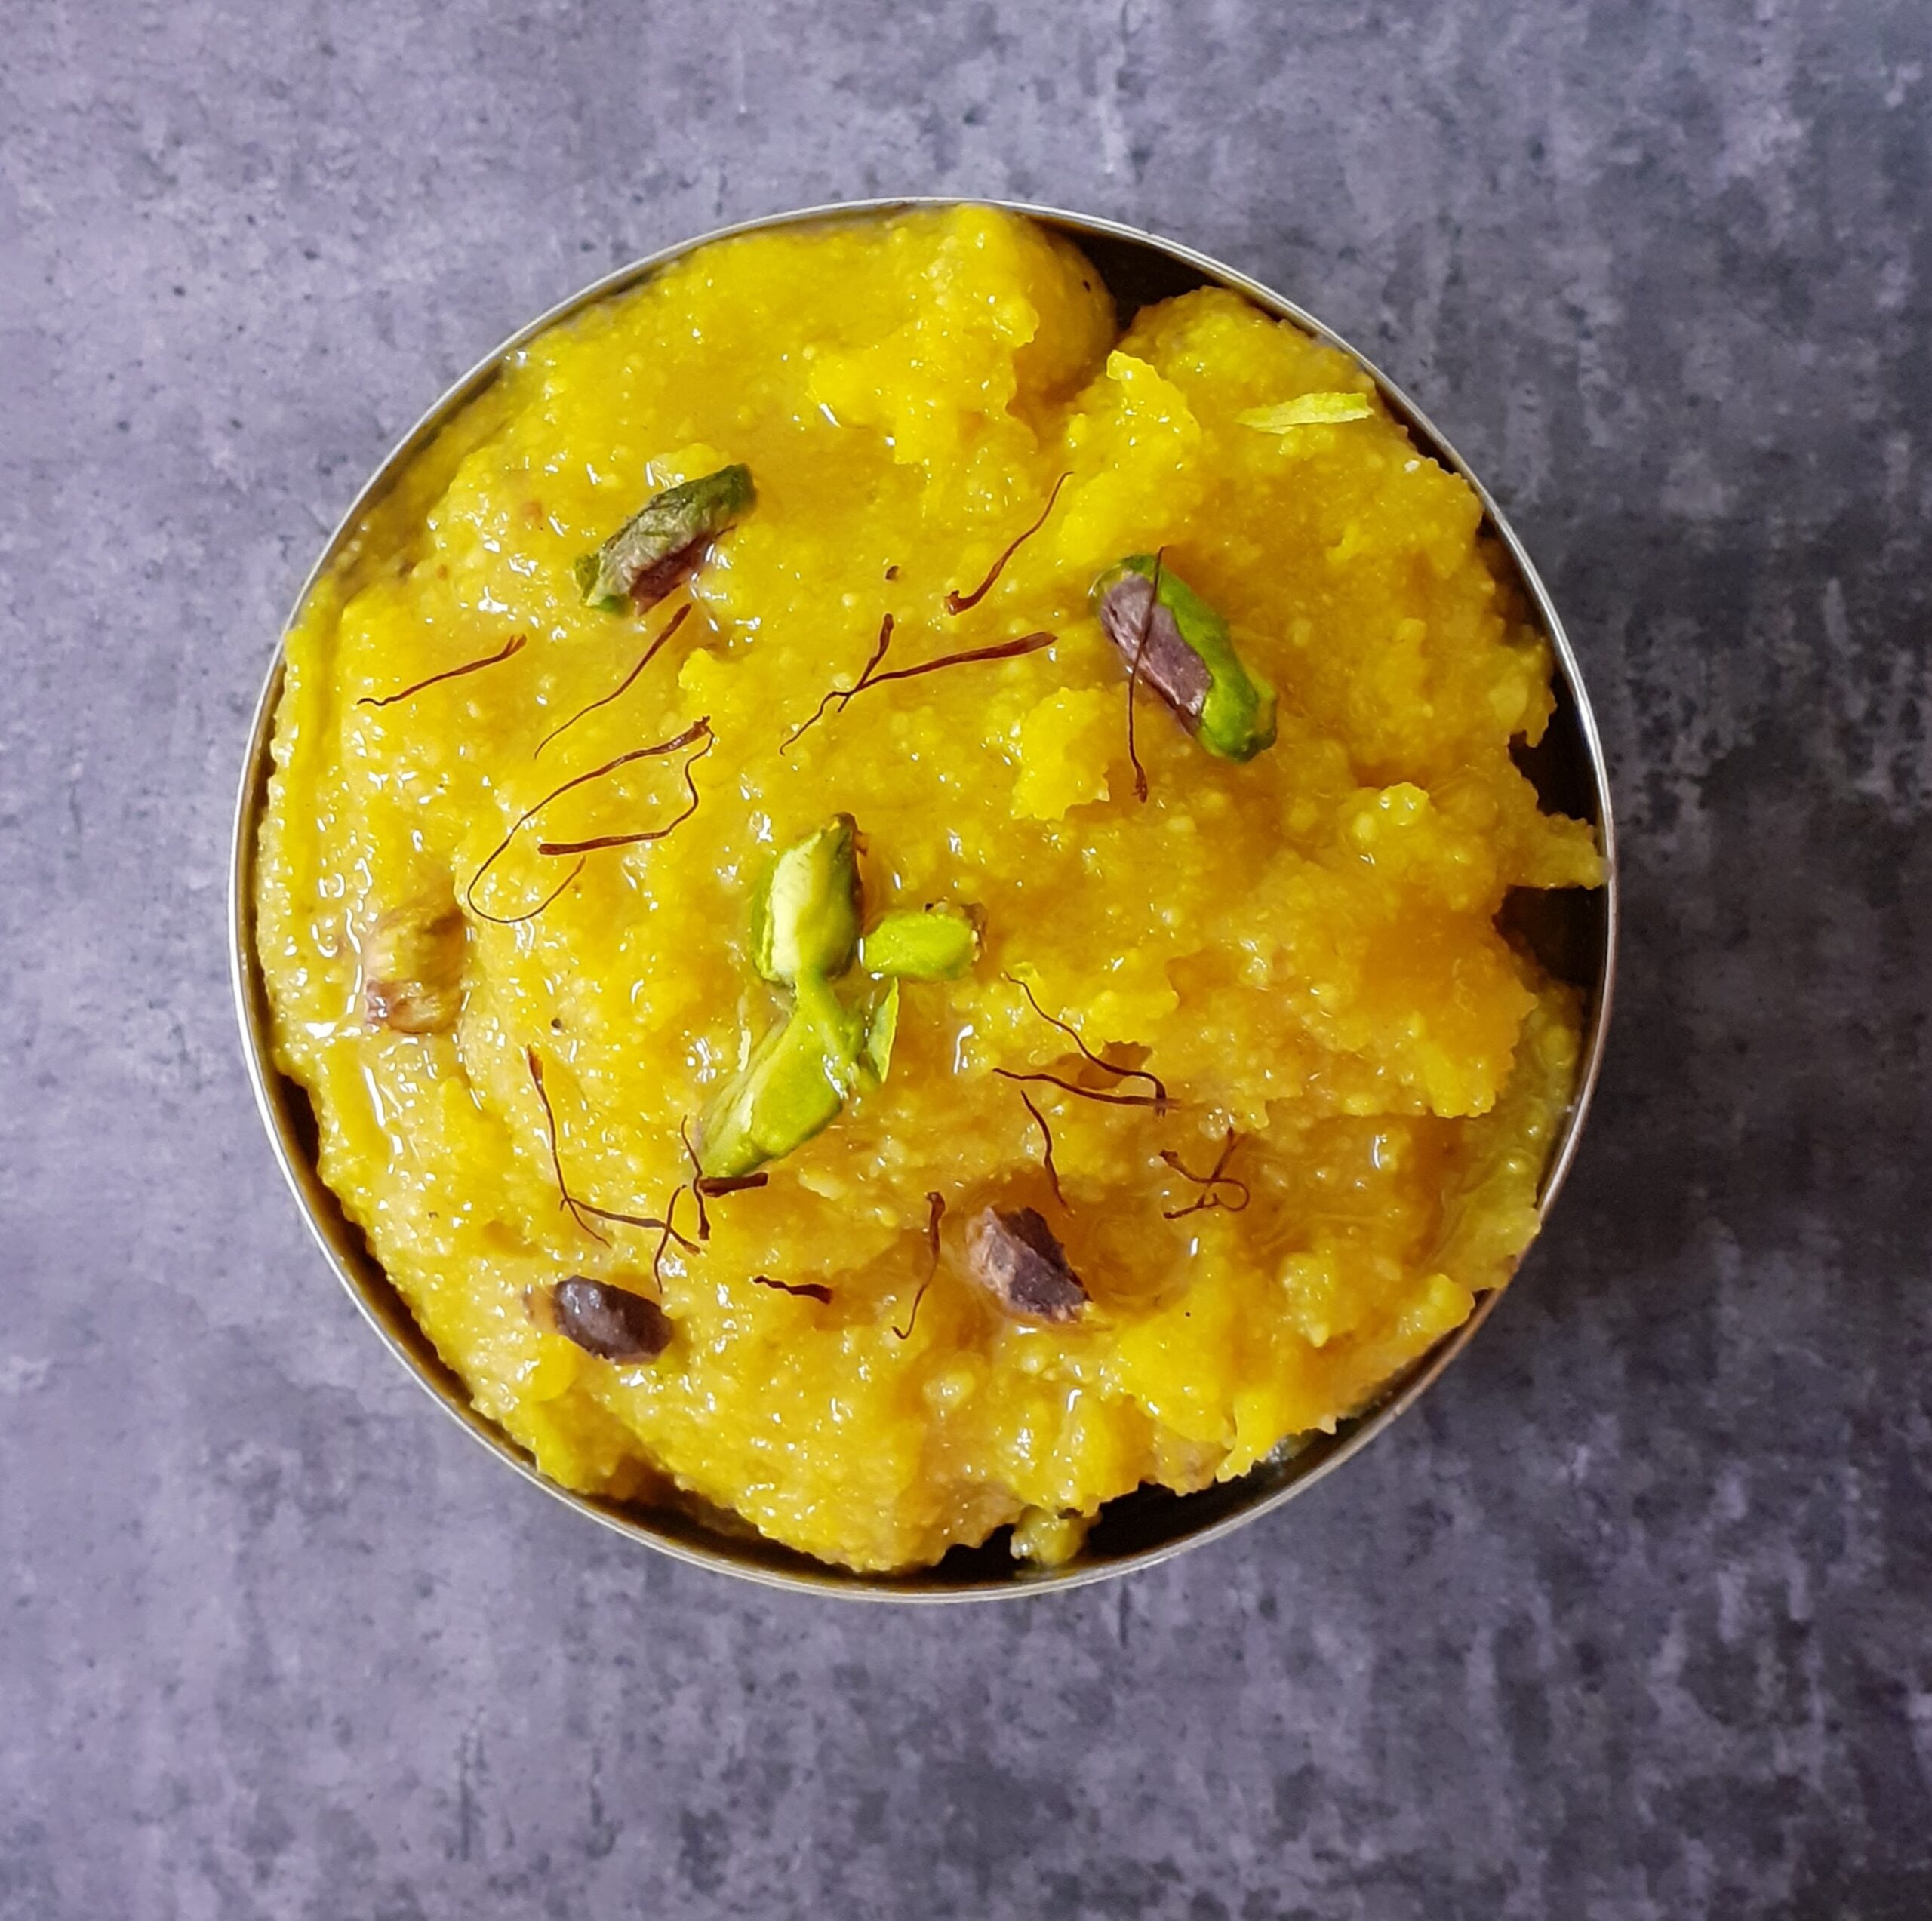
Beetroot Halwa
I have a long standing relationship with Beetroot. I have liked it as a child and continue to do so. What I meant by long standing relationship is that, when I was anemic for a certain period, I was advised to eat Beetroot and Pomegranate regularly. And yes Dates too. These three are always part of my diet even now. I cook Beetroot in many forms. Stir fry, Falafel, Paratha, Salad and more. But my most favourite version is of this dessert, Beetroot Halwa. In fact I prefer Beetroot halwa to Carrot Halwa.
If you have followed my Carrot halwa recipe you will see that I have followed the same method. These root vegetables have an earthy taste and smell. So to make a dessert with them, it is necessary to get rid of the earthy taste. That’s done by boiling them in milk( a good amount of it). This not only removes that raw taste, but add that nice milkiness that we require for a Halwa or any fudge kind of recipe.
If not boiling them in milk, you need something like unsweetened Mava or Khoya, which is dehydrated milk to get rid of the taste. This version I have done in my Gajar Halwa Barfi recipe. It is a very quick version of the Carrot Halwa itself. Finally, this halwa is such a guilt free dish because a lot of sugar is not needed owing to the natural sweetness of the beets, and ghee has been used only for frying the nuts.
Coming to the vegetable itself and why one must include it in their diet is because they are packed with essential vitamins, minerals, some of which have medicinal properties. Another popular reason is that they have any nutrients, and fewer calories, so it is good for weight watchers. It helps keep blood pressure in check. They also have a decent amount of Fiber, folate and Vitamin C. Isn’t this reason enough for it to be a part of our meal plan?
I am cooking this Halwa on a day I have excess milk, so you will see me using my regular milk vessel, instead of my Kadai or Pan which I usually prefer. This is also Pandemic time, so no house help around. The more vessels I use, the more clean up I end up doing… getting the drift?????
While you are here check out other dessert recipes of mine like- Carrot Kheer, Gajar/Carrot Halwa, Moong Dal Halwa, Dry fruit ladoo, Red Poha Ladoo, Sweet Potato Puranpoli, and more…
Here is the recipe for Beet root Halwa.

Ingredients:
Beetroot 2 medium around 250 gm grated
Milk 500 ml
Sugar 3/4 cup
Cardamom powder 2 pinches
Cashewnuts few broken to bits
Pistachio a few (optional)
Ghee for frying nuts
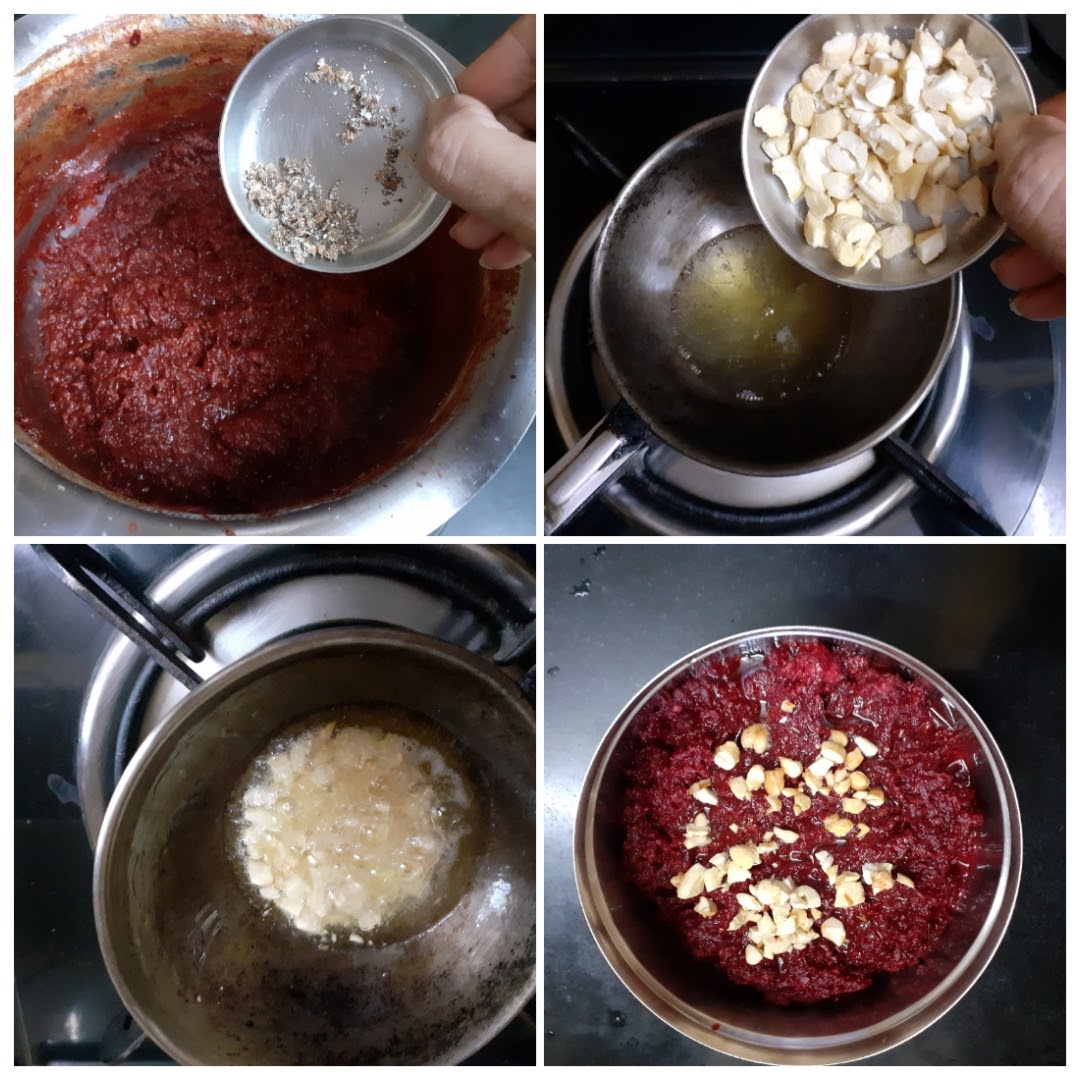
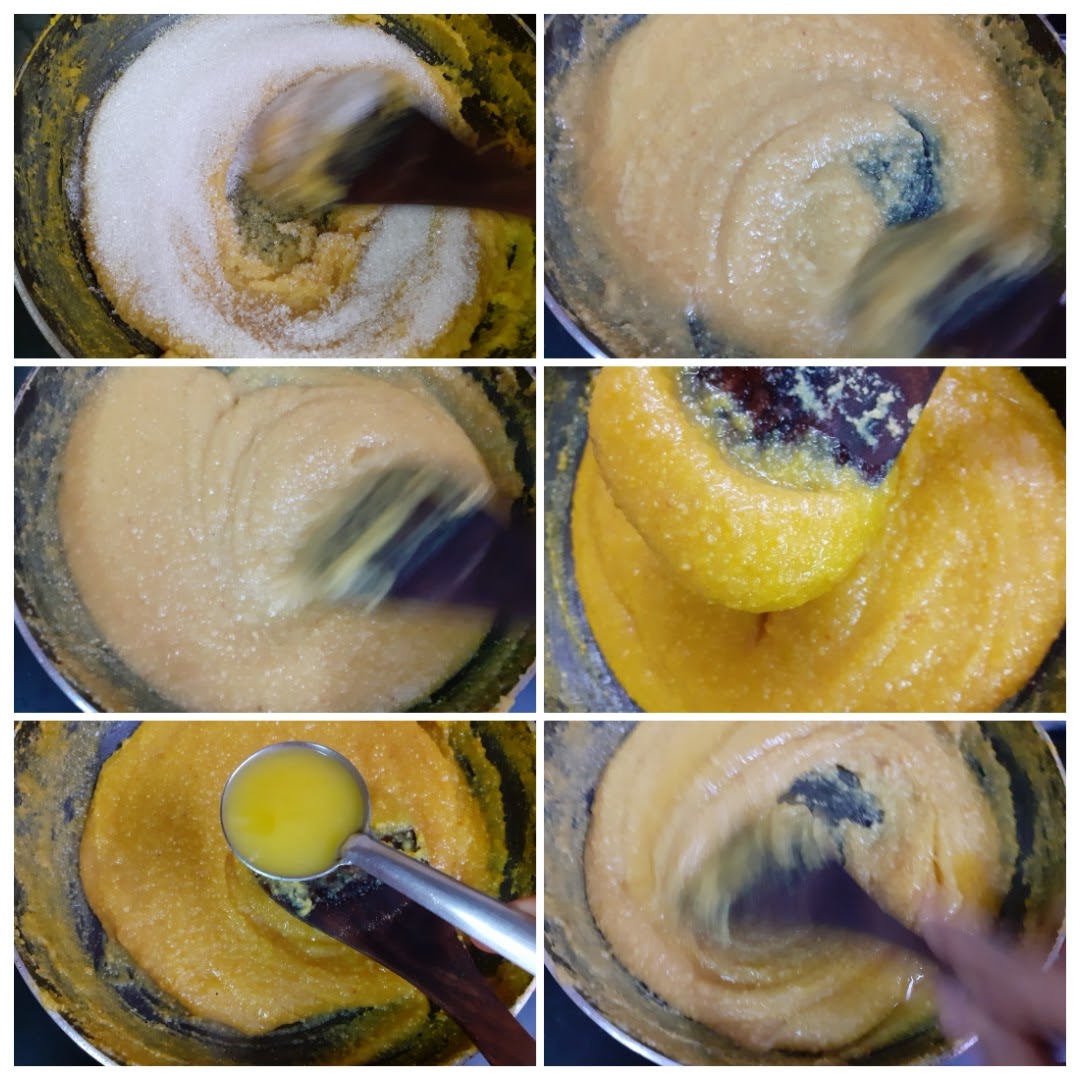
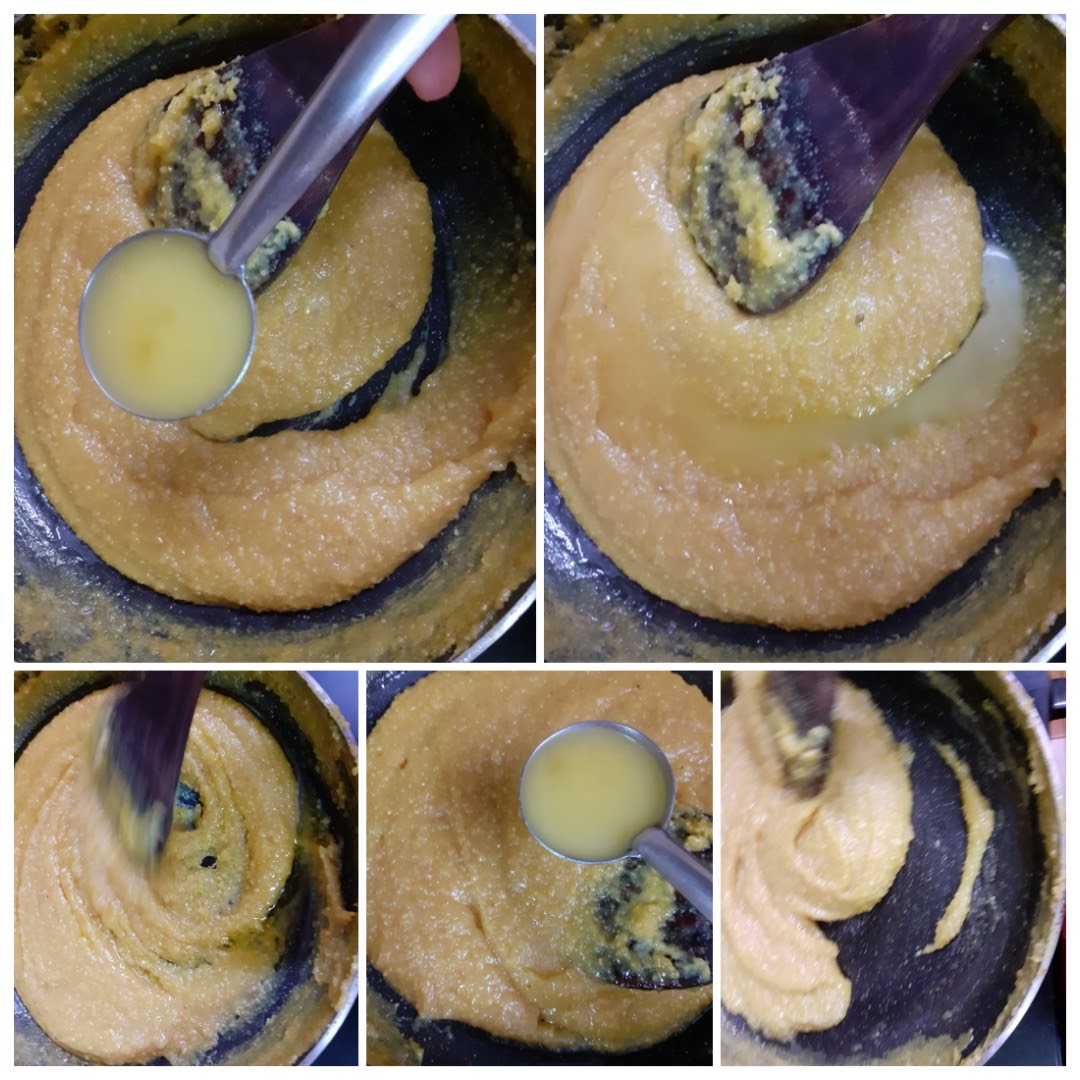
Directions: Boil Milk in a Pan/Kadai or heavy bottomed vessel. Once boiled, add the grated beetroot and cook. Keep stirring continuously, so that the milk doesn’t get burnt. This is an important step. If the milk sticks to the bottom of the vessel and burns, the dessert will not taste good any more. The stirring and cooking process has to continue until the mixture becomes almost dry. This takes about 40 to 45 minutes, if done on medium flame, while stirring constantly. I have indicated the steps of evaporation of milk in the mixture, in my pictures. When the mixture is almost dry, it is time to add the sugar. Keep stirring again. The mixture will liquefy. Not to worry. Keep stirring, and it will start solidifying again. Keep stirring until the mixture no more sticks to the bottom of the pan. This is the right consistency. Switch off the flame and, add cardamom powder. Now in a small tadka Kadai heat some ghee, drop in the broken cashew pieces and fry until golden brown. Pour this over the Halwa and enjoy warm. Garnish with Pistachios if you prefer.
STEPWISE RECIPE FOLLOWS:
1. Boil Milk in a Pan/Kadai or heavy bottomed vessel. Once boiled, add the grated beetroot and cook. Keep stirring continuously, so that the milk doesn’t get burnt. This is an important step. If the milk sticks to the bottom of the vessel and burns, the dessert will not taste good any more.
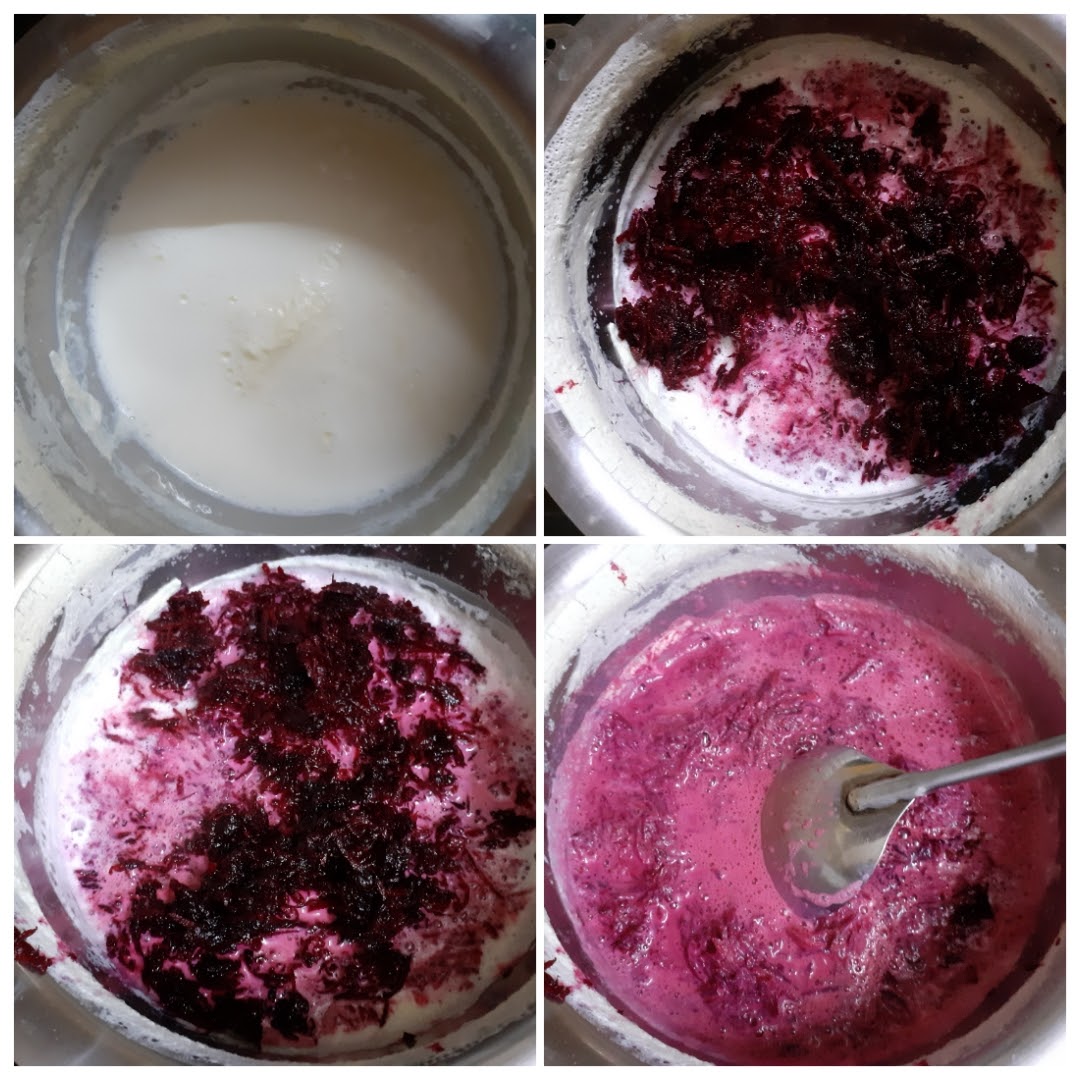
2. The stirring and cooking process has to continue until the mixture becomes almost dry. This takes about 40 to 45 minutes, if done on medium flame, while stirring constantly. I have indicated the steps of evaporation of milk in the mixture, in my pictures.
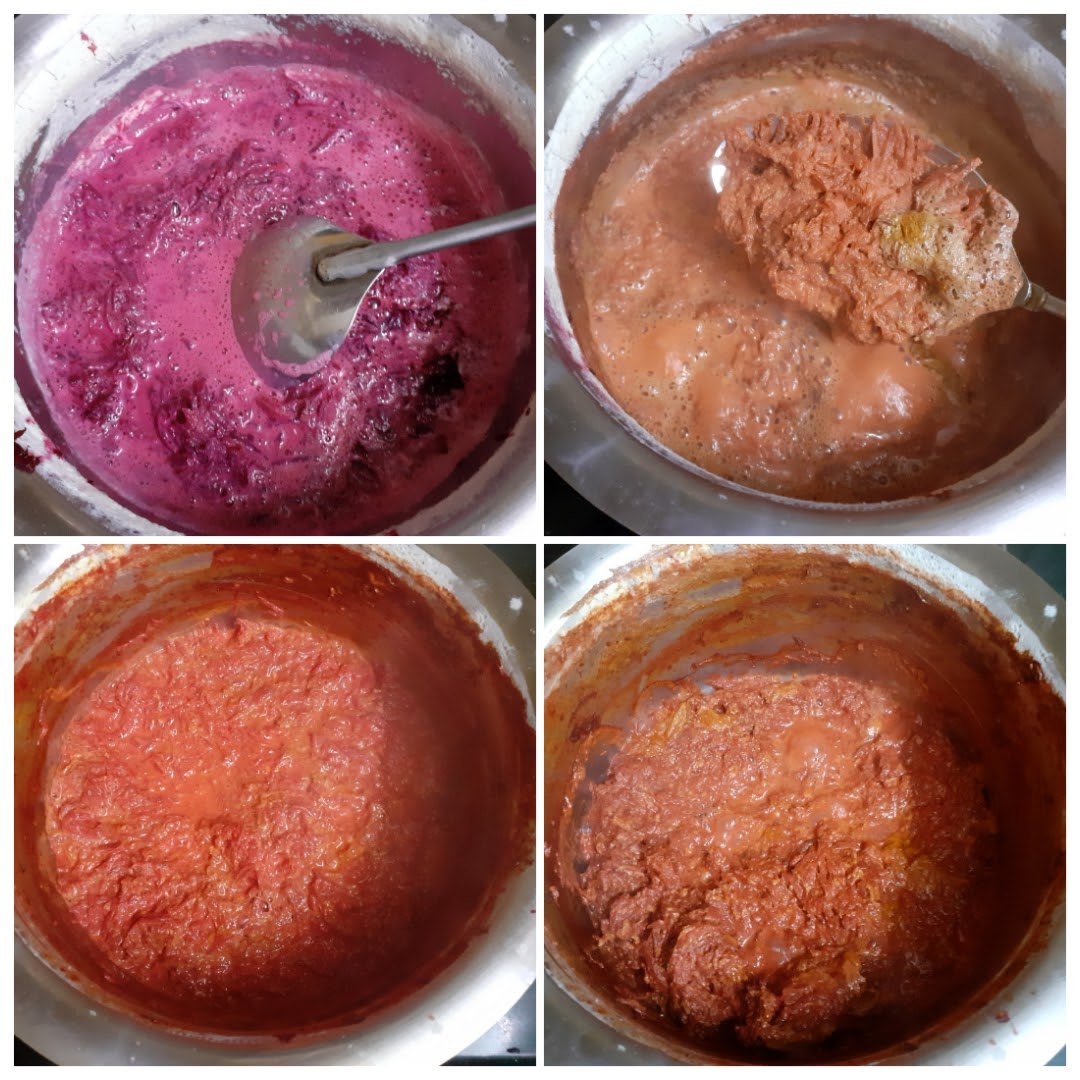
3. When the mixture is almost dry, it is time to add the sugar. Keep stirring again. The mixture will liquefy. Not to worry. Keep stirring, and it will start solidifying again. Keep stirring until the mixture no more sticks to the bottom of the pan. This is the right consistency.
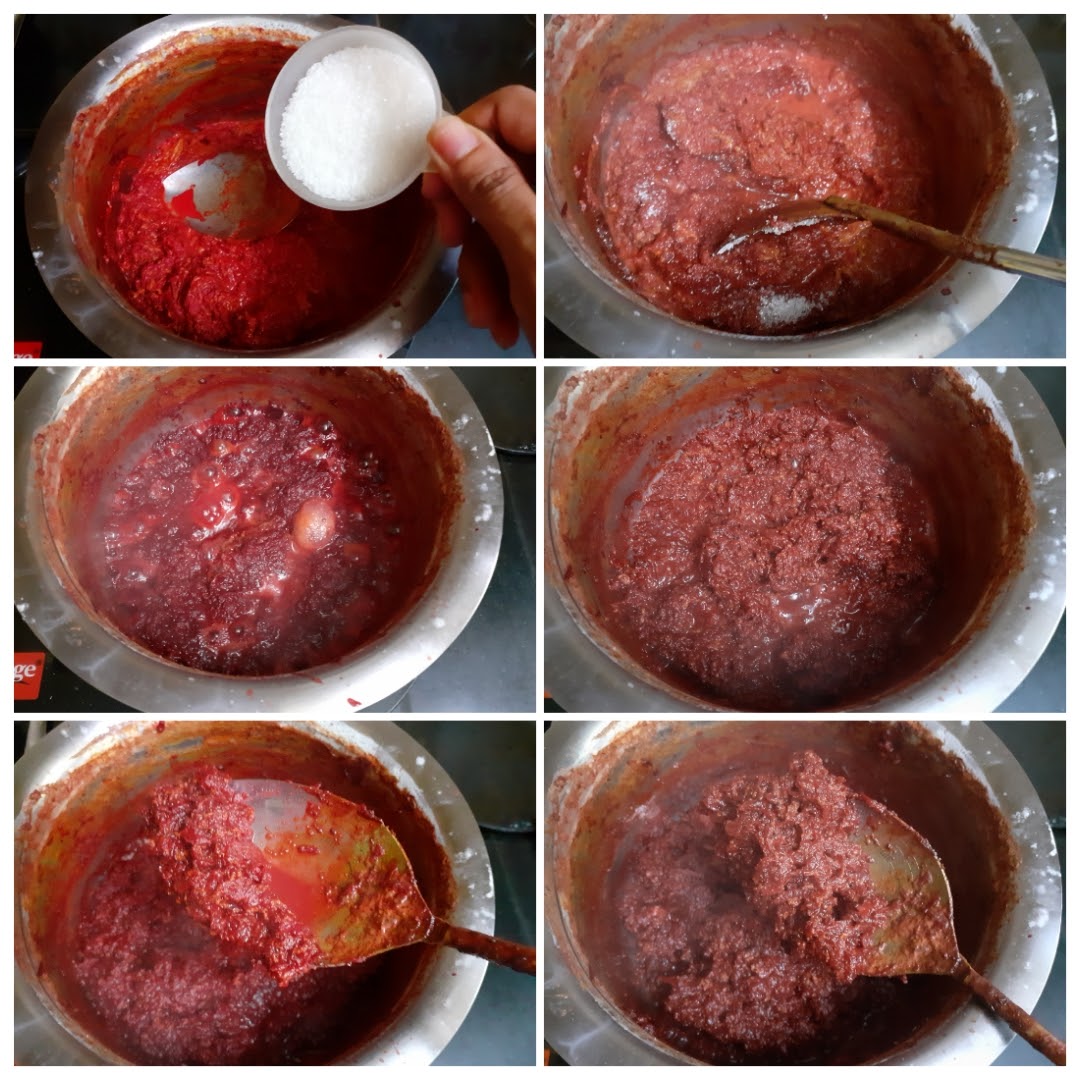
4. Switch off the flame and, add cardamom powder. Now in a small tadka Kadai heat some ghee, drop in the broken cashew pieces and fry until golden brown. Pour this over the Halwa and enjoy warm. Garnish with Pistachios if you prefer.
If you tried this recipe and liked it please comment below. I would love to hear from you. If you have a query about the recipe email us and ill respond as soon as I can.
Moong Dal Halwa
Moong dal Halwa is an Indian dessert made from yellow lentils. It is basically a fudge and is very rich because of the amount ghee/ clarified butter added to it. Though I make many sweet varieties and desserts, I’m not generally the one who will stay until dessert. I’m immensely intuitive while I create sweet dishes, but I don’t crave sweets much. But this halwa is very close to my heart because it probably is the first sweet dish I ever liked. Thanks to our stint in Delhi, I have got to taste the best ones.
Infact, I liked this sweet dish so much that I have attempted to make it in the past, failed miserably and had given up on ever trying it again. But last year during the pandemic lockdown I was craving it badly, and as you know “ when you want something very badly, the universe conspires to make it happen” ????. So I had a viola moment during Diwali, while I was documenting the sweets and savoury prepared by me, when a simple method to make this halwa struck m
If you have attempted making this halwa any time or have searched the net for the recipe, all of them will tell you it takes 3 to 4 hours to get this sweet dish done. The actual recipe asks to soak and grind the lentils and them cook it in milk/ water and then add the sweetening agent. As I have claimed here on the blog before, I will take a short cut as long as it does not alter the taste, flavour and texture of the dish. And I took a short cut to this recipe and I don’t regret it because the outcome was just like the original.
If you follow the procedure as given here by me without altering I’m sure it’s a no fail recipe. And why stand by the stove for hours when you can get the same taste and flavour in an hour’s time? Having failed at this recipe many times, and knowing what went wrong each time, this time the recipe was made with so much conviction of technique that it turned out wonderfully.
While you are here do check out other dessert recipes like Carrot kheer, Strawberry and Lemon loaf, Red Poha Ladoo, Shrikhand, Malpua with Gulab Jamun mix, Akkaravadisal, Sweet Poha, and more…
Here is the recipe of Moong Dal Halwa-
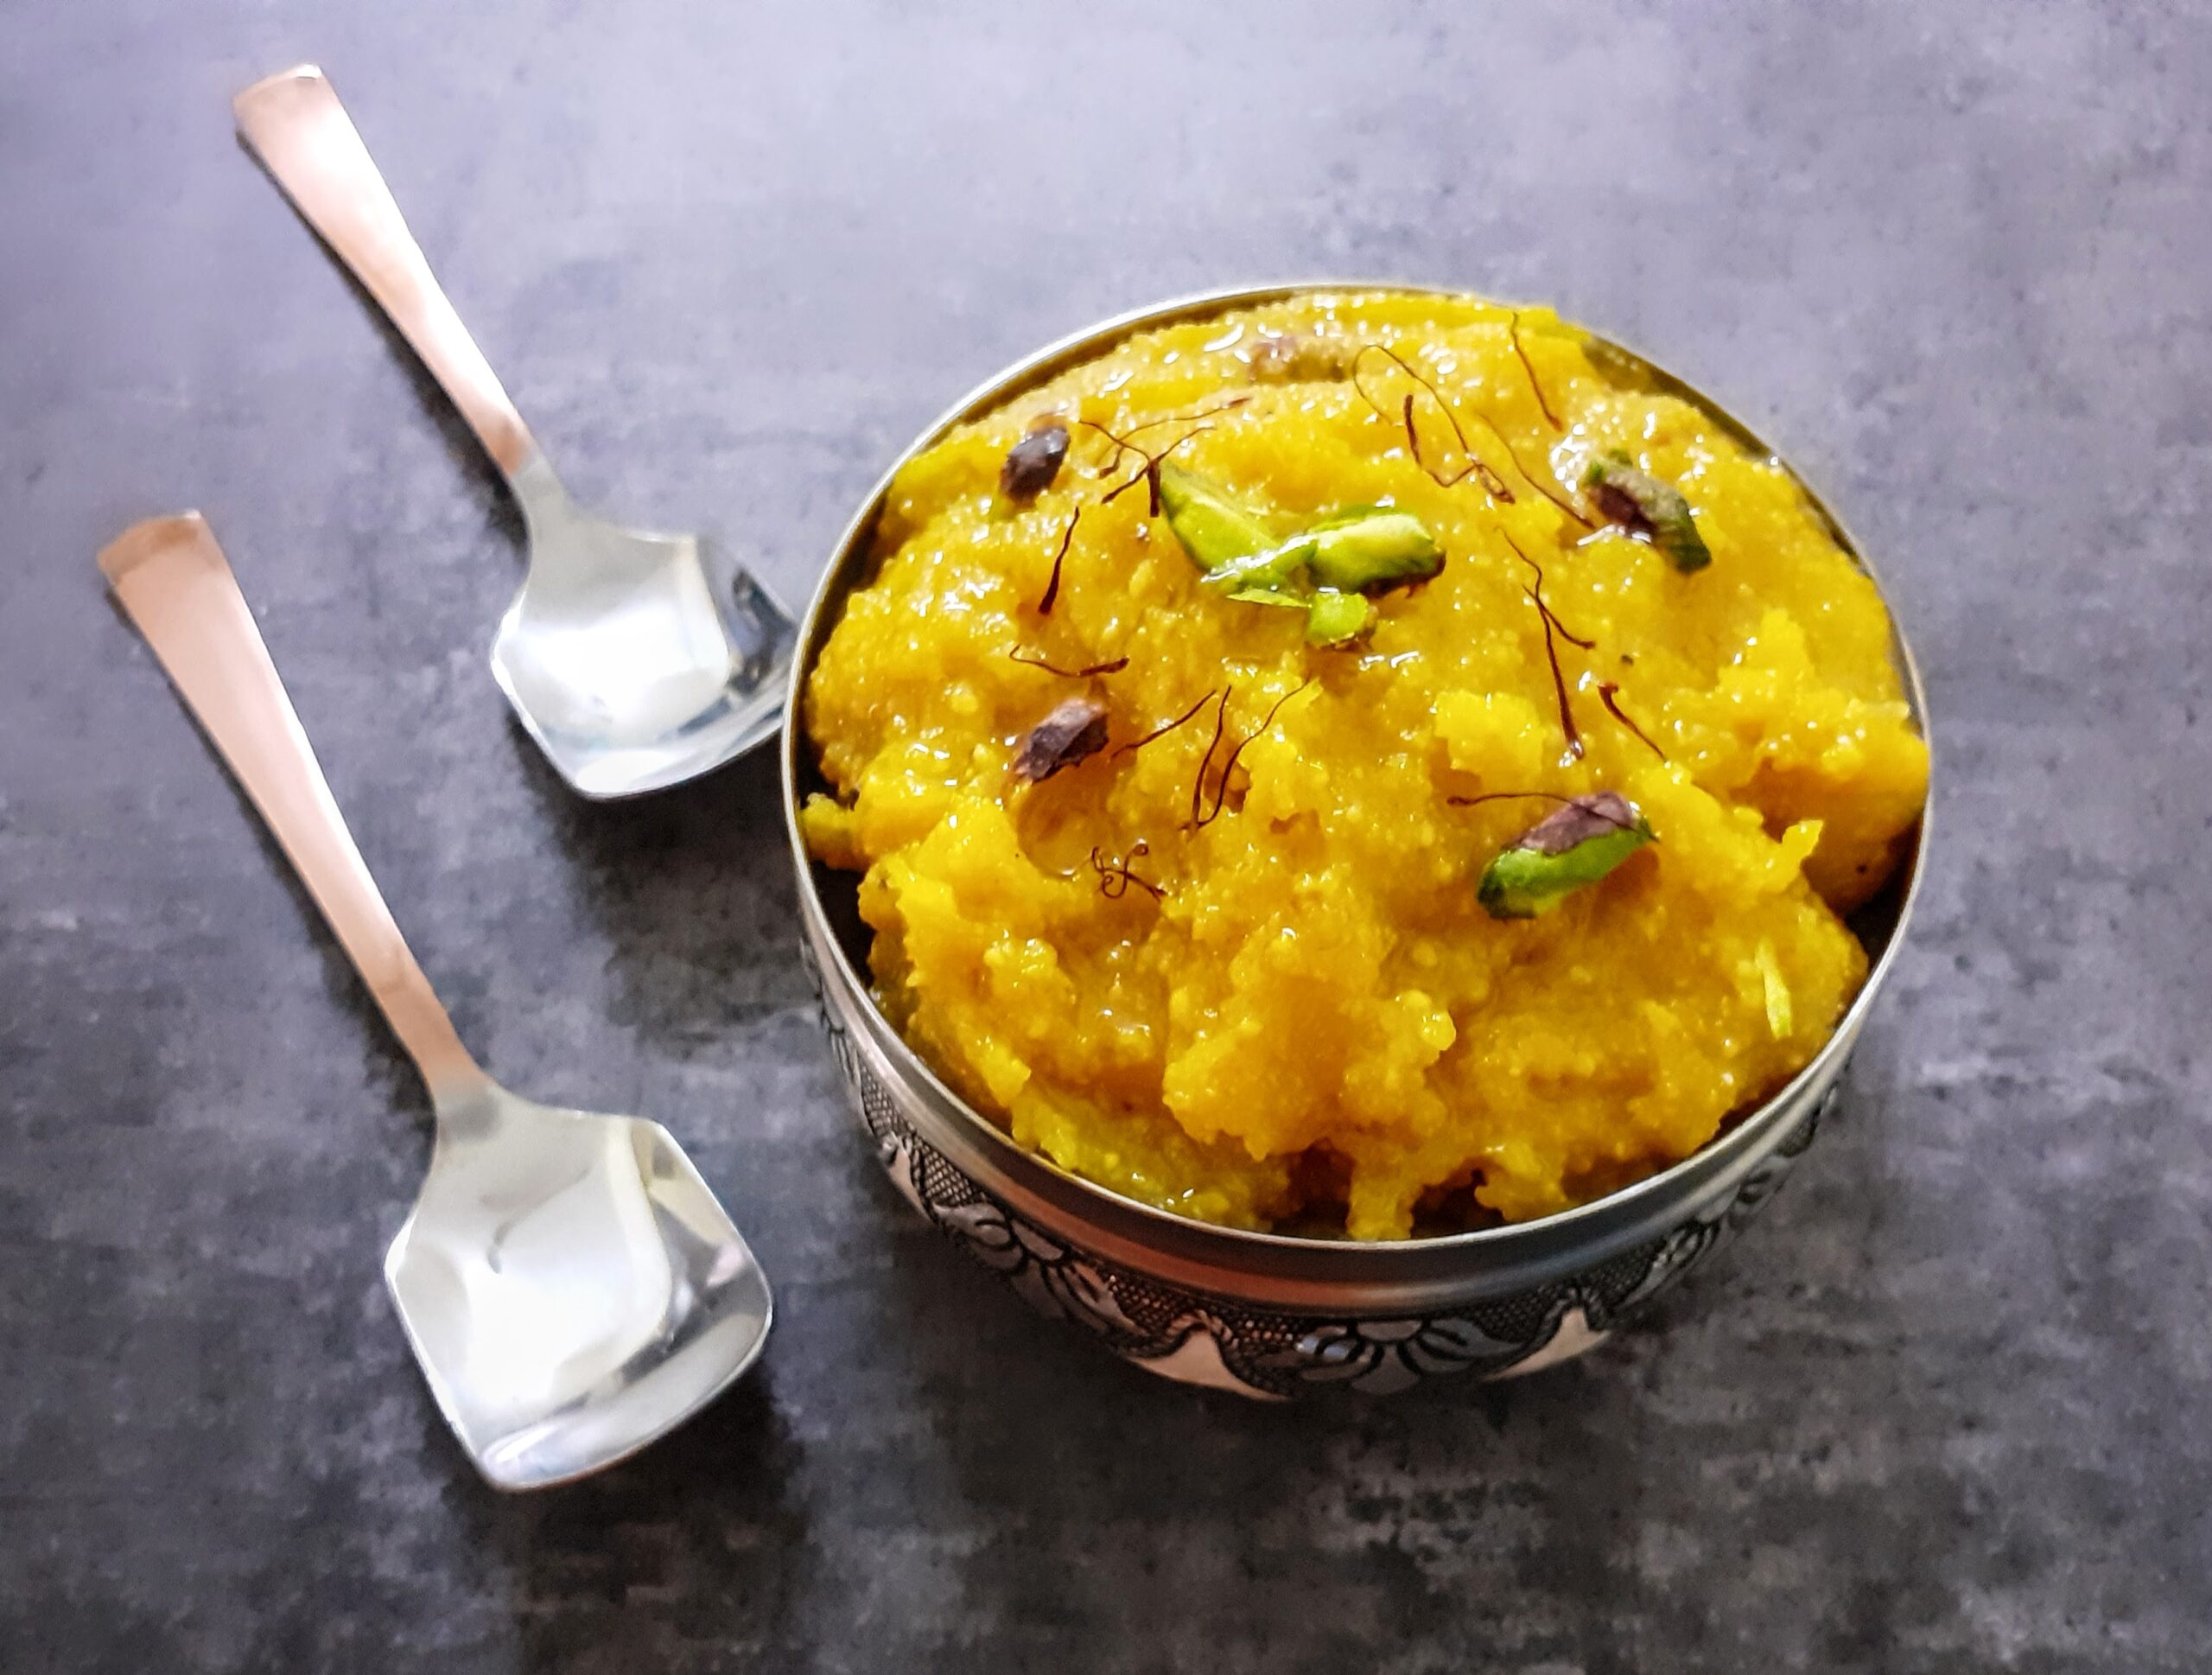
Ingredients:
Moong dal split ( yellow lentils) 1 cup
Milk 1 cup
Water 2 cups
Sugar 1 cup
Saffron strands a few (optional)
Yellow food colour/turmeric powder for colour 2 pinches
Ghee 100 GM approx
Cardamom/ Elaichi powder 1/4 tsp
Almonds and Pistachio chopped a few
Directions:
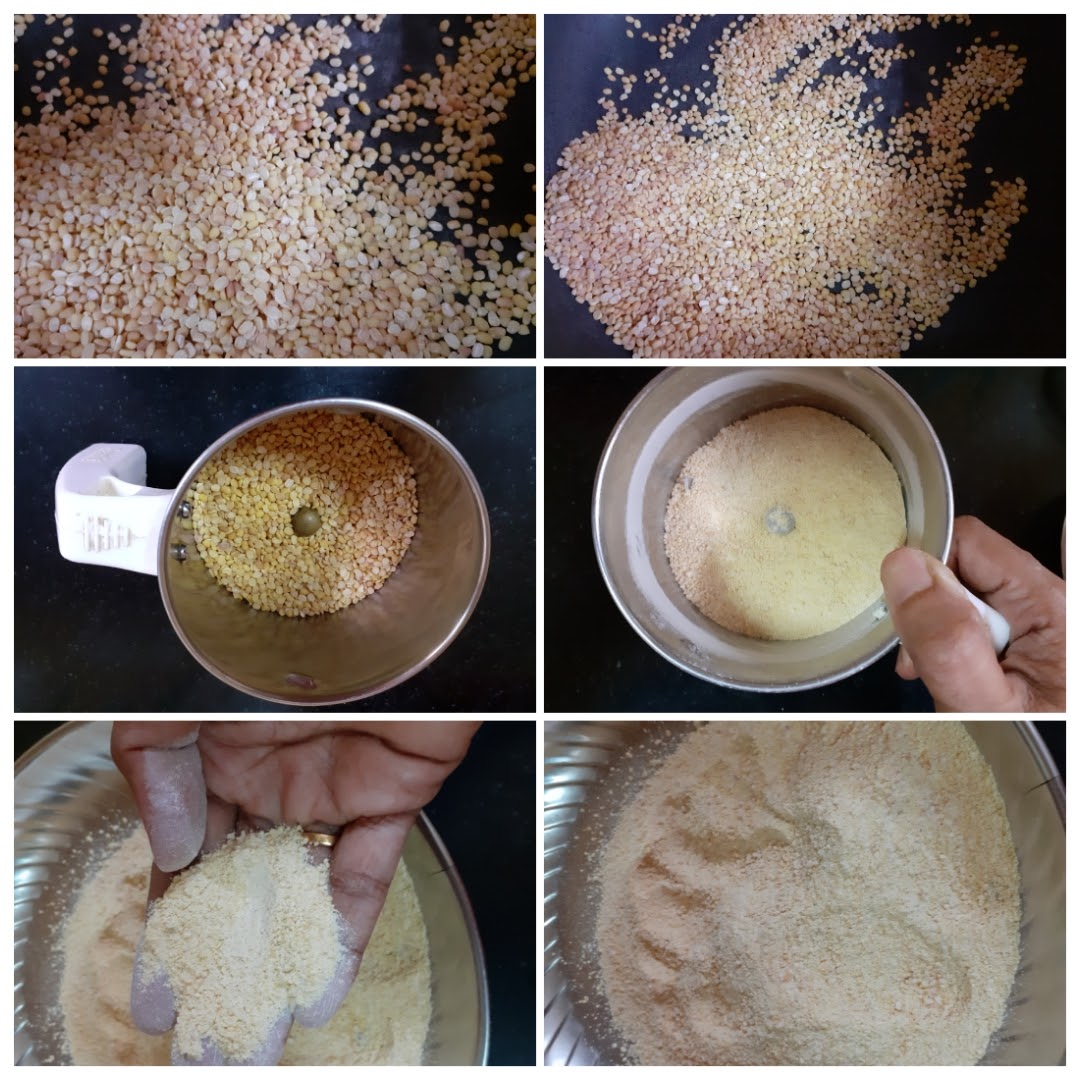
The foremost and important step is dry roasting the dal to a light brown colour. This has to be done patiently on low heat. On this depends the entire recipe. First put a pan/ kadai on flame and warm it. Now put the dal and start the roasting procedure by stirring constantly. This step can be done ahead. Cool the roasted dal and grind it in a blender. For a smooth texture of halwa grind it finely, for a grainy texture grind it coarse. Whole dal should not be visible. Now put this ground dal powder in a pan, add one cup milk, followed by 2 cups water, and stir to make it lump free. Now put the pan on the flame, add the food colour/turmeric powder, and start cooking the mixture on medium flame. Slowly the mixture will start thickening. If adding saffron strands, add now. Keep stirring gently, scraping the sides of the pan from time to time. Once the mixture thickens, check if there is any rawness in the smell. That is, if the dal smell/ taste is still coming. If yes, add another ladle of milk and continue to stir again. If your mixture has thickened and there is no raw smell or taste, add the sugar gently and start stirring again. As the sugar melts the dal mixture will liquefy. Don’t worry and continue to stir. The mixture will start thickening again. Now is the time to start pouring the ghee. Pour one ladle at a time and stir until the ghee is absorbed. Continue this process until no more ghee gets absorbed, but remains on the halwa. You will also notice that at this stage your mixture/ halwa no longer sticks to the pan/ kadai bottom, but comes out clean while stirring. Another way to tell the Halwa is done, is when you take a little of it in your fingers and try to form a ball, you should be able to do it. Add the cardamom powder and nuts and transfer the halwa to a container. The delicious Moong dal halwa is ready to relish .
STEPWISE RECIPE FOLLOWS:
1. First out a pan/ kadai on flame and warm it. Now put the dal and start the roasting procedure by stirring constantly. This step can be done ahead. Cool the roasted dal and grind it in a blender. For a smooth texture of halwa grind it finely, for a grainy texture grind it coarse.
2. Now put this ground dal powder in a pan, add one cup milk, followed by 2 cups water, and stir to make it lump free. Now put the pan on the flame, add the food colour/turmeric powder, and start cooking the mixture on medium flame.

3. Slowly the mixture will start thickening. Keep stirring gently, scraping the sides of the pan from time to time. If adding saffron strands, add now. Once the mixture thickens, check if there is any rawness in the smell. That is, if the dal smell/ taste is still coming. If yes, add another ladle of milk and continue to stir again. If your mixture has thickened and there is no raw smell or taste, add the sugar gently and start stirring again.
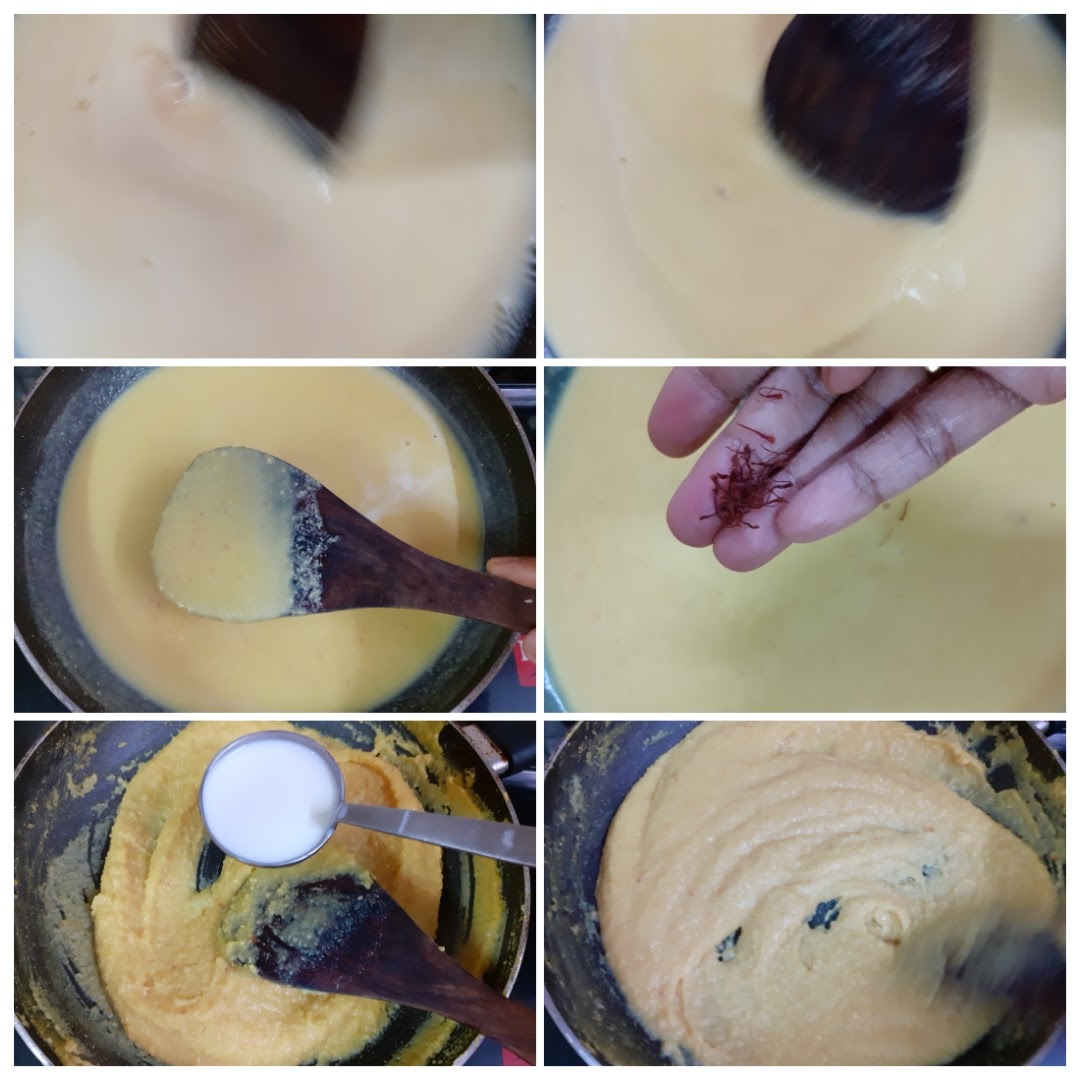
4. As the sugar melts the dal mixture will liquefy. Don’t worry and continue to stir. The mixture will start thickening again. Now is the time to start pouring the ghee. Pour one ladle at a time and stir until the ghee is absorbed. Continue this process until no more ghee gets absorbed, but remains on the halwa.
5. You will also notice that at this stage your mixture/ halwa no longer sticks to the pan/ kadai bottom, but comes out clean while stirring. Another way to tell the Halwa is done, is when you take a little of it in your fingers and try to form a ball, you should be able to do it. Add the cardamom powder and nuts and transfer the halwa to a container. The delicious Moong dal halwa is ready to relish .

If you tried this recipe and liked it please comment below. I would love to hear from you. If you have a query about the recipe email us and ill respond as soon as I can.
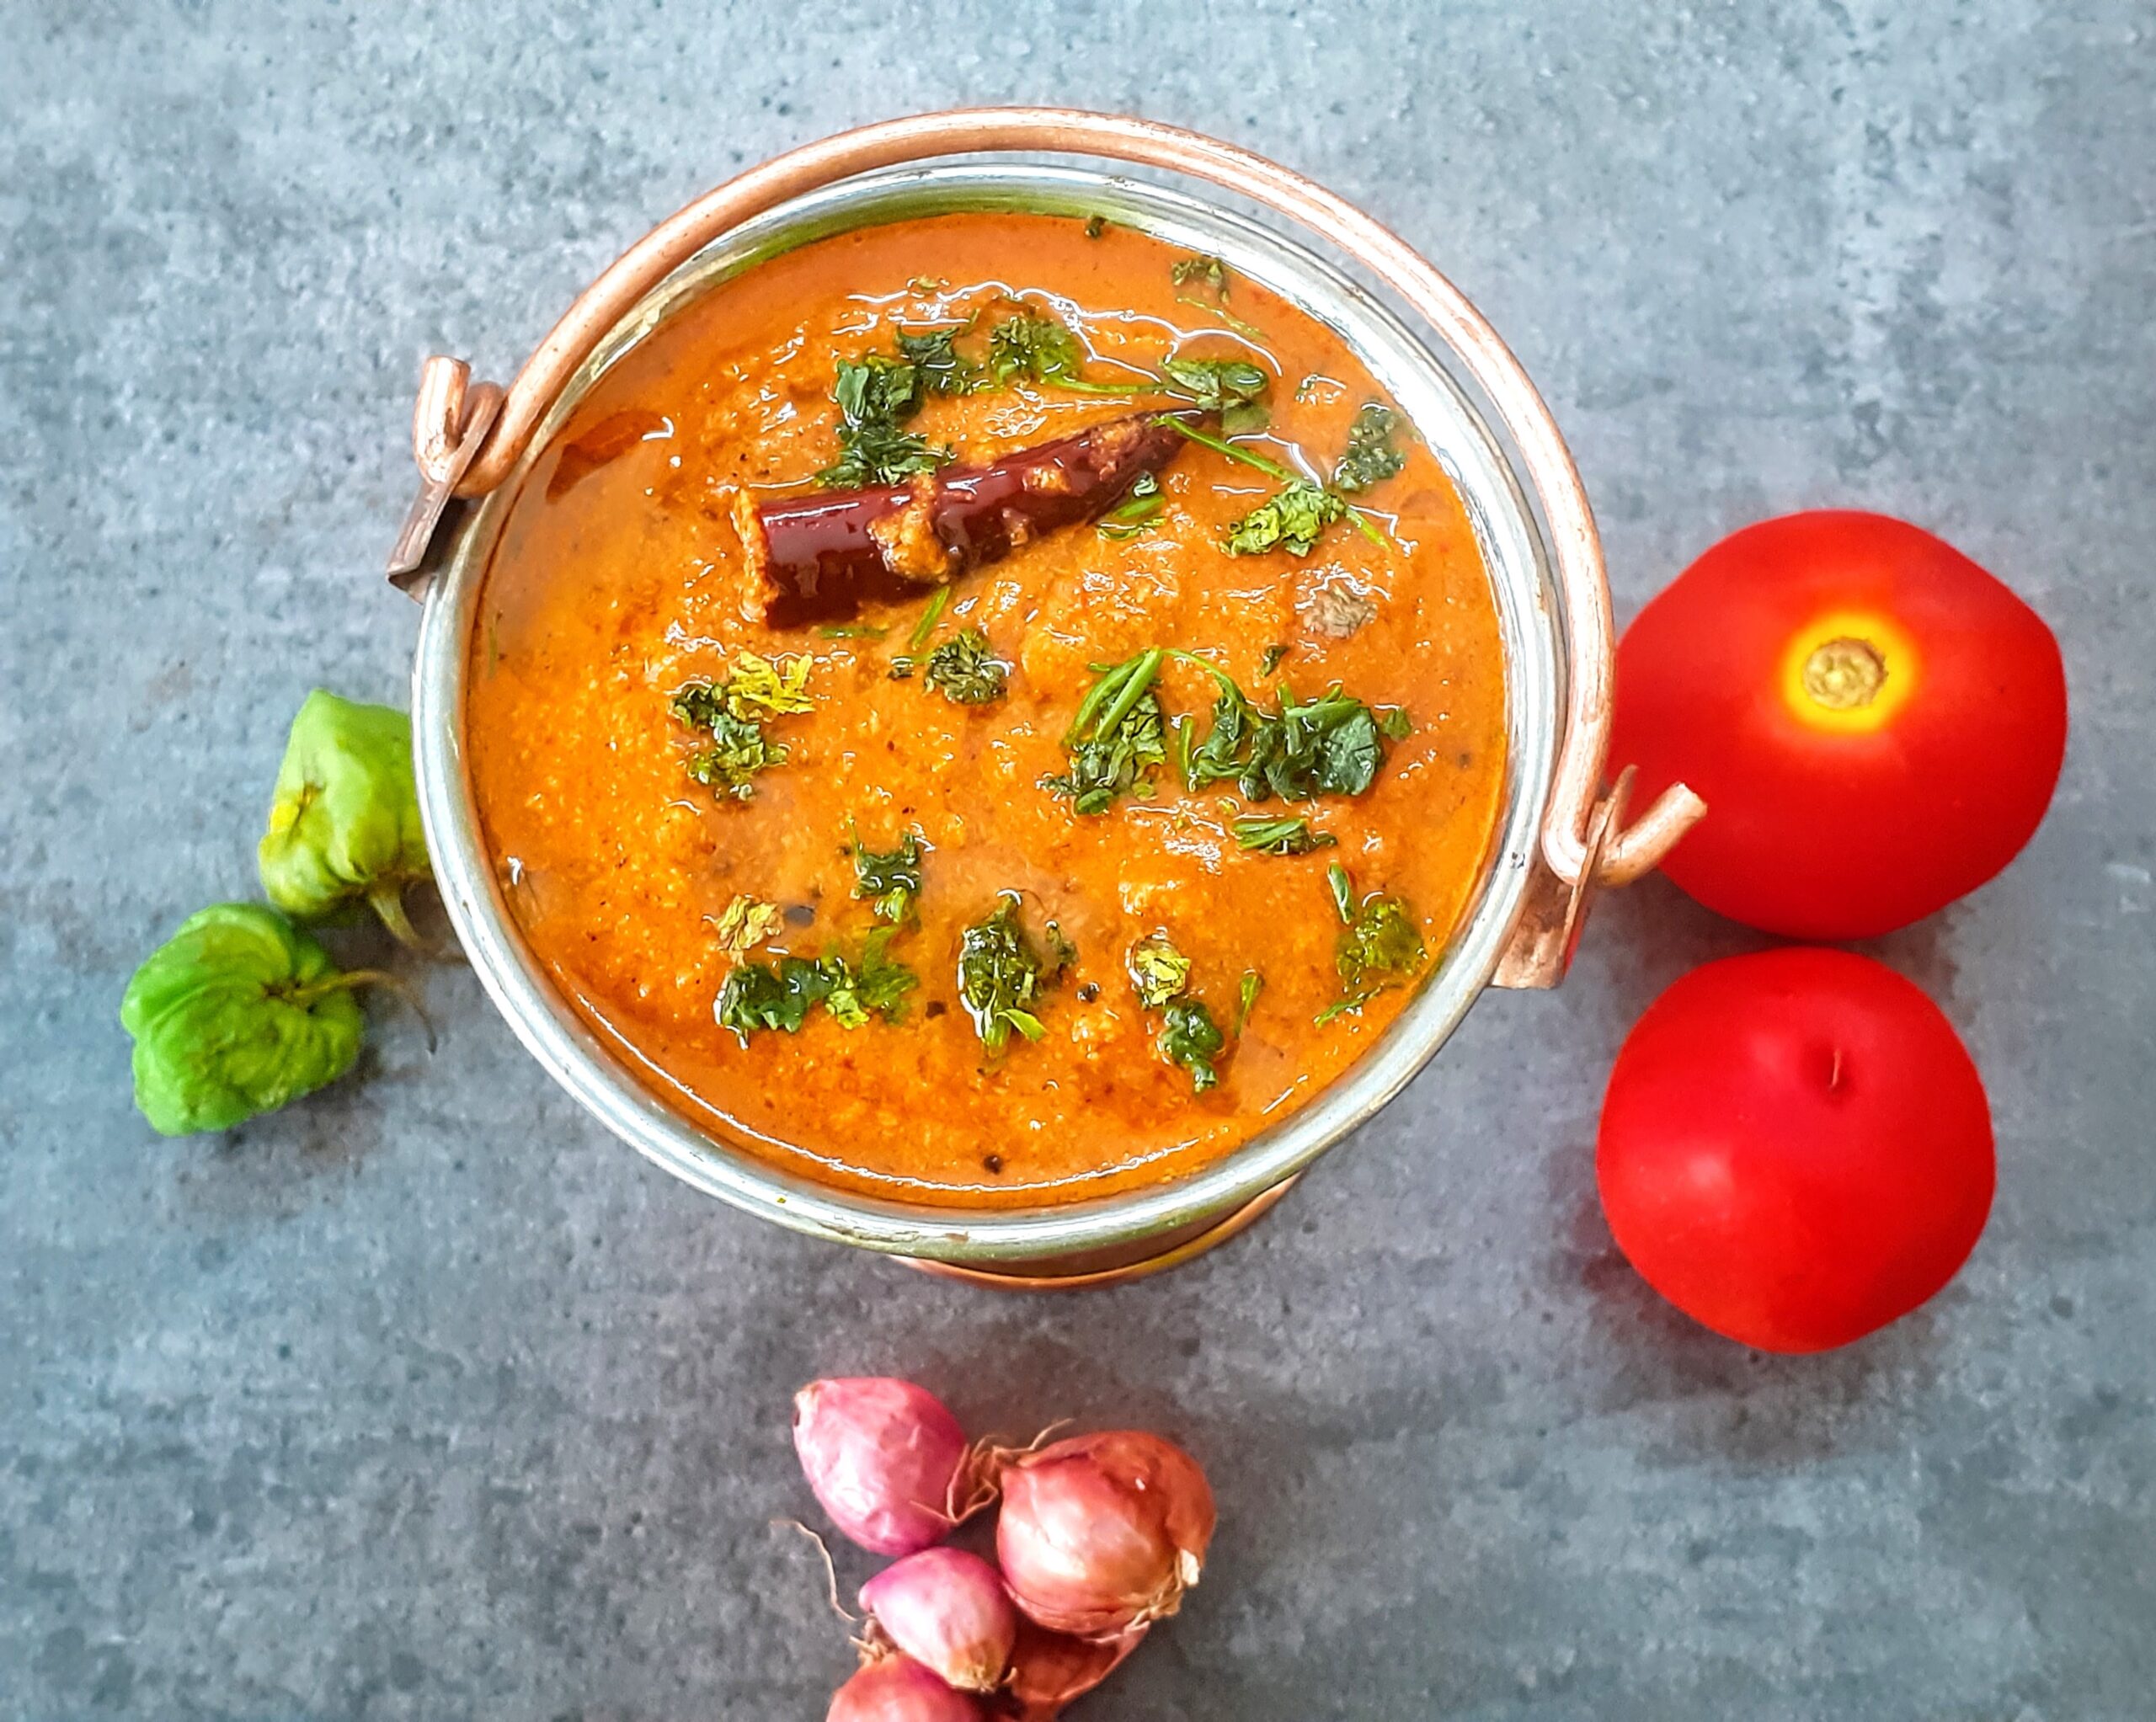
Thakkali Aati Kachina Kuzhambu
Thakkali Aati Kachina Kuzhambu is basically a Tomato curry, that goes on the sides with pretty much anything. Idli, Dosa, Parathas and Rice, all taste great with this. This a traditional recipe from the Kongunaad region of Tamil Nadu. I have deviated a little from the original recipe, a few addition/deletion of spices and condiments. The rich taste and flavour of tomatoes and the texture given by coconut, makes this curry a winner.
This curry is different from a chutney or sambar, in its basic ingredients. The consistency may be that of Sambar, but there is no dal used in this curry. Just three ingredients Shallots(Sambar onions), Tomatoes,Coconut, apart from other spices. Even better is the fact that you can store it in the fridge for a couple of days, and use as required.
If you have been following the blog, then you know by now what a tomato addict I am, and I just can’t cook without them. Anyone on the same page as me? Infact, in my social media handle I have spoken many times about my insecurity of tomatoes getting over. So much that i keep stocking excess of them. And this stocking has become excess during the pandemic lockdown. So every now and then such Tomato gravies and chutney’s are made at my place to keep consuming them????.
While you are here check out other curry recipes on the blog like Chakki Ki Shak, Rasakalan, Miloni Baby Corn and Bell peppers Curry, Menthiya keerai Kootu, Mirch Ka salan, Dum Aloo Ajwaini, and more…
Here is the recipe for Thakkali Aati Kachina Kuzhambu-
Ingredients:
STEPWISE RECIPE FOLLOWS:
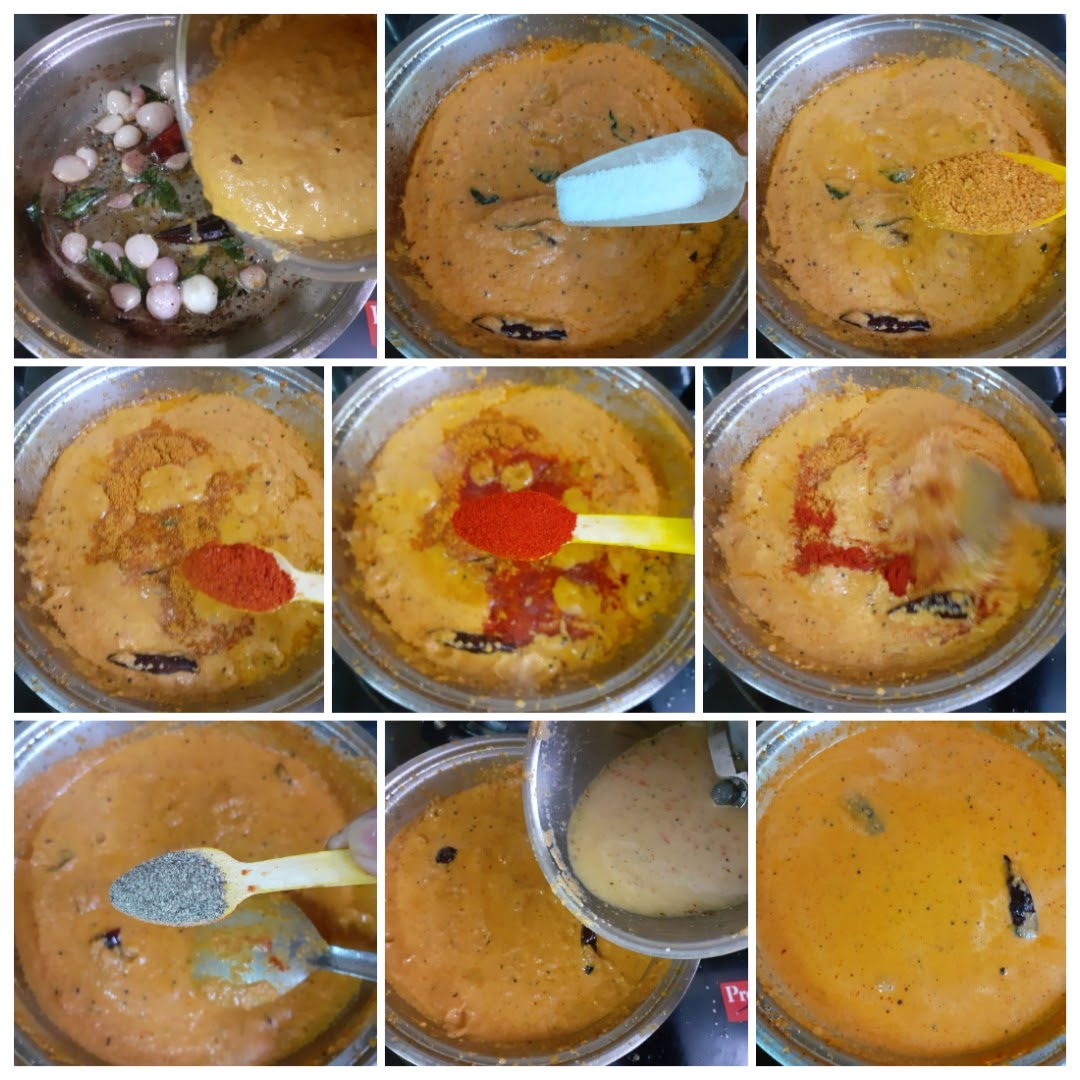
1. In a Pan/Kadai heat some oil for sauteing. Gently drop the shallots(half of them), garlic and red chillies and saute. Add curry leaves and continue to saute. When the onions start turning a light brown, add the tomatoes and saute until they turn mushy. Now add the coconut and saute for a minute or two. Put off the flame and cool the mixture.
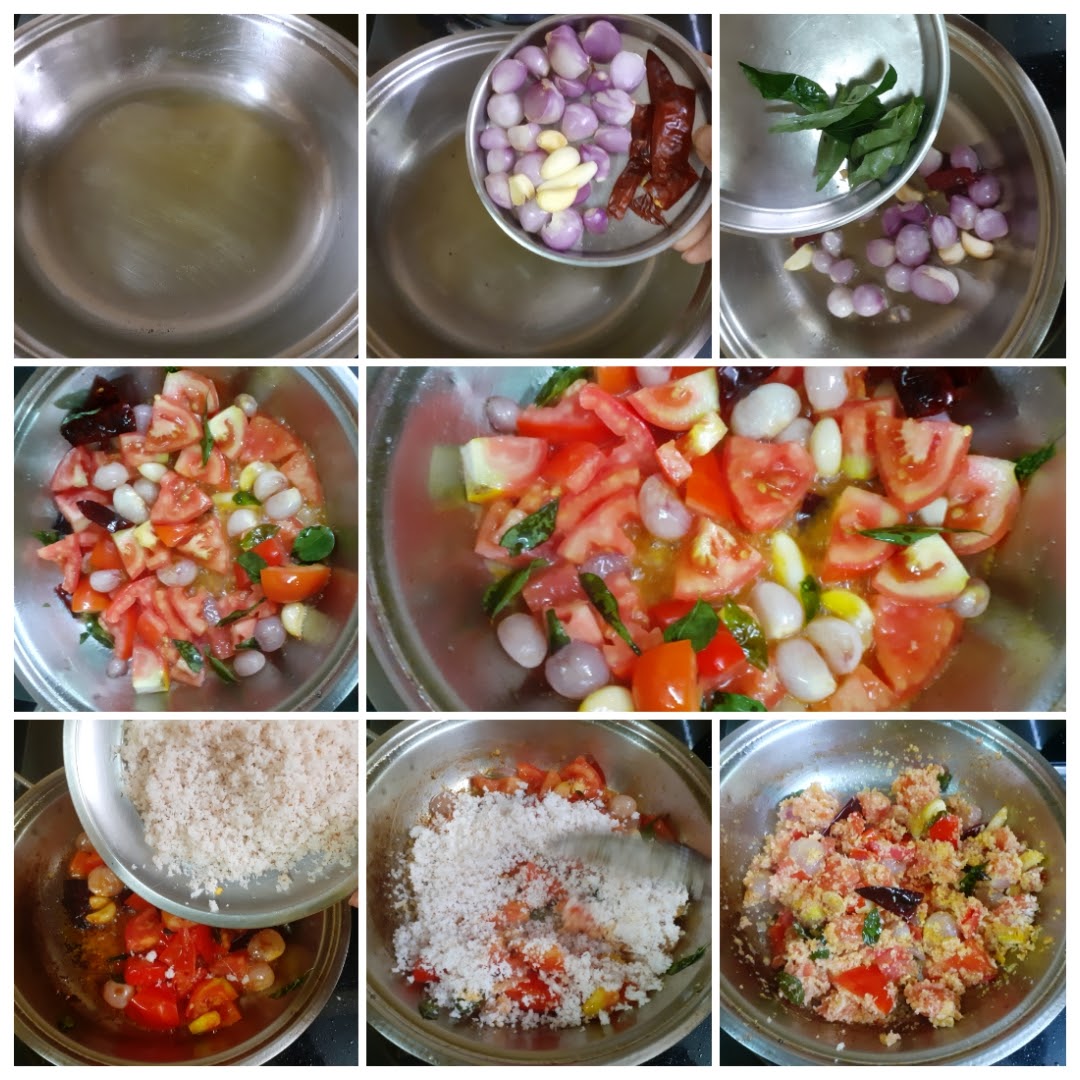
2. Once cool, grind this mixture to a smooth paste and keep aside. Now to the same kadai, add a little more oil and heat. Add mustard seeds, fenugreek seeds, dry red chilli and curry leaves. Add some asafoetida. Now add the remaining shallots and saute until light brown.

3. Now add the prepared tomato paste. Also add salt, sambar powder, red chilli powder(regular), kashmiri red chilli powder, and mix well. Now add some pepper powder. Add about 2 cups water and allow the gravy to thicken. The final consistency of the gravy should be like Sambar.
NOTES:
1. Country tomatoes are the best variety for this recipe, as they are a little sour.
2. Instead of adding pepper powder later, once can add whole peppercorns while sauteing the onion and tomatoes.
3. This curry can be kept in the refrigerator for 3 days and warmed up as required.
Rasakalan
Rasakalan is a traditional mixed vegetable dish from the Palakkad cuisine. The dish is so rustic and delicious and very easy to make. It is great to go with hot rice or can be served on the sides with Dosa or Idli. The vegetables mostly used in this dish are Ash gourd, Sweet potato, pumpkin, that are cooked in a tangy tamarind sauce and then a flavourful coconut masala paste is added. It is the paste that makes all the difference. Finally the seasoning in coconut oil enhances the flavours of the dish and takes it to a different level.

If you tried this recipe and liked it please comment below. I would love to hear from you. If you have a query about the recipe email us and ill respond as soon as I can.
.
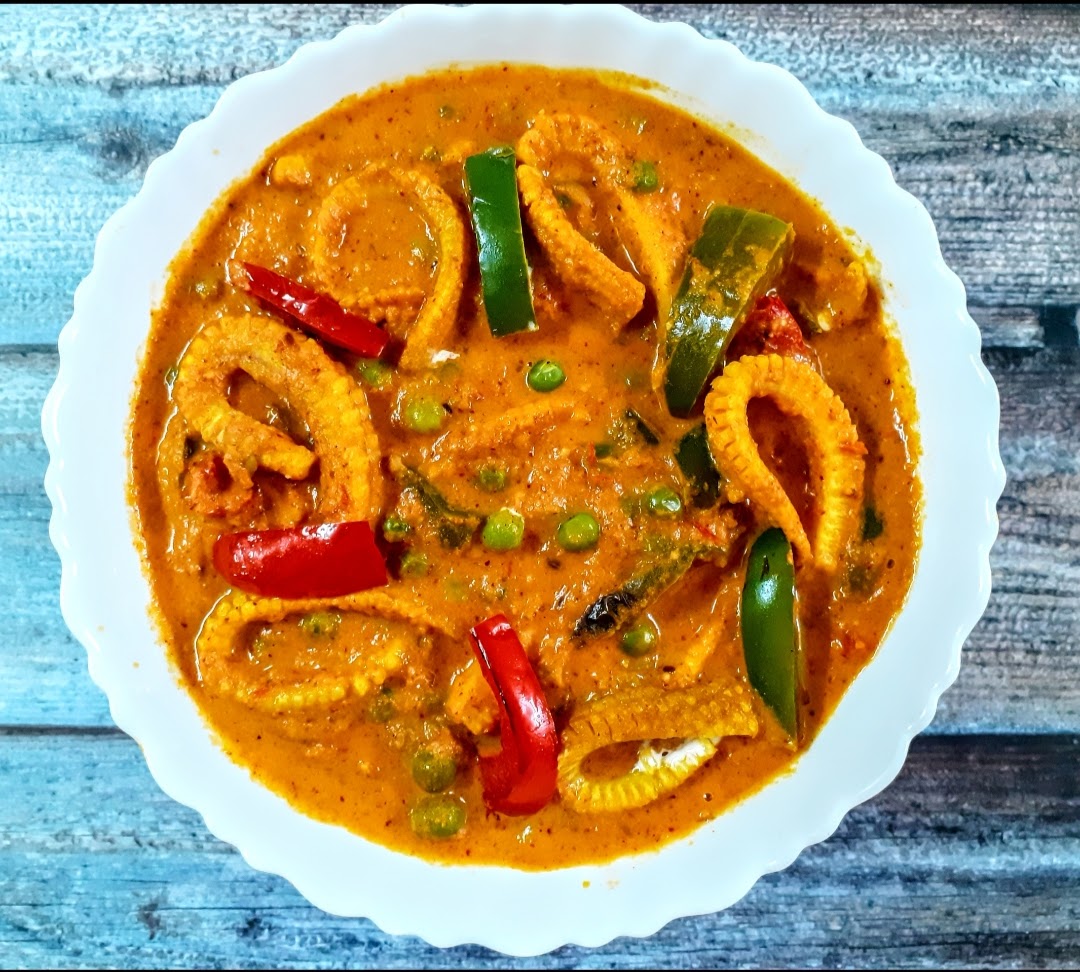
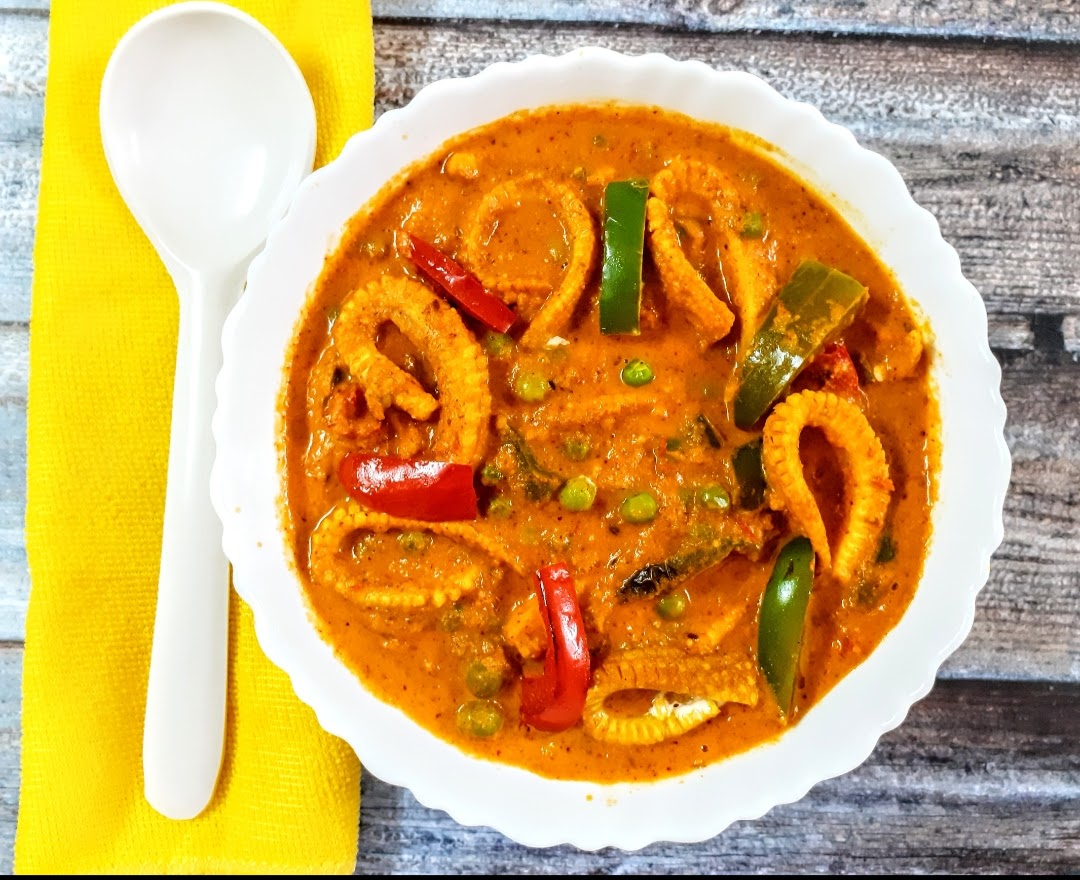
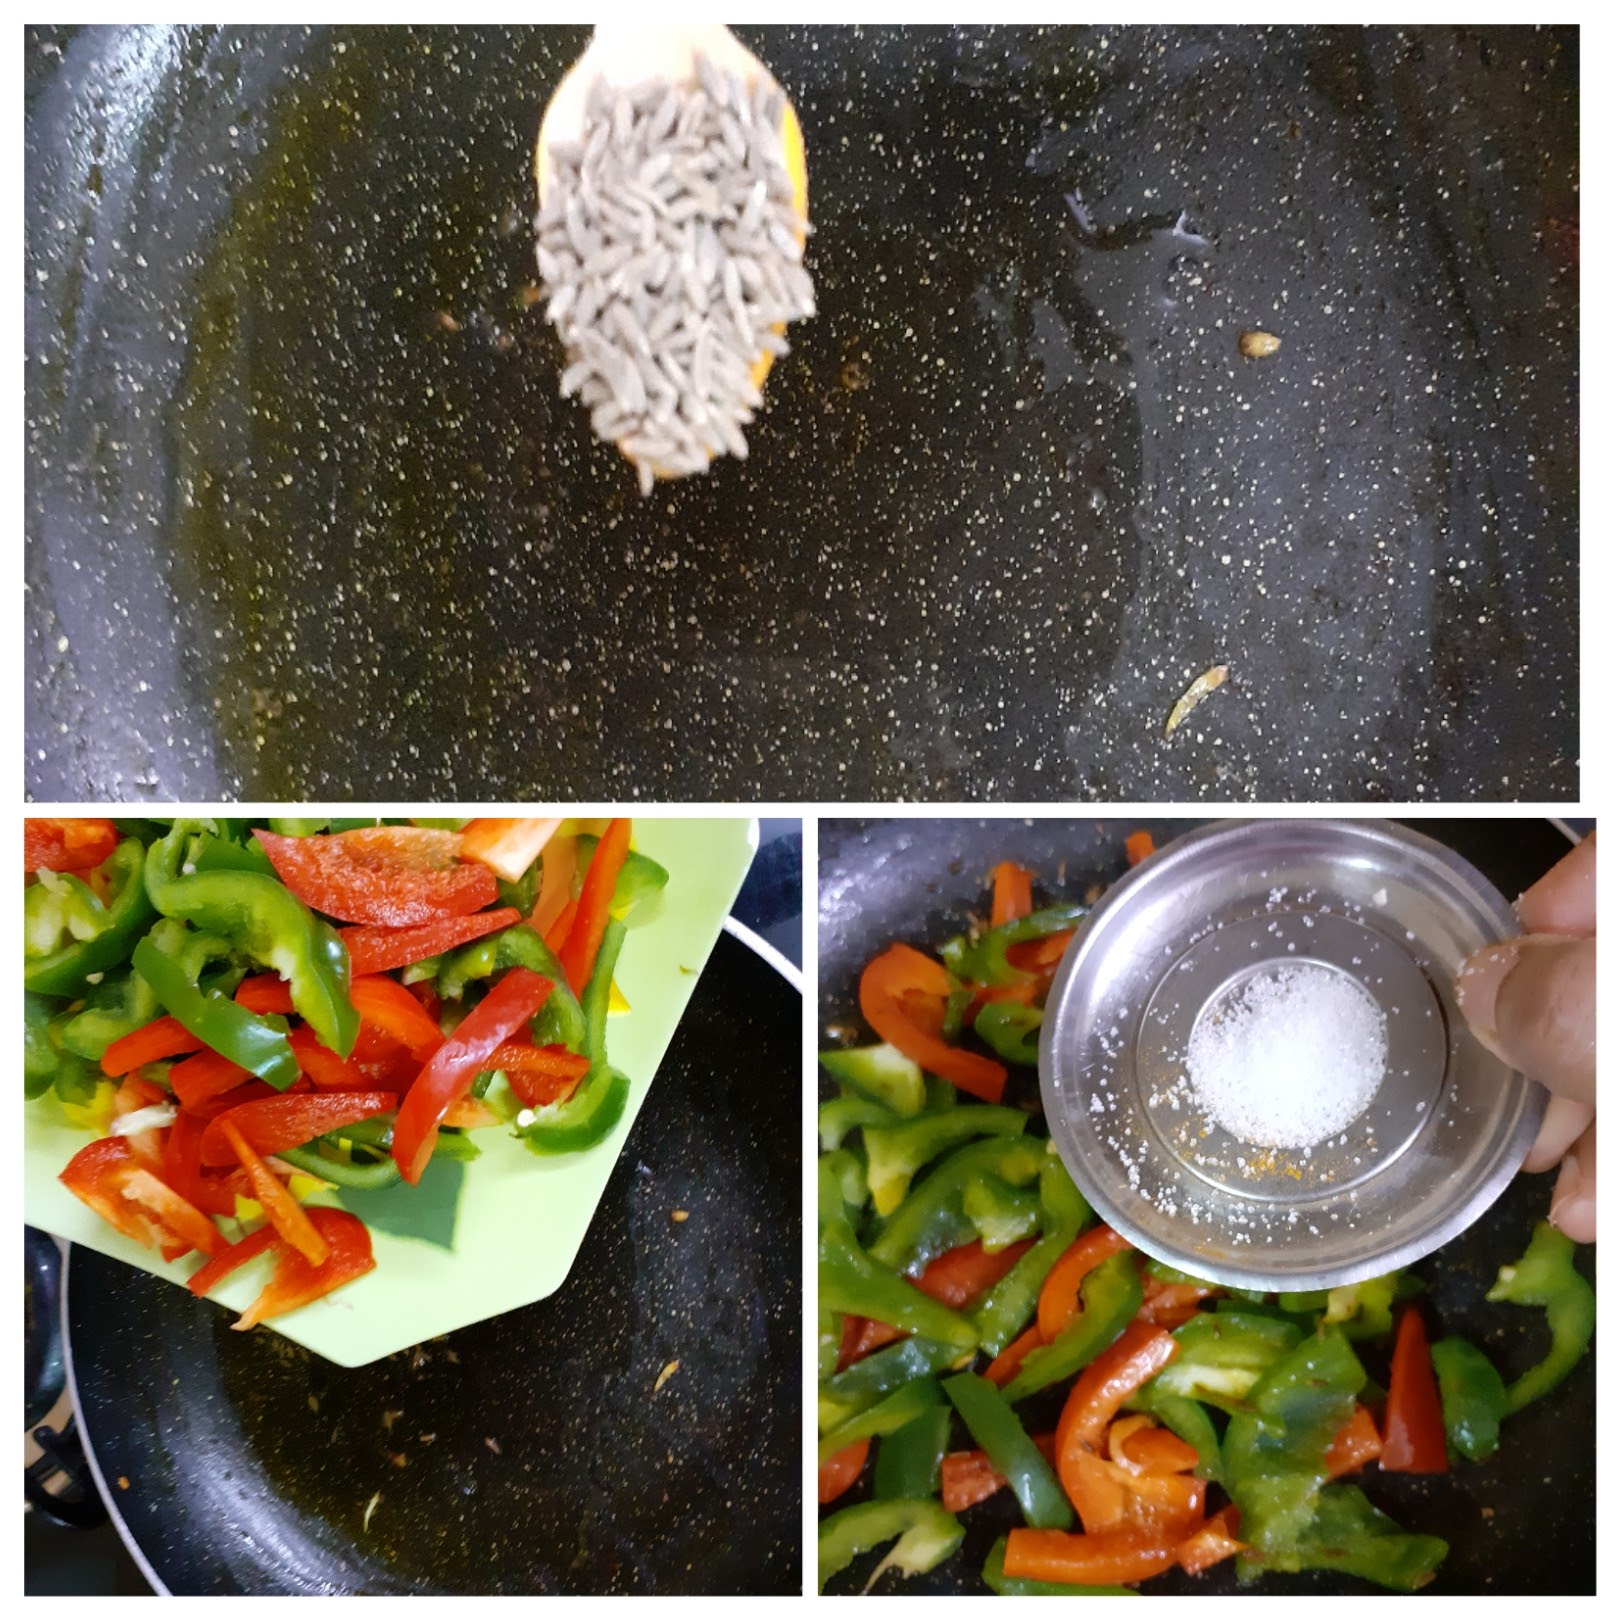
Miloni Babycorn & Bell Peppers Curry (Mixed Vegetable Curry)
Miloni Baby corn and Bell Peppers( both green and red) is a mixed vegetable curry that is simple and easy to make. With a little prep and chopping it can also be made on a working day. Some recipes use Spinach/Palak in Subz Miloni, but I have skipped it entirely, to bring out the flavours of the Baby corn and bell-peppers and some green peas too have been used, as they are in season now.
The flavours of this dish are very delicate and go very well with both Rice and Rotis(flatbread). This is one of those recipes where I have just gone with the follow and created, without any pre planning. When I started, only Baby corn and bell-peppers were chopped, but as I proceeded kept adding things to create this dish. This happens when I am bored of my own cooking and am looking for some inspiration from within.
While you are here do check out other subji and curry recipes like- Kadai Paneer Gravy, Kadai Paneer (semi dry), Bhindi Aloo, Paneer Khurchan, Dum Aloo Ajwaini, Methi wale Baingan, Mava Paneer Curry, and more…
Here is the recipe for Miloni Baby corn and Bell Peppers for you-
Ingredients:
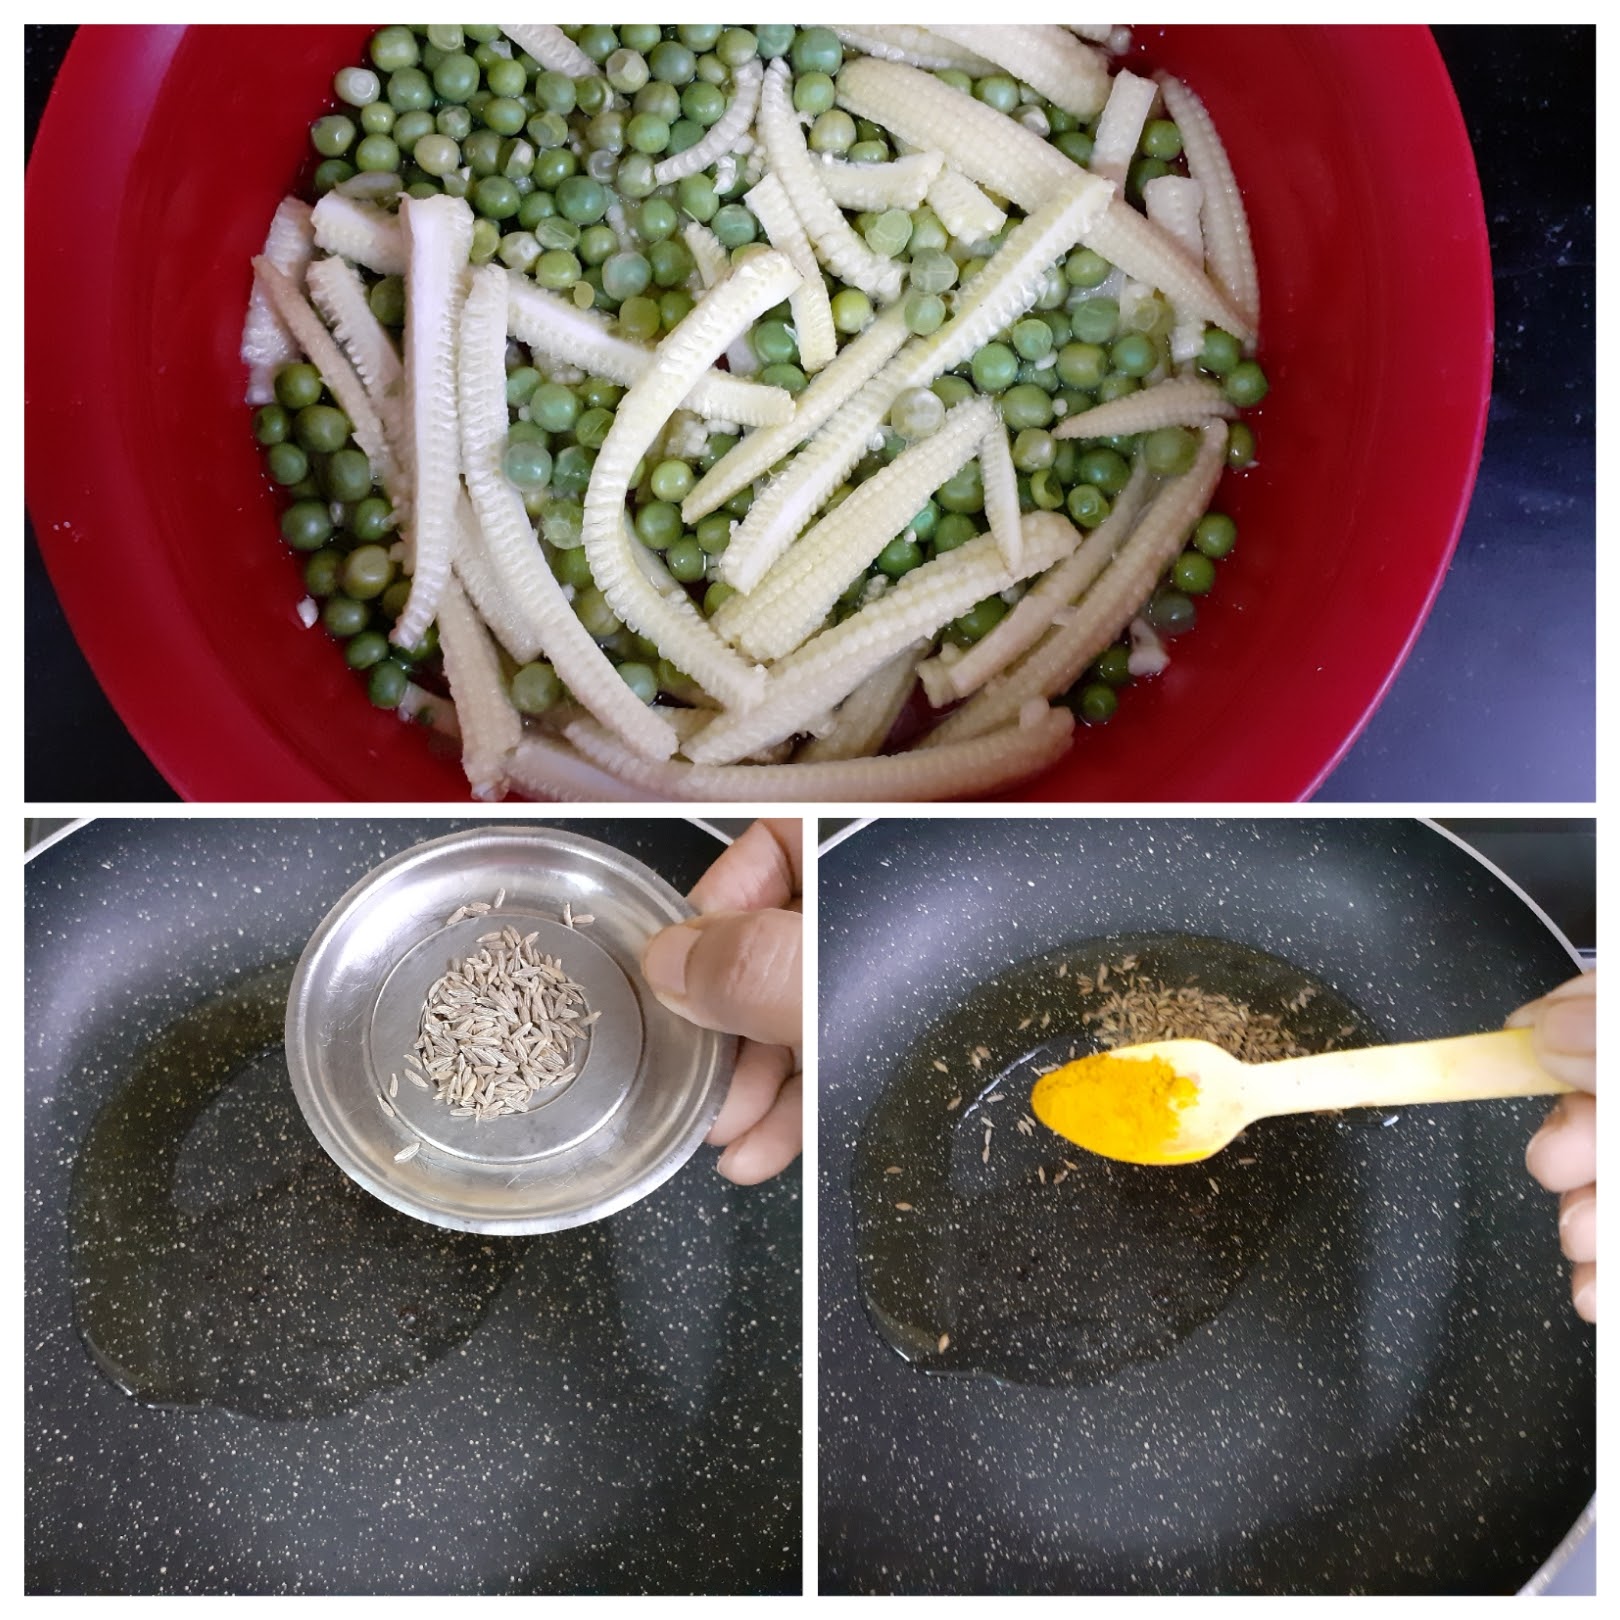
Baby Corn 12 to 15 cut lengthwise
Red Bell Pepper 1 chopped to strips
Capsicum/ Green bell pepper 1 chopped to strips
Green Peas 1 handful (optional)
Onion 1 large chopped
Ginger 1 inch piece
Garlic 3 cloves
Tomatoes 2 large chopped
Green chillies 2
Cashewnuts 10 to 12
Salt as required
Cumin Seeds 1 tsp
Turmeric powder 1/2 tsp
Red chilli powder 1 to 2 tsp (depending on spice preference)
Kashmiri chilli powder 1 tsp for colour (optional)
Coriander powder 2 tsp
Sugar 1 tsp (optional)
Cream 1 tbsp (optional)
Garam Masala powder 1/2 tsp
Oil for sauteing
Directions:
Cook the chopped Baby Corn and peas until done. I put them in the Microwave, so that they don’t overcook and the baby corn retains shape. Next, in a pan pour oil for sauteing and when hot add the cumin seeds, followed by turmeric powder. Now add the chopped onion, tomatoes, ginger, garlic and slit green chillies and saute. Add little salt(about 1/4 tsp) so that the tomatoes break, add the Cashewnuts and saute until the onion turns transparent and the tomatoes breakdown. Switch off flame and cool completely. On cooling, grind to a fine paste and keep it aside. Now in the same pan take some more oil. Add some Cumin seeeds and put in the chopped Bell Peppers(both red and green) and saute. Add a little sugar and continue to saute. When the Bell peppers appear cooked add the cooked baby corn and peas after draining all the water. Add turmeric powder and salt and stir. Now add the ground paste followed by red chilli powders(both regular and kashmiri), coriander powder and pour 1 to 1.5 cups of water( I poured water into my mixie jar, gave it a spin and used it so that is don’t waste the stuck paste ). Stir nicely for the masalas to combine and cook until the water is partially absorbed, and gravy comes together. Finally, add the cream and put off the flame and sprinkle the garam masala giving the curry a final stir. The yummy Miloni Baby Corn and Bell peppers is ready to serve.
Serving Suggestions: With hot Phulkas, Roti, Parathas, Plain rice, Jeera rice, Peas Pulav and more.
STEPWISE RECIPE FOLLOWS:
1. Cook the chopped Baby Corn and peas until done. I put them in the Microwave, so that they don’t overcook and the baby corn retains shape. Next, in a pan pour oil for sauteing and when hot add the cumin seeds, followed by turmeric powder.
2. Now add the chopped onion, tomatoes, ginger, garlic and slit green chillies and saute. Add little salt(about 1/4 tsp) so that the tomatoes break, add the Cashewnuts and saute until the onion turns transparent and the tomatoes breakdown. Switch off flame and cool completely. On cooling, grind to a fine paste and keep it aside.
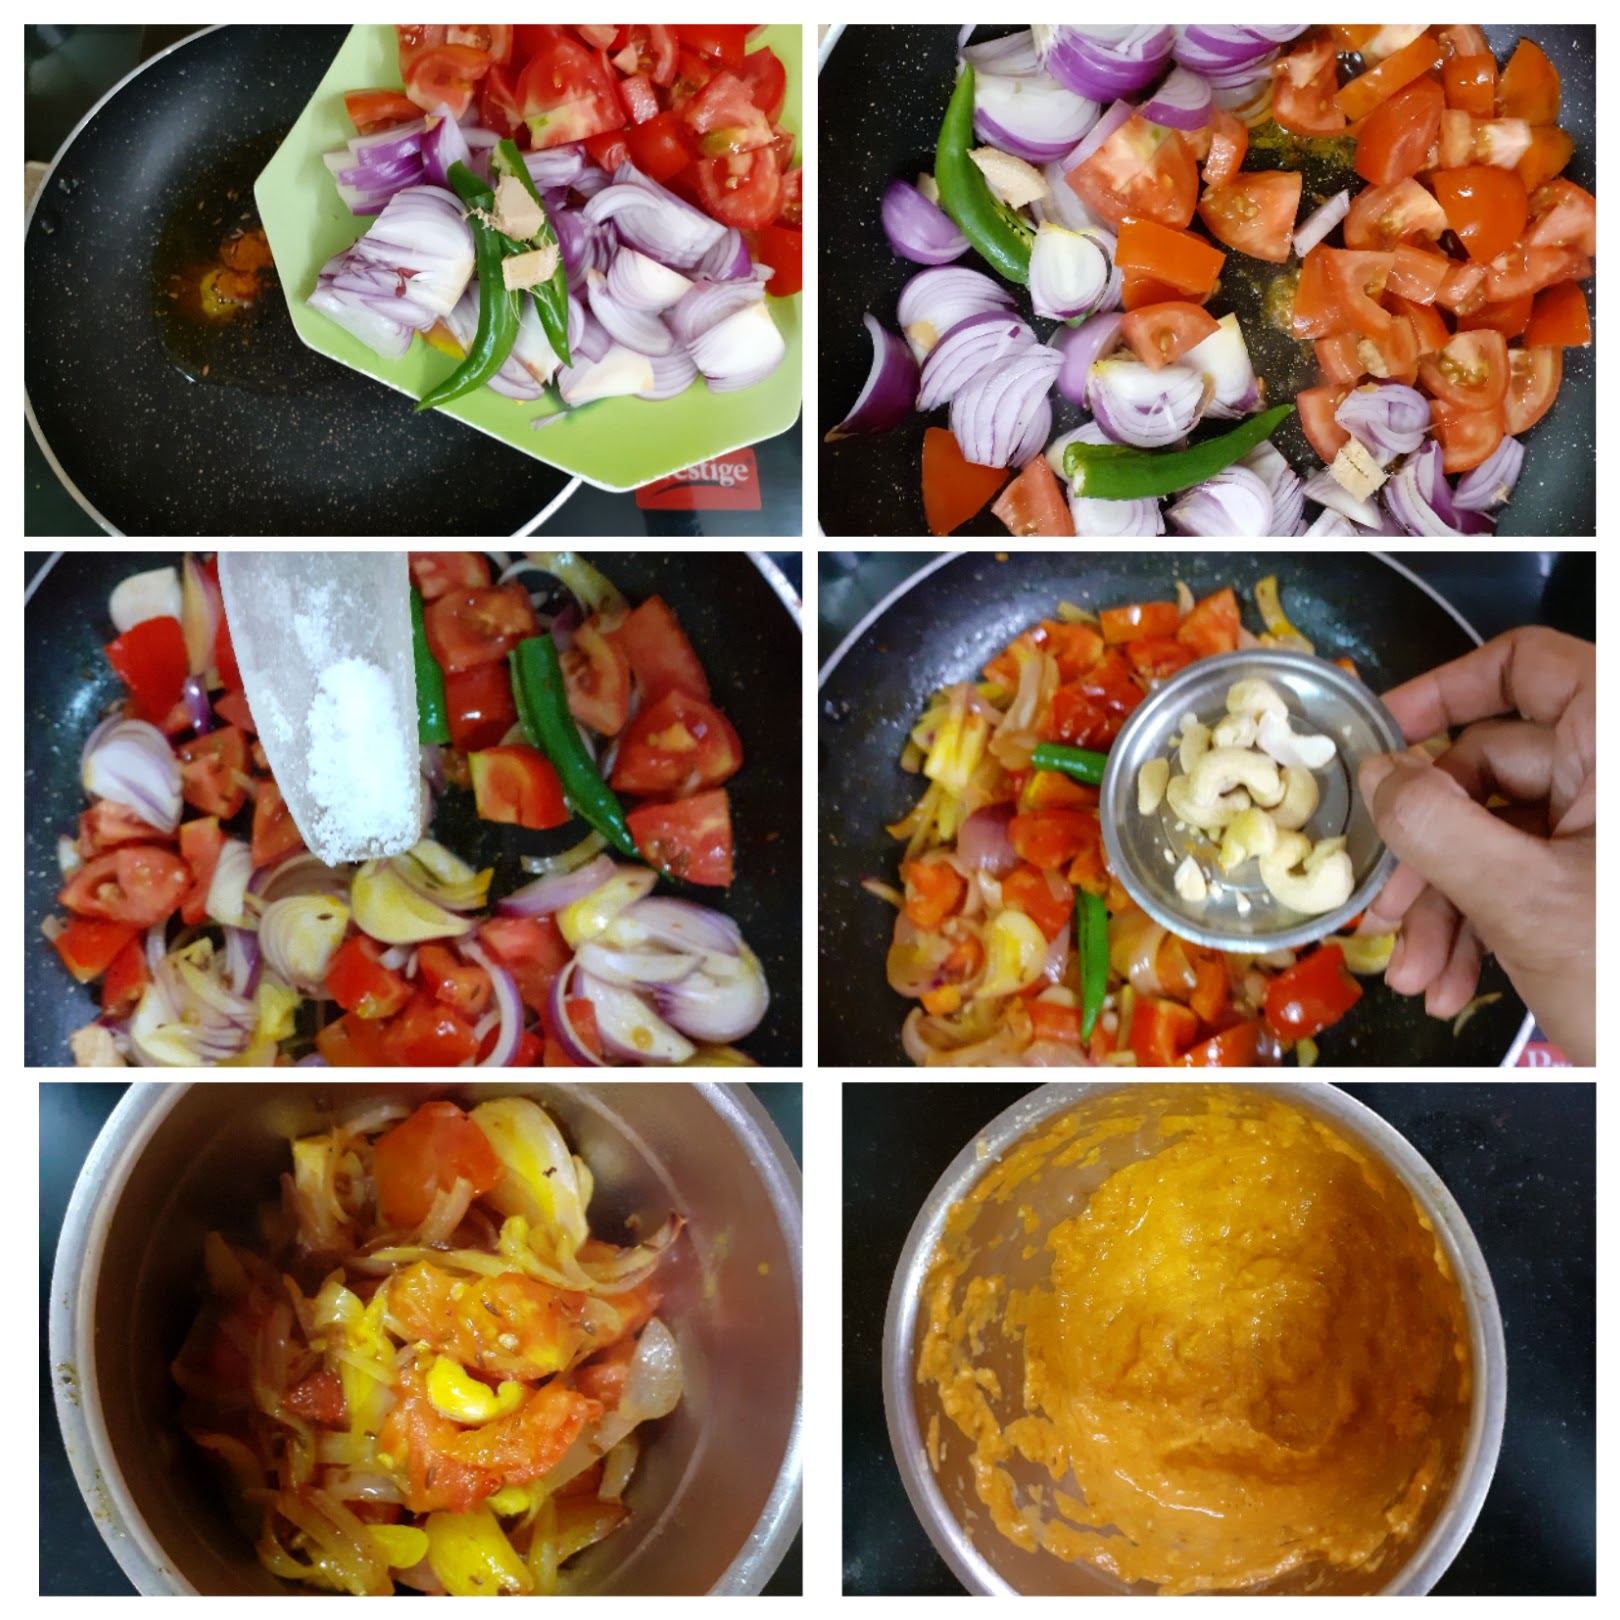
3. Now in the same pan take some more oil. Add some Cumin seeds and put in the chopped Bell Peppers(both red and green) and saute. Add a little sugar and continue to saute.
4. When the Bell peppers appear cooked add the cooked baby corn and peas after draining all the water. Add turmeric powder and salt and stir.
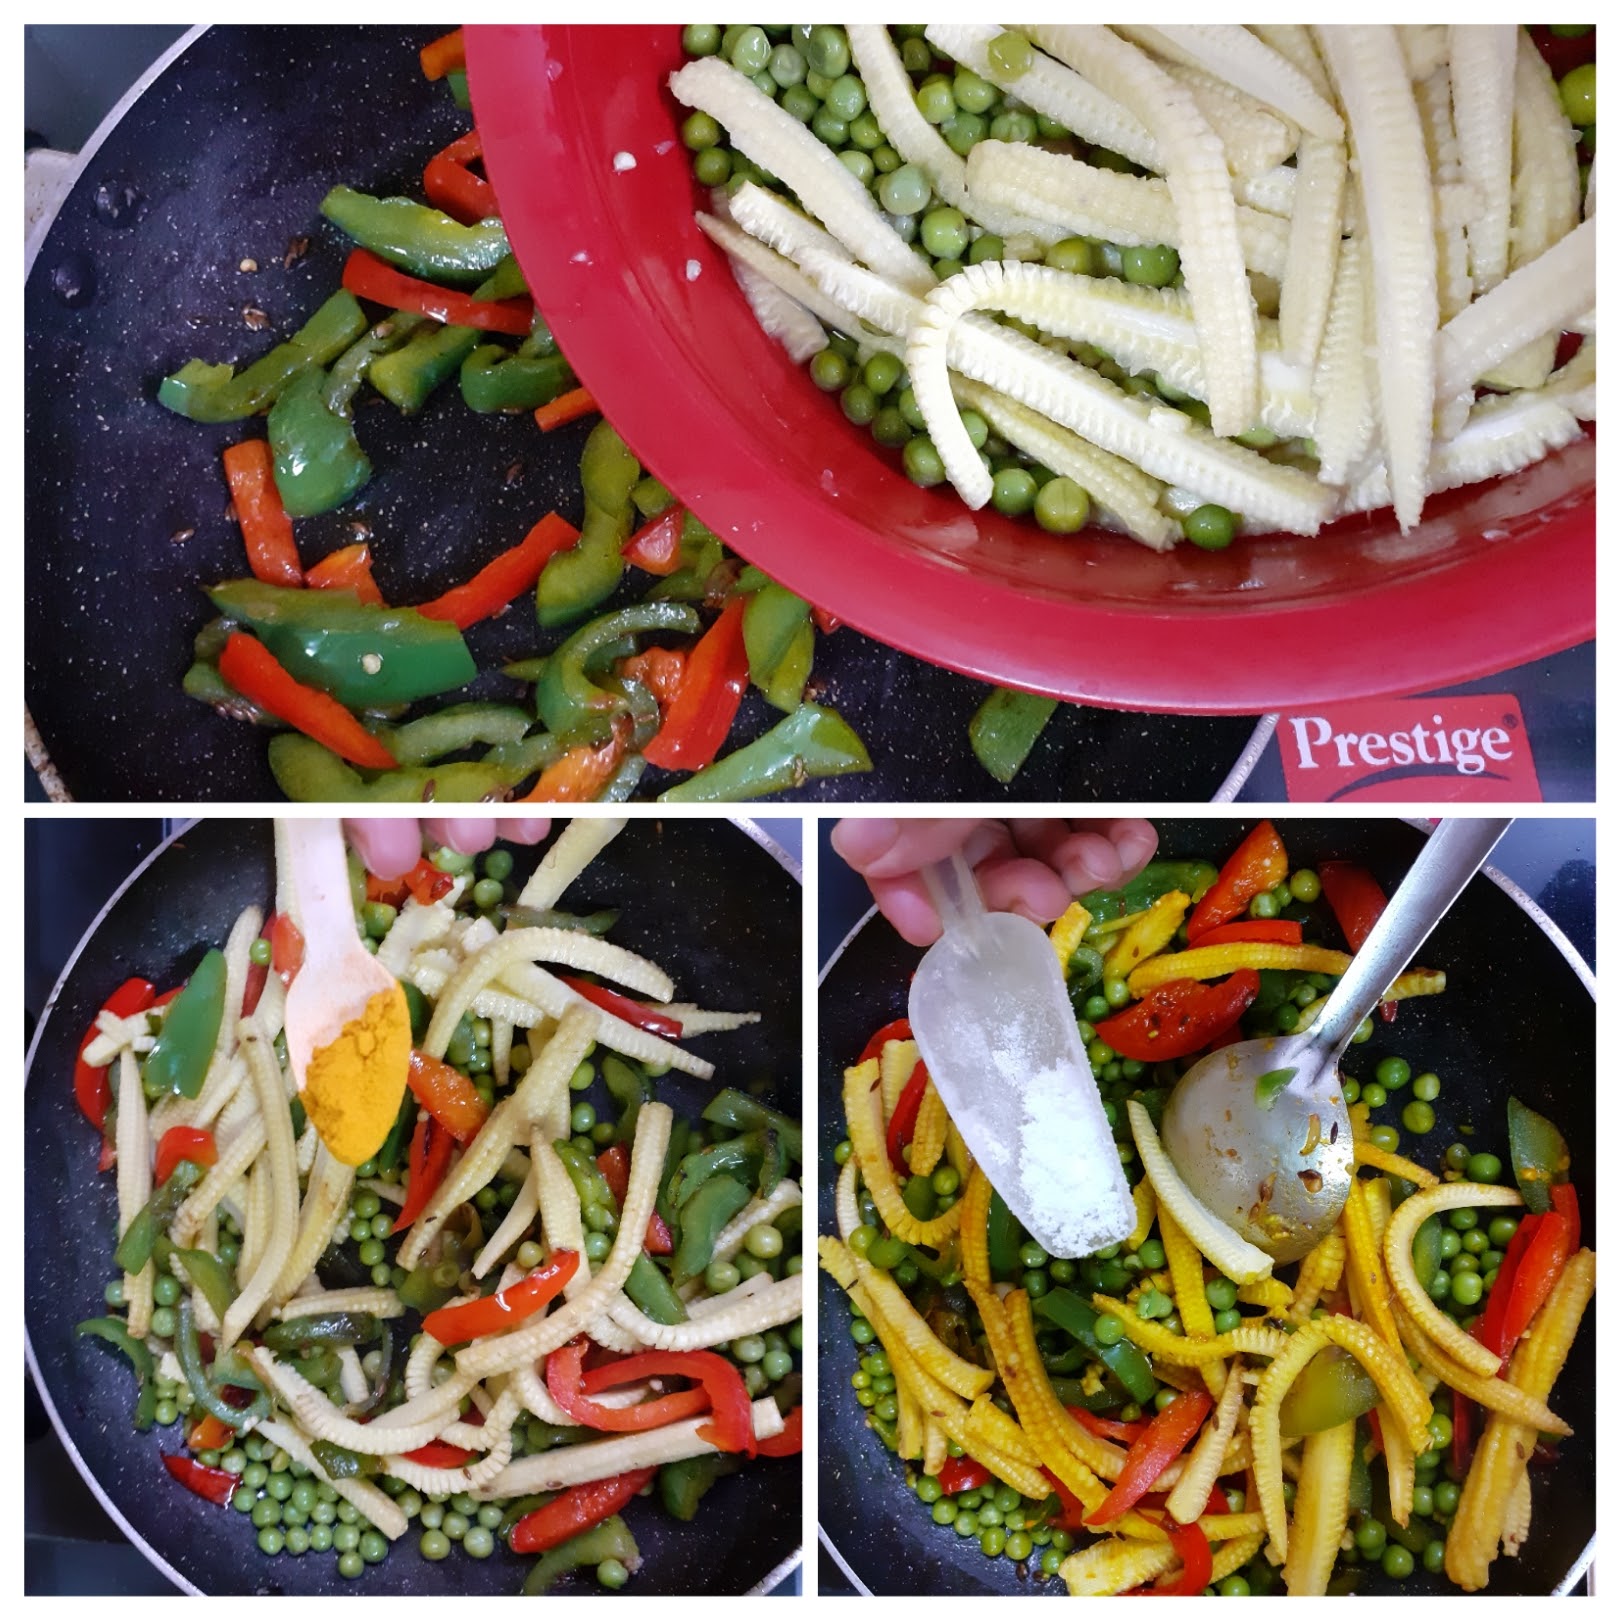
5. Now add the ground paste followed by red chilli powders(both regular and Kashmiri), coriander powder and pour 1 to 1.5 cups of water( I poured water into my mixie jar, gave it a spin and used it so that is don’t waste the stuck paste ).
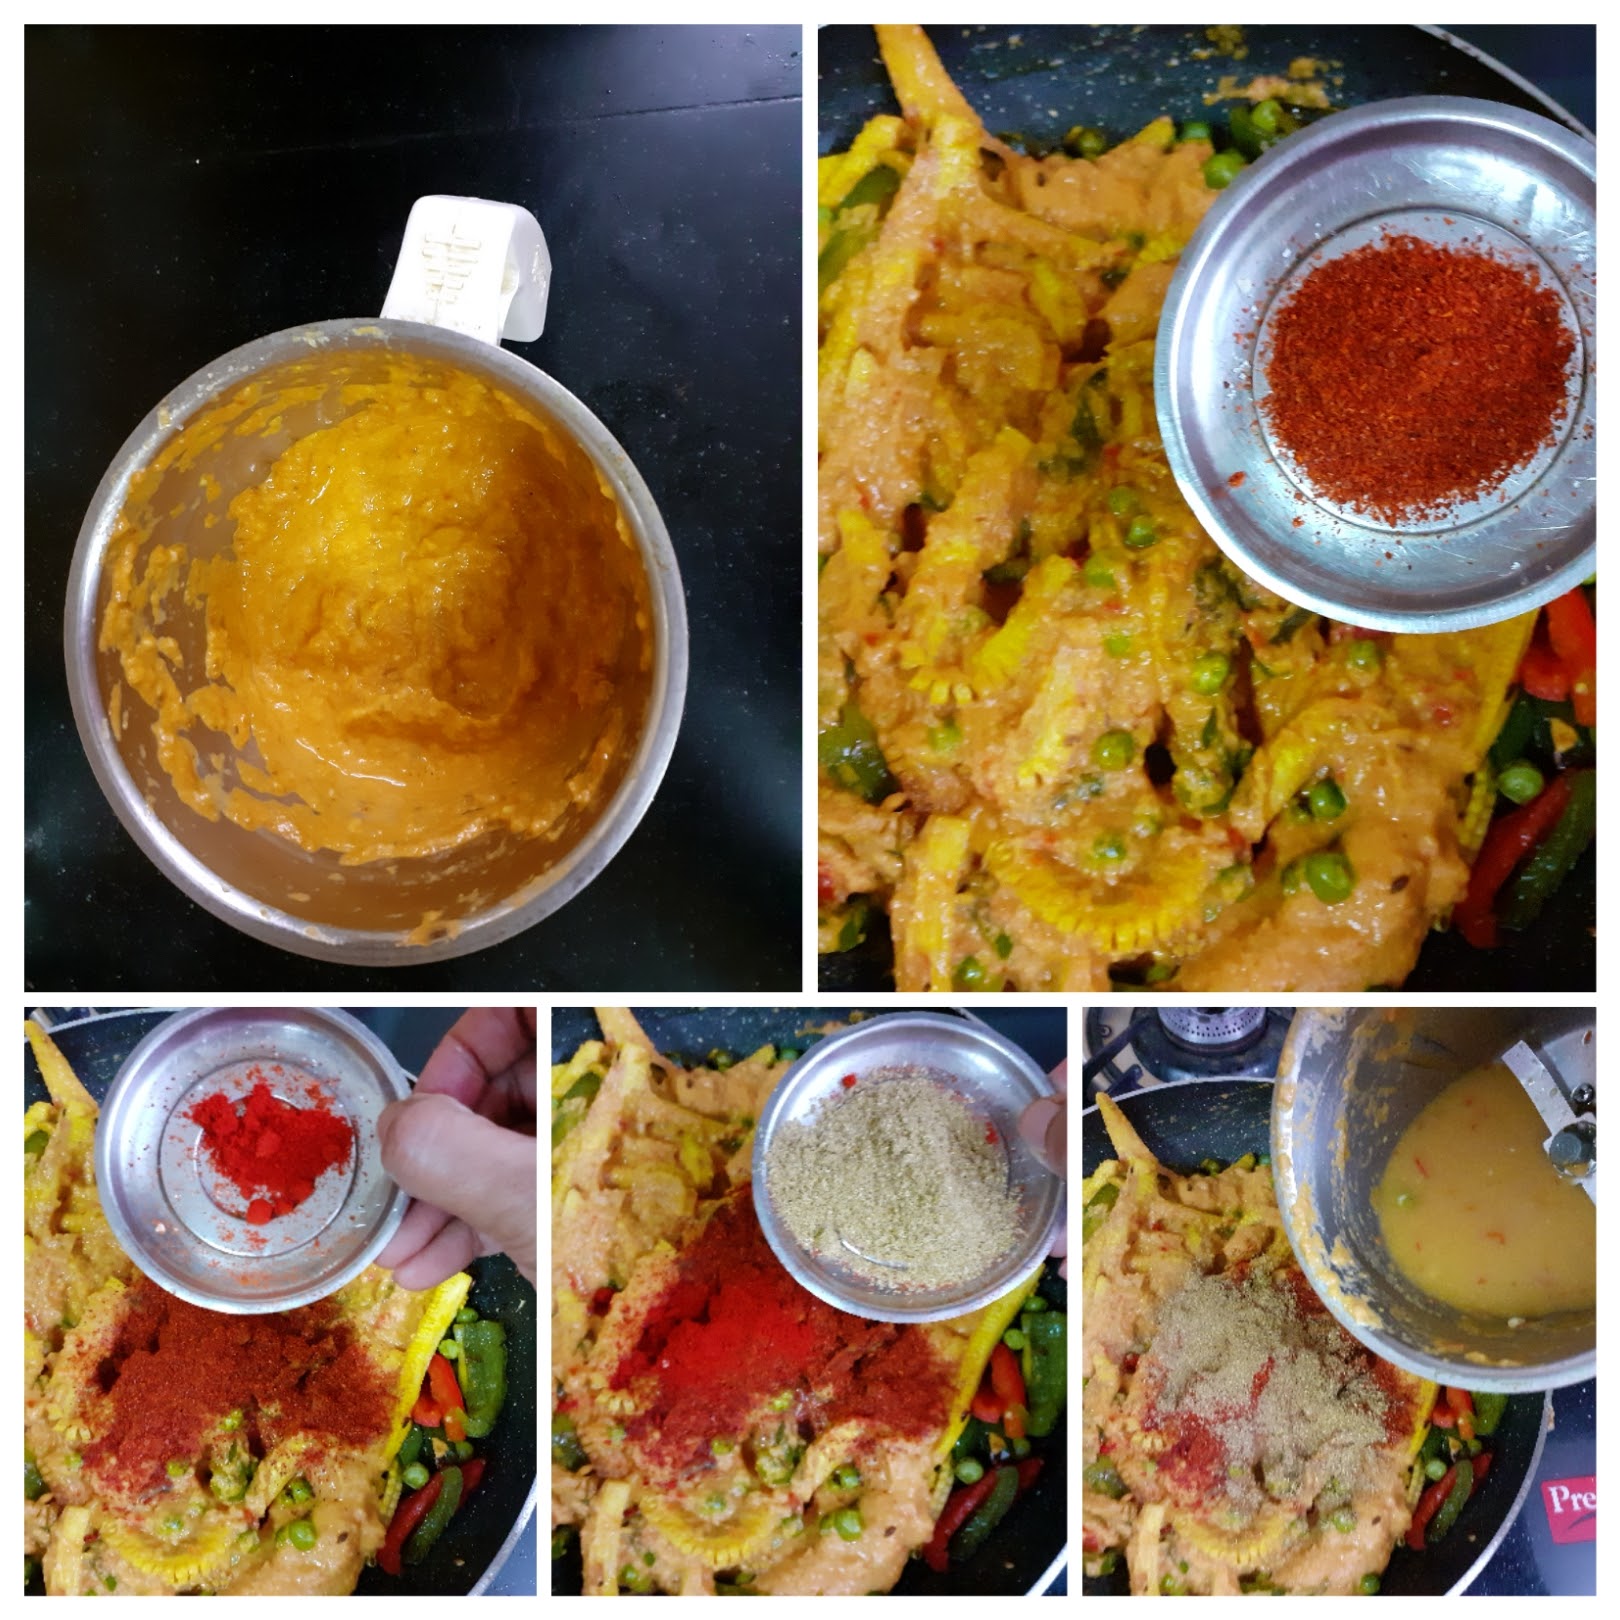
6. Stir nicely for the masalas to combine and cook until the water is partially absorbed, and gravy comes together. Finally, add the cream and put off the flame and sprinkle the garam masala giving the curry a final stir. The yummy Miloni Baby Corn and Bell peppers is ready to serve.
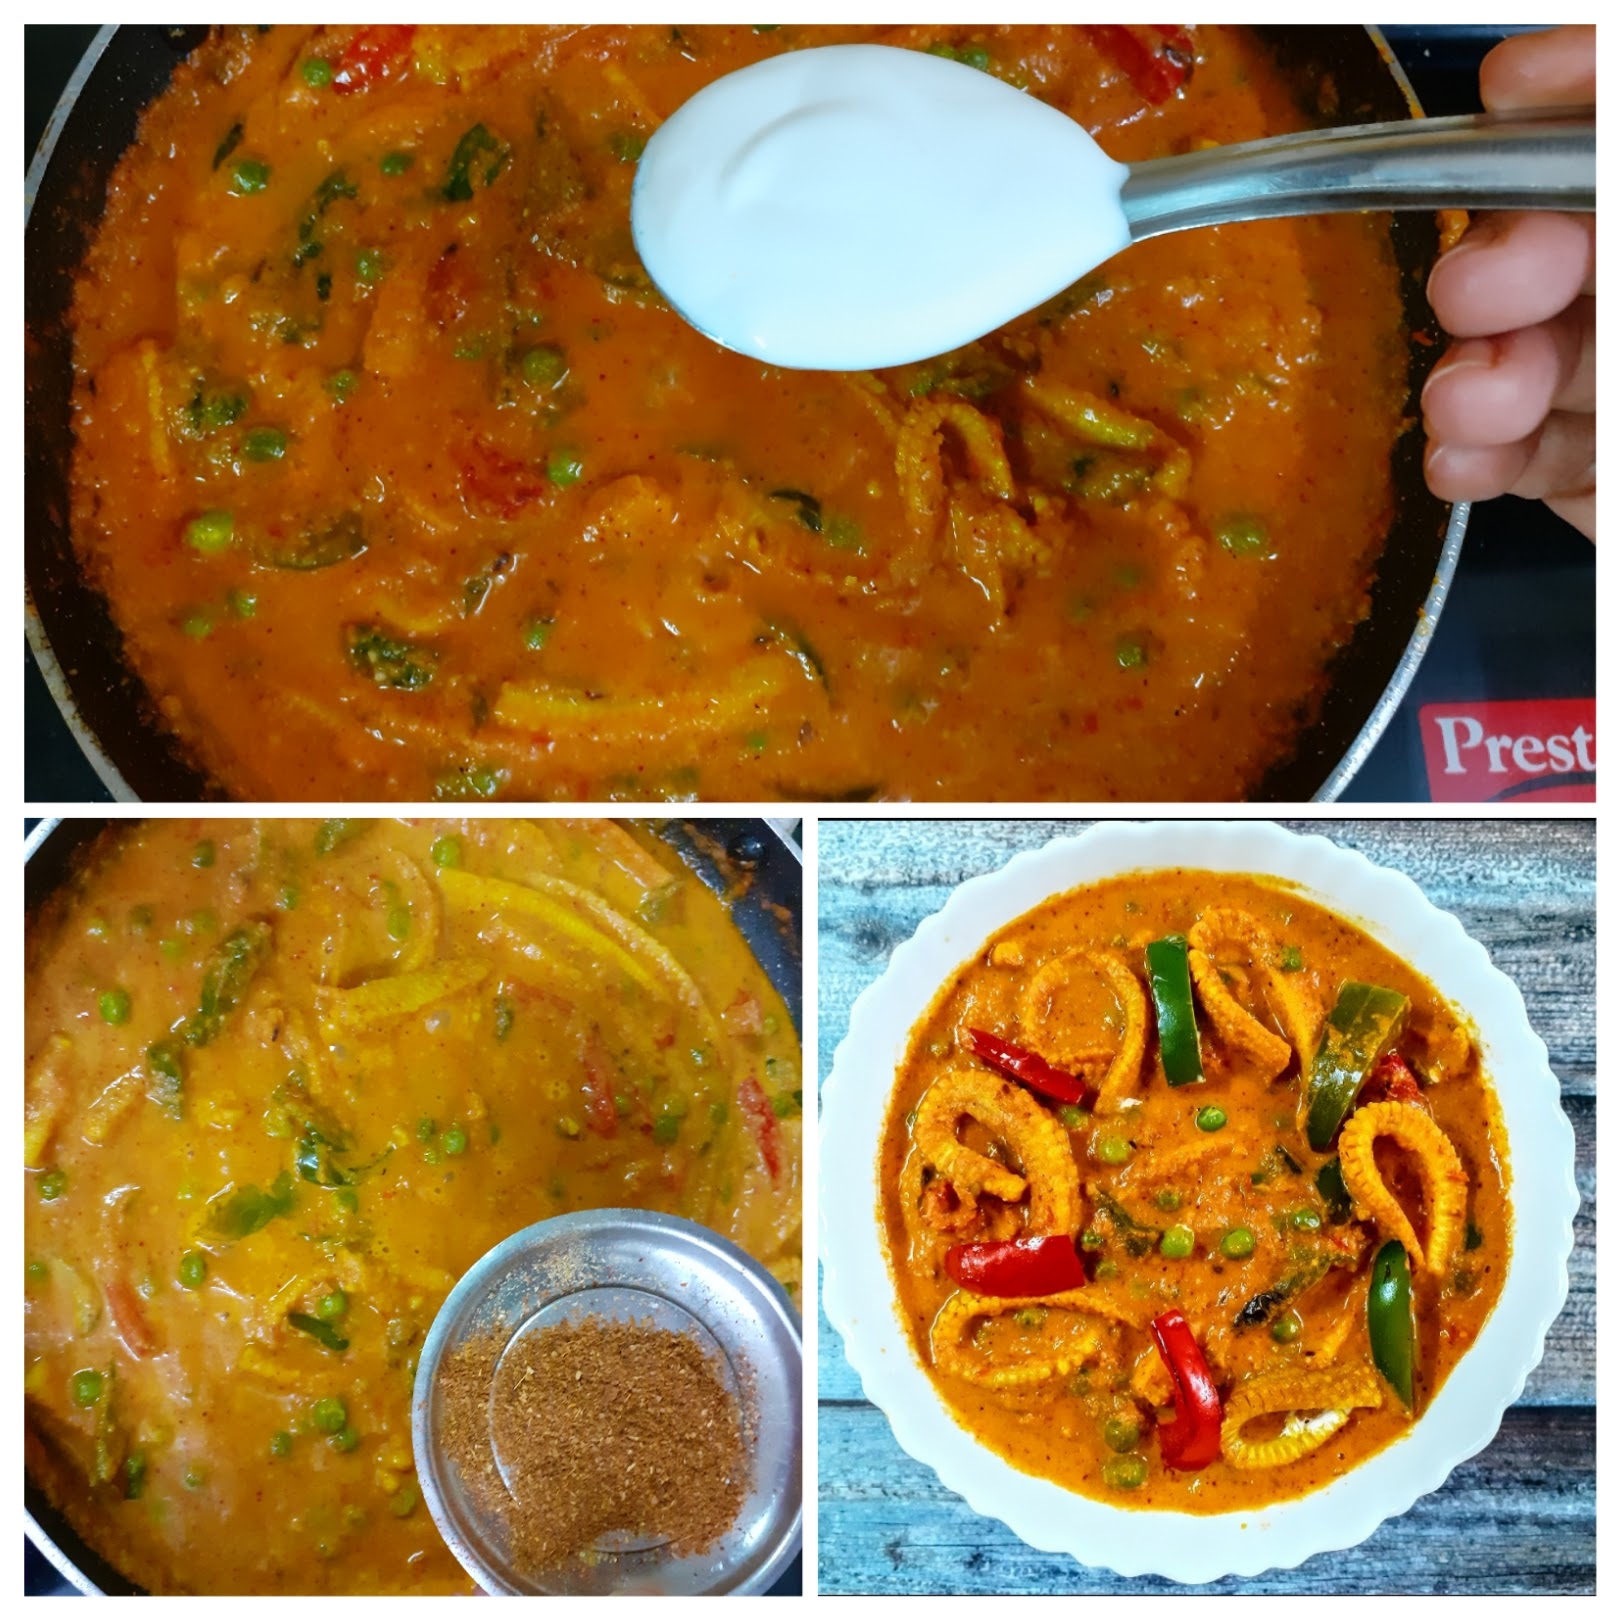
NOTES:
1. I have deliberately stayed clear of the regular mixed assorted Vegetables for this curry. There is a recipe for the regular mixed vegetable curry without onion and garlic, in case you are interested. It is very simple and basic recipe, which can be done by beginners too. Check it out here.
Menthiya Keerai Kootu/South Indian Methi Dal
Fenugreek or Methi green are my most favorite greens and i wish they were perennial. That said, even though they can be grown at home perennially, its always good to eat seasonal food, to get the maximum benefits out of them. These slightly bitter greens have loads of benefits to offer and one should make the most of it.
TOTAL TIME: 25 MINS COURSE: MAIN
CUISINE: SOUTH INDIAN SERVINGS: 4
AUTHOR: RAJNI RAM


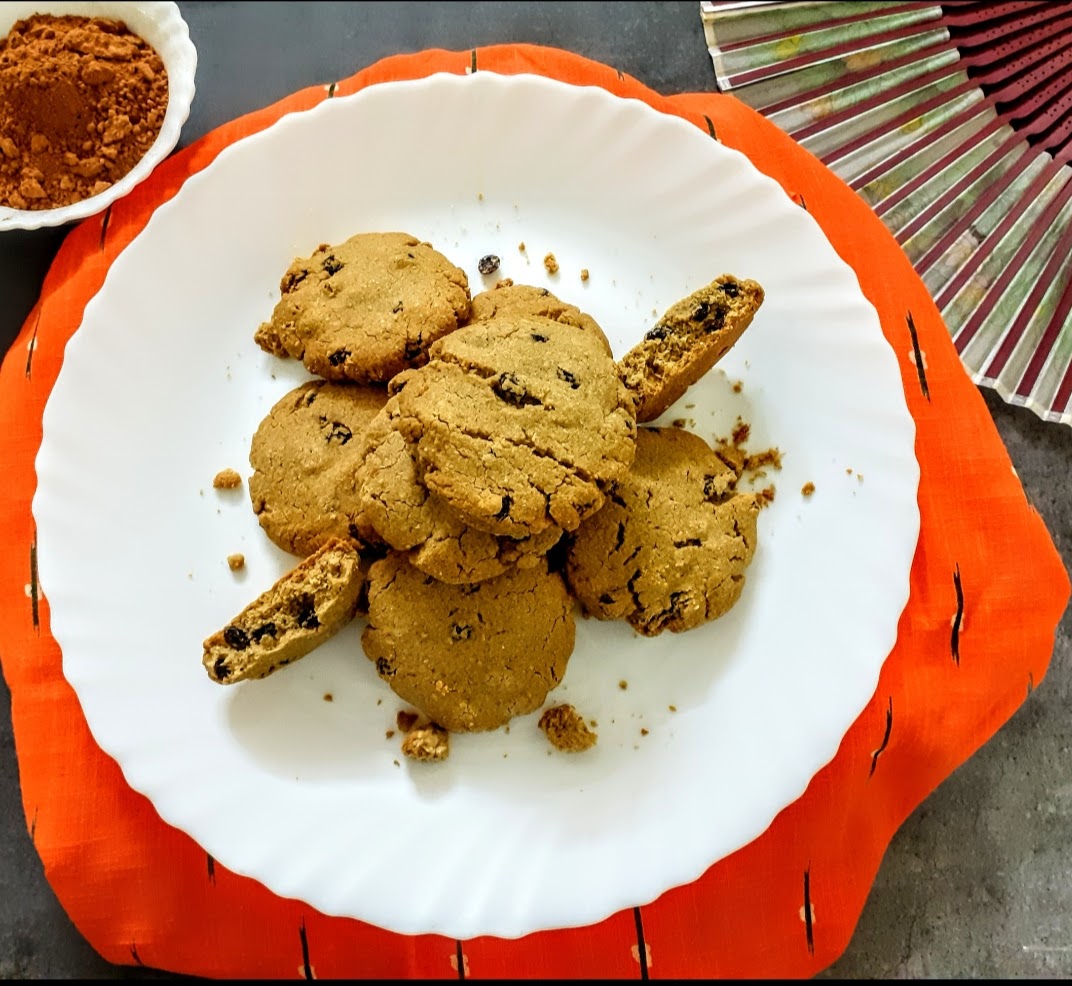
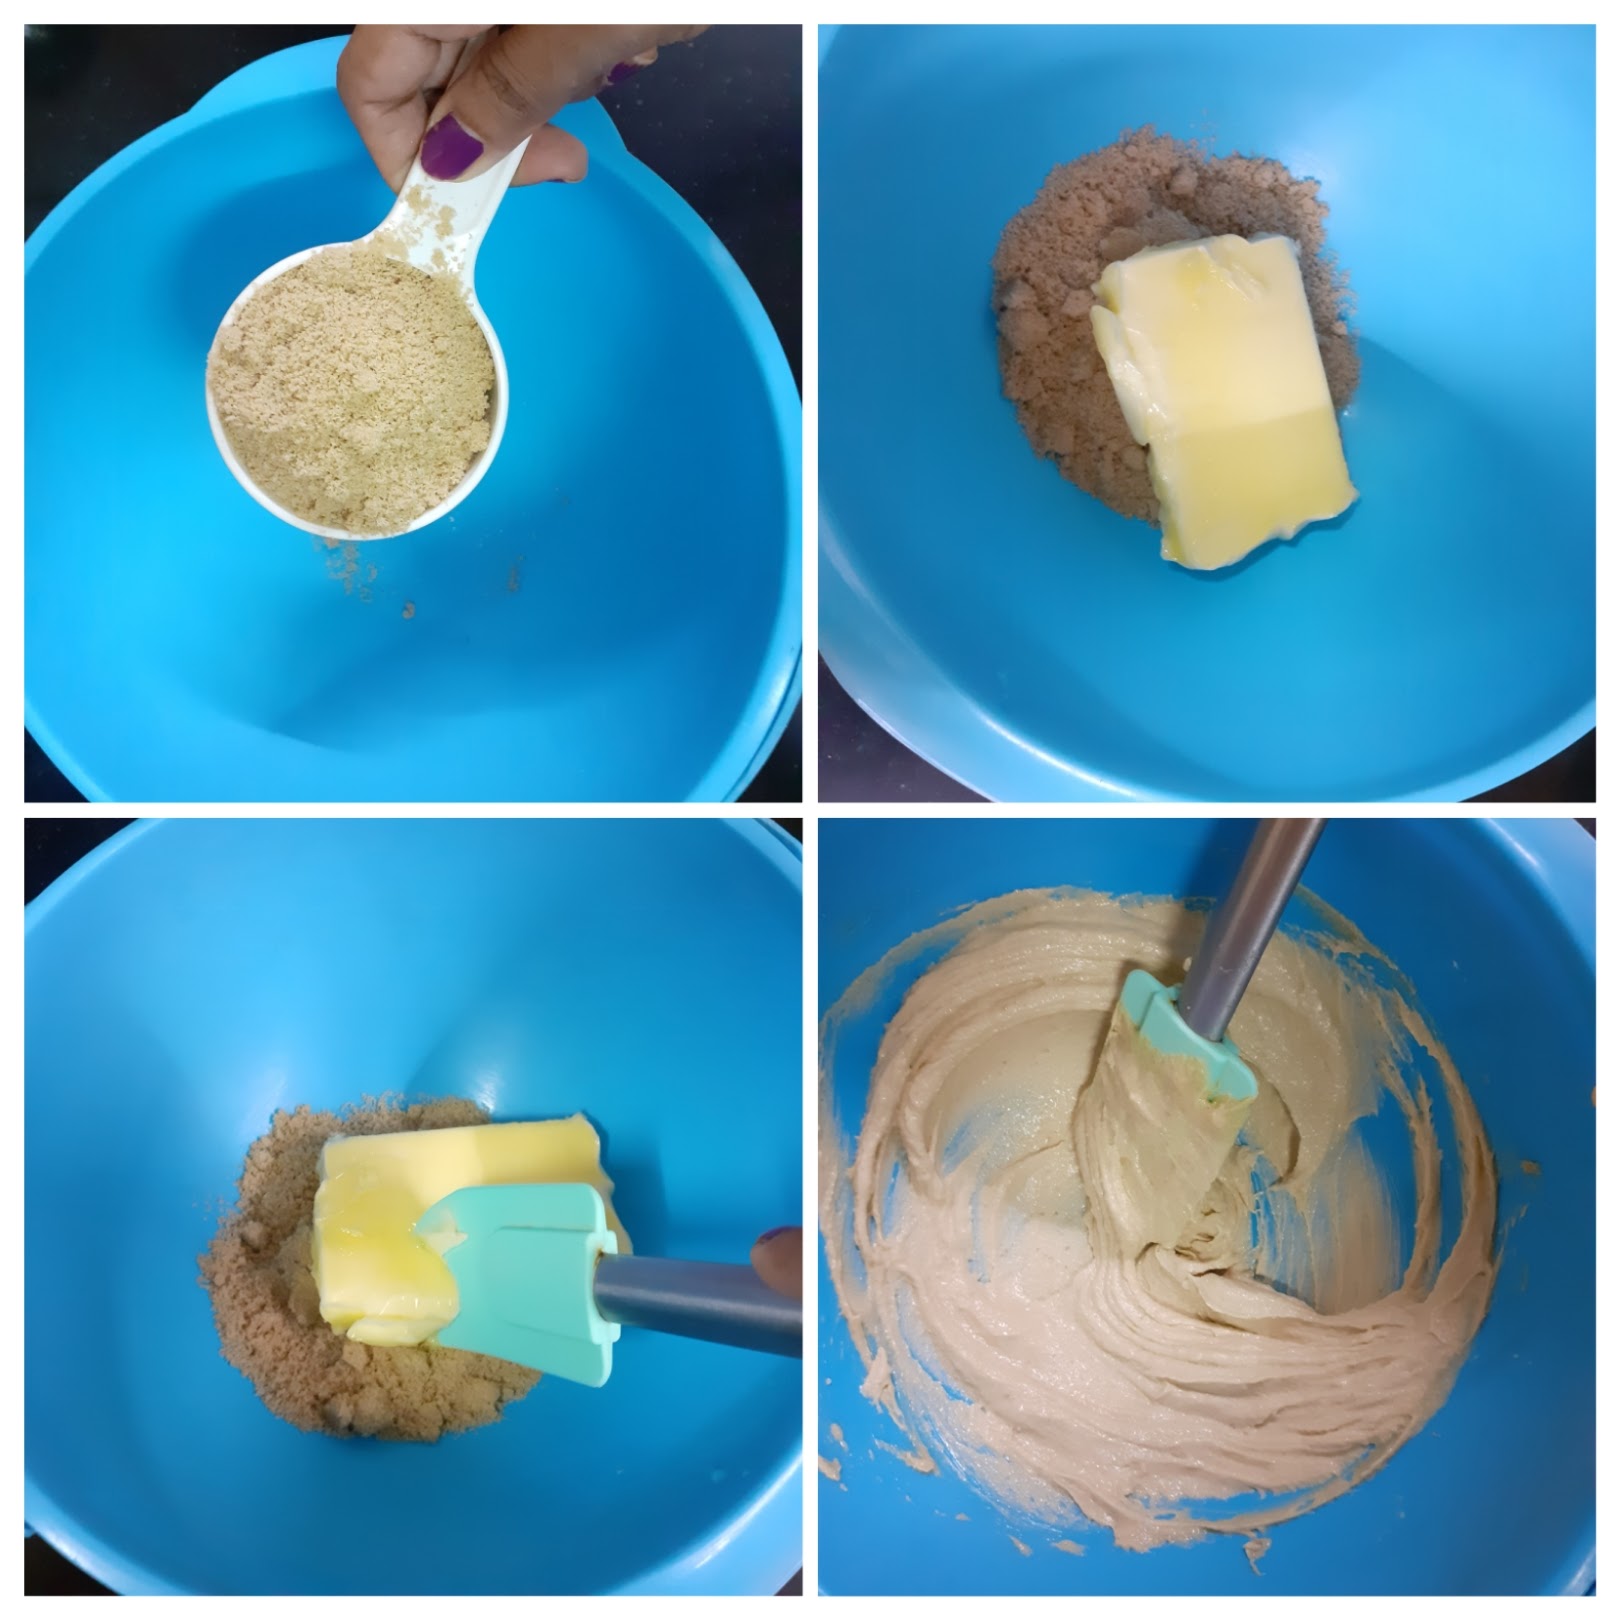
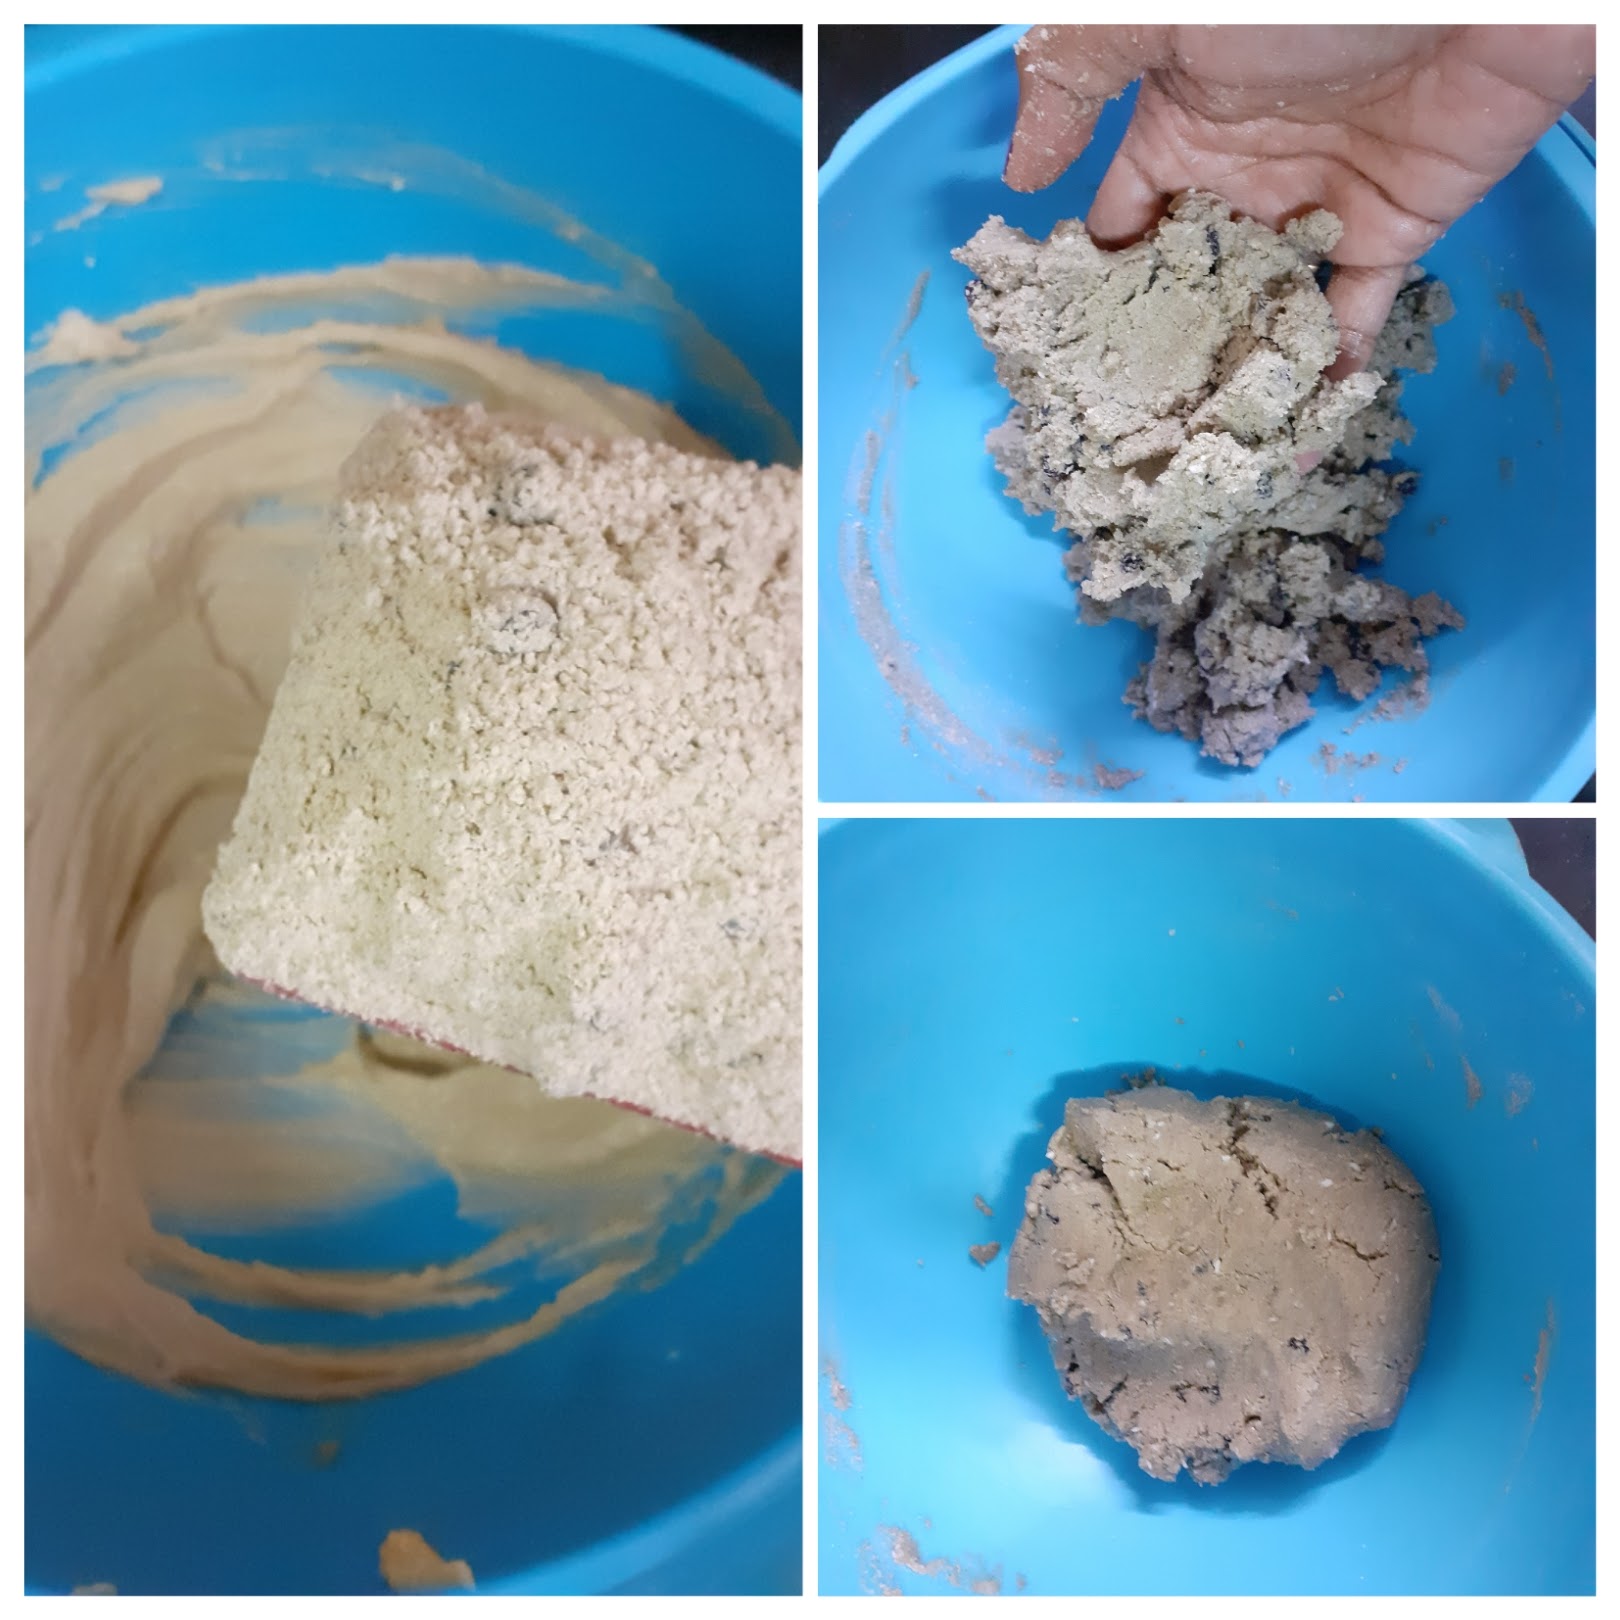
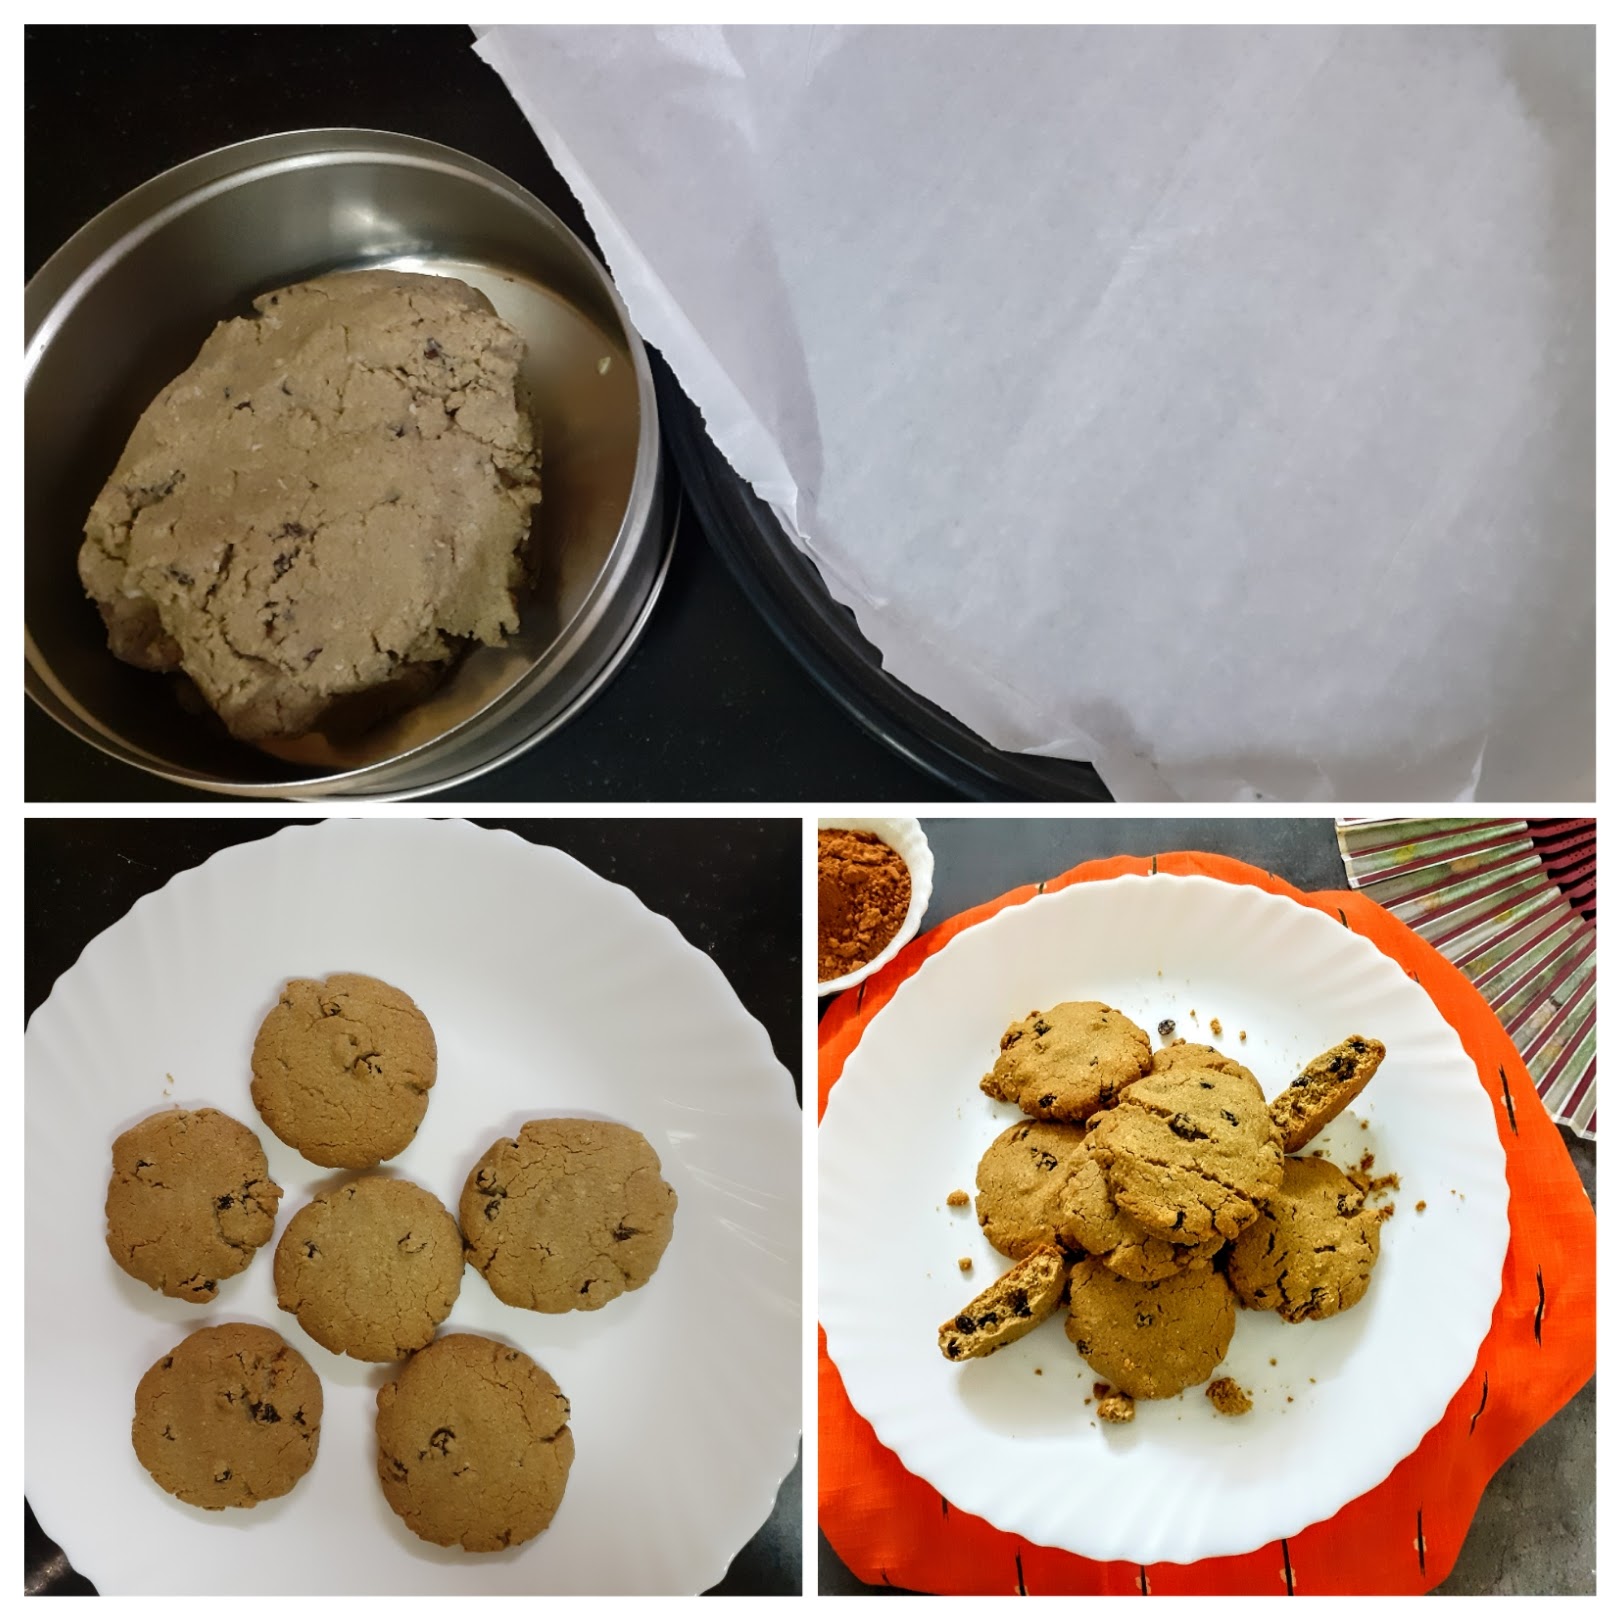
Bajra And Almond Flour Cookies (Millet Cookies)
I surfed the internet to find the easiest Cookie recipe with Millet’s (that are trending currently), using ingredients that are easily available in our pantries, I scored and scored but couldn’t find anything that interested me. By now those who are following the blog and my social media handles know that when it comes to baking, I choose the most easiest recipes, which can be mixed in a single bowl and stashed in the oven to bake. Zero mess.

If you tried this recipe and liked it please comment below. I would love to hear from you. If you have a query about the recipe email us and ill respond as soon as I can.
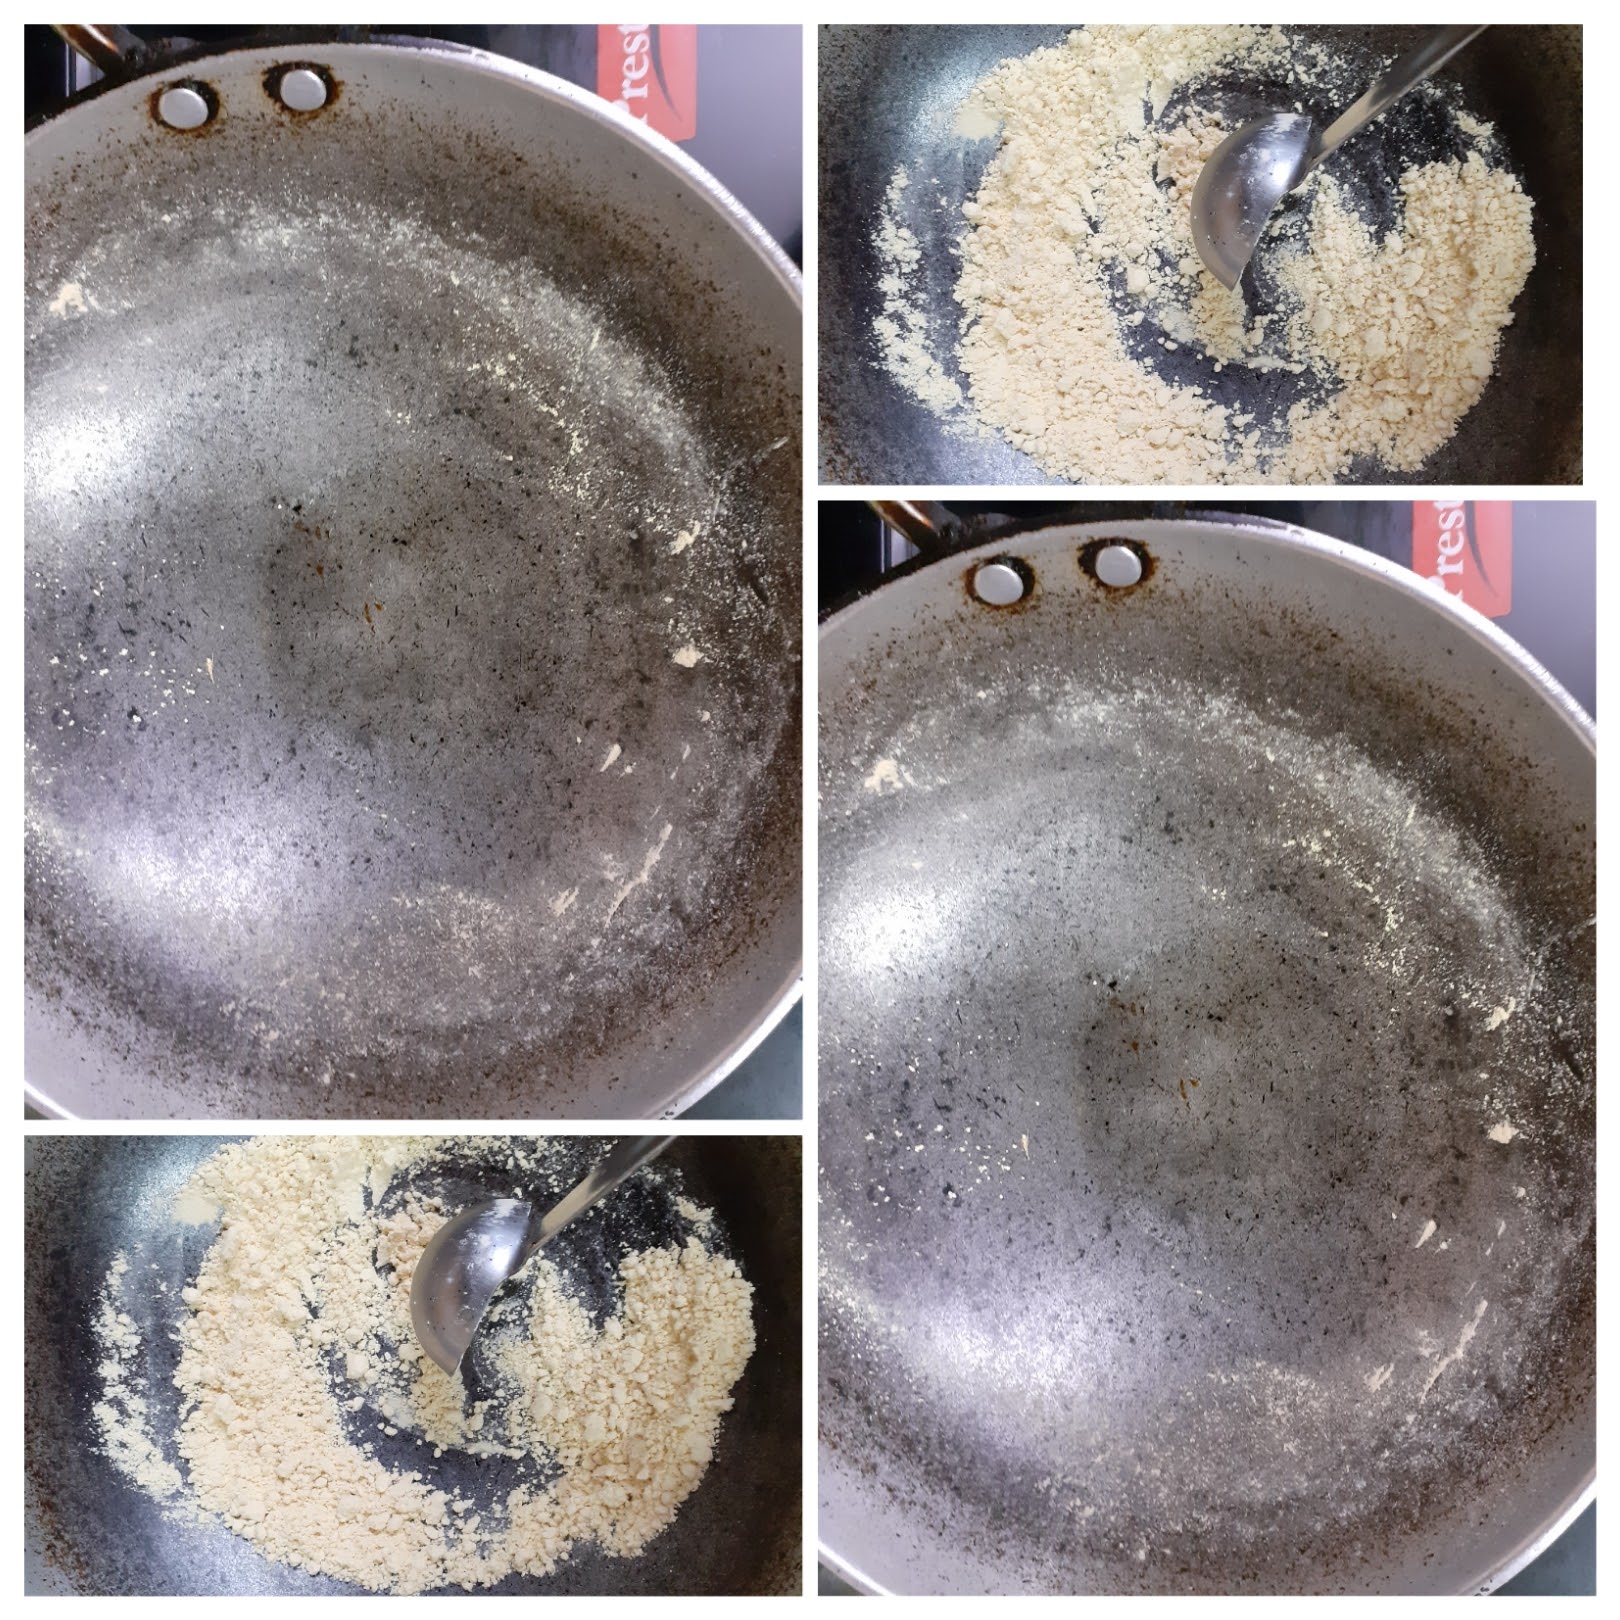
Kadai Paneer (Gravy)
Kadai Paneer is a dish I like and make very frequently at home. I have this weekly one day is Paneer day compulsorily policy. Here on my blog I have another Kadai Paneer recipe which is a Semi dry version of this recipe. Though the Masala is same, the way I made it is slightly different. The Semi dry Kadai Paneer recipe is good to go with Rotis, and other flat breads and is a good lunch box recipe as it doesn’t have much in the name of gravy and so is not messy at all, to carry in a box.
This gravy version is a great option to go with rice dishes like Matar Pulav, Jeera Rice, Biriyani etc. This version is what you will find at Dhabas in the North India. Considering Dhaba meals are supposed to be reasonably priced, do you think they would use Cashewnuts and cream etc, to thicken their gravy? Well, they use a very everyday ingredient that is found in Indian Kitchens and is gaining popularity the world over for its high protein quotient (and we have been using it since ages, that’s India for us, a treasure house of recipes and food culture). Any guesses as to what that ingredient is? Besan. Yes, the humble chickpea flour. To find out how to use it, read the recipe and try it out and you will agree that it tastes delicious.
While you are here try out my other Paneer recipes likes Palak Paneer, Mava Paneer Curry, Paneer Khurchan, Malpua with Gulab Jamun mix and Paneer, and more…
Here goes the recipe for Kadai Paneer gravy style-
PREP TIME: 15 COOK TIME:15 MINS
TOTAL TIME: 30 MINS COURSE: MAIN
CUISINE: NORTH INDIAN SERVINGS: 5
AUTHOR: RAJNI RAM
Ingredients:
Paneer 200 gm cubed
Onion 1 large cut into petals
Onion 1 medium size chopped finely
Capsicum 1 medium cut to large cubes
Green chillies 2 slit lengthwise
Ginger garlic paste 1 tsp
Garlic 3 to 4 cloves (big ones)
Tomatoes 2 large pureed
Tomato 1 medium diced
Turmeric powder 1/2 tsp
Salt as required
Cumin seeds 1 tsp
Besan/ Chick pea flour 1.5 tbsp roasted on low flame until aromatic
Methi seeds/ Fenugreek seeds 2 pinches
Garam Masala Powder 1/2 tsp
To be ground:
Coriander seeds 1 tbsp
Cloves 2
Jeera/ Cumin seeds 1 tsp
Dry red chilli 2 regular and 1 Kashmiri dry red chilli (optional)
Directions:
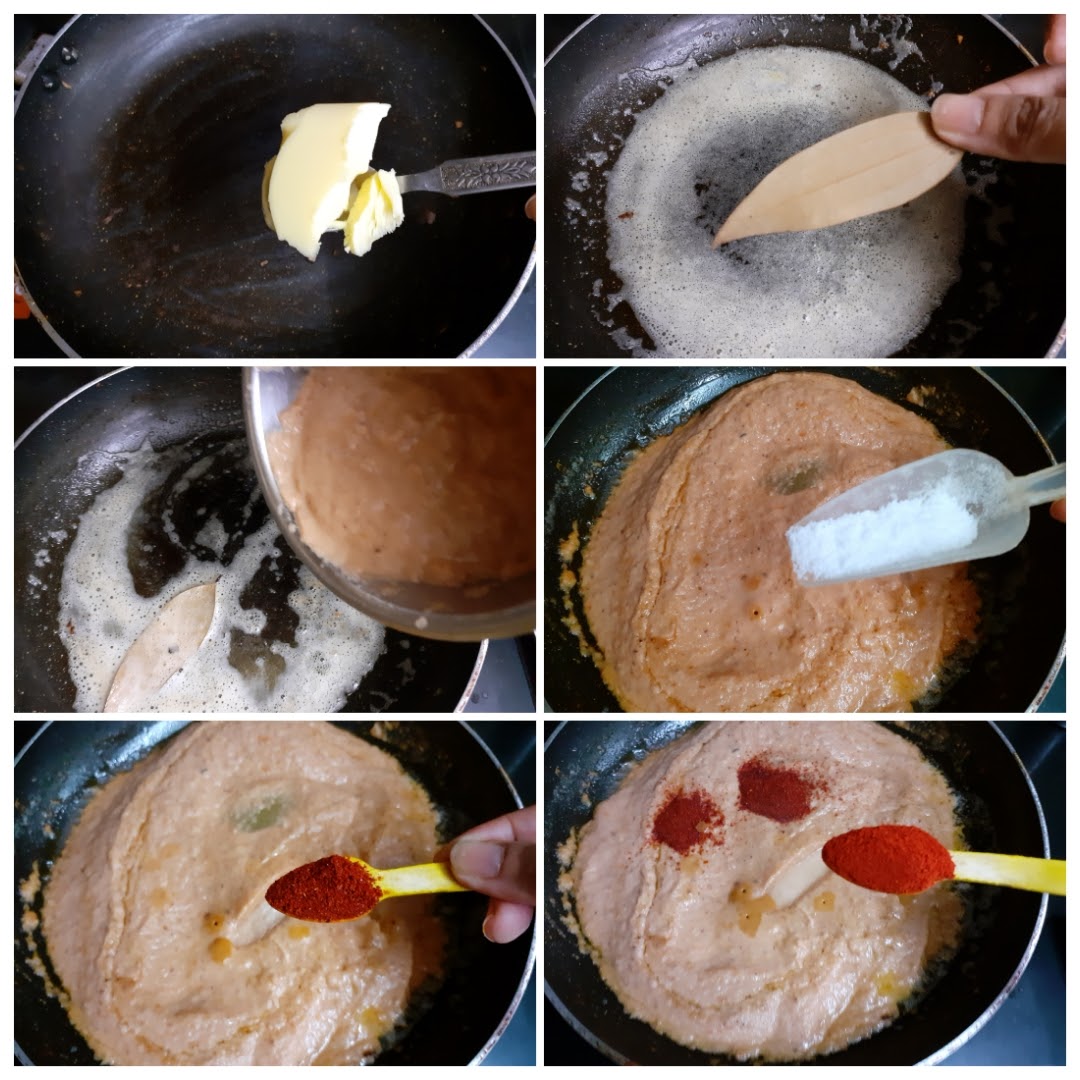
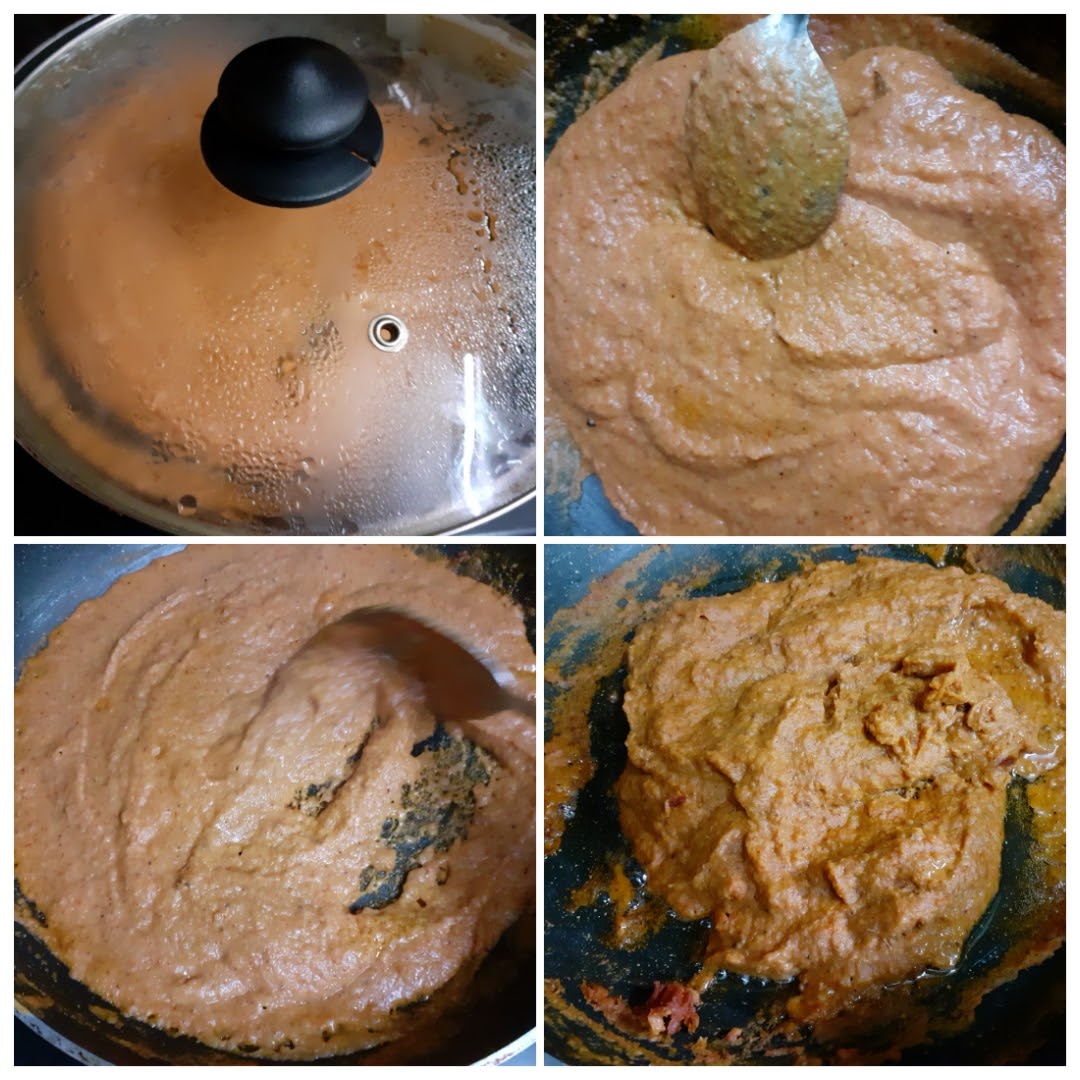
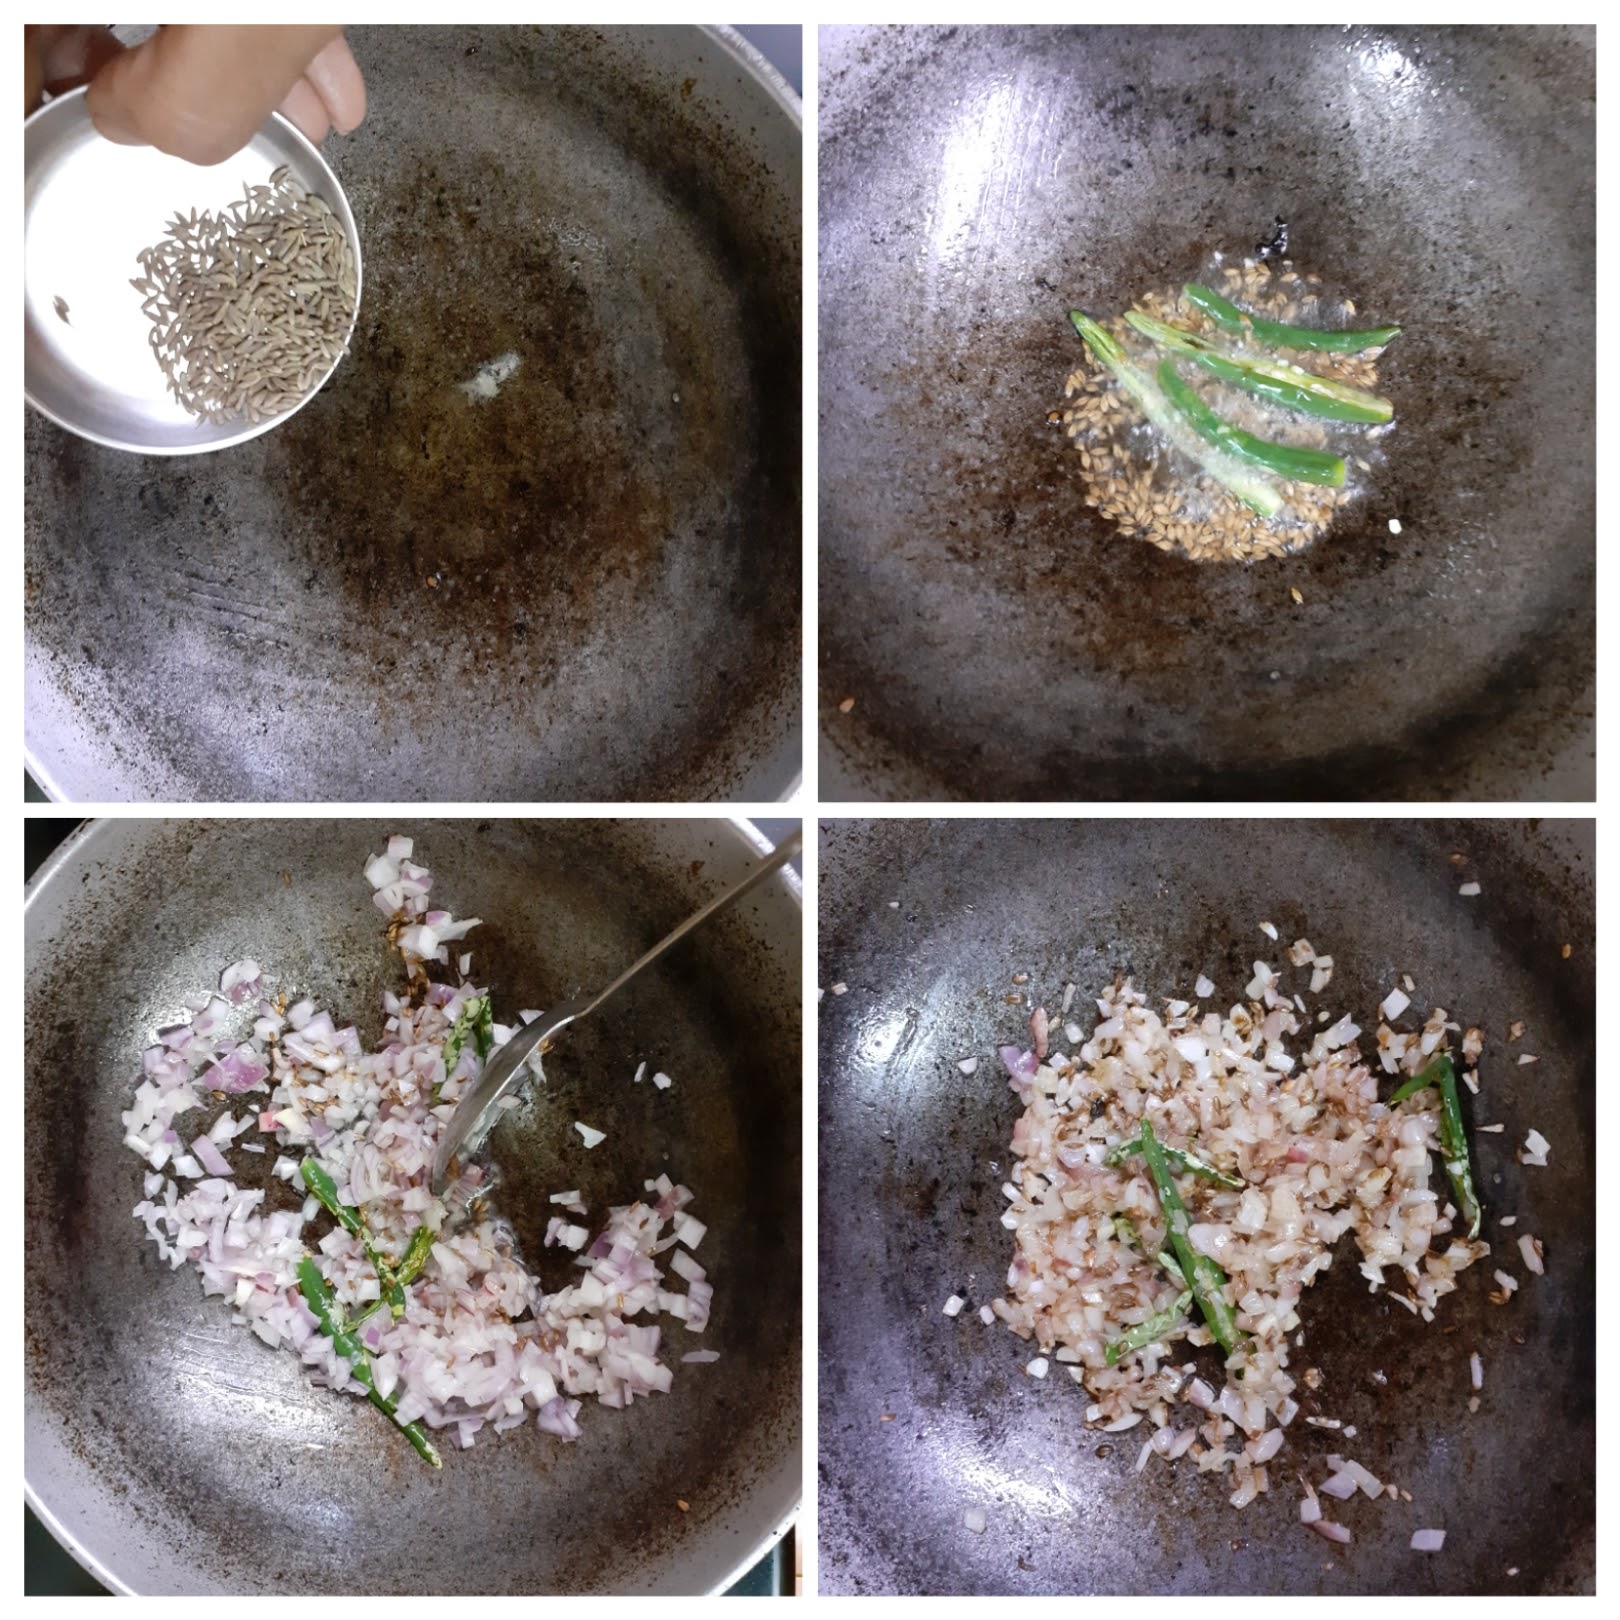
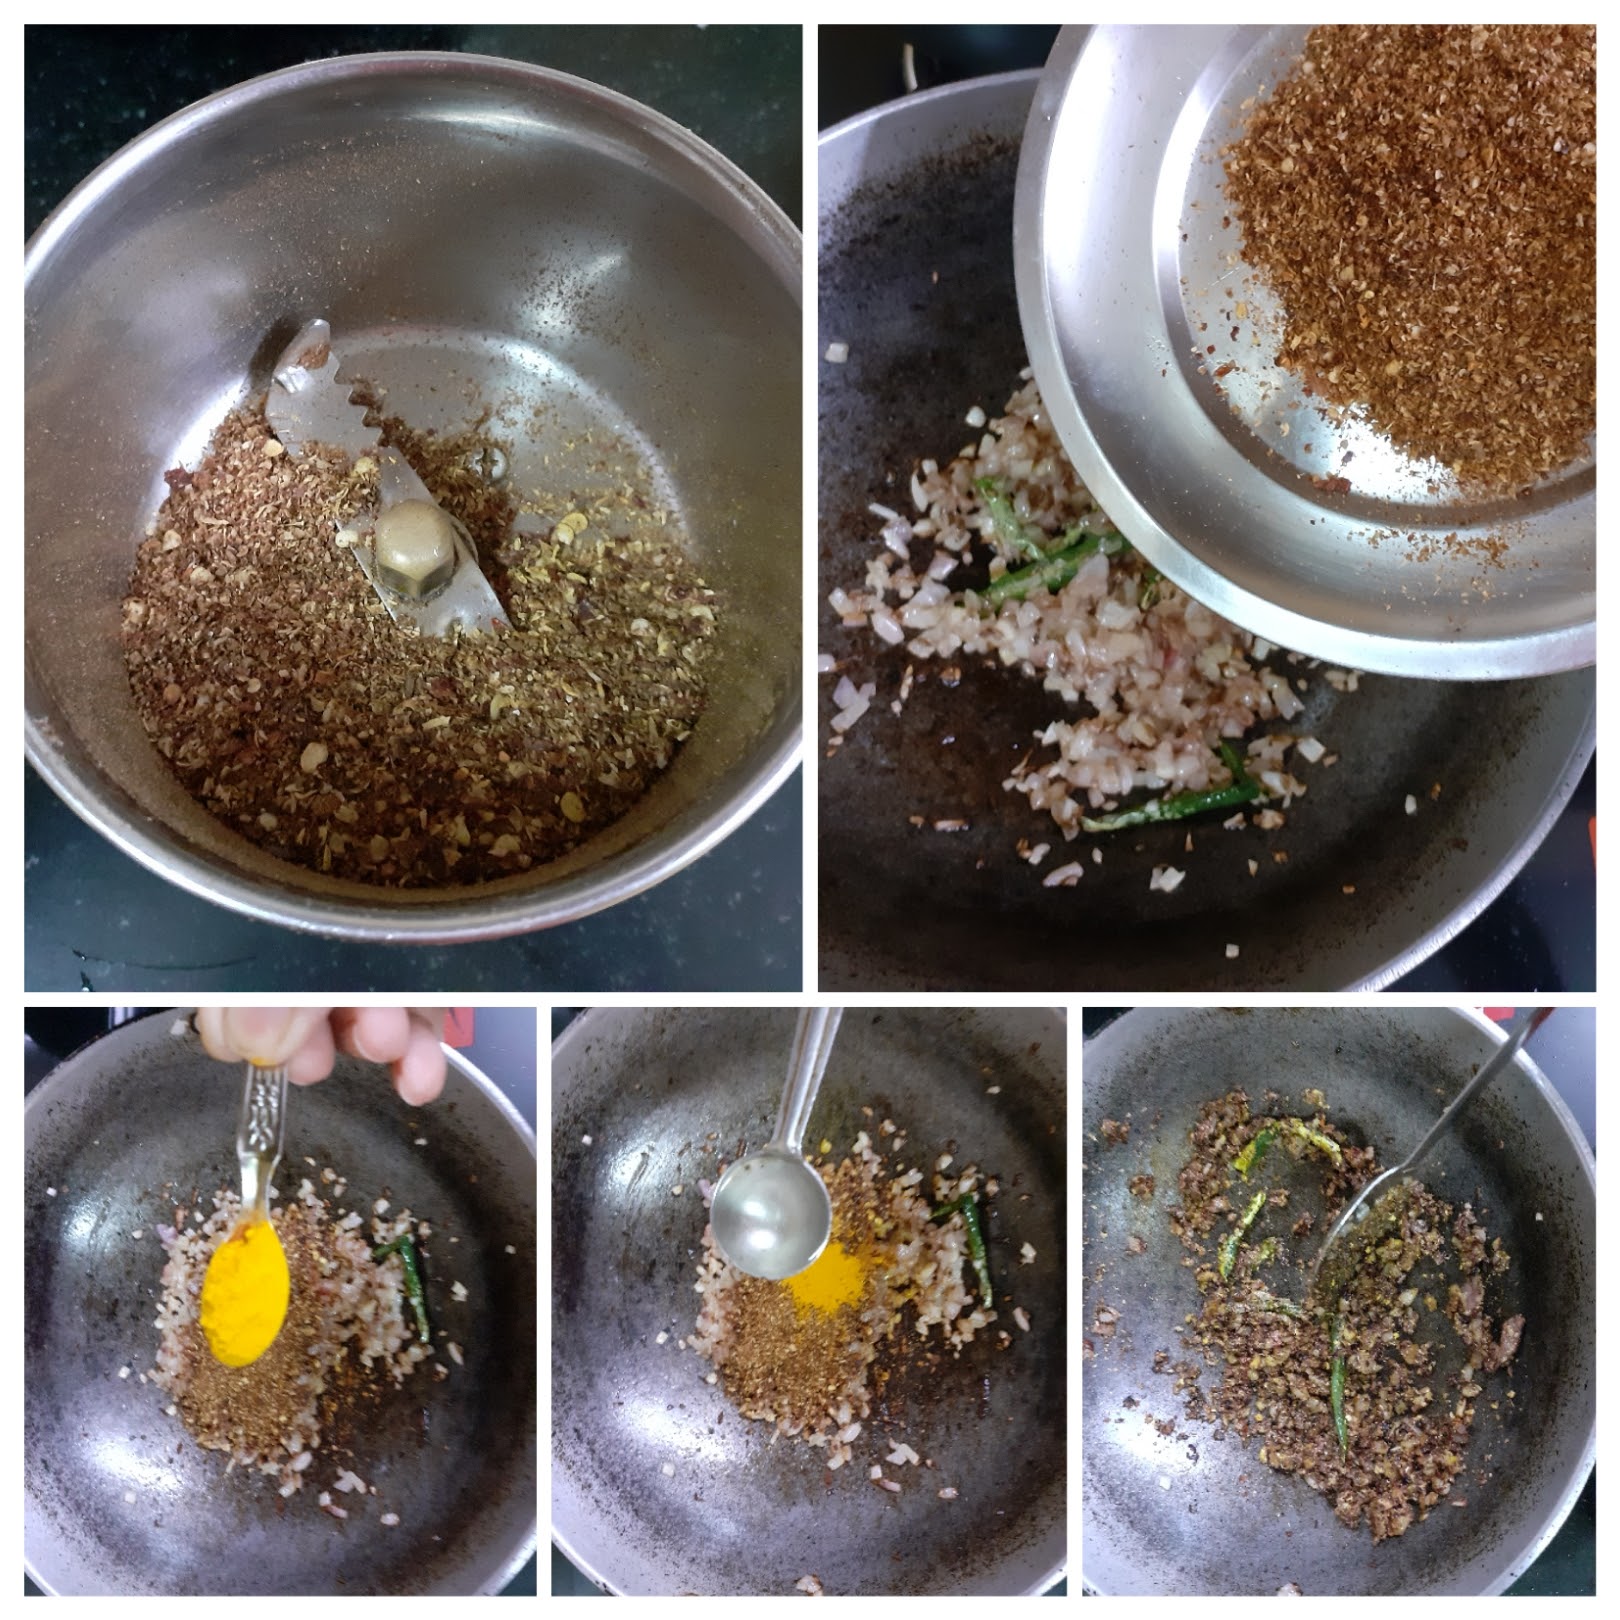
Take a Kadai and heat it, add the Besan and saute on low flame until it turns aromatic and light brown in colour. Keep stirring so that the Besan does not burn. Once aromatic, transfer to a plate. Now in the same kadai take 1 tbsp oil and drop in the Onion petals and saute for 1 minute. Now add the cubed capsicum and continue to saute over high flame for another 1 minute. Take care to stir constantly and the onion and capsicum should not overcook or turn limp. Transfer to a plate. Now in the same kadai take some more oil and add cumin seeds. Once they start crackling add the slit green chillies and saute for 30 secs. Now add the finely chopped onions and crushed garlic and continue to saute until the onion starts turning brown. In the meanwhile roast and grind the spices mentioned under “to be ground” and set aside. Grind them coarse and not very fine. Now add this powder to the sauteed onions, add turmeric powder, and if the mixture looks dry add another teaspoon of oil and saute the masalas in oil. Now add the roasted Besan and saute until the mixture starts appearing crumbly, but dry. To this add the tomato puree and mix nicely. Smoothen out all the lumps from the Besan. Add salt, followed by 1 to 1.5 cups water, drop in the diced tomatoes and cook for 5 minutes. Check for taste and add red chilli powder if required and adjust salt if required. Now add the cubed Paneer pieces , and the previously sauteed onion and capsicum and stir nicely. Add the fenugreek/Methi seeds. Cook until the gravy thickens. If you are particular about adding cream add now(this step is optional). Add garam masala powder and put off the flame. The yummy Kadai Paneer gravy style is ready. Enjoy with your favourite rice or Flat bread. Bon Appetit.
STEPWISE RECIPE FOLLOWS:
1. Take a Kadai and heat it, add the Besan and saute on low flame until it turns aromatic and light brown in colour. Keep stirring so that the Besan does not burn. Once aromatic, transfer to a plate.
2. Now in the same kadai take 1 tbsp oil and drop in the Onion petals and saute for 1 minute. Now add the cubed capsicum and continue to saute over high flame for another 1 minute. Take care to stir constantly and the onion and capsicum should not overcook or turn limp. Transfer to a plate.

3. Now in the same kadai take some more oil and add cumin seeds. Once they start crackling add the slit green chillies and saute for 30 secs. Now add the finely chopped onions and crushed garlic and continue to saute until the onion starts turning brown.
4. In the meanwhile roast and grind the spices mentioned under “to be ground” and set aside. Grind them coarse and not very fine. Now add this powder to the sauteed onions, add turmeric powder, and if the mixture looks dry add another teaspoon of oil and saute the Masalas in oil.
5. Now add the roasted Besan and saute until the mixture starts appearing crumbly, but dry. To this add the tomato puree and mix nicely. Smoothen out all the lumps from the Besan. Add salt, followed by 1 to 1.5 cups water, drop in the diced tomatoes and cook for 5 minutes. Check for taste and add red chilli powder if required and adjust salt if required.
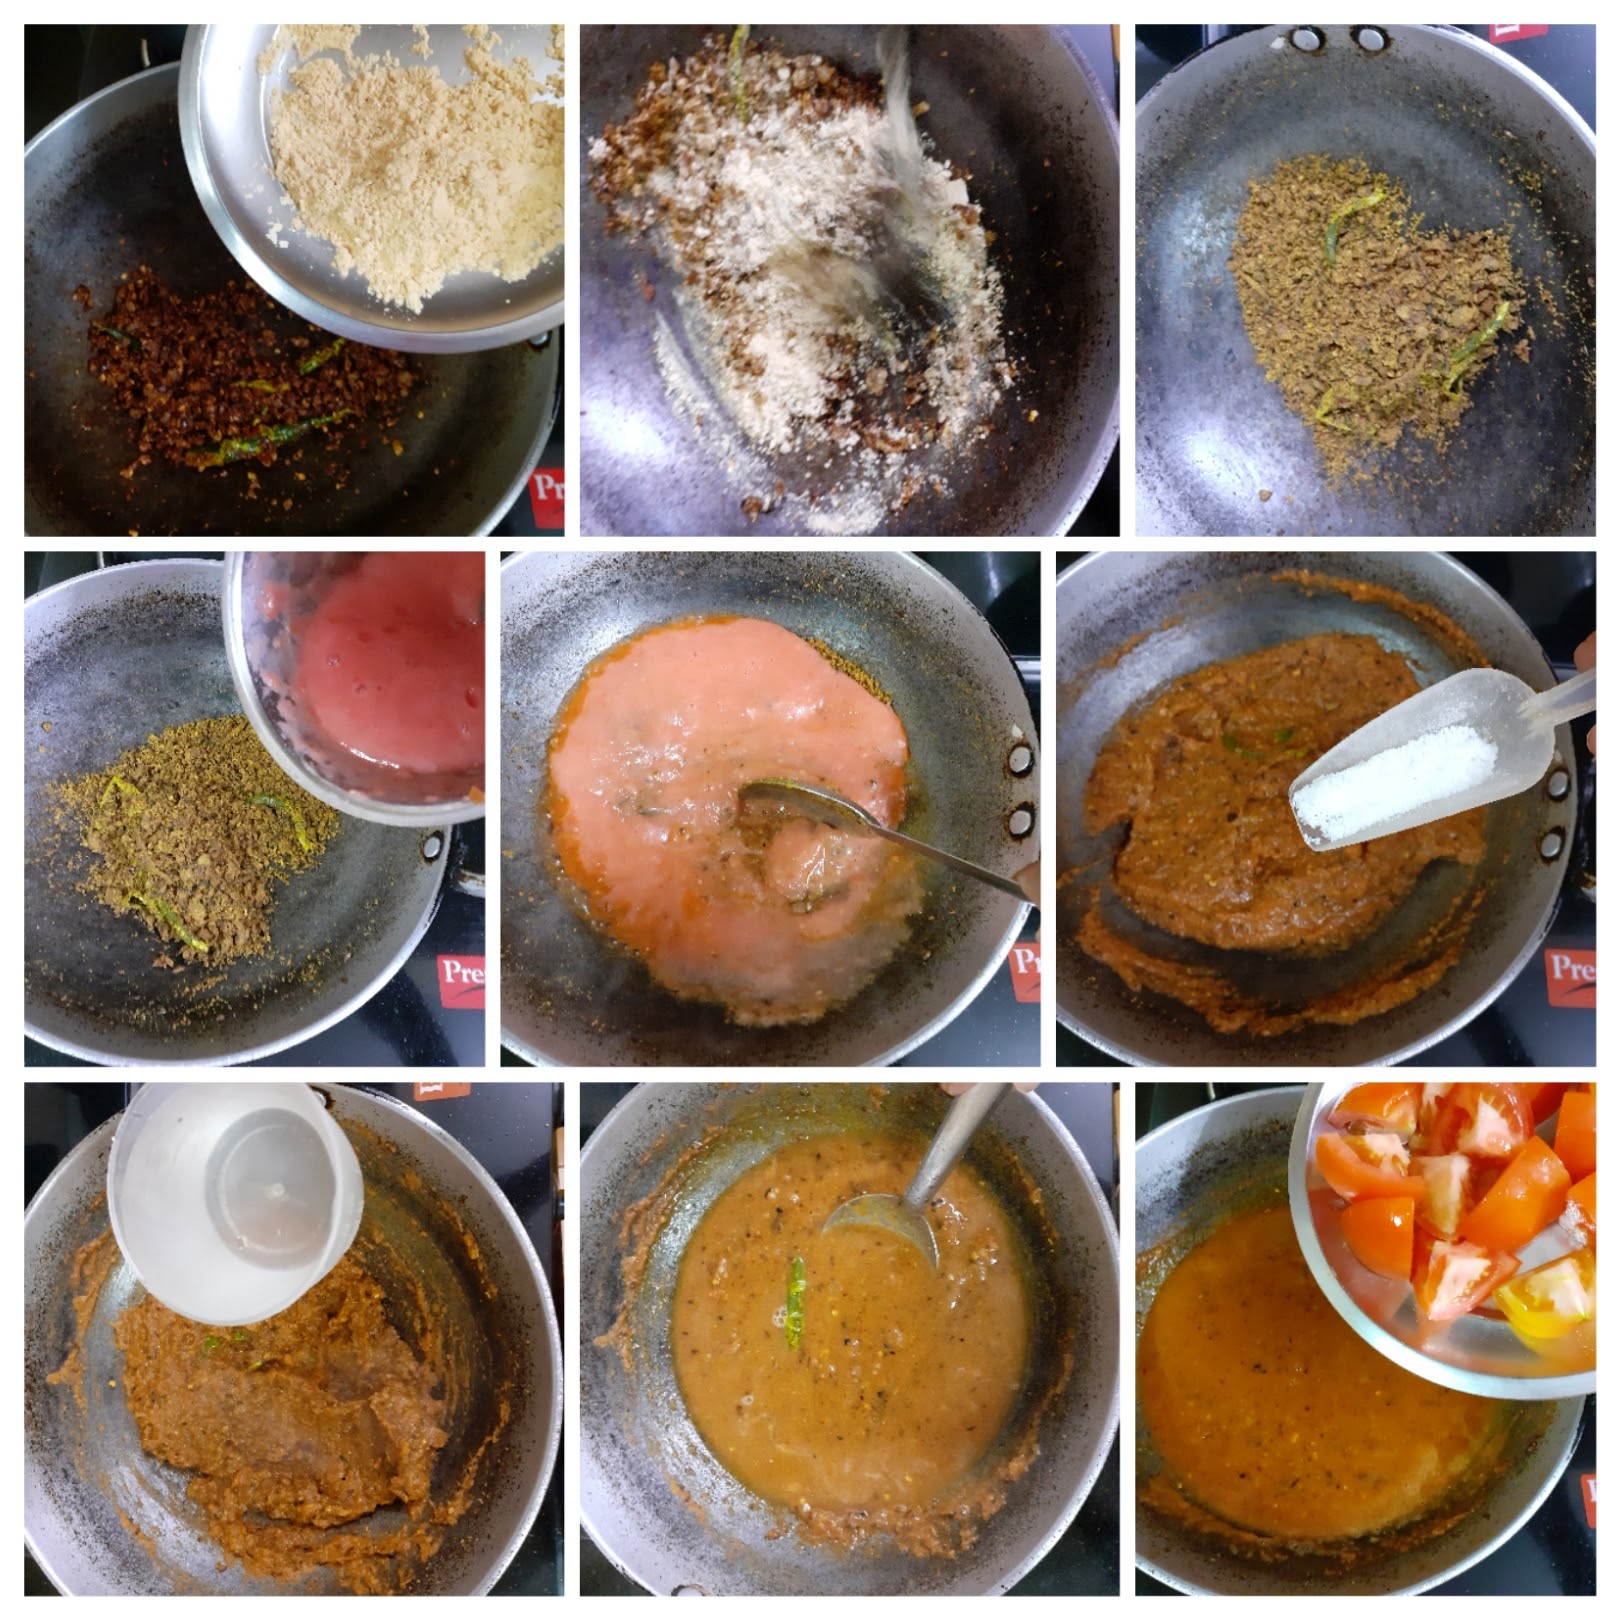
6. Now add the cubed Paneer pieces , and the previously sauteed onion and capsicum and stir nicely. Add the Methi seeds and cook until the gravy thickens. If you are particular about adding cream add now(this step is optional). Add Garam Masala powder and put off the flame. Garnish with coriander leaves. The yummy Kadai Paneer gravy style is ready.
NOTES:
1. Roast the Besan very carefully. Any burnt taste or flavour will change the taste of the dish. I always have a bottle of roasted Besan in my kitchen it helps to thicken gravies in a jiffy.
2. The roast and ground powder can be made ahead and stored in a bottle. This called the Kadai Masala because of which the dish gets its name.
3. I have not used cream in this dish. If you prefer adding cream, do go ahead and do so. I have specifically mentioned when to do so.
If you tried this recipe and liked it please comment below. I would love to hear from you. If you have a query about the recipe email us and ill respond as soon as I can.
Garlic Naan
Usually when we think of Naan we think of eating it at a restaurant. That’s also the reason why I have never attempted to make this at home until now. But the Pandemic has made us all crave restaurant style food at home and so the search for the perfect Naan recipe, which can be made at home easily, without any sophisticated gadgets was on.
Its also common knowledge that an Iron Kadai is used to cook the Naan. But I wanted to get the dough right. One which will yield perfect Naans without much effort and also I did not want to make the instant one with baking soda, because when baking soda is used the dough must go on the girdle immediately without resting it. I always prefer resting the dough, be it Roti’s, Paratha’s or Naan. So, in this recipe I have used yeast, because that is what gives the perfect texture and fluffiness to the Naan.
As far as possible I try to use less, or no Maida, but, to get the fluffiness the Maida needs to be added, whereas taste and nutrition comes from wheat. So in this recipe I have used both. The result was fluffy and perfectly cooked Naan’s.
While you are here check out my other bread recipes like Aloo Methi Paratha, Beetroot Paratha, Missi Roti and more…
Here is the recipe of Garlic Naan for you-
PREP TIME: 10 MINS+ 2 hrs COOK TIME:15 MINS
TOTAL TIME: 2 hr 25 MINS COURSE: MAIN
CUISINE: NORTH INDIAN SERVINGS: 5
AUTHOR: RAJNI RAM
Ingredients for dough:
Whole Wheat flour 2 cups
Maida 2 cups
Water(lukewarm) 1 cup ( refer note1)
Dry yeast 2 tsp
Sugar 1 tbsp
Salt to taste or 1 tsp
Oil 3 tbsp
Curd 2 tbsp
Milk less than1/2 cup
Fresh coriander leaves finely chopped
Kalonji/ Nigella seeds 2 tsp
For Garlic butter:
Table butter/salted butter 50 gm
Garlic 2 pods minced
Coriander leaves finely chopped 1 tsp
Directions to make Garlic butter: Put all ingredients in a microwave safe bowl and microwave for 30 seconds, alternately put the ingredients in a bowl and melt the butter.
Directions:
In a large mixing bowl take both the flours, add the salt and mix well. Now in a bowl take lukewarm water, add the sugar followed by the yeast. Let this stand for 10 mins or until the yeast blooms and becomes frothy. Now to the bowl of bloomed yeast add the oil, milk and curd and mix well. Now use this mixture to knead the dough. Add little at a time to knead the dough. In case after using the whole mixture the dough is still dry, add water to make the dough. The dough will be sticky, but stiff. Grease a container and put the dough in it to rest 2 hours. After 2 hours, the dough would have doubled up in size. Take it out, punch to release the air inside and knead again. Now divide the dough into 10 equal portions. Dust a little flour and roll out in oval shape. Sprinkle the Kalonji/Nigella seeds and fresh coriander and gently press it on the rolled dough. Take an iron Kadai (non stick doesn’t give the best results), and invert it over the gas flame. When it is hot, stick the rolled out Naan on it and cook. When done the Naan comes out easily, without sticking. Now remove the Naan from the Kadai and transfer over direct flame and cook on both sides like how you would a Phulka. Transfer to a plate, apply the garlic butter over it and serve hot.
Serving Suggestions: Serve this Naan with Paneer Butter Masala, Mava Paneer Curry. Also goes well with Dal Makhni, Paneer Khurchan, Choley or Rajma.
STEPWISE RECIPE FOLLOWS:
1. In a large mixing bowl take both the flours, add the salt and mix well. Now in a bowl take lukewarm water, add the sugar followed by the yeast. Let this stand for 10 mins or until the yeast blooms and becomes frothy.

2. Now to the bowl of bloomed yeast add the oil, milk and curd and mix well. Now use this mixture to knead the dough. Add little at a time to knead the dough. In case after using the whole mixture the dough is still dry, add water to make the dough. The dough will be sticky, but stiff. Grease a container and put the dough in it to rest 2 hours. ( Please add the sugar, curd and milk, those pictures are not here and will be added as soon as possible)
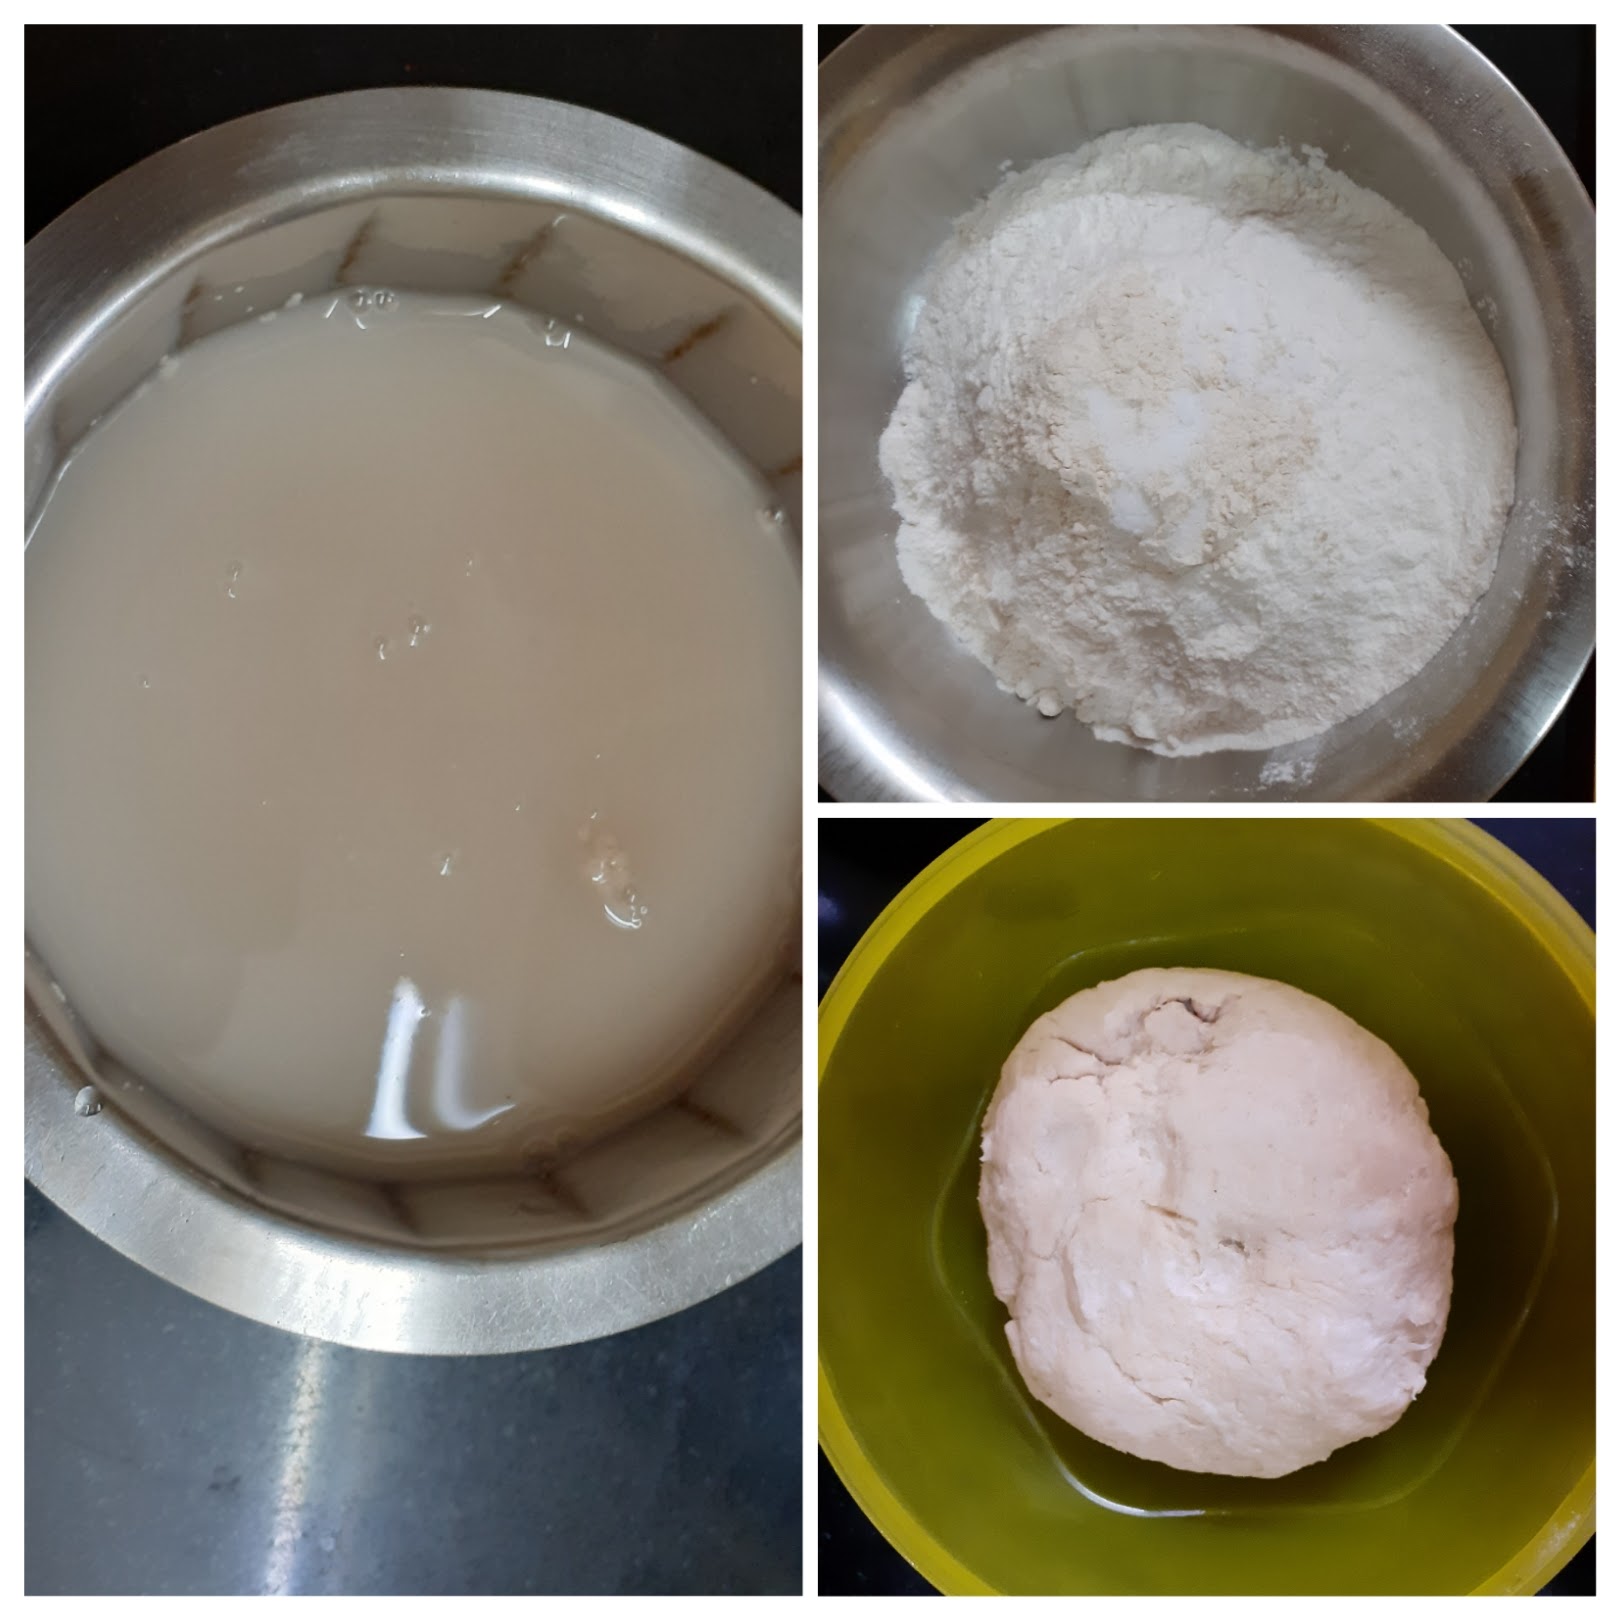
3. After 2 hours, the dough would have doubled up in size. Take it out, punch to release the air inside and knead again. Now divide the dough into 10 equal portions. Dust a little flour and roll out in oval shape. Sprinkle the Kalonji/Nigella seeds and fresh coriander and gently press it on the rolled dough

4. Take an iron Kadai (non stick doesn’t give the best results), and invert it over the gas flame. When it is hot, stick the rolled out Naan on it and cook. When done the Naan comes out easily, without sticking. Now remove the Naan from the Kadai and transfer over direct flame and cook on both sides like how you would a Phulka. Transfer to a plate, apply the garlic butter over it and serve hot.
NOTES:
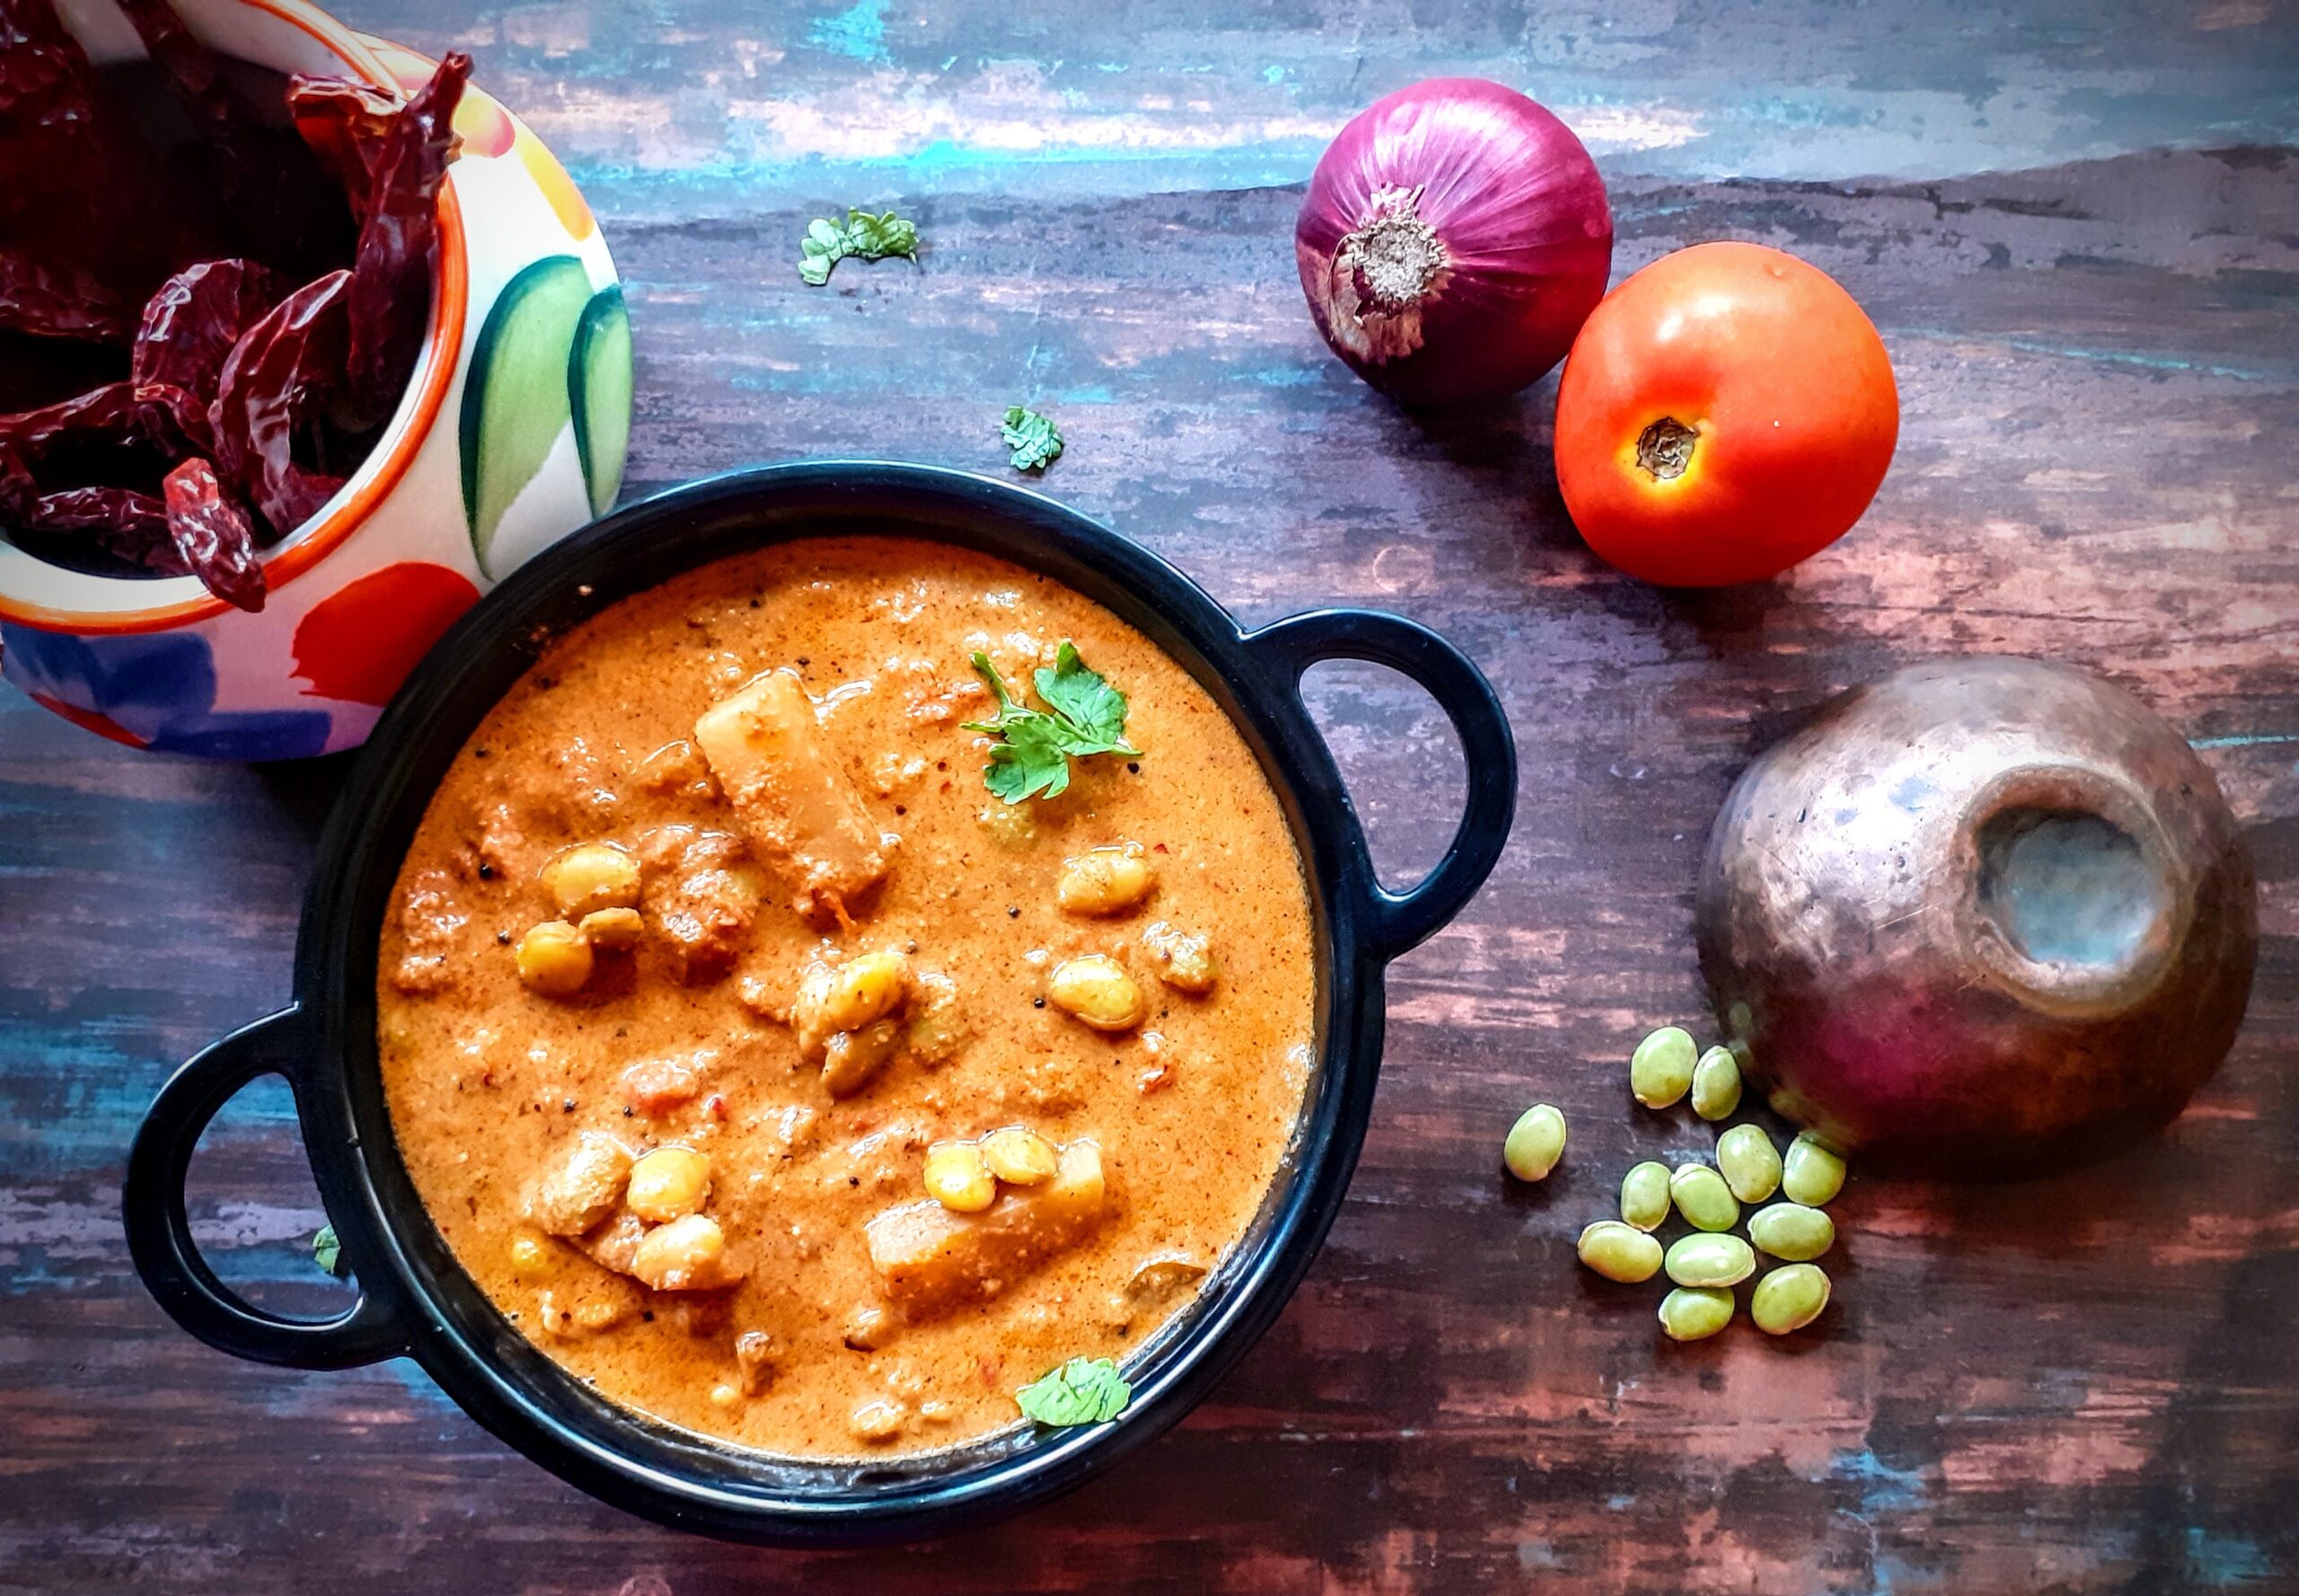
Pachai Mochai Kuzhambu (Field Beans Gravy)
Though I may try fancy recipes from time to time, eat local and seasonal has always been my slogan. When it is carrot season I make my Gajar Halwa and during the Grape season my Grape conserve. Homemade is always a better option and the pandemic has taught us just that.
In south India December to February and specially the time around the harvest festival Pongal, is the season for Field Beans or Mocha Kottai as it is called in Tamil Nadu. These beans are used in the Pongal Kuzhambu that is made on the day of the Pongal festival, where in a Kuzhambu or Sambar is made with all the freshly harvested vegetables, which includes tubers, green vegetables and legumes likes the Field Beans.
I usually make this recipe in the Chettinad style where a the beans are cooked in a tangy gravy with garlic and coconut paste. This time however, I have tried it out in a different style which tasted very good and was an instant hit in my house. I added some Potatoes too and it turned out like a two in one curry, one that can go with rice as well as with Paratha, chapati etc. The vessel just went empty. In my house when the vessel goes empty and nothing remains for dinner, it means the dish was super good????, and here comes this dish called the Pachai(fresh) Mochai Kuzhambu with a different gravy.
While you are here checkout my other recipes like Pachai Sundakkai Kuzhambu, Bonda Morkuzhambu, Vatha Kuzhambu, Parupu Urundai Kuzhambu and more…
Here is the recipe for Pachai Mochai Kuzhambu for you-
PREP TIME: 20 MINS COOK TIME:15 MINS
TOTAL TIME: 35 MINS COURSE: MAIN
CUISINE:INDIAN SERVINGS: 4
AUTHOR: RAJNI RAM

Ingredients:
Pachai Mochai Kottai (fresh Field Beans) 200 gm (pressured cooked for 5 whistles)
Onion 1 roughly chopped
Tomatoes 2 roughly chopped
Potato 1 large diced
Sambar Powder 1 tbsp. (refer notes)
Red chilli powder 1 tsp
Tamarind gooseberry sized ball pulp extracted
Jaggery a small bit
To be roasted and ground:
Peanuts 2 tbsp.
Dry red chillies 3 large ones
Fennel 1 tsp
Poppy seeds/Khus khus 1 tsp
Coconut 2 tbsp
To temper:
Oil 1 tbsp
Mustard seeds 1 tsp
Mustard seeds a pinch
Chana dal 2 tsp
Asafoetida 1/2 tsp
Dry red chilli 1 broken
Curry leaves a few
Directions:
In a big Kadai/pan put the oil and heat. Add all ingredients mentioned under “to temper”. When the mustard seeds begin to pop add the onion and sauté. When the onions start turning a light brown, add the potatoes and continue to sauté for a minute or two. Now add the chopped tomatoes, followed by salt, Sambar powder, red chilli powder, and the cooked Mocha Kottai(field beans). Mix nicely and let it cook for 2 minutes. Now pour the tamarind extract and let the potatoes cook. Keep the flame low. In the meanwhile take a small kadai and add 1 tsp oil and roast all ingredients mentioned under “to be roast and ground”. Start by adding the groundnuts first, followed by coconut, dry red chilli, fennel seeds and poppy seeds, Roast until the coconut starts turning a light brown in colour. Cool and grind to a smooth paste adding a little water. The potatoes must have cooked by now. Check for doneness of potatoes and add the ground paste and mix well. Dilute adding 2 cups water and continue to cook. The gravy will come together and the consistency will thicken. Add a small bit of jaggery and stir and put off the flame. The delicious Pachai Mochai Kuzhambu is ready to serve. Enjoy. Bon Appetit.
STEPWISE RECIPE FOLLOWS:
1. In a big Kadai/pan put the oil and heat. Add all ingredients mentioned under “to temper”. When the mustard seeds begin to pop add the onion and sauté.

2. When the onions start turning a light brown add the potatoes and continue to sauté for a minute or two. Now add the chopped tomatoes, followed by salt, Sambar powder, red chilli powder, and the cooked Mocha Kottai(field beans). Mix nicely and let it cook for 2 minutes.

3. Now pour the tamarind extract and let the potatoes cook. In the meanwhile take a small kadai and add 1 tsp oil and roast all ingredients mentioned under “to be roast and ground”. Start by adding the groundnuts first, followed by coconut, dry red chilli, fennel seeds and poppy seeds, Roast until the coconut starts turning a light brown in colour. Cool and grind to a smooth paste adding a little water.
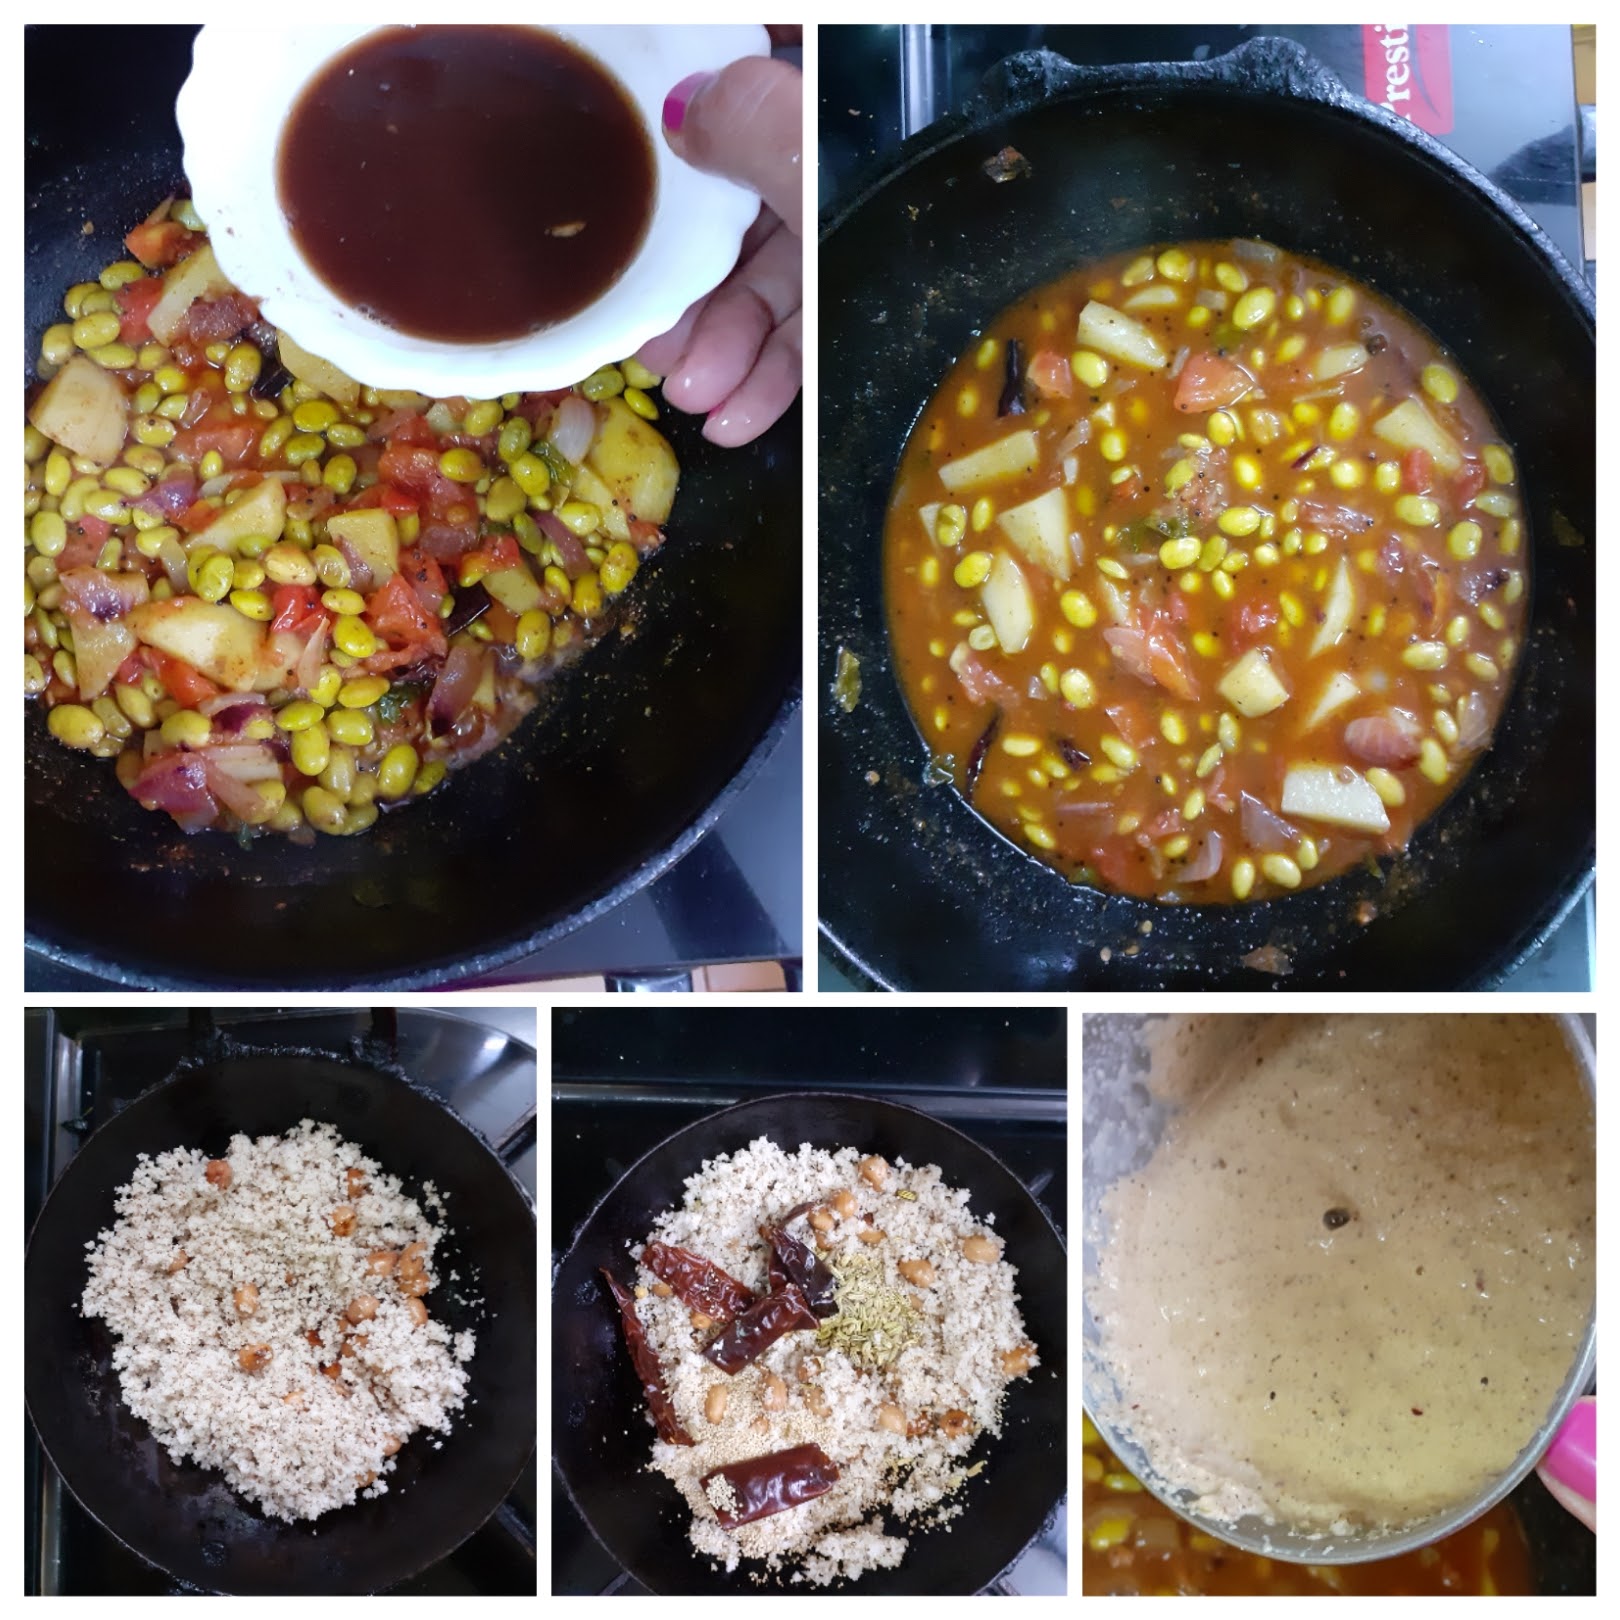
4. The potatoes must have cooked by now. Add the ground paste and mix well. Dilute adding 2 cups water and continue to cook. The gravy will come together and the consistency will thicken. Add a small bit of jaggery and stir and put off the flame. The delicious Pachai Mochai Kuzhambu is ready to serve.
NOTES:
1. I used homemade sambar powder as that really enhances the taste of the dish. However, store bought one also can be used. Foe the recipe of homemade sambar powder click here.
2. The use of jaggery is to cut down the gassiness of the peanuts, as some people cannot digest it. I recommend adding it though adding jaggery is not compulsory.
3. Take care not to overcook the Beans, at the same time they must be cooked well.
4. If you have roasted peanuts that too can be added, then only the coconut, chillies, fennel and poppy seeds need to be roasted.
5. This recipe can be followed for any fresh beans(seeds) variety. When the fresh Mochai are not available, the dry ones are sold. They can be soaked, cooked and the same recipe can be followed.
If you tried this recipe and liked it please comment below. I would love to hear from you. If you have a query about the recipe email us and ill respond as soon as I can.
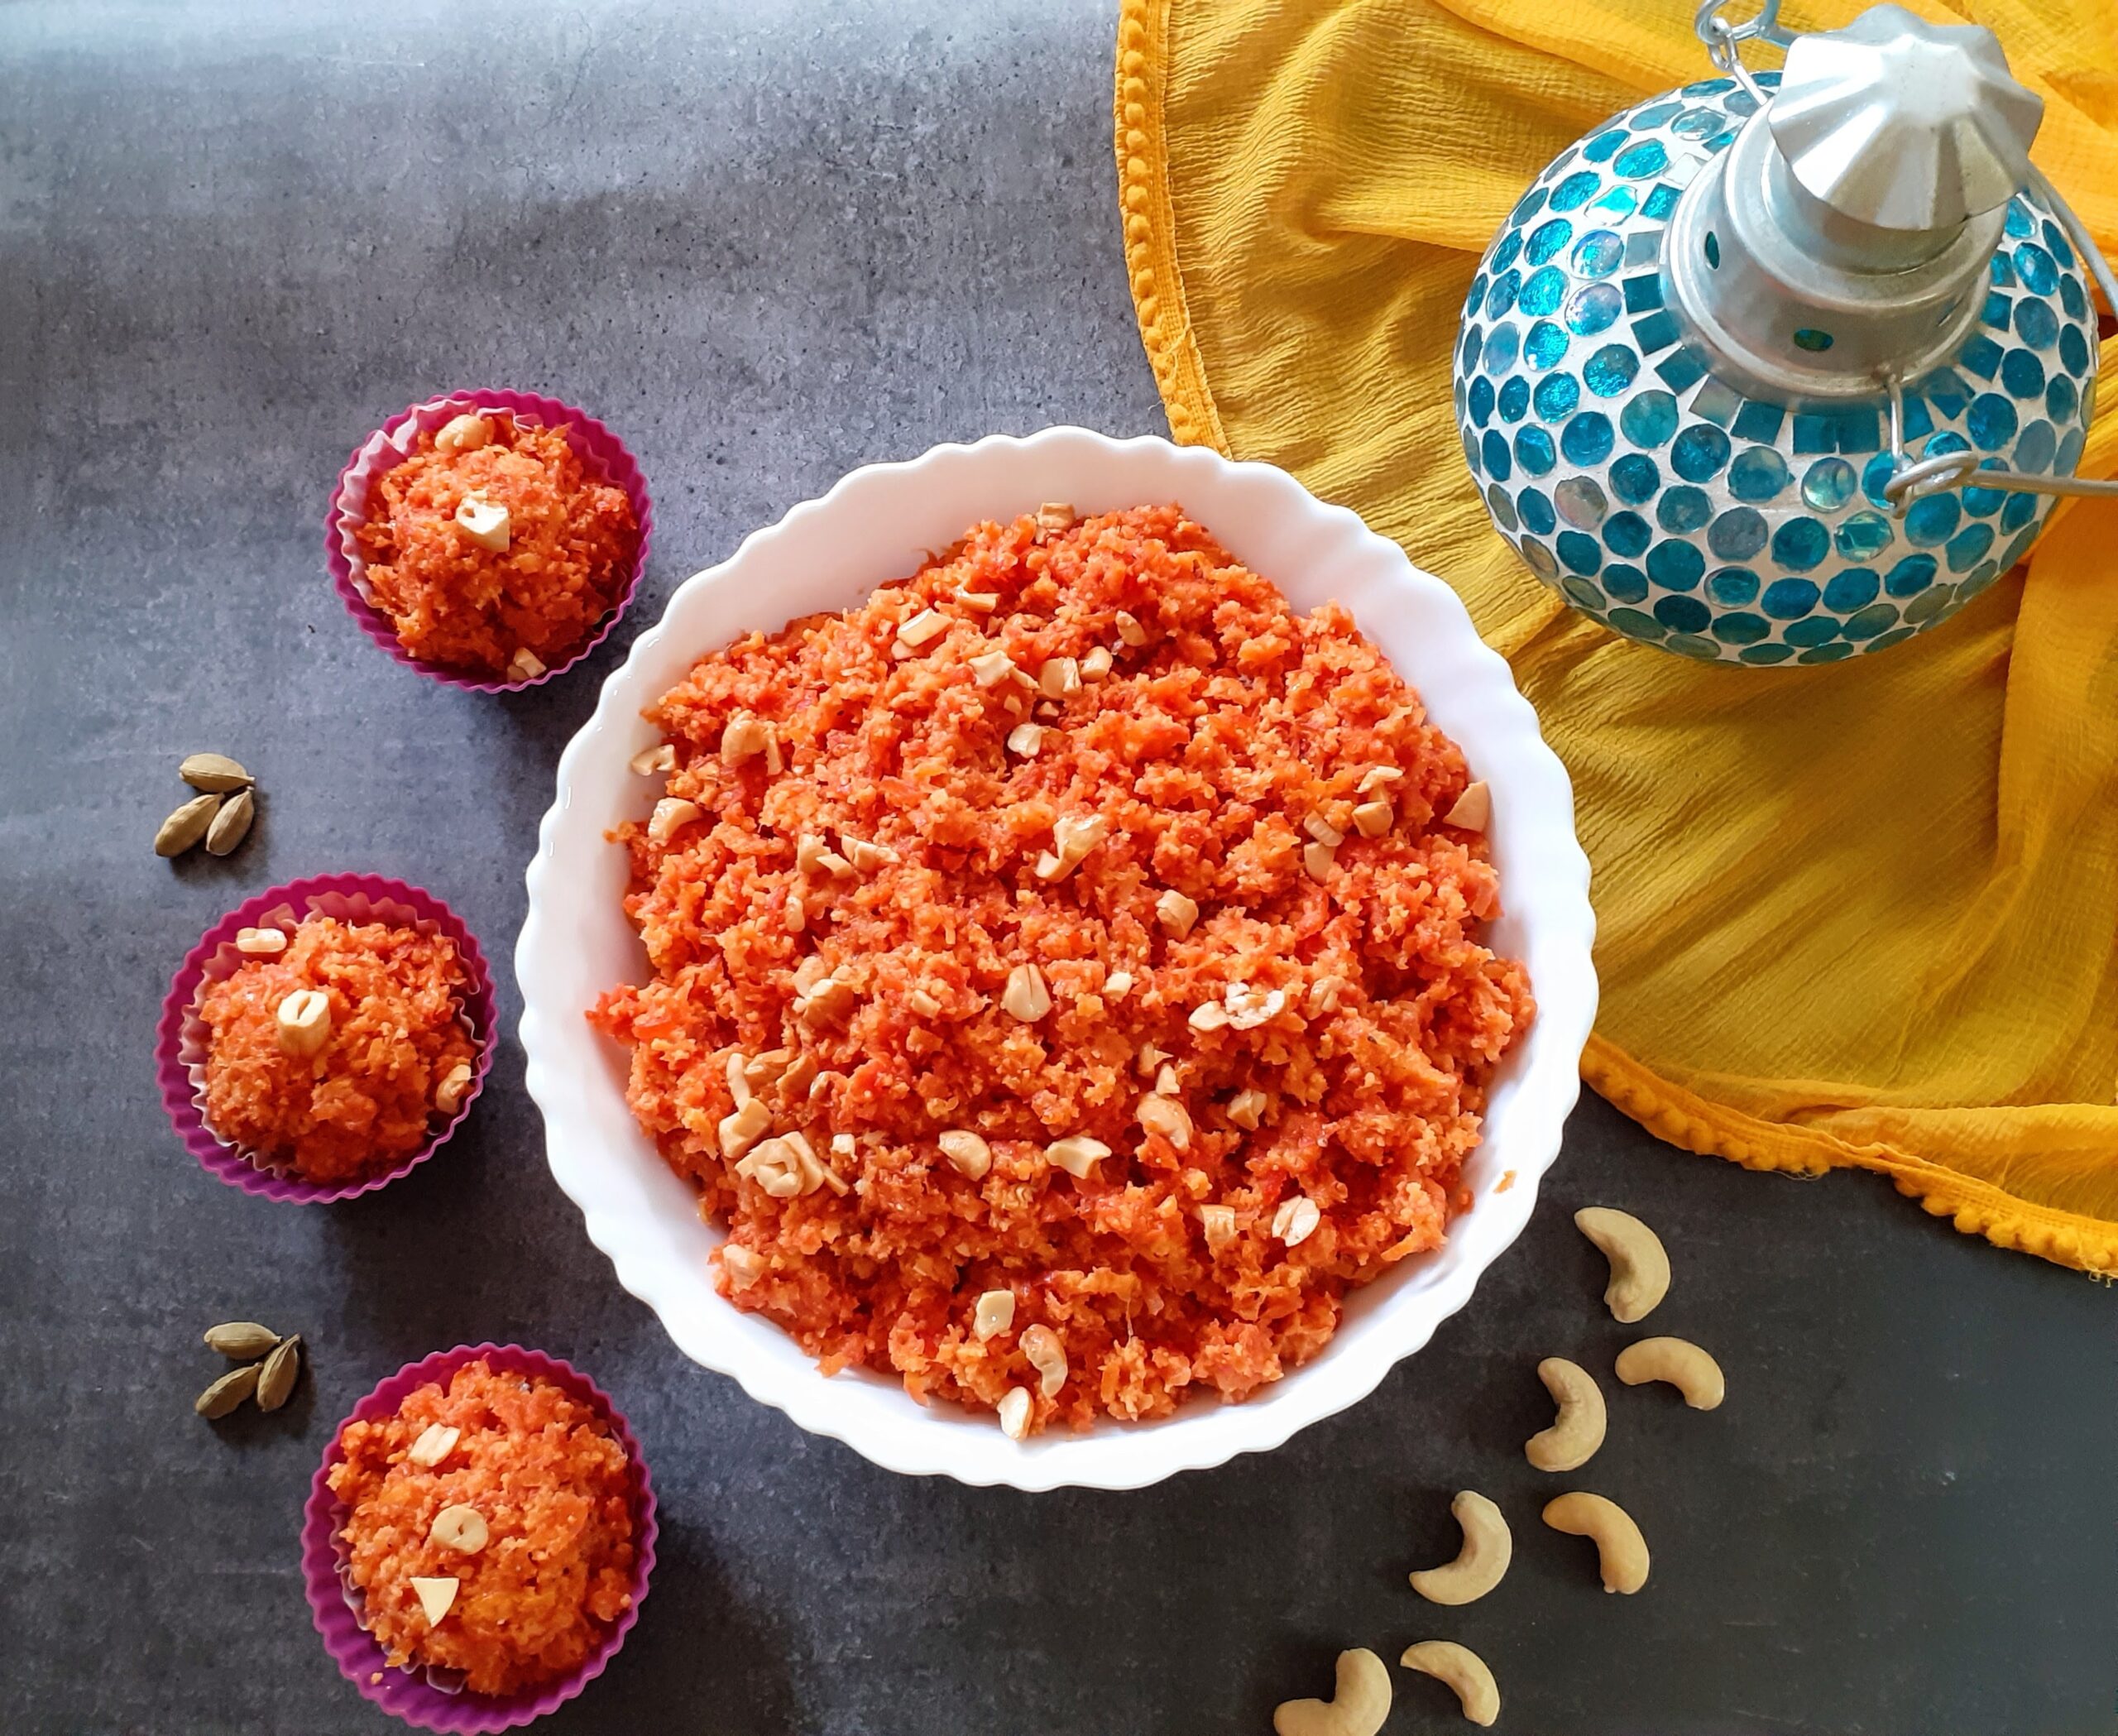
GAJAR HALWA/ CARROT HALWA
Gajar Halwa/ Carrot Halwa is a very popular Indian dessert. Mostly a winter dessert. Though it is made frequently with the regular carrots ( English Carrots), using the Delhi Carrots or Red Carrots as they are called gives the best results.
This is one dessert I love and consider it very sacred, so if you are looking for an easy, one pot or microwave recipe, you are going to be disappointed. As far as Gajar Halwa is concerned I am old school. I cook it in milk( and a whole lot of milk) so that the raw taste of the Carrots is gone and the milk crumbles to a Rabri like texture. The taste of such a Halwa is divine. This is one recipe I have never made with regular carrot except in my dessert recipe- Gajar halwa Barfi where I was shaping it like fudge( Barfi) and using Khoya to speed up the process. Whereas this recipe of Gajar Halwa is a slow cook process. The slower it cooks the better it tastes. Am I disappointing you? Well, make it like this and you will be hooked to it for life. Remember the best things in life come with a lot of patience.
My belief is that when I wait a whole year for the Red Carrots to appear in the Market and then make the Halwa, then it should be made the authentic way. Which does not involve adding condensed milk or Koya or milk powder but in cooking the carrots in milk( whole cream), to perfection.
I use only whole cream milk to make this dessert. So the taste of the Halwa depends entirely on the quality of milk. A full/whole cream milk Halwa will give you better taste and I can say this because I have tried it will all milk varieties available in the market and what works best is whole/full cream milk.
So after the whole mega write up, taking you to the recipe. While you are here do check out my other carrot based desserts like Carrot Kheer( another speciality from Rajjo’s Kitchenn) and Gajar Halwa Barfi.
Ingredients:
Carrots ( Preferably Red ones) 1.5 kilo grated
Milk whole cream/ full cream 2 litres
Sugar 300 gm
Cardamom/ Elaichi powder
Ghee 4 tbsp
Cashews a new broken
Directions:
Wash, peel and grate the carrots and keep aside. In a huge thick bottomed vessel/ kadai/ or urli boil the milk. When it comes to a boil, reduce the flame and put in the grated carrots. Start stirring the mixture. The flame can be increased now but constant stirring is required . This process has to continue until almost all the milk dries up. The texture will look like Rabri stickng to carrot. Once all milk dries up, reduce the flame and add the sugar. Continue to stir again. Once the sugar is added the mixture will liquify, continue to stir until all the moisture is absorbed. The halwa will come together but it will not be gooey. Now add the cardamom powder. Fry the nuts in ghee and pour it over the halwa along with the nuts. The healthy and delicious Gajar Halwa is ready. Serve warm. Bon Appetite.
STEPWISE RECIPE FOLLOWS:
1. Wash, peel and grate the carrots and keep aside. In a huge thick bottomed vessel/ kadai/ or Urli boil the milk.
2. When it comes to a boil, reduce the flame and put in the grated carrots. Start stirring the mixture. The flame can be increased now but constant stirring is required . This process has to continue until almost all the milk dries up. Showing you the stages of reduction in pictures below that are self explanatory.
3. Once all milk dries up, reduce the flame and add the sugar. Continue to stir again. Once the sugar is added the mixture will liquefy, continue to stir until all the moisture is absorbed. The Halwa will come together but it will not be gooey. (forgot to click a picture finally to show the final consistency, so have included the one showing the cardamom powder. Please follow that texture for final consistency of Halwa).

4. Now add the cardamom powder. Fry the nuts in ghee and pour it over the Halwa along with the nuts. The healthy and delicious Gajar Halwa is ready. Serve warm.

NOTES:
1. While cooking at high heat keep stirring constantly to avoid burning the contents at the bottom of the pan.
2. Actually after sometime of cooking the milk and carrot mixture , it does not overflow from the vessel. That time the stirring can be relaxed a bit, but stir every couple of minutes. If you are following this reduce flame when not stirring.
3. Good quality full cream milk yields the best result, the Halwa can be made with milk of any consistency though. The results may not be what I have described .
4. Feel free to try this with regular Carrots too. Method being the same.
5. Sometimes people try to over power the subtle carrot flavour by adding huge amounts of ghee. This is not required. Pouring ghee at the right time is very important, such that the flavour is enhanced and a lot of ghee is not poured unnecessarily. Check out my Cakkara Pongal post for the directions on how to pour the ghee.
If you tried this recipe and liked it please comment below. I would love to hear from you. If you have a query about the recipe email us and ill respond as soon as I can.
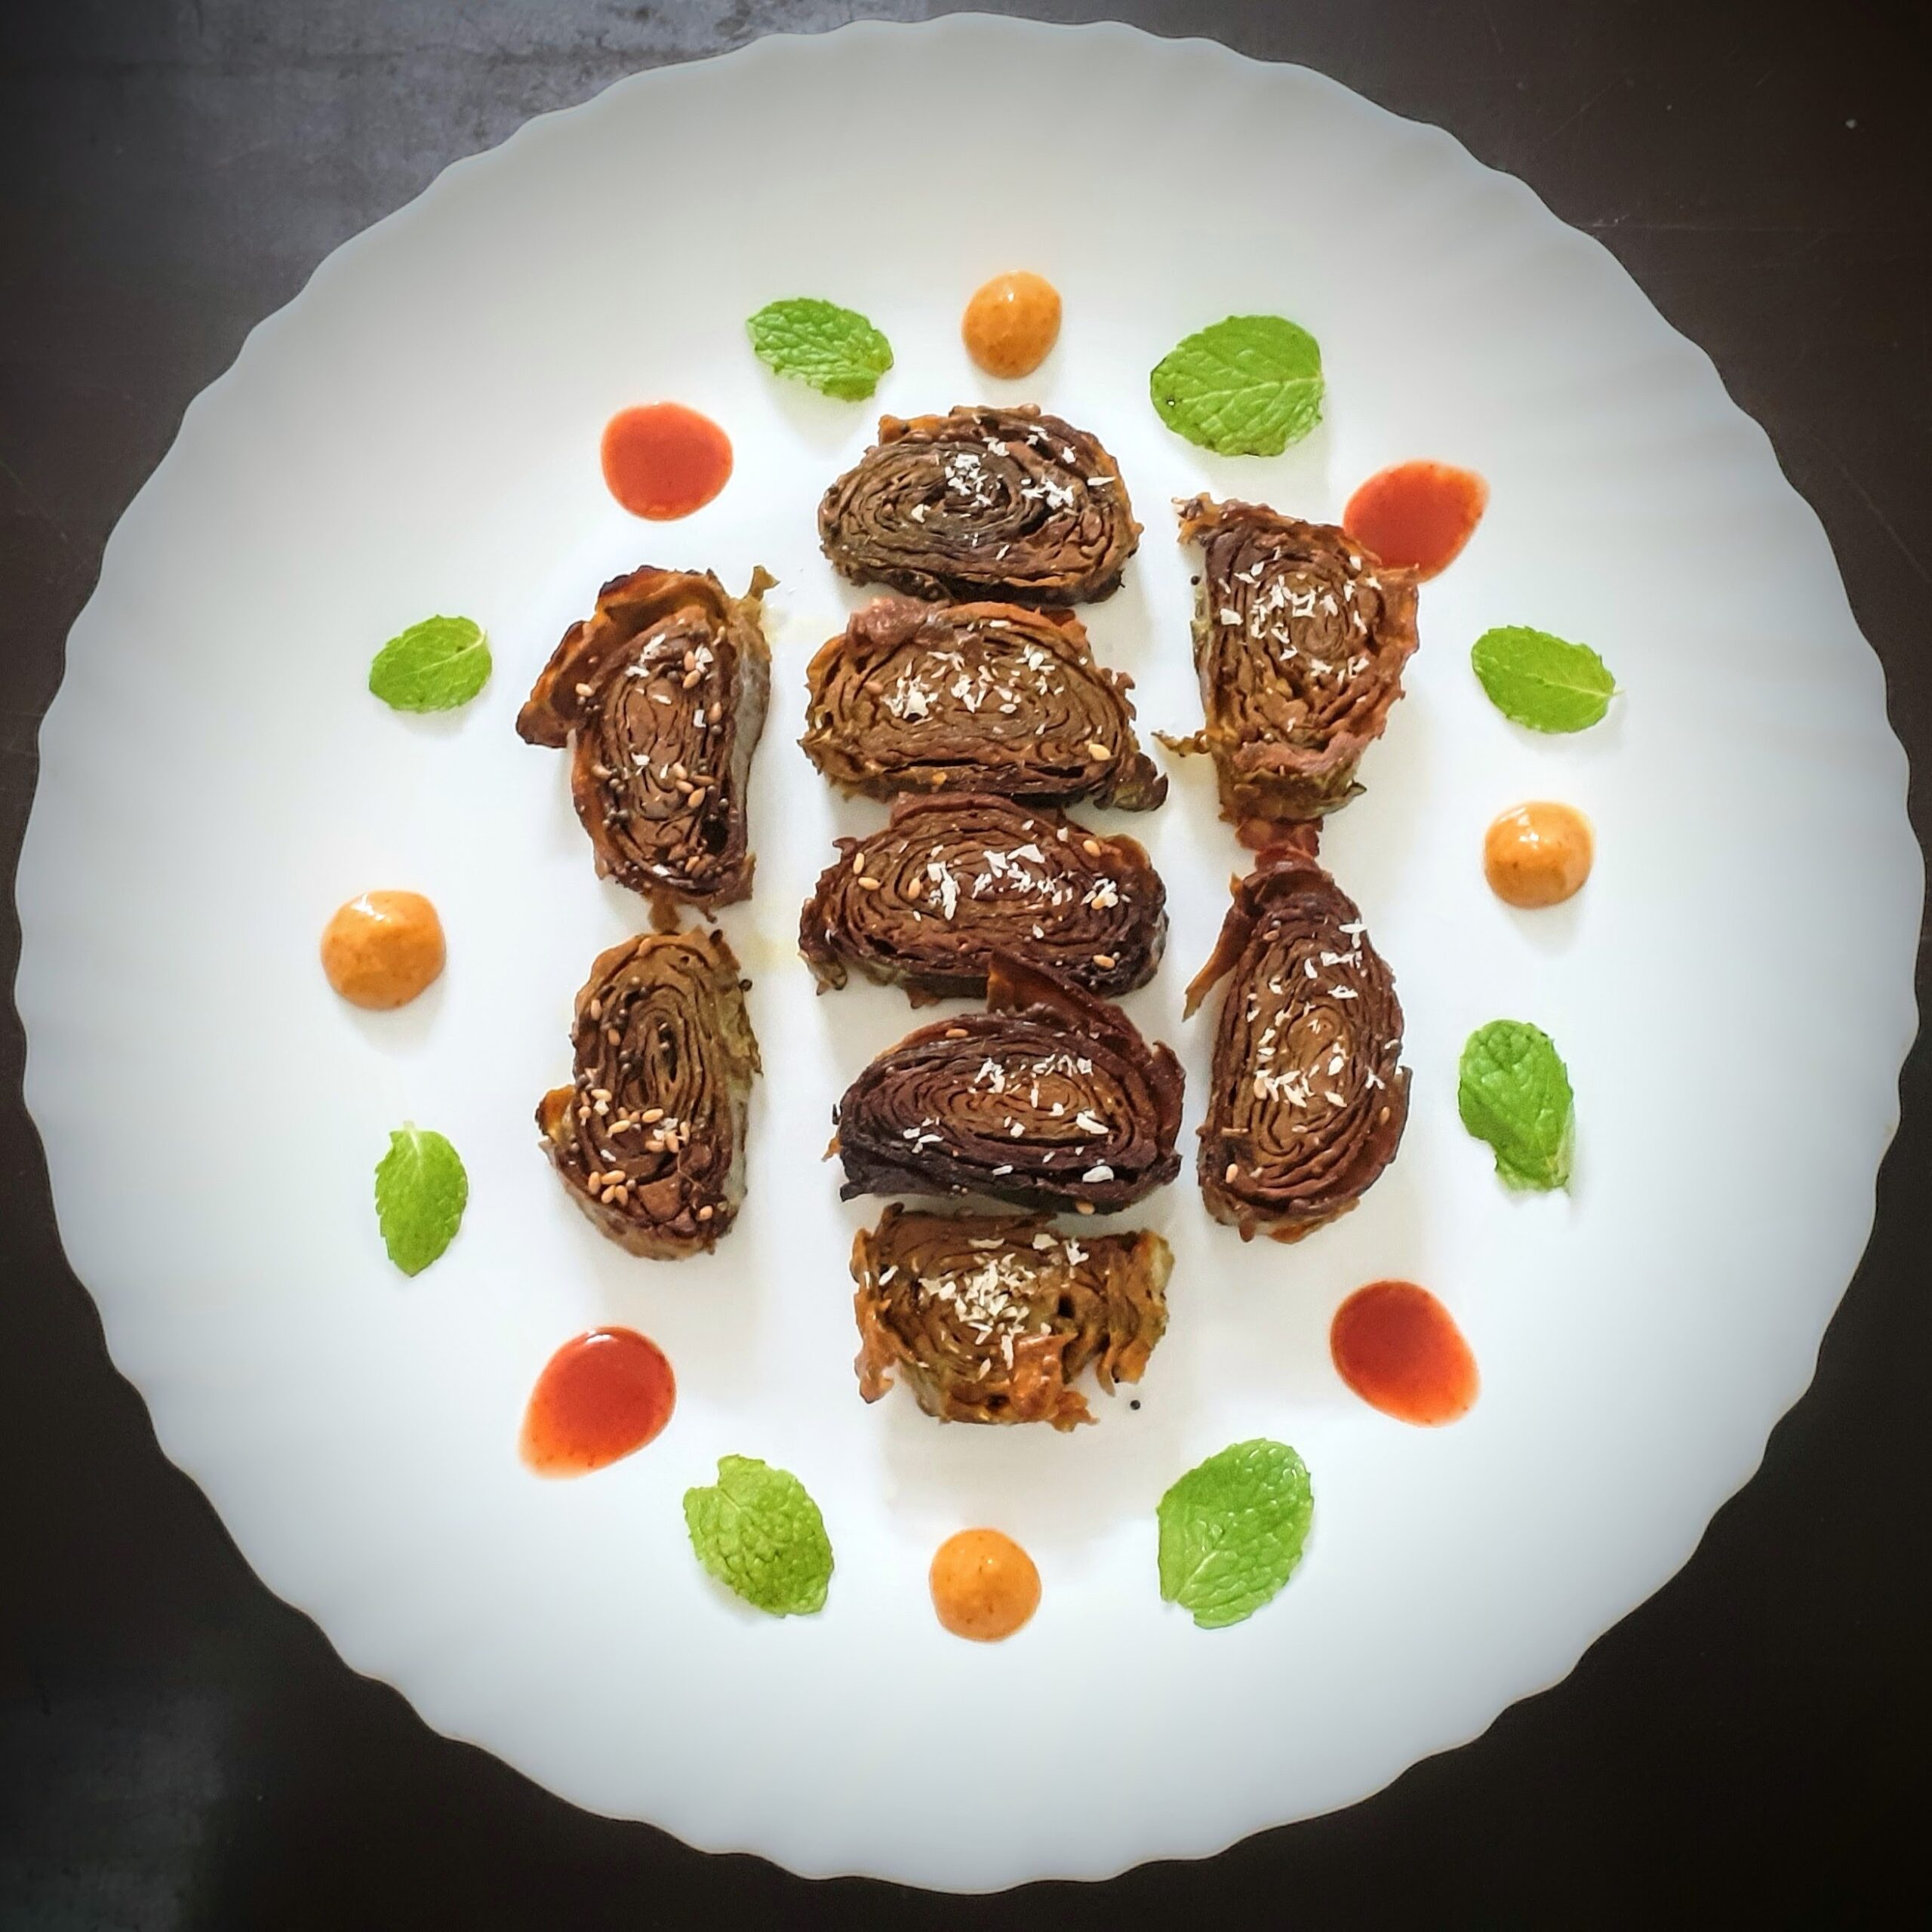
Patra/Patrode With Bok Choy Leaves (Alu Wadi)
Patra or Patrode is a simple and healthy snack from western India. It is also called Alu Wadi in some regions. This dish is popular in karnataka too. Different regions, different names same dish.
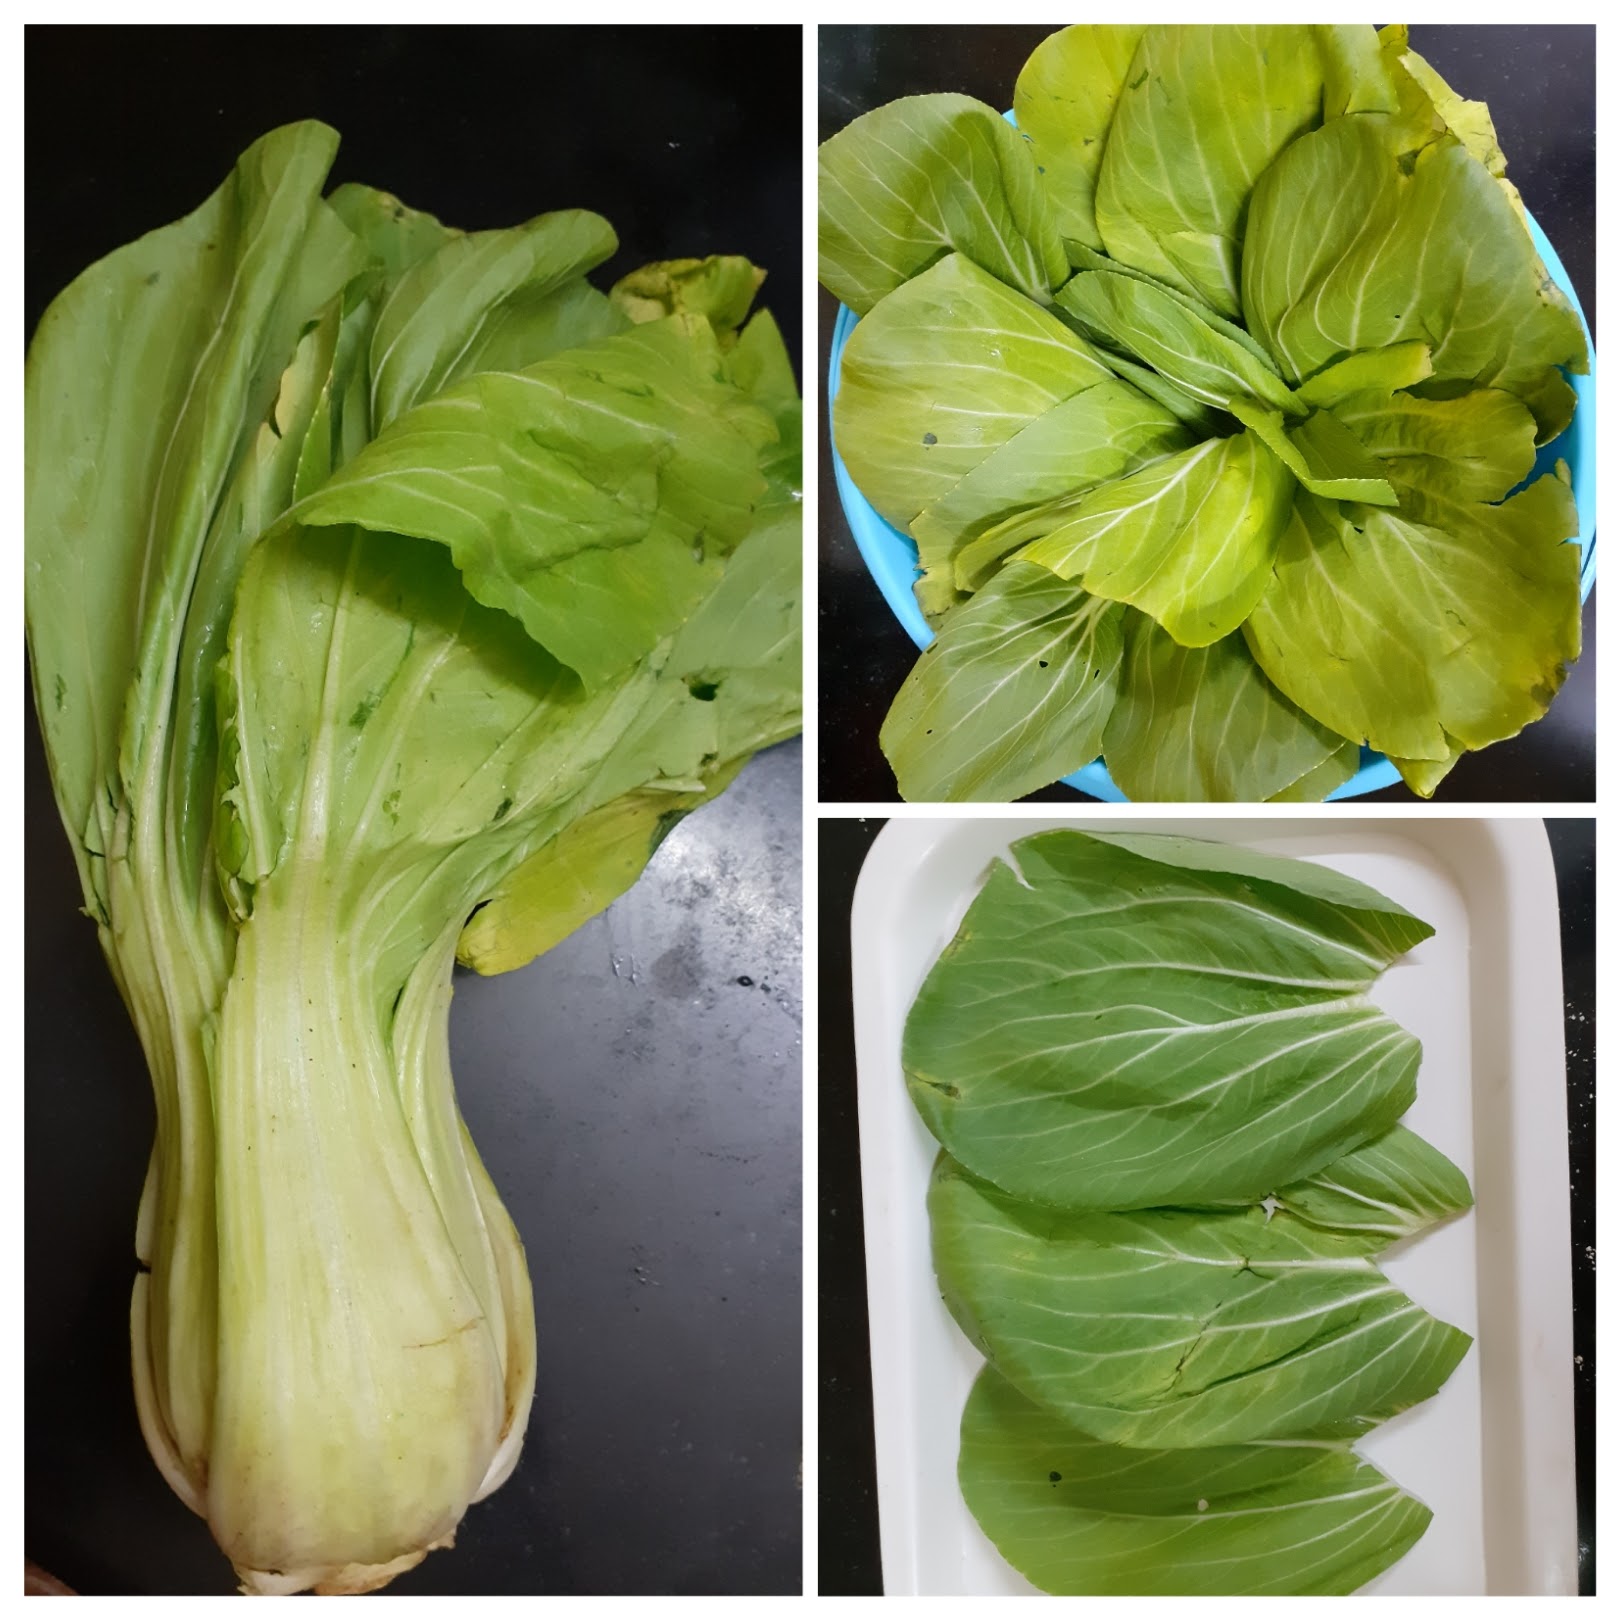
In this healthy snack usually the Arbi or Colacassia leaves are used. Spinach leaves can also be used, but they have to be big and thick. Since that variety is not available all the time I decided to give the dish a twist by using a different leaf altogether. Bok Choy, or Pok choy is a type of chinese cabbage. The leaves are thick and nice so I decided to give the Patra a try with these leaves. It was a huge hit in my house and everyone came back for more.
Since I was making this the first time, I made only a small quantity and with my folks asking for more have promised to make some again very soon. So, what I’m driving at is that if you are one of those people who loves this dish and wait for the Arbi leaves to arrive in the market, well don’t wait. Grab some Pok Choy and try it out. The Pok Choy is closer in taste to Spinach with which Patra are made, if not for Arbi/Colaccssia leaves.
This is a steamed snack just like the Kothimbir Vadi, it can be fried too of you prefer. I have steamed and pan roasted them.
While you are here check out my other snack recipes like Mirchi Bajji, Semolina Cheese balls, Samosa Pie, Potato Cheddar Bake, Dhania wale Namak Parey and more…
Here is the recipe ot Patra with Bok Choy Leaf-
PREP TIME: 15MINS COOK TIME: 30MINS
TOTAL TIME: 45 MINS CUISINE: INDIAN
COURSE :SNACK SERVINGS: 5
AUTHOR: RAJNI RAM
Bok choy/ Pok choy 2 heads ( clip leaves carefully, wash and dab dry with towel)
Besan/ Chickpea flour 2 cups
Salt as required
Red chilli powder 1 tsp
Coriander powder 1 tsp
Fennel powder 1 tsp
Turmeric powder 1/2 tsp
Sugar 1/2 tsp
Tamarind pulp 2 tsp diluted in 1/2 cup water or make pulp with Gooseberry size tamarind ball.
Green chilli 1 finely chopped
Ginger 1/2 inch piece finely chopped
Sesame seeds a few
Kopra / desiccated coconut 2 tsp
Oil 3 tsp for tempering
Directions:
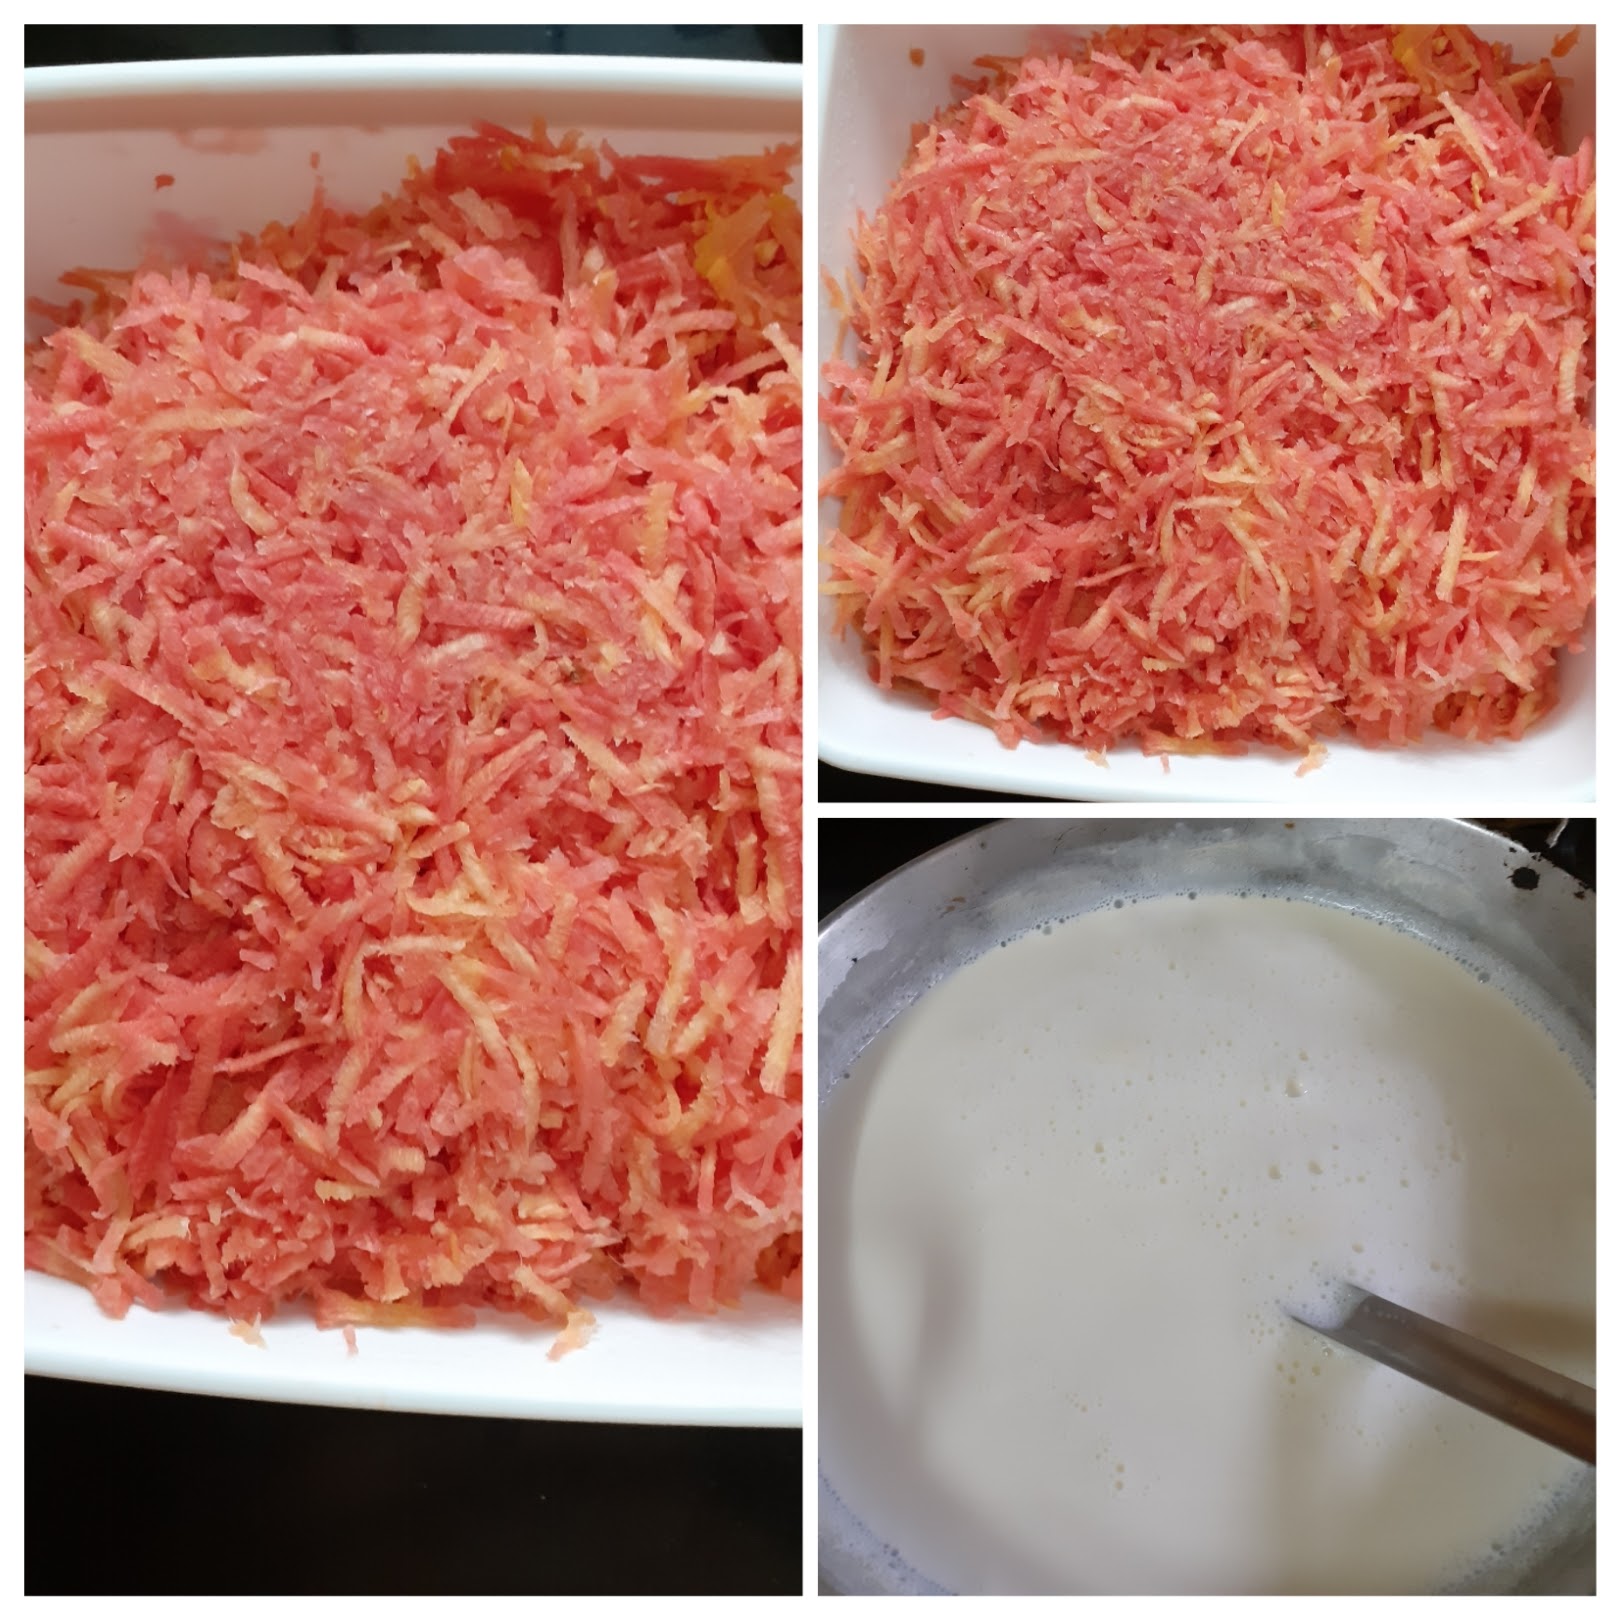
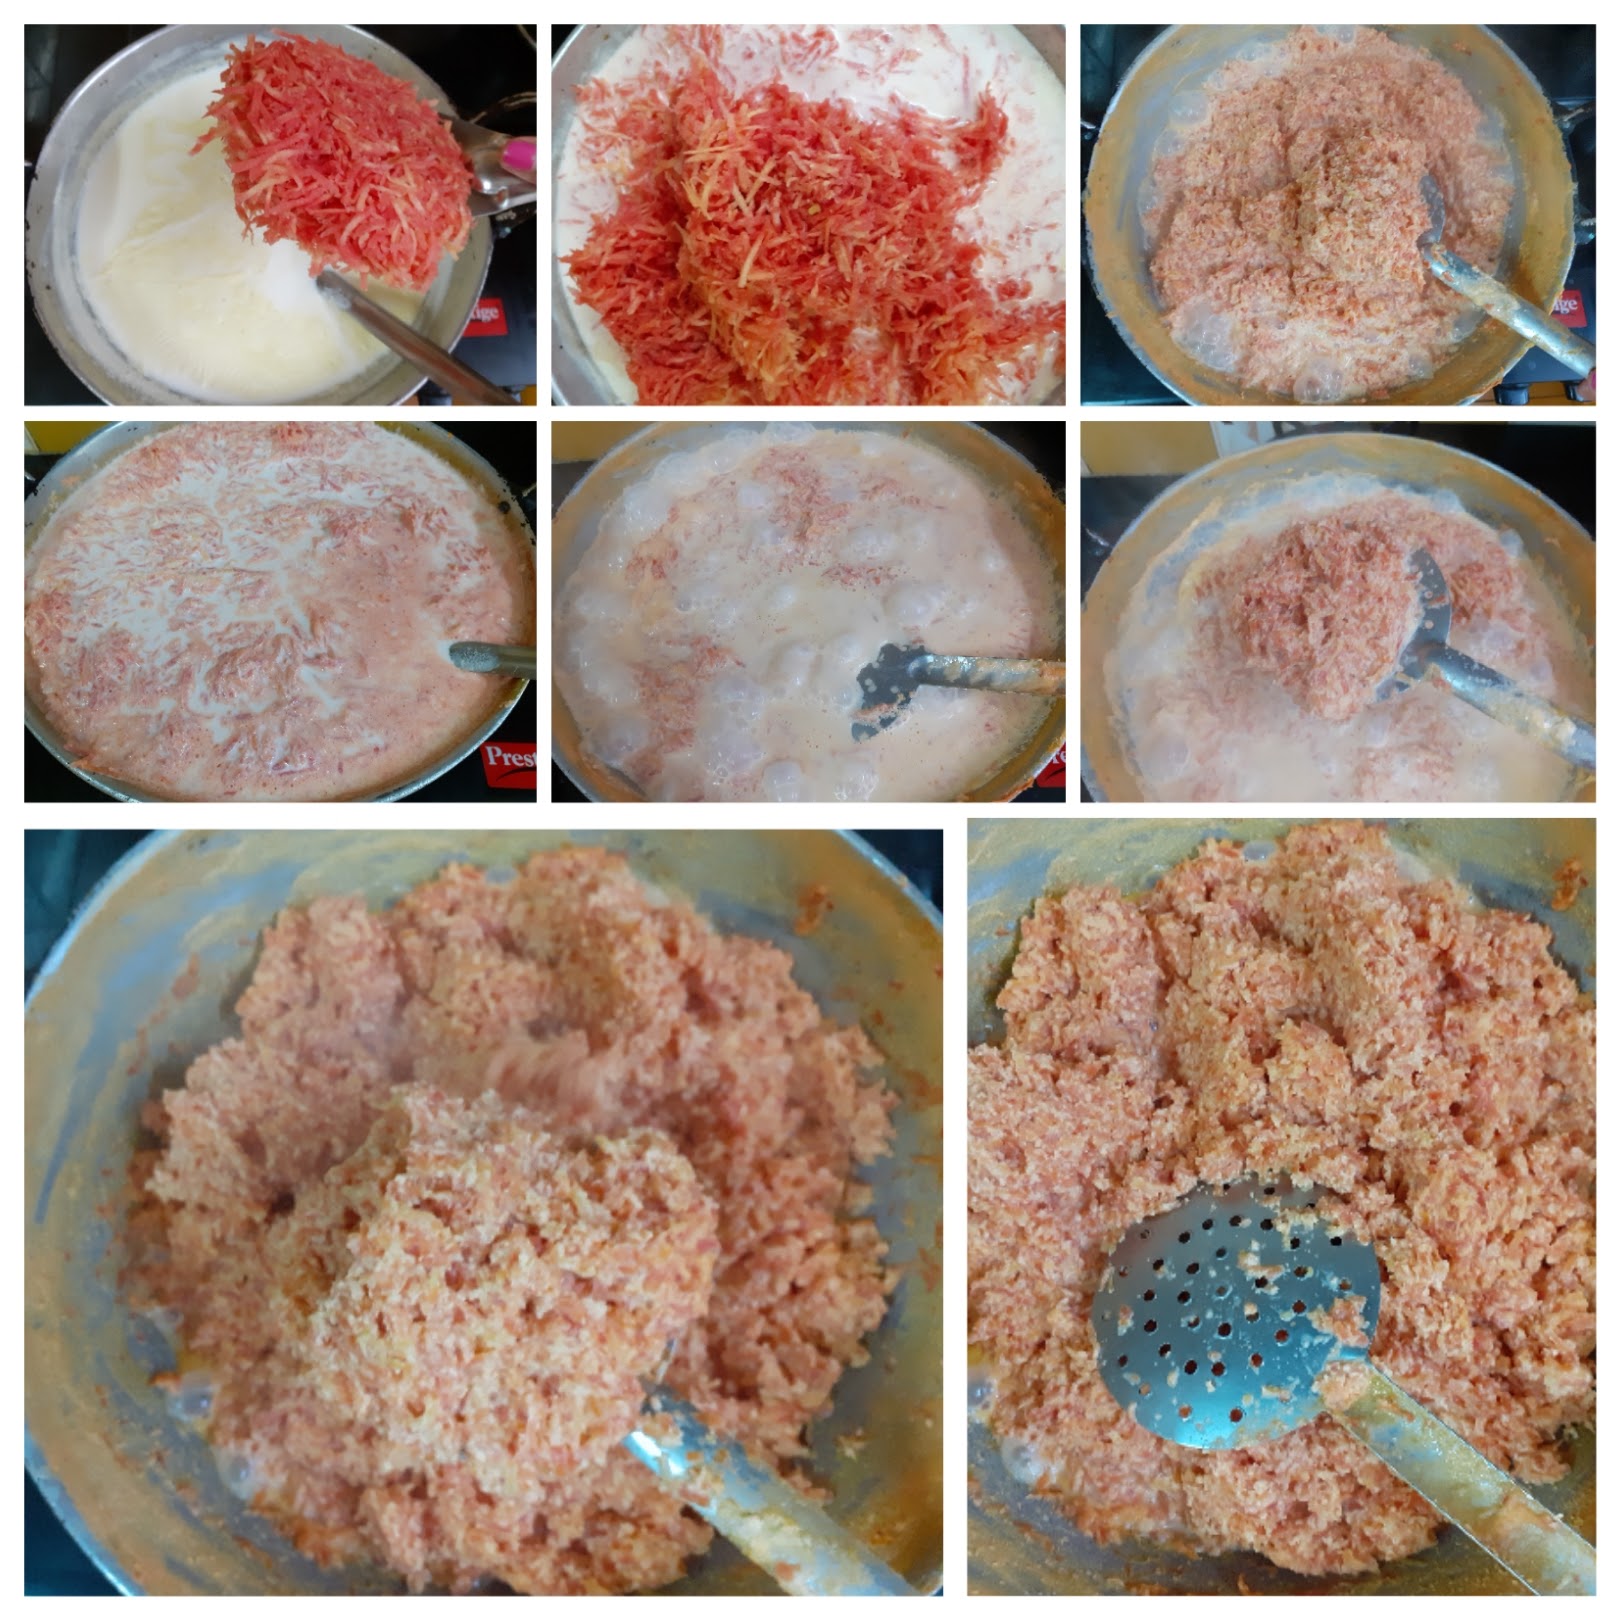
Carefully cut the leaves from the Bok choy, wash them in water and pat dry. Keep aside. Now in a bowl take the besan and add all the masala powders and salt. Mix well with fingers and now start adding the tamarind water little by little to make a thick paste/ batter. If using tamarind paste add paste along with masalas, mix and then use water to make the paste. The batter has to be smooth and thick that it sticks to the leaves and does not slide off. Now take the leaves, bigger ones. Apply the paste to 3 leaves, and arrange 3 of them over lapping the other as shown in the picture. This is the first layer. On this another 3 paste applied leaves have to be arranged. If the leaves are in different sizes, keep bigger ones below and smaller ones on top. Like this for 3 layers. Now start rolling the leaves from left to right, and as you role more of the paste has to be applied each time you roll the leaf. After rolling completely, apply the besan paste all over the rolled leaf. Place this in a greased cooker vessel. Repeat for remaining leaves. I made two such rolls. Place the second roll also in the cooker vessel and keep the vessel in the cooker to steam. Steam for 20 to 25 minutes. Put off the cooker and wait 2 minutes. Now open and cool the steams rolls completely. Once cooled cut them into 1/2 inch thick circles and keep aside. Take oil in a Tava or Pan and heat. Add mustard seeds, Jeera, asafoetida, green chillies, sesame seeds and ginger. When the mustard pops arrange the cut circles on the tava and roast on one side. When it turns a golden brown, flip and roast the other side. Sprinkle some Kopra/ desiccated coconut and remove the Parta off the Tava. Enjoy with some green chutney and chai. Bon Appetit!!!
STEPWISE RECIPE FOLLOWS:
1.Carefully cut the leaves from the Bok choy, wash them in water and pat dry. Keep aside.
2. Now in a bowl take the besan and add all the masala powders and salt. Mix well with fingers and now start adding the tamarind water little by little to make a thick paste/ batter. The batter has to be thick and smooth.

3. Apply the paste to 3 leaves, and arrange 3 of them over lapping the other as shown in the picture. This is the first layer. On this another 3 paste applied leaves have to be arranged. Make 3 such layers.
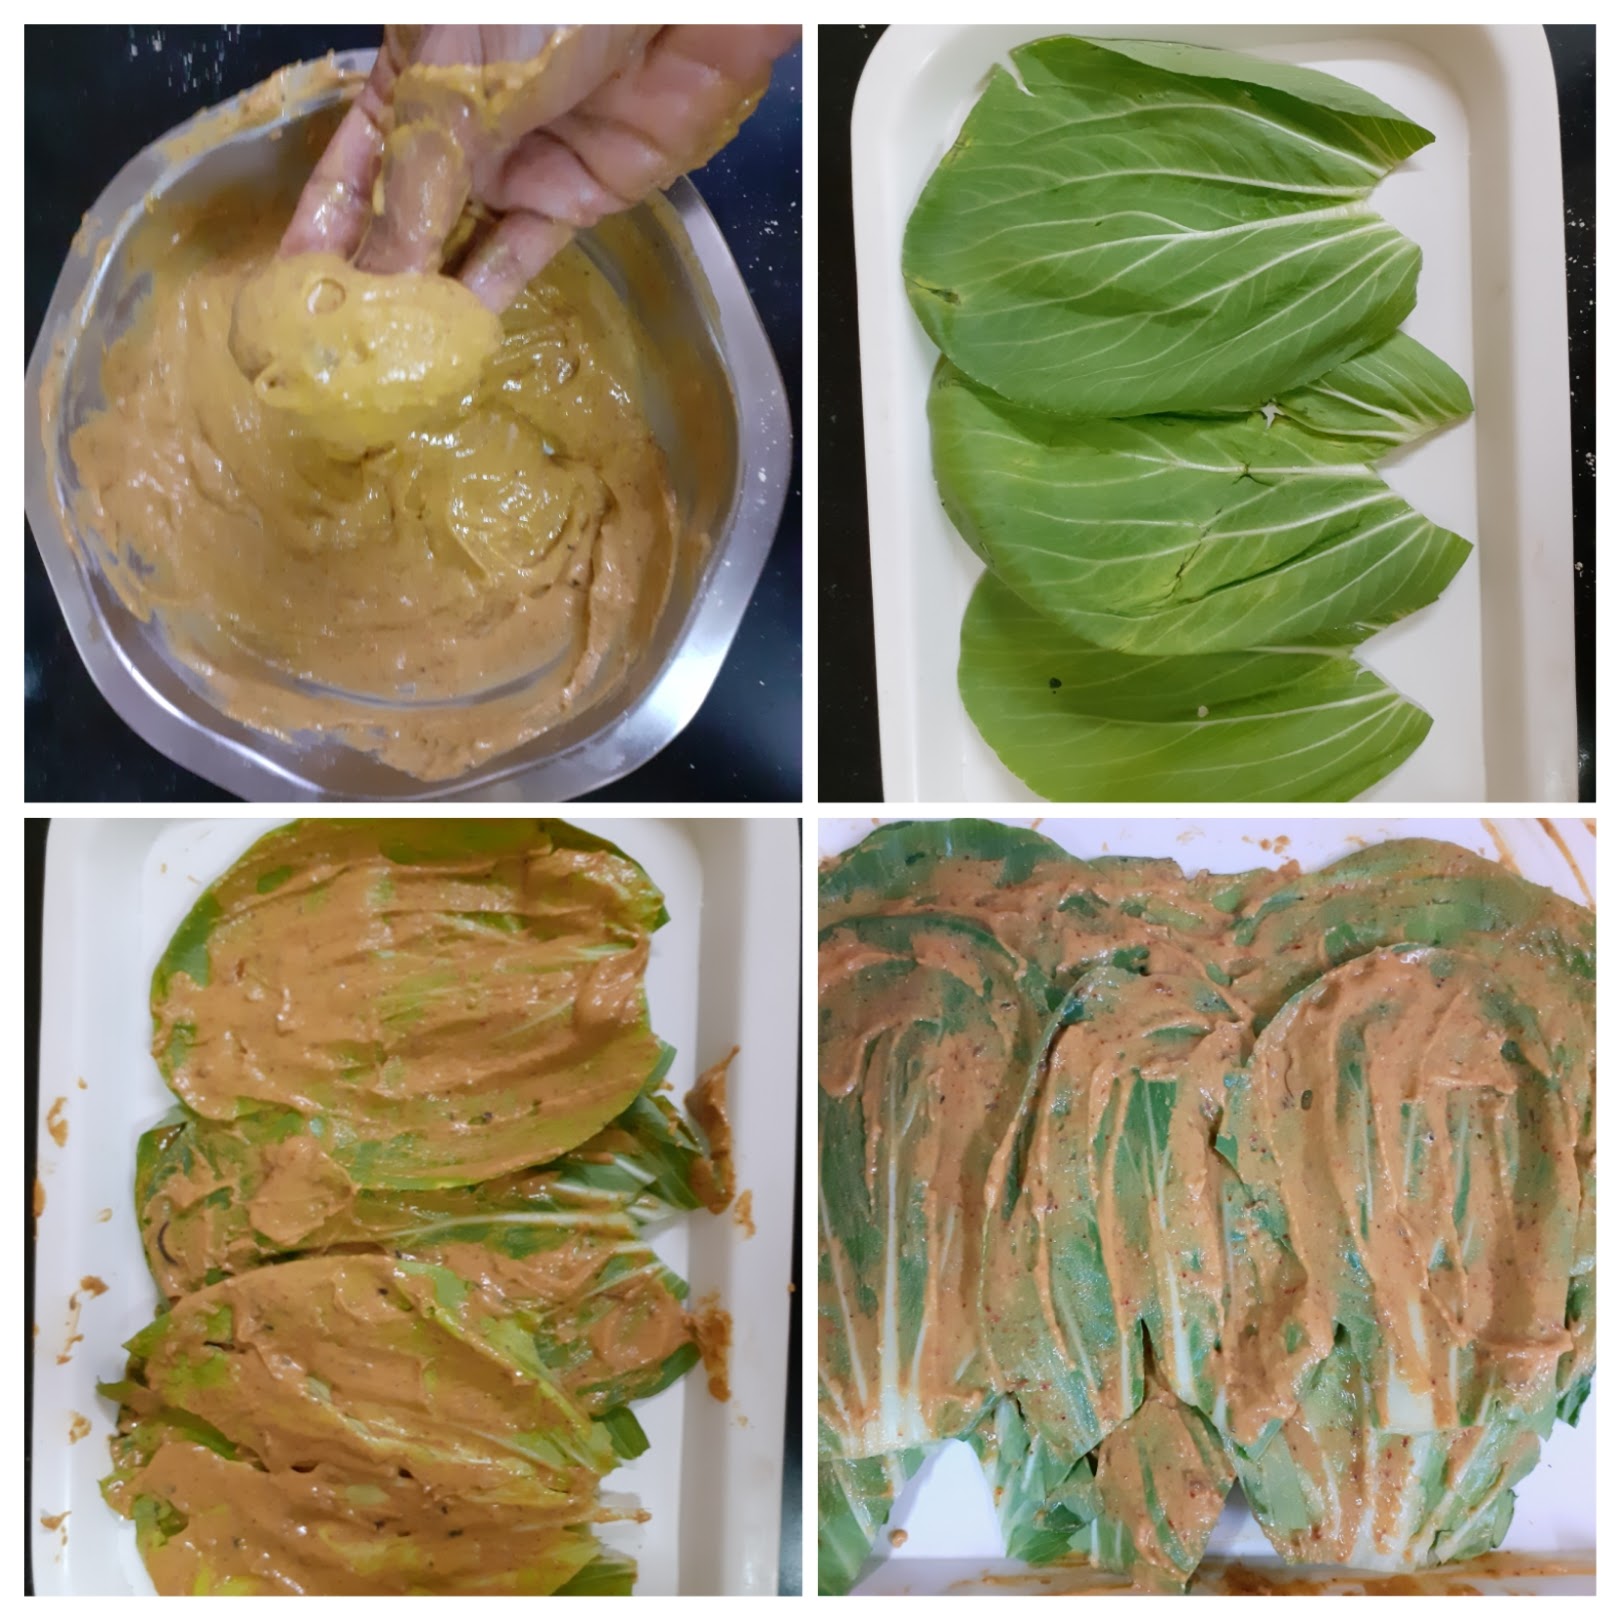
4. Now start rolling the leaves from left to right, and as you role more of the paste has to be applied each time you roll the leaf. After rolling completely, apply the besan paste all over the rolled leaf. Place this in a greased cooker vessel. Repeat the process and put both rolls in cooker vessel.
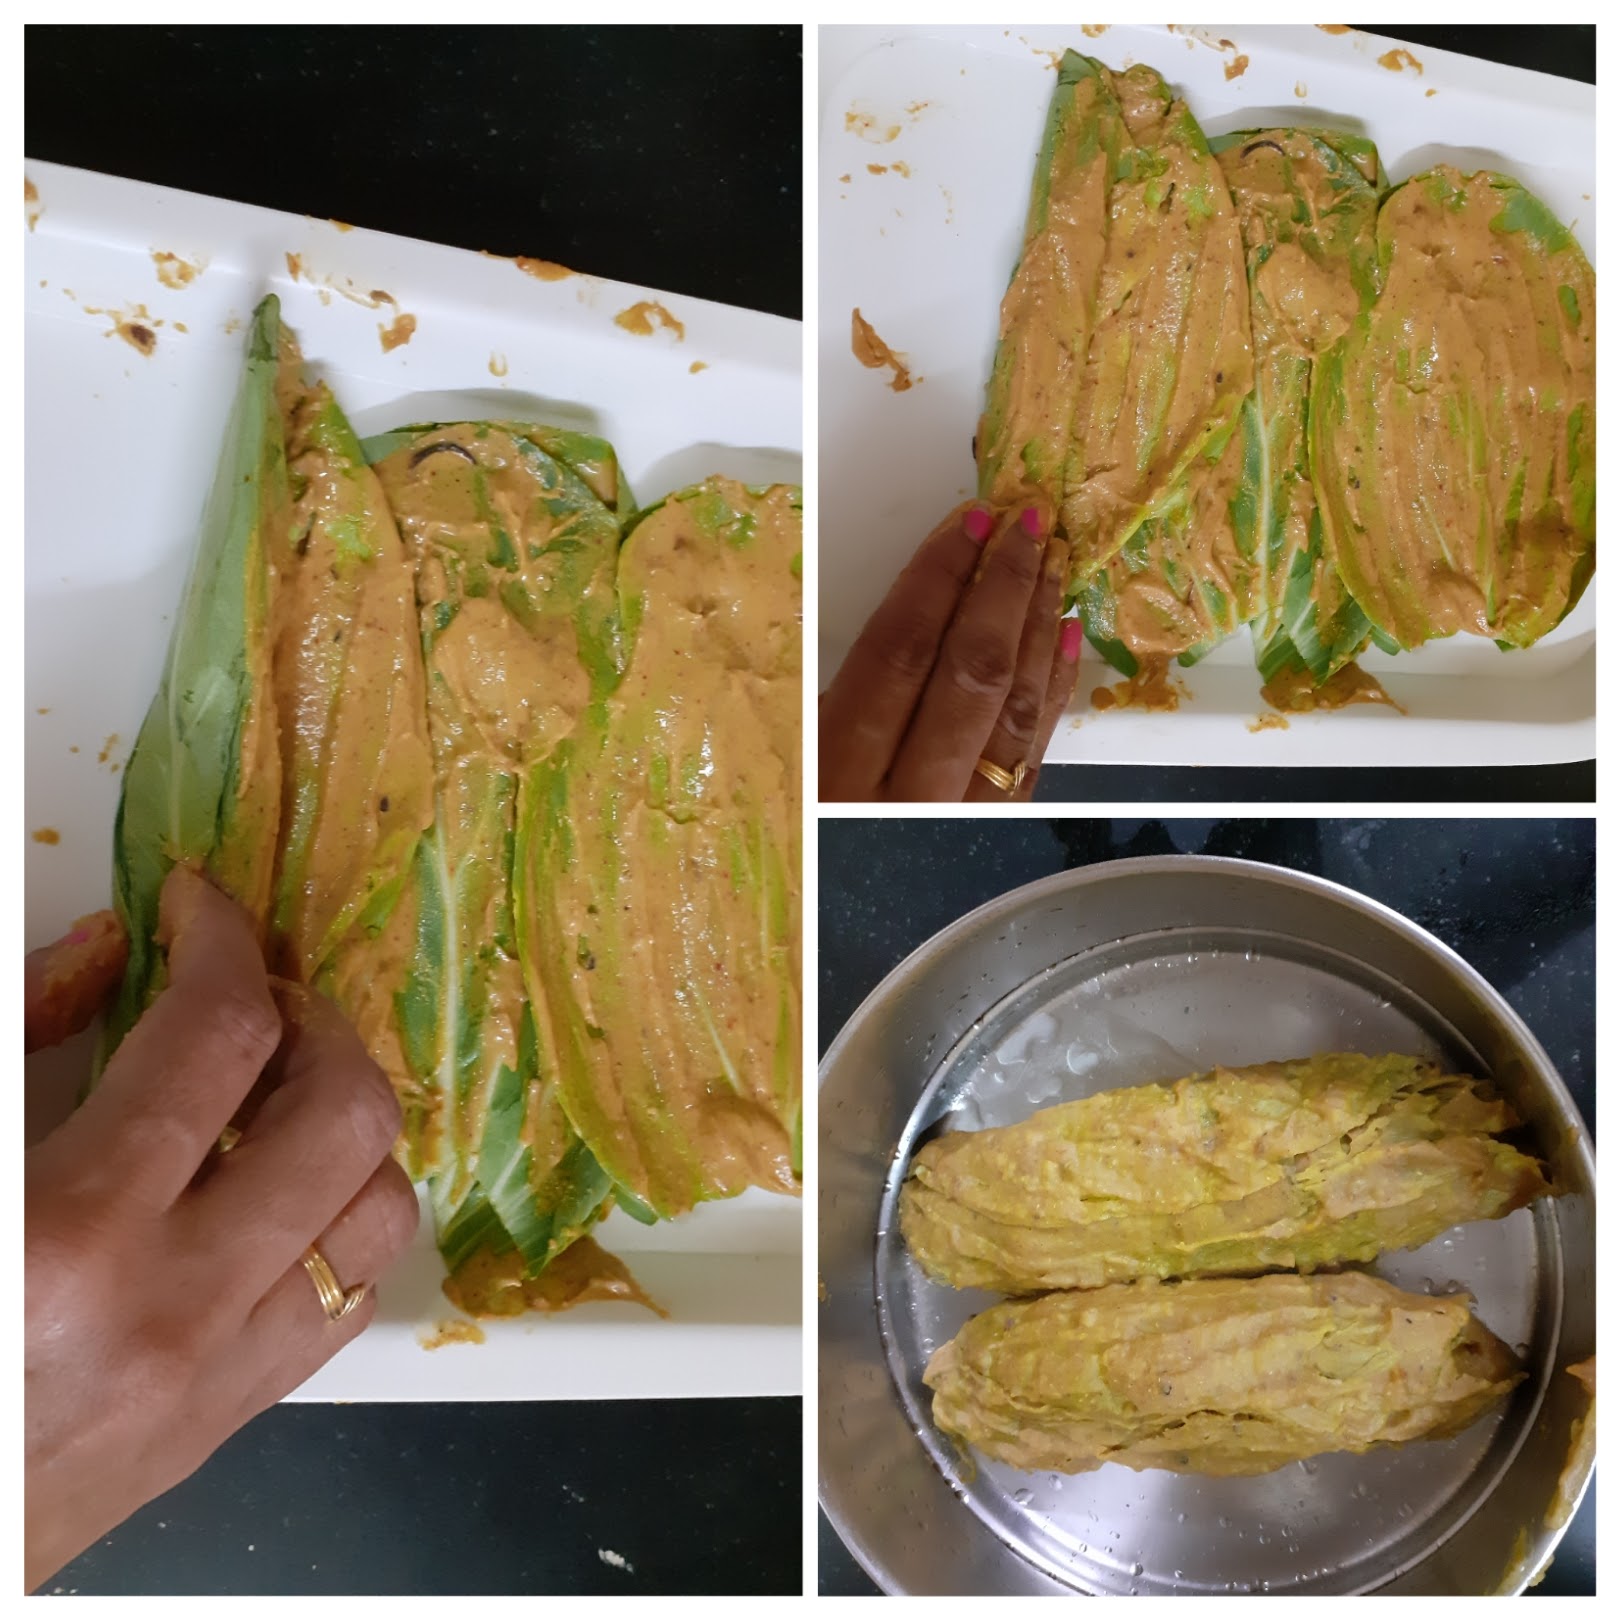
5. Keep the vessel in the cooker to steam. Steam for 20 to 25 minutes. Put off the cooker and wait 2 minutes. Now open and cool the steams rolls completely. Once cooled cut them into 1/2 inch thick circles and keep aside.
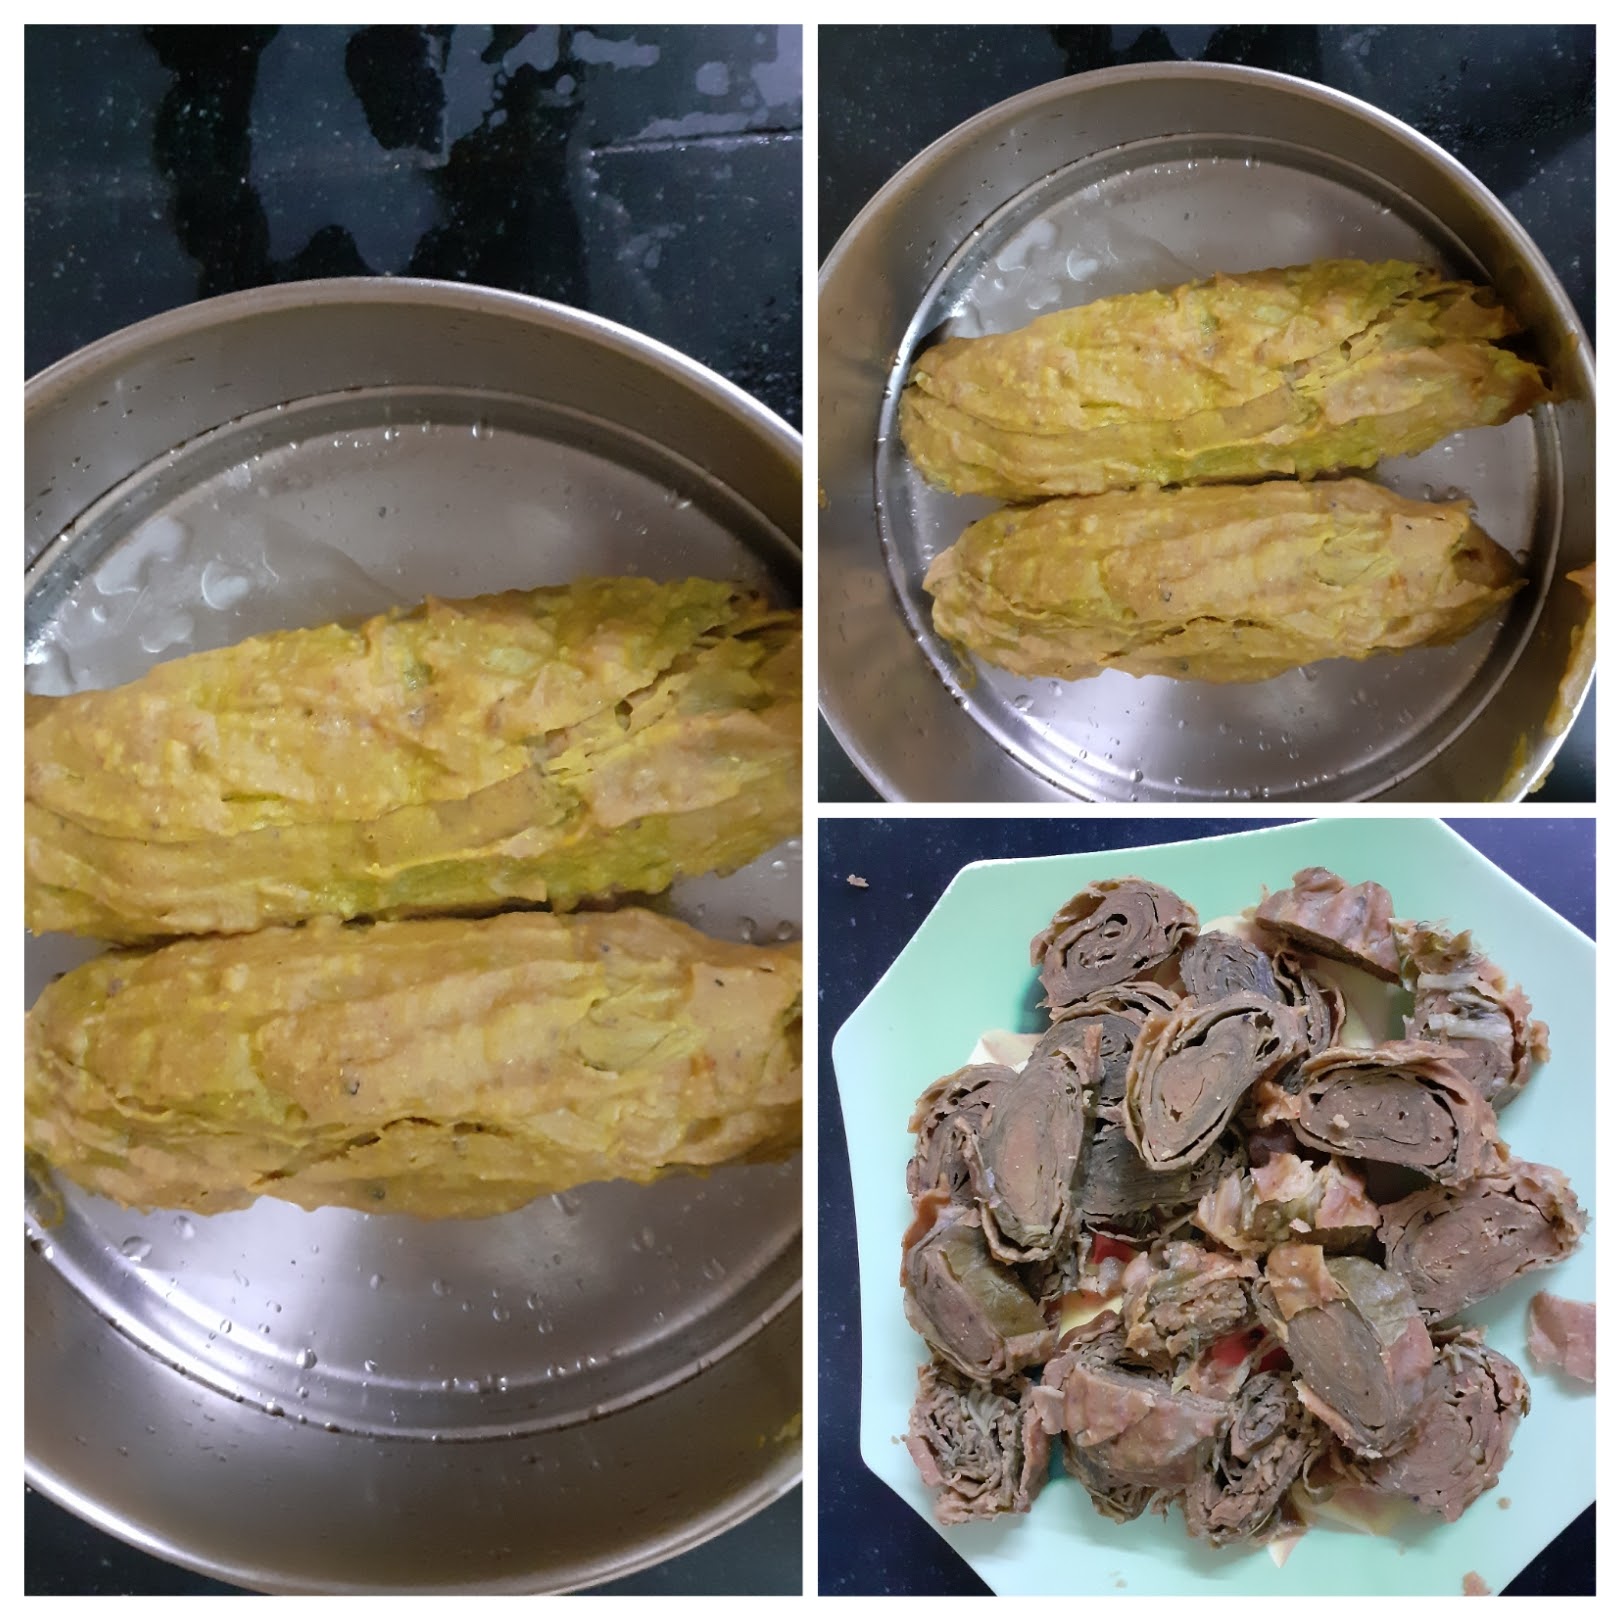
6. Take oil in a Tava or Pan and heat. Add mustard seeds, Jeera, asafoetida, green chillies, sesame seeds and ginger. When the mustard pops arrange the cut circles on the tava and roast on one side. When it turns a golden brown, flip and roast the other side. Sprinkle some Kopra/ desiccated coconut and remove the Parta off the Tava. Enjoy.


NOTES:
1. Select leaves which are fresh and big.
2. At the base of the leaf if the stem is hard, make a V shape cut to remove the hard veins.
3. Ensure the batter is thick like a paste or else it won’t stick to the leaf. Incase the batter turns runny add more besan and adjust spice and continue with the recipe.
4. While toasting on the Tava take care not to burn them or the taste will change.
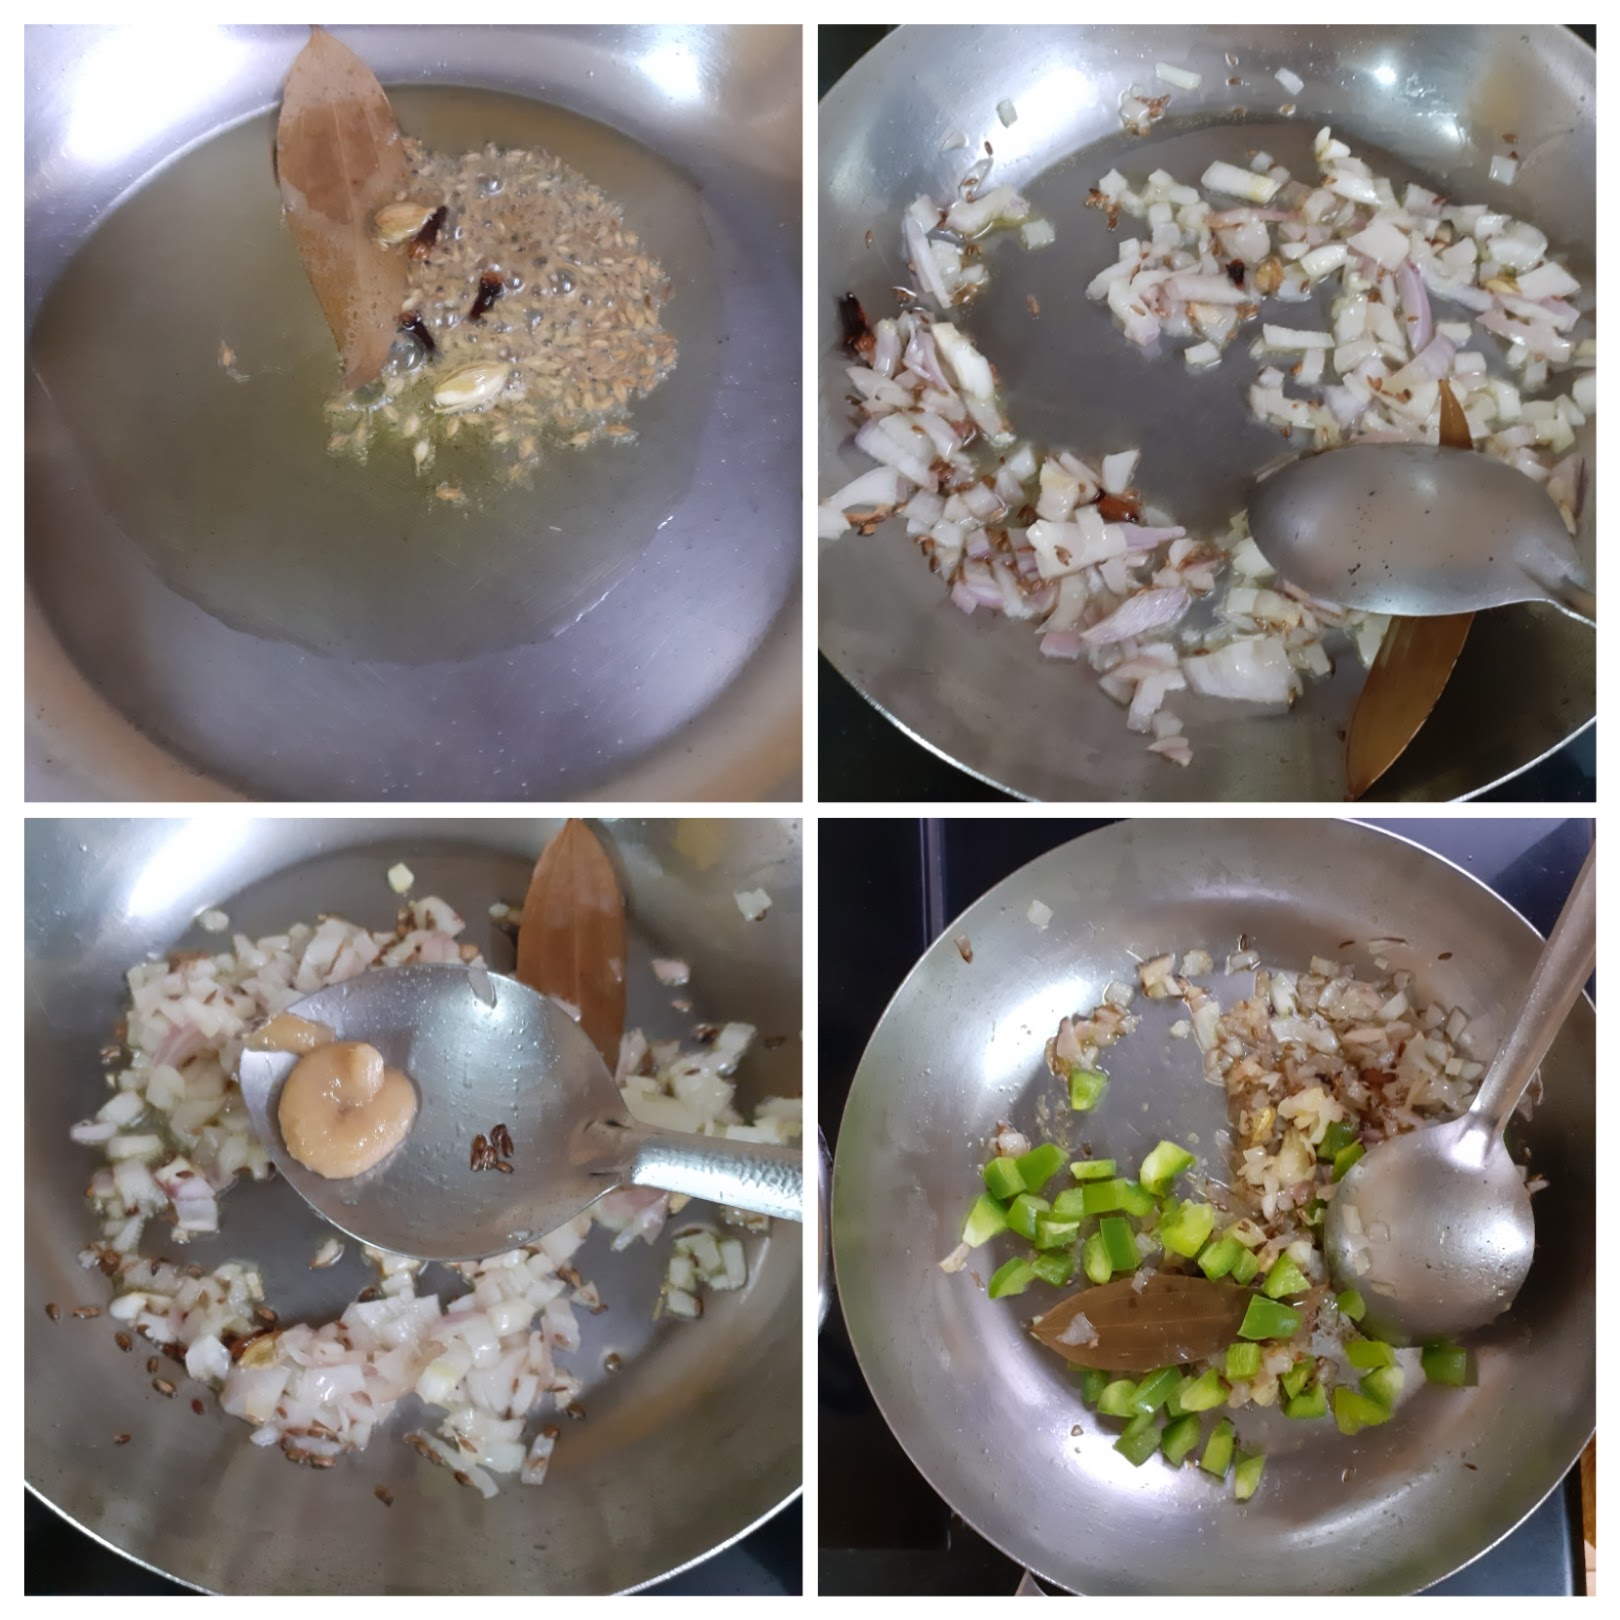
South Indian Vegetable Kurma
The South Indian Vegetable Kurma is a very popular dish in most south Indian restaurants. It goes very well with most south Indian dishes like the Sevai aka string hoppers, Parotta, Kothu Parotta( for which it forms part of the kotthu gravy), Poori, Dosa, Kal Dosa Rava Dosa, and more…
Than the ones at a restaurant I like the home version as the masalas can be customized. I find the restaurant ones very pungent with a strong masala impact which subdues the taste of the vegetables. A good kurma is one where the taste and texture of the vegetables is retained and the mild masalas enhance the taste of the dish.
So here’s my version of the South Indian Vegetable Kurma–
PREP TIME: 15 MINS COOK TIME:15 MINS
TOTAL TIME: 30 MINS COURSE: MAIN
CUISINE:INDIAN SERVINGS: 4
AUTHOR: RAJNI RAM
Ingredients:
Chopped Mix vegetables 200 gm ( carrot, cauliflower, potatoes, beans) etc;
Green peas 50 gm
Capsicum 1 chopped
Onion 1 medium chopped
Tomatoes 2 large pureed
Cashewnuts 10
Coconut 1 tbsp
Fennel seeds 1 tsp
Bay leaf/ Tej patha 1 medium
Cumin seeds 1 tsp
Green cardamom 2
Cloves 3 -4
Ginger garlic paste 1 tsp
Green chilli 1
Biryani masala 1 tsp depending on flavour
Red chilli powder 2 tsp
Oil for sauteeing
Garam masala powder 1/2 tsp optional
Directions:
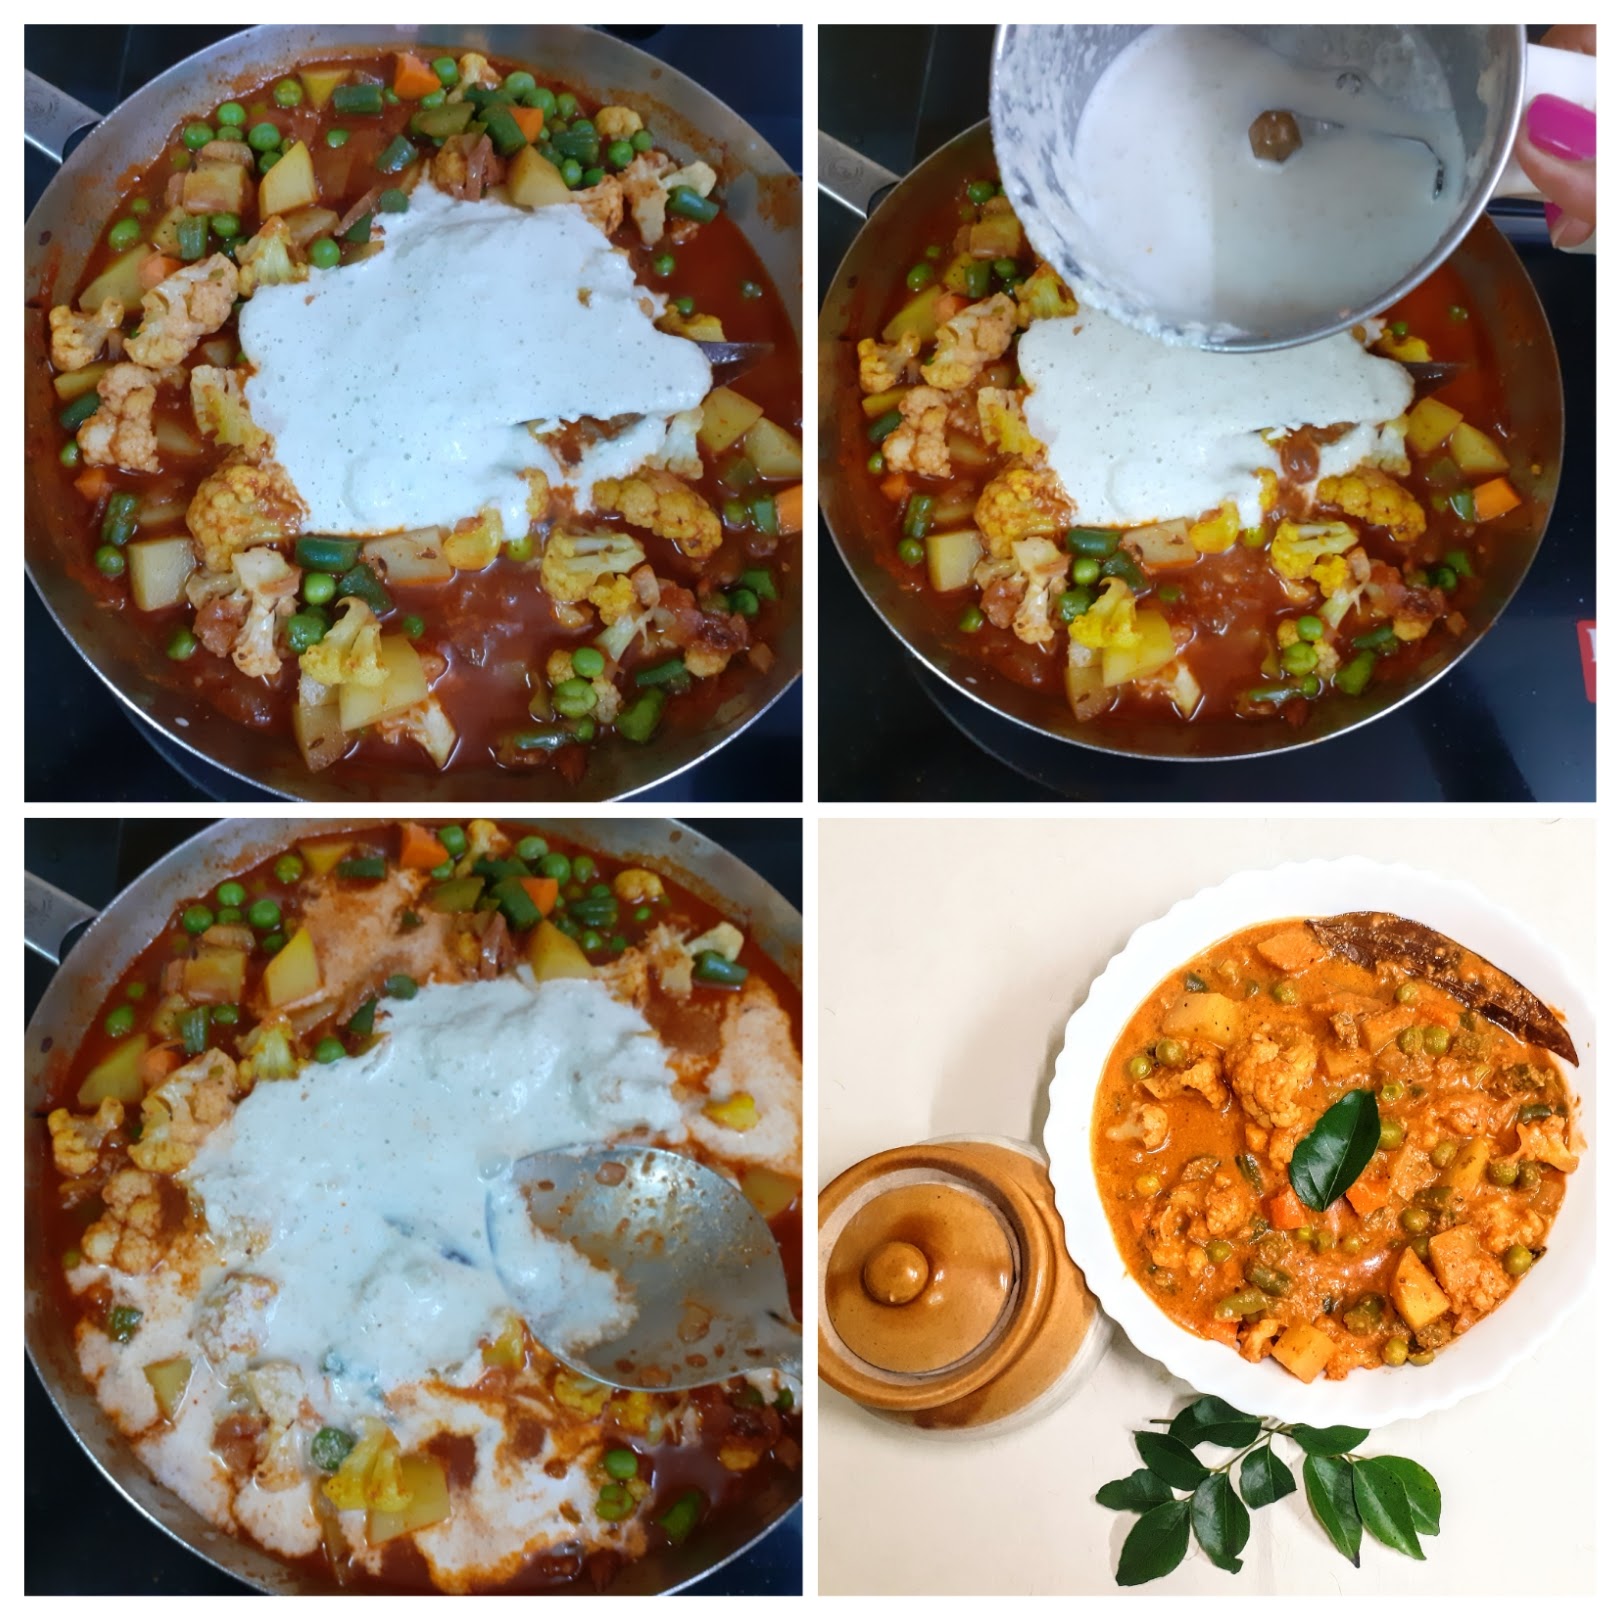
Steam all the mix vegetables with salt and turmeric powder, except capsicum, onion and tomatoes. Take care to not turn them mushy. Now in a pan or Kadai pour oil and heat. Put in the Bay leaf, cumin seeds, green cardamom and cloves and fry for 30 seconds. Now add the onions and ginger garlic paste,and saute for 30 seconds. Add the capsicum and continue to saute for another minute. Now add the tomato puree and all other spice powders like red chilli powder, biryani masala and the salt. Cook the gravy until the oil separates. Now add the steamed vegetables, mix well and cook for a minute. Grind the coconut, fennel seed, cashewnuts and green chillies to a smooth paste adding a little water. Pour this paste into the cooking gravy. Cook for another2 minutes or until the gravy cones together and put of the stove. Garnish with curry leaves add the garam masala powder now if using, and enjoy with your choice of tiffin.
STEPWISE RECIPE FOLLOWS:
1. Steam all the mix vegetables with some salt and turmeric powder, except capsicum, onion and tomatoes. Take care to not turn them mushy.

2. Now in a pan or Kadai pour oil and heat. Put in the Bay leaf, cumin seeds, green cardamom and cloves and fry for 30 seconds. Now add the onions and ginger garlic paste, and saute for 30 seconds. Add the capsicum and continue to saute for another minute
3. Now add the tomato puree and all other spice powders like red chilli powder, biryani masala and the salt. Cook the gravy until the oil separates.
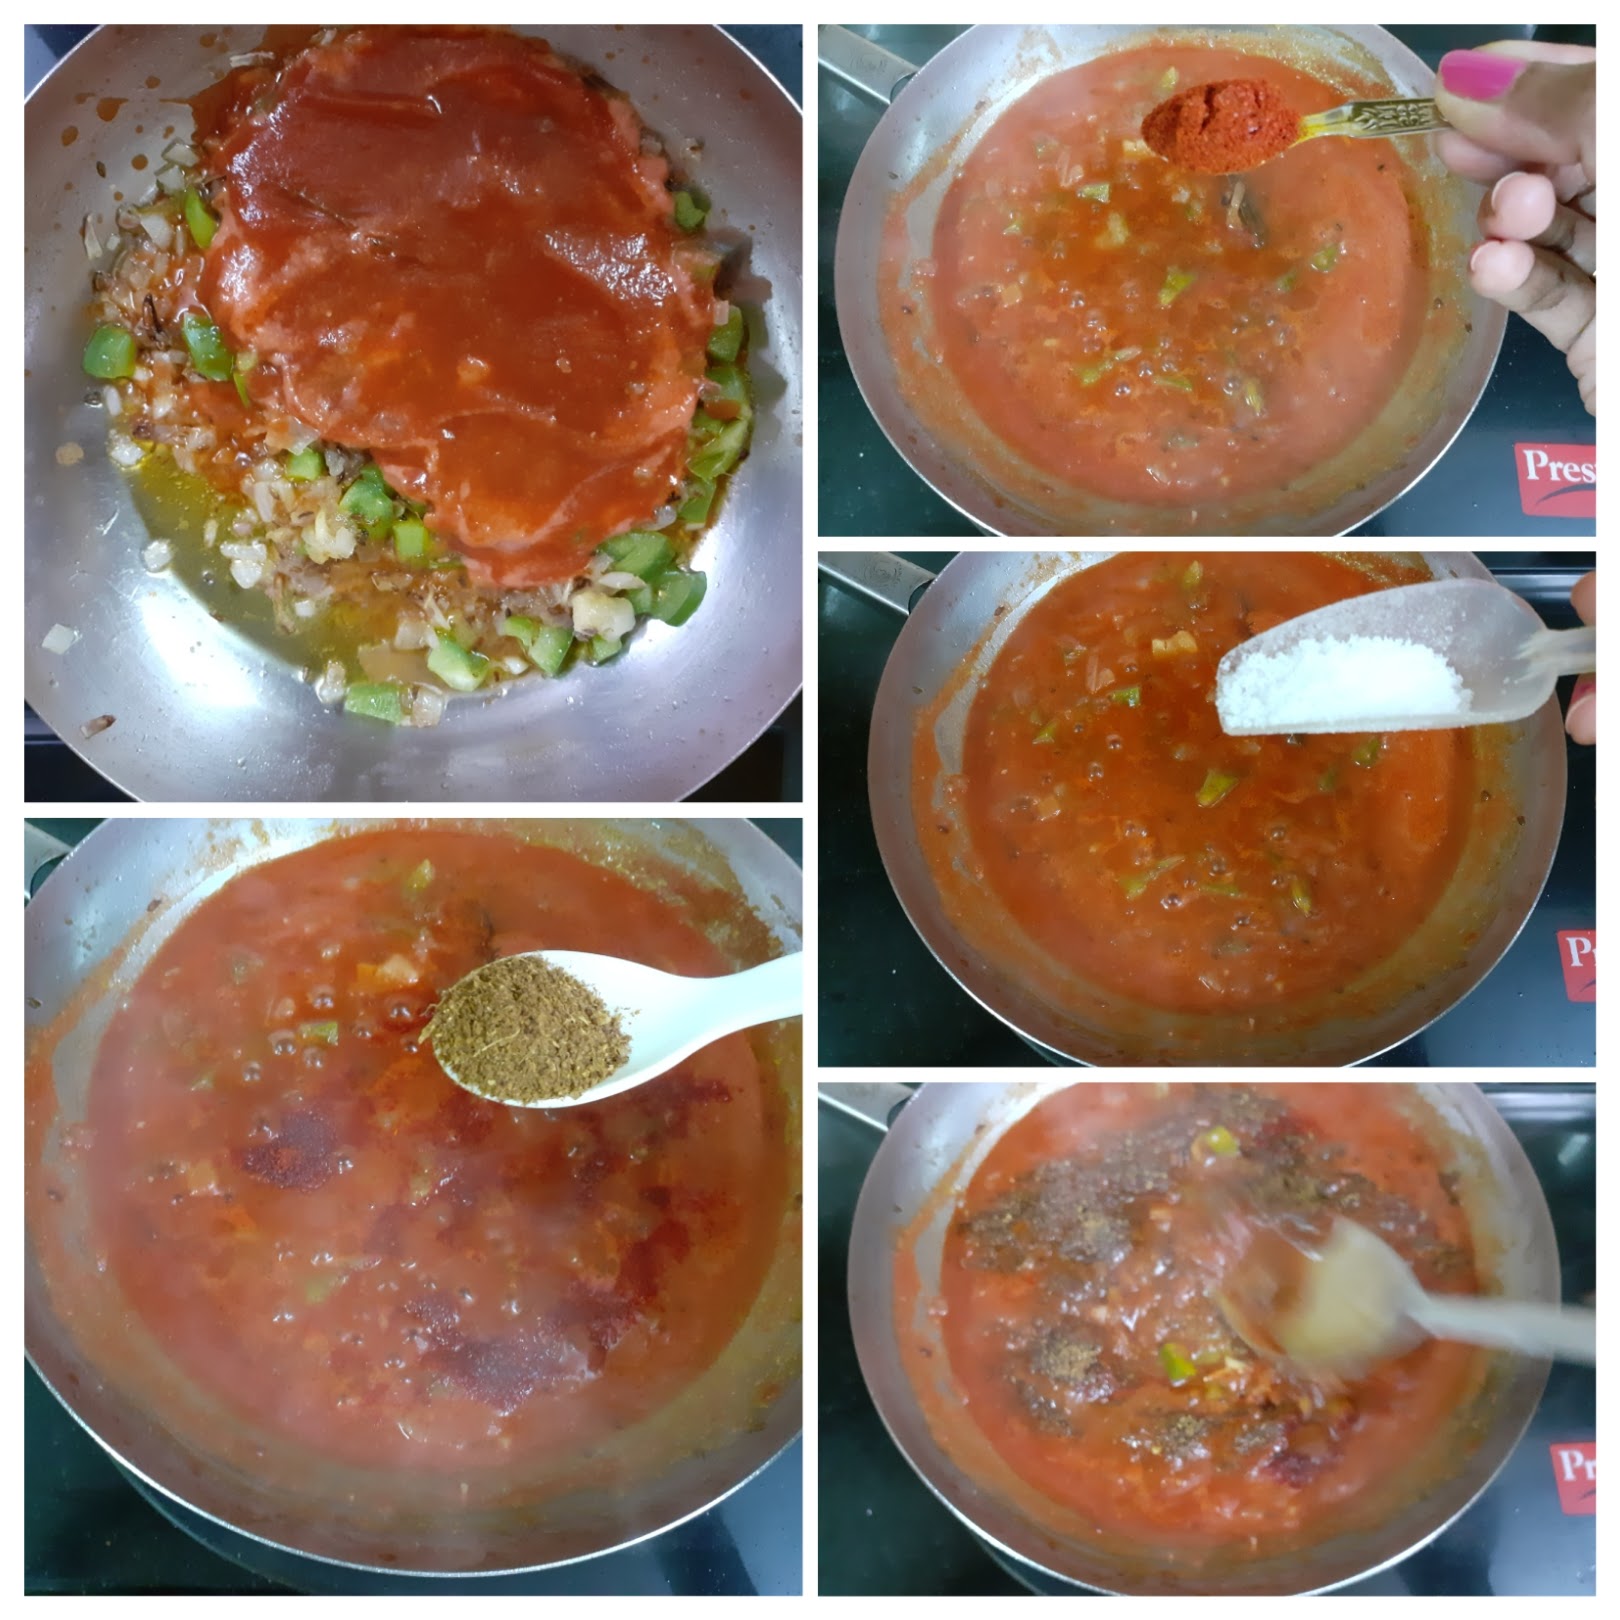
4. Now add the steamed vegetables, mix well and cook for a minute. Grind the coconut, fennel seed, cashewnuts and green chillies to a smooth paste adding a little water.
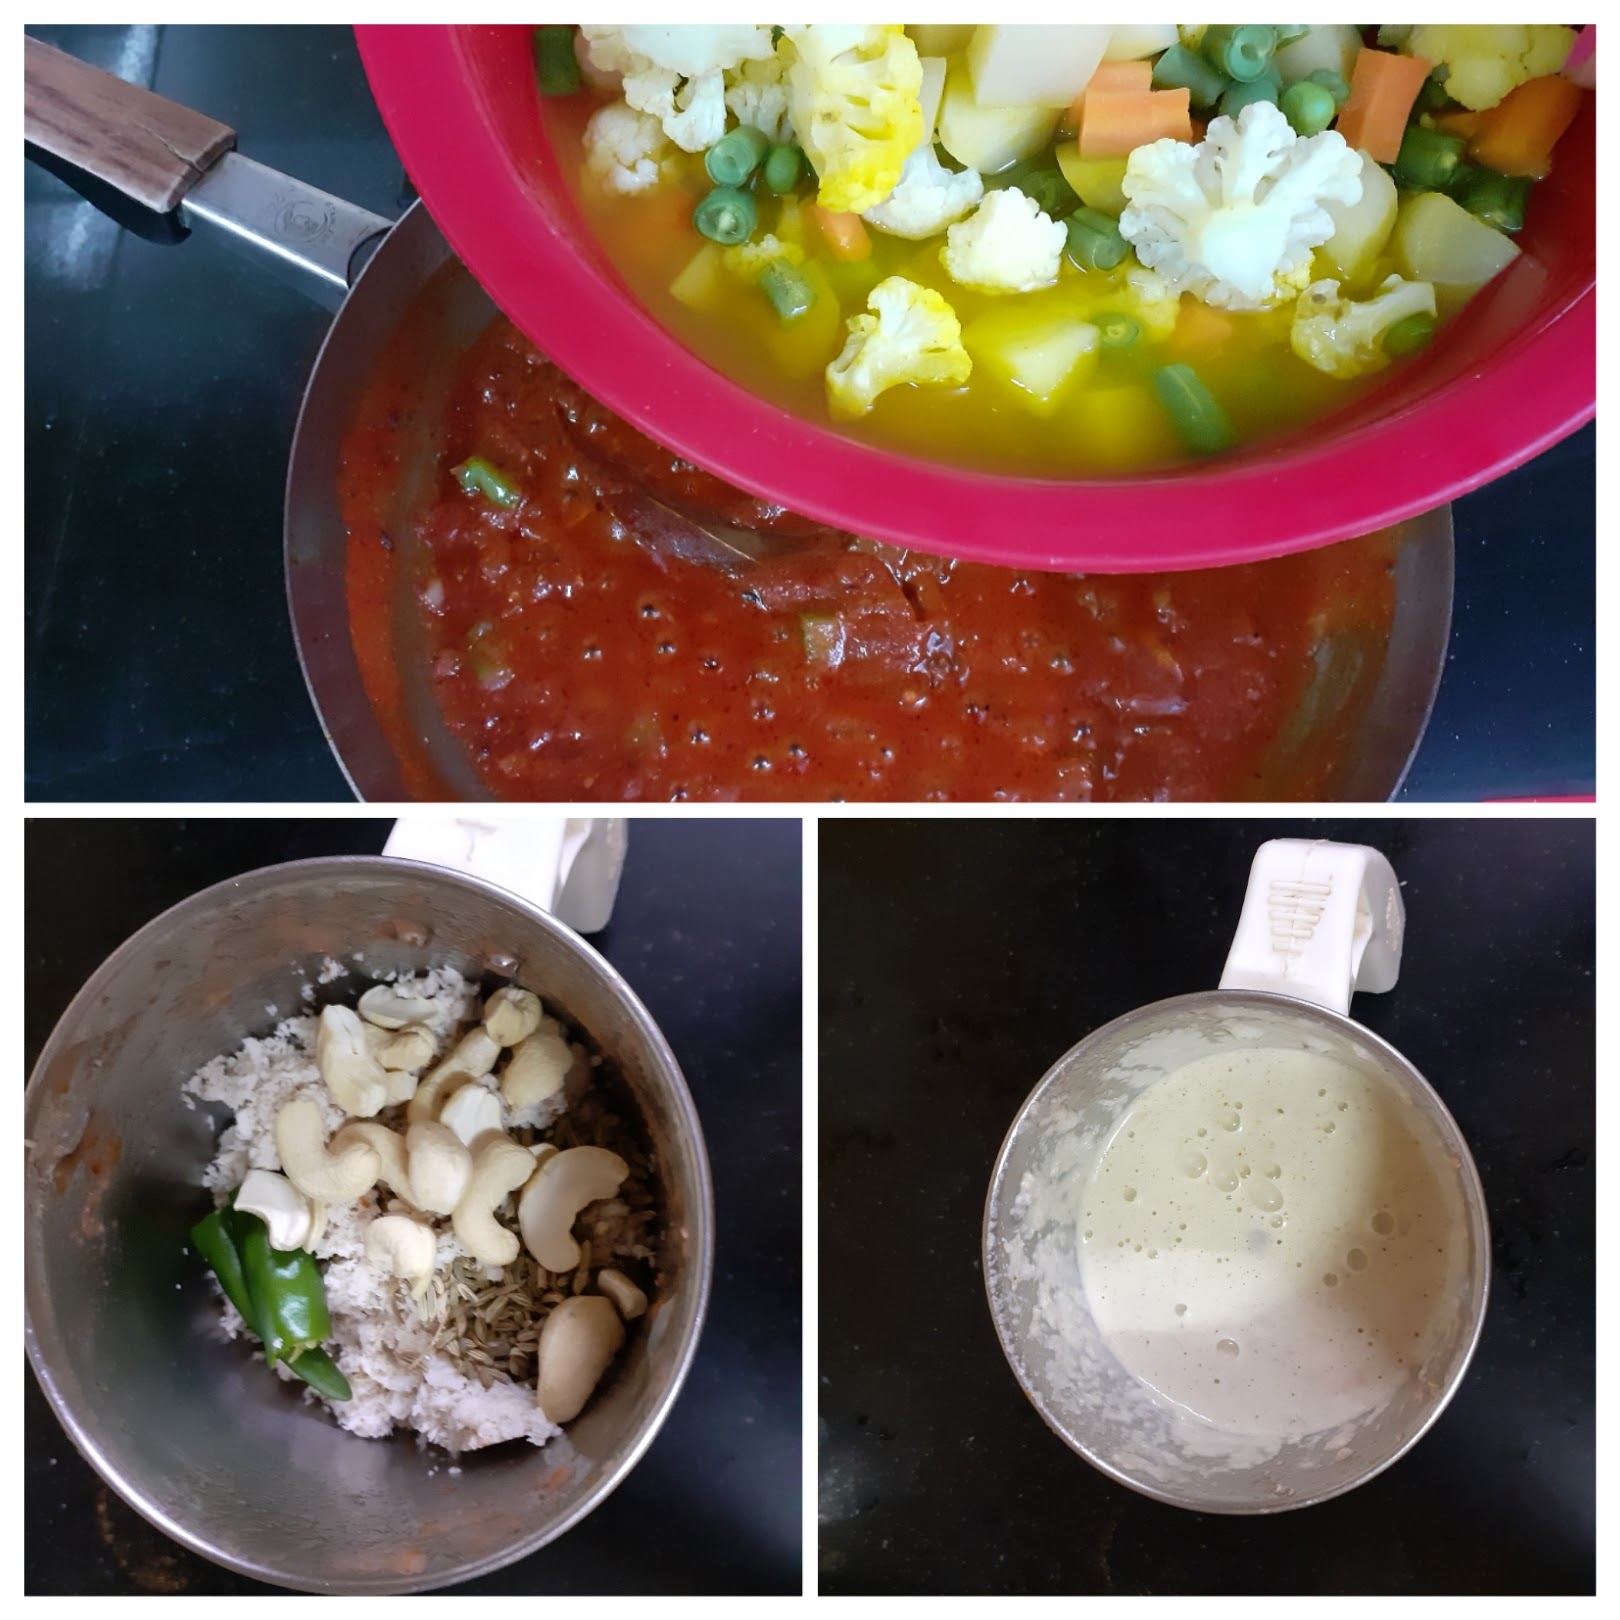
5. Pour this paste into the cooking gravy. Cook for another2 minutes or until the gravy cones together and put of the stove. Garnish with curry leaves add the garam masala powder now if using, and enjoy with your choice of tiffin
NOTES:
1. The vegetables used can be customized to your liking. That said vegetables with a lit of water content like gourds, brinjal etc are not preferred much.
2. For a thicker gravy add more cashew and coconut. For a thinner one reduce the cashew and coconut or use the quantity given and then thin down with water
3. I use biryani masala for the kurma as it gives a very nice flavoring to the kurma. One can use garam masala too but the authentic taste does not come in.
4. I use homemade Biryani masala. For recipe of Biryani masala click here. Feel free to use store bought one too.
If you tried this recipe and liked it, please let us know in the comment box. I would love to hear from you. If you would like to receive our future posts on your mail, please leave your mail Id so that we can post it to you.
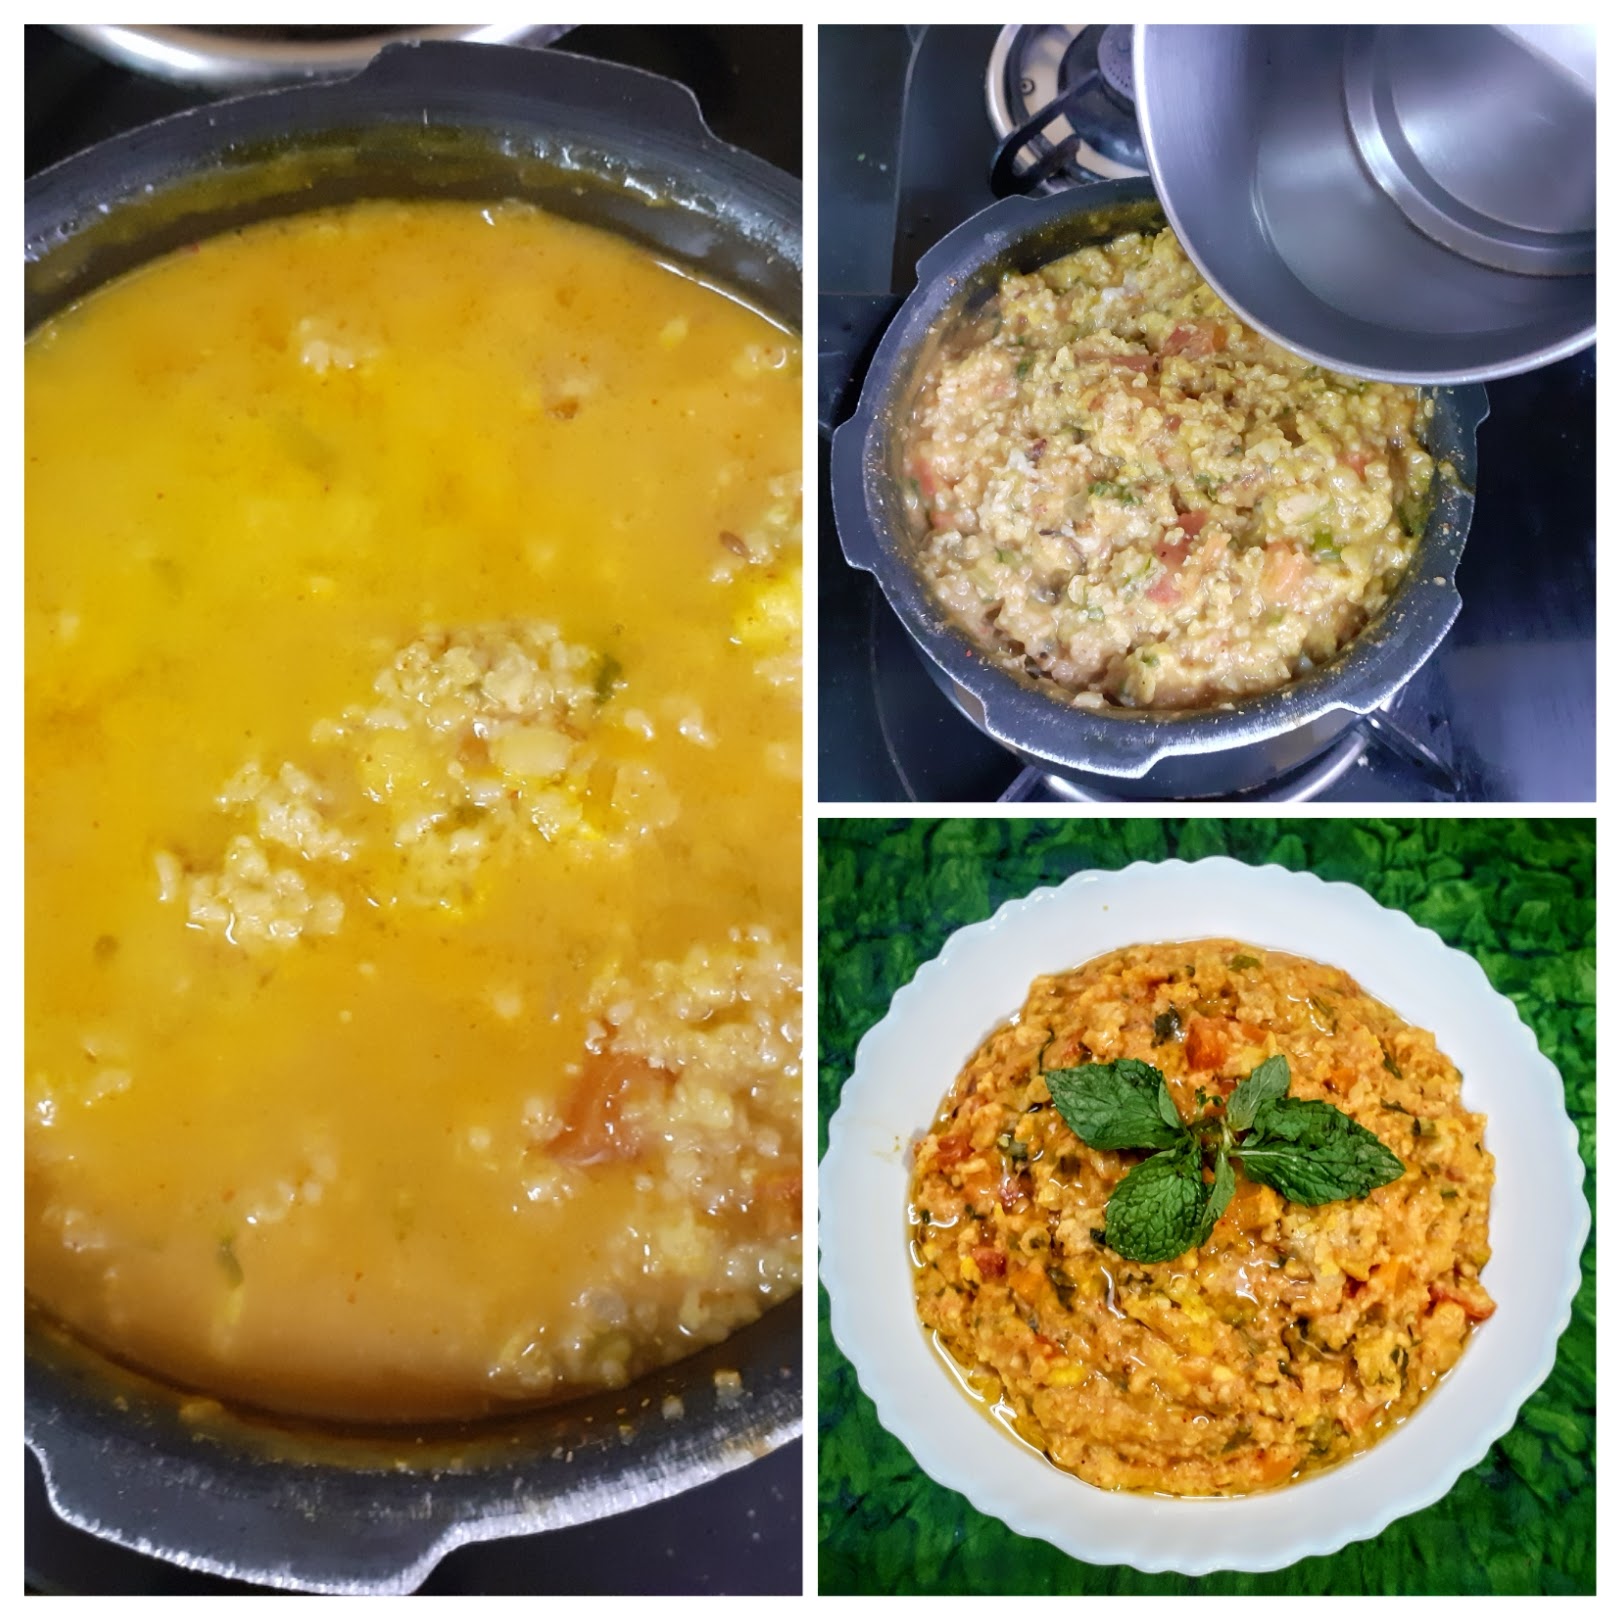
Vegetable Oats Kichdi
This Oats and vegetable kichdi is very simple to make and is a one pot recipe. It can be customized to your preference be it spice or the vegetables added. In all it is a healthy, delicious and simple meal for the days you want a simple yet yummy meal.
I usually make this for dinner on the days our lunch is heavy or make it as a quick meal after a shopping trip as it gets ready in a jiffy.
I use Moong dal mostly but this time I have used half of Moong dal and half of Tuvar dal and it turned out yummy. But since I used Tuvar dal I had to pre cook the dal in a vessel for 10 mi utes and then transfer to cooker along with all other ingredients. If you want a fully one pot recipe, then use only Moong dal.
While you are here visit my other recipes like Barnyard millet Pongal, Cauliflower fried rice, Coriander Rice, Adai, Bhindi Raita and more…
Here is the Vegetable Oats Kichdi recipe for you-
PREP TIME: 10 MINS COOK TIME: 15 MINS
TOTAL TIME: 25 MINS CUISINE: INDIAN
COURSE : MAIN SERVINGS: 5
AUTHOR: RAJNI RAM

Ingredients:
Instant Oats 2 cups
Moong dal 1/4 cup
Tuvar dal 1/4 cup
Onion 1 small finely chopped
Spring onion 3 sprigs finely chopped with greens
Capsicum 1 small
Carrot 1/2 finely chopped
Baby corn 3 to 4 finely chopped
Tomatoes 2 finely chopped
Palak/ Spinach few leaves finely chopped
Salt as required
Turmeric powder 1/2 tsp
Red chilli powder ( regular) 1 tsp
Kashmiri Red chilli powder 1 tsp
Coriander powder 1.5 to 2 tsp
Cumin seeds 1 tsp
Fennel powder 1 tsp
Ghee 1 tbsp for topping
Oil for sauteeing 1 tbsp
Directions:
Wash the dals and cook in open pan for 10 mins in 2 cups water. Set aside. Now in a cooker take 1 tbsp oil and heat. Add cumin seeds and as they splutter add the chopped onions, followed by spring onions and sauteed for a minute. Now add the capsicum and saute for another30 seconds. Now add all other vegetables and tomatoes and mix well. Add the partially cooked dals along with the water and the Oats and mix all of them nicely. Now add 4.5 cups water, followed by salt, turmeric powder, red chilli powders, coriander powder, fennel powder and stir nicely. Close the cooker and cook for 5 to 6 whistles. Switch off the flame and allow the pressure to settle. Now open cooker, adjust consistency of the kichdi if required by adding some hot water, check and adjust salt or spices if required. Drizzle 1 tbsp ghee on top and enjoy this healthy and delicious meal.
STEPWISE RECIPE FOLLOWS:
1. Wash the dals and cook in open pan for 10 mins in 2 cups water. Set aside

2. Now in a cooker take 1 tbsp oil and heat. Add cumin seeds and as they splutter add the chopped onions, followed by spring onions and sauteed for a minute.

3. Now add the capsicum and saute for another30 seconds. Now add all other vegetables and tomatoes and mix well. Add the partially cooked dals along with the water and the Oats and mix all of them nicely.
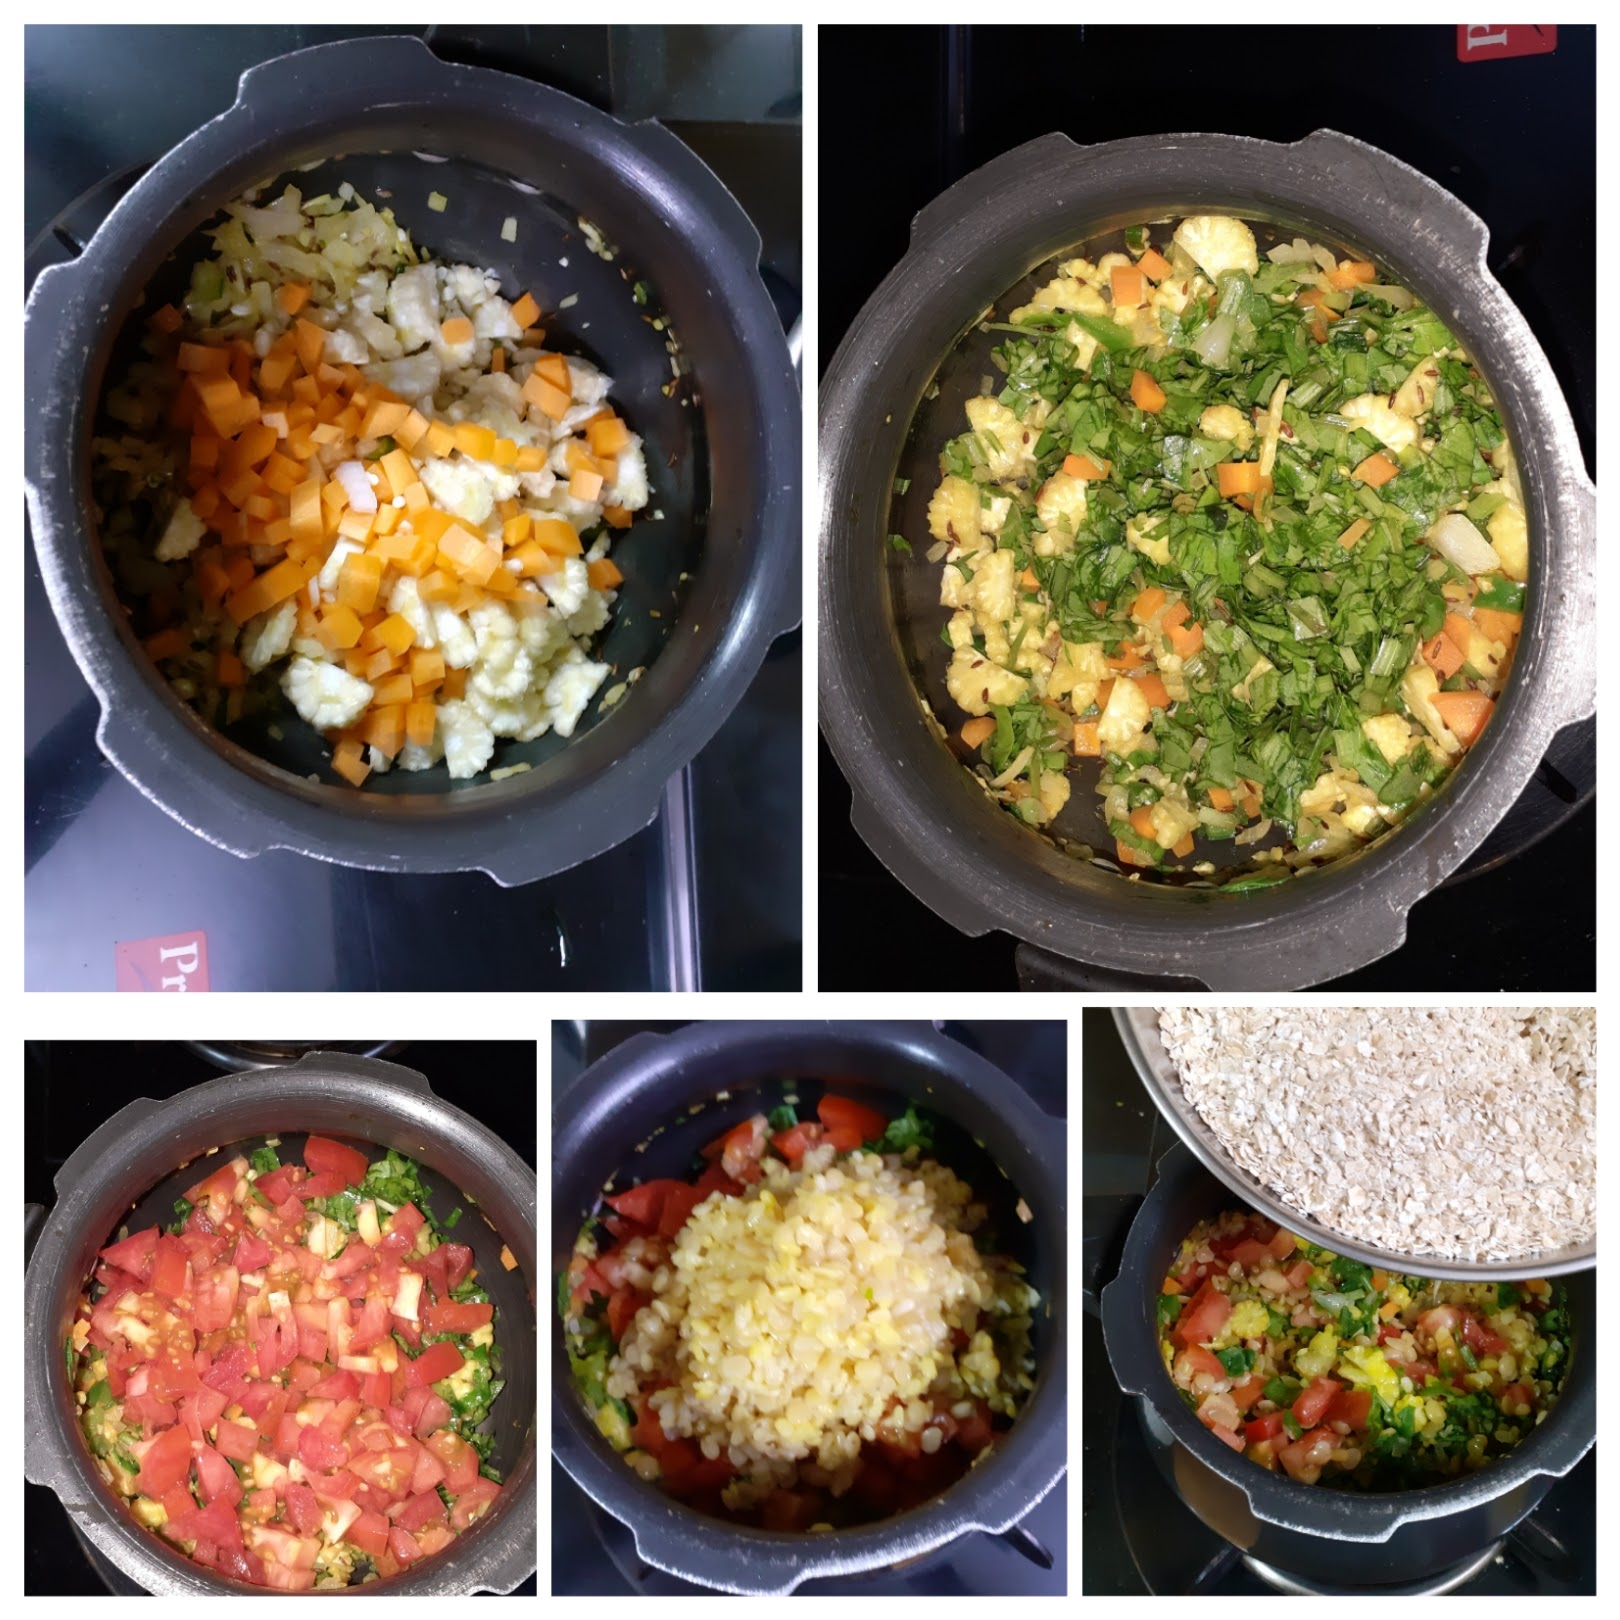
4. Now add 4.5 cups water, followed by salt, turmeric powder, red chilli powders, coriander powder, fennel powder and stir nicely. Close the cooker and cook for 5 to 6 whistles. Switch off the flame and allow the pressure to settle.

5. Now open cooker, adjust consistency of the kichdi if required by adding some hot water, check and adjust salt or spices if required. Drizzle 1 tbsp ghee on top and enjoy this healthy and delicious meal.
If you tried this recipe and liked it please comment below. I would love to hear from you. If you have a query about the recipe email us and ill respond as soon as I can.
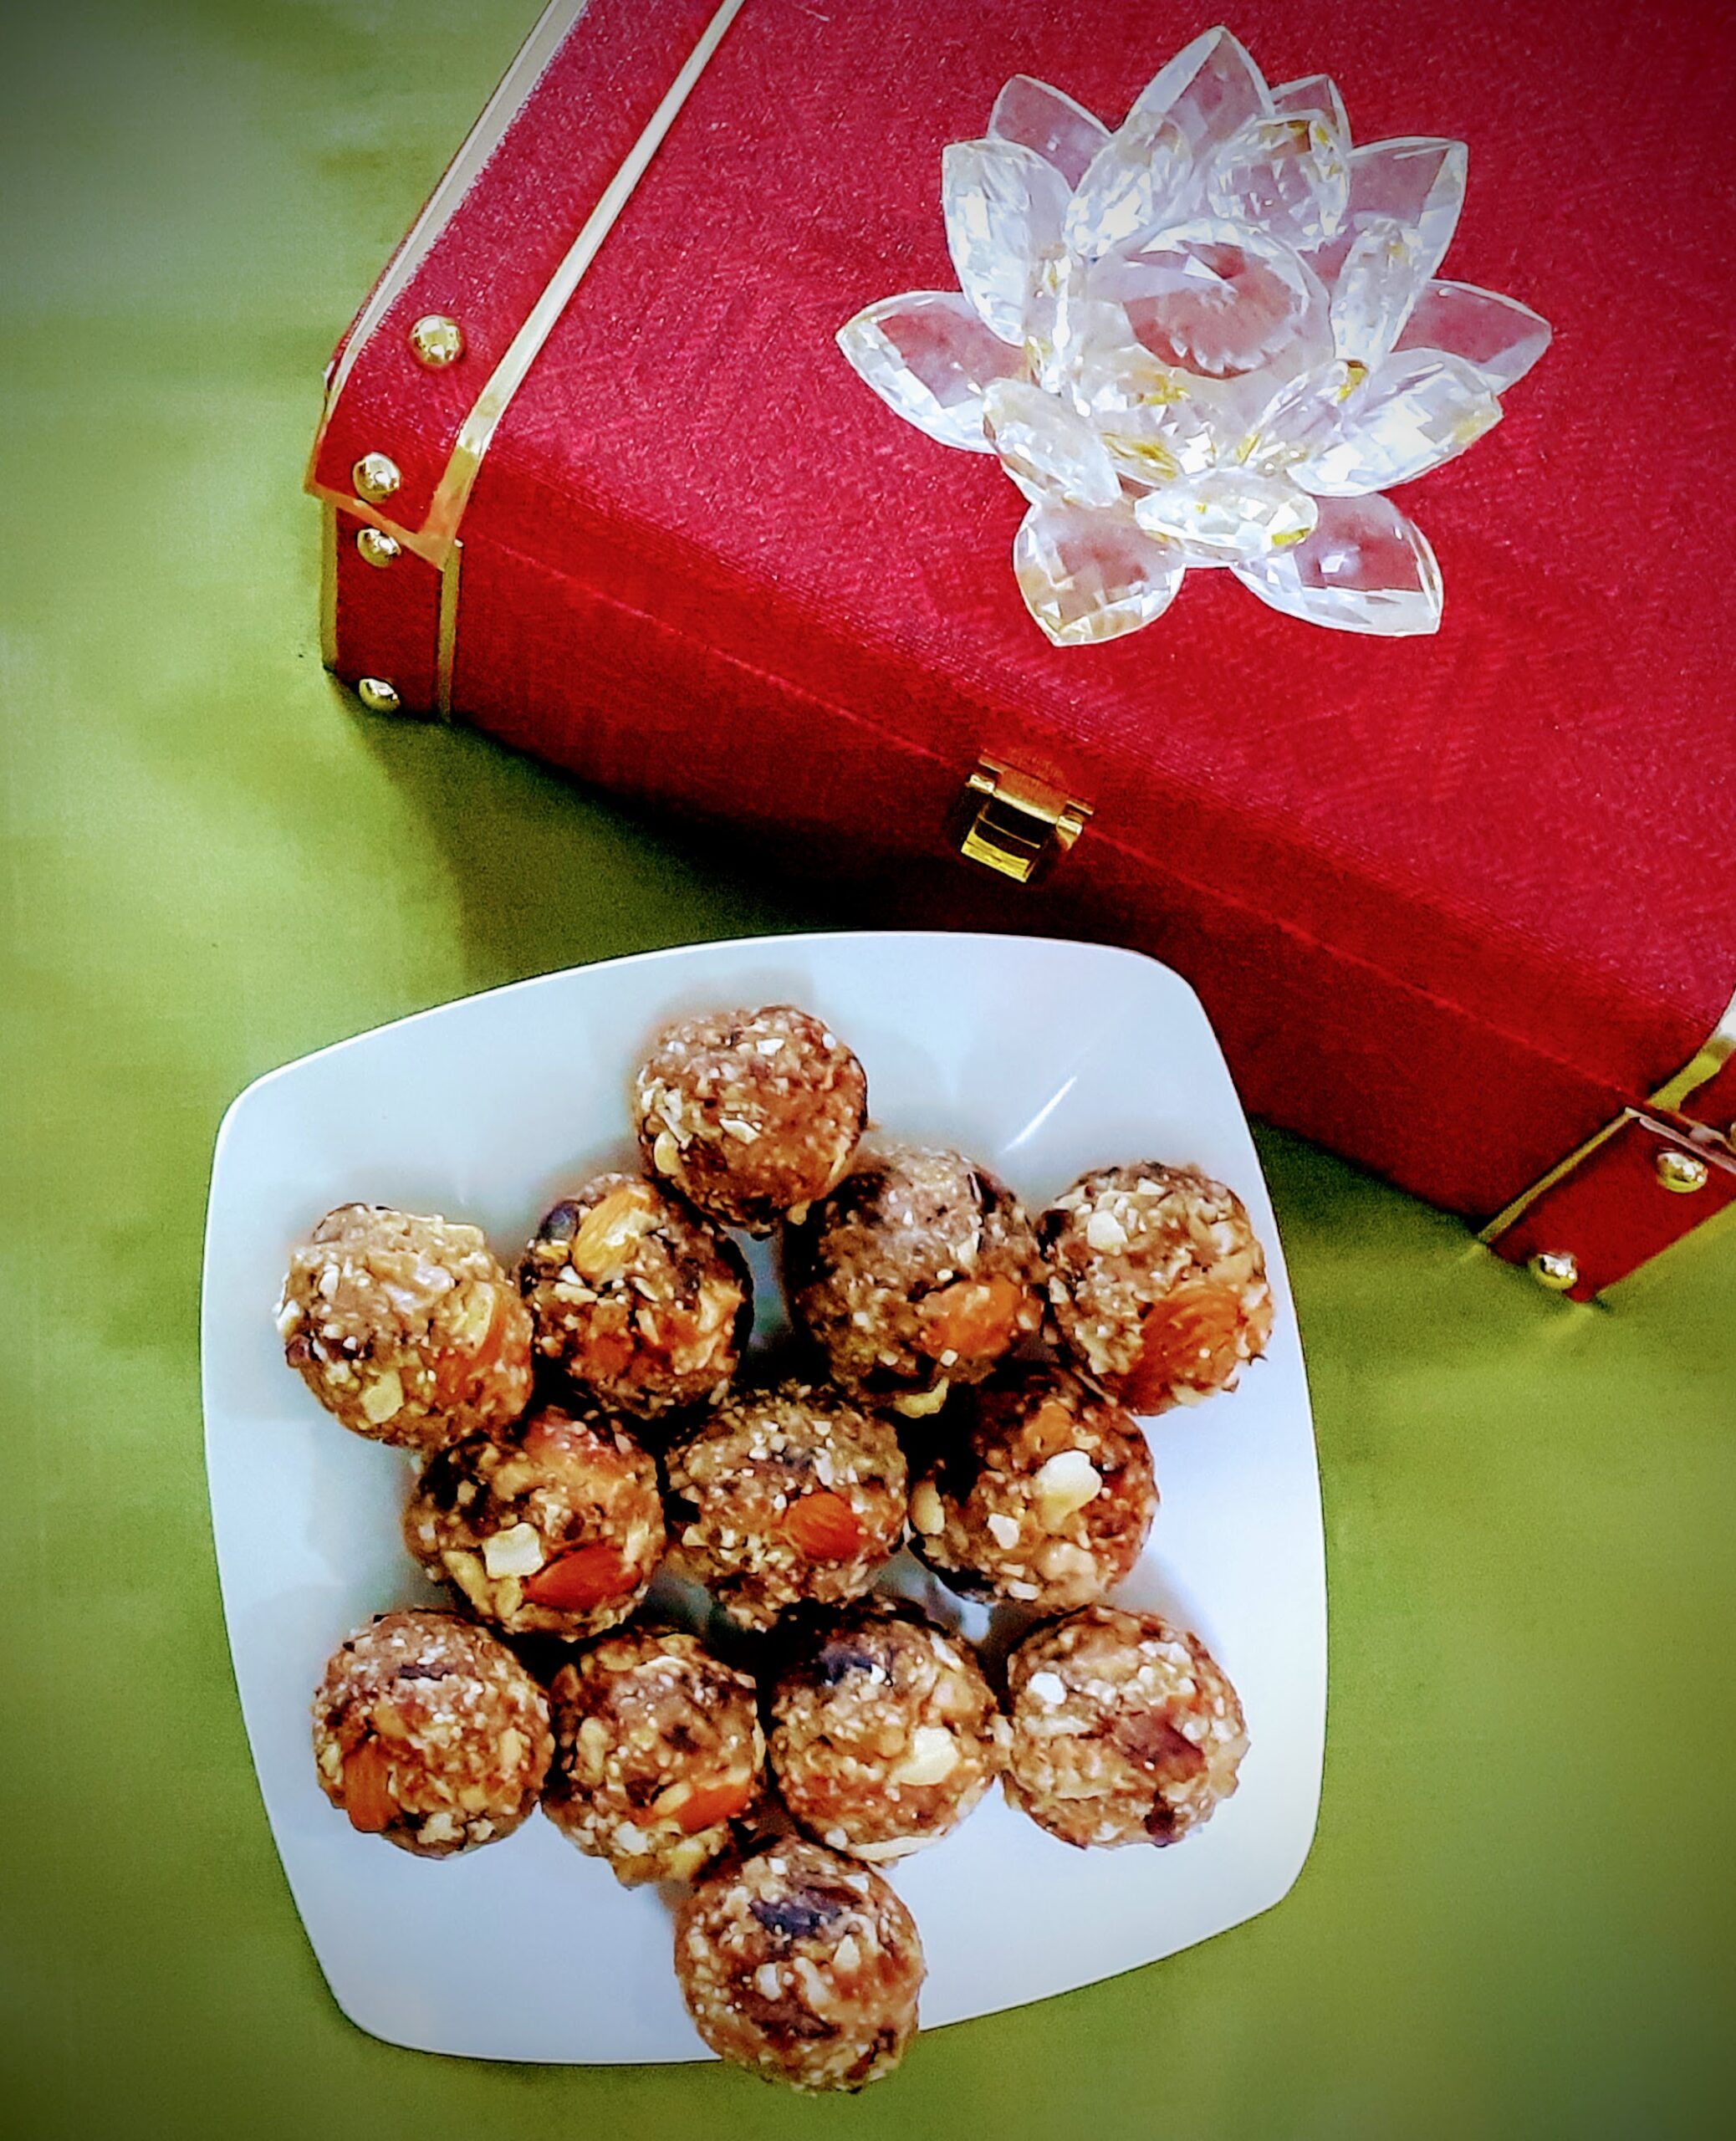
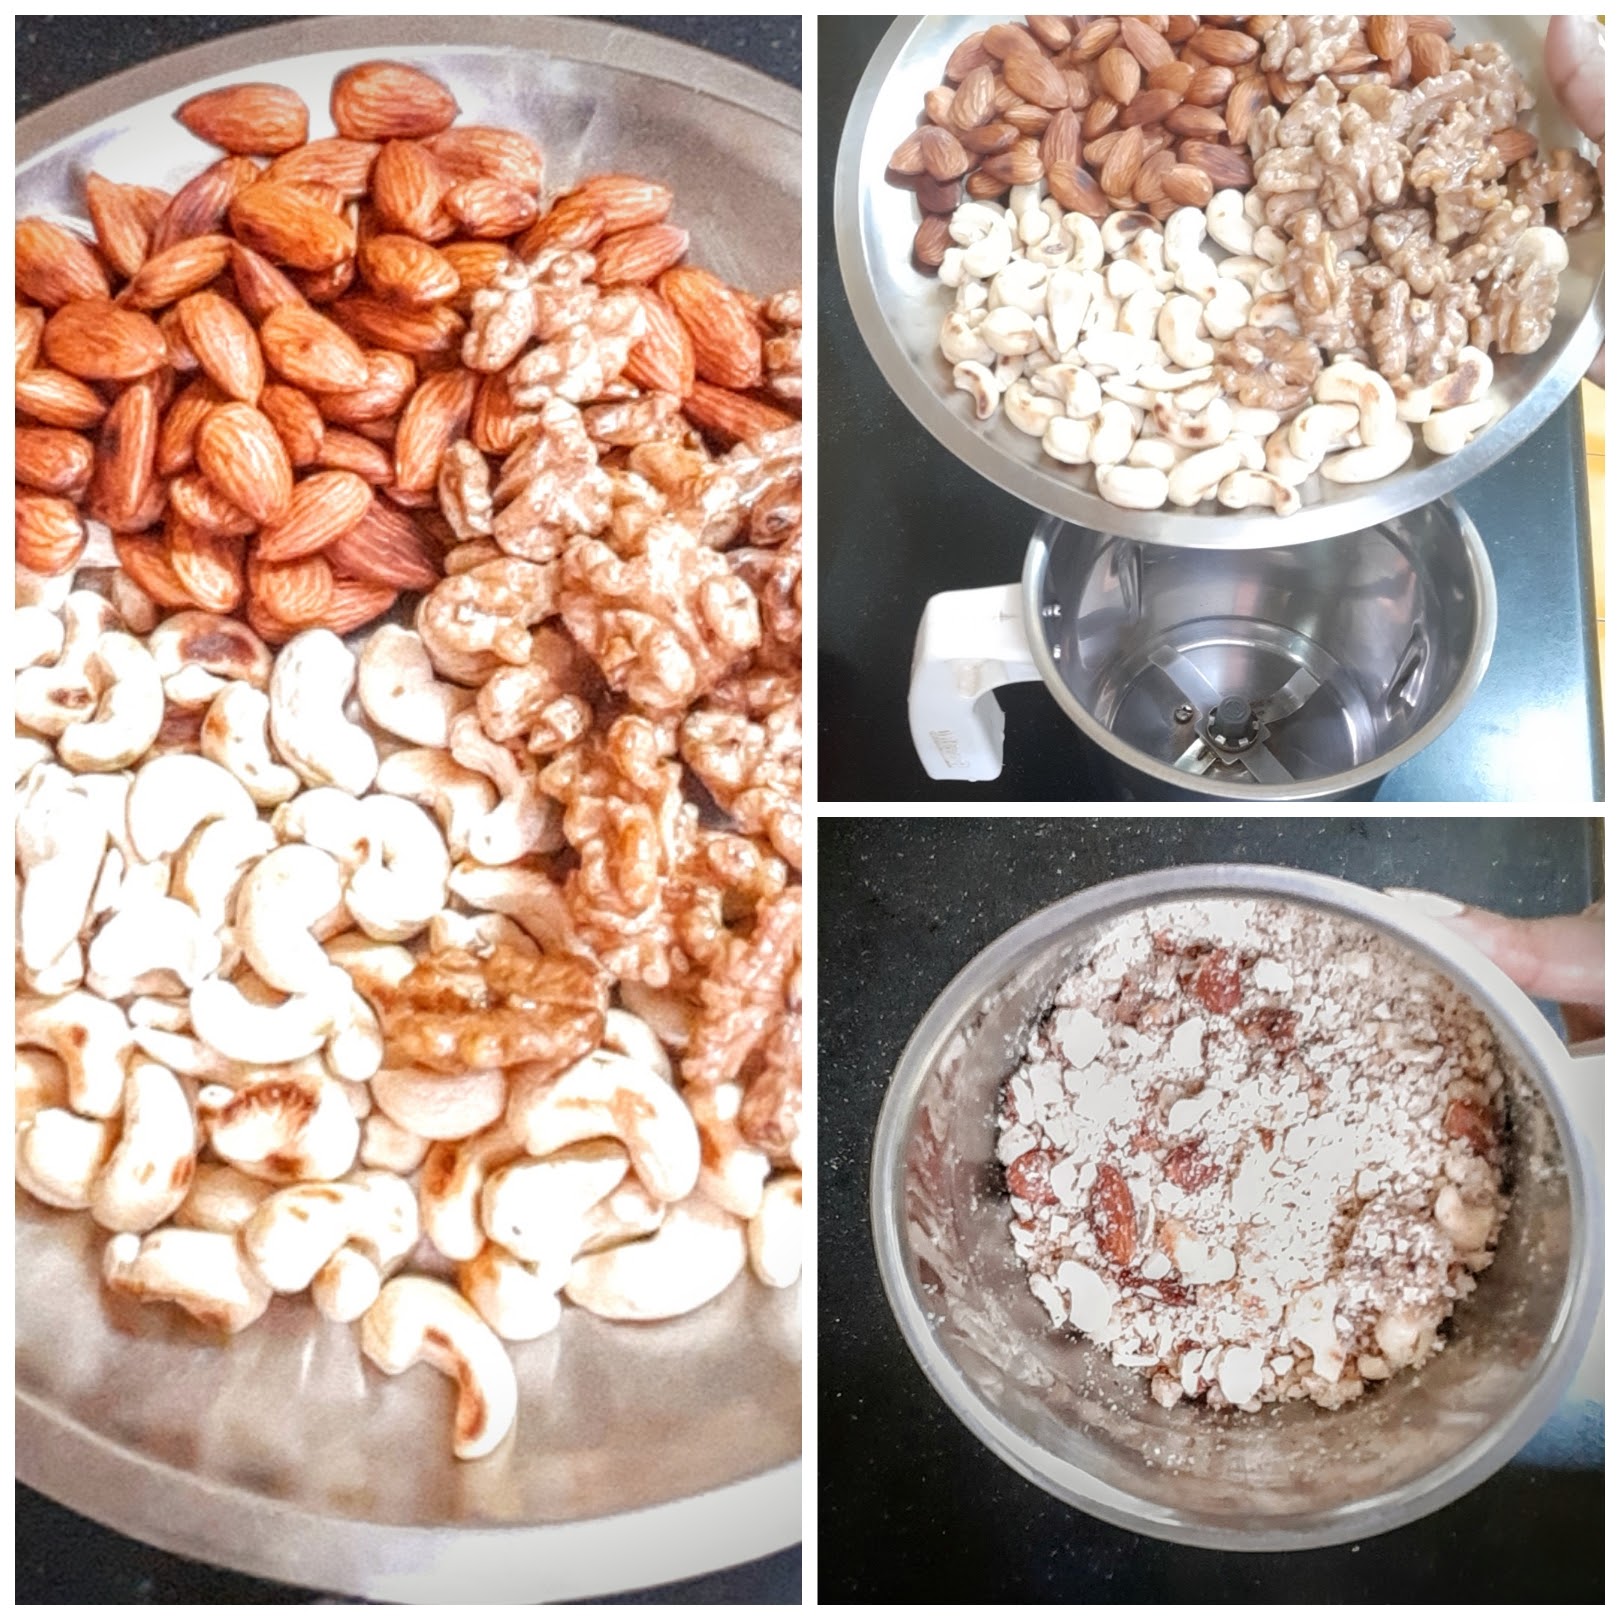
Dry Fruit Ladoo
These Ladoos are absolutely delicious and healthy. In my house, these are made not only during Diwali but all year through. They have a long shelf life and can sometimes substitute for breakfast. People who fast can rely on this for some quick energy. No sugar or honey or jaggery is added and I use minimum ghee(about 3 teaspoons). Yes! this is a whole package of health. Remember good things always come in small packages? This is that package????.
My daughter gets it packed for hostel without fail every time she comes homes on her break. According to her, whenever she gets up late and is late for breakfast at the mess, she pops in 2 of these ladoos and grabs a glass of milk and her breakfast is taken care of for that day. I don’t recommend this on a daily basis, but we all have times when we are running against time, this healthy ladoo comes in handy, it also takes care of sudden hunger pangs. My home always has a stock of these ladoos. And the best part you can customize them as per your desired dry fruits and nuts.
While you are here please check out my other sweet/dessert recipes like- Red Poha Ladoo, Carrot Kheer, Gajar halwa barfi, Maa Ladoo, and more…
Here is the recipe for Dry fruit ladoo-
Ingredients:
Dates ( juicy, fleshy ones) 250 gms deseeded
Cashewnuts 100 -125 gms
Almonds 100 gm
Walnut 75 gm
Ghee 1 tbsp
Directions:
Put a pan over the flame and add 1 tsp ghee to it. Now roast all the nuts separately to a nice golden colour. Take care not to burn them, as the burnt smell will reduce the taste and flavour of the ladoo. Transfer them to a plate and cool them. On cooling using the “pulse mode” of your blender, blend them to a coarse mixture. Now to the same pan add another teaspoon ghee and put in the deseeded dates. Keep stirring and mashing them with the back of a spatula. As it turns warm, the dates start getting a little gooey. Now start adding the coarse nut mixture, little by little, until the gooey date paste absorbs most of it( mixture will look semi-dry). All through this process, the flame should be on low. Once your date and nut mixture is combined, remove from flame and cool for 5 minutes. We want a little warmth for binding, so don’t let it go too cold. Grease your palms with a little ghee and start making ladoo of them. Repeat for the entire mixture. The yummy and tasty Dry fruit ladoo are ready. Store them in an airtight jar once they are completely cool.
STEPWISE RECIPE FOLLOWS:
1. Assemble all ingredients. Put a pan over the flame and add 1 tsp ghee to it. Now roast all the nuts separately to a nice golden colour. Take care not to burn them, as the burnt smell will reduce the taste and flavour of the ladoo.
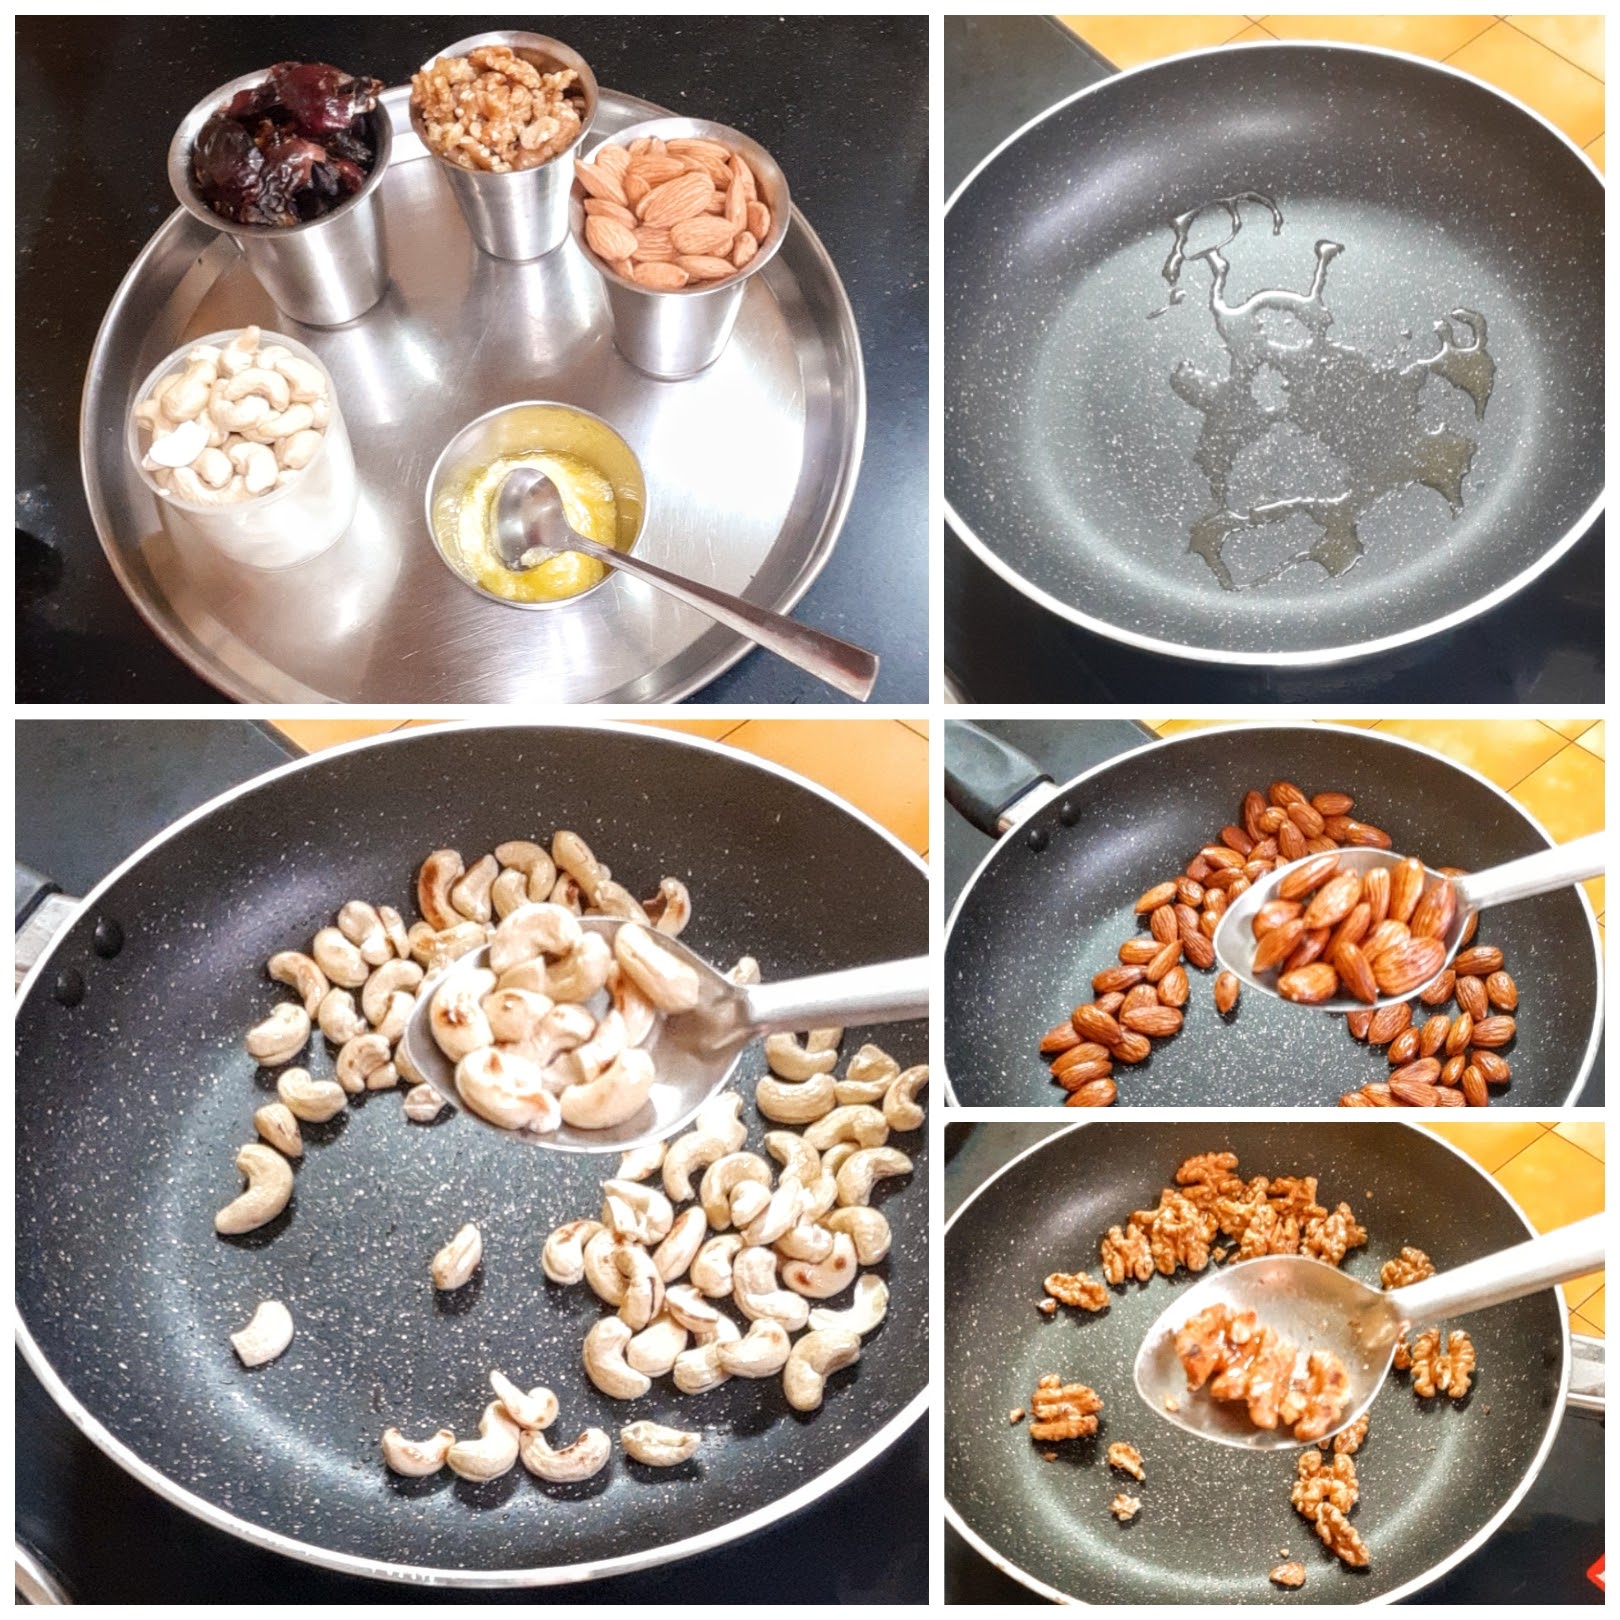
2. Transfer them to a plate and cool them. On cooling using the “pulse mode” of your blender, blend them to a coarse mixture.
3. Now to the same pan add another teaspoon ghee and put in the deseeded dates. Keep stirring and mashing them with the back of a spatula. As it turns warm, the dates start getting a little gooey.
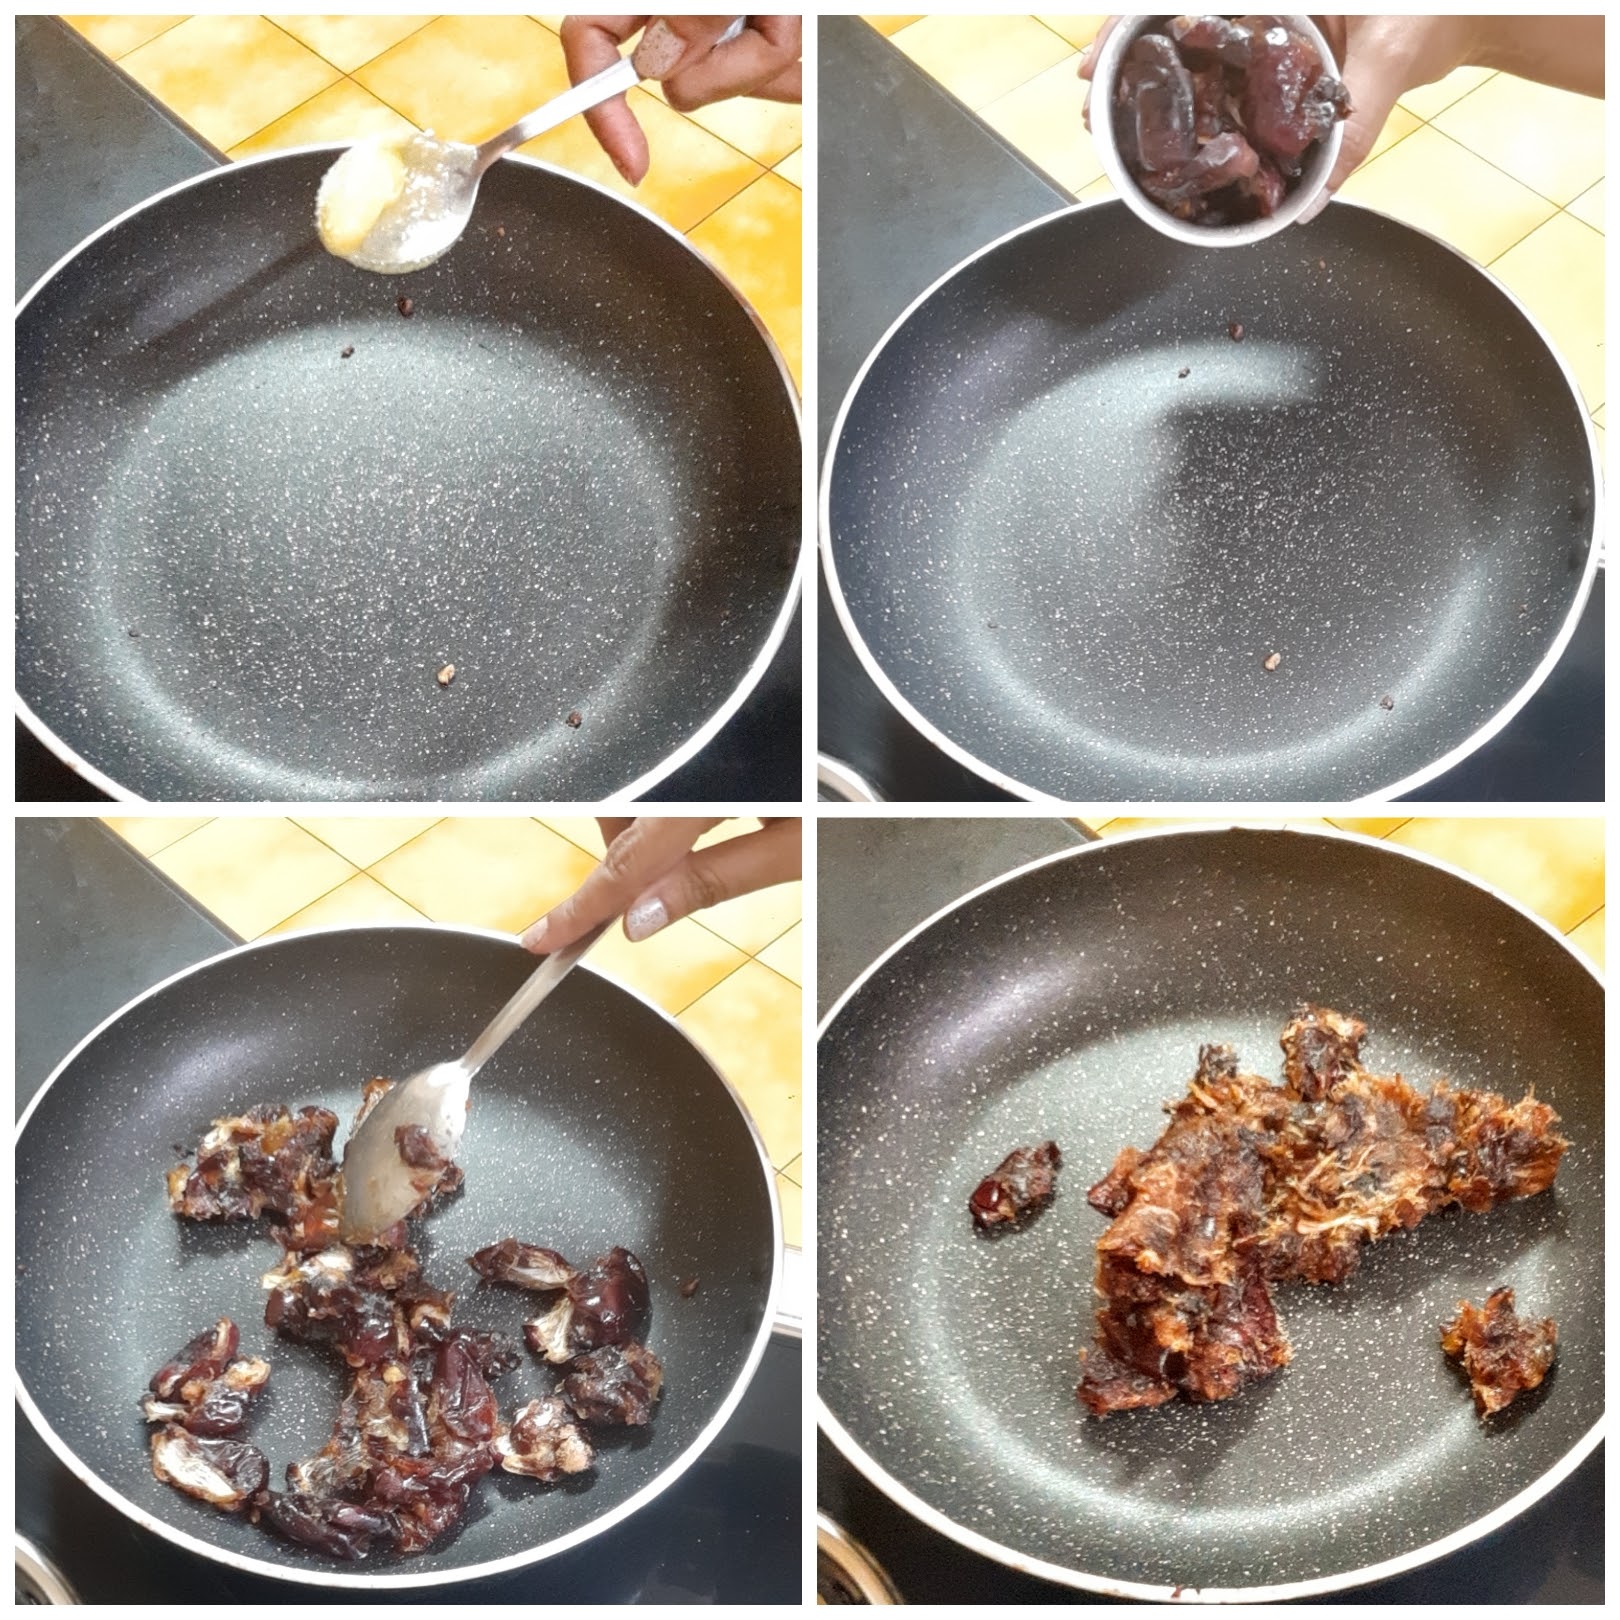
4. Now start adding the coarse nut mixture, little by little, until the gooey date paste absorbs most of it( mixture will look semi-dry). All through this process, the flame should be on low. Once your date and nut mixture is combined, remove from flame and cool for 5 minutes.
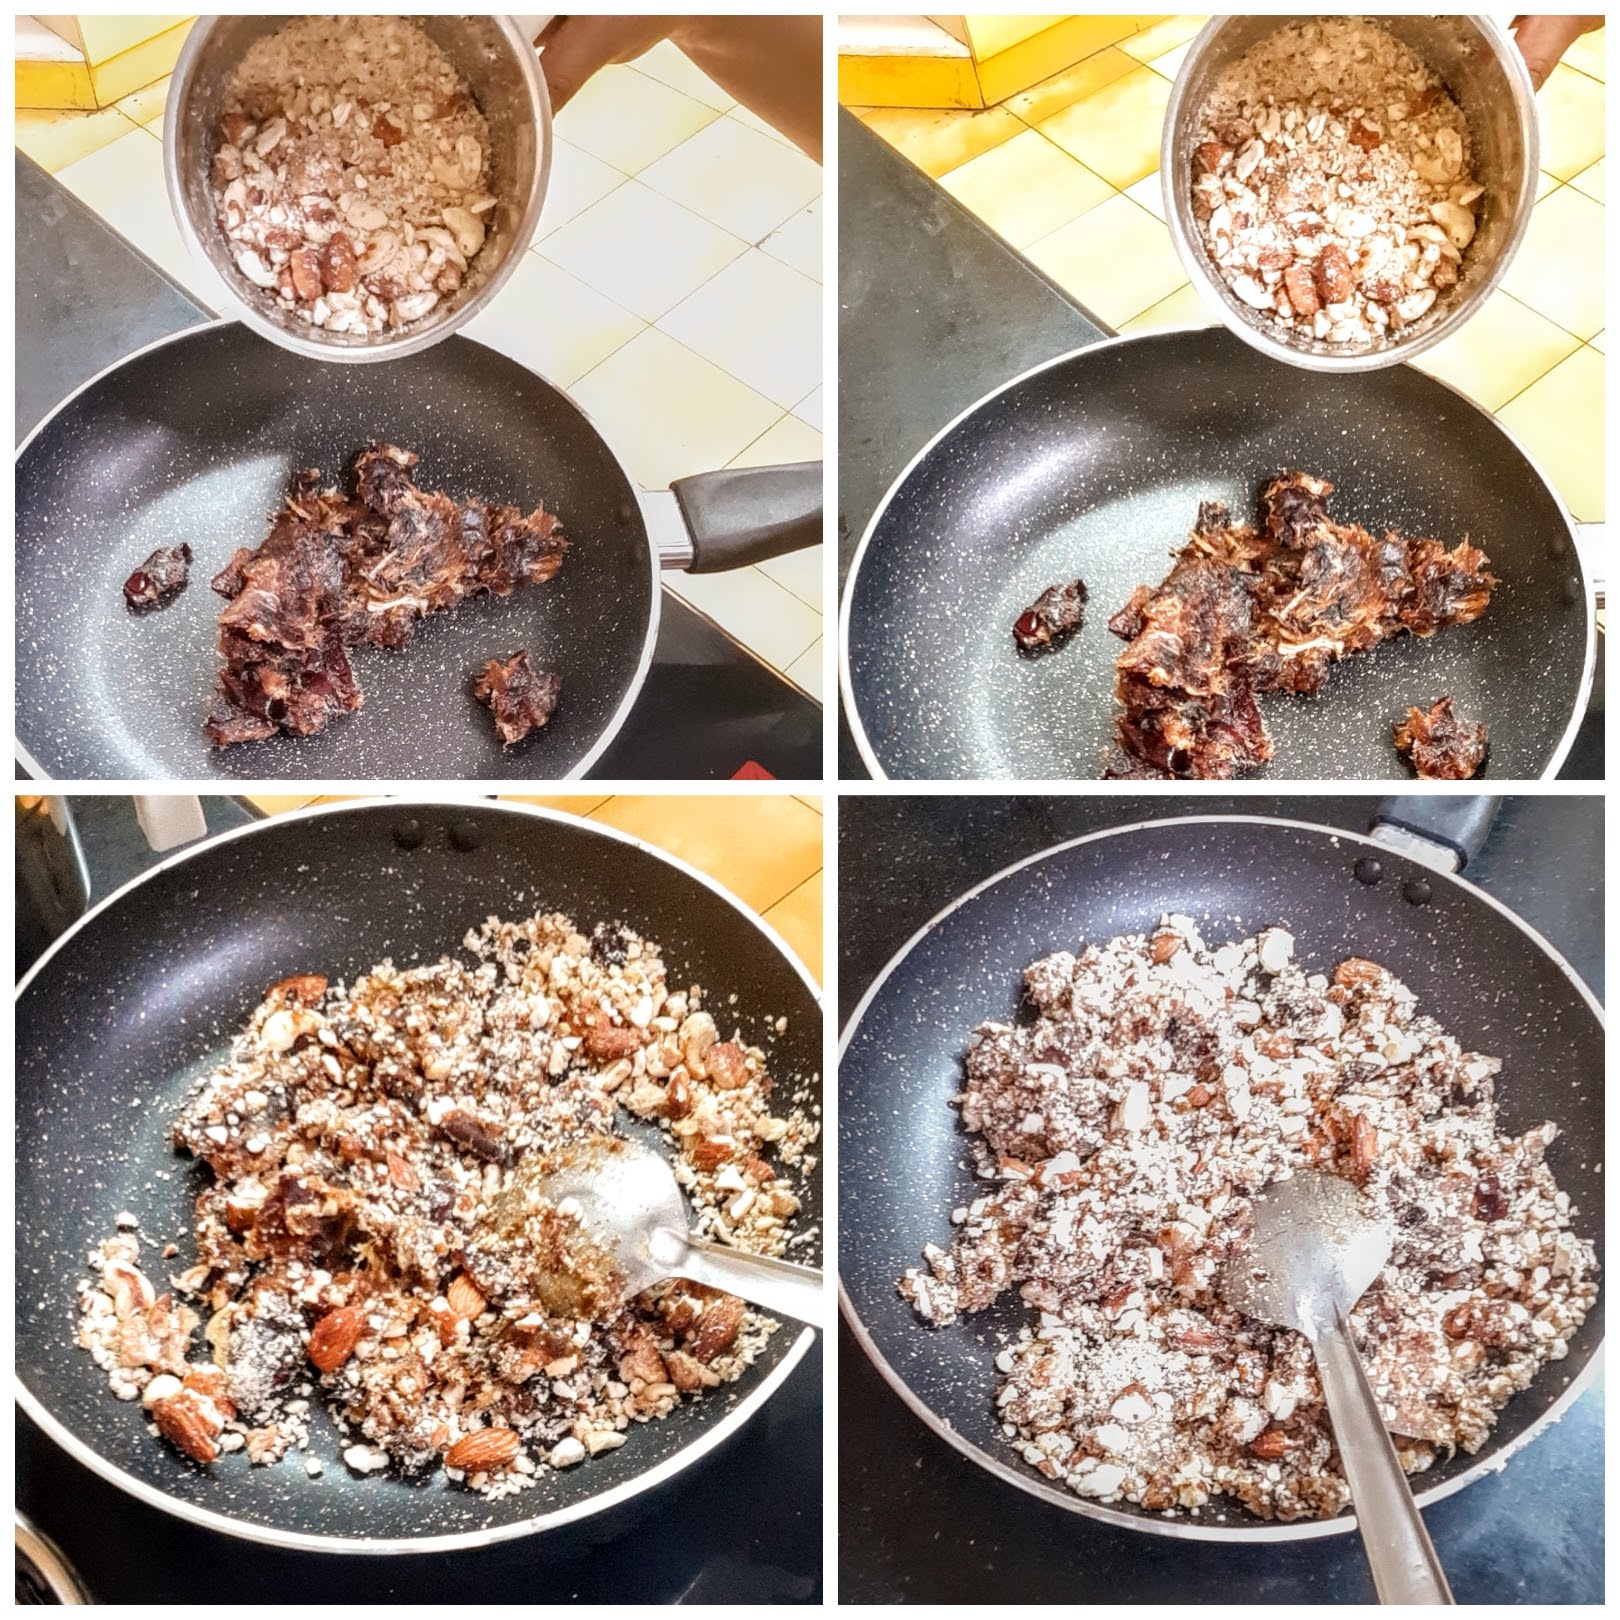
5. Grease your palms with a little ghee and start making ladoo of them. Repeat for the entire mixture. The yummy and tasty Dry fruit ladoo are ready.
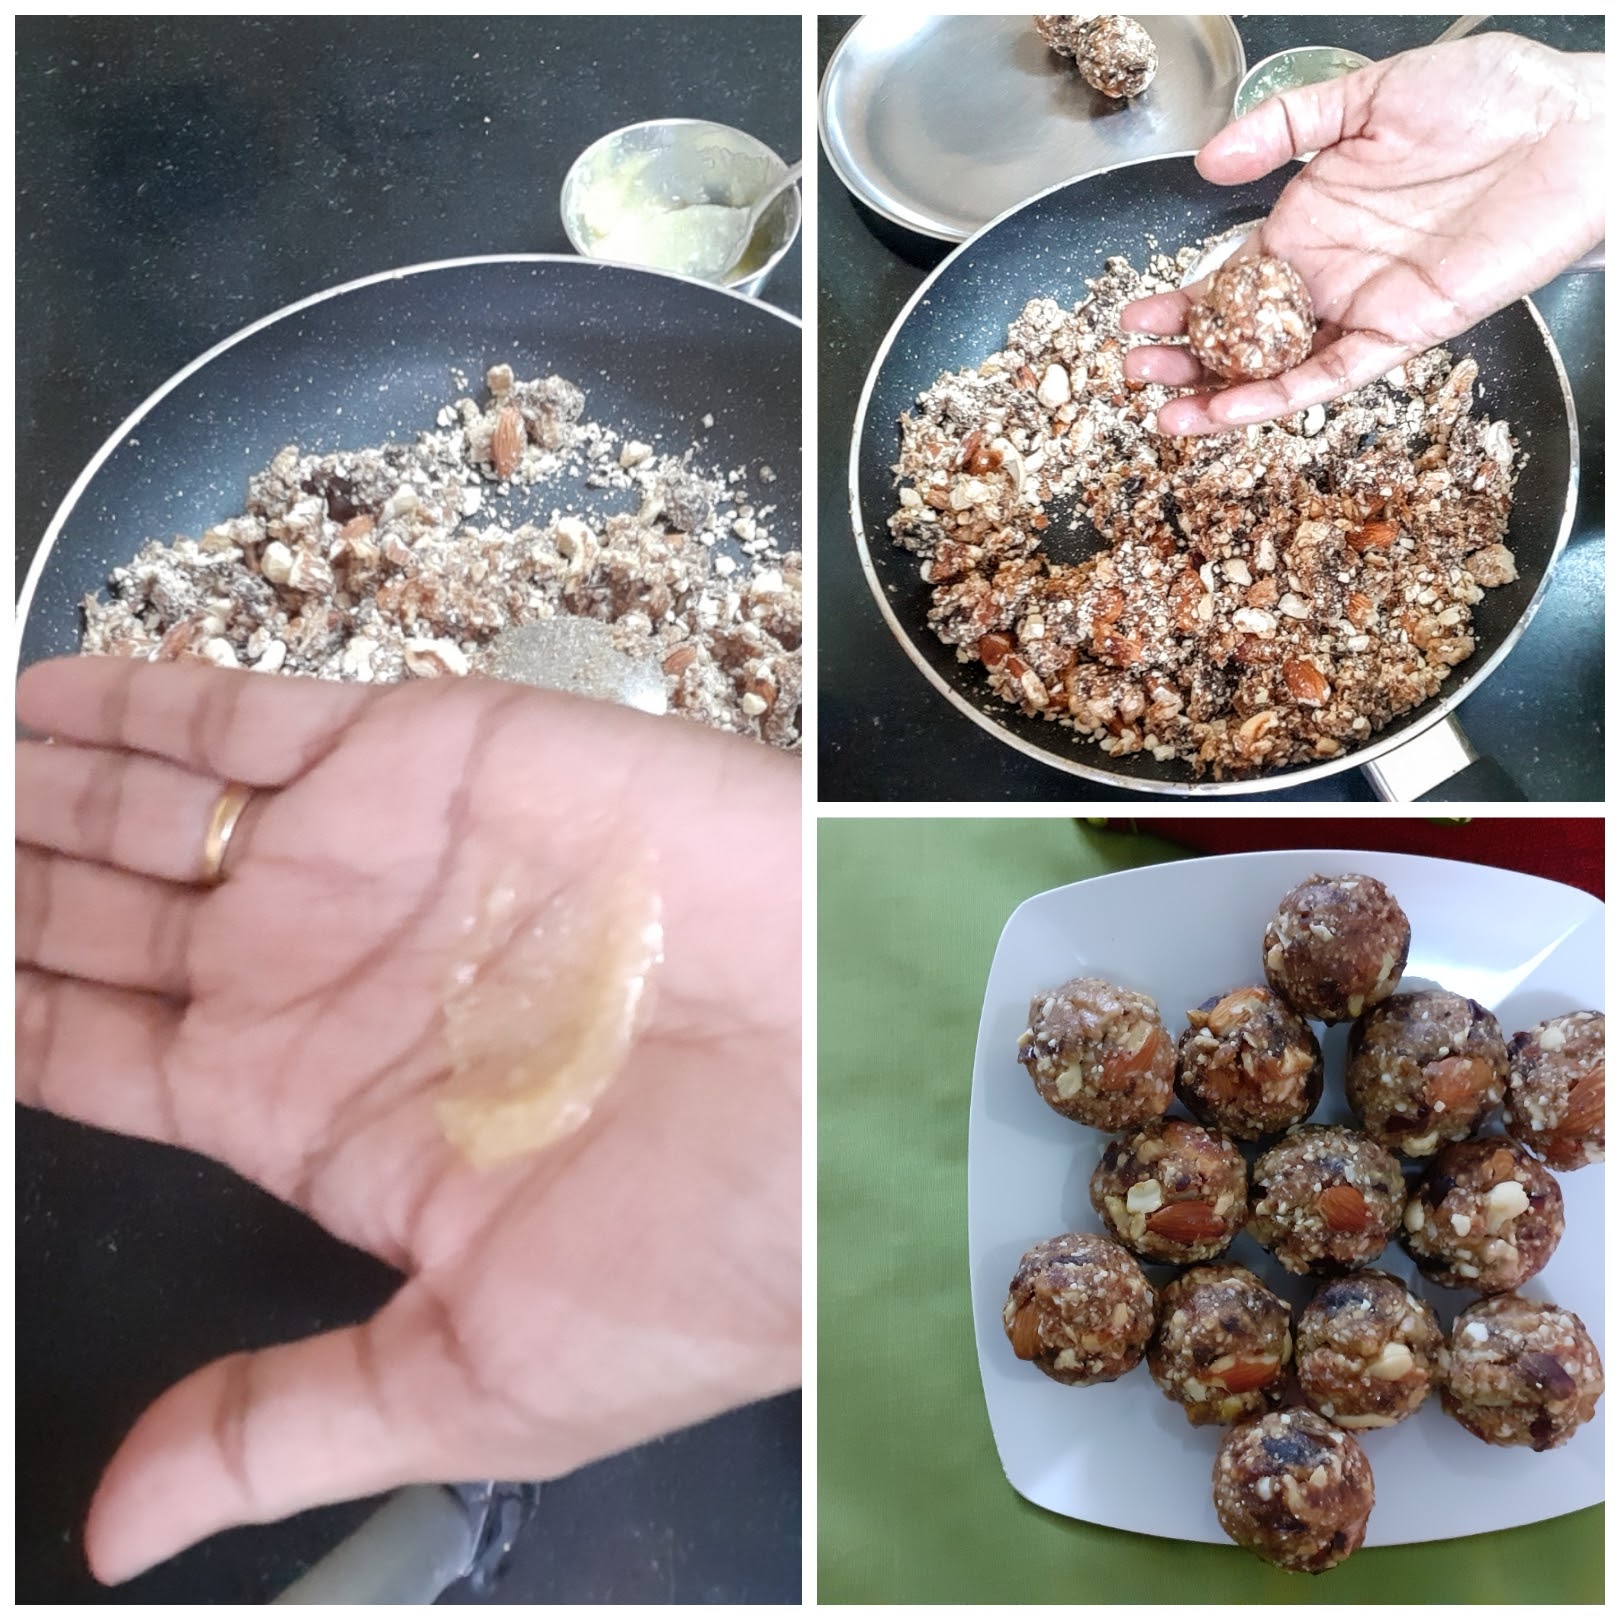
NOTES:
1. The amount of nuts required depends upon the juiciness of the dates. The juicier the dates the more nuts will be required.
2. Good quality nuts and dates always give the best taste.
3. During Diwali we all receive lots of dry fruits and nuts and have to stuff everything into our refrigerators to avoid insects accessing them. These ladoos are a great idea to use up all those dry fruits in the best possible way.
4. After adding the required amount of coarse nuts to the dates, if it is still gooey then add more nut mixture after roasting and coarsely grinding them.
5. After adding the nut mixture to dates if you find it is too dry and are not able to make ladoos, them warm up more dates and add to them.
If you tried this recipe and liked it please comment below. I would love to hear from you. If you have a query about the recipe email us and ill respond as soon as I can.
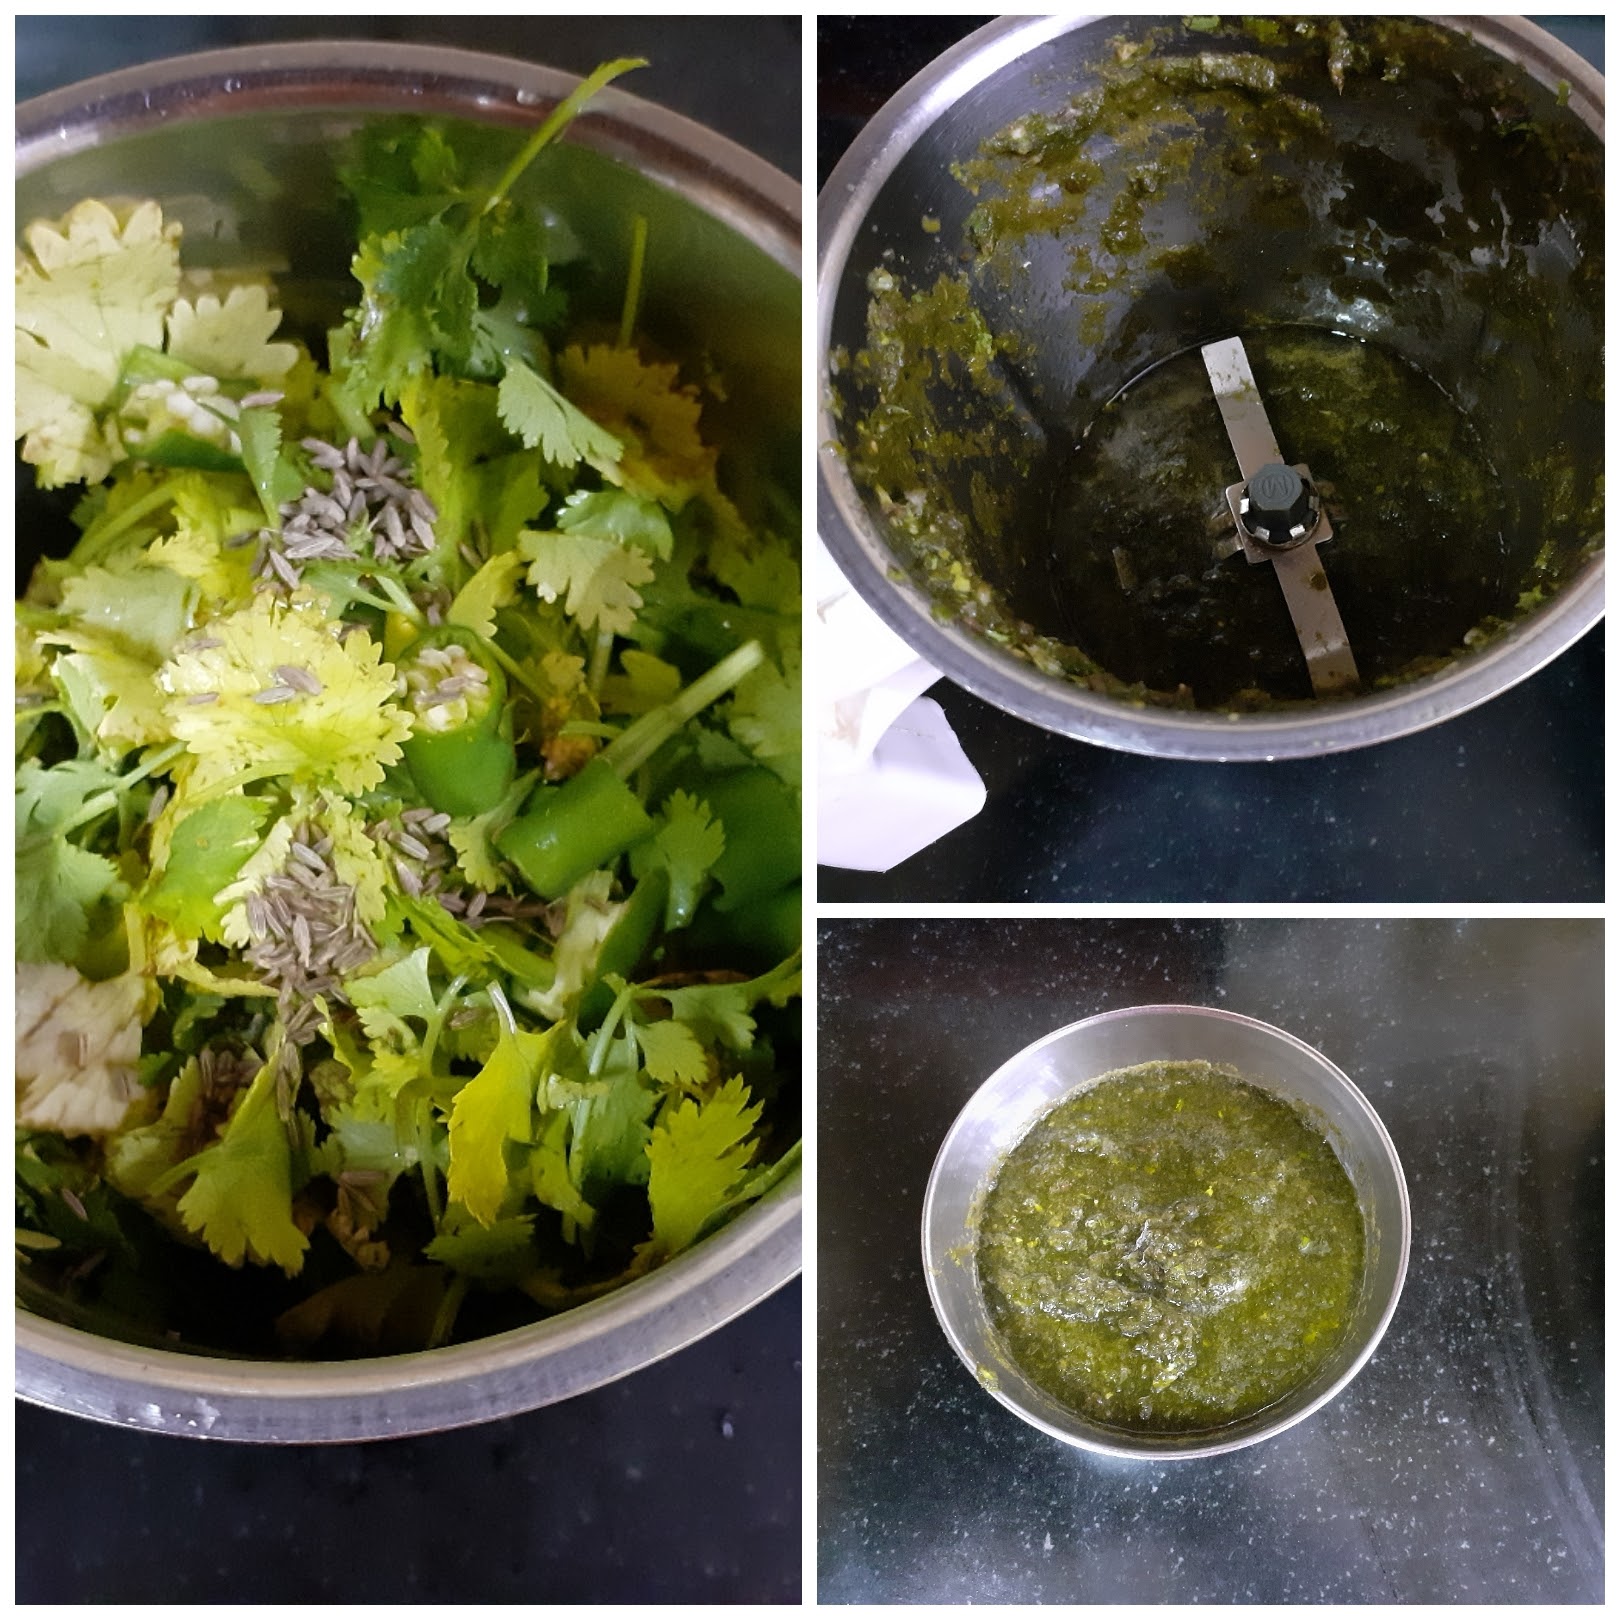
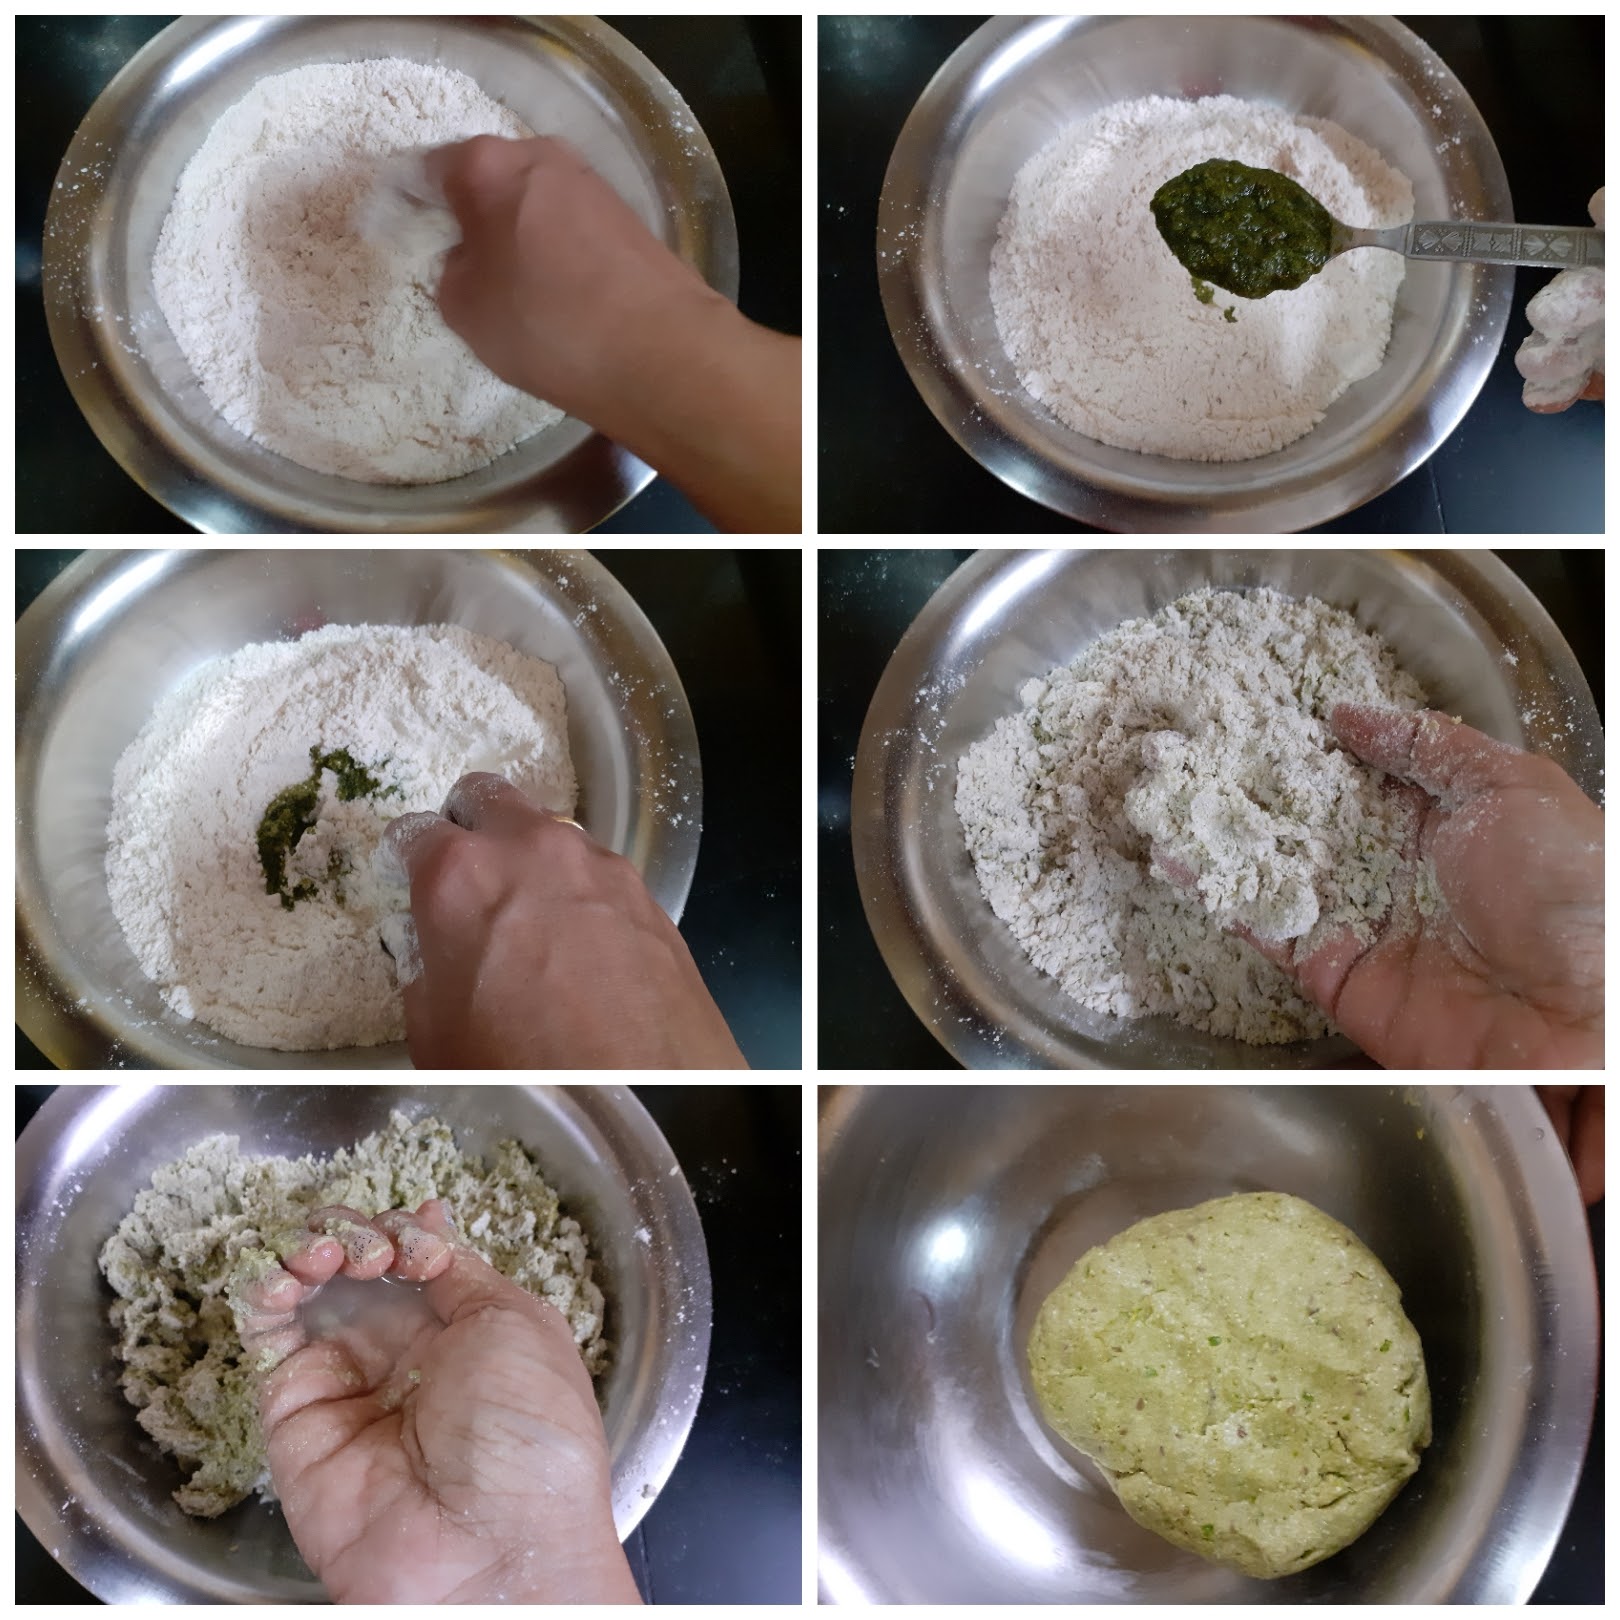
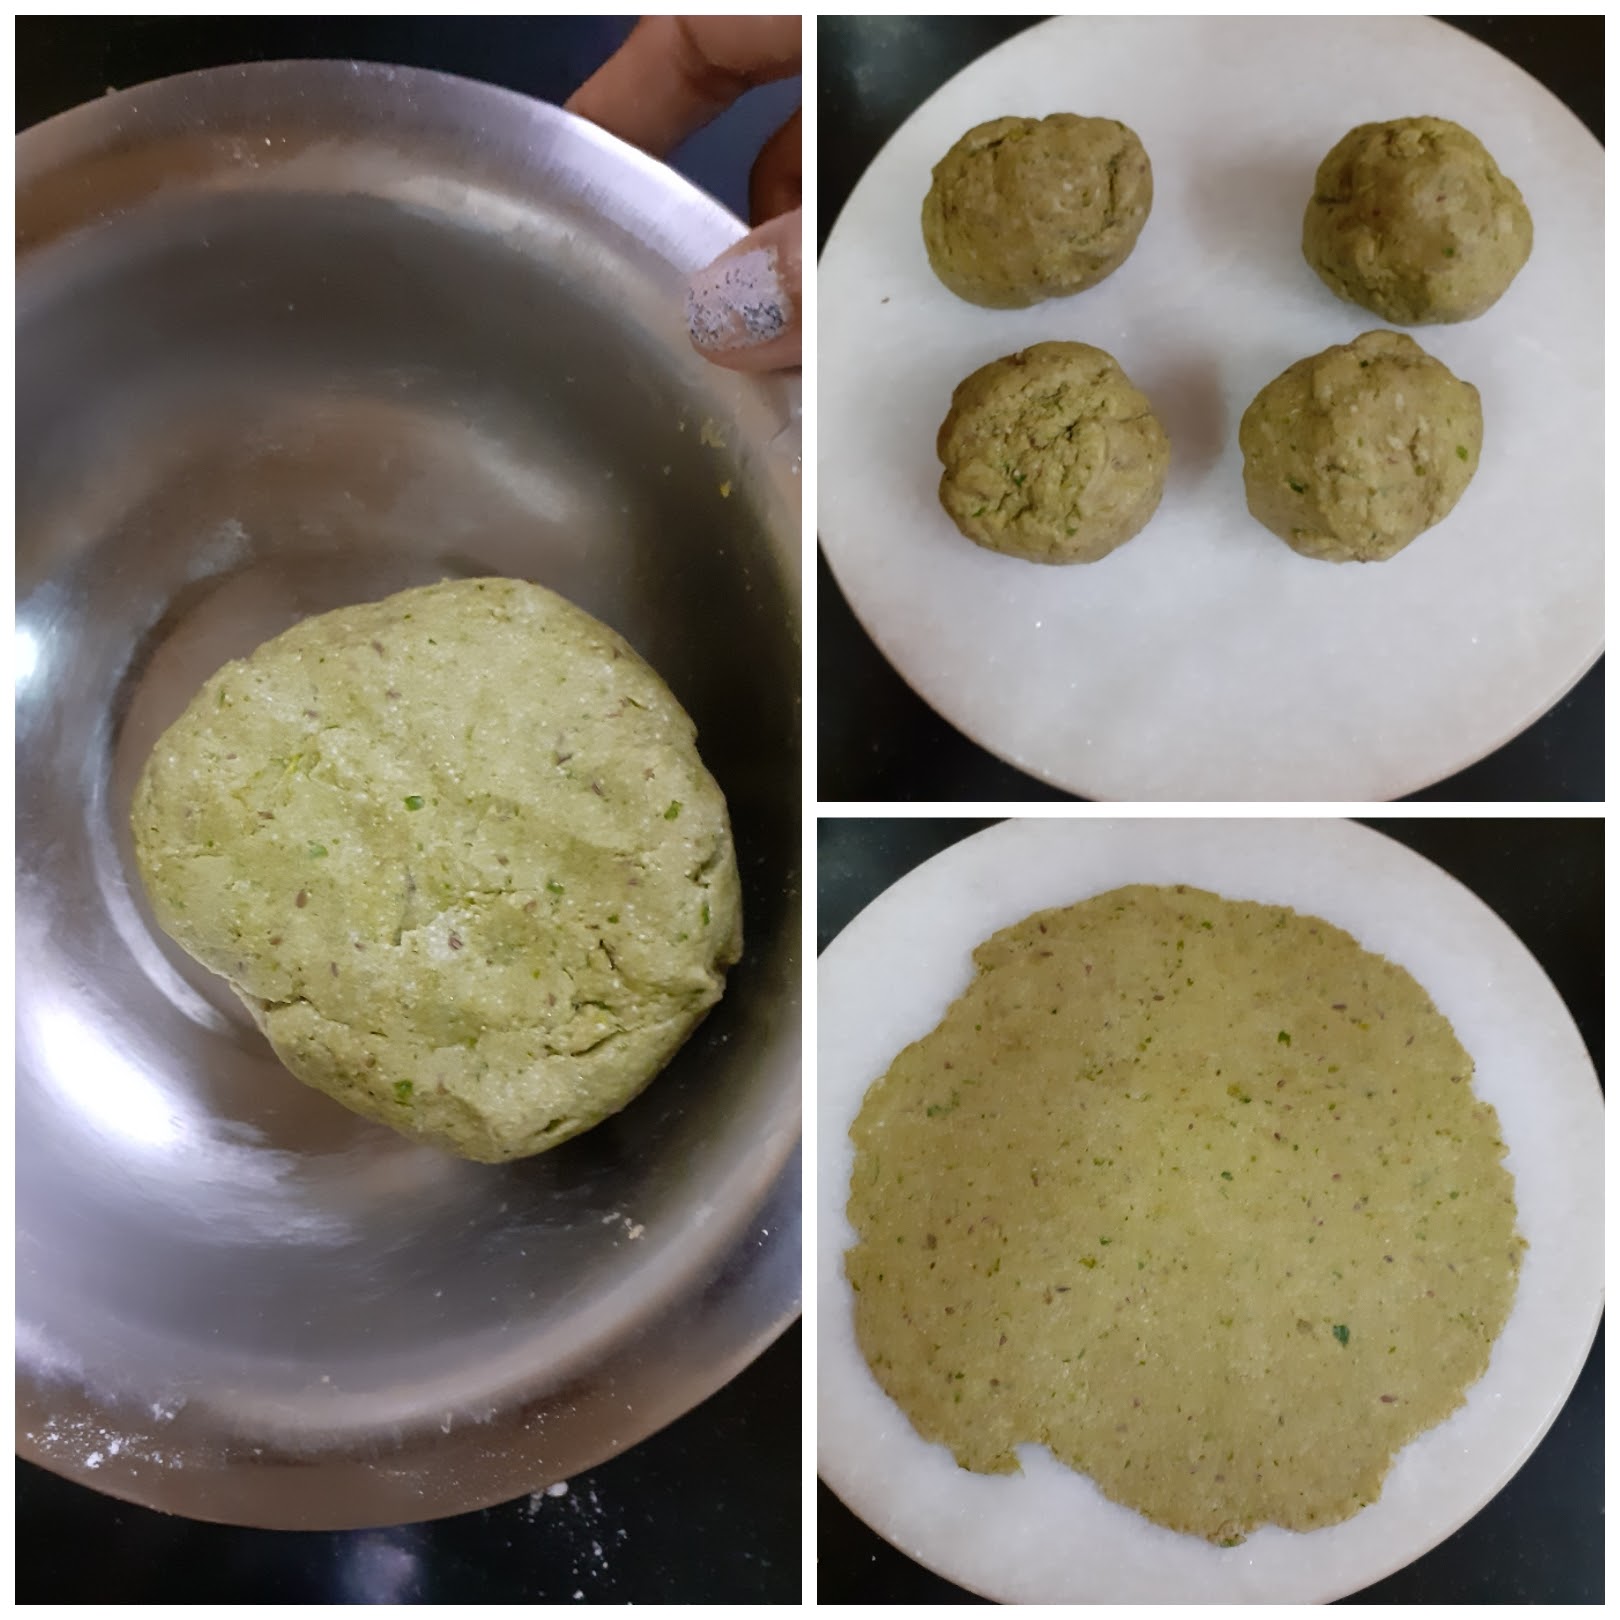
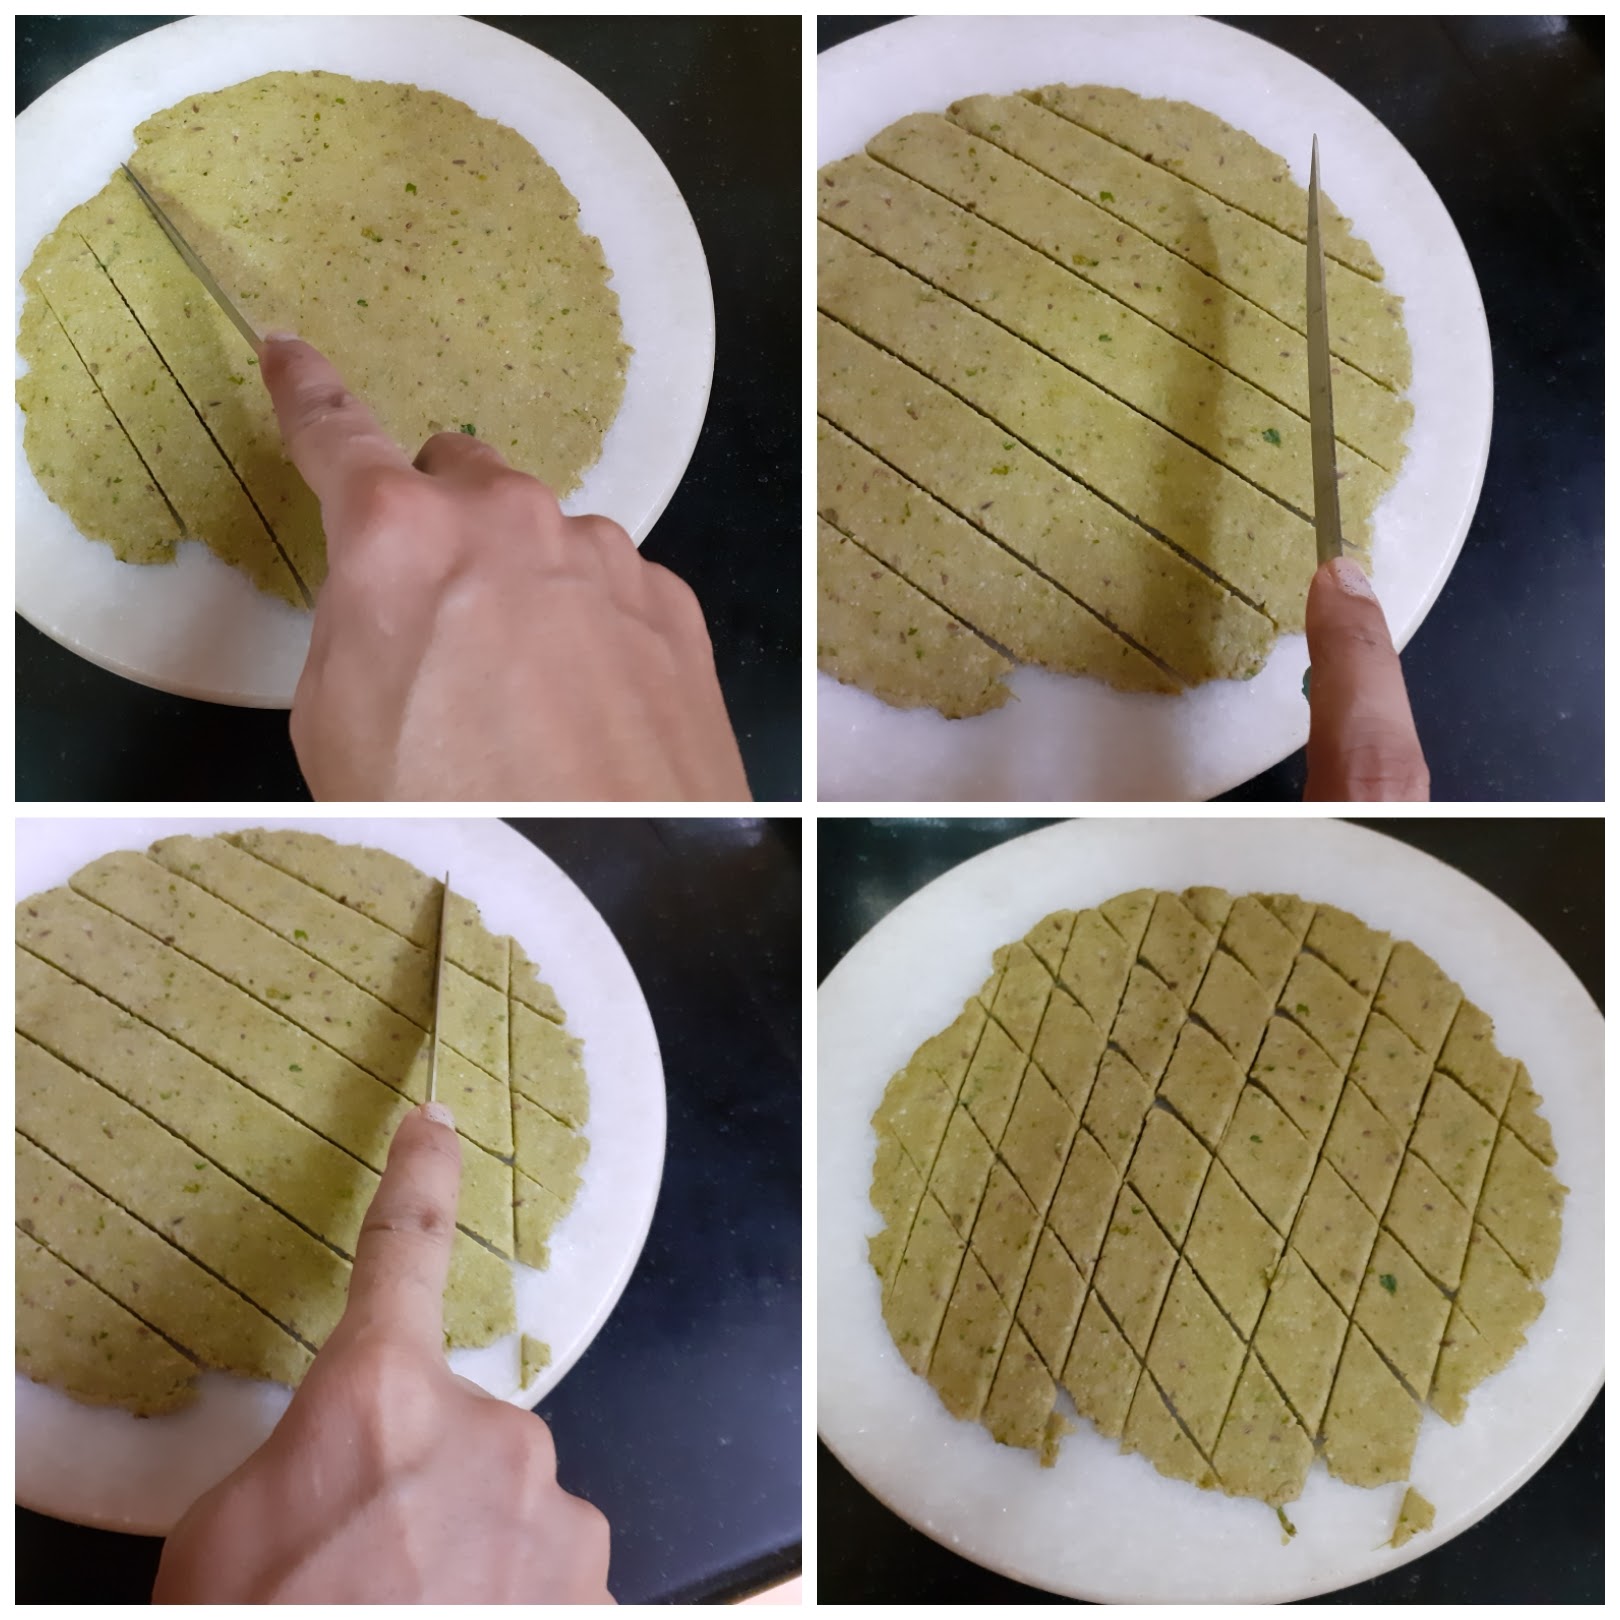
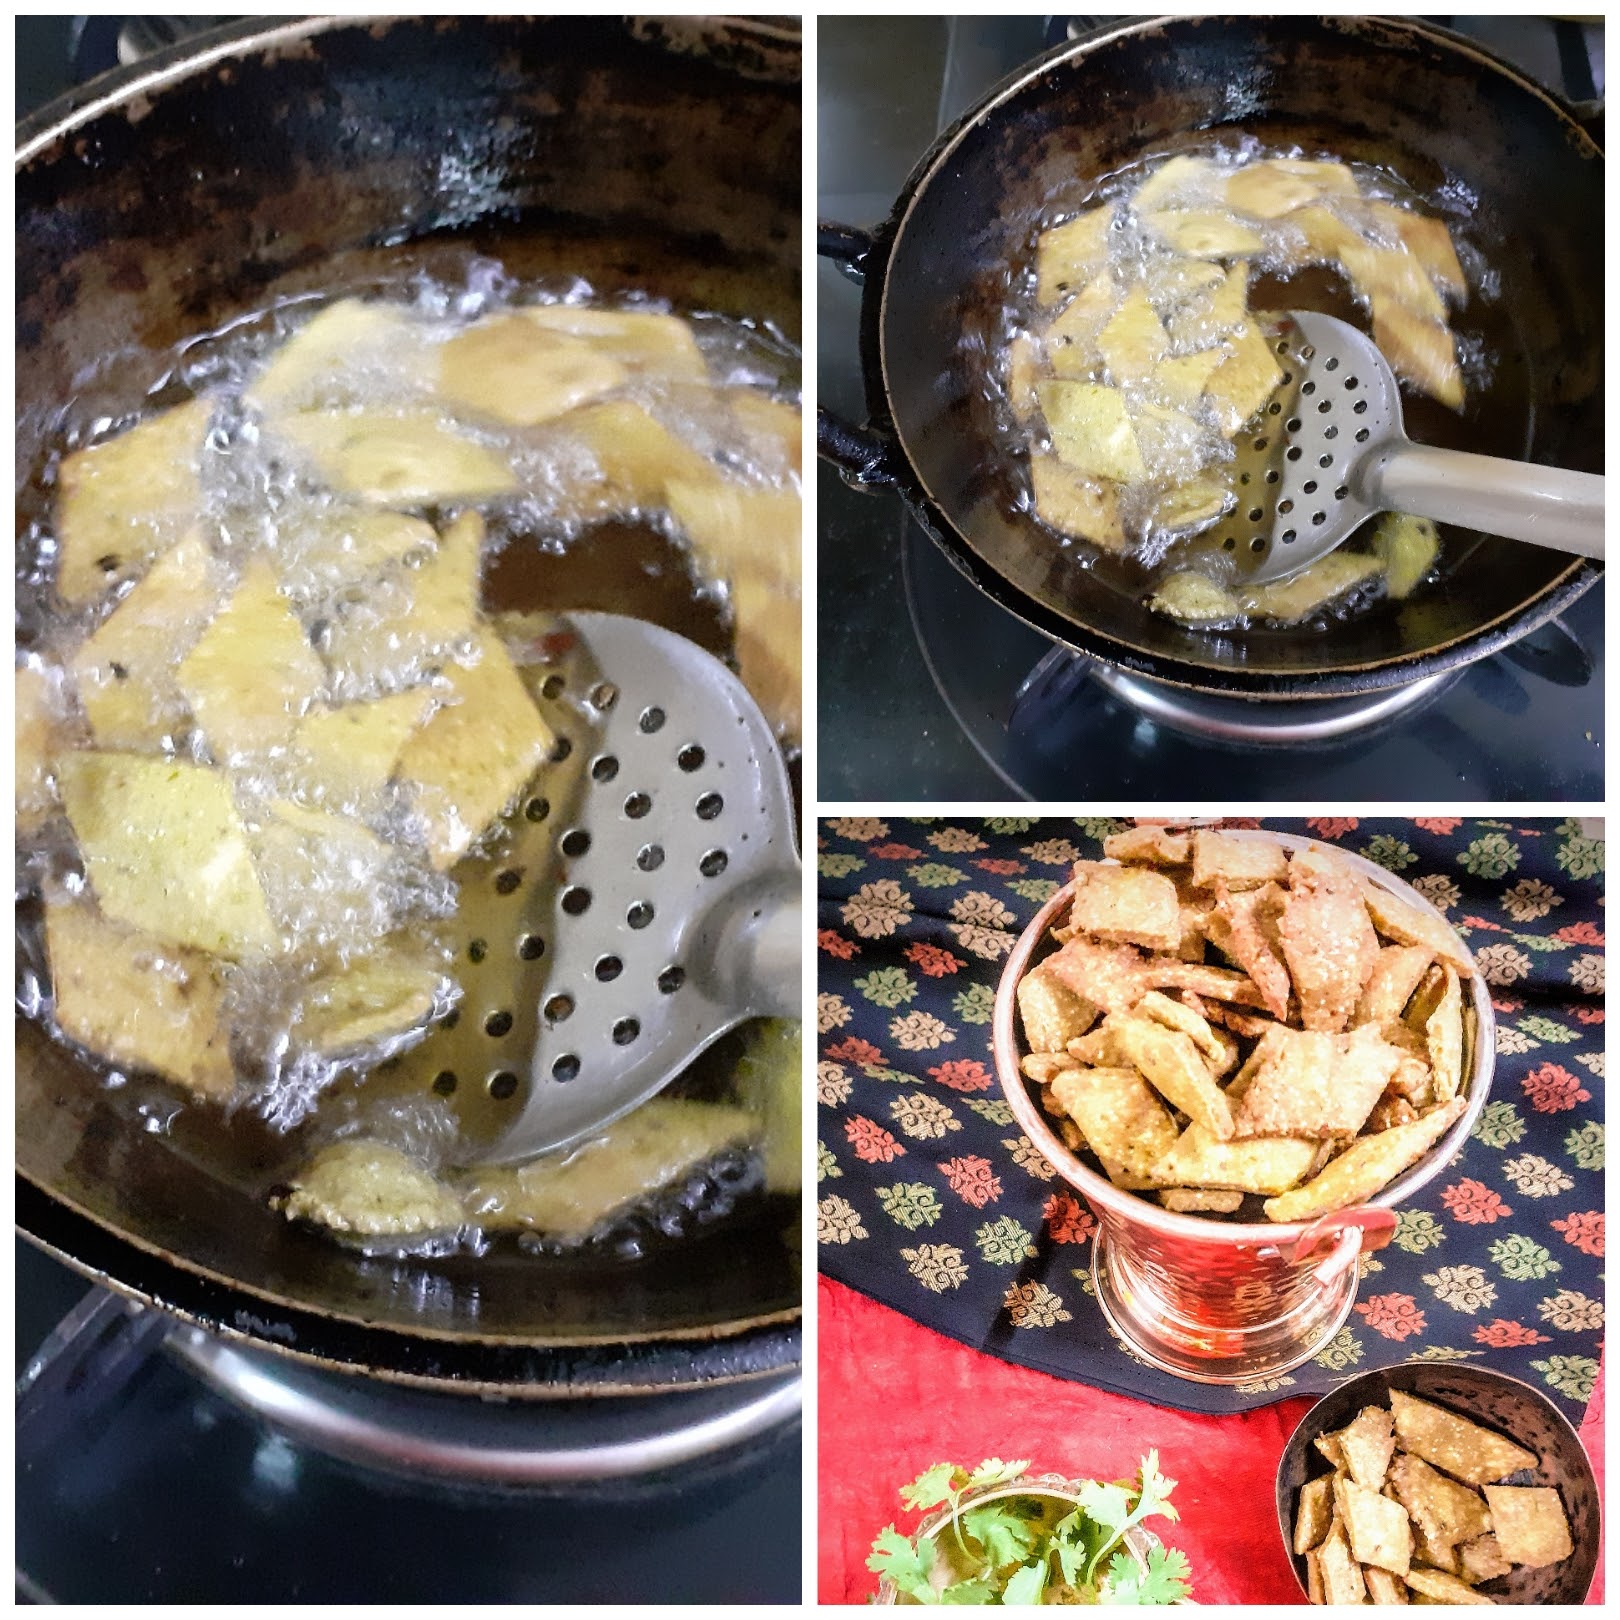
Dhaniya Wale Namak Pare (Namak Pare)
Namak Para’s are a simple dry snack made from refined flour or whole wheat flour. They make for a good tea time snack too. Here the flour is combined with salt and spices to form a stiff dough. The dough is then rolled out and cut into diamonds and deep-fried in oil. This is an easy savory recipe to make around festivals like Diwali or Janmashtami where the tradition calls for making some flour-based snacks. One can just make it as a regular tea time snack too.


If you tried this recipe and liked it please comment below. I would love to hear from you. If you have a query about the recipe email us and ill respond as soon as I can.
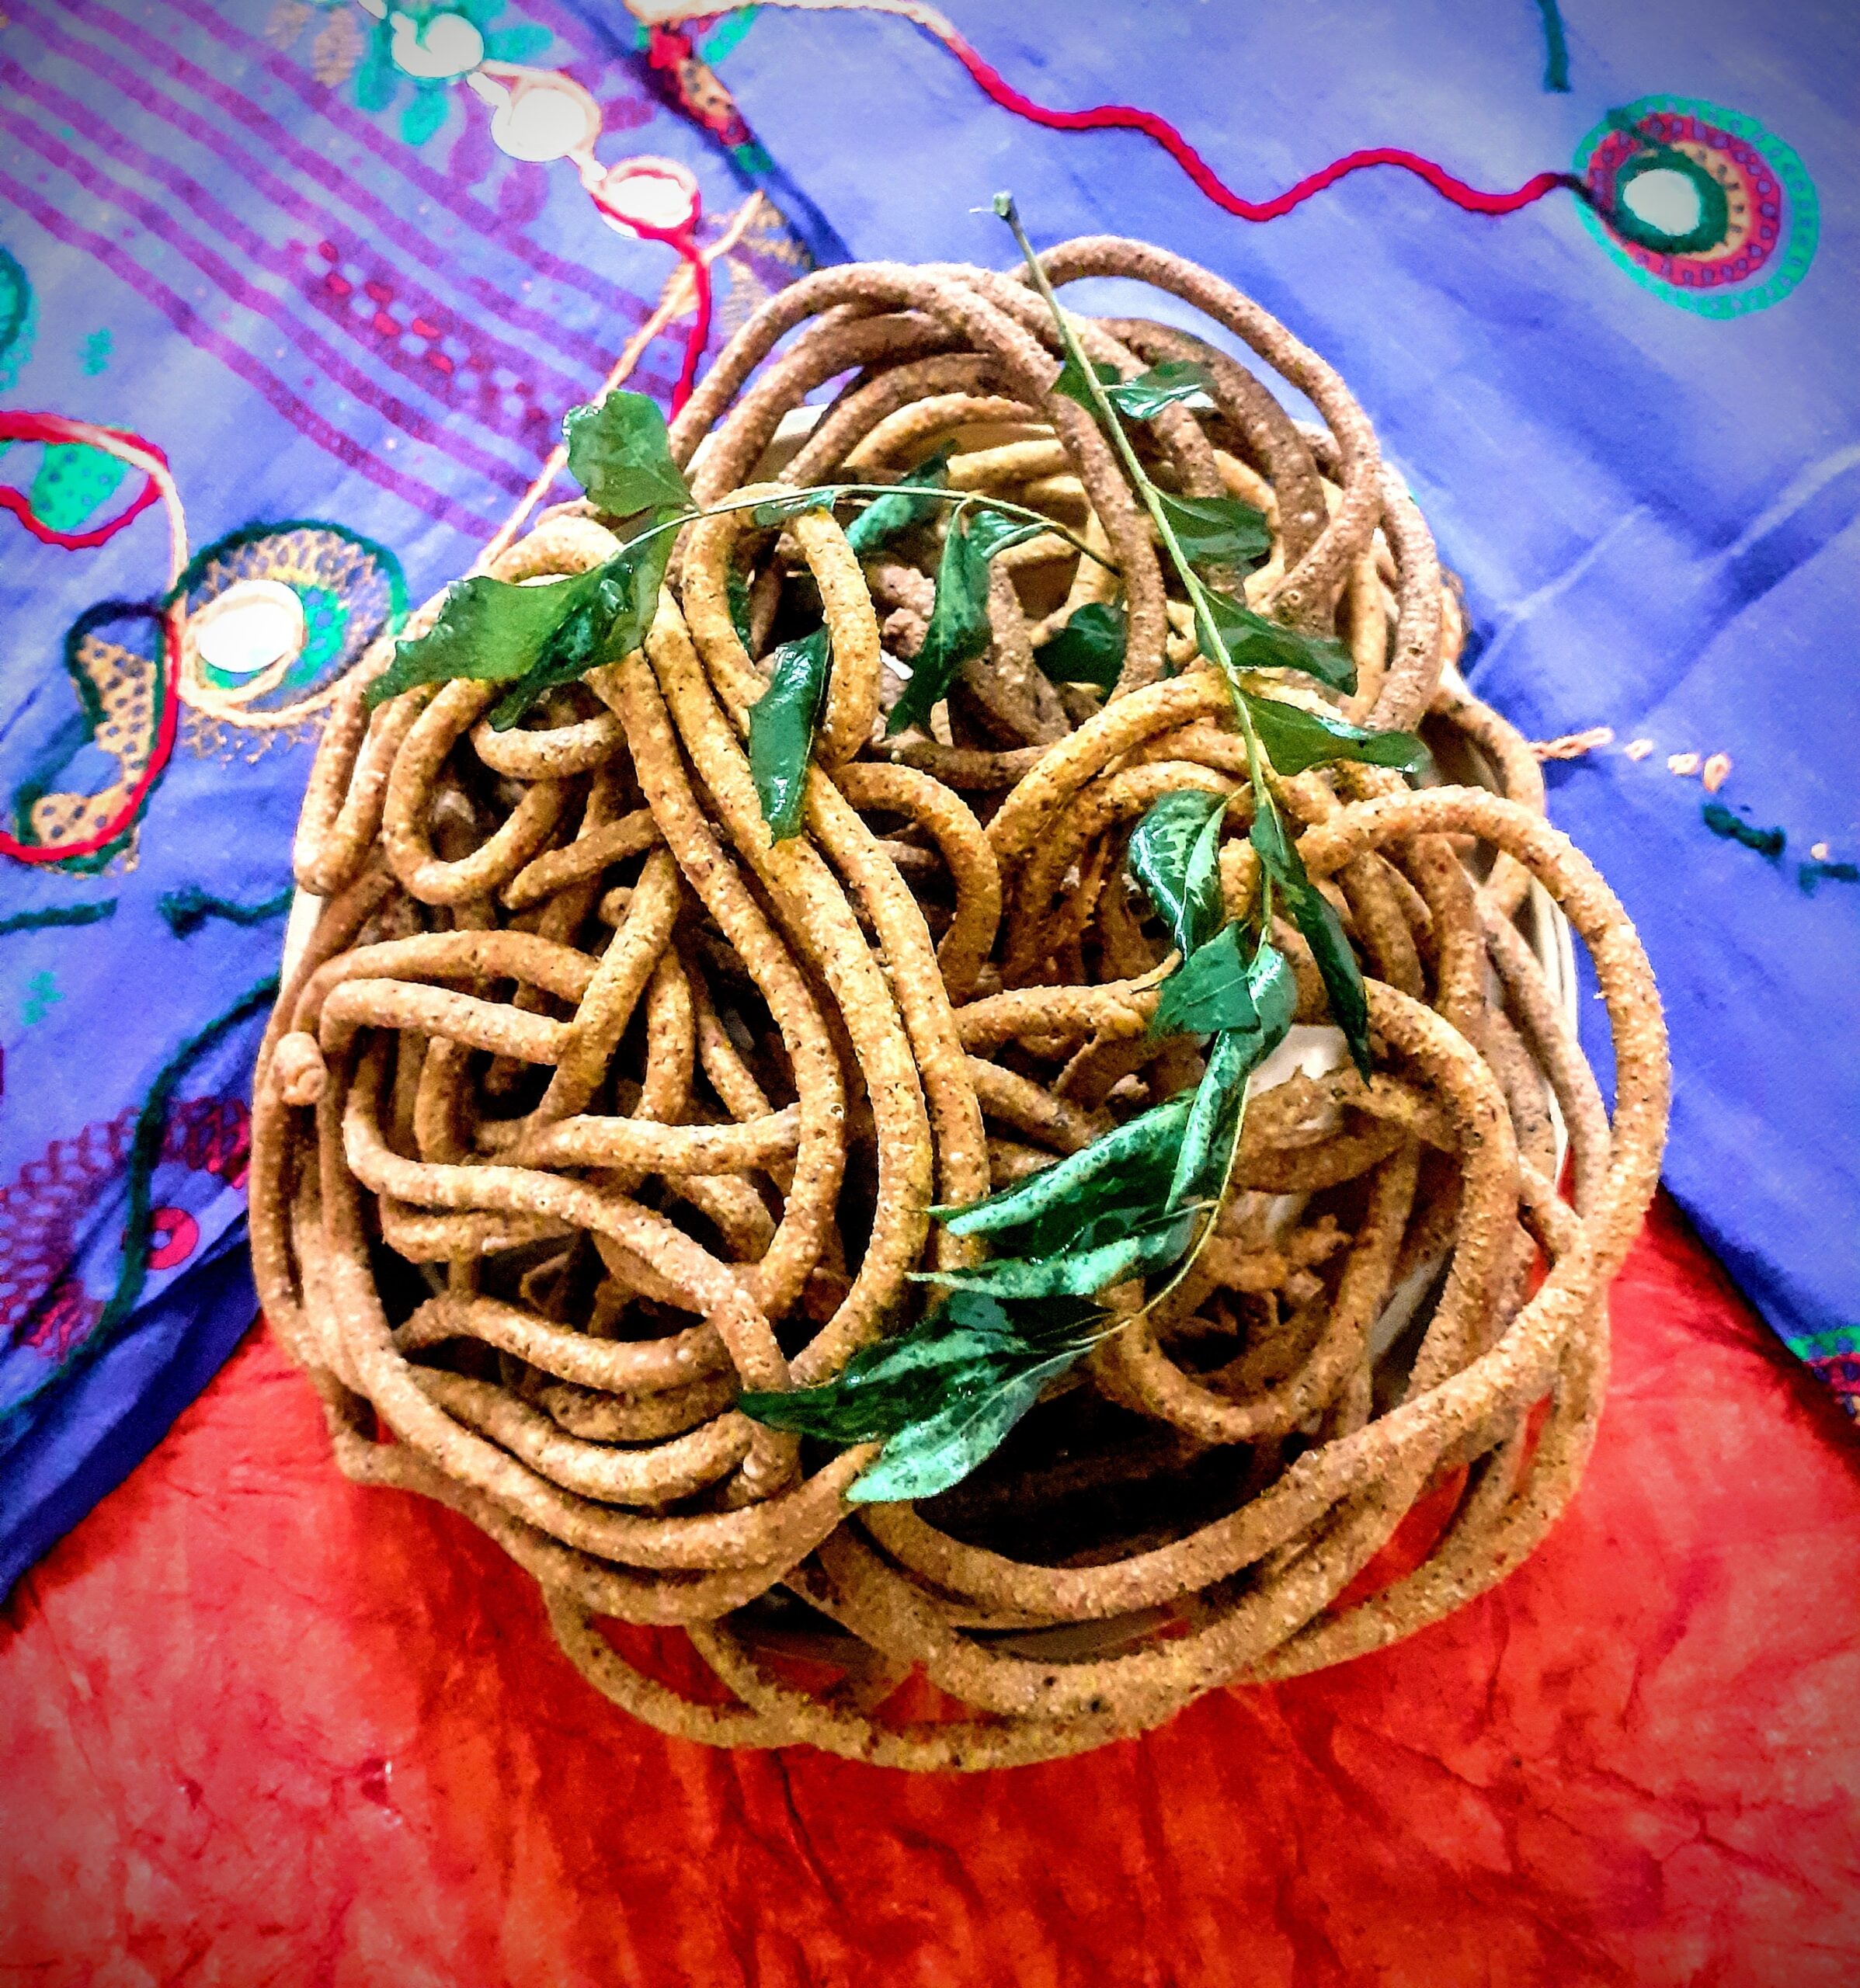
Ratlami Sev
Usually every Diwali I make the usual Omapodi( sev) , Tenkozhal and Ribbon Pakoda. This time I have tried something different. This is called the Ratlami Sev and though we get it at the sweet shops and some brands also market it, I have never tried making it at home. The credit to this recipe goes to @indiankhana.net , where I found this while browsing for something new.
This is a simple recipe( oh yes, I mostly pick simple, as that’s what we all want). Very similar to the Kara Sev of South India, but different in taste because of the masalas used and the Ratlami Sev does not have rice flour, while the Kara Sev does.
This savory gets its name from a place in Madhya Pradesh, India, called Ratlam, where it is famous. As I mentioned it is a quick recipe and difficult to resist munching.
While you are here checkout my other Diwali Sweet and Savoury recipes like Maa Ladoo, Thattai, Gajar Halwa Barfi, Masala wheat flour Papdis, Baked Samosa pie, and more…
Here is the recipe of Ratlami Sev
Ingredients:
Besan/ chickpea flour 1 cup
Cooking Soda 1 pinch
Hot oil 3 tbsp
Salt as required
Red chilli powder 3/4 to 1 tsp depending on taste
Turmeric powder 1/2 tsp
Clove powder 1/4 tsp
Fennel powder 1/4 tsp
Pepper powder 1/4 tsp
Ginger powder 1/4tsp
Black salt 1/4 tsp
Cinnamon powder 1/4 tsp
Ajwain powder 1/4 tsp
Roasted Cumin powder 1/2 tsp
Asafoetida 1/2 tsp
Dry ginger powder 1/4 tsp
Lemon juice 2 tsp
Oil for deep frying
Directions:
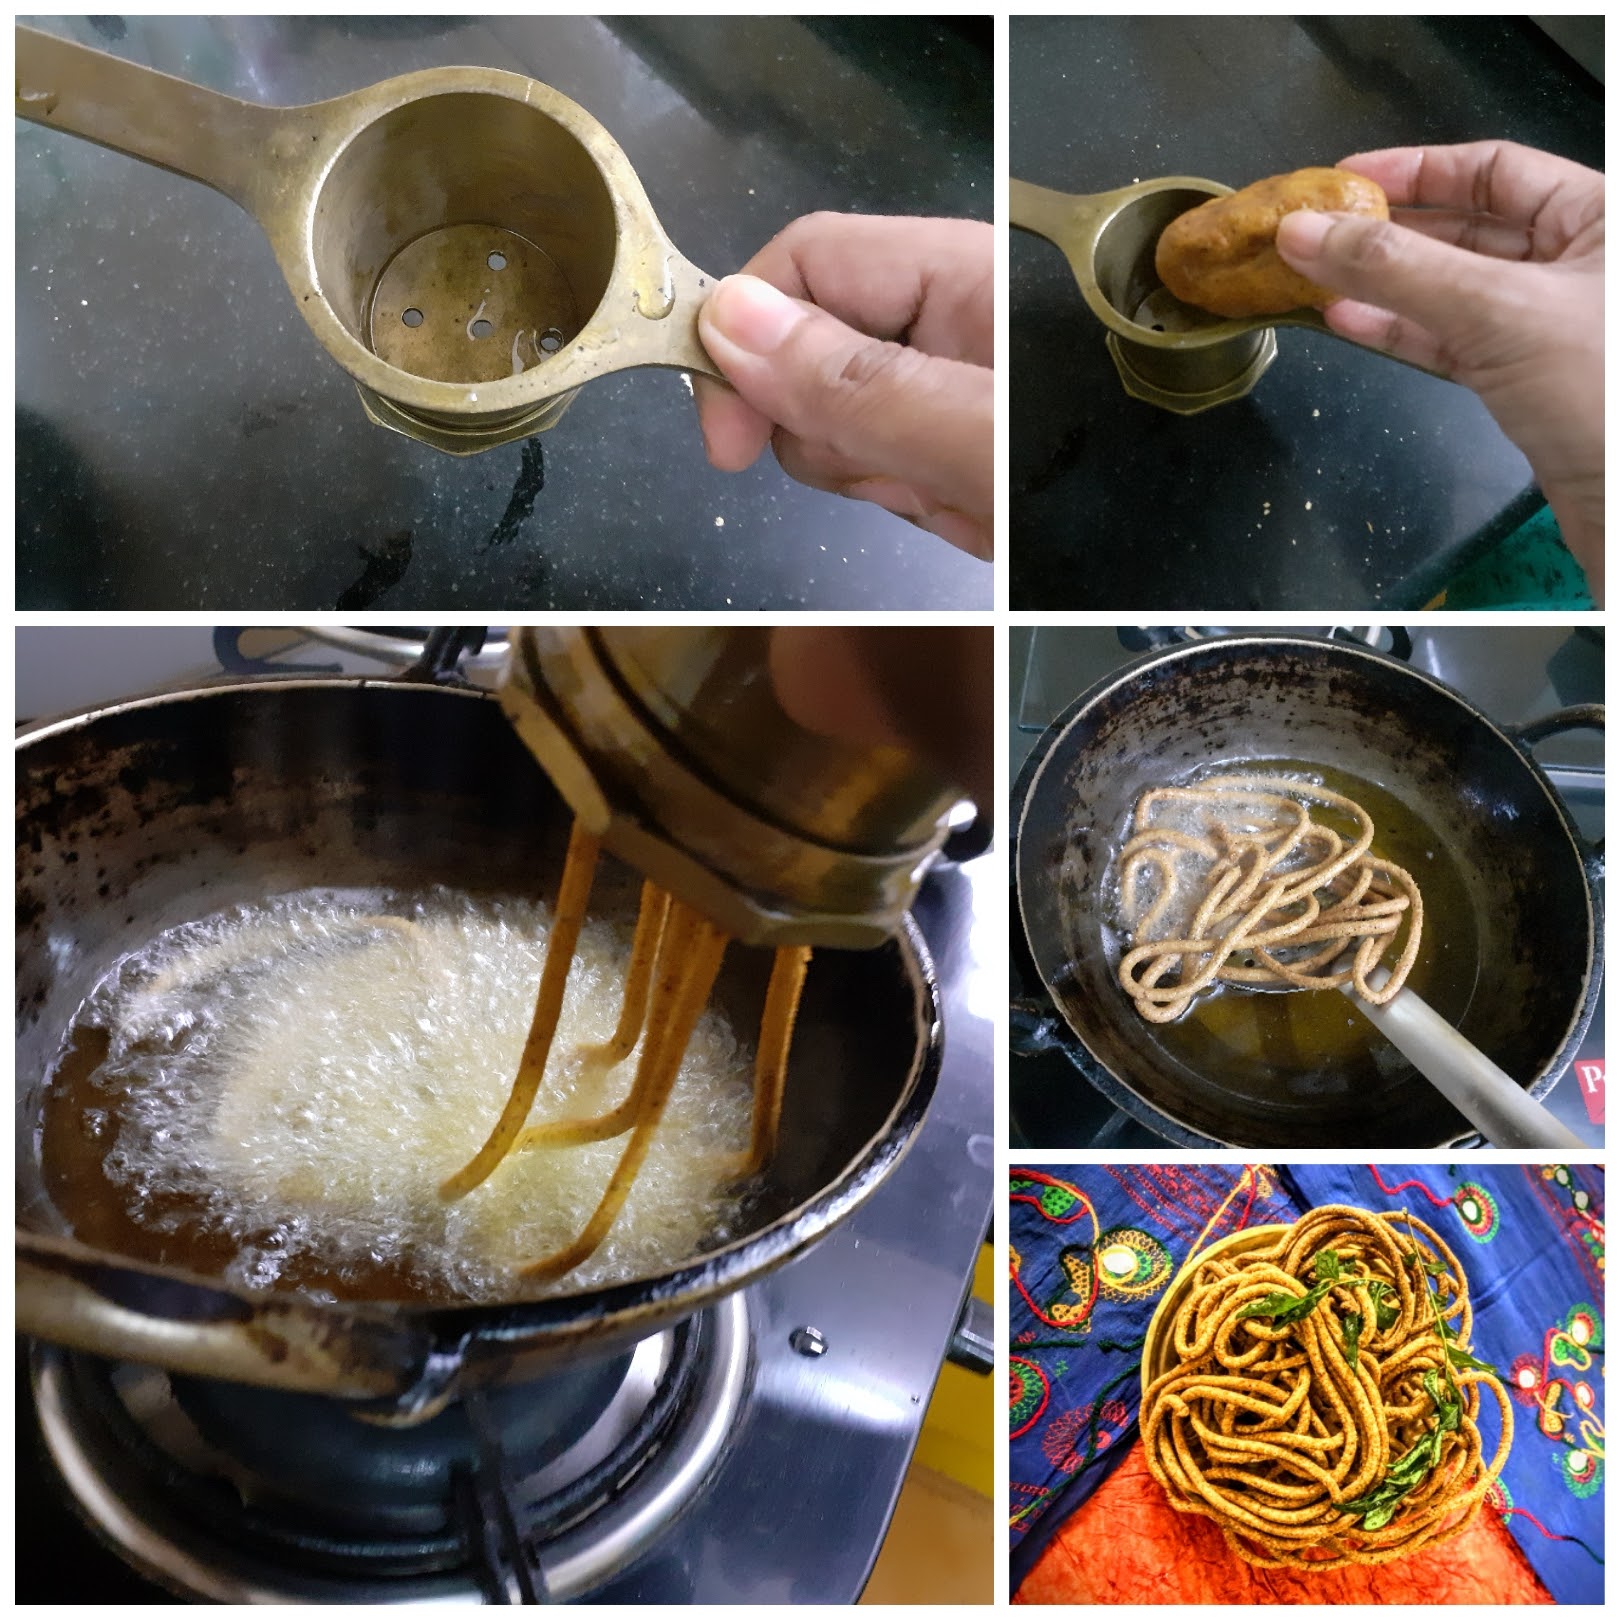
In a mixing bowl take the Besan/ Chickpea flour. To it add Salt, red chilli powder, turmeric powder and all the other powders like clove, fennel, cinnamon, Ajwain/ carrot seeds, black salt and asafoetida , cooking soda,and 2 tsp of lemon juice. To this add 3 tbsp of hot oil and mix nicely with a spoon( as the oil will be hot), when it turns warm mix nicely with your fingers to form a crumbly mixture. Now adding water 1 tbsp at a time make a soft but stiff dough. Heat oil in a Karahi for deep frying. Grease the Chakli/ Muruku press with oil and put in a little dough into it and squeeze into the oil when it is hot. Oil should be medium hot. Fry on medium heat, until the bubbles subside and the Sev turns a golden brown. Repeat for the whole mixture. The spicy and flavorful Ratlami Sev is ready.
I have combined the Cinnamon Powder, pepper powder, Roasted cumin powder, dry ginger powder, fennel powder, clove powder, Ajwain powder, and black salt, in the given measures and made it as a single powder, and am calling it the Ratlami spice mix.
Some of these powders we might not have at home readily, for which one can roast 1 tsp of all the given ingredients under Ratlami spice mix as a whole and powder them. Use 1 to 1.5 tsp of this for the recipe.
STEPWISE RECIPE FOLLOWS:
1. In a mixing bowl take the Besan/ Chickpea flour. To it add salt, red chilli powder, turmeric powder, and Ratlami spice mix( refer paragraph above). Also, add the asafoetida, Cooking soda, and 2 tsp lemon juice. (I forgot to add salt in the beginning and have added towards the end as you will see in one of the pictures).
2. Now heat 3 tbsp oil in a Kadai ( heat it well, but don’t turn it smoky) and pour it into the Besan and spice mixture. Using a spoon combine well(do not use your hand now as the oil is hot).
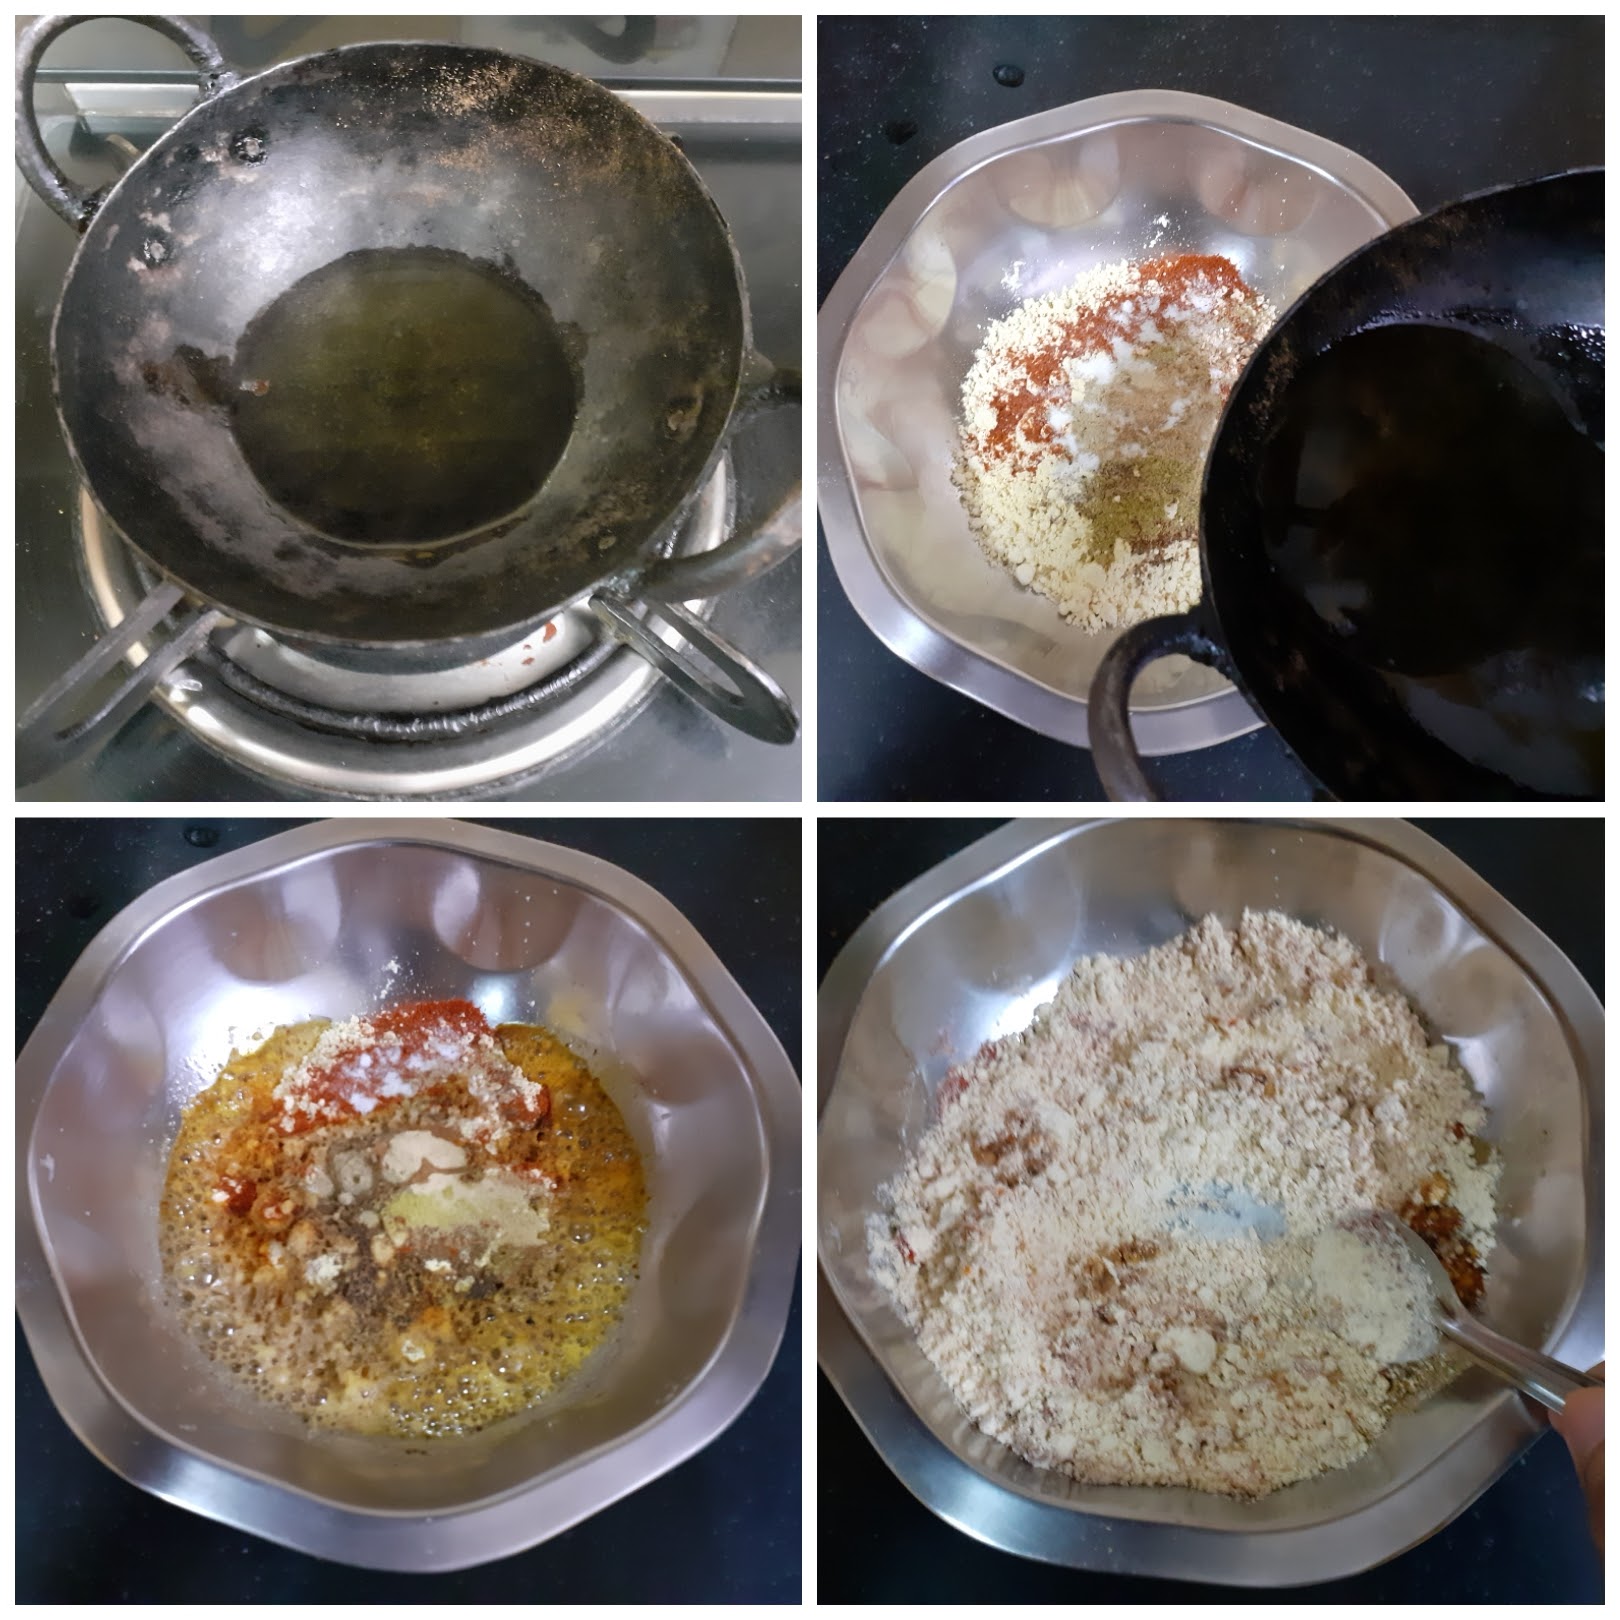
3. After it turns a little warm, using your fingers nicely mix the mixture until it turns crumbly. Now adding water one tablespoon at a time start combining it to form a soft but stiff dough. We want a dough that is easy to squeeze through, but also stiff enough to retain shape. I used about 3 tbsp water to make my dough.
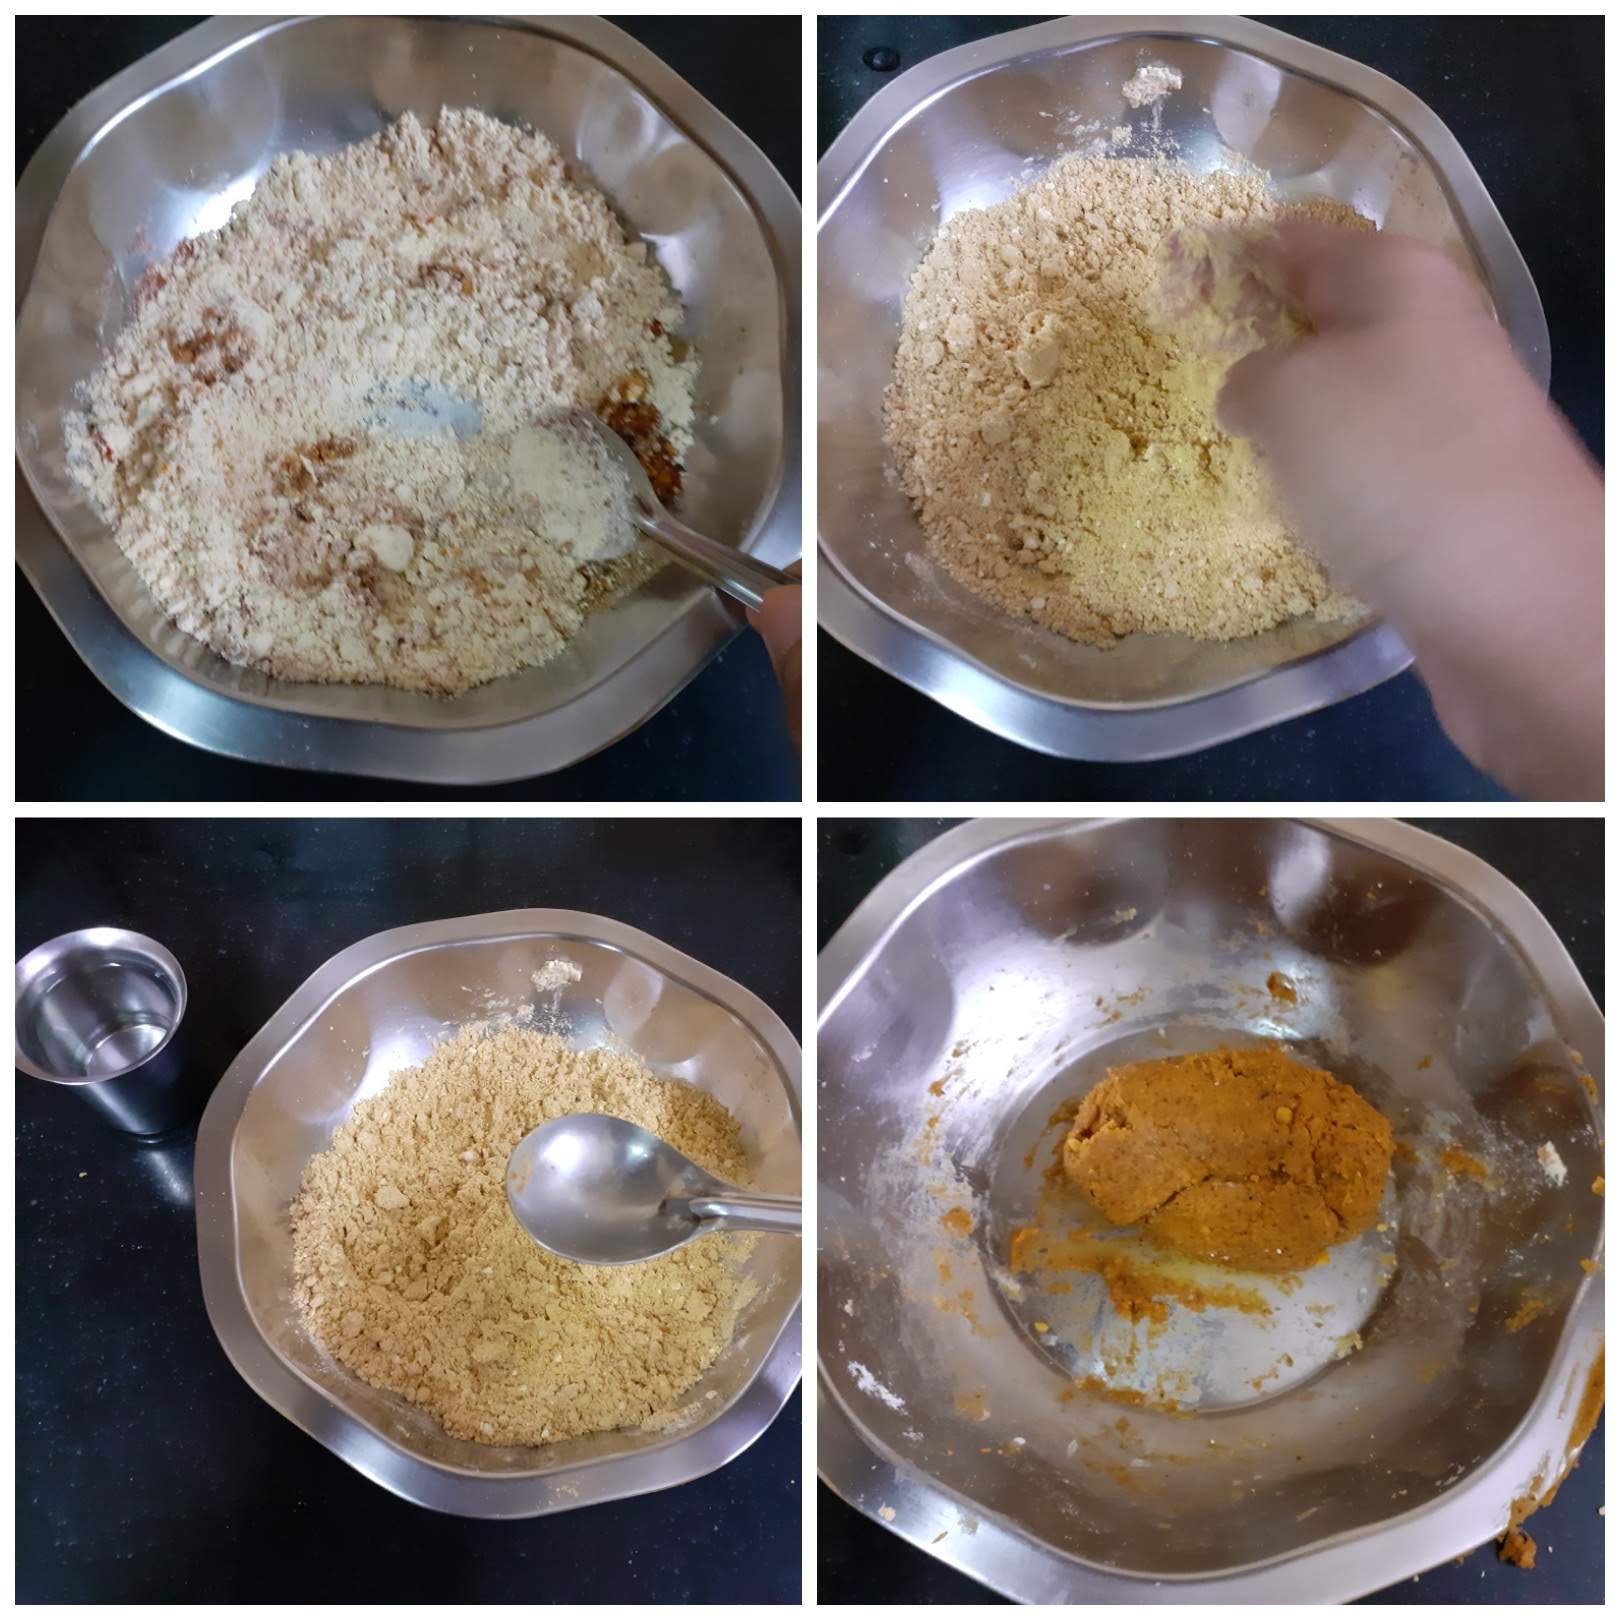
4. Heat oil for deep frying on medium-high. Grease the Chakli/ Muruku press with oil and put in a little dough into it and squeeze into the oil when it is hot. Oil should be medium hot. Fry on medium heat, until the bubbles subside and the Sev turns a golden brown. Repeat for the whole mixture. The tasty and spicy Ratlami Sev is ready.
NOTES:
1. Some of these powders we might not have at home readily, for which one can roast 1 tsp of all the given ingredients under Ratlami spice mix as a whole and powder them. Use 1 to 1.5 tsp of this for the recipe.
2. I used 3 tbsp water, one can use more as required as different qualities of Besan absorb water differently.
3. Take care not to use your fingers as soon as you pour hot oil in the mix. Let it become warm and then use your fingers to combine.
If you tried this recipe and liked it please comment below. I would love to hear from you. If you have a query about the recipe email us and ill respond as soon as I can.